Hello friends, I hope you all are doing great. Today, I am going to share the Raspberry Pi 5 Temperature Screening Gate - Proteus Simulation, the twenty-fourth project of our IoT Projects series. If you have searched for a Proteus simulation of a contactless thermometer with a Raspberry Pi, here is a complete one. A Raspberry Pi 5 reads an MLX90614 infrared thermometer pointed at the forehead of each person at a door, shows the temperature and the verdict on a TM1638 display board, and opens a gate arm, an MG996R servo, only for a normal temperature. A live web dashboard shows every screening and lets a guard open the gate.
Contactless temperature screening became familiar at the doors of hospitals, airports, offices and schools: a person stops in front of a sensor for a second, a display shows the temperature, and a door or a turnstile opens. The heart of most of these stations is a small infrared thermometer like the MLX90614, which measures the heat a surface radiates without touching it. In this tutorial, we will go through the circuit, learn how an infrared thermometer measures a temperature from a distance and why the distance matters, read it over SMBus with a checksum on every word, write its emissivity into its EEPROM, drive the TM1638 display and keys on three plain GPIO pins, move a servo gate, walk through the Python program, and then run the simulation: an empty doorway, a person too far away, a normal temperature, a high one, a guard override, the keys, and a hot cup held up to fool the sensor. At the end, you can download the project with the program, every library file and the Python runtime the Pi needs.
NOTICE: Our team has put a lot of effort into this project: the circuit, the code and every part in the simulation are our own work, and you get them all free. Your feedback is the fuel that keeps us going, so please tell us what you think in the comments below. And if our free projects help you, you can buy us a coffee. So, let's get started with the Raspberry Pi 5 Temperature Screening Gate - Proteus Simulation:
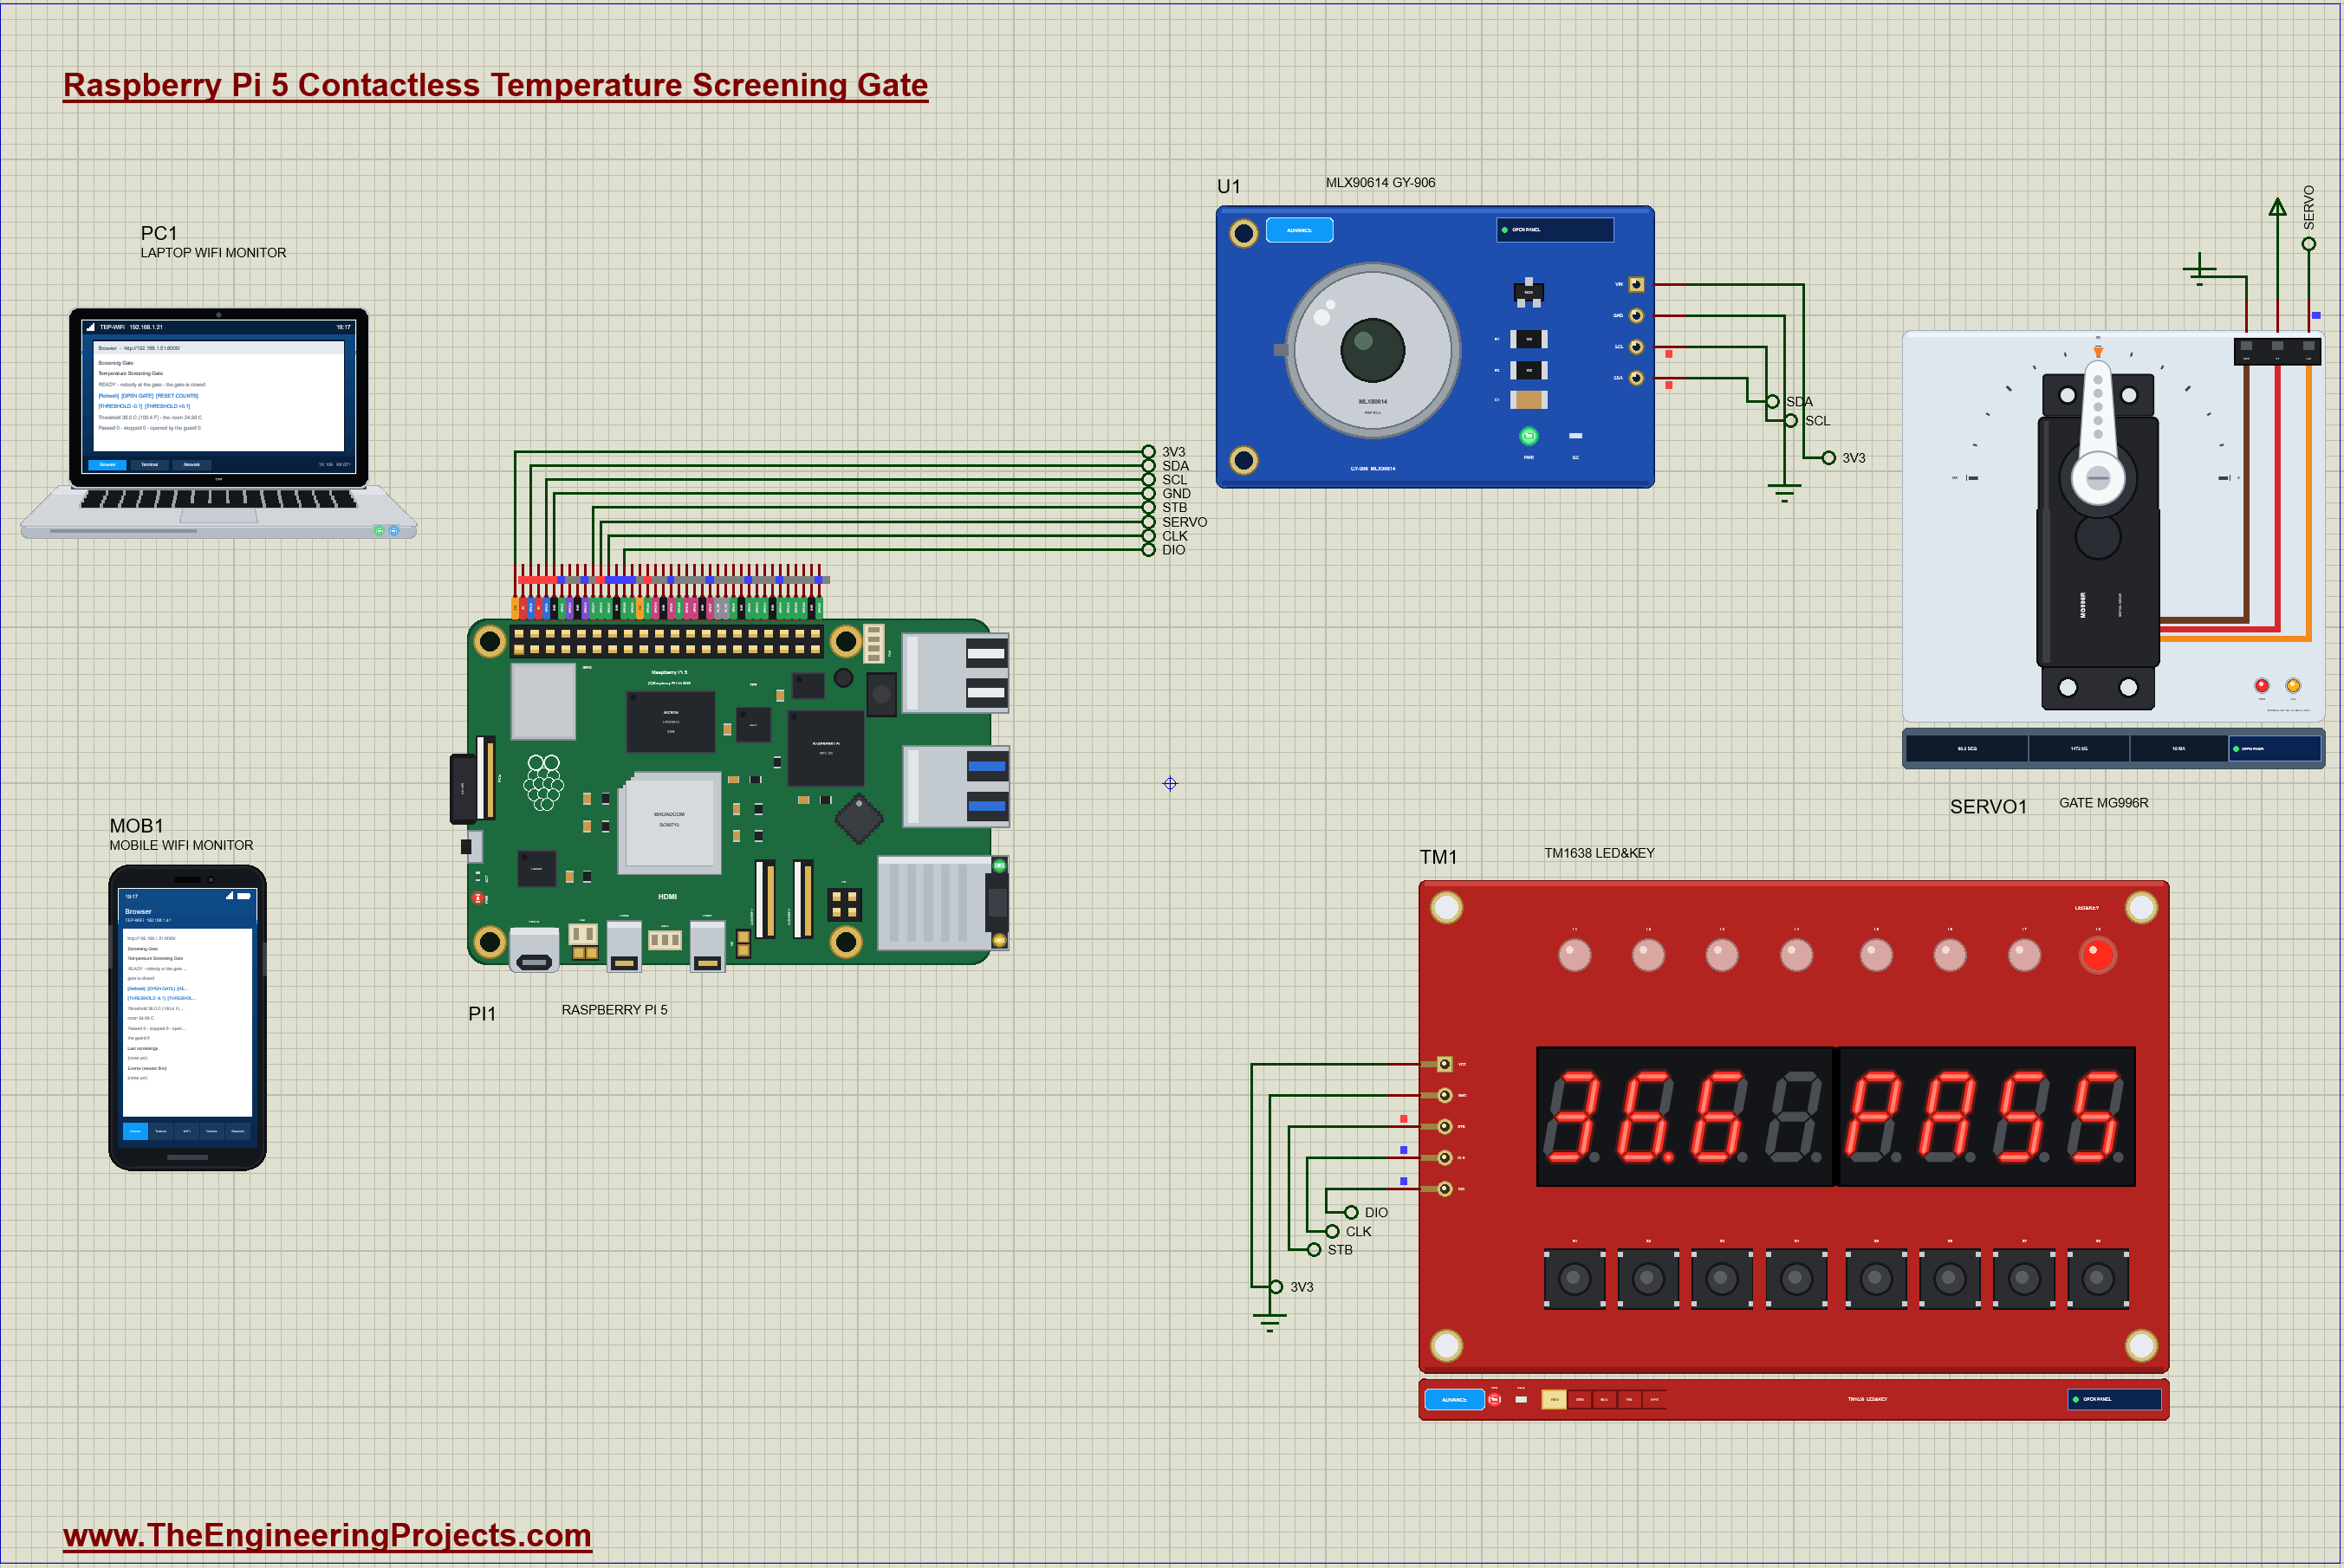
What Does This Screening Gate Do?
- A contactless thermometer: ten readings a second of the forehead and of the room, each checked with its PEC checksum.
- A fair measurement: it waits until a forehead is close enough, then averages five readings over one second.
- A clear verdict: PASS under 38.0 degrees C (100.4 F) opens the gate for 4 seconds; HIGH keeps it shut and flashes all eight LEDs.
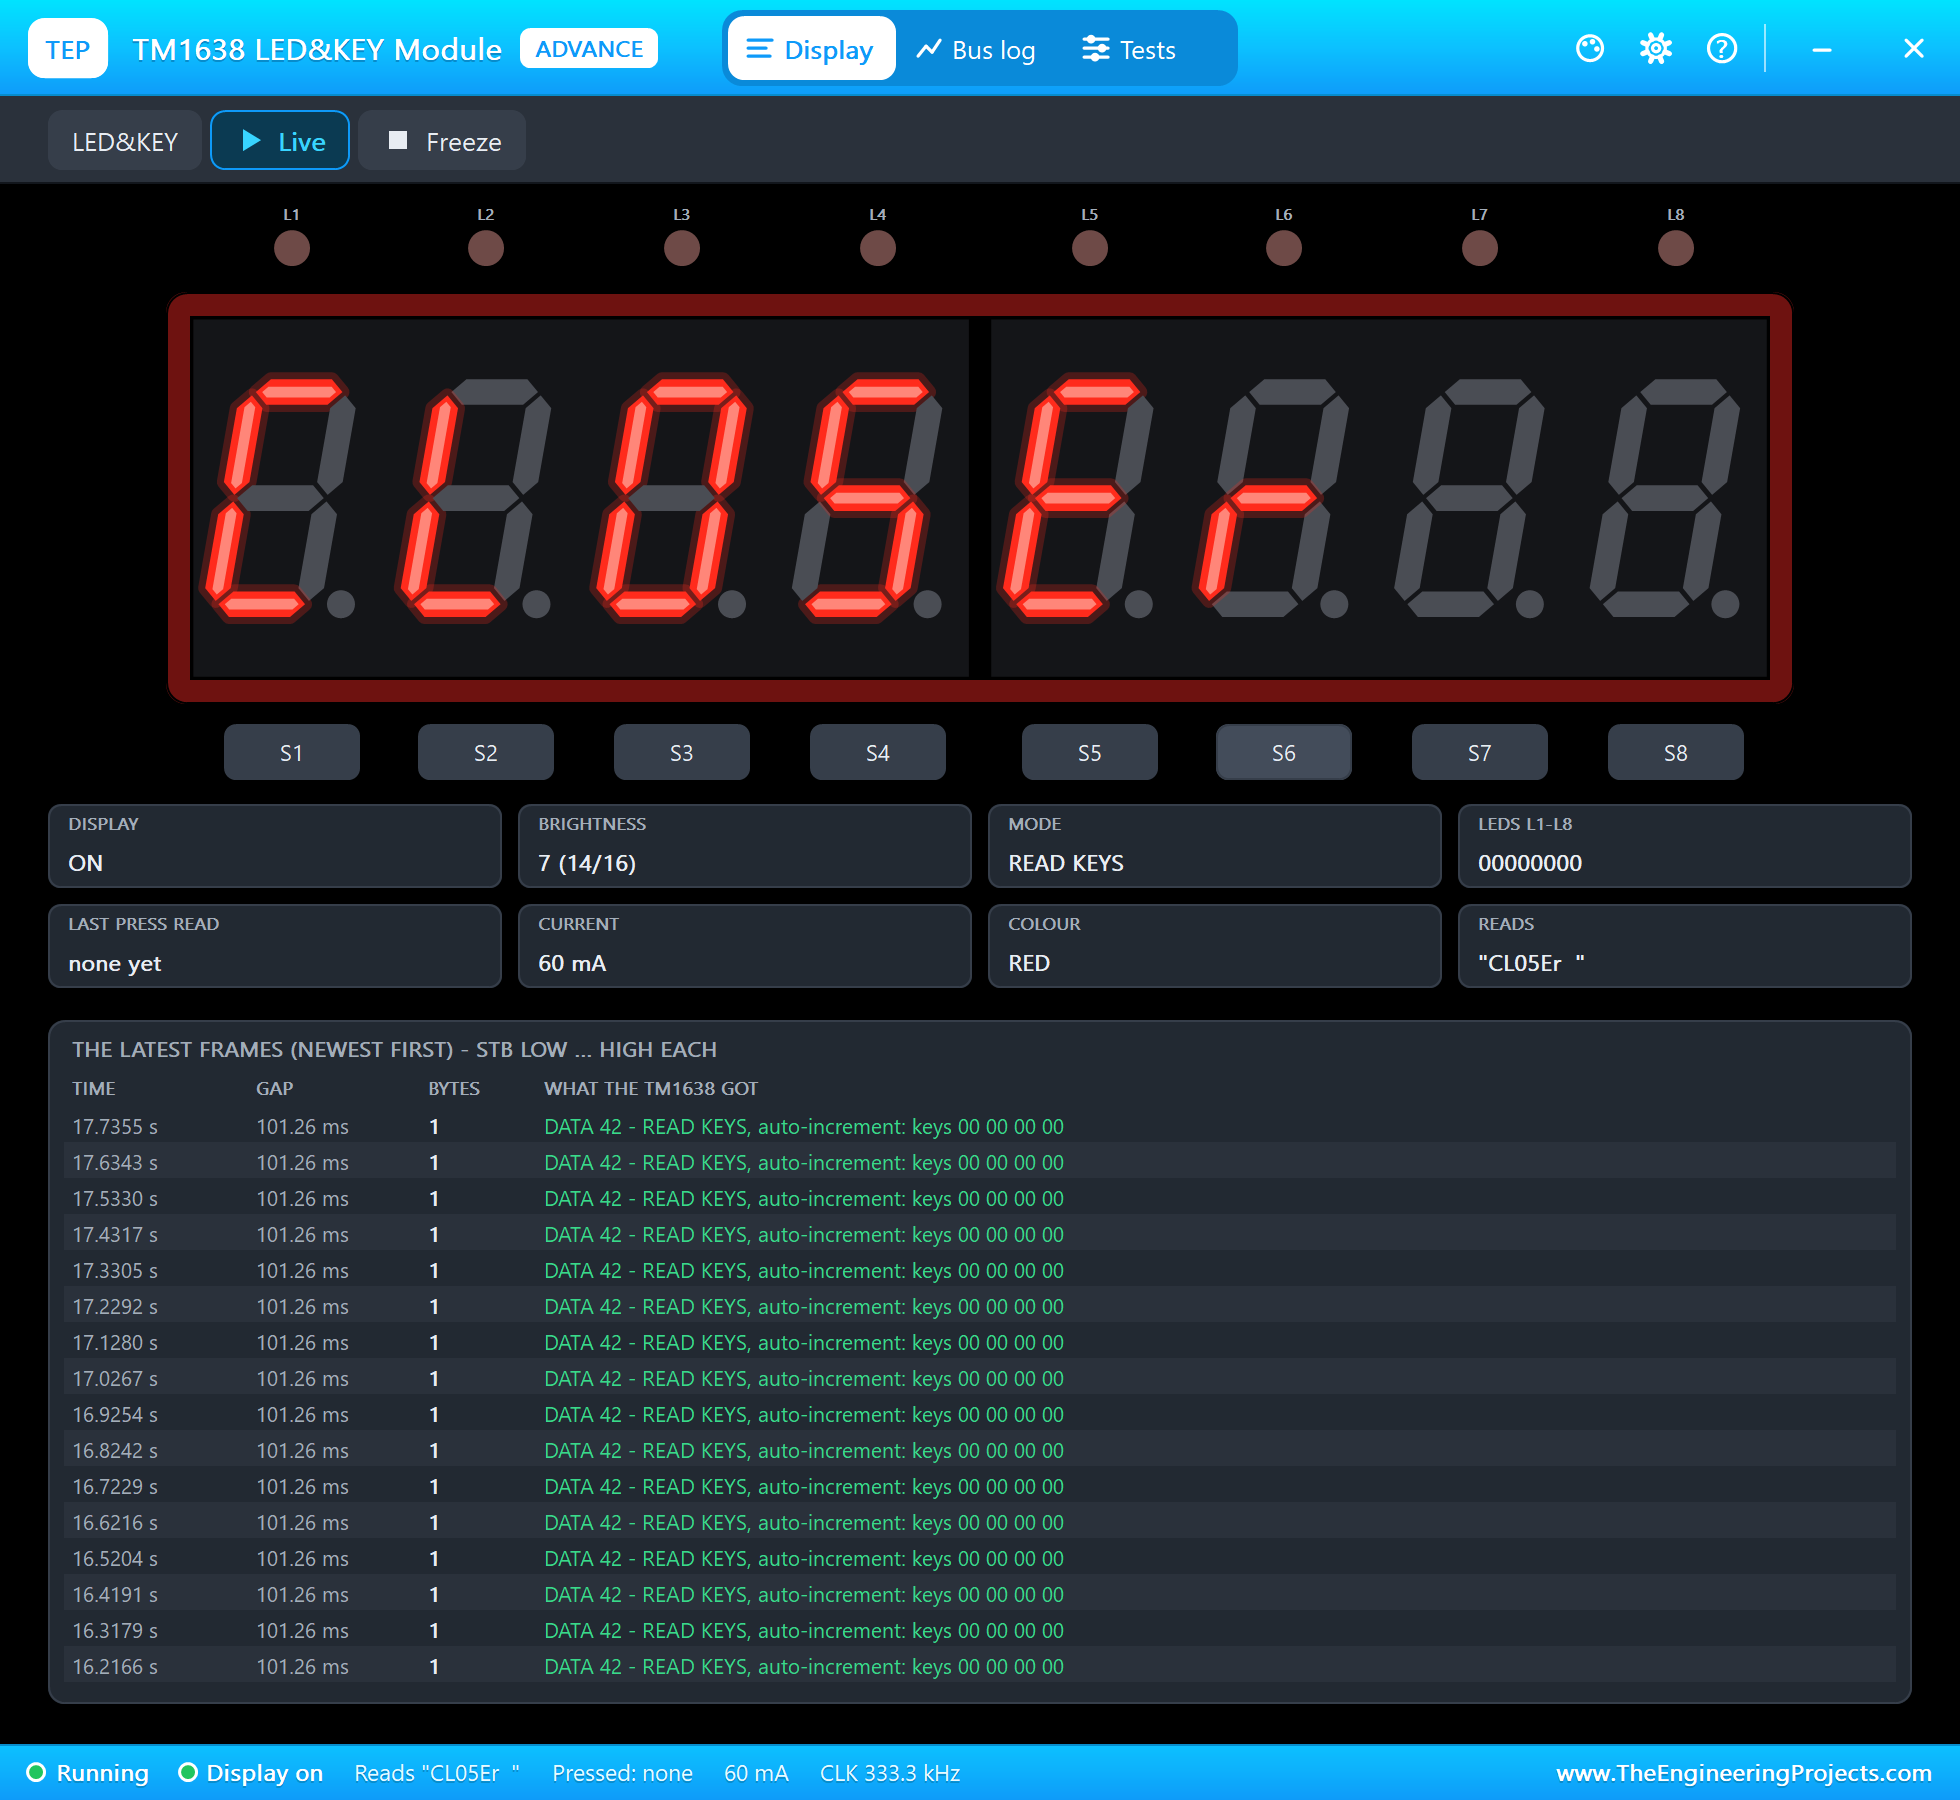
- Helpful messages: CLOSEr when the person stands too far away, HOt when something far hotter than a forehead is held up.
- A guard override: key S8 on the board or OPEN GATE on the dashboard opens the gate after a person has been checked by hand.
- A dashboard: the gate, the last reading, the counts of people passed and stopped, the threshold, the last screenings and the events.
It is a great project to learn three skills in one build: the SMBus protocol with its packet error checking, bit-banging a serial protocol on plain GPIO pins, and servo control, all on the Raspberry Pi 5. In the simulation, the people come from the MLX90614's pop-up: you set the temperature of the object, its material and its distance from the sensor.
Components Used in the Proteus Simulation
All the parts come from our Proteus libraries, each with its own tutorial. The project zip at the end includes every LIB and DLL file.
| Part | Proteus device | Library post | Connection |
|---|---|---|---|
| Raspberry Pi 5 | RASPBERRY PI 5 | Raspberry Pi 5 Library for Proteus | PI1, Ethernet 192.168.1.51 |
| MLX90614 IR thermometer (GY-906) | MLX90614ADVTEP | MLX90614 IR Thermometer Library for Proteus | U1, I2C1 (SMBus) 0x5A |
| TM1638 display and key board | TM1638ADVTEP | TM1638 Library | TM1, STB / CLK / DIO on three GPIOs |
| MG996R servo (the gate arm) | MG996RSERVOTEP | MG996R Servo Motor Library | SERVO1, GPIO18 |
| Laptop WiFi Monitor | LAPTOP WIFI MONITOR | Laptop WiFi Monitor | PC1 |
| Mobile WiFi Monitor | MOBILE WIFI MONITOR | Mobile WiFi Monitor | MOB1 |
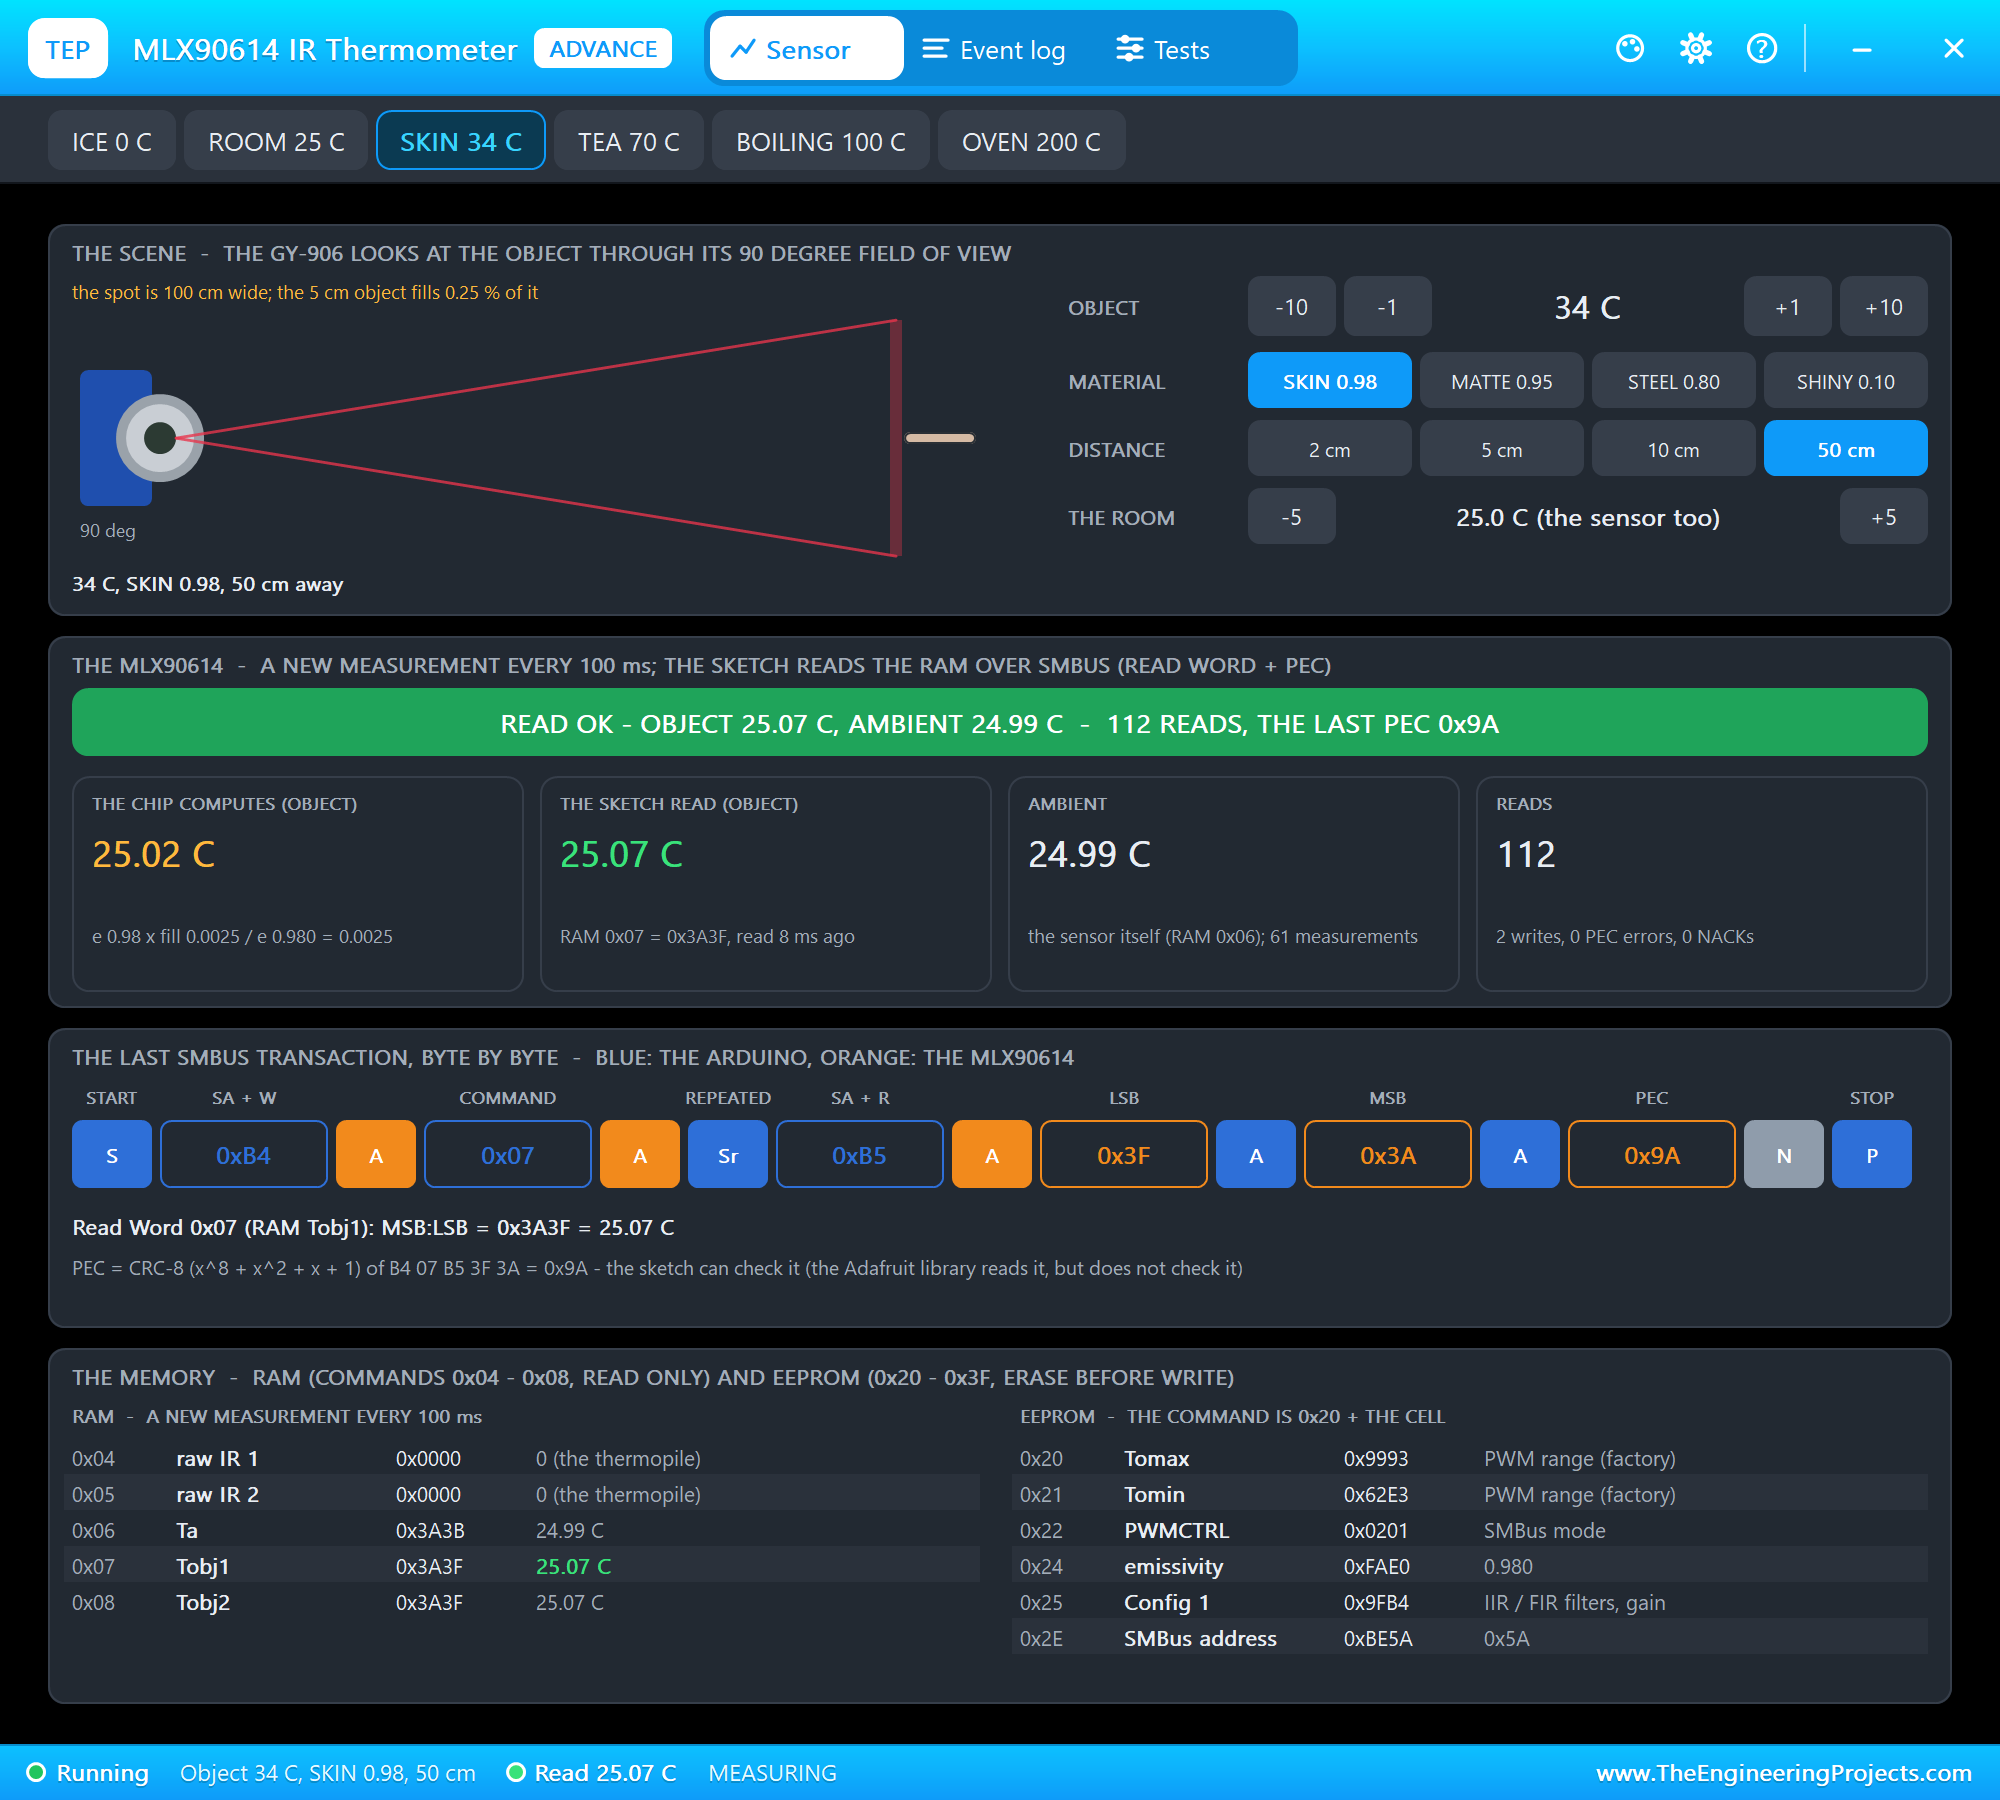
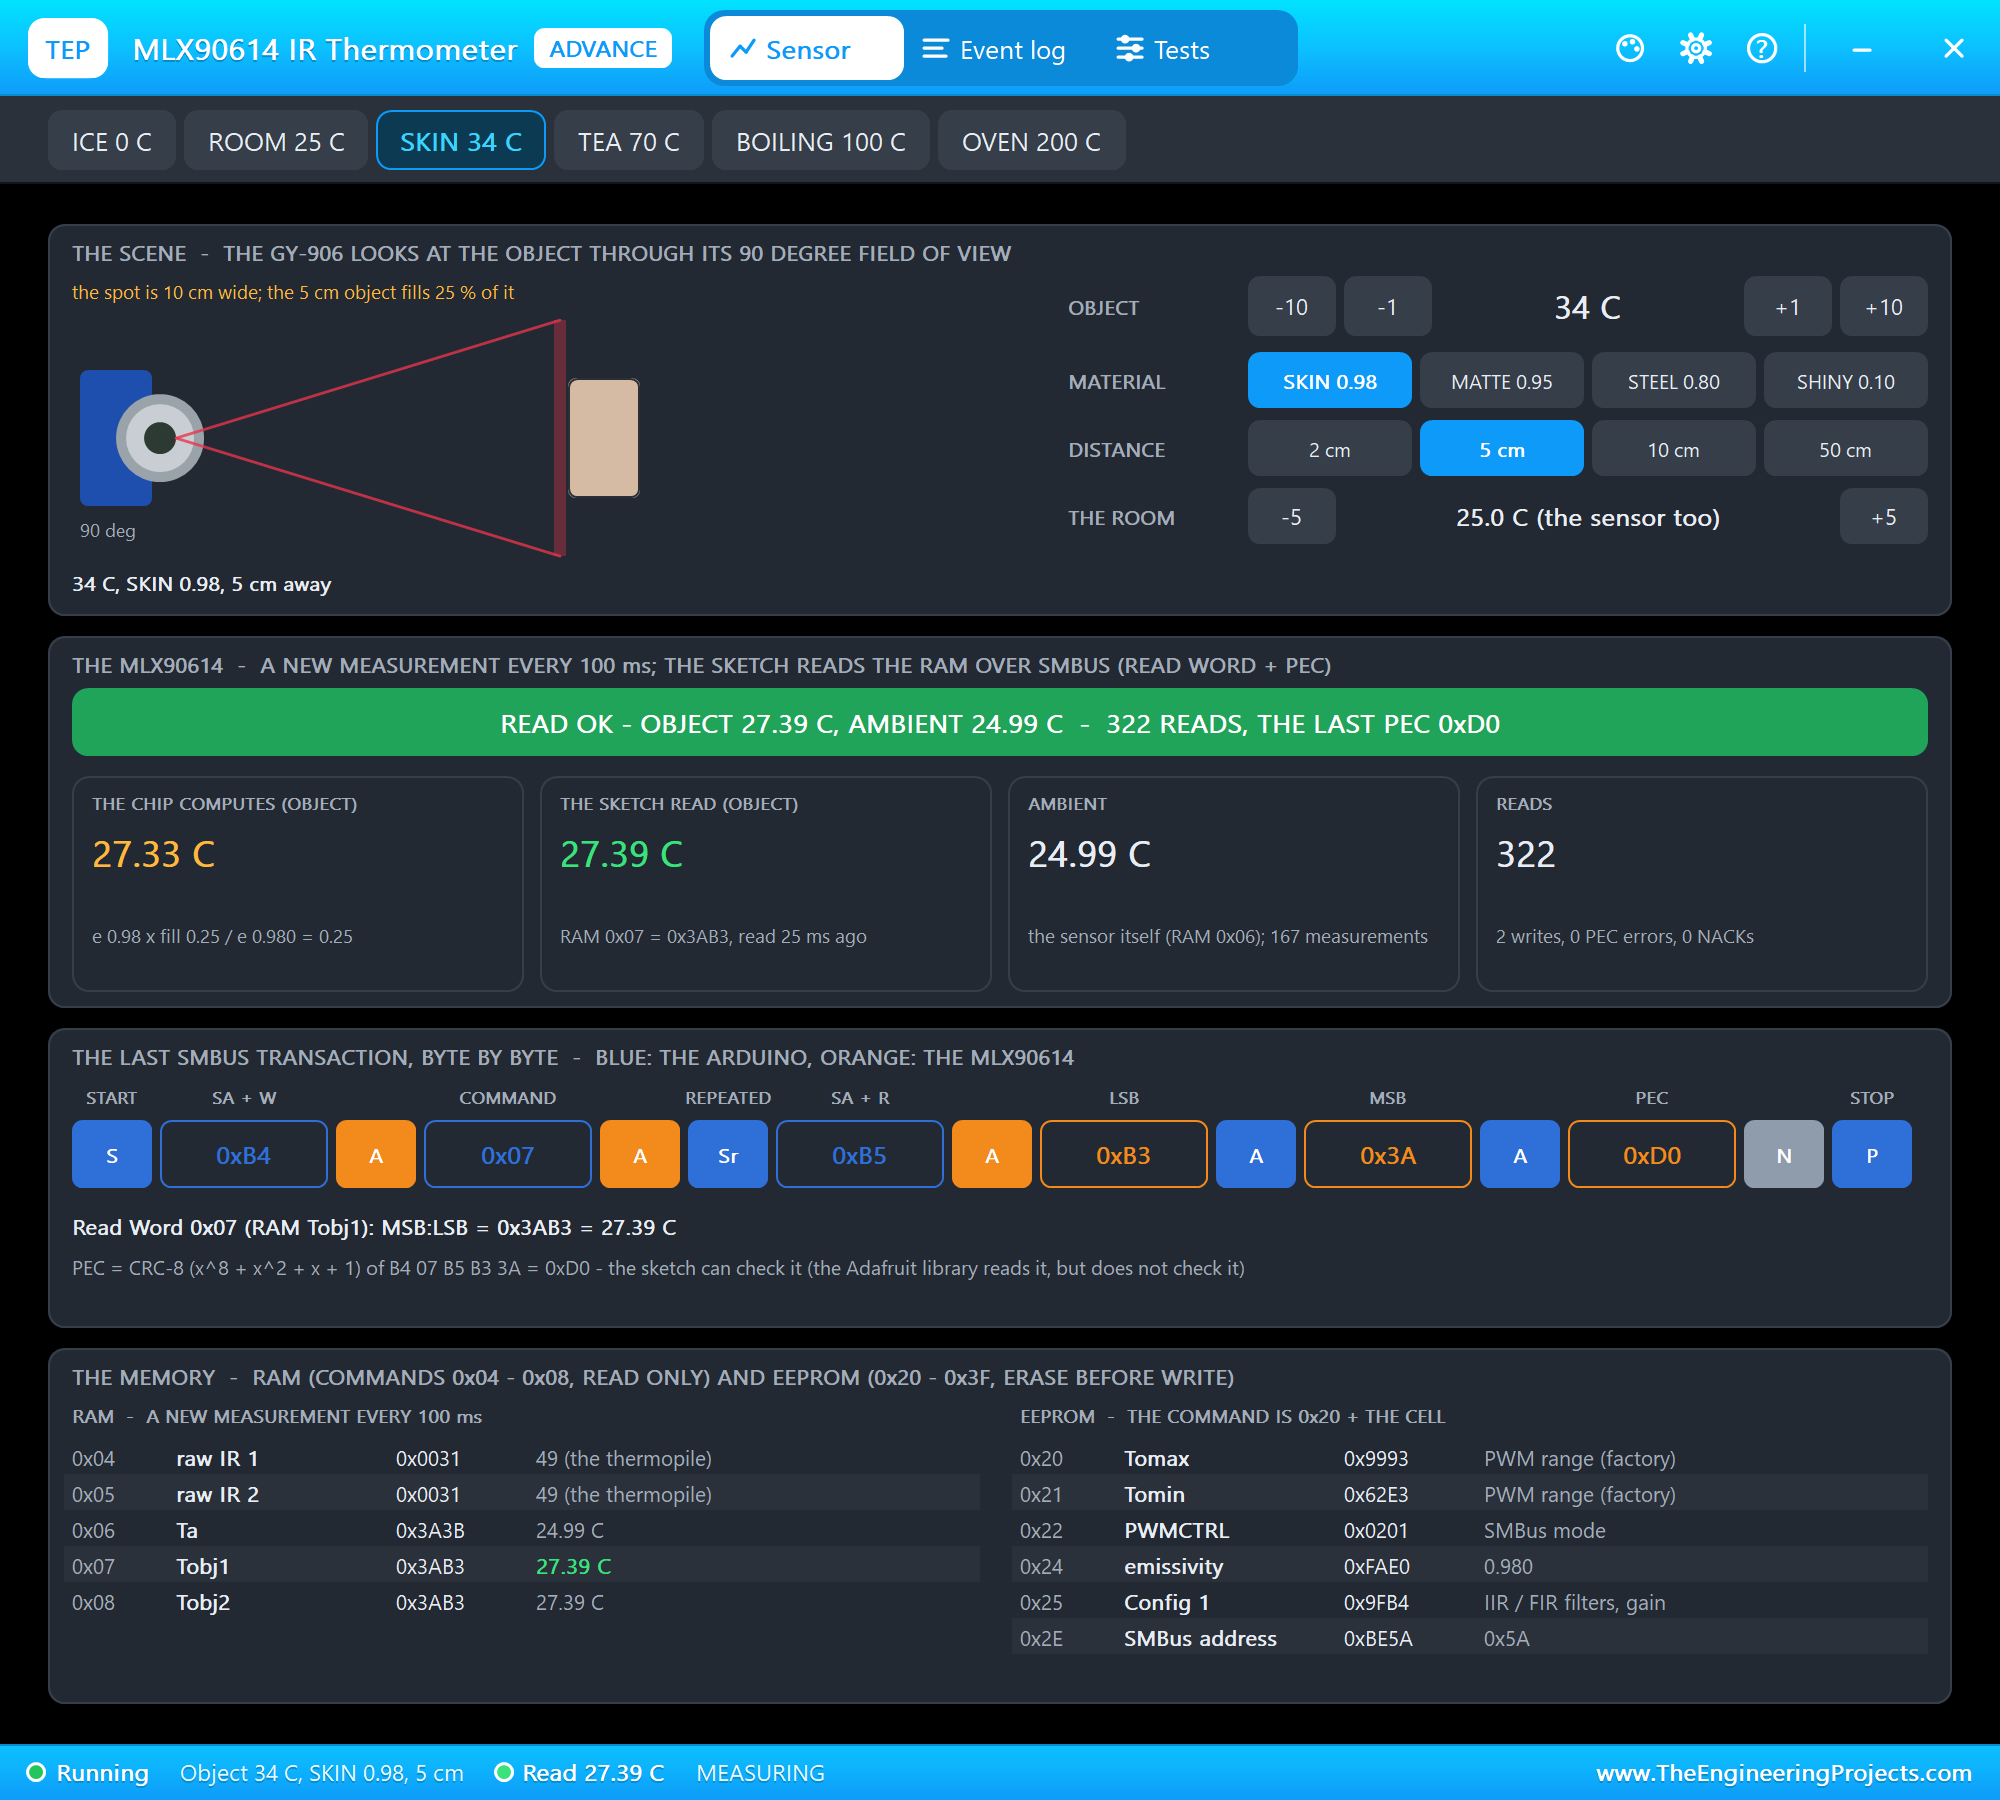
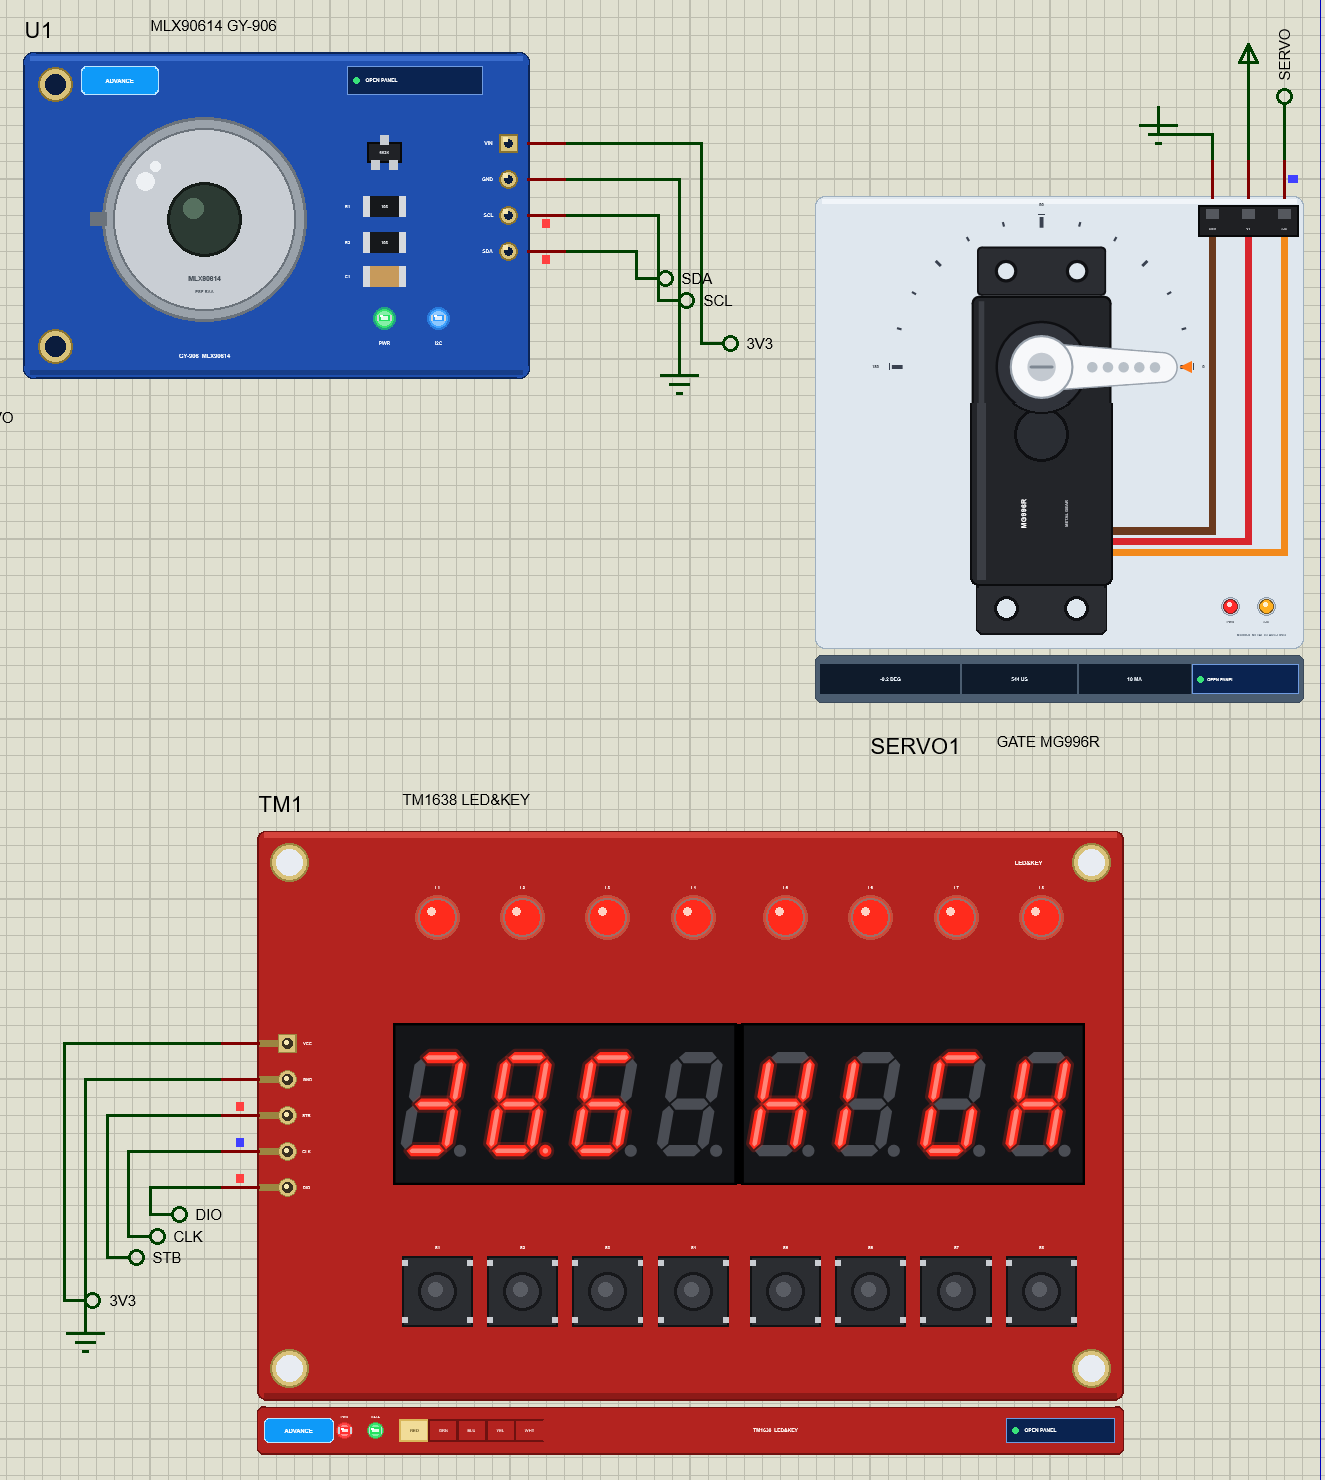
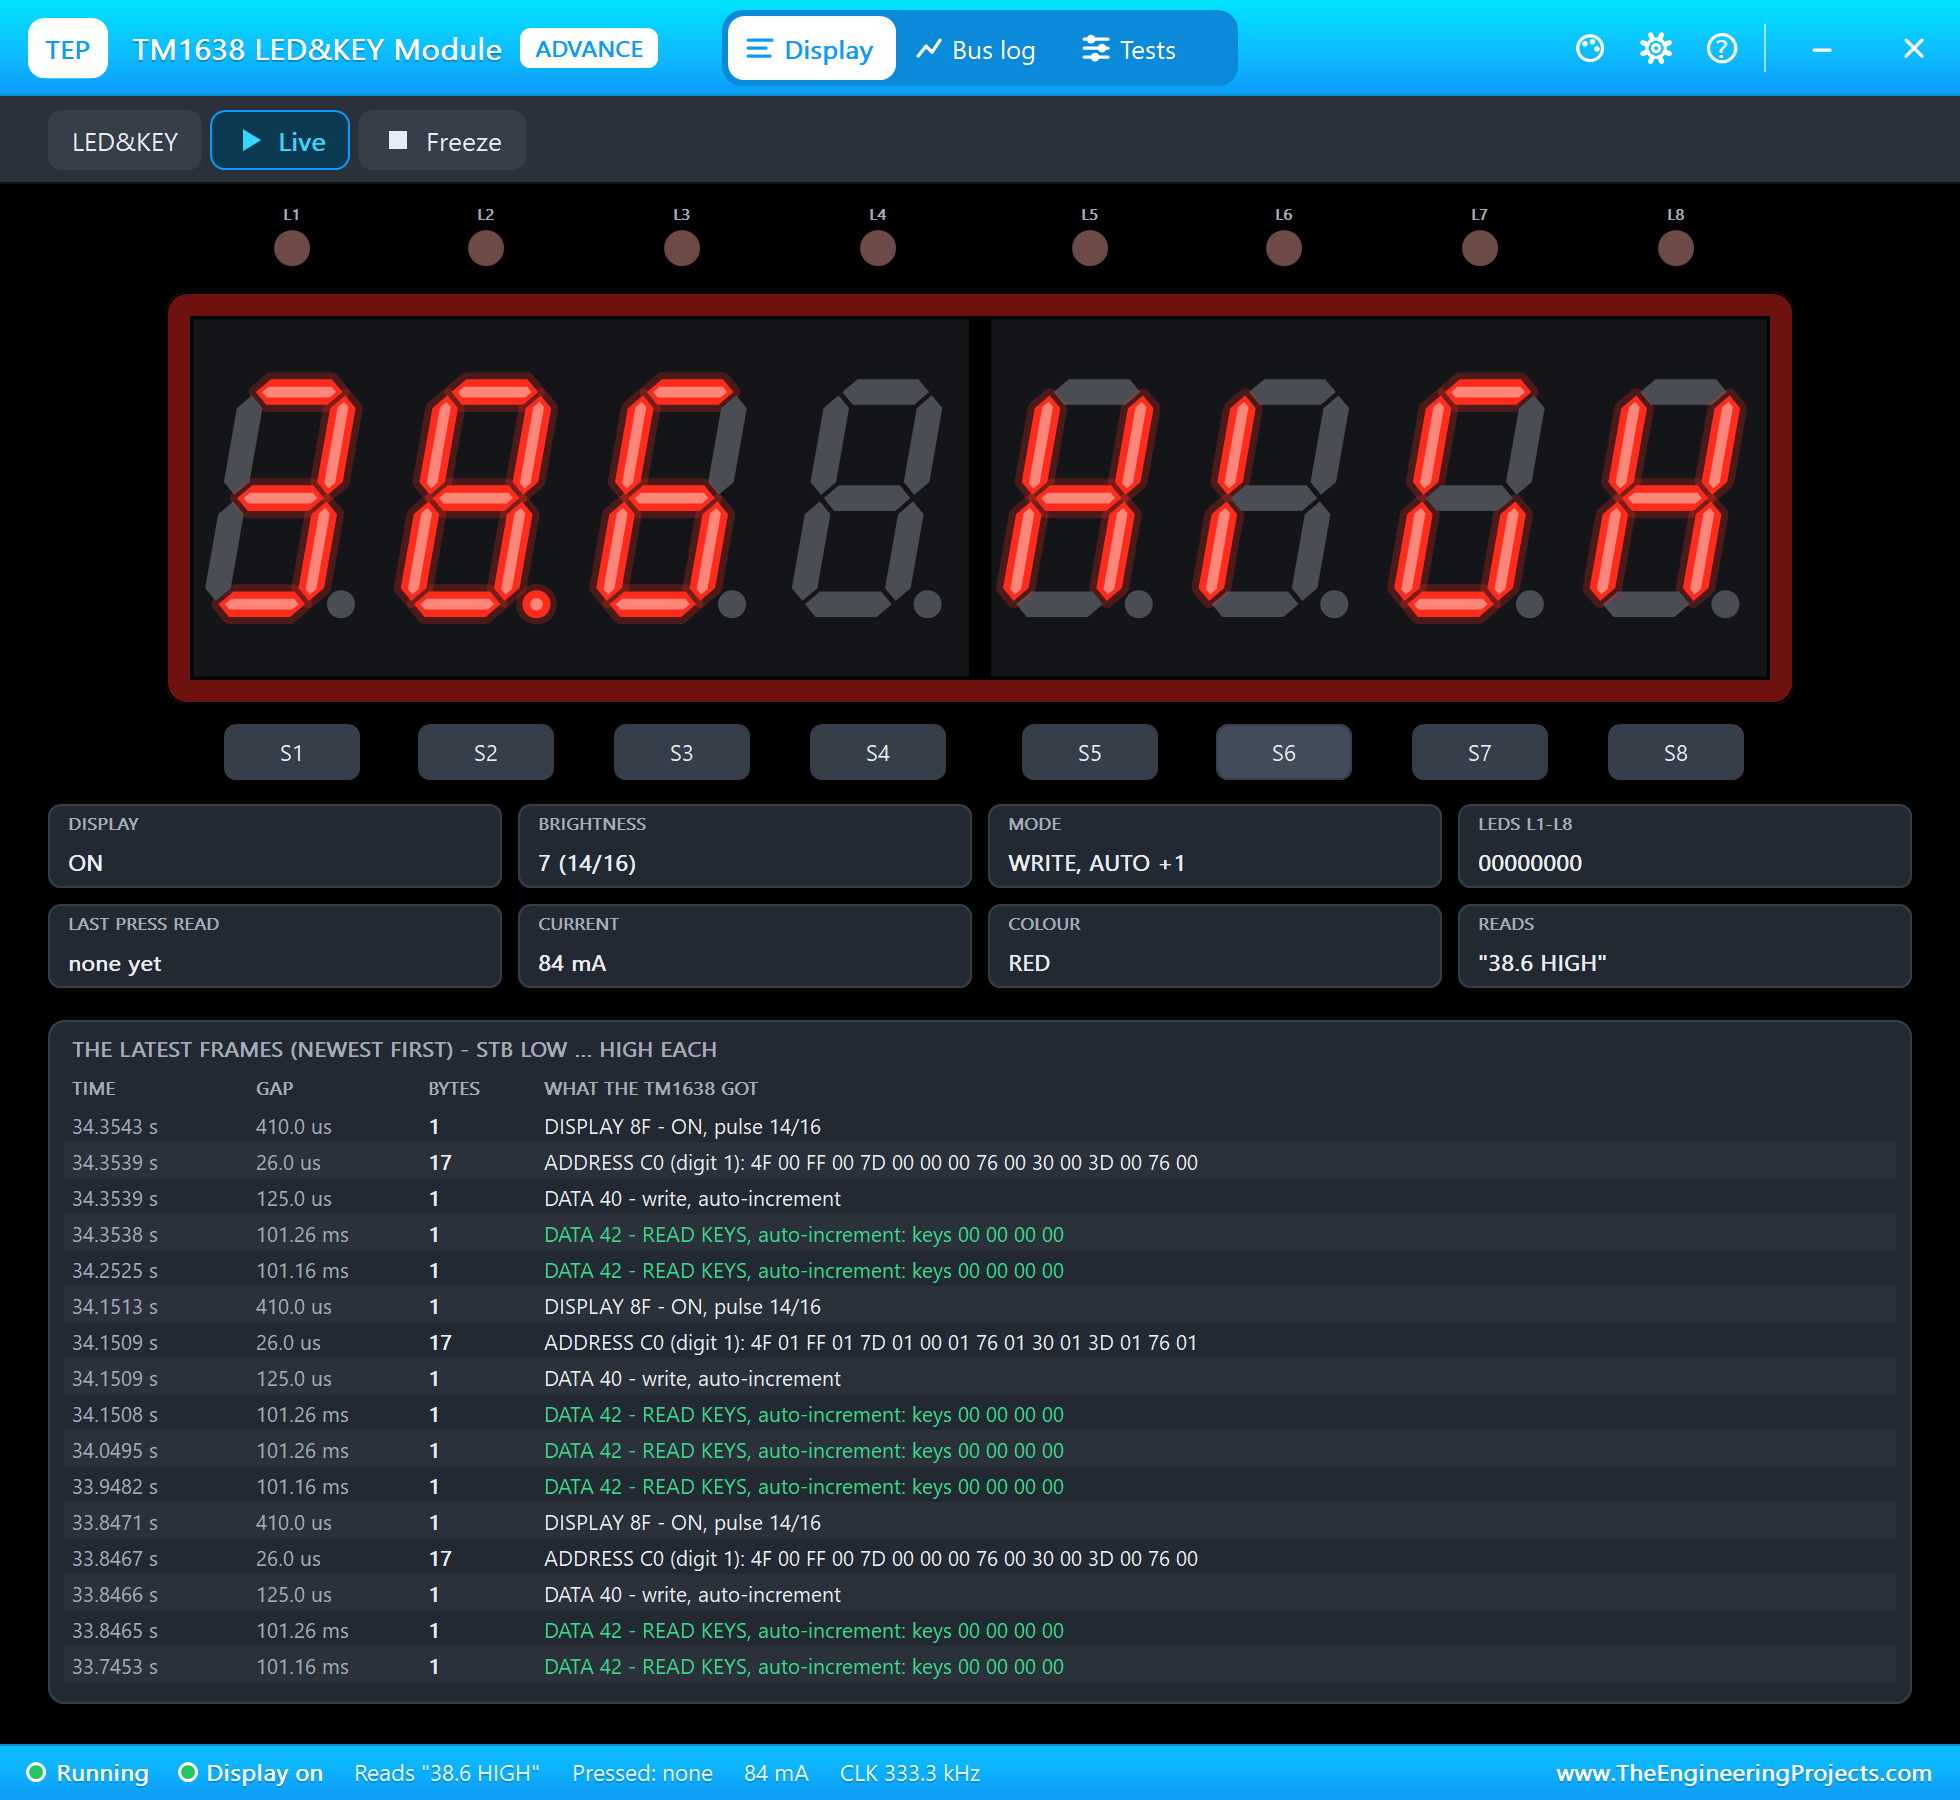
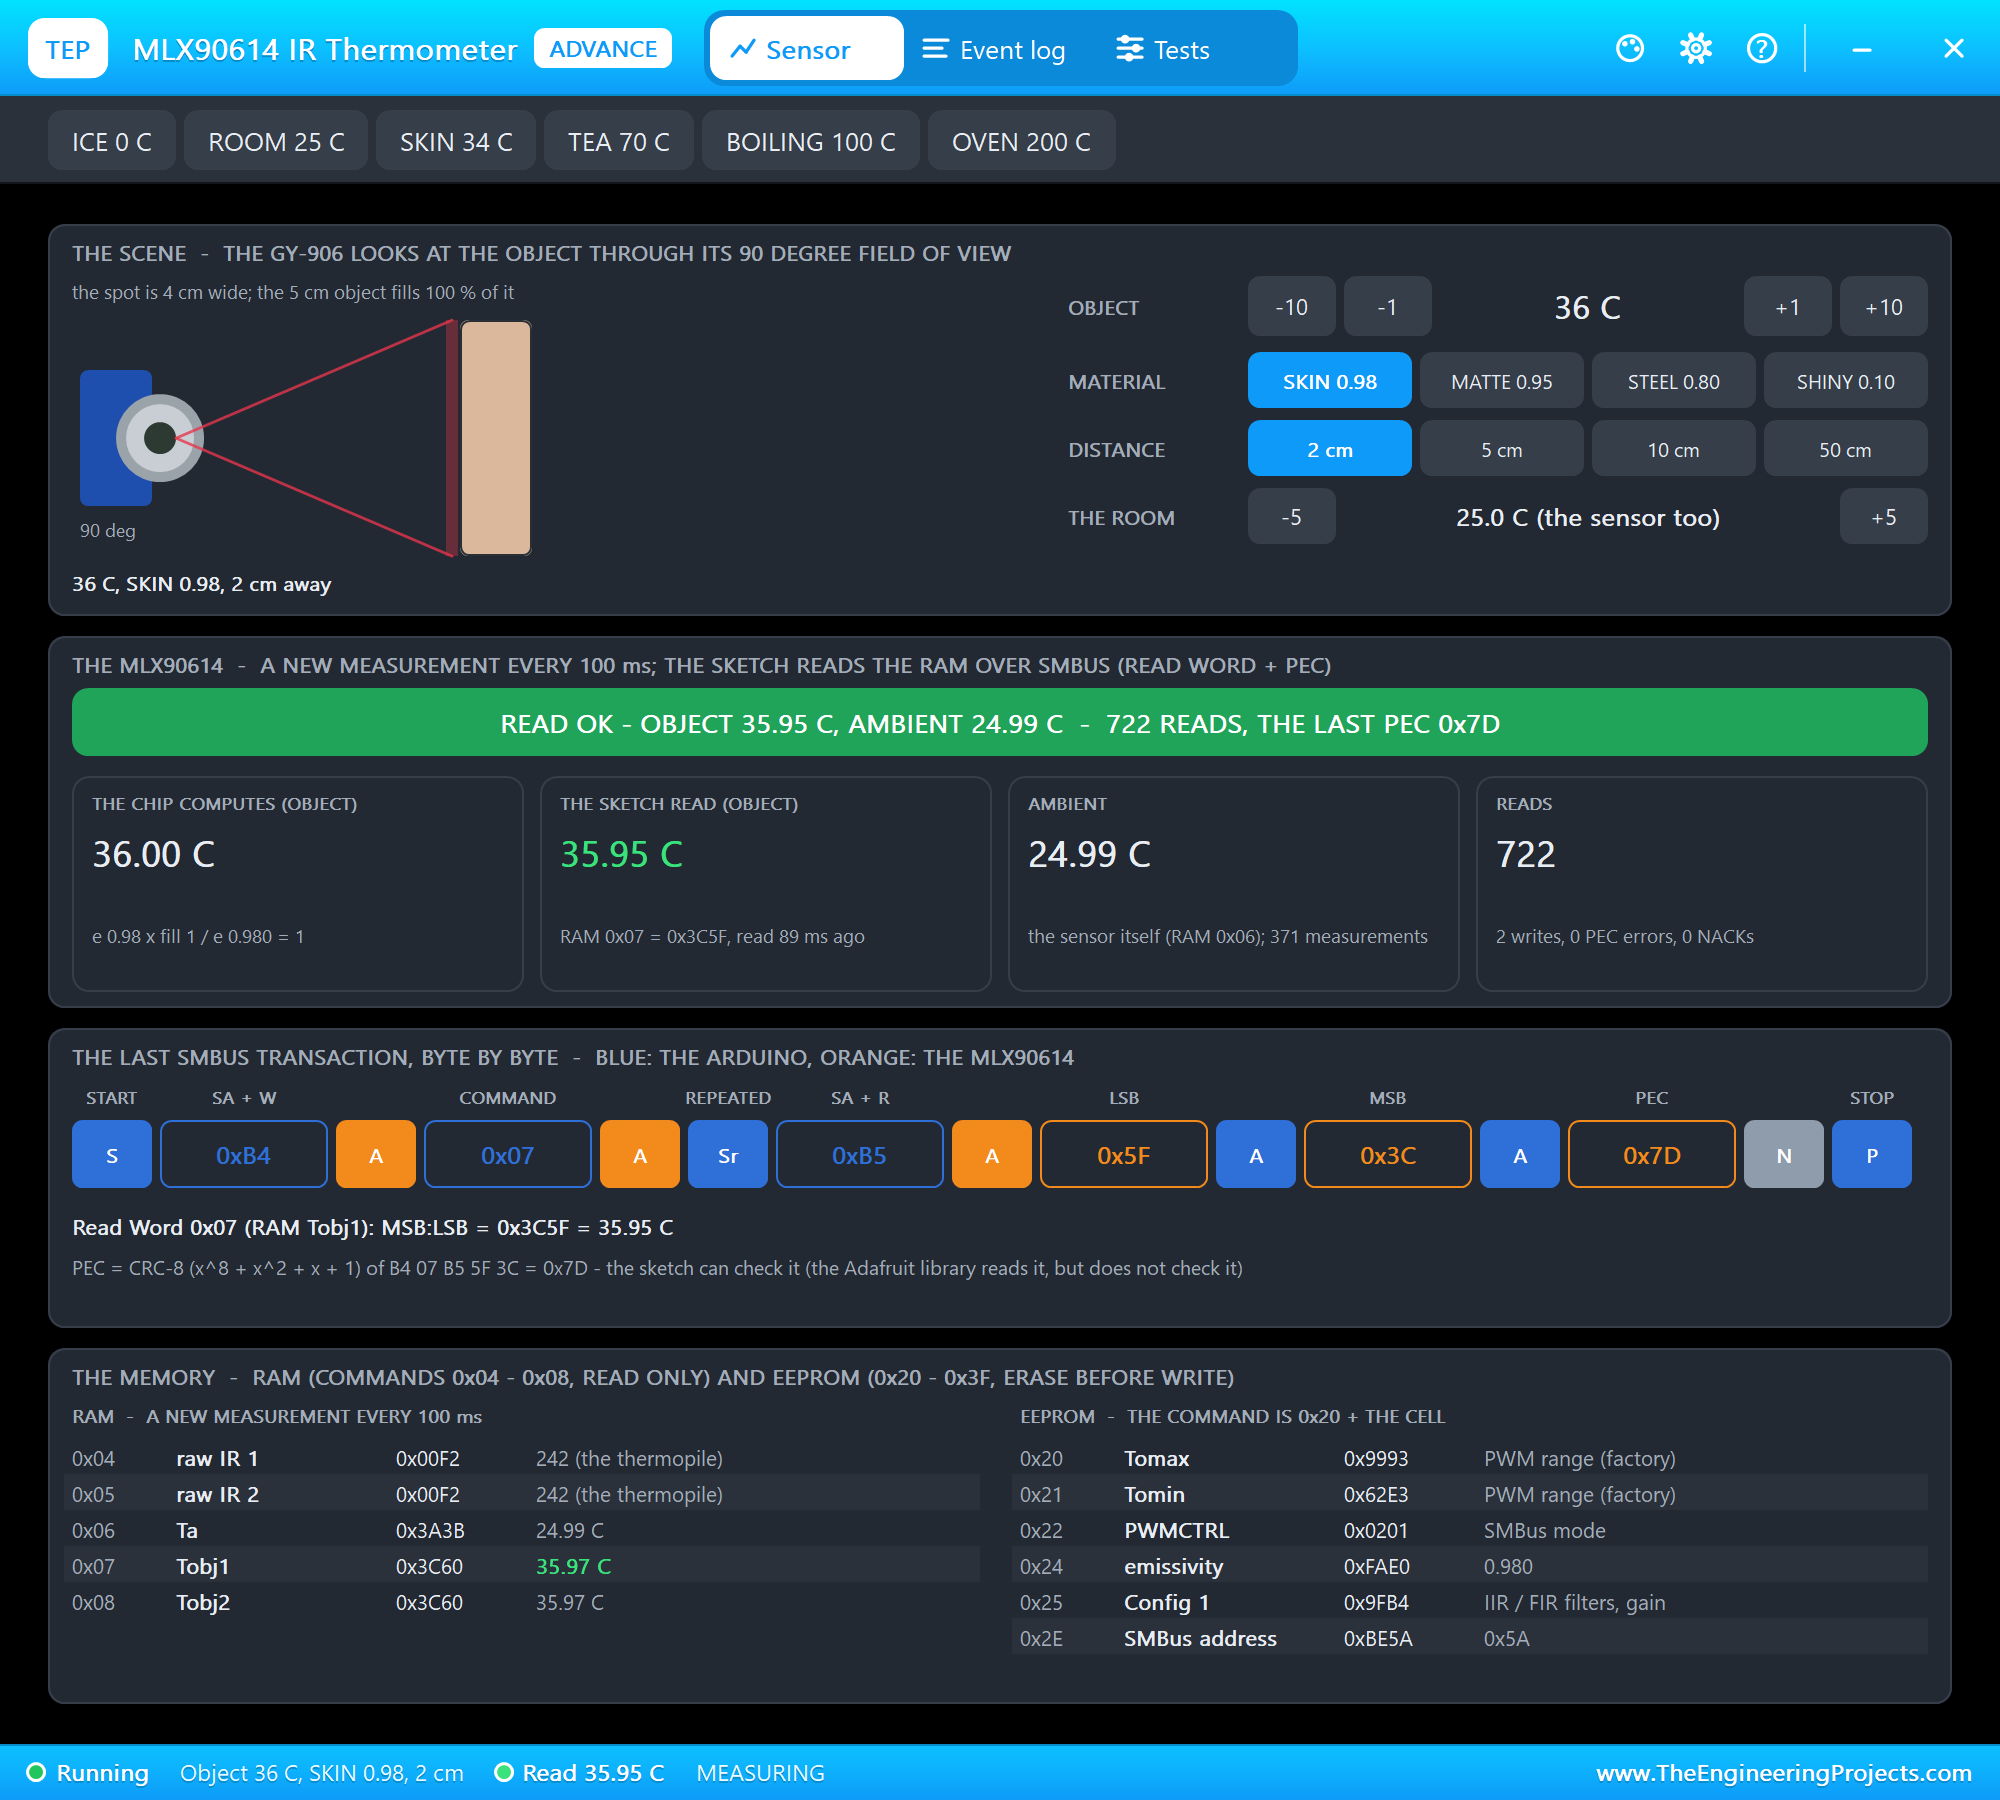
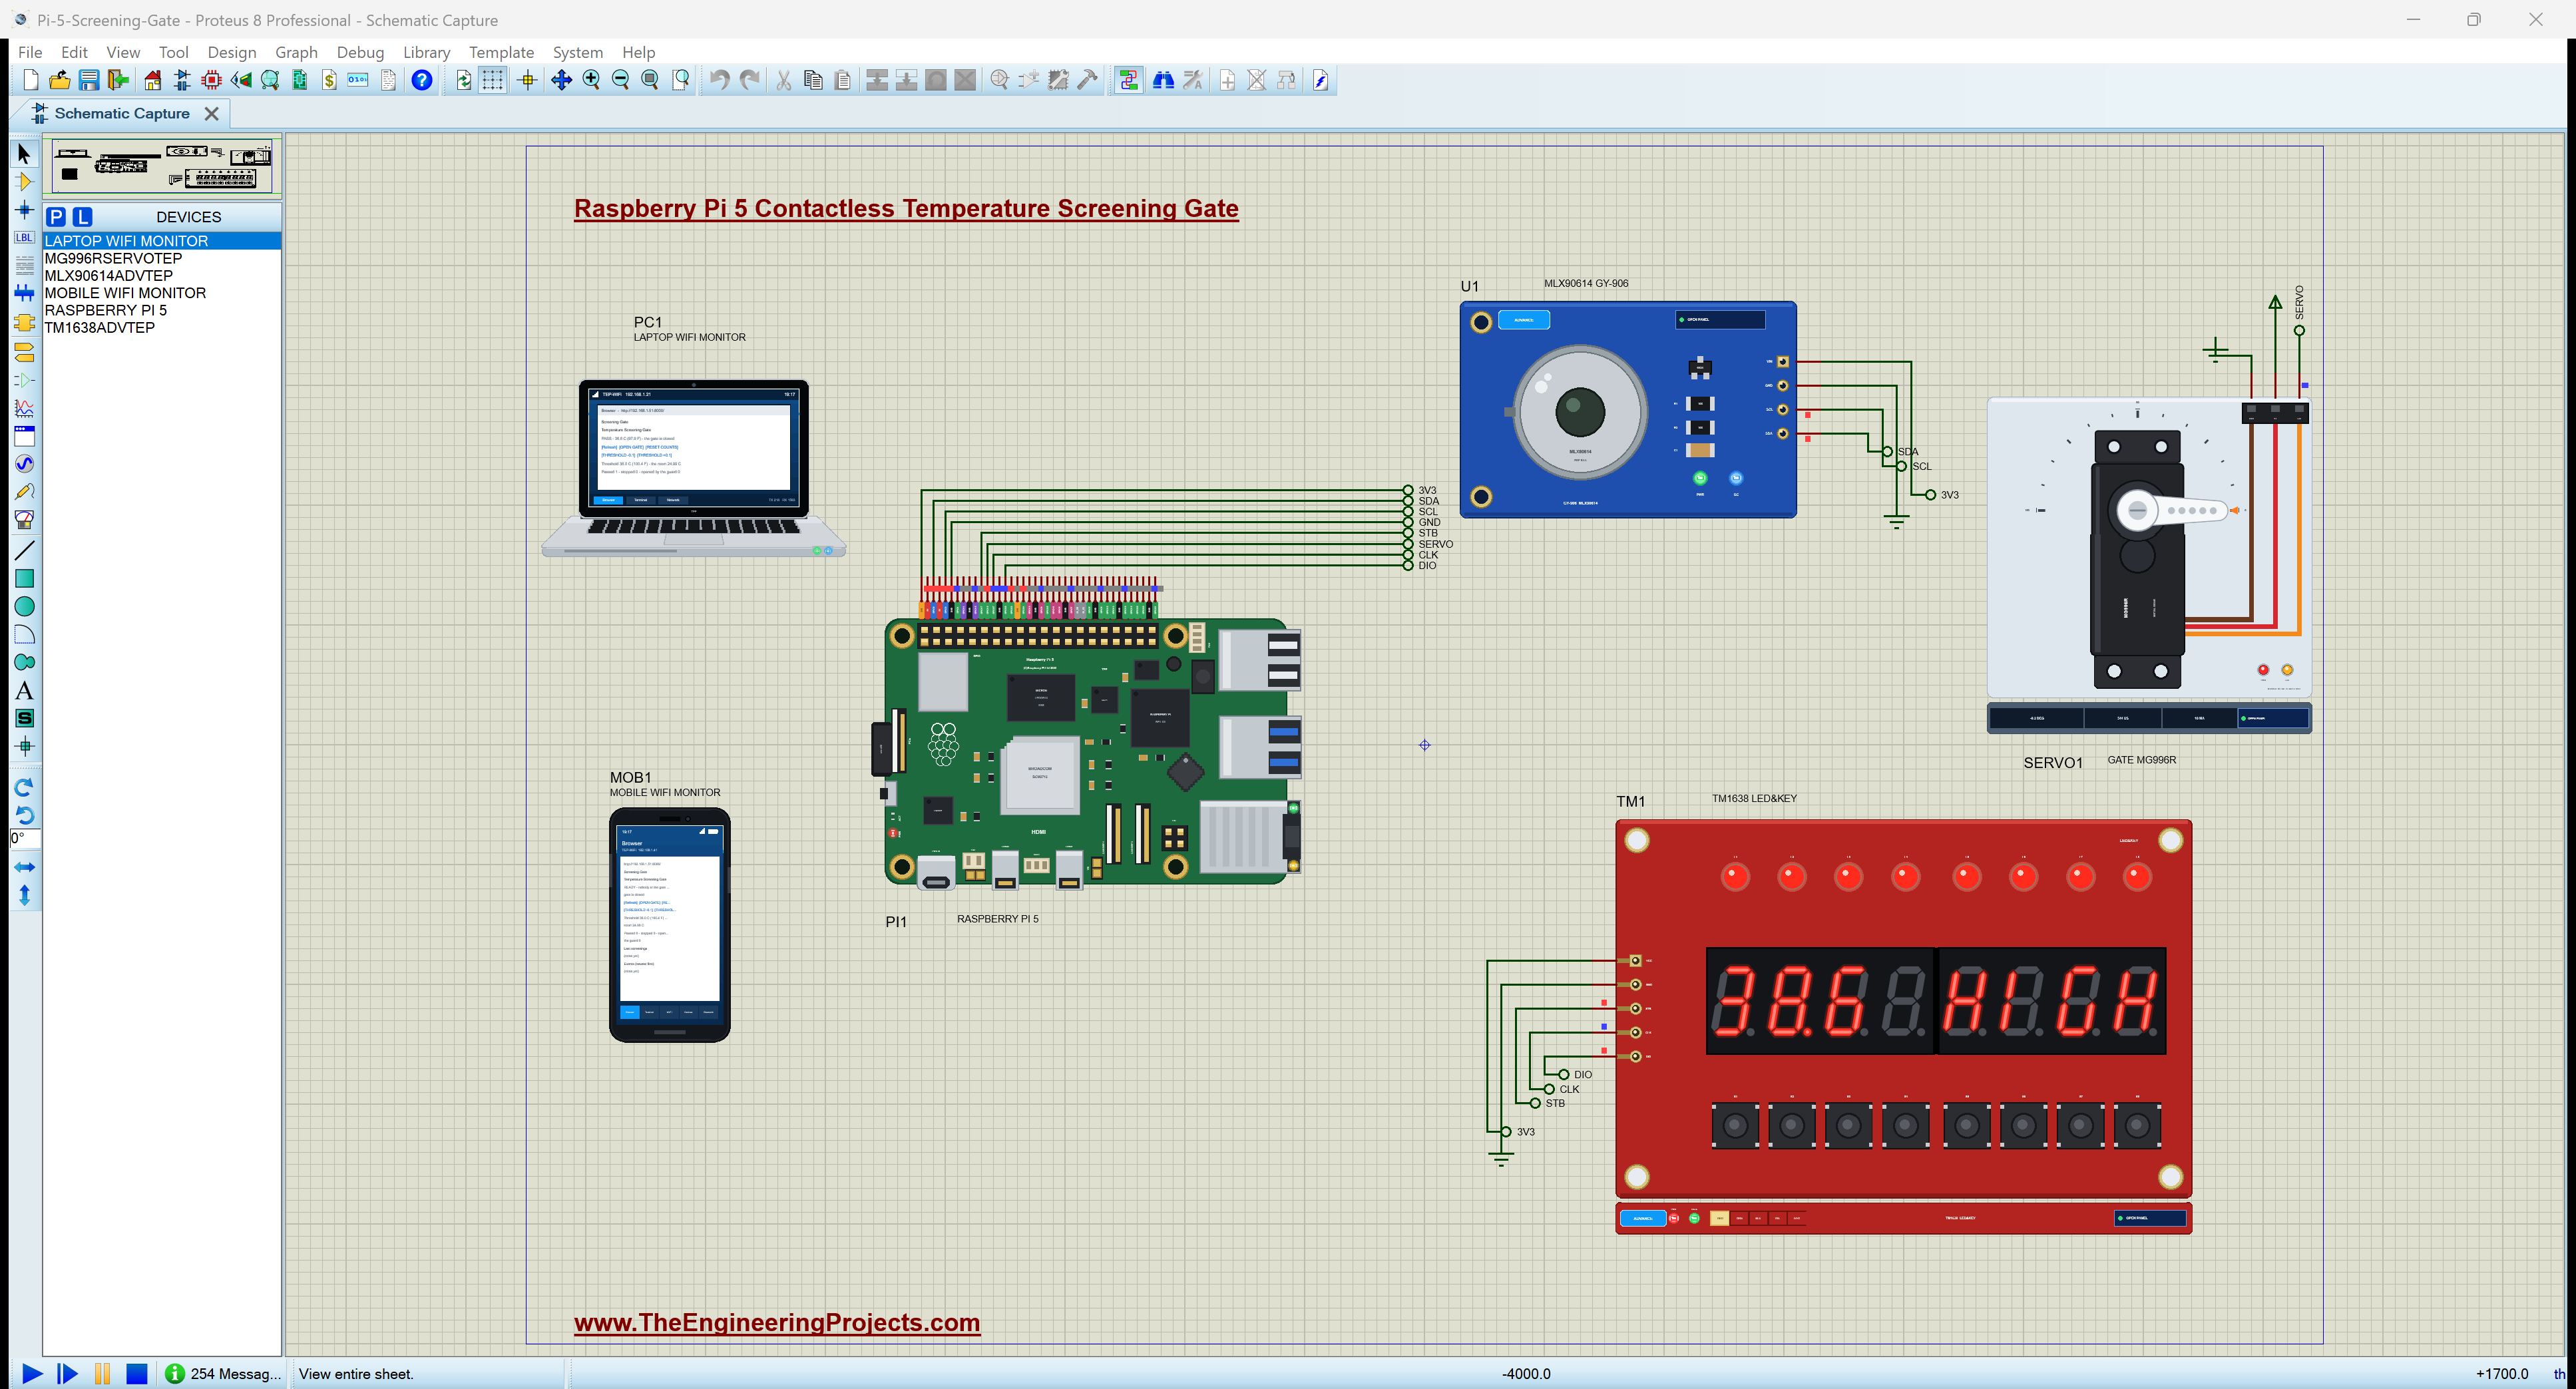
The three modules are models with pop-ups. The MLX90614's pop-up holds the scene: the object's temperature (presets such as ROOM 25 C, SKIN 34 C and TEA 70 C, plus steps of 1 and 10 degrees), its material (SKIN 0.98, MATTE, STEEL, SHINY) and its distance (2, 5, 10 and 50 cm); it also shows the last SMBus transaction byte by byte and the chip's RAM and EEPROM. The TM1638's pop-up shows the eight digits, the eight LEDs and the keys S1 to S8, which you can click, and every frame the Pi sends. The servo's pop-up shows the horn's angle, the pulse width and the current.
Proteus Simulation of the Screening Gate: the Circuit
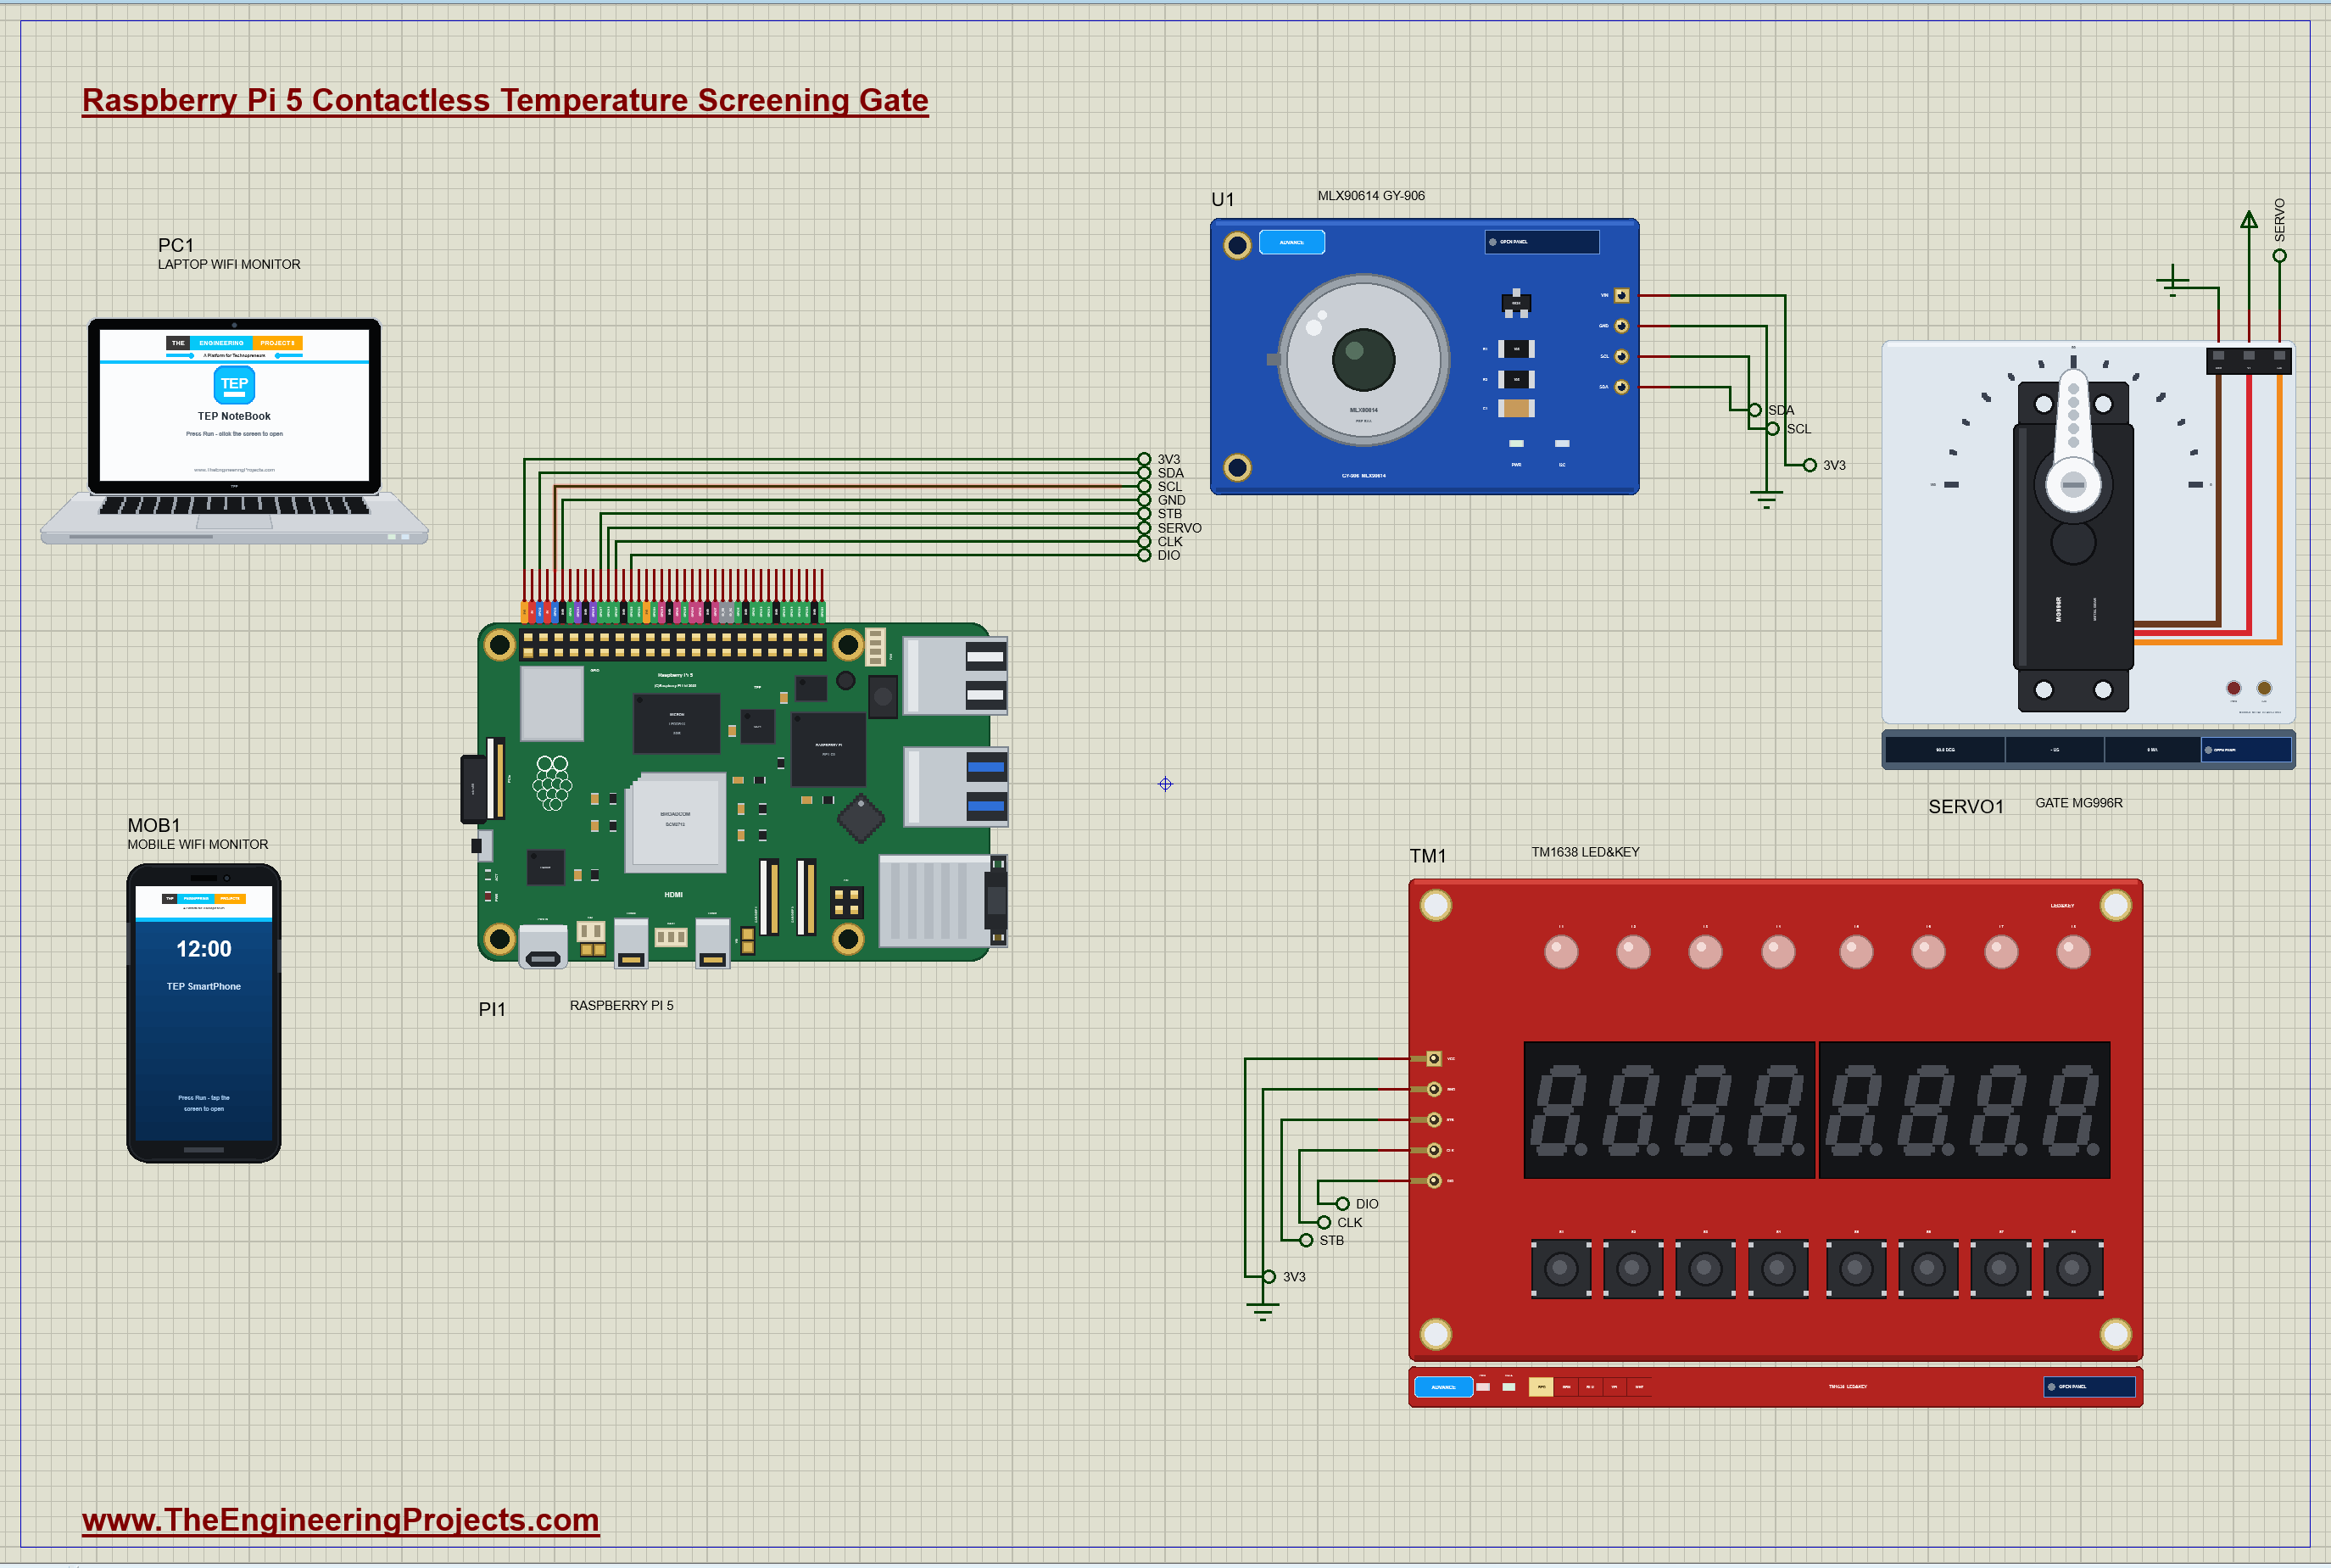
| Part | Pins | Raspberry Pi 5 header |
|---|---|---|
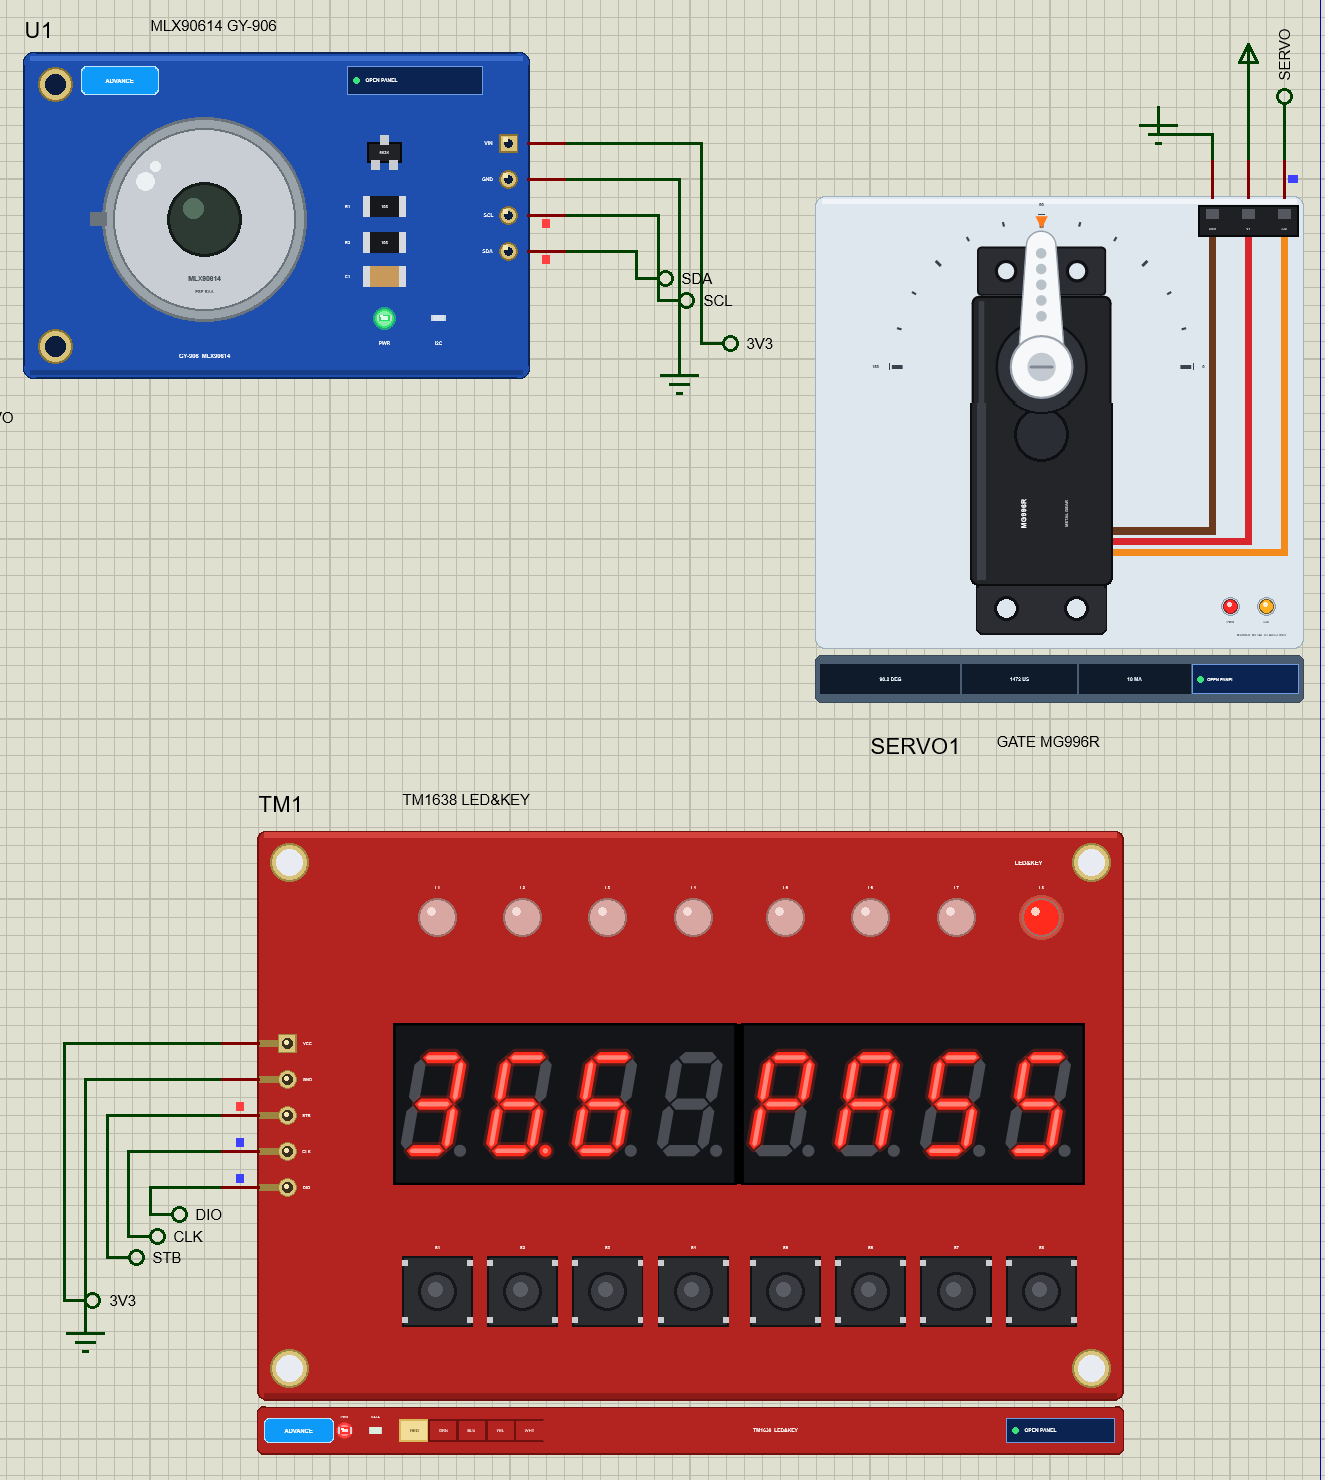
| U1 MLX90614 (GY-906) | VIN / GND / SDA / SCL | 3V3 (pin 1) / GND (pin 6) / GPIO2 (pin 3) / GPIO3 (pin 5) |
| TM1 TM1638 board | VCC / GND / STB / CLK / DIO | 3V3 / GND / GPIO17 (pin 11) / GPIO27 (pin 13) / GPIO22 (pin 15) |
| SERVO1 MG996R | V+ / GND / SIG | the 5 V rail / GND / GPIO18 (pin 12) |
The circuit is short. The GY-906 module carries its own regulator and the I2C pull-up resistors, so it connects straight to the Pi's I2C1 pins. The TM1638 board runs on 3.3 V here, which keeps its DIO line, the one that talks back to the Pi when the keys are read, at a level the Pi's GPIOs accept. The servo takes its power from the 5 V rail and only its signal from the Pi: GPIO18 carries the 50 Hz pulses that set the gate arm's angle.
How the Screening Gate Works
Measuring Temperature with Infrared
Everything warmer than absolute zero radiates infrared light, and the warmer it is, the more it radiates: the power grows with the fourth power of the temperature in kelvin, the Stefan-Boltzmann law. The MLX90614 has a thermopile behind a silicon window, a tiny stack of thermocouples that warms up when infrared light falls on it, and a second sensor that measures the chip's own temperature. From the two it computes the temperature of whatever it looks at. It reports two numbers: Ta, the ambient (the chip itself, which is the room), in RAM address 0x06, and Tobj1, the object, in RAM address 0x07. Both are in kelvin times 50, so one step is 0.02 degrees.
Worked example: a raw word of 0x3BFF is 15,359; 15,359 x 0.02 = 307.18 K, and 307.18 - 273.15 = 34.03 degrees C, a typical forehead.
Why the Distance Matters
The GY-906 module's MLX90614 sees a cone 90 degrees wide, so at a distance d its spot is 2 x d wide. A forehead is about 5 cm wide. At 2 cm the spot is 4 cm wide and the forehead fills all of it; at 5 cm the spot is 10 cm wide and the forehead fills only a quarter of its area, (5 / 10) squared; the rest of the spot sees the wall behind, at room temperature. The sensor mixes the two, weighted by the fourth powers. Worked example for a 34 degree forehead at 5 cm in a 25 degree room: in kelvin, 307.15 to the fourth is 8.900 x 10 to the 9th and 298.15 to the fourth is 7.902 x 10 to the 9th; a quarter of the difference times the emissivity 0.98 adds 0.245 x 10 to the 9th to the room's 7.902, giving 8.147 x 10 to the 9th, whose fourth root is 300.4 K, about 27.3 degrees. That is why every real screening station tells people where to stand, and why this program says CLOSEr instead of reporting 27 degrees as a temperature.
Emissivity, and Writing the EEPROM
A surface does not radiate as much as a perfect black body: the fraction it does is its emissivity. Human skin is about 0.98, matte paint about 0.95, polished metal 0.1 or less. The MLX90614 keeps the emissivity it assumes in EEPROM cell 0x04, which the SMBus command 0x24 reaches, as 65,535 times the emissivity; from the factory it is 1.000, 0xFFFF. Our program writes skin's 0.98 at start-up: 0.98 x 65,535 = 64,224.3, rounded to 64,224, which is 0xFAE0. An EEPROM cell must be erased first, by writing 0x0000, and each write takes about 5 ms, during which the chip does not answer. The program reads the cell first and writes only when it differs, so a real chip's EEPROM is not worn out by a write at every start.
SMBus and the PEC Checksum
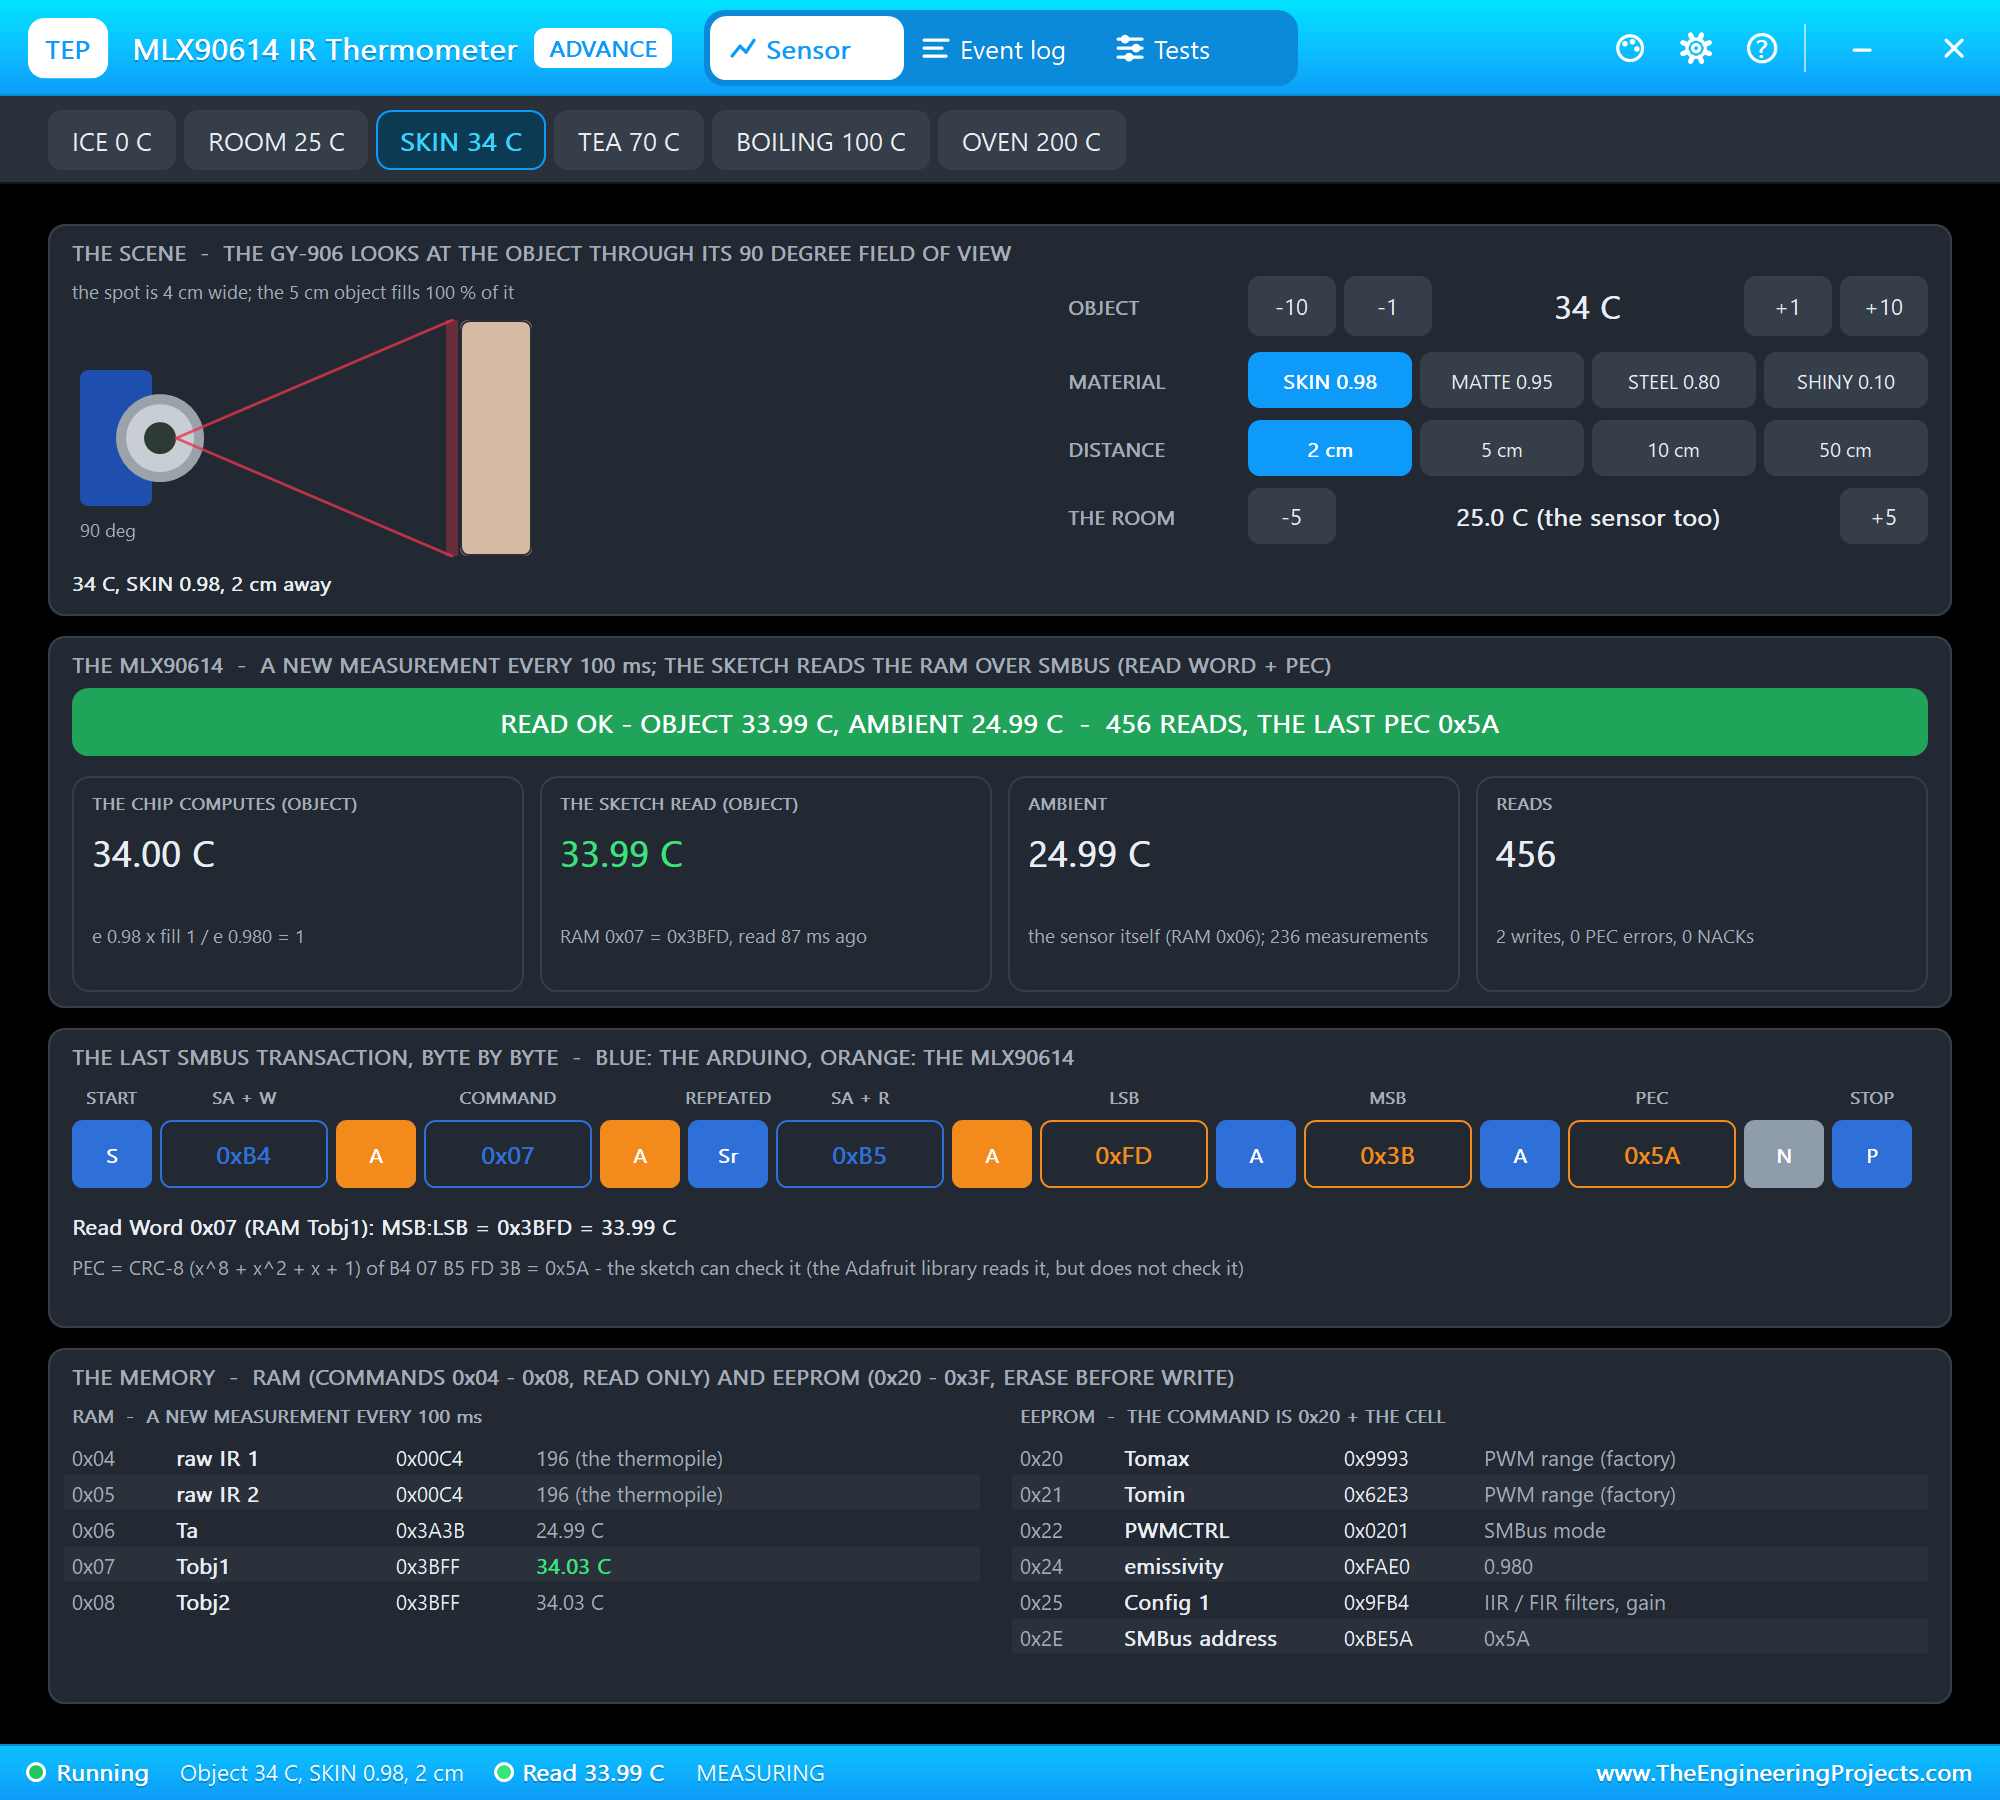
The MLX90614 speaks SMBus, a stricter form of I2C. Reading a word takes one transaction: START, the address 0x5A with the write bit (0xB4), the command (0x07 for the object), a REPEATED START with no STOP in between, the address with the read bit (0xB5), then the chip sends three bytes: the low byte, the high byte and the PEC. The PEC, packet error code, is a CRC-8 with the polynomial x^8 + x^2 + x + 1 over every byte of the transaction, including the address bytes. Worked example from our run: the bytes B4 07 B5 FF 3B give a PEC of 0x70, and the chip sent 0x70, so the word 0x3BFF, 34.03 degrees, is trusted. A word whose PEC does not match is thrown away. On a screening gate this matters: a disturbed bus could otherwise turn a fever into a normal reading.
From the Forehead to a Body Temperature
The skin of the forehead is cooler than the inside of the body, usually by 2 to 3 degrees, and it changes with the room, sweat and hair. Commercial screening thermometers turn the skin reading into an estimated body temperature with a calibration curve from their maker. This project uses the simplest version, a fixed offset: the body temperature is the forehead plus 2.6 degrees. So a forehead at 34.0 degrees gives 36.6, a normal temperature, and a forehead at 36.0 gives 38.6. The limit is 38.0 degrees C, 100.4 degrees F, a common definition of a fever. Both numbers sit at the top of the program, where you can change them. This is a learning project and not a medical device: a real screening station needs a certified sensor, a proper calibration and a person to check anyone it stops.
| What the sensor sees | State | The display | The gate |
|---|---|---|---|
| the room (less than 1.5 C above it) | READY | rEAdY | closed |
| a little warmer, under 32 C | CLOSER | CLOSEr | closed |
| 32 - 40 C: a forehead | SCAN | SCAn and the reading, L1-L5 count the readings | closed |
| the average + 2.6 C under the limit | PASS | for example 36.6 PASS | open for 4 s, L8 on |
| the average + 2.6 C at or above the limit | HIGH | for example 38.6 HIGH, all LEDs flash | stays shut |
| above 40 C | HOT | for example 70.0 HOt | closed |
One rule makes the counts honest: after a PASS or a HIGH, the gate waits until the person has walked on, until the sensor sees the room again, before it screens anybody. Without it, a person who stays in front of the sensor would be counted again and again.
The TM1638 Board on Three Wires
The TM1638 is a driver chip for up to eight 7-segment digits and a key matrix, and the popular board around it carries eight digits, eight red LEDs and eight keys. It talks over three lines: STB, the strobe (LOW for the length of one frame), CLK, the clock, and DIO, the data, which goes both ways. Each byte travels the least significant bit first, and the chip takes DIO on the rising edge of CLK. The Pi has no hardware port for this protocol, so the program drives the three pins itself, bit by bit: bit-banging. To show something, it sends the command 0x40 (write the display RAM, the address counting up by itself), then a frame with the address 0xC0 and 16 bytes, then 0x8F (display on, full brightness). The even addresses are the digits from the left, the odd ones the LEDs L1 to L8.
A digit is one byte: bit 0 is segment a at the top, then b, c, d, e, f, g clockwise to the middle bar, and bit 7 is the decimal point. Worked example: a 3 lights a, b, c, d and g, 1 + 2 + 4 + 8 + 64 = 0x4F; a P lights a, b, e, f and g, 1 + 2 + 16 + 32 + 64 = 0x73. With a point after it, 0x80 is added, which is how 36.6 is drawn. Seven segments cannot draw every letter, which is why the display says rEAdY, CLOSEr and HOt, the letters a 7-segment display can make. To read the keys, the program sends 0x42 and then turns DIO round into an input with a pull-up, and clocks in four bytes that the TM1638 drives; in byte i, bit 0 is key S(i+1) and bit 4 is key S(i+5).
The Servo Gate
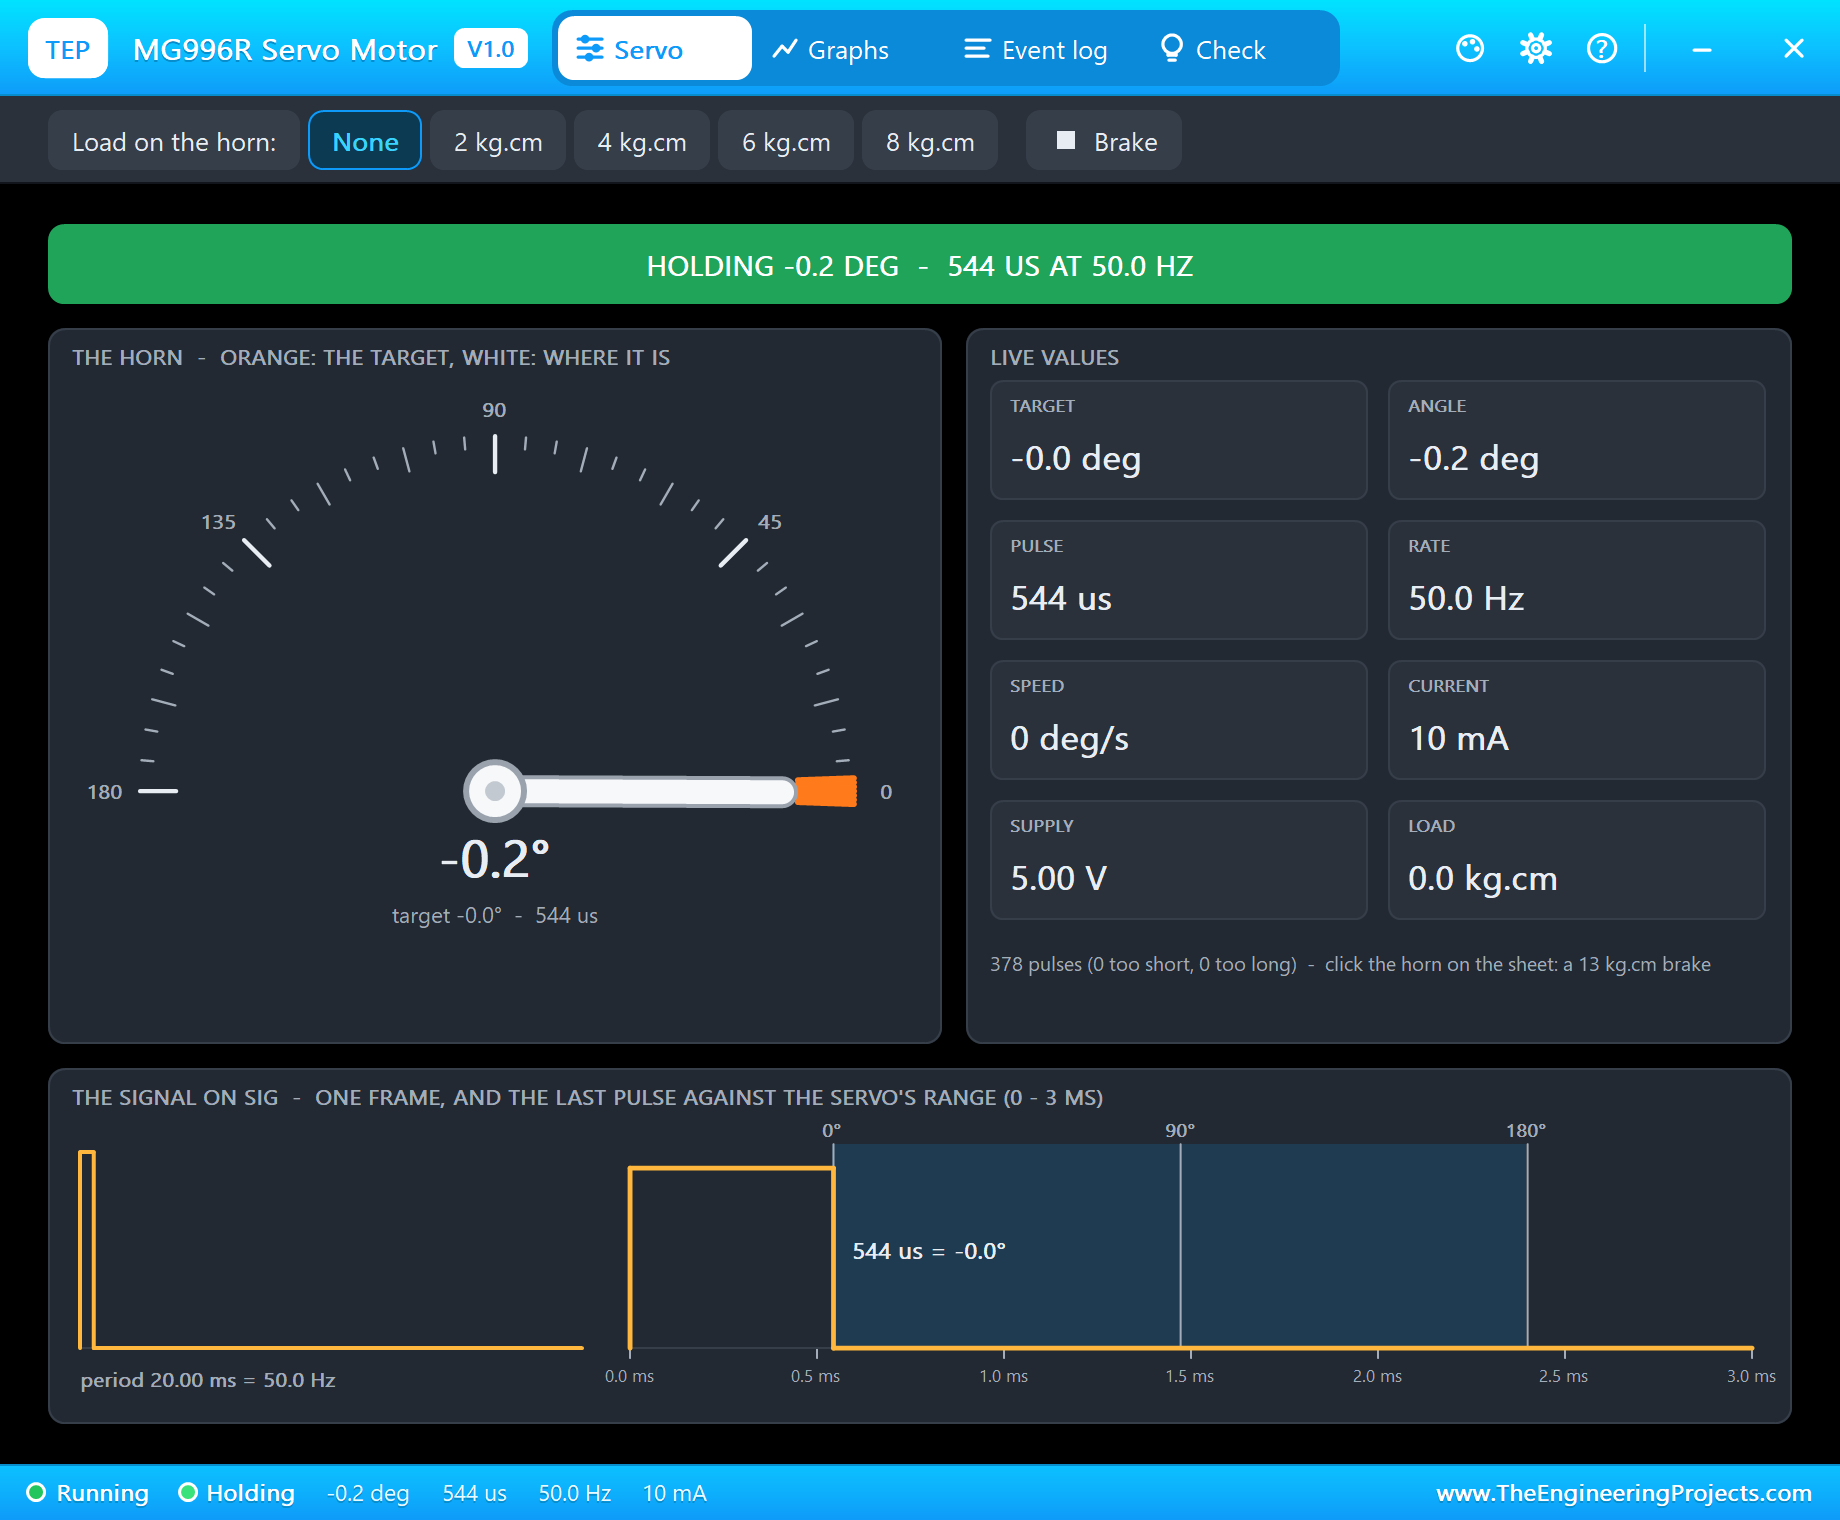
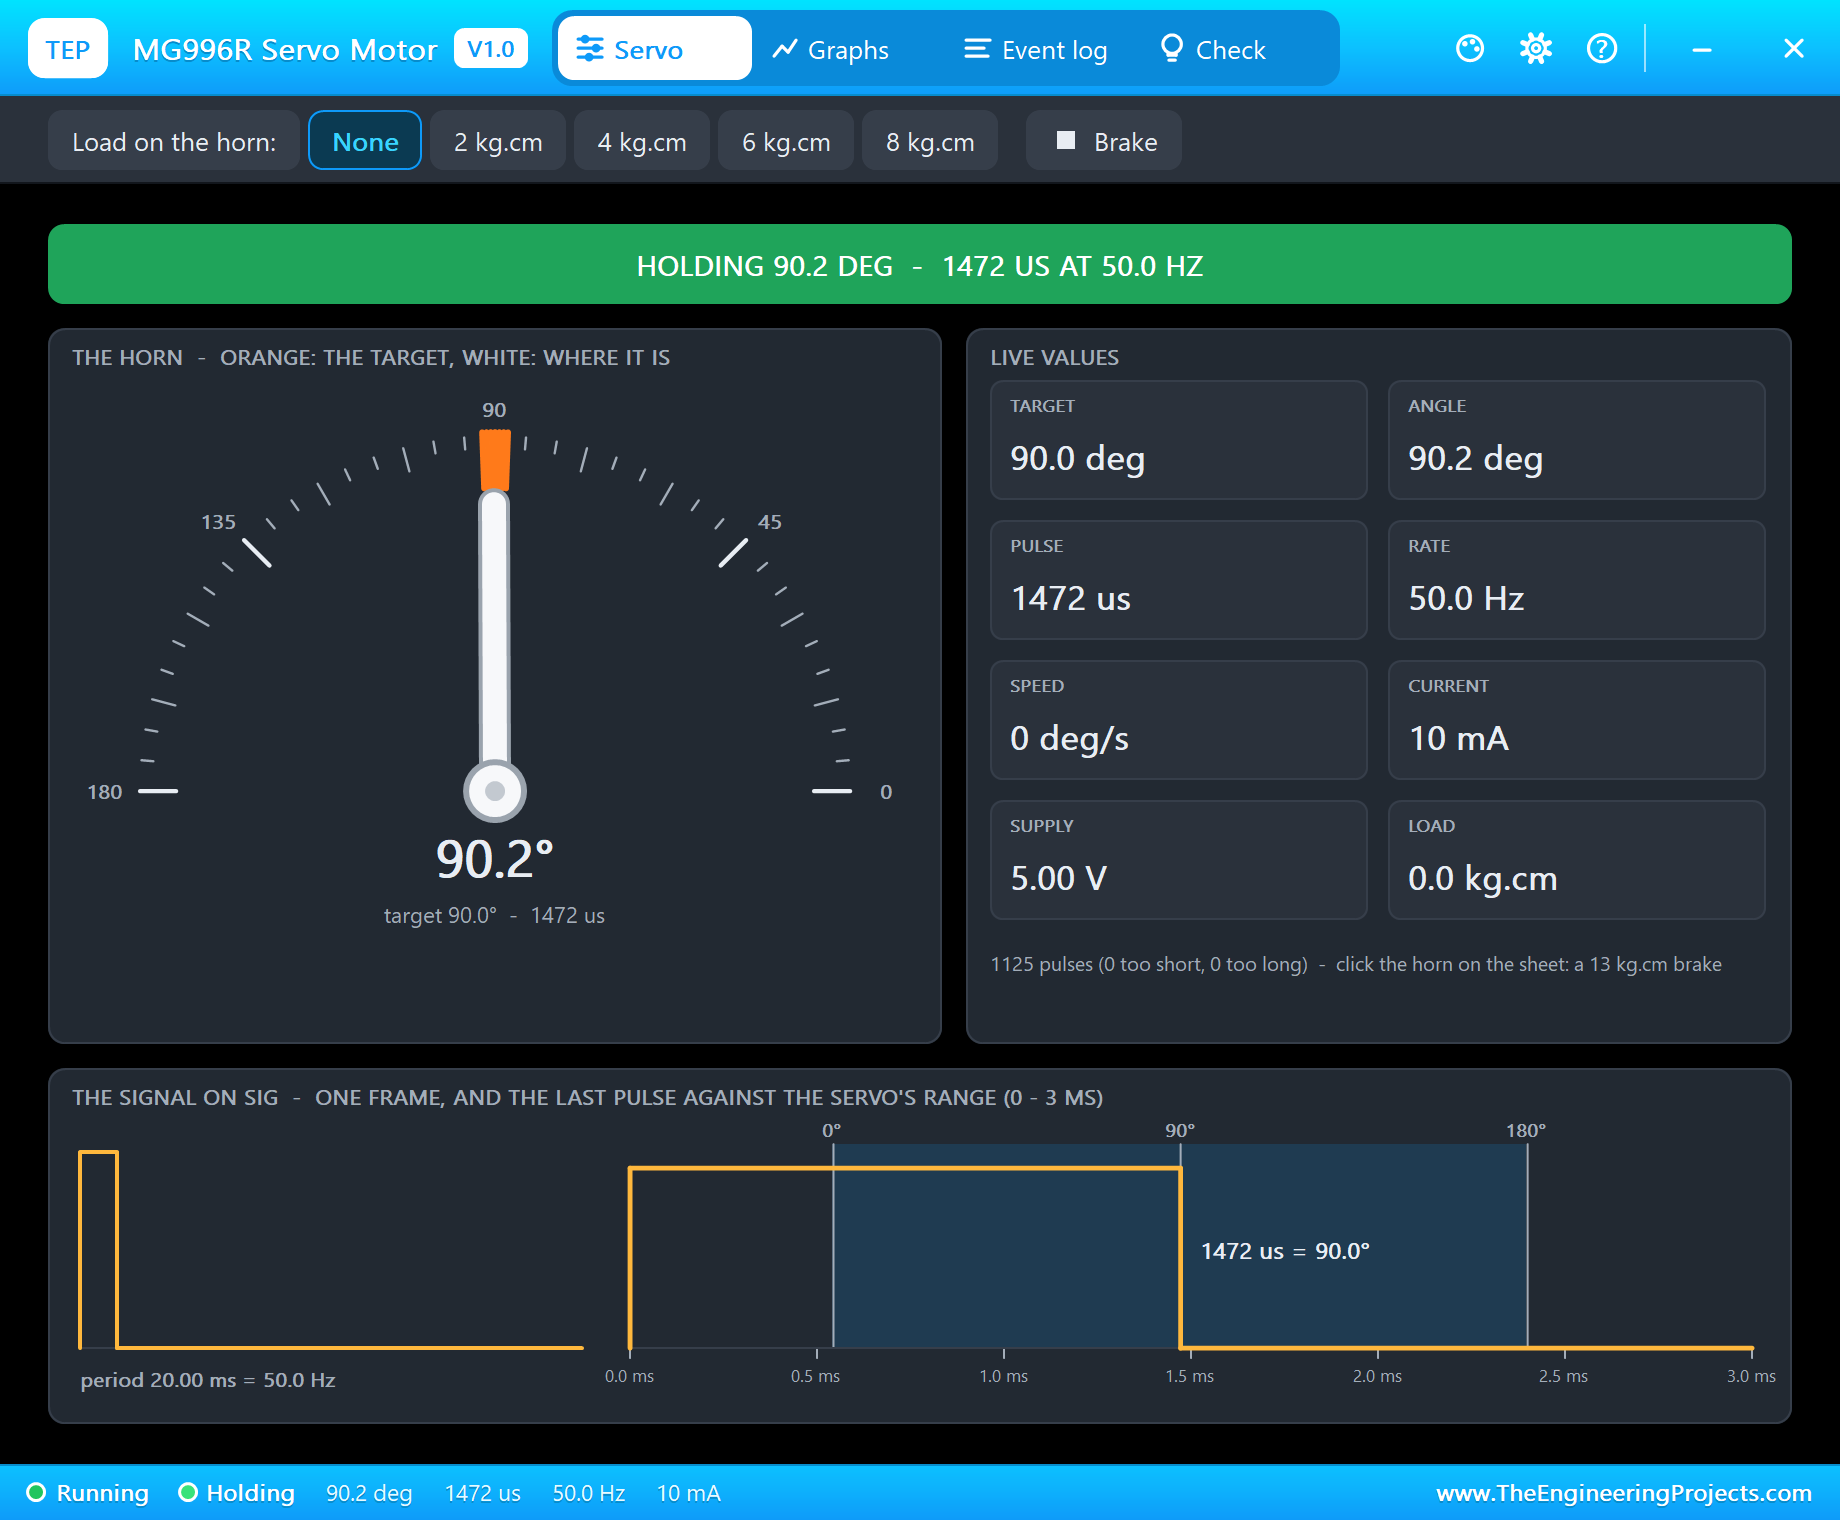
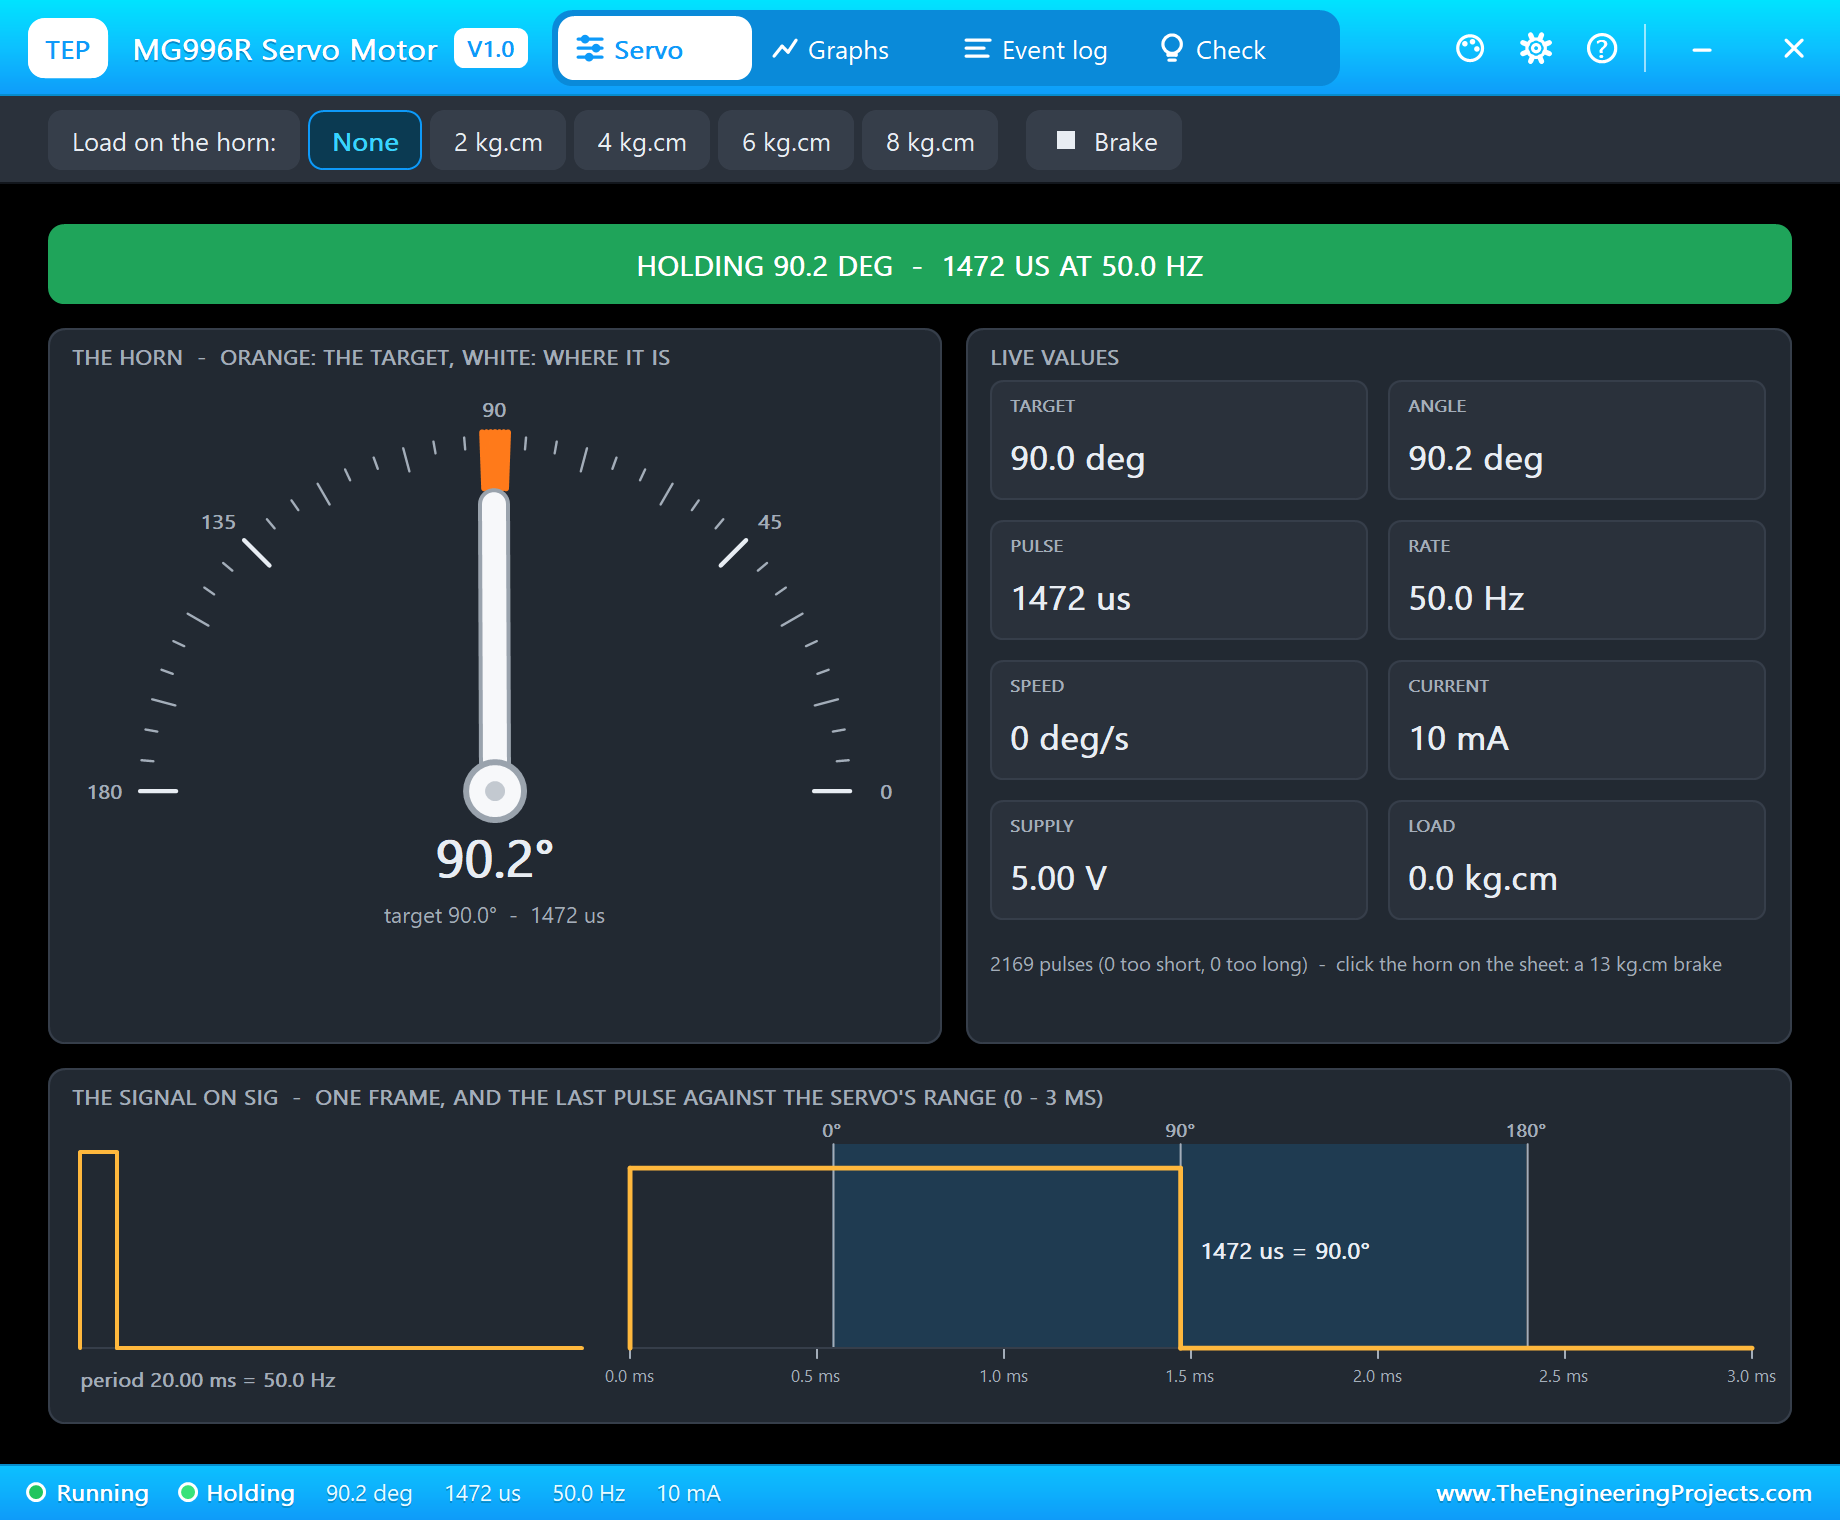
The MG996R is a standard-size, metal-gear servo of 9.4 kg.cm at 4.8 V, strong enough for a light barrier arm. It wants a pulse every 20 ms, 50 Hz, whose width sets the angle: 544 microseconds for 0 degrees and 2,400 for 180, the same numbers as the Arduino Servo library. Worked example: 90 degrees, the open gate, is 544 + 90 x (2,400 - 544) / 180 = 1,472 microseconds. The lgpio library's tx_servo() makes these pulses in the background, steady while the program sleeps, so the arm holds its position without the program's attention.
The Python Code Explained
The whole program is included in the download. It uses lgpio for the GPIOs, the I2C bus and the servo pulses, and the standard library's http.server for the dashboard. At the top are the rules:
OFFSET = 2.6                               # C: the body temperature = the forehead + 2.6 C
THRESHOLD = 38.0                           # C: 38.0 or more = HIGH (100.4 F)
PERSON_C = 1.5                             # the object this much above the room = someone in front of the sensor
SKIN_MIN, SKIN_MAX = 32.0, 40.0            # a forehead 2 cm away reads in this range
SAMPLES, SAMPLE_S = 5, 0.2                 # five readings, 0.2 s apart
OPEN_S = 4.0                               # the gate stays open 4 s
Reading the MLX90614 with Its PEC
The PEC is computed exactly as the chip does it, one bit at a time:
    crc = 0
    for b in data:
        crc ^= b
        for _ in range(8):
            crc = ((crc << 1) ^ 0x07) & 0xFF if crc & 0x80 else (crc << 1) & 0xFF
    return crc
lgpio's i2c_read_i2c_block_data() sends the command and reads three bytes with a repeated start between them, exactly the SMBus Read Word. The program then checks the PEC over the five bytes of the transaction:
n, d = lgpio.i2c_read_i2c_block_data(self.h, cmd, 3) if n != 3 or crc8([self.addr << 1, cmd, self.addr << 1 | 1, d[0], d[1]]) != d[2]:
self.errors += 1 # no answer, or a word with a wrong PEC: never trust it
return None return w * 0.02 - 273.15 # kelvin x 50 -> CWriting the emissivity erases the cell first, and each write carries its own PEC:
        self.write_word(0x24, 0x0000)
        self.write_word(0x24, want)
Bit-Banging the TM1638
One byte, the least significant bit first, the data set before the rising clock edge:
        for i in range(8):
            lgpio.gpio_write(self.c, self.dio, b >> i & 1)
            lgpio.gpio_write(self.c, self.clk, 1)
            lgpio.gpio_write(self.c, self.clk, 0)
Reading the keys turns DIO into an input for the four bytes the chip sends, then back into an output:
        self._byte(0x42)
        lgpio.gpio_claim_input(self.c, self.dio, lgpio.SET_PULL_UP)
k |= v << i # byte i: S(i+1) in bit 0, S(i+5) in bit 4The display is written only when what it shows changes, which keeps the bus quiet most of the time.
The Screening and the Gate
Every 0.1 seconds the loop reads the room and the object, reads the keys and decides the state. While a forehead is in range, it keeps one reading every 0.2 seconds, and after five it decides:
                    skin = sum(samples) / len(samples)
                    body = round(skin + OFFSET, 1)
if gate_until is None:
lgpio.tx_servo(chip, SERVO_PIN, servo_us(OPEN_DEG))
gate_until = now + OPEN_S return 544 + deg * (2400 - 544) / 180 # the MG996R: 544 us = 0 deg, 2400 us = 180 degThe keys work on a new press only, so a key held down counts once: S1 shows the counts for 2 seconds (P for passed, b for blocked), S2 and S3 lower and raise the threshold by 0.1 degrees, and S8 opens the gate for the guard. The web server runs in the main thread; when OPEN GATE is clicked on the dashboard, it only leaves a request, and the screening loop, which owns the servo and the display, carries it out. The pages are / (the dashboard), /open, /reset, /down, /up and /data (JSON).
How to Run the Proteus Simulation
- Download the project zip below and install the library files and the TEPPi folder (the steps are under the download button).
- Open Pi-5-Screening-Gate.pdsprj from the Proteus Simulation folder. Keep screening_gate.py and the DLL files next to it.
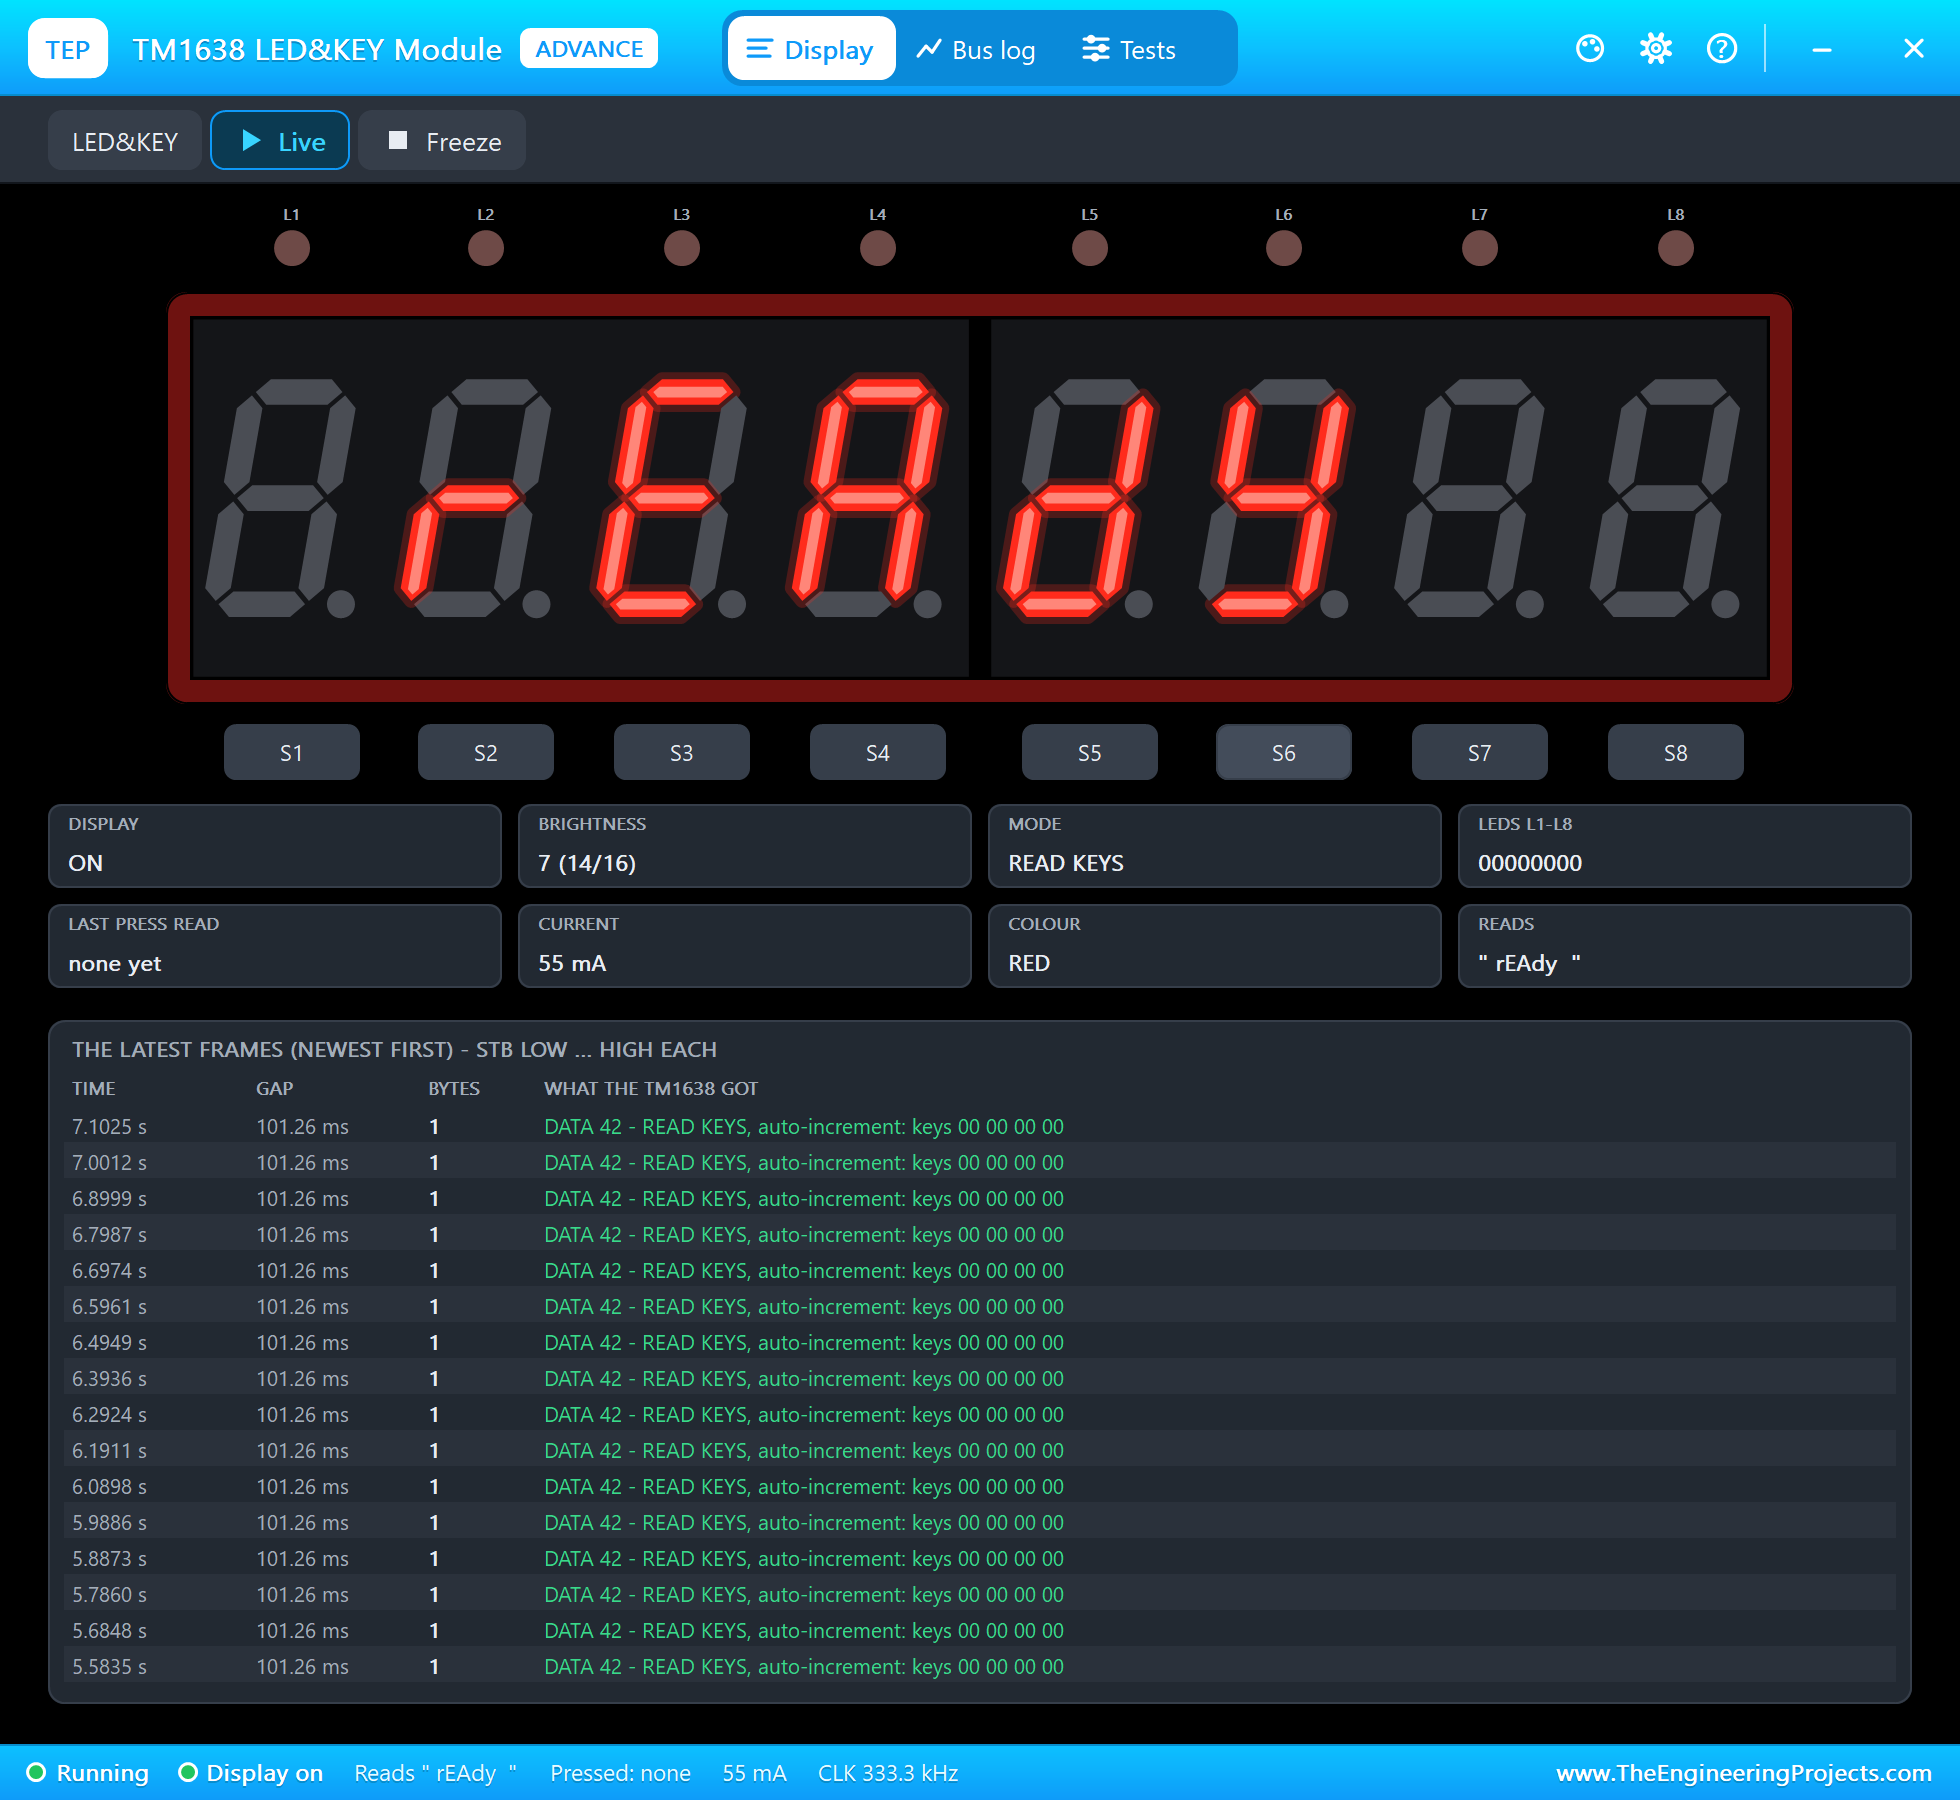
- Press Play. The display shows rEAdY: the forehead in the MLX90614's scene is 50 cm away, which the sensor sees as the room.
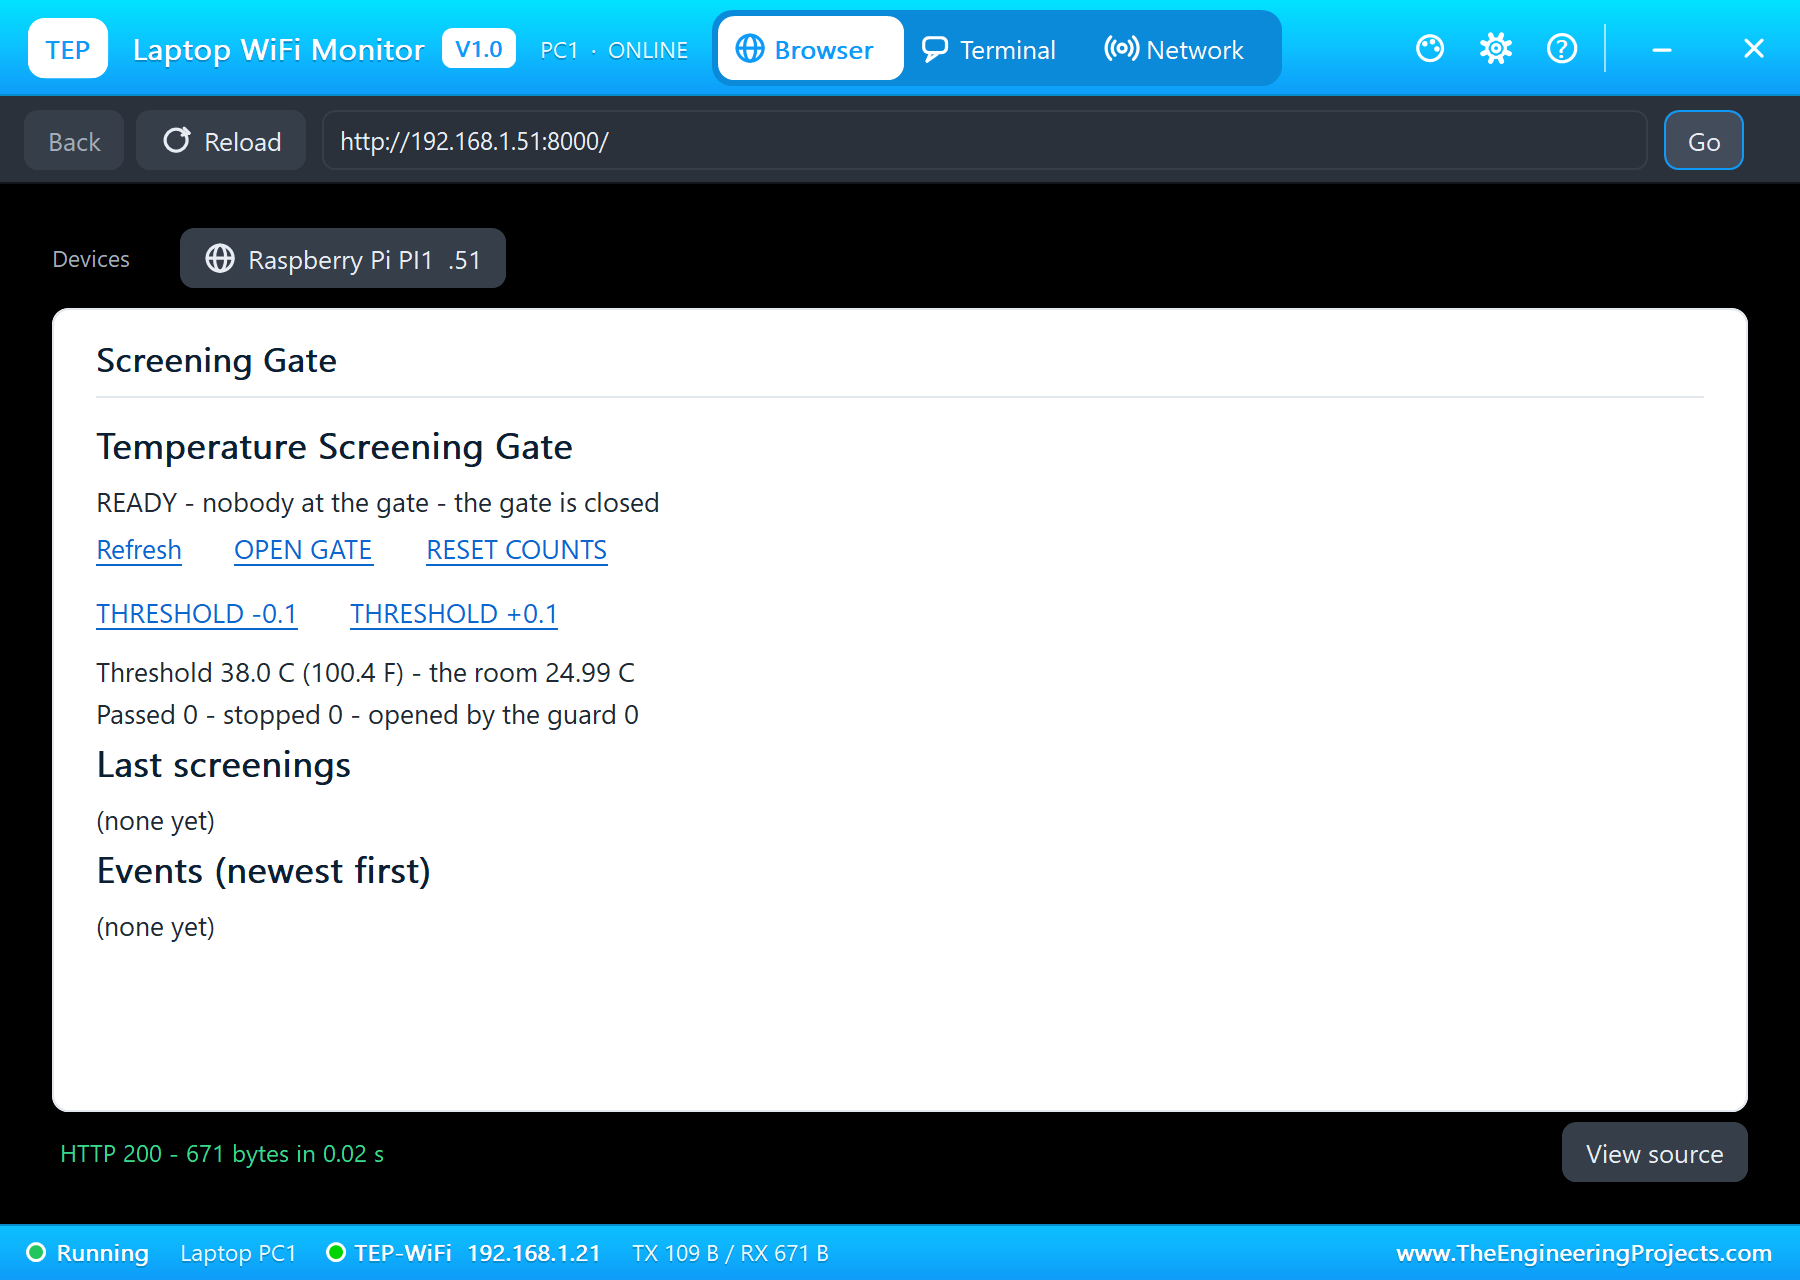
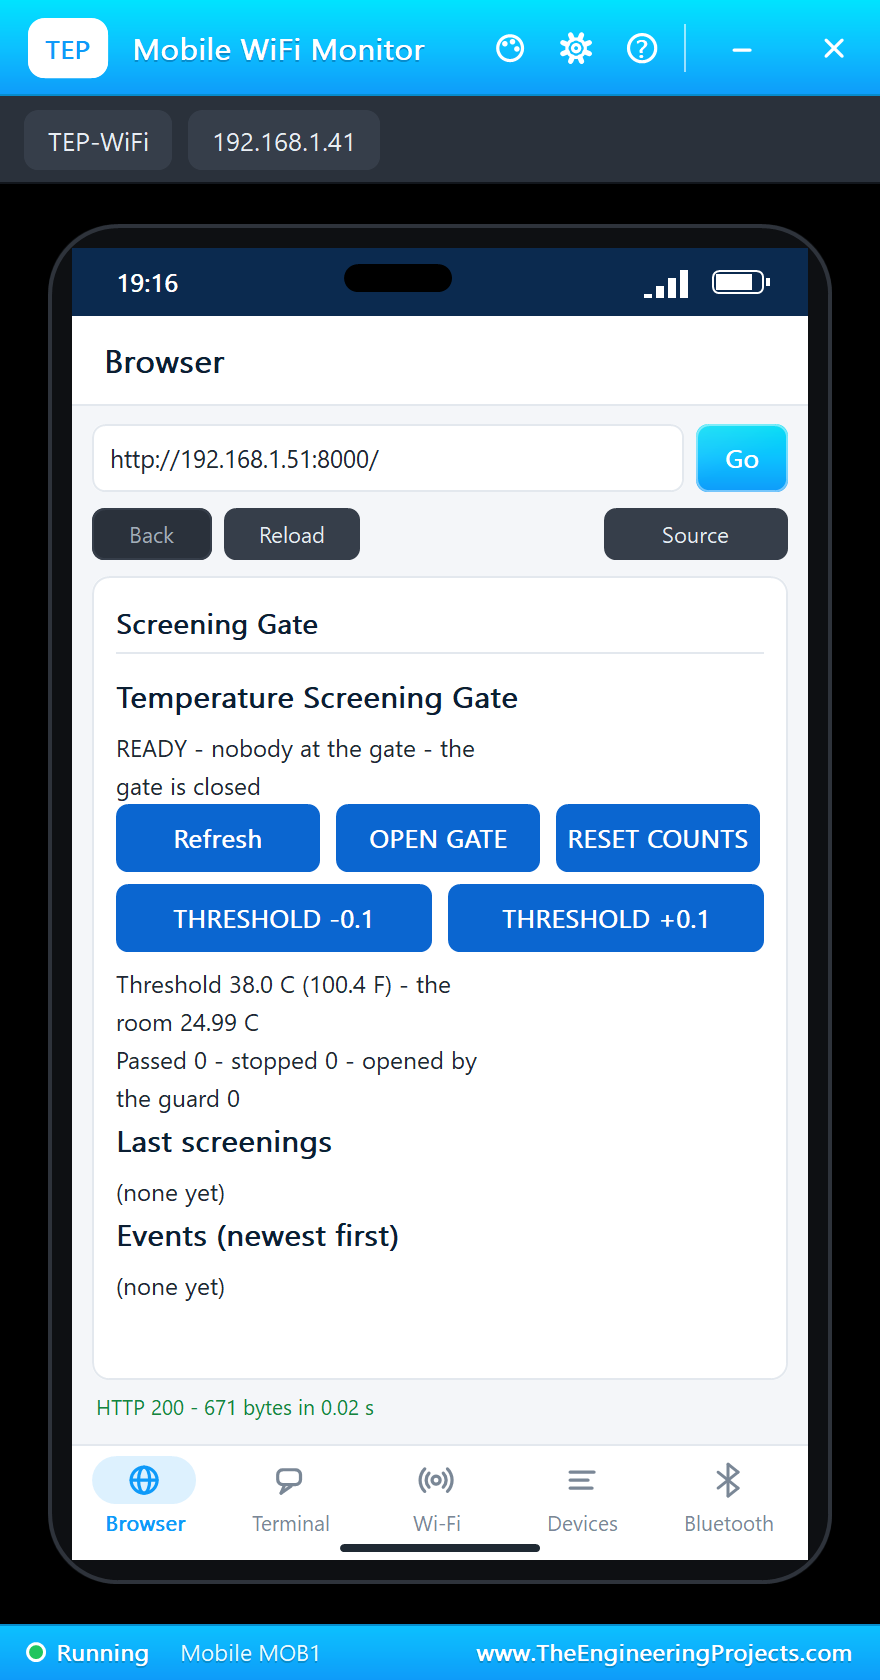
- Open the Laptop WiFi Monitor (PC1) or the Mobile WiFi Monitor (MOB1) and press Go.
- In the MLX90614's pop-up (U1) pick 5 cm, then 2 cm: CLOSEr, then a scan and PASS.
- Pick 50 cm, press +1 twice for a 36 degree forehead and pick 2 cm again: HIGH. Then try OPEN GATE, the keys S1, S3 and S8, and TEA 70 C.
Proteus Simulation Results
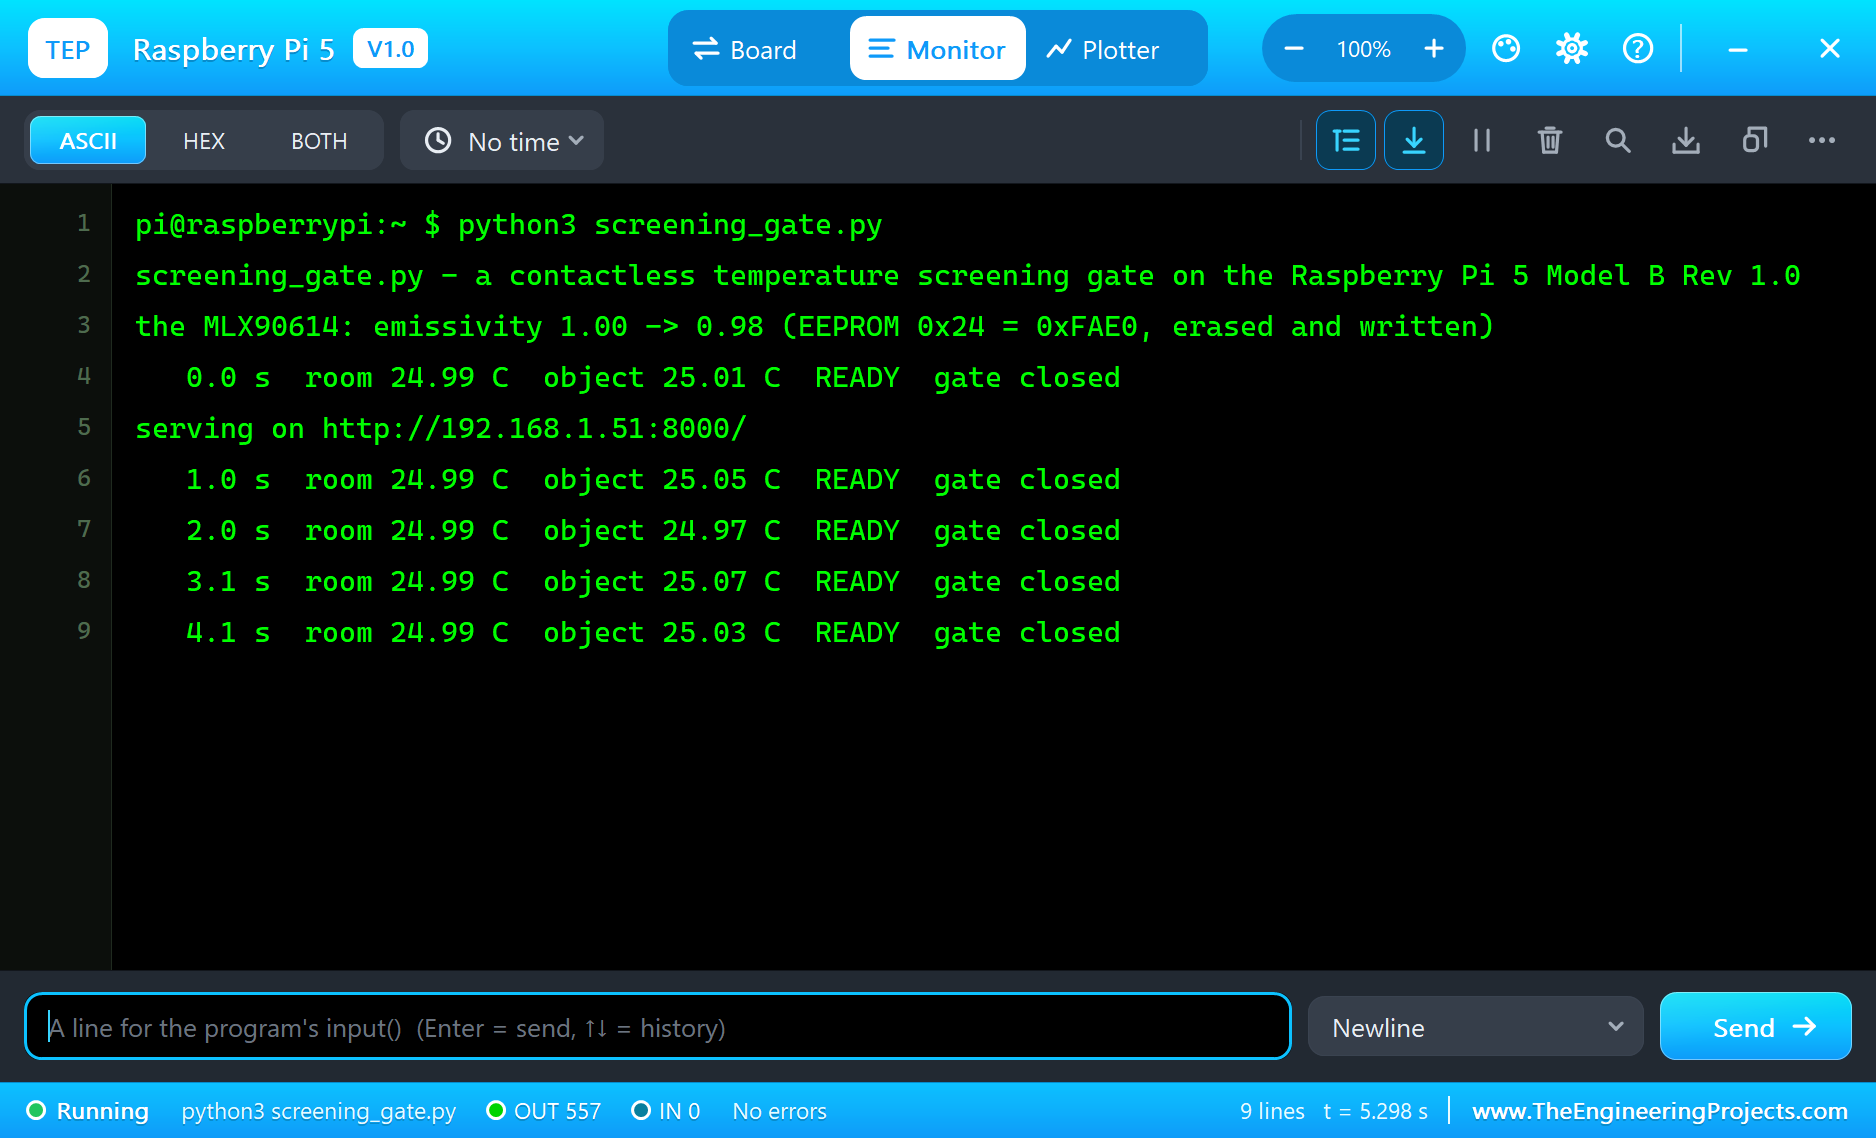
Here is one complete run of the simulation, with the numbers from our final test run; the times are the program's seconds since it started. At start-up the program found the factory emissivity of 1.00 in the MLX90614 and wrote skin's 0.98: it erased EEPROM cell 0x24 and then wrote 0xFAE0, and the pop-up's memory table showed 0.980 with 2 writes. The room read 24.99 degrees and the object 25.0: the forehead in the scene was 50 cm away, so the sensor saw only the room, and the display said rEAdY.
Too Far Away
First, the person stopped 5 cm from the sensor. The MLX90614's pop-up said it plainly: the spot is 10 cm wide, and the 5 cm forehead fills 25 percent of it. The chip computed 27.33 degrees, exactly the 27.3 of our worked example, and at 14.0 seconds the program logged "STEP CLOSER - 27.33 C at the sensor (the room 24.99 C)" and showed CLOSEr. Reporting that 27 degrees as a temperature would have let anybody through, whatever their temperature.
A Normal Temperature
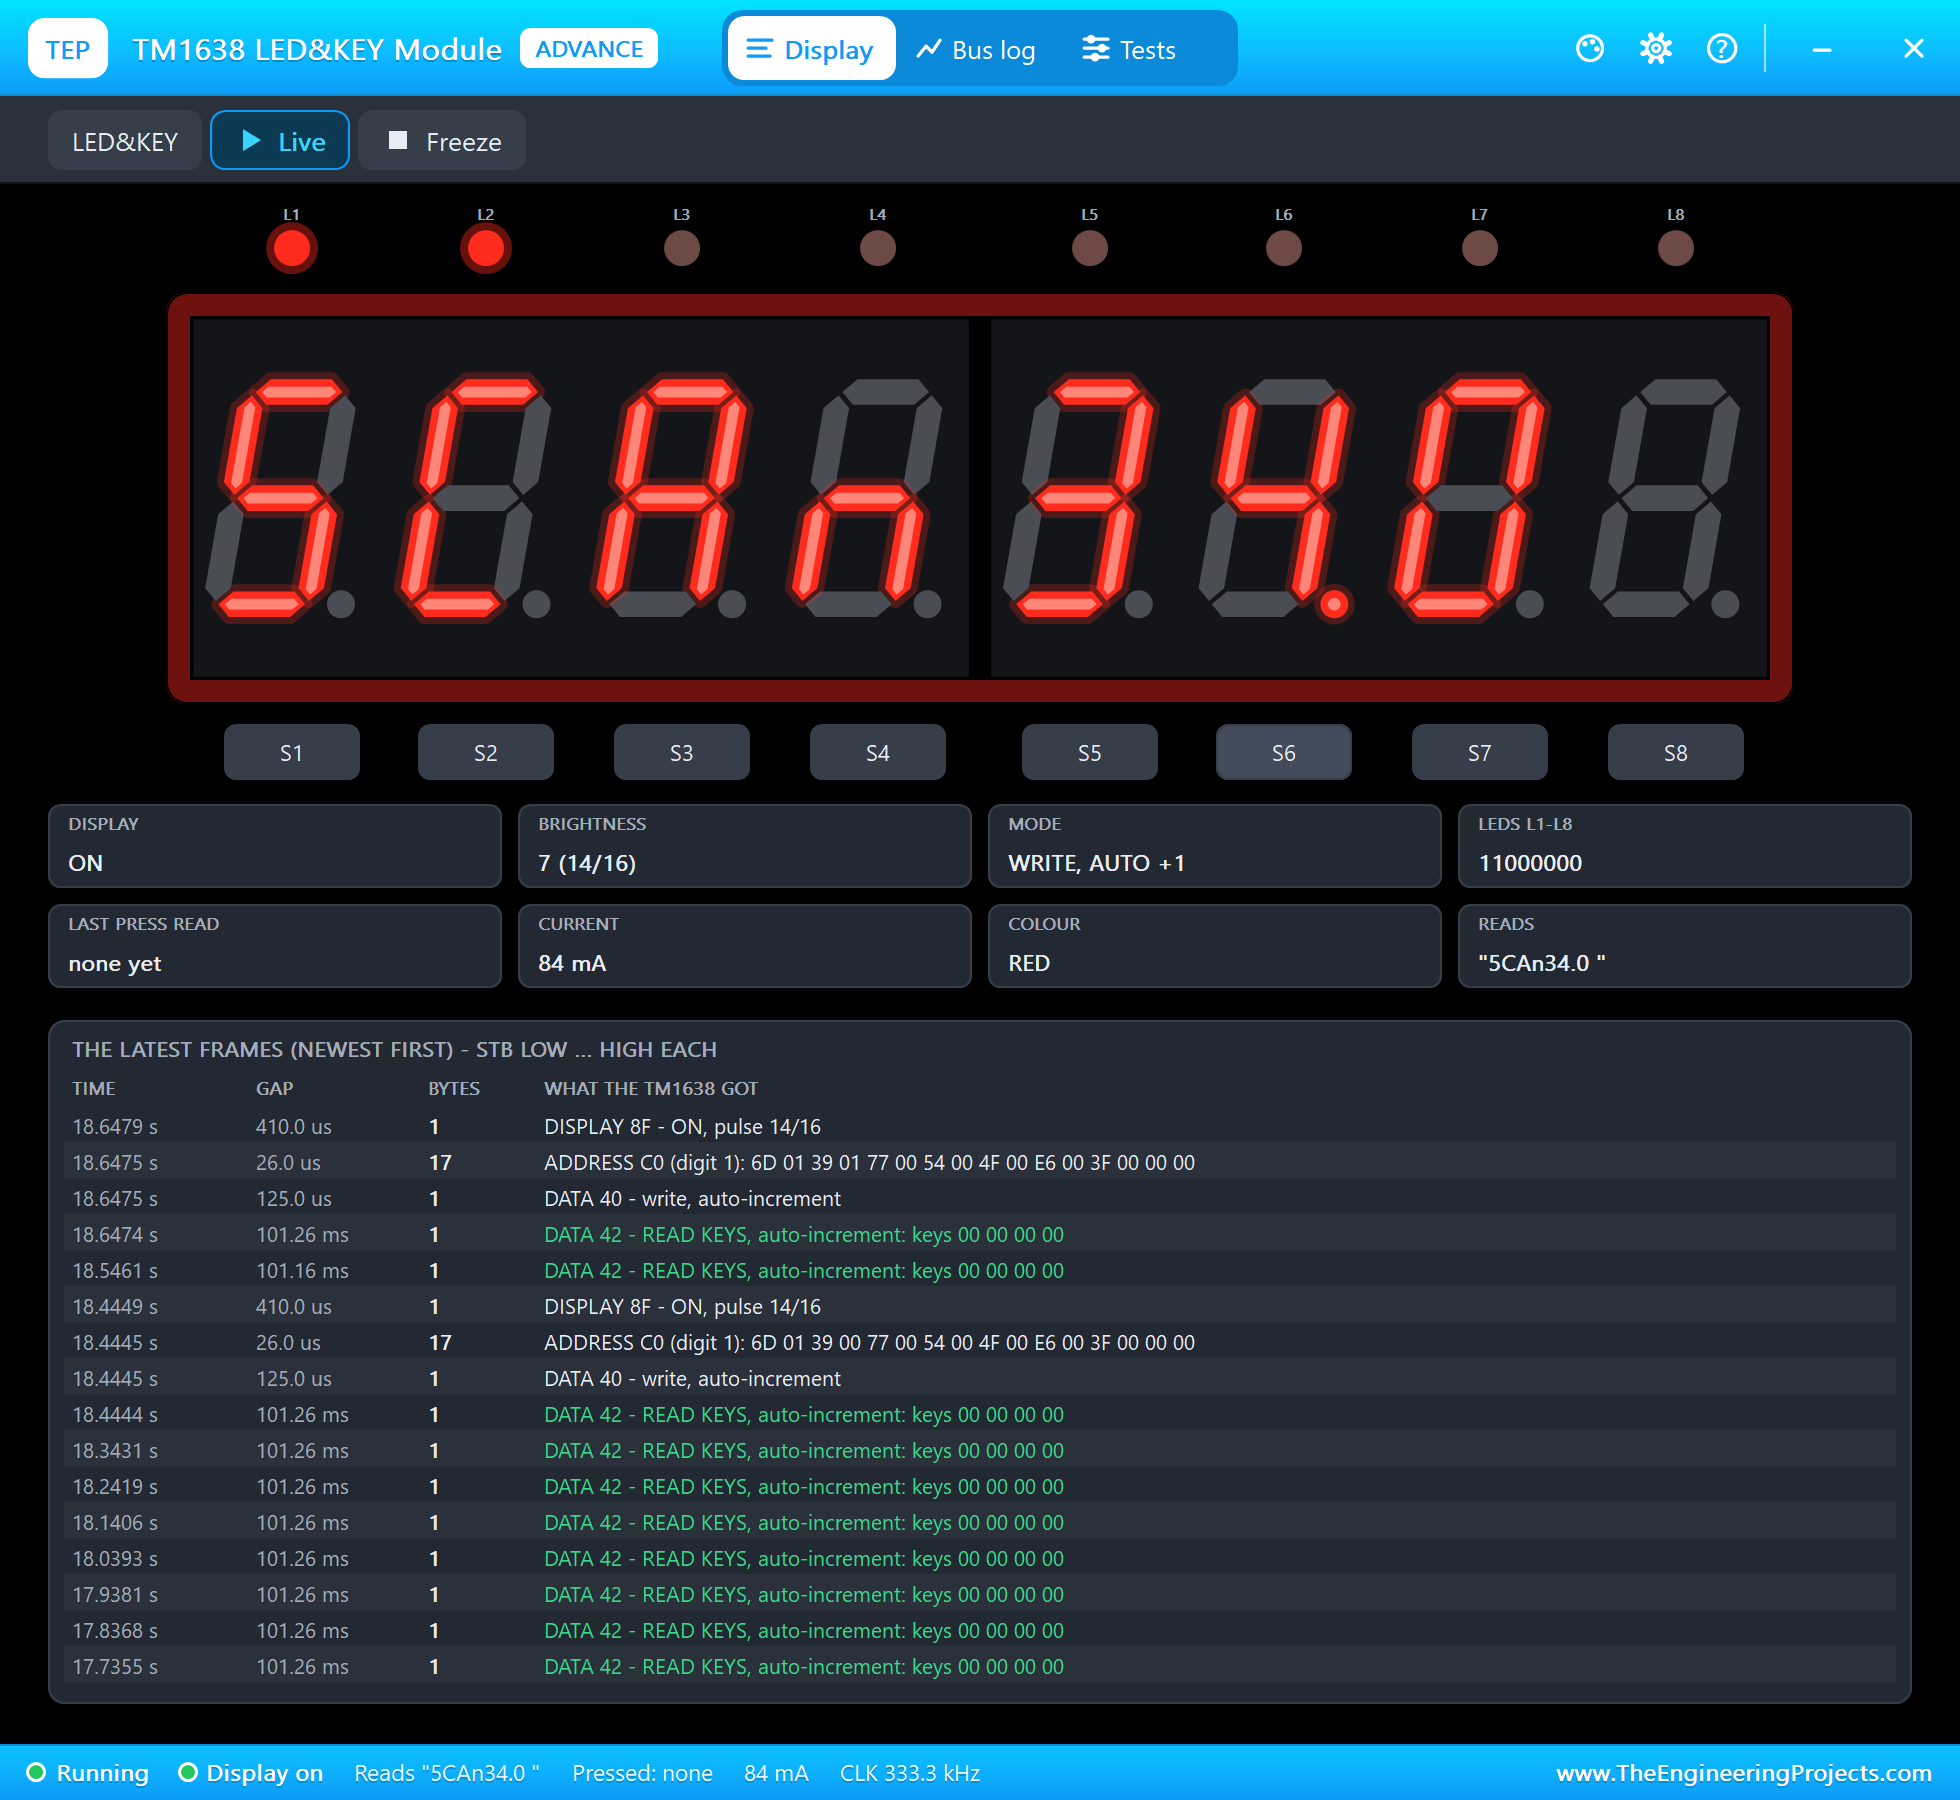
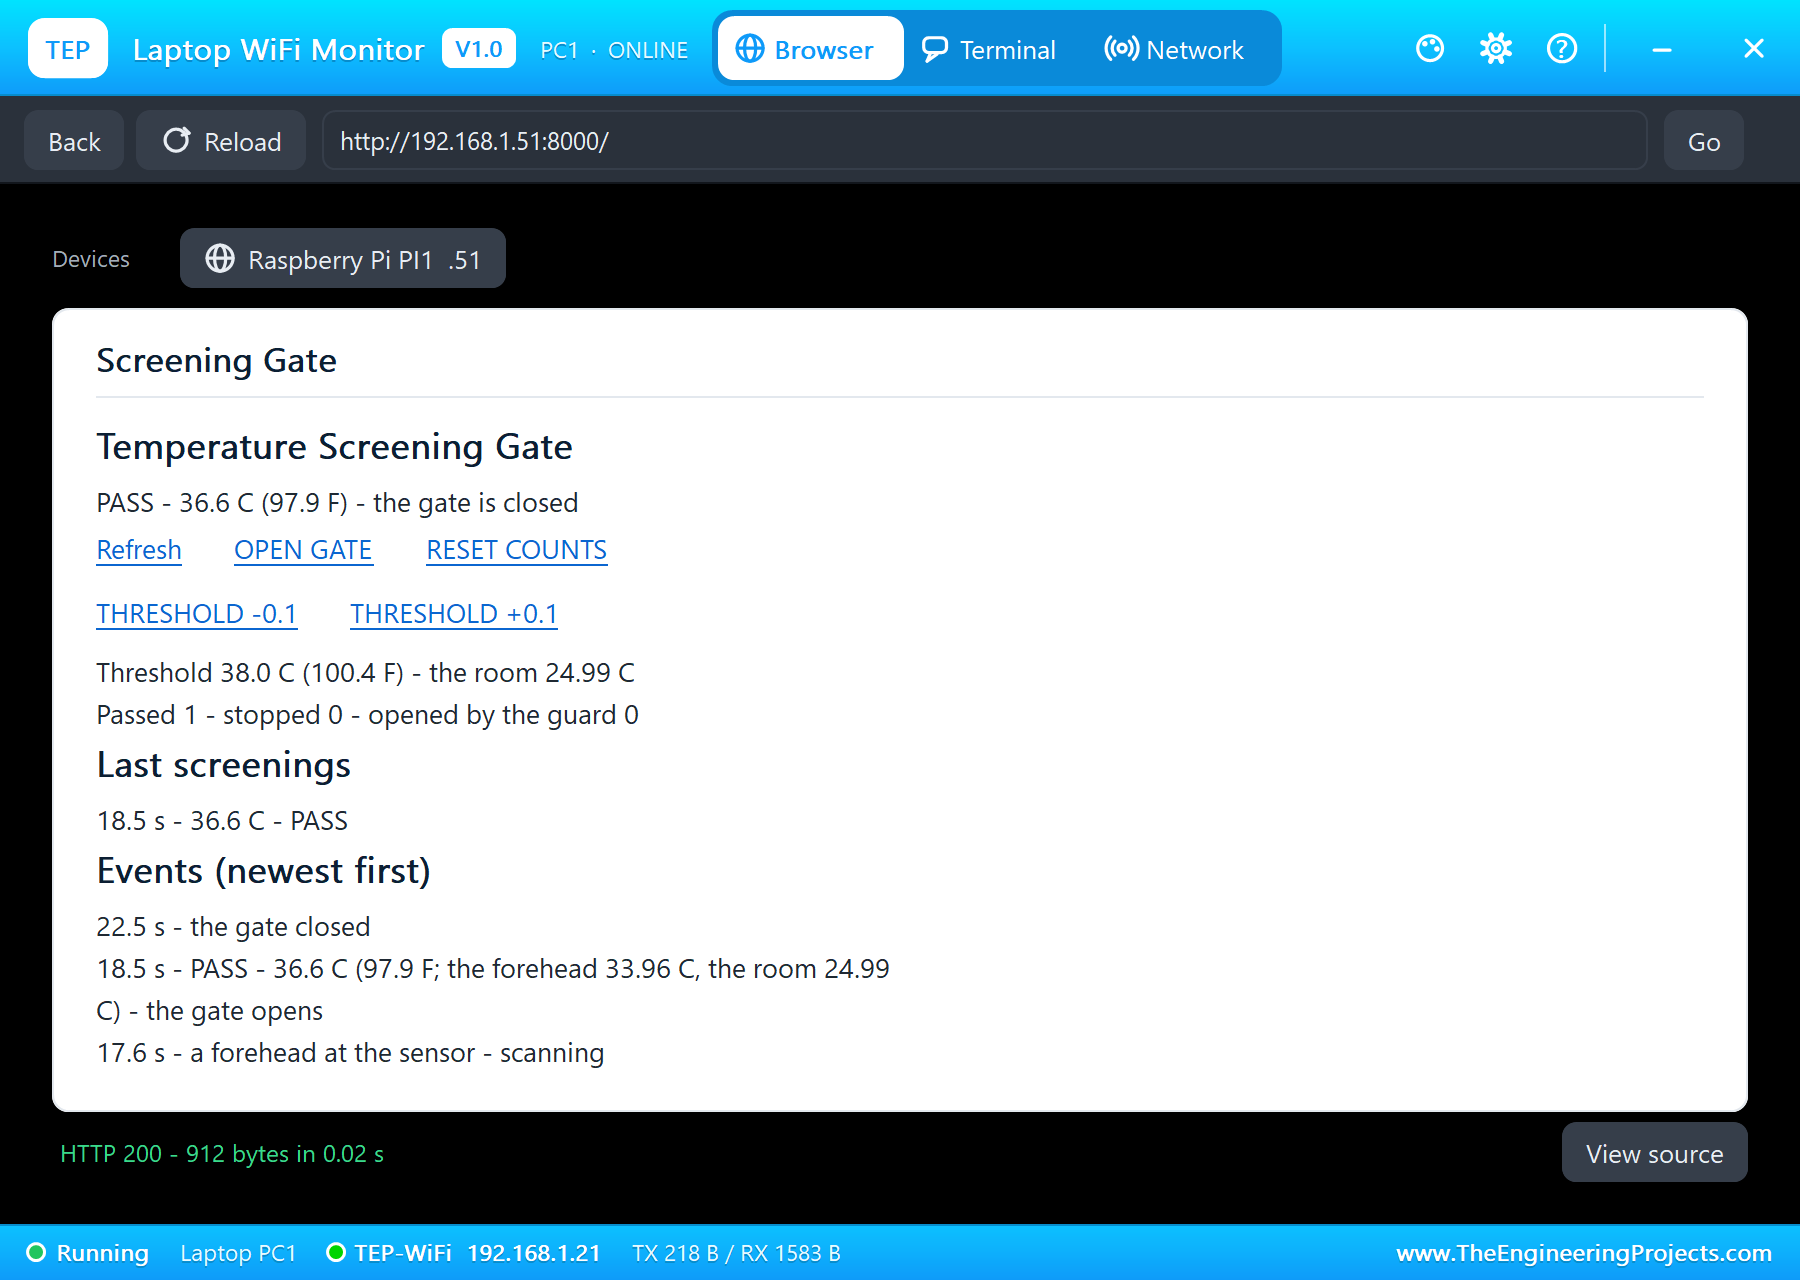
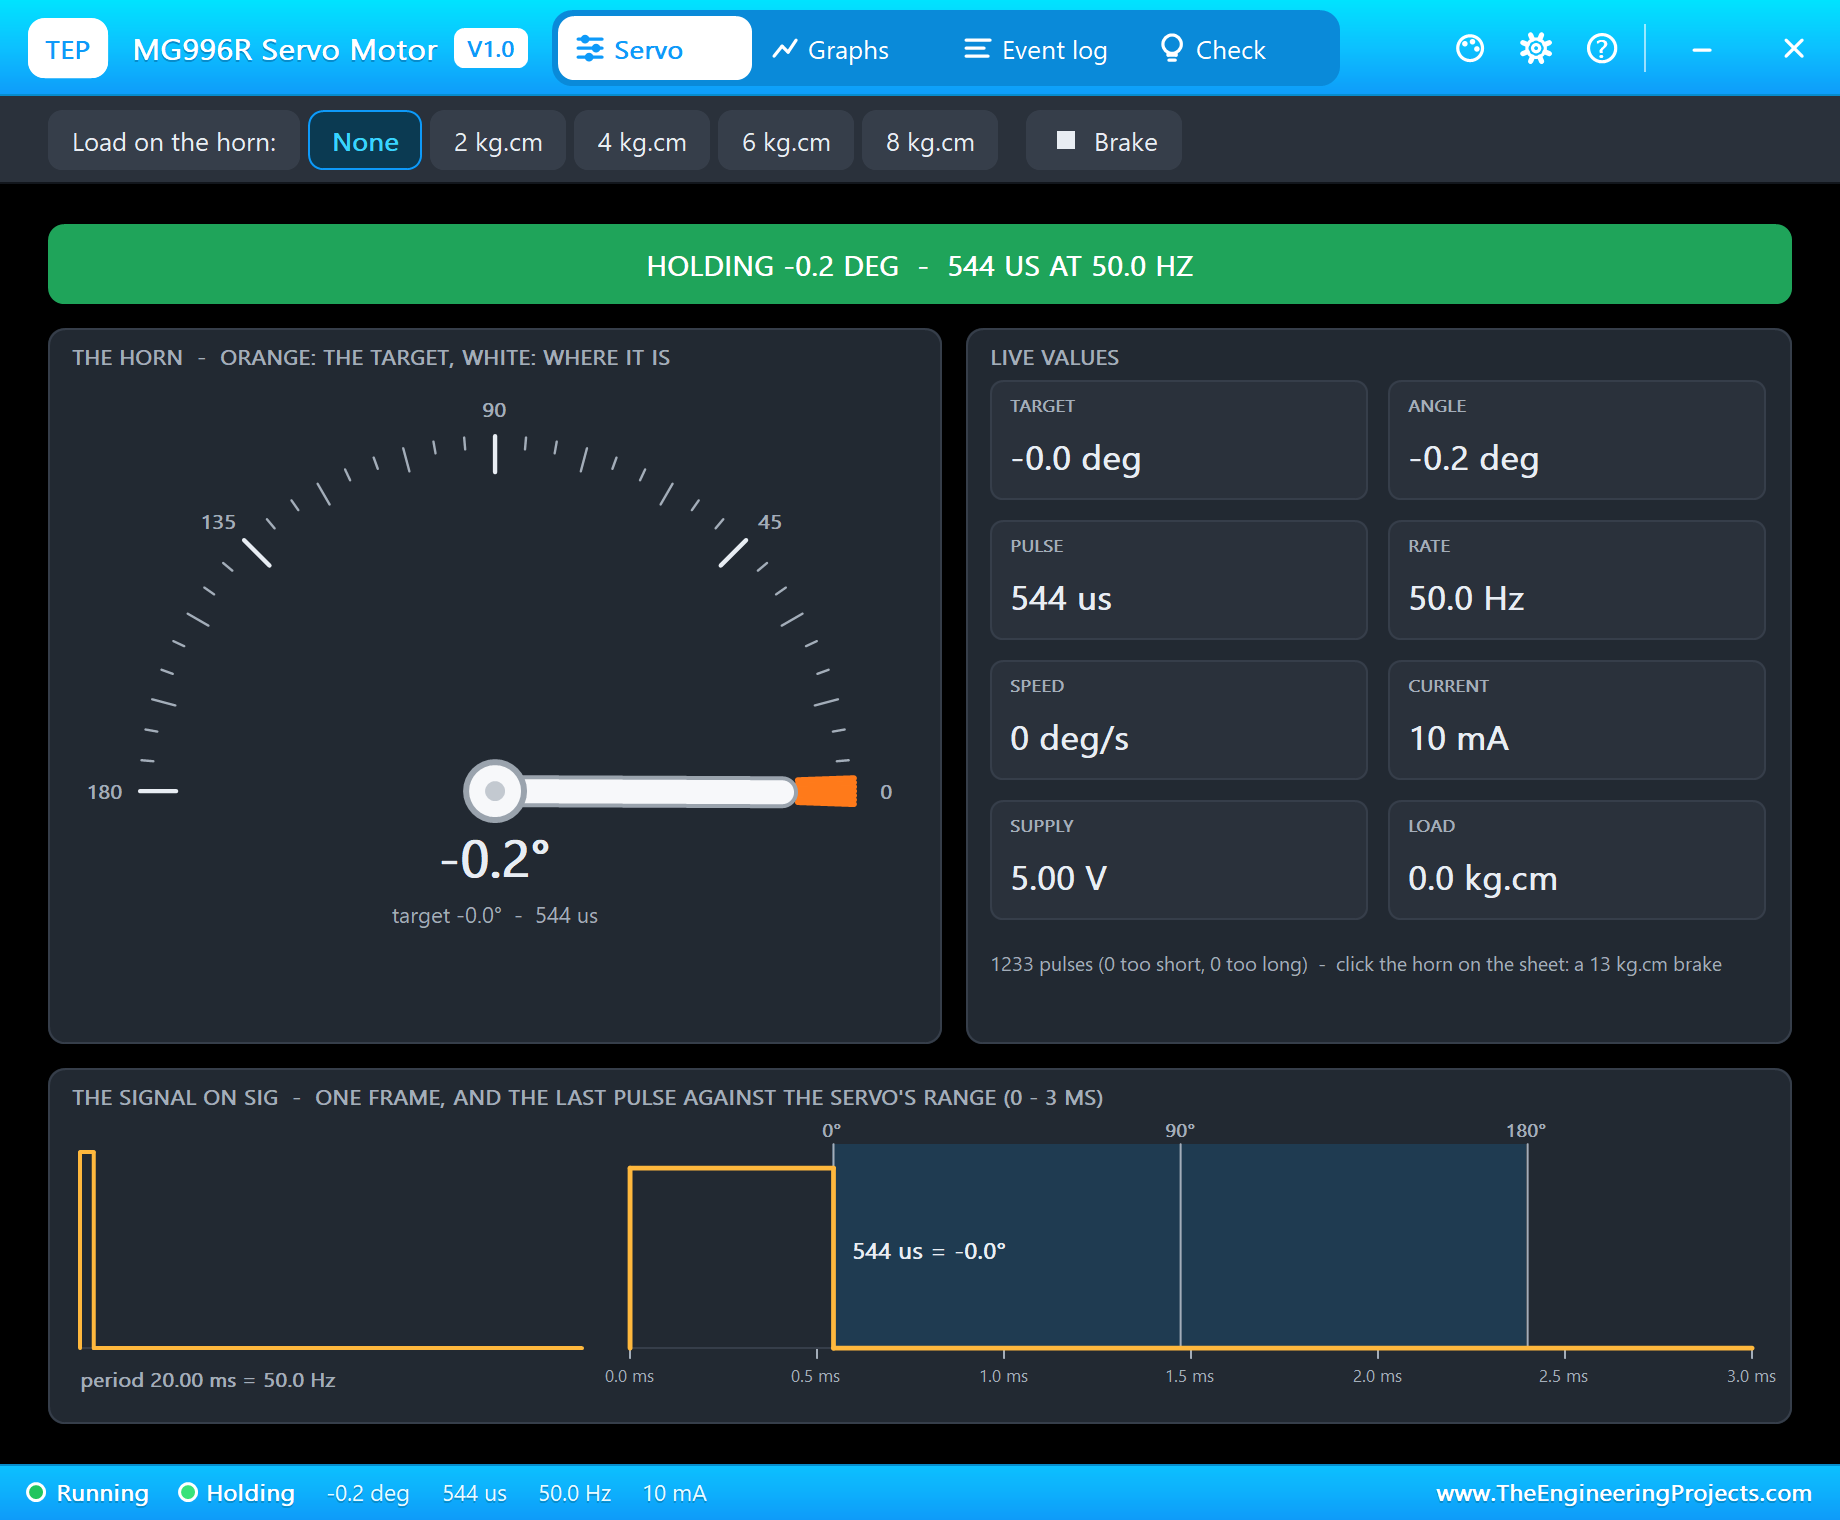
Then 2 cm: at 17.6 seconds "a forehead at the sensor - scanning", and the display showed SCAn with the live reading, while the LEDs L1 to L5 counted the readings. One second later, at 18.5 seconds: "PASS - 36.6 C (97.9 F; the forehead 33.96 C, the room 24.99 C) - the gate opens". The average of the five readings was 33.96 degrees, plus 2.6 gives 36.56, rounded to 36.6. The servo swung to 90.2 degrees on 1,472 microsecond pulses, the value of our worked example, and L8 lit while the gate stood open. The TM1638's pop-up showed every frame the Pi sent, with the clock at 333.3 kHz in the simulation.
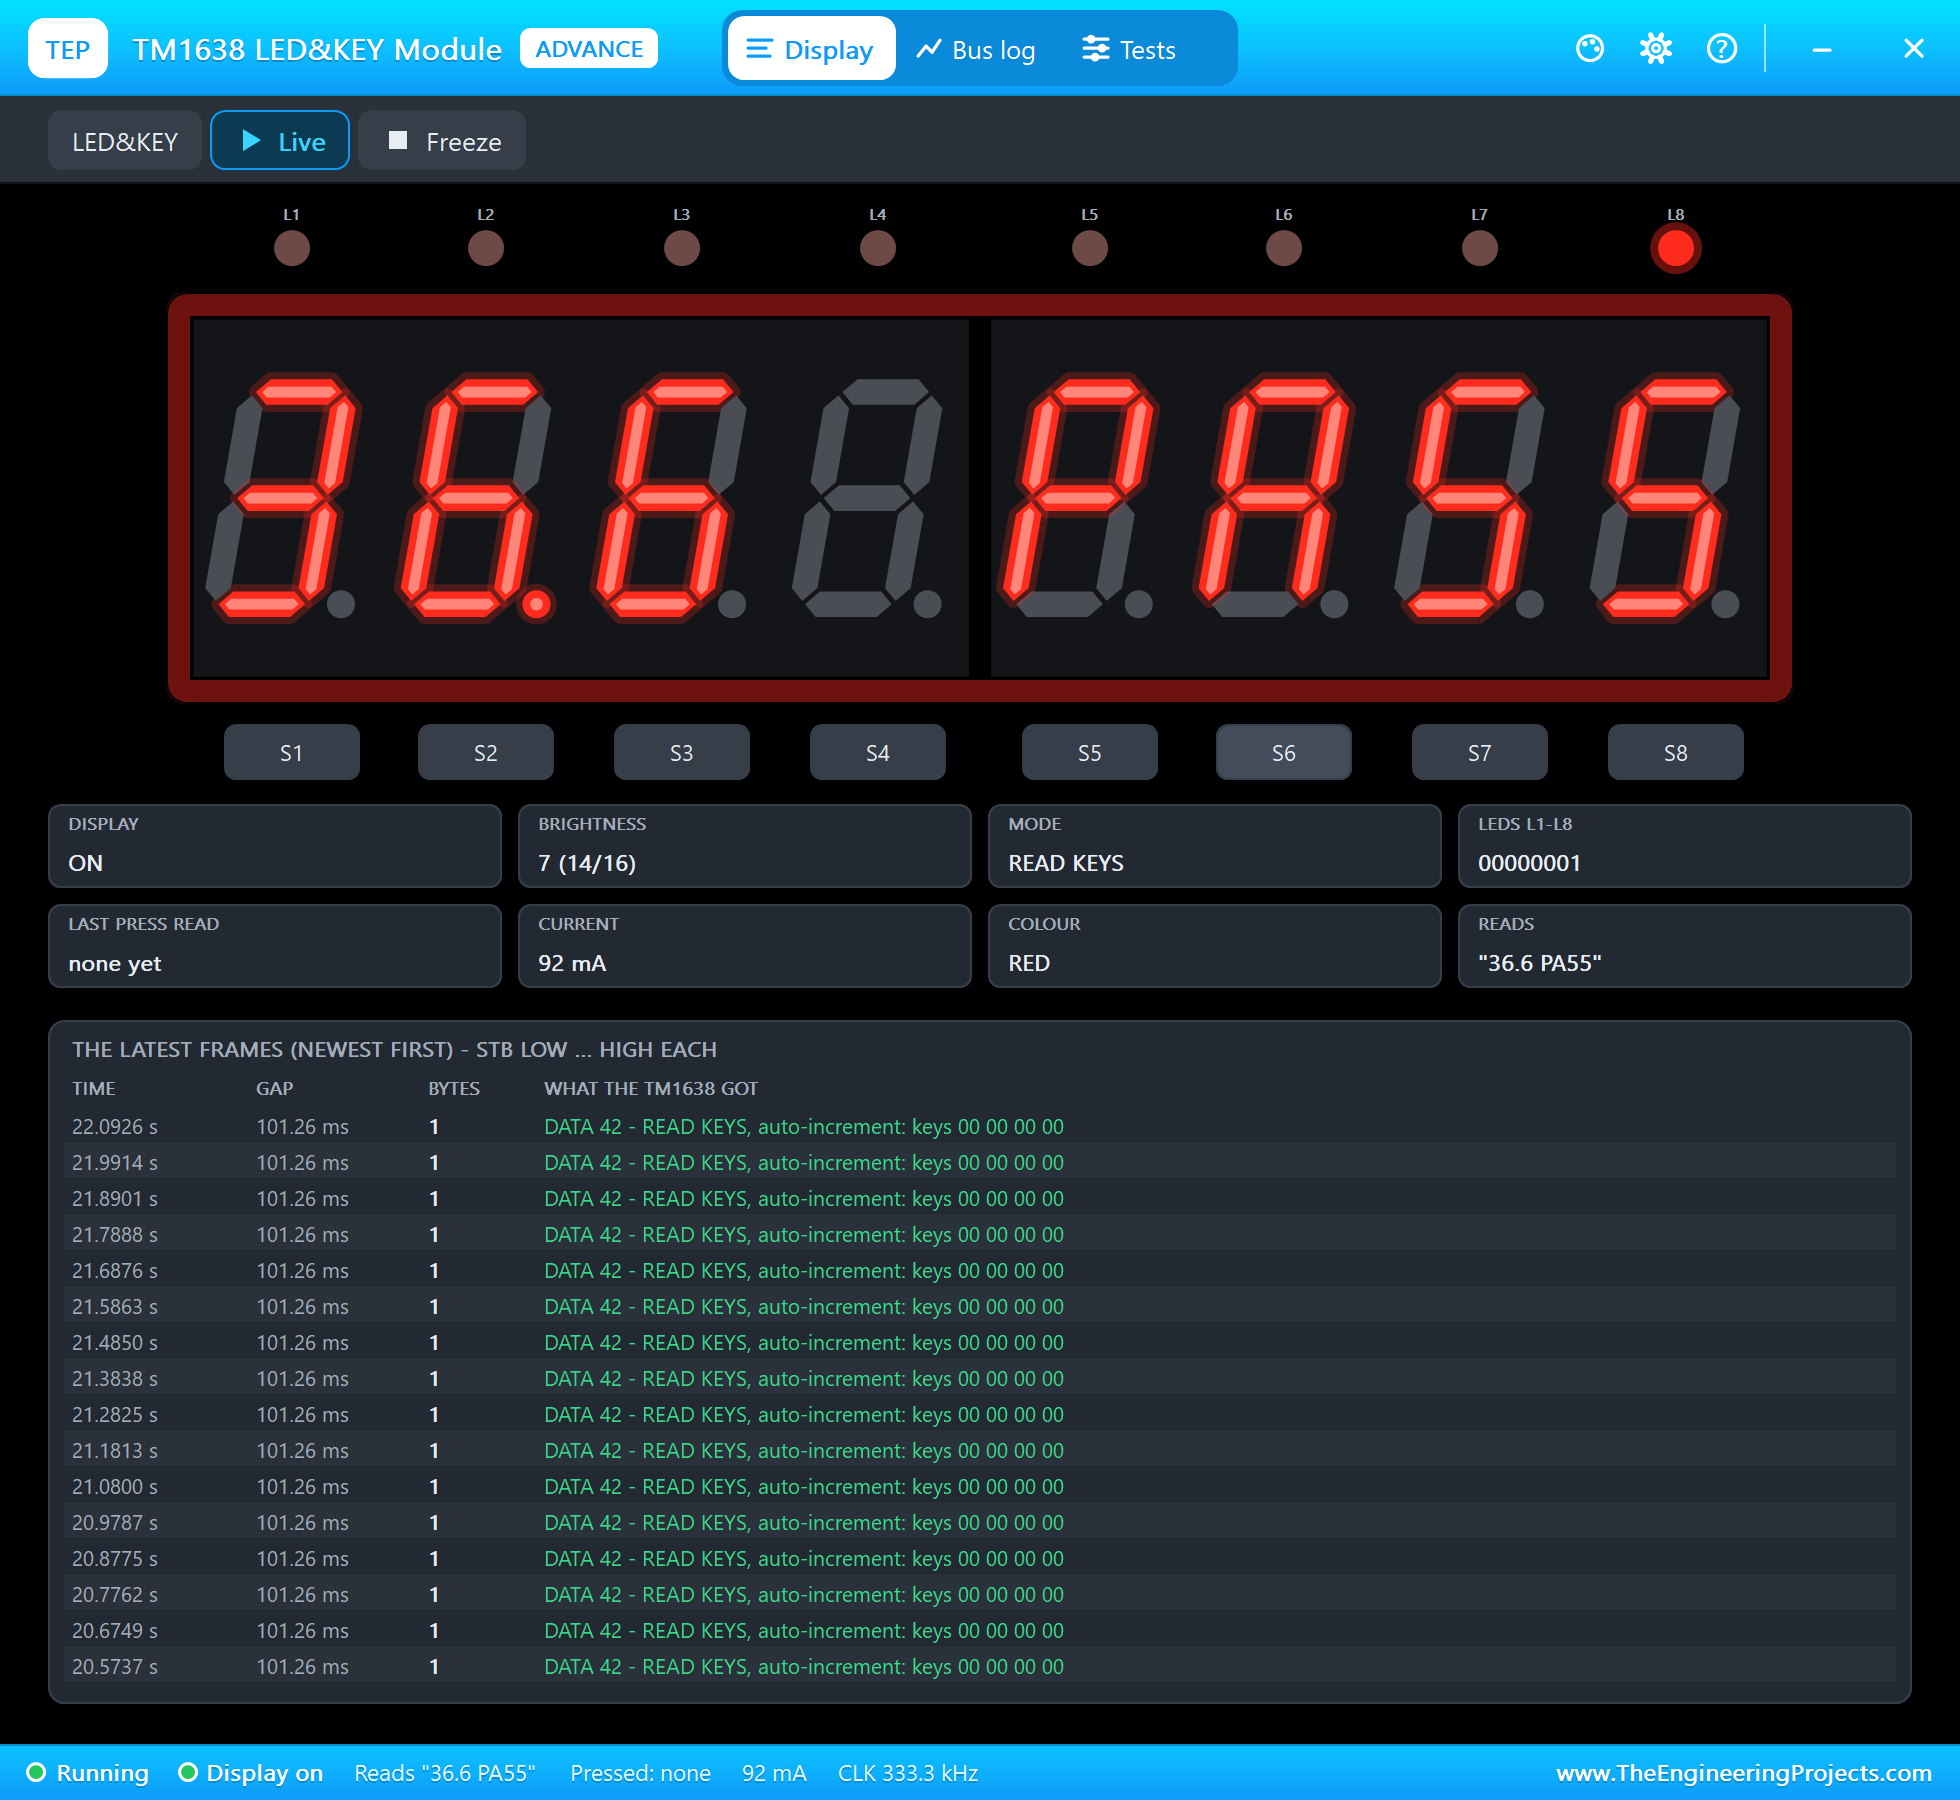
At 22.5 seconds, 4 seconds after it opened, "the gate closed", and the servo went back to 0 degrees. The person stayed in front of the sensor for a few more seconds, and the program did not screen them again; when the forehead went back to 50 cm, at 27.1 seconds: "the person walked on - READY".
A High Temperature
The next person had a fever: in the pop-up, OBJECT +1 twice made the forehead 36 degrees while it was still 50 cm away, and then the distance went to 2 cm. At 31.0 seconds: "HIGH - 38.6 C (101.5 F; the forehead 36.00 C, the room 24.99 C) - the gate stays shut". The display showed 38.6 HIGH, all eight LEDs flashed twice a second, and the servo stayed at 0 degrees. The page and the phone showed HIGH at once, so a guard could see who was waiting.
The Guard Decides
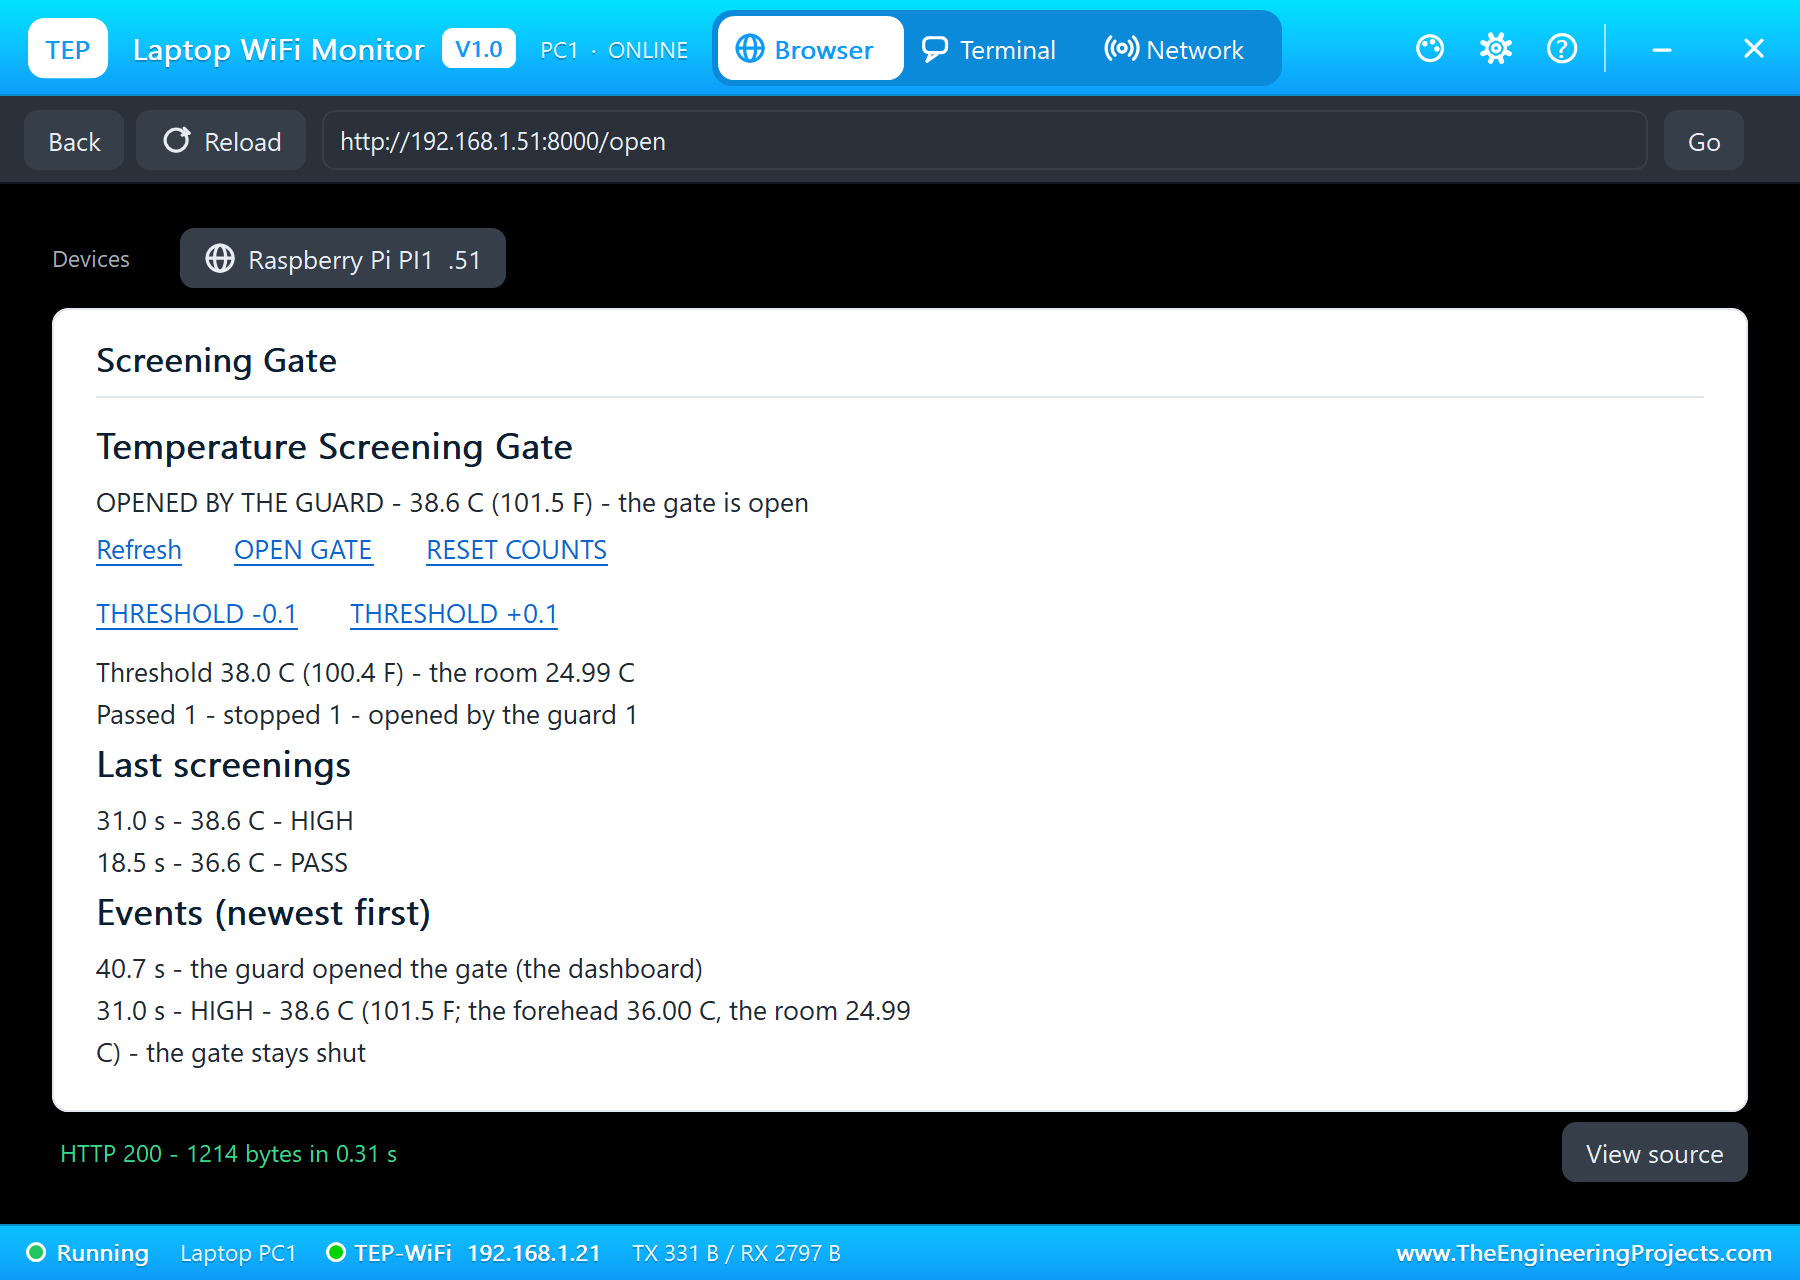
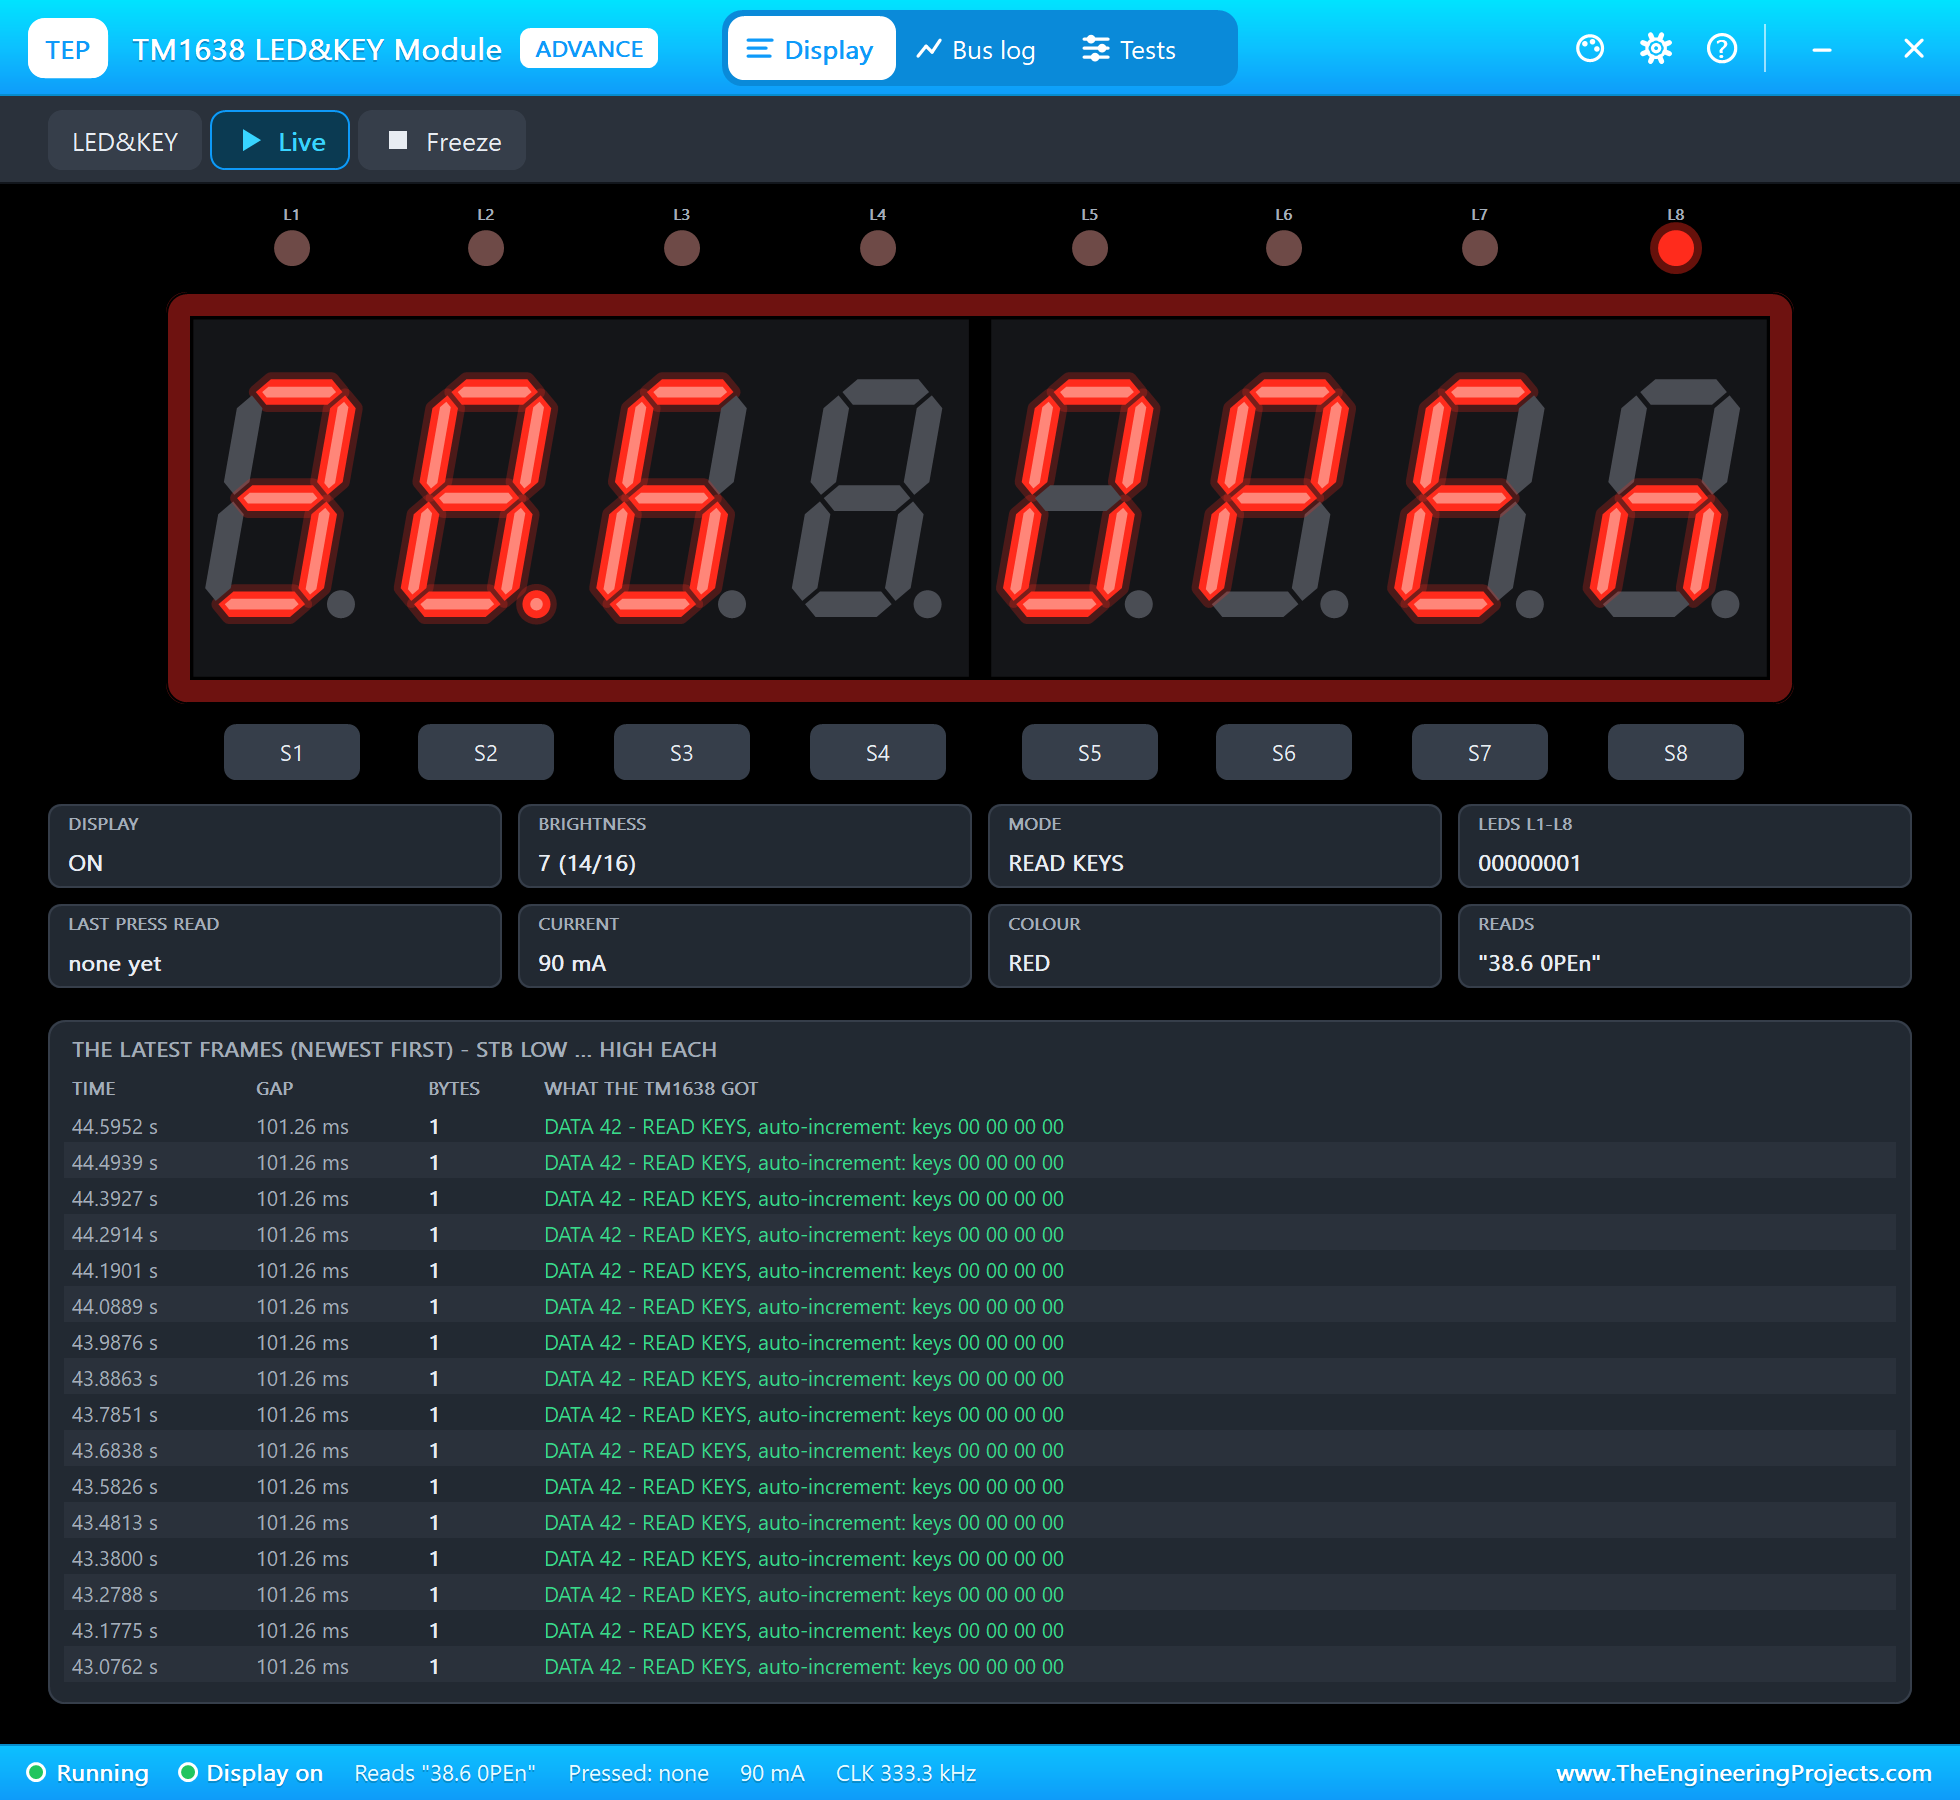
A guard checked the person by hand and pressed OPEN GATE on the laptop at 40.7 seconds: "the guard opened the gate (the dashboard)". The gate opened for 4 seconds, the display changed to 38.6 OPEn, and the count of people opened by the guard went to 1. The gate closed at 44.7 seconds, and the person walked on at 45.3 seconds.
The Keys
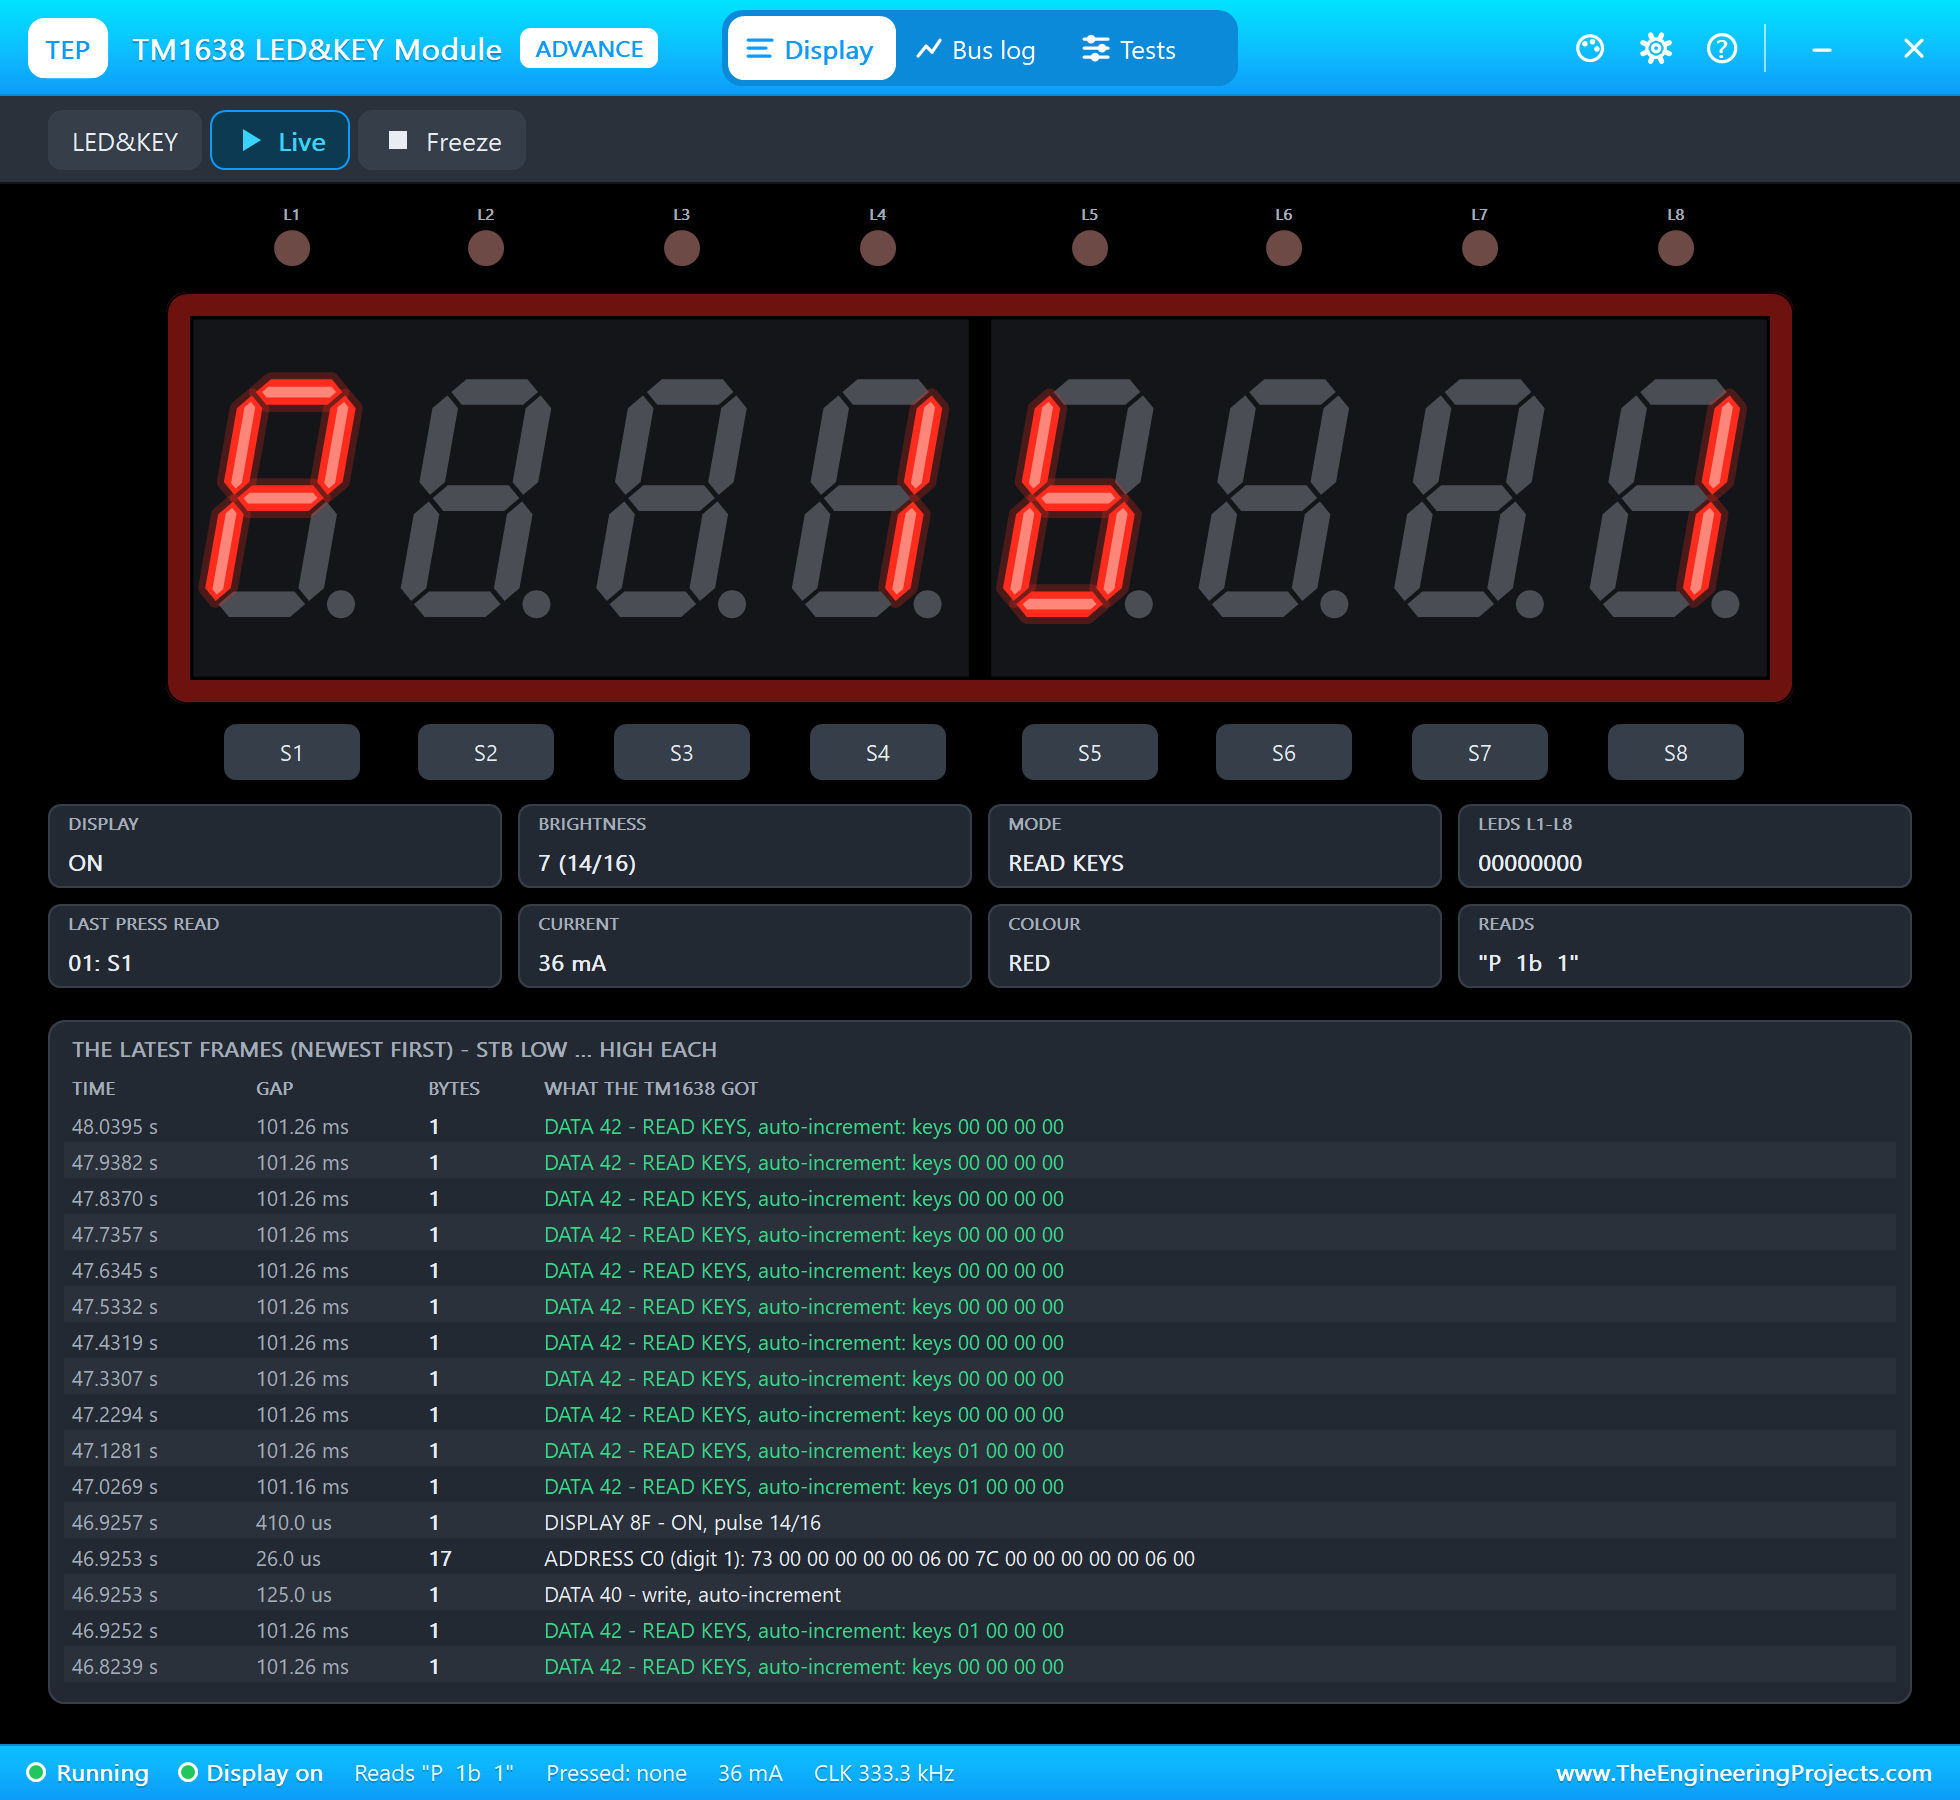
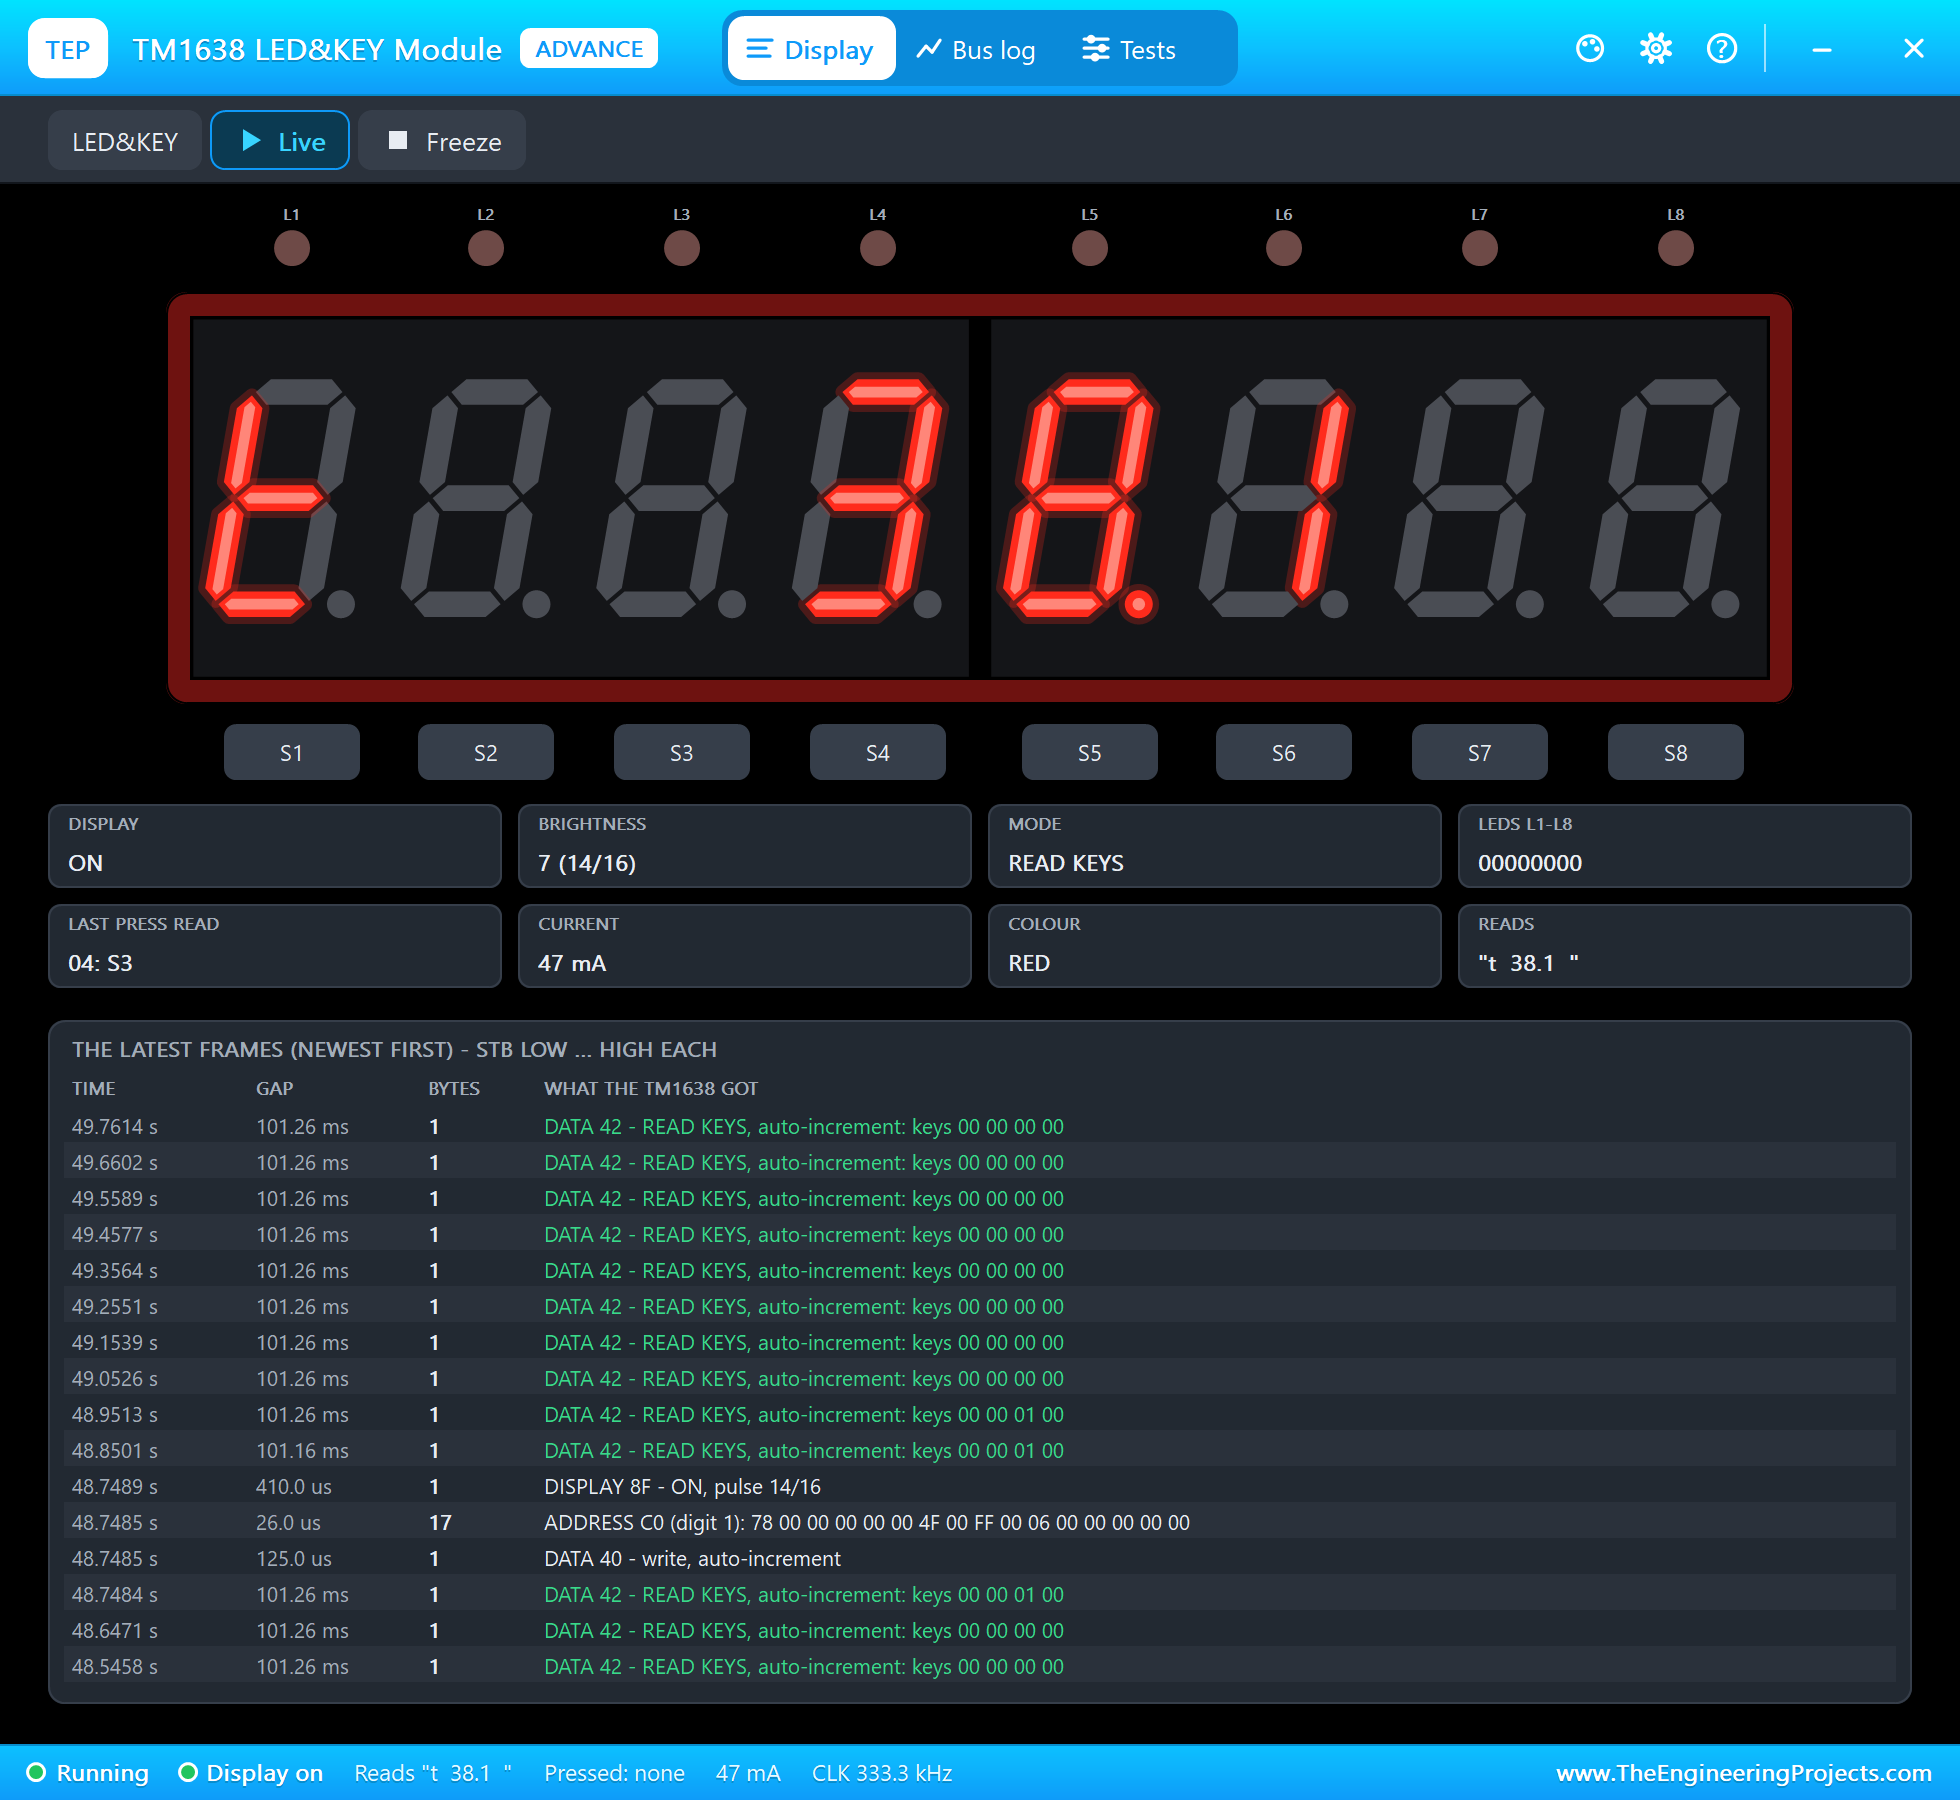
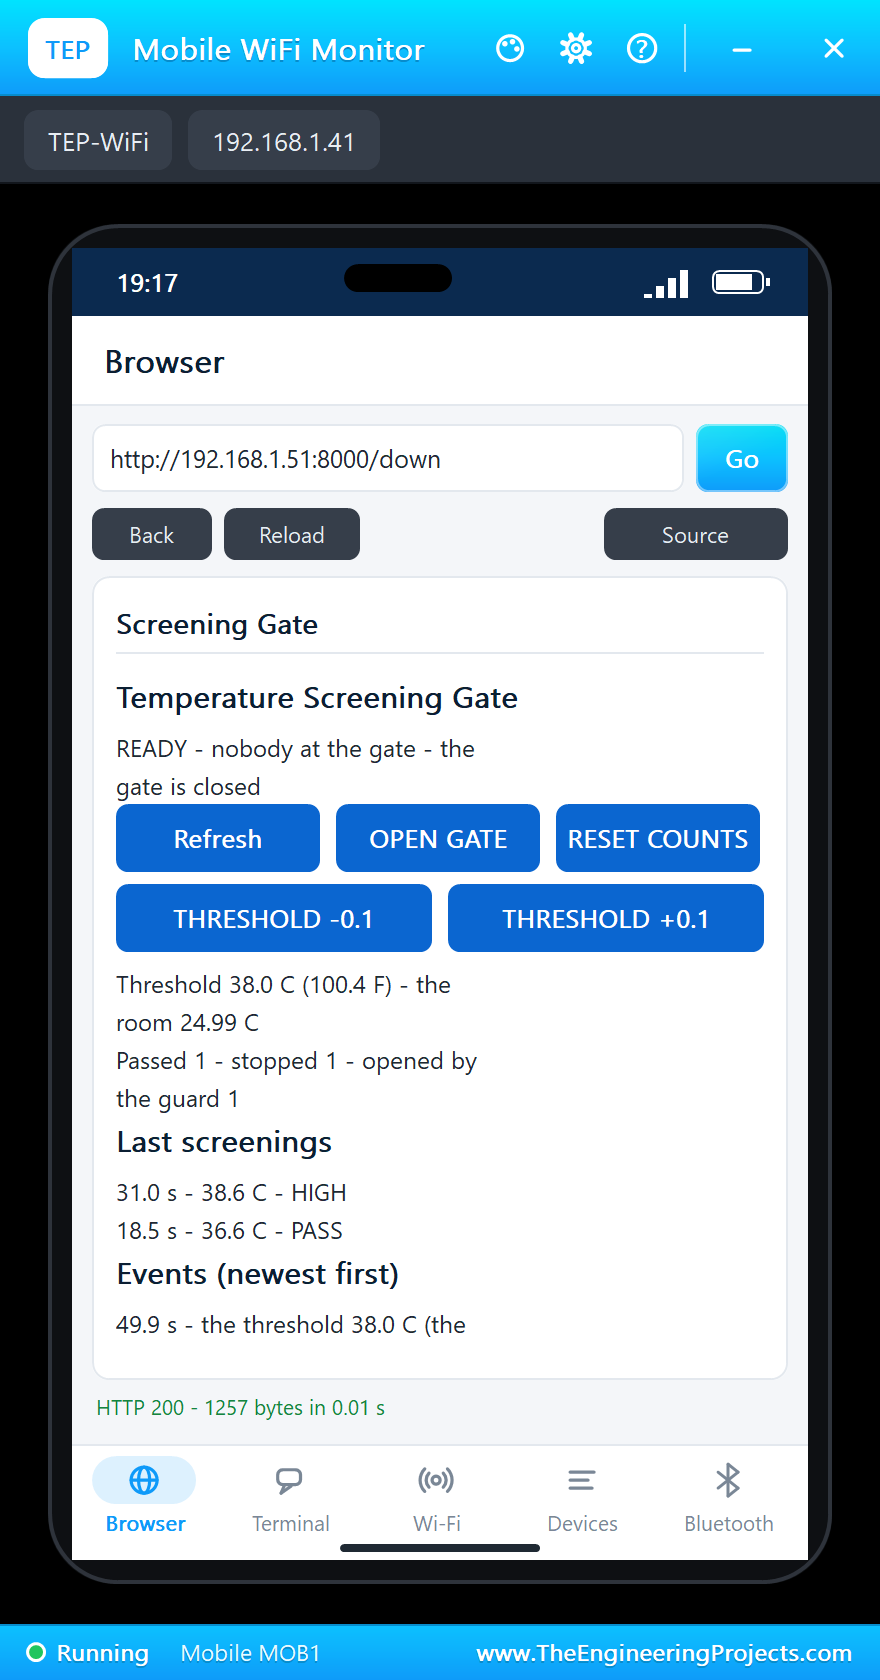
Key S1 on the TM1638 board showed the counts for 2 seconds: P 1 b 1, one person passed and one blocked. Key S3 raised the threshold: "the threshold 38.1 C (key S3)" at 47.9 seconds, with t 38.1 on the display. THRESHOLD -0.1 on the phone brought it back: "the threshold 38.0 C (the dashboard)" at 49.9 seconds. The keys and the dashboard change the same setting.
Trying to Fool the Sensor
Last, somebody held a cup of tea up to the sensor: the TEA 70 C preset at 2 cm. At 52.8 seconds: "not a forehead - 70.03 C (a hot object)", and the display showed 70.0 HOt; the gate stayed closed and nothing was counted. Back to ROOM 25 C, the display said rEAdY again at 55.6 seconds.
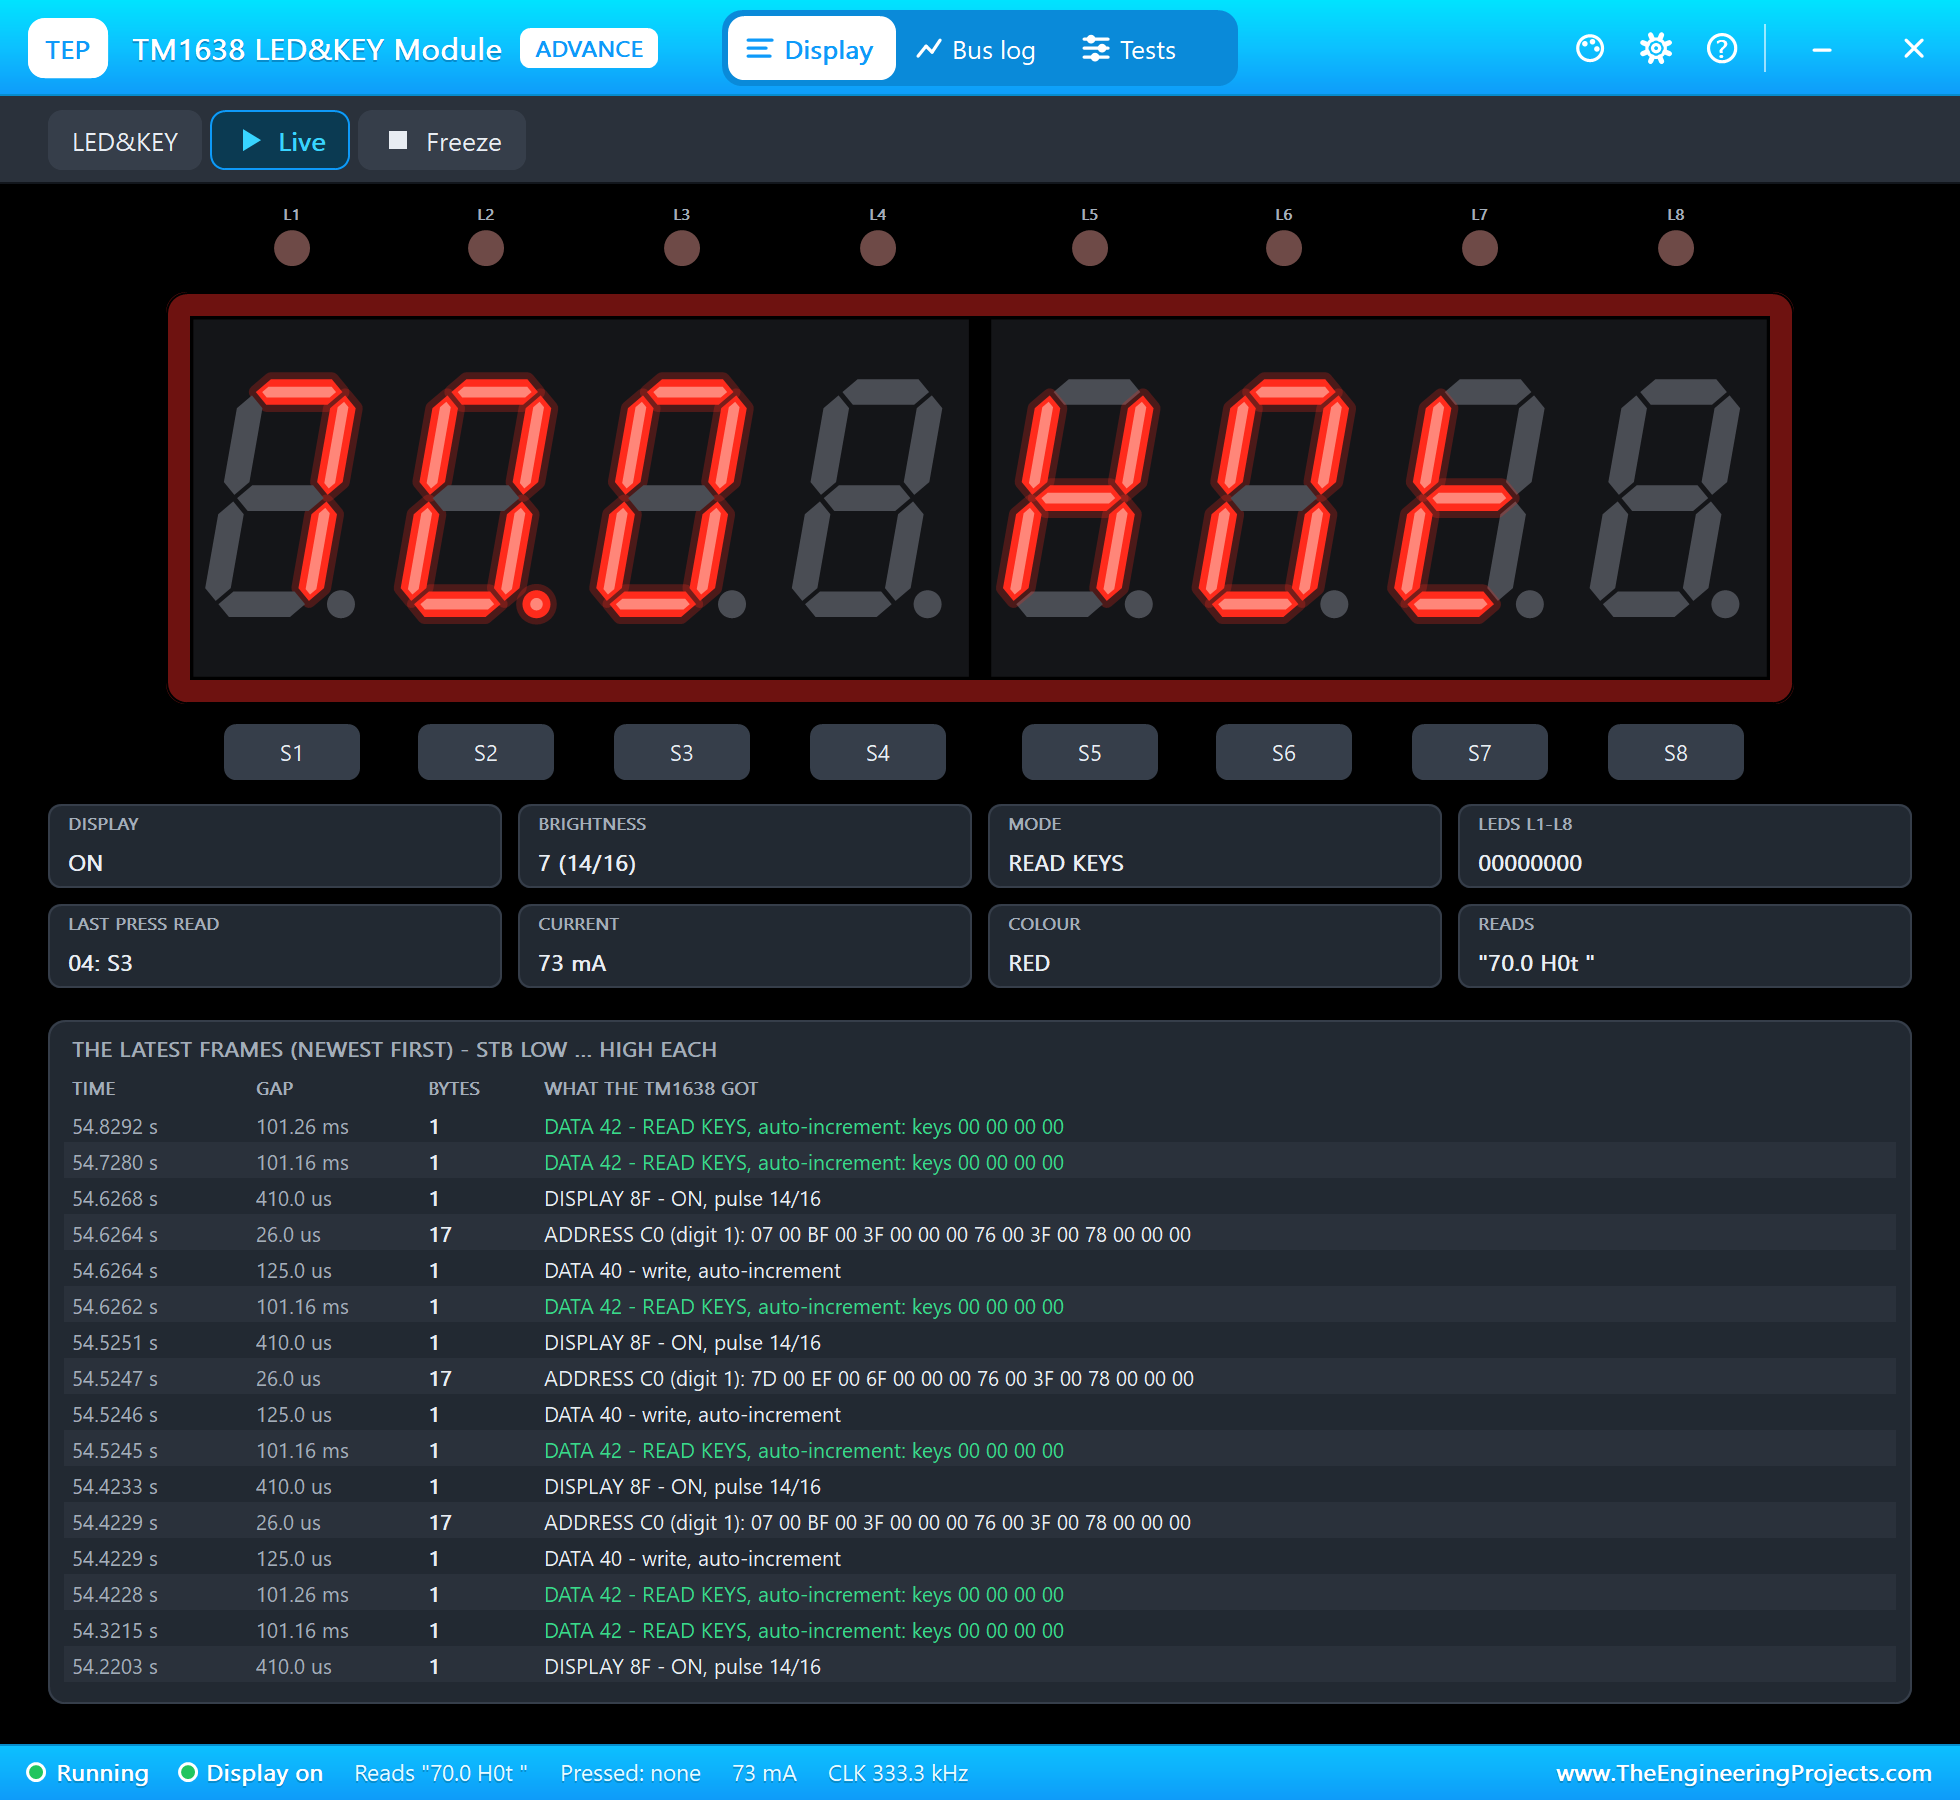
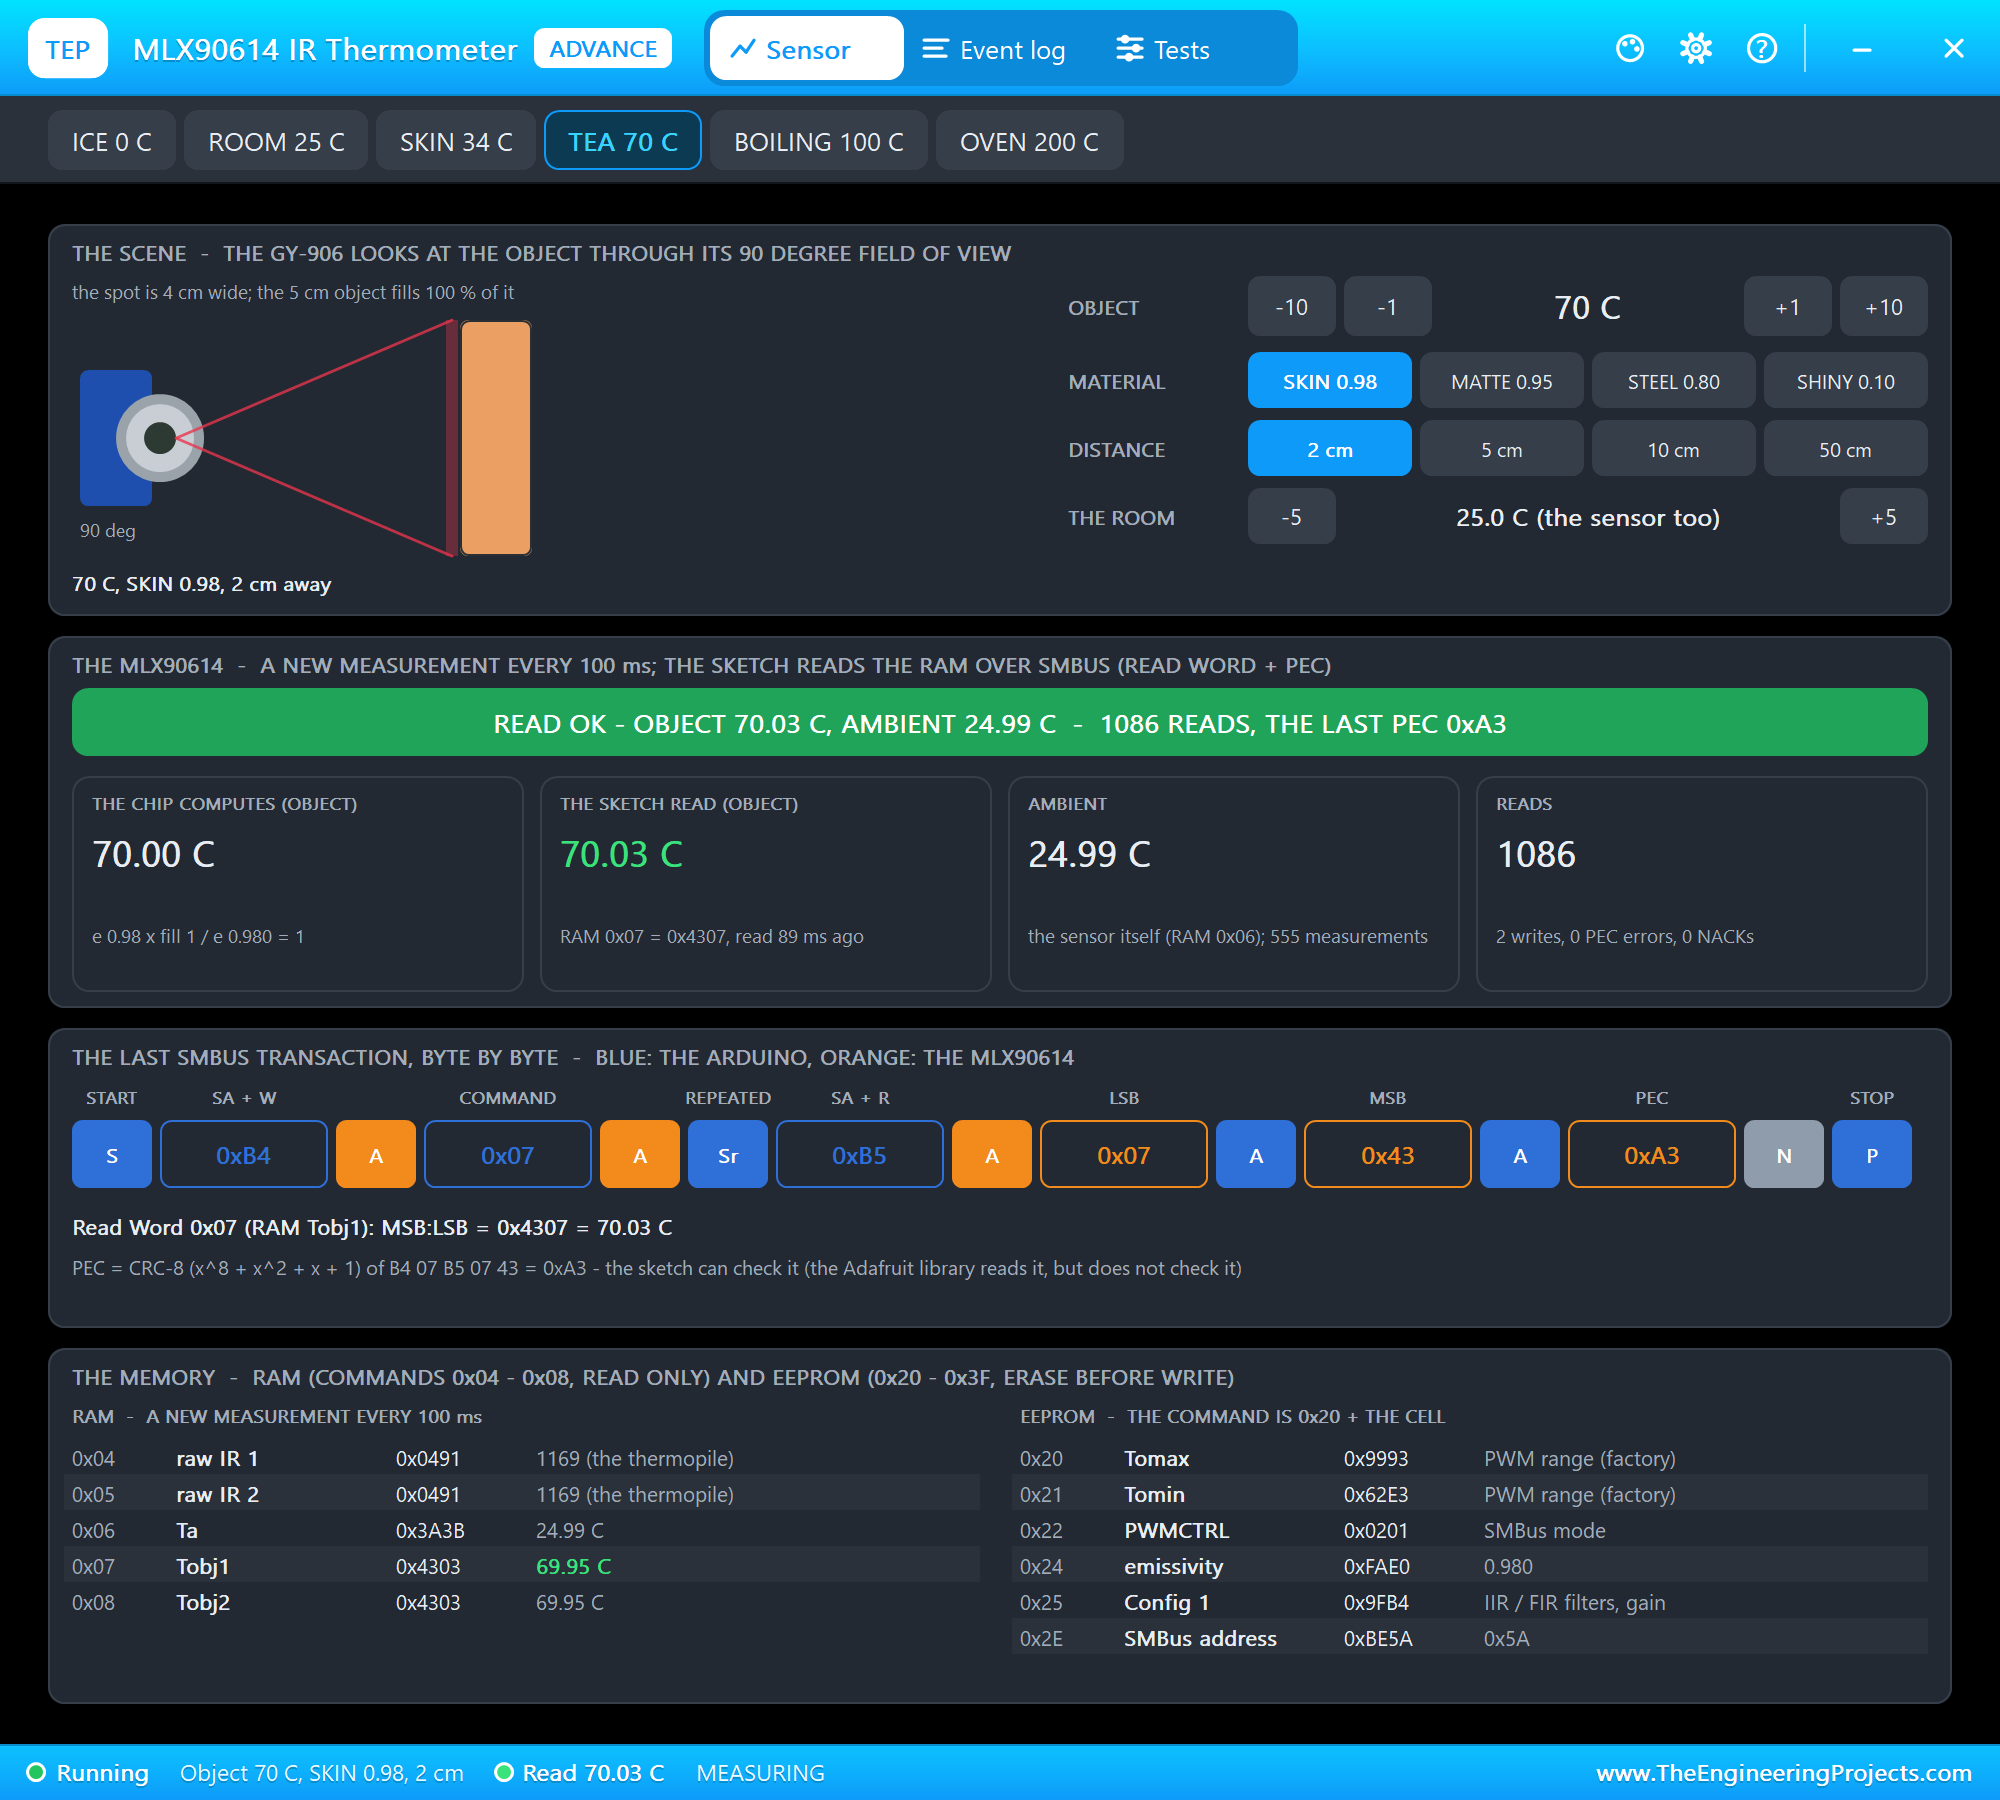
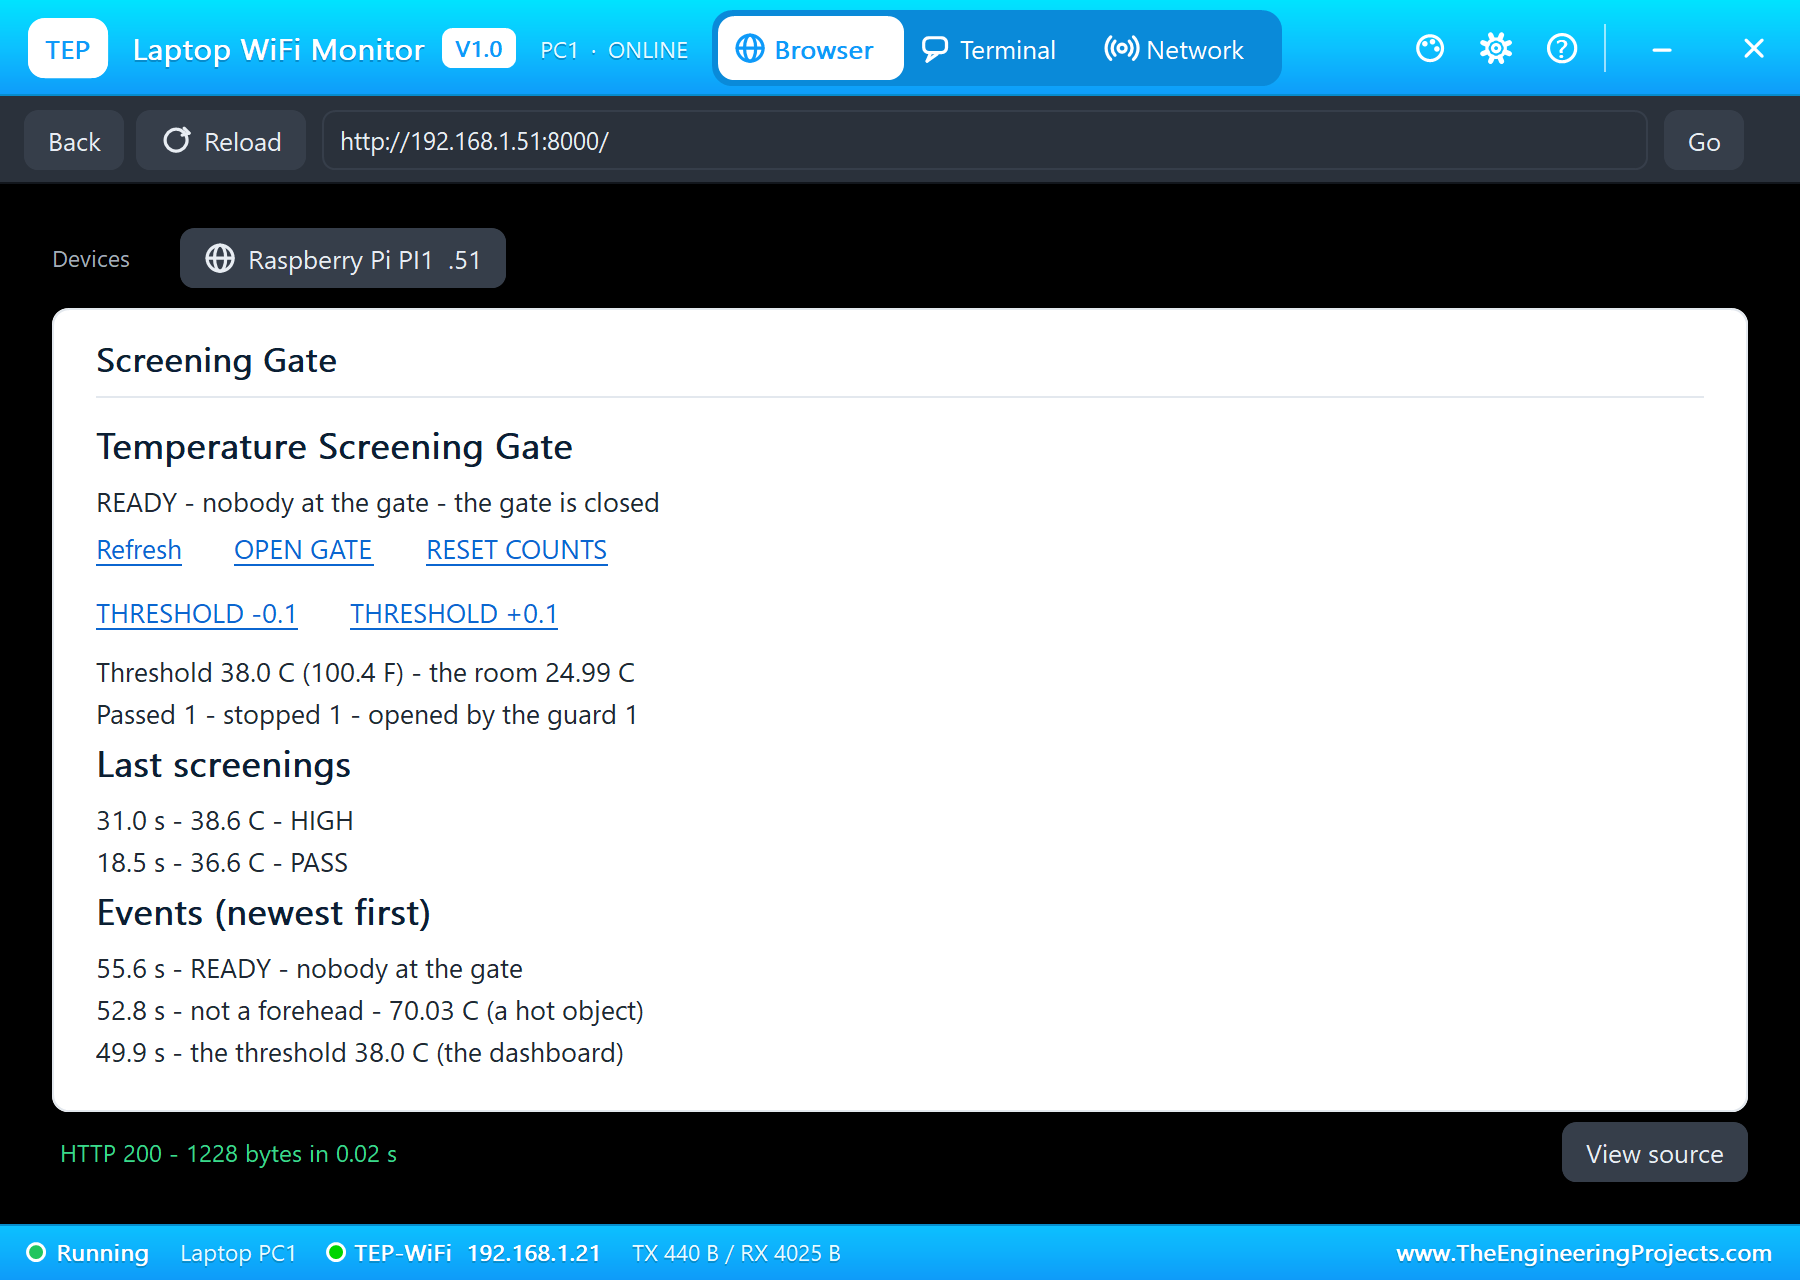
The terminal holds the whole story:
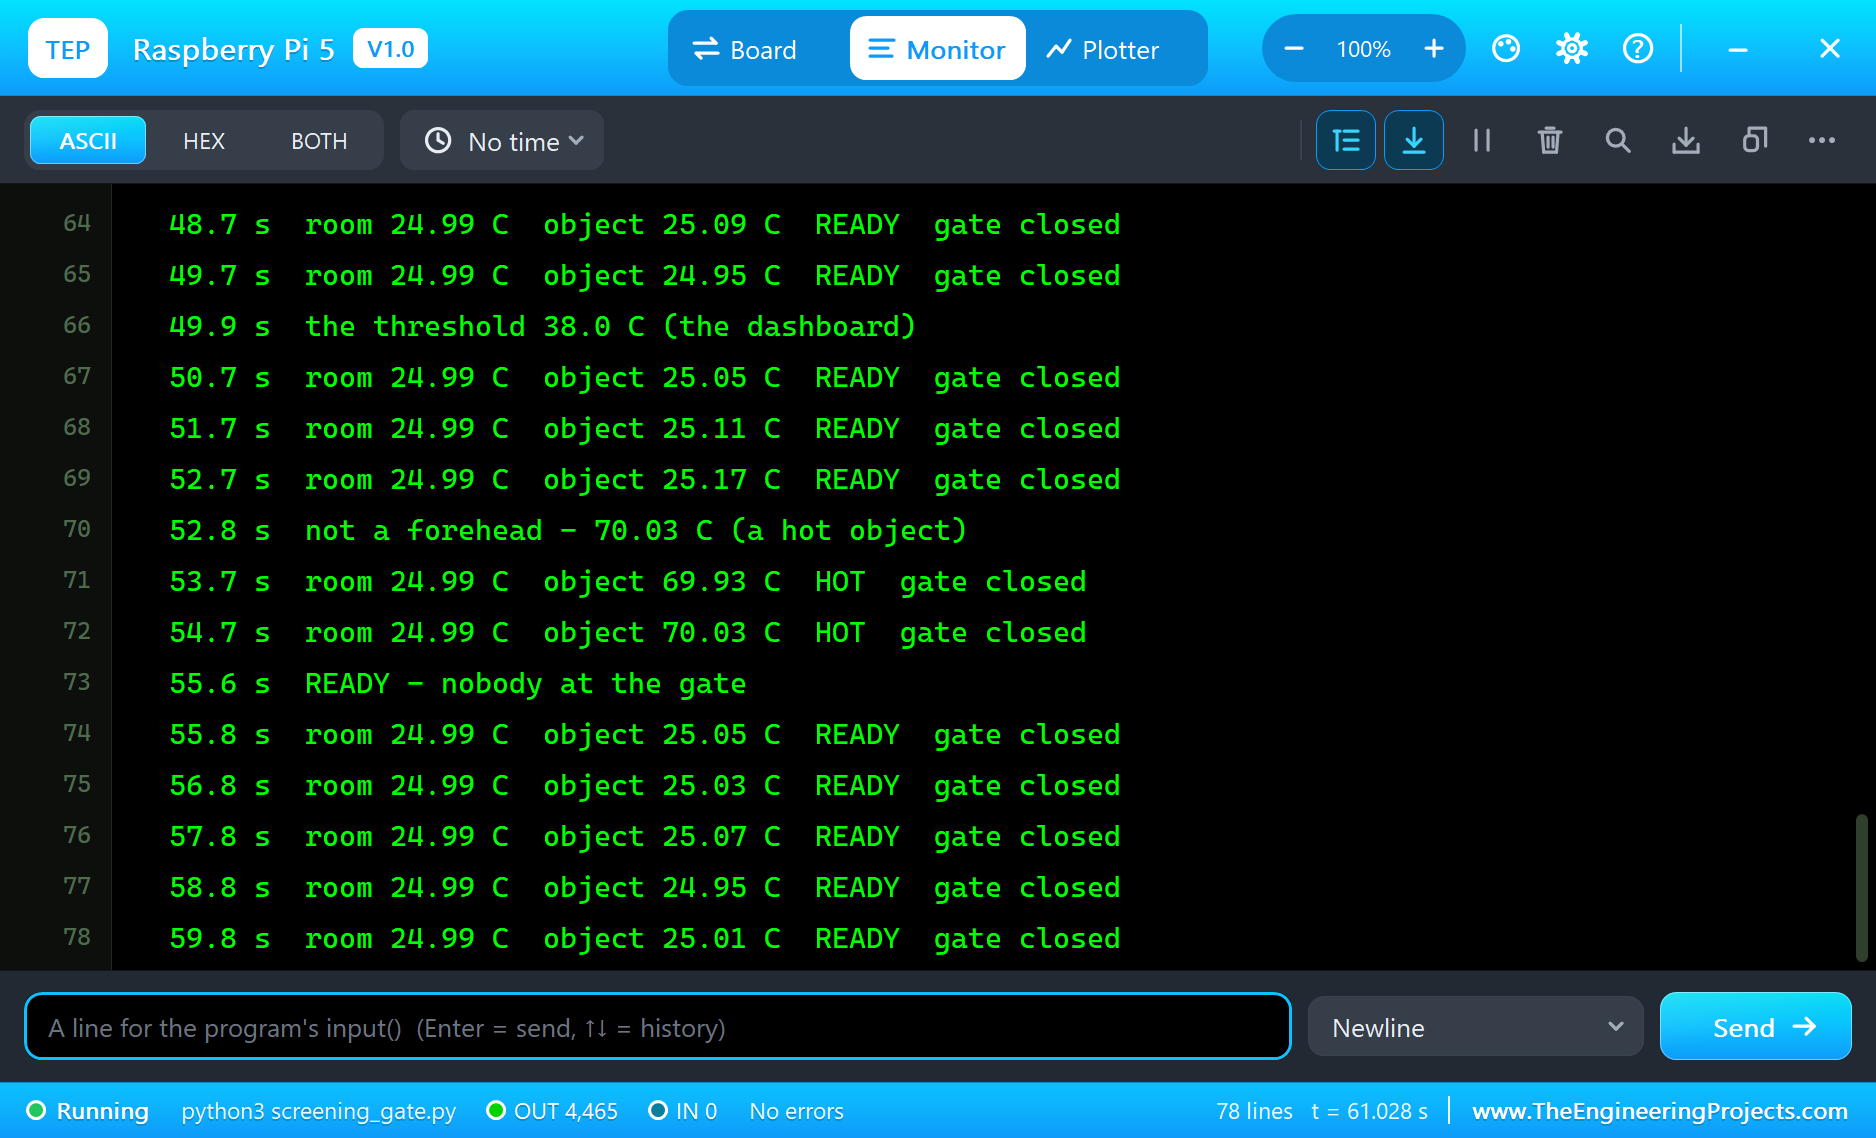
In all, 61 seconds of simulation took about 5 minutes on our PC with all the screenshots. The MLX90614 answered 1,196 reads and took 2 EEPROM writes, with no PEC error and no refused transaction.
Download the Project Files
Click the button below to download Raspberry-Pi-5-Temperature-Screening-Gate-Proteus-Simulation-v1.0.zip (about 13.7 MB, without the source code of the models):
Raspberry Pi 5 Temperature Screening Gate - Proteus Simulation V1.0- Proteus Simulation: Pi-5-Screening-Gate.pdsprj, the program screening_gate.py and copies of the models.
- Python Code: screening_gate.py, the complete program.
- Proteus Library Files: the LIB files of the Raspberry Pi 5, the MLX90614, the TM1638 board, the MG996R servo and the two WiFi Monitors.
- Proteus Model Files: the DLL models and the TEPPi folder, the Python 3.11 and the runtime that the Pi board runs.
- README.txt: the installation steps, the properties, the test results and the links to every library post.
No Proteus yet? Read How to Download and Install Proteus 7 and 8. New to libraries? Follow How to Install a New Library in Proteus.
How to Install the Project Files
- Close Proteus and extract the whole zip file, for example to your Desktop.
- Copy the files from Proteus Library Files into the LIBRARY folder of Proteus.
- Copy everything in Proteus Model Files, the DLL files and the TEPPi folder, into the MODELS folder.
- Start Proteus and open the project from the Proteus Simulation folder.
Changing the Code
The program is plain Python 3: edit screening_gate.py beside the project and press Play again; the Pi board runs the new file. The offset, the threshold and the timings are at the top. The same program runs on a real Raspberry Pi 5 with Raspberry Pi OS and lgpio; enable I2C in raspi-config. For our other Raspberry Pi 5 project with a servo barrier, see the Raspberry Pi 5 Smart Parking System.
Ideas to Extend the Project
- Add a buzzer: one short beep for PASS and three long ones for HIGH.
- Log every screening with its time to a CSV file and draw the day's numbers on the page.
- Add an RFID reader, so each screening is saved with the person's card.
- Measure the room with a separate sensor and adjust the offset to it, as commercial stations do.
- Count the people who walk away after a CLOSEr without being screened.
- Drive a turnstile or a door lock instead of the servo arm through a relay.
From Simulation to Real Hardware
- Give the servo its own supply: an MG996R draws up to 2.5 A when it stalls, far more than the Pi's 5 V pins should give; use a 5 or 6 V supply with its ground joined to the Pi's.
- Mark where to stand: with a 90 degree sensor, a forehead must be within about 2.5 cm to fill the spot; models with a narrow field of view (the MLX90614 versions with a 10 or 5 degree lens) measure from further away.
- Let people settle: a person coming in from a cold street has a cold forehead for a few minutes.
- Shield the sensor: sunlight, a heater or a lamp in the field of view adds to the reading.
- Bit-banging speed: Python on a real Pi toggles the pins far slower than the TM1638's 1 MHz limit, which is fine; the chip has no minimum speed.
- Treat it as a demonstration: for real screening, use a certified thermometer and have a person check everyone the gate stops.
Troubleshooting
- The display stays dark or shows rubbish: STB, CLK and DIO are swapped, or the program sends the bits in the wrong order (the TM1638 wants the least significant bit first).
- The keys never react: DIO stays an output during the read, or there is no pull-up on it.
- The MLX90614 does not answer at 0x5A: check VIN, GND, SDA and SCL; a read with a STOP between the command and the data (no repeated start) is refused.
- Every reading is about 0.5 degrees low: the emissivity is still 1.00; let the program write 0.98.
- Always CLOSEr: the forehead is too far for the sensor's wide field of view.
- The terminal cannot start Python: the TEPPi folder is not in MODELS.
Limitations of the Simulation
- The people come from the MLX90614's pop-up: a 5 cm wide object at a chosen temperature, material and distance.
- The body temperature is the forehead plus a fixed 2.6 degrees, the simplest calibration; real screening devices use their makers' curves.
- The network is simulated: the dashboard travels between the Pi and the two monitors inside Proteus; the times in this tutorial are simulation time.
- Raspberry Pi is a trademark of Raspberry Pi Ltd and MLX90614 a product of Melexis; this project is not made or endorsed by them or by Labcenter. It is a learning project, not a medical device.
So, that was all about the Raspberry Pi 5 Temperature Screening Gate - Proteus Simulation. I hope it helps you build your own: an infrared thermometer read over SMBus with a checksum on every word, an emissivity written into its EEPROM, a display and key board driven bit by bit on three GPIOs, and a servo gate, all tested in a simulation before you put anything at a door. More IoT projects with the ESP32 and the Raspberry Pi 5 are coming in this series. If you have any questions, ask in the comments and I will help you out. Till the next tutorial, take care and have fun!