Design a Simple Calculator with 8051 Microcontroller

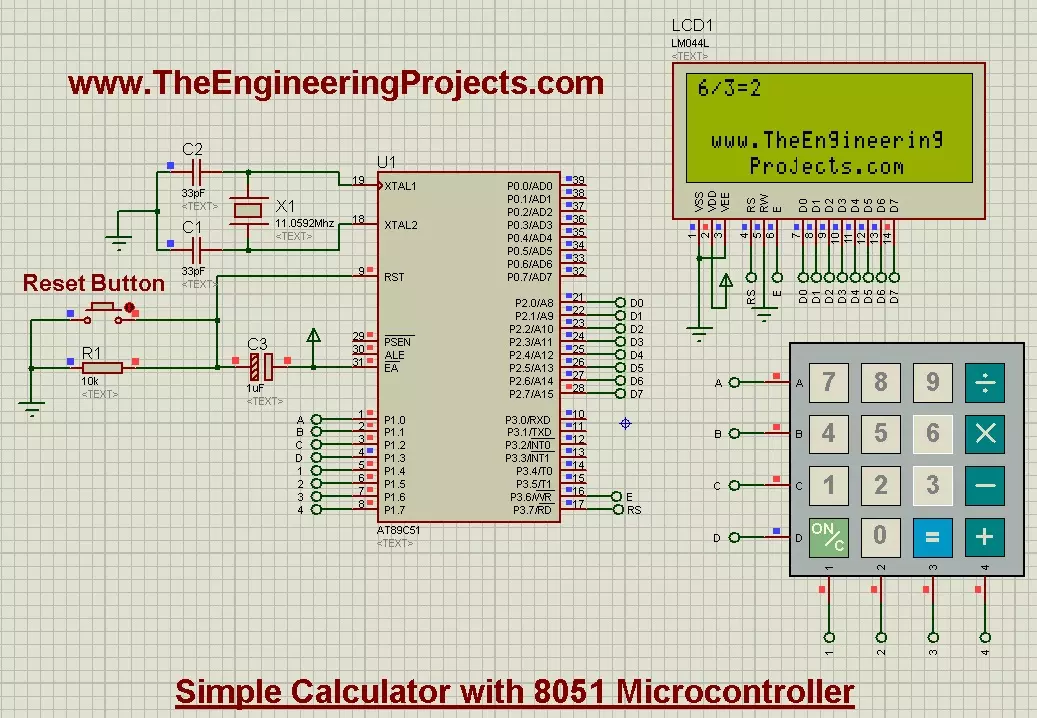
Hello friends, today's post is about designing a simple calculator with 8051 Microcontroller. In our previous post, we have seen How to Interface keypad with 8051 Microcontroller in Proteus ISIS. Moreover, we have also worked on Interfacing of LCD with 8051 Microcontroller in Proteus ISIS. If you haven't read these two posts then my suggestion is to read them first before going into the details of this post, as we are going to use both keypad and LCD in order to design the simple calculator with 8051 Microcontroller.

Actually we have already understood the working of both keypad and LCD so I thought to share this small project as it will give you the practical application of both keypad and LCD. And if you are new to 8051 Microcontroller then its always better to first design a small project and then move to pro one. The Simulation file along with hex file and complete code is given at the end for download. But my suggestion is to design it by yourself as it will help you in learning. You will do mistakes but obviously it will help you in learning so make mistakes and learn with it. So, let's get started with it.

Design a Simple Calculator with 8051 Microcontroller

  • The calculator we are going to design in this post is quite basic calculator, it will only perform 4 tasks, which are as follows:
    • When you press the (+) button then it will add the two digits. For example, you want to add 2 and 3 then you need to press 2 + 2 = these four buttons in sequence and when you press the = button it will automatically will give you the sum.
    • When you press (-) button it will subtract the two digits like 3 - 2 = and it will give you the result.
    • When you press (x) button it will multiply the two digits.
    • When you press the (/) button it will simply divide the two digits.
  • Whenever you press the (=) button, it will give you the output depending on the function you used before and if you press (=) in the start then it will give "Wrong Input".
  • Finally, there's (ON/C) button on the Calculator, when you press this it will simply reset the code and will clear the LCD.
  • So, that's how this calculator is gonna work. Moreover, it will always reset when you try to calculate new value.
  • As its a simple calculator, so its only limited to 1 digit, means it will only apply the operation on single digit input like 2+3 but it won't work on more than 1 digit like 12 + 13.
  • I will soon design a more complicated calculator but for this one its only limited to single digit.
  • So, now let's design this calculator, so first we are gonna have a look at the Proteus simulation of Simple calculator with 8051 Microcontroller.
  • After that, we will do the coding part for calculator with 8051 Microcontroller.
  • So, now let's get started with Proteus Simulation.
Proteus Simulation
  • So, you can see we have used the same LCD which is 20x4 and have used the same keypad as did in previous tutorial.
  • You can see this keypad has all the required operations for this project which are (+), (-), (x) and (/).
  • So, now let's have a look at the programming code for calculator with 8051 Microcontroller.
Programming Code
  • We have already seen the programming code for keypad and LCD and I am assuming that you have also read those posts so I am not going into the details of those posts.
  • So,we know that how to print data on LCD and we are also aware of how to get key press from keypad and then display it on LCD.
  • So, now let's move on to adding these functions.
while(1)
   { 
     //get numb1
     key = get_key();
     writecmd(0x01);            //clear display
	 writedata(key);            //Echo the key pressed to LCD
	 num1 = get_num(key);       //Get int number from char value, it checks for wrong input as well
     
	 if(num1!=Error)            //if correct input then proceed, num1==Error means wrong input
	 {
		 //get function
		 key = get_key();
		 writedata(key);                  //Echo the key pressed to LCD
		 func = get_func(key);            //it checks for wrong func
		 
		 if(func!='e')                    //if correct input then proceed, func=='e' means wrong input
		 {
			 //get numb2
			 key = get_key();
			 writedata(key);              //Echo the key pressed to LCD
			 num2 = get_num(key);         //Get int number from char value, it checks for wrong input as well
			 
			 if(num2!=Error)              //if correct input then proceed, num2==Error means wrong input
			 {
				 //get equal sign
				 key = get_key();
				 writedata(key);          //Echo the key pressed to LCD
				 
				 if(key == '=')           //if = is pressed then proceed
				 {
					 switch(func)         //switch on function
					 {
					 case '+': disp_num(num1+num2); break;
					 case '-': disp_num(num1-num2); break;
					 case 'x': disp_num(num1*num2); break;
					 case '/': disp_num(num1/num2); break;
					 }
				 }
				 else				      //key other then = here means error wrong input
				 { 
					 if(key == 'C')       //if clear screen is pressed then clear screen and reset
						writecmd(0x01);   //Clear Screen
					 else
						DispError(0); 	  //Display wrong input error
				 }                                 
			 }
		 }
     }
   }
  • As you can see in the above function, I have first check for the first key press.
  • When you pressed the first key on keypad then I get this key and converter it to integer.
  • After that I waited for the next key which must be some operation key like + - X or / otherwise it will generate the error message.
  • After that code is waiting for the third key which should be some numerical digit and then I converter it to integer again and if you entered some invalid key then it will generate the error.
  • Finally waiting for the = sign. When you press the = sign it will automatically perform the required operation which I placed in the switch case loop.
  • It will calculate the value and then print out the result and on next key press it will first clear the screen and then get the value and will continue.
  • Below is the detailed code for the project with comments and I hope you wont get into any trouble and will get it clearly.
#include<reg51.h>
#include<string.h>

//Define Macros
#define Error  13    // Any value other than 0 to 9 is good here

//Function declarations
void cct_init(void);
void delay(int);
void lcdinit(void);
void writecmd(int);
void writedata(char);
void writeline(char[]);
void ReturnHome(void);
char READ_SWITCHES(void);
char get_key(void);
int get_num(char);
char get_func(char);
void DispError(int);
void disp_num(int);
void WebsiteLogo();

//*******************
//Pin description
/*
P2 is data bus
P3.7 is RS
P3.6 is E
P1.0 to P1.3 are keypad row outputs
P1.4 to P1.7 are keypad column inputs
*/
//********************
// Define Pins
//********************
sbit RowA = P1^0;     //RowA
sbit RowB = P1^1;     //RowB
sbit RowC = P1^2;     //RowC
sbit RowD = P1^3;     //RowD

sbit C1   = P1^4;     //Column1
sbit C2   = P1^5;     //Column2
sbit C3   = P1^6;     //Column3
sbit C4   = P1^7;     //Column4

sbit E    = P3^6;     //E pin for LCD
sbit RS   = P3^7;     //RS pin for LCD

// ***********************************************************
// Main program
//
int main(void)
{
   char key;                     //key char for keeping record of pressed key
   int num1 = 0;                 //First number
   char func = '+';              //Function to be performed among two numbers
   int num2 = 0;                 //Second number
   
   cct_init();                   //Make input and output pins as required
   lcdinit();                    //Initilize LCD
   WebsiteLogo();
   while(1)
   { 
     WebsiteLogo();
     //get numb1
     key = get_key();
     writecmd(0x01);            //clear display
	 WebsiteLogo();
	 writedata(key);            //Echo the key pressed to LCD
	 num1 = get_num(key);       //Get int number from char value, it checks for wrong input as well
     
	 if(num1!=Error)            //if correct input then proceed, num1==Error means wrong input
	 {
		 //get function
		 key = get_key();
		 writedata(key);                  //Echo the key pressed to LCD
		 func = get_func(key);            //it checks for wrong func
		 
		 if(func!='e')                    //if correct input then proceed, func=='e' means wrong input
		 {
			 //get numb2
			 key = get_key();
			 writedata(key);              //Echo the key pressed to LCD
			 num2 = get_num(key);         //Get int number from char value, it checks for wrong input as well
			 
			 if(num2!=Error)              //if correct input then proceed, num2==Error means wrong input
			 {
				 //get equal sign
				 key = get_key();
				 writedata(key);          //Echo the key pressed to LCD
				 
				 if(key == '=')           //if = is pressed then proceed
				 {
					 switch(func)         //switch on function
					 {
					 case '+': disp_num(num1+num2); break;
					 case '-': disp_num(num1-num2); break;
					 case 'x': disp_num(num1*num2); break;
					 case '/': disp_num(num1/num2); break;
					 }
				 }
				 else				      //key other then = here means error wrong input
				 { 
					 if(key == 'C')       //if clear screen is pressed then clear screen and reset
					 {
					    writecmd(0x01);   //Clear Screen
						WebsiteLogo();
					 }
					 else
					 {
					 	DispError(0); 	  //Display wrong input error
						WebsiteLogo();
					 }
				 }                                 
			 }
		 }
     }
   }
}

void WebsiteLogo()
{
   writecmd(0x95);
   writedata('w');                                 //write
   writedata('w');                                 //write
   writedata('w');                                 //write
   writedata('.');                                 //write
   writedata('T');                                 //write
   writedata('h');                                 //write
   writedata('e');                                 //write
   writedata('E');                                 //write
   writedata('n');                                 //write
   writedata('g');                                 //write
   writedata('i');                                 //write
   writedata('n');                                 //write
   writedata('e');                                 //write
   writedata('e');                                 //write
   writedata('r');                                 //write
   writedata('i');                                 //write
   writedata('n');                                 //write
   writedata('g');                                 //write
 
   writecmd(0xd8);
 
   writedata('P');                                 //write
   writedata('r');                                 //write
   writedata('o');                                 //write
   writedata('j');                                 //write
   writedata('e');                                 //write
   writedata('c');                                 //write
   writedata('t');                                 //write
   writedata('s');                                 //write
   writedata('.');                                 //write
   writedata('c');                                 //write
   writedata('o');                                 //write
   writedata('m');                                 //write
   writecmd(0x80);
}

void cct_init(void)
{
	P0 = 0x00;   //not used
	P1 = 0xf0;   //used for generating outputs and taking inputs from Keypad
	P2 = 0x00;   //used as data port for LCD
	P3 = 0x00;   //used for RS and E   
}

void delay(int a)
{
   int i;
   for(i=0;i<a;i++);   //null statement
}

void writedata(char t)
{
   RS = 1;             // This is data
   P2 = t;             //Data transfer
   E  = 1;             // => E = 1
   delay(150);
   E  = 0;             // => E = 0
   delay(150);
}


void writecmd(int z)
{
   RS = 0;             // This is command
   P2 = z;             //Data transfer
   E  = 1;             // => E = 1
   delay(150);
   E  = 0;             // => E = 0
   delay(150);
}

void lcdinit(void)
{
  ///////////// Reset process from datasheet /////////
     delay(15000);
   writecmd(0x30);
     delay(4500);
   writecmd(0x30);
     delay(300);
   writecmd(0x30);
     delay(650);
  /////////////////////////////////////////////////////
   writecmd(0x38);    //function set
   writecmd(0x0c);    //display on,cursor off,blink off
   writecmd(0x01);    //clear display
   writecmd(0x06);    //entry mode, set increment
}

void ReturnHome(void)     /* Return to 0 cursor location */
{
   writecmd(0x02);
   delay(1500);
   WebsiteLogo();
}

void writeline(char Line[])
{
   int i;
   for(i=0;i<strlen(Line);i++)
   {
      writedata(Line[i]);     /* Write Character */
   }
   
   ReturnHome();          /* Return to 0 cursor position */
}

char READ_SWITCHES(void)	
{	
	RowA = 0; RowB = 1; RowC = 1; RowD = 1; 	//Test Row A

	if (C1 == 0) { delay(10000); while (C1==0); return '7'; }
	if (C2 == 0) { delay(10000); while (C2==0); return '8'; }
	if (C3 == 0) { delay(10000); while (C3==0); return '9'; }
	if (C4 == 0) { delay(10000); while (C4==0); return '/'; }

	RowA = 1; RowB = 0; RowC = 1; RowD = 1; 	//Test Row B

	if (C1 == 0) { delay(10000); while (C1==0); return '4'; }
	if (C2 == 0) { delay(10000); while (C2==0); return '5'; }
	if (C3 == 0) { delay(10000); while (C3==0); return '6'; }
	if (C4 == 0) { delay(10000); while (C4==0); return 'x'; }
	
	RowA = 1; RowB = 1; RowC = 0; RowD = 1; 	//Test Row C

	if (C1 == 0) { delay(10000); while (C1==0); return '1'; }
	if (C2 == 0) { delay(10000); while (C2==0); return '2'; }
	if (C3 == 0) { delay(10000); while (C3==0); return '3'; }
	if (C4 == 0) { delay(10000); while (C4==0); return '-'; }
	
	RowA = 1; RowB = 1; RowC = 1; RowD = 0; 	//Test Row D

	if (C1 == 0) { delay(10000); while (C1==0); return 'C'; }
	if (C2 == 0) { delay(10000); while (C2==0); return '0'; }
	if (C3 == 0) { delay(10000); while (C3==0); return '='; }
	if (C4 == 0) { delay(10000); while (C4==0); return '+'; }

	return 'n';           	// Means no key has been pressed
}

char get_key(void)           //get key from user
{
	char key = 'n';              //assume no key pressed

	while(key=='n')              //wait untill a key is pressed
		key = READ_SWITCHES();   //scan the keys again and again

	return key;                  //when key pressed then return its value
}

int get_num(char ch)         //convert char into int
{
	switch(ch)
	{
		case '0': return 0; break;
		case '1': return 1; break;
		case '2': return 2; break;
		case '3': return 3; break;
		case '4': return 4; break;
		case '5': return 5; break;
		case '6': return 6; break;
		case '7': return 7; break;
		case '8': return 8; break;
		case '9': return 9; break;
		case 'C': writecmd(0x01); return Error; break;  //this is used as a clear screen and then reset by setting error
		default: DispError(0); return Error; break;     //it means wrong input
	}
}

char get_func(char chf)            //detects the errors in inputted function
{
	if(chf=='C')                   //if clear screen then clear the LCD and reset
	{ 
		writecmd(0x01);            //clear display
		WebsiteLogo();
		return 'e'; 
	}
	
	if( chf!='+' && chf!='-' && chf!='x' && chf!='/' )  //if input is not from allowed funtions then show error
	{ 
		DispError(1); 
		WebsiteLogo();
		return 'e'; 
	}

	return chf;                        //function is correct so return the correct function
}


void DispError(int numb)           //displays differet error messages
{
	writecmd(0x01);                //clear display
	WebsiteLogo();
	switch(numb)
	{
	case 0: 	writeline("Wrong Input");      break;
	case 1: 	writeline("Wrong Function");   break;
	default:    writeline("Wrong Input");      break;
	}
}

void disp_num(int numb)            //displays number on LCD
{	
	unsigned char UnitDigit  = 0;  //It will contain unit digit of numb
	unsigned char TenthDigit = 0;  //It will contain 10th position digit of numb

	if(numb<0)
	{
		numb = -1*numb;  // Make number positive
		writedata('-');	 // Display a negative sign on LCD
	}

	TenthDigit = (numb/10);	          // Findout Tenth Digit

	if( TenthDigit != 0)	          // If it is zero, then don't display
		writedata(TenthDigit+0x30);	  // Make Char of TenthDigit and then display it on LCD

	UnitDigit = numb - TenthDigit*10;

	writedata(UnitDigit+0x30);	  // Make Char of UnitDigit and then display it on LCD
}

  • The above code is quite self explanatory and the main part I have already explained but still if you get into any troubled then ask in comments and I will resolve them.
  • Now copy this code in your keil uvision 3 and get the hex file.
  • Upload your hex file in Proteus ISIS and run your simulation.
  • The first screen you will get is as follows, which obviously displays our website address :P
  • Now, let's add 3 + 5 and we will get as shown in below figure:
  • Next operation, we are gonna do is the subtract one, so lets do this operation 3-9 = , shown below:
  • Now, lets do the third operation which is multiplication, so let's do this operation 9x9, shown below:
  • Now, finally do the last operation which is division, so I did 6/3 and result is shown below:
  • So, all the operations are shown in above figures, now if you give it wrong number like 2 digit number then it will display error message, as shown below:
  • It has become quite a lengthy post, so let's have the ending part. :)
  • You can download the Proteus Simulation along with hex file and code by clicking the below button.
Download Proteus Simulation and Code

So, that's all with the designing of simple Calculator with 8051 Microcontroller. I will try to work on advanced calculator, if I got time but I am not sure of that. :) So, that's all for today and will meet in next tutorial soon. till than have fun. !!! :)

Interfacing of Keypad with 8051 Microcontroller in Proteus

Hello friends, in today's post we are gonna have a look at Interfacing of Keypad with 8051 Microcontroller in Proteus ISIS. In the previous project, we have seen the Interfacing of LCD with 8051 Microcontroller and I have told there that LCD is a great debugging tool as we can print our data on it and can display different values and that's what is gonna done in today's post. Today, I will get the values from keypad and then question is how to know that we are getting the correct values. So in order to do so, we will display these values over LCD. So, that's how we are gonna use LCD as a debugging tool. As the debugging is concerned, there's another great tool for debugging which is called Serial port, we can also display these values over to Serial port. So, you should also read Serial communication with 8051 Microcontroller in Proteus ISIS, and try to display these keypad characters over to Serial port as a homework.

Anyways, let's come back to keypad, if you wanna read the keypad details then you should read Interfacing of keypad with Arduino in Proteus ISIS as I have mentioned all the basic details about keypad in that tutorial and I am not gonna repeat it. But as a simple recall, keypad works on matrix system like it has 4 columns and 4 rows so we will have total 8 pins through which we are gonna control these 16 buttons.  So, let's get started with it.

Interfacing of Keypad with 8051 Microcontroller in Proteus ISIS

  • Keypad is quite an easy and basic tool in embedded projects which is used in almost every kind of engineering project.
  • Today, we will first design the Proteus Simulation and after that we will design the programming code for 8051 Microcontroller.
  • The 8051 Microcontroller I have used is AT89C51 while the compiler I used for this microcontroller is keil uvision 3 and the simulation is designed in Proteus ISIS.
  • So, let's get started with Proteus simulation:
Proteus Simulation
  • Get the below components from Proteus components library and place it in your workspace.
  • Now design a circuit in Proteus software as shown in below figure:
  • Now as you can see in the above figure, I have used 4x4 keypad which has 4 rows and 4 columns and that's why there are total 16 buttons on it.
  • So, I have connected 8 pins of keypad with Port 1 of 8051 microcontroller.
  • LCD data pins are connected with Port 2 while the RS and E pins are connected to Port 3.
  • So, now let's move to the programming code for Interfacing of keypad with 8051 Microcontroller.
Programming Code
  • For programming purposes I have used Keil uvision 3 Compiler.
  • Most of the code is quite similar to that for Interfacing of LCD with 8051 Microcontroller, so if you wanna read about that then read this post.
  • The new code added in this post is about keypad which is as follows:
char READ_SWITCHES(void)	
{	
	RowA = 0; RowB = 1; RowC = 1; RowD = 1; 	//Test Row A

	if (C1 == 0) { delay(10000); while (C1==0); return '7'; }
	if (C2 == 0) { delay(10000); while (C2==0); return '8'; }
	if (C3 == 0) { delay(10000); while (C3==0); return '9'; }
	if (C4 == 0) { delay(10000); while (C4==0); return '/'; }

	RowA = 1; RowB = 0; RowC = 1; RowD = 1; 	//Test Row B

	if (C1 == 0) { delay(10000); while (C1==0); return '4'; }
	if (C2 == 0) { delay(10000); while (C2==0); return '5'; }
	if (C3 == 0) { delay(10000); while (C3==0); return '6'; }
	if (C4 == 0) { delay(10000); while (C4==0); return 'x'; }
	
	RowA = 1; RowB = 1; RowC = 0; RowD = 1; 	//Test Row C

	if (C1 == 0) { delay(10000); while (C1==0); return '1'; }
	if (C2 == 0) { delay(10000); while (C2==0); return '2'; }
	if (C3 == 0) { delay(10000); while (C3==0); return '3'; }
	if (C4 == 0) { delay(10000); while (C4==0); return '-'; }
	
	RowA = 1; RowB = 1; RowC = 1; RowD = 0; 	//Test Row D

	if (C1 == 0) { delay(10000); while (C1==0); return 'C'; }
	if (C2 == 0) { delay(10000); while (C2==0); return '0'; }
	if (C3 == 0) { delay(10000); while (C3==0); return '='; }
	if (C4 == 0) { delay(10000); while (C4==0); return '+'; }

	return 'n';           	// Means no key has been pressed
}
  • In the above function, which is READ_SWITCHES(), what we are doing is we are first checking the rows and after that for each row we are checking the columns.
  • For example, if you have pressed the button "1" then it will detect that first ROW and the first COLUMN has gone LOW and it will print out 1 as shown in above code.
  • That's how its reading all the 16 buttons, first detecting the Rows and then for each row detecting all the columns and then printing out the respective character.
  • Quite simple, isn't it?
  • So now, here's the complete code for the Interfacing of Keypad with 8051 Microcontroller:
#include<reg51.h>

//Function declarations
void cct_init(void);
void delay(int);
void lcdinit(void);
void writecmd(int);
void writedata(char);
void Return(void);
char READ_SWITCHES(void);
char get_key(void);

//*******************
//Pin description
/*
P2 is data bus
P3.7 is RS
P3.6 is E
P1.0 to P1.3 are keypad row outputs
P1.4 to P1.7 are keypad column inputs
*/
//********************
// Define Pins
//********************
sbit RowA = P1^0;     //RowA
sbit RowB = P1^1;     //RowB
sbit RowC = P1^2;     //RowC
sbit RowD = P1^3;     //RowD

sbit C1   = P1^4;     //Column1
sbit C2   = P1^5;     //Column2
sbit C3   = P1^6;     //Column3
sbit C4   = P1^7;     //Column4

sbit E    = P3^6;     //E pin for LCD
sbit RS   = P3^7;     //RS pin for LCD

// ***********************************************************
// Main program
//
int main(void)
{
   char key;                // key char for keeping record of pressed key

   cct_init();              // Make input and output pins as required
   lcdinit();               // Initilize LCD

   writecmd(0x95);
   writedata('w');                                 //write
   writedata('w');                                 //write
   writedata('w');                                 //write
   writedata('.');                                 //write
   writedata('T');                                 //write
   writedata('h');                                 //write
   writedata('e');                                 //write
   writedata('E');                                 //write
   writedata('n');                                 //write
   writedata('g');                                 //write
   writedata('i');                                 //write
   writedata('n');                                 //write
   writedata('e');                                 //write
   writedata('e');                                 //write
   writedata('r');                                 //write
   writedata('i');                                 //write
   writedata('n');                                 //write
   writedata('g');                                 //write
 
   writecmd(0xd8);
 
   writedata('P');                                 //write
   writedata('r');                                 //write
   writedata('o');                                 //write
   writedata('j');                                 //write
   writedata('e');                                 //write
   writedata('c');                                 //write
   writedata('t');                                 //write
   writedata('s');                                 //write
   writedata('.');                                 //write
   writedata('c');                                 //write
   writedata('o');                                 //write
   writedata('m');                                 //write
   writecmd(0x80);
   while(1)
   { 
     key = get_key();       // Get pressed key
	 //writecmd(0x01);        // Clear screen
	 writedata(key);        // Echo the key pressed to LCD
   }
}


void cct_init(void)
{
	P0 = 0x00;   //not used
	P1 = 0xf0;   //used for generating outputs and taking inputs from Keypad
	P2 = 0x00;   //used as data port for LCD
	P3 = 0x00;   //used for RS and E   
}

void delay(int a)
{
   int i;
   for(i=0;i<a;i++);   //null statement
}

void writedata(char t)
{
   RS = 1;             // This is data
   P2 = t;             //Data transfer
   E  = 1;             // => E = 1
   delay(150);
   E  = 0;             // => E = 0
   delay(150);
}


void writecmd(int z)
{
   RS = 0;             // This is command
   P2 = z;             //Data transfer
   E  = 1;             // => E = 1
   delay(150);
   E  = 0;             // => E = 0
   delay(150);
}

void lcdinit(void)
{
  ///////////// Reset process from datasheet /////////
     delay(15000);
   writecmd(0x30);
     delay(4500);
   writecmd(0x30);
     delay(300);
   writecmd(0x30);
     delay(650);
  /////////////////////////////////////////////////////
   writecmd(0x38);    //function set
   writecmd(0x0c);    //display on,cursor off,blink off
   writecmd(0x01);    //clear display
   writecmd(0x06);    //entry mode, set increment
}

void Return(void)     //Return to 0 location on LCD
{
  writecmd(0x02);
    delay(1500);
}

char READ_SWITCHES(void)	
{	
	RowA = 0; RowB = 1; RowC = 1; RowD = 1; 	//Test Row A

	if (C1 == 0) { delay(10000); while (C1==0); return '7'; }
	if (C2 == 0) { delay(10000); while (C2==0); return '8'; }
	if (C3 == 0) { delay(10000); while (C3==0); return '9'; }
	if (C4 == 0) { delay(10000); while (C4==0); return '/'; }

	RowA = 1; RowB = 0; RowC = 1; RowD = 1; 	//Test Row B

	if (C1 == 0) { delay(10000); while (C1==0); return '4'; }
	if (C2 == 0) { delay(10000); while (C2==0); return '5'; }
	if (C3 == 0) { delay(10000); while (C3==0); return '6'; }
	if (C4 == 0) { delay(10000); while (C4==0); return 'x'; }
	
	RowA = 1; RowB = 1; RowC = 0; RowD = 1; 	//Test Row C

	if (C1 == 0) { delay(10000); while (C1==0); return '1'; }
	if (C2 == 0) { delay(10000); while (C2==0); return '2'; }
	if (C3 == 0) { delay(10000); while (C3==0); return '3'; }
	if (C4 == 0) { delay(10000); while (C4==0); return '-'; }
	
	RowA = 1; RowB = 1; RowC = 1; RowD = 0; 	//Test Row D

	if (C1 == 0) { delay(10000); while (C1==0); return 'C'; }
	if (C2 == 0) { delay(10000); while (C2==0); return '0'; }
	if (C3 == 0) { delay(10000); while (C3==0); return '='; }
	if (C4 == 0) { delay(10000); while (C4==0); return '+'; }

	return 'n';           	// Means no key has been pressed
}

char get_key(void)           //get key from user
{
	char key = 'n';              //assume no key pressed

	while(key=='n')              //wait untill a key is pressed
		key = READ_SWITCHES();   //scan the keys again and again

	return key;                  //when key pressed then return its value
}
  • So, now upload this code to your keil and get the hex file.
  • Upload this hex file to your Proteus software and run the simulation.
  • Now if everything goes fine then you will get first screen as shown in below figure:
  • Obviously our website link at the bottom, now when you press the buttons on Keypad then it will start displaying on the first row of LCD.
  • Now I have pressed all the 12 buttons of keypad and they are shown on LCD as shown in below figure:
  • Now you can see the keypad buttons are displayed on the LCD.
  • Now you can download the Proteus Simulation along with hex file and code by clicking the below button.

Download Proteus Simulation with Code

That's all about Interfacing of Keypad with 8051 Microcontroller. Its not that difficult but if you have problems then ask in comments and I will try to resolve them. So, will meet in the next tutorial, till then take care. !!! :)

Interfacing of LCD with 8051 Microcontroller in Proteus ISIS

Hello friends, hope you all are fine and having fun with your lives. Today's post is about Interfacing of LCD with 8051 Microcontroller. In my previous post, we have seen How to do Serial Communication with 8051 Microcontroller, which was quite a basic tutorial and doesn't need much hardware attached to it. Now today we are gonna have a look at Interfacing of LCD with 8051 Microcontroller. LCD is always the basic step towards learning embedded as it serves as a great debugging tool for engineering projects.

LCD is also used almost in every Engineering Project for displaying different values. For example, if you have used the ATM machine, which you must have, then you have seen an LCD there displaying the options to select. Obviously that's quite a big LCD but still LCD. Similarly, all mobile phones are also equipped with LCDs. The LCD we are gonna use in this project is quite small and basic. It is normally known as the 16x2 LCD as it has rows and 2 columns for writing purposes. So, we are gonna interface that LCD with 8051 Microcontroller. The proteus Simulation along with hex file and the programming code in keil uvision 3 is given at the end of this post for download. If you are working with Arduino, then you should have a look at Interfacing of LCD with Arduino. The next level from LCD is Graphical LCD also known as GLCD, so if you wanna know more about that then you should read Interfacing of Arduino with GLCD. So, let's get started with it.

Interfacing of LCD with 8051 Microcontroller in Proteus ISIS

  • First of all, we are gonna need to design the Proteus Simulation as we always did.
  • After designing the simulation, we are gonna write our embedded code for 8051 Microcontroller.
  • I will be designing the code in Keil uvision3 compiler and the 8051 Microcontroller I am gonna use is AT89C51.
  • So, let's first get started with Proteus Simulation for interfacing of LCD with 8051 Microcontroller.
Proteus Simulation
  • First of all, get the below components from the Proteus components Library and place them in your workspace.
  • Now design a circuit in Proteus using these above components as shown in below figure:
  • If you have read the previous tutorial, you have noticed a small change, which is the RESET button.
  • Its a good thing to have a RESET button in your project. When you press this button, your 8051 Microcontroller will get reset and will start again.
  • Moreover, we have added a 20x4 LCD. The data pins of this LCD are attached with Port 2, while the RS and enable pins are connected to 0 and 1 pins of Port 1.
  • So, now let's design the programming code for interfacing of LCD with 8051 Microcontroller.
Programming Code
  • For programming code I have used Keil uvision 3 software. I am gonna first explain the code in bits so let's get started with it.
  • Before starting the LCD programming, let me clear few basic concepts.
  • In LCD, there are two types of data, we need to sent.
    • The first type is the command like we need to tell the LCD either to start from first column or second column so we need to place the LCD cursor at some point from where we need to start writing. So, this type of data is called commands to LCD.
    • The second type of data is the actual data we need to print on the LCD.
    • So first of all we send commands to the LCD like the cursor should go to second line and then we send the actual data which will start printing at that point.
  • The first function, I have used is named as lcdinit() , this function will initialize the LCD and will give the initializing commands to it.
void lcdinit(void)
{
    delay(15000);
   writecmd(0x30);
     delay(4500);
   writecmd(0x30);
     delay(300);
   writecmd(0x30);
     delay(650);

   writecmd(0x38);    //function set
   writecmd(0x0c);    //display on,cursor off,blink off
   writecmd(0x01);    //clear display
   writecmd(0x06);    //entry mode, set increment 
}
  • Now in this function I have used another function which is writcmd, which is as follows:
void writecmd(int z)
{
   RS = 0;             // => RS = 0
   P2 = z;             //Data transfer
   E  = 1;             // => E = 1
   delay(150);
   E  = 0;             // => E = 0
   delay(150);
}
  • In order to send the commands to LCD with 8051 Microcontroller, we have to make the RS pin LOW and then we send the data and make the Enable pin HIGH to LOW which I have done in the above writecmd() function.
  • Next function, we have used is writedata() function, which is as follows:
void writedata(char t)
{
   RS = 1;             // => RS = 1
   P2 = t;             //Data transfer
   E  = 1;             // => E = 1
   delay(150);
   E  = 0;             // => E = 0
   delay(150);
}
  • So, if you check above two functions then its quite clear that when we send command to the LCD then we have to make RS pin 0 but when we need to send data to be printed on LCD then we need to make RS pin 1. That's the only thing worth understanding in interfacing of LCD with 8051 Microcontroller.
  • Now below is the complete code for interfacing of LCD with 8051 Microcontroller and I think now you can get it quite easily.
#include<reg51.h>

//Function declarations
void cct_init(void);
void delay(int);
void lcdinit(void);
void writecmd(int);
void writedata(char);
void ReturnHome(void);

//*******************
//Pin description
/*
P2 is data bus
P1.0 is RS
P1.1 is E
*/
//********************

// Defines Pins
sbit RS = P1^0;
sbit E  = P1^1;

// ***********************************************************
// Main program
//
void main(void)
{
   cct_init();                                     //Make all ports zero

   lcdinit();                                      //Initilize LCD

   writecmd(0x81);
   writedata('w');                                 //write
   writedata('w');                                 //write
   writedata('w');                                 //write
   writedata('.');                                 //write
   writedata('T');                                 //write
   writedata('h');                                 //write
   writedata('e');                                 //write
   writedata('E');                                 //write
   writedata('n');                                 //write
   writedata('g');                                 //write
   writedata('i');                                 //write
   writedata('n');                                 //write
   writedata('e');                                 //write
   writedata('e');                                 //write
   writedata('r');                                 //write
   writedata('i');                                 //write
   writedata('n');                                 //write
   writedata('g');                                 //write

   writecmd(0xc4);

   writedata('P');                                 //write
   writedata('r');                                 //write
   writedata('o');                                 //write
   writedata('j');                                 //write
   writedata('e');                                 //write
   writedata('c');                                 //write
   writedata('t');                                 //write
   writedata('s');                                 //write
   writedata('.');                                 //write
   writedata('c');                                 //write
   writedata('o');                                 //write
   writedata('m');                                 //write

   ReturnHome();                                   //Return to 0 position

    while(1)
    {
    }

}


void cct_init(void)
{
P0 = 0x00;   //not used 
P1 = 0x00;   //not used 
P2 = 0x00;   //used as data port
P3 = 0x00;   //used for generating E and RS
}

void delay(int a)
{
   int i;
   for(i=0;i<a;i++);   //null statement
}

void writedata(char t)
{
   RS = 1;             // => RS = 1
   P2 = t;             //Data transfer
   E  = 1;             // => E = 1
   delay(150);
   E  = 0;             // => E = 0
   delay(150);
}


void writecmd(int z)
{
   RS = 0;             // => RS = 0
   P2 = z;             //Data transfer
   E  = 1;             // => E = 1
   delay(150);
   E  = 0;             // => E = 0
   delay(150);
}

void lcdinit(void)
{
    delay(15000);
   writecmd(0x30);
     delay(4500);
   writecmd(0x30);
     delay(300);
   writecmd(0x30);
     delay(650);

   writecmd(0x38);    //function set
   writecmd(0x0c);    //display on,cursor off,blink off
   writecmd(0x01);    //clear display
   writecmd(0x06);    //entry mode, set increment 
}

void ReturnHome(void)     //Return to 0 location
{
  writecmd(0x02);
    delay(1500);
}
  • So, place this code in your keil software and get the hex file.
  • Upload this hex file in your Proteus software and Run it.
  • If everything goes fine then you will get something as shown in below figure:
  • Now, you can see we have printed our website address on the LCD with 8051 Microcontroller.
  • You can print anything you wanna print on this LCD instead of our address.
  • You can download the Proteus Simulation along with hex file and the programming code in keil uvision 3 by clicking on below button.

Download Proteus Simulation & Code

That's all for today, in the next post I am gonna share how to display custom characters on LCD with 8051 Microcontroller, because till now you can just display the simple characters like alphabets and numbers on it but can't display the custom characters like arrowhead etc. You should have a look at LCD Interfacing with Microcontrollers, where I have combined all tutorials related to LCD. So stay tuned and have fun.
Syed Zain Nasir

I am Syed Zain Nasir, the founder of <a href=https://www.TheEngineeringProjects.com/>The Engineering Projects</a> (TEP). I am a programmer since 2009 before that I just search things, make small projects and now I am sharing my knowledge through this platform.I also work as a freelancer and did many projects related to programming and electrical circuitry. <a href=https://plus.google.com/+SyedZainNasir/>My Google Profile+</a>

Share
Published by
Syed Zain Nasir