


Introduction to MAX30100


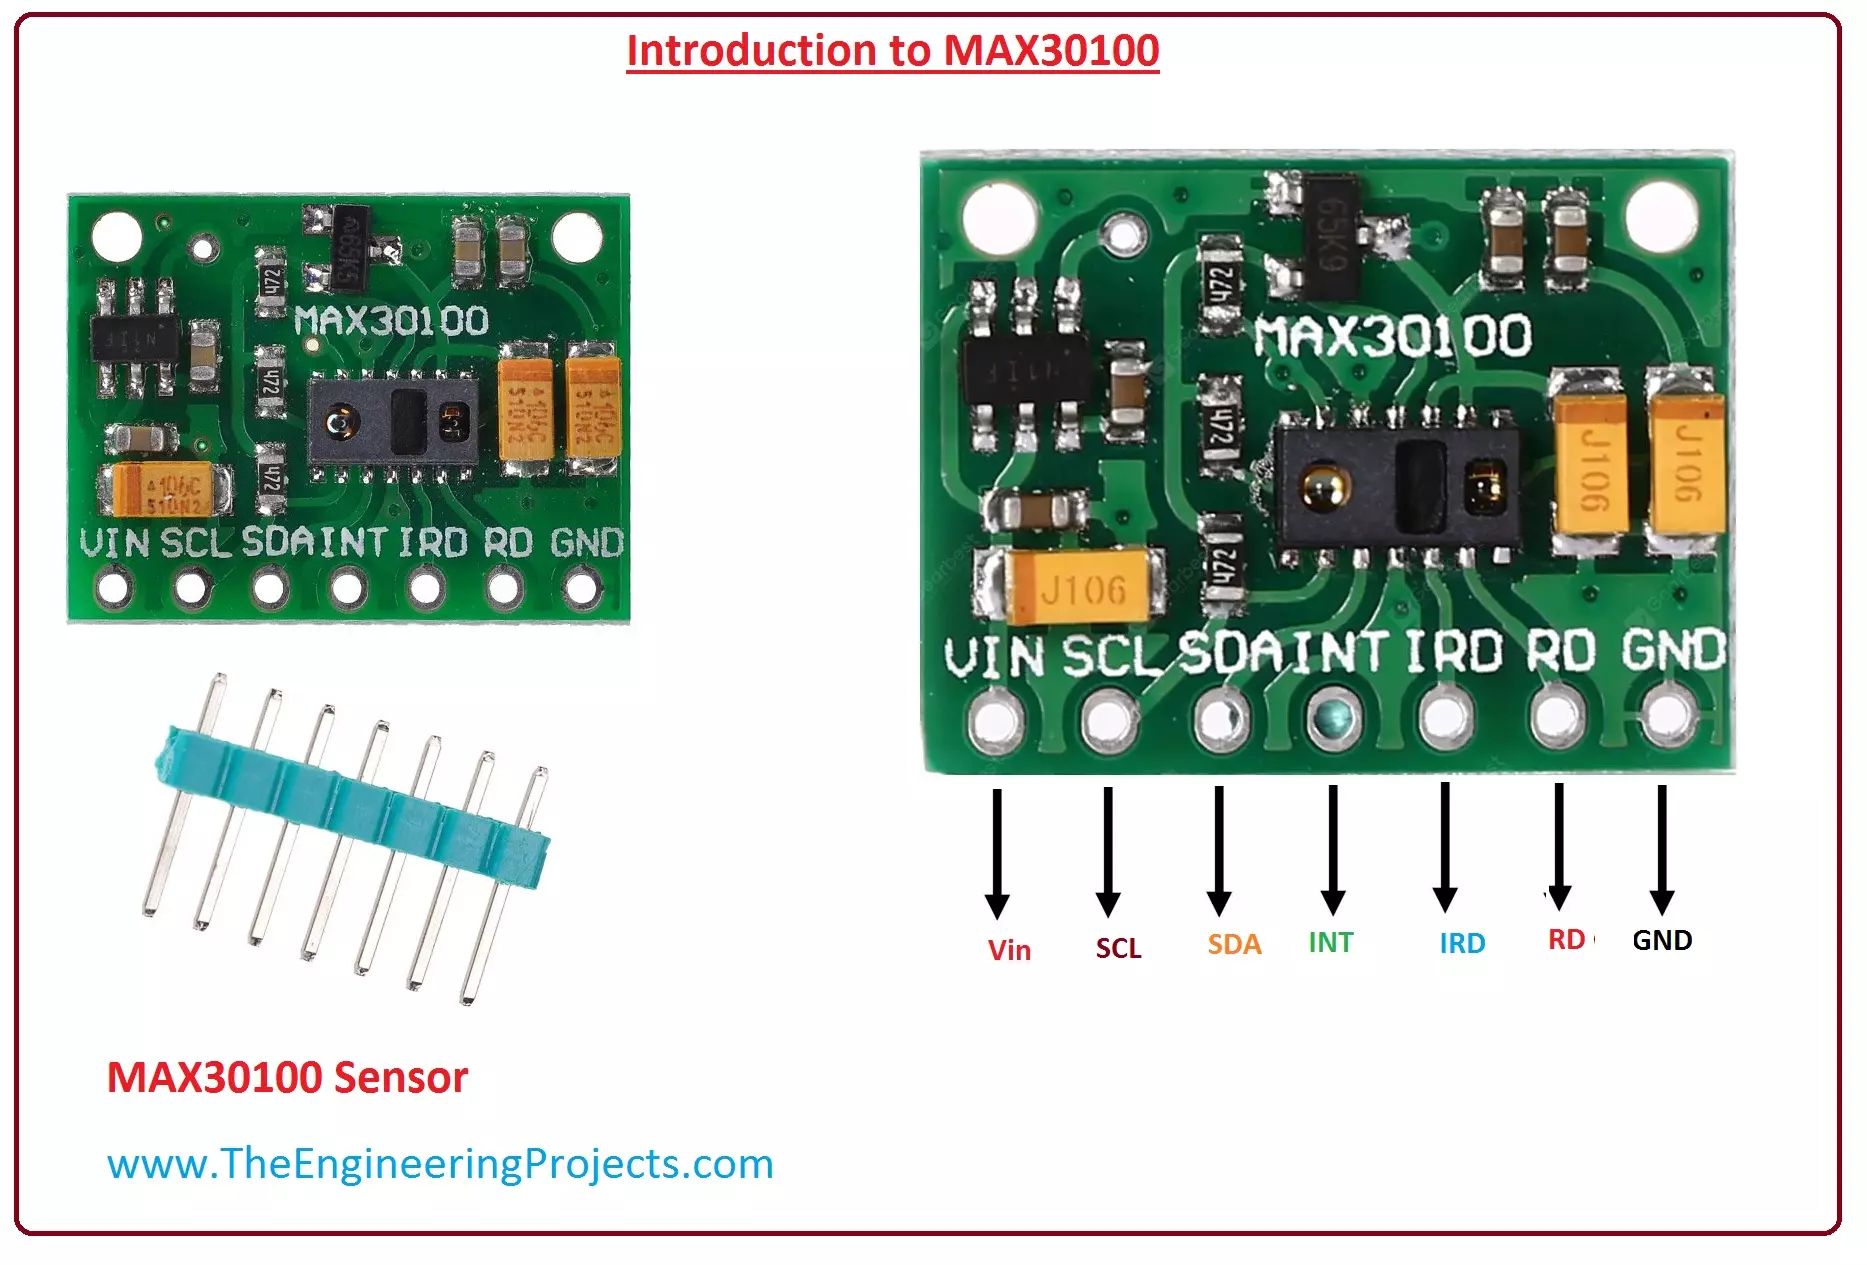
Hello friends, I hope you all are doing great. In today's tutorial, we are gonna have a look at a detailed Introduction to MAX30100. MAX30100 is a heart pulse rate monitor sensor. This sensor consists of two Light Emitting Diodes (LEDs), (one emits infrared light and the other emits red light) modifiable optics, low noise signal processor that detects heart pulse rate signal. Its operating voltage is from 1.8v to 3.3v.
The MAX30100 is used in different industrial and medical equipment such as fitness measurement devices, medical devices, and different wearable instruments. In today's post, we will have a look at its working, pinout, protocol, features, etc. I will also share some links where I have interfaced it with other microcontrollers. If you have any questions about it please ask in the comments, and I will resolve your problems. So, let's get started with a basic Introduction to MAX30100.
Introduction to MAX30100
- MAX30100 is a heart pulse rate monitor sensor. This sensor consists of two Light Emitting Diodes (LEDs), (one emits infrared light and the other emits red light) modifiable optics, low noise signal processor that detects heart pulse rate signal.
- This module can be configured by software registers, and its output data is stored in sixteen FIFOs on this module.
- This sensor communicates with the other microcontroller by the I2C interface. The pulse measurement system in this module has Ambient light cancellation, 16-bit ADC, and a time filter.
- It has an I2C digital interface to communicate with a host microcontroller. MAX30100 has ambient light cancellation, 16-bit ADC and a time filter.
- This module uses low power which makes it useable for battery-operated systems. It operates on the voltage range of 1.8 to 3.3V.
- As earlier we discussed that it has two Light Emitting Diodes, one emits red light with a wavelength of (650nm) and the other emits infrared with a wavelength of (950nm).
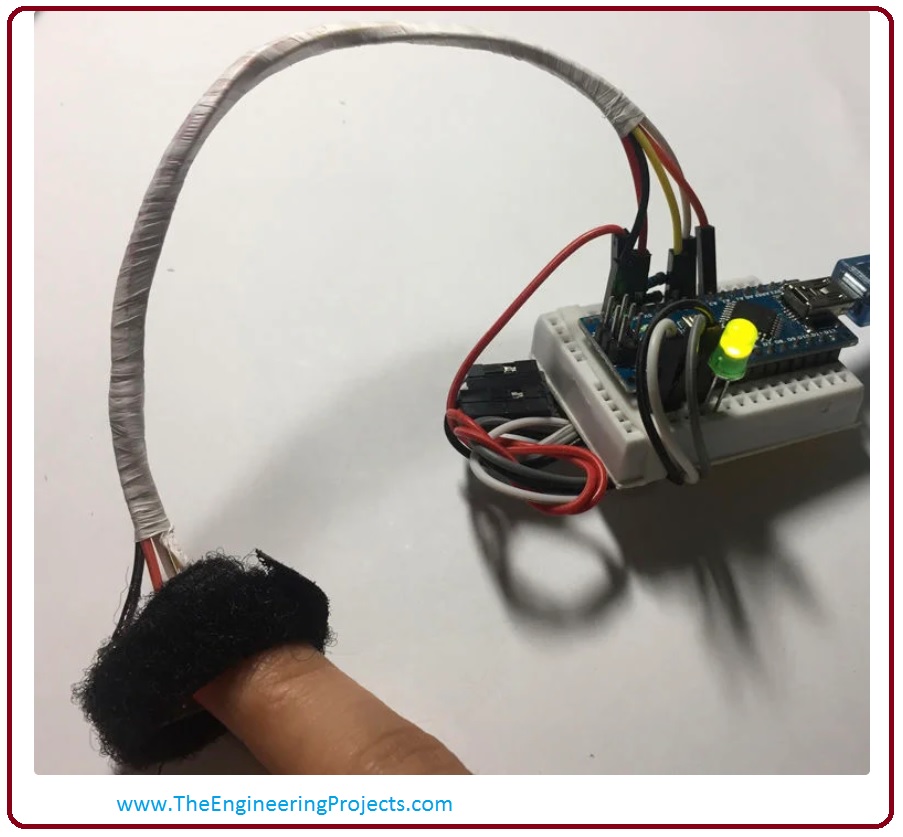
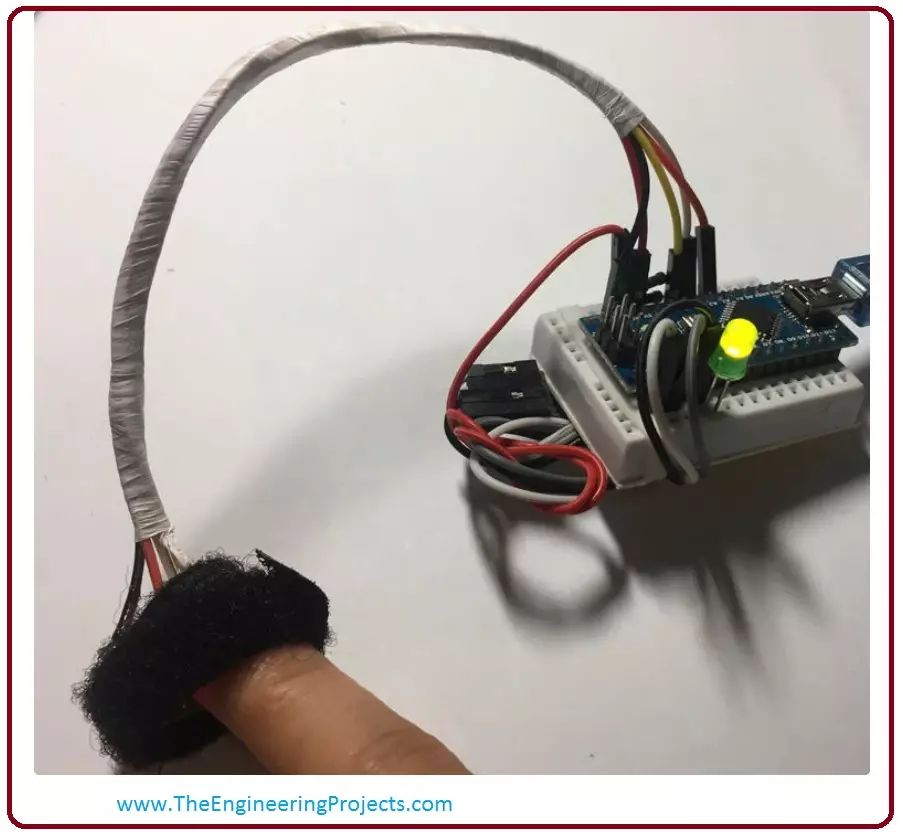
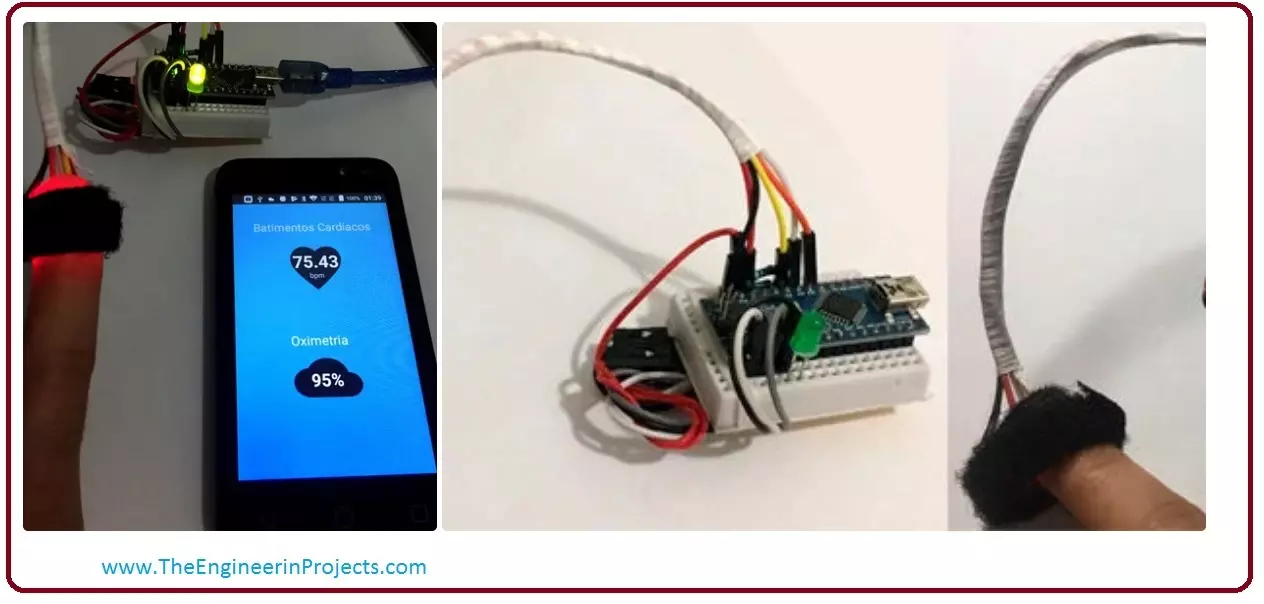
- As this device is used for measurement of heart pulse rate and oxygen concentration in blood, for these measurements wear this sensor on your finger or earlobe it can also put any part of the body which is not thick.
- When you wear it on your finger for measurement both infrared and red light pass through the tissues of a finger, absorption these lights can be measured by a photodiode.
- Depending on the quantity of oxygen which you have in your blood the ratio of absorbed red light and infrared light will be different.
- By this ratio, we can easily calculate the oxygen level in your blood hemoglobin.
- Now we discuss the Pinout of MAX30100.
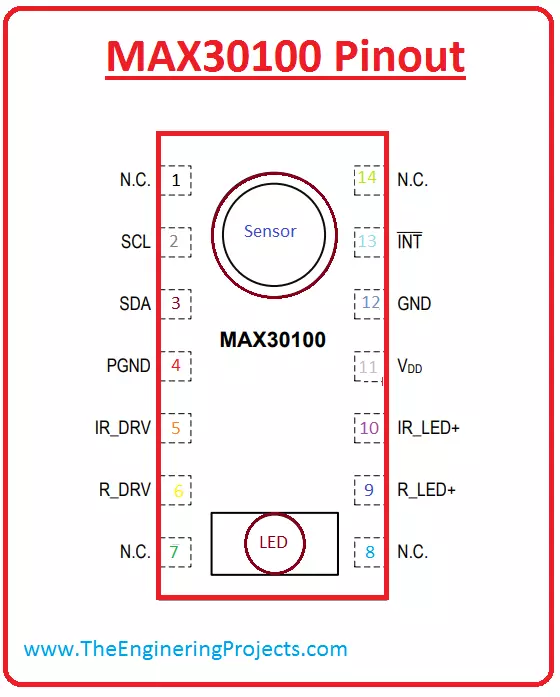
MAX30100 Pinout
- These are the main pinouts of MAX30100.
| Pin# | Type | Parameters |
| Pin#1, 7, 8, 14 | N.C | These pinouts are not used for any purpose. All these are open pinouts. |
| Pin#2 | SCL | This pin is used for I2C clock for input. |
| Pin#3 | SDA | This is I2C bidirectional data sending pinout. |
| Pin#4 | PGND | This is pin is used for power ground of drivers of light emitting diodes. |
| Pin#5 | IR_DRV | This pin is used for cathode of infrared led to connect with the LED drivers point. You can |
| Pin#6 | R_DRV | This pin is for the cathode of red LE to connect with its driver point. This can also be suspended in a circuit. |
| Pin#9 | R_LED+ | This pin is for red led to connect with the supply voltage. By this pin, it is connected with the infrared led. |
| Pin#10 | IR_LED+ | This pin helps to connect the anode of infrared led to the input voltage. It is connected with the red led by internally. |
| Pin#11 | Vdd | This is input supply pinout for this module, you can connect this with the ground for better performance. |
| Pin#12 | GND | It is an analog Ground pin. |
| Pin#13 | INT | It is Active-Low break off pinout. |
Features of MAX30100
- These are some features of MAX30100.
- This sensor is available in the simplest circuitry for heartbeat measurements.
- This module consists of two led infrared and red, a photodiode for light sensing, and, has an analog front end.
- The dimensions of this module are 5.6mm x 2.8mm x 1.2mm with the fourteen pinouts which are available in optically improved closed packages.
- It provides low power battery solutions for handheld electronic devices. We can program It in an easy way and suitable for low power components.
- Its high signal to noise ratio (SNR) gives high motion production flexibility.
- This sensor provides the confined light annulment, higher rate capacity, and fast-moving output data.
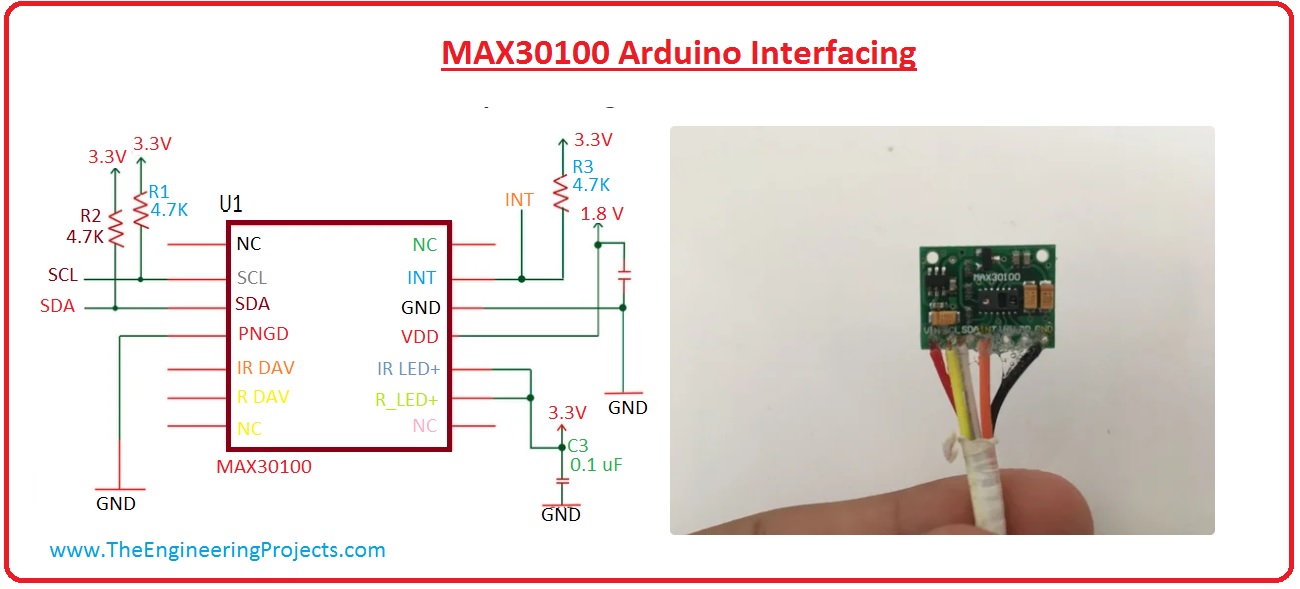
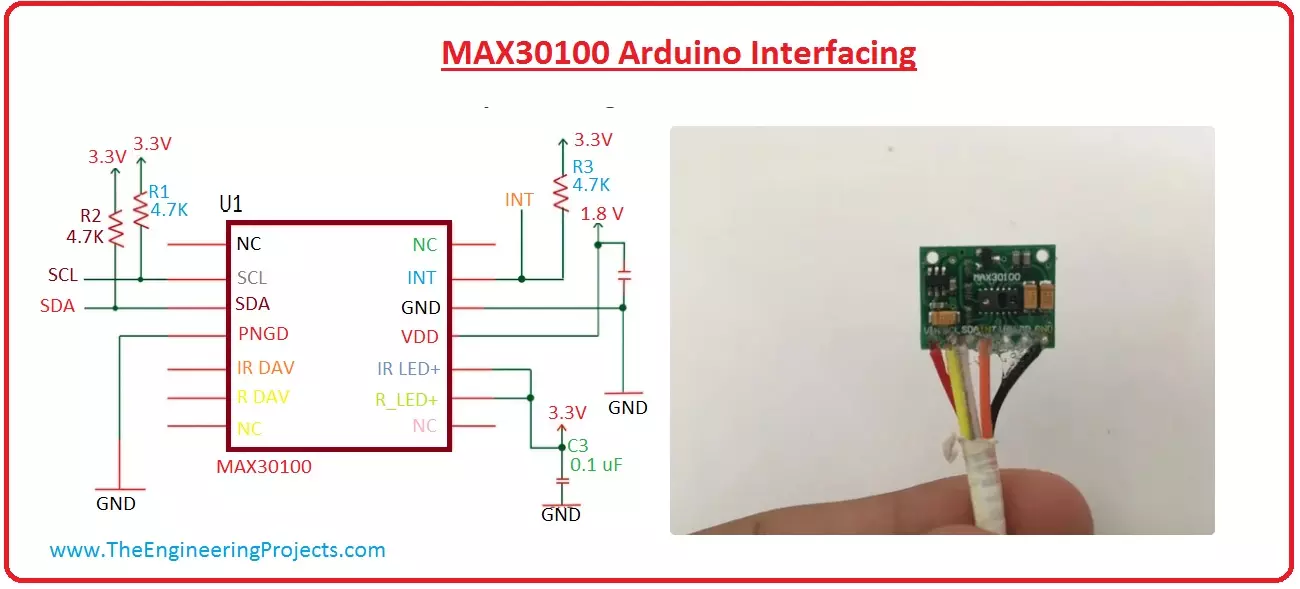
MAX30100 Arduino Interfacing
- Now we discuss its Arduino interfacing by giving an example of a project, which described below. Let's discuss this project with detail.
- These are components which we will use for this project.
- Arduino Nano.
- Small Breadboard.
- Wires.
- The Bluetooth Module HC-06.
- Sensor MAX30100.
- Light Emitting Diode (LED).
- Two resistors of 4.7k Ohm.
- First of all, we connect all these components with each other for working of MAX30100, given diagram shows us a better understanding of connections this circuit.
- First connect all pinouts of MAX30100 with the wires, connect female part of a jumper with sensor and left male part open for Arduino interfacing. For the wiring connection, you can see a given picture.

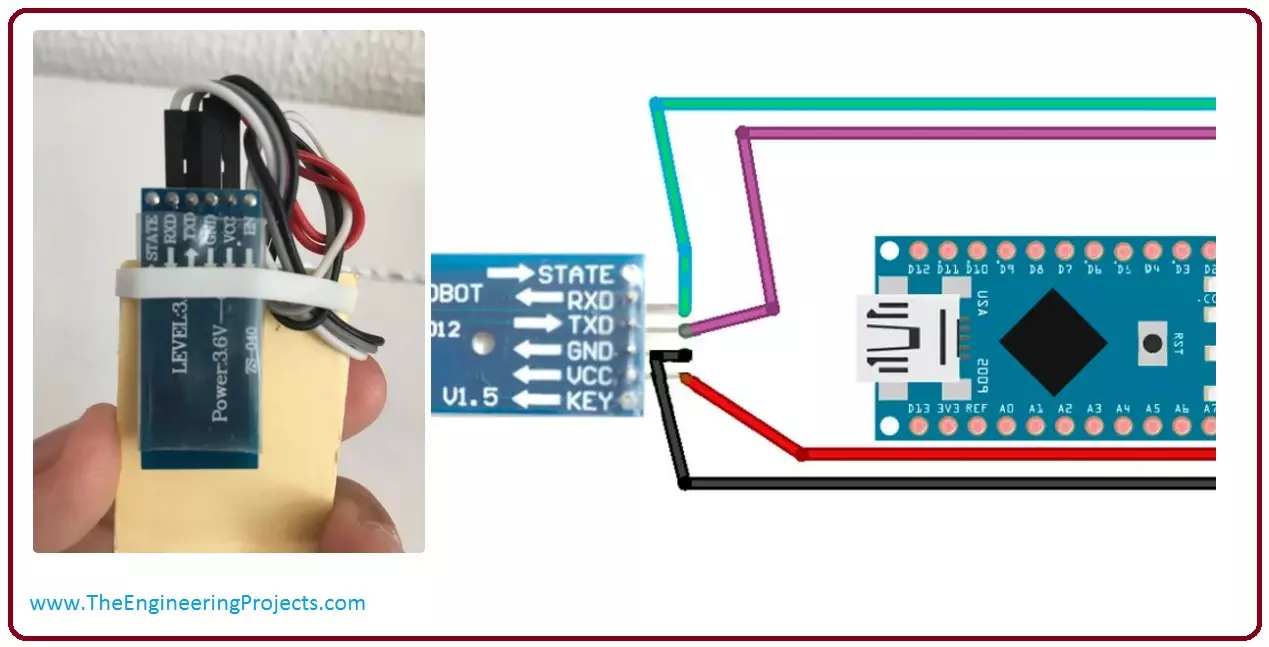
- After connecting MAX30100 with wires and jumpers we will also connect HC-06 with wires. Let's discuss this process.
- All data received by this Bluetooth device we send to Arduino by serial communication.
- This Bluetooth mode is like the Bluetooth which sends data to ten meters range. The HC-06 works like a slave device, which means it allows other devices to connect to make the connection with it.
- This Bluetooth module has four pinouts which are supply pin (Vcc), ground (GND), receiver (RX) and transmitter (TX).
- After all these connections we will set all these components on a breadboard and connect them with each other.
- Let's discuss these connections step by step with detail.
- First step: Connect the Arduino with the breadboard.
- Second step: After interfacing of Arduino on a breadboard, connect the Bluetooth device with Arduino in a given sequence of wires.
- TX1 pin of Arduino connects with the Bluetooth pin RX.
- Connect RX0 pinout of Arduino with the TX pin of the Bluetooth module.
- Connect the ground of HC-o6 with the ground Arduino.
- Connect Vcc pin of Bluetooth with the Arduino 5V pinout.
- Third step: This step we connect MAX30100 with Arduino. Connection discusses incoming lines.
- Connect Vin pinout of MAX30100 sensor with the Arduino pinout of five volts. (As we did in with the Bluetooth).
- Connect A5 pinout of Arduino with the SDA pin of the MAX30100.
- A2 pinout of Arduino connects with the INT pin of MAX30100.
- Ground pinout of MAX30100 connects with the ground pin of Arduino.
- After this assemble one resistor in the breadboard and connect one end of the resistor with 5V pinout and another point of the resistor with A5 pinout.
- Take another resistor and connect it with the 5v pin and A5 pinout.
- Fourth step: Afterall this interfacing we will connect an led to show reading s of the sensor.
- First, connect the small point of light emitting diode with the ground pin and connect the other part of the light emitting diode with the D2 pinout.

- First, connect the small point of light emitting diode with the ground pin and connect the other part of the light emitting diode with the D2 pinout.
Applications of MAX30100
- These are some applications of MAX30100.
- It is used in handheld devices.
- It is used in devices related to fitness measurement.
- It use as main componnet in medical measurment devices.
So, that was all about MAX30100, if you want to know something more about it as in comments I will explain to you more about it. Take care until the next tutorial.


