

We've already seen how to create a web server and how to provide an HTML page on our ESP8266. We use the PROGMEM command to store an HTML code in FLASH memory. For a simple page, this works fine, but what if we have a more complex webpage? With a better style? What if we want to include images?
Today we will learn how to use SPIFFS with ESP8266 to store files (regardless of type) in FLASH memory.
| Where To Buy? | ||||
|---|---|---|---|---|
| No. | Components | Distributor | Link To Buy | |
| 1 | ESP8266 | Amazon | Buy Now | |
What is SPIFFS?
- SPIFFS (SPI Flash File System) is a system designed for managing SPI flash memory in embedded devices. Its main goal is to use minimal RAM to access files. It's very useful when using pen drives, memory cards, and the ESP8266's flash memory.
- SPIFFS allows you to access files (create, read, write, delete) just like on a computer. But with a much simpler folder structure.
- To show how the tool works, we will create a web server with a styled page and an image. Then when accessing the webserver, the browser will receive the HTML file, the CSS file, and the images.
Create Webserver with ESP8266 using SPIFFS
- For that, we will need two things:
- Library to manage SPIFFS.
- Tool to load the files in FLASH.
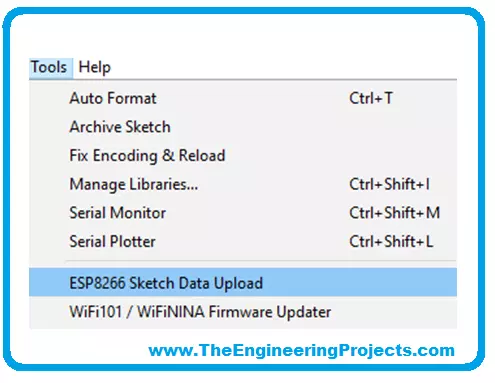
- The upload tool is a plugin called ESP8266fs that integrates python into the Arduino IDE.
- Download the ESP8266FS-0,5.0.zip file from Github and unzip the files into Arduino's tools folder ( Possibly C:\program files x86\arduino \tools).
- Restart Arduino IDE and the tool should appear available as shown in the image.
- Now let's take a look at how it works.
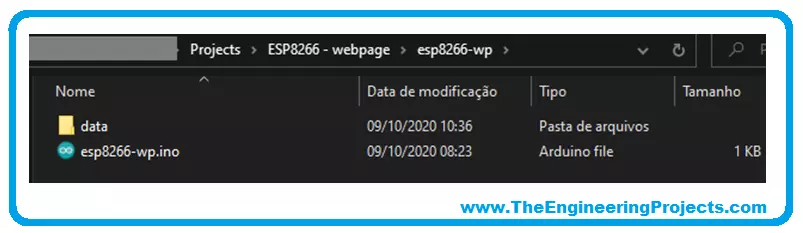
- Your sketch will always be saved inside a folder. The Arduino IDE cannot open an .INO file if it is not inside a folder with the same name.
- Our upload tool will look inside that folder and look for another folder called “data”. Everything inside that folder will be transferred to the ESP8266's FLASH memory.
Our page will have 3 main objects:
- An image that will change depending on the status of the LED.
- A text with the status of the LED.
- A button to change the status of the LED.
Files on Webserver
And to build this page we will use 4 files:
- html, which will contain the page itself.
- css, containing the styling to make the page more beautiful.
- Image of the lamp
- Image of the lamp

- The two images were chosen from the pixabay repository. You can use another one. But I recommend not using very large files as it takes a little longer to load. I also recommend using some service to resize the image, such as tinypng.
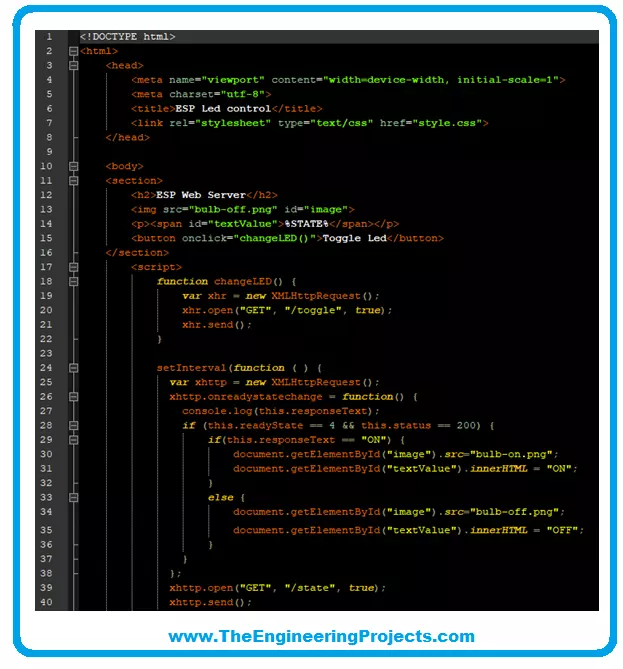
- In our index.html file, we will have:
- In our style.css file, we will have:

Understanding ESP8266 Webserver Code
- Created and saved, we used ESP8266 Sketch Data Upload to load the file into FLASH memory.
- Before we look at the code, it's important to understand how the browser behaves when accessing a page.
- When accessing the web server address, the browser sends an HTTP GET command in the path “/” and waits for an index file in response.
- Inside index file it can be informed that it needs other files. What happens in our code.
- In line 7 of the index.html file, it is informed that the style.css file will also be needed and that it is of type text/css.
- Then the browser sends another HTTP GET command with the path “/style.css” and expects to receive a file with that name.
- In line 13, the <img> tag informs the path to an image, and the browser sends another HTTP GET command to the address “/bulb-off.png”, this time the browser expects an image file.
- The browser will send GET commands each time we click the Toggle button (“/toggle” path) and every 1 second to receive an updated status (“/state” path).
- Doing yet another GET to the lit lamp image (path: “/bulb-on.png”).
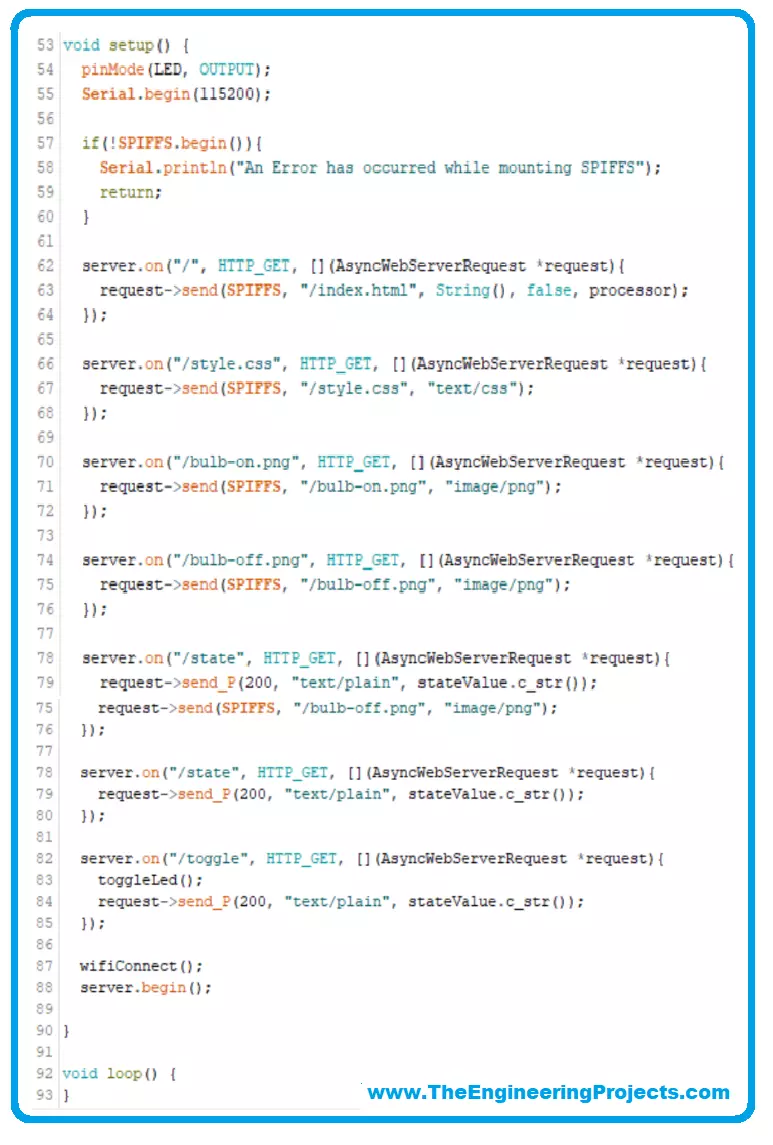
So we will need to handle it in our .INO code the GET requests in the paths:
- “/”
- “/style.css”
- “/bulb-off.png”
- “/bulb-on.png”
- “/toggle”
- “/state”
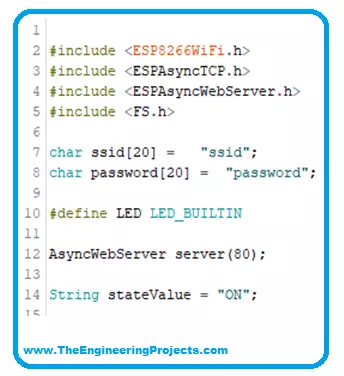
Our style.css file sets sizes, alignments, and colors for components. We start our .INO file by importing four libraries:
- h – That will take care of our WiFi connection.
- h and ESPAsyncWebServer.h – Which will manage the webserver (including HTTP GET commands).
- h – File System Library that will take care of our SPIFFS.
We define the pin for our LED. We create variables with SSID and password of the wifi network where we will connect. We created our server on port 80 and a variable to monitor the LED status.
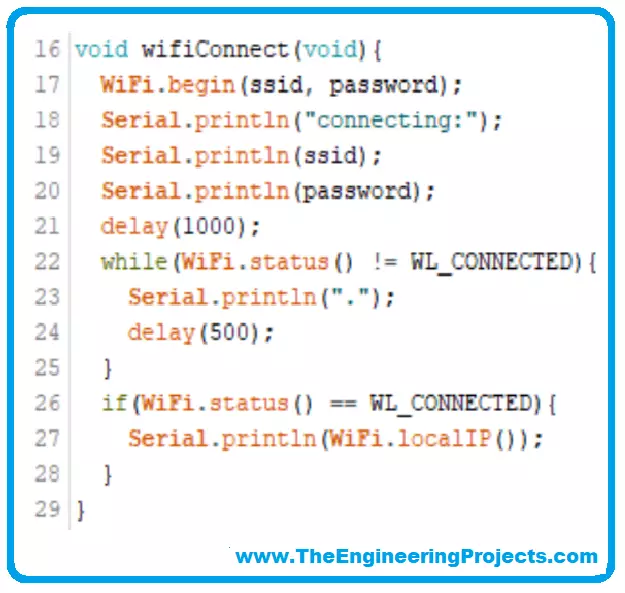
- The wifiConnect() function will connect the ESP8266 to the chosen wifi network by printing the IP address on the serial monitor.
- Pay attention to this number. You will need to access the webserver from the browser.
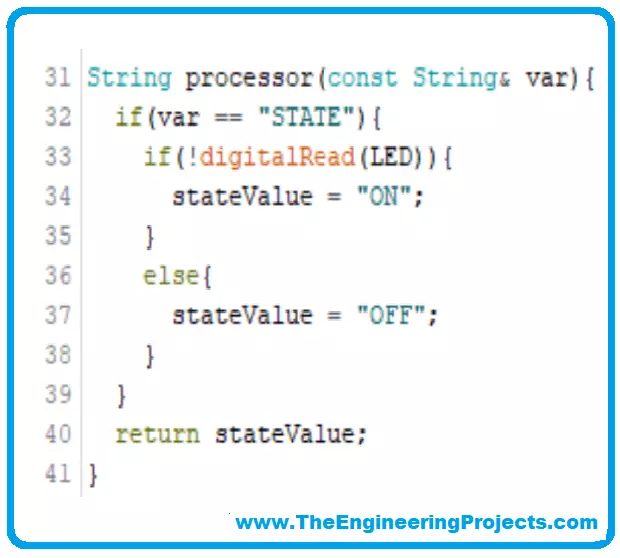
- The processor() function is responsible for updating the variable with the status of the LED.
- We will use it in handling our GETs.
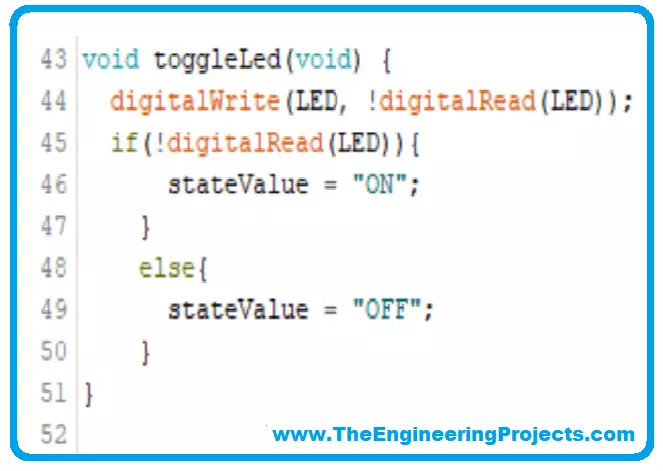
- The toggleLed() function toggles the LED state. We will use it in the GET “/toggle”.
- And finally, our setup() function. We start by setting our LED to OUTPUT (otherwise, our toggle won't work.
- Next, we start Serial with a baud rate of 115200 to view the IP address on the Serial Monitor.
- With SPIFFS.begin(), we initialize our filesystem in flash memory.
- If an error occurs, our code stops here and reports on Serial Monitor. In that case, upload the files again.
- And finally, we've included our GETs.
The “server.on” structure is an event manager provided by the ESPAsyncWebServer.h library. In short, we inform a route, a method (HTTP-GET, for our case), and action when receiving the request. But we need to take a closer look at some variations of the function.
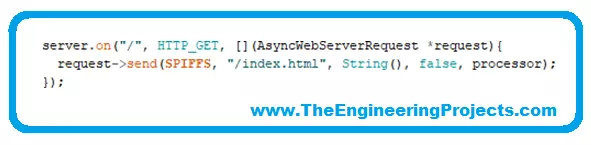
- The server receives a request for the “/” route with the HTTP GET method.
- In request->send, we inform that the response is a SPIFFS file with the name index.html and that it will be sent in string format.
- The last two fields (“false” and “processor”) inform that the index.html file is a template that depends on more information. This information will be provided by the processor() function.
It is necessary to send the index file with the updated LED state value.
For style files and images, we use a similar principle, but these files are not being changed before they are uploaded. So we only inform the origin, name, and type (if you want to know a little more about file types in HTTP, I recommend a study on MIME TYPES. Any type of file can be sent, but MIME standardizes what browsers can understand).
Lastly, we have the “/state” returning the stateValue variable on each update and the “/toggle” which changes the state before sending the same variable. The response format has a small change. As we are sending only one variable, we inform the MIME TYPE “text/plain”, the response code 200 (default for success over HTTP), and the variable converted to a string.
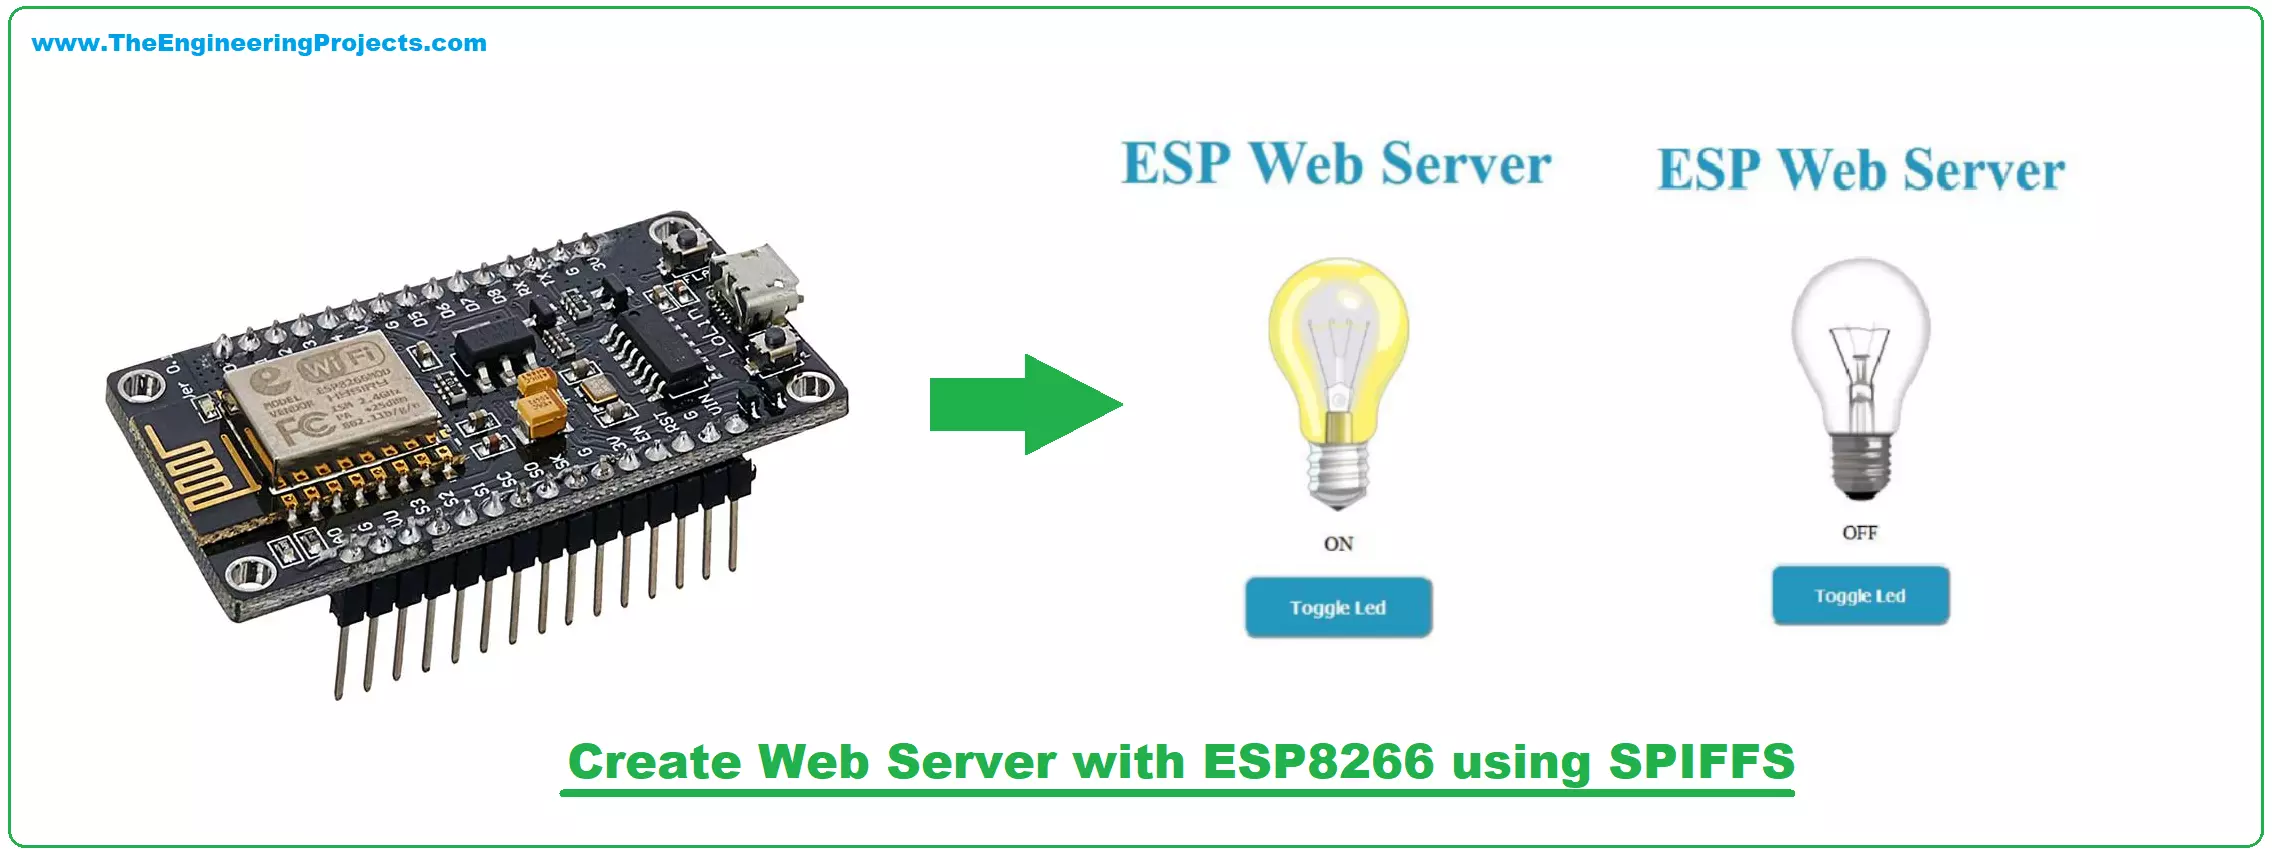
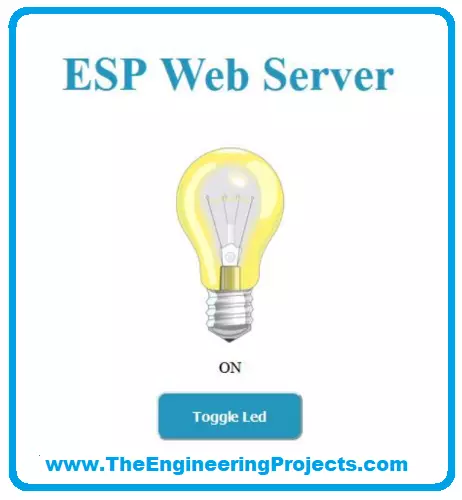
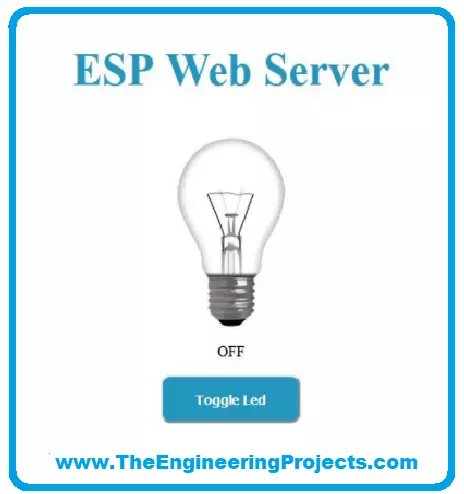
Results
- With the code compiled and recorded, check the IP of the webserver in the Serial Monitor and access it in the browser.
- Example: for IP: 10.10.10.11 access: http://10.10.10.11.
- Attention: As we use port 80 on the web server, we use HTTP and not HTTPS. The result on the screen should look like the images below:
So that was all for today. I hope you have enjoyed today's lecture because it will improve the presentation of your project. If you got any queries, ask in the comments. Thanks for reading!!!
