Hello friends, I hope you all are doing great. Today, I am going to share the Long-Range ESP32 LoRa Soil Station with SX1278 in Proteus Simulation, the fifty-first project of our IoT Projects series. If you have searched for an ESP32 LoRa project with the SX1278 (Ra-02), a LoRa sender and receiver with an answer, or a Proteus simulation of a long-range sensor link, here is a complete one. A soil station out in a field, kilometres from the farmhouse and far from any Wi-Fi, measures the soil and sends its readings over LoRa to a gateway at the farmhouse; the gateway answers each reading with the valve command, switches both radios to a longer range mode when the signal fades, raises an alarm when the field goes silent, and shows everything on a web dashboard on a laptop or a phone.
Wi-Fi reaches across a house, Bluetooth across a room, but farms, pipelines and water tanks are kilometres wide. LoRa fills that gap: a radio that trades speed for range, sending a few bytes kilometres away on a tiny battery. In this tutorial, we will go through the circuit with two ESP32 boards and two SX1278 modules, see how LoRa spreads a signal in chirps and what the spreading factor does to range and time on air, work out a link budget for 2 km and 10 km, see why a LoRa sensor only listens right after it sends, build an answer-and-fallback protocol on top, drive a solenoid valve the efficient way and make it fail safe, walk through both Arduino sketches, and then run the simulation: the field at 2 km, then 10 km, then 20 km and back, the soil watered, and the valve opened by hand from a phone. At the end, you can download the project with both sketches and every library file.
NOTICE: Our team has put a lot of effort into this project: the circuit, the code and every part in the simulation are our own work, and you get them all free. Your feedback is the fuel that keeps us going, so please tell us what you think in the comments below. And if our free projects help you, you can buy us a coffee. So, let's get started with the ESP32 LoRa soil station in Proteus simulation:
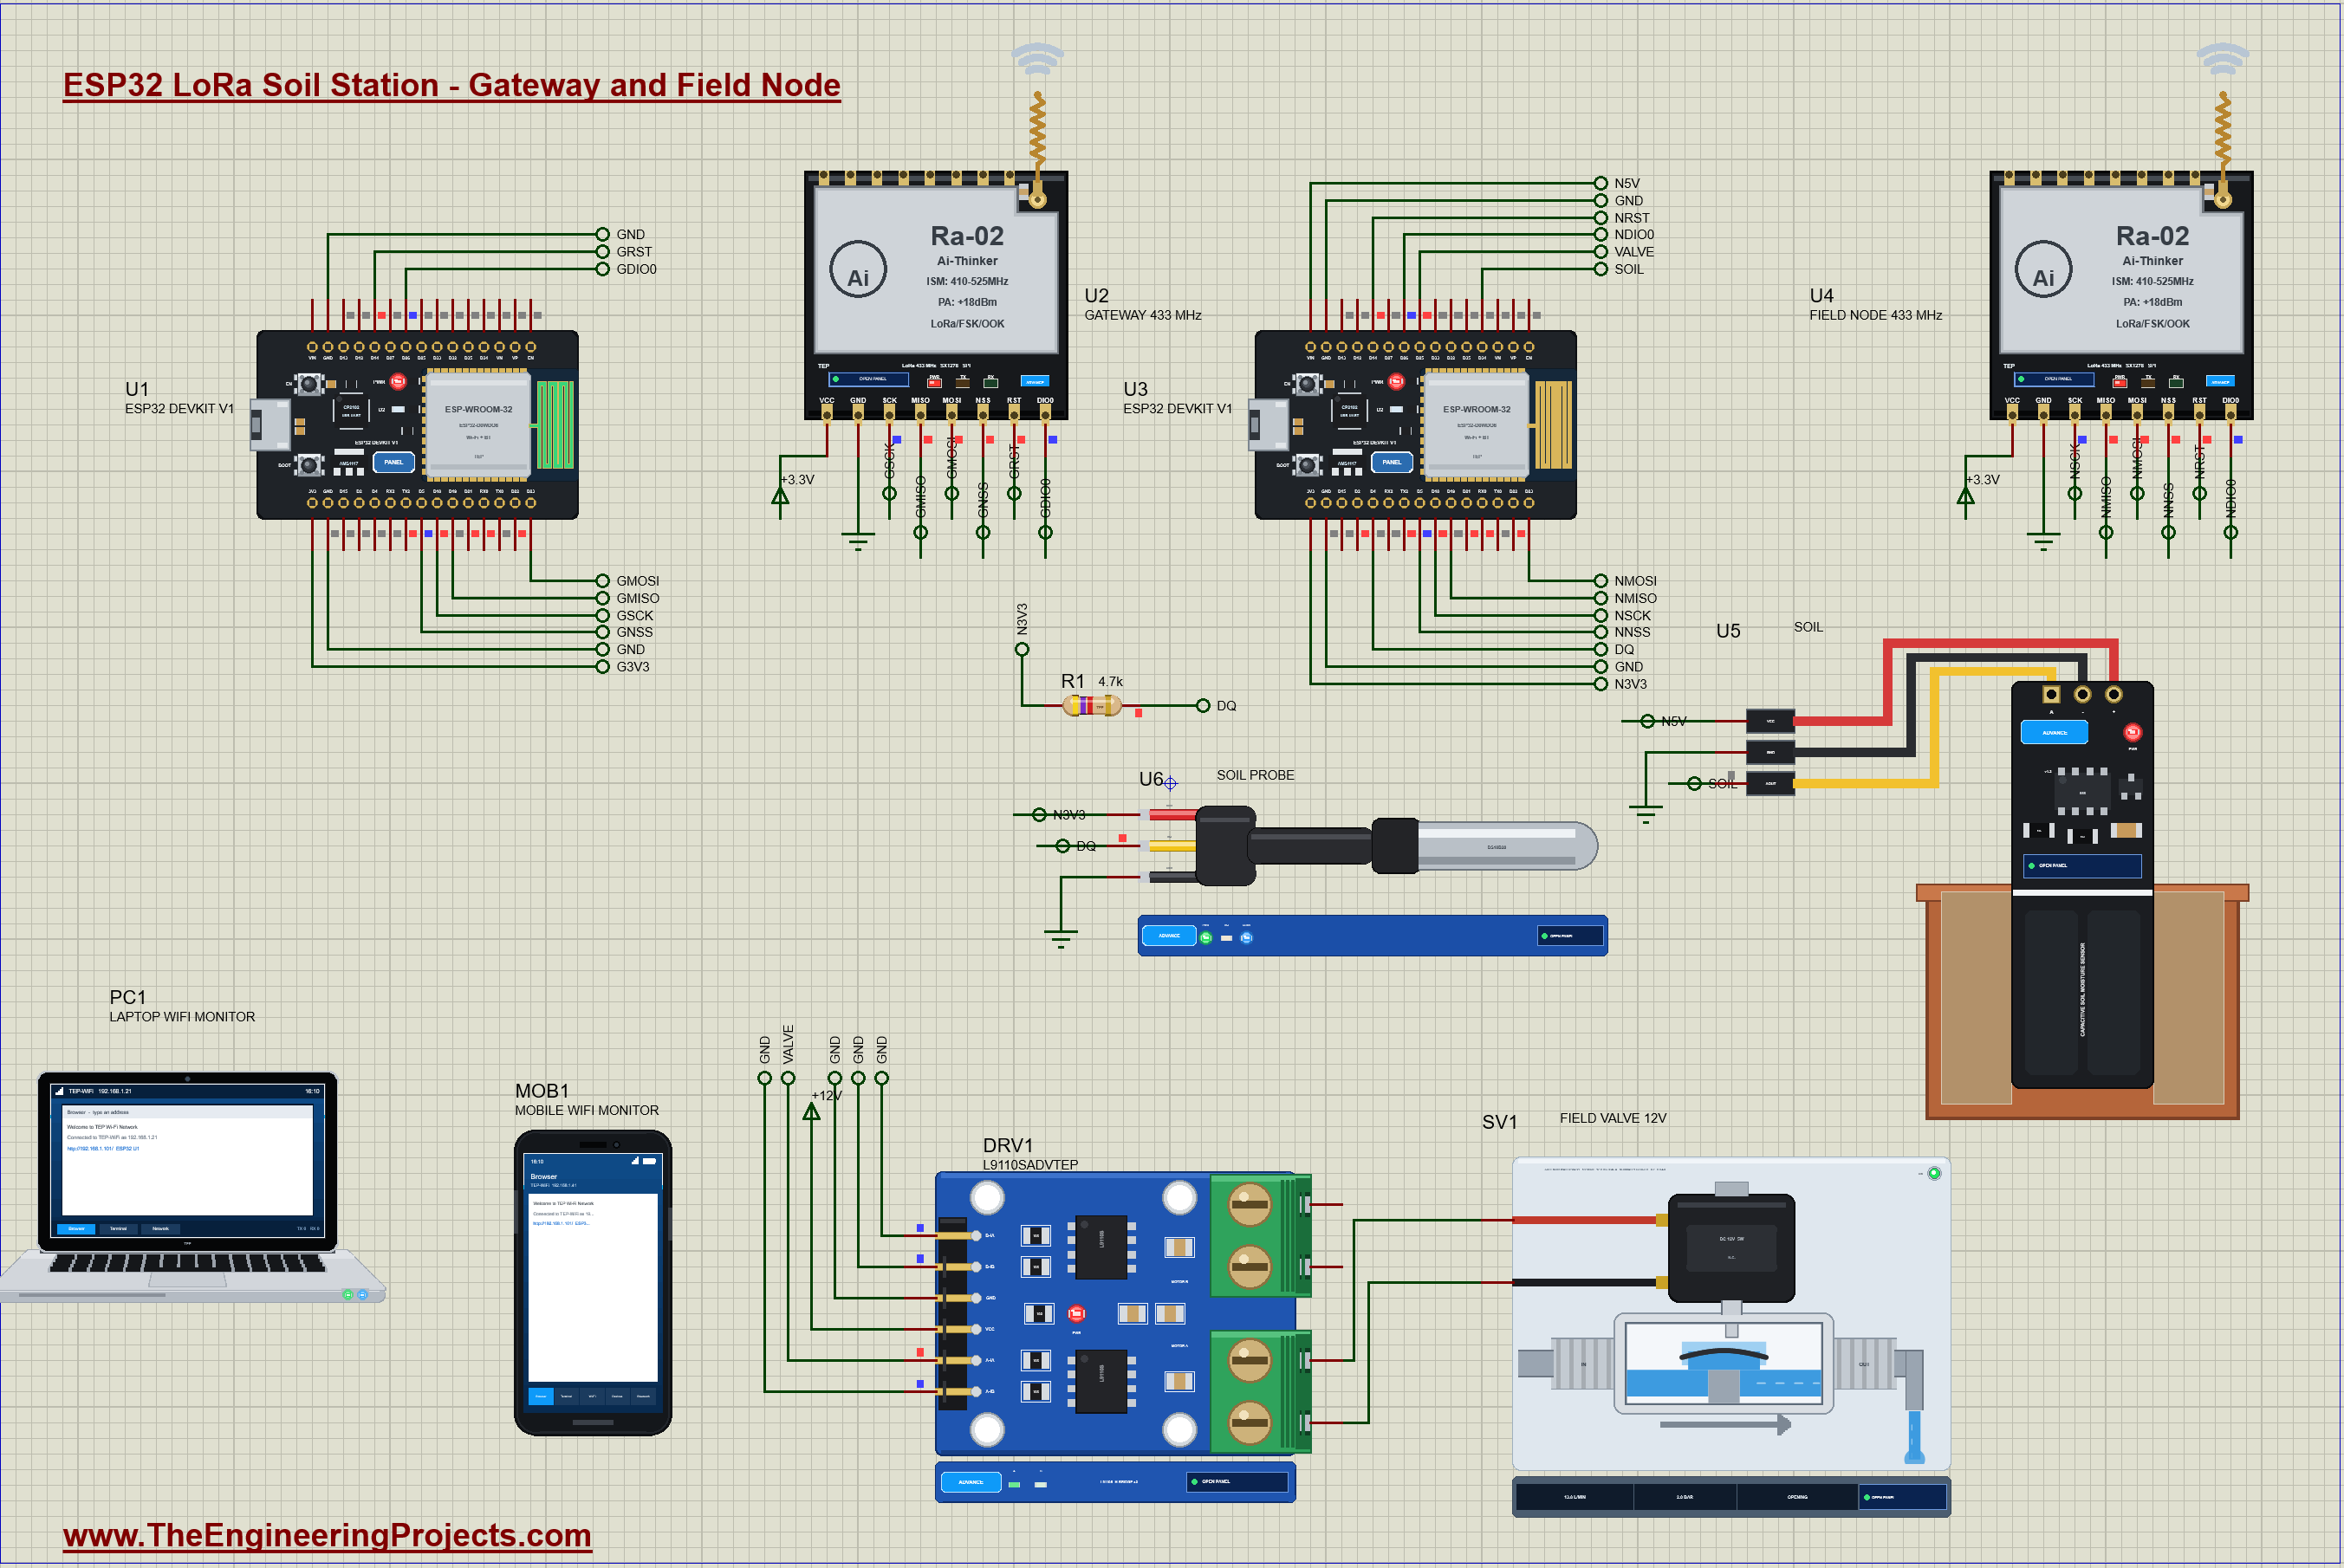
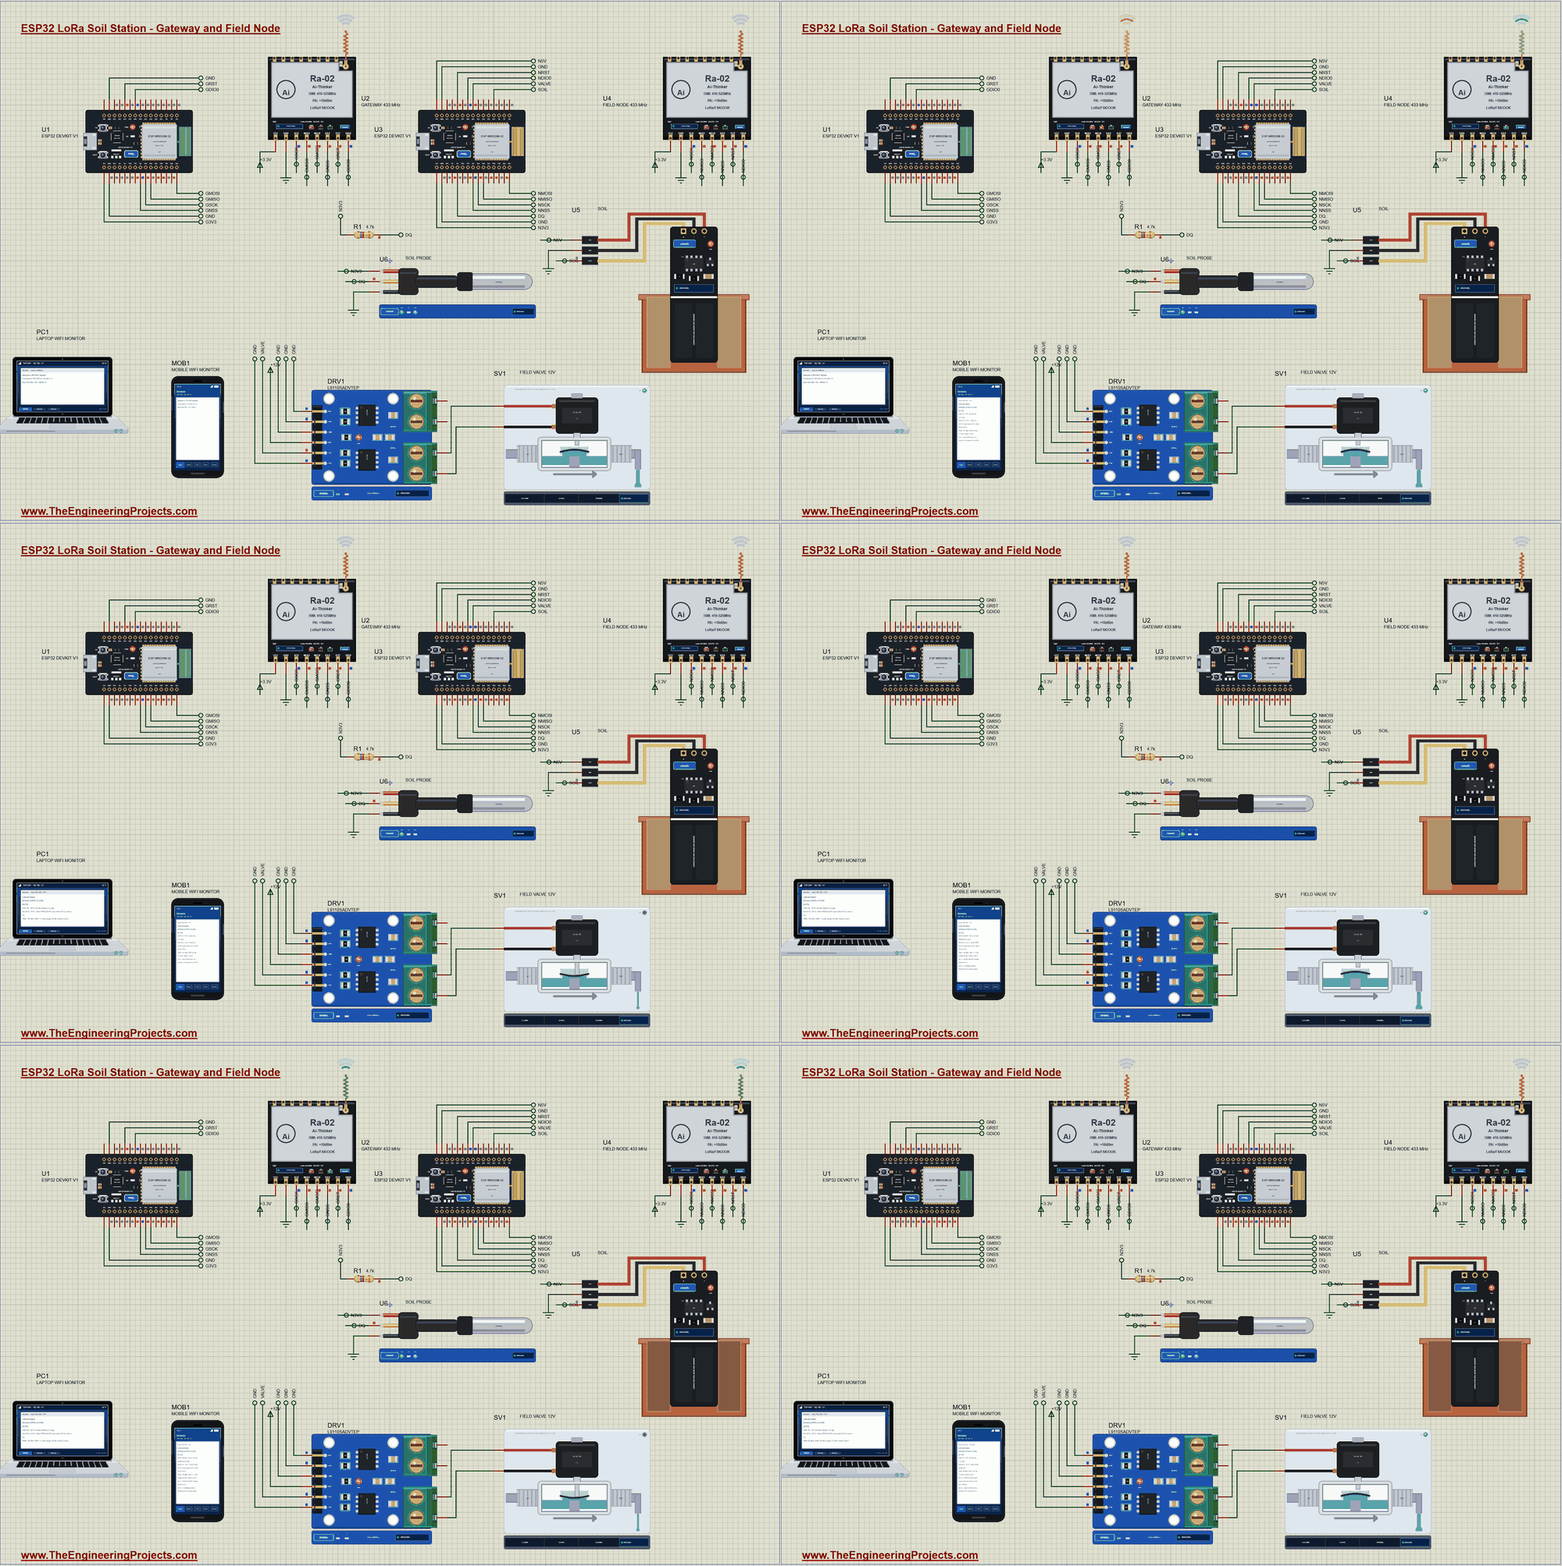
What Does This LoRa Soil Station Do?
- Measures the field: soil moisture with a capacitive sensor and soil temperature with a DS18B20 probe.
- Talks over kilometres: an SX1278 LoRa module at 433 MHz sends each reading to the farmhouse gateway.
- Gets an answer: the gateway answers every reading at once, with the valve command and the spreading factor to use.
- Waters by itself: AUTO opens the field valve below 30 % and closes it above 45 %, decided at the farmhouse.
- Adapts the radio: when three readings go unanswered, both ends switch from SF7 to SF12, the long-range mode, and back to SF7 when the signal is strong again.
- Fails safe: with no answer for four readings the node closes the valve, and the gateway shows NODE SILENT.
- A web dashboard: the link, the soil, the valve, RSSI, SNR and margin, with OPEN, CLOSE and AUTO, on a laptop or a phone.
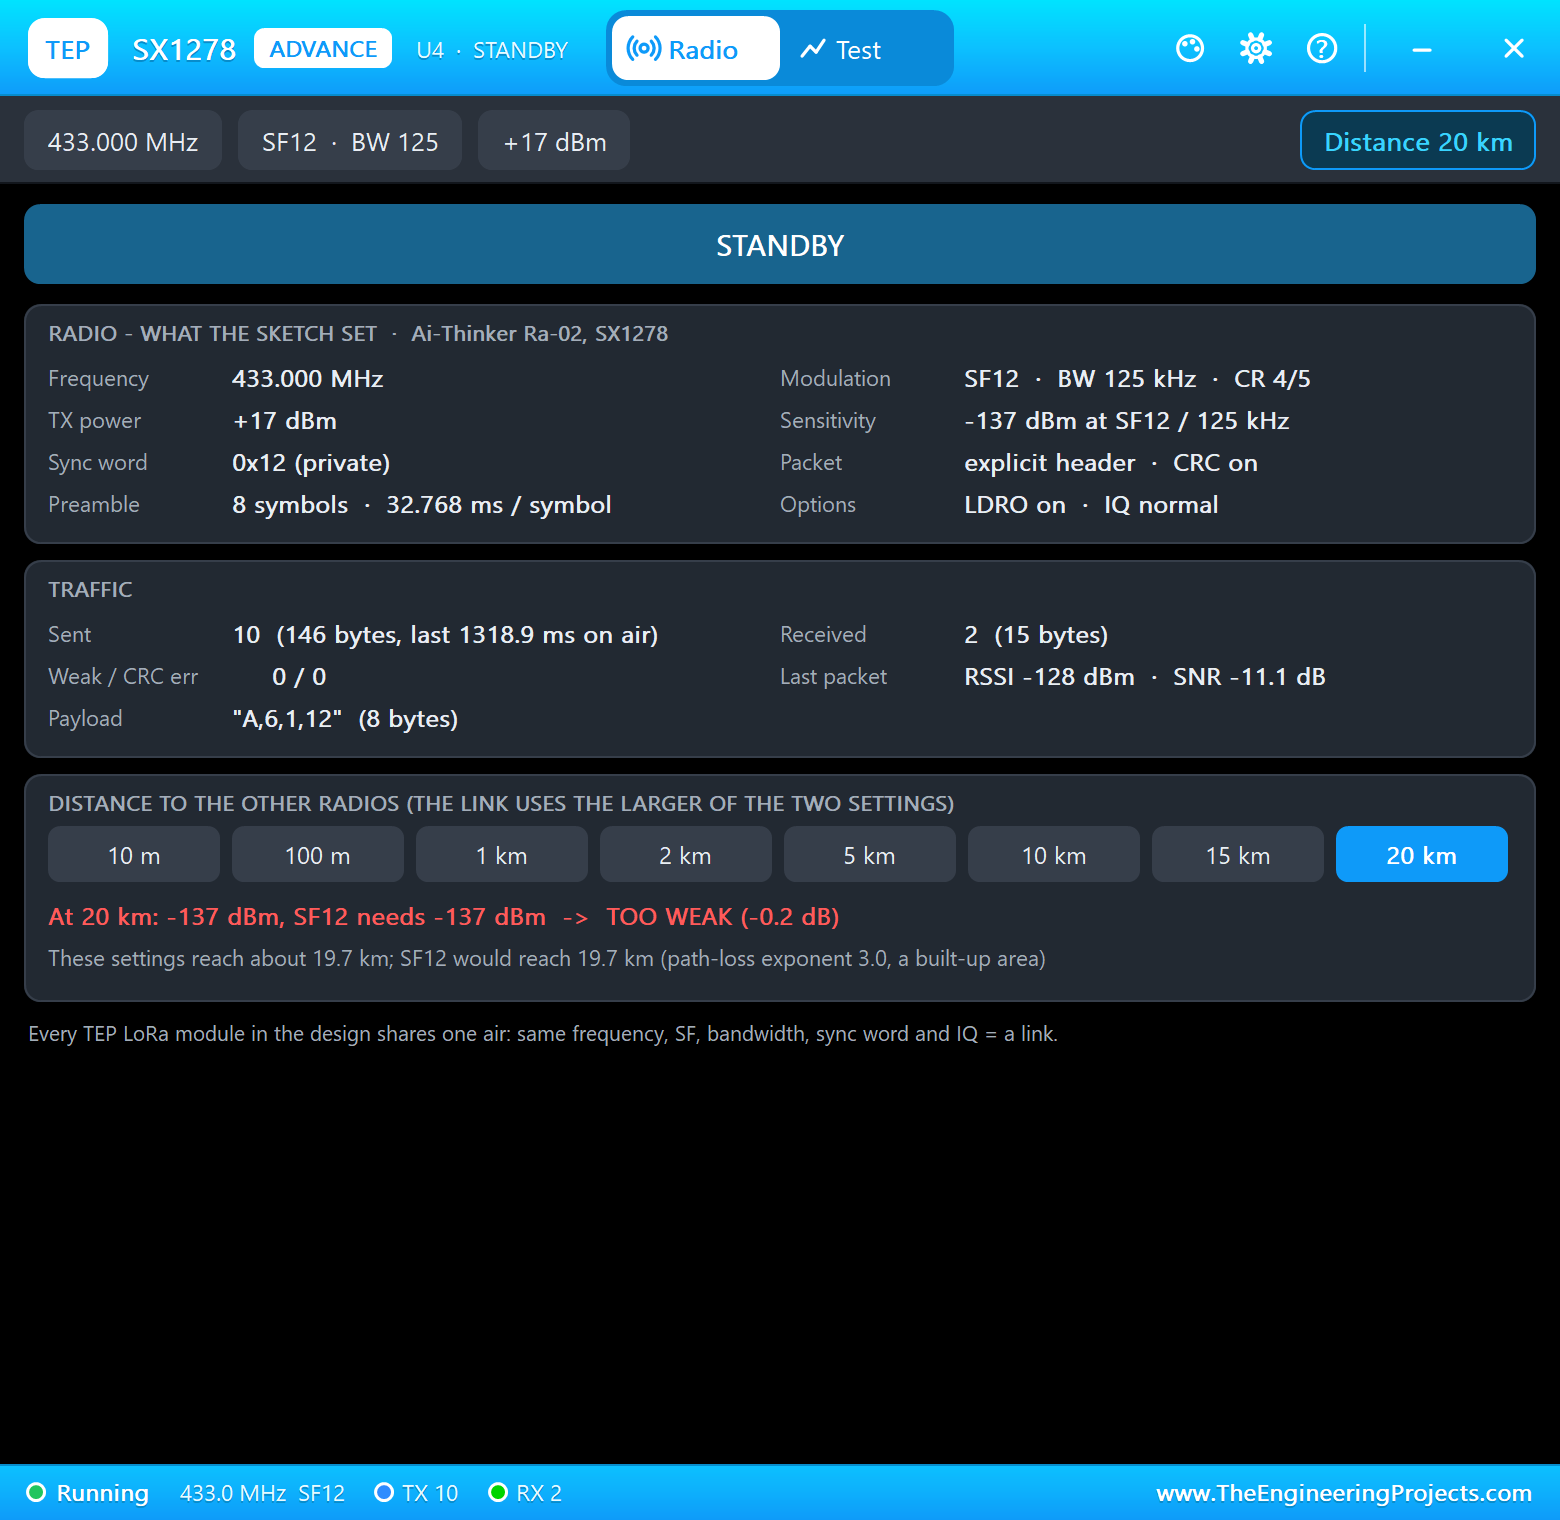
It is a great project for learning LoRa radios and their settings, SPI, link budgets, a small radio protocol with acknowledgements and retries, sensor calibration, and driving a solenoid valve. In the simulation, every SX1278 pop-up shows what the sketch set, every packet sent and heard with its RSSI and SNR, and eight DISTANCE buttons that move the radios apart; the valve's pop-up shows the coil current, the plunger and the water; the L9110S pop-up shows the PWM; the soil sensor's pop-up shows the water in the soil and lets you water it.
Components Used in the Proteus Simulation
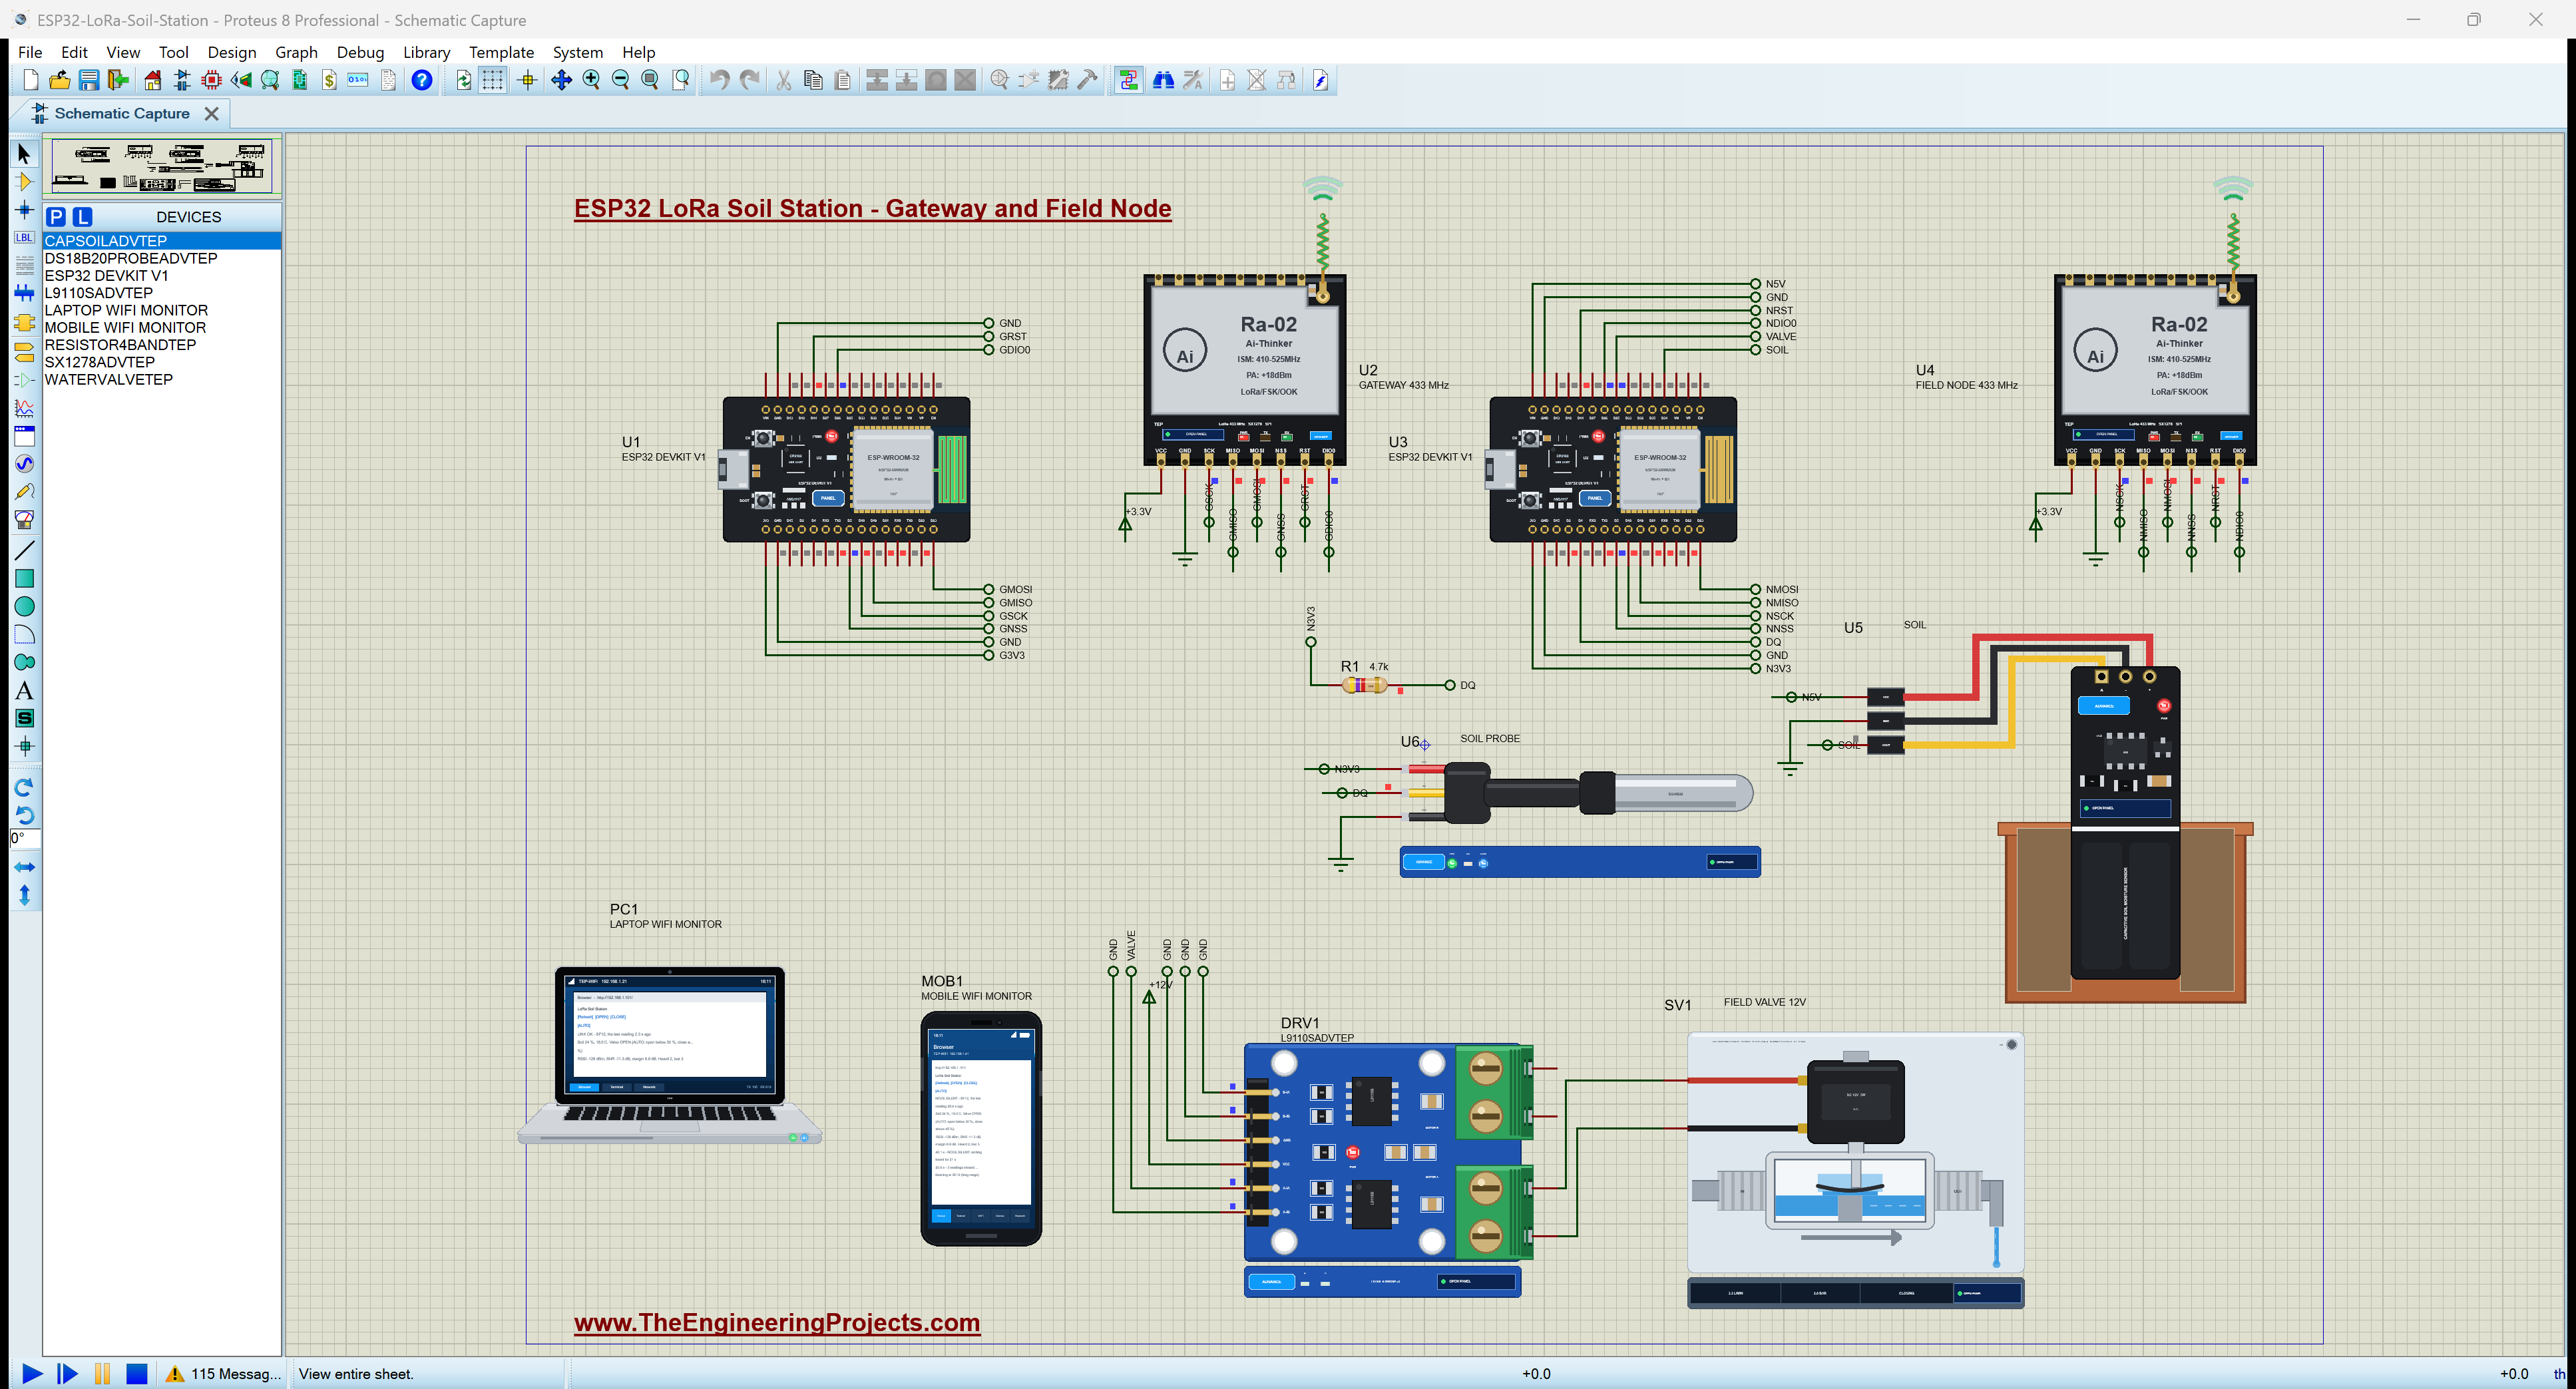
All the parts come from our Proteus libraries, each with its own tutorial. The project zip at the end includes every LIB and DLL file.
| Part | Proteus device | Library post | Connection |
|---|---|---|---|
| ESP32 DevKit V1 (x2) | ESP32 DEVKIT V1 | ESP32 DevKit V1 Library for Proteus | U1 the gateway (TEP-WiFi 192.168.1.101), U3 the field node |
| SX1278 LoRa module, Ra-02 (x2) | SX1278ADVTEP | SX1278 LoRa Library for Proteus | U2 on U1, U4 on U3: SPI, NSS D5, RST D14, DIO0 D26 |
| Capacitive soil moisture sensor | CAPSOILADVTEP | Capacitive Soil Moisture Sensor Library | U5, AOUT to D34 of the node |
| DS18B20 waterproof probe | DS18B20PROBEADVTEP | DS18B20 Library | U6, DQ to D4, R1 4.7 kohm pull-up |
| 12 V solenoid water valve | WATERVALVETEP | 12V Solenoid Water Valve Library | SV1 on motor A of DRV1 |
| L9110S motor driver | L9110SADVTEP | L9110S Motor Driver Library | DRV1 on +12V, A-IA from D25 |
| Resistor 4.7 kohm | RESISTOR4BANDTEP | Resistor Library | R1, the 1-Wire pull-up |
| Laptop WiFi Monitor | LAPTOP WIFI MONITOR | Laptop WiFi Monitor | PC1 |
| Mobile WiFi Monitor | MOBILE WIFI MONITOR | Mobile WiFi Monitor | MOB1 |
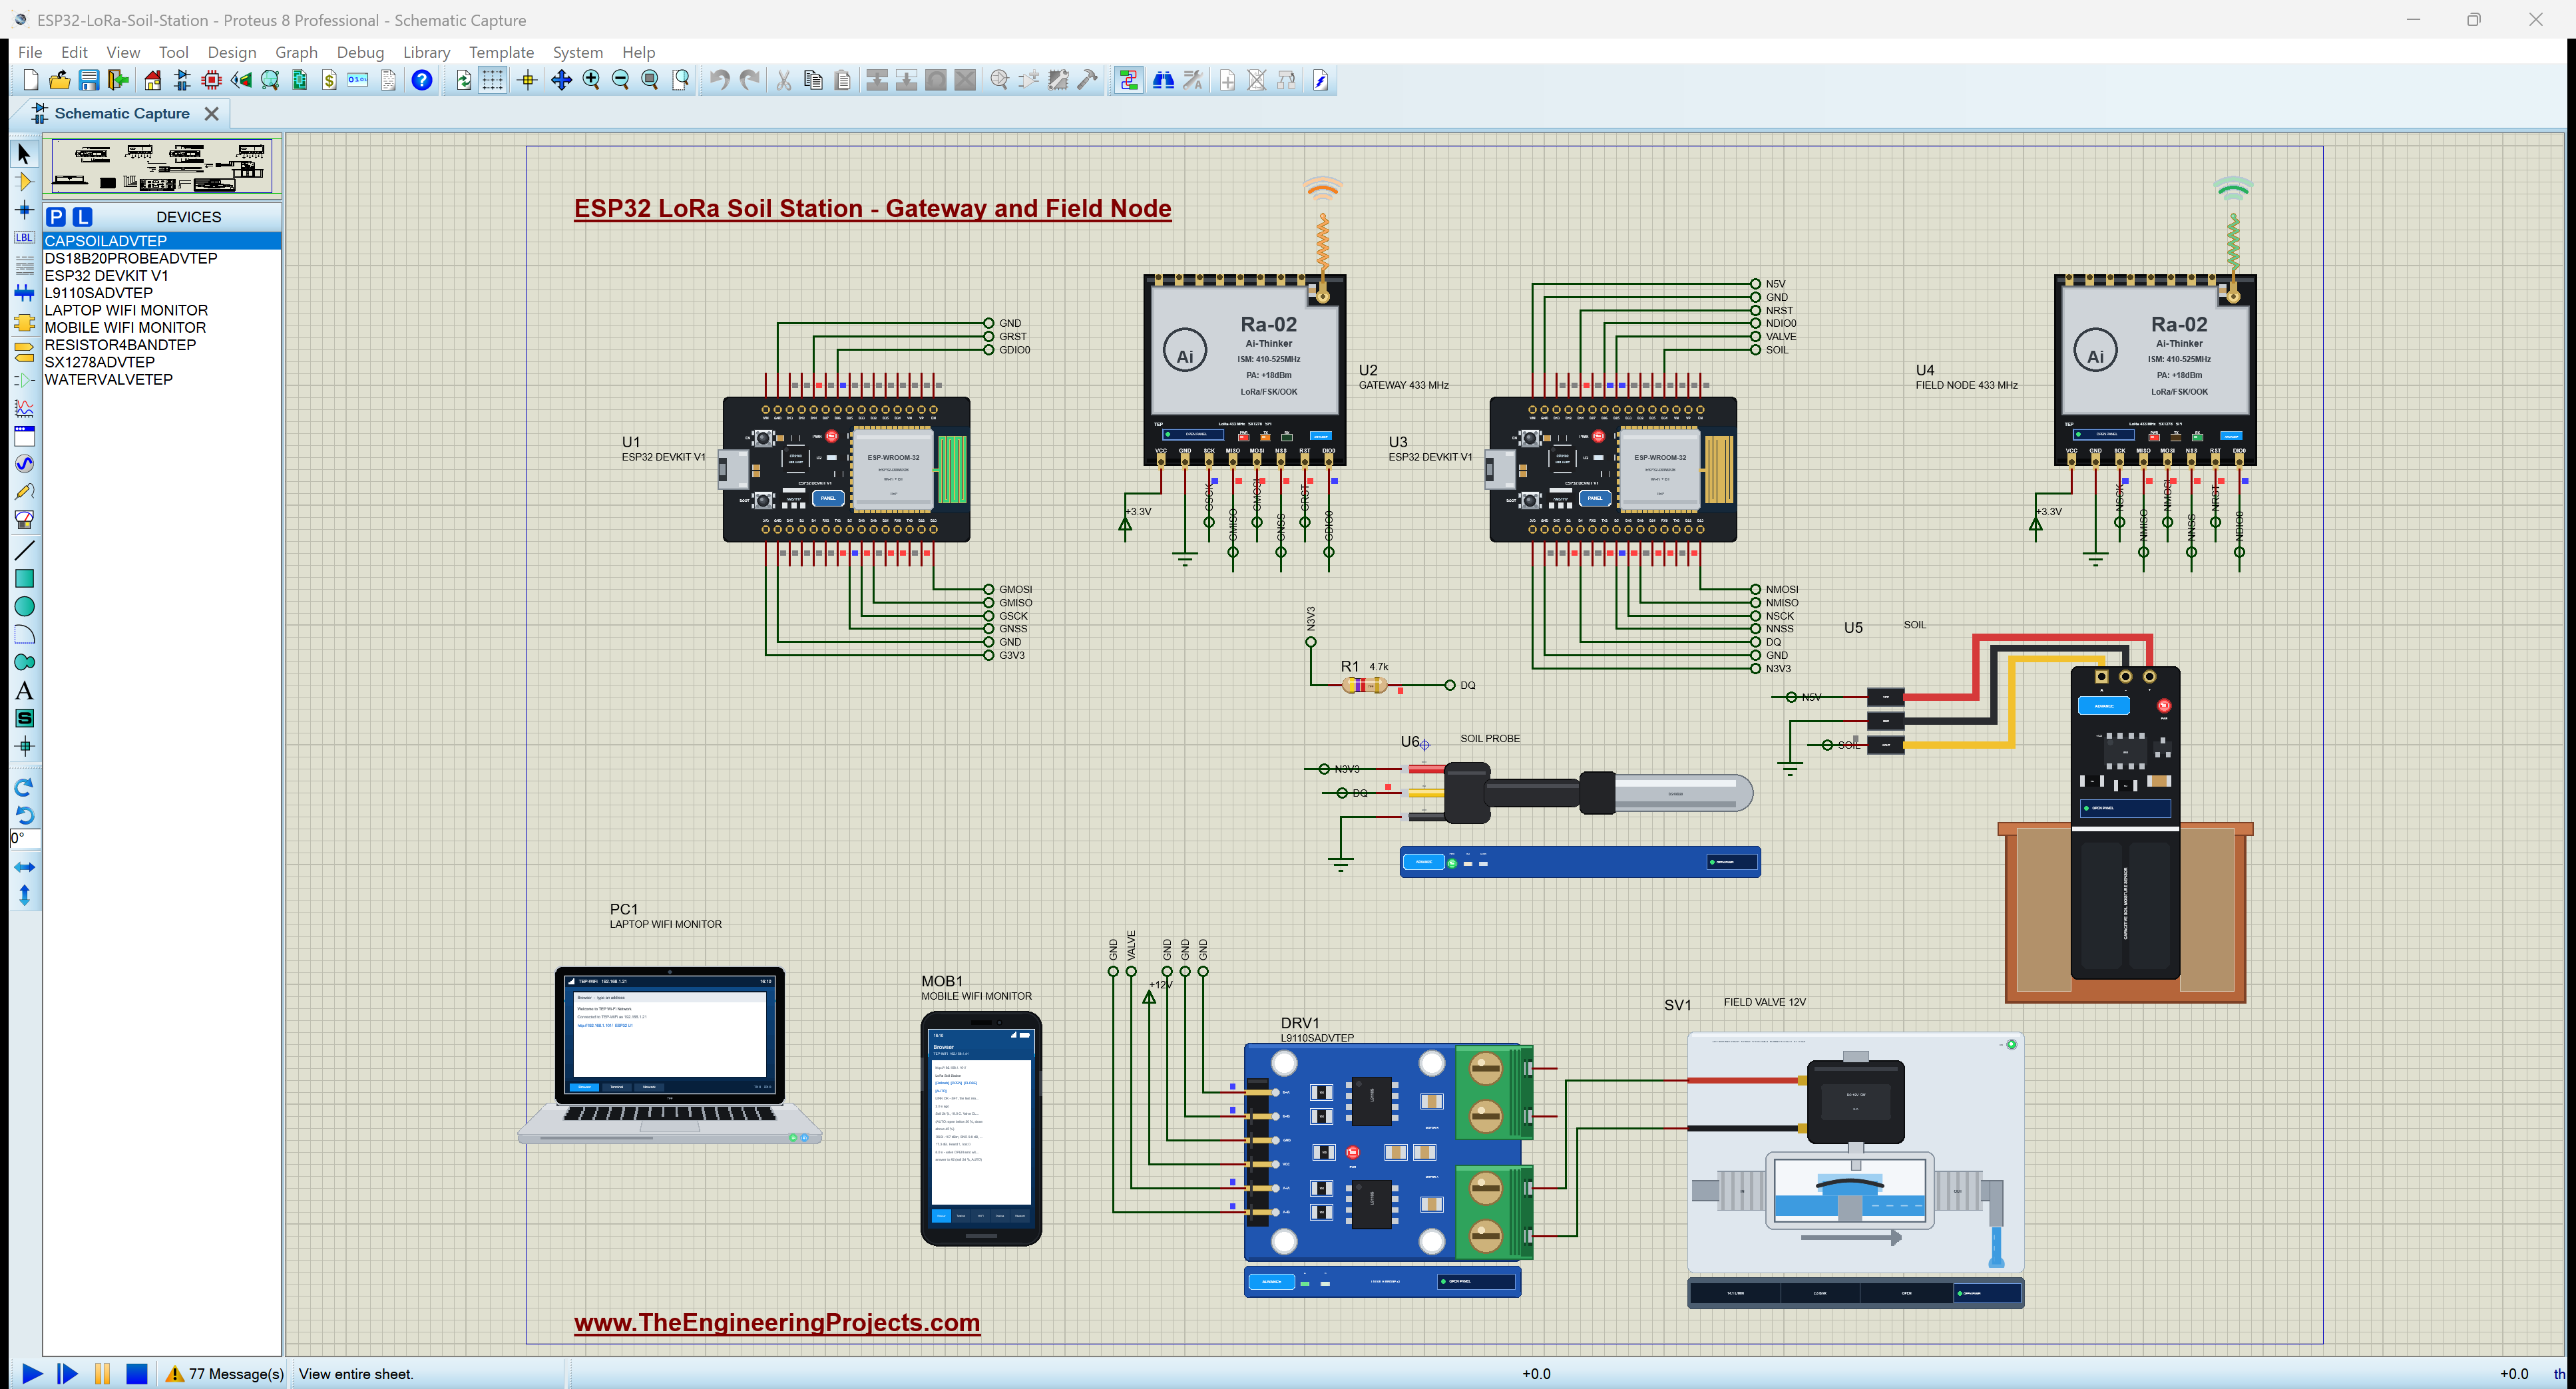
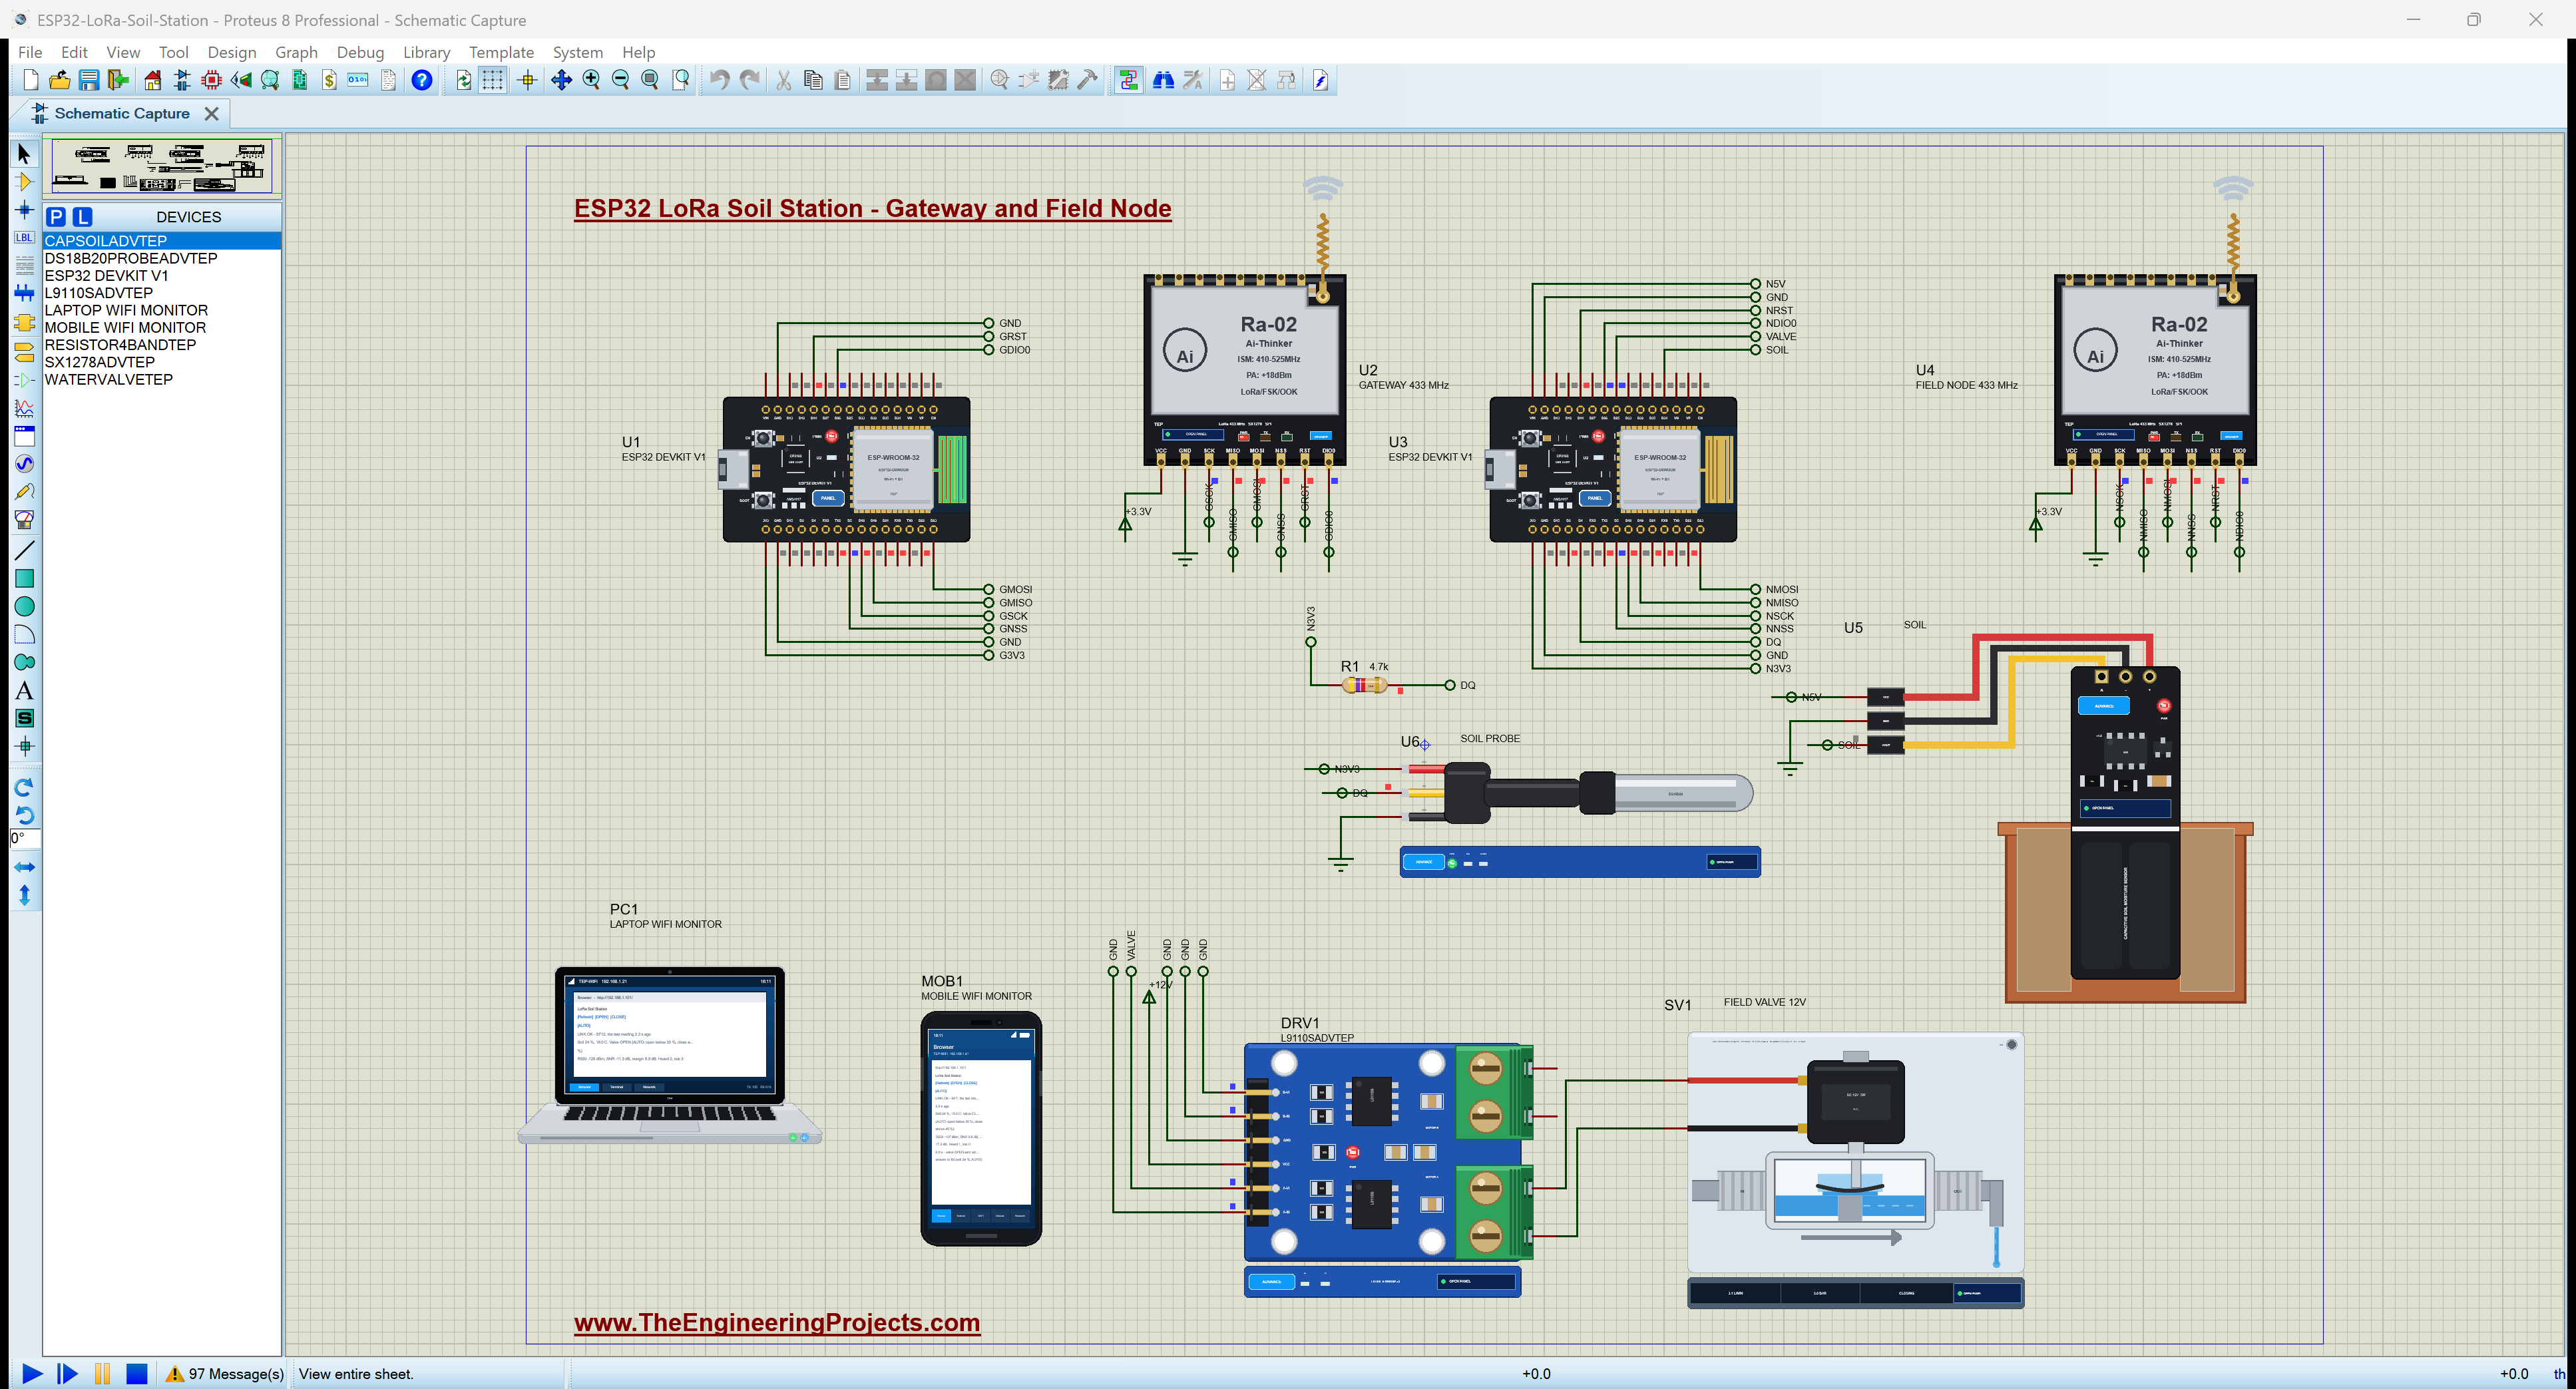
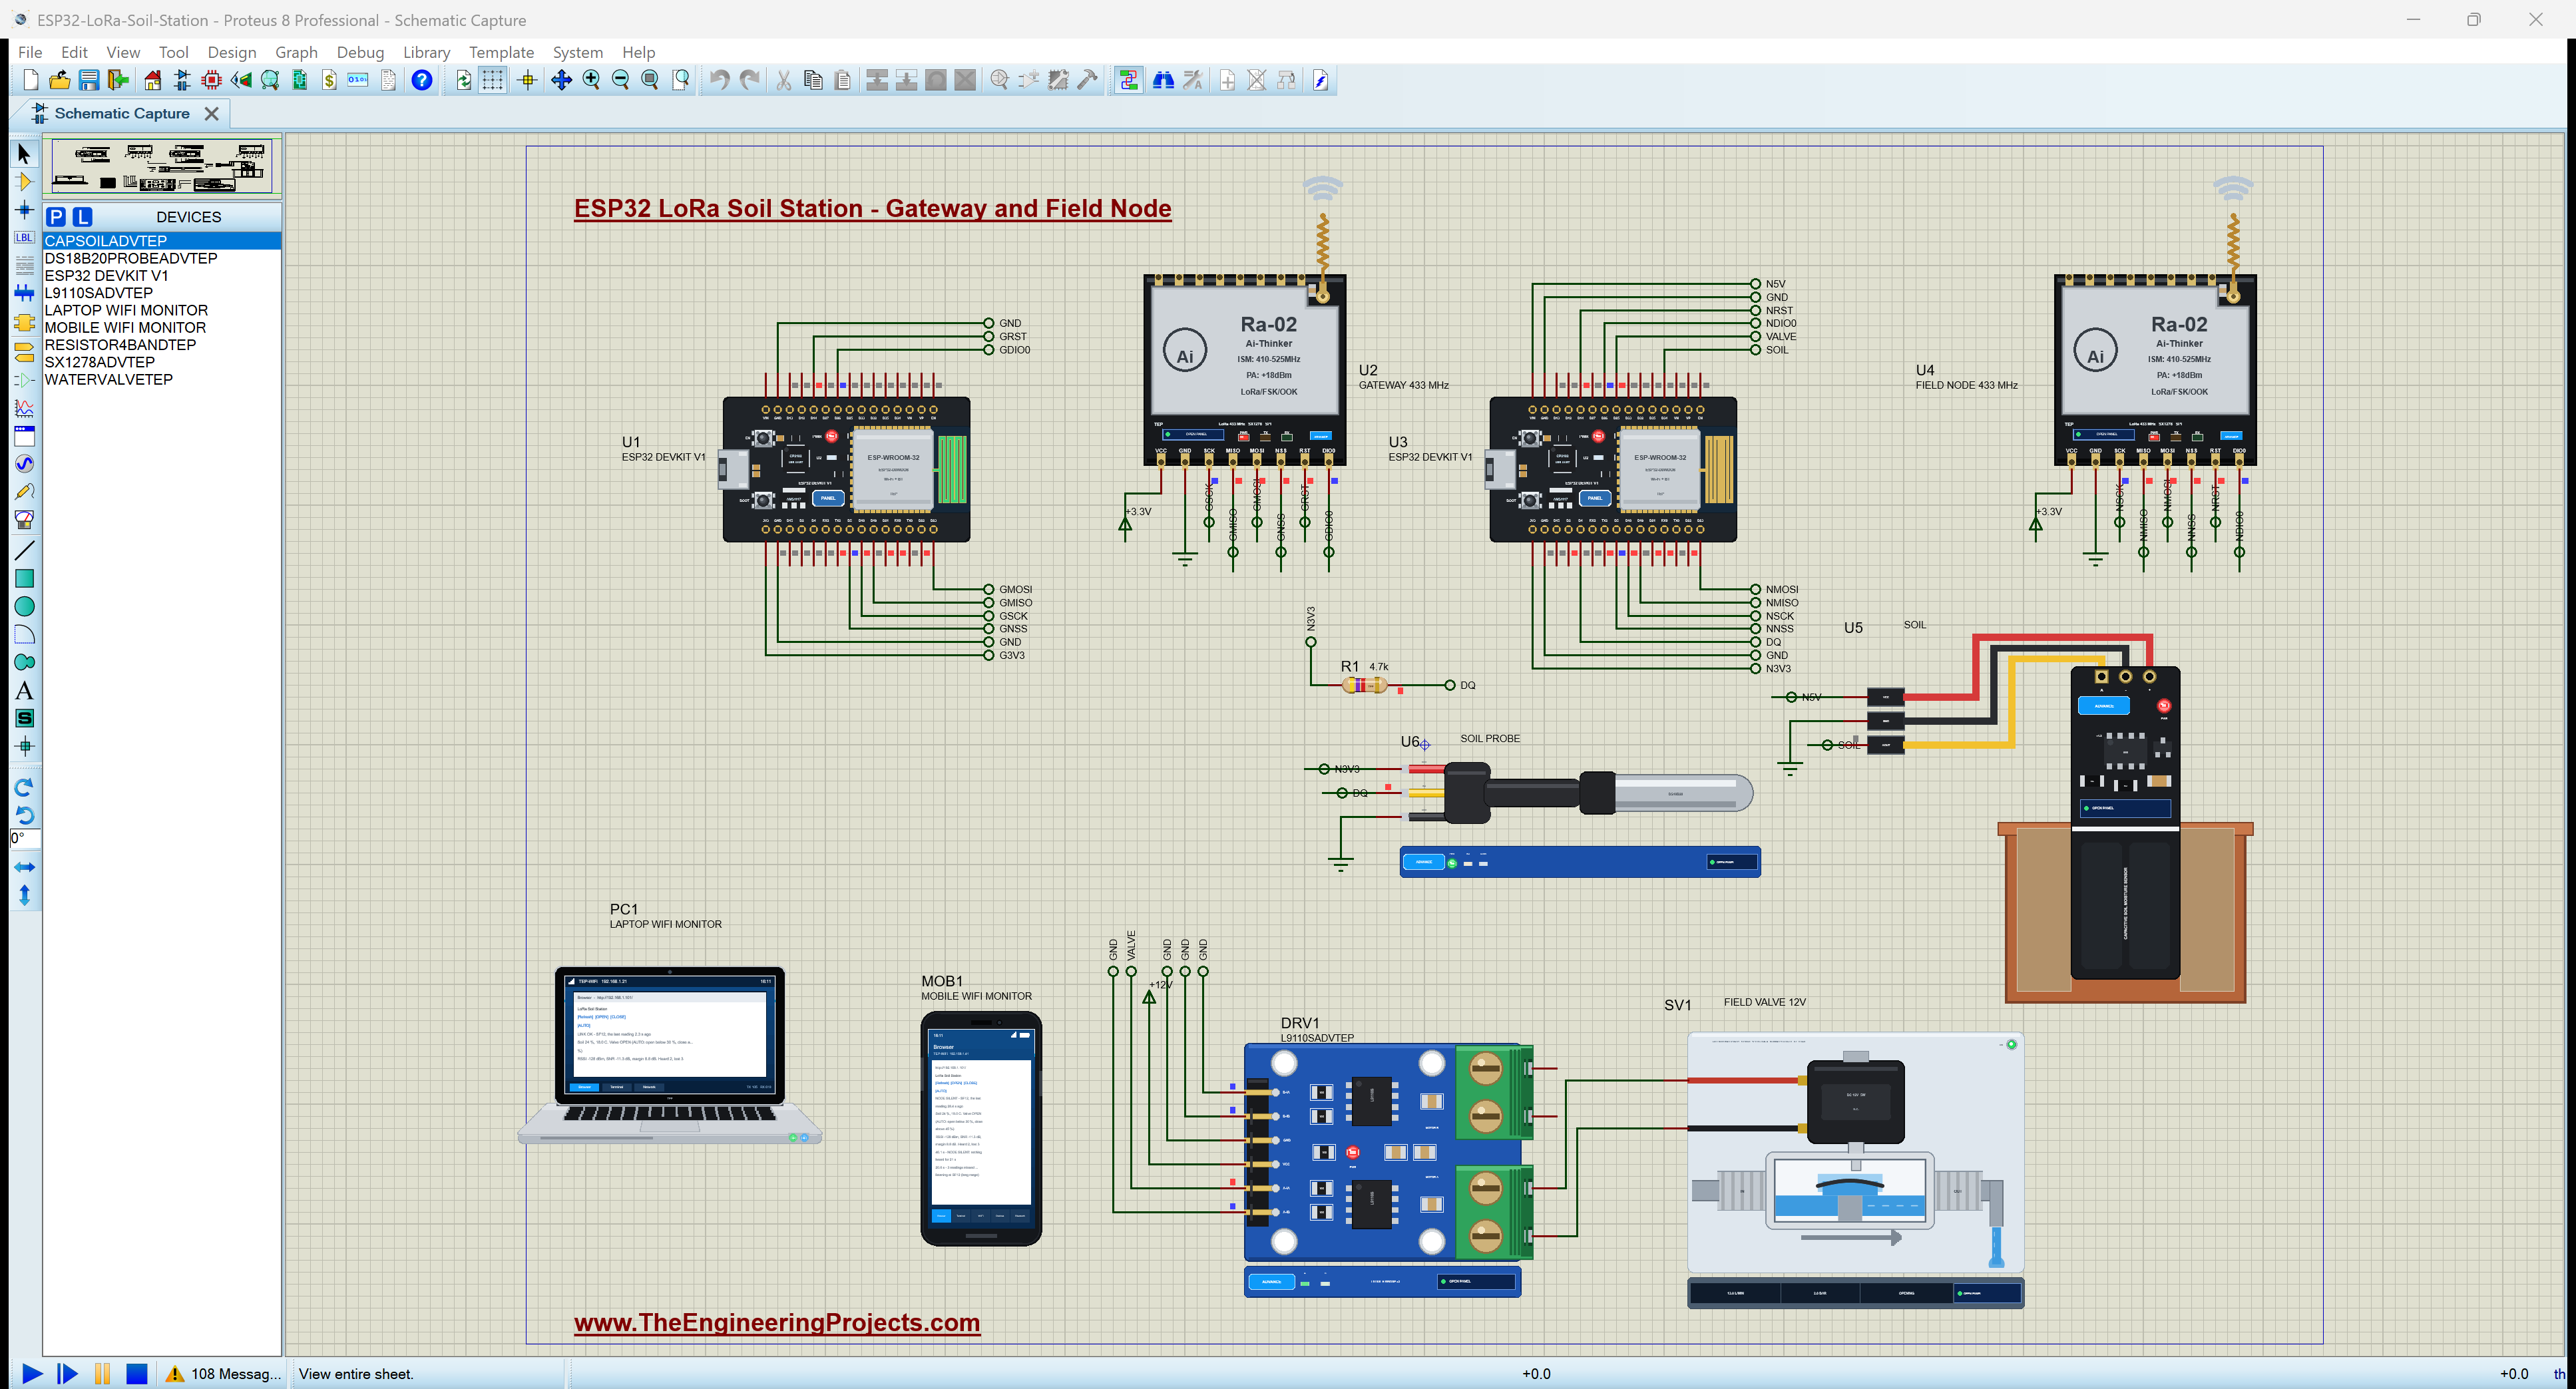
The two halves of the sheet are two places kilometres apart: the gateway at the farmhouse on the left, with the Wi-Fi that reaches the laptop and the phone, and the field node on the right, with no Wi-Fi at all. In the simulation every LoRa module in the design shares one air, and the distance between them is chosen with a button on a module's pop-up.
Proteus Simulation of the LoRa Soil Station: the Circuit
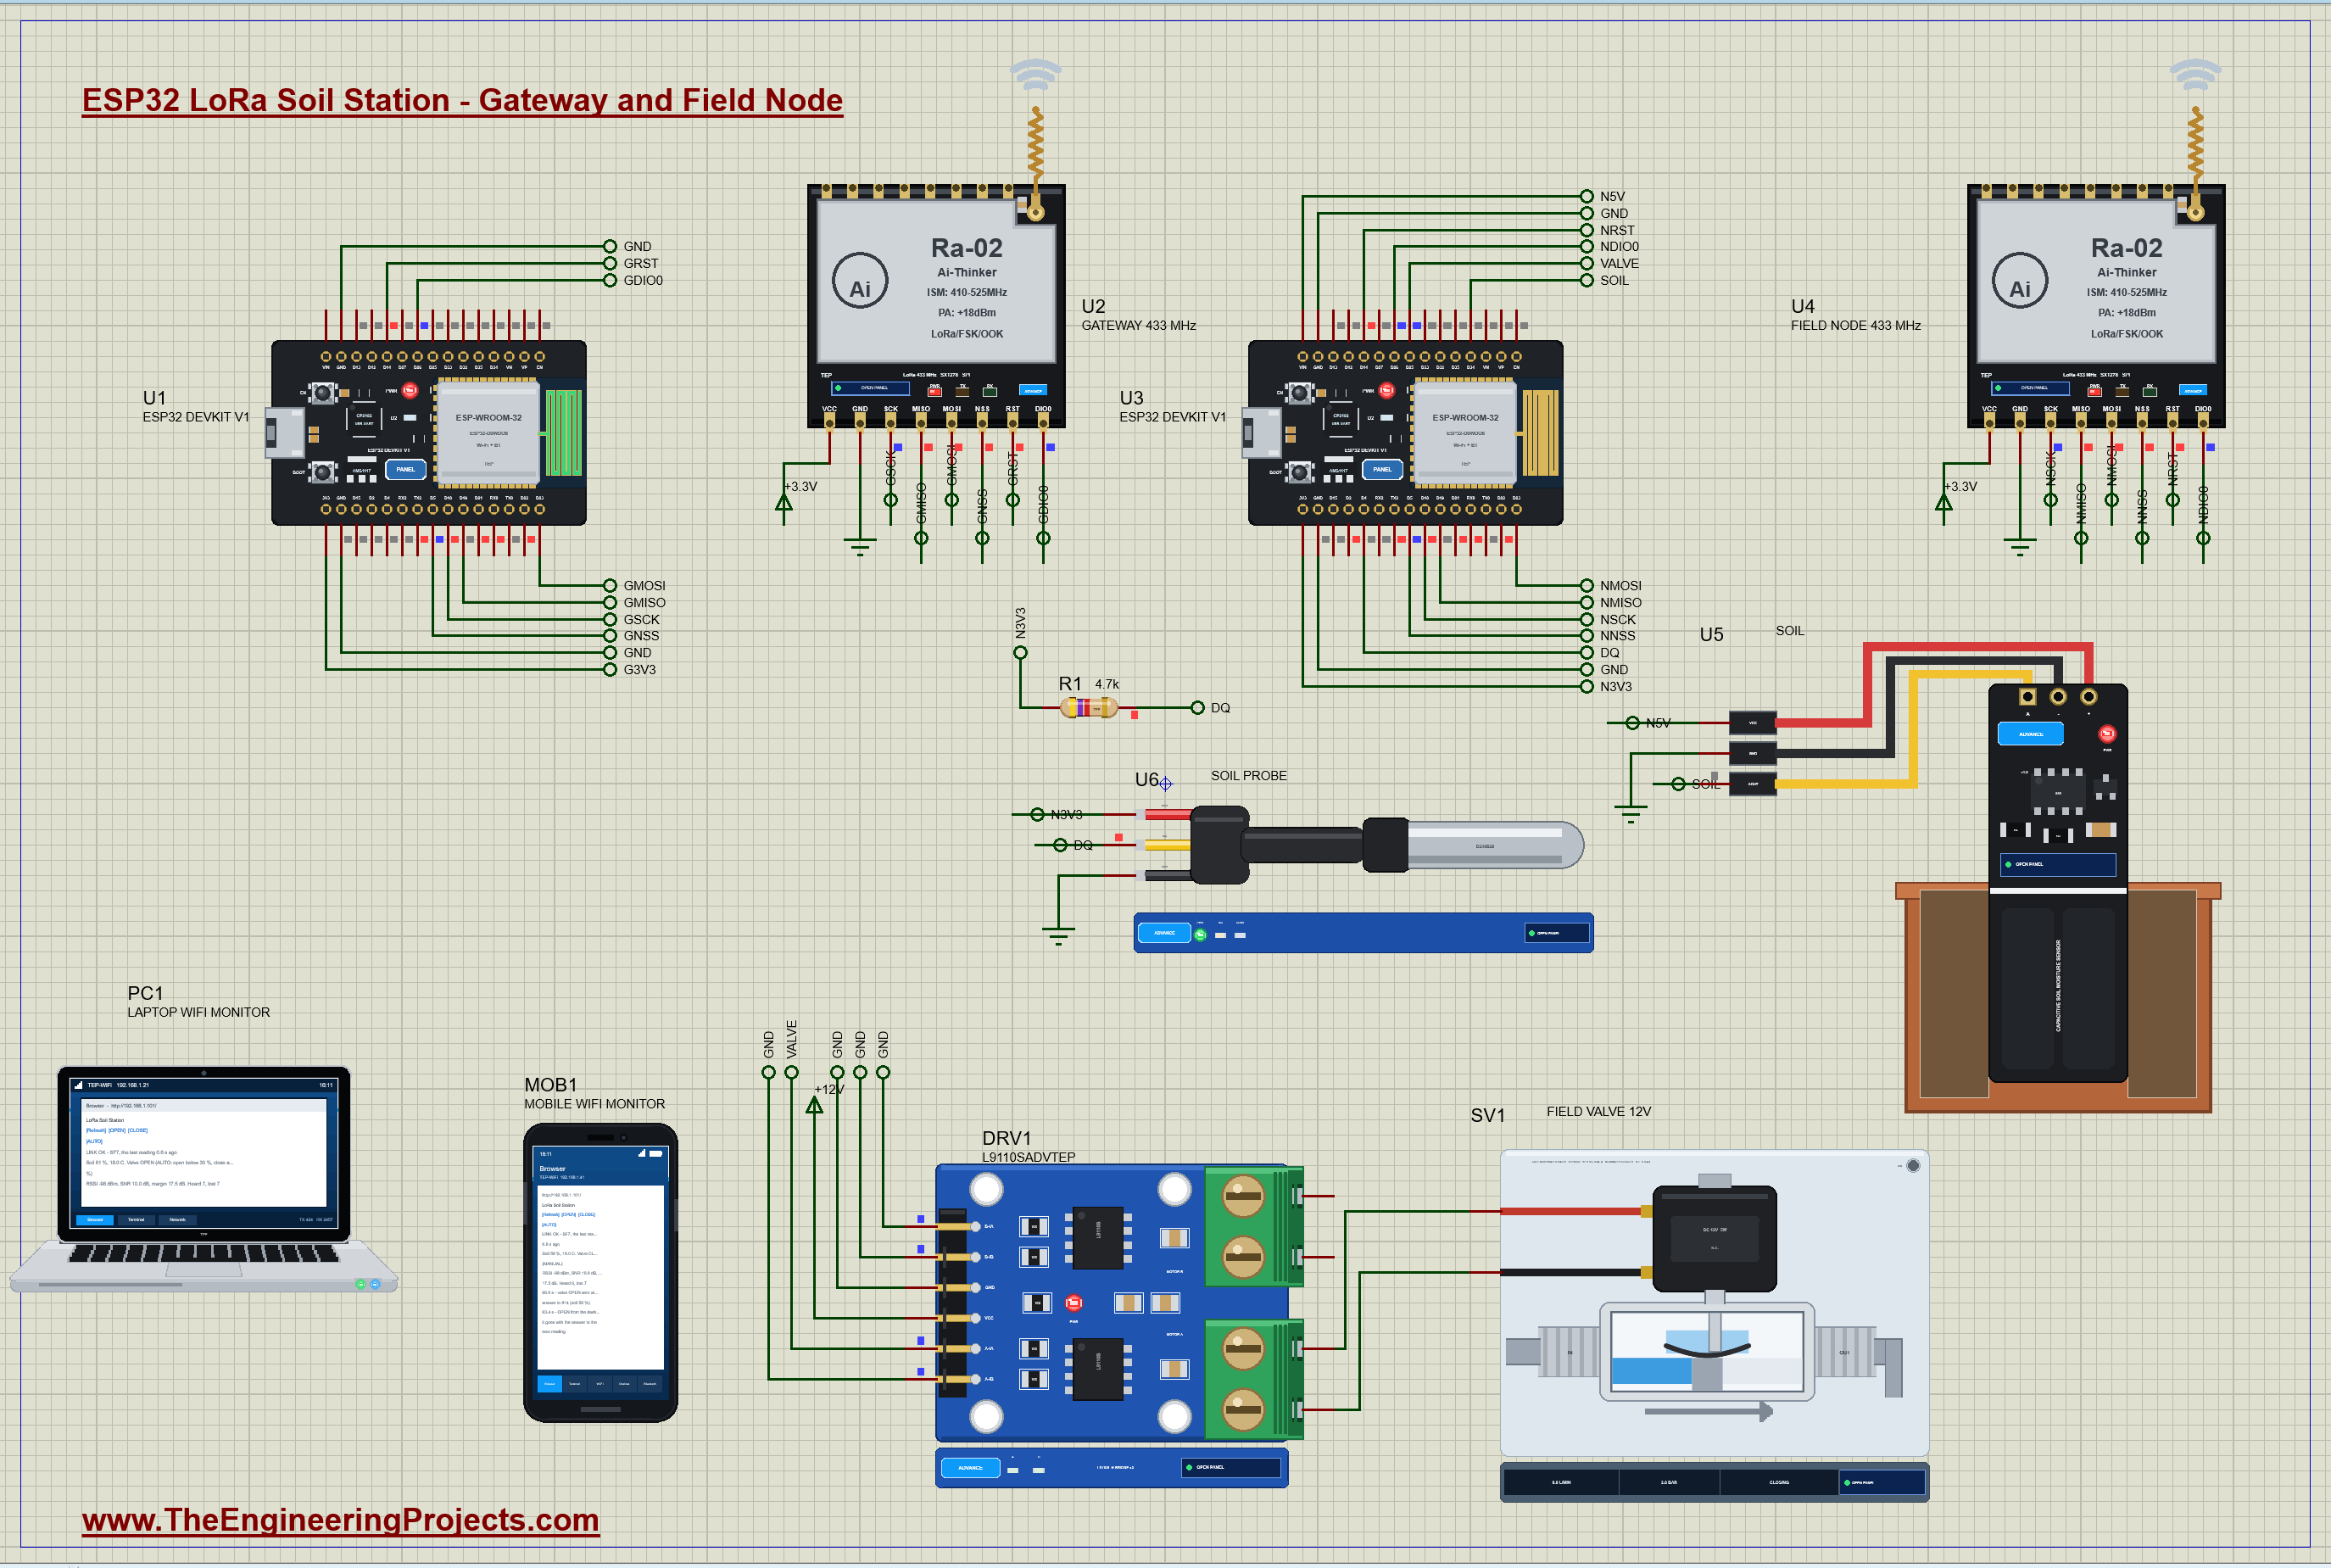
| Part | Pins | ESP32 / other |
|---|---|---|
| U2 / U4 SX1278 | SCK / MISO / MOSI | D18 / D19 / D23 (the ESP32's VSPI) |
| U2 / U4 SX1278 | NSS / RST / DIO0 | D5 / D14 / D26 |
| U2 / U4 SX1278 | VCC / GND | +3.3 V / GND |
| U5 soil sensor | VCC / AOUT / GND | 5 V (the node's VIN) / D34 / GND |
| U6 DS18B20 | VDD / DQ / GND | 3.3 V / D4 with R1 4.7 kohm to 3.3 V / GND |
| DRV1 L9110S | A-IA / A-IB, B-IA, B-IB / VCC | D25 (PWM) / GND / +12V |
| SV1 valve | + / - | A-OA / A-OB of DRV1 |
Both radios are wired the same way, on the ESP32's VSPI pins, with NSS (the chip select) on D5, RST on D14 and DIO0, the radio's "packet done" line, on D26. The Ra-02 runs on 3.3 V and its pins are not 5 V tolerant, which is one more reason the 3.3 V ESP32 suits it so well. The soil sensor needs 5 V for its regulator and still gives 0 to 3 V on AOUT, safe for the ESP32's ADC. The valve's coil takes 0.45 A at 12 V, far beyond any GPIO pin, so it hangs on the L9110S, an H-bridge with its own protection diodes.
How the LoRa Soil Station Works
LoRa: Range Bought with Time
LoRa sends each bit as a chirp, a tone sweeping up through the whole channel, and the receiver correlates the chirps it expects with what it hears. That correlation pulls a signal out from below the noise: a LoRa receiver decodes packets whose level is lower than the background noise itself, which no ordinary radio can. The price is speed. The spreading factor, SF7 to SF12, sets how long each chirp lasts: every step up doubles the symbol time and halves the data rate, and in return gains about 2.5 dB of sensitivity. The symbol time is 2^SF / bandwidth.
Worked example: at 125 kHz, an SF7 symbol lasts 128 / 125000 = 1.024 ms, and an SF12 symbol 4096 / 125000 = 32.8 ms, 32 times longer. The same 16-byte reading that takes 46 ms on air at SF7 takes about 1.3 s at SF12. That is the trade the whole project is built on: SF7 for speed and battery when the signal is good, SF12 for range when it is not.
A Link Budget
Whether a packet arrives is simple arithmetic in decibels. The transmitter puts out +17 dBm; the path between the radios loses some of it, more the further apart they are; what is left is the received level, the RSSI. The receiver's noise floor at 125 kHz is about -117 dBm, and the signal-to-noise ratio, SNR, is the RSSI minus that floor. Each spreading factor decodes down to a certain SNR: SF7 down to -7.5 dB, SF12 down to -20 dB. The difference between the SNR you have and the SNR you need is the margin, and a link with a few decibels of margin to spare is a link that survives rain, leaves and a passing truck.
| Distance | RSSI | SNR | At SF7 (needs -7.5 dB) | At SF12 (needs -20 dB) |
|---|---|---|---|---|
| 100 m | -68 dBm | +10 dB (capped) | OK, margin 17.5 dB | OK |
| 2 km | -107 dBm | +10 dB | OK, margin 17.5 dB | OK |
| 10 km | -128 dBm | -11 dB | too weak, 3.5 dB short | OK, margin 9 dB |
| 20 km | -137 dBm | -20 dB and below | too weak | out of reach |
Worked example: at 10 km the signal arrives at -128 dBm, so the SNR is -128 - (-117) = -11 dB. SF7 needs -7.5 dB and misses by 3.5 dB: every packet is too weak. SF12 needs -20 dB and has 9 dB to spare. That is why the protocol below falls back to SF12 when SF7 stops working, and why it does not simply use SF12 all the time: SF12 costs 28 times more air time, and air time is battery and, by law, a limited share of the band.
Time on Air and the Duty Cycle
Radio bands for licence-free devices come with rules. In Europe the 433 MHz band allows each device a 10 % duty cycle, the 868 MHz band mostly 1 %: a radio may transmit only that share of the time. A 1.3 s packet at SF12 under a 10 % rule means at least 13 s between packets. The node here sends every 4 s at SF7 and every 6 s at SF12 to keep the simulation short; a real soil station would send every 10 or 15 minutes, which is plenty for soil that changes over hours, and its battery would last for years.
Class A: Listening Only After Sending
A receiver that listens all the time drains a battery in days. So the field node does what a LoRaWAN class A device does: it sleeps, wakes, sends a reading, listens for a short window right after it, and sleeps again. The gateway, on mains power, listens all the time and answers each reading at once, inside that window: 1 s at SF7, 3 s at SF12, long enough for the answer's own time on air. The consequence is worth knowing: a command from the farmhouse can only reach the field with the answer to the next reading. Press OPEN on the dashboard and the valve opens when the node next reports in, up to one period later.
Answers, Retries and the Fallback
The answer also tells the node that its reading arrived. The node counts the readings that got no answer. After three in a row it assumes the link has faded and switches to SF12; the gateway, which counts the time since the last reading, switches to SF12 after three and a half periods of silence, so both ends meet in the long-range mode without any message being needed. When the gateway hears the node at SF12 with an SNR so good that SF7 would still have 10 dB to spare, it puts SF7 in its answer and both switch back. This is a small version of what LoRaWAN calls adaptive data rate.
A Fail-Safe Valve
A watering valve that stays open because its controller vanished floods a field. So the node closes the valve by itself when four readings in a row go unanswered: no instruction from the farm, no water. The gateway, for its part, shows NODE SILENT when nothing has arrived for three and a half periods at SF12, 21 seconds here, so somebody goes and looks. When the link comes back, the gateway's next answer carries the valve command again and the node follows it.
Driving the Solenoid Valve: Kick and Hold
The valve is pilot-operated: the coil only lifts a small plunger, and the water pressure does the heavy work of opening the diaphragm. Its 26.7 ohm coil takes 12 / 26.7 = 0.45 A, 5.4 W, at full voltage. Lifting the plunger needs that force, but holding it up needs much less, so the node gives a kick of full voltage for 150 ms and then holds the valve with a 40 % PWM. The coil's inductance smooths the PWM into a steady current of about 0.4 x 0.45 = 0.18 A, and the heat in the coil falls to 0.18^2 x 26.7 = 0.86 W, one sixth of the full 5.4 W. The coil stays cool and the 12 V supply works far less.
Reading the Soil
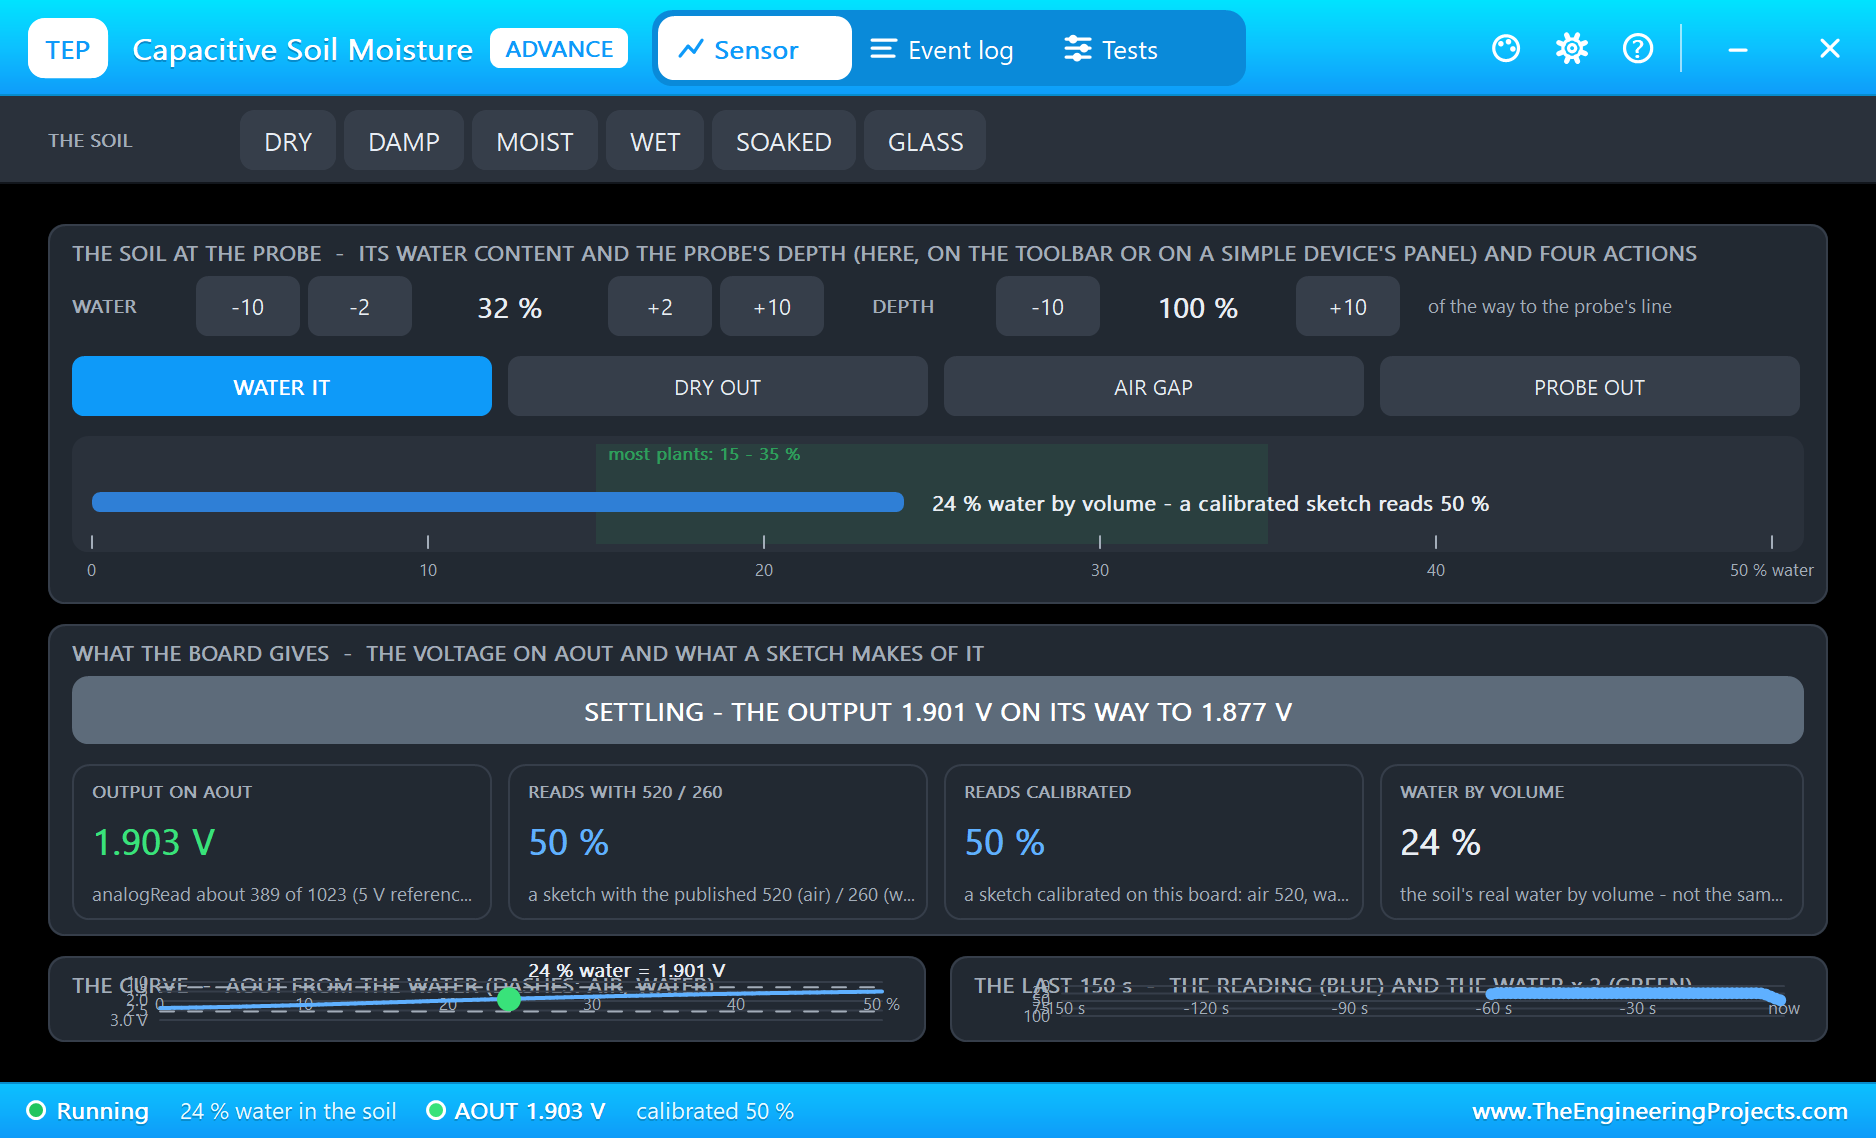
A capacitive soil sensor has no bare metal in the soil, so it does not corrode like the cheap two-prong sensors. Its two tracks form a capacitor with the soil as the dielectric; water raises the capacitance, and the board turns that into a voltage on AOUT that falls as the soil gets wetter. The sketch calibrates it with two numbers, the output in air (2.54 V) and in water (1.27 V), and maps everything between onto 0 to 100 %. That percentage is the sensor's own scale, not the water content by volume: moist soil with 25 % water reads about 54 %. The 30 % and 45 % thresholds of AUTO are on that scale, so they would be tuned for a real field.
The DS18B20 probe reads the soil temperature over 1-Wire, one data line with a 4.7 kohm pull-up. A 12-bit conversion takes 750 ms, so the node starts the next conversion right after each reading and collects the result before the next packet, without ever waiting for it.
The Arduino Code Explained
Both sketches are included in the download: ESP32_LoRa_Node for the field and ESP32_LoRa_Gateway for the farmhouse. They use the LoRa library by Sandeep Mistry for the SX1278, and the node OneWire and DallasTemperature for the probe. Both radios start the same way: the pins, then LoRa.begin with the frequency.
const int LORA_NSS = 5, LORA_RST = 14, LORA_DIO0 = 26; // SPI: SCK 18, MISO 19, MOSI 23 LoRa.setPins(LORA_NSS, LORA_RST, LORA_DIO0);
if (!LoRa.begin(FREQ)) {The Field Node
The node's timing and its patience are at the top:
const unsigned long PERIOD_SF7 = 4000, PERIOD_SF12 = 6000;          // one reading every 4 s at SF7, every 6 s at SF12 (its time on air)
const int FALLBACK_AFTER = 3, FAILSAFE_AFTER = 4;                   // packets without an answer
The soil reading uses the two calibration points:
float p = (AIR_V - volts) * 100.0 / (AIR_V - WATER_V); // 0 % in air, 100 % in water (the sensor's own scale)A reading is a short line of text with a sequence number, so the gateway can tell which ones it missed:
snprintf(msg, sizeof msg, "N,%u,%d,%d,%d,%d", seq, soil, t10, valveOpen ? 1 : 0, sf); LoRa.endPacket(); // returns when the packet is on the air and doneThen the receive window, longer at SF12 because the answer takes longer on air:
unsigned long window = sf >= 12 ? 3000 : 1000, w0 = millis(); // the receive window right after the packetNo answer: count it, fall back to SF12 after three, close the valve after four:
if (missed >= FALLBACK_AFTER && sf != 12) { if (missed >= FAILSAFE_AFTER && valveOpen) {A probe that misses one reading must not raise a false frost alarm: when the DS18B20 does not answer, the library returns -127 C, and the node keeps the last good temperature instead:
if (t == DEVICE_DISCONNECTED_C) { // -127: the probe did not answer this timeOpening the valve, the kick and then the hold:
    analogWrite(VALVE_PIN, 255); delay(150);                        // the kick: full voltage lifts the plunger
    analogWrite(VALVE_PIN, HOLD_DUTY);                              // then 40 % holds it
The Gateway
The gateway listens in its loop, between serving the dashboard and watching the silence. It asks the radio every 2 ms, not thousands of times a second: a preamble lasts 12.5 ms even at SF7, and every question is an SPI transaction:
  if (millis() - lastPoll >= 2) {                                   // the radio every 2 ms: a preamble lasts 12.5 ms even at SF7
    lastPoll = millis();
    if (LoRa.parsePacket()) onReading();
  }
For every reading it counts the missing sequence numbers, decides the valve in AUTO, and checks whether the link is strong enough for SF7:
if (heard && seq > lastSeq + 1) lost += seq - lastSeq - 1; // the numbers that never arrived if (soil < SOIL_OPEN) wantOpen = true;
else if (soil > SOIL_CLOSE) wantOpen = false; if (sf == 12 && snr - NEED_SF7 >= STEP_DOWN) next = 7; // a strong link: the faster, shorter SF7 againAnd it answers at once, inside the node's receive window:
snprintf(ack, sizeof ack, "A,%u,%d,%d", seq, wantOpen ? 1 : 0, next);Silence is measured in periods: three and a half at SF7 to fall back, three and a half at SF12 for NODE SILENT:
if (sf != 12 && gap > 3 * PERIOD_SF7 + PERIOD_SF7 / 2) {The dashboard's pages are / (the dashboard), /open and /close (the valve by hand), /auto and /data (everything as JSON). The links come first and the page stays short, because the WiFi Monitors show one screen of a page. Both boards print every packet on their serial monitors.
How to Run the Proteus Simulation
- Download the project zip below and install the library files (the steps are under the download button).
- Open ESP32-LoRa-Soil-Station.pdsprj from the Proteus Simulation folder. Keep both HEX files and the DLL files next to it.
- Press Play. The node sends a reading every 4 s; the gateway answers; the dry soil opens the valve.
- On the field node's SX1278 pop-up (U4), choose a DISTANCE: 10 km, 20 km, then 1 km, and watch both serial monitors.
- Click the soil sensor for its pop-up and press WATER IT.
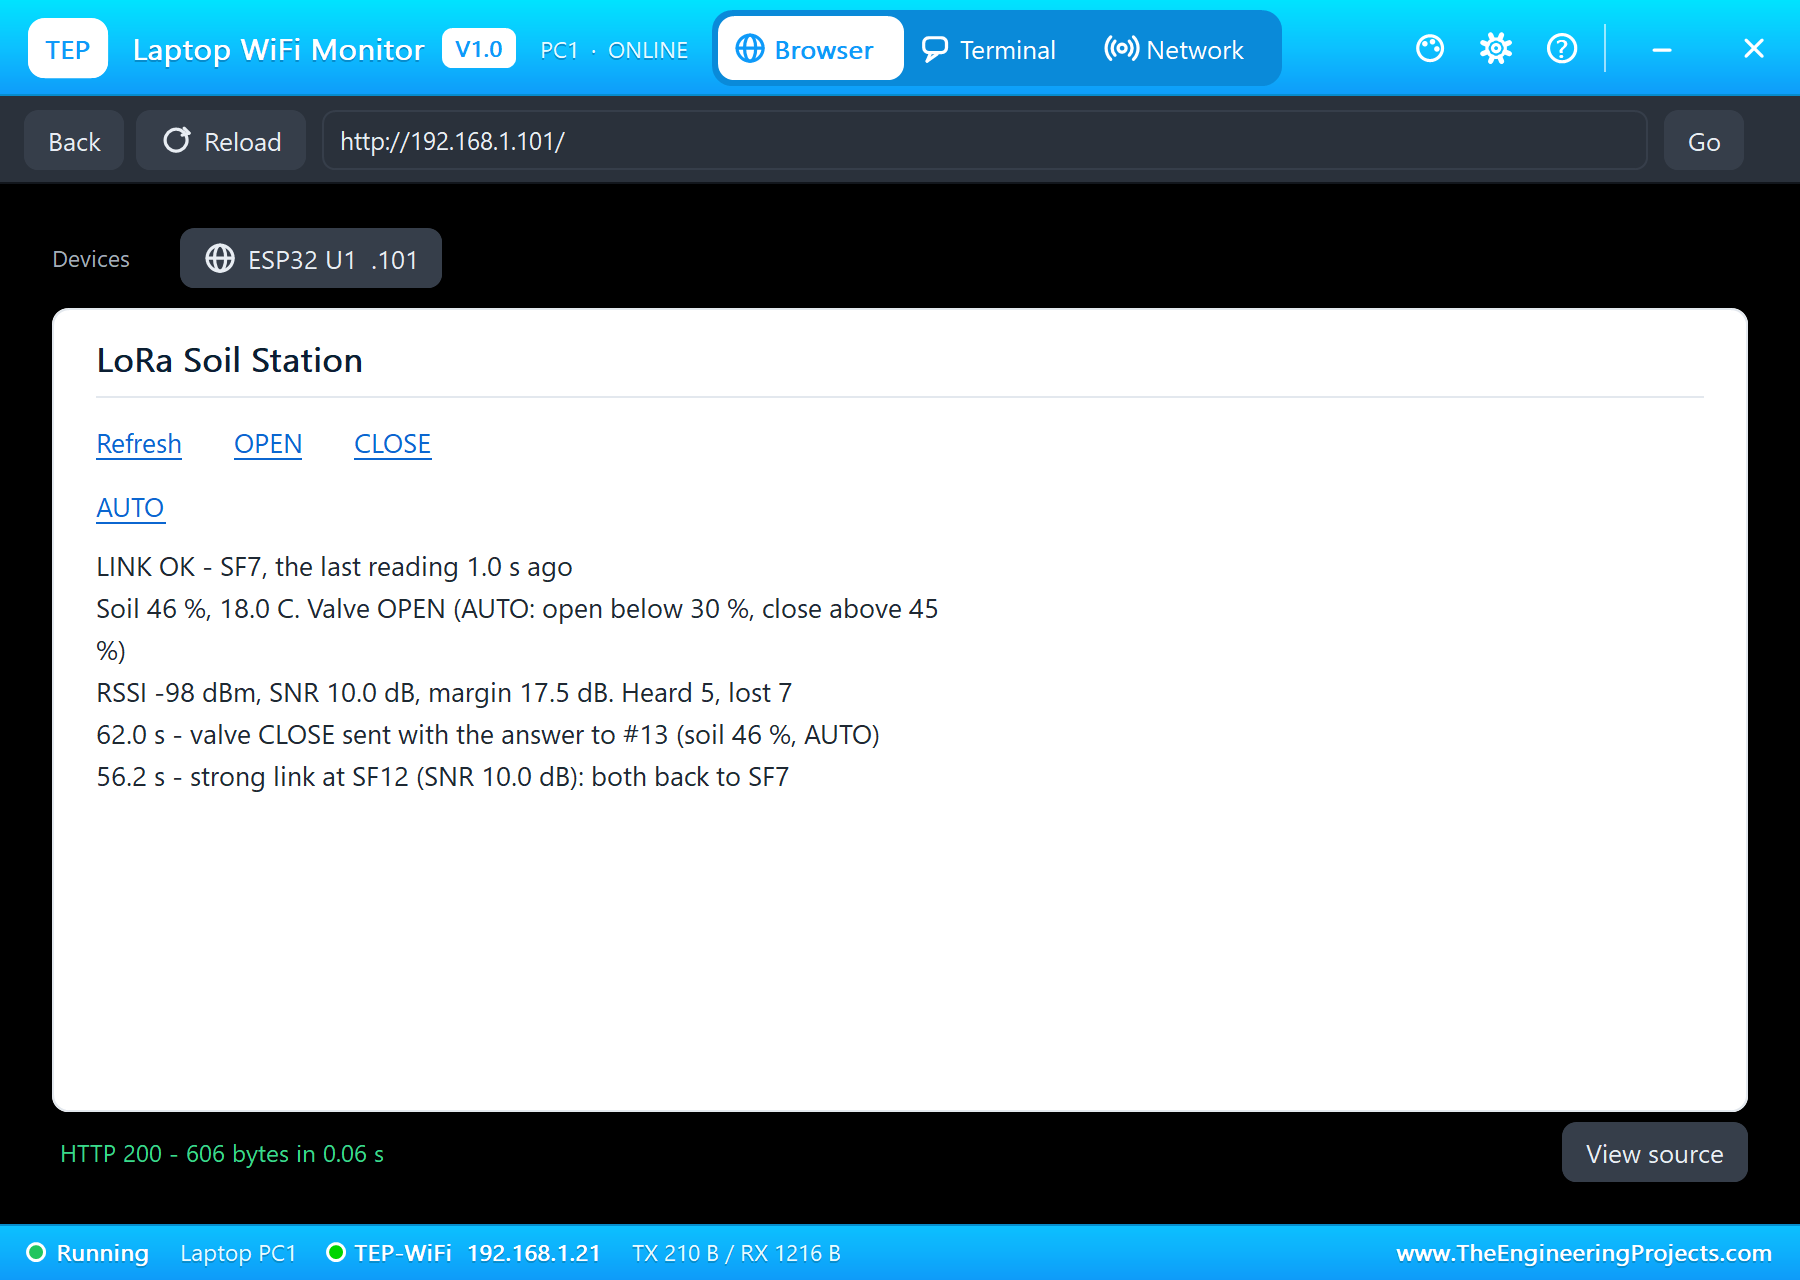
- Open the Laptop or the Mobile WiFi Monitor and press Go for the dashboard, with OPEN, CLOSE and AUTO.
Simulation Results: the LoRa Soil Station in Proteus
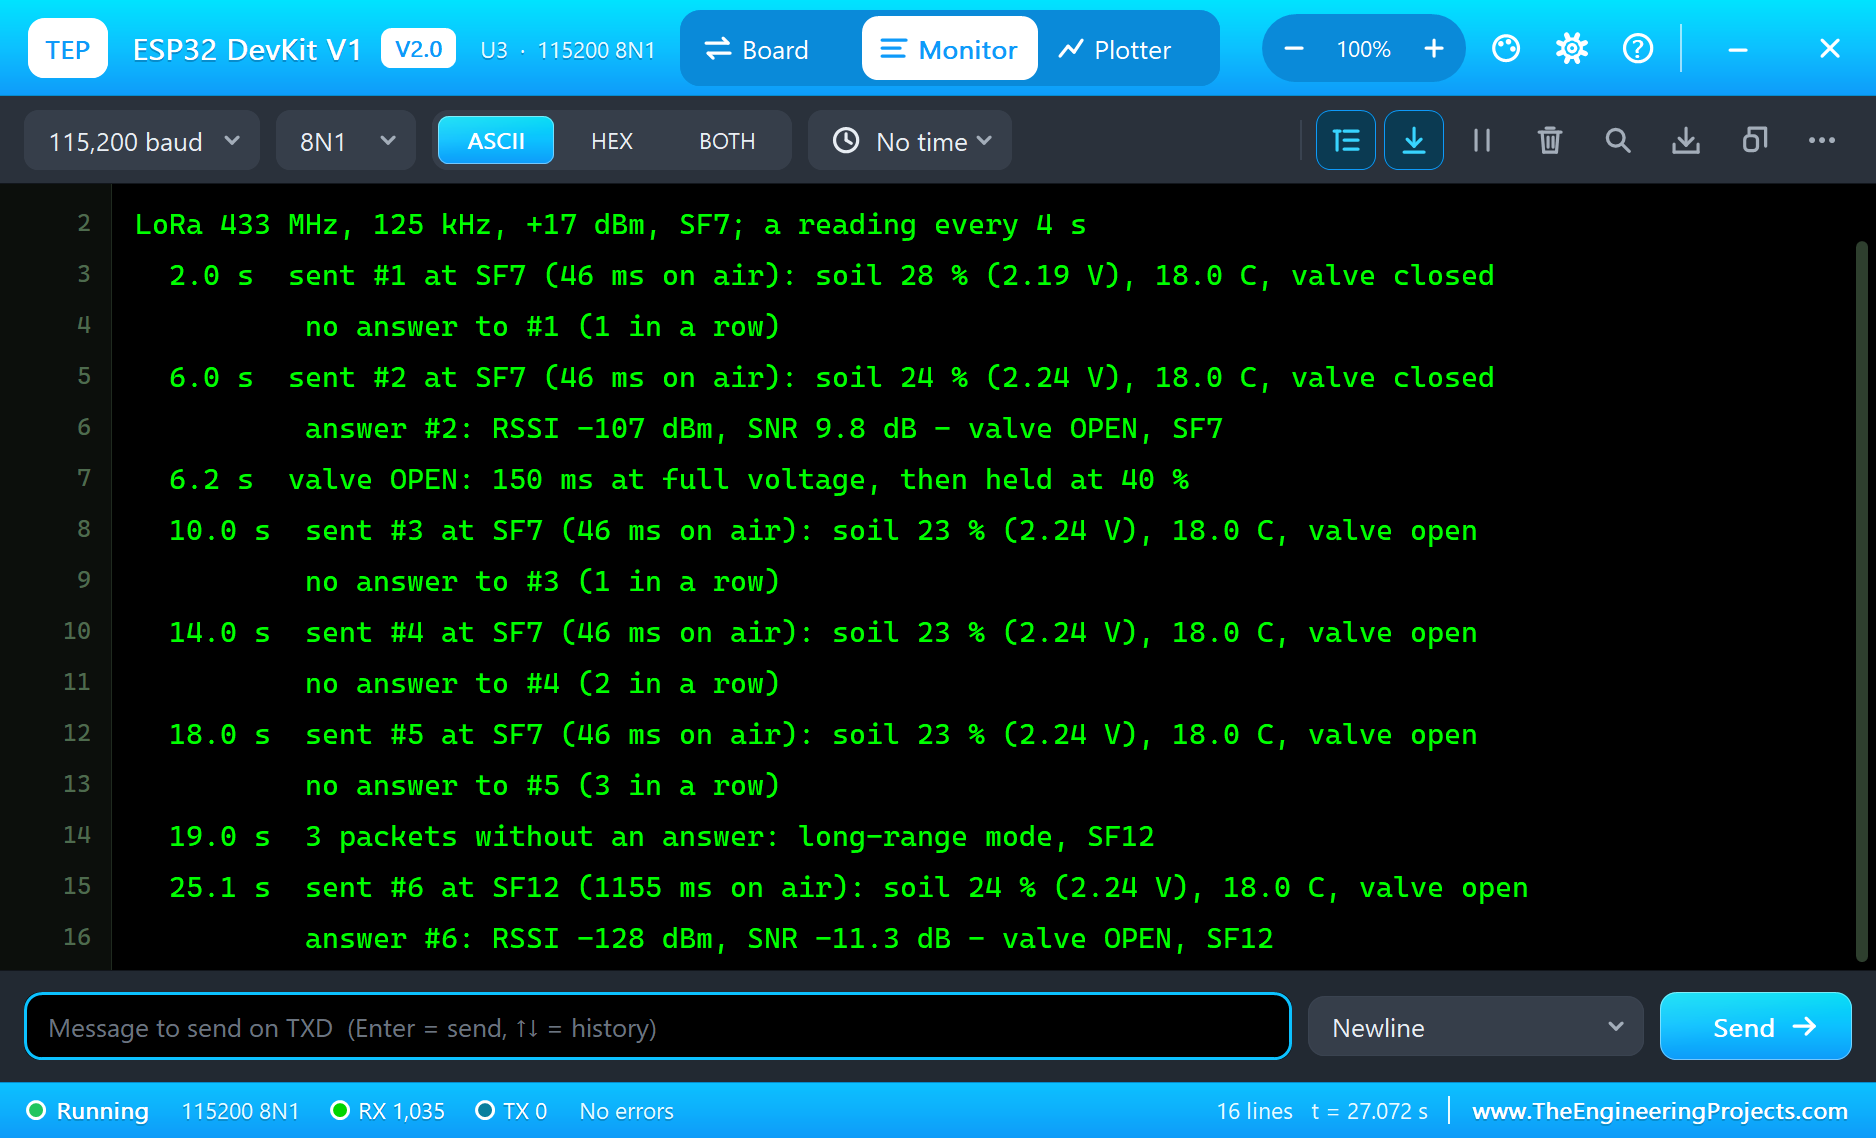
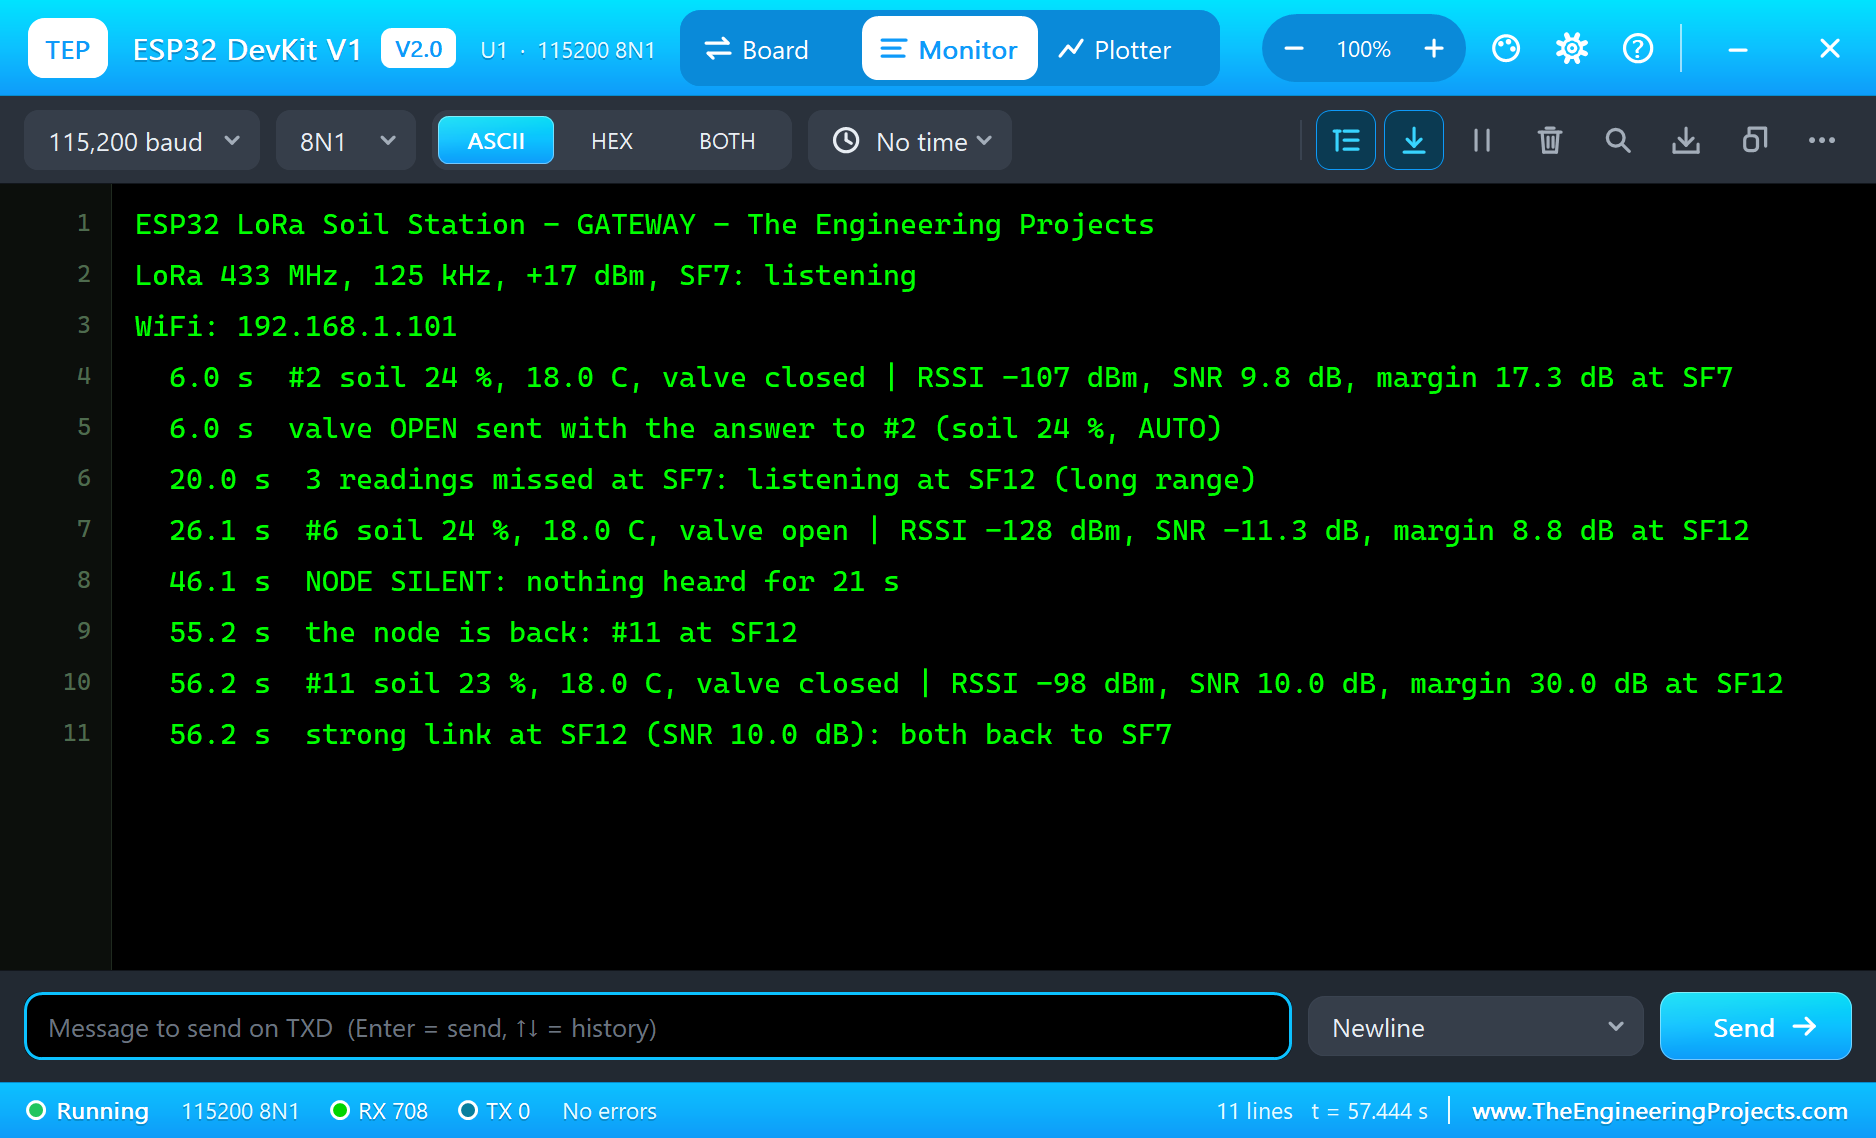
Here is the run that made the screenshots of this tutorial, 71 seconds of simulation: the field at 2 km, then 10 km, 20 km and 1 km, the soil watered, and the valve opened by hand. The times are the sketches' own clocks, as they printed them on the two serial monitors; the parts' numbers come from their pop-ups.
2 km: the First Readings and AUTO
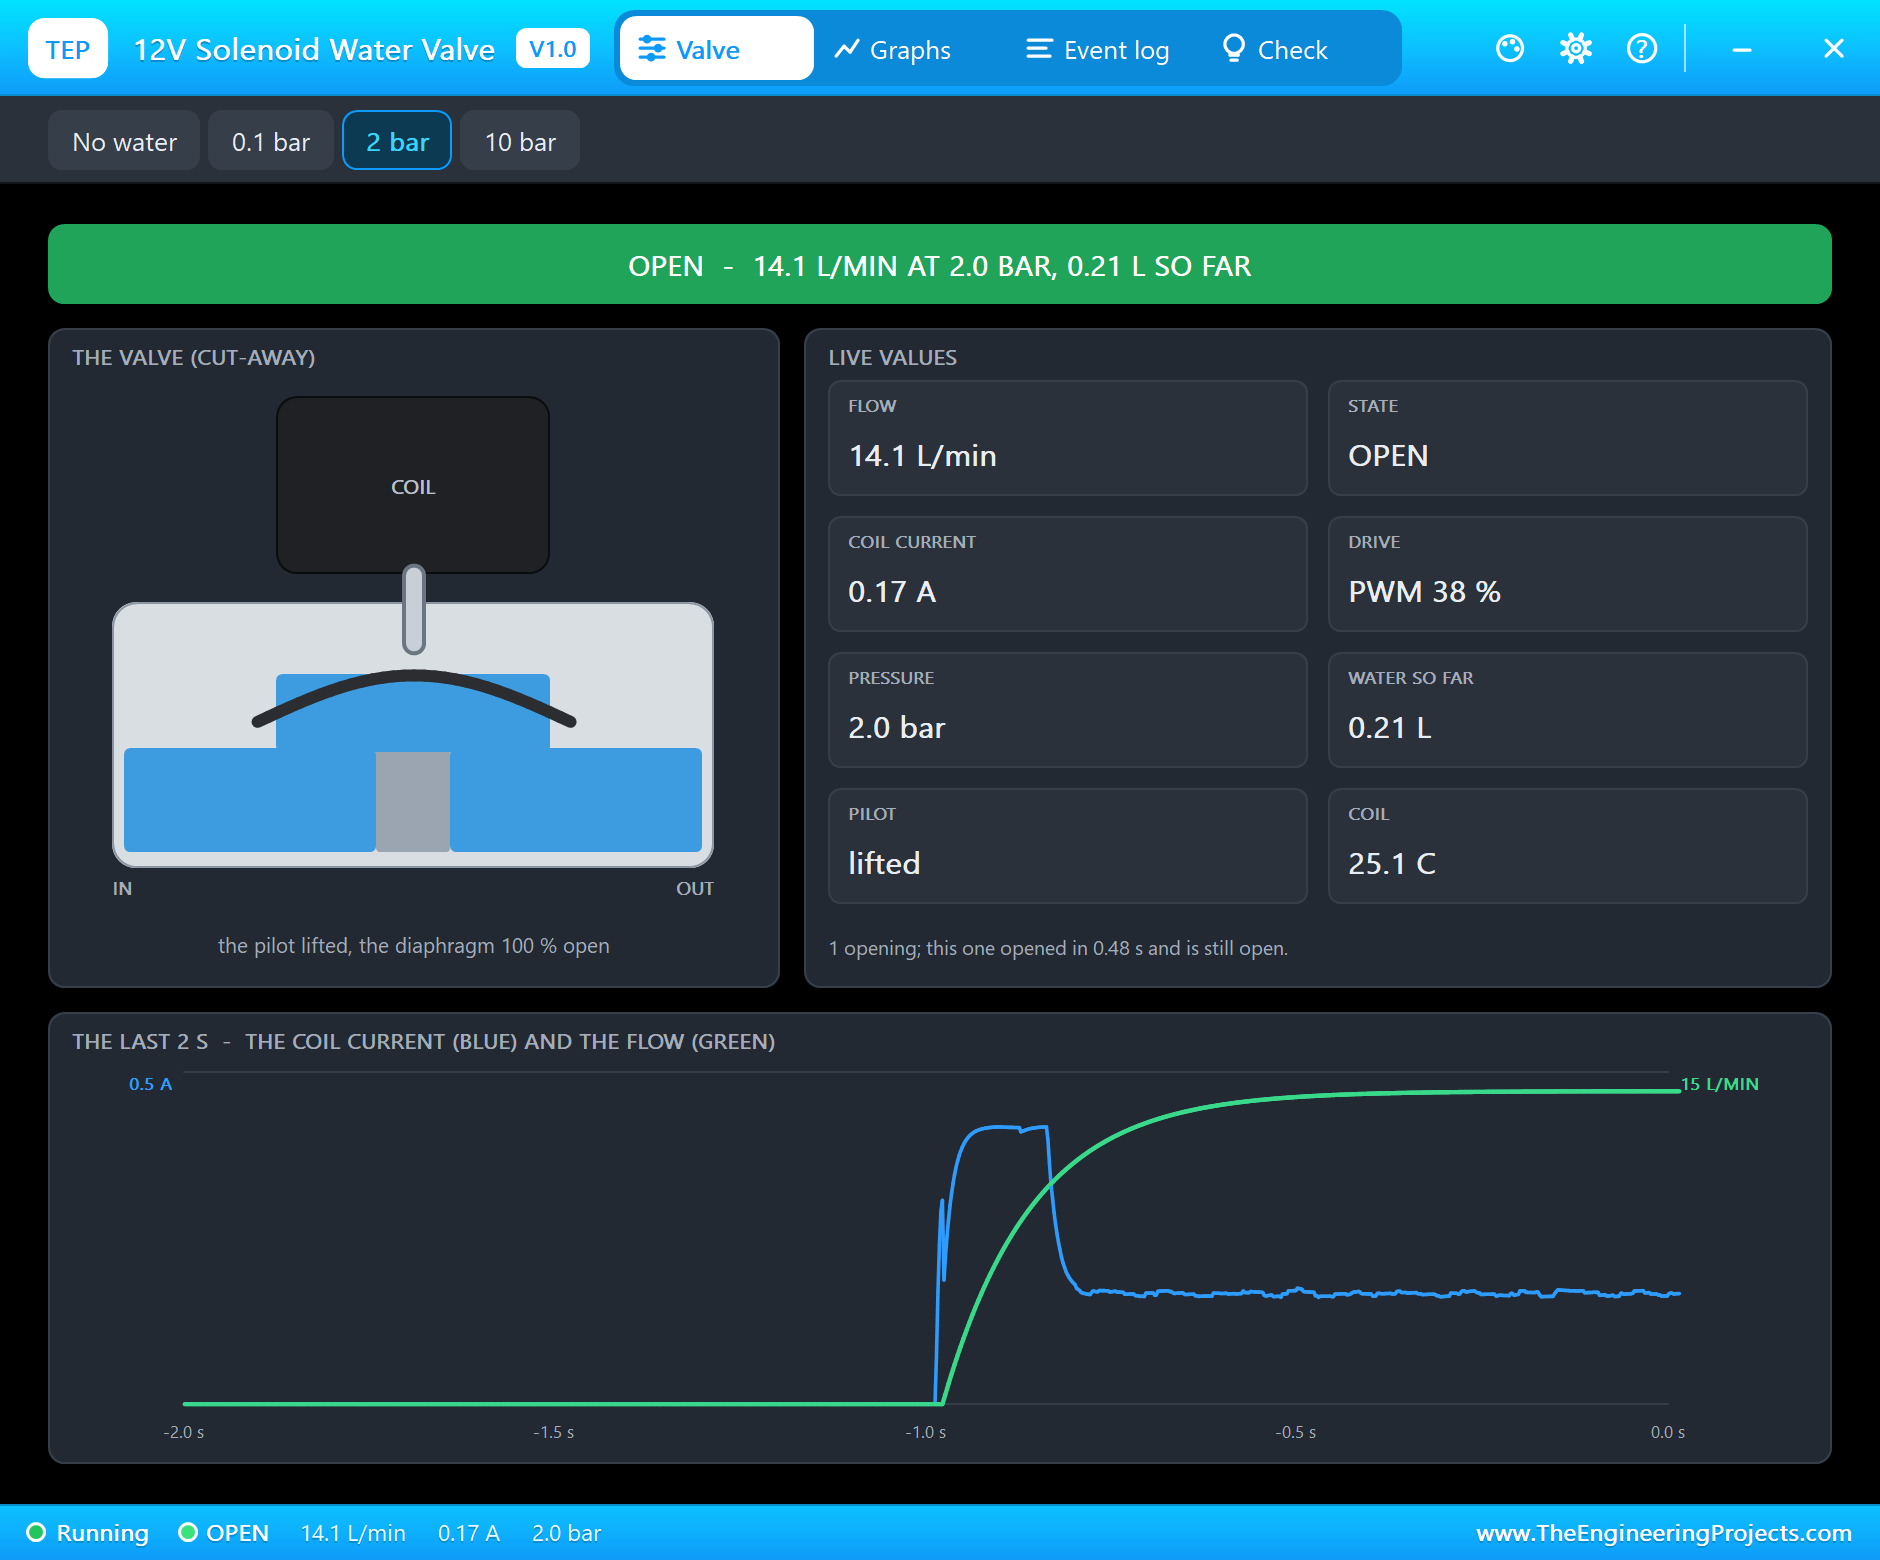
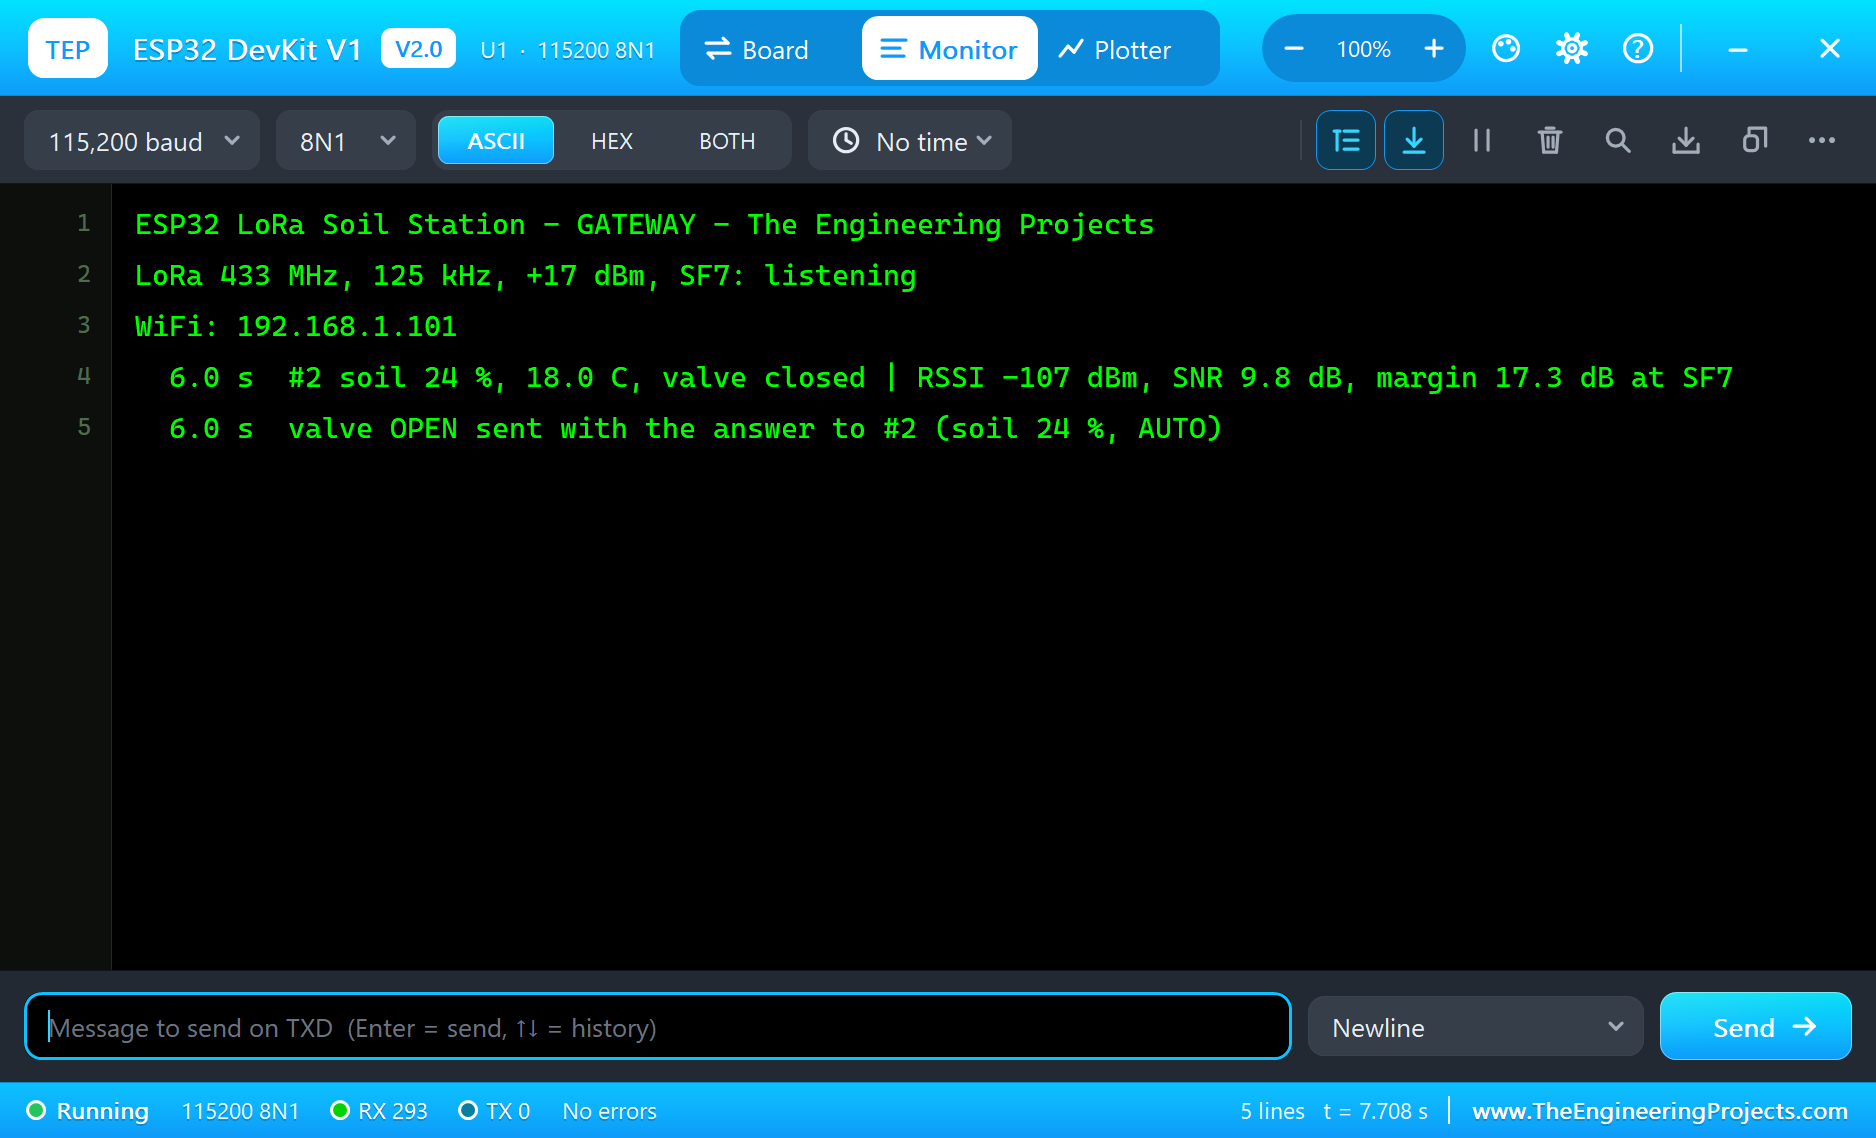
The field node's SX1278 pop-up is set to 2 km at the start. Reading #1 at 2.0 s gets no answer: the gateway is still joining the Wi-Fi network, and the node simply counts one miss. Reading #2 at 6.0 s, 46 ms on air, is heard at RSSI -107 dBm with an SNR of 9.8 dB, a margin of 17.3 dB at SF7. It says the soil is at 24 %, below 30 %, so the gateway's answer carries "valve OPEN", and at 6.2 s the node opens the valve: "150 ms at full voltage, then held at 40 %". The valve's pop-up shows it open, 14.1 L/min at 2 bar, and its graph shows the kick: the coil current jumps up for the first 150 ms and settles at about 0.17 A for the hold. The soil sensor's pop-up shows the dry soil, 8 % water by volume, read as 23 %, and the DS18B20's pop-up the soil at 18.0 C.
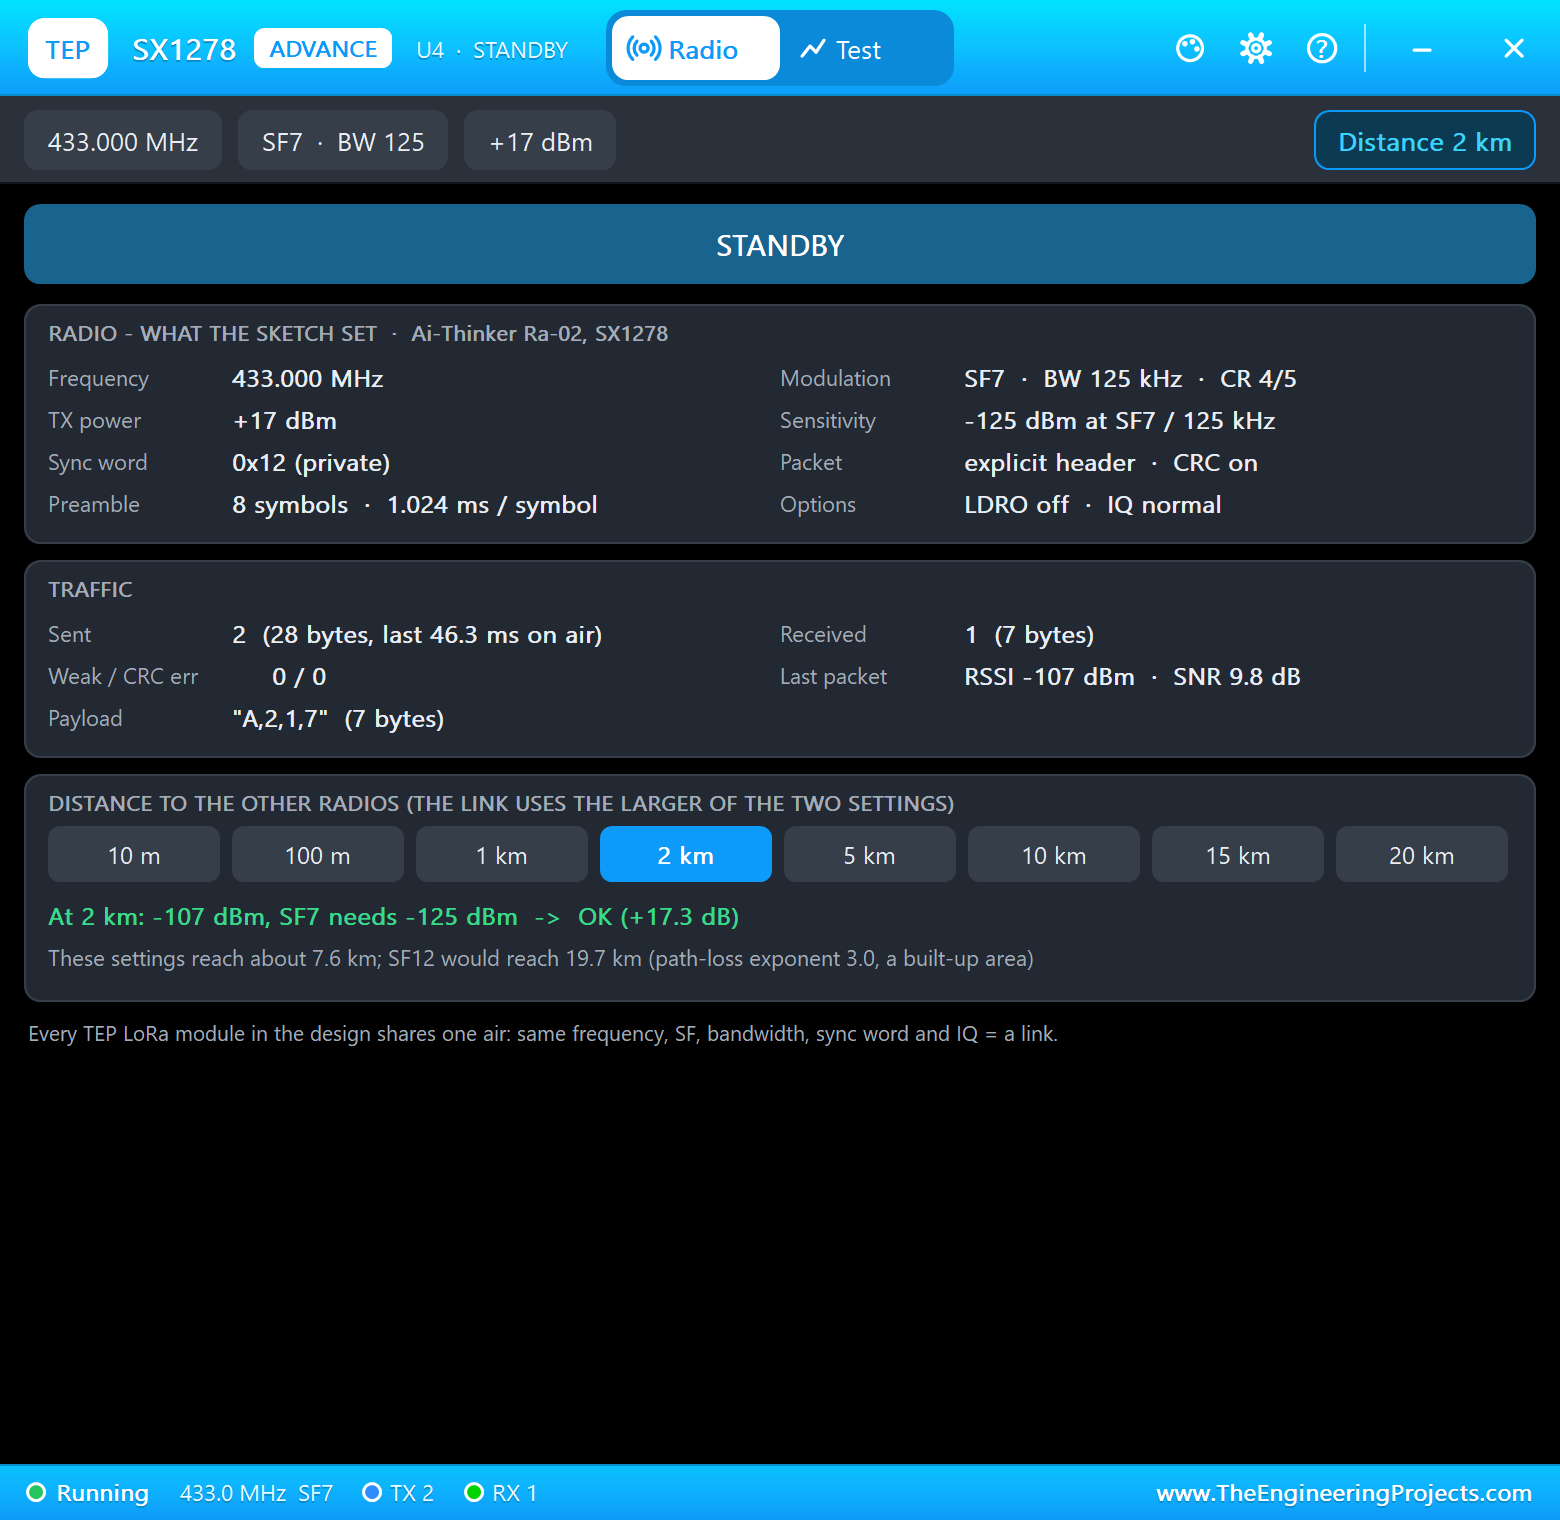
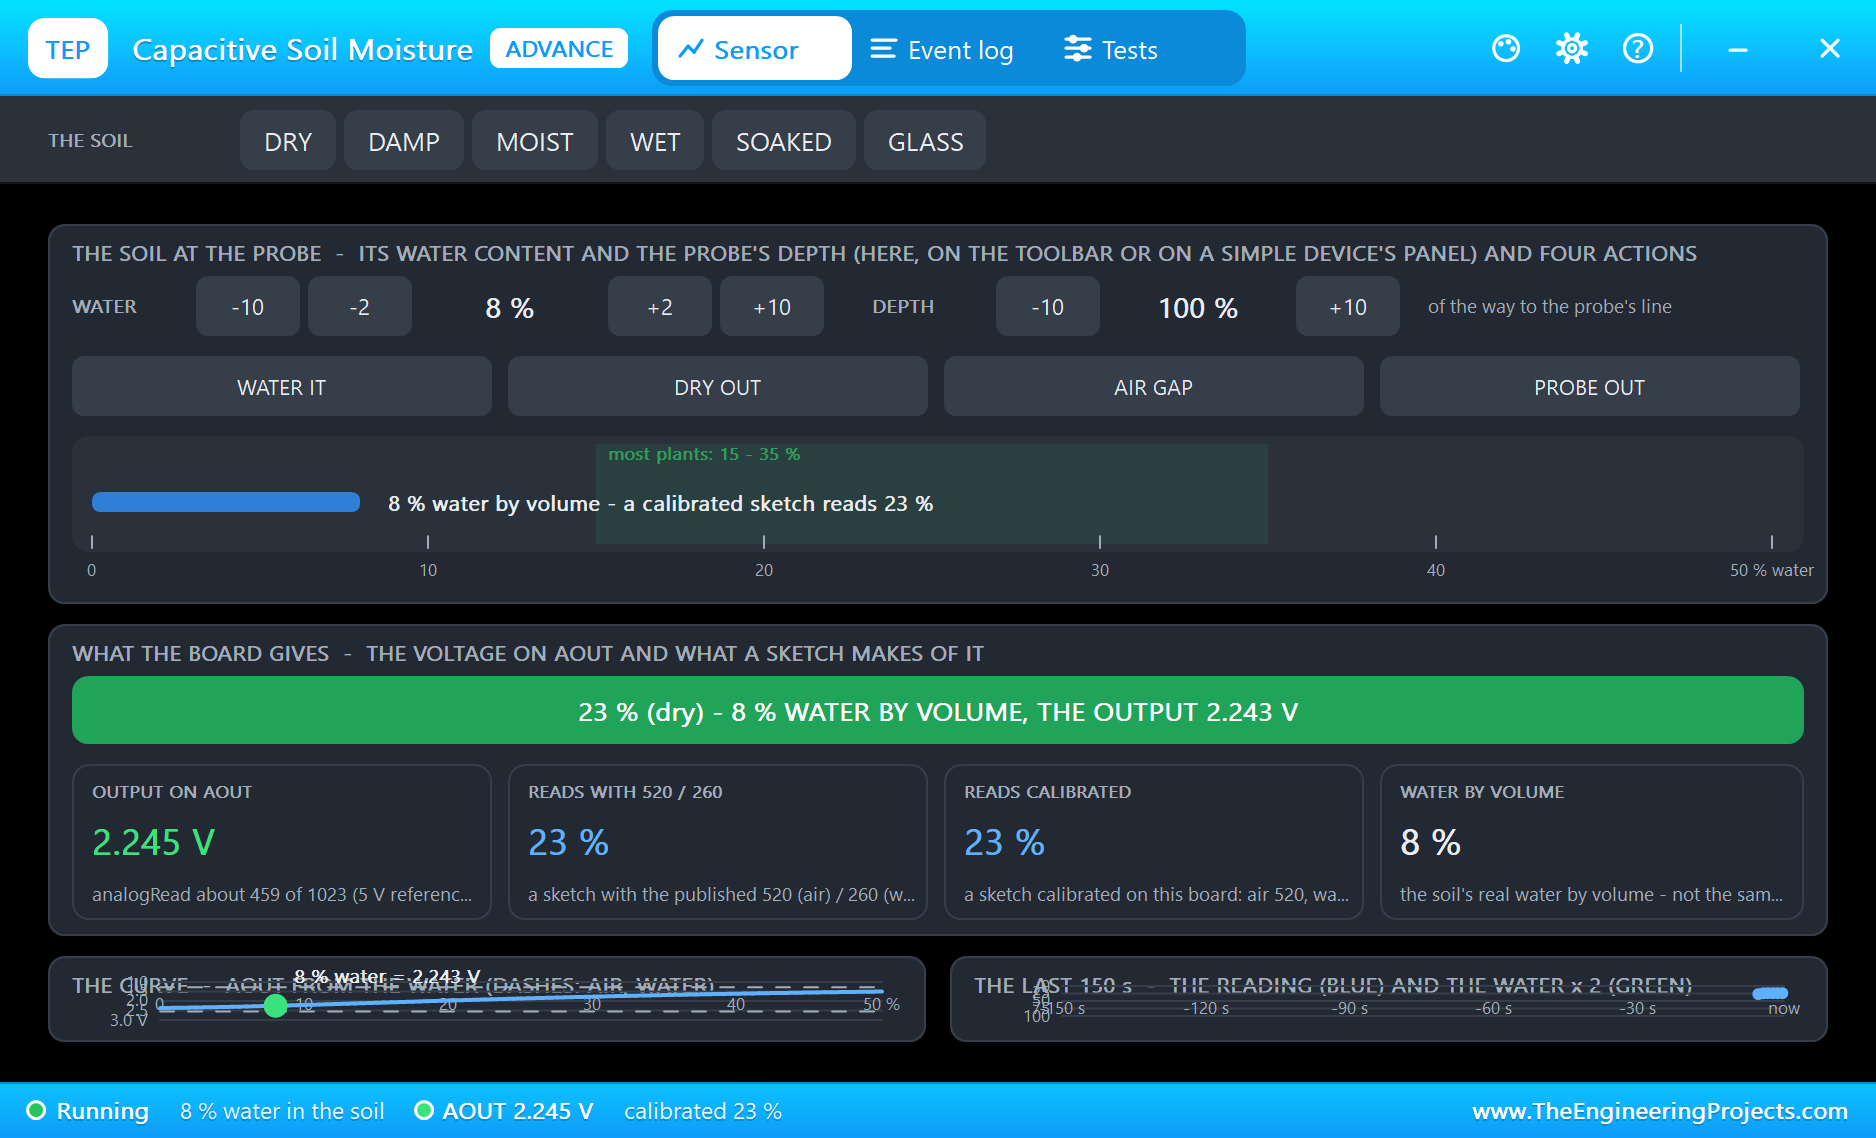
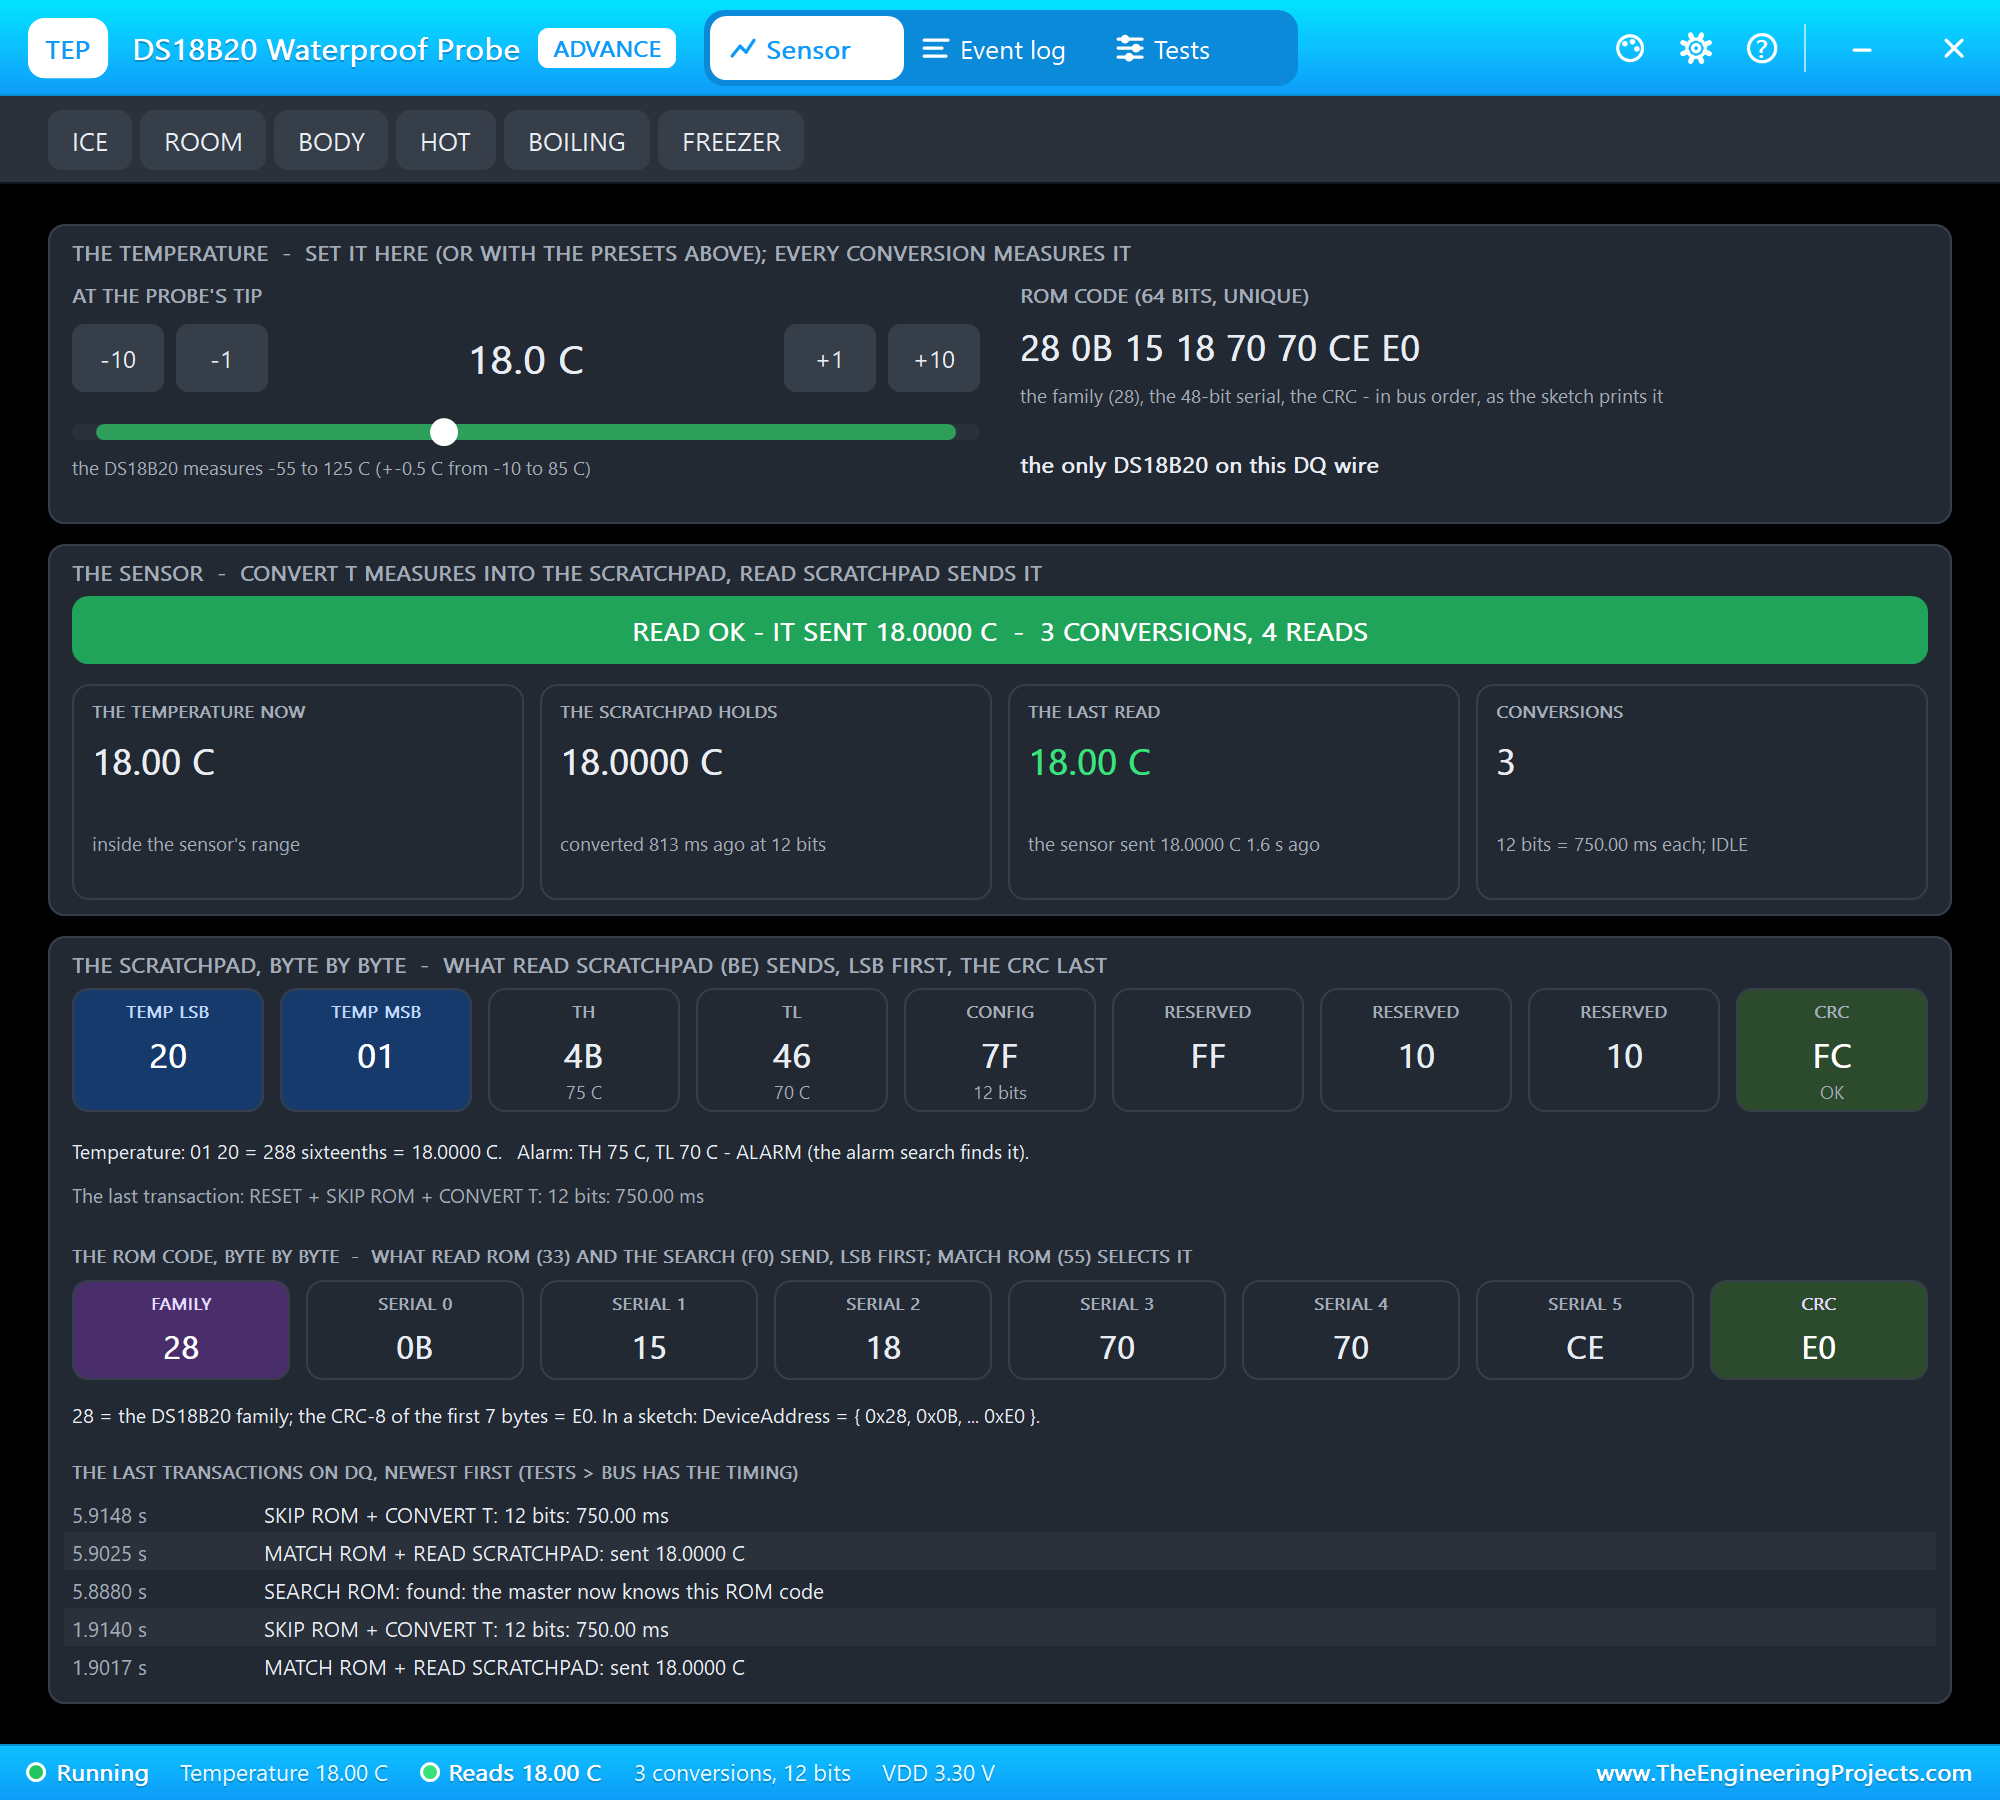
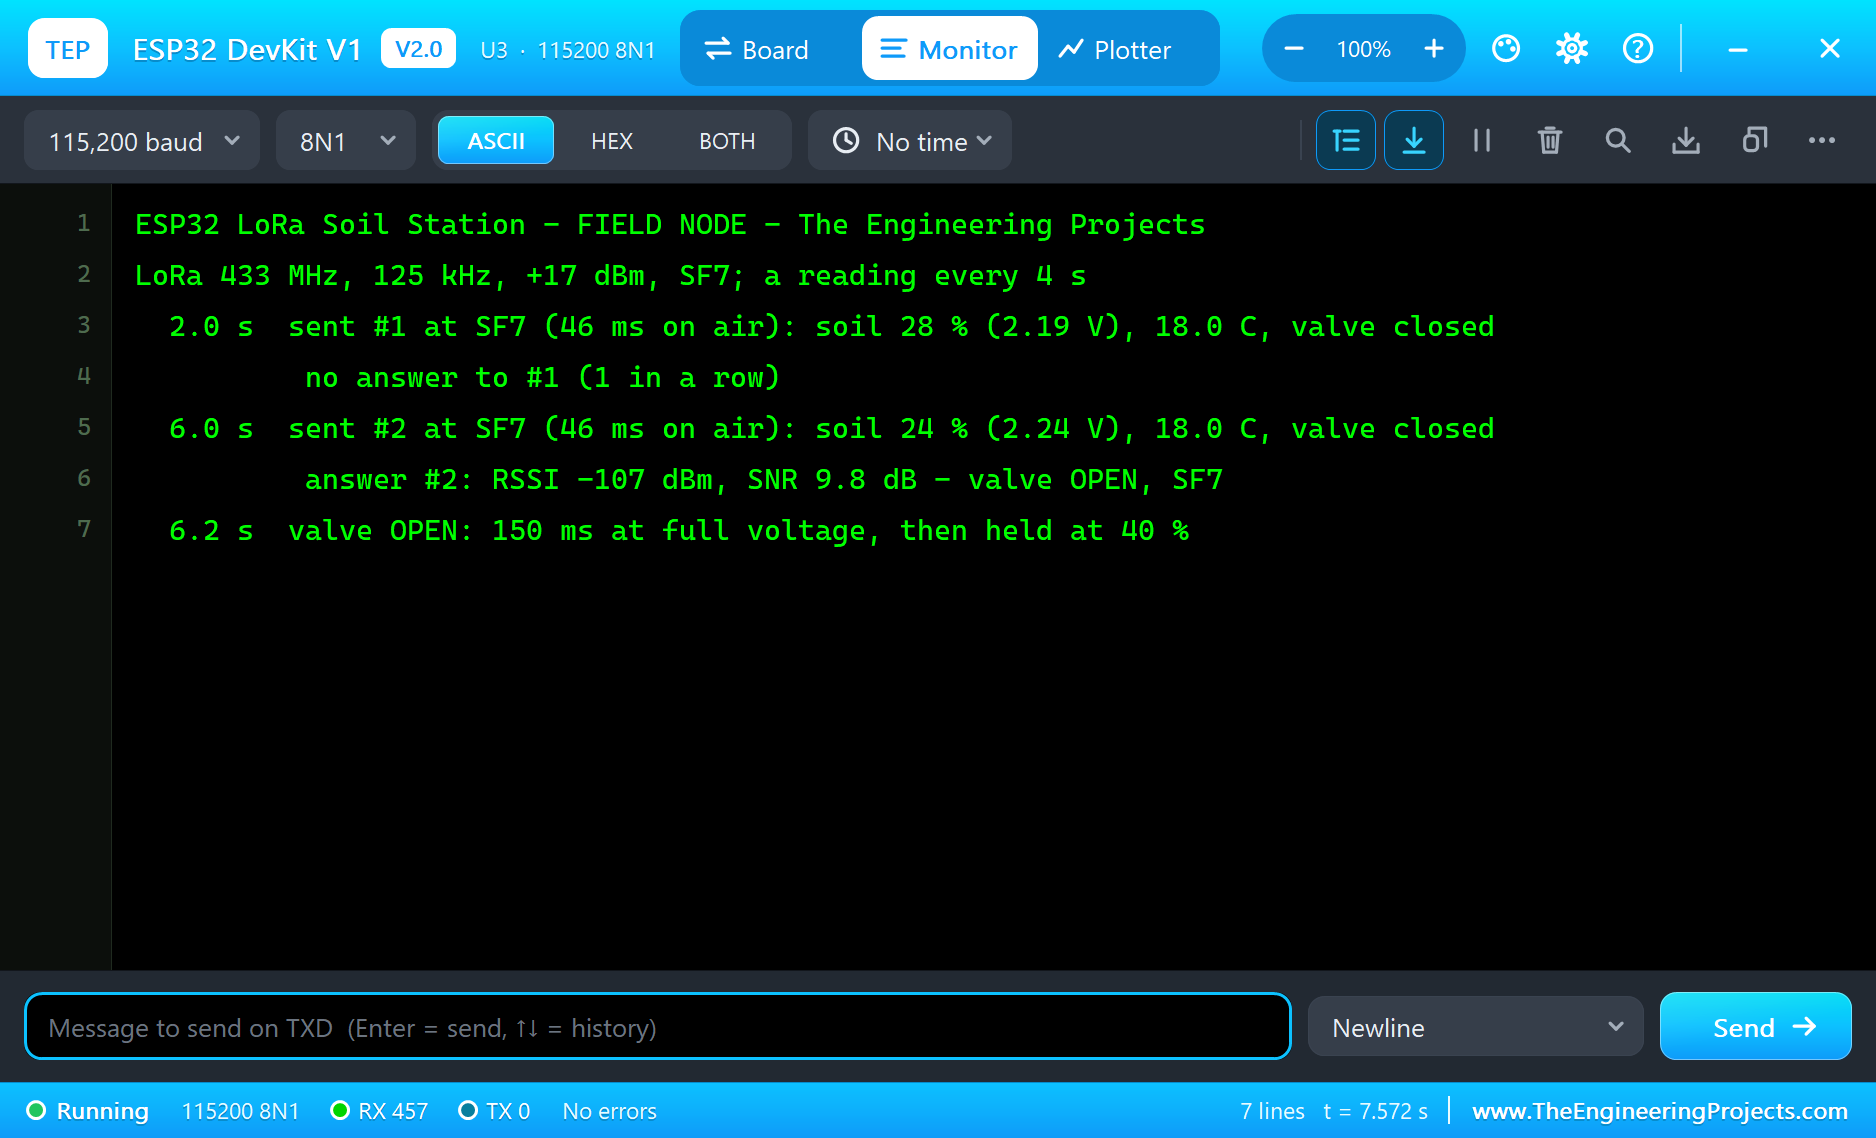
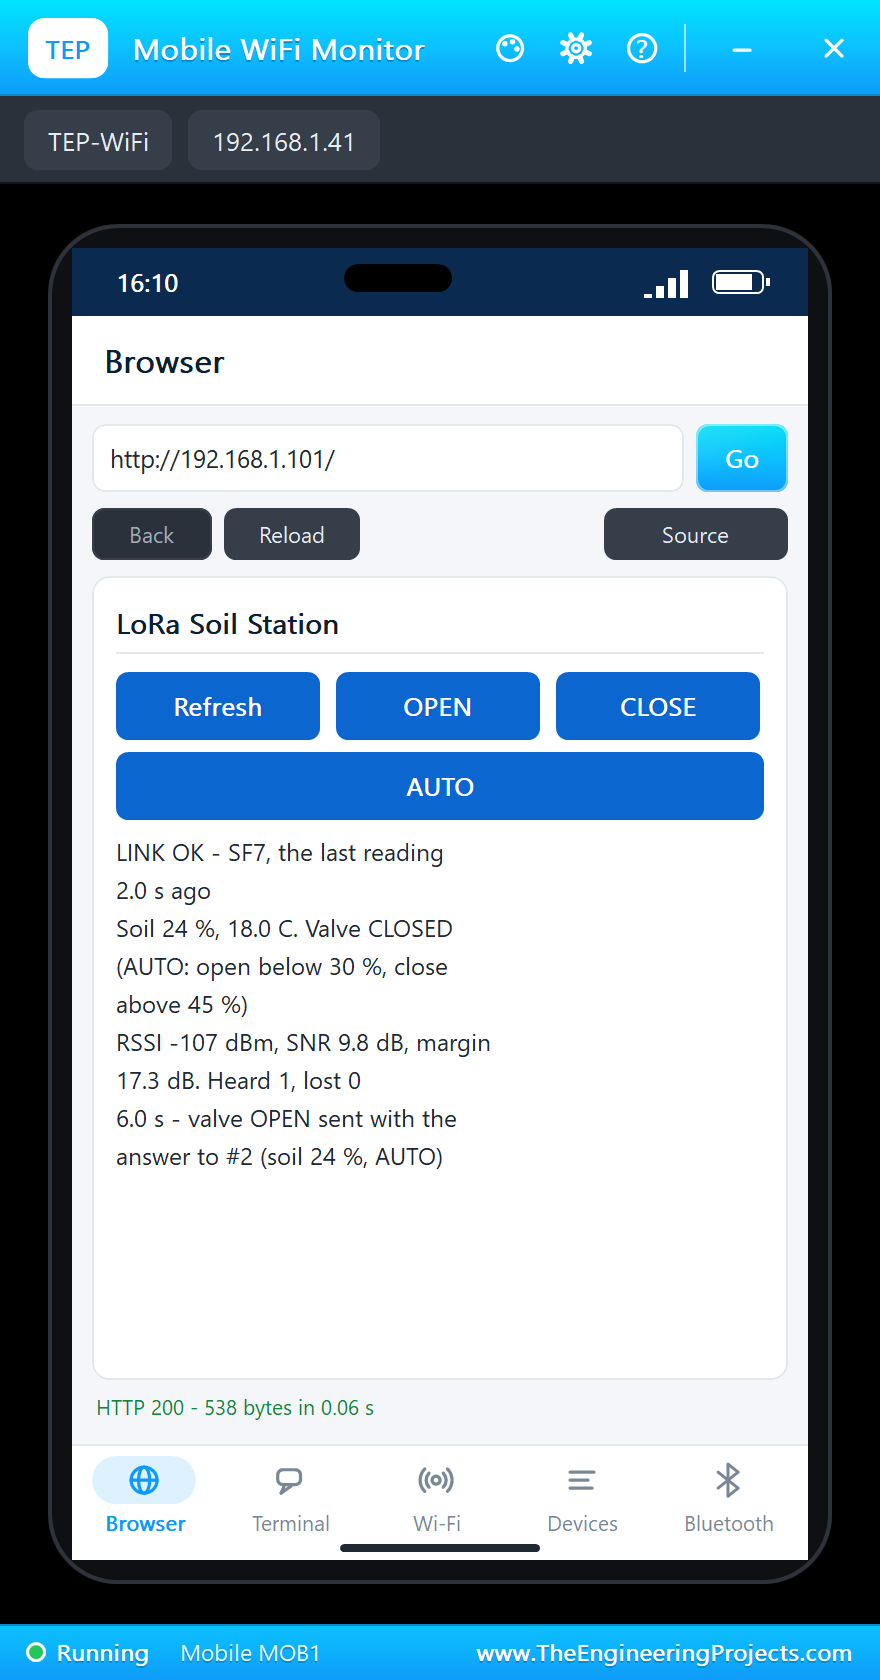
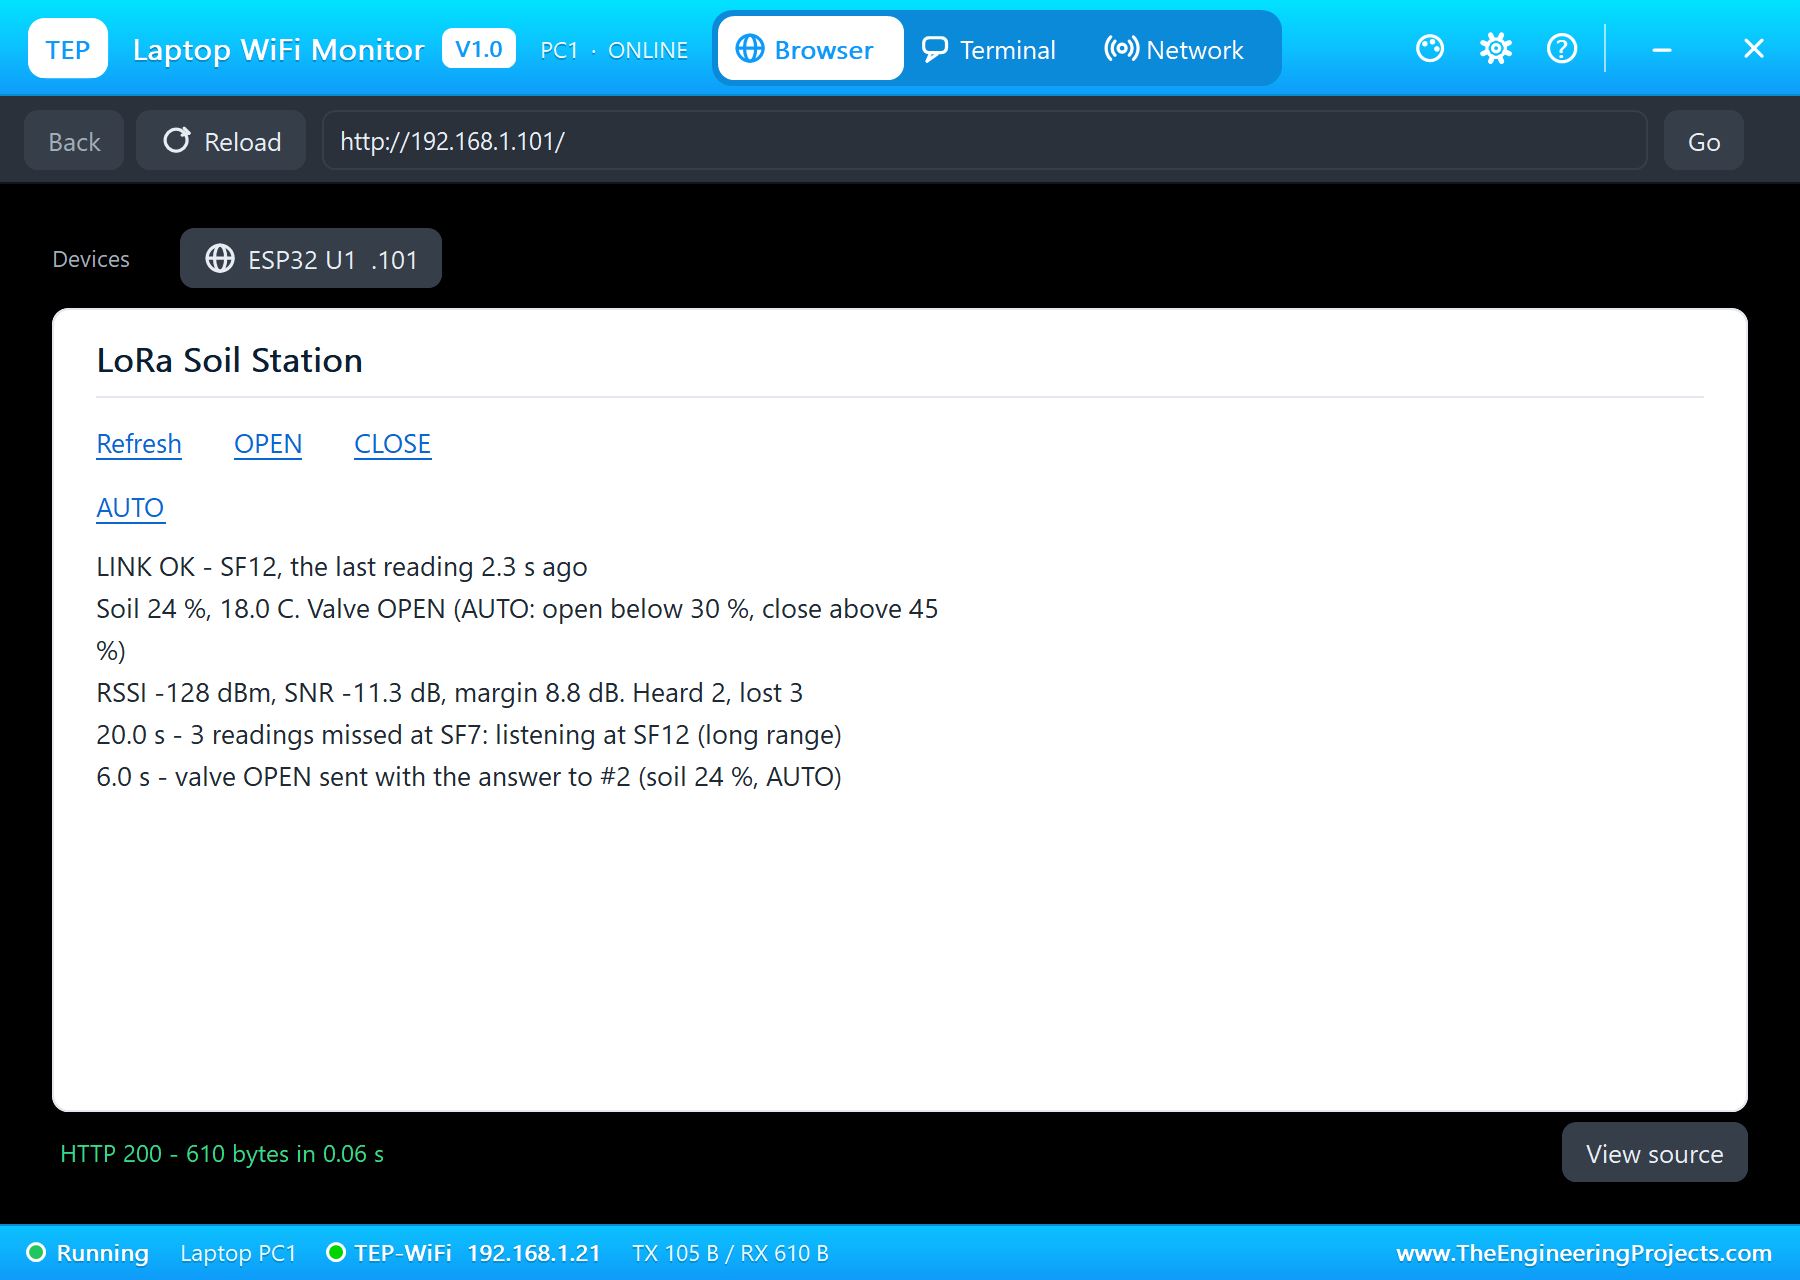
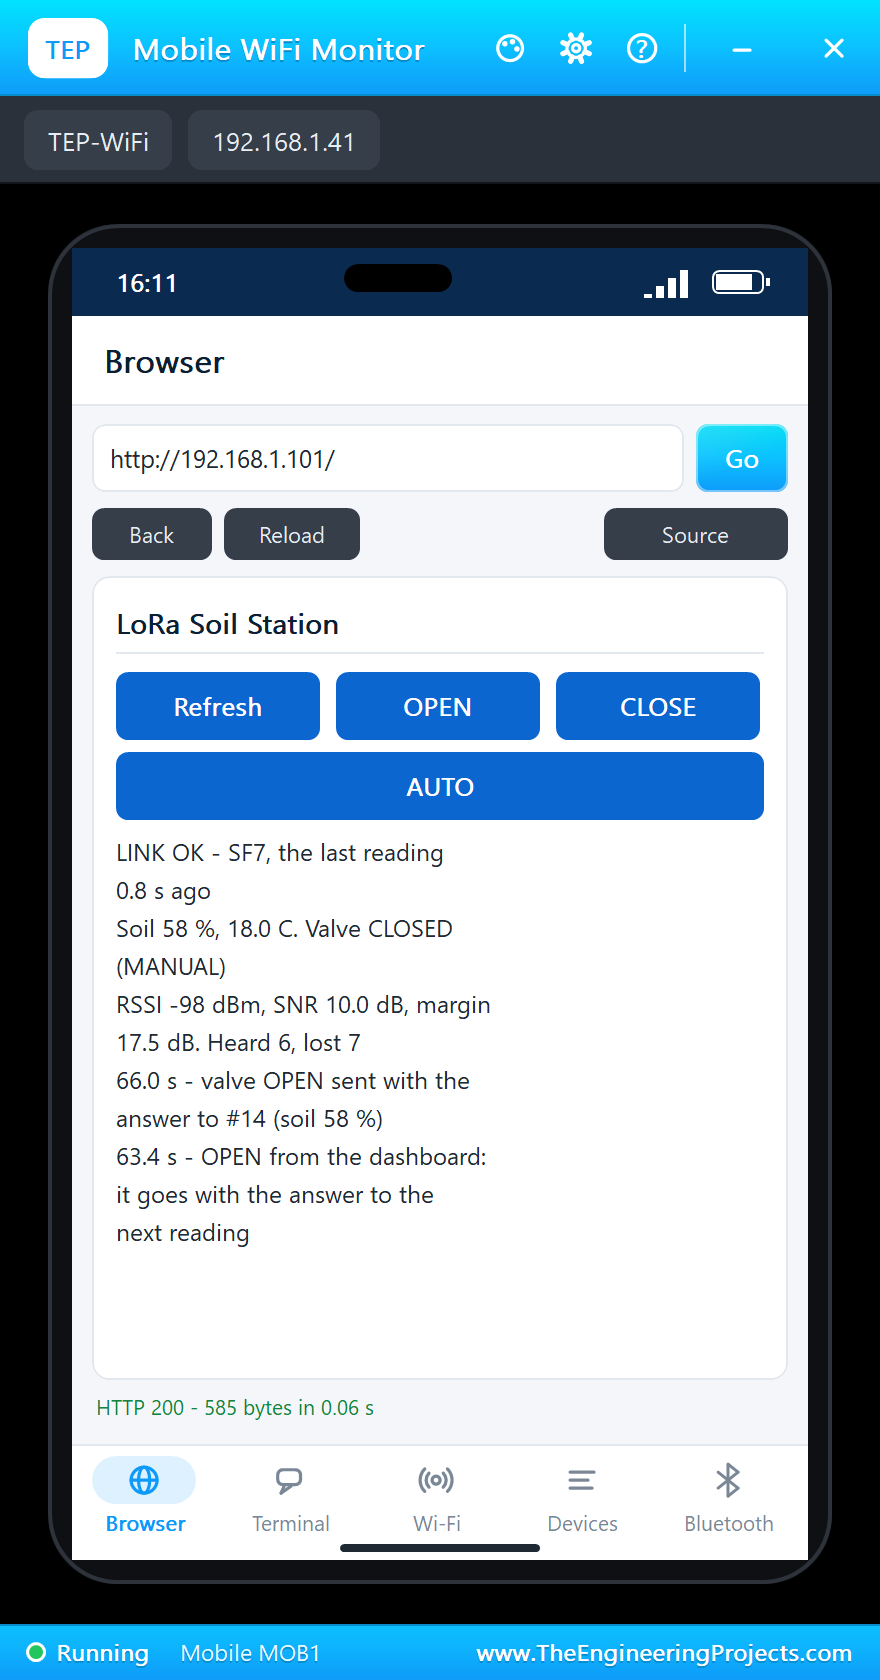
On the phone the dashboard shows LINK OK at SF7, the soil, the valve, RSSI, SNR and the margin.
10 km: SF7 Fails, Both Go to SF12
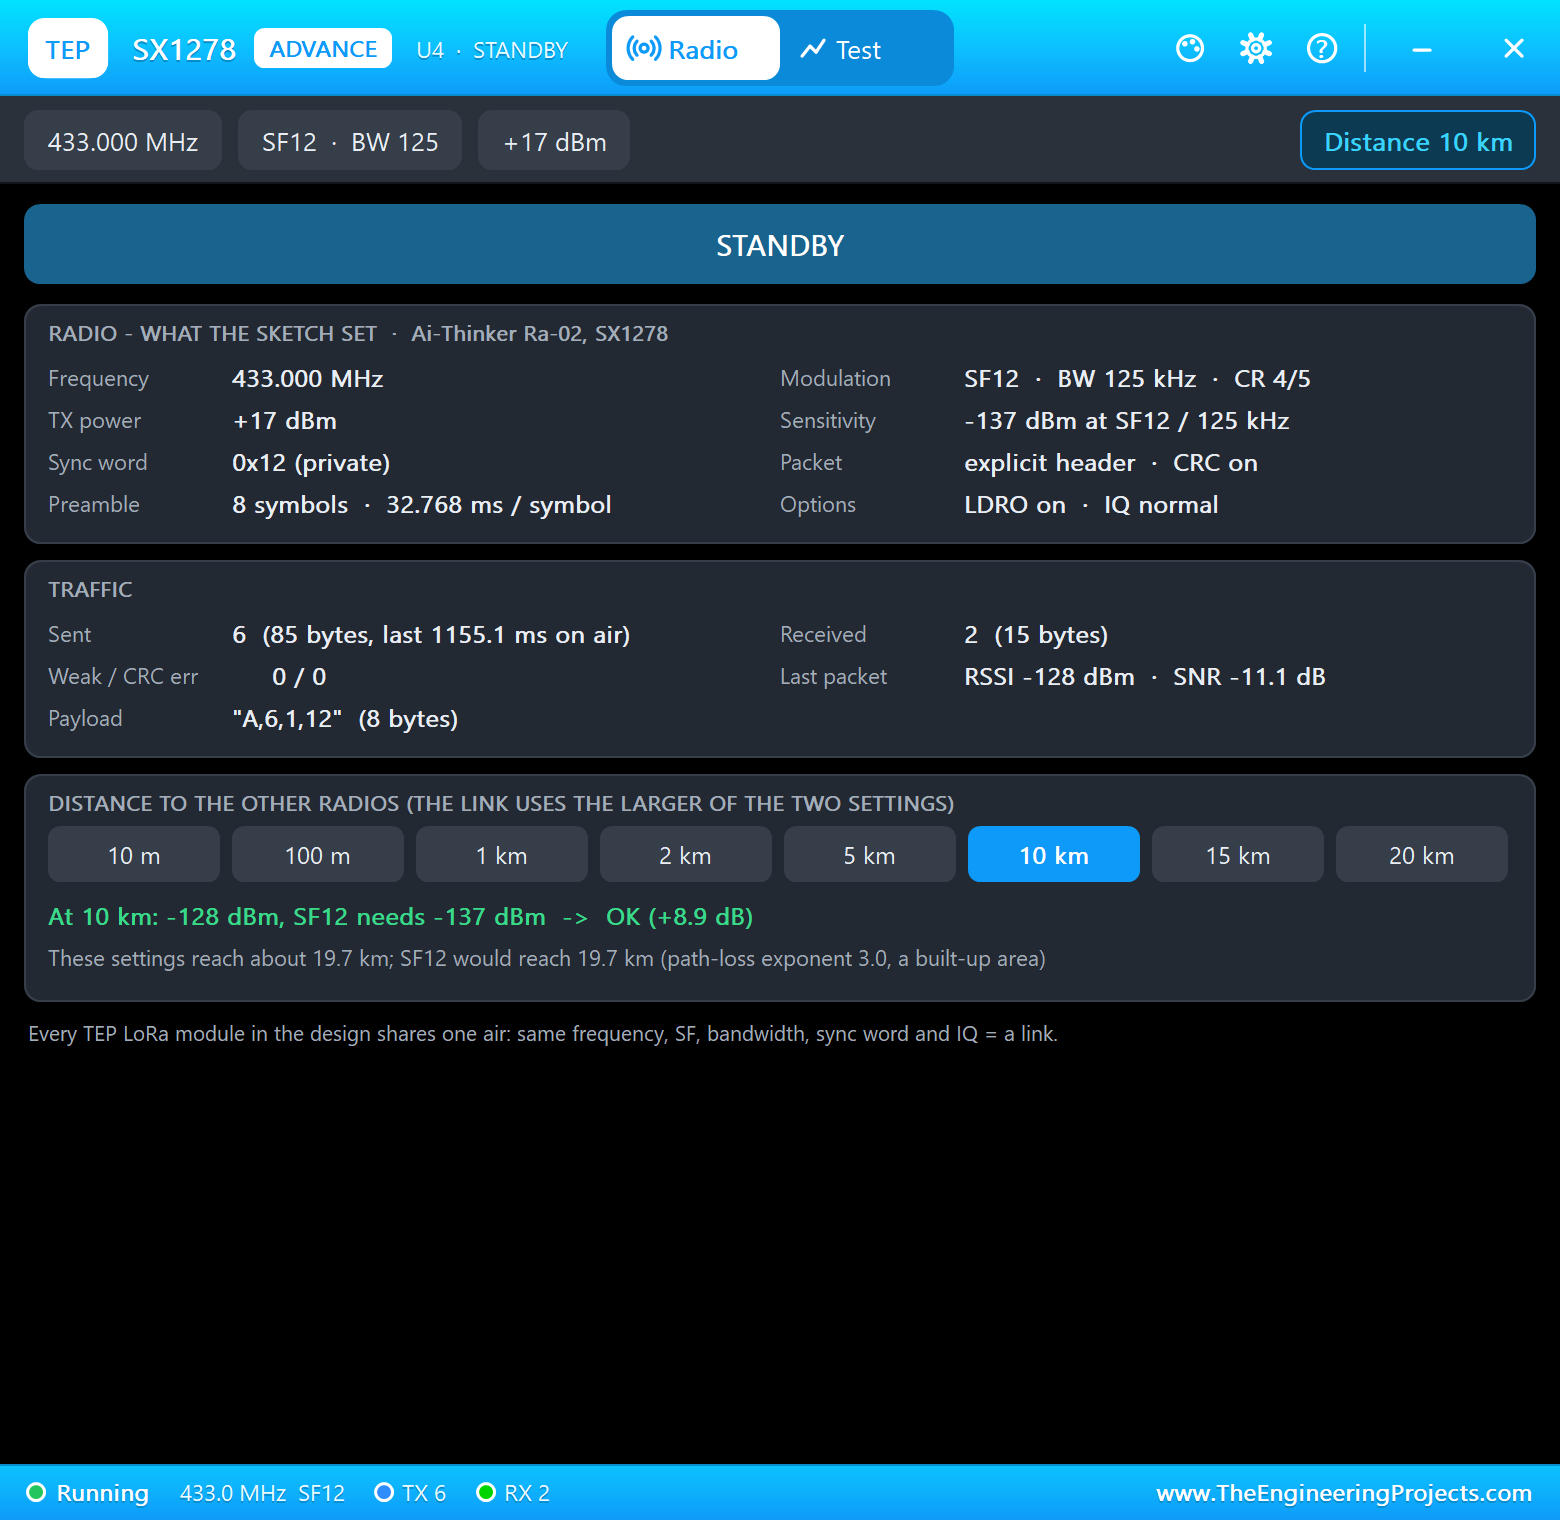
At 8.3 s the field moves to 10 km. Readings #3, #4 and #5 go out at SF7 and nothing comes back: at -128 dBm they are too weak for SF7. At 19.0 s the node reports "3 packets without an answer: long-range mode, SF12", and at 20.0 s the gateway, after three and a half silent periods, "listening at SF12". Reading #6 at 25.1 s takes 1155 ms on air, 25 times longer than at SF7, and arrives: RSSI -128 dBm, SNR -11.3 dB, a margin of 8.8 dB at SF12. The link is back, at long range.
20 km: NODE SILENT and the Fail-Safe
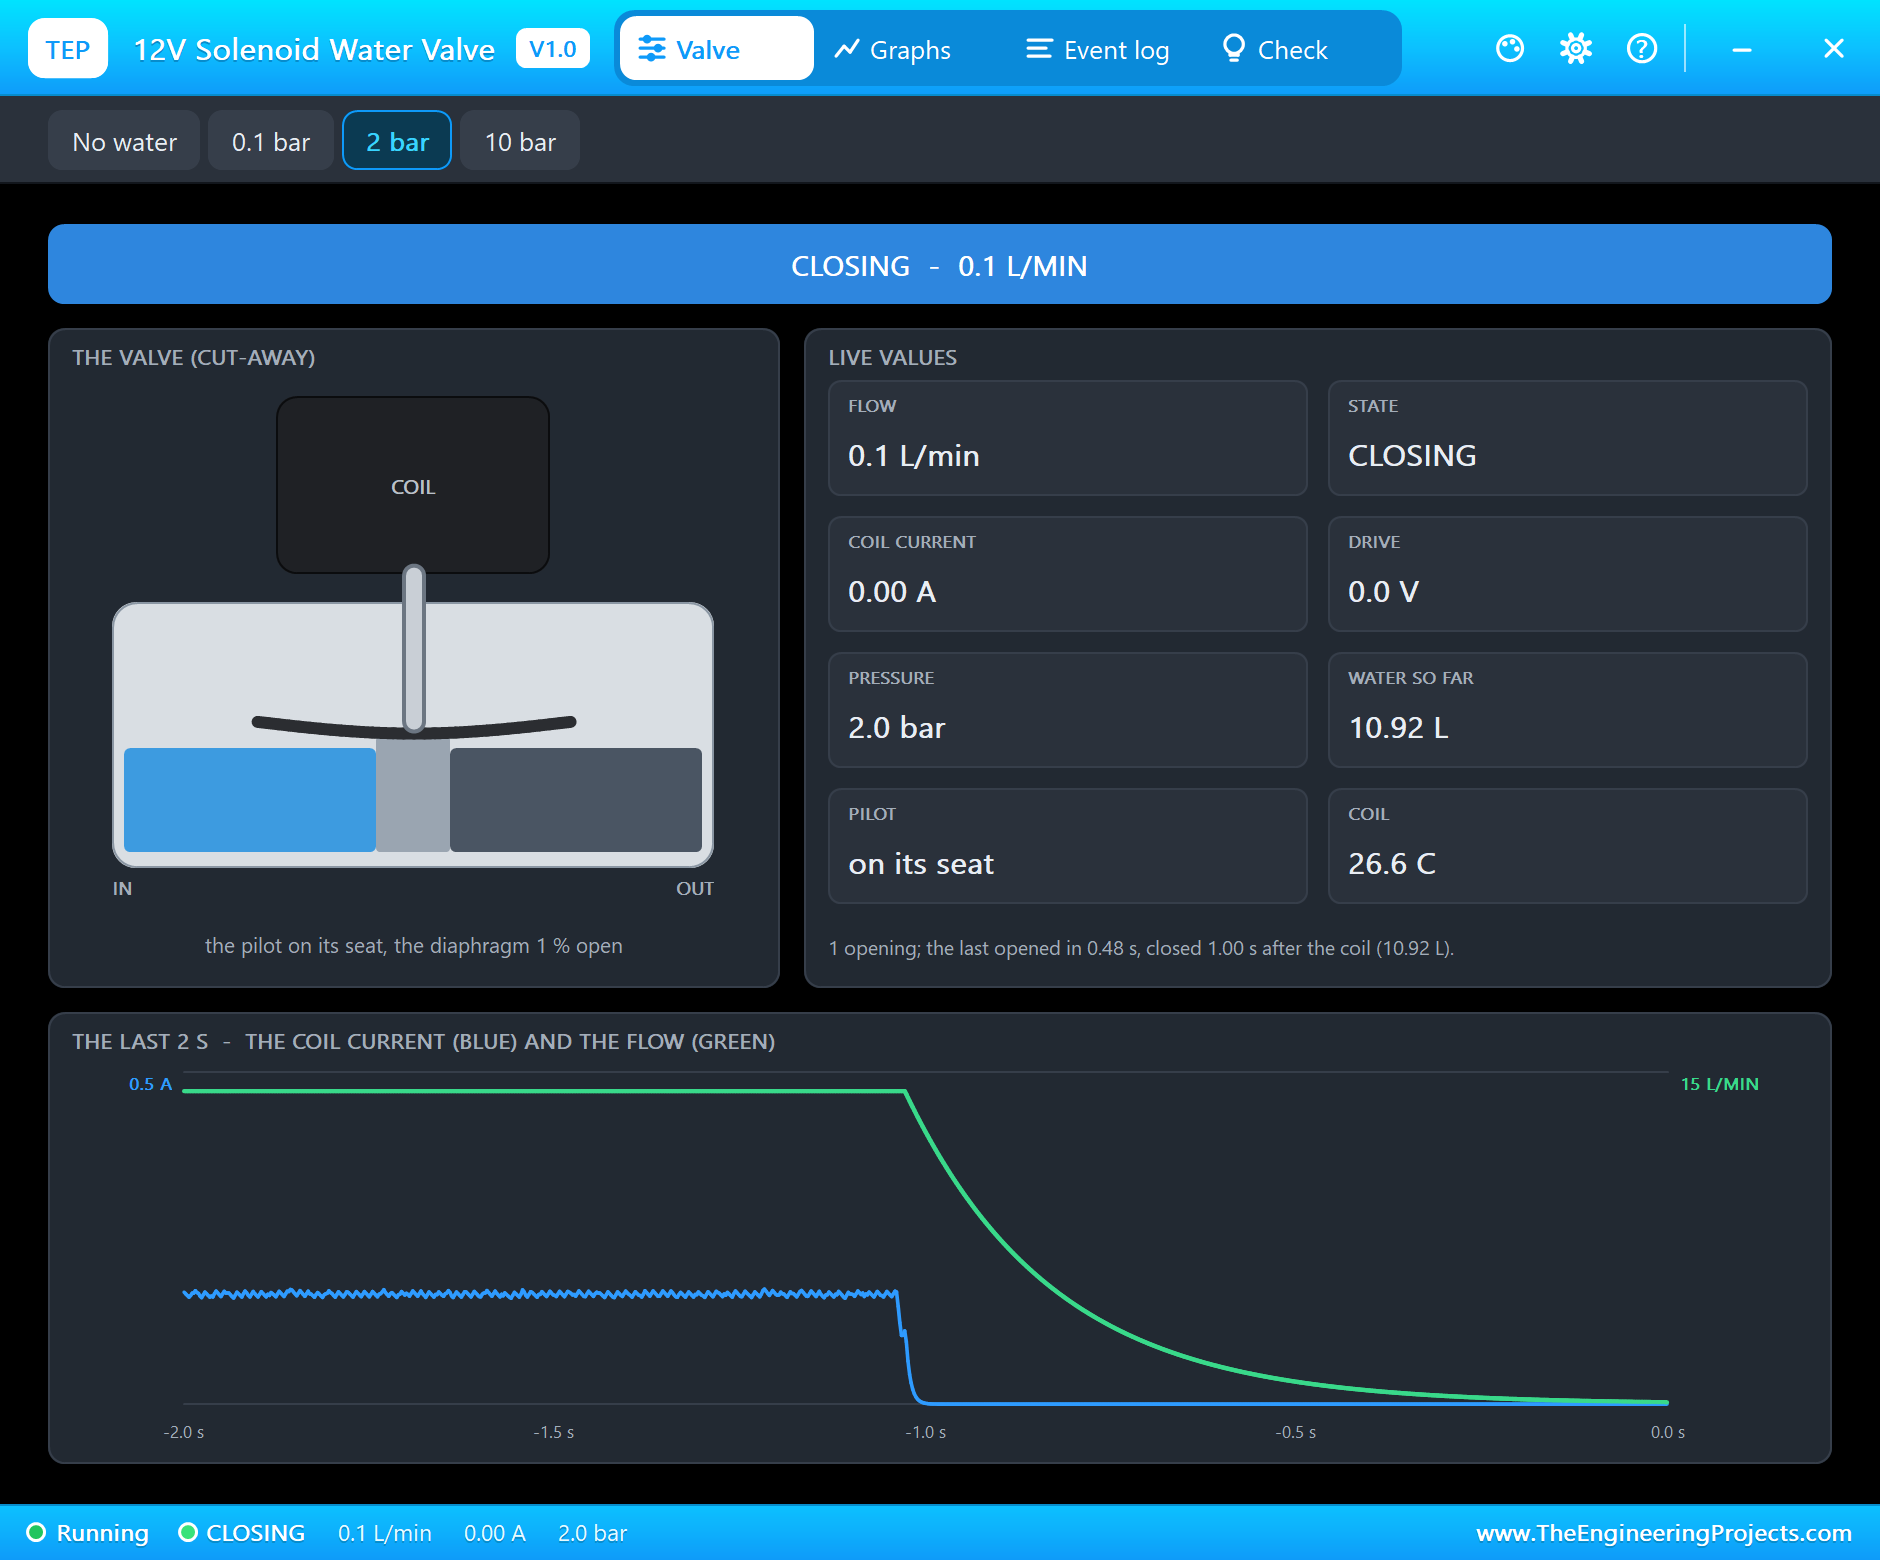
At 27.9 s the field moves to 20 km, out of reach even at SF12: -137 dBm, 0.2 dB short. Readings #7 to #10 get no answer. At 46.1 s the gateway reports "NODE SILENT: nothing heard for 21 s", and at 52.2 s, after the fourth unanswered reading, the node closes the valve by itself: "fail-safe: no gateway for 4 packets - the valve closes". The valve's pop-up shows it closing and the flow falling to nothing. On the way, the probe once failed to answer, and the node printed "the probe did not answer: the last temperature is kept" and sent 18.0 C as before: the guard doing its job.
1 km: Back, and Back to SF7
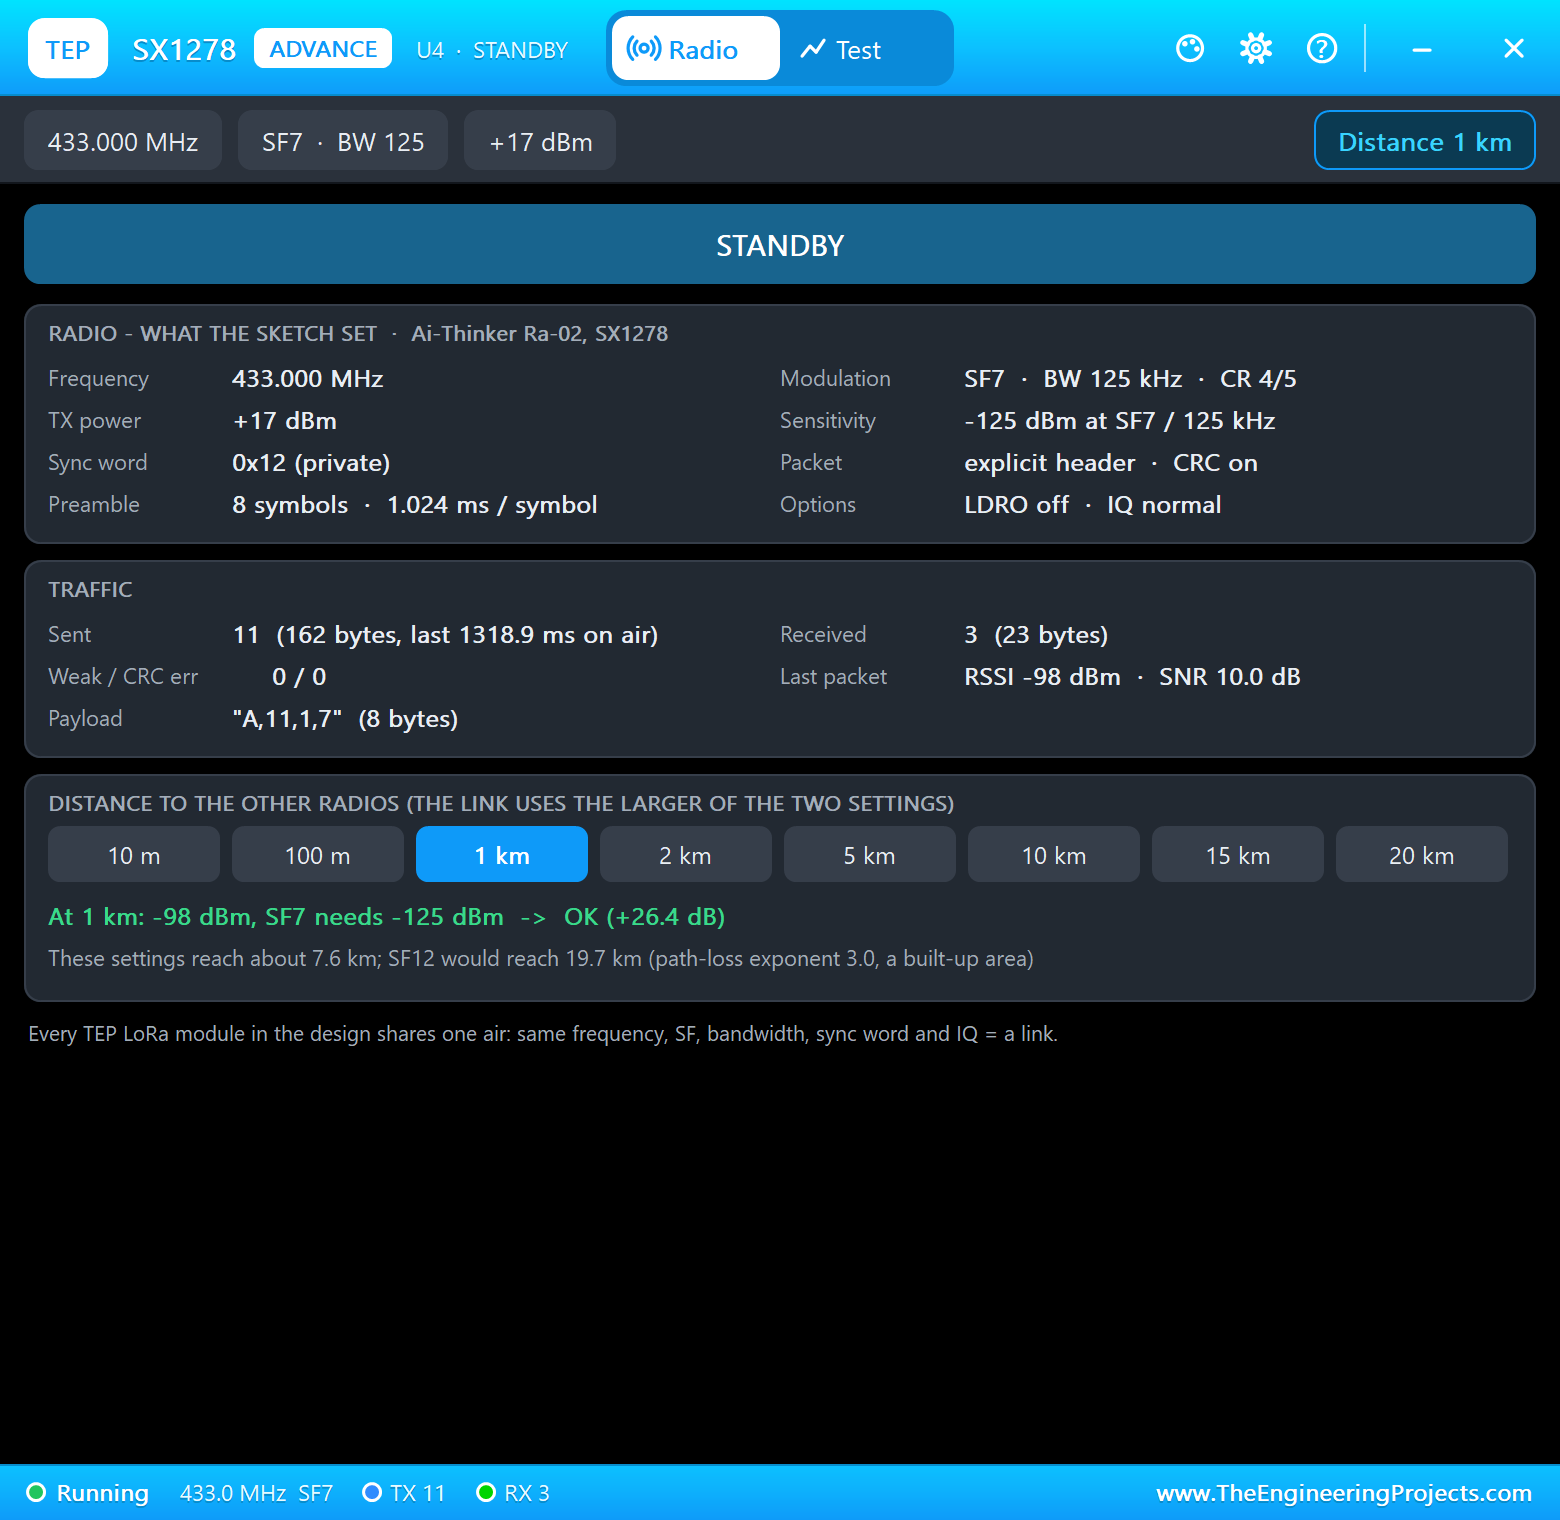
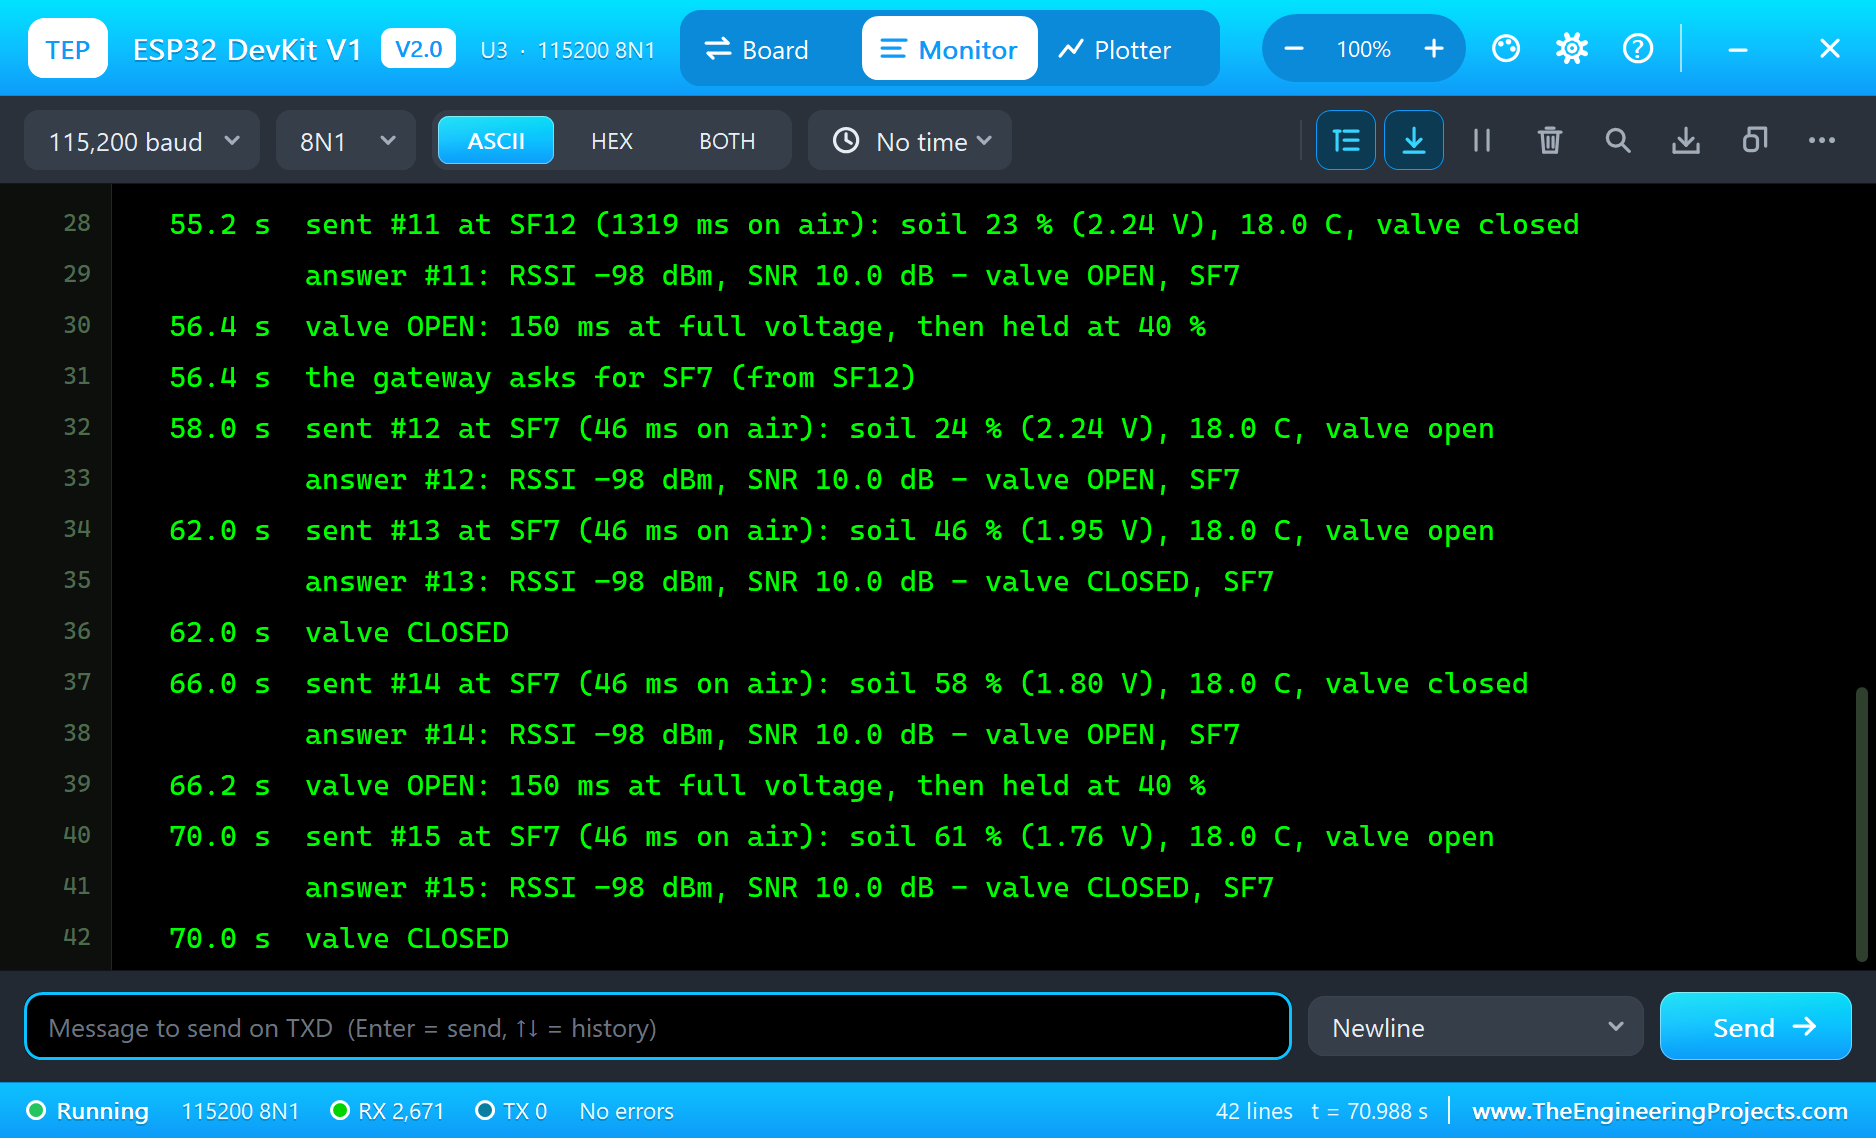
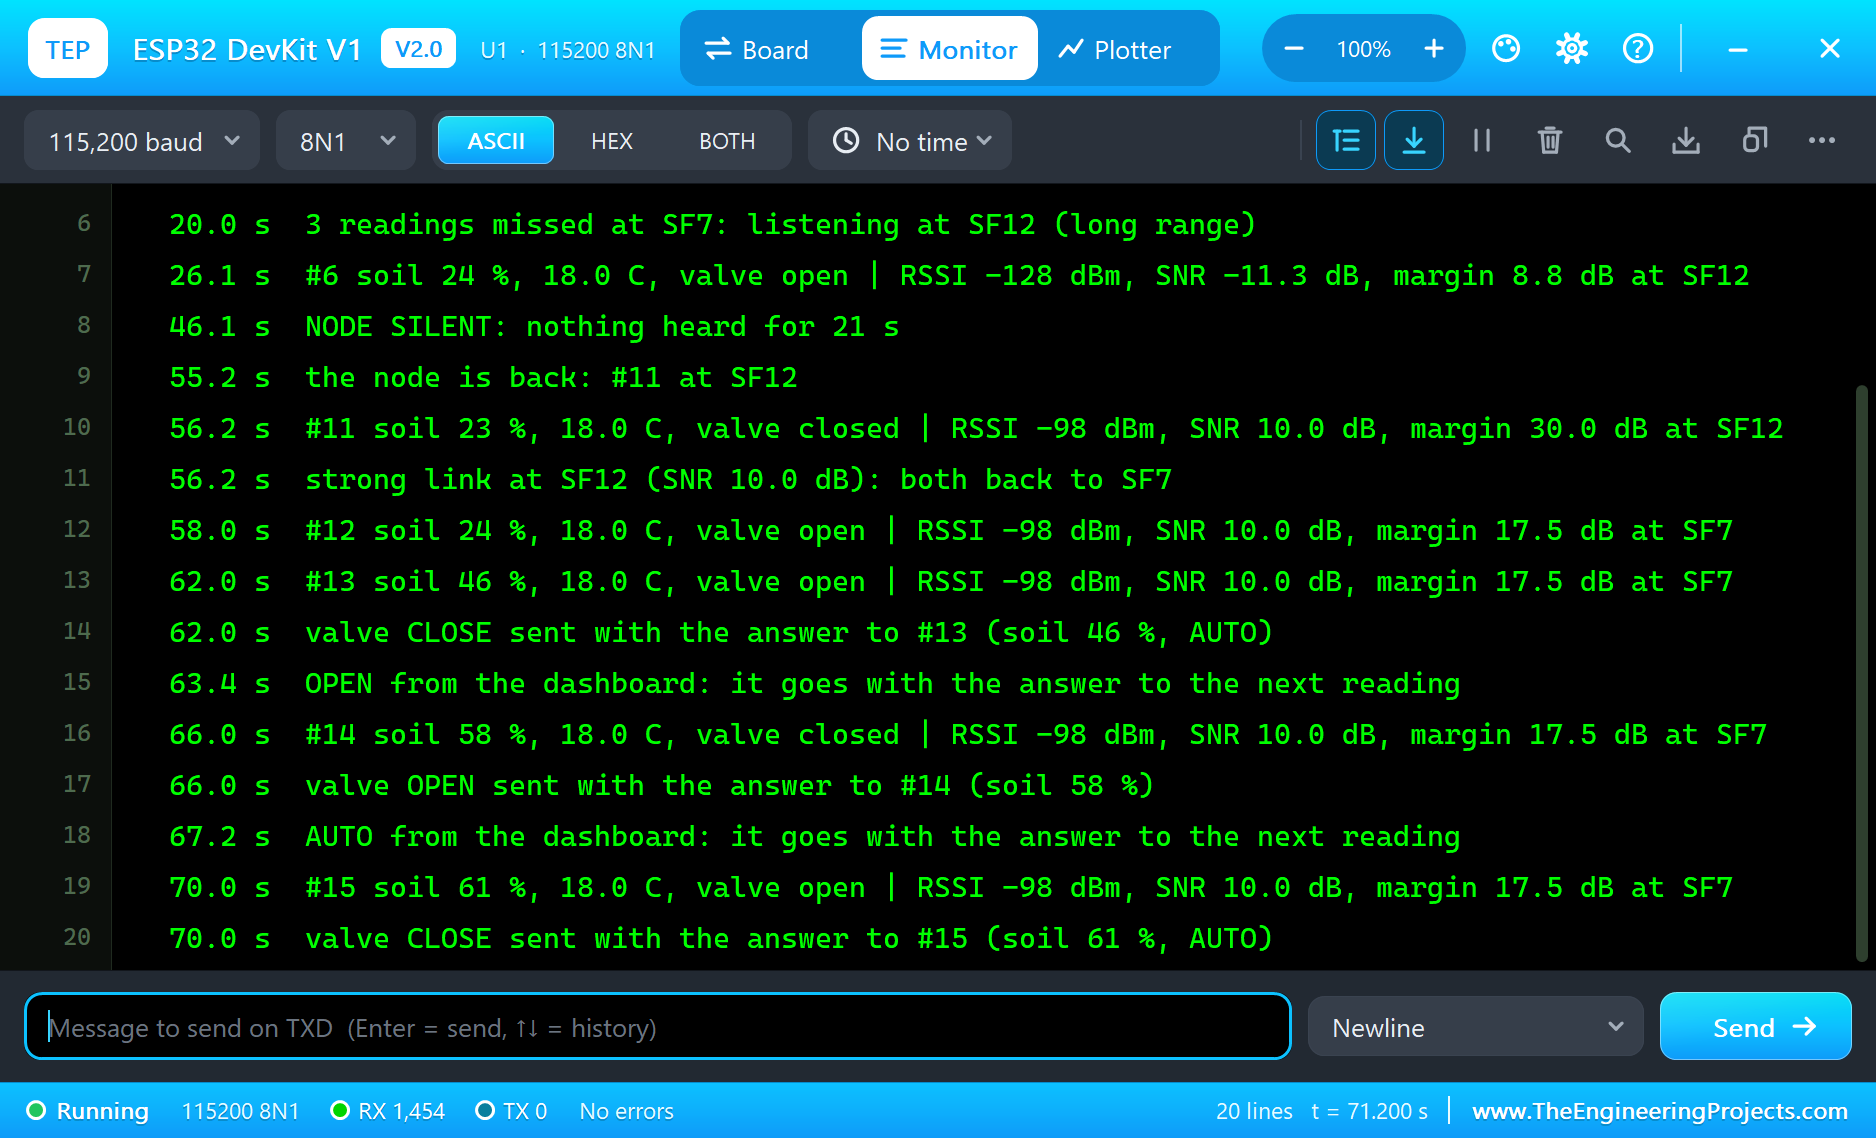
At 53.9 s the field comes back to 1 km. Reading #11 at SF12, at 55.2 s, arrives at -98 dBm with an SNR of 10 dB, a margin of 30 dB: "the node is back", and so strong that the gateway puts SF7 in its answer, "strong link at SF12: both back to SF7". The same answer still says "valve OPEN", because the soil is still dry, so the node opens the valve again and switches to SF7; reading #12 at 58.0 s is back to 46 ms on air.
Watering, AUTO, and the Valve by Hand
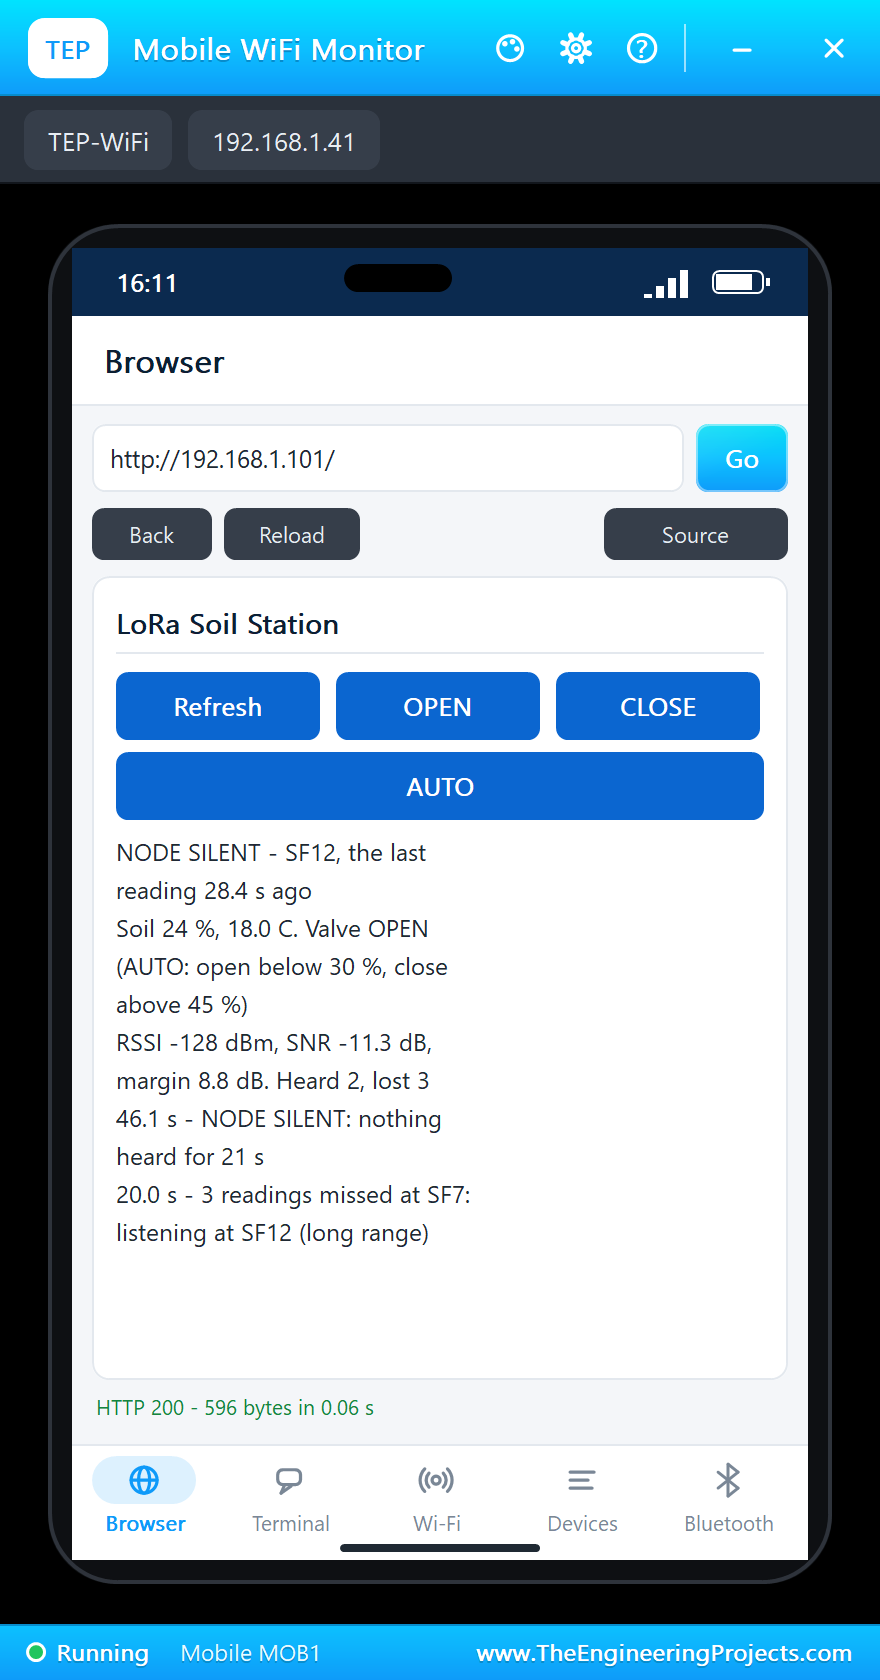
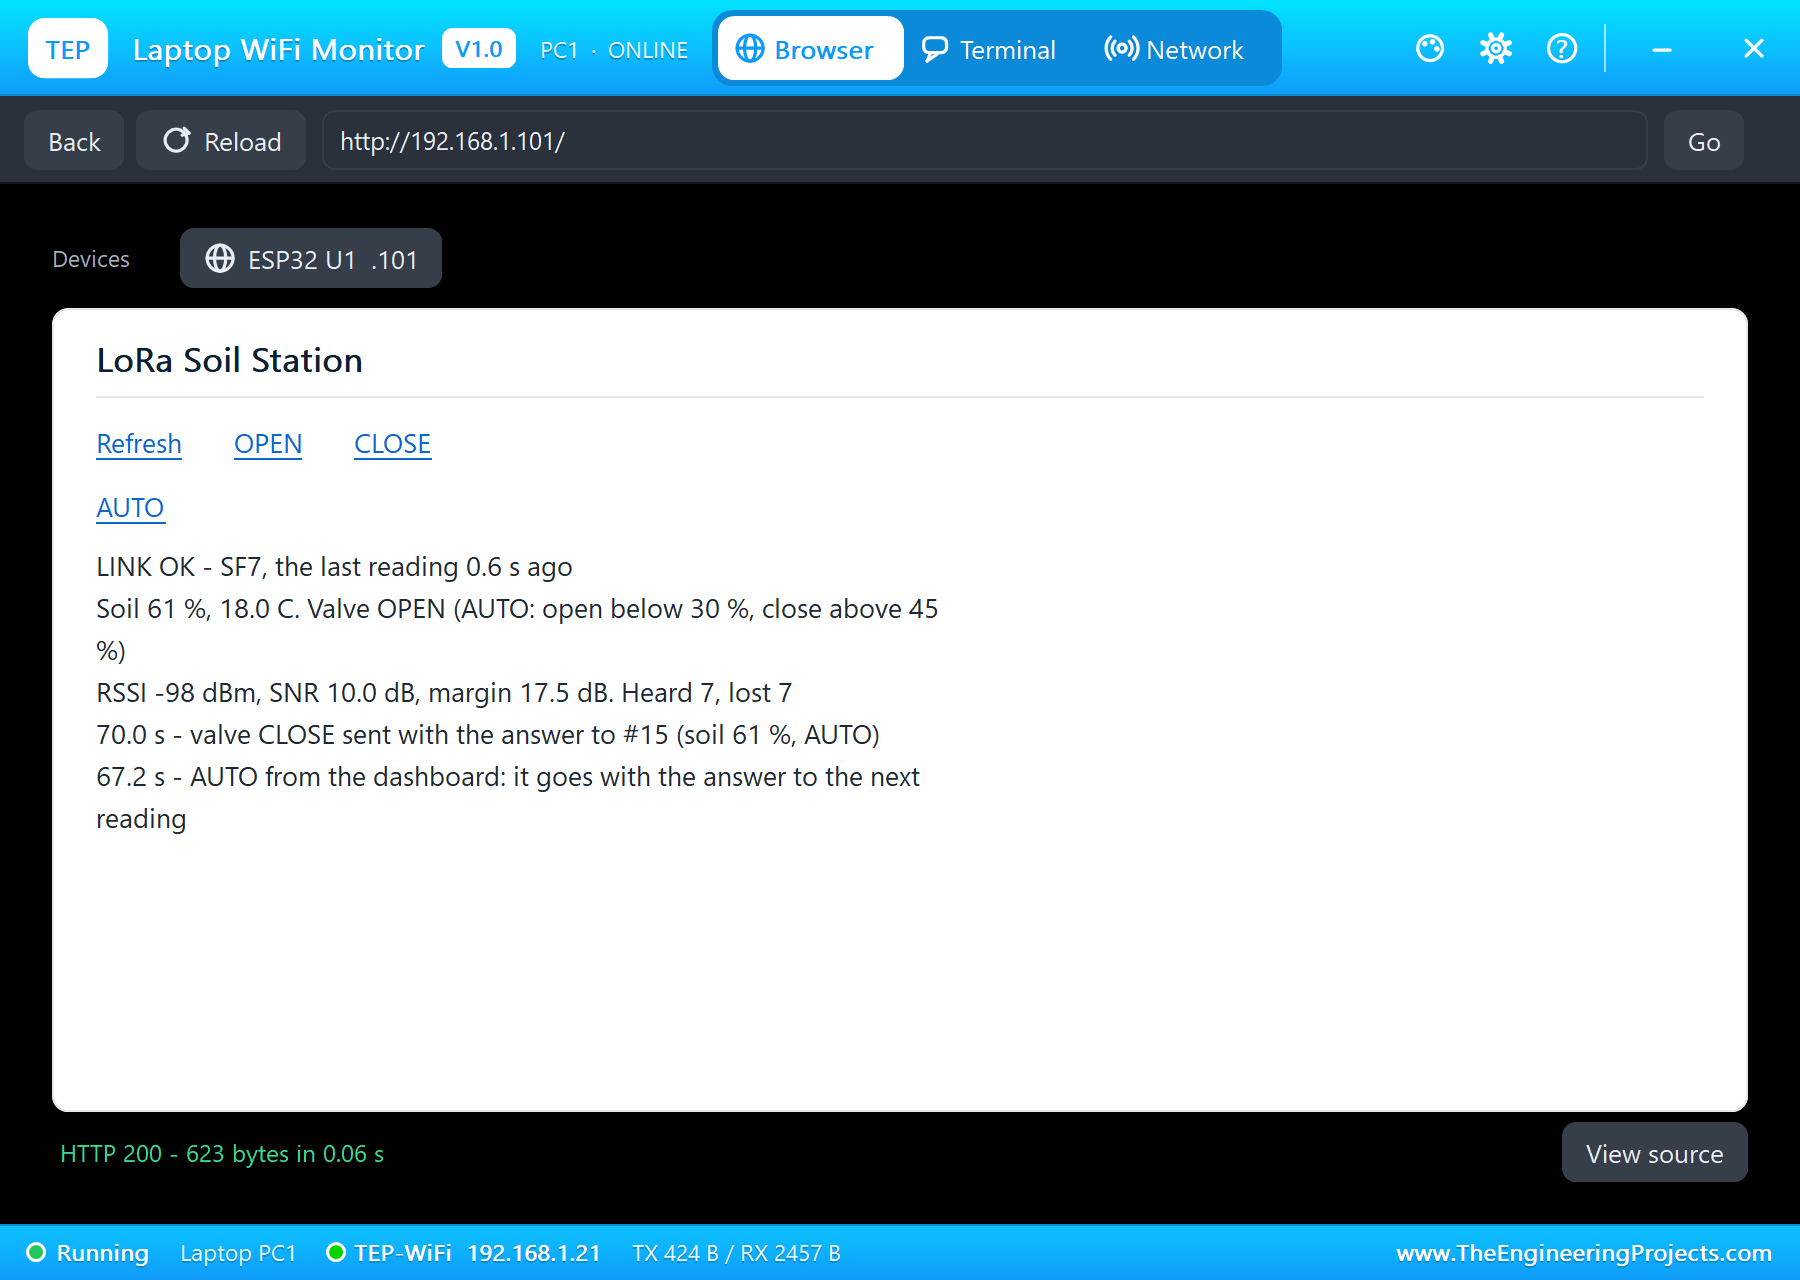
Two clicks of WATER IT on the soil sensor's pop-up pour water into the soil, and it soaks in over a few seconds. Reading #13 says 46 %, above 45 %, and AUTO closes the valve with the answer. Then OPEN on the phone: the dashboard says the command "goes with the answer to the next reading", and at the next reading the valve opens, by hand. AUTO on the laptop hands control back, and with the soil at 61 % the next answer closes the valve again. Notice that the dashboards show the valve as the node last reported it: the command is listed at once, but the new state appears with the next reading, one period later - class A again.
The Numbers of the Run
| What | Result |
|---|---|
| 2 km at SF7 | RSSI -107 dBm, SNR 9.8 dB, margin 17.3 dB; 46 - 47 ms on air |
| AUTO | soil 24 %: valve OPEN with the answer to #2 (kick 150 ms, hold 40 %, 0.17 A) |
| 10 km | SF7 too weak; SF12 after 3 unanswered readings; RSSI -128 dBm, SNR -11.3 dB, margin 8.8 dB; 1155 ms on air |
| 20 km | out of reach; NODE SILENT after 21 s; the fail-safe closed the valve after 4 readings |
| 1 km | RSSI -98 dBm, margin 30 dB at SF12: both back to SF7, the valve open again |
| Watering | soil 46 %: AUTO closed the valve; OPEN by hand, then AUTO closed it at 61 % |
| Simulation | 71 s of simulation, 15 readings, 7 lost to distance |
Download the Project Files
Click the button below to download ESP32-LoRa-Soil-Station-SX1278-Proteus-Simulation-v1.0.zip (about 4.7 MB, without the source code of the models):
Long-Range ESP32 LoRa Soil Station with SX1278 in Proteus Simulation V1.0- Proteus Simulation: ESP32-LoRa-Soil-Station.pdsprj, both HEX files and copies of the models.
- Arduino Code: ESP32_LoRa_Gateway and ESP32_LoRa_Node, the two sketches.
- Proteus Library Files: the LIB files of the ESP32 DevKit V1, the SX1278, the capacitive soil sensor, the DS18B20, the valve, the L9110S, the resistor and the two WiFi Monitors.
- Proteus Model Files: the DLL models.
- README.txt: the installation steps, the properties, the test results and the links to every library post.
No Proteus yet? Read How to Download and Install Proteus 7 and 8. New to libraries? Follow How to Install a New Library in Proteus.
How to Install the Project Files
- Close Proteus and extract the whole zip file, for example to your Desktop.
- Copy the files from Proteus Library Files into the LIBRARY folder of Proteus.
- Copy the files from Proteus Model Files into the MODELS folder.
- Start Proteus and open the project from the Proteus Simulation folder.
Changing the Code
Both sketches compile in the Arduino IDE with our TEP Boards for Proteus package: install the LoRa library by Sandeep Mistry, OneWire and DallasTemperature from the Library Manager, export the compiled binary of each sketch and set U1's or U3's PROGRAM property to the new file. The periods, the thresholds and the fallback counts are at the top of the sketches. On real hardware the same sketches run on ESP32 boards with Ra-02 modules; set the frequency your country allows.
Ideas to Extend the Project
- Put the node to deep sleep between readings and estimate its battery life.
- Add more field nodes, each with its own number, and a gateway that answers them all.
- Step the spreading factor one at a time (SF7, SF9, SF12) instead of jumping straight to SF12.
- Lower the transmit power when the margin is large, to save the battery further.
- Add a rain sensor at the node and skip watering when it rains.
- Forward the readings from the gateway to a cloud dashboard over MQTT.
From Simulation to Real Hardware
- Use your country's band: the Ra-02 is a 433 MHz module; in the EU use 433.05 - 434.79 MHz (for example 433.92 MHz) and keep to the duty cycle. For 868 or 915 MHz use an RFM95W or SX1276 module.
- Never transmit without an antenna: it can destroy the module's power amplifier.
- 3.3 V only: the Ra-02's pins are not 5 V tolerant; add a 10 uF capacitor at its VCC for the transmit peaks.
- Height wins range: a gateway antenna on a roof reaches far further than the free-space numbers of a built-up area.
- Valve power: give the 12 V supply enough current for the 0.45 A kick and keep the coil's wires short.
Troubleshooting
- "LoRa module not found": SCK, MISO, MOSI, NSS or RST is on the wrong pin, or VCC is missing.
- The gateway hears nothing: both ends need the same frequency, spreading factor, bandwidth and sync word, and the distance must suit the spreading factor.
- The valve never opens: DRV1 needs +12V, and A-IA must be on D25.
- The soil reads 0 % or 100 %: the sensor needs 5 V on VCC; check AIR_V and WATER_V.
- Commands arrive late: that is class A: a command travels with the answer to the next reading.
Limitations of the Simulation
- Both radios are on one sheet; the distance between them is the setting on a module's pop-up, and the path loss is a fixed built-up-area model, not real terrain.
- The periods are seconds instead of minutes, to keep the simulation short; the duty cycle is not enforced.
- The soil does not get wetter when the valve opens: in the simulation you water it from the soil sensor's pop-up.
- The network to the laptop and the phone is simulated inside Proteus.
- ESP32 is a product of Espressif Systems, LoRa a technology of Semtech and the Ra-02 a module of Ai-Thinker; this project is not made or endorsed by them or by Labcenter.
So, that was all about the Long-Range ESP32 LoRa Soil Station with SX1278 in Proteus Simulation. I hope it helps you understand how LoRa buys range with time, how to work out a link budget, why a LoRa sensor listens only right after it sends, how a small protocol of answers, retries and fallbacks keeps a link alive, and how to drive a valve efficiently and safely, all tested in a simulation before you put a radio in a field. More IoT projects with the ESP32 and the Raspberry Pi 5 are coming in this series. If you have any questions, ask in the comments and I will help you out. Till the next tutorial, take care and have fun!