Hello friends, I hope you all are doing great. Today, I am going to share the IoT Smart Weighing Scale with ESP32 - Proteus Simulation, the eleventh project of our IoT Projects series. If you have searched for a Proteus simulation of a digital weighing scale with an ESP32, here is a complete one. An ESP32 reads a 5 kg load cell through an HX711 24-bit ADC, takes the price per kg from a 4x4 keypad, works out the price of each item like a shop's price-computing scale, adds the items to a bill, shows everything on a 20x4 LCD and serves a live web dashboard for your laptop and your phone.
Every grocery shop, bakery and post office has one of these scales, and the same parts sit inside kitchen scales, luggage scales and industrial weighing systems. In this tutorial, we will go through the circuit, learn how a load cell turns weight into a few millivolts, how the HX711 turns those millivolts into a number, calibrate the scale, read a keypad by scanning its rows and columns, walk through the ESP32 code, and then run the simulation: a calibration check, two items on one bill, an overload and a tare with a bowl. At the end, you can download the project with the code and every library file it needs.
NOTICE: Our team has put a lot of effort into this project: the circuit, the code and every part in the simulation are our own work, and you get them all free. Your feedback is the fuel that keeps us going, so please tell us what you think in the comments below. And if our free projects help you, you can buy us a coffee. So, let's get started with the IoT Smart Weighing Scale with ESP32 - Proteus Simulation:
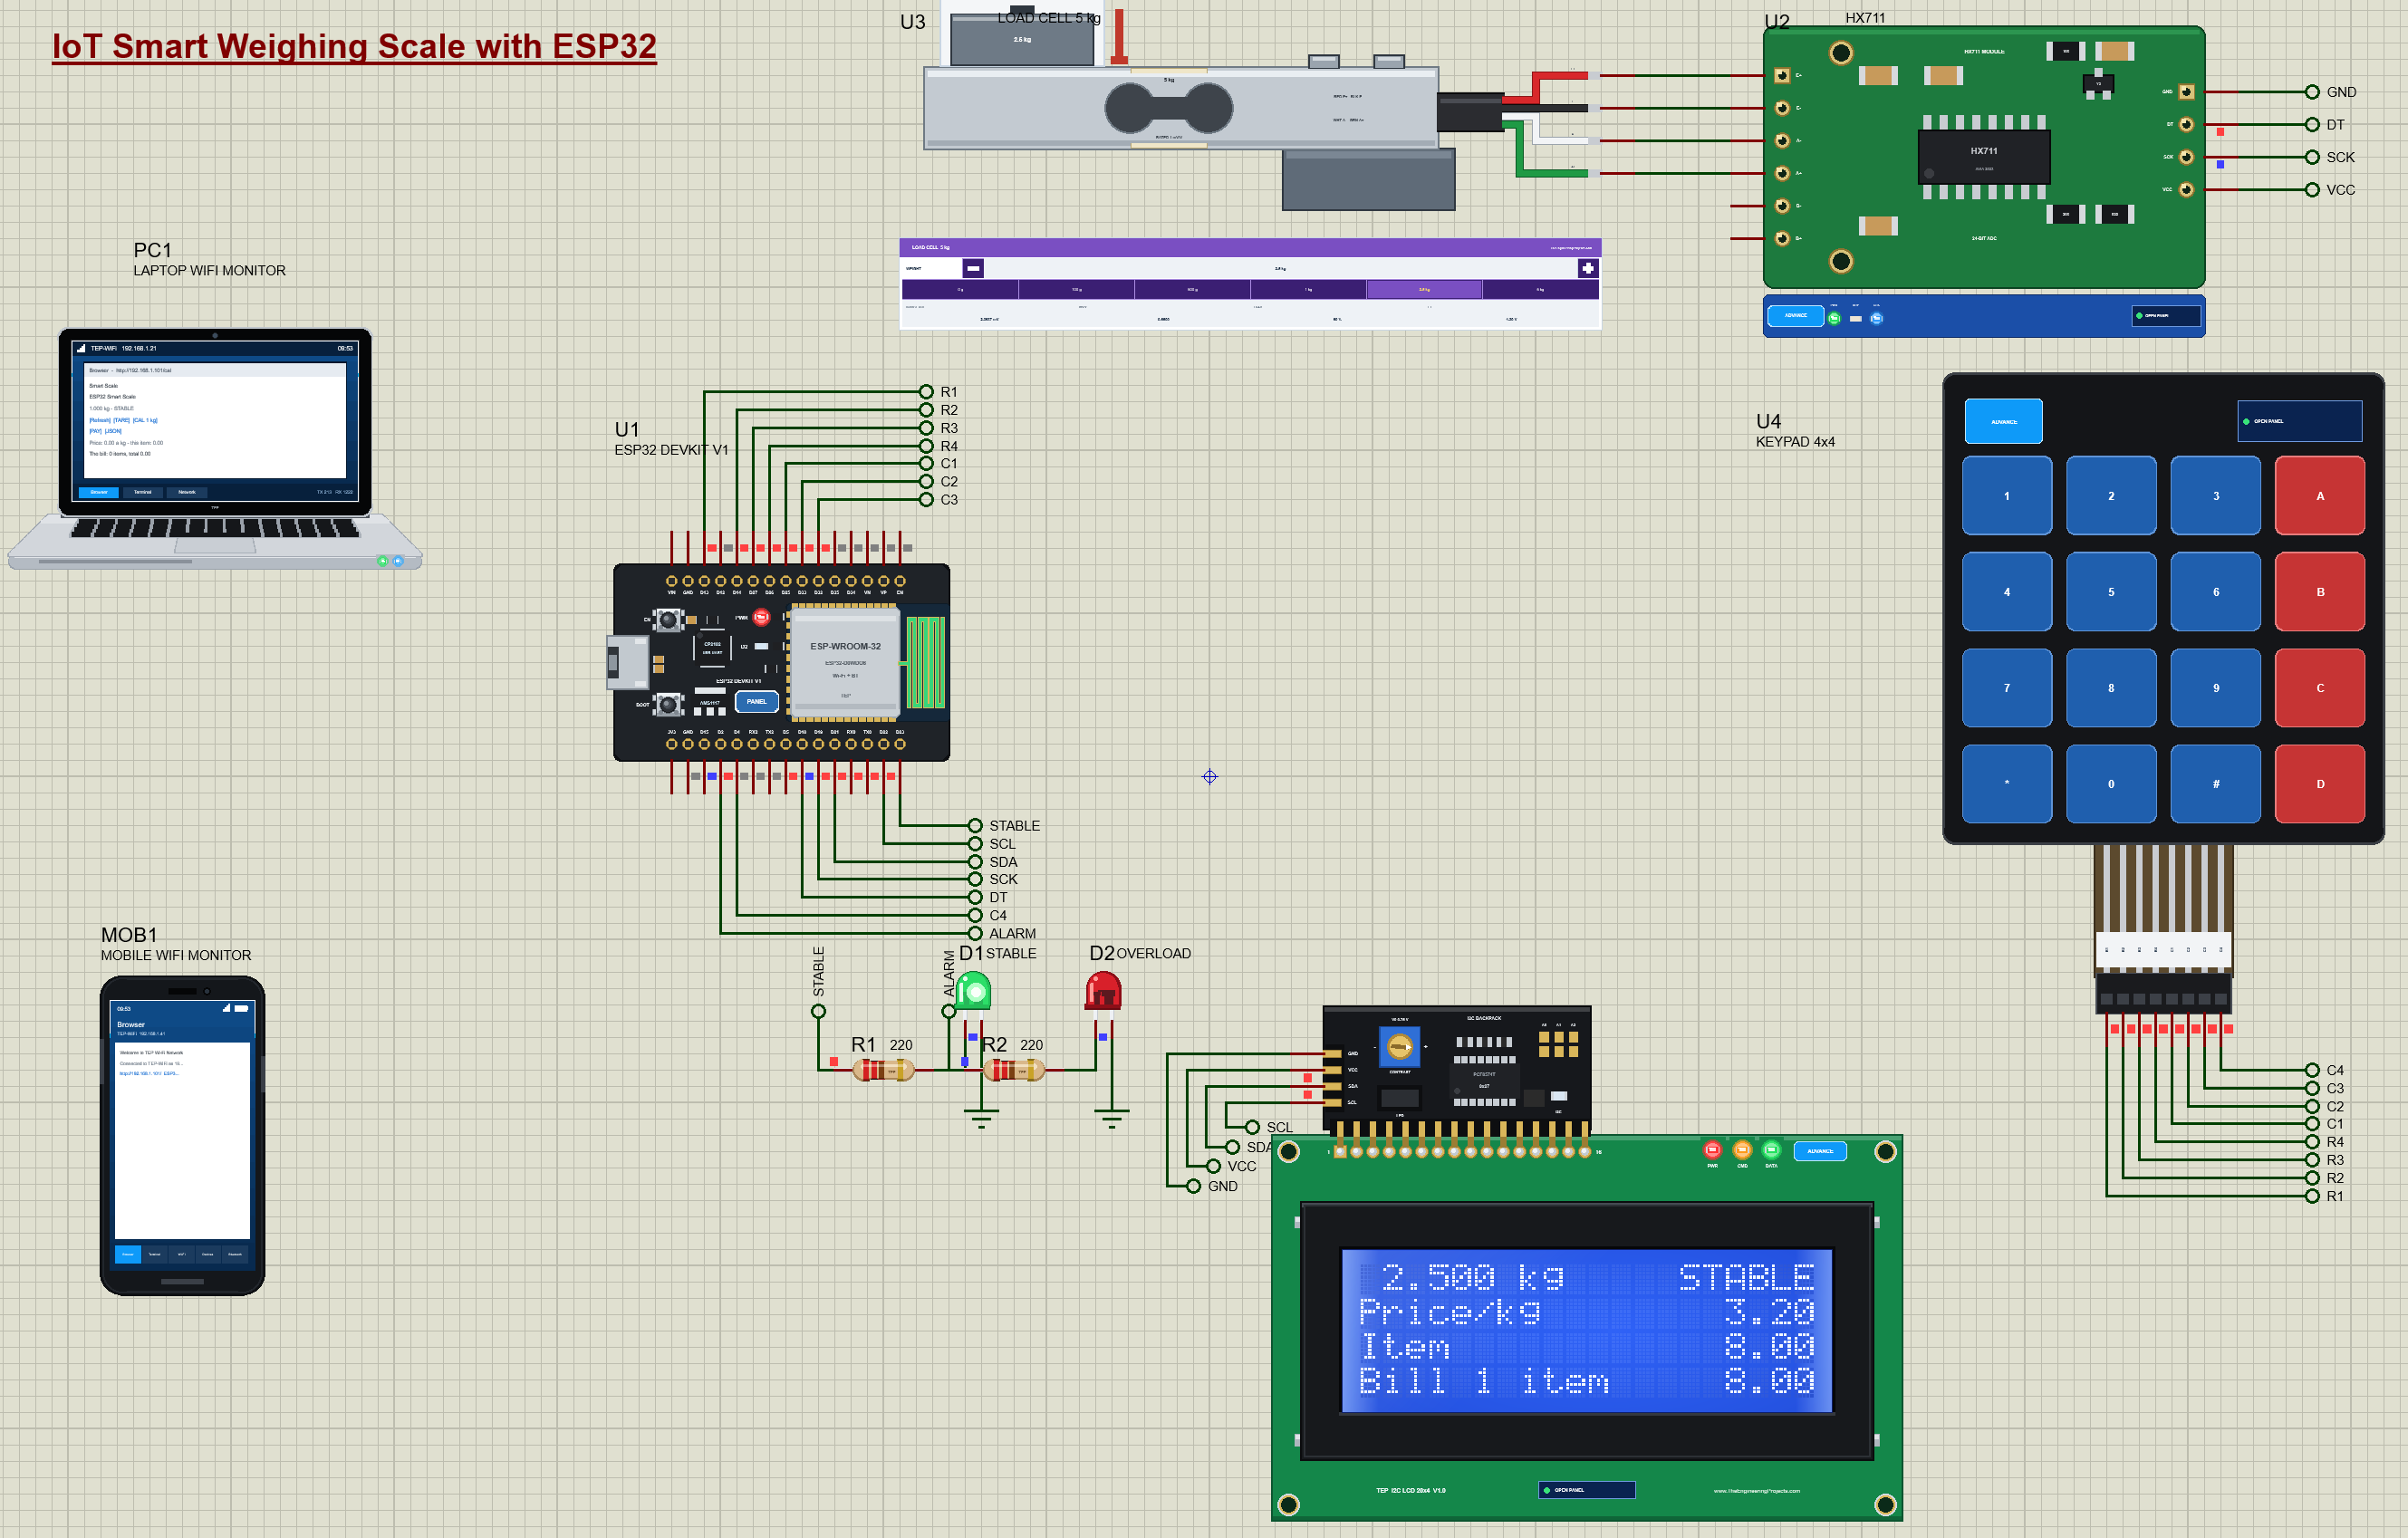
What Does This Smart Weighing Scale Do?
The scale does the work of a shop's price-computing scale, with a web page on top:
- Weighing: the weight in kg, averaged over the last five readings, with a STABLE sign once it stops moving.
- Tare: one key zeroes the scale with a bowl or a box on it, so only the contents are weighed.
- Price per kg: typed on the keypad, with the * key as the decimal point.
- A bill: each item's weight, price per kg and cost are added to a bill, and # closes the bill as paid.
- Overload: a red LED and a warning when more than the load cell's 5 kg is on it.
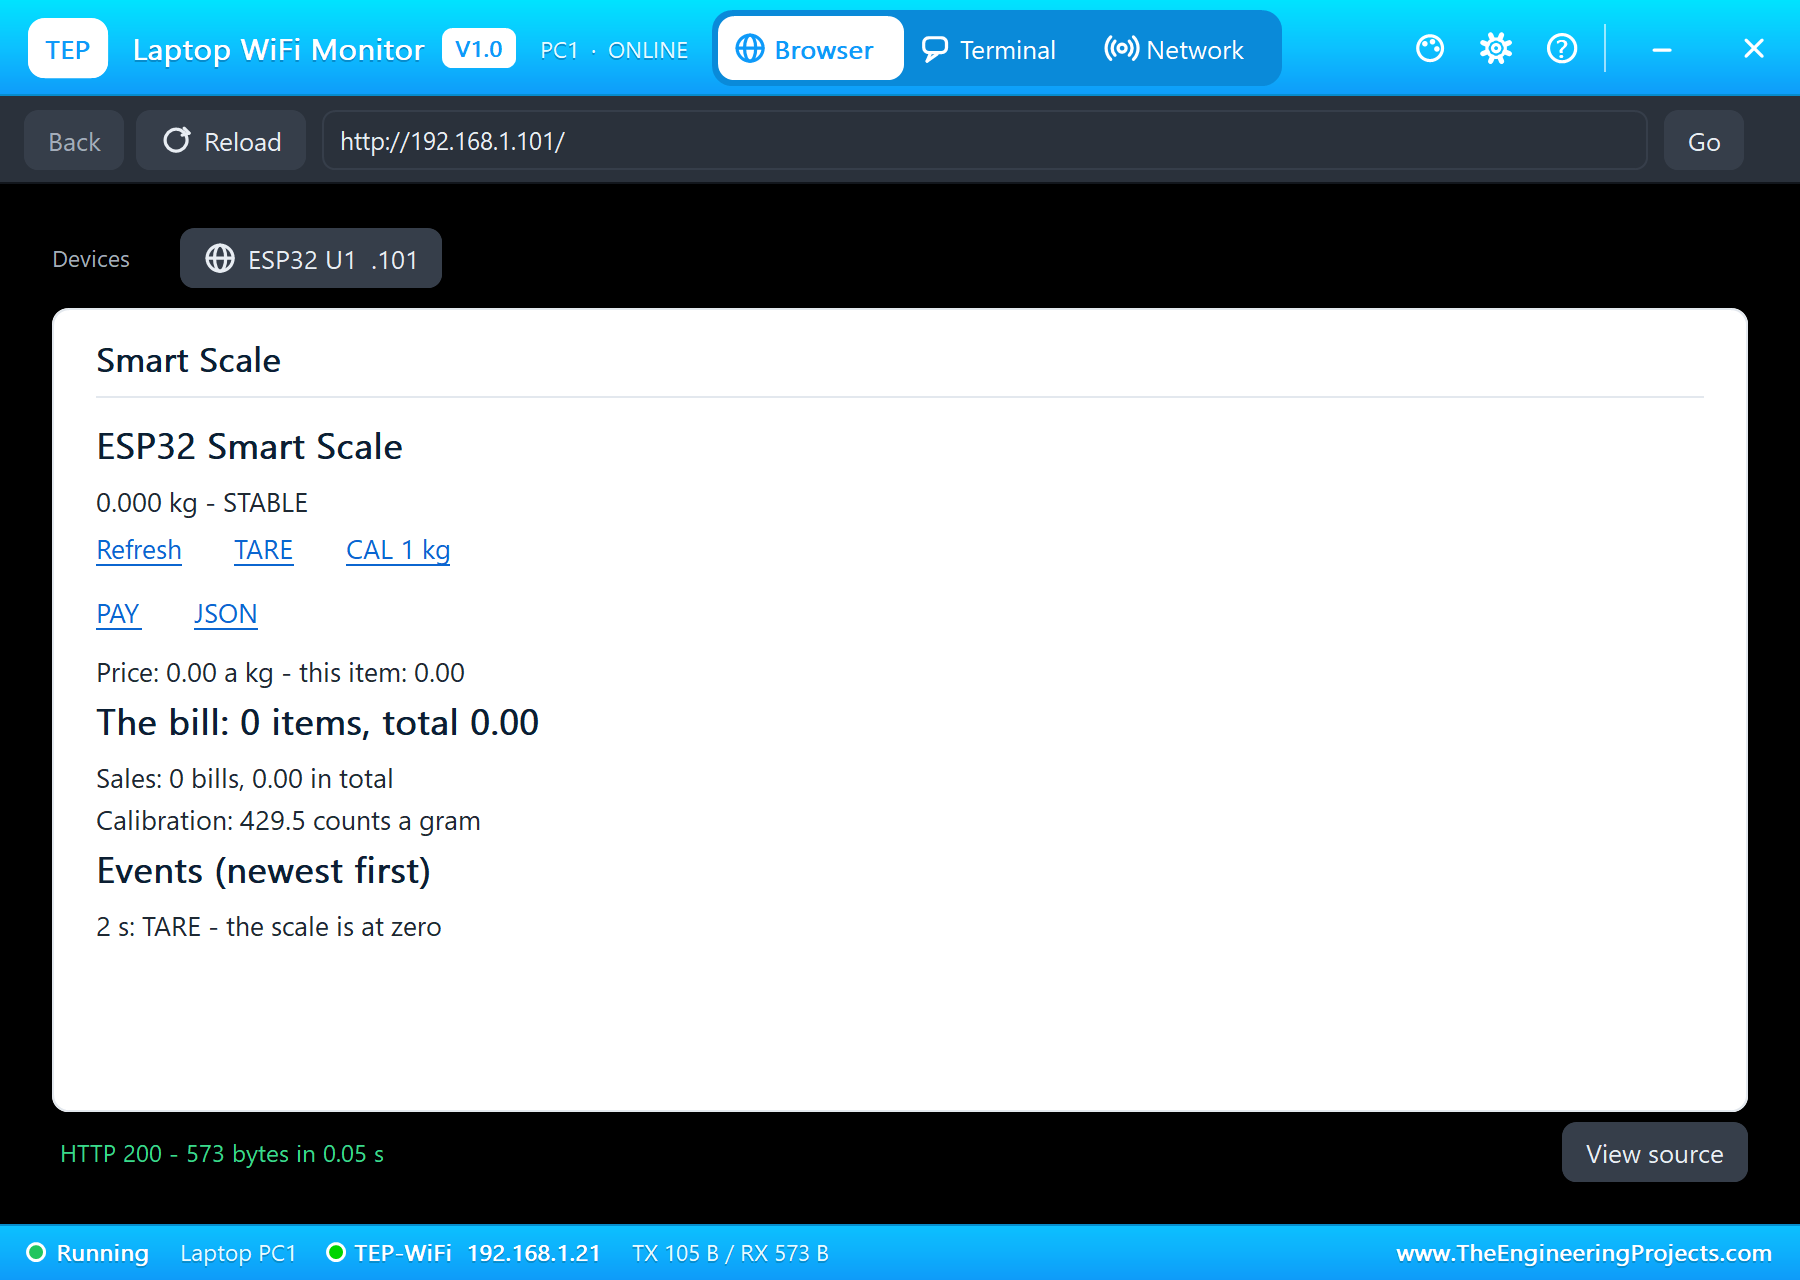
- A dashboard: the weight, the bill, the sales, the calibration and an event log, with TARE, CAL 1 kg and PAY links.
It is a great project for anyone learning the ESP32 with sensors, keypads and displays, and a popular final-year project for smart shops and inventory systems. In the simulation, the weight comes from the HX711's pop-up and the keys from the keypad's pop-up, one click each.
Components Used in the Proteus Simulation
All the parts come from our Proteus libraries, each with its own tutorial. The project zip at the end includes every LIB and DLL file.
| Part | Proteus device | Library post | Connection |
|---|---|---|---|
| ESP32 DevKit V1 | ESP32 DEVKIT V1 | ESP32 DevKit V1 Library for Proteus | U1, TEP-WiFi 192.168.1.101 |
| HX711 load cell amplifier | HX711ADVTEP | HX711 Load Cell Library for Proteus | U2, DT on D18, SCK on D19 |
| Load cell, 5 kg bar | LOADCELL5KGTEP | HX711 Load Cell Library for Proteus | U3, on the HX711's E+ / E- / A- / A+ |
| Membrane keypad 4x4 | KEYPAD4X4ADVTEP | Membrane Keypad Library for Proteus | U4, rows D13 D14 D27 D26, columns D25 D33 D32 D4 |
| I2C LCD 20x4 | I2CLCD20X4BLUEADVTEP | I2C LCD 20x4 Library for Proteus | LCD1, 0x27, SDA D21, SCL D22 |
| 5 mm LEDs, green and red | LED5MMGREENTEP, LED5MMREDTEP | 5mm LED Library | D1 on D23 (STABLE), D2 on D2 (OVERLOAD) |
| Resistors 220 ohm | RESISTOR4BANDTEP | Resistor Library | R1, R2 for the LEDs |
| Laptop WiFi Monitor | LAPTOP WIFI MONITOR | Laptop WiFi Monitor | PC1 |
| Mobile WiFi Monitor | MOBILE WIFI MONITOR | Mobile WiFi Monitor | MOB1 |
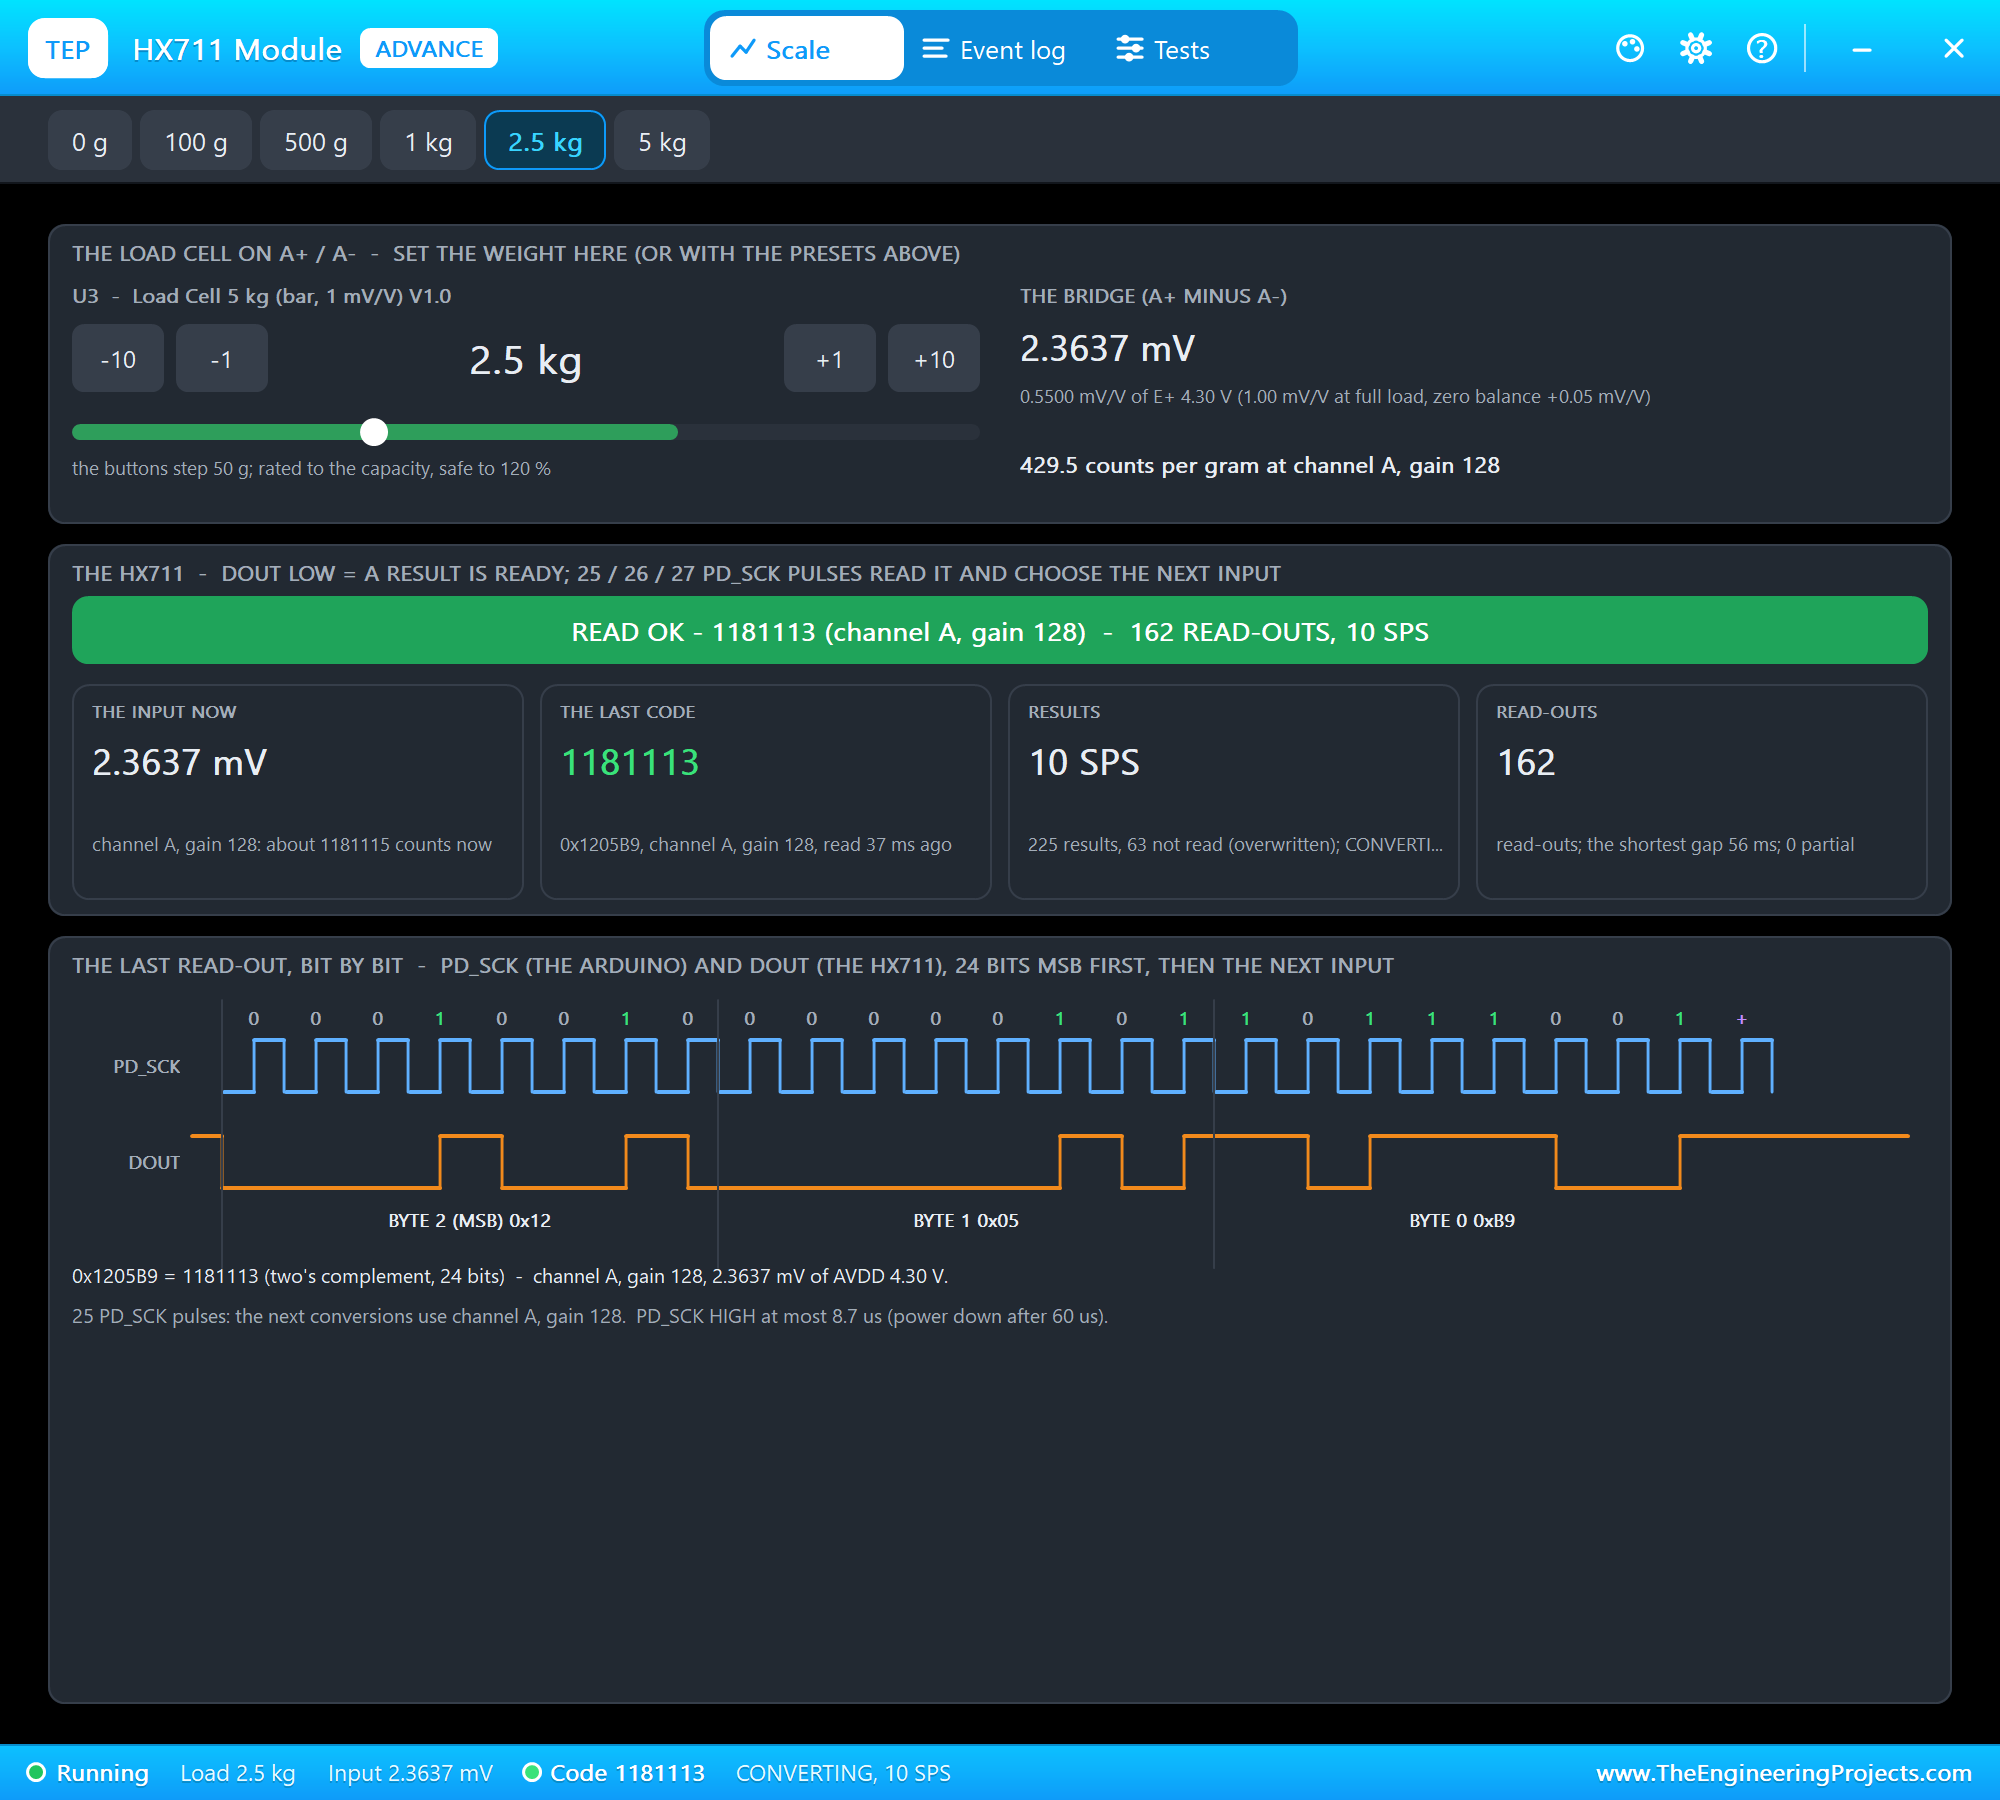
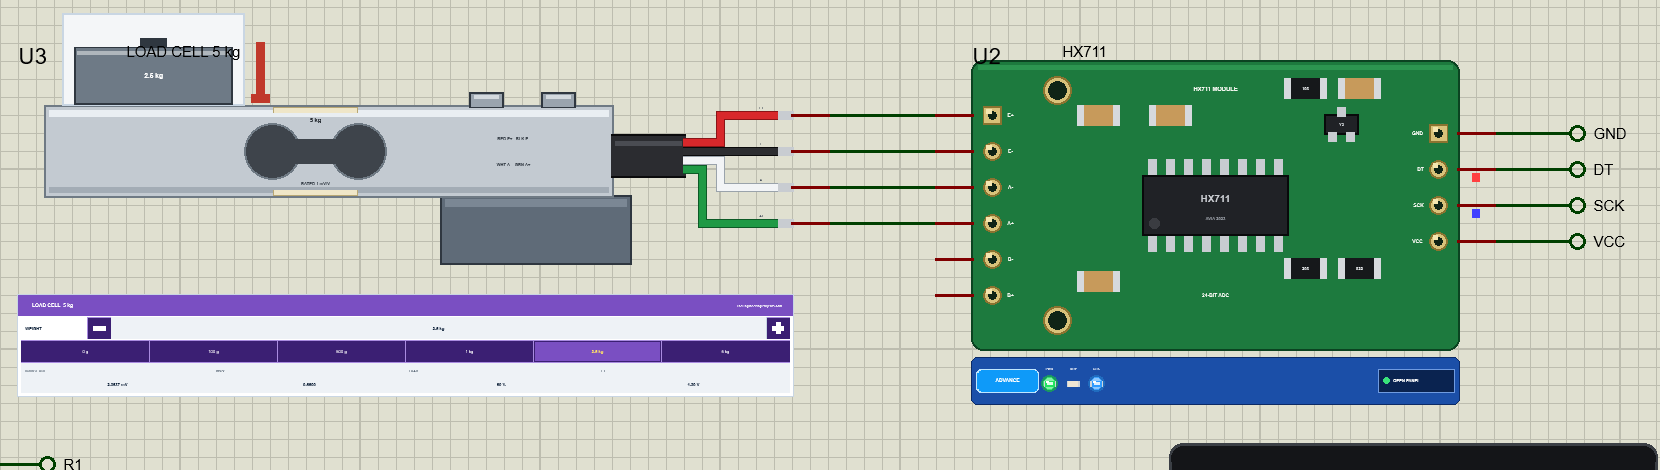
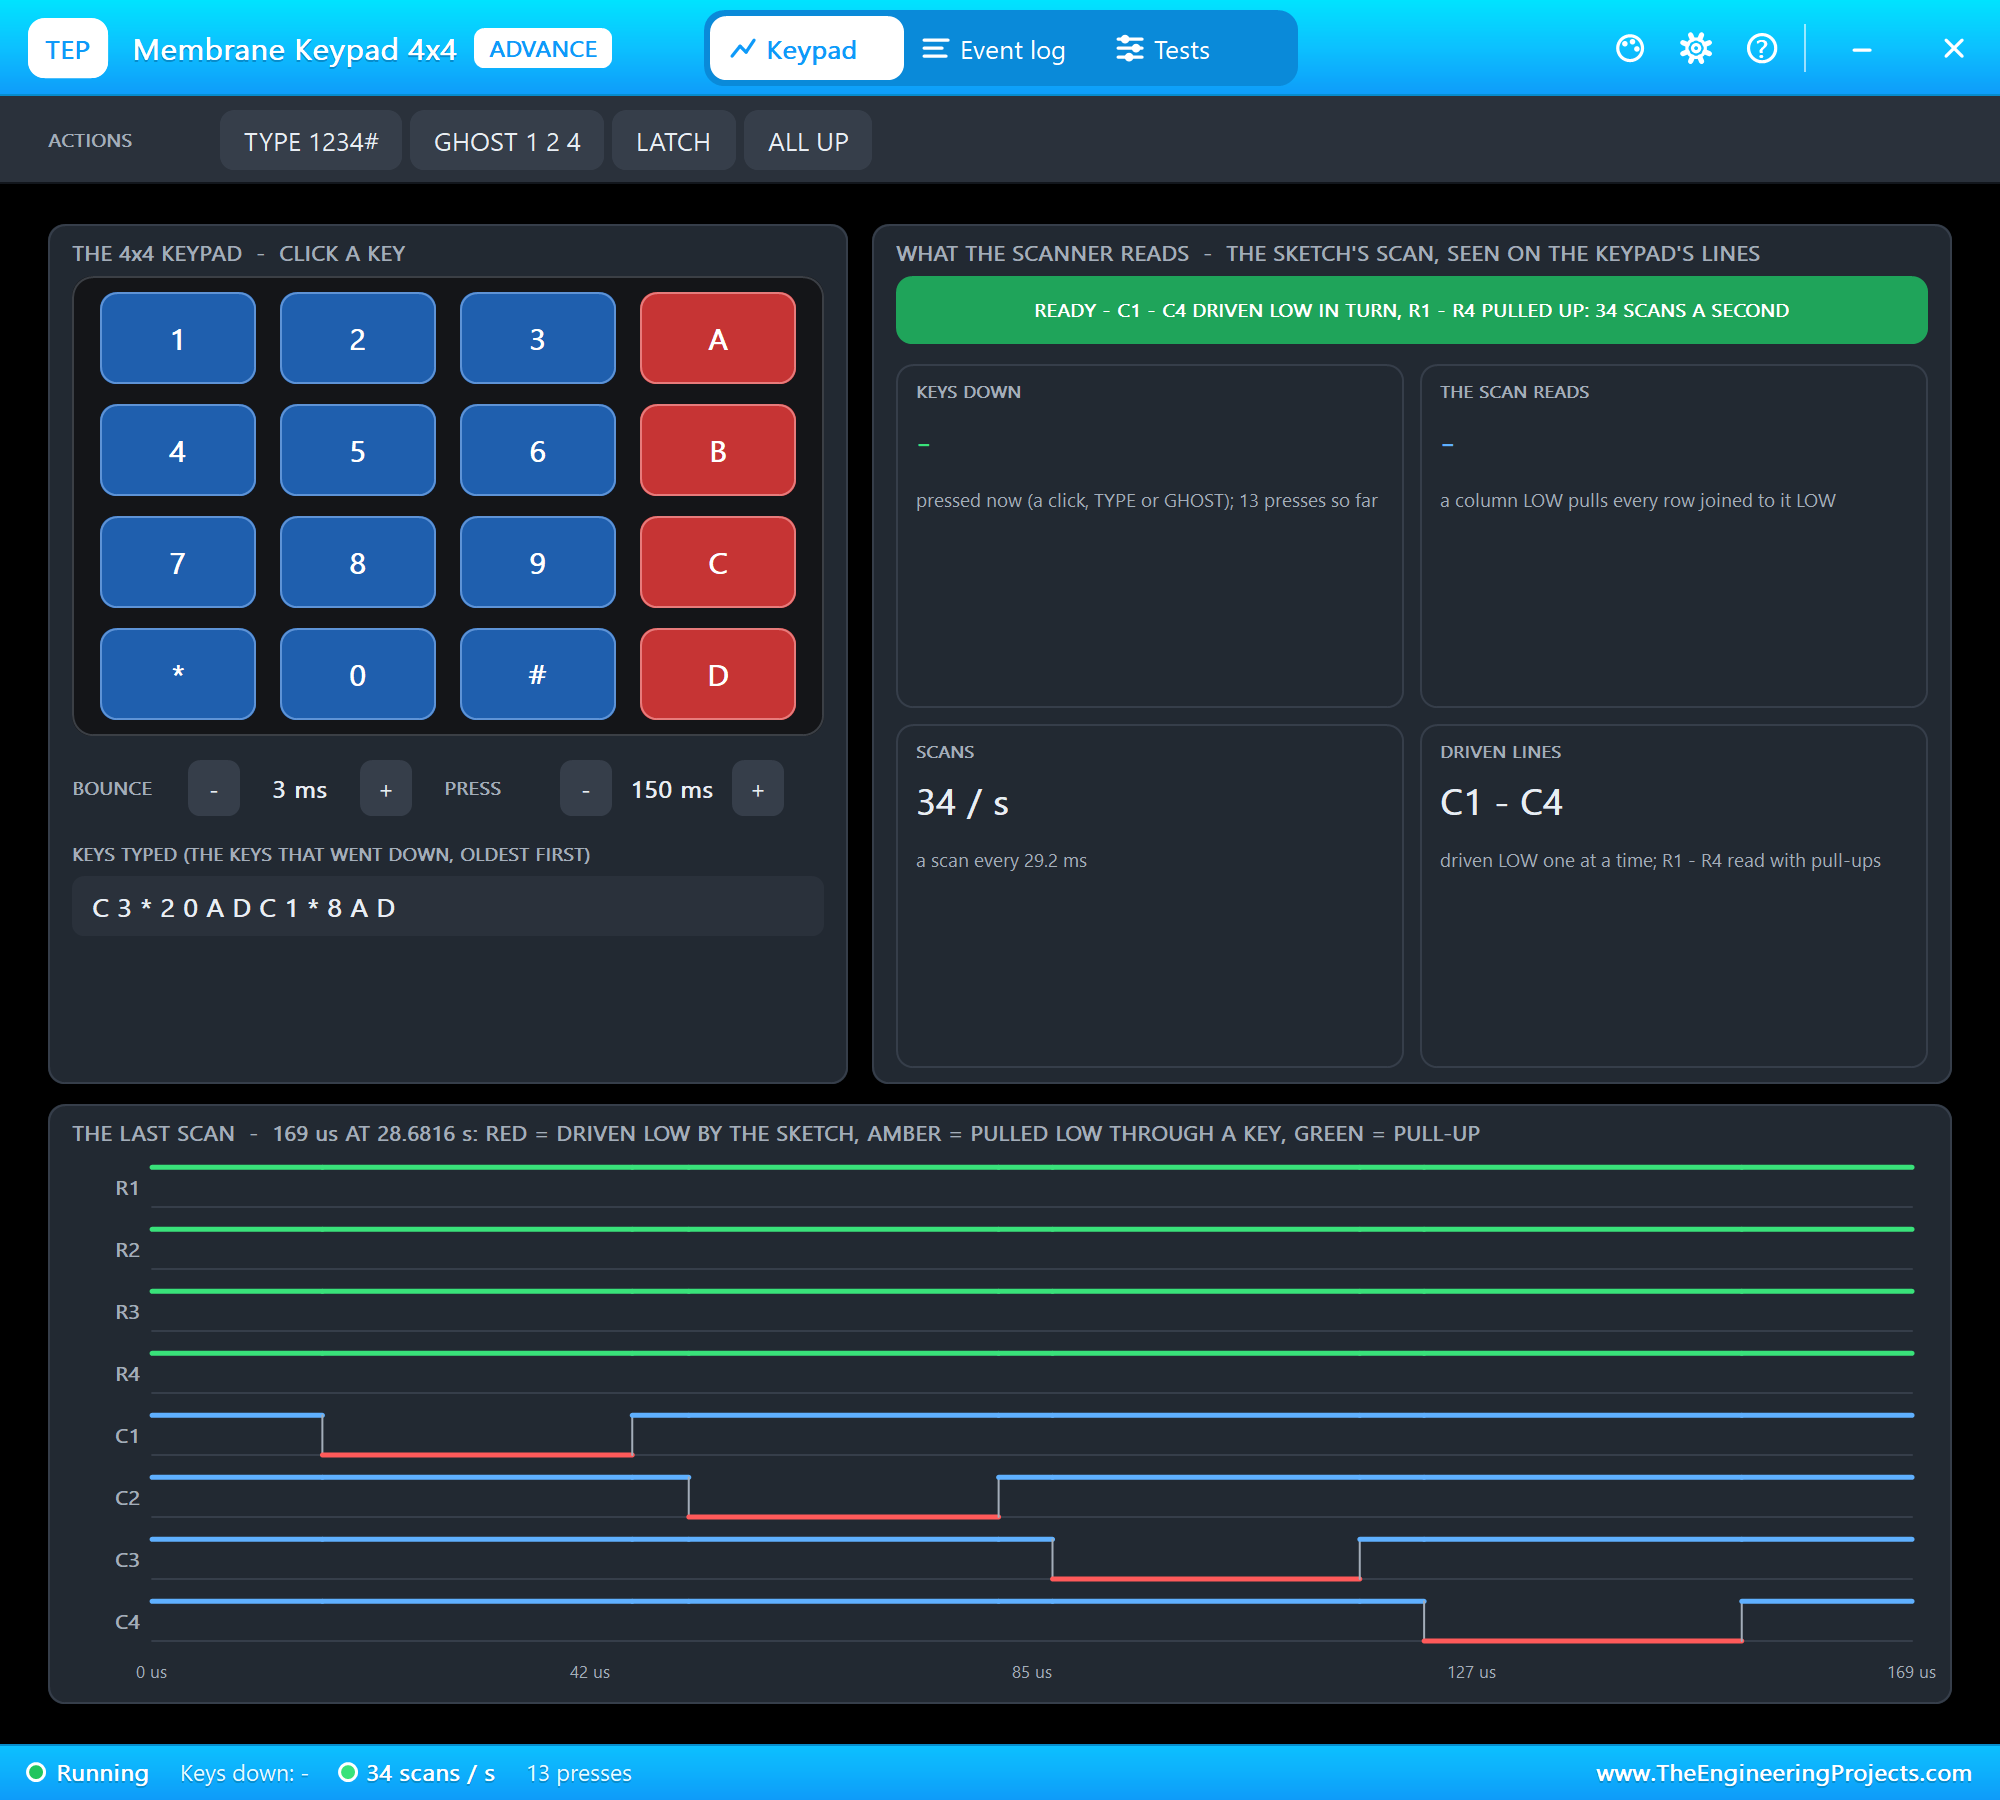
The HX711, the keypad and the LCD are Advance models with pop-ups. The HX711's pop-up sets the weight on the load cell: the presets 0 g, 100 g, 500 g, 1 kg, 2.5 kg and 5 kg, and buttons that step 50 g or 500 g. It also shows the bridge voltage, the last 24-bit code and the read-out bit by bit. The keypad's pop-up has clickable keys and shows the sketch's scan, and the LCD's pop-up shows the display large.
Proteus Simulation of the Smart Weighing Scale: the Circuit
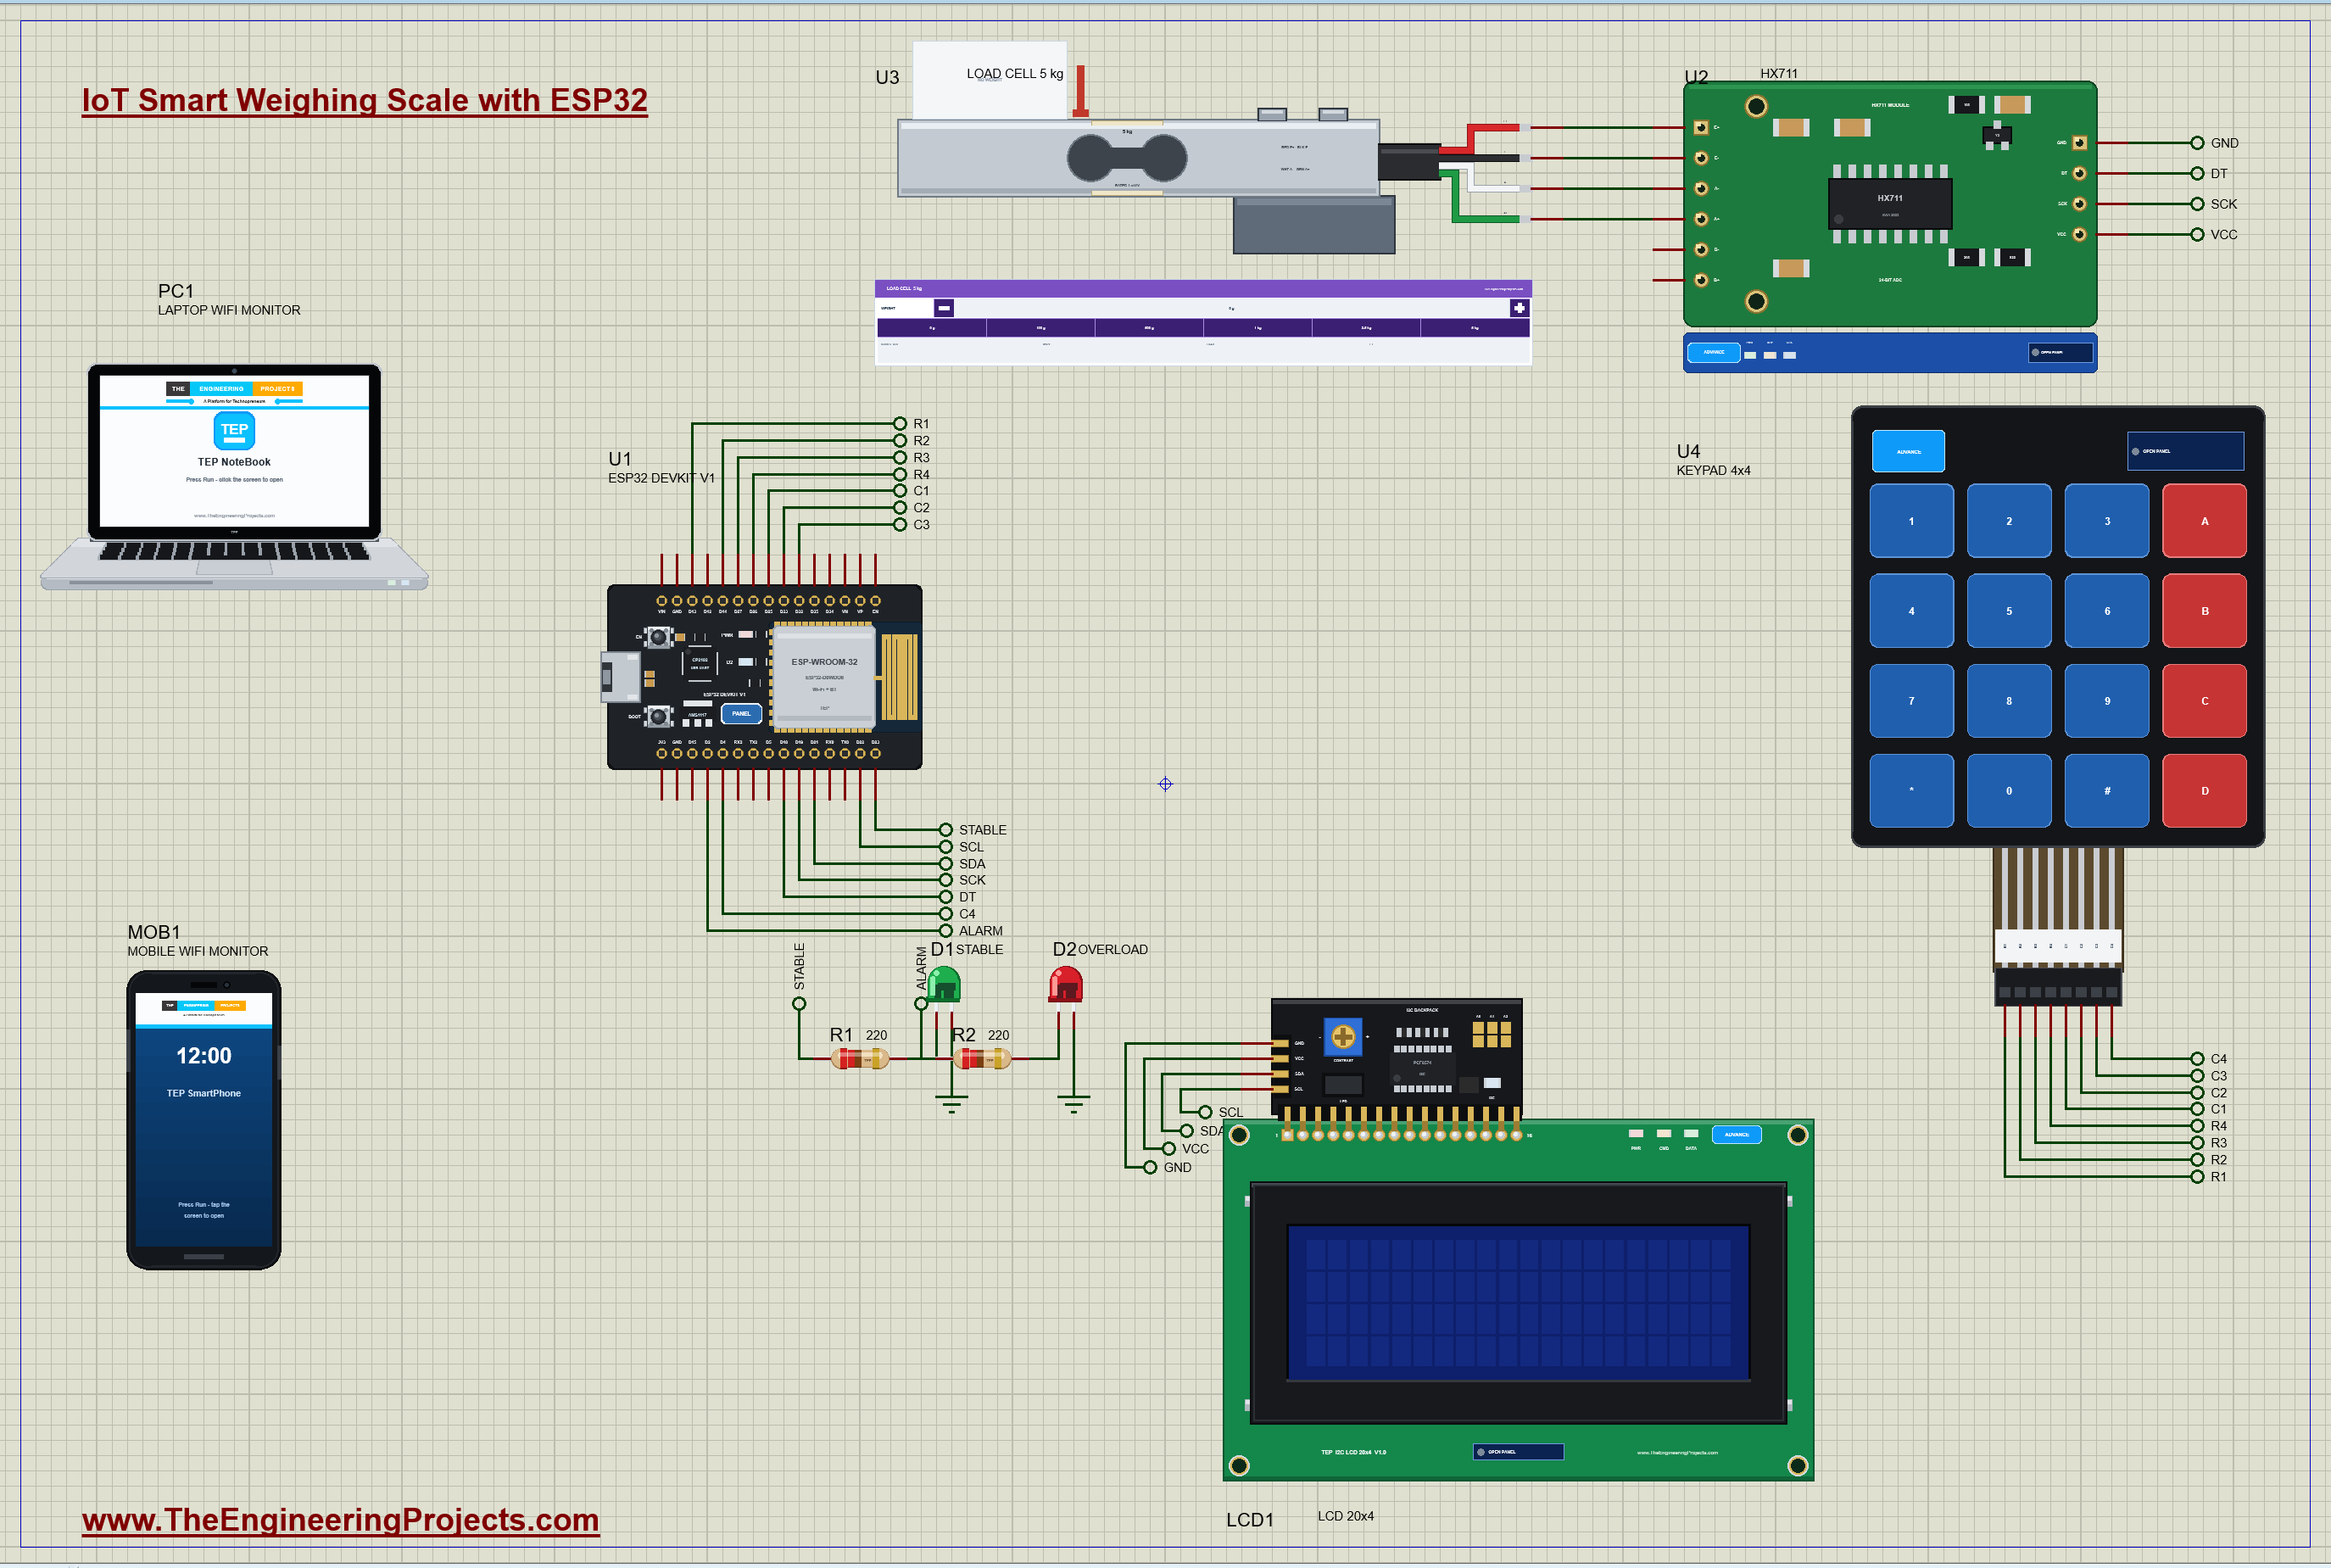
The load cell's four wires go straight to the HX711, in the colours of a real cell: red E+, black E-, white A- and green A+. Everything else leaves the ESP32 through net labels:
| Part | Pins | ESP32 GPIOs |
|---|---|---|
| U2 HX711 | DT / SCK | D18 / D19 |
| U2 HX711 | VCC / GND | 5 V / GND |
| U4 keypad | R1 / R2 / R3 / R4 (rows) | D13 / D14 / D27 / D26, inputs with pull-ups |
| U4 keypad | C1 / C2 / C3 / C4 (columns) | D25 / D33 / D32 / D4, outputs |
| LCD1 | SDA / SCL | D21 / D22 (the ESP32's default I2C pins) |
| D1 green LED | anode through R1 220 ohm | D23: the weight is stable |
| D2 red LED | anode through R2 220 ohm | D2: overload (the board's blue LED lights with it) |
Supplies and Logic Levels
In the simulation, the HX711 module and the LCD run on 5 V. On a real ESP32, whose GPIOs must never see more than 3.3 V, power the HX711 module from 3.3 V: its DT output then has the same 3.3 V level, and because the bridge is ratiometric, the calibration still works. The LCD's I2C backpack has pull-up resistors to its own 5 V supply; on a real build, use a small I2C level shifter or a 3.3 V backpack. The keypad needs no supply at all: it is only switches.
How the Smart Weighing Scale Works
How a Load Cell Measures Weight
A bar load cell is a block of aluminium with a hole machined through its middle, so that it bends a tiny bit under a load. Four strain gauges are glued where it bends most: thin metal foil patterns whose resistance rises when they are stretched and falls when they are squeezed. The four gauges form a Wheatstone bridge between E+ and E-. With no load the bridge is balanced and A+ and A- sit at the same voltage; a load stretches two gauges and squeezes the other two, and a small difference appears between A+ and A-. A cell is rated by that difference at its full load: 1 mV/V means 1 millivolt for every volt of excitation. Our 5 kg cell on the HX711's 4.3 V gives only 4.3 mV at 5 kg.
How the HX711 Reads It
Such a small voltage needs a special converter. The HX711 has a programmable amplifier with a gain of 128 and a 24-bit sigma-delta ADC, and it powers the bridge itself from its 4.3 V regulator. It works on its own, 10 times a second, and lowers DOUT (the module's DT pin) when a new result is ready. The ESP32 then sends 24 clock pulses on SCK and reads one bit after each, the most significant bit first; a 25th pulse tells the HX711 to keep channel A at gain 128 for the next reading. The result is a two's complement number, so a reading can be negative. One rule matters: SCK must never stay HIGH for 60 microseconds, or the HX711 powers down. That is why the sketch reads the 24 bits with interrupts off.
A Worked Example: Counts per Gram
At gain 128, the HX711's full scale is plus or minus half of AVDD divided by 128: 0.5 x 4.3 V / 128 = 16.8 mV, which is the code 8,388,607 (2 to the power 23, minus 1). The 5 kg cell gives 4.3 mV at 5 kg. So 5 kg reads 4.3 / 16.8 x 8,388,608 = 2,147,484 counts, and one gram is 2,147,484 / 5,000 = 429.5 counts. The AVDD cancels out, which is what ratiometric means: 1 mV/V x 128 / 0.5 x 2 to the power 23 / 5,000 g = 429.5 counts per gram, whatever the supply. The HX711's pop-up shows the same 429.5 counts per gram. A real cell also has a zero balance, a small offset with no load; our model's cell has +0.05 mV/V, about 107,380 counts. The TARE at start-up measures that offset and subtracts it from every reading.
Averaging, Stability and Calibration
The last few digits of an HX711 reading always move a little with noise. The sketch averages the last five readings, half a second at 10 readings a second, and calls the weight STABLE when those five lie within 4 g of each other; only a stable weight can go on the bill, as on a real shop scale. A real load cell is never exactly 1 mV/V, so a real scale must be calibrated: put a known weight on it and divide the counts by the grams. The CAL 1 kg link on the web page does exactly that with a 1 kg weight on the scale.
Reading the Keypad
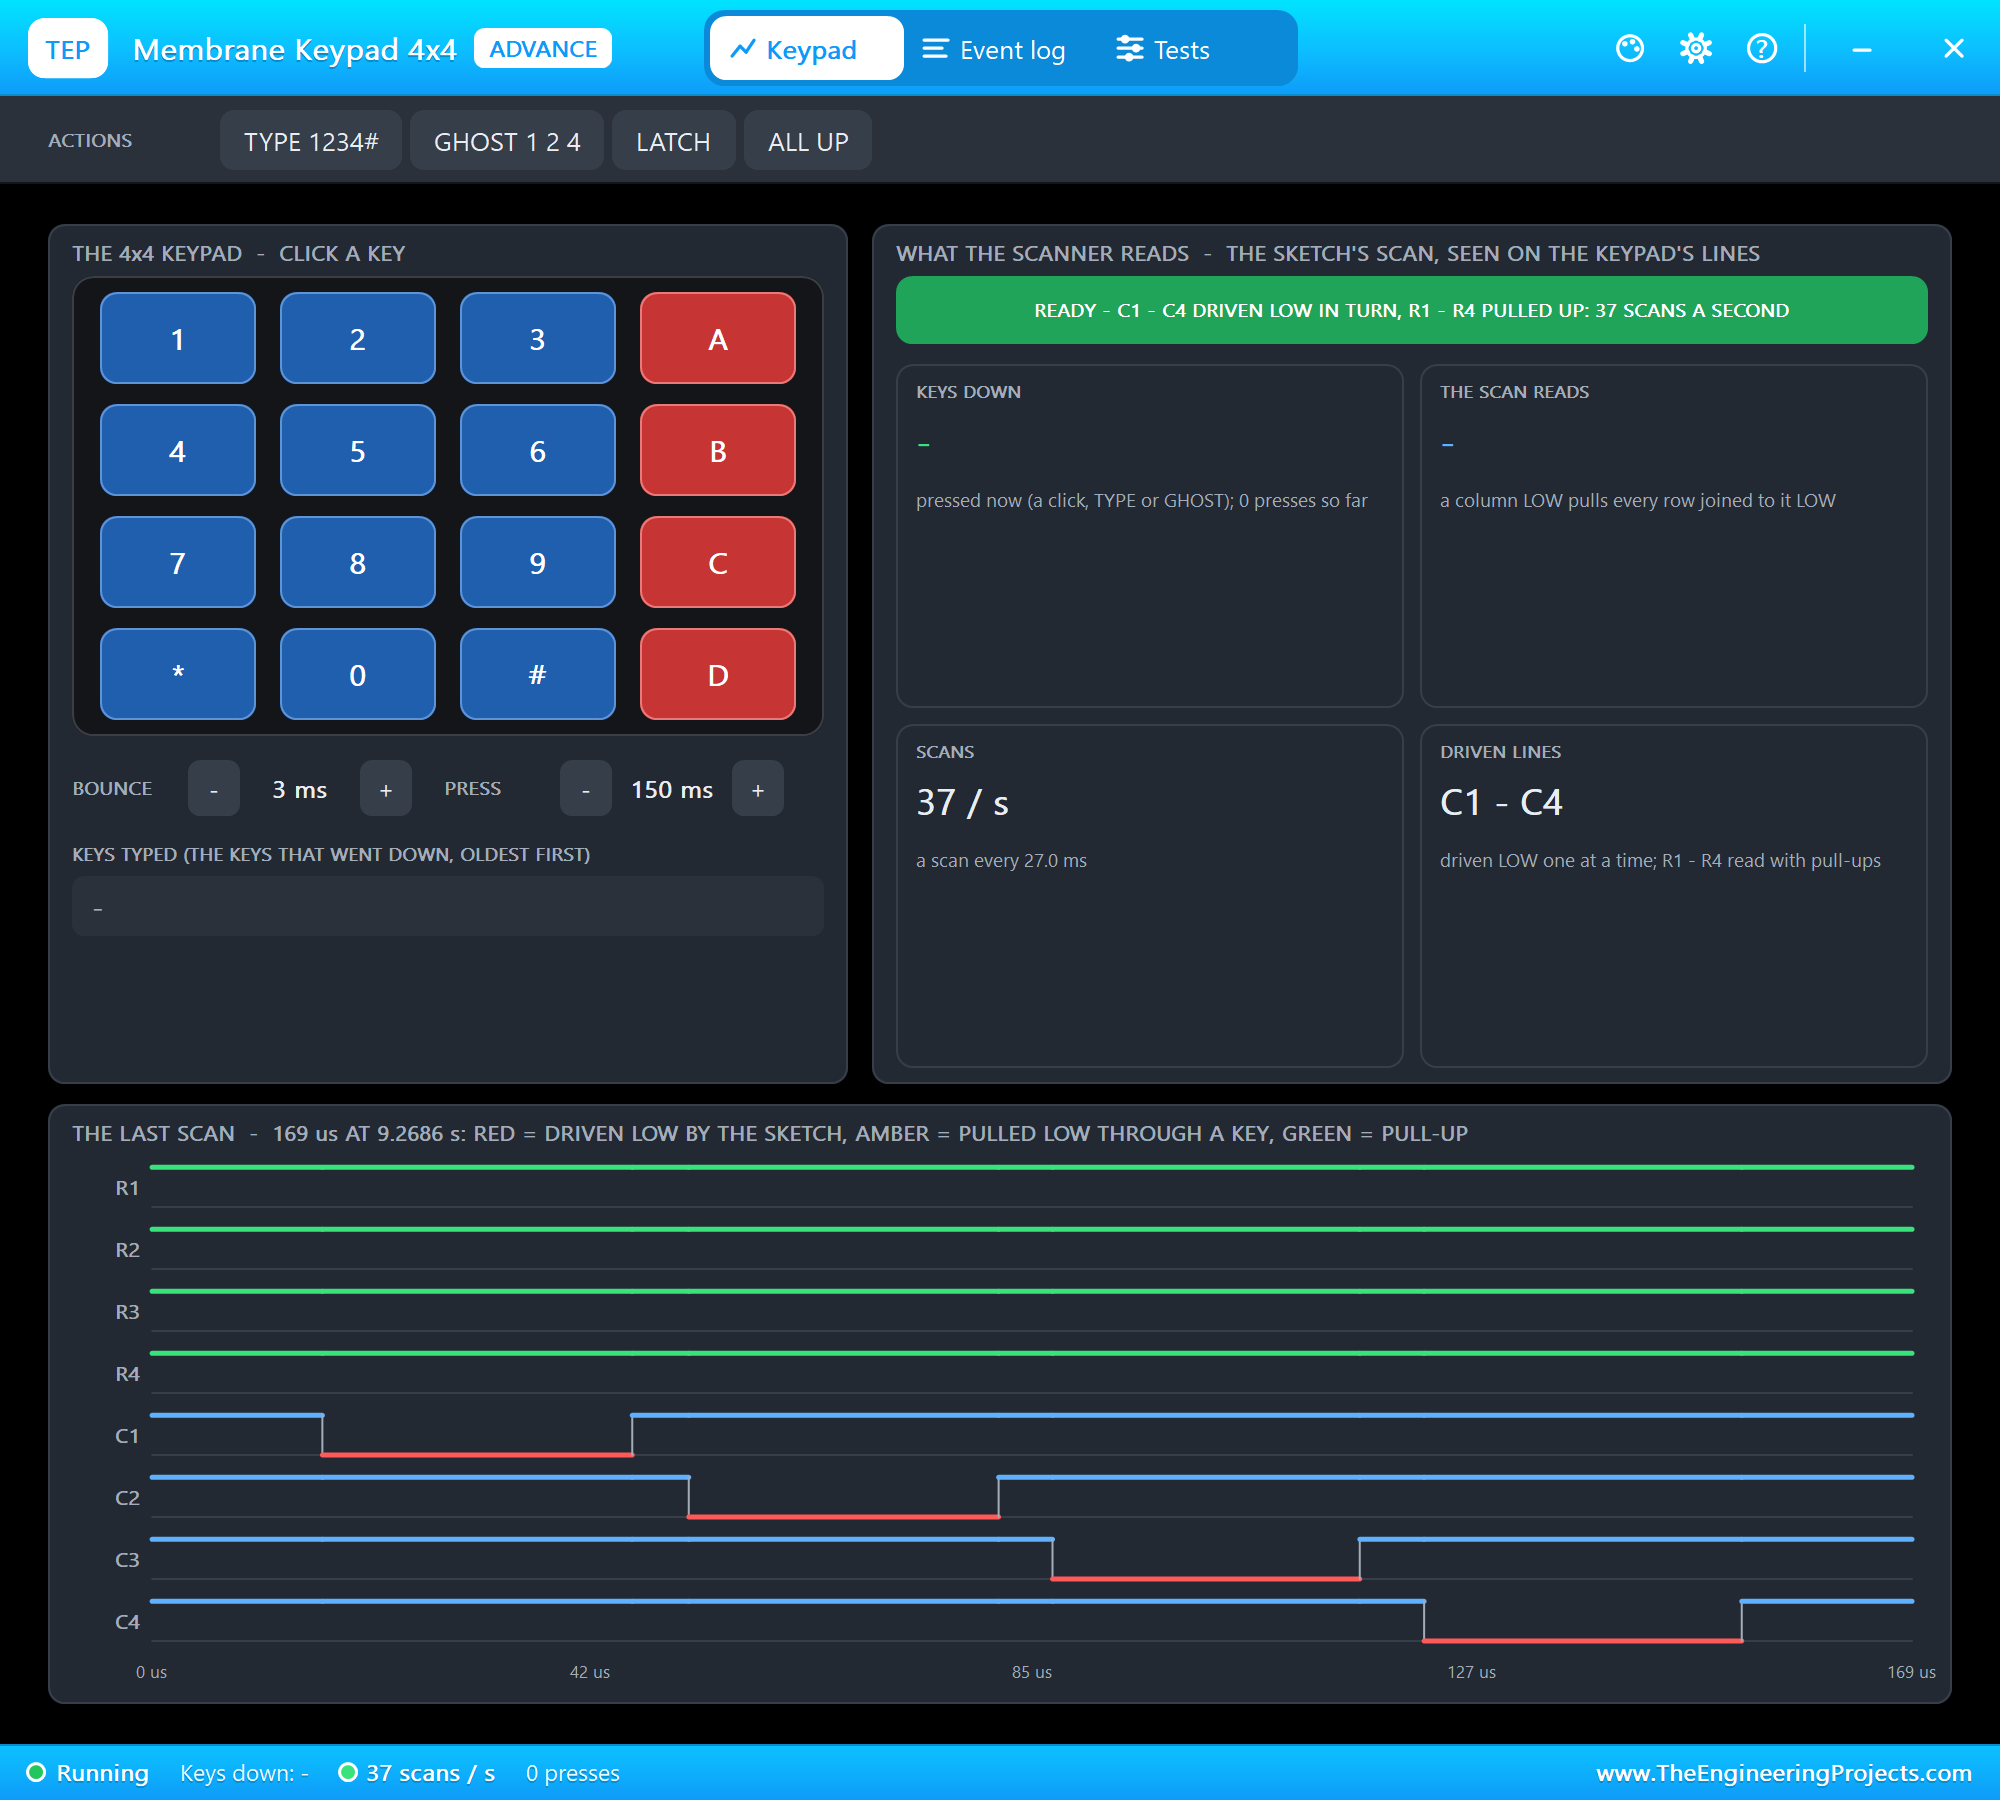
A membrane keypad is a grid of switches: each key joins one row line to one column line, and that is all. The sketch drives one column LOW at a time and reads the four rows with their pull-up resistors on. A row that reads LOW has its key pressed in the column that is LOW at that moment. Sixteen keys need only eight pins this way. The sketch scans 50 times a second and acts on a key once, when it goes down, so holding it does not repeat it, and the 20 ms between scans is longer than the contacts' bounce.
The Keys
| Key | What it does |
|---|---|
| 0 - 9 | type a number (up to 7 characters) |
| * | the decimal point: 3 * 2 0 is 3.20 |
| A | the typed number becomes the price of 1 kg |
| B | tare: zero the scale with whatever is on it |
| C | clear the typed number |
| D | add the item on the scale to the bill (only when the weight is stable) |
| # | the bill is paid: it goes into the sales and a new bill starts |
The Arduino Code Explained
The whole sketch is included in the download. It reads the HX711 and scans the keypad with its own code, so it needs only one extra library, LiquidCrystal_I2C for the LCD; the Wi-Fi and the web server come with the board. At the top are the pins:
const byte HX_DT = 18, HX_SCK = 19;
const byte ROW_PIN[4] = {13, 14, 27, 26};                // R1 - R4: inputs with pull-ups
const byte COL_PIN[4] = {25, 33, 32, 4};                 // C1 - C4: one at a time LOW
Reading the HX711
Each SCK pulse shifts the next bit out of the HX711; the sketch builds the 24-bit number one bit at a time:
  for (byte i = 0; i < 24; i++) {
    digitalWrite(HX_SCK, HIGH);
    delayMicroseconds(1);
    v = (v << 1) | digitalRead(HX_DT);
    digitalWrite(HX_SCK, LOW);
    delayMicroseconds(1);
  }
A 24-bit negative number has its bit 23 set. Filling the top eight bits with ones turns it into the same negative number in a 32-bit long:
if (v & 0x800000) v |= 0xFF000000; // 24-bit two's complement to a 32-bit longFrom Counts to Grams
The starting calibration comes from the worked example above; the tare offset and the counts per gram turn a reading into grams:
float countsPerGram = 429.5; // 5 kg cell, 1 mV/V, gain 128: 0.256 x 2^23 counts at 5000 g (the CAL link measures it) float g = (hxRead() - offset) / countsPerGram; stable = histN == AVG && hi - lo <= 2 * STABLE_G;The calibration with 1 kg on the scale measures the counts per gram directly:
countsPerGram = (raw - offset) / 1000.0;The overload test has 50 g of hysteresis, so a weight right at 5 kg cannot make the warning flicker on and off:
bool over = overload ? grams > CAPACITY_G - 50 : grams > CAPACITY_G + 50; // (50 g either way: no flicker at 5 kg)Scanning the Keypad
One column LOW, a short pause for the line to settle, then the four rows; the first LOW row gives the key:
    digitalWrite(COL_PIN[c], LOW);
    delayMicroseconds(10);
    for (byte r = 0; r < 4; r++) {
      if (digitalRead(ROW_PIN[r]) == LOW) { digitalWrite(COL_PIN[c], HIGH); return KEYS[r][c]; }
In the loop, a key counts only when it is new, so a key held down for many scans is one press:
    char k = scanKeys();
    if (k && k != lastKey) key(k);
    lastKey = k;
The Price and the Bill
An item's cost is its weight in kg times the price of 1 kg; the bill keeps up to eight items:
it.g = grams; it.price = pricePerKg; it.cost = grams / 1000 * pricePerKg;The LCD shows the weight with STABLE or OVERLOAD, the price per kg, the cost of the item on the scale (or the number being typed) and the bill. The web page shows the same, plus every item on the bill, the sales and the latest events, newest first. TARE, CAL 1 kg and PAY work from the page as well as from the keypad, and JSON gives everything to another device.
How to Run the Proteus Simulation
- Download the project zip below and install the library files (the steps are under the download button).
- Open ESP32-Smart-Scale.pdsprj from the Proteus Simulation folder. Keep the HEX and DLL files next to it.
- Press Play. The scale tares itself with nothing on it, joins the Wi-Fi and shows 0.000 kg.
- Open the Laptop WiFi Monitor (PC1) or the Mobile WiFi Monitor (MOB1) and press Go.
- Type a price on the keypad's pop-up (U4), for example 3 * 2 0, then press A.
- Put a weight on the load cell from the HX711's pop-up (U2), for example 2.5 kg. When it says STABLE, press D to add it to the bill, and # when the bill is paid.
Proteus Simulation Results
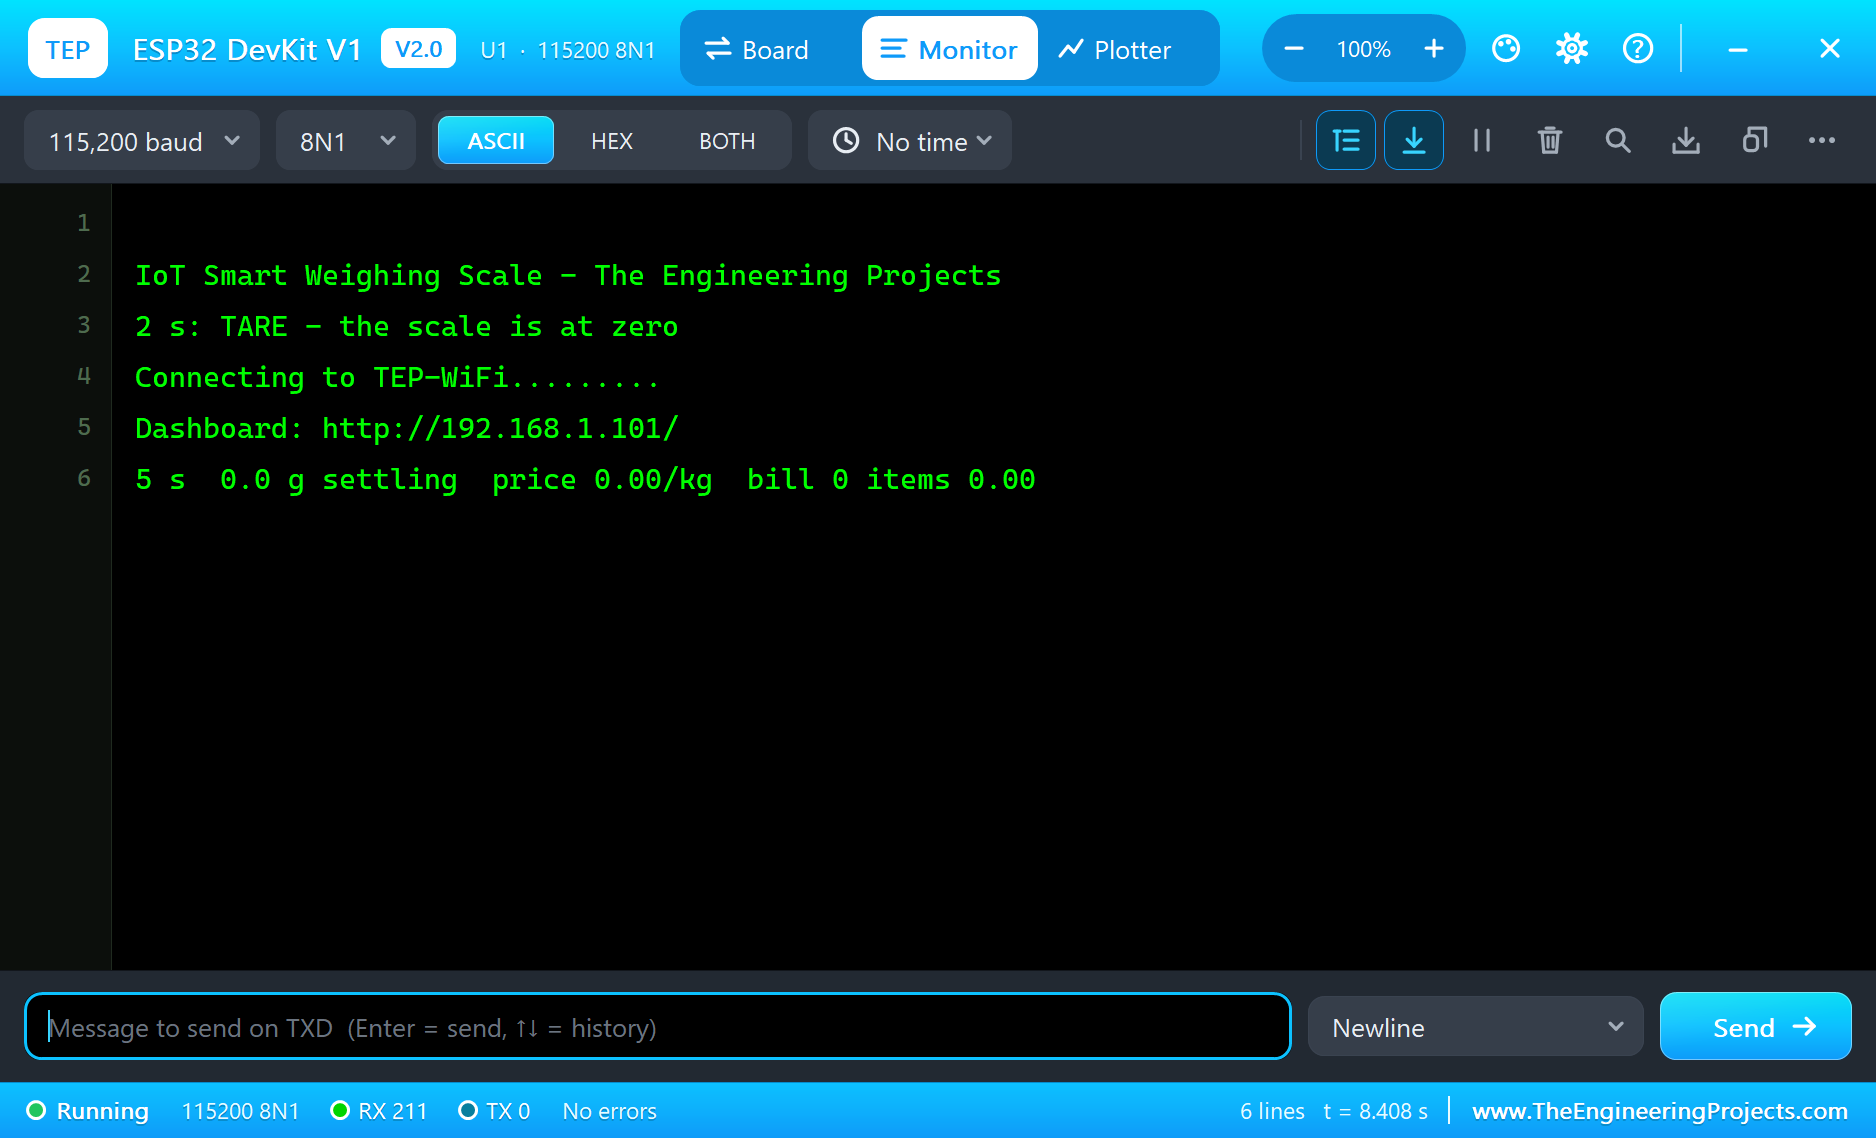
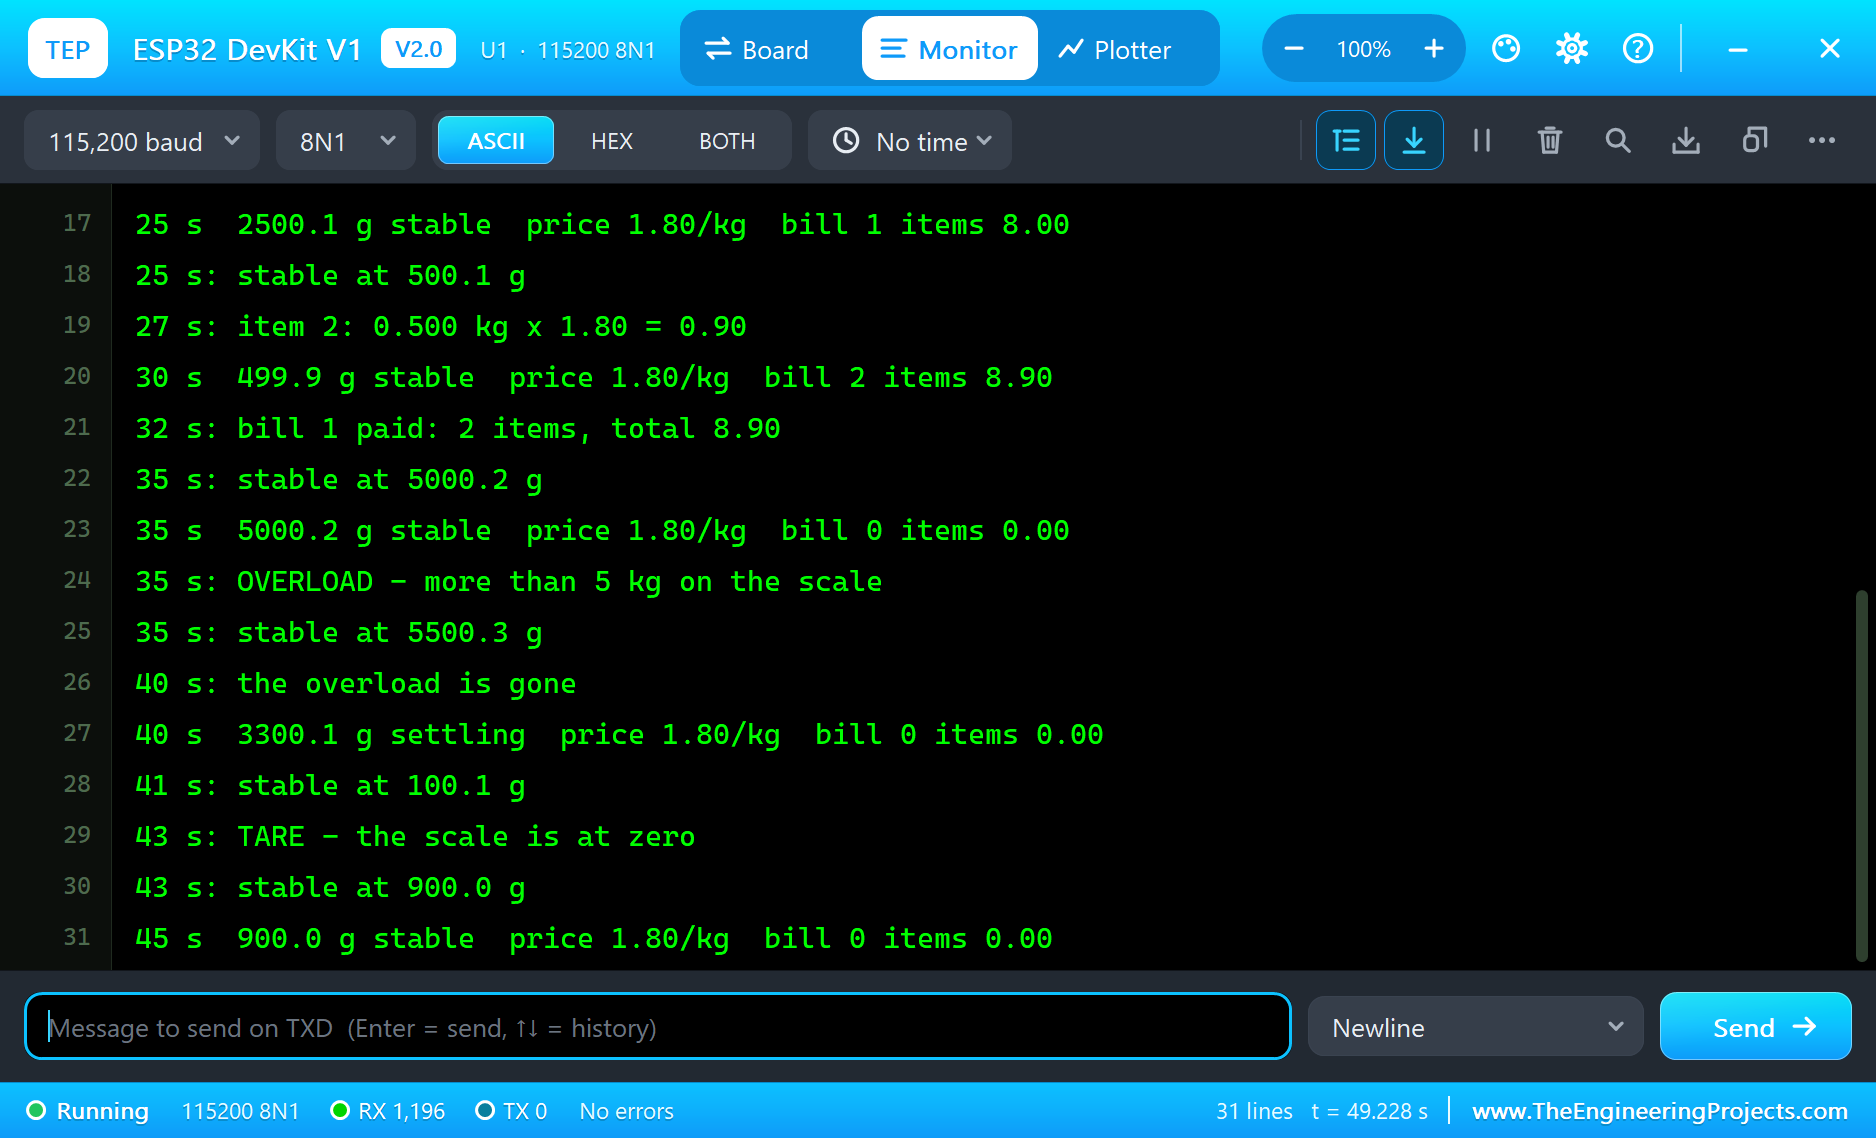
Here is one complete run of the simulation, with the numbers from our final test run; the times are simulation seconds. The serial monitor shows the start: the TARE at 2 seconds with nothing on the scale, the Wi-Fi joined and the dashboard's address, and then a status line every 5 seconds, 0.0 g and stable:
The Scale at Rest
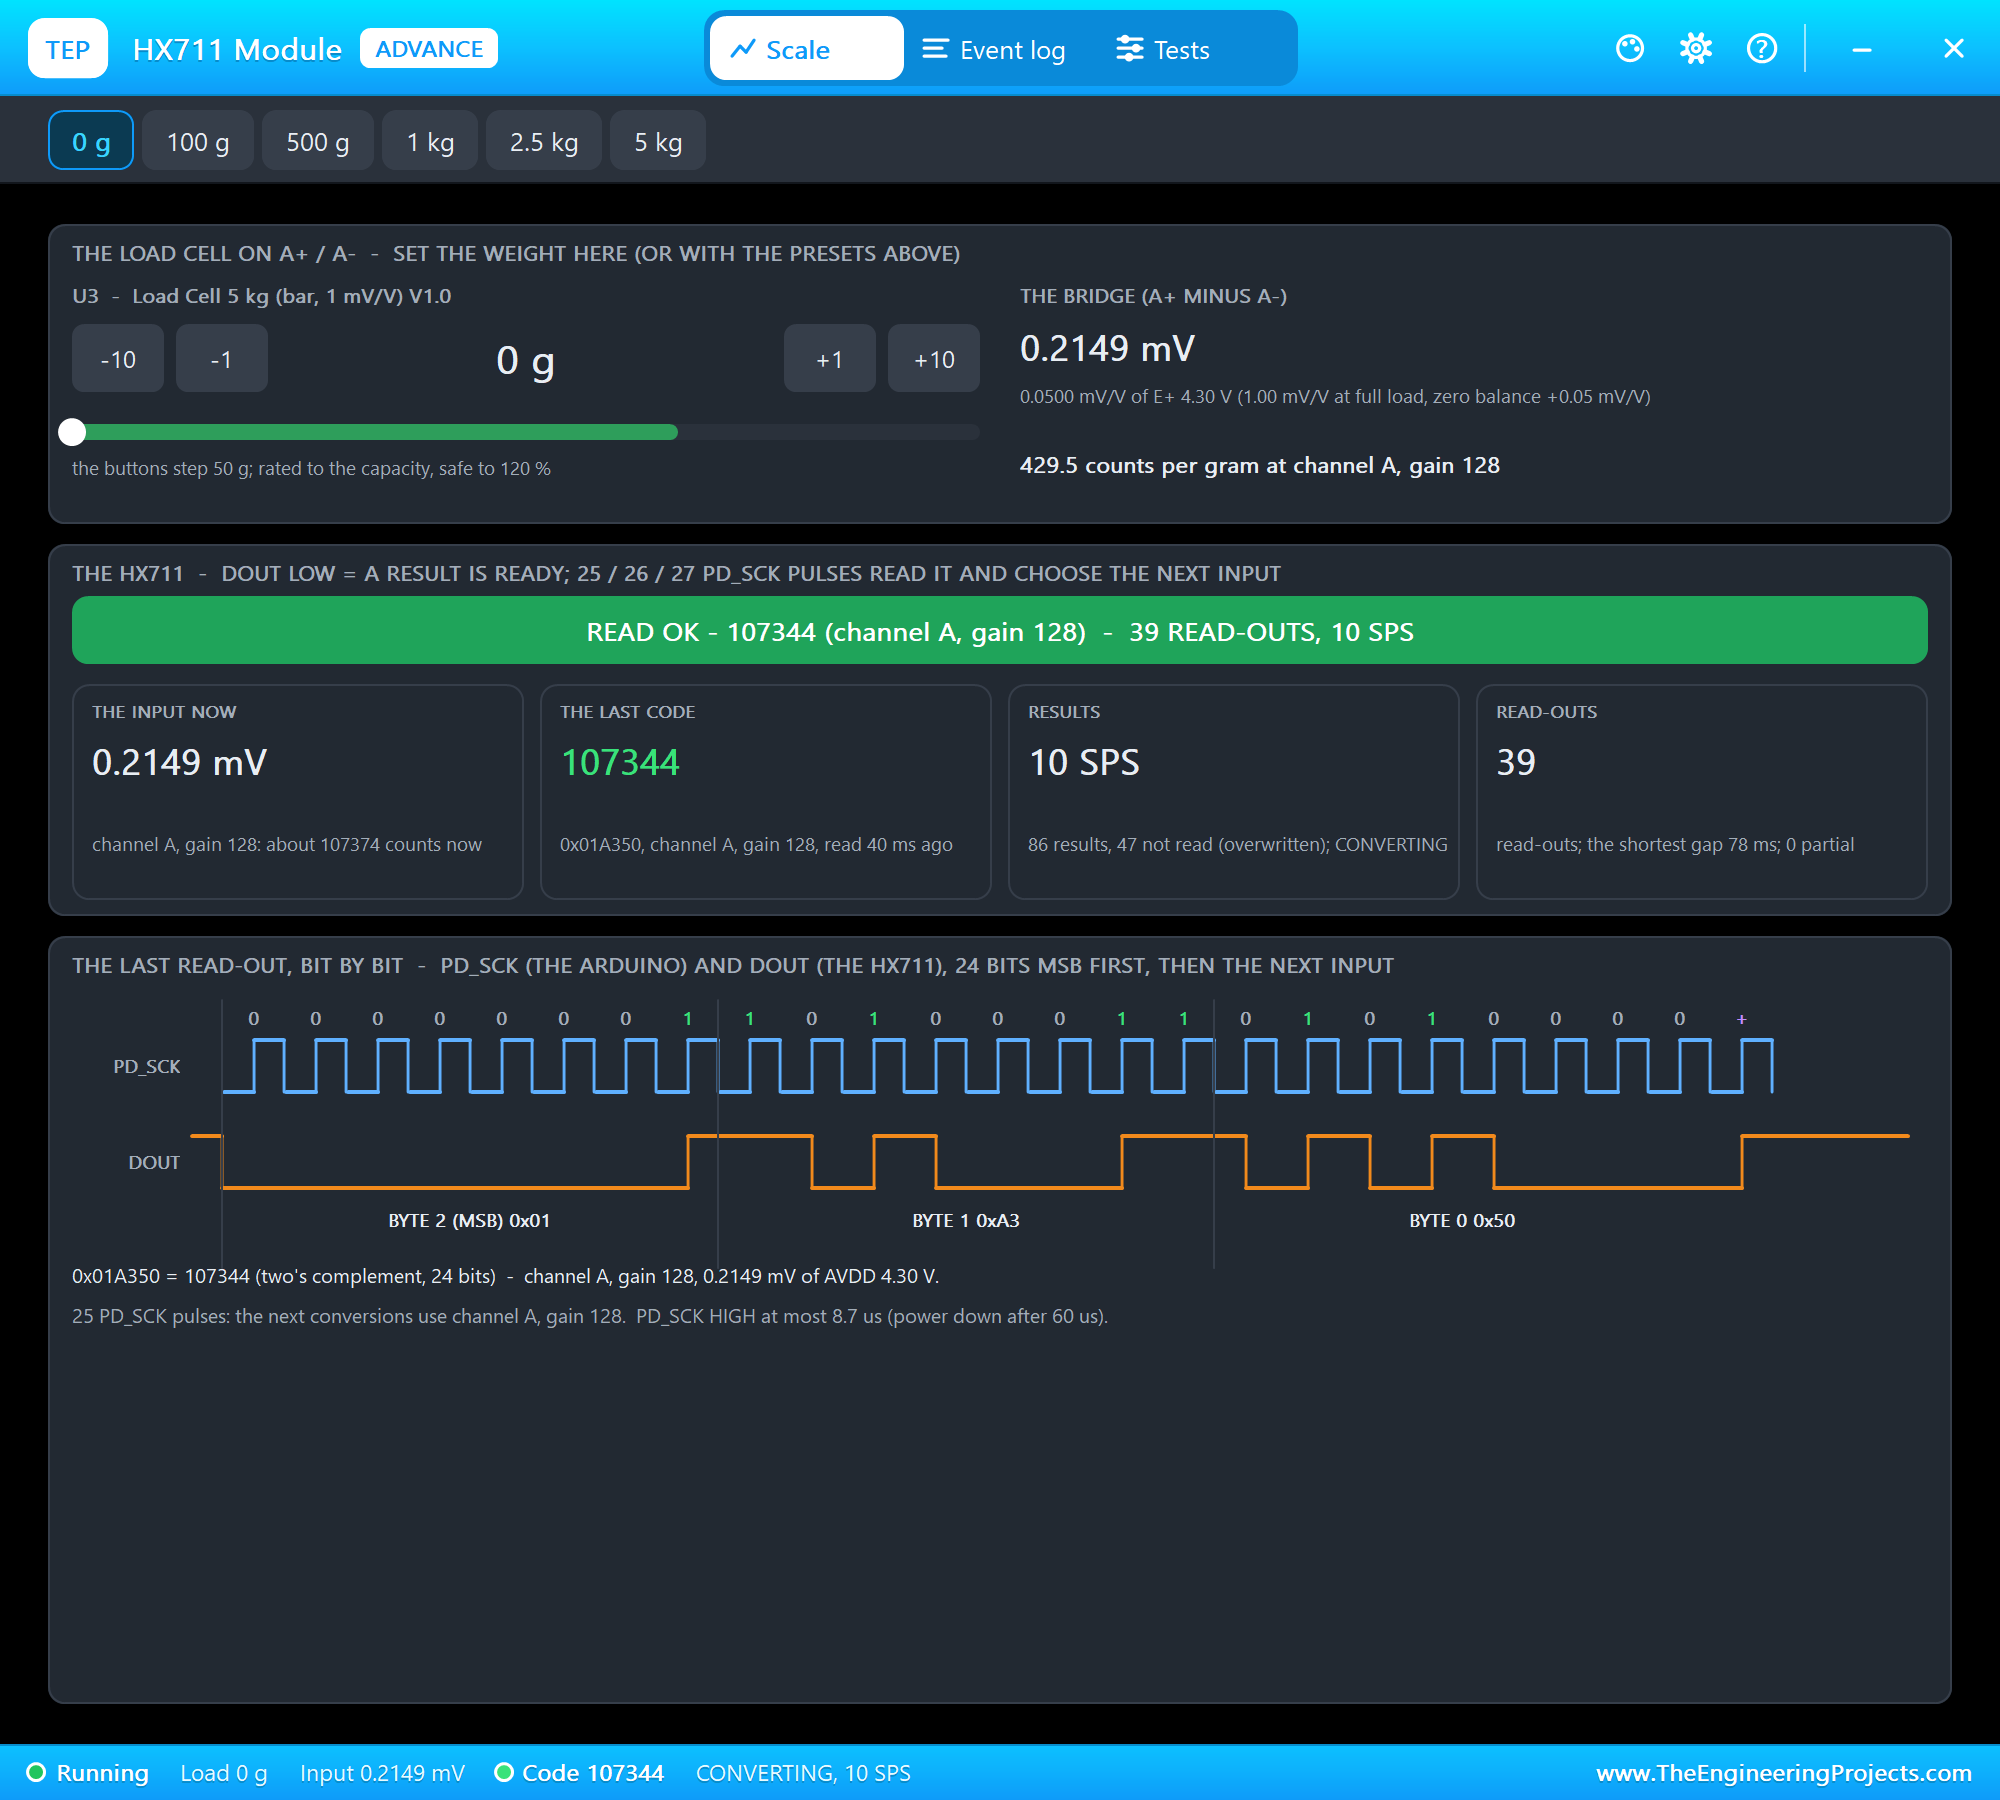
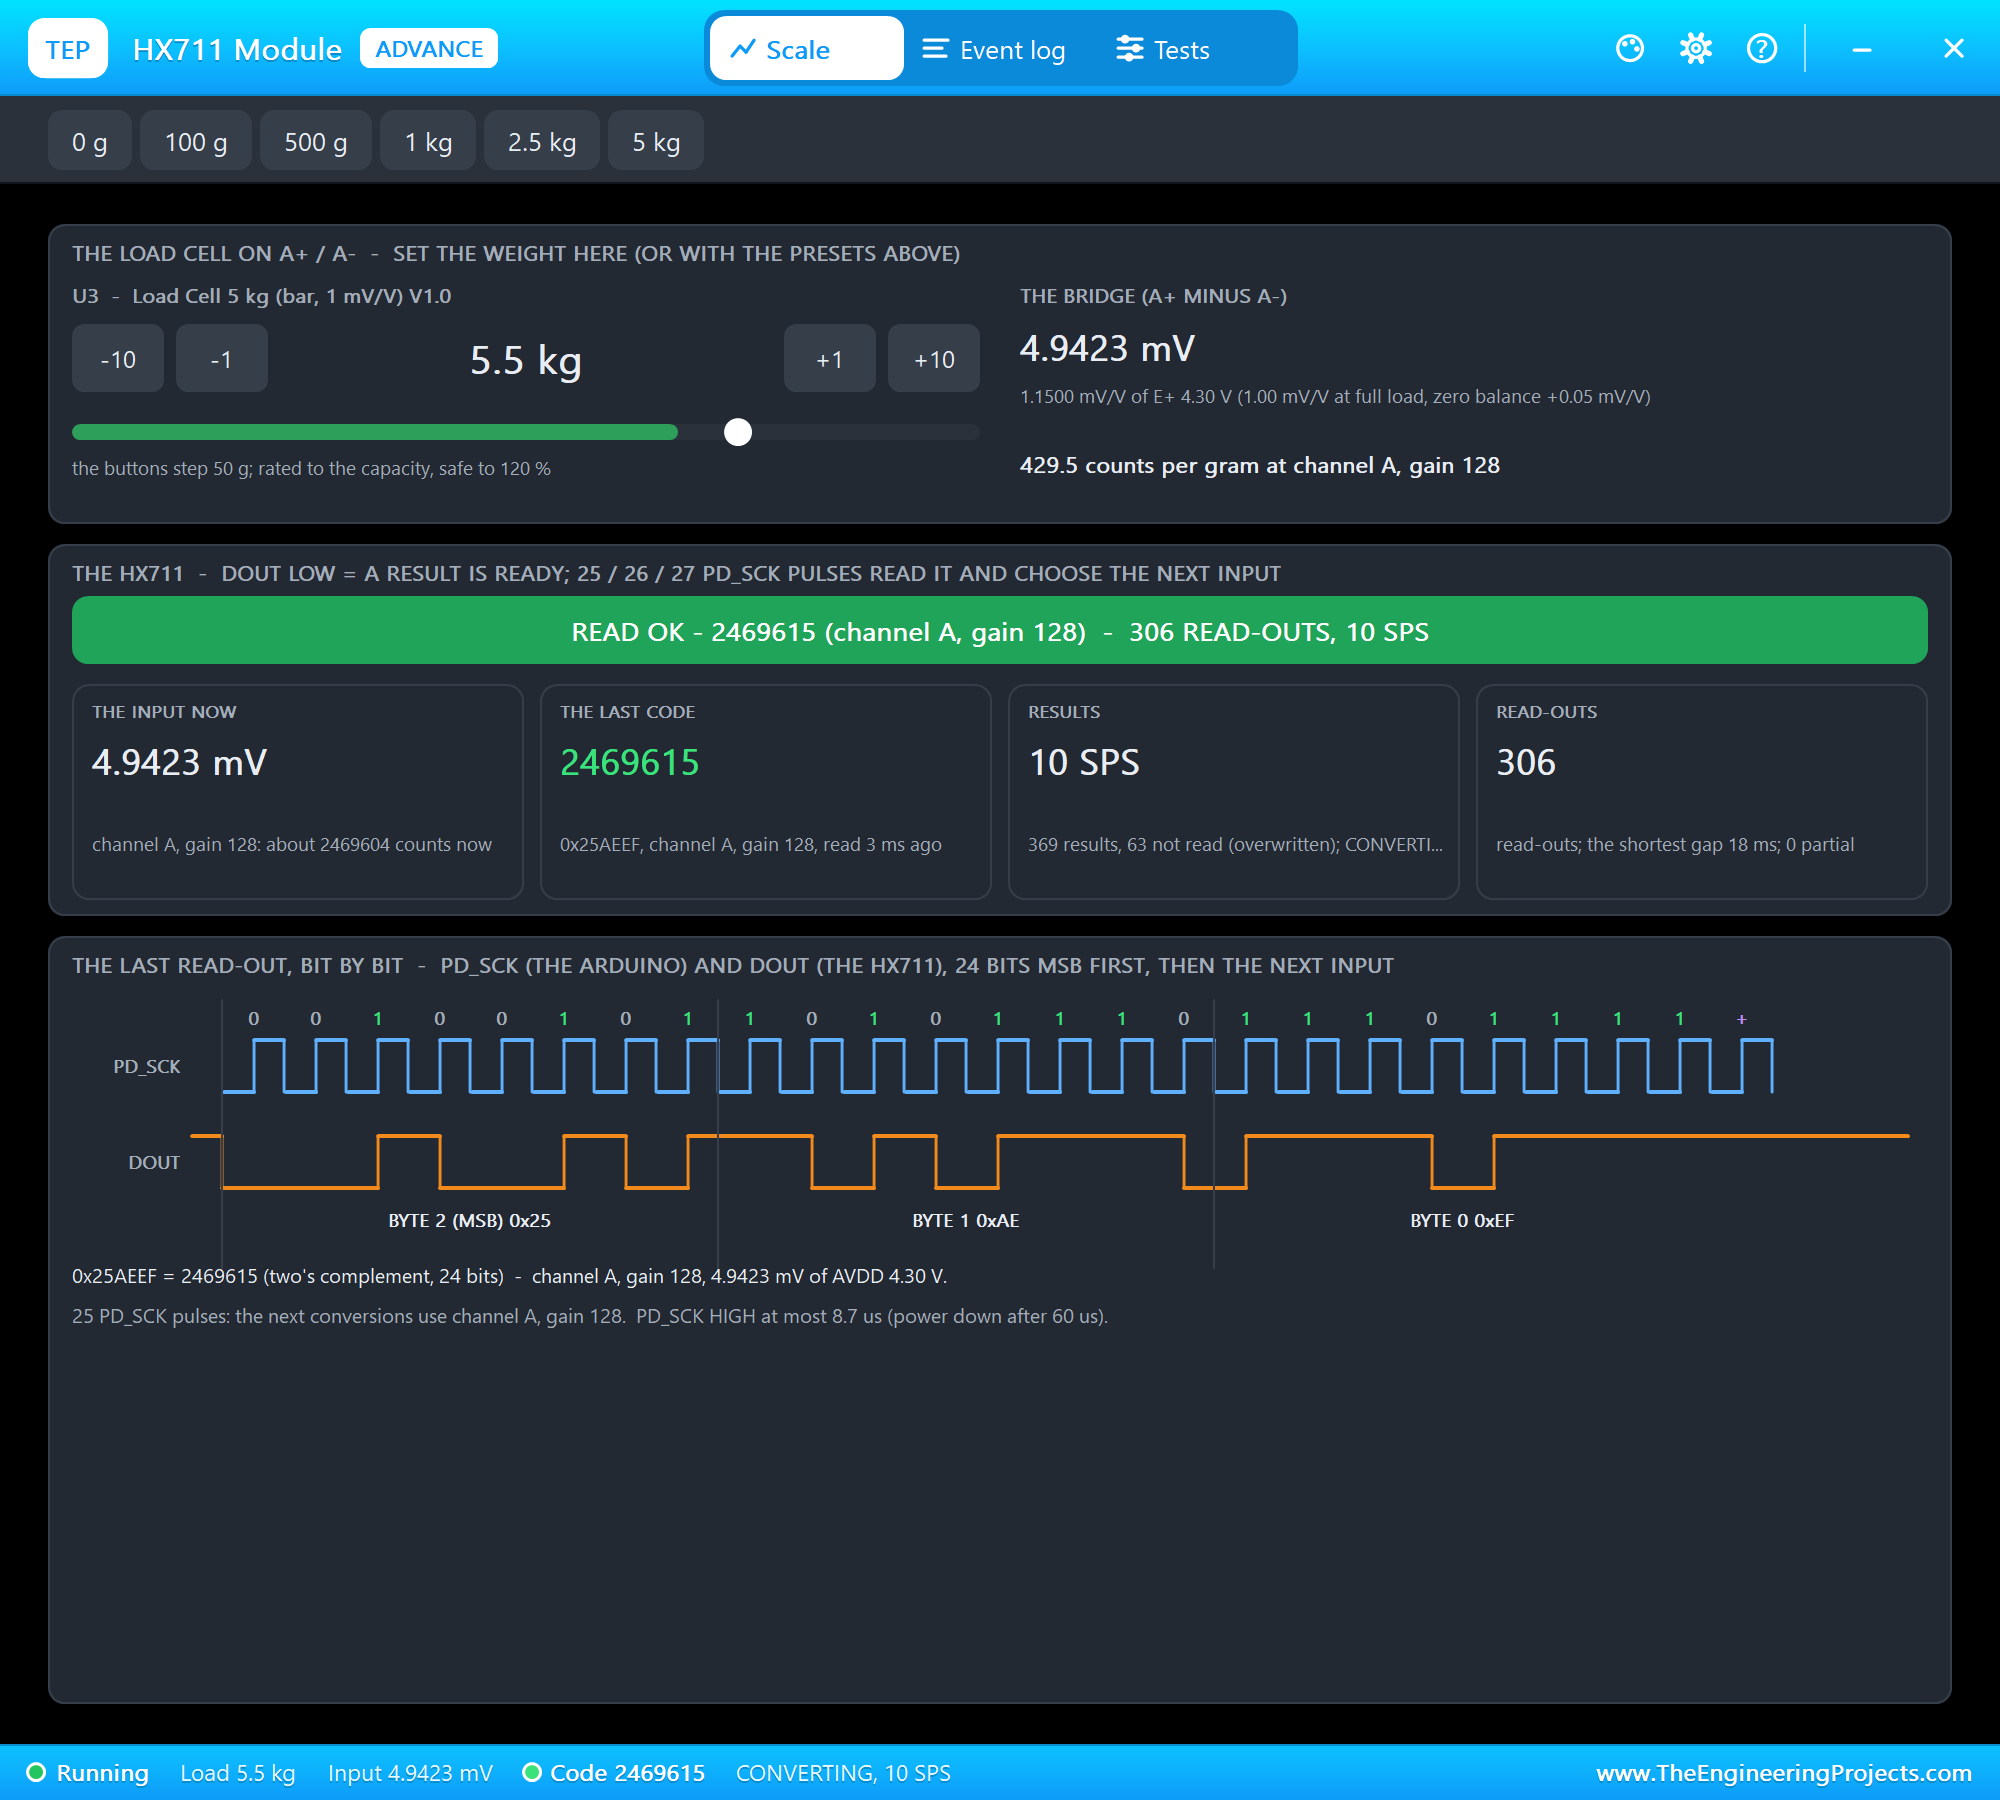
Even with nothing on it, the bridge gives 0.2149 mV, the cell's zero balance, which the HX711 reads as about 107,380 counts. That is exactly what the start-up TARE removes. The pop-up draws the sketch's last read-out: 24 clock pulses, the bits of DOUT, and the 25th pulse for channel A at gain 128. It also confirms the timing: SCK was HIGH for at most 8.7 microseconds, far below the 60 microseconds that would power the chip down.
Checking the Calibration
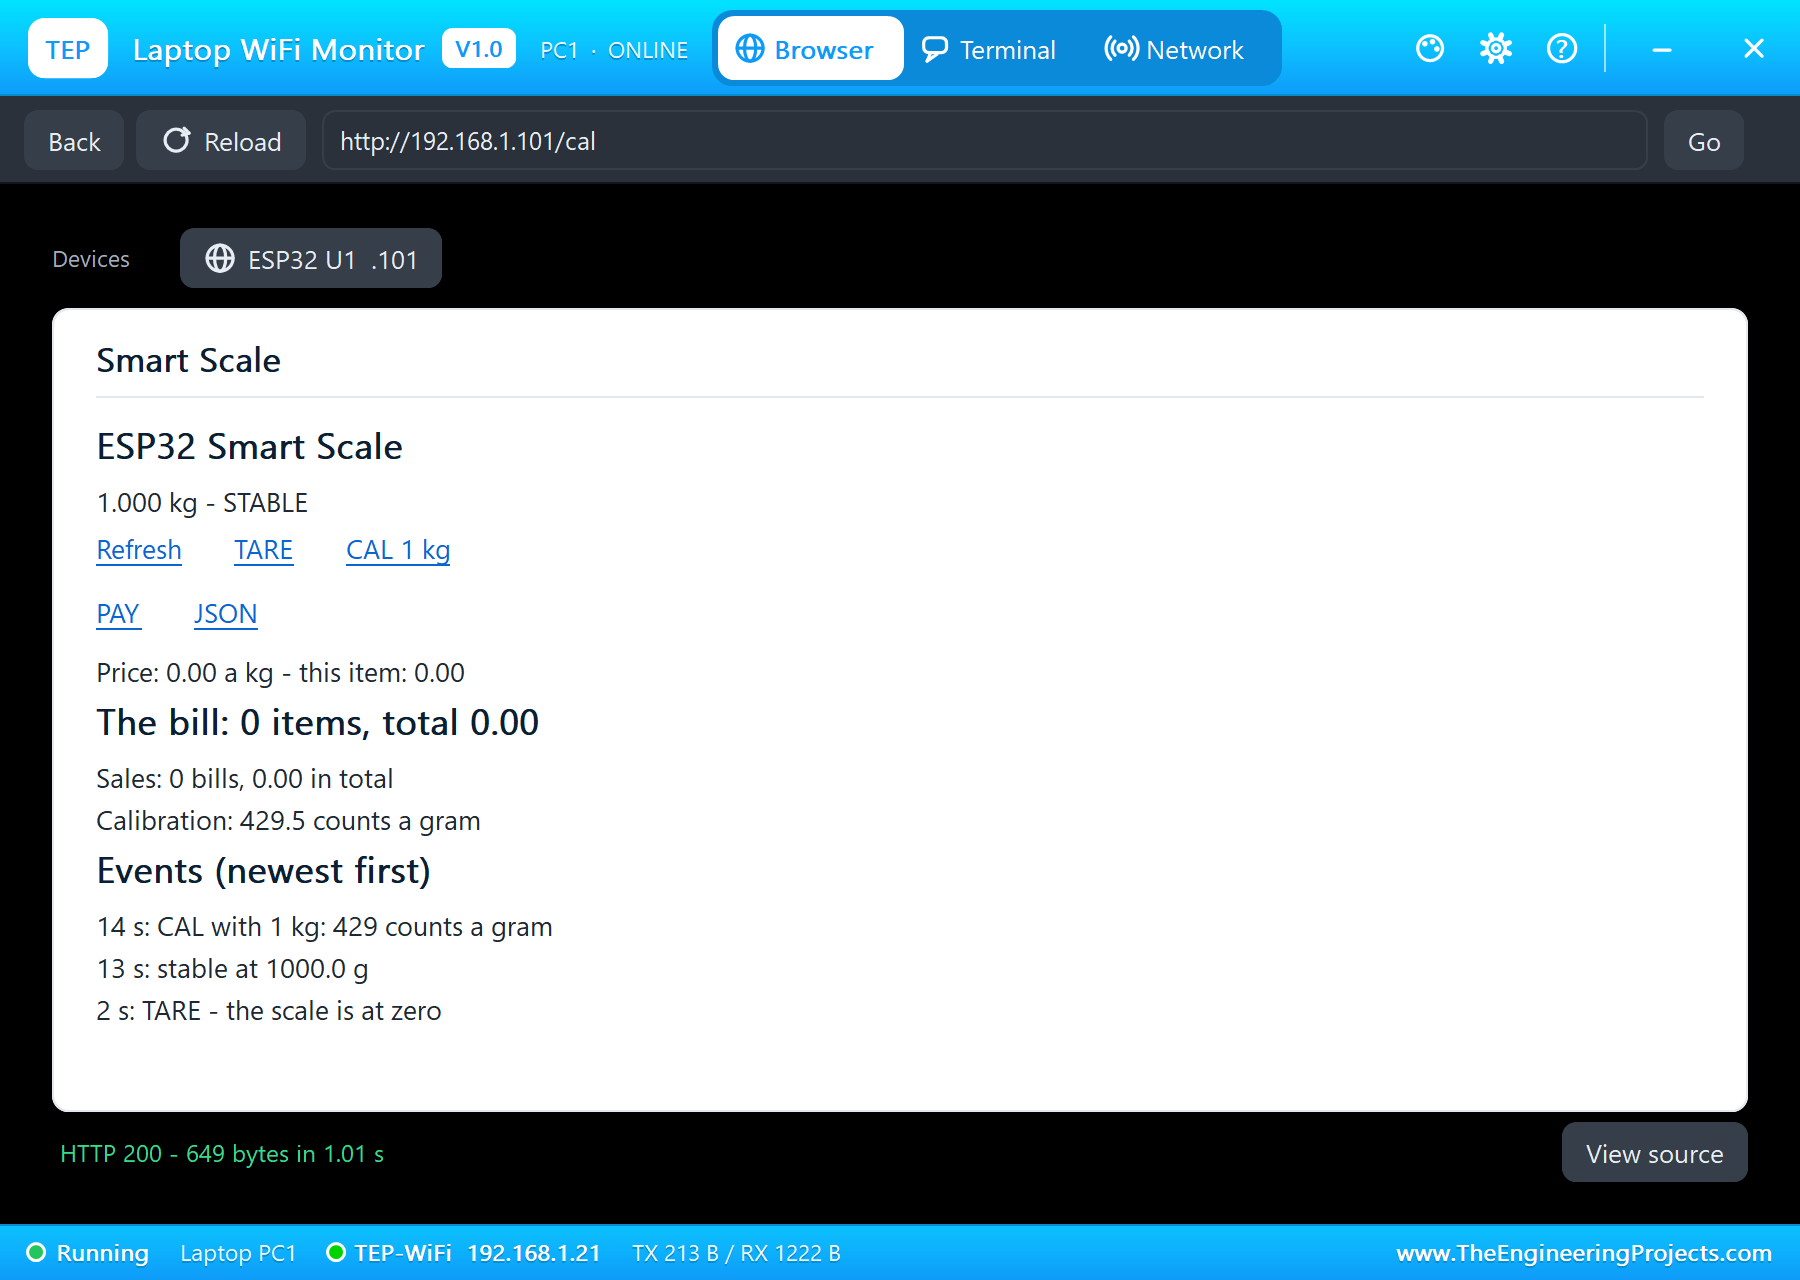
First, 1 kg on the load cell from the HX711's pop-up. At 13 seconds the scale said "stable at 1000.0 g", already right with the calibration from the worked example. Then CAL 1 kg on the laptop measured it again: "CAL with 1 kg: 429 counts a gram", and the page showed 429.5. The theory and the measurement agree.
The First Customer: Two Items
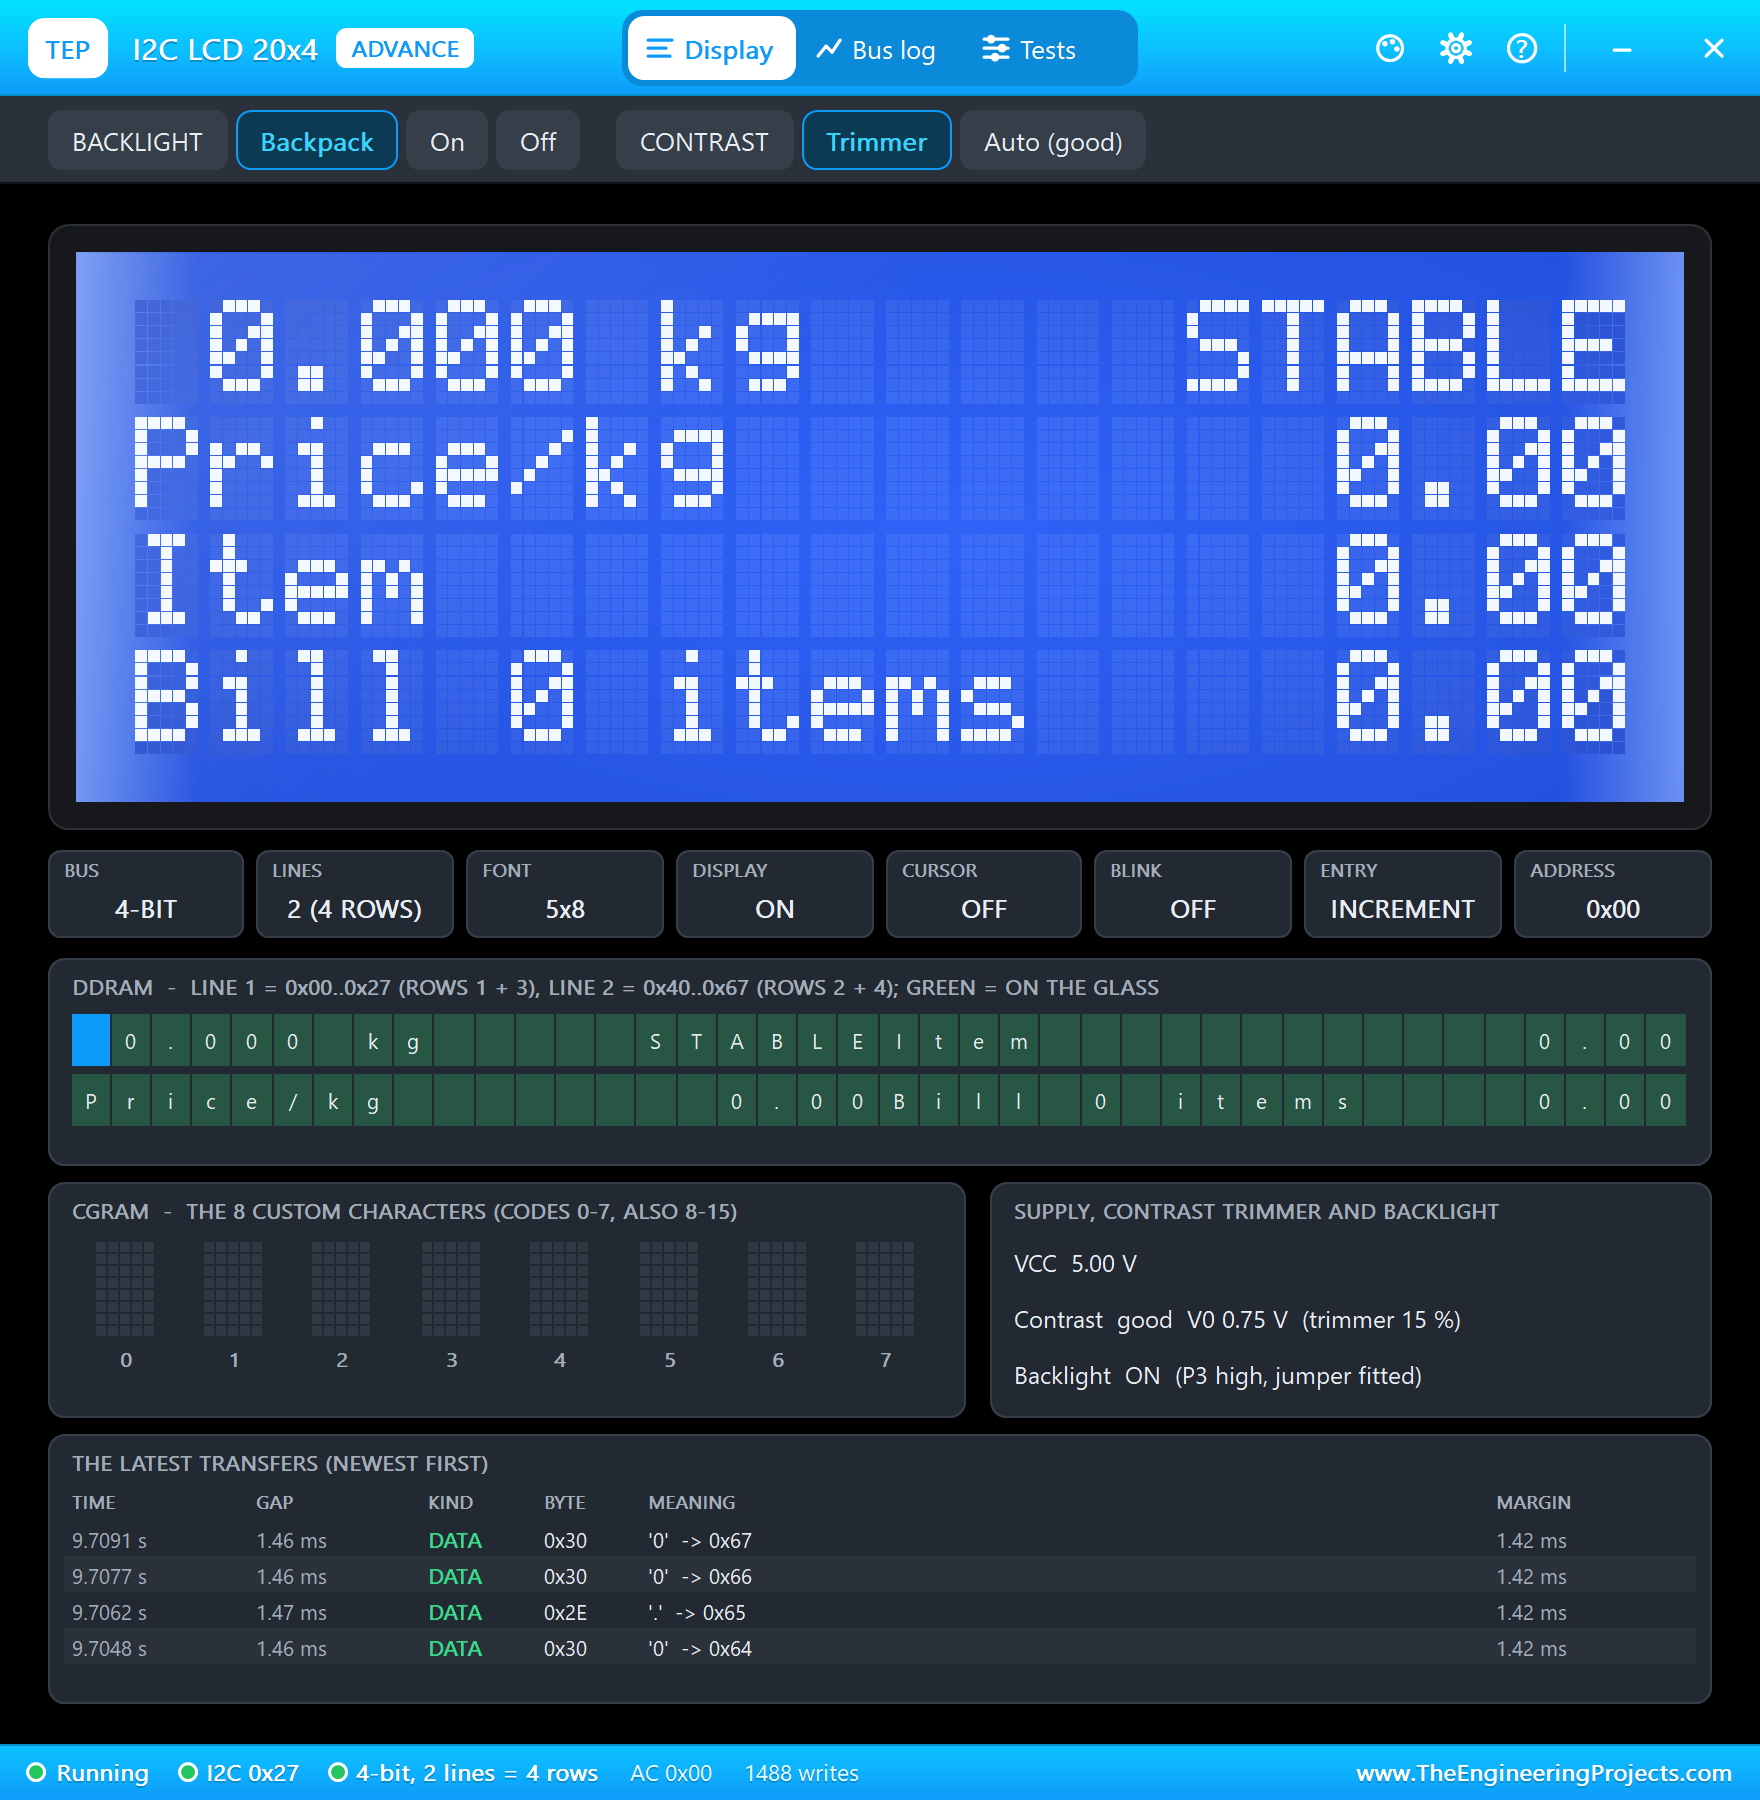
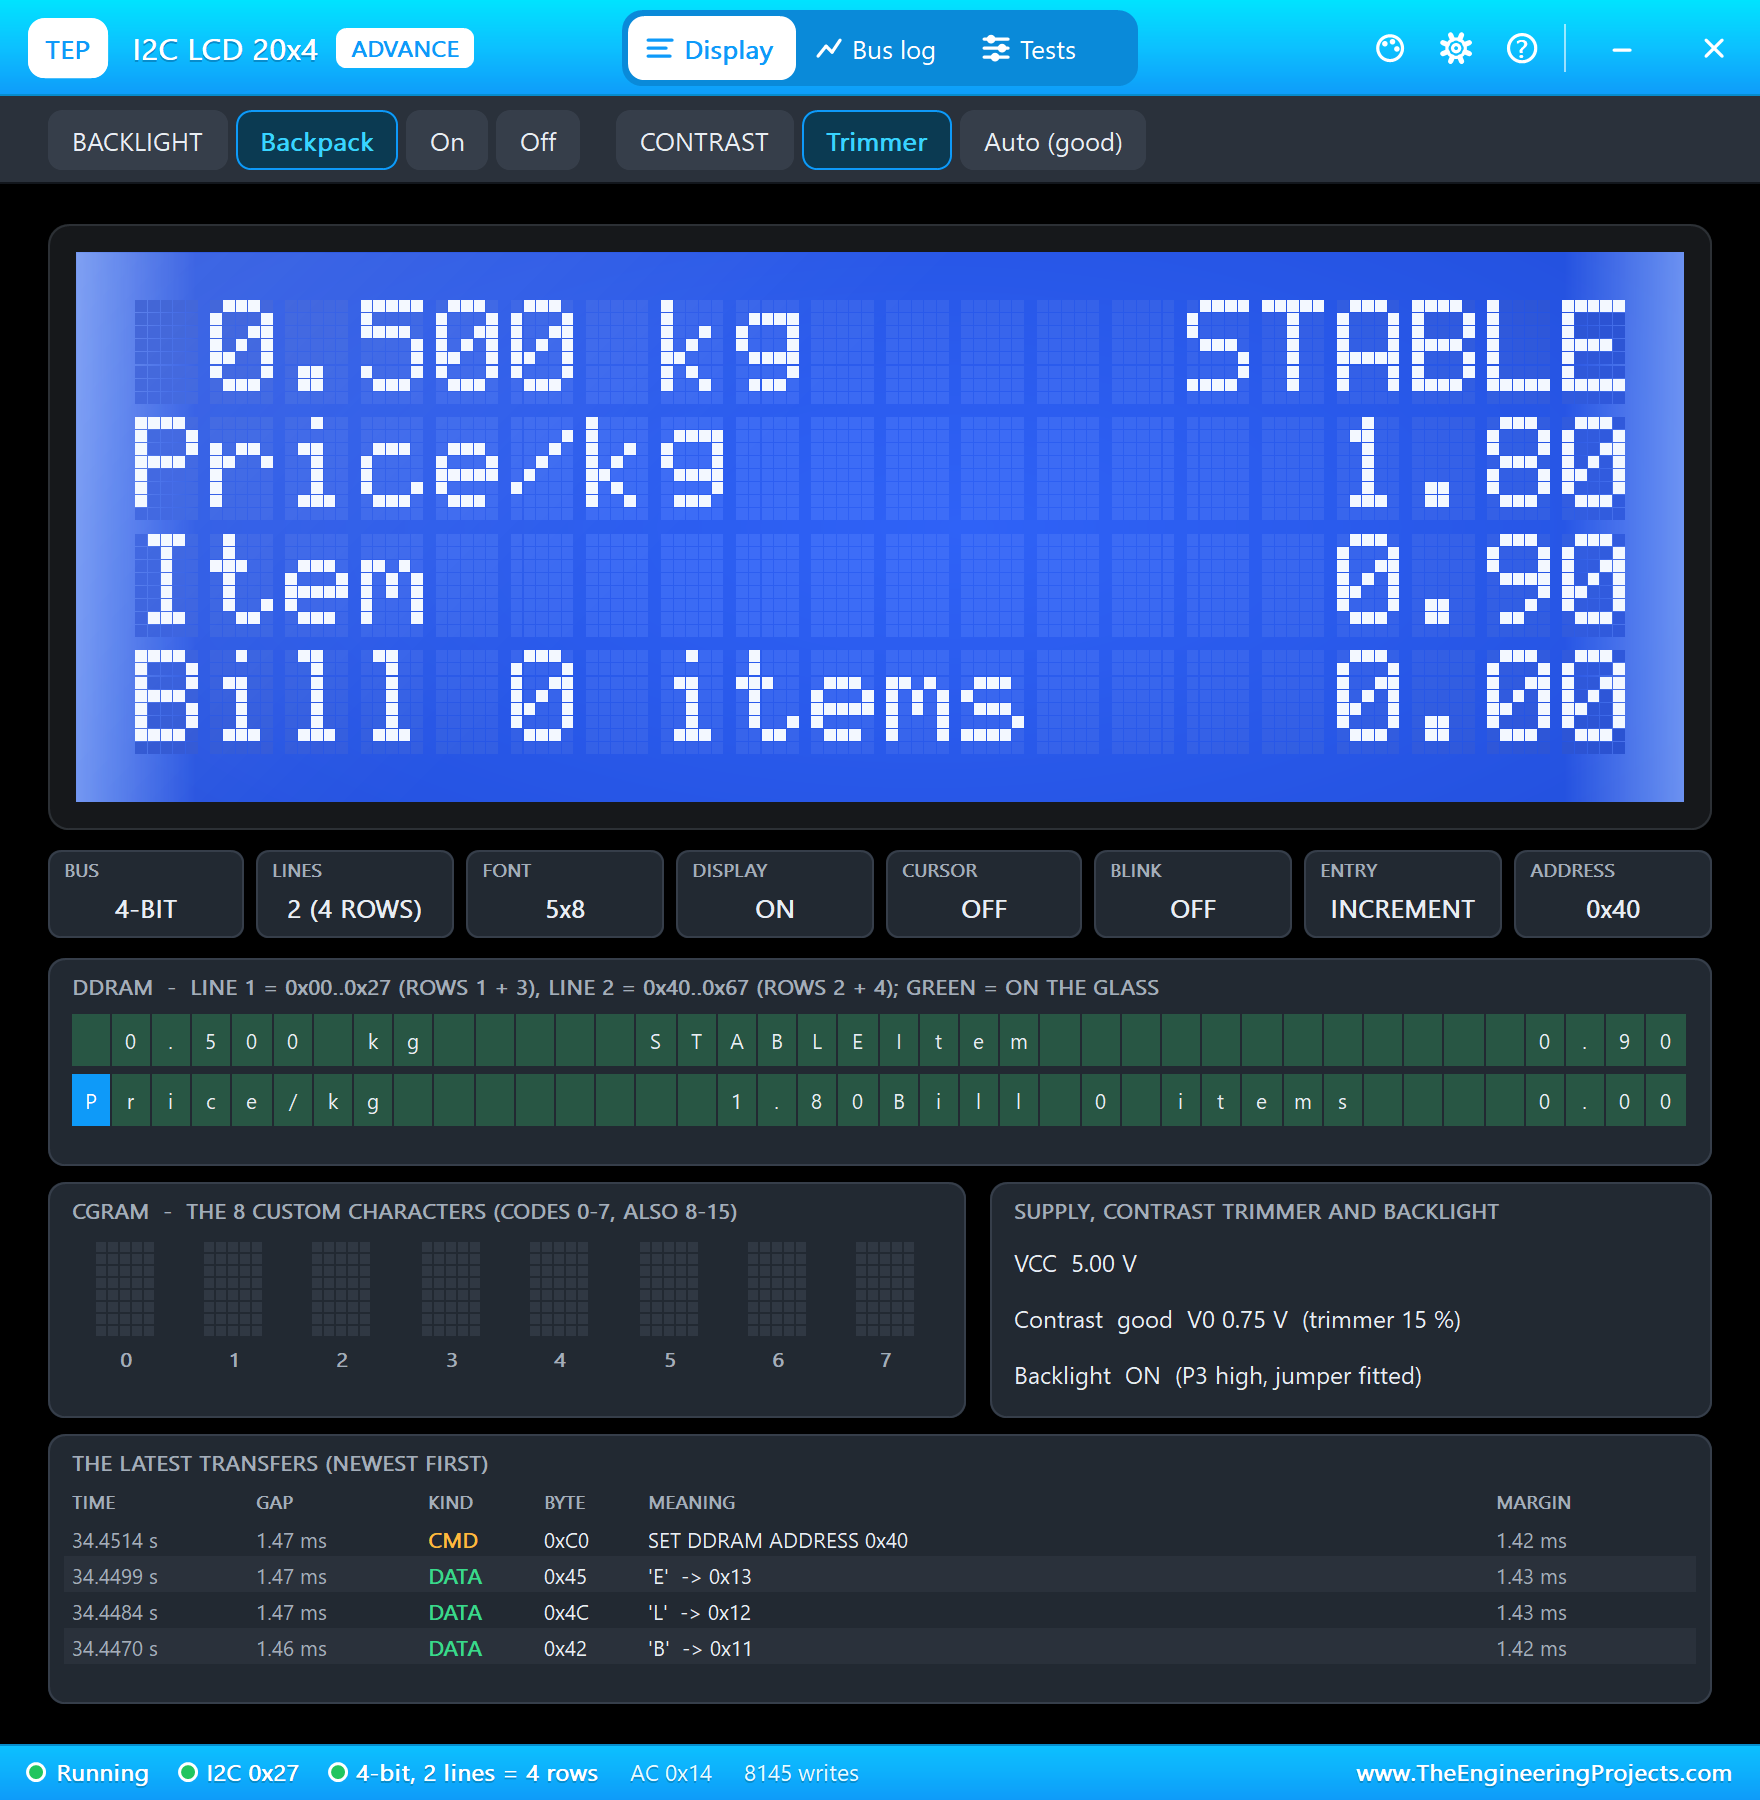
The price came from the keypad: 3, *, 2, 0. While the digits are typed, the LCD's third row shows them, and A at 18 seconds set "price set to 3.20 a kg".
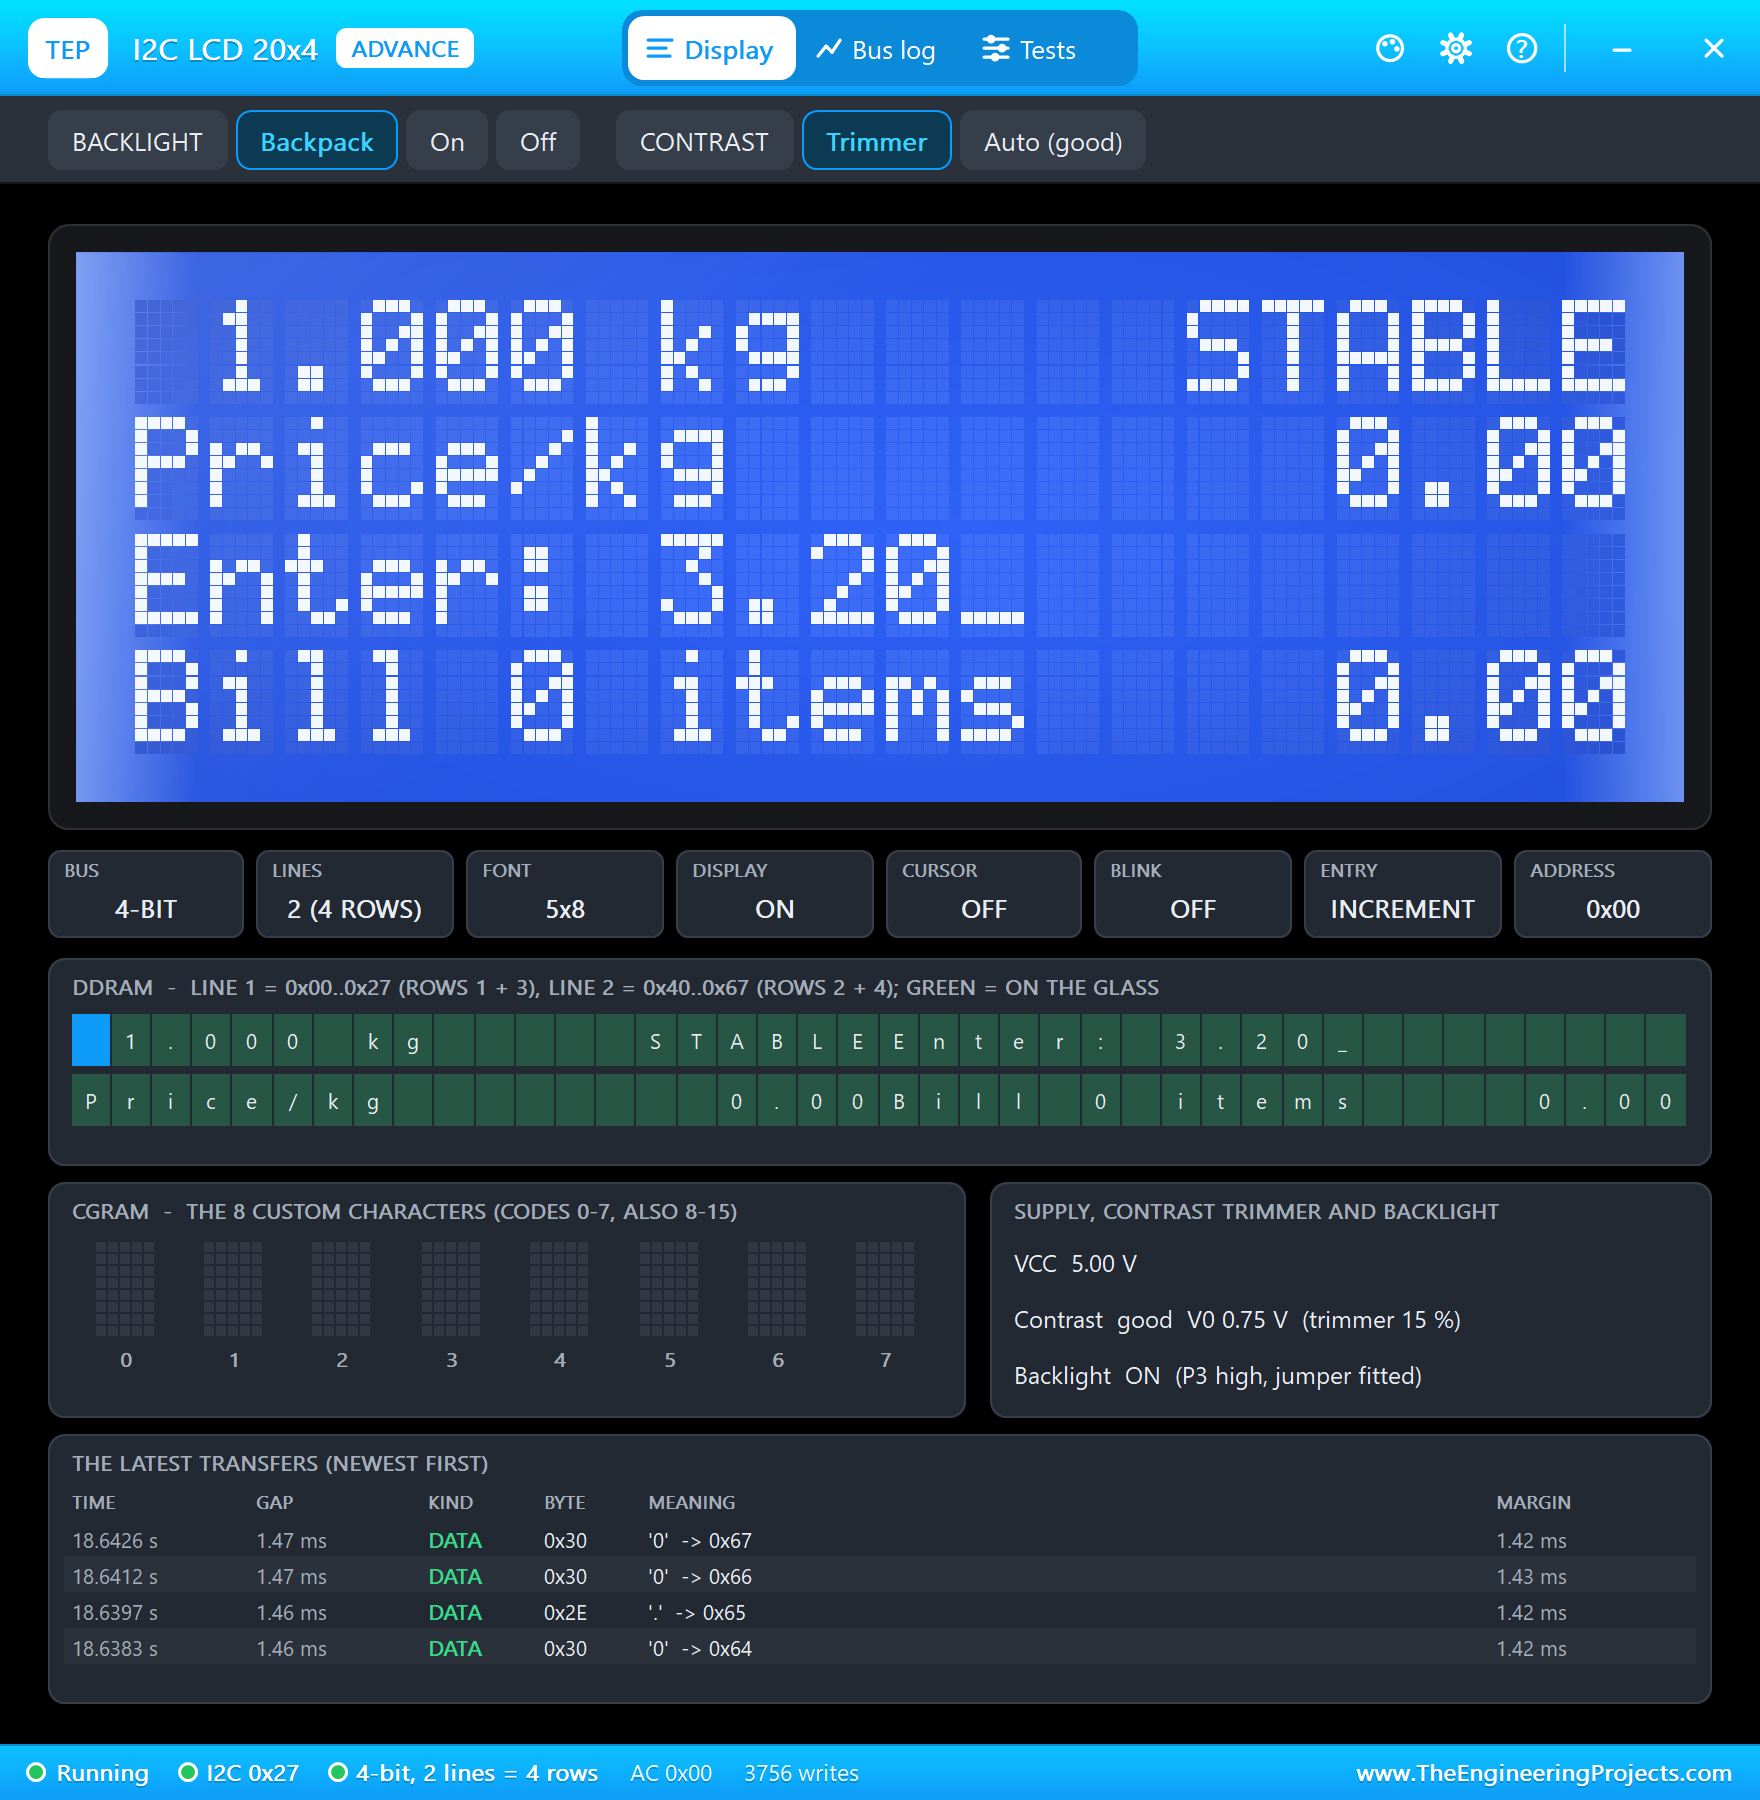
Then 2.5 kg on the load cell: "stable at 2500.1 g" at 19 seconds, and D added it to the bill: "item 1: 2.500 kg x 3.20 = 8.00".
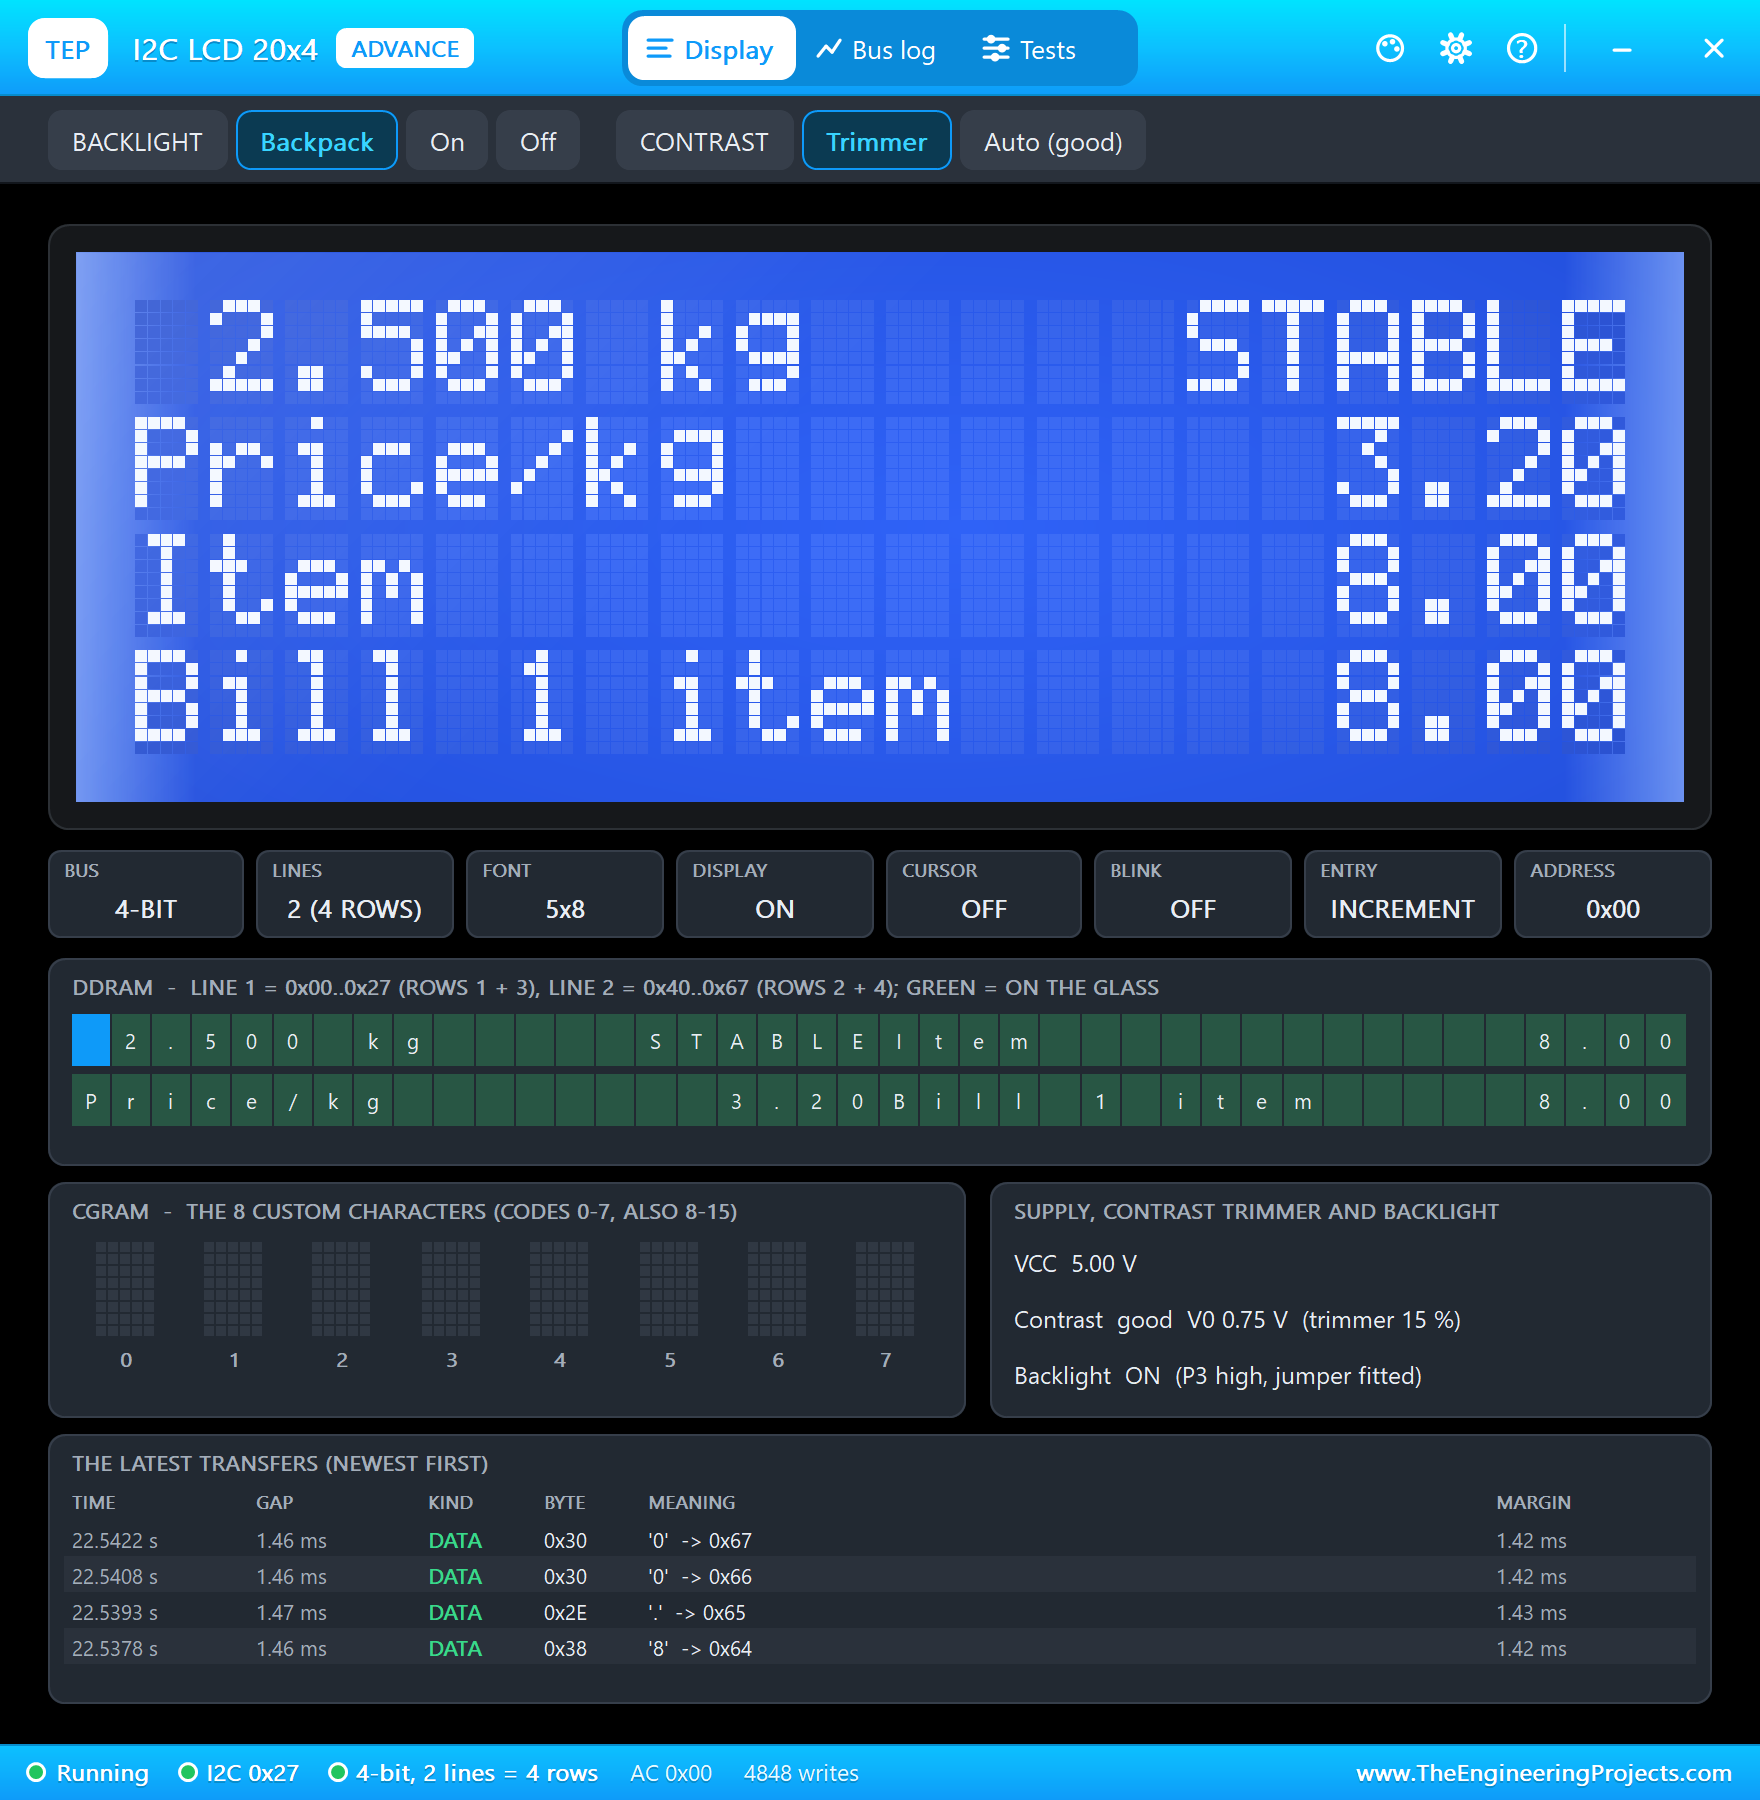
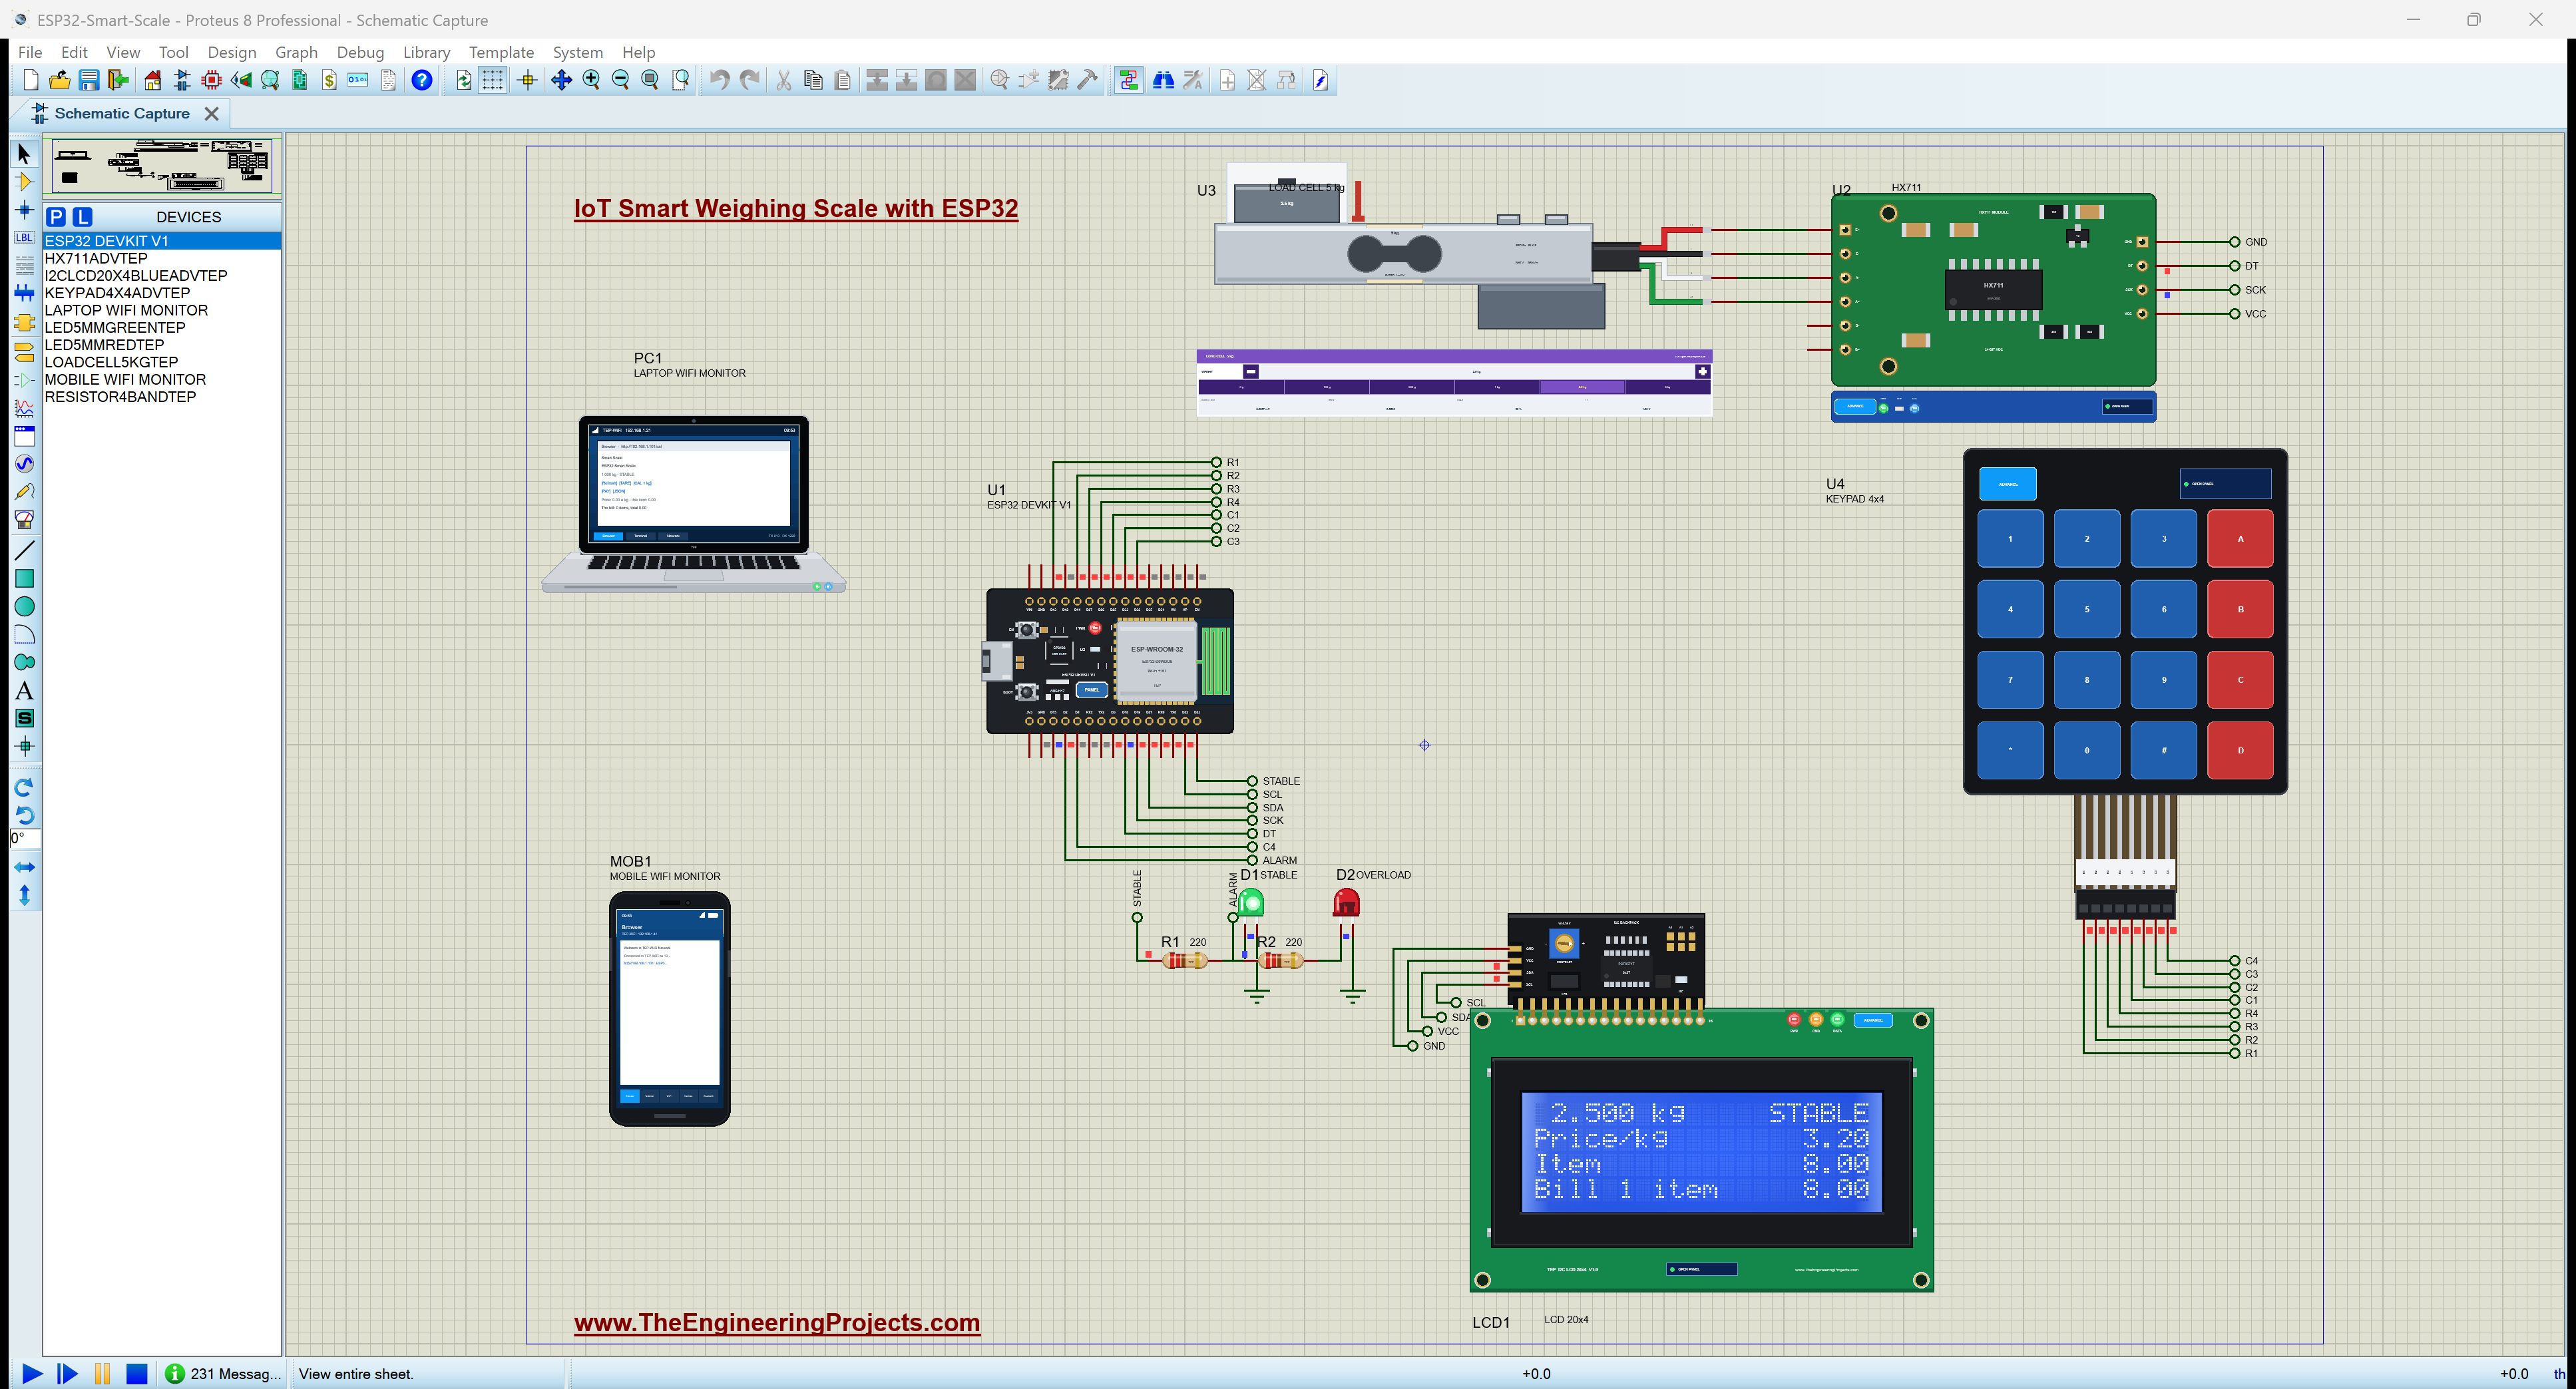
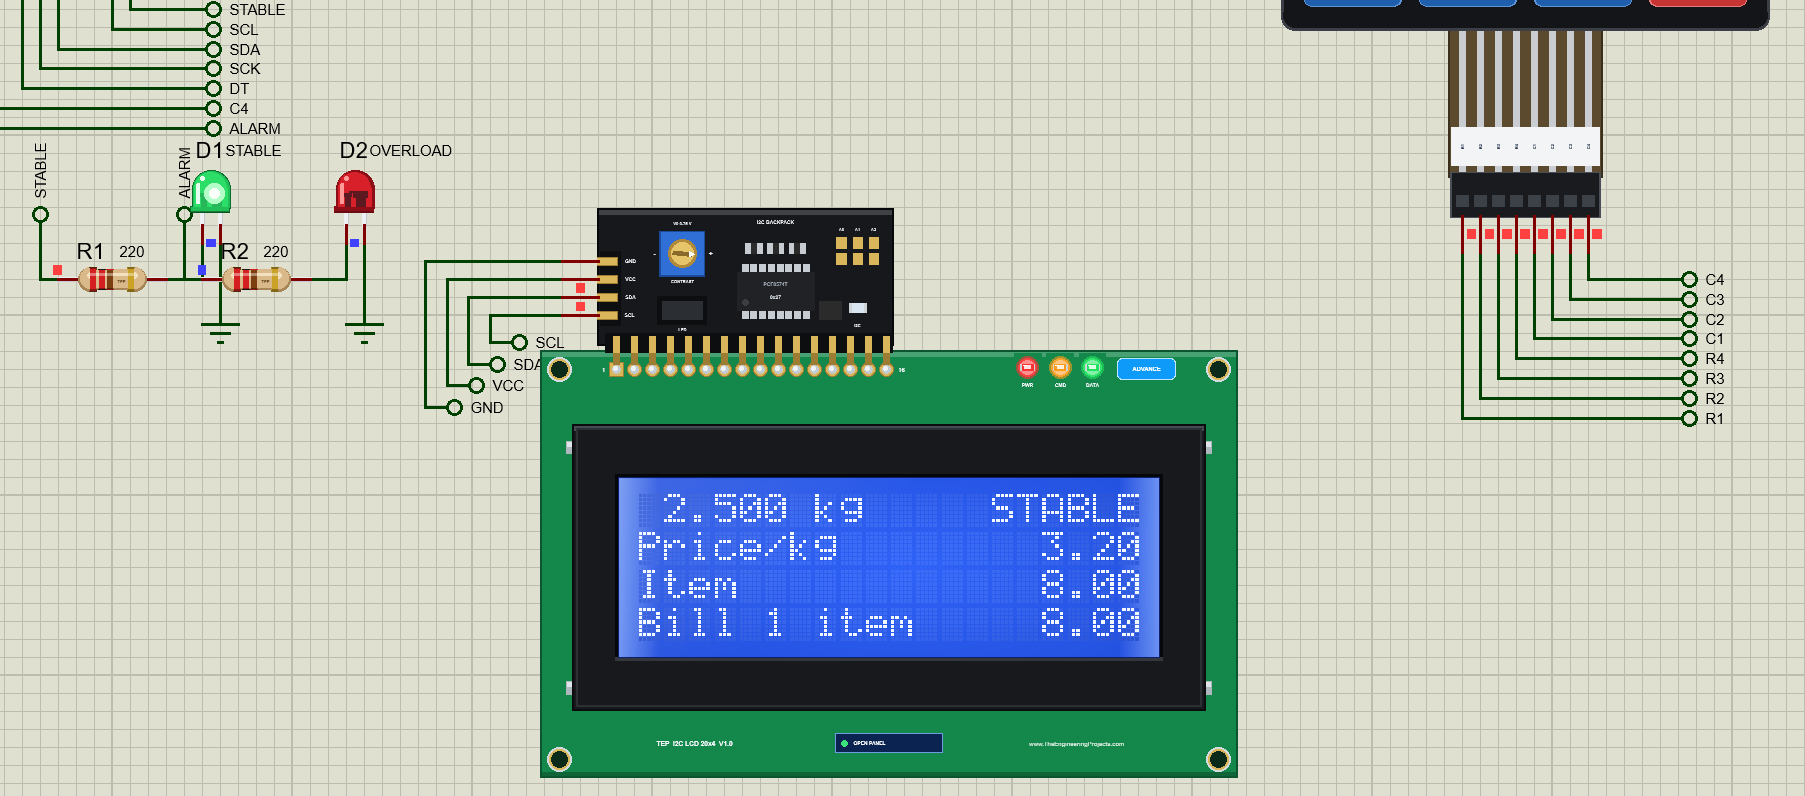
The second item: 1, *, 8 and A for 1.80 a kg, then 500 g, "stable at 500.1 g", and D: "item 2: 0.500 kg x 1.80 = 0.90". The laptop and the phone showed the bill with both items and the total, 8.90.
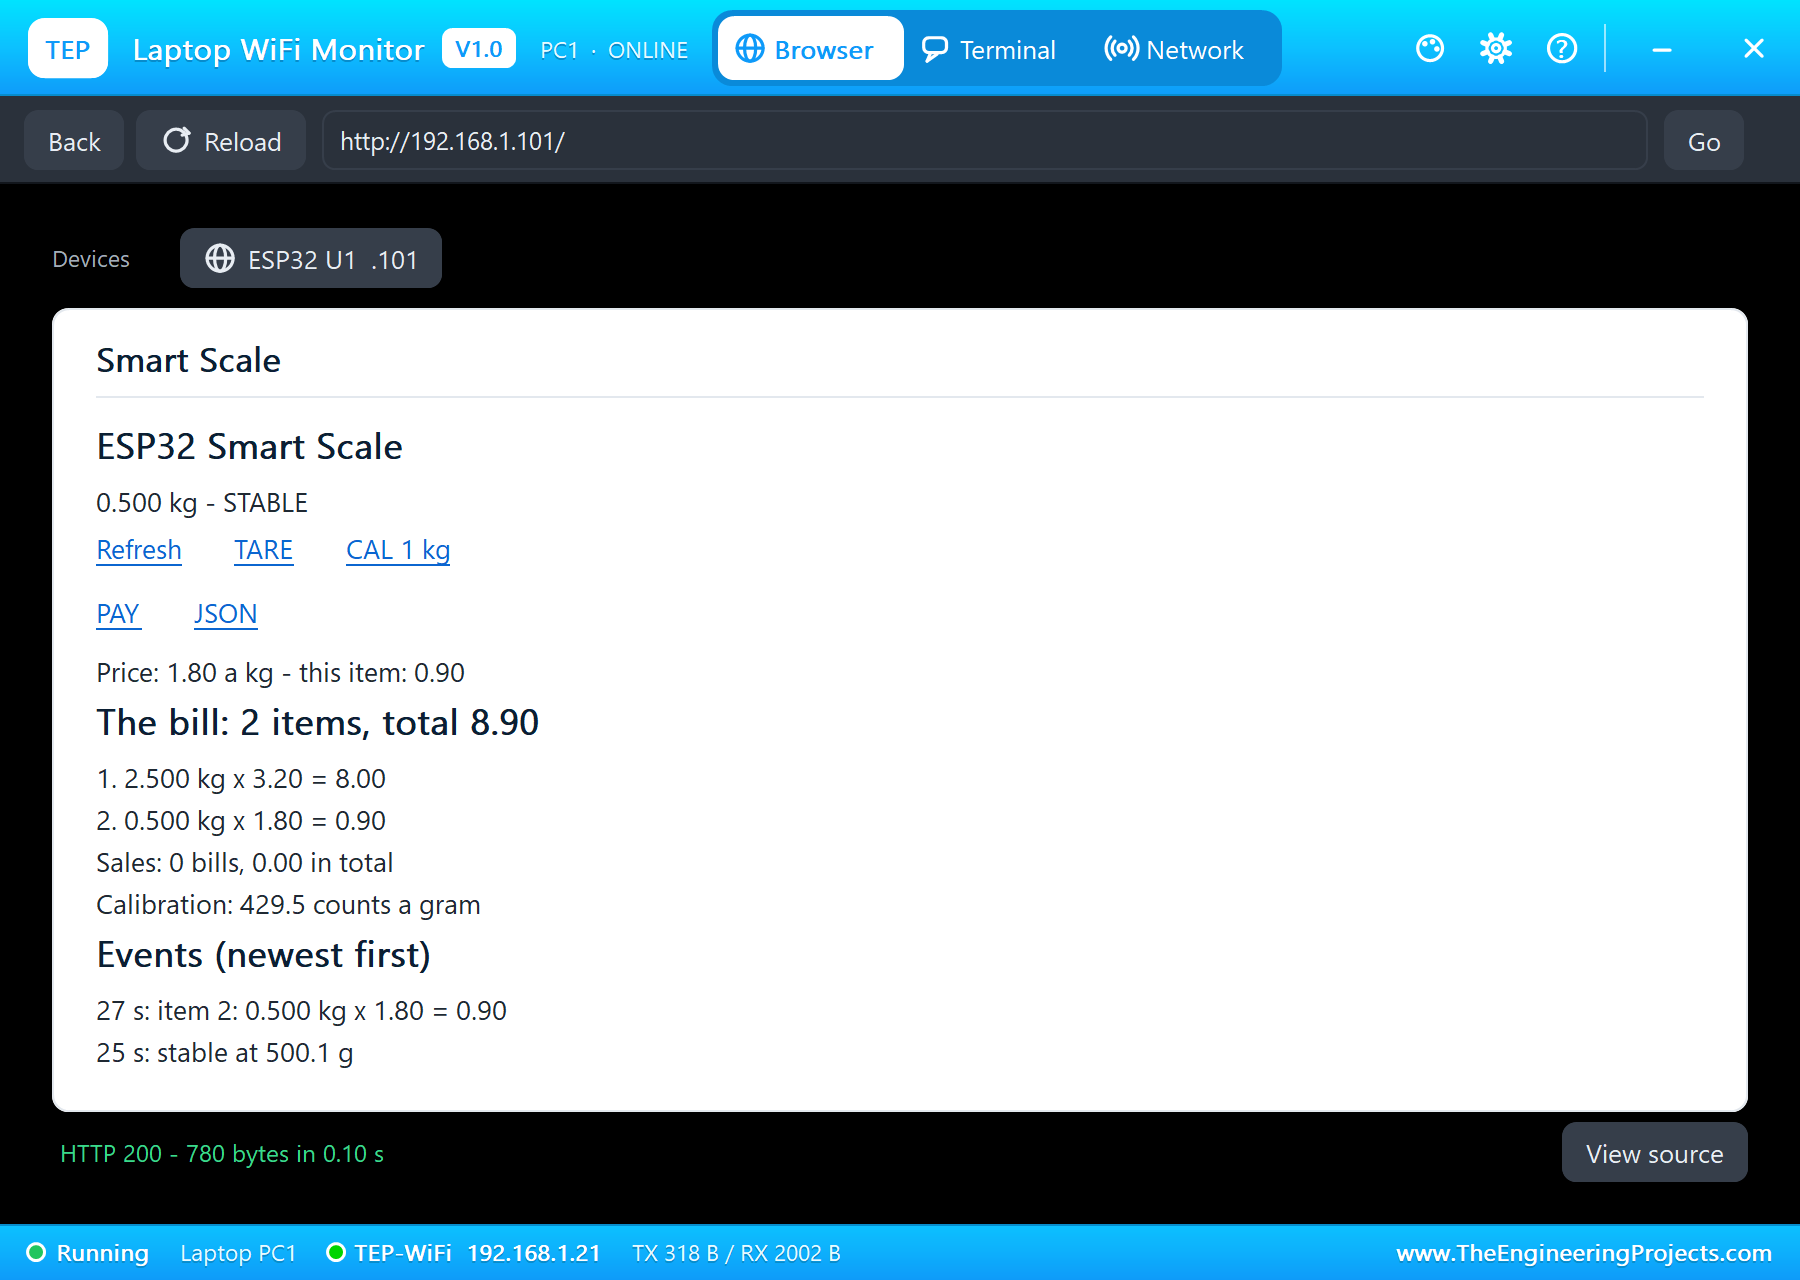
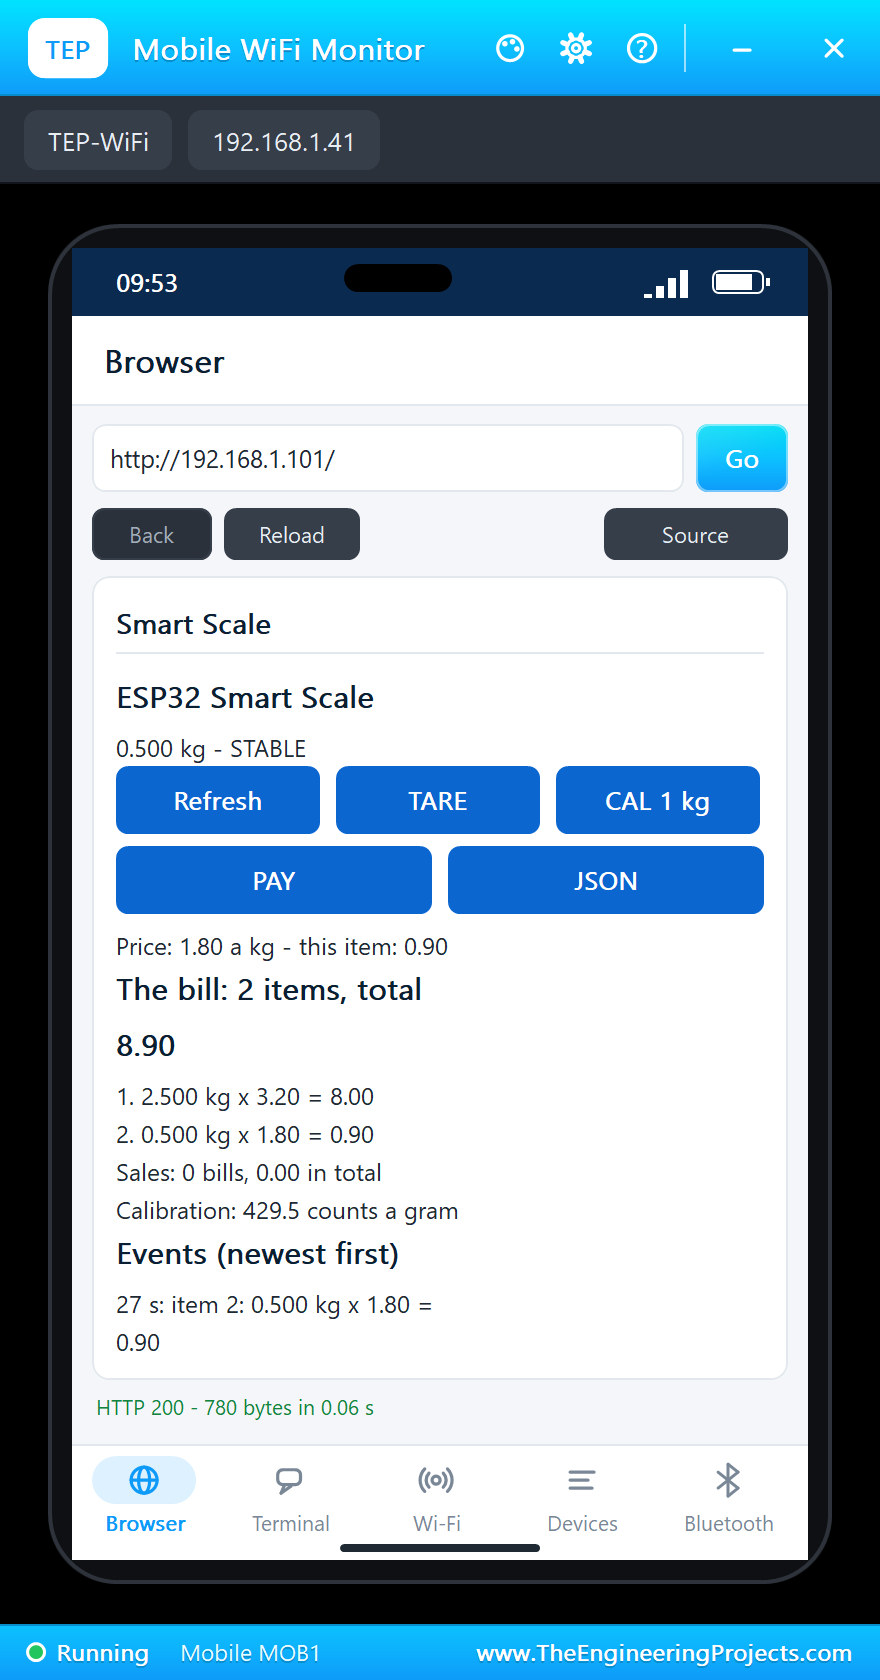
The customer paid: # at 32 seconds logged "bill 1 paid: 2 items, total 8.90", the sales counted it and a new, empty bill started.
Too Much Weight
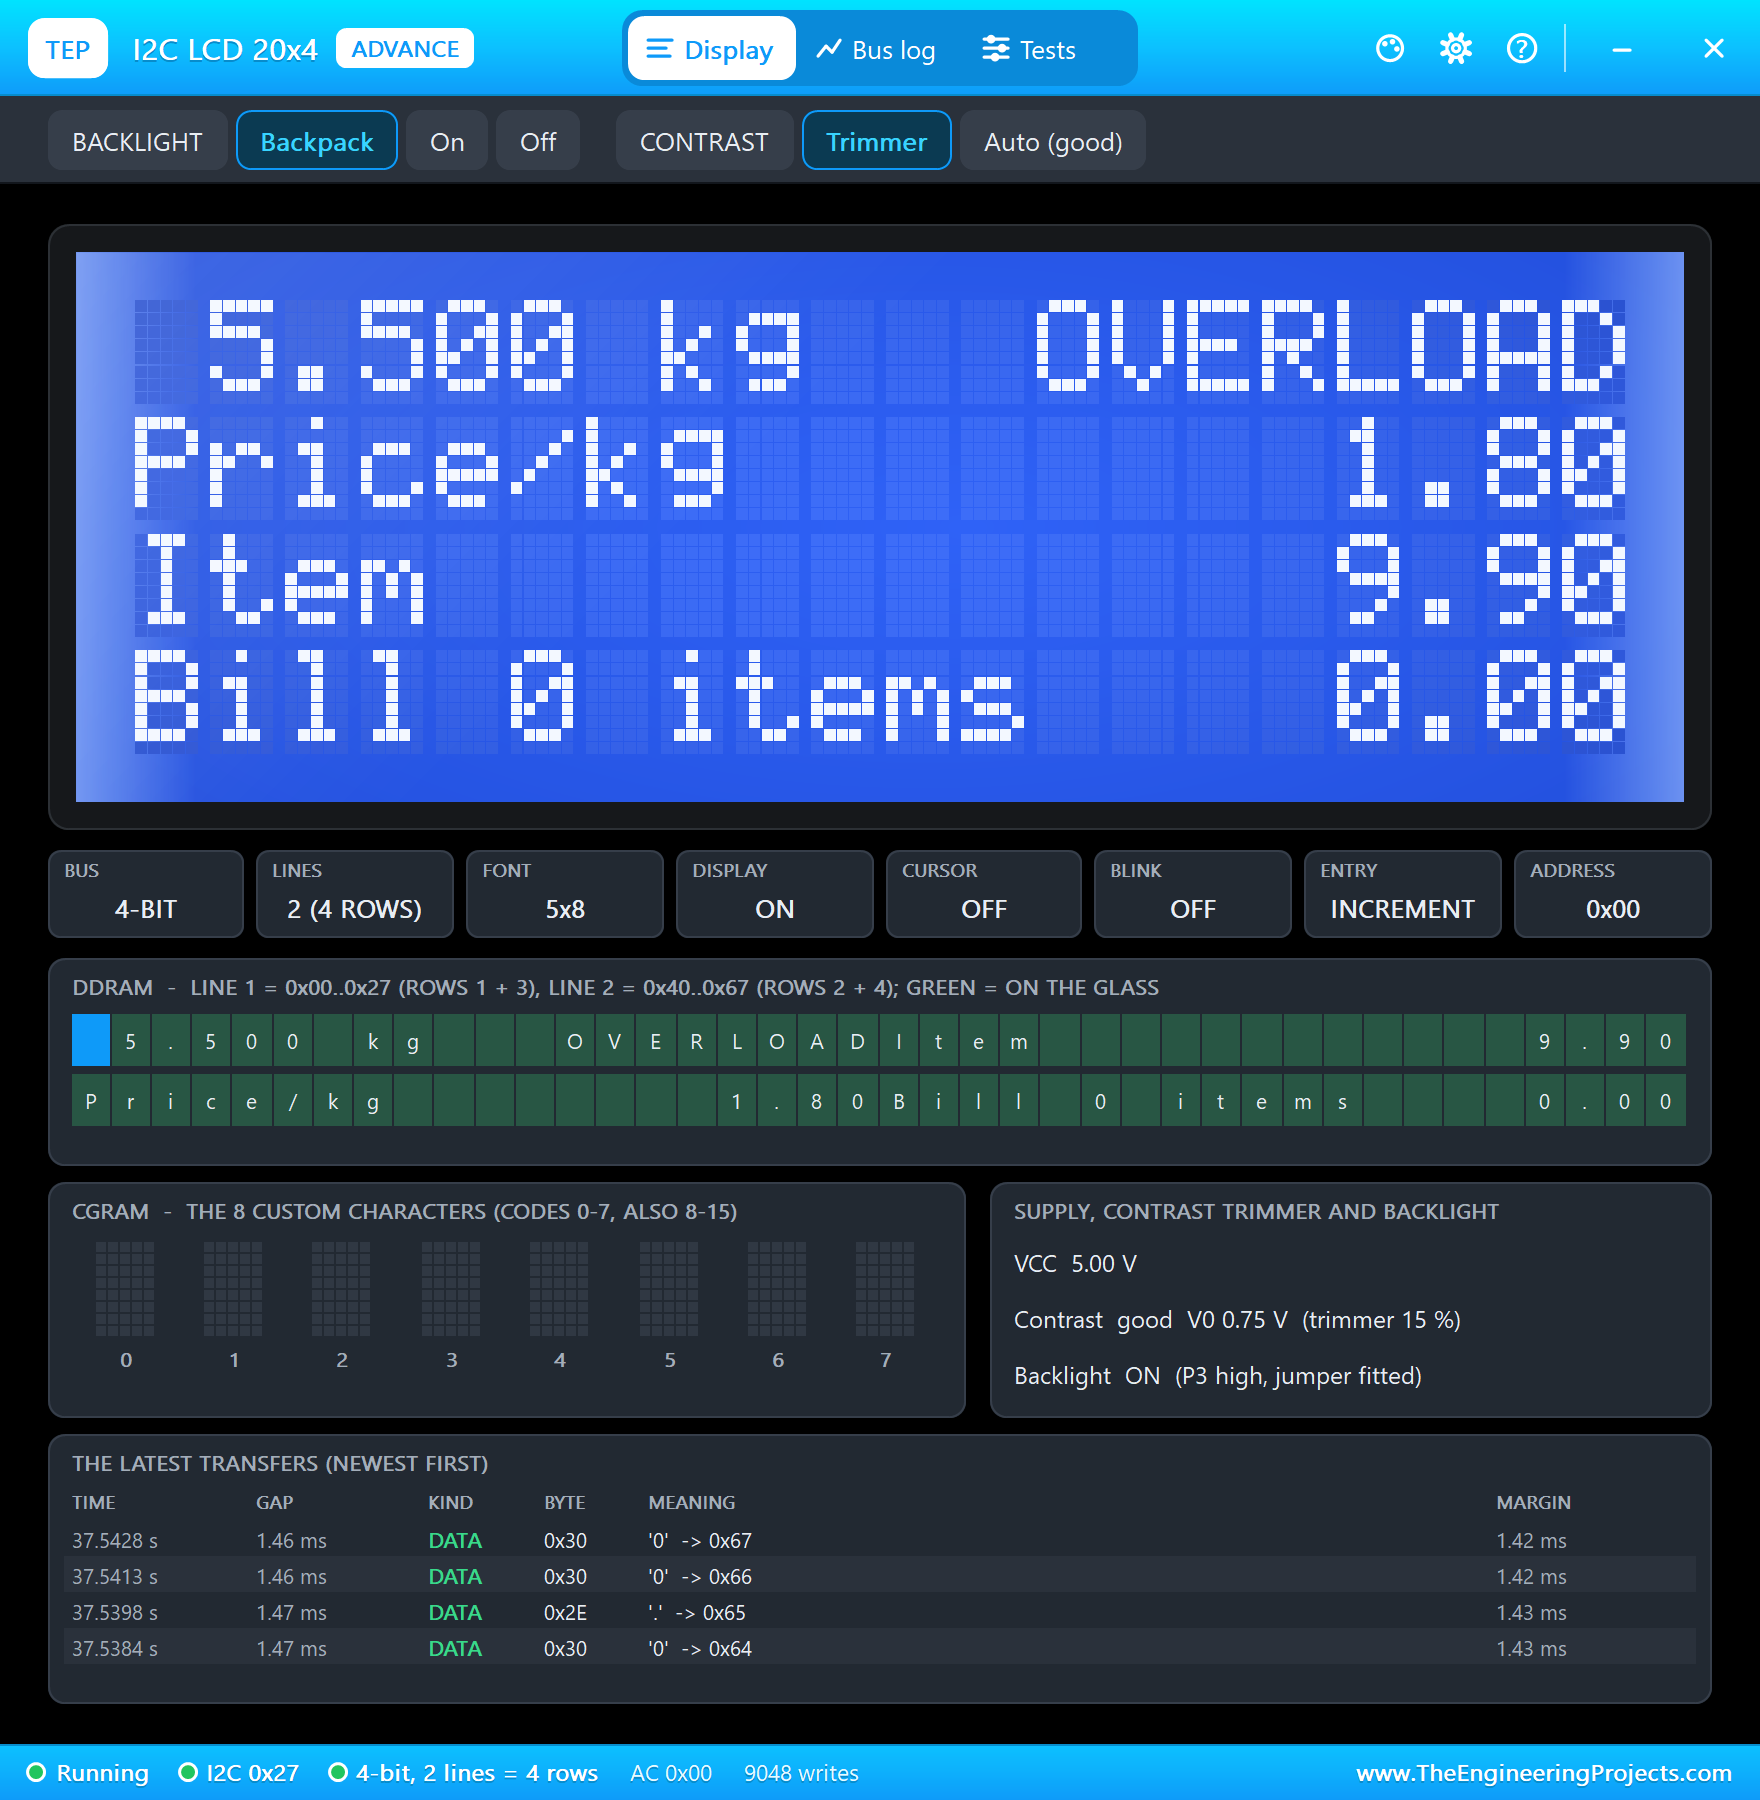
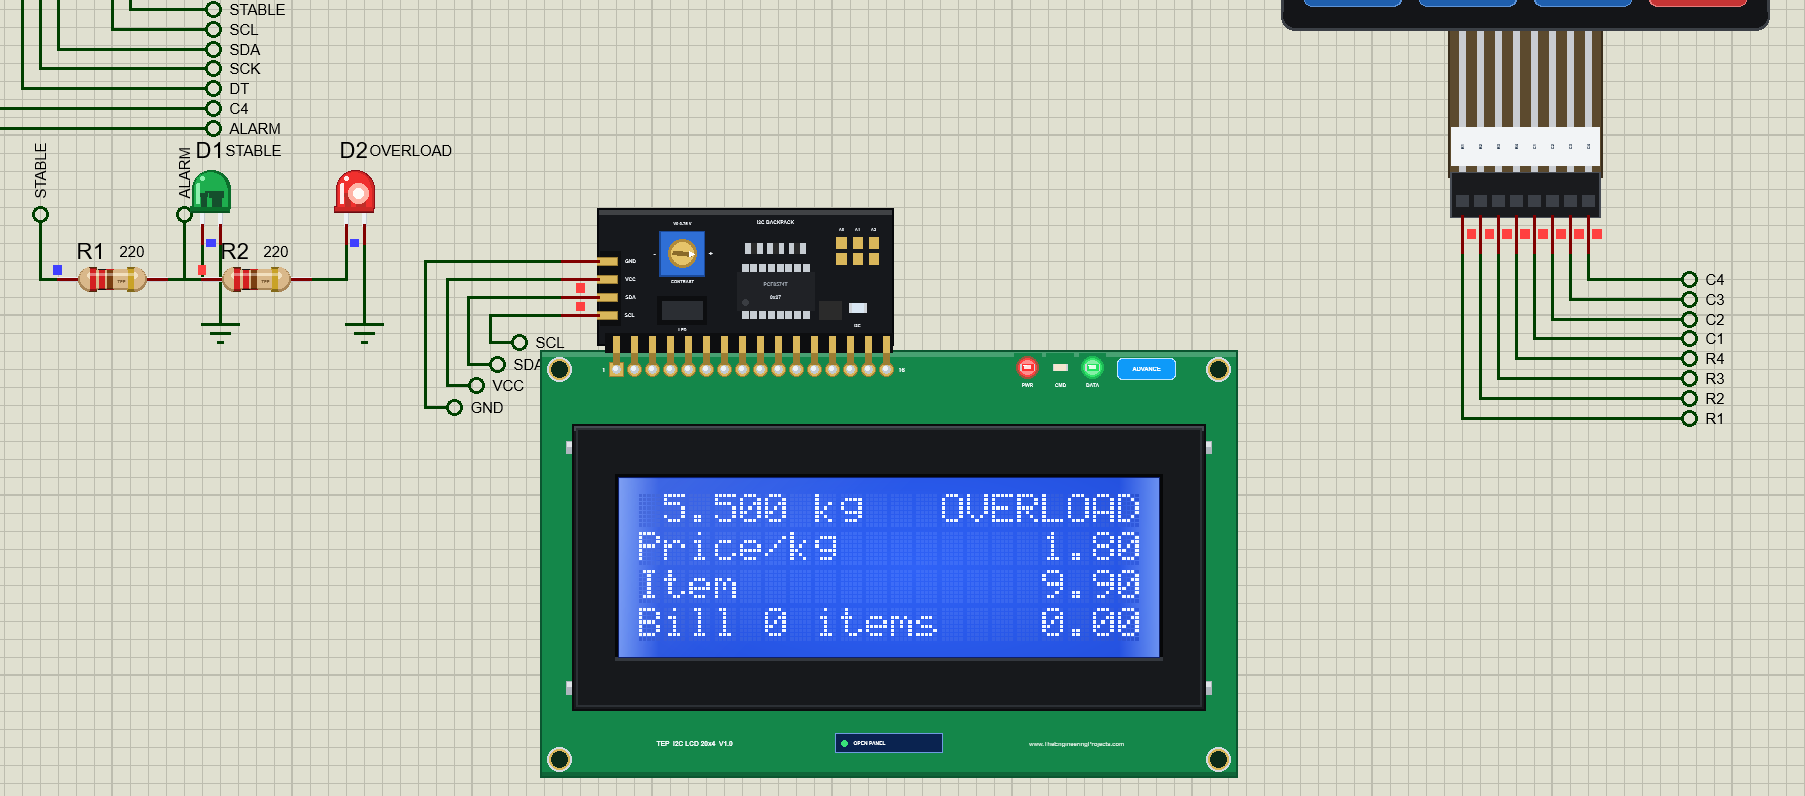
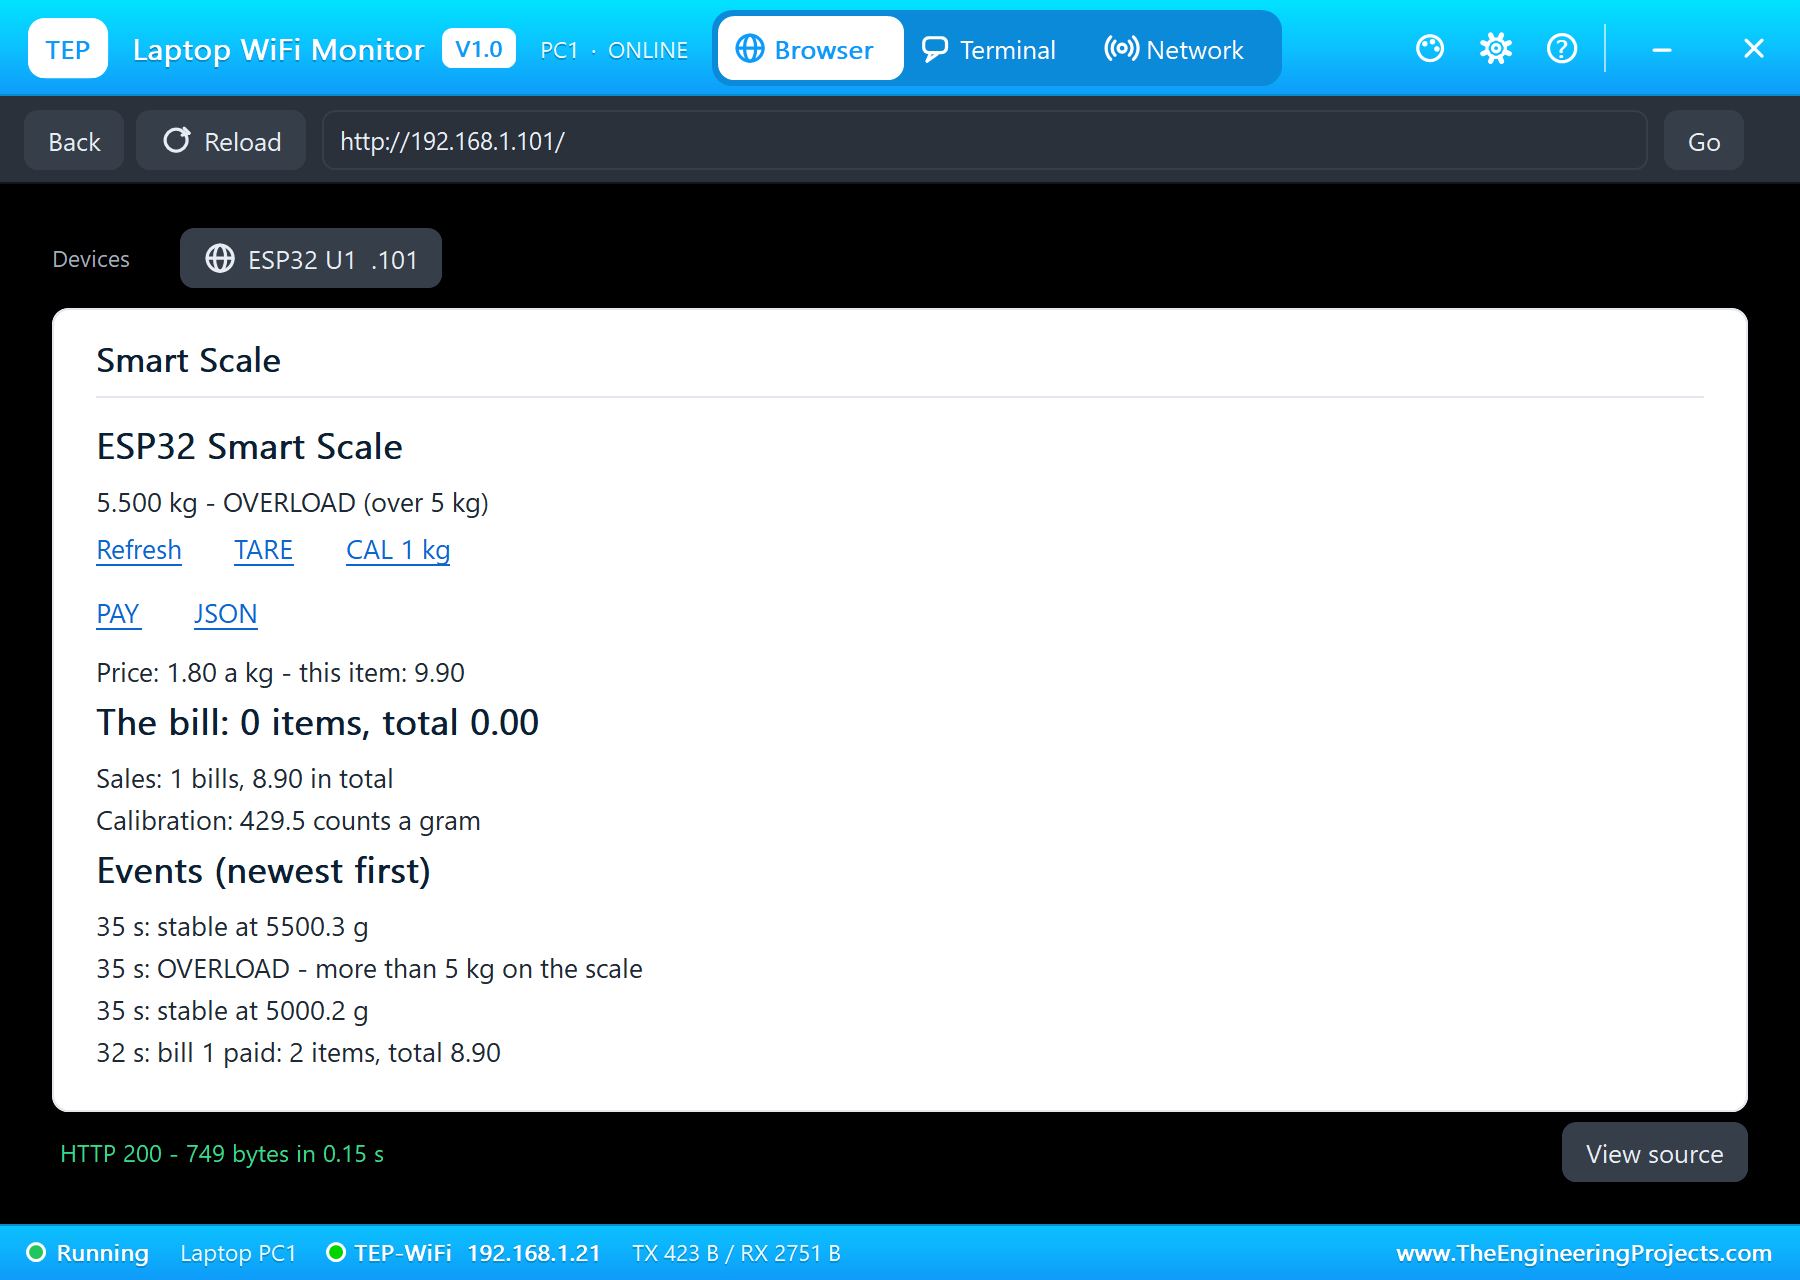
Next, 5 kg, the load cell's rated load: "stable at 5000.2 g", no warning. Then 500 g more with the pop-up's +10 button: at 35 seconds, "OVERLOAD - more than 5 kg on the scale". The LCD showed 5.500 kg OVERLOAD, the red LED came on, and the green one went off.
Back to 0 g, and the scale logged "the overload is gone" at 40 seconds.
Tare with a Bowl
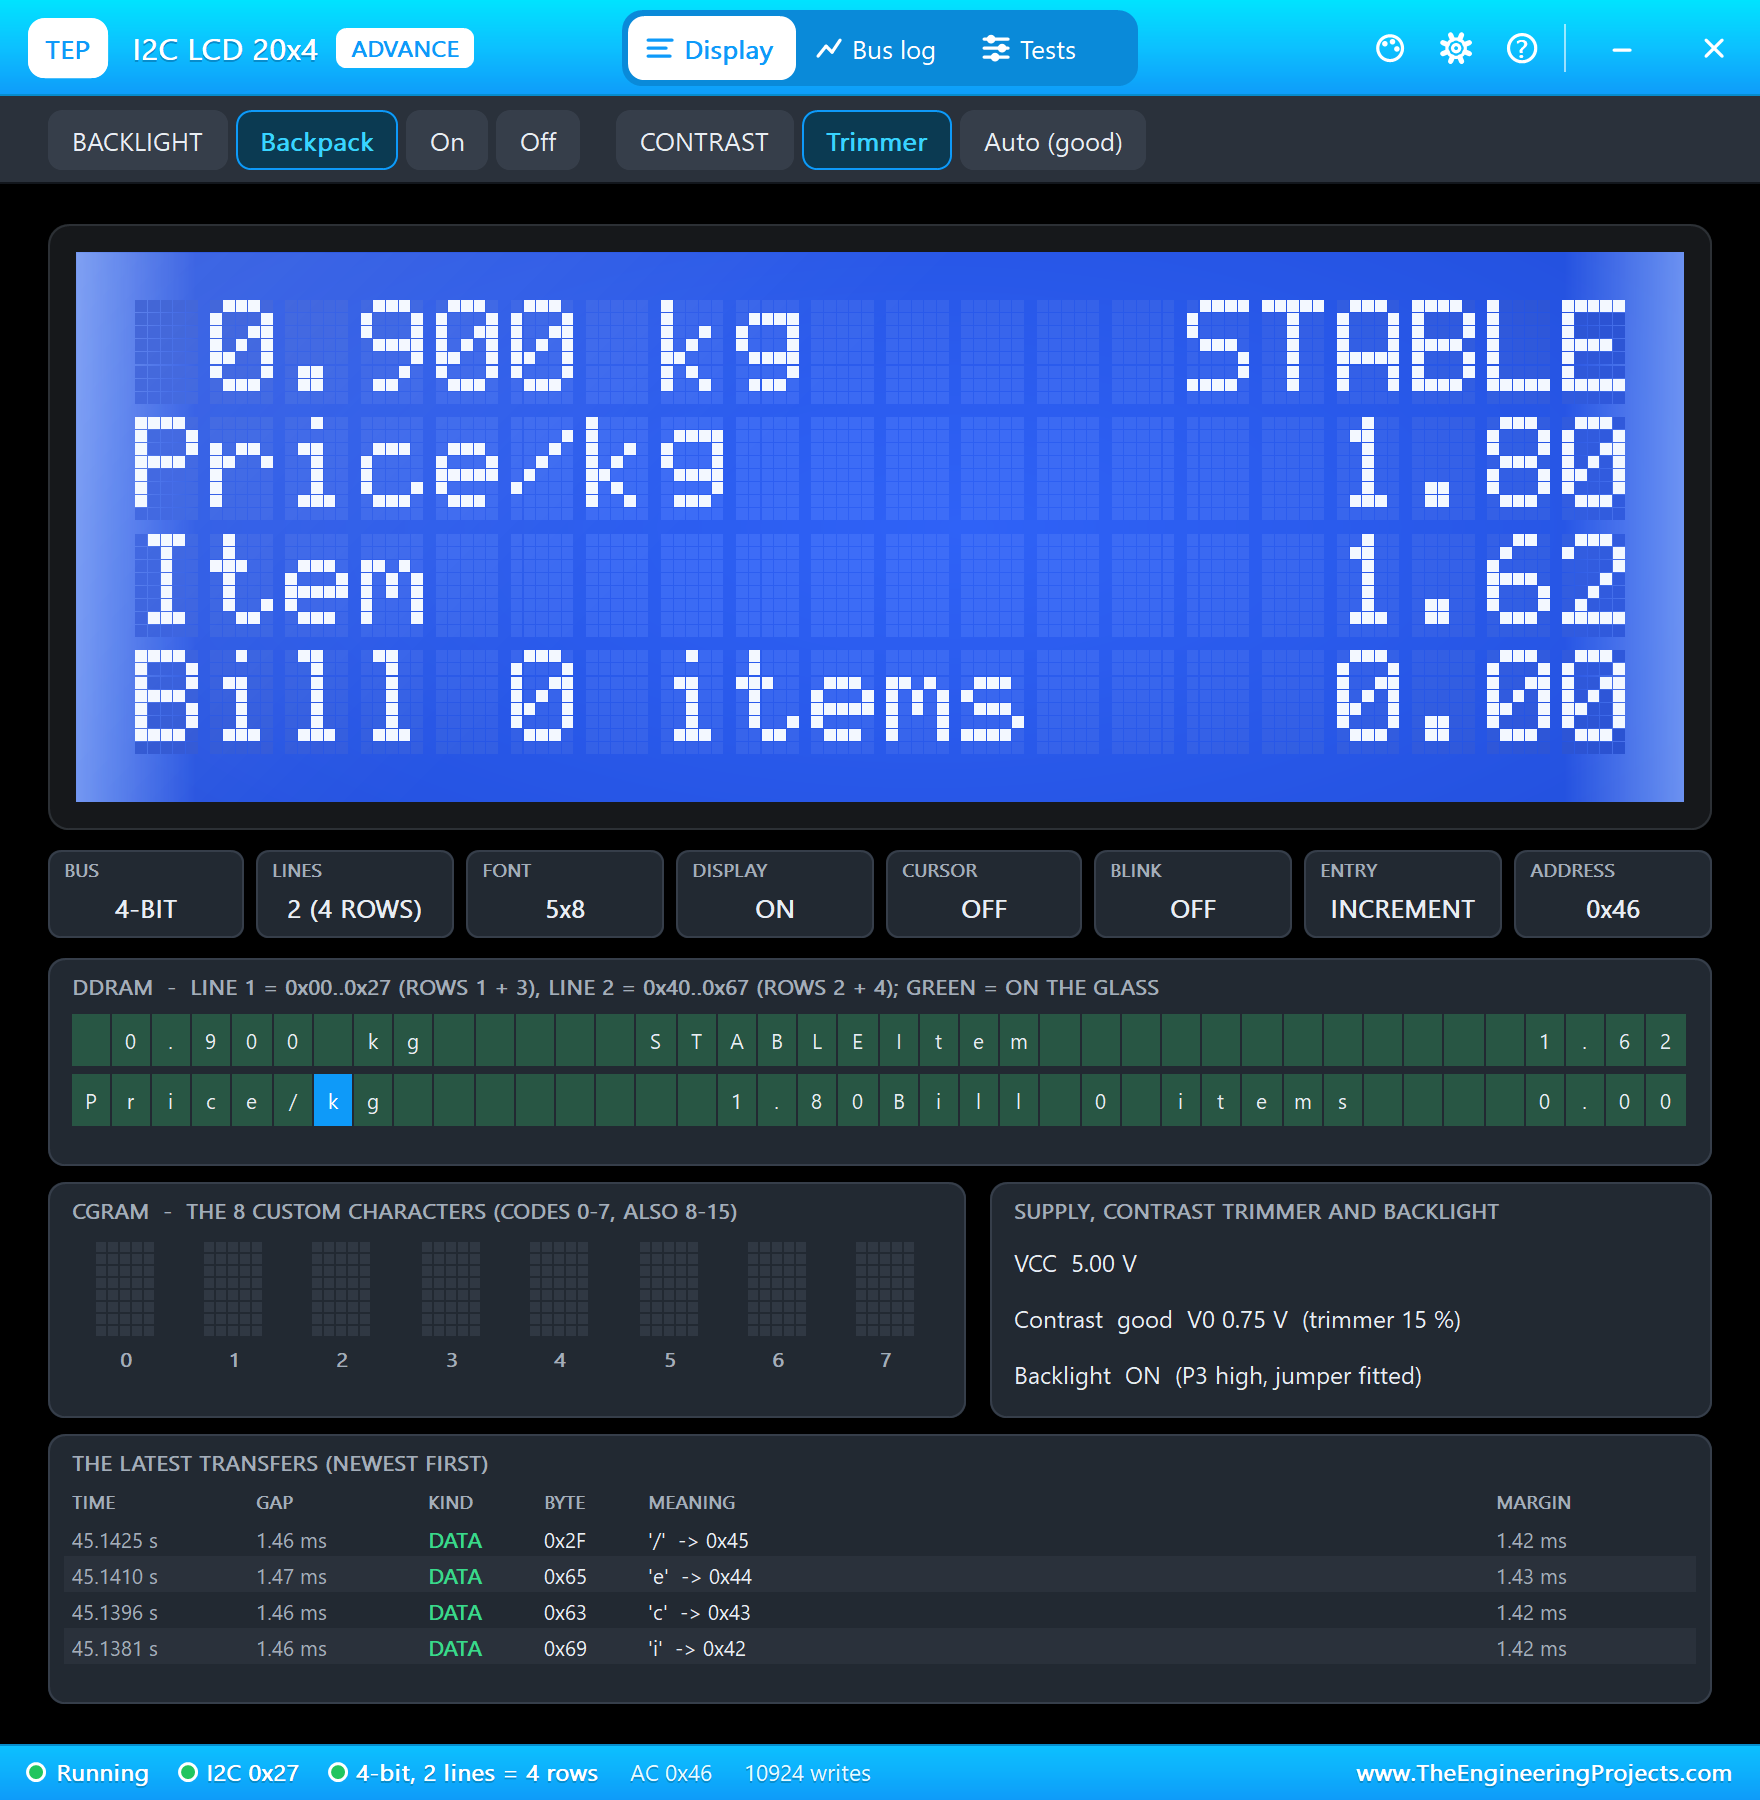
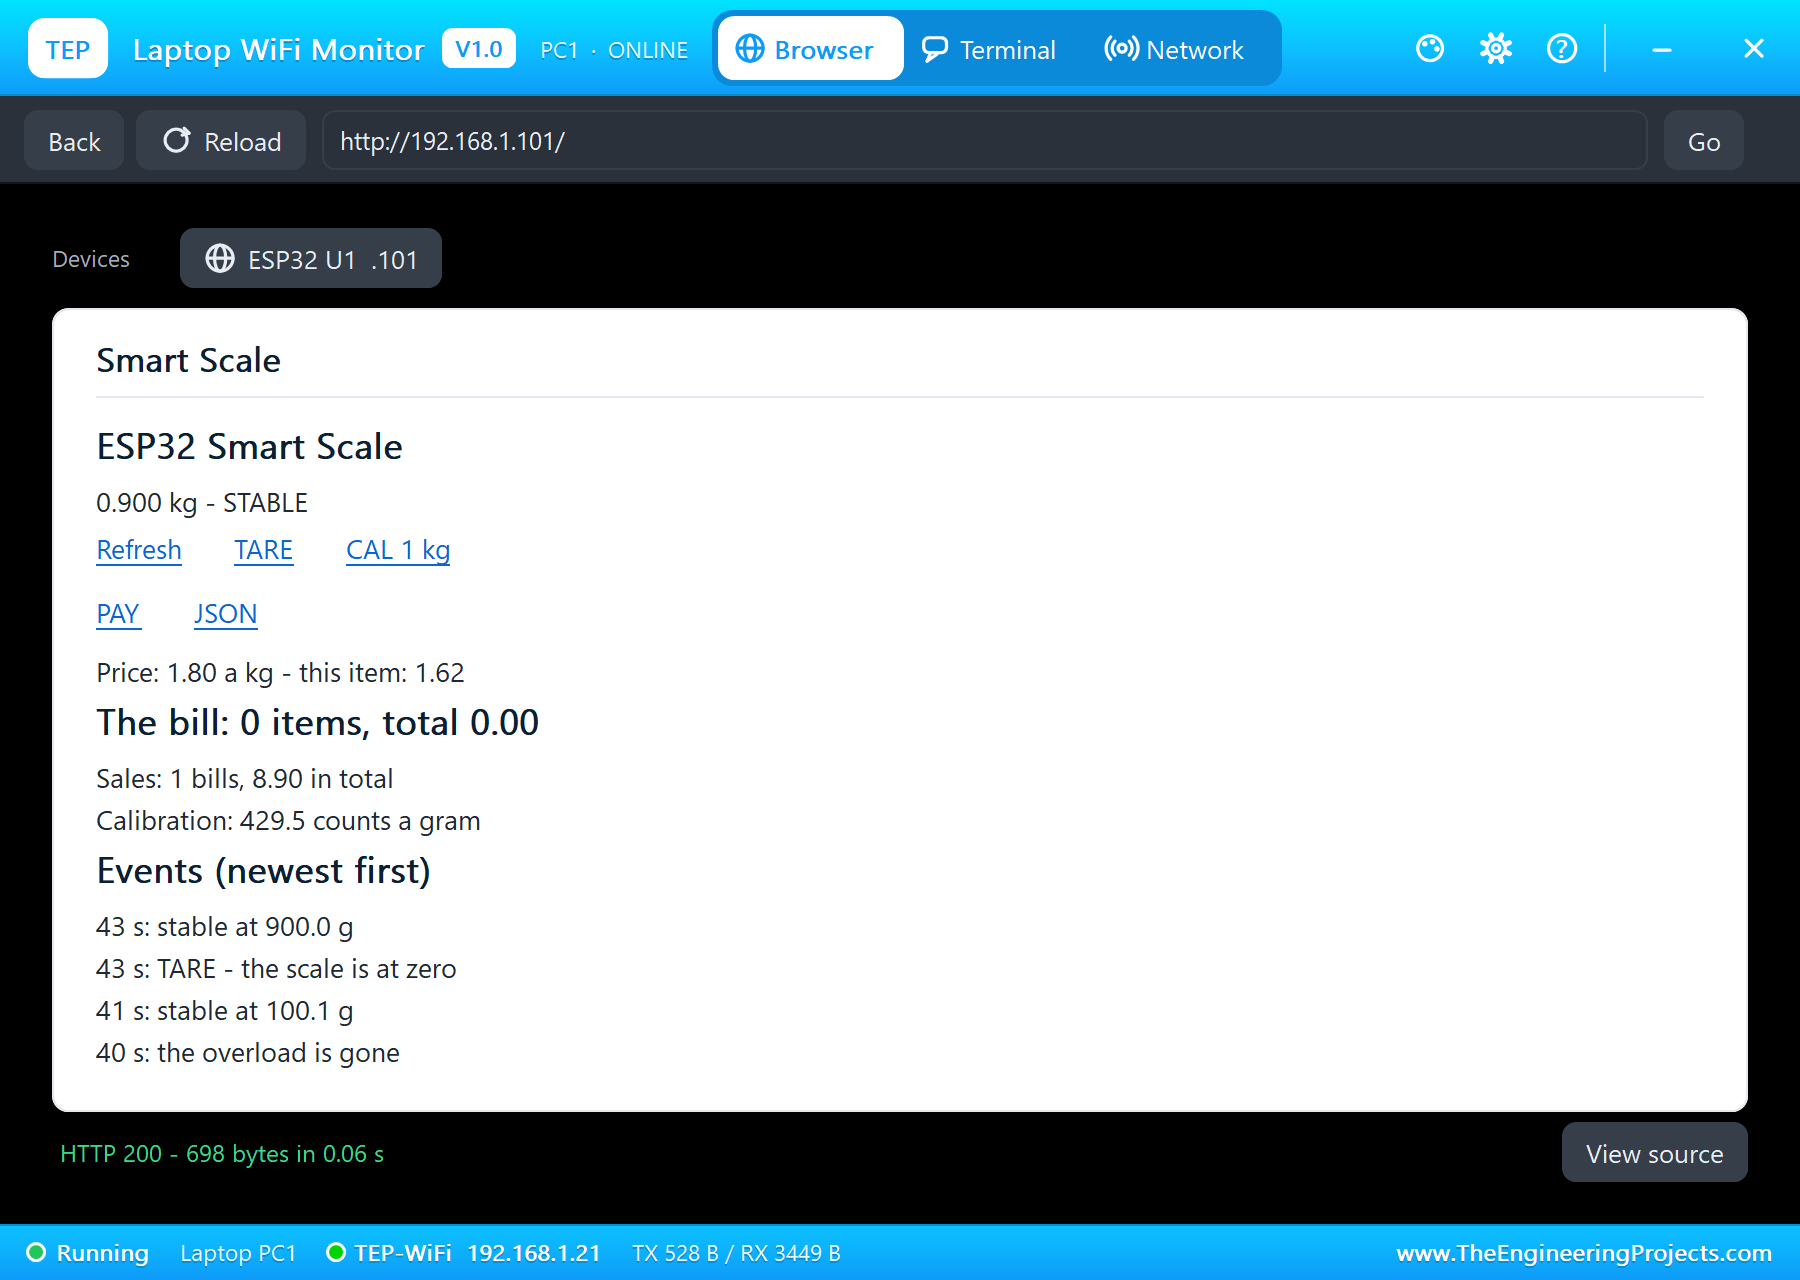
Last, the everyday use of tare. A 100 g bowl on the scale: "stable at 100.1 g". B at 43 seconds: "TARE - the scale is at zero". Then 1 kg in the bowl, 1.1 kg in all: the scale said "stable at 900.0 g", only the contents.
| Time | What happened | Result |
|---|---|---|
| 2 s | the start-up tare, nothing on the scale | 0.0 g |
| 13 - 14 s | 1 kg; CAL 1 kg from the laptop | 1000.0 g; 429.5 counts a gram |
| 18 - 21 s | price 3.20; 2.5 kg; D | item 1: 8.00 |
| 24 - 27 s | price 1.80; 500 g; D | item 2: 0.90, the bill 8.90 |
| 32 s | # | bill 1 paid: 2 items, 8.90 |
| 35 - 40 s | 5 kg, then 5.5 kg; then 0 g | OVERLOAD, red LED; then gone |
| 41 - 43 s | a 100 g bowl; B; 1 kg in it | TARE; 900.0 g net |
The whole run covered 49 seconds of simulation and took about 11 minutes on our PC, including all the screenshots.
Download the Project Files
Click the button below to download IoT-Smart-Weighing-Scale-ESP32-Proteus-Simulation-v1.0.zip (about 4.4 MB, without the source code of the models):
IoT Smart Weighing Scale with ESP32 - Proteus Simulation V1.0- Proteus Simulation: ESP32-Smart-Scale.pdsprj, the firmware ESP32_Smart_Scale.hex and copies of the models.
- Arduino Code: ESP32_Smart_Scale.ino, the complete sketch.
- Proteus Library Files: the LIB files of the ESP32 DevKit V1, the HX711 and load cells, the keypad, the I2C LCD, the LEDs, the resistors and the two WiFi Monitors.
- Proteus Model Files: the DLL models, with
TEPNET.DLLfor the board and the Wi-Fi network. - README.txt: the installation steps, the properties, the test results, the links to every library post and the licence of the LCD library in the HEX file.
No Proteus yet? Read How to Download and Install Proteus 7 and 8. New to libraries? Follow How to Install a New Library in Proteus.
How to Install the Project Files
- Close Proteus and extract the whole zip file, for example to your Desktop.
- Copy the files from Proteus Library Files into the LIBRARY folder of Proteus.
- Copy the files from Proteus Model Files into the MODELS folder.
- Start Proteus and open the project from the Proteus Simulation folder.
Changing the Code
The sketch builds with the TEP Boards for Proteus add-on for the Arduino IDE, which comes with our ESP32 DevKit V1 Library for Proteus, plus the LiquidCrystal I2C library from the Library Manager. Choose ESP32 DevKit V1 (TEP Proteus) as the board, export the compiled binary and set the ESP32's PROGRAM property to the new HEX file. The same sketch runs on a real ESP32 Dev Module. For another ESP32 project with sensors and a web page, see our IoT GPS Vehicle Tracker with ESP32.
Ideas to Extend the Project
- Print the bill on a small thermal printer over a serial port.
- Keep a list of products with their prices, and pick one with a number key instead of typing its price.
- Save the calibration in the ESP32's flash, so the scale keeps it after a power cut.
- Send each sale to a cloud spreadsheet or a shop's server through
/data. - Count pieces: weigh ten screws once, then the scale counts any pile of them.
- Use four load cells under a platform for a bigger bathroom or parcel scale.
From Simulation to Real Hardware
- Mount the load cell properly: fix one end to the base and the other to the pan, with spacers so the middle can bend; follow the arrow on the cell.
- Calibrate with a known weight: a real cell is never exactly 1 mV/V; use CAL 1 kg with an accurate 1 kg weight.
- Let it warm up: strain gauges drift with temperature; tare again after a few minutes.
- Mind the logic levels: power the HX711 from 3.3 V on an ESP32, and level-shift the LCD's I2C lines.
- Keep the wires short: the bridge signal is a few millivolts; long or loose wires pick up noise.
Troubleshooting
- The weight reads negative: A+ and A- are swapped; swap them, or the load is on the wrong side of the cell.
- The weight never becomes stable: the readings are noisy; check the wires, or widen STABLE_G in the sketch.
- No key works: the rows and the columns are swapped, or the rows have no pull-ups.
- The LCD stays blank: its address is not 0x27, or SDA and SCL are swapped.
- "Connecting to TEP-WiFi" never ends: the HEX file is missing beside the project, or
TEPNET.DLLis not in MODELS.
Limitations of the Simulation
- The weight comes from the HX711's pop-up; a real load swings and settles, which the averaging and the STABLE test handle.
- The model's load cell is exactly 1 mV/V, so the calibration and the theory agree; a real cell needs its own calibration.
- The HX711 and the LCD run on 5 V here; a real ESP32 needs the 3.3 V supply or level shifting described above.
- The network is simulated: the dashboard travels between the ESP32 and the two monitors inside Proteus; the times in this tutorial are simulation time.
- ESP32 is a name of Espressif Systems and HX711 of Avia Semiconductor; this project is not made or endorsed by them or by Labcenter.
So, that was all about the IoT Smart Weighing Scale with ESP32 - Proteus Simulation. I hope it helps you build your own: a load cell read through an HX711 with your own code, a keypad scanned row by row, a price-computing bill on an LCD and a web dashboard, all tested in a simulation before a single screw goes into a load cell. More IoT projects with the ESP32 and the Raspberry Pi 5 are coming in this series. If you have any questions, ask in the comments and I will help you out. Till the next tutorial, take care and have fun!