Hello friends, I hope you all are doing great. Today, I am going to share the Raspberry Pi 5 Water Meter and Leak Detector - Proteus Simulation, the twentieth project of our IoT Projects series. If you have searched for a Proteus simulation of a smart water meter or a water leak detector with a Raspberry Pi, here is a complete one. A Raspberry Pi 5 counts the pulses of a YF-S201 water flow sensor on the pipe into a house, works out the flow and the litres, logs every use of water, and shuts a 12 V solenoid valve through a relay when the water behaves like a leak or a burst pipe. An LCD, a buzzer and a live web dashboard show what it sees.
A dripping tap is easy to notice, but a running toilet cistern, a pinhole in a pipe behind a wall or a hose left on in the garden can waste thousands of litres before anybody sees a puddle. Water companies fit smart meters for this reason, and insurance companies sell automatic shut-off valves, because a burst pipe in an empty house is one of the most expensive accidents a home can have. The idea behind them is simple: measure the water, learn what normal use looks like, and close the main valve when the flow never stops or is far too strong. In this tutorial, we will go through the circuit, learn how the flow sensor turns water into pulses, count those pulses on the Pi, turn them into litres per minute and litres, define a use of water, write three leak rules, drive a solenoid valve safely with a relay and a diode, walk through the Python program, and then run the simulation: a normal use, a running cistern, a burst pipe and a leak while nobody is home. At the end, you can download the project with the program, every library file and the Python runtime the Pi needs.
NOTICE: Our team has put a lot of effort into this project: the circuit, the code and every part in the simulation are our own work, and you get them all free. Your feedback is the fuel that keeps us going, so please tell us what you think in the comments below. And if our free projects help you, you can buy us a coffee. So, let's get started with the Raspberry Pi 5 Water Meter and Leak Detector - Proteus Simulation:
What Does This Water Meter Do?
- A live water meter: the flow in litres per minute and the litres used today, on the LCD and on the web page.
- A log of every use: each time the water runs and stops, the program records how many litres went through and for how long.
- Three leak rules: water that runs without a break for too long (a LEAK), a flow far stronger than any tap (a BURST), and any water at all while the house is empty (an AWAY LEAK).
- An automatic shut-off: every alarm closes the 12 V solenoid valve on the supply pipe and sounds the buzzer until it is silenced.
- A check of the valve itself: water through the meter a few seconds after the valve has closed means the valve does not seal.
- A dashboard: the flow, today's litres, the valve, the alarm, the last uses and the events, with OPEN, CLOSE, AWAY and SILENCE.
It is a great project for anyone learning to count fast pulses, drive a relay and a solenoid valve, and serve a web page from the Raspberry Pi, and a useful final-year project with a clear real-world purpose. In the simulation, the water comes from the flow sensor's pop-up: its presets set the tap, and its actions add a leak or close a valve upstream.
Components Used in the Proteus Simulation
All the parts come from our Proteus libraries, each with its own tutorial. The project zip at the end includes every LIB and DLL file.
| Part | Proteus device | Library post | Connection |
|---|---|---|---|
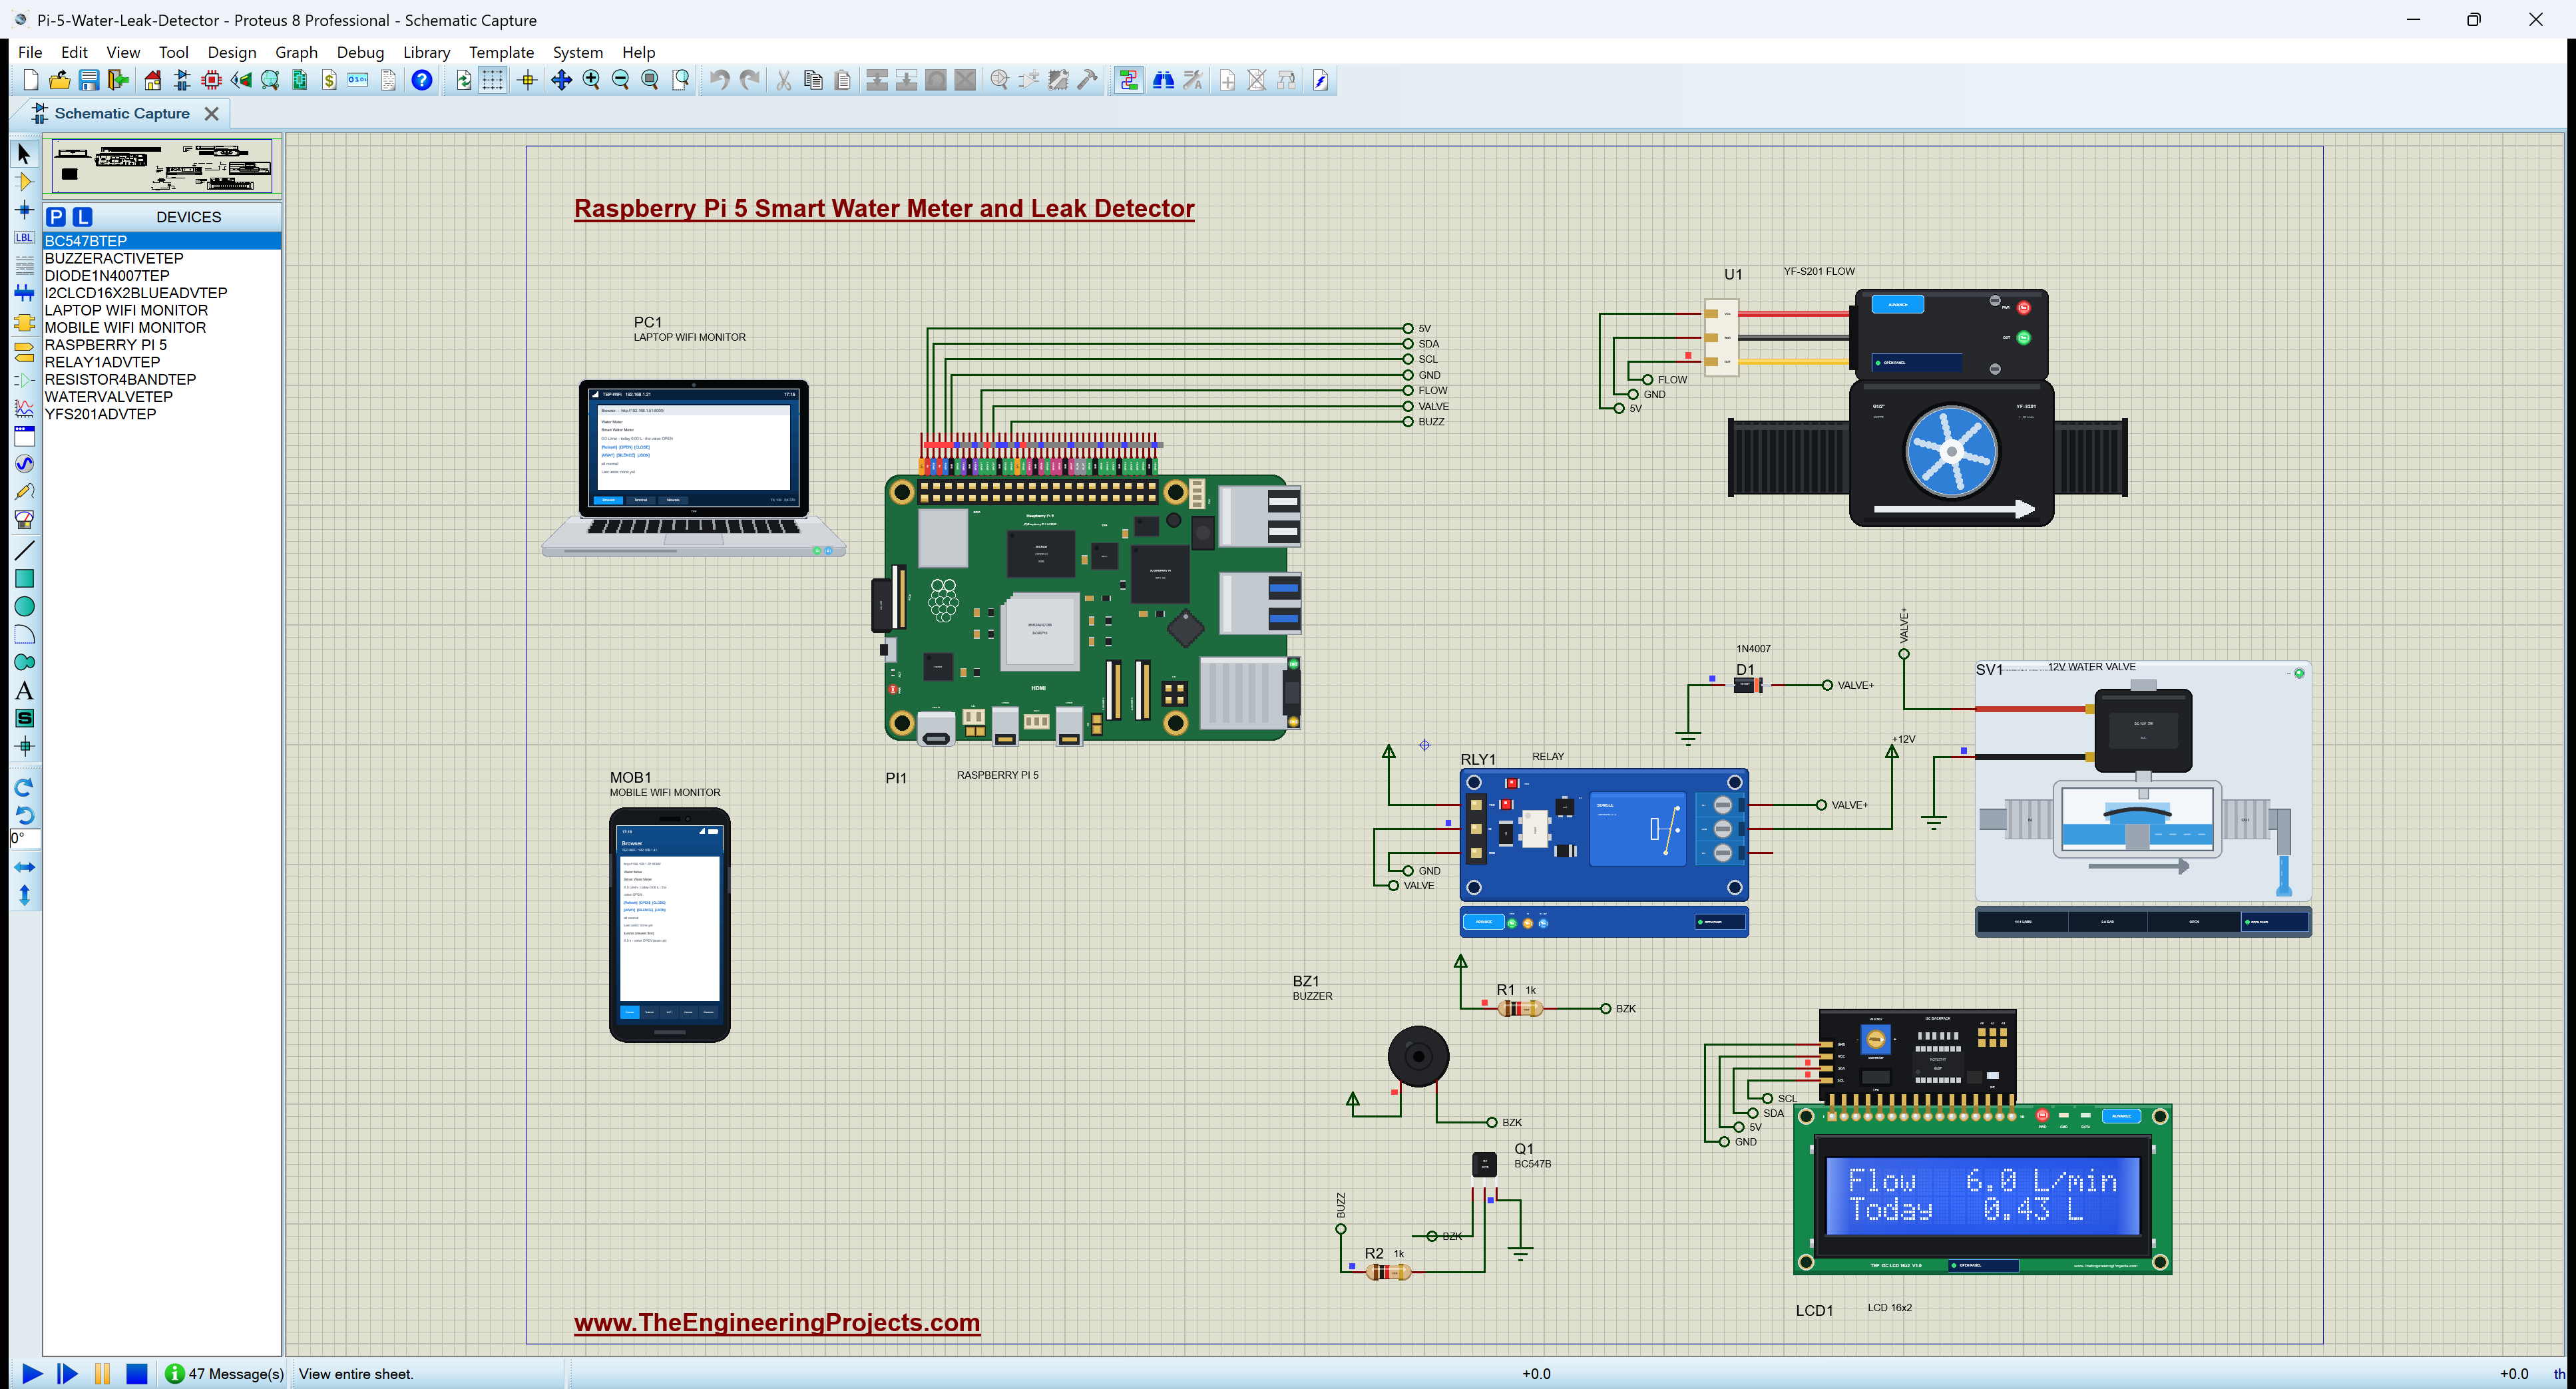
| Raspberry Pi 5 | RASPBERRY PI 5 | Raspberry Pi 5 Library for Proteus | PI1, Ethernet 192.168.1.51 |
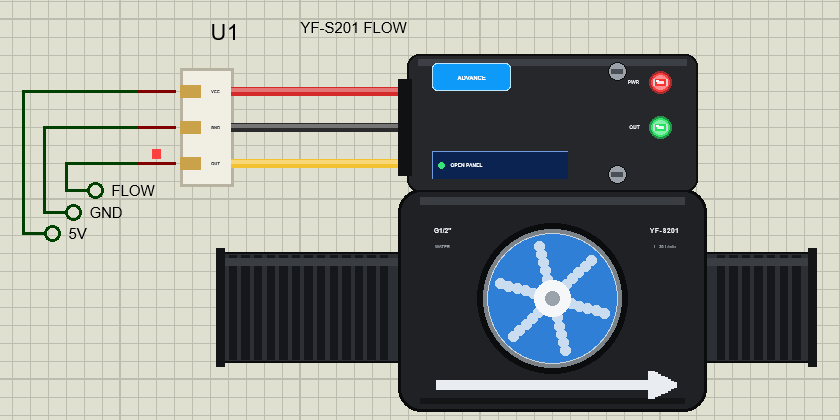
| YF-S201 water flow sensor | YFS201ADVTEP | YF-S201 Water Flow Sensor Library for Proteus | U1, OUT on GPIO17 |
| 1-channel relay module | RELAY1ADVTEP | Relay Module Library | RLY1, IN on GPIO27 (active LOW) |
| 12 V solenoid water valve (normally closed) | WATERVALVETEP | 12V Solenoid Water Valve Library | SV1, on the relay's NO contact |
| 1N4007 diode | DIODE1N4007TEP | 1N4007 Diode Library | D1, across the valve's coil |
| I2C LCD 16x2 (PCF8574 at 0x27) | I2CLCD16X2BLUEADVTEP | I2C LCD 16x2 Library for Proteus | LCD1, SDA GPIO2 / SCL GPIO3 |
| Active buzzer | BUZZERACTIVETEP | Active Buzzer Library | BZ1, switched by Q1 |
| BC547 transistor | BC547BTEP | Small Transistors Library | Q1, base from GPIO23 through 1k |
| Resistors 1k, 1k | RESISTOR4BANDTEP | Resistor Library | R1 across the buzzer, R2 to the base |
| Laptop WiFi Monitor | LAPTOP WIFI MONITOR | Laptop WiFi Monitor | PC1 |
| Mobile WiFi Monitor | MOBILE WIFI MONITOR | Mobile WiFi Monitor | MOB1 |
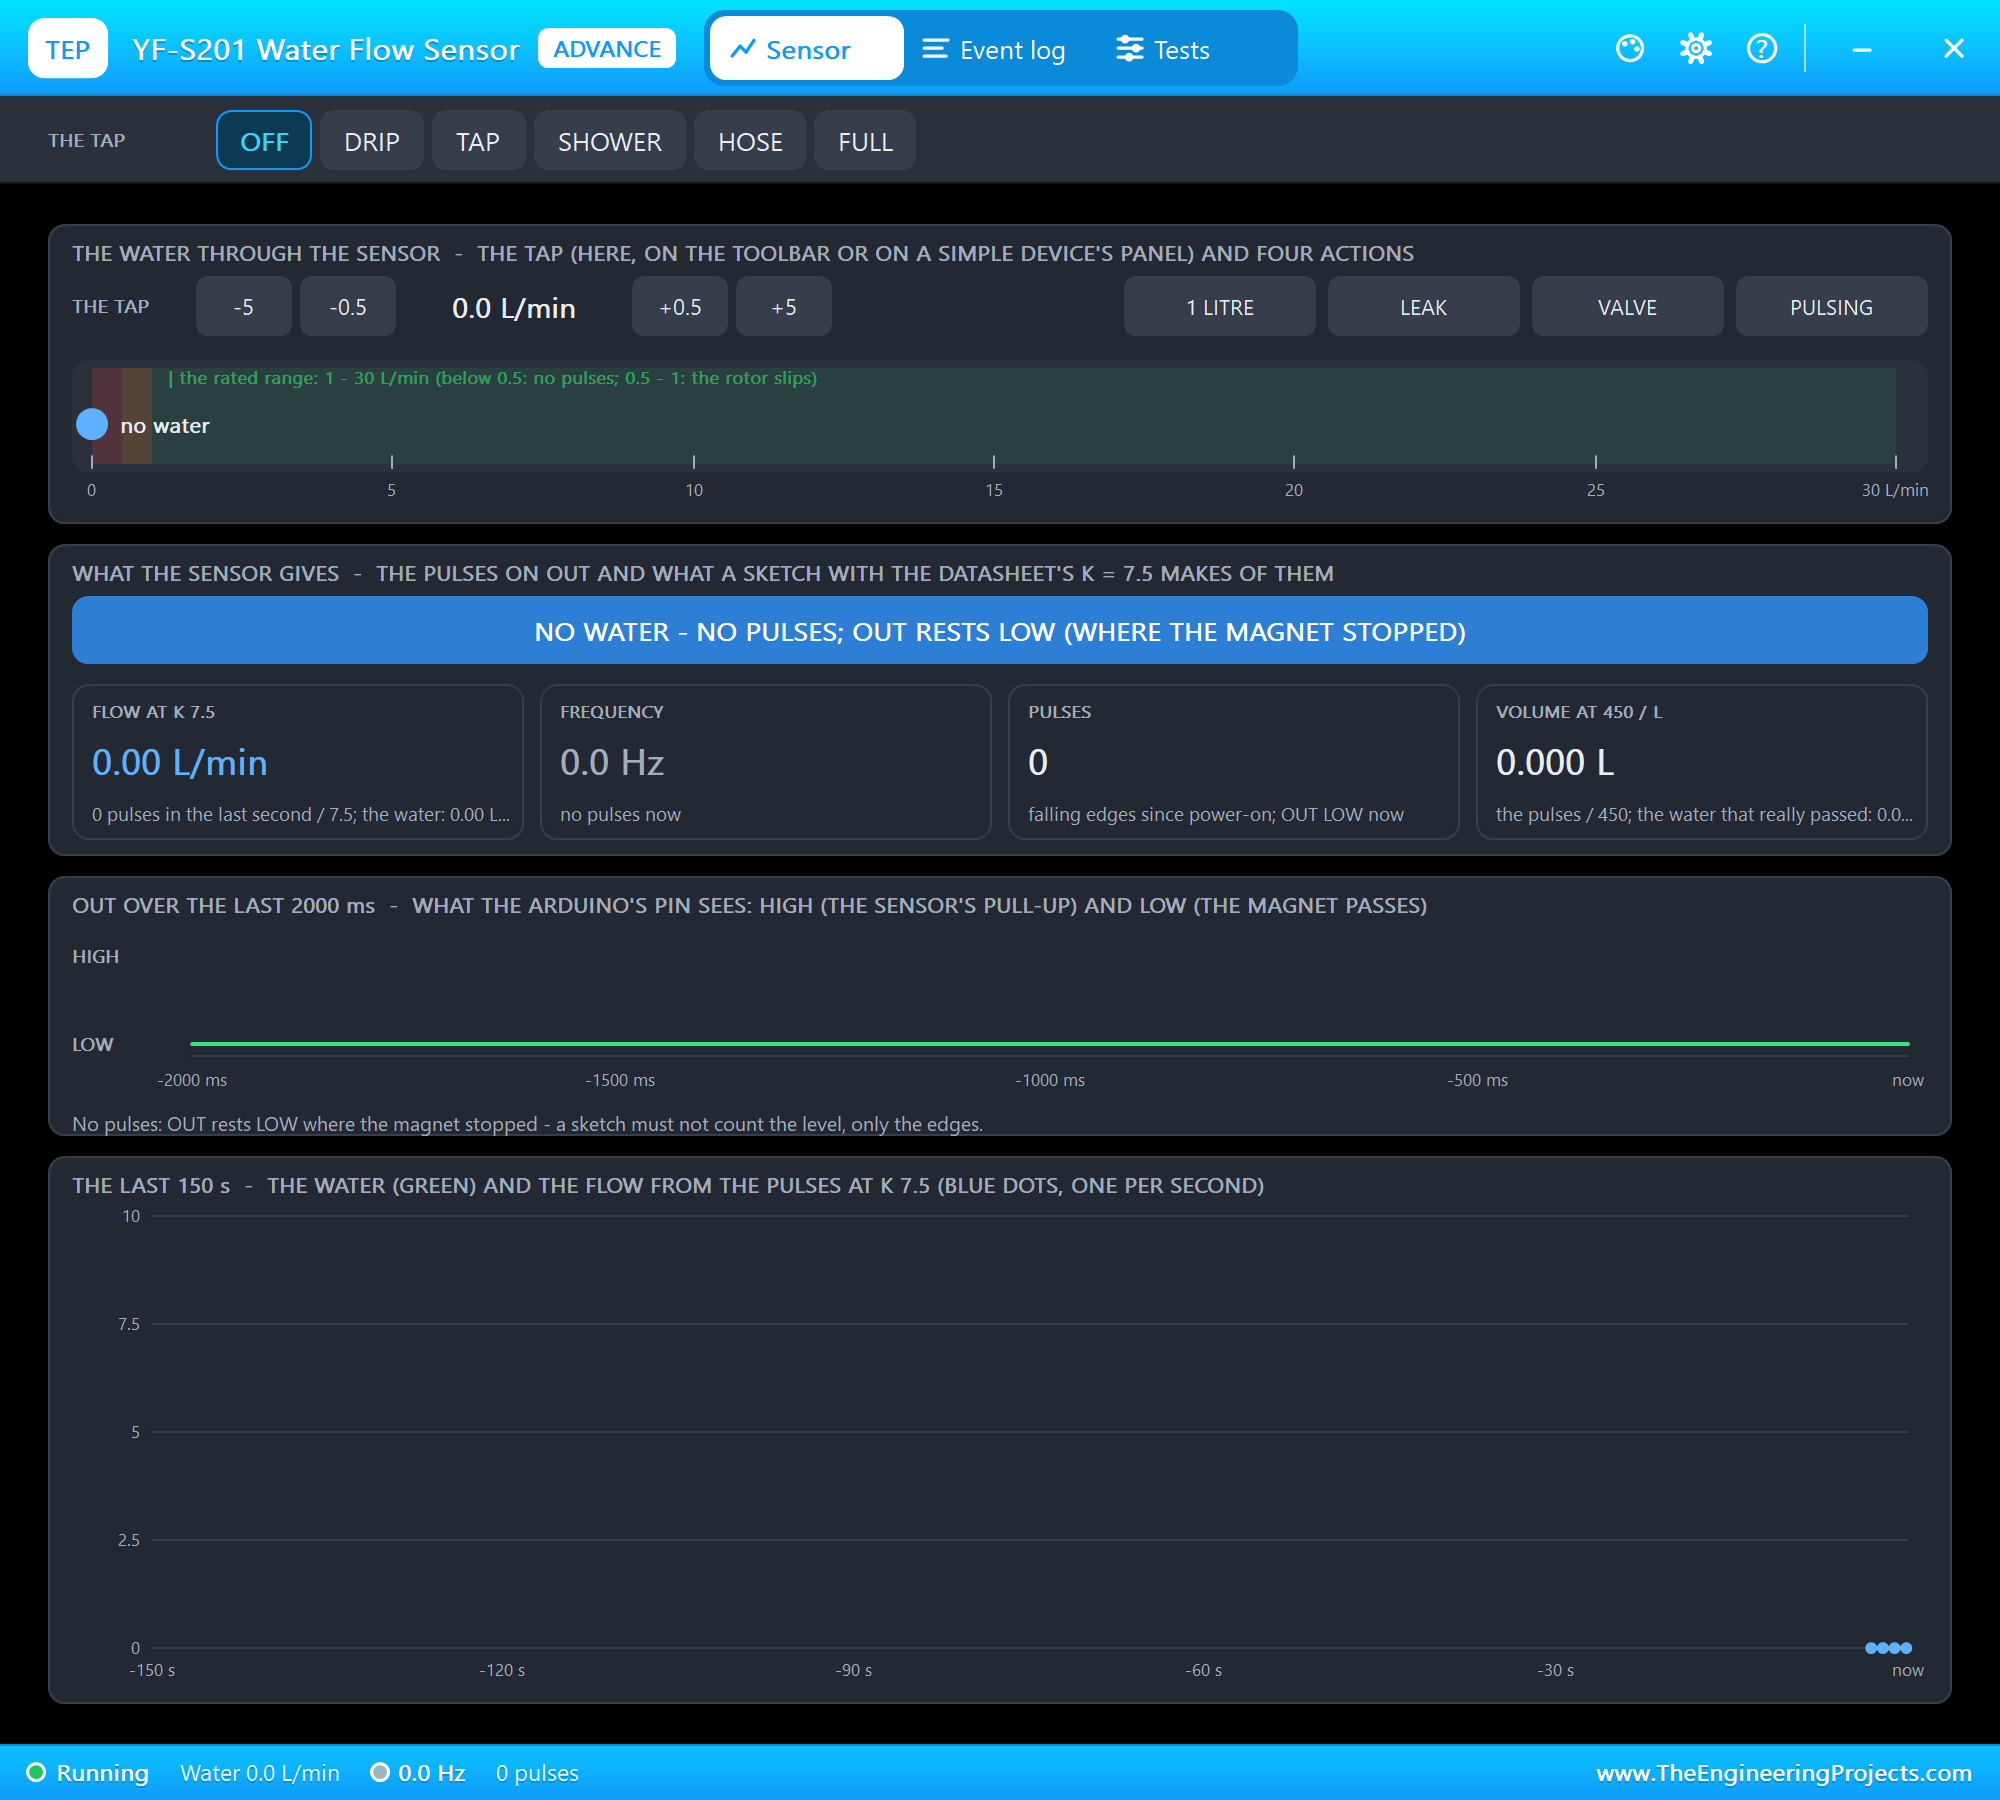
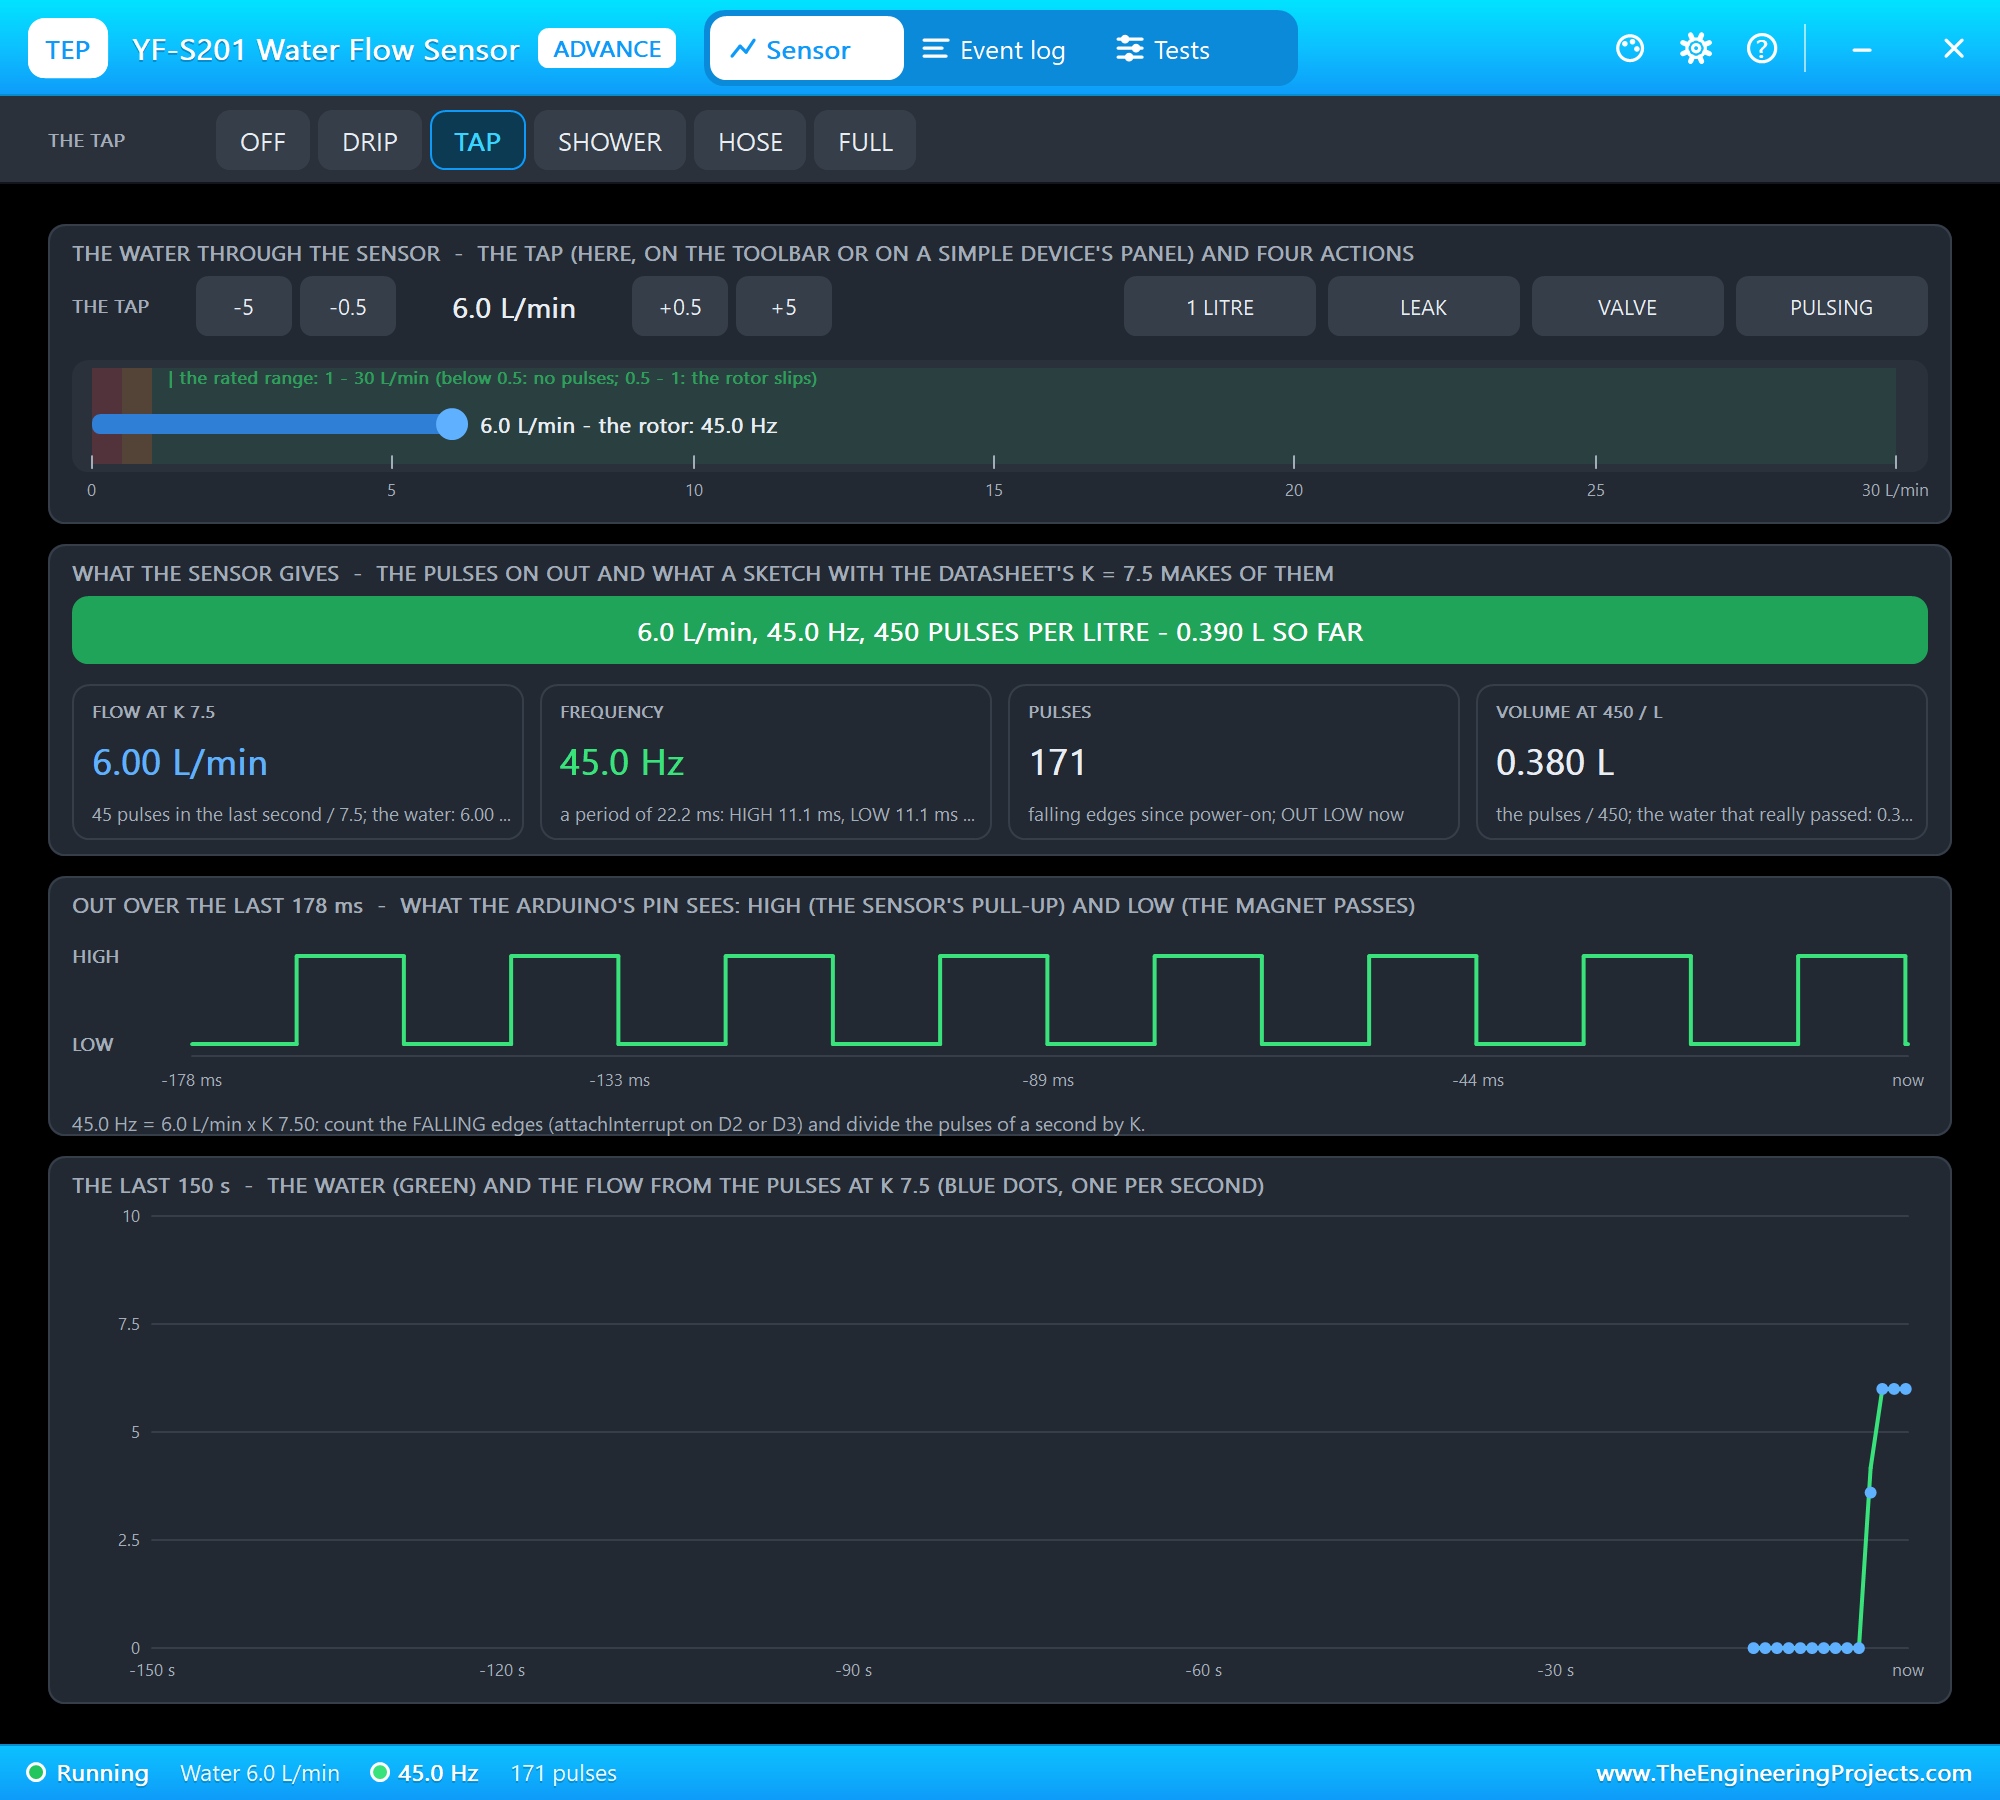
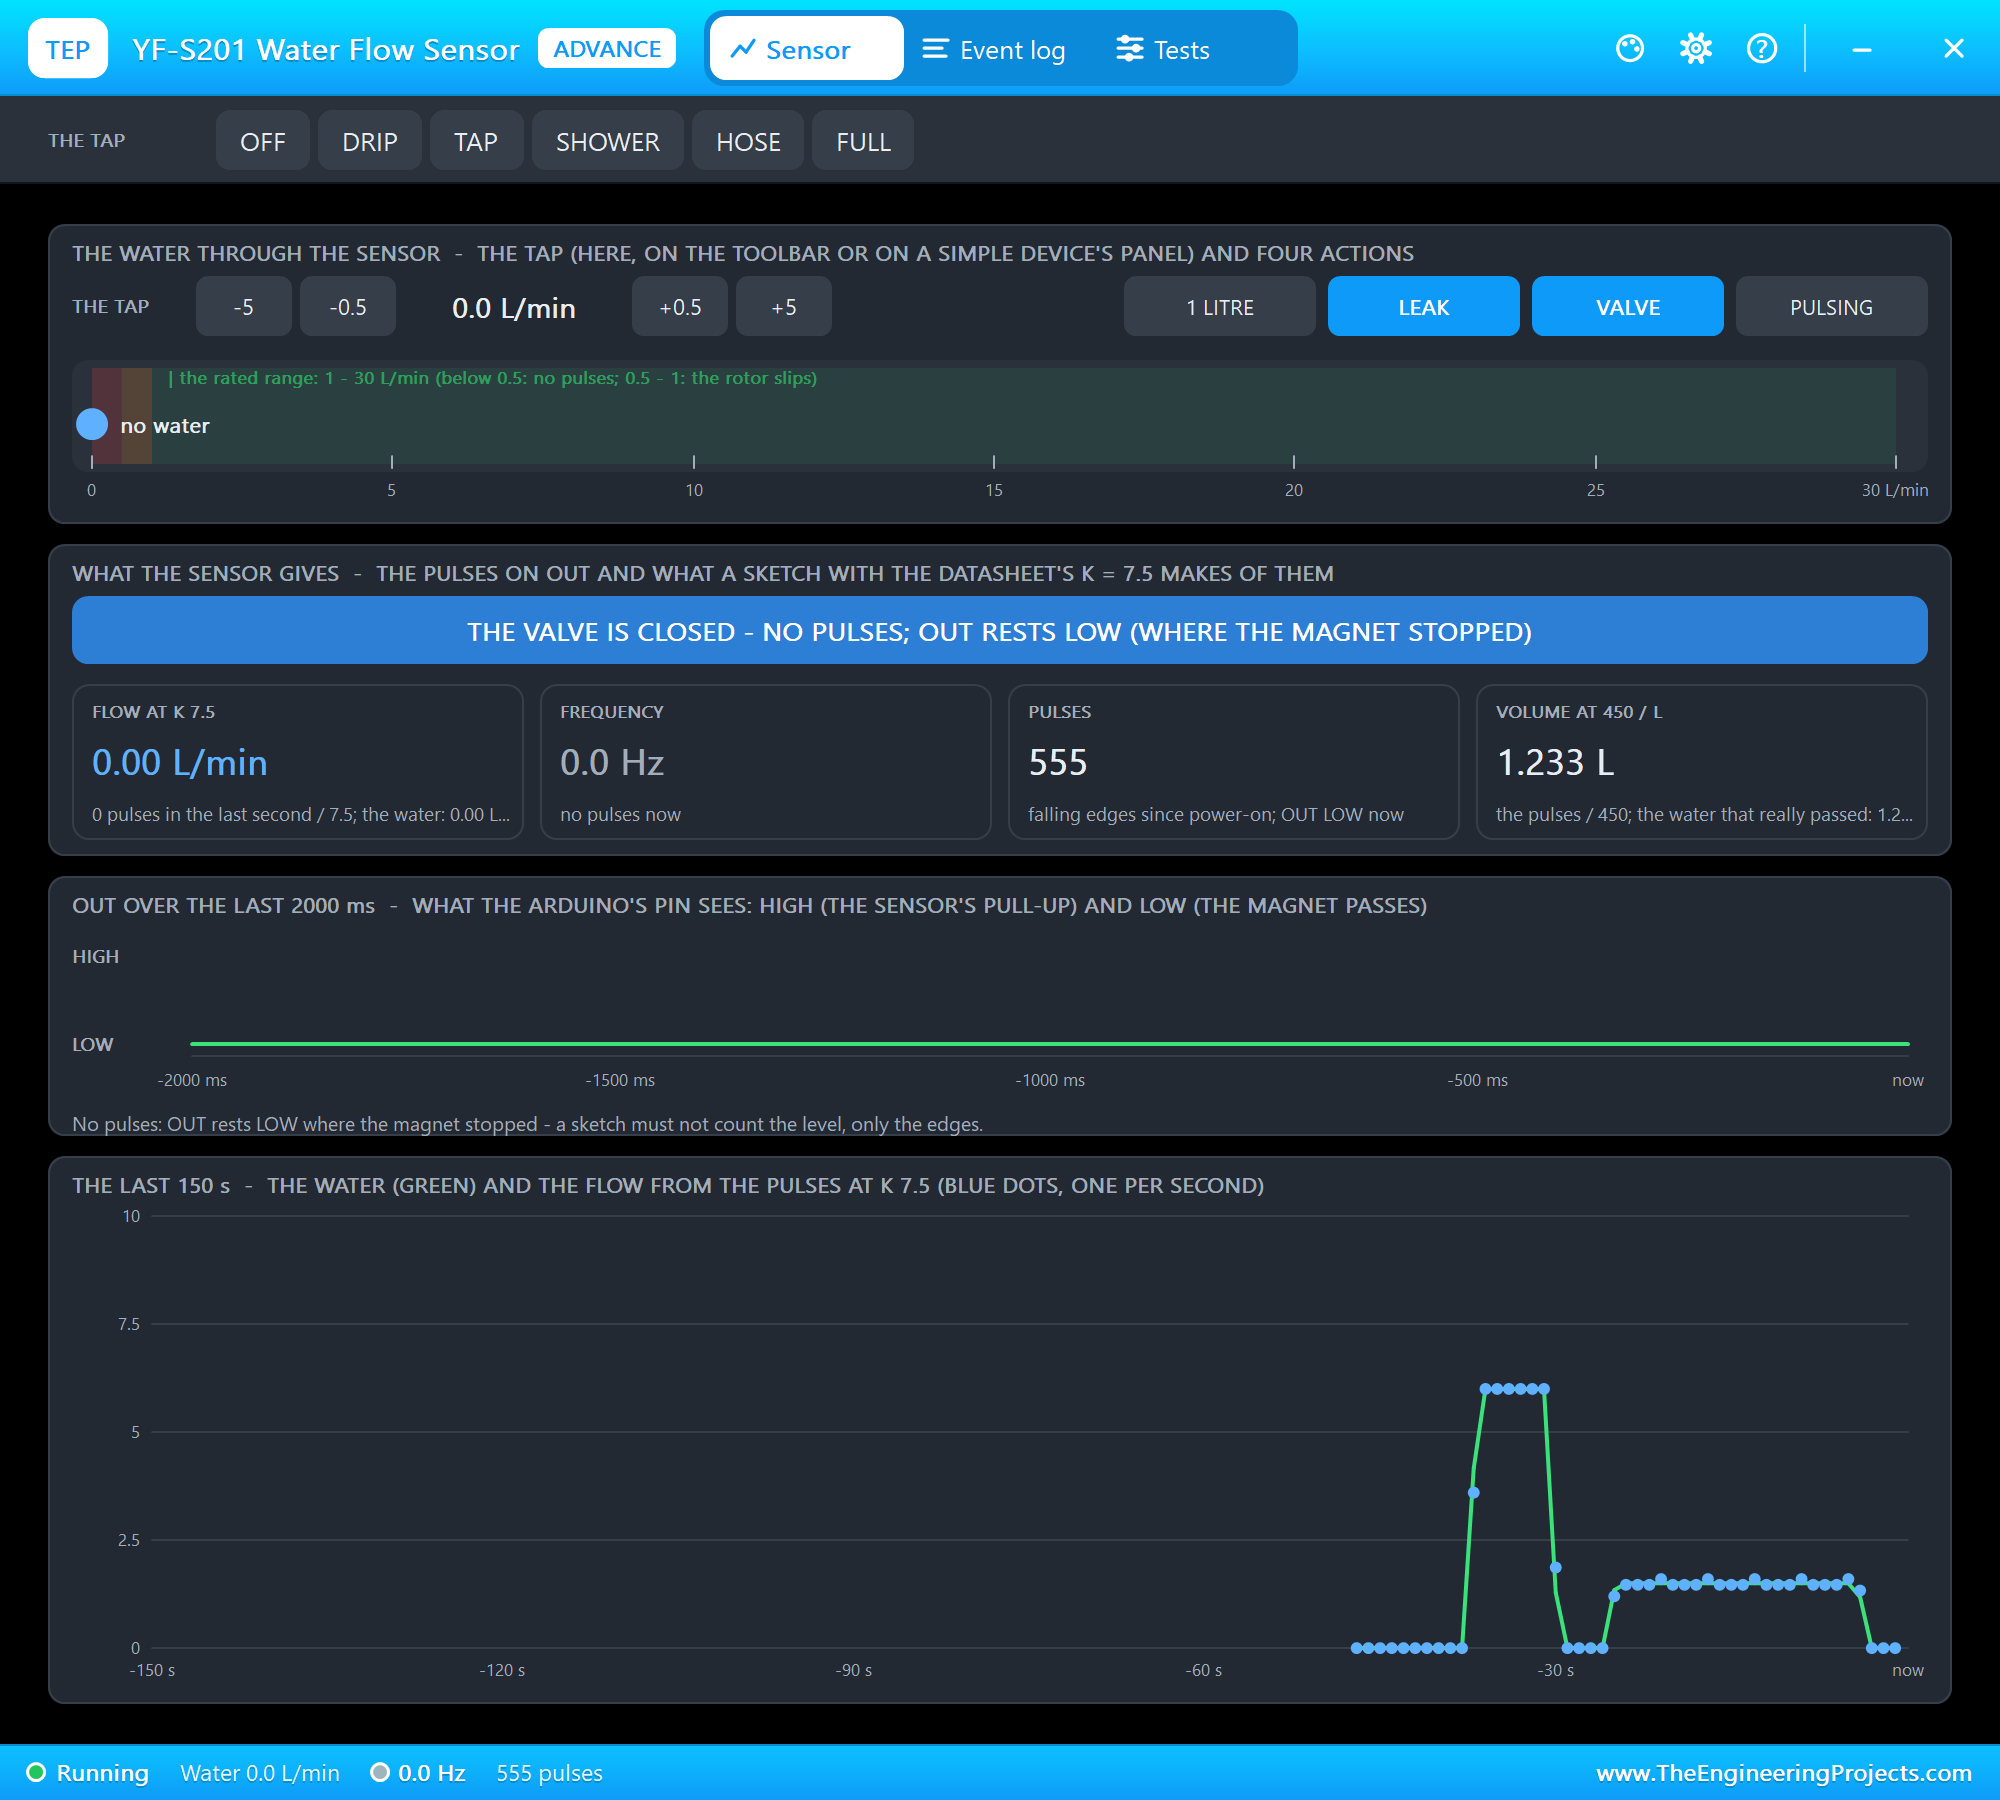
The flow sensor, the relay, the valve and the LCD are models with pop-ups. The YF-S201's pop-up sets the tap with six presets (OFF, DRIP 0.3, TAP 6, SHOWER 9, HOSE 15 and FULL 30 litres per minute) and has four actions: 1 LITRE, LEAK (a running cistern, 1.5 L/min more all the time), VALVE (a closed valve upstream, no water) and PULSING. It shows the pulses on OUT, the frequency, the pulse count and the water that really passed. The valve's pop-up shows its coil current, the water pressure and a cut-away of the diaphragm.
Proteus Simulation of the Water Meter: the Circuit
| Part | Pins | Raspberry Pi 5 header |
|---|---|---|
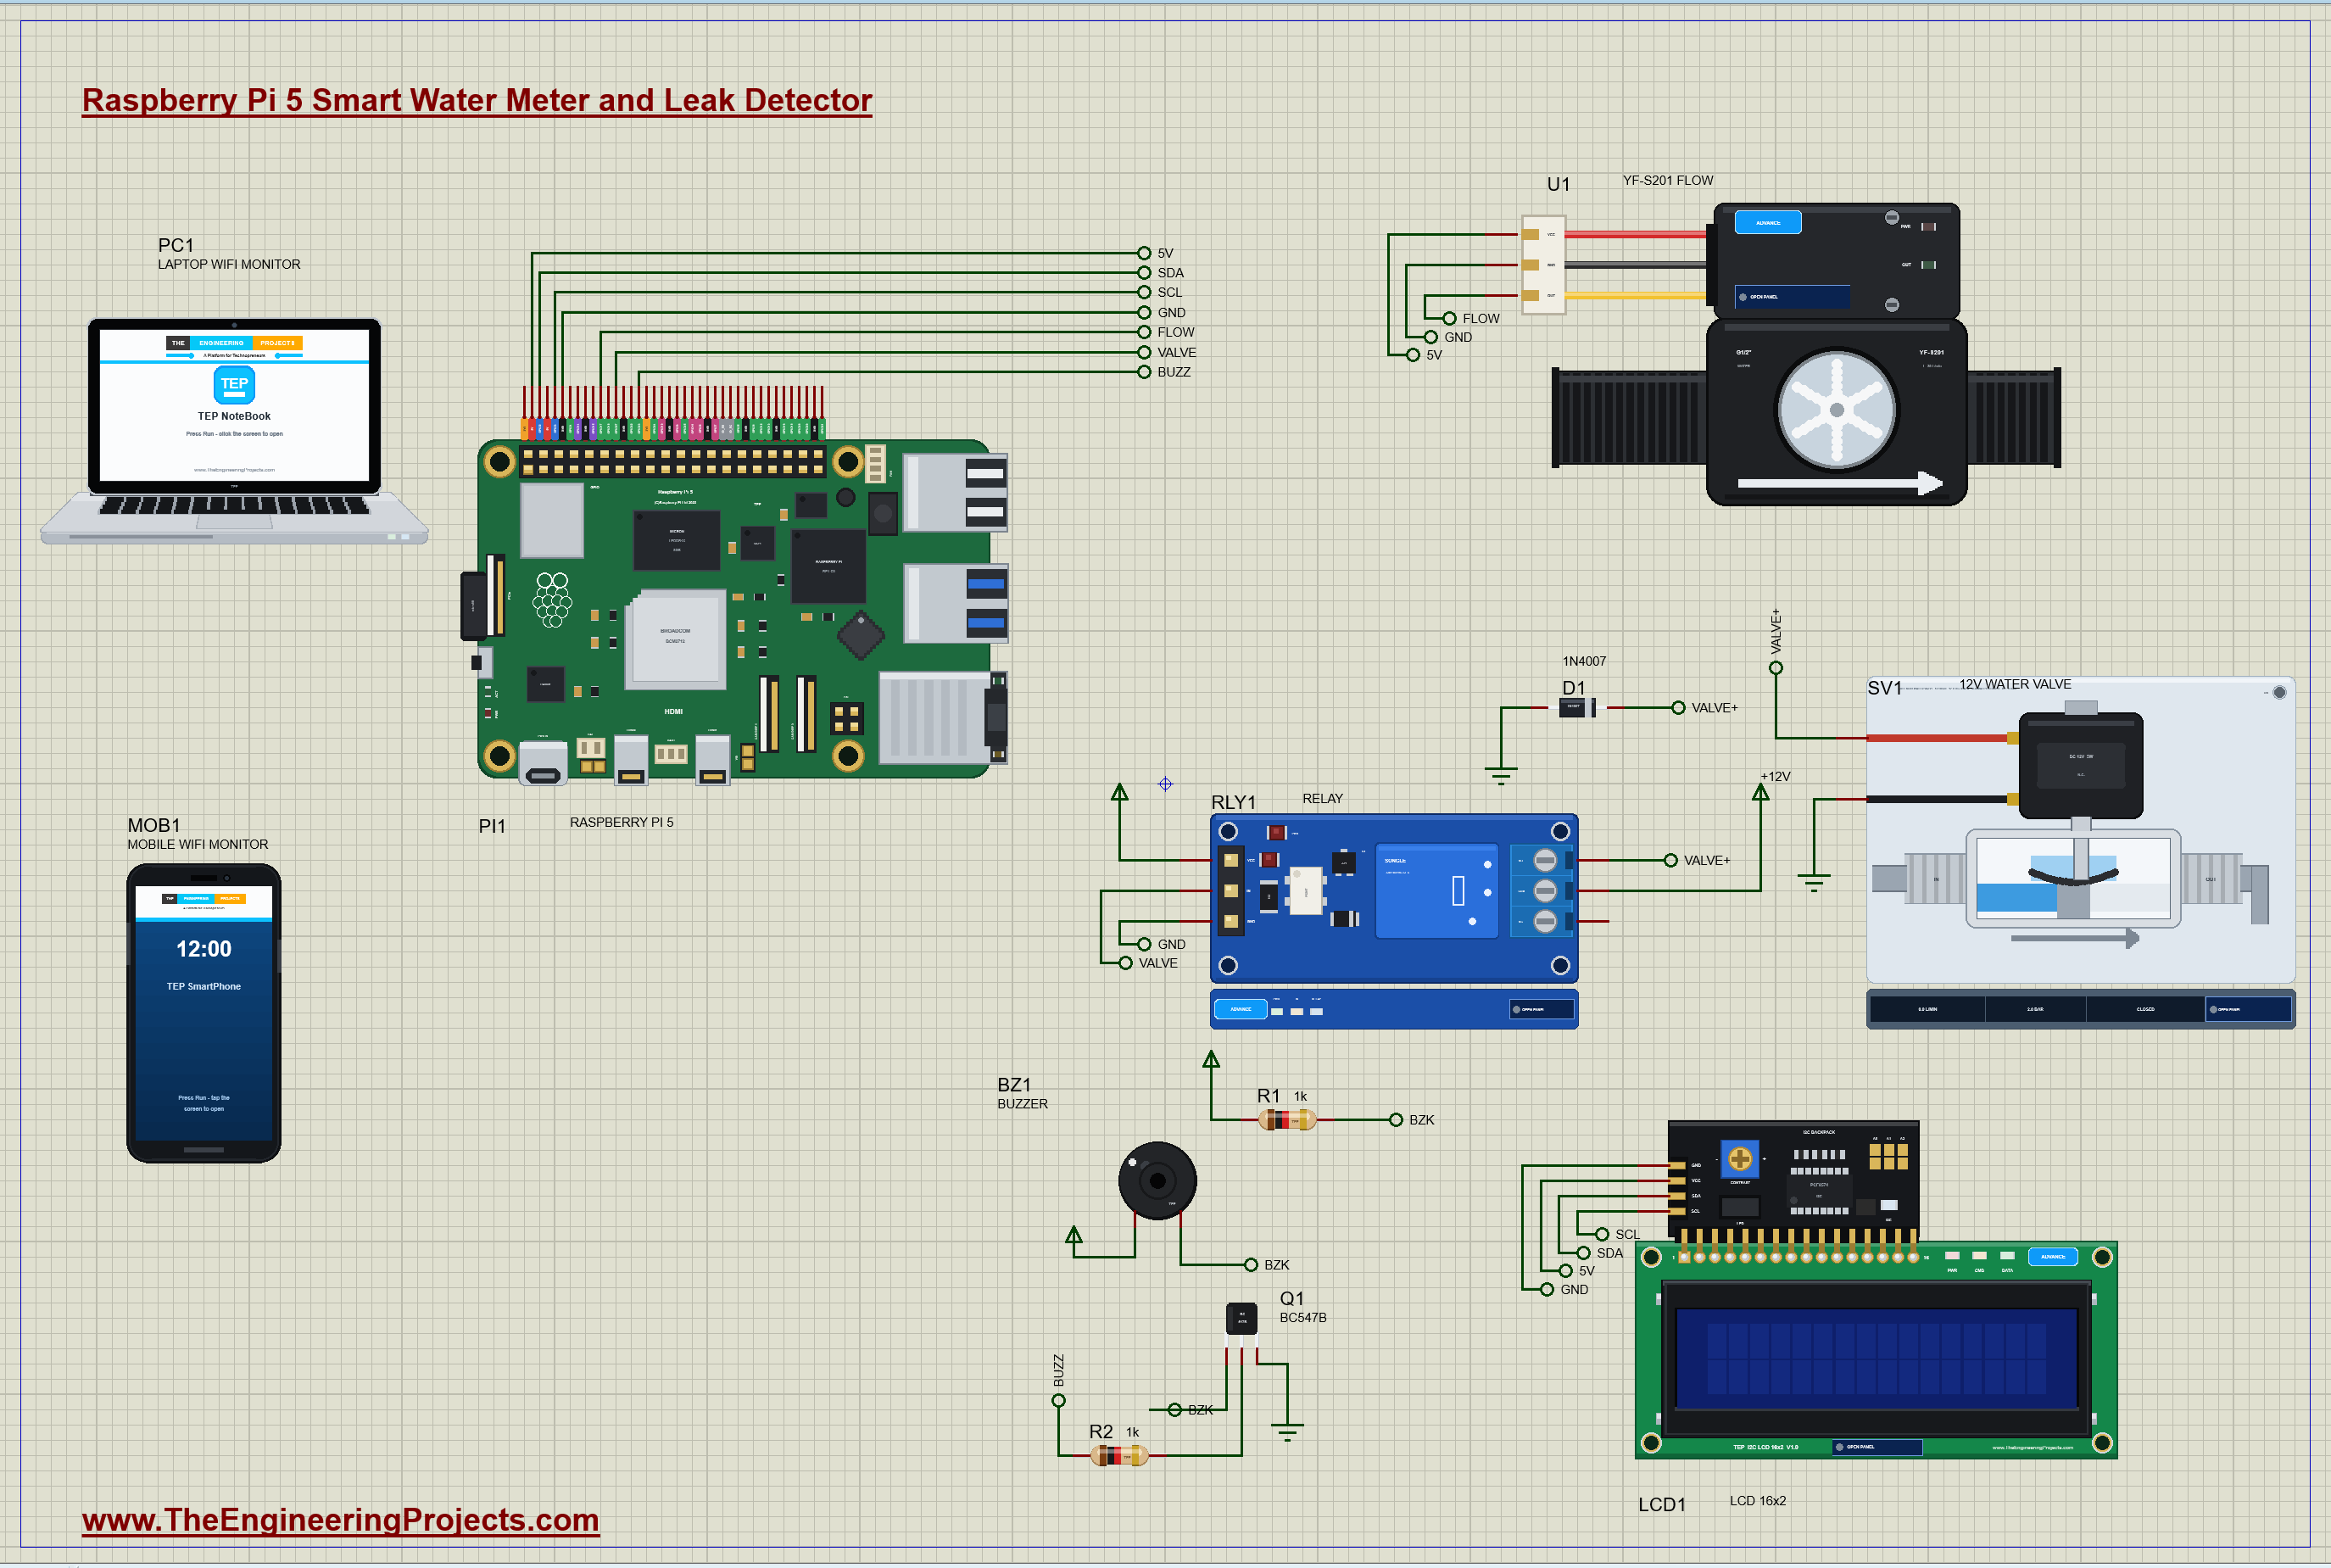
| U1 YF-S201 | VCC / GND / OUT | 5V (pin 2) / GND (pin 6) / GPIO17 (pin 11) |
| RLY1 relay module | IN / GND (VCC on the 5 V rail) | GPIO27 (pin 13) / GND |
| LCD1 | VCC / GND / SDA / SCL | 5V / GND / GPIO2 (pin 3) / GPIO3 (pin 5) |
| Q1 BC547 (the buzzer) | base through R2 1k | GPIO23 (pin 16) |
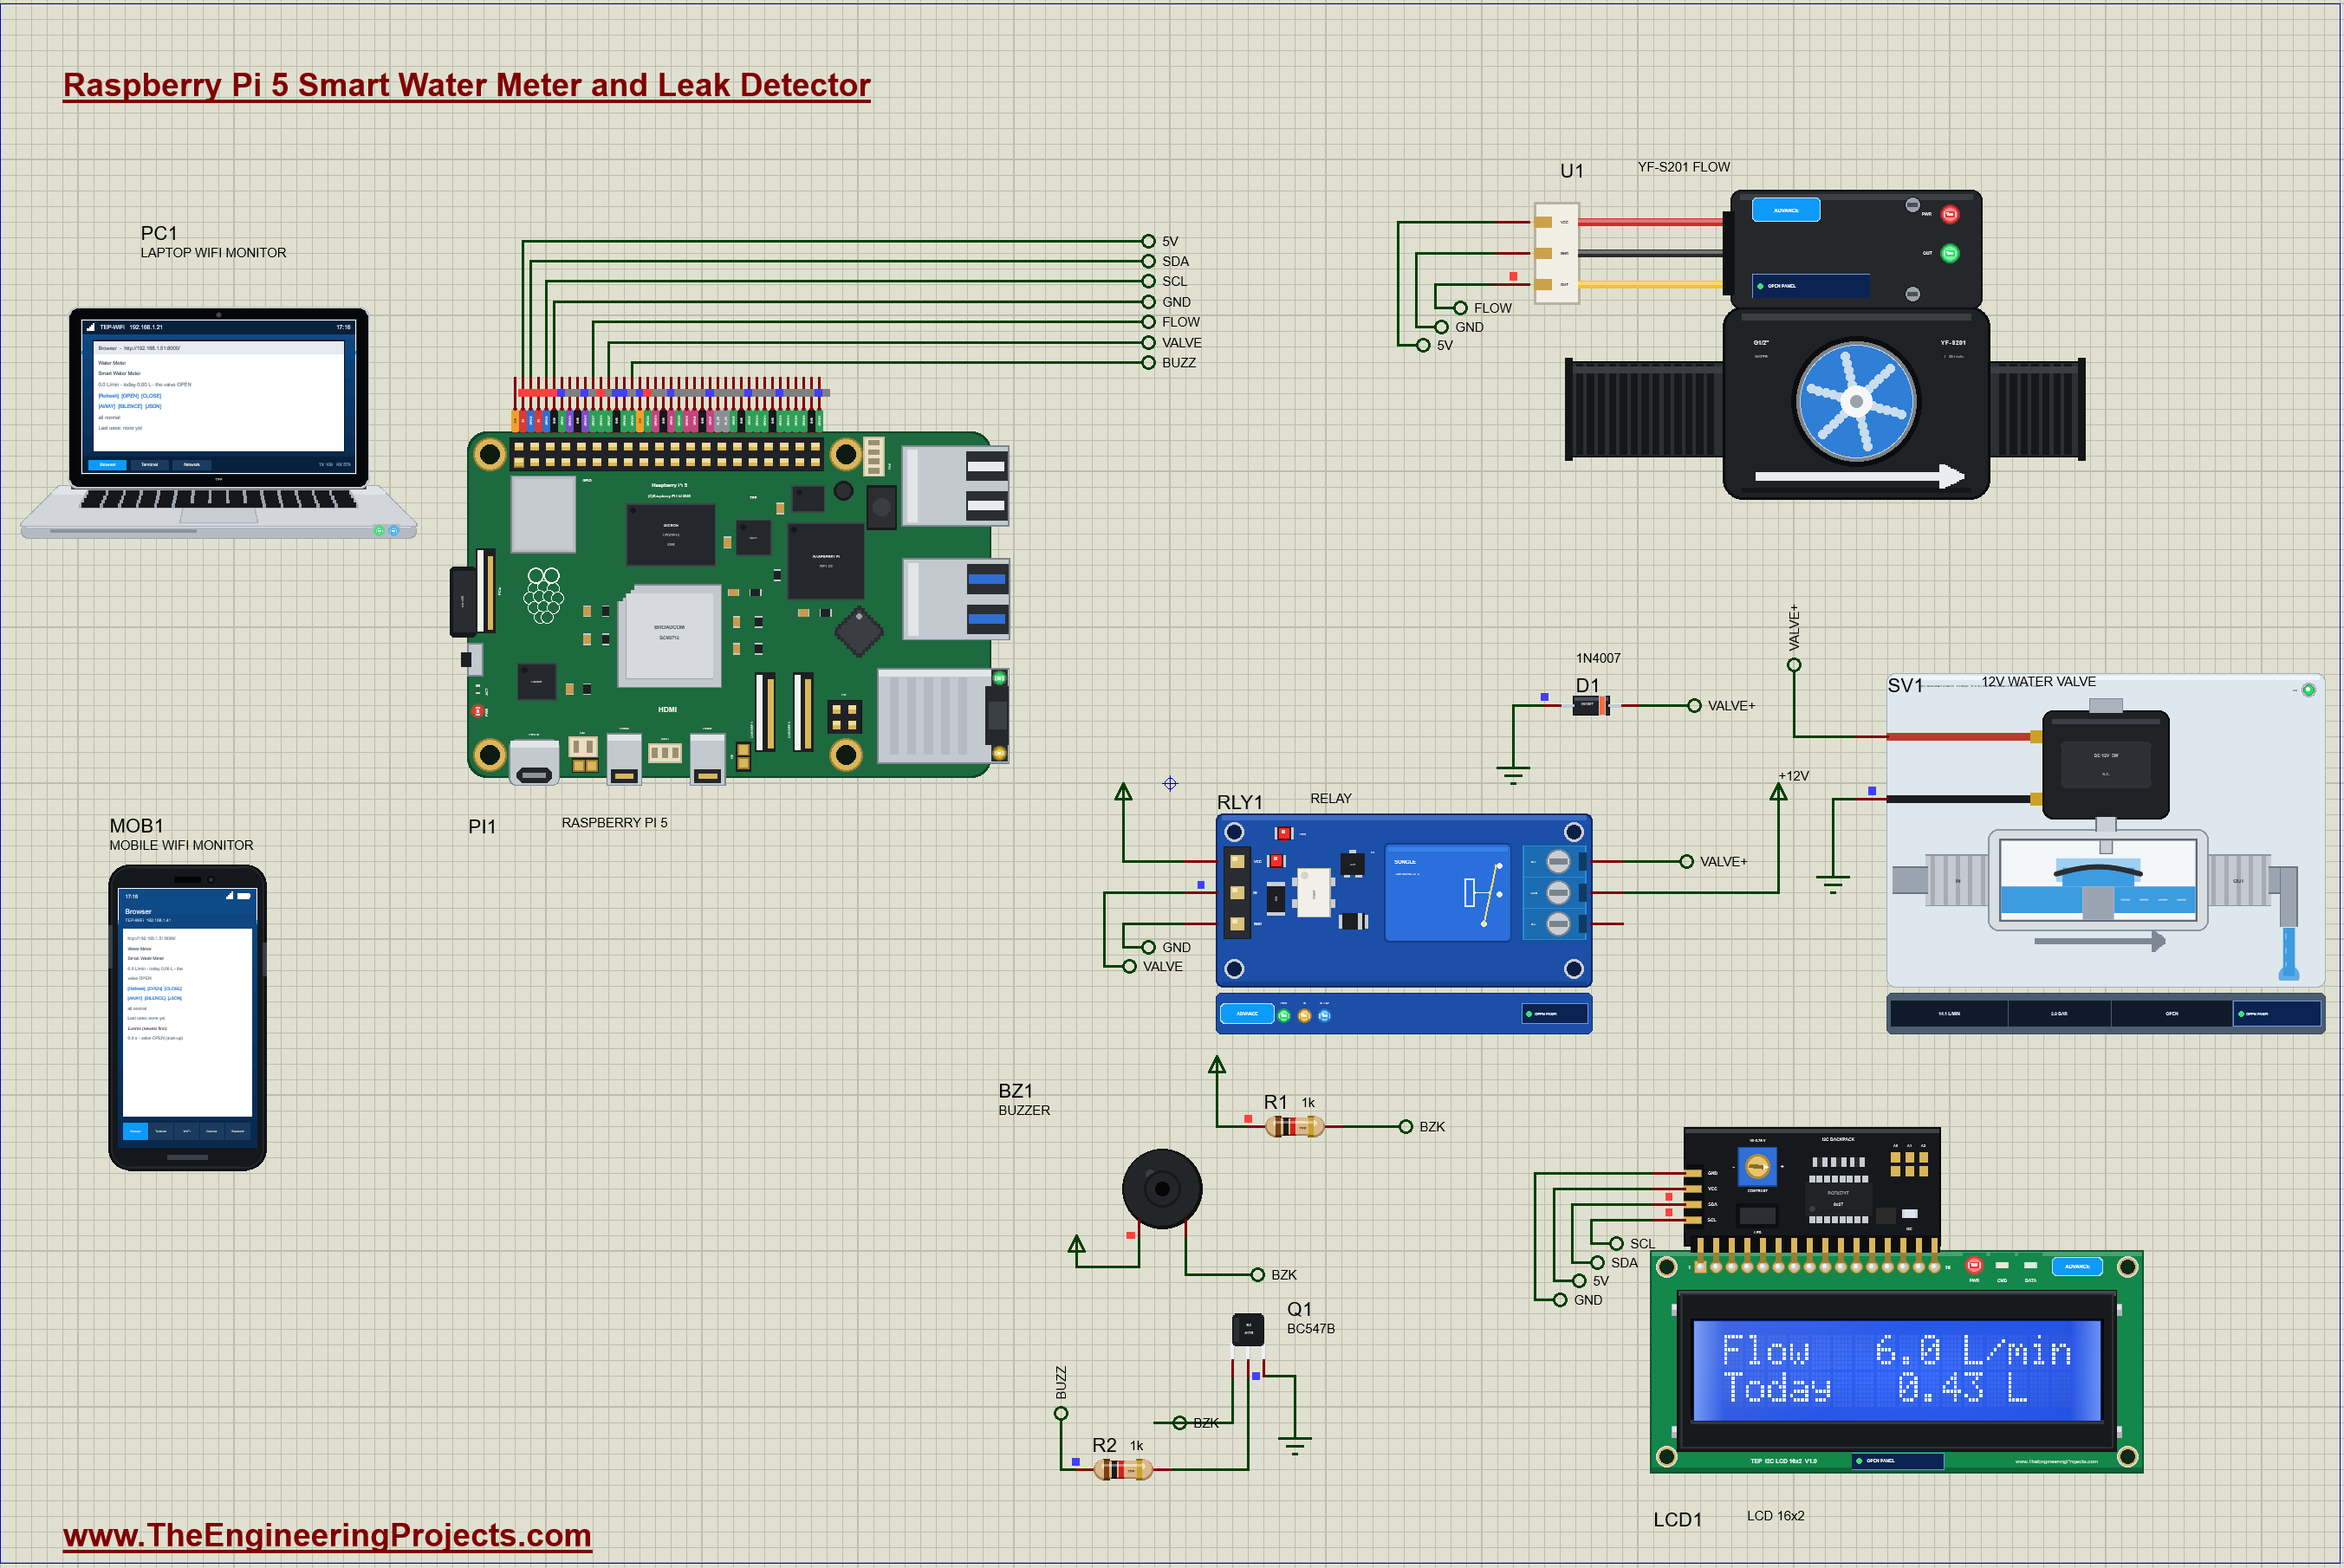
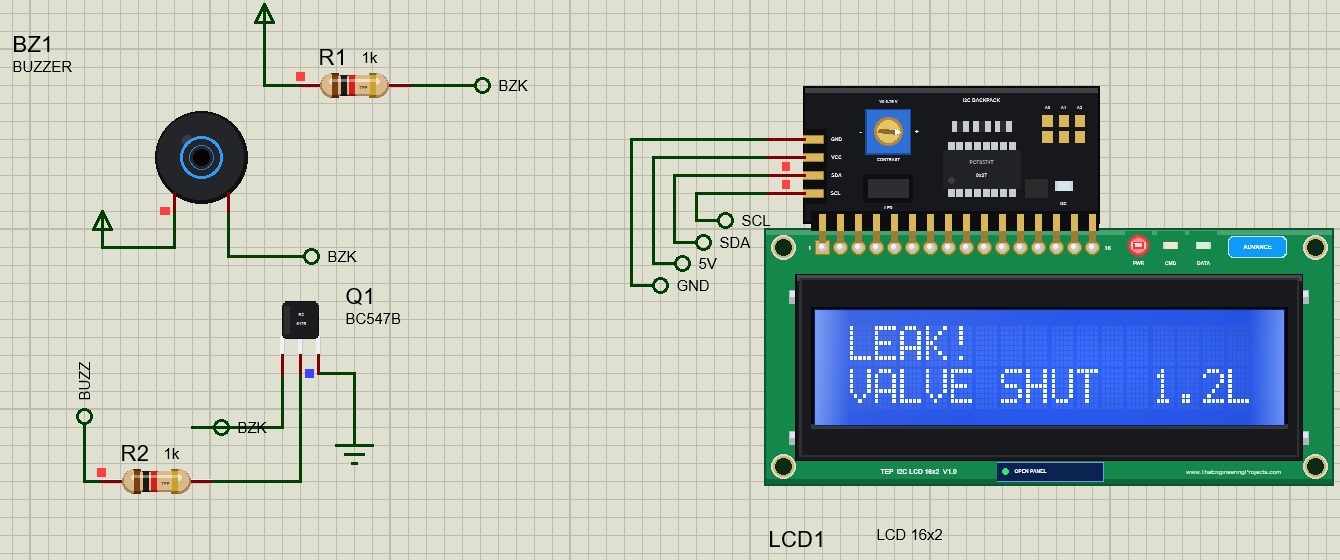
The relay's contacts switch the valve's 12 V supply: COM goes to +12V and NO, the contact that closes when the relay is energized, goes to the valve's plus terminal; the valve's minus goes to ground. The 1N4007 sits across the valve's coil with its cathode on the plus side, so it never conducts while the valve is powered. The relay module has its own transistor and LED, and its input is active LOW: a LOW on GPIO27 energizes the coil. The buzzer draws more current than a GPIO should give, so a BC547 switches its low side, and the 1k across the buzzer keeps the collector at a defined voltage while it is silent.
One wire needs care on real hardware. The YF-S201's output is pulled up inside the sensor to its own supply, so powered from 5 V its HIGH is close to 5 V, and the Raspberry Pi's GPIOs take 3.3 V at most. In the simulation, OUT goes straight to GPIO17; on a real board, put a divider on the yellow wire: 10k from OUT to GPIO17 and 20k from GPIO17 to ground give 5 x 20 / 30 = 3.3 V.
How the Water Meter Works
The YF-S201 Flow Sensor
Inside the black plastic body of the YF-S201 is a small impeller with a magnet, and in its cap a Hall-effect sensor. Water flowing through the body turns the impeller, and every turn pulls the output LOW for a moment as the magnet passes. The more water, the faster the impeller and the faster the pulses. The datasheet gives the relation as F = 7.5 x Q, the frequency in hertz for a flow in litres per minute, so one litre is 7.5 x 60 = 450 pulses. Worked example: a kitchen tap at 6 L/min gives 7.5 x 6 = 45 pulses a second, and 6 litres a minute is 0.1 litre a second, which is 45 pulses, as it should be. The rated range is 1 to 30 L/min; below about 0.5 L/min the impeller does not turn at all, so a slowly dripping tap gives no pulses.
Counting Pulses on the Raspberry Pi
At the sensor's top flow of 30 L/min the pulses come 225 times a second, only 4.4 ms apart, and each LOW lasts about 2 ms. A Python loop that reads the pin now and then would miss many of them. The program therefore asks the lgpio library to watch GPIO17 for falling edges itself: lgpio's own thread receives every edge from the kernel and adds it to a tally, and the program only reads and resets that tally once a second. Counting edges, not levels, matters too: when the water stops, the magnet can stop anywhere, and the output can rest HIGH or LOW for hours.
From Pulses to Litres per Minute and Litres
Once a second, the program takes the pulses of the last second and the exact time since the previous reading. The flow in litres per minute is the frequency divided by 7.5, and the water of that second is the pulses divided by 450. Worked example: 45 pulses in 1.00 second are 45 / 1.00 / 7.5 = 6.0 L/min and 45 / 450 = 0.1 litre. Adding the litres of every second gives the total for the day. Real YF-S201 sensors differ from the datasheet's 7.5 by up to 10 percent, so the constant K is at the top of the program, ready to be calibrated with a bucket of known size.
A Use of Water
A use starts with the first second in which water flows, at least 0.3 L/min, and ends after 2 seconds without water; then the program logs the litres, the duration and the flow. The litres are exact, because every pulse is counted, but the duration needs a little thought: the tap rarely opens or closes exactly when a one-second reading starts, so the first and the last second of a use are only partly full of water and read low. The program therefore takes the flow as the average of the seconds between them and works out the duration as the litres divided by that flow. Worked example: a tap at 6 L/min for 5.6 seconds gives 0.56 litre; its readings might be 3.0, 6.0, 6.0, 6.0, 6.0 and 2.6 L/min; the four full seconds average 6.0 L/min, and 0.56 litre at 6.0 L/min is 0.56 / 6.0 x 60 = 5.6 seconds. Counting whole seconds instead would have said 6 seconds, or 5, and a wrong average with it. Uses are what make a meter smart: a household has a pattern of short and long uses through the day, and the pattern of a leak is different.
Three Leak Rules
The program checks three rules every second while the valve is open and no alarm is active:
| Rule | Condition in the program | What it catches |
|---|---|---|
| LEAK | water for 20 s without a break | a running cistern, a dripping pipe, a tap left on |
| BURST | more than 20 L/min for 3 s | a burst pipe or a split hose |
| AWAY LEAK | in AWAY mode, any water for 5 s | anything at all while nobody is home |
The 20 seconds of the LEAK rule is a demonstration value, so that the simulation does not take an hour. In a real house, a shower or a bath can run for 10 to 20 minutes, and the usual choice is 30 to 60 minutes. The other two rules can stay as they are. Worked example: a running cistern at 1.5 L/min is 90 litres an hour and 2,160 litres a day, more than a whole family uses; it never stops for 2 seconds, so the LEAK rule always catches it in the end.
The Solenoid Valve and the Relay
The valve is a normally closed solenoid valve: without power, a spring and the water pressure keep it shut; with 12 V on its coil, the coil lifts a small pilot and the water pressure opens the main diaphragm. Normally closed is the safe choice for a shut-off: if the Pi crashes, the power fails or a wire breaks, the water goes off rather than running unwatched. The price is that the coil draws current the whole time the water is on; the model's pop-up shows about 0.45 A at 12 V, about 5.4 W, and the coil grows warm. The Pi switches the relay, and the relay's contacts switch the coil, so the Pi never carries the valve's current.
The diode is there for the moment the relay lets go. A coil stores energy in its magnetic field, and its current cannot stop instantly: when the contact opens, the coil drives the voltage as high as it must to keep the current flowing, easily hundreds of volts, which burns the relay's contacts and disturbs everything nearby. The 1N4007 across the coil gives that current a path in a loop through the diode, where it dies away in a few milliseconds at less than one volt.
Checking the Valve Itself
A valve that does not seal is as bad as no valve. Once the valve has been closed for 3 seconds, the meter should see no water at all, and if it does, the program logs that the valve must be checked. The 3 seconds give the valve time to close and the impeller time to stop.
The Python Code Explained
The whole program is included in the download. It uses lgpio for the GPIOs and the I2C bus and the standard library's http.server for the dashboard. At the top are the constants of the worked examples and the three rules:
K = 7.5                            # pulses a second per L/min (the YF-S201's datasheet); 450 pulses = 1 litre
FLOWING = 0.3                      # L/min: below this the water counts as off
QUIET_S = 2                        # a use ends after 2 s without water
CONT_S = 20                        # rule 1: water running for 20 s without a break = a leak (a real house: 30 - 60 minutes)
BURST_LPM, BURST_S = 20.0, 3       # rule 2: more than 20 L/min for 3 s = a burst pipe
AWAY_S = 5                         # rule 3: in AWAY mode any water for 5 s = a leak
Setting Up the GPIOs
The relay's pin is claimed HIGH first, because the module is active LOW and the valve must stay shut until the program decides. The flow pin becomes an alert pin, and a callback without a function simply counts its falling edges:
lgpio.gpio_claim_output(chip, VALVE_PIN, 1) # (HIGH first: the relay is active LOW - the valve stays shut)pulses = lgpio.callback(chip, FLOW_PIN, lgpio.FALLING_EDGE) # (no function: it just counts the falling edges)The Meter Loop
Once a second, the tally becomes litres per minute and litres, exactly as in the worked example:
        n = pulses.tally(); pulses.reset_tally()
        dt = now - last; last = now
        lpm = n / dt / K                                       # F = 7.5 x Q, so Q = F / 7.5
        litres = n / (K * 60)                                  # 450 pulses per litre
        flowing = lpm >= FLOWING
A use starts with the first flowing second and ends after QUIET_S seconds of quiet; its flow is the average of the full seconds, without the first and the last:
        elif use_start is not None and now - use_quiet >= QUIET_S:
            full = use_rates[1:-1] or use_rates
            rate = sum(full) / len(full)
Each rule keeps the time its condition started; a condition that breaks resets its timer to None:
            run_since = (run_since or now) if flowing else None
            burst_since = (burst_since or now) if lpm > BURST_LPM else None
            away_since = (away_since or now) if (flowing and d['away']) else None
if burst_since and now - burst_since >= BURST_S:After an alarm or a shut-off, the timers start again from zero, and water that keeps flowing past SHUT_GRACE seconds is reported once:
if not d['valve'] and flowing and now - d['changed'] >= SHUT_GRACE and not warned:The Alarm and the Valve
An alarm records its kind, logs it and closes the valve; the valve function turns "open" into the relay's active-LOW level:
def alarm(kind, text):
    with lock:
        s['alarm'] = kind; s['silenced'] = False
    event('%s - %s' % (kind, text))
    set_valve(False, kind)
lgpio.gpio_write(chip, VALVE_PIN, 0 if open_ else 1) # the relay's IN is active LOW: LOW = the valve powered = openThe buzzer is on for one second and off for the next during an alarm, until SILENCE:
lgpio.gpio_write(chip, BUZZ_PIN, 1 if (d['alarm'] and not d['silenced'] and beep) else 0)The web server runs in the main thread and the meter in its own thread, with a lock around the shared state. OPEN clears the alarm and opens the valve; CLOSE shuts it by hand; AWAY switches the third rule on and off; /data returns everything as JSON for another program.
How to Run the Proteus Simulation
- Download the project zip below and install the library files and the TEPPi folder (the steps are under the download button).
- Open Pi-5-Water-Leak-Detector.pdsprj from the Proteus Simulation folder. Keep water_meter.py and the DLL files next to it.
- Press Play. The program opens the valve (the relay switches on) and the LCD shows the flow and today's litres.
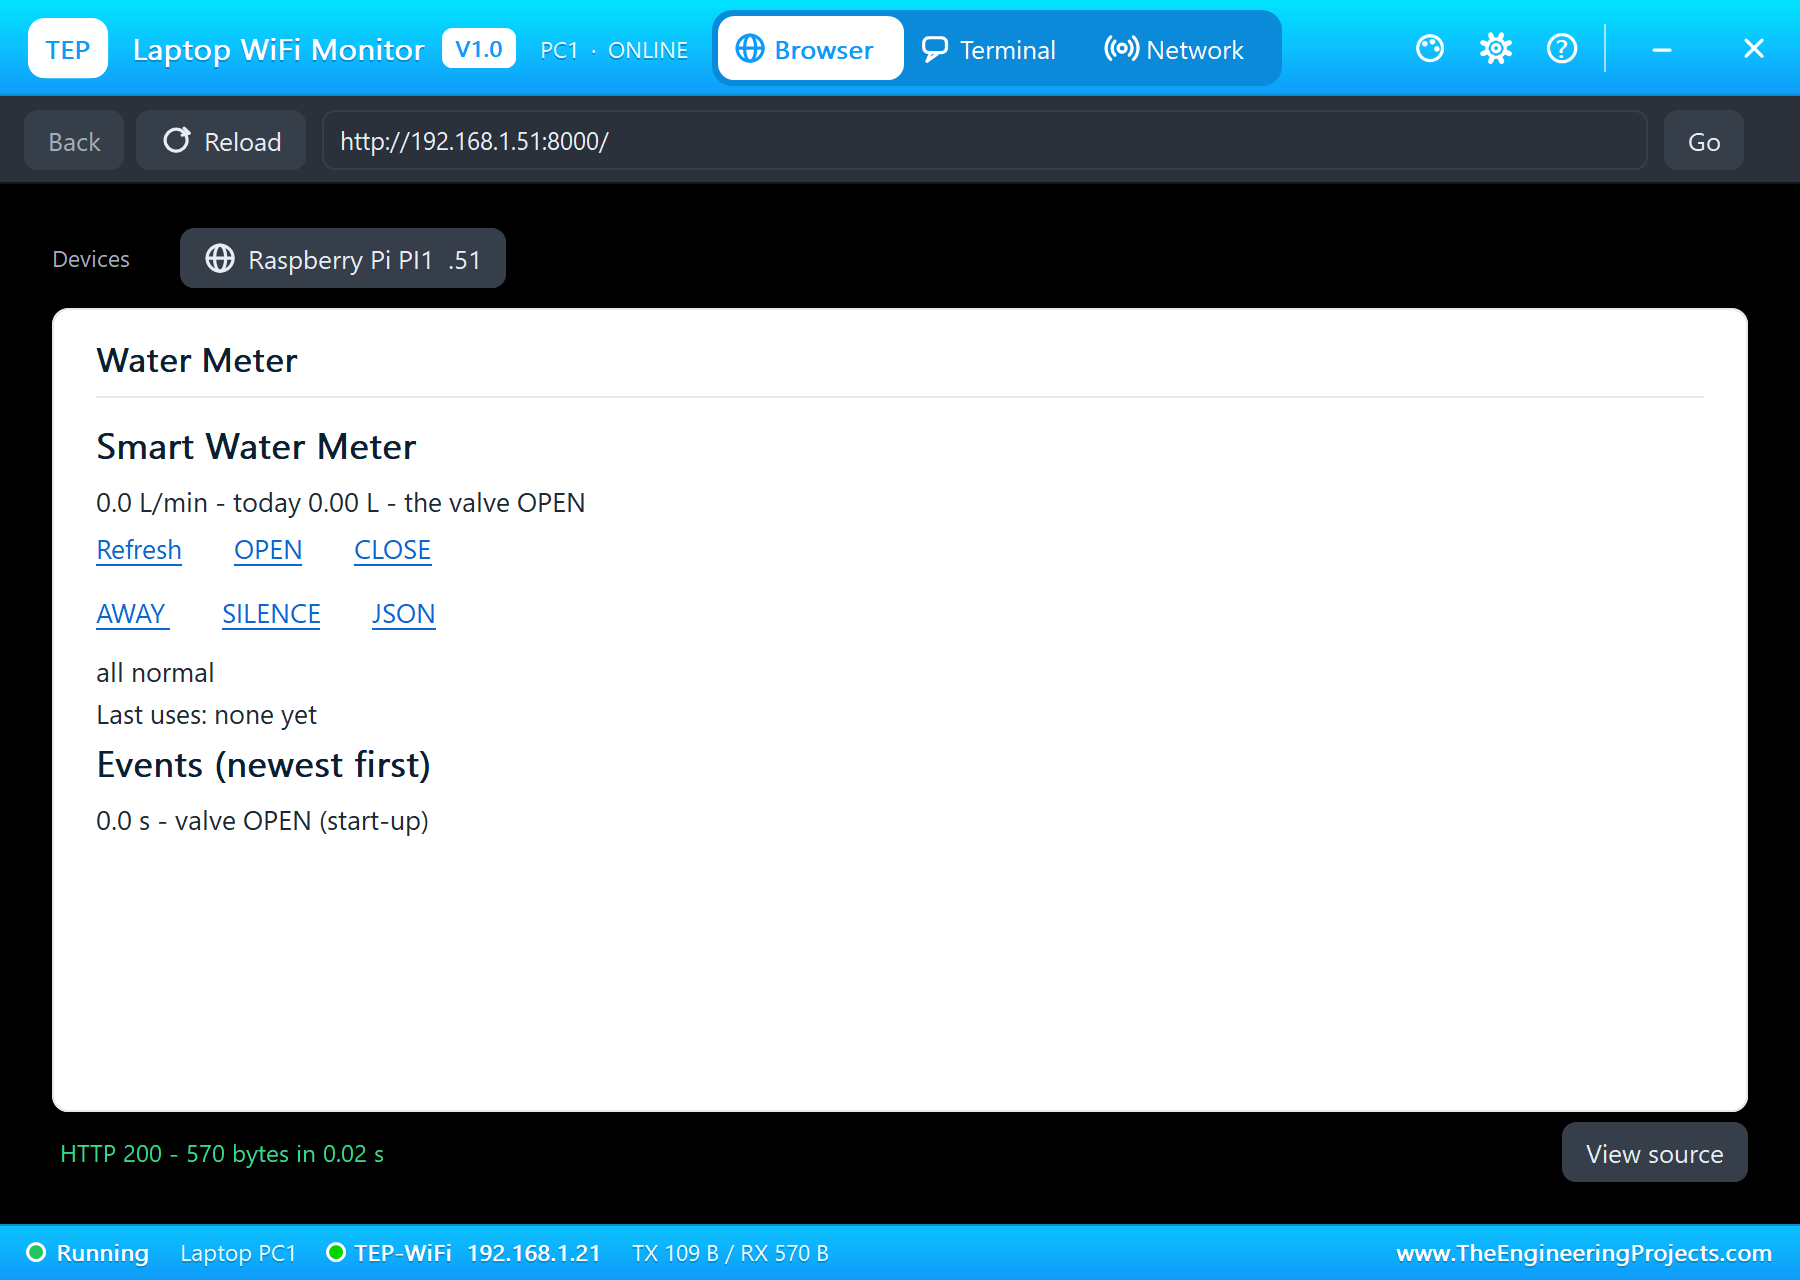
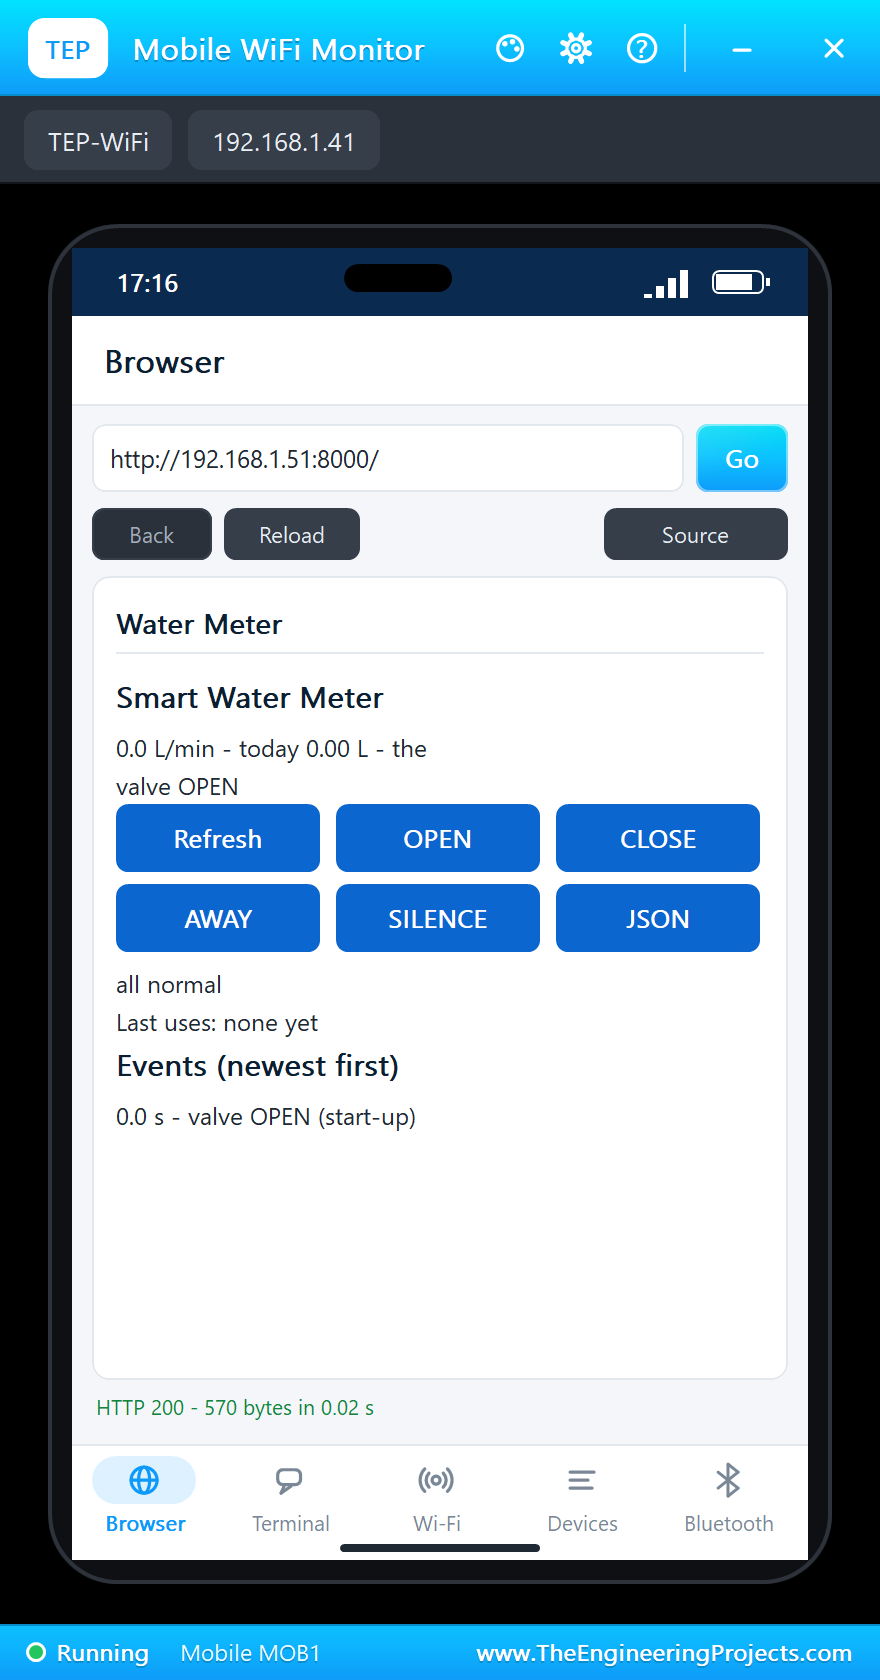
- Open the Laptop WiFi Monitor (PC1) or the Mobile WiFi Monitor (MOB1) and press Go.
- In the YF-S201's pop-up (U1) press TAP, then OFF, then LEAK and wait 20 seconds.
- After a shut-off, press VALVE in the same pop-up to stop the water, as the closed valve would; press it again and fix the LEAK before OPEN on the page.
Proteus Simulation Results
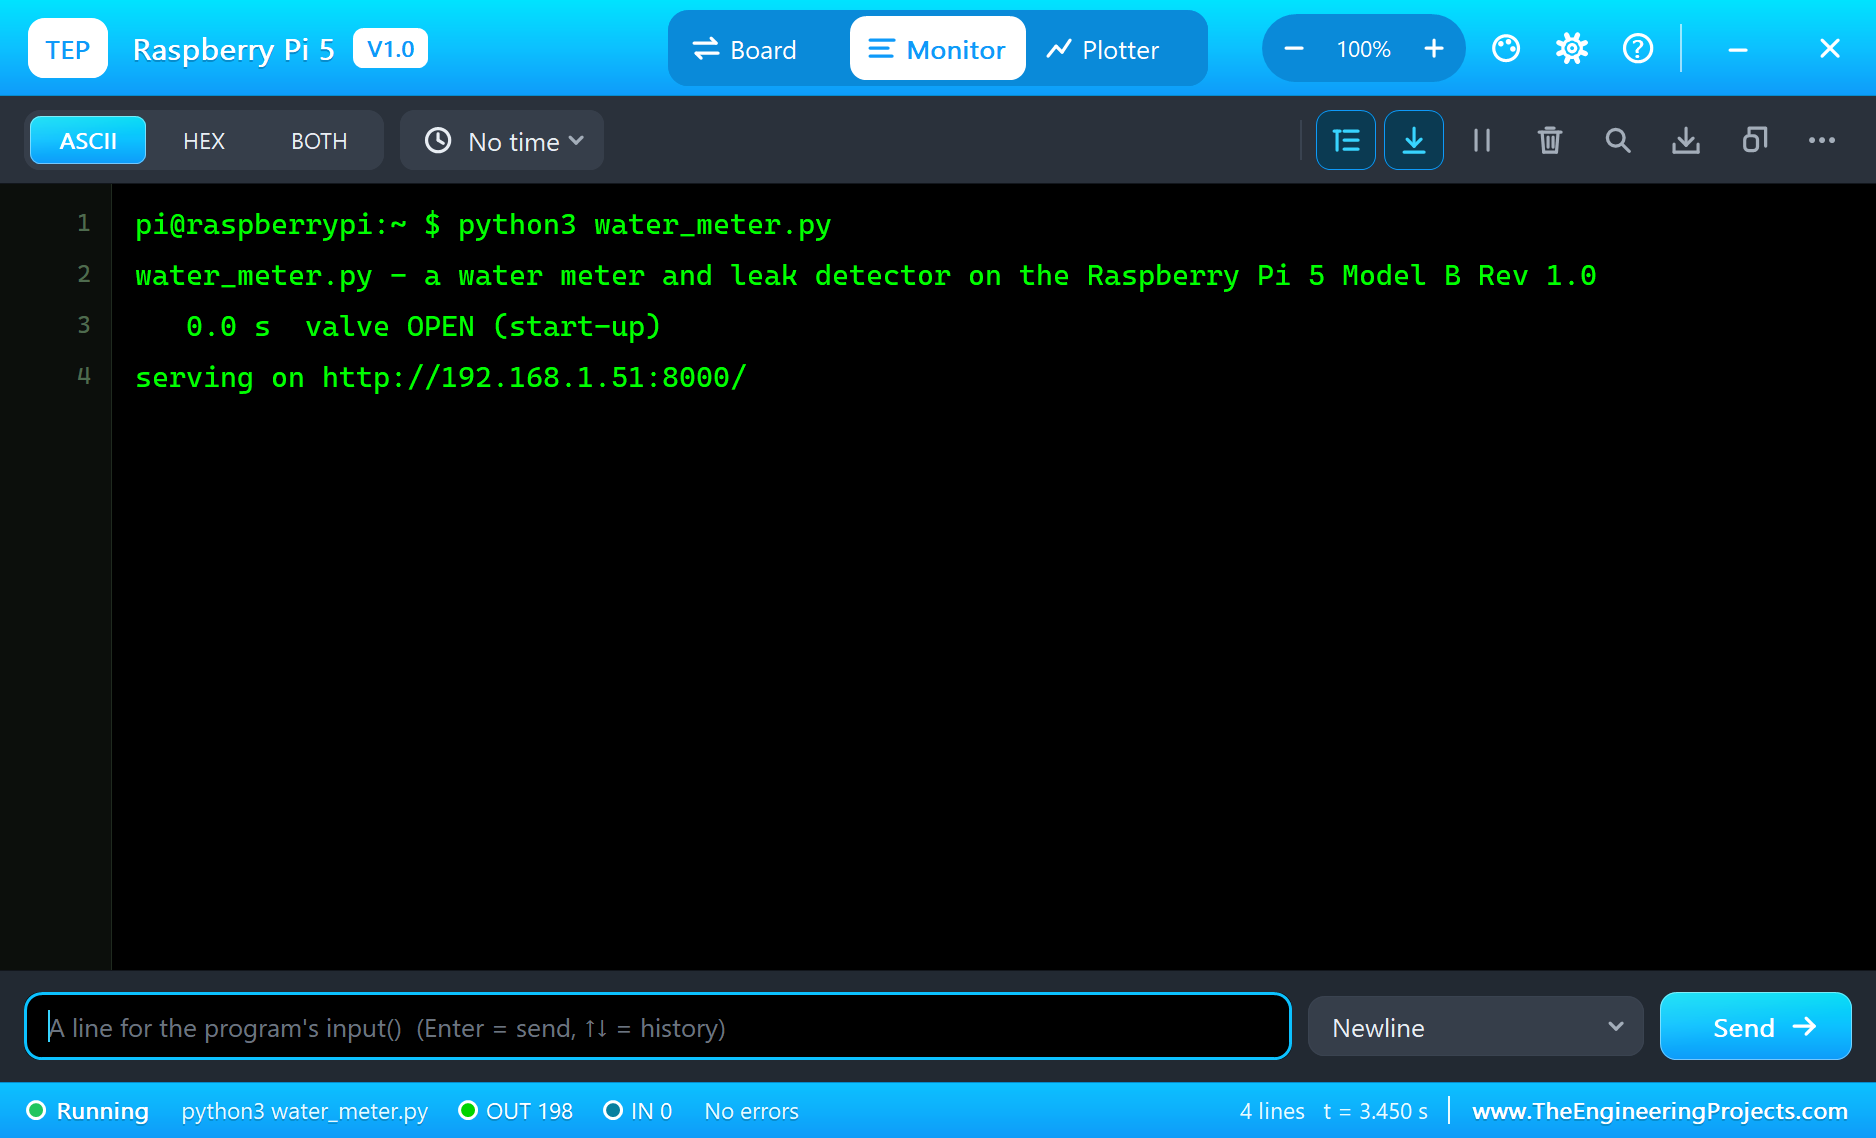
Here is one complete run of the simulation, with the numbers from our final test run; the times are the program's seconds since it started. The terminal shows the start: the program opened the valve at once, "valve OPEN (start-up)" at 0.0 seconds, started the server on port 8000 and printed a status line every 5 seconds: the flow, today's litres, the valve and the alarm state.
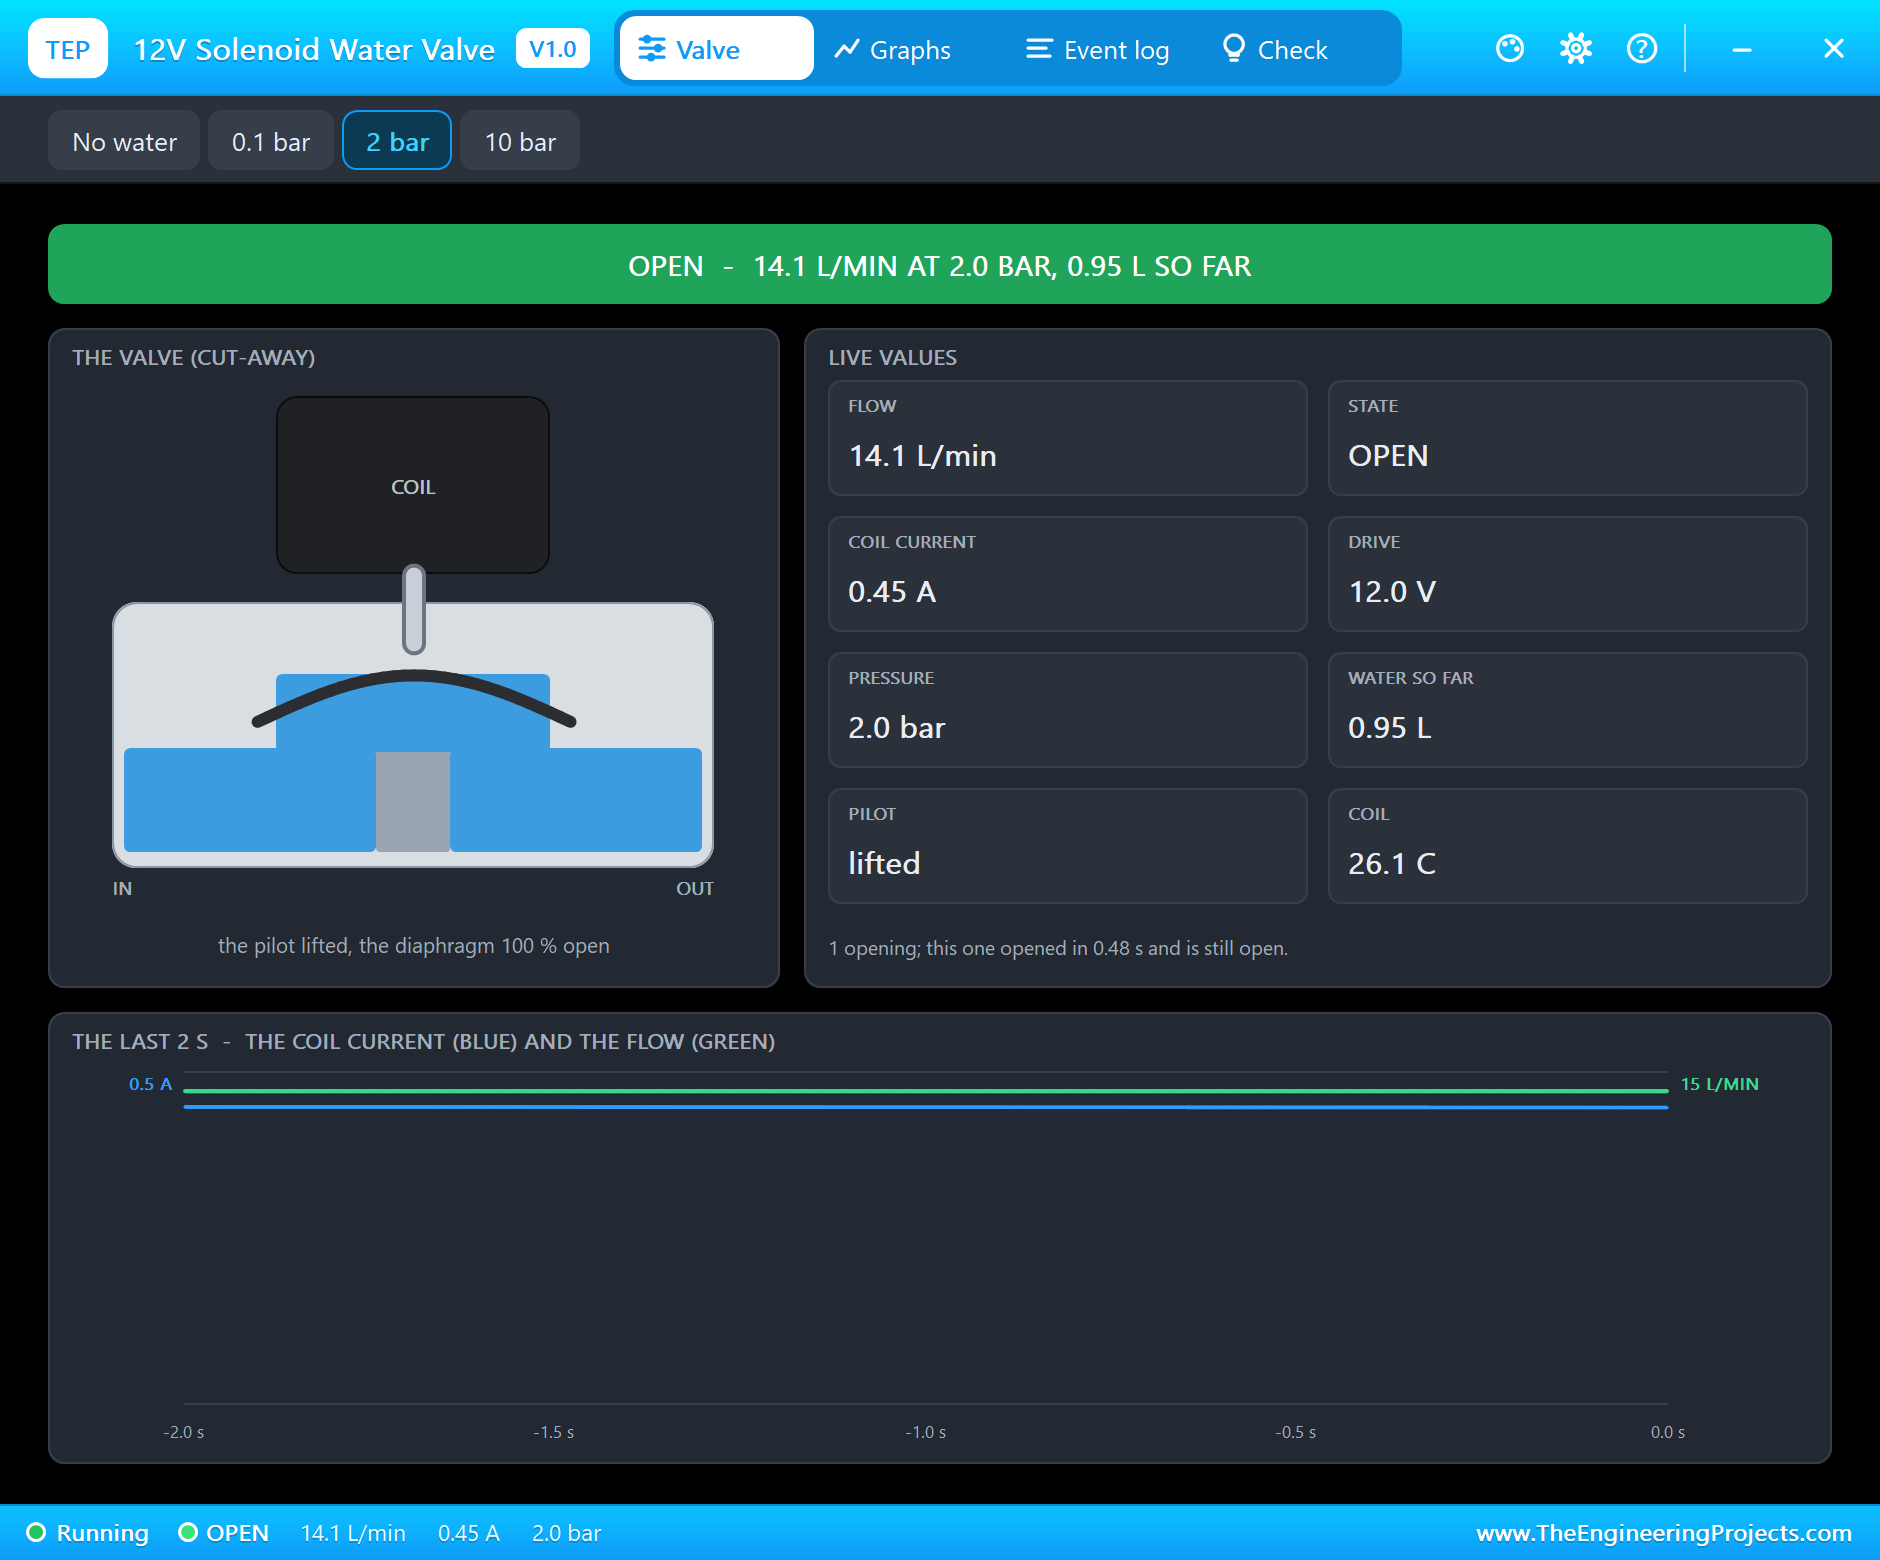
The valve's pop-up confirmed what the relay did: 12.0 V on the coil, 0.45 A, the pilot lifted and the diaphragm fully open, 0.48 seconds after the coil was powered. Its own flow figure, 14.1 L/min at 2 bar, is the valve model's full-open flow at its pressure preset; the water through the meter is set separately in the flow sensor's pop-up.
A Normal Use of Water
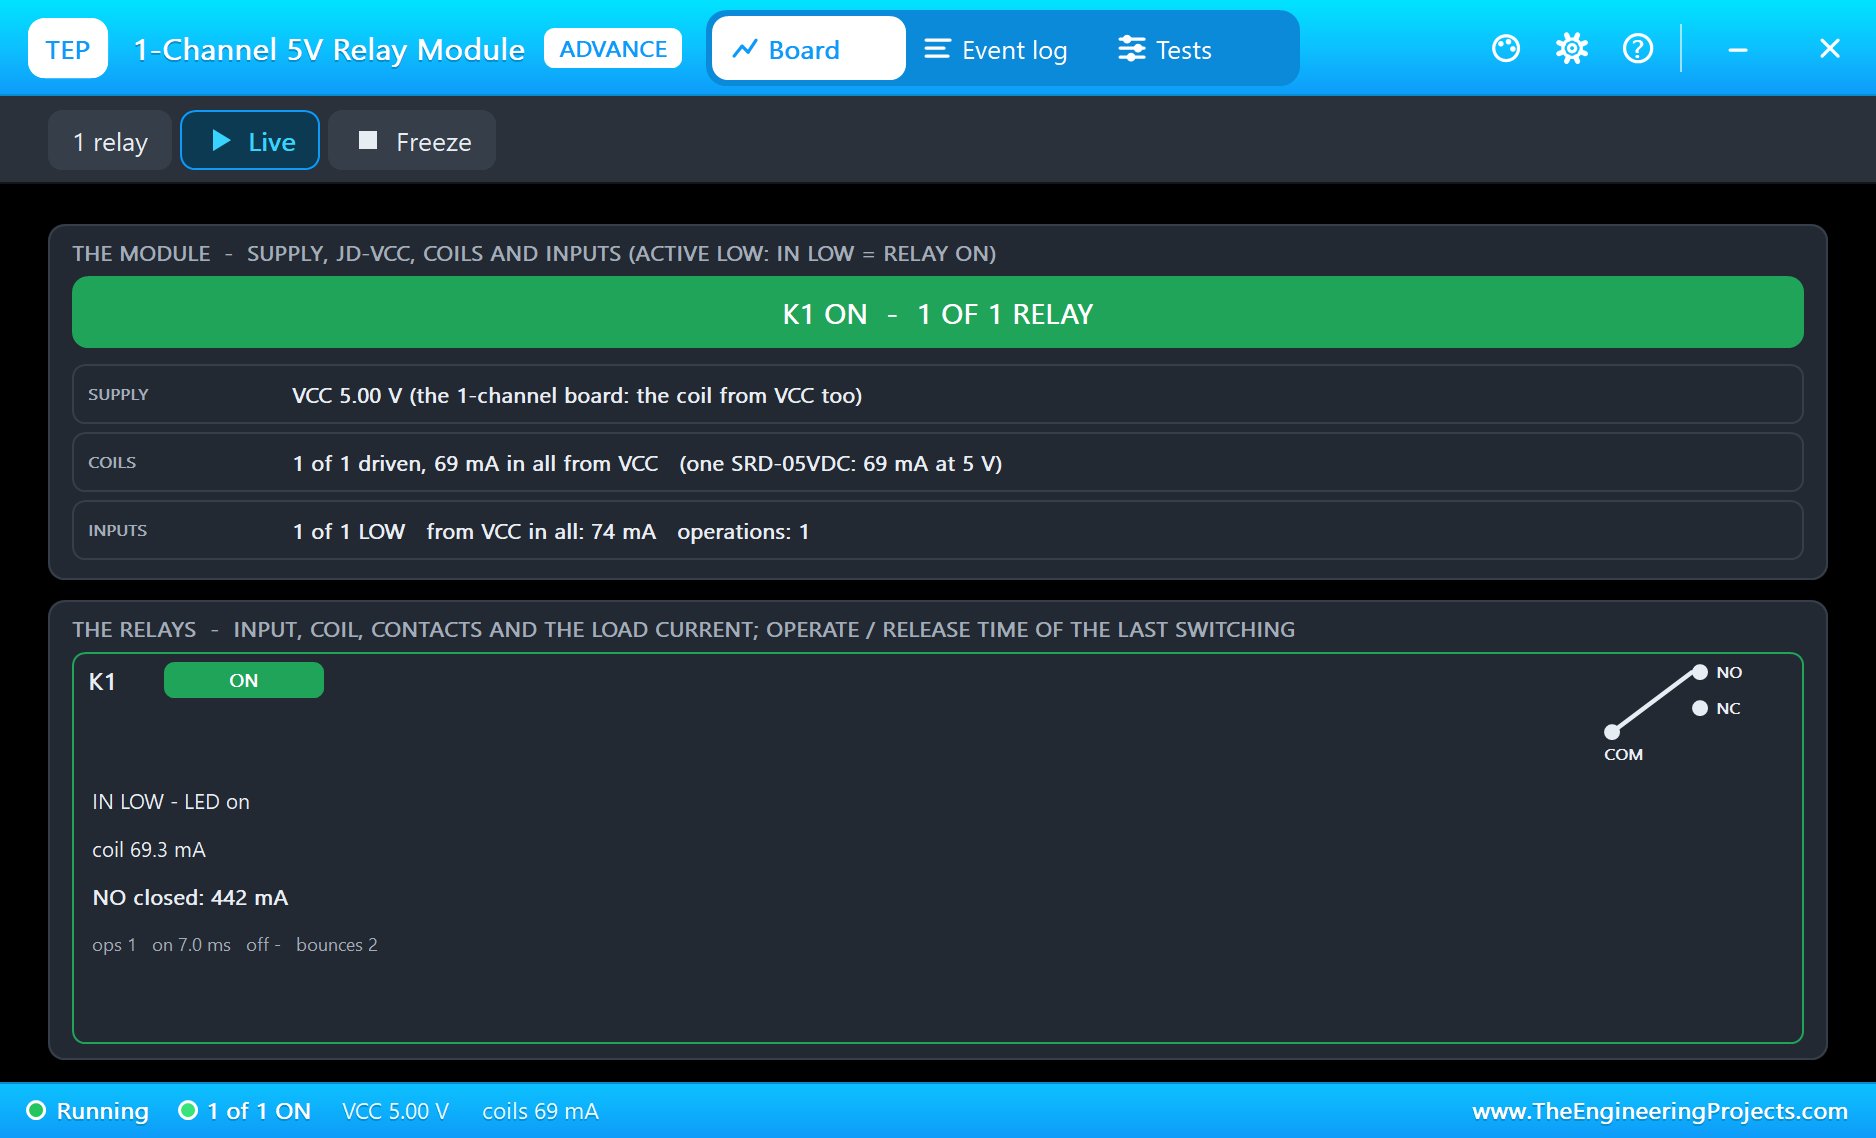
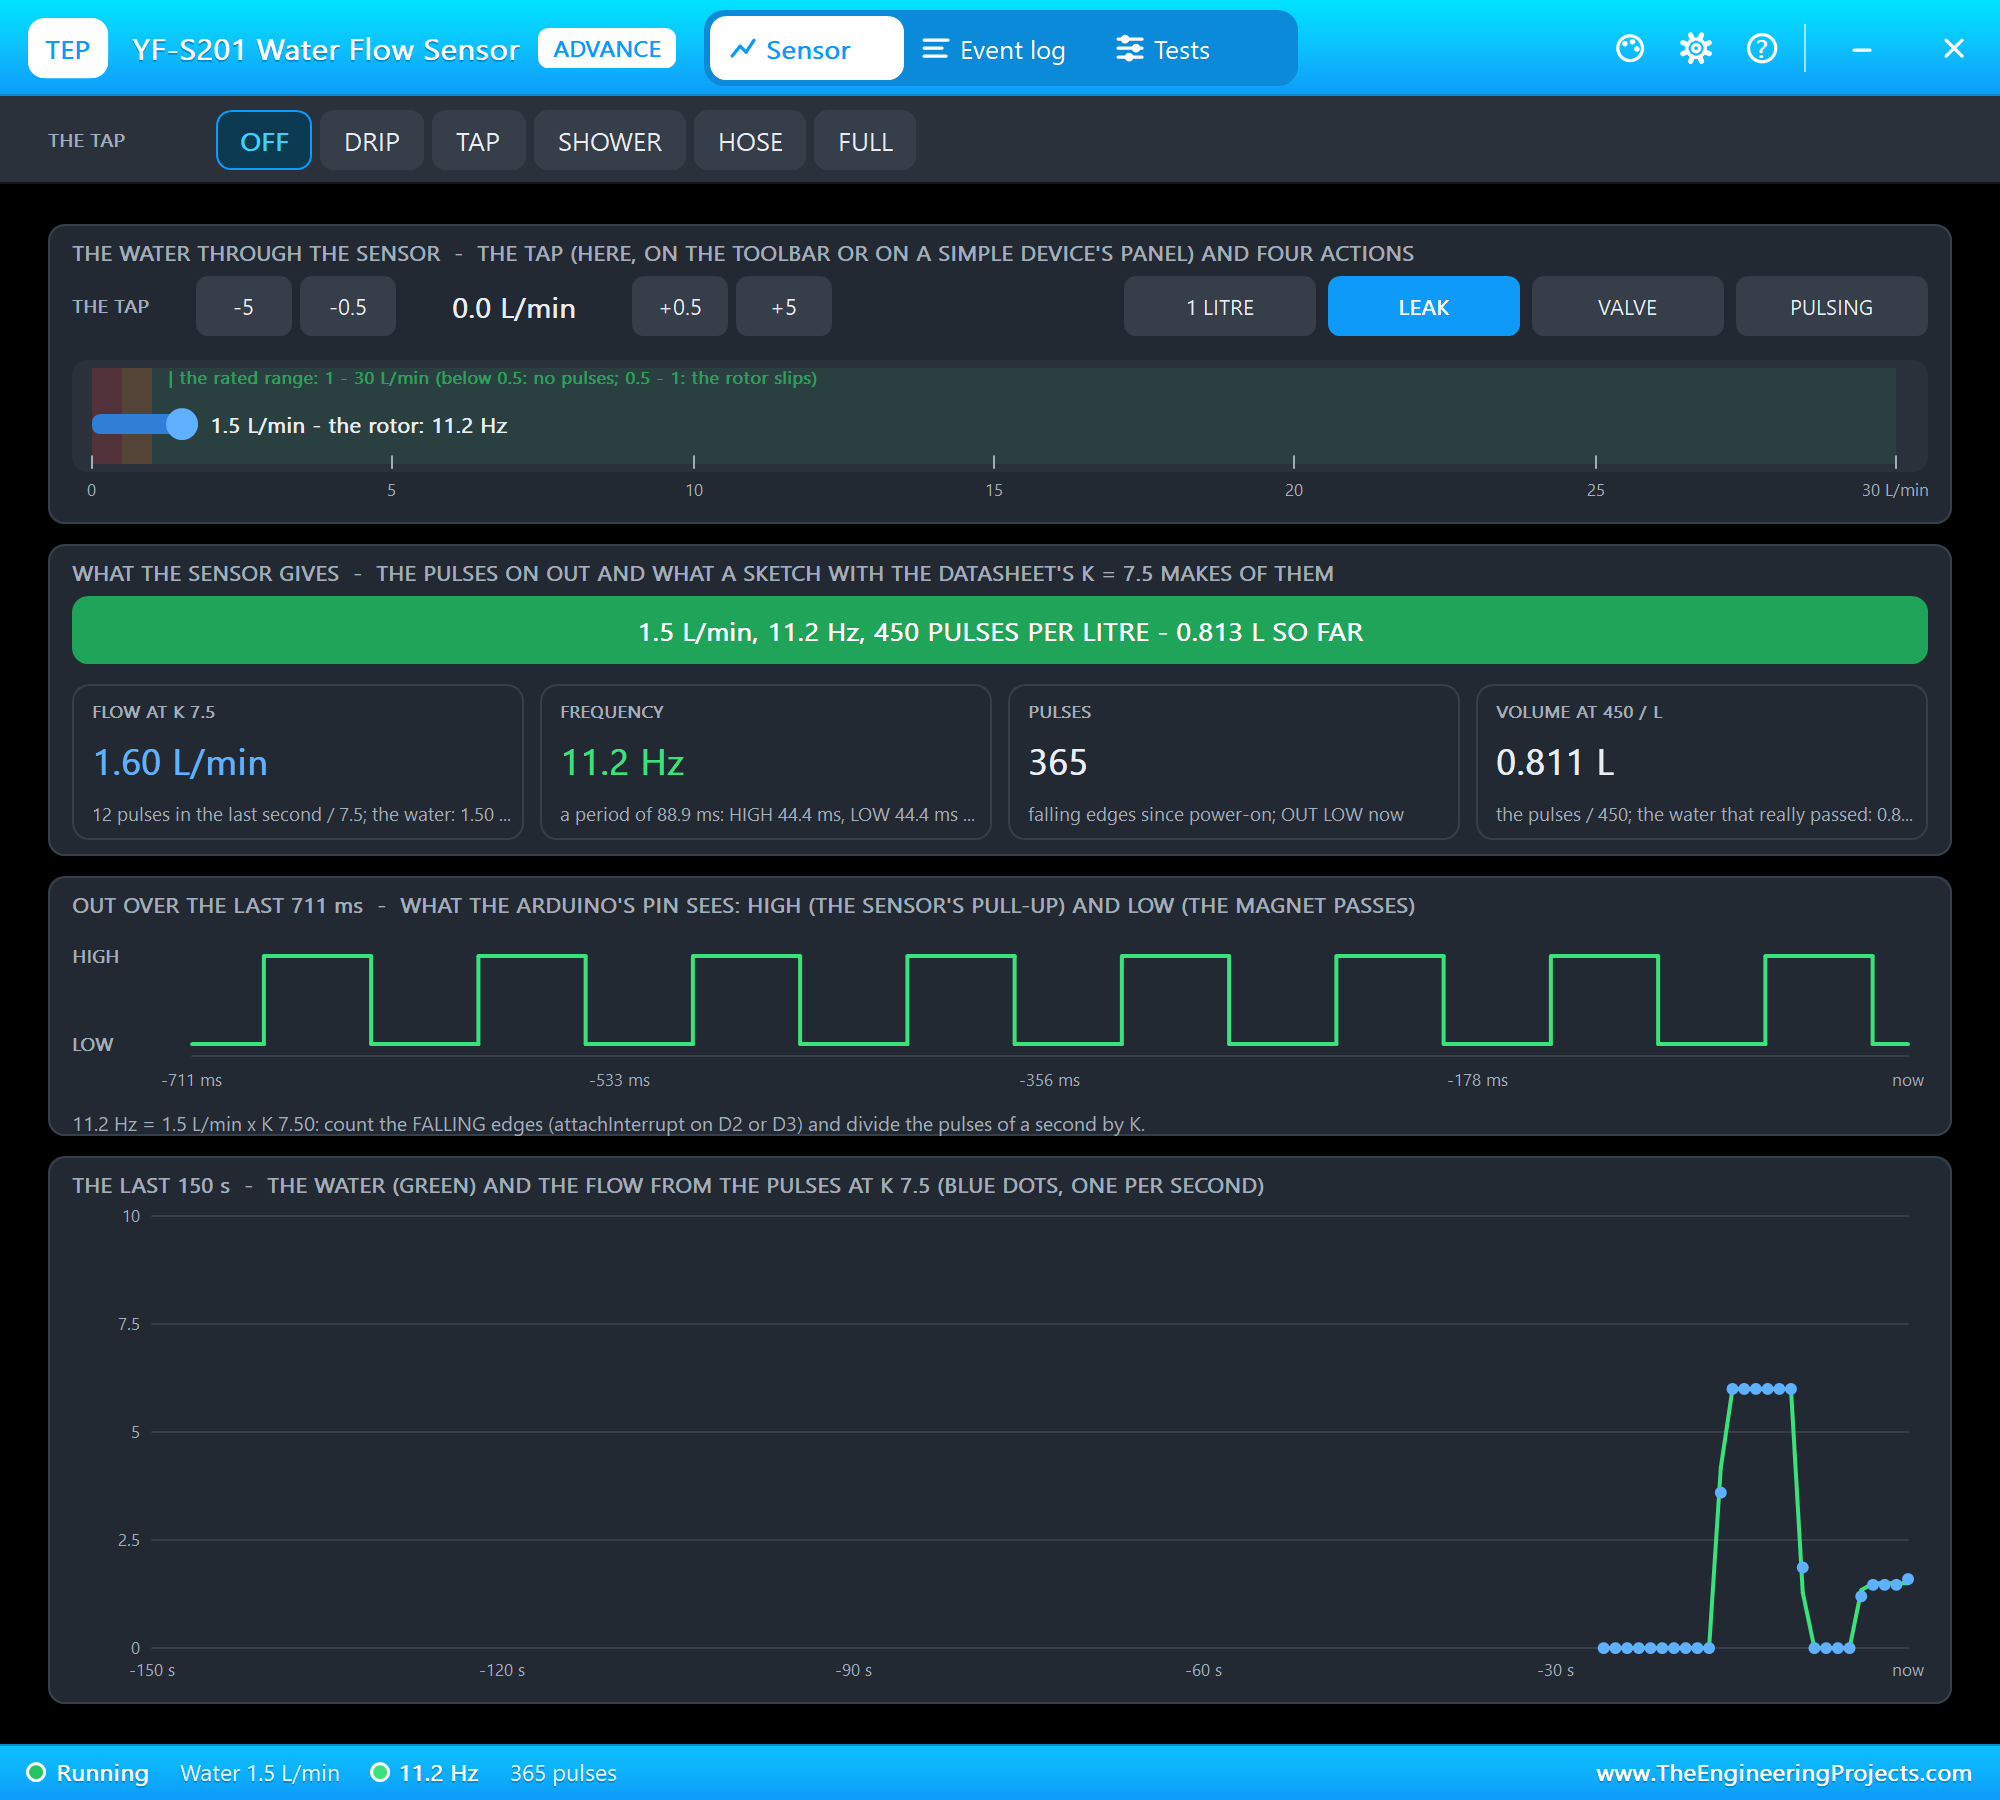
First, TAP in the YF-S201's pop-up: 6 L/min. The pop-up showed the impeller turning at 45.0 Hz, a period of 22.2 ms, exactly 7.5 x 6 from the worked example, and the Pi's status line read 6.0 L/min. The LCD showed the flow and the litres climbing, and the relay's pop-up showed the valve's current through its NO contact: 442 mA, with the relay's own coil drawing 69.3 mA from the 5 V rail.
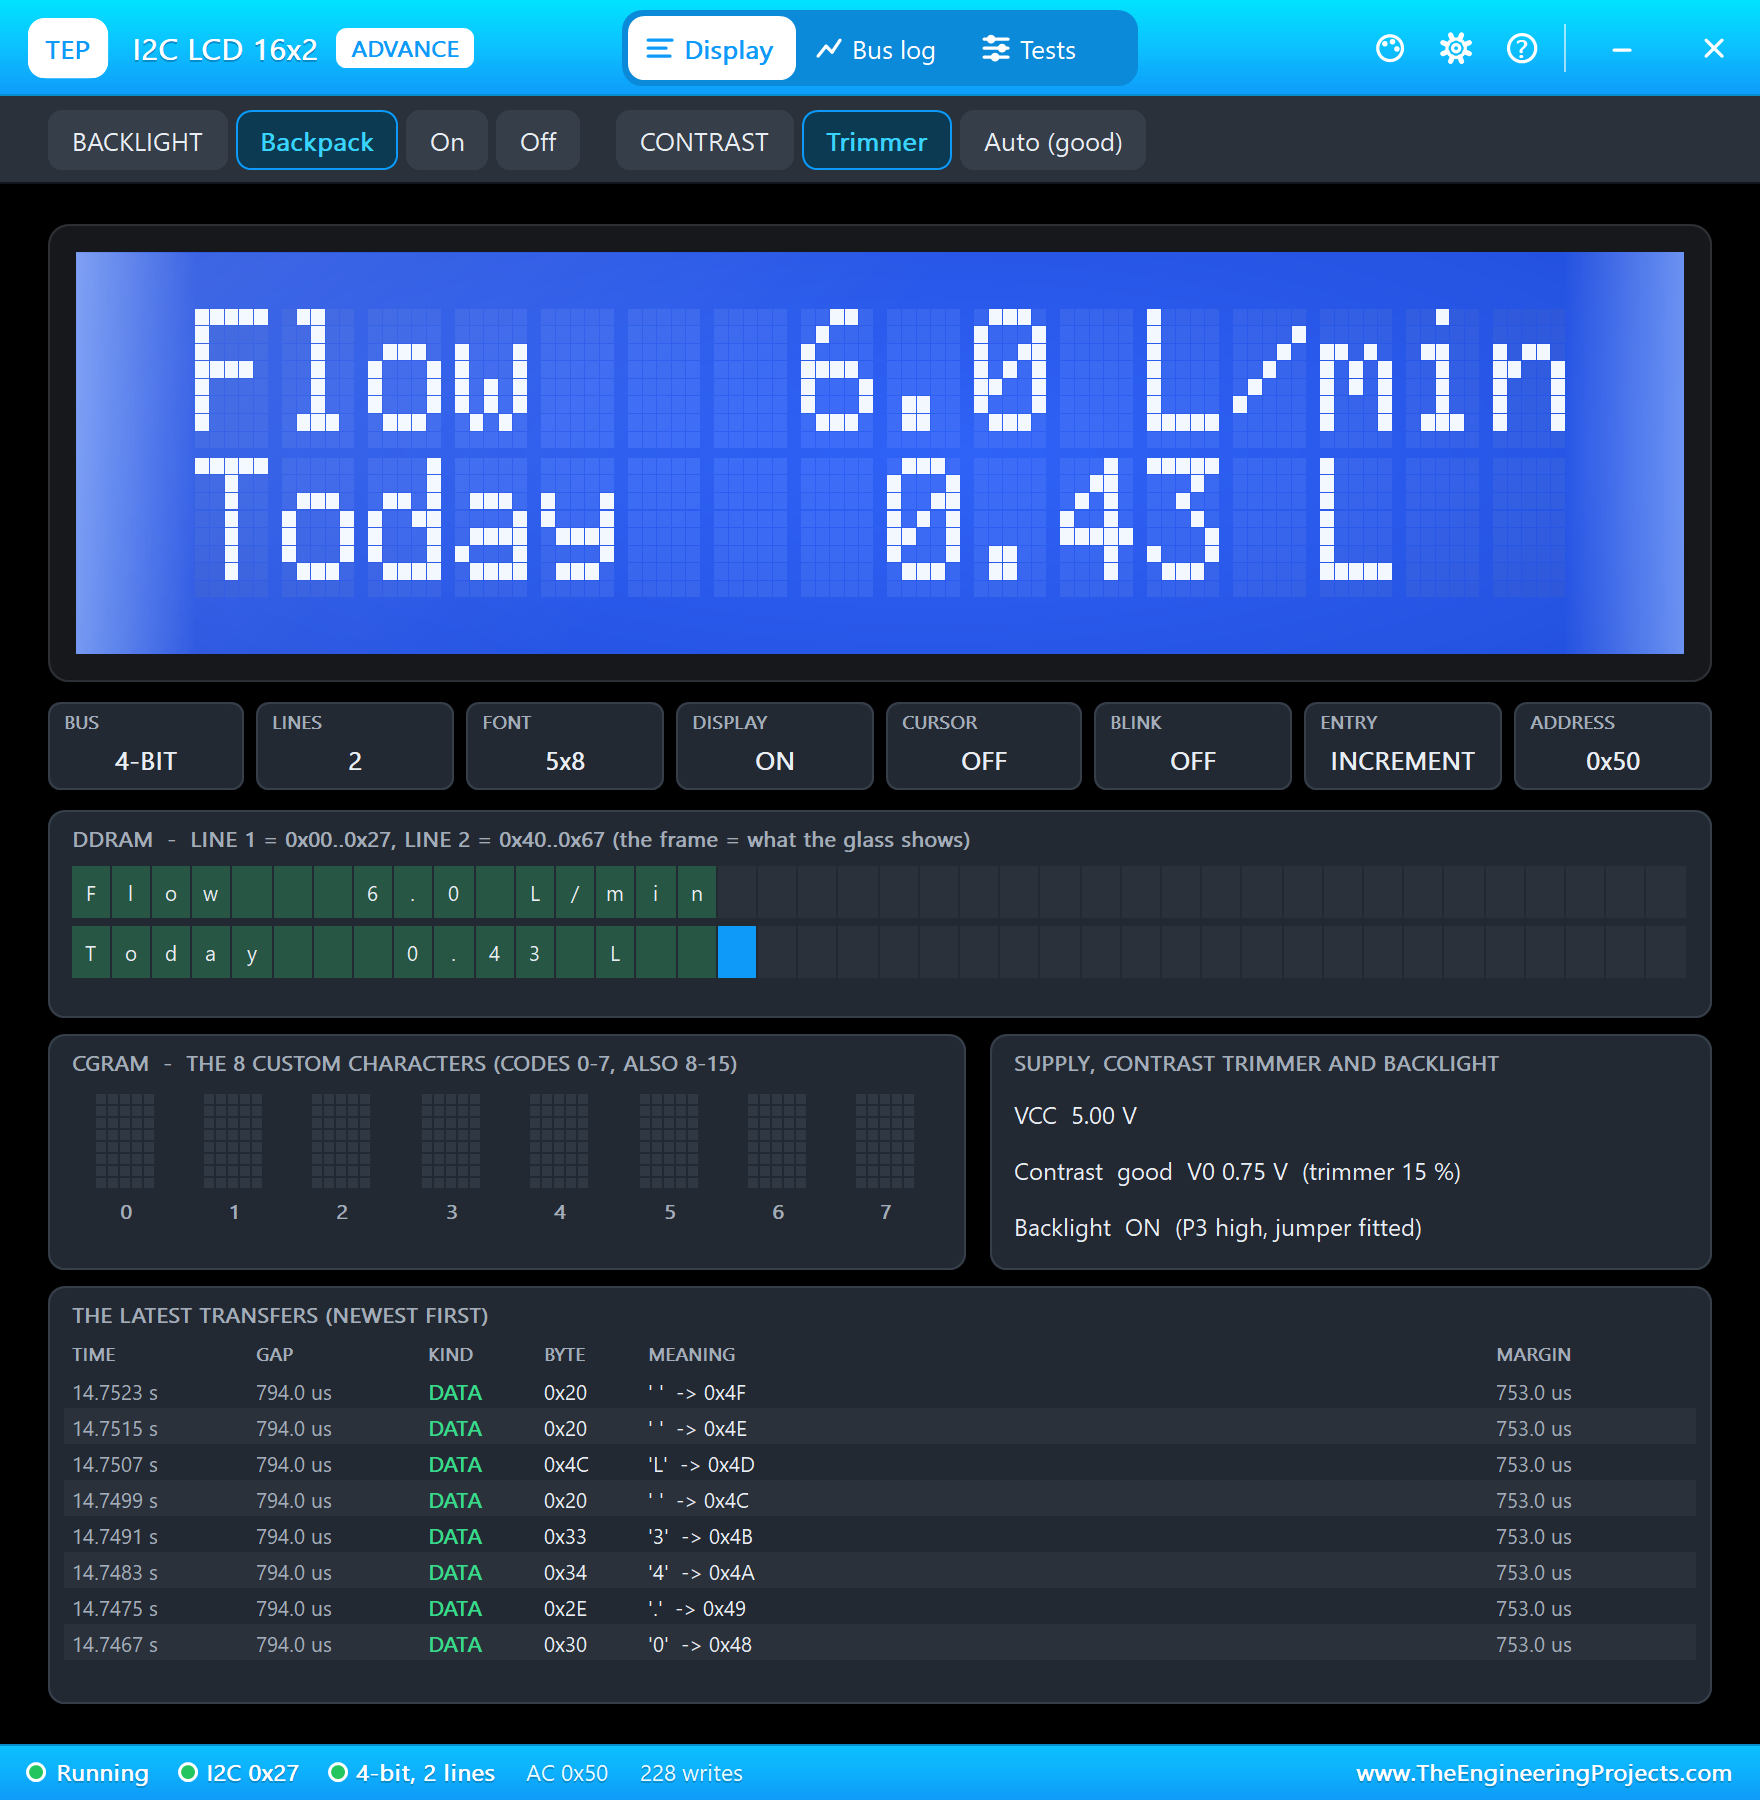
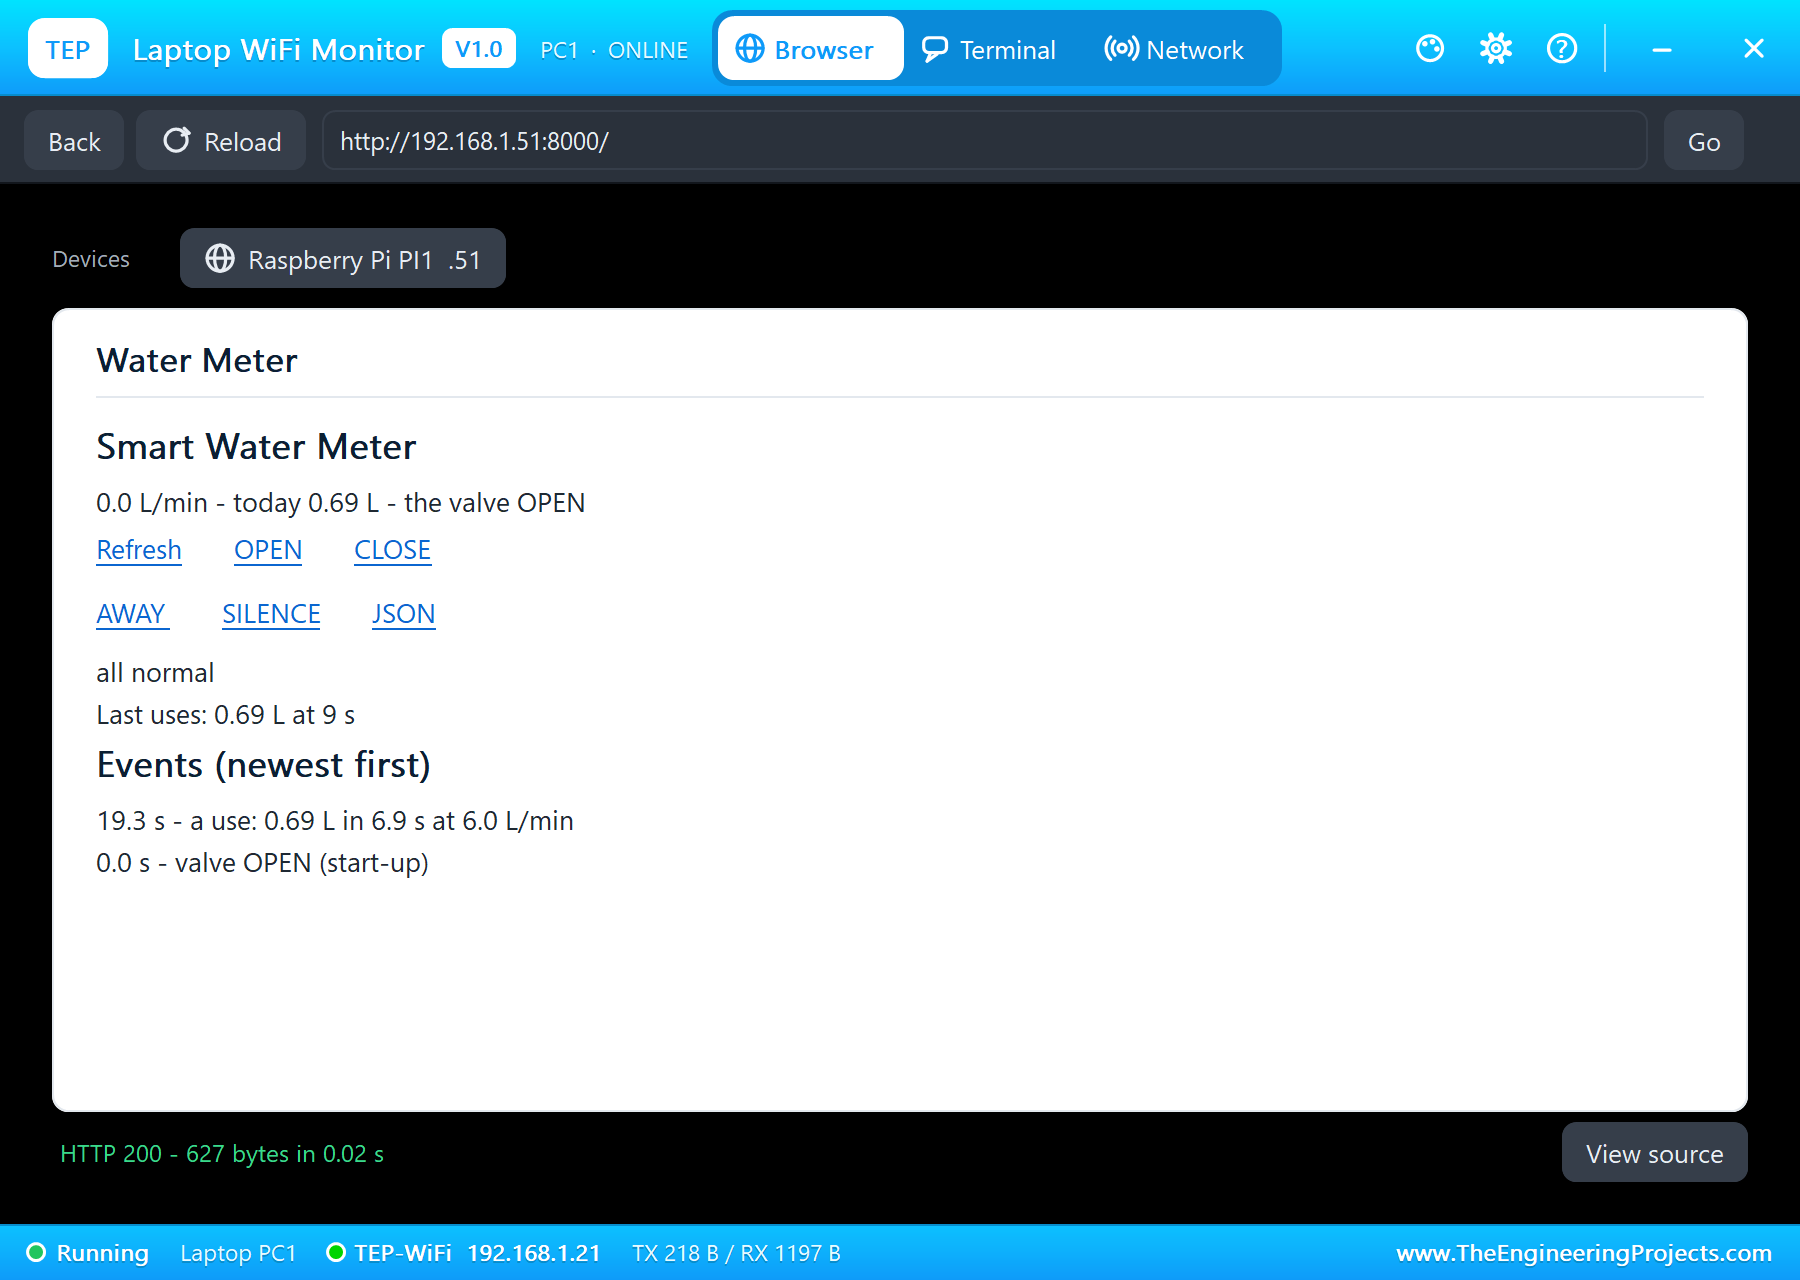
Then OFF. Two seconds later, at 19.3 seconds, the program logged the use: "a use: 0.69 L in 6.9 s at 6.0 L/min". The flow came from the full seconds and the duration from the litres, as in the worked example; the tap had run for about 7 seconds.
A Running Cistern
Next, LEAK in the pop-up: a running cistern, 1.5 L/min that never stops. The impeller turned at 11.2 Hz, and because 11.25 pulses a second cannot be counted in whole pulses, the Pi's readings moved between 1.4 and 1.6 L/min. The water never stopped for 2 seconds, so the LEAK rule's timer kept running.
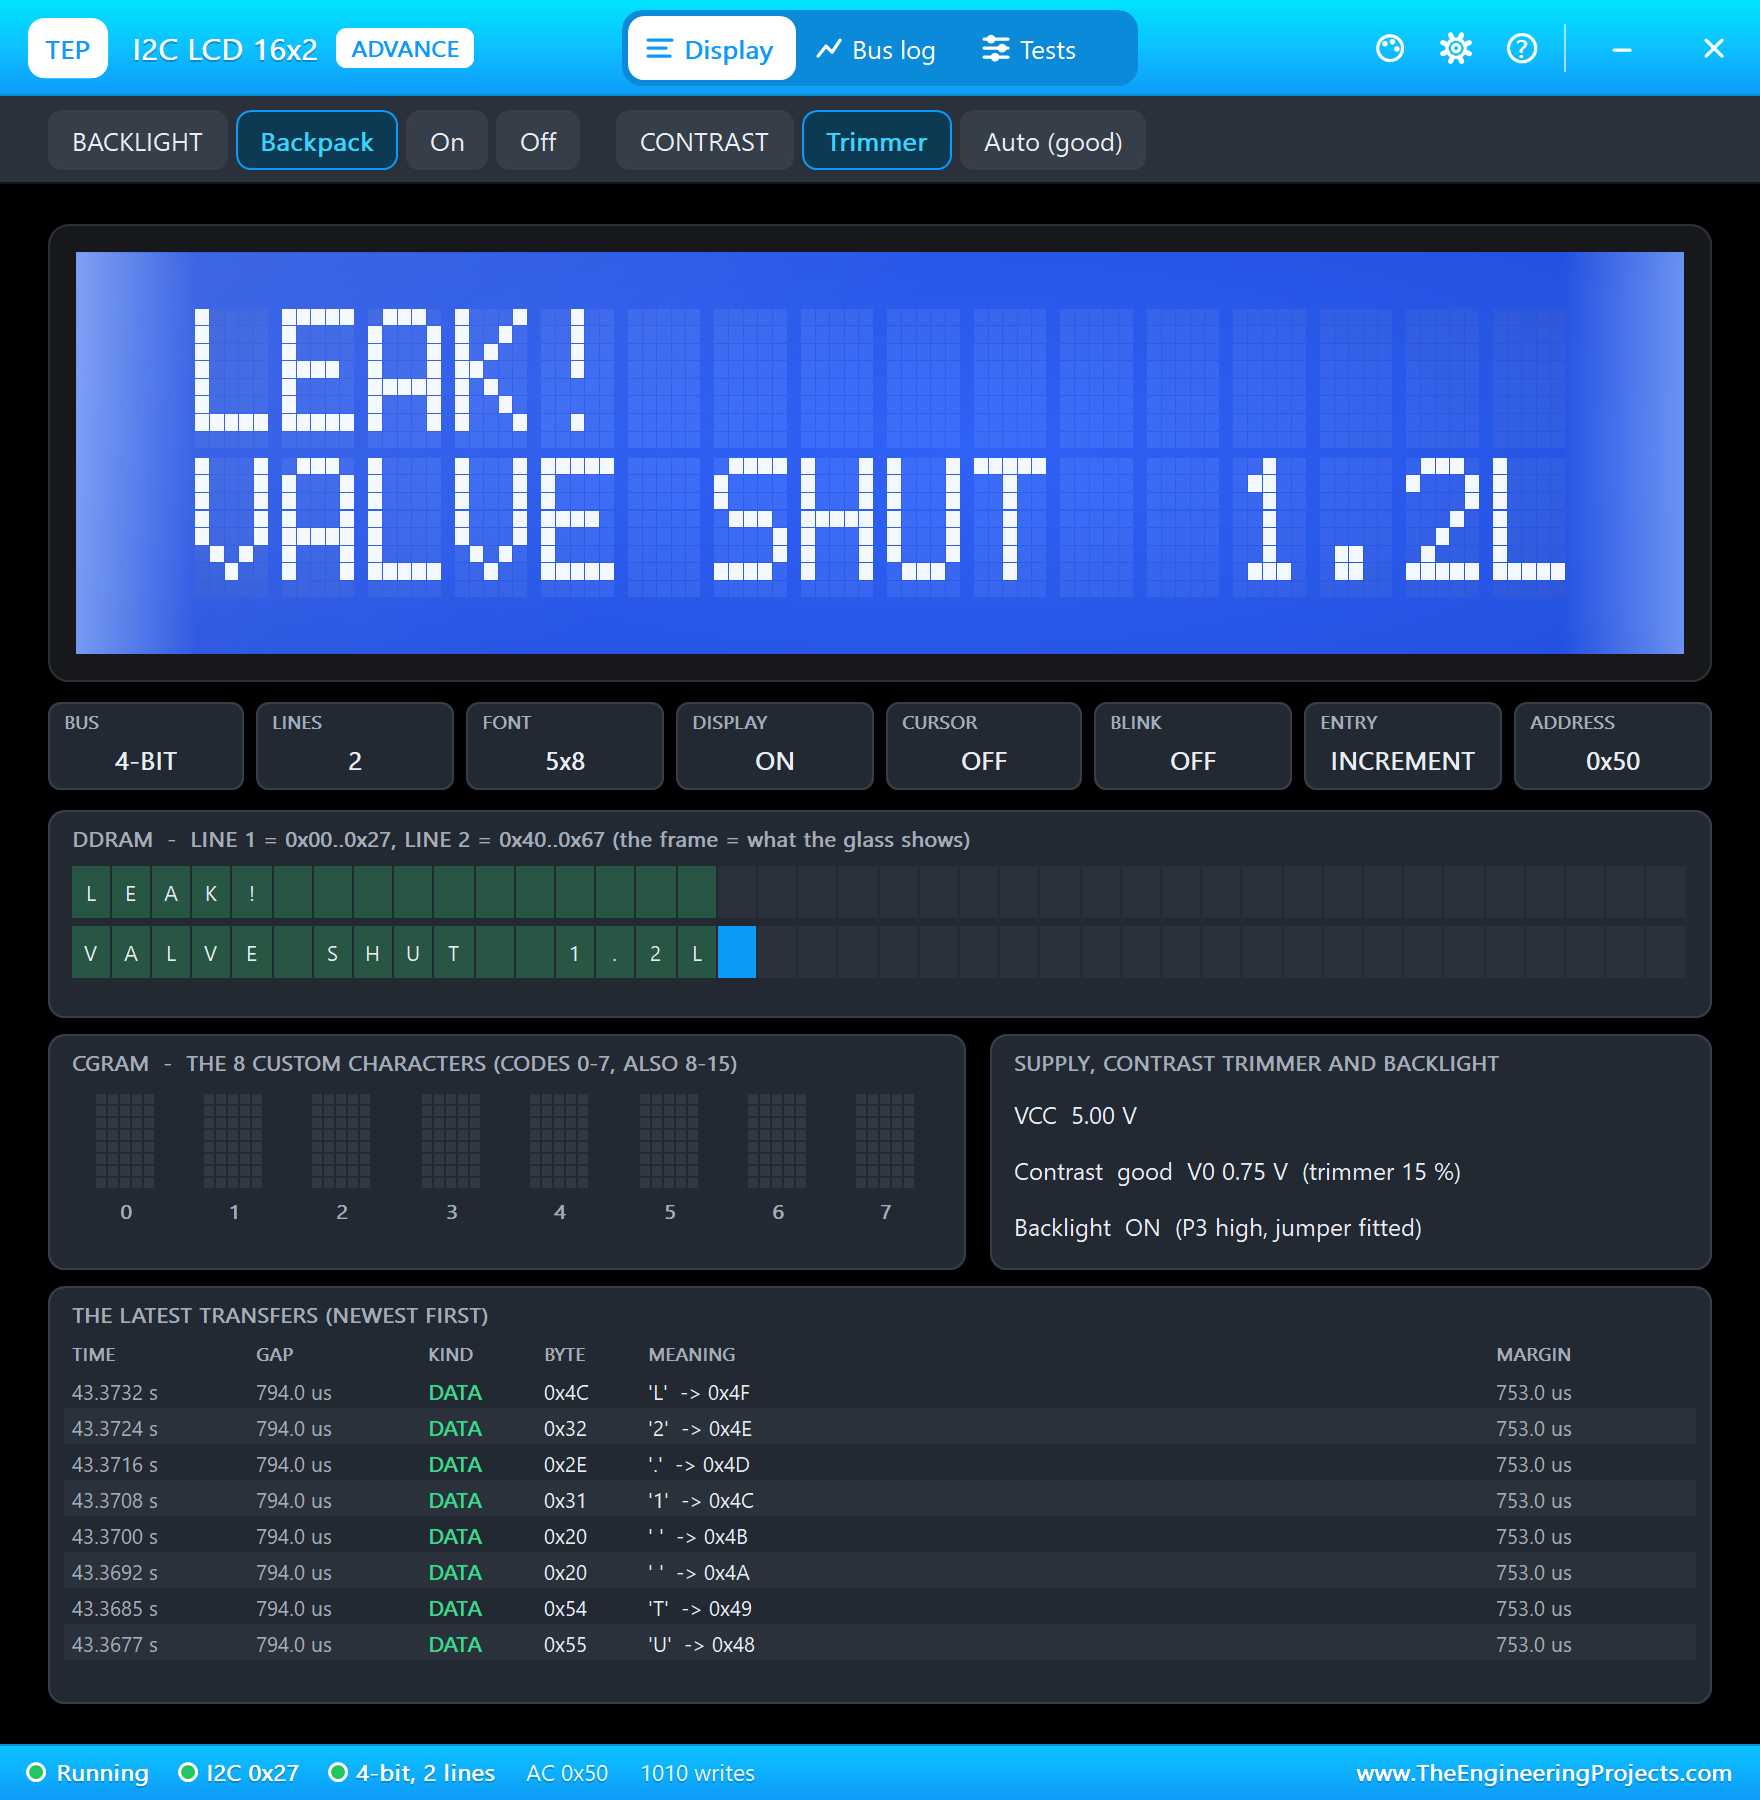
At 42.8 seconds, 20 seconds after the leak began, "LEAK - water has run for 20 s without a break (1.6 L/min)", and in the same second "valve CLOSED (LEAK)". The relay let go, the valve's coil lost its 12 V, the buzzer began to beep and the LCD showed LEAK! with the valve shut.
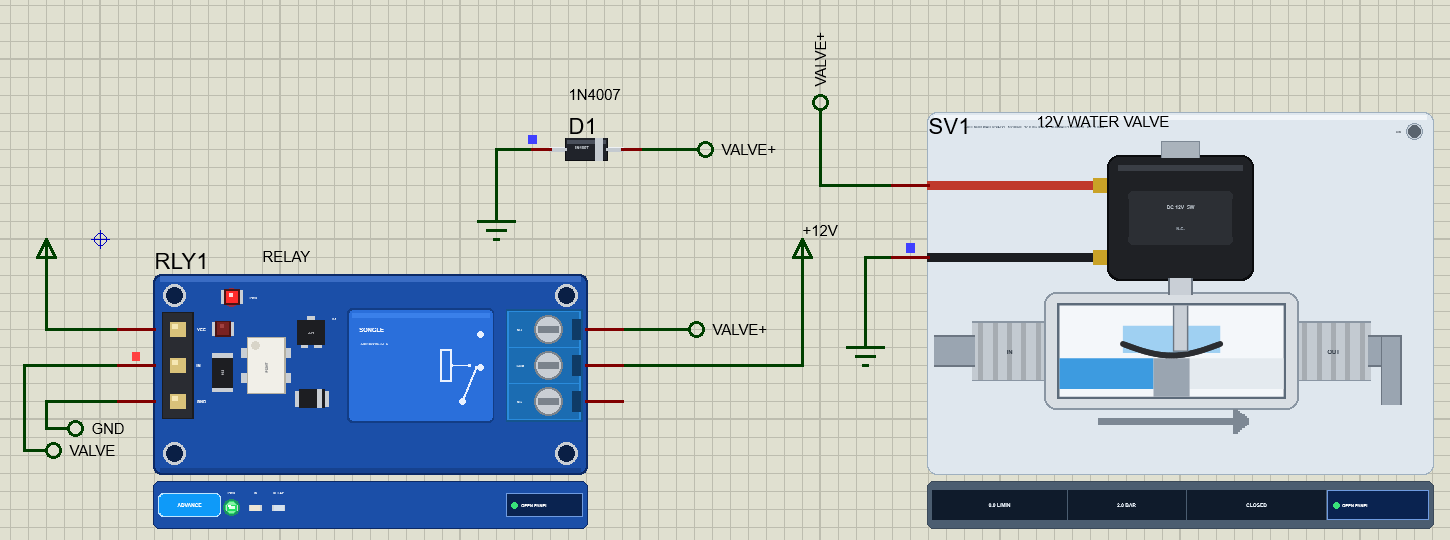
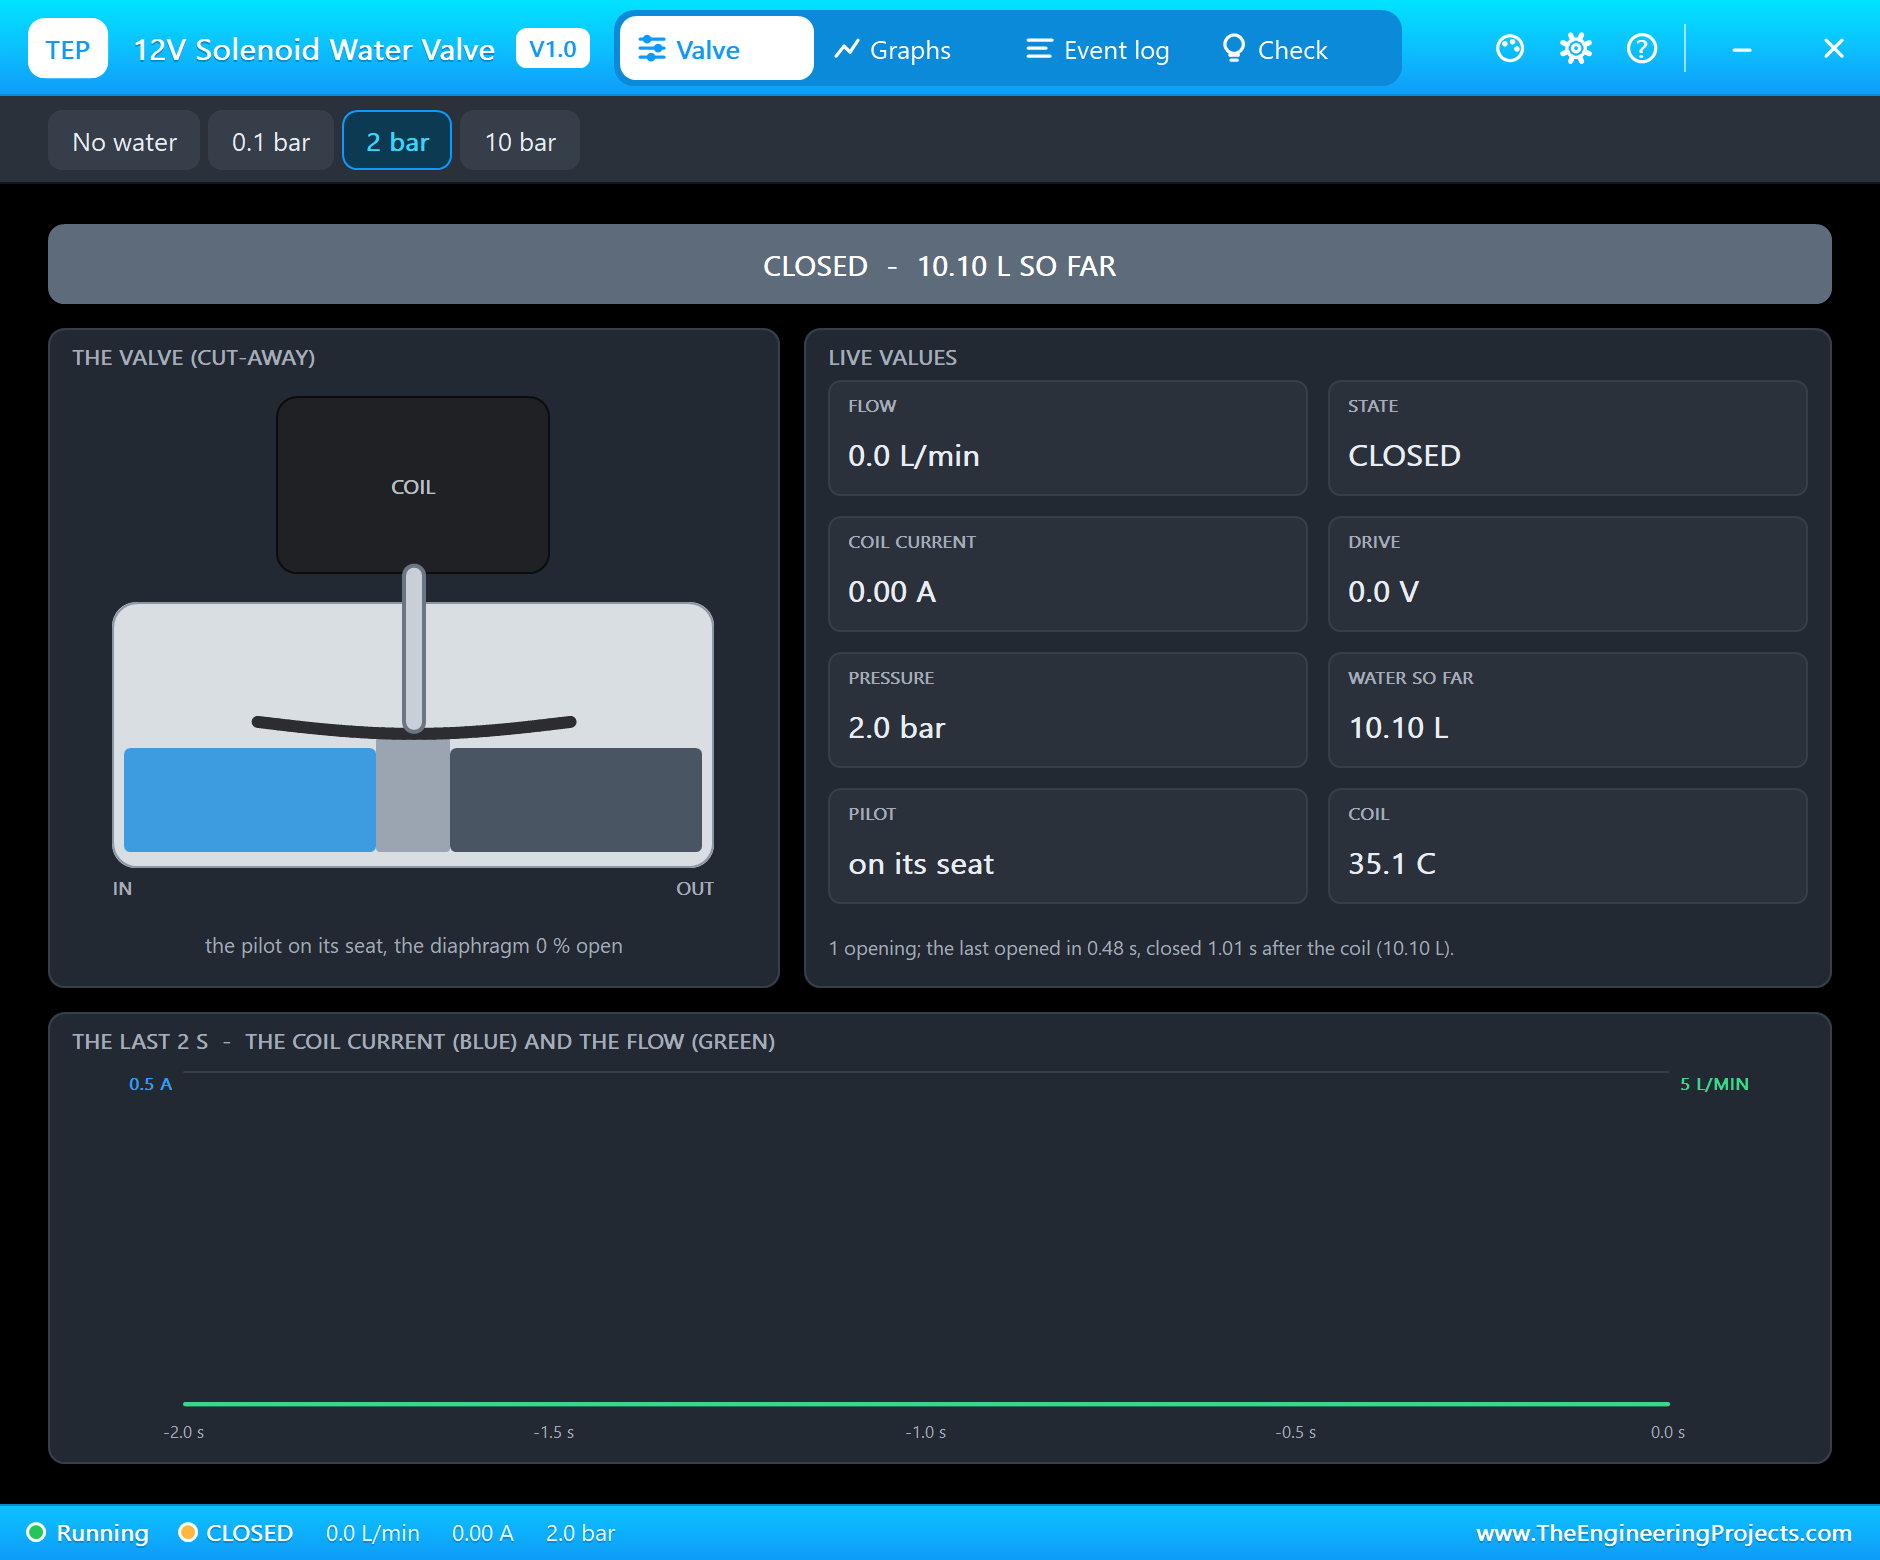
The valve's pop-up showed it closed: no voltage, no current, the pilot back on its seat, 1.01 seconds after the coil lost its power. The flow sensor's model does not know about the valve, so we pressed VALVE in its pop-up, the closed valve upstream, and the water through the meter stopped. The program then closed the leak's use: "a use: 0.54 L in 21.7 s at 1.5 L/min".
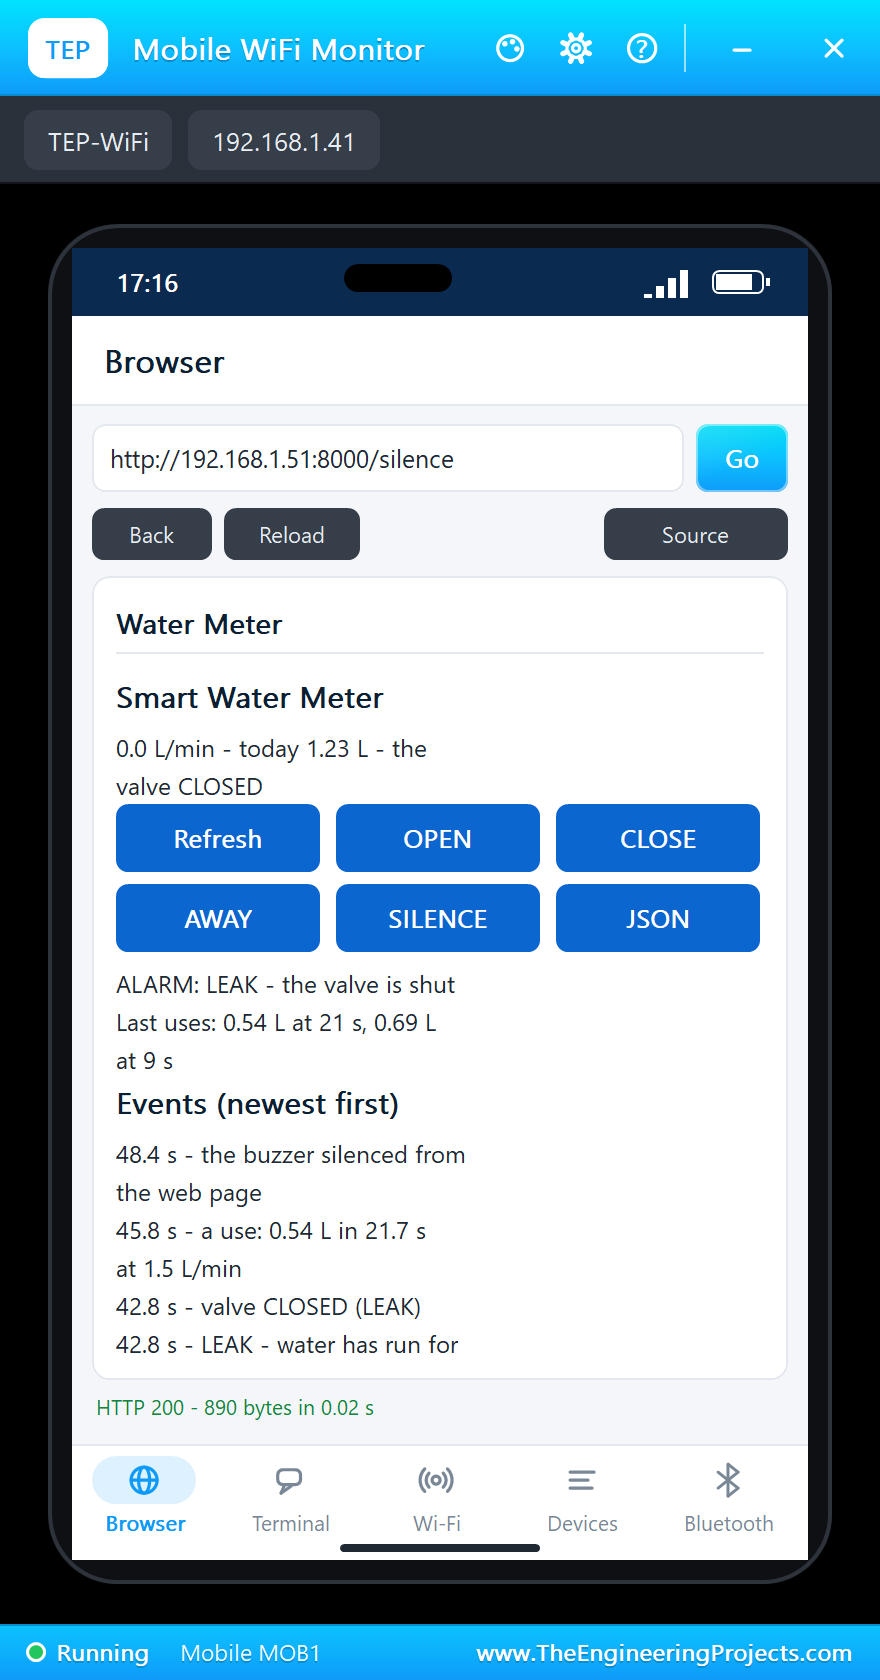
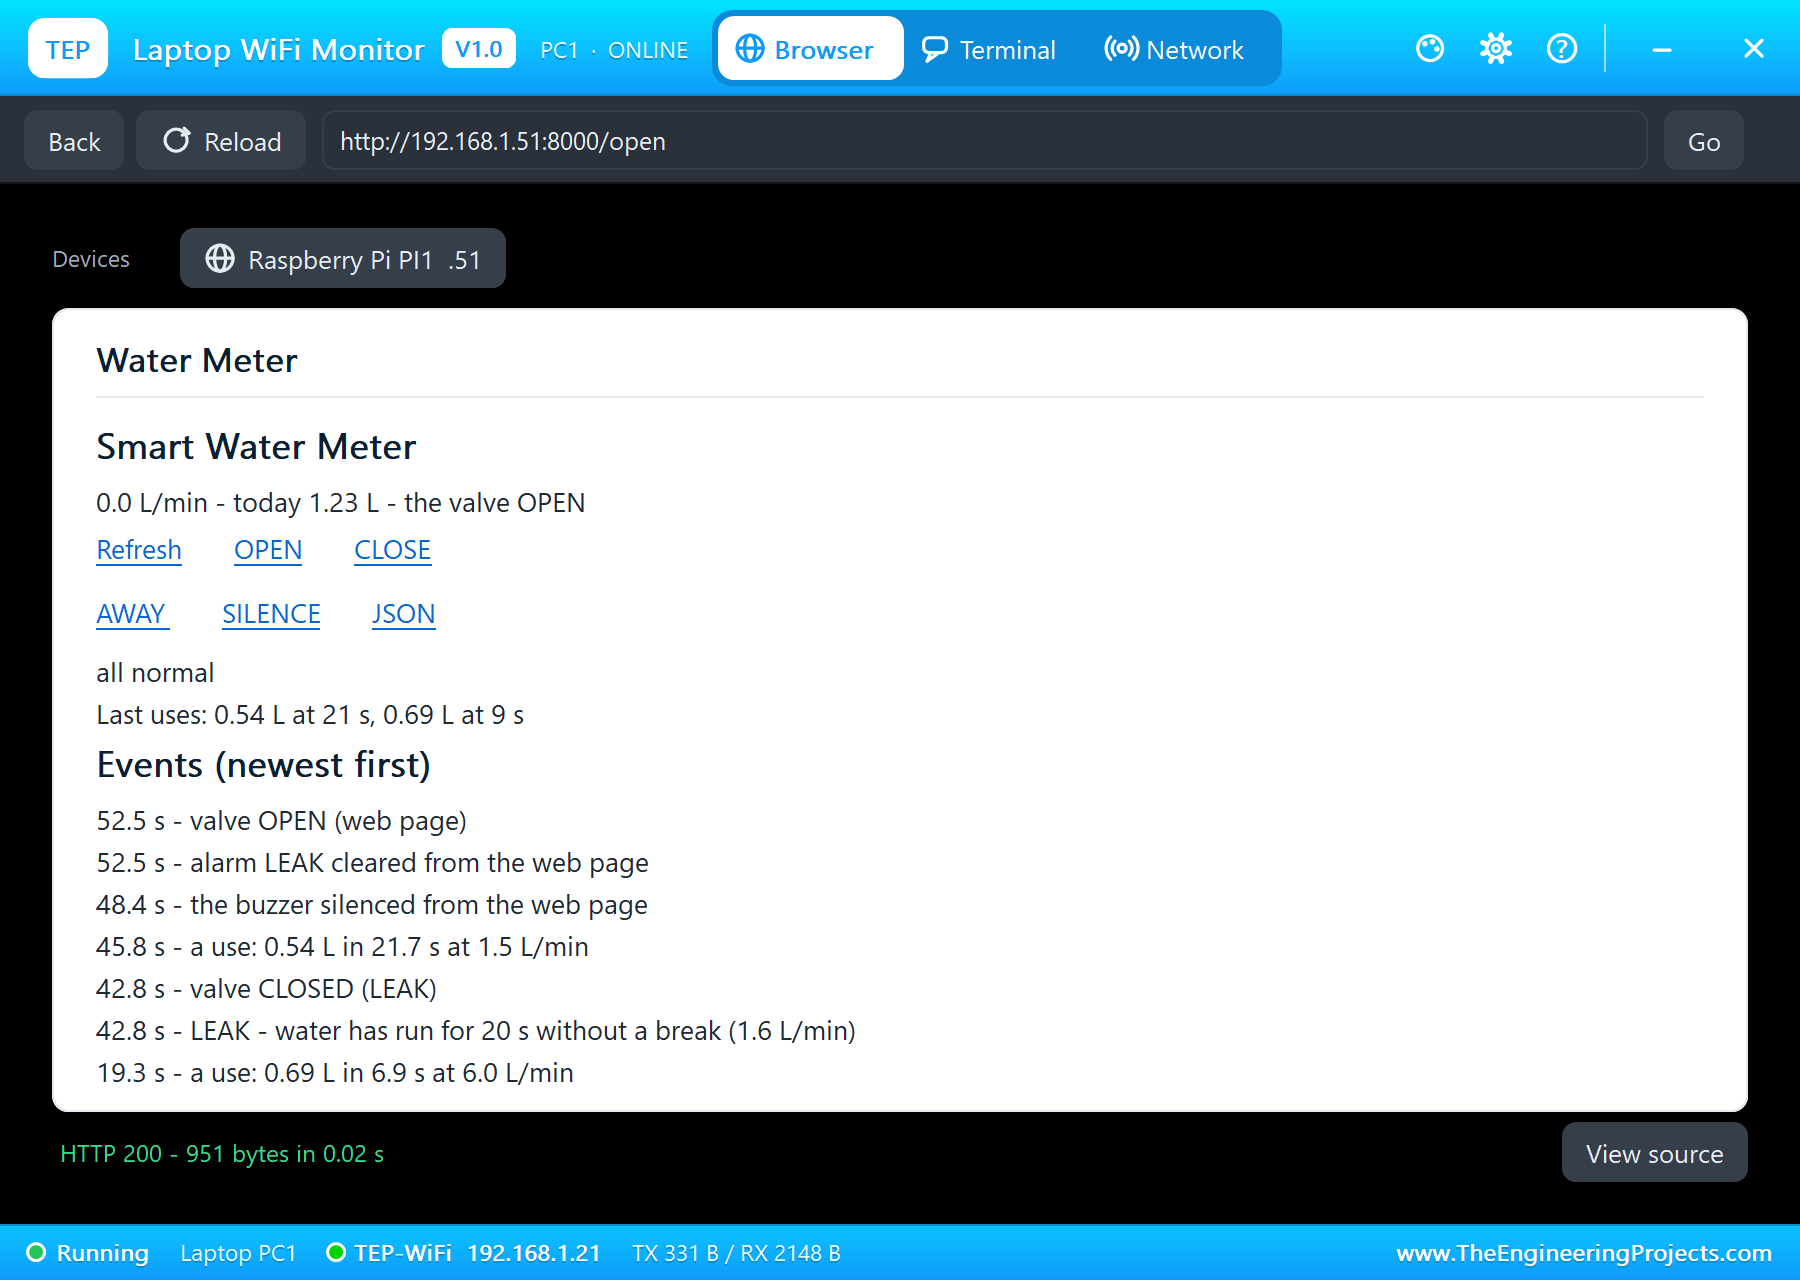
SILENCE on the phone at 48.4 seconds stopped the beeps, while the alarm and the closed valve stayed. Then the cistern was repaired: LEAK off in the pop-up, VALVE open again (no water flows, because the tap is off), and OPEN on the laptop at 52.5 seconds: "alarm LEAK cleared from the web page" and "valve OPEN (web page)".
A Burst Pipe
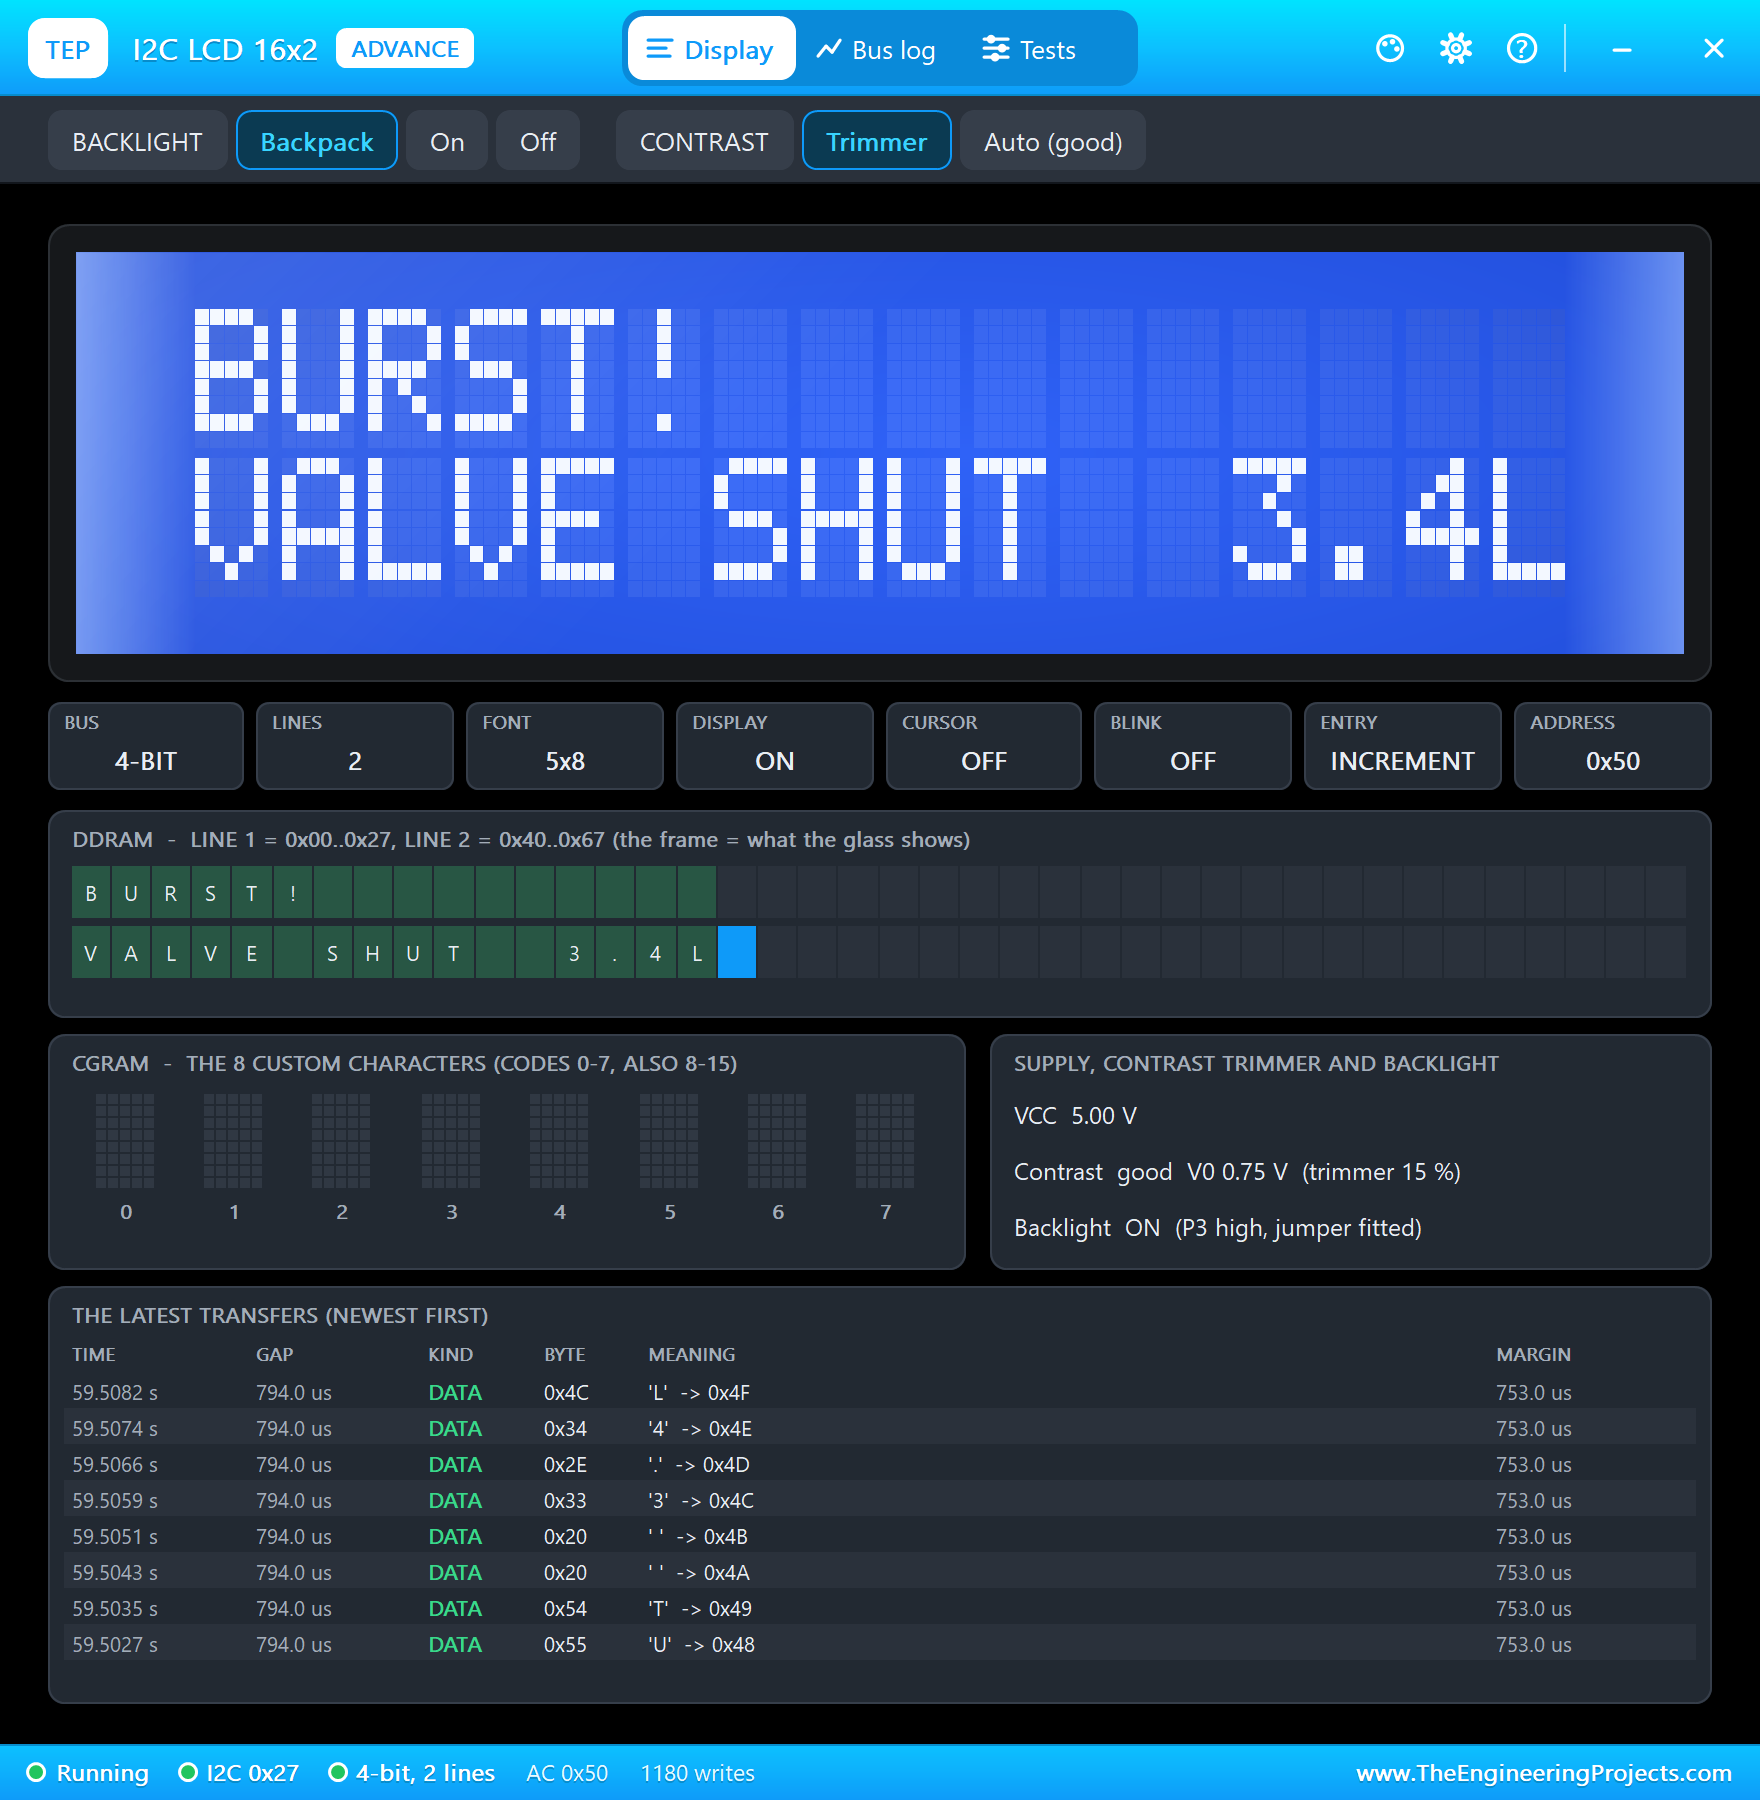
Now FULL in the pop-up: 30 L/min, the sensor's rated maximum and five times the kitchen tap. The first full second read 30.0 L/min, and at 57.9 seconds, 3 seconds above 20 L/min, "BURST - 30.0 L/min for 3 s - more than 20 L/min" and "valve CLOSED (BURST)". After VALVE in the pop-up, the burst's use was logged as "a use: 2.17 L in 4.3 s at 30.0 L/min": a burst pipe lets out half a litre a second, and the shut-off held the loss to about 2 litres.
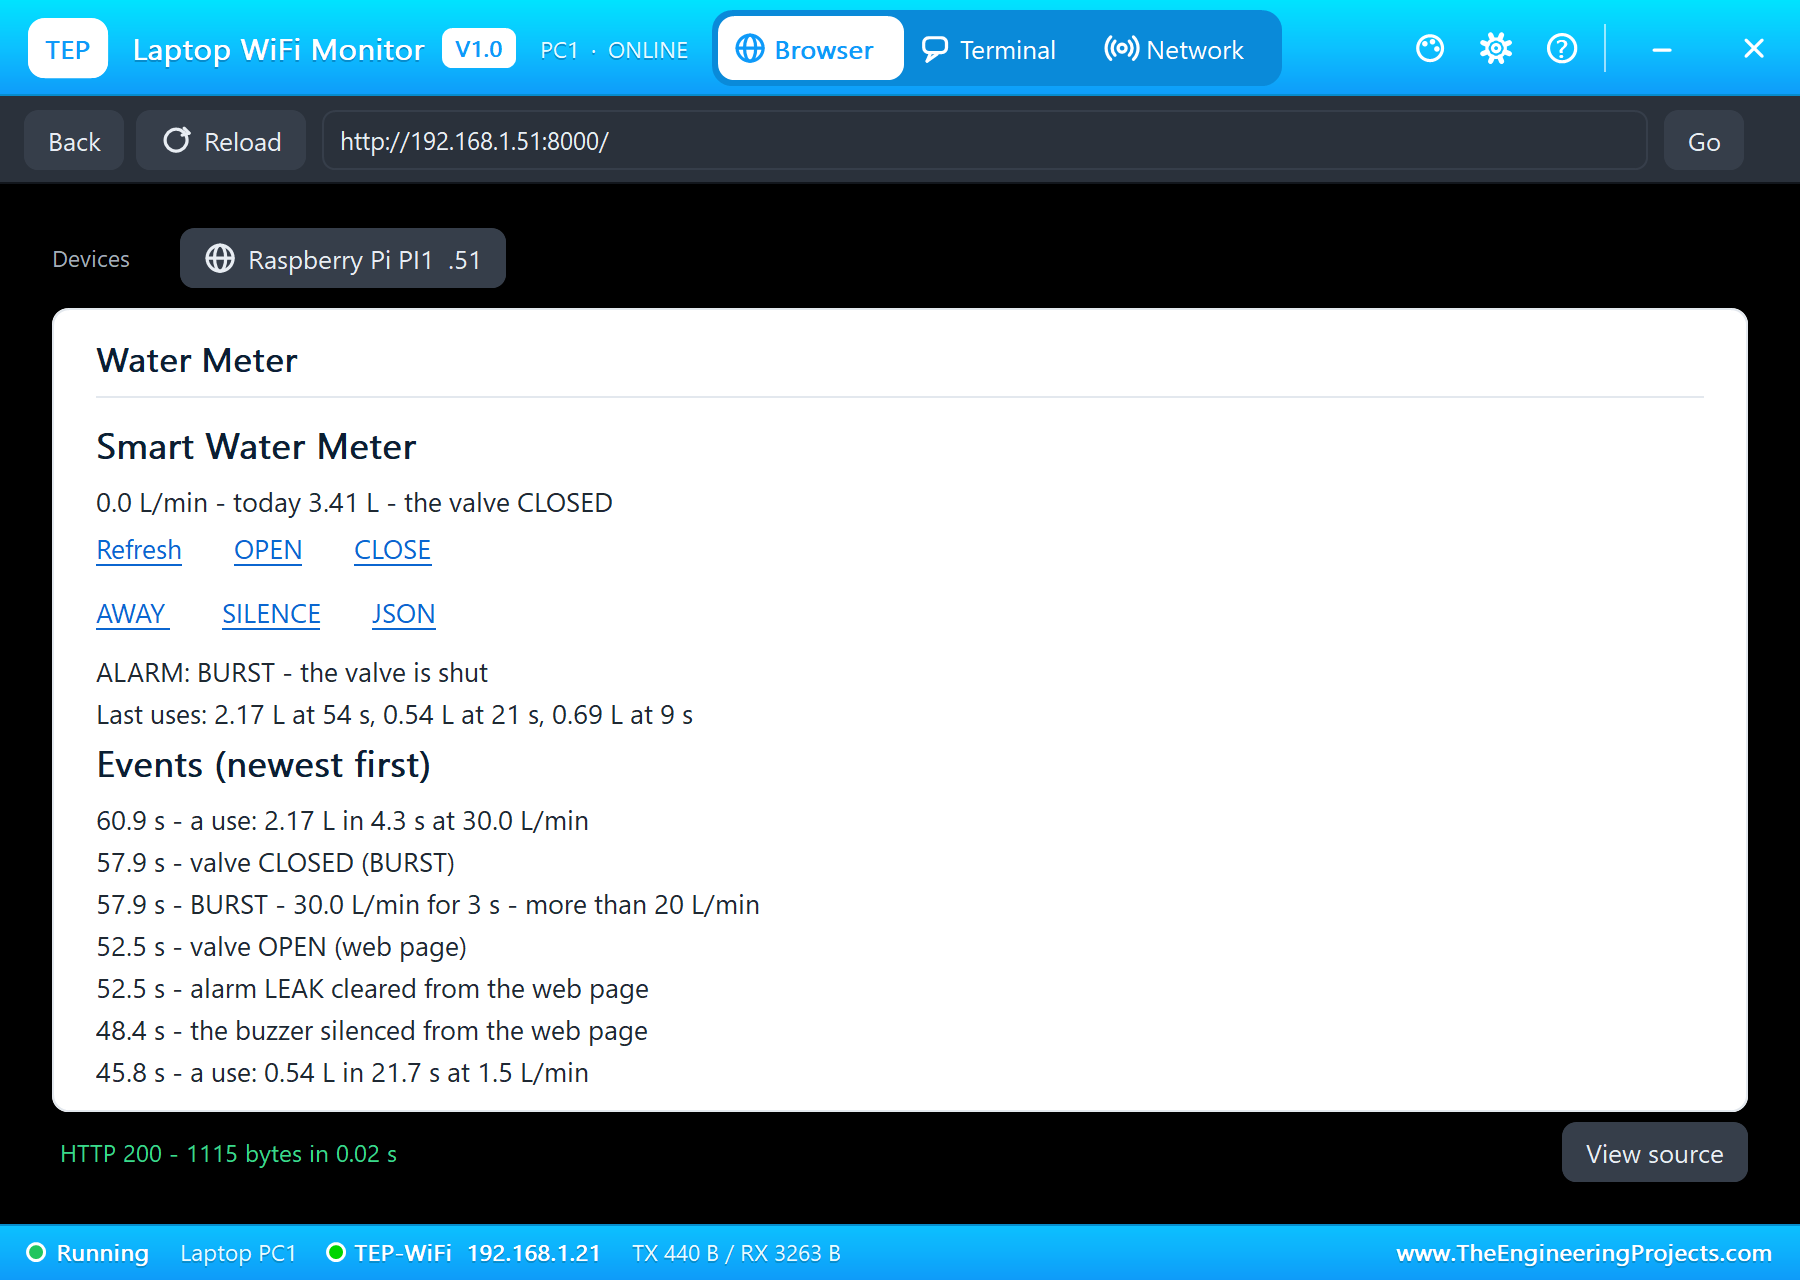
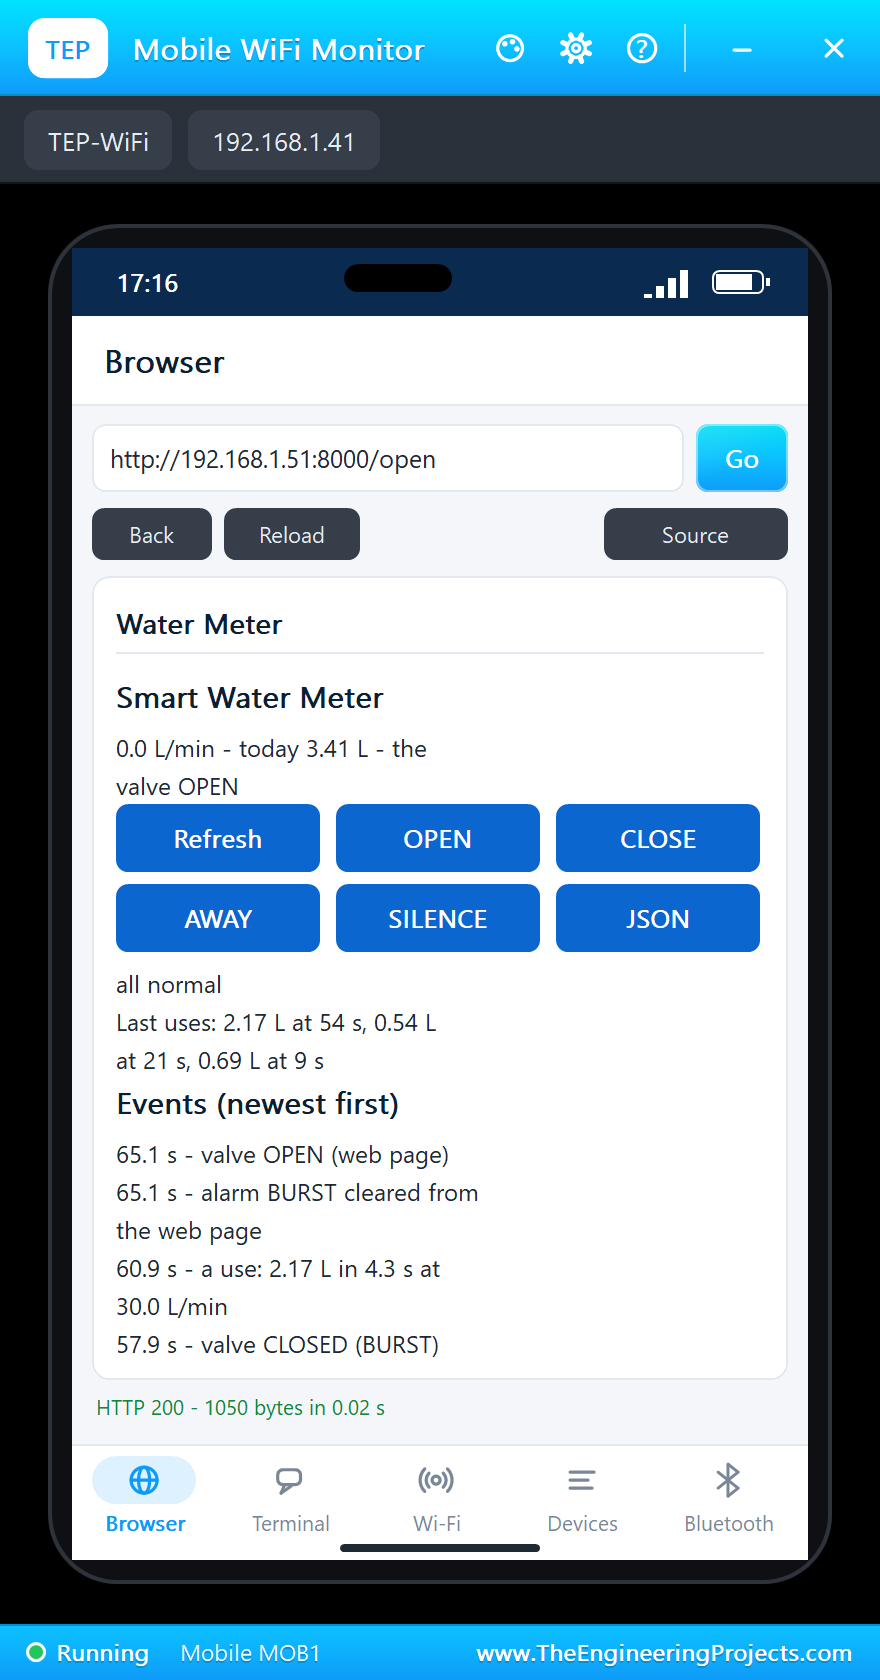
With the tap back to OFF and VALVE open again, OPEN on the phone at 65.1 seconds cleared the BURST alarm and opened the valve.
Water While Nobody Is Home
Last, AWAY on the laptop at 66.9 seconds: "AWAY mode ON - any water is a leak". Then TAP again, 6 L/min, an ordinary flow that the other two rules would allow. In AWAY mode it was enough: at 74.1 seconds, "AWAY LEAK - water flowing (6.0 L/min) while nobody is home", and the valve closed. After VALVE and OFF, the use read "a use: 0.62 L in 6.2 s at 6.0 L/min".
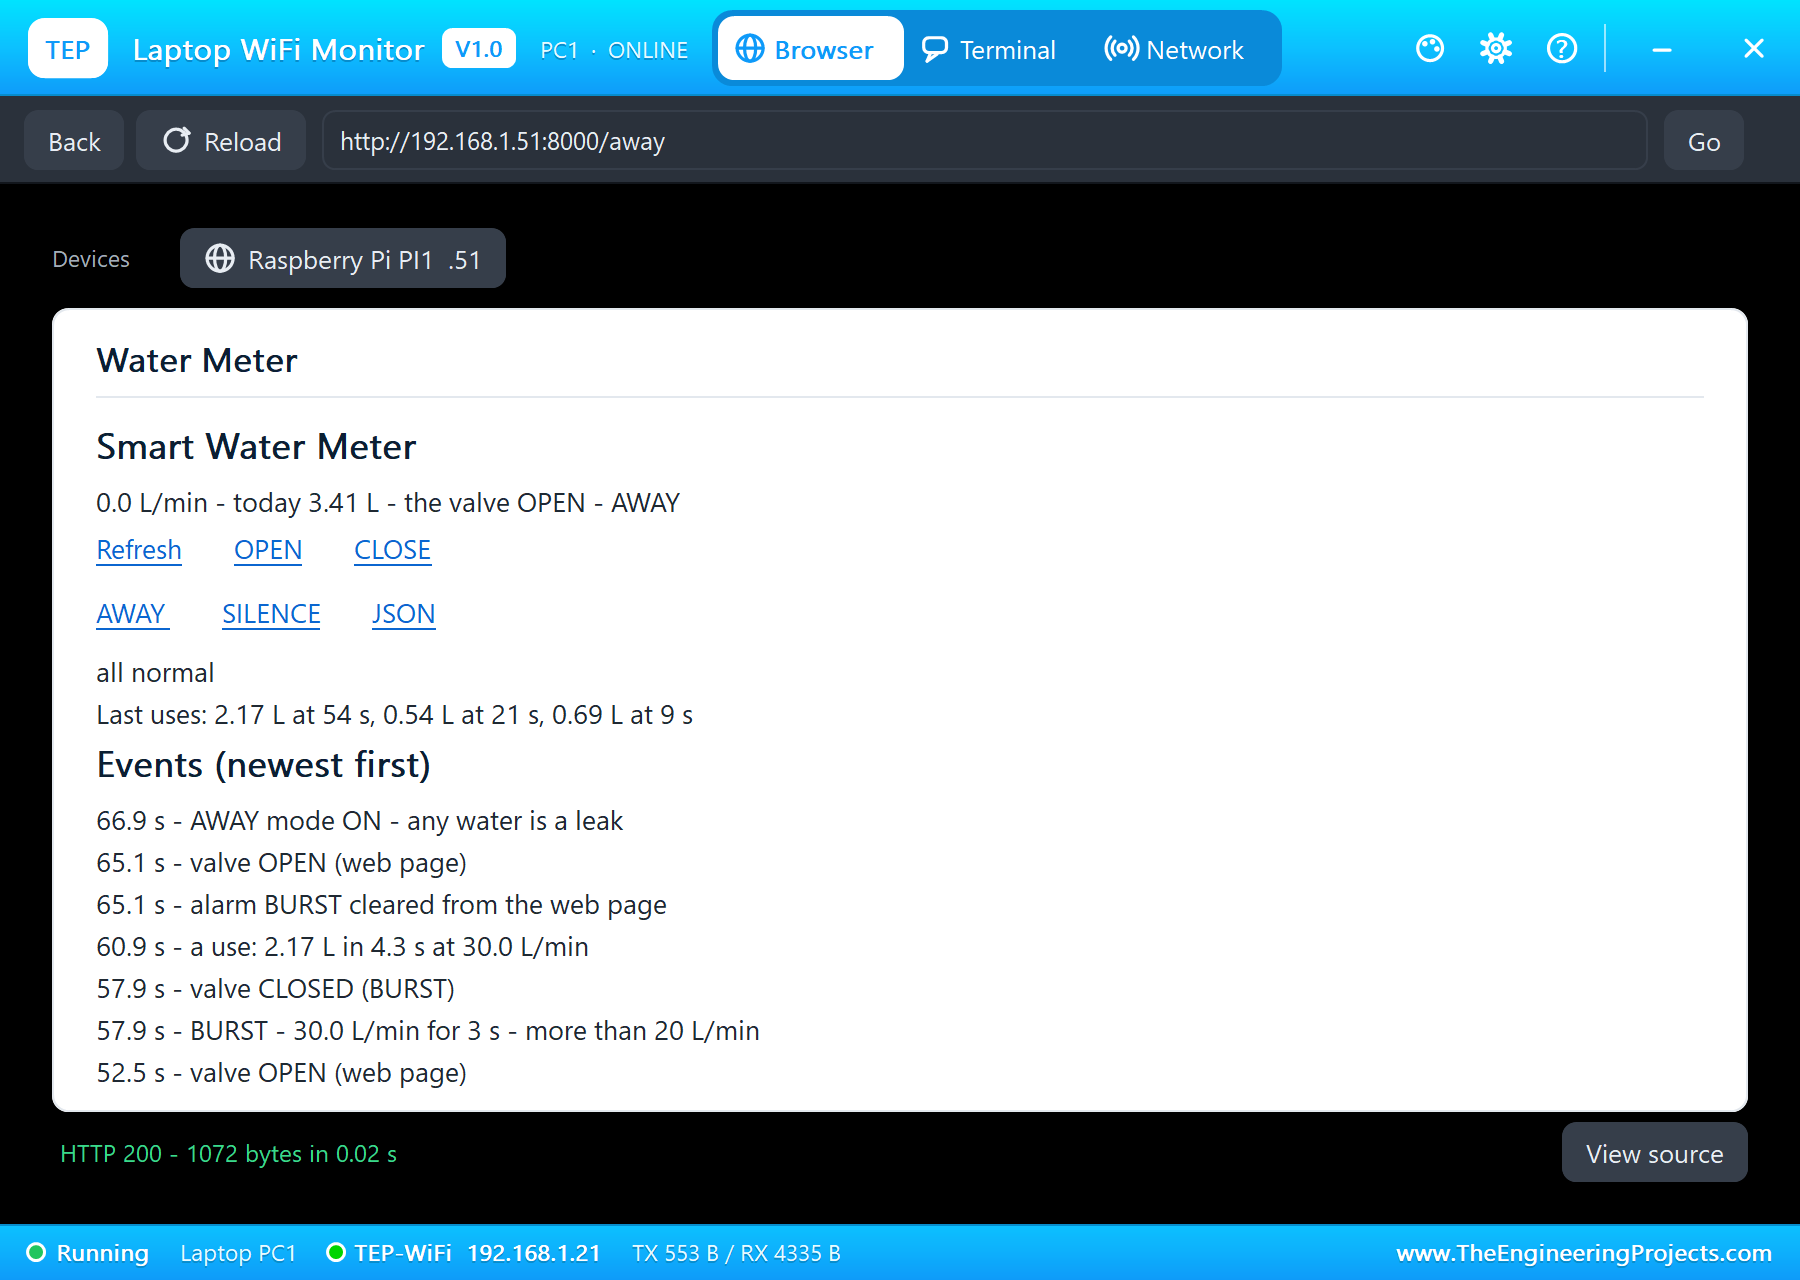
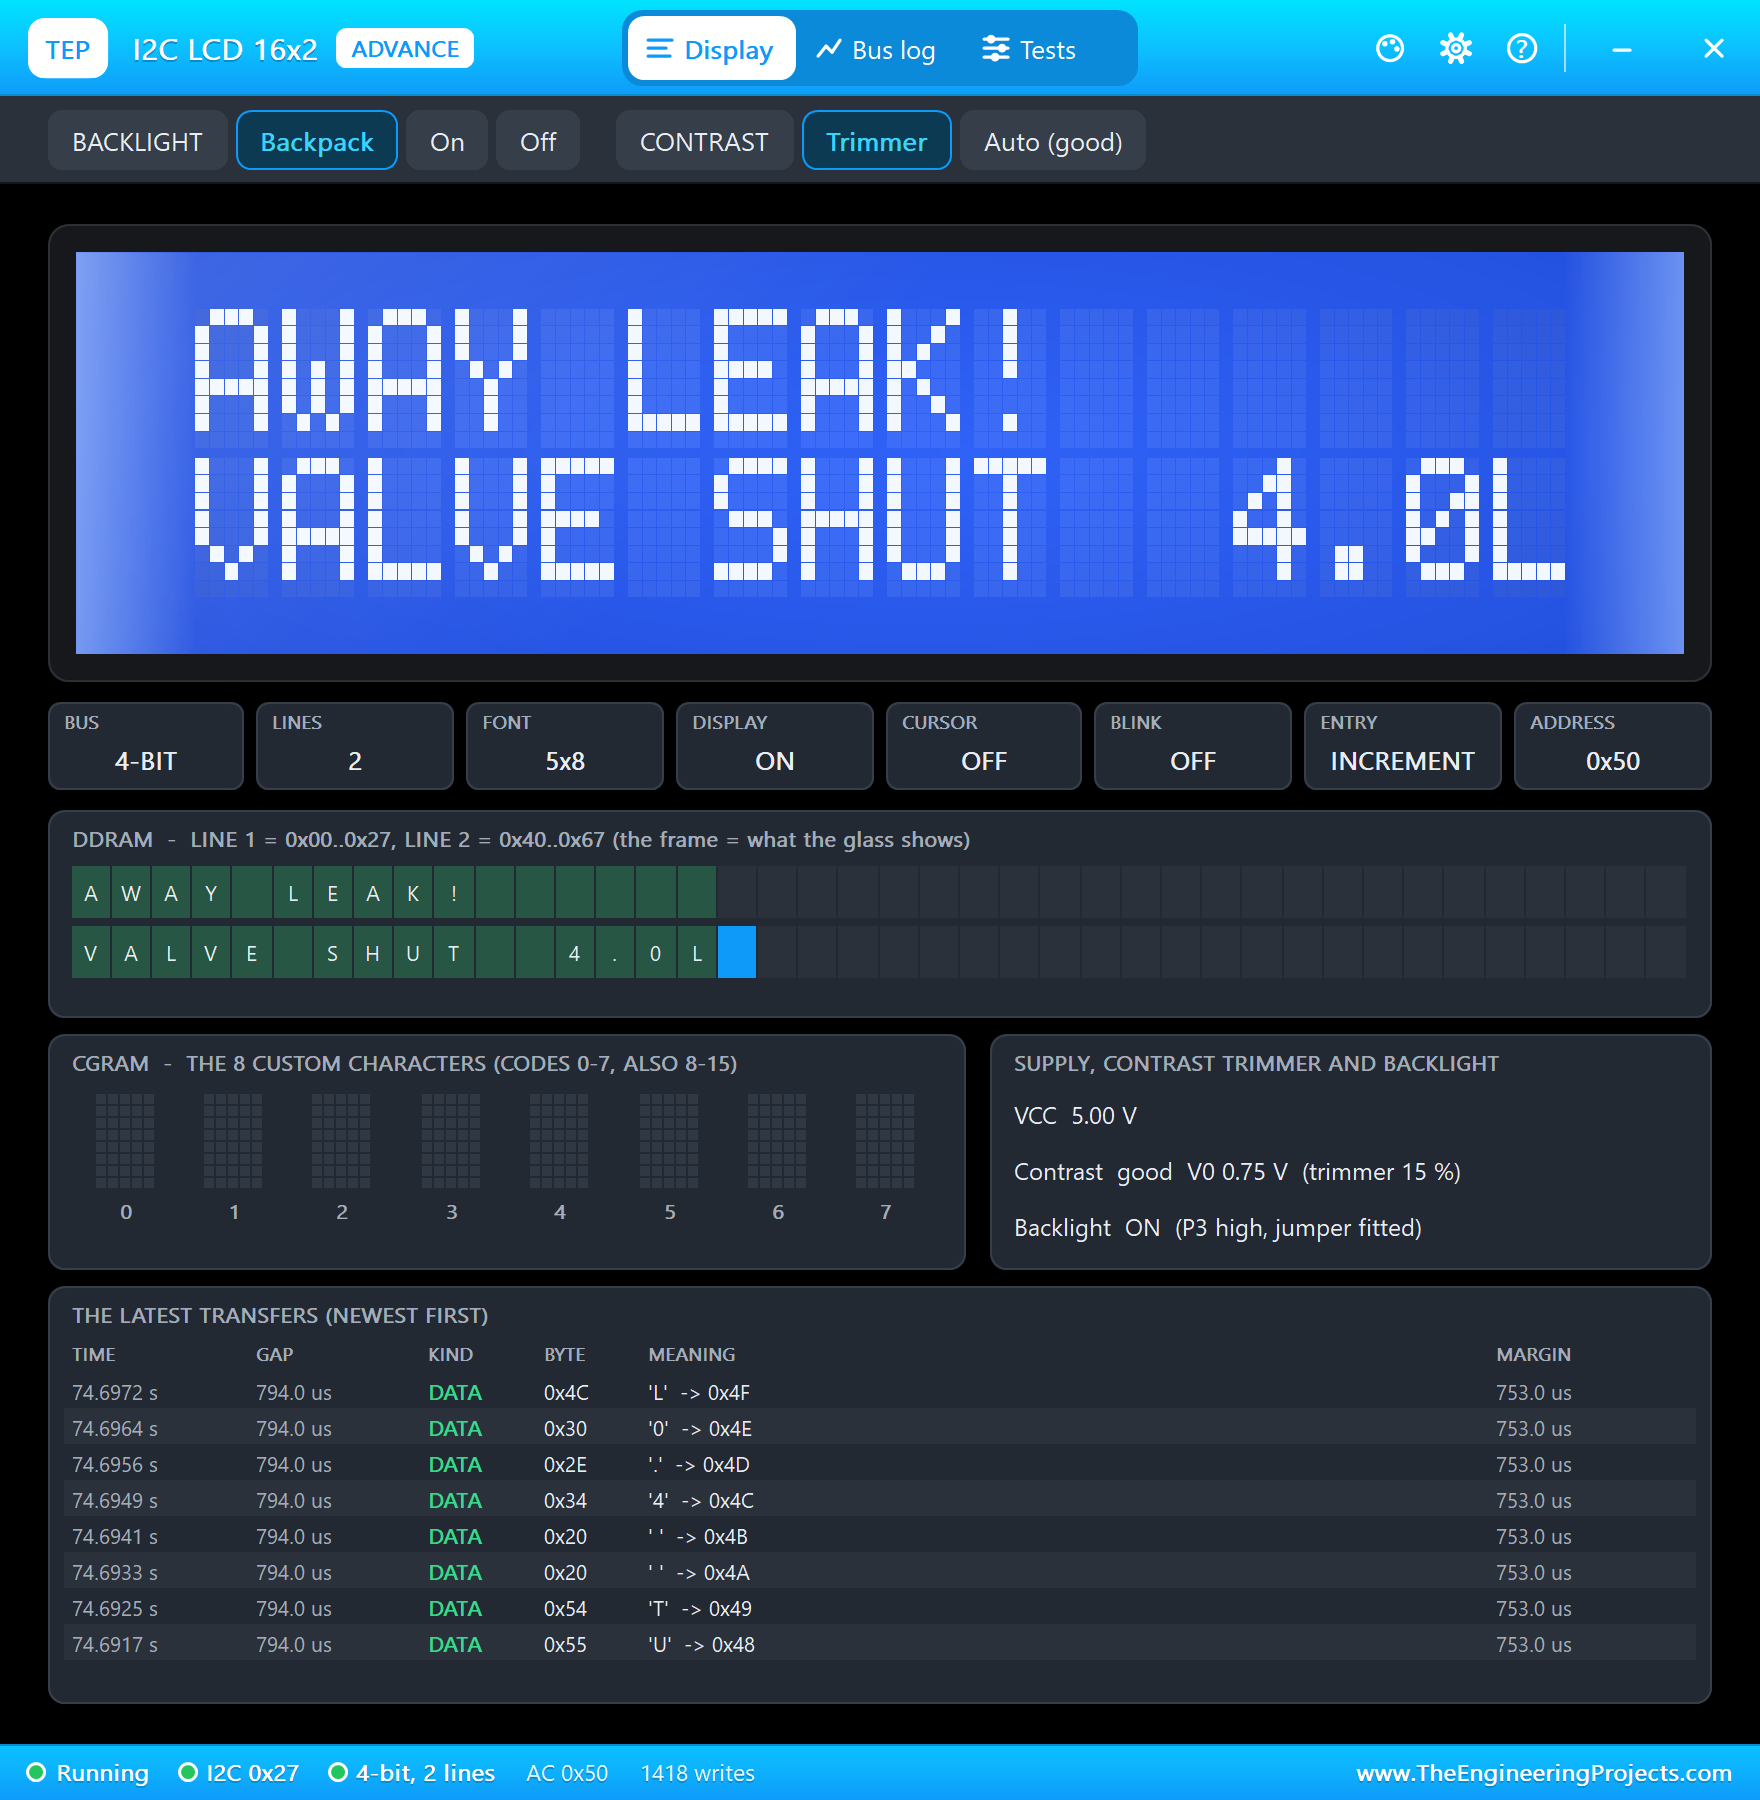
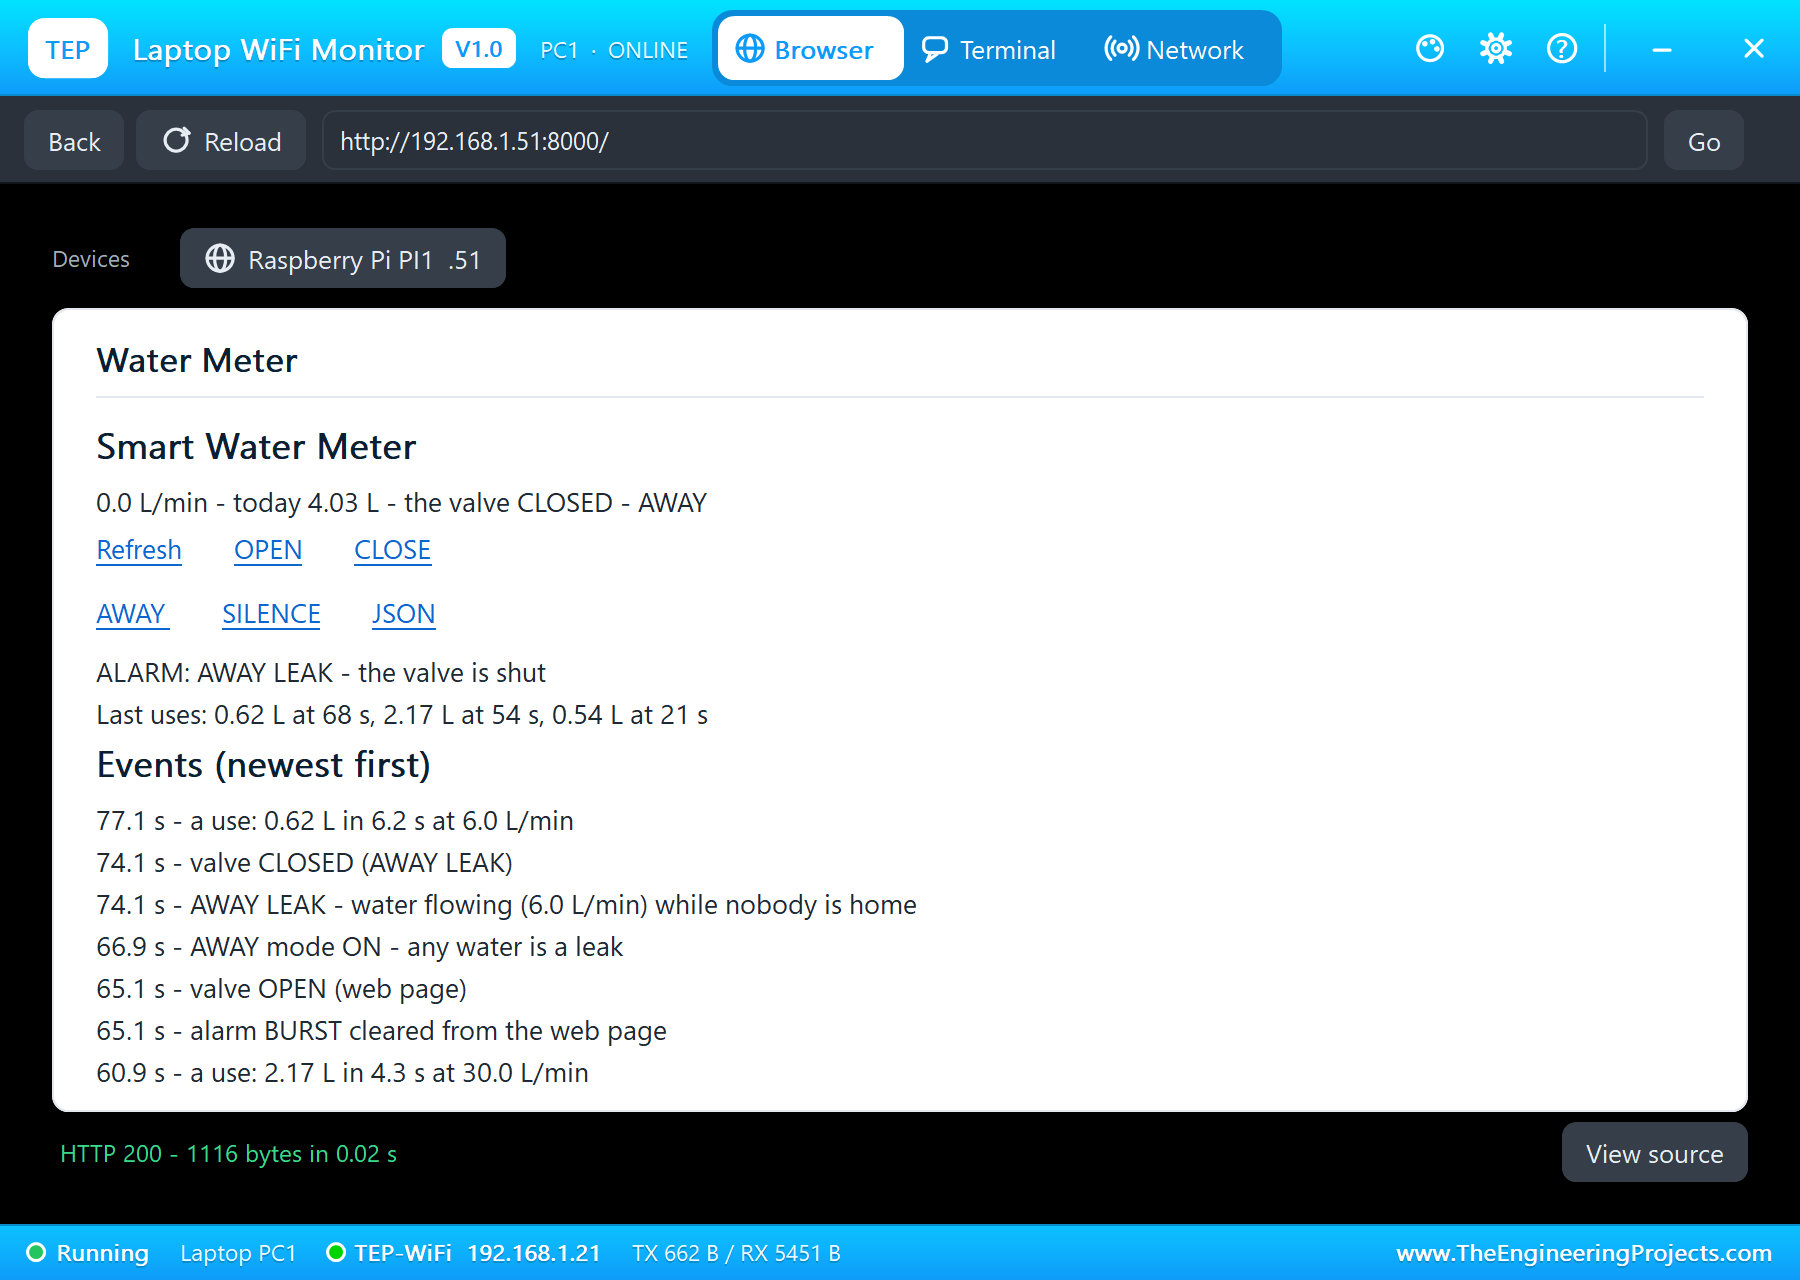
The terminal holds the whole story:
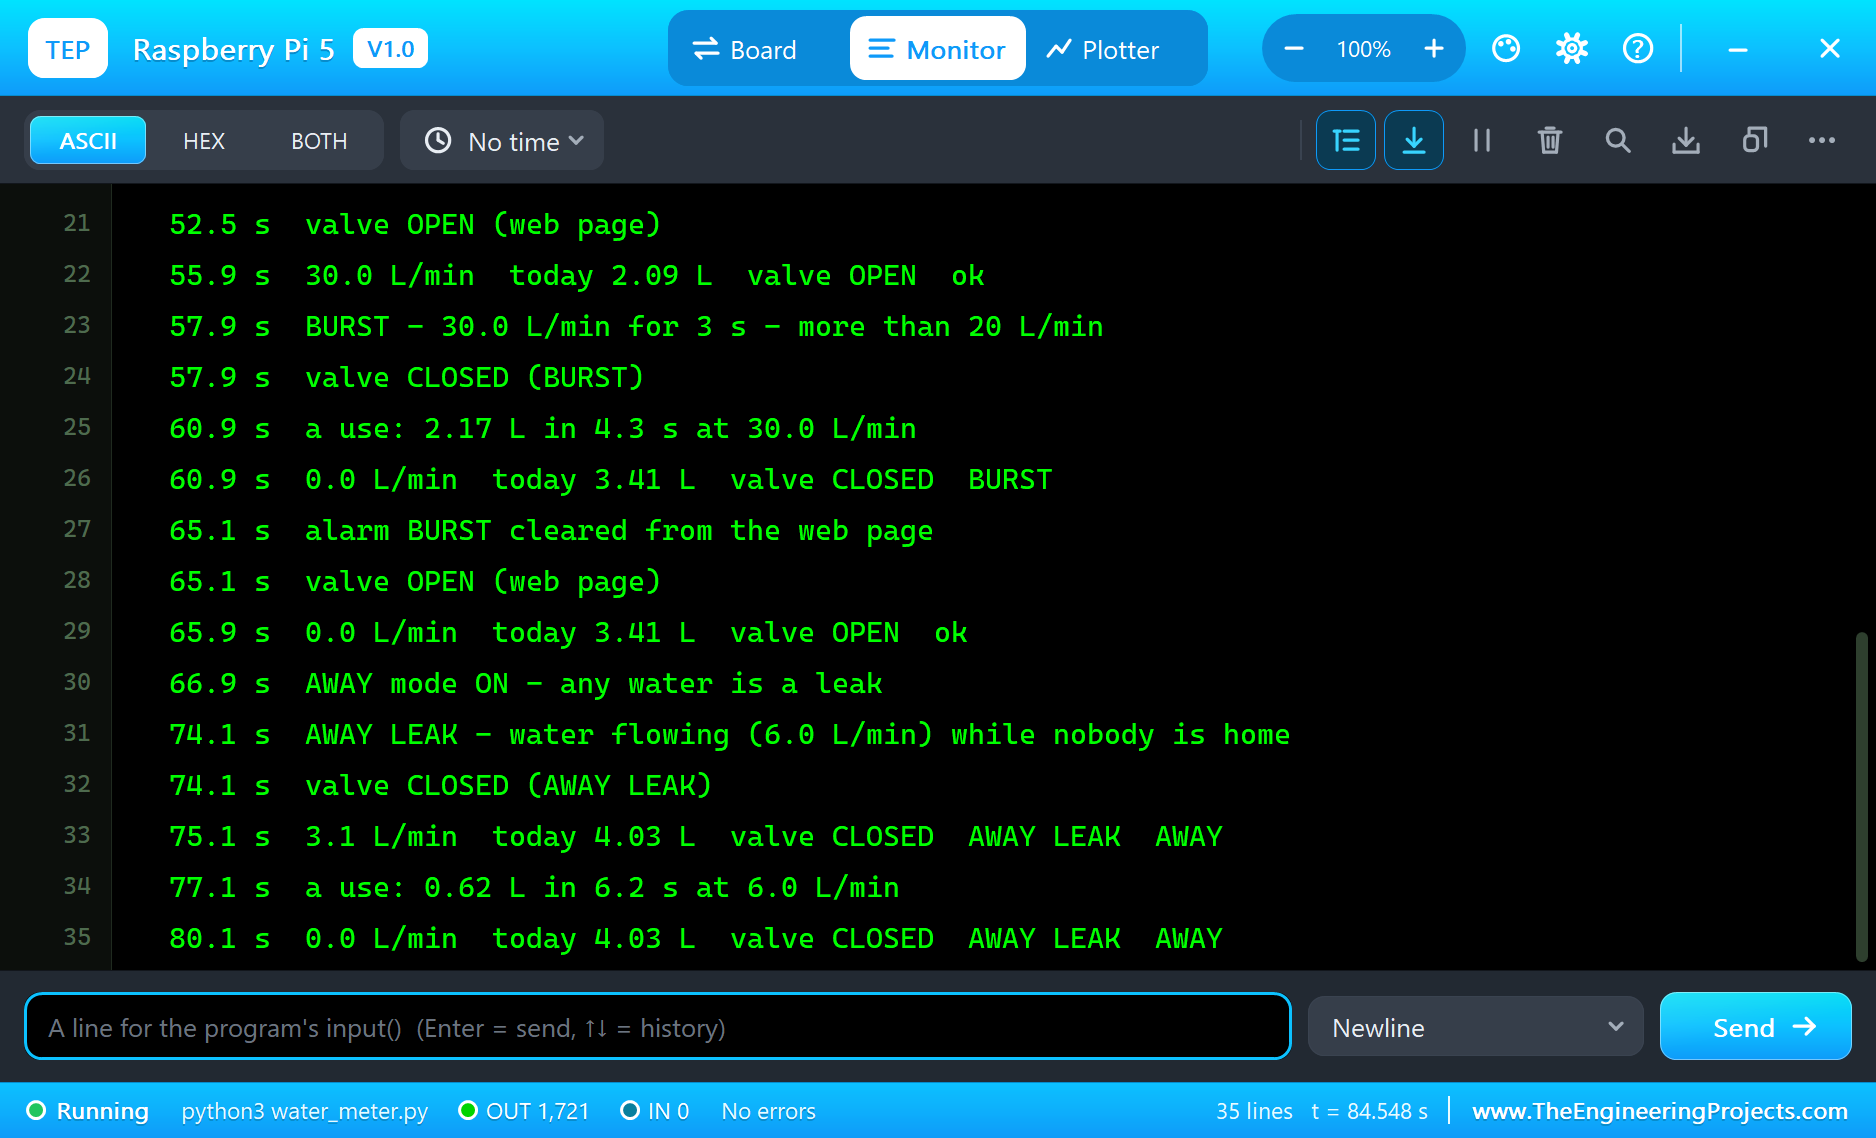
At the end, the program counted 4.03 litres for the day, and the flow sensor's own counter agreed: 1,812 pulses, 4.03 litres of water that really passed. In all, 85 seconds of simulation took about 7 minutes on our PC with all the screenshots. An earlier test run is worth mentioning too: it counted a use's duration in whole seconds and logged the 6 L/min tap as "0.56 L in 5 s (6.6 L/min on average)"; the litres were right, the average was not, and that is why the program now uses the full seconds.
Download the Project Files
Click the button below to download Raspberry-Pi-5-Water-Meter-Leak-Detector-Proteus-Simulation-v1.0.zip (about 15.3 MB, without the source code of the models):
Raspberry Pi 5 Water Meter and Leak Detector - Proteus Simulation V1.0- Proteus Simulation: Pi-5-Water-Leak-Detector.pdsprj, the program water_meter.py and copies of the models.
- Python Code: water_meter.py, the complete program.
- Proteus Library Files: the LIB files of the Raspberry Pi 5, the YF-S201, the relay, the valve, the 1N4007, the LCD 16x2, the buzzer, the BC547, the resistor and the two WiFi Monitors.
- Proteus Model Files: the DLL models and the TEPPi folder, the Python 3.11 and the runtime that the Pi board runs.
- README.txt: the installation steps, the properties, the test results and the links to every library post.
No Proteus yet? Read How to Download and Install Proteus 7 and 8. New to libraries? Follow How to Install a New Library in Proteus.
How to Install the Project Files
- Close Proteus and extract the whole zip file, for example to your Desktop.
- Copy the files from Proteus Library Files into the LIBRARY folder of Proteus.
- Copy everything in Proteus Model Files, the DLL files and the TEPPi folder, into the MODELS folder.
- Start Proteus and open the project from the Proteus Simulation folder.
Changing the Code
The program is plain Python 3: edit water_meter.py beside the project and press Play again; the Pi board runs the new file. The limits are at the top. The same program runs on a real Raspberry Pi 5 with Raspberry Pi OS and the lgpio package; enable I2C in raspi-config. For another Raspberry Pi 5 project with relays and a web page, see our Raspberry Pi 5 Smart Greenhouse.
Ideas to Extend the Project
- Save the uses to a file or a small database and draw the daily and weekly use on the dashboard.
- Learn the household's normal pattern and raise the alarm for a use that is far longer than usual at that time of day.
- Add a second flow sensor on the garden line and meter the outside water separately.
- Send a message to a phone when an alarm closes the valve.
- Use a motorised ball valve instead of the solenoid valve: it needs power only while it moves.
- Add a water sensor on the floor under the washing machine and close the valve on a wet floor too.
From Simulation to Real Hardware
- Protect the GPIO: the YF-S201's HIGH is close to its 5 V supply; use the 10k / 20k divider on the yellow wire.
- Calibrate K: fill a bucket of known size through the sensor and compare the litres with the program's count.
- Mount the sensor the right way: the arrow in the direction of the flow, the cap on top, a straight pipe before it.
- Size the valve and the supply: a 12 V valve at about 0.45 A needs a 12 V adapter of at least 1 A; check the valve's minimum pressure.
- Keep the water away from the electronics: mount the Pi, the relay and the adapter above the pipes in a closed box.
- Ask a plumber: a valve on the main supply is a plumbing job, and local rules may ask for approved parts.
Troubleshooting
- The flow stays at 0.0 L/min: OUT is not on GPIO17, or the sensor has no 5 V.
- The litres are a few percent wrong: the sensor's K is not 7.5; calibrate it with a bucket.
- The valve never opens: the relay's COM has no +12V, or the valve is on NC instead of NO.
- LEAK while a bath fills: CONT_S is too short for your house; raise it.
- The terminal cannot start Python: the TEPPi folder is not in MODELS.
Limitations of the Simulation
- The water comes from the YF-S201's pop-up, and the sensor model does not know the valve's state: after a shut-off, press VALVE in its pop-up to stop the water by hand.
- The LEAK rule waits 20 seconds instead of the 30 to 60 minutes a real house needs.
- The network is simulated: the dashboard travels between the Pi and the two monitors inside Proteus; the times in this tutorial are simulation time.
- Raspberry Pi is a trademark of Raspberry Pi Ltd; this project is not made or endorsed by them or by Labcenter. A hobby leak detector does not replace a plumber or the safety devices your water supplier asks for.
So, that was all about the Raspberry Pi 5 Water Meter and Leak Detector - Proteus Simulation. I hope it helps you build your own: a flow sensor counted by edges, pulses turned into litres per minute and litres, every use logged, three leak rules, and a solenoid valve driven safely through a relay with its diode, all tested in a simulation before a single pipe is cut. More IoT projects with the ESP32 and the Raspberry Pi 5 are coming in this series. If you have any questions, ask in the comments and I will help you out. Till the next tutorial, take care and have fun!