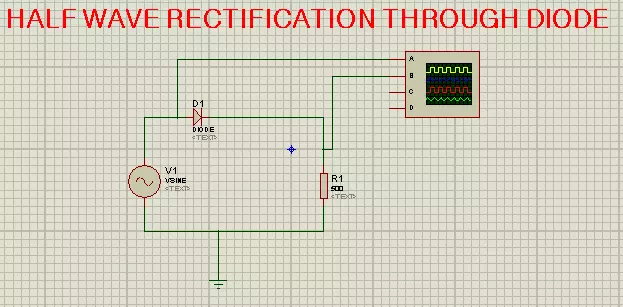
Hello friends, I hope you all are doing great. In today's tutorial, I will show you how to perform Simplest Half Wave Rectification in Proteus. In this tutorial, we will design a simple Proteus simulation, where we will use a diode for half-wave rectification.
Before designing the Proteus simulation, we will first have a theoretical overview of Half Wave Rectification as it's always the best approach to read theory before practical (Proteus Simulation). So, let's get started:
What is Rectification ???
Rectification is an electrical process, used to convert Alternating(AC) Voltage into Direct(DC) Voltage using a circuit called rectifier.
The Rectification process is always carried out using diodes, as we know diodes allow the current to flow in one direction only, thus t ...
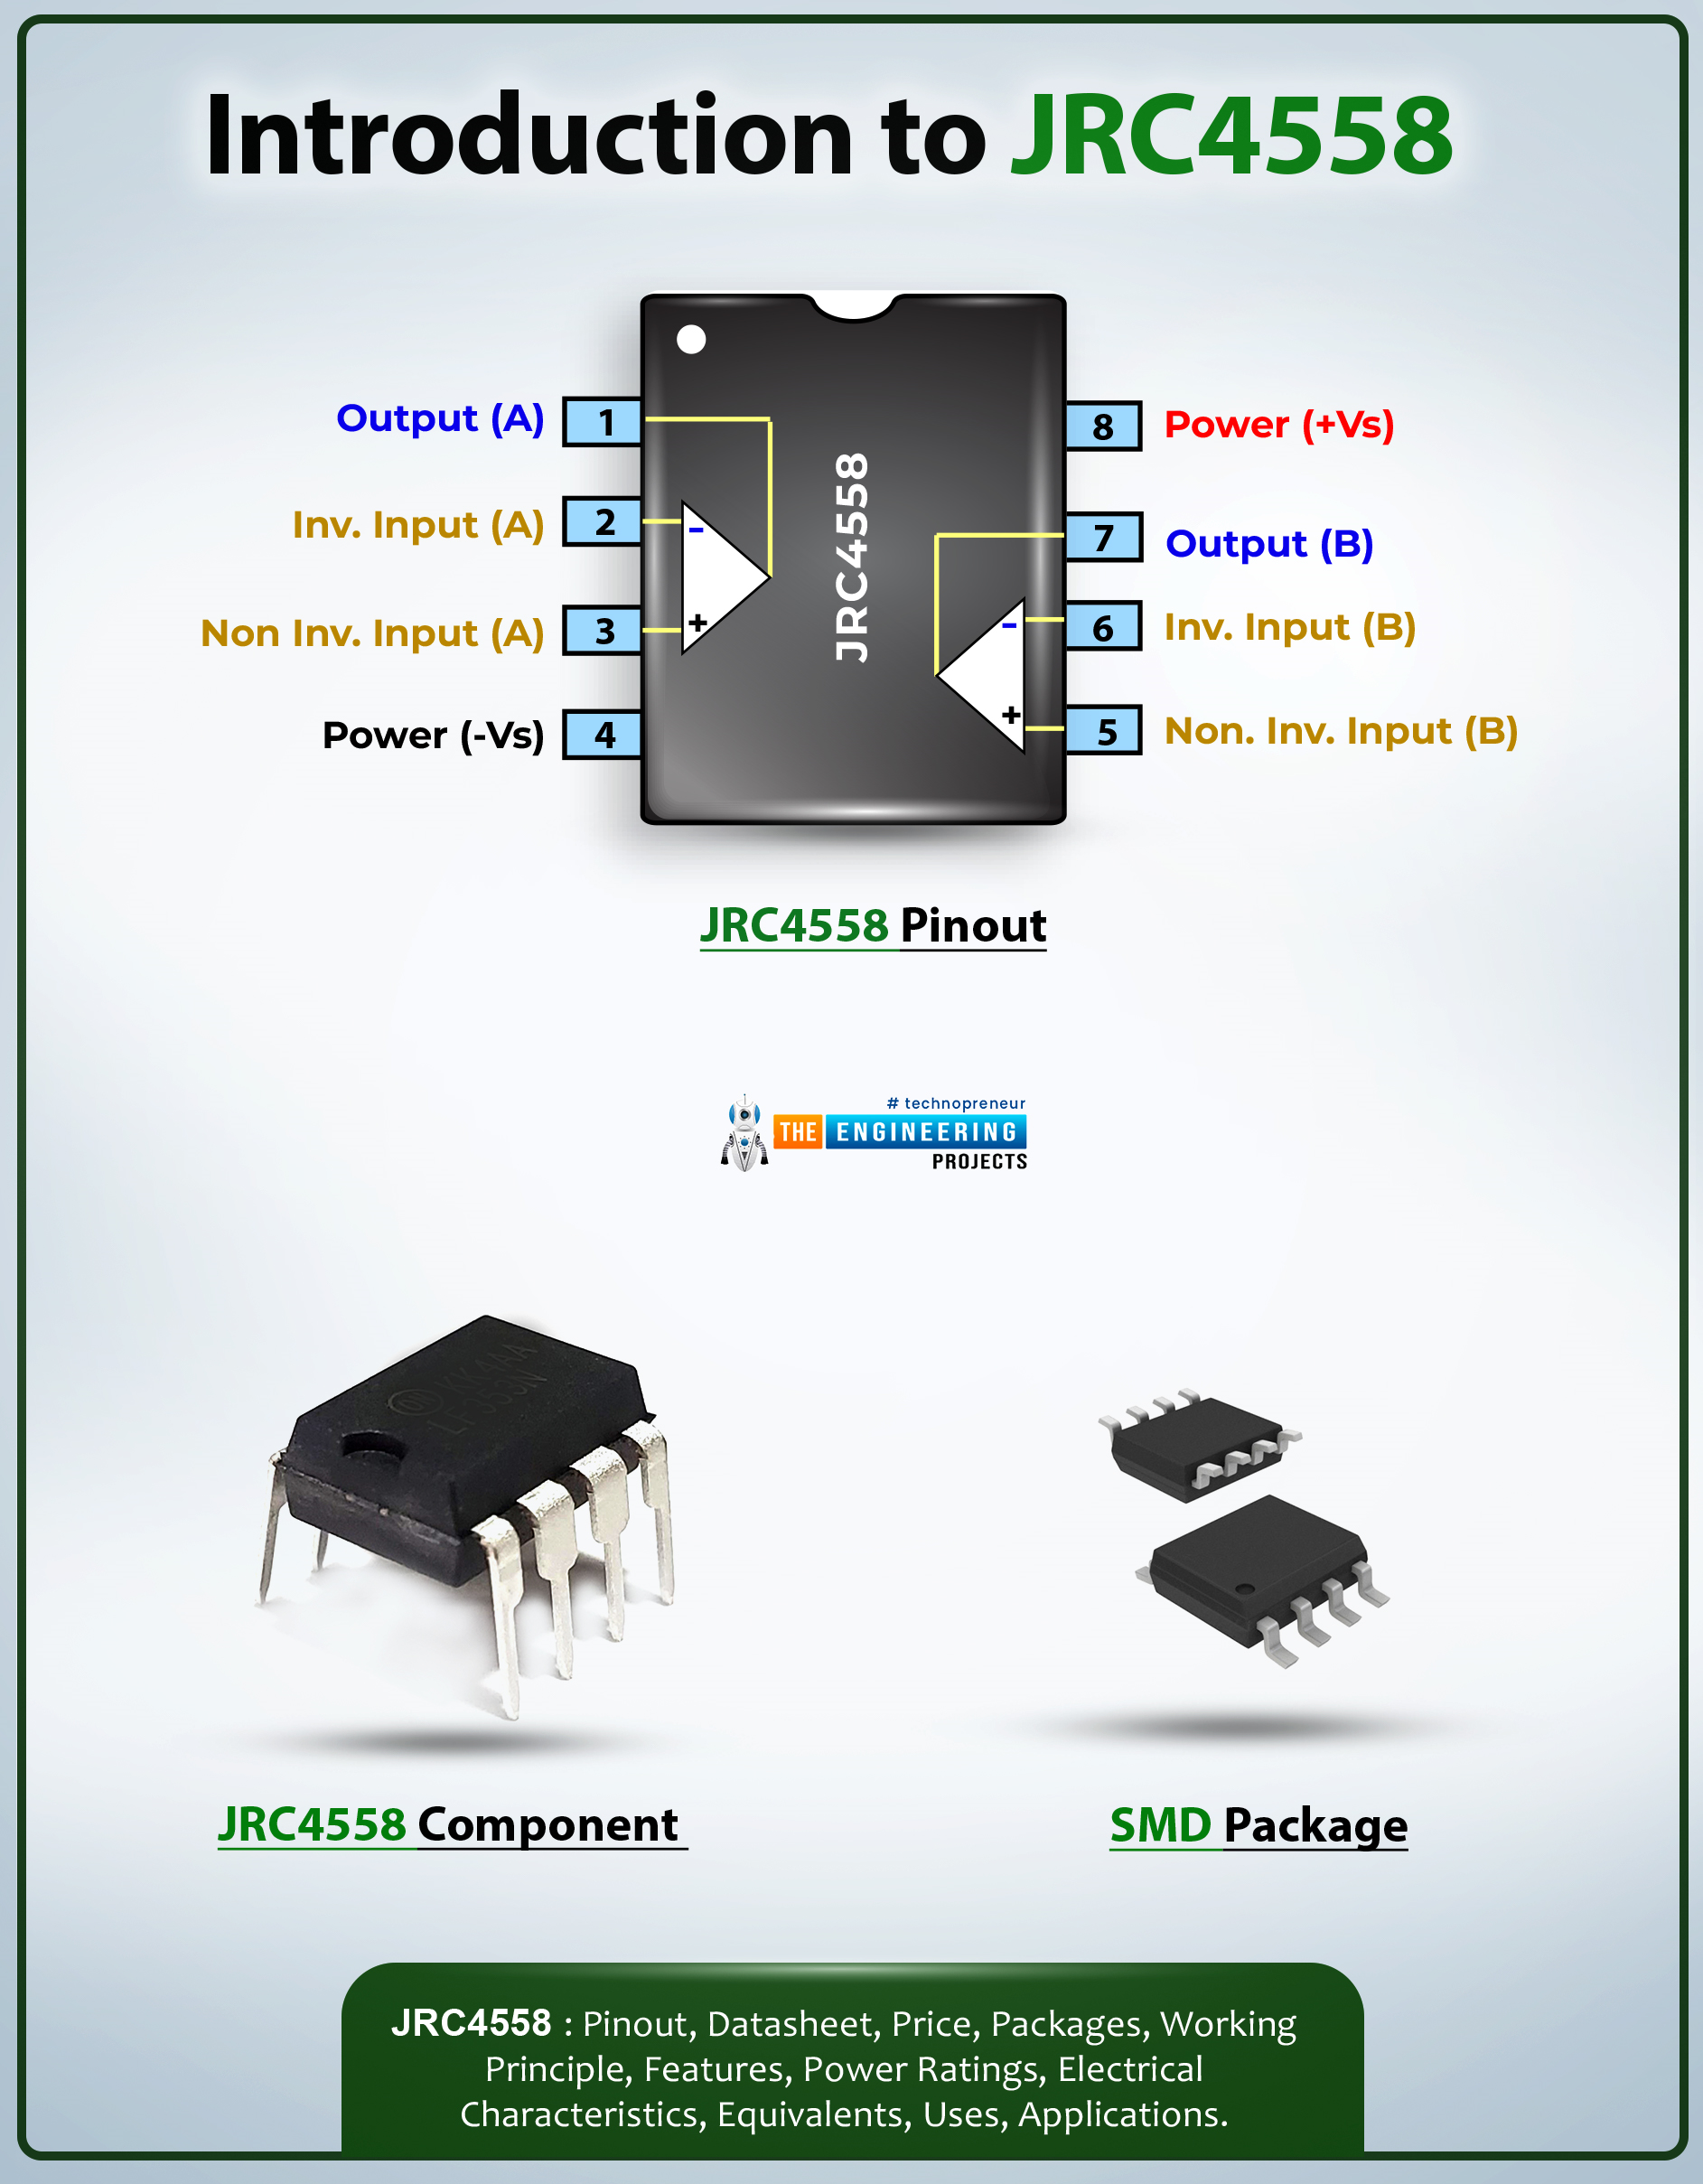
Hi Guys! Happy to see you around. I welcome you on board. Thank you for clicking this read. In this post today, I’ll walk you through the Introduction to JRC4558.The JRC4558 is a single silicon-chip monolithic dual operational amplifier. This amplifier is a high-performance device and is internally compensated. It is widely used in sample and hold amplifiers and pedal circuit designs. The JRC4558 is available with a remarkable input impedance of around 5 MO, a high voltage gain of around 100 dB, and a good slew rate of around 1.7V/µs.
I suggest you buckle up as I will walk you through the complete introduction to JRC4558 covering datasheet, pinout, features, alternatives, and applications. Let’s jump right in.
Introduction to JRC4558
The JRC4558 is a single silicon-chip mono ...
Hi Guys! Hope you're well today. Glad to have you here. In this post today I'll detail why EV pickup trucks will spearhead the switch to electric motors.
In 2019, approximately 63 percent of Americans looking to buy a car were interested in buying an EV, according to Consumer Reports. The stage is set for major EV manufacturers to contend over the market. Of all body styles, pickup trucks seem to be of particular interest to them. General Motors, Tesla, and Ford are doubling down their efforts in EV pickup design. This is all so that models like the Hummer EV and the Cyber truck can release within the next few years.
Trucks are favored for their towing power, traversal abilities, and relatively low need for maintenance. Those are perfect attribu ...
Hi Everyone! I welcome you on board. Thank you for clicking this read. In this post today, I’ll walk you through the Introduction to LM2576.LM2576 is a step-down voltage regulator, also known as a buck converter, mainly employed as a pre-regulator in linear regulators. The customized output version of this buck converter gives you the ability to set the output voltage as you like better. It is available with a remarkably good load and line regulation. Moreover, it is used to drive load under 1A and is available in fixed output voltages with 3.3V, 5V, 12V, and 15V.
I suggest you buckle up and read this post all the way through, as in this post I’ll detail the Introduction to LM2576 covering the datasheet, pinout, features, and applications. Let’s jump right in.
Introduction to LM2576
...
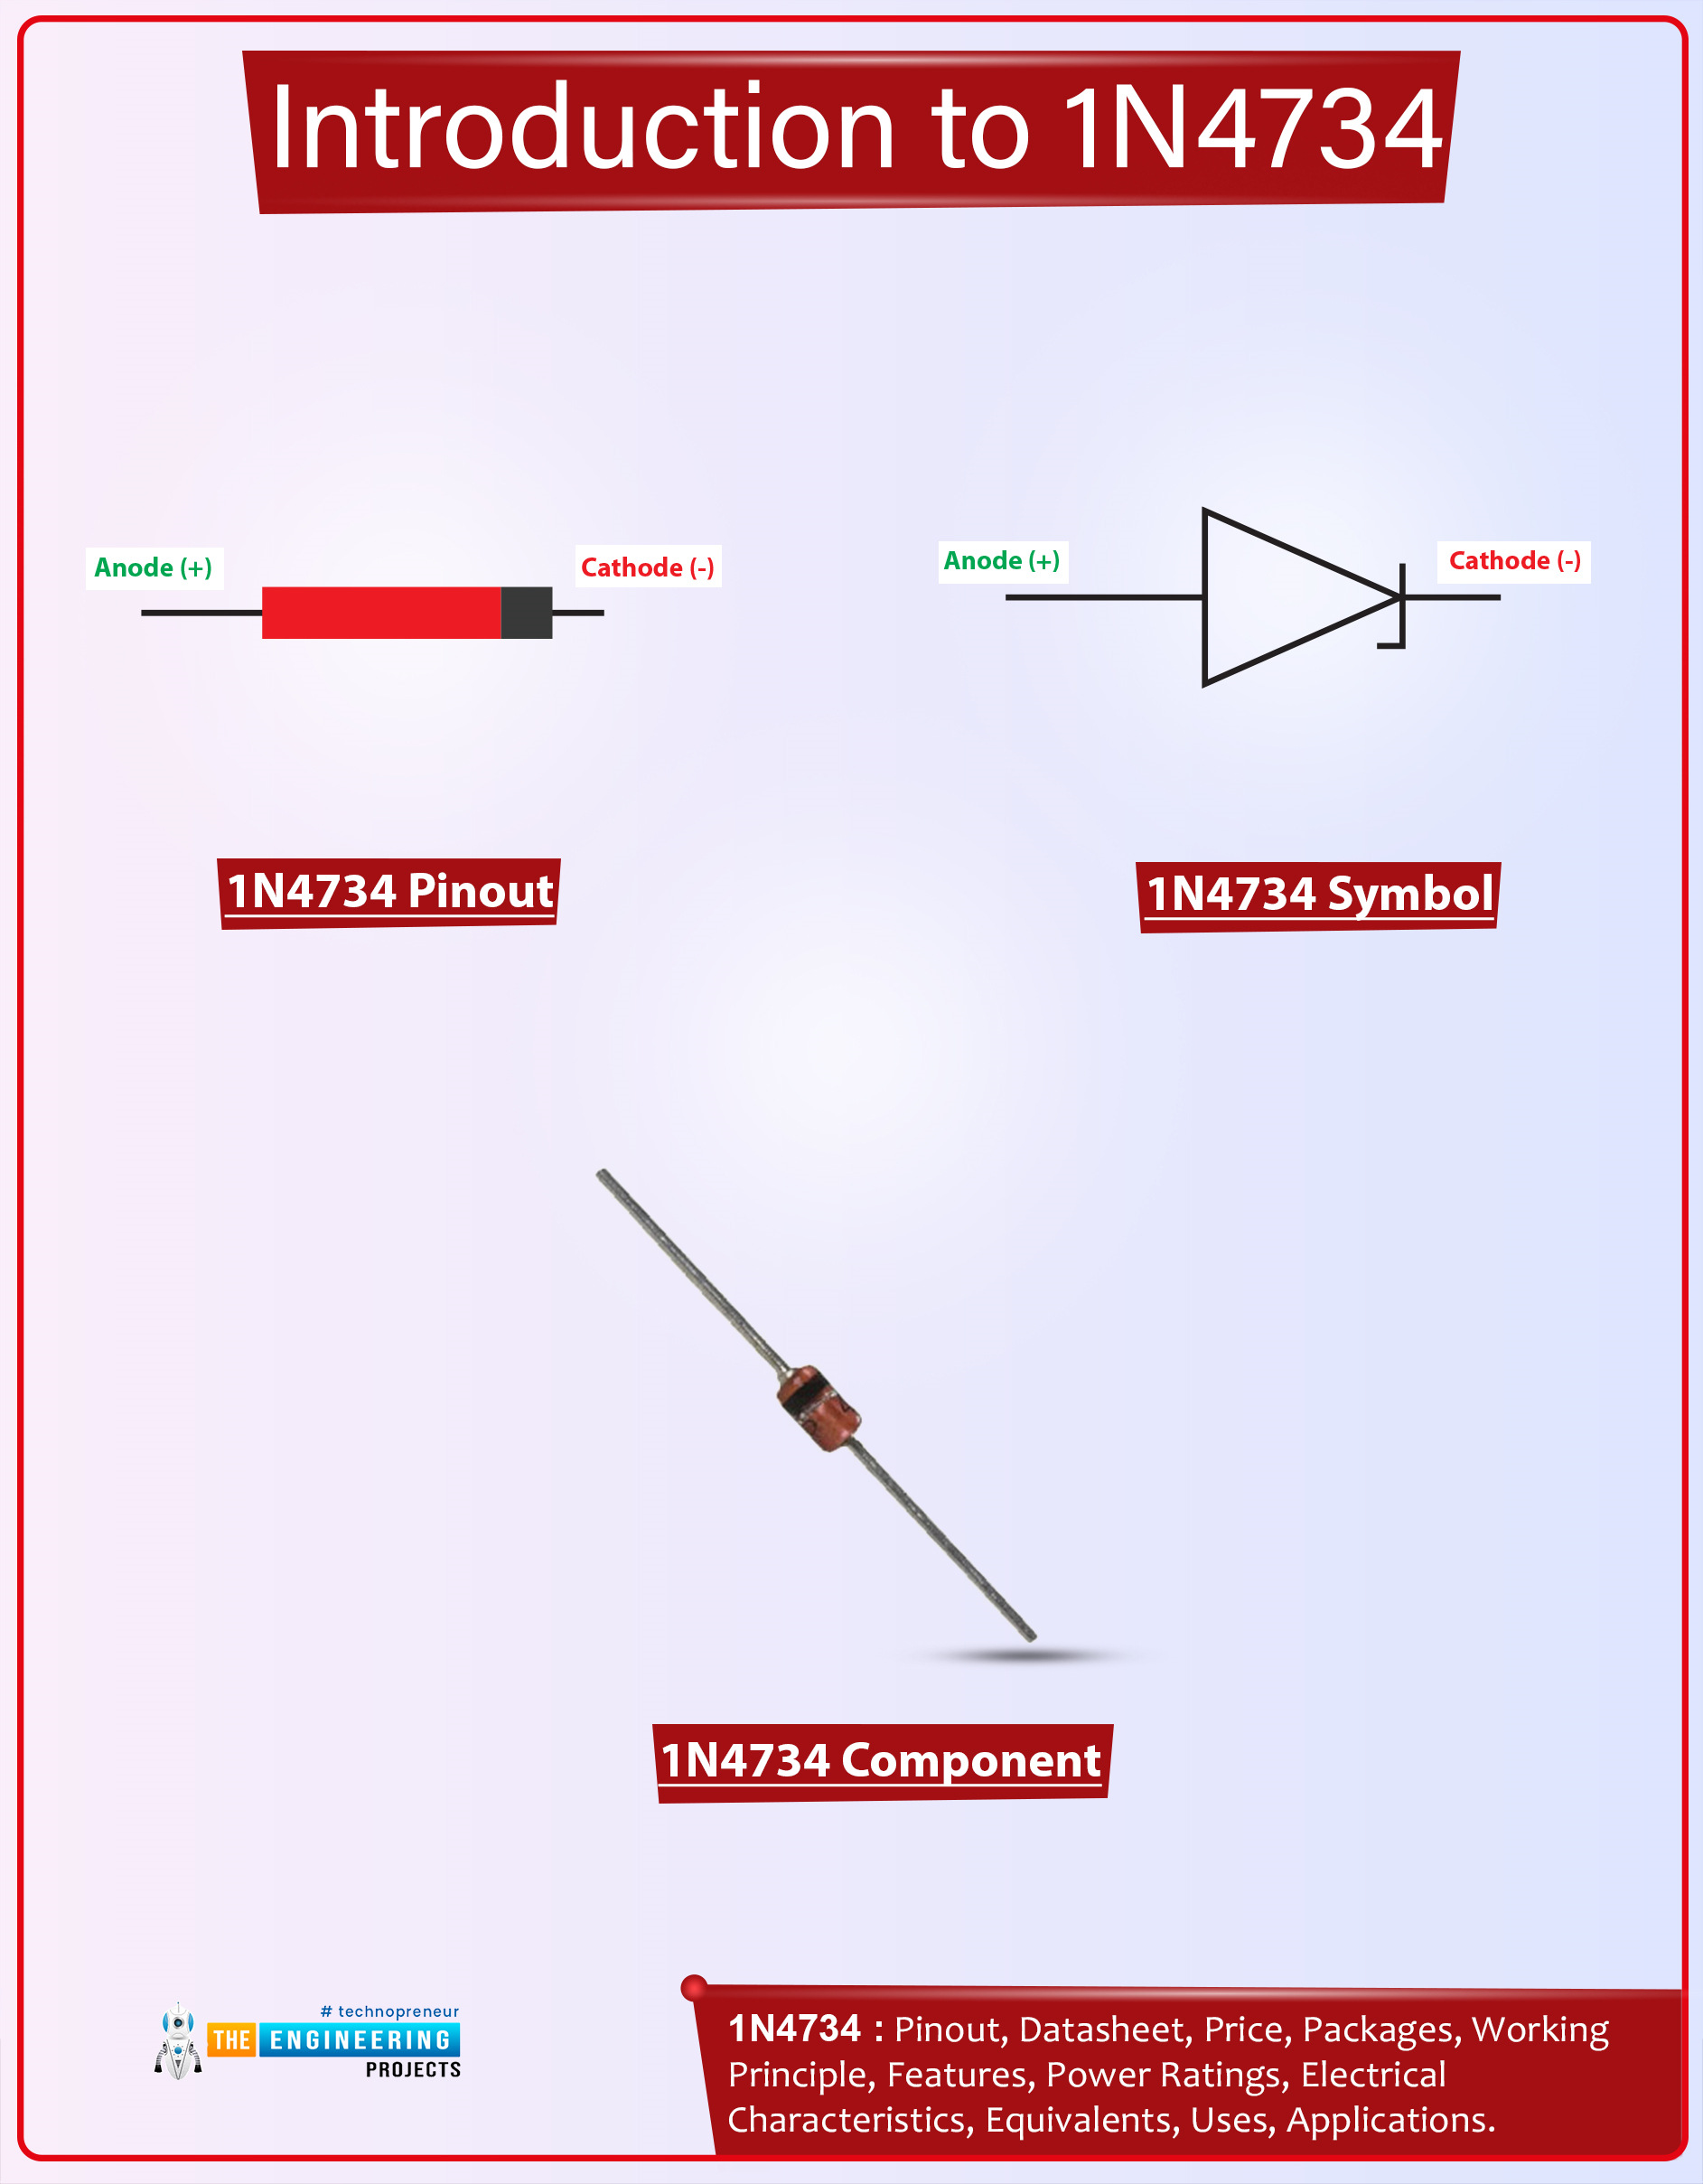
Hi Folks! I hope you’re well today. I welcome you on board. In this post today, I’ll walk you through the Introduction to 1n4734.The 1n4734 is a silicon planner power Zener diode that is employed as a low current voltage regulator. It is incorporated as a shunt regulator in many applications. This Zener diode conducts the current in both directions in contrast to the regular diode that conducts in one direction only i.e. regular diode conducts in forward biased condition only. This Zener diode conducts in both conditions forward biased condition and reverse biased condition. Power dissipation in this Zener diode is 1W and standard Zener voltage tolerance is ±10%.
I suggest you read this entire post till the end, as I’ll detail the complete Introduction to 1n4734 covering datasheet, pino ...
Hi Friends! Hope you’re well today. I welcome you on board. Thank you for clicking this read. In this post today, I’ll detail the Top 10 Professional PCB Design Software.
PCB designing is an integral part of executing some electrical projects. No matter if you’re a tech geek or starting the very first time, you may come across the PCB designing process at times. And believe me… if you do some drill beforehand, you don’t need to hire professional services from outside, and you can easily design and execute an electrical project yourself.
In this post today, I’ll mention the comprehensive list of Professional PCB Design Software. Some of them are free to use and give you the ability to design your PCB on the go, while some are available with limit ...
Hi Friends! Hope you’re well today. I welcome you on board. In this post today, I’ll detail the best technologies for catching security flaws in 2020.
Security is a key priority for all organizations, and attacks have become increasingly specific. Usually, attackers take advantage of specific bugs or vulnerabilities to gain access to sensitive data. The cost of breaches can be huge, which is why organizations are equipping themselves with the best technologies aimed at catching vulnerabilities and security flaws before a potential hacker can take advantage of them.
Let’s take a look at the best technologies being used in 2020.
White Box Testing (SAST)
One of the older technologies that has been around for over 10 years is white box testing. It i ...
Hello everyone, how are you doing and I hope everybody is doing great. i am going to discuss today the Types of PCB (Printed Circuit Board). Thank you, everyone, for coming back to our website and it means so much. we are grateful for your engagement and most importantly for choosing to educate yourself over anything else in the world.
PCB circuit boards are everywhere and we daily use dozens of circuit boards and interact with them. There is no doubt in saying that the PCB has made our lives easier and advanced. For example, the first thing in the morning your alarm goes off, and wherever you hit snooze, every time you send a signal through its circuit board. And probably the list goes on as you turn the light on off etc.
Let's b ...
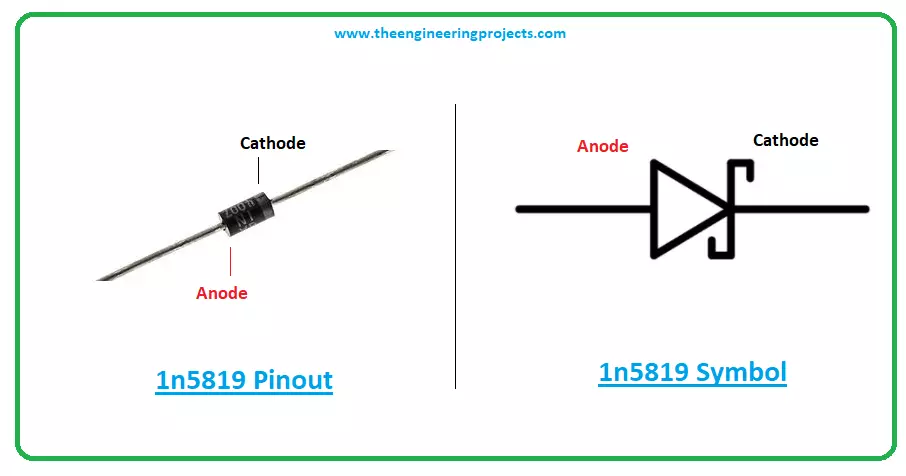
Hello Friends! Happy to see you around. Thank you for clicking this read. In this post today, I’ll document the Introduction to 1n5819.
The 1n5819 is a Schottky diode, also called hot-carrier diode, employed for extremely fast switching. This diode is formed when the metal material is combined with the semiconductor material. This combination results in the formation of a barrier that blocks the flow of electrons. The reason this is also called a hot-carrier diode.
I suggest you read this post all the way through, as I’ll walk you through the complete introduction to 1n5819 covering datasheet, pinout, features, equivalents, and applications.
Let’s get started.
Introduction to 1N5819
The 1n5819 is a Schottky diode used for fast switching appl ...
Hi Fellas! I hope you’re well today. Happy to see you around. In this post today, I’ll walk you through the Introduction to IRF840.The IRF840 is an n-channel power MOSFET. It is a fast switching and high voltage device that is available with low on-state resistance. As this is an n-channel MOSFET here conduction process is exercised by the movements of the electrons. In other words, though conduction is carried out by both the movement of holes and electrons, electrons are major carriers in this case.
I suggest you read this entire post till the end as I’ll discuss the complete Introduction to IRF840 covering datasheet, pinout, features, equivalent, and applications. Let’s jump right in.
Introduction to IRF840
The IRF840 is an n-channel power MOSFET that supports loads up to 8A an ...