C# ProgressBar Control

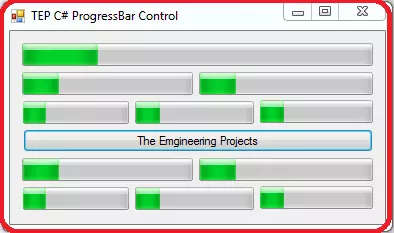
I hope you are doing good, In the tutorial, I'm going to explore C# ProgressBar Control. C# ProgressBar is used to express progress of any process. When you have to perform a long process within your desktop application then you have to use C# ProgressBar to show a user how much time left or how much progress is done. You can use C# ProgressBar for multiple purposes such as the downloading of life and result retrieving.

C# ProgressBar Control

A progress bar is used to show the progress of any process which takes a long time compared to normal processes. Mostly you have viewed these kinds of progress bar during the installation of software. C# ProgressBar has three parameters, Maximum, Minimum and the value. Maximum represents the max progress or upper range of progress and minimum represent the min progress or lower value or range, where the value is the current point of a progress bar. By default in C# ProgressBar, the value of minimum is set to zero and maximum is 100. Progress bar filled from left to right as the universal standard. You can easily drag and drop the C# ProgressBar from the GUI toolbox to your desktop application. By default, the first instance of C# ProgressBar named as the ProgressBar1. If you are wanted to preview the outcome of progress bar then you can simply set the value in the initialize phase, as you can observe in the following code we have used four progress bar with different values.
using System;
using System.Collections.Generic;
using System.ComponentModel;
using System.Data;
using System.Drawing;
using System.Linq;
using System.Text;
using System.Threading.Tasks;
using System.Windows.Forms;

namespace TEPArticle
{
    public partial class Form1 : Form
    {
        public Form1()
        {
            InitializeComponent();
            progressBar1.Value = 25;
            progressBar2.Value = 50;
            progressBar3.Value = 75;
            progressBar4.Value = 100;
        }      
    }
}
You can observe that we have used four progress bars which have values as 25, 50, 75 and 100. As you know the default value of the minimum range is zero and max range is 100 that's why we have used above values to demonstrate the states of the progress bar. In the following image, you can be observed the output of above code with progress bar states. Default instance named as progressbar1,2,3 and so on following. If you want to rename the object name of progress bar according to you then you have to visit the properties tab after selecting the relative progress bar and then change the name as you can be observed in the following image. If you are wanted to change the size of ProgressBar according to absolute values then there are two methods which you can use. The first method is, you have to select the relative ProgressBar then go to the properties tab and search for the size where you can insert the absolute values to resize the ProgressBar according to your requirements. In the following image, you can be observed the flow of actions. The second method is to do the same action with the help of programming code. We have to use the Size property and pass the values of the width and height in the constructor of Size. You can be observed the following code for better understanding.
using System;
using System.Collections.Generic;
using System.ComponentModel;
using System.Data;
using System.Drawing;
using System.Linq;
using System.Text;
using System.Threading.Tasks;
using System.Windows.Forms;

namespace TEPArticle
{
    public partial class Form1 : Form
    {
        public Form1()
        {
            InitializeComponent();
            TEPprogressBar1.Value = 25;
            TEPprogressBar1.Size = new Size(100,23);
            
        }      
    }
}
If you are looking to change the ProgressBar style then you can change that from the properties tab. There are three styles for the ProgressBar, by default its set to block and others are Continuous and Marquee. Even that you can set the ProgressBar styles from the following code.
using System;
using System.Collections.Generic;
using System.ComponentModel;
using System.Data;
using System.Drawing;
using System.Linq;
using System.Text;
using System.Threading.Tasks;
using System.Windows.Forms;

namespace TEPArticle
{
    public partial class Form1 : Form
    {
        public Form1()
        {
            InitializeComponent();
            
            TEPprogressBar1.Style = ProgressBarStyle.Blocks;
            TEPprogressBar2.Style = ProgressBarStyle.Continuous;
            TEPprogressBar3.Style = ProgressBarStyle.Marquee;

            TEPprogressBar1.Value = 25;
            TEPprogressBar2.Value = 50;
            TEPprogressBar3.Value = 75;

        }      
    }
}
We have used three progress bars, before copy, the above code inserts the three progress bar in your desktop application. Then you can be used the above code but replaced the TEPprogressBar1,2,3 with the instance names which are using for your ProgressBars. If you are wanted to make Right to left moving progress bar then you have to activate two properties for this. First, you have to make RightToLeftLayout true and then you have set RightToLeft.Yes as the value of a RightToLeft property of relative progress bar. From the following code, you can get the idea.
using System;
using System.Collections.Generic;
using System.ComponentModel;
using System.Data;
using System.Drawing;
using System.Linq;
using System.Text;
using System.Threading.Tasks;
using System.Windows.Forms;

namespace TEPArticle
{
    public partial class Form1 : Form
    {
        public Form1()
        {
            InitializeComponent();
            
            TEPprogressBar1.Style = ProgressBarStyle.Blocks;
            TEPprogressBar1.RightToLeftLayout = true;
            TEPprogressBar1.RightToLeft = RightToLeft.Yes;

            TEPprogressBar1.Value = 25;
            

        }      
    }
}
Now you can observe the above code, we have activated two properties which are compulsory to change the progress bar flow. We have also attached the Image below which is the exact output of the above code.

C# ProgressBar Event Handlers

After learning the basics, its time to move to advanced level to play with a progress bar. In C# there are several built-in functions which are known as the event handler because they only execute on specific situations. Such as you are wanted to perform any task whenever the user will click on the progress bar. Then you will use a relative event handler to tackle this situation. There are several event handlers which you can use with ProgressBar. In the following section of the article, we are going to explore each event handler to demonstrate their purpose of use.
  • C# ProgressBar Click Event Handler
  • C# ProgressBar MouseEnter Event Handler
  • C# ProgressBar MouseHover Event Handler
  • C# ProgressBar MouseLeave Event Handler
  • C# ProgressBar Resize Event Handler

C# ProgressBar Click Event Handler

This event is designed to perform functionality whenever the user will once click on the progress bar. As much time the user will click on the progress bar that much times function is executed which is declared within the braces of click event handler. Most developers used to execute the notifications and the messages on click event handler, like the warnings. First, you have to activate the click event handler for relative progress bar then you can add your functionalities with that like in the below code.
using System;
using System.Collections.Generic;
using System.ComponentModel;
using System.Data;
using System.Drawing;
using System.Linq;
using System.Text;
using System.Threading.Tasks;
using System.Windows.Forms;

namespace TEPArticle
{
    public partial class Form1 : Form
    {
        public Form1()
        {
            InitializeComponent();
            
        }

        private void TEPprogressBar1_Click(object sender, EventArgs e)
        {
            MessageBox.Show("You have clicked on the TEP ProgressBar");
        }
    }
}
In the above code, you can observe we have used the message box as the functionality which will be performed on the single click. You can declare any kind of functionality like change the color, size and value of progress bar. In the following image, there is the exact output of above code.

C# ProgressBar MouseEnter Event Handler

This event handler is used to execute any functionality when the mouse cursor enters in the boundaries of the progress bar. The visible part of the progress bar is considered as the boundaries. When you slightly enter the cursor within the visible part this event handler will get executed. You can experiment this situation by the following a code.
using System;
using System.Collections.Generic;
using System.ComponentModel;
using System.Data;
using System.Drawing;
using System.Linq;
using System.Text;
using System.Threading.Tasks;
using System.Windows.Forms;

namespace TEPArticle
{
    public partial class Form1 : Form
    {
        public Form1()
        {
            InitializeComponent();
            
        }

        private void TEPprogressBar1_MouseEnter(object sender, EventArgs e)
        {
            MessageBox.Show("MouseEnter in the TEP ProgressBar");
        }
    }
}
In the above code, you can be observed that we have used message box as the functionality within MouseEnter Event handler. So that whenever user will enter the mouse cursor within the visible part of progress bar message will get executed. Below is the exact output of the above code is attached.

C# ProgressBar MouseHover Event Handler

This event is designed to perform an action whenever the user will hover the mouse in the visible part, hovers mean to stay for a moment during movement over visible part. Until you will moving the mouse over progress bar it will not execute, you must have to stay for a while over progress bar to activate this event handler. In the following code, we have created the proper code for above scenario.
using System;
using System.Collections.Generic;
using System.ComponentModel;
using System.Data;
using System.Drawing;
using System.Linq;
using System.Text;
using System.Threading.Tasks;
using System.Windows.Forms;

namespace TEPArticle
{
    public partial class Form1 : Form
    {
        public Form1()
        {
            InitializeComponent();
            
        }
   
        private void TEPprogressBar1_MouseHover(object sender, EventArgs e)
        {
            MessageBox.Show("MouseHover in the TEP ProgressBar");
        }
    }
}
You can observe that we have used the message box as the functionality. When the MouseHover event occurs message box prompt and shows a message which is defined by the MouseHover event handler. We have also attached the output of above code which you can preview below.

C# ProgressBar MouseLeave Event Handler

This event is designed to perform functionality whenever the mouse cursor will leave the visible boundaries of ProgressBar. In short, we can be said it is the reciprocal or inverse of MouseEnter event handler. Now we are going to create the code with MouseLeave event handler. After the activation of this event handler, you have to write functionality which you want to perform within MouseLeave event handler. From the following code, you can be observed the sequence of a program which we are going to execute.
using System;
using System.Collections.Generic;
using System.ComponentModel;
using System.Data;
using System.Drawing;
using System.Linq;
using System.Text;
using System.Threading.Tasks;
using System.Windows.Forms;

namespace TEPArticle
{
    public partial class Form1 : Form
    {
        public Form1()
        {
            InitializeComponent();
            
        }

        private void TEPprogressBar1_MouseLeave(object sender, EventArgs e)
        {
            MessageBox.Show("MouseLeave the TEP ProgressBar");
        }
    }
}
In the above code, we will observe we have used the message box. So that whenever mouse cursor will leave the visible part of progress bar it will get executed. You can perform any functionality instead of message box as you are required, for this tutorial we have used the message box. In the following image, you can observe the exact output which will come after execution.

C# ProgressBar Resize Event Handler

This event handler is designed to perform whenever the size of a progress bar is get changed in any mean such as the change in width or height. Now we are going to perform this event handler. You have to place a button on which click event handler you will declare the size changed functionality for a progress bar. So that, when you will click on the button size of a progress bar, is get changed. Then we will be used the Resize event handler for a relative progress bar. When size is get changed resize progress bar get executed. You can copy the below code and execute on your computer to get a clear idea.
using System;
using System.Collections.Generic;
using System.ComponentModel;
using System.Data;
using System.Drawing;
using System.Linq;
using System.Text;
using System.Threading.Tasks;
using System.Windows.Forms;

namespace TEPArticle
{
    public partial class Form1 : Form
    {
        public Form1()
        {
            InitializeComponent();
            
        }

        private void TEPprogressBar1_Resize(object sender, EventArgs e)
        {
            MessageBox.Show("TEP ProgressBar Size is Changed Now !!");
        }

        private void button1_Click(object sender, EventArgs e)
        {
            TEPprogressBar1.Size = new Size(100, 30);
        }
    }
}
In above code, you can observe that we have used message box as the functionality to be executed within Resize event handler. Before copy the above code you must have to place the progress bar and button on your desktop application and don't forget to change their name. Following is the image of exact above code which is taken after execution. In this tutorial, we have tried to summarize the C# ProgressBar in depth. So that beginner can understand their usage in software development. After this, you are able to create your own small application in which you can reflect processing via C# ProgressBar. For further advanced topics, you can read, C# PictureBoxC# Checked ListBoxC# CheckBox, and C# RadioButton. Don't forget to share it with your friends if you found this tutorial informative.  

C# PictureBox Control

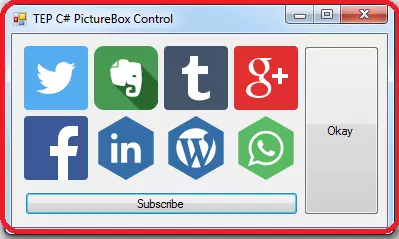
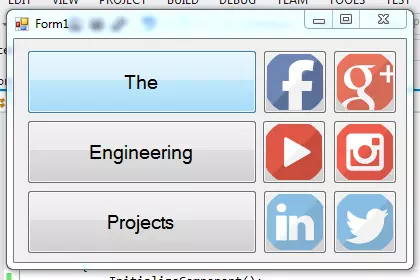
Hey everyone hopes you are good. In this tutorial, I'm going to share an amazing GUI tool which is mostly used in Point of Sale application which is C# PictureBox Control. As the name reflects it's feature, it's the box which allows you to preview the images. In short, we can say that this the PictureBox which is used to show images on the application, such as the logo or social media icon etc. In my previous tutorials, I have explained C# ListBox ControlC# Button ControlC# Label Control and C# TextBox Control which are similar to C# PictureBox. You will get to know about each and everything of C# PictureBox including Events. You can simply drag and drop the C# PictureBox from the toolbox in design tab and adjust that according to your needs. You can use C# PictureBox for many purposes according to your requirement of application development. In point of sale application developer used C# PictureBox to preview the image of a scanned item in the POS. If you are looking to add images in your desktop application then you have to use the C# PictureBox.

C# PictureBox Control

It's simple image box which allows you to add images in your desktop application. You can simply add PictureBox by drag the PictureBox object from the toolbox of design tab. PictureBox can't be received the inputs because it's not the selectable control tool like C# ListBox ControlC# Button ControlC# Label Control and C# TextBox Control etc. You can only add the images and perform any specific action with there event handlers. Suppose that you are wanted to add the PictureBox in your application, then simply drag and drop. Then in the main code call by the object name which is by default pictureBox1. To show the image within PictureBox we have used the image property which will set the path of the image to be previewed in C# PictureBox. In the following code, you can be observed how we have set the path of the image for PictureBox.
using System;
using System.Drawing;
using System.Windows.Forms;

namespace TEP
{
    public partial class Form1 : Form
    {
        public Form1()
        {
            InitializeComponent();
        }

        private void Form1_Load(object sender, EventArgs e)
        {
            pictureBox1.Image = Image.FromFile("c:\\testImage.jpg");          
        }

    }
}
First, you have to declare the PictureBox image property then you have to define the path from the constructor of Image.FromFile as mention in above code. In the following image, you can preview that how we have set the TestImage inside PictureBox. By default name of C# PictureBox is pictureBox1, if you are wanted to change the default name then you have to go to properties and search for the name. In the name, you can override the name easily. In the following image, you can see that how we have changed the name of C# PictureBox instance. It will be helpful if you are working on the mega projects, to get remember which object is used for which specific purposes.

C# PictureBox Events

C# PictureBox Events will allow you to perform the specific task or functionality according to the requirements on specific actions done by the end-user. There are many Events which you can use with the PictureBox to make your desktop application more interactive. Here is the list of those events which we will discuss further in this tutorial.
  • C# PictureBox Click Events
  • C# PictureBox DoubleClick Events
  • C# PictureBox MouseEnter Events
  • C# PictureBox MouseHover Events
  • C# PictureBox MouseLeave Events
There are many other events handler which you can be used, we have selected these events because these are frequently used during the development of desktop applications.

C# PictureBox Click Events

Click event is used to handle the click of the user on the PictureBox. Supposed you are wanted to perform any specific functionality when user will click on the PictureBox then you have to use the Click Event handler of PictureBox. You just need to declare the functionality within the click event. Whenever the user will click the picture box, click event capture the click and get executed. In the following code, you can observe that we have used simple message box within the Click event handler. So that when user will click on the PictureBox it will show the message prompt.
using System;
using System.Collections.Generic;
using System.ComponentModel;
using System.Data;
using System.Drawing;
using System.Linq;
using System.Text;
using System.Threading.Tasks;
using System.Windows.Forms;

namespace TEPArticle
{
    public partial class Form1 : Form
    {
        public Form1()
        {
            InitializeComponent();
        }

        private void TEPpictureBox1_Click(object sender, EventArgs e)
        {
            MessageBox.Show("You Just Click On the TEP PictureBox");
        }
    }
}
You can declare any kind of functionality within the click event handler according to your desire, we just used the message box to minimize the code and save our time. The main purpose is to share the basic logic of click event handler. In the following image, you can observe that when we have to click the PictureBox it's prompt the message.

C# PictureBox DoubleClick Events

This event occurs when user will click twice on the PictureBox. Sometimes we have required performing any functionality when user will DoubleClick on the PictureBox. You just have to activate the DoubleClick event handler and declare the functionality which you want to perform. So that when user will click twice on the picture box that functionality get executed. In the following code, you can observe that how we have declared the message box in the double click event handler. When user will click twice on the picture box a prompt message appears.
using System;
using System.Collections.Generic;
using System.ComponentModel;
using System.Data;
using System.Drawing;
using System.Linq;
using System.Text;
using System.Threading.Tasks;
using System.Windows.Forms;

namespace TEPArticle
{
    public partial class Form1 : Form
    {
        public Form1()
        {
            InitializeComponent();
        }

        private void TEPpictureBox1_DoubleClick(object sender, EventArgs e)
        {
            MessageBox.Show("You Just DoubleClick On the TEP PictureBox");
        }
    }
}
We have declared the message box in DoubleClick event handler. You can declare any other functionality within double click event handler. In the following image, you can be observed that how message prompt when user will click twice on the C# PictureBox.

C# PictureBox MouseEnter Events

This event handler is used to perform any action when the mouse cursor enters the boundaries of C# PictureBox. Supposed you are required to perform any functionality when even user will enter the mouse cursor in the boundaries of PictureBox. For this case, we will use the MouseEnter Event handler. We will declare a message box within the MouseEnter Event handler. Whenever you will enter the mouse to the visible part of PictureBox it will prompt the message box. In the following code, you can observe the whole scenario.
using System;
using System.Collections.Generic;
using System.ComponentModel;
using System.Data;
using System.Drawing;
using System.Linq;
using System.Text;
using System.Threading.Tasks;
using System.Windows.Forms;

namespace TEPArticle
{
    public partial class Form1 : Form
    {
        public Form1()
        {
            InitializeComponent();
        }

        private void TEPpictureBox1_MouseEnter(object sender, EventArgs e)
        {
            MessageBox.Show("You Just Enter in visible part of TEP PictureBox");
        }
    }
}
We have declared the message box within the MouseEnter event handler. Now when user will enter the mouse cursor to visible part message prompt. In the following image, you can observe the output of the above code.

C# PictureBox MouseHover Events

This event handler will occur whenever user will hover the mouse cursor for a while on PictureBox. There is a very little difference between MouseEnter and MouseHover Event handler. Until user will hover the mouse cursor this event will not be executed. Supposed that you are required to change the image of picture box whenever user will hover the mouse. For this scenario, we have created the code which you can get from the following.
using System;
using System.Collections.Generic;
using System.ComponentModel;
using System.Data;
using System.Drawing;
using System.Linq;
using System.Text;
using System.Threading.Tasks;
using System.Windows.Forms;

namespace TEPArticle
{
    public partial class Form1 : Form
    {
        public Form1()
        {
            InitializeComponent();
        }
        private void TEPpictureBox1_MouseHover(object sender, EventArgs e)
        {
            TEPpictureBox1.Image = Image.FromFile("C: \\Users\\Public\\Pictures\\test.jpg");
        }
    }
}
In the above code, you can observe that we have used the test.jpg as the image when the MouseHover event will be executed. You can declare any kind of functionality as you are required. You can replace the path of the image and set MouseHover event to your C# PictureBox. When you will execute the code and hover the mouse cursor on the PictureBox it will change the image.

C# PictureBox MouseLeave Events

This event is executed whenever the mouse cursor leaves the boundaries of PictureBox or the visible area. If you are wanted to perform any action when user will leave the PictureBox then you can use the MouseLeave event handler with C# PictureBox. In the following code, we have used MouseHover Event handler too along with the MouseLeave Event handler. We have declared pic1 for MouseHover and pic2 for MouseLeave event. When user will hover the mouse PictureBox set to pic1 and when leaving the PictureBox it will set to pic2. You can get the code from the following.
using System;
using System.Collections.Generic;
using System.ComponentModel;
using System.Data;
using System.Drawing;
using System.Linq;
using System.Text;
using System.Threading.Tasks;
using System.Windows.Forms;

namespace TEPArticle
{
    public partial class Form1 : Form
    {
        public Form1()
        {
            InitializeComponent();
        }


        private void TEPpictureBox1_MouseHover(object sender, EventArgs e)
        {
            TEPpictureBox1.Image = Image.FromFile("C: \\Users\\Public\\Pictures\\pic1.jpg");
        }

        private void TEPpictureBox1_MouseLeave(object sender, EventArgs e)
        {
            TEPpictureBox1.Image = Image.FromFile("C: \\Users\\Public\\Pictures\\pic2.jpg");

        }
    }
}
When you will execute above code, and hover the PictureBox the image get changed and when left the PictureBox image get change again. By this, you can create animated effects in your desktop application. Remember if you will copy the above code you have to add these event handlers to the C# PictureBox. We have tried to give you basic to advance information about C# PictureBox. In this tutorials, you have learned many different techniques which are used in the professional development of desktop application along with the usage of Event handlers. After this, you can go for C# ListBox ControlC# Button ControlC# Label Control and C# ComboBox Control. In all of this, don't forget to subscribe our YouTube Channel "TheEngineeringProjectsand C# Video Tutorial PlayList.

C# Checked ListBox Control

Hey, everyone, hope you are doing great. In today's article, we are going to explore C# Checked ListBox Control. In the previous article, we discussed in details about C# TextBox, C# Label, C# ListBox, C# ComboxBox and C# Button. C# Checked ListBox plays very important role in Point Of Sale applications. In some words, we can say this is a combination of check boxes and list. C# Checked ListBox is used to gain specific information from end-user. It's mostly used in survey-based application to gain the voting for a specific purpose. We will work with Checked ListBox same as we have worked with ListBox & ComboBox. You can use C# Checked ListBox for multiple purposes. You can use this as the attendance taker to mark the attendance of students.

C# Checked ListBox Control

The C# Checked ListBox is simple list box with the combination of checks. It provides you the list and checks to mark them as you select the items. The user can select the single and multiple checks. According to the need, you can set the checks enabled and disabled. You can create conditional statements on which C# Checked ListBox will become enabled and disabled. When professional programmers used Checked ListBox they will also use the Conditional Statements. They make sure that checked boxes will become enabled only when user will fill up or proceed the above instructions. A live example of checkbox usage is the terms & condition form of any organization. If you are getting started with YouTube they will be asked you to read their terms and checked in the last that you are agreed or not. If you will check the box only then you can process forward. Same is the case will C# Checked ListBox, developers make the conditional check for inputs gained from C# Checked ListBox. If you are wanted to add the Checked ListBox, then go to the toolbox in design tab. Drag the C# Checked ListBox on the form. Now the CheckListBox is added to the form. The default name of first drag Checked ListBox is as CheckedListBox1. You can change this name from the property tab on the right-hand side. Supposed you are wanted to add values in C# Checked ListBox, then you have to write items after the default name and select the add method. In the following code, you can be observed how we inserted the values inside C# Checked ListBox.
using System;
using System.Drawing;
using System.Windows.Forms;

namespace TEPNet
{
    public partial class Form1 : Form
    {
        public Form1()
        {
            InitializeComponent();

        }

        private void button1_Click(object sender, EventArgs e)
        {
            checkedListBox1.Items.Add("TEP 1");
            checkedListBox1.Items.Add("TEP 2");
            checkedListBox1.Items.Add("TEP 3");
            checkedListBox1.Items.Add("TEP 4");
        }
    }
}
We have used the button. When user will click the button, C# Checked ListBox values appears. It depends on your logic that how you wanted to process the codes. I have used the button if you don't want to use the button you can simply copy the code after the InitializeComponent function. It will generate the following output when a button is clicked.

C# Checked ListBox Properties

If you are looking to change the default styles, color scheme, font size etc then there are many properties which you can use to modify the Checked ListBox. Default Checked ListBox is simple in appearance, you can make that attractive by customising the properties. In the following part of an article, we will discuss, how to change foreground color and background color of a checked list box. How to change the font size and make checked and uncheck marks on checked ListBox items. If you are wanted to make the Checked ListBox items marked check when executing the program, then you have to use the CheckState attribute. There are three values which you can use for CheckState attribute.
  • Checked
  • UnChecked
  • Indeterminate
In the following code, we have used all the above values for CheckState attribute. By default all the Checked ListBox items are UnChecked so you don't need to write the UnChecked values.
using System;
using System.Drawing;
using System.Windows.Forms;

namespace TEPNet
{
    public partial class Form1 : Form
    {
        public Form1()
        {
            InitializeComponent();

        }

        private void button1_Click(object sender, EventArgs e)
        {
            checkedListBox1.Items.Add("TEP 1", CheckState.Checked);
            checkedListBox1.Items.Add("TEP 2", CheckState.Indeterminate);
            checkedListBox1.Items.Add("TEP 3", CheckState.Unchecked);
            checkedListBox1.Items.Add("TEP 4");
        }
    }
}
We don't use the CheckState for the 4th item because by default it's unchecked. If you will execute the code, you observed that Check will be marked, Indeterminate is Check but can't edit and uncheck is unmarked. If you can't understand then the below image will the exact output of the above code. If you are looking to change the background color then you have to use the backColor property. BackColor property is applicable on all tools which are available in ToolBox. In the following code, we are going to change the background color of Checked ListBox from white to AliceBlue. We will use the Color property to set the color. You can get the idea from the code.
using System;
using System.Drawing;
using System.Windows.Forms;

namespace TEPNet
{
    public partial class Form1 : Form
    {
        public Form1()
        {
            InitializeComponent();
            checkedListBox1.BackColor = Color.AliceBlue;
            checkedListBox1.Items.Add("TEP 1");
            checkedListBox1.Items.Add("TEP 2");
            checkedListBox1.Items.Add("TEP 3");
            checkedListBox1.Items.Add("TEP 4");
        }

       
    }
}
If you are wanted to change the foreground color or color of the font, then you have to use the ForeColor property to set the colors. We will be used the Color property to set the value of color which is assigned to the foreColor. In the following code, we have used BlueViolet color and set it for the foreground or for the font.
using System;
using System.Drawing;
using System.Windows.Forms;

namespace TEPNet
{
    public partial class Form1 : Form
    {
        public Form1()
        {
            InitializeComponent();
            checkedListBox1.ForeColor = Color.BlueViolet;
            checkedListBox1.Items.Add("TEP 1");
            checkedListBox1.Items.Add("TEP 2");
            checkedListBox1.Items.Add("TEP 3");
            checkedListBox1.Items.Add("TEP 4");
        }

       
    }
}
If you are wanted to change the font size, then you have to used to set the font property. We have to call the font constructor and passed two parameters. The first parameter is Font.FontFamily and the second parameter is the size of the font. In the following code, you can observe that how we changed the font size for Checked ListBox. The first parameter is the prototype and the second parameter is the font style property.
using System;
using System.Drawing;
using System.Windows.Forms;

namespace TEPNet
{
    public partial class Form1 : Form
    {
        public Form1()
        {
            InitializeComponent();
            checkedListBox1.Font = new Font(Font.FontFamily, 12);
            checkedListBox1.Items.Add("TEP 1");
            checkedListBox1.Items.Add("TEP 2");
            checkedListBox1.Items.Add("TEP 3");
            checkedListBox1.Items.Add("TEP 4");
        }

       
    }
}
If you are wanted to change the text style into italic, then you have to use the FontStyle property. We have to use the font constructor and passed two parameters. The first parameter is the prototype and the second one is the FontStyle.Value which is set to Italic in the following code. We have passed the CheckedListBox1.Font as the prototype parameter.
using System;
using System.Drawing;
using System.Windows.Forms;

namespace TEPNet
{
    public partial class Form1 : Form
    {
        public Form1()
        {
            InitializeComponent();
            checkedListBox1.Font = new Font(checkedListBox1.Font, FontStyle.Italic);
            checkedListBox1.Items.Add("TEP 1");
            checkedListBox1.Items.Add("TEP 2");
            checkedListBox1.Items.Add("TEP 3");
            checkedListBox1.Items.Add("TEP 4");
        } 
    }
}
If you are wanted to bold the text, then you have to use the font constructor and passed the Font style as the bold. In the following code, we have changed the text of checkedListBox items to bold.
using System;
using System.Drawing;
using System.Windows.Forms;

namespace TEPNet
{
    public partial class Form1 : Form
    {
        public Form1()
        {
            InitializeComponent();
            checkedListBox1.Font = new Font(checkedListBox1.Font, FontStyle.Bold);
            checkedListBox1.Items.Add("TEP 1");
            checkedListBox1.Items.Add("TEP 2");
            checkedListBox1.Items.Add("TEP 3");
            checkedListBox1.Items.Add("TEP 4");
        }

       
    }
}
If you are wanted to change the font family style then you have to use the font constructor and passed the font family name and size as the parameter. The first parameter is the name of font family and the second parameter is the font size. In the following code, we have used the "Times New Roman" and the size as 20.
using System;
using System.Drawing;
using System.Windows.Forms;

namespace TEPNet
{
    public partial class Form1 : Form
    {
        public Form1()
        {
            InitializeComponent();
            checkedListBox1.Font = new Font("Times New Roman",20);
            checkedListBox1.Items.Add("TEP 1");
            checkedListBox1.Items.Add("TEP 2");
            checkedListBox1.Items.Add("TEP 3");
            checkedListBox1.Items.Add("TEP 4");
        }

       
    }
}
If you are wanted to check that what the value you have selected, then you have to use the SelectedItem. In the following code, I have used the button and message box to show the selected item value. If you will execute the code, then you have to select the items first then click the button and it returns the selected item value in the message box.
using System;
using System.Drawing;
using System.Windows.Forms;

namespace TEPNet
{
    public partial class Form1 : Form
    {
        public Form1()
        {
            InitializeComponent();
            checkedListBox1.Items.Add("TEP 1");
            checkedListBox1.Items.Add("TEP 2");
            checkedListBox1.Items.Add("TEP 3");
            checkedListBox1.Items.Add("TEP 4");
        }

        private void button1_Click(object sender, EventArgs e)
        {
            MessageBox.Show(checkedListBox1.SelectedItem.ToString());
        }

       
    }
}
If you are wanted to verify that, which items are marked or check, then you have to use the foreach loop. In the following code, we have used the foreach loop to get the value from checkedListBox1.CheckedItems into an object-based variable which is itemCheck. Then we have to use message box to show the value of itemCheck in each step of a loop by converting the object type value into a string by calling the ToSting method.
using System;
using System.Drawing;
using System.Windows.Forms;

namespace TEPNet
{
    public partial class Form1 : Form
    {
        public Form1()
        {
            InitializeComponent();
            checkedListBox1.Items.Add("TEP 1");
            checkedListBox1.Items.Add("TEP 2");
            checkedListBox1.Items.Add("TEP 3");
            checkedListBox1.Items.Add("TEP 4");
        }

        private void button1_Click(object sender, EventArgs e)
        {          
         foreach (object itemChecked in checkedListBox1.CheckedItems)
            {           
                MessageBox.Show(itemChecked.ToString());
            }
        }   
    }
}
If you are wanted to change the border style of Checked ListBox, then you have to use the BorderStyle property and set the style according to your need. There are three styles which you can apply, all those styles are mention in the following code. You can check them one by one, if you will execute all of these styles at once then only the last one is getting executed and other above will get ignored by the compiler.
checkedListBox1.BorderStyle = BorderStyle.Fixed3D;
checkedListBox1.BorderStyle = BorderStyle.FixedSingle;
checkedListBox1.BorderStyle = BorderStyle.None;

C# Checked ListBox Events

C# provides various events to utilize with GUI tools. We can be used events to Checked ListBox and enhanced its features. Events are introduced to create conditional checks for the users to perform specific functionalities at specific times. You can change any attribute when user will click on the listed or checked items. Changed the color when items mark checked. It depends on the requirement of the software in which you will use the CheckedListBox. Following are some events which we are going to demonstrate with Checked ListBox.
  • Checked ListBox Click Event
  • Checked ListBox MouseHover Event
  • Checked ListBox MouseLeave Event
  • Checked ListBox BackColorChanged Event
  • Checked ListBox ForeColorChanged Event
  • Checked ListBox FontChanged Event
There are many other events, which we can use. Each event has its own logic of occurrence. Some events are common across the GUI Tools and some events are specifically used by GUI Tools. Checked ListBox Click Event This event will be executed when the user clicks within the boundaries of Checked ListBox. Whatever user will click on any listed item, checkbox or border it will get executed. To get the concept of the click event, suppose that you are wanted when someone clicks on CheckedListBox then the message will pop up and show notification of click. In the following program, we have created the code, which can execute in your compiler too.
using System;
using System.Drawing;
using System.Windows.Forms;

namespace TEPNet
{
    public partial class Form1 : Form
    {
        public Form1()
        {
            InitializeComponent();
            checkedListBox1.Items.Add("TEP 1");
            checkedListBox1.Items.Add("TEP 2");
            checkedListBox1.Items.Add("TEP 3");
            checkedListBox1.Items.Add("TEP 4");
        }

       
        private void checkedListBox1_Click(object sender, EventArgs e)
 {
 MessageBox.Show("You have Clicked !!");
 }  
    }
}
An output of the above code is given in the following image. You can perform any functionality as you required. For the demonstration purpose just used the message box to reflect any action. In the above code, we have to use the click event, if you want to activate the click event then simply click on the CheckedListBox in the design tab and it will create automatically click function. There is another option to do this, first, create any simple function and then set that function to the click event. In the following image, you can observe that when you click on CheckedListBox _Click function is set to click event.   Checked ListBox MouseHover Event This event will be executed when mouse will hover the boundaries of Checked ListBox. To clear the concept in the following code we are going to perform mousehover function. When user will hover the mouse on the boundaries event will get executed and show the message popup.
using System;
using System.Drawing;
using System.Windows.Forms;

namespace TEPNet
{
    public partial class Form1 : Form
    {
        public Form1()
        {
            InitializeComponent();
            checkedListBox1.Items.Add("TEP 1");
            checkedListBox1.Items.Add("TEP 2");
            checkedListBox1.Items.Add("TEP 3");
            checkedListBox1.Items.Add("TEP 4");
        }

        private void checkedListBox1_MouseHover(object sender, EventArgs e)
        {
            MessageBox.Show("Mouse is Hover !!");
        }   
    }
}
The above function is builtin and if you want to set the user define function then you can set by your own in the event property. You can perform any kind of functionality, we have used the message box, if you wanted to change anything then you can change such as the color, font family, and size of the text. In the following image, you can view the output of the above code. Checked ListBox MouseLeave Event This event will be executed when the cursor of the mouse will leave the boundaries of Checked ListBox. Once you have to hover the boundaries and slightly left the boundaries suddenly the popup shown on the screen and remind you that MouseLeave Event is get executed. In the following code, you can be observed the above concept.
using System;
using System.Drawing;
using System.Windows.Forms;

namespace TEPNet
{
    public partial class Form1 : Form
    {
        public Form1()
        {
            InitializeComponent(); 
        }
        private void button1_Click(object sender, EventArgs e)
        {
            checkedListBox1.Items.Add("TEP 1");
            checkedListBox1.Items.Add("TEP 2");
            checkedListBox1.Items.Add("TEP 3");
            checkedListBox1.Items.Add("TEP 4");
        }
        private void checkedListBox1_MouseLeave(object sender, EventArgs e)
        {
            MessageBox.Show("Mouse is Leave !!");
        }       
    }
}
MouseLeave is the default function which you can use after the name of CheckedListBox object name. You can set any user define function also as the alternative of the default function. When you will click the button it will be inserted the values in the CheckedListBox and when you hover the mouse cursor and leave the boundaries it will be executed the MouseLeave method. If you will not click the button, in this case, MousLeave method worked also. The following image is the screenshot of output. Checked ListBox BackColorChanged Event This event will occur when you will change the backColor or Background color of CheckListBox. Supposed you are wanted to perform any functionality when the user changed the backColor. Then we will code the functionality in the builtin BackColorChanged event. Instead of performing any functionality we are going to show a message box. In the following code, you can observe we have used the button to change the backColor of checkedListBox. When button will be clicked, the back color will be changed and BackColorChange Event will get executed.
using System;
using System.Drawing;
using System.Windows.Forms;

namespace TEPNet
{
    public partial class Form1 : Form
    {
        public Form1()
        {
            InitializeComponent();
            checkedListBox1.Items.Add("TEP 1");
            checkedListBox1.Items.Add("TEP 2");
            checkedListBox1.Items.Add("TEP 3");
            checkedListBox1.Items.Add("TEP 4");
           
        }

        private void button1_Click(object sender, EventArgs e)
        {
            checkedListBox1.BackColor = Color.AliceBlue;
        }

        private void checkedListBox1_BackColorChanged(object sender, EventArgs e)
        {
            MessageBox.Show("BackColor Is Changed !");
        }  
    }
}
In the above code, we have inserted the values in CheckedListBox during the form initialization phase. Then we have declared the Alice Blue as the backColor of the CheckedListBox within button click event. When user will click on the button, a background color of checkedListBox is get changed and the backColorChanged event gets executed. In the following image, you can preview the output of the above code. Checked ListBox ForeColorChanged Event This event is get executed when user will change the ForeColor of CheckedListBox. There are many ways to change ForeColor programmatically. Suppose we have created a button and add instruction to change the ForeColor of CheckListBox. To execute the ForeColor method we have to change the foreColor and best solution is to add foreColor change instruction into button click event. In the following code, you can be observed the above case.
using System;
using System.Drawing;
using System.Windows.Forms;

namespace TEPNet
{
    public partial class Form1 : Form
    {
        public Form1()
        {
            InitializeComponent();
            checkedListBox1.Items.Add("TEP 1");
            checkedListBox1.Items.Add("TEP 2");
            checkedListBox1.Items.Add("TEP 3");
            checkedListBox1.Items.Add("TEP 4");

        }

        private void button1_Click(object sender, EventArgs e)
        {
            checkedListBox1.ForeColor = Color.Red;
        }

        private void checkedListBox1_ForeColorChanged(object sender, EventArgs e)
        {
            MessageBox.Show("ForeColor Is Changed !");
        }   
    }
}
In the above code, we have inserted the demo values in the initialization phase of the form. Then we have used the button click event to change the foreColor of the CheckedListBox. Then we have used message box as the functionality which is performed when ForeColor is changed. In the following image, you can observe the output of the above code. Checked ListBox FontChanged Event This event will be executed when the font changed. There are several ways to change the fonts, such as you can change the font on the runtime or changed by the events. In the following code, we will create button event and write instruction to change the font the user click. Then used the message box to show interrupt when the font is getting changed. When any kind of change occurs in the font then this event will be executed, whatever you change the font size or font family. In the code, we just change the size of the font for demonstration.
using System;
using System.Drawing;
using System.Windows.Forms;

namespace TEPNet
{
    public partial class Form1 : Form
    {
        public Form1()
        {
            InitializeComponent();
            checkedListBox1.Items.Add("TEP 1");
            checkedListBox1.Items.Add("TEP 2");
            checkedListBox1.Items.Add("TEP 3");
            checkedListBox1.Items.Add("TEP 4");

        }

        private void button1_Click(object sender, EventArgs e)
        {
            checkedListBox1.Font = new Font(Font.FontFamily, 12);
        }

        private void checkedListBox1_FontChanged(object sender, EventArgs e)
        {
            MessageBox.Show("Font Is Changed !");
        }   
    }
}
If you want to execute above code in your compiler, then you have to drag the button and CheckedListBox. Then activate the button click and FontChanged Event. Then copy paste the above code into a compiler and you will be able to execute the program. Below is the output image of above code. In this tutorial, we have tried to give you a basic overview of advanced knowledge of C# Checked ListBox. All the above codes are added after the testing. You can do anything with C# Checked ListBox according to your requirements and ideas. If you face any kind of problem let us know. You can also get similar concepts from C# ListBox and C# ComboBox. You can also get the latest updates of C# Video tutorials from our YouTube Playlist (C# Video Tutorials). Don't forget to share it with your friends.

C# CheckBox Control

Hello, everyone, I hope you are doing great. In this tutorial, I am going to explain you about C# checkbox control, in my previous tutorials I have already explain you, C# RadioButton Control, C# ListBox Control, C# Button Control and C# Checked ListBox Control. C Sharp checkboxes have their own values in point of sale mission and desktop application development. Checkboxes are basically used to retrieve the specific data from the user. C# CheckBox allows the user to give specific input. It's mostly used where we have to retrieve the specific data from the user such as the gender selection, terms and condition agreement, and age-restricted data. You can simply use a single object C# CheckBox or multiple objects it totally depends on your requirement of developing a desktop app.

C# CheckBox Control

C# CheckBox is a simple checkbox along with the text which is the name of the checkbox. It will allow a user to make a multiple and specific selection. If the user will click first time on the checkbox then the small tick sign is marked on a checkbox. When user will click again on the checkbox it will get uncheck. Its mean user can select and deselect the checkbox. If you want to add the checkbox into your desktop application then you have to simply search for it from a toolbox, available in Visual Studio. Then drag the checkbox to your desktop application. Now you are able to use this checkbox. In the following image, you can observe that we have used 15 checkboxes. We just drag one instance of checkbox and replicate that to 14 Times. You will observe that each checkbox have the default name such as checkbox1, checkbox2, checkbox 3 and so on. You have two options to change the name of a checkbox. The first method is that go to the design tab, click on any of the checkboxes. On the right bottom, the property tab gets activate from where you can change the text of checkbox. In the following image, you can observe the property tab from where you can change the text of checkboxes. The second method is to change the name programmatically. You can access the same properties which are available in property tab with the help of programming attributes. Programmatically change the name of checkboxes we have to use text property. In the following code, we have used text property and assign a string value. A string value now becomes the text of checkbox when desktop application is executed.
using System;
using System.Drawing;
using System.Windows.Forms;

namespace TEP
{
    public partial class Form1 : Form
    {
        public Form1()
        {
            InitializeComponent();
            checkBox1.Text = "TEP CheckBox1";
            checkBox2.Text = "TEP CheckBox2";
            checkBox3.Text = "TEP CheckBox3";
            checkBox4.Text = "TEP CheckBox4";
            checkBox5.Text = "TEP CheckBox5";
        }  
    }
}
In the above code, you have observed that we have used text property right after initializecomponent() method. Because we are setting checkbox text dynamically and it will only happen when we will declare this code in the initialization phase of a desktop application. In the following image, you can observe the output of above code.

C# CheckBox Properties

There are several propertie are available, which you can override. In this section, we will discuss all those properties which we can be used to customize C# CheckBox. Such as the Text Color, Text Size, Text Font family etc. The default tools are looks very simple and common. To increase the interactivity of the user we have to create attractive applications and forms. For this purpose, we have to override the default properties. Supposed that you are wanted, if the program is executed Checkbox is by default marked checked. Then we will use the Checked property to mark it true. In the following code, you can observe that we have used three checkboxes to marked them true.
using System;
using System.Drawing;
using System.Windows.Forms;

namespace TEP
{
    public partial class Form1 : Form
    {
        public Form1()
        {
            InitializeComponent();
            checkBox1.Checked = true;
            checkBox2.Checked = true;
            checkBox3.Checked = true;
        }  
    }
}
In the above code, we only marked check first three checkboxes. By this, you can mark check and uncheck the checkboxes by default. In the following image, you can observe the output of above code. Supposed that you are wanted to change the background color of Checkbox. Then you have to use the backColor property available for CheckBox. There are many colors available which you can easily be used for your checkboxes. In the following code, you can be observed the different color for each of the checkboxes.
using System;
using System.Drawing;
using System.Windows.Forms;

namespace TEP
{
    public partial class Form1 : Form
    {
        public Form1()
        {
            InitializeComponent();
            checkBox1.BackColor = Color.AliceBlue;
            checkBox2.BackColor = Color.Beige;
            checkBox3.BackColor = Color.BlueViolet;

            checkBox4.BackColor = Color.BurlyWood;
            checkBox5.BackColor = Color.DarkBlue;
            checkBox6.BackColor = Color.DarkOrange;

            checkBox7.BackColor = Color.DeepSkyBlue;
            checkBox8.BackColor = Color.Gainsboro;
            checkBox9.BackColor = Color.LawnGreen;
            checkBox10.BackColor = Color.LightSeaGreen;
        }  
    }
}
There are ten checkboxes in the above code, each checkbox has a unique color. Color combination is the major part of designing phase. The client basically focused on the front end of the desktop app that's why coloring matters a lot. In the following image, you can be observed that what right color mean to the eye and whats the wrong color means to an eye, its the output of above code. Supposed you are wanted to change the color of font or the foreground then you have to use the ForeColor property. By using the ForeColor property we can change the font color. By using the BackColor we have changed the background color and ForeColor property is the inverse. In the following code we just simply changed the BackColor into ForeColor and all the above color which we used for the background now used as the foreground.
using System;
using System.Drawing;
using System.Windows.Forms;

namespace TEP
{
    public partial class Form1 : Form
    {
        public Form1()
        {
            InitializeComponent();
            checkBox1.ForeColor = Color.AliceBlue;
            checkBox2.ForeColor = Color.Beige;
            checkBox3.ForeColor = Color.BlueViolet;

            checkBox4.ForeColor = Color.BurlyWood;
            checkBox5.ForeColor = Color.DarkBlue;
            checkBox6.ForeColor = Color.DarkOrange;

            checkBox7.ForeColor = Color.DeepSkyBlue;
            checkBox8.ForeColor = Color.Gainsboro;
            checkBox9.ForeColor = Color.LawnGreen;
            checkBox10.ForeColor = Color.LightSeaGreen;
        }  
    }
}
In the above code, some colors are very light in shade and some are dark. We can't judge the color by their names. Because there are many colors to be used. If you want to select any color then you can to try all the color first. In the following image, you can observe the output of the above code. Some colors are the light that's why you can't clearly saw the output. Supposed that you are wanted to change the size of the checkbox text. Then you have to use the font property to assign the text size. We will be used font constructor and passed the two parameters. The first parameter is the prototype and second is the size. In the following code, you can be observed how we set the font size for checkboxes.
using System;
using System.Drawing;
using System.Windows.Forms;

namespace TEP
{
    public partial class Form1 : Form
    {
        public Form1()
        {
            InitializeComponent();
            checkBox1.Font = new Font(Font.FontFamily, 5);
            checkBox2.Font = new Font(Font.FontFamily, 6);
            checkBox3.Font = new Font(Font.FontFamily, 7);

            checkBox4.Font = new Font(Font.FontFamily, 8);
            checkBox5.Font = new Font(Font.FontFamily, 9);
            checkBox6.Font = new Font(Font.FontFamily, 10);

            checkBox7.Font = new Font(Font.FontFamily, 11);
            checkBox8.Font = new Font(Font.FontFamily, 12);
            checkBox9.Font = new Font(Font.FontFamily, 13);
            checkBox10.Font = new Font(Font.FontFamily, 14);
        }  
    }
}
We have used Font.FontFamily as the prototype and integer value as the size of the font. You can also change the font family by using the font constructor. In the following image, you can observe the output of above code. You will also observe that as much integer value is small the size gets decreased and as much the value is incremented the size get increased. If you are wanted to change the font family of C# CheckBox text then you have to use the font constructor. We will pass two parameters the first parameter will be a name of font family and the second parameter will be the size of the text. On the note, you must have to know that font constructor does not allow single parameter. In the following code, you can be observed the name of font families.
using System;
using System.Drawing;
using System.Windows.Forms;

namespace TEP
{
    public partial class Form1 : Form
    {
        public Form1()
        {
            InitializeComponent();

            checkBox1.Font = new Font("Times New Roman", 11);
            checkBox2.Font = new Font("Century", 11);
            checkBox3.Font = new Font("Arial", 11);
            checkBox4.Font = new Font("Comic Sans MS", 11);
            checkBox5.Font = new Font("Copperplate Gothic Light", 11);
            checkBox6.Font = new Font("Georgia", 11);
            checkBox7.Font = new Font("Impact", 11);
            checkBox8.Font = new Font("Lucida Console", 11);
        }  
    }
}
All the above font family names are the default fonts which are available in the windows. If you want to use the special kind of font then you have to install that first before use. You have also mentioned the size along with the font family name. In the following image, you can be observed the output of the above code, and what font effects on the desktop application. If you are wanted to validate which checkbox is checked or not then you can simply be used the conditional statements. In the following code, I have used the button in which we have used a conditional statement. We used simple checks that which checkbox is marked will return the message box on the button click. When user will check any checkbox and click on the button it will return the message boxes with the named of marked checkboxes.
using System;
using System.Drawing;
using System.Windows.Forms;

namespace TEP
{
    public partial class Form1 : Form
    {
        public Form1()
        {
            InitializeComponent();

            
        }

        private void button1_Click(object sender, EventArgs e)
        {
            if (checkBox1.Checked == true)
            {
                MessageBox.Show(checkBox1.Text);
            }
            if (checkBox2.Checked == true)
            {
                MessageBox.Show(checkBox2.Text);
            }
            if (checkBox3.Checked == true)
            {
                MessageBox.Show(checkBox3.Text);
            }
            if (checkBox4.Checked == true)
            {
                MessageBox.Show(checkBox4.Text);
            }
            if (checkBox5.Checked == true)
            {
                MessageBox.Show(checkBox5.Text);
            }
            if (checkBox6.Checked == true)
            {
                MessageBox.Show(checkBox6.Text);
            }
            if (checkBox7.Checked == true)
            {
                MessageBox.Show(checkBox7.Text);
            }
            if (checkBox8.Checked == true)
            {
                MessageBox.Show(checkBox8.Text);
            }
            if (checkBox9.Checked == true)
            {
                MessageBox.Show(checkBox9.Text);
            }
            if (checkBox10.Checked == true)
            {
                MessageBox.Show(checkBox10.Text);
            }
        }  
    }
}
You can observe the output of the above code in the following image. In which we have to click the button after the selection of checkbox3 and it returns the message box with its name. If you are wanted to set any image as the background of C# checkBox then you have to use the image property and have to set the path of an image. In the following code, we are going to set the image for just checkbox1. Remeber that don't use large images for the background because it will disturb your whole layout.
using System;
using System.Drawing;
using System.Windows.Forms;

namespace TEP
{
    public partial class Form1 : Form
    {
        public Form1()
        {
            InitializeComponent();
            checkBox1.Image = Image.FromFile("C:\\Users\\Jade\\Pictures\\brownImage.jpg");
        }  
    }
}

C# CheckBox Event

C# provides many built-in functions which get executed on certain condition. Each condition is nominated as the event. Such as the TextChange Event. When user will change the text of any tool this event is getting executed. We can create a user define functions and assign them to event handlers. There are many events which we can use to enhance the interaction of C# CheckBox. Following are the basic C# CheckBox Events which we will use in a further section of this tutorial.
  • C# CheckBox BackColorChanged Event
  • C# CheckBox CheckedChanged Event
  • C# CheckBox Click Event
  • C# CheckBox ForeColorChanged Event
  • C# CheckBox MouseHover Event
  • C# CheckBox MouseLeave Event
  • C# CheckBox TextChanged Event
All the above event have their own condition on which they get executed. In the following part, we will discuss them one by one. We will also create example codes to learn their execution reasons and flow.

C# CheckBox BackColorChanged Event

This event raised when someone changed the background color of Checkbox or change color by any sort of code. The main thing behind the execution of this event is changing the background color. If we create a program in which we first change the color of the background and used this event then it will get executed right after background color gets changed. In the following code, you can get the idea. We have used the button click event handler in which we declared the background color for C# CheckBox. Then we have declared the BackColorChanged Event for C# CheckBox. When user will click on the button, background color gets changed and BackColorChanged Event gets executed.
using System;
using System.Drawing;
using System.Windows.Forms;

namespace TEP
{
    public partial class Form1 : Form
    {
        public Form1()
        {
            InitializeComponent();   
        }

        private void button1_Click(object sender, EventArgs e)
        {
            checkBox1.BackColor = Color.AliceBlue; 
        }

        private void checkBox1_BackColorChanged(object sender, EventArgs e)
        {
            MessageBox.Show("BackColorChanged Executed!");
        }  
    }
}
We have used AliceBlue color for the background. You can use other colors too, there are varieties of colors are available. In the following image, you can observe the output of above code. We have executed just message box when the color changed, you can perform any kind of functionality.

C# CheckBox CheckedChanged Event

This event is get executed when user will be changed the selection. Supposed you have marked check any checkbox and if you uncheck that CheckedChanged event is get executed. Every time you change the selection it will get executed. In the following code, you can observe that we have used CheckedChanged Event just of the checkBox1. So if a user will change the selection of checkbox1 then only it's get executed.
using System;
using System.Drawing;
using System.Windows.Forms;

namespace TEP
{
    public partial class Form1 : Form
    {
        public Form1()
        {
            InitializeComponent();
            
        }

        private void checkBox1_CheckedChanged(object sender, EventArgs e)
        {
            MessageBox.Show("CheckedChanged Executed!");
        }  
    }
}
You have to create a CheckedChange event for each of the C# CheckBox. We have just created for the first checkBox. In the following image, you can observe that we only mark checked the first checkbox and it returns the message popup.

C# CheckBox Click Event

This event will be executed when user will click on the text or on the checkbox. Supposed that you are wanted to perform any functionality when user will click any specific checkbox then you will be used the Click Event. This event is mostly used with buttons. In the following code you can be observed that we have added this event with the first checkbox so when user will click on the text of the first checkbox or click on the checkbox it will get executed.
using System;
using System.Drawing;
using System.Windows.Forms;

namespace TEP
{
    public partial class Form1 : Form
    {
        public Form1()
        {
            InitializeComponent();       
        }

        private void checkBox1_Click(object sender, EventArgs e)
        {
            MessageBox.Show("Click Executed!");
        }  
    }
}
In the above code, we just declare click event for checkbox1 only, if you will copy paste it multiple times and rename as checkbox2 and checkbox3 then it would not work. Because you have also assigned the event to the event property which is on the right bottom of visual studio. In the following image, you can be observed the output after execution of the code.

C# CheckBox ForeColorChanged Event

This event is executed when user will change the ForeColor or foreColor is get changed. Supposed if you have created the button click event and declare the foreColor for any specific C# Checkbox and used ForeColorChanged Event just for that specific CheckBox. Then we can execute this event properly. Because on the click of user ForeColor get changed and the ForeColorChanged event gets executed. In the following code, you have observed the above scenario.
using System;
using System.Drawing;
using System.Windows.Forms;

namespace TEP
{
    public partial class Form1 : Form
    {
        public Form1()
        {
            InitializeComponent();

            
        }

        private void button1_Click(object sender, EventArgs e)
        {
            checkBox1.ForeColor = Color.AliceBlue;

        }

        private void checkBox1_ForeColorChanged(object sender, EventArgs e)
        {
            MessageBox.Show("ForeColorChanged Executed!");
        }  
    }
}
When user will click the button, ForeColor of first C# CheckBox is get changed from Black to AliceBlue. After color get changed ForeColorChanged event get executed the return the message popup. In the following image, you can be observed the output that C# CheckBox1 foreColor gets changed.

C# CheckBox MouseHover Event

This event is executed when user will hover the mouse on C# CheckBox. Supposed you are wanted to perform any kind of functionality when user will hover the mouse on CheckBox then you have to use the CheckBox MouseHover event. In the following code, we have used ForeColor to be changed when user will hover the mouse on CheckBox.
using System;
using System.Drawing;
using System.Windows.Forms;

namespace TEP
{
    public partial class Form1 : Form
    {
        public Form1()
        {
            InitializeComponent();

            
        }

        private void checkBox1_MouseHover(object sender, EventArgs e)
        {
            checkBox1.ForeColor = Color.BlueViolet;
            MessageBox.Show("ForeColorChanged Executed!");
        }  
    }
}
This is a quite good example to demonstrate the MouseHover event. When user will hover the mouse cursor on the CheckBox1 then ForeColor is get changed into Blue Violet. In the following image, you can get the main idea how it looks after the execution.

C# CheckBox MouseLeave Event

This event is executed when user will hover the mouse and then left the mouse cursor from the boundaries of CheckBox. In short, this event is the inverse of MouseHover event. Now we are going to create animation via MouseLeave and MouseHover event. We will declare the BlueVoilet color for the font when user will hover the mouse and Black color for the font when user will leave the checkBox. Let's have a look at the code and observe its flow of execution.
using System;
using System.Drawing;
using System.Windows.Forms;

namespace strnull
{
    public partial class Form1 : Form
    {
        public Form1()
        {
            InitializeComponent();

            
        }

        private void checkBox1_MouseHover(object sender, EventArgs e)
        {
            checkBox1.ForeColor = Color.BlueViolet;
            
        }

        private void checkBox1_MouseLeave(object sender, EventArgs e)
        {
            checkBox1.ForeColor = Color.Black;
           
        }  
    }
}
If you want to execute the above code, then you have to drag one checkbox on your windows form. Then add mouse leave and mouse hover event. Copy the above code and inserted into your compiler and executed. When you will hover the mouse on the checkbox1 its font color gets changed and when leaving the checkbox then fore color get to default.

C# CheckBox TextChanged Event

This event is get executed when Text of checkbox is get changed. You can change the text simply write a code. Its depend on your logic and condition of the program. We simply going to change the text when user will click the button. We have used the simple message box to show the prompt that TextChanged event is get executed. In the following code, you can be observed the above scenario.
using System;
using System.Drawing;
using System.Windows.Forms;

namespace TEP
{
    public partial class Form1 : Form
    {
        public Form1()
        {
            InitializeComponent();           
        }

        private void button1_Click(object sender, EventArgs e)
        {
            checkBox1.Text = "Changed !";

        }

        private void checkBox1_TextChanged(object sender, EventArgs e)
        {
            MessageBox.Show("Text Changed !!");
        }  
    }
}
For each checkbox, you have to declare the separate TextChanged event handler. In the above code, we declared it just for the checkbox1. So when the default text of checkbox1 is get changed, TextChanged event get raised. In the following image, you can be observed the output. We have tried to explain you about the C# CheckBox from the beginning to its depth. By using the various examples. We have tried to give the touch of professional usage of events used with C# CheckBox with generic coding. All the above codes are tested first then uploaded, you can also check the executed output in the images which are given right after the codes. If you have any kind of problem regarding C# CheckBox you can share it with us, we will try to resolve your problems at first priority. You can also check our previous tutorials like C# ListBox ControlC# Button ControlC# Label Control and C# TextBox Control.

C# RadioButton Control

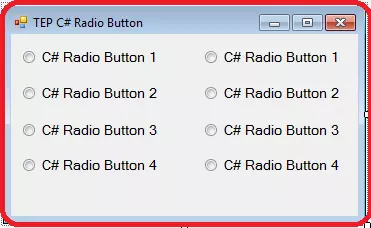
Hello folks, hope you are doing good. Today in this article I'm going to explain you all about C# RadioButton Control. In my previous articles, we discussed C# Checked ListBox & C# ListBox Control. C# RadioButton is also known as the OptionButton. The radio button allows the user to select the specific values as the input. When user will click on the radio button, it will get activated, a user can select only one radio button at the same time. Radio buttons have mostly used in the point of same applications and signup forms. You have mostly seen the radio button for the gender selection in the forms. Radio button makes easier for a user to give input. You can make specific input values. You can create any kind of application with the help of Radio Button. Even that you can create the polling desktop application by using a Radio button.

C# RadioButton Control

C# RadioButton has its own importance in desktop applications. Mostly point of sale applications used a Radio button to retrieve the specific input values. Such as the payment method is cash or credit. C# RadioButton enables the user to checked just one option at the same time and other options remain unchecked or unselected. If you are wanted to add C# RadioButton in your desktop application then you have to use the ToolBox in the design tab. Just search for the RadioButton and drag it to your application. In the following image, you can be observed that we have added the 8 RadioButtons and only one is selected. Because you can't select more than one RadioButton at the same time. You also observed that the name of radio buttons are the default names. If you want to change their name then you have two options. The first option is to change the name from the property section which is at the right side of visual studio development environment. We have changed the name of the first column radio buttons by this method. In the following image, you can be observed how we changed the name of radio buttons. The second method to change the name of a radio button is programmatically. In the source code, you have to set the radio button name with the help of Text property of radio button. After the name of radio button object call the text property and set the value. In the following code, you can be observed that how we set the value of radio button text property.
using System;
using System.Drawing;
using System.Windows.Forms;

namespace TEP
{
    public partial class Form1 : Form
    {
        public Form1()
        {
            InitializeComponent();
            radioButton5.Text = "TEP Code RB5";
            radioButton6.Text = "TEP Code RB6";
            radioButton7.Text = "TEP Code RB7";
            radioButton8.Text = "TEP Code RB8";
        }
    }
}
It depends on your ease, you can use the both method to set the name of radio buttons. For your better understanding, we have attached the screenshot of output along with the code.

C# RadioButton Properties

If you are wanted to override the default properties of C# RadioButton. Then you have to know about all properties,  such as you can change the color of radio button text, changed the size of text, a color of background and foreground etc. Supposed that you are wanted to change the state of RadioButton, by default every radio button is unchecked, you can be checked any radio button during the execution of a desktop application. In the following code, we have used the Checked property and make that true.
using System;
using System.Drawing;
using System.Windows.Forms;

namespace TEP
{
    public partial class Form1 : Form
    {
        public Form1()
        {
            InitializeComponent();
            radioButton1.Checked = true;
        }
    }
}
If you will add more radio buttons checked true then the only last radio button will be checked. Because you can only be checked one radio button at the same time. In the following image, you can preview that only radio button1 is checked. If you are wanted to change the background color of any RadioButton then you have to use the BackColor property and set the color. There are varieties of color which you can use to set as the background color. In the following code, we have used different colors for each of the buttons.
using System;
using System.Drawing;
using System.Windows.Forms;

namespace strnull
{
    public partial class Form1 : Form
    {
        public Form1()
        {
            InitializeComponent();
            radioButton1.BackColor = Color.AliceBlue;
            radioButton2.BackColor = Color.AntiqueWhite;
            radioButton3.BackColor = Color.Aqua;
            radioButton4.BackColor = Color.Aquamarine;
            radioButton5.BackColor = Color.Azure;
            radioButton6.BackColor = Color.Beige;
            radioButton7.BackColor = Color.Bisque;
            radioButton8.BackColor = Color.BlueViolet;
        }
    }
}
You must have to use the Color object to set any color. For the better understanding, we have taken the screenshot of output along with the code which is overriding the color properties. If you are wanted to change the forecolor or the color of the text then you have to use the ForeColor properties. It's same as the BackColor. In the following code, we have used the dark colors to dominate them on a windows form.
using System;
using System.Drawing;
using System.Windows.Forms;

namespace TEP
{
    public partial class Form1 : Form
    {
        public Form1()
        {
            InitializeComponent();
            radioButton1.ForeColor = Color.YellowGreen;
            radioButton2.ForeColor = Color.Tomato;
            radioButton3.ForeColor = Color.Violet;
            radioButton4.ForeColor = Color.Turquoise;
            radioButton5.ForeColor = Color.SteelBlue;
            radioButton6.ForeColor = Color.Sienna;
            radioButton7.ForeColor = Color.SeaGreen;
            radioButton8.ForeColor = Color.BlueViolet;
        }
    }
}
We used the Color object to set the color. In the following image, you can observe that how the color changes the appearance and interface. By using the color schemes you can make eye attractive windows form and make easier for the user to identified usable features of your app. If you are wanted to change the font size for radio button text then you have to use the Font property. To set the size we have to pass the font family prototype and font size as the parameter in font constructor. In the following code, you can observe that how we changed the font size of a radio button.
using System;
using System.Drawing;
using System.Windows.Forms;

namespace TEP
{
    public partial class Form1 : Form
    {
        public Form1()
        {
            InitializeComponent();
            radioButton1.Font = new Font(Font.FontFamily,10);
            radioButton2.Font = new Font(Font.FontFamily, 11);
            radioButton3.Font = new Font(Font.FontFamily, 12);
            radioButton4.Font = new Font(Font.FontFamily, 13);
            radioButton5.Font = new Font(Font.FontFamily, 12);
            radioButton6.Font = new Font(Font.FontFamily, 11);
            radioButton7.Font = new Font(Font.FontFamily, 10);
            radioButton8.Font = new Font(Font.FontFamily, 9);
        }
    }
}
In the above code, we have used a different size for each RadioButton. The first four RadioButton size is increased and other four RadioButton size get a decrease. In the following image, you can observe the size of radio buttons. If you are wanted to change the font family then you have to use the same font property which is used to change the font size. There are two parameters which we used to change the font family, the first parameter is the name of font and second parameter is the size of the text. Font constructor doesn't allow single parameter that's why we passed the size. In the following code, we have used the different fonts for each C# RadioButton.
using System;
using System.Drawing;
using System.Windows.Forms;

namespace TEP
{
    public partial class Form1 : Form
    {
        public Form1()
        {
            InitializeComponent();
            radioButton1.Font = new Font("Times New Roman", 11);
            radioButton2.Font = new Font("Century", 11);
            radioButton3.Font = new Font("Arial", 11);
            radioButton4.Font = new Font("Comic Sans MS", 11);
            radioButton5.Font = new Font("Copperplate Gothic Light", 11);
            radioButton6.Font = new Font("Georgia", 11);
            radioButton7.Font = new Font("Impact", 11);
            radioButton8.Font = new Font("Lucida Console", 11);
            
        }
    }
}
All the above-used fonts are the default font which is available in Windows. If you don't know which font you have to used then used Google Font. It will help you to select the best font for your desktop application. In the following image, you can observe how font changes the appearance of your desktop application. If you are wanted to validate which of the Radio Button is selected as the option then you can use the Checked property after the name of RadioButton Object name. You have to use the If Conditional Statement to create the logic if radio button object is checked then show the popup message. In the following code, we have demonstrated the functionality. Each radio button contains a logical statement to return the value in the message box if it is checked.
using System;
using System.Drawing;
using System.Windows.Forms;

namespace TEP
{
    public partial class Form1 : Form
    {
        public Form1()
        {
            InitializeComponent(); 
        }
        private void button1_Click(object sender, EventArgs e)
        {
            if (radioButton1.Checked == true)
            {
                MessageBox.Show(radioButton1.Text);
            }
            else
            if (radioButton2.Checked == true)
            {
                MessageBox.Show(radioButton2.Text);
            }
            else
            if (radioButton3.Checked == true)
            {
                MessageBox.Show(radioButton3.Text);
            }
            else
            if (radioButton4.Checked == true)
            {
                MessageBox.Show(radioButton4.Text);
            }
            else
            if (radioButton5.Checked == true)
            {
                MessageBox.Show(radioButton5.Text);
            }
            else
            if (radioButton6.Checked == true)
            {
                MessageBox.Show(radioButton6.Text);
            }
            else
            if (radioButton7.Checked == true)
            {
                MessageBox.Show(radioButton7.Text);
            }
            else
            if (radioButton8.Checked == true)
            {
                MessageBox.Show(radioButton8.Text);
            }
        }
    }
}
If you want to try the above code in your own compiler, then you have to add button click event first then you can execute the above code. It will allow you to select an option, and when you press the button it will generate the popup message and return the value of selected radio button. In the following image, you can observe the output of the above code. If you are wanted to use the image as the background for the radio button then you have to use the image property. We will be used the image property to set the path of an image as the background. Don't use the large image as the background because it will extend to screen automatically. In the following code, you can be observed how you can set any image as the background.
using System;
using System.Drawing;
using System.Windows.Forms;

namespace TEP
{
    public partial class Form1 : Form
    {
        public Form1()
        {
            InitializeComponent();
            radioButton1.Image = Image.FromFile("C:\\Users\\Jade\\Pictures\\brownImage.jpg");
        }  
    }
}

C# RadioButton Event

C# allows us to enhance the functionalities according to our requirements. Every desktop application has their own needs and uniqueness. If you want to perform any specific function on the certain time or on the certain action, then we used the C# Events. C# Events are simple as the other common functions, which are provided by the visual studio. You can use any user define a function and set it as the event handler. It depends on the developer ease. Mostly developer used the builtin events. There are several C# Events which are common among all the C# Tools. Some Events are specific to C# Tools, mean you can't use all the events for all the tools. Following are the C# Events which we will be used with RadioButton to enhance the interaction of the end-user.
  • C# RadioButton BackColorChanged Event
  • C# RadioButton CheckedChanged Event
  • C# RadioButton Click Event
  • C# RadioButton ForeColorChanged Event
  • C# RadioButton MouseHover Event
  • C# RadioButton MouseLeave Event
  • C# RadioButton TextChanged Event
We have already mentioned that there are several C# Events which you can use with RadioButton. We just used the above events with RadioButton to give the major concepts behind every event and logical usage.

C# RadioButton BackColorChanged Event

This event will occur only when the background color of a radio button is changed. Supposed we want to show a message or perform any functionality when background color of radio button changed, then we will use BackColorChanged Event. There is two method by which we can set this event for RadioButton. The first method is to activate this event from the property section of radio button via events. The second method is to create a user-defined function and set as the BackColorChanged Event in the event properties. In the following image, you can compare the both method.
First Method Second Method
In the following code, we have used the button and it clicks event. We set the backColor to AliceBlue. When user will click the button, background color set to the AliceBlue. You also observed there is BackColorChanged Event in which we have used just a message box to just demonstrate that something is performed.
using System;
using System.Drawing;
using System.Windows.Forms;

namespace strnull
{
    public partial class Form1 : Form
    {
        public Form1()
        {
            InitializeComponent();

        }

        private void button1_Click(object sender, EventArgs e)
        {
            radioButton1.BackColor = Color.AliceBlue;
        }

        private void radioButton1_BackColorChanged(object sender, EventArgs e)
        {
            MessageBox.Show("BackColor is changed to " + radioButton1.BackColor.ToString());
        }
        
    }
}
In the above code, when the background color of the radio button is changed. Message prompt with the name of color which is set as the background. In the following image, you can observe the output of the above code.

C# RadioButton CheckedChanged Event

This event will occur and executed when user will change the option, such as user have select A first and then select the B then this event will be executed. In the following code, we are going to demonstrate the above scenario.
using System;
using System.Drawing;
using System.Windows.Forms;

namespace TEP
{
    public partial class Form1 : Form
    {
        public Form1()
        {
            InitializeComponent();
           
        }

        private void radioButton1_CheckedChanged(object sender, EventArgs e)
        {
            MessageBox.Show("Option changed.");
        }
        
    }
}
In the above code, we have used two radio button. Whenever you will change the radio buttons value or option CheckedChanged event gets executed. In the below image you can observe the output

C# RadioButton Click Event

This event will occur when user will click on the radio button, whatever user will click to check the option or just click in the text of radio button. Supposed that you have required performing any kind of functionality when user will click on the radio button or the text of radio button then you can used Click event which will fulfill your requirement for this scenario. In the following code, we have demonstrated the above scenario.
using System;
using System.Drawing;
using System.Windows.Forms;

namespace TEP
{
    public partial class Form1 : Form
    {
        public Form1()
        {
            InitializeComponent();
           

        }

        private void radioButton1_Click(object sender, EventArgs e)
        {
            MessageBox.Show("You Clicked!");
        }
        
    }
}
In the above code, we have used two radio buttons and just added the click event to the first radio button. If you will click the radio button1 then you will observe the popup message but if you clicked in the radio button2 then nothing will happen except that radio button2 get selected. It's because we have added the Click event just for the radio button1. In the following image, you can observe the output of above code.

C# RadioButton ForeColorChanged Event

This event gets executed when user will change the font color or fore color of the radio button. Supposed that you have created a button and set fore color changed the code in button click function. So that when user will click the button, fore color get changed and after this ForeColorChanged event performed on the changing of the fore color. In the following code, you can observe the above scenario.
using System;
using System.Drawing;
using System.Windows.Forms;

namespace TEP
{
    public partial class Form1 : Form
    {
        public Form1()
        {
            InitializeComponent();
           

        }

        private void button1_Click(object sender, EventArgs e)
        {
            radioButton1.ForeColor = Color.BlueViolet;

        }


        private void radioButton1_ForeColorChanged(object sender, EventArgs e)
        {
            MessageBox.Show("ForeColor Is changed to " + radioButton1.ForeColor.ToString());
        }
        
    }
}
In the above code, we have set the ForeColor ti BlueViolet when user will click the button. Then ForeColorChanged Event executed and prompt the message which color is selected as the ForeColor. In the following image, you can observe the output of the above code.

C# RadioButton MouseHover Event

This event is executed whenever the user hovers the cursor of the mouse on the radio button. If you will hover the mouse on radio button text then its also executed because that's also included in the boundaries of a radio button. In the following code, we are going to demonstrate the above scenario.
using System;
using System.Drawing;
using System.Windows.Forms;

namespace TEP
{
    public partial class Form1 : Form
    {
        public Form1()
        {
            InitializeComponent();
           

        }

        private void radioButton1_MouseHover(object sender, EventArgs e)
        {
            MessageBox.Show("Mouse Hover to " + radioButton1.Text.ToString());
        }
        
    }
}
In the above code, we have set the prompt message when user will hover the first radio button. You can declare any kind of functionality which you want to perform. In the following Image, you can be observed the output.

C# RadioButton MouseLeave Event

This event occurs when mouse cursor will leave the boundaries of the radio button, it's opposite to the mouseHover event. We are going to demonstrate this scenario in the following code along with the MouseHover Event. So that we can be observed both events at once.
using System;
using System.Drawing;
using System.Windows.Forms;

namespace strnull
{
    public partial class Form1 : Form
    {
        public Form1()
        {
            InitializeComponent();
        }

        private void radioButton1_MouseHover(object sender, EventArgs e)
        {
            MessageBox.Show("Mouse Hover to " + radioButton1.Text.ToString());
        }

        private void radioButton1_MouseLeave(object sender, EventArgs e)
        {
            MessageBox.Show("Mouse Left " + radioButton1.Text.ToString());
        }
        
    }
}
In the above code, you cab observed the MouseHover and MouseLeave both events. When user will hover the mouse a prompt message show that user is hover mouse cursor on radiobutton1 and when a user left the radiobutton1 boundaries its show prompt message again. In the below image you can observe the output of above code.

C# RadioButton TextChanged Event

This event will execute when user will change the text. To perform its functionality we have to create a button click event in which we declared to change the radio button text. When user will click the button, a text of radio button is get changed and cause of change text, TextChanged Event get executed. In the following code, we have demonstrated the above scenario. We used the simple message box to pop the message when TextChanged Event gets executed.
using System;
using System.Drawing;
using System.Windows.Forms;

namespace TEP
{
    public partial class Form1 : Form
    {
        public Form1()
        {
            InitializeComponent();

        }

        private void button1_Click(object sender, EventArgs e)
        {
            radioButton1.Text = "New Text";
        }

        private void radioButton1_TextChanged(object sender, EventArgs e)
        {
            MessageBox.Show("Radio Button Text changed to " + radioButton1.Text.ToString());
        }
        
    }
}
You can observe in the above code, there are two events. The button click event changed the text of radio button and TextChanged event get executed when text gets changed. In the following image, you can be observed the output. You also observed that when button event is executed radio button text doesn't change but the value is set to new text. After the execute of textChanged Event, it's get changed. It's because all the events have same priority or execution, so first events get executed then their effects applied. We hope you will learn a lot of things from this C# Tutorial. We are looking forward from you about your experience with C# RadioButton. If you want to learn more on C# then you can subscribe our YouTube Channel and Playlist of C# Tutorials. We tried our best to provide you all possible solutions and concepts which you can use with C# RadioButton to enhance your desktop application development. Don't forget to share it with your friends. You can also check C# ListBox ControlC# Button ControlC# Label Control and C# TextBox Control.

C# ListBox Control

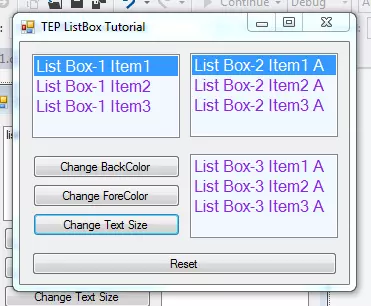
Hey, everyone, I hope you all are doing great. In this article, I am going to explain C# ListBox Control. In the previous article, we have discussed the C# ComboBox Control. C# ListBox is quite similar to ComboBox. C# ListBox is just a simple list, which is showing the data. The user can easily select an option from the list by clicking on any of its items. Some features are common in ComboBox and ListBox. Such as the data is inserted like items. Insertion, deletion, and selection are also same. We will insert the values, then after performing the selection, we will delete them. We will also focus on the text styling, colors and events handling etc. So, let's get started with C# ListBox Control:

C# ListBox Control

  • There are multiple functionalities which we can perform with C# ListBox. Usually, we used ListBox to give options in the form of a list.
  • Mostly it's used in signup forms and point of sale applications. If you want to insert the values inside Listbox. Then you have to write the name of the list box and after that write Items.Add("YourData").
  • In the following code, I have inserted countries names as the data of listbox:
using System;
using System.Drawing;
using System.Windows.Forms;

namespace TEPTUT
{
    public partial class Form1 : Form
    {
        public Form1()
        {
            InitializeComponent();
            listBox1.Items.Add("Pakistan");
            listBox1.Items.Add("United States");
            listBox1.Items.Add("United Kingdom");
            listBox1.Items.Add("India");
        }
      
   }
}
  • Here is the image which is generated after the execution of above code:
  • You can add the values in Listboxes using the arrays and string type variables. It depends on the logic of software development.
  • You can also insert the values from the textbox.
  • Here are following example codes which you can use to insert values in C# ListBox:
using System;
using System.Drawing;
using System.Windows.Forms;

namespace TEPTUT
{
    public partial class Form1 : Form
    {
        public Form1()
        {
            InitializeComponent();
            String var1 = "Lahore";
            String var2 = "Multan";
            String var3 = "Islamabad";
            String var4 = "Karachi";
            listBox1.Items.Add(var1);
            listBox1.Items.Add(var2);
            listBox1.Items.Add(var3);
            listBox1.Items.Add(var4);
            
        }
      
   }
}
  • In the above code, we have inserted the values in C# ListBox with the string type variables.
  • You can test the code in your compiler, drag the list box on the windows application and copied the above code and then execute.
  • Now, we are gonna insert data in ListBox using arrays. Here's the code for it:
using System;
using System.Drawing;
using System.Windows.Forms;

namespace TEPTUT
{
    public partial class Form1 : Form
    {
        public Form1()
        {
            InitializeComponent();

            String[] city = new String[] { "Lahore", "Multan", "Islamabad", "Karachi"};

            for (int x = 0; x < city.Length; x++)
            {
                listBox1.Items.Add(city[x]);
            }
            
        }
      
   }
}
  • The above code will insert the values in C# ListBox through Array with the help of loop.
  • Now let's have some fun and get some input from the user in C# Textbox Control and then add it in the ListBox.
  • In the below code, I am getting value from the TextBox and then sending it to ListBox:
using System;
using System.Drawing;
using System.Windows.Forms;

namespace TEPTUT
{
    public partial class Form1 : Form
    {
        public Form1()
        {
            InitializeComponent();


        }

        private void button1_Click(object sender, EventArgs e)
        {
            listBox1.Items.Add(textBox1.Text);
        }
      
   }
}
  • In the above code, we have used C# Button Control and C# Textbox Control.
  • A textbox will get the values as the string and button will insert this value into ListBox.
  • Here is the image after execution of above code:
  • Till now, we have hada look at How to insert data in C# ListBox, now we will learn How to select any item from ListBox.
  • Suppose you want to retrieve the selected item value, then you have to use the SelectedItem property.
  • In the below code I have added a button, so after selection of your item, when you click this button, an event will raise and it will generate a message popup of selected item value.
using System;
using System.Drawing;
using System.Windows.Forms;

namespace TEPTUT
{
    public partial class Form1 : Form
    {
        public Form1()
        {
            InitializeComponent();

            listBox1.Items.Add("A");
            listBox1.Items.Add("B");
            listBox1.Items.Add("C");
            listBox1.Items.Add("D");
            
        }

        private void button1_Click(object sender, EventArgs e)
        {

            MessageBox.Show(listBox1.SelectedItem.ToString());
        }
      
   }
}

C# ListBox Multiple Selection

  • Supposed if you want to select multiple options at the same time, then you have to use the SelectionMode property and set it to the SelectionMode.MultiSimple.
  • Using above mentioned property, you will be able to select multiple items at the same time.
  • In the below code I have used the SelectionMode.MultiSimple property and used the foreach loop to show the message popup with the value of selected items.
  • You just have to drag the list box and button on your application form, then copy the below code and execute it.
  • To get a response on button click you have to select the multiple items in your ListBox:
using System;
using System.Drawing;
using System.Windows.Forms;
namespace WindowsFormsApplication1
{
    public partial class Form1 : Form
    {
        public Form1()
        {
            InitializeComponent();
        }
        private void Form1_Load(object sender, EventArgs e)
        {
            listBox1.Items.Add("Sunday");
            listBox1.Items.Add("Monday");
            listBox1.Items.Add("Tuesday");
            listBox1.Items.Add("Wednesday");
            listBox1.Items.Add("Thursday");
            listBox1.Items.Add("Friday");
            listBox1.Items.Add("Saturday");
            listBox1.SelectionMode = SelectionMode.MultiSimple;
        }
        private void button1_Click(object sender, EventArgs e)
        {
            foreach (Object obj in listBox1.SelectedItems )
            {
                MessageBox.Show(obj.ToString ());
            }
        }
    }
}
  • Here is the screenshot of the above code execution.
  • You can clearly see that I have select the first three indexes and It generates the message popup of just Sunday.
  • Because I have used the foreach loop and it will give output in the form of the cycle and each cycle contain just one output.
  • When you will close the popup the next selected index value is shown in the message box. It's running until the selected indexes are left.

Clear C# ListBox

  • Supposed you are wanted to remove all the values at once from listbox then you have to use the clear method.
  • In the following code I have inserted the values inside Listbox and when user will click on the button it will clear the whole list.
  • Create the new application and drag button and listbox. Then copy the following code and execute it:
using System;
using System.Drawing;
using System.Windows.Forms;

namespace TEPTUT
{
    public partial class Form1 : Form
    {
        public Form1()
        {
            InitializeComponent();
            listBox1.Items.Add("A");
            listBox1.Items.Add("B");
            listBox1.Items.Add("C");
            listBox1.Items.Add("D");
           
            
        }

        private void button1_Click(object sender, EventArgs e)
        {
            listBox1.Items.Clear();
        }
      
   }
}

Remove C# ListBox Items

  • If you are wanted to remove a specific index or specific item value then you have to use Remove or RemoveAt methods.
  • Remove method is used to delete the value by the exact wording and RemoveAt method is used to delete values according to the indexes.
  • Here's the code for it:
using System;
using System.Drawing;
using System.Windows.Forms;

namespace TEPTUT
{
    public partial class Form1 : Form
    {
        public Form1()
        {
            InitializeComponent();
            listBox1.Items.Add("A");
            listBox1.Items.Add("B");
            listBox1.Items.Add("C");
            listBox1.Items.Add("D");       
        }

        private void button1_Click(object sender, EventArgs e)
        {
            listBox1.Items.RemoveAt(0);
        }
      
   }
}
  • The above code is removing the values by the reference of the index number.
  • When the user will click on the button the Zero index is getting removed from the list.
  • When the zero index is getting deleted the next index has automatically become zero.
  • The following code is the implementation of this Method:
using System;
using System.Drawing;
using System.Windows.Forms;

namespace TEPTUT
{
    public partial class Form1 : Form
    {
        public Form1()
        {
            InitializeComponent();
            listBox1.Items.Add("A");
            listBox1.Items.Add("B");
            listBox1.Items.Add("C");
            listBox1.Items.Add("D");
           
            
        }

        private void button1_Click(object sender, EventArgs e)
        {
            listBox1.Items.Remove("A");
        }
      
   }
}
  • The above code will delete the exact matched value only.
  • I have selected A to delete. When you will execute the above code and click the button it will only remove the A.
  • On the next button click it will not remove any of the indexes.

How to Change C# ListBox Text Size

  • If you have to change the text size of C# ListBox, then you have to use Font property.
  • In the following code, there is button click event, in which I have declared that when user will click the button the size of C# ListBox text will increase.
using System;
using System.Drawing;
using System.Windows.Forms;

namespace TEPTUT
{
    public partial class Form1 : Form
    {
        public Form1()
        {
            InitializeComponent();
            listBox1.Items.Add("A");
            listBox1.Items.Add("B");
            listBox1.Items.Add("C");
            listBox1.Items.Add("D");           
        }

        private void button1_Click(object sender, EventArgs e)
        {
    listBox1.Font = new Font(Font.FontFamily, 12);
        }
      
   }
}

How to Change C# ListBox Text Background Color

  • If you are want to change the color of text or the background color of text. Then you have to use the BackColor property.
  • In the following code, we have to change the color of list box text background.
  • There are many colors which you can use as backColor.
using System;
using System.Drawing;
using System.Windows.Forms;

namespace TEPTUT
{
    public partial class Form1 : Form
    {
        public Form1()
        {
            InitializeComponent();
            listBox1.Items.Add("A");
            listBox1.Items.Add("B");
            listBox1.Items.Add("C");
            listBox1.Items.Add("D");
            listBox1.BackColor = Color.LightCyan;
        }
        
   }
}
  • Here's the screenshot of output to give you an idea:

Changed C# ListBox Text Foreground Color

  • If you are wanted to change the color of text or the foreground color, then you have to use the ForeColor property.
  • In the following code, we have changed the color of the text to white and backColor to black, to prominent the text.
using System;
using System.Drawing;
using System.Windows.Forms;

namespace TEPTUT
{
    public partial class Form1 : Form
    {
        public Form1()
        {
            InitializeComponent();
            listBox1.Items.Add("The");
            listBox1.Items.Add("Engineering");
            listBox1.Items.Add("Projects");
            listBox1.Font = new Font(Font.FontFamily, 15);
            listBox1.BackColor = Color.Black;
            listBox1.ForeColor = Color.White;
        }
        
      
   }
}

C# ListBox Events

  • If you want to perform specific tasks and functionality when user will do something specific, then we will use the C# Events.
  • Some events are common across all the GUI tools. Now we will learn some events which will be worked with ListBox.
  • Click Event
  • Double Click Event
  • MouseHover Event
  • MouseLeave Event
  • BackColorChanged Event
  • ForeColorChanged Event
  • SelectedIndexChanged Event

There are several more events which you can try to make list box more interactive. These events are used to give innovative concepts.

C# ListBox Click Event

  • This event is used when you are wanted to perform any action in return of single click on Listbox.
  • Suppose you want to show any kind of warning message in the form of a popup.
  • Then we will be used this function.
  • In the below code I have created a program, which will show the message when user will click once on the Listbox.
using System;
using System.Drawing;
using System.Windows.Forms;

namespace TEPTUT
{
    public partial class Form1 : Form
    {
        public Form1()
        {
            InitializeComponent();

        }

        private void listBox1_Click(object sender, EventArgs e)
        {
            MessageBox.Show("Warn ! Click is disable..");
        }
        
      
   }
}
  • Here is the image of above code after execution.

  • You can perform any kind of functionality with _Click Event. You can guide the user with these kinds of popup messages, about how to use your developed application.

C# ListBox Double Click Event

This event occurs when user will click twice on the Listbox. Supposed you are wanted to perform any action when user will double click on the ListBox, then we will use this event. In the following code, we are changing the back color of ListBox when user will click twice.

using System;
using System.Drawing;
using System.Windows.Forms;

namespace TEPTUT
{
    public partial class Form1 : Form
    {
        public Form1()
        {
            InitializeComponent();

        }
        private void listBox1_DoubleClick(object sender, EventArgs e)
        {
            listBox1.BackColor = Color.Black;
        }     
   }
}

To demonstrate double click event, we changed the color. You can code any functionality according to your needs.

C# ListBox MouseHover Event

This event occurs when user will hover mouse cursor on the Listbox. In the following code, we have changed the foreColor on mouse hover. When the mouse cursor will hover the color of font will be changed.

using System;
using System.Drawing;
using System.Windows.Forms;

namespace TEPTUT
{
    public partial class Form1 : Form
    {
        public Form1()
        {
            InitializeComponent();
            listBox1.Items.Add("The Engineering Projects");
        }

        private void listBox1_MouseHover(object sender, EventArgs e)
        {
            listBox1.ForeColor = Color.Bisque;
        }     
   }
}

C# ListBox MouseLeave Event

This event occurs when user will remove the cursor from the Listbox. In the above code, we have changed the forecolor when a user hovers the mouse cursor. In the below code, we will change the forecolor again to black when a user removes mouse cursor.

using System;
using System.Drawing;
using System.Windows.Forms;

namespace TEPTUT
{
    public partial class Form1 : Form
    {
        public Form1()
        {
            InitializeComponent();
            listBox1.Items.Add("The Engineering Projects");
        }

        private void listBox1_MouseHover(object sender, EventArgs e)
        {
            listBox1.ForeColor = Color.Bisque;
        }

        private void listBox1_MouseLeave(object sender, EventArgs e)
        {
            listBox1.ForeColor = Color.Black;
        }     
   }
}

C# ListBox BackColorChanged Event

This event occurs when user will change the background color of the Listbox. In the following code, we are going to change the color of background when user will hover the mouse on ListBox. When color will change, BackColorChanged event will occur. In which we will show popup message.

using System;
using System.Drawing;
using System.Windows.Forms;

namespace TEPTUT
{
    public partial class Form1 : Form
    {
        public Form1()
        {
            InitializeComponent();
            listBox1.Items.Add("The Engineering Projects");
        }

        private void listBox1_MouseHover(object sender, EventArgs e)
        {
            listBox1.BackColor = Color.Bisque;
        }

        private void listBox1_BackColorChanged(object sender, EventArgs e)
        {
            MessageBox.Show("BackGround Color is changed !!");
        }
    
   }
}

C# ListBox ForeColorChanged Event

This event occurs when user will change the foreground color of the Listbox. In the following code, we will be used mouse hover event to changed the foreColor and ForeColorChanged Event also. The forecolorchanged event will raise the message popup when a color of the foreground is getting changed.

using System;
using System.Drawing;
using System.Windows.Forms;

namespace TEPTUT
{
    public partial class Form1 : Form
    {
        public Form1()
        {
            InitializeComponent();
            listBox1.Items.Add("The Engineering Projects");
        }

        private void listBox1_MouseHover(object sender, EventArgs e)
        {
            listBox1.ForeColor = Color.Bisque;
        }

        private void listBox1_ForeColorChanged(object sender, EventArgs e)
        {
            MessageBox.Show("ForeGround Color is changed !!");
        }
    
   }
}

C# ListBox SelectedIndexChanged Event

This event occurs when user will select any item in the Listbox. In the below code I have taken two list box. When user will select any value from the first list box then according to that value listbox2 will show it's valued.

using System;
using System.Drawing;
using System.Windows.Forms;

namespace TEPTUT
{
    public partial class Form1 : Form
    {
        public Form1()
        {
            InitializeComponent();
            listBox1.Items.Add("The Engineering Projects");
            listBox1.Items.Add("C# Tutorials");
        }


        private void listBox1_SelectedIndexChanged(object sender, EventArgs e)
        {
            if (listBox1.SelectedIndex == 0)
            {
                listBox2.Items.Clear();
                listBox2.Items.Add("Arduino Projects");
                listBox2.Items.Add("Proteus Projects");
                listBox2.Items.Add("Matlab Projects");
            }
            else
                if (listBox1.SelectedIndex == 1)
                {
                    listBox2.Items.Clear();
                    listBox2.Items.Add("C# Label");
                    listBox2.Items.Add("C# TextBox");
                    listBox2.Items.Add("C# ComboBox");
                }
        }
    
   }
}

If you wanted to test the above code, then place two list boxes and copied the above code.

  • Here's the Video for C# ListBox Control:

We have tried to give basics to major concepts of C# ListBox. All the above codes are working fine and added after testing. If you will cover all the above codes then you will become able to play with ListBoxes. ListBoxes play very important roles in Point Of Sale applications. Thanks for reading our tutorial, moreover you can watch ListBox video.

C# Button Control

Hey, everyone, I hope you are doing great. In this article, I will guide you about the C# Button Control. In my previous article, I have show you How to use C# Label Control. C# Button Control is quite familiar to Label Control. If you have a strong grip on the Label than its quite easy to understand the button control. Basically, the button is very important part of every software. Because we deal every action and event with buttons in any software. You have noticed that in mega software 40% of the projects is based on the button events.

Button are reusable components such as the exit and quit buttons which will perform the same functionality in each form and able to reuse again and again. The button will give end-user quite a clear navigation of software. The shape of the button is unique and have its own appearance properties by which its user can easily judge where is the button located. In short, the button is the controller which is used to create interactivity between user and application. Did you know that button is directly inherited from its base class? which is ButtonBase. You can click the button with the mouse and even with keyboard keys, it depends on the situation. So, let's have a look at How to sue C# Button Control:

C# Button Control

There are two ways using which you can add the C# button into your program. First one is the programming way to create a button.It's quite difficult one. The second way is to drag the button directly from the toolbar and place it on your application. Which is much easier than the programming one. When you drag the button you will get the default name of the button as button1 which you can change from the right panel under the properties tab.

  • If you want to change the button text during the run time or dynamically then you have to write the code, as shown below:
button1.Text = "TEP Button Example Text";
  • After the name of a button when you will insert the (.) dot, lot of functions will pop up.
  • You have to select the Text attribute and after the (=) equal sign just place the text inside double quotation which will become the string.
  • You can also try the other attribute which comes after the (.) dot.

  • I have already explained, how you can change the background color and foreground color of the C# Label Control, these properties are exactly same for C# Button Control.
  • If you want to show the image inside the button then you have to use the Image property.
  • FromFile is used to set the path of an image which you want to set.
  • Here is the example code where we have set the brownImage.jpg inside button.
button1.Image = Image.FromFile("C:\\Users\\Jade\\Pictures\\brownImage.jpg");
  • Here is the image after the execution of above code.
  • You just have to drag the button on the form and set the dimensions by drag the coordinates of the button to make it larger.
  • Then place the above code in the main function and don't forget to change the path along with an extension of an image and you have done to set image for the button.

  • If you want to set the background color of the button then you have to use the BackColor property.
  • With BackColor property we can change the colors.
  • Here is the demo code in which we have changed the color of the button.
  • You can use the builtin color attributes to set colors.
button1.BackColor = Color.Aqua;
  • Here is the image of the code after execution, there are many colors which you can be used and we have select Aqua for the demonstration purpose.

  • Now you have done with a Background color, what about the foreground color.
  • If you want to change the color of foreground or text then you have to use the ForeColor property which will help us to set text color.
  • Below is the example code which will change the foreground color. I'm going to set the foreground color to white.
button1.ForeColor = Color.White;
button1.BackColor = Color.Black;
  • In the above code, we have used BackColor as black to prominent the effect of a foreground.
  • Here is the image after executing the above code:

  • If you want to change the size of button text, then you have used the Font property.
  • The above codes are easier to remember but this code is difficult.
  • Because you have to change the font size with technical parsing.
  • It's mean you can observed the below code, that we have used the Font property and allocate new Font object and passed the button.font.fontfamily and after the comma, there is the size of the button text.
button1.ForeColor = Color.White;
button1.BackColor = Color.Black;
button1.Font = new Font(button1.Font.FontFamily, 33);
  • You can do the above code in an alternative way which is easier to understand.
  • First, take the integer type variable and allocated the size and then pass as the reference in Font Object constructor, as shown in below code:
int newSize = 33;
button1.ForeColor = Color.White;
button1.BackColor = Color.Black;
button1.Font = new Font(button1.Font.FontFamily, newSize);
  • Here is the output image of the above code, you can clearly get the concept from this:

There are several events which we can use with buttons. Events are some conditional checks to perform the specific functionalities when user will do something specific. C# programming language provides a couple of events which you can use with button and we are going to implement some of them which are commonly used. Here is the list of common events which are used with C# Button.
  • Click Event
  • Text Changed Event
  • MouseHover Event
  • MouseLeave Event

Now we will create the code of above-listed events and handle them with their methods. You can create separate methods and appoint them in replacement of built-in methods. But that's some difficult, so we will simply use the built-in methods.

C# Button Click Event

This event will occur when end user will click on the button once. If you want to perform any functionality when user will click on the button then we will use the _Click event to handle this functionality. After the name of a button, you have to write the _Click, suppose you go with default name which is button1. Then you have to create the method with name button1_Click. In the following code, I have used the button when user will click, it will generate the message box.

using System;
using System.Drawing;
using System.Windows.Forms;

namespace TEPTUT
{
    public partial class Form1 : Form
    {
        public Form1()
        {
            InitializeComponent();
        }
        private void Form1_Load(object sender, EventArgs e)
        {
       
        }

        private void button1_Click(object sender, EventArgs e)
        {
            MessageBox.Show("C# Button Click Event Executed");
        }


   }
}

C# Button Text Changed Event

This event occurs when the text of the button is changed. This is the built-in method with the name _TextChanged. In the following code, there is a button1_TextChanged event which will generate the message popup when the text of the button is changed. Button1_Click event is used to change the text when user will click. Logic is when user will click the button, the text of button will be changed and button1_TextChanged is performed.

using System;
using System.Drawing;
using System.Windows.Forms;

namespace TEPTUT
{
    public partial class Form1 : Form
    {
        public Form1()
        {
            InitializeComponent();
        }
        private void Form1_Load(object sender, EventArgs e)
        {
       
        }

        private void button1_Click(object sender, EventArgs e)
        {
            button1.Text = "New Text";
        }

       
        private void button1_TextChanged(object sender, EventArgs e)
        {
            MessageBox.Show("C# Button TextChanged Event");
        }


   }
}

C# Button MouseHover Event

This event occurs when user will hover the mouse cursor on the button. This is a built-in event with the name _MouseHover after the default name of the button or your desired button named. Here in this code, we have used the default name of a button which is button1. When user will hover the mouse cursor over the button it will generate the message popup.

using System;
using System.Drawing;
using System.Windows.Forms;

namespace TEPTUT
{
    public partial class Form1 : Form
    {
        public Form1()
        {
            InitializeComponent();
        }
        private void Form1_Load(object sender, EventArgs e)
        {
       
        }


        private void button1_MouseHover(object sender, EventArgs e)
        {
            MessageBox.Show("C# Button MouseHover Event");
        }


   }
}

C# Button MouseLeave Event

This event is occurring when user will leave the button or move the cursor from the button boundaries. In the following code, we have created the _MouseLeave event with the default name of the button. When user will remove the mouse cursor out of button it will get executed and generate the message popup.

using System;
using System.Drawing;
using System.Windows.Forms;

namespace TEPTUT
{
    public partial class Form1 : Form
    {
        public Form1()
        {
            InitializeComponent();
        }
        private void Form1_Load(object sender, EventArgs e)
        {
       
        }

        private void button1_MouseLeave(object sender, EventArgs e)
        {
            MessageBox.Show("C# Button MouseLeave Event");
        }


   }
}
  • Here's the video in which I have shown How to use these codes:

Now you are able to add functionalities in C# button. We have tried to explain you the major concepts so that you can get the idea to work with C# button. By using the above events you can make your software more accurate and interactive. We have described the basic two major functionalities. Now you are able to change text, color, style, and handle the events. If are facing any kind of problem regarding the codes, let us know through the comment section.

SciTechDaily - An Ocean of Knowledge

Hello, everyone, I hope you all are doing great. Today I am not gonna share any tutorials with you guys. Instead, today I am going to share an awesome website, which is kind of n essential source of information for engineering students. If you are a student of science and have any kind of relation with Technology then you must have to know about this source. SciTechDaily is a well-known website that is working very great and contributing knowledge in the field of science and technology. SciTechDaily is in action since 1998, having an age of almost 20 years so now you can get an idea about its knowledge database. This website contains research base content or which covers the scientific and Technology topic. They are not only limited to Science and Technology but also they are working on high physics and energy concepts.

What's New in SciTechDaily

  • Now SciTechDaily becomes the Encyclopaedia of the latest trending news in Science and Technology.
  • They also provide you with a huge collection of valid coupons on various e-commerce sites related to science and technology.
  • The major goal of SciTechDaily is to provide high-quality research data to Scholars and doctorate students.
  • There are more than thousands of research articles are available right now.
  • All of those articles are authorized and credible. More than 20 research articles are daily uploaded.
  • There basic sauce of information is the international universities that provide them with research papers.

SciTechDaily Research

  • It's not easy to grasp the knowledge of research paper for a common person.
  • SciTechDaily authors create the articles by extracting the main Idea and concept from research papers.
  • SciTechDaily not only contributing their time but they are also motivated research.
  • Their research on earth and environment is outstanding. Every time I visit this website my general knowledge get enhanced.
  • I don't know much about the Earth and the environmental studies, but after reading there articles I get to know what are the weaknesses and what are the major reasons behind the melting glaciers.
We read more than hundreds of articles and words of other to just get to know about politics. Don't focus on search, as a science student, I don't even focus on technology with the Deep eye and deep thoughts. We even don't know what is the importance of Biology chemistry in our daily life. We use Science and technology in our daily life, without knowing the facts. SciTechDaily provides you research articles on science and technology which is used in daily life. Science and technology don't mean that it is limited to computer science and other subjects. Science is the big topic which we can't cover even that every engineering field is driven by Science and Technology is the enhancement of equipment and tools. If you are wanted to get up to date with science and technology news then you must visit SciTechDaily. Get to know first before the world, because sometimes knowledge is expensive than money. I hope you will like this amazing source of research-based articles. There are a lot of websites which provide you general information about science. But this site will provide you research data which is authorized by international Scholars, Universities, and organizations. Don't forget to share it with your friend if you like this amazing resource. Let us know your reviews about this article.

C# Label Control

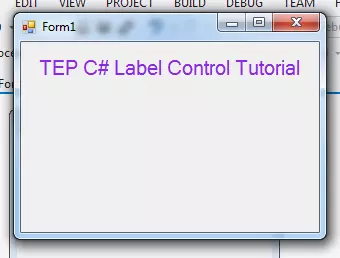
Hello everyone, I hope you all are doing great. In today's article, I will guide you about the C# Label Control. I will show you how to deal with label in C Sharp Programming Language. Labels have their own importance in the software development to nominate the input and output fields. You have observed that every software which you have used and with you are familiar have some labels. Such as in the website login forms there are labels too. It's recommended to use the labels in the software to make the user interface rich with the helping material. If you will just use the C# Button, C# TextBox, and C# ComboBox and don't use the C# Labels then your developed software will not be easy to use. In simple words, it won't be user-friendly. So, in order to make it user-friendly, we have to use Labels in our software. So, let's have a look at How to use C# Label Control and How to change its Properties:

C# Label Control

  • We used the C# Label to display the text on the software to give direction for the user.
  • Label control is also used to show the descriptive text such as the notes and warning about the usage of the software.
  • To define the label in C# you have to declare namespace as follows.
System.Windows.Forms

  • You can also add the label from the toolbox and drag the label from the form designer tab.
  • Label1 is the default Name of the very first label which you will use in your application.
  • You can adjust the size on the form by stretch the coordinates.
  • You can change the text from the right panel under the property label.
  • You can also change the text using the below code:
label1.Text = "TEP C# Label Control Example Text";
  • Here's the output of this code:
  • You can do anything with the label box. There are many properties which you can use to manipulate the functionality of simple label.
  • For example, if you want to change the background color of the label then you need to use BackColor property.
  • BackColor Property is used to change the background color, after the equal (=) sign you have to declare that you want to change color by writing the property Color and after dot, you have to write the name of the color which you want to allocate to the background
  • In the below code I have declared the Aqua color for the background, there are many colors which you can be used for the background of the label.
label1.BackColor = Color.Aqua;
  • Here's the output of above code:
  • If you want to change the foreground color or the color of text, then you need to use ForeColor Property.
  • ForeColor is the name of the property which is used to assign the color of the text in the label.
  • Here's the code for it:
label1.ForeColor = Color.BlueViolet;

  • If you want to set the images as the background of C# label then need to use below code:
label1.Image = Image.FromFile("C:\\Users\\Jade\\Pictures\\brownImage.jpg");
  • Image property is used to set the image. You have to use the Image.FormFile method to set the proper path of an image which you want to set.
  • In double quotation write the path and used "\\" to separate the directories, you have to mention the image with the extension. It will generate the following results.

C# Label Events

Let's do some advanced code to improve the interaction level of your application. Now let's study the builtin events which we can apply on our C# Label to improve its functionality. Events are created to perform some functionalities when user will do any specific task. There are several Events which you can use to implement on your label, here are the few of them:
  • Click Event
  • Double Click Event
  • Text Changed Event
  • MouseHover Event
  • MouseLeave Event

There are several more events which we can use, but the main task here is to just give you the basic concept of C# Label. That's why we will focus on most commonly used events.

C# Label Click Event

  • The first event is the Click Event, which will perform when user will click on the label.
  • Let me give you an example, suppose you need to create a program in which you want to surprise someone, so now when someone click on your software then a hidden message shows up. It could be Happy Birthday !! ;)
  • Here's the code for it, you can change the text to anything you want.
private void label1_Click(object sender, EventArgs e)
        {
            label1.Text = "Text Changed";
        }
  • After the default name, you have to write the _Click  and create the method and declare the functionality which you want to perform.
  • You can do any kind of manipulation inside click event.

C# Label Double Click Event

  • This event will occur when user will click twice on the label.
  • Here's the code for it:
 private void label1_DoubleClick(object sender, EventArgs e)
        {
            label1.Text = "Text Changed";
        }
  • After the default name, you have to write _DoubleClick method and declare the functionality which you want to perform. It will occur when user will click twice on the label.

C# Label Text Changed Event

  • This event will occur when the text of the label is changed.
  • Suppose you want to change any value on the application when the text of the label is changed. Then you will use the TextChanged Event.
  • Let me explain it with an example, I have taken two labels.
  • Now the logic is when the text of one label is changed then the other label text should change automatically.
  • For the first label, I will use the _Click Event and _TextChanged Event too.
  • So, now when user will click on the label, the text of label will change because of _Click Event
  • Now, when text is changed, _TextChanged Event will occur and 2nd label text will also change.
  • Here's the code which you should try.
private void label1_Click(object sender, EventArgs e)
        {
            label1.Text = "Text Changed";
        }


        private void label1_TextChanged(object sender, EventArgs e)
        {
            label2.Text = "2nd Text Changed";

        }
  • To test the above code you have to drag two labels on your application. Then copy the above code into your application.

C# Label MouseHover Event

  • This event will occur when user will hover the mouse cursor on the label.
  • Suppose you want to change the text when user will hover the mouse cursor on the label.
  • Here's the code for it:
private void label1_MouseHover(object sender, EventArgs e)
        {
            label1.Text = "Text Changed";
        }

C# Label MouseLeave Event

  • This event will occur when the cursor will leave the label.
  • Suppose you want to change the text of label when mouse cursor will leave the label.
  • Here is the code, which will perform this functionality:
private void label1_MouseLeave(object sender, EventArgs e)
        {
            label1.Text = "again Text Changed";
        }
  • By the combination of the above events and methods, you can create your own C# applications with multiple functionalities.

If you are looking to learn more about the C# label control and other features of the C# programming language than you should subscribe our YouTube channel where we have uploaded latest tutorials on C#. Thanks for reading, have a good day !!! :)

C# TextBox Control

Hello everyone, I hope you are doing great. In this article, we will talk about C# TextBox Control. In the previous articles, you have already get familiar with C# Button ControlC# Label Control, this is the sequence of those. In short C# TextBox Control is just same as the other expect some few changing. Before getting started with C# TextBox you must have knowledge of previous concepts. It's not essential but it will give you the edge to understand the advanced elements of C#.

C# TextBox is used to get input from users or it can also be used to display some values to the user. The textbox is a container for text blocks, you can take inputs or show the text as you required in the form of paragraphs. If you used TextBox as the input field then you can only take one line of text as the input but if you want multiple line input then you have to activate the multiple line property of C# TextBox.

You can also change your input field as the password field if you are using the TextBox for password. A user can write input in the textbox and the even user can simply paste the data too in the field. You can also add some advance features like grabbing the copied data automatically when user hover the mouse on the input field, it will be done by accessing the clipboard where the copied data is saved temporarily, but this is the advance feature which we will cover after the basics. So, now let me show you how to use C# TextBox:

C# TextBox Control

  • First of all, you have to drag the TextBox from the toolbox and adjust it on your application form as you wanted.
  • The Default Name of textbox is 'textbox1' which you can change from the right panel under the property tab.
  • You can also change the Text Property inside of the textbox from the property panel, but if you want to change the text runtime or dynamically then you have to code like below.
 textBox1.Text = "TheEngineeringProjects.com";
  • In the above code, it's clearly mentioned that I have declared the Text property as "TheEngineeringProjects.com".
  • Now when you will execute the code, a textbox will appear with the text automatically, as shown in below figure:
  • You can also give the value of the textbox with the help of variables, like store the string in any variable and then passed to the textbox. Code is given below:
string var = "TheEngineeringProjects.com";
textBox1.Text = var;
  • Till now we have seen How to input value into textbox, now we are gonna have a look at how to extract value from textbox.
  • If you want to extract the value from textbox then you have to use below code:
string var;
var = textBox1.Text;
  • By using the above code, you can easily store the value of textbox into any variable and make it reusable for the whole application.
  • You can set the textbox properties with the help of property panel too.
  • If you want to modify the textbox from property panel then the shortcut for that is F4.
  • If you want to change the textbox height and width dynamically then you have to use the below code.
  • One more thing, you can also change its dimensions from the designer tab by just dragging the coordinates of textbox.
textBox1.Width = 250;
textBox1.Height = 50;
  • If you want to change the background color, then below code will help you out:
textBox1.BackColor = Color.Blue;
  • If you want to change the foreground color, then here's the code for it:
textBox1.ForeColor = Color.White;
  • Now when you apply these codes then you will get something as shown in below figure:
  • Now let's have a look at few of its Border styles.
  • There are three types of the border which you can apply.
    • FixedSingle.
    • Fixed3d.
    • None.
  • If you want to change the border style for textbox then you have to use below codes:
textBox1.BorderStyle = BorderStyle.Fixed3D;
textBox1.BorderStyle = BorderStyle.FixedSingle;
textBox1.BorderStyle = BorderStyle.None;
  • Till now we have seen different Properties of C# TextBox, now let's check out few of the events associated with it.
  • Few of these events are keydown or keypress events.
  • In the below code, I have captured the keystroke from the user and after that I have placed a check for the ENTER keystroke.
  • So, whenever you press ENTER in C# TextBox then a Message Box will open up showing "You Pressed Enter".
private void textBox1_keydown(object sender, KeyEventArgs e)
{
   if(e.KeyCode == Keys.Enter)
   {
      MessageBox.Show("You Pressed Enter");
   }
}
  • You can also add some advanced features too like text change event which will occur when user will change the default text.
private void textBox1_TextChanged(object sender, EventArgs e)
{
      label1.Text = textBox1.Text;
}

 
  • If you want to set the maximum length of the text inside textbox then you can also handle this with max length property like below code.
textBox1.MaxLength = 40;
  • Sometimes you have to fix the textbox so that user can't add the value, in short, to make the textbox disable from the input. For this, you have to activate the ReadOnly property as true.
textBox1.ReadOnly = true;
  • In the beginning, I have declared that you can make your text box as the multiline textbox for that you have to activate the multiline property as the following code do.
textBox1.Multiline = true;
  • If you want your textbox as the password type input field then you have to make the characters as the password using below code.
textBox1.PasswordChar = '*';
  • If you want to make your textbox like whenever the user enters any data it will start from the newline then there are two ways to do it, I'm sharing both the codes:
//First Method
textBox1.Text += "your text" + "\r\n";

//Second Method
textBox1.Text += "your text" + Environment.NewLine;
  • Sometimes we use textbox only for integer values, but when the user adds an integer value in the textbox it will consider as the string by default, so we have to convert that into the integer. It's the major concept for which beginners are searching. Here in the below code, you will get the basic idea how to retrieve the integer value from the textbox input.
int i;
i = int.Parse (textBox1.Text);
  • First, we have taken an integral type variable and then parsed the textbox value through integer. Now, we will parse the textbox with float and double using below code:
//String to Float conversion

		float  i;
		i = float.Parse (textBox1.Text);
//String to Double conversion

		double   i;
		i = float.Parse (textBox1.Text);
  • Here we have done with our C# TextBox Control, and elaborate almost every property which we need in daily software development routine.
  • If you practice these properties than you will become able to create your own small calculators and inventory systems.
  • For just conclusion, I'm going to recap all the properties in one chunk of code given below:
using System;
using System.Drawing;
using System.Windows.Forms;

namespace WindowsFormsApplication1
{
    public partial class Form1 : Form
    {
        public Form1()
        {
            InitializeComponent();
        }

        private void Form1_Load(object sender, EventArgs e)
        {
            textBox1.Width = 250;
            textBox1.Height = 50;
            textBox1.Multiline = true;
            textBox1.BackColor = Color.Blue;
            textBox1.ForeColor = Color.White;
            textBox1.BorderStyle = BorderStyle.Fixed3D;
        }

        private void button1_Click(object sender, EventArgs e)
        {
            string var;
            var = textBox1.Text;
            MessageBox.Show(var);
        }
    }
}
  • You need to drag the textbox and button on your form and then copy the code.
  • When you will execute this code, it will demand any input from you and when you will enter and press the button it will show you the popup message box in which the input text appears.
  • Here's the video which will help you better in understanding C# TextBox control:
So, that's all for today. I hope you have enjoyed today's tutorial on C# TextBox. I will share more tutorials on C# soon. If you have any questions regarding today's tutorial then you can as in comments. Thanks and take care !!! :)
Syed Zain Nasir

I am Syed Zain Nasir, the founder of <a href=https://www.TheEngineeringProjects.com/>The Engineering Projects</a> (TEP). I am a programmer since 2009 before that I just search things, make small projects and now I am sharing my knowledge through this platform.I also work as a freelancer and did many projects related to programming and electrical circuitry. <a href=https://plus.google.com/+SyedZainNasir/>My Google Profile+</a>

Share
Published by
Syed Zain Nasir