Hello friends, I hope you all are doing great. In today's tutorial, we will have a look at different Razor Layout Views in ASP.NET Core. It's our 10th tutorial in ASP.NET Core series. You must have noticed in websites that they have common sections, which remains the same throughout the website i.e. Header Section, Footer Section, Sidebar etc.
In today's lecture, we will have a look at how to design these default layouts of a website. We have already discussed the MVC architecture in detail so now it's time to start building our site's layout or basic structure. Today we will just discuss different files available in ASP.NET Core for default layout designing. So, let's get started with Layout View in ASP.NET Core:
Razor Layout View in ASP.NET Core
Razor Layout View in ASP.NET Core is a Razor file ( extension .cshtml ), used to design default Layouts of the website, which are then embedded in all ( or desired ) Views of the website.
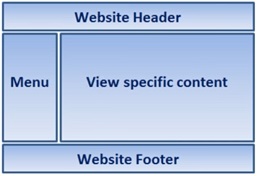
A simple website's layout is shown in the figure on right side and these are normal sections of a blog and depending on site, these sections may increase or decrease.
Moreover, you may have more than 1 Layout for a single View i.e. different layouts for signed in users and guest users.
We place these Layout Views in Shared sub folder of Views folder, so let's create this Shared Folder inside Views folder and then click on Add > New item.
Add New Item dialog box will open up, make a search for razor in it, as shown in below figure:
We have already used Razor View to create Info View Page and we have seen that in razor files, we can use both html and C#, these are like smart HTML Pages.
So, today we will have a look at remaining Razor files and first let's add this Razor Layout file in our Views > Shared folder.
You must have noticed the underline sign ( _ ) before Layout name, its a convention ( not necessary ) to differentiate Layout files from other files, although you can write any name you want.
Why use Razor Layout View ?
It reduces repetition of code thus saves time especially in bigger projects.
Let's say you are working on a blog then you have to place these Footers, Headers & Sidebars etc and if you hard code them in each of your page then editing will be a serious issue.
That's why it's better to have all the default settings of our Views in a single file, so that we could change them easily.
Layouts are also used for consistent look and behavior of the website across all its webpages, you can think of them as HTML theme of your web application.
These Layout files are the alternative of Master Pages in ASP.NET Web Forms.
So, let's add some code in our newly created Layout View File:
Adding code in Razor Layout View file
We have added the Razor Layout file in our Views > Shared folder, open this file and you will find HTML code in it, as shown in the figure on right side.
As you can see this code is kind of an HTML wrapper having all the required tags i.e. head, body, meta, title etc. but it doesn't have any content in it.
It has 2 C# code lines in it:
First one is Title property which will set the title of the page.
Second one is RenderBody() method, View specific content will be injected here.
Both of these C# lines will be getting data from the View, which will be calling this razor layout.
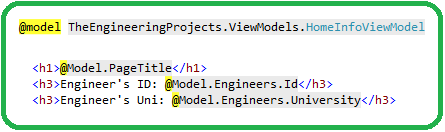
Now, let's open our Info View file, and delete the wrapping HTML code, as shown in figure on right side.
Now, I just have the content HTML code in my Info View file.
Now let's enable this Info View file to use Razor Layout file and for that we have to include a new razor code block in our View file.
Layout Property in Razor View file
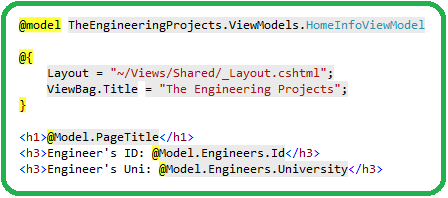
You can see in figure on right side that I have added a new razor code block at the top of my Info View File.
In this razor code block, I have specified two properties:
First one is the Layout property, where I have provided the path to the Razor Layout File.
Second one is ViewBag.Title, which was also present in Layout file and this property will set the Title of the Page.
Now run your web application and obviously you won't find any difference and if you check the Page soruce of Info page then you will find the complete html code in it with all required tags i.e. head, body, title etc.
Now let's have a look at another property called Sections in Razor Layout Files:
Render Sections in Razor Layout Files
Sections is a property in Razor Layout Files, which is used for the organized placement of few page elements.
You must have seen any movie review site, normally in such reviews, the review box is placed right at the top in either left or right corner displaying the overall review aggregate.
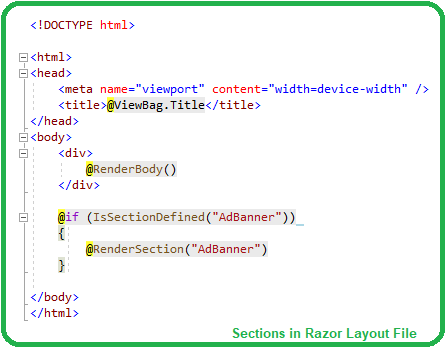
Sections are used to place such sticky elements in web pages, I have placed a Render section in my _Layout.cshtml file named AdBanner.
First I have placed an IF loop to check if the section is present in the View or not and if it's present then execute that section.
This IF statement is necessary as it makes the section optional otherwise it will be mandatory and if you don't have it in your View file then you will get a run time error.
So, this Ad Banner section will be placed at the end of the webpage.
Now, we need to create this AdBanner section in our Info View File, so open your View file and place the code as shown in figure on right side.
You can see I have used @section directive and then provided it the same name as in our Layout file and then in curly brackets { } placed the content ( which doesn't make much sense for now ).
Now run your project and open this link home/info and if everything goes fine then you will see this line at the end of your file, as shown in below figure:
So, despite the fact that we have placed the section at the top of our Razor View File but still it appeared at the bottom, as specified in the Razor Layout File.
We can create as many sections as we want in our Razor Layout file.
You must have noticed that we have to add the path of our Layout file in every View file, which is clearly a negation of DRY ( Don't Repeat Yourself ). So, let's see How to get rid of this linking.
Razor View Start File in ASP.NET Core
Razor View Start File in ASP.NET Core is used to specify the Razor Layout file location for Razor View Files.
It is normally placed inside the Views folder, so let's Add New item and in the search dialog box, make a search for razor, as shown in belwo figure:
Previously, we have selected Razor Layout file and this time we are going to select Razor View Start file and you can see it also has underscore sign ( _ ) at the start of the name.
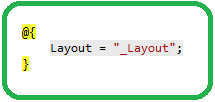
Add this file to your project and you will find a simple code in it, as shown in figure on right side.
This code is automatically generated by visual studio, as it knows we have the Layout file in our project, so now we have successfully specified the Layout file for our View files.
So, now remove your path from the Info View file and run your project and it will still work the same.
It's really helpful as if you wanna change the name or path of your Layout file then you can quite easily do it here and it will be applicable to your entire application.
Moreover, Razor View Start file is hierarchical i.e. you can add View Start files in each folder and it will override the parent View Start settings.
So, if you wanna assign different Layouts to different Controllers then you can easily do that by adding a new View Start file in these folders.
We can still specify path to Layout file directly in View file and it will override everything, we can also make Layout = "null", which will remove all the Layouts from that View.
So, the Razor View Start file reduces the code redundancy and thus increases maintainability.
Finally, let's have a look at the Razor View Imports file, which is the last one in razor files import section:
Razor View Imports in ASP.NET Core
Razor View Imports in ASP.NET Core are used to include common namespaces, required by the Razor View files.
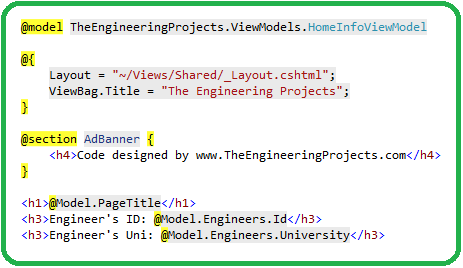
In our Info View file, you have seen that we have specified @model directive at the top and then provided fully qualified name of our View Model, which in our case is:
So, if we have to add more View Models or simple Models then we have to write full name again, which is again a violation of DRY, so it's always a better approach to place most commonly used namespaces in our Razor View Imports file.
This file is placed inside Views folder and is hierarchical ( similar to View Starts ).
So, right click on Views folder and then Add > New Item and select Razor View Imports file, it's name also starts with underscore sign ( _ ).
Inside this file, place this single line of code, as shown in the figure on right side.
Here, I have placed @using directive and then specified the namespace if my ViewModels folder and it will be automatically included in my View files.
So, now open your Info View File and remove this namespace from @model directive and now we will just specify the name of the ViewModel, which we are using for the View, as shown in below figure:
So, that's our final Info View Code and you can see that now we don't have any code repeatability in it.
The code is clean and contains only the content of this View file, so our project is more organized and maintained, although have no effect on the output.
So, that was all for today. I hope you have enjoyed today's lecture, it was quite a lengthy one but you must have got the idea how important it is. In the next lecture, we will have a look at Routing in ASP.NET Core. Till then take care & have fun !!!