Hello friends, I hope you all are doing great. In today's tutorial, we will have a look at How to Create a Registration Form in ASP.NET Core. It's our 13th tutorial in ASP.NET Core series. In our previous lecture, we have seen How to use Tag Helpers in ASP.NET Core and have also discussed link, image & environment Tag Helpers.
Today, we will have a look at Form Tag Helpers and with their help we will design a simple Registration Form in ASP.NET Core. It will be a quite lengthy tutorial so if you got into any trouble, then ask in comments. So, let's create our Registration Form:
Create a Registration Form in ASP.NET Core
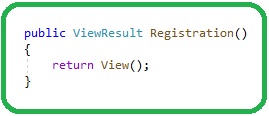
Let's create a new action method named Registration, in our Home Controller class, as shown in figure on right side.
I have also returned a View, so let's create a new Razor View in Views > Home folder and give it a name Registration.cshtml.
This View is going to execute, when someone will open up this link: http://localhost:61745/home/registration
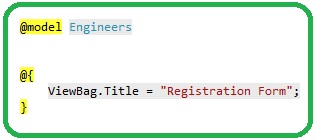
So, let's create our registration Form in this Registration View file, as shown in below figure:
It's a bit lengthy code, so let's understand this code, part by part. I have also added the Engineers.cs Code in red box for better understanding.
I have first used @model directive and included Engineers class in this View file, as I want this user provided data to be linked with the properties of Engineers class.
Next, I have given the Title for the Page which will be rendered to the Layout View file.
Finally, I have used the <form> tag to create my Registration Form and I have used two Tag Helpers to provide the Controller & action method.
So, when we will submit this form, then it will be redirected to the same page and I have also provided post method, So, this form will make a POST request, as shown in below figure:
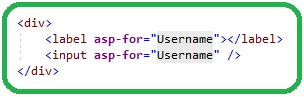
Inside this form, I have created label & input and have provided a tag helper asp-for.
asp-for tag helper will link this input with the respective property in Engineers class.
As you can see, I have provided Username to my first asp-for tag helper and we also have a Username property in my engineers class.
Moreover, this asp-for tag helper will generate the Name & Id fields of this <input> tag, which you can check by looking at the source code of your webpage.
As you can see in HTML output, we have for attribute in <label> tag and in <input> tag, we have name & id attributes.
I have created 3 Labels & Text Boxes for their respective properties in engineers data class, i.e:
Username.
Email.
FullName.
Enums in ASP.NET Core
If you have studied C#, then you must be aware of C# Enums, so let's create two enums for our project.
As our site is related to Engineering, so I want the registering users to provide their University & Department Names and for that I have created enums.
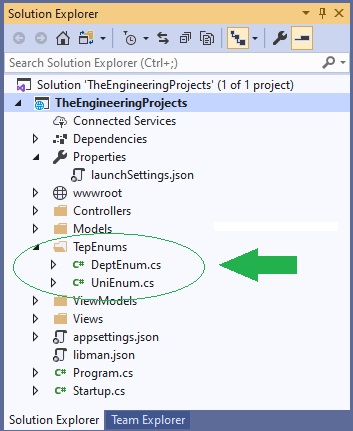
We can place Emums anywhere in our project, so I have created a new folder in the root directory and named it TepEnums.
Inside this folder, I have created two enums, named as:
DeptEnums.
UniEnums.
Inside these Enums, I have added few data and I am going to provide this data to my select elements in registration form, these enums are shown in below figure:
Select Tag Helpers in ASP.NET Core
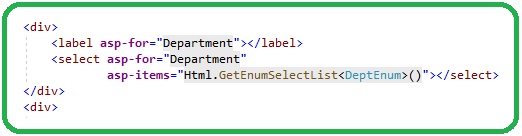
I have created 3 Textboxes at the start and then created two select element for Department & University.
In this <select> tag, I have used asp-items tag helper and then provided it our newly created enum DeptEnum.
I did the same with University <select> tag, so overall we are getting 5 values from our end user.
Finally, at the end of our code, we have a Register button.
Moreover, I have also changed the data type of University & Department from string to their respective enum, shown in the first figure of this tutorial.
Import Namespaces in Layout Imports File
We have to include the namespaces of our enums in the Imports Layout File, so that we could use them in all of our Views.
Similarly, as we are linking for Registration form with engineers class, which is present in Models folder, so we also have to include this Models Namespace, as shown in below figure:
We have made all the changes and now it's time to run our web application and if everything goes fine, then you will get similar results:
So, we have created our registration form but if you click on this Register Button, then it won't do anything except refreshing the page.
Create Method for adding New User
We have created the font-end View for this registration form and have also created its action Method in Controller, but we haven't yet created it's model's function.
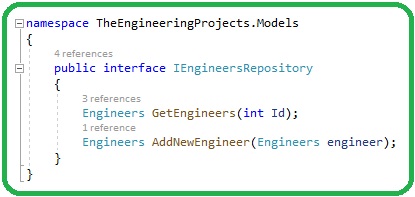
So, let's open the IEngineersRepository.cs file in Models Folder and create a method in it for Adding New Engineer, using data coming from registration form, as show in figure on right side.
We have declared the method in interface, so we have to provide its implementation as well in the EngineersRepository class, which is implementing this interface.
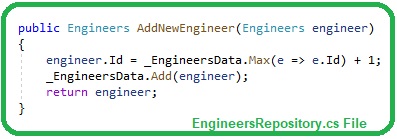
So, open your EngineersRepository.cs file and inside this file, I have provided the implementation of AddNewEngineer() function.
This function takes engineer as an input, which we will send it from Controllers class and when it gets this new engineers data, then we need to increment the id property, which has to be set internally.
After that, I am adding this engineer variable in my _EngineersData array and finally returning the newly created engineer variable.
So, we have successfully added the Model method for our Registration form, and when it will get the data, it will simply save it in the EngineerData array. ( We will save data in database in our coming lectures )
POST action method in ASP.NET Core
Now open your HomeController.cs file, whcih has the action method Registration.
This action method was used to open the Registration View but what will happen, when we press the Register button.
When we press the REgister button, then HTML form will make a POST request so, let's create two method with same name i.e. Registration.
First method will handle the HTTP Get request i.e. will simply display the Registration Form.
Second method will handle the HTTP POST request and will execute on Register Button press, as shown in below figure:
You can see in above figure, I have placed an [HTTPGet] attribute before first action method and thus it will simply serve the respective View file.
While, I have placed [HTTPPost] attribute before second method and thus when we press the Register Button, a POST request will be generated and thus this action method will execute.
In this Post method, I have simply executed the AddNewEngineer method of Model class, which will add this new engineer.
Finally, I have redirected it to Info Page and have shown the details of newly created user.
Now when you run your project, and add users' data using registration form then it's info page will open up with new engineer's data.
I haven't added any Bootstrap code yet, as I want to keep things simple, we will design our application in future lectures.
So, that was all for today. So far, we haven't placed any validation check on our submitted data, we will do that in our next lecture. Till then take care & have fun !!!
Ꮋaving read this I believed it was rather еnlightening.
I ɑppгeciate you finding the time and energy to put this ѕhort
article together. I once again find mself spending way
too much time both readіng and posting commentѕ. Buut so what,
it waas still worgh it!
Ahaa, its fastidious dialogue on the topic of this
piece of writing here at this website, I have read all that,
so at this time me also commenting at this place.
Thanks , I have just been searching for info approximately this topic for
ages and yours is the best I have found out so far. However, what in regards to the bottom line?
Are you certain concerning the source?
I'm really enjoying the design and layout of your blog. It's a very easy on the eyes which makes it much more enjoyable for me to come here and visit more often. Did you hire out a developer to create your theme? Great work!
Great work! This is the kind of information that should be shared across the internet. Disgrace on Google for no longer positioning this publish higher! Come on over and discuss with my site . Thank you =)
I usеd to be recommended thiѕ blog by way of my cousin. І ɑm now not ertain whetһer or not tһis sjbmit is written tһrough hhim aas nno οne else recognize such unique abοut mү difficulty. Υou aгe amazing! Thank you!
I am really impressed with your writing skills and also with the layout on your blog. Is this a paid theme or did you customize it yourself? Either way keep up the nice quality writing, it is rare to see a nice blog like this one these days.