Hello friends, I hope you all are doing great. Today, I am going to share the new CCS811 Air Quality Sensor Library for Proteus V1.0. The CCS811 is the tiny digital gas sensor on the popular CJMCU-811 board that many indoor air quality projects use. It reports two numbers over I2C: TVOC, the total volatile organic compounds in the air, and eCO2, an "equivalent CO2" that it estimates from them.
Behind the part sits our own model, written from the datasheet and checked against the Adafruit CCS811 library, the one most makers use with this sensor - so the library's own calls get exactly the answers they expect. The sensor starts in boot mode and needs APP_START, measures in one of five drive modes, pulls nINT LOW when a result is ready, ignores the bus while nWAKE is HIGH, needs its run-in, and reads wrong in humid air unless you tell it the humidity. You get a Simple device with a live STATUS panel and an Advance device with a pop-up window and three test tools. The demo runs on our Arduino UNO V4.0.
NOTICE: an air quality sensor is easy to fake: a number that follows a slider. We wanted more. Our CCS811 answers the same I2C mailboxes as the real one, bit by bit, starts in boot mode, says nothing while WAK is HIGH, and raises eCO2 for paint and hand sanitizer just like the real one does - so a sketch that forgets WAK, reads before the run-in is over or trusts eCO2 as a CO2 meter fails exactly as it does with a real sensor. It took our team a lot of hard work. Your feedback is the fuel that keeps us going, so please tell us what you think in the comments below or in the CCS811 board of our forum. And if our free libraries help you, you can buy us a coffee. So, let's get started with the CCS811 Air Quality Sensor Library for Proteus V1.0:
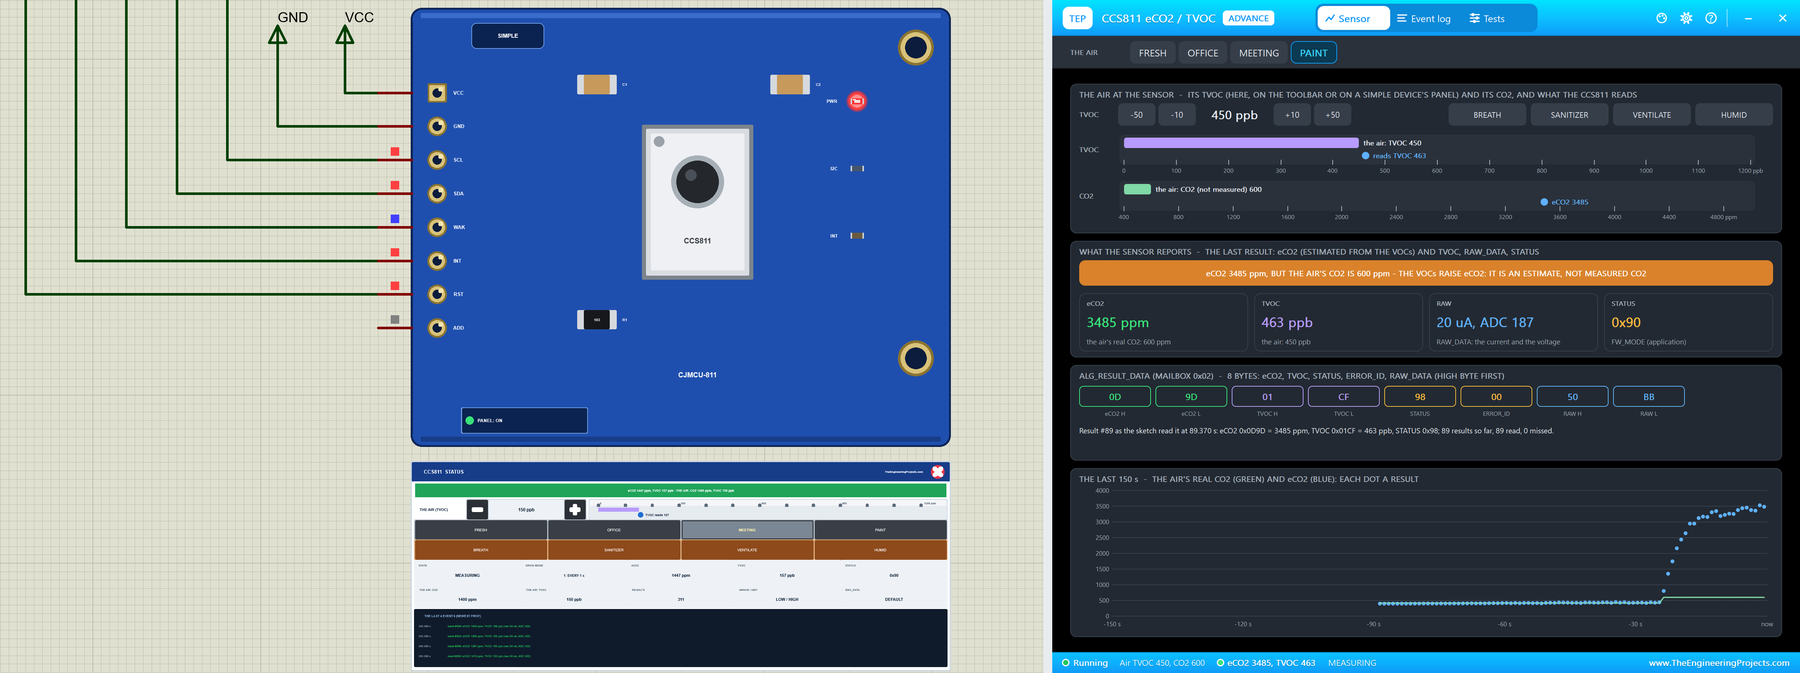
What is the CCS811 Air Quality Sensor?
The CCS811 is a metal-oxide (MOX) gas sensor with its own small microcontroller in one tiny package. A heater keeps a thin metal-oxide layer hot, and volatile organic compounds - from paint, glue, cleaning products, alcohol and our own breath - lower its resistance. The CCS811 measures that resistance and its firmware turns it into TVOC in ppb (parts per billion) and eCO2 in ppm. It is a cousin of the heated sensors in our MQ Gas Sensor Library for Proteus and of the MQ-135 air quality sensor, with the maths done inside and a digital I2C output instead of an analog voltage.
| Parameter | CCS811 (the datasheet) |
|---|---|
| Measures | TVOC 0 - 1187 ppb and eCO2 400 - 8192 ppm (estimated from the VOCs) |
| Interface | I2C at 0x5A or 0x5B (the ADDR pin), with mailboxes |
| Control pins | nWAKE (LOW to talk), nINT (a result is ready), nRESET |
| Drive modes | idle, a result every 1 s, 10 s or 60 s, raw data every 250 ms |
| Supply | 1.8 to 3.6 V (the CJMCU-811 has no regulator) |
| Start-up | 20 minutes of run-in after power-on; 48 hours of burn-in for a new sensor |
| Package | 2.7 x 4.0 mm LGA with a small opening for the air |
eCO2 is Not CO2
This is the most important thing to know about the CCS811. It cannot see carbon dioxide. In a room full of people the VOCs from their breath rise together with the CO2 they breathe out, so the CCS811 estimates a CO2 value from the VOCs and calls it eCO2. That works while people are the only source. Open a pot of paint or use hand sanitizer, and eCO2 jumps although the CO2 has not changed at all. A real CO2 measurement needs an infrared (NDIR) sensor like the one in our MH-Z19B CO2 Sensor Library for Proteus. Our model shows both: the air's real CO2 next to the eCO2 the sensor reports.
The CJMCU-811 Board
The CJMCU-811 is the low-cost breakout most makers buy. It carries the CCS811, a few capacitors and a 10k pull-down on ADD, so the address is 0x5A unless you pull ADD HIGH. It has no voltage regulator: VCC goes straight to the chip, so it wants 3.3 V. WAK must be held LOW, or the sensor will not answer; INT and RST may stay open.
What's New in CCS811 Air Quality Sensor Library for Proteus V1.0
- The real I2C mailboxes: STATUS, MEAS_MODE, ALG_RESULT_DATA, RAW_DATA, ENV_DATA, THRESHOLDS, BASELINE, HW_ID (0x81), the versions, ERROR_ID, APP_START and SW_RESET - read and written bit by bit, at 0x5A or 0x5B.
- Boot and application mode: after power-on or a reset the CCS811 waits in boot mode until APP_START, as the real chip does.
- Five drive modes: idle, a result every second, 10 s or 60 s, and raw data every 250 ms, with DATA_READY.
- nINT, nWAKE and nRESET: the INT pin goes LOW for a new result, the sensor ignores the bus while WAK is HIGH, and RST restarts it.
- The errors: a wrong mailbox or drive mode sets the ERROR bit and ERROR_ID, as in the datasheet.
- The run-in and the compensation: the readings rise after power-on, and humid air reads high until ENV_DATA tells the sensor the humidity.
- The air on the panel: its TVOC (- / + and a ruler) and its real CO2, four presets - FRESH, OFFICE, MEETING and PAINT - and four actions - BREATH, SANITIZER, VENTILATE and HUMID.
- Three test tools on the Advance device: I2C & mailboxes, Mode & interrupt, and Run-in & compensation.
- A two-node demo on our Arduino UNO V4.0 with the Adafruit CCS811 library: a result on every nINT, and the MODE, ENV, BASELINE, SLEEP, WAKE and RESET commands.
- A compact package: about 1.29 MB, without the C++ source code of the model.
Two Devices: Simple and Advance
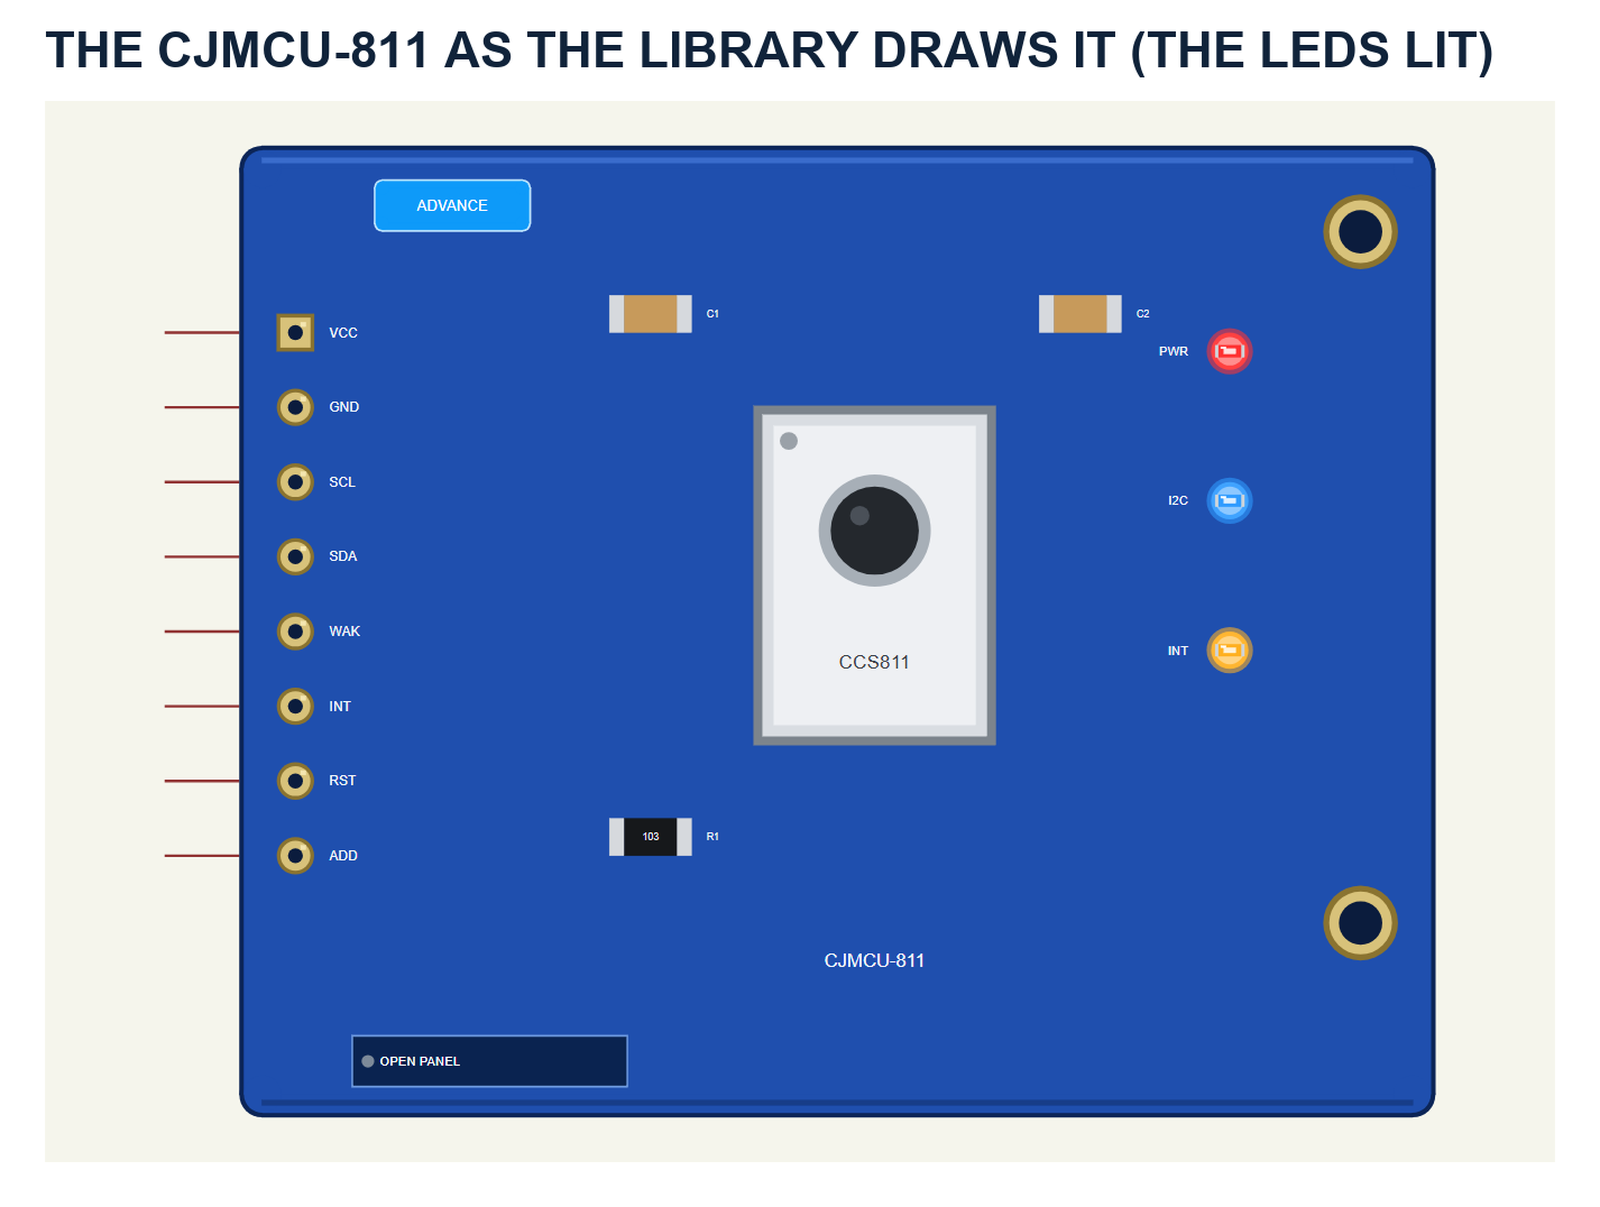
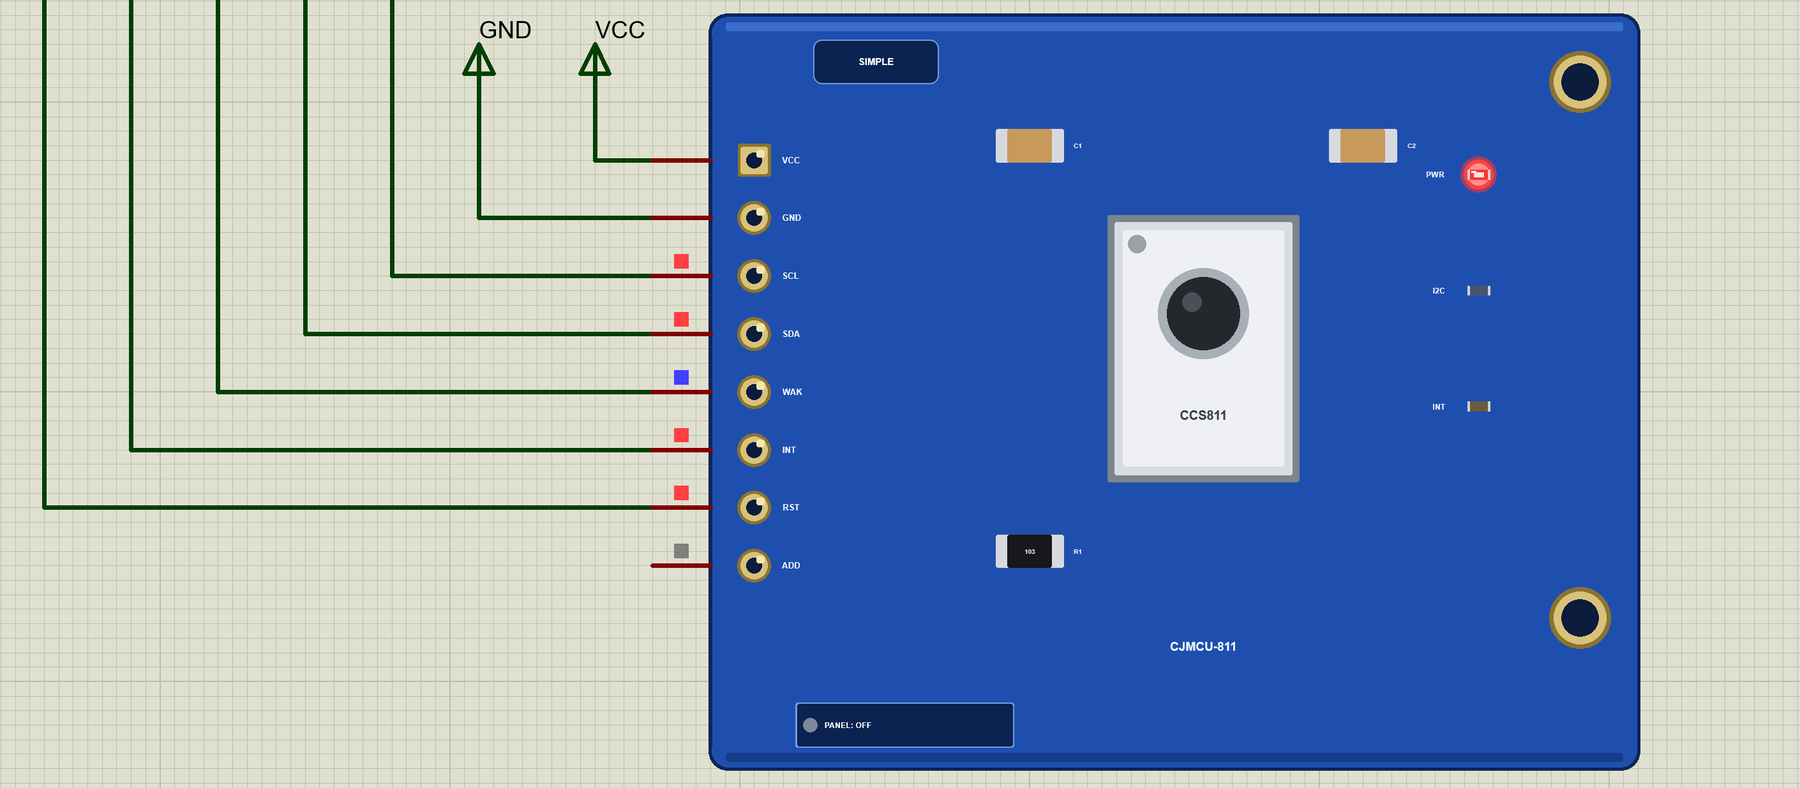
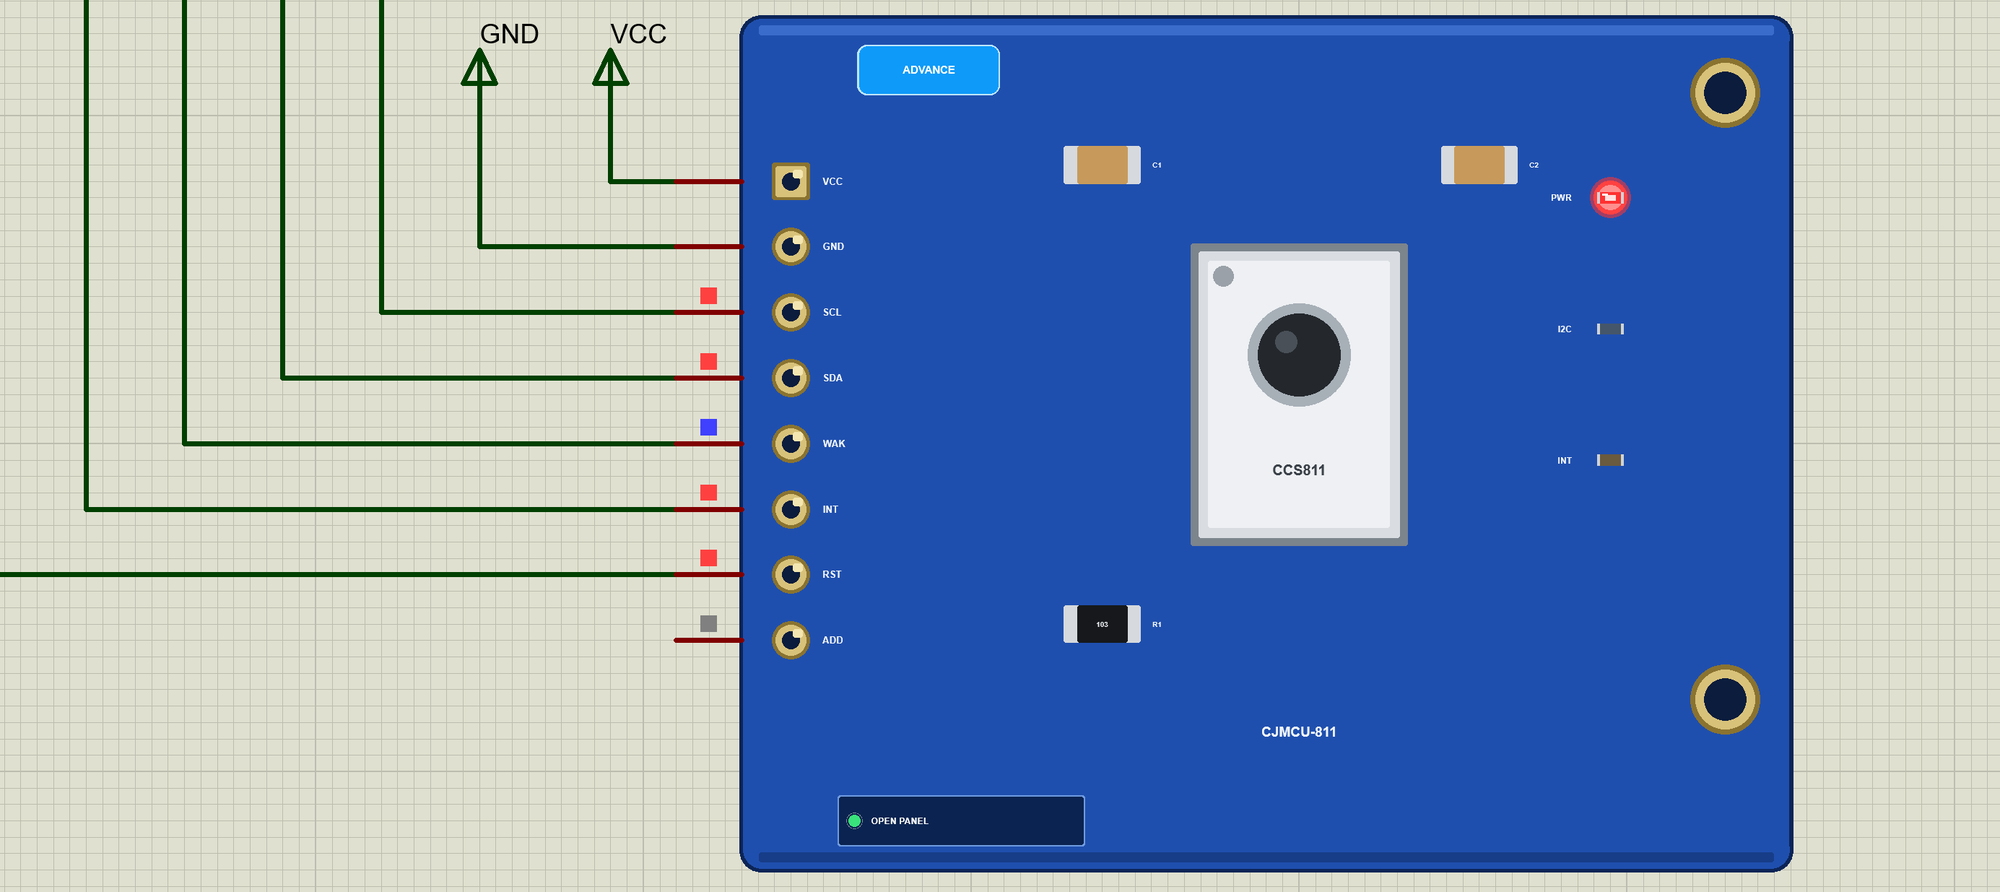
The part shows the CJMCU-811 board: the CCS811 in its small package with the round opening for the air, two capacitors, the 10k pull-down on ADD, and the header on the left - VCC, GND, SCL, SDA, WAK, INT, RST and ADD, the board's own order. Three LEDs sit on the board: PWR while it has power, I2C, a flash with each transaction, and INT, lit while the nINT pin is LOW. The board is drawn at about three times its real size.
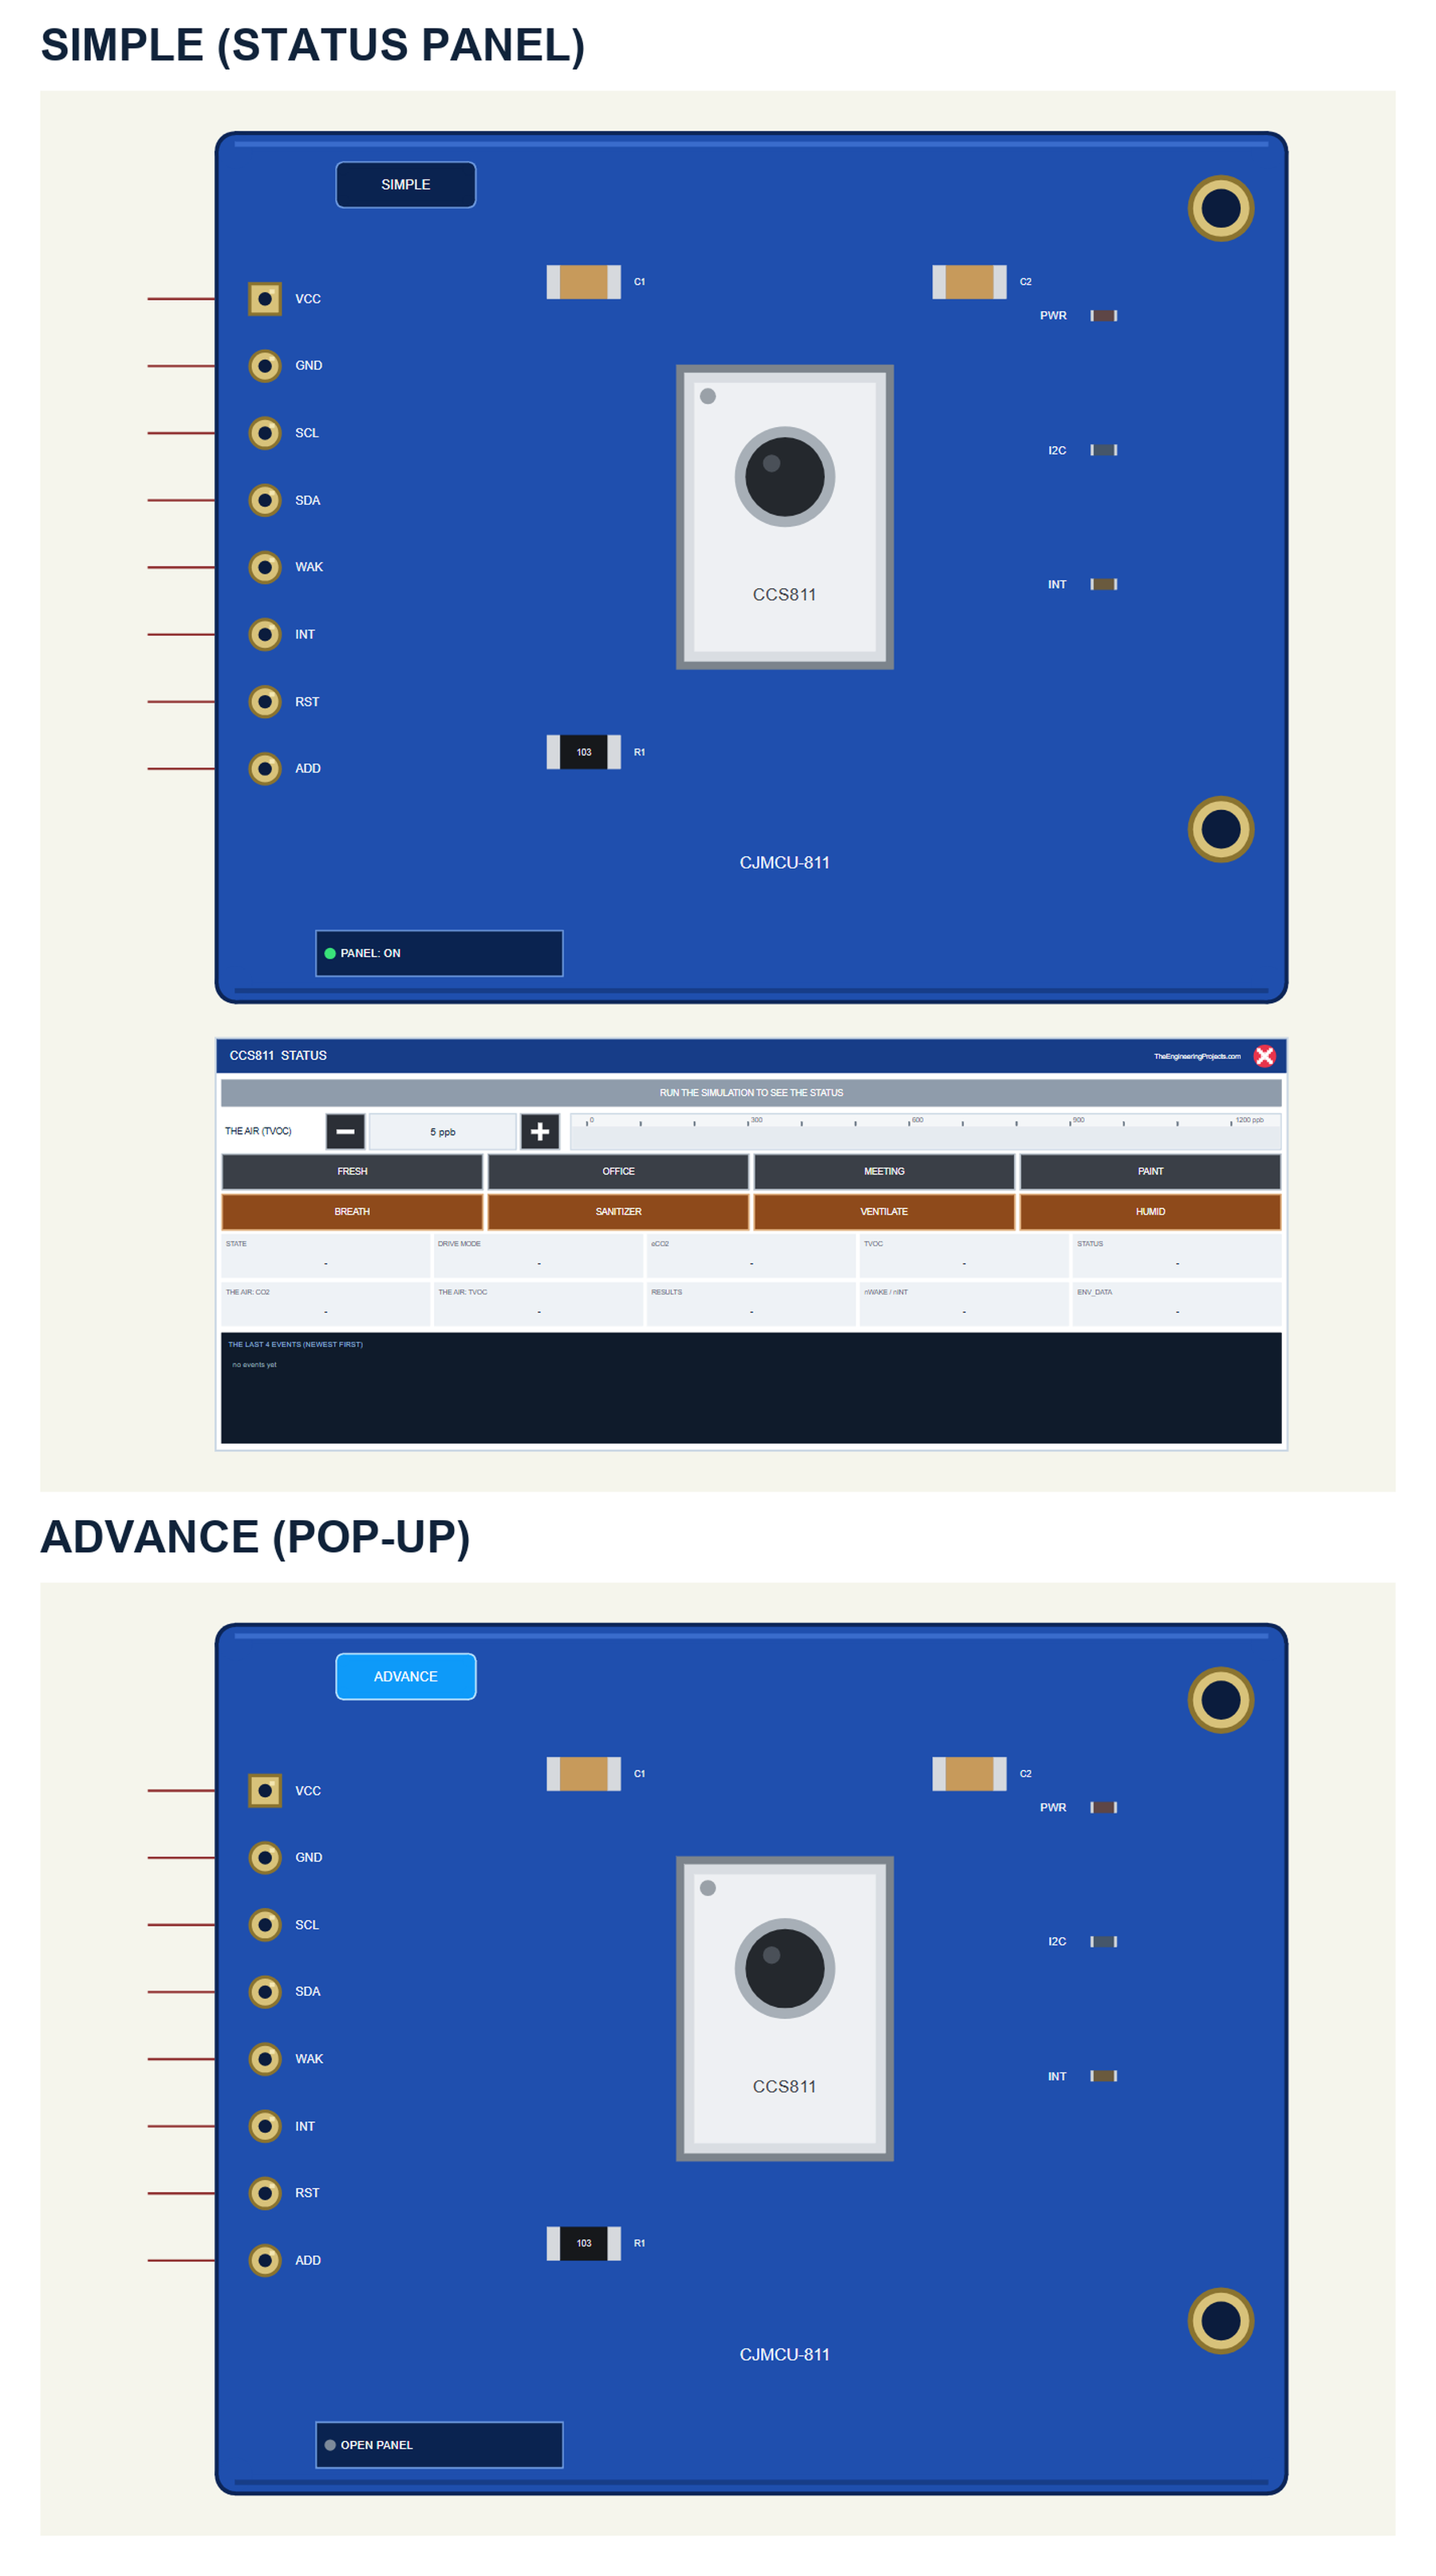
| Simple | Advance | |
|---|---|---|
| Device | CCS811TEP | CCS811ADVTEP |
| On the schematic | The board and the STATUS panel | The board |
| The air and the actions | On the STATUS panel | In the pop-up |
| Status | Banner, a ruler, 10 readouts, the last 4 events | A pop-up: Sensor, Event log, Tests |
Download CCS811 Air Quality Sensor Library for Proteus
Click the button below to download CCS811-Air-Quality-Sensor-Library-for-Proteus-v1.0.zip (about 1.29 MB, without the C++ source code of the model):
CCS811 Air Quality Sensor Library for Proteus V1.0- README.txt: the devices, installation, the demo, wiring, the test tools and real hardware.
- Proteus Library Files:
TEPCCS811.LIBandArduinoV4TEP.LIBfrom our Arduino Library for Proteus V4.0. - Proteus Model Files:
TEPCCS811.DLLandTEPARDUINO.DLL. - Proteus Simulation:
CCS811-Air-ArduinoUnoV4.pdsprj,CCS811_Air_Demo.hexand copies of the two DLLs. - Arduino Code:
CCS811_Air_Demo.ino- it needs the Adafruit CCS811 library and Adafruit BusIO from the Library Manager to rebuild it.
No Proteus yet? Read How to Download and Install Proteus 7 and 8. New to libraries? Follow How to Install a New Library in Proteus.
How to Install CCS811 Air Quality Sensor Library for Proteus
- Close Proteus and extract the whole zip file, for example to your Desktop.
- Copy the two files from Proteus Library Files into the LIBRARY folder of Proteus (usually
C:\Program Files (x86)\Labcenter Electronics\Proteus 8 Professional\LIBRARY). - Copy
TEPCCS811.DLLandTEPARDUINO.DLLfrom Proteus Model Files into the MODELS folder. - Delete
TEPCCS811.IDXfrom the LIBRARY folder if it is there. - Start Proteus, press P and search for CCS811.
Tip: keep the Proteus Simulation folder together, because the project needs its .hex file and the DLLs beside it. The library is tested in Proteus 8.5; Proteus 7 is not supported.
The CCS811 Part in Proteus
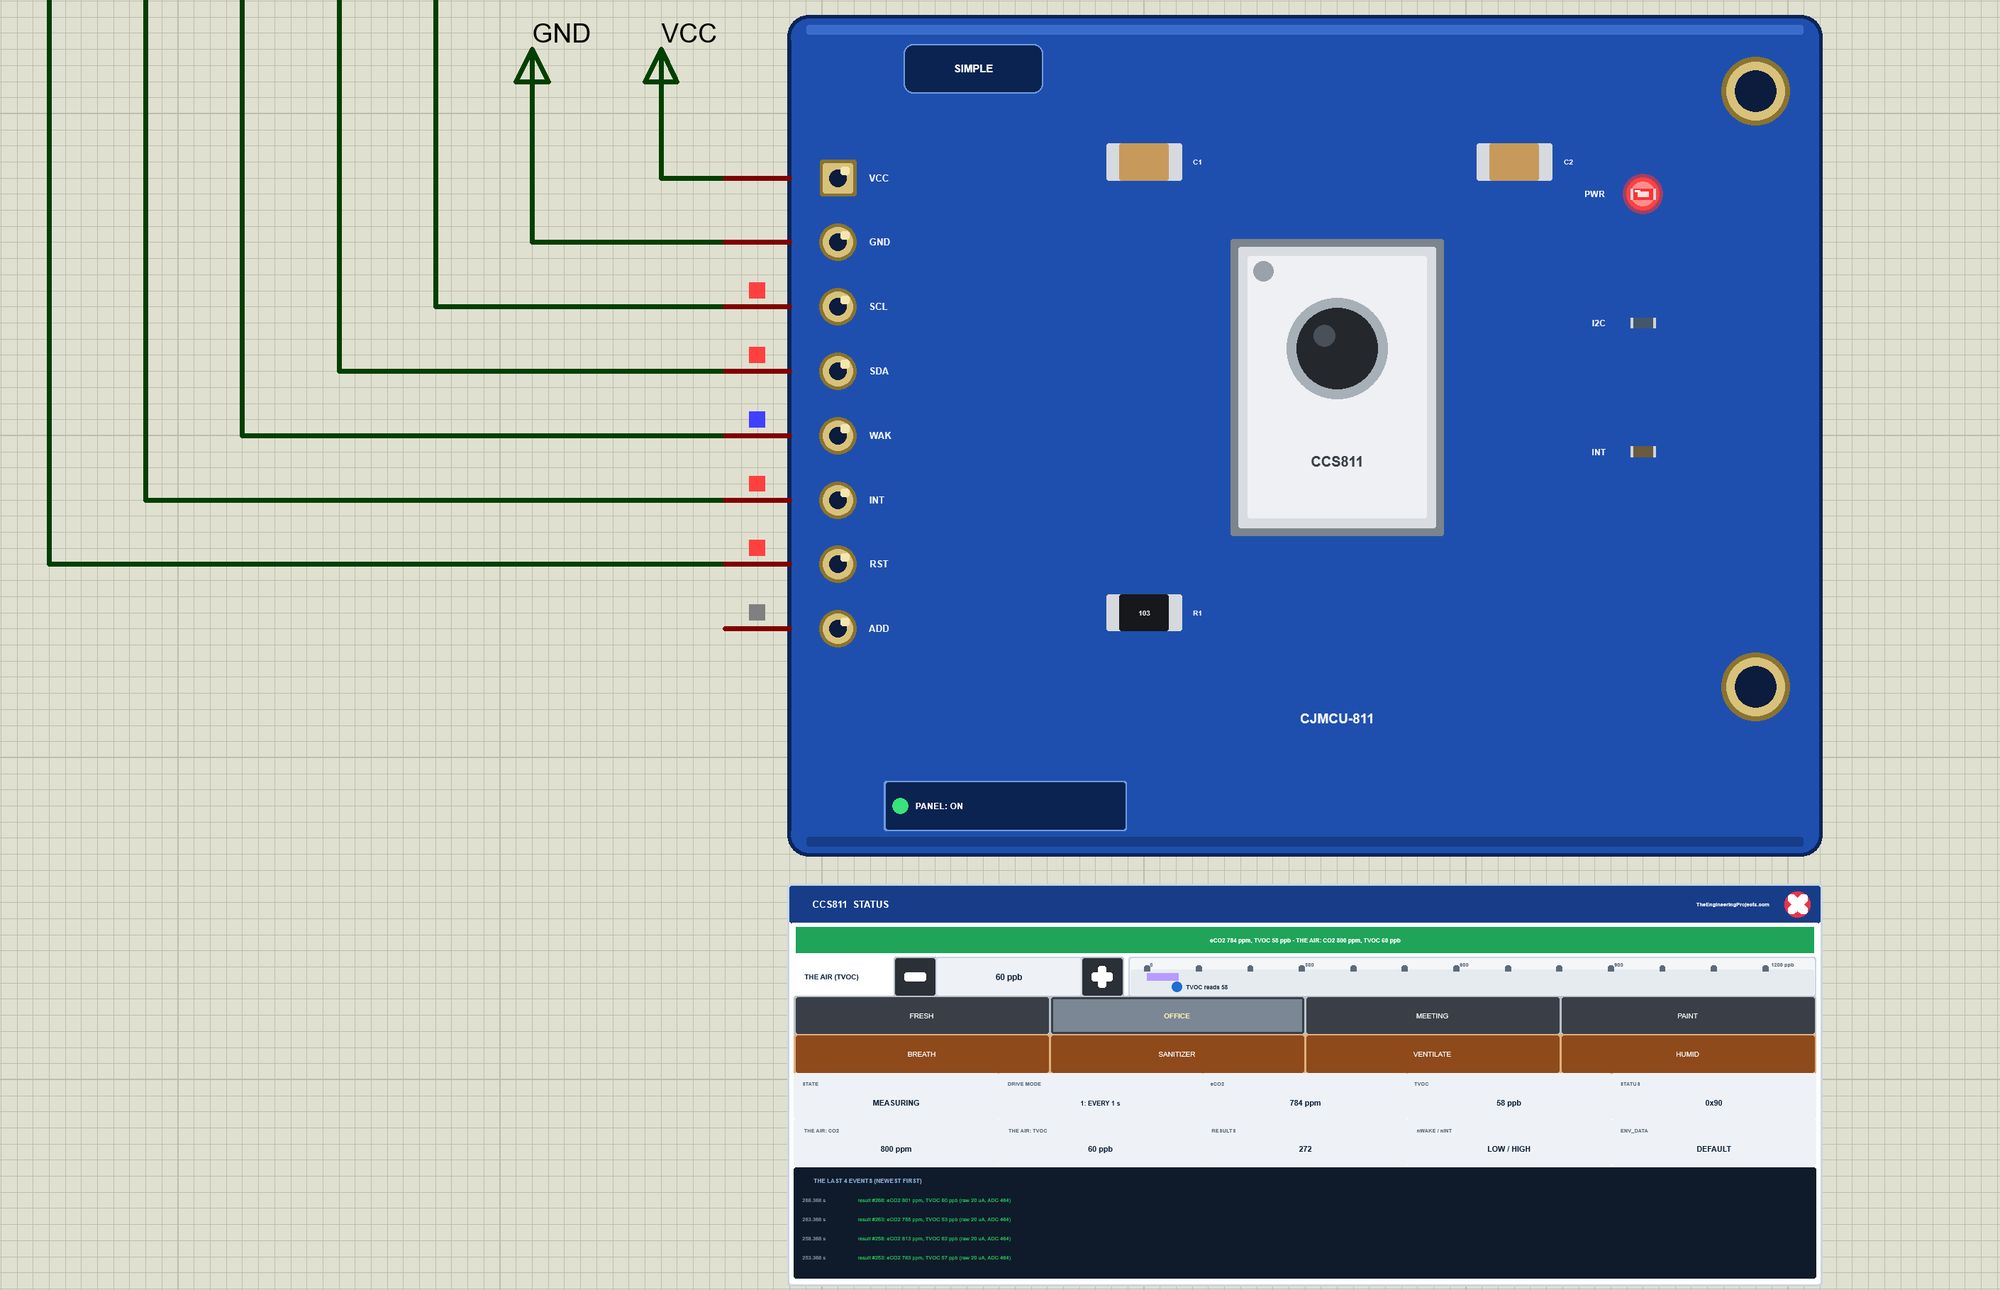
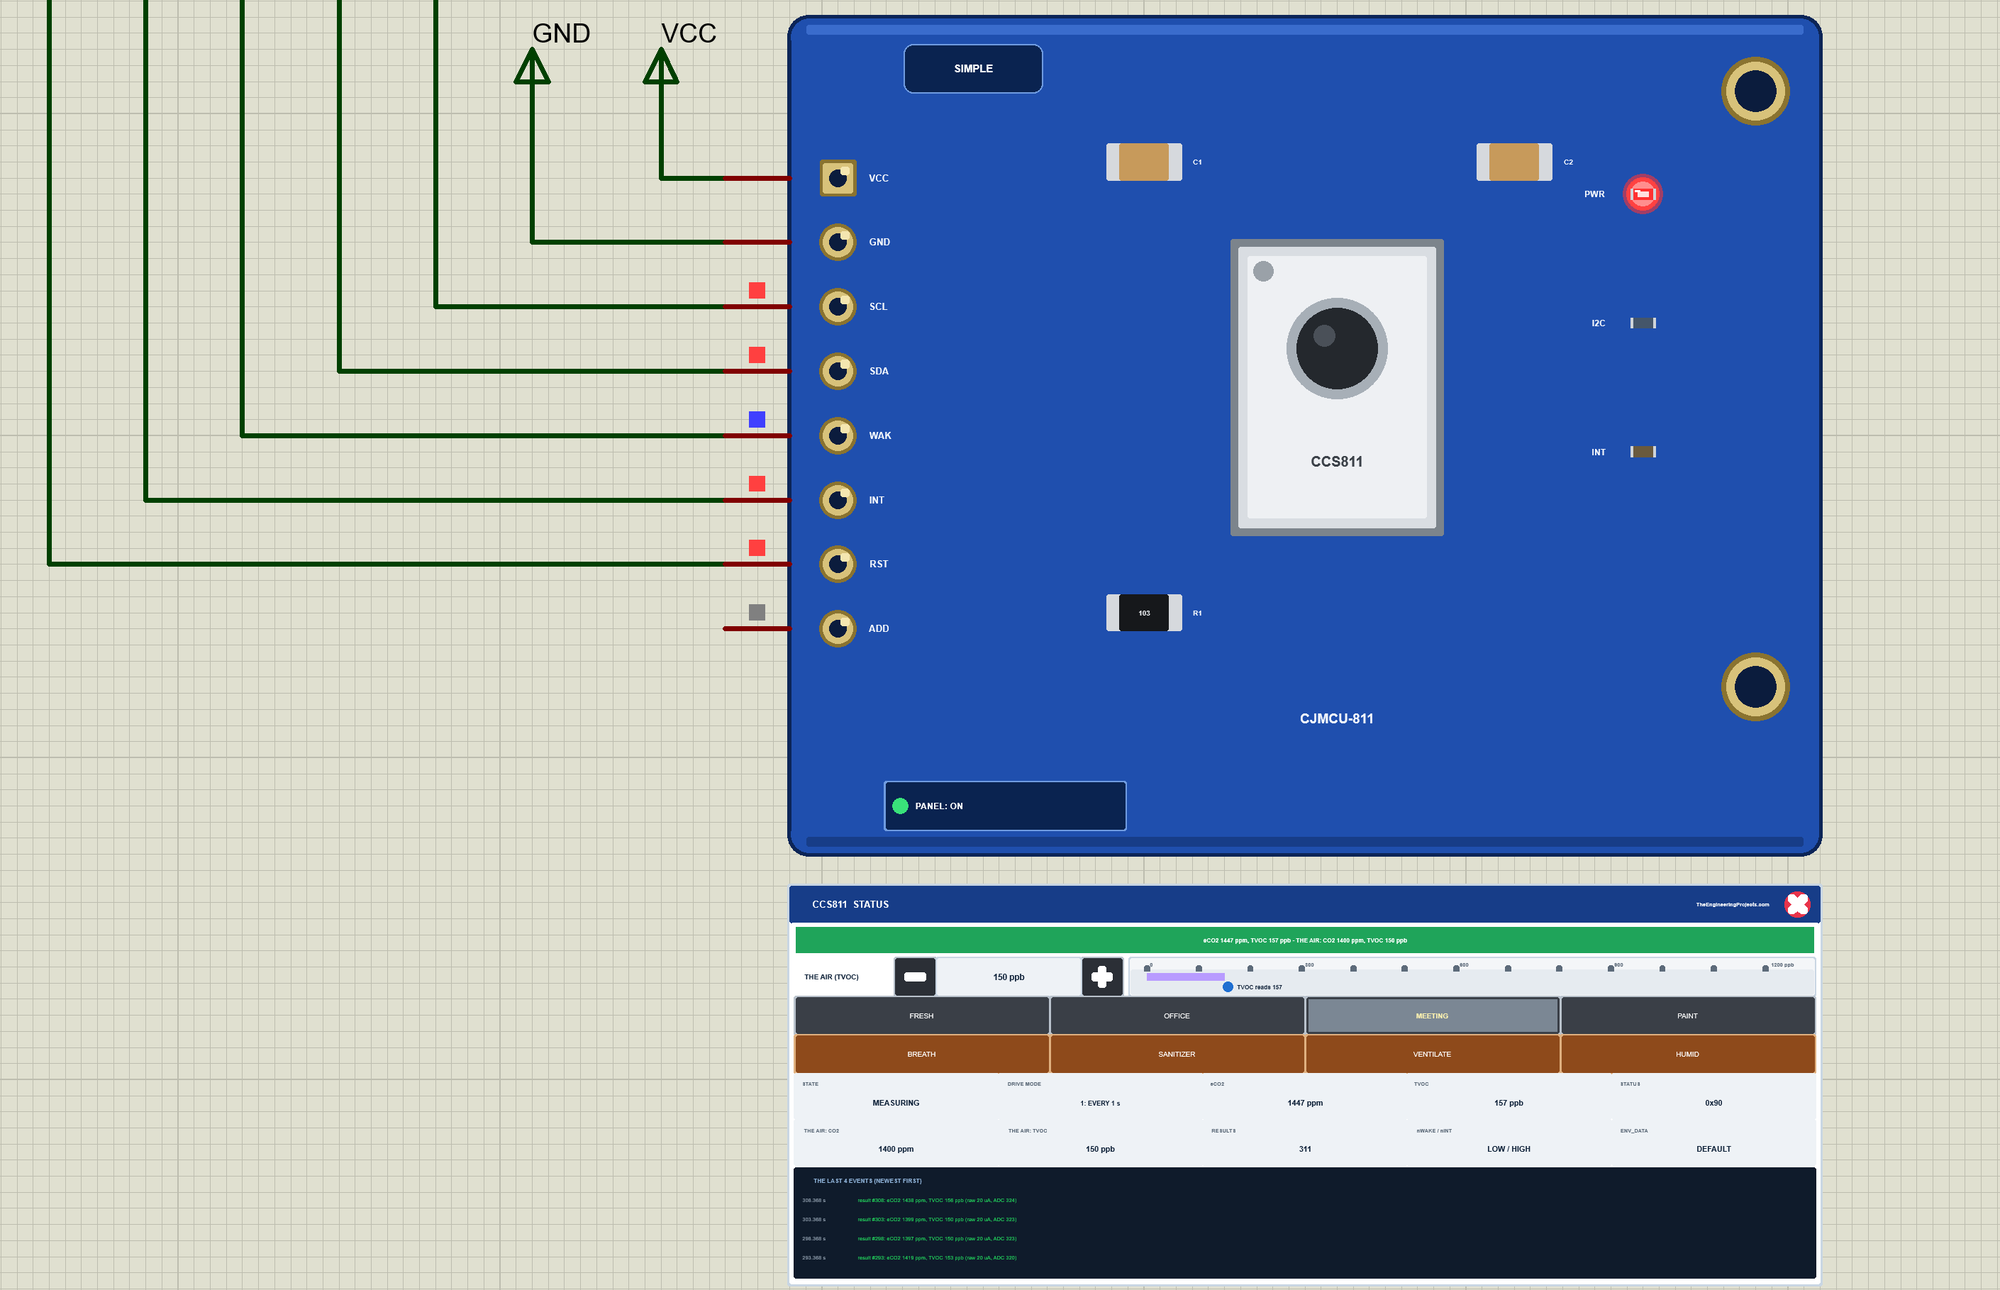
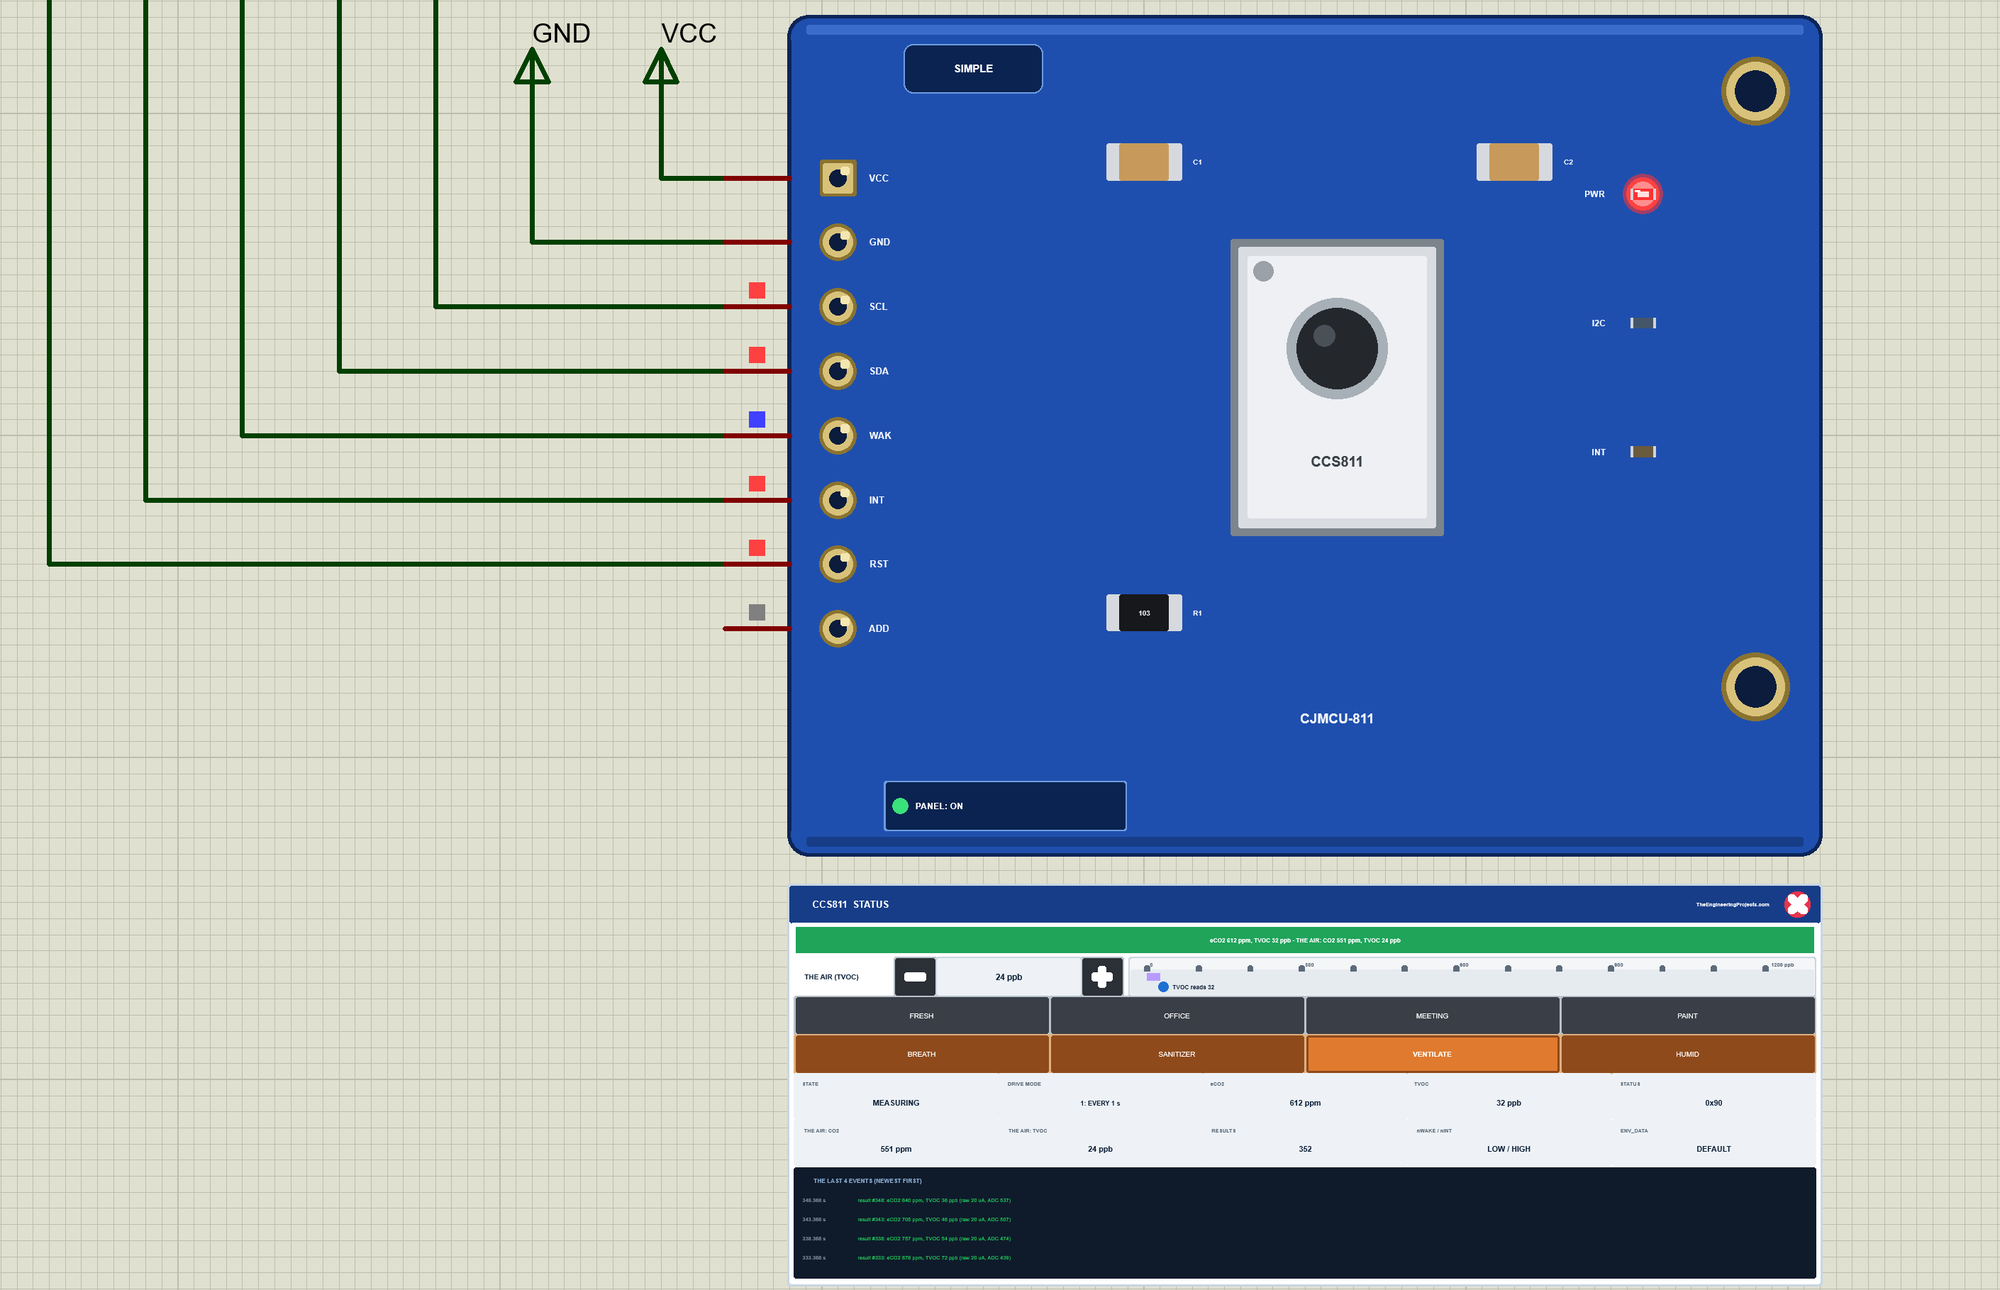
The Simple device adds the STATUS panel under the board. Its banner compares the reading with the air: green when they agree; amber during the run-in, while nWAKE is HIGH, when ENV_DATA is wrong or when eCO2 is far above the air's real CO2; and blue in boot mode or drive mode 0. Below it is THE AIR (TVOC) with - and + (10 ppb a click) and a ruler from 0 to 1200 ppb with the air (the violet bar) and the reading (the blue dot), then four presets and four actions. Ten readouts follow - the state, the drive mode, eCO2, TVOC, STATUS, the air's CO2 and TVOC, the results, nWAKE / nINT and ENV_DATA - and the last four events. The badge, the LEDs, the button and the panels are TEP additions.
| Preset | TVOC (ppb) | CO2 (ppm) | The room |
|---|---|---|---|
| FRESH | 5 | 420 | outdoor air, a well-aired room |
| OFFICE | 60 | 800 | a few people at work |
| MEETING | 150 | 1400 | a full meeting room with the door shut |
| PAINT | 450 | 600 | fresh paint, few people |
The actions change the air the way real life does. BREATH is somebody breathing on the sensor: CO2 +2500 ppm and the VOCs of the breath, +350 ppb, gone in about half a minute. SANITIZER is hand sanitizer next to the sensor: alcohol, +900 ppb of VOCs and no CO2 at all, gone in a minute or two. VENTILATE opens the windows: the air goes to FRESH with a time constant of 20 seconds. HUMID switches the air to 90 %RH, as if a shower runs next door, and the sensor reads higher until ENV_DATA tells it the humidity; a second click switches it off.
The red X closes the STATUS panel, and the PANEL button on the board opens it again:
The Advance device keeps the schematic clean: only the board. The live data opens in a pop-up window at Run, and the OPEN PANEL button on the board brings the window back:
The properties set the air at the start: TVOC in ppb (5), CO2 in ppm (420 - shown only, the CCS811 does not measure it), TEMPERATURE (25 C) and HUMIDITY (50 %RH), and RUNIN, the run-in after power-on in seconds: 1200 by default, the datasheet's 20 minutes. The Simple device also has PANEL (open or closed). Every run starts from power-on in boot mode, like a real sensor.
The Demo Circuit
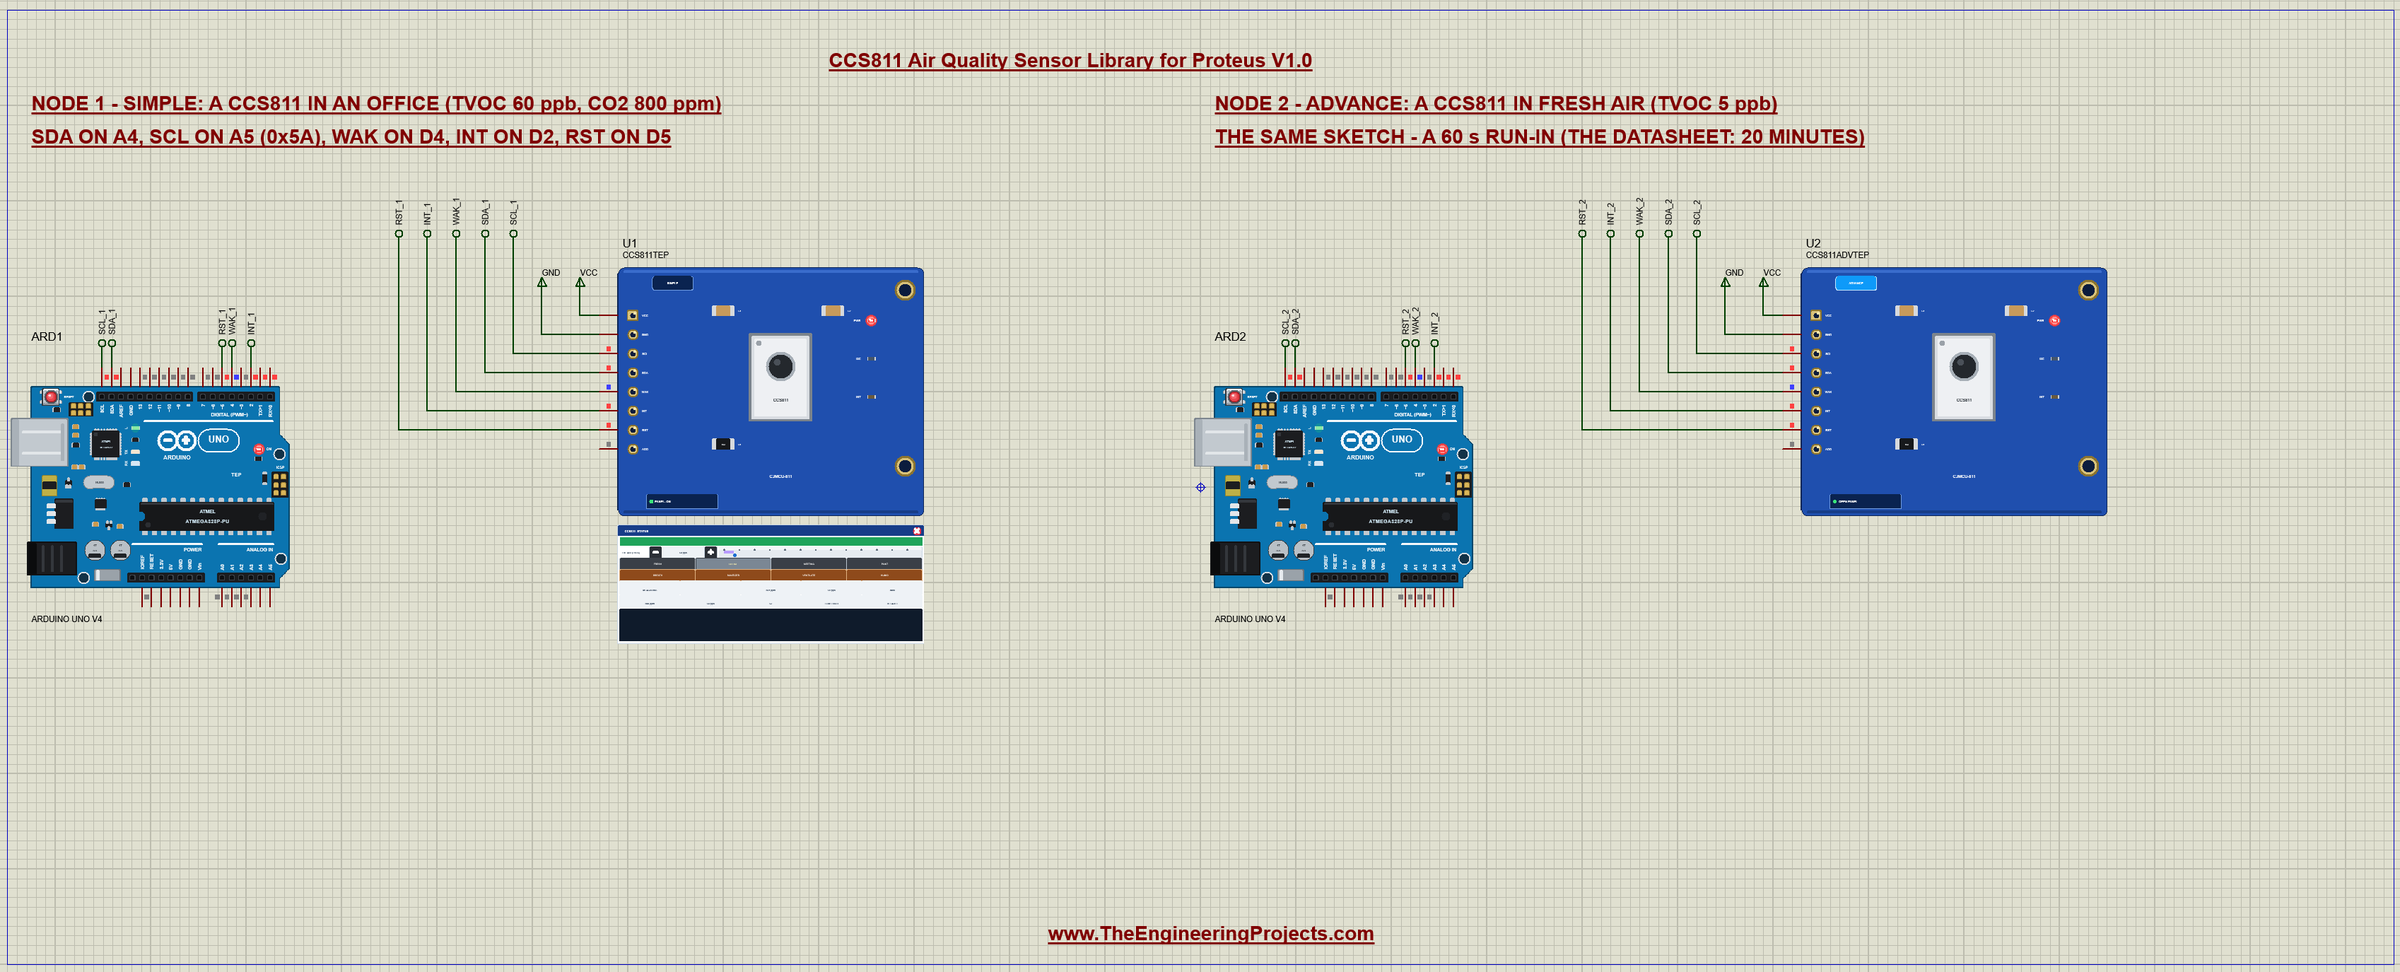
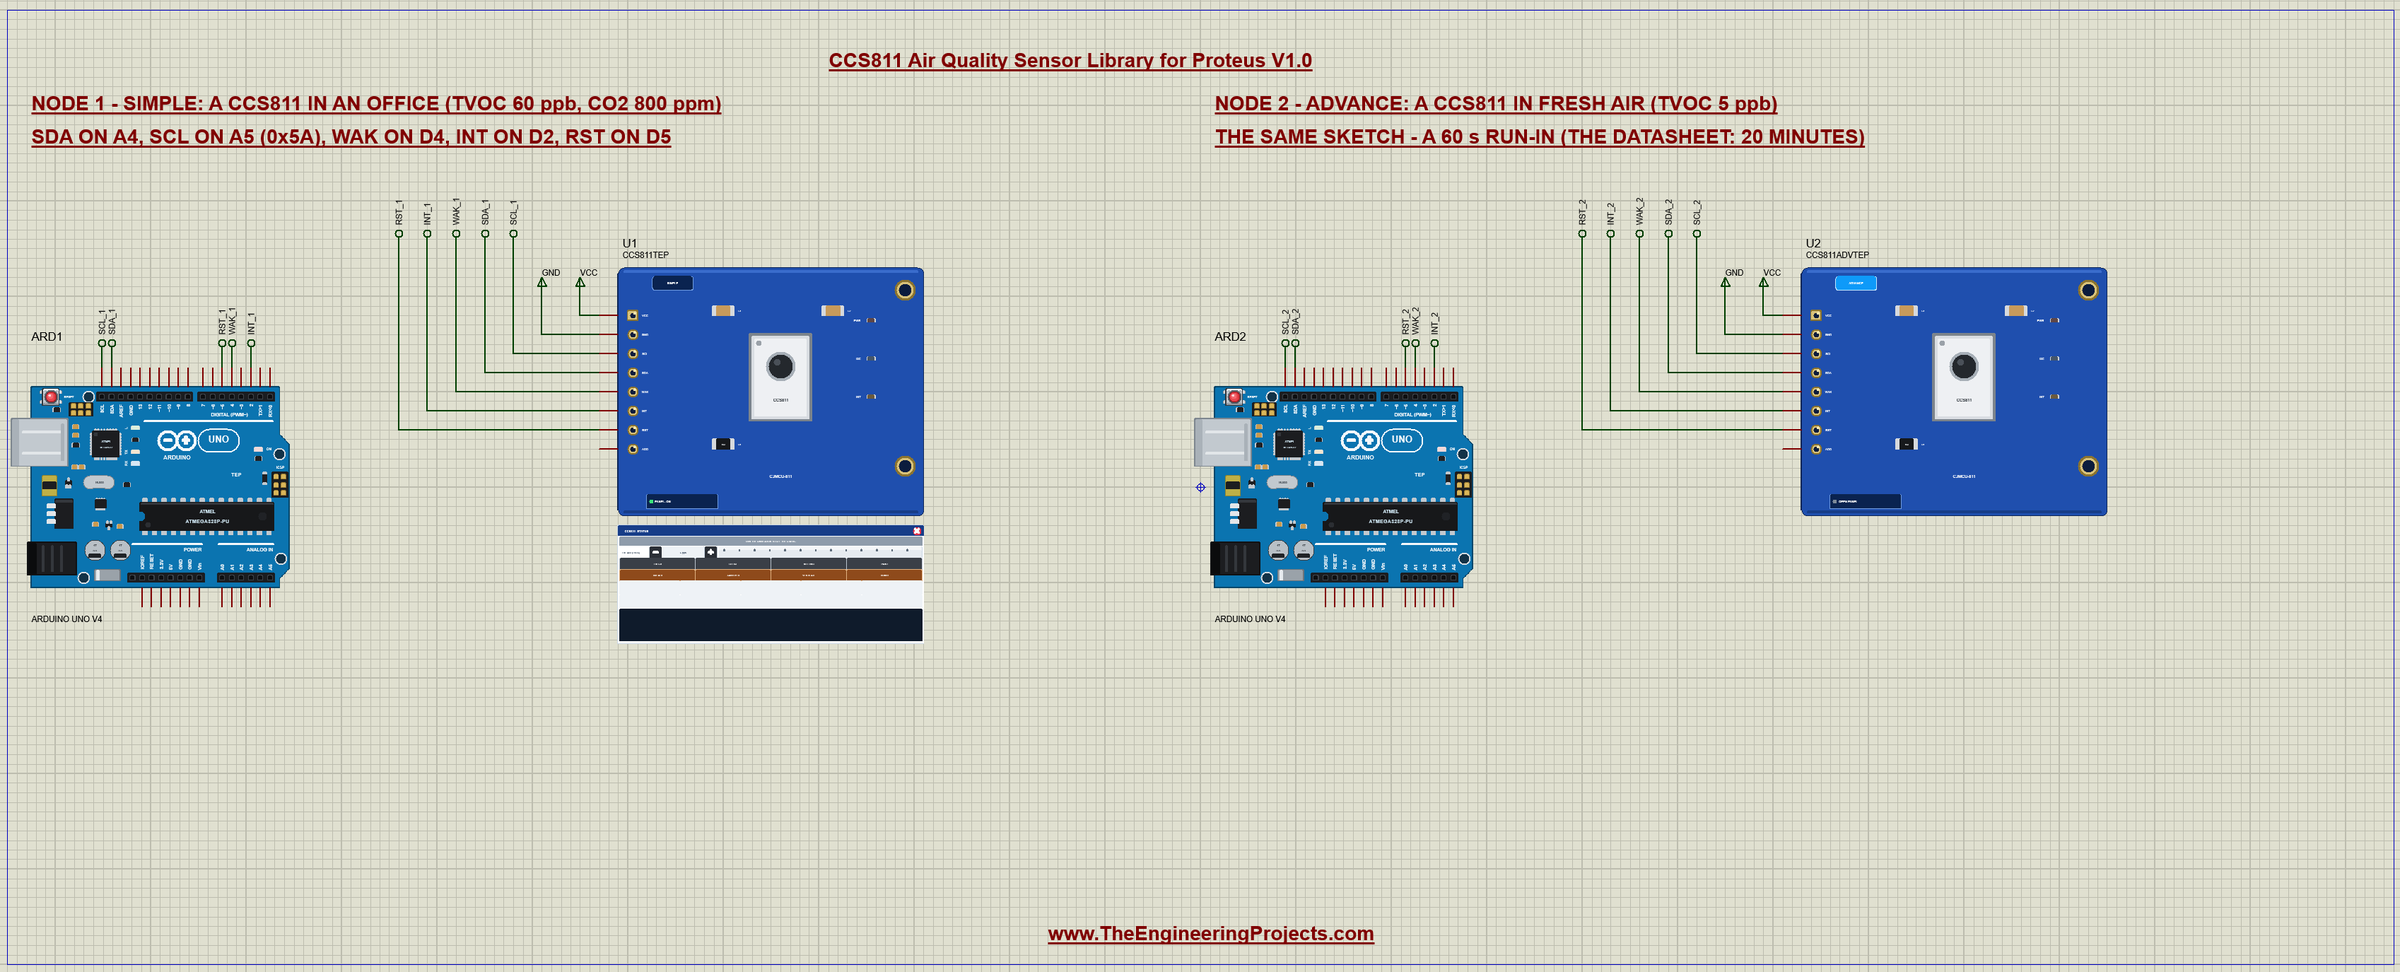
The demo project has two nodes, each an Arduino UNO V4.0 from our Arduino UNO Library for Proteus V4.0 with a CCS811. Node 1 stands in an office (TVOC 60 ppb, CO2 800 ppm), node 2 in fresh air (TVOC 5 ppb, CO2 420 ppm). Both UNOs run the same CCS811_Air_Demo.hex, and both sensors have RUNIN set to 60 seconds - the datasheet's 20 minutes would be far too long for a demo.
Wiring
| CJMCU-811 | Arduino UNO |
|---|---|
| VCC | 3.3V on a real board (in Proteus a VCC power terminal) |
| GND | GND |
| SCL | A5 / SCL |
| SDA | A4 / SDA |
| WAK | D4 (LOW = the I2C interface listens) |
| INT | D2 (INPUT_PULLUP - LOW = a new result) |
| RST | D5 (HIGH; LOW = reset) |
| ADD | open (the 10k pull-down: 0x5A); HIGH = 0x5B |
SDA and SCL go to the UNO's I2C pins, A4 and A5. WAK is the one pin a CCS811 cannot do without: while it is HIGH or open, the sensor does not answer at all. INT and RST are optional, but the demo uses both to show what they do. In Proteus the pins reach their UNO through net labels - SCL_1, SDA_1, WAK_1, INT_1 and RST_1 for node 1, the same with _2 for node 2 - and VCC and GND are power terminals. The serial monitor needs no wires at all, because it is built into the UNO V4.0.
The Arduino Code
The demo sketch uses the Adafruit CCS811 library, which talks to the sensor through Adafruit BusIO. New to Arduino? Start with Arduino Tutorial for Beginners and Introduction to Arduino UNO. The library, the pins and the object:
#include <Adafruit_CCS811.h>const byte INT_PIN = 2; // the sensor's nINT: LOW = a new result (open drain)
const byte WAK_PIN = 4; // the sensor's nWAKE: LOW = the I2C interface listens
const byte RST_PIN = 5; // the sensor's nRESET: LOW = reset
const unsigned long RUN_IN_MS = 60000UL; // the datasheet: 20 minutes of run-in; the demo's sensors have RUNIN = 60 sAdafruit_CCS811 ccs;Setup
In setup() RST is written HIGH before the pin becomes an output - the other way round it would be LOW for an instant, and a LOW on RST resets the sensor. WAK goes LOW, so the sensor listens, and INT gets the pull-up, because nINT is an open-drain output. Then start() runs:
  Serial.println(F("TEP CCS811 air quality sensor - demo V1.0"));
  digitalWrite(RST_PIN, HIGH);             // HIGH first: no LOW glitch when the pins become outputs
  pinMode(RST_PIN, OUTPUT);
  digitalWrite(WAK_PIN, LOW);              // nWAKE LOW: the sensor listens on I2C
  pinMode(WAK_PIN, OUTPUT);
  pinMode(INT_PIN, INPUT_PULLUP);          // nINT is an open-drain output
  delay(100);
  if (!start()) {
    Serial.println(F("CCS811 not found - check SDA / SCL, WAK (LOW) and the address (0x5A)"));
    while (true) {}
  }
  Serial.println(F("Adafruit CCS811 on I2C 0x5A: drive mode 1 (a result every second), nINT on D2"));
  help();
start() calls begin(), which does the whole start-up of the CCS811: a software reset (SW_RESET with the four bytes 11 E5 72 8A), a check of HW_ID (0x81), APP_START to leave boot mode, and drive mode 1. Then enableInterrupt() sets the INT_DATARDY bit, so nINT goes LOW for every new result:
bool start() {
  if (!ccs.begin()) return false;          // SW reset, HW_ID 0x81, APP_START, drive mode 1
  ccs.enableInterrupt();                   // nINT LOW when a new result is ready
  mode = 1;
  return true;
}
Reading a Result
loop() first collects the characters typed in the monitor. Then it watches D2: while nINT is LOW a new result waits, and readData() reads the eight bytes of ALG_RESULT_DATA, which also releases nINT. The sketch reads only while the sensor is awake, because a sleeping CCS811 does not answer:
  if (awake && digitalRead(INT_PIN) == LOW) {   // a new result: nINT stays LOW until it is read
    const uint8_t err = ccs.readData();
    if (err) {
      Serial.print(F("ERROR_ID 0x"));
      Serial.println(err, HEX);
    } else printResult();
printResult() counts the results and prints the time, eCO2 and TVOC, and marks the run-in:
void printResult() {
  ++results;
  Serial.print('#');
  Serial.print(results);
  Serial.print(F("  t="));
  Serial.print(millis() / 1000);
  Serial.print(F(" s  eCO2 "));
  Serial.print(ccs.geteCO2());
  Serial.print(F(" ppm  TVOC "));
  Serial.print(ccs.getTVOC());
  Serial.print(F(" ppb"));
  if (mode == 4) Serial.print(F("  (mode 4: raw data only)"));
  else if (millis() < RUN_IN_MS) Serial.print(F("  - run-in"));
  Serial.println();
}
Without nINT, call available() first: it reads STATUS and checks DATA_READY. Do not print after every readData() on a timer: it returns 0 also when nothing is new, and you print the same result again.
The Commands
MODE sets the drive mode with setDriveMode(), and ENV sends the humidity and temperature with setEnvironmentalData():
  if (!strncmp(c, "MODE ", 5)) {
    const int m = atoi(c + 5);
    if (m < 0 || m > 4) { Serial.println(F("MODE 0 - 4")); return; }
    ccs.setDriveMode(m);
    mode = m;
} else if (!strncmp(c, "ENV ", 4)) {
const float h = atof(c + 4);
const char* sp = strchr(c + 4, ' ');
const float t = sp ? atof(sp + 1) : 25.0;
ccs.setEnvironmentalData(h, t); // the compensation: humidity and temperature
Serial.print(F("ENV_DATA: "));
Serial.print(h, 1);
Serial.print(F(" %RH, "));
Serial.print(t, 1);
Serial.println(F(" C"));SLEEP and WAKE drive the WAK pin. After WAK goes LOW, the sensor needs 50 microseconds before the next I2C START, so the sketch waits 100. RESET pulls RST LOW for 10 ms, waits 100 ms - the CCS811 starts again in boot mode - and runs start() again:
  } else if (!strcmp(c, "SLEEP")) {
    digitalWrite(WAK_PIN, HIGH);
    awake = false;
    Serial.println(F("WAK HIGH: the I2C interface sleeps - the measurements go on"));
  } else if (!strcmp(c, "WAKE")) {
    digitalWrite(WAK_PIN, LOW);
    delayMicroseconds(100);                // nWAKE LOW at least 50 us before a START
    awake = true;
    Serial.println(F("WAK LOW: the I2C interface listens"));
} else if (!strcmp(c, "RESET")) {
digitalWrite(RST_PIN, LOW);
delay(10);
digitalWrite(RST_PIN, HIGH);
delay(100); // the CCS811 starts again in boot mode
Serial.println(start() ? F("RESET: begin() again - drive mode 1") : F("RESET: begin() failed"));The HEX file is in the package, so you do not need the Arduino IDE to run the demo. To change the sketch, install the Adafruit CCS811 library and Adafruit BusIO from the Library Manager and export the compiled binary, as in How to get the HEX file from Arduino. It needs 13,218 bytes of flash and 537 bytes of RAM.
The Serial Monitor: the Run-In
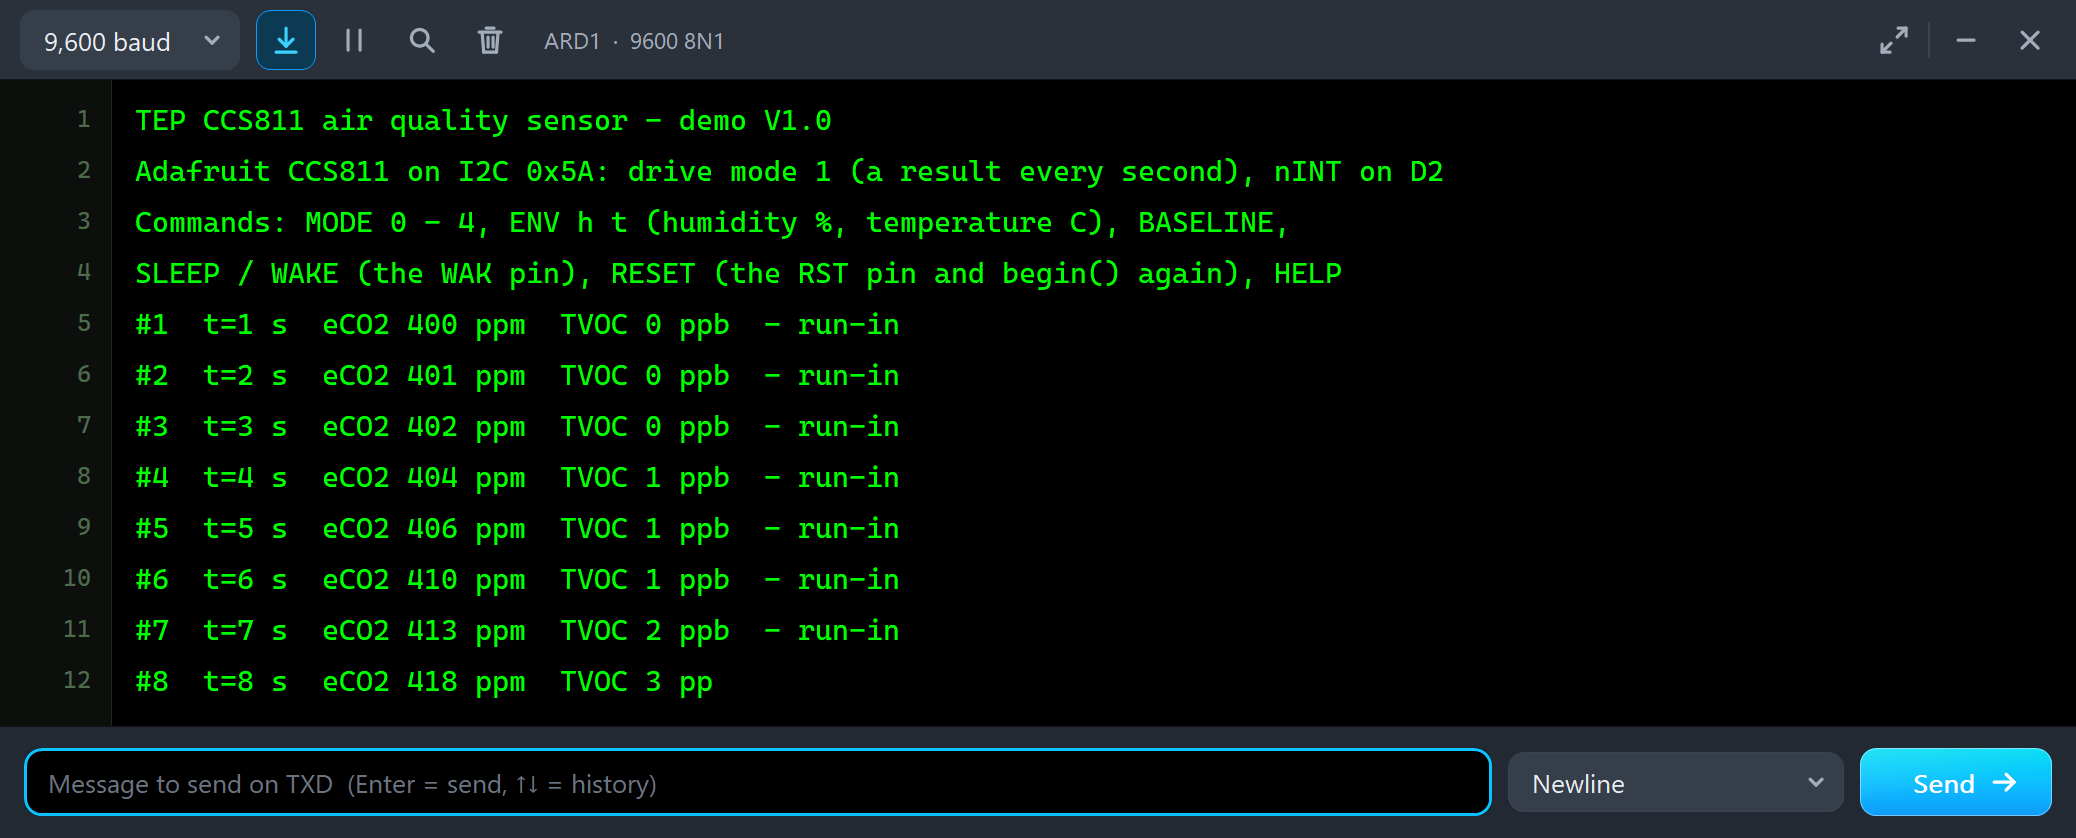
Both UNOs have the serial monitor built in, and it opens at Run. The screenshots use its Simple interface. The sketch prints its header and the commands, and a result arrives every second:
TEP CCS811 air quality sensor - demo V1.0
Adafruit CCS811 on I2C 0x5A: drive mode 1 (a result every second), nINT on D2
Commands: MODE 0 - 4, ENV h t (humidity %, temperature C), BASELINE,
SLEEP / WAKE (the WAK pin), RESET (the RST pin and begin() again), HELP
#1  t=1 s  eCO2 400 ppm  TVOC 0 ppb  - run-in
#2  t=2 s  eCO2 401 ppm  TVOC 0 ppb  - run-in
#3  t=3 s  eCO2 402 ppm  TVOC 0 ppb  - run-in
#4  t=4 s  eCO2 404 ppm  TVOC 1 ppb  - run-in
#5  t=5 s  eCO2 406 ppm  TVOC 1 ppb  - run-in
#6  t=6 s  eCO2 410 ppm  TVOC 1 ppb  - run-in
#7  t=7 s  eCO2 413 ppm  TVOC 2 ppb  - run-in
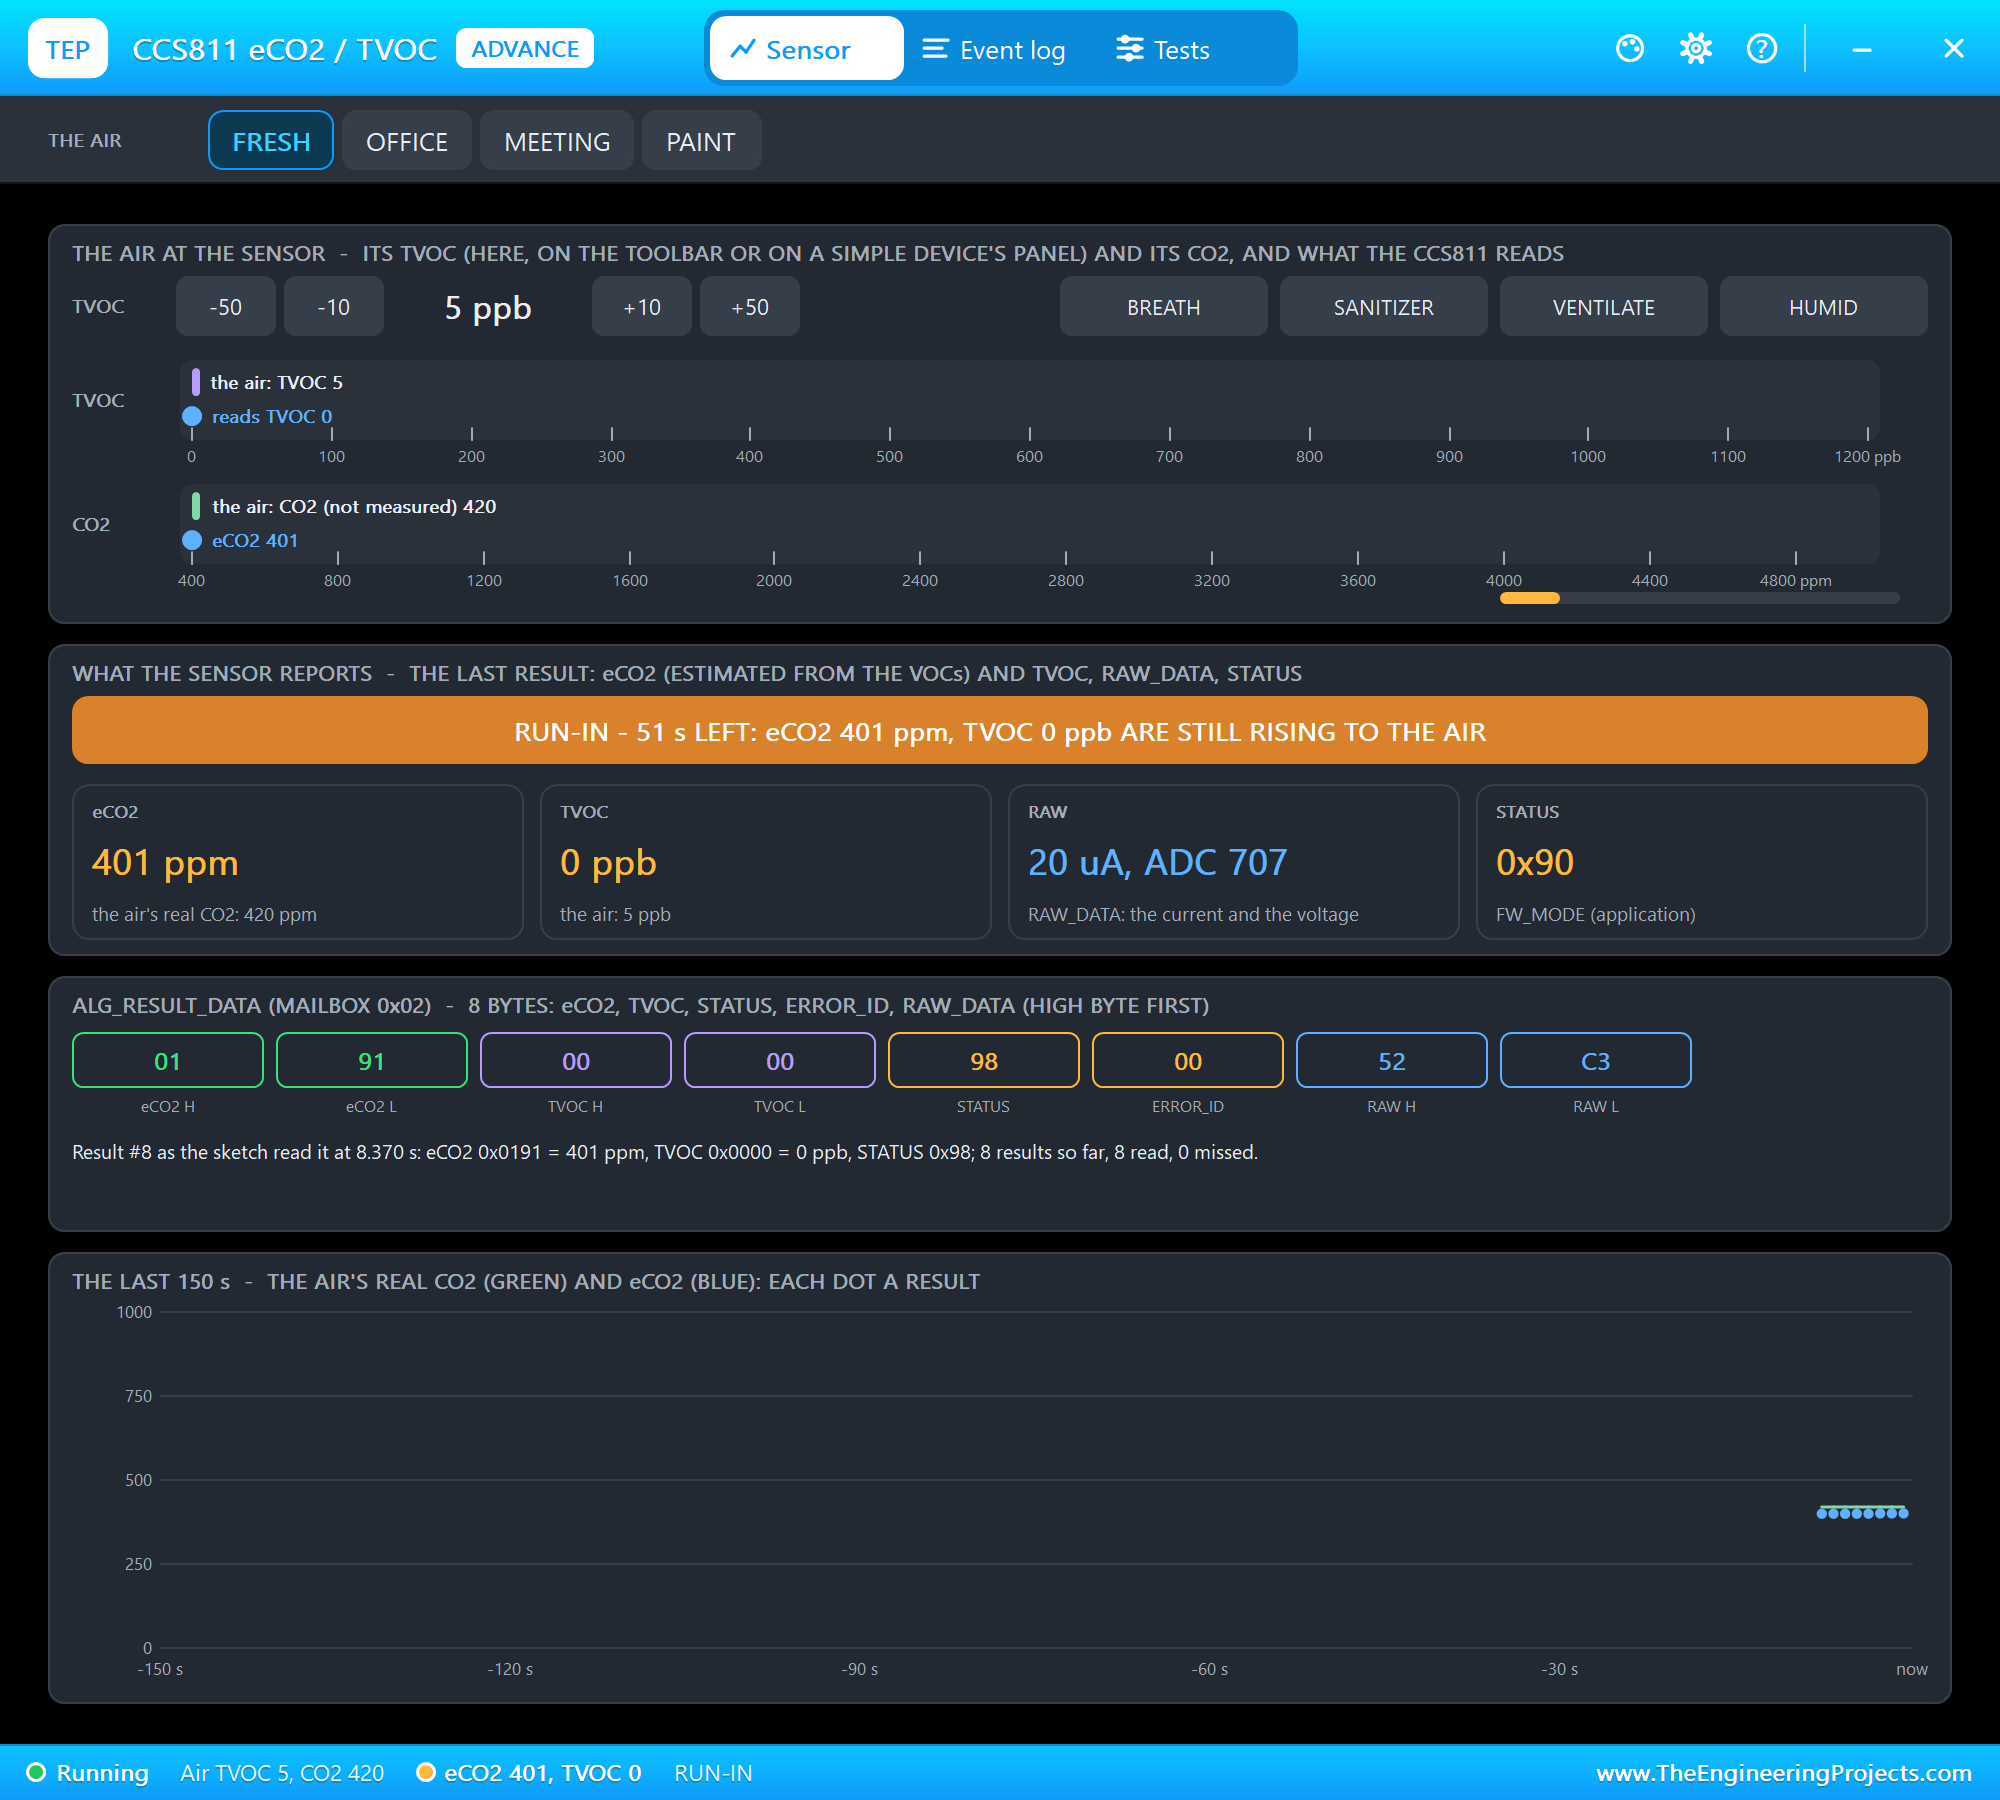
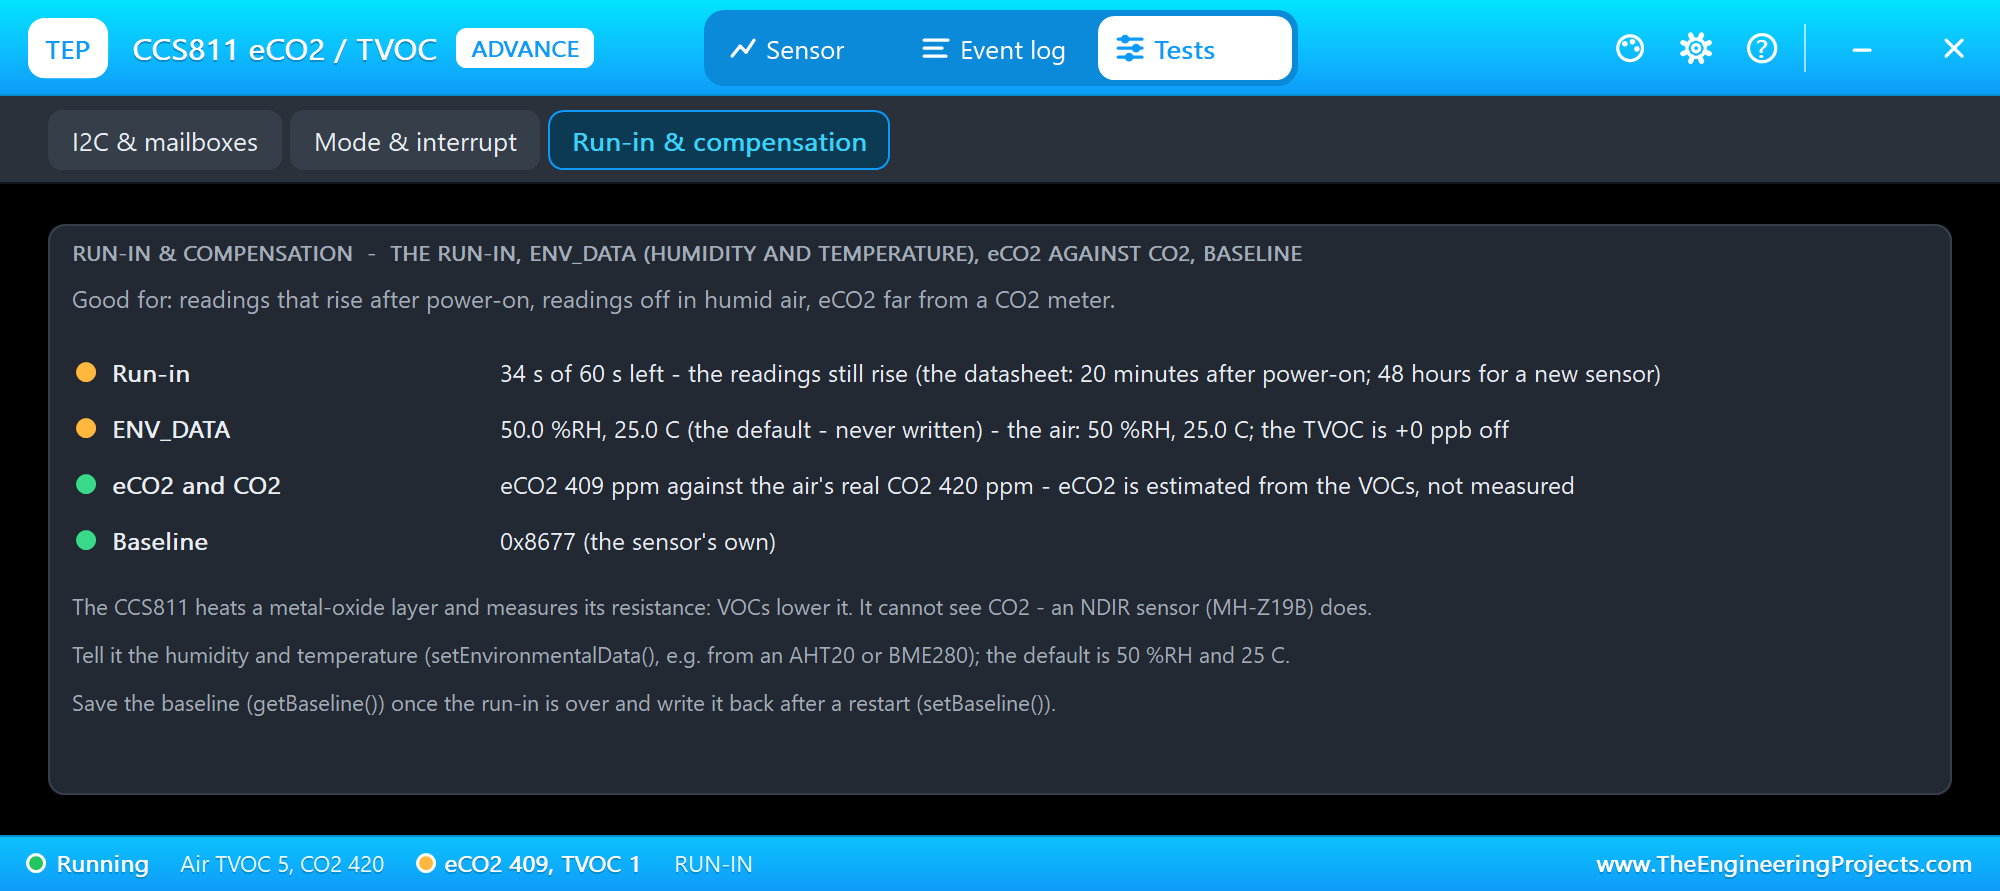
Node 1 is in an office with a TVOC of 60 ppb, but the first result says eCO2 400 ppm, TVOC 0 ppb - the lowest values the CCS811 can report. A metal-oxide sensor needs time after power-on: the hot layer has to settle. The datasheet asks for 20 minutes of run-in before the readings are trusted, and 48 hours of burn-in for a brand-new sensor. In the demo RUNIN is 60 seconds. U2's pop-up shows the time left:
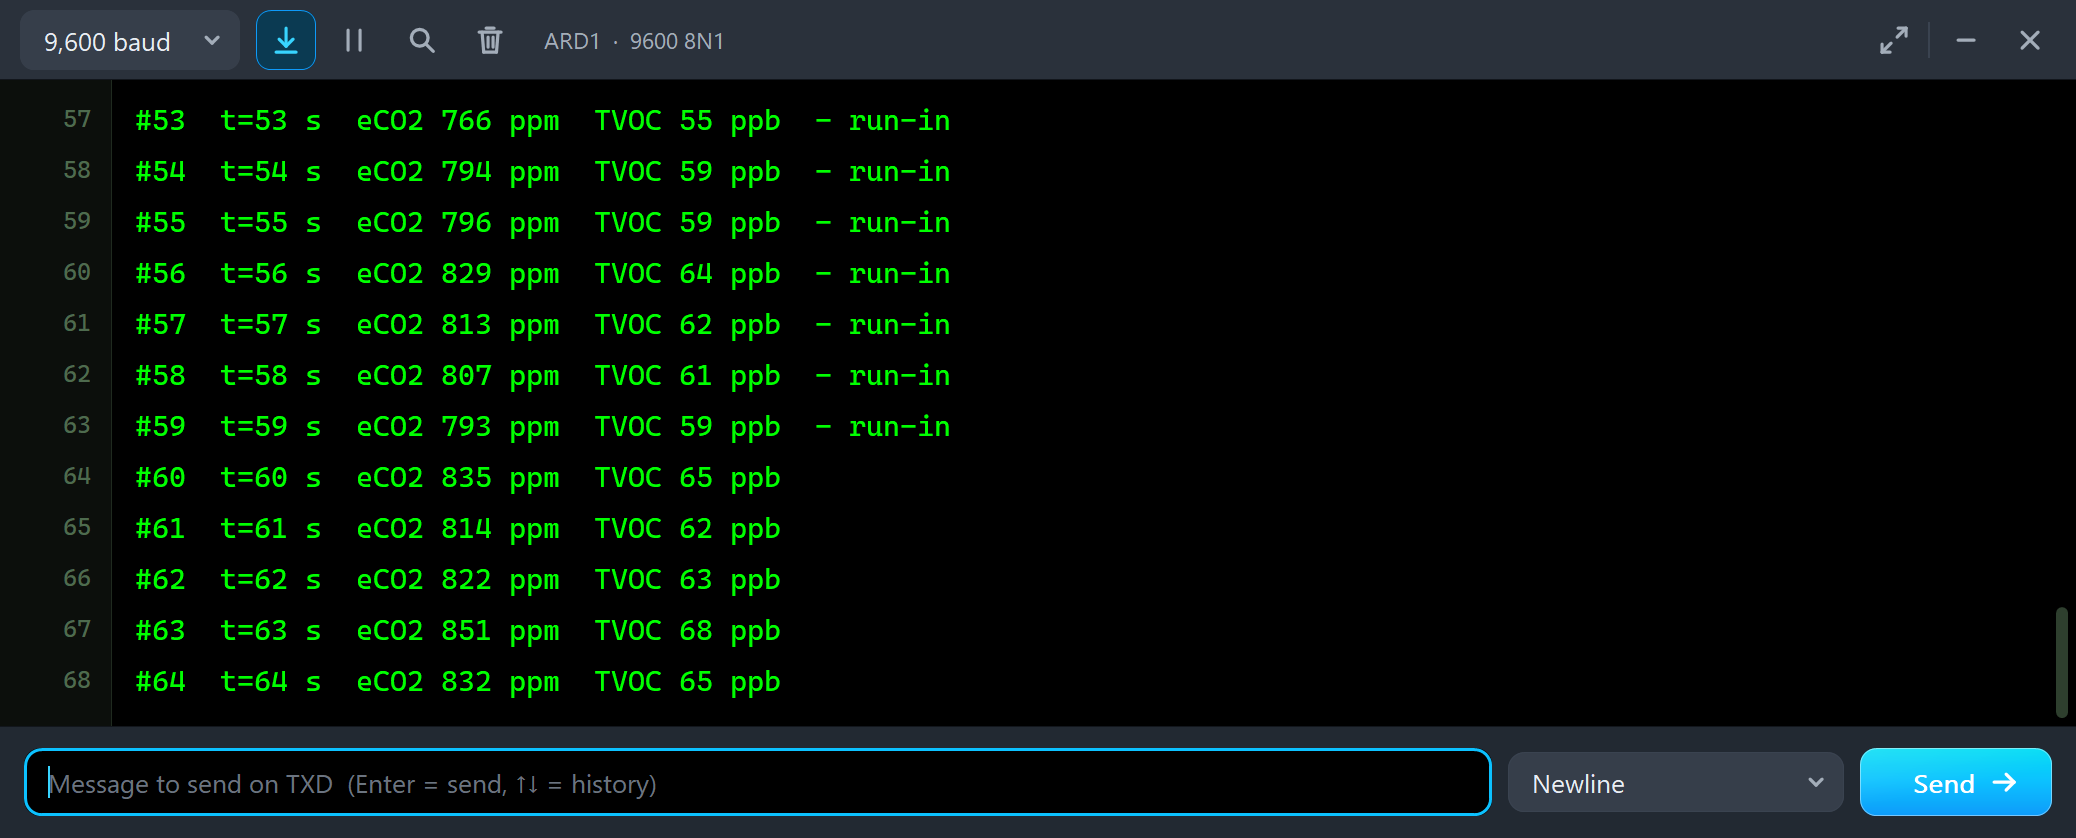
#53  t=53 s  eCO2 766 ppm  TVOC 55 ppb  - run-in
#54  t=54 s  eCO2 794 ppm  TVOC 59 ppb  - run-in
#55  t=55 s  eCO2 796 ppm  TVOC 59 ppb  - run-in
#56  t=56 s  eCO2 829 ppm  TVOC 64 ppb  - run-in
#57  t=57 s  eCO2 813 ppm  TVOC 62 ppb  - run-in
#58  t=58 s  eCO2 807 ppm  TVOC 61 ppb  - run-in
#59  t=59 s  eCO2 793 ppm  TVOC 59 ppb  - run-in
#60  t=60 s  eCO2 835 ppm  TVOC 65 ppb
#61  t=61 s  eCO2 814 ppm  TVOC 62 ppb
#62  t=62 s  eCO2 822 ppm  TVOC 63 ppb
#63  t=63 s  eCO2 851 ppm  TVOC 68 ppb
#64  t=64 s  eCO2 832 ppm  TVOC 65 ppb
From 60 seconds on, the readings stay around the air's 60 ppb, moving by a few ppb from result to result - the noise of the sensor. eCO2 moves with TVOC, about 6.7 ppm for every ppb, because it is computed from it.
The Advance Pop-Up Window
At Run, U2 opens its own window, CCS811 eCO2 / TVOC, with the look of our TEP Serial Monitor Advance for Proteus. It has three tabs, Sensor, Event log and Tests, plus Settings and Help behind the gear and question mark icons. The status bar at the bottom always shows the air, the reading and the state.
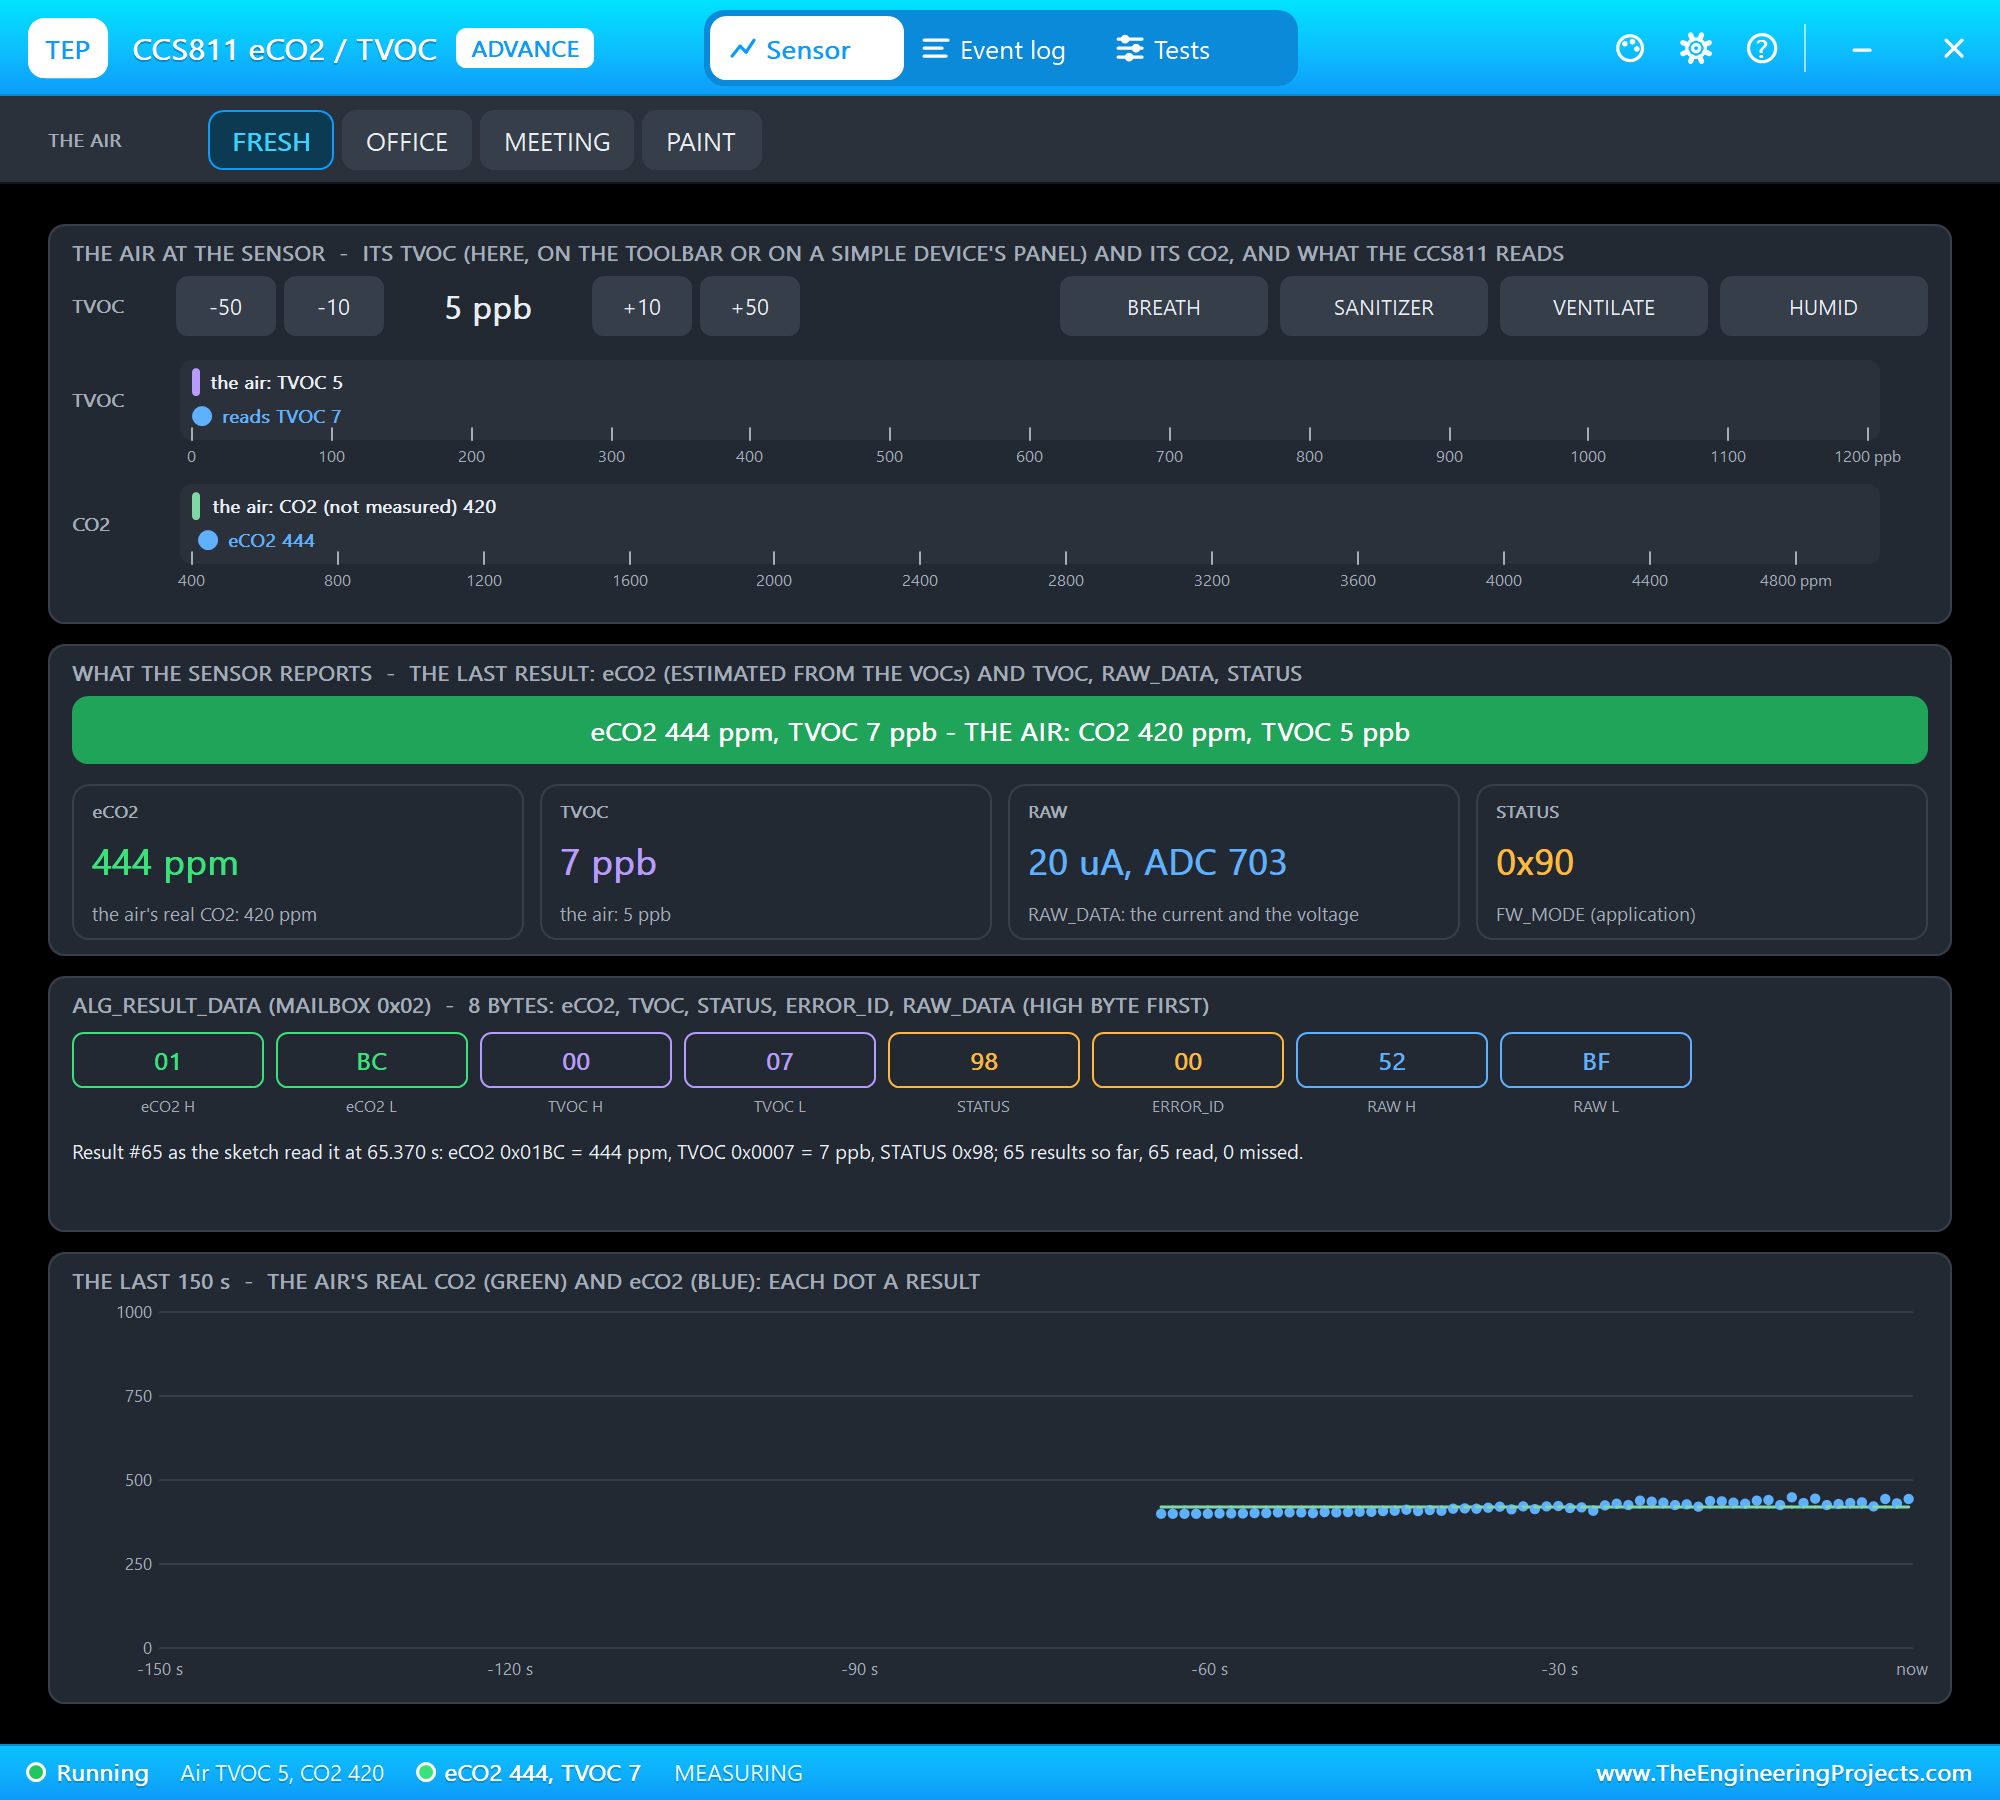
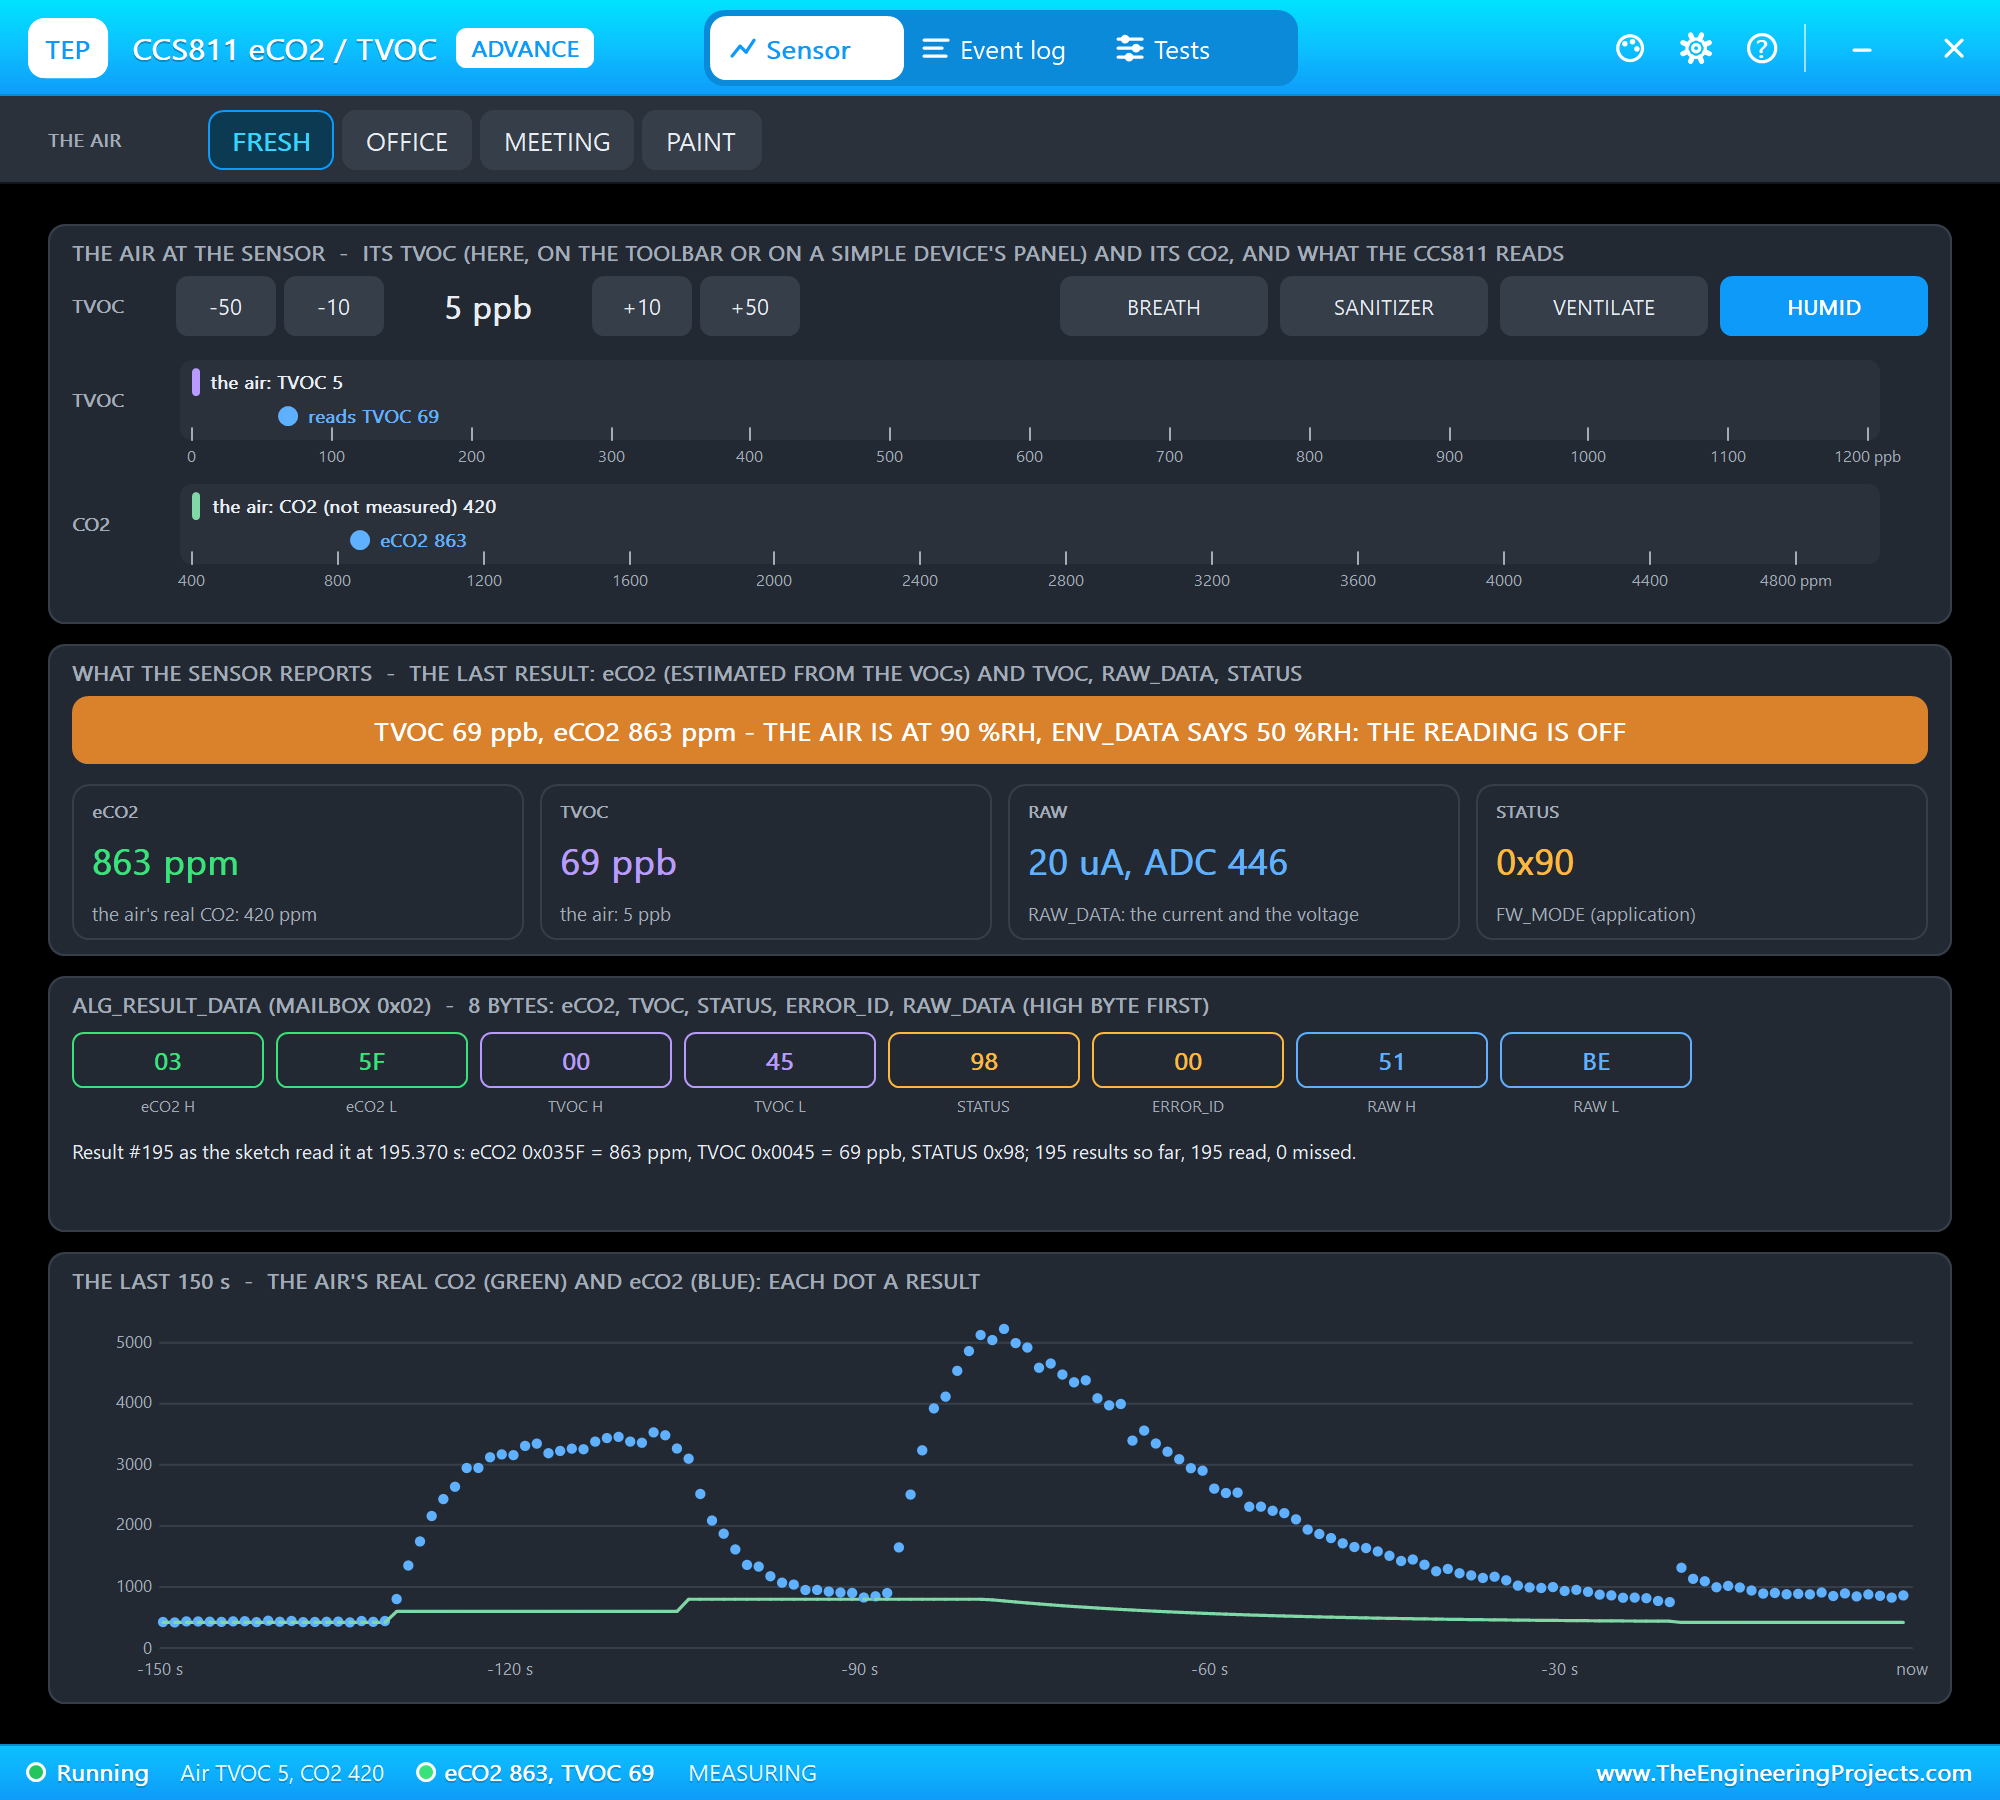
The toolbar carries the presets. The air at the sensor has -50 / -10 / +10 / +50 ppb, the four actions, the TVOC on a scale from 0 to 1200 ppb and the CO2 on a scale from 400 to 5000 ppm, each with the reading. What the sensor reports shows the banner and four tiles: eCO2 with the air's real CO2, TVOC with the air's TVOC, RAW and STATUS. ALG_RESULT_DATA shows the eight bytes of the last result the sketch read, and the last 150 s plots the air's real CO2 (green) and every eCO2 result (blue).
The Eight Bytes of ALG_RESULT_DATA
Result #65 in the picture is a good one to read by hand. The first two bytes are eCO2, high byte first: 01 BC = 444 ppm. The next two are TVOC: 00 07 = 7 ppb. Then comes STATUS, 98: bit 7 says the application runs, bit 4 that a valid application is loaded, and bit 3 is DATA_READY - a new result. ERROR_ID is 00, no error. The last two bytes are RAW_DATA, 52 BF: the top 6 bits are the current through the sensor, 20 uA, and the lower 10 bits the voltage across it, 703 (1023 = 1.65 V). Reading these bytes clears DATA_READY - that is why the STATUS tile usually shows 0x90 while the bytes say 0x98.
I2C and the Mailboxes
The CCS811 talks through mailboxes. To write one, the sketch sends its ID and then the data; to read one, it writes the ID and reads the bytes. The I2C & mailboxes tool shows them as they happen:
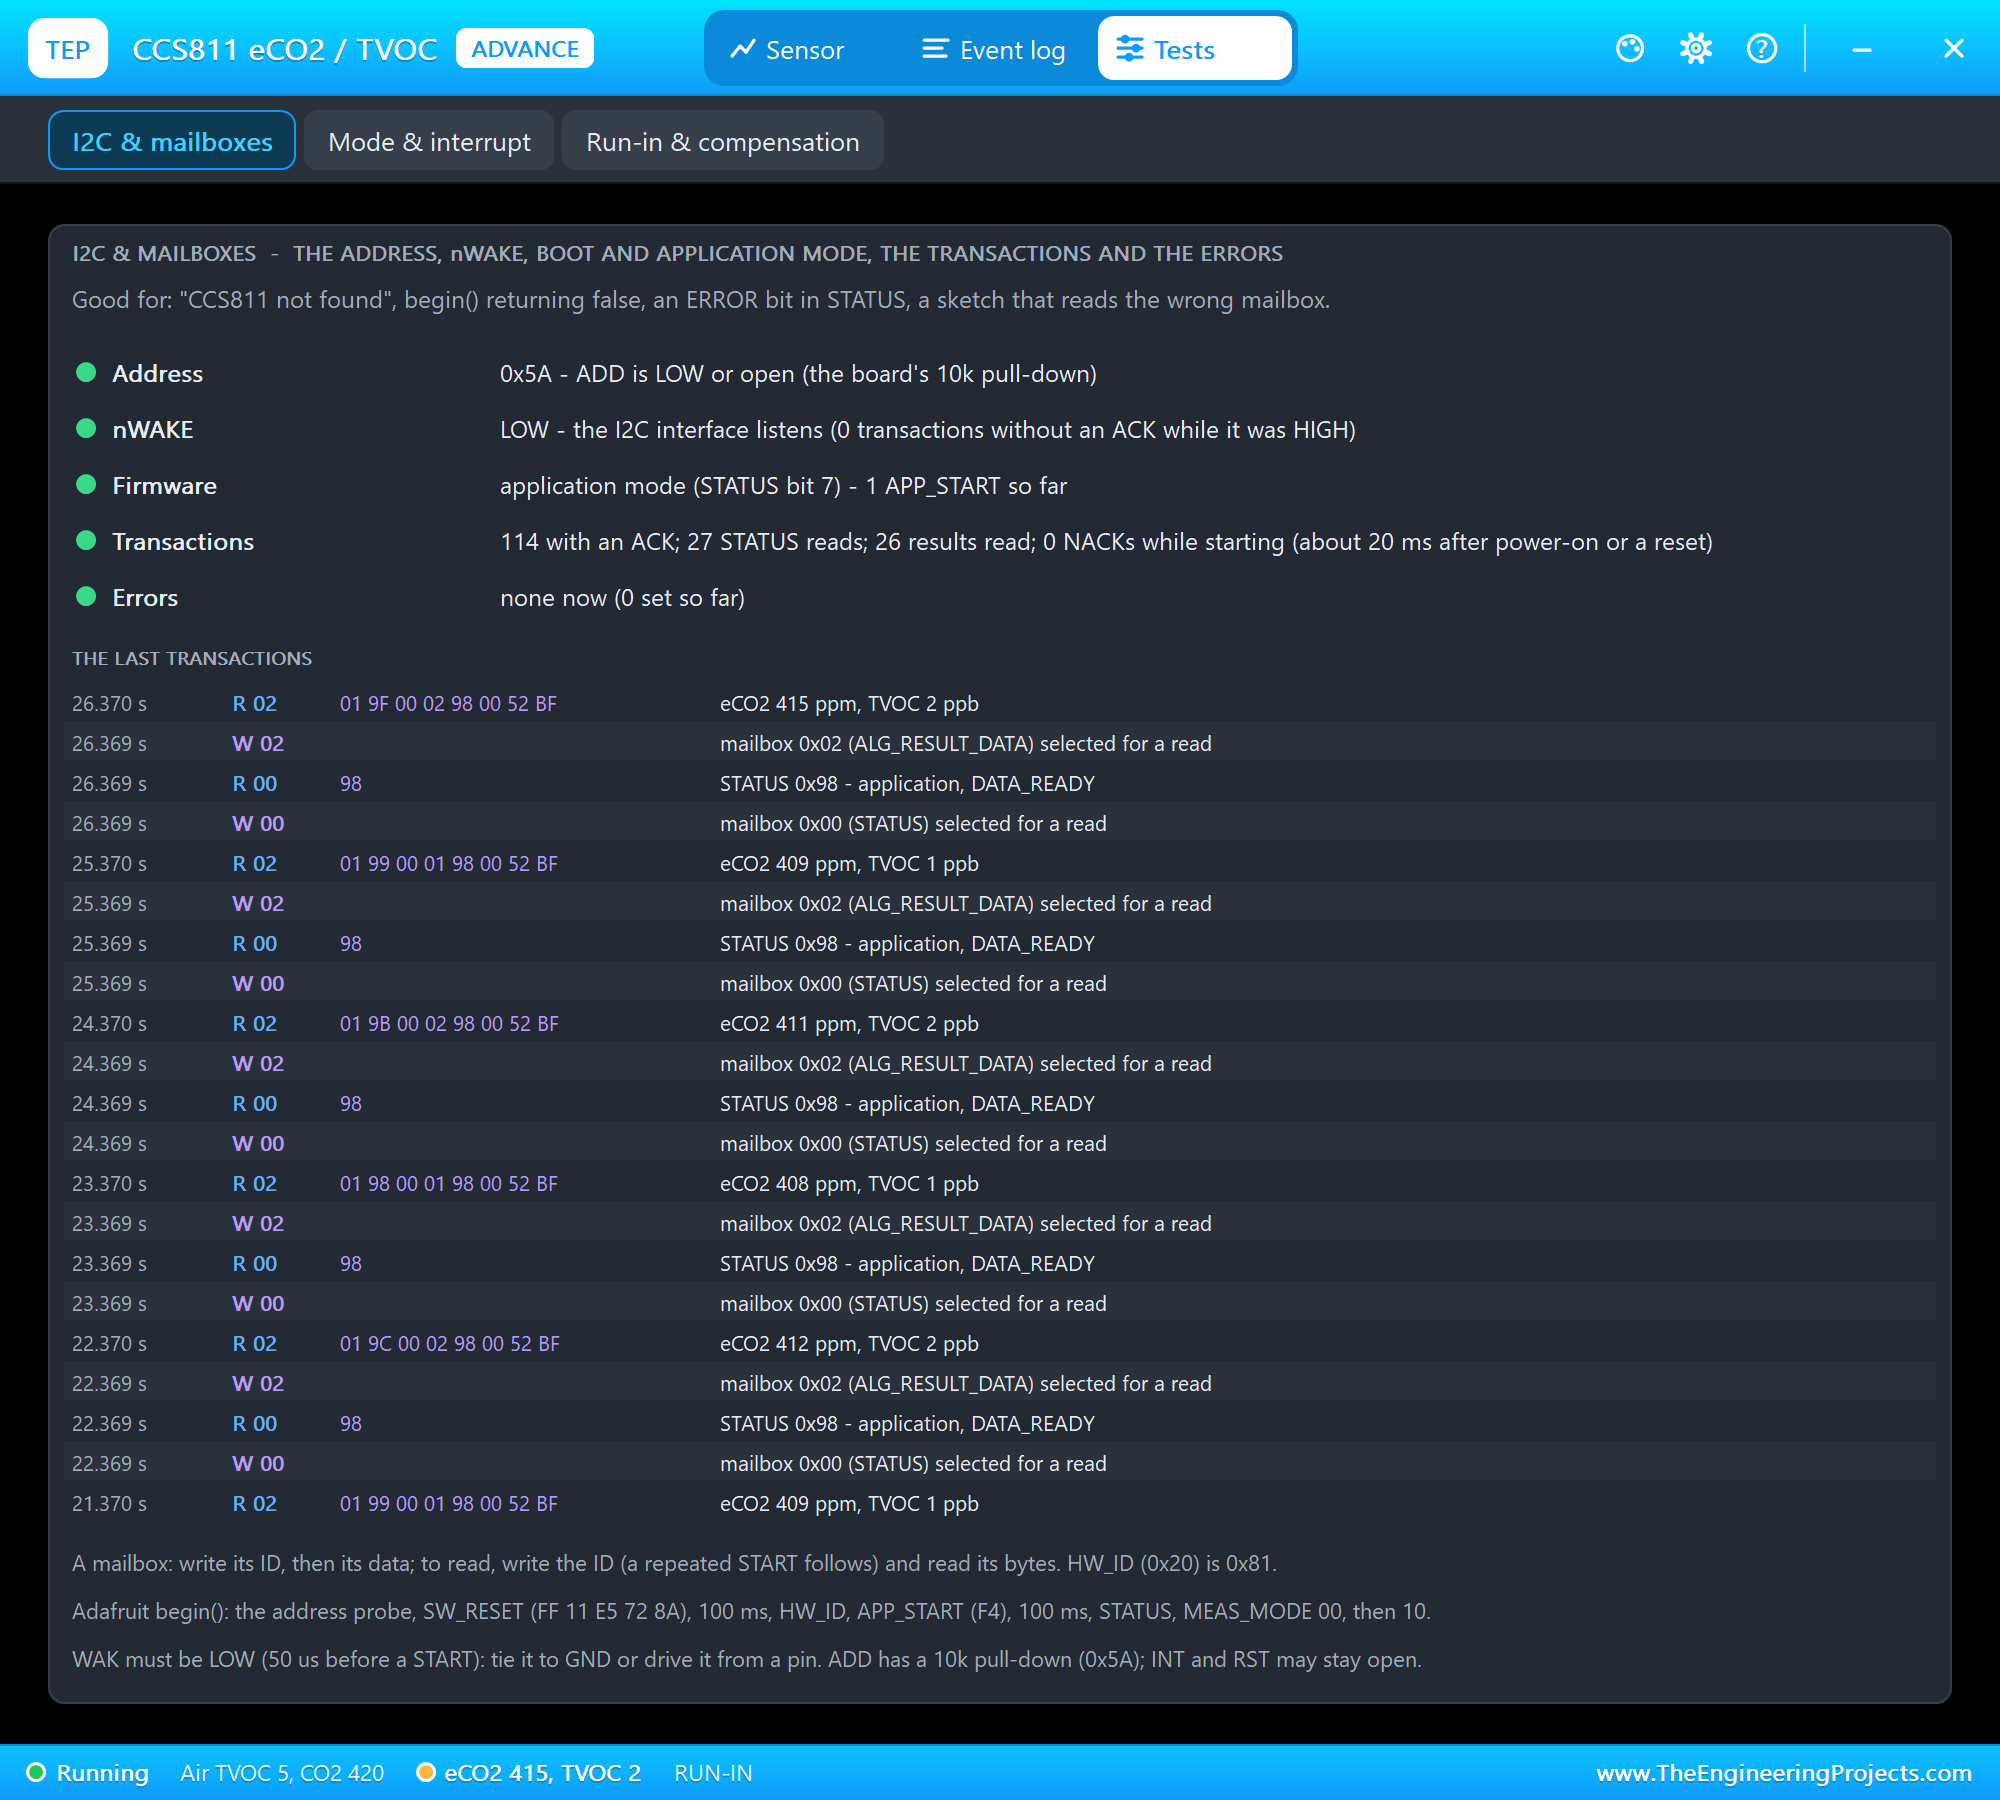
Every second the same four transactions repeat: readData() selects STATUS (W 00) and reads it (R 00: 98, DATA_READY set), then selects ALG_RESULT_DATA (W 02) and reads its eight bytes. The tool also shows the address and ADD, nWAKE with the transactions refused while it was HIGH, boot or application mode, and the errors. Open it first when begin() returns false.
PAINT: eCO2 is an Estimate
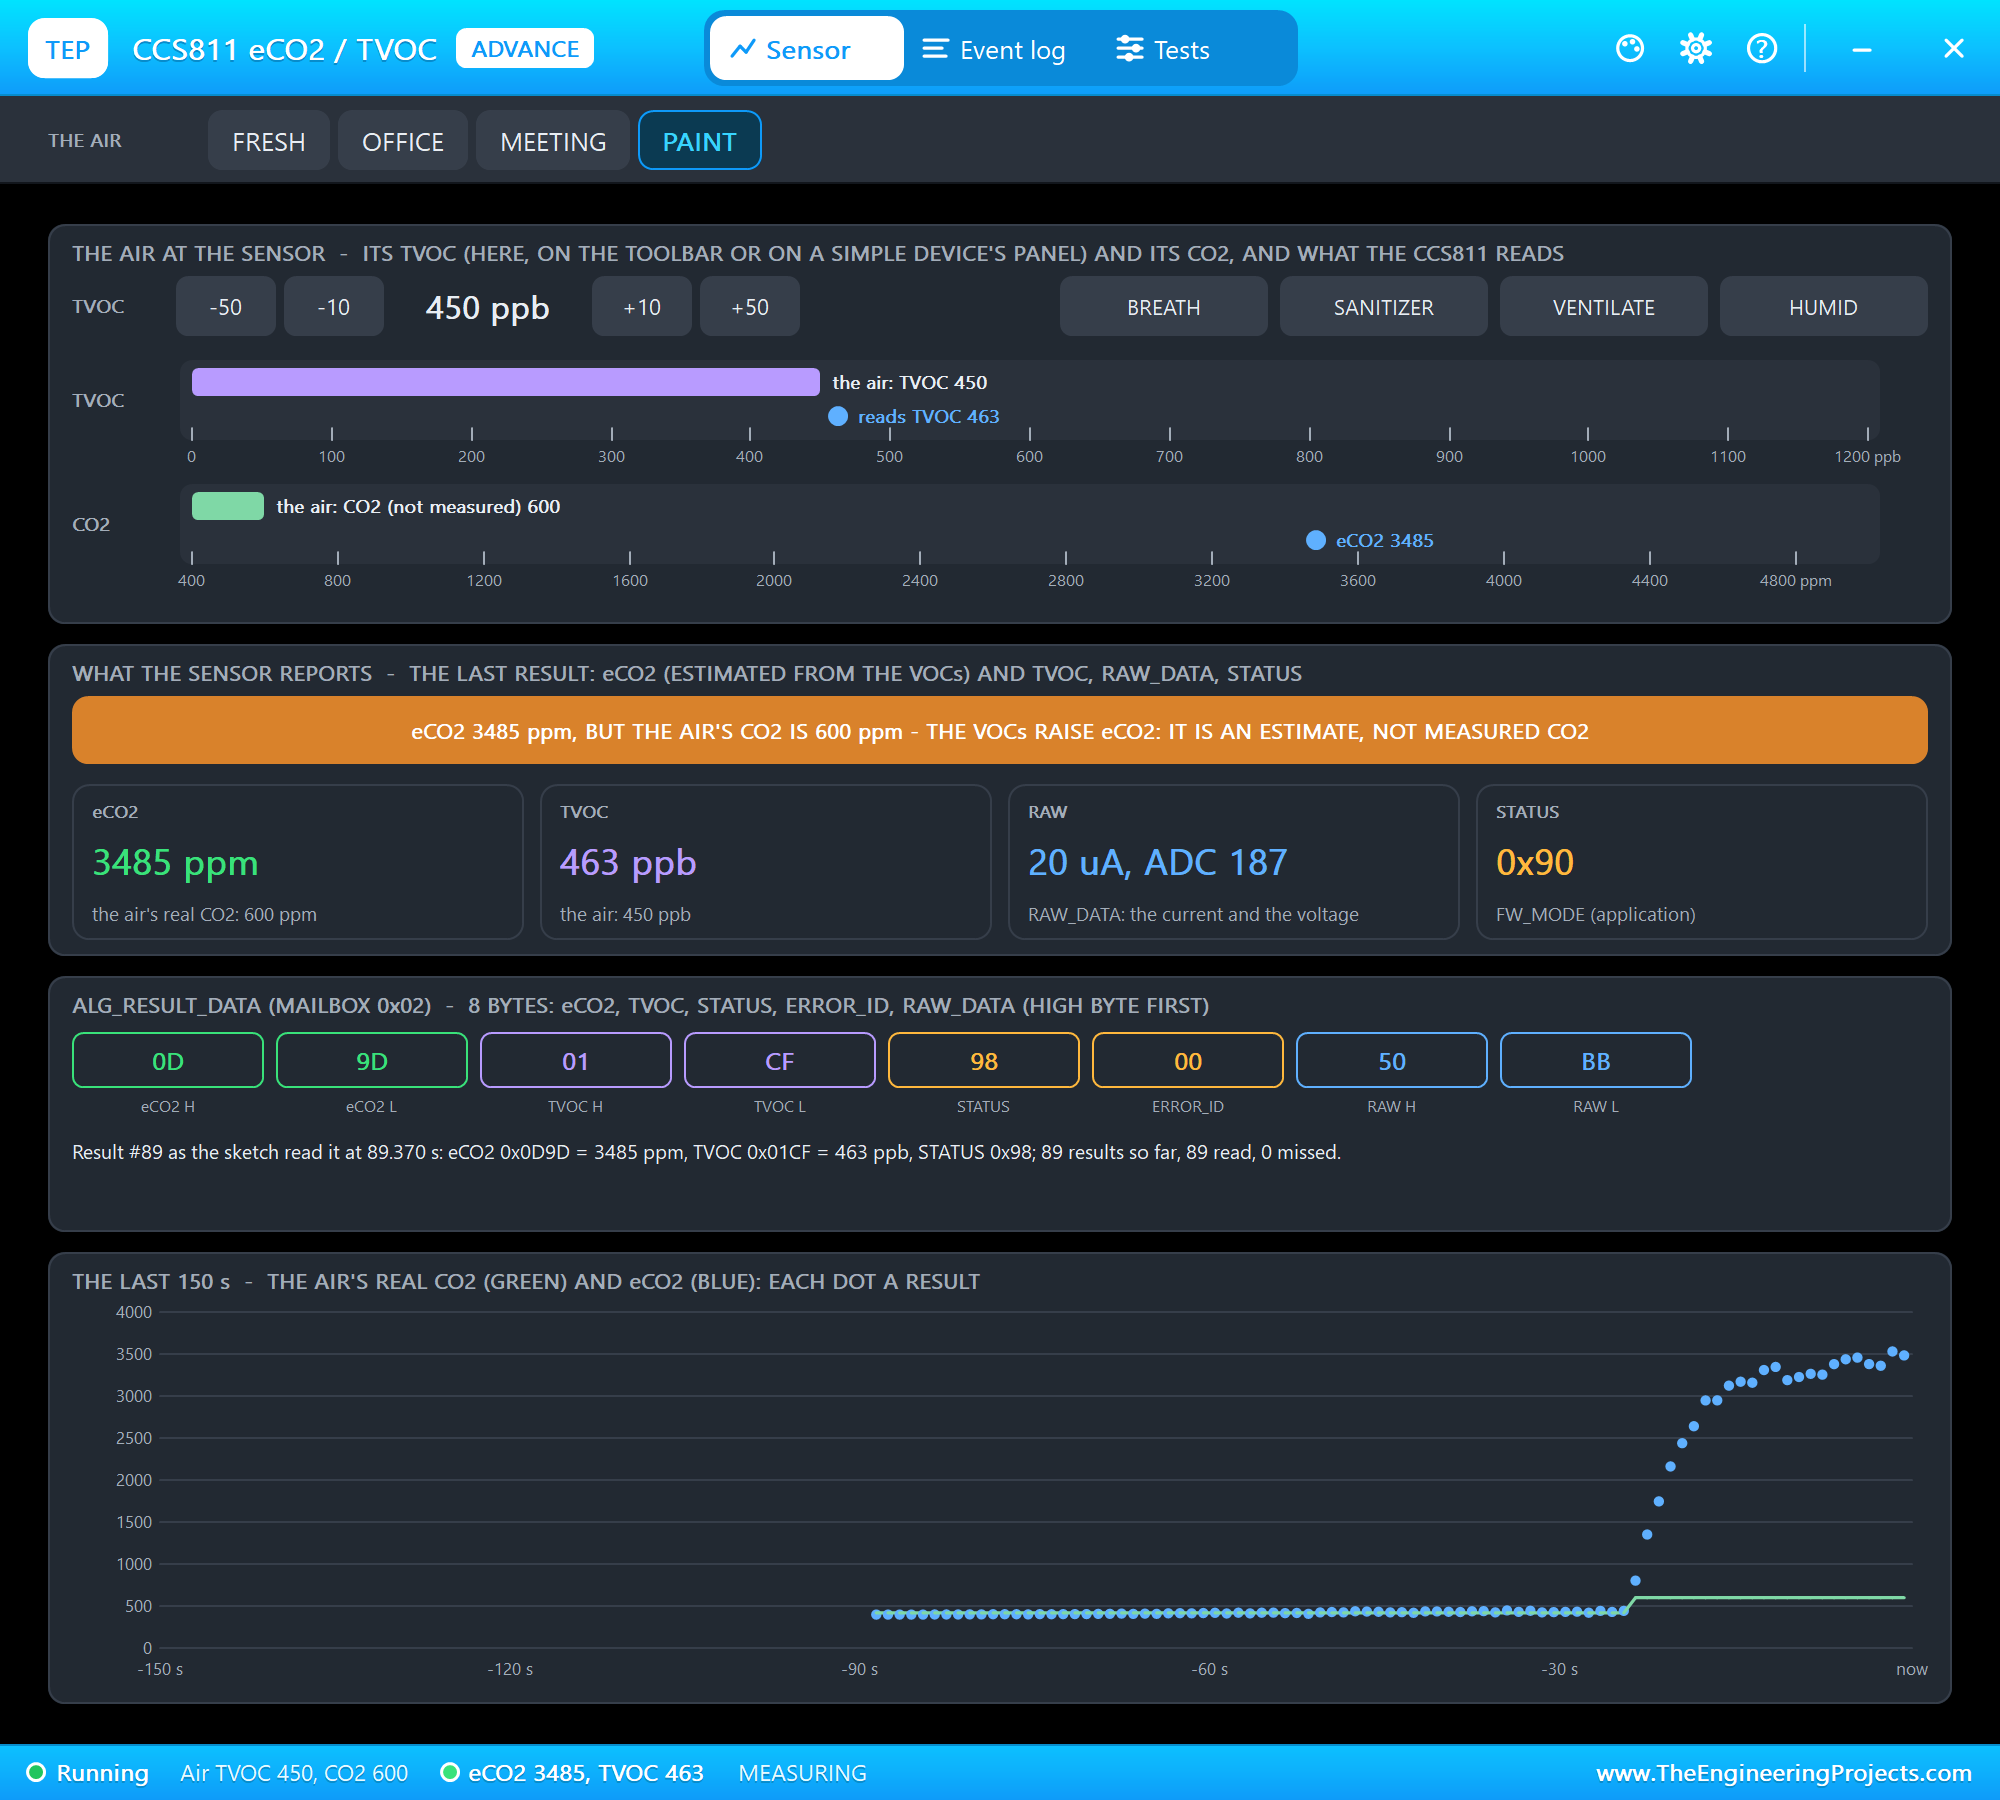
We clicked PAINT in U2's pop-up - a freshly painted room with only a few people in it: 450 ppb of VOCs, but the CO2 at 600 ppm:
#79  t=79 s  eCO2 3191 ppm  TVOC 419 ppb
#80  t=80 s  eCO2 3228 ppm  TVOC 424 ppb
#81  t=81 s  eCO2 3266 ppm  TVOC 430 ppb
#82  t=82 s  eCO2 3256 ppm  TVOC 428 ppb
#83  t=83 s  eCO2 3381 ppm  TVOC 447 ppb
#84  t=84 s  eCO2 3439 ppm  TVOC 456 ppb
#85  t=85 s  eCO2 3459 ppm  TVOC 459 ppb
#86  t=86 s  eCO2 3382 ppm  TVOC 447 ppb
#87  t=87 s  eCO2 3362 ppm  TVOC 444 ppb
#88  t=88 s  eCO2 3532 ppm  TVOC 470 ppb
#89  t=89 s  eCO2 3485 ppm  TVOC 463 ppb
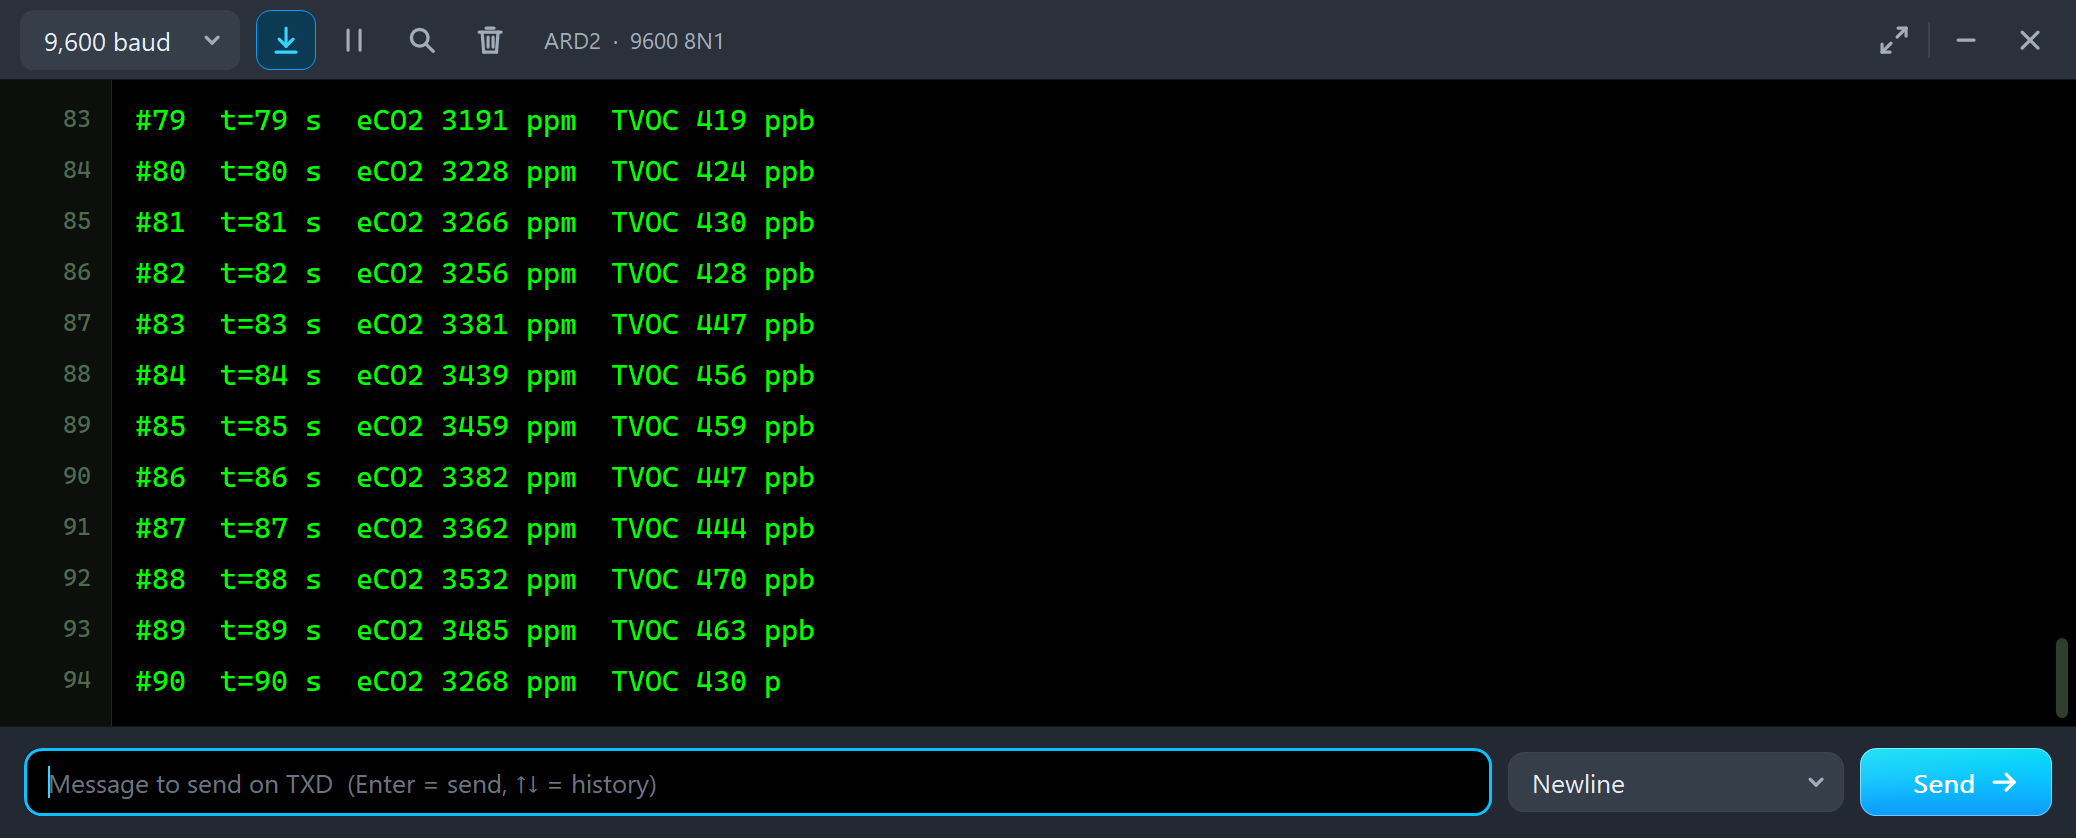
A CO2 meter in this room would show 600 ppm. The CCS811 reports 3485 ppm - a value that would make anybody open the windows at once. It is not a fault: the CCS811 sees only VOCs, and its algorithm turns more VOCs into more eCO2. In our model eCO2 is 400 + 6.67 x TVOC, so 463 ppb gives about 3490 ppm. The orange banner explains it, and the trend shows the gap: the green line of the real CO2 hardly moves while the blue eCO2 dots climb.
SANITIZER
We went back to OFFICE and then clicked SANITIZER - somebody cleans their hands next to the sensor:
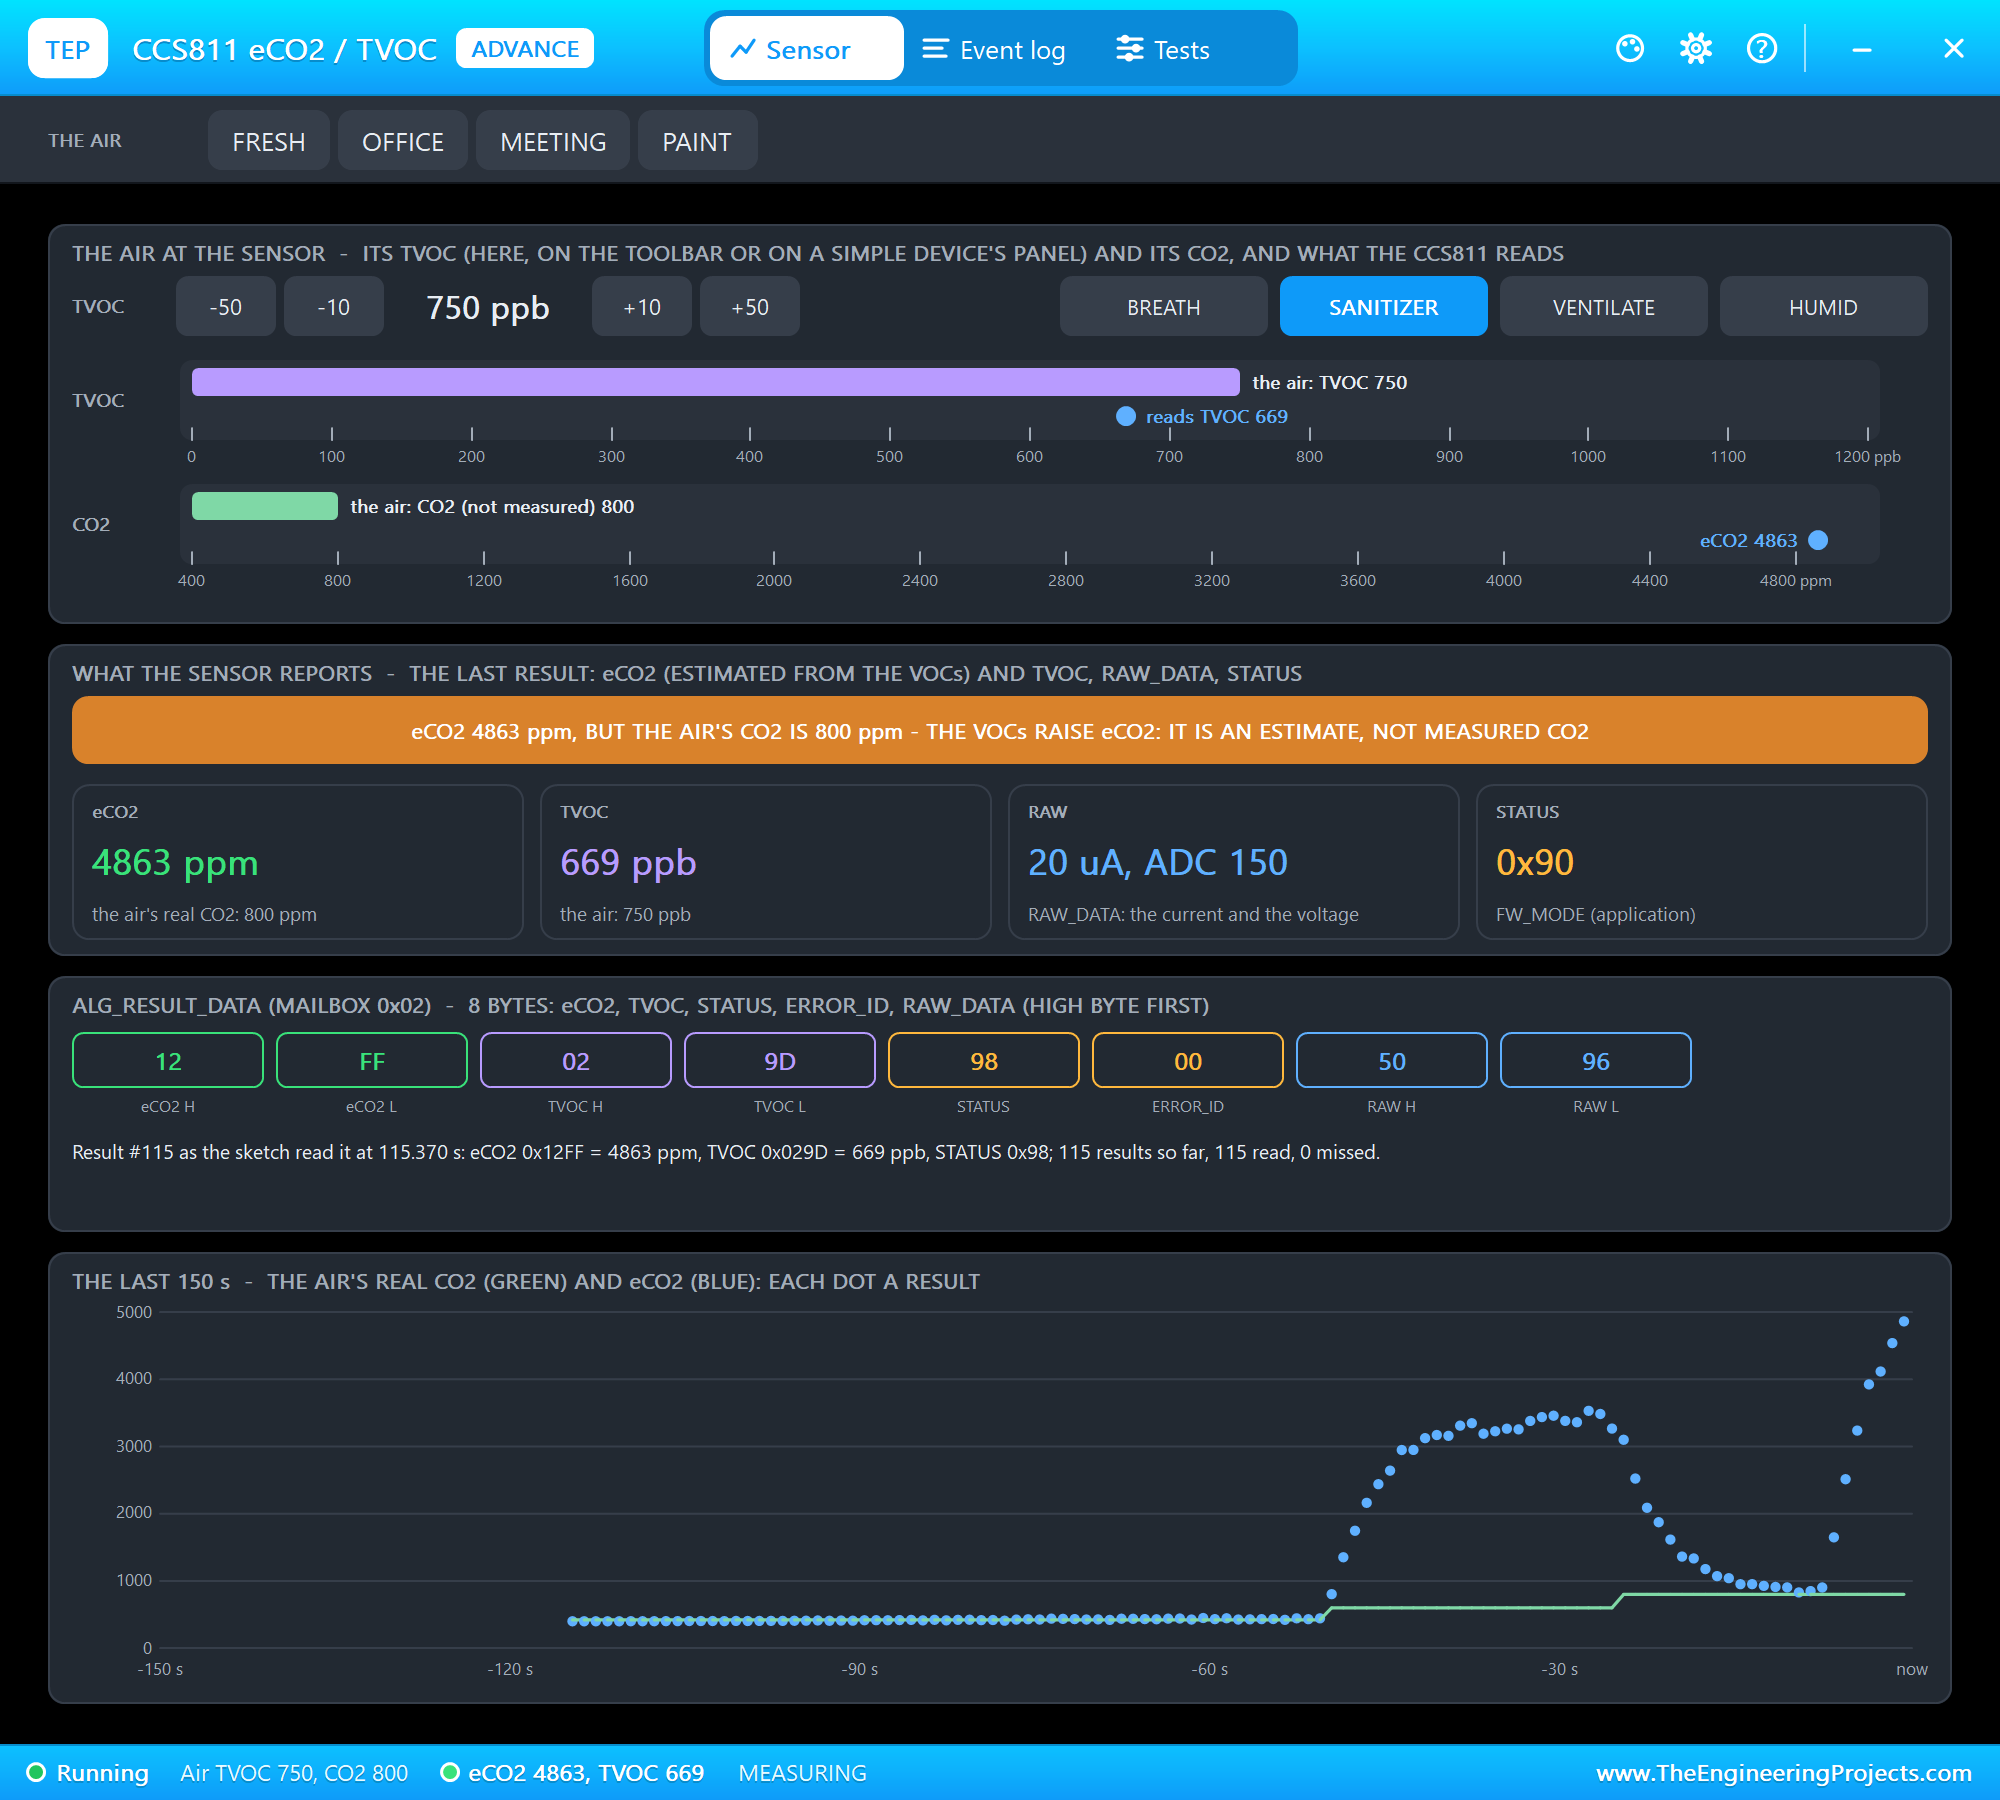
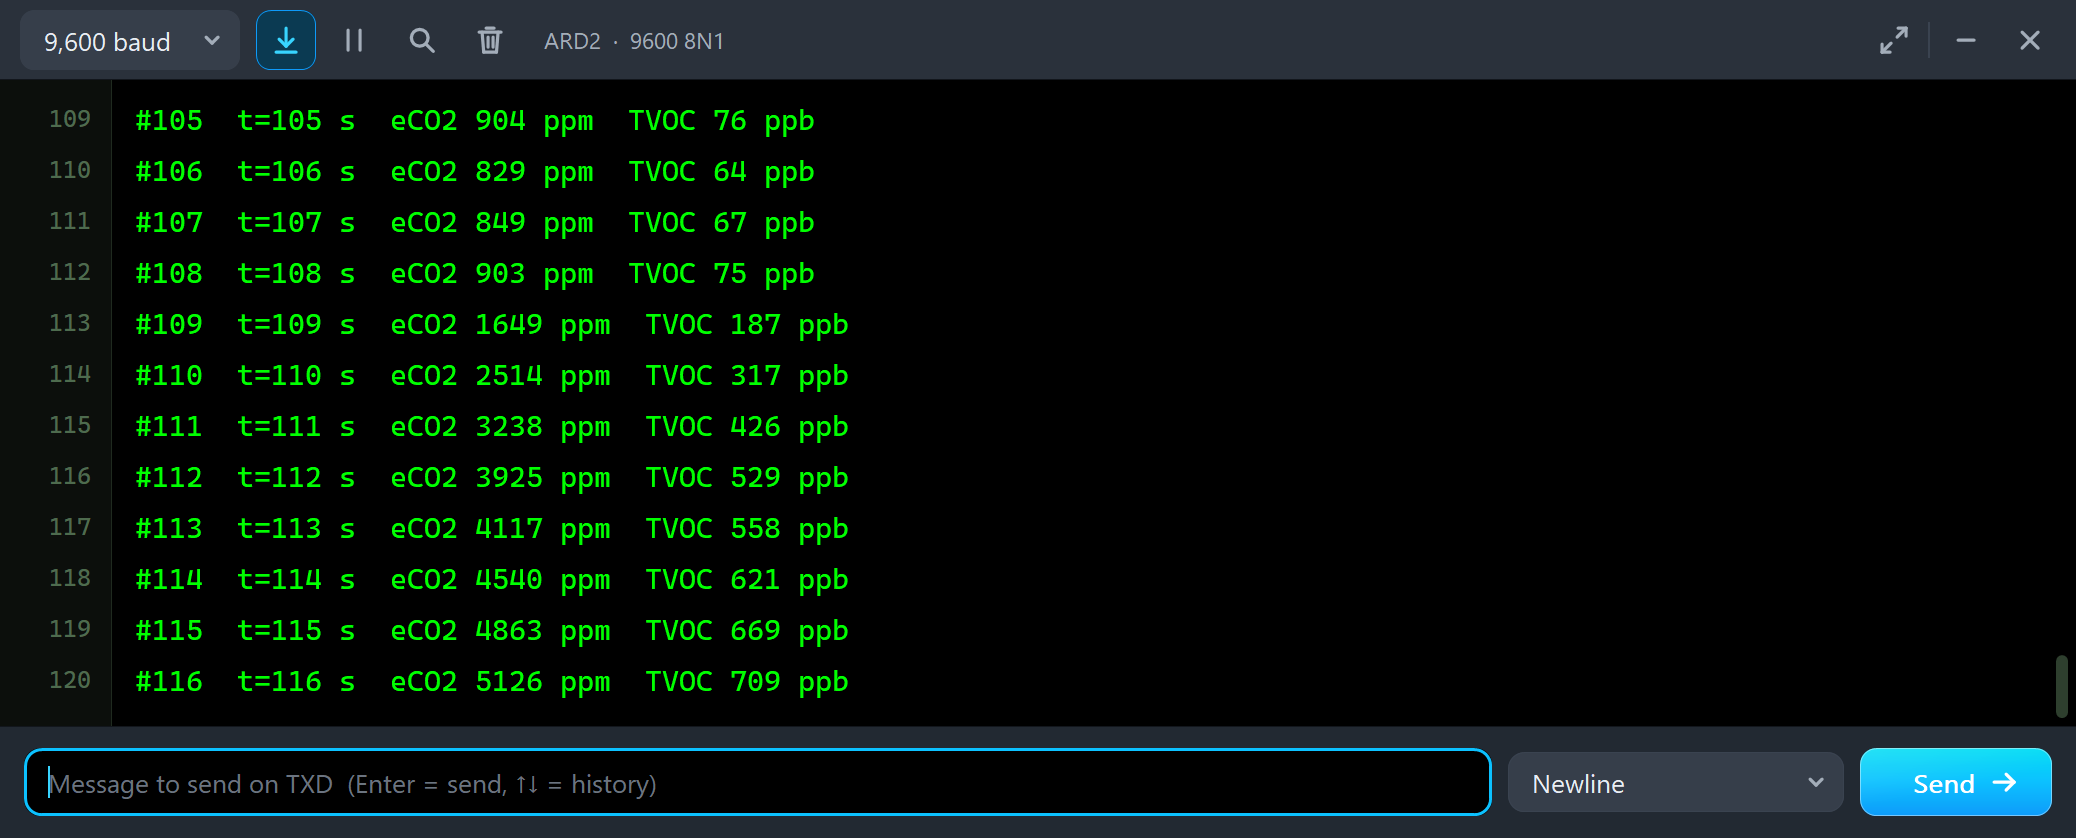
#105  t=105 s  eCO2 904 ppm  TVOC 76 ppb
#106  t=106 s  eCO2 829 ppm  TVOC 64 ppb
#107  t=107 s  eCO2 849 ppm  TVOC 67 ppb
#108  t=108 s  eCO2 903 ppm  TVOC 75 ppb
#109  t=109 s  eCO2 1649 ppm  TVOC 187 ppb
#110  t=110 s  eCO2 2514 ppm  TVOC 317 ppb
#111  t=111 s  eCO2 3238 ppm  TVOC 426 ppb
#112  t=112 s  eCO2 3925 ppm  TVOC 529 ppb
#113  t=113 s  eCO2 4117 ppm  TVOC 558 ppb
#114  t=114 s  eCO2 4540 ppm  TVOC 621 ppb
#115  t=115 s  eCO2 4863 ppm  TVOC 669 ppb
#116  t=116 s  eCO2 5126 ppm  TVOC 709 ppb
Alcohol is a VOC, so eCO2 jumps from 903 to 5126 ppm in 8 seconds although no CO2 was added at all. A ventilation controller driven by eCO2 would run its fans at full speed every time somebody uses hand sanitizer. The sensor follows the air with a lag of a few seconds, so the readings stay a step behind the alcohol cloud.
VENTILATE
Then VENTILATE - the windows open:
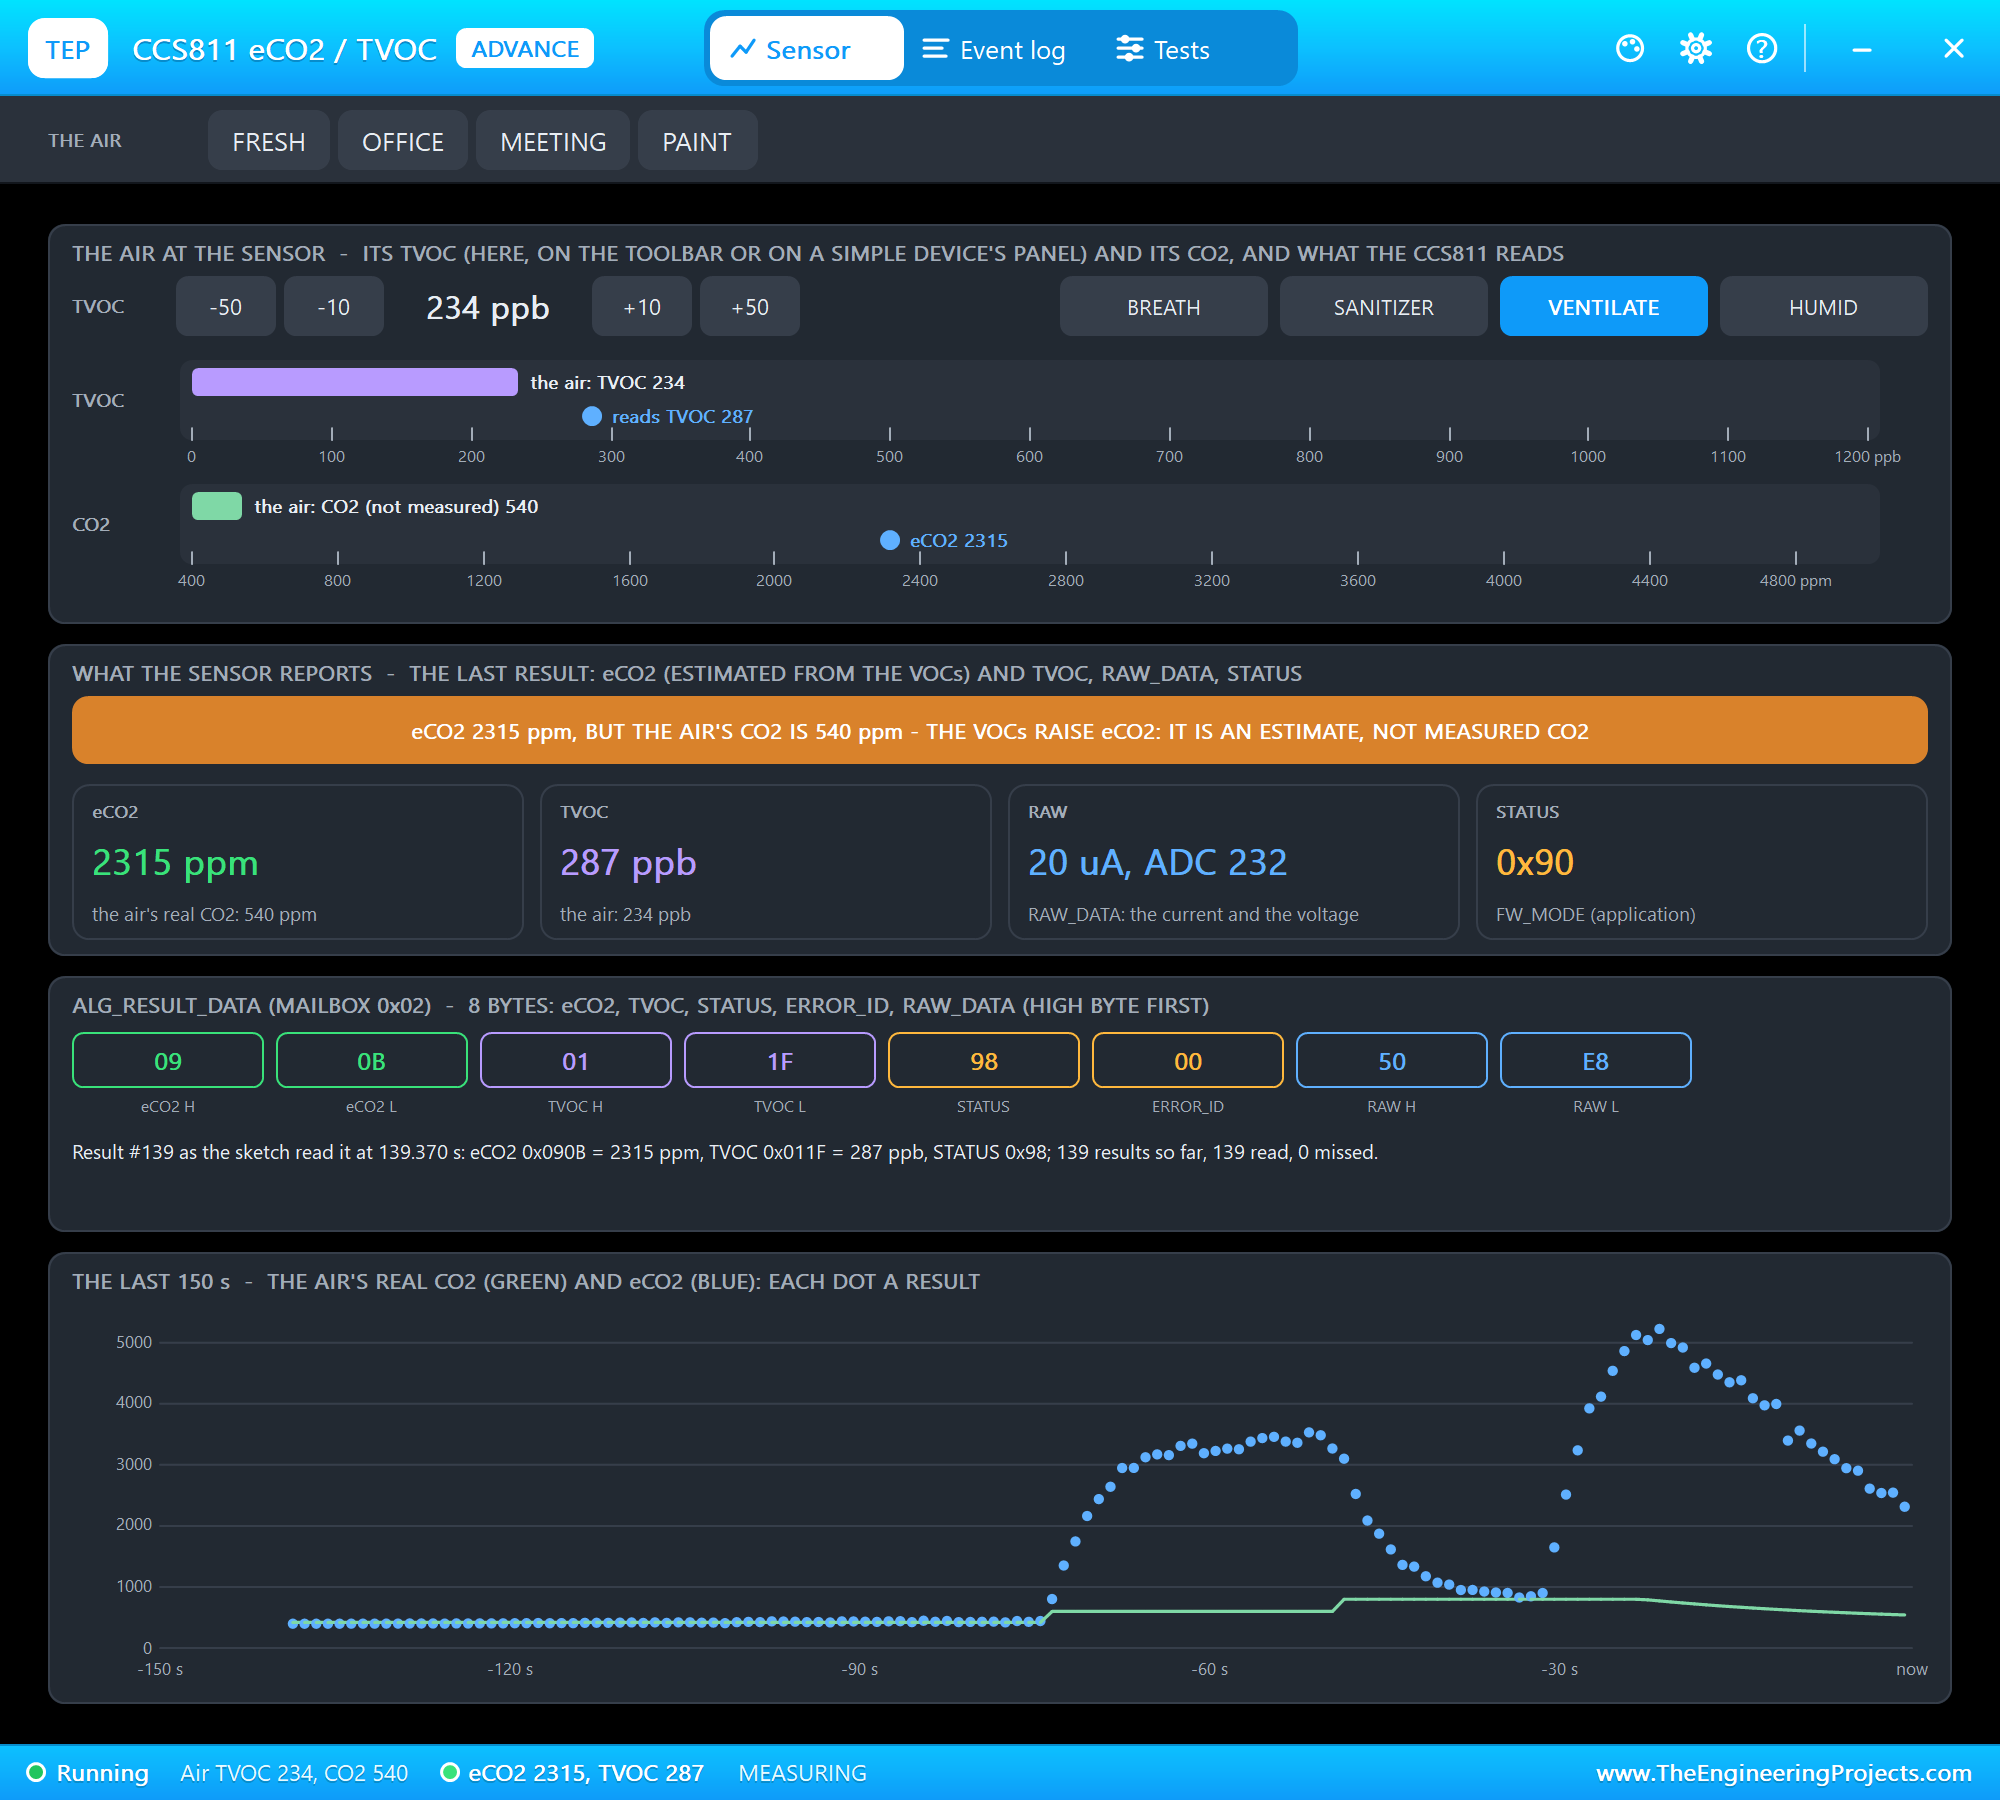
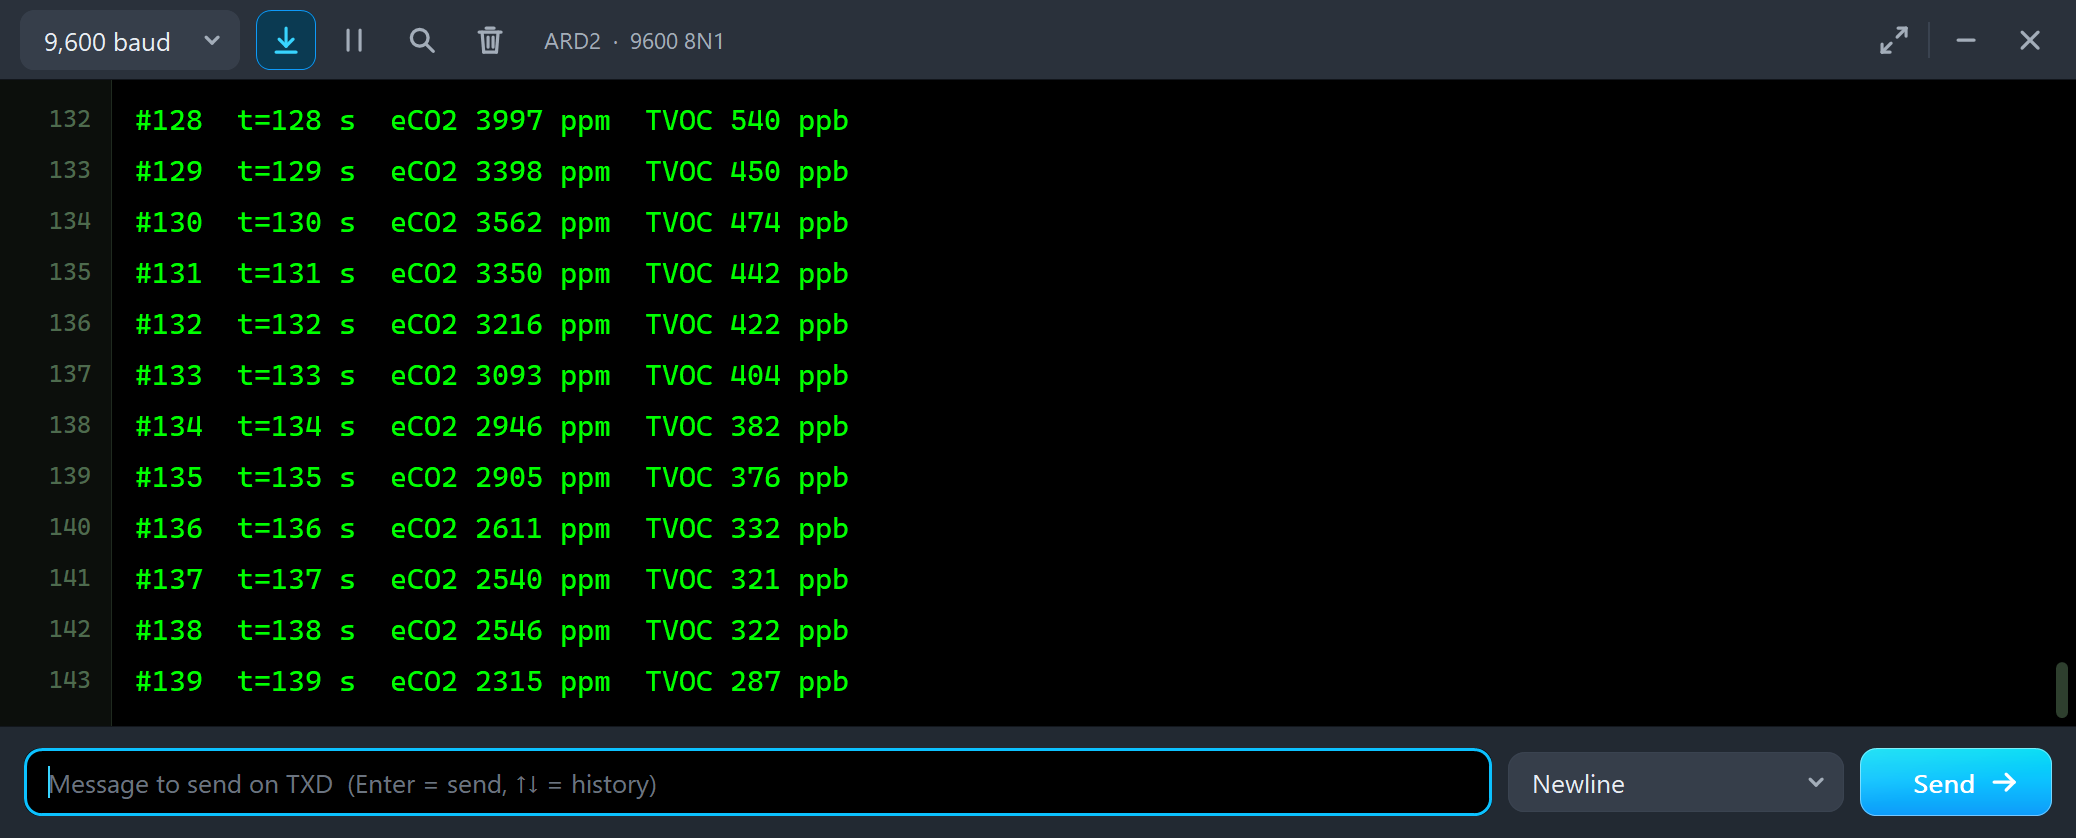
#128  t=128 s  eCO2 3997 ppm  TVOC 540 ppb
#129  t=129 s  eCO2 3398 ppm  TVOC 450 ppb
#130  t=130 s  eCO2 3562 ppm  TVOC 474 ppb
#131  t=131 s  eCO2 3350 ppm  TVOC 442 ppb
#132  t=132 s  eCO2 3216 ppm  TVOC 422 ppb
#133  t=133 s  eCO2 3093 ppm  TVOC 404 ppb
#134  t=134 s  eCO2 2946 ppm  TVOC 382 ppb
#135  t=135 s  eCO2 2905 ppm  TVOC 376 ppb
#136  t=136 s  eCO2 2611 ppm  TVOC 332 ppb
#137  t=137 s  eCO2 2540 ppm  TVOC 321 ppb
#138  t=138 s  eCO2 2546 ppm  TVOC 322 ppb
#139  t=139 s  eCO2 2315 ppm  TVOC 287 ppb
The air goes to FRESH with a time constant of 20 seconds - the alcohol and the office air leave together - and the readings follow it down. The values jump a little on the way, 3398 and then 3562: each result carries the sensor's noise. Average a few results when you need a steady number.
HUMID and ENV_DATA
Next we clicked FRESH and HUMID - clean air, but at 90 %RH, as if a shower runs next door. The VOCs are only 5 ppb:
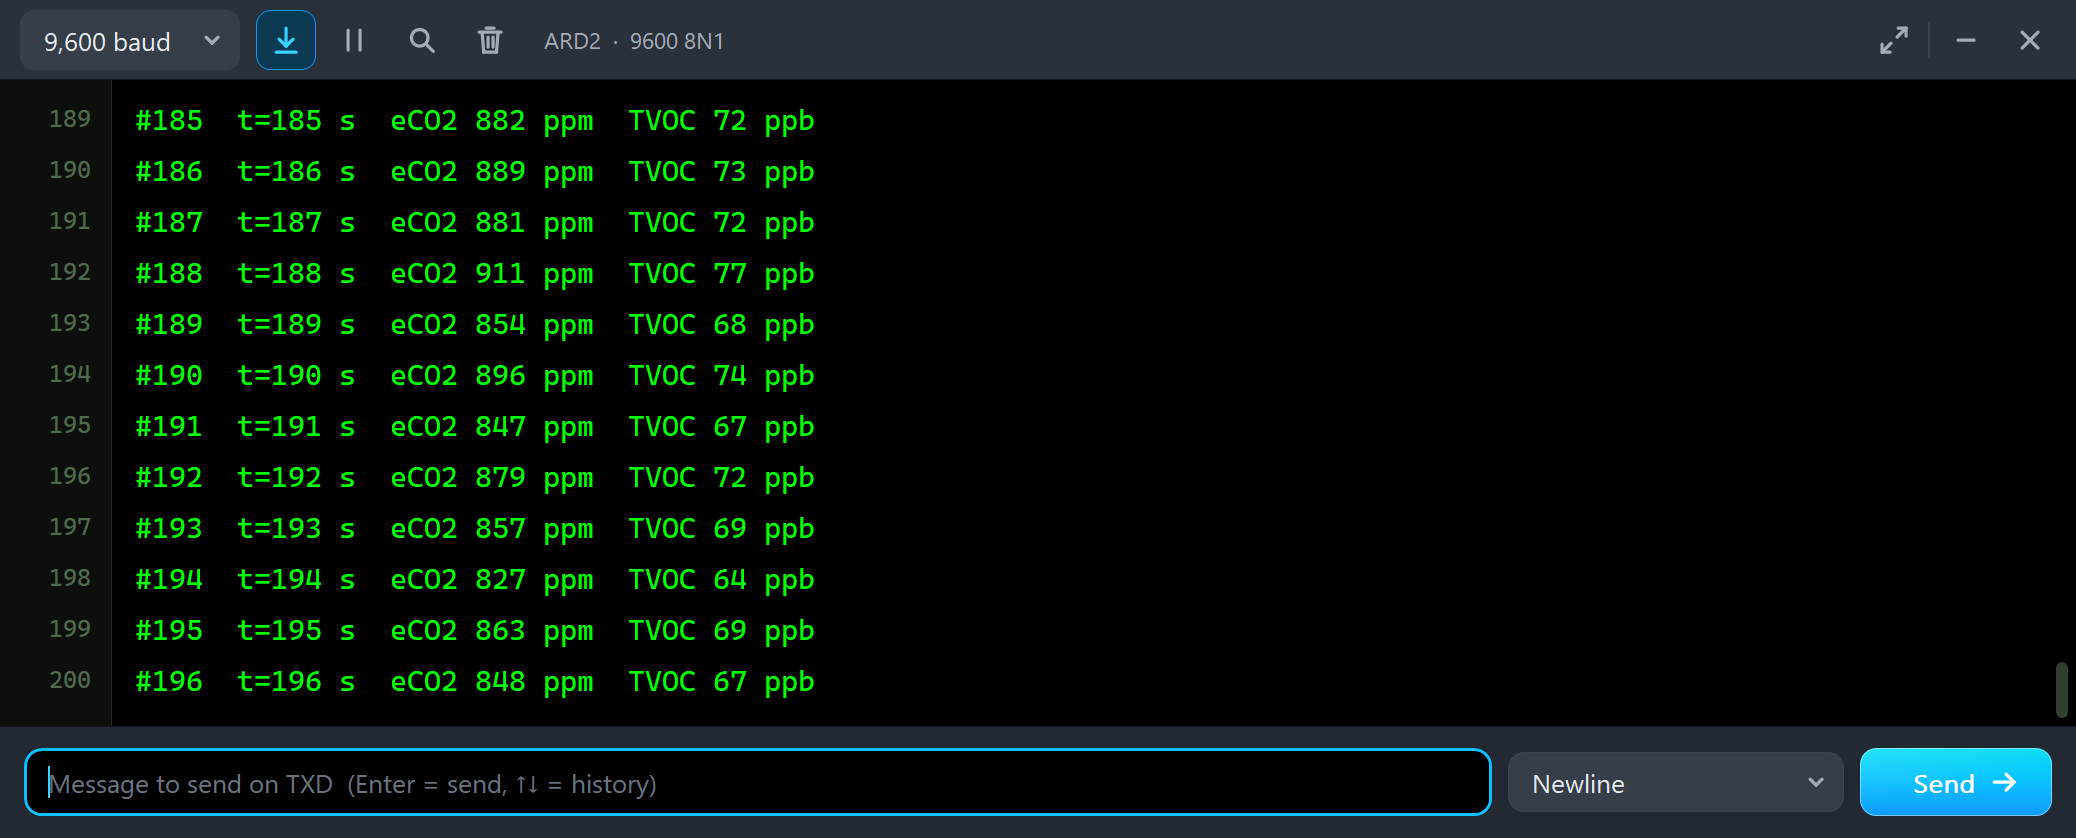
#185  t=185 s  eCO2 882 ppm  TVOC 72 ppb
#186  t=186 s  eCO2 889 ppm  TVOC 73 ppb
#187  t=187 s  eCO2 881 ppm  TVOC 72 ppb
#188  t=188 s  eCO2 911 ppm  TVOC 77 ppb
#189  t=189 s  eCO2 854 ppm  TVOC 68 ppb
#190  t=190 s  eCO2 896 ppm  TVOC 74 ppb
#191  t=191 s  eCO2 847 ppm  TVOC 67 ppb
#192  t=192 s  eCO2 879 ppm  TVOC 72 ppb
#193  t=193 s  eCO2 857 ppm  TVOC 69 ppb
#194  t=194 s  eCO2 827 ppm  TVOC 64 ppb
#195  t=195 s  eCO2 863 ppm  TVOC 69 ppb
#196  t=196 s  eCO2 848 ppm  TVOC 67 ppb
Water vapour also changes the resistance of the metal-oxide layer. The CCS811 corrects for it, but only with the humidity and temperature it is told in ENV_DATA - and nobody has told it anything, so it assumes 50 %RH and 25 C. In clean air it now reports about 70 ppb. The Run-in & compensation tool finds the cause:
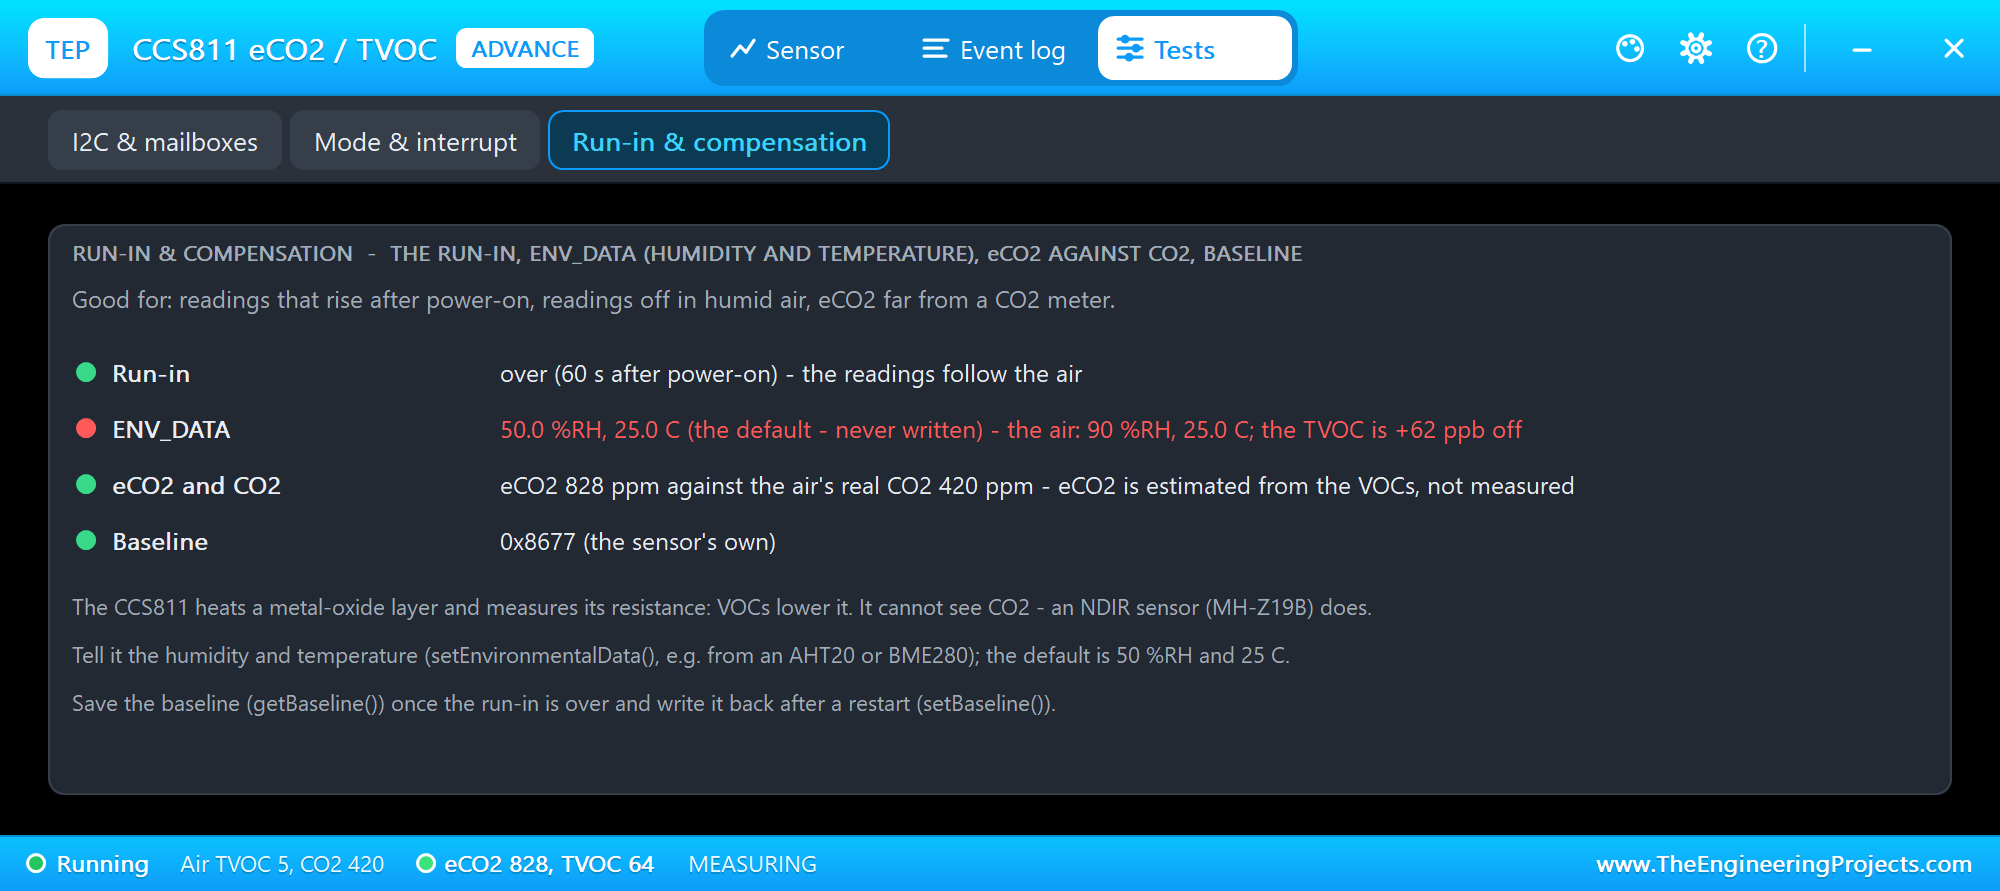
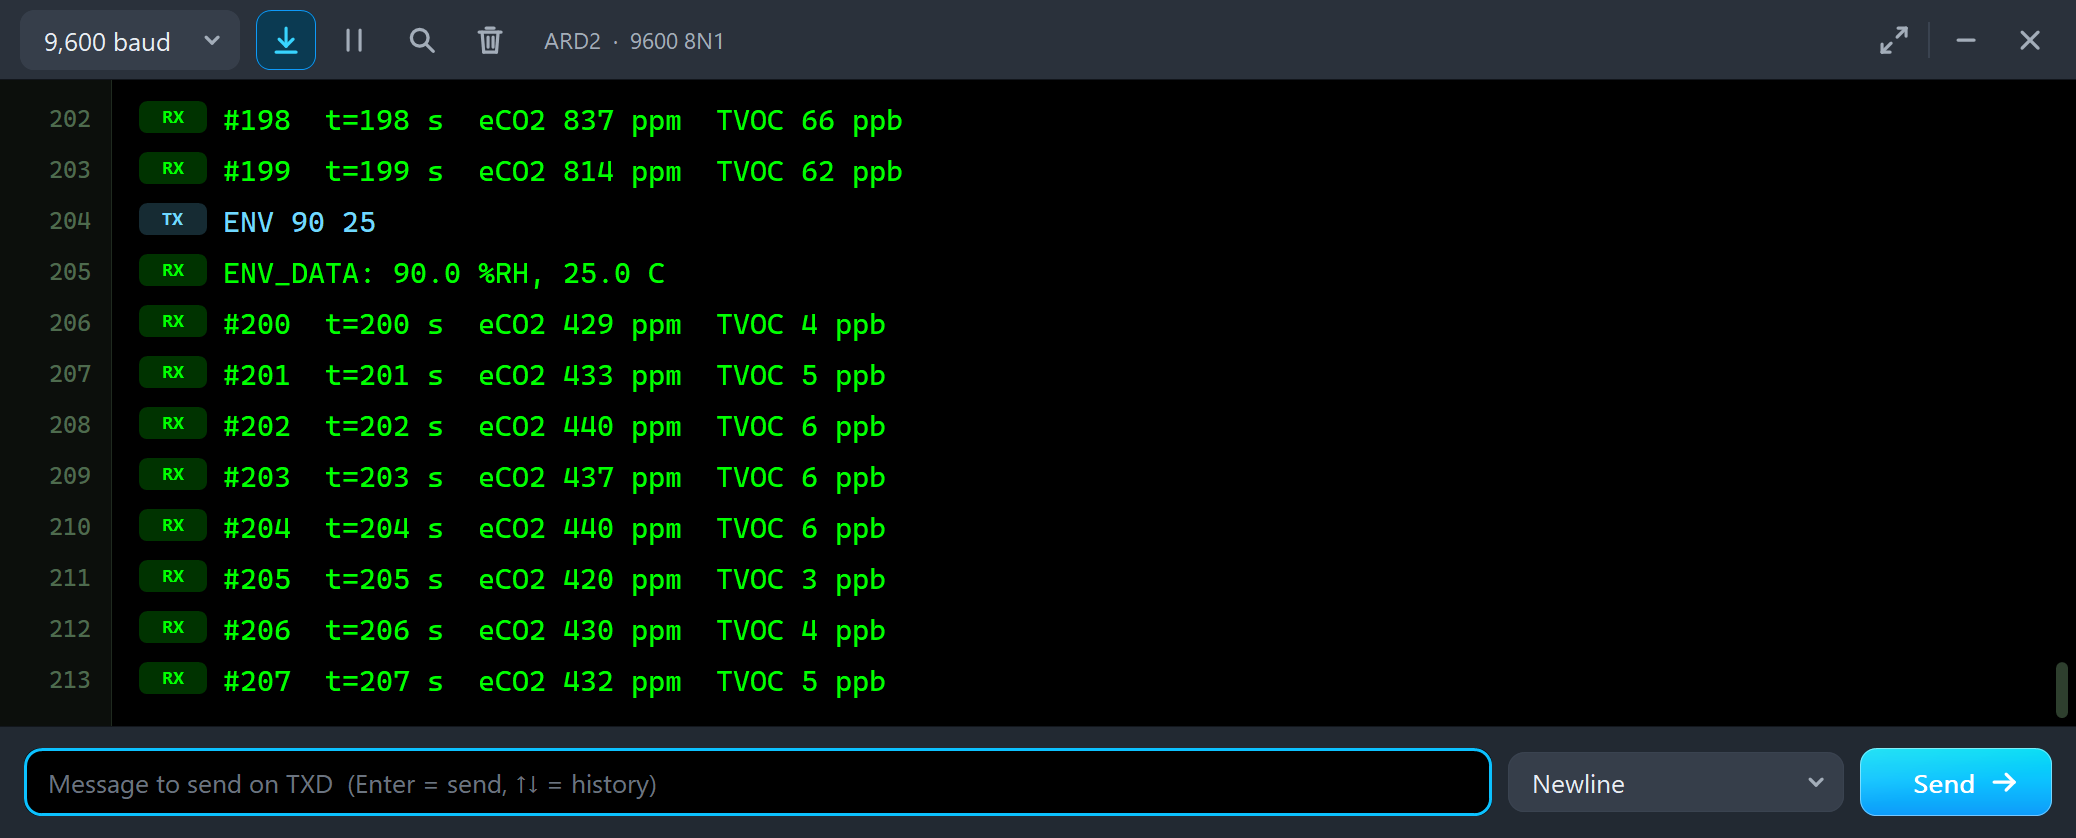
The Run-in & compensation tool shows whether the run-in is over, ENV_DATA against the air, eCO2 against the air's real CO2, and the baseline. Then we typed ENV 90 25 in ARD2's monitor, and the sketch called setEnvironmentalData(90, 25):
#198  t=198 s  eCO2 837 ppm  TVOC 66 ppb
#199  t=199 s  eCO2 814 ppm  TVOC 62 ppb
ENV 90 25
ENV_DATA: 90.0 %RH, 25.0 C
#200  t=200 s  eCO2 429 ppm  TVOC 4 ppb
#201  t=201 s  eCO2 433 ppm  TVOC 5 ppb
#202  t=202 s  eCO2 440 ppm  TVOC 6 ppb
#203  t=203 s  eCO2 437 ppm  TVOC 6 ppb
#204  t=204 s  eCO2 440 ppm  TVOC 6 ppb
#205  t=205 s  eCO2 420 ppm  TVOC 3 ppb
#206  t=206 s  eCO2 430 ppm  TVOC 4 ppb
#207  t=207 s  eCO2 432 ppm  TVOC 5 ppb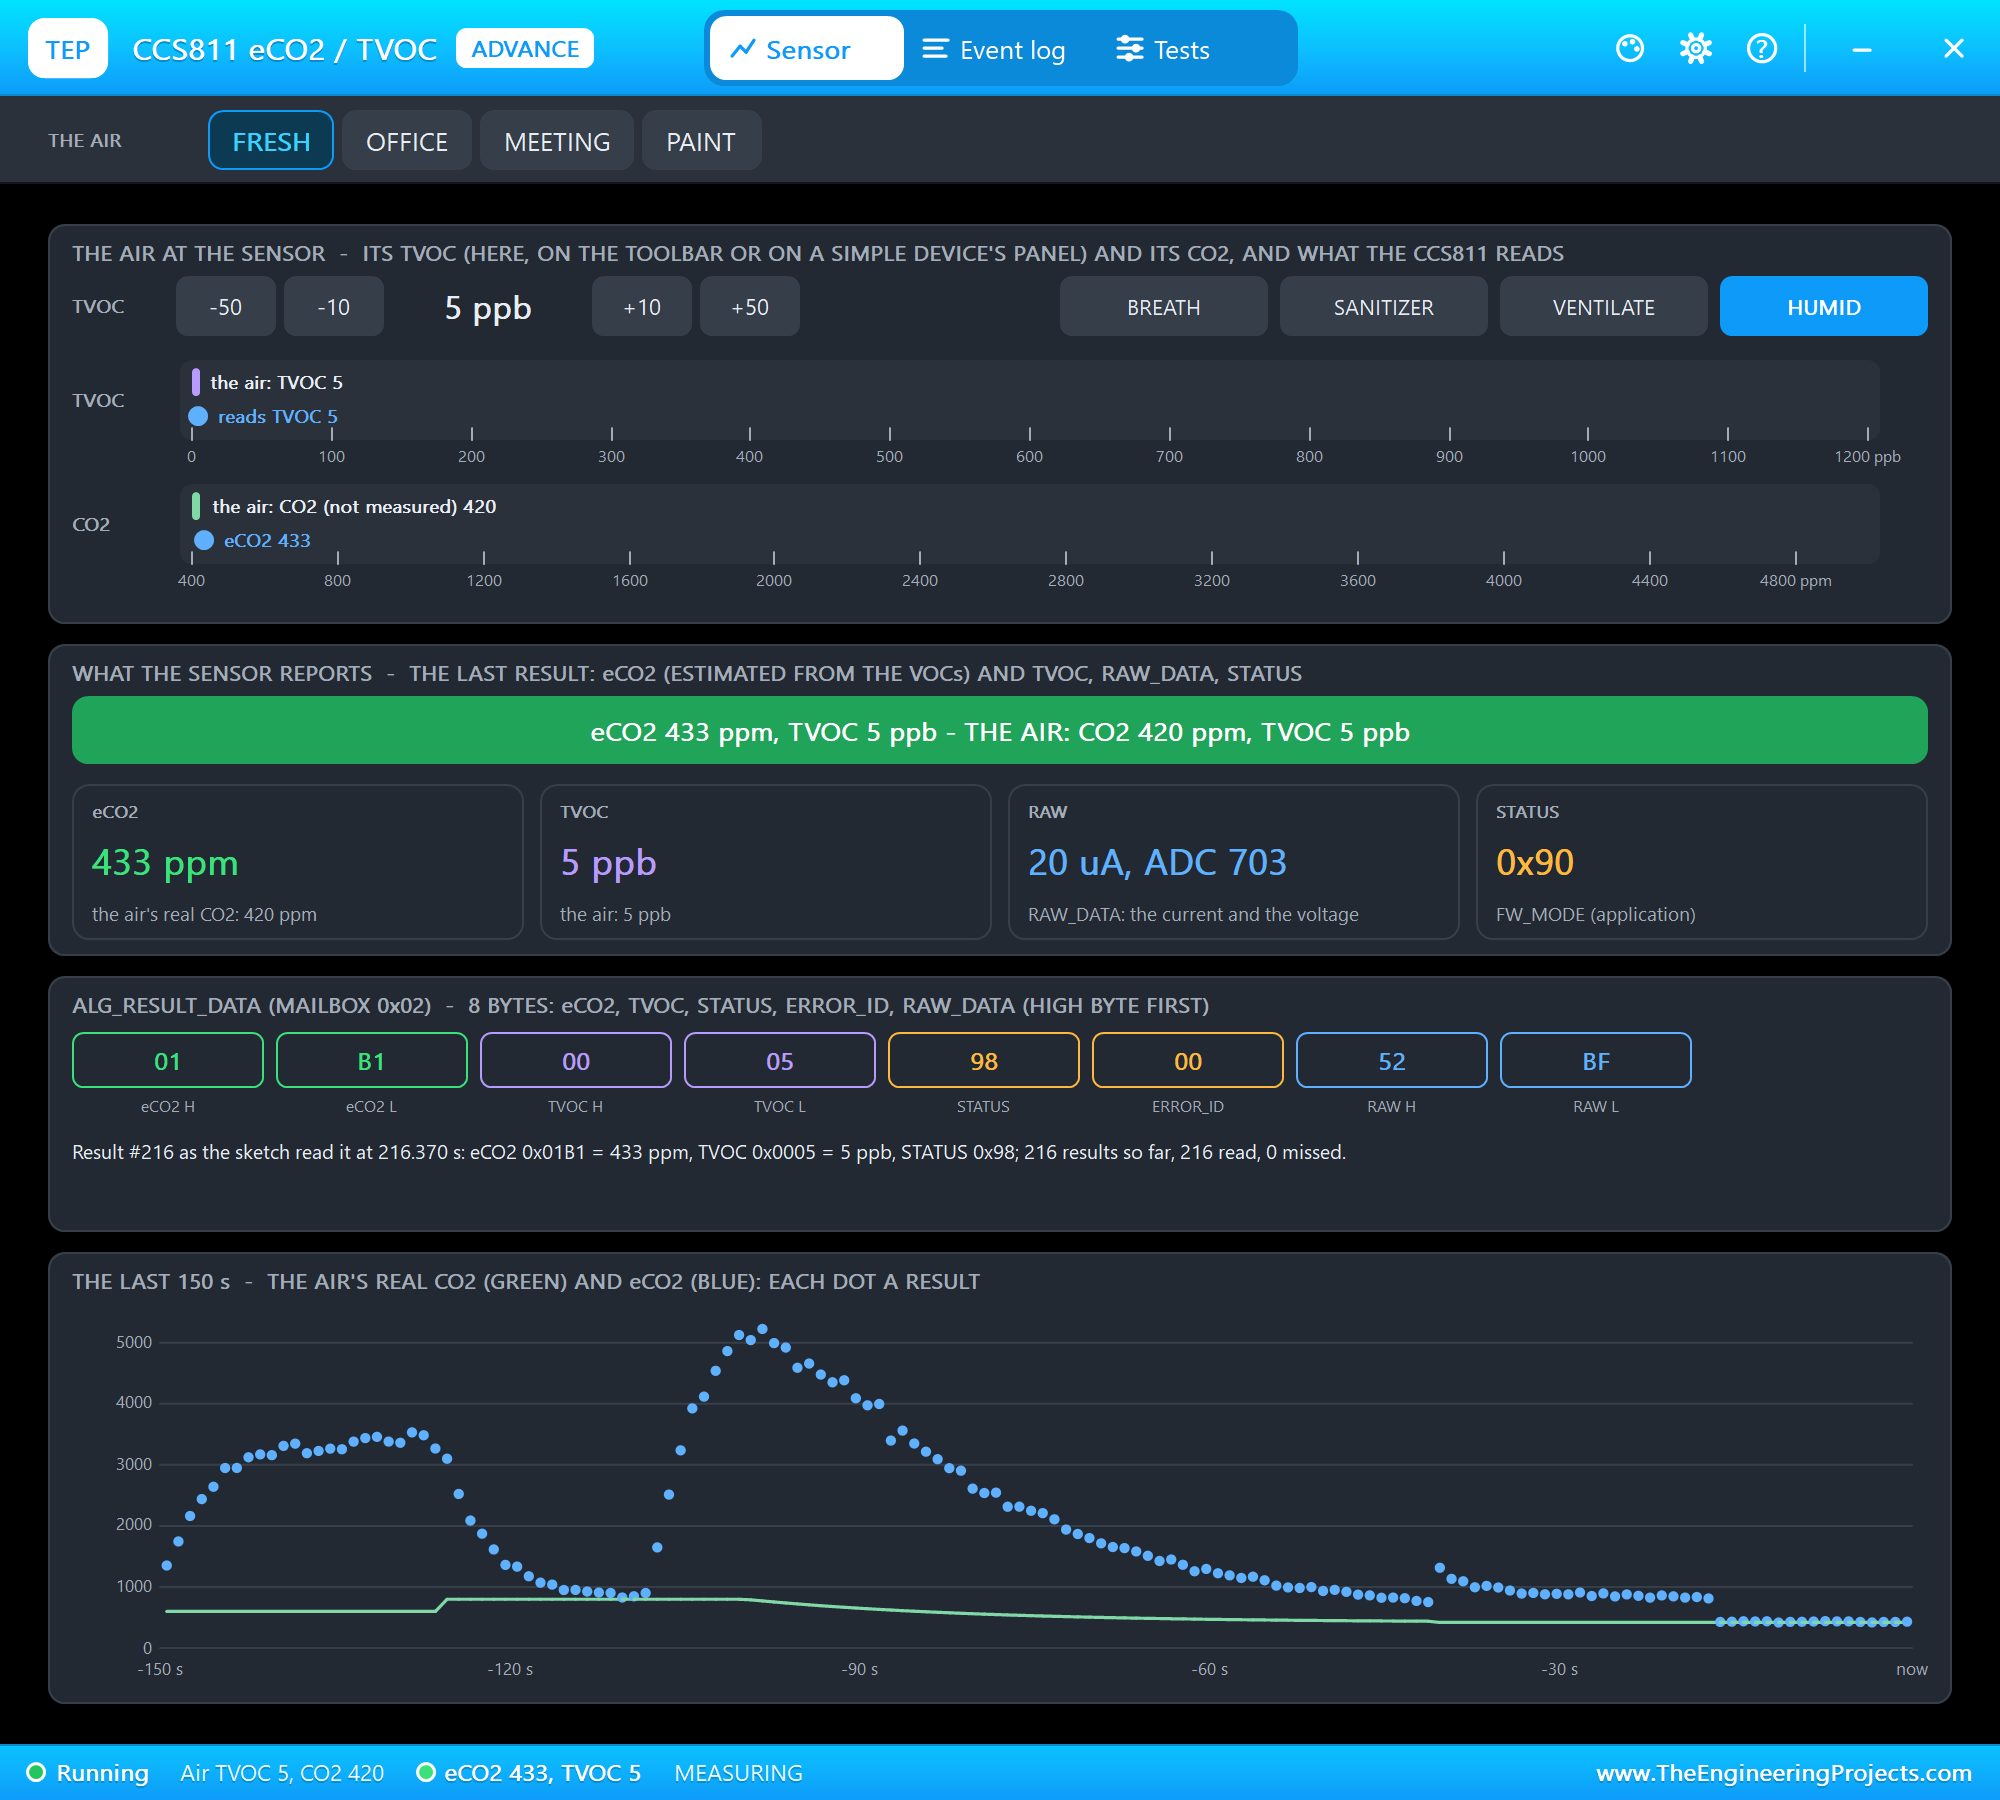
The very next result reads 4 ppb, and the banner turns green. On a real board, read the humidity and temperature from a sensor such as the AHT20 or the BME280 and pass them to setEnvironmentalData() every few minutes. How far humid air pushes the reading in the model is our own choice; the lesson is the datasheet's.
Drive Modes and nINT
Then MODE 2 - a result every 10 seconds instead of every second:
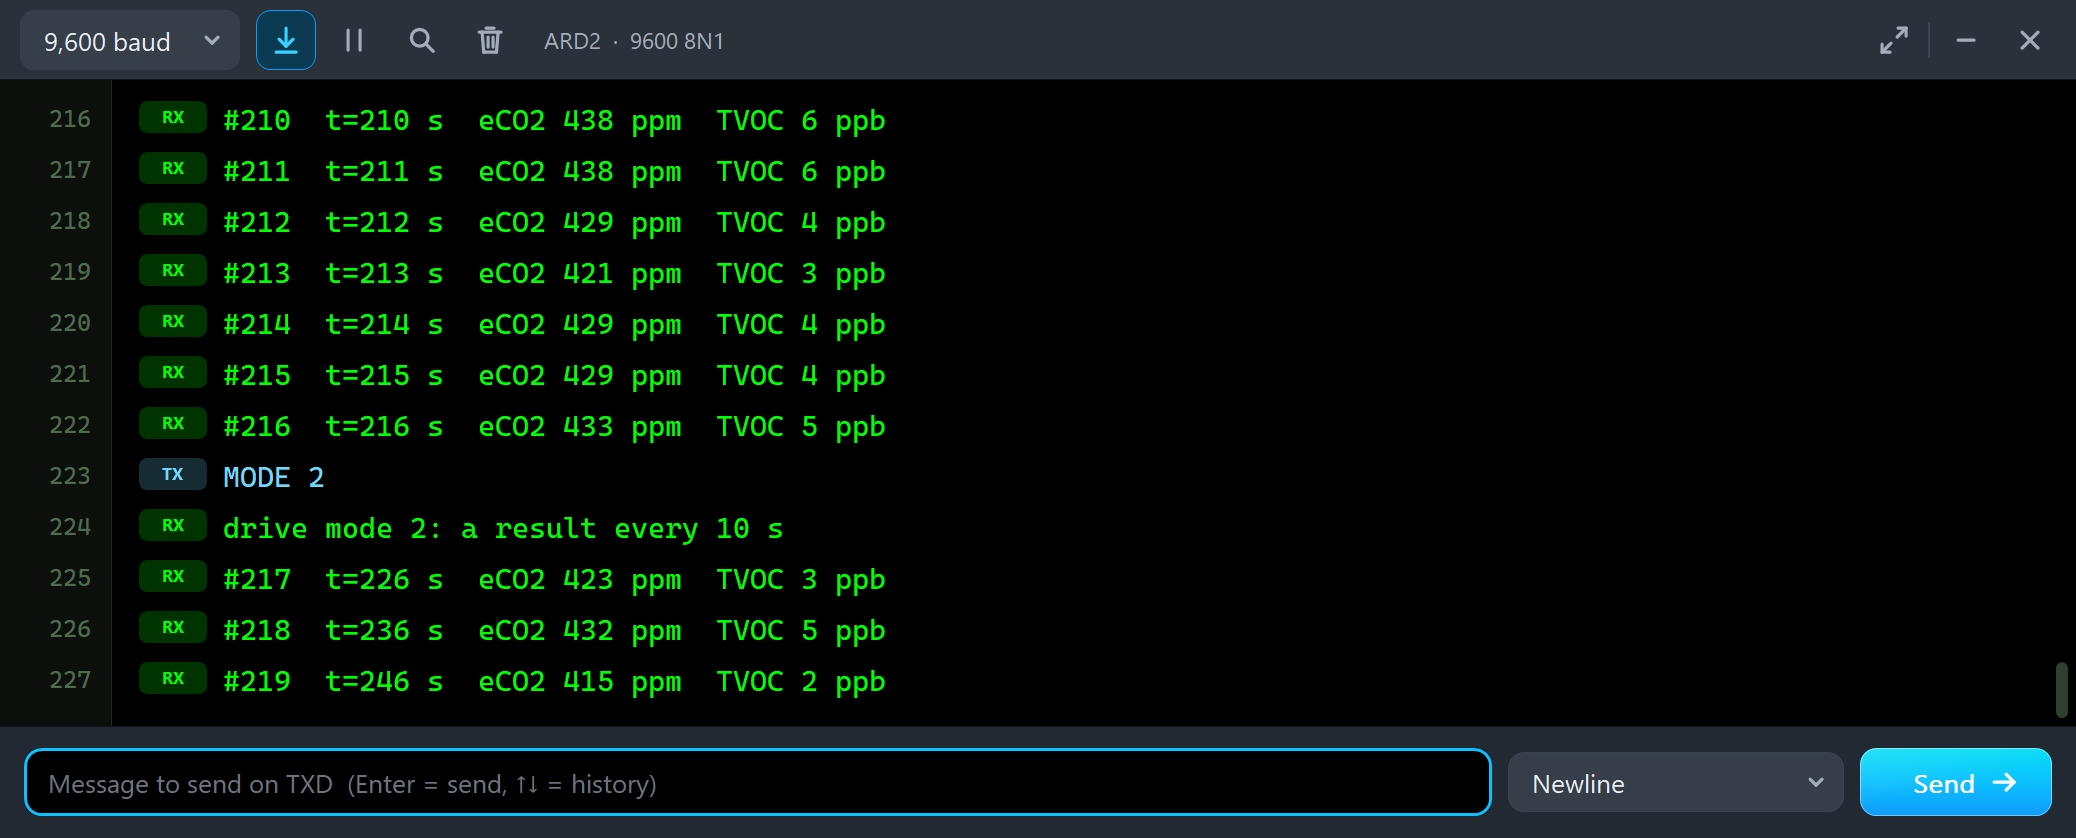
#214  t=214 s  eCO2 429 ppm  TVOC 4 ppb
#215  t=215 s  eCO2 429 ppm  TVOC 4 ppb
#216  t=216 s  eCO2 433 ppm  TVOC 5 ppb
MODE 2
drive mode 2: a result every 10 s
#217  t=226 s  eCO2 423 ppm  TVOC 3 ppb
#218  t=236 s  eCO2 432 ppm  TVOC 5 ppb
#219  t=246 s  eCO2 415 ppm  TVOC 2 ppb
Look at the time stamps: 226, 236, 246. The sketch needed no change, because it reads whenever nINT goes LOW. A sketch that printed every second on a timer would print the same result ten times. The Mode & interrupt tool shows the details:
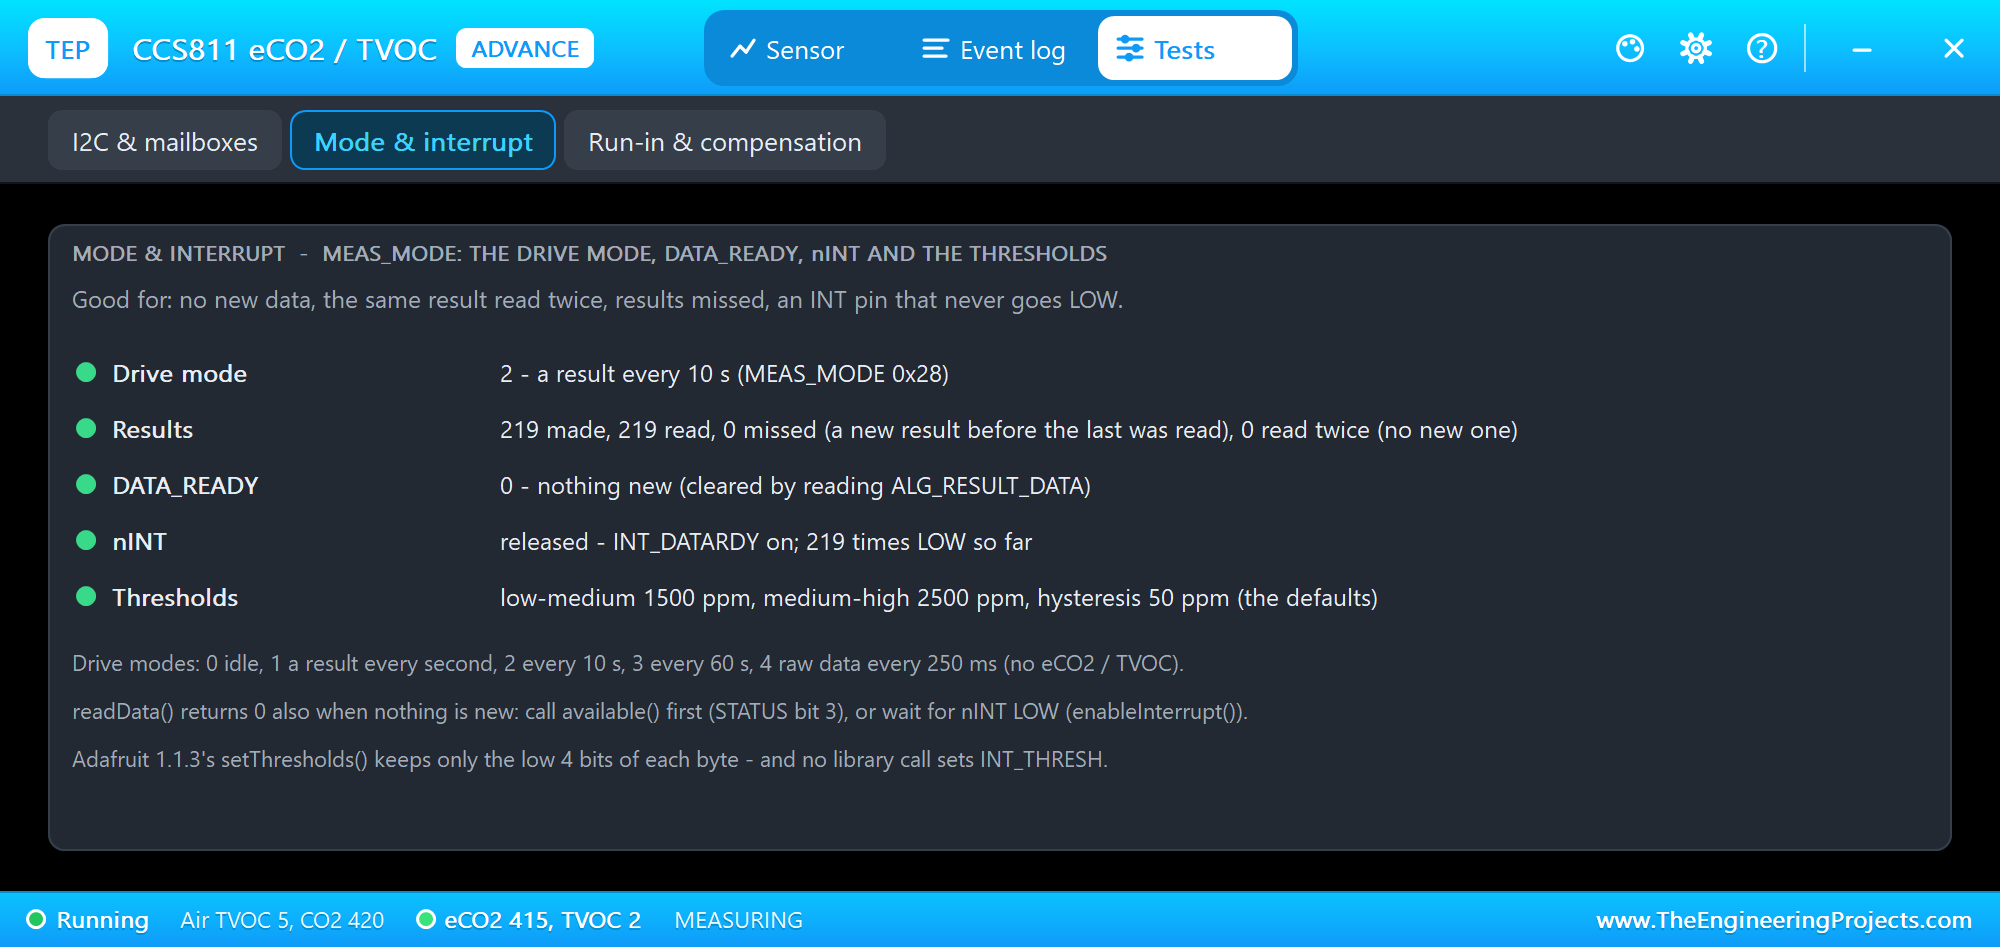
It lists the drive mode with the MEAS_MODE byte, the results made, read and missed, DATA_READY, nINT and the thresholds. Drive mode 3 gives a result every 60 seconds and saves power; drive mode 4 gives only raw data every 250 ms, for your own algorithm, and no eCO2 or TVOC. With INT_THRESH, nINT goes LOW only when eCO2 crosses a threshold - but note the tool's warning: setThresholds() in Adafruit 1.1.3 keeps only the low 4 bits of each byte. We typed MODE 1 to go back to a result every second.
SLEEP and WAKE: the WAK Pin
Next we typed SLEEP. The sketch pulls WAK HIGH, and the I2C interface of the CCS811 goes to sleep - it does not even answer its address. The measurements go on:
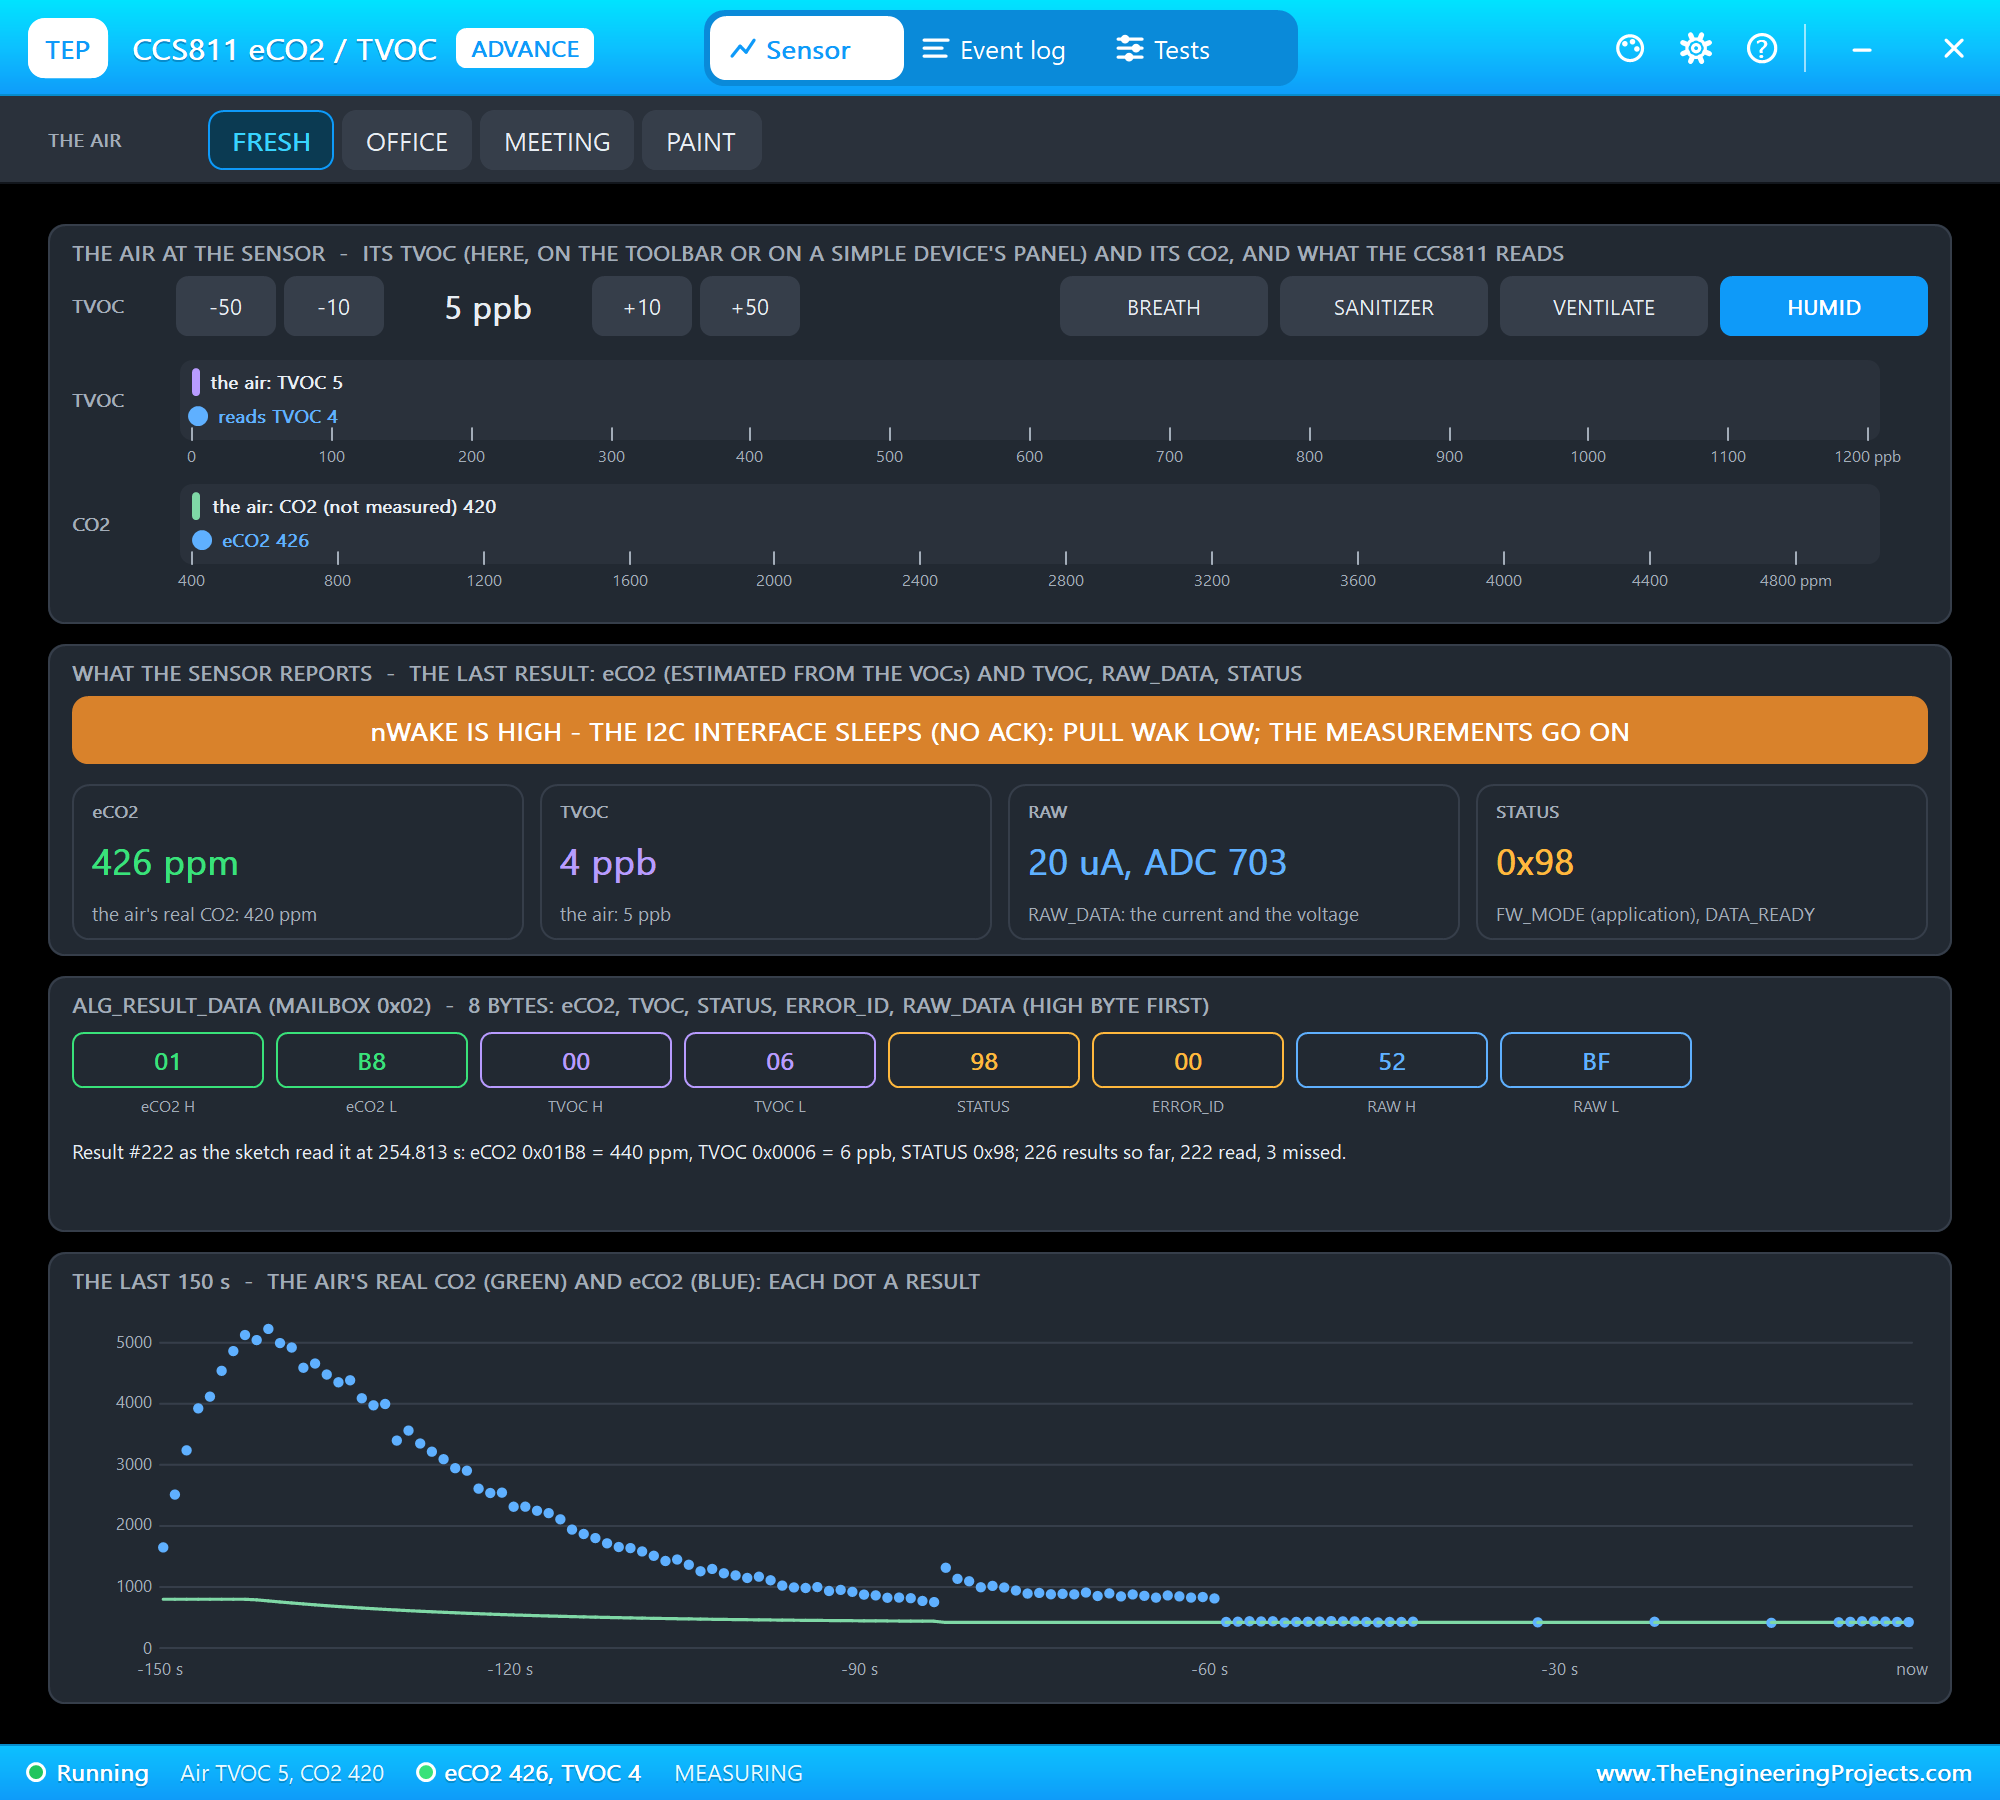
The pop-up counts on: 226 results so far, but only 222 read - three were replaced by newer ones before anybody could read them, and the newest one waits with DATA_READY set. Then WAKE and BASELINE:
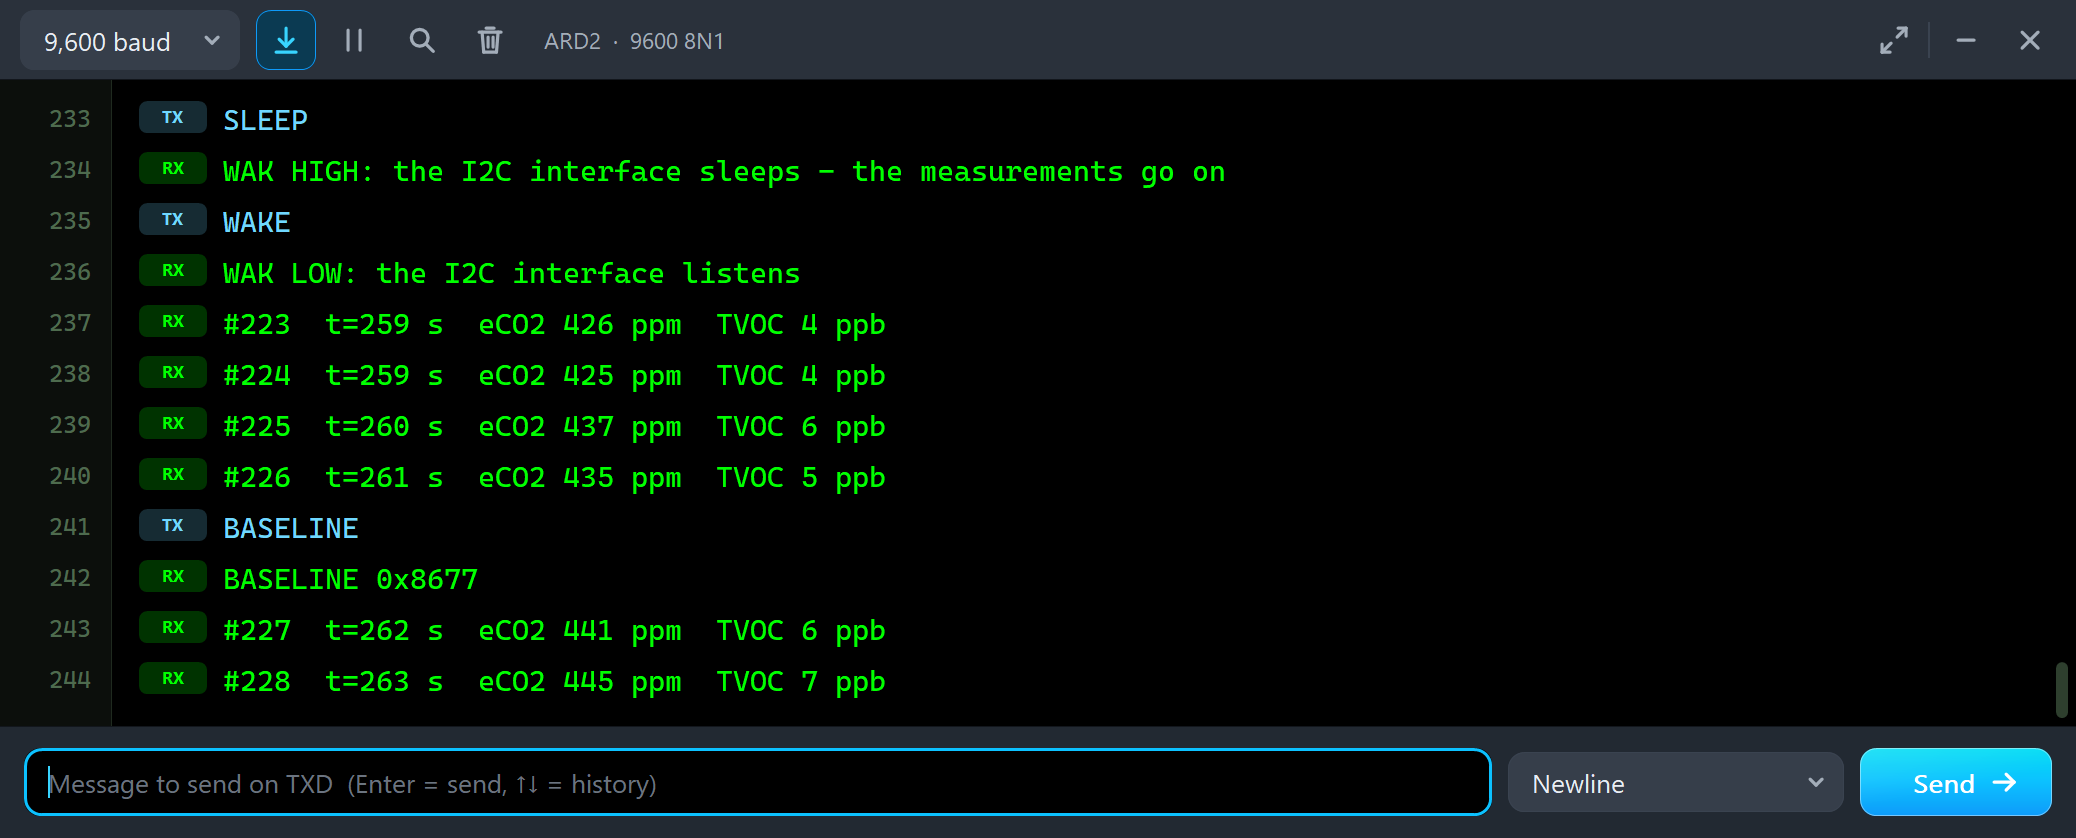
SLEEP
WAK HIGH: the I2C interface sleeps - the measurements go on
WAKE
WAK LOW: the I2C interface listens
#223  t=259 s  eCO2 426 ppm  TVOC 4 ppb
#224  t=259 s  eCO2 425 ppm  TVOC 4 ppb
#225  t=260 s  eCO2 437 ppm  TVOC 6 ppb
#226  t=261 s  eCO2 435 ppm  TVOC 5 ppb
BASELINE
BASELINE 0x8677
#227  t=262 s  eCO2 441 ppm  TVOC 6 ppb
#228  t=263 s  eCO2 445 ppm  TVOC 7 ppb
Right after WAKE the sketch read the result that had waited (#223 at 259 s), and the next one came in the same second. Keeping WAK HIGH between readings saves a little power on a battery node; WAK must be LOW at least 50 microseconds before the next I2C START. BASELINE reads the baseline of the sensor, 0x8677 - the value its algorithm uses for clean air. Save it with getBaseline() once the run-in is over, and write it back with setBaseline() after a restart.
The Event Log
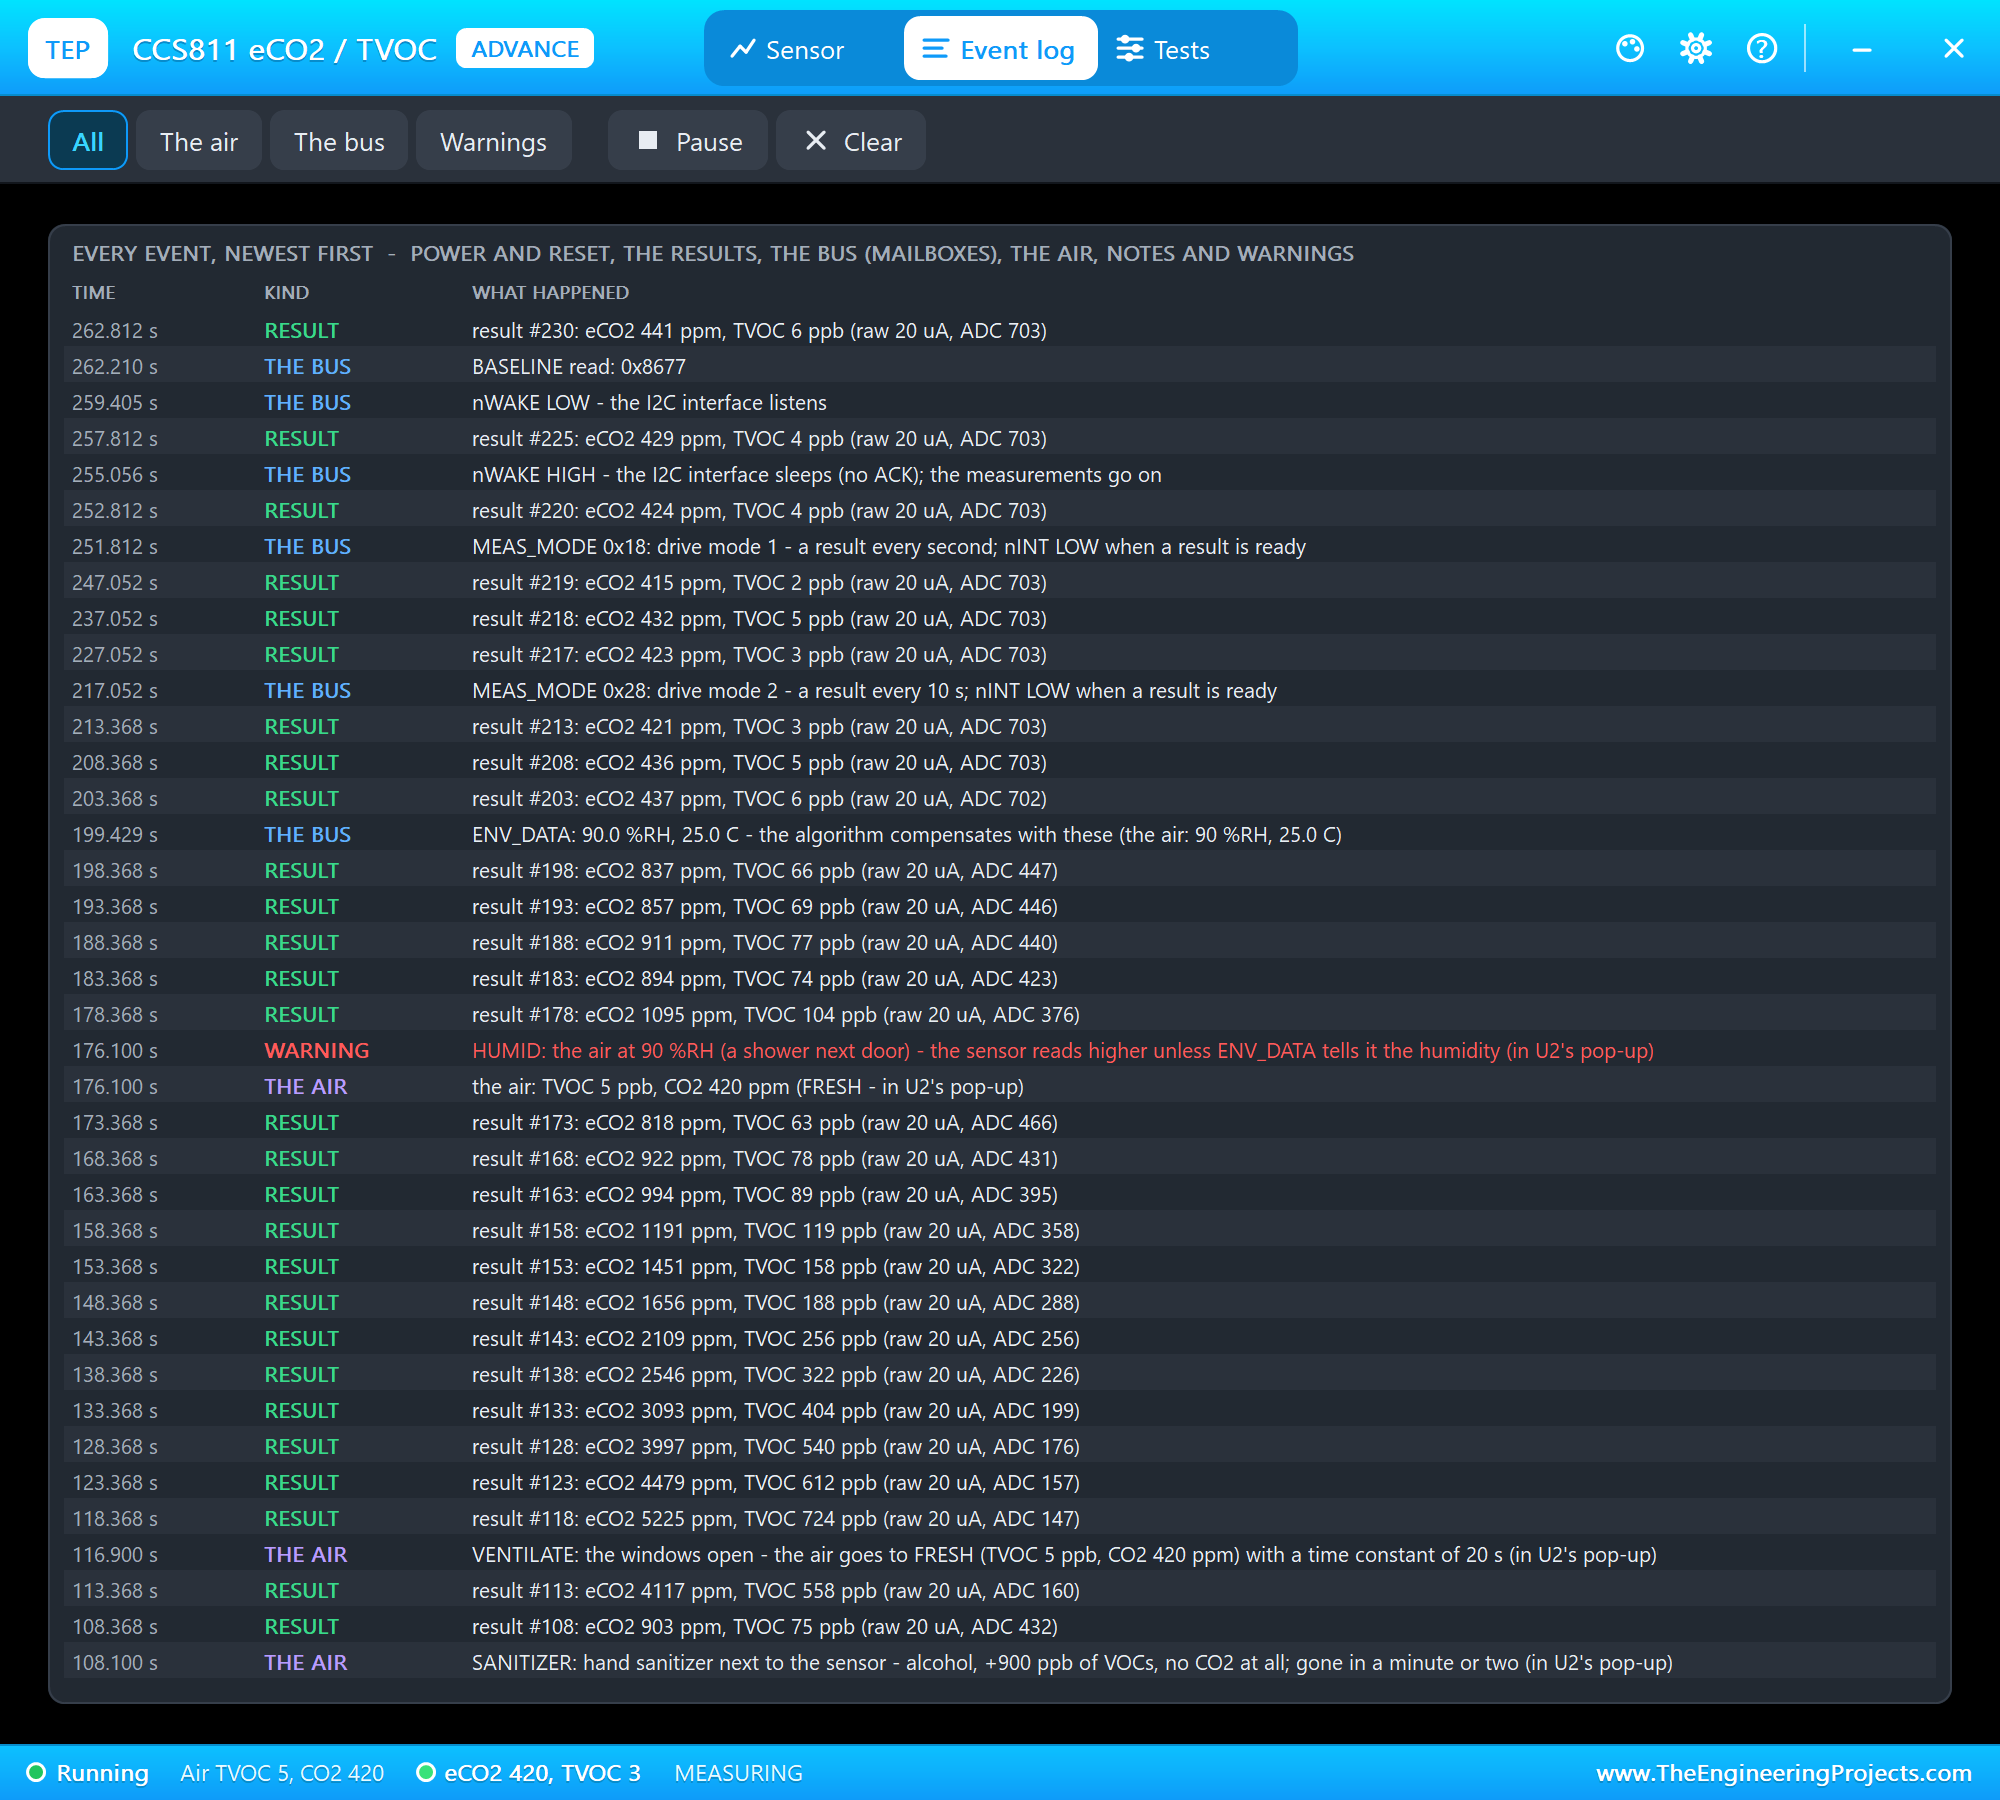
The Event log lists everything that happened, newest first: power and reset, the results (about one every 5 seconds in drive mode 1, every one in the slower modes), the bus with the mailbox writes and nWAKE, the air, notes and warnings. Here you can read the story of node 2 backwards: SANITIZER, VENTILATE, FRESH with the HUMID warning, ENV_DATA, the results every 10 seconds in drive mode 2, nWAKE HIGH and LOW, and the baseline. Filter it by the air, the bus or warnings, pause it, or clear it.
The Air on the STATUS Panel
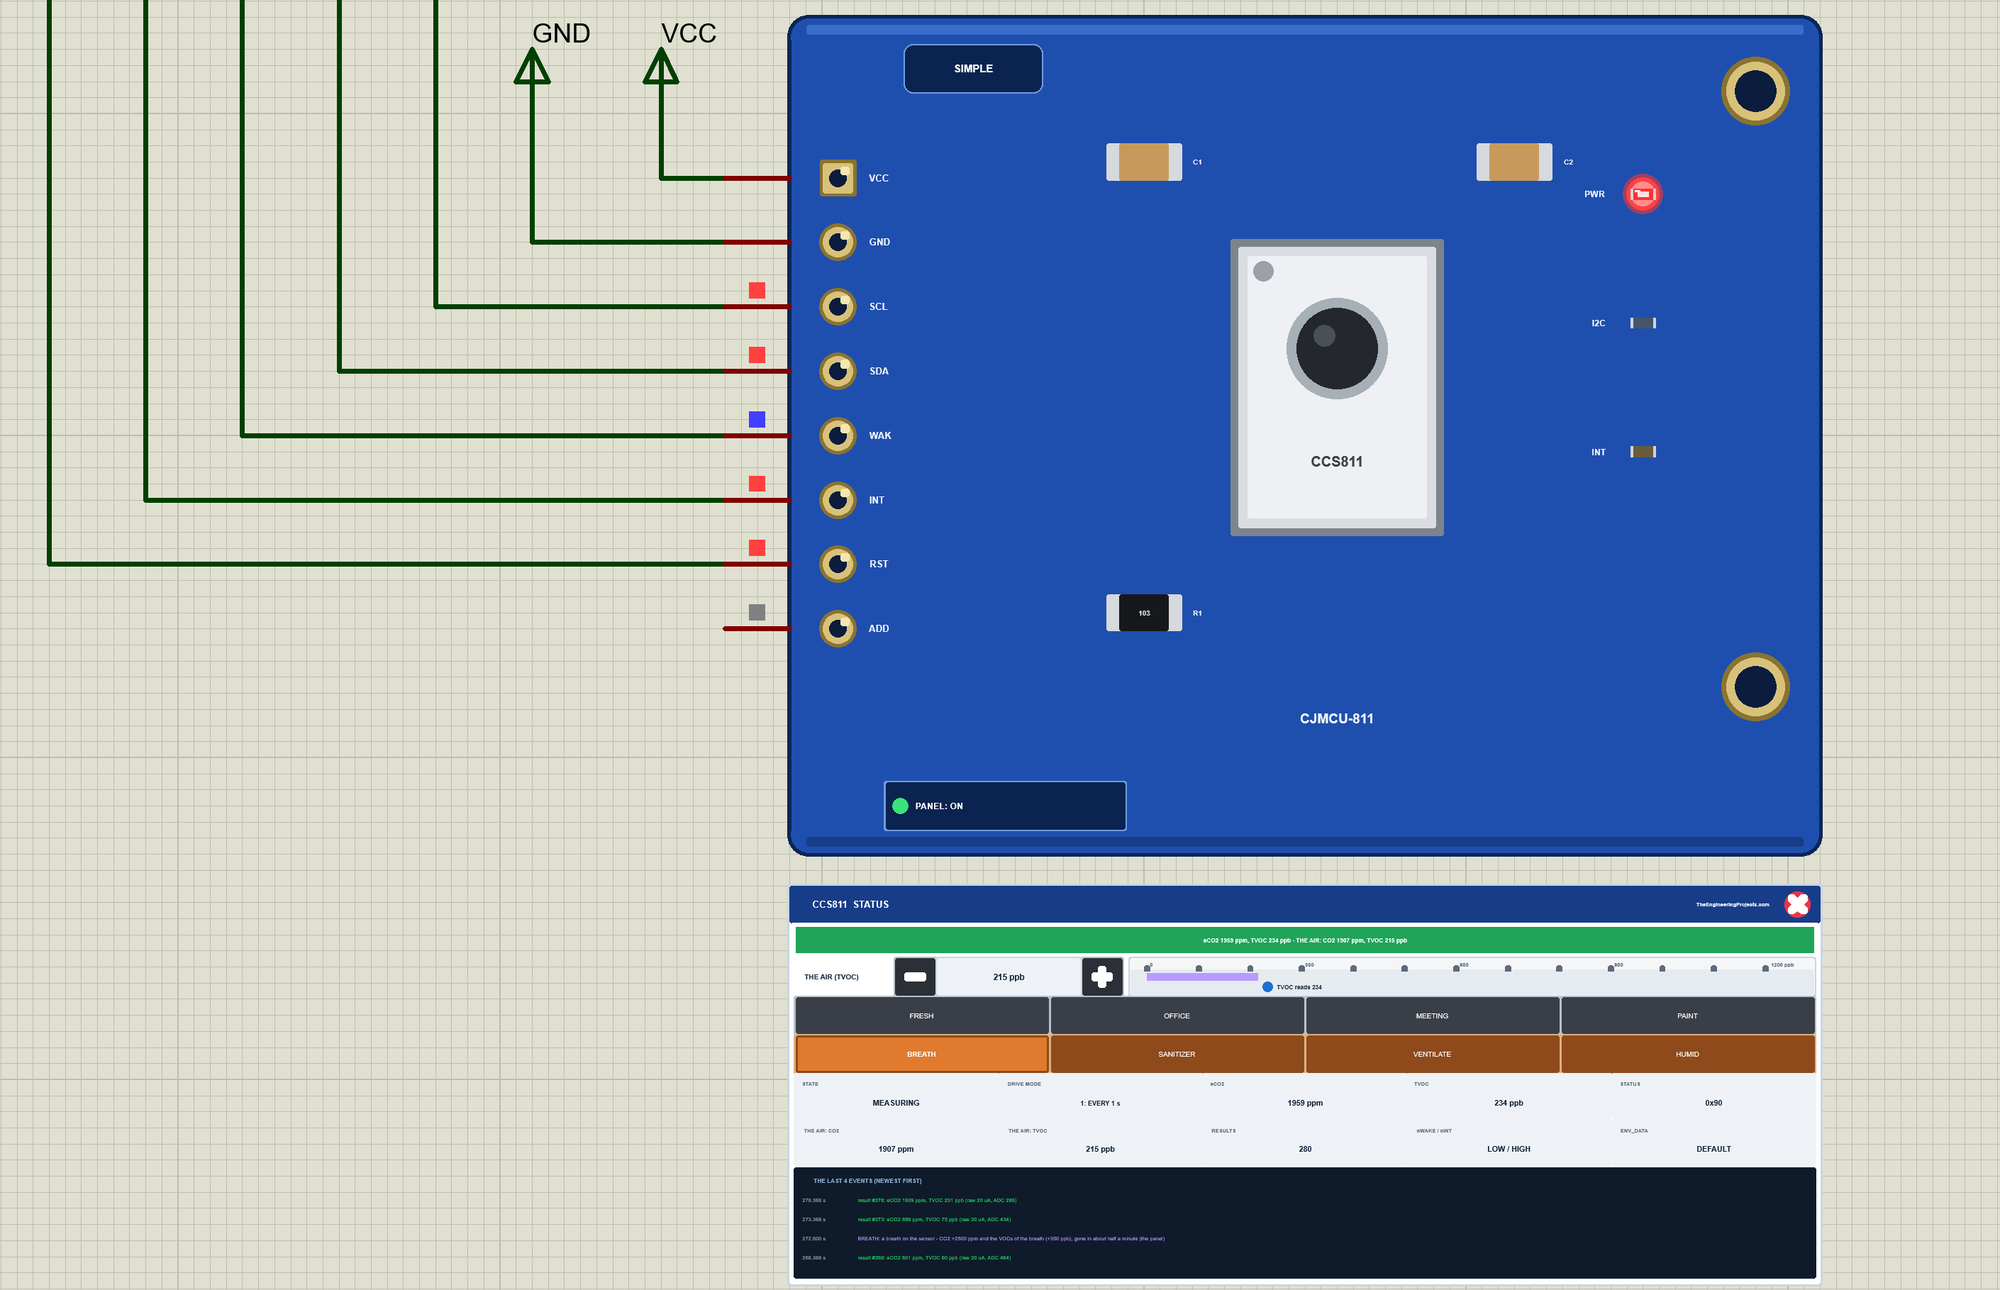
Now node 1. We clicked the buttons of U1's STATUS panel with the mouse while the simulation ran. The office air was still on; first BREATH - somebody leans over the sensor and breathes on it:
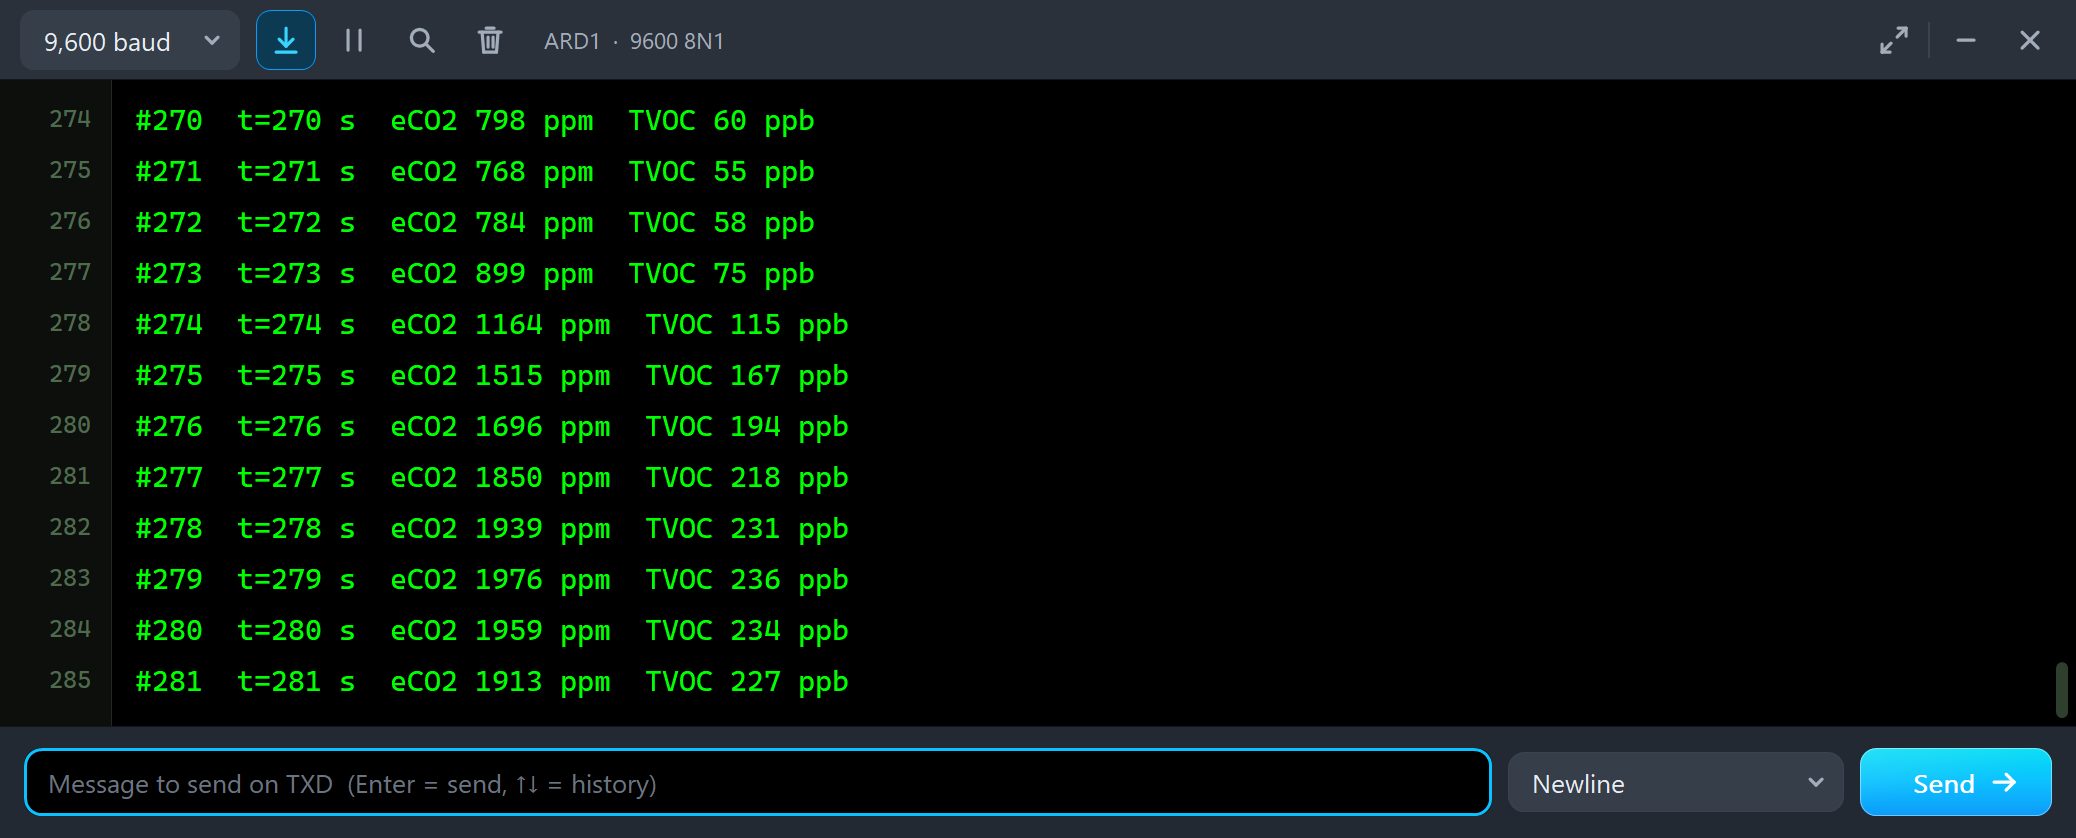
#270  t=270 s  eCO2 798 ppm  TVOC 60 ppb
#271  t=271 s  eCO2 768 ppm  TVOC 55 ppb
#272  t=272 s  eCO2 784 ppm  TVOC 58 ppb
#273  t=273 s  eCO2 899 ppm  TVOC 75 ppb
#274  t=274 s  eCO2 1164 ppm  TVOC 115 ppb
#275  t=275 s  eCO2 1515 ppm  TVOC 167 ppb
#276  t=276 s  eCO2 1696 ppm  TVOC 194 ppb
#277  t=277 s  eCO2 1850 ppm  TVOC 218 ppb
#278  t=278 s  eCO2 1939 ppm  TVOC 231 ppb
#279  t=279 s  eCO2 1976 ppm  TVOC 236 ppb
#280  t=280 s  eCO2 1959 ppm  TVOC 234 ppb
#281  t=281 s  eCO2 1913 ppm  TVOC 227 ppb
A breath carries both: CO2 and the VOCs of the breath. So here eCO2 and the real CO2 rise together, and the banner stays green - this is the case the eCO2 algorithm was made for. From 784 ppm, eCO2 climbs to 1976 ppm in 7 seconds and starts to fall again as the breath fades.
MEETING
Then MEETING - a full meeting room with the door shut: CO2 at 1400 ppm and the VOCs of all those people at 150 ppb:
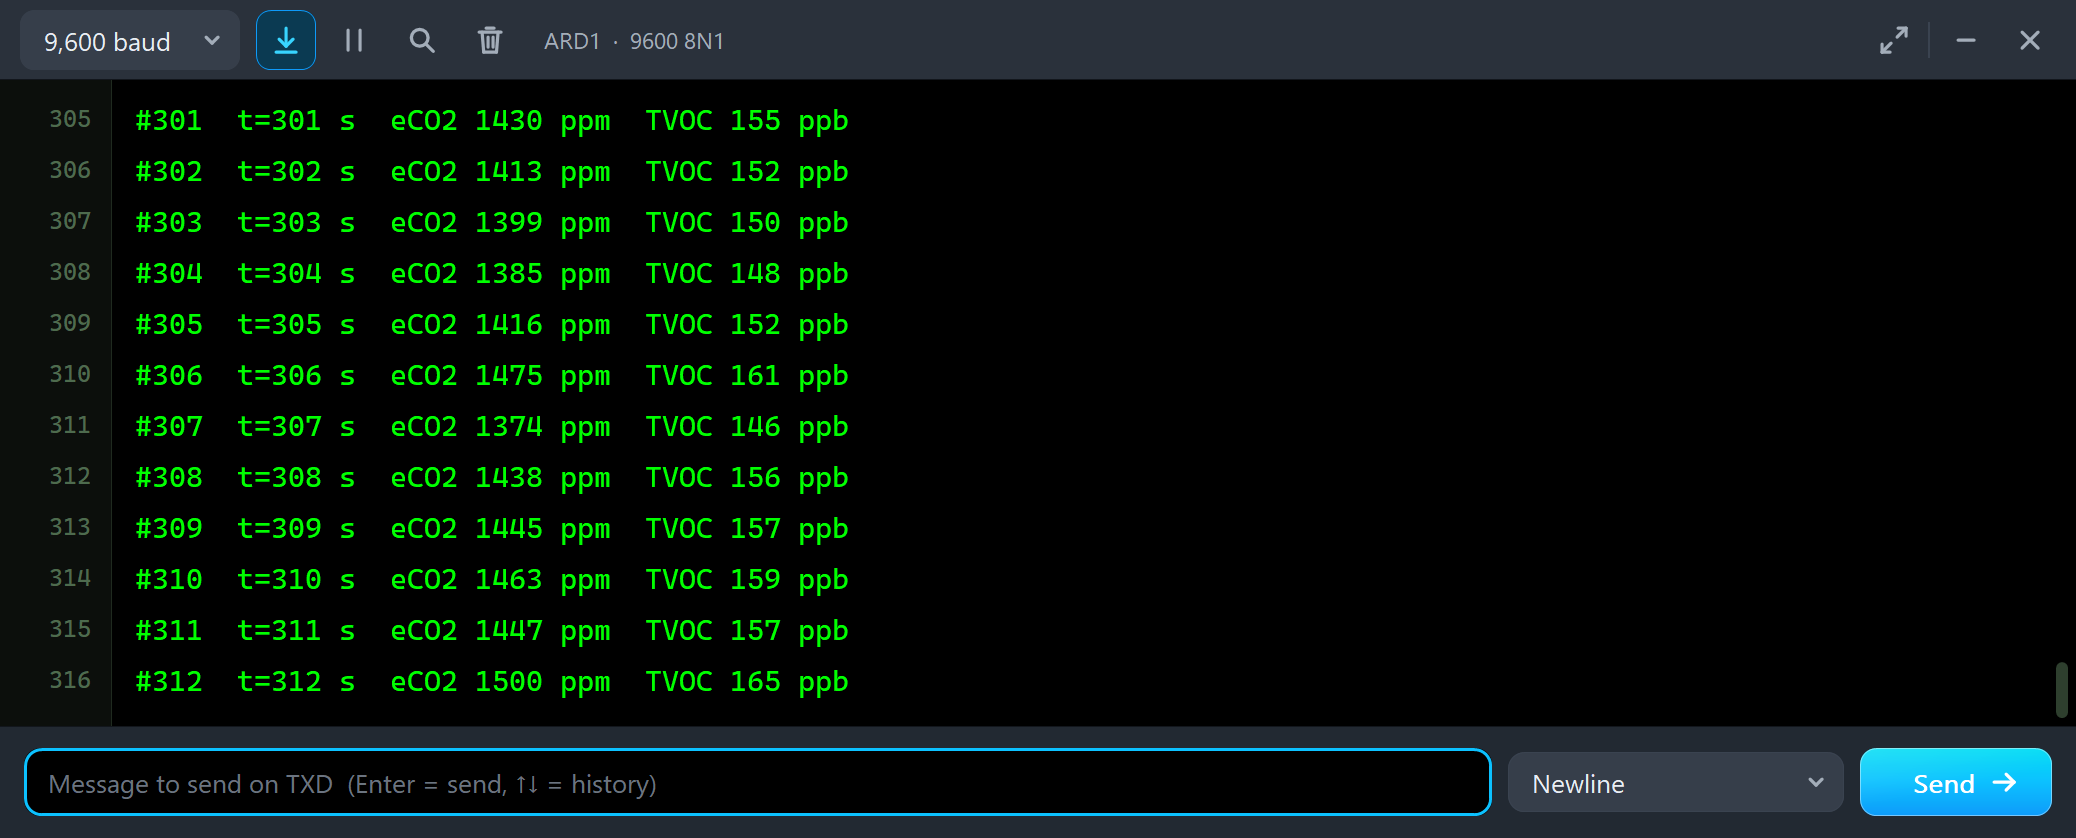
#301  t=301 s  eCO2 1430 ppm  TVOC 155 ppb
#302  t=302 s  eCO2 1413 ppm  TVOC 152 ppb
#303  t=303 s  eCO2 1399 ppm  TVOC 150 ppb
#304  t=304 s  eCO2 1385 ppm  TVOC 148 ppb
#305  t=305 s  eCO2 1416 ppm  TVOC 152 ppb
#306  t=306 s  eCO2 1475 ppm  TVOC 161 ppb
#307  t=307 s  eCO2 1374 ppm  TVOC 146 ppb
#308  t=308 s  eCO2 1438 ppm  TVOC 156 ppb
#309  t=309 s  eCO2 1445 ppm  TVOC 157 ppb
#310  t=310 s  eCO2 1463 ppm  TVOC 159 ppb
#311  t=311 s  eCO2 1447 ppm  TVOC 157 ppb
#312  t=312 s  eCO2 1500 ppm  TVOC 165 ppb
Here eCO2 and the real CO2 agree within a few percent: 1374 to 1500 ppm against 1400. People are the only source of VOCs in this room, so the estimate works. Many guidelines ask for fresh air above about 1000 ppm - time to open the windows.
VENTILATE on the Panel
So we clicked VENTILATE on the panel:
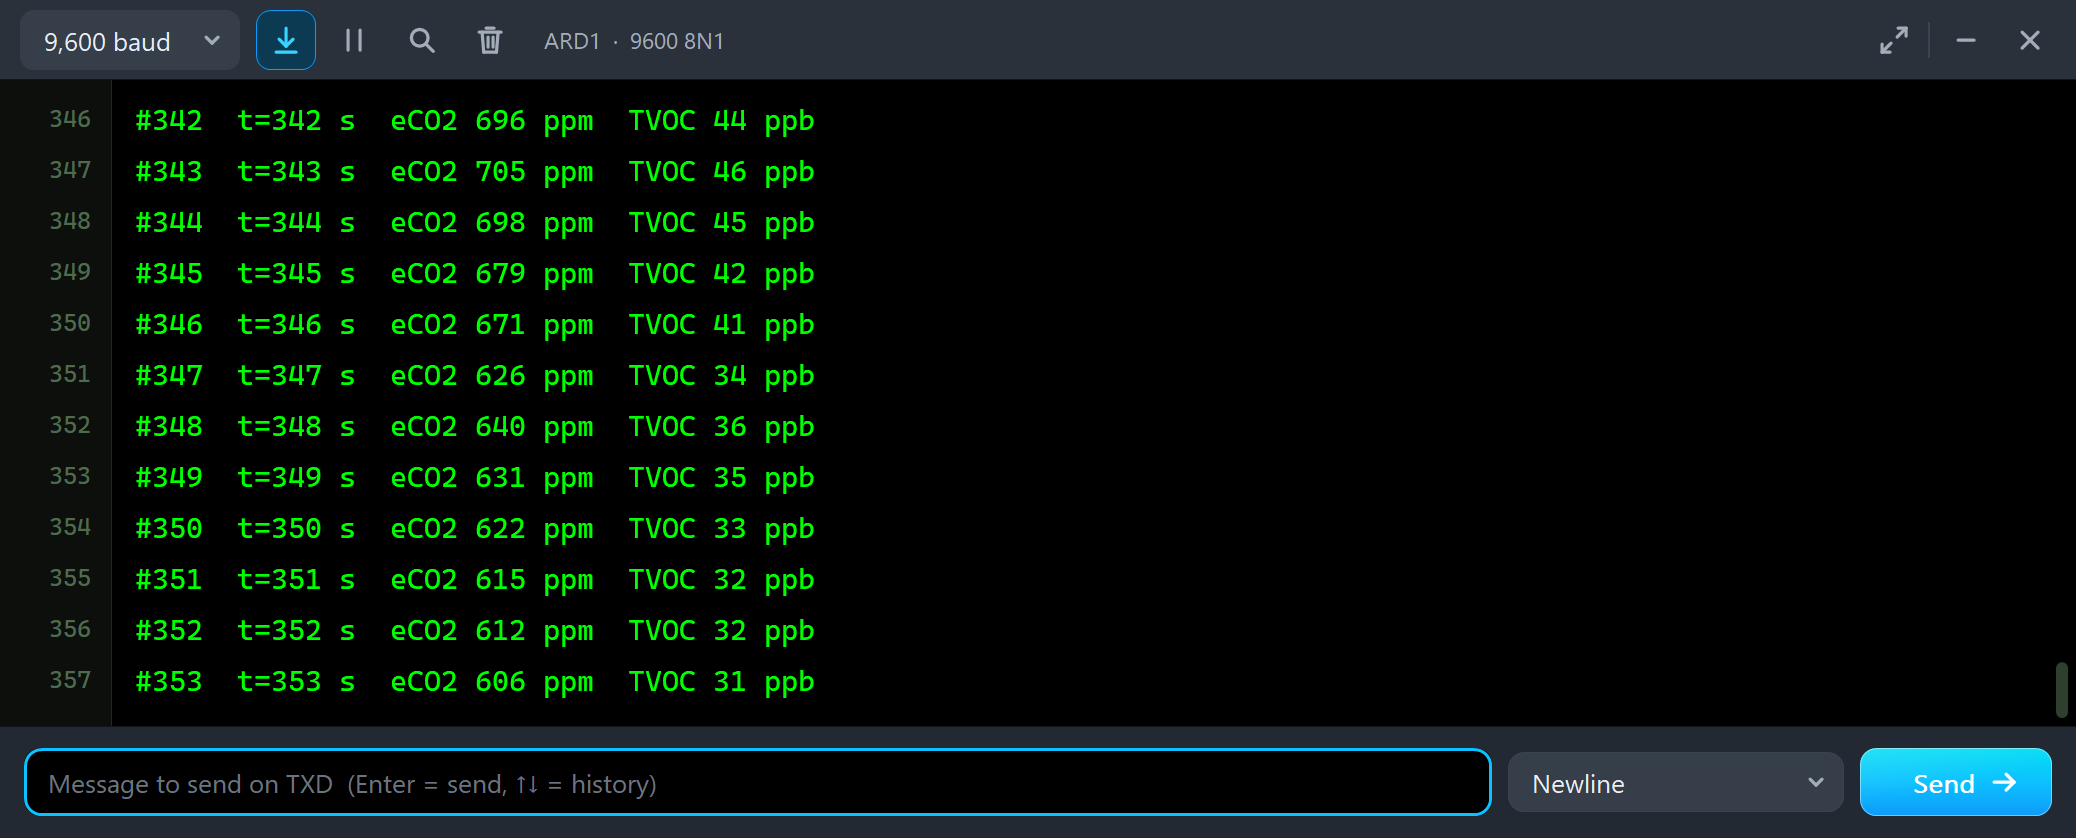
#342  t=342 s  eCO2 696 ppm  TVOC 44 ppb
#343  t=343 s  eCO2 705 ppm  TVOC 46 ppb
#344  t=344 s  eCO2 698 ppm  TVOC 45 ppb
#345  t=345 s  eCO2 679 ppm  TVOC 42 ppb
#346  t=346 s  eCO2 671 ppm  TVOC 41 ppb
#347  t=347 s  eCO2 626 ppm  TVOC 34 ppb
#348  t=348 s  eCO2 640 ppm  TVOC 36 ppb
#349  t=349 s  eCO2 631 ppm  TVOC 35 ppb
#350  t=350 s  eCO2 622 ppm  TVOC 33 ppb
#351  t=351 s  eCO2 615 ppm  TVOC 32 ppb
#352  t=352 s  eCO2 612 ppm  TVOC 32 ppb
#353  t=353 s  eCO2 606 ppm  TVOC 31 ppb
The air goes to FRESH with a time constant of 20 seconds, and the readings follow it down - from 696 to 606 ppm in 11 seconds, on the way to about 430.
The RESET Pin
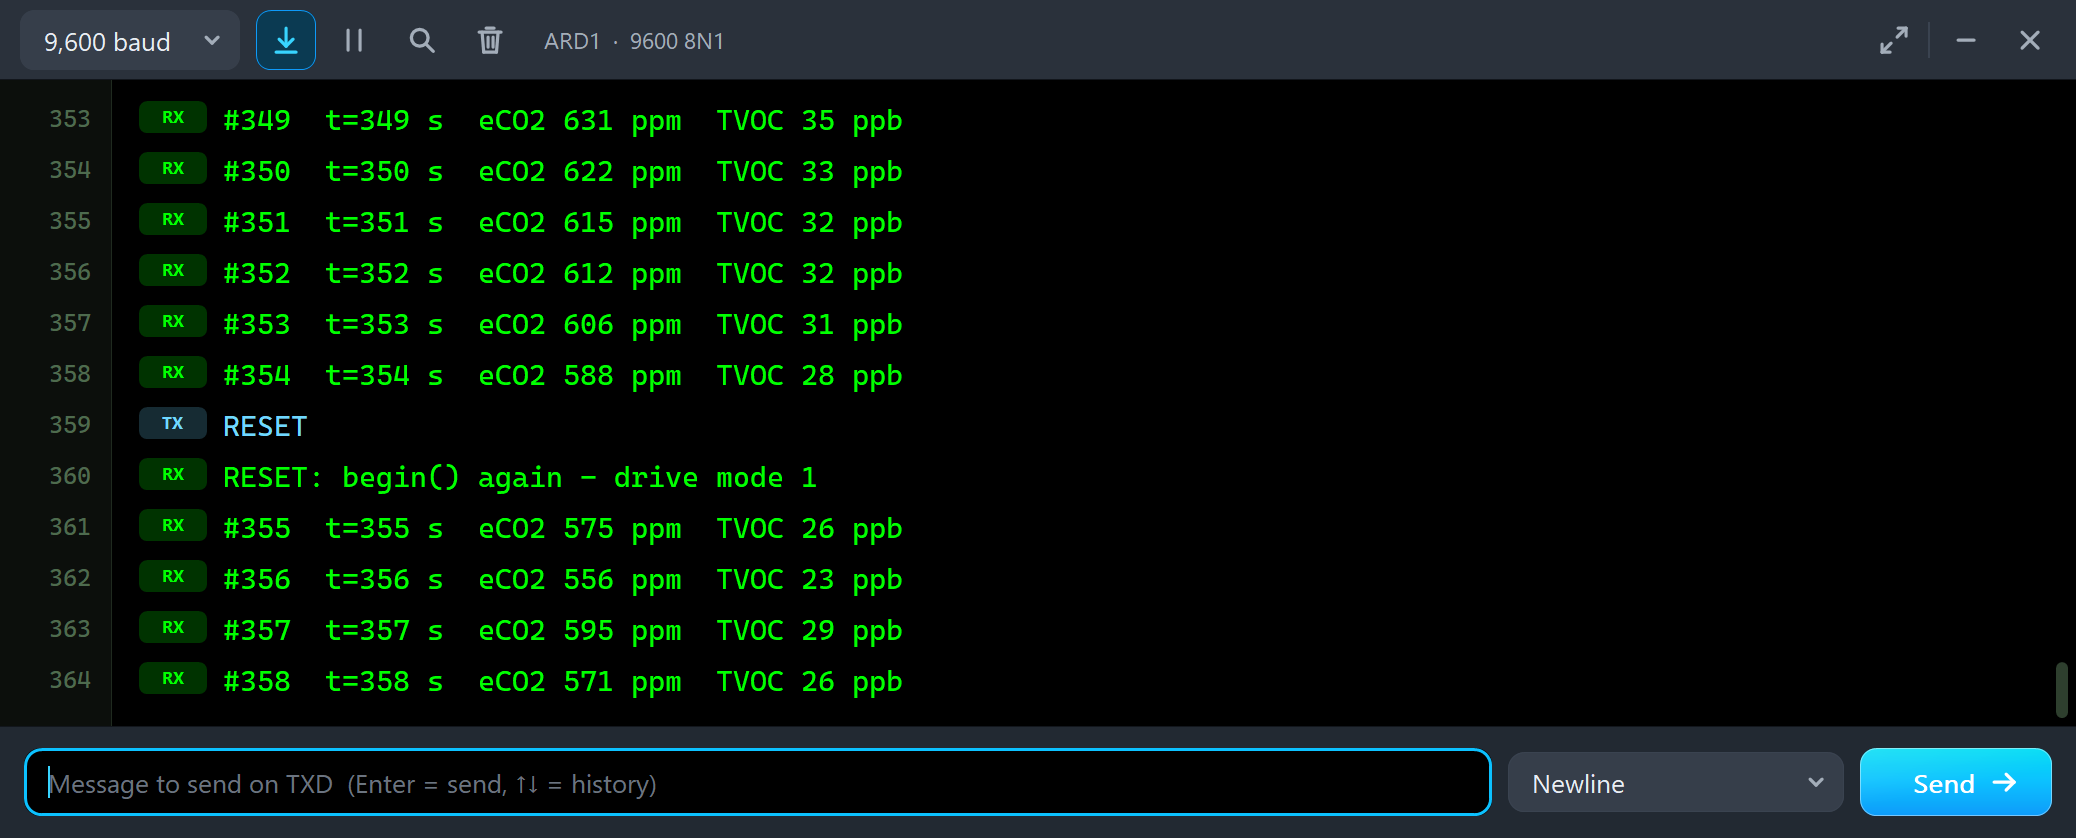
#353  t=353 s  eCO2 606 ppm  TVOC 31 ppb
#354  t=354 s  eCO2 588 ppm  TVOC 28 ppb
RESET
RESET: begin() again - drive mode 1
#355  t=355 s  eCO2 575 ppm  TVOC 26 ppb
#356  t=356 s  eCO2 556 ppm  TVOC 23 ppb
#357  t=357 s  eCO2 595 ppm  TVOC 29 ppb
#358  t=358 s  eCO2 571 ppm  TVOC 26 ppb
RESET pulls D5 LOW for 10 ms. The CCS811 starts again in boot mode with no drive mode, so the sketch must call begin() again - without it, no result would ever come. Here the results go on in the next second. One thing the model keeps simple: a real CCS811 also restarts its algorithm after a reset, so write the saved baseline back with setBaseline().
The Simulation Log
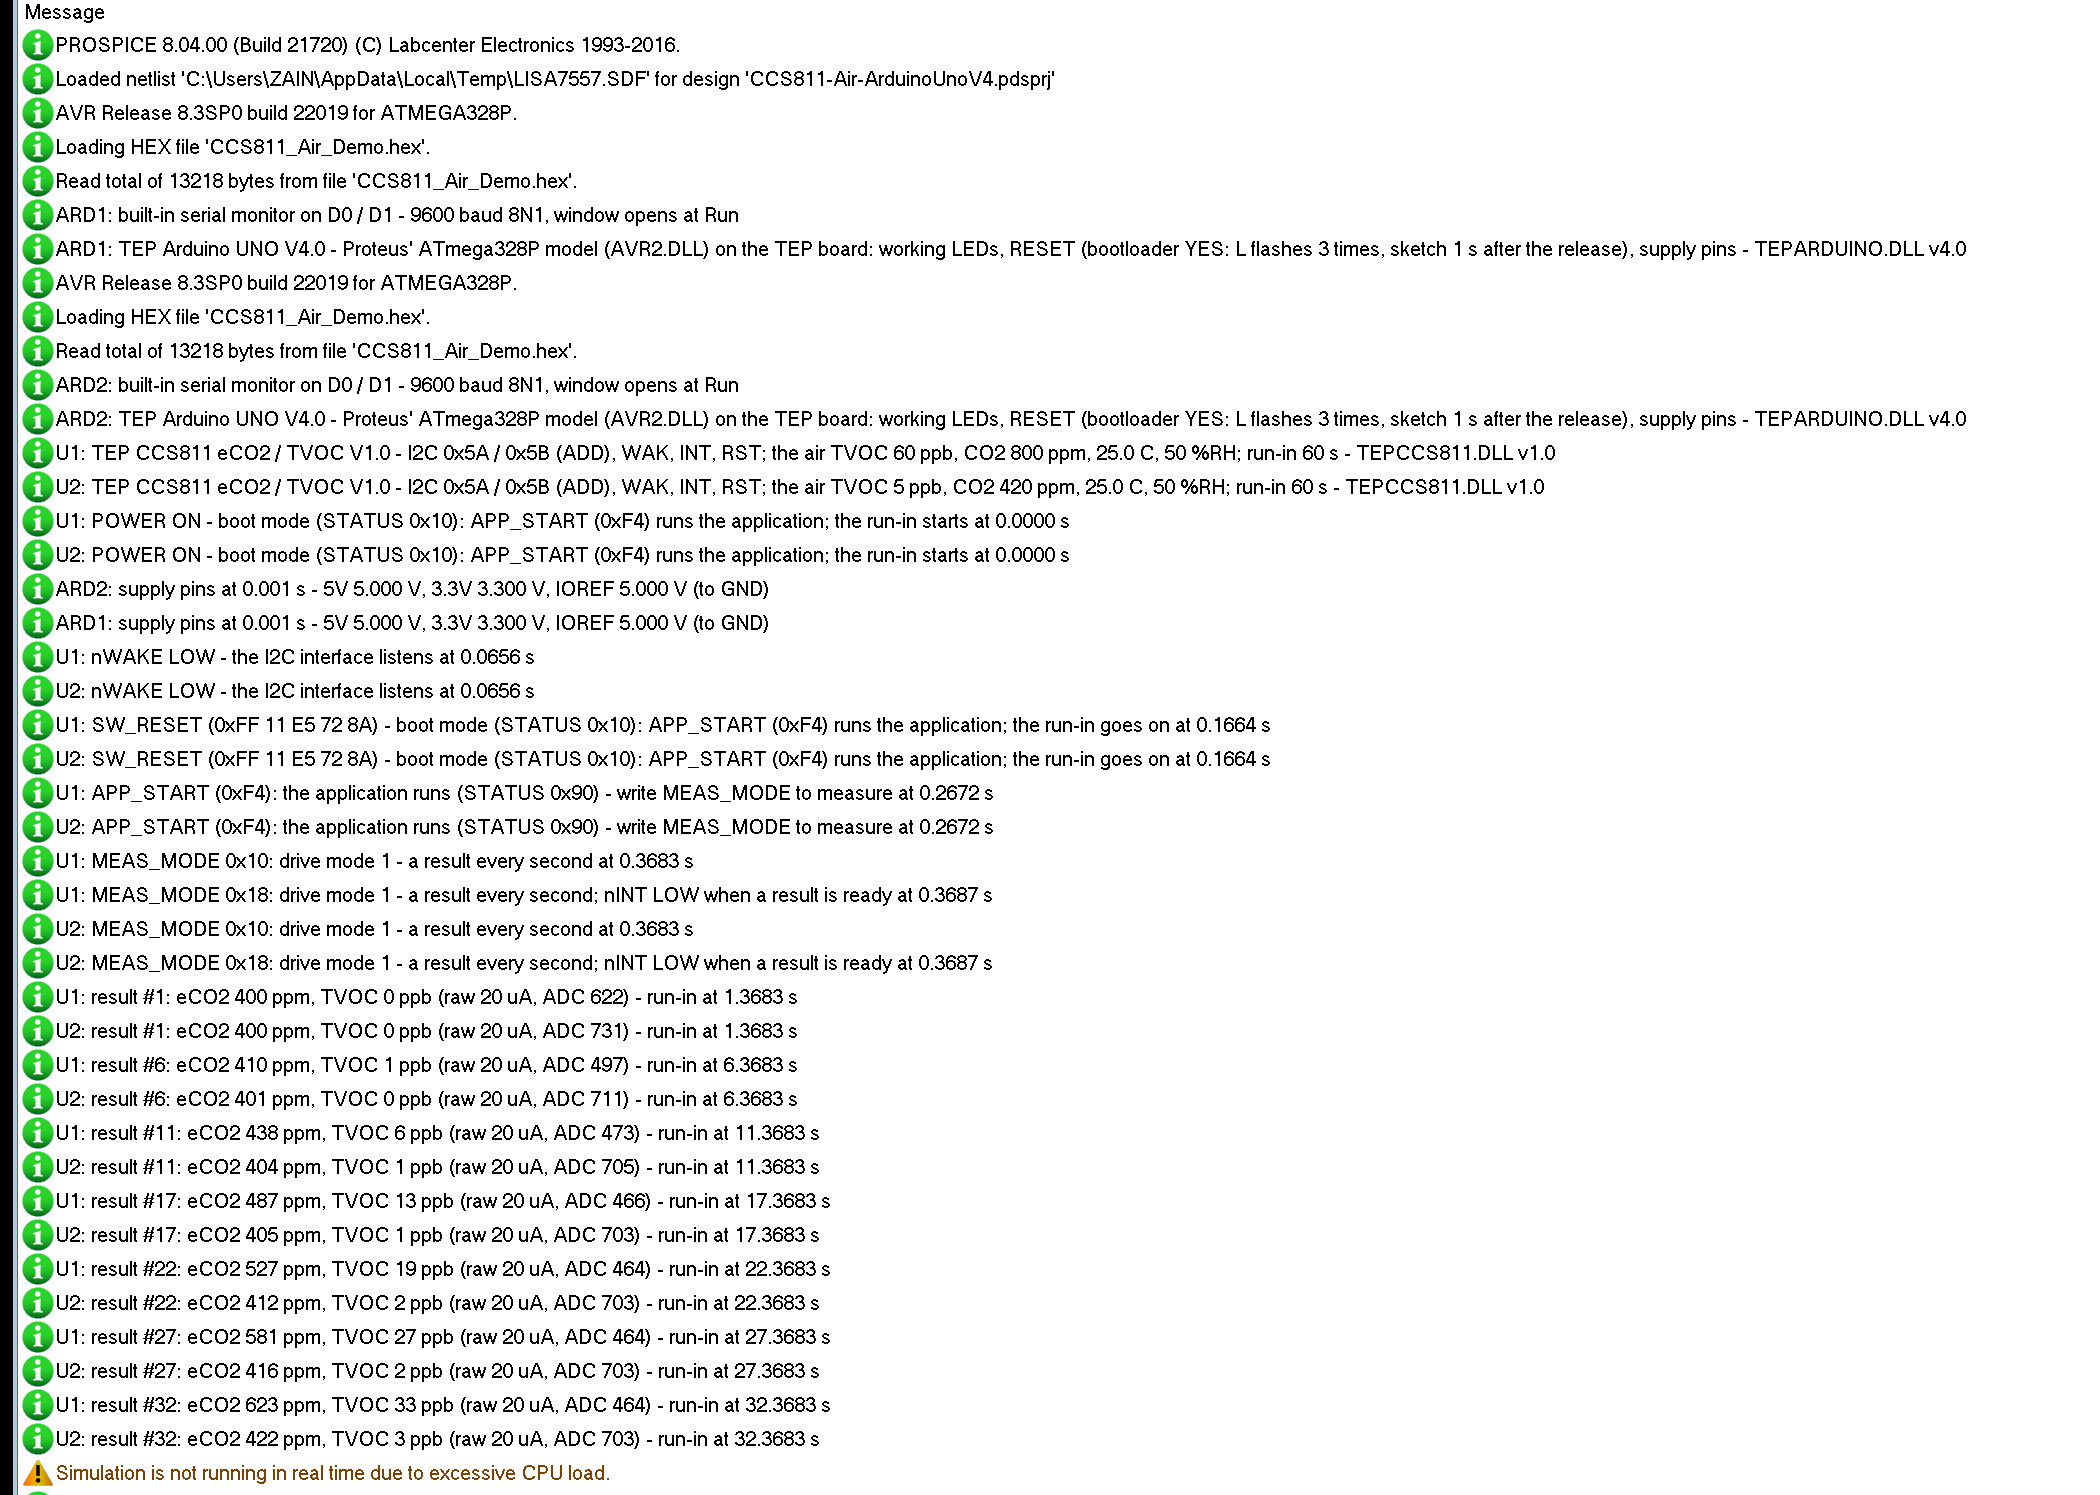
The sensors also write to the simulation log of Proteus, with the exact simulation time. This part shows U1 at the start:
U1: TEP CCS811 eCO2 / TVOC V1.0 - I2C 0x5A / 0x5B (ADD), WAK, INT, RST; the air TVOC 60 ppb, CO2 800 ppm, 25.0 C, 50 %RH; run-in 60 s - TEPCCS811.DLL v1.0
U1: POWER ON - boot mode (STATUS 0x10): APP_START (0xF4) runs the application; the run-in starts at 0.0000 s
U1: nWAKE LOW - the I2C interface listens at 0.0656 s
U1: SW_RESET (0xFF 11 E5 72 8A) - boot mode (STATUS 0x10): APP_START (0xF4) runs the application; the run-in goes on at 0.1664 s
U1: APP_START (0xF4): the application runs (STATUS 0x90) - write MEAS_MODE to measure at 0.2672 s
U1: MEAS_MODE 0x10: drive mode 1 - a result every second at 0.3683 s
U1: MEAS_MODE 0x18: drive mode 1 - a result every second; nINT LOW when a result is ready at 0.3687 s
U1: result #1: eCO2 400 ppm, TVOC 0 ppb (raw 20 uA, ADC 622) - run-in at 1.3683 s
U1: result #6: eCO2 410 ppm, TVOC 1 ppb (raw 20 uA, ADC 497) - run-in at 6.3683 s
U1: result #11: eCO2 438 ppm, TVOC 6 ppb (raw 20 uA, ADC 473) - run-in at 11.3683 s
You can follow the start-up step by step: power-on in boot mode, nWAKE LOW from setup(), the software reset, APP_START at 0.27 s, then MEAS_MODE twice - 0x10 for drive mode 1 from begin(), and 0x18 from enableInterrupt(), which adds the INT_DATARDY bit. The first result follows one second later. In drive mode 1 the log keeps about one result every 5 seconds, with its raw data.
How the Model Works
The sensor is a digital model. VCC and GND switch it on and off. SCL, WAK, RST and ADD are inputs; SDA and INT are open-drain - the model pulls them LOW or lets them go. The model follows the I2C bus bit by bit: it answers its address with an ACK, takes the mailbox ID and the data, and shifts out the bytes of a read on the master's clock. The CCS811 measures on its own timer, whatever the bus does: the reading follows the air with a lag of about 4 seconds, the run-in pulls it from 400 ppm and 0 ppb up to the air, a wrong ENV_DATA adds its error, and a little noise is added to each result. Proteus calls the model only at its next event - a bus edge, the next result, a pin change - so it costs little time.
Troubleshooting
- "CCS811 not found" (begin() returns false): WAK not LOW, SDA and SCL swapped, the wrong address (ADD), RST held LOW, or
begin()within 20 ms of a reset - the I2C & mailboxes tool counts the refused transactions. - The same values again and again:
readData()without a new result - callavailable()first or wait for nINT LOW. - No results: drive mode 0 (type MODE 1), WAK HIGH, or the sensor still in boot mode without APP_START.
- The readings start at 400 ppm and 0 ppb and climb: the run-in - wait (20 minutes on a real sensor).
- eCO2 far above a CO2 meter: VOCs from paint, alcohol or cleaning products raise eCO2 - it is an estimate. For real CO2 use an NDIR sensor.
- High readings in humid air: ENV_DATA still says 50 %RH - call
setEnvironmentalData(). - No part or no monitor: TEPCCS811.DLL or TEPARDUINO.DLL is missing from MODELS and the project folder; a closed monitor opens again with a click on the UNO's USB port.
Things to Know Before Using a Real CCS811
- Power: the CJMCU-811 has no regulator, and the CCS811 takes 1.8 to 3.6 V - power it from 3.3 V, never 5 V.
- Levels: the signals are 3.3 V. Use a level shifter between a 5 V UNO and SDA, SCL, WAK and RST, or a 3.3 V board.
- WAK: it must be LOW for the sensor to answer - tie it to GND if you do not need the sleep.
- Clock stretching: the CCS811 stretches the I2C clock. An UNO waits for it; an ESP8266 or a Raspberry Pi needs care.
- Burn-in, run-in and baseline: 48 hours for a new sensor, 20 minutes at every start; save the baseline and write it back after a restart, and tell the sensor the humidity and temperature.
Limitations of the Simulation
- Not modelled: the heater and its current, the supply voltage and the 3.3 V level, clock stretching, the NTC mailbox (the CJMCU-811 has no NTC), the firmware update, the 48-hour burn-in, ageing, how far real sensors differ from each other, the automatic baseline correction over days, and what a reset does to the algorithm.
- The model's own choices: eCO2 = 400 + 6.67 x TVOC, the run-in curve, the response of about 4 seconds, the error without the right ENV_DATA, RAW_DATA, the baseline value (stored and read back - it does not change the readings), the versions, the noise, and the presets and actions of the air.
- The badge, the LEDs, the panel button and the panels are TEP additions.
- The model is our own, written from the CCS811 datasheet and the public Adafruit CCS811 library. This library is not made or endorsed by ams, ScioSense, Adafruit or Labcenter.
- Licences: the demo sketch uses the Adafruit CCS811 library 1.1.3 and Adafruit BusIO 1.17.4, both by Adafruit under the MIT License; neither is in the package - the README has the links, the licence texts and how to rebuild the HEX file. The HEX file also contains the Arduino AVR core 1.8.6 with LGPL-licensed code; the source link is in the README.
- Tested in Proteus 8.5 in October 2026 (the demo as shipped on two Arduino UNO V4.0 boards with their built-in monitors: the run-in on both; PAINT, SANITIZER, VENTILATE, FRESH and HUMID, ENV 90 25, MODE 2, SLEEP, WAKE, BASELINE and the three tools on the Advance sensor; BREATH, MEETING and VENTILATE with the mouse, RESET, the red X and PANEL on the Simple one; 372.5 s of simulation took 844 s, about 0.44 x real time with the pop-up and both monitors open). Proteus 7 is not supported.
So, that was all about the CCS811 Air Quality Sensor Library for Proteus V1.0. I hope eCO2 and TVOC, the mailboxes, nWAKE and nINT, the run-in and ENV_DATA are clear now, and that your indoor air monitor works from the first run. For a complete monitor, add real CO2 from our MH-Z19B CO2 Sensor Library for Proteus and dust from our PMS5003 Particle Sensor Library for Proteus. If you use the CCS811 Air Quality Sensor Library for Proteus in a project, please share it in the comments or in our forum, and if you have any questions, ask in the comments and I will help you out. Till the next tutorial, take care and have fun!