Hello friends, I hope you are doing well. This is the twentieth and final tutorial in our series on how to create a Proteus library. In the previous tutorial, How to Test a Custom Proteus Library with Arduino, our parts passed their first real test: an Arduino UNO ran a traffic light sketch on them, the push button requested a pedestrian phase, and the control panel caught a configuration mistake at a glance. The library works on our PC. Today, we make it work on everybody else's. Our topic is how to package and share your own Proteus library.
A Proteus library is not one file. Our three parts live in a device library, their footprint in a package library, two of them need model files, one needs a DLL, and the example project needs a HEX file and an Arduino board that Proteus does not have. Leave out one file, and the user sees a part without a footprint or a simulation that refuses to start. We will clean up the library files, give the footprint a library of its own, collect everything into one folder with a README and checksums, and check what we can before the ZIP leaves our PC.
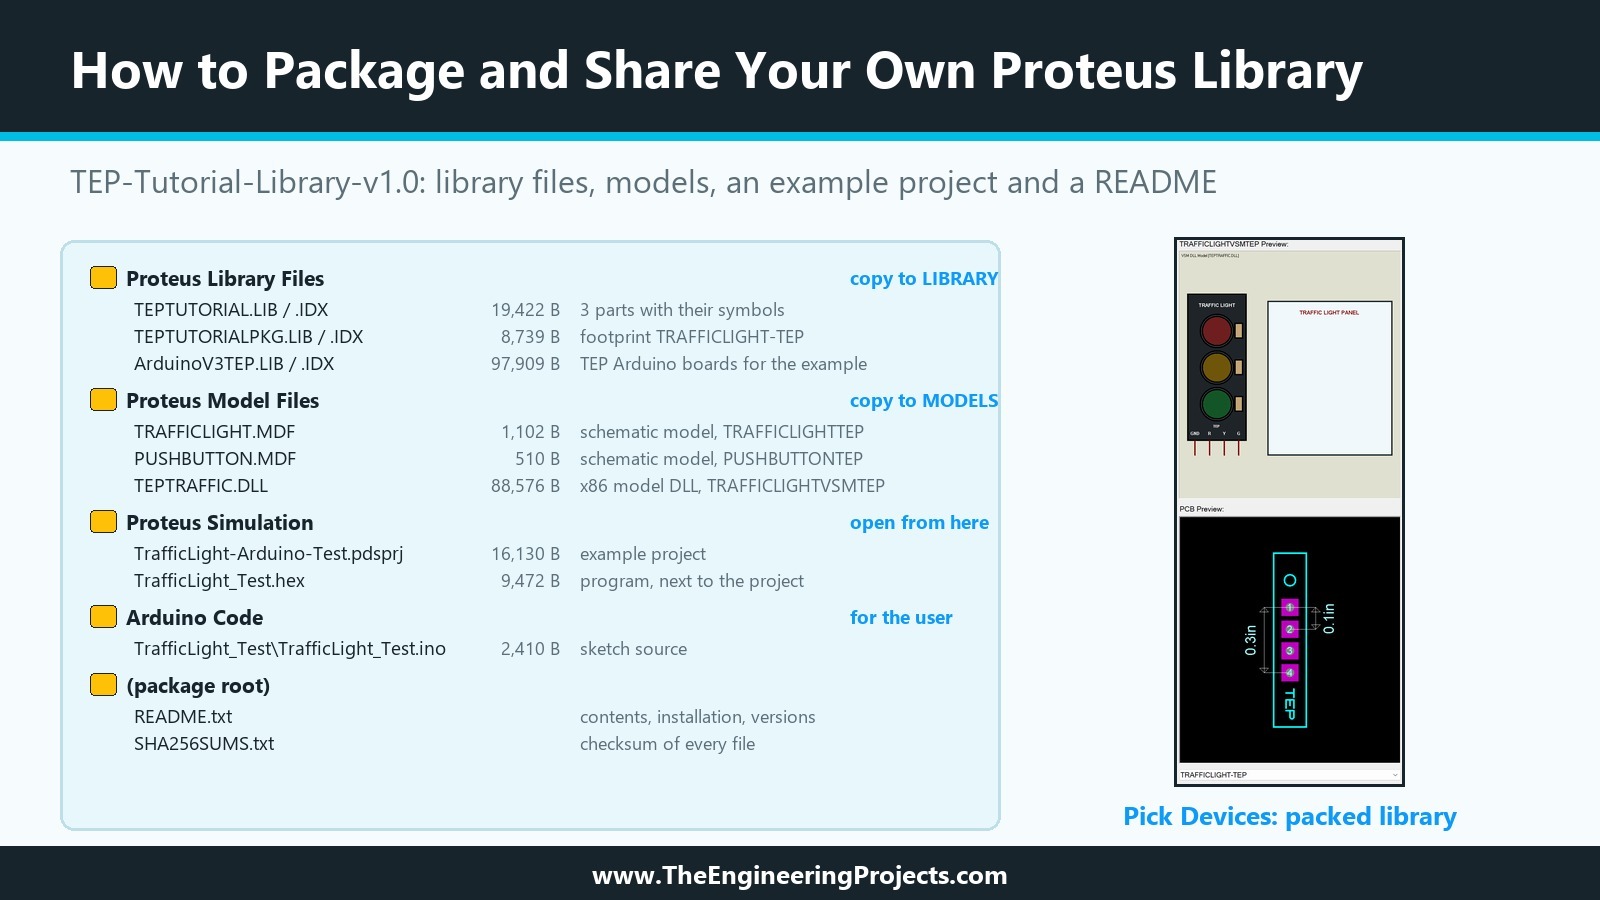
Everything shown here was done in Proteus 8.5 Professional on our PC. The picture below shows the finished package, TEP-Tutorial-Library-v1.0, with every file and where it goes, and a part from the packed library in Pick Devices, with the footprint in the PCB preview.
What Belongs in a Proteus Library Package?
A user needs every file that Proteus reads when the parts are picked, placed, simulated and laid out, and nothing that could damage their own installation.
Library Files
Proteus keeps parts in libraries with the extension LIB, and each library has an index with the extension IDX next to it. A device library holds the parts with their scripts and, as we saw in the fifteenth tutorial, a copy of every symbol they use, so USERSYM does not need to be shipped. A package library holds PCB footprints. Our package has three pairs: TEPTUTORIAL for the parts, TEPTUTORIALPKG for the footprint and ArduinoV3TEP for the Arduino UNO of the example project.
Model Files
The models are separate files in the MODELS folder: TRAFFICLIGHT.MDF and PUSHBUTTON.MDF from the fourteenth and sixteenth tutorials, and TEPTRAFFIC.DLL from the last two tutorials. A part whose model file is missing still appears in Pick Devices, but it cannot be simulated.
An Example Project
An example that runs at the first click is the fastest way for a user to see that the library works, and it is our test project from the previous tutorial, together with its program, TrafficLight_Test.hex, and the sketch it was compiled from.
A README and Checksums
The README says what is in the package, where each file goes and how to start the example. A checksum file lets the user check that nothing was damaged or changed on the way.
What Does Not Belong in the Package
Never ship USERDVC, USERSYM or USERPKG. Every Proteus installation has these libraries for its owner's own parts, and copying ours over them would delete the user's work. The same applies to Labcenter's libraries: the Library Manager help says they should stay read only and warns that the update system replaces them, so parts saved into them would be lost anyway. Our footprint was in USERPKG, which is why it needs a library of its own in Step 3.
Whether to ship model sources is the author's decision. Our package contains none: the source of TEPTRAFFIC.DLL is printed in the seventeenth and eighteenth tutorials, and the package only needs the compiled DLL.
How to Name the Files and Parts You Share
Your library will sit next to Labcenter's libraries and those of other authors on the user's PC, so its names must not clash with anything there.
Library File Names
Proteus finds libraries by their files in the LIBRARY folder, so a library named like an existing one replaces it. Our names start with TEP, our short name, and say what they hold: TEPTUTORIAL for the parts of this series and TEPTUTORIALPKG for its footprint. Always ship a LIB together with its IDX, because the index belongs to exactly that library.
Part, Symbol and Model Names
Part names should be unique as well. Proteus already has a part called TRAFFIC LIGHTS in its ACTIVE library, which is why ours have names like TRAFFICLIGHTTEP and TRAFFICLIGHTVSMTEP, with our short name at the end. The same idea protects the state symbols, TLMTEP and BTNTEP, and the model DLL, TEPTRAFFIC.DLL. Model files are a special risk, because the MODELS folder is shared by all libraries: a DLL or MDF file with a common name, such as TRAFFIC.DLL, could overwrite another author's model and break their parts without any warning.
What a Proteus Project Carries, and What It Does Not
Before deciding on the files, we looked inside our example project. A pdsprj file is a ZIP archive, and ours contains PROJECT.XML, ROOT.DSN with the schematic, ROOT.CDB and a small script file. ROOT.DSN contains the placed parts with their symbol names, TLMTEP_C, TLMTEP_0_1, BTNTEP_1 and the others, which matches the Compile To Library command of Proteus that stores all placed components of a design in a library. The property MODDLL=TEPTRAFFIC.DLL and the file name TrafficLight_Test.hex are in the design too, but the DLL, the MDF files and the HEX file themselves are not.
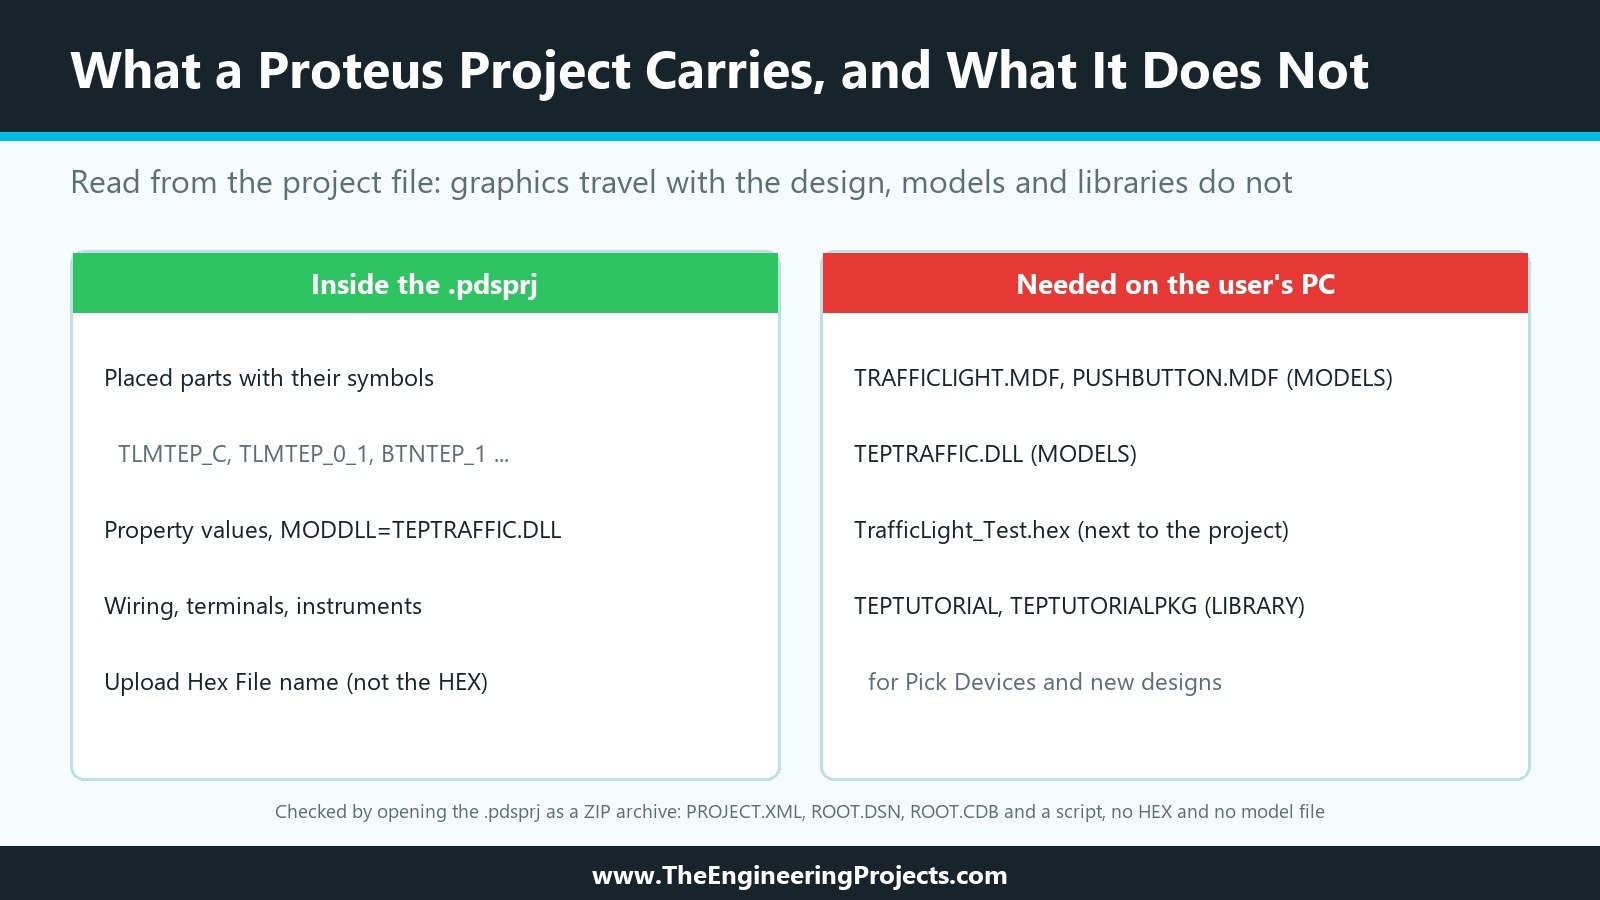
So the example project brings the pictures of our parts with it, but the simulation still needs the model files and the program on the user's PC, and Pick Devices still needs the libraries for every new design.
How to Package and Share Your Own Proteus Library: Step by Step
We built the package in seven steps, from a backup of the library files to the finished ZIP.
Step 1: Back Up the Libraries
The next steps change library files, so we copied TEPTUTORIAL, USERSYM and USERPKG, each with its IDX, into a backup folder next to our projects first. The Library Manager can do the same with Backup Libraries, which writes a BAK file next to the selected library; the help explains that renaming the BAK file to LIB restores it.
Step 2: Pack the Device Library
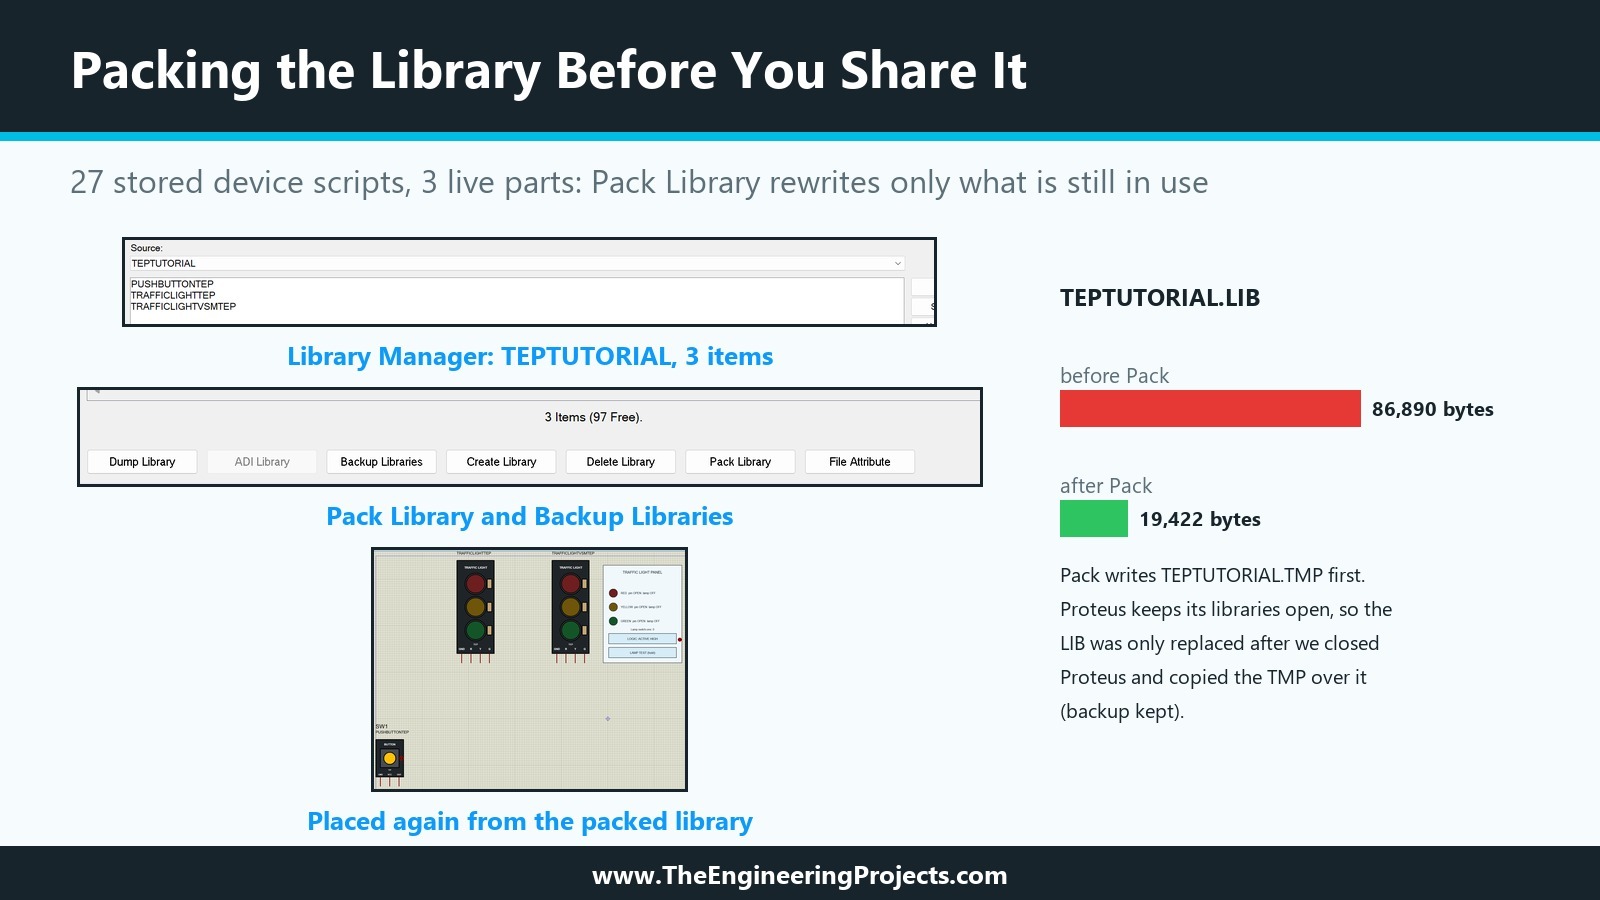
Every Make Device in this series stored a new version of a part and left the old one in the file. TEPTUTORIAL.LIB had grown to 86,890 bytes and contained 27 device scripts, while the Library Manager listed only three parts. Pack Library rewrites a library with only the objects it still lists.
Packing with the Library Manager
We closed our project, opened an empty schematic, chose Library, Library Manager, selected TEPTUTORIAL as the source library and clicked Pack Library, and confirmed the question Pack library "TEPTUTORIAL"? with Yes.
Proteus Keeps Its Libraries Open
The library file did not change. Instead, Pack had written TEPTUTORIAL.TMP with 19,422 bytes, which held our three parts with all their symbols and the same file header as the library. It could not replace TEPTUTORIAL.LIB because Proteus itself keeps its libraries open while it runs, even with only an empty design open. We closed Proteus, copied TEPTUTORIAL.TMP over TEPTUTORIAL.LIB, with the backup from Step 1 at hand, and started Proteus again.
Checking the Packed Library
Pick Devices listed all three parts with their previews and the footprint, the example project ran as before, and we placed all three parts again from the packed library into a new design: TRAFFICLIGHTTEP, TRAFFICLIGHTVSMTEP with its panel and PUSHBUTTONTEP. The library had shrunk to less than a quarter of its size without losing anything.
Step 3: Give the Footprint Its Own Library
The footprint TRAFFICLIGHT-TEP from the tenth tutorial was in USERPKG, which must not be shipped. It needs a package library with its own name.
Create Library or a Copy
In the PCB Layout, Library, Library Manager lists the package libraries, and its Create Library button opens a Create New Library dialogue that asks for a file name in the LIBRARY folder. After that, Copy Items copies selected footprints from one library into the other.
In our case, there was a shorter way. The Library Manager showed USERPKG with exactly one item, TRAFFICLIGHT-TEP, and the file starts with PACKAGE LIBRARY and does not contain its own name. So a copy of USERPKG.LIB and USERPKG.IDX under the names TEPTUTORIALPKG.LIB and TEPTUTORIALPKG.IDX is a package library with exactly our footprint, and its index still says Connectors, Through Hole, SIL Headers and our description. If your USERPKG holds other footprints too, use Create Library and Copy Items instead, so you share only your own.
Step 4: Collect the Model Files
We copied TRAFFICLIGHT.MDF, PUSHBUTTON.MDF and TEPTRAFFIC.DLL from the MODELS folder and checked the DLL once more: it is the panel version from the previous tutorial with 88,576 bytes, a 32-bit DLL, and dumpbin /dependents lists only KERNEL32.dll. Because we linked the C++ runtime statically with /MT, the user does not need any runtime installation, and KERNEL32.dll is part of every Windows.
Step 5: Add the Example Project and the Program
The example project and TrafficLight_Test.hex go into the same folder, because the project stores only the file name of the program. The sketch goes into a folder of the same name, TrafficLight_Test, as the Arduino IDE expects. We also added ArduinoV3TEP.LIB and its IDX, because the example project uses our TEP Arduino UNO V3, which Proteus does not have.
Step 6: Write the README
Our README is short and complete: contents, installation, the example, the connections and the versions. Note the first installation step; after Step 2, we know why Proteus must be closed while library files are copied.
TEP TUTORIAL LIBRARY FOR PROTEUS - V1.0
Traffic Light Module and Push Button Module
Designed by The Engineering Projects
www.TheEngineeringProjects.com

Made in our tutorial series "How to Create a Proteus Library".
Tested with Proteus 8.5 Professional on Windows 11.

CONTENTS
  Proteus Library Files\TEPTUTORIAL.LIB, TEPTUTORIAL.IDX
      TRAFFICLIGHTTEP     Traffic Light Module, schematic model with lamp currents
      TRAFFICLIGHTVSMTEP  Traffic Light Module, DLL model with LOGIC and control panel
      PUSHBUTTONTEP       Push Button Module with 10k pull-down
  Proteus Library Files\TEPTUTORIALPKG.LIB, TEPTUTORIALPKG.IDX
      TRAFFICLIGHT-TEP    PCB footprint of the Traffic Light Module
  Proteus Library Files\ArduinoV3TEP.LIB, ArduinoV3TEP.IDX
      TEP Arduino UNO V3 and other TEP Arduino boards, for the example project
  Proteus Model Files\TRAFFICLIGHT.MDF, PUSHBUTTON.MDF, TEPTRAFFIC.DLL
  Proteus Simulation\TrafficLight-Arduino-Test.pdsprj, TrafficLight_Test.hex
  Arduino Code\TrafficLight_Test\TrafficLight_Test.ino

INSTALLATION
1. Close Proteus. Proteus keeps its library files open while it runs.
2. Copy the files in "Proteus Library Files" into the LIBRARY folder of
   Proteus. They do not replace any Labcenter library or your USER libraries.
3. Copy the files in "Proteus Model Files" into the MODELS folder of Proteus.
4. Start Proteus and search for "TEP Tutorial" in Pick Devices.

EXAMPLE PROJECT
Open "Proteus Simulation\TrafficLight-Arduino-Test.pdsprj" and press Run.
The Arduino runs TrafficLight_Test.hex (keep it next to the project).
The Virtual Terminal prints every phase; click the red marker of the push
button during green to request a pedestrian phase.

CONNECTIONS (Traffic Light Module)
  GND -> ground   R -> D12   Y -> D11   G -> D10
  LOGIC = High: a lamp lights when its pin is HIGH (Low: when it is LOW).
CONNECTIONS (Push Button Module)
  VCC -> +5V   GND -> ground   OUT -> A0 (HIGH while pressed)

VERSIONS
  TRAFFICLIGHTTEP 1.4, TRAFFICLIGHTVSMTEP 2.1, PUSHBUTTONTEP 1.0
  TEPTRAFFIC.DLL is a 32-bit model DLL for Proteus 8.5 (x86).

SHA256SUMS.txt lists a checksum for every file of this package.
Step 7: Checksums and ZIP
We wrote SHA256SUMS.txt with one line per file, the SHA-256 checksum and the path inside the package, made with Get-FileHash in PowerShell. Users can check a file with the same command, or with certutil -hashfile and SHA256. Finally, we packed the folder into TEP-Tutorial-Library-v1.0.zip, which came out with 86,525 bytes, less than the uncompressed ArduinoV3TEP.LIB alone.
How to Test the Package
A package is only tested when it has been installed on a PC that has never seen the library. We could not do that test here, so we did what we could on our own PC and list the rest for you.
What We Checked
- The packed library: all three parts appear in Pick Devices and can be placed into a new design.
- The footprint: the PCB preview of TRAFFICLIGHTVSMTEP shows TRAFFICLIGHT-TEP with its four pads. On our PC, the same footprint is still in USERPKG too, so this check cannot tell which library supplied it; the clean PC can.
- The example project: it runs and prints the phases on the Virtual Terminal, with the same HEX file.
- The files: the checksums of the package match the installed files, and the DLL needs no runtime.
What to Check on a Clean PC
- Follow the README exactly, as a user would, and note every step that is unclear.
- Search for TEP Tutorial in Pick Devices and place each part.
- Open and run the example project, press the button during green and click LOGIC on the panel.
- Make a PCB layout from a design with the traffic light and check that the footprint is found.
A virtual machine with a fresh Proteus installation is ideal for this, because it can be reset to the clean state for every new version of the package.
Versions and Updates
Libraries change, and users need to know which version they have.
The VERSION Property
Every part in our library has a read-only VERSION property, which we raised with each change: TRAFFICLIGHTTEP is at 1.4, TRAFFICLIGHTVSMTEP at 2.1 and PUSHBUTTONTEP at 1.0. A user can see it in the part's properties and compare it with the README.
Library Formats
The Library Manager help describes library versions too: a library in an older format must be updated before parts from a newer library can be copied into it. Our files were made with Proteus 8.5, and that is the version the README names. A user with an older Proteus should be told that the library is untested there.
Updating the Package
For a new version, repeat the steps: back up, change the parts, raise VERSION, pack, test with the example project, write the changes into the README, make new checksums and a new ZIP with the version in its name.
Common Mistakes When Sharing a Proteus Library
| Problem | Cause | Solution |
|---|---|---|
| Pack Library does not shrink the file | Proteus keeps the library open | Close Proteus and replace the LIB with the packed TMP |
| The user's own parts disappear | USERDVC, USERSYM or USERPKG were shipped | Ship only libraries with your own names |
| The part has no footprint on the user's PC | The footprint stayed in USERPKG | Put it into your own package library |
| The simulation of the example does not start | Model files missing in MODELS | Ship every MDF and DLL the parts name |
| The Arduino runs nothing | HEX file missing next to the project | Ship the HEX in the project's folder |
| The example misses a part | A third-party library, like the Arduino board, was not included | Ship every library the example uses |
| The DLL does not load | Missing runtime or 64-bit build | Build x86 with /MT and check with dumpbin |
The Series in Review
This tutorial ends our series. In twenty tutorials, we built two parts and everything around them:
- Tutorials 1 to 6: how a Proteus library works, the design of a component, its drawing, colours and styles, Make Symbol and pins.
- Tutorials 7 to 11: Make Device, properties, our own library file, the PCB footprint and updating a part.
- Tutorials 12 to 15: simulation models, a SPICE model, a schematic model and an animated part.
- Tutorials 16 to 18: an interactive push button, a model DLL in C++ and a live control panel.
- Tutorials 19 and 20: a test with a real Arduino sketch and today's package.
In the first tutorials, the Traffic Light Module was a plan on paper. It is now a library with three parts, two kinds of models, a panel and a package that installs in four steps.
FAQ
Which files do I need to share a Proteus library?
The LIB and IDX files of your device and package libraries, every model file your parts name (MDF, DLL or SPICE files), and ideally an example project with its program and a README.
Where do Proteus library files go?
Library files go into the LIBRARY folder of Proteus and model files into the MODELS folder, or into folders added in the library and model paths of the System Settings.
Why does Pack Library not make my library smaller?
On our PC, Pack Library wrote the packed library as a TMP file but could not replace the LIB while Proteus was running. Close Proteus and replace the LIB with the TMP, with a backup at hand.
Can I share USERDVC.LIB with my parts?
No. Every Proteus user has their own USER libraries, and yours would replace theirs. Copy your parts into a library with its own name first.
Does a Proteus project contain the libraries it uses?
It contains the placed parts with their symbols, so it opens with the right pictures, but not the model files or the program, and new designs still need the libraries.
That is all for today, and for this series. Thank you for following it from the first sketch of a traffic light to a package you can share. If you build your own library with these tutorials, tell us about it in the comments. Take care.