Hello friends, I hope you all are doing great. Today, I am going to share the EMG Muscle-Controlled Gripper on Raspberry Pi 5 in Proteus Simulation, the fortieth project of our IoT Projects series. If you have searched for a Proteus simulation of a Raspberry Pi with an EMG muscle sensor, here is a complete one. A Raspberry Pi 5 reads the electrical activity of a forearm muscle through an EMG sensor and an ADS1115, and closes a DS3218 servo gripper in proportion to how hard the muscle contracts, the same idea that drives a myoelectric prosthetic hand. It measures the muscle at rest, calibrates a full contraction, can lock the grip so the muscle can relax while the hand holds on, and serves a live web dashboard on a laptop or a phone.
Every time a muscle contracts, thousands of its fibres fire tiny electrical pulses, and electrodes on the skin above can pick up their sum: the electromyogram, or EMG. A stronger contraction recruits more fibres and fires them faster, so the EMG grows with the effort. That is enough to steer a machine with a thought turned into a flex. In this tutorial, we will go through the circuit, learn what the EMG signal is and how a muscle sensor turns it into a smooth envelope, read it with an ADS1115, calibrate the rest level and the full contraction, map the strength onto the grip with a dead band and smoothing, drive the servo with pulses timed by the Pi, walk through the Python program, and then run the simulation: six contractions of different strengths, a calibration, a locked grip and an open hand. At the end, you can download the project with the program, every library file and the Python runtime the Pi needs.
NOTICE: Our team has put a lot of effort into this project: the circuit, the code and every part in the simulation are our own work, and you get them all free. Your feedback is the fuel that keeps us going, so please tell us what you think in the comments below. And if our free projects help you, you can buy us a coffee. So, let's get started with the EMG Muscle-Controlled Gripper on Raspberry Pi 5 in Proteus Simulation:
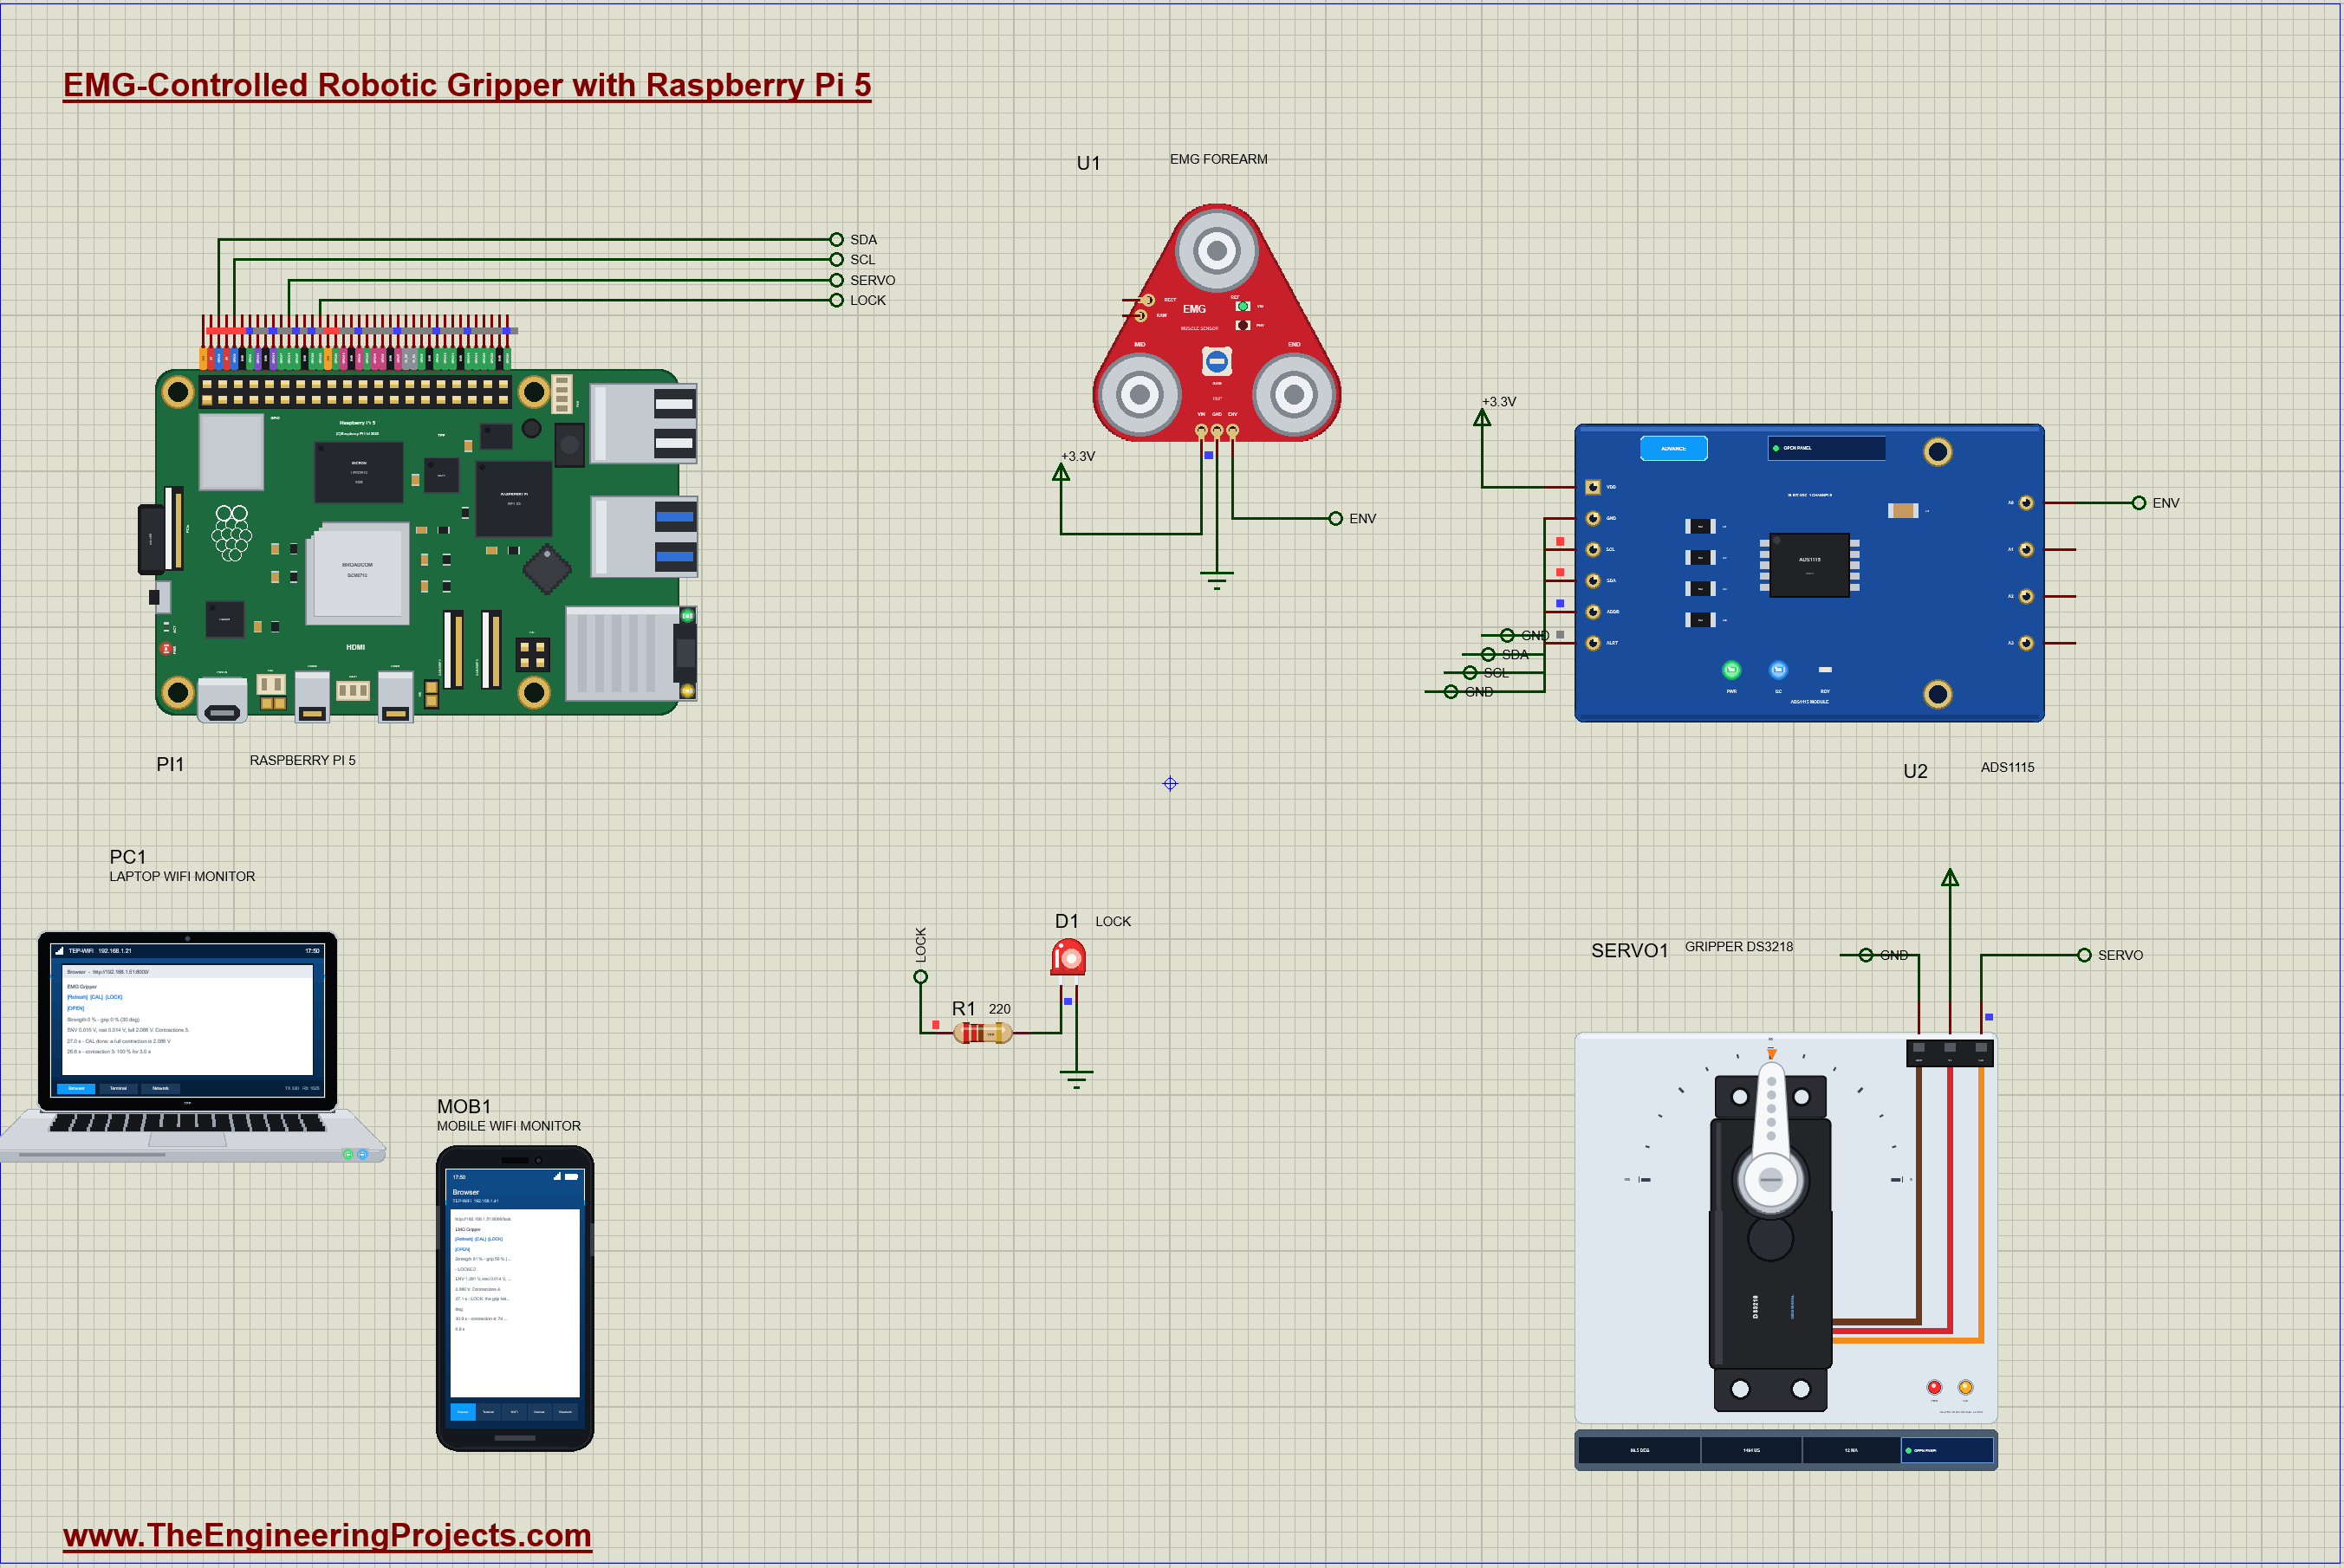
What Does This EMG Gripper Do?
- Reads a muscle: an EMG sensor on the forearm gives an envelope that grows with the contraction.
- Proportional grip: a light flex closes the hand a little, a hard one closes it fully.
- Ignores a relaxed muscle: a 10 % dead band keeps the noise of a resting muscle from moving the hand.
- Calibrates itself: the rest level at the start, the full contraction on CAL.
- LOCK: holds the grip while the muscle relaxes, as a prosthesis user would when carrying something.
- Measures every contraction: its peak strength and how long it lasted.
- A dashboard: CAL, LOCK and OPEN, the strength, the grip and the events, on a laptop or a phone.
It is a great project for learning how biosignals are measured and turned into control, how to map a noisy sensor onto an actuator with a dead band and a filter, and how to drive a servo with precise pulses. In the simulation, the EMG sensor's pop-up shows an arm flexing with the muscle and the raw, rectified and envelope signals, and the DS3218's pop-up shows the horn closing.
Components Used in the Proteus Simulation
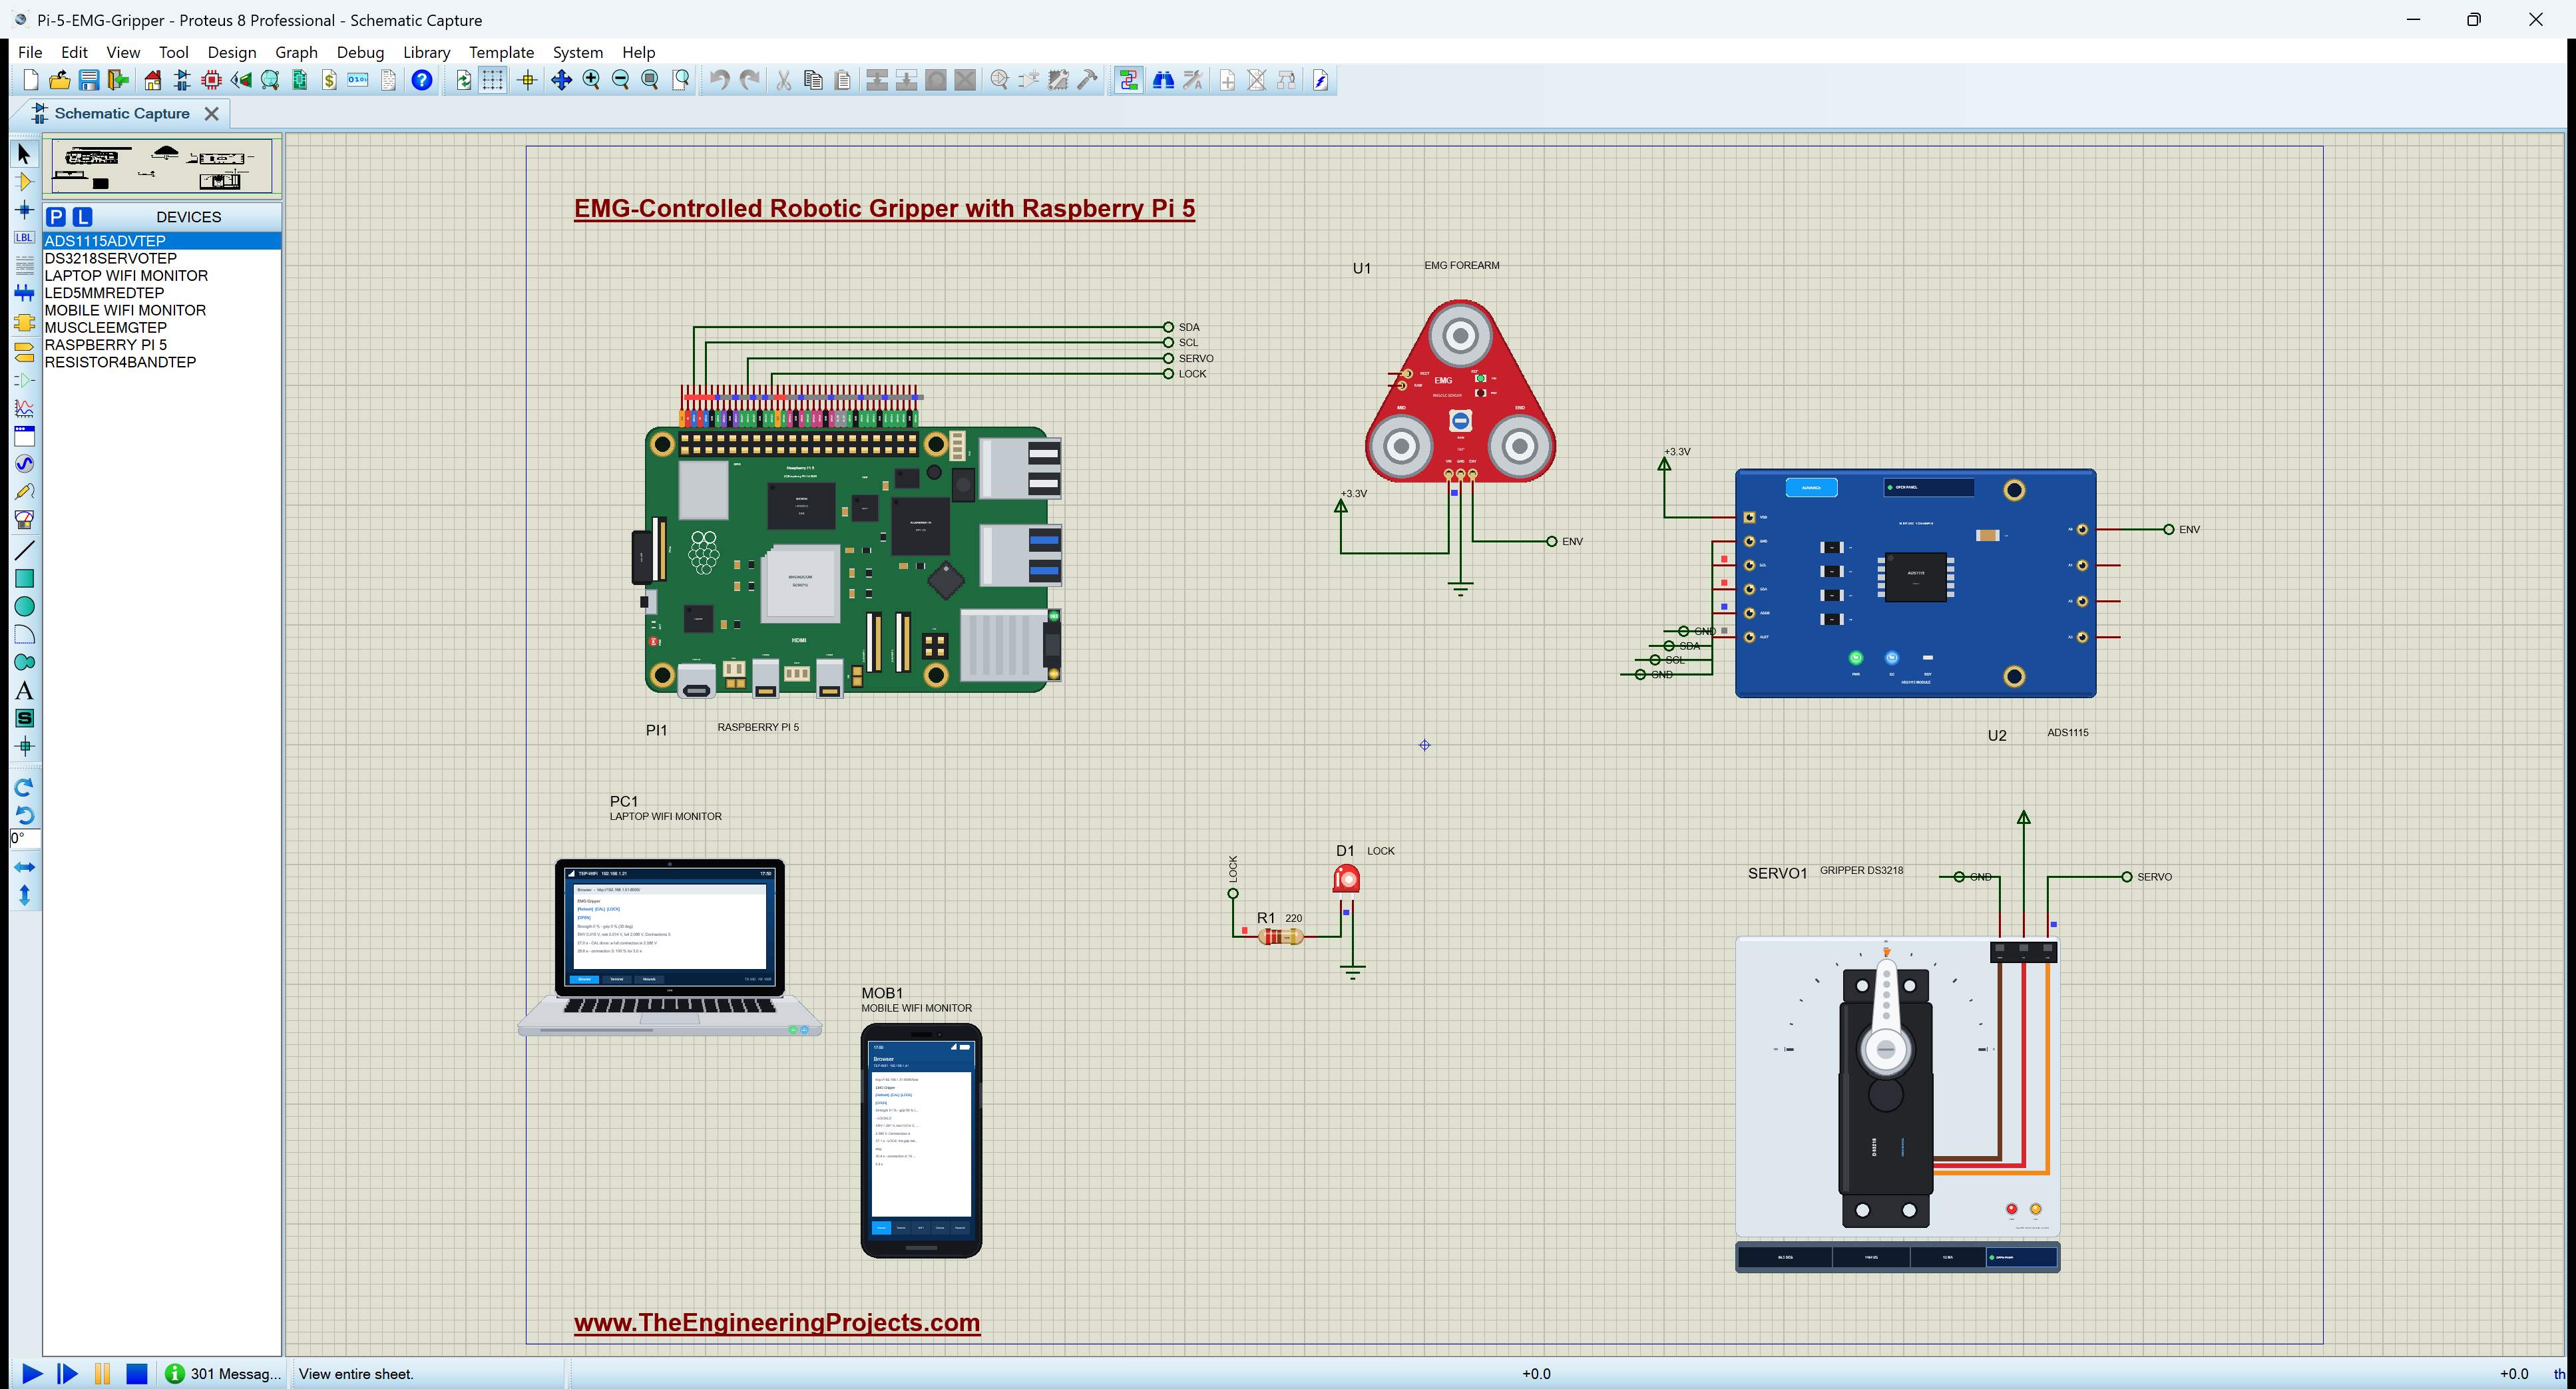
All the parts come from our Proteus libraries, each with its own tutorial. The project zip at the end includes every LIB and DLL file.
| Part | Proteus device | Library post | Connection |
|---|---|---|---|
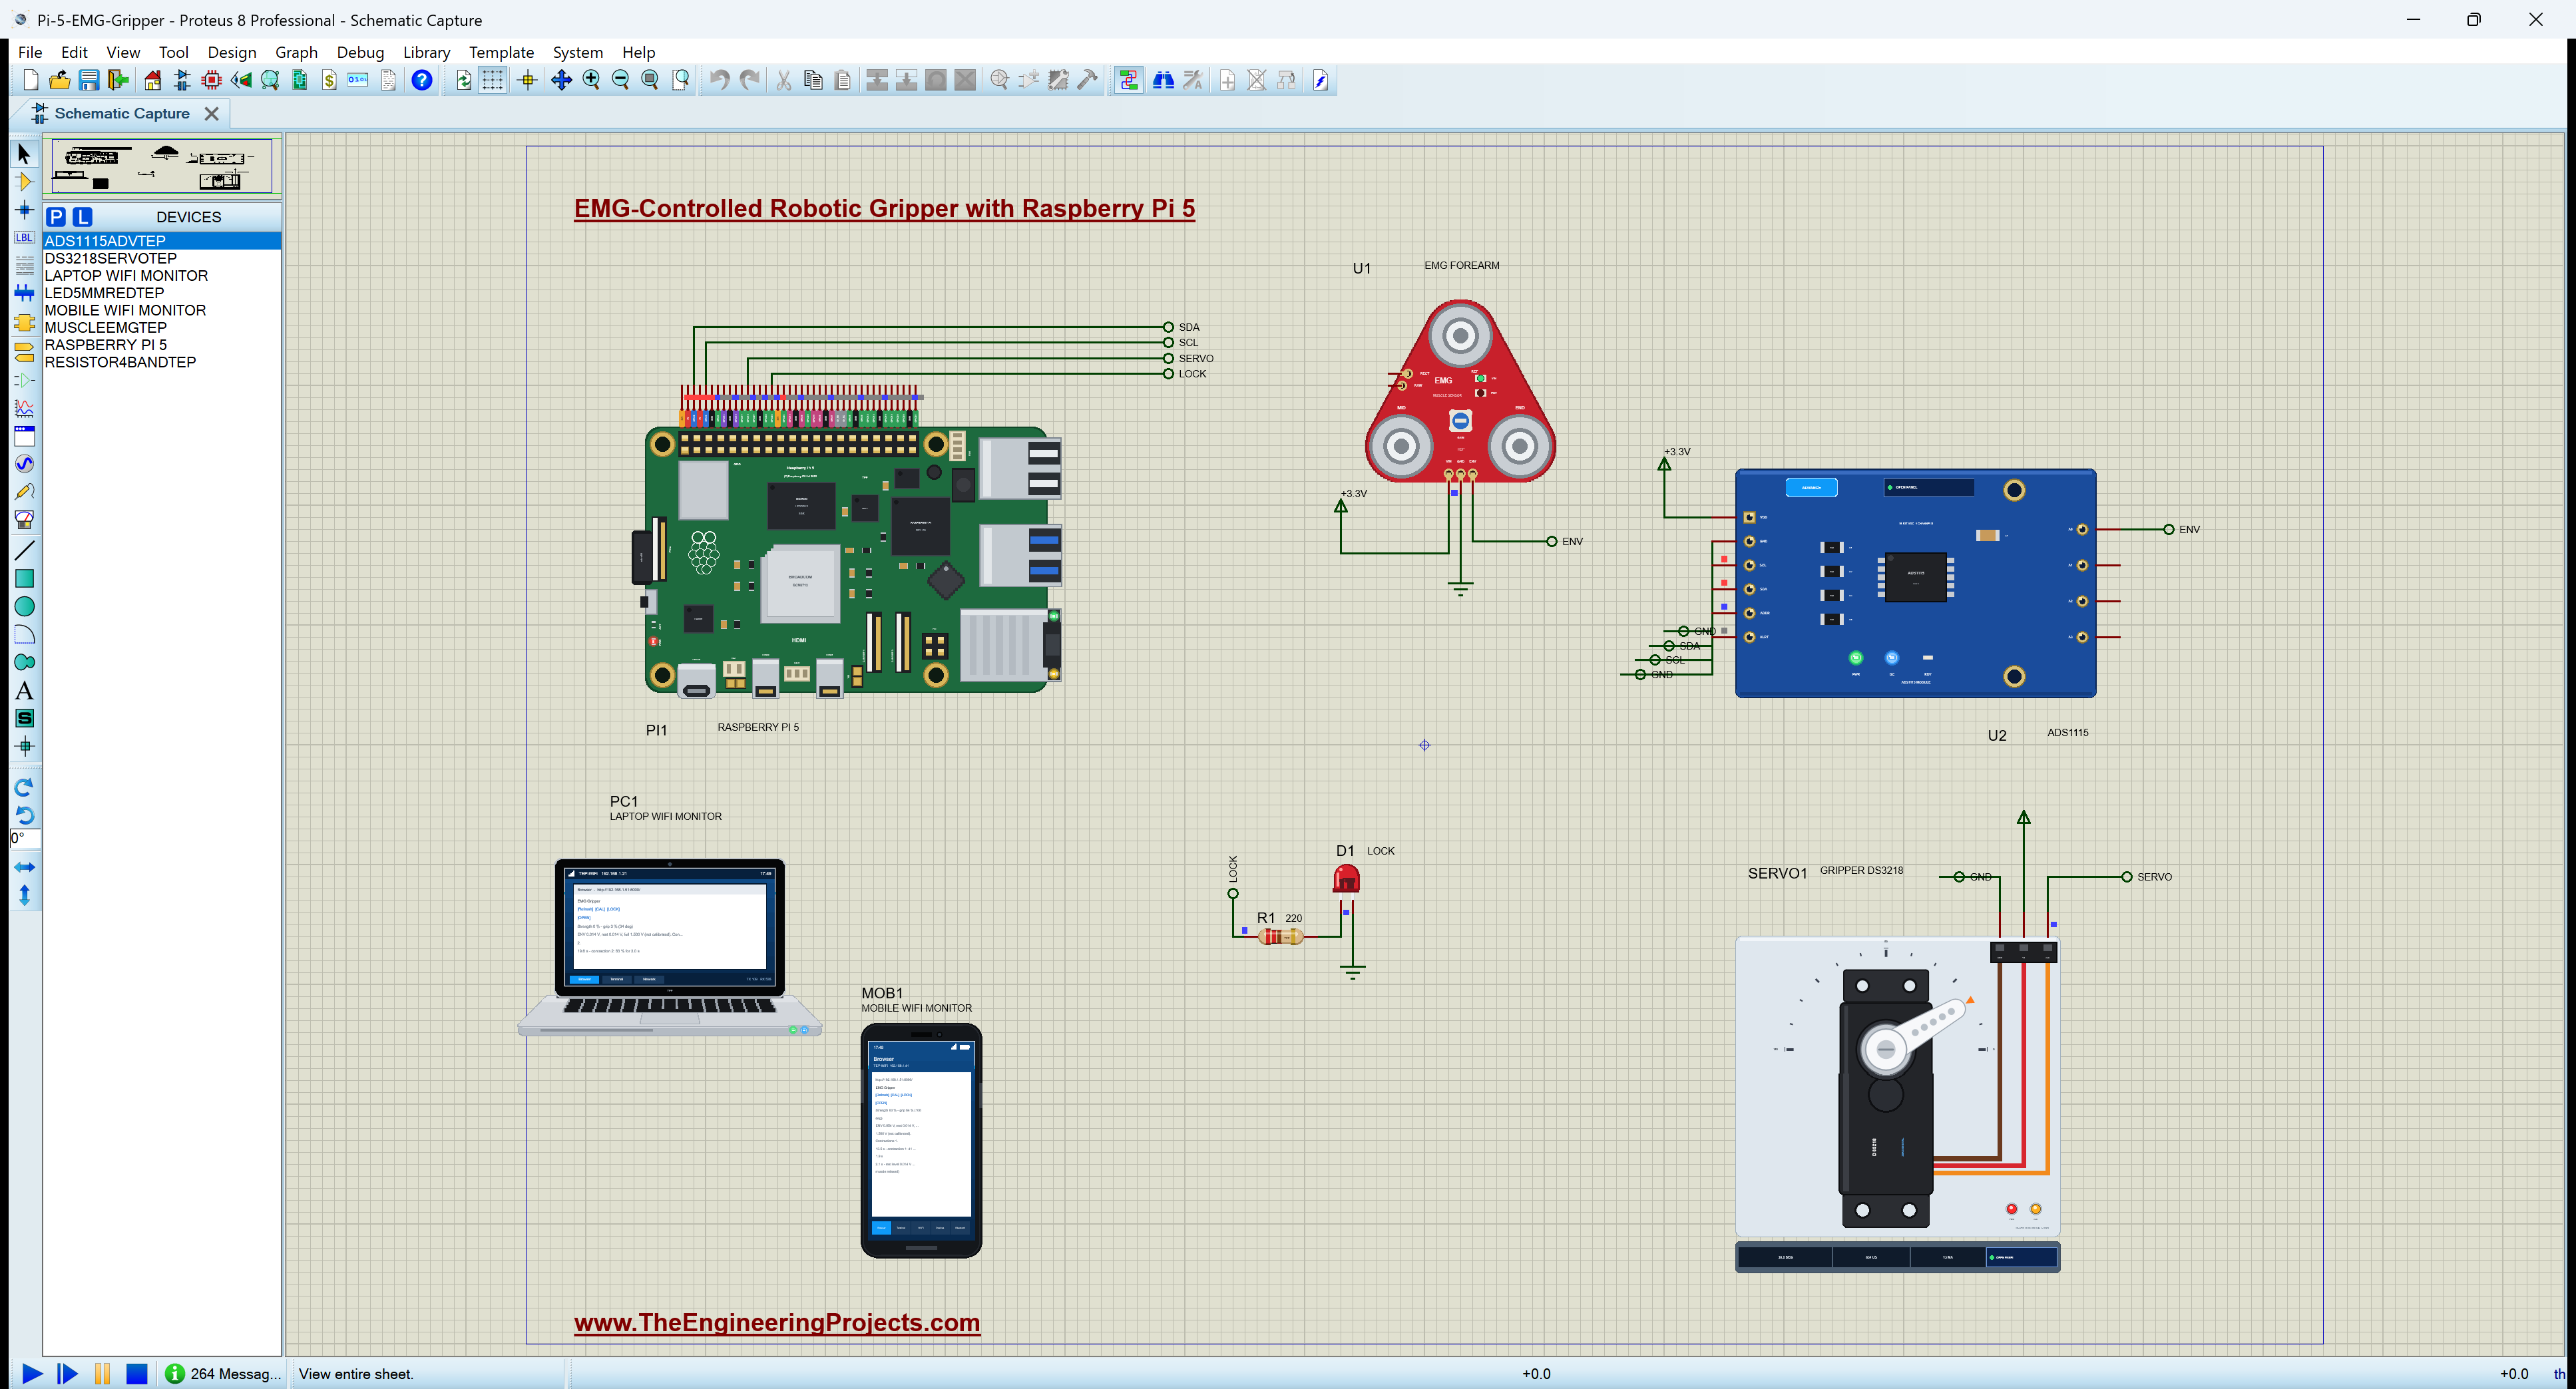
| Raspberry Pi 5 | RASPBERRY PI 5 | Raspberry Pi 5 Library for Proteus | PI1, Ethernet 192.168.1.51 |
| EMG muscle sensor | MUSCLEEMGTEP | EMG Muscle Sensor Library for Proteus | U1, ENV to the ADS1115 |
| ADS1115 16-bit ADC | ADS1115ADVTEP | ADS1115 ADC Library for Proteus | U2, I2C1 at 0x48 |
| DS3218 20 kg servo | DS3218SERVOTEP | DS3218 Servo Motor Library for Proteus | SERVO1, GPIO18 |
| Red LED LOCK | LED5MMREDTEP | 5mm LED Library | D1, GPIO23 |
| Resistor 220 ohm | RESISTOR4BANDTEP | Resistor Library | R1 |
| Laptop WiFi Monitor | LAPTOP WIFI MONITOR | Laptop WiFi Monitor | PC1 |
| Mobile WiFi Monitor | MOBILE WIFI MONITOR | Mobile WiFi Monitor | MOB1 |
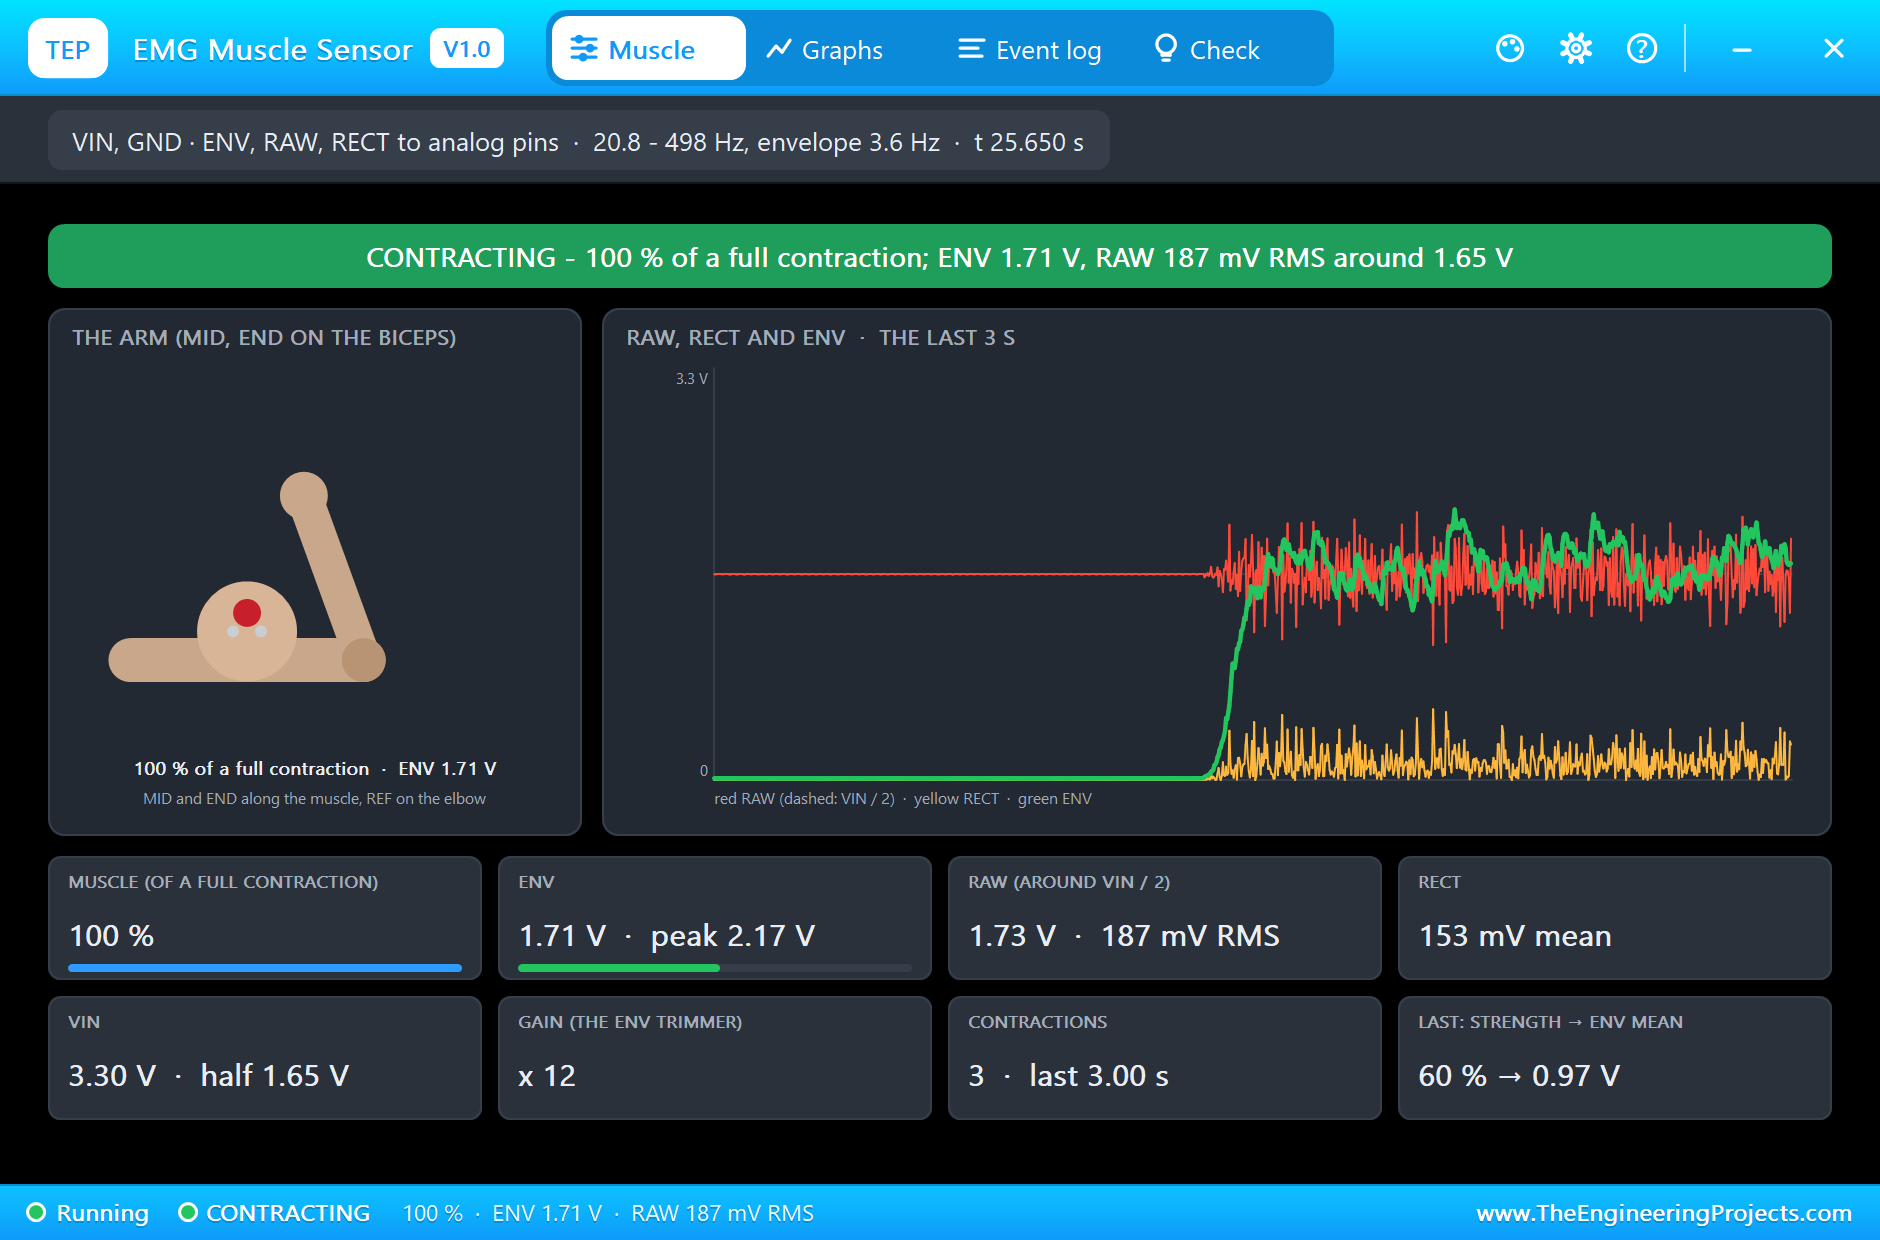
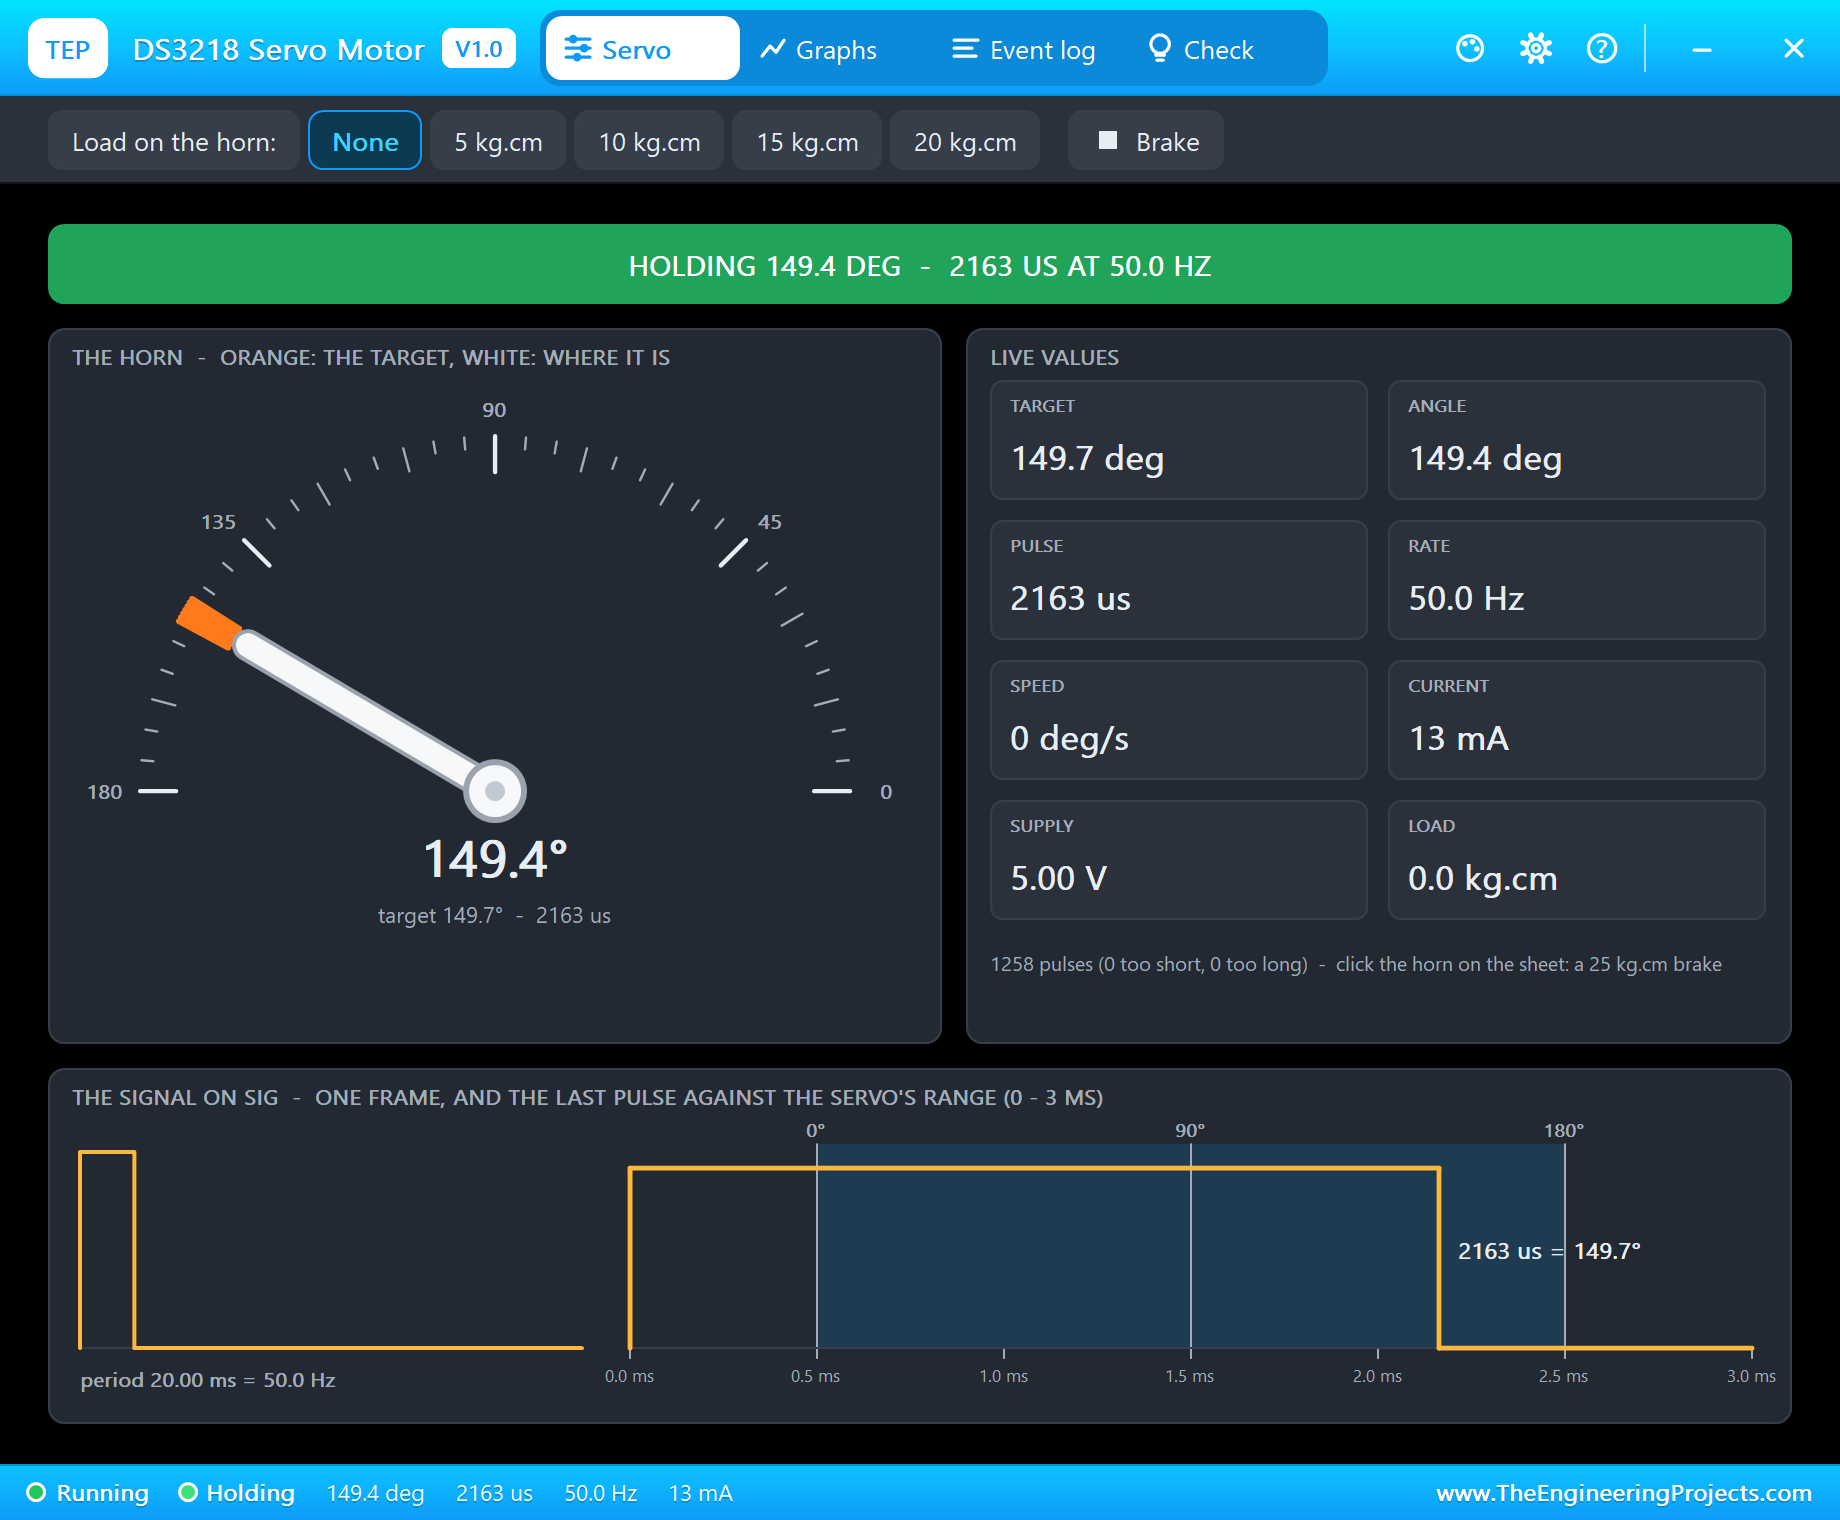
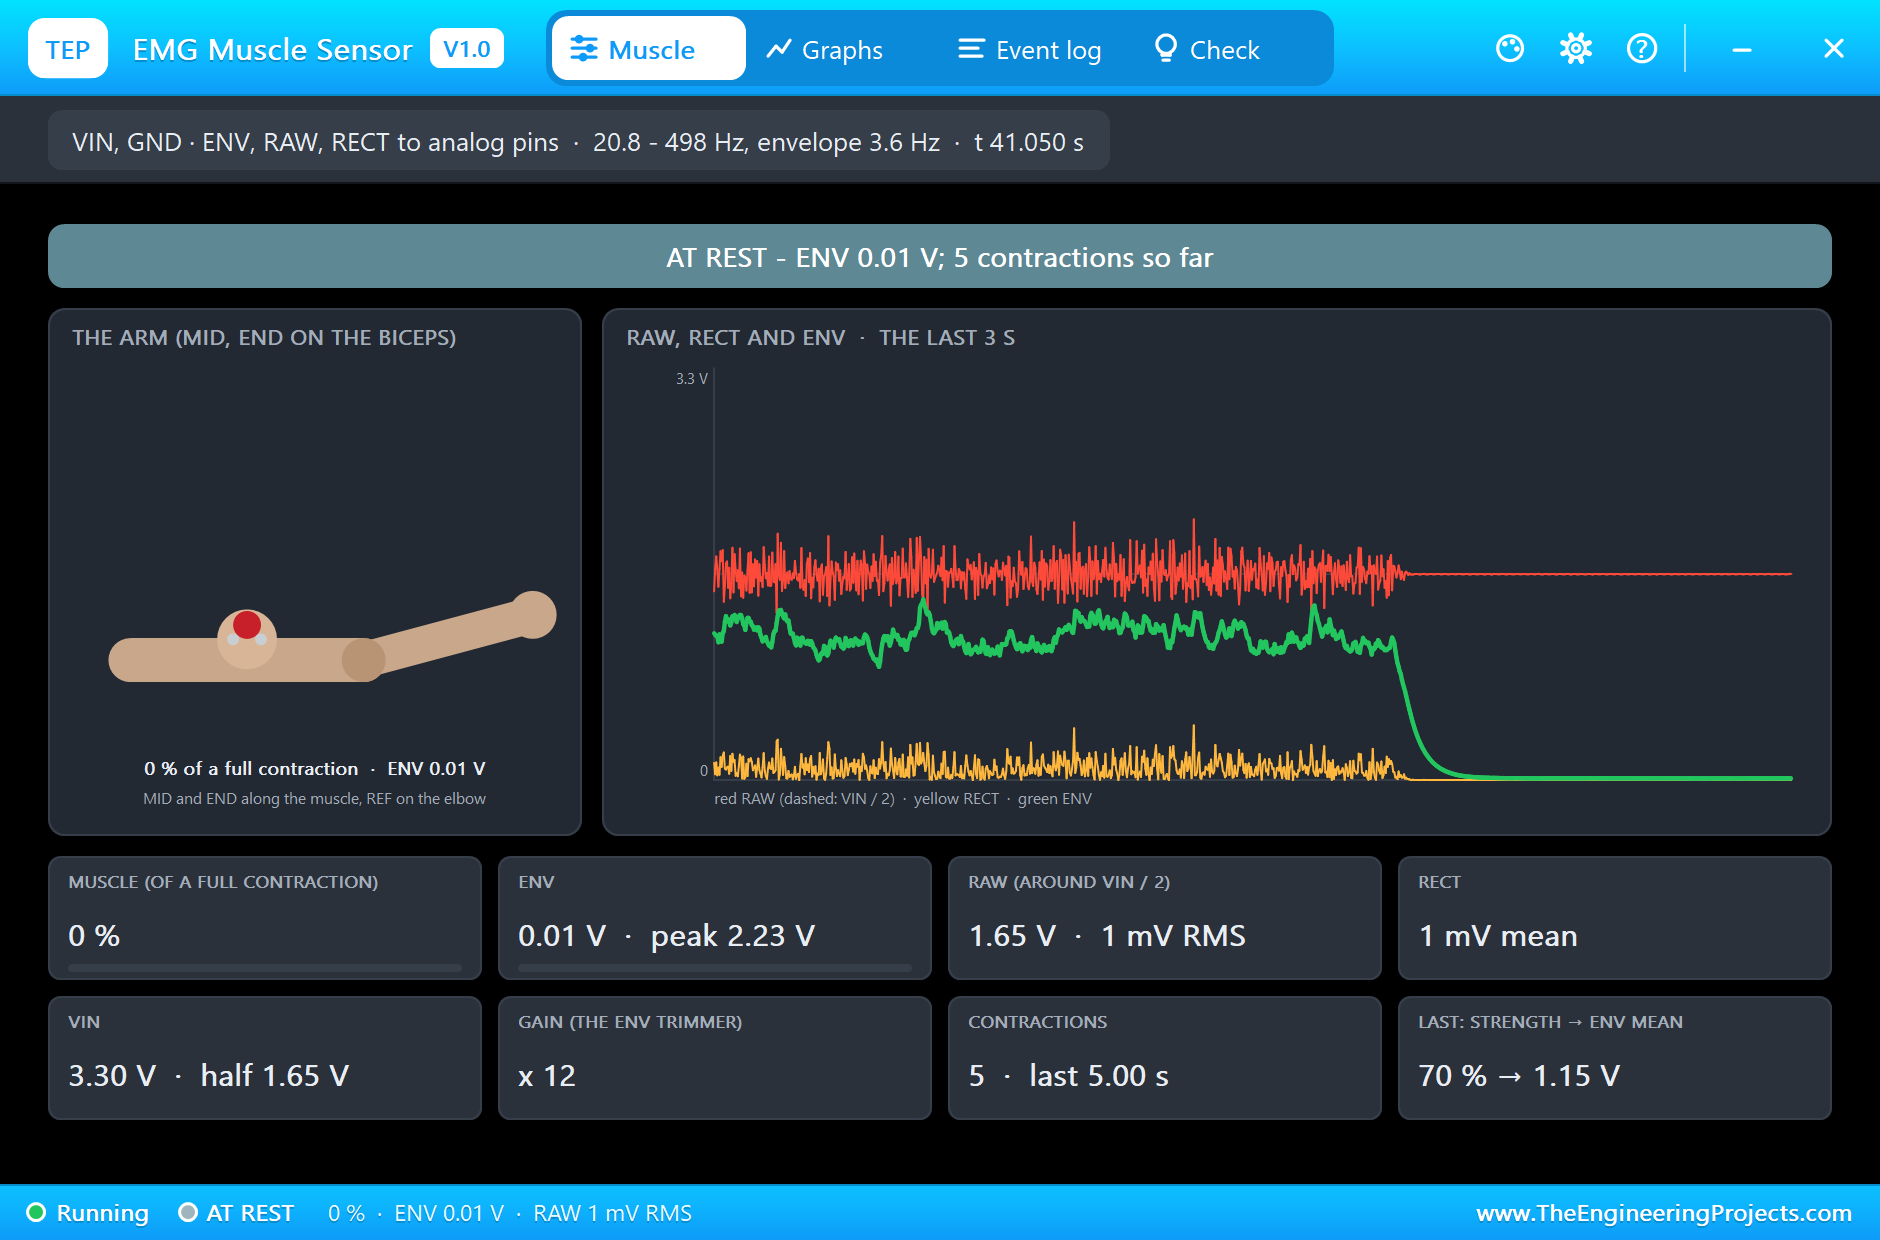
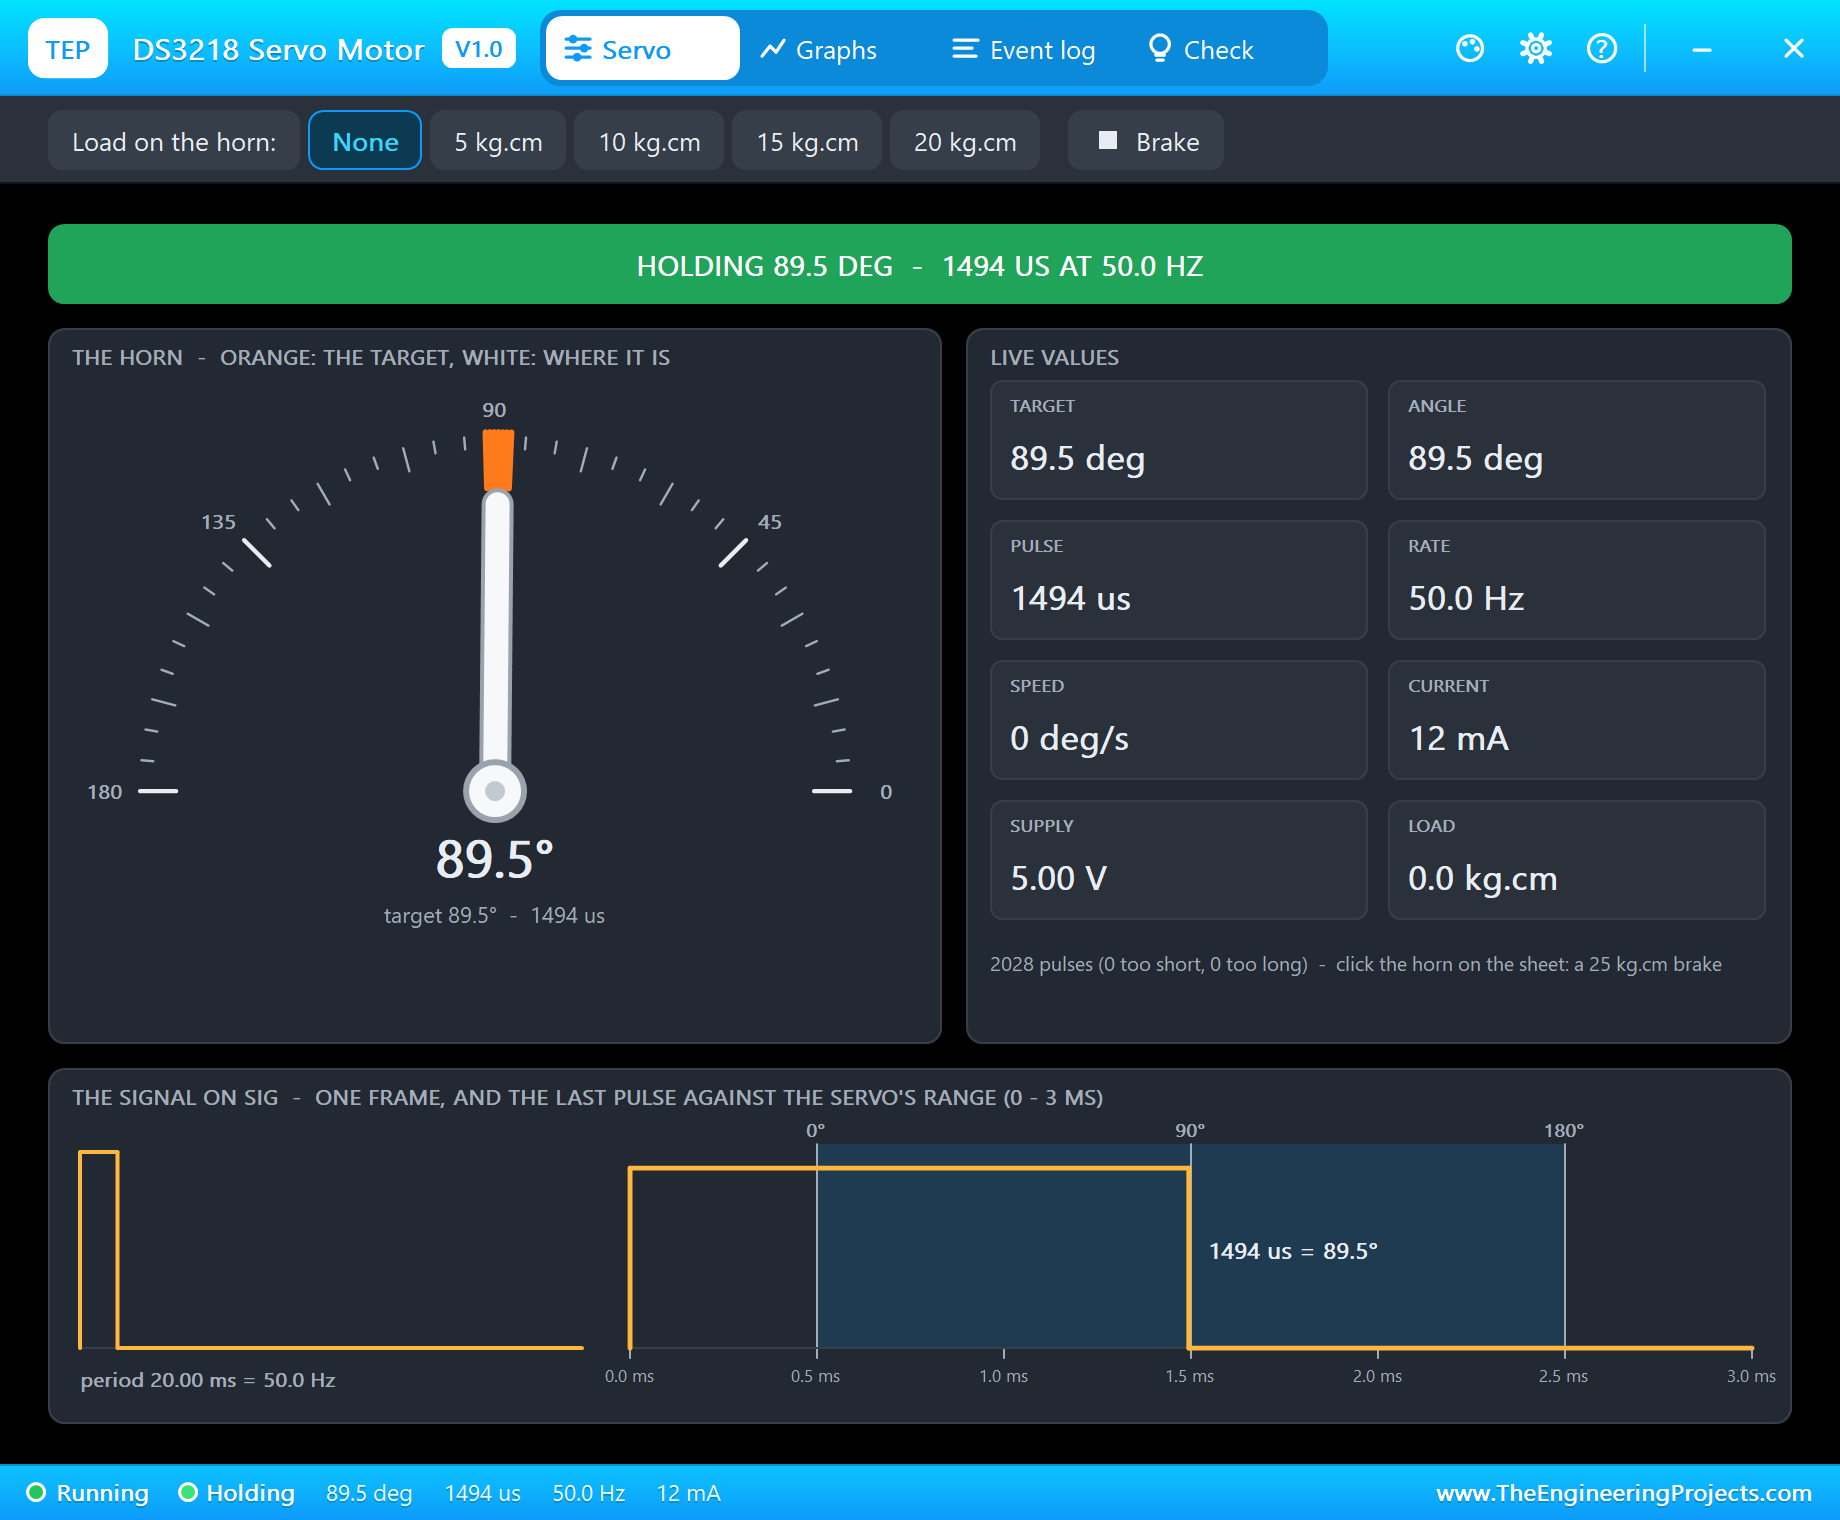
The EMG sensor, the ADS1115 and the DS3218 are models with pop-ups. The EMG sensor's pop-up draws the arm with its biceps bulging, the RAW, RECT and ENV signals over the last 3 s, and every contraction. Its FLEX property scripts the contractions of the run, so the muscle works by itself. The DS3218's pop-up shows the horn's angle, the pulses, the current and the load.
Proteus Simulation of the EMG Gripper: the Circuit
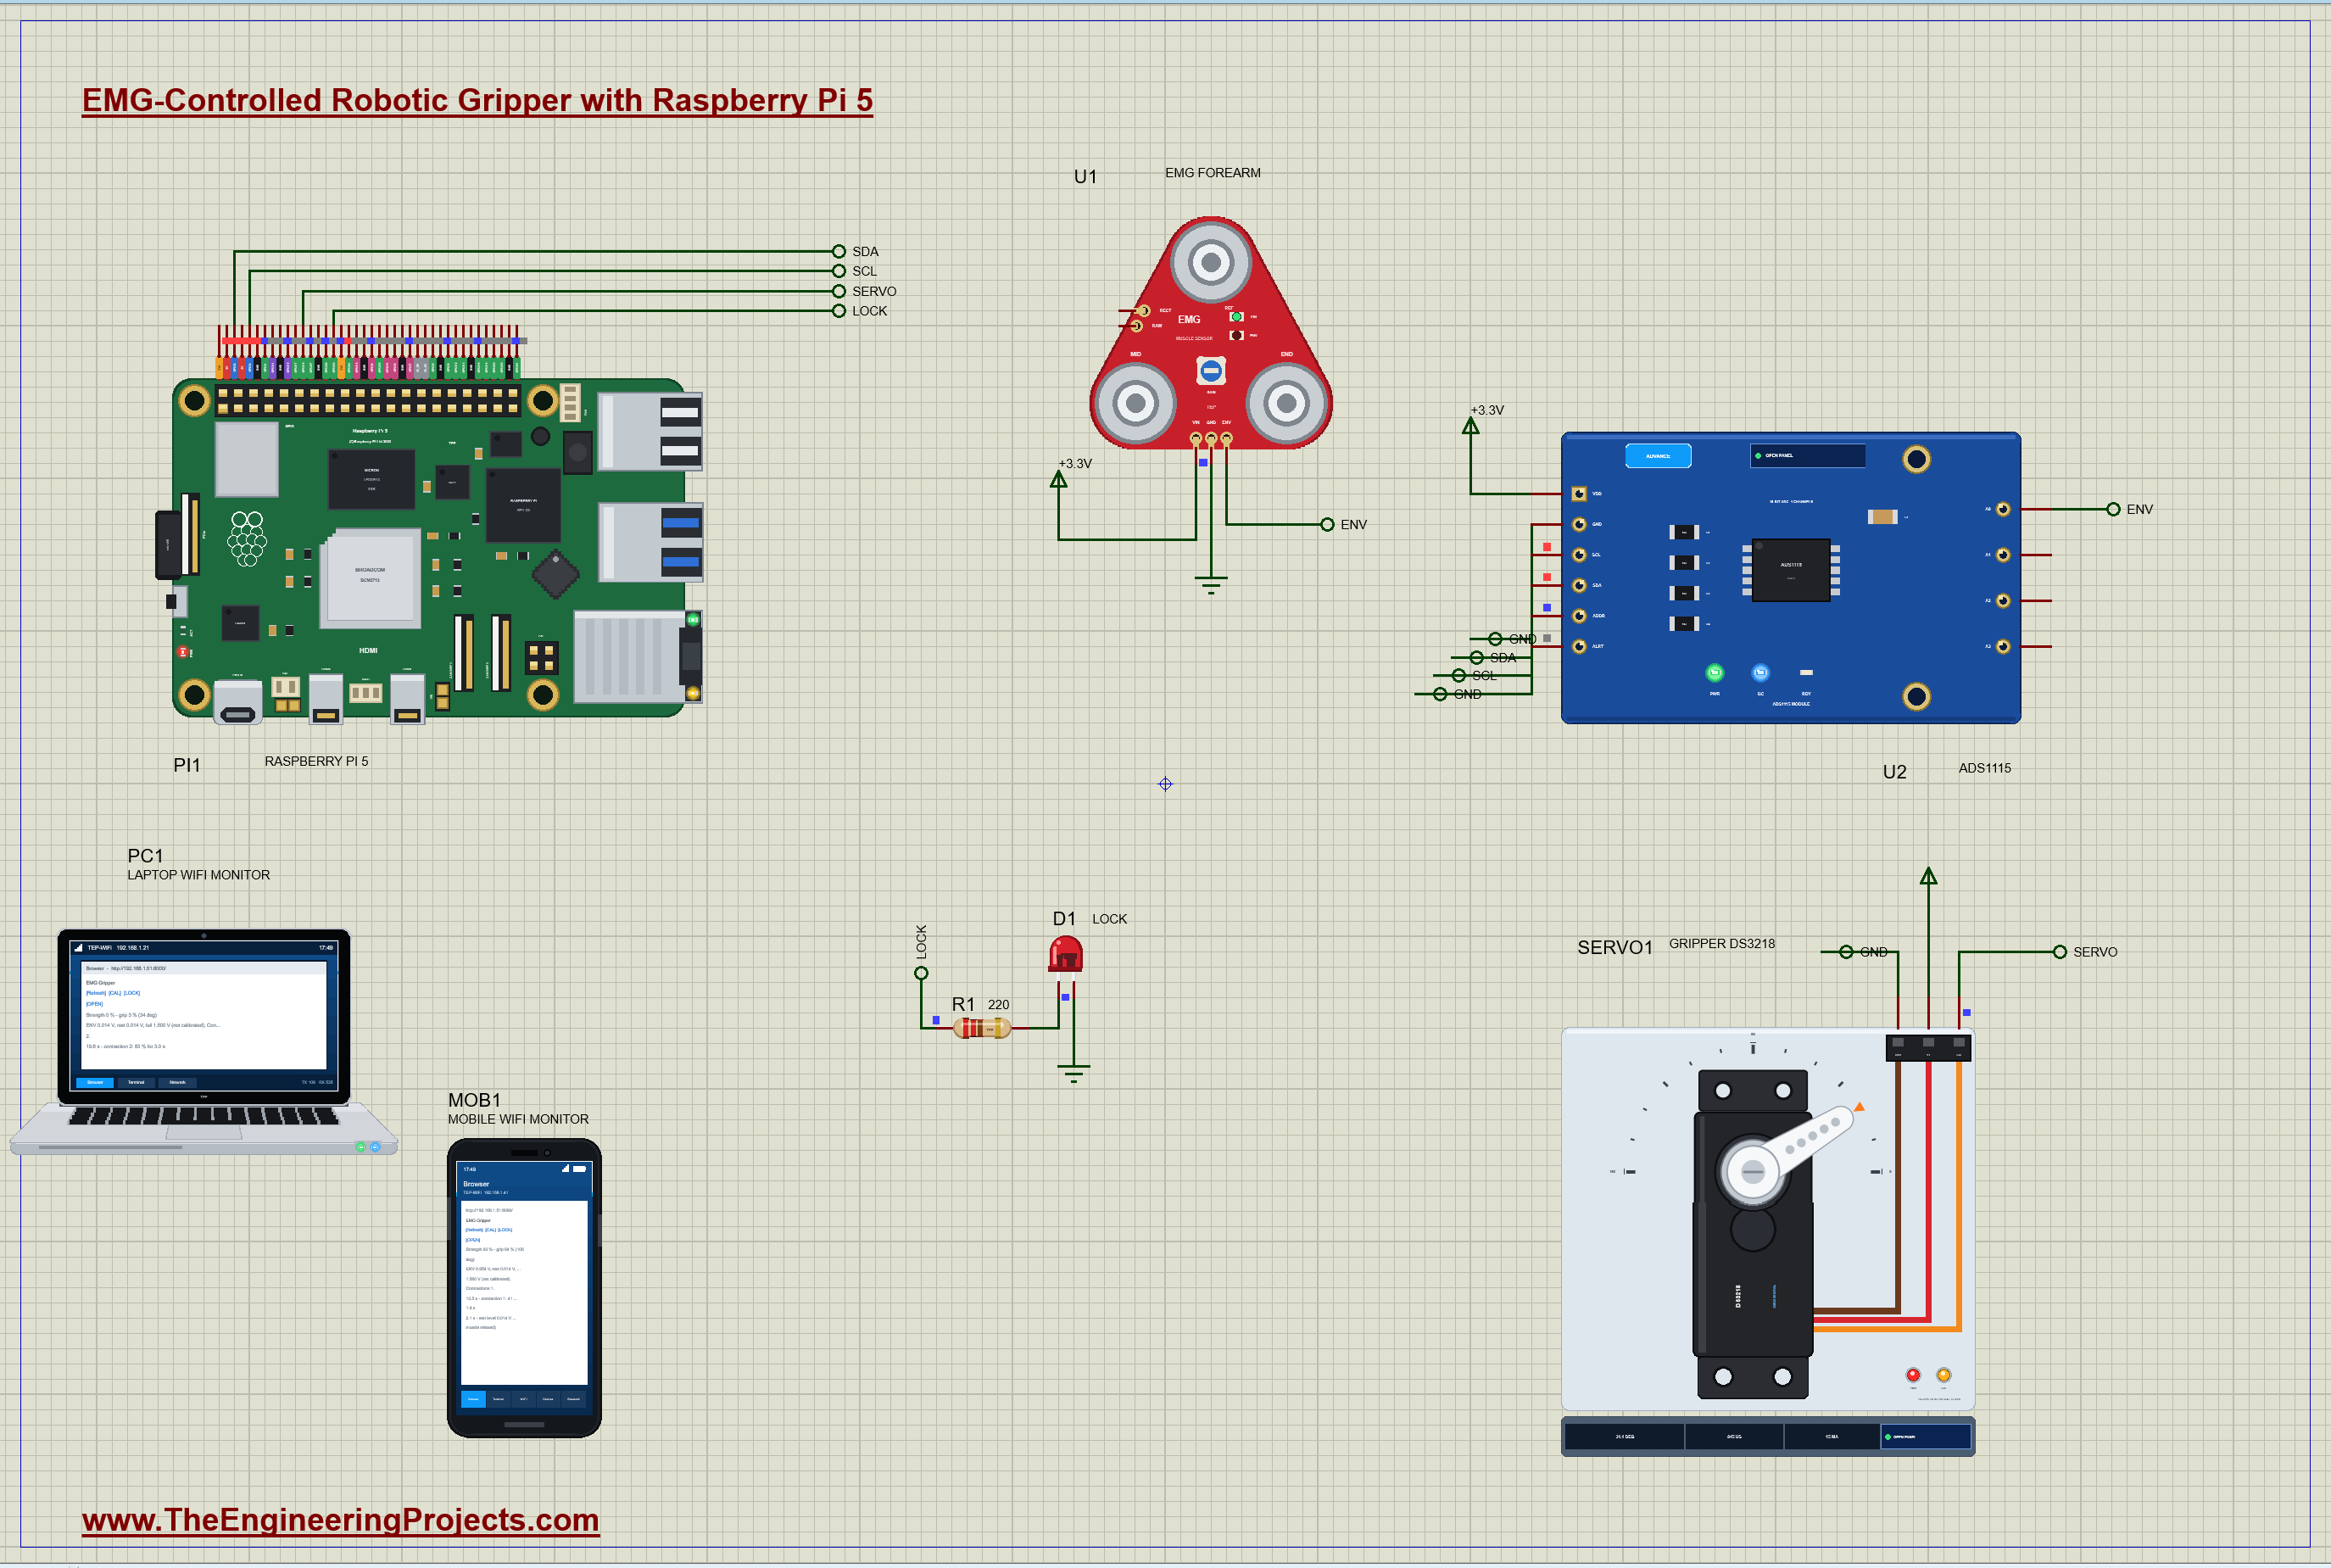
| Part | Pins | Raspberry Pi 5 header / other |
|---|---|---|
| U1 EMG sensor | VIN / GND / ENV | +3.3V / GND / the ADS1115's A0 |
| U2 ADS1115 | VDD / GND / SDA / SCL / ADDR | +3.3V / GND / GPIO2 (pin 3) / GPIO3 (pin 5) / GND |
| SERVO1 DS3218 | SIG / V+ / GND | GPIO18 (pin 12) / the 5 V rail / GND |
| D1 LOCK | A / K | GPIO23 (pin 16) through R1 220 ohm / GND |
The EMG sensor runs from 3.3 V, so its ENV output can never exceed what the ADS1115 and the Pi expect. The servo takes its power from the 5 V rail, never from a GPIO pin: a DS3218 can draw over 3 A when it starts or stalls. Only its signal comes from the Pi.
How the EMG Gripper Works
From Muscle Fibres to an Envelope
Raw EMG is a noise-like voltage of about a millivolt at a full contraction, with most of its energy between 20 and 500 Hz. The sensor amplifies it 200 times and filters it to that band: that is RAW, centred on half the supply. It then rectifies RAW, turning every negative swing positive (RECT), and smooths the result with a 3.6 Hz low-pass filter, times the gain of its trimmer: that is ENV, a slow voltage that follows the effort. Worked example: in the simulation a 70 % contraction gives RAW at 134 mV RMS, RECT at 102 mV on average, and ENV at about 1.27 V, the rectified signal times the gain of 12. The 3.6 Hz filter has a time constant of 1 / (2 x pi x 3.6) = 44 ms, so ENV follows a contraction in a fraction of a second without the buzz of the raw signal.
Reading ENV with the ADS1115
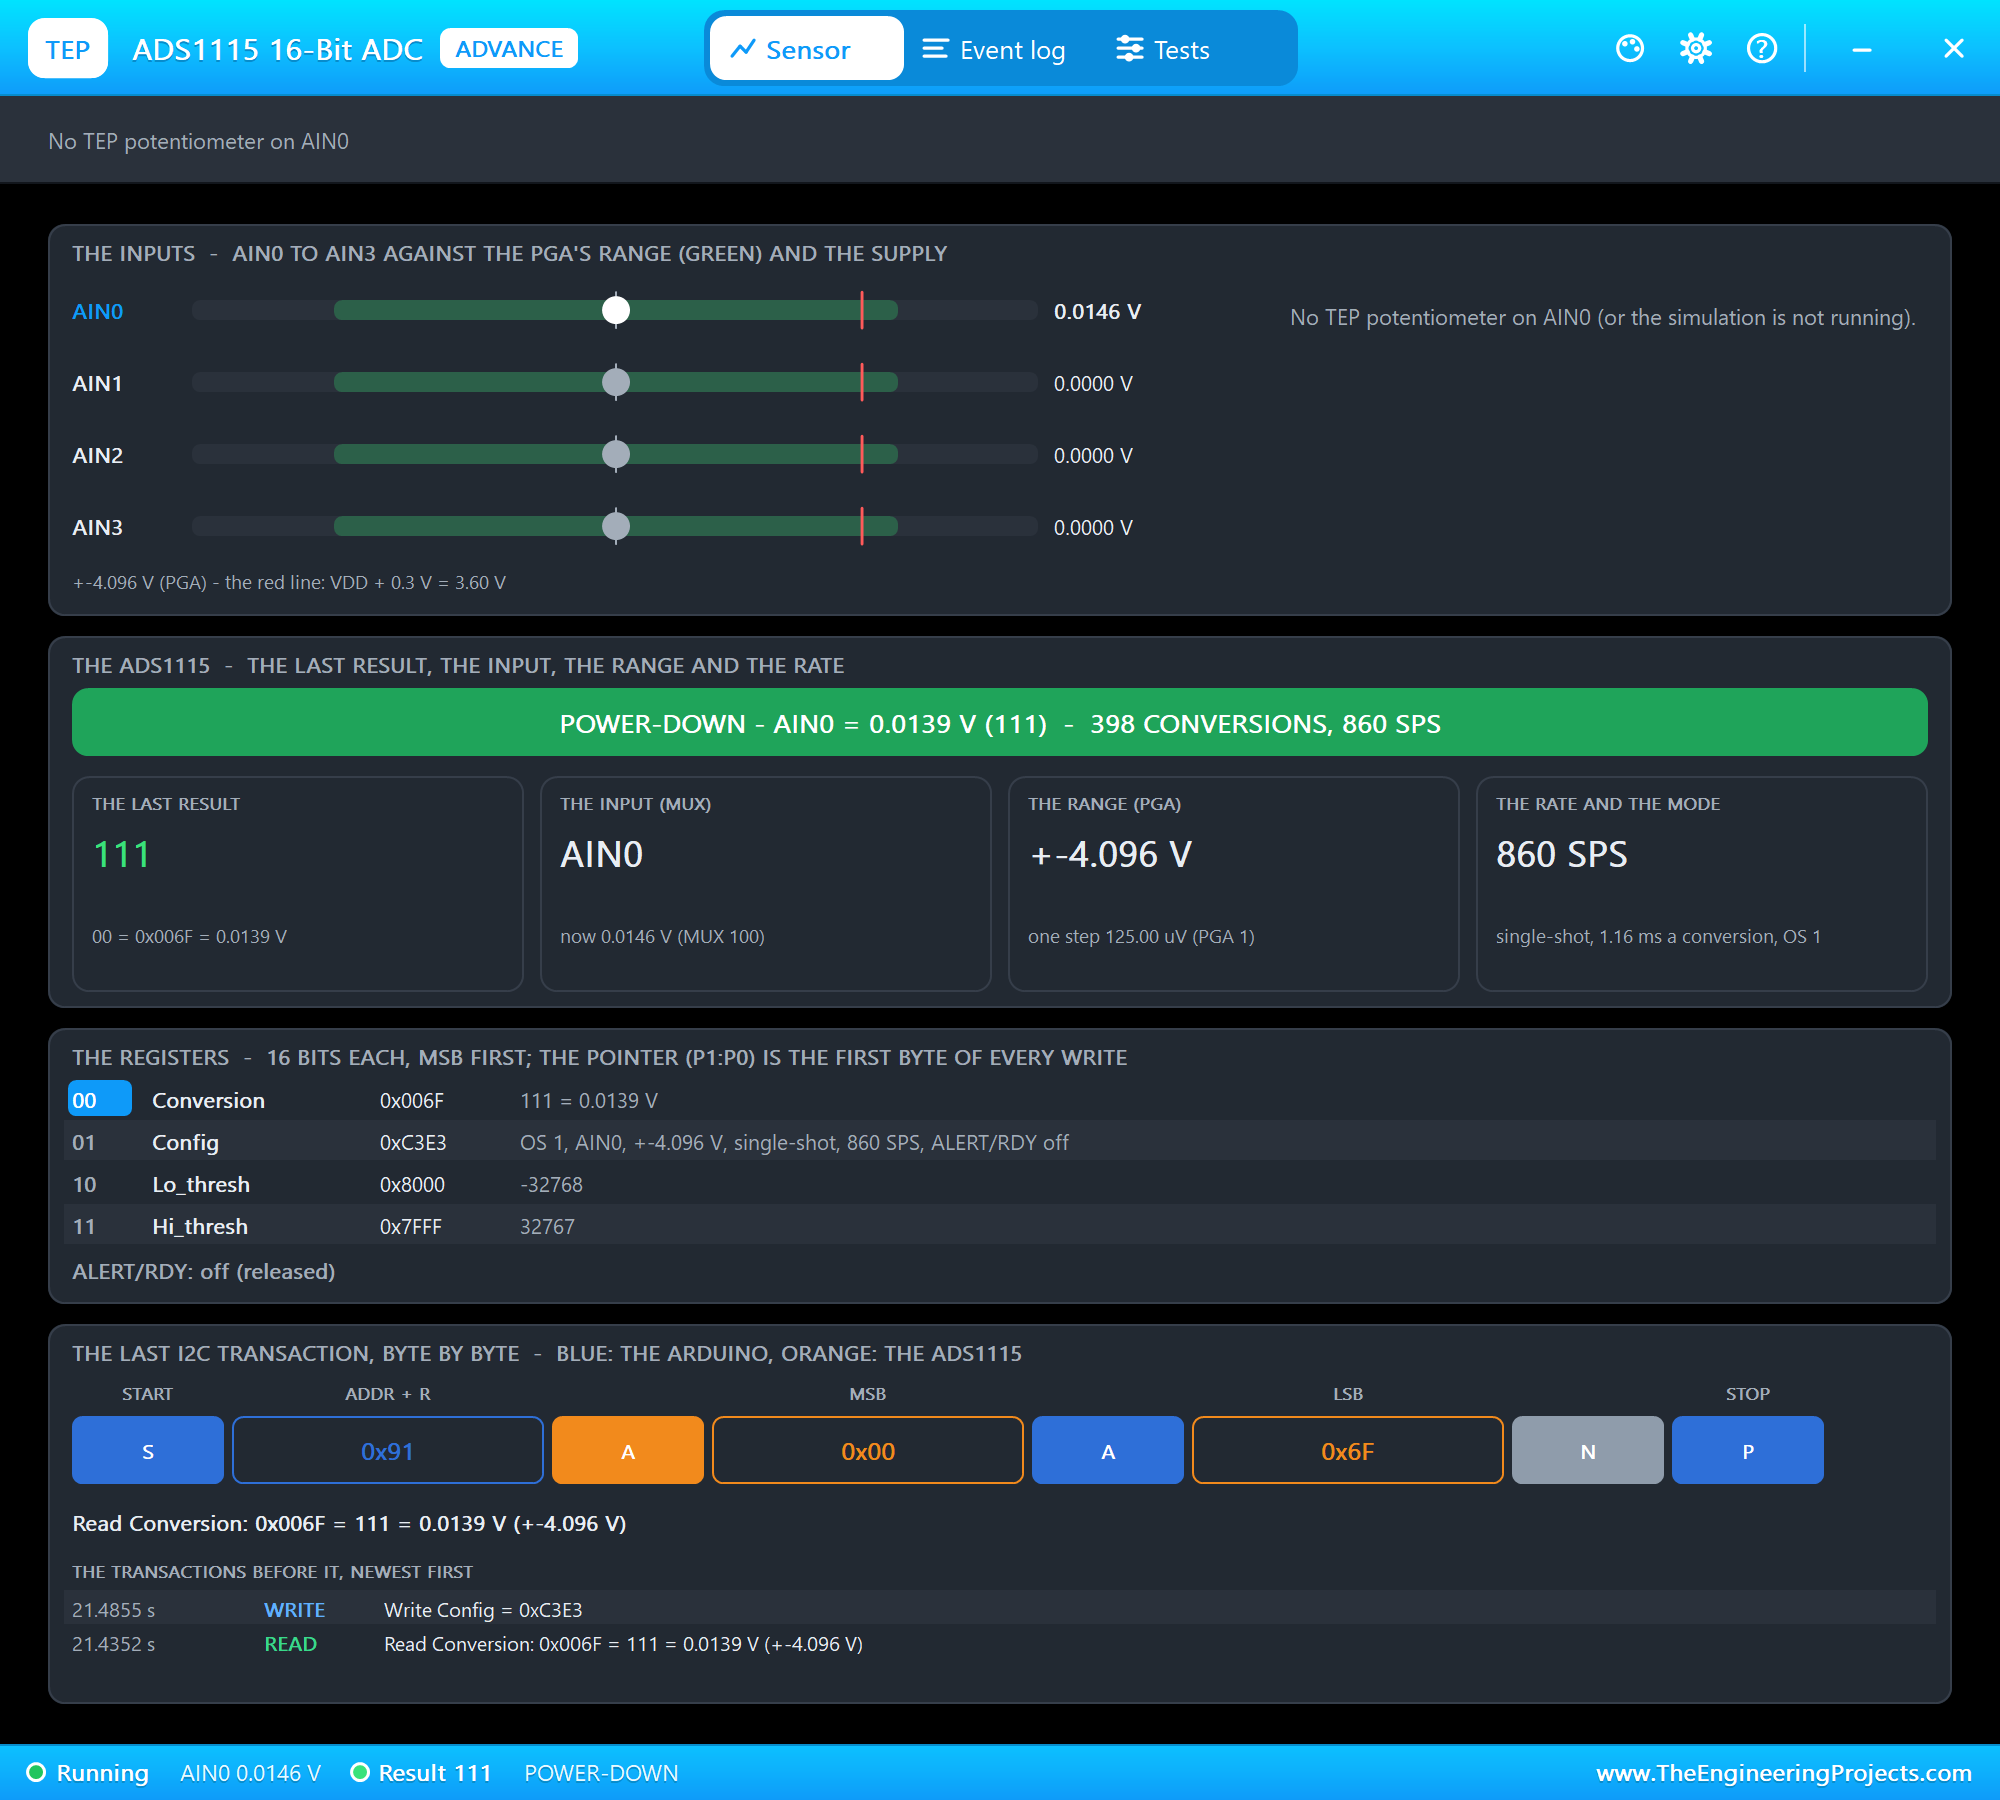
The Raspberry Pi has no analog input, so the ADS1115 measures ENV on A0, twenty times a second, in single conversions at 860 samples a second on the +-4.096 V range: one step is 125 microvolts, thousands of steps across the envelope's swing. At the start the program averages 2 s of a relaxed muscle as the rest level, about 0.014 V in the simulation.
Strength, Dead Band and Smoothing
The strength is where ENV sits between the rest level and a full contraction: (ENV - rest) / (full - rest). Below 10 % the hand does not move at all, so the restless noise of a relaxed muscle cannot creep the gripper shut; above it, the remaining 90 % is stretched over the whole travel from 30 degrees (open) to 150 degrees (closed). Worked example: with a rest of 0.014 V and a full contraction of 1.85 V, ENV at 1.27 V is a strength of 68 %; minus the dead band that is a drive of 64.6 %, and the grip goes to 30 + 120 x 0.646 = 107.5 degrees, a servo pulse of 500 + 2000 x 107.5 / 180 = 1694 microseconds. Each reading moves the grip a fifth of the way to its target: with twenty readings a second the hand gets 90 % of the way in about half a second, smooth but quick.
Why proportional and not simply open or closed? An on-off hand, closed above a threshold and open below it, is easy to build but hard to use: it slams shut on a paper cup and gives no way to hold something gently. With proportional control the user grades the grip with the effort, light for an egg and hard for a hammer, just as with a real hand. The price is a hand that must not shake with the noise of the signal, which is what the dead band and the smoothing pay for. Worked example: without the smoothing, an envelope wandering between 55 and 72 % of a full contraction, as a steady effort really does, would swing the grip by about 23 degrees from one reading to the next; with each reading moving it only a fifth of the way, the swing shrinks to a few degrees.
The servo has its own speed limit too. The DS3218 turns 60 degrees in about 0.13 to 0.17 s with no load at 5 V, so the full travel from open to closed, 120 degrees, takes about a third of a second: a little faster than the smoothing, so the smoothing, not the motor, sets how quickly the hand follows the muscle. If you make the smoothing faster, the servo becomes the limit, and a heavy object in the jaws slows it further.
Calibration, LOCK and OPEN
Every arm and every electrode placement gives a different envelope, so a full contraction is learned, not assumed. Until CAL, the program takes 1.5 V; CAL records the strongest ENV of the next three seconds, while the user flexes as hard as they can. LOCK freezes the grip and lights the red LED, so the user can relax while the hand keeps holding a cup or a tool, which is how myoelectric hands avoid a tiring, constant contraction. OPEN unlocks and opens the hand.
The Python Code Explained
The whole program is included in the download. It uses lgpio for the I2C bus, the servo pulses and the LED, a thread for the control loop, and the standard library's http.server for the dashboard. At the top are the gripper's limits and the control's two constants:
OPEN_DEG, CLOSED_DEG = 30, 150                        # the gripper's servo angles
DEAD_BAND = 0.10                                      # below 10 % of the full contraction the hand does not move
SMOOTH = 0.2                                          # each reading moves the grip 20 % of the way to its target
Reading the Envelope
lgpio.i2c_write_i2c_block_data(self.h, 0x01, [0x80 | mux << 4 | 0x03, 0xE3]) # start, +-4.096 V, single shot, 860 SPSFrom Strength to Grip
strength = min(1.0, max(0.0, (env - s['rest']) / (s['full'] - s['rest']))) drive = 0.0 if strength < DEAD_BAND else (strength - DEAD_BAND) / (1 - DEAD_BAND) if not locked: target = OPEN_DEG + (CLOSED_DEG - OPEN_DEG) * drive s['angle'] += SMOOTH * (target - s['angle']); angle = s['angle']The Servo Pulses and the Calibration
The servo's pulses come from lgpio's tx_servo, timed by the Pi itself, 50 a second; 500 to 2500 microseconds span the DS3218's 0 to 180 degrees:
lgpio.tx_servo(chip, SERVO, int(500 + 2000 * deg / 180), 50) s['cal_peak'] = max(s['cal_peak'], env)A contraction is counted when the strength rises above 15 % and ends when it falls below 10 %; the two thresholds keep a wavering contraction from being counted twice:
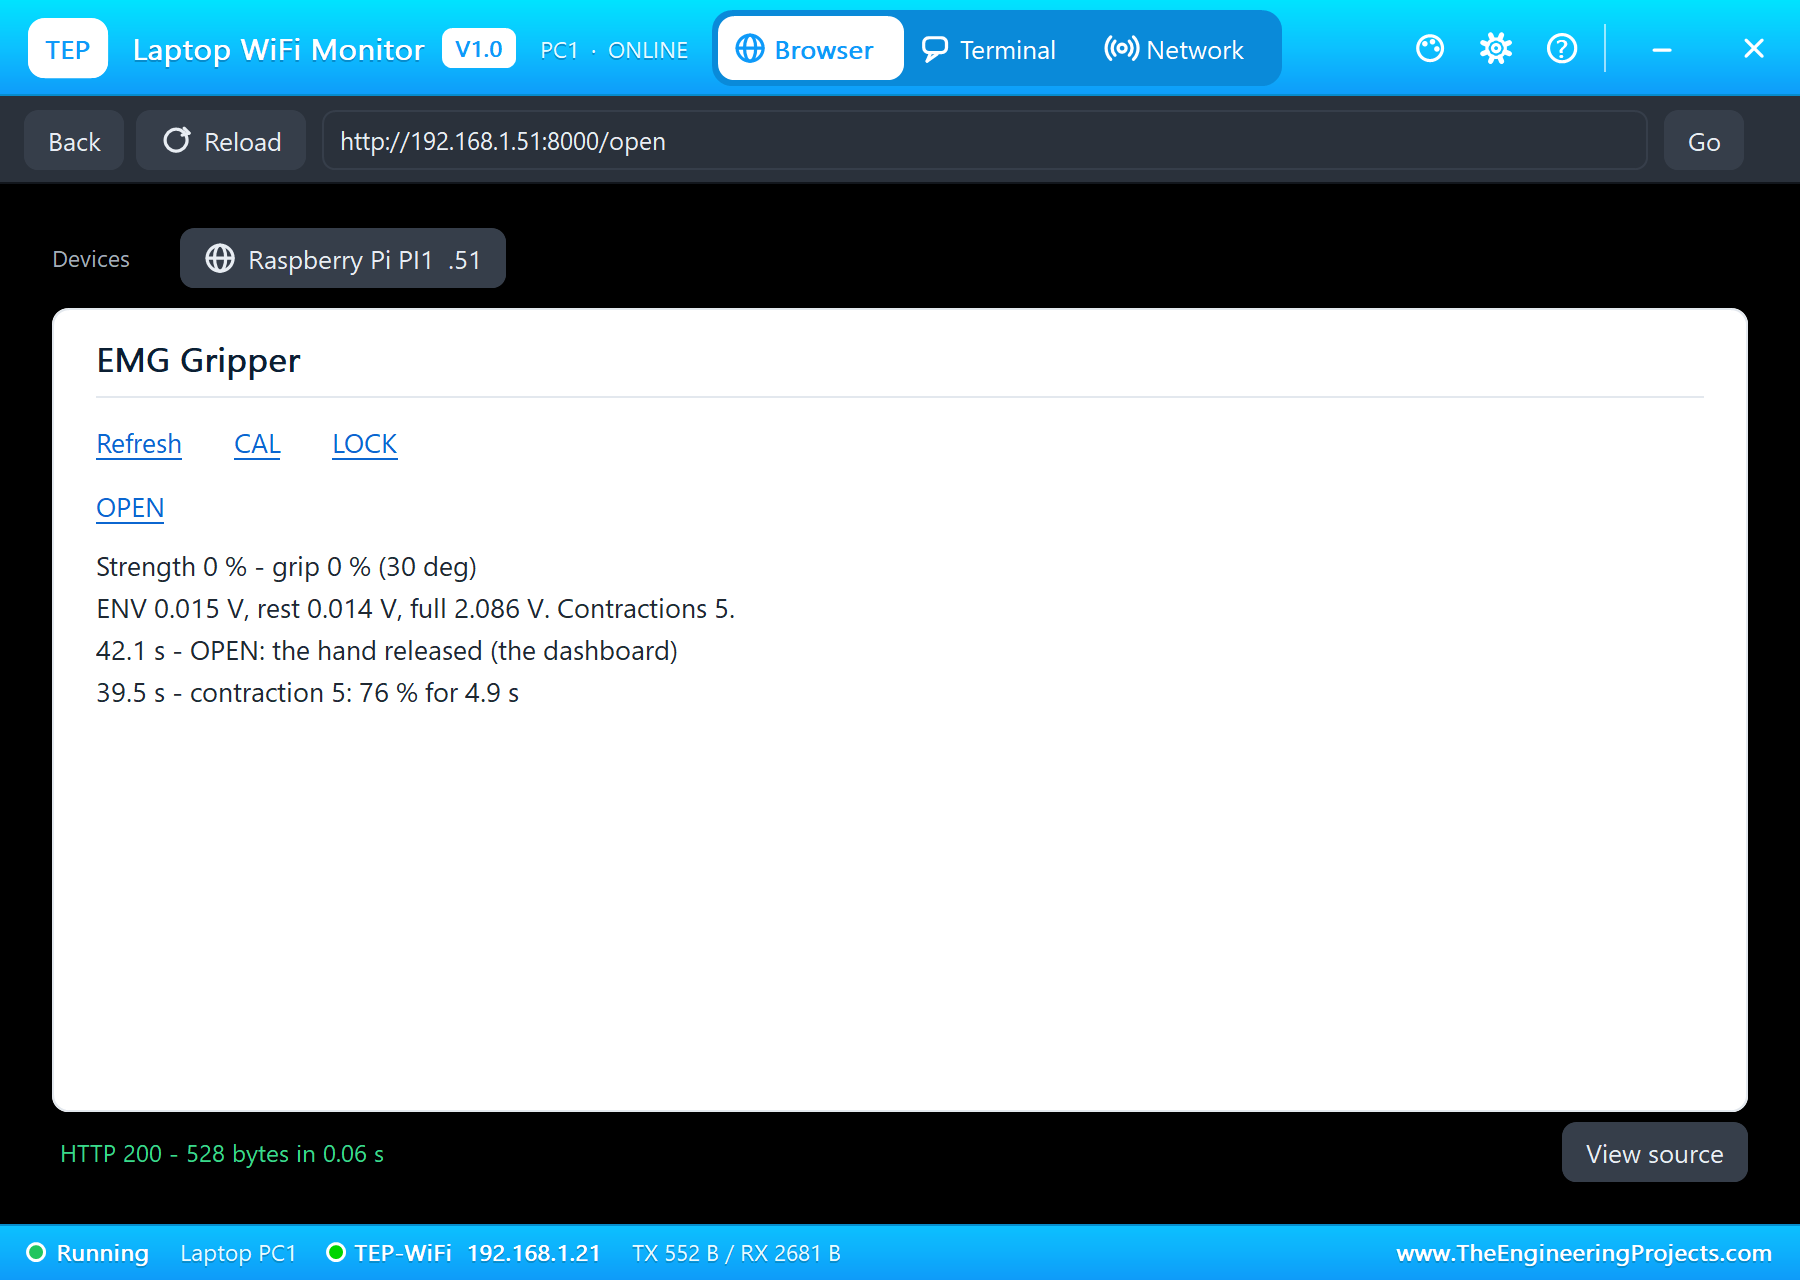
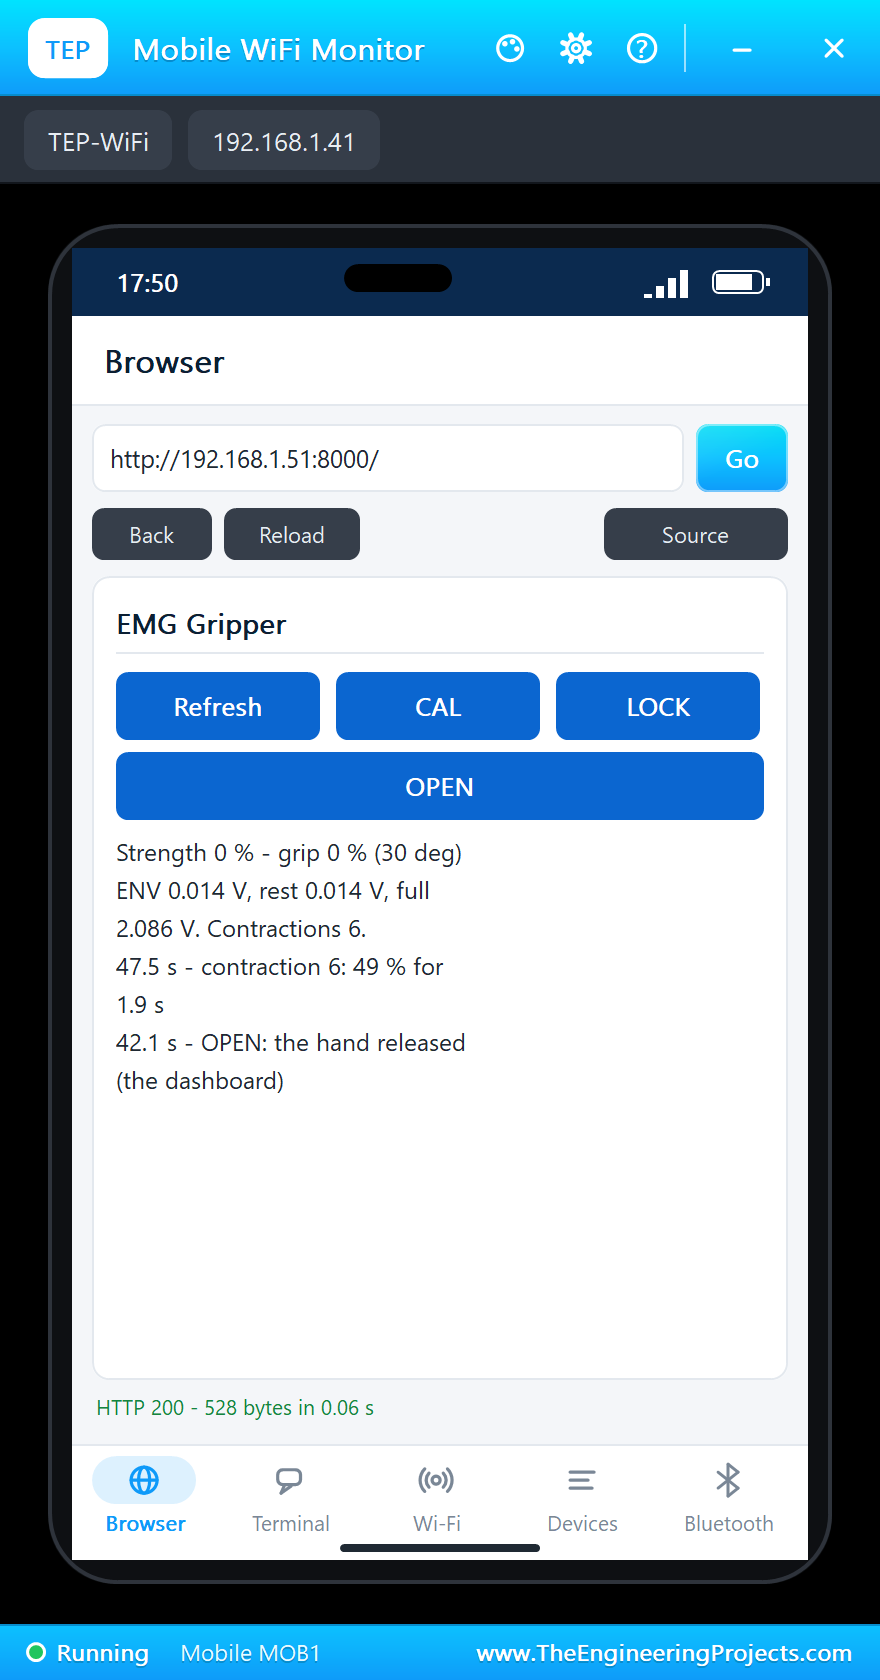
if not flexing and strength > FLEX_ON:The pages are / (the dashboard), /cal, /lock (hold or release), /open and /data (JSON). The dashboard puts its links first and stays short, because the WiFi Monitors show one screen of a page.
How to Run the Proteus Simulation
- Download the project zip below and install the library files and the TEPPi folder (the steps are under the download button).
- Open Pi-5-EMG-Gripper.pdsprj from the Proteus Simulation folder. Keep emg_gripper.py and the DLL files next to it.
- Press Play. The muscle stays relaxed for the first seconds while the program takes the rest level.
- The contractions come by themselves, from U1's FLEX property: watch the gripper follow them.
- Open the Laptop WiFi Monitor (PC1) or the Mobile WiFi Monitor (MOB1) and press Go: CAL during a hard contraction, LOCK and OPEN.
Simulation Results: the EMG Gripper in Proteus
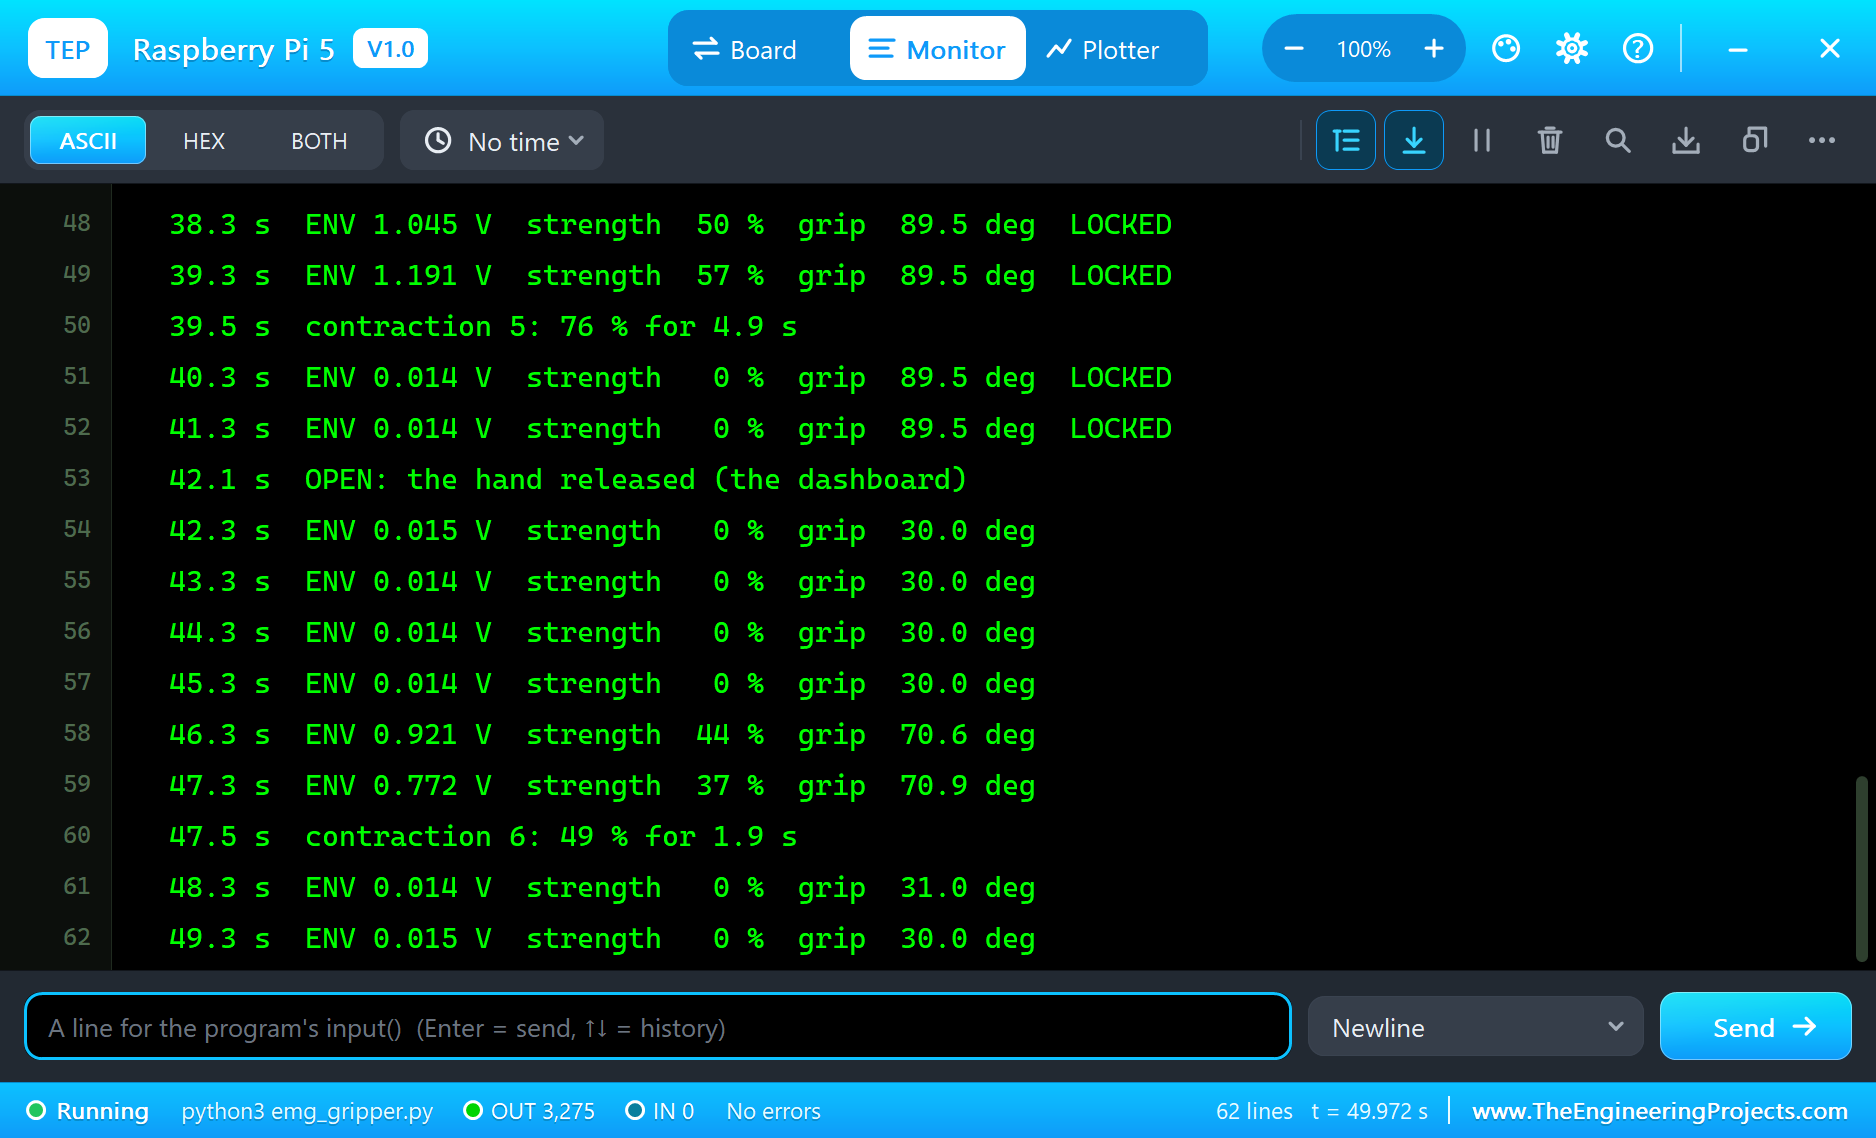
Here is the run that made the screenshots of this tutorial, 50.1 seconds of simulation. The times are the program's own, the seconds since it started, as it printed them in the Pi's terminal. The muscle followed the EMG sensor's FLEX property: 30 % at 12 s, 60 % at 17 s, 100 % at 24 s, a short 80 % at 30.5 s, 70 % at 35 s and 50 % at 46 s.
At Rest
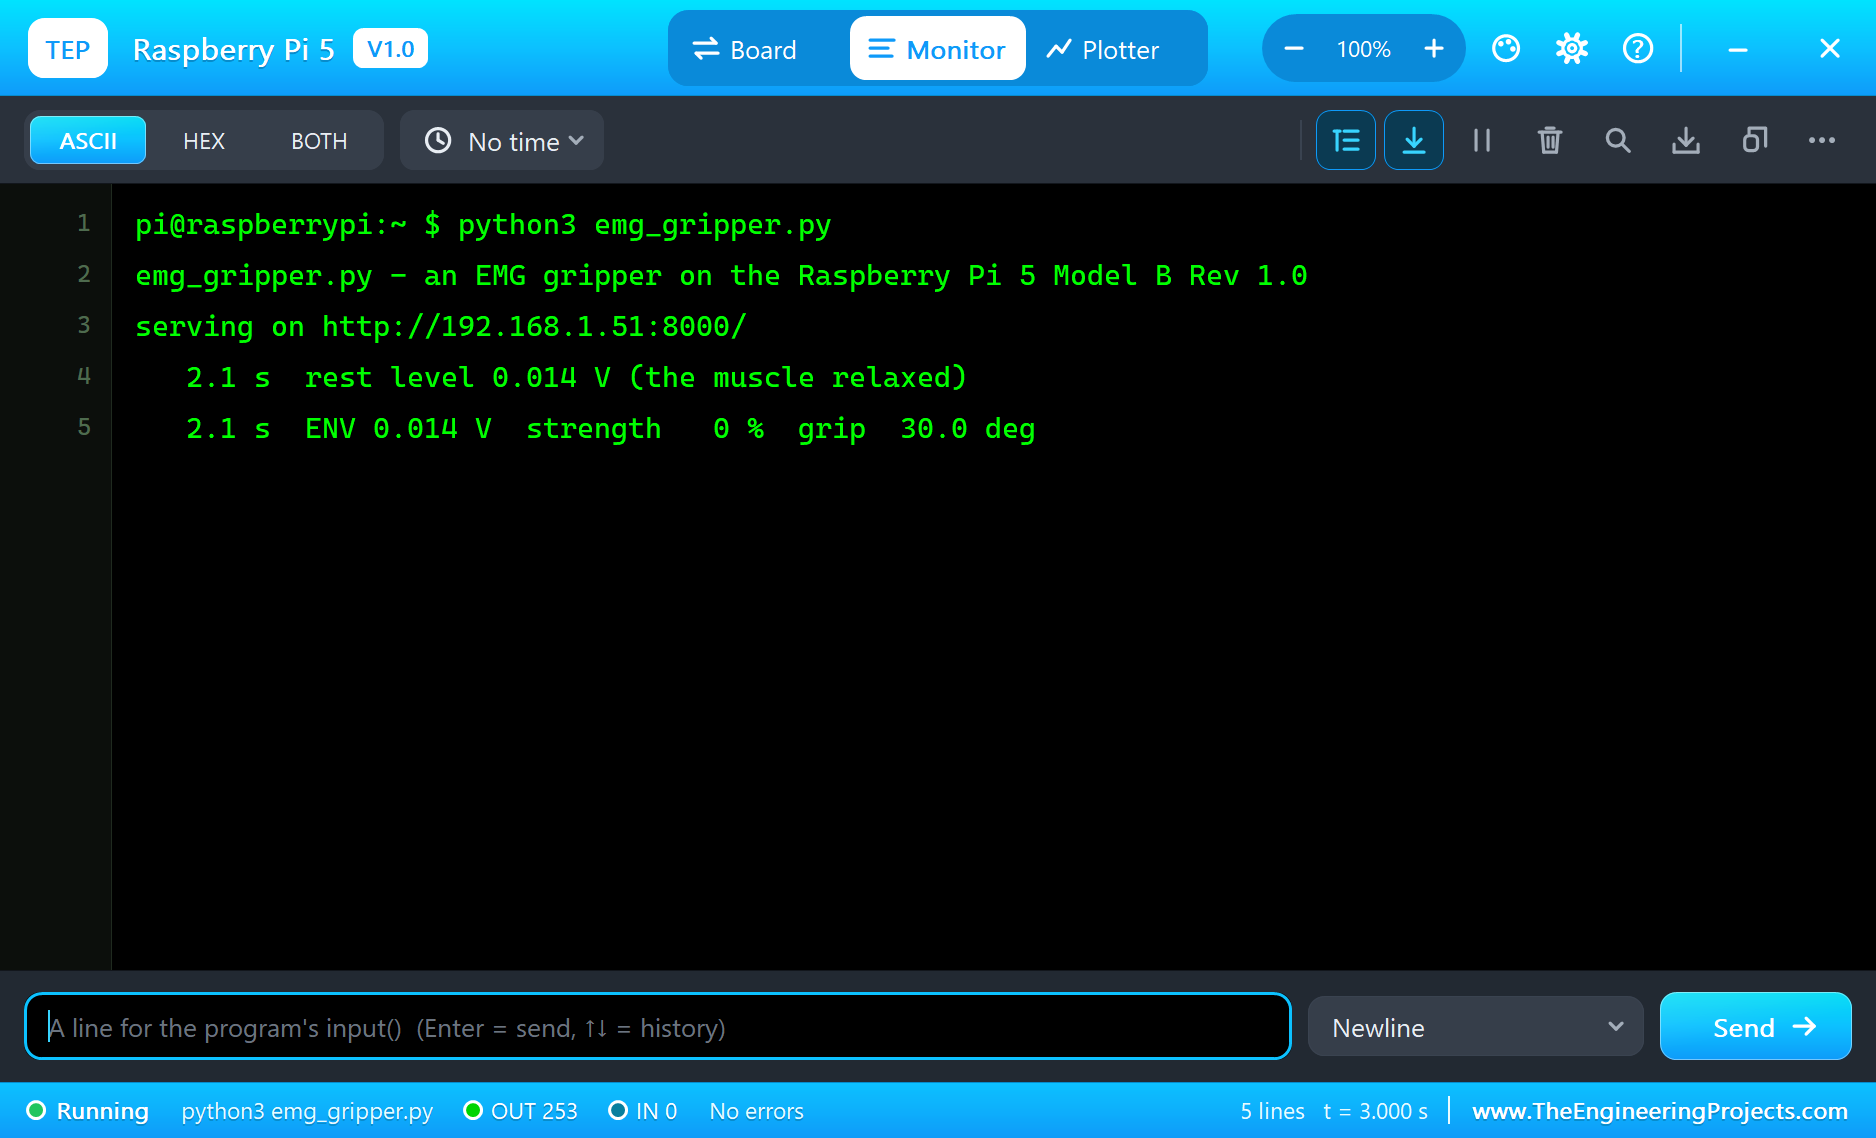
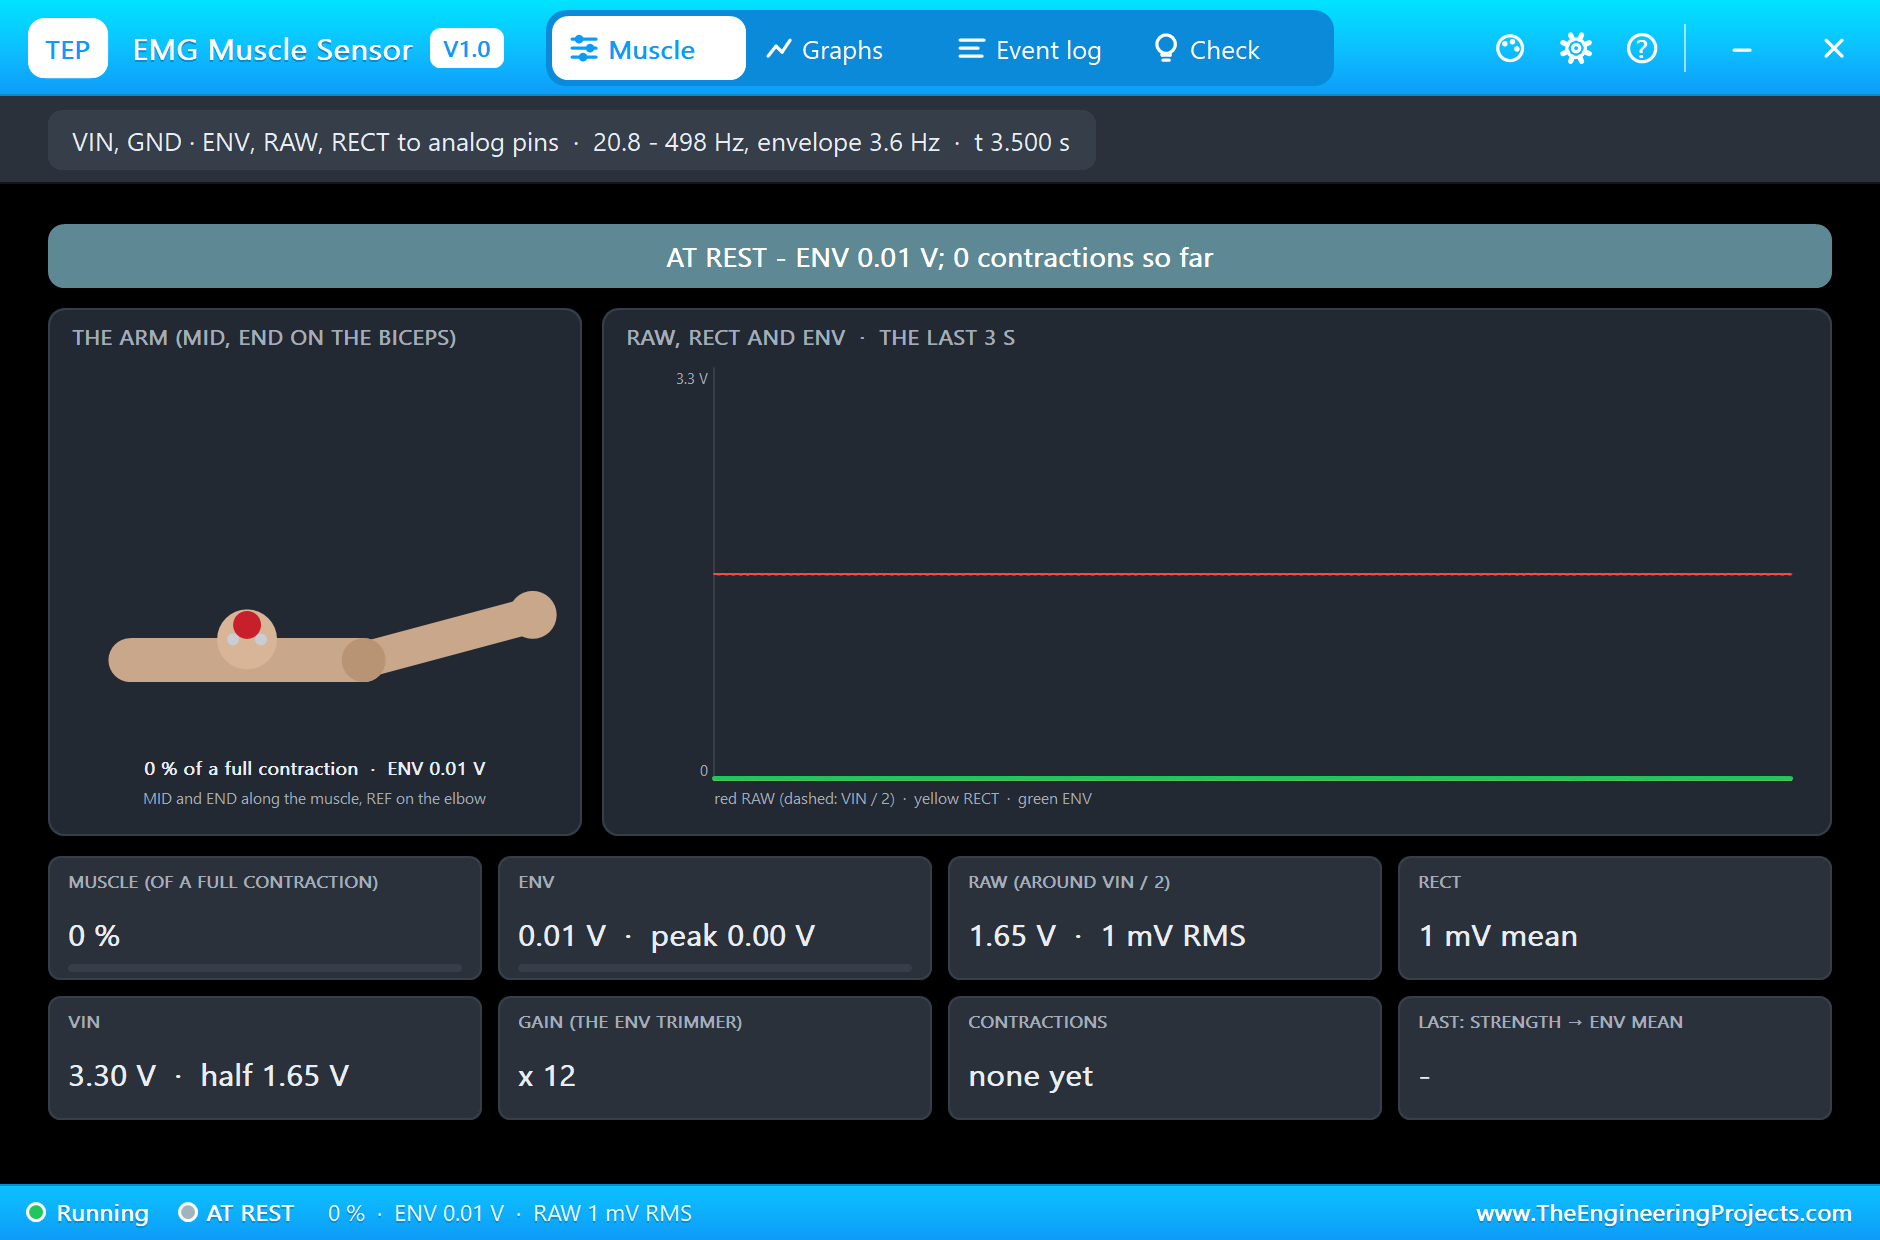
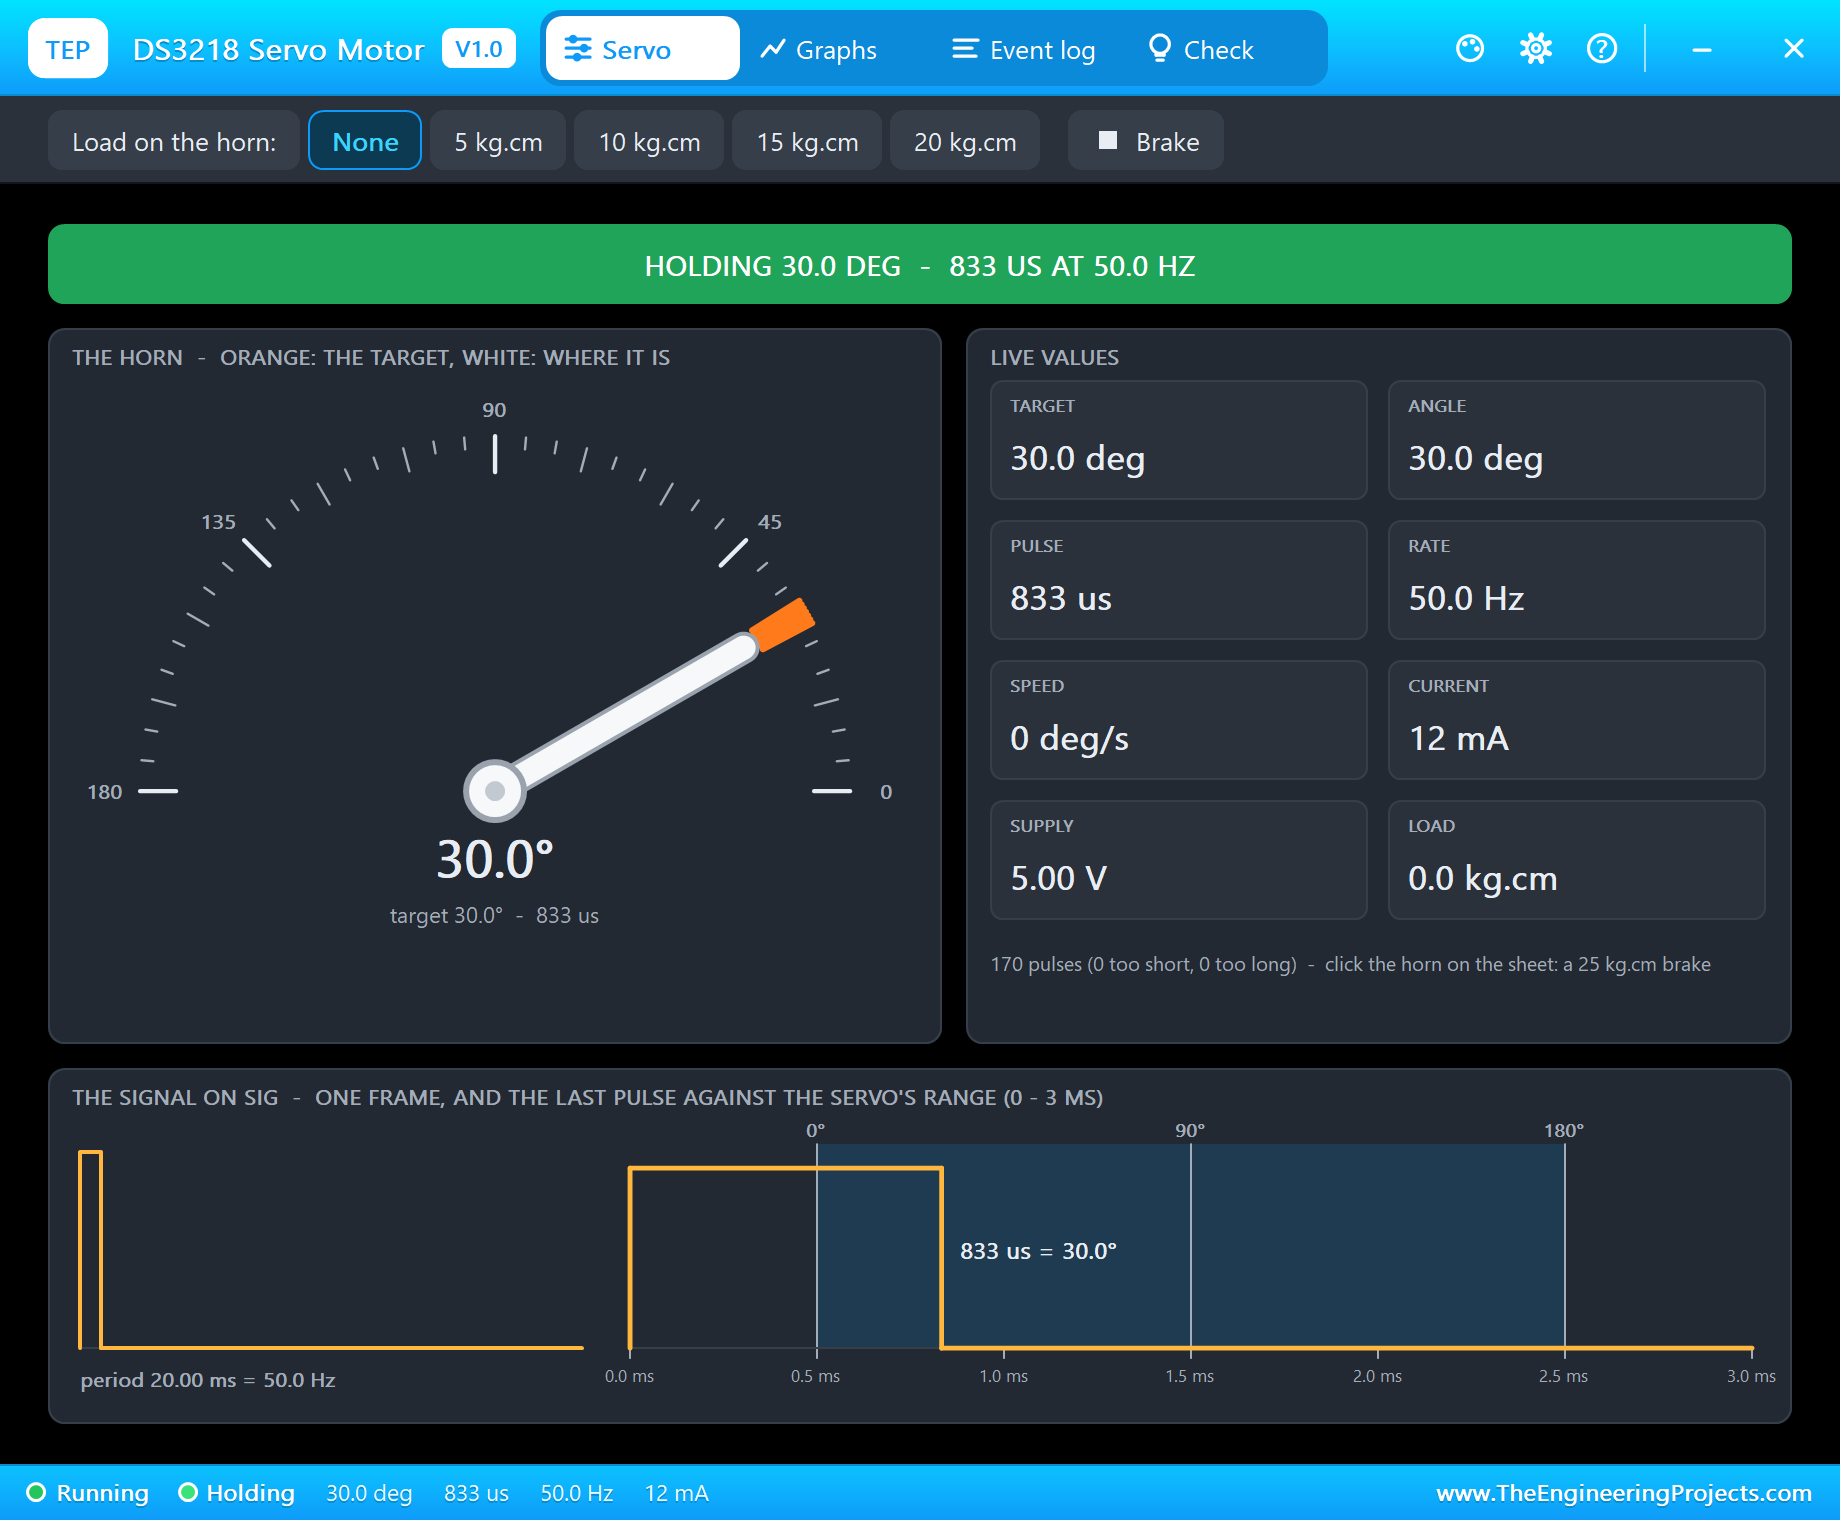
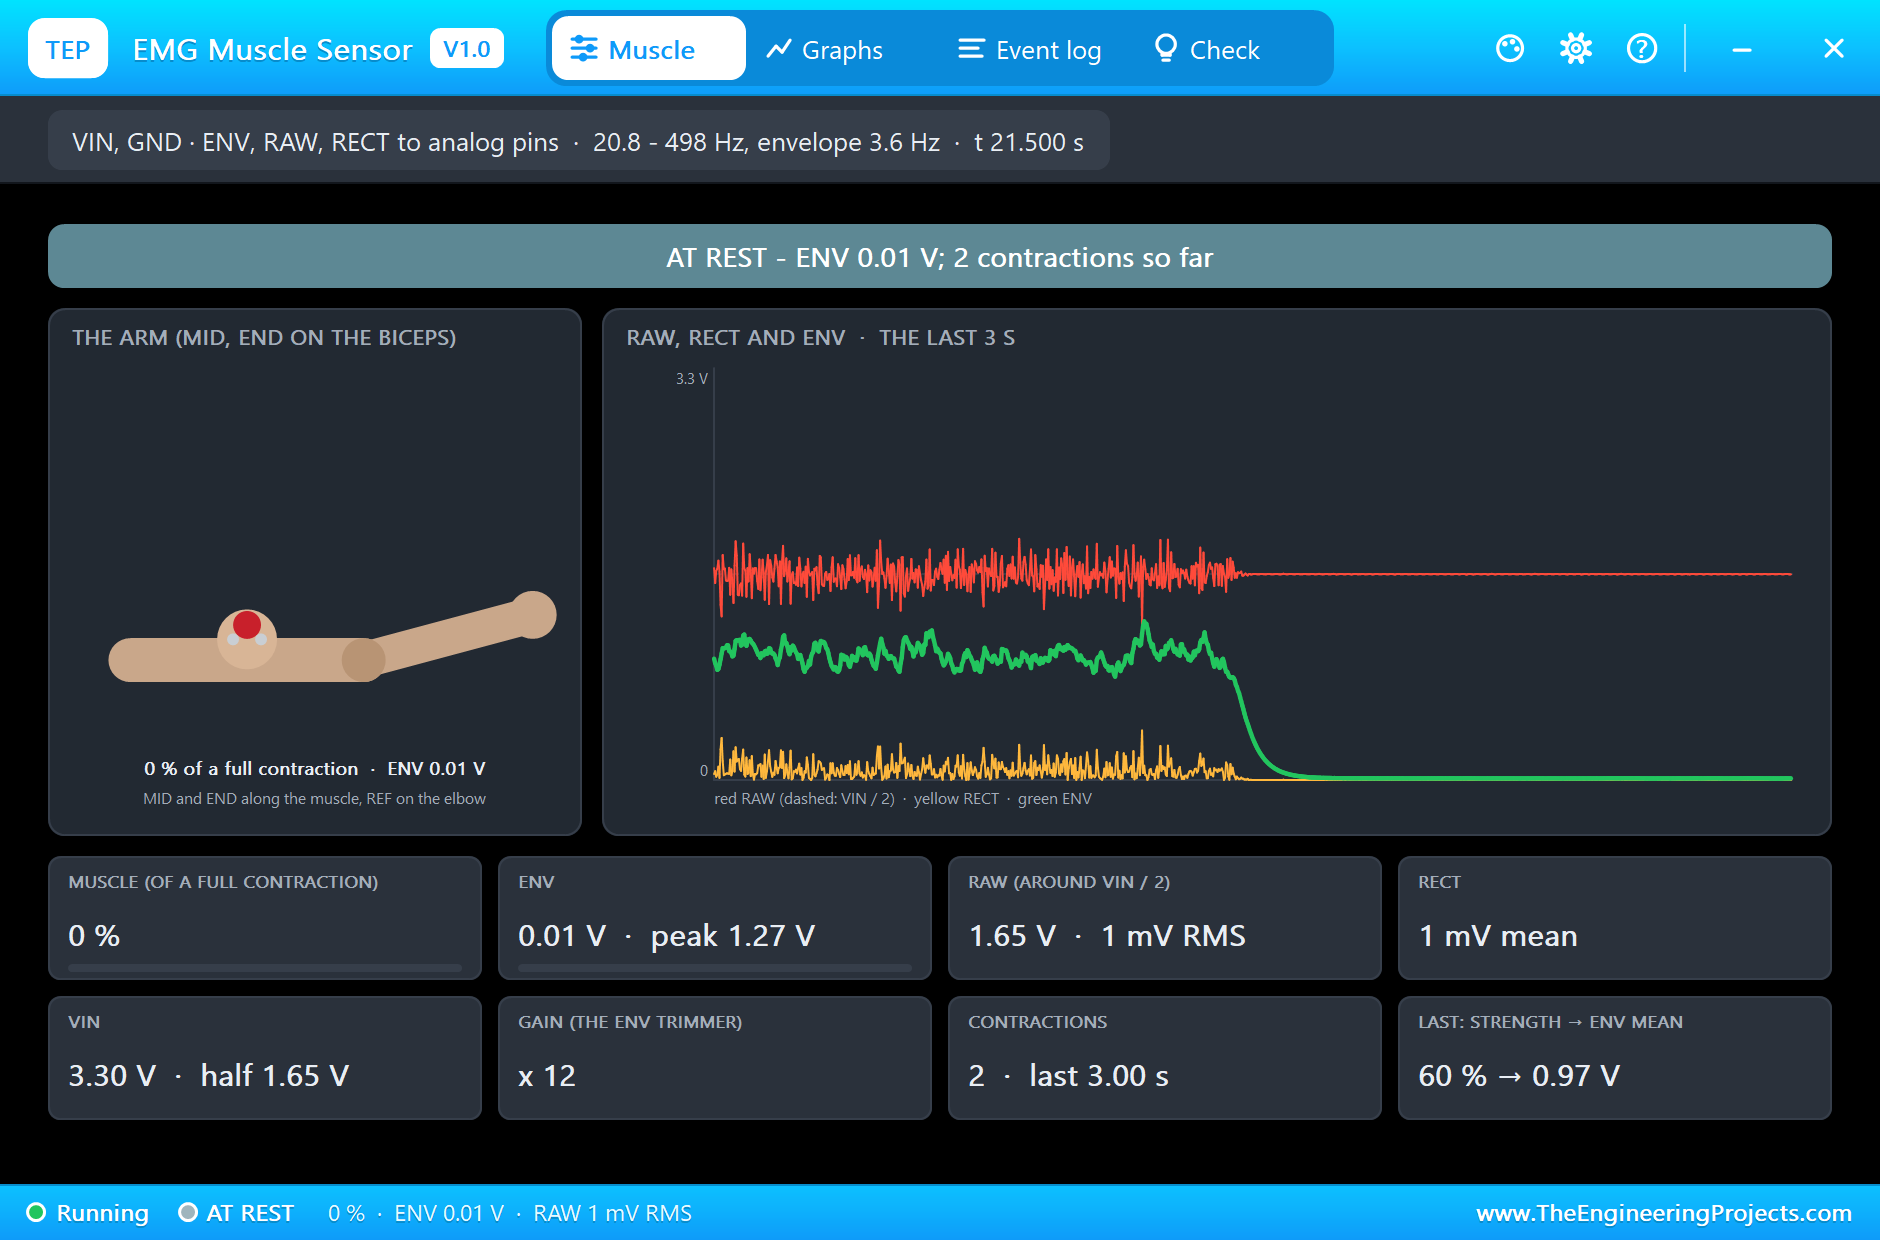
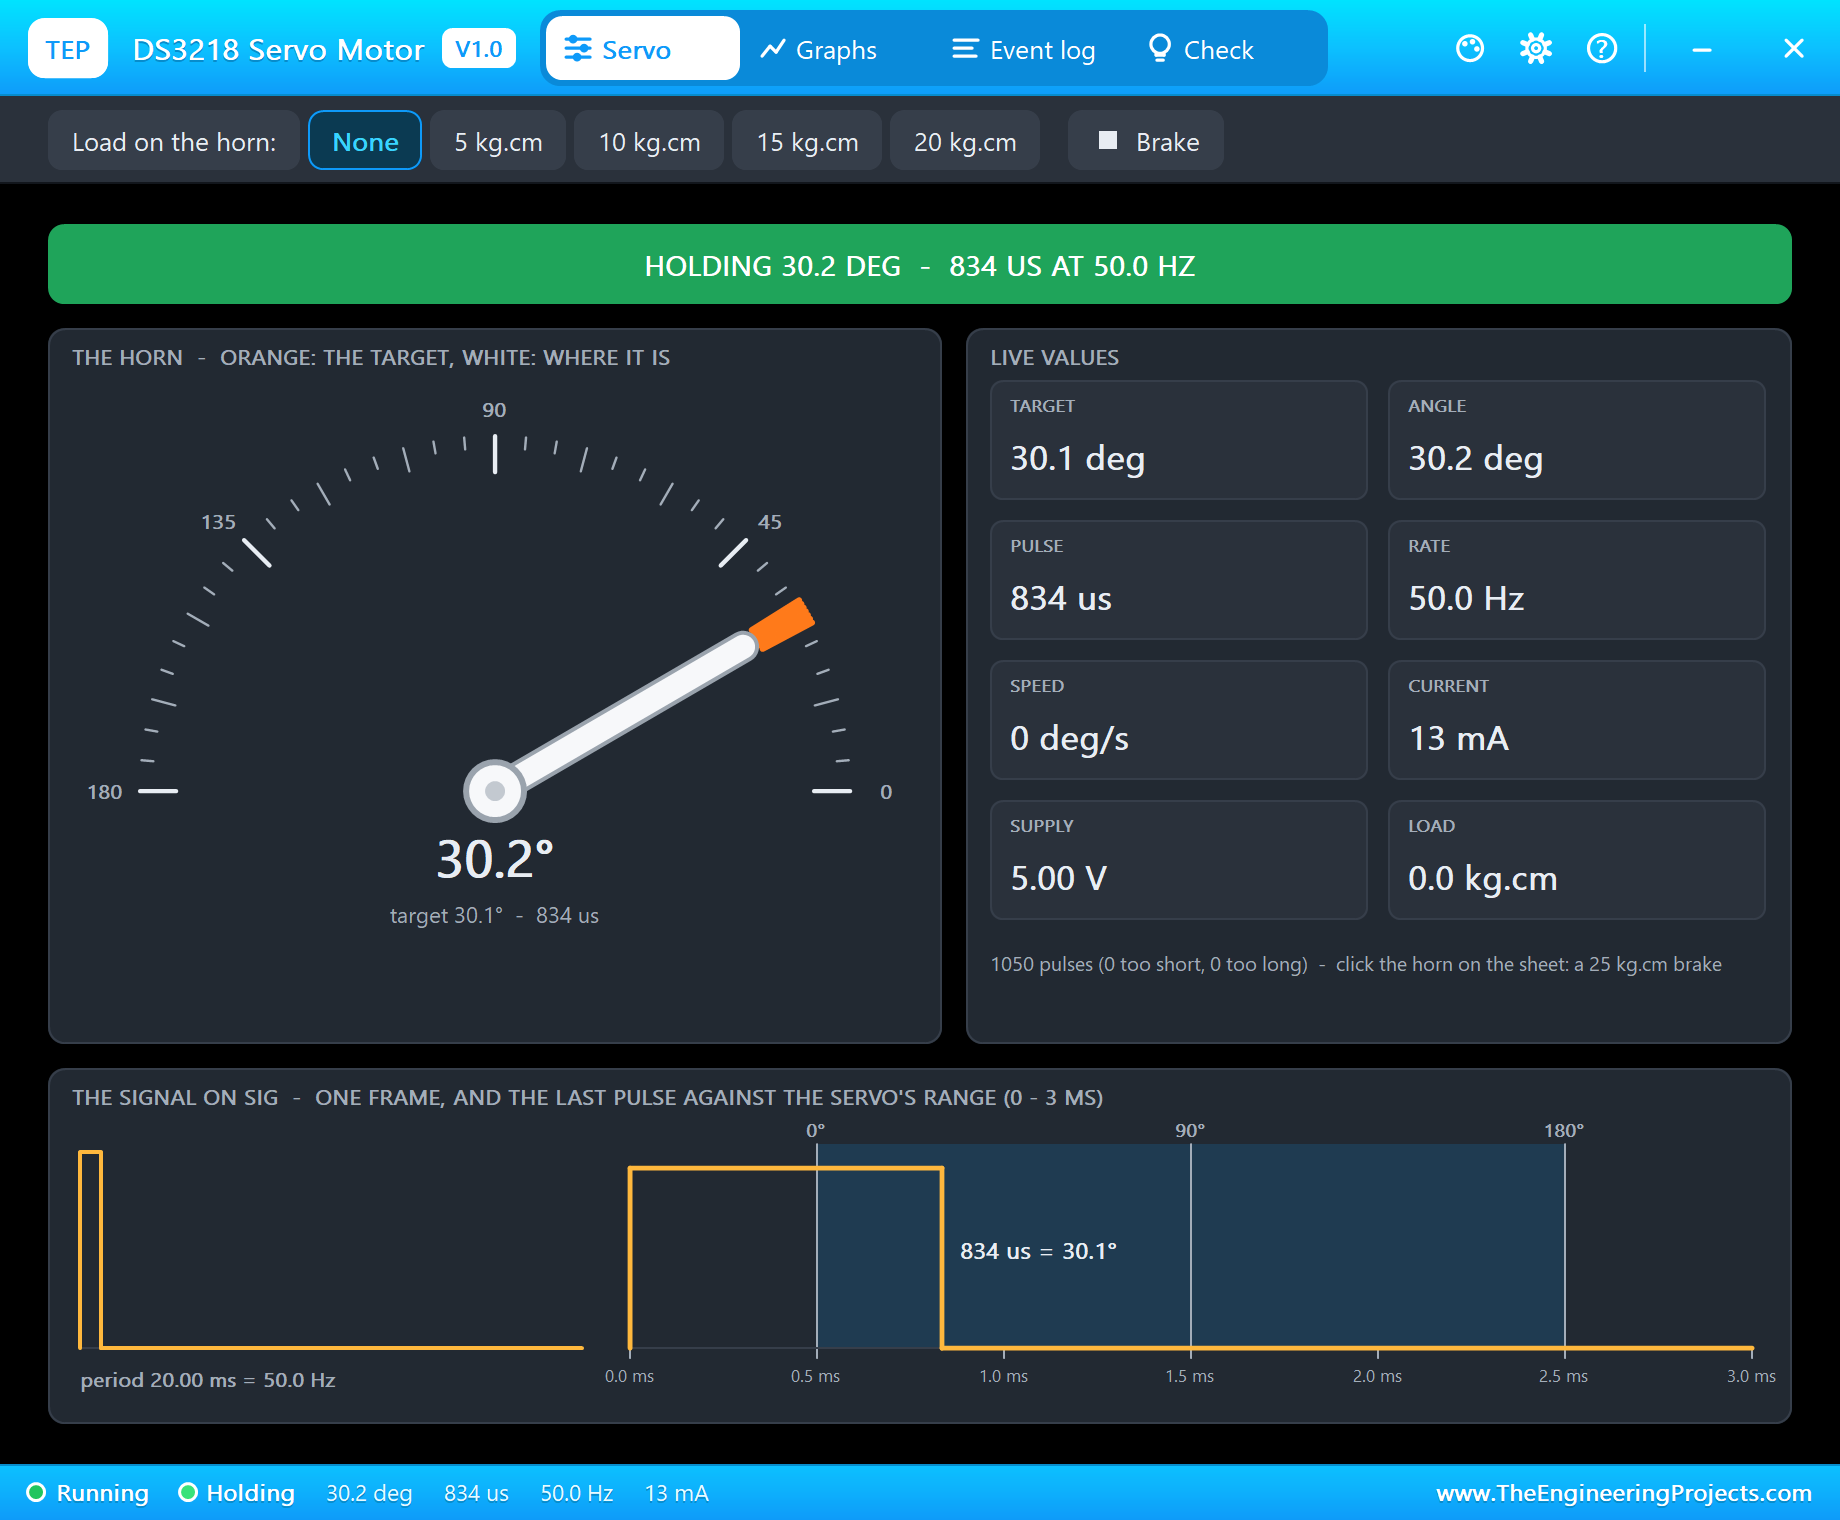
At 2.1 s the program reports "rest level 0.014 V (the muscle relaxed)". The sensor's pop-up shows the arm hanging, RAW flat at half the supply and ENV near zero; the DS3218 holds the gripper open at 30 degrees.
A Medium Contraction
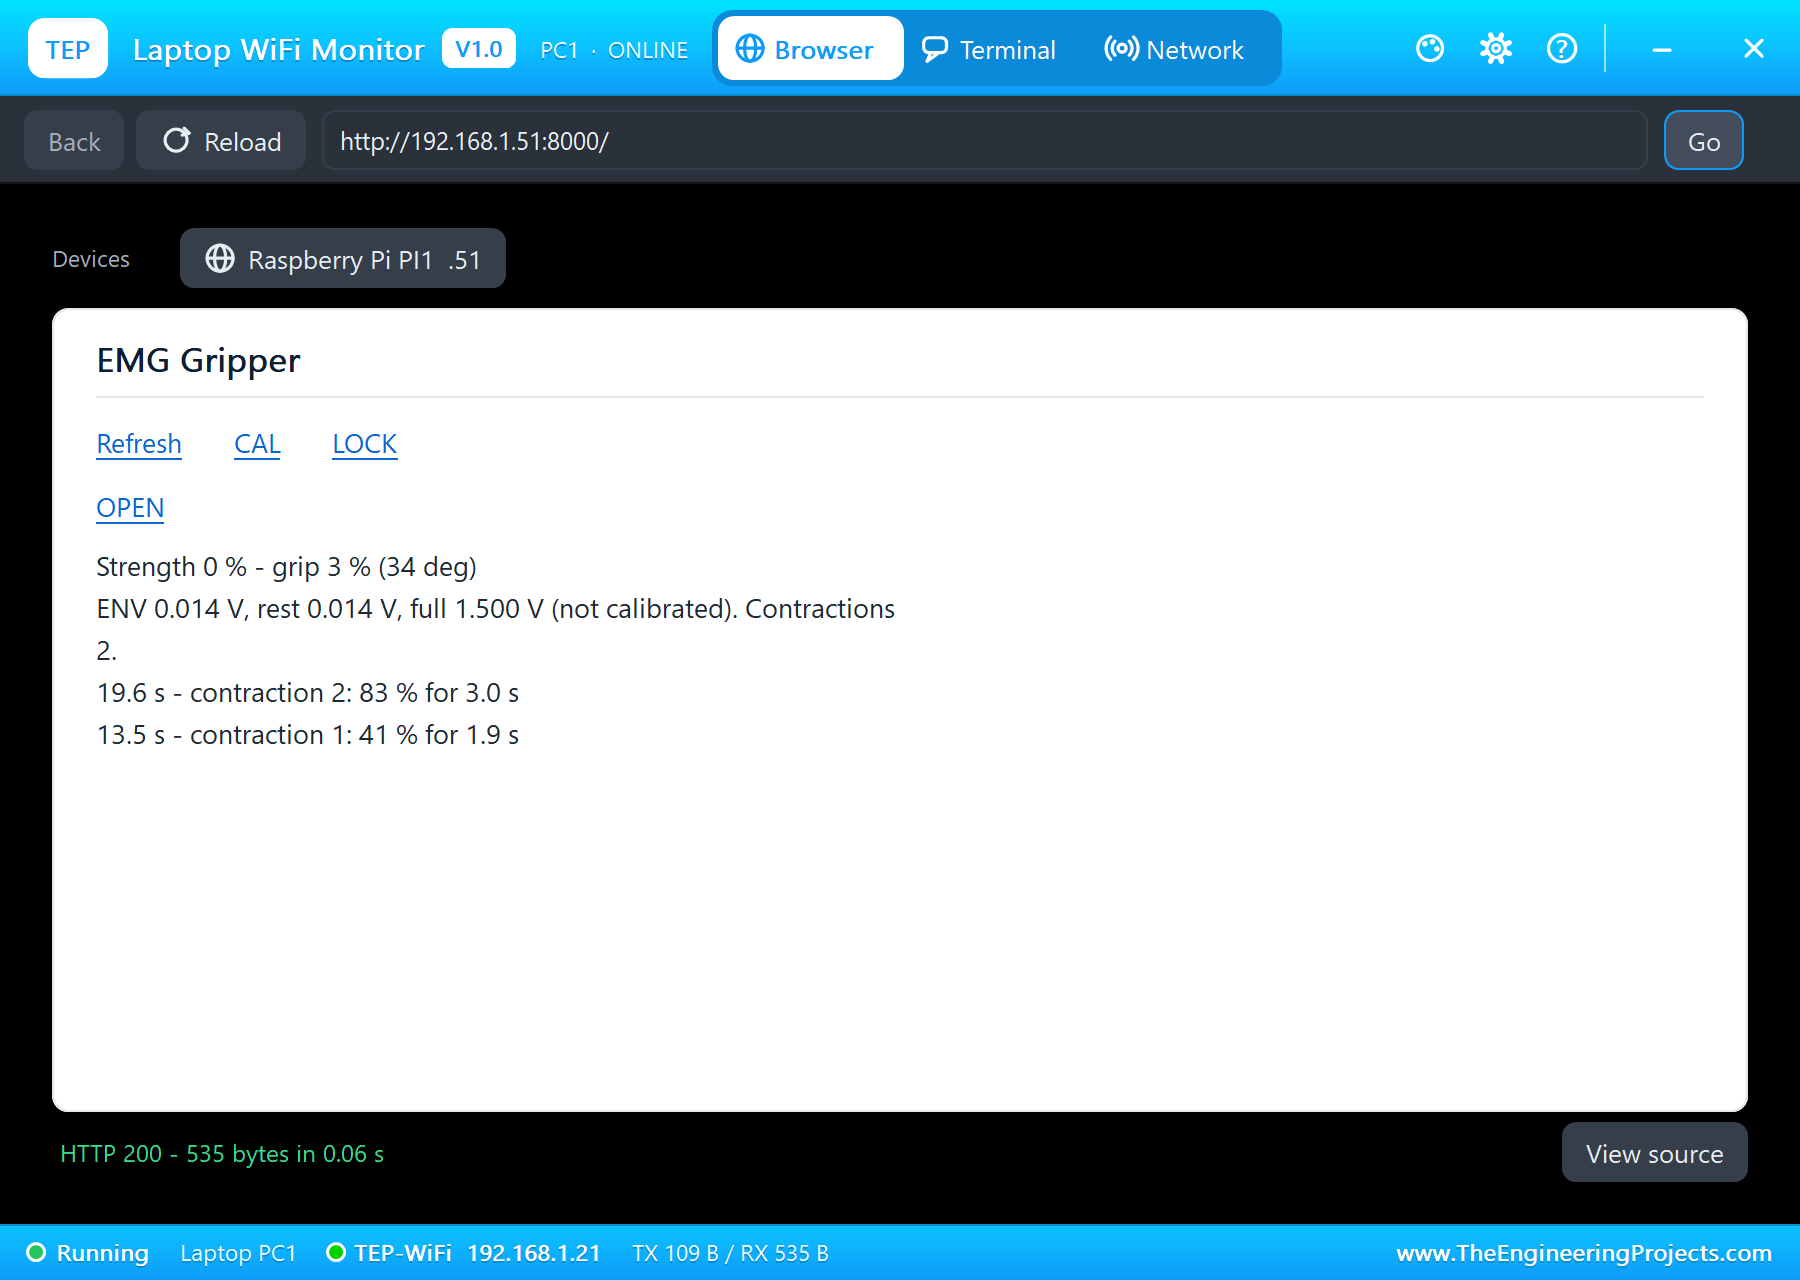
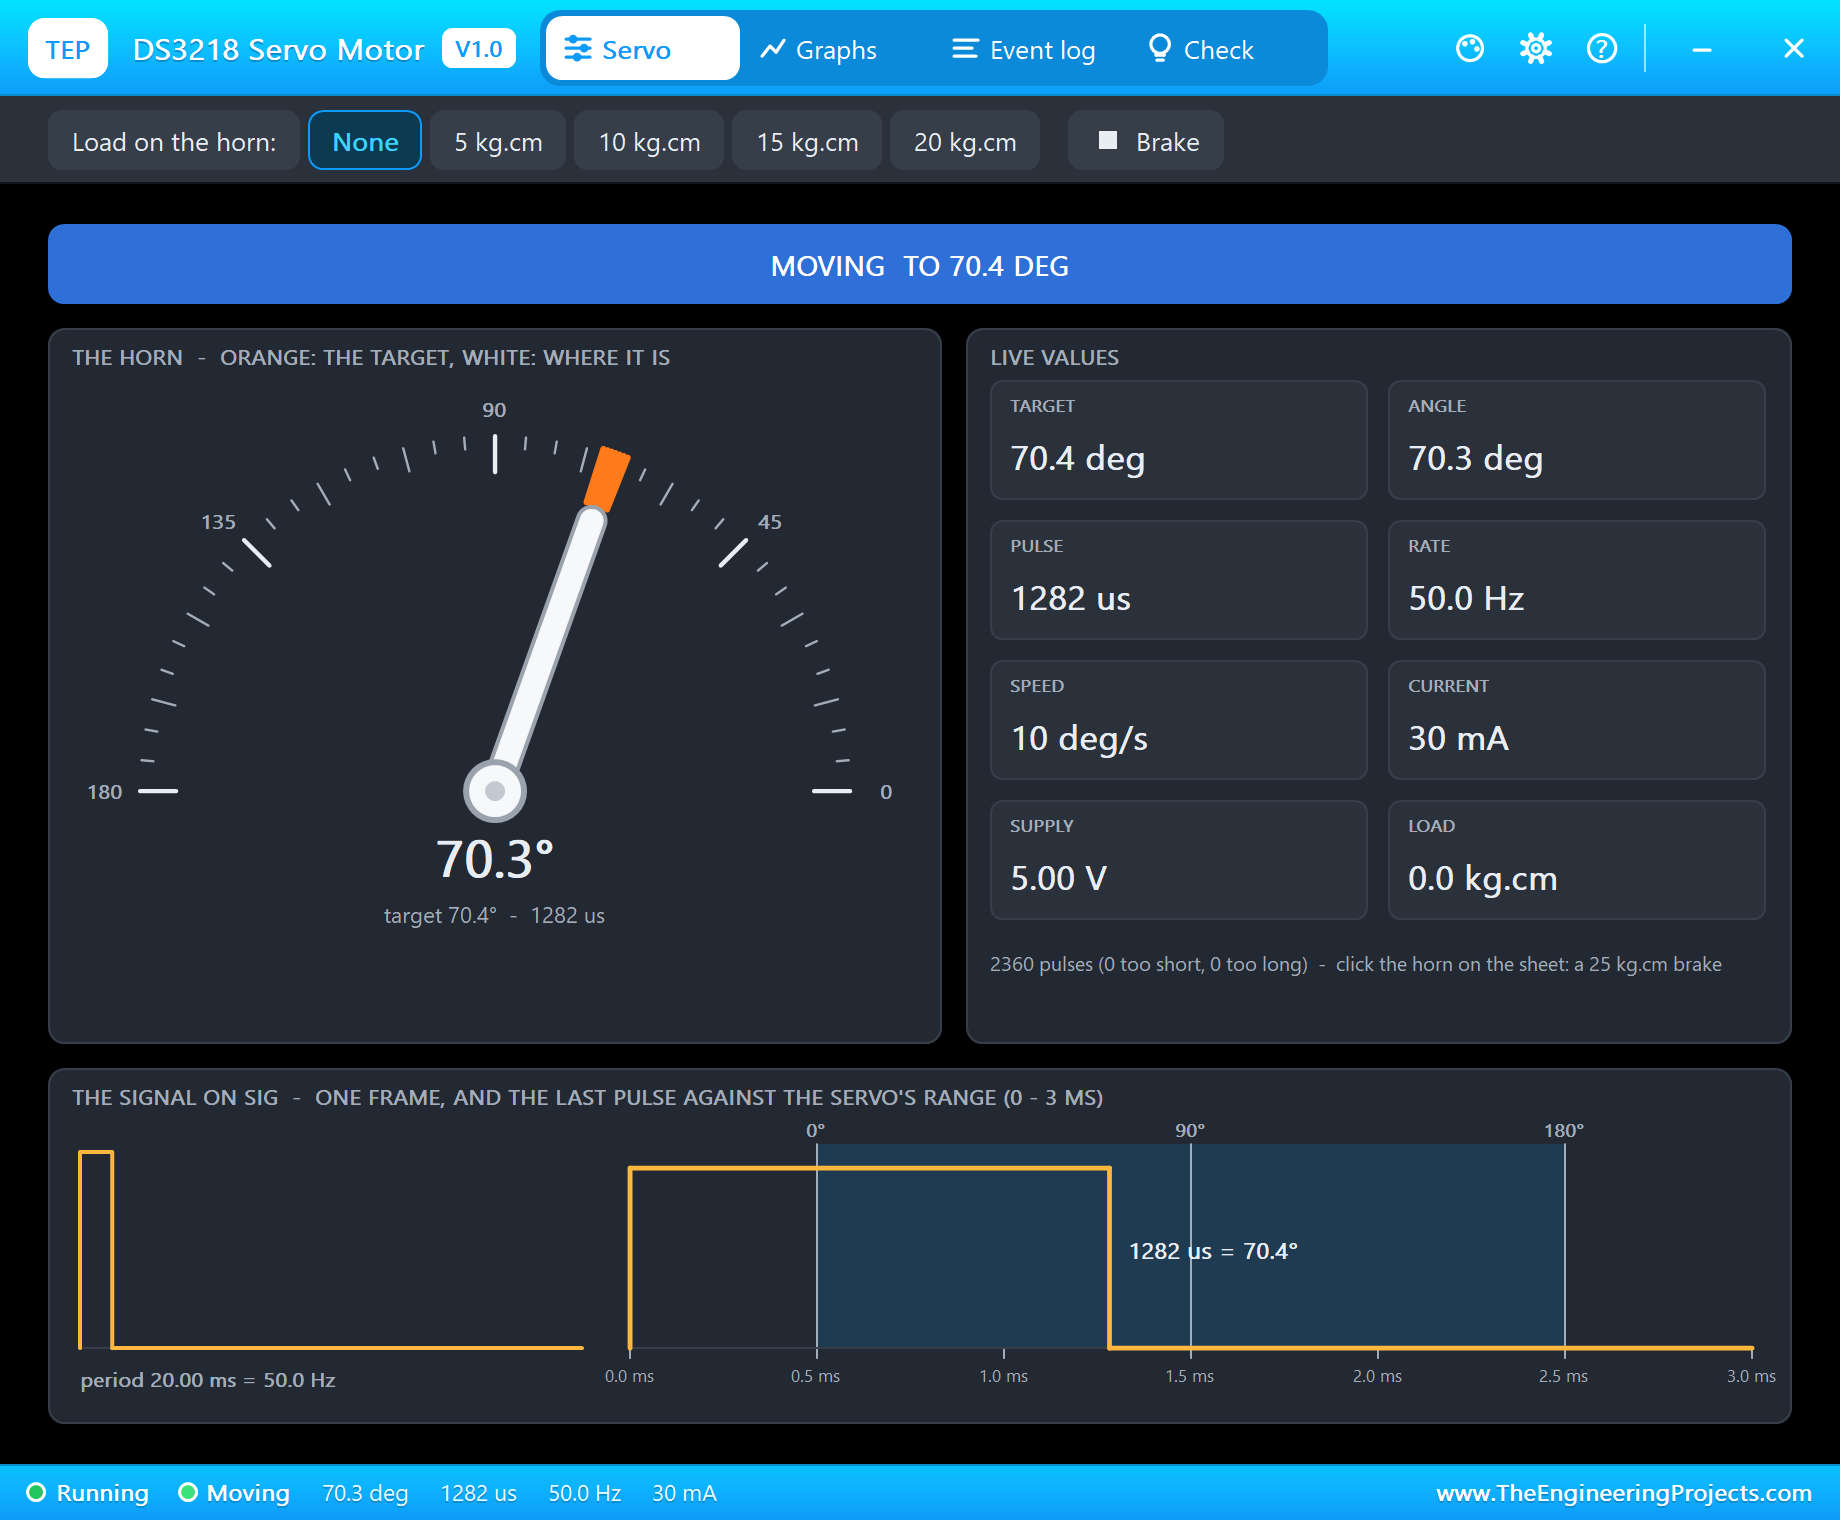
The first contraction, 30 %, gives ENV of 0.44 to 0.56 V and closes the hand to 64 degrees; it is measured as "contraction 1: 41 % for 1.9 s", a little high because the full contraction is still the uncalibrated 1.5 V. The 60 % contraction at 17 s gives ENV about 1.0 V and a grip of about 105 degrees: the hand three quarters closed, held there for as long as the muscle holds its effort, and opening again within half a second when it relaxes.
Calibration on a Full Contraction
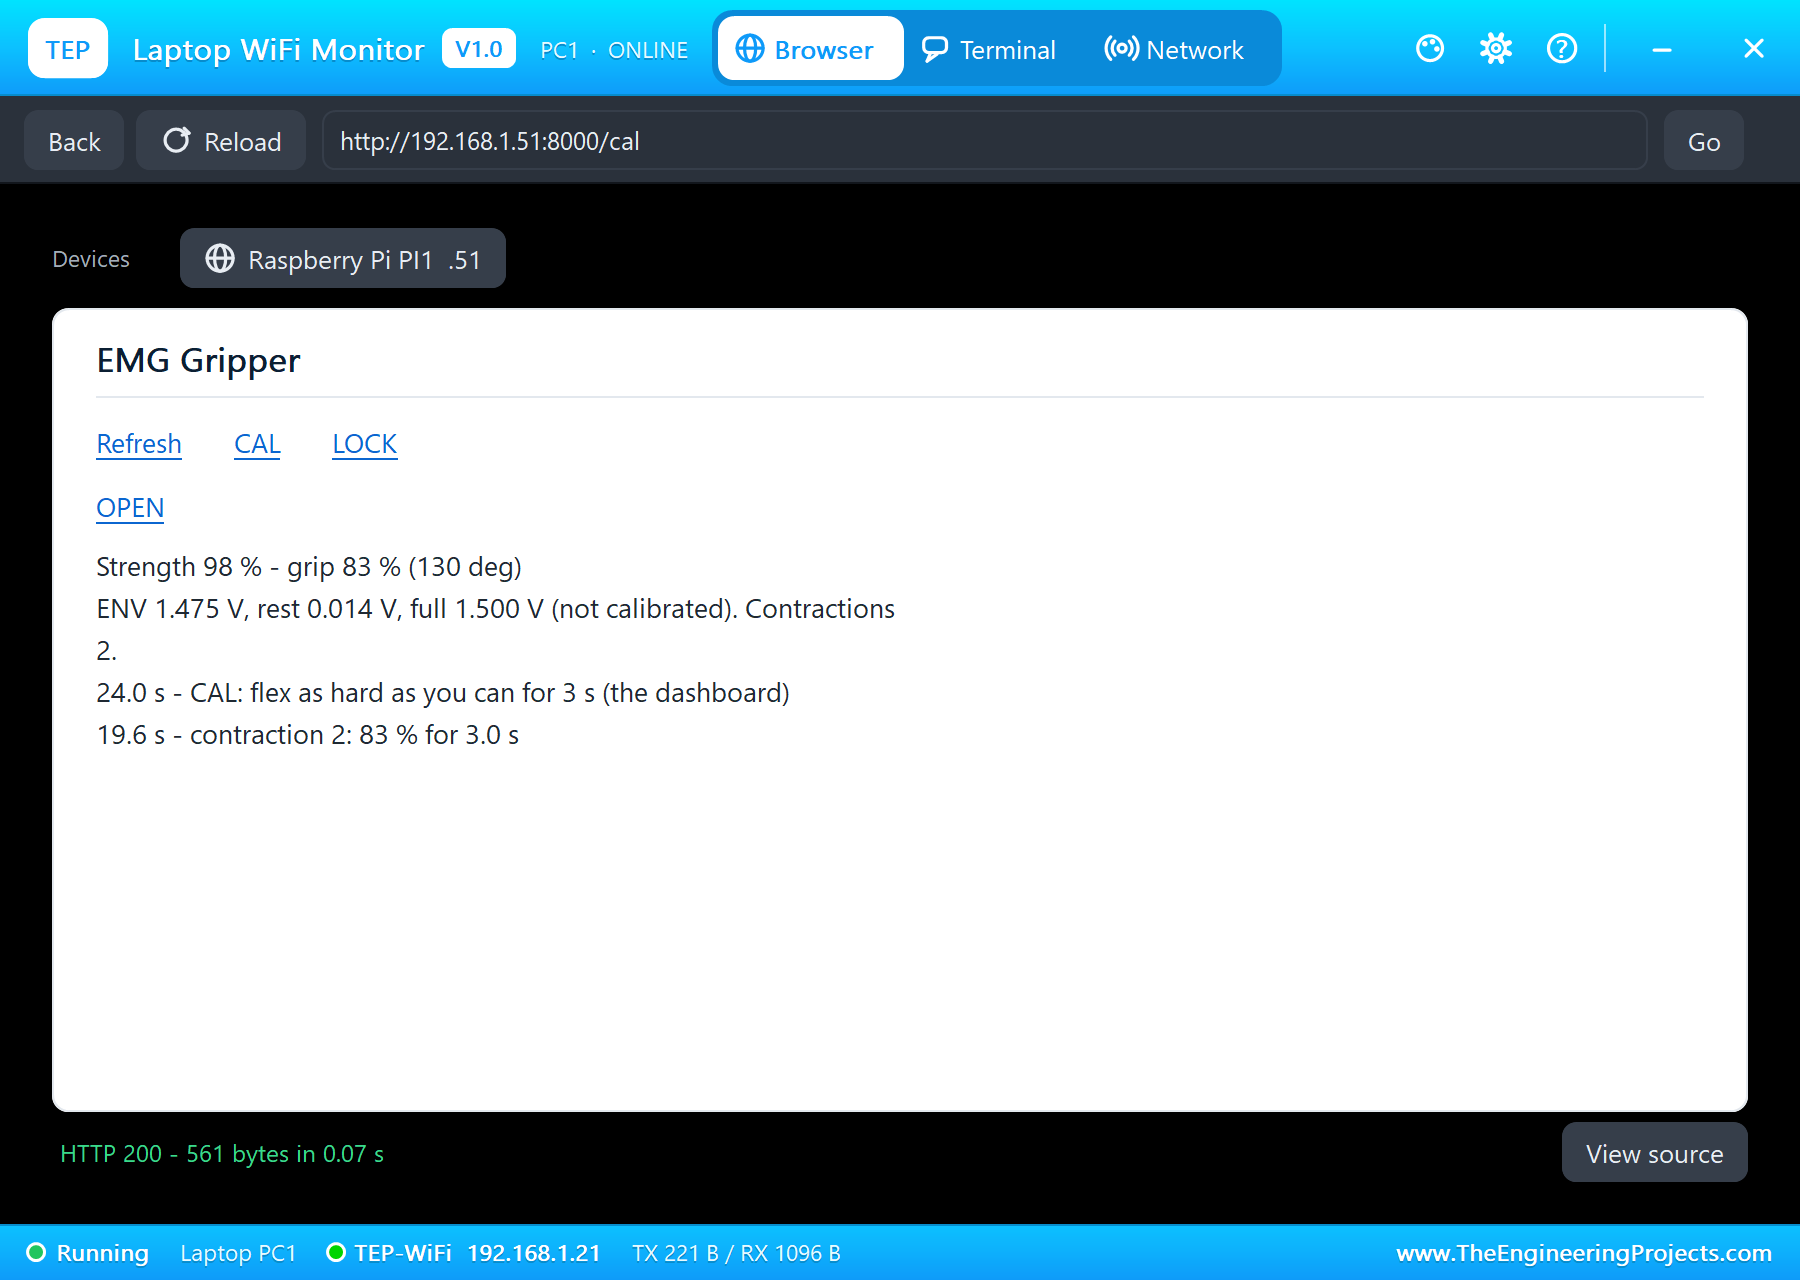
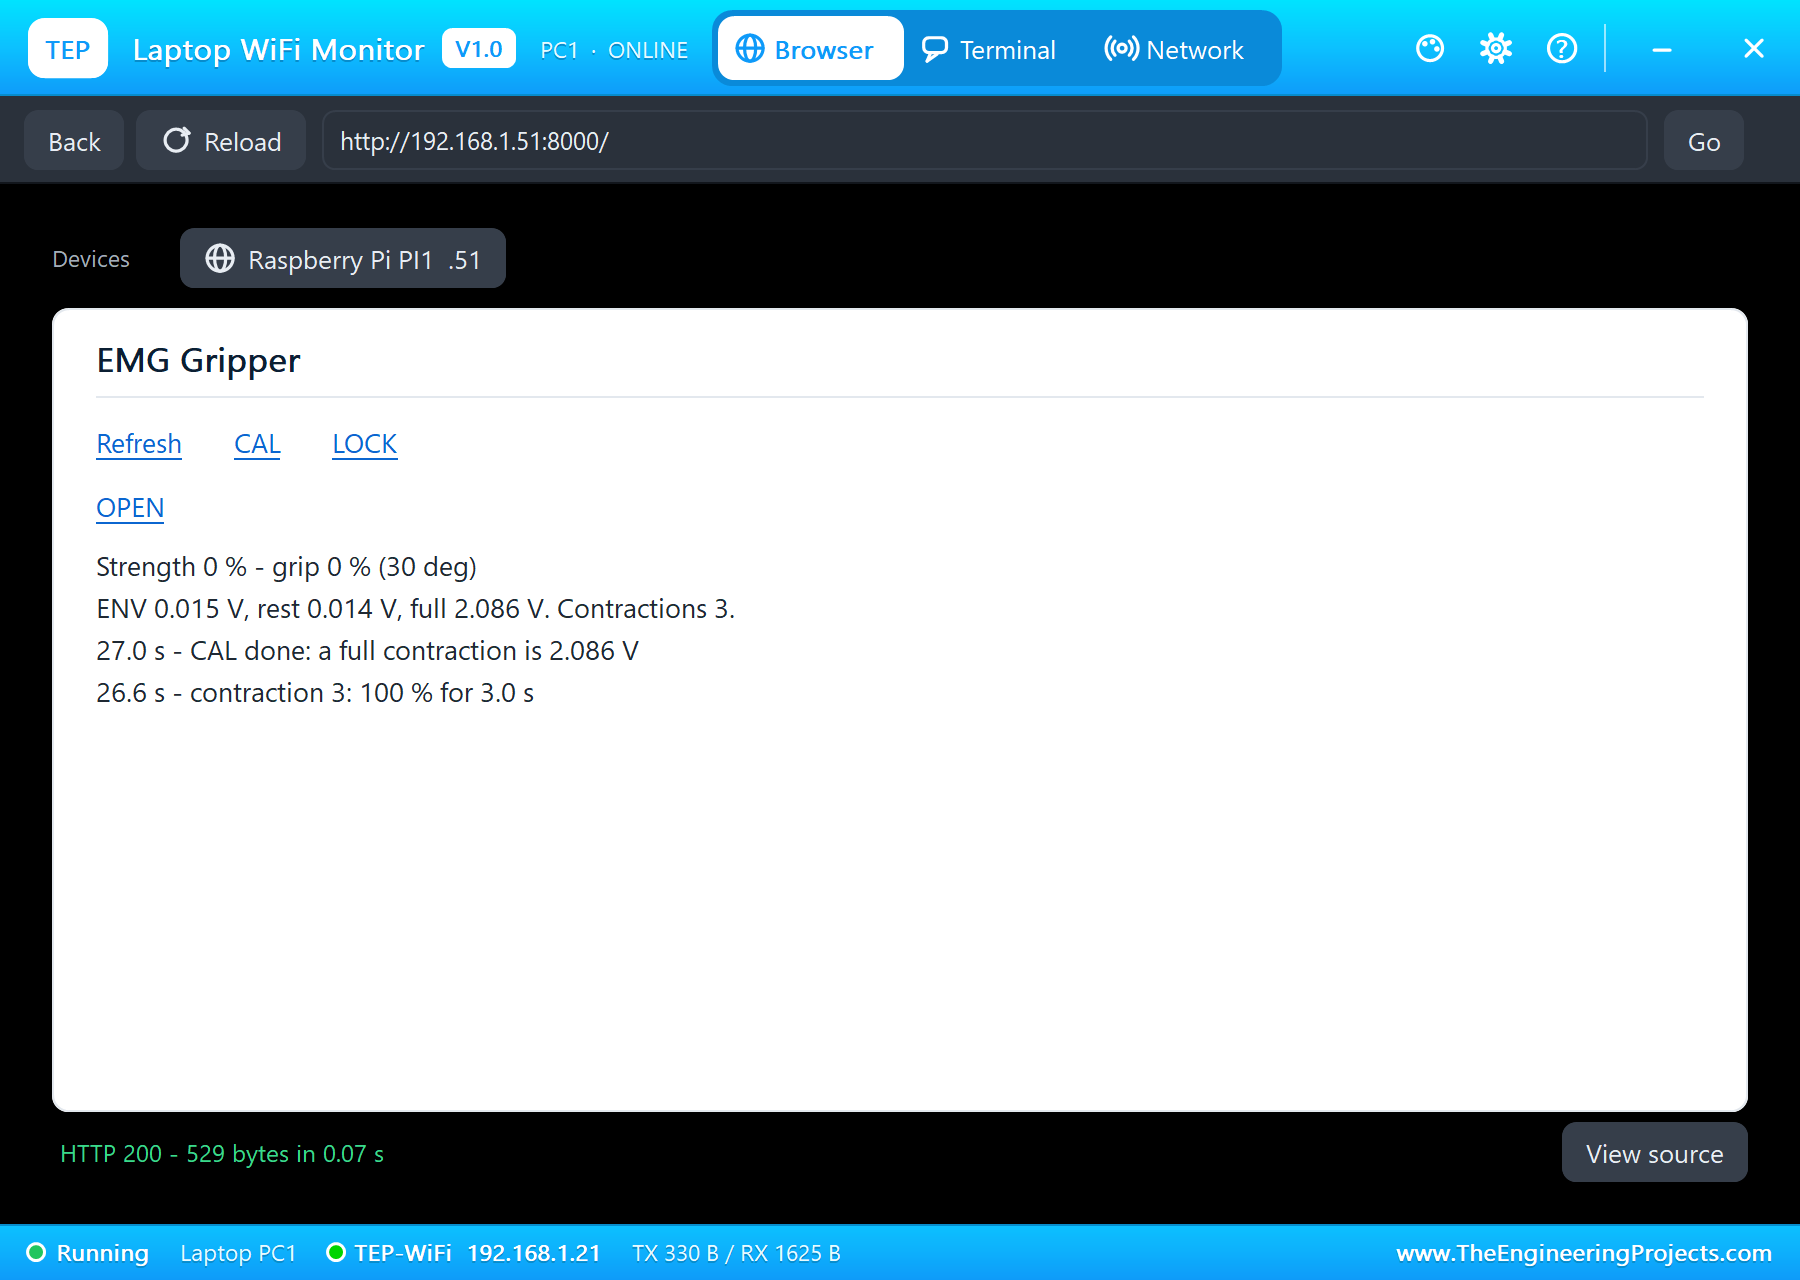
At 24.0 s, as the full contraction begins, CAL on the laptop starts the three-second recording: "CAL: flex as hard as you can for 3 s". At 27.0 s: "CAL done: a full contraction is 2.086 V", the strongest envelope of those three seconds. During the full contraction the hand closes completely, 149.8 degrees. From now on every strength is measured against 2.086 V: the later contractions read lower, and closer to the truth, than before CAL.
LOCK: Holding Without Effort
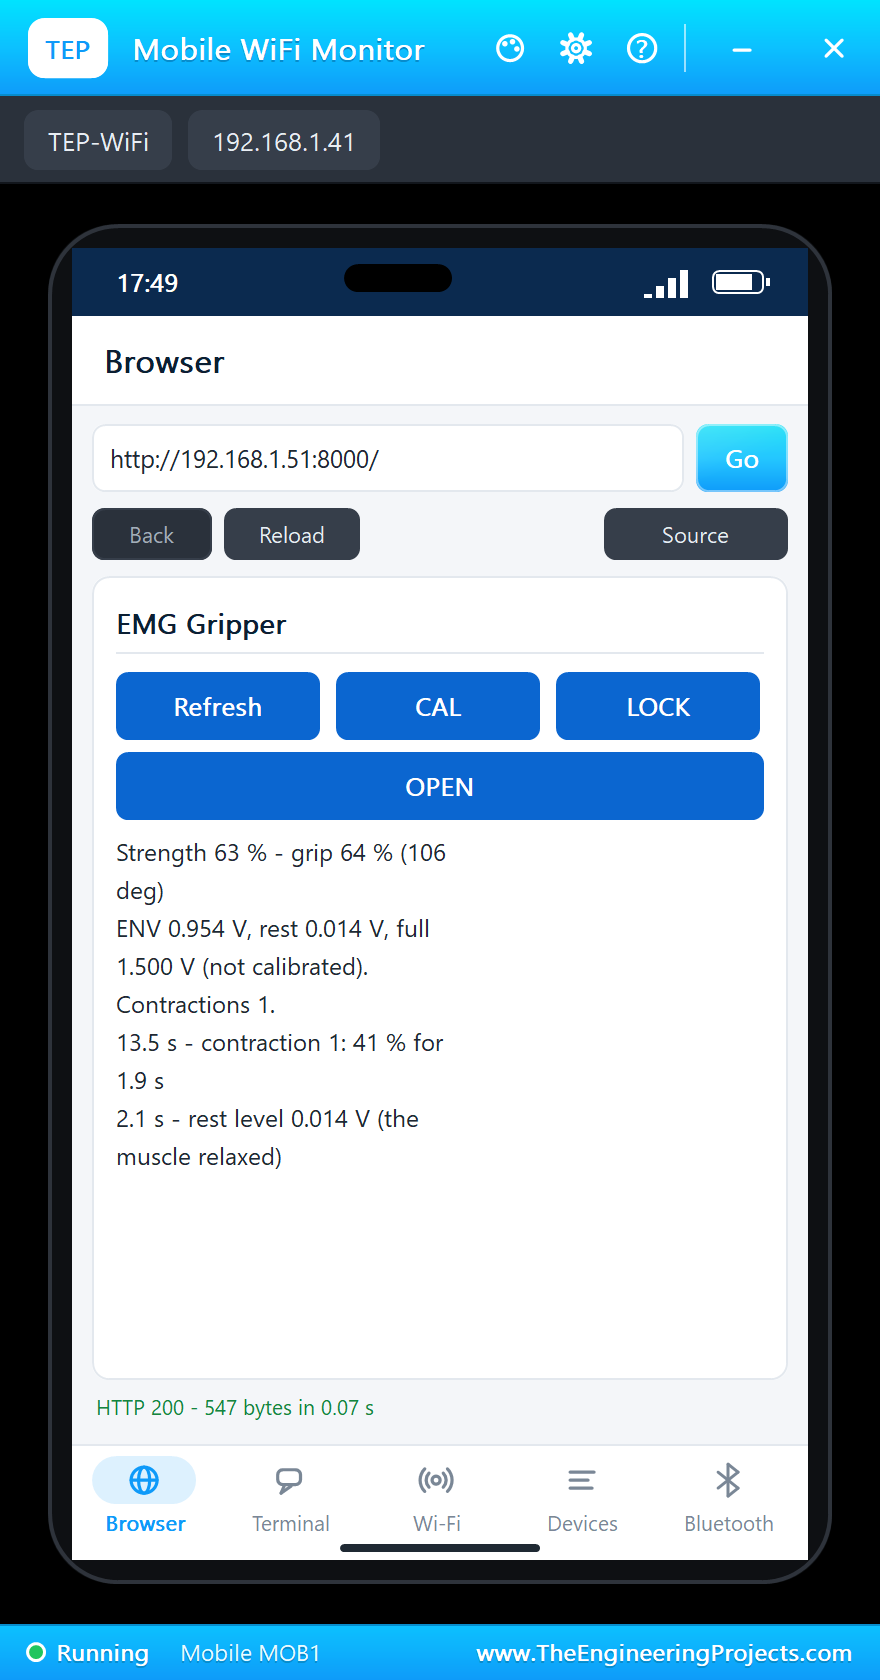
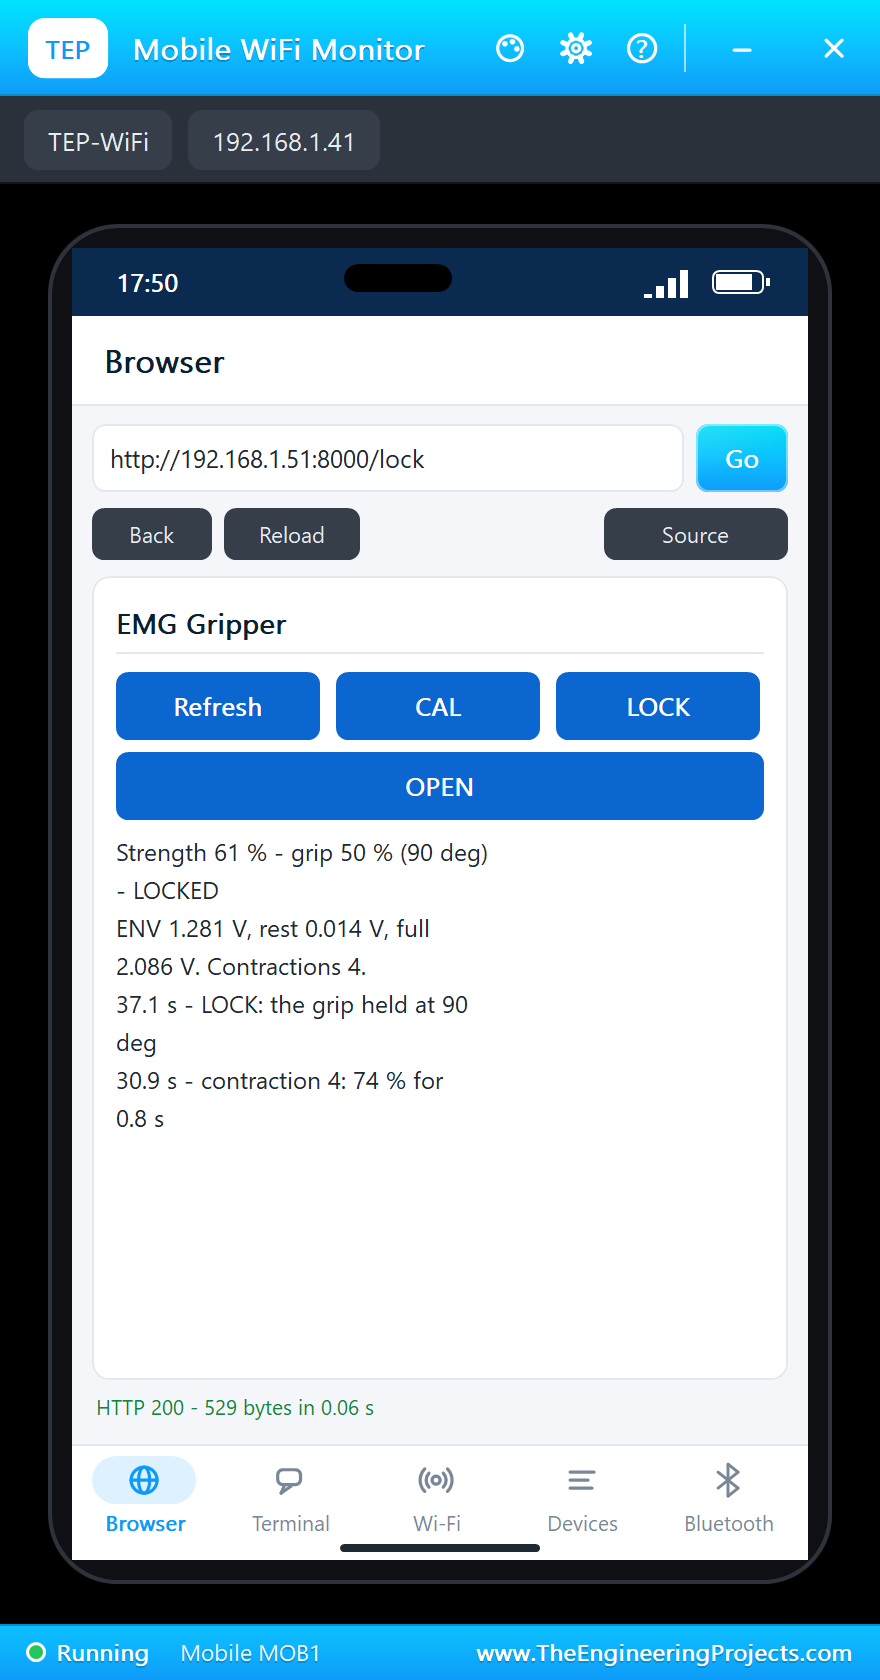
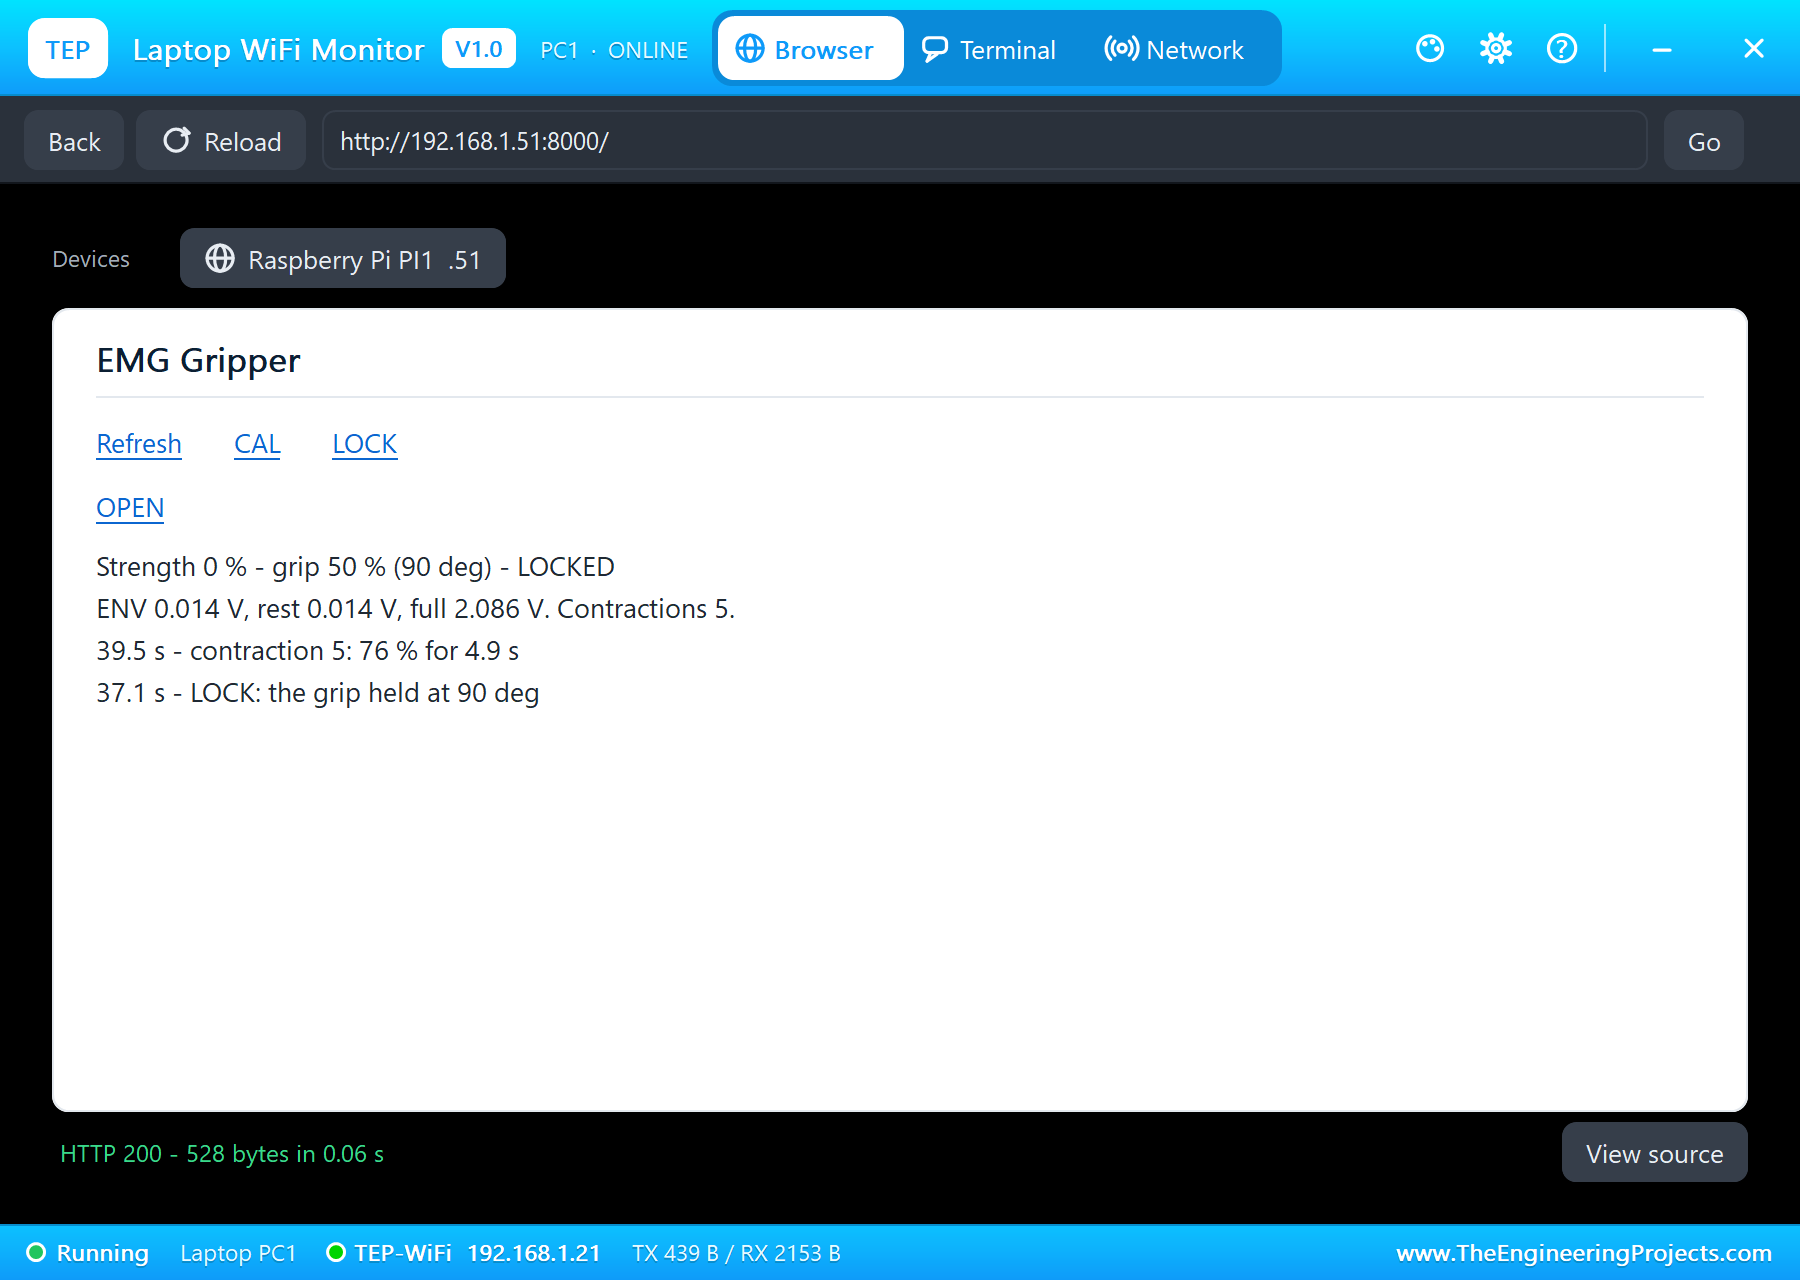
The 70 % contraction at 35 s closes the hand to about 91 degrees. At 37.1 s LOCK on the phone: "LOCK: the grip held at 90 deg", and the red LED lights. The muscle keeps working for another three seconds, its strength wandering between 50 and 63 %, but the grip stays at 89.5 degrees; at 40 s the muscle relaxes, ENV falls to 0.014 V, and the grip still stays at 89.5 degrees. This is the point of LOCK: the hand holds what it holds while the arm rests.
OPEN, and Control Again
At 42.1 s OPEN on the laptop releases the lock and opens the hand to 30 degrees. The last contraction, 50 % at 46 s, closes it to 71 degrees: the muscle drives the hand again. Six contractions in all, each with its peak and its length in the log.
The Numbers of the Run
| What | Result |
|---|---|
| Rest level | 0.014 V |
| 30 % / 60 % / 70 % | grip 64 / about 105 / about 91 degrees |
| Full contraction | CAL 2.086 V; the gripper closed at 149.8 degrees |
| LOCK | held at 89.5 degrees with the muscle relaxed |
| After OPEN | 50 % closes the hand to 71 degrees |
| Simulation | 50.1 s of simulation, 6 contractions |
Download the Project Files
Click the button below to download EMG-Muscle-Controlled-Gripper-Raspberry-Pi-5-Proteus-Simulation-v1.0.zip (about 14.3 MB, without the source code of the models):
EMG Muscle-Controlled Gripper on Raspberry Pi 5 in Proteus Simulation V1.0- Proteus Simulation: Pi-5-EMG-Gripper.pdsprj, the program emg_gripper.py and copies of the models.
- Python Code: emg_gripper.py, the complete program.
- Proteus Library Files: the LIB files of the Raspberry Pi 5, the EMG sensor, the ADS1115, the DS3218, the LED, the resistor and the two WiFi Monitors.
- Proteus Model Files: the DLL models and the TEPPi folder, the Python 3.11 and the runtime that the Pi board runs.
- README.txt: the installation steps, the properties, the test results and the links to every library post.
No Proteus yet? Read How to Download and Install Proteus 7 and 8. New to libraries? Follow How to Install a New Library in Proteus.
How to Install the Project Files
- Close Proteus and extract the whole zip file, for example to your Desktop.
- Copy the files from Proteus Library Files into the LIBRARY folder of Proteus.
- Copy everything in Proteus Model Files, the DLL files and the TEPPi folder, into the MODELS folder.
- Start Proteus and open the project from the Proteus Simulation folder.
Changing the Code
The program is plain Python 3: edit emg_gripper.py beside the project and press Play again; the Pi board runs the new file. The angles, the dead band and the smoothing are at the top; the contractions are U1's FLEX property, "start-end:percent" in seconds. The same program runs on a real Raspberry Pi 5 with Raspberry Pi OS and lgpio. For our other Raspberry Pi 5 project with servos, a four-joint arm, see the IoT Robot Arm Controller with Raspberry Pi 5.
Ideas to Extend the Project
- Use two EMG sensors, one on the flexors and one on the extensors, to close and open the hand separately, as most prostheses do.
- Switch between grip patterns with a quick double flex.
- Add a force sensor in the gripper's jaws and stop closing at a set force, so an egg survives.
- Log the contractions over a day as a muscle-training tracker.
- Drive a whole robot arm, one muscle for each joint.
- Show the live EMG envelope as a graph on the dashboard.
From Simulation to Real Hardware
- Electrode placement: put MID and END along the muscle's belly and REF on a bony spot; clean skin gives a cleaner signal.
- Isolation: power the sensor from a battery or an isolated supply when it is on a person, never from a mains-connected computer.
- Calibrate often: sweat, fatigue and electrode movement change the envelope during a session; repeat CAL.
- Servo power: give the DS3218 its own 5 to 6.8 V supply that can deliver its 3 A stall current, with a common ground.
- Not a medical device: this is for learning and hobby projects only.
Troubleshooting
- The hand moves with a relaxed muscle: the rest level was taken during a contraction; restart relaxed.
- The hand never closes fully: the full contraction is set too high; CAL during a hard contraction.
- The hand closes at a weak contraction: CAL was done with a weak flex; do it again.
- The servo does not move: SIG is not on GPIO18, or V+ has no 5 V.
- The terminal cannot start Python: the TEPPi folder is not in MODELS.
Limitations of the Simulation
- The muscle is scripted by the FLEX property; a real EMG varies with fatigue, sweat and the electrodes' position.
- The gripper is the servo alone; there are no jaws and no object, so the grip is an angle, not a force.
- The network is simulated: the dashboard travels between the Pi and the two monitors inside Proteus; the times in this tutorial are simulation time.
- Raspberry Pi is a trademark of Raspberry Pi Ltd, MyoWare of Advancer Technologies, and the ADS1115 is made by Texas Instruments. This project is not made or endorsed by them or by Labcenter, and it is not a medical device.
So, that was all about the EMG Muscle-Controlled Gripper on Raspberry Pi 5 in Proteus Simulation. I hope it helps you take your first steps with biosignals: a muscle's electricity turned into an envelope, a rest level and a calibration that fit the arm, a dead band and a filter that make the hand steady, and pulses that turn the strength into a grip, all tested in a simulation before you stick a single real electrode on an arm. More IoT projects with the ESP32 and the Raspberry Pi 5 are coming in this series. If you have any questions, ask in the comments and I will help you out. Till the next tutorial, take care and have fun!