Hello friends, I hope you all are doing great. Today, I am going to share the IoT Kiln Temperature Monitor with Raspberry Pi 5 - Proteus Simulation, the twenty-sixth project of our IoT Projects series. If you have searched for a Proteus simulation of a Raspberry Pi thermocouple monitor for a kiln or a furnace, here is a complete one. A Raspberry Pi 5 reads a K-type thermocouple through a MAX6675 converter, shows the temperature and the firing stage on a 128 x 64 LCD 12864, sounds an alarm on a mini speaker when the kiln reaches its target or overheats, and serves a live web dashboard that you can open on a laptop or a phone.
A pottery kiln reaches about 1,000 degrees Celsius for a bisque firing, far beyond any ordinary temperature sensor. A thermocouple, two wires of different metals welded together, is the classic sensor for such heat, and the MAX6675 turns its tiny voltage into a clean digital reading. In this tutorial, we will go through the circuit, learn how a thermocouple produces a voltage and why it needs cold-junction compensation, read the MAX6675 over SPI and decode its 16-bit word, drive the LCD 12864 in its serial mode bit by bit, follow a bisque firing through its stages, sound the alarms with PWM tones, walk through the Python program, and then run the simulation: a cold kiln, drying, heating, the target reached, an overshoot with a siren, muting it from a phone, cooling, safe to open, a broken thermocouple and a new firing. At the end, you can download the project with the program, every library file and the Python runtime the Pi needs.
NOTICE: Our team has put a lot of effort into this project: the circuit, the code and every part in the simulation are our own work, and you get them all free. Your feedback is the fuel that keeps us going, so please tell us what you think in the comments below. And if our free projects help you, you can buy us a coffee. So, let's get started with the IoT Kiln Temperature Monitor with Raspberry Pi 5 - Proteus Simulation:
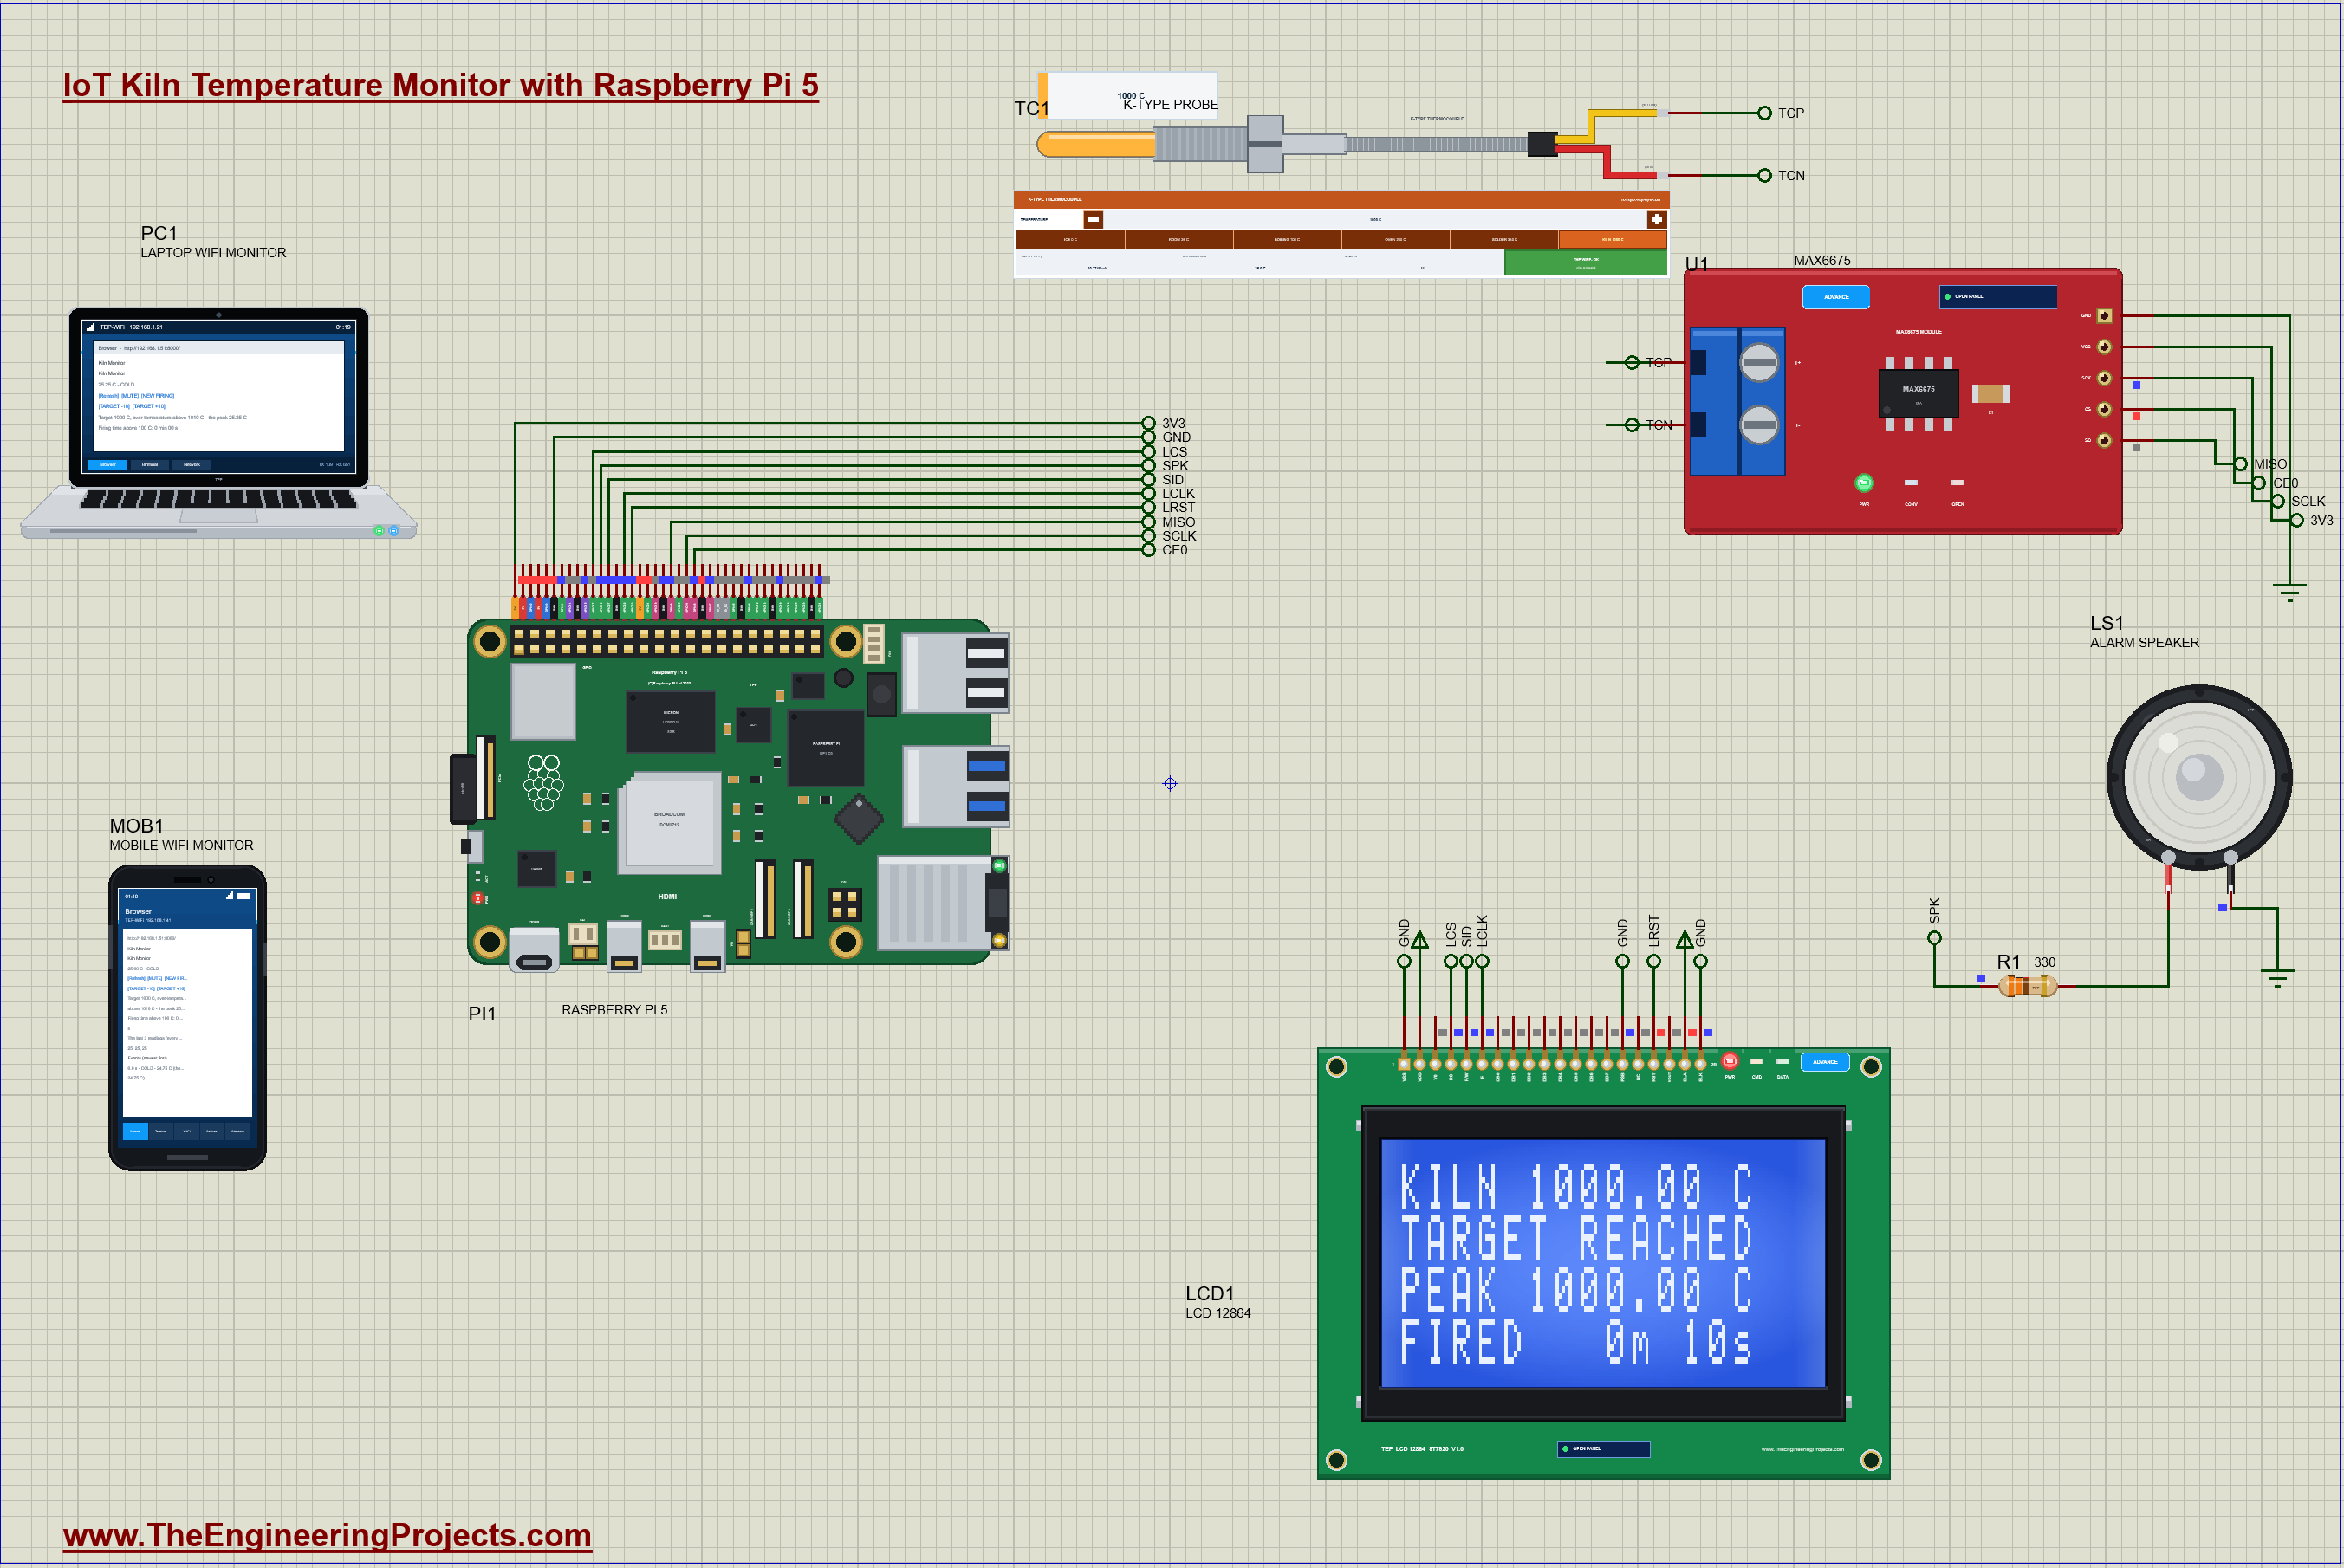
What Does This Kiln Monitor Do?
- Reads up to 1,023.75 degrees: a K-type thermocouple through a MAX6675, two readings a second, in 0.25-degree steps.
- Knows the firing stage: COLD, DRYING, HEATING, PEAK, TARGET REACHED, OVER TEMP, COOLING and SAFE TO OPEN.
- Sounds the alarms: three beeps at the target, a two-tone siren above the limit, a beep every 2 seconds when the thermocouple breaks.
- Shows everything on an LCD 12864: the temperature, the stage, the peak and the firing time, in the display's own font.
- Keeps the peak and the firing time: the hottest point and the time spent above 100 degrees.
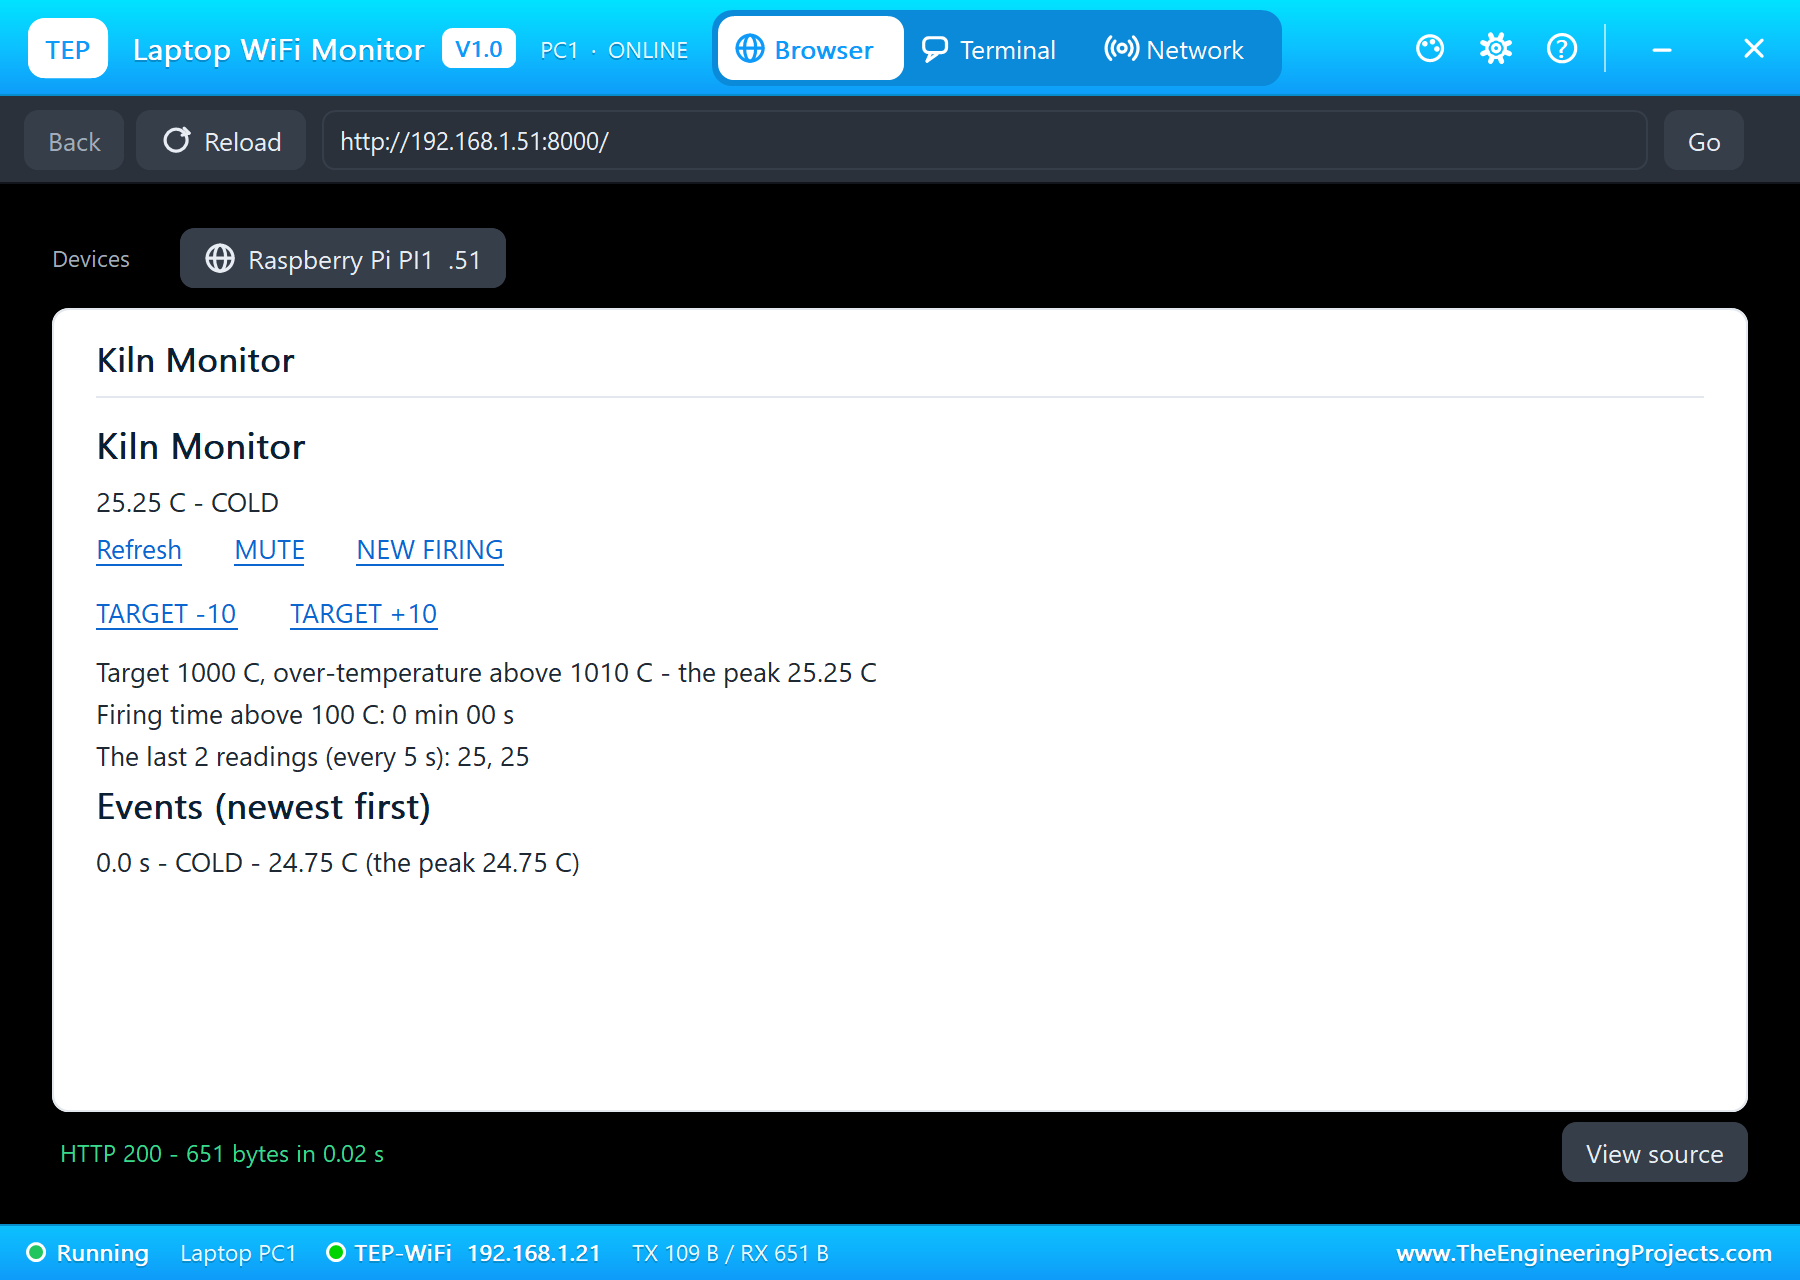
- A dashboard: the readings, the alarms, MUTE, NEW FIRING and the target up or down by 10 degrees.
It is a practical project for anyone who fires pottery, enamels or glass, and a great lesson in SPI, bit-banged serial buses and PWM on the Raspberry Pi 5. In the simulation, the kiln's heat comes from the MAX6675's pop-up: presets from ICE 0 C to KILN 1000 C, steps of 5 and 50 degrees, and a button that breaks the thermocouple's wire.
Components Used in the Proteus Simulation
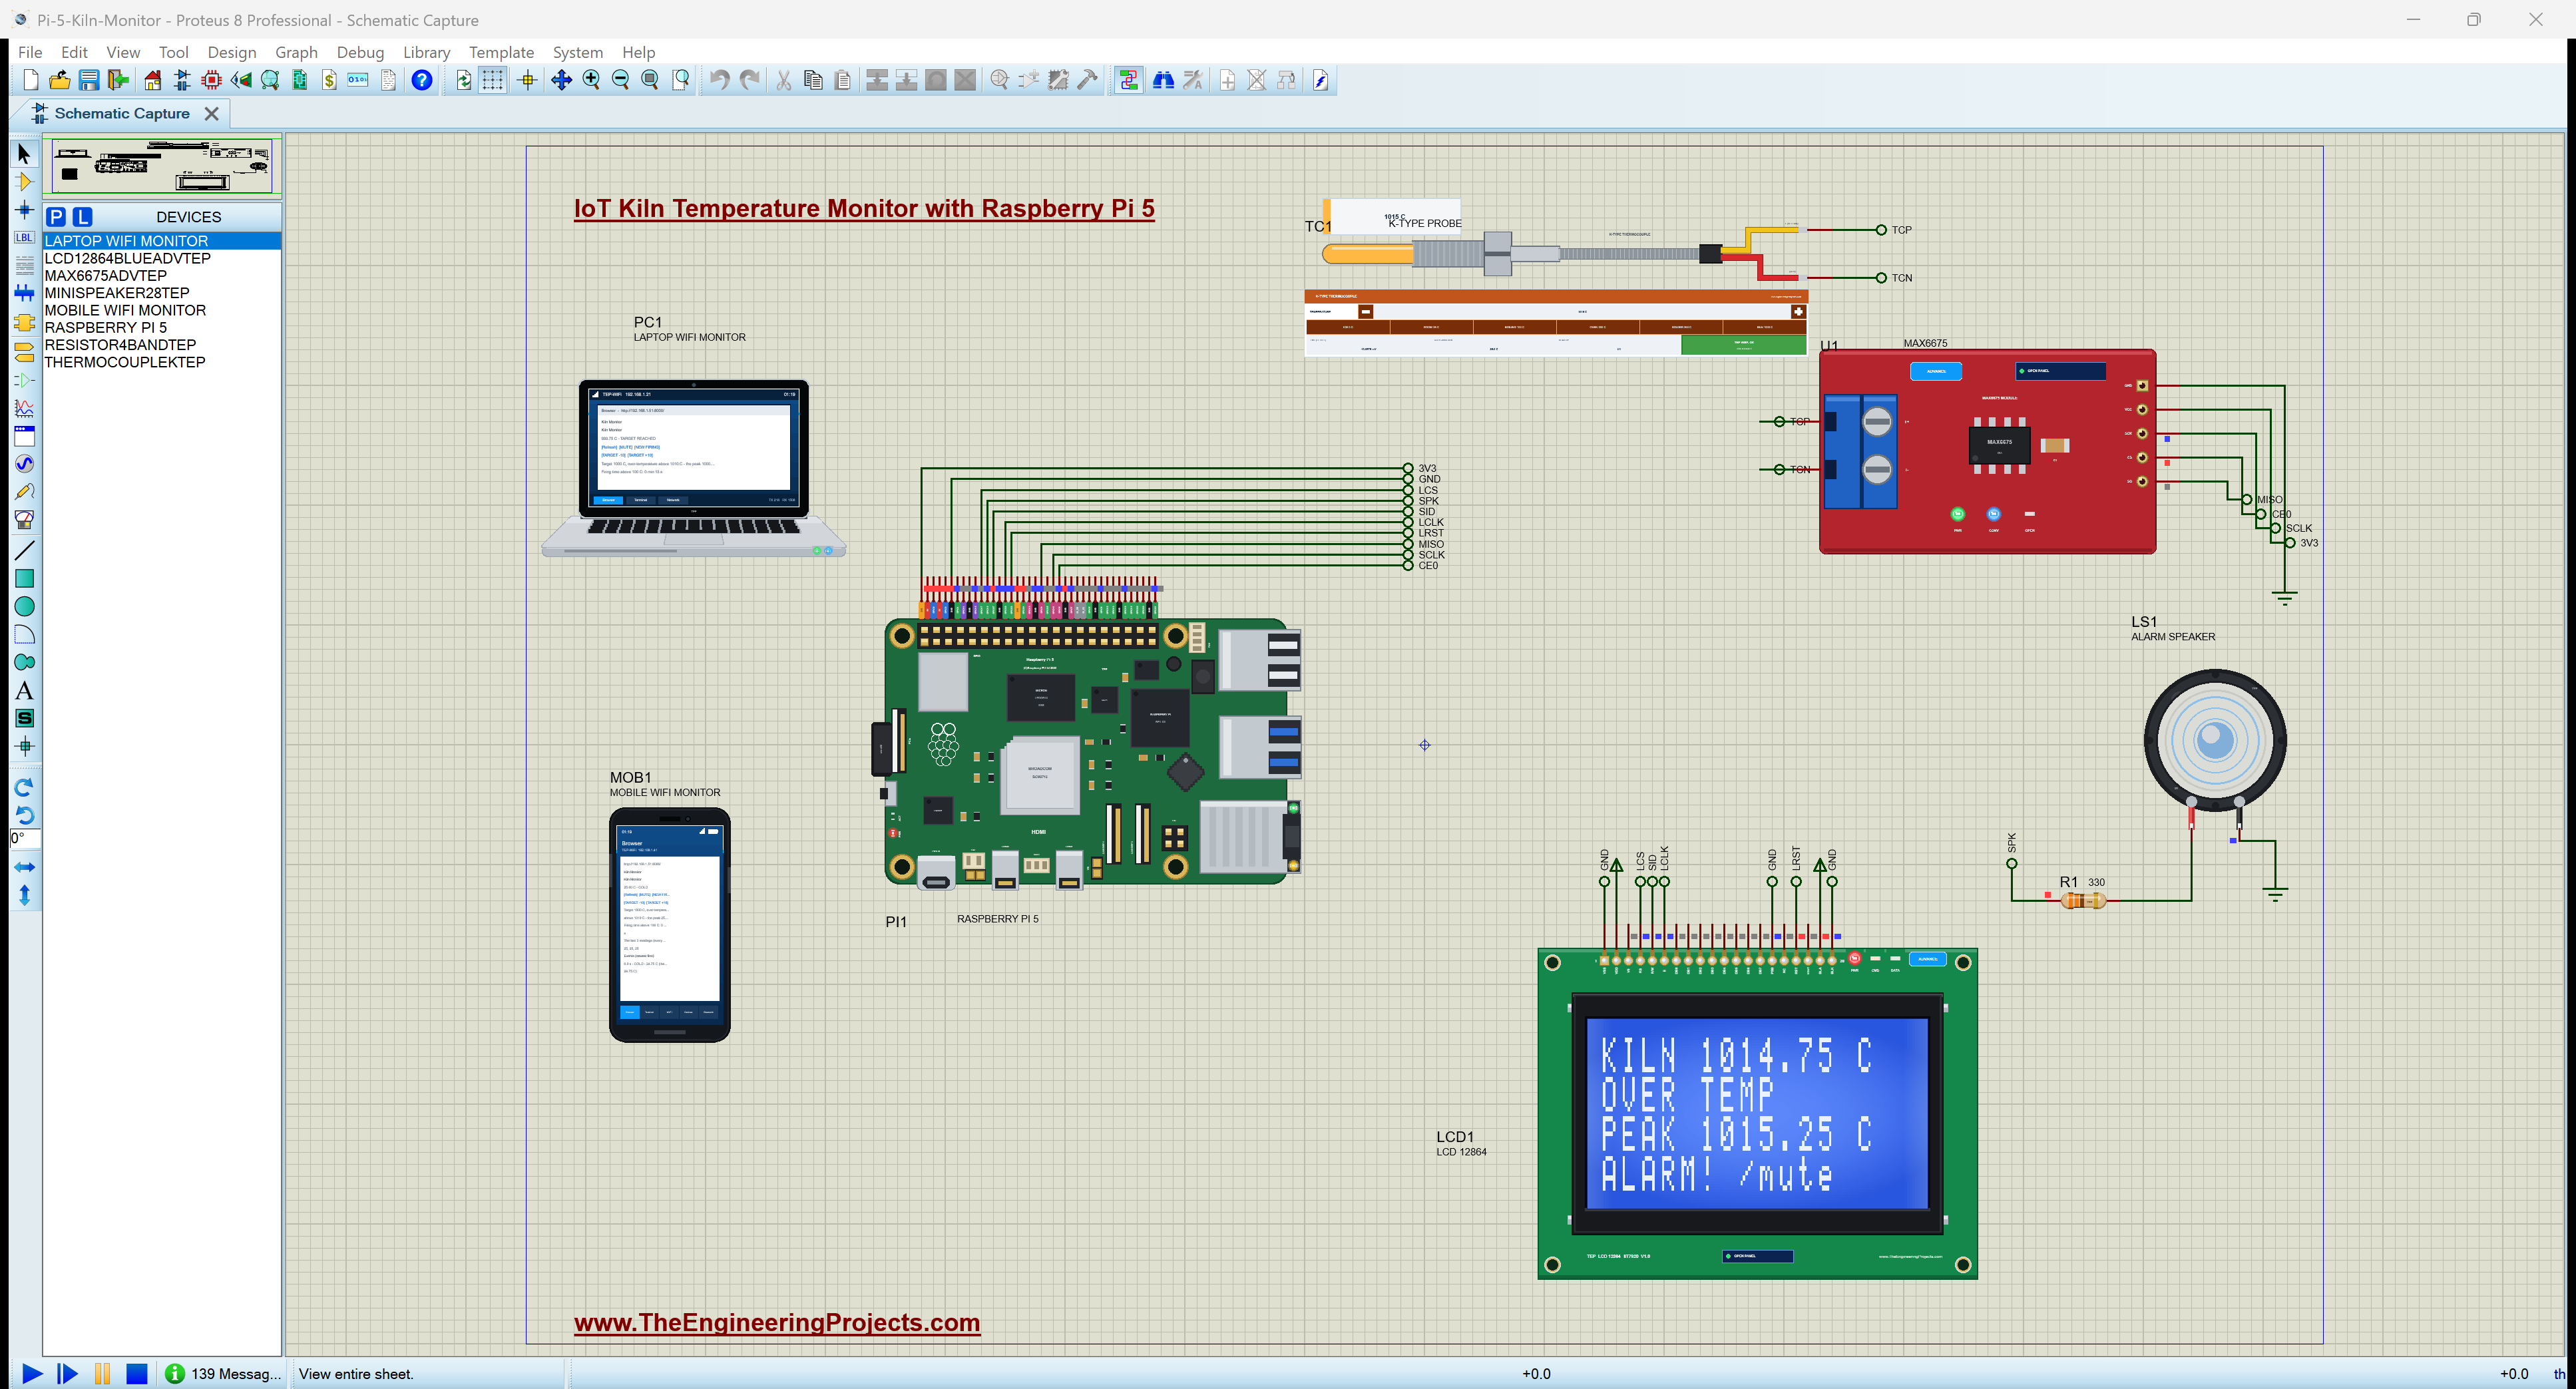
All the parts come from our Proteus libraries, each with its own tutorial. The project zip at the end includes every LIB and DLL file.
| Part | Proteus device | Library post | Connection |
|---|---|---|---|
| Raspberry Pi 5 | RASPBERRY PI 5 | Raspberry Pi 5 Library for Proteus | PI1, Ethernet 192.168.1.51 |
| MAX6675 thermocouple converter | MAX6675ADVTEP | MAX6675 Thermocouple Library for Proteus | U1, SPI0 CE0 |
| K-type thermocouple probe | THERMOCOUPLEKTEP | MAX6675 Thermocouple Library for Proteus | TC1, on T+ / T- |
| LCD 12864 (ST7920), blue | LCD12864BLUEADVTEP | LCD 12864 Library | LCD1, serial mode |
| Mini speaker 28 mm, 8 ohm | MINISPEAKER28TEP | Mini Speaker Library | LS1, GPIO18 through 330 ohm |
| Resistor 330 ohm | RESISTOR4BANDTEP | Resistor Library | R1 |
| Laptop WiFi Monitor | LAPTOP WIFI MONITOR | Laptop WiFi Monitor | PC1 |
| Mobile WiFi Monitor | MOBILE WIFI MONITOR | Mobile WiFi Monitor | MOB1 |
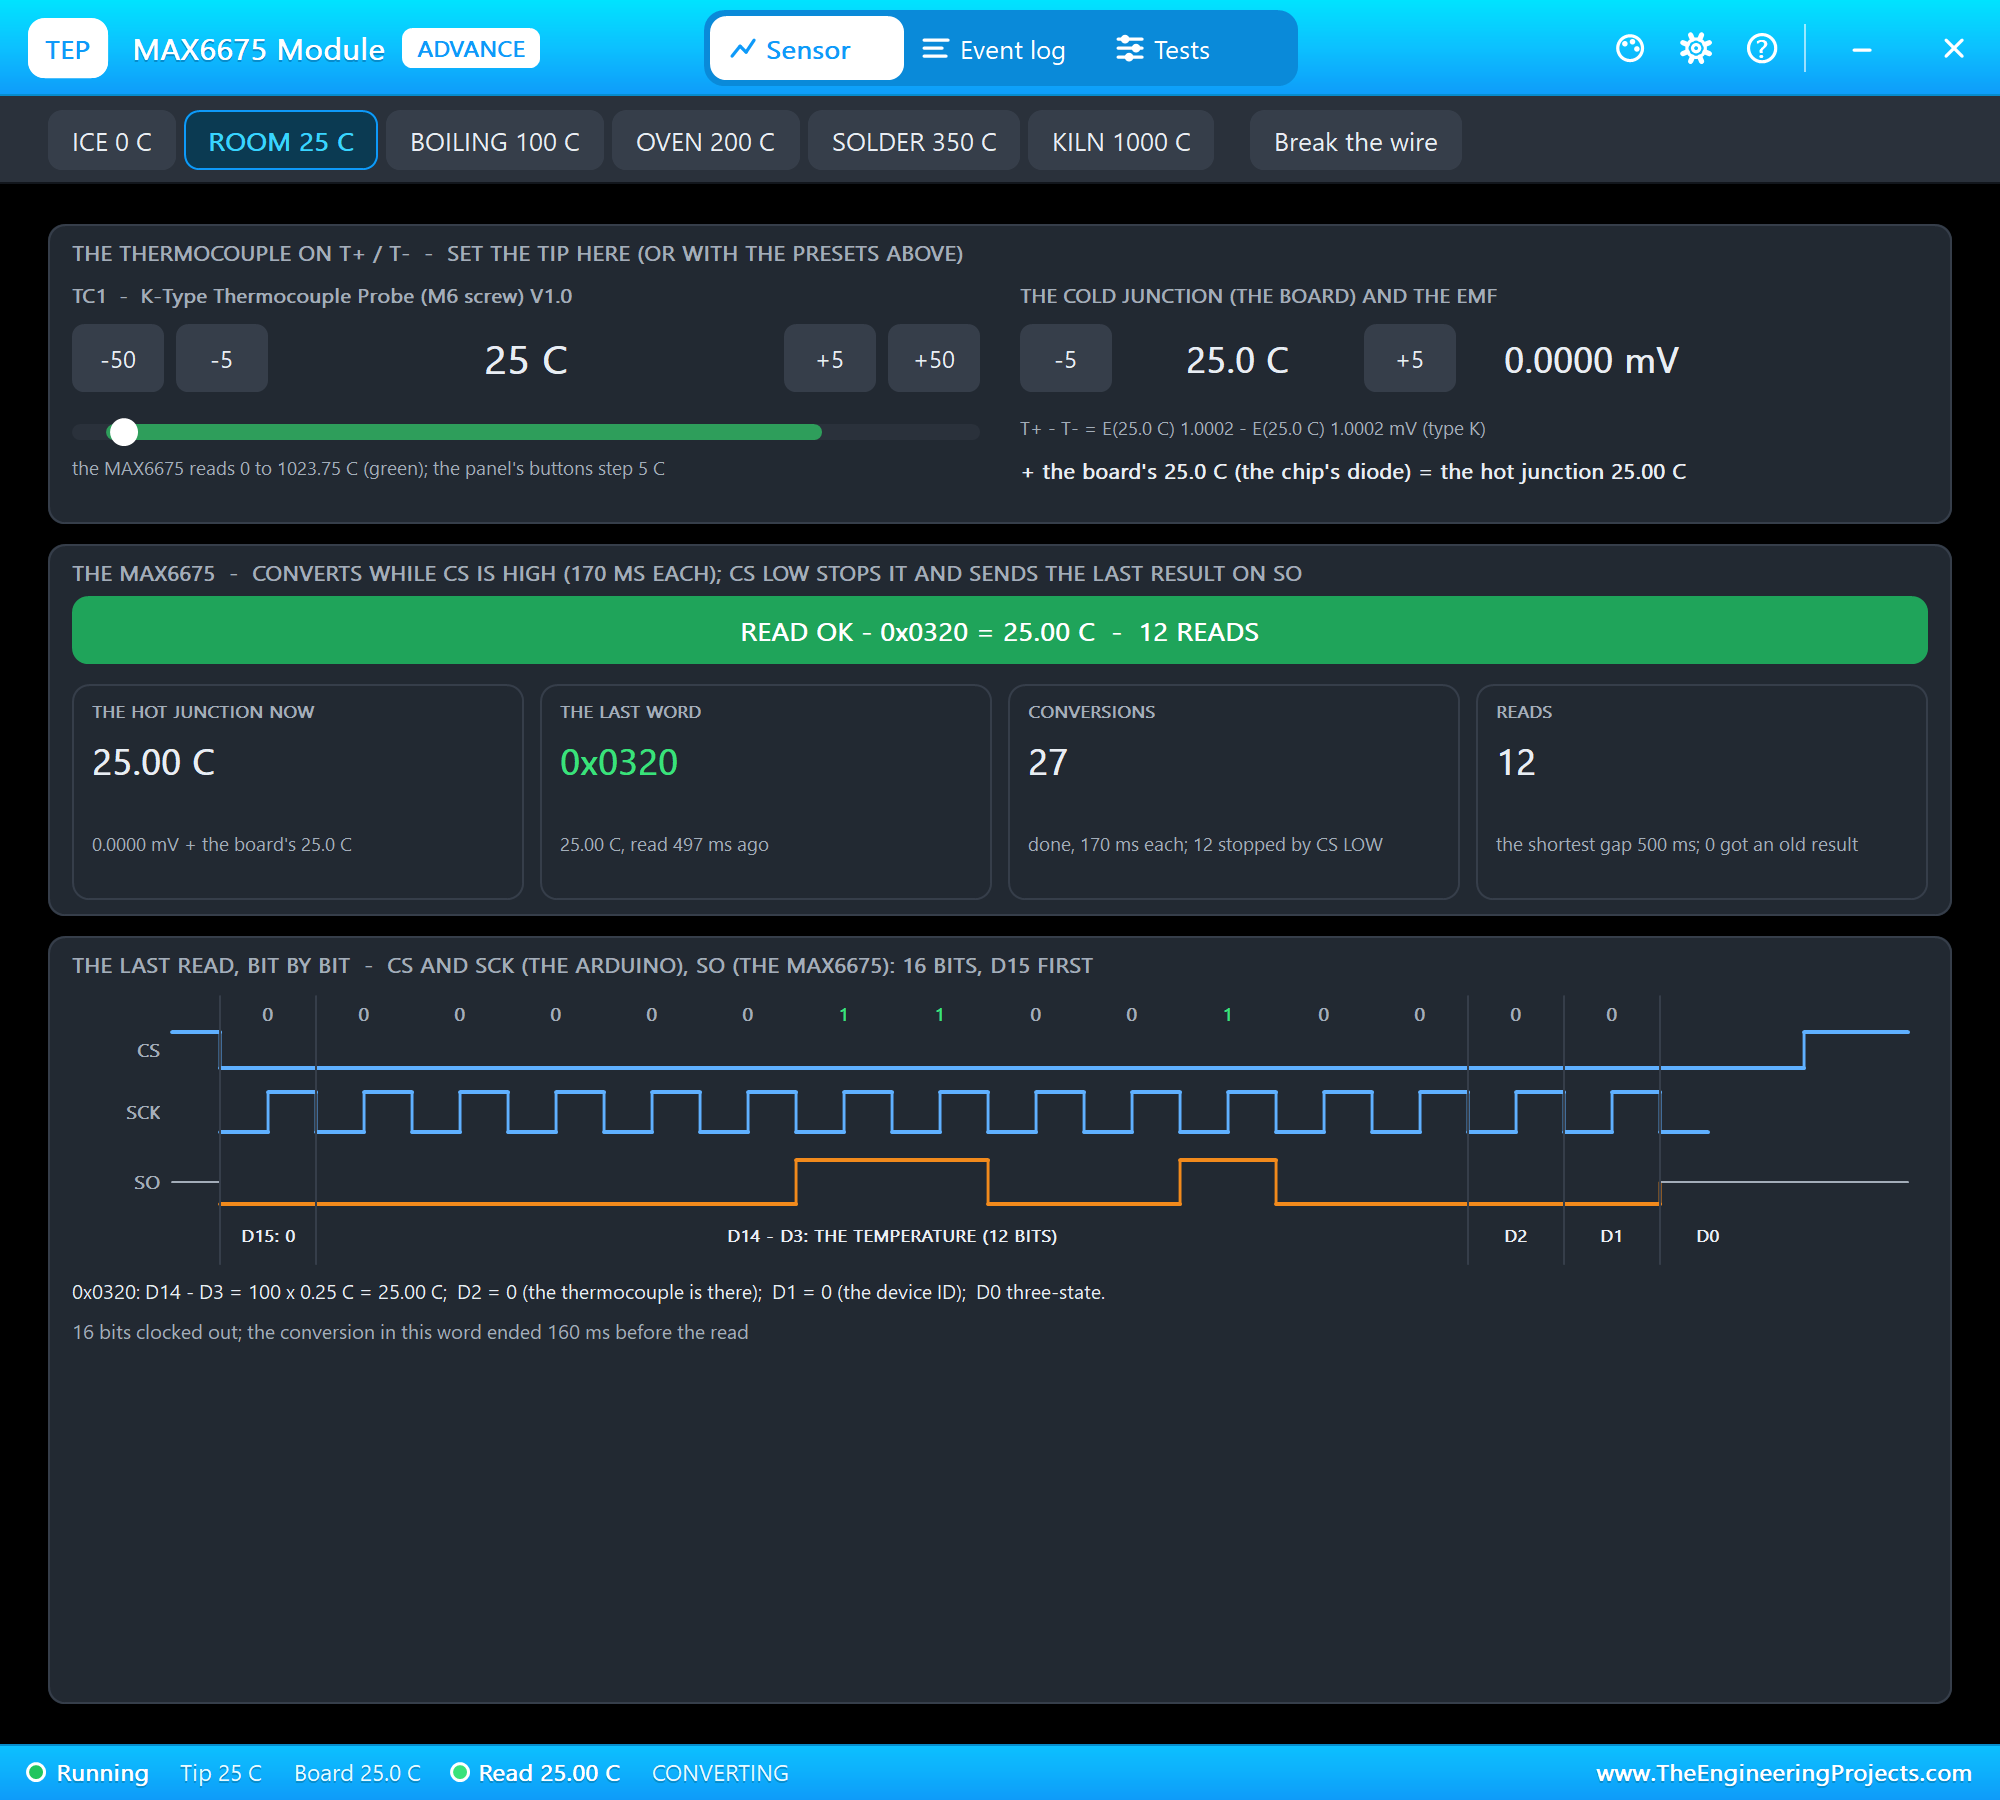
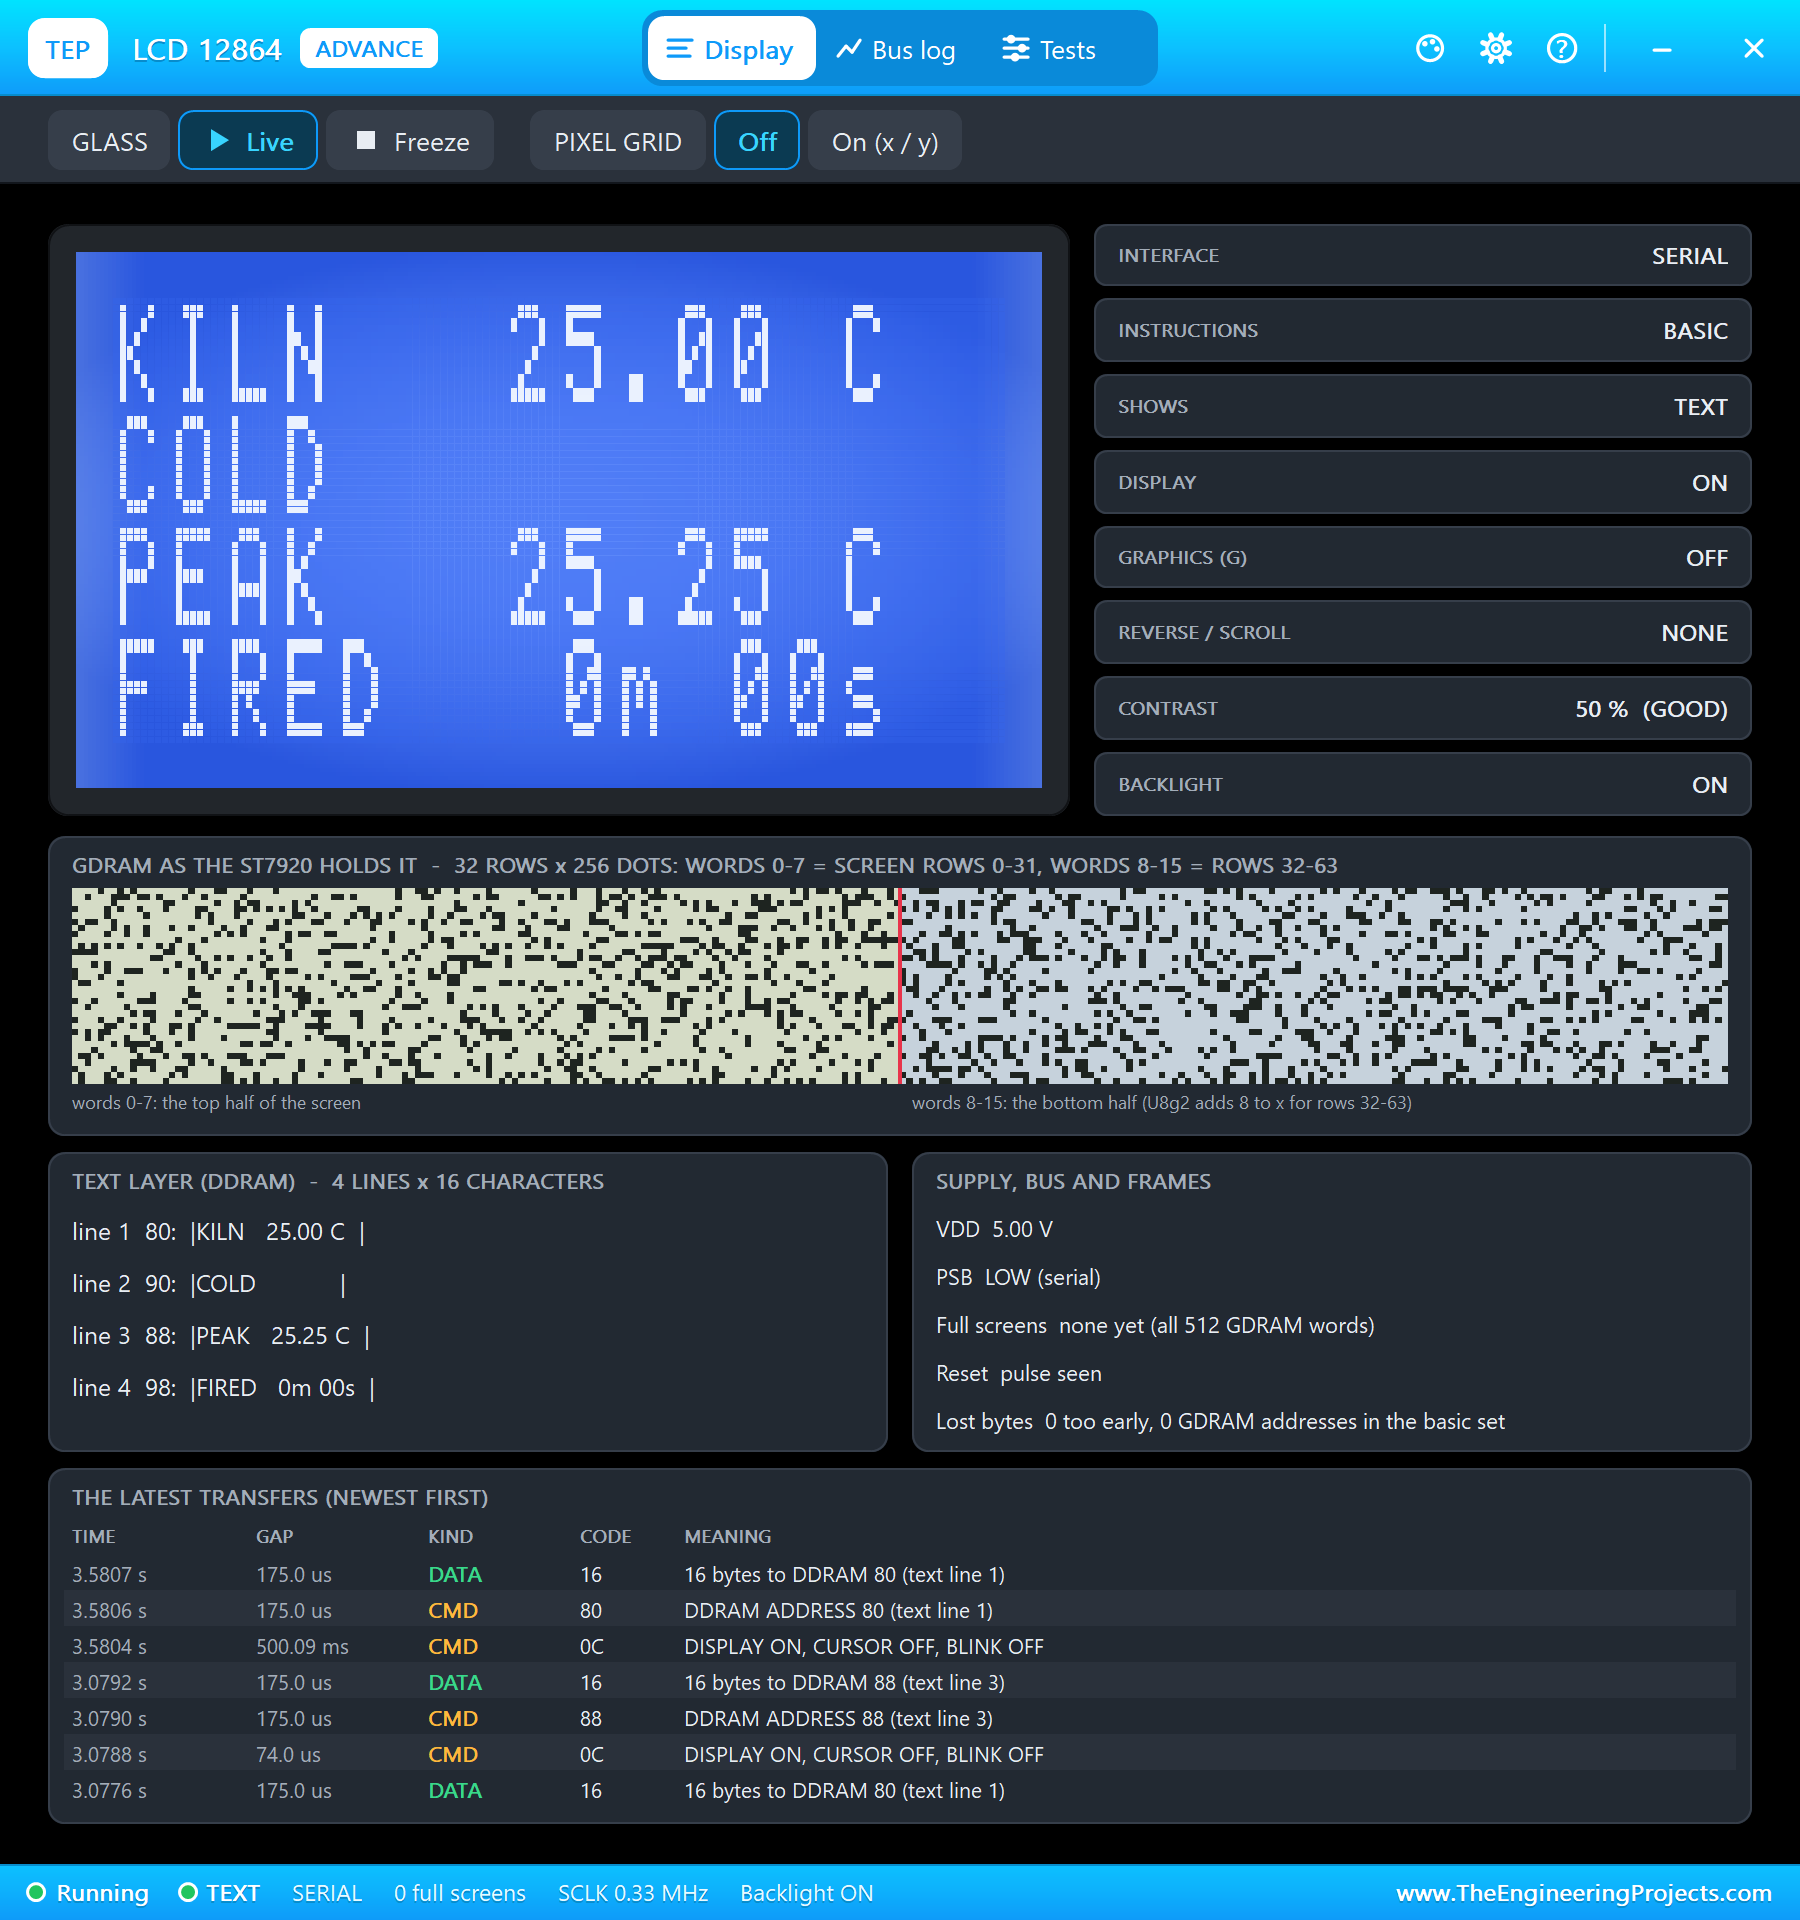
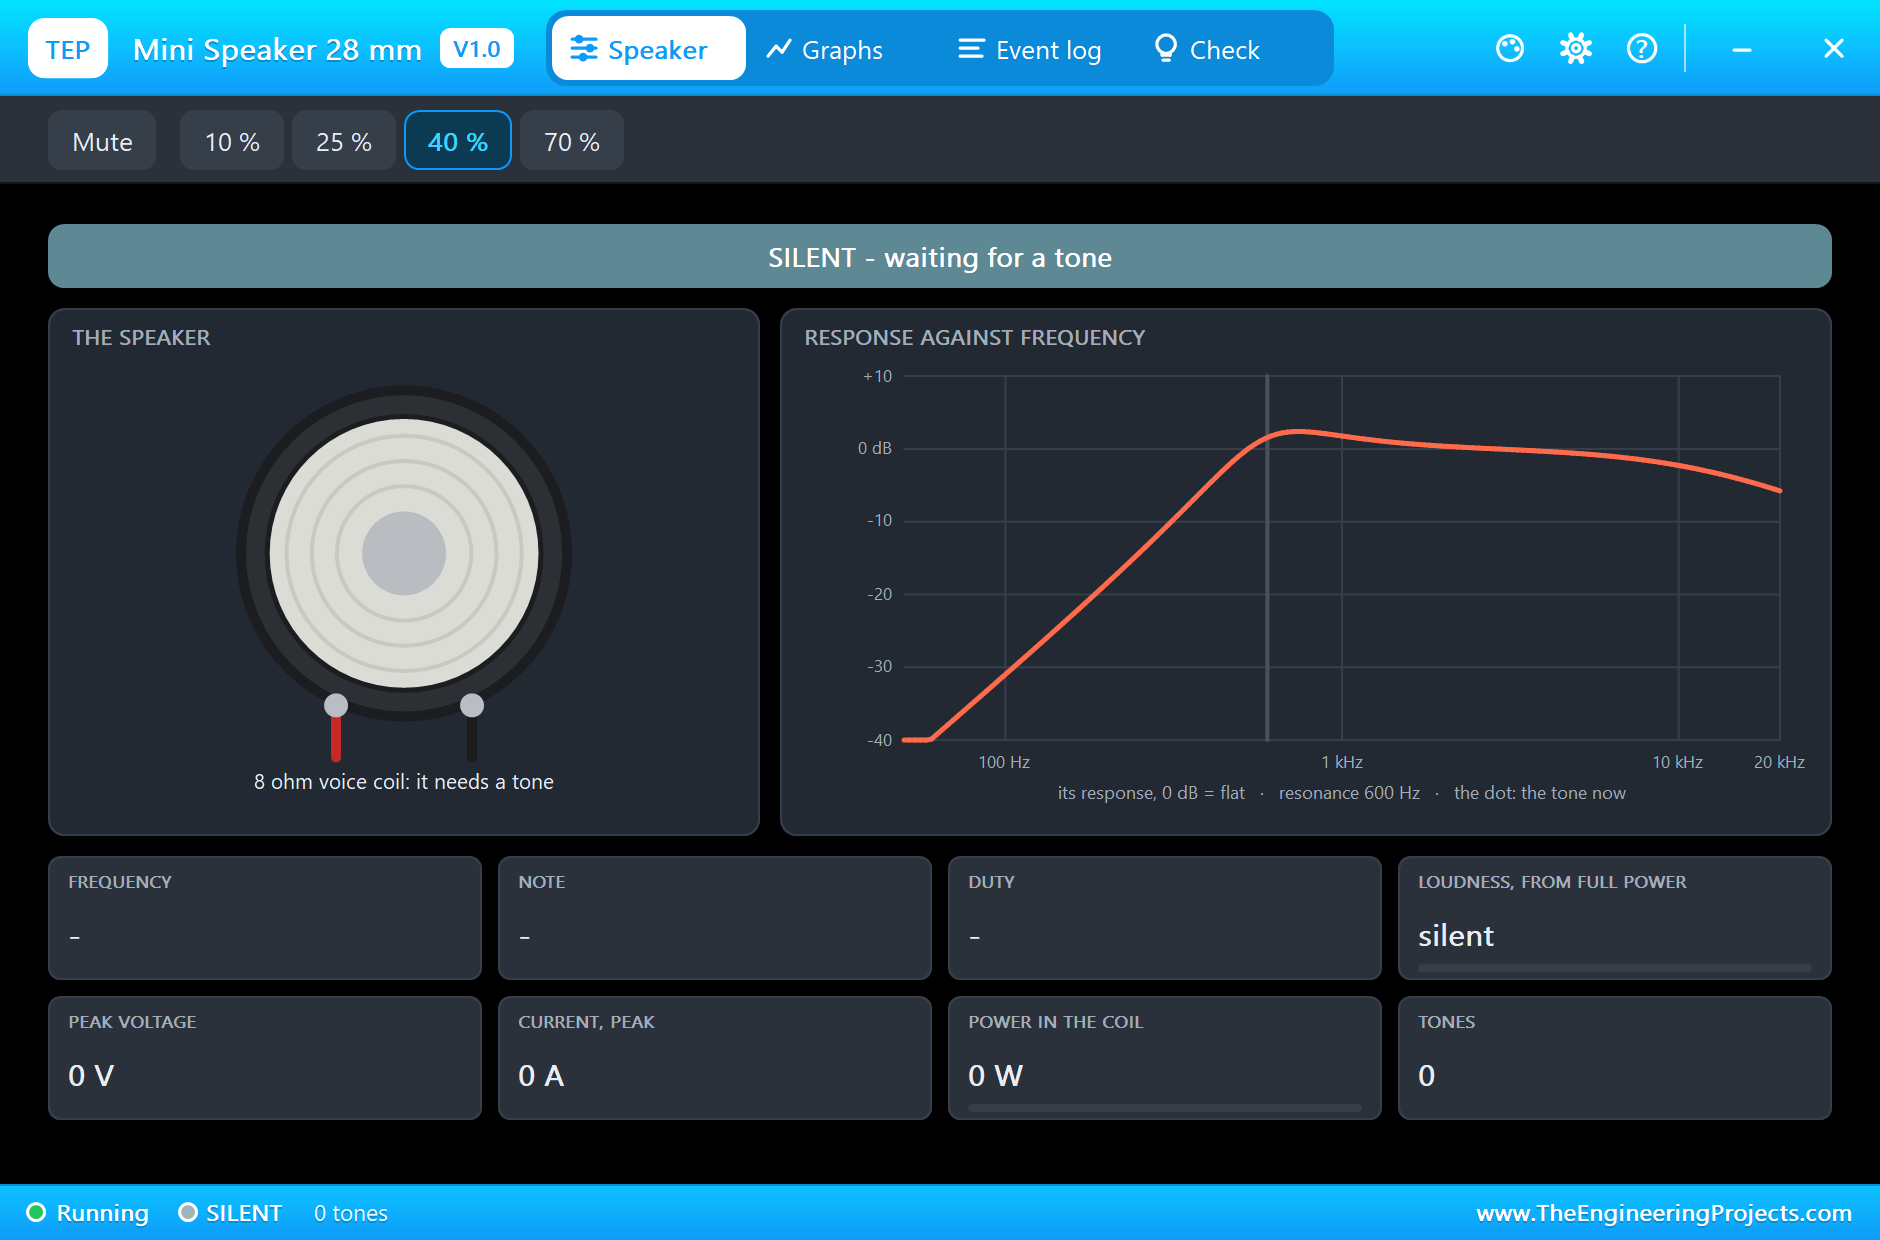
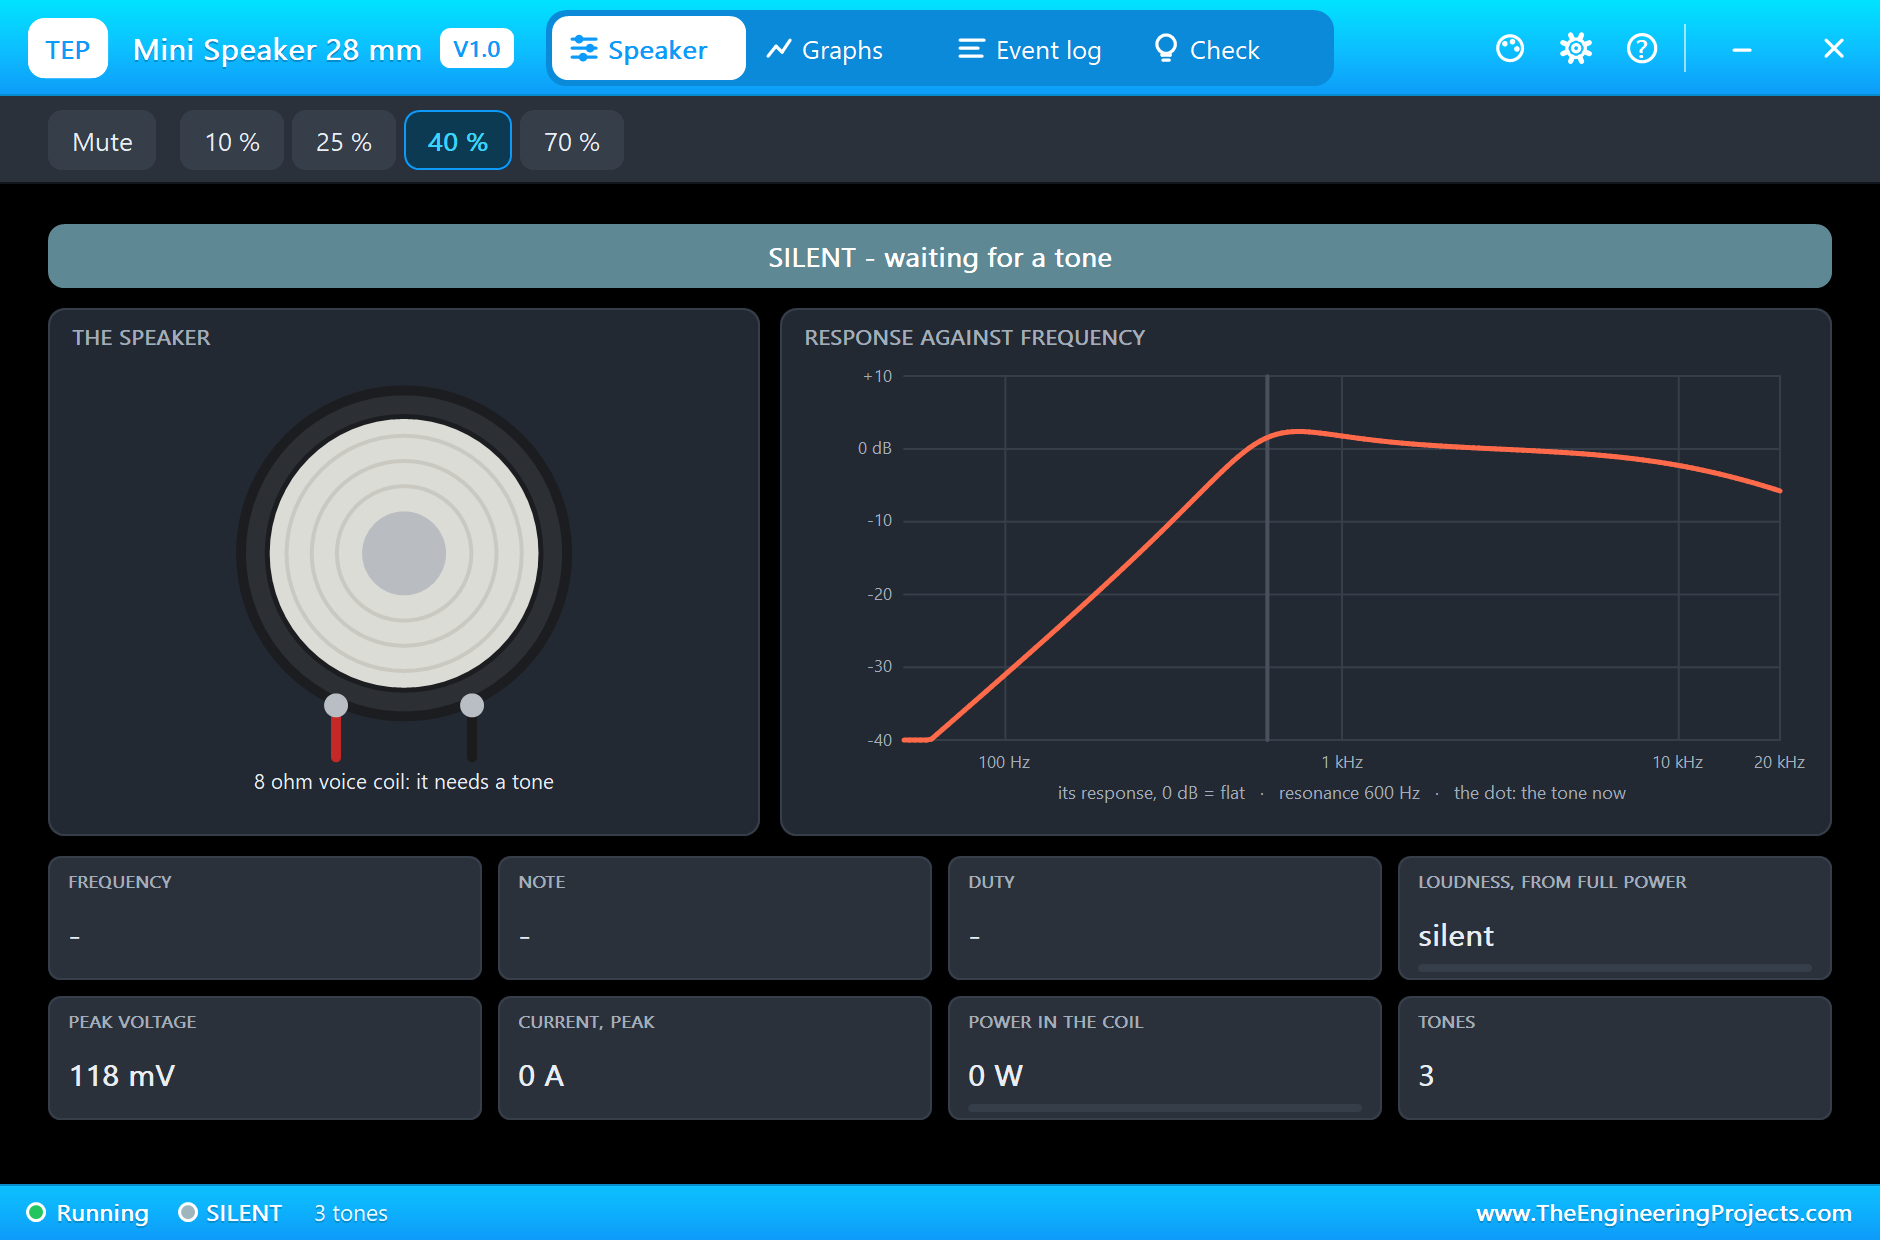
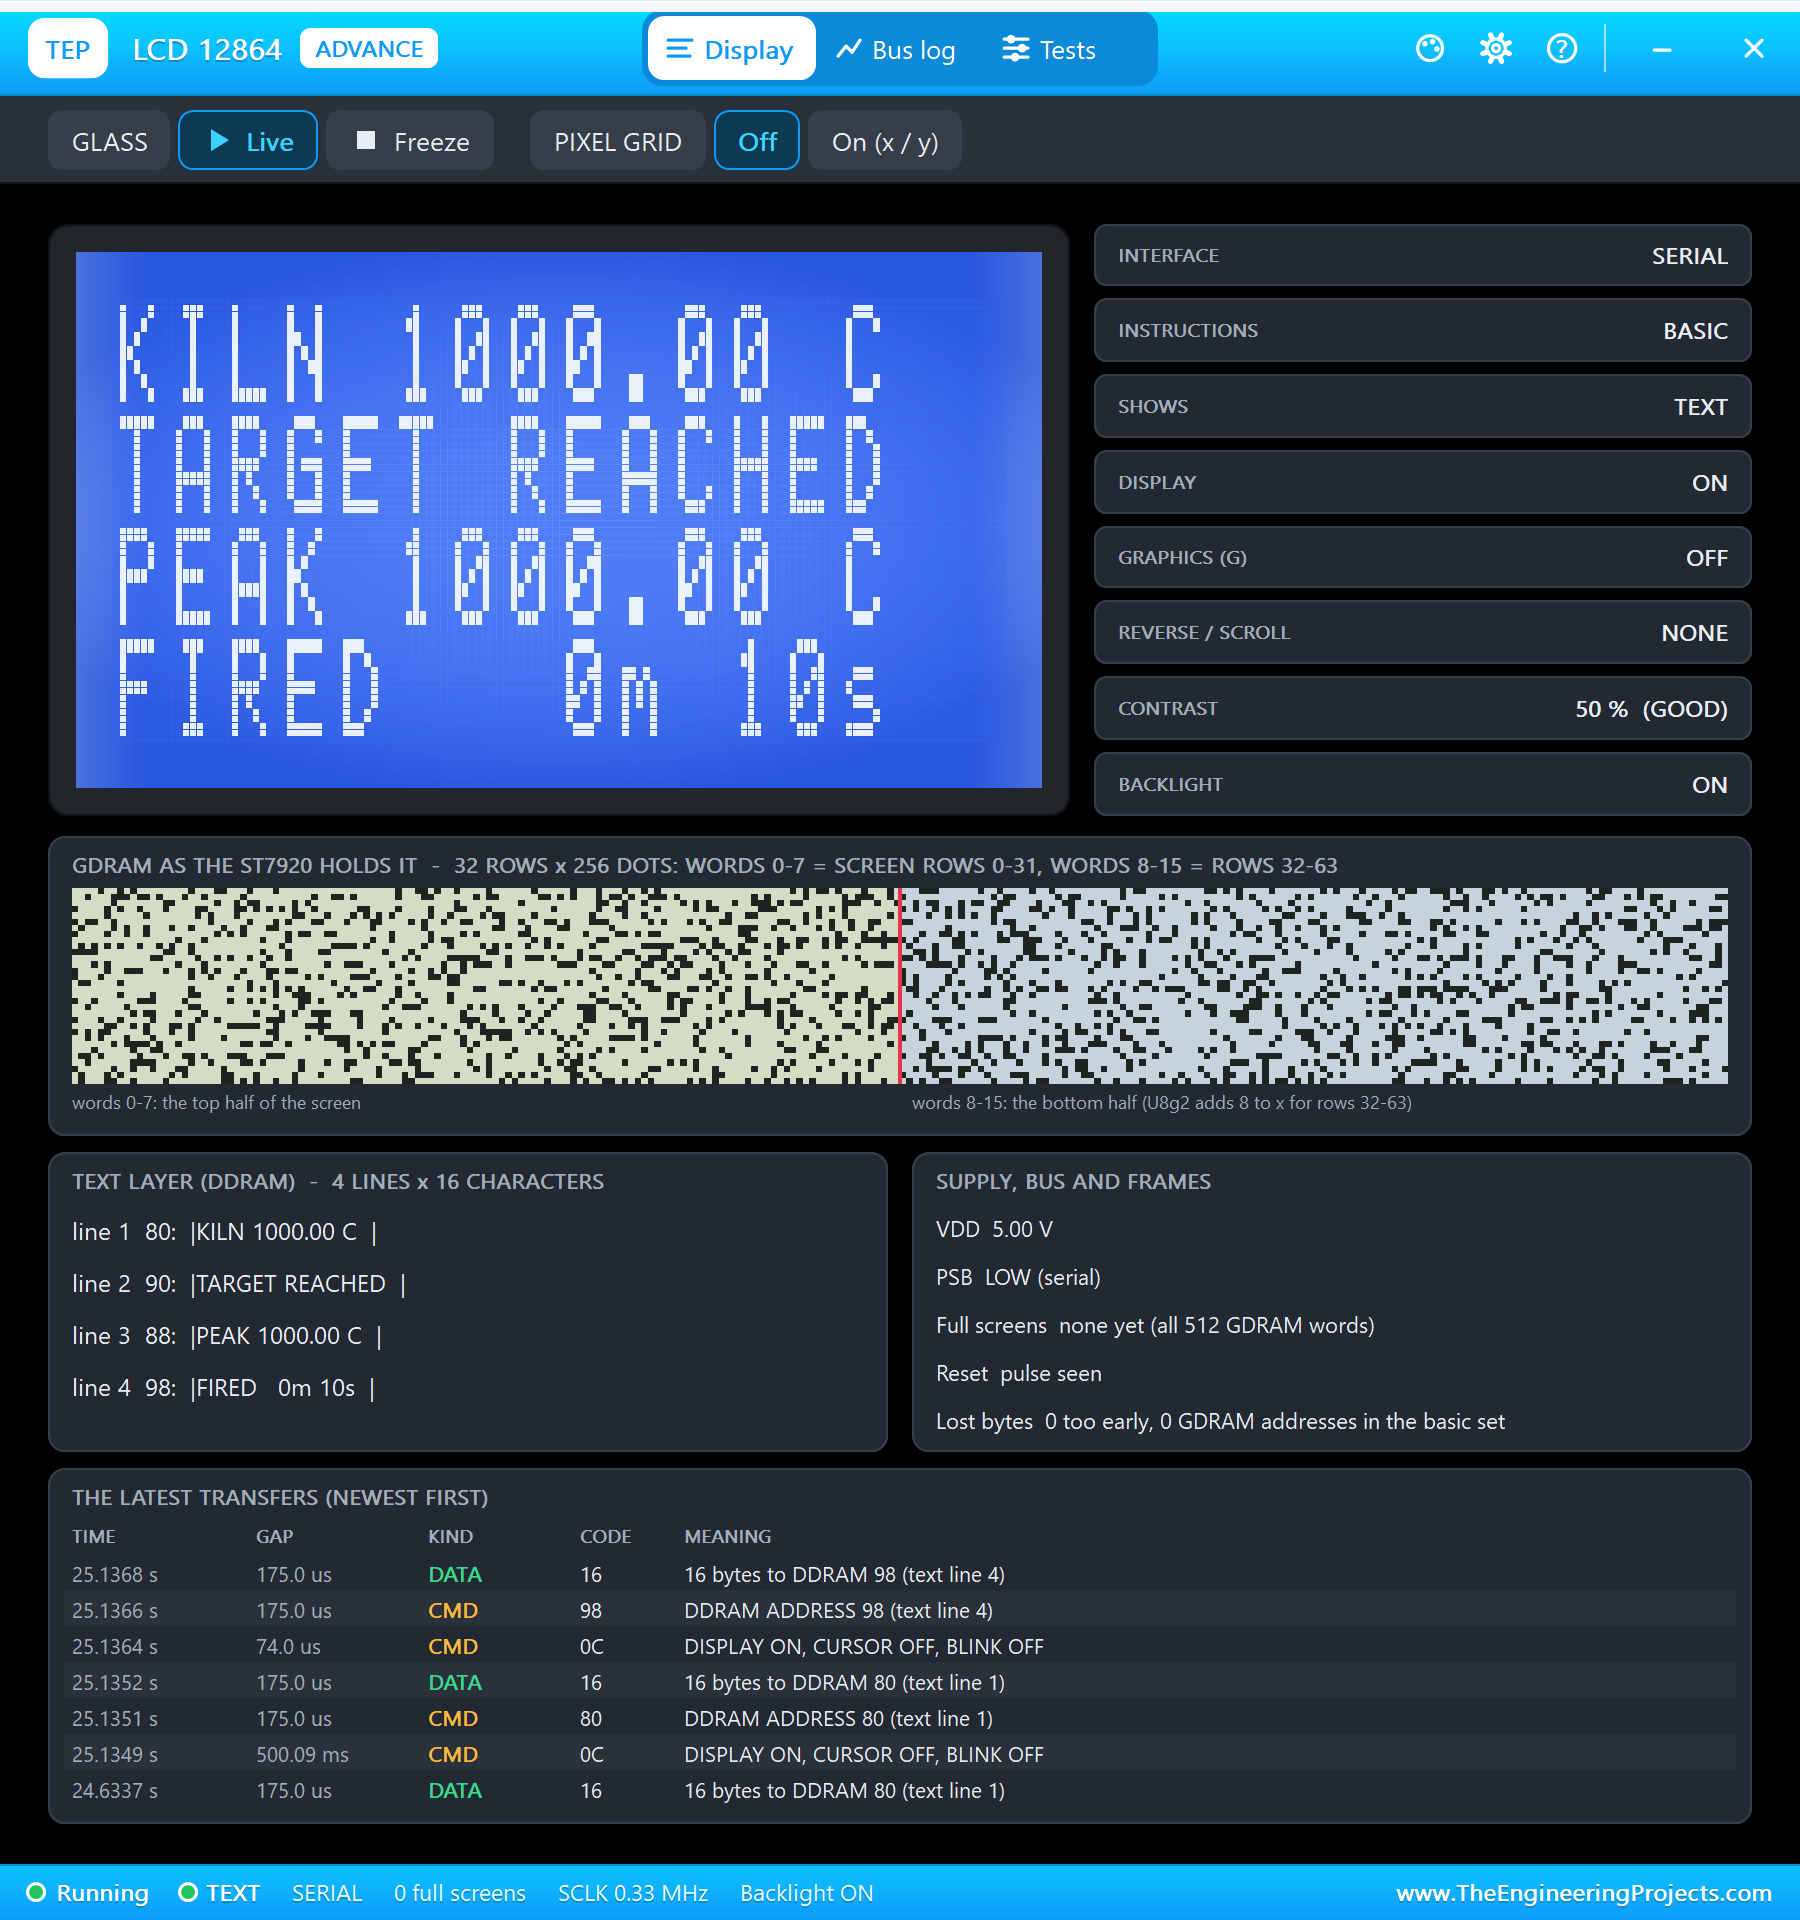
The MAX6675, the LCD and the speaker are models with pop-ups. The MAX6675's pop-up sets the probe's tip, shows the thermocouple's voltage, the cold junction and every bit of the last 16-bit word. The LCD's pop-up shows the glass, the text and graphics layers of the ST7920 and every transfer. The speaker's pop-up shows the tone it plays, its frequency and the power in its coil.
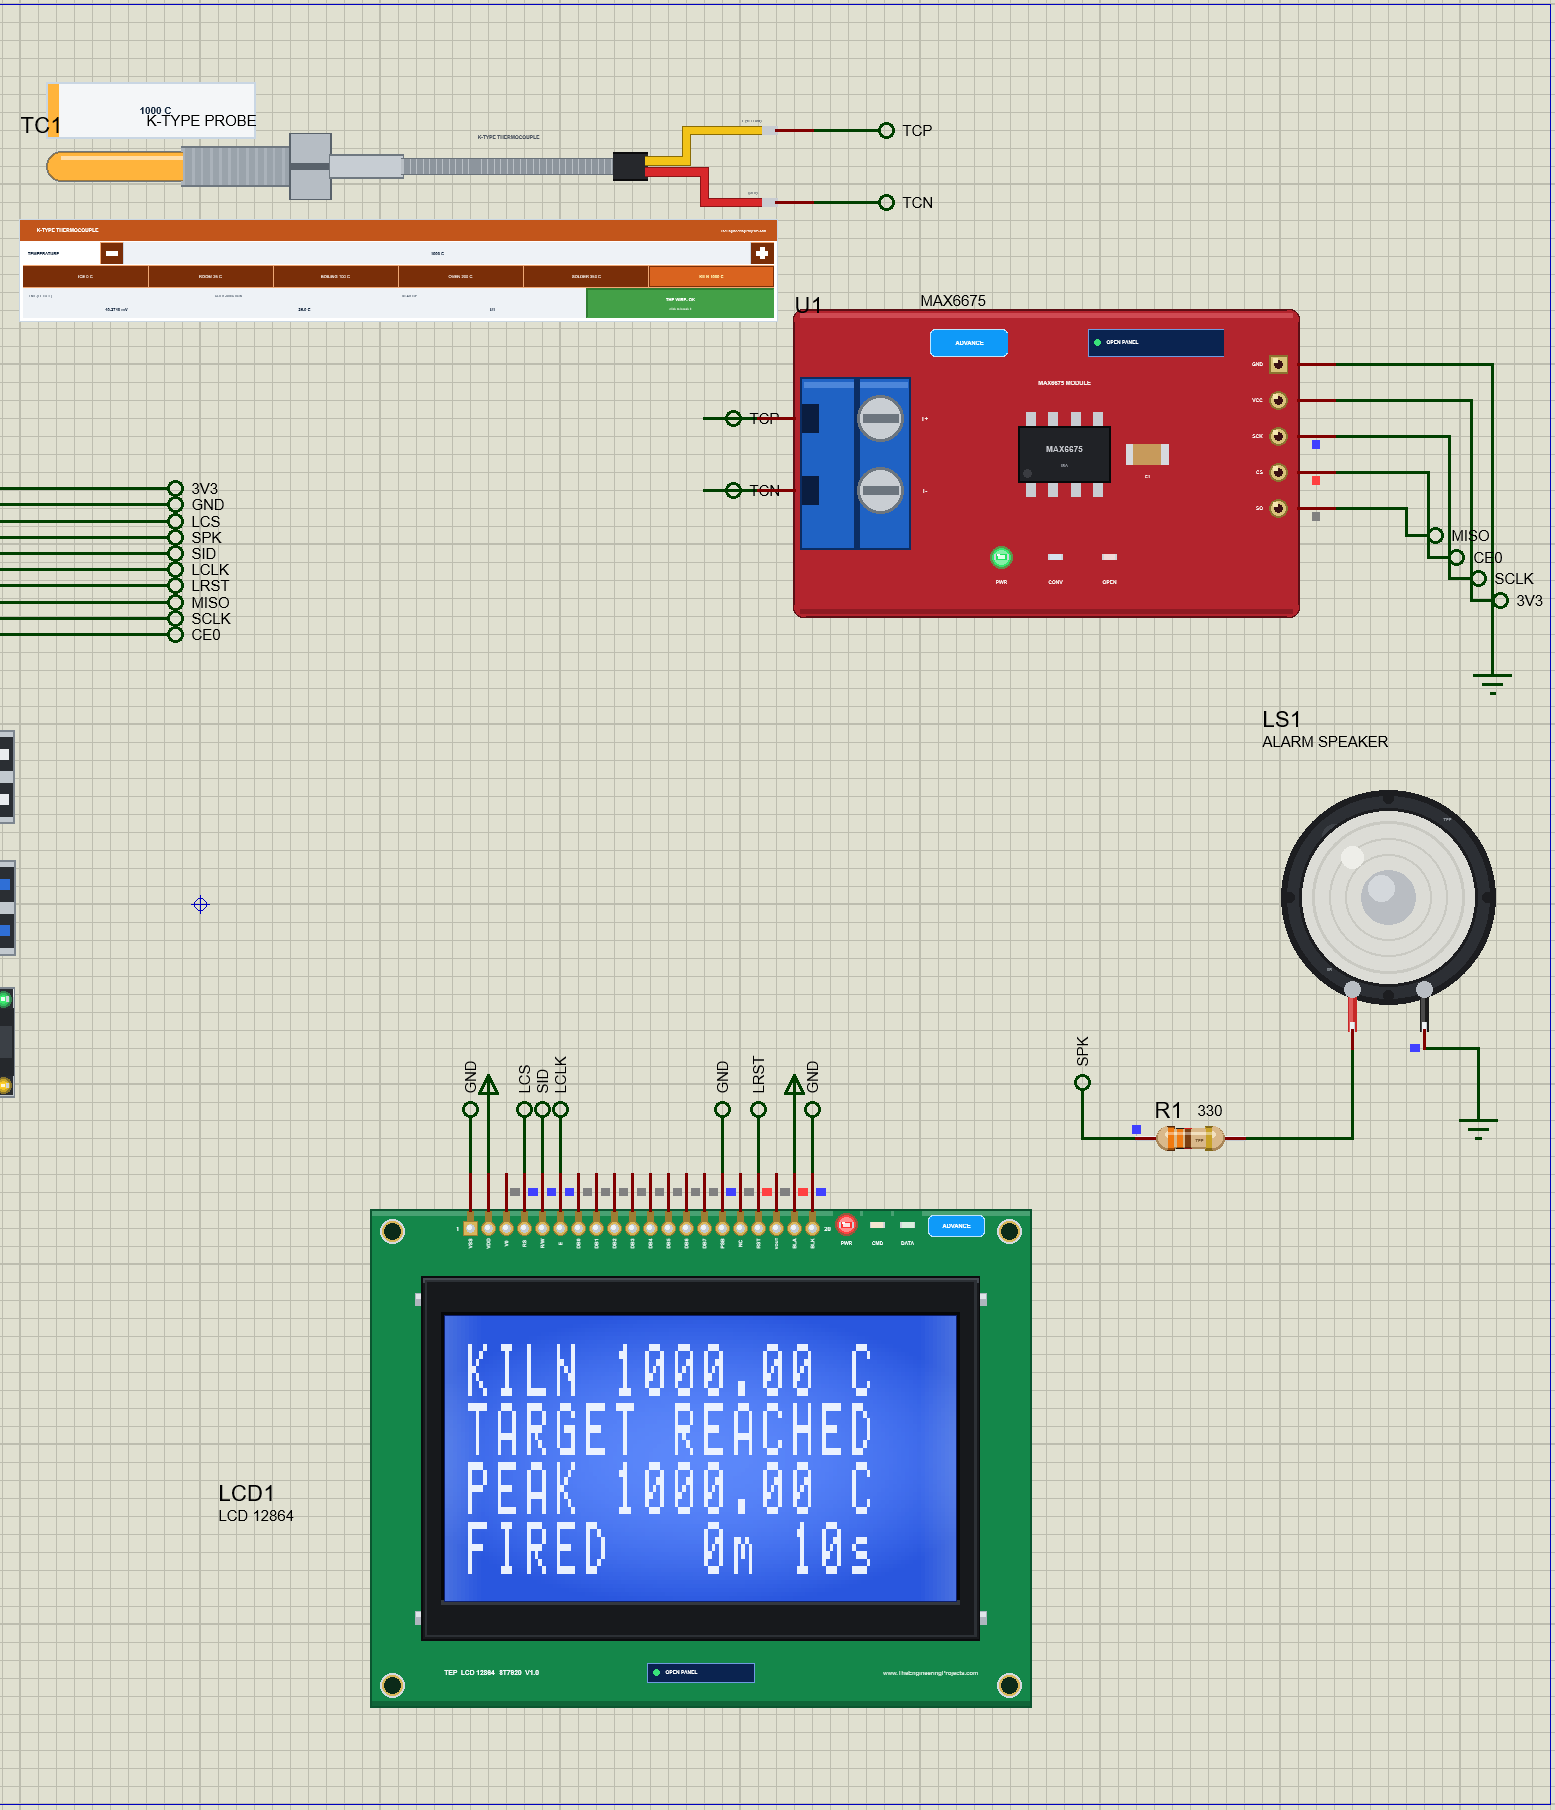
Proteus Simulation of the Kiln Monitor: the Circuit
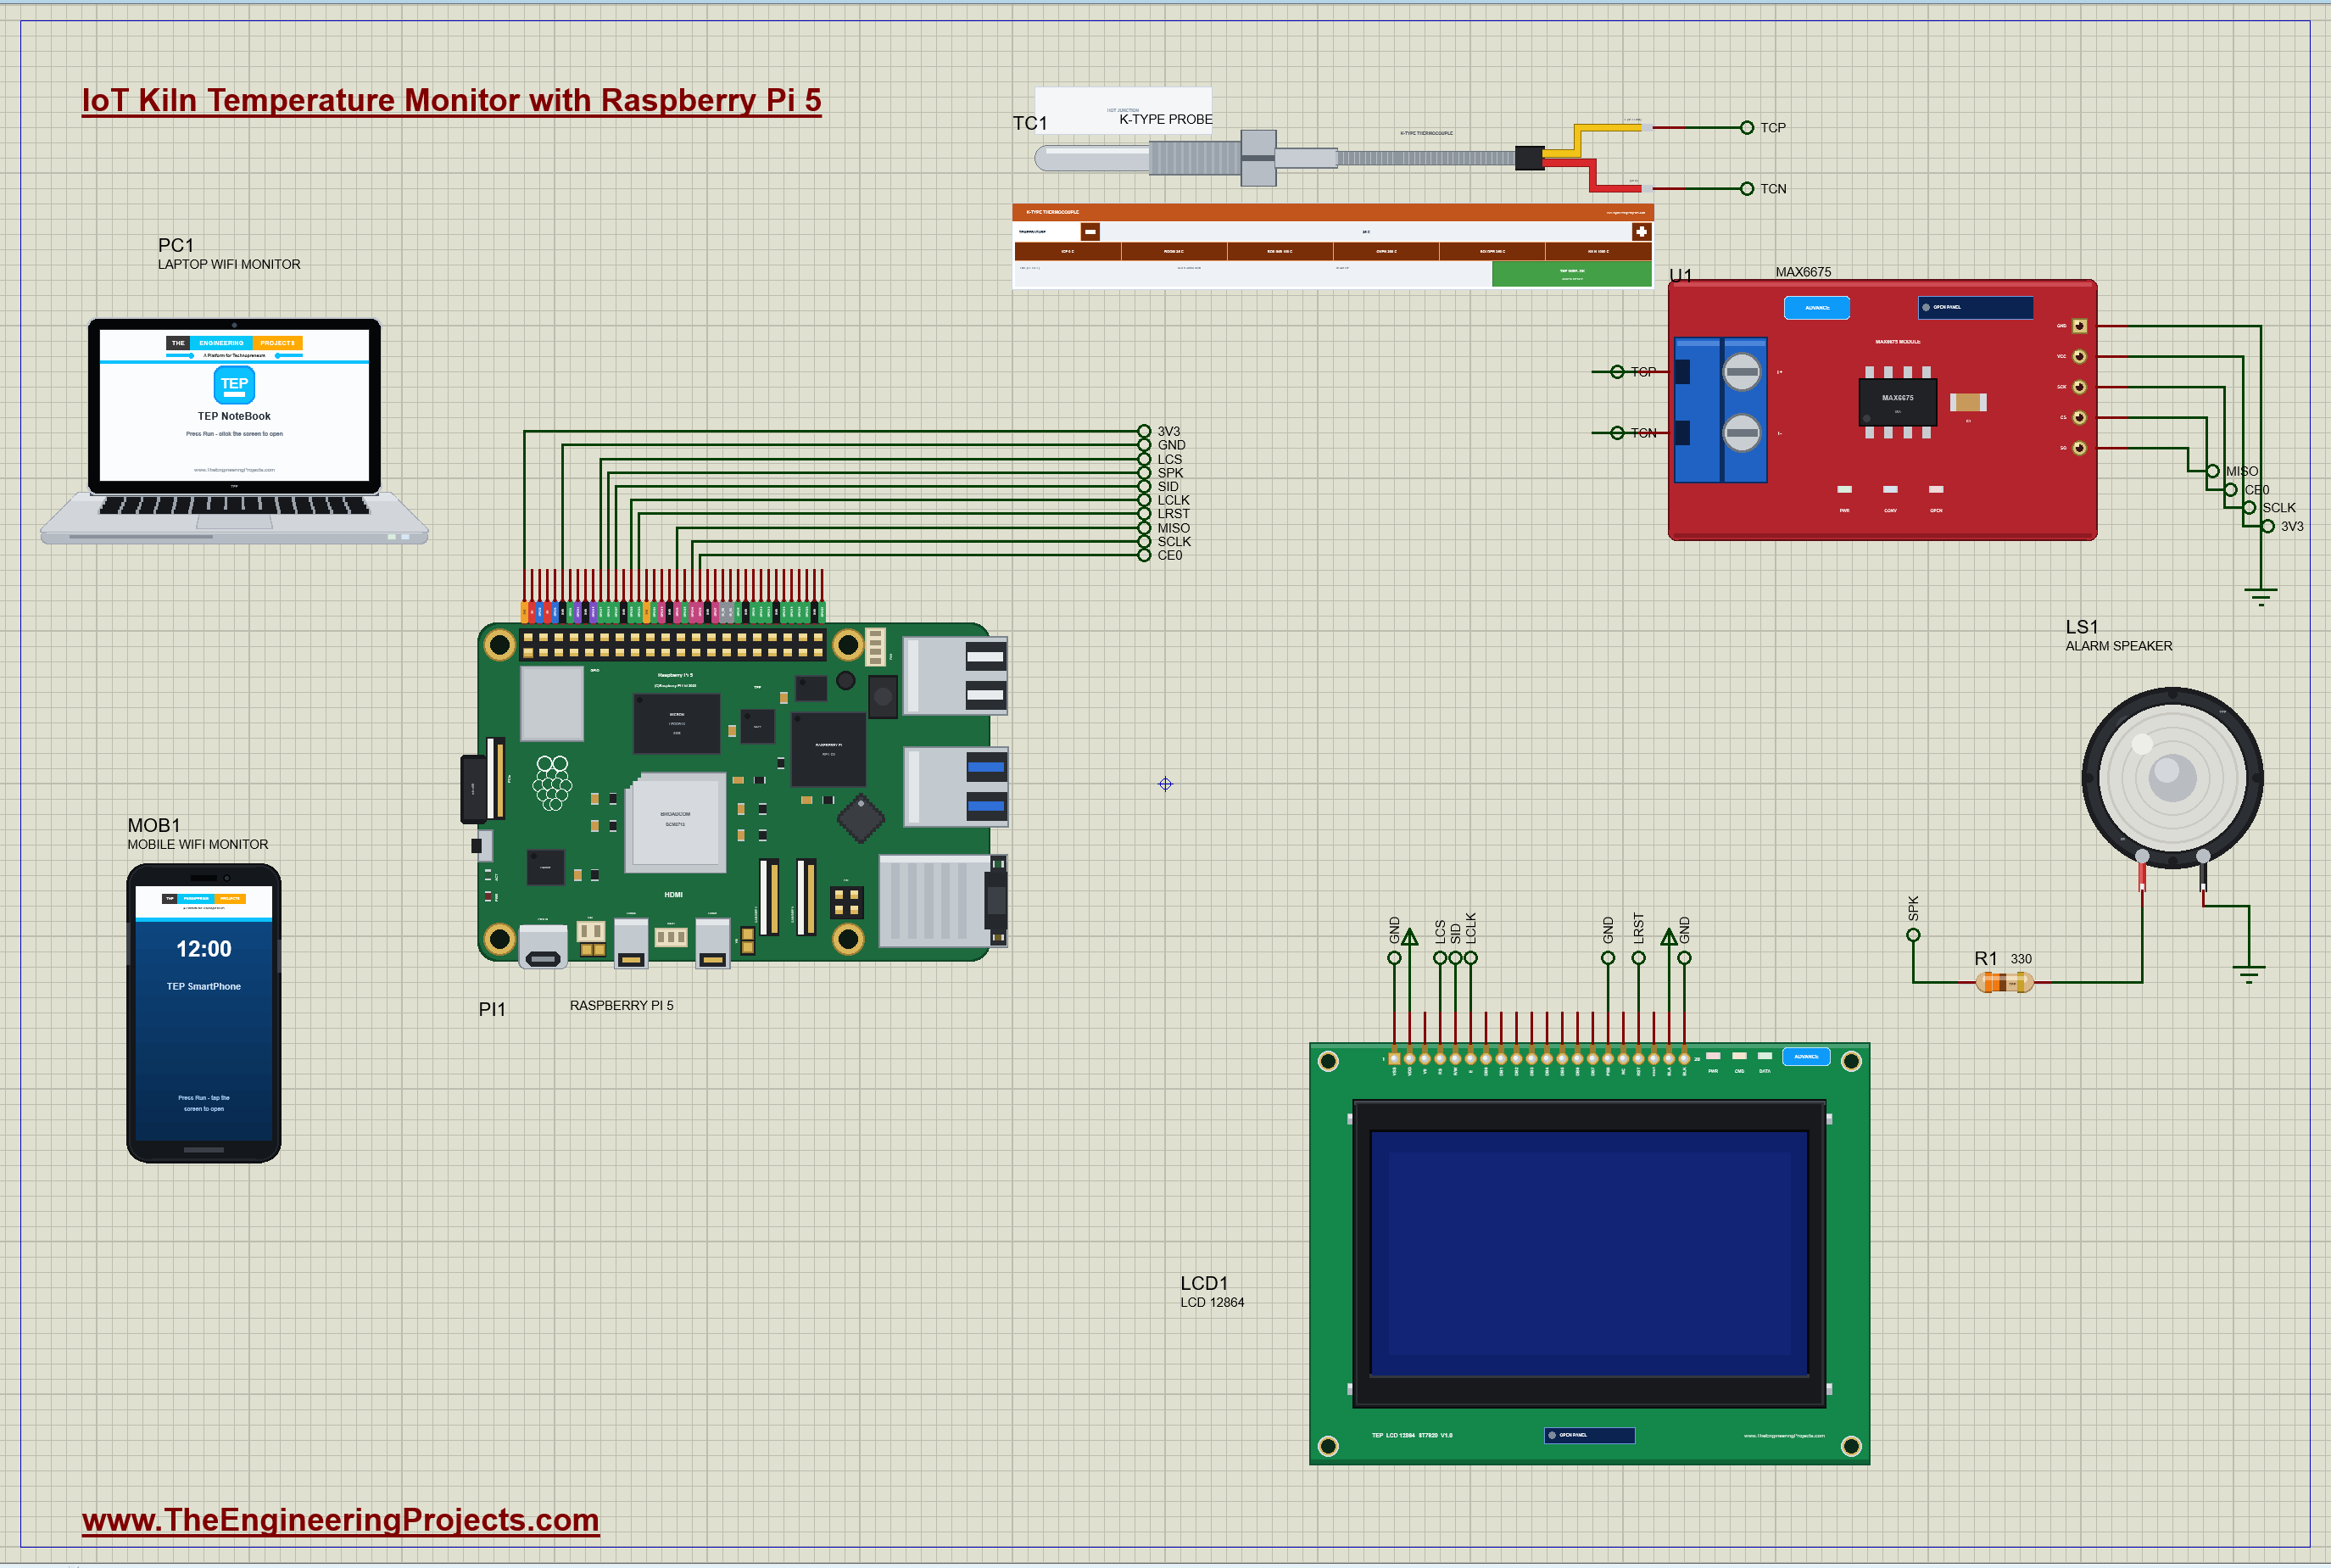
| Part | Pins | Raspberry Pi 5 header |
|---|---|---|
| U1 MAX6675 | VCC / GND / SO / SCK / CS | 3V3 (pin 1) / GND / MISO GPIO9 (pin 21) / SCLK GPIO11 (pin 23) / CE0 GPIO8 (pin 24) |
| TC1 K-type probe | T+ (yellow) / T- (red) | to the MAX6675's T+ / T- |
| LCD1 LCD 12864 | RS (CS) / RW (SID) / E (SCLK) / RST / PSB | GPIO17 (pin 11) / GPIO27 (pin 13) / GPIO22 (pin 15) / GPIO23 (pin 16) / GND |
| LCD1 power | VDD / BLA / VSS / BLK | the 5 V rail / the 5 V rail / GND / GND |
| LS1 speaker | + (through R1 330 ohm) / - | GPIO18 (pin 12) / GND |
The MAX6675 sits on the Pi's hardware SPI bus: it only talks, so its SO pin goes to MISO and MOSI stays free. The LCD 12864 runs in its serial mode: with PSB tied to ground, three of its pins change their jobs, RS becomes the chip select, R/W the data line SID and E the clock SCLK. Its supply and backlight take 5 V, and the ST7920 accepts the Pi's 3.3 V logic levels. The speaker hangs on GPIO18 through 330 ohm, which keeps the current under 15 mA, safe for a GPIO pin.
How the Kiln Monitor Works
How a Thermocouple Measures Heat
Join two wires of different metals at one end, heat that end, and a small voltage appears between the two free ends: the Seebeck effect. A K-type thermocouple uses chromel and alumel and gives about 41 microvolts per degree, from minus 200 to about 1,260 degrees. But the voltage depends on the difference between the hot tip and the cold end where the wires meet the circuit. So a converter must also measure that cold end, the cold junction, and add it back: cold-junction compensation. The MAX6675 does both with a diode inside the chip, and its linearisation turns the voltage into degrees.
Reading the MAX6675 over SPI
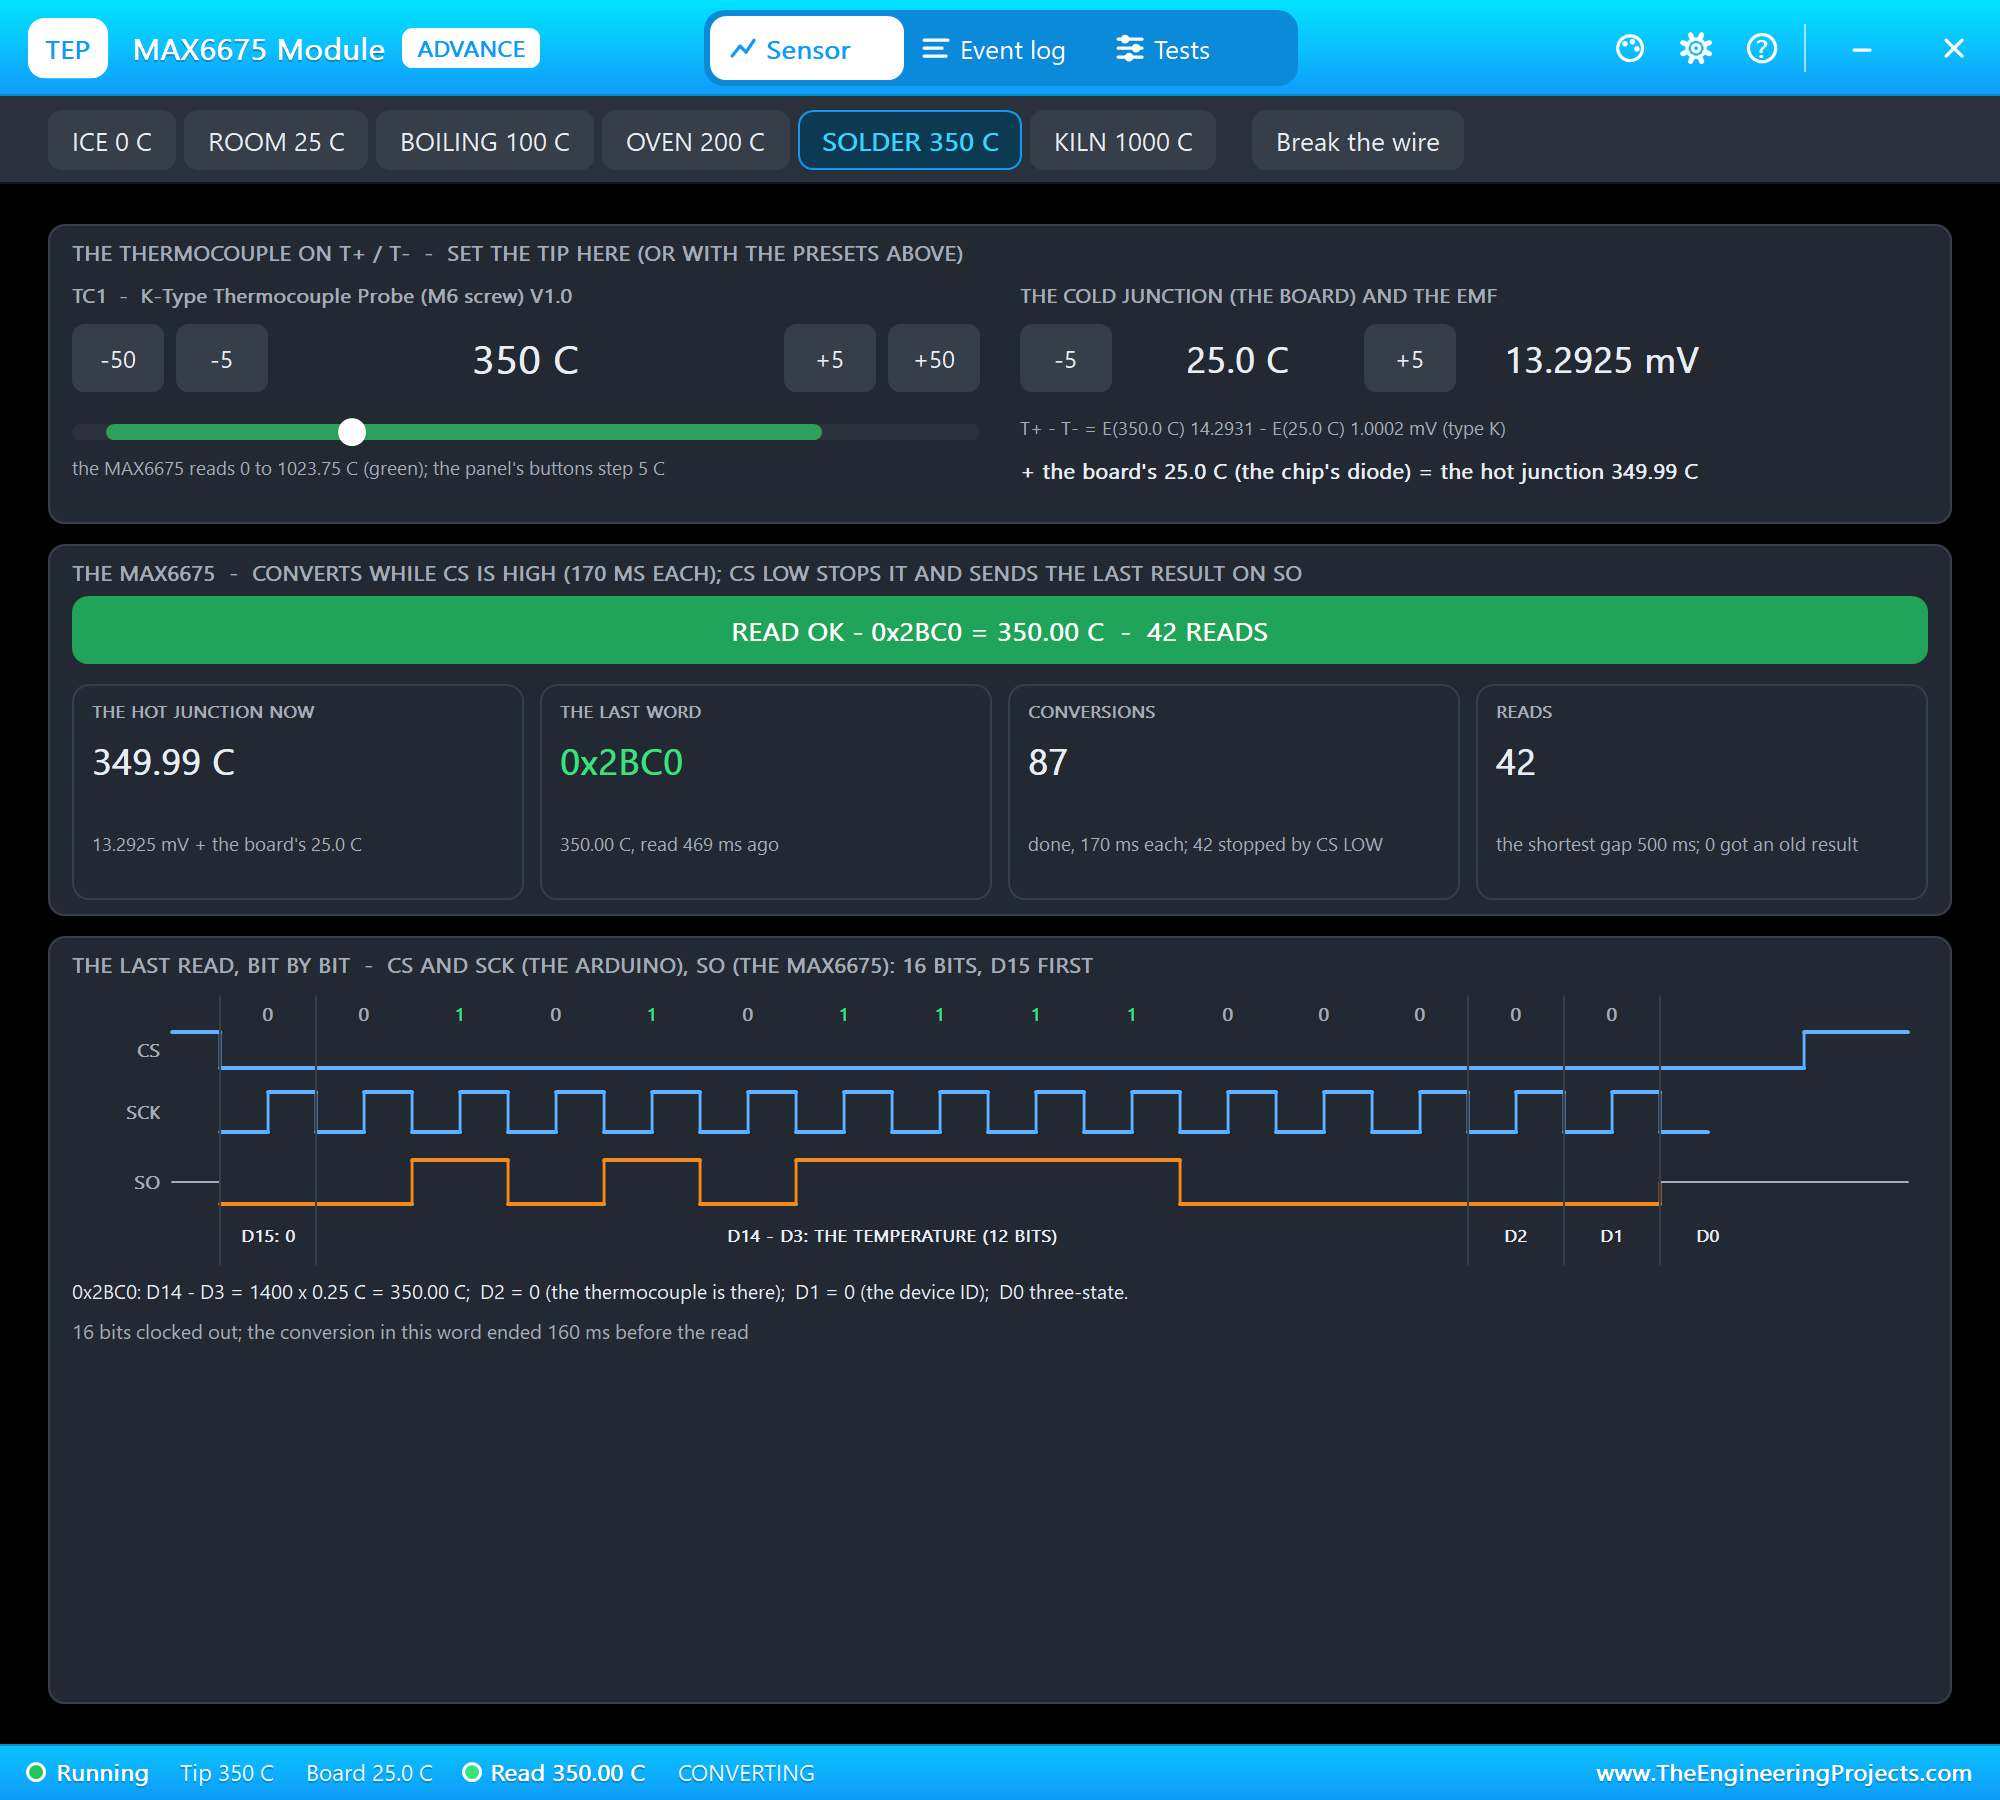
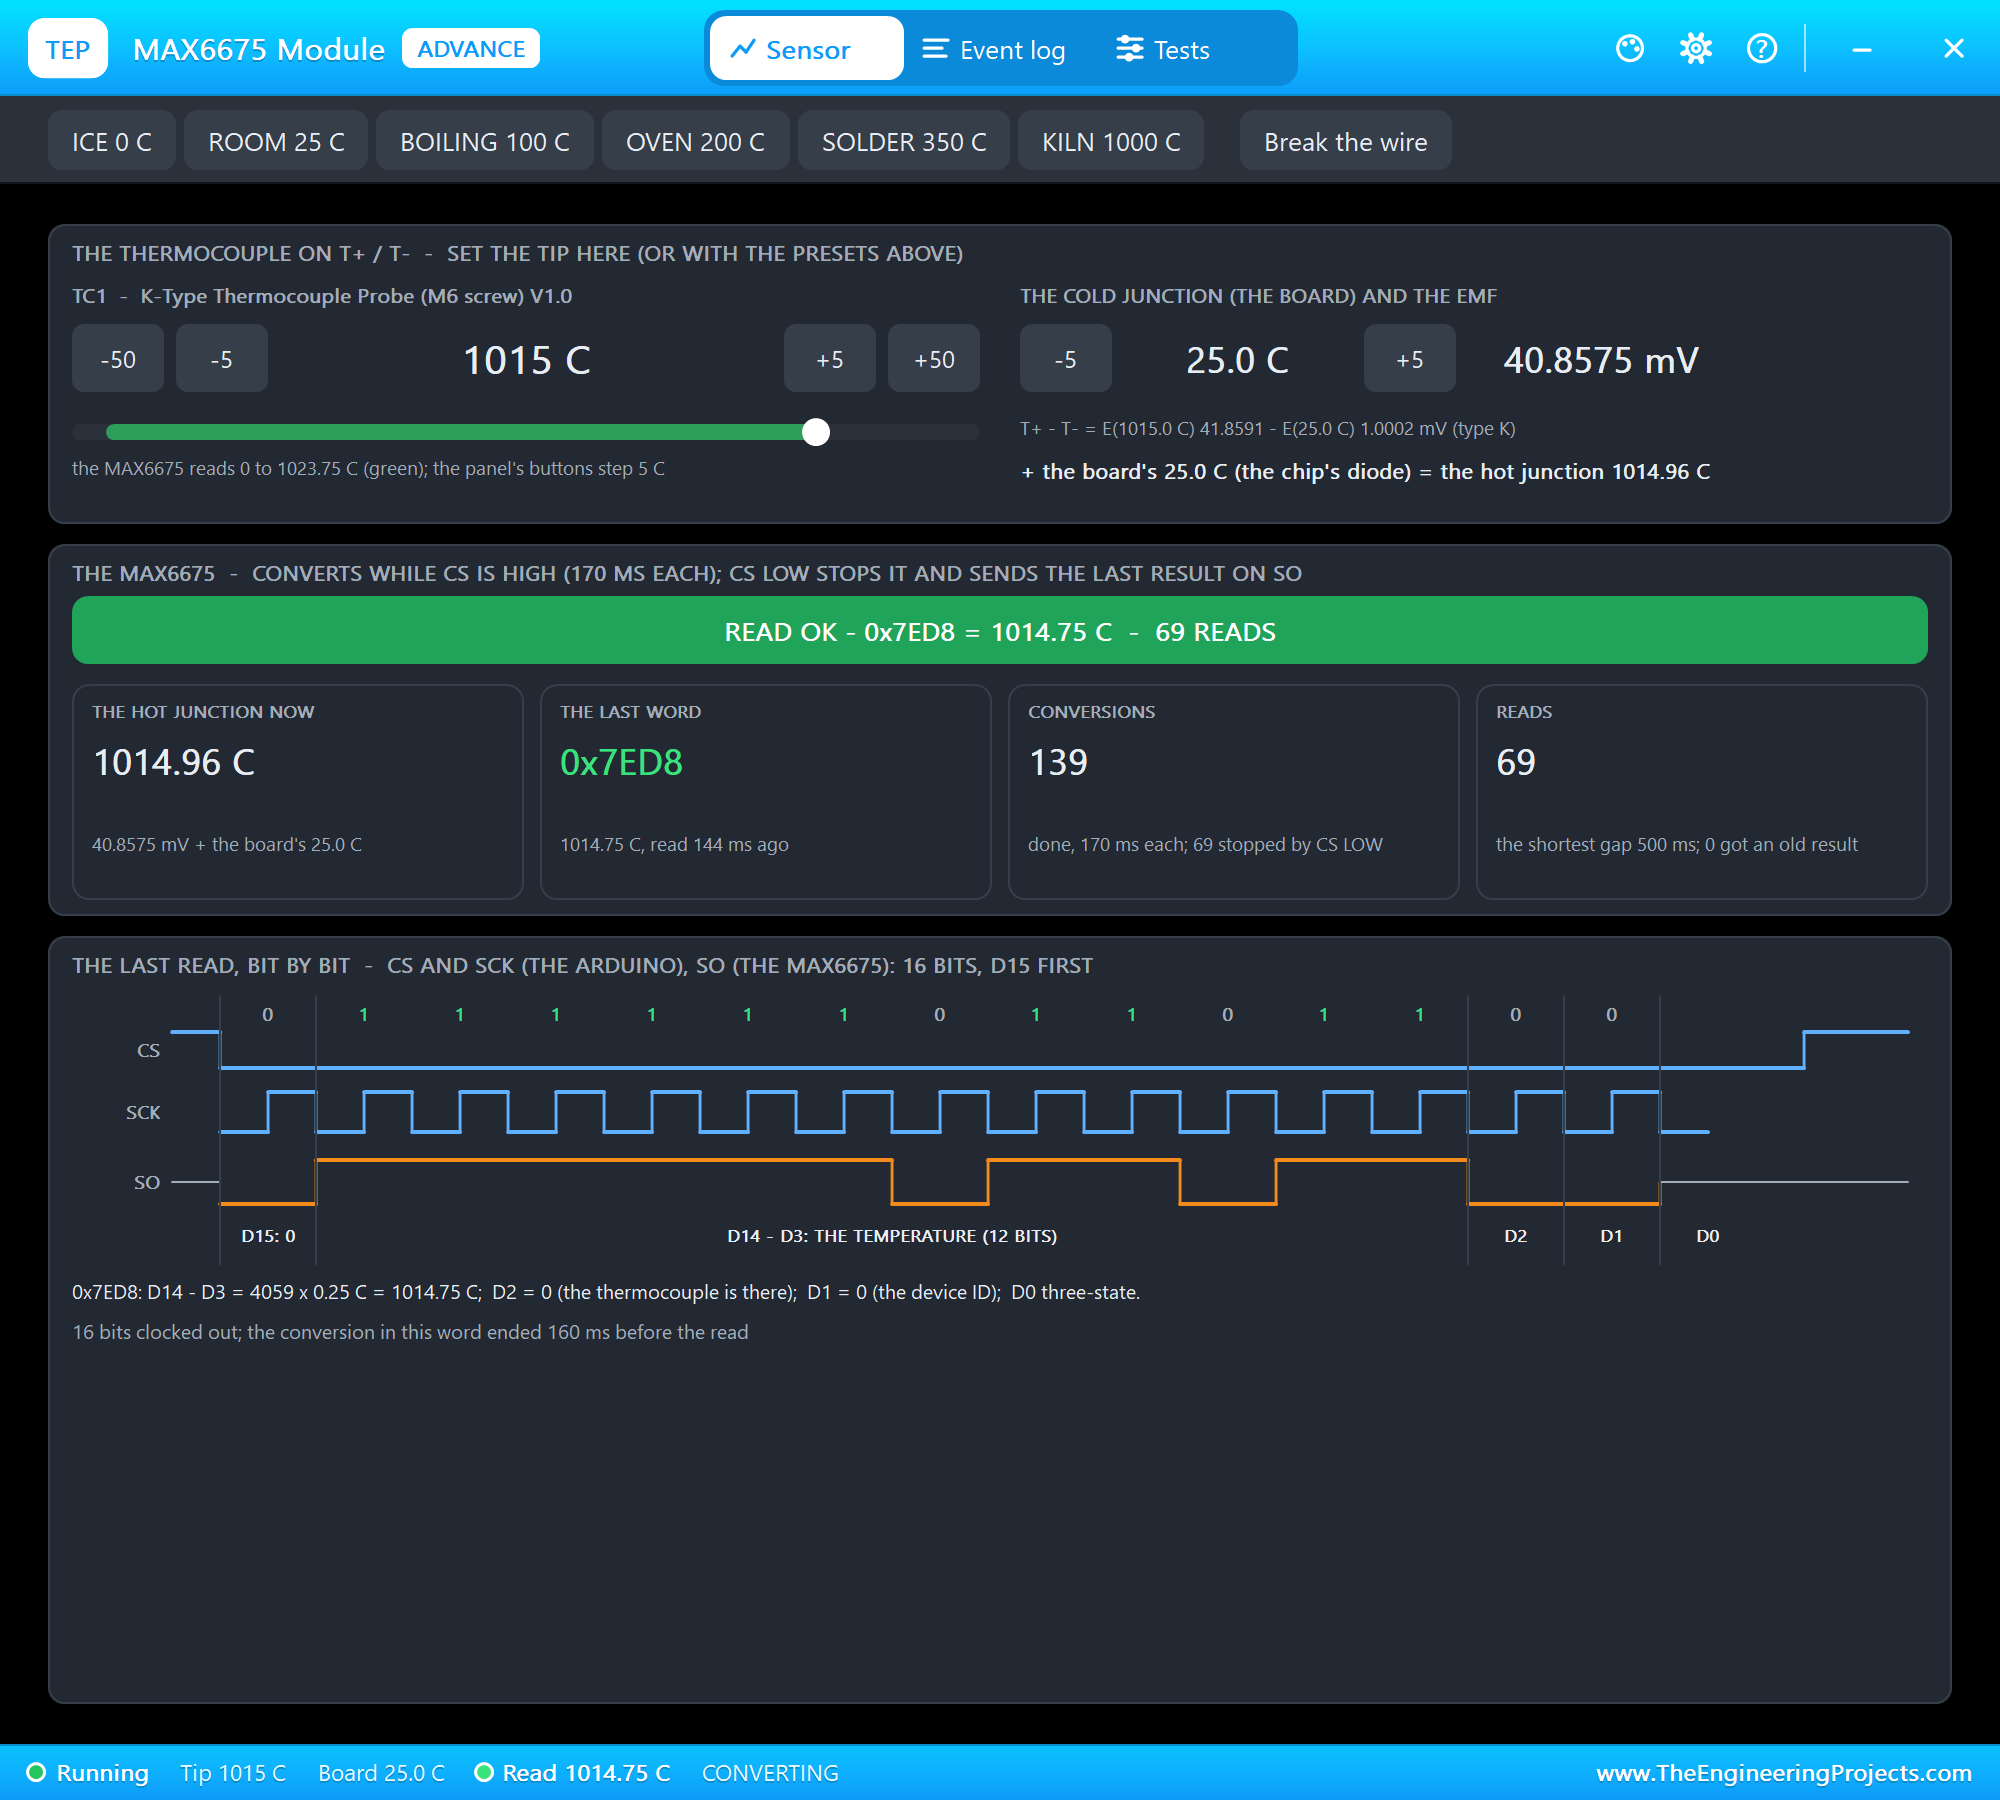
The MAX6675 converts all the time while its CS pin is high, about 170 ms per conversion. Pulling CS low stops the conversion and puts the result on SO, 16 bits, the most significant first, clocked by SCK. Bit 15 is always 0, bits 14 to 3 are the temperature in 0.25-degree steps, bit 2 is 1 when no thermocouple is connected, bit 1 is the device ID and bit 0 floats. Worked example from our run: the word 0x0328 is 808; shifted right by 3 it is 101, and 101 x 0.25 = 25.25 degrees. At the kiln's 1,000 degrees the 12 bits hold 4,000, and the word is 4,000 x 8 = 32,000, 0x7D00. Twelve bits stop at 4,095, which is why the MAX6675 ends at 1,023.75 degrees.
A Bisque Firing, Stage by Stage
A bisque firing turns dry clay into hard, porous ware ready for glazing. The program follows it by the temperature and the direction:
| Temperature | Stage | What happens |
|---|---|---|
| under 50 C | COLD | the kiln is off or just started |
| 50 - 300 C | DRYING | the last water leaves the clay: go slowly |
| 300 - 950 C | HEATING | the clay changes for good; quartz inverts at 573 C |
| 950 C to the target | PEAK | close to the top |
| the target (1000 C) | TARGET REACHED | three beeps: switch the kiln off |
| above the target + 10 C | OVER TEMP | a siren until it is muted or the kiln cools |
| 20 C under the peak | COOLING | keep the lid closed: fast cooling cracks the ware |
| under 65 C after a firing | SAFE TO OPEN | the ware can come out |
| no thermocouple | PROBE OPEN | a beep every 2 seconds |
A firing counts as started once the kiln passes 100 degrees; only then can COOLING and SAFE TO OPEN appear, so a cold kiln at the start is COLD, not SAFE TO OPEN. Once reached, TARGET REACHED holds down to 5 degrees under the target, so the reading's noise of a quarter of a degree cannot flip it on and off. The firing time counts the time spent above 100 degrees.
The LCD 12864 in Serial Mode
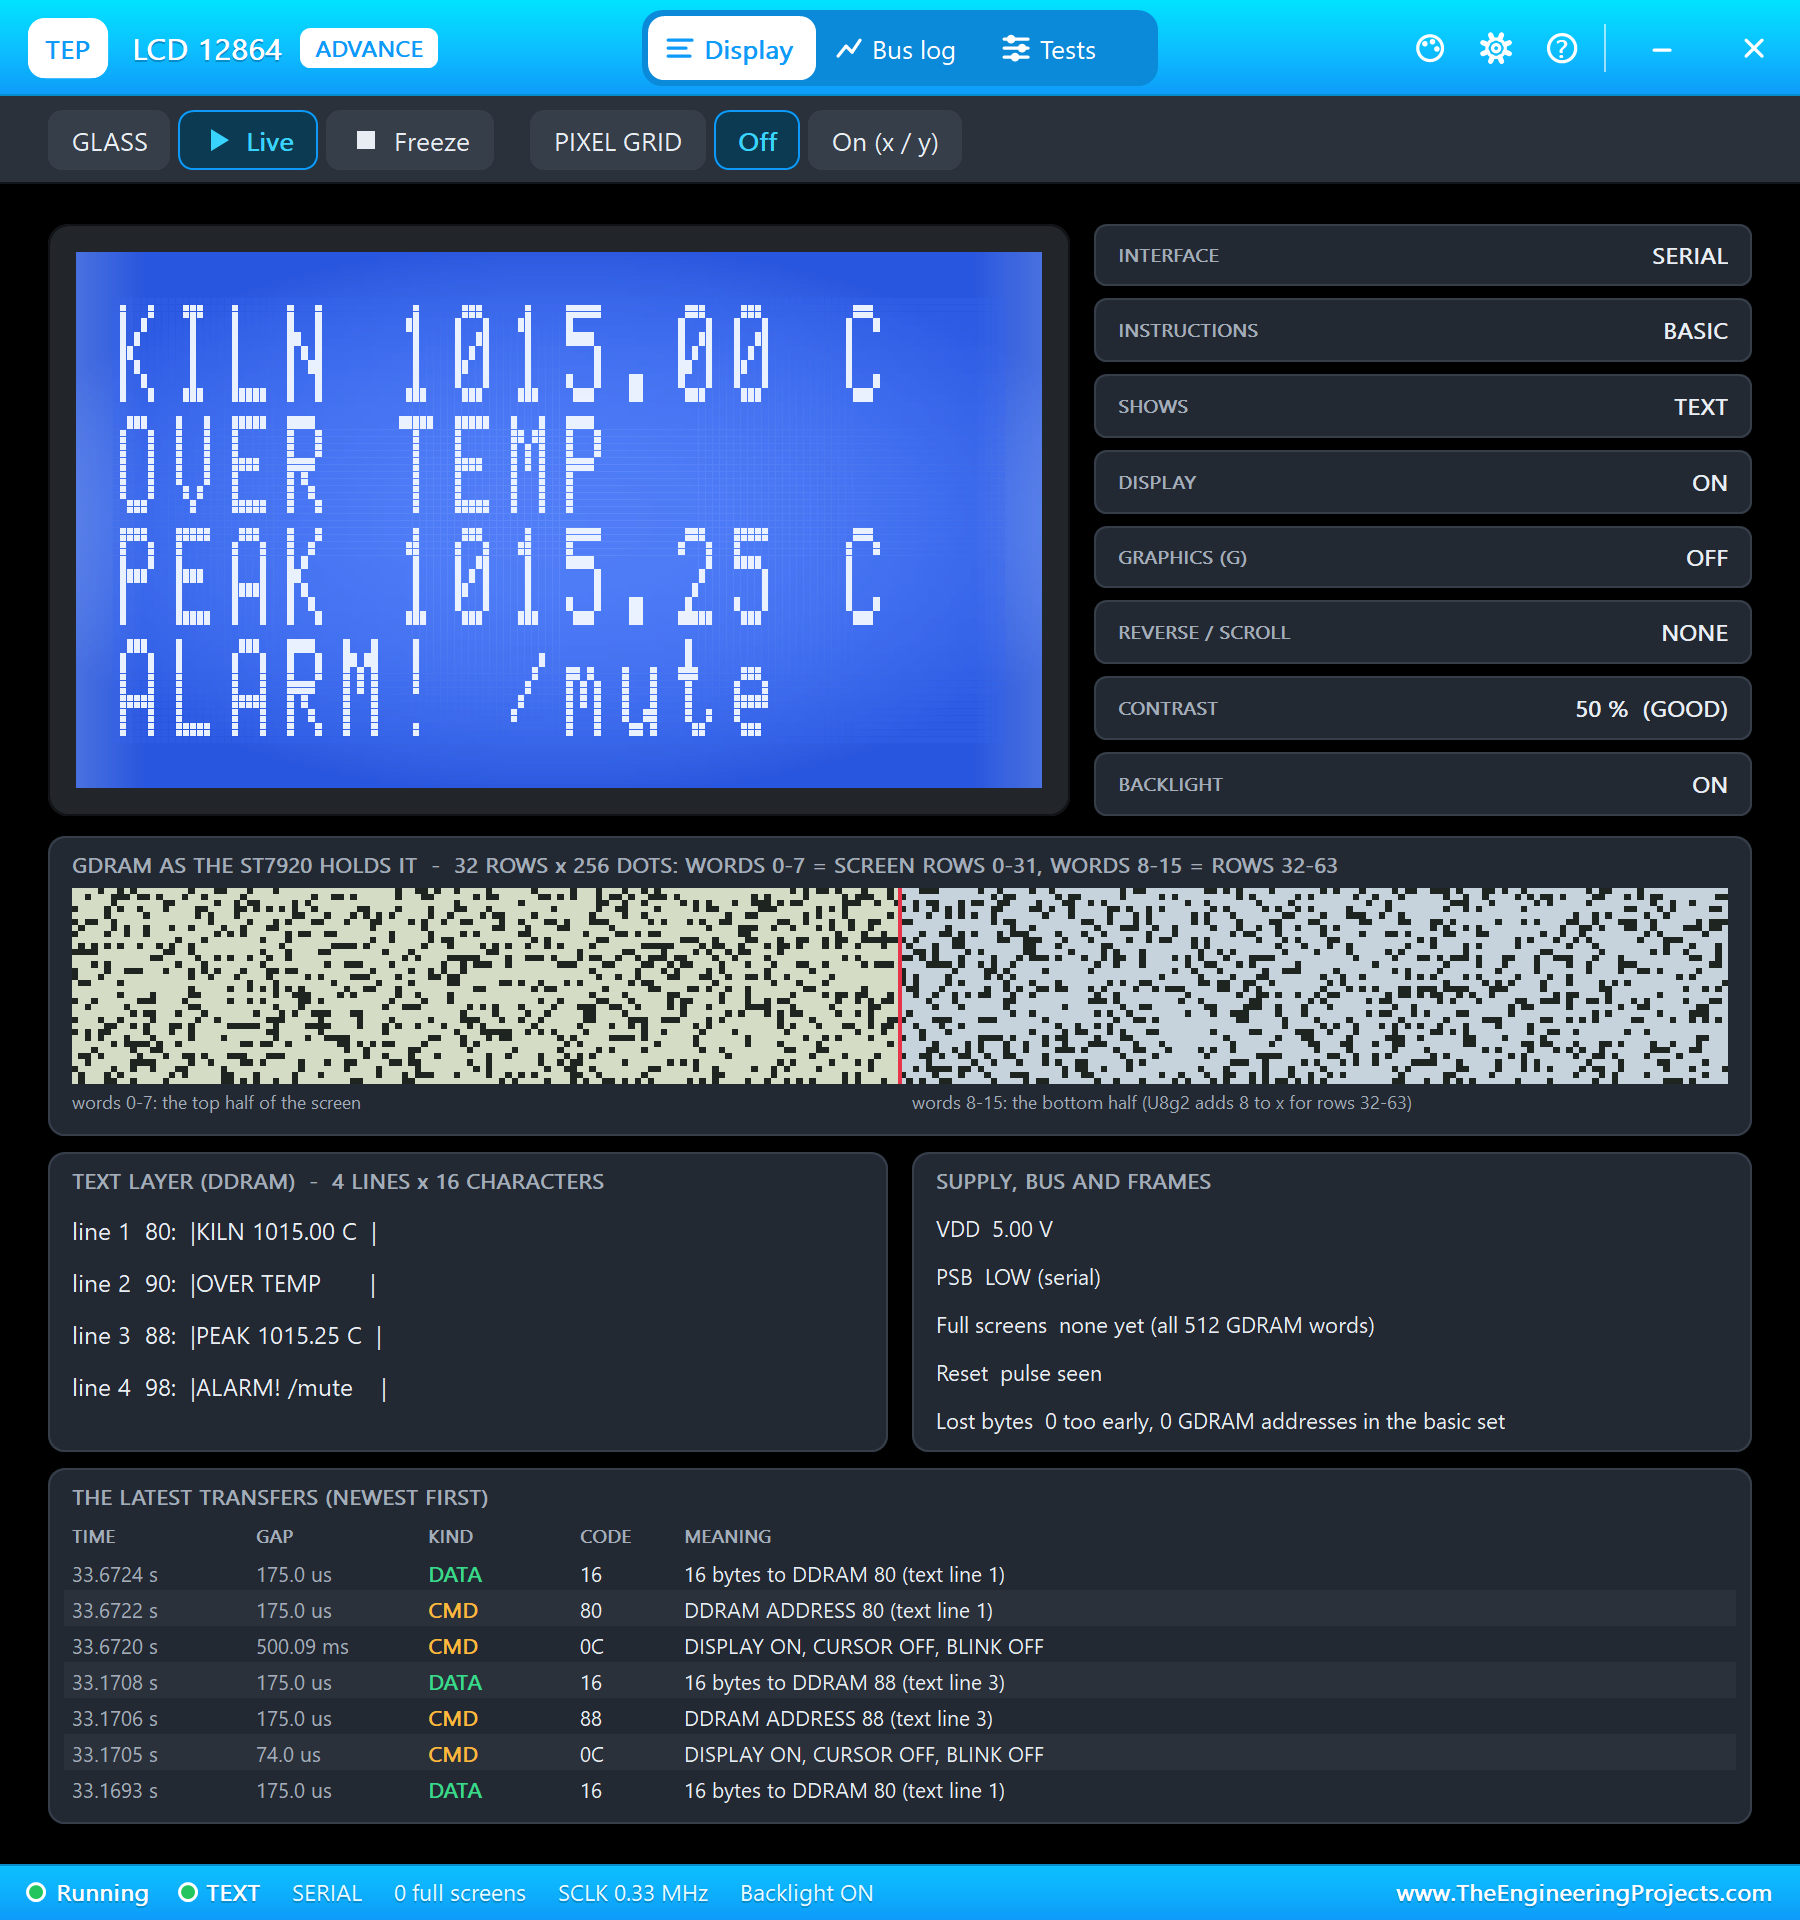
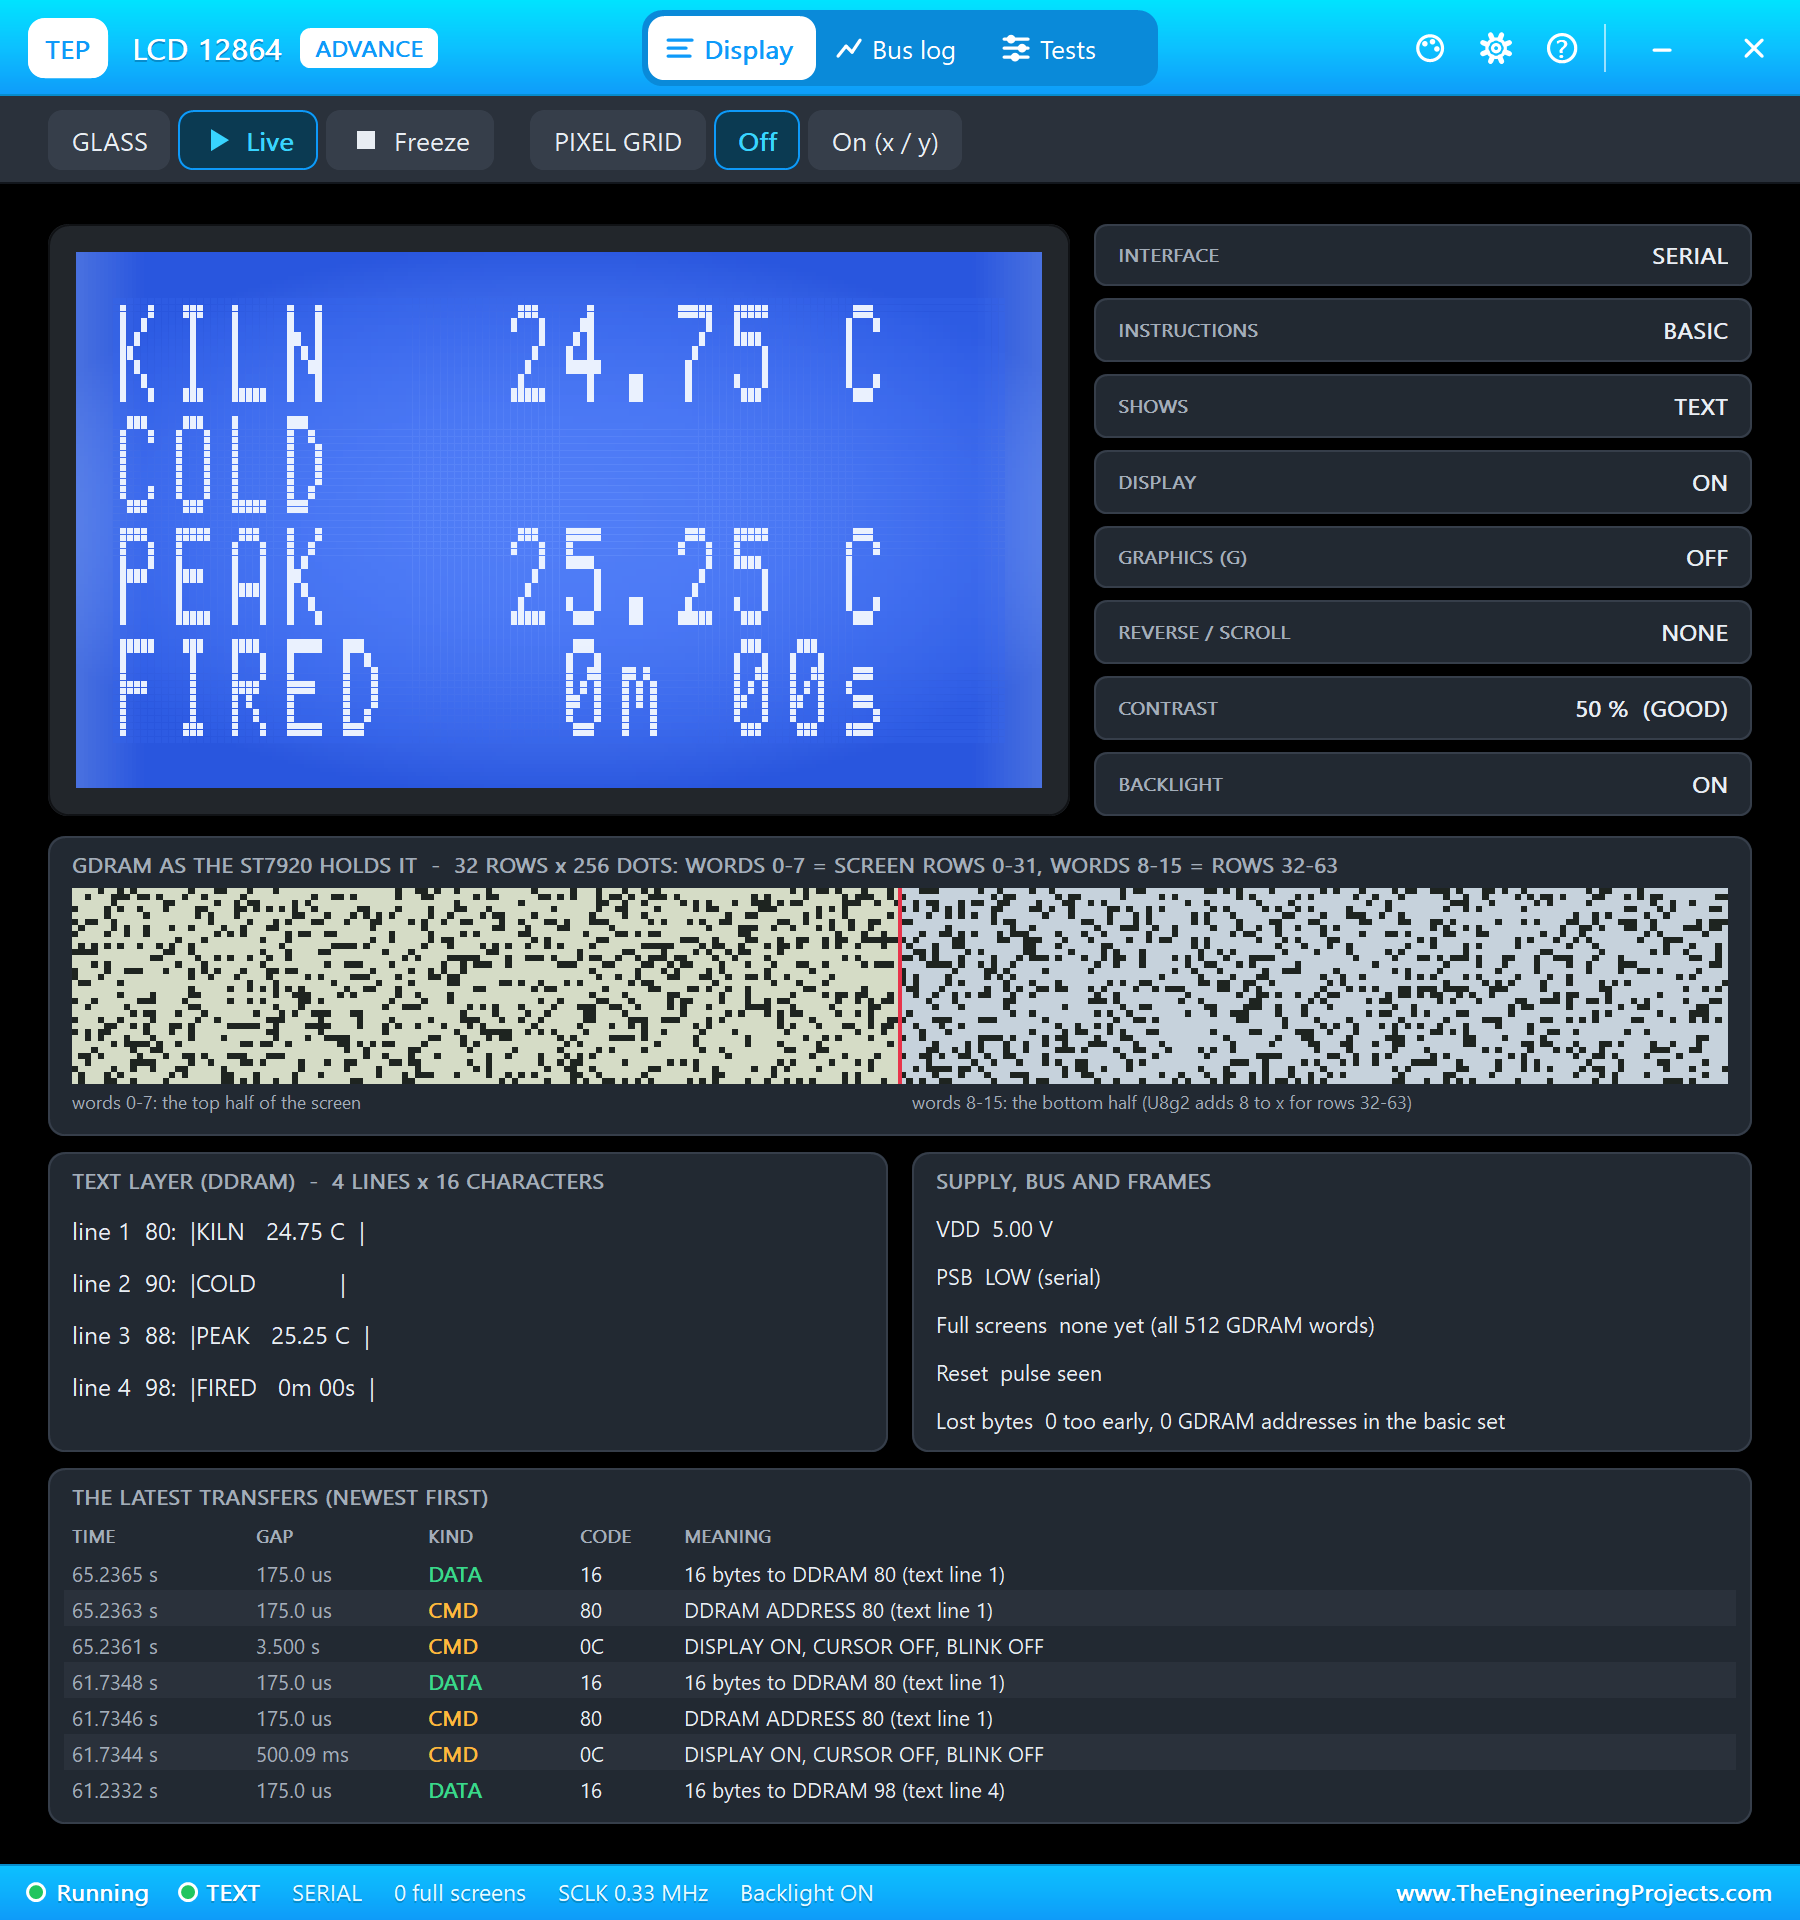
The ST7920 controller of the LCD 12864 has two layers on one glass: a text layer of four lines of 16 characters in its own font, and a graphics layer of 128 x 64 dots. This project uses the text layer, so the Pi sends only characters. The text lines start at the DDRAM addresses 0x80, 0x90, 0x88 and 0x98. In serial mode, every byte travels as three bytes: a sync byte, 11111 followed by RW, RS and 0, so 0xF8 for a command and 0xFA for data; then the high four bits of the value, then the low four bits, each in the top half of a byte. Worked example: the letter K is 0x4B, so it is sent as 0xFA, 0x40, 0xB0. SID is taken on the rising edge of SCLK, most significant bit first, while CS is high. Most instructions need 72 microseconds, the clear instruction 1.6 ms.
Alarm Tones with PWM
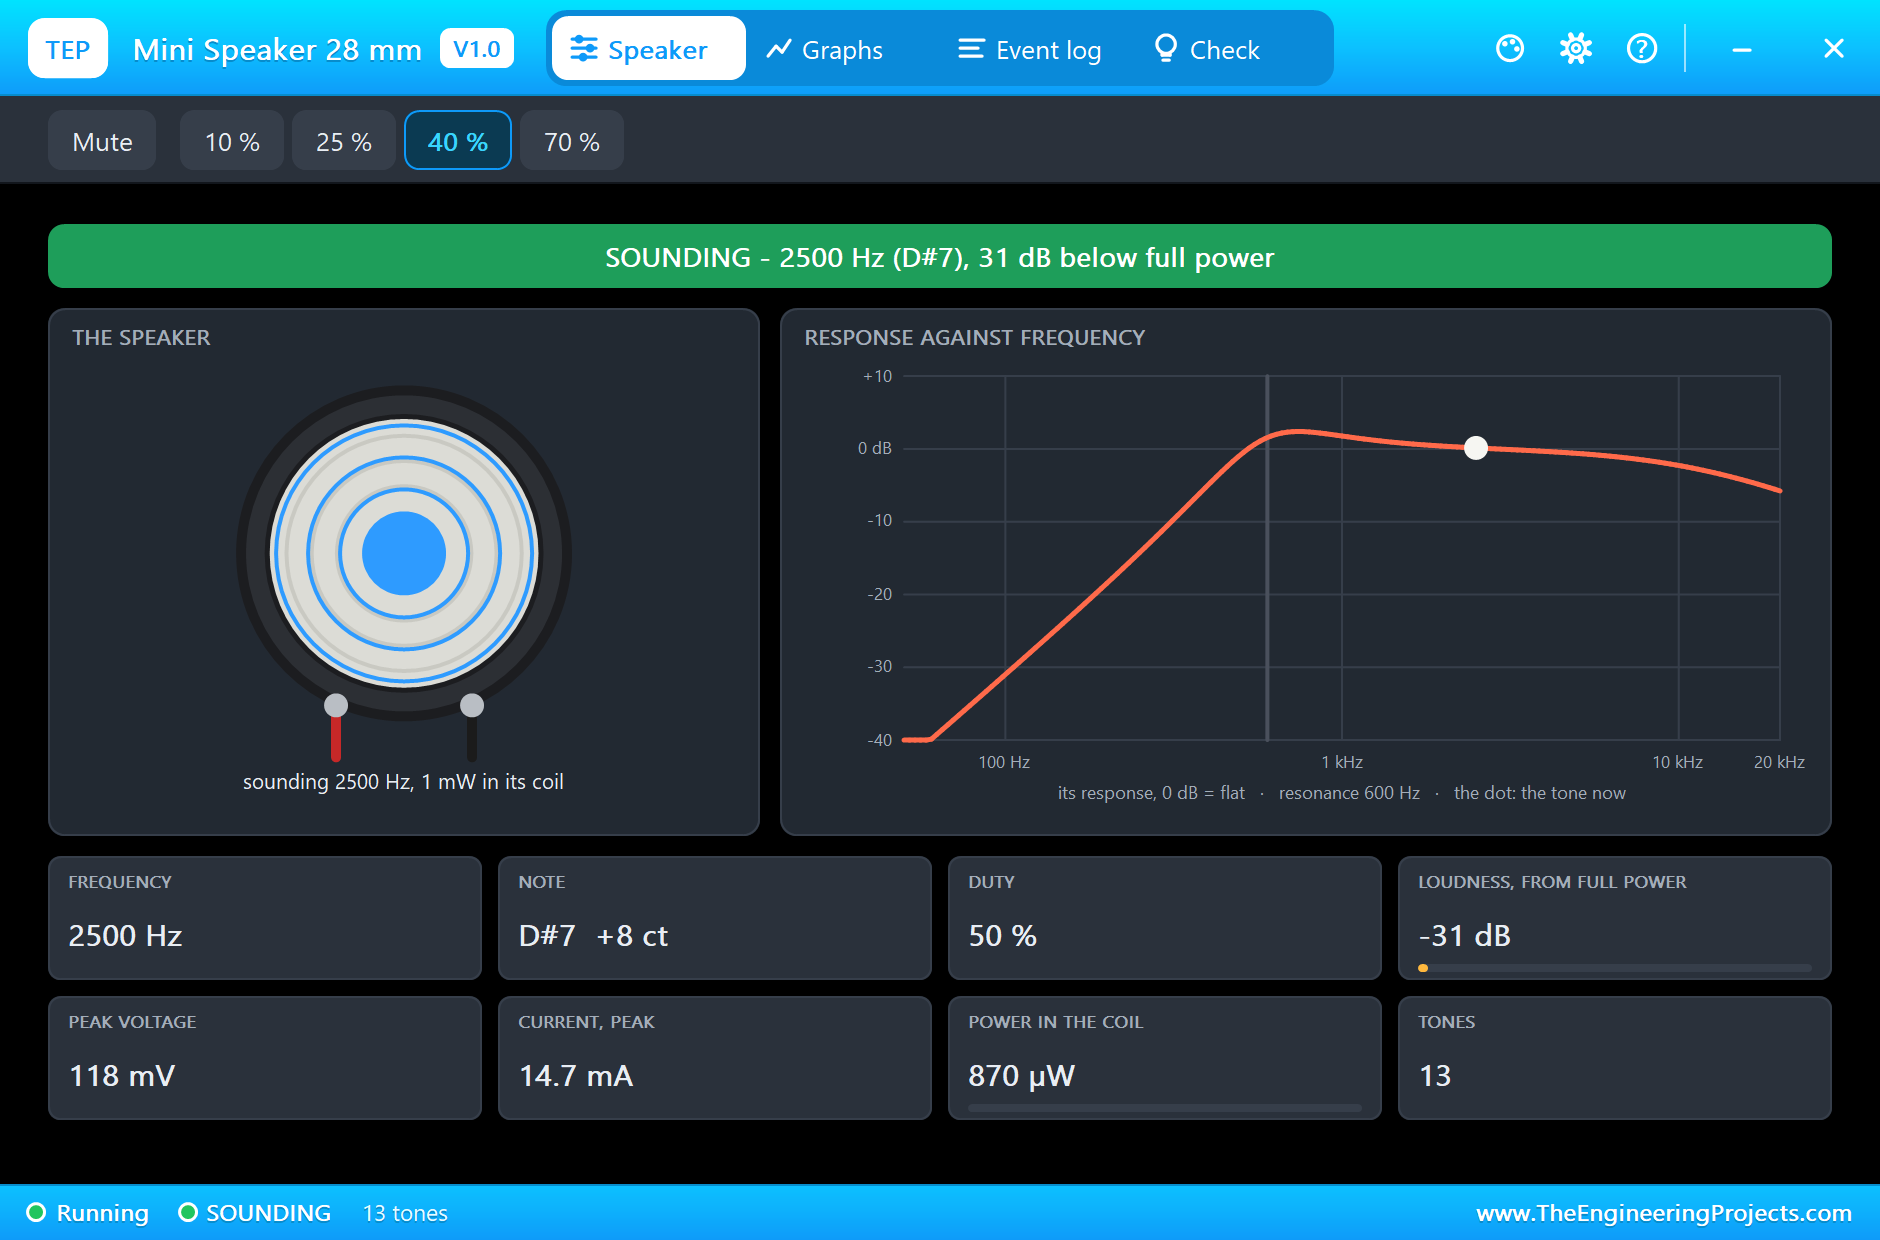
The speaker plays whatever frequency the pin gives it. lgpio's tx_pwm() makes a square wave in the background: 2,500 Hz at 50 percent duty for a beep, and for the siren the program alternates 1,500 and 2,500 Hz every quarter of a second. A beep pattern runs in its own thread, so the measurements never wait for the speaker.
The Python Code Explained
The whole program is included in the download. It uses spidev for the MAX6675, lgpio for the LCD's pins and the speaker's PWM, and the standard library's http.server for the dashboard. At the top are the limits:
TARGET = 1000.0            # C: the bisque firing's top (about cone 06)
OVER = 10.0                # C above the target = OVER TEMP
DRYING_C, HEATING_C, PEAK_C, COLD_C, SAFE_C = 300.0, 950.0, 950.0, 50.0, 65.0
COOL_DROP = 20.0           # C under the peak = COOLING
The MAX6675
        hi, lo = self.spi.xfer2([0, 0])
        word = hi << 8 | lo
if word & 0x04:
return None, word # D2: no thermocouple (open)
return (word >> 3) * 0.25, wordThe LCD 12864
One byte, most significant bit first, SID set before the rising clock edge:
        for i in range(7, -1, -1):
            lgpio.gpio_write(self.c, LCD_SID, b >> i & 1)
            lgpio.gpio_write(self.c, LCD_SCLK, 1)
            lgpio.gpio_write(self.c, LCD_SCLK, 0)
A command or a character: CS high, the sync byte, then the two halves:
        self._byte(0xF8 | rs << 1)                             # sync: 11111, RW = 0 (write), RS
        self._byte(value & 0xF0)
        self._byte((value << 4) & 0xF0)
A line is sent only when its text has changed, which keeps the bus quiet:
self.command((0x80, 0x90, 0x88, 0x98)[n]) # the DDRAM address of line nThe Stages and the Alarms
            if temp > target + OVER:
                stage, alarm = 'OVER TEMP', 'OVER TEMP'
            elif temp >= target or (reached and temp > target - HYST):
                stage, alarm = 'TARGET REACHED', ''
elif fired and peak - temp >= COOL_DROP:
stage, alarm = ('SAFE TO OPEN' if temp < SAFE_C else 'COOLING'), '' elif a == 'OVER TEMP' and not muted:
tone(2500 if k % 2 else 1500); time.sleep(0.25)A tone is lgpio's PWM at 50 percent duty, and the three target beeps are short tones with pauses:
lgpio.tx_pwm(chip, SPEAKER, hz, 50 if hz else 0) for _ in range(beeps):
tone(2500); time.sleep(0.15); tone(0); time.sleep(0.15)A new alarm always sounds again, even after an earlier one was muted. The pages are / (the dashboard), /mute, /reset (a new firing), /down, /up and /data (JSON).
How to Run the Proteus Simulation
- Download the project zip below and install the library files and the TEPPi folder (the steps are under the download button).
- Open Pi-5-Kiln-Monitor.pdsprj from the Proteus Simulation folder. Keep kiln_monitor.py and the DLL files next to it.
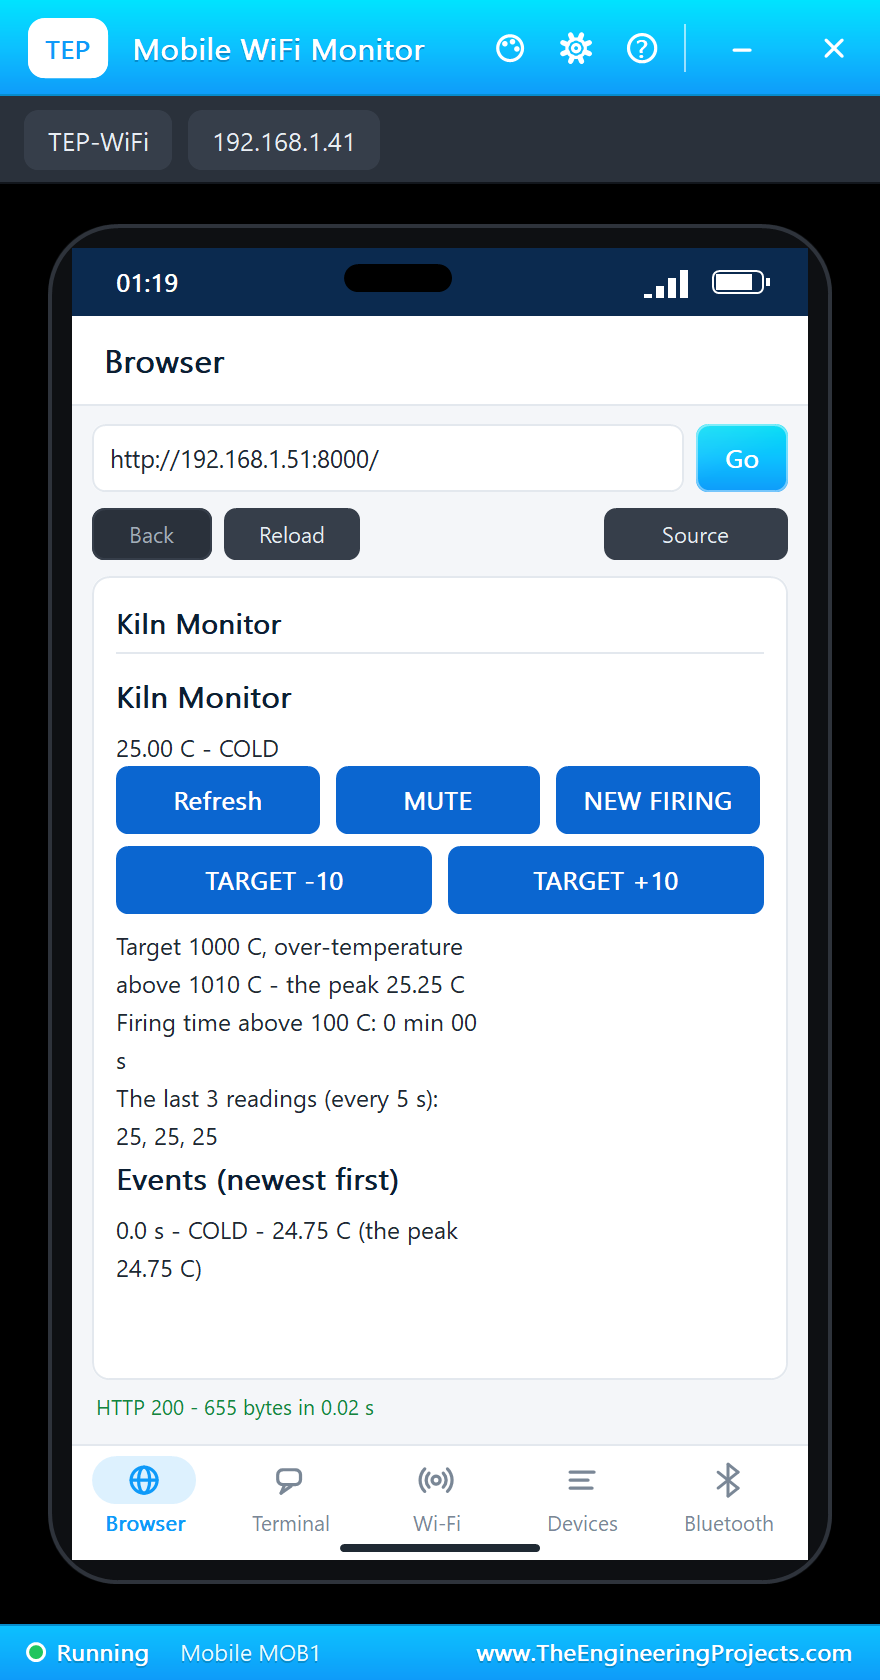
- Press Play. The LCD shows the kiln at about 25 degrees, COLD.
- Open the Laptop WiFi Monitor (PC1) or the Mobile WiFi Monitor (MOB1) and press Go.
- In the MAX6675's pop-up (U1) pick BOILING 100 C, SOLDER 350 C and KILN 1000 C, then press +5 three times.
- Press MUTE on the dashboard, then -50, ROOM 25 C, and try Break the wire.
Proteus Simulation Results
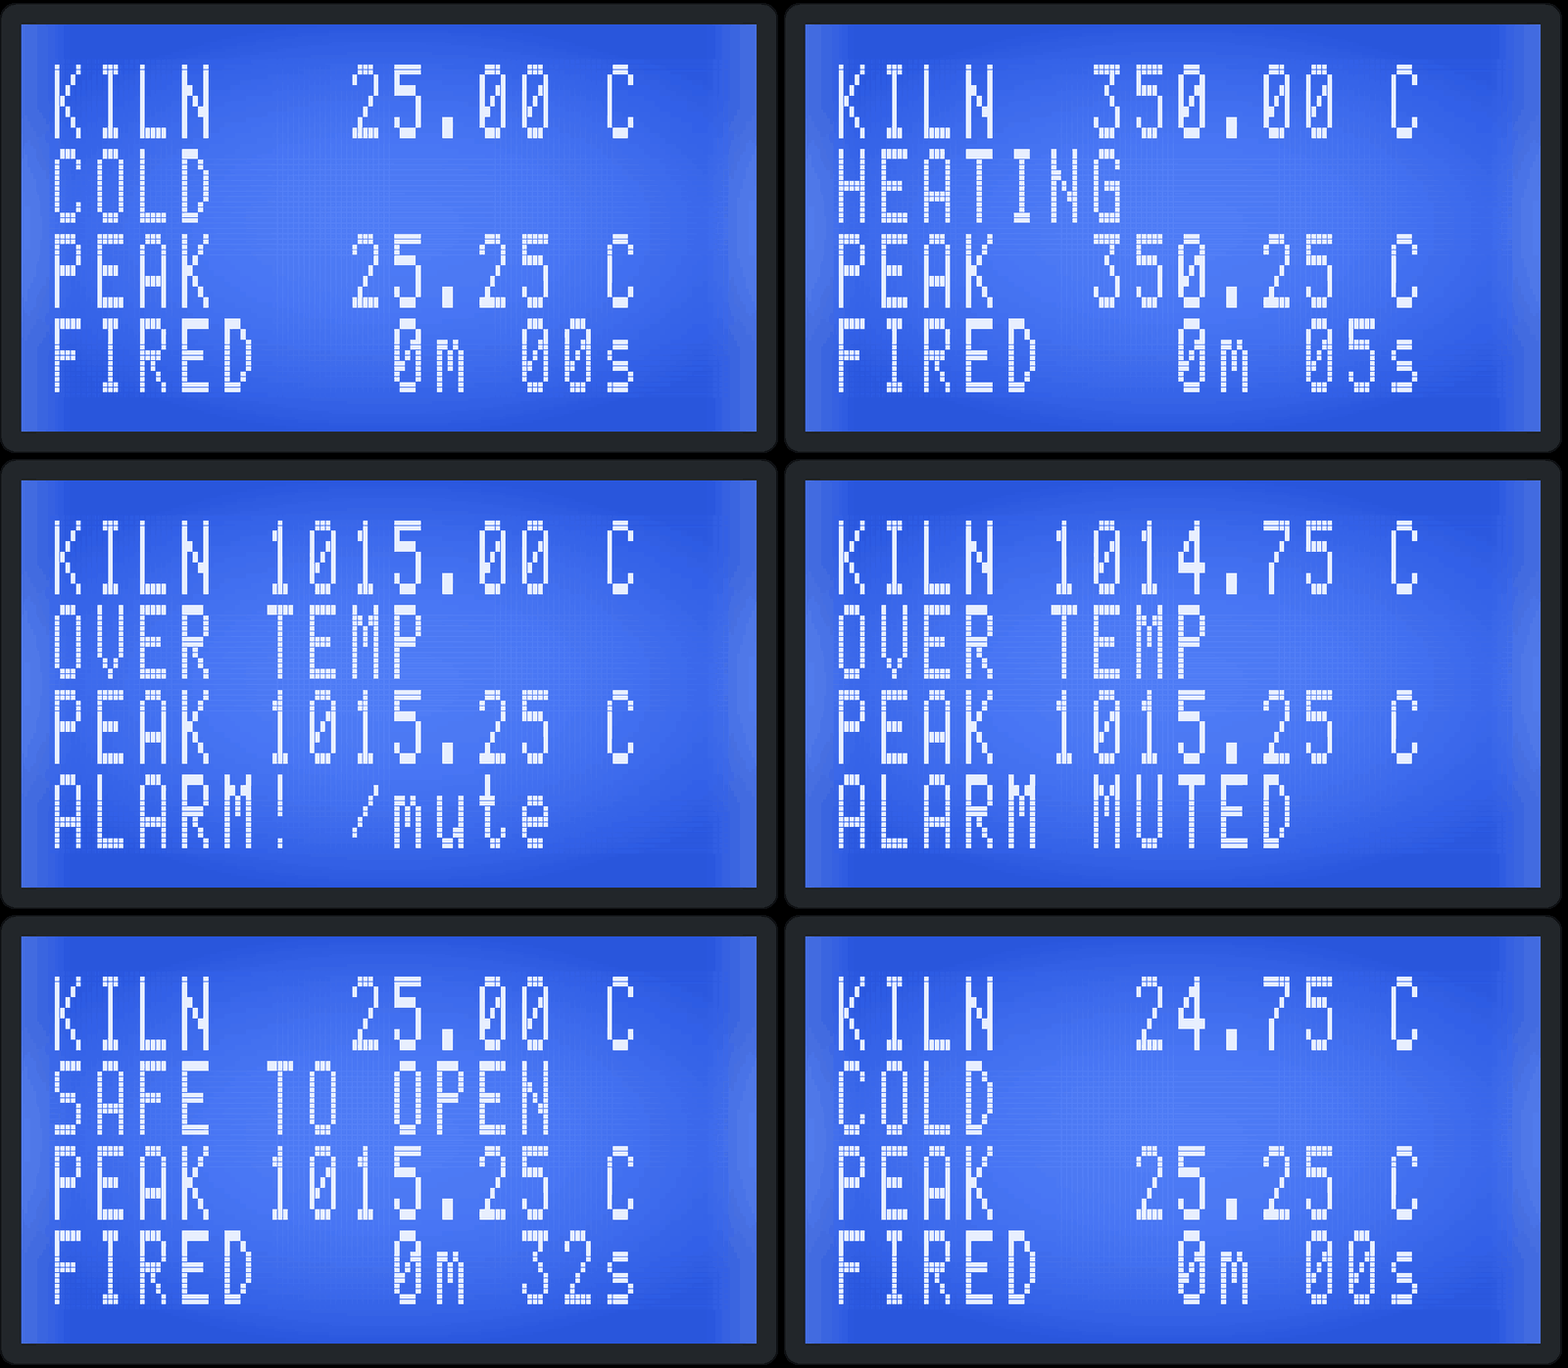
Here is one complete run of the simulation, with the numbers from our final test run; the times are the program's seconds since it started. The kiln began at room temperature: the MAX6675 sent the word 0x0328, 25.25 degrees, or 0x0320, 25.00 degrees, as the reading's quarter-degree noise moved, and the LCD showed KILN 25.00 C, COLD, the peak and a firing time of zero.
The Kiln Heats Up
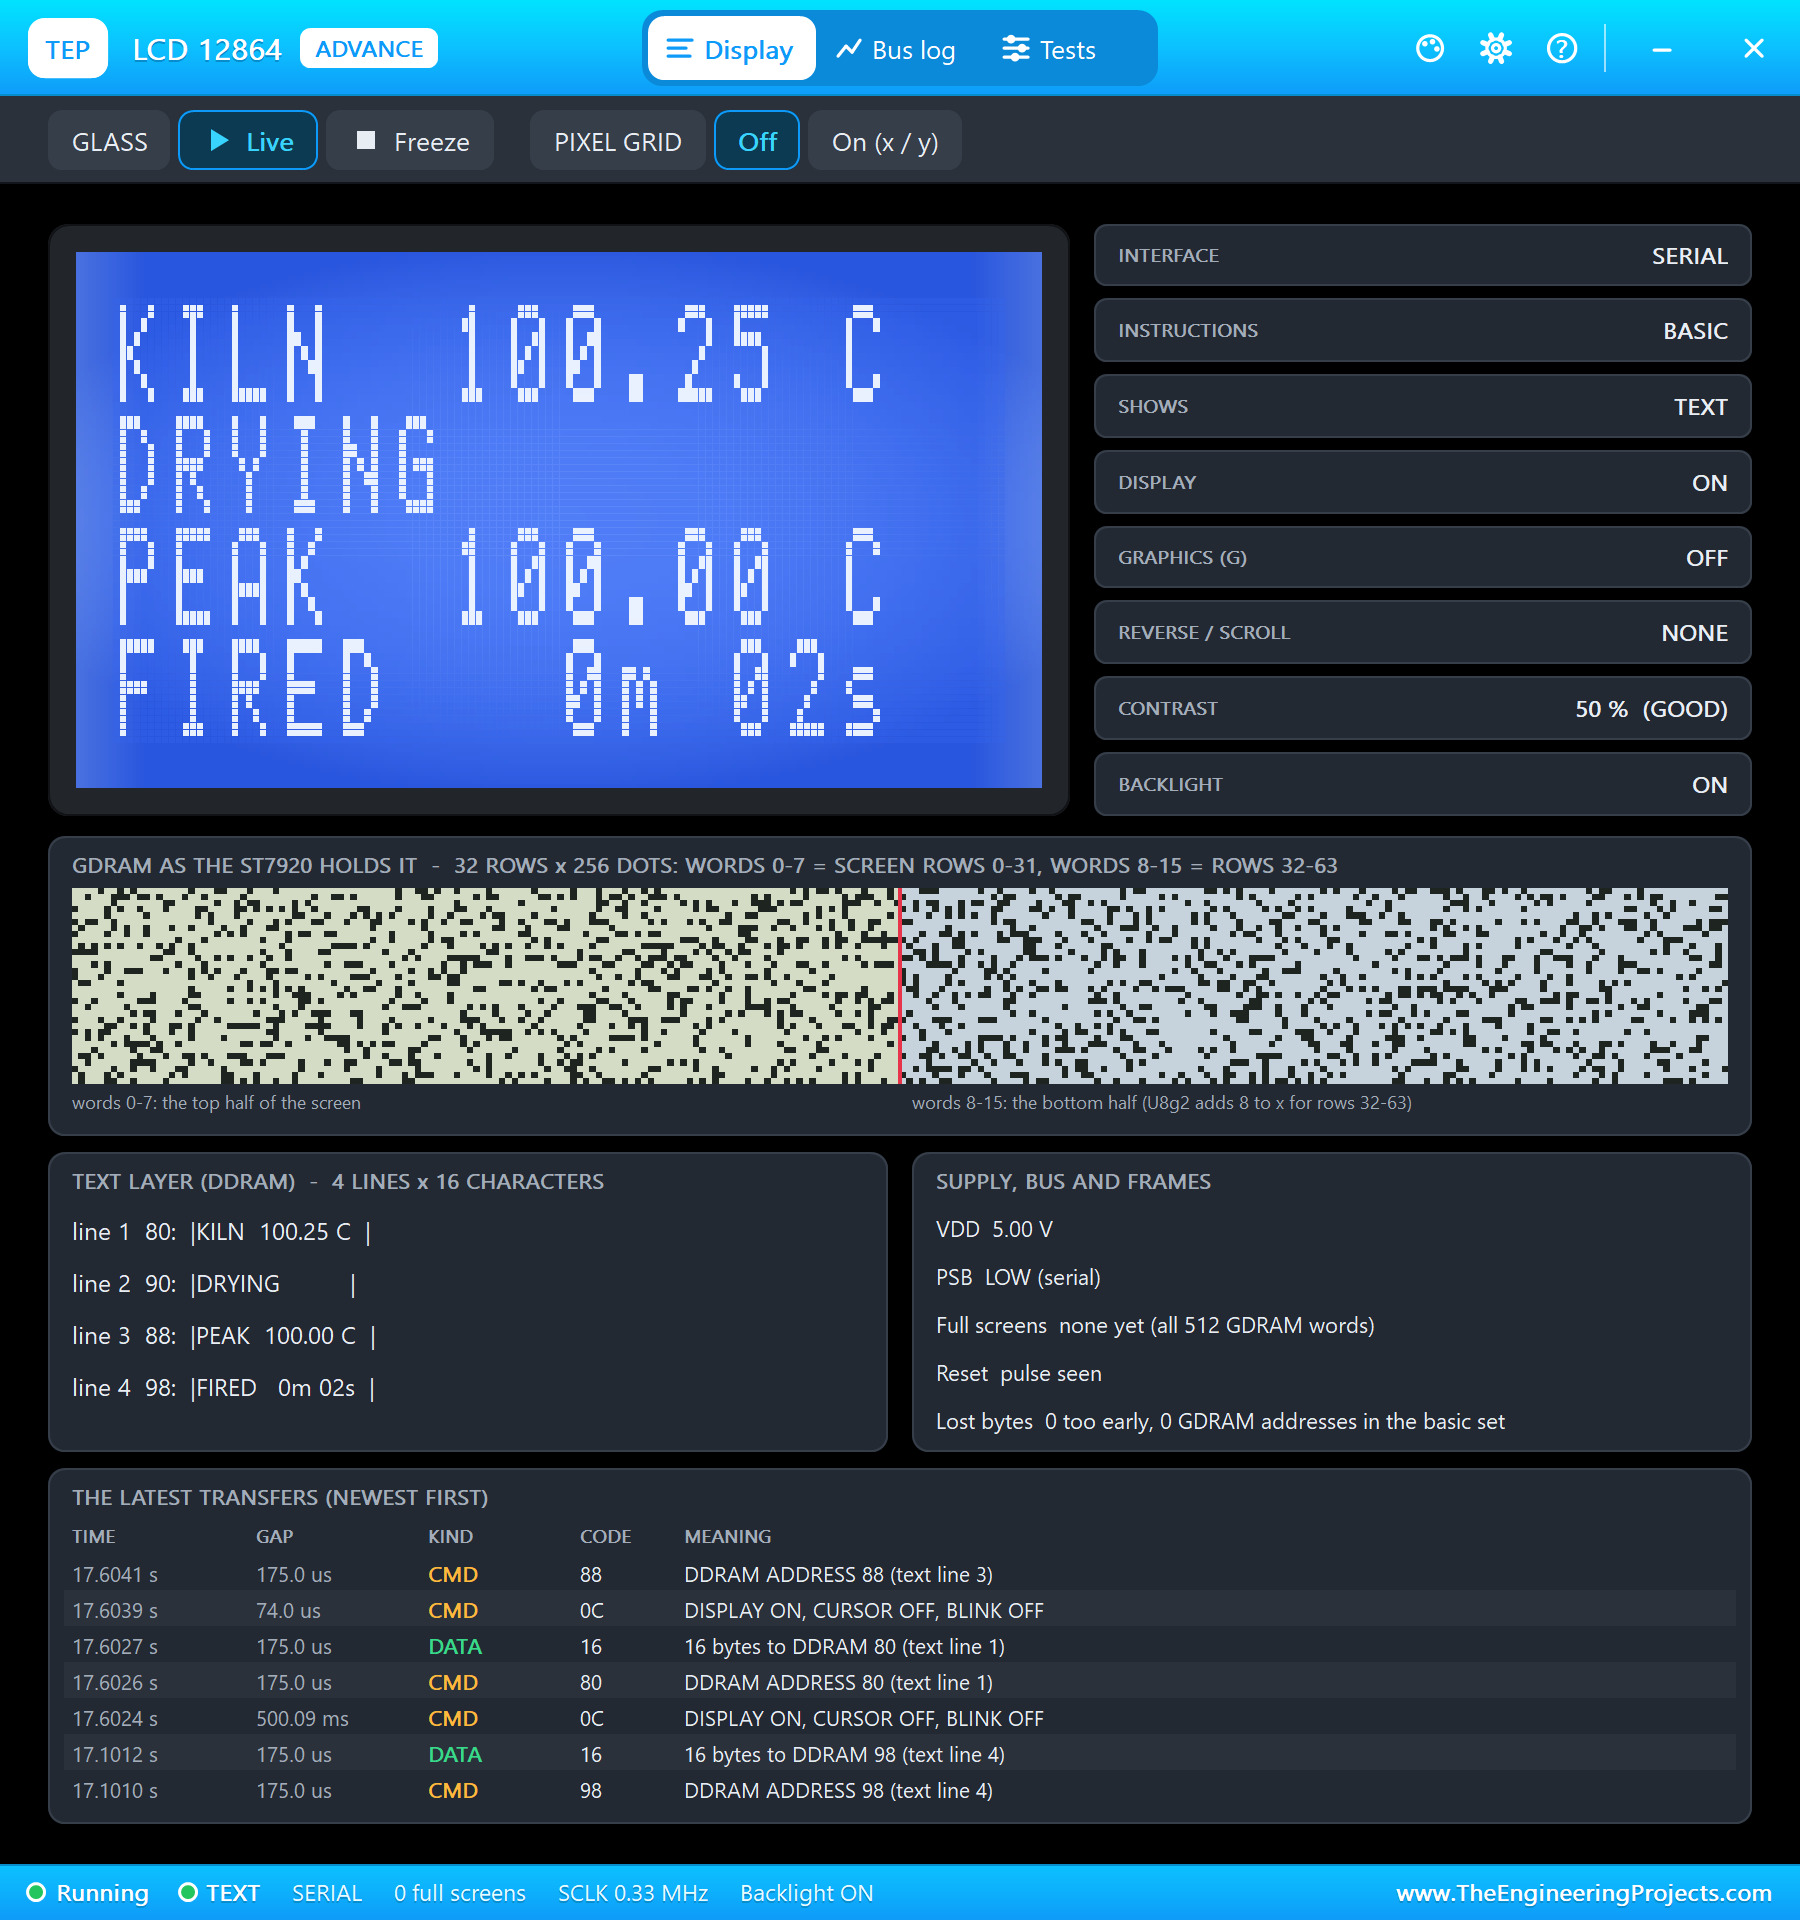
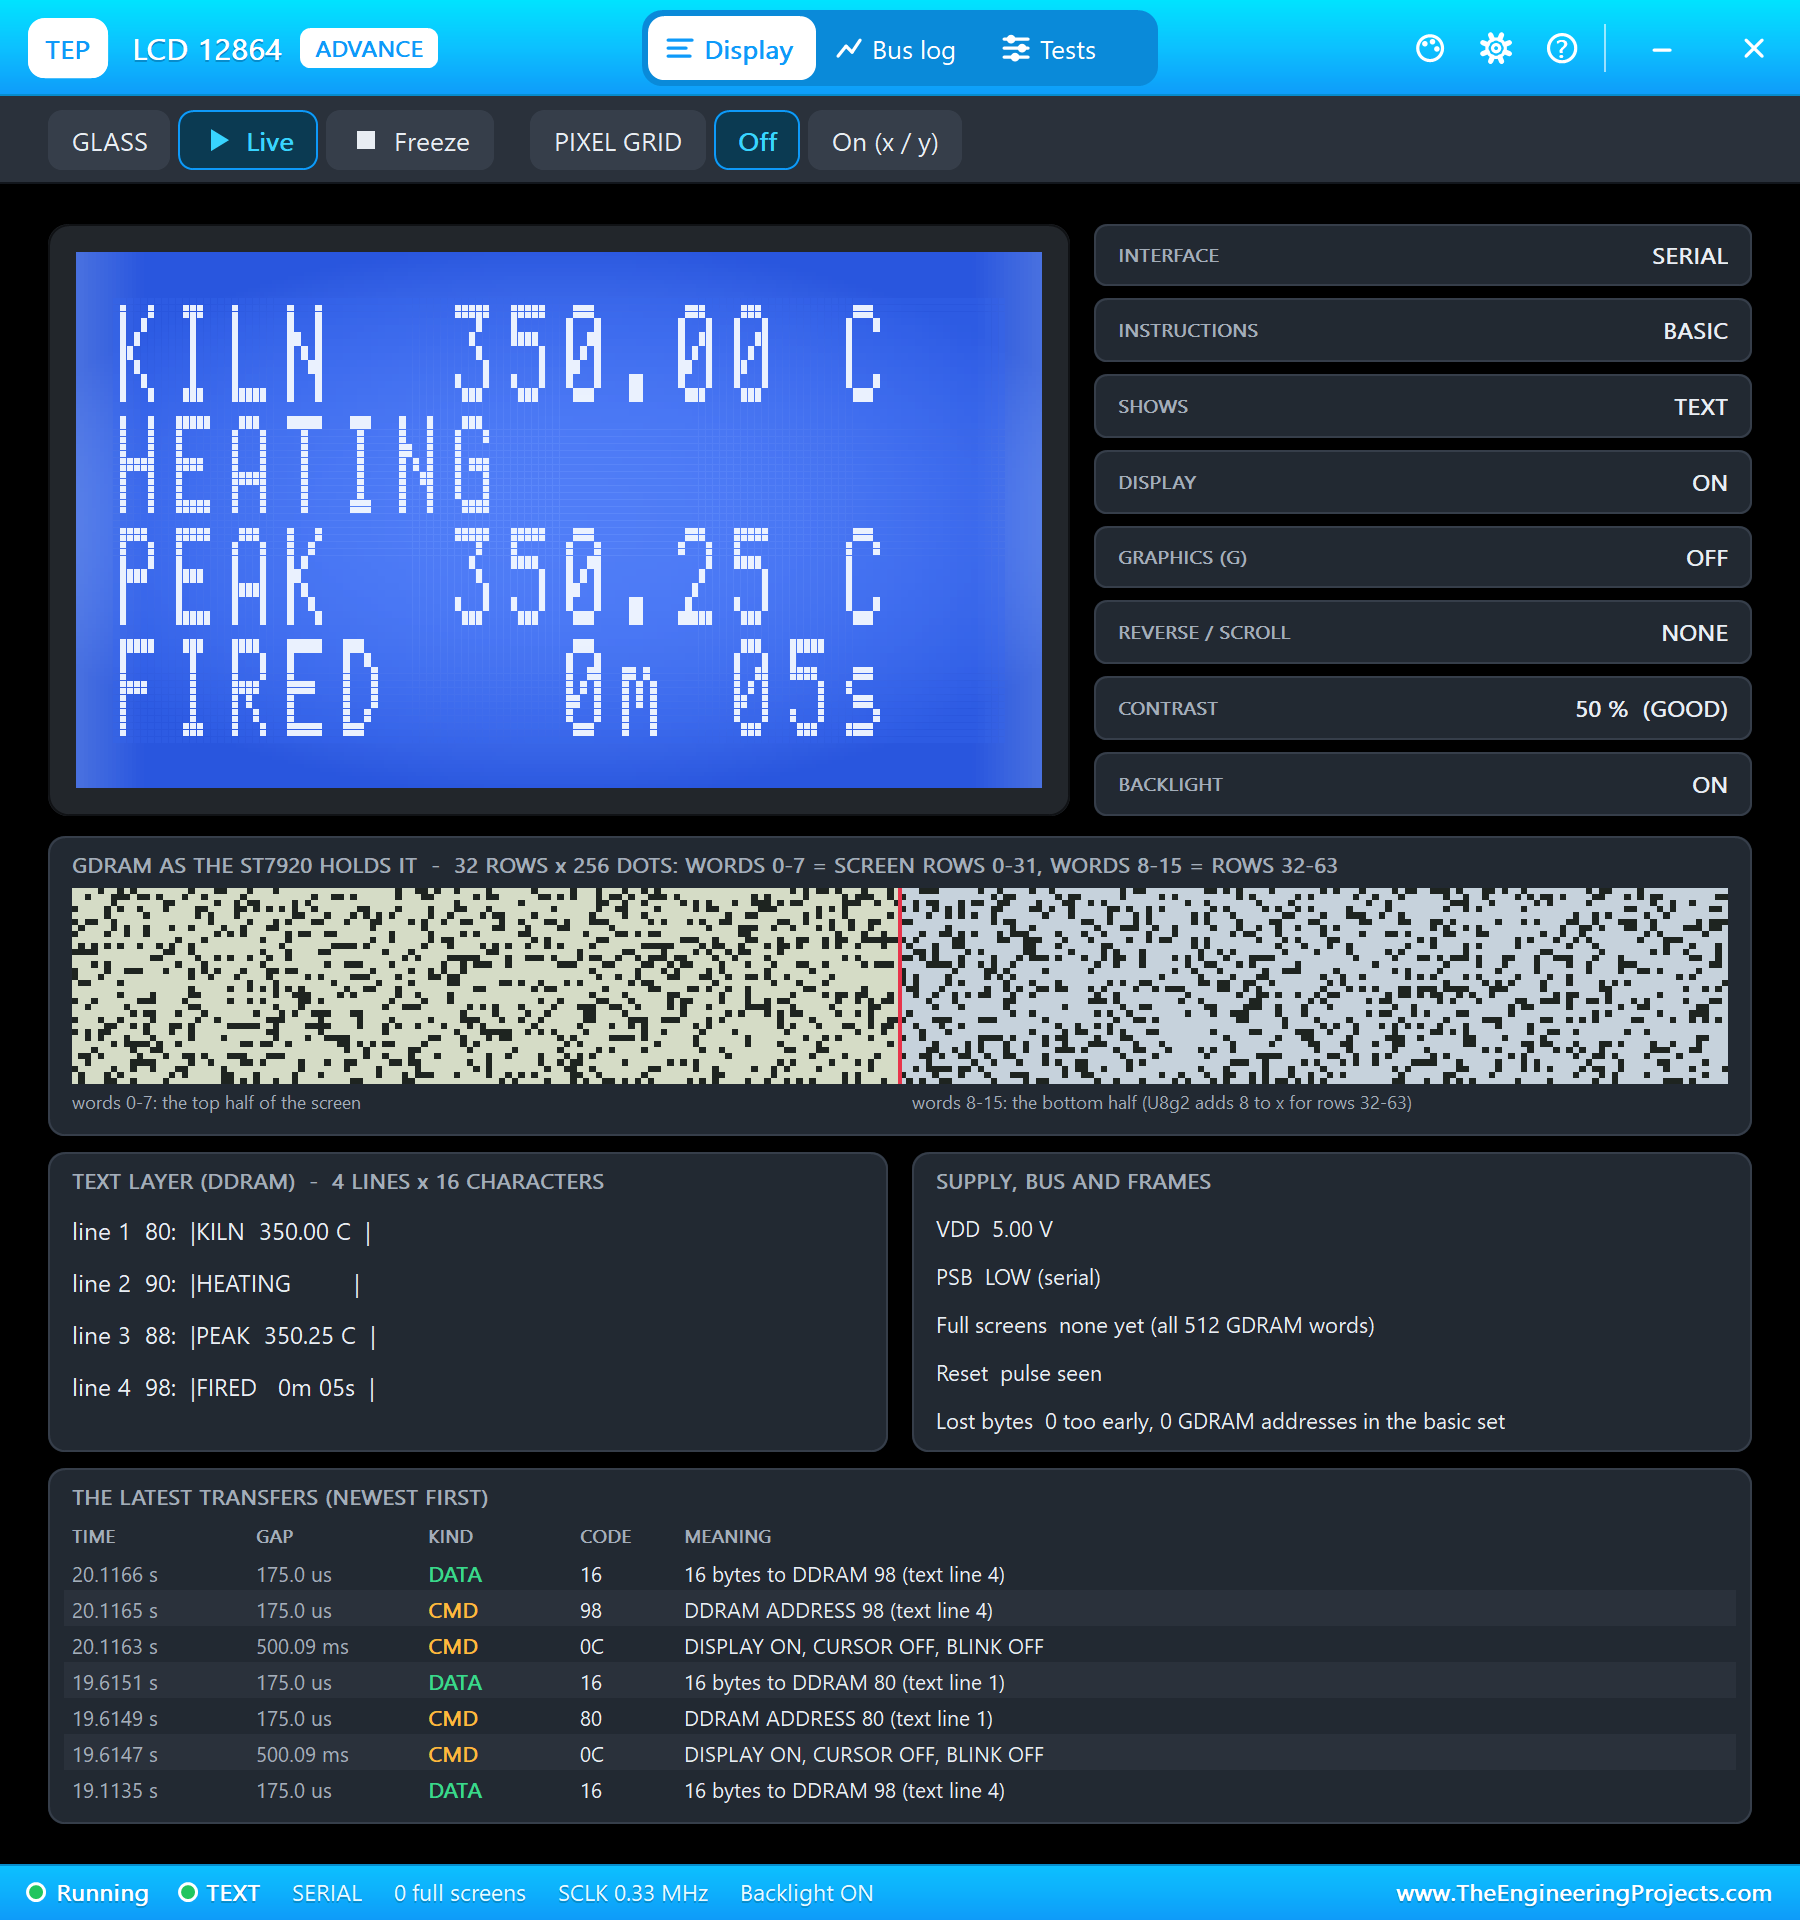
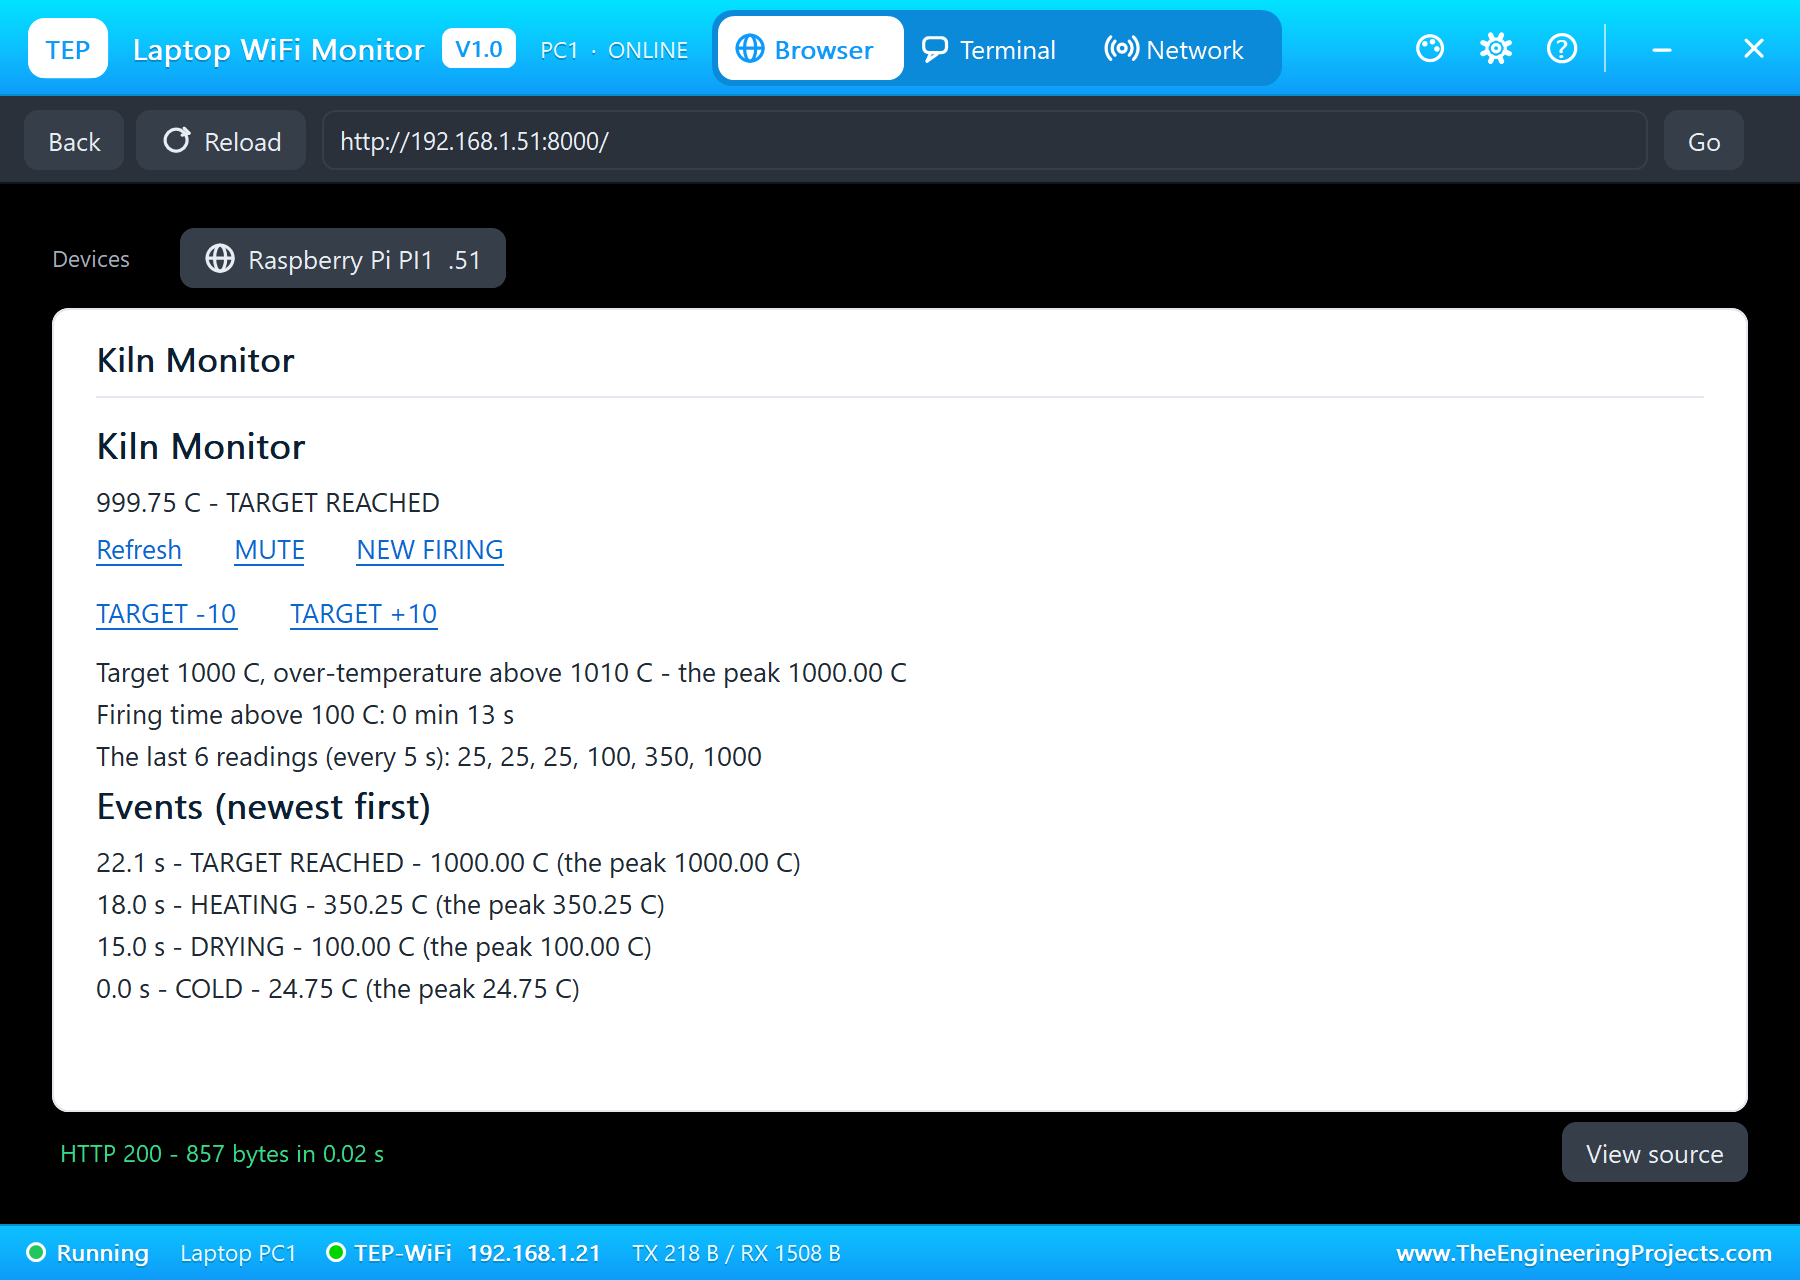
BOILING 100 C in the MAX6675's pop-up: at 15.0 seconds "DRYING - 100.00 C", and the firing timer started. SOLDER 350 C: "HEATING - 350.25 C" at 18.0 seconds. The MAX6675's pop-up showed the word for 350 degrees: 1,400 steps of a quarter of a degree, shifted left by three, 0x2BC0, give or take the noise.
The Target Reached
KILN 1000 C: at 22.1 seconds "TARGET REACHED - 1000.00 C" and three beeps on the speaker, the signal to switch the kiln off. The readings went on alternating between 1,000.00 and 999.75 degrees, and the stage stayed steady thanks to the 5-degree hysteresis. This taught us something in testing: in our first run, without it, the stage flipped between TARGET REACHED and PEAK every half second at exactly 1,000 degrees.
An Overshoot and the Siren
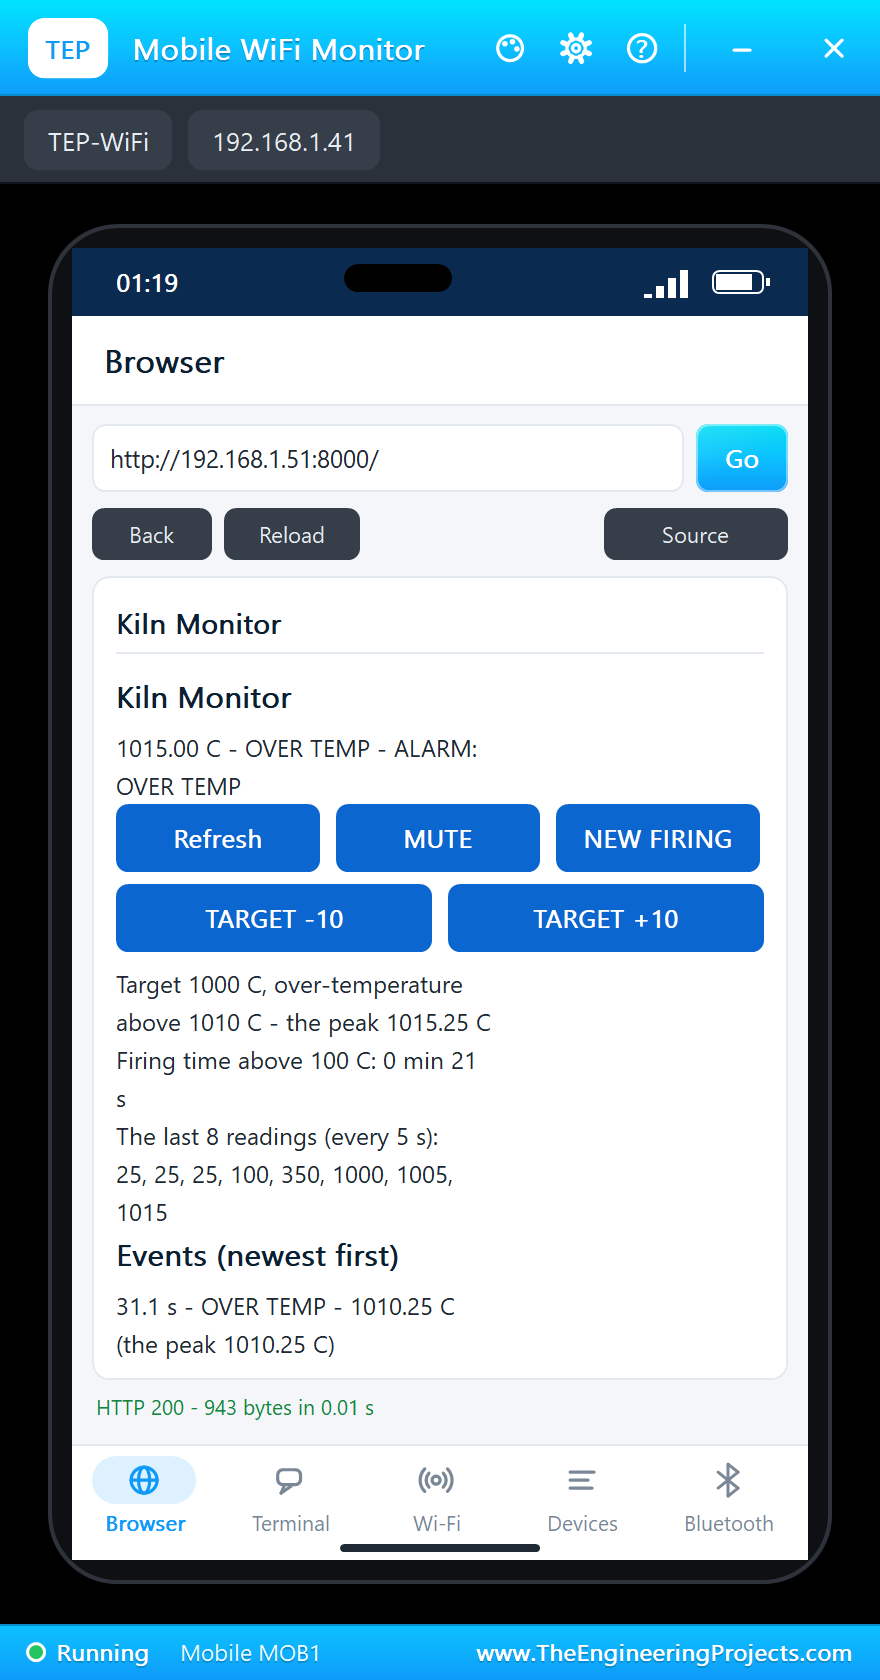
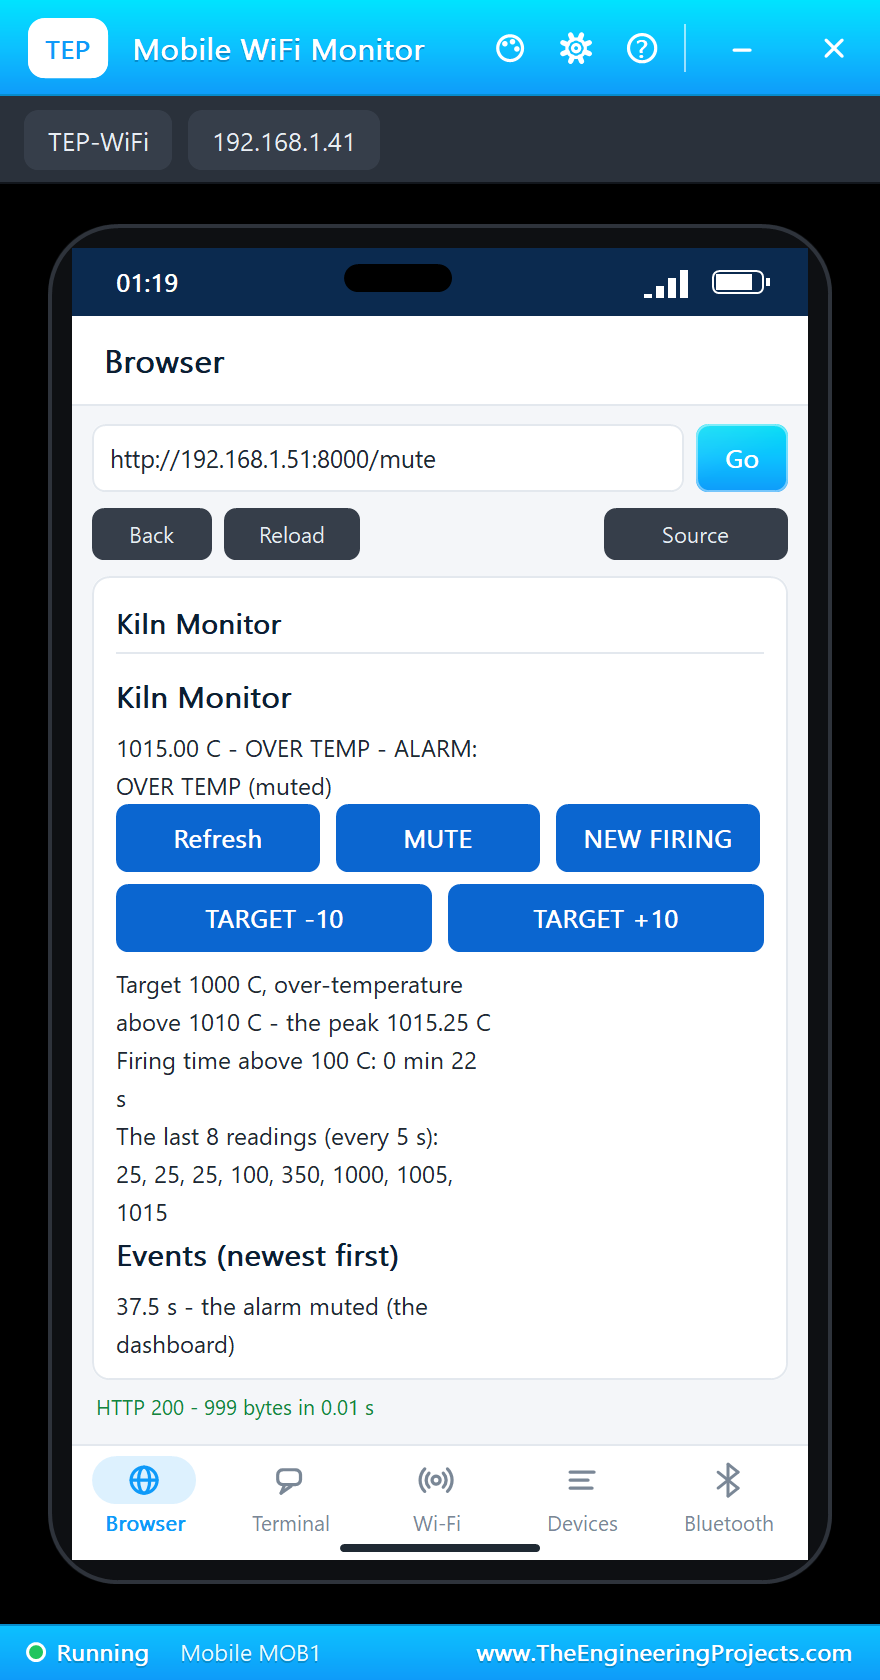
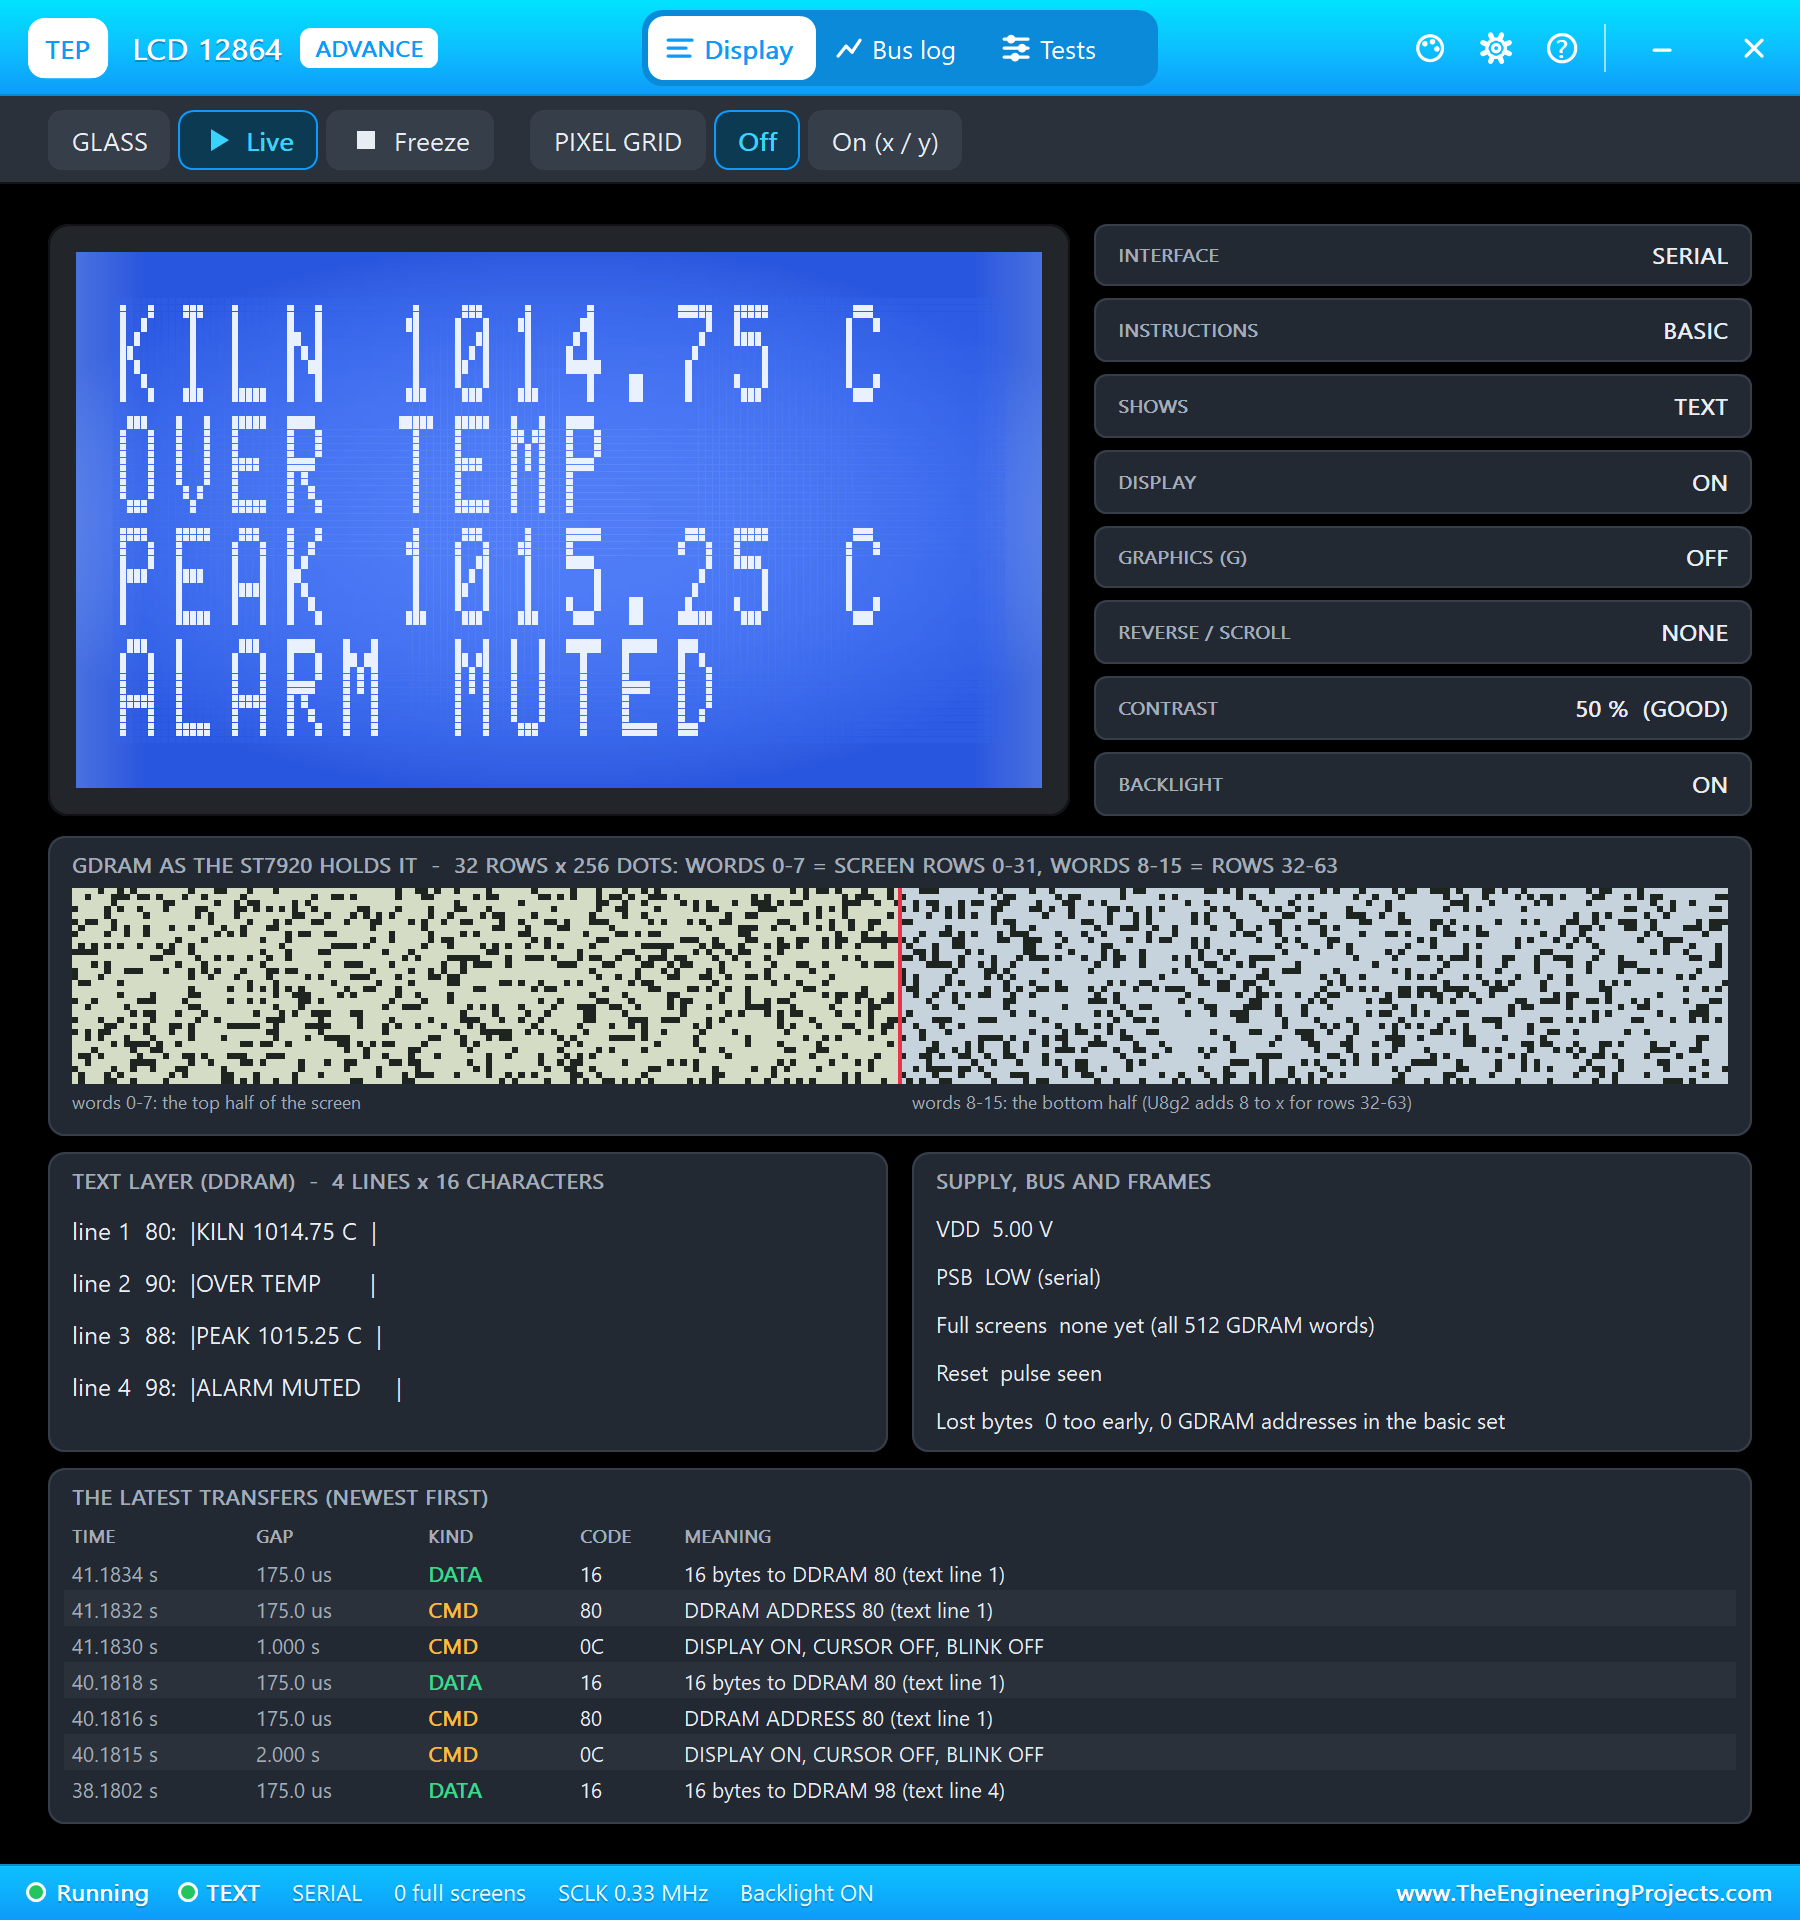
A kiln that is not switched off keeps climbing. Two presses of +5 took the probe to 1,010 degrees, and with the noise the reading was 1,010.25, a quarter of a degree over the limit: "OVER TEMP - 1010.25 C" at 31.1 seconds, ALARM! /mute on the LCD and the siren on the speaker, 2,500 Hz and 1,500 Hz in turn, here at 2,500 Hz with 14.7 mA at the peak. A third +5 made it 1,015 degrees. MUTE on the phone at 37.5 seconds silenced the siren, and the LCD changed to ALARM MUTED.
Cooling Down
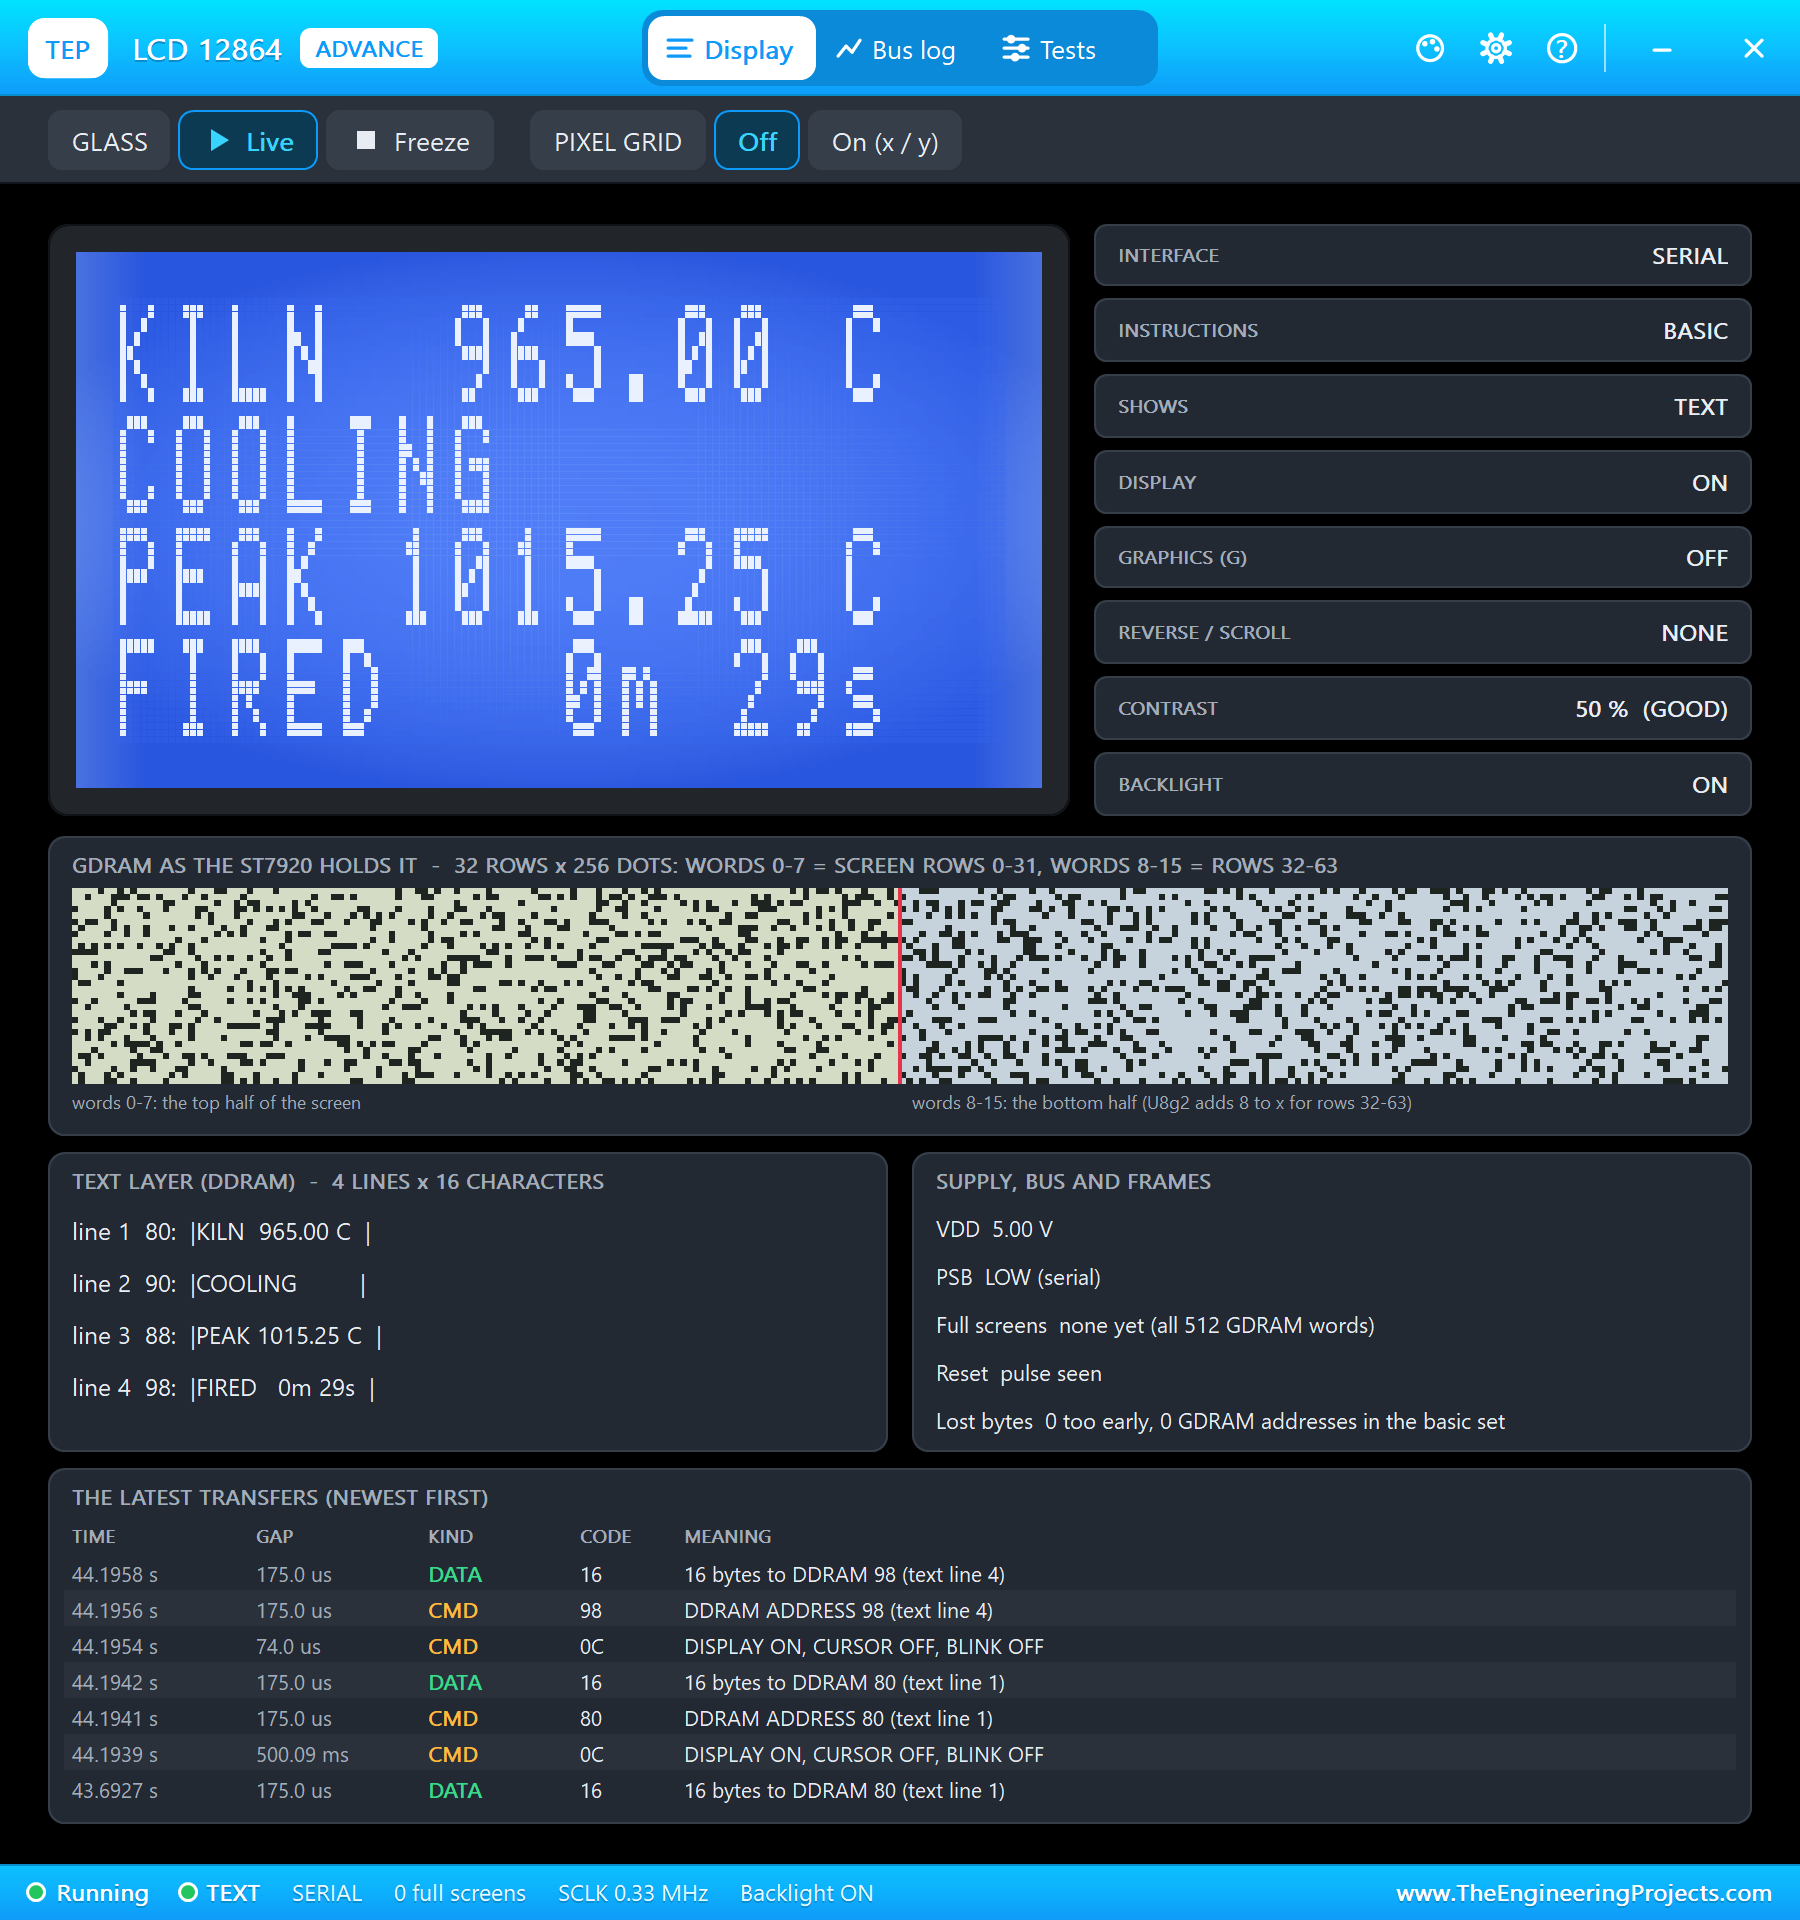
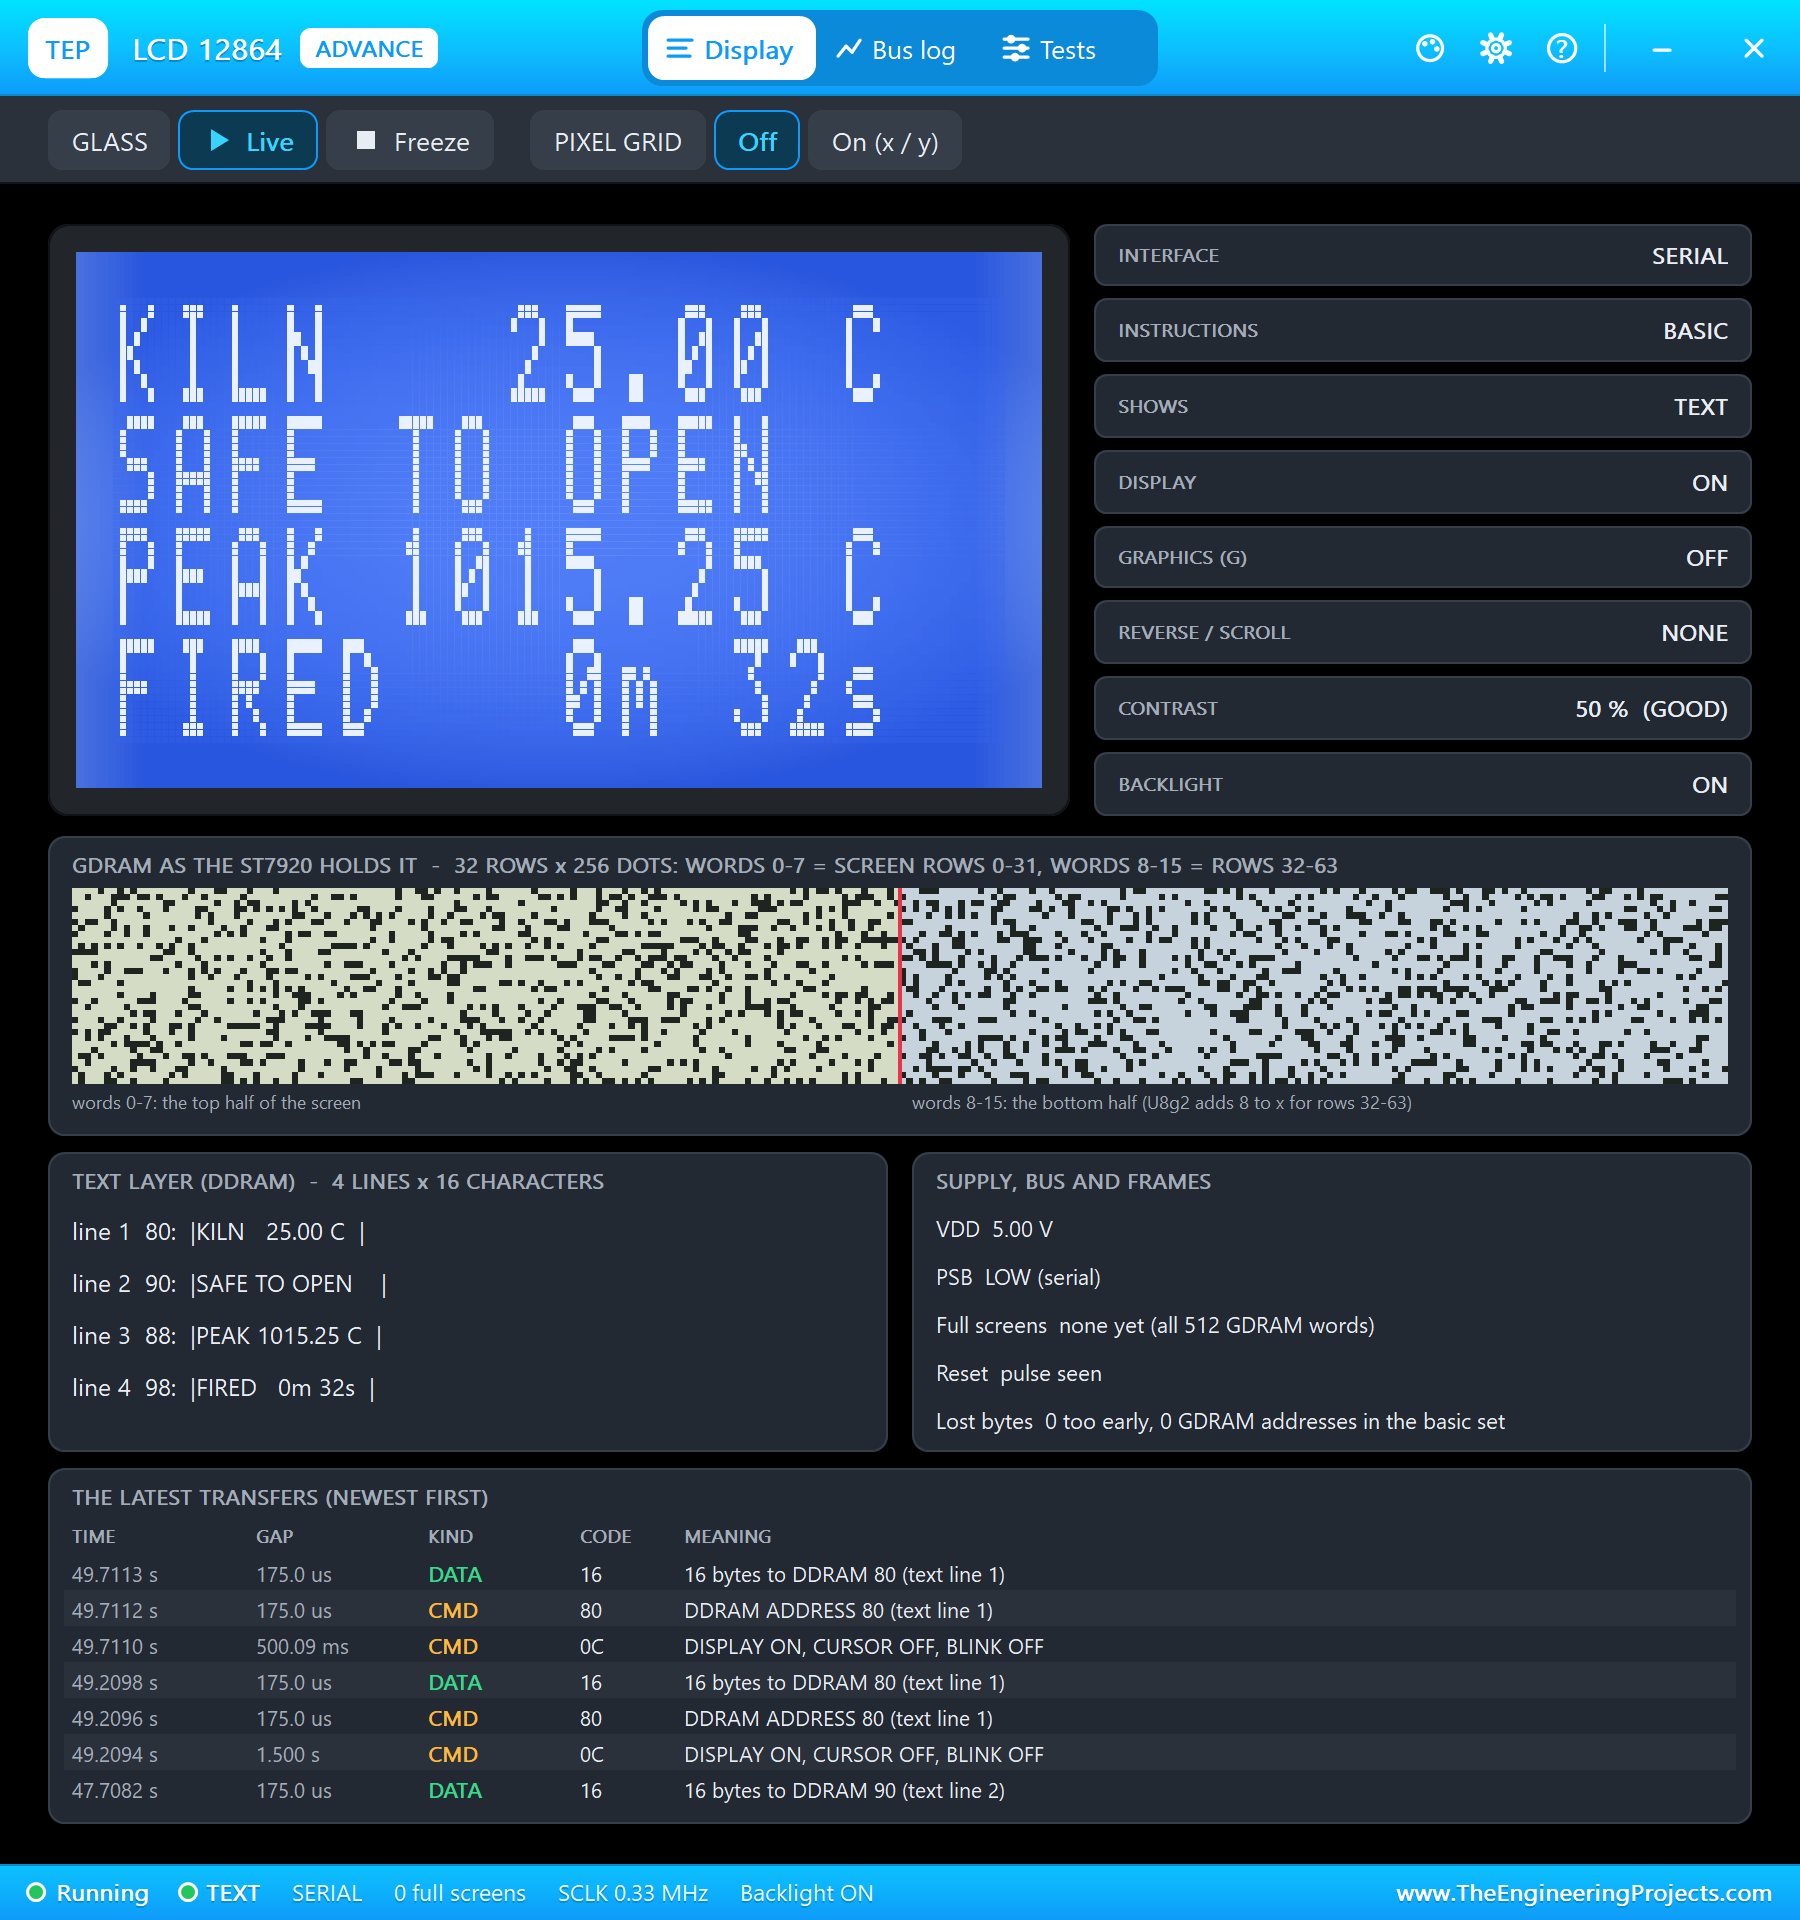
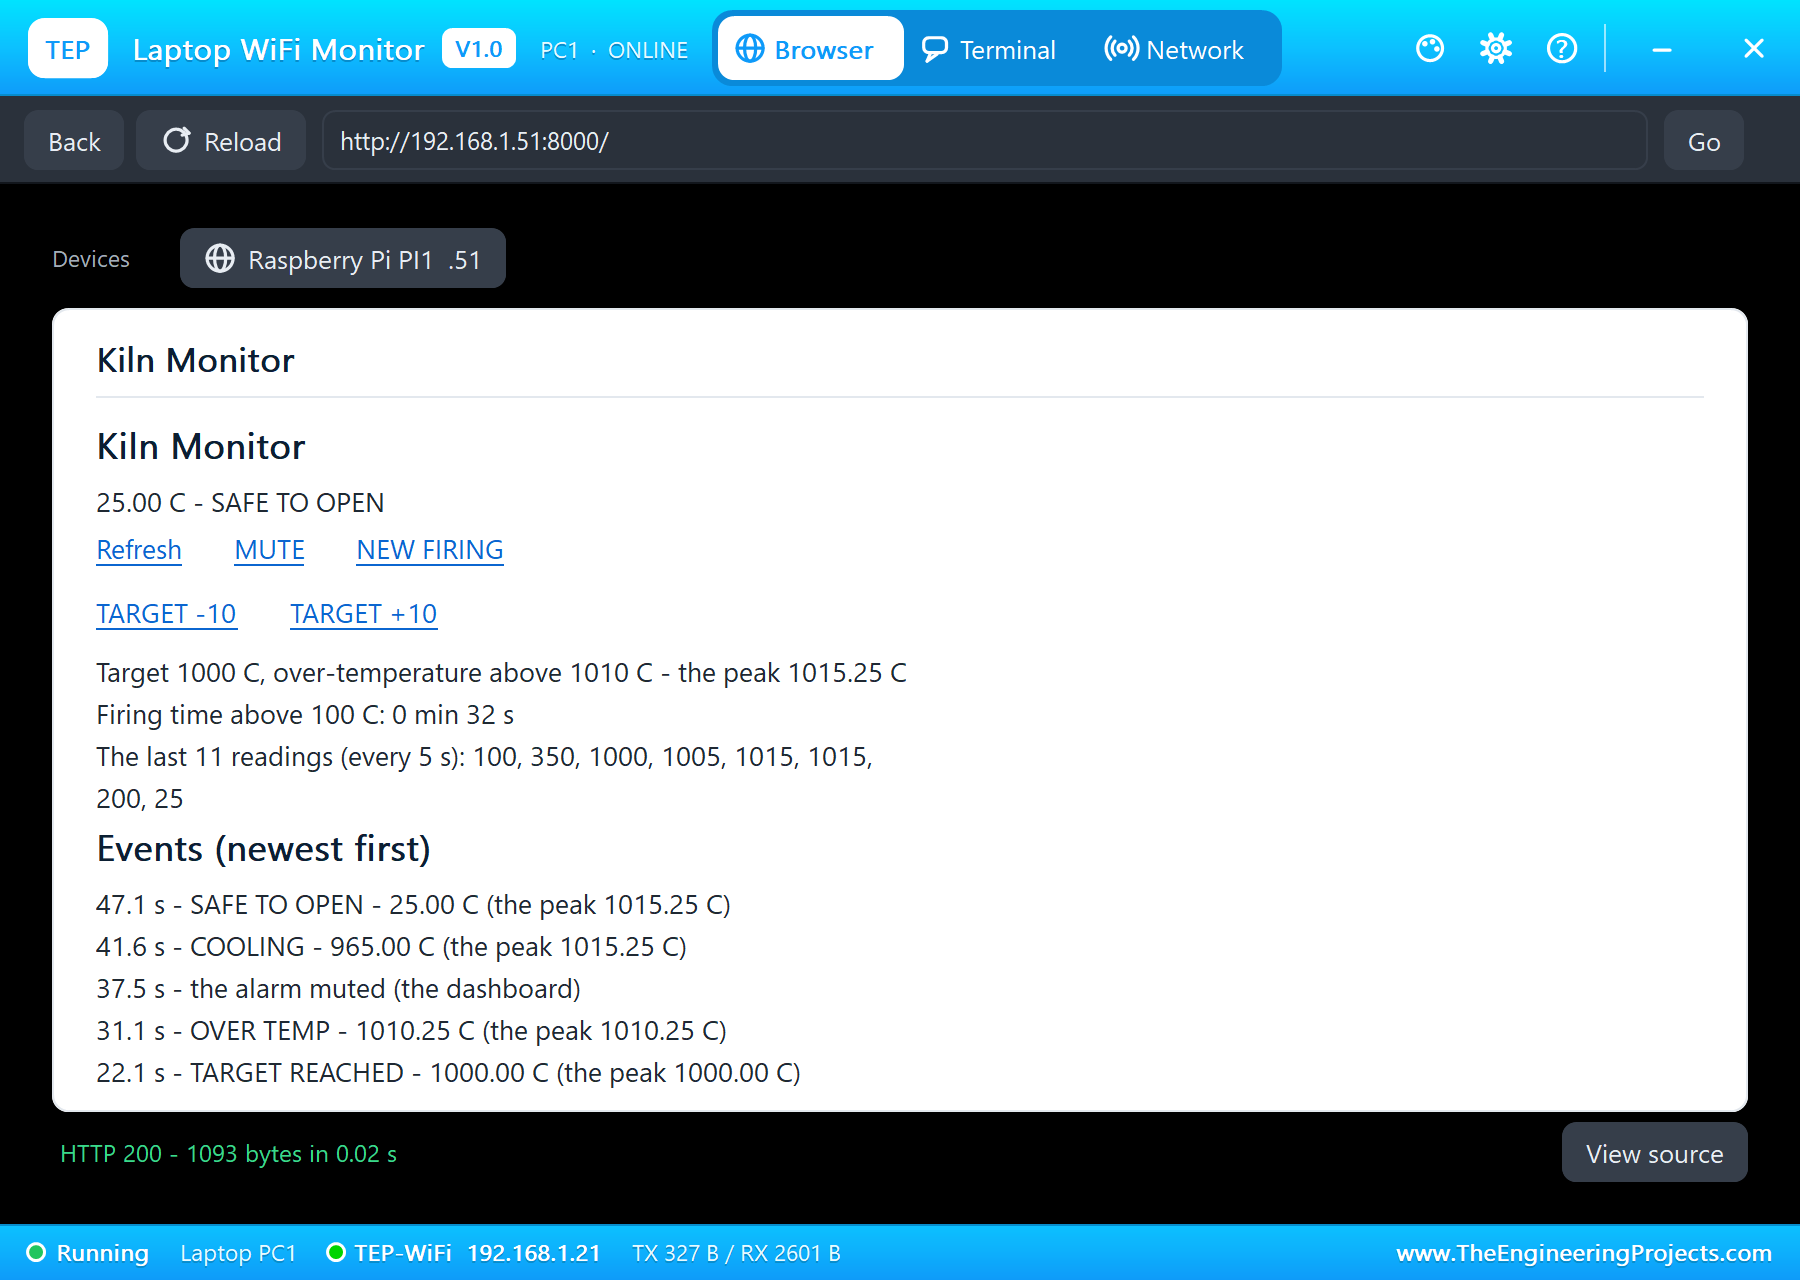
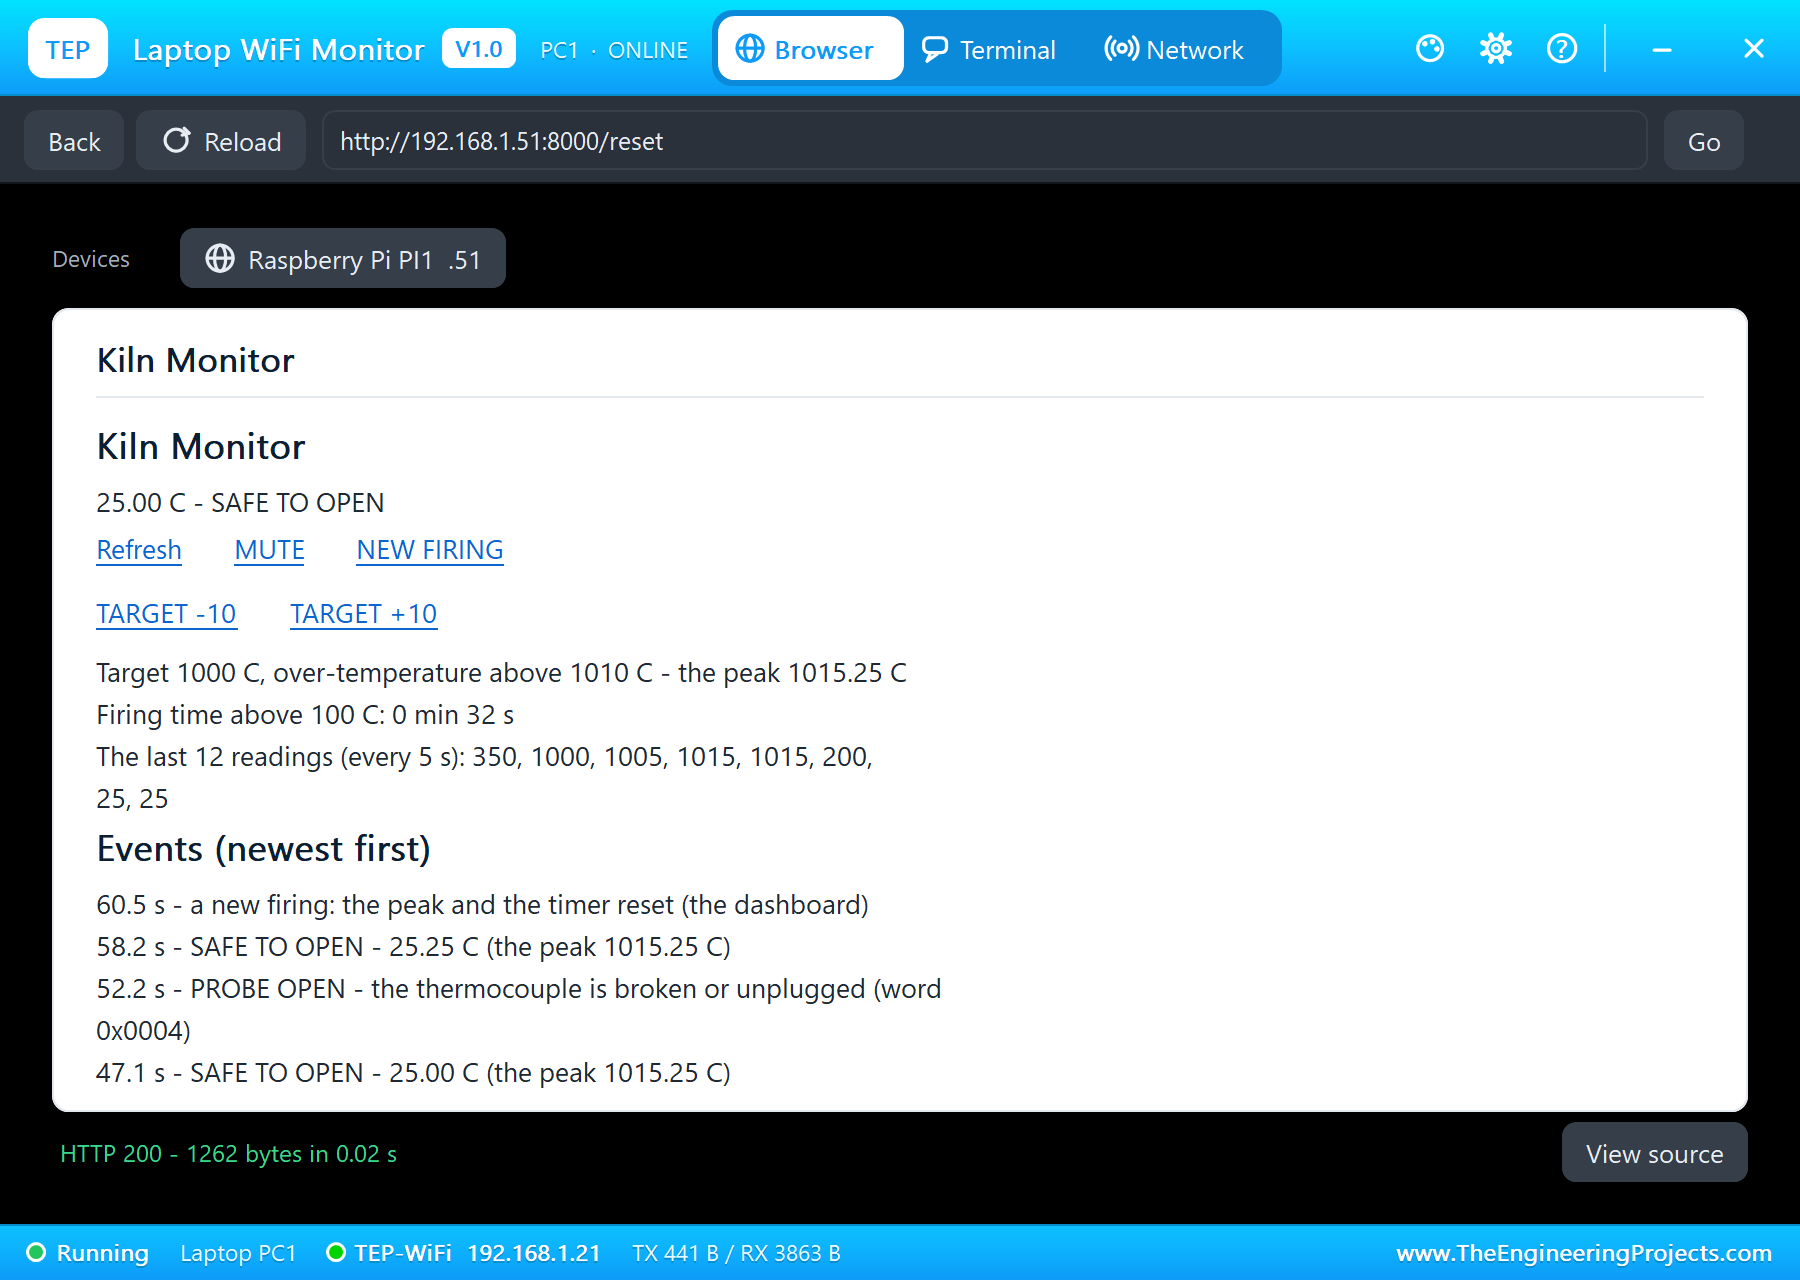
The kiln was switched off and the probe went down by 50 degrees: at 41.6 seconds "COOLING - 965.00 C", 50 degrees under the peak of 1,015.25, and the over-temperature alarm cleared by itself. OVEN 200 C kept it COOLING, and ROOM 25 C gave "SAFE TO OPEN - 25.00 C" at 47.1 seconds. The firing time stopped at 32 seconds above 100 degrees.
A Broken Thermocouple
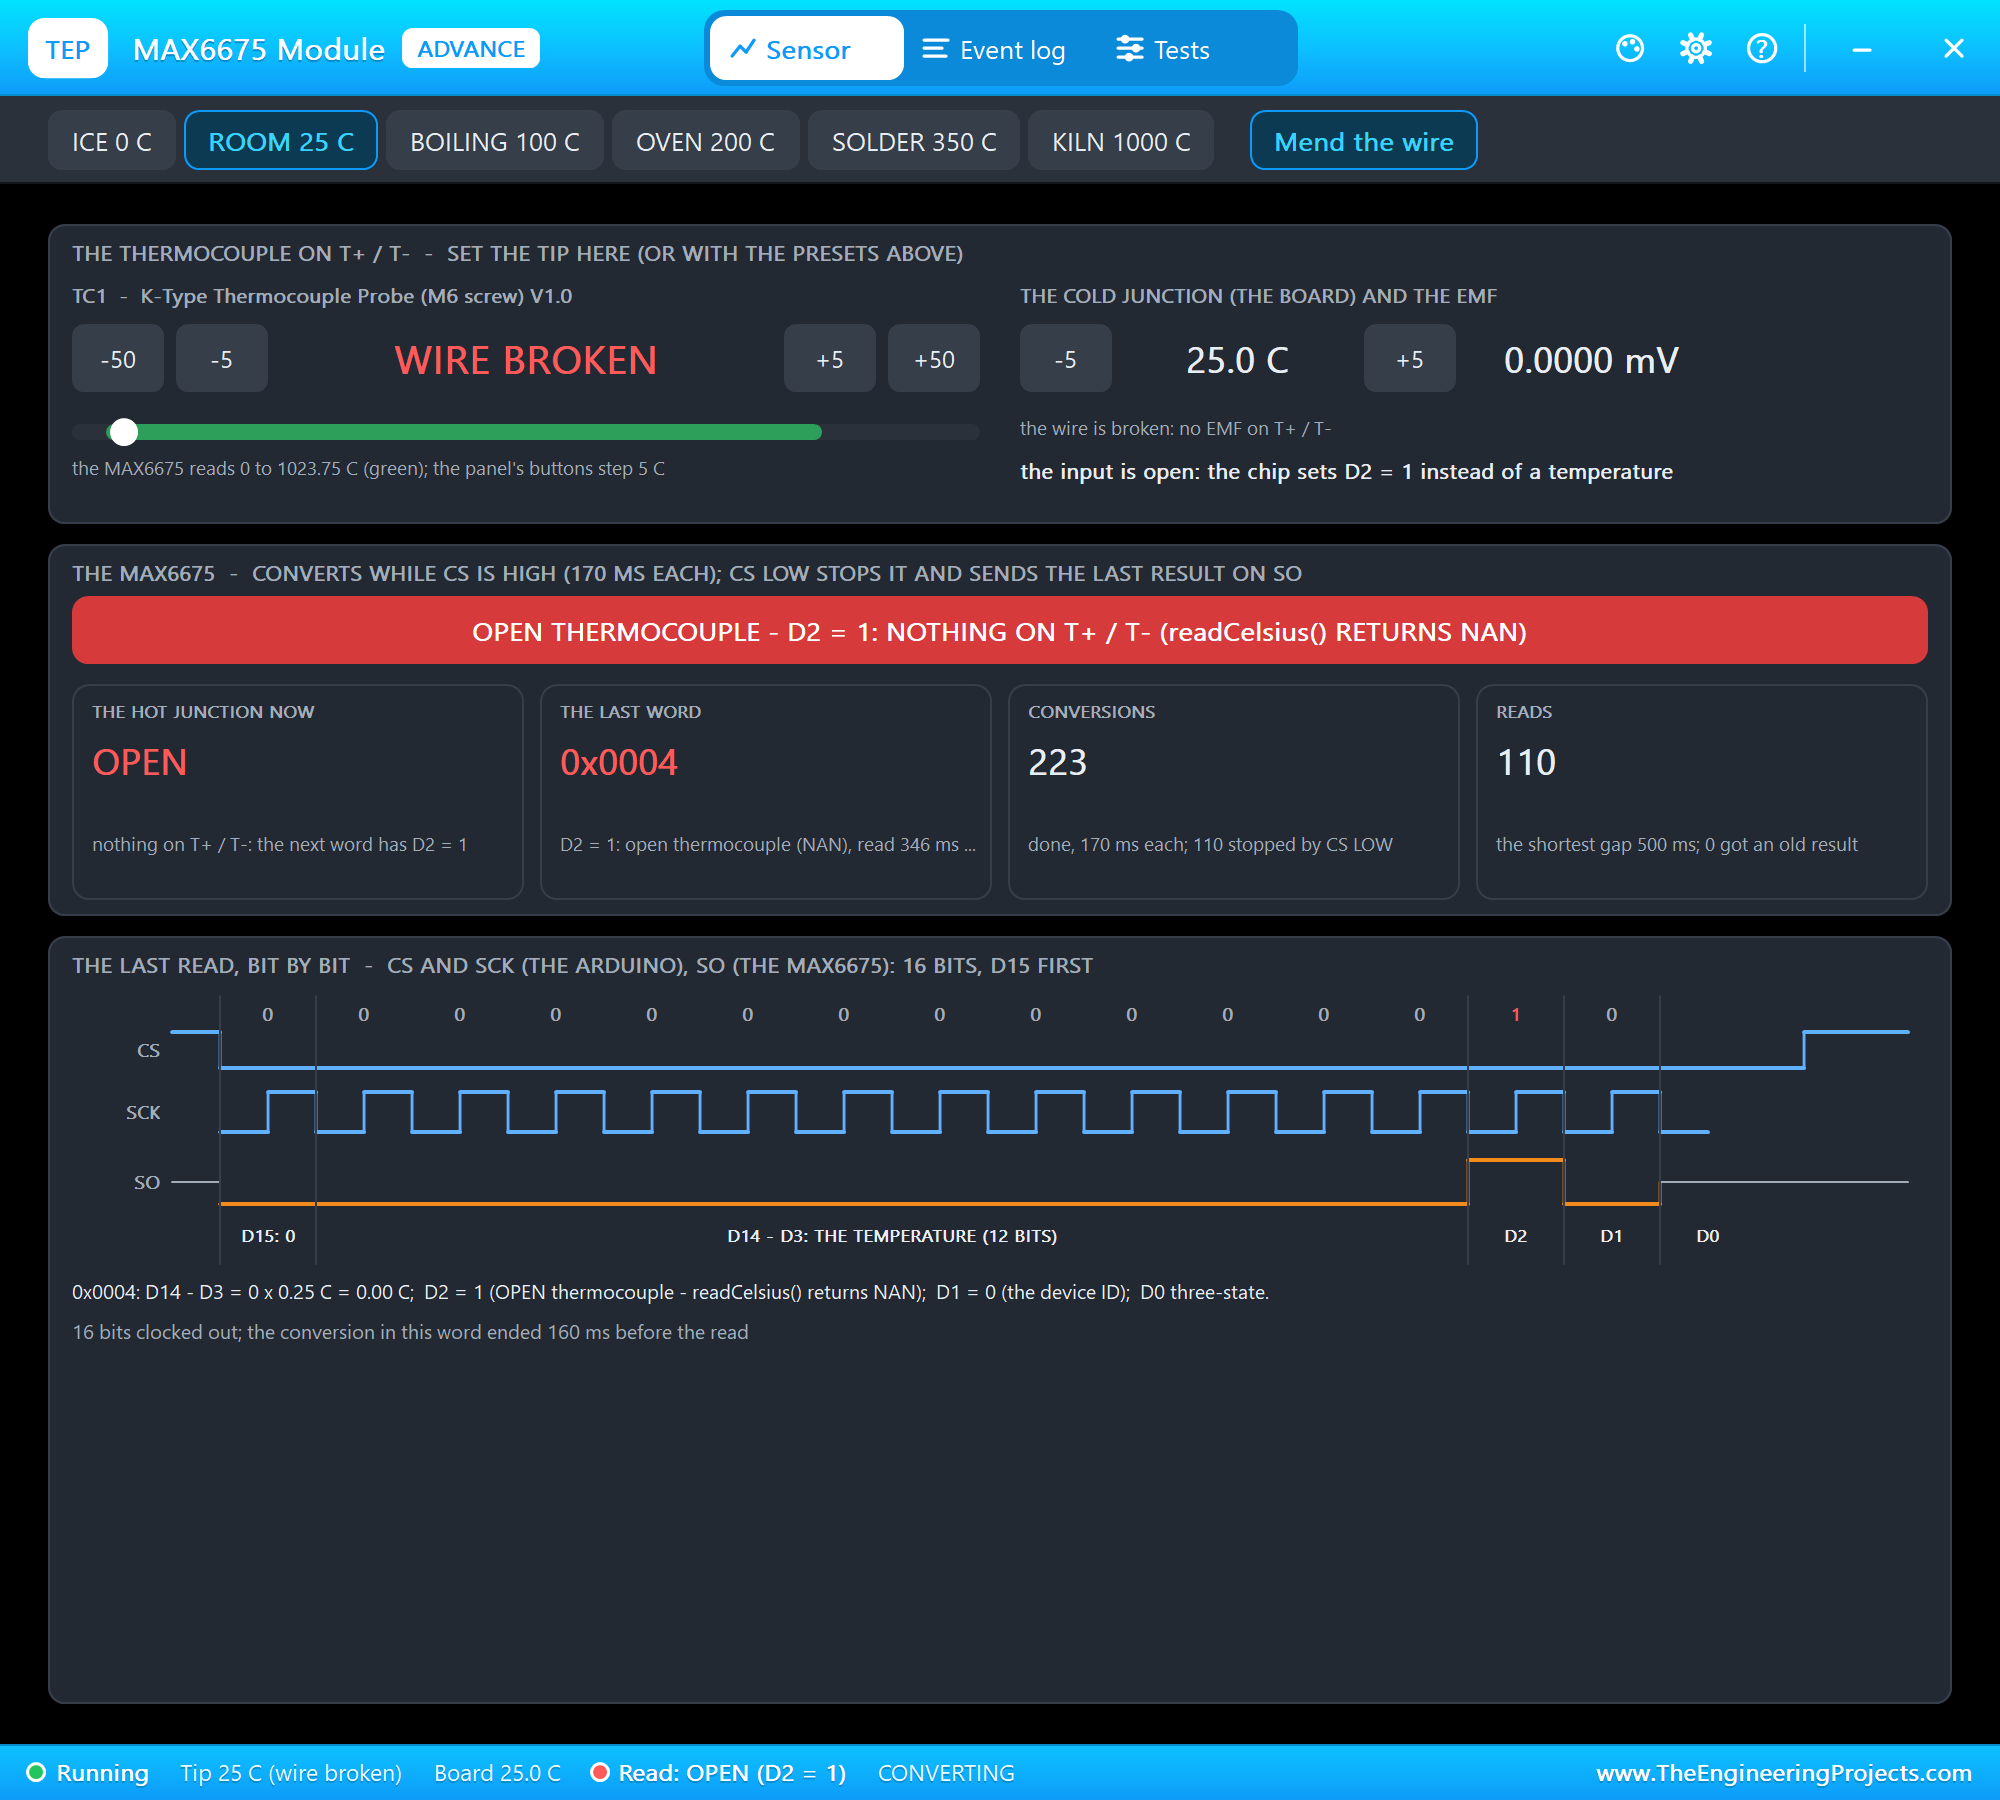
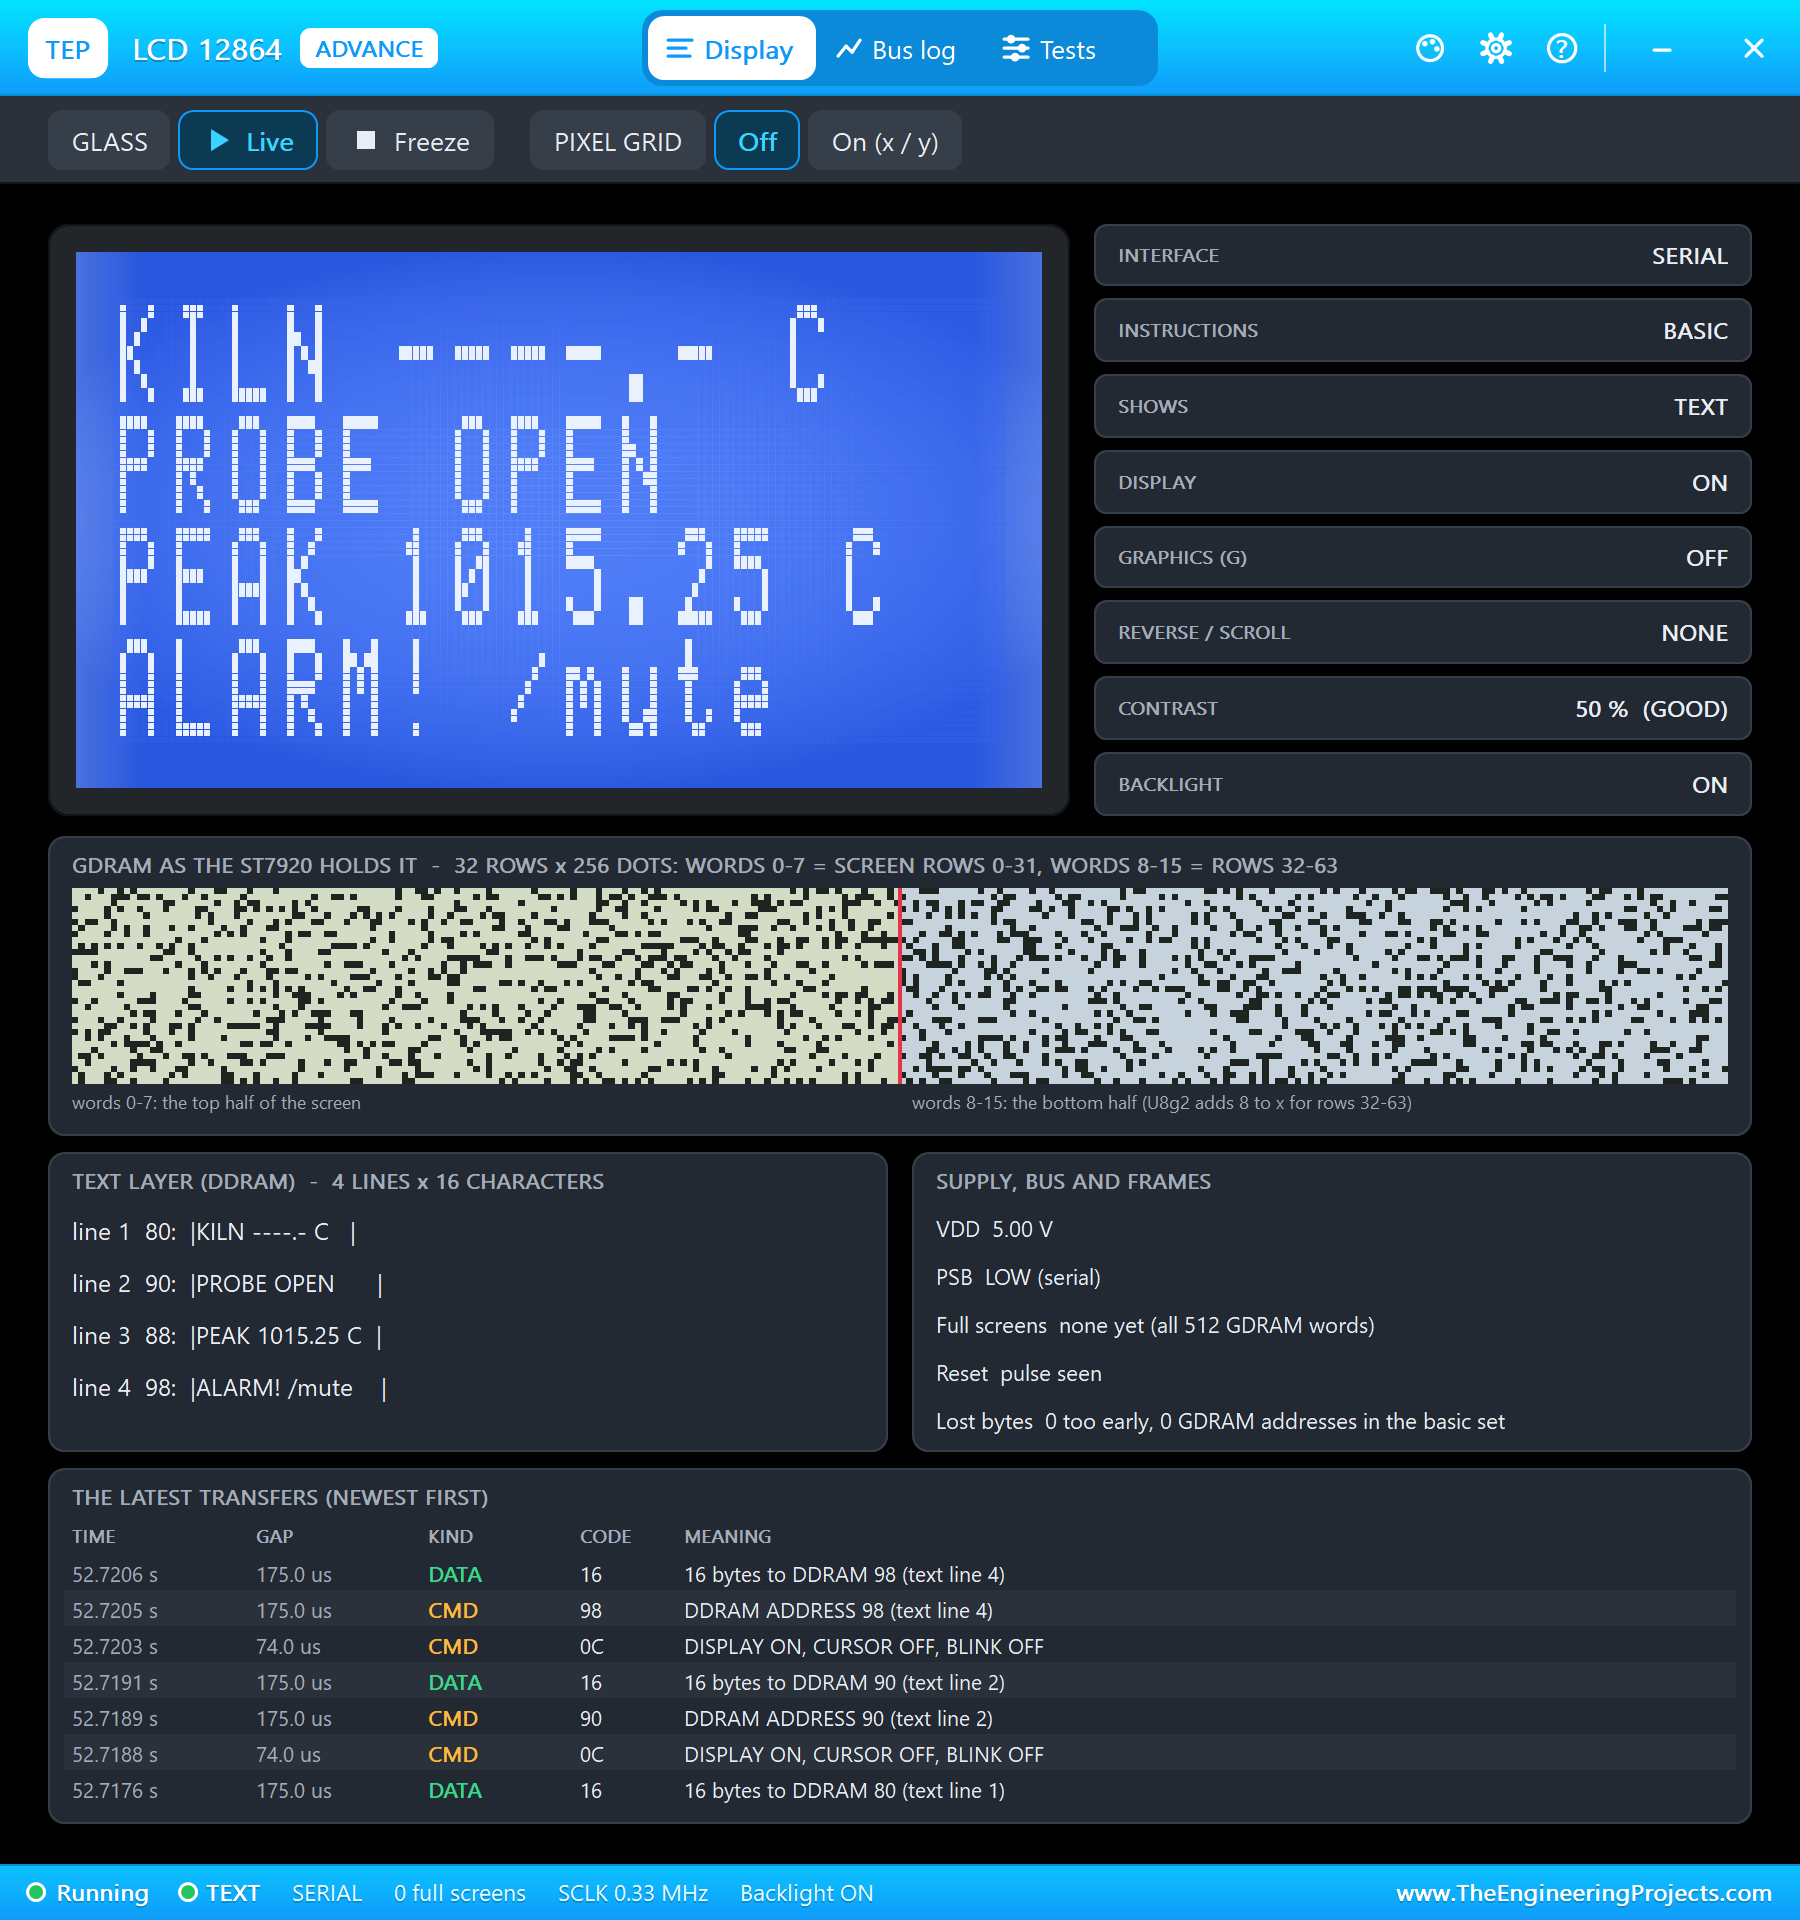
Break the wire in the MAX6675's pop-up opened the thermocouple: the chip set bit 2 and sent the word 0x0004, and at 52.2 seconds the program logged "PROBE OPEN - the thermocouple is broken or unplugged (word 0x0004)", showed ----.- on the LCD and beeped every 2 seconds. With the wire repaired, it was back to SAFE TO OPEN at 58.2 seconds.
A New Firing
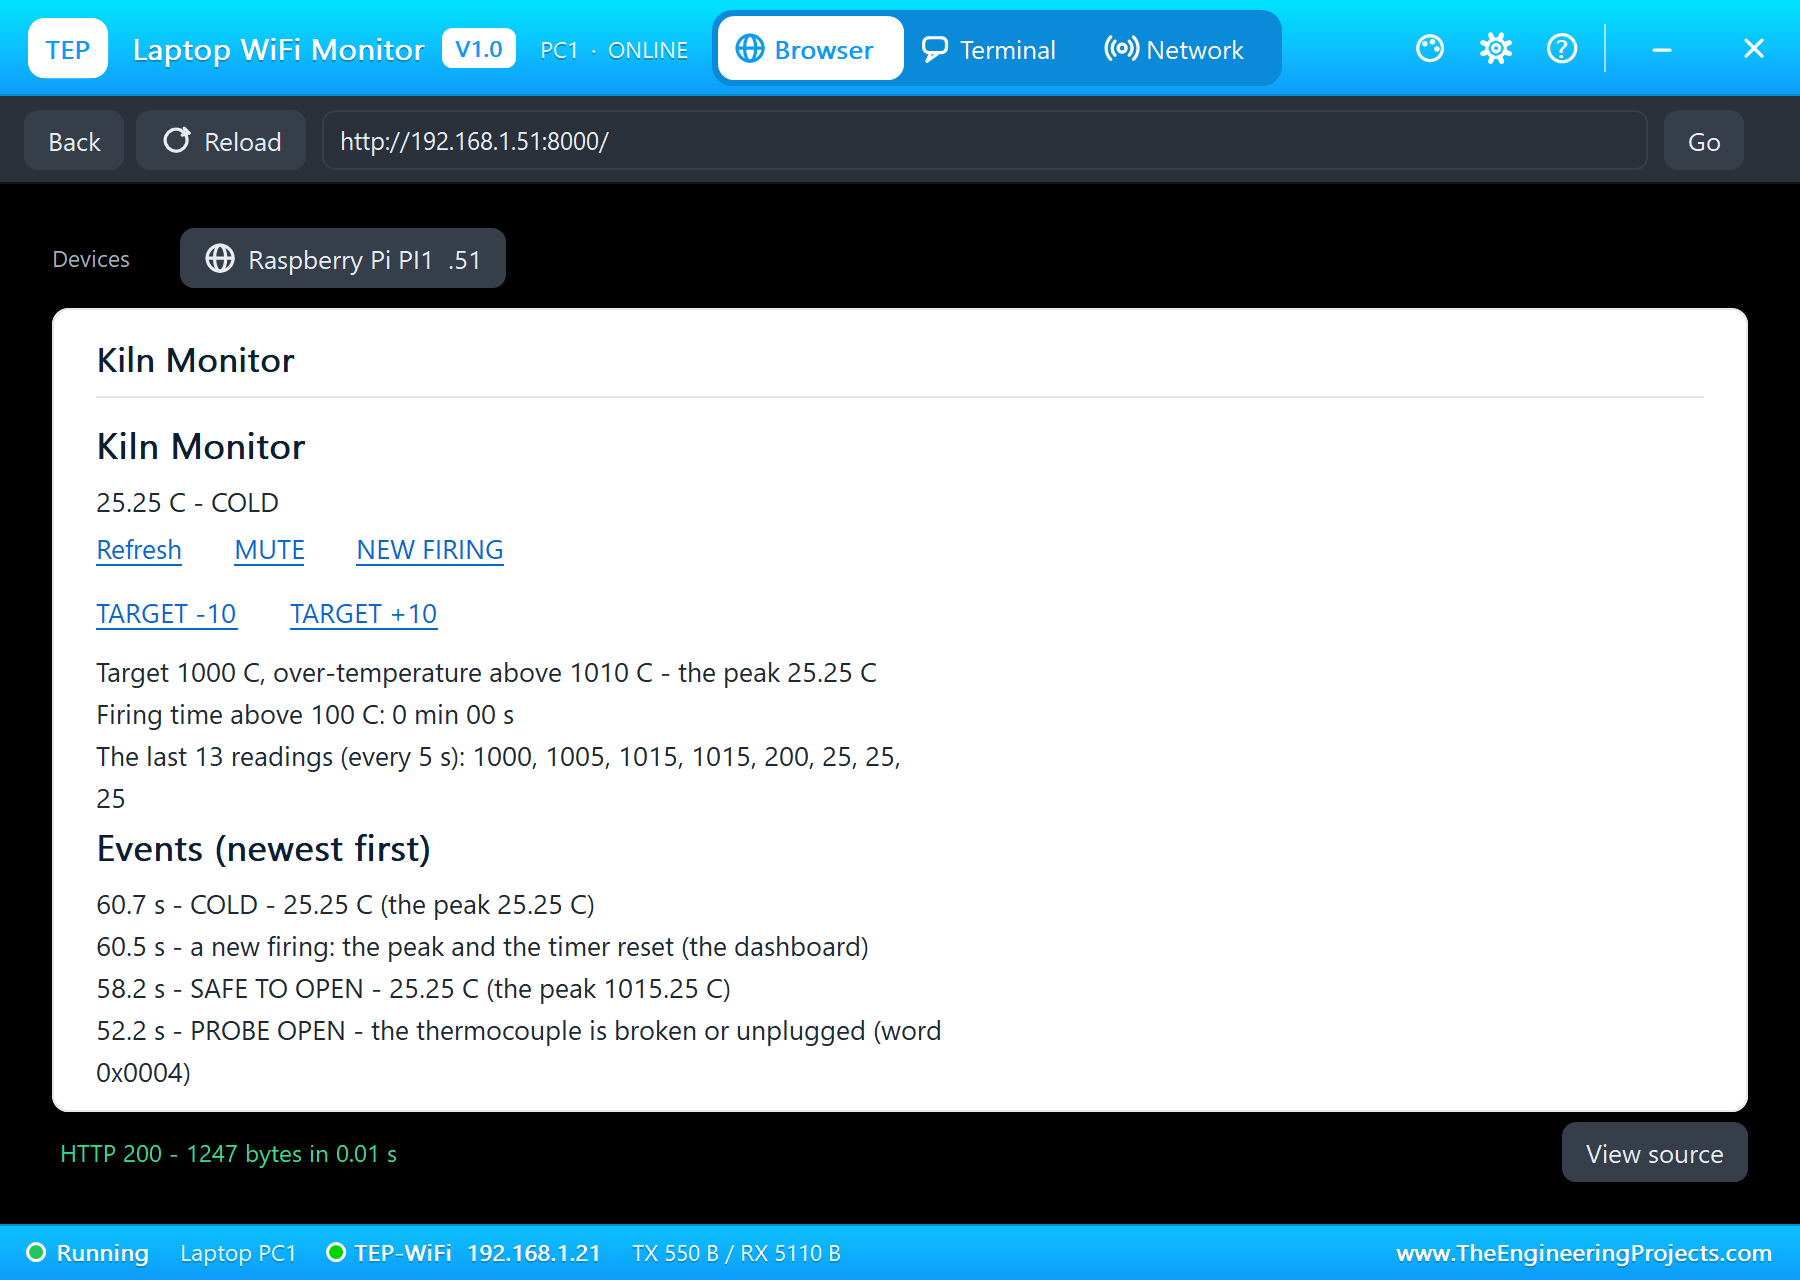
NEW FIRING on the laptop at 60.5 seconds reset the peak and the timer, and at 60.7 seconds the kiln was COLD again, ready for the next load.
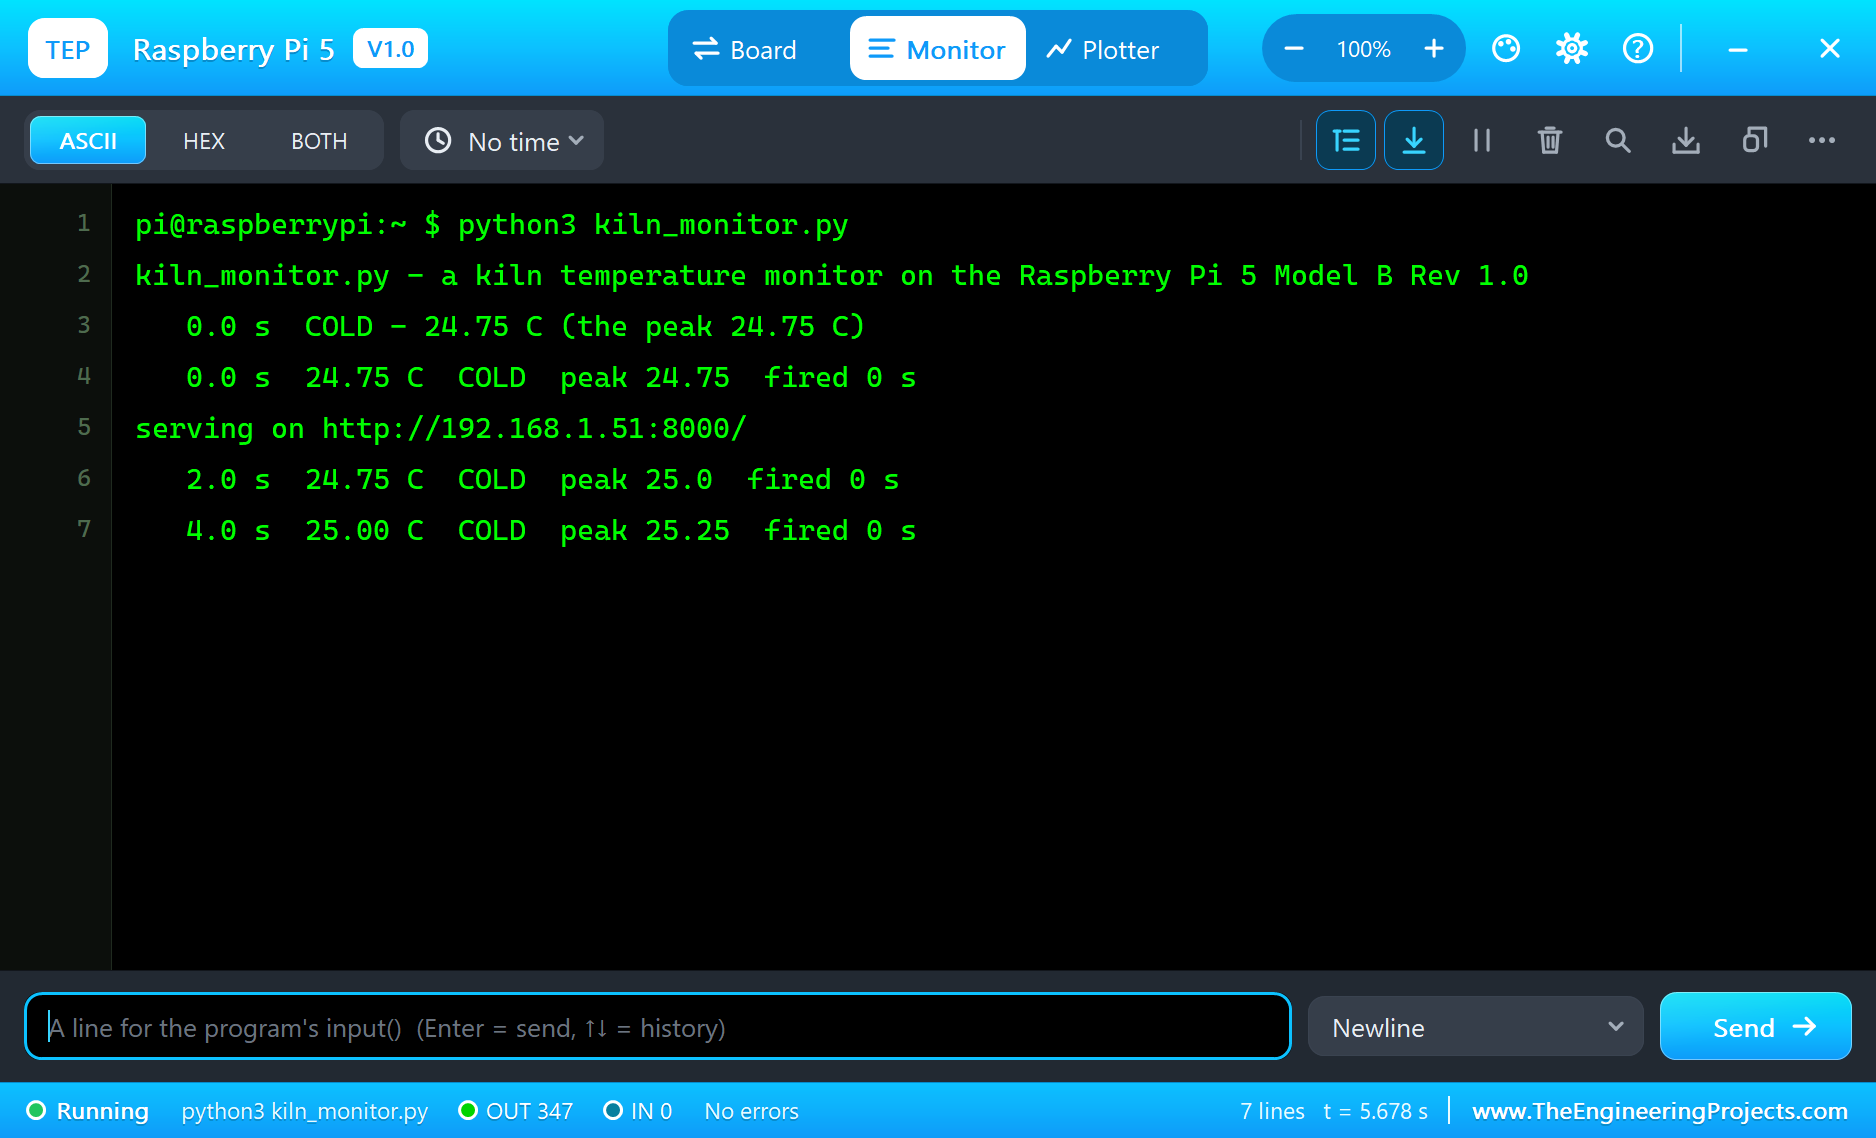
The terminal holds the whole story:
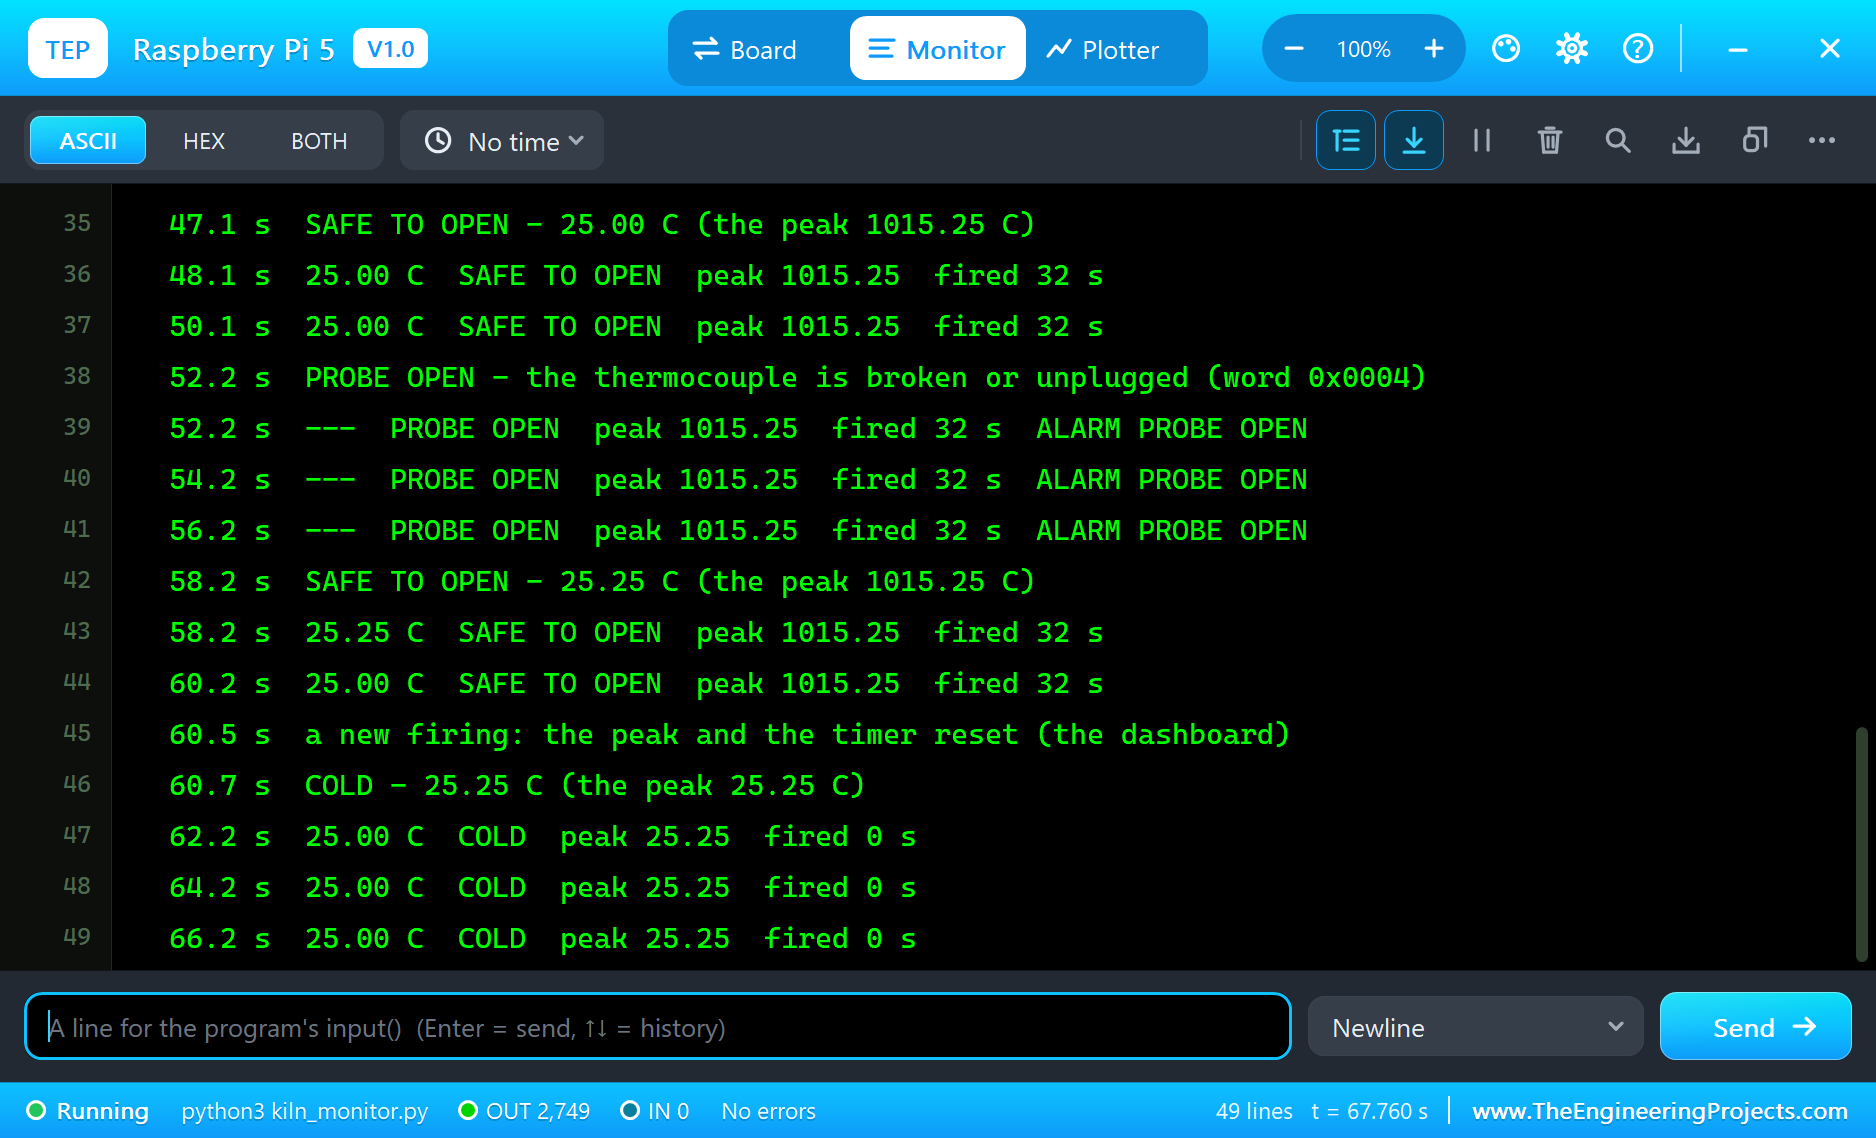
In all, 68 seconds of simulation took about 5 minutes on our PC with all the screenshots, and the MAX6675 answered 135 reads, 12 of them with the thermocouple open.
Download the Project Files
Click the button below to download IoT-Kiln-Temperature-Monitor-Raspberry-Pi-5-Proteus-Simulation-v1.0.zip (about 14.0 MB, without the source code of the models):
IoT Kiln Temperature Monitor with Raspberry Pi 5 - Proteus Simulation V1.0- Proteus Simulation: Pi-5-Kiln-Monitor.pdsprj, the program kiln_monitor.py and copies of the models.
- Python Code: kiln_monitor.py, the complete program.
- Proteus Library Files: the LIB files of the Raspberry Pi 5, the MAX6675 and its probe, the LCD 12864, the mini speaker, the resistor and the two WiFi Monitors.
- Proteus Model Files: the DLL models and the TEPPi folder, the Python 3.11 and the runtime that the Pi board runs.
- README.txt: the installation steps, the properties, the test results and the links to every library post.
No Proteus yet? Read How to Download and Install Proteus 7 and 8. New to libraries? Follow How to Install a New Library in Proteus.
How to Install the Project Files
- Close Proteus and extract the whole zip file, for example to your Desktop.
- Copy the files from Proteus Library Files into the LIBRARY folder of Proteus.
- Copy everything in Proteus Model Files, the DLL files and the TEPPi folder, into the MODELS folder.
- Start Proteus and open the project from the Proteus Simulation folder.
Changing the Code
The program is plain Python 3: edit kiln_monitor.py beside the project and press Play again; the Pi board runs the new file. The target and the limits are at the top. The same program runs on a real Raspberry Pi 5 with Raspberry Pi OS, spidev and lgpio; enable SPI in raspi-config. For our other Raspberry Pi 5 temperature project, which controls a heater with PID, see the Raspberry Pi 5 PID Temperature Control.
Ideas to Extend the Project
- Control the kiln: switch its heater through a solid-state relay and follow a firing schedule, so many degrees an hour up to the top.
- Log the whole firing to a CSV file and draw its curve on the dashboard.
- Use a MAX31855 for glaze firings: it reads a K-type thermocouple up to 1,350 degrees.
- Add a second thermocouple for the top and the bottom of a large kiln.
- Send a message to the potter's phone at the target and when the kiln is safe to open.
- Watch the rate of rise and warn when the kiln heats too fast through the quartz inversion around 573 degrees.
From Simulation to Real Hardware
- Use thermocouple wire all the way: extend a K-type thermocouple only with K-type extension wire, or the joints make new thermocouples.
- Protect the probe: inside a kiln, use a probe with a ceramic or Inconel sheath rated for the temperature.
- Keep the converter cool: the MAX6675 measures the cold junction on its own board; mount it away from the kiln's heat.
- Mind the limit: the MAX6675 stops at 1,023.75 degrees; a cone 6 glaze firing needs about 1,220 degrees and a MAX31855.
- Drive the speaker properly: for a loud alarm, use a transistor and a bigger buzzer; 15 mA from a GPIO is only for a small speaker.
- Never rely on software alone: a real kiln needs its own kiln sitter or limit switch that cuts the power.
Troubleshooting
- The temperature reads 0 or jumps: SO and SCK swapped, or the SPI mode is not 0.
- PROBE OPEN all the time: the thermocouple is not on T+ / T-, or a lead is broken.
- The temperature falls when the kiln heats: the thermocouple's leads are swapped; T+ is the yellow lead.
- The LCD stays blank: PSB is not tied to ground (the module then expects the parallel bus), or the backlight has no 5 V.
- The terminal cannot start Python: the TEPPi folder is not in MODELS.
Limitations of the Simulation
- The kiln's heat comes from the MAX6675's pop-up: the presets jump at once, where a real kiln rises 100 to 150 degrees an hour, so the program shows the peak and the firing time rather than a rate of rise.
- The kiln itself is not simulated: the program monitors, it does not switch a heater.
- The network is simulated: the dashboard travels between the Pi and the two monitors inside Proteus; the times in this tutorial are simulation time.
- Raspberry Pi is a trademark of Raspberry Pi Ltd and MAX6675 a product of Analog Devices (formerly Maxim Integrated); this project is not made or endorsed by them or by Labcenter.
So, that was all about the IoT Kiln Temperature Monitor with Raspberry Pi 5 - Proteus Simulation. I hope it helps you build your own: a K-type thermocouple read through a MAX6675 over SPI, an LCD 12864 driven bit by bit in its serial mode, the stages of a bisque firing, and alarms in PWM tones, all tested in a simulation before you put a probe into a real kiln. More IoT projects with the ESP32 and the Raspberry Pi 5 are coming in this series. If you have any questions, ask in the comments and I will help you out. Till the next tutorial, take care and have fun!