


Create Setup File in Visual Studio 2010


Hello friends, I hope you are doing well. In this tutorial, we will publish a Visual Basic or C# Windows Forms application from Visual Studio 2010 by using ClickOnce. This is useful when you have completed a desktop program, such as the serial terminal from our Serial Port in VB 2010 tutorial, and want to install it on another Windows computer.
Visual Studio 2010 is a legacy environment whose Microsoft support ended in July 2020. We are keeping it here because the original project and screenshots use that version. For a new application, use a supported Visual Studio and .NET release and follow the current deployment workflow.
Build Output, ClickOnce and MSI Are Different
The phrases EXE file and setup file are often used as if they mean the same thing. They describe different deployment artifacts:
| Artifact | Purpose | Typical result |
|---|---|---|
| Build output | Compiled application and its local dependencies | An EXE plus DLL and configuration files in bin\Release |
| ClickOnce publication | Per-user deployment with manifests, prerequisites and optional updates | setup.exe, an .application manifest and versioned files |
| Windows Installer package | Managed machine installation with explicit installer behavior | Usually an MSI, sometimes launched by a bootstrapper EXE |
The Publish tab shown in this tutorial creates a ClickOnce deployment. It does not create a traditional MSI package. Microsoft explains that ClickOnce uses application and deployment manifests to describe the files, version, permissions and update location.
Does Publishing Protect the Source Code?
Publishing does not include your Visual Studio project files or original source files, so users do not receive the project in its editable form. However, a compiled .NET assembly contains intermediate language and metadata that can often be inspected or decompiled. An EXE is therefore a deployment format, not a guarantee that program logic or embedded secrets cannot be recovered.
Never embed database passwords, API secrets or private keys in a desktop application. Code signing proves publisher identity and detects modification; it does not encrypt the application. Obfuscation can increase reverse-engineering effort, but security must come from architecture and access control.
Prepare the Project
- Run the application and complete the main functional tests.
- Select the Release configuration rather than Debug for distribution.
- Remove development-only files and logging that exposes sensitive information.
- Confirm the target .NET Framework version.
- Identify every data file, image, DLL, configuration file and device driver the application requires.
- Decide whether users will install from a folder, network share, removable medium or website.
- Decide whether the application should check for updates.
A successful build on the developer's computer does not prove that deployment is complete. That computer may already have libraries, drivers or framework versions that are missing on a clean target computer.
Step 1: Open Project Properties
Open the completed application in Visual Studio 2010. In Solution Explorer, select the Windows application project rather than the solution. Open the Project menu and select the project's Properties command. The example project in the screenshot is named CNC Gcode.
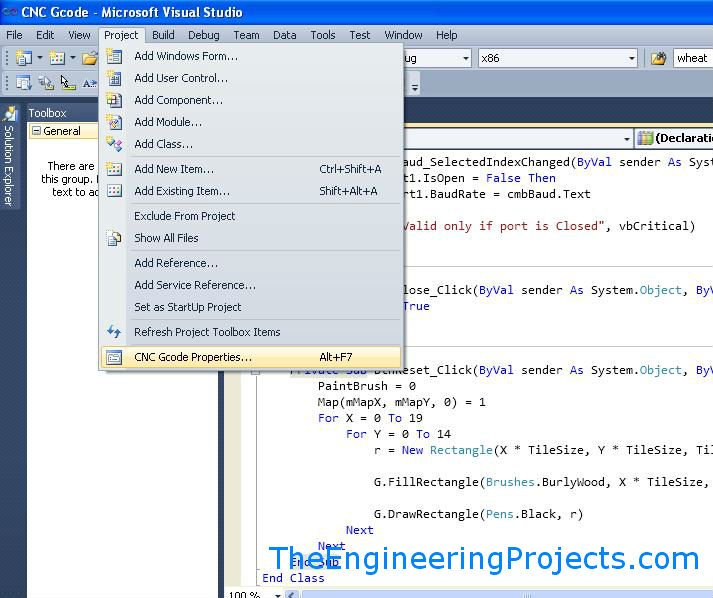
You can also right-click the project in Solution Explorer and select Properties. If the solution contains several projects, confirm that you opened the executable startup project.
Step 2: Review Application Properties
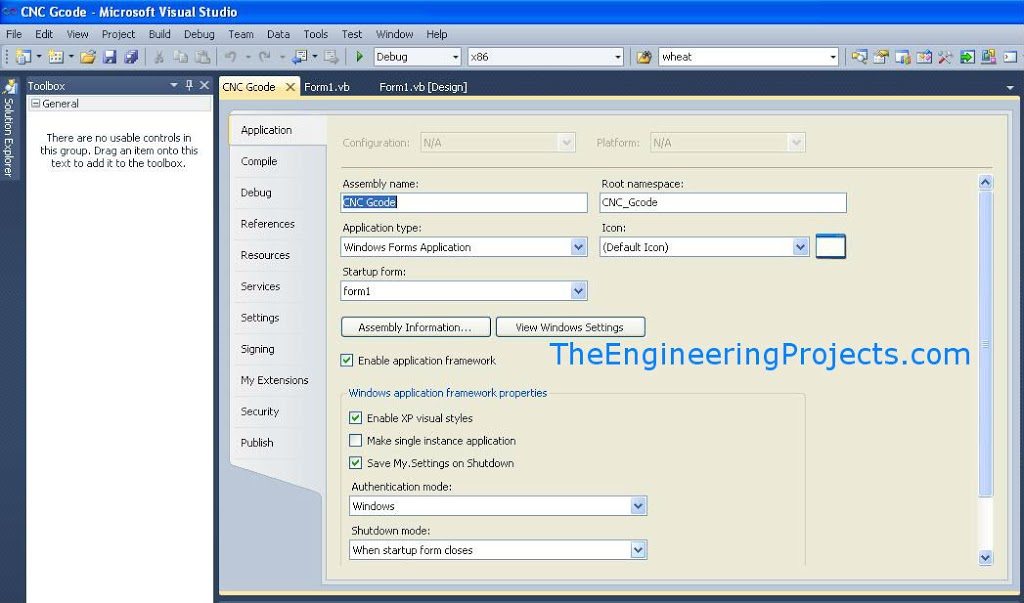
Review the following settings before publishing:
- Assembly name: the base name of the compiled application.
- Root namespace: the default namespace used by project code.
- Application icon: the icon embedded in the program.
- Target framework: the .NET Framework version required on the target computer.
- Startup object: the form or entry point that starts the application.
- Assembly information: title, company, product and version metadata.
Build the Release configuration after changing these properties. Fix compiler warnings that indicate missing files, platform mismatches or obsolete references before creating the deployment.
Step 3: Open the Publish Tab
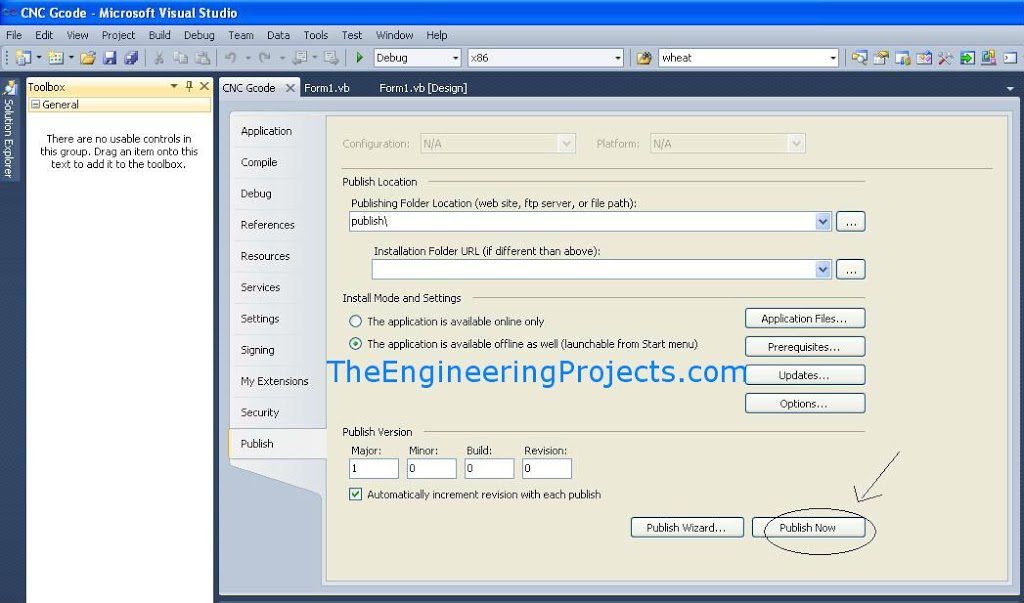
Select the Publish tab in Project Designer. This page controls the ClickOnce publish folder, installation location, update behavior, application files, prerequisites and publish version.
You may also start the Publish Wizard from the Build menu. Microsoft documents a local folder, file share, FTP location or website as possible ClickOnce publication locations, depending on the Visual Studio version and project type.
Step 4: Choose the Publish Location
The publish location is where Visual Studio writes the deployment package. Use a clean folder separate from the project's bin and obj directories. For example:
C:\Releases\SerialTerminal\
If users install through a network share or website, the installation URL and update URL must remain reachable. Moving published files without updating and re-signing the manifests can break installation or updates.
Step 5: Configure Application Files
Select Application Files on the Publish page. Visual Studio automatically includes the main EXE and local assembly references, but review every entry.
| Publish status | Meaning |
|---|---|
| Include | The file is copied as part of the application |
| Data File | The file is deployed as application data |
| Prerequisite | The assembly must already be available as a prerequisite |
| Exclude | The file is omitted from publication |
Files with Build Action set to Content are normally included automatically. Check templates, configuration files, images, local help and database files individually. A file that exists only beside the developer's EXE will be missing on the user computer unless the project and publish settings include it.
Step 6: Configure Prerequisites
Select Prerequisites and choose the .NET Framework version targeted by the project. Keep Create setup program to install prerequisite components enabled when the deployment should provide the bootstrapper.
The generated setup.exe is a bootstrapper. It checks and installs selected prerequisites before launching the ClickOnce application. Microsoft calls this process bootstrapping. Decide whether prerequisites are downloaded from the component vendor, the same publication location or a custom path.
Only redistribute components under their applicable license. Hardware drivers, database engines and vendor libraries may require separate installers and silent-install parameters.
Step 7: Configure Updates
ClickOnce can check for updates before the application starts or after it starts. Configure:
- Whether the application checks for updates.
- The update location.
- How often it checks.
- Whether a minimum version is mandatory.
- The publish version for the new release.
The assembly version and ClickOnce publish version serve different purposes. ClickOnce uses its publish version to identify deployments and updates. If automatic increment is enabled, verify the resulting version before distributing each build.
Step 8: Sign the ClickOnce Manifests
Open the Signing page and configure a suitable code-signing certificate. Signed manifests let Windows verify the publisher and detect changes after publication. Use a certificate whose private key is protected and whose identity matches the publisher shown to users.
A temporary test certificate is useful during development but will not give external users the trust experience of a certificate issued for production signing. Keep signing credentials outside source control and restrict access to the private key.
Step 9: Publish the Application
Select Publish Now or finish the Publish Wizard. Visual Studio builds the application and writes the ClickOnce package to the configured folder. A typical folder contains:
setup.exe, which installs prerequisites and starts deployment.- An
.applicationdeployment manifest. - An Application Files folder containing versioned application manifests and files.
- An optional publication webpage, depending on the selected settings.
Distribute the complete publication, not only setup.exe. The bootstrapper and manifest refer to other files in the publication location.
Step 10: Test on a Clean Computer
- Copy or host the complete published folder at the intended location.
- Use a test Windows account without Visual Studio or developer tools installed.
- Run
setup.exeand confirm the publisher information. - Verify prerequisite detection and installation.
- Launch every important feature and open required data files.
- Restart Windows and confirm the application still launches.
- Publish a higher test version and verify the update path.
- Uninstall the application and confirm the expected user data remains or is removed according to policy.
ClickOnce Limitations
ClickOnce works well for per-user desktop deployment and straightforward updates. It is less suitable when installation must configure Windows services, make extensive machine-wide registry changes, install shared components, customize installation dialogs or perform complex upgrade and repair logic. Those cases normally need Windows Installer technology or another packaging system.
Visual Studio 2010 editions and installed extensions differ in their support for Setup projects. Do not confuse an optional Visual Studio Installer project with the built-in ClickOnce Publish tab used here.
Troubleshooting
| Problem | Likely cause | Action |
|---|---|---|
| Application works only on development PC | Missing dependency or data file | Test on a clean computer and review Application Files |
| Required .NET Framework is missing | Prerequisite was not selected or source is unreachable | Review Prerequisites and bootstrapper download source |
| Publisher warning appears | Unsigned, expired or untrusted signing certificate | Use a suitable certificate and sign the manifests |
| Update is not detected | Version did not increase or update URL is wrong | Check publish version, manifest and update location |
| Setup.exe alone fails | Other publication files were omitted | Distribute the complete publish output |
| Serial hardware is unavailable | Device driver was not installed | Package or document the vendor's supported driver separately |
Practical Review
The Publish tab in Visual Studio 2010 creates a ClickOnce deployment rather than a single standalone EXE or traditional MSI. The publication contains manifests, versioned application files and often a prerequisite bootstrapper named setup.exe. Users need the complete publication at a stable location.
Good deployment requires more than selecting Publish Now. Review application files, framework prerequisites, update settings, versioning and signing, then test from a clean Windows account. Publishing hides the Visual Studio project structure from normal distribution, but it does not make .NET code or embedded secrets impossible to inspect.
Frequently Asked Questions
Does Publish Now create one independent EXE?
No. It normally creates a ClickOnce publication containing setup.exe, manifests and versioned application files. Keep and distribute the full output.
What is the difference between setup.exe and my application EXE?
The ClickOnce setup.exe is a bootstrapper that handles prerequisites and starts deployment. Your application EXE contains the compiled program.
Can users recover my source code from a .NET EXE?
They do not receive the original project, comments or source files, but compiled .NET code can often be decompiled into a readable approximation. Do not rely on compilation to protect secrets.
Should I publish Debug or Release?
Publish a tested Release build for normal distribution. Keep symbols separately if they are needed for controlled diagnostics.
Why must I sign the manifests?
Signing helps users and Windows verify publisher identity and detect altered deployment files. It does not encrypt the program.
Can ClickOnce install for every user on a machine?
Traditional .NET Framework ClickOnce is primarily a per-user deployment model. Use an installer technology suited to machine-wide installation when that is a requirement.
Can I still use Visual Studio 2010 for a new product?
The procedure still applies to maintaining a legacy project, but Visual Studio 2010 is out of support. Use a supported toolchain and target framework for new production software.

Comments
3