Today, I would like to give a detailed discussion on Introduction to myRIO. myRIO is basically a sort of micro controller introduced by National Inst...
Hello everyone! I hope you all will be absolutely fine and having fun. Today, I would like to give a detailed discussion on Introduction to myRIO. myRIO is basically a sort of micro controller introduced by National Instrument (NI), that is why it is sometimes known as NI myRIO. First of all I would like to tell you a bit about this device then we will move further. After listening its name i.e. myRIO, the first question comes in mind that what is this RIO. So, RIO is basically abbreviated from Re-configurable Input/Output.
myRIO is a portable device and students can easily use it for the design and control of robots and may other systems quite efficiently. It operates on the frequency 667 MHz. myRIO has dual core ARM cortex A9 programmable processor. It has a Xilinx Field Programmable Gate Array (FPGA). FPGA support in myRIO helps the students to design real life developing systems and to solve real problems quite faster as compared to the other micro controllers. Using FPGA support we can avoid the complicated syntax used in C language and in many other. We just have to create logic instead of writing the complicated code with the proper syntax. So, it has reduced the student's difficulties while designing complicated systems. It is student friendly device and is very easy to use. The processing speed of myRIO is quite higher than the standard micro controllers. So, it can be used t solve real life problems and it can be easily used in efficient systems which need a quick output response. It supports different languages e.g. C, C++ and graphical language (FPGA). The further detail about NI myyRIO will be provided later in this article.
Introduction to myRIO
myRIO is a real time embedded for evaluation. It was introduced by National Instruments. We can use it to develop the systems which require on board FPGA and microprocessor. LabVIEW is required to program it. Using this device, it is quite easy for the students to design complicated systems and to solve real life problems quite efficiently and quickly. It processing speed is almost ten times of the standard general micro-controllers and microprocessor. We can us this device in the systems where there is a need of quick responses e.g. CNC machines, two wheeled self balancing robots, robots performing different human operations. NI myRIO is shown in the figure given below.
If you are using myRIO for the first time, you should go through How to Configure NI myRIO on Wifi first in order to get the complete idea about its configuration using USB canle or WiFi.
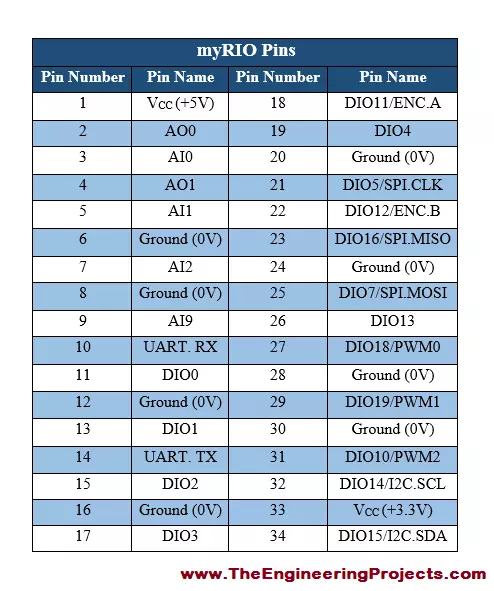
1. myRIO Pins
myRIO has thirty four (34) pins in total, each having different functionality.
All of these pins are listed in the table shown in the figure below.
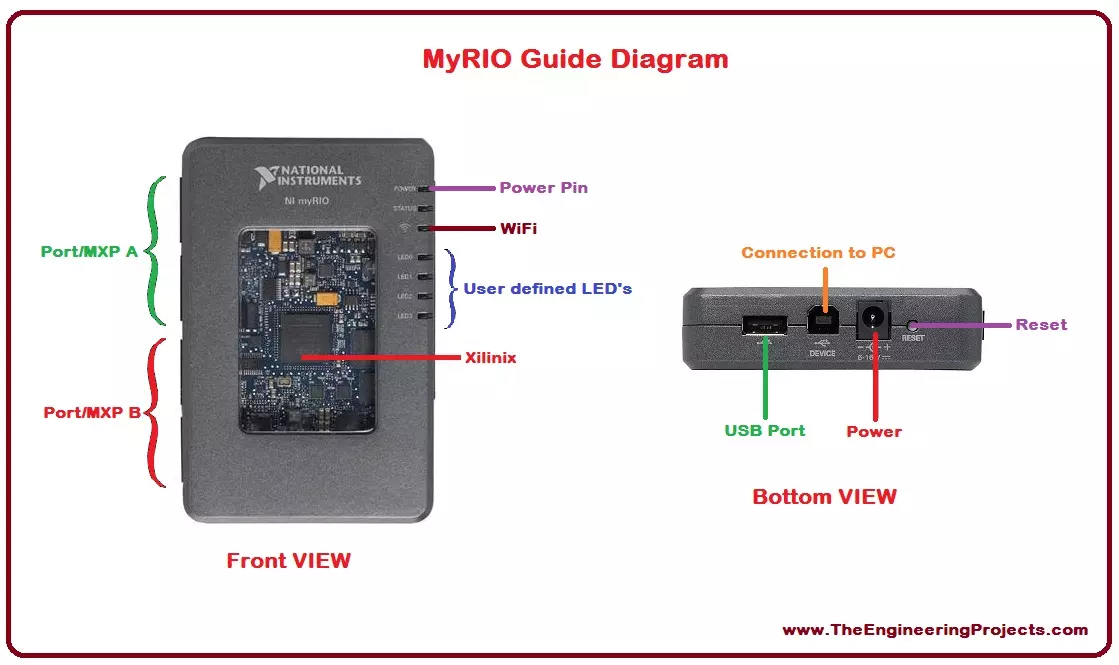
2. myRIO Front View
myRIO has two ports named as port A and port B.
It has a builtin WiFi shield and on board LED's.
The front view of the myRIO is shown in the figure given below.
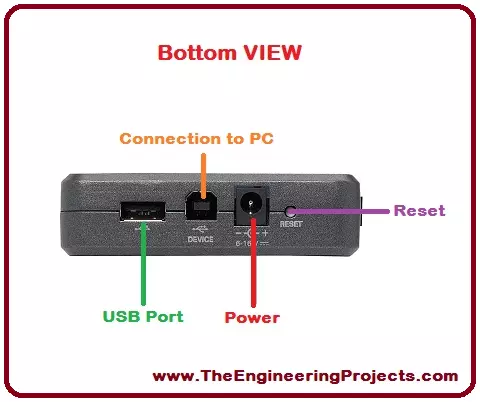
3. myRIO Bottom View
At the bottom side of the myRIO, it has power pin, PC connection point, and USB port.
The bottom view of the myRIO is shown in the figure given below.
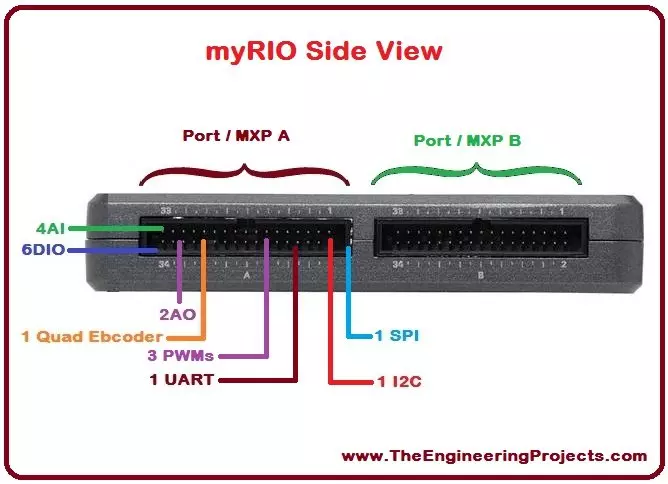
4. myRIO Side View
myRIO side view consists of two types of ports named as MXP A and MXP B.
The side view of NI myRIO is shown in the figure given below.
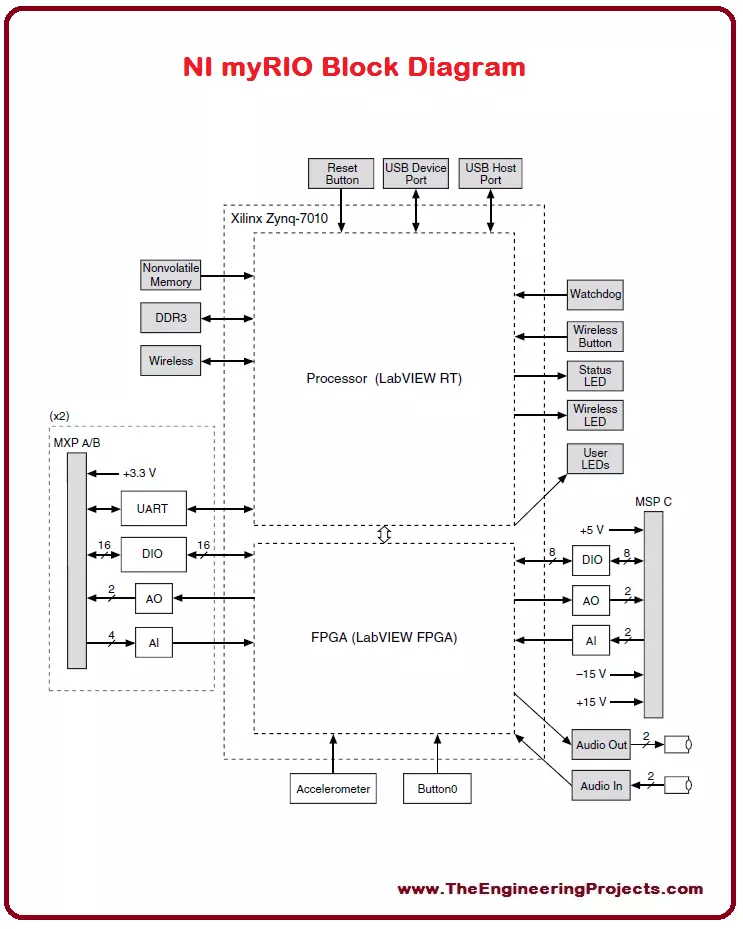
5. myRIO Block Diagram
The block diagram helps us to understand the internal structure of a device.
NI myRIO block diagram is shown in the figure given below.
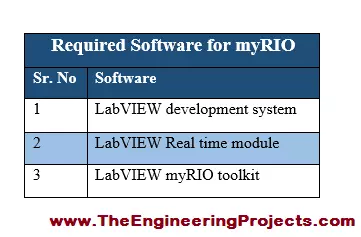
6. myRIO Required Software
There are different software required for NI myRIO.
These software are shown in the table shown in the figure given below.
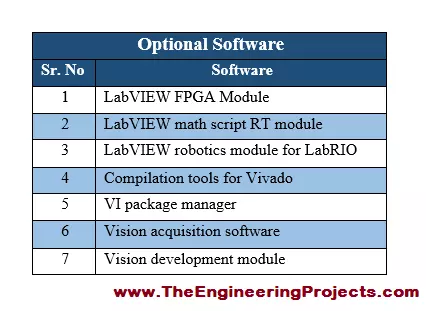
7. myRIO Optional Software
There are some optional software which can be used in case of myRIO.
Some optional software are listed in the table shown in the figure given below.
myRIO has able to perform tasks on different operating systems.
The different operating systems are given in the table shown in the figure below.
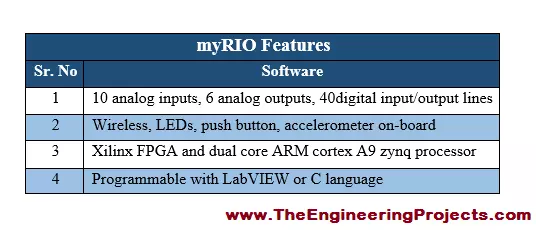
9. myRIO Features
The unique features can make a device more and more popular.
myRIO major features are listed in the table given in the figure shown below.
In the tutorial Introduction to myRIO, I have tried my level best to provide you the entire necessary details about the basic use of NI myRIO. I have provided complete pins configurations in order to use it properly. I hope you have enjoyed the tutorial. If you have any problem you can ask us in comments anytime you want. Me and my entire team is 24/7 available to entertain you. I will share different interesting topics in my upcoming tutorials. Till my next tutorial Take care and bye :)
syedzainnasir
I am Syed Zain Nasir, the founder of The Engineering Projects (TEP). I am a
programmer since 2009 before that I just search things, make small projects and now I am sharing my
knowledge through this platform. I also work as a freelancer and did many projects related to
programming and electrical circuitry. My Google Profile+Follow
Get Connected
Comments on ‘’ Introduction to myRIO ‘’ ( 1 )
0
aryaraj
Says:
How an algorithm works in myRIO?
Reply