

DS18B20 is normally used in industrial projects where high accuracy is necessary. I will give you a detailed overview of this temperature sensor in today's post where we will have a look at its Pinout, working, protocol, etc. I will also share some links to projects where I have interfaced it with Arduino or other microcontrollers. If you have any questions, please ask in comments and I will try my best to resolve them all. So, let's get started with a basic Introduction to DS18B20:
Introduction to DS18B20
- DS18B20 is a digital temperature sensor that follows a 1-wire protocol and can measure temperature from -55oC to +125oC ( -67oF to +257oF ) with an accuracy of +-5%.
- Data received from the single wire is in the ranges of 9-bit to 12-bit.
- As DS18B20 follows the 1-wire protocol so we can control this sensor via a single pin of Microcontroller. (We also have to provide GND)
- 1-wire protocol is an advanced level protocol and each DS18B20 is equipped with a serial code of 64 bit which helps in controlling multiple sensors via a single pin of the microcontroller.
- In simple words, it assigns different addresses to all sensors attached and by calling the address, you can get that sensor's value.
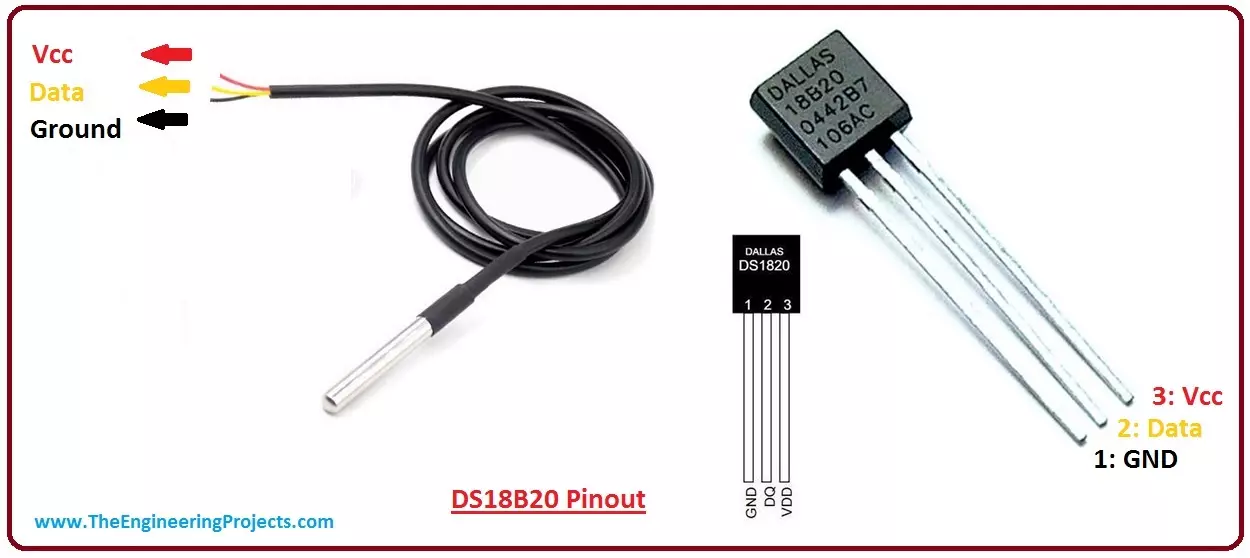
- So, now let's have a look at the DS18B20 Pinout:
DS1820 Pinout
- DS18B20 has 3 pins in total, which are:
- Pin # 1: Vcc ( We have to provide +5V here ).
- Pin # 2: Data Pin ( It's the 1-wire from where we will get temperature readings ).
- Pin # 3: GND ( We have to provide ground here ).
- It is available in two packages, one is simple while the other one is waterproof DS18B20, both of their pinouts are shown in the below figure:
- Now let's have a look at some of DS18B20's Characteristics and features:
DS18B20 Features
- I have assembled a table where I have added all the features and characteristics of DS18B20.
| No. | Parameter | Symbol | Value | Unit |
| 1. | Supply Voltage | VDD | +3 to 5.5 | V |
| 2. | Pull-up Supply Voltage | VPU | +3 to 5.5 | V |
| 3. | Input Logic Low | VIL | -0.3 to +0.8 | V |
| 4. | Input Logic High | VIH | +2.2 | V |
| 5. | Sink Current | IL | 4.0 | ma |
| 6. | Standby Current | IDDS | 750 to 1000 | na |
| 7. | Active Current | IDD | 1 to 1.5 | ma |
| 8. | DQ Input Current | IDQ | 5 | ua |
| 9. | Drift | +-2 | C | |
| 10. | NV Write Cycle Time | tWR | 2 to 10 | ms |
| 11. | EEPROM Writes | NEEWR | 50k | writes |
| 12. | EEPROM Data Retention | tEEDR | 10 | years |
| 13 | Temperature Conversion Time | tCONV | 93.75 | ms |
| 14. | Time to Strong Pullup On |
tSPON |
10 | ms |
| 15. | Time Slot |
tSLOT |
120 | us |
| 16. | Recovery Time | TREC | 1 | us |
| 17. | Write 0 Low Time |
tLOW0 |
120 | us |
| 18. | Write 1 Low Time | tLOW1 | 15 | us |
| 19 | Read Data Valid |
tRDV |
15 | us |
| 20. | Reset Time High |
tRSTH |
480 | us |
| 21 | Reset Time Low |
tRSTL |
480 | us |
| 22. | Presence-Detect High |
tPDHIGH |
60 | us |
| 23 | Presence-Detect Low | tPDLOW | 240 | us |
| 20. | Capacitance |
CIN/OUT |
25 | pf |
- Let's have a look at one wire Bus system:
One Wire Bus System
- As I told earlier that DS18B20 follows 1 wire protocol, so in order to understand its working, we must have a look at this protocol first.
- The main advantage of 1 wire protocol is that we can control multiple 1-wire devices via a single pin of Microcontroller.
- You must have heard of the master-slave system, where 1 master device can control or communicate with all slave devices.
- 1-wire protocol follows a similar master-slave system, where microcontroller acts as a master and all our 1-wire devices e.g. DS18B20 act as slaves.
- If we have interfaced only one device with our microcontroller then such a system is called a single drop but if we interface multiple 1-wire devices via a single pin then it's called multidrop system.
- Now let's have a better understanding of One Wire System from the figure given below:

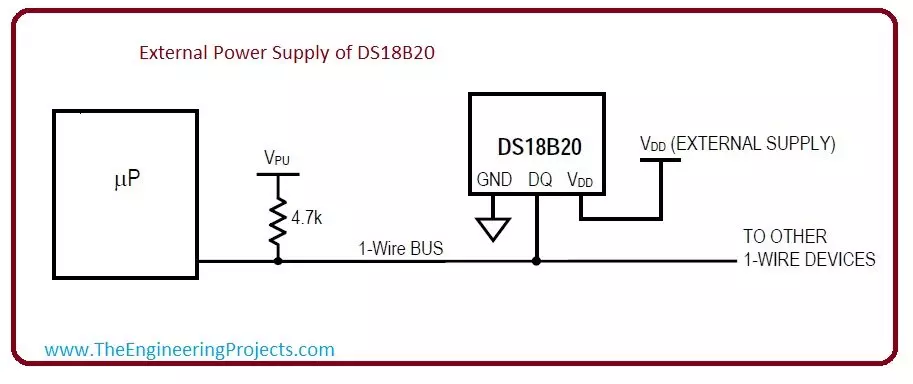
- Now let's have a look at DS18B20 Power Supply:
Power Supply of DS18B20
- There are two ways to power up this temperature sensor DS18B20, which are:
- External Power Supply.
- Parasite Power Supply.
- Let's discuss both of these power supplies in detail:
External Power supply of DS18B20
- In this method, we provide power to DS18B20 by conventional method i.e. battery or adapter.
- This method is applicable for temperature below +100 degree Celsius.
- The main benefit of this method is, there is no extra load on the resistor which uses in this method and it performs work correctly.
- Let's have a look at the connections in the below figure:
Parasite Power Mode of DS18B20
- In this method, we do not need a special power supply.
- This method is used for temperature greater than +100 Celsius.
- In a normal situation, this method provides efficient current and voltage to DS18B20
- But, in special work when DS18B20 convert temperature value into digital then current value increase to such value which can damage resister.
- To limit current in save the value and good working of DS18B20 it is necessary to use pull up mosfet.
- As it is used only for specific temperature value there we use an external power supply.

Working of DS18B20
- It works on the principle of direct conversion of temperature into a digital value.
- Its main features are to change its bit numbers according to change in temperature
- Like, it changes a bit in 9. 10, 11, and 12 bits as temperature changes in values 0.5 ° C. 0.25°C,1.25 and 0.0625°C respectively.
- Its default bits value is 12 but it changes values according to Temperature Change
- It has alarm and LCD as temperature changes alarms work and temperature value changes which we can get from LCD.
- Now let's have a look at the DS18B20 memory map
DS18B20 Memory Map
- There are are two types of memories which have DS18B20
- One SRAM and other is EEPROM.
- Sram is volatile memory it has data only in on the condition
- EEPROM is Non-volatile memory it stores data in the off condition
- EEPROM also has a low and high alarm trigger
- To have a better understanding of Memory Map of DS18B20 look at pictures which gives a better idea of a memory map of ds18b20

- Now let's have a look at Function Commands of DS18B20
DS18B20 Function Commands
These are function Commands of DS18B20. These commands allow some to read and write data on DS18B20 scratched memory. Let's discuss them
- Convert T[44h]: This command starts the single temperature conversion.
- Write scratched Pad [4Eh]: In this command, we can write data on memory of DS18B20 to three bytes. Data is transferred in the least multiple bits first.
- Read Scratched Pad[BEh]: In this command, we can read data on a scratched pad memory of DS18B20.
- Copy Scratchpad [48h]: This command data from the scratched pad and send data to EEPROM in 2, 3 and 4 bytes.
- Read Power Supply [B4h]: This command tells about the power supply mode of DS18B20.
Now let's have a look at Applications of DS18B20:
Applications of DS18B20
DS18B20 is used for temperature measurement. There are some applications of DS18B20:
- We can use it in the thermostat controls system.
- It can be used in industries as a temperature measuring device.
- It can be used as a thermometer.
- We can use it in thermally sensitive devices.
- It can also use in HVAC systems.
So, that was all about temperature sensor DS18B20. I hope you have enjoyed today's tutorial. IF you have any questions then ask in comments and we will resolve them all. Thanks for reading. Take care !!! :)
