Hello friends. We hope you are doing fine. The world is full of colours. Isn’t it? We humans can see and differentiate the colours very easily. But teaching robots and AI apps about colours is a real challenge. With the advancement of computer vision and embedded systems, this task has become easier than before. Today, we are going to make an RGB colour identifier using the ESP32-CAM. This project combines the power of OpenCV with the ESP32-CAM module to create a simple but effective system for detecting and tracking basic colors in real time.
System Architecture
1. Overview
This system consists of an ESP32-CAM module acting as a live-streaming camera server and a Python-based computer vision application running on a remote computer. The Python application fetches images from the ESP32-CAM, processes them using OpenCV, and detects objects of specific colours (red, green, and blue) based on HSV filtering.
2. System Components
A. Hardware Components
ESP32-CAM (AI Thinker module)
Captures images in JPEG format.
Streams images over WiFi using a built-in web server.
WiFi Router/Network
Connects ESP32-CAM and the processing computer.
Processing Computer (Laptop/Desktop/Raspberry Pi)
Runs Python with OpenCV to process images from ESP32-CAM.
Performs colour detection and contour analysis.
B. Software Components
ESP32-CAM Firmware (Arduino Code)
Uses the esp32cam library for camera control.
Uses WiFi.h for network connectivity.
Uses WebServer.h to create an HTTP server.
Captures and serves images at http://
/cam-hi.jpg. Python OpenCV Script (Color Detection Algorithm)
Fetches images from ESP32-CAM via urllib.request.
Converts images to HSV format for color-based segmentation.
Detects red, green, and blue objects using defined HSV thresholds.
Draws bounding contours and labels detected colours.
Displays processed video frames with detected objects.
4. Data Flow
Step 1: ESP32-CAM Initialization
ESP32-CAM connects to WiFi.
Sets up a web server to serve captured images at http://
/cam-hi.jpg.
Step 2: Image Capture and Streaming
The camera captures images in JPEG format (800x600 resolution).
Stores and serves the latest frame via an HTTP endpoint.
Step 3: Python Application Fetches Image
The Python script sends a request to ESP32-CAM to get the latest image frame.
The image is received in JPEG format and decoded using OpenCV.
Step 4: Color Detection Processing
Converts the image from BGR to HSV.
Applies thresholding masks to detect red, green, and blue objects.
Extracts contours of detected objects.
Filters out small objects using an area threshold (>2000 pixels).
Computes the centroid of detected objects.
Draws bounding contours and labels detected objects.
Step 5: Displaying Processed Image
Shows the original frame with detected objects and labels.
Pressing 'q' stops execution and closes all OpenCV windows.
List of components

Components |
Quantity |
ESP32-CAM WiFi + Bluetooth Camera Module |
1 |
FTDI USB to Serial Converter 3V3-5V |
1 |
Male-to-female jumper wires |
4 |
Female-to-female jumper wire |
1 |
MicroUSB data cable |
1 |
Circuit diagram
The following is the circuit diagram for this project:

Fig: Circuit diagram

ESP32-CAM WiFi + Bluetooth Camera Module |
FTDI USB to Serial Converter 3V3-5V (Voltage selection button should be in 5V position) |
|---|---|
5V |
VCC |
GND |
GND |
UOT |
Rx |
UOR |
TX |
IO0 |
GND (FTDI or ESP32-CAM) |
Programming
Board installation
If it is your first project with any board of the ESP32 series, this part of the tutorial is for you. you need to do the board installation. You may also need to install the CP210x USB driver. If ESP32 boards are already installed in your Arduino IDE, you can skip this installation section. Go to File > preferences, type https://dl.espressif.com/dl/package_esp32_index.json and click OK.
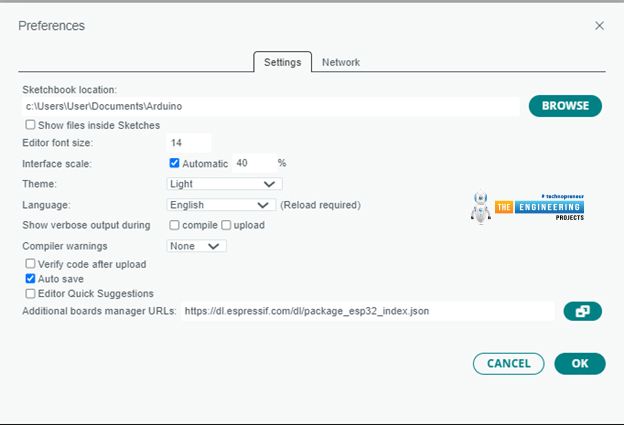
Fig: Board Installation
Go to Tools>Board>Boards Manager and install the ESP32 boards.
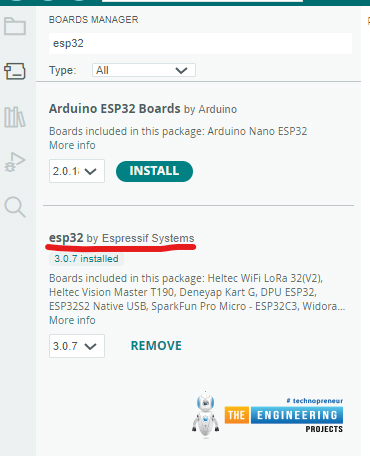
Fig: Board Installation
Install the ESP32-CAM library.
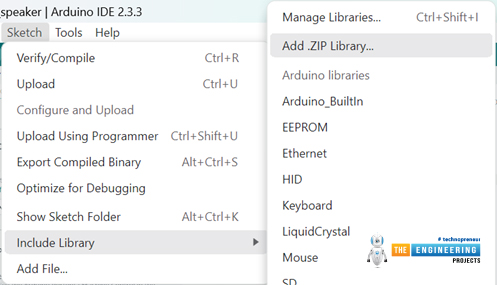
Download the ESP32-CAM library from Github (the link is given in the reference section). Then install it by following the path sketch>include library> add.zip library.
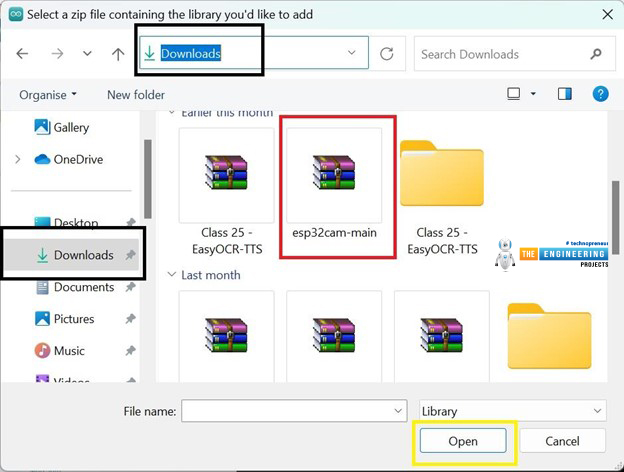
Now select the correct path to the library, click on the library folder and press open.
Board selection and code uploading
Connect the camera board to your computer. Some camera boards come with a micro USB connector of their own. You can connect the camera to the computer by using a micro USB data cable. If the board has no connector, you have to connect the FTDI module to the computer with the data cable. If you never used the FTDI board on your computer, you will need to install the FTDI driver first.
After connecting the camera, Go to Tools>boards>esp32>Ai thinker ESP32-CAM

Fig: Camera board selection
After selecting the board, select the appropriate COM port and upload the following code:
#include
#include
#include
const char* WIFI_SSID = "SSID";
const char* WIFI_PASS = "password";
WebServer server(80);
static auto hiRes = esp32cam::Resolution::find(800, 600);
void serveJpg()
{
auto frame = esp32cam::capture();
if (frame == nullptr) {
Serial.println("CAPTURE FAIL");
server.send(503, "", "");
return;
}
Serial.printf("CAPTURE OK %dx%d %db\n", frame->getWidth(), frame->getHeight(),
static_cast
server.setContentLength(frame->size());
server.send(200, "image/jpeg");
WiFiClient client = server.client();
frame->writeTo(client);
}
void handleJpgHi()
{
if (!esp32cam::Camera.changeResolution(hiRes)) {
Serial.println("SET-HI-RES FAIL");
}
serveJpg();
}
void setup(){
Serial.begin(115200);
Serial.println();
{
using namespace esp32cam;
Config cfg;
cfg.setPins(pins::AiThinker);
cfg.setResolution(hiRes);
cfg.setBufferCount(2);
cfg.setJpeg(80);
bool ok = Camera.begin(cfg);
Serial.println(ok ? "CAMERA OK" : "CAMERA FAIL");
}
WiFi.persistent(false);
WiFi.mode(WIFI_STA);
WiFi.begin(WIFI_SSID, WIFI_PASS);
while (WiFi.status() != WL_CONNECTED) {
delay(500);
}
Serial.print("http://");
Serial.println(WiFi.localIP());
Serial.println(" /cam-hi.jpg");
server.on("/cam-hi.jpg", handleJpgHi);
server.begin();
}
void loop()
{
server.handleClient();
}
After uploading the code, disconnect the IO0 pin of the camera from GND. Then press the RST pin. The following messages will appear.

Fig: Code successfully uploaded to ESP32-CAM
You have to copy the IP address and paste it into the following part of your Python code.

Python code
Main python script
Copy-paste the following Python code and save it using a Python interpreter.
import cv2
import urllib.request
import numpy as np
def nothing(x):
pass
url = 'http://192.168.1.108/cam-hi.jpg'
cv2.namedWindow("live transmission", cv2.WINDOW_AUTOSIZE)
# Red, Green, and Blue HSV ranges
red_lower1 = np.array([0, 120, 70])
red_upper1 = np.array([10, 255, 255])
red_lower2 = np.array([170, 120, 70])
red_upper2 = np.array([180, 255, 255])
green_lower = np.array([40, 70, 70])
green_upper = np.array([80, 255, 255])
blue_lower = np.array([90, 70, 70])
blue_upper = np.array([130, 255, 255])
while True:
img_resp = urllib.request.urlopen(url)
imgnp = np.array(bytearray(img_resp.read()), dtype=np.uint8)
frame = cv2.imdecode(imgnp, -1)
hsv = cv2.cvtColor(frame, cv2.COLOR_BGR2HSV)
# Create masks for Red, Green, and Blue
mask_red1 = cv2.inRange(hsv, red_lower1, red_upper1)
mask_red2 = cv2.inRange(hsv, red_lower2, red_upper2)
mask_red = cv2.bitwise_or(mask_red1, mask_red2)
mask_green = cv2.inRange(hsv, green_lower, green_upper)
mask_blue = cv2.inRange(hsv, blue_lower, blue_upper)
# Find contours for each color independently
for color, mask, lower, upper in [("red", mask_red, red_lower1, red_upper1),
("green", mask_green, green_lower, green_upper),
("blue", mask_blue, blue_lower, blue_upper)]:
cnts, _ = cv2.findContours(mask, cv2.RETR_TREE, cv2.CHAIN_APPROX_SIMPLE)
for c in cnts:
area = cv2.contourArea(c)
if area > 2000: # Only consider large contours
# Get contour center
M = cv2.moments(c)
if M["m00"] != 0: # Avoid division by zero
cx = int(M["m10"] / M["m00"])
cy = int(M["m01"] / M["m00"])
# Draw contours and color label
cv2.drawContours(frame, [c], -1, (255, 0, 0), 3) # Draw contour in blue
cv2.circle(frame, (cx, cy), 7, (255, 255, 255), -1) # Draw center circle
cv2.putText(frame, color, (cx - 20, cy - 20), cv2.FONT_HERSHEY_SIMPLEX, 1, (0, 0, 255), 2)
res = cv2.bitwise_and(frame, frame, mask=mask_red) # Show result with red mask
cv2.imshow("live transmission", frame)
cv2.imshow("res", res)
key = cv2.waitKey(5)
if key == ord('q'):
break
cv2.destroyAllWindows()
Setting Up Python Environmen
Install Dependencies:
1)Create a virtual environment:
python -m venv venv
source venv/bin/activate # Linux/Mac
venv\Scripts\activate # Windows
2)Install required libraries:
pip install opencv-python numpy
pip install urllib3
After setting the Pythong Environment, run the Python code.
ESP32-CAM code breakdown
#include
#include
#include
#include
: Adds support for creating a lightweight HTTP server. #include
: Allows the ESP32 to connect to Wi-Fi networks. #include
: Provides functions to control the ESP32-CAM module, including camera initialization and capturing images.
const char* WIFI_SSID = "SSID";
const char* WIFI_PASS = "password";
WIFI_SSID and WIFI_PASS: Define the SSID and password of the Wi-Fi network that the ESP32 will connect to.
WebServer server(80);
WebServer server(80): Creates an HTTP server instance that listens on port 80 (default HTTP port).
static auto hiRes = esp32cam::Resolution::find(800, 600);
esp32cam::Resolution::find: Defines camera resolutions:
hiRes: High resolution (800x600).
void serveJpg()
{
auto frame = esp32cam::capture();
if (frame == nullptr) {
Serial.println("CAPTURE FAIL");
server.send(503, "", "");
return;
}
Serial.printf("CAPTURE OK %dx%d %db\n", frame->getWidth(), frame->getHeight(),
static_cast
server.setContentLength(frame->size());
server.send(200, "image/jpeg");
WiFiClient client = server.client();
frame->writeTo(client);
}
esp32cam::capture: Captures a frame from the camera.
Failure Handling: If no frame is captured, it logs a failure and sends a 503 error response.
Logging Success: Prints the resolution and size of the captured image.
Serving the Image:
Sets the content length and MIME type as image/jpeg.
Writes the image data directly to the client.
void handleJpgHi()
{
if (!esp32cam::Camera.changeResolution(hiRes)) {
Serial.println("SET-HI-RES FAIL");
}
serveJpg();
}
handleJpgHi: Switches the camera to high resolution using esp32cam::Camera.changeResolution(hiRes) and calls serveJpg.
Error Logging: If the resolution change fails, it logs a failure message to the Serial Monitor.
void setup(){
Serial.begin(115200);
Serial.println();
{
using namespace esp32cam;
Config cfg;
cfg.setPins(pins::AiThinker);
cfg.setResolution(hiRes);
cfg.setBufferCount(2);
cfg.setJpeg(80);
bool ok = Camera.begin(cfg);
Serial.println(ok ? "CAMERA OK" : "CAMERA FAIL");
}
WiFi.persistent(false);
WiFi.mode(WIFI_STA);
WiFi.begin(WIFI_SSID, WIFI_PASS);
while (WiFi.status() != WL_CONNECTED) {
delay(500);
}
Serial.print("http://");
Serial.println(WiFi.localIP());
Serial.println(" /cam-hi.jpg");
server.on("/cam-hi.jpg", handleJpgHi);
server.begin();
}
Serial Initialization:
Initializes the serial port for debugging.
Sets baud rate to 115200.
Camera Configuration:
Sets pins for the AI Thinker ESP32-CAM module.
Configures the default resolution, buffer count, and JPEG quality (80%).
Attempts to initialize the camera and log the status.
Wi-Fi Setup:
Connects to the specified Wi-Fi network in station mode.
Waits for the connection and logs the device's IP address.
Web Server Routes:
Maps URL endpoint ( /cam-hi.jpg).
Server Start:
Starts the web server.
void loop()
{
server.handleClient();
}
server.handleClient(): Continuously listens for incoming HTTP requests and serves responses based on the defined endpoints.
Summary of Workflow
The ESP32-CAM connects to Wi-Fi and starts a web server.
URL endpoint /cam-hi.jpg) lets the user request images at high resolution.
The camera captures an image and serves it to the client as a JPEG.
The system continuously handles new client requests.
Python code breakdown
Code Breakdown
This code captures images from a live video stream over the network, processes them to detect red, green, and blue regions, and highlights these regions on the video feed.
Imports
cv2 (OpenCV):
Used for image and video processing, including reading, decoding, and displaying images.
urllib.request:
Handles HTTP requests to fetch the video feed from the given URL.
numpy:
Handles array operations, which are used for creating HSV ranges and masks.
Function Definition
nothing(x)
Purpose: A placeholder function that does nothing. Typically used for trackbar callbacks in OpenCV.
Usage in Code: It's defined but not used in this snippet.
Global Variables
url:
Stores the URL of the live video feed (http://192.168.1.106/cam-hi.jpg).
Colour Ranges:
Red: Two HSV ranges for red, as red wraps around the HSV hue space (0–10 and 170–180 degrees).
Green: HSV range for green (40–80 degrees).
Blue: HSV range for blue (90–130 degrees).
Window Initialization
cv2.namedWindow
Creates a window named "live transmission" for displaying the processed video feed.
cv2.WINDOW_AUTOSIZE: Ensures the window size adjusts automatically based on the image size.
Main Loop (while True)
Fetch Image:
img_resp = urllib.request.urlopen(url)
imgnp = np.array(bytearray(img_resp.read()), dtype=np.uint8)
frame = cv2.imdecode(imgnp, -1)
urllib.request.urlopen(url): Opens the URL and fetches the image bytes.
bytearray(img_resp.read()): Converts the response data to a byte array.
np.array(..., dtype=np.uint8): Converts the byte array into a NumPy array.
cv2.imdecode(imgnp, -1): Decodes the NumPy array into an image (frame).
Convert to HSV:
hsv = cv2.cvtColor(frame, cv2.COLOR_BGR2HSV)
Converts the image from BGR to HSV color space, which makes color detection easier.
Create Color Masks:
mask_red1 = cv2.inRange(hsv, red_lower1, red_upper1)
mask_red2 = cv2.inRange(hsv, red_lower2, red_upper2)
mask_red = cv2.bitwise_or(mask_red1, mask_red2)
mask_green = cv2.inRange(hsv, green_lower, green_upper)
mask_blue = cv2.inRange(hsv, blue_lower, blue_upper)
cv2.inRange(hsv, lower, upper): Creates a binary mask where pixels in the HSV range are white (255) and others are black (0).
Combines two masks for red (since red spans two HSV ranges).
Creates masks for green and blue.
Find and Process Contours:
cnts, _ = cv2.findContours(mask, cv2.RETR_TREE, cv2.CHAIN_APPROX_SIMPLE)
cv2.findContours:
Finds contours (boundaries of white regions) in the binary mask.
cv2.RETR_TREE: Retrieves all contours and reconstructs a full hierarchy.
cv2.CHAIN_APPROX_SIMPLE: Compresses horizontal, vertical, and diagonal segments to save memory.
Contour Processing:
for c in cnts:
area = cv2.contourArea(c)
if area > 2000: # Only consider large contours
M = cv2.moments(c)
if M["m00"] != 0:
cx = int(M["m10"] / M["m00"])
cy = int(M["m01"] / M["m00"])
cv2.drawContours(frame, [c], -1, (255, 0, 0), 3)
cv2.circle(frame, (cx, cy), 7, (255, 255, 255), -1)
cv2.putText(frame, color, (cx - 20, cy - 20), cv2.FONT_HERSHEY_SIMPLEX, 1, (0, 0, 255),
cv2.contourArea(c): Calculates the area of the contour.
Threshold: Only processes contours with an area > 2000 to ignore noise.
Moments: Used to calculate the centre of the contour (cx, cy).
Drawing:
cv2.drawContours: It draws the contour in blue.
cv2.circle: It draws a white circle at the center.
cv2.putText: Labels the contour with its colour name.
Display the Results:
res = cv2.bitwise_and(frame, frame, mask=mask_red)
cv2.imshow("live transmission", frame)
cv2.imshow("res", res)
cv2.bitwise_and: Applies the red mask to the original frame, keeping only the red regions visible.
cv2.imshow: Displays the processed video feed in two windows:
"live transmission" shows the annotated frame.
"res" shows only the red regions.
Exit Condition:
key = cv2.waitKey(5)
if key == ord('q'):
break
cv2.waitKey(5): Waits for 5 ms for a key press.
Exit Key: If 'q' is pressed, the loop breaks.
Cleanup
cv2.destroyAllWindows()
Closes all OpenCV windows after exiting the loop.
Summary
This script continuously fetches images from a network camera, processes them to detect red, green, and blue regions, and overlays visual markers and labels on the detected regions. It is a real-time colour detection and visualization application with a clear exit mechanism.
Let’s test the setup
Power up the ESP32-CAM and connect it to Wi-Fi.
Run the Python script. Make sure that the ESP32-CAM URL is correctly set.
Test with Red, Green and Blue objects. You have to place the objects in front of the ESP32-CAM.

Fig: Green detected
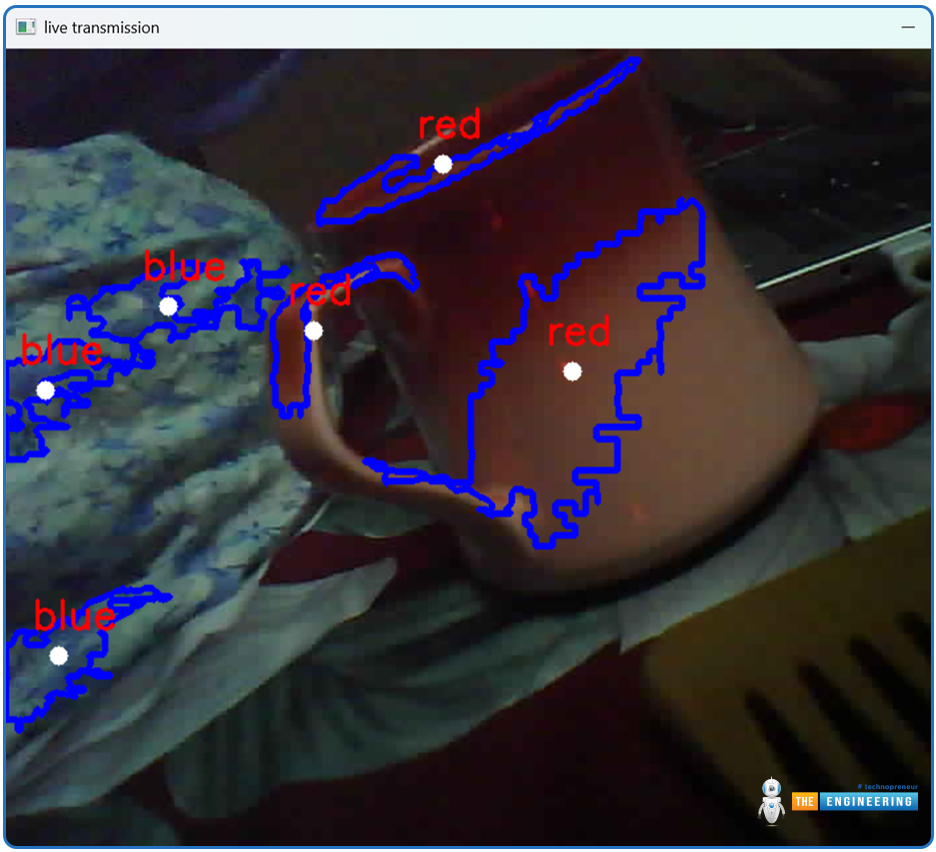
Fig: Red and blue detected
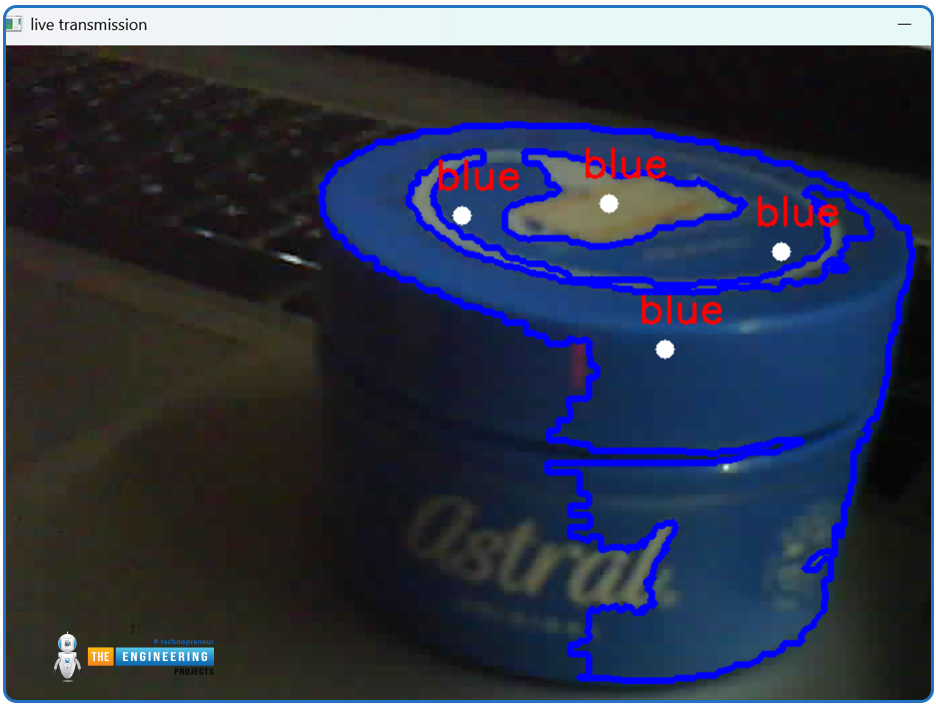
Fig: Blue detected
Troubleshooting:
Guru Meditation Error: Ensure stable power to the ESP32-CAM.
No Image Display: You probably entered the wrong IP address! Check the IP address and ensure the ESP32-CAM is accessible from your computer.
Library Conflicts: Use a virtual environment to isolate Python dependencies.
Dots when uploading the code: Immediately press the RST button.
Multiple failed upload attempts despite pressing the RST button: Restart your computer and try again.
To wrap up
By integrating ESP32 and OpenCV, we have made a basic RGB colour identifier in this project. We can use this to make apps for colour-blind people. Depending on colours, industrial control systems often need to sort products and raw materials. This project can be integrated with such sorting systems. Colour detection is also important for humanoid robots. Our project can be integrated with humanoid robots to add that feature. The code can be further fine-tuned to identify more colours.


 ESP32 Projects
 xeohacker
 0 Comments


