Hello friends, I hope you all are doing great. Today, I am going to share our new Rotary Encoder Library for Proteus. The KY-040 is the small black rotary encoder module you find in almost every Arduino kit: a knurled knob that turns endlessly in 20 clicks per turn, with a push switch built into the shaft. It is the knob behind many volume controls, menus and set-point inputs. With this Rotary Encoder Library for Proteus, you turn that knob in the simulation (one click, five clicks or a non-stop spin) and press it, and your Arduino reads the CLK, DT and SW pins exactly as it would read the real module, contact bounce included.
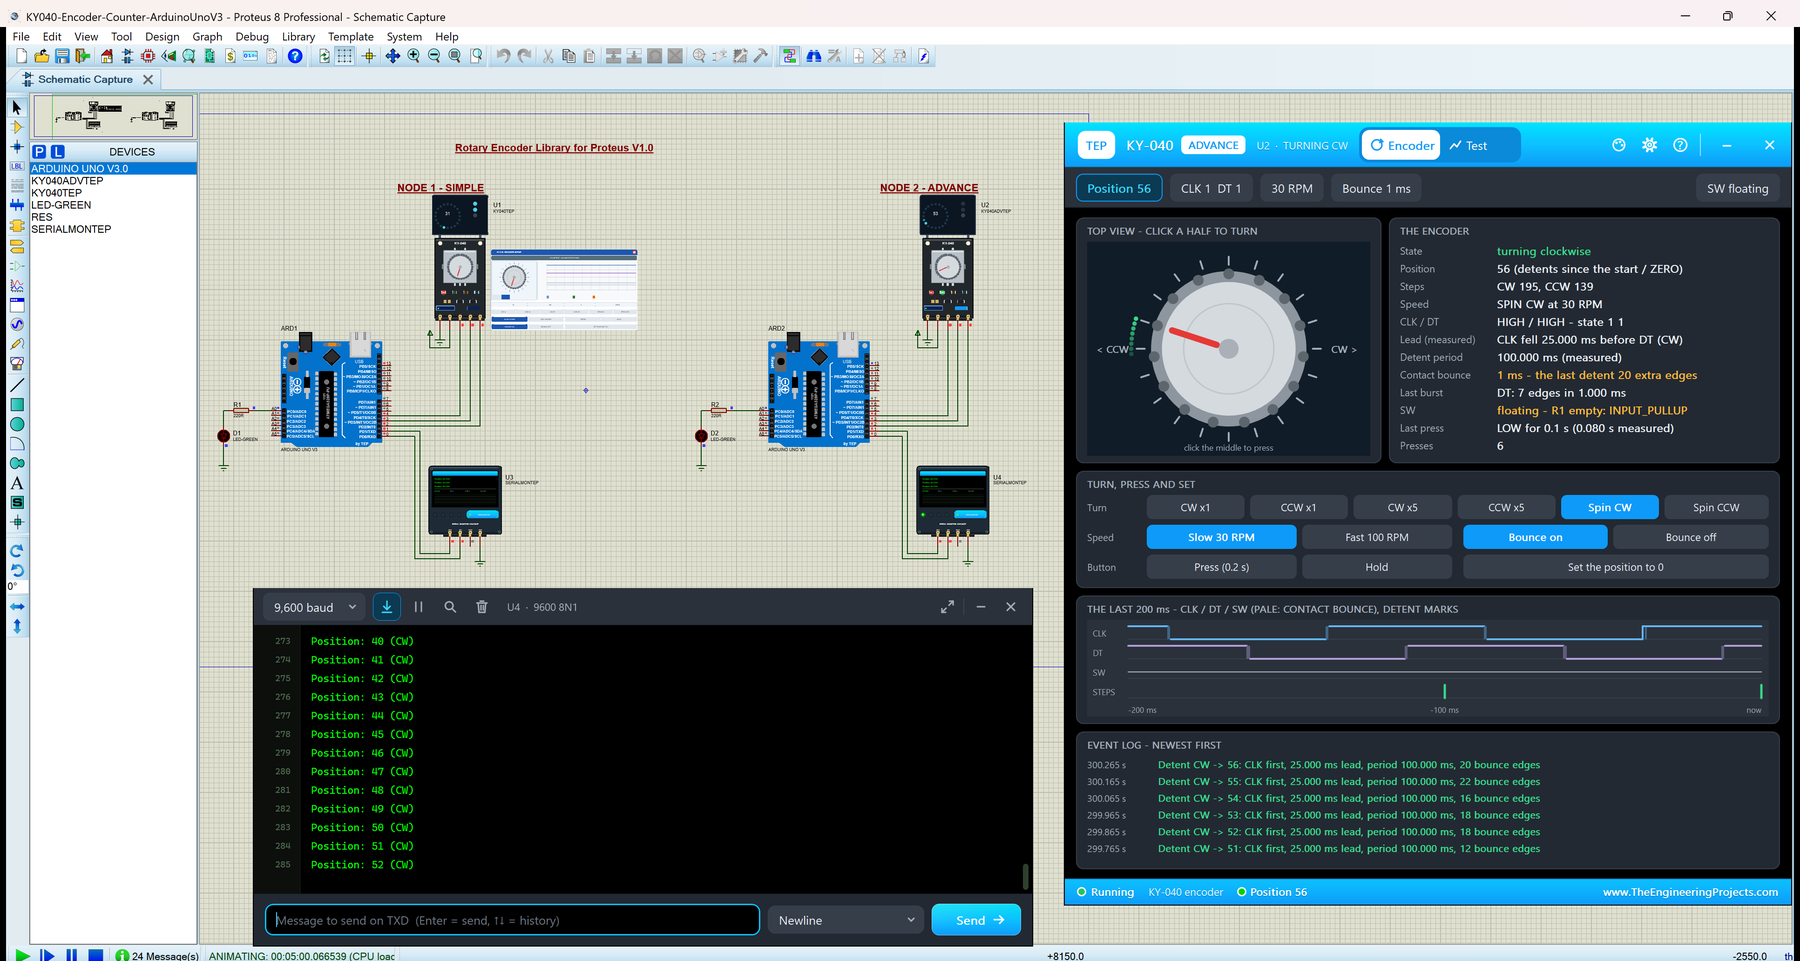
This is the first version (V1.0) of our rotary encoder library, and it comes with two devices: KY-040 Simple, with an encoder scene and a logic analyzer on the schematic, and KY-040 Advance, with a pop-up window, an event log and four measured encoder test tools. The KY-040 Arduino Proteus demo runs on two Arduino UNOs, counts the clicks with the INT0 interrupt and a 2 ms debounce, and shows everything in the compact Simple interface of our TEP Serial Monitor.
NOTICE: This library is very special to our team. Our KY-040 model drives CLK and DT at the exact quadrature edge times of every click, adds contact bounce bursts to every edge, models the push switch with and without its missing pull-up, and measures everything it does: the lead of the leading contact, the time per click, the bounce of every edge and the length of every press. It took our team a lot of hard work, many test runs and many design changes. Your feedback is the fuel that keeps us going, so please tell us what you think in the comments below or in the Rotary Encoder Library board of our forum. And if our free libraries help you, you can buy us a coffee. So, let's get started with the Rotary Encoder Library for Proteus:
What is a Rotary Encoder?
A rotary encoder turns the rotation of a shaft into electrical pulses. The KY-040 uses an incremental mechanical encoder of the EC11 class: two sliding contacts run over a ring of metal segments as the shaft turns. Each contact connects its pin to ground (GND) for a part of every click, so the module gives two pulse trains, called CLK (also A) and DT (also B). The pulses tell your Arduino how far the knob turned, and the contact that closes first tells it which way.
Unlike a potentiometer, a rotary encoder has no end stop and no absolute position: it only says "one click clockwise" or "one click counter-clockwise", and the sketch keeps the count. That suits menus, volume knobs and any value you change in steps. The knob is also a push button, SW, which connects its pin to ground while you press it.
The KY-040 at a Glance
| Feature | Value |
|---|---|
| Encoder | EC11-class mechanical incremental encoder with a push switch |
| Clicks (detents) per turn | 20, one full CLK / DT cycle per click (18 degrees per click) |
| Outputs | CLK and DT: two contacts to GND with 10 k pull-ups (R2, R3); SW: the push switch to GND |
| SW pull-up | R1, an empty footprint on most boards |
| Pins | GND, +, SW, DT, CLK |
| Supply | 3.3 to 5 V; no active parts and no LED |
| Contact current | A few mA (10 mA at most) |
| Contact bounce | Up to 5 ms on the EN11 datasheet; EC11 types often about 2 ms |
| Rated speed | Up to 100 RPM |
Rotary Encoder Terms You Will See in This Article
| Term | Meaning |
|---|---|
| Detent (click) | One step of the knob you can feel; 20 per turn on the KY-040 |
| CLK / DT | The two encoder contacts (A and B); LOW when closed, HIGH when open |
| SW | The push switch on the shaft; LOW while you press the knob |
| Quadrature | Two signals a quarter of a cycle (90 degrees) apart; their order is the direction |
| State | The two levels as a pair, written CLK DT: 11, 01, 00 or 10 |
| Lead | How long the leading contact closes before the other one (25 ms at 30 RPM) |
| Contact bounce | The fast on-off chatter of a mechanical contact while it closes or opens |
| Debounce | Ignoring that chatter in the sketch, for example with a dead time after each edge |
| RPM | Revolutions per minute; at 30 RPM, one click takes 100 ms |
| INT0 / INT1 | The two external interrupts of the Arduino UNO, on D2 and D3 |
| PCINT | Pin-change interrupts; the AVR model of Proteus 8.5 never runs them |
How a Rotary Encoder Tells the Direction
One Click, One Full CLK / DT Cycle
At rest, at a detent, both contacts are open, so the 10 k pull-ups hold CLK and DT HIGH: the state is 11. During one click clockwise, CLK closes first, then DT; then CLK opens, then DT. The state walks through 11, 01, 00, 10 and back to 11. Counter-clockwise, DT leads, and the state walks the other way: 11, 10, 00, 01 and 11. Each step changes only one contact (a Gray code), so the order of the states is the direction.
The Edge Times Inside a Click
Our model turns the knob at a constant speed inside each click. For a click that takes the time P, the leading contact closes at P/8 and the other one at 3P/8; the leading contact opens at 5P/8 and the other one at 7P/8. So the two contacts are always a quarter of a click, 90 degrees, apart:
| Speed | Time per click (P) | Contact edges apart (P / 4) | Clicks per second |
|---|---|---|---|
| SLOW 30 RPM | 100 ms | 25 ms | 10 |
| FAST 100 RPM (the rated maximum) | 30 ms | 7.5 ms | 33.3 |
Reading the Direction: When CLK Falls, Read DT
Here is the simple rule most KY-040 sketches use, and our demo too. When CLK falls, look at DT. Turning clockwise, CLK falls first, so DT is still HIGH: count +1. Turning counter-clockwise, DT fell a quarter of a click earlier (25 ms at 30 RPM), so DT is already LOW: count -1. CLK falls once per click, so the sketch counts once per click.
Contact Bounce
A mechanical contact does not close cleanly. It chatters for a short time, and the pin goes LOW, HIGH, LOW and so on before it settles. The EN11 datasheet allows up to 5 ms of bounce, and EC11 types often give about 2 ms. Our model makes every edge of CLK, DT and SW chatter: the pin changes 3, 5 or 7 times instead of once (1 to 3 extra pulses), all within the BOUNCE time (1 ms by default, from OFF up to 5 ms). Every extra CLK fall looks like another click, so a sketch without a debounce counts them, and the count jumps or even runs backwards. The bursts are made by the model inside the datasheet range; they are not a recording of a real part.
The Push Switch and the Missing R1
SW connects its pin to GND while you press the knob. When you let go, nothing pulls it HIGH again: the board has a place for a pull-up resistor, R1, but on most KY-040 boards it is empty. So SW floats, and a sketch must use INPUT_PULLUP. Our model does the same: SW floats after a release, unless you set the SWPULLUP property to 10K, which fits R1. The switch bounces too, just like CLK and DT.
Features of Rotary Encoder Library for Proteus V1.0
This is our first rotary encoder library for Proteus. Here is what you get:
- Two devices in
TEPKY040.LIB: KY-040 Simple (KY040TEP) and KY-040 Advance (KY040ADVTEP), with one model,TEPKY040.DLL. - Exact quadrature: 20 clicks per turn, one full CLK / DT cycle per click, the edges at P/8, 3P/8, 5P/8 and 7P/8; clockwise CLK leads, counter-clockwise DT leads.
- Contact bounce on every edge of CLK, DT and SW, from OFF up to 5 ms (1 ms by default).
- The push switch with or without the R1 pull-up: PRESS, HOLD, or hold the mouse button on the knob.
- A live black KY-040 board: the knob and its red pointer turn 18 degrees per click; PWR, CW, CCW and SW LEDs (a TEP addition) and the ENCODER VIEW screen with a ring of 20 LEDs.
- An encoder scene with a logic analyzer of the last 200 ms on the Simple device, and an event log with measured values on the Advance device.
- Four measured test tools: Step count, Bounce & debounce, Direction and Push button.
- A two-UNO demo with the TEP Serial Monitor: INT0 on CLK with a 2 ms debounce, a press resets the count, and the commands HELP, STATUS, RESET and DEBOUNCE ms; no Arduino library is needed.
- Light: a package of about 1.43 MB, and a panel that redraws only what changed, at most 12.5 times a second.
Rotary Encoder Library for Proteus: Simple vs Advance
Both devices run the same model with the same properties (the Advance has no PANEL property); only the panel differs:
| Feature | Simple | Advance |
|---|---|---|
| Full KY-040 model (quadrature, contact bounce, push switch, power) | ✔ | ✔ |
| Black KY-040 board: turning knob, PWR / CW / CCW / SW LEDs, ENCODER VIEW screen | ✔ | ✔ |
| Click and hold the knob on the board to press it | ✔ | ✔ |
| Encoder scene on the schematic: banner, TOP VIEW knob, logic analyzer and buttons | ✔ | ✘ |
| Pop-up window you can move, resize and minimise | ✘ | ✔ |
| Encoder page: THE ENCODER card with measured values, the last 200 ms and the event log | ✘ | ✔ |
| Step count, Bounce & debounce, Direction and Push button tools | ✘ | ✔ |
| TEP Dark / Light theme, text size, Help page with Copy diagnostics | ✘ | ✔ |
Choose Simple to keep the knob and the logic analyzer beside your circuit, and Advance when your sheet is full or you want hard numbers about your sketch. The demo has one of each.
Download Rotary Encoder Library for Proteus
Click the button below to download Rotary-Encoder-Library-for-Proteus-v1.0.zip (about 1.43 MB, without the C++ source code):
Rotary Encoder Library for Proteus V1.0- README.txt: a detailed guide to the files, the wiring, the model, the test tools and real hardware.
- Proteus Library Files:
TEPKY040.LIB(both devices),TEPSERIALMON.LIBand our Arduino UNO libraryArduinoV3TEP.LIB/ArduinoV3TEP.IDX. - Proteus Model Files:
TEPKY040.DLLandTEPSERIALMON.DLL. - Proteus Simulation:
KY040-Encoder-Counter-ArduinoUnoV3.pdsprj,KY040_Encoder_Counter.hex(both UNOs run it) and copies of both DLLs. - Arduino Code:
KY040_Encoder_Counter.ino, the demo sketch; it needs no Arduino library.
How to Install Rotary Encoder Library for Proteus
- Close Proteus and extract the whole zip file.
- Copy the four files from Proteus Library Files into the LIBRARY folder, usually
C:\Program Files (x86)\Labcenter Electronics\Proteus 8 Professional\LIBRARY(on some PCsC:\ProgramData\Labcenter Electronics\Proteus 8 Professional\LIBRARY; use the folder that already holds the .LIB files of Proteus). - Copy
TEPKY040.DLLandTEPSERIALMON.DLLinto the MODELS folder. - Start Proteus, press P and search for KY-040 or Rotary Encoder. You get the Simple and the Advance device (category Sensors > Rotary Encoders).
Good to know: keep the .hex file and the two DLLs beside the demo project; the DLL copies there let it run as it is. Tested in Proteus 8.5; Proteus 7 is not supported.
The KY-040 Board in Proteus
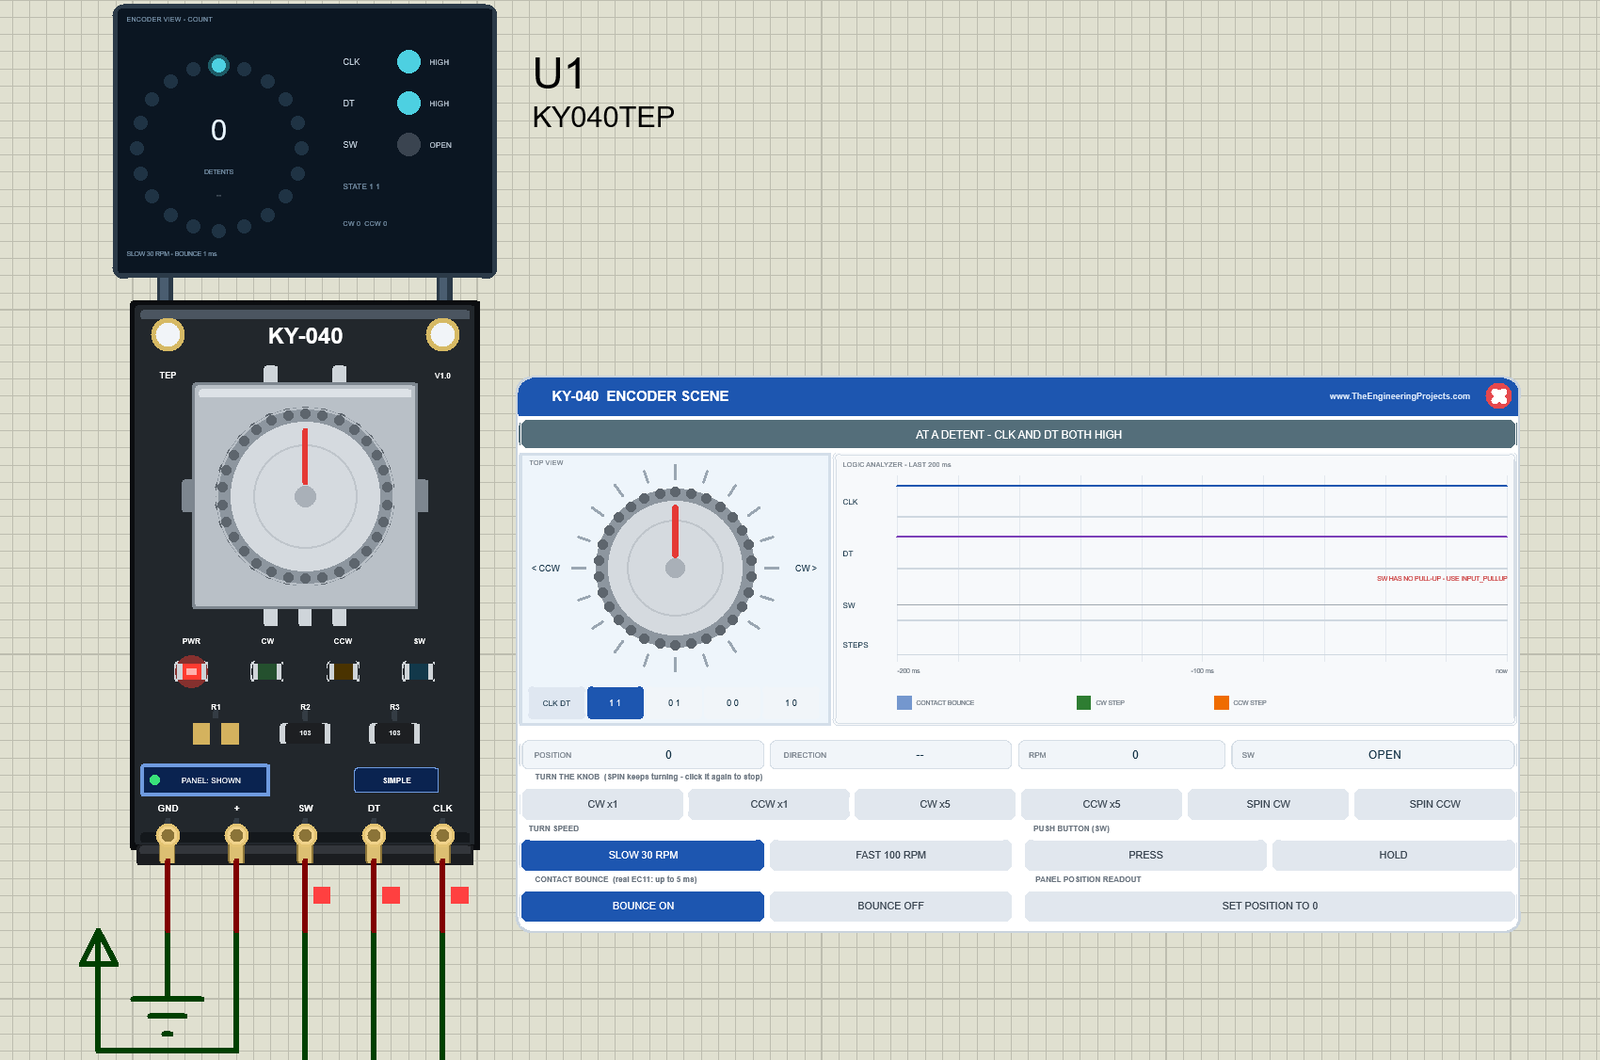
We drew the KY-040 as a clean TEP board in the black of the real module: the silver EC11 body with its tabs and legs, the knurled knob with a red pointer, the resistors R1 (an empty footprint), R2 and R3 ("103", 10 k), the two mounting holes and the white "KY-040" print. Here is U1, the Simple device, at rest after Run:
The ENCODER VIEW Screen
On two posts above the board sits the ENCODER VIEW - COUNT screen. It shows what the encoder tells a sketch: a ring of 20 LEDs with the position of the count lit (one LED per click of a turn), the count in big digits with the last direction below it (CW > or < CCW), the CLK, DT and SW levels as lamps, the quadrature STATE, the CW and CCW steps, and at the bottom the speed and the bounce (here SLOW 30 RPM - BOUNCE 1 ms).
Pinout
| Pin | What it does | Demo connection |
|---|---|---|
| GND | Ground | GND |
| + | Supply, 3.3 to 5 V | Power terminal (+5 V) |
| SW | The push switch to GND: LOW while pressed, floating when released (no R1) | Arduino D4 (INPUT_PULLUP) |
| DT | Encoder contact B with its 10 k pull-up | Arduino D3 |
| CLK | Encoder contact A with its 10 k pull-up | Arduino D2 (INT0) |
LEDs and Indicators
| Indicator | What it shows |
|---|---|
| Knob and red pointer | They turn 18 degrees per click; the knob looks pushed in while SW is LOW |
| PWR LED (red) | Lit while + and GND are connected |
| CW LED (green) | Flashes for 0.3 s on every clockwise click |
| CCW LED (amber) | Flashes for 0.3 s on every counter-clockwise click |
| SW LED (blue) | Lit while SW is LOW (the knob pressed) |
| ENCODER VIEW | The count, the ring, the CLK / DT / SW lamps, the state, the steps, the speed and the bounce |
| PANEL: SHOWN / CLOSED or OPEN PANEL, SIMPLE / ADVANCE | The panel button and the device badge |
The real KY-040 has no LED at all: PWR, CW, CCW and SW, the ENCODER VIEW and the board button are TEP additions. On both devices, the knob on the board is the push switch: click it and hold the mouse button.
Component Properties
| Property | Meaning | Default |
|---|---|---|
| SPEED | Turn speed: SLOW (30 RPM, 100 ms per click) or FAST (100 RPM, 30 ms per click) | SLOW |
| BOUNCE | Contact bounce in ms, 0 (OFF) to 5 | 1 |
| SWPULLUP | The SW pull-up R1: NONE (as on most boards) or 10K | NONE |
| PANEL | Simple only: the encoder scene OPEN or CLOSED at Run | OPEN |
A bad value is noted in the Simulation Log, and the default is used. The panel style comes from the device, not from a property.
KY-040 Simple: The Encoder Scene on the Sheet
Beside the Simple board sits the KY-040 ENCODER SCENE panel (on the right of the image above):
| Part | What it does |
|---|---|
| Header, red X | KY-040 ENCODER SCENE; the X closes the panel |
| Banner | AT A DETENT - CLK AND DT BOTH HIGH, TURNING CLOCKWISE - CLK FALLS FIRST, THEN DT, TURNING COUNTER-CLOCKWISE - DT FALLS FIRST, THEN CLK, KNOB PRESSED - SW SHORTED TO GND, or NO POWER |
| TOP VIEW | The knob seen from above: click its left half for one click CCW, its right half for one click CW; below it the state row CLK DT 1 1, 0 1, 0 0, 1 0 with the current state in blue |
| LOGIC ANALYZER - LAST 200 ms | CLK, DT and SW lanes, the contact bounce as pale bursts, and a STEPS mark at every click |
| POSITION, DIRECTION, RPM, SW | The panel's own count, the last direction, the speed while turning and the switch (OPEN or PRESSED) |
| TURN THE KNOB | CW x1, CCW x1, CW x5, CCW x5, SPIN CW, SPIN CCW (click a SPIN button again to stop) |
| TURN SPEED | SLOW 30 RPM or FAST 100 RPM; a change applies from the next click |
| PUSH BUTTON (SW) | PRESS (SW LOW for 0.2 s) or HOLD (until you click it again) |
| CONTACT BOUNCE | BOUNCE ON (the BOUNCE property, 1 ms when it is 0) or BOUNCE OFF (ideal contacts) |
| SET POSITION TO 0 | Sets the POSITION readout of the panel back to 0 (the sketch keeps its own count) |
In the start image, SLOW 30 RPM and BOUNCE ON are dark blue, the active settings, and the red line "SW HAS NO PULL-UP - USE INPUT_PULLUP" reminds you that R1 is empty. Clicks queue up, and opposite clicks cancel each other.
Five Clicks Clockwise
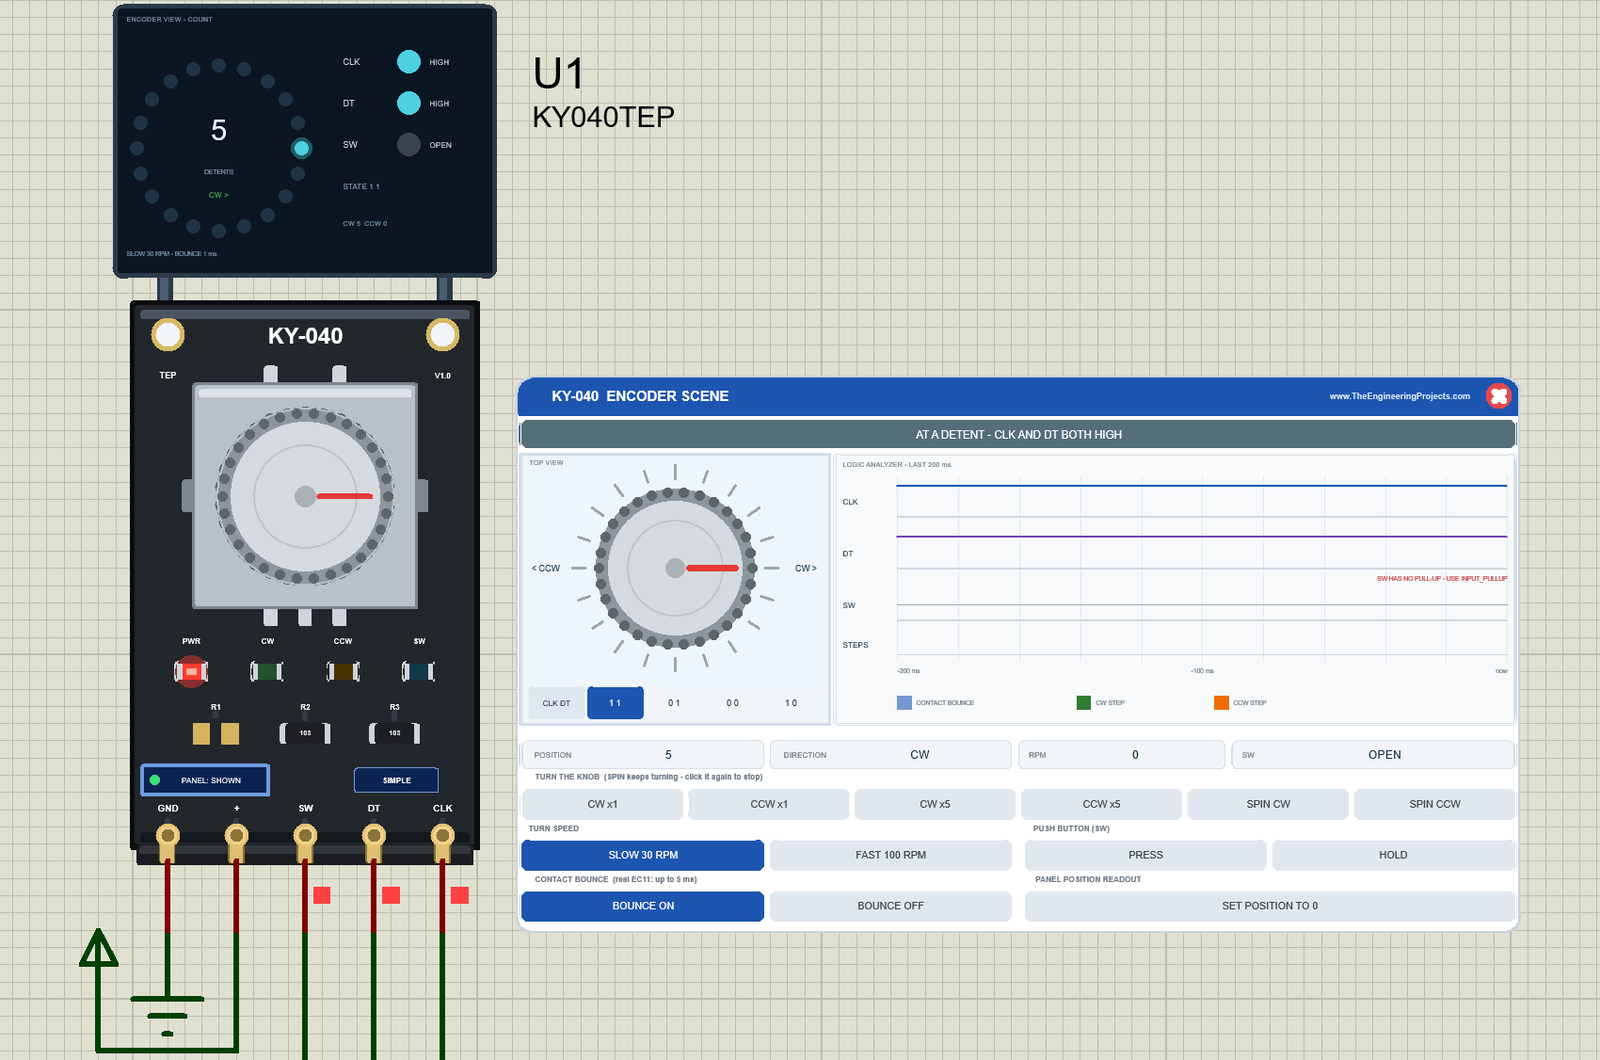
Click CW x5. The knob turns five clicks, 100 ms each at SLOW 30 RPM, and the CW LED flashes on every click. Then the pointer stands at 90 degrees (5 x 18), the fifth LED of the ring is lit, and the screen says 5 and CW >. The state is back at 1 1 (both contacts open at a detent), RPM reads 0, and the logic analyzer is flat again: its 200 ms window has passed. The sketch on UNO 1 printed one Position line per click on U3.
Spinning: The Logic Analyzer
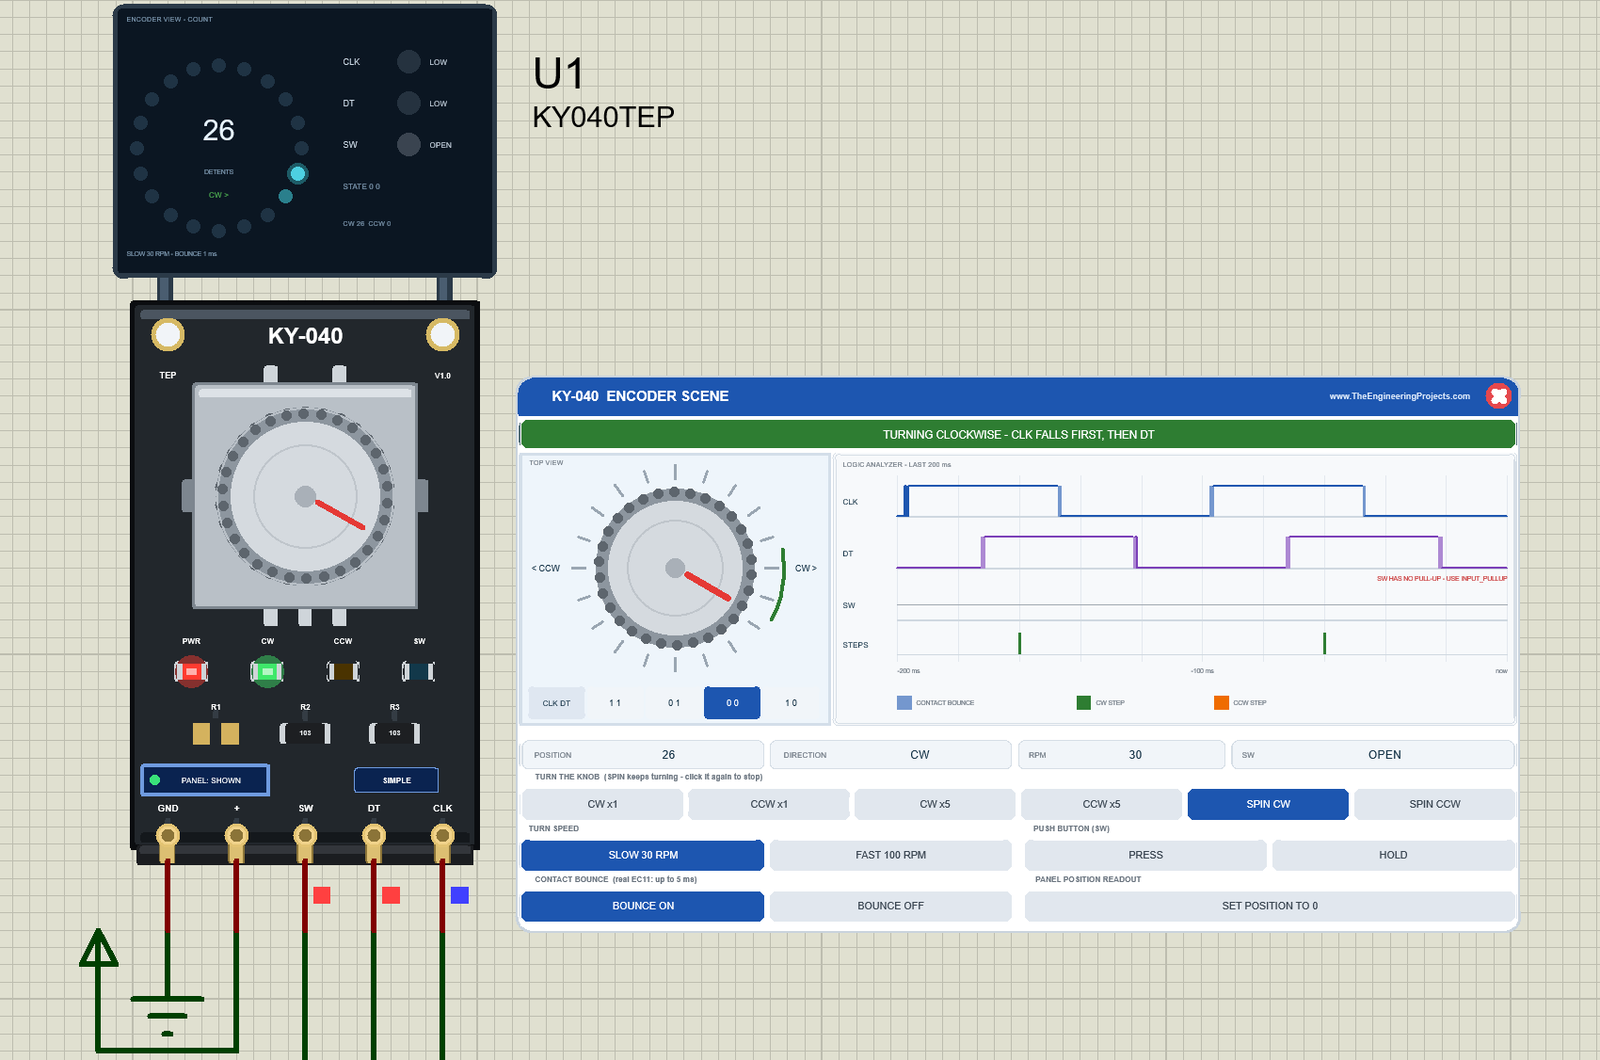
Click SPIN CW: the knob keeps turning until you click it again. The banner turns green and says TURNING CLOCKWISE - CLK FALLS FIRST, THEN DT, a green trail follows the TOP VIEW knob, and RPM reads 30. The logic analyzer shows the last 200 ms, two clicks: CLK goes LOW first, DT follows 25 ms later, then CLK and DT go HIGH again in the same order. The pale lines at each edge are the contact bounce, and the green STEPS marks sit at the detents. In this frame both contacts are closed (state 0 0, in blue), the middle of a click.
Pressing the Knob
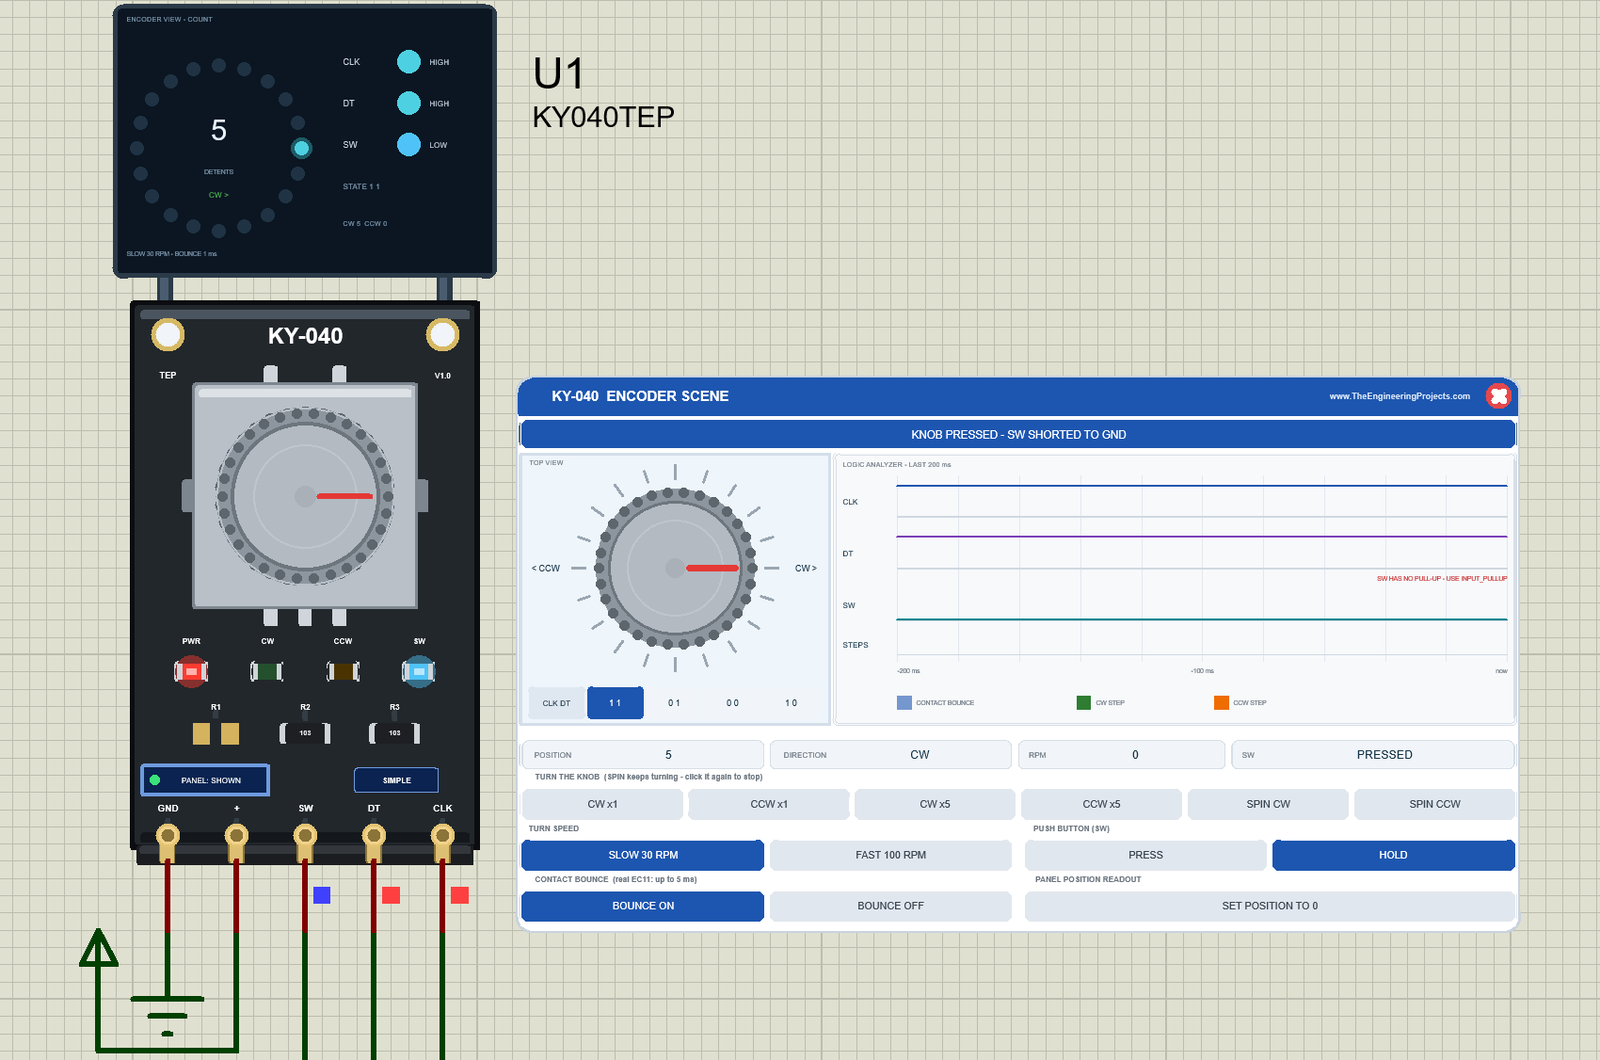
Click HOLD, or click the knob on the board and hold the mouse button. SW goes LOW: the banner turns blue, the knob looks pushed in, the SW LED and lamp light up, and the SW lane drops. Click HOLD again to let go; PRESS gives a 0.2 s press. The panel's POSITION stays at 5: only the sketch resets its count on a press, and it prints "Button pressed - reset to 0" and, after the release, how long you pressed.
Closing the Panel
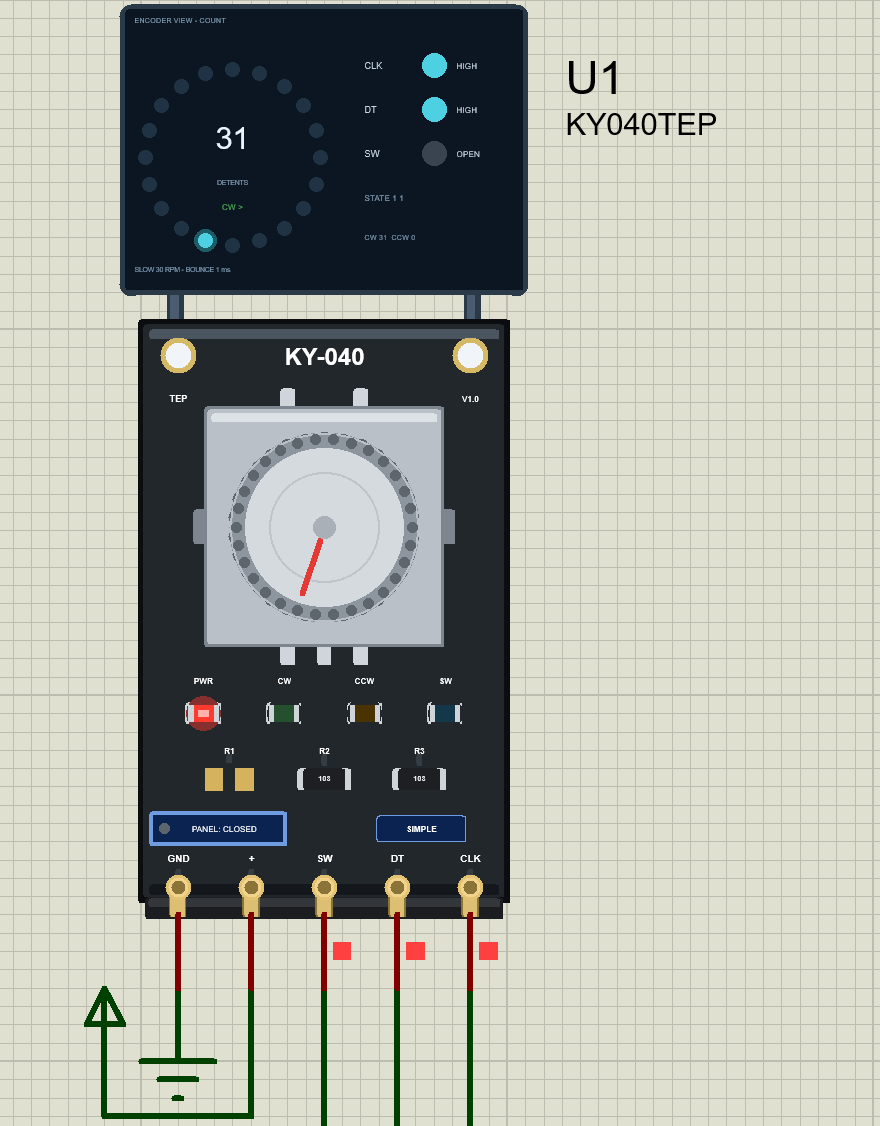
Click the red X: the panel disappears, the board button says PANEL: CLOSED, and the encoder keeps working. Click PANEL: CLOSED to bring the panel back. Here, U1 stands at 31 clicks with its panel closed:
KY-040 Advance: The Pop-Up Encoder Window
The Advance device keeps only the board on the schematic. Here is U2 after the four tests:
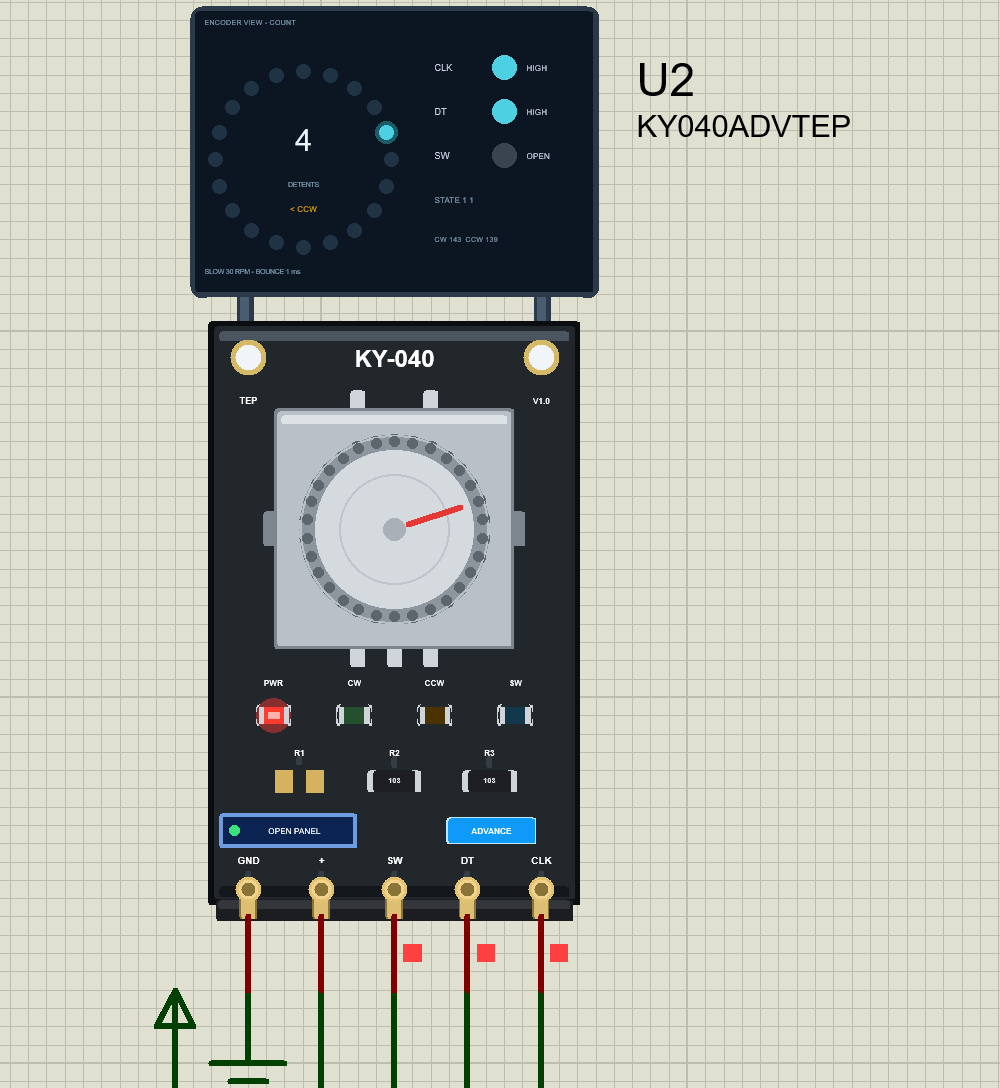
At Run, the "TEP KY-040 Advance" pop-up opens with the look of our TEP Serial Monitor and no Windows title bar: move it by its header, resize or minimise it, and reopen it with OPEN PANEL. The header shows the state (for example U2 · TURNING CW), the Encoder and Test tabs and the theme, Settings and Help icons; chips below show the position, CLK and DT, the speed, the bounce and SW.
The Encoder Page
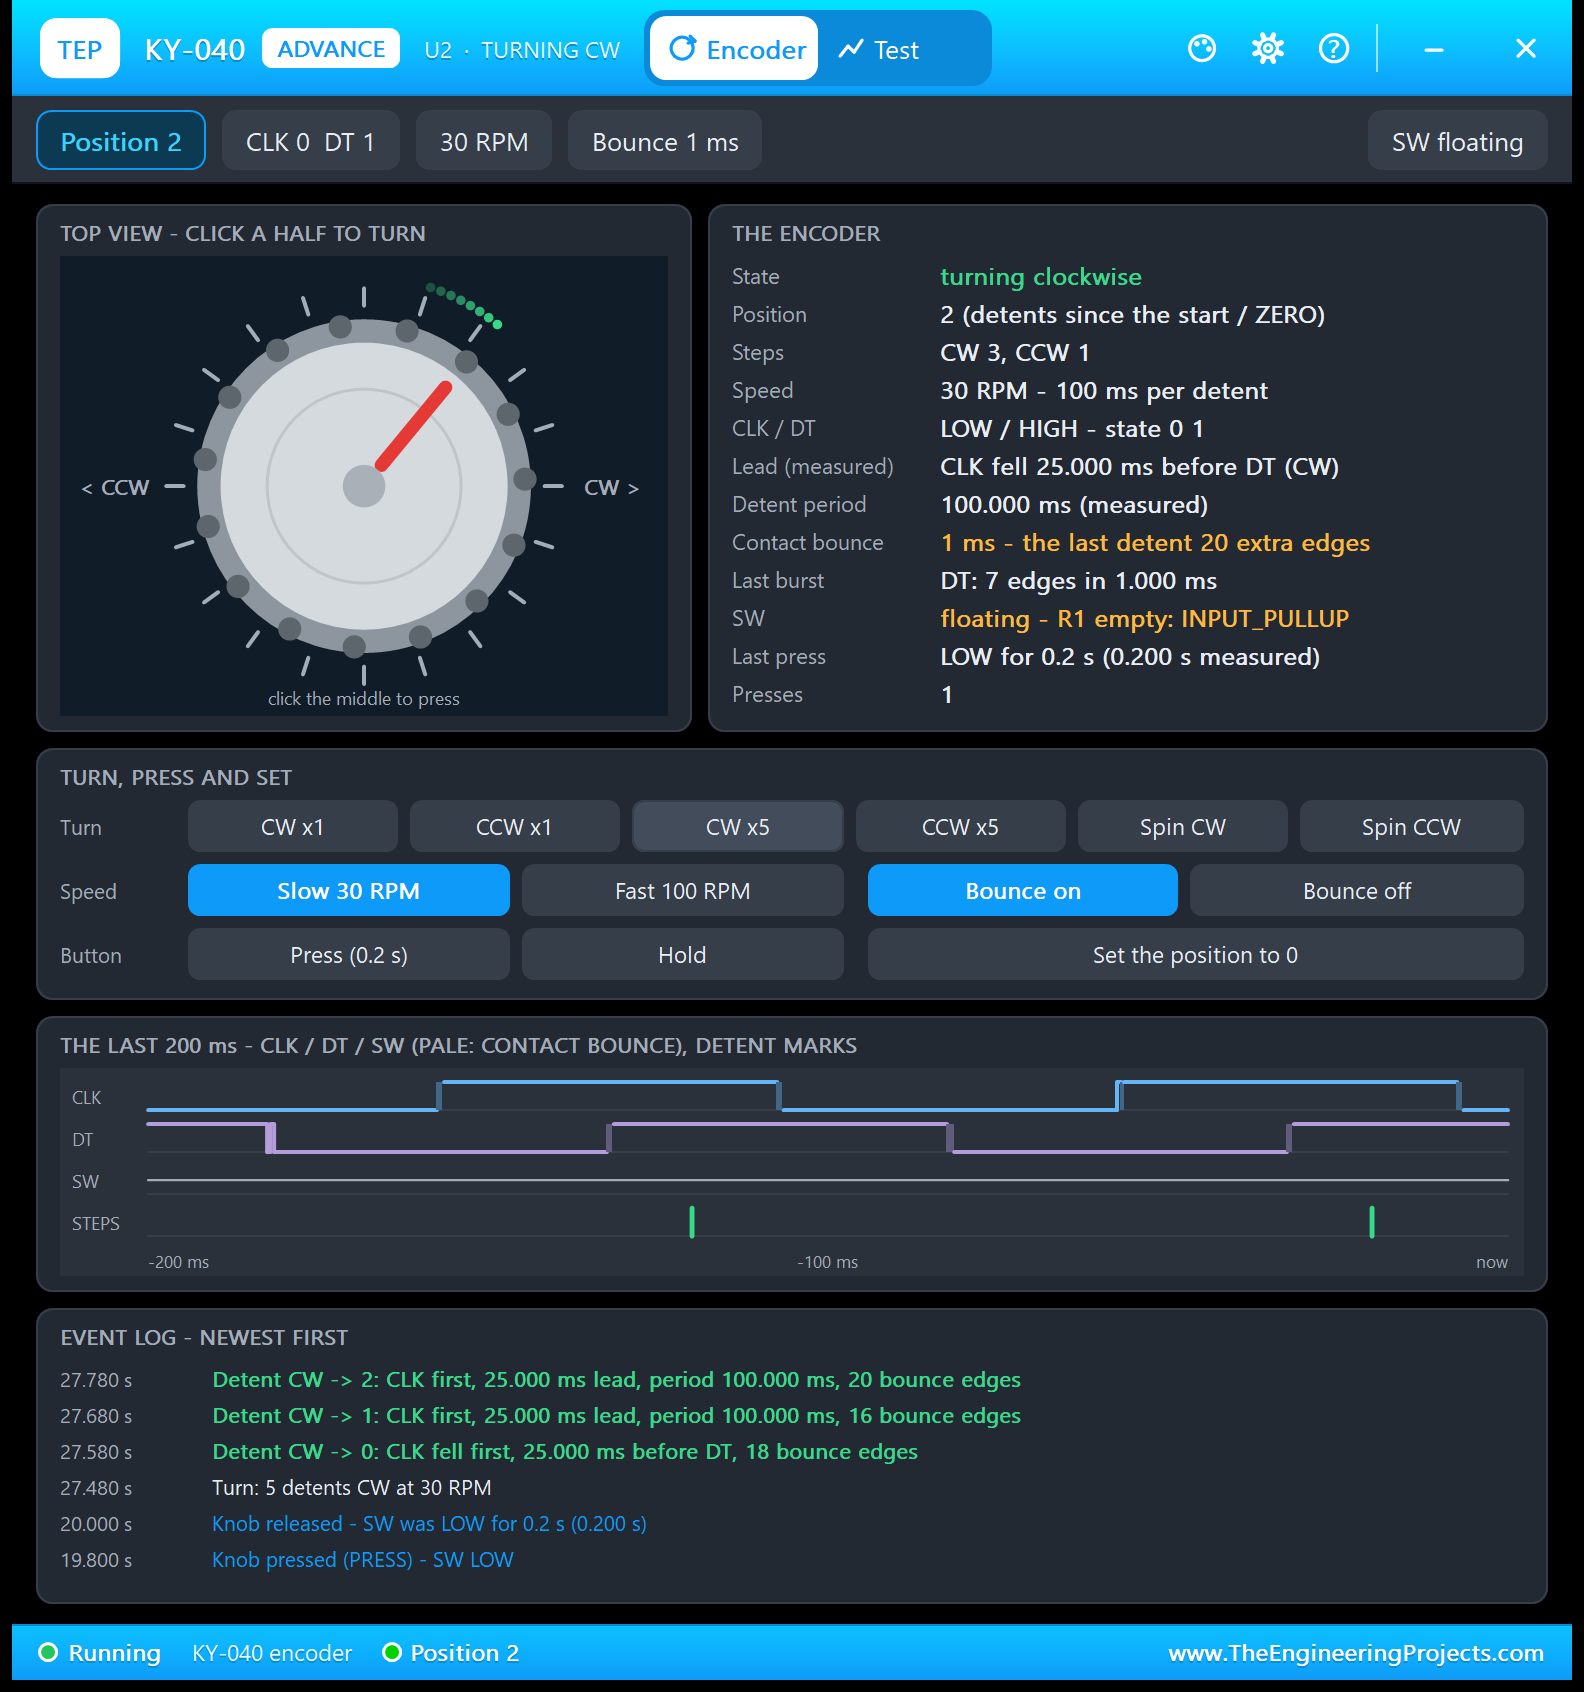
This is U2 in the middle of CW x5, after one click CCW and a PRESS. The page has five parts:
- TOP VIEW: click the left half for one click CCW, the right half for one click CW, the middle for a 0.2 s press.
- THE ENCODER: the state, the position (since the start or the last zero), the steps (CW 3, CCW 1), the speed, CLK / DT (state 0 1) and the measured values.
- TURN, PRESS AND SET: the controls of the Simple panel.
- THE LAST 200 ms: CLK, DT and SW with the bounce drawn pale, and the detent marks.
- EVENT LOG - NEWEST FIRST: every command, click and press with its simulation time.
The measured lines are the interesting ones: Lead "CLK fell 25.000 ms before DT (CW)", the quarter click at 30 RPM; Detent period 100.000 ms, from click to click; Contact bounce "1 ms - the last detent 20 extra edges" and Last burst "DT: 7 edges in 1.000 ms"; and Last press "LOW for 0.2 s (0.200 s measured)".
The Event Log
Read the event log above from the bottom up: at 19.800 s "Knob pressed (PRESS) - SW LOW", at 20.000 s "Knob released - SW was LOW for 0.2 s (0.200 s)", at 27.480 s "Turn: 5 detents CW at 30 RPM", and then one line per click, every 100 ms, with the new position. The first click says "CLK fell first, 25.000 ms before DT, 18 bounce edges"; it has no period, because no click came just before it. The next ones add it: "CLK first, 25.000 ms lead, period 100.000 ms, 16 bounce edges".
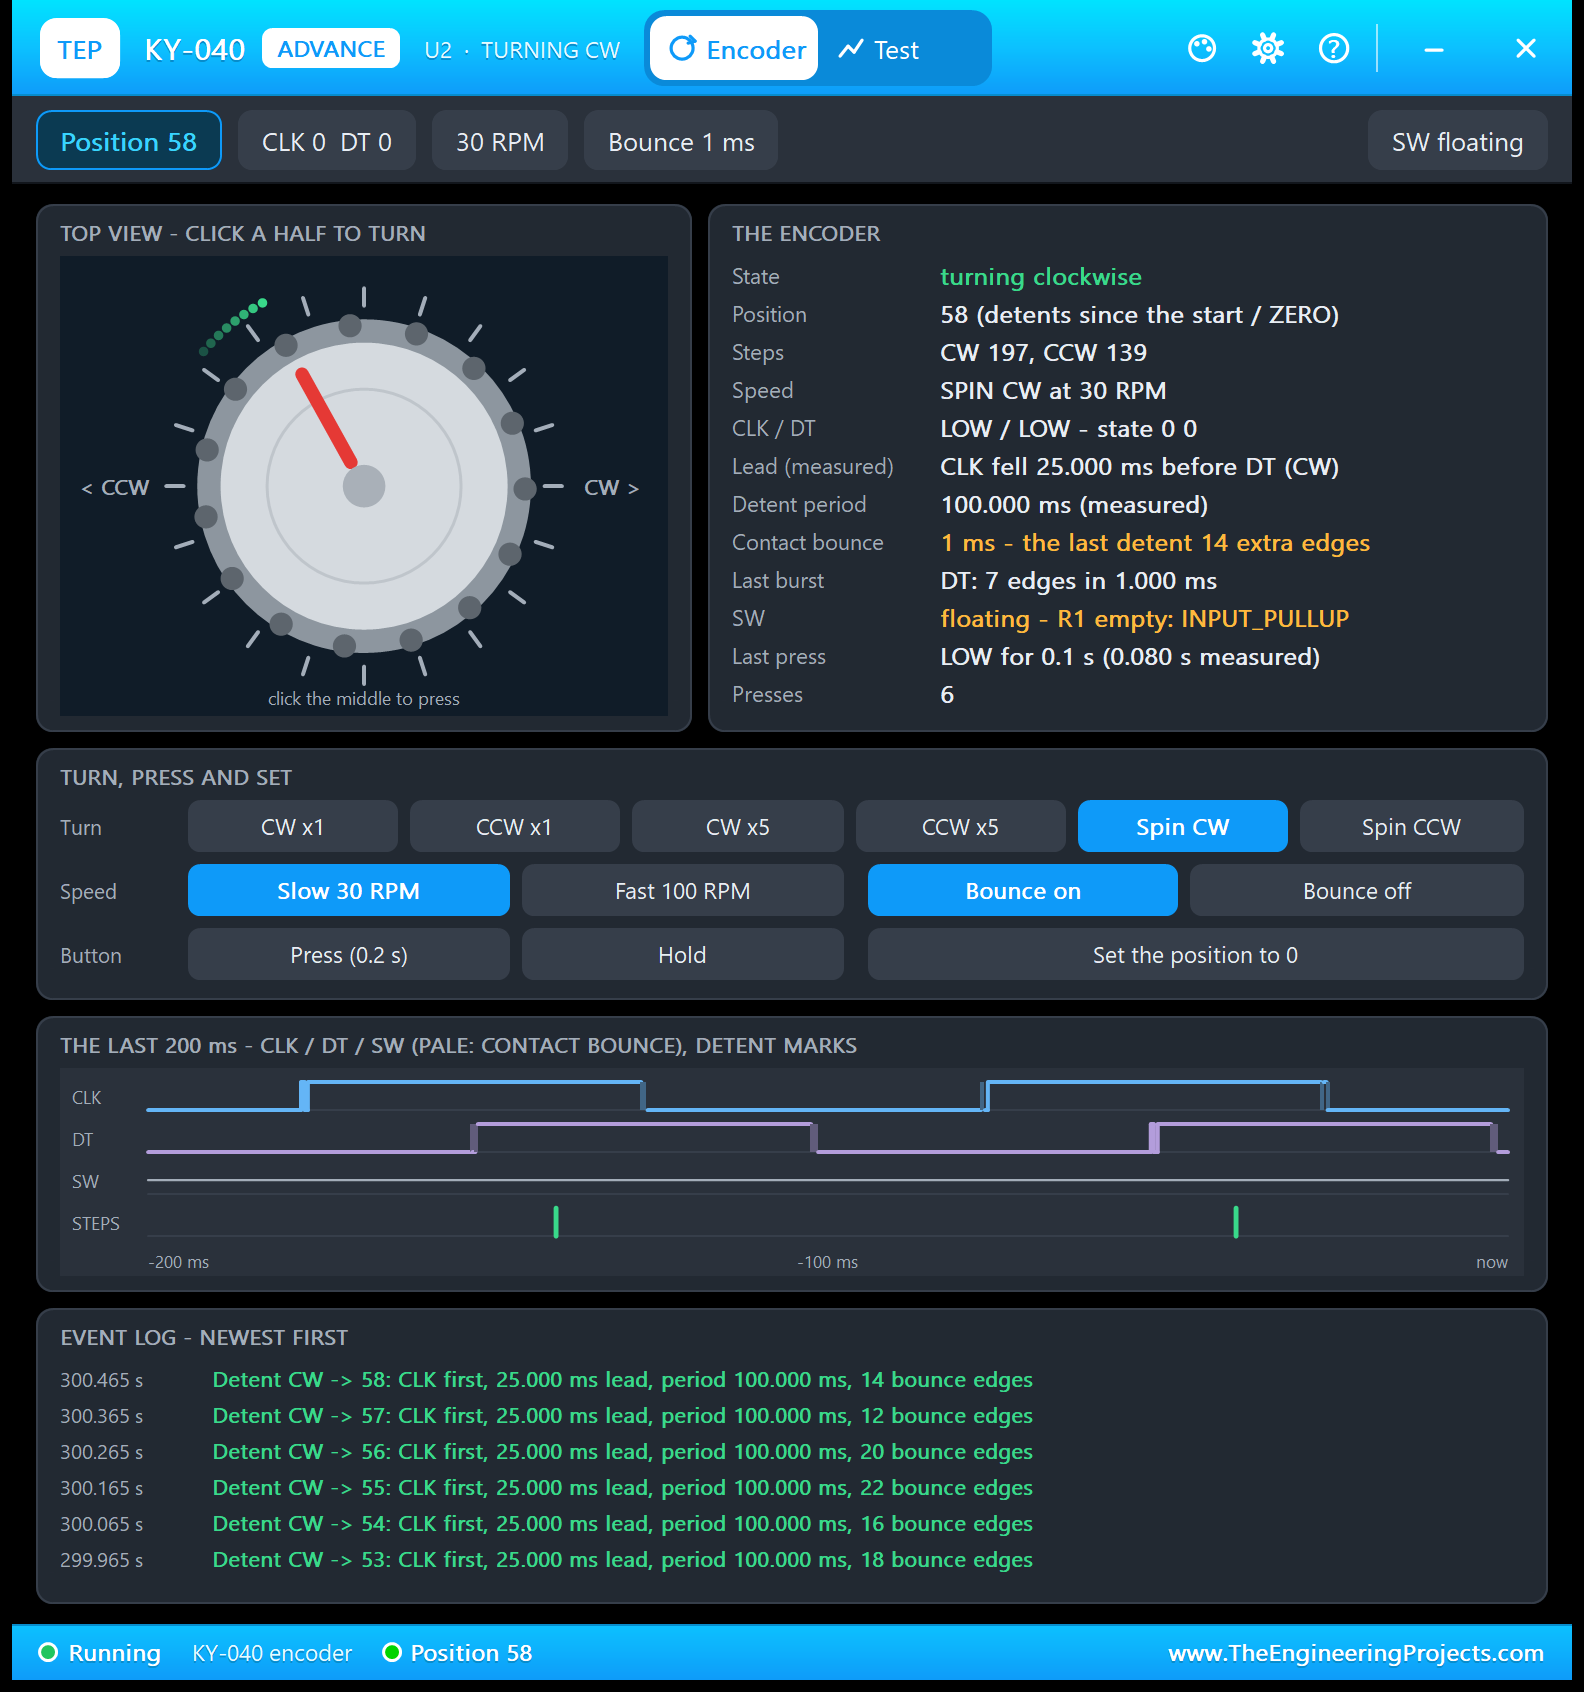
After the tests, I clicked Spin CW. Both contacts are closed in this frame (state 0 0), and the event log adds a click every 100 ms, each with 12 to 22 bounce edges: the chatter differs from edge to edge. Position 58 is 197 clicks CW minus 139 CCW. The 6 presses are the PRESS from before and the five of the Push button test, the last one an 80 ms click. Copy diagnostics on the Help page copies these values and events for a bug report.
The Test Page: Four Measured Encoder Test Tools
The four tools on the Test tab only turn the knob, switch the bounce or press the switch, and then read the CLK, DT and SW edges the model really drove. So every number is measured with the simulation clock, and every tool puts the speed and the bounce back when it ends. A tool refuses to start, with the reason, when the encoder has no power or another test runs. Each one ends with a bold "Good for:" line, and its result tiles show "-" until it has measured a value. All results below come from U2 in Proteus 8.5.
1. Step Count: Which Way of Reading Keeps Up?
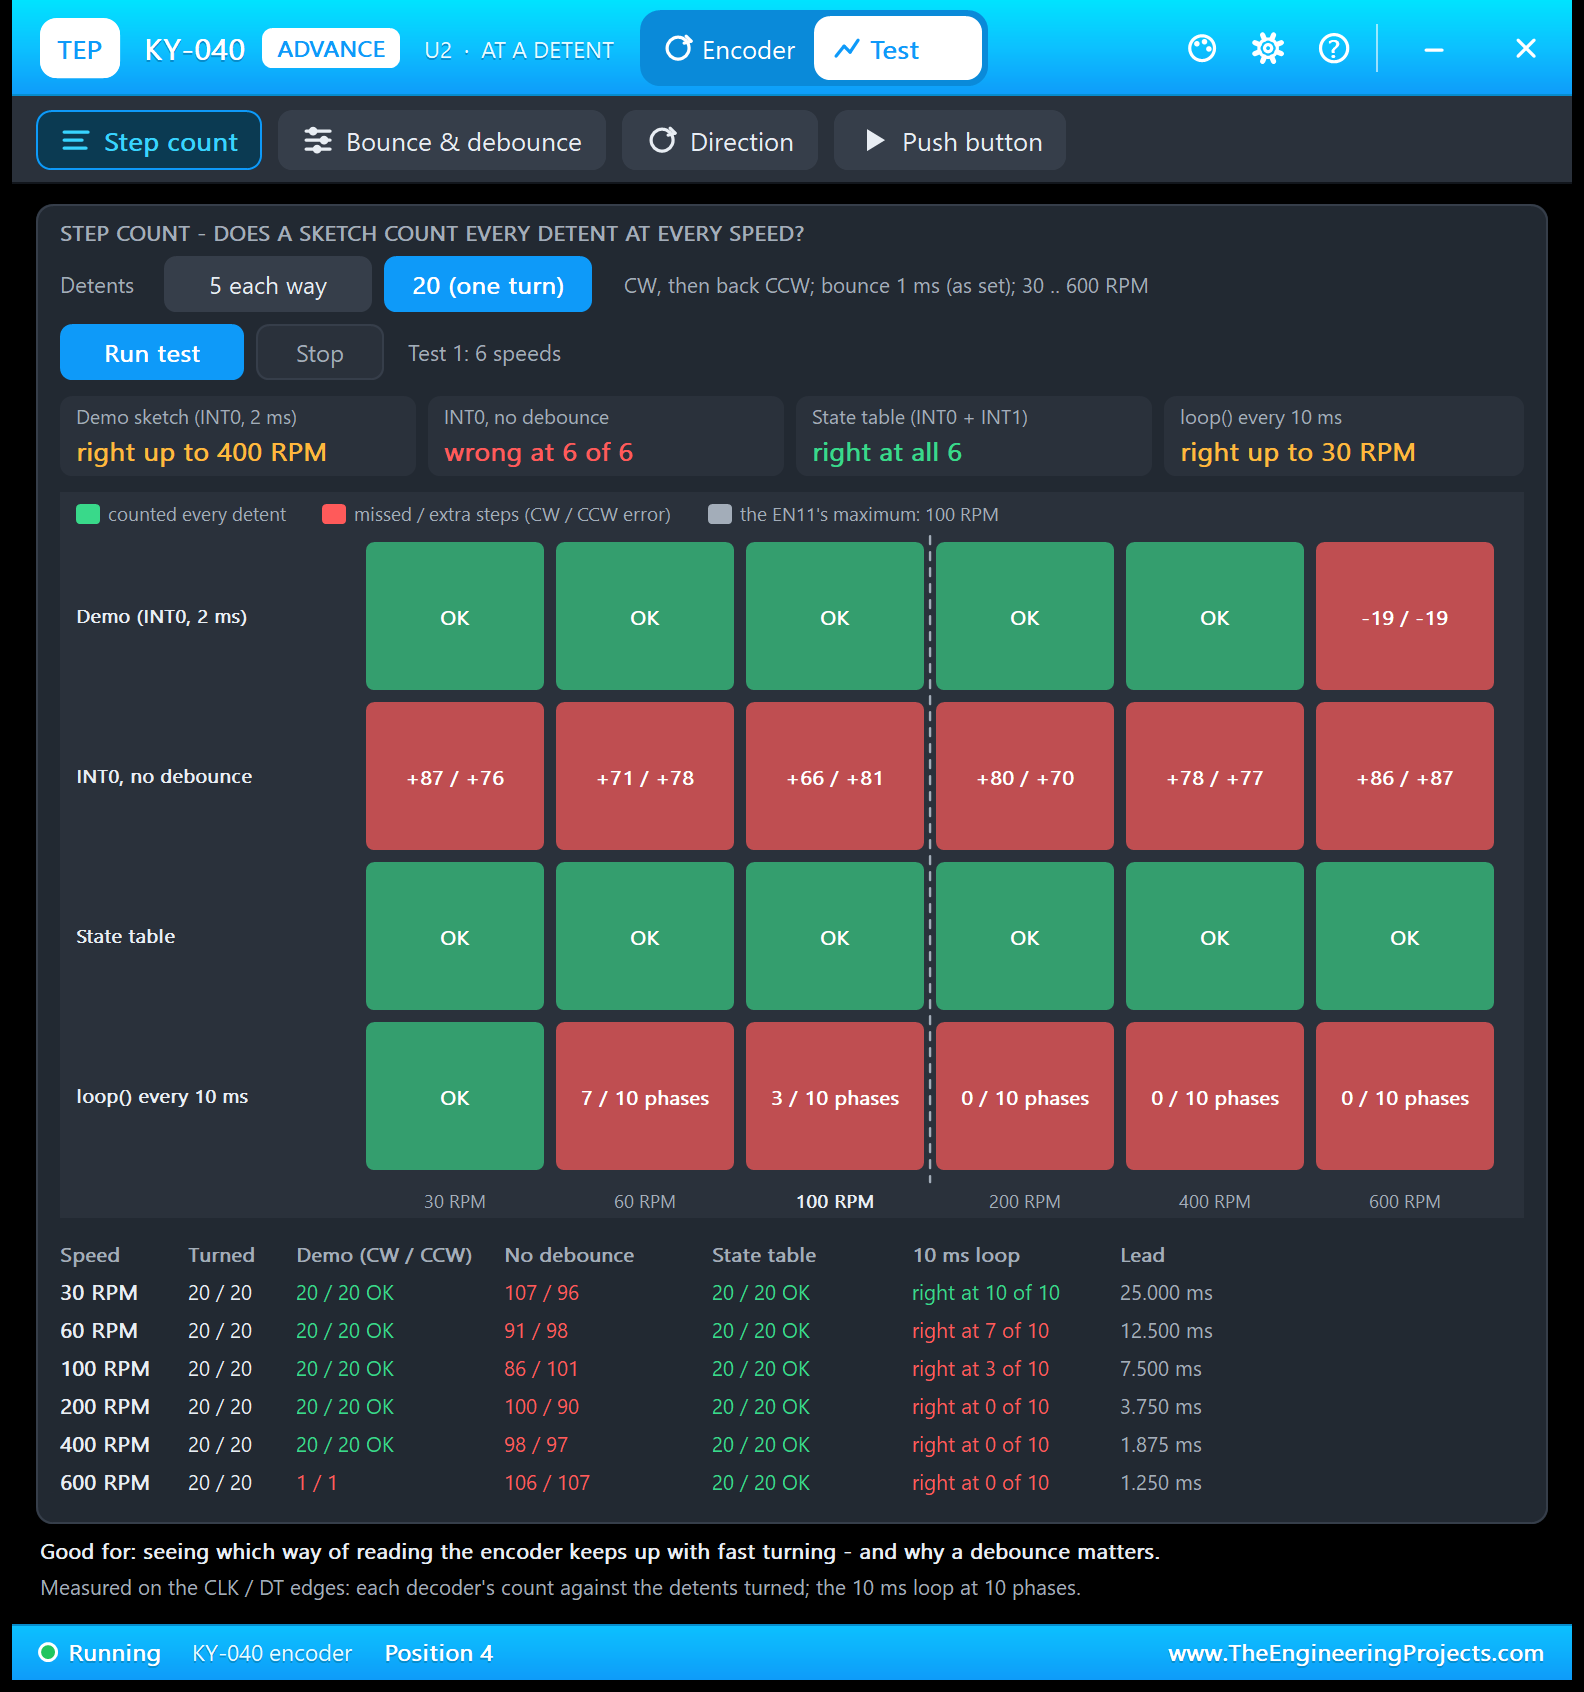
Good for: "seeing which way of reading the encoder keeps up with fast turning - and why a debounce matters." The tool turns 5 or 20 clicks CW and back CCW at 30, 60, 100, 200, 400 and 600 RPM, and four decoders read the same captured edges:
- Demo sketch (INT0, 2 ms): our demo's rule with its 2 ms debounce.
- INT0, no debounce: the same rule, but every CLK fall counts.
- State table (INT0 + INT1): interrupts on both pins and the full Gray-code table.
- loop() every 10 ms: a sketch that reads both pins every 10 ms, tried at 10 phases.
| Speed | Demo (CW / CCW) | No debounce | State table | 10 ms loop | Lead |
|---|---|---|---|---|---|
| 30 RPM | 20 / 20 OK | 107 / 96 | 20 / 20 OK | right at 10 of 10 | 25.000 ms |
| 60 RPM | 20 / 20 OK | 91 / 98 | 20 / 20 OK | right at 7 of 10 | 12.500 ms |
| 100 RPM | 20 / 20 OK | 86 / 101 | 20 / 20 OK | right at 3 of 10 | 7.500 ms |
| 200 RPM | 20 / 20 OK | 100 / 90 | 20 / 20 OK | right at 0 of 10 | 3.750 ms |
| 400 RPM | 20 / 20 OK | 98 / 97 | 20 / 20 OK | right at 0 of 10 | 1.875 ms |
| 600 RPM | 1 / 1 | 106 / 107 | 20 / 20 OK | right at 0 of 10 | 1.250 ms |
Without a debounce, the bursts add dozens of steps (107 CW and 96 CCW for one turn each way at 30 RPM), wrong at all six speeds. The demo's 2 ms debounce counts right up to 400 RPM. At 600 RPM, CLK changes every 2.5 ms, the quiet time between the bursts is shorter than 2 ms, and the demo ignores almost every fall: 1 / 1 instead of 20 / 20. The real encoder is rated to 100 RPM (the dashed line), so 400 RPM is a large margin.
The state table is right at all six speeds, even with no debounce: a bounce only flips between two neighbouring states and back, a step forward and a step back. The 10 ms loop counts right at every phase only at 30 RPM. At 60 RPM, where the states change every 12.5 ms, close to the loop's 10 ms, it is right at 7 of 10 phases, and from 200 RPM on, at none. The Lead column is the measured quarter click: a polling loop must look at the pins clearly more often than that.
2. Bounce & Debounce: How Long Should Your Debounce Be?
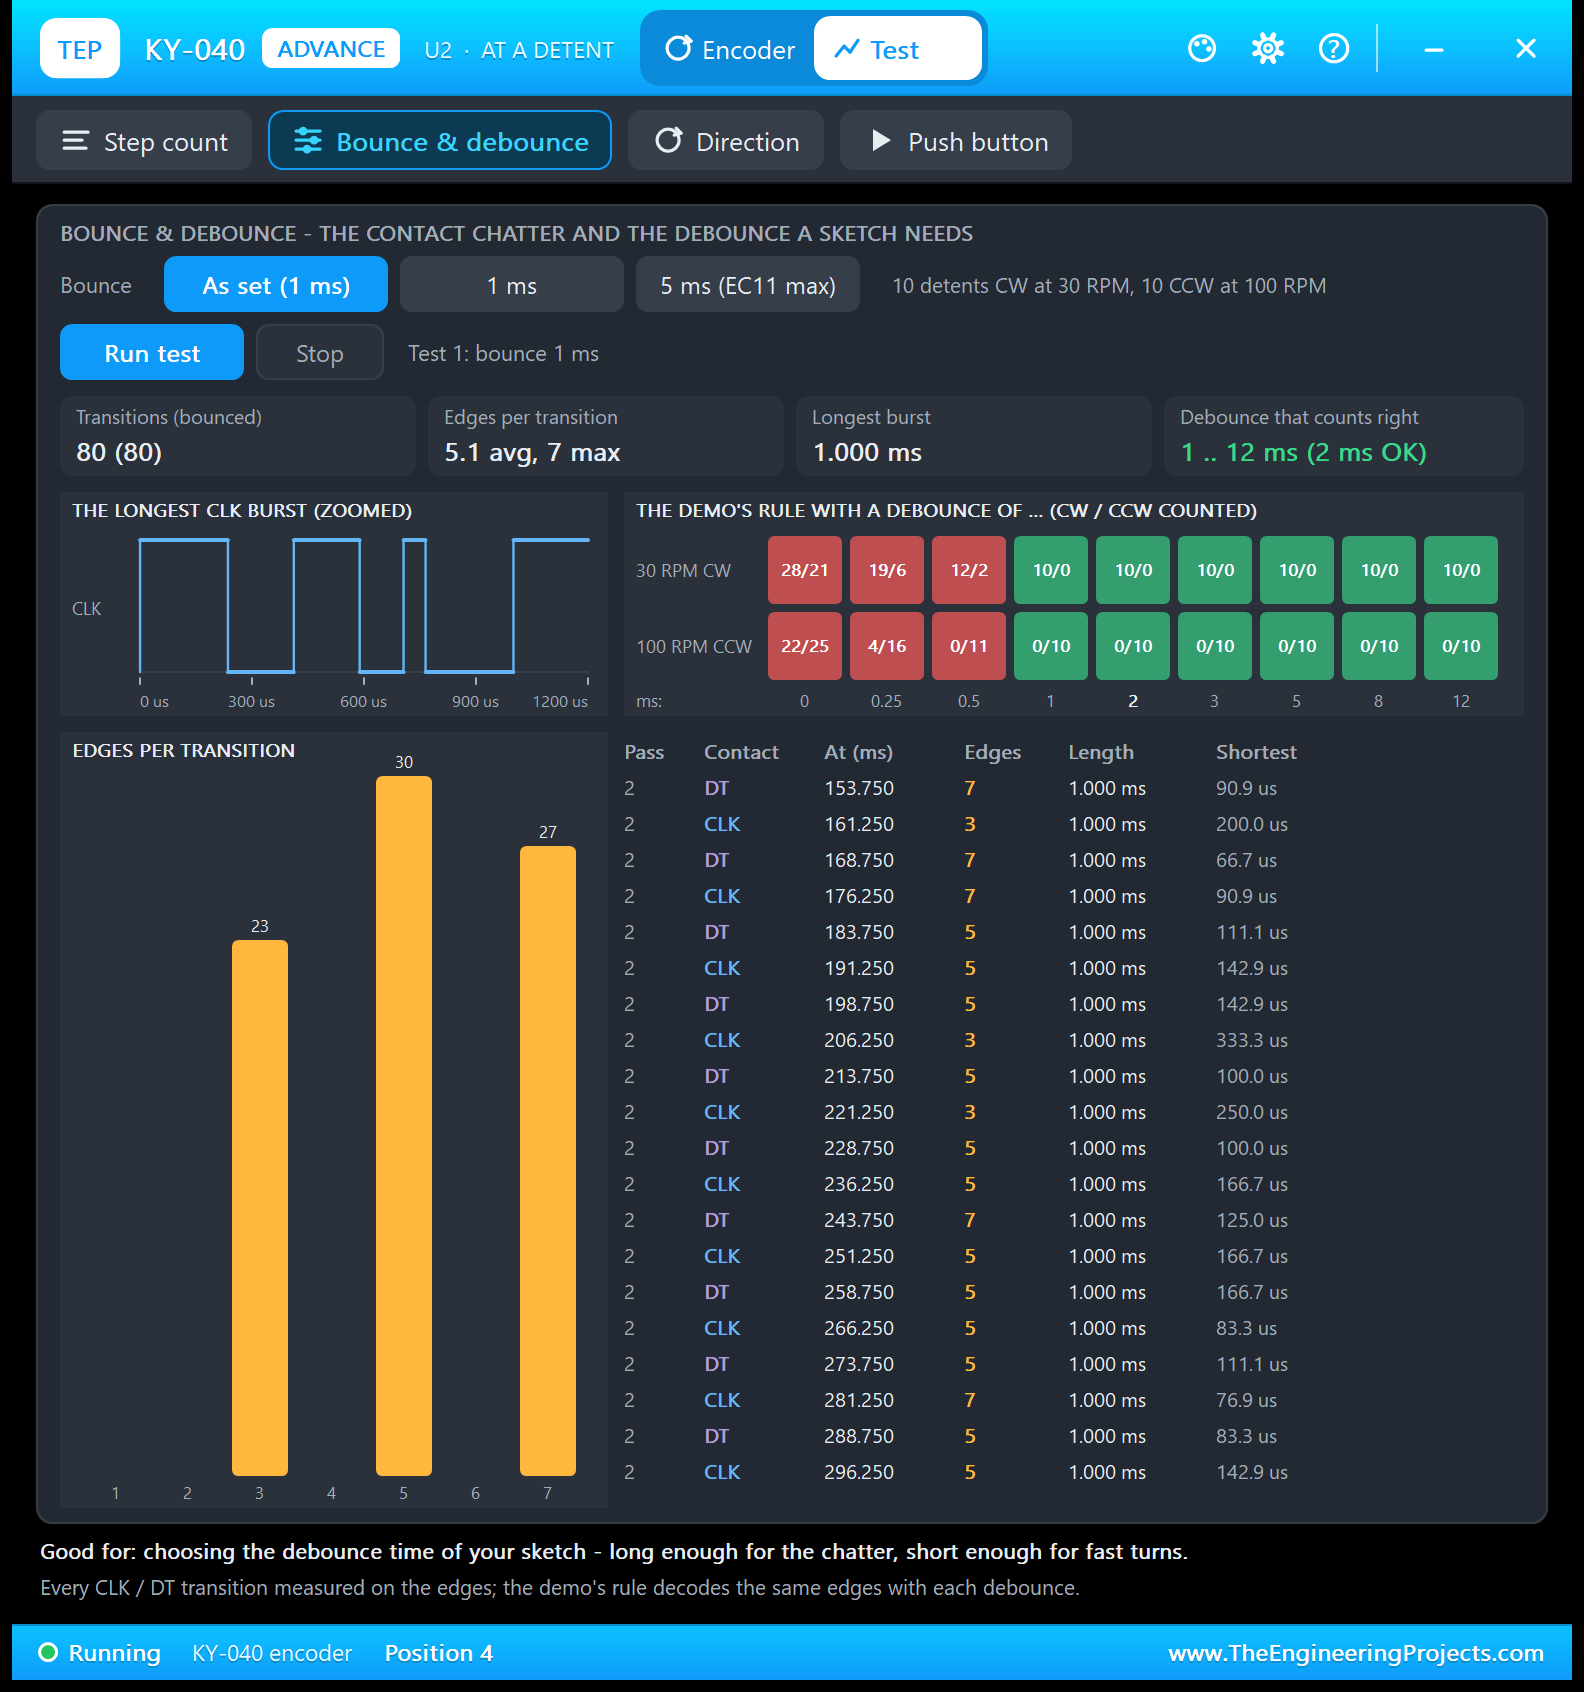
Good for: "choosing the debounce time of your sketch - long enough for the chatter, short enough for fast turns." Choose the bounce (as set, 1 ms, or 5 ms, the EC11 maximum) and click Run test. The tool turns 10 clicks CW at 30 RPM and 10 clicks CCW at 100 RPM, and it measures every CLK and DT transition: its edges, its length and its shortest pulse.
Twenty clicks with four contact changes each make 80 transitions, and all 80 bounced. The histogram shows 23 transitions with 3 edges, 30 with 5 and 27 with 7: 5.1 edges on average, all within 1.000 ms. The list shows the 100 RPM pass: a transition every 7.5 ms, with pulses as short as 66.7 us. Then the tool runs the demo's rule on the same edges with nine debounce times:
| Debounce | 30 RPM CW (10 clicks) | 100 RPM CCW (10 clicks) |
|---|---|---|
| 0 ms | 28 / 21 | 22 / 25 |
| 0.25 ms | 19 / 6 | 4 / 16 |
| 0.5 ms | 12 / 2 | 0 / 11 |
| 1 ms | 10 / 0 | 0 / 10 |
| 2 ms (the demo) | 10 / 0 | 0 / 10 |
| 3 ms | 10 / 0 | 0 / 10 |
| 5 ms | 10 / 0 | 0 / 10 |
| 8 ms | 10 / 0 | 0 / 10 |
| 12 ms | 10 / 0 | 0 / 10 |
A debounce shorter than the bounce lets the chatter through; from 1 ms to 12 ms, every debounce counts right here. With a 5 ms bounce, the README's PC run gives a right count only from 5 to 8 ms, so the demo's 2 ms is then wrong: send DEBOUNCE 5 from U4 first (one of its quick buttons). A debounce can also be too long: at 100 RPM, CLK changes only every 15 ms, and the bounce eats into that quiet time.
3. Direction: Which Contact Leads?
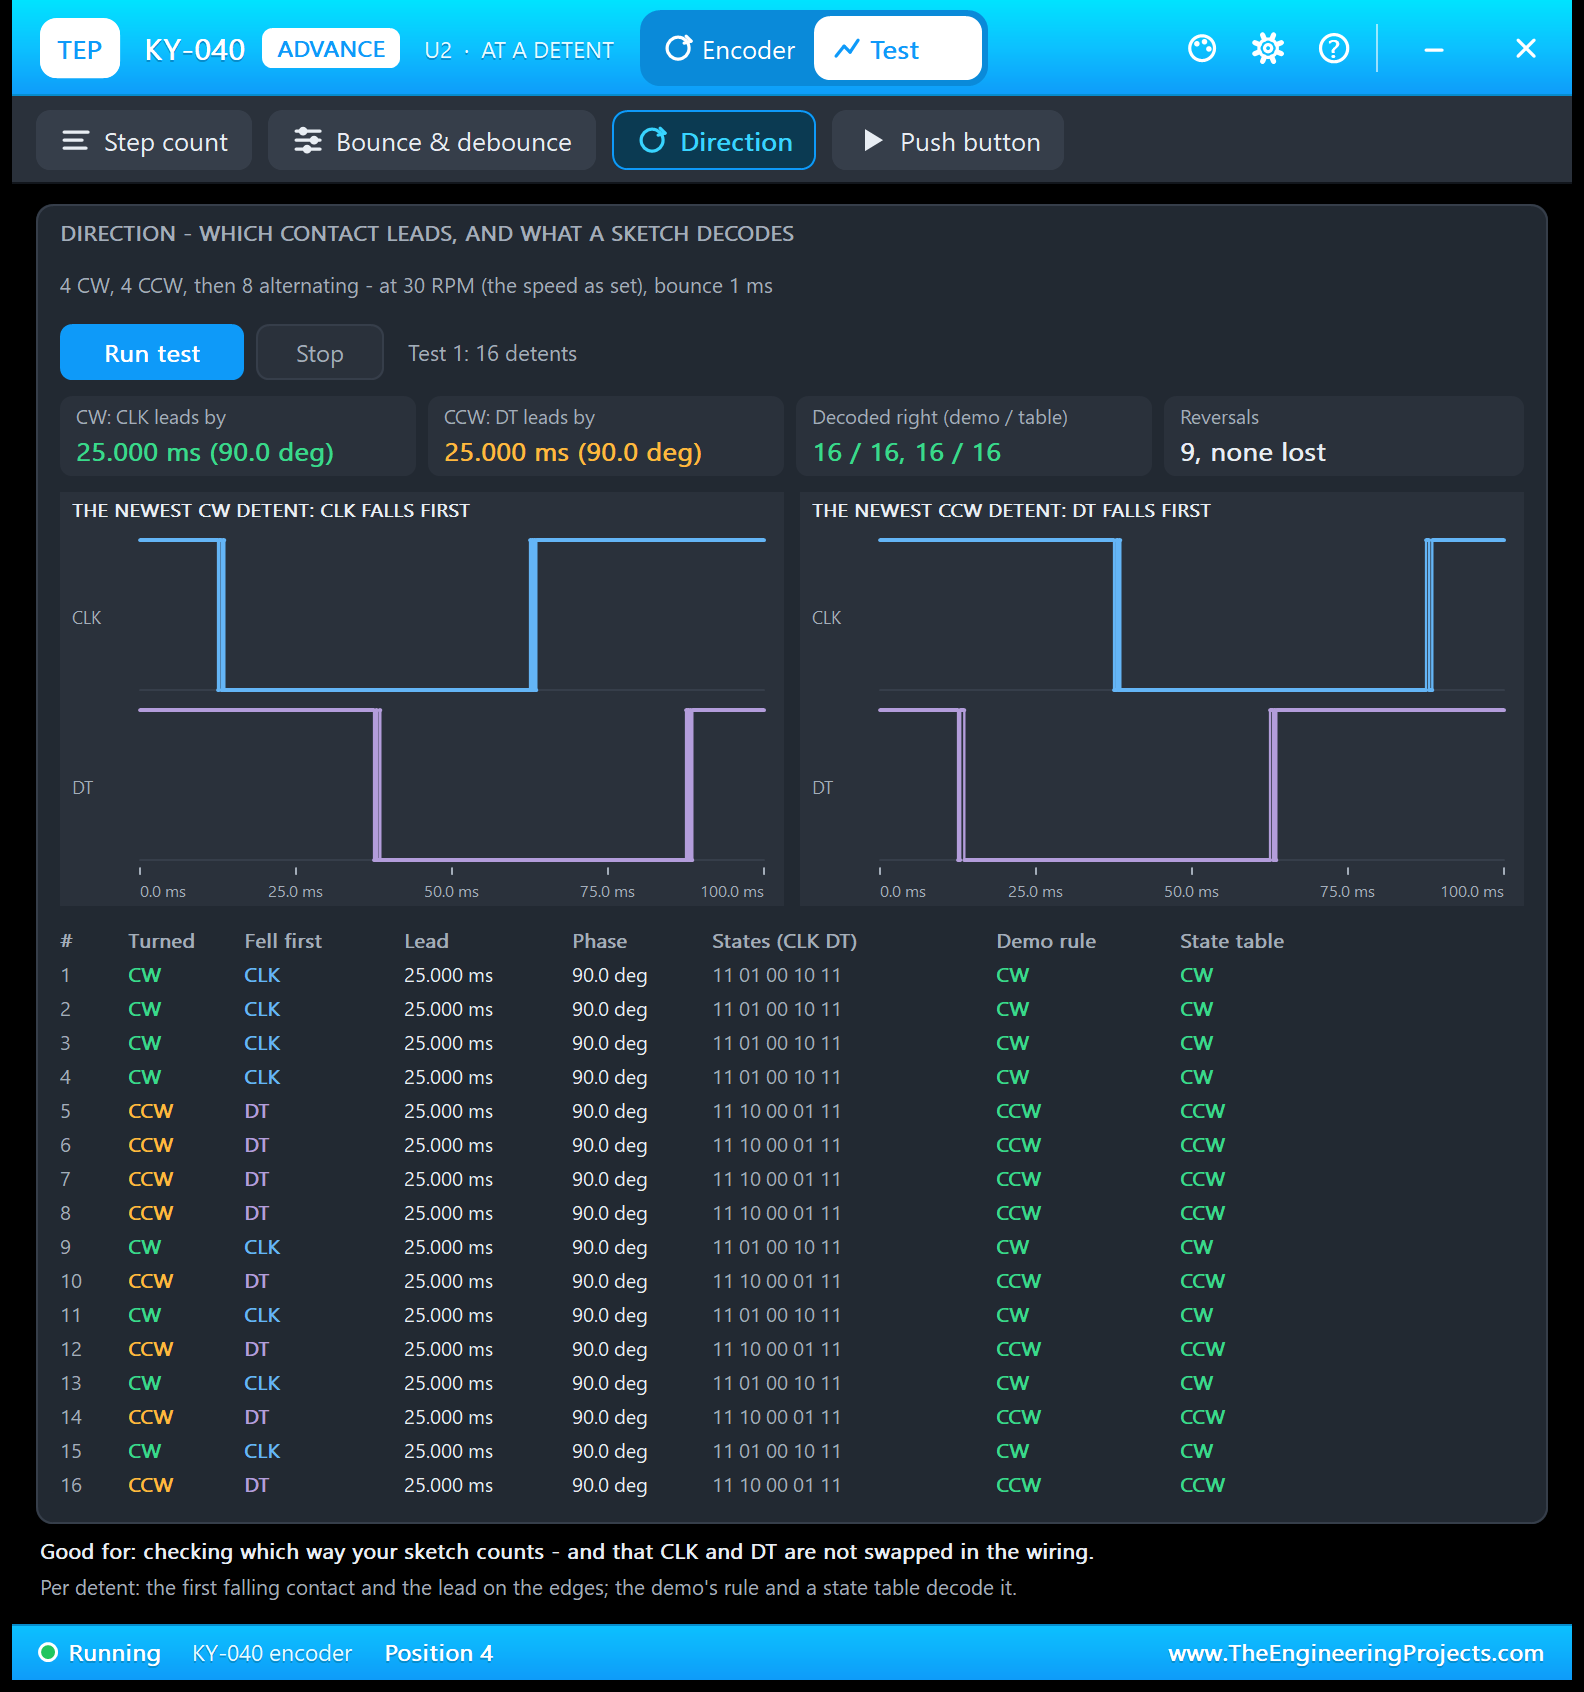
Good for: "checking which way your sketch counts - and that CLK and DT are not swapped in the wiring." The tool turns 4 clicks CW, 4 CCW and then 8 alternating, at the speed as set (30 RPM here). For every click, it lists the contact that fell first, its lead in ms and in degrees, the four states, and what the demo rule and a state table decode.
The two plots show the newest click of each direction. CW: CLK falls at 12.5 ms, DT at 37.5 ms, CLK rises at 62.5 ms and DT at 87.5 ms, exactly P/8, 3P/8, 5P/8 and 7P/8 of a 100 ms click; CCW is the same with DT first. The states run 11 01 00 10 11 (CW) and 11 10 00 01 11 (CCW), and both decoders got all 16 clicks right through 9 reversals. If your sketch counts the wrong way on real hardware, swap CLK and DT.
4. Push Button: Press Times and What a Sketch Sees
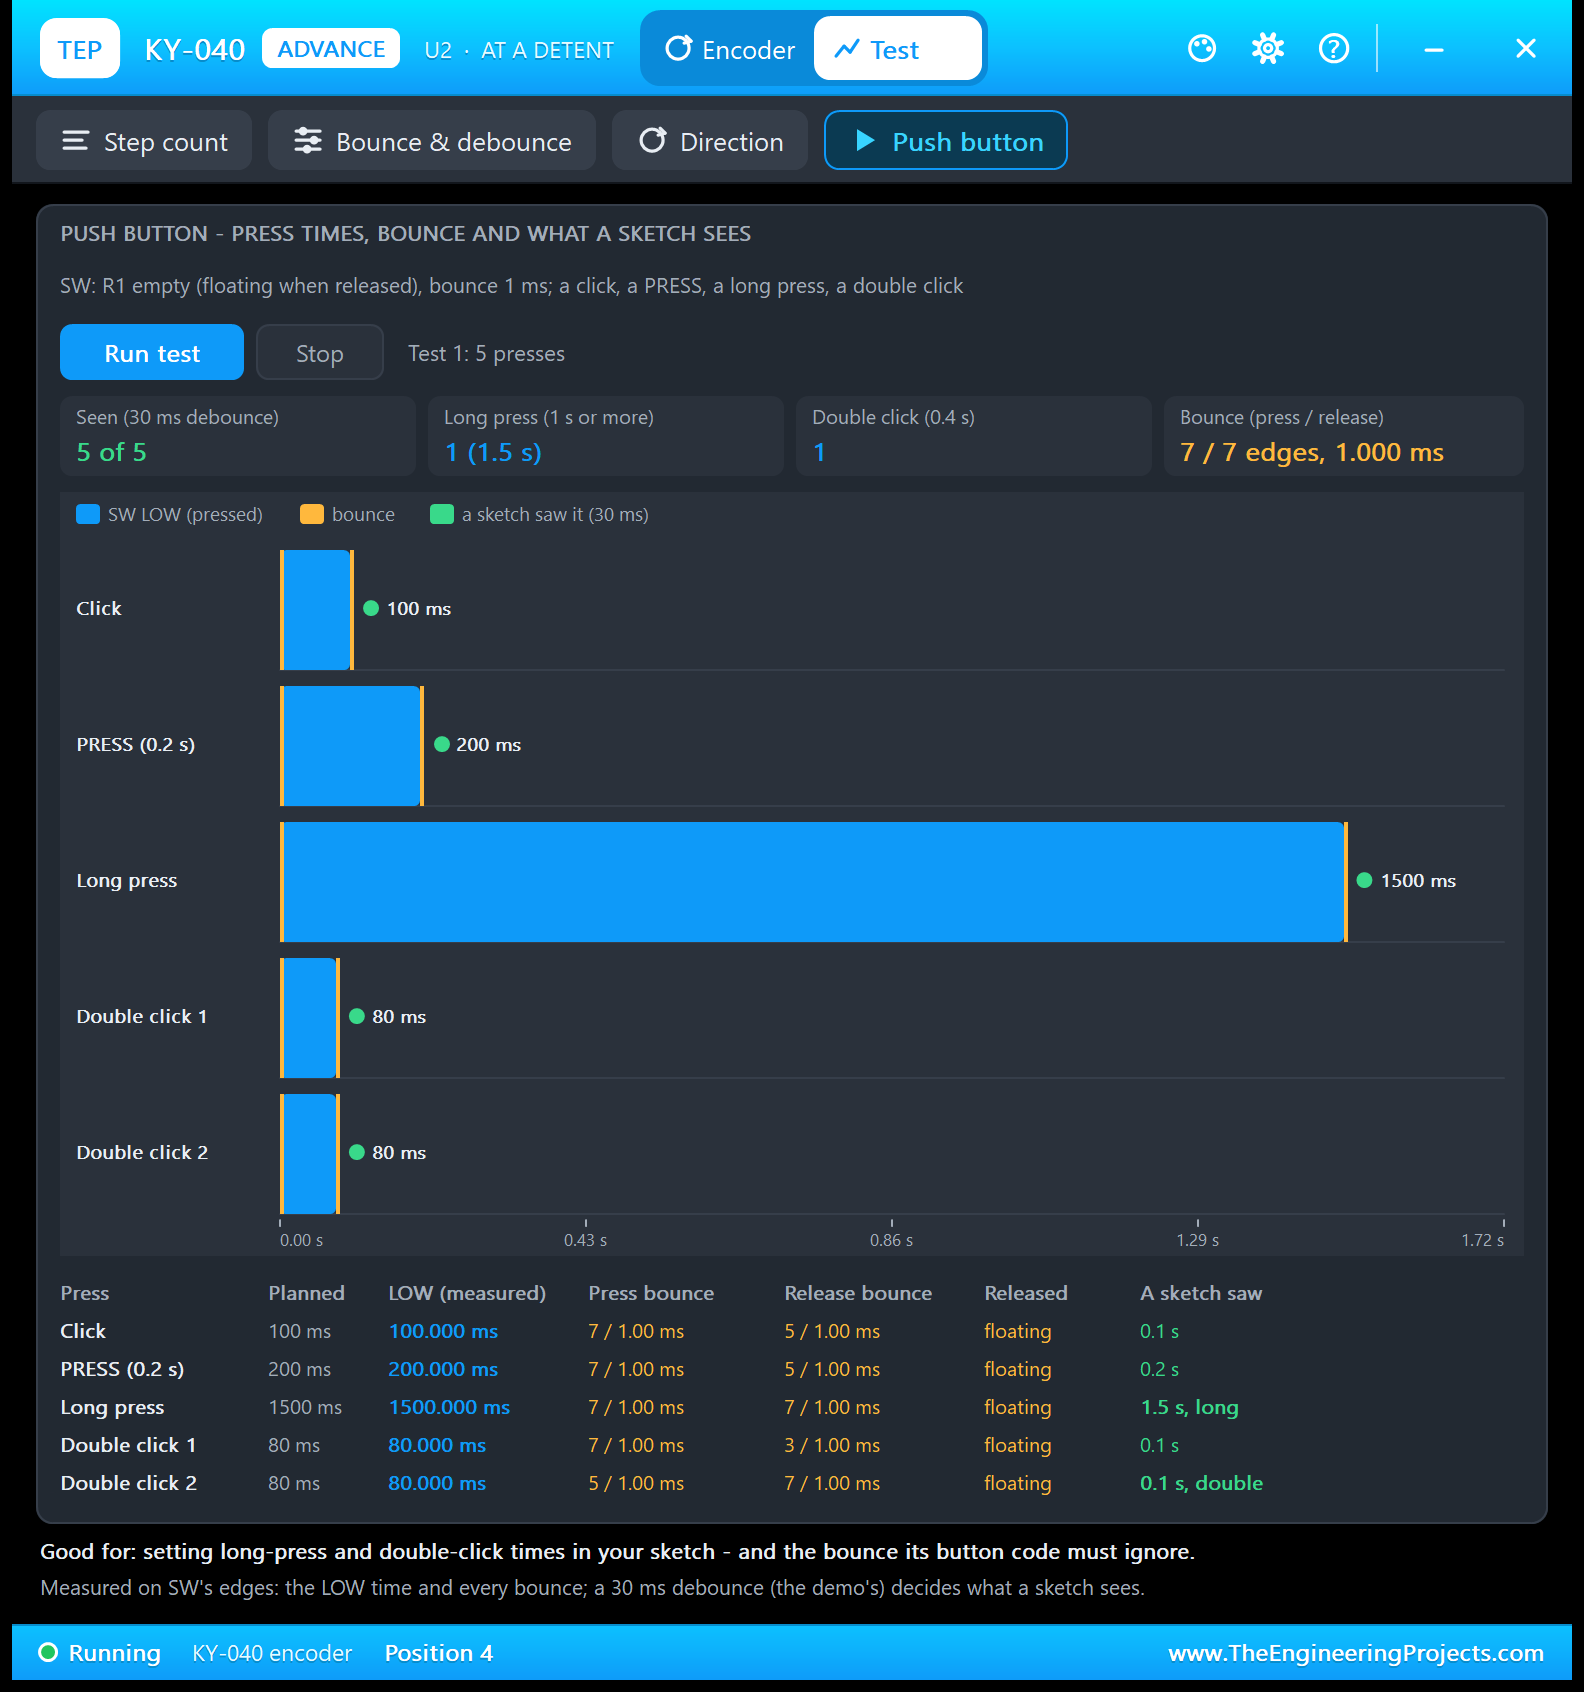
Good for: "setting long-press and double-click times in your sketch - and the bounce its button code must ignore." The tool presses the switch five times and measures the LOW time and the bounce on the edges of SW. A 30 ms debounce, the demo's, decides what a sketch sees: a long press lasts 1 s or more, a double click is two presses within 0.4 s.
| Press | Planned | LOW (measured) | Press bounce | Release bounce | A sketch saw |
|---|---|---|---|---|---|
| Click | 100 ms | 100.000 ms | 7 edges / 1.00 ms | 5 edges / 1.00 ms | 0.1 s |
| PRESS (0.2 s) | 200 ms | 200.000 ms | 7 edges / 1.00 ms | 5 edges / 1.00 ms | 0.2 s |
| Long press | 1500 ms | 1500.000 ms | 7 edges / 1.00 ms | 7 edges / 1.00 ms | 1.5 s, long |
| Double click 1 | 80 ms | 80.000 ms | 7 edges / 1.00 ms | 3 edges / 1.00 ms | 0.1 s |
| Double click 2 | 80 ms | 80.000 ms | 5 edges / 1.00 ms | 7 edges / 1.00 ms | 0.1 s, double |
Every LOW time matches the plan to the microsecond, and U4 printed the same five presses (see the Serial Monitor below). After each release SW floats, because R1 is empty; the demo's INPUT_PULLUP pulls it HIGH.
Settings and Help
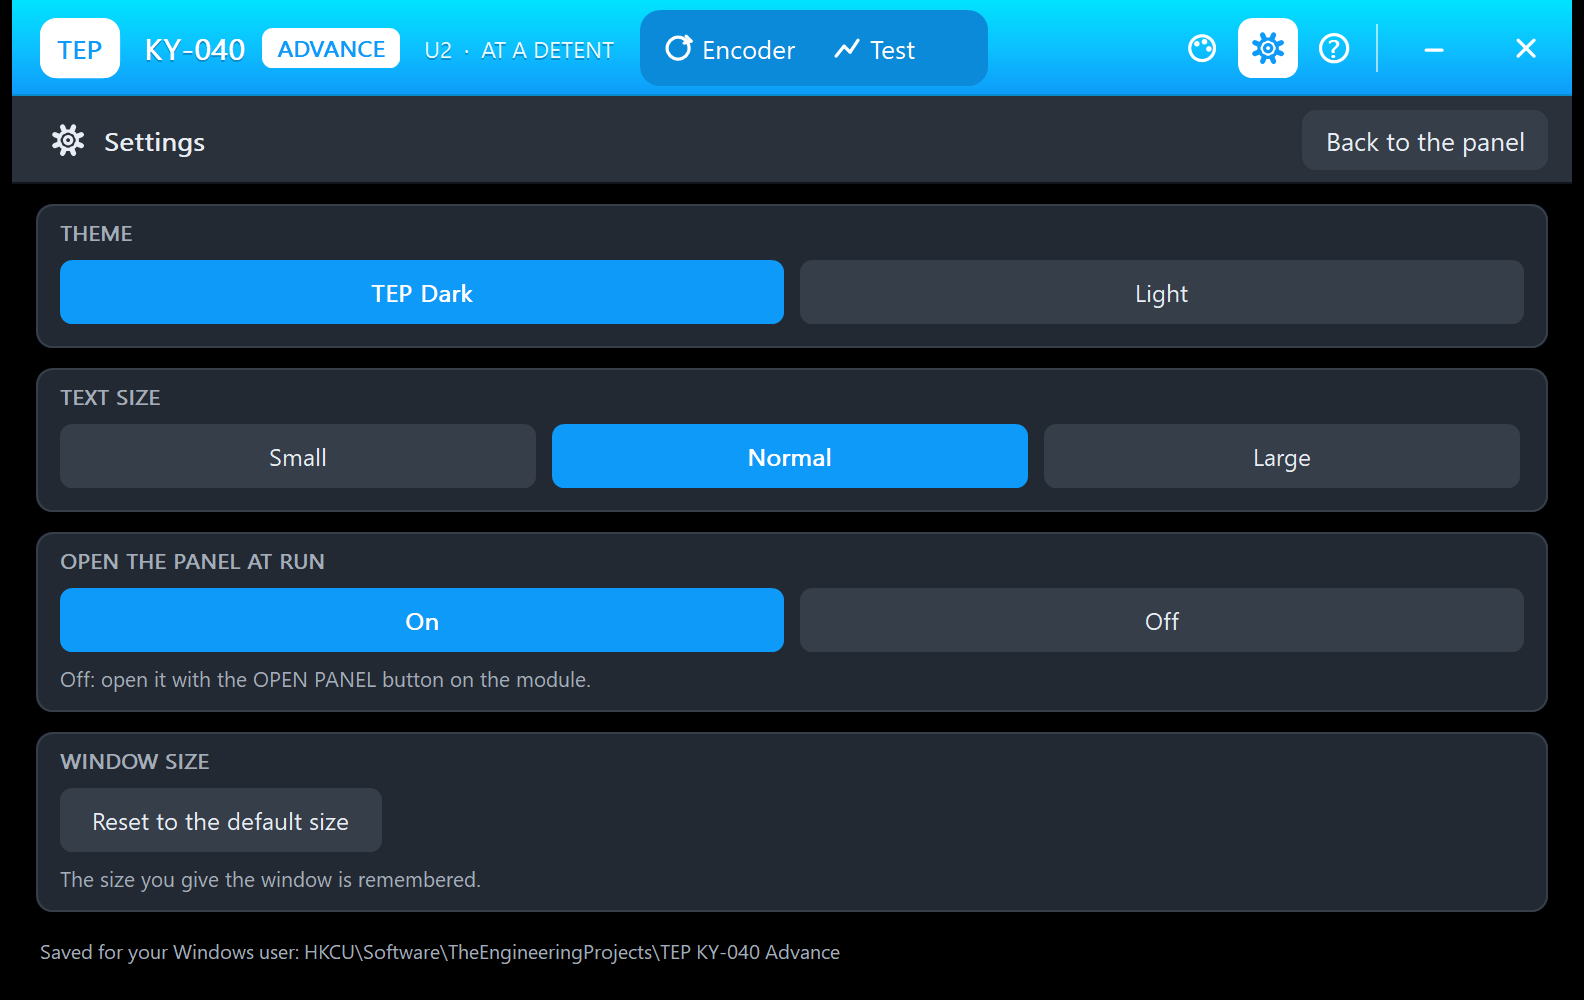
The gear opens Settings: theme, text size, open at Run and window size, saved for your Windows user.
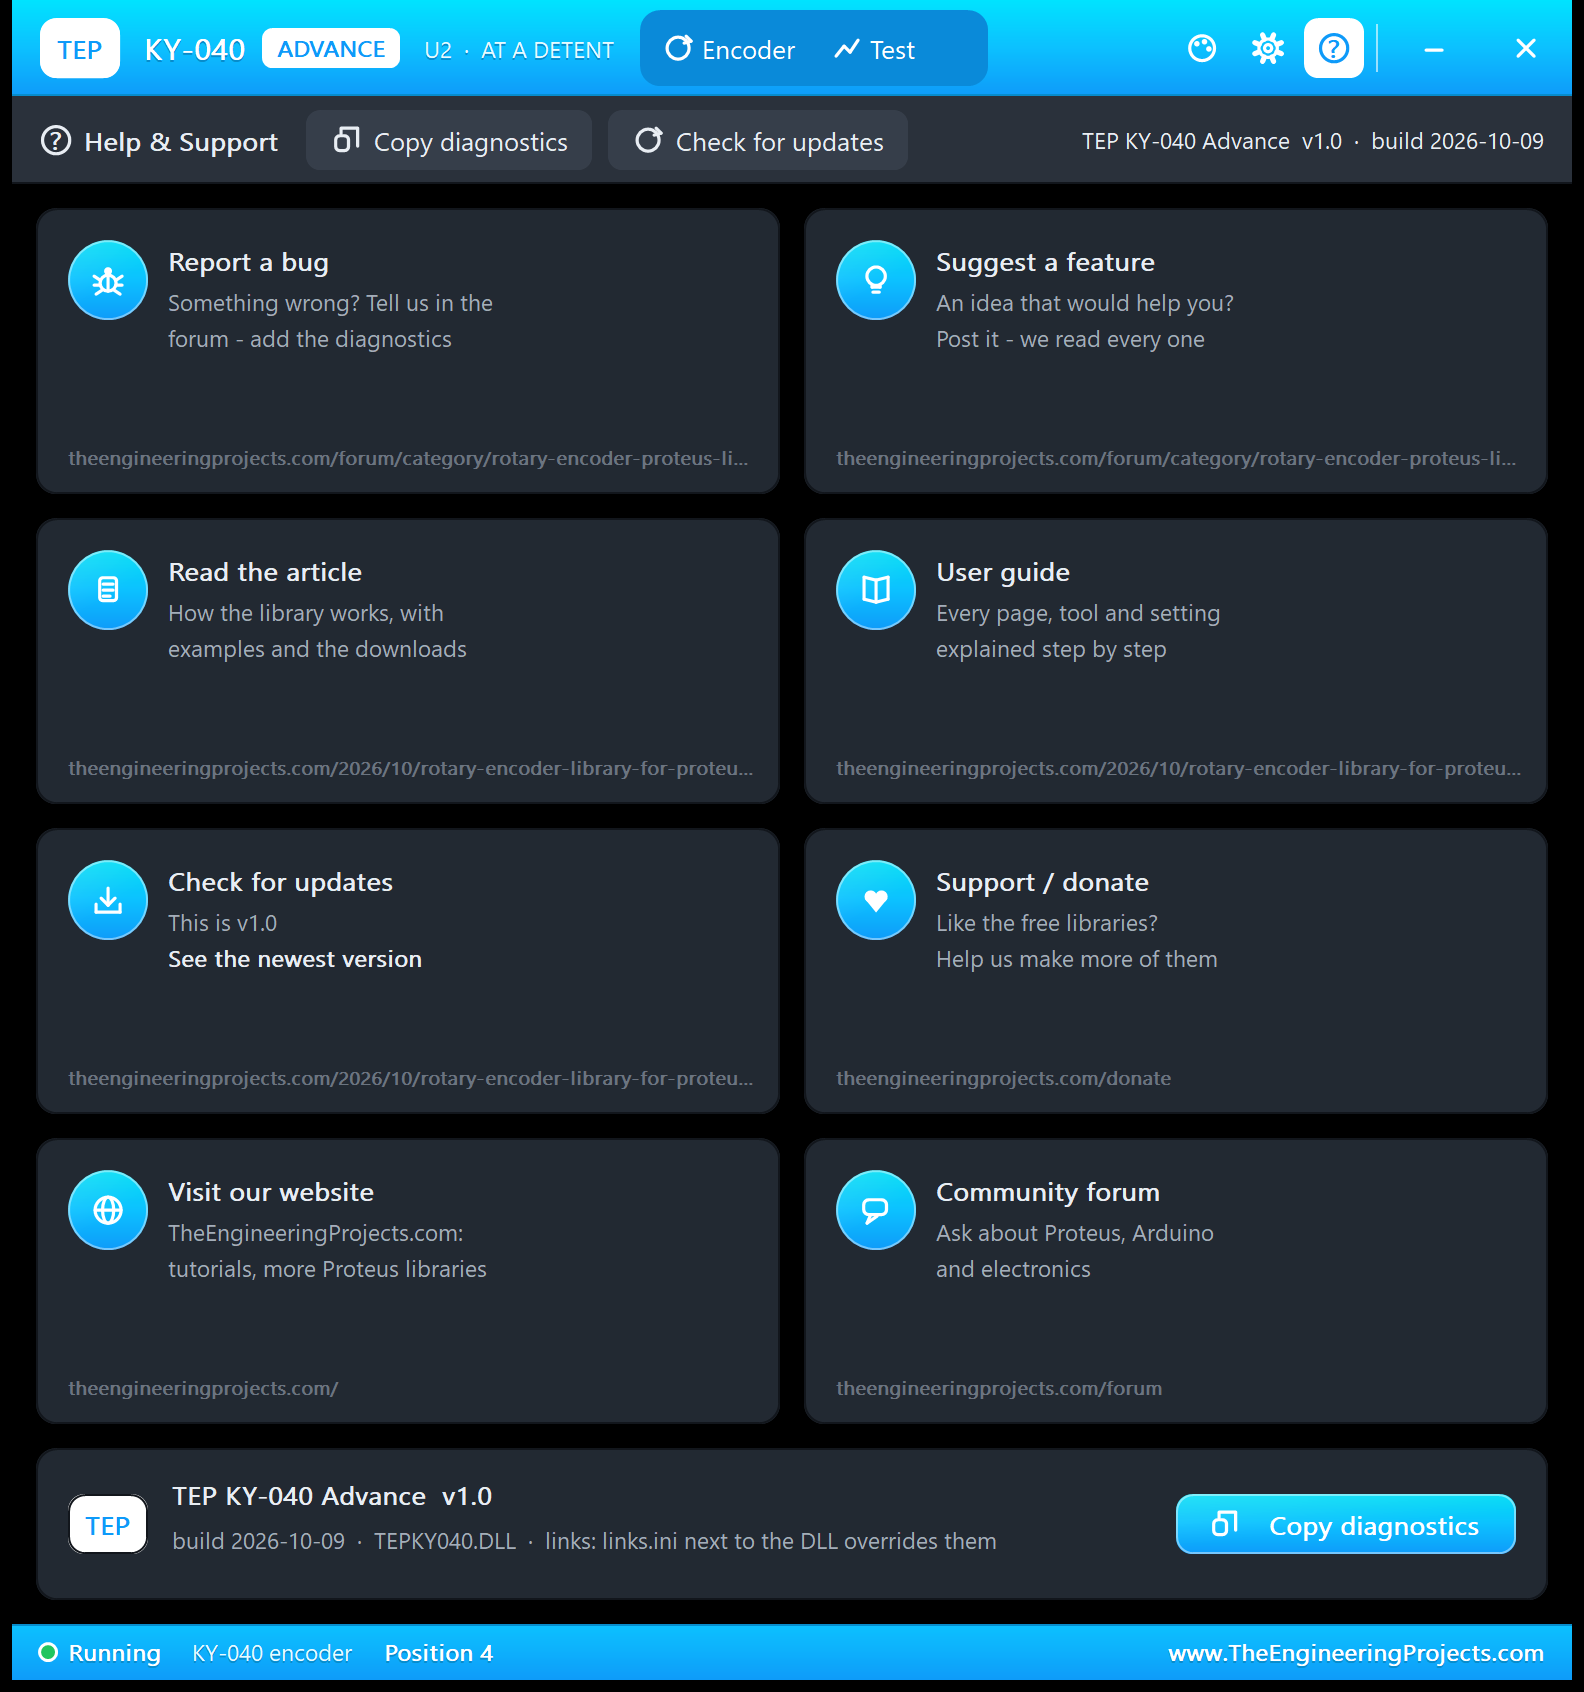
The ? icon opens Help & Support: eight cards with their links (the rotary encoder forum board, this article, updates, donate, the website and the forum) and Copy diagnostics for a bug report. A links.ini next to the DLL can change the links.
Rotary Encoder Counter with Arduino in Proteus
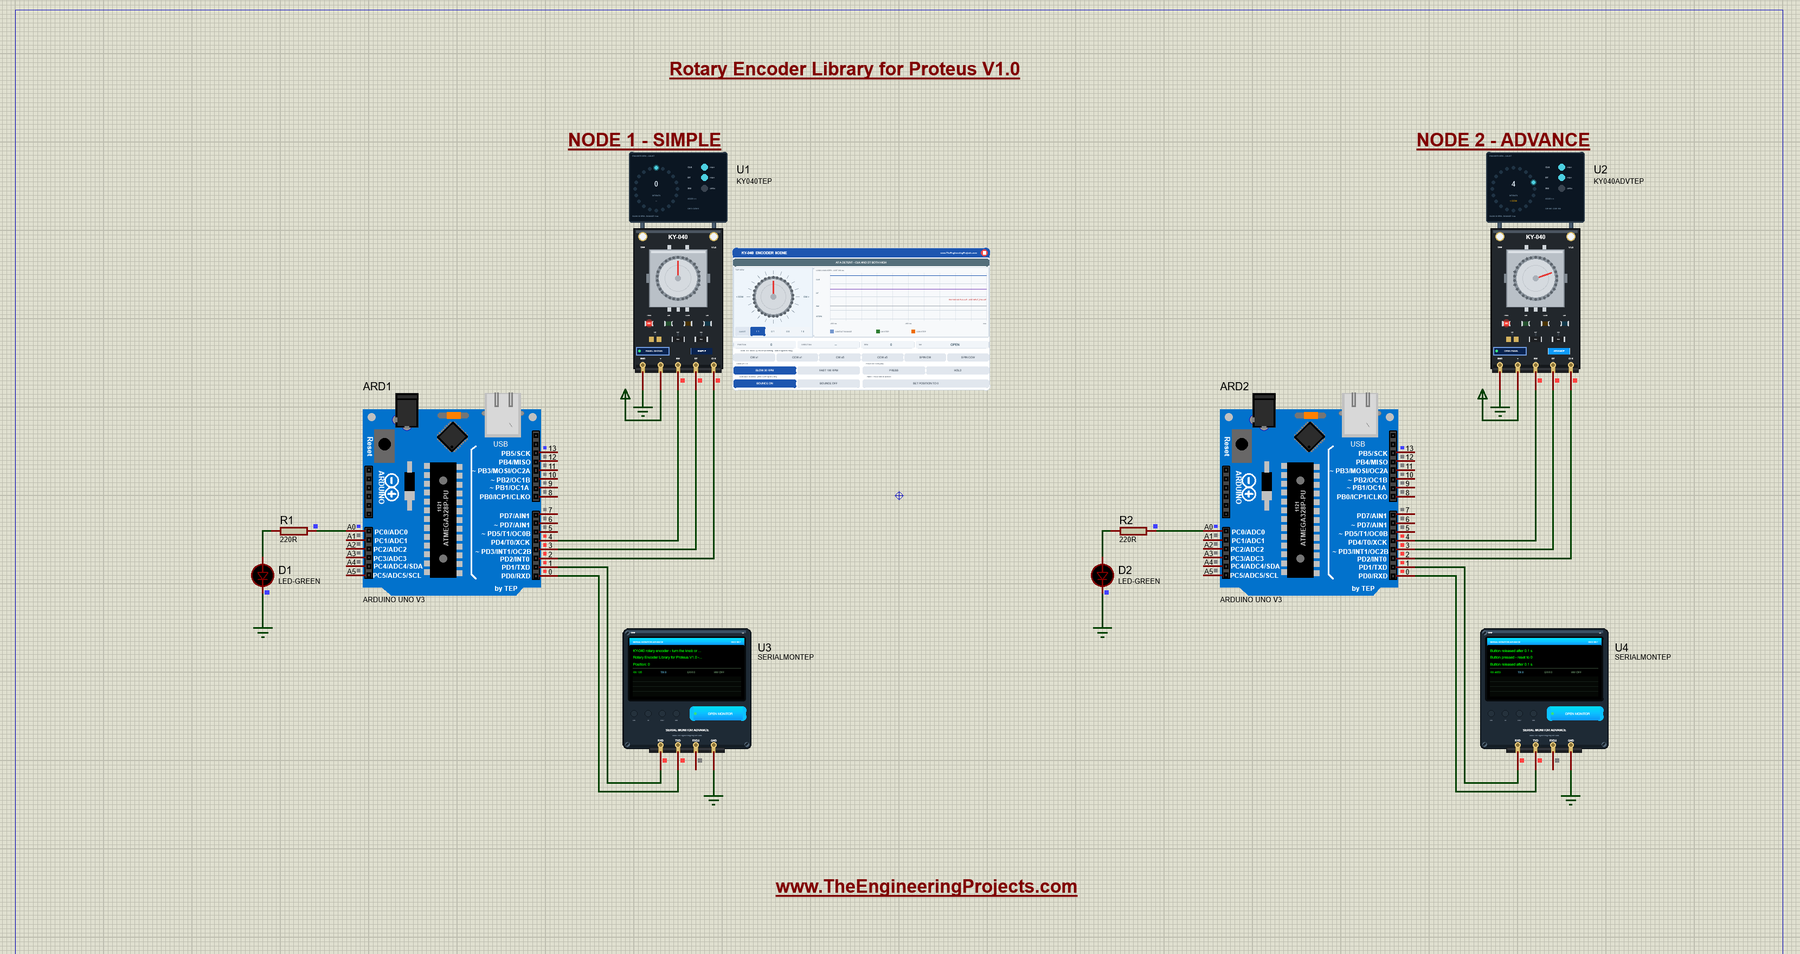
Open KY040-Encoder-Counter-ArduinoUnoV3.pdsprj from the Proteus Simulation folder, with KY040_Encoder_Counter.hex and both DLLs beside it. Its two Arduino UNOs, from our TEP Arduino UNO V3 library, run the same HEX file:
- NODE 1 - SIMPLE: UNO 1 (ARD1) with the KY-040 Simple (U1) and Serial Monitor U3.
- NODE 2 - ADVANCE: UNO 2 (ARD2) with the KY-040 Advance (U2) and Serial Monitor U4.
Wiring
| From | To | Why |
|---|---|---|
| KY-040 CLK | Arduino D2 | INT0: an interrupt on every CLK change |
| KY-040 DT | Arduino D3 | Read in the interrupt (D3 is INT1, free for a state-table sketch) |
| KY-040 SW | Arduino D4 | The push switch, read with INPUT_PULLUP |
| KY-040 + / GND | Power terminal / ground | Power (the PWR LED lights) |
| Serial Monitor RXD / TXD / GND | Arduino D1 / D0 / ground | Shows what the Arduino prints, sends what you type |
| Serial Monitor RXD2 | Not connected | The sketch prints what it decodes |
| LED + 220 Ω on A0 | Not used | Left from the demo template; the sketch does not use it |
The UNO's own LED on D13 toggles on every press. No Arduino library is needed: the sketch reads the pins itself.
Why INT0? Proteus Has No Pin-Change Interrupts
Many encoder libraries for Arduino count with pin-change interrupts (PCINT), which work on any pin. The AVR model of Proteus 8.5 never runs pin-change interrupts, so such a sketch does not count in the simulation. Our demo uses the external interrupt INT0 on D2, which Proteus runs; INT1 on D3 works too. The same sketch runs on a real UNO.
The Arduino Code
The sketch starts with its pins and the shared variables. Everything the interrupt changes is volatile:
const int PIN_CLK = 2;
const int PIN_DT = 3;
const int PIN_SW = 4;
const int PIN_LED = 13;

const unsigned long BUTTON_DEBOUNCE_MS = 30;  // the push button must be stable for 30 ms

volatile unsigned long debounceUs = 2000;     // ignore CLK chatter shorter than 2 ms (DEBOUNCE ms)
volatile long position = 0;                   // changed inside the interrupt
In setup(), CLK and DT are plain inputs, because the board has its own 10 k pull-ups, and SW gets the internal pull-up of the UNO. Then INT0 is attached to CLK for every change, and the three start lines follow:
void setup() {
  Serial.begin(9600);
  pinMode(PIN_CLK, INPUT);                     // CLK and DT have 10k pull-ups on the KY-040 board
  pinMode(PIN_DT, INPUT);
  pinMode(PIN_SW, INPUT_PULLUP);               // SW has no pull-up on most boards
  pinMode(PIN_LED, OUTPUT);
  attachInterrupt(digitalPinToInterrupt(PIN_CLK), onClkChange, CHANGE);
  Serial.println("KY-040 rotary encoder - turn the knob or press it");
  Serial.println("Rotary Encoder Library for Proteus V1.0 - type HELP for the commands.");
  Serial.println("Position: 0");
}
The interrupt runs on every CLK change, rising or falling, bounce included. It measures the quiet time since the last CLK change and goes on only for a CLK fall that comes more than the debounce time after it:
// Runs every time CLK changes (rising or falling)
void onClkChange() {
  unsigned long now = micros();
  unsigned long quietTime = now - lastClkChange;
  lastClkChange = now;
  clkInterrupts++;
  if (digitalRead(PIN_CLK) == LOW) {
    if (quietTime > debounceUs) {
Then it reads DT with digitalRead(PIN_DT). DT still HIGH means CLK fell first: clockwise, +1:
        position++;
        lastDirection = 1;
        cwSteps++;
DT already LOW means DT fell first: counter-clockwise, -1. A CLK fall within the debounce time is a bounce, and the sketch only counts it as ignored:
        position--;
        lastDirection = -1;
        ccwSteps++;
      }
      moved = true;
    } else {
      ignoredFalls++;                            // a bounce of the contact, not a new click
    }
  }
}
The loop prints the position only when it changed. It copies the shared values with the interrupts off, so it never reads a value the interrupt is changing at that moment:
  // 1. Print the position when the knob moved
  if (moved) {
    noInterrupts();                            // copy the shared values safely
    long p = position;
    int dir = lastDirection;
    moved = false;
    interrupts();
    if (p != shownPosition) {
      shownPosition = p;
      Serial.print("Position: ");
      Serial.print(p);
      Serial.println(dir > 0 ? " (CW)" : " (CCW)");
    }
  }
The push button has its own debounce: SW must be stable for 30 ms. A press resets the count and toggles the LED; a release prints how long you pressed:
  // 2. The push button: debounce it, then reset the count and toggle the LED
  bool reading = digitalRead(PIN_SW);
  if (reading != lastButtonReading) {
    buttonChangedAt = millis();
    lastButtonReading = reading;
  }
  if (millis() - buttonChangedAt > BUTTON_DEBOUNCE_MS && reading != buttonState) {
    buttonState = reading;
    if (buttonState == LOW) {                  // pressed (SW is pulled to GND)
      noInterrupts();
      position = 0;
      interrupts();
      shownPosition = 0;
      ledOn = !ledOn;
      digitalWrite(PIN_LED, ledOn ? HIGH : LOW);
      presses++;
      pressedAt = millis();
      Serial.println("Button pressed - reset to 0");
    } else {                                   // released: how long it was held
      Serial.print("Button released after ");
      printSeconds(millis() - pressedAt);
      Serial.println();
    }
  }
printSeconds() rounds the time to 0.1 s:
// prints a time in milliseconds as seconds with one decimal, e.g. 1.5 s (rounded to 0.1 s)
void printSeconds(unsigned long ms) {
  ms += 50;
  Serial.print(ms / 1000);
  Serial.print('.');
  Serial.print((ms % 1000) / 100);
  Serial.print(" s");
}
DEBOUNCE ms changes the debounce time while the sketch runs, from 0 to 20 ms:
  } else if (strncmp(text, "DEBOUNCE", 8) == 0 && numberAfter(text) >= 0 && numberAfter(text) <= 20) {
    unsigned long ms = numberAfter(text);
    noInterrupts();
    debounceUs = ms * 1000;
    interrupts();
    if (ms == 0) Serial.println("Debounce off: every CLK fall counts (bounce adds steps).");
    else {
      Serial.print("Debounce: CLK changes within ");
      Serial.print(ms);
      Serial.println(" ms of the last one are ignored.");
    }
STATUS copies the counters in the same safe way before it prints them, and HELP prints three short lines:
void printStatus() {
  noInterrupts();                                // copy the shared values safely
  long p = position;
  unsigned long cw = cwSteps, ccw = ccwSteps, isr = clkInterrupts, ignored = ignoredFalls, us = debounceUs;
  interrupts();
void printHelp() {
Serial.println("Commands: HELP, STATUS, RESET, DEBOUNCE ms");
Serial.println(" RESET: the position back to 0 (a press does it too)");
Serial.println(" DEBOUNCE ms: ignore CLK changes within ms (0-20)");
}The values live in RAM, so a new Run starts again at position 0 with a 2 ms debounce. To change the sketch, open it in the Arduino IDE, select Arduino Uno, use Sketch > Export Compiled Binary, and replace the HEX file of the simulation with the exported one.
Serial Monitor Commands
| Command | What it does |
|---|---|
| HELP | The command list (three lines) |
| STATUS | Two lines: the position with the CW / CCW steps; the CLK interrupts, the bounce falls ignored, the debounce and the presses |
| RESET | The position back to 0 (a press does it too) |
| DEBOUNCE ms | Ignore CLK changes within ms of the last one, 0 to 20 (2 at start); DEBOUNCE 0 shows the bounce miscounts |
How to Run the Demo
- Press Run. Both Serial Monitors (9600 baud) and U2's pop-up open, and U3 and U4 print the three start lines.
- On U1's panel, click CW x5 and CCW x5; try SPIN CW, FAST 100 RPM, BOUNCE OFF and PRESS, or hold the mouse button on the board's knob.
- On U3, click STATUS, then DEBOUNCE 0, and turn the knob: the bounce adds clicks. DEBOUNCE 2 makes it right again.
- On U2, try the Encoder page, then the four tools on the Test tab.
- Close U2's window and open it again with OPEN PANEL; close U1's panel with its red X and open it with PANEL: CLOSED.
Rotary Encoder Proteus Simulation Results
The Serial Monitor in Its Simple Interface
Both monitors in this demo run in the Simple interface of our TEP Serial Monitor, as in every monitor screenshot here. Only the log, the send box and one slim toolbar row stay visible (baud rate, follow, pause, search and clear), so the window stays small.
- Switch to it: right-click the log and choose Simple interface, or press Ctrl+Shift+U.
- Back to the full view: click the corner button (the expand arrows at the top right), press Esc or Ctrl+Shift+U, or right-click and choose Full interface.
- Your choice is remembered.
Type commands such as STATUS or DEBOUNCE 5 in the send box and press Enter; the quick buttons come back with the full view. Every line of the sketch is shorter than 80 characters (the longest has 69), so it fits this small window. Read all about the monitor in TEP Serial Monitor Advance for Proteus.
Start-Up, One Click Back, a Press and Five Clicks
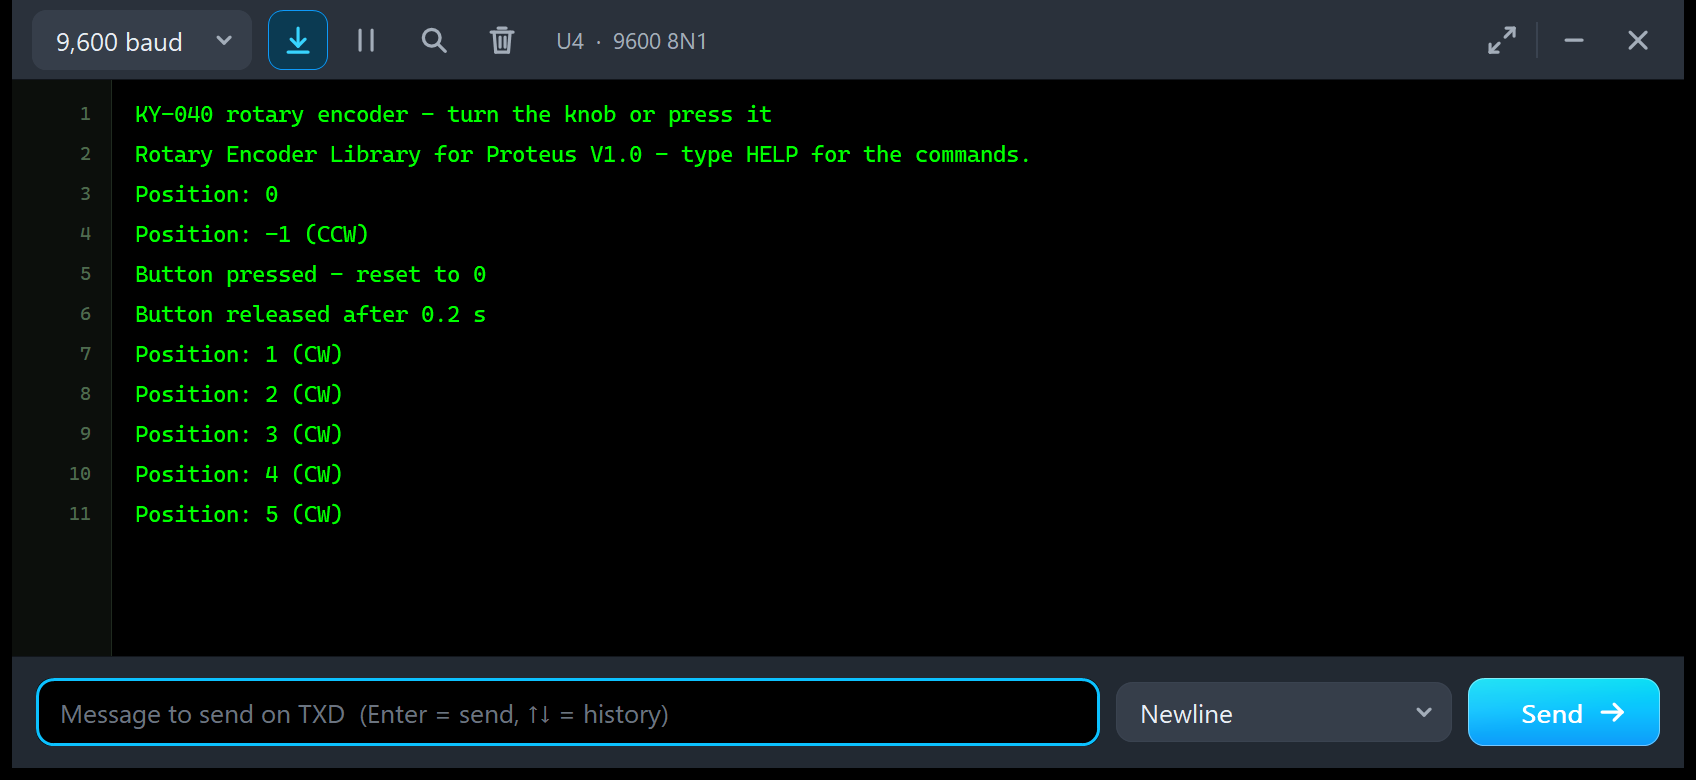
After Run, U4 prints the three start lines. Then I clicked CCW x1, Press (0.2 s) and CW x5 on U2's Encoder page:
KY-040 rotary encoder - turn the knob or press it
Rotary Encoder Library for Proteus V1.0 - type HELP for the commands.
Position: 0
Position: -1 (CCW)
Button pressed - reset to 0
Button released after 0.2 s
Position: 1 (CW)
Position: 2 (CW)
Position: 3 (CW)
Position: 4 (CW)
Position: 5 (CW)
One line per click and nothing in between: the sketch prints only when something happens. The press reset the count to 0, so CW x5 counts from 1 to 5, while the pop-up, which counts since the start, went from -1 to 4.
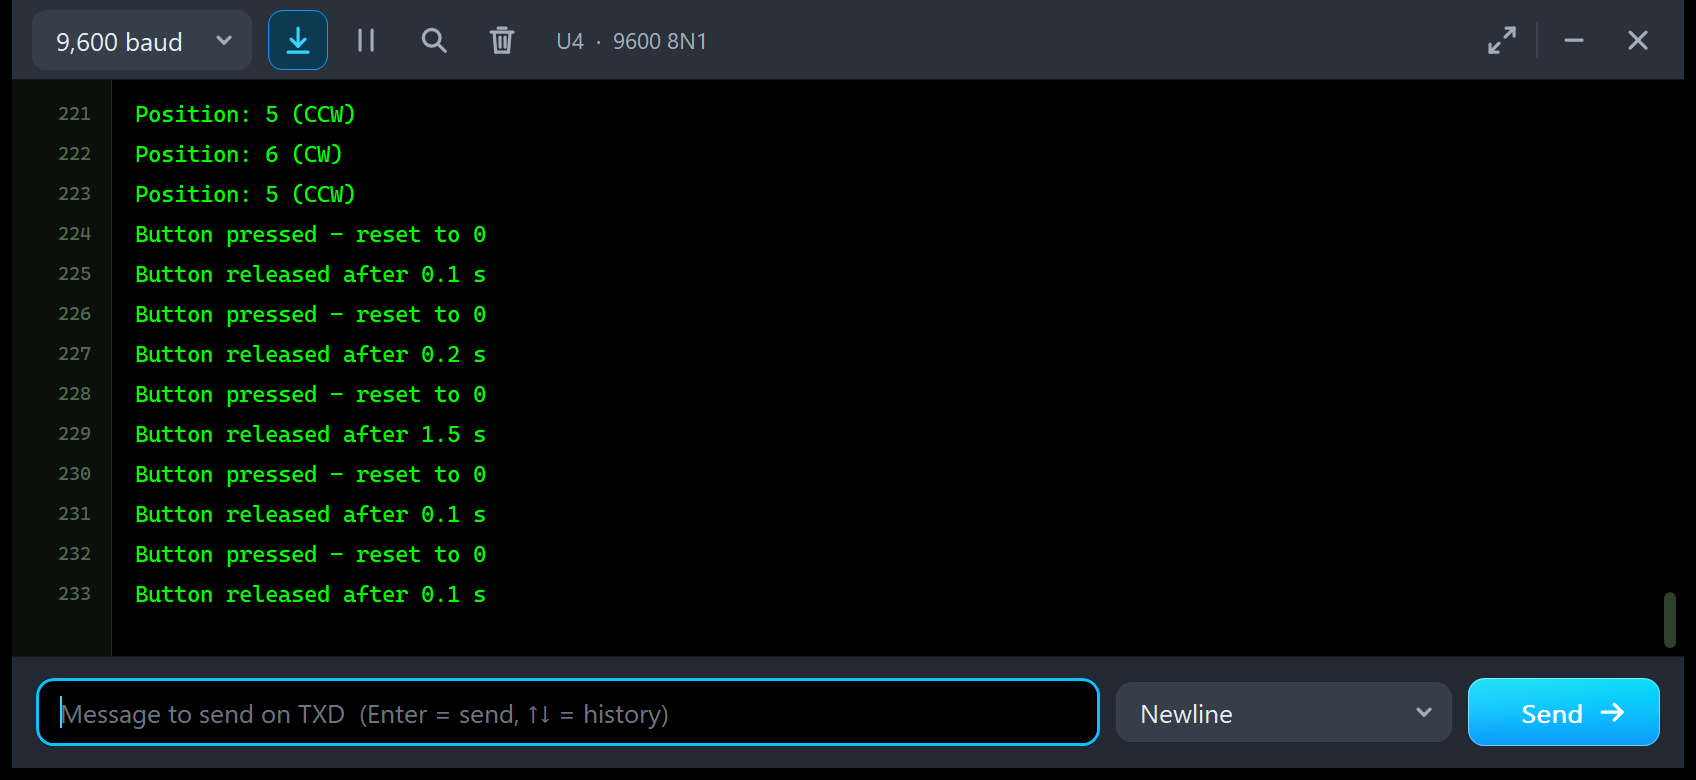
The Push Button Test on U4
Position: 5 (CCW)
Position: 6 (CW)
Position: 5 (CCW)
Button pressed - reset to 0
Button released after 0.1 s
Button pressed - reset to 0
Button released after 0.2 s
Button pressed - reset to 0
Button released after 1.5 s
Button pressed - reset to 0
Button released after 0.1 s
Button pressed - reset to 0
Button released after 0.1 s
The first three lines are the end of the Direction test (alternating clicks). Then come the five presses of the Push button test: the sketch, with its 30 ms debounce, saw all five, and its times are the measured LOW times of the tool rounded to 0.1 s (100, 200, 1500, 80 and 80 ms).
STATUS and DEBOUNCE 0
STATUS answers with two lines. Here is the README's example after five clicks CW and a press (the numbers depend on the run and the bounce):
Position: 0  (CW steps 5, CCW steps 0)
  CLK interrupts 46, bounce ignored 18; debounce 2 ms; presses 1
Five clicks are only 10 real CLK changes; the other interrupts are bounce. Now send DEBOUNCE 0 ("Debounce off: every CLK fall counts (bounce adds steps).") and turn one click CW. The README's example shows what that single click can print:
Position: 1 (CW)
Position: 2 (CW)
Position: 1 (CCW)
Position: 0 (CCW)
Position: -1 (CCW)
That is the contact bounce, made visible. Send DEBOUNCE 2 ("Debounce: CLK changes within 2 ms of the last one are ignored."), and every click counts once again.
Troubleshooting
- The count jumps by 2 or 3 per click, or goes the wrong way: that is the contact bounce with no debounce in the sketch. Use DEBOUNCE 2, or BOUNCE OFF on the panel to see ideal contacts.
- The count runs backwards: CLK and DT are swapped in the wiring, or your board labels them the other way round. Swap them.
- SW reads random values: R1 is empty, as on most boards, so SW floats after a release. Use
INPUT_PULLUP, or set SWPULLUP to 10K. - Nothing counts with an encoder library that uses pin-change interrupts: Proteus 8.5 never runs them. Use D2 / D3 (INT0 / INT1), as the demo does.
- The Step count tool shows the demo missing clicks at 600 RPM: that is correct. At that speed, the quiet time between CLK changes (2.5 ms minus the bounce) is shorter than the 2 ms debounce; the real encoder is rated to 100 RPM.
- The Test tab says "Cannot start: ...": the reason is in the message (no power, or another test is running).
- The part is not simulated, there is no panel or no monitor window: TEPKY040.DLL or TEPSERIALMON.DLL is missing from MODELS and the project folder; click OPEN MONITOR on a closed monitor.
- The Advance pop-up does not appear: click OPEN PANEL on the board, or turn "Open the panel at Run" back on in Settings.
Things to Know Before Using a Real KY-040
The demo sketch uses no library, so it runs on a real UNO and KY-040 as it is. Keep in mind:
- Supply: 3.3 to 5 V. The contacts carry only a few mA (10 mA at most); the module has no active parts and no LED.
- Clicks: 20 per turn, one full CLK / DT cycle per click. Encoders with 30 clicks and 15 pulses per turn (half a cycle per click) exist; our model does not cover them, and a sketch that counts only CLK falls sees every second click on them.
- Contact bounce: up to 5 ms on the EN11 datasheet (EC11 types often about 2 ms); 100 RPM is the rated maximum speed. A 5 ms debounce counted right at both bounce settings in our Bounce & debounce tool, so DEBOUNCE 5 is a safe start for an unknown part.
- CLK and DT names: some clones and tutorials label them the other way round. If your count runs backwards, swap the two wires or the two pins in the sketch.
- SW pull-up: R1 is missing on most boards, so use
INPUT_PULLUP. - Pin order: GND + SW DT CLK with the header at the bottom; check the silkscreen of your board.
- Interrupts: on a real UNO, pin-change interrupts work too; INT0 and INT1 work in both worlds.
Limitations of the Simulation
- Not modelled: 30-click / 15-pulse encoders, the uneven speed of a hand inside a click, sliding noise and contact resistance, the difference between 3.3 V and 5 V, and wear.
- The bounce bursts are generated by the model inside the datasheet range; they are not a measurement of a real part.
- The model is our own implementation, written from the published KY-040, EN11 and EC11 descriptions; it contains no third-party code. The HEX file also contains the Arduino AVR core 1.8.6, which includes LGPL-licensed code; its source code is on GitHub.
- Tested in Proteus 8.5 in October 2026 (the demo, both panels, the four tools and every screenshot here), at about 0.62 x real time with a test tool running, the pop-up open and two monitors, and with 1,277 automatic PC checks, all passed, 28 of them with the real demo sketch on two UNOs. Proteus 7 is not supported.
Need another input for your menus? See our Joystick Module Library for Proteus, or our Touch Sensor Library for Proteus V2.0 for a touch button. To send the knob's position to another Arduino by radio, add our HC-12 Library for Proteus.
So, that was all about the Rotary Encoder Library for Proteus. I hope the turning knob, the logic analyzer with its contact bounce, the measured event log and the four test tools make the KY-040 much easier to understand, so your encoder sketch counts right the first time you wire a real module. If you use the Rotary Encoder Library for Proteus in a project, please share your feedback in the comments or in our forum, and if you have any questions, ask in the comments and I will help you out. Till the next tutorial, take care and have fun!