Hello friends, I hope you all are doing great. Today, I am going to share the Raspberry Pi 5 Smart Greenhouse - Proteus Simulation, the fourteenth project of our IoT Projects series. If you have searched for a Proteus simulation of a smart greenhouse with a Raspberry Pi, here is a complete one. A Raspberry Pi 5 measures the air with a DHT22, the soil, the light and the water reservoir through an ADS1115 ADC, waters the plants with a 12 V peristaltic pump in measured doses, cools the air with a PC fan, switches a grow lamp on in the dark, and serves a live web dashboard for your laptop and your phone.
A greenhouse is a small climate of its own: on a sunny afternoon it overheats, overnight it gets dark, and the soil dries at its own pace. Automating it is one of the most popular Raspberry Pi projects, because it brings together sensors, actuators and simple control rules. In this tutorial, we will go through the circuit, learn how each sensor measures, read analog sensors on a Pi through an ADC, water in doses with a soak in between, use hysteresis so nothing chatters, walk through the Python program, and then run the simulation: dry soil, a hot afternoon, nightfall and an empty reservoir. At the end, you can download the project with the program, every library file and the Python runtime the Pi needs.
NOTICE: Our team has put a lot of effort into this project: the circuit, the code and every part in the simulation are our own work, and you get them all free. Your feedback is the fuel that keeps us going, so please tell us what you think in the comments below. And if our free projects help you, you can buy us a coffee. So, let's get started with the Raspberry Pi 5 Smart Greenhouse - Proteus Simulation:
What Does This Smart Greenhouse Do?
The Pi looks after four things a gardener would check every day:
- Watering: below 35 % soil moisture, the peristaltic pump gives a 4-second dose, waits 10 seconds for the water to soak in, and repeats until the soil reaches 45 %.
- Cooling: above 30 degrees C or 85 %RH, the PC fan runs at full speed; below 28 degrees C and 75 %RH it goes back to a gentle minimum.
- Light: when the light falls below 25 %, the grow lamp comes on through a relay, and goes off again above 40 %.
- The reservoir: below 25 % the pump is blocked, so it never runs dry, and the page asks for a refill.
- A dashboard: every reading, the pump, the fan with its speed, the lamp and an event log, with WATER, FAN, LAMP and AUTO links.
It is a great project for anyone learning the Raspberry Pi with analog sensors, motor drivers and relays, and a popular final-year project in agriculture and automation. In the simulation, the weather and the soil change with one click on a sensor's pop-up.
Components Used in the Proteus Simulation
All the parts come from our Proteus libraries, each with its own tutorial. The project zip at the end includes every LIB and DLL file.
| Part | Proteus device | Library post | Connection |
|---|---|---|---|
| Raspberry Pi 5 | RASPBERRY PI 5 | Raspberry Pi 5 Library for Proteus | PI1, Ethernet 192.168.1.51 |
| DHT22 temperature and humidity | DHT22ADVTEP | DHT11 / DHT22 Library for Proteus | DHT1, DATA on GPIO4 |
| ADS1115 16-bit ADC | ADS1115ADVTEP | ADS1115 ADC Library for Proteus | U1, I2C 0x48 |
| Soil moisture sensor | SOILADVTEP | Soil Moisture Sensor Library for Proteus | U2, A0 to the ADS1115's A0 |
| LDR light sensor | LDRADVTEP | LDR Sensor Library for Proteus | U3, A0 to the ADS1115's A1 |
| Water level sensor | WATERLEVELADVTEP | Water Sensor Library for Proteus | U4, S to the ADS1115's A2 |
| L9110S motor driver | L9110SADVTEP | L9110S Motor Driver Library for Proteus | DRV1, A-IA GPIO17, A-IB GPIO27 |
| 12 V peristaltic pump | PERIPUMPTEP | 12V Peristaltic Pump Library for Proteus | M1, on the L9110S's A outputs |
| 4-pin PC fan | PCFAN4PINTEP | 4-Pin PC Fan Library for Proteus | FAN1, PWM GPIO18, TACH GPIO23 |
| 1-channel relay module | RELAY1ADVTEP | Relay Module Library for Proteus | RLY1, IN on GPIO22 (active LOW) |
| 12 V lamp (W5W) as the grow lamp | BULBW5WTEP | Filament Bulb Library for Proteus | L1, through the relay |
| Laptop WiFi Monitor | LAPTOP WIFI MONITOR | Laptop WiFi Monitor | PC1 |
| Mobile WiFi Monitor | MOBILE WIFI MONITOR | Mobile WiFi Monitor | MOB1 |
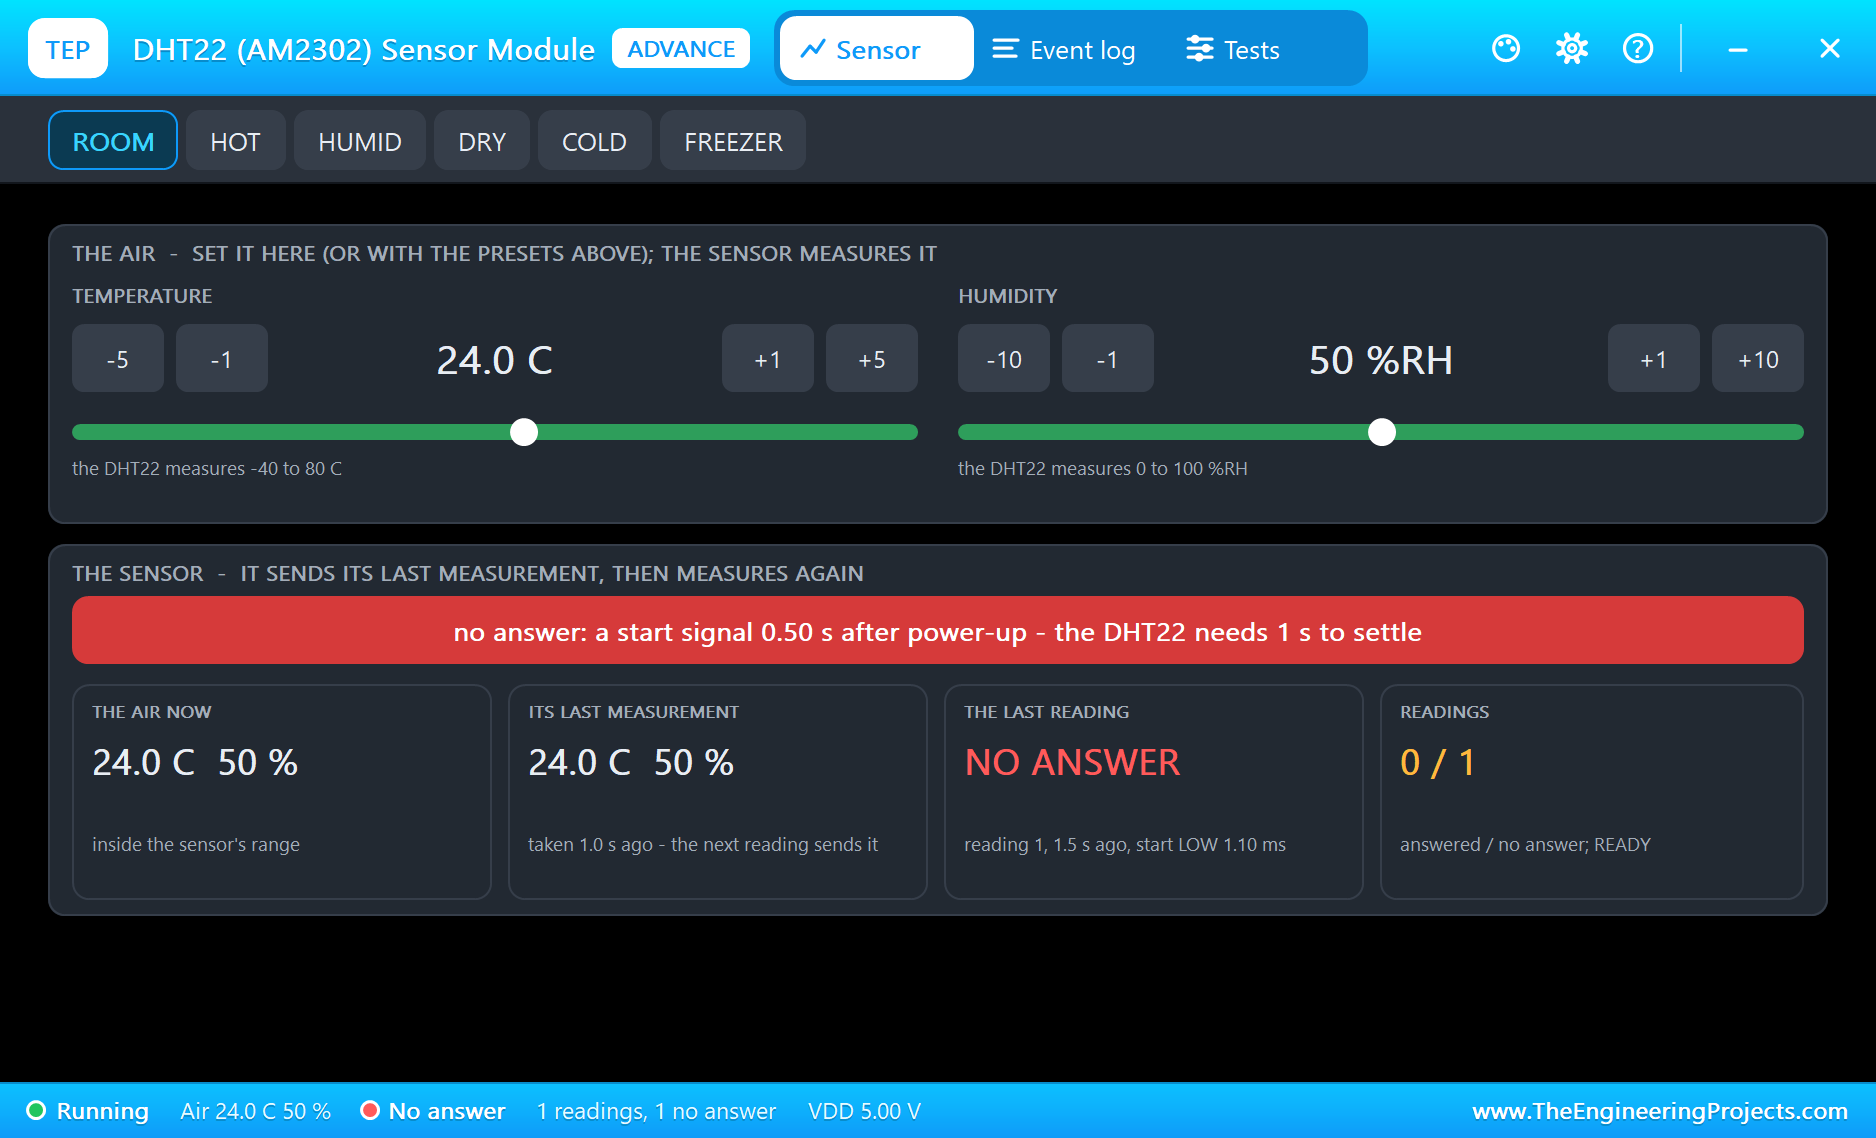
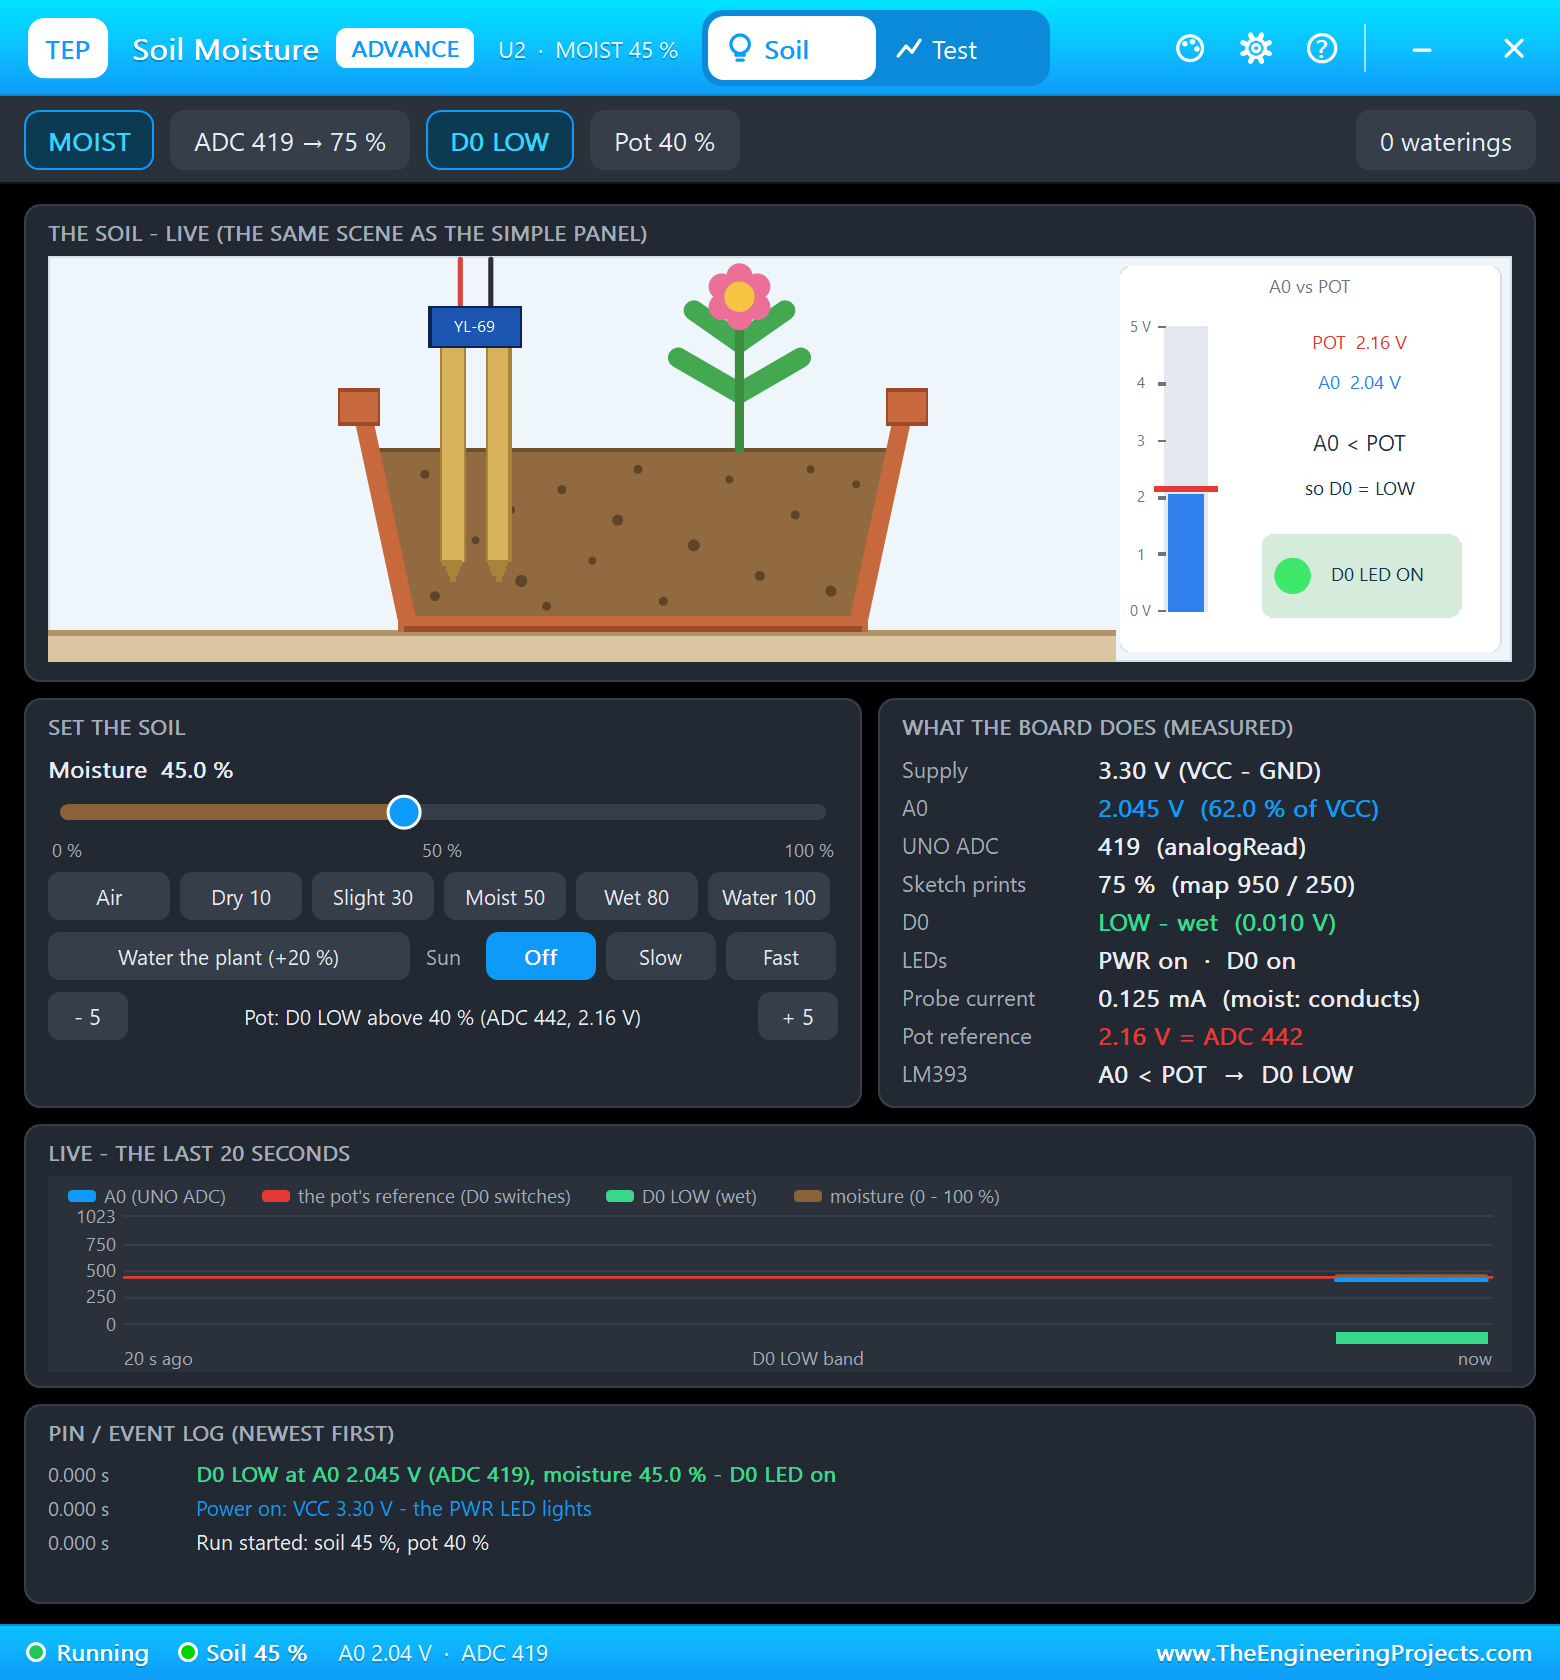
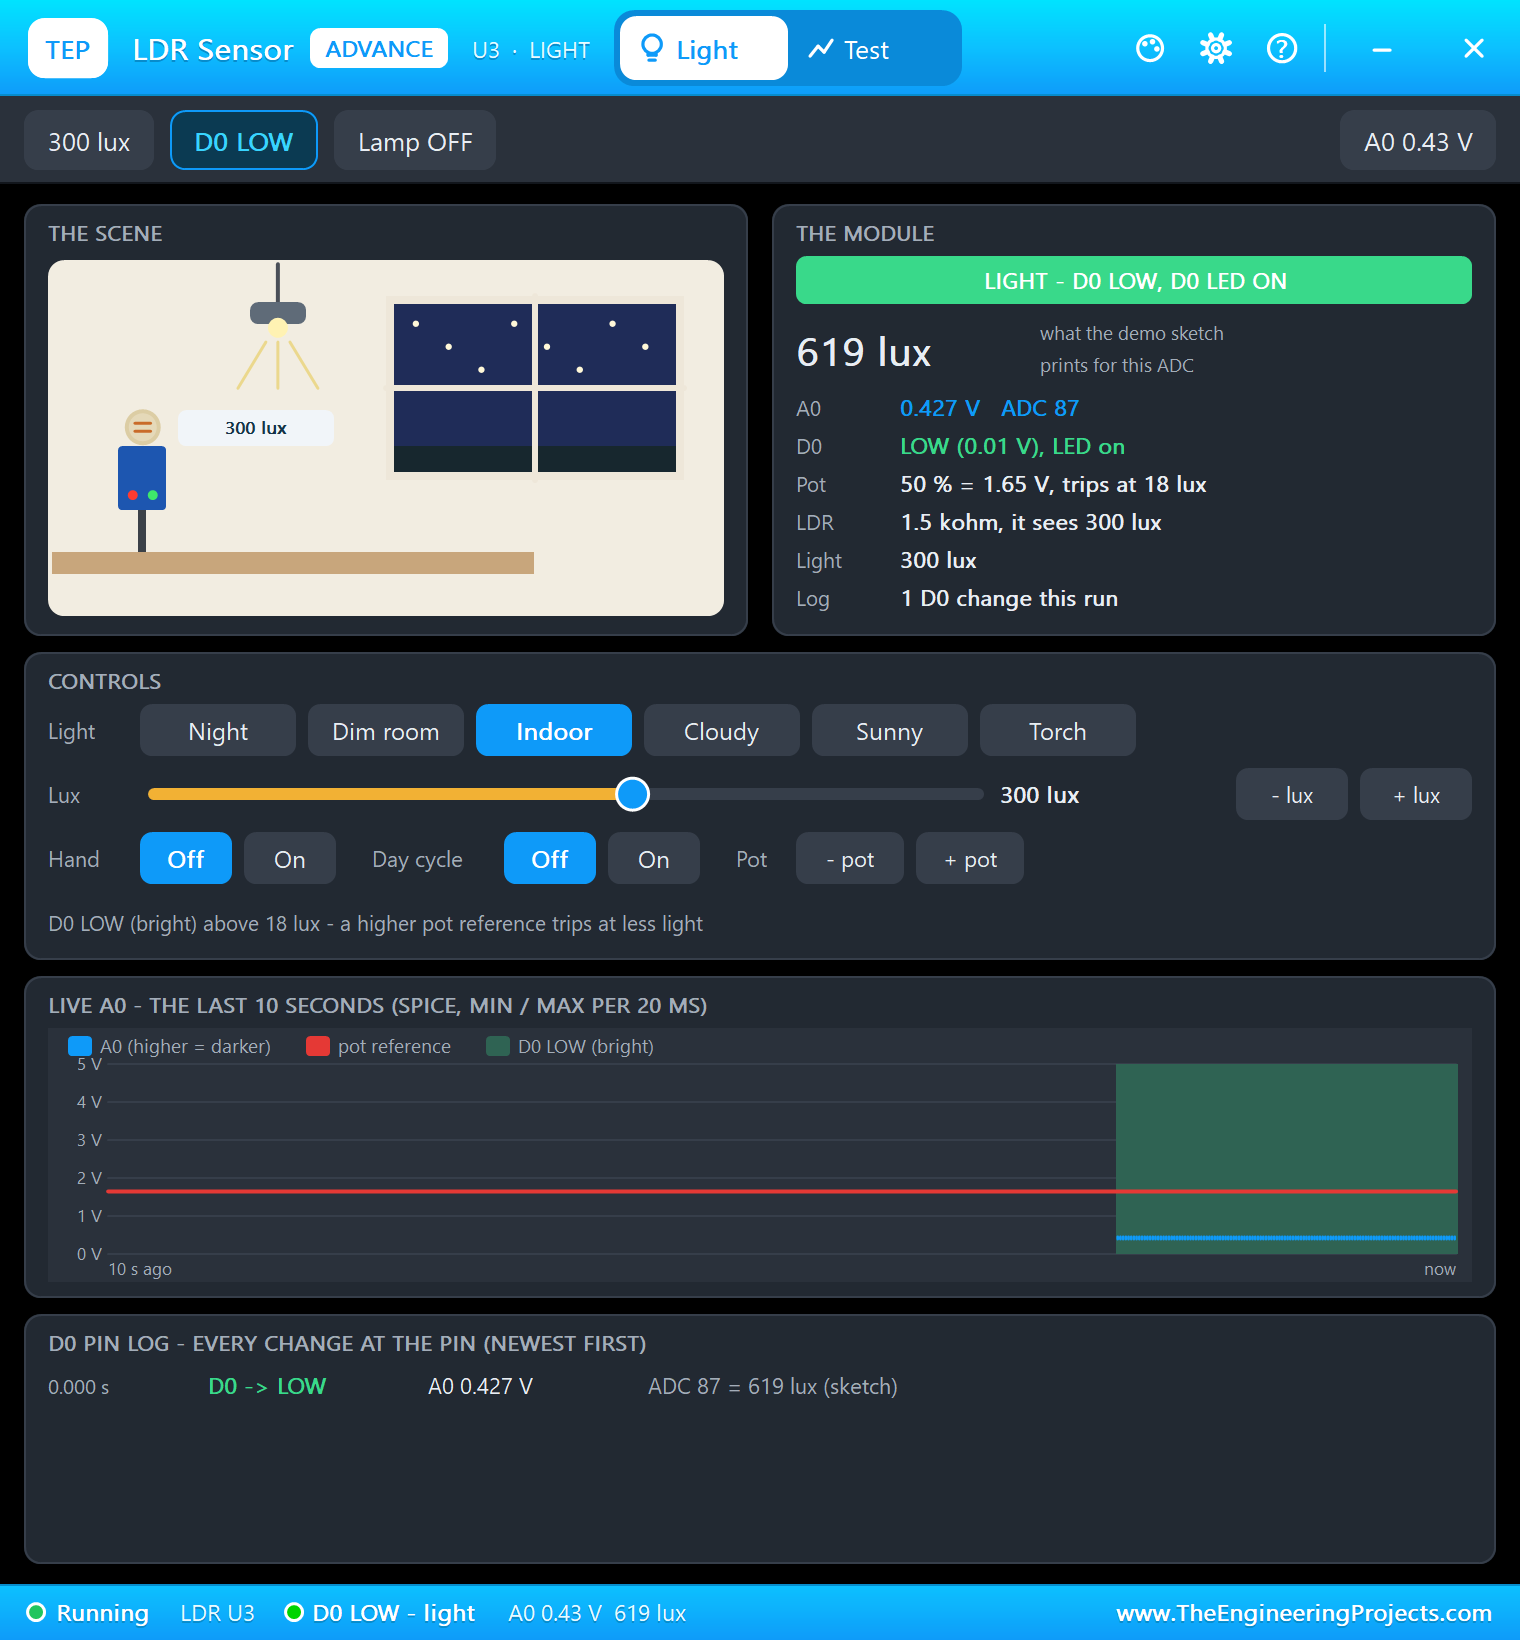
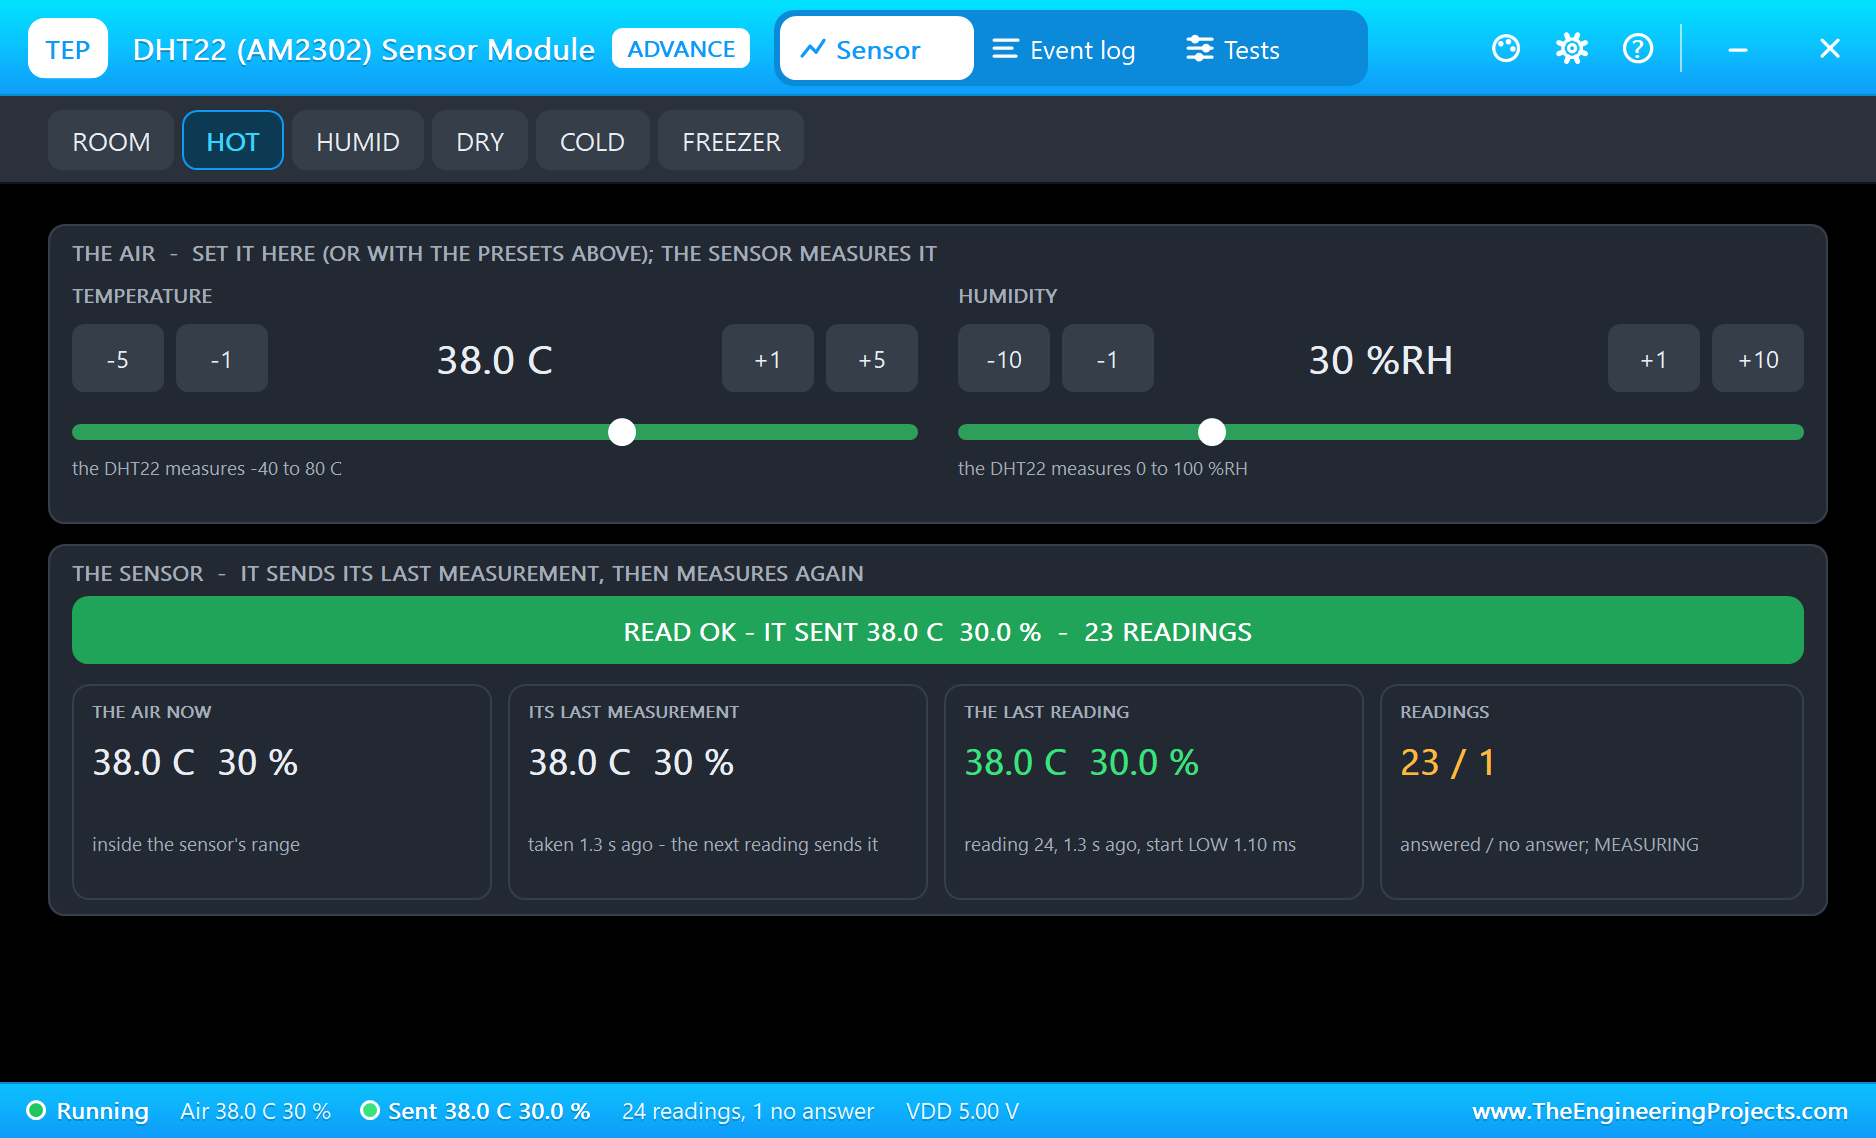
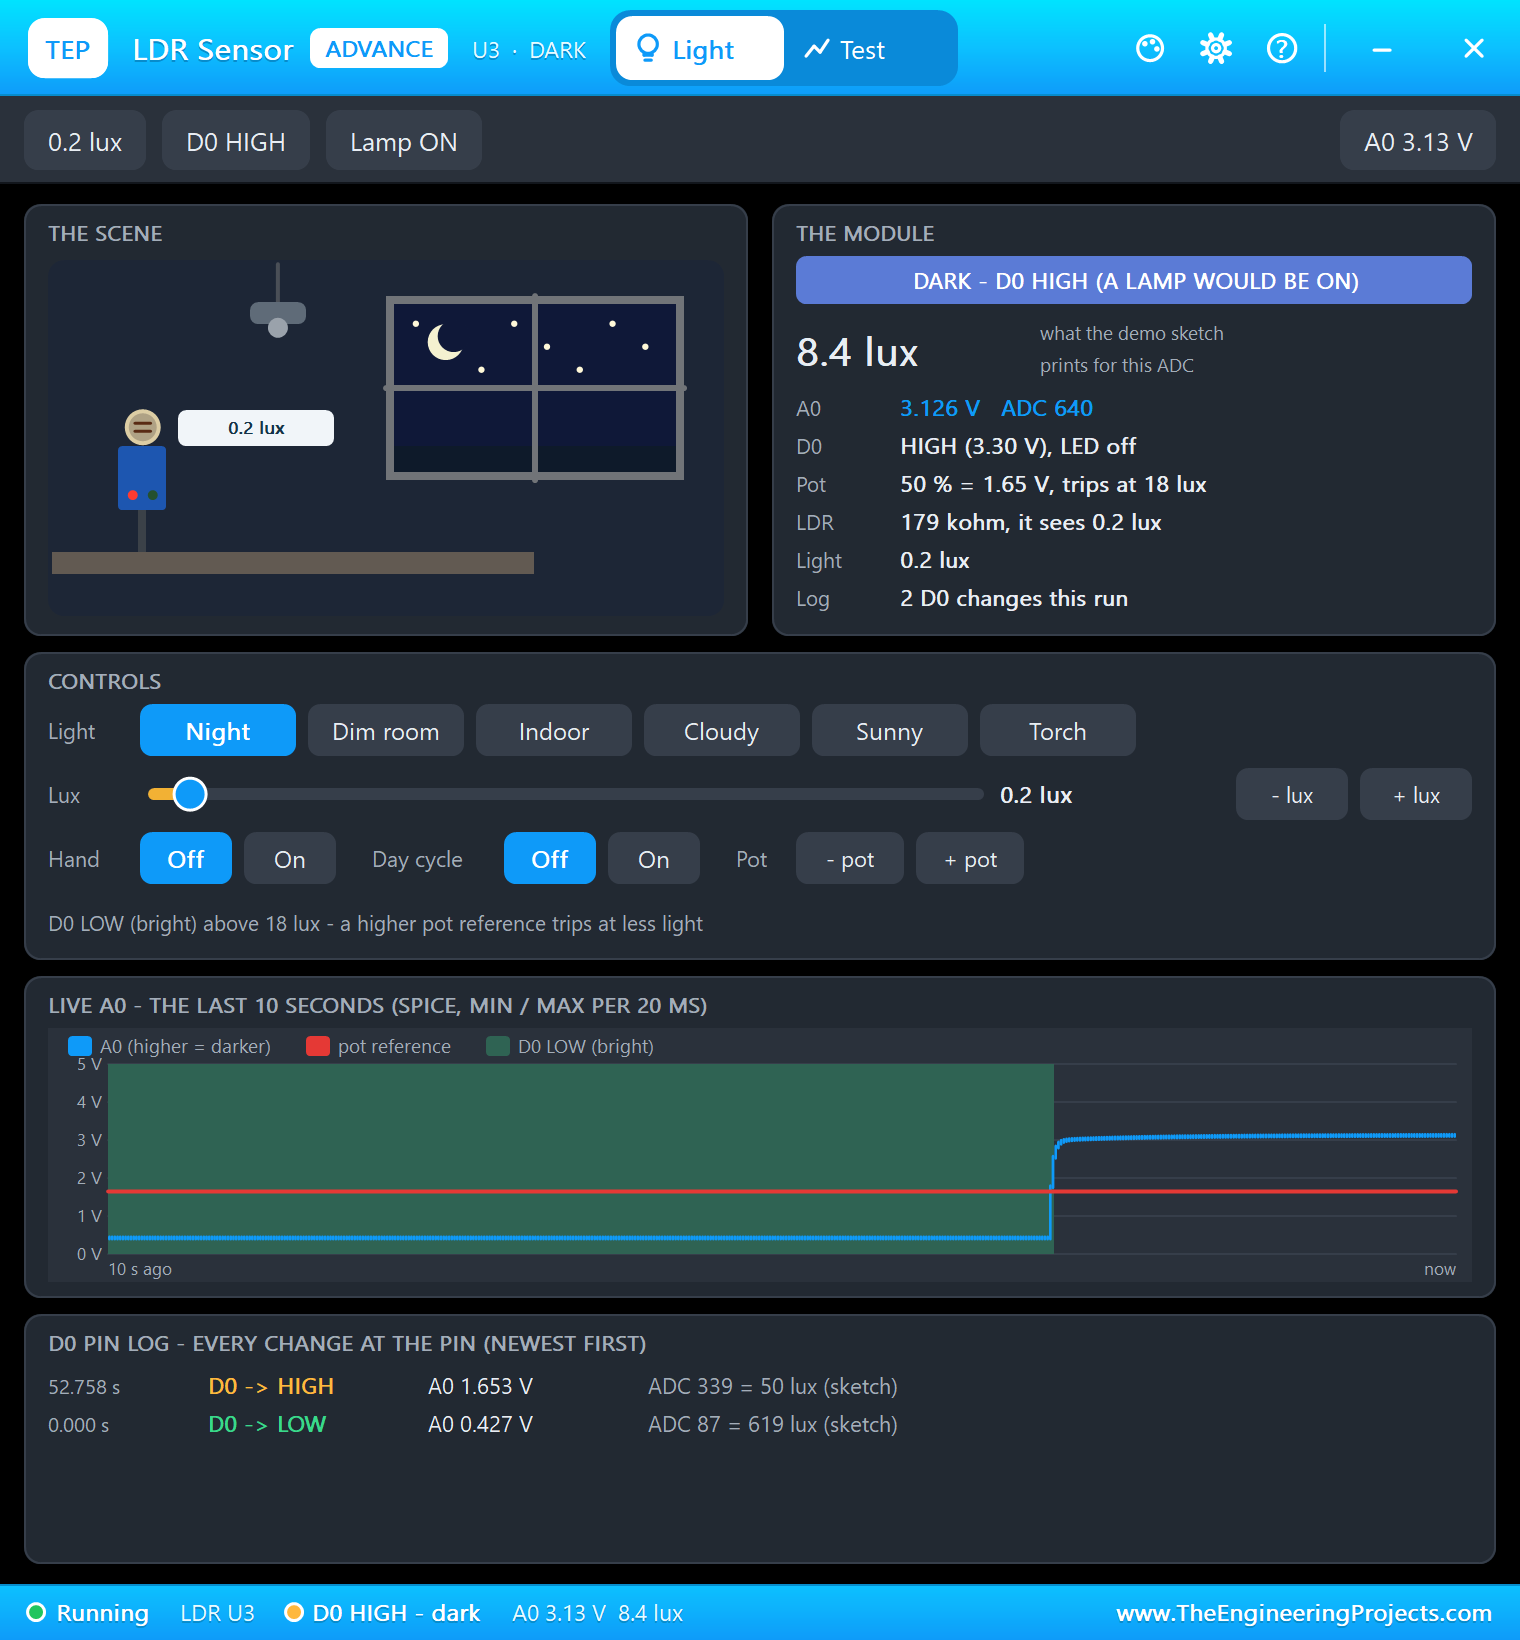
The sensors, the ADC, the driver and the relay are Advance models with pop-ups. The DHT22's pop-up has the presets ROOM, HOT, HUMID, DRY, COLD and FREEZER. The soil sensor's pop-up shows a pot with a plant and has Dry, Moist and Wet presets and a WATER THE PLANT button. The LDR's pop-up sets the light from Night to Sunny, and the water sensor's pop-up holds a little tank from Empty to Full.
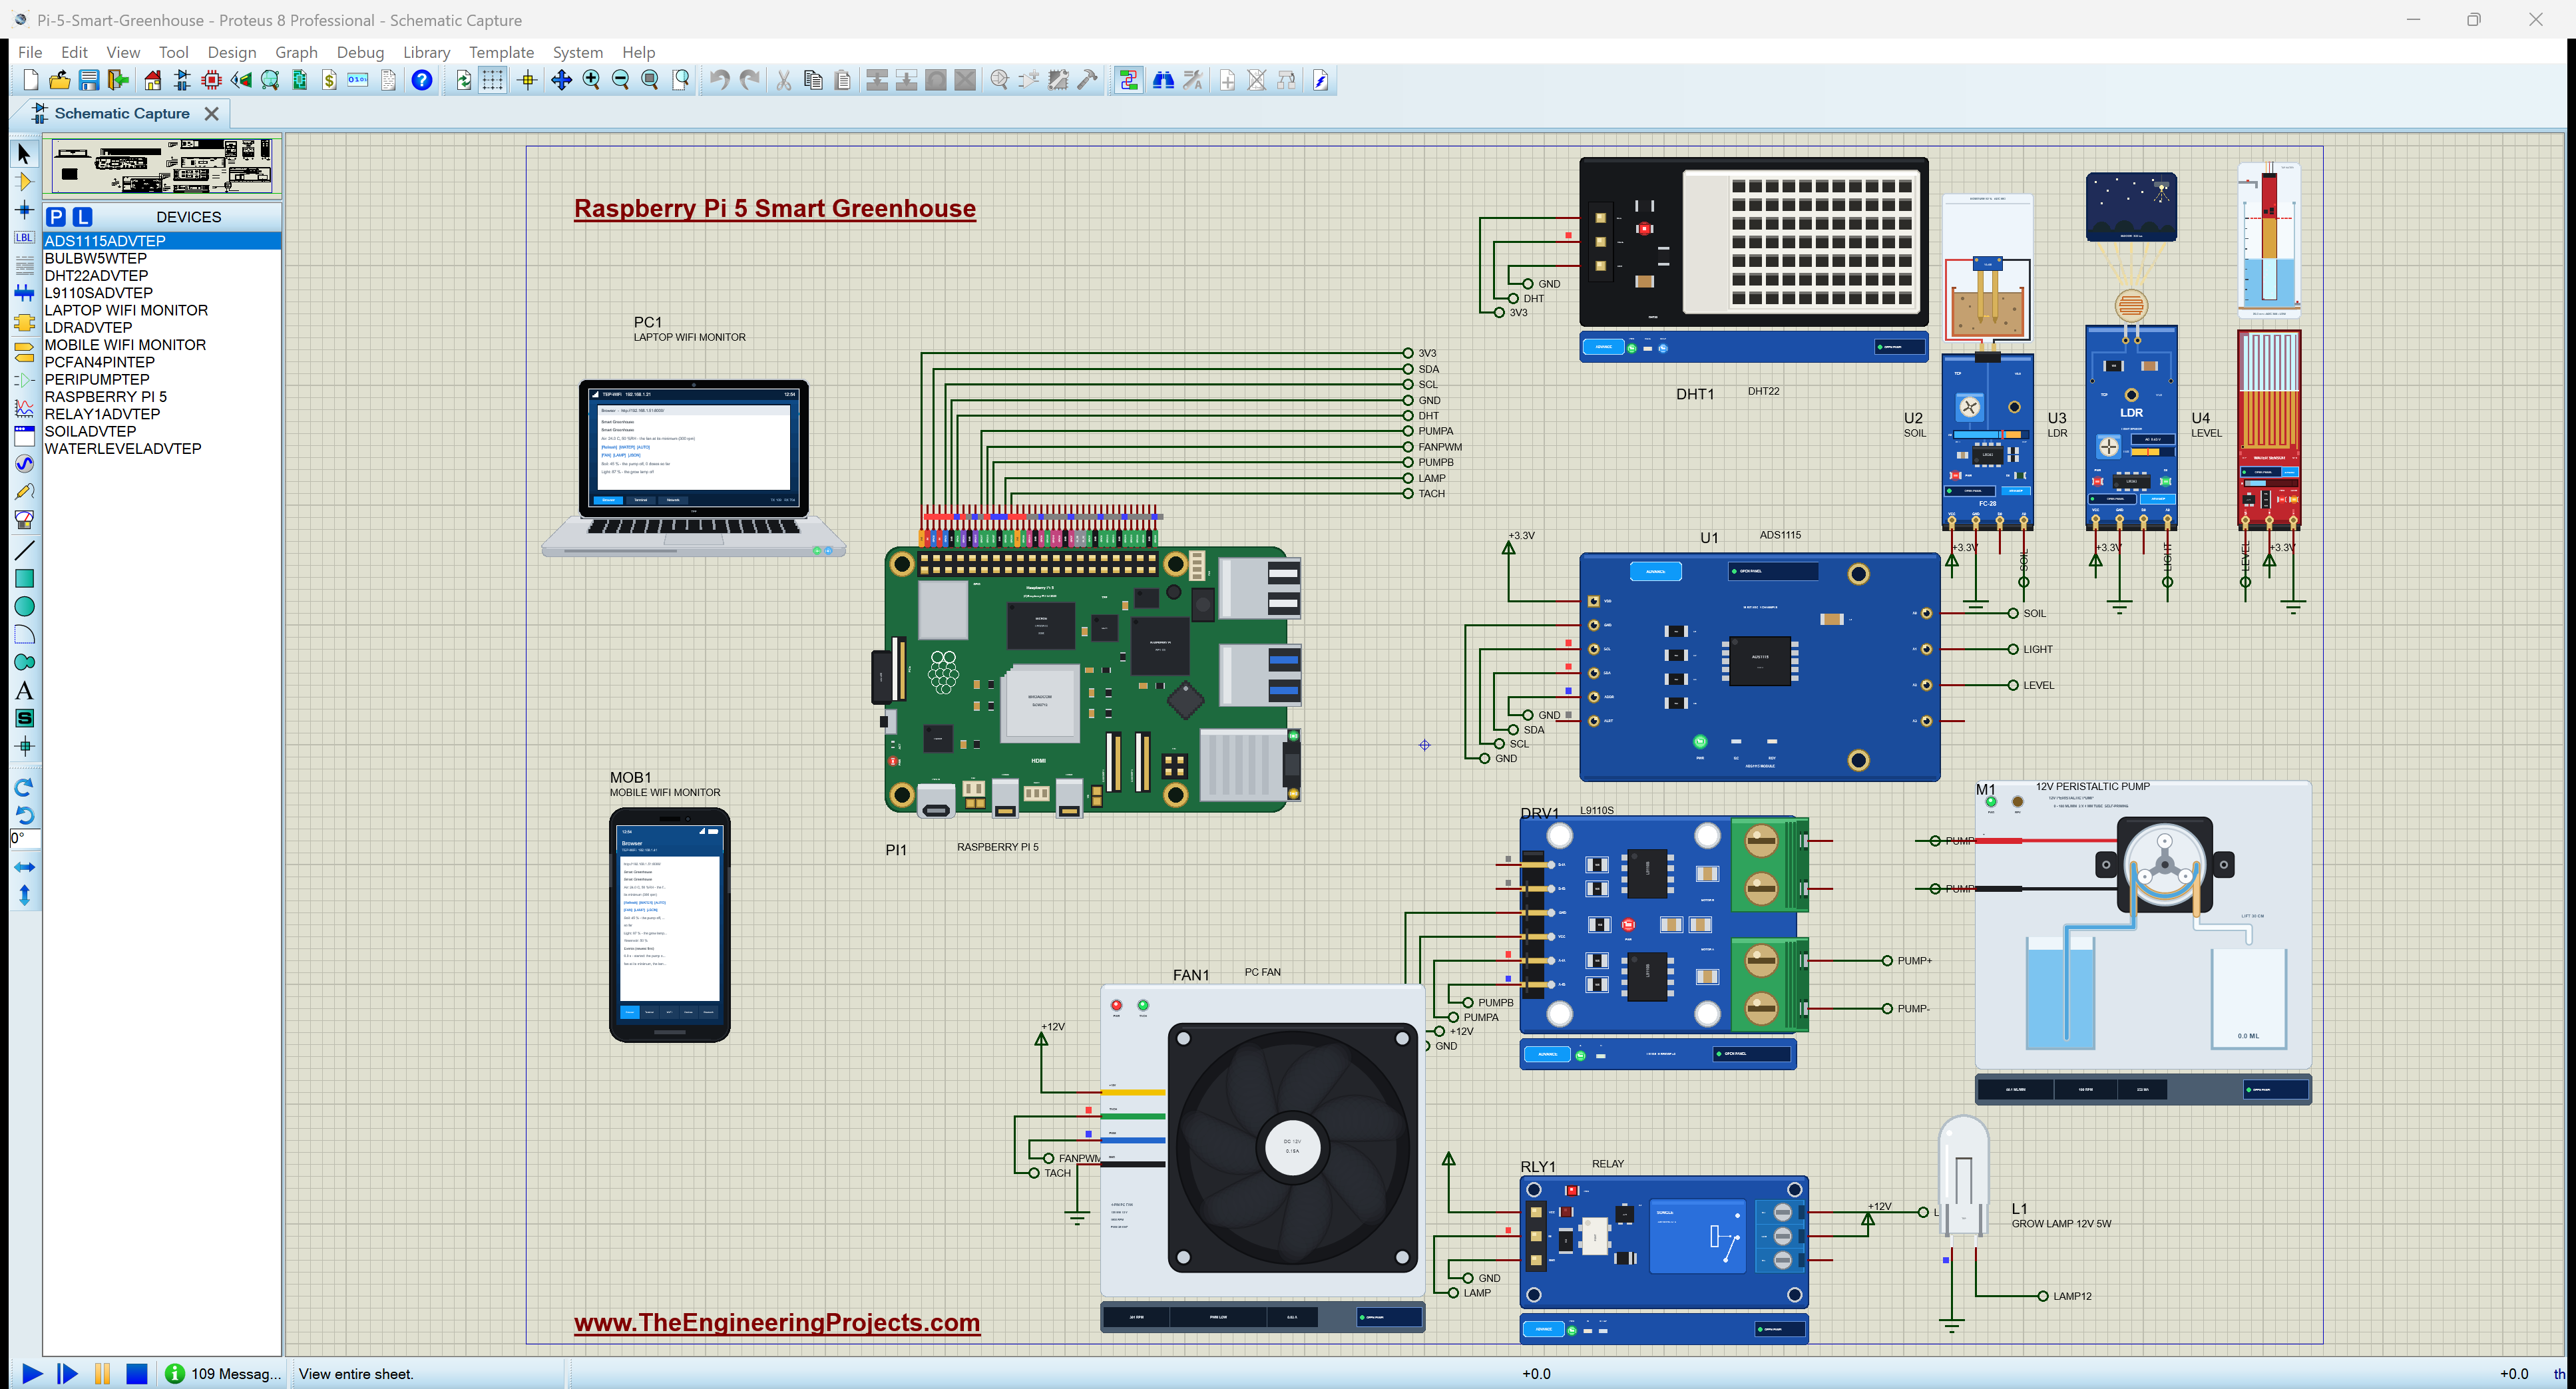
Proteus Simulation of the Smart Greenhouse: the Circuit
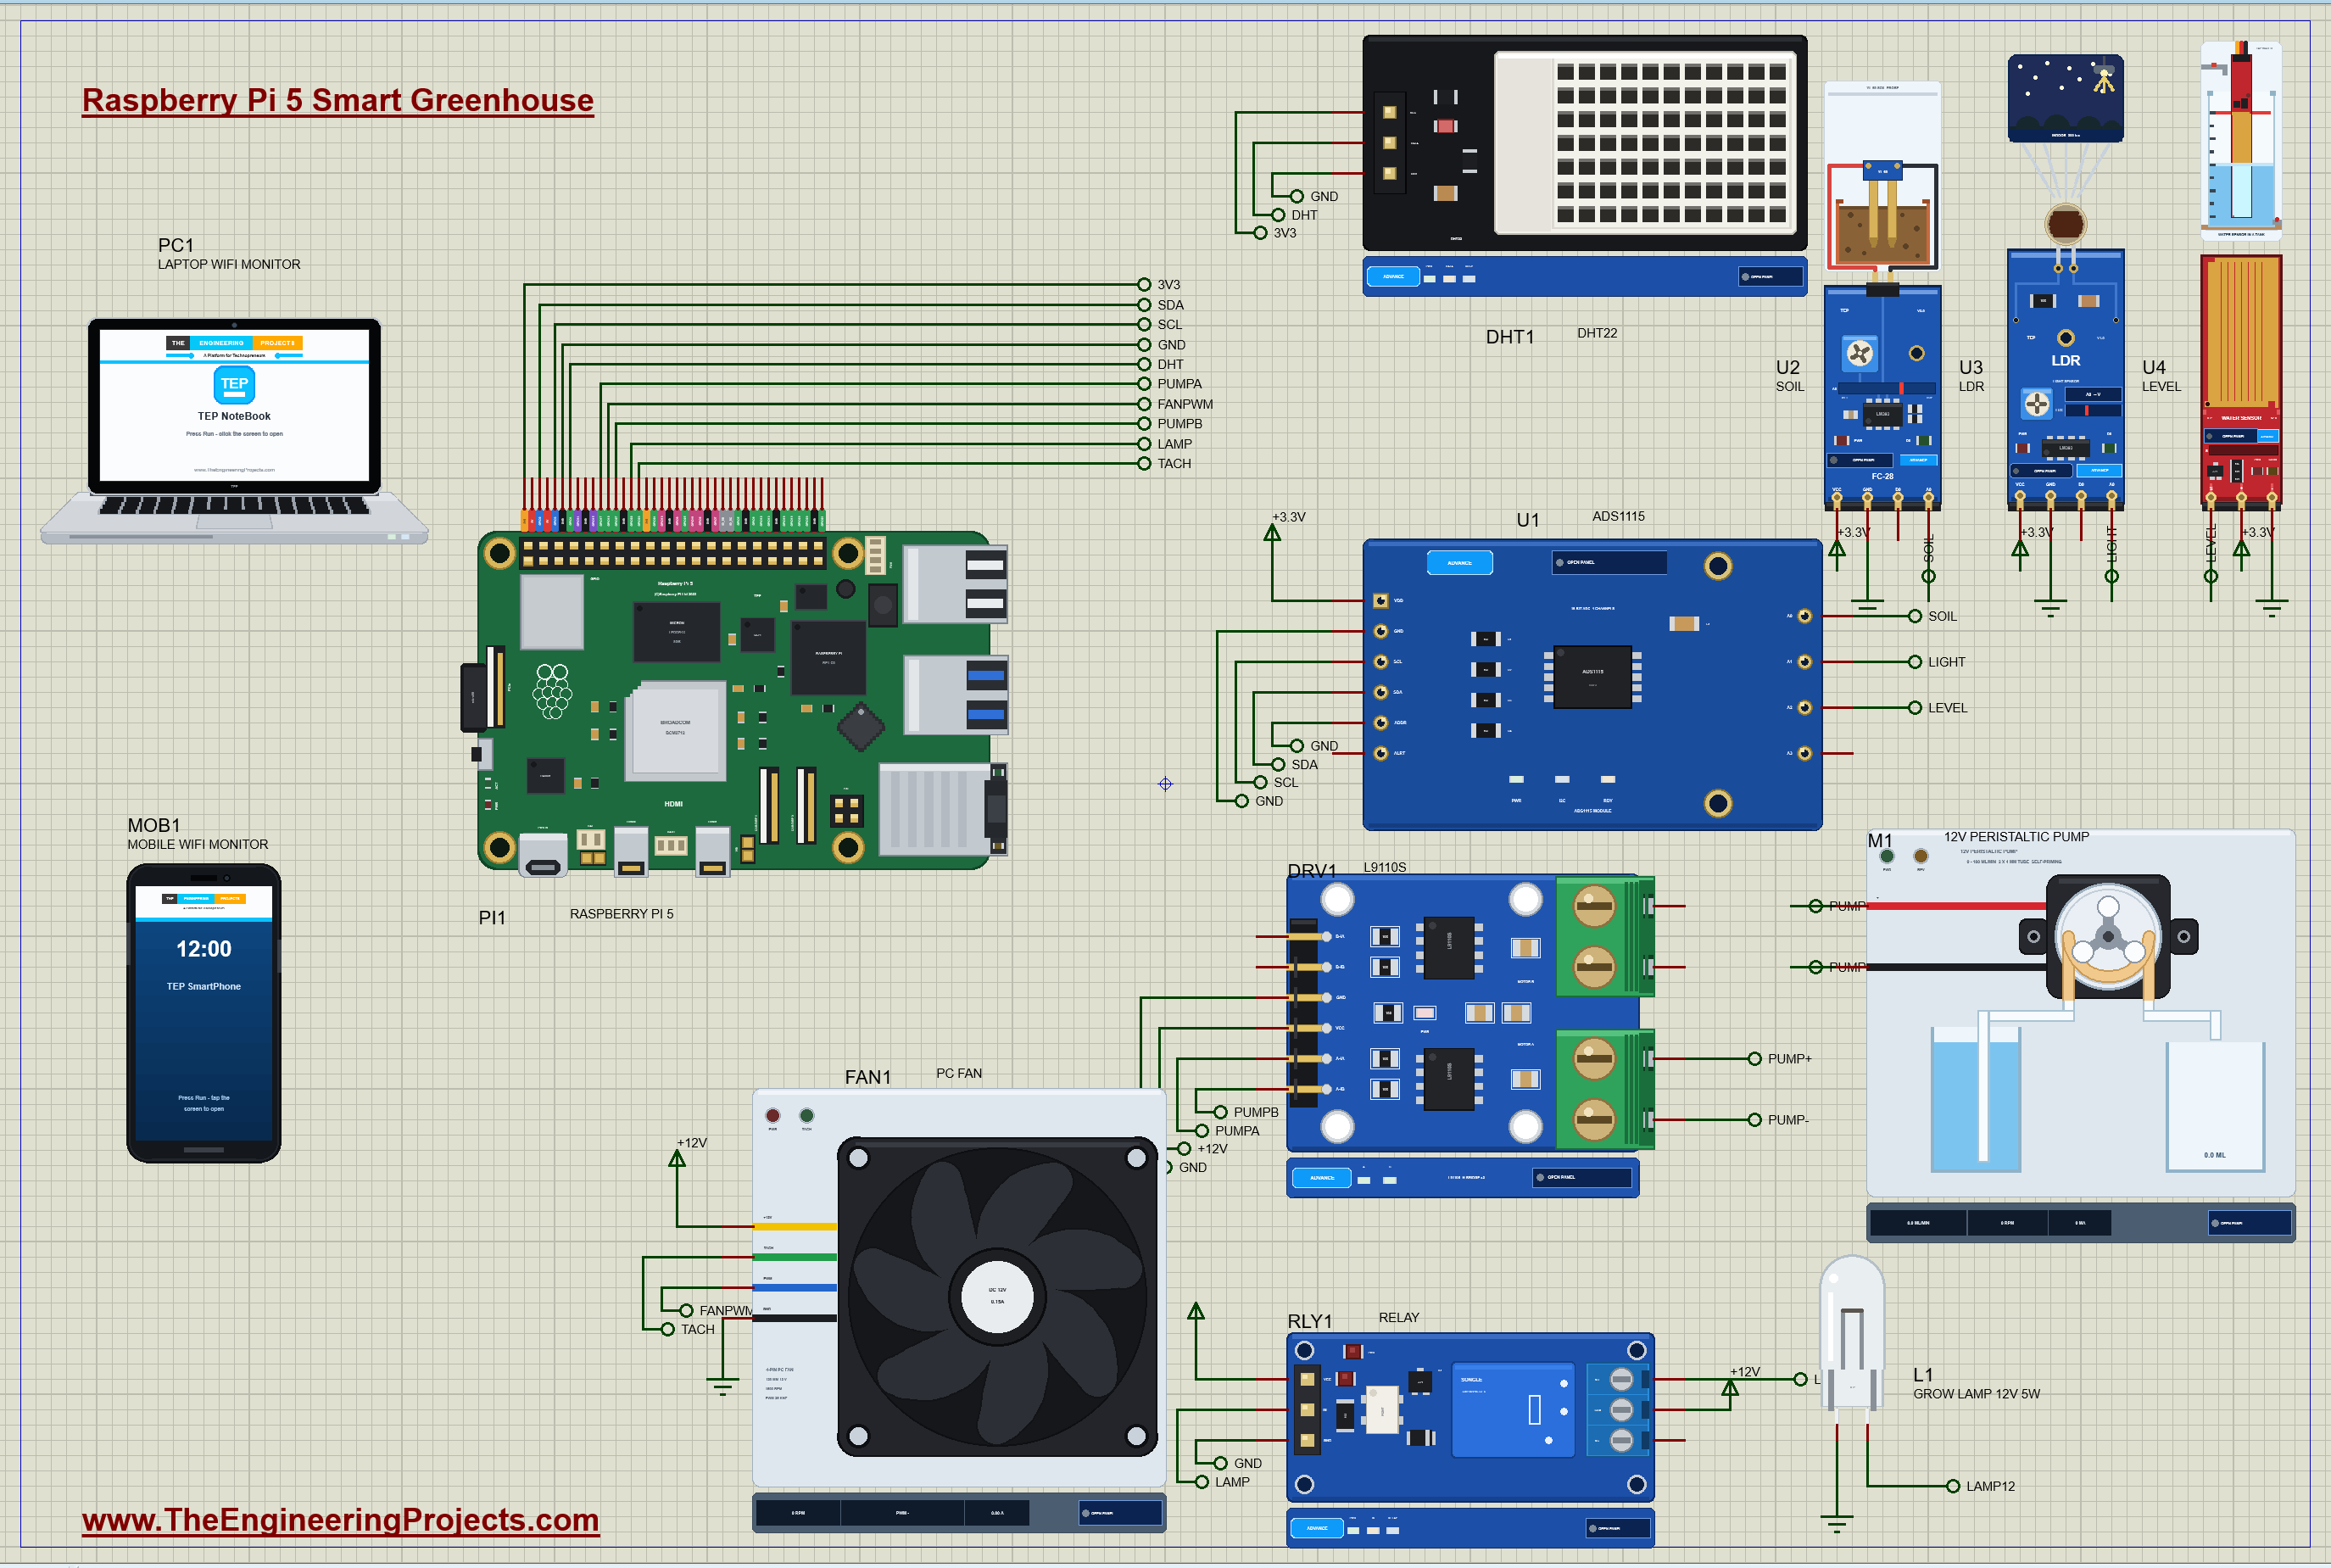
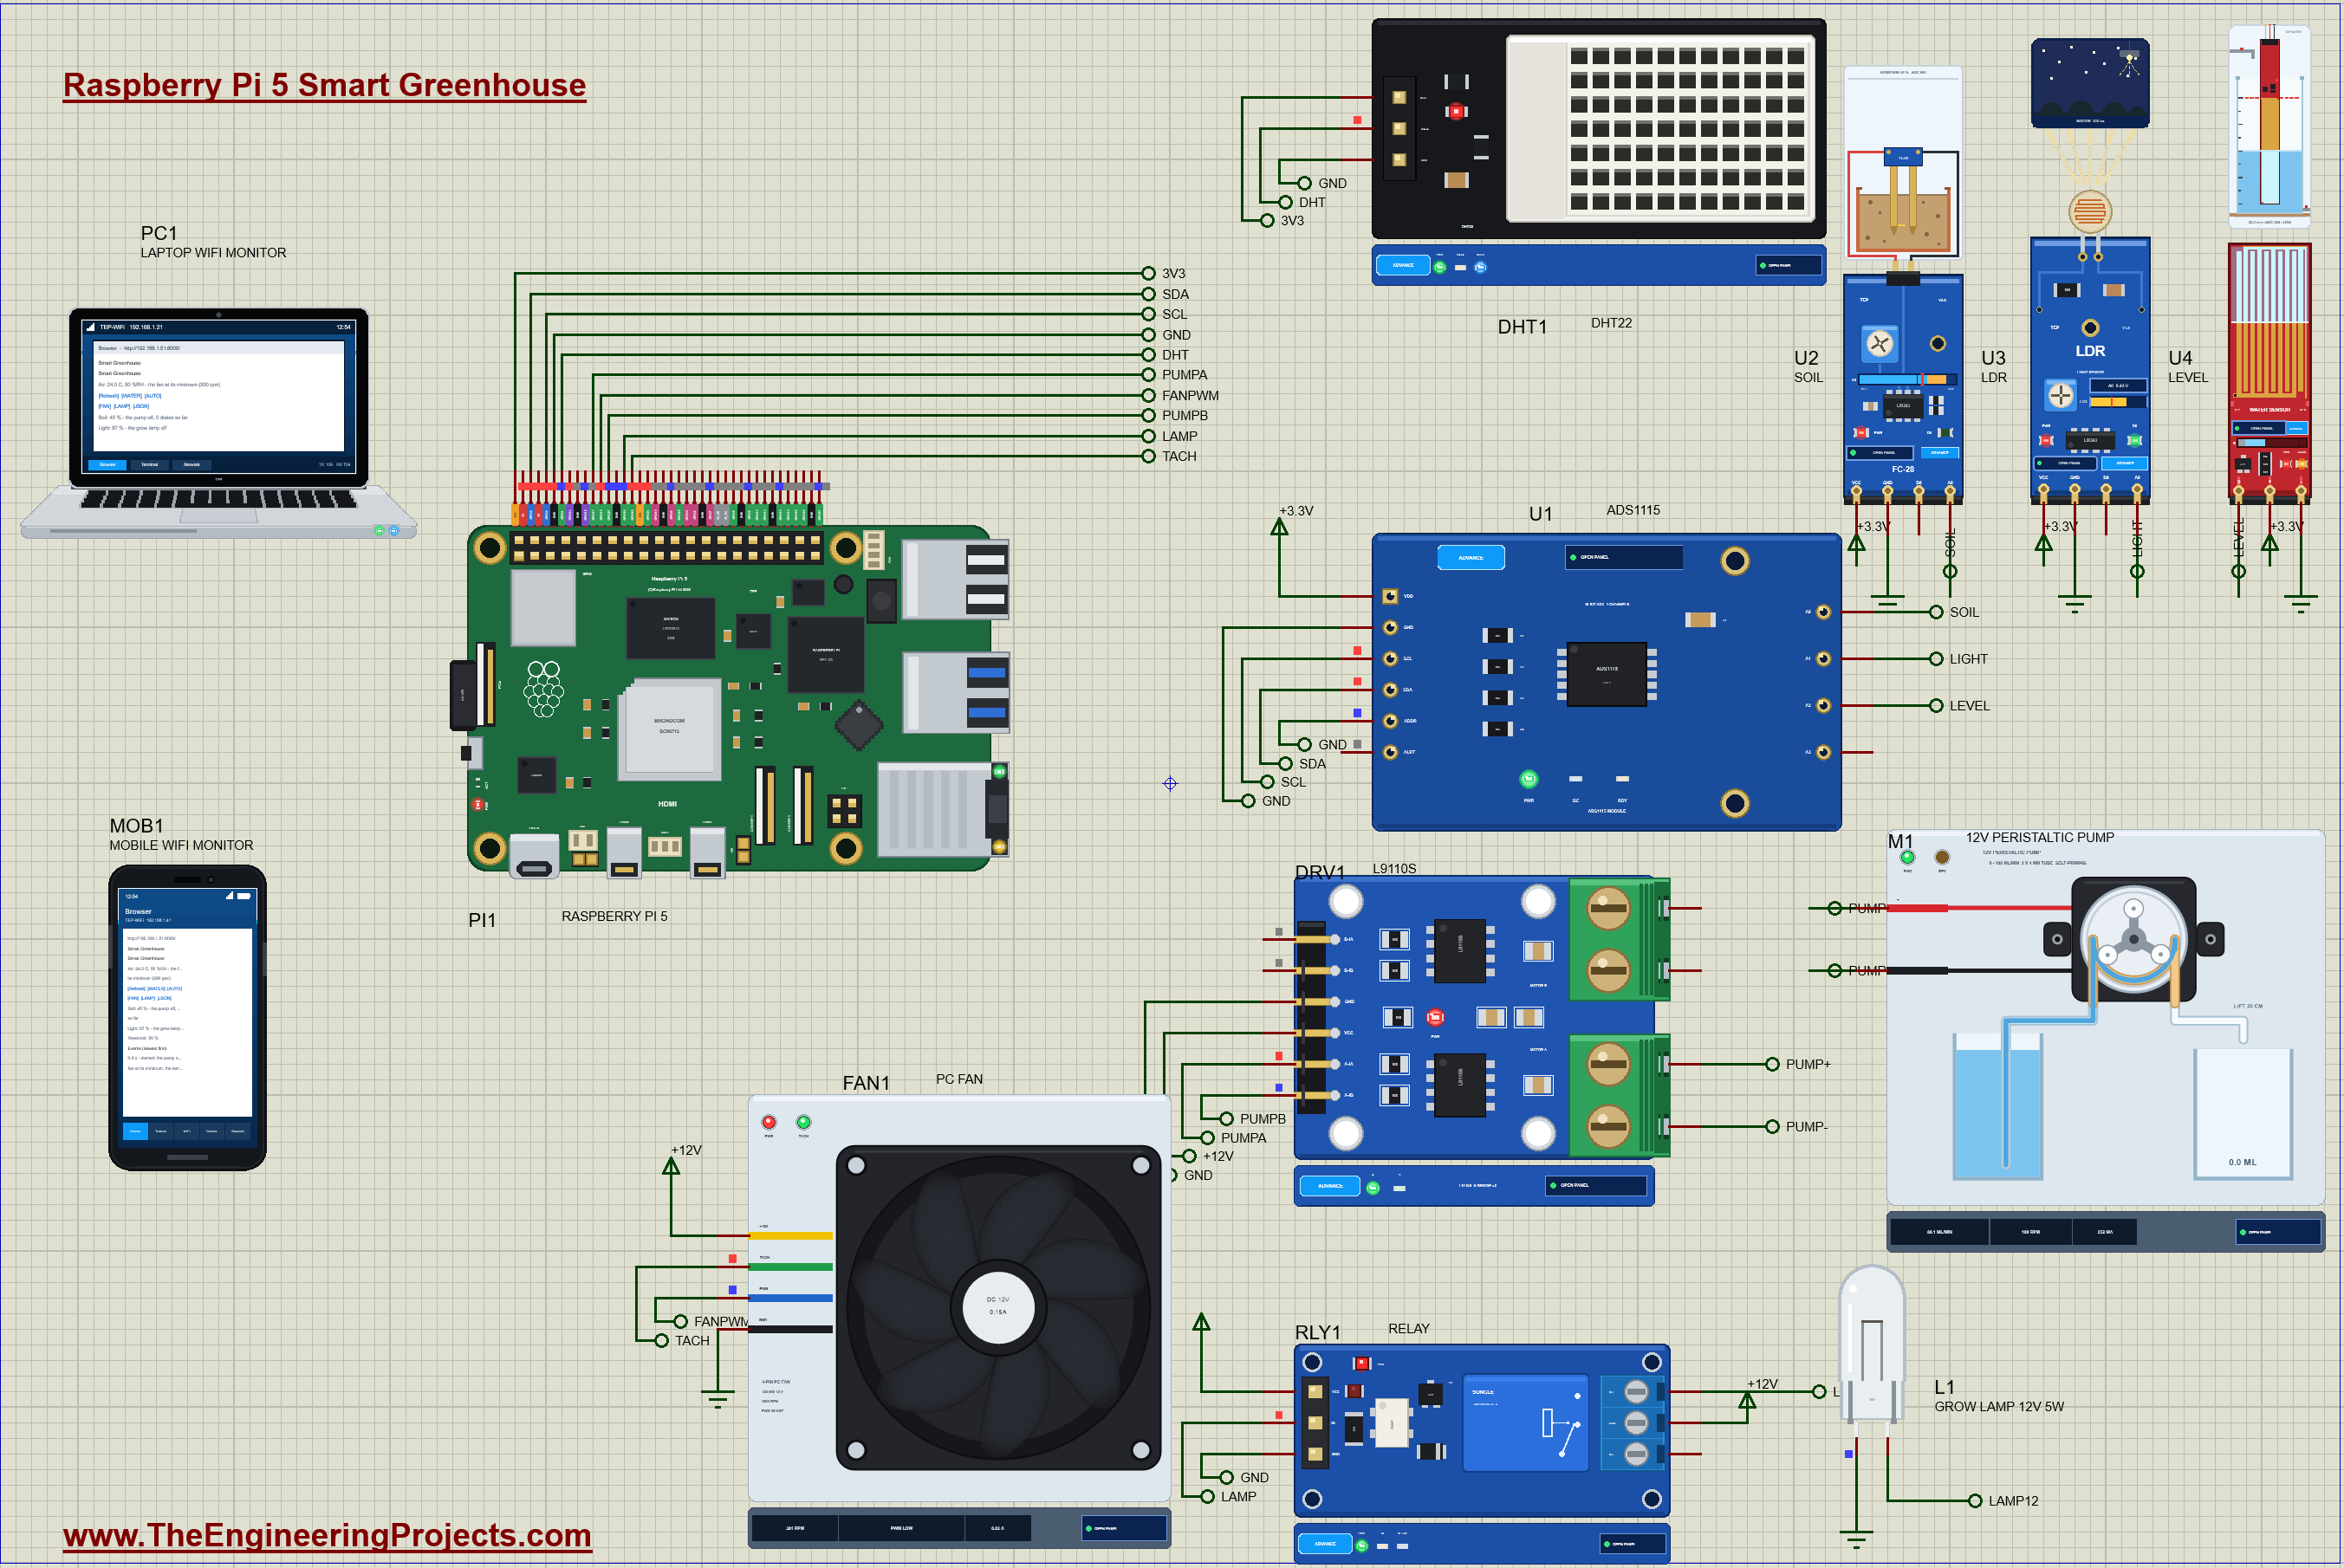
Every signal leaves the Pi's header through a net label:
| Part | Pins | Raspberry Pi 5 header |
|---|---|---|
| DHT1 DHT22 | VCC / DATA / GND | 3V3 (pin 1) / GPIO4 (pin 7) / GND (pin 6) |
| U1 ADS1115 | SDA / SCL (ADDR to GND = 0x48) | GPIO2 (pin 3) / GPIO3 (pin 5) |
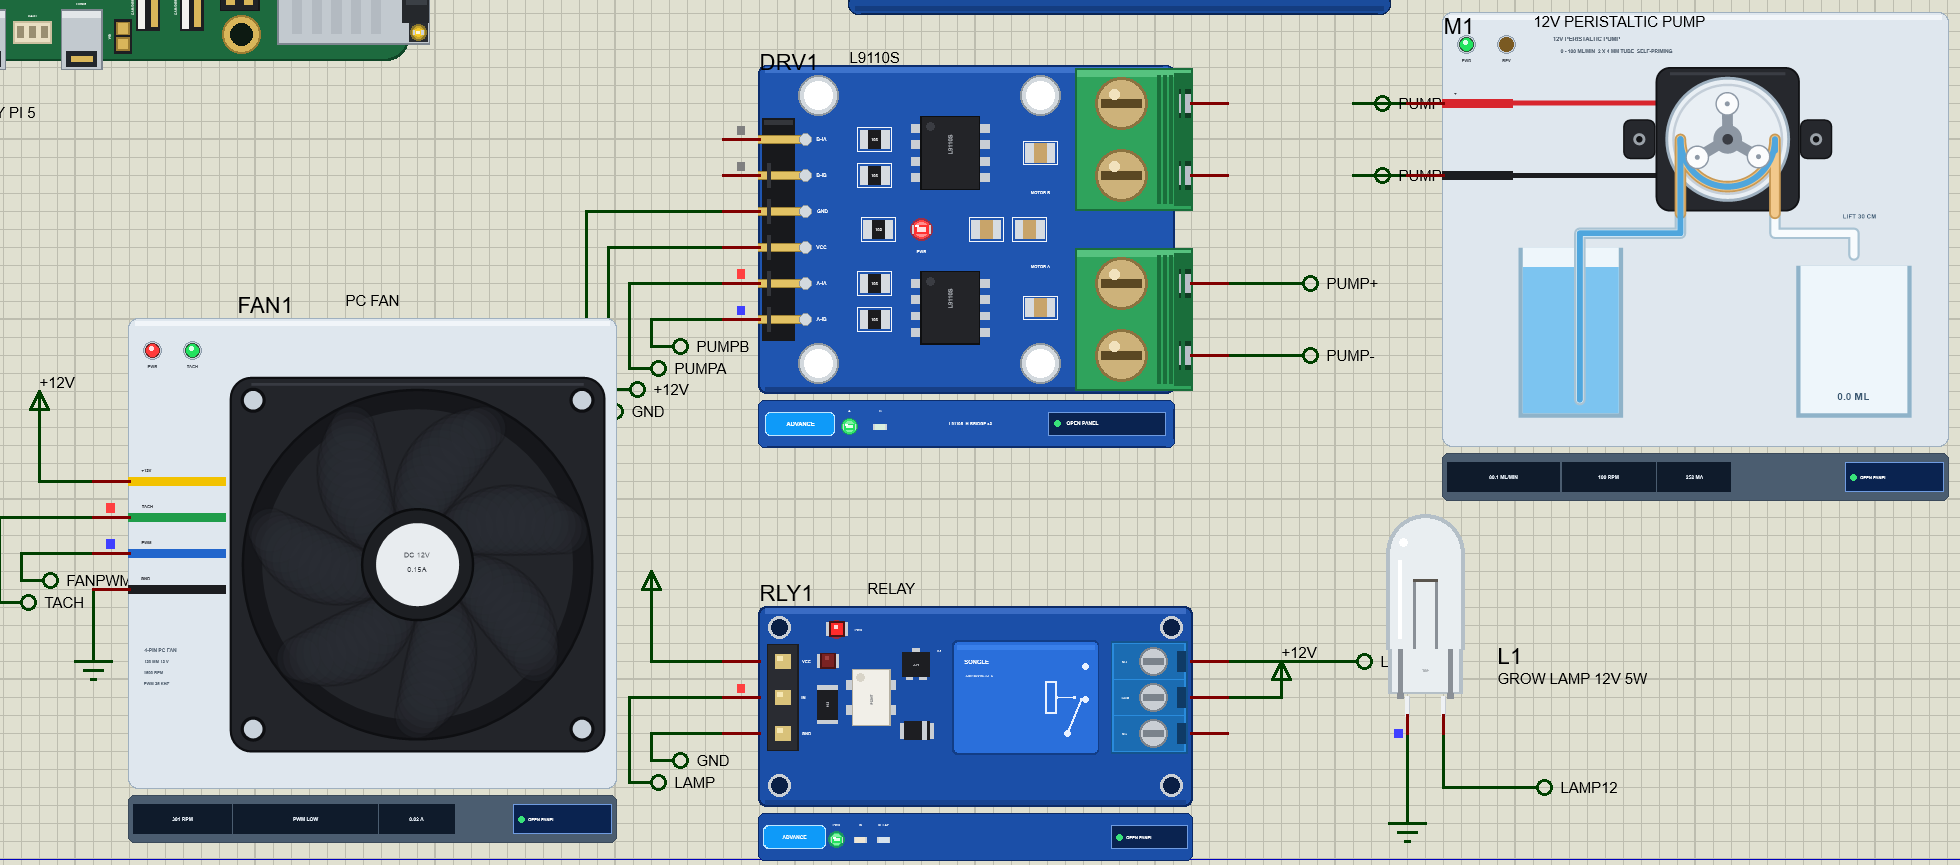
| DRV1 L9110S | A-IA / A-IB | GPIO17 (pin 11) / GPIO27 (pin 13) |
| FAN1 PC fan | PWM / TACH | GPIO18 (pin 12) / GPIO23 (pin 16) |
| RLY1 relay | IN | GPIO22 (pin 15) |
| the ADS1115's inputs | A0 / A1 / A2 | soil / light / water level |
Supplies
The three analog sensors and the ADS1115 run on 3.3 V, so their outputs never exceed the ADC's supply; the DHT22 takes 3.3 V from the Pi's header. The pump, the fan and the lamp run on 12 V: the L9110S gets 12 V on its VCC and switches it to the pump, the fan has its own 12 V, and the relay's contact switches 12 V to the lamp. The relay module itself runs on 5 V, and all the grounds are joined, which every mixed-voltage circuit needs.
How the Smart Greenhouse Works
Reading Analog Sensors on a Raspberry Pi
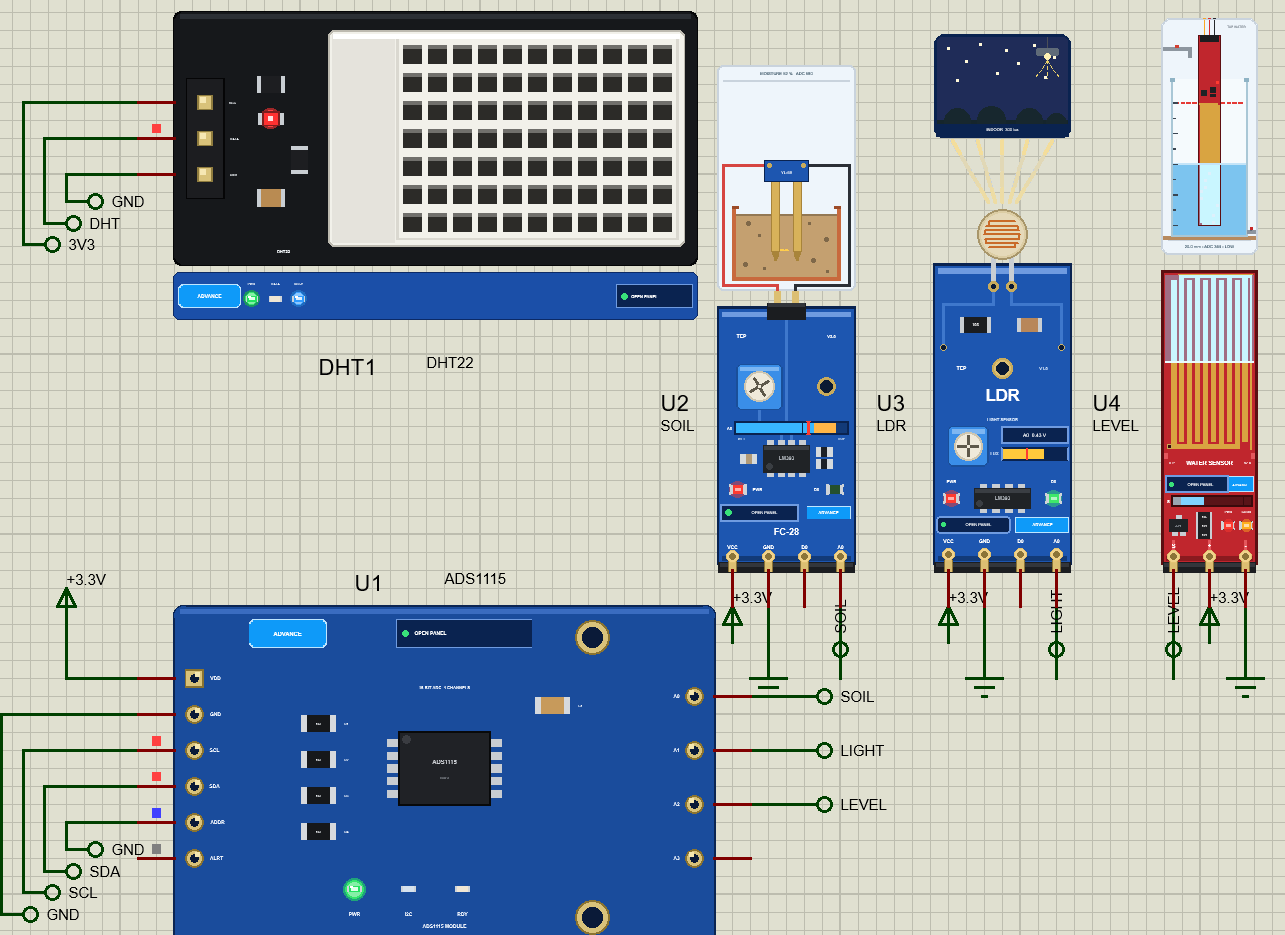
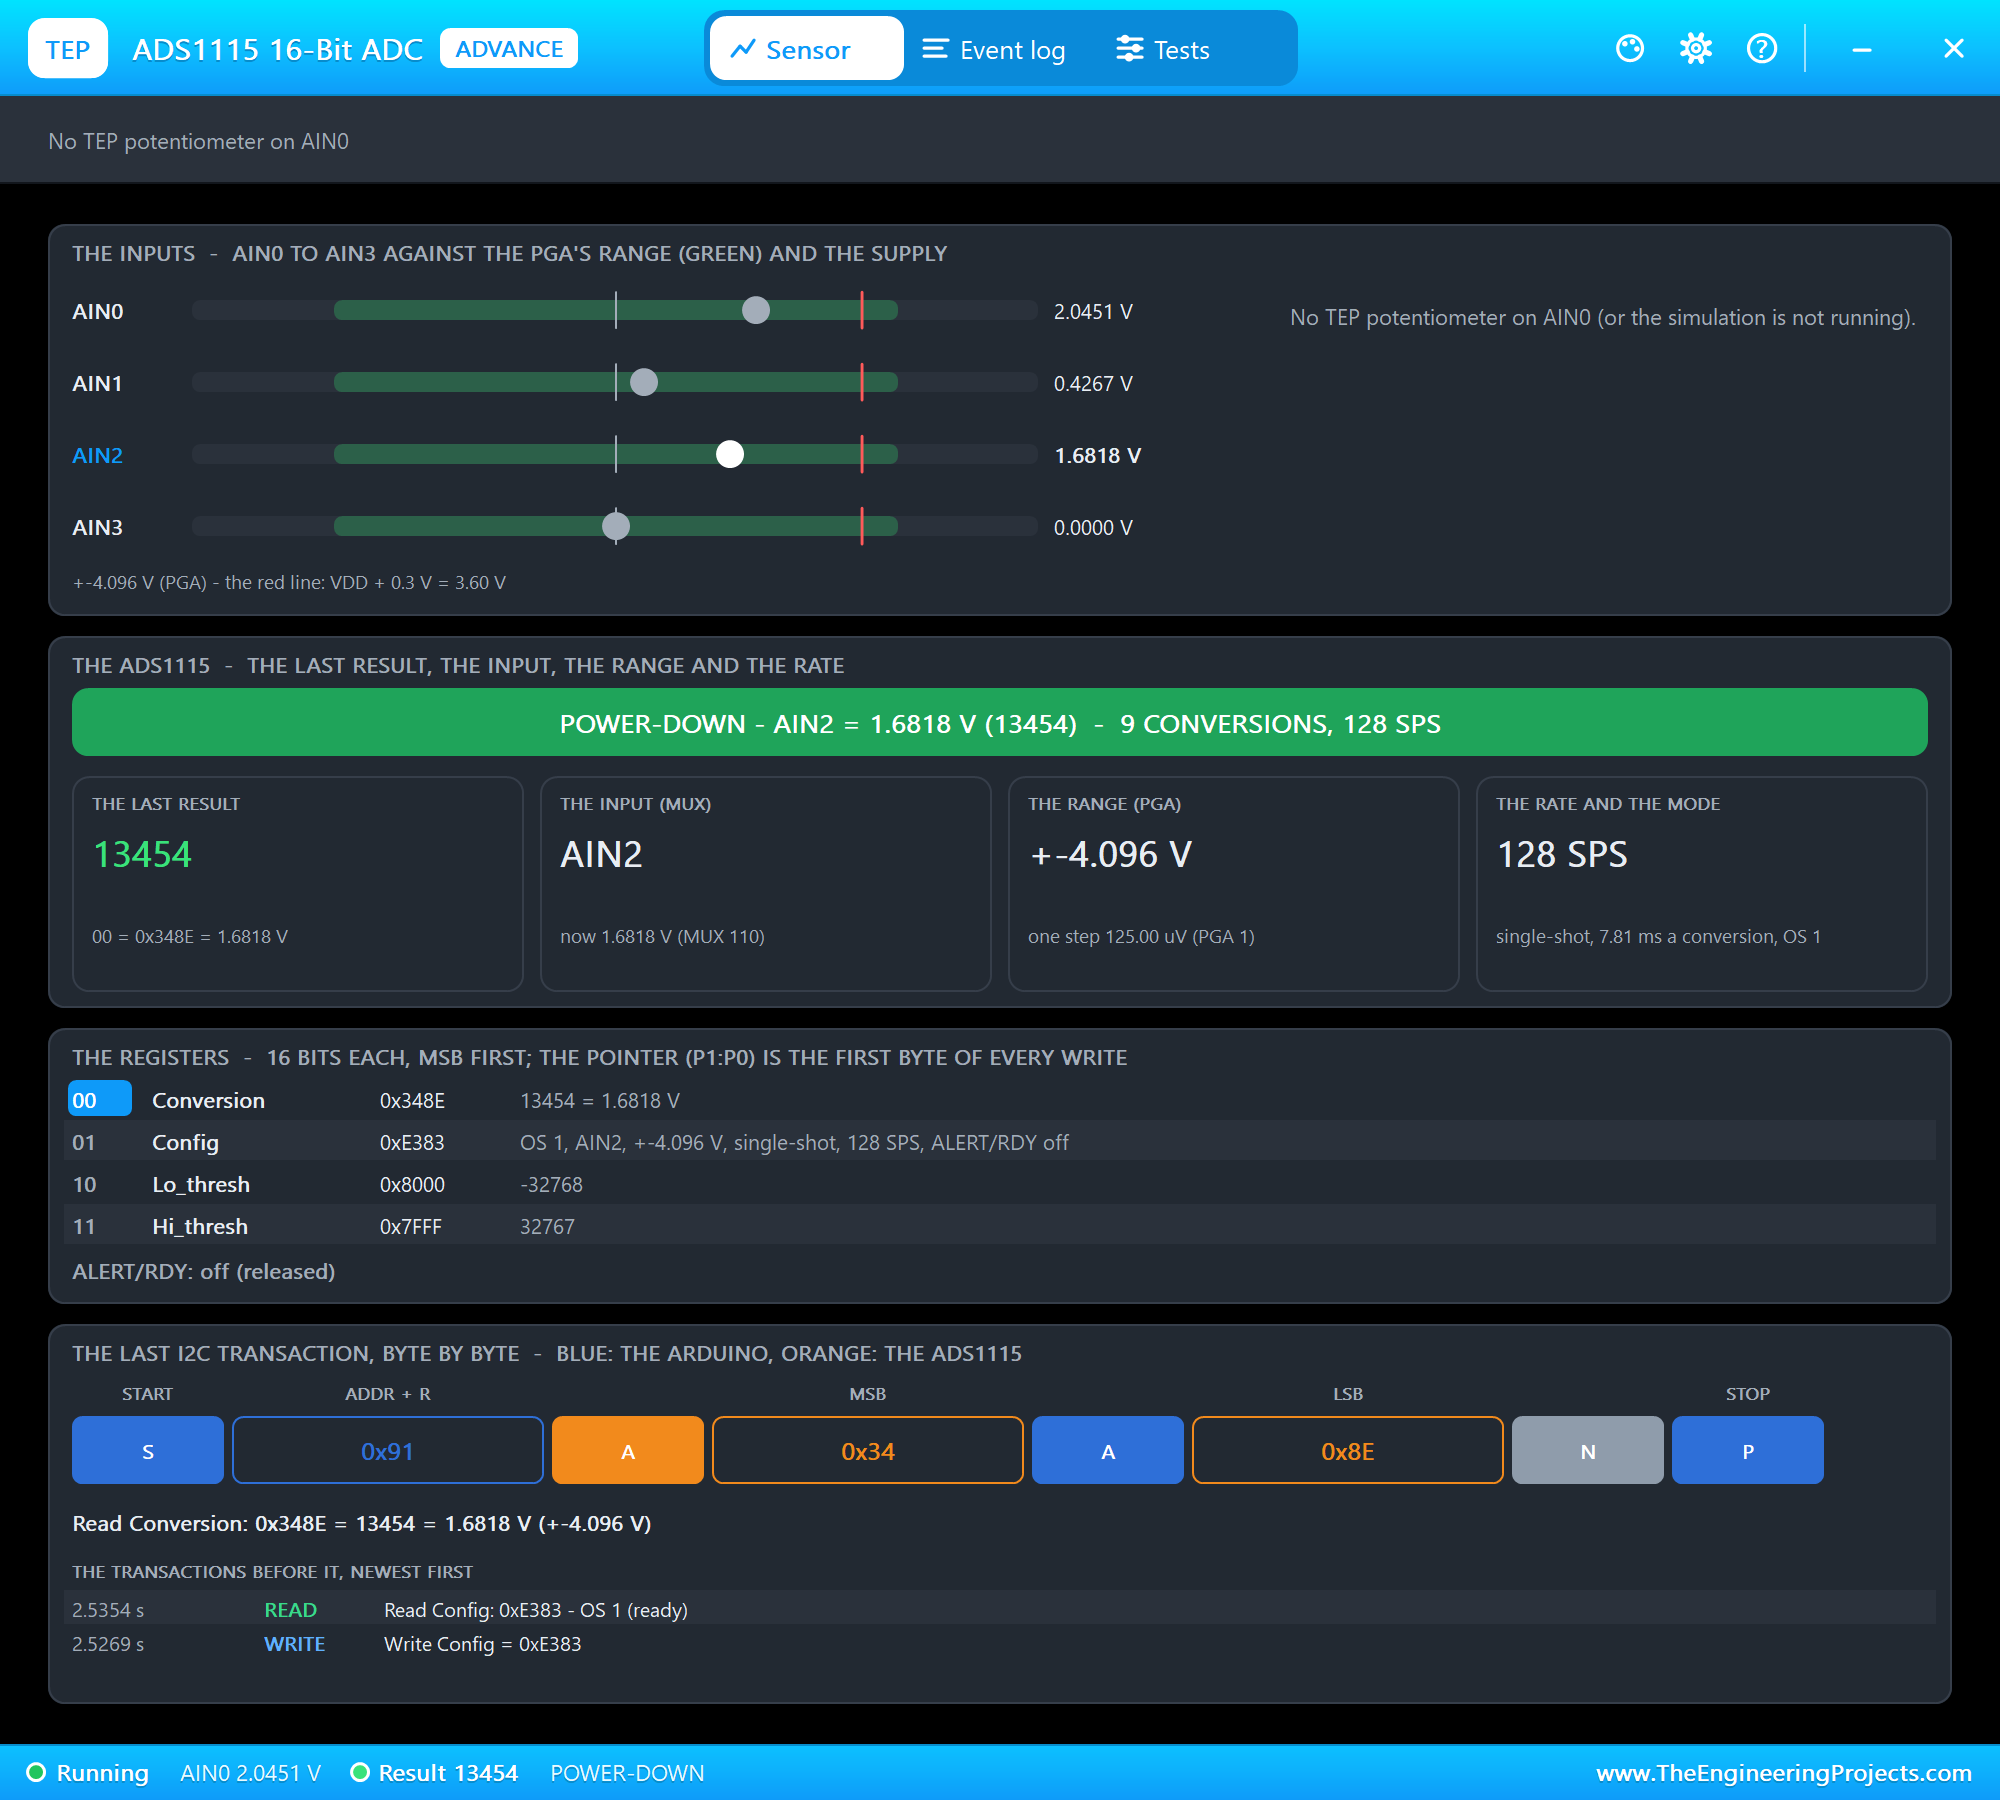
The Raspberry Pi has no analog inputs at all. The ADS1115 fills the gap: a 16-bit ADC with four inputs on the I2C bus. The program starts a single conversion by writing the config register, waits for its OS bit to report the result ready, and reads the result register. At a full scale of plus or minus 4.096 V, one step is 125 microvolts, far finer than the sensors need.
The Soil Moisture Sensor
The fork-shaped probe pushed into the soil is a variable resistor: wet soil conducts well, dry soil hardly at all. On the module, the probe and a 10k resistor form a divider, so A0 = VCC x Rprobe / (Rprobe + 10k). Bone-dry soil gives about 0.93 of the supply, very wet soil about 0.24, and the model is linear in between, so the program turns the ratio into a percentage directly. For example, at 45 % moisture the module gives 2.045 V on 3.3 V, a ratio of 0.62, and (0.93 - 0.62) / (0.93 - 0.24) x 100 = 45 %.
The Light and the Water Level
The LDR module works the same way, with a GL5528 photoresistor in its divider: its resistance rises in the dark, so A0 rises too, from about 0.13 of the supply in a lit room to 0.95 at night. The water level sensor has bare copper traces; the deeper they stand in water, the more current flows and the higher S goes, but not in a straight line. The program uses a small table measured at 3.3 V (10 mm: 0.385, 20 mm: 0.509, 30 mm: 0.578, 40 mm: 0.615 of the supply) and interpolates between its points; 40 mm is a full reservoir.
The DHT22
The DHT22 (AM2302) measures temperature and humidity and sends them on one data wire. The Pi pulls the line low to ask, the sensor answers with 40 bits, 16 for the humidity, 16 for the temperature and 8 for a checksum, and it needs 2 seconds between readings. The adafruit_dht library handles all of that, and the program keeps the last good reading when one fails its checksum.
Watering in Doses
Soil reacts slowly: water poured on top takes several seconds to reach the probe. A controller that pumps until the probe reads wet would flood the pot. So the program waters in doses: the pump runs 4 seconds, then waits 10 seconds for the water to soak in, then checks again. A peristaltic pump suits this well: its rollers squeeze a tube, so every turn moves the same small volume, the liquid never touches the mechanism, and it primes itself. The L9110S drives it as a simple H-bridge: A-IA HIGH and A-IB LOW turn the motor forward.
Hysteresis: No Chattering
| Actuator | On when | Off again when |
|---|---|---|
| the pump (watering) | the soil below 35 % | the soil at 45 % or more |
| the fan at full speed | above 30 C or 85 %RH | below 28 C and 75 %RH |
| the grow lamp | the light below 25 % | the light above 40 % |
| the pump block | the reservoir below 25 % | the reservoir at 25 % or more |
Each rule has a gap between its on and off points. With a single limit, a reading that wobbles around it would switch the fan or the lamp on and off every second; with the gap, it switches once and stays. The fan's PWM wire is used as a switch: LOW gives the fan's minimum speed for gentle air movement, HIGH gives full speed, and its tach wire, two pulses a turn, lets the Pi measure the speed.
The Python Code Explained
The whole program is included in the download. It uses adafruit_dht for the DHT22, lgpio for the GPIOs, the I2C bus and the tach, and the standard library's http.server for the dashboard. At the top are the rules:
SOIL_DRY, SOIL_WET = 35, 45        # % moisture: water below 35 %, stop at 45 % (a gap of 10 %: no chattering)
DOSE_S, SOAK_S = 4, 10             # the pump runs 4 s, then waits 10 s for the water to soak in before it checks again
The ADS1115
One config word starts a conversion on the chosen input:
cfg = 0x8000 | (4 + ch) << 12 | 0x0200 | 0x0100 | 0x0080 | 0x0003From Volts to Percent
return max(0.0, min(100.0, (0.93 - v / SUPPLY) / (0.93 - 0.24) * 100)) return max(0.0, min(100.0, (1 - v / SUPPLY) * 100))LEVEL_CURVE = [(0.0, 0), (0.385, 10), (0.509, 20), (0.578, 30), (0.615, 40)]The DHT22
dht = adafruit_dht.DHT22(board.D4) temp, hum = dht.temperature, dht.humidityWatering
After each soak, the program either stops, because the soil is moist again, or gives the next dose; the reservoir check comes first:
low = tank < TANK_MIN elif soil >= SOIL_WET and not force_dose: lgpio.gpio_write(chip, PUMP_IA, 1 if on else 0) # IA HIGH, IB LOW: the motor turns forwardThe Fan and the Lamp
Each rule compares against its "on" point while off and its "off" point while on, which is the hysteresis in one line:
fan = (temp > HOT_C or hum > HUMID_ON) if not d['fan'] else (temp > COOL_C or hum > HUMID_OFF) lamp = light < DARK_ON if not d['lamp'] else light < DARK_OFF rpm = tach.tally() * 30 / dt # two tach pulses a turnThe controller runs in its own thread once a second, the web server in the main thread, and a lock guards the shared readings. WATER on the page gives one dose by hand; FAN and LAMP switch to manual, and AUTO hands them back.
How to Run the Proteus Simulation
- Download the project zip below and install the library files and the TEPPi folder (the steps are under the download button).
- Open Pi-5-Smart-Greenhouse.pdsprj from the Proteus Simulation folder. Keep greenhouse.py and the DLL files next to it.
- Press Play. The Pi's terminal shows a status line every 5 seconds.
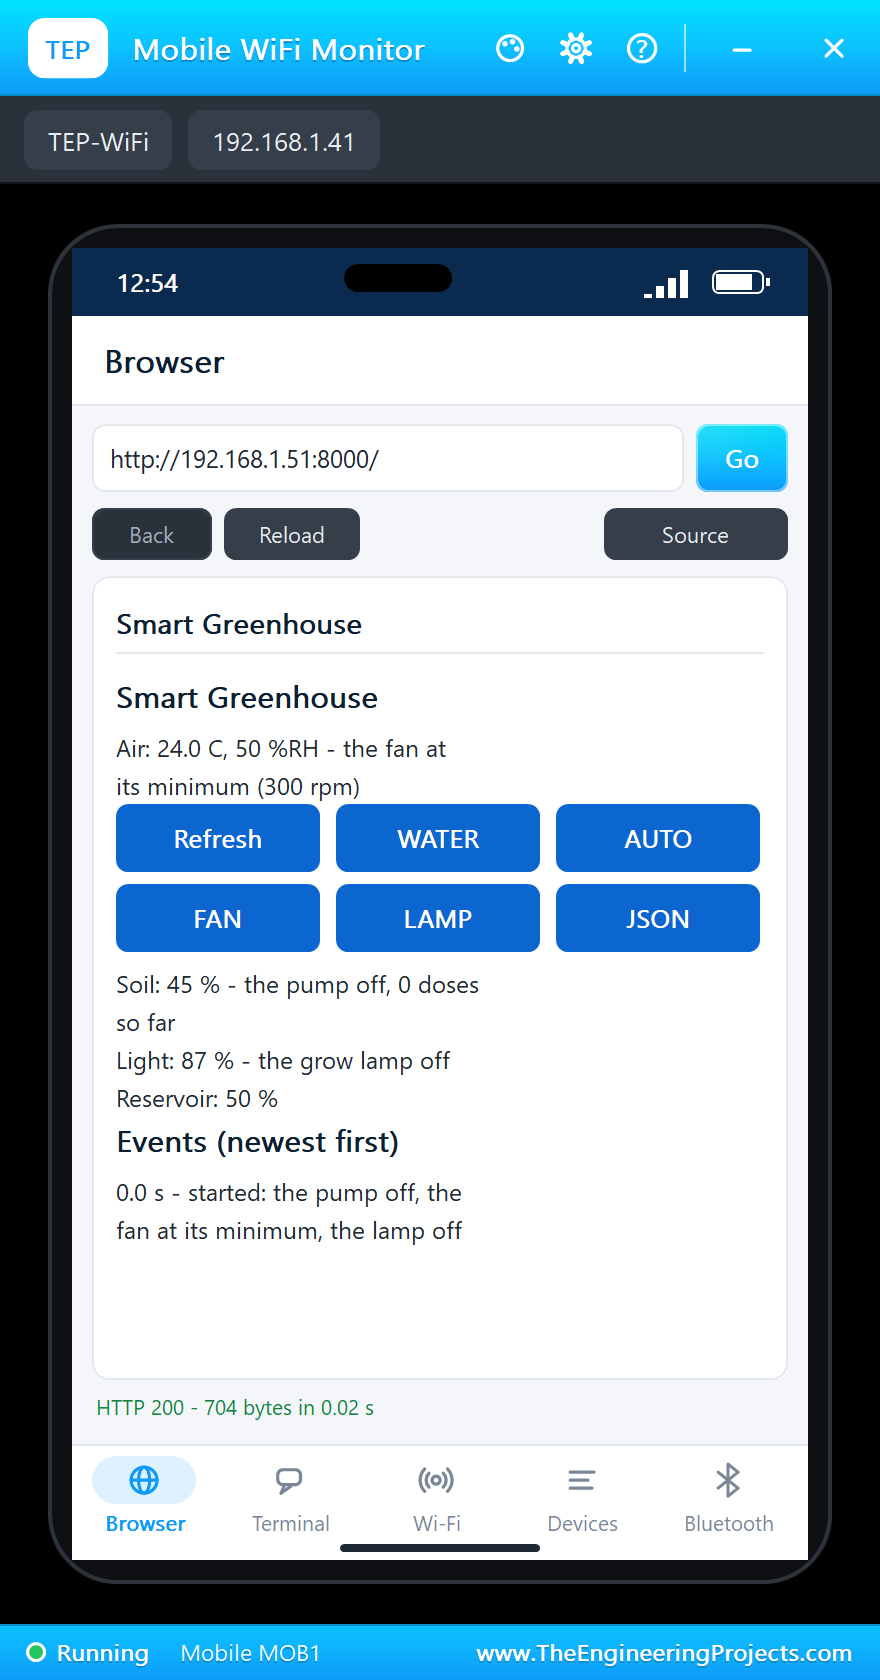
- Open the Laptop WiFi Monitor (PC1) or the Mobile WiFi Monitor (MOB1) and press Go.
- In the soil sensor's pop-up (U2) press Dry 10: the pump starts dosing. Press Water the plant after each dose to see the soil respond.
- Try HOT on the DHT22 (DHT1), Night on the LDR (U3) and Empty on the water sensor (U4).
Proteus Simulation Results
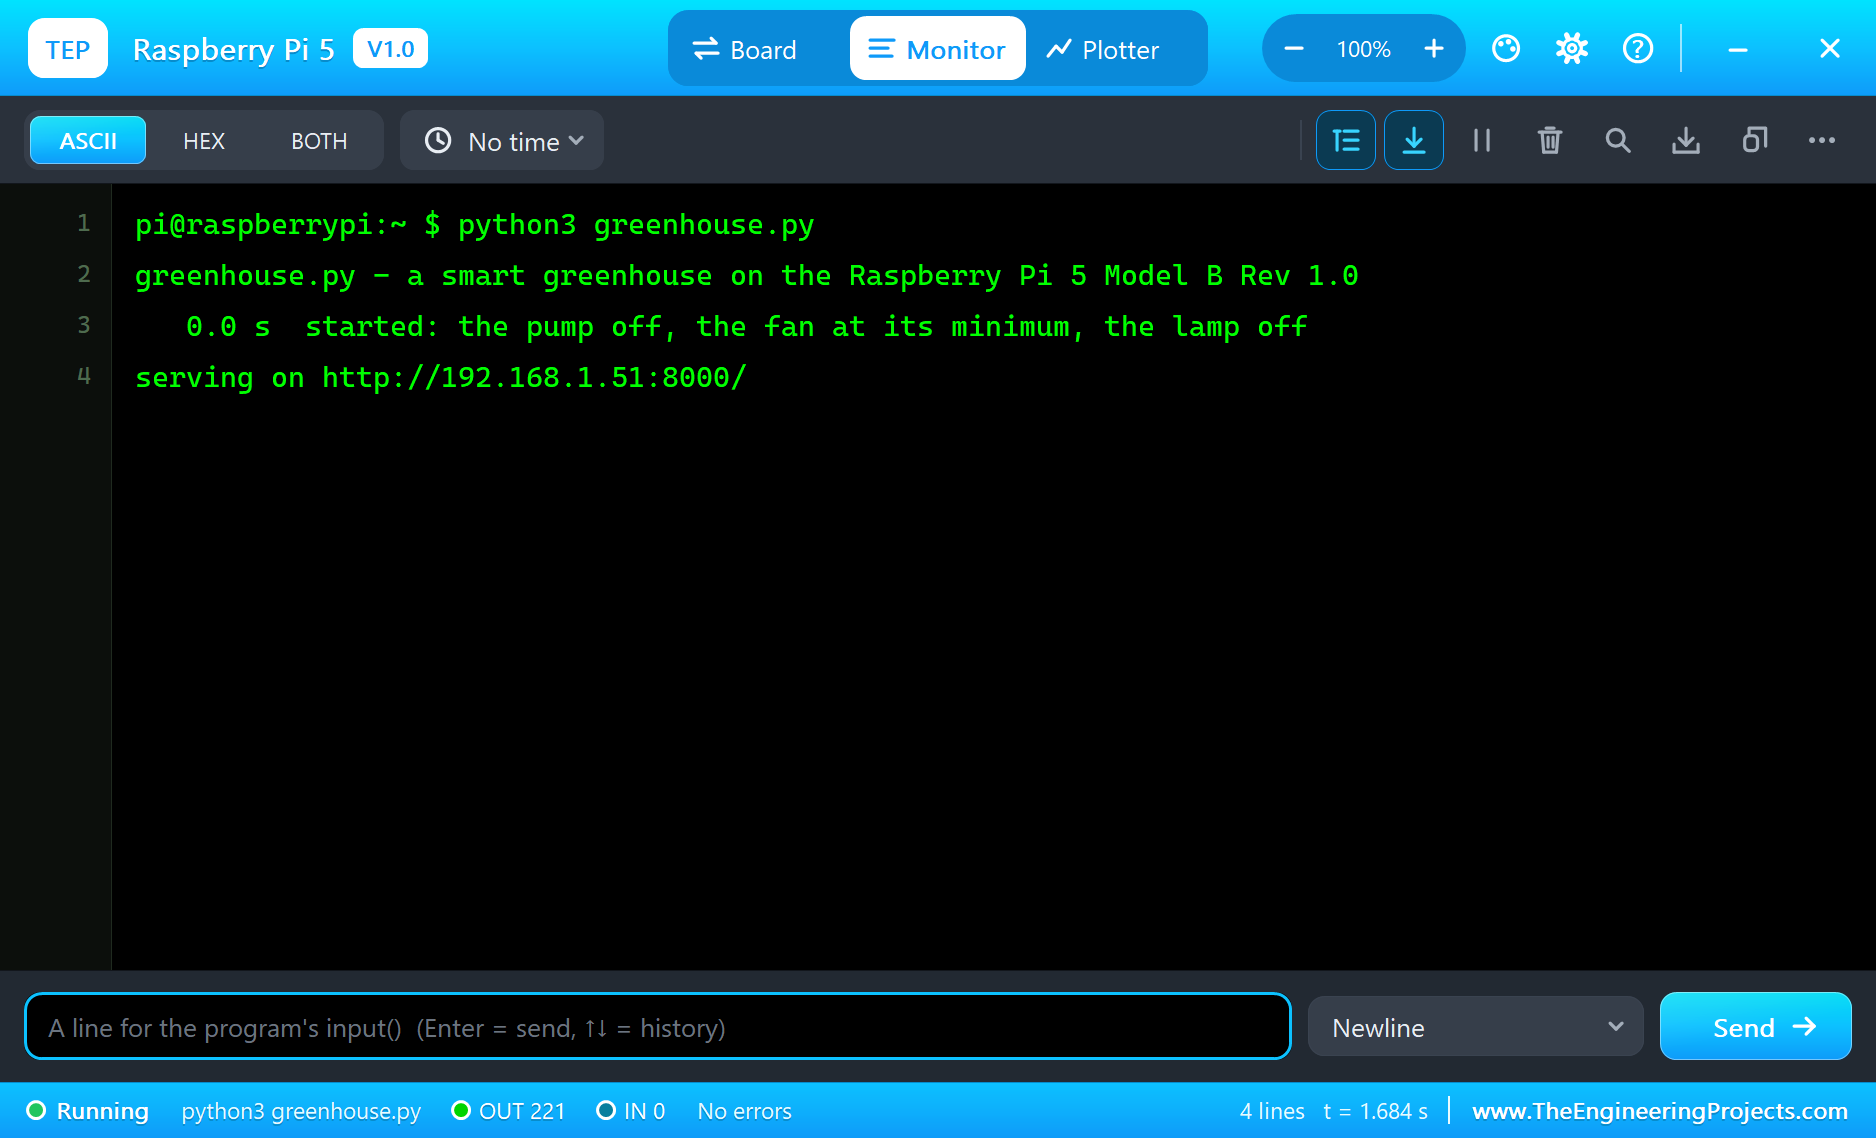
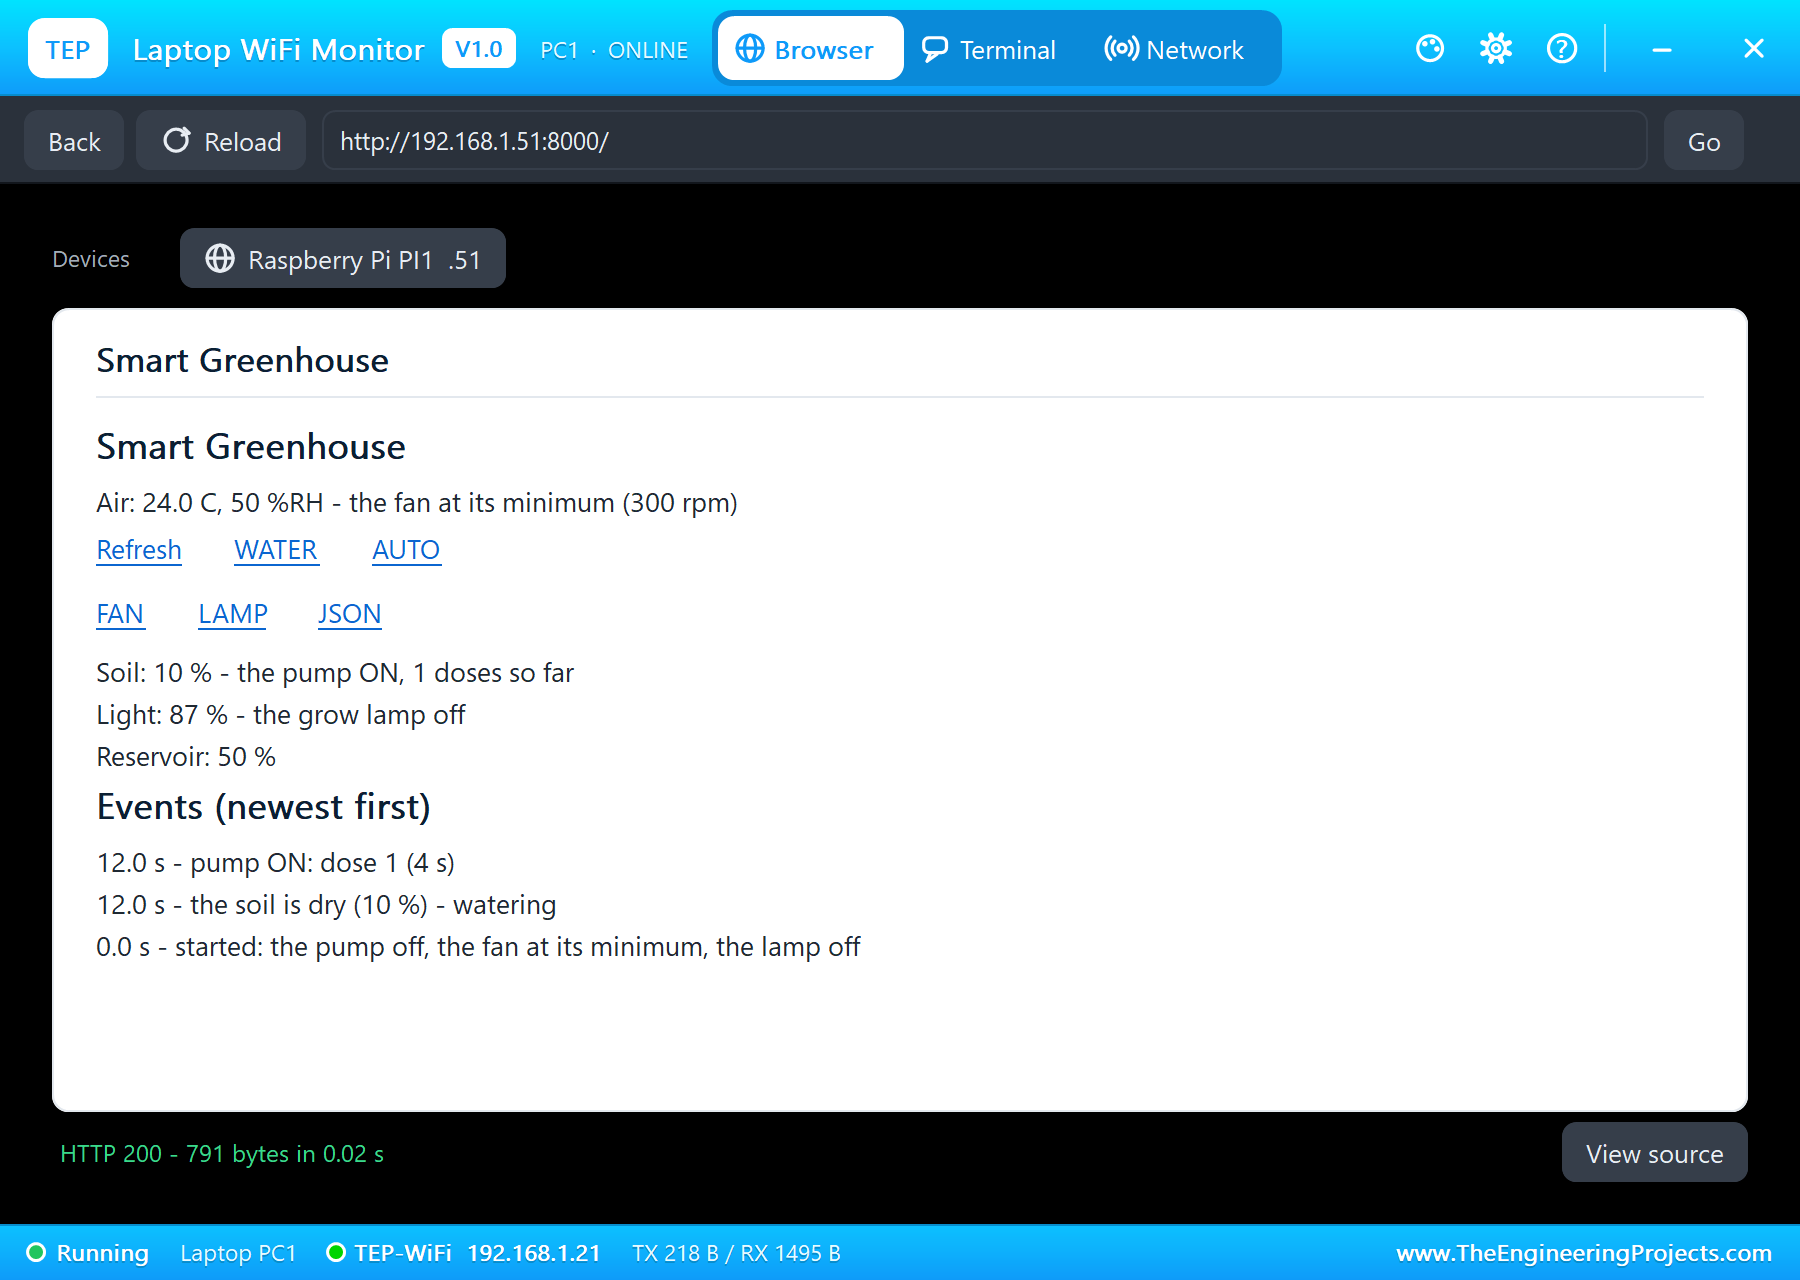
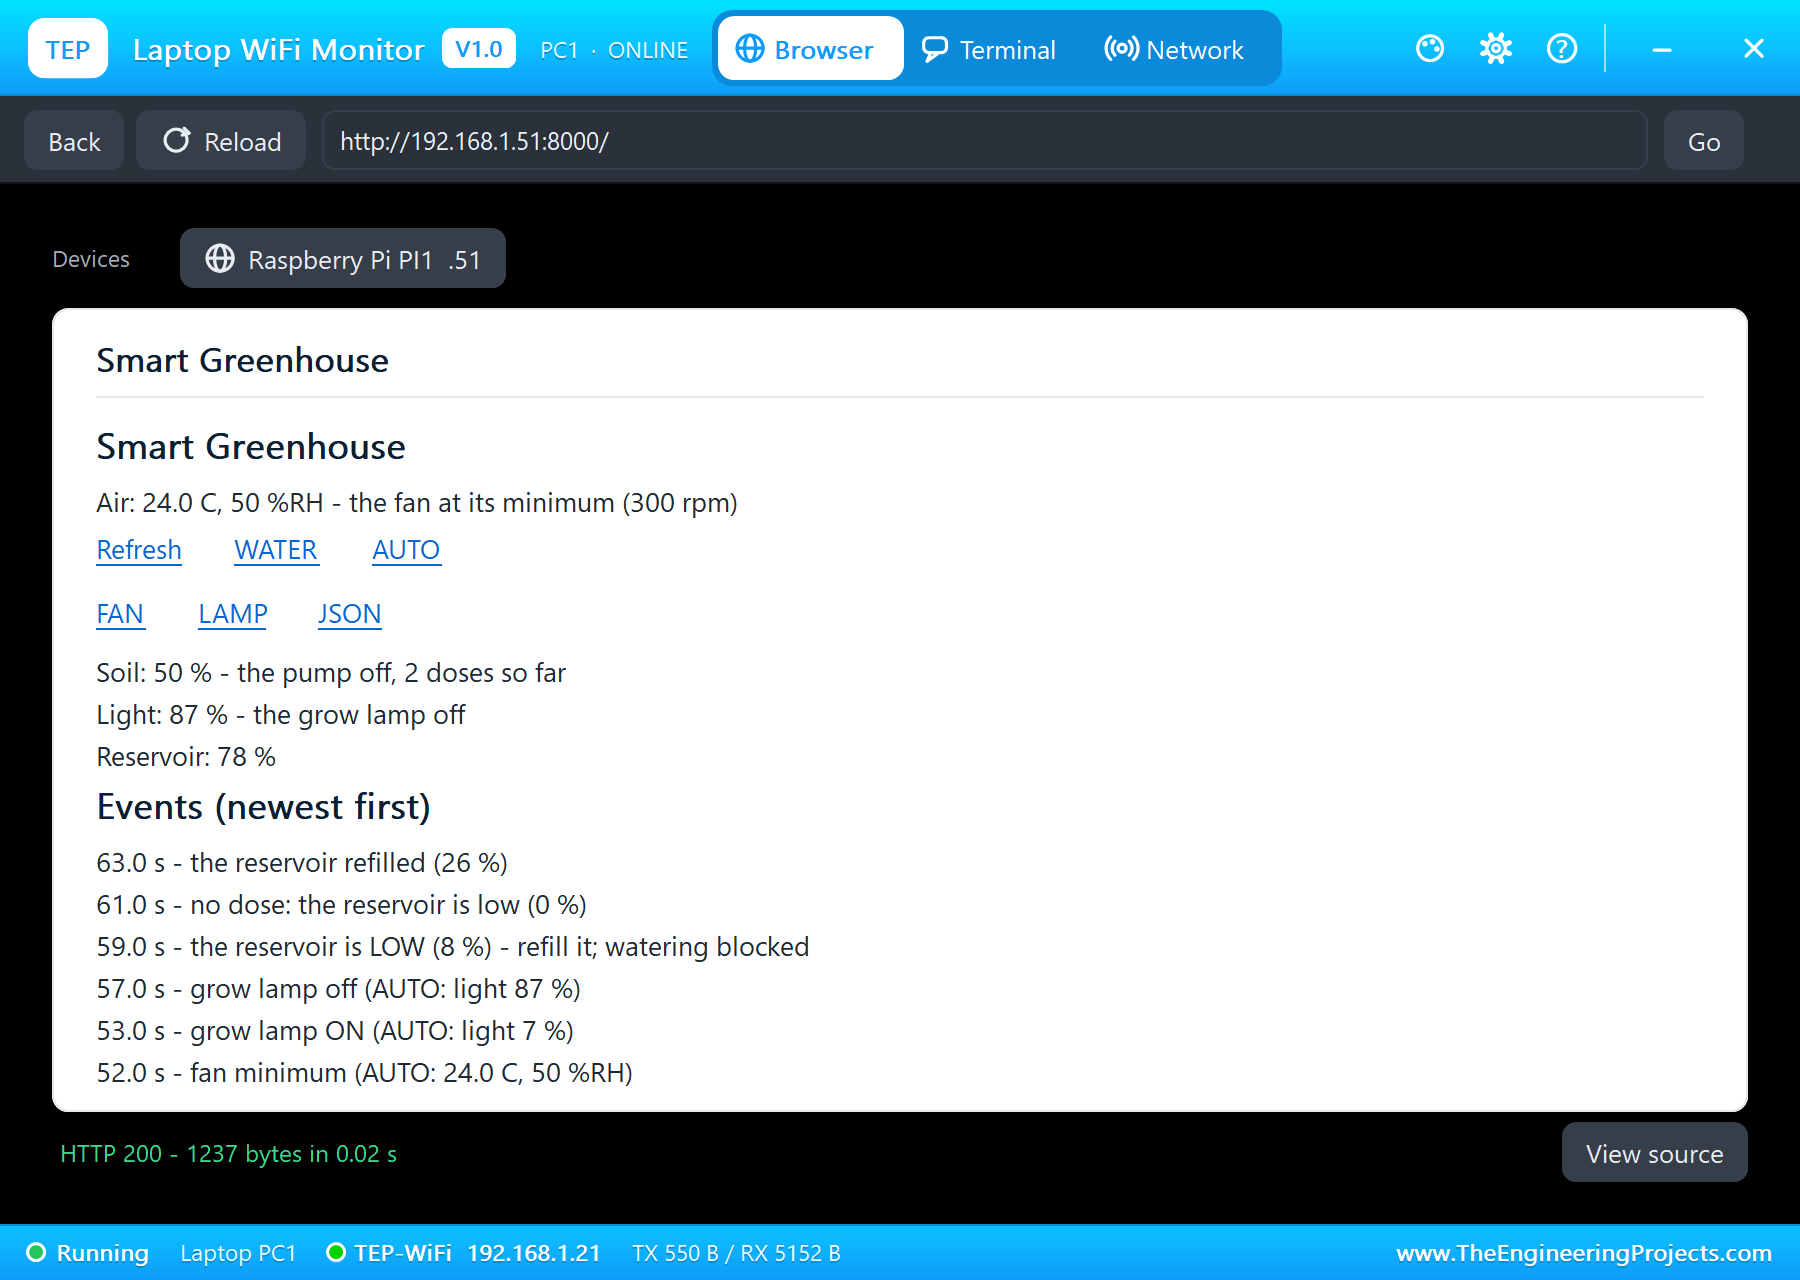
Here is one complete run of the simulation, with the numbers from our final test run; the times are simulation seconds since the program started. The Pi's terminal shows the start: the pump off, the fan at its minimum, the lamp off, the server on port 8000, and a status line every 5 seconds: 24.0 degrees C, 50 %RH, the soil at 45 %, the light at 87 % and the reservoir at 50 %.
The Sensors at Rest
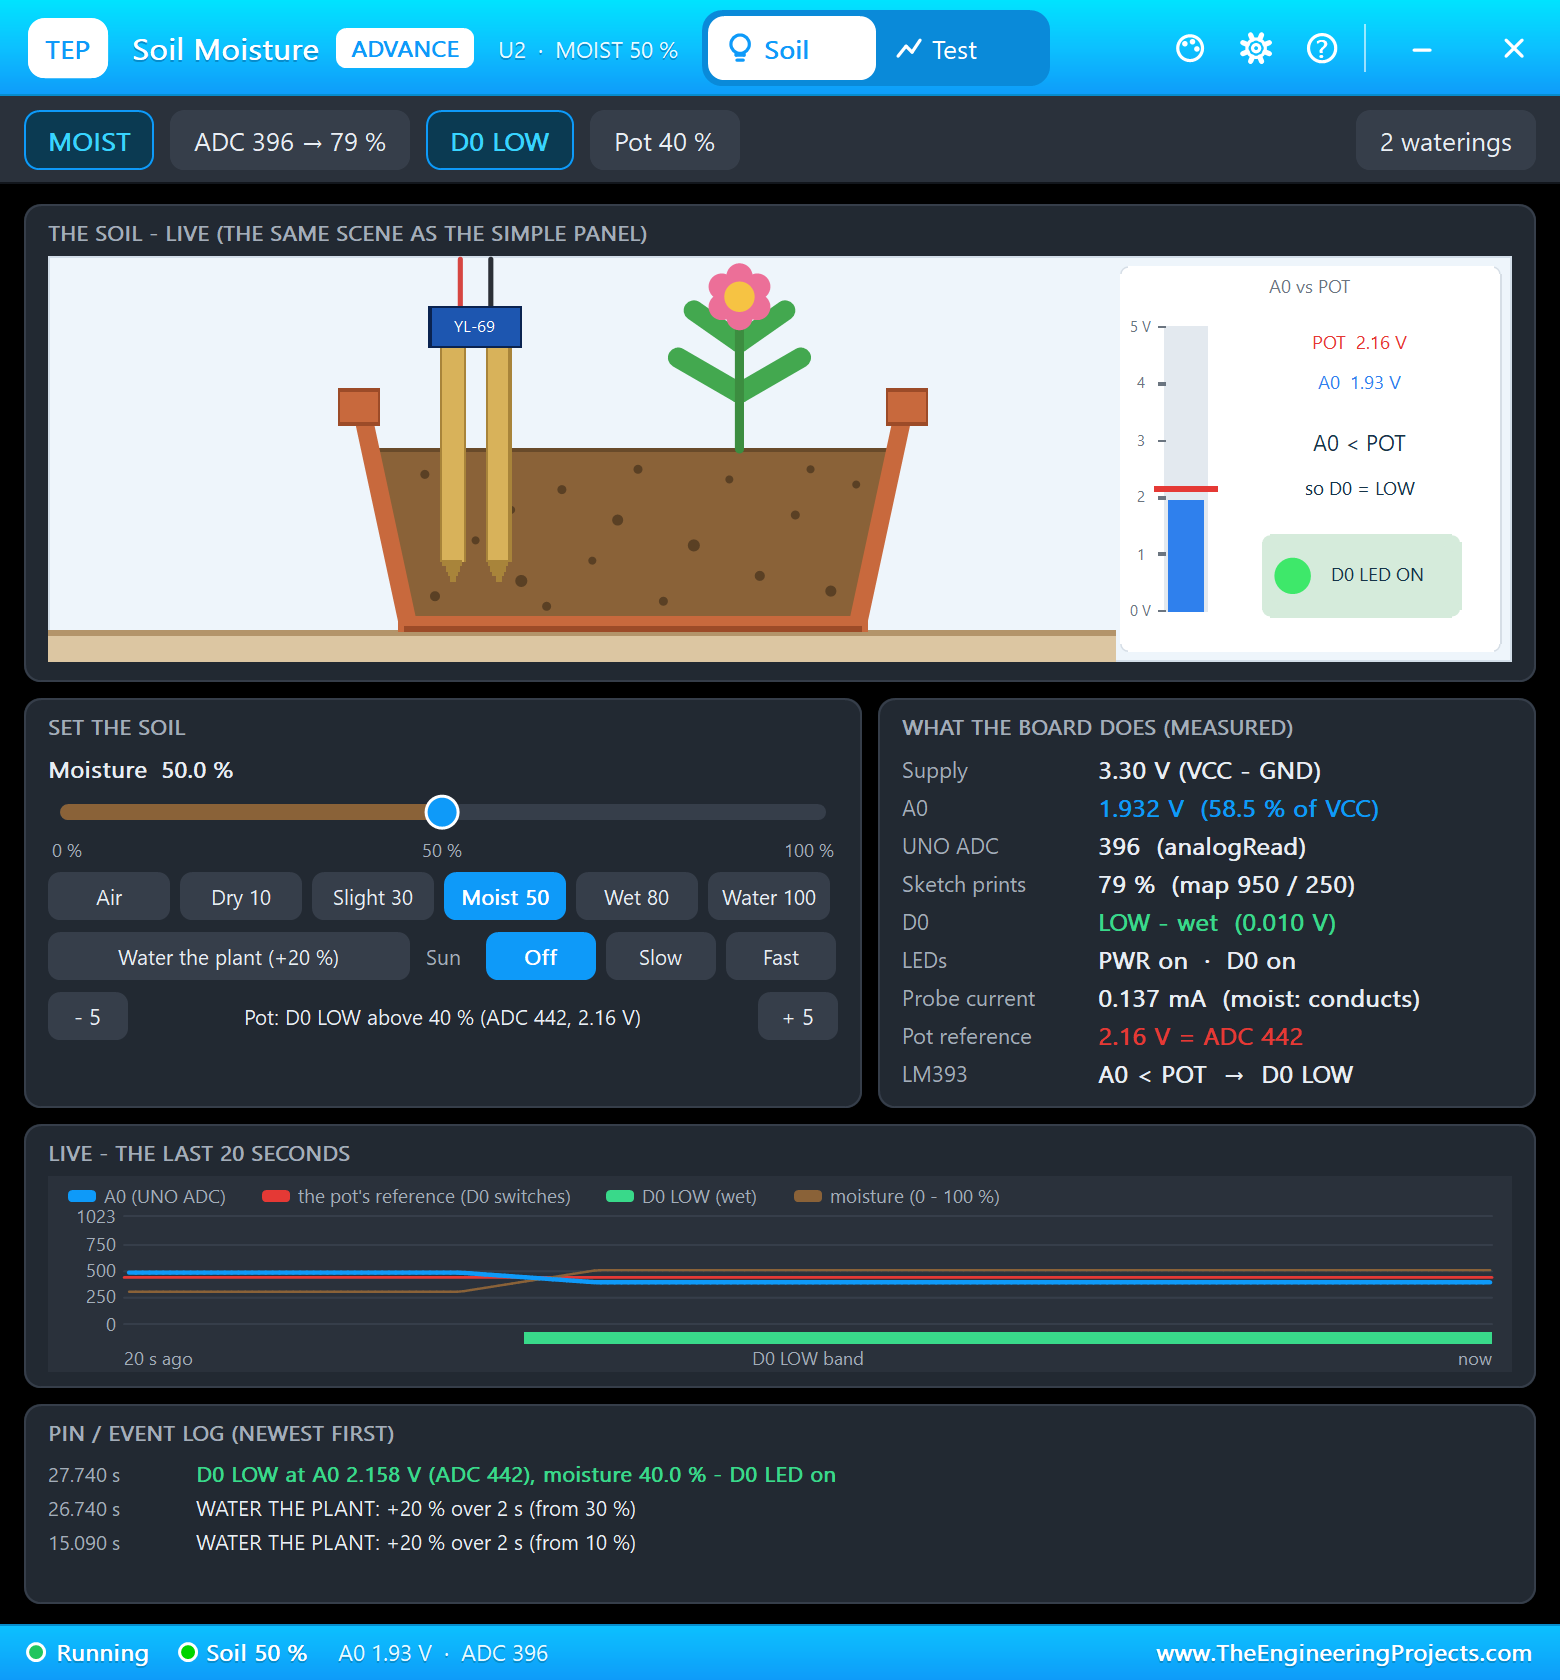
Each pop-up shows what its sensor measures. The soil sensor's A0 sits at 2.045 V, 62.0 % of its 3.3 V supply, which the program turns into 45 %, as in the worked example above. The ADS1115's pop-up shows all three inputs at once: 2.0451 V on AIN0 (the soil), 0.4267 V on AIN1 (the light, 87 %) and 1.6818 V on AIN2 (the reservoir, 20 mm, 50 %), and the config word 0xE383 that the program wrote for AIN2.
The Soil Dries: Watering in Doses
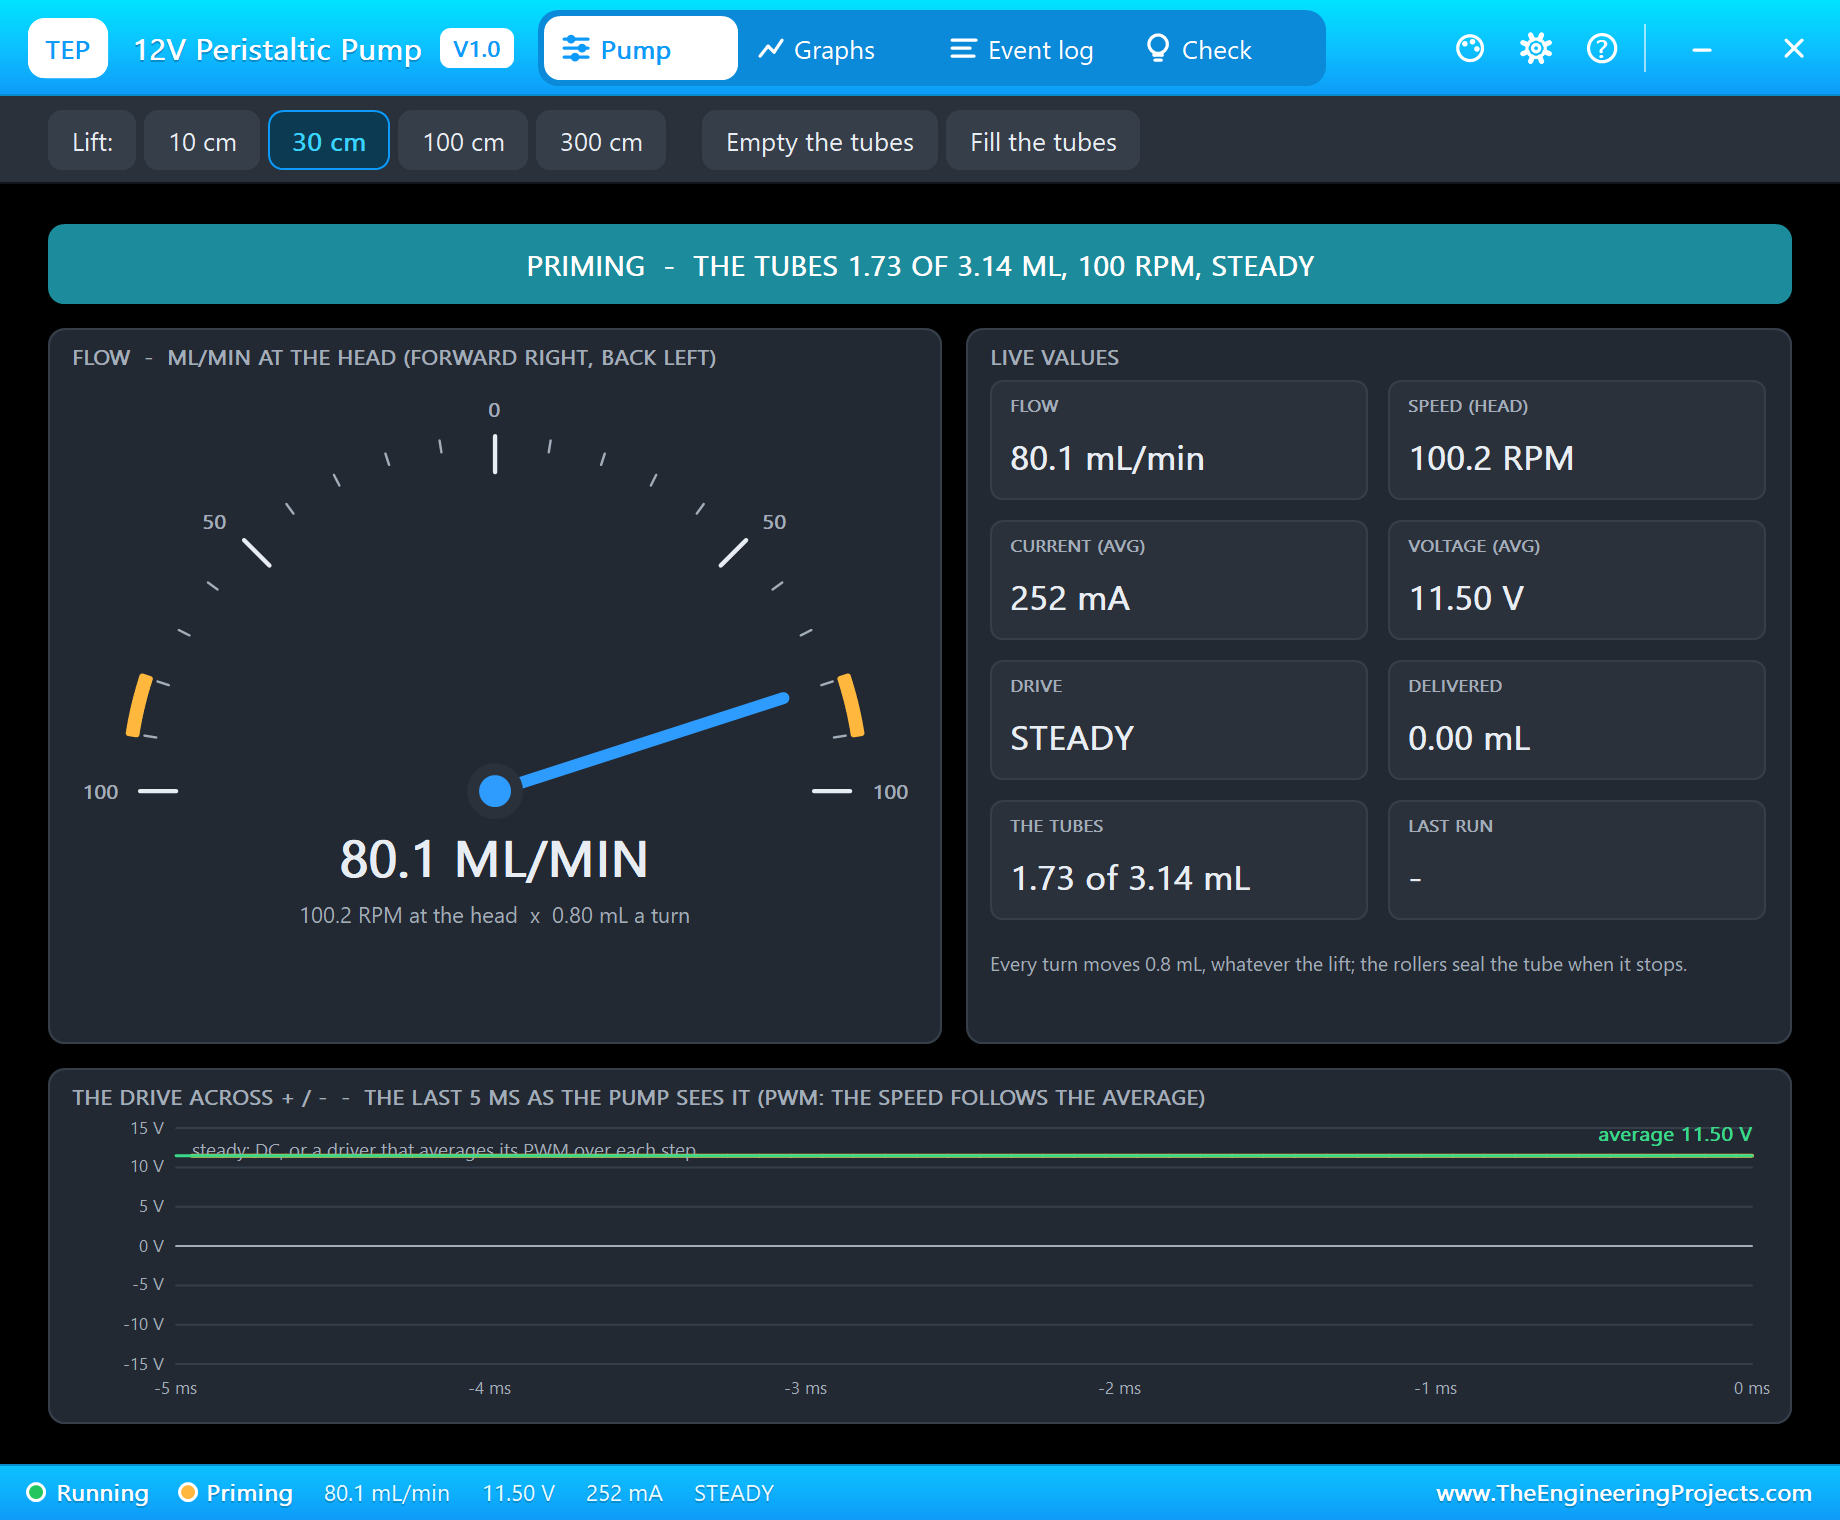
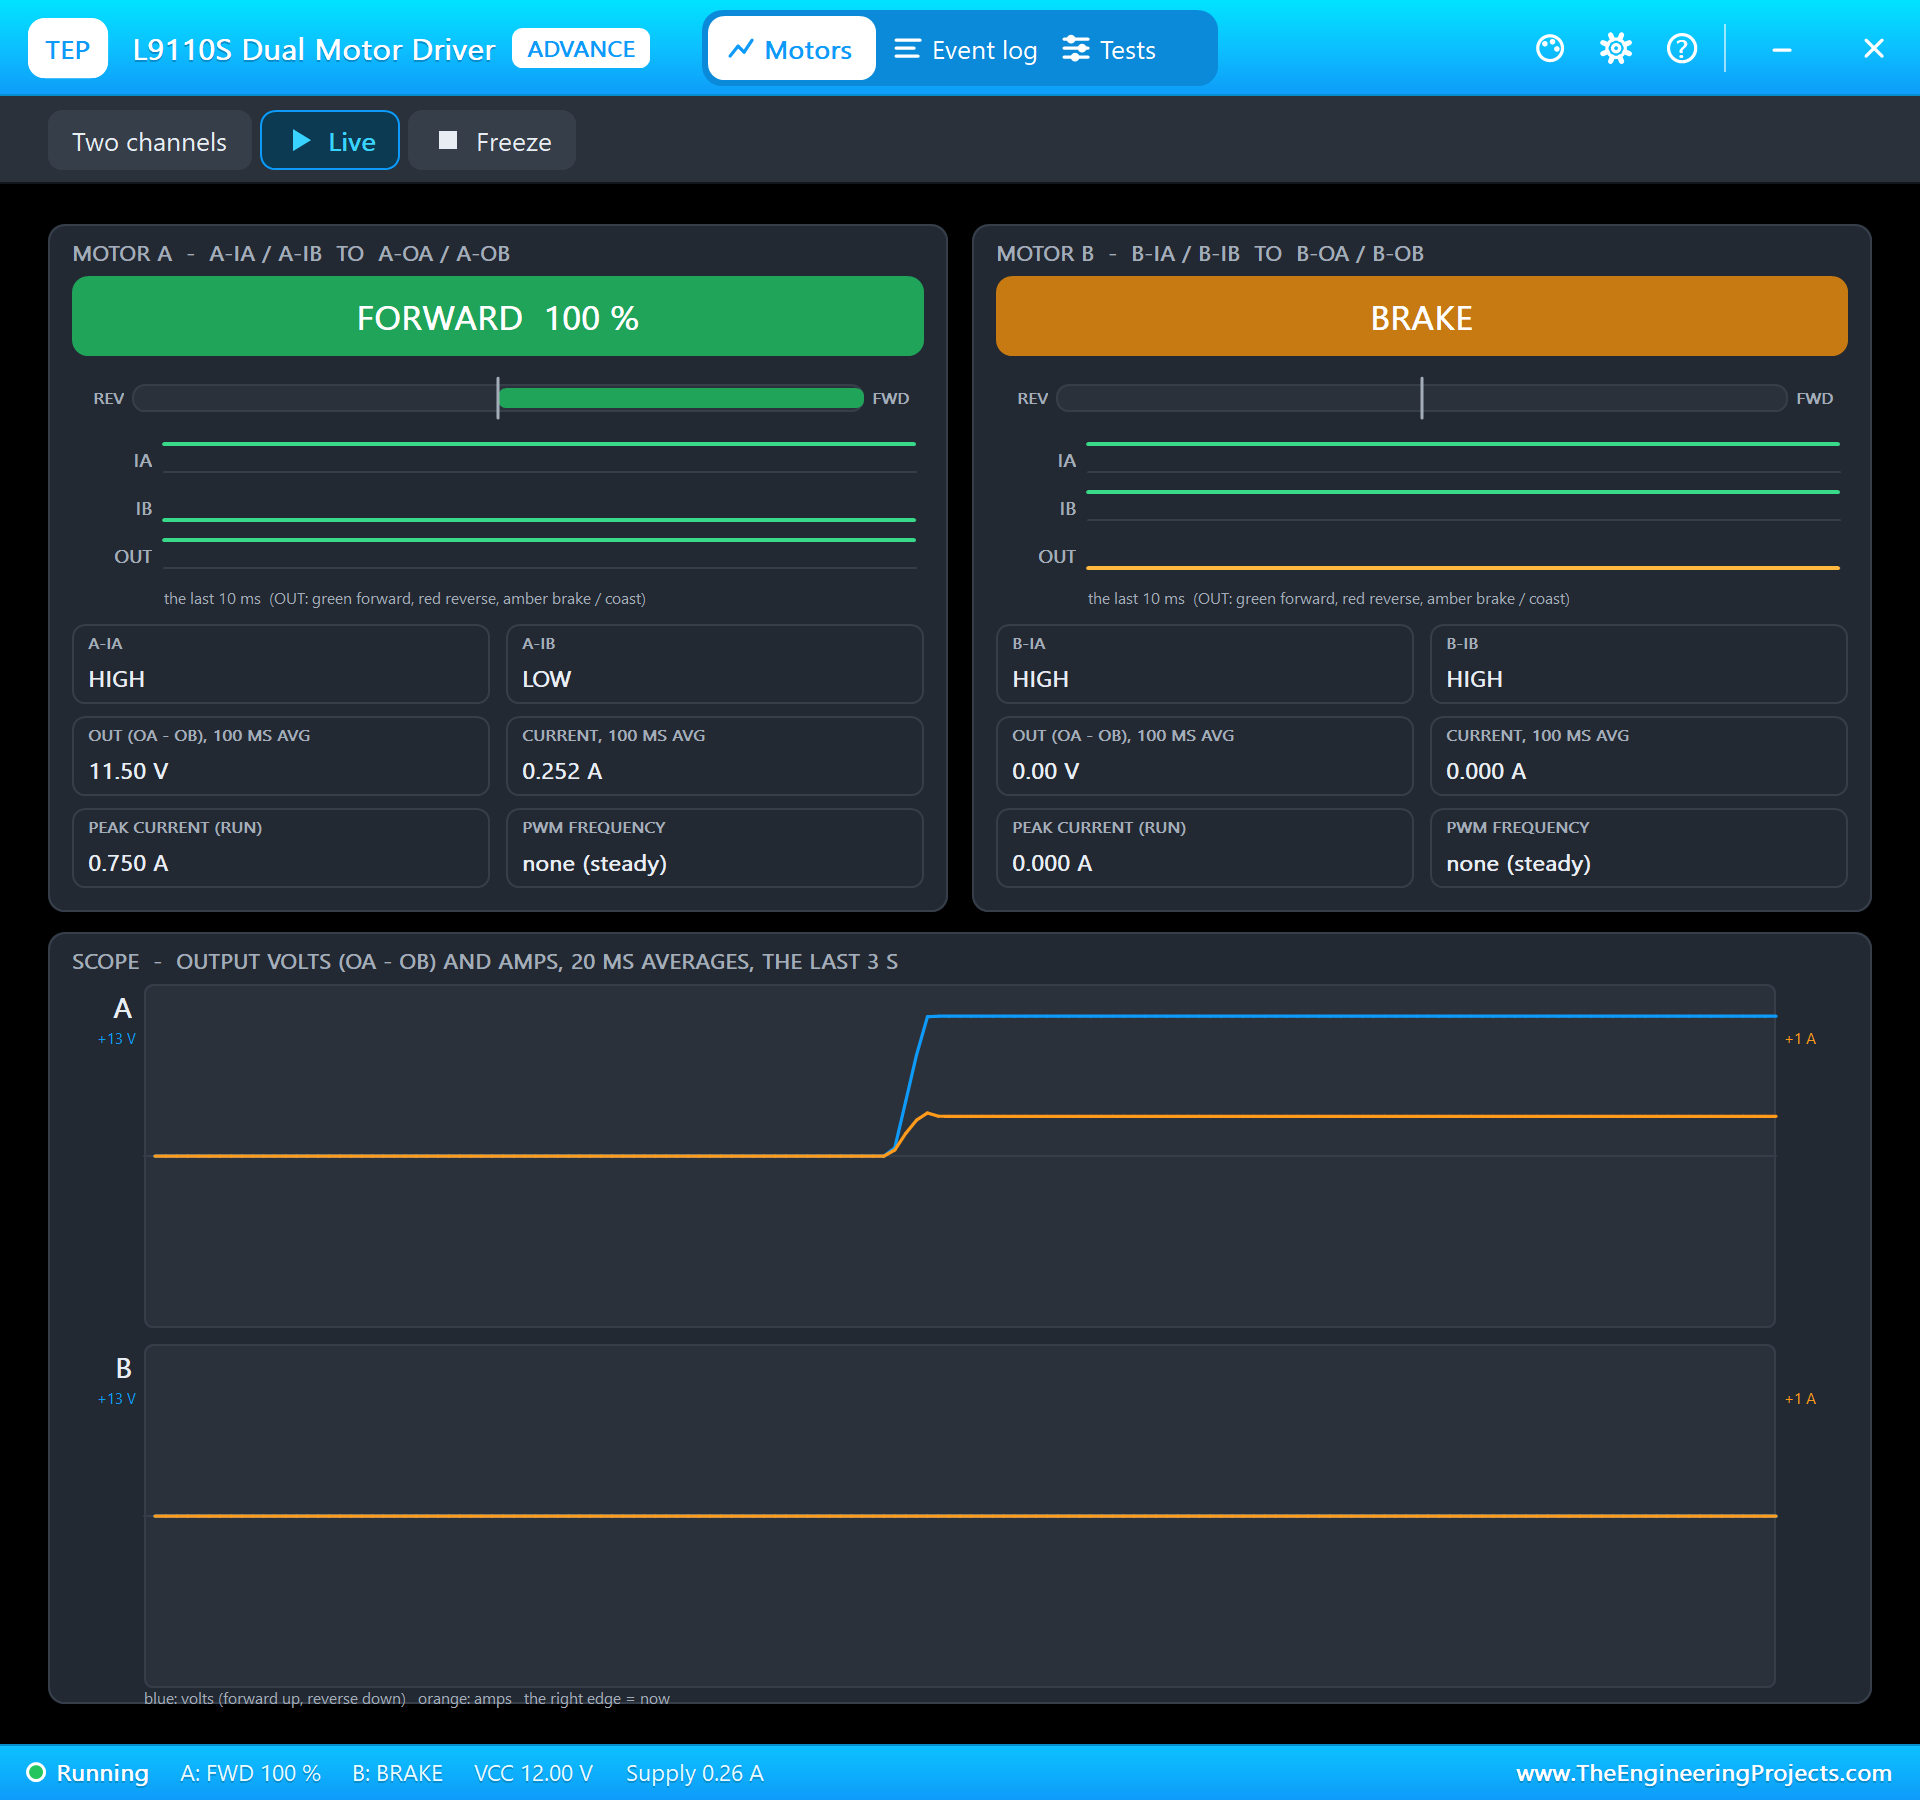
First, Dry 10 in the soil sensor's pop-up. At 12.0 seconds the program logged "the soil is dry (10 %) - watering" and gave the first dose: "pump ON: dose 1 (4 s)". The pump's pop-up shows it running at 100.2 RPM, 80.1 mL/min, with 11.50 V and 252 mA from the L9110S; its first job is to fill its own tubes (3.14 mL) before any water comes out, the priming every real peristaltic pump does. The L9110S's pop-up shows channel A FORWARD at 100 %: A-IA HIGH, A-IB LOW.
At 16.0 seconds the dose ended: "pump OFF - soaking for 10 s". The simulated pump does not wet the soil, so we pressed Water the plant in the soil sensor's pop-up after each dose (+20 %). The soil rose to 30 %, still below 45 %, so after the soak, at 26.0 seconds, came dose 2. After the second Water the plant the soil read 50 %, and when that soak ended at 40.0 seconds: "the soil is moist again (50 %) - watering done after 2 doses". The program never checked the soil while the water was still soaking in, exactly as planned.
A Hot Afternoon: the Fan
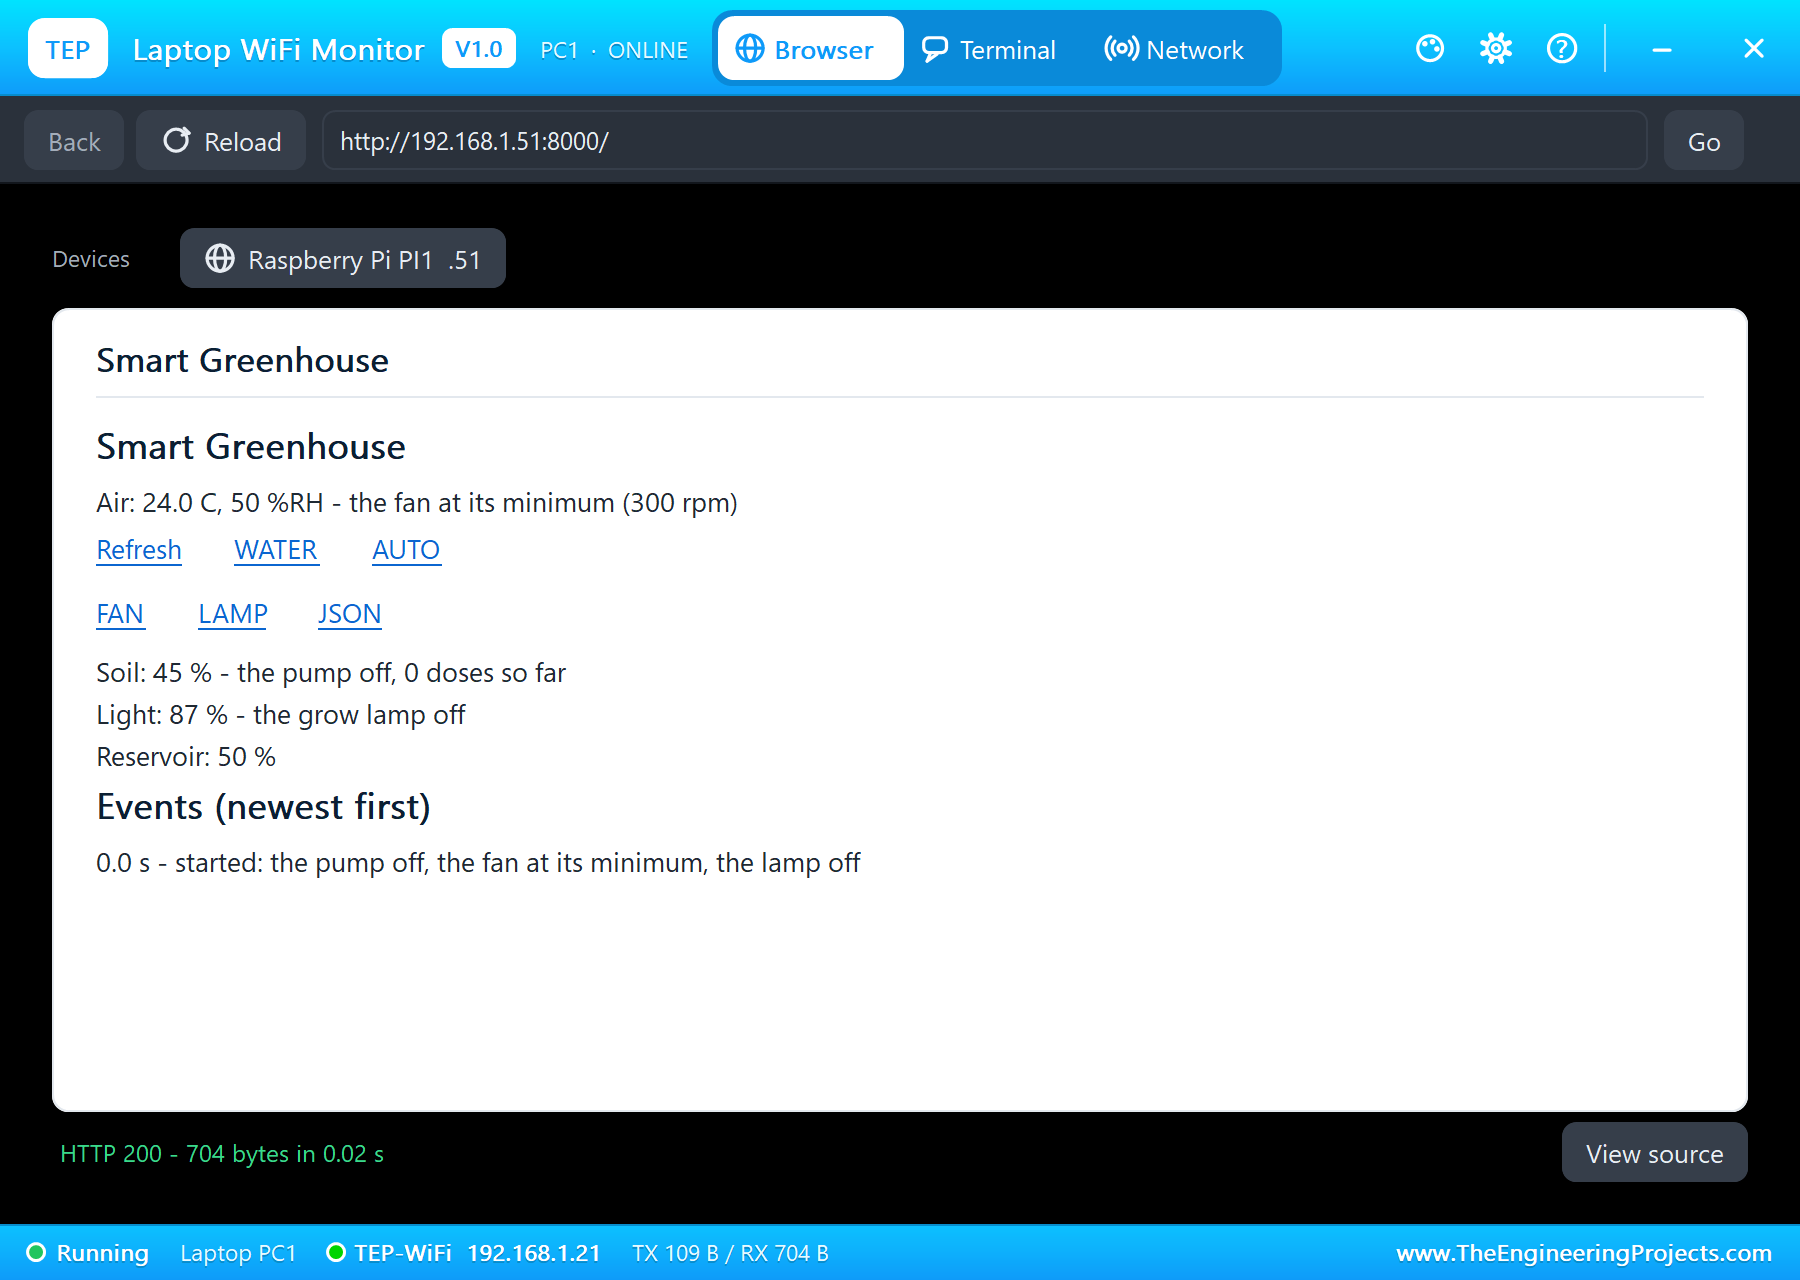
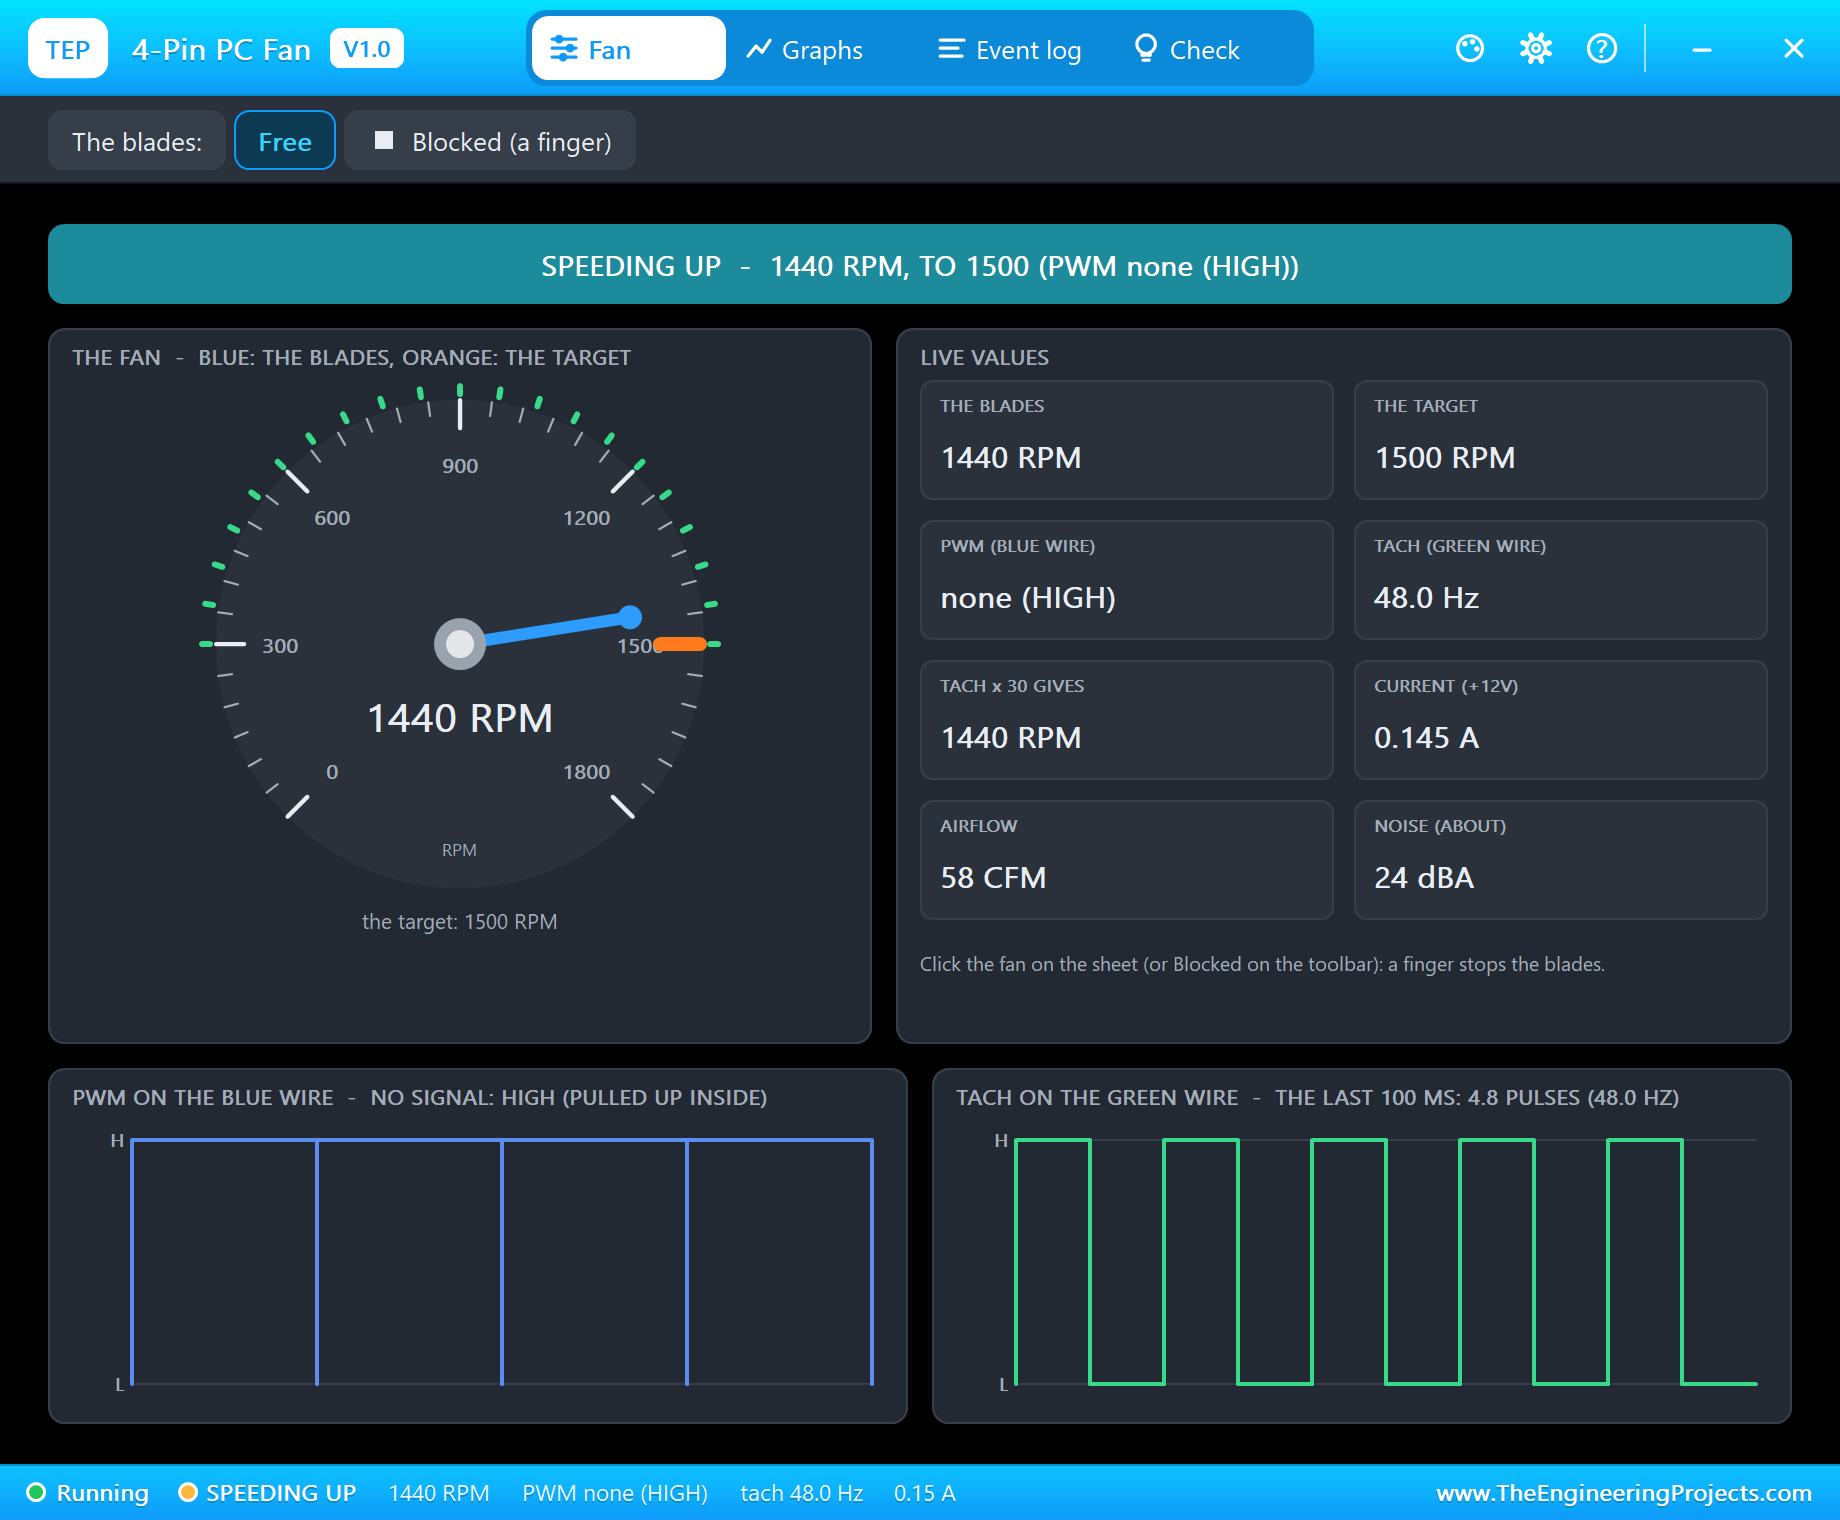
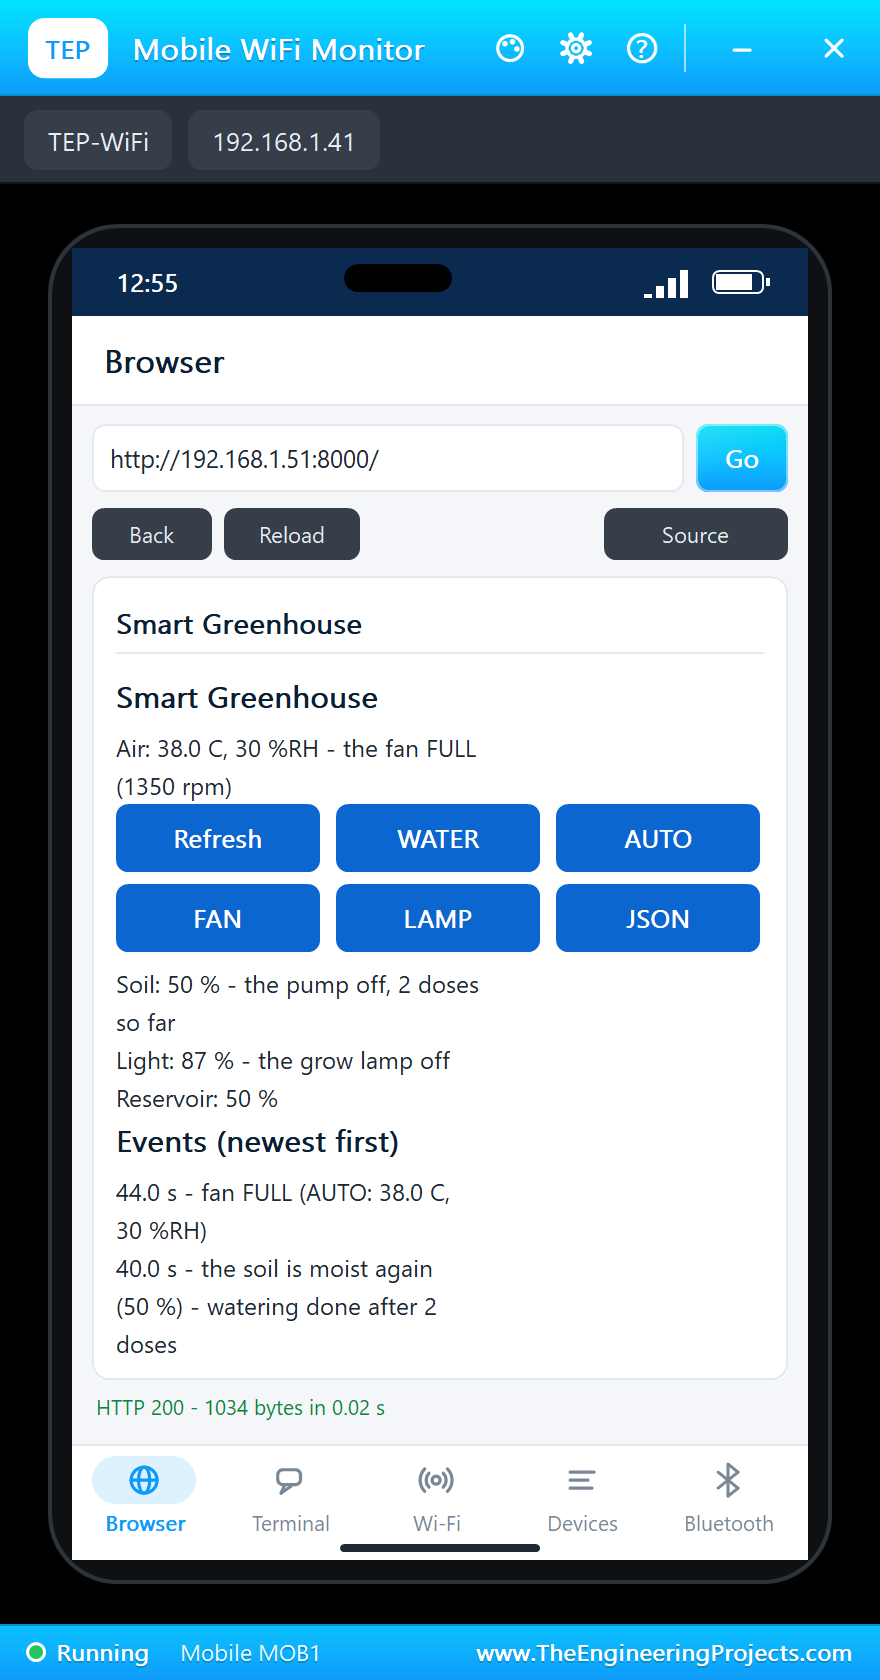
Then HOT in the DHT22's pop-up: 38.0 degrees C and 30 %RH. At 44.0 seconds, "fan FULL (AUTO: 38.0 C, 30 %RH)". The fan's pop-up shows the blades speeding up from 300 RPM towards 1500 RPM: 1440 RPM, a tach of 48.0 Hz (48 x 30 = 1440, the same sum as the program's), 0.145 A and 58 CFM of air. The program's own figure comes from the tach pulses it counted over the last second, so it trails the blades a little: 1350 RPM on the phone, then 1470 RPM in the next status line.
Back to ROOM air, 24.0 degrees C and 50 %RH, below both "off" points: at 52.0 seconds, "fan minimum (AUTO: 24.0 C, 50 %RH)", and the blades slowed back to 300 RPM.
Night: the Grow Lamp
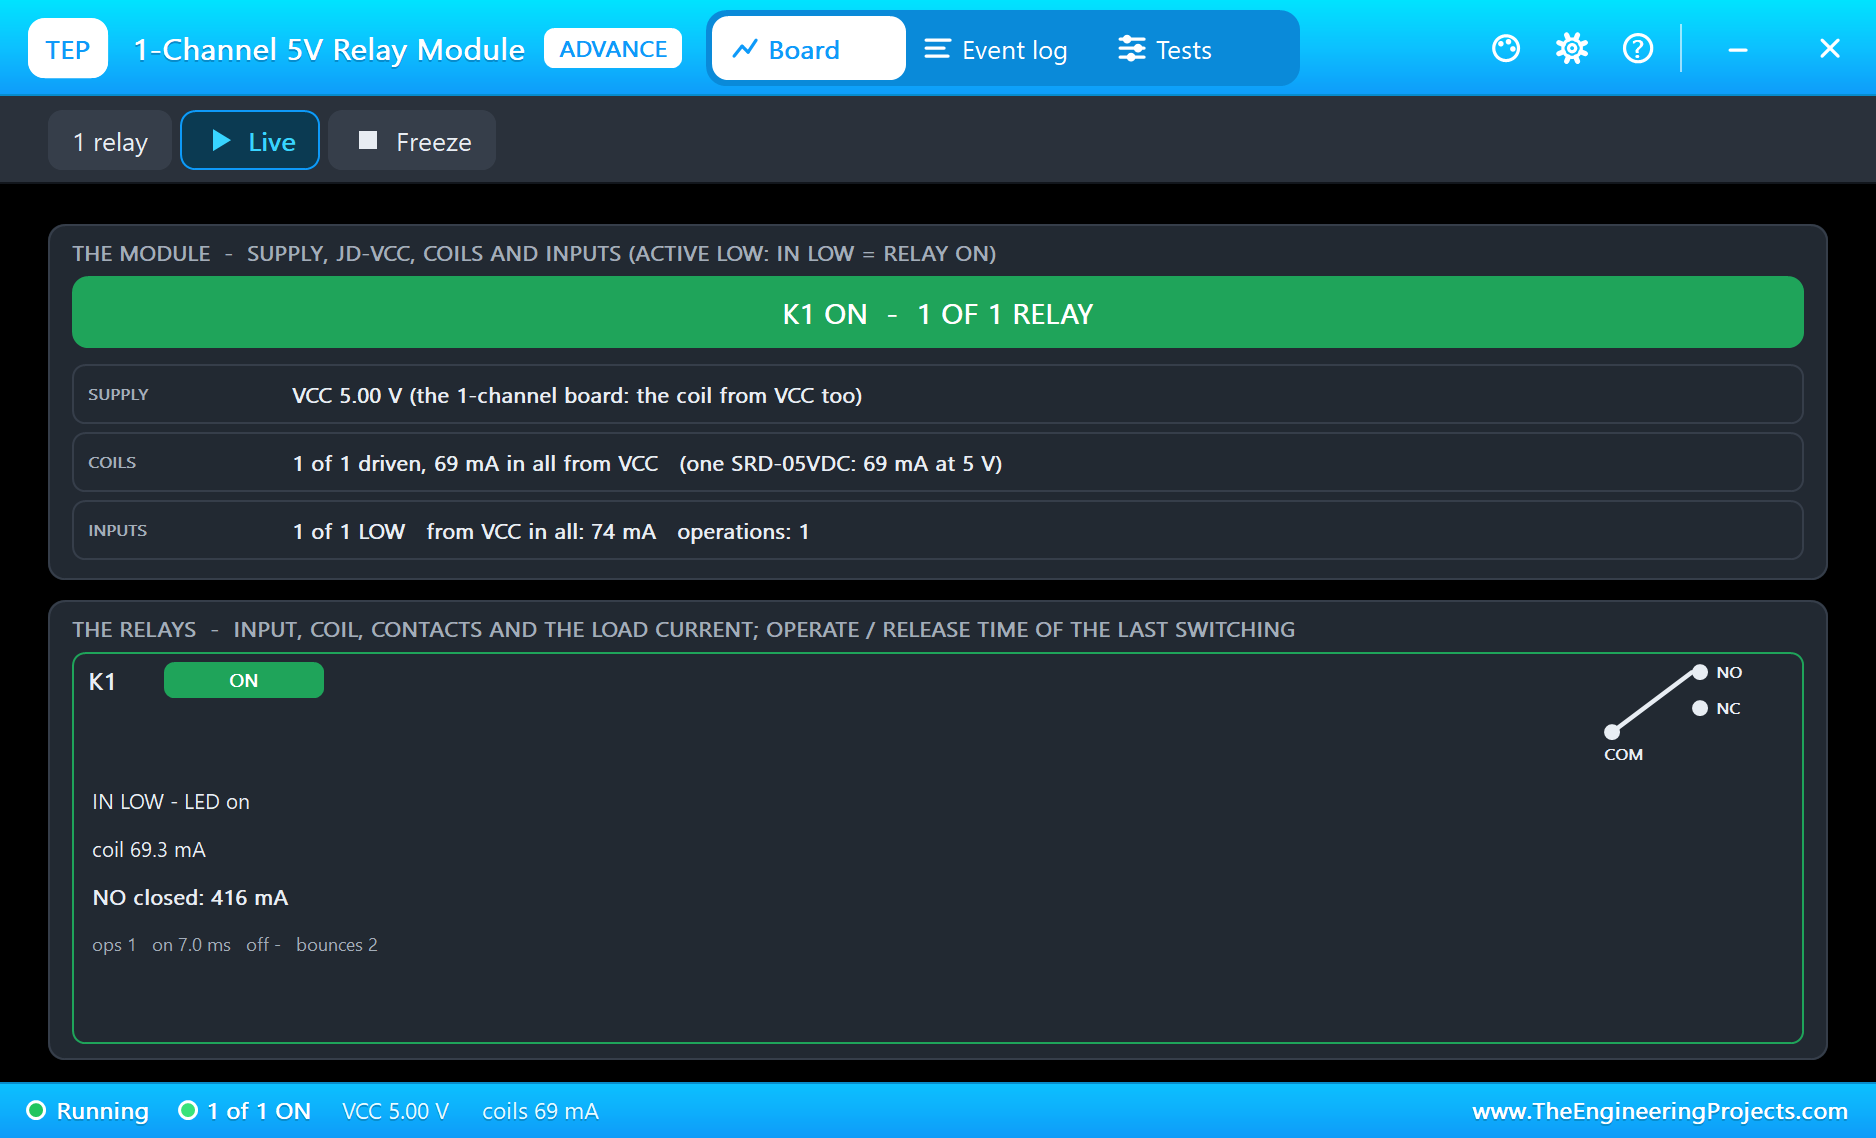
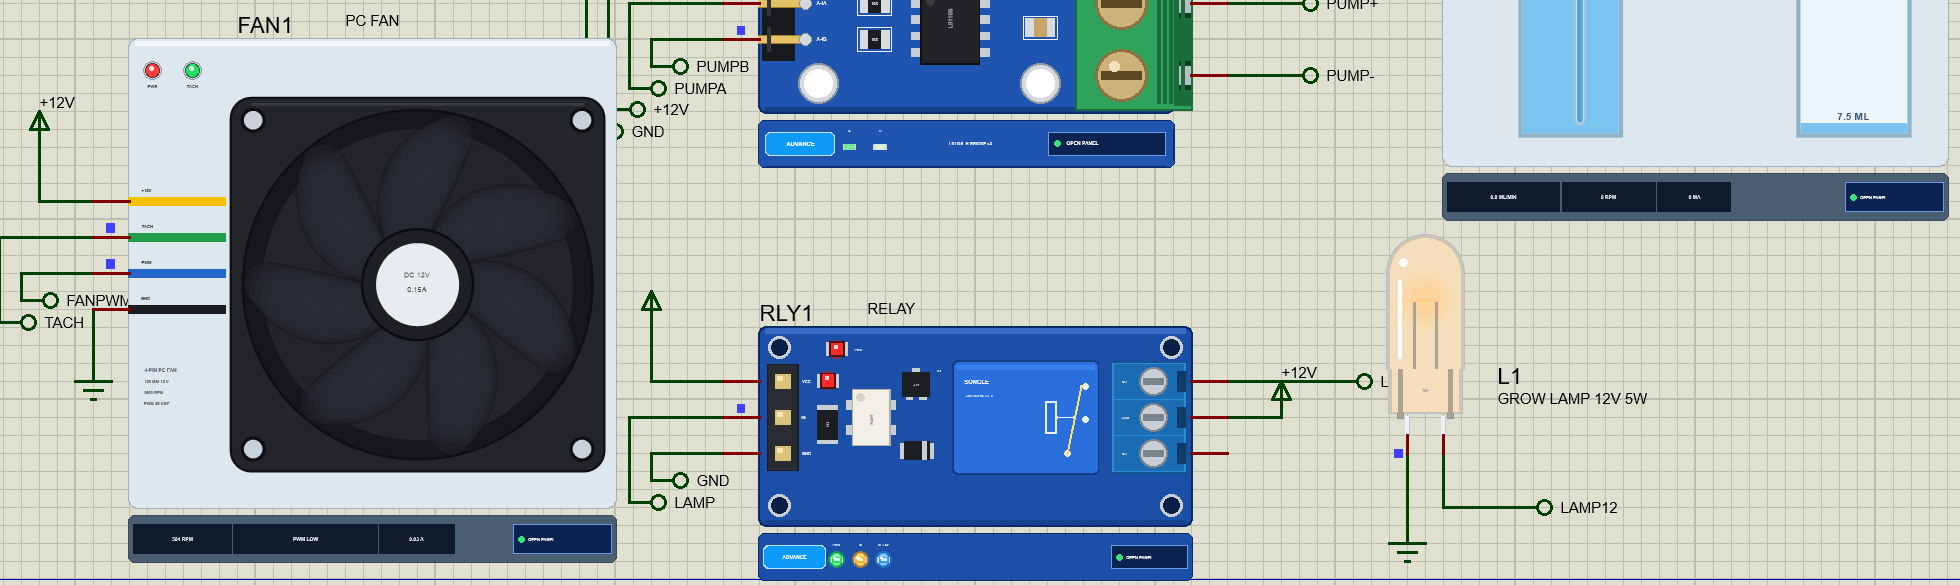
Then Night in the LDR's pop-up. The LDR rose to 179 kilo-ohms in the dark, its A0 to 3.126 V, and at 53.0 seconds the program read the light at 7 %: "grow lamp ON (AUTO: light 7 %)". GPIO22 went LOW, the relay's coil took 69.3 mA, its contact closed in 7.0 ms and the lamp drew 416 mA through it.
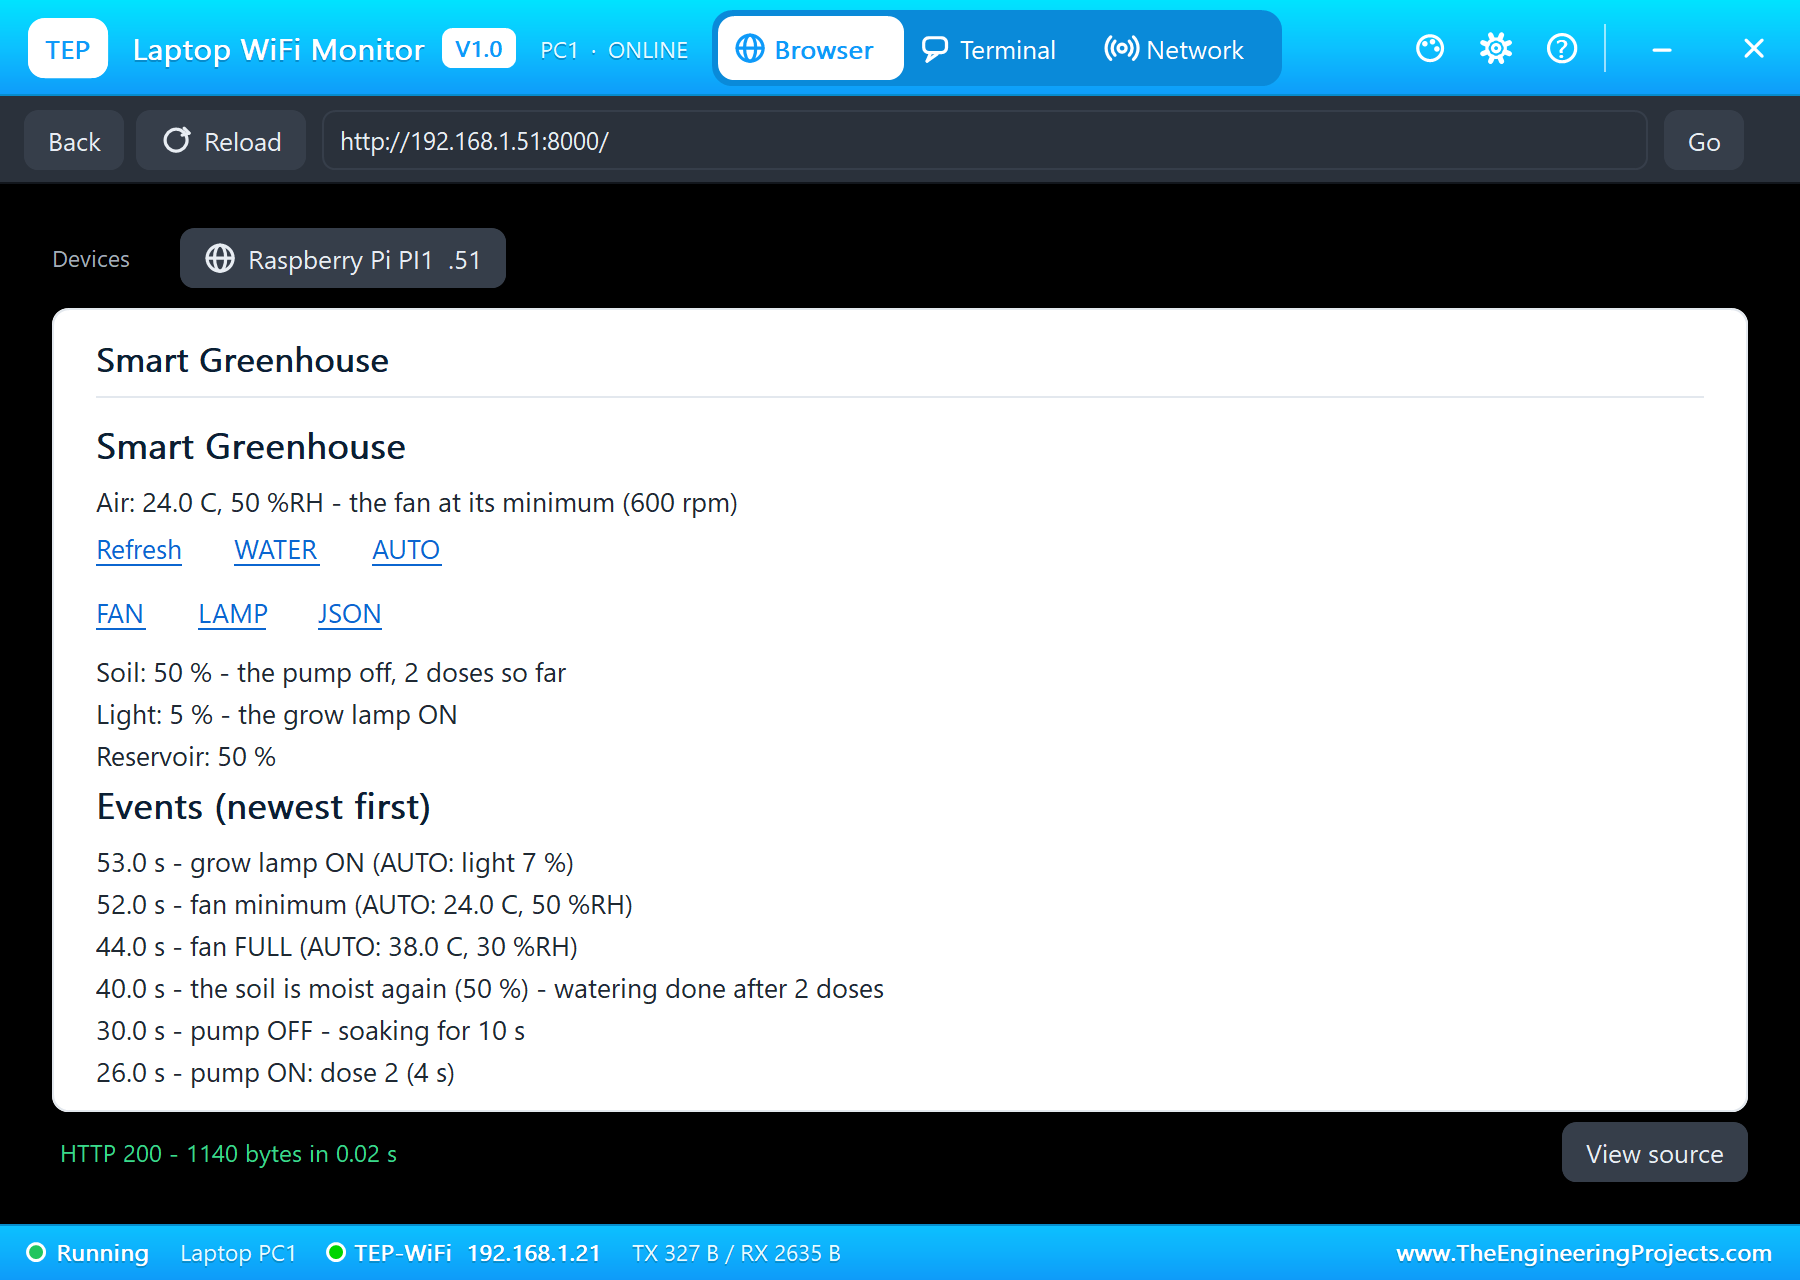
Indoor light again, 87 %, above the 40 % "off" point: at 57.0 seconds, "grow lamp off (AUTO: light 87 %)".
The Reservoir Runs Dry
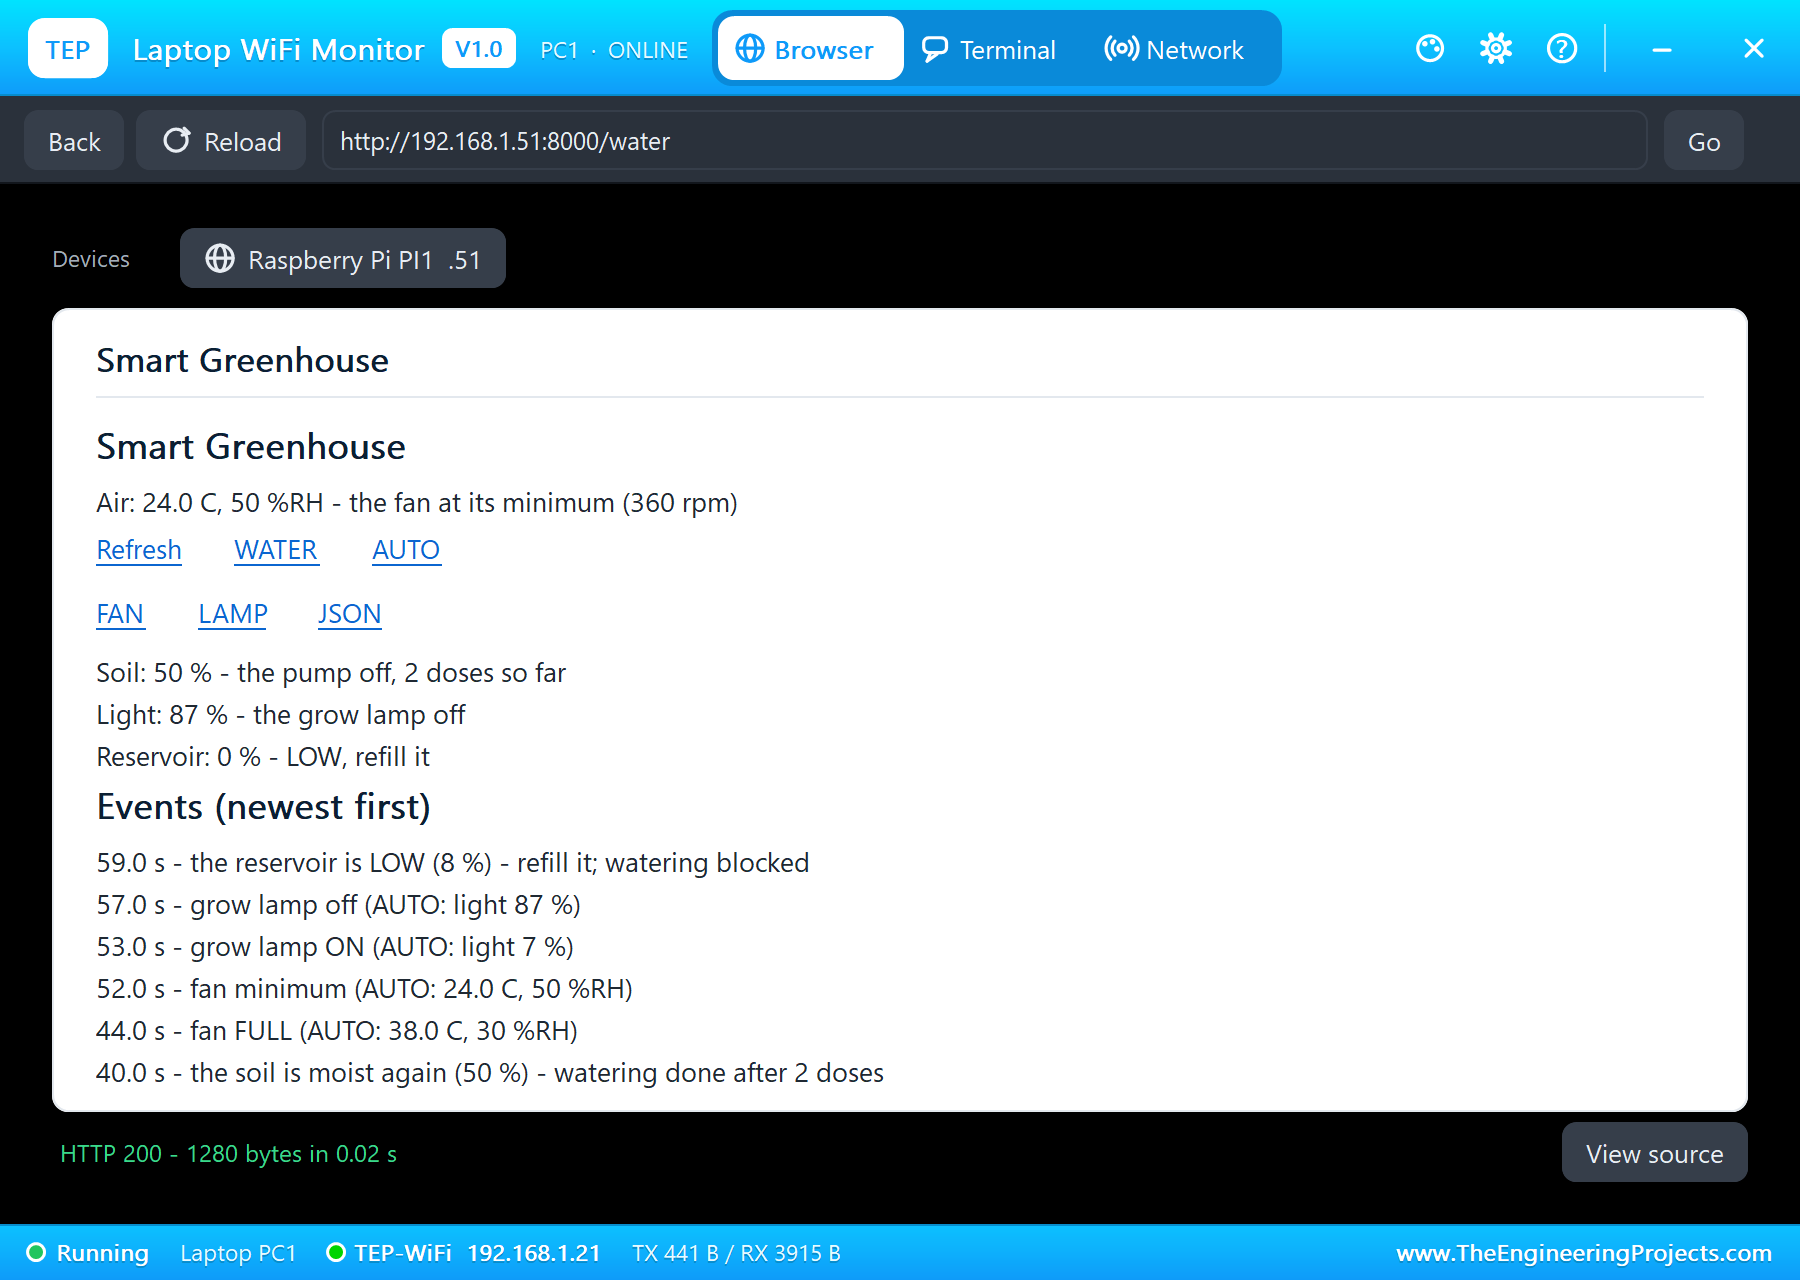
Last, Empty in the water sensor's pop-up. At 59.0 seconds, "the reservoir is LOW (8 %) - refill it; watering blocked". Then WATER on the laptop, a dose by hand: the program refused it at 61.0 seconds, "no dose: the reservoir is low (0 %)", so the pump never ran dry. Full 40 refilled it: "the reservoir refilled (26 %)" at 63.0 seconds, the moment the level passed 25 %, and the next status line read 78 %.
The terminal holds the whole story, every event and every status line:
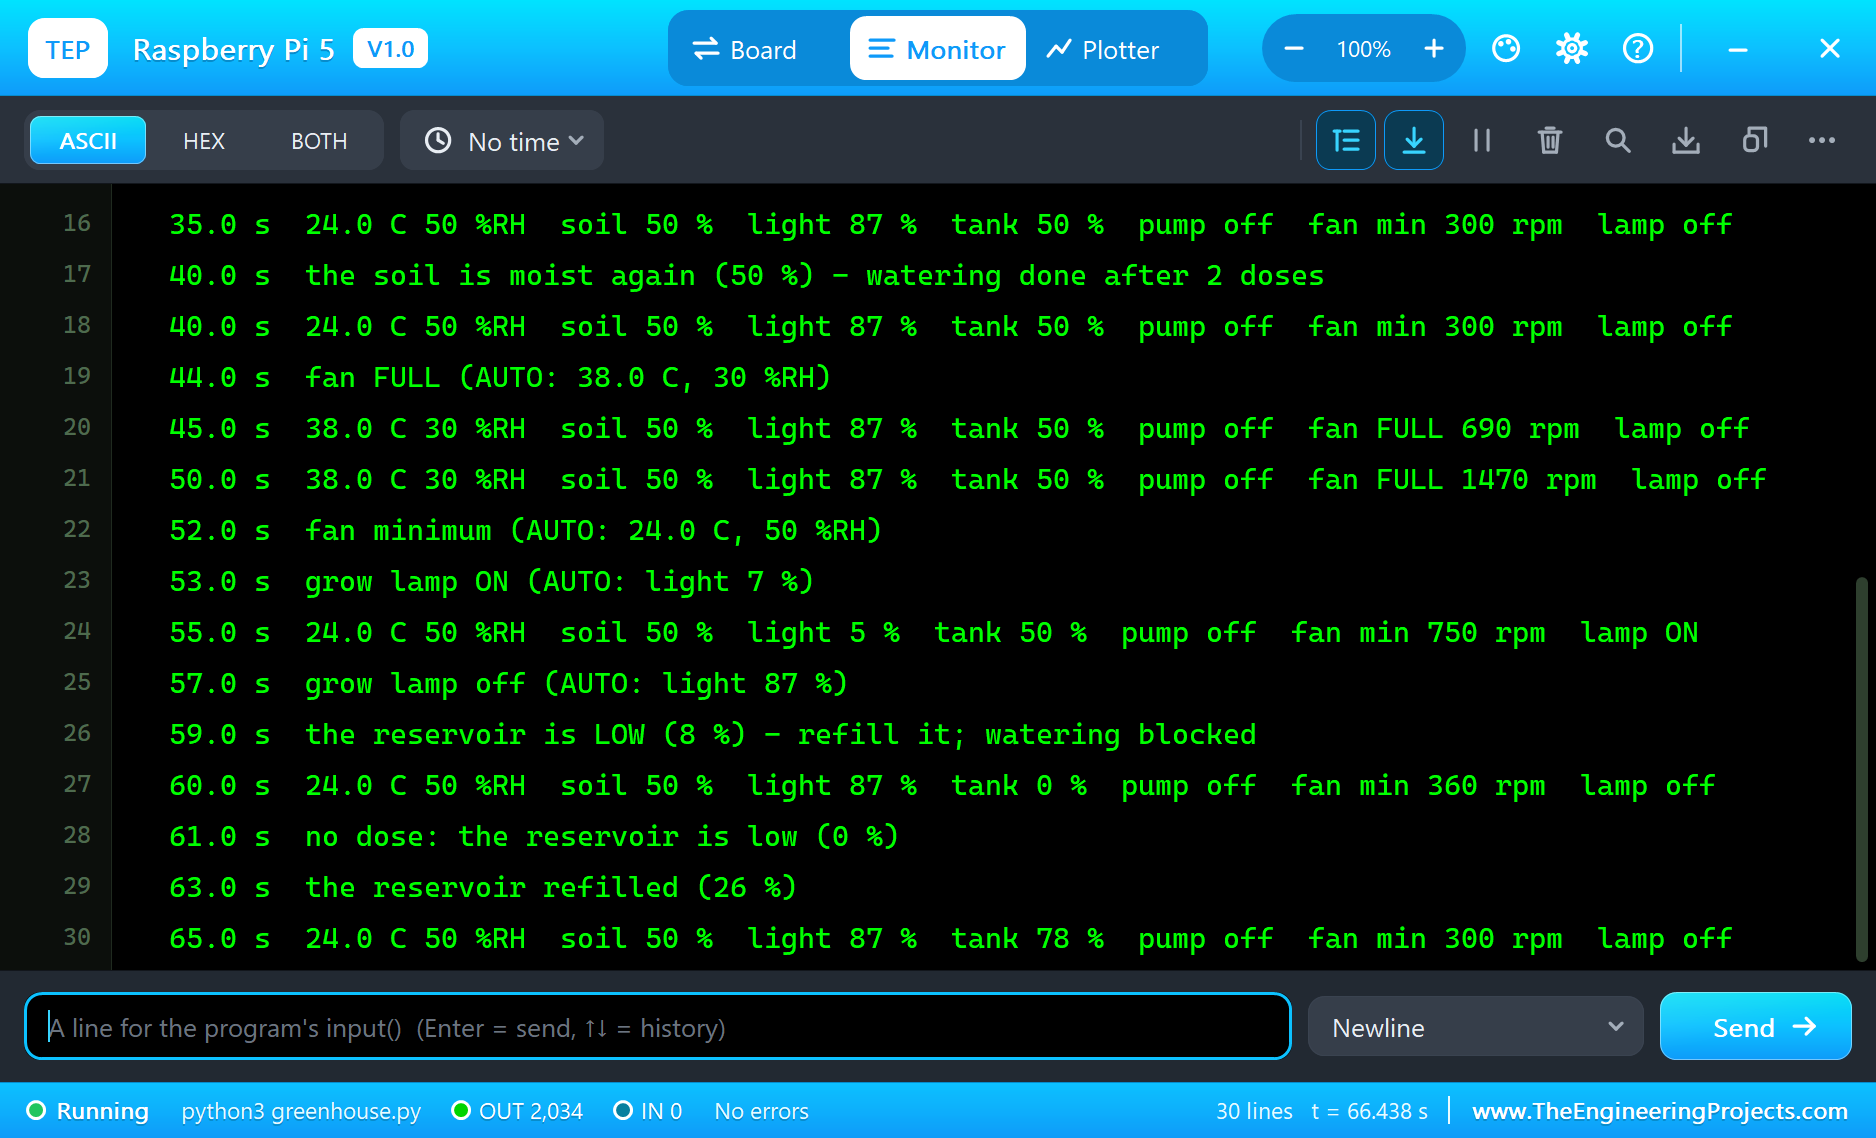
In all, 66 seconds of simulation took about 14 minutes on our PC with all the screenshots. The two doses moved 10.7 mL; after the 3.14 mL that filled the tubes, 7.5 mL reached the pot, which is the figure the pump's bottle shows in the night close-up.
Download the Project Files
Click the button below to download Raspberry-Pi-5-Smart-Greenhouse-Proteus-Simulation-v1.0.zip (about 16.2 MB, without the source code of the models):
Raspberry Pi 5 Smart Greenhouse - Proteus Simulation V1.0- Proteus Simulation: Pi-5-Smart-Greenhouse.pdsprj, the program greenhouse.py and copies of the models.
- Python Code: greenhouse.py, the complete program.
- Proteus Library Files: the LIB files of the Raspberry Pi 5, the DHT22, the ADS1115, the soil, LDR and water sensors, the L9110S, the pump, the fan, the relay, the lamp and the two WiFi Monitors.
- Proteus Model Files: the DLL models and the TEPPi folder, the Python 3.11 and the runtime that the Pi board runs.
- README.txt: the installation steps, the properties, the test results and the links to every library post.
No Proteus yet? Read How to Download and Install Proteus 7 and 8. New to libraries? Follow How to Install a New Library in Proteus.
How to Install the Project Files
- Close Proteus and extract the whole zip file, for example to your Desktop.
- Copy the files from Proteus Library Files into the LIBRARY folder of Proteus.
- Copy everything in Proteus Model Files, the DLL files and the TEPPi folder, into the MODELS folder.
- Start Proteus and open the project from the Proteus Simulation folder.
Changing the Code
The program is plain Python 3: edit greenhouse.py beside the project and press Play again; the Pi board runs the new file. The thresholds are at the top. The same program runs on a real Raspberry Pi 5 with Raspberry Pi OS: enable I2C in raspi-config and install the adafruit-circuitpython-dht library. For another Raspberry Pi 5 project with sensors and a web page, see our Raspberry Pi 5 Home Security System.
Ideas to Extend the Project
- Add a second pump and soil sensor for another bed, with its own thresholds.
- Switch the grow lamp on a schedule with a real-time clock, so the plants get a fixed day length.
- Log the readings to a CSV file and draw a day's chart of temperature and moisture.
- Add a CO2 sensor and open a vent with a servo when the air gets stale.
- Send a message when the reservoir runs low or the air overheats.
- Use a real PWM signal on the fan, so its speed follows the temperature smoothly.
From Simulation to Real Hardware
- Power the water level sensor only while reading: its bare traces corrode when powered all the time; a real build switches its supply from a GPIO for a moment before each reading.
- Prefer a capacitive soil probe outdoors: a resistive probe also corrodes; a capacitive one has no exposed metal.
- Calibrate the soil readings: measure your probe in dry and in wet soil and use those two ratios instead of 0.93 and 0.24.
- Keep the DHT22 in the shade: a sensor in direct sun reads the sun, not the air.
- Separate the supplies: the pump and the fan run on 12 V; keep their wiring and ground currents away from the Pi's signal wires.
Troubleshooting
- The temperature shows "no reading yet": the DHT22's DATA is not on GPIO4, or its supply is missing.
- All three analog readings are 0: the ADS1115 is not at 0x48 (ADDR must be on GND), or SDA and SCL are swapped.
- The pump never runs: the reservoir is low, or the L9110S has no 12 V on its VCC.
- The fan never goes to full speed: the PWM wire is not on GPIO18.
- The terminal cannot start Python: the TEPPi folder is not in MODELS.
Limitations of the Simulation
- The pump does not wet the soil in the simulation: the soil sensor's pop-up sets the moisture, and WATER THE PLANT adds 20 % by hand.
- The weather comes from the sensors' pop-ups; a real greenhouse changes slowly over hours.
- The fan's PWM wire is used as an on/off switch here, which keeps the simulation fast.
- The network is simulated: the dashboard travels between the Pi and the two monitors inside Proteus; the times in this tutorial are simulation time.
- Raspberry Pi is a trademark of Raspberry Pi Ltd; the DHT22 (Aosong) and the ADS1115 (Texas Instruments) are names of their makers; this project is not made or endorsed by them or by Labcenter.
So, that was all about the Raspberry Pi 5 Smart Greenhouse - Proteus Simulation. I hope it helps you build your own: analog sensors through an ADC, watering in doses with a peristaltic pump, a fan and a grow lamp with hysteresis, and a web dashboard, all tested in a simulation before a single seed goes into the soil. More IoT projects with the ESP32 and the Raspberry Pi 5 are coming in this series. If you have any questions, ask in the comments and I will help you out. Till the next tutorial, take care and have fun!