

Introduction to HC-SR04 ( Ultrasonic Sensor )
- HC-SR04 is an ultrasonic sensor mainly used to determine the distance of the target object.
- It measures accurate distance using a non-contact technology - A technology that involves no physical contact between sensor and object.
- Transmitter and receiver are two main parts of the sensor where former converts an electrical signal to ultrasonic waves while later converts that ultrasonic signals back to electrical signals.
- You can download HCSR04 Datasheet by clicking below button:
- These ultrasonic waves are nothing but sound signals that can be measured and displayed at the receiving end.
- Following table shows the main features of this ultrasonic sensor.
| Parameter | Value |
| Main Parts | Transmitter & Receiver |
| Technology Used | Non-Contact Technology |
| Operating Voltage | 5 V |
| Operating Frequency | 4 MHz |
| Detection Range | 2cm to 400cm |
| Measuring Angle | 30º |
| Resolution | 3mm |
| Operating Current | <15mA |
| Sensor Dimensions | 45mm x 20mm x 15mm |
- It gives precise measurement details and comes with accuracy (resolution) around 3mm, terming there might be a slight difference in the calculated distance from the object and the actual distance.
HC-SR04 Pinout & Description
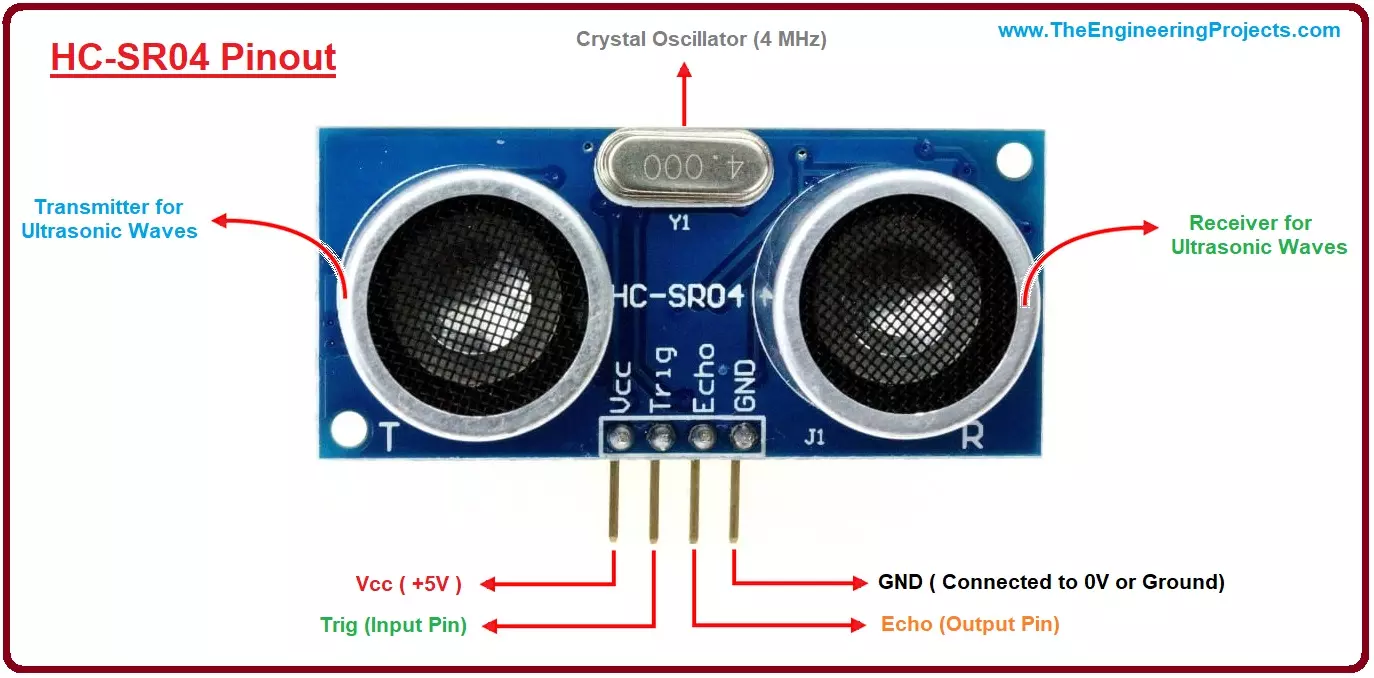
- HC-SR04 contain 4 pins in total.
- Following table shows the HC-SR04 Pinout & Description:
| No. | Pin Name | Pin Description |
| 1 | VCC | The power supply pin of the sensor that mainly operates at 5V DC. |
| 2 | Trig Pin | It plays a vital role to initialize measurement for sending ultrasonic waves. It should be kept high for 10us for triggering the measurement. |
| 3 | Echo Pin | This pin remains high for short period based on the time taken by the ultrasonic waves to bounce back to the receiving end. |
| 4 | Ground | This pin is connected to ground. |
- I have labelled these HC-SR04 Pinout in below figure for better visualization:
How does it work?
The HC-SR04 Ultrasonic (US) sensor is an ultrasonic transducer that comes with 4 pin interface named as Vcc, Trigger, Echo, and Ground. It is very useful for accurate distance measurement of the target object and mainly works on the sound waves. As we connect the module to 5V and initialize the input pin, it starts transmitting the sound waves which then travel through the air and hit the required object. These waves hit and bounce back from the object and then collected by the receiver of the module.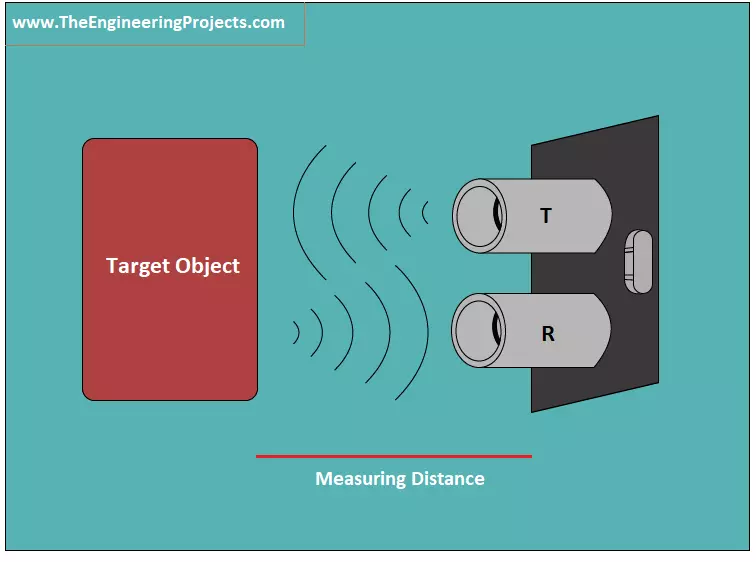
S = (V x t)/2
Where S is the required distance, V is the speed of sound and t is the time sound waves take to come back after hitting the object. We need to divide the value by 2 because time will be double as the waves travel and bounce back from the initial point. Dividing it by 2 will give the actual distance of the target object.Using HC-SR04 with Arduino Module
In order to get the precise distance measurement, HC-SR04 is mostly used in combination with different Arduino Modules like Arduino Uno and Arduino Mega. You can connect Arduino with this sensor in the following way.- First, you need to power up the sensor using 5V DC regulated input to the sensor. Connect the ground pin with the ground of the voltage source. You can also power the sensor module using the Arduino 5V pins as the current drawn by the sensor is less than 15mA, won't be affecting the current ratings of the Arduino Module.
- As the waves bounce back, consequently, the Echo pin will turn on until the sounds waves are received by the receiver. This time will be calculated using Arduino Module.
Applications
HC-SR04 comes with a wide range of applications mainly targeting distance and direction measurements. Following are the major applications it can be used for.- Speed and direction measurement
- Wireless charging
- Humidifiers
- Medical ultrasonography
- Burglar alarms
- Embedded system
- Depth measurement
- Non-destructive testing
