


Introduction to HC-SR501


Introduction of HC-SR501
- HC-SR501 is a Passive Infrared (PIR) motion detector sensor.
- It is used for the detection of moving objects, particularly for the human.
- Such, a device consists of such components and is integrated as a component of a system that automatically performs a task or alerts a user motion in that area.
- They form a vital component of security, home control, energy efficiency, automatic light control and other useful systems.
- Its module also contains time delay adjustment and trigger selection which allow for fine tuning with your application.
- Now let's have a look at the HC-SR501 pinout.
HC-SR501 PINOUT
- HC-SR501 has a total of three pinout, which are:
- PIN 1: This pin is Vcc, it is used for input voltage. Its input voltage varies from 5V to 12V.
- PIN 2: It's the OUT Pin which is fed to the microcontroller.
- PIN 3: We have to apply ground on this pin.
- Now, for better understanding lets have look a at HC-SR501 Pinout figure:

- Lets have a look at working of HC-SR501:
Working of HC-SR501
- Every living object with a temperature above Absolute Zero (0 Kelvin / -273.15 °C) emit heat energy in the form of infrared radiations.
- The hotter an object is the more radiation it emits. Human body works on a similar pattern and emits heat energy.
- HC-SR 501 sensor is designed to detect such level of infrared radiation. It basically consists of two main parts:
- A Pyroelectric Sensor.
- A special lens called Fresnel lens which focuses the infrared signals onto the pyroelectric sensor.
- For better understanding lets see figure and explain it.
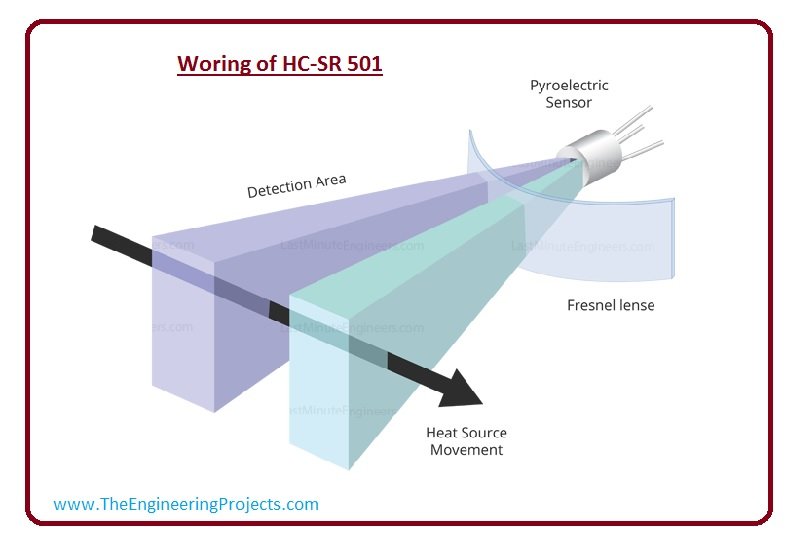
- A pyroelectric sensor has two rectangular slots in it, which made of such material which allow infrared radiation to pass through it.
- Behind these two slots, there are two sensor electrodes,
- One responsible for positive output.
- Second for negative output.
- The two electrode wire up so that they cancel each other out. If one half sees less or more infrared radiations then other, the output will swing high or low.

- When the sensor is idle: If there is no movement around the sensor, both slots detect the same amount of infrared radiations, resulting in a zero output signal.
- When a warm body like a human or animal passes by: If someone pass by as sensor then, it first intercept one half of the sensor, which causes a positive differential change between the two halves. When the warm body leaves the sensing area, the reverse happen, then the sensor generates a negative differential change. The Corresponding pulse of signals results in the sensor setting its output pin high.
Using HC-SR501 as a Standalone Unit
- One of the reasons, HC-SR501 to be extremely popular is the fact that HC-SR 501 is a very versatile sensor that is pretty capable all on its own.
- By using it with other microelectronic such as Arduino you can expand upon its versatility even further.

- Connection for this circuit is very simple. Batteries are connected with Vcc and GND of the sensor and small Red LED connected to the output pin through a 220O current limiting resistor.
- When the sensor detects motion, the output pin will go “high” and light up the LED.
- One thing is to be remembered is that once you power up the circuit you need to wait 30-60 seconds for the to acclimatize to the infrared energy in the room.
- During this time LED may blink a little. Weight until LED is off and move around in front of it to see led light up.
- Let discuss its circuit diagram with aurdino.
HC-SR501 Interfaced With Aurdino
- Now we have an understanding of HC-SR501 working, lets discus its interfacing with Aurdino. Connection of this circuit is very simple.
- HC-SR501 acts as a digital sensor so all you need to do is listen for the output pin to flip HIGH or LOW.
- For correctly working, you will want to set the jumper on the HC-SR501 to the H (Retriggering) position.
- You should also download PIR Sensor Library for Proteus so that you can easily simulate it in Proteus.
- You should also have a look at PIR Sensor Arduino Interfacing.
- Lets see a diagram of this circuit.

HC-SR501 Features
- Wide range of voltages we can apply on its input varying from 4.V to 12V (+5V recommended).
- Its best feature is that it can distinguish between men movement and object movement.
- Its Output voltage is High/Low (3.3V TTL).
- It cover a distance of 7 meter and an area of 110 degrees.
- It's operating temperature is from -20° to +80° Celsius.
HC SR501 Functional Description
Lets discuss HC-SR501 Functional Description with detail and know how it operate when someone come in its working range.- When someone comes under infrared waves regions, then sensor detect variations in infrared waves it trip alarm and tell about someone appearance at that point. We can its adjustment according to our requirements.
- HC-SR501 Initialization:
- When we start function on it, it require a minute for the initiate. During this period, it does not work properly. During this period for it to work properly, we need a circuit or controller to take this initialization period into consideration.
- HC-SR501 Area of Detection:
- In the coming line, we will discuss about its detection area.
- It works in the range of 110 degree cone area and 3 to 7 meters.

HC -SR 501 Applications
These are some application of HC-SR501:- It can be used as Automatically sensing light for Floor, bathroom, basement, porch, warehouse and in Garage.
- It can also be used in the ventilator.
- We can use it for security purposes as well.
×
![]()


