

Introduction to LM35
- LM35 is a commonly used temperature sensor, It shows values in the form of output voltages instead of degrees Celsius.
- LM35 shows higher voltage values than thermocouples and may not need the output voltage to be amplified.
- The output voltage of LM35 is proportional to the Celsius temperature. The scale factor is .01 V/°C.
- One most important characteristics is that it draws just 60 microamps from its supply and acquires a low self-heating capacity.
- LM35 temperature sensor available in many different packages like T0-46 metal transistor-like package, TO-92 plastic transistor-like package, 8-lead surface mount SO-8 small outline package.
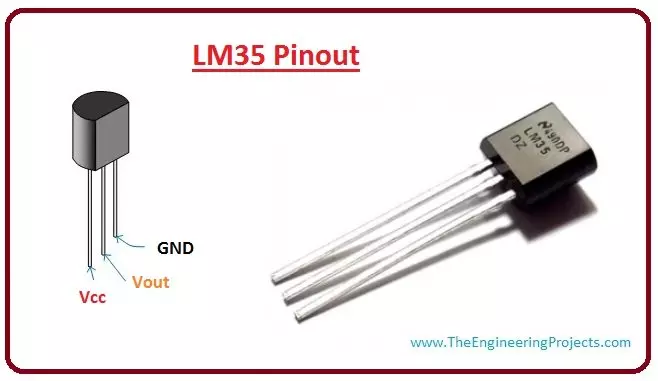
LM35 Pinout
- LM35 has three pinouts which are:
- PIN 1: Vcc, it used as input at this pin we apply +5 V input voltage.
- PIN 2: At this pin, we get output voltage.
- PIN 3: This pin is used for ground.
- Here's the table for LM35 Pinout for better understanding:
| No. | Parameter | Pin Type |
| 1. | Vcc | Power Pin ( Connected to +5V ) |
| 2 | Vout | Output Pin (It should be connected with an analog pin of Microcontroller) |
| 3 | Ground | Ground Pin ( Connected to 0V or GND ) |
Working of LM35
- LM35 is used to measure precise centigrade temperature. The output of this sensor changes describes the linearity. The output voltages of this sensor are linearly comparative to the Celsius temperature.
- The output voltage range of this sensor is from -55° to +150°C. It also has low self-heating power.
- Its operating voltages is 4 to 30 volts.
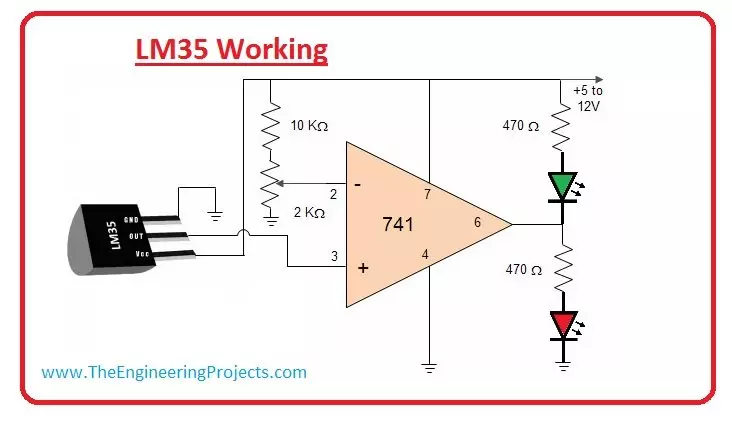
- In the most circuit, this sensor is used with an operational amplifier. An amplifier is a device which amplifies applied a voltage at a certain level.
- Operational Amplifier has three terminal, first two are inverting and noninverting inputs third one is used for output.
- By using LM35 with operational amplifier we can get amplification of output voltages of LM35.
- For better understanding lets have a look at circuit diagram.
LM35 Features
- Its maximum and minimum input voltages are 35 V and -2 V respectively. It typically operates at 5 V.
- It can measure temperature from -55°C to 150°C.
- Its Output voltage is directly proportional (Linear) to temperature (i.e.) there will be a rise of 10mV (0.01V) for every 1°C rise in temperature.
- Its Drain current is less than 60 uA.
- Its low-cost temperature sensor.
- It is small and hence suitable for remote applications.
- It is available in TO-92, TO-220, TO-CAN and SO IC package.
- It is low self-heating, 0.08 C in still air n Non-linearity only ±1/4C typical.
Parameters of LM35
Let's discuss some working parameters of LM35| No. | Parameter | Conditions | Value | Unit |
| 1. | Accuracy LM35, LM 35C | T A=+25°C | ±0.4 | °C |
| 2 | Accuracy, LM35D | T A=+25°C | ±0.6 | °C |
| 3 | Non linearity | T MIN=TA=T MAX | ±0.3 | °C |
| 4 | Sensor Gain | T MIN=TA=T MAX | +10.0 | mV/°C |
| 5 | Load Regulation | T A=+25°C | ±0.4 | mV/mA |
| 6 | Line Regulation | T A=+25°C | ±0.01 | mV/V |
| 7 | Quiescent Current | V S=+5V, +25°C | 56 | µA |
| 8 | Change of Quiescent Current | 4V=VS=30V | 0.2 | µA |
| 9 | Temperature Coefficient of Quiescent Current | - | +0.39 | µA/°C |
| 10 | Long Term Stability T J=T MAX, for 1000 hours | ±0.08 | ±0.08 | °C |
LM35 Interfaced with Aurdino
Now, let's discuss LM35 interfacing with Arduino and design a simple project:- The project which we are gonna discuss is Temperature Monitoring on Virtual Terminal of Arduino.
- Temperature Sensor we are gonna use is LM35.
- In this circuit, Aurdino is the main component because it controls all functions.
- In this circuit LM35 senses the temperature and converts into an electoral (analog) signal, then this signal applied to Microelectronic Unit through an analog-to-digital converter (ADC).
- The analog signal is converted into digital format by the ADC.
- The value of temperature sensed by the sensor will be displayed on Serial Terminal or virtual Terminal if you are working on Proteus.
- You can download this complete Proteus simulation from Interfacing of LM35 with Arduino in Proteus.
- I have also shared Interfacing of LM35 with PIC Microcontroller, so if you are working on PIC Microcontroller then you should read that out.
- For better understanding lets see the circuit diagram of this project:

Applications of LM35
These are some applications of LM35, let discuss them.- It's used for measuring the temperature of a particular environment.
- It provides thermal shutdown for a circuit or component used in a specific project.
- It can be used for battery temperature measurement. It provides battery protection from overheating.
- It can be used in HVAC applications as a temperature measurement device.
