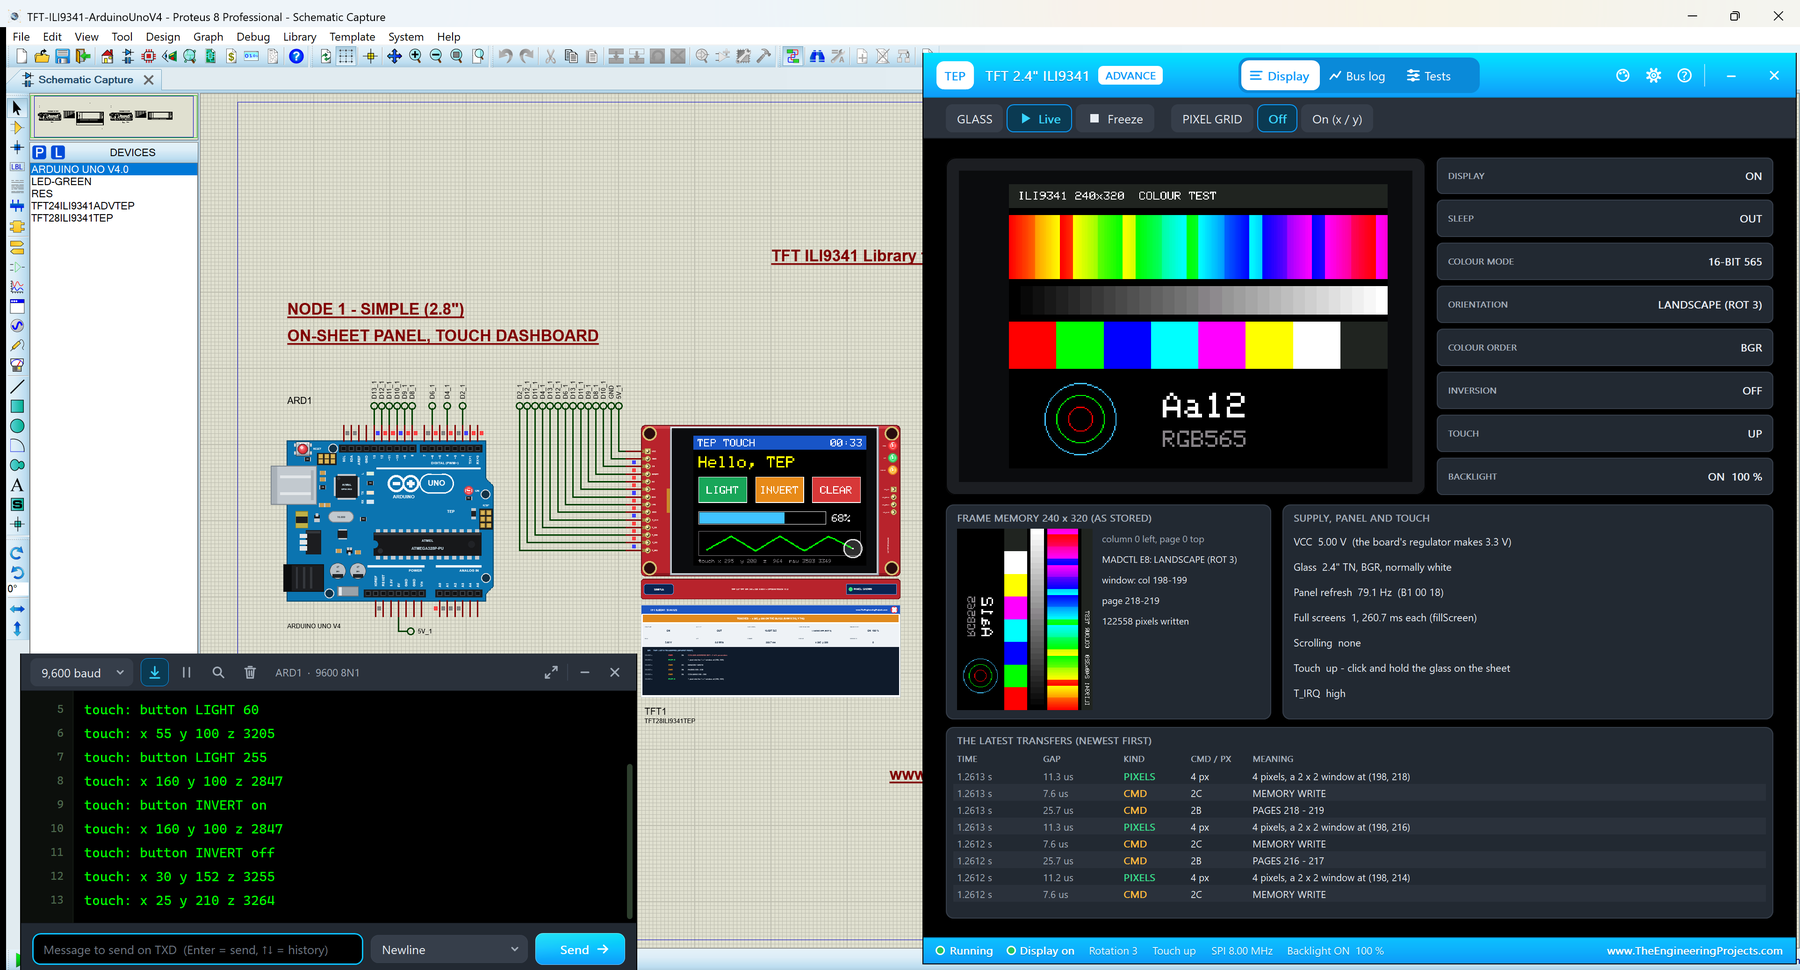
Hello friends, I hope you all are doing great. Today, I am going to share the new TFT ILI9341 Library for Proteus V1.0. The red 2.4" and 2.8" TFT with touch is the colour screen that turns an Arduino project into a real device: 240 x 320 pixels, 65,536 colours, a bright backlight and a resistive touch screen you can press, all on a few SPI wires. Buttons, sliders, menus and drawing pads become possible. With this TFT ILI9341 Library for Proteus, your sketch draws on a TFT that behaves like the real one, and you touch it with the mouse: click and drag on the glass, and the touch controller reports the point, just as a finger would.
This is our own model of the module, with two chips written from their datasheets: the ILI9341 display controller, with the SPI interface bit by bit, every command, the frame memory, the rotations, the colour order, the backlight and even the register reads; and the XPT2046 touch controller, with its conversions, the pressure and the touch interrupt. You get four devices, the 2.8" and the 2.4" module, each as TFT Simple with a live STATUS panel on the schematic and as TFT Advance with a pop-up window, a bus log and five TFT test tools. The demo runs on our Arduino UNO V4.0, with its serial monitor built into the board.
NOTICE: This library is very special to our team. It is our first display you can touch: two chips on one SPI bus, a 76,800-pixel colour glass and a resistive film that turns a mouse click into raw coordinates and pressure. We modelled both chips from their datasheets, tested them pixel by pixel against the real Adafruit and XPT2046 libraries in all four rotations, and made the model explain what went wrong: a white screen, swapped colours, a touch in the wrong place. It took our team a lot of hard work and many test runs. Your feedback is the fuel that keeps us going, so please tell us what you think in the comments below or in the LCD Library board of our forum. And if our free libraries help you, you can buy us a coffee. So, let's get started with the TFT ILI9341 Library for Proteus V1.0:
What is a 2.4" / 2.8" TFT ILI9341 Touch Display?
A TFT (thin-film transistor) display is a colour LCD: every pixel has its own tiny transistor, and three sub-pixels, red, green and blue, filter the white light of the backlight. The red 2.4" and 2.8" modules carry a 240 x 320 glass with the ILI9341 controller, which keeps the picture in its own frame memory and refreshes the glass from it about 79 times a second. Over the glass lies a resistive touch film, read by a second chip, the XPT2046. Both chips share the Arduino's SPI bus; each has its own chip-select pin.
The TFT ILI9341 Touch Module at a Glance
| 2.4" / 2.8" TFT ILI9341 + touch | |
|---|---|
| Glass | 2.4 or 2.8 inch diagonal, 240 x 320 pixels, a normally-white TN panel with BGR colour filters |
| Colours | 65,536 (16-bit, RGB565) or 262,144 (18-bit) |
| Display controller | ILI9341 (ILI Technology), 240 x 320 x 18-bit frame memory, SPI up to 10 MHz for writes |
| Touch controller | XPT2046: a 12-bit converter for the resistive film, SPI up to about 2.5 MHz, a pen interrupt |
| Interface | 14 pins: VCC, GND, CS, RESET, DC, SDI (MOSI), SCK, LED, SDO (MISO), T_CLK, T_CS, T_DIN, T_DO, T_IRQ |
| Supply | 3.3 - 5 V on VCC (the board has a 3.3 V regulator); the logic is 3.3 V |
| Backlight | White LEDs on the LED pin: high = on, PWM dims them |
| Board | 2.8": 86.0 x 50.0 mm; 2.4": 77.2 x 42.7 mm; an SD card slot with its own 4 pins |
Terms You Will See in This Article
| Term | Meaning |
|---|---|
| RGB565 | A colour in 16 bits: 5 for red, 6 for green, 5 for blue. Adafruit GFX colours are RGB565. |
| Address window | The rectangle the next pixels go into, set with CASET (columns) and PASET (pages, i.e. rows) |
| MADCTL | The command that sets the rotation (MY, MX, MV) and the colour order (RGB or BGR) |
| DC | Data / command: low = the byte is a command, high = a parameter or pixel data |
| Raw X / Y | The touch controller's 12-bit readings, 0 - 4095, that the sketch maps to pixels |
| Z (pressure) | How hard the film is pressed, from the readings Z1 and Z2; the library sees a touch from 400 |
| T_IRQ (PENIRQ) | The touch controller's interrupt pin: low while the film is pressed |
How the ILI9341 and the XPT2046 Work
Everything goes over SPI. For the display, the DC pin tells the ILI9341 what a byte is: with DC low it is a command, with DC high a parameter or, after MEMORY WRITE (2C), pixel data. To draw, a library sets the address window with CASET (2A) and PASET (2B), sends 2C and then the pixels: two bytes each at 16-bit colour. A filled rectangle is one window and many identical pixels, which is why fillRect() is fast and drawPixel() is slow. The ILI9341 also answers: after a read command it shifts its registers out on SDO (MISO), and Adafruit's readcommand8() uses that to read the power mode, MADCTL and the pixel format back.
At power-on the ILI9341 is asleep and its display is off. After a reset a sketch must wait 120 ms, send SLEEP OUT (11), choose 16-bit colour with 3A, set MADCTL and send DISPLAY ON (29). Adafruit's begin() does all of this. Until then the glass is not driven, and a TFT glass that is not driven is white.
The touch film is two resistive layers that touch where you press. To measure X, the XPT2046 puts a voltage across one layer and reads it on the other; for Y it swaps the layers; two more readings, Z1 and Z2, give the pressure. Each reading starts with a control byte from the Arduino and returns 12 bits on T_DO. While the film is pressed, the chip pulls T_IRQ low, so the library can sleep until a touch comes. The XPT2046 knows nothing about pixels: the sketch maps the raw values, about 240 - 3855 for X and 290 - 3805 for Y on this film, to the screen with map().
What's New in TFT ILI9341 Library for Proteus V1.0
- Our first touch display: the 2.4" and 2.8" red SPI TFT with the ILI9341 and the XPT2046, drawn at their real size, turned to landscape so the 14-pin header faces the Arduino.
- Touch it with the mouse: click and hold on the glass to press it, drag to move your finger. The XPT2046 reports the raw X, Y and pressure, and T_IRQ goes low, as on the real film.
- The full ILI9341 command set from the datasheet: sleep, display on / off, the address window, MADCTL with its four rotations and the colour order, 16 and 18-bit colour, inversion, idle mode, scrolling, the frame rate and the display function.
- Register reads on MISO: the ID, the status, the power mode, MADCTL, the pixel format, the self-diagnostic and the memory read, with the datasheet's dummy clocks. The two chips share MISO.
- The white screen and the classic colour faults (red and blue swapped, colours inverted), as on a real module, with a banner that names the cause.
- The datasheet's waits: a command sent too early after a reset or SLEEP OUT is ignored and flagged.
- The backlight with PWM on the LED pin.
- Five TFT test tools on the Advance devices: Init check, SPI bus, Speed, Pixels and Touch.
- A touch demo on our Arduino UNO V4.0: buttons, a slider, a paint strip and a calibration screen, with the serial monitor built into the board.
- A compact package: about 1.34 MB, without the C++ source code.
TFT Simple vs TFT Advance
| TFT Simple | TFT Advance | |
|---|---|---|
| Devices | TFT28ILI9341TEP (2.8"), TFT24ILI9341TEP (2.4") | TFT28ILI9341ADVTEP (2.8"), TFT24ILI9341ADVTEP (2.4") |
| On the schematic | The board + the TFT ILI9341 STATUS panel | The board only |
| Status | Banner, 10 readouts, the last 6 transfers | A pop-up window: Display, Bus log, Tests |
| Test tools | - | Init check, SPI bus, Speed, Pixels, Touch |
| Best for | Seeing the state at a glance | Finding out why a screen or a touch is wrong |
Download TFT ILI9341 Library for Proteus
Click the button below to download TFT-ILI9341-Library-for-Proteus-v1.0.zip (about 1.34 MB, without the C++ source code):
TFT ILI9341 Library for Proteus V1.0- README.txt: a detailed guide to the devices, the installation, the demo, the wiring, the test tools, the touch calibration and real hardware.
- Proteus Library Files:
TEPILI9341.LIB(the four devices) andArduinoV4TEP.LIBfrom our Arduino Library for Proteus V4.0, with the Arduino UNO V4.0 of the demo. - Proteus Model Files:
TEPILI9341.DLLandTEPARDUINO.DLL. - Proteus Simulation:
TFT-ILI9341-ArduinoUnoV4.pdsprj,TFT_ILI9341_Touch_Demo.hex(both UNOs run it) and copies of both DLLs. - Arduino Code:
TFT_ILI9341_Touch_Demo.ino, the demo sketch. It needs "Adafruit ILI9341" (which offers Adafruit GFX and Adafruit BusIO too) and "XPT2046_Touchscreen" from the Library Manager.
No Proteus yet? Read How to Download and Install Proteus 7 and 8. New to libraries? Follow How to Install a New Library in Proteus.
How to Install TFT ILI9341 Library for Proteus
- Close Proteus and extract the whole zip file to a normal folder, for example your Desktop.
- Copy the two files from Proteus Library Files into the LIBRARY folder, usually
C:\Program Files (x86)\Labcenter Electronics\Proteus 8 Professional\LIBRARY(on some PCsC:\ProgramData\Labcenter Electronics\Proteus 8 Professional\LIBRARY). - Copy
TEPILI9341.DLLandTEPARDUINO.DLLfrom Proteus Model Files into the MODELS folder. If you have our Arduino Library V4.0, its files are the same. - Delete
TEPILI9341.IDXfrom the LIBRARY folder if there is one. - Start Proteus, press P and search for ILI9341: you get the four devices.
Tip: the demo project needs its .hex file and the two DLLs beside it, so keep the Proteus Simulation folder together. The library was tested in Proteus 8.5; Proteus 7 is not supported.
The TFT ILI9341 Board in Proteus
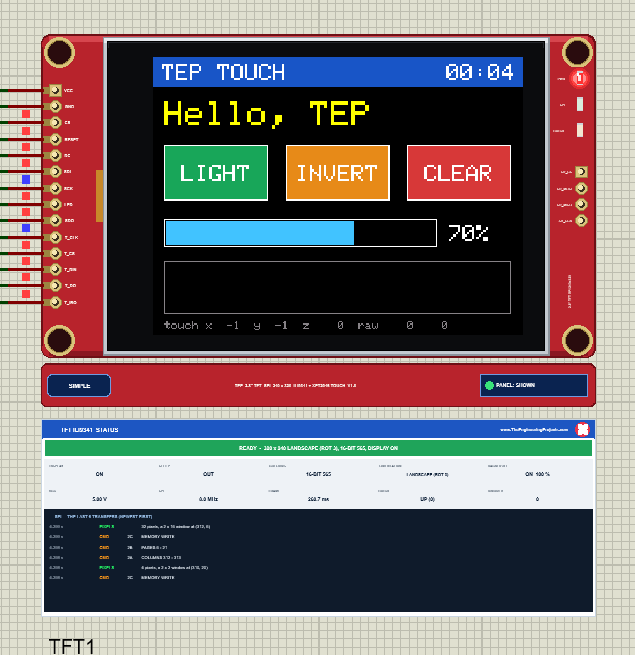
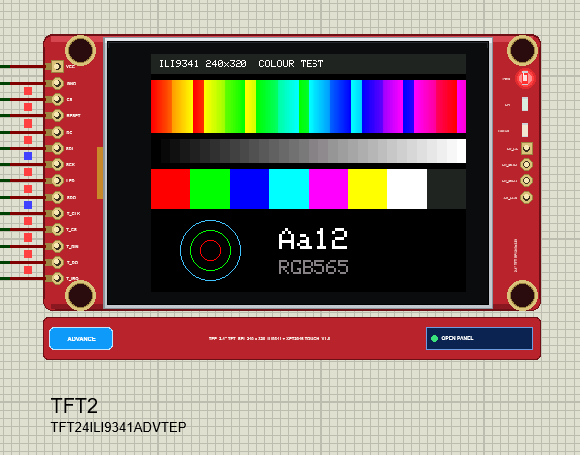
The part looks like the real module at its real size: the red board with its four holes, the glass with its black frame and the touch film, the 14-pin header and the SD card pads. The real module is portrait, with the header at the bottom; on the schematic it is turned to landscape, so the header is on the left and faces the Arduino, and the picture is 320 x 240. Adafruit's setRotation(3) is upright this way.
Pinout
| Pin | Function | The demo |
|---|---|---|
| VCC | 3.3 - 5 V (the board regulates it to 3.3 V) | 5V |
| GND | Ground | GND |
| CS | TFT chip select, active low | D10 |
| RESET | Hardware reset, active low | D8 |
| DC | Data / command | D9 |
| SDI (MOSI) | SPI data into the TFT | D11 |
| SCK | SPI clock | D13 |
| LED | Backlight: high = on, PWM dims it | D6 (PWM) |
| SDO (MISO) | SPI data out of the TFT (the register reads) | D12 |
| T_CLK | Touch SPI clock | D13 |
| T_CS | Touch chip select, active low | D4 |
| T_DIN | Touch SPI data in | D11 |
| T_DO | Touch SPI data out | D12 |
| T_IRQ | Touch interrupt: low while pressed | D2 (INT0) |
LEDs, the TEP Strip and the Properties
Three LEDs at the SD card end show what happens: PWR lights with power, SPI flashes when a byte reaches the TFT, and TOUCH lights while the film is pressed. A slim TEP strip under the board holds the SIMPLE / ADVANCE badge, the title and the panel button. The LEDs, the strip and the panels are TEP additions; a real module has none of them. The SD card is not simulated in V1.0; its pads are drawn only.
| Property | Values | What it does |
|---|---|---|
| PANEL | OPEN (default), CLOSED | Simple only: the STATUS panel at the start |
Touch the TFT with the Mouse
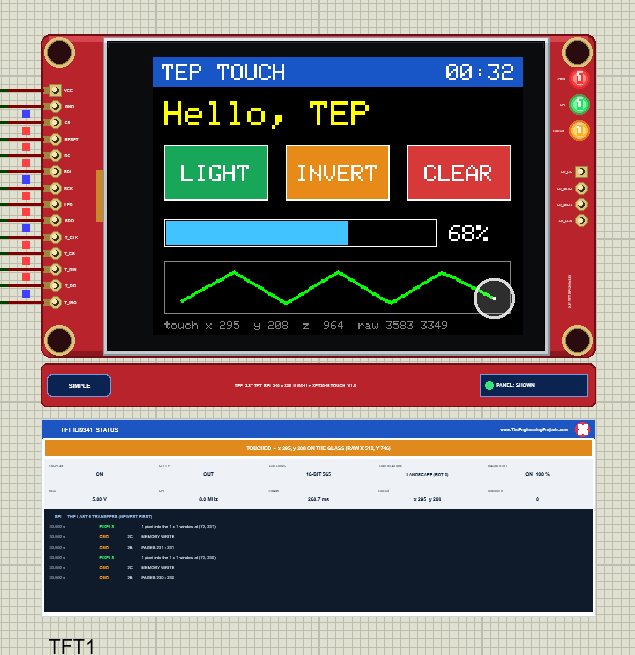
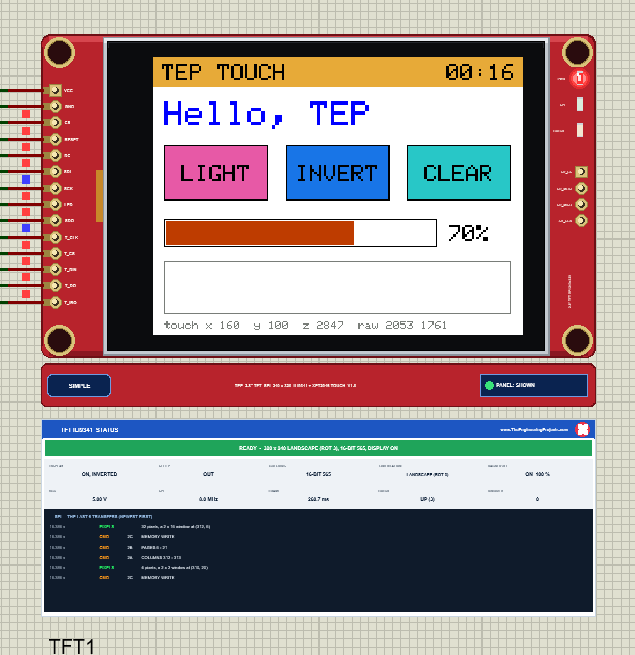
In Proteus your mouse is the finger. Press the left button on the glass and hold it: the film is pressed at that point. Move the mouse with the button down and the finger slides. Let go and the film is released. The model turns the point into what the real film gives the XPT2046: raw X and Y between about 240 and 3855 (X) and 290 and 3805 (Y), and Z1 / Z2 readings for the pressure, with T_IRQ low while the button is down. The touch lasts as long as you hold the button, so a quick click is a short tap.
The demo's dashboard shows what a touch screen sketch does with it. The three buttons act once per press, the slider follows the finger, and the paint strip draws a line along your drag. The status line under it shows the screen point, the pressure and the raw values, and the serial monitor prints every new touch.
Calibrating the Touch Screen
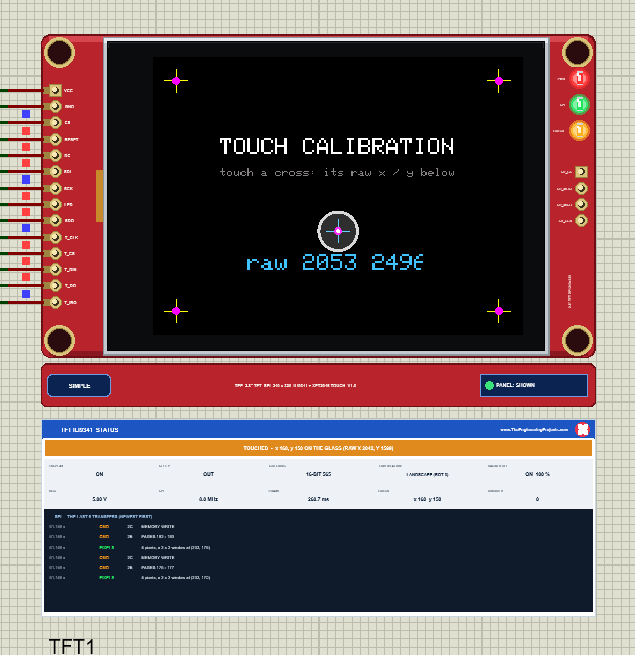
Every real touch film is a little different, so a sketch needs four numbers: the raw values at the glass edges. Type CAL in the monitor, touch the crosses in the corners and read the raw values; these are the TS_MINX / TS_MAXX / TS_MINY / TS_MAXY of the sketch. The Touch tool of the Advance device shows them too. On this model the film reads X 240 - 3855 and Y 290 - 3805 at the glass edges, and those are the demo's numbers.
The White Screen: Why a TFT Starts White
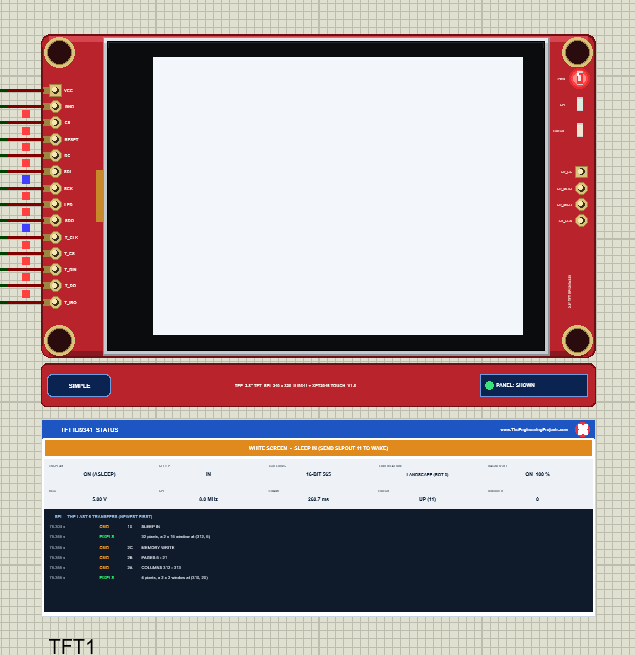
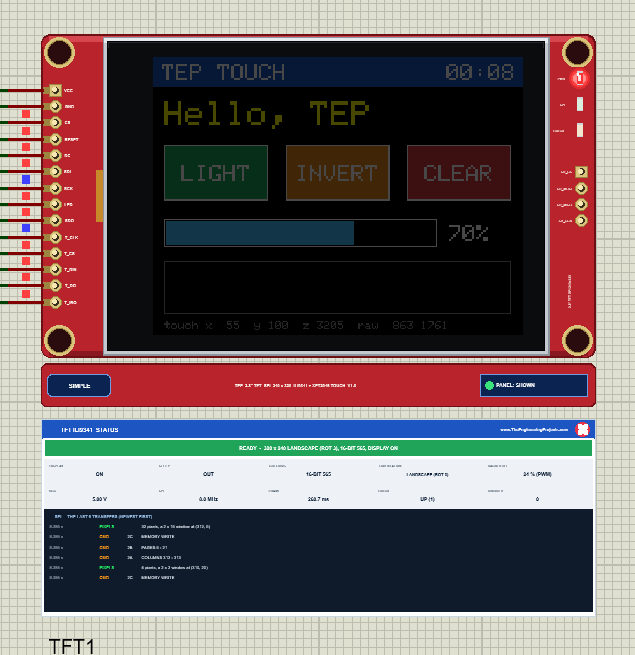
The glass of these modules is a normally-white TN panel: where the controller drives no voltage, the liquid crystal lets the backlight through, and the screen is white. That is why a TFT is white while it is asleep, while its display is off, and when the sketch never initialised it. The "white screen" is the most common TFT question, and its usual causes are a CS or DC pin wired wrong, wrong pins in the constructor or a missing tft.begin().
The model shows exactly that, and the STATUS panel names the cause: NOTHING ON SPI YET (check CS, DC, SDI, SCK), STILL IN SLEEP: SEND SLPOUT (11), DISPLAY OFF: SEND DISPON (29), or SLEEP IN after the sketch's SLPIN, as in the picture. Two more faults have their own red banners: RED / BLUE SWAPPED when MADCTL asks for RGB order on this BGR glass, and COLOURS INVERTED when the display function (B6) sets REV = 0 on a normally-white glass.
Rotation on a Landscape Module
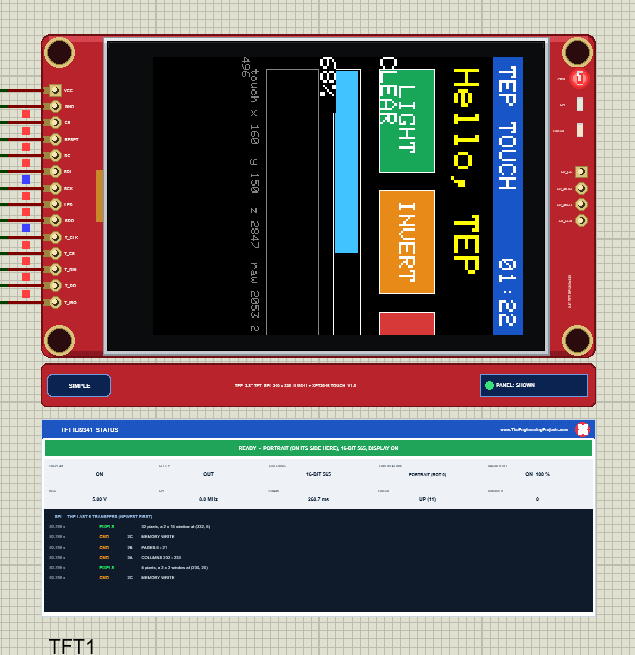
setRotation() is one command: MADCTL with its MY, MX and MV bits. Rotations 0 and 2 are portrait, 1 and 3 landscape, and on this module rotation 3 is upright. The touch library has its own setRotation() for the raw values, and it must get the same number as the TFT, or touches land in the wrong place. Our PC test compares the glass with Adafruit's own picture in all four rotations, pixel by pixel, and touches every button in every rotation.
TFT Simple: The STATUS Panel
The Simple devices keep a live TFT ILI9341 STATUS panel right under the board. The banner says READY, TOUCHED with the point, or what is wrong: NO POWER, WHITE SCREEN with its cause, STILL ASLEEP after a SLEEP OUT that came too early, RED / BLUE SWAPPED, COLOURS INVERTED, IN RESET or BACKLIGHT OFF. Ten readouts show DISPLAY, SLEEP, COLOURS, ORIENTATION, BACKLIGHT, VCC, SPI (the measured clock), FRAME (the time of a full screen), TOUCH and IGNORED, and the dark log lists the last 6 transfers. The red X closes the panel; PANEL on the strip opens it again.
TFT Advance: The Pop-Up Window
The Advance devices keep only the board on the schematic and open a TEP pop-up window at Run, with the look of our serial monitor: the tabs Display, Bus log and Tests, Settings, Help and a theme switch.
The Display Page
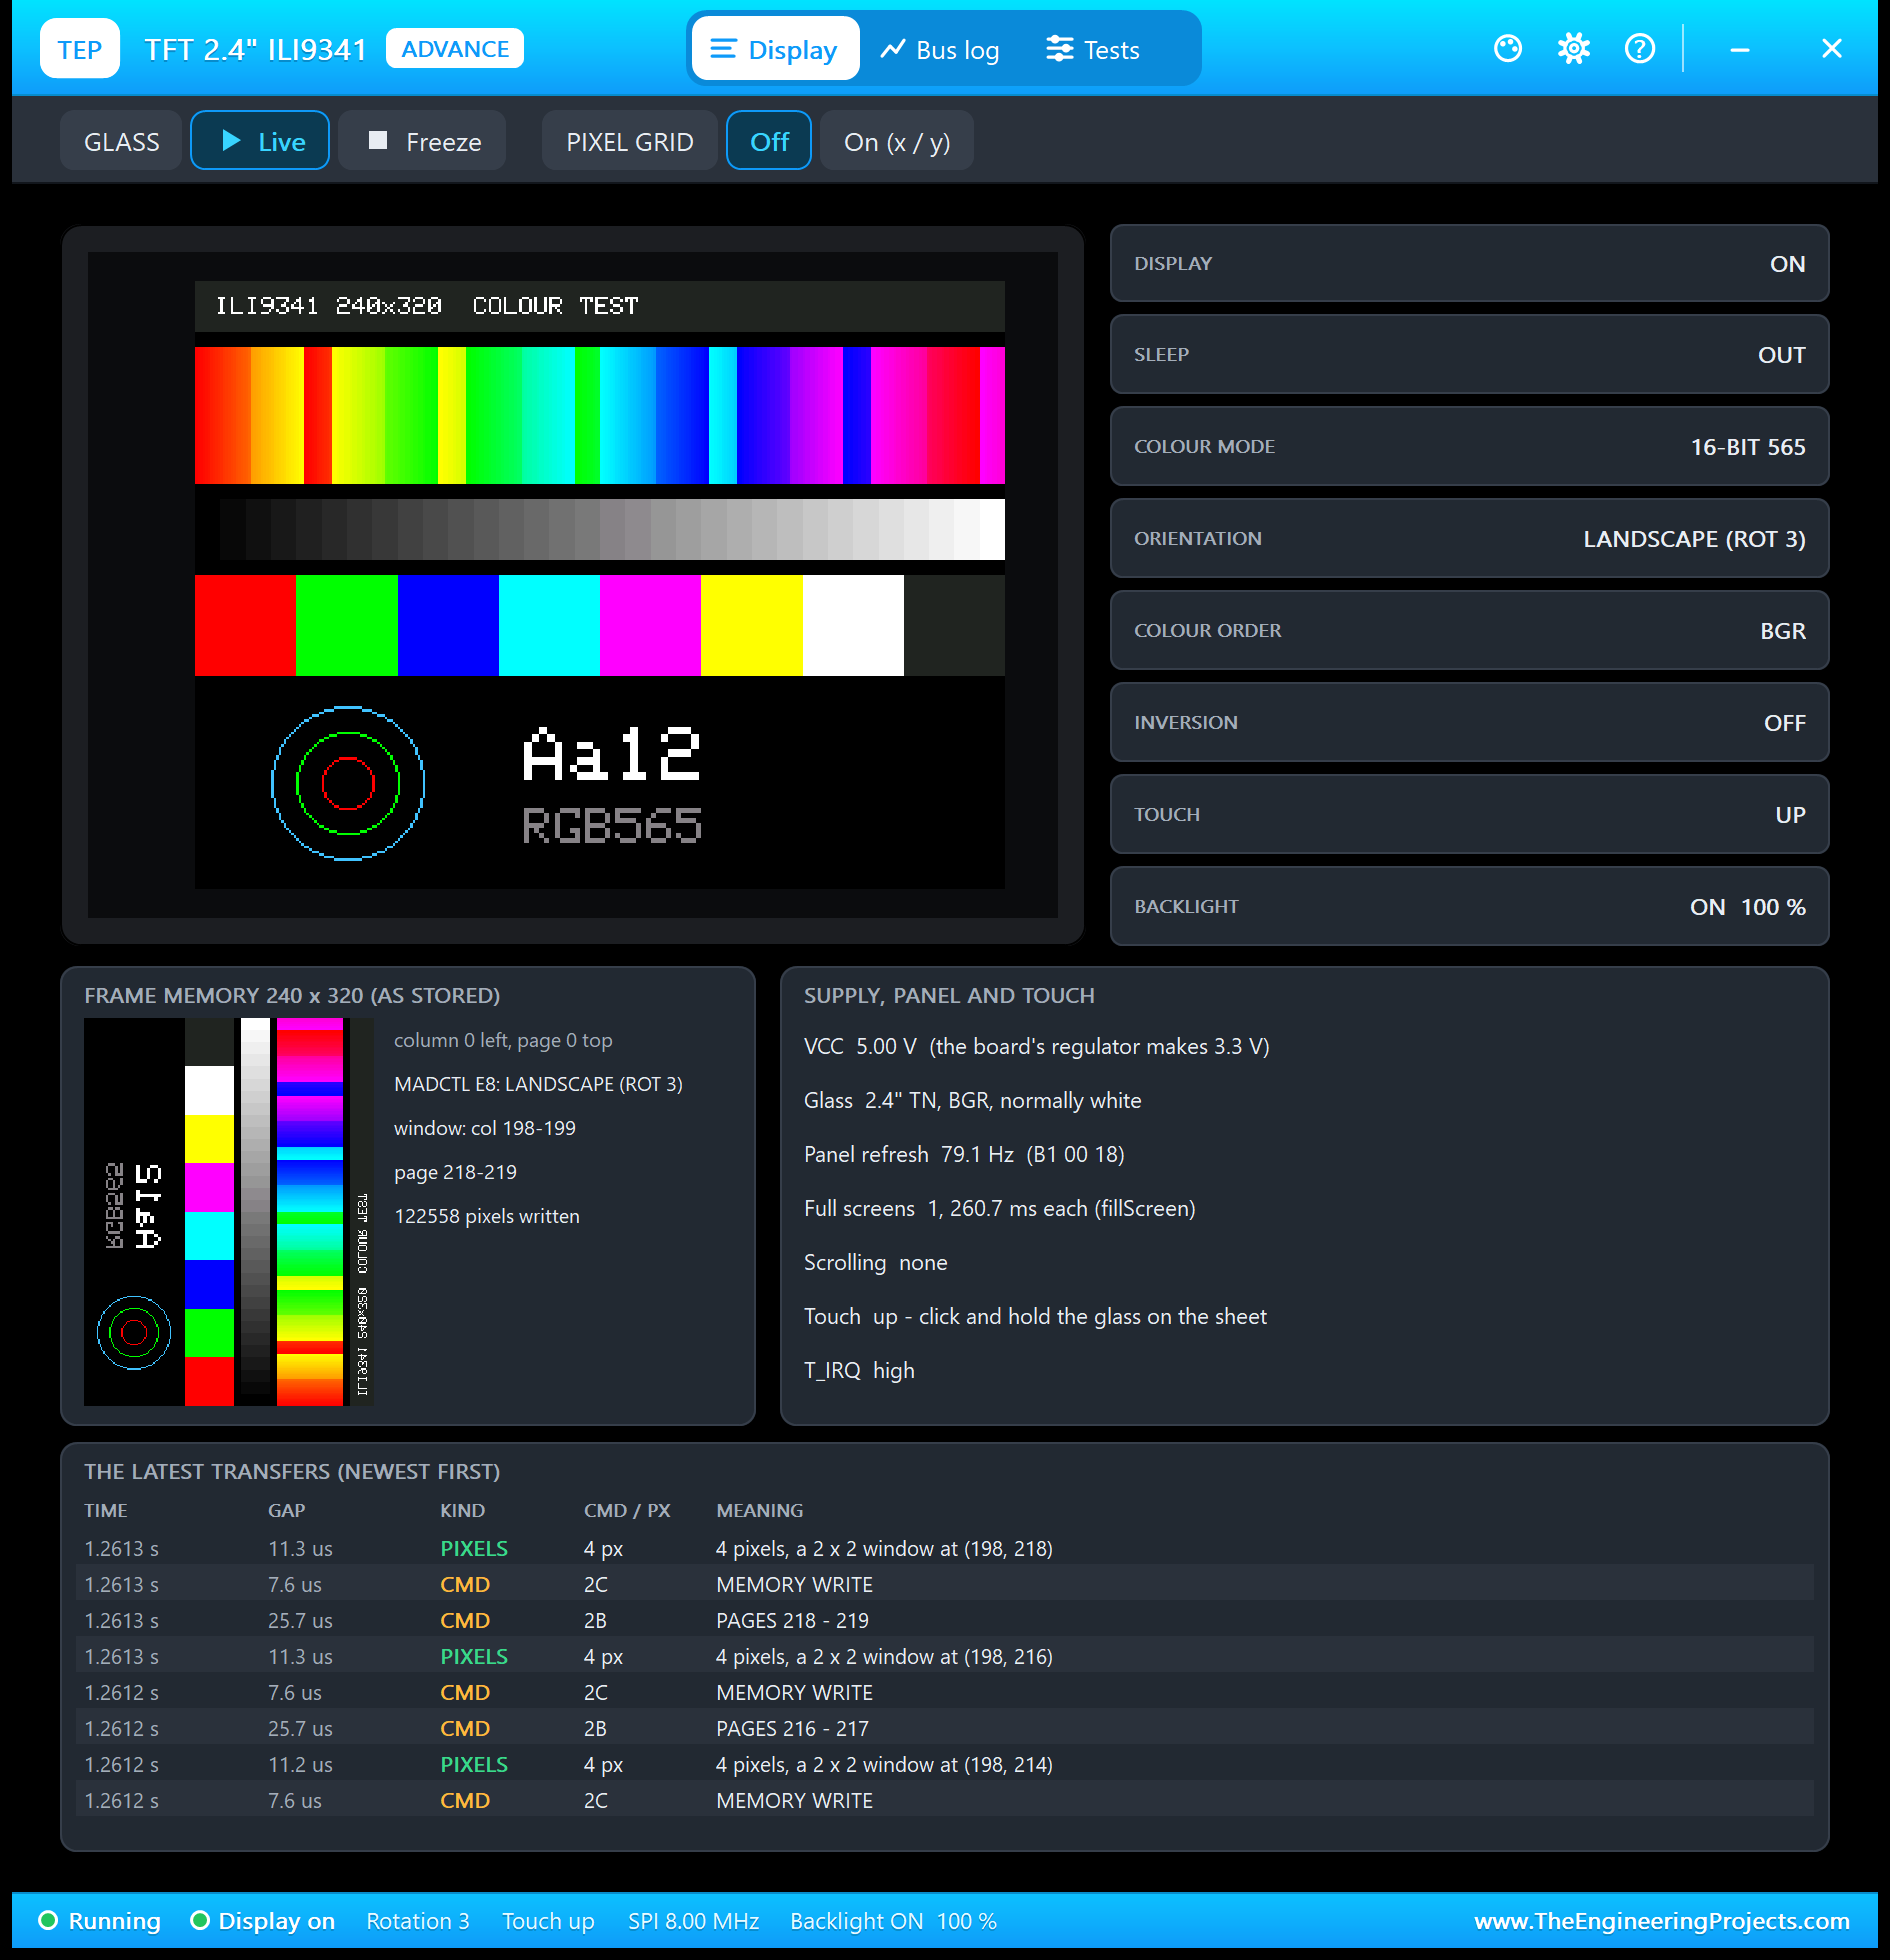
The tiles read the controller: display, sleep, colour mode, orientation, colour order, inversion, touch and backlight. The frame memory card shows the picture as the ILI9341 stores it, column 0 on the left and page 0 at the top: on this landscape module it is turned. Freeze holds the picture; the pixel grid adds x / y numbers.
The Bus Log Page
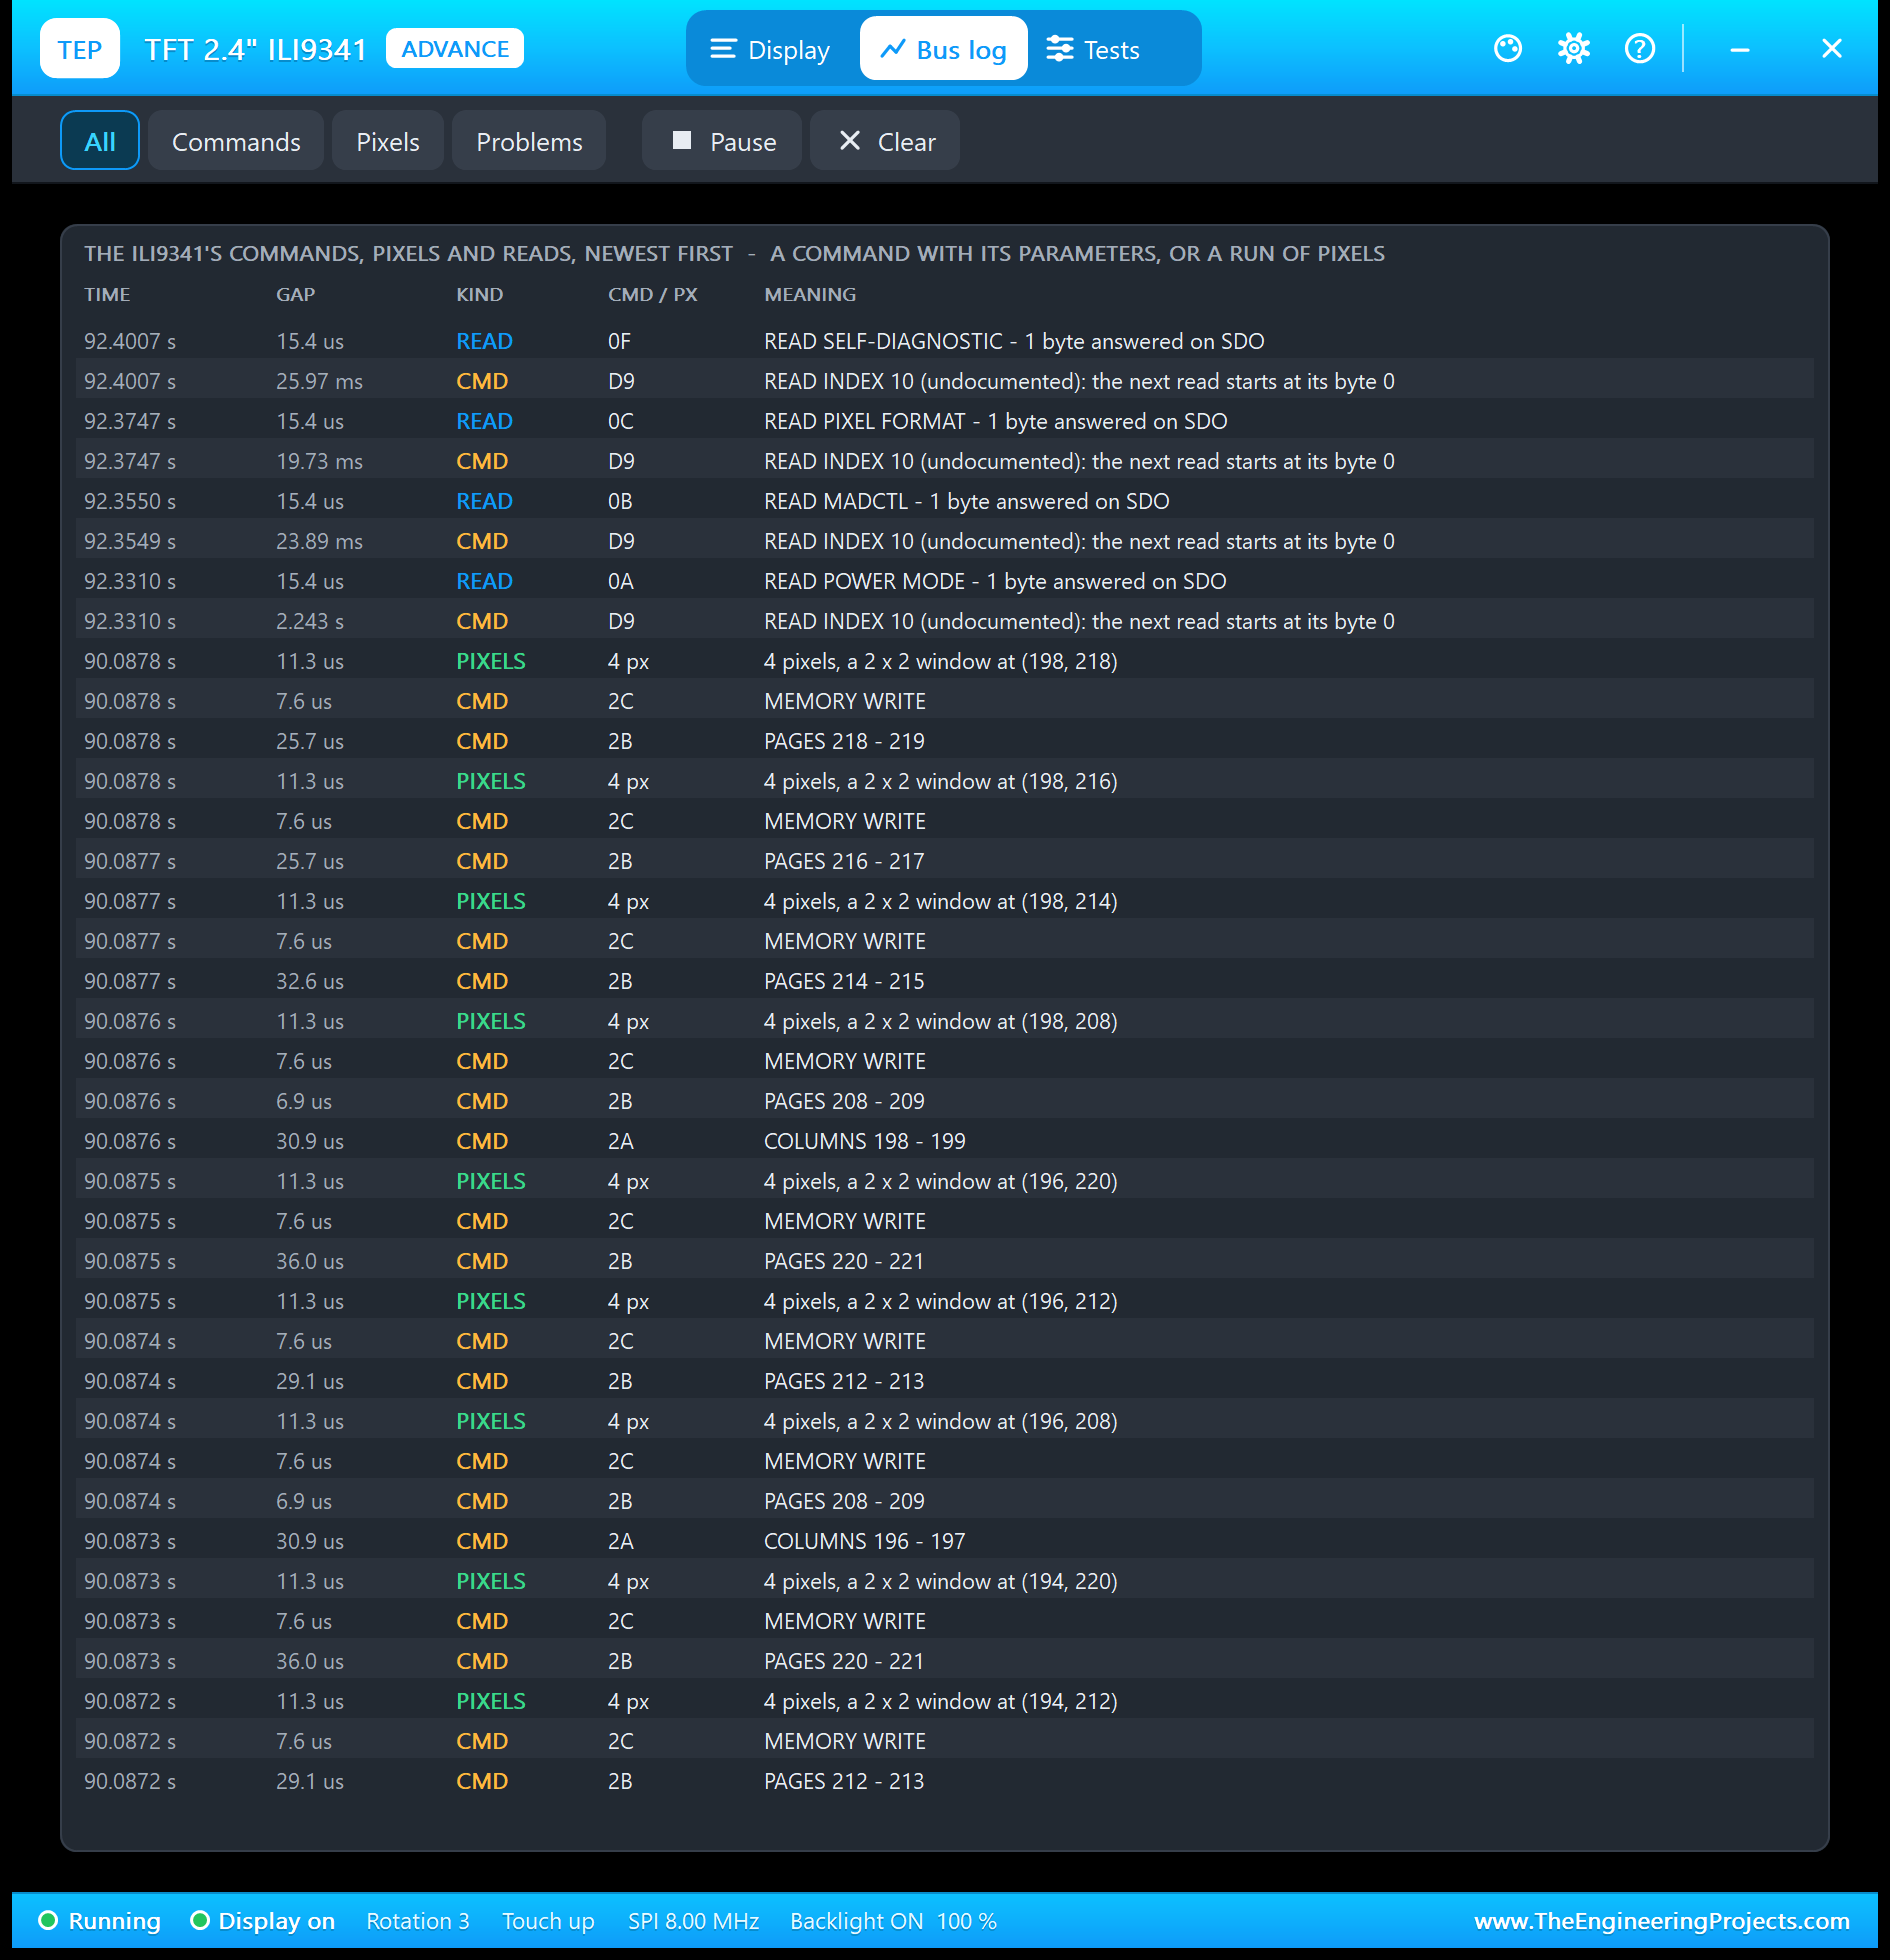
Every command, every read and every run of pixels: the time, the gap, the kind, the command byte or the pixel count and what it means. The filters show Commands, Pixels or only Problems.
The Tests Page: Five TFT Test Tools
1. Init Check: Did begin() Do It Right?
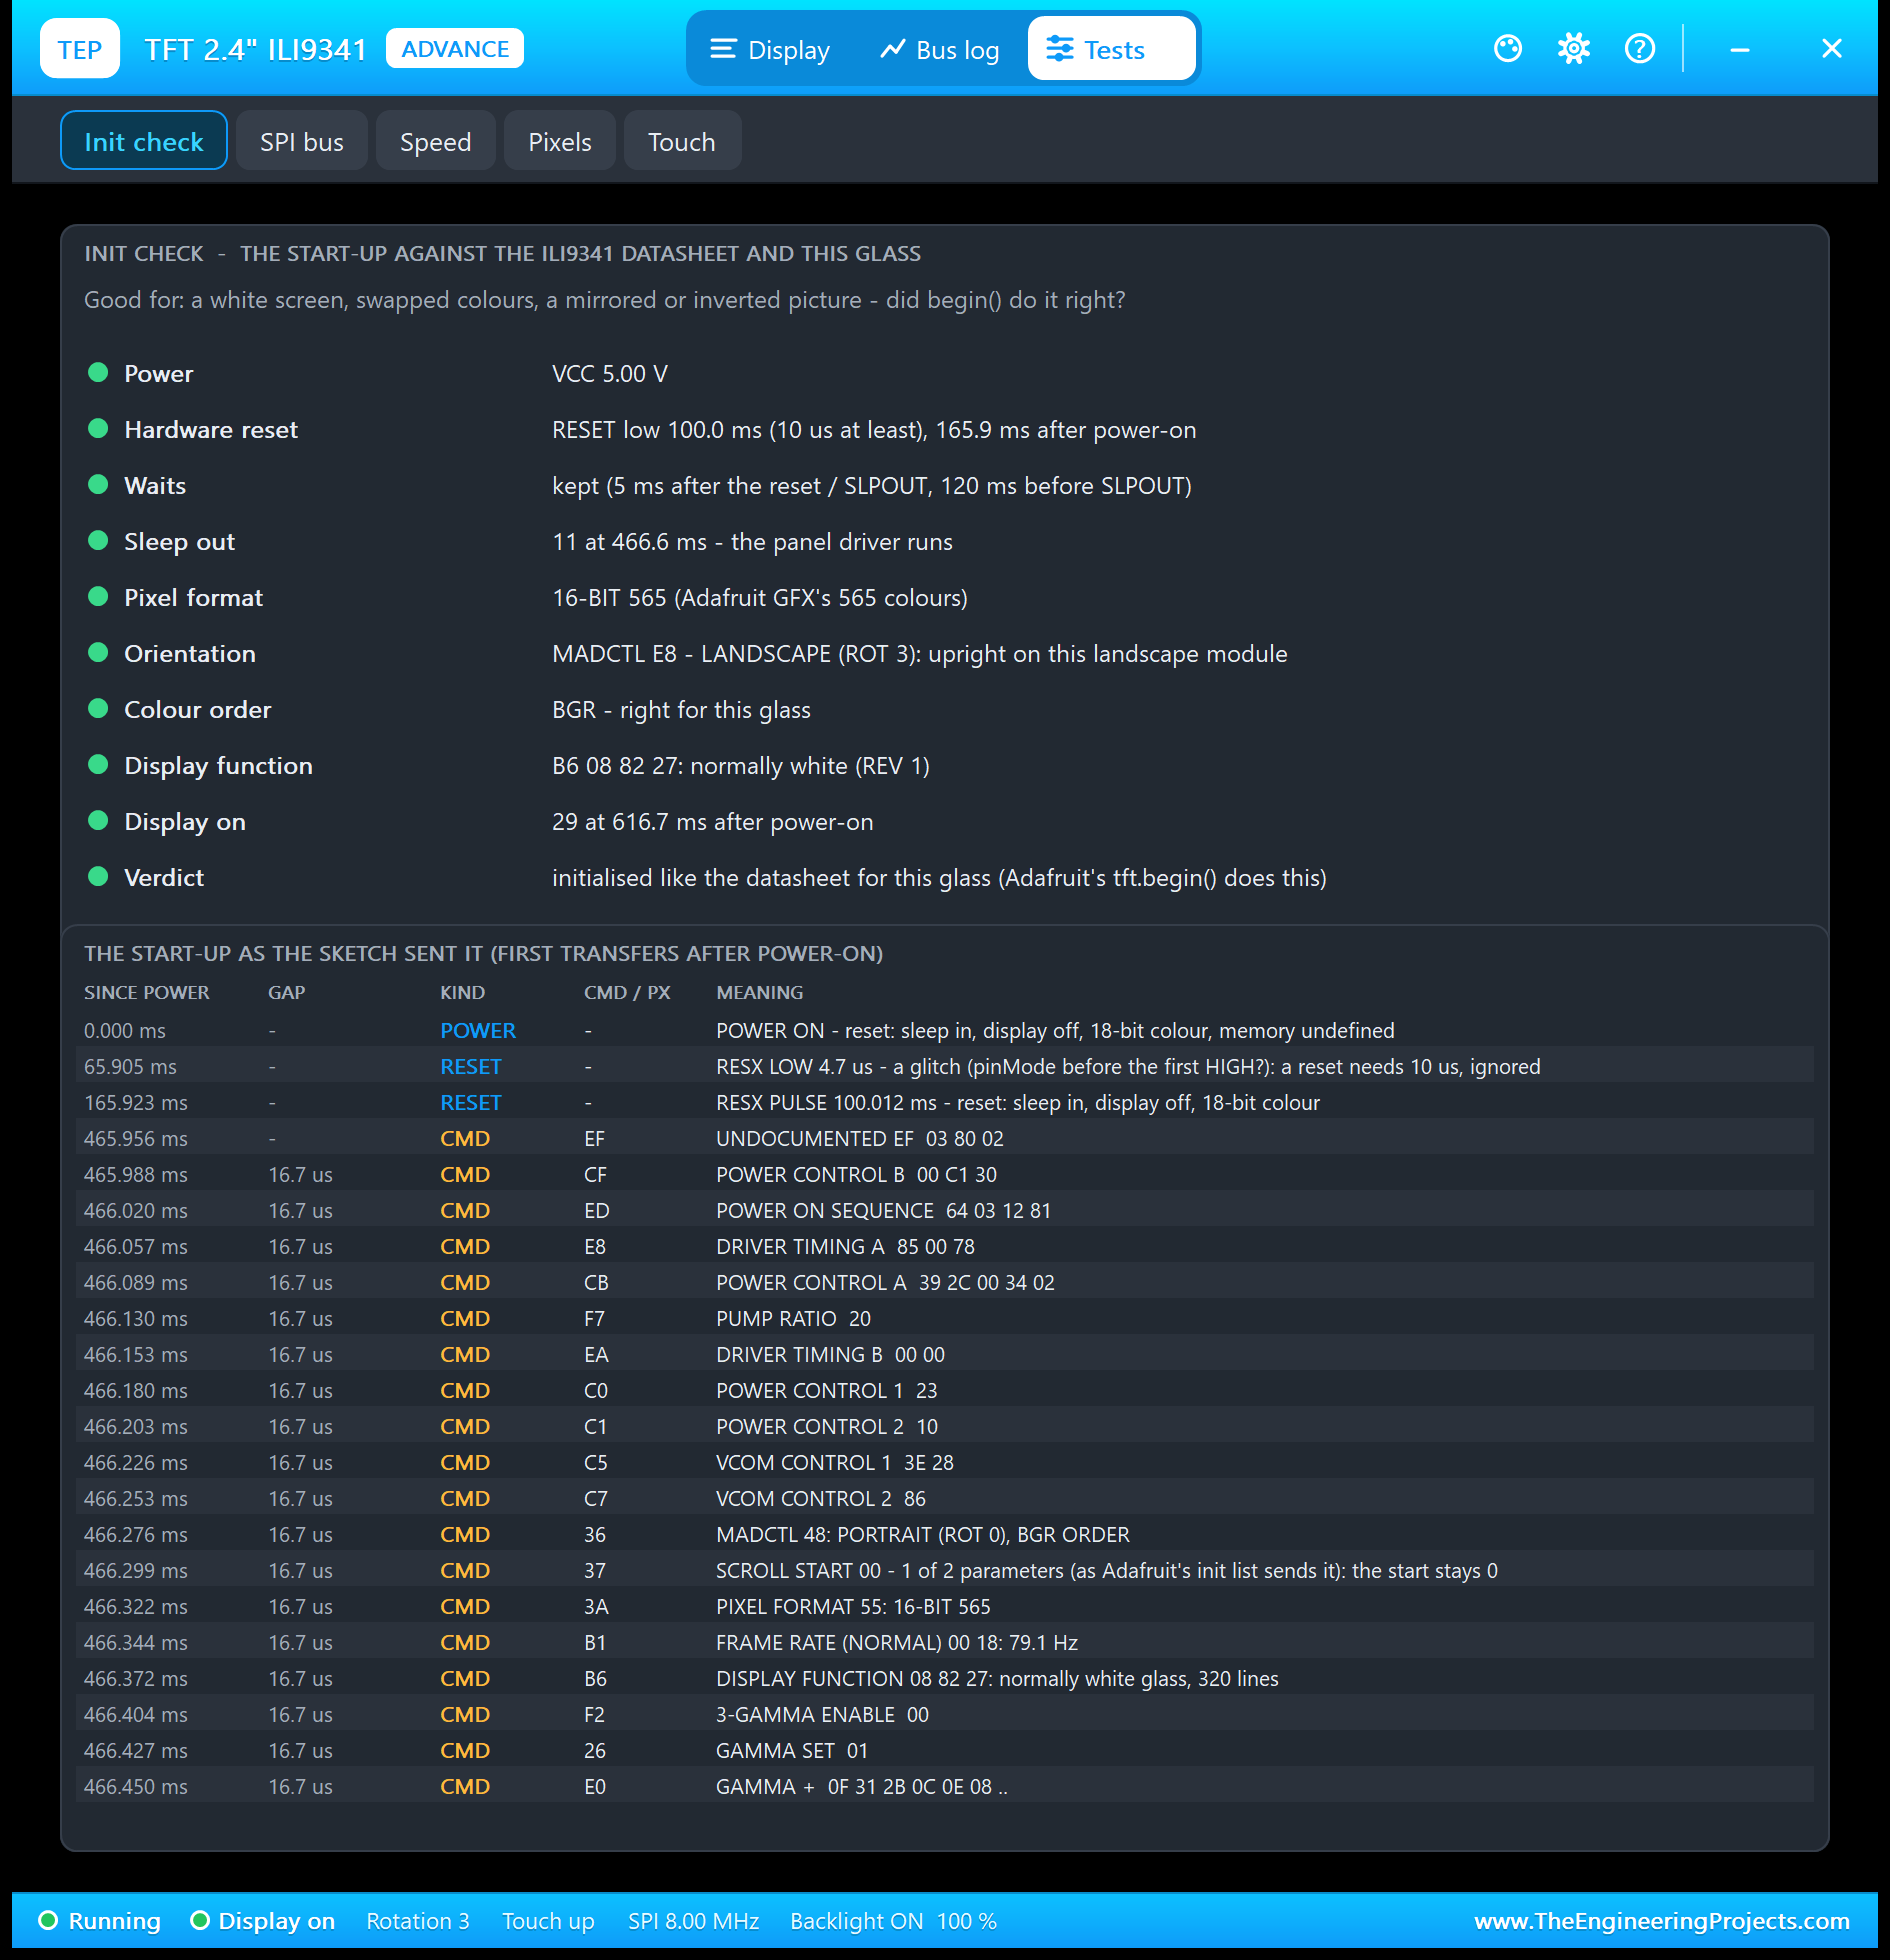
The start-up against the datasheet and this glass: the reset, the waits, SLEEP OUT, the pixel format, MADCTL, the colour order, the display function and DISPLAY ON, each with a green, amber or red light and a verdict. Below it, the start-up as the sketch sent it, from power-on: Adafruit's list of power, VCOM, frame rate and gamma commands, each with its meaning.
2. SPI Bus: Is the Sketch Talking to This TFT?
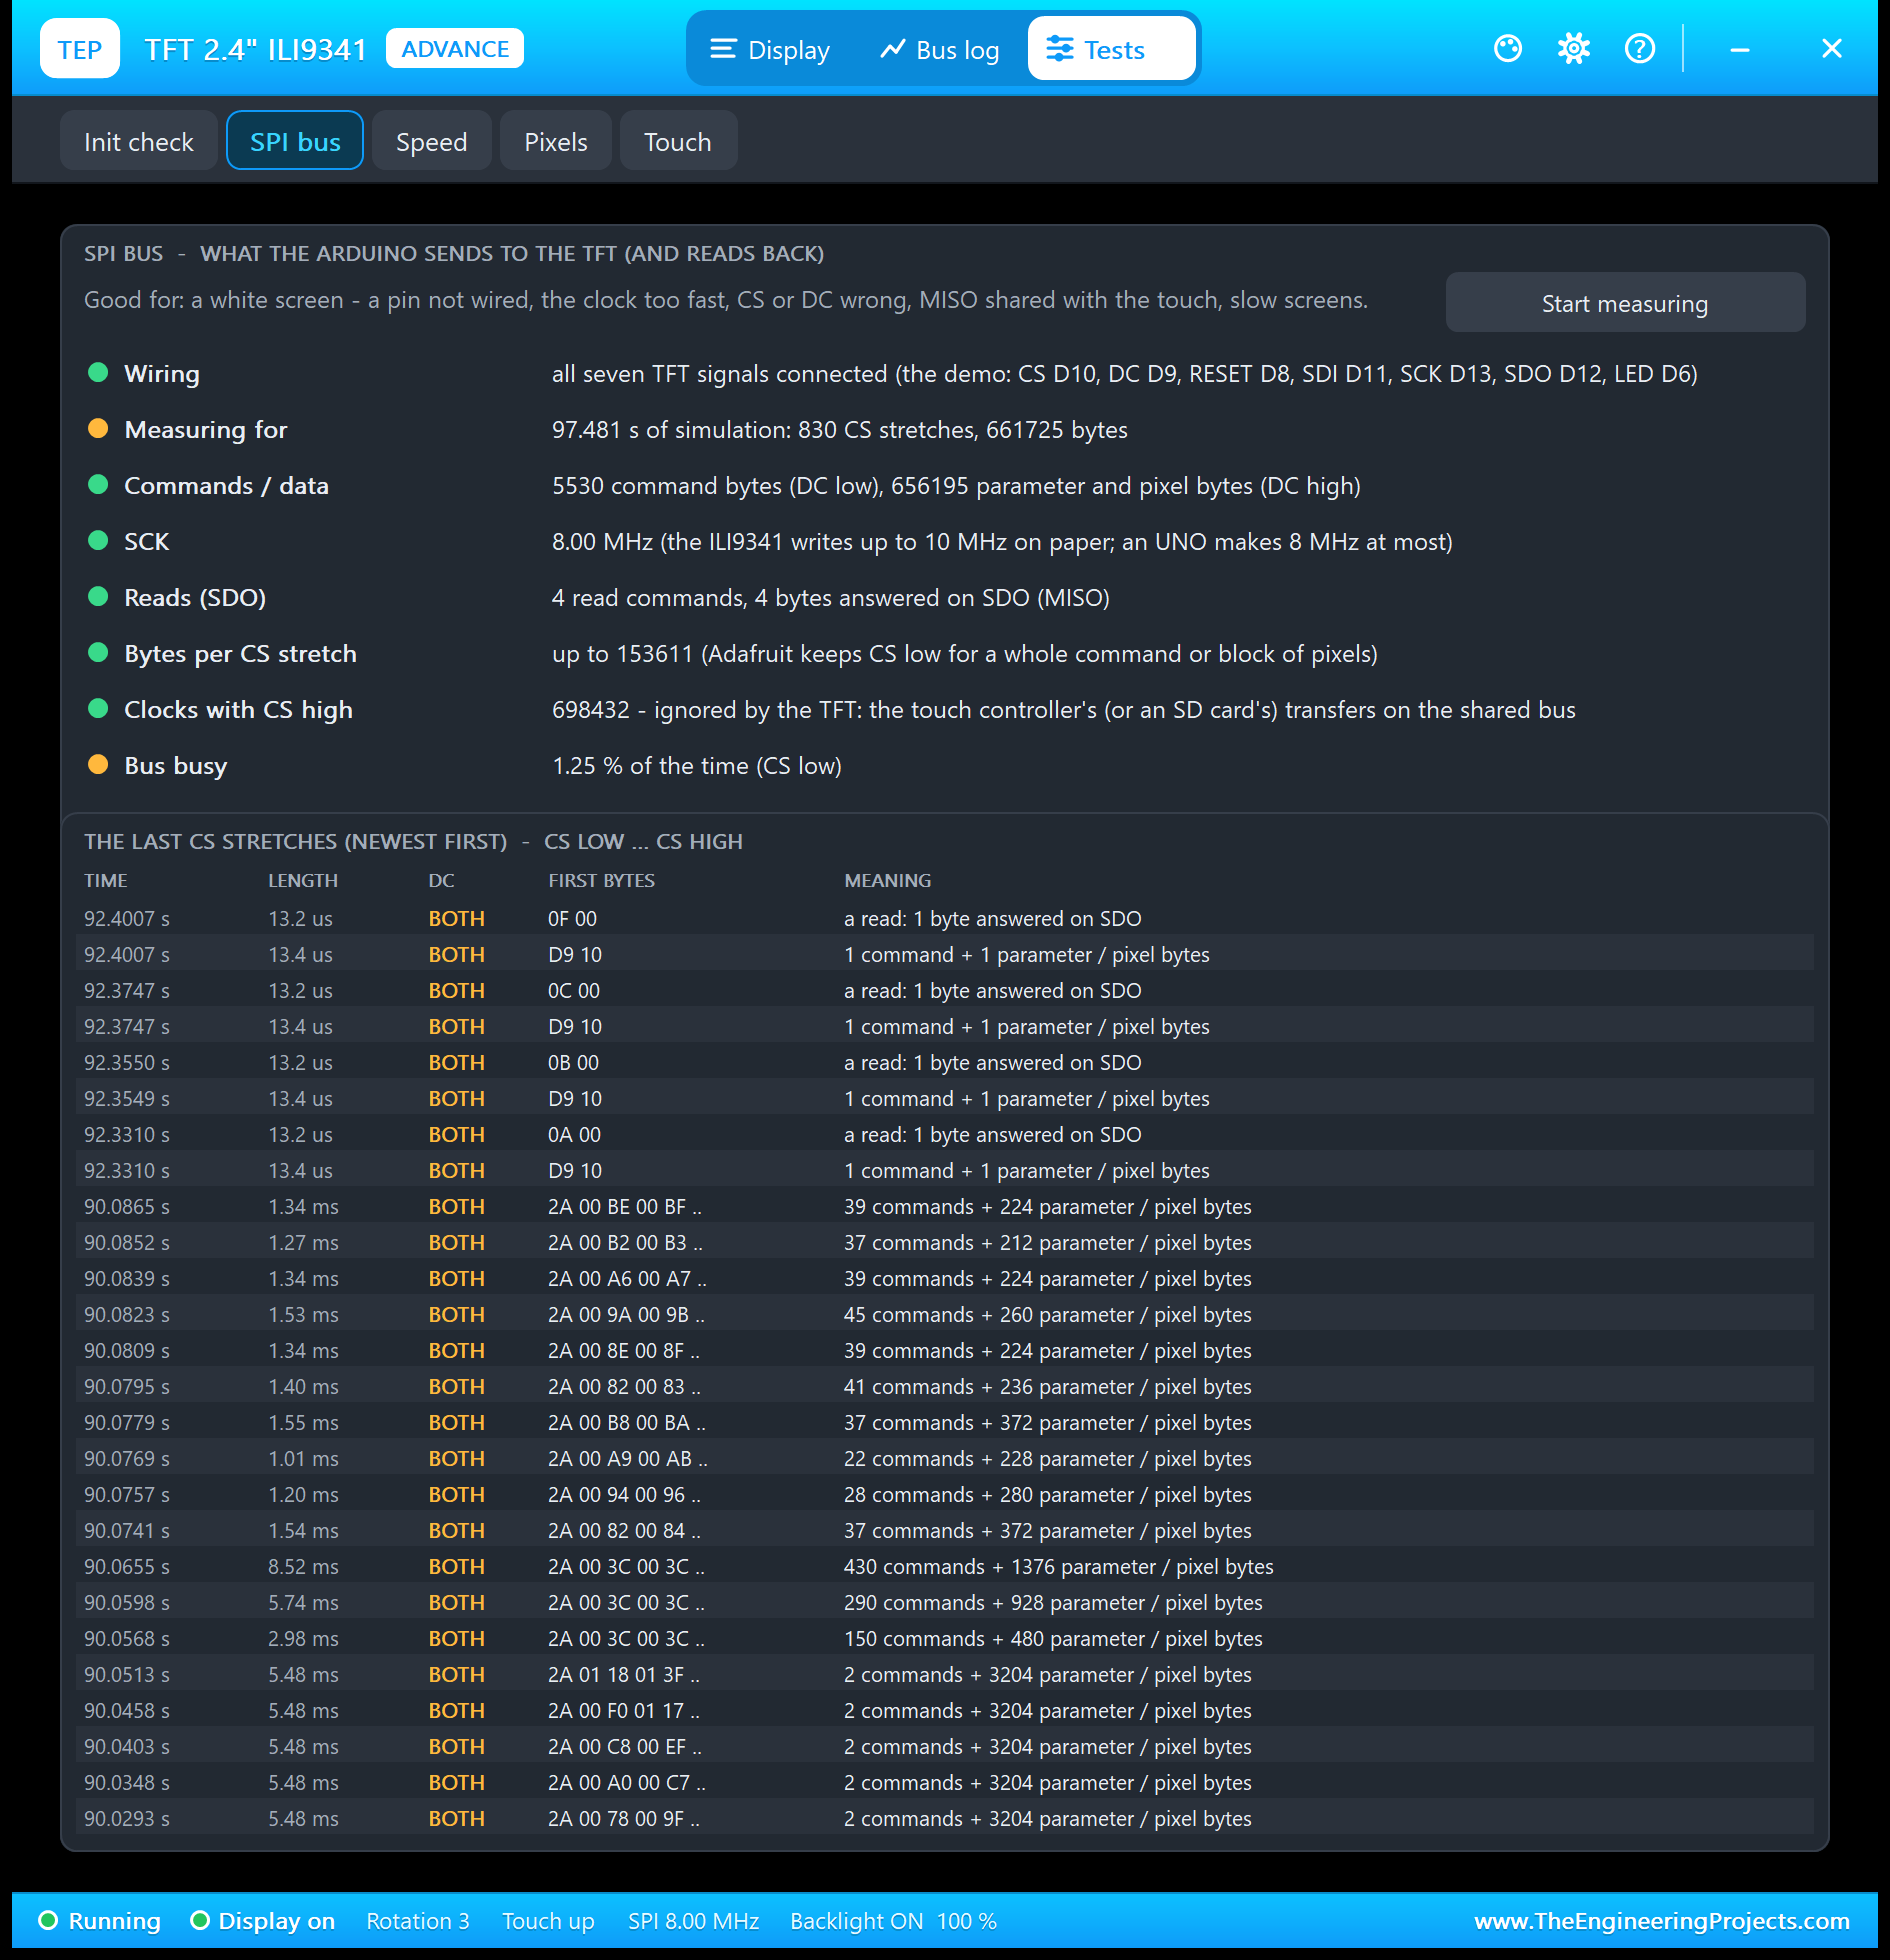
Good for a white screen: which of the seven signals are connected, the measured clock (the ILI9341 takes up to 10 MHz for writes, an UNO makes 8 MHz), the reads answered on SDO, bytes cut by CS, and the clocks the TFT ignored because its CS was high: on this bus those belong to the touch controller, which shares SCK, MOSI and MISO.
3. Speed: How Fast Can the Picture Change?
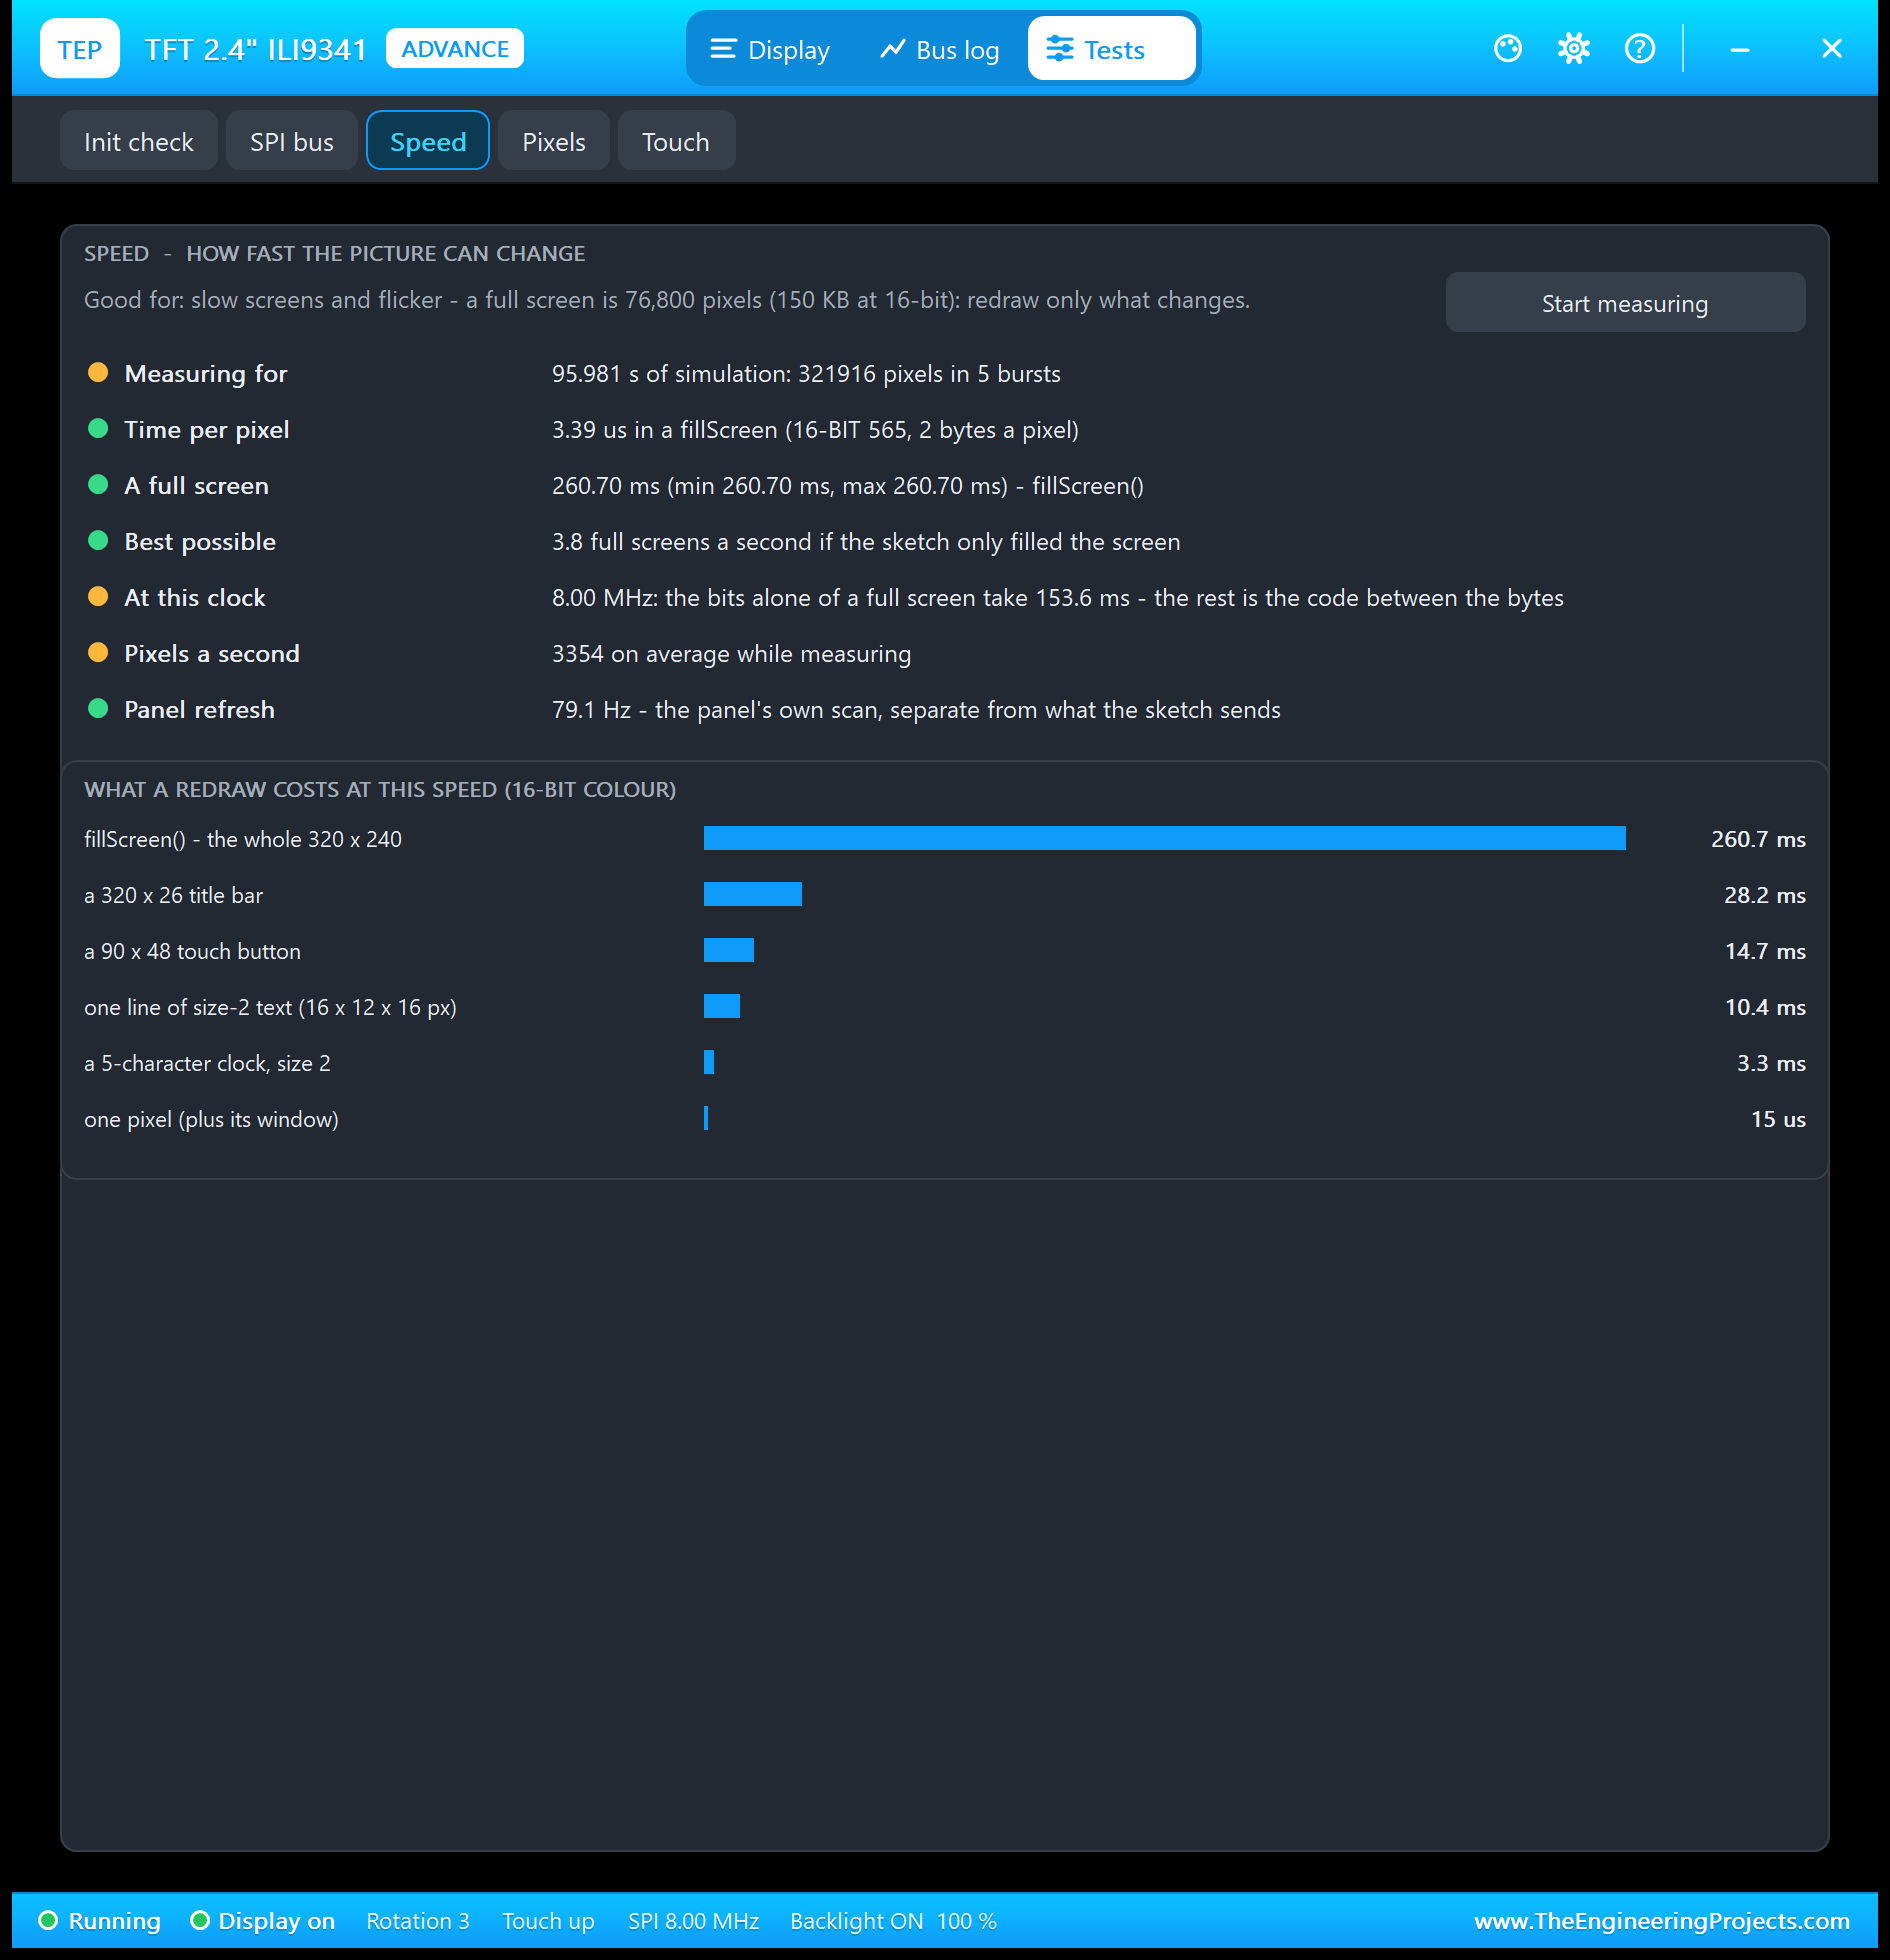
A full screen is 76,800 pixels, 153,600 bytes at 16-bit colour: on an UNO about a quarter of a second. The bits alone take 154 ms at 8 MHz; the rest is the code between the bytes. So a TFT sketch must redraw only what changes. The cost table shows why the demo's clock (a few ms) never flickers while a fillScreen would.
4. Pixels: Where Does a Pixel Live?
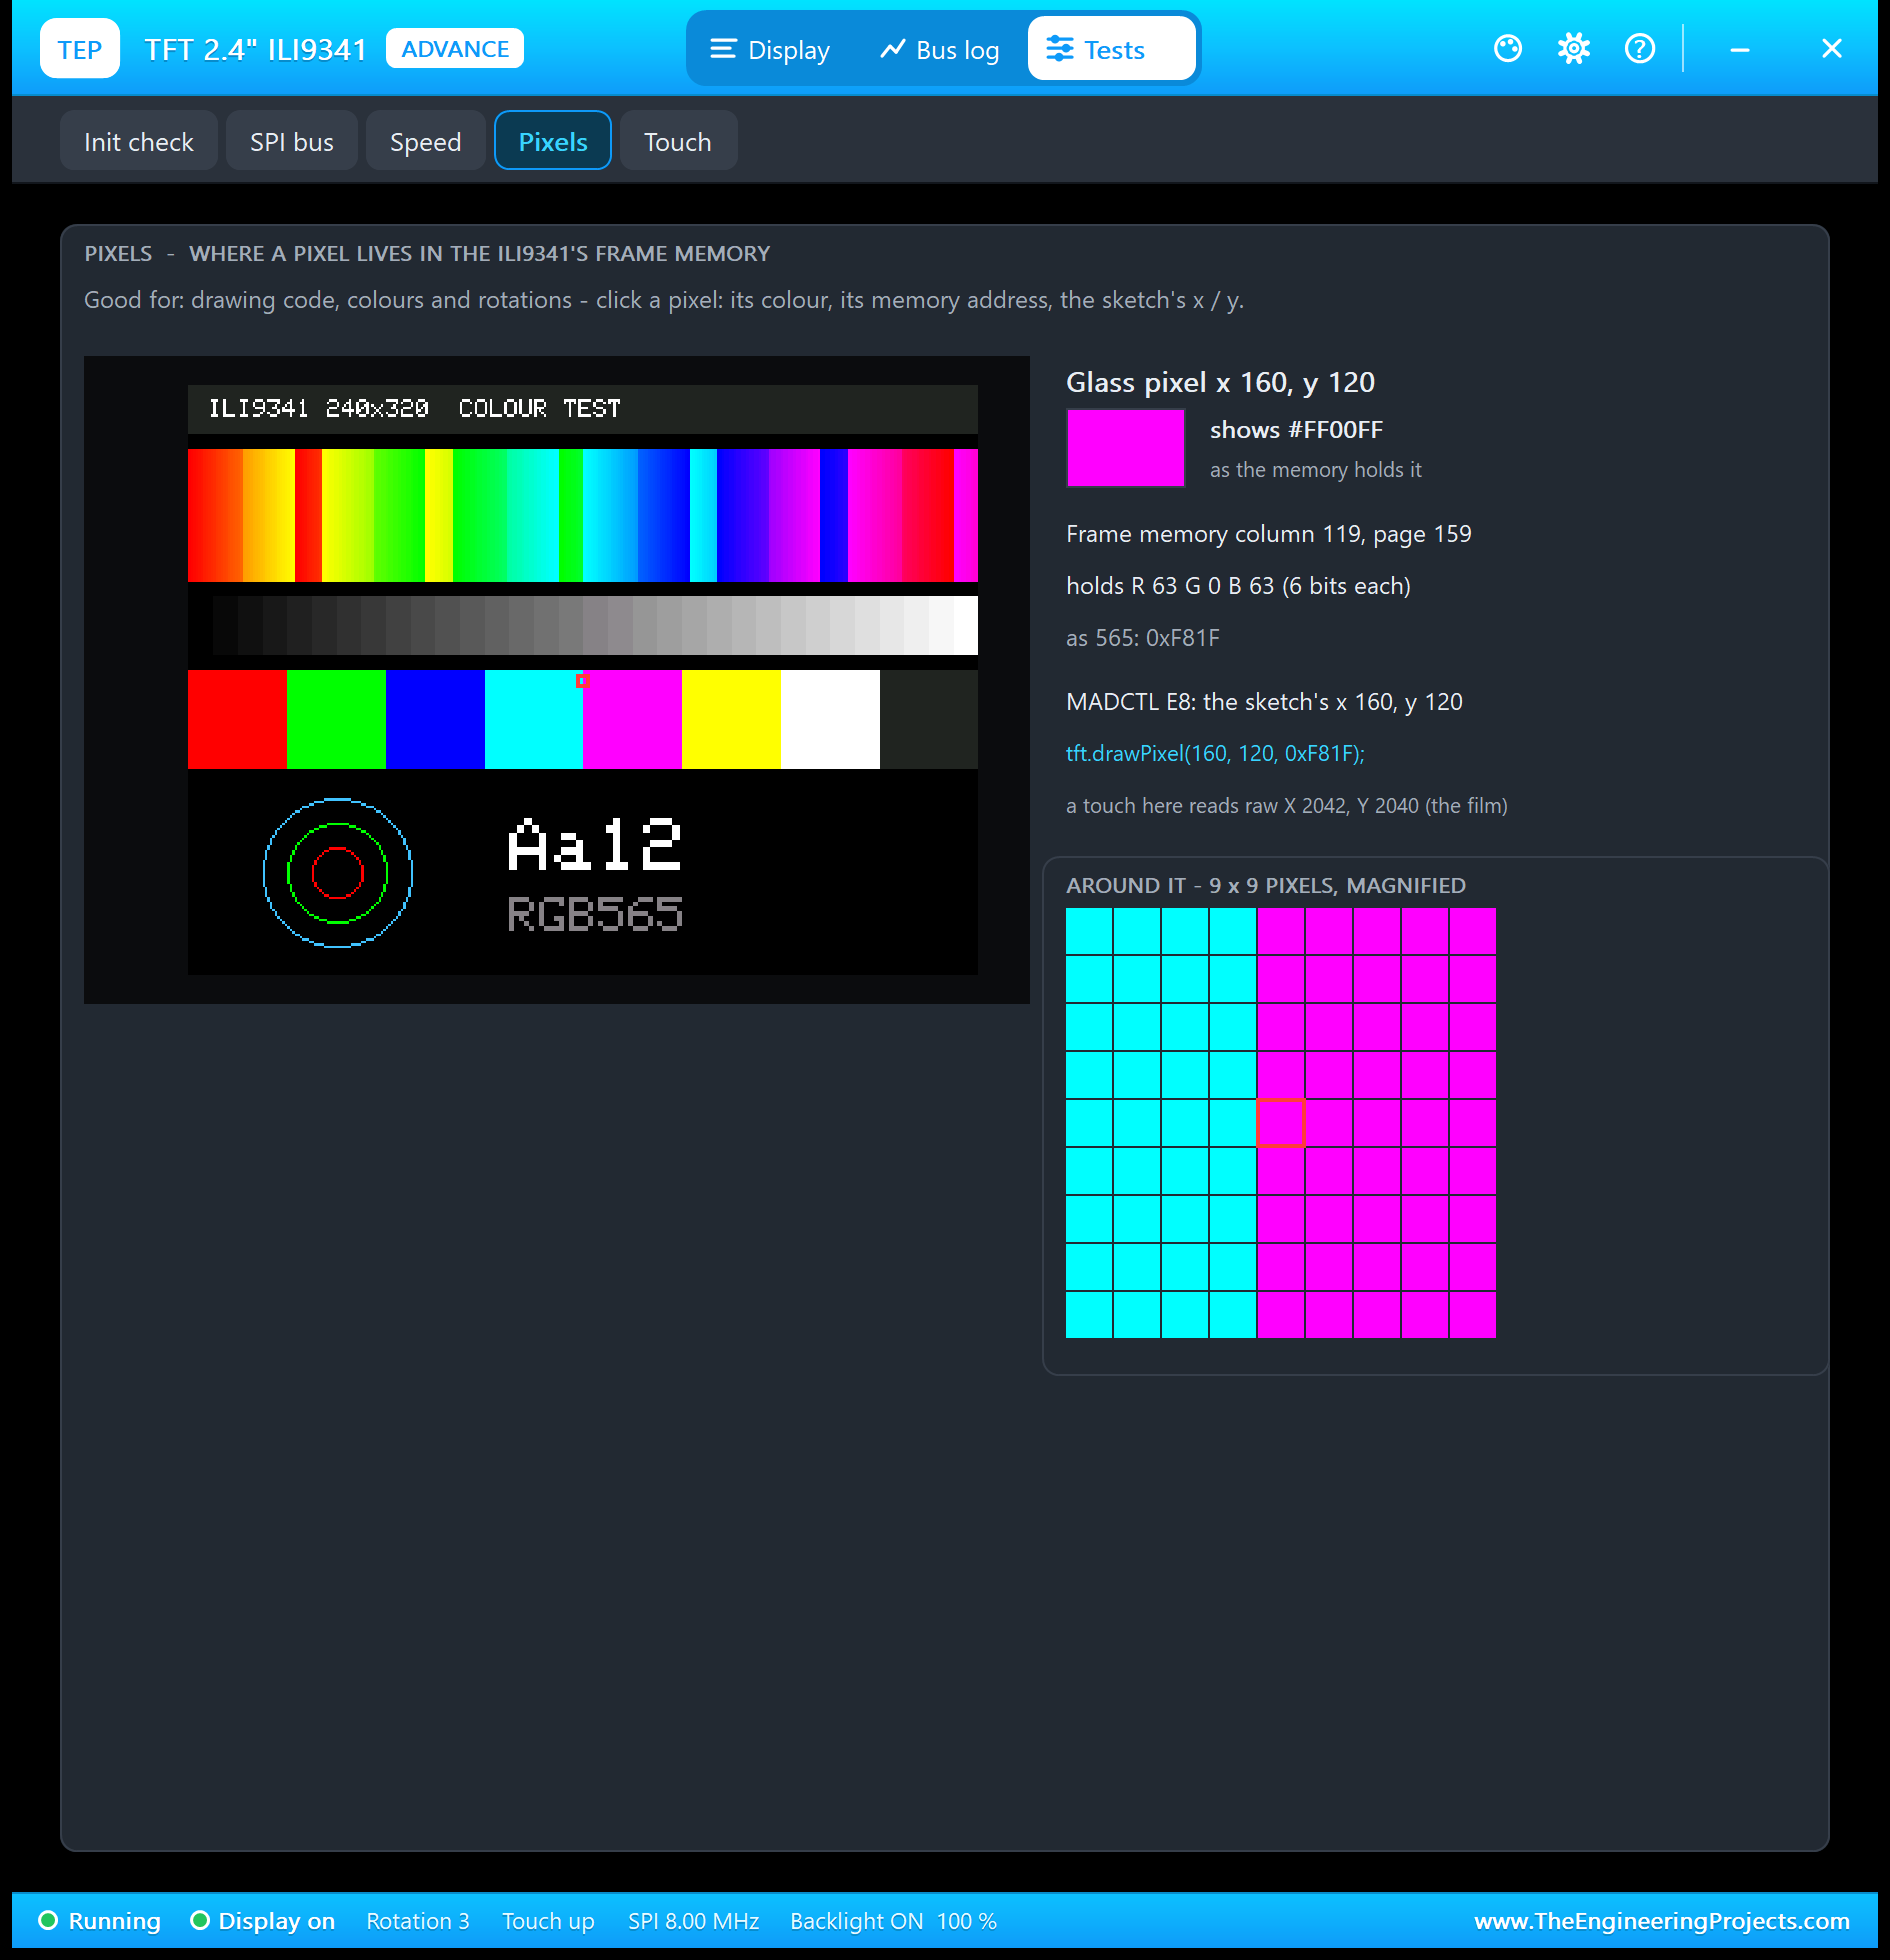
Click a pixel: its colour, its frame-memory column and page, its 18 bits and its RGB565 value, the sketch's x / y in the current rotation and the drawPixel() line that writes it, the raw values a touch at that point gives, and the pixels around it, magnified.
5. Touch: What Does the XPT2046 Report?
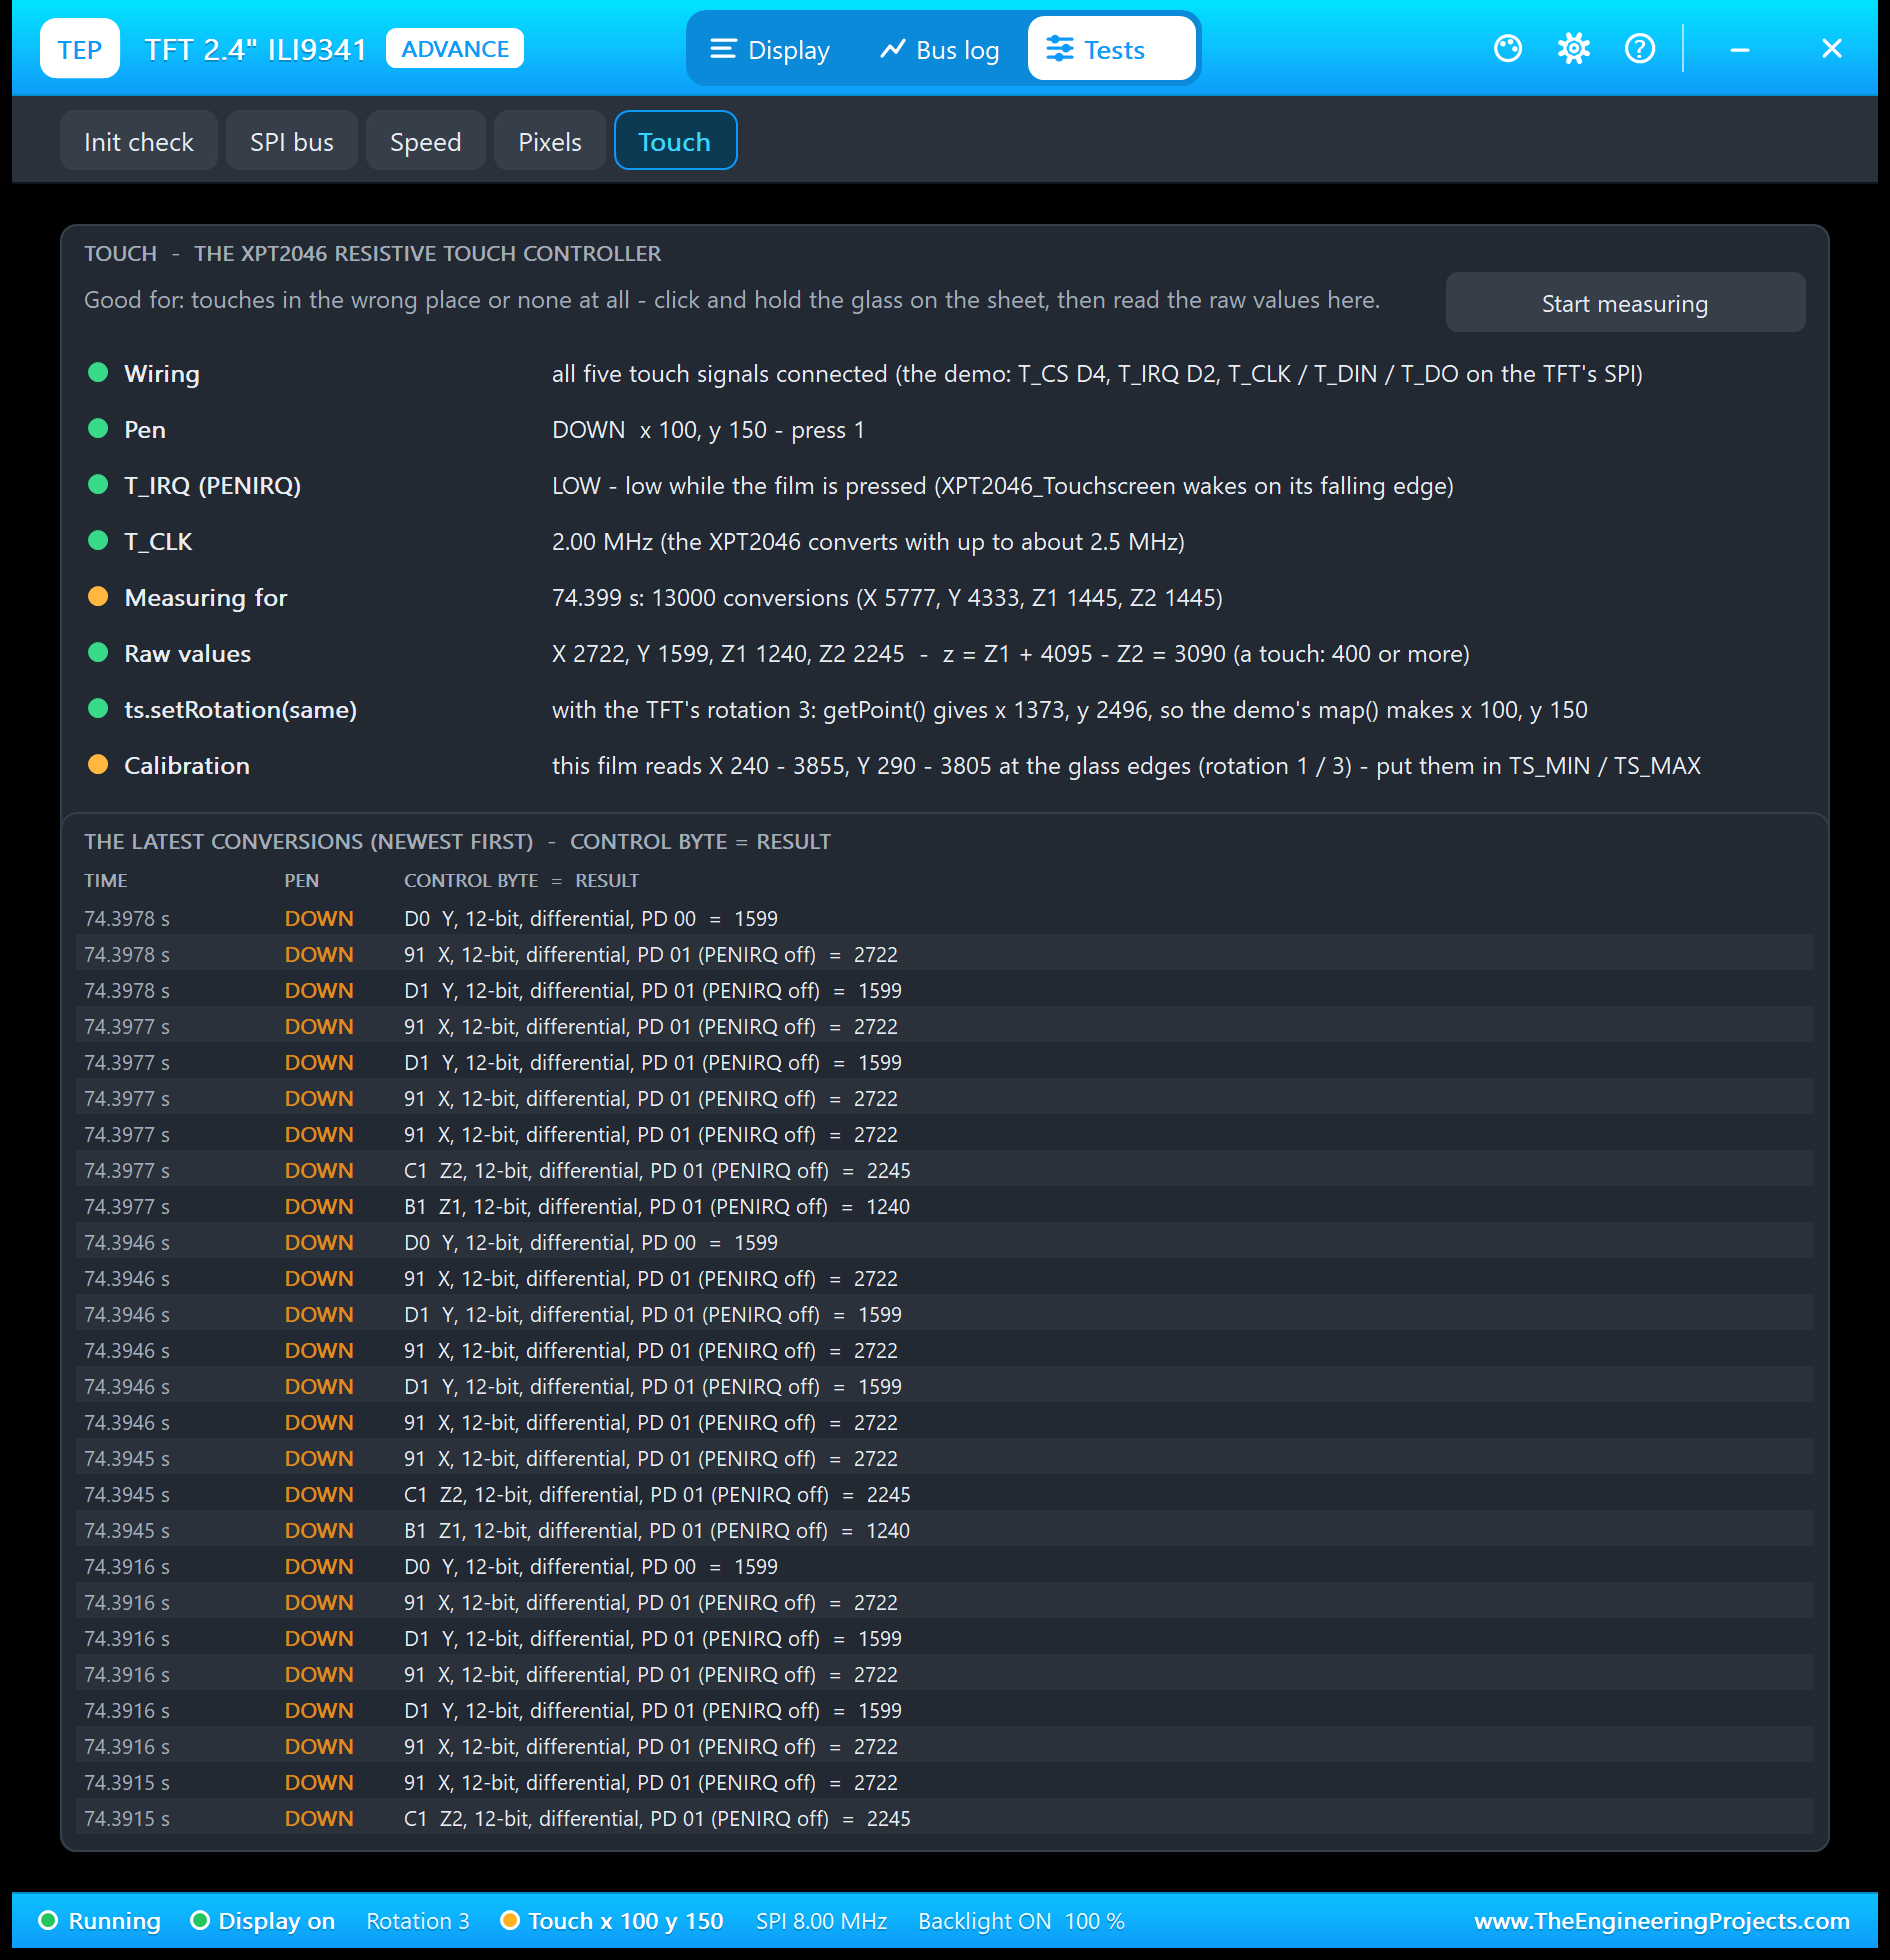
Good for touches in the wrong place or none at all: which of the five touch signals are connected, the pen and the presses, T_IRQ, the T_CLK clock (the XPT2046 converts with up to about 2.5 MHz), the conversions per channel, the latest raw X, Y, Z1 and Z2 with the pressure the library computes, and what getPoint() and the demo's map() make of them in the TFT's rotation. The table below lists every conversion: its control byte (channel, mode, power-down bits) and its result.
TFT ILI9341 with Arduino in Proteus
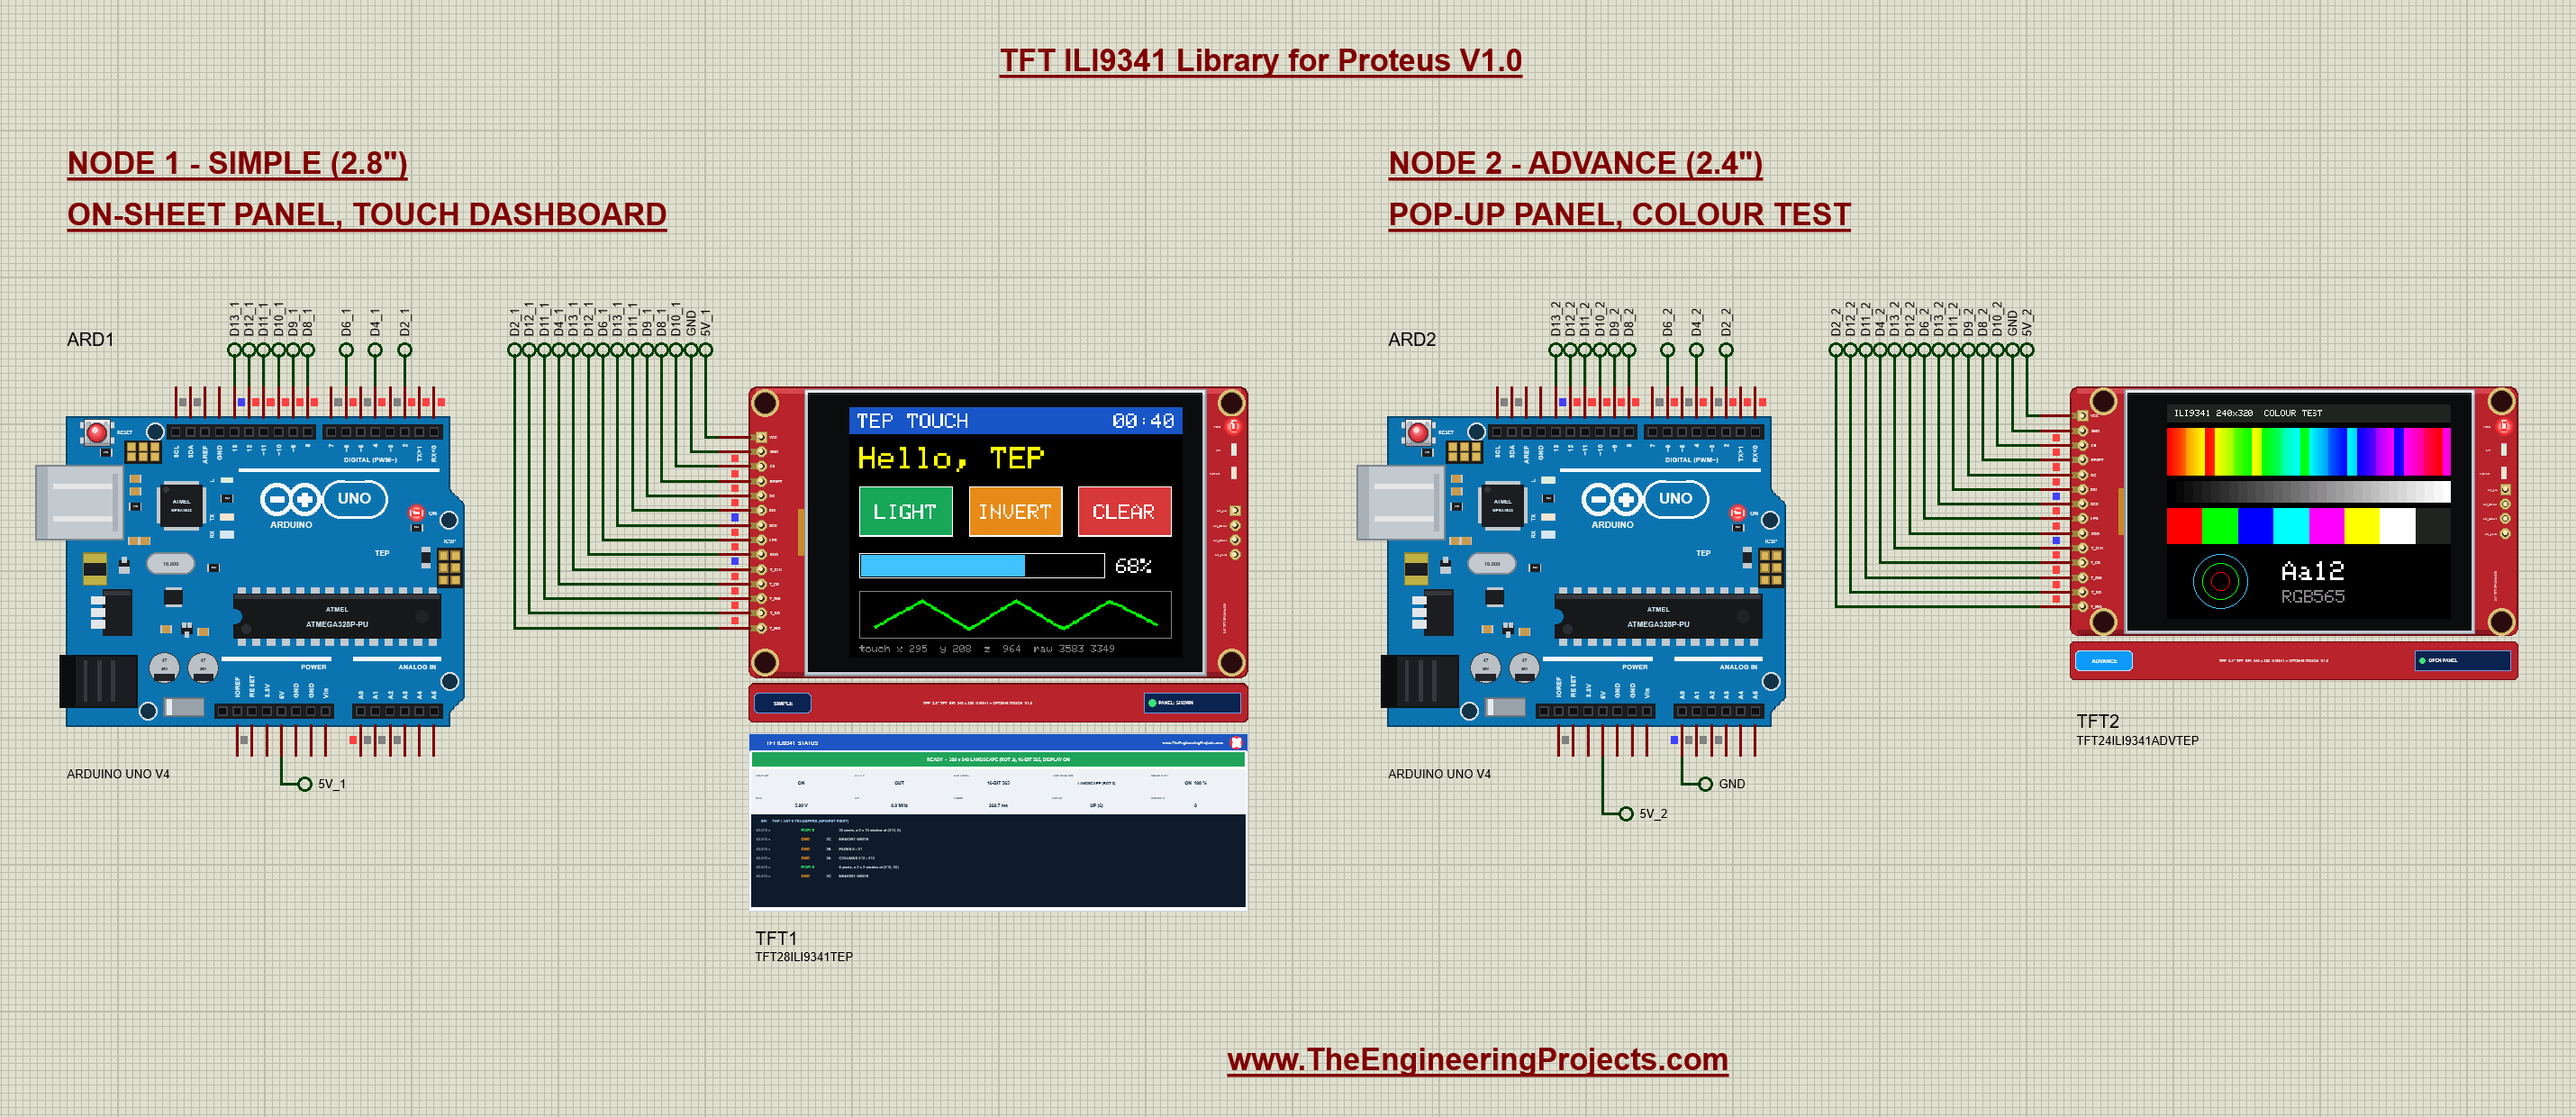
Open TFT-ILI9341-ArduinoUnoV4.pdsprj. Two Arduino UNO V4.0 boards from our Arduino UNO Library for Proteus V4.0 run the same sketch; ARD2's A0 is tied to GND, so it starts with the colour test. Each UNO has the serial monitor built in, so there is no Virtual Terminal to wire (see our Introduction to Arduino UNO for its pins).
Wiring
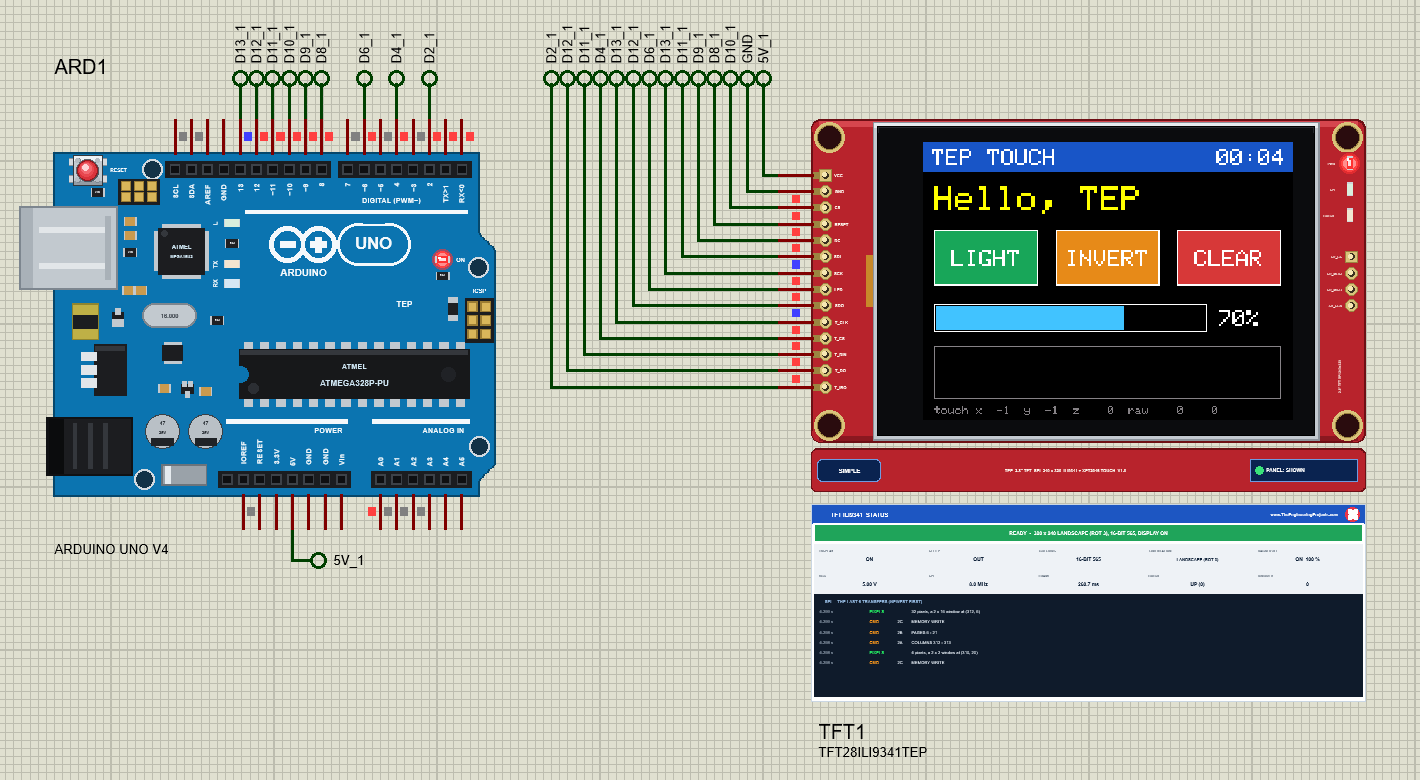
Both chips hang on the UNO's hardware SPI: SCK (D13), MOSI (D11) and MISO (D12) go to the TFT and to the touch controller, and each chip has its own chip select, D10 for the TFT and D4 for the touch. T_IRQ goes to D2, the UNO's INT0.
| TFT pin | Arduino UNO | Touch pin | Arduino UNO |
|---|---|---|---|
| VCC | 5V | T_CLK | D13 (SCK) |
| GND | GND | T_CS | D4 |
| CS | D10 | T_DIN | D11 (MOSI) |
| RESET | D8 | T_DO | D12 (MISO) |
| DC | D9 | T_IRQ | D2 (INT0) |
| SDI | D11 (MOSI) | ||
| SCK | D13 (SCK) | ||
| LED | D6 (PWM) | ||
| SDO | D12 (MISO) |
The Arduino Code
The demo uses the Adafruit ILI9341 library (version 1.6.2) with the Adafruit GFX library (1.12.6) for the display, and Paul Stoffregen's XPT2046_Touchscreen library (1.4) for the touch, all on the UNO's hardware SPI:
#include <SPI.h>
#include <Adafruit_GFX.h>
#include <Adafruit_ILI9341.h>
#include <XPT2046_Touchscreen.h>
The calibration: the raw values at the glass edges, read on the CAL screen:
#define TS_MINX 240
#define TS_MAXX 3855
#define TS_MINY 290
#define TS_MAXY 3805
One object for each chip: the TFT with its CS, DC and RESET pins, the touch controller with T_CS and T_IRQ:
Adafruit_ILI9341 tft(TFT_CS, TFT_DC, TFT_RST);   // hardware SPI: SDI = D11, SCK = D13, SDO = D12
XPT2046_Touchscreen ts(TOUCH_CS, TOUCH_IRQ);
The rotation goes to both, so the touch film follows the picture:
void setRot(byte r) {
  rotation = r & 3;
  tft.setRotation(rotation);
  ts.setRotation(rotation);                      // the same number: the touch film follows the picture
}
In setup(), both chips start and rotation 3 makes the picture upright on this module:
  tft.begin();
  ts.begin();
  setRot(3);
Reading the touch: touched() is cheap (with T_IRQ wired, it does not even talk to the chip until the film is pressed), and getPoint() returns the raw X, Y and Z. map() turns them into pixels:
  const bool touched = ts.touched();
  if (touched) {
    const TS_Point p = ts.getPoint();
lastX = wide ? map(p.x, TS_MINX, TS_MAXX, 0, tft.width()) : map(p.x, TS_MINY, TS_MAXY, 0, tft.width());
lastY = wide ? map(p.y, TS_MINY, TS_MAXY, 0, tft.height()) : map(p.y, TS_MINX, TS_MAXX, 0, tft.height());A button must act once per press, not on every loop while the finger stays on it:
    if (y >= 76 && y < 124) {                    // the buttons: once a press (holding a button does not repeat it)
      if (!first) return;
And the paint strip joins the touch points into a line, so a fast drag leaves no gaps:
      if (first || paintX < 0) tft.fillCircle(x, y, 1, pen);
      else for (int d = -1; d <= 1; ++d) { tft.drawLine(paintX, paintY + d, x, y + d, pen); tft.drawLine(paintX + d, paintY, x + d, y, pen); }
STATUS reads four registers back from the ILI9341 over MISO:
  hex(F("Power mode 0x0A: "), tft.readcommand8(ILI9341_RDMODE));
  hex(F("MADCTL 0x0B: "), tft.readcommand8(ILI9341_RDMADCTL));
The most important trick for a TFT: redraw only what changes. The clock is printed with a background colour, so the new digits overwrite the old ones, with no fillRect and no flicker:
tft.setTextColor(WHITE, BLUE); // with a background colour: the new digits overwrite the old onesFILL times a full screen with millis(), so you can compare it with the Speed tool:
    const unsigned long t0 = millis();
    tft.fillScreen(ILI9341_BLUE);
    fillMs = millis() - t0;
To change the sketch, export a new HEX file and load it into the UNO; see How to get the HEX file from Arduino. New to Arduino? Start with our Arduino Tutorial for Beginners.
Serial Monitor Commands
| Command | What it does |
|---|---|
| HELP / STATUS | The command list / the rotation, screen, text, bar, backlight, four registers read back, touches |
| TEXT <text> | The big text (16 characters) |
| BAR <0-100> | The slider (only its changed part is drawn) |
| DASH / TEST / CAL | The touch dashboard / the colour test / the touch calibration |
| CLEAR | A black screen |
| FILL | A timed fillScreen: "fillScreen took N ms" |
| ROTATE <0-3> | setRotation() of the TFT and the touch screen: 3 upright here, 1 upside down, 0 / 2 portrait |
| INVERT ON / OFF | invertDisplay() |
| LIGHT <0-255> | The backlight on D6 (PWM) |
| SLEEP / WAKE | SLPIN / SLPOUT: the glass goes white / comes back |
| TOUCH | Pressed or released, the last raw x / y / z and the screen x / y |
How to Run the Demo
- Press Run. Both monitor windows and TFT2's pop-up open; move them aside. The glasses are white for a moment, then show the dashboard and the colour test.
- Touch TFT1: click LIGHT, INVERT and CLEAR; press on the slider and drag; draw in the paint strip with the button held down. Watch ARD1's monitor and the TOUCH LED.
- Type STATUS, TEXT Hi TEP, BAR 25 and FILL in ARD1's monitor; then CAL and touch the crosses, ROTATE 0 and ROTATE 3, SLEEP and WAKE.
- On TFT2's pop-up, open the Tests and try the five tools; hold TFT2's glass while the Touch tool is open.
TFT ILI9341 Proteus Simulation Results
The Built-in Serial Monitor in Its Simple Interface
Each Arduino UNO V4.0 carries its own copy of our TEP Serial Monitor Advance, wired inside the board to D0 / D1 like the USB chip of a real UNO. Its window, "TEP Arduino UNO - ARD1", opens at Run, and a click on the board's USB port opens it again. The screenshots show its Simple interface: only the log and the line to send.
- Switch to it: press Ctrl+Shift+U, or use the monitor's ... menu.
- Back to the full view: press Esc; the full view has the Board, Monitor and Plotter tabs.
Read all about the monitor in TEP Serial Monitor Advance for Proteus.
ARD1: The Touches
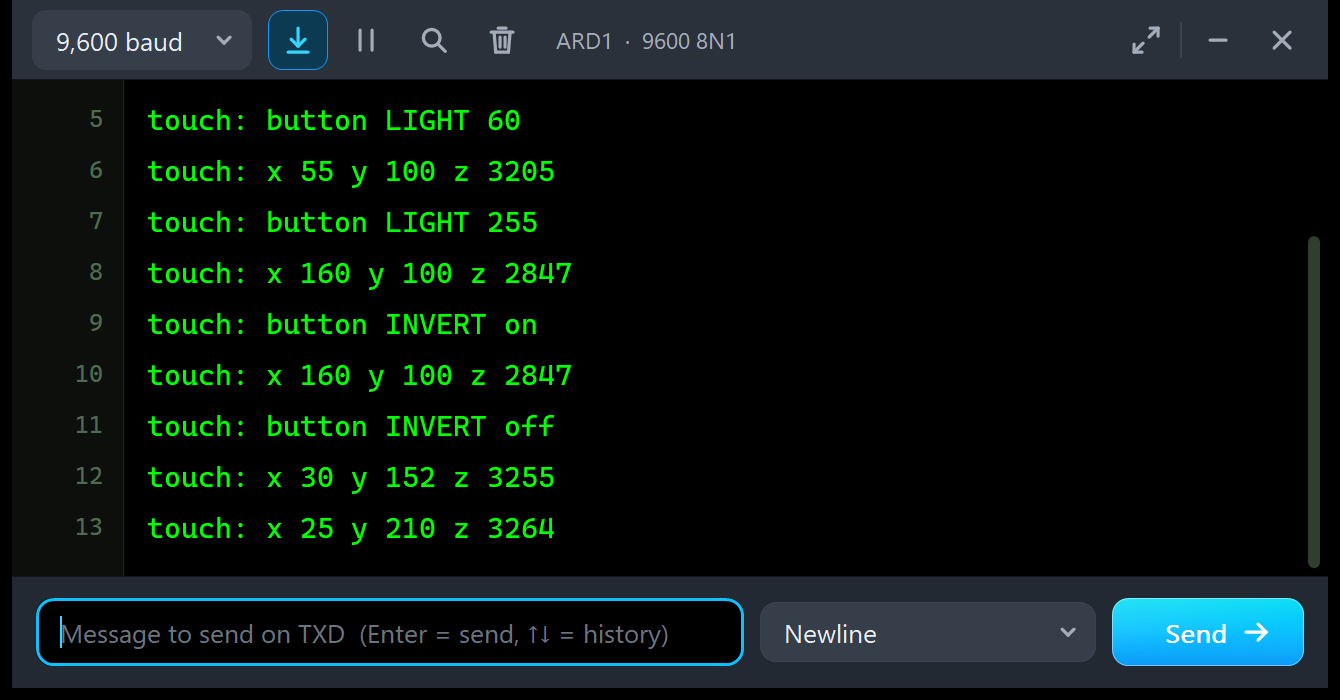
touch: button LIGHT 60
touch: x 55 y 100 z 3205
touch: button LIGHT 255
touch: x 160 y 100 z 2847
touch: button INVERT on
touch: x 160 y 100 z 2847
touch: button INVERT off
touch: x 30 y 152 z 3255
touch: x 25 y 210 z 3264
ARD1: STATUS, With the Registers Read Back
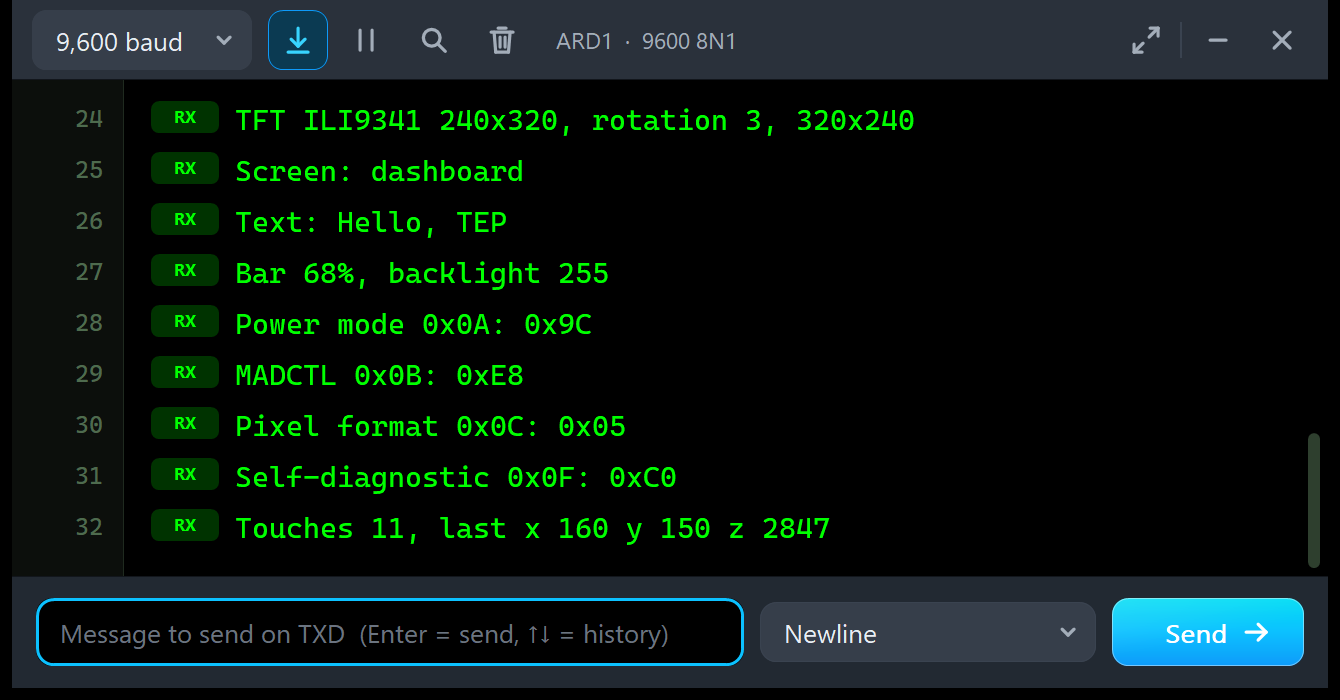
TFT ILI9341 240x320, rotation 3, 320x240
Screen: dashboard
Text: Hello, TEP
Bar 68%, backlight 255
Power mode 0x0A: 0x9C
MADCTL 0x0B: 0xE8
Pixel format 0x0C: 0x05
Self-diagnostic 0x0F: 0xC0
Touches 11, last x 160 y 150 z 2847
ARD2: TOUCH and FILL
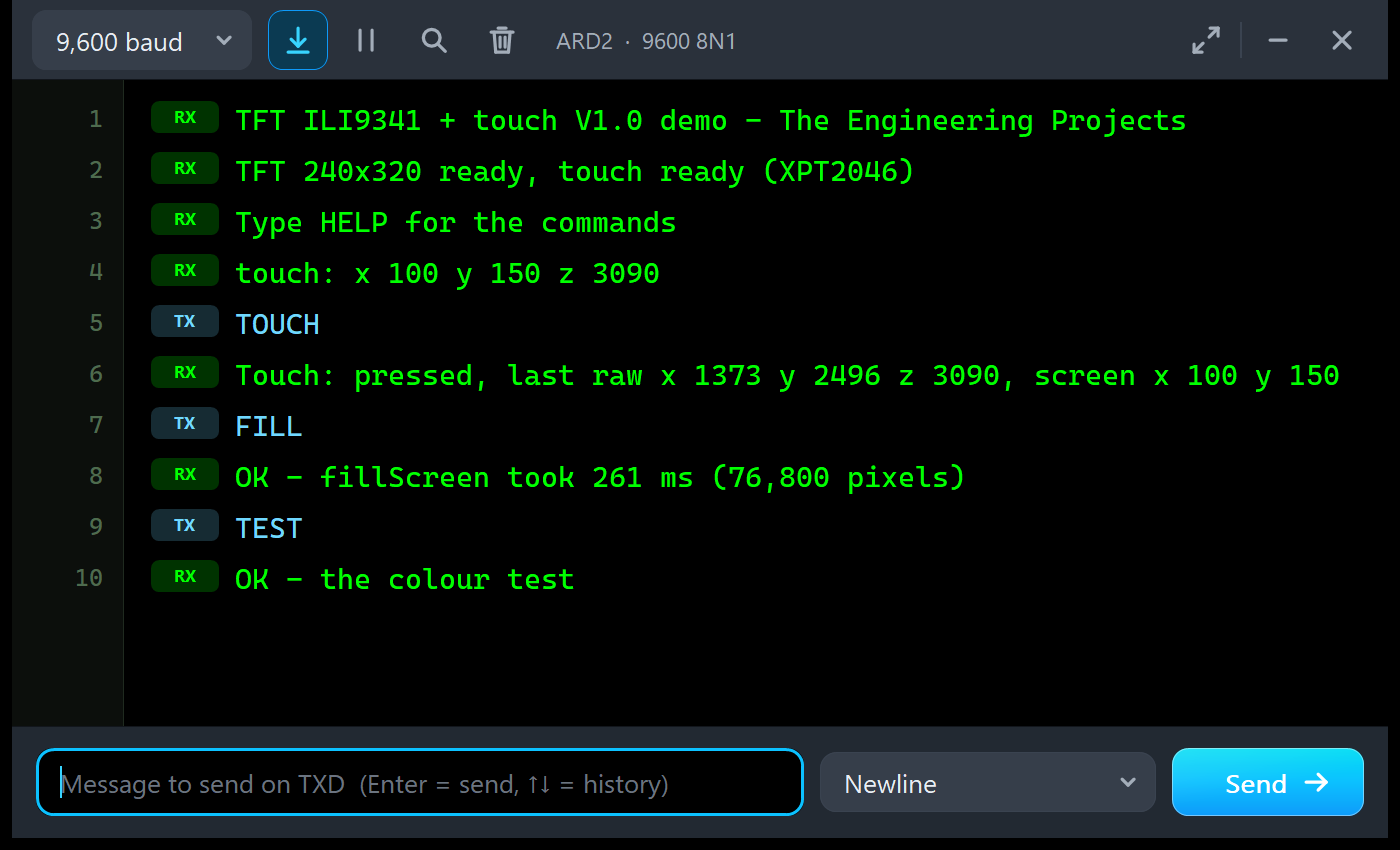
TFT ILI9341 + touch V1.0 demo - The Engineering Projects
TFT 240x320 ready, touch ready (XPT2046)
Type HELP for the commands
touch: x 100 y 150 z 3090
TOUCH
Touch: pressed, last raw x 1373 y 2496 z 3090, screen x 100 y 150
FILL
OK - fillScreen took 261 ms (76,800 pixels)
TEST
OK - the colour test
The sketch measures 261 ms with millis(), and the Speed tool 260.7 ms on the bus: the same fillScreen seen from both sides.
Troubleshooting
- The glass stays dark and the PWR LED is off: no power. Check VCC and GND (the module needs 3.3 - 5 V).
- WHITE SCREEN - NOTHING ON SPI YET: check SCK on D13, SDI on D11, CS and DC, and that the sketch calls
tft.begin(). The SPI bus tool lists the pins that are not connected. - WHITE SCREEN - STILL IN SLEEP or DISPLAY OFF: SLEEP OUT (11) or DISPLAY ON (29) was never sent;
begin()sends both. - STILL ASLEEP - SLPOUT CAME TOO EARLY: wait 120 ms after a reset before SLEEP OUT.
- RED / BLUE SWAPPED: the sketch's MADCTL asks for RGB order; this glass is BGR. Adafruit's rotations set it right; other drivers have an RGB / BGR option.
- COLOURS INVERTED: B6 with REV = 0, or INVERT ON: this glass needs REV = 1 and INVOFF.
- The picture is on its side or upside down: use setRotation(3) on this module.
- Touches land in the wrong place: give
ts.setRotation()the TFT's number, and check the TS_MIN / TS_MAX values with CAL or the Touch tool. - No touch at all: check T_CS, T_CLK, T_DIN, T_DO and T_IRQ, and hold the mouse button down on the glass: the touch lasts as long as you hold it.
- BACKLIGHT OFF: drive the LED pin high, PWM it, or wire it to 3.3 V / 5 V.
- The part or the UNO is not simulated, or no monitor window: TEPILI9341.DLL or TEPARDUINO.DLL is missing from MODELS and the project folder; a closed monitor opens again with a click on the UNO's USB port.
- The Advance pop-up does not appear: click OPEN PANEL on the strip.
Things to Know Before Using a Real ILI9341 Touch TFT
The demo sketch uses only SPI, the Adafruit and XPT2046 libraries and Serial, so it runs on a real UNO and module too. Keep in mind:
- 3.3 V logic: both chips are 3.3 V parts and the red boards have no level shifter. On a 5 V UNO, put a level shifter such as a 74HC4050 on CS, RESET, DC, SDI, SCK, T_CLK, T_CS and T_DIN.
- A shared MISO: on some boards SDO is never released; if the touch reads garbage, leave SDO open (Adafruit needs it only for the register reads).
- Calibrate your film: run CAL and put your raw edge values into TS_MINX / TS_MAXX / TS_MINY / TS_MAXY.
- The backlight: check whether your board has a resistor on LED; if not, add one (e.g. 100 ohm).
- Speed: about a quarter of a second for a full screen on an UNO; draw only what changes.
- RAM: Adafruit_ILI9341 keeps no picture in RAM; the demo uses 766 bytes of the UNO's 2,048.
- The SD card has its own SPI pins: wire them to the same bus with another CS pin.
Limitations of the Simulation
- Not modelled: the parallel and RGB interfaces (this module is SPI only), the 3-line SPI mode, the partial mode's non-display area, the effect of the gamma, power and VCOM settings on the picture, the panel's response time, timing violations shorter than the simulation's edges, the current draw, damage from 5 V signals or a reversed supply (the model only warns), more than one finger, the film's noise and drift, the XPT2046's battery and auxiliary inputs, and the SD card.
- The LEDs, the strip with the badge and the panel button, and the panels are TEP additions.
- The model is our own implementation, written from the ILI9341 and XPT2046 datasheets. ILI9341 is an ILI Technology part and XPT2046 a Shenzhen XPTEK part; this library is not made or endorsed by ILI Technology, XPTEK, Adafruit, PJRC or Labcenter.
- Licences: the demo sketch uses Adafruit ILI9341 1.6.2, Adafruit GFX 1.12.6 (BSD licence), Adafruit BusIO 1.17.4 (MIT licence) and XPT2046_Touchscreen 1.4 (MIT-style licence) and Arduino's SPI library. The HEX file contains them and the Arduino AVR core 1.8.6, which includes LGPL-licensed code; its source code is on GitHub. The README holds the licence texts.
- Tested in Proteus 8.5 in October 2026 (the demo as shipped on two Arduino UNO V4.0 boards with their built-in monitors: the dashboard and the colour test, touches with the real mouse - a click, a held button, drags on the slider and the paint strip - and with presses fed to the model at exact times for these screenshots, CAL, the Serial commands with the register reads, LIGHT, INVERT, ROTATE, SLEEP / WAKE, the panel, the pop-up and the five tools; about 0.4 x real time with the pop-up and both monitors open) and with automatic PC checks, 0 failed: 176 with the real demo sketch and the unmodified Adafruit ILI9341, Adafruit GFX and XPT2046_Touchscreen libraries talking bit by bit to the model, where the glass equals Adafruit's own GFXcanvas16 pixel by pixel after every command in all four rotations, 61 on the two controllers alone and 12 on the pop-up pages. Proteus 7 is not supported.
Looking for another display? Our TFT ST7735 Library for Proteus V1.0 has the smaller 1.8" colour TFT, our LCD 128x64 Library for Proteus V1.0 the big ST7920 graphic LCD, our Nokia 5110 LCD Library for Proteus V1.0 the classic 84 x 48 LCD, and our OLED Library for Proteus V1.0 the 0.96", 0.91" and 1.3" OLEDs.
So, that was all about the TFT ILI9341 Library for Proteus V1.0. I hope the shared SPI bus, the white screen, the rotation and the touch calibration are clear now, so your touch TFT works the first time you wire a real one. If you use the TFT ILI9341 Library for Proteus in a project, please share your feedback in the comments or in our forum, and if you have any questions, ask in the comments and I will help you out. Till the next tutorial, take care and have fun!