Interfacing of Keypad with 8051 Microcontroller in Proteus


Anyways, let's come back to keypad, if you wanna read the keypad details then you should read Interfacing of keypad with Arduino in Proteus ISIS as I have mentioned all the basic details about keypad in that tutorial and I am not gonna repeat it. But as a simple recall, keypad works on matrix system like it has 4 columns and 4 rows so we will have total 8 pins through which we are gonna control these 16 buttons. So, let's get started with it.
Interfacing of Keypad with 8051 Microcontroller in Proteus ISIS
- Keypad is quite an easy and basic tool in embedded projects which is used in almost every kind of engineering project.
- Today, we will first design the Proteus Simulation and after that we will design the programming code for 8051 Microcontroller.
- The 8051 Microcontroller I have used is AT89C51 while the compiler I used for this microcontroller is keil uvision 3 and the simulation is designed in Proteus ISIS.
- So, let's get started with Proteus simulation:
Proteus Simulation
- Get the below components from Proteus components library and place it in your workspace.

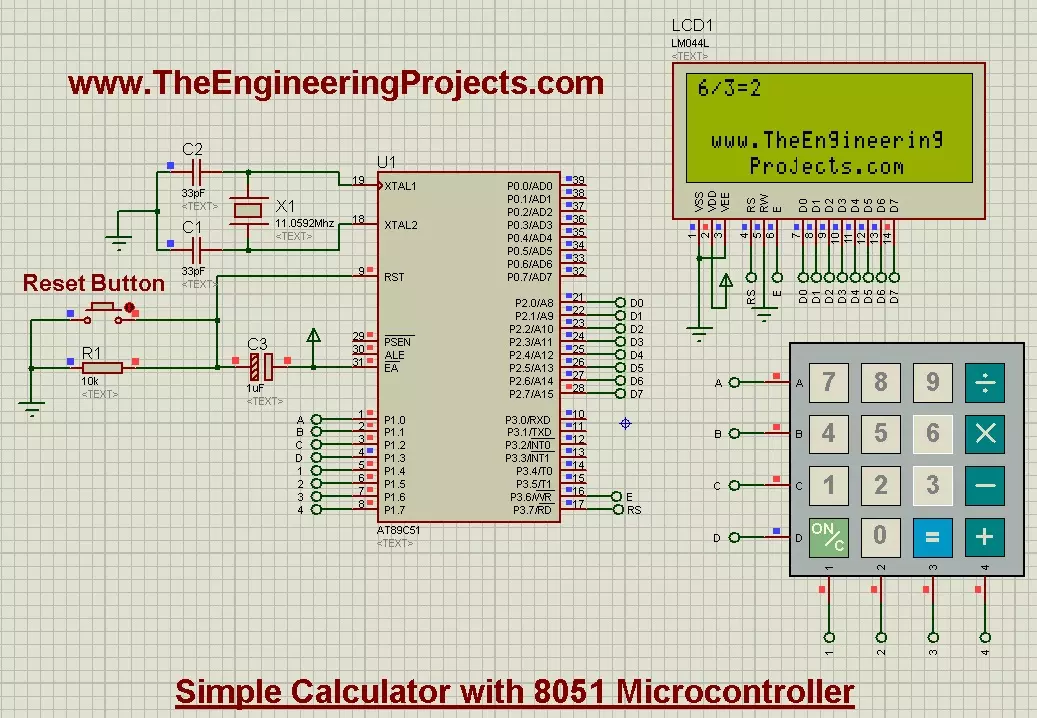
- Now design a circuit in Proteus software as shown in below figure:
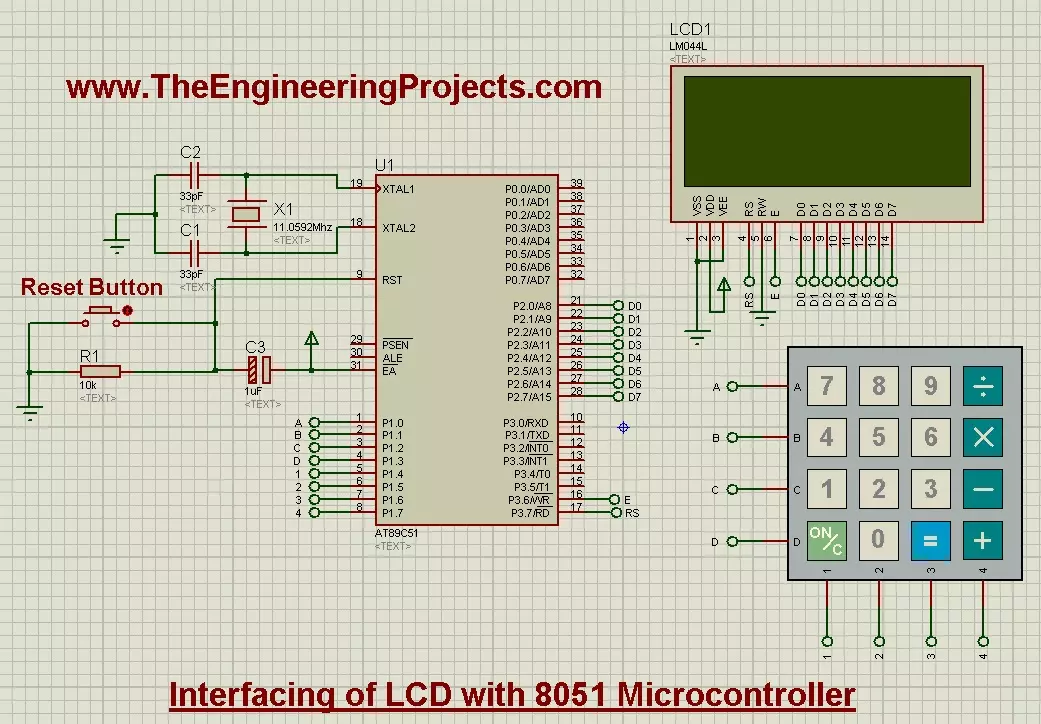
- Now as you can see in the above figure, I have used 4x4 keypad which has 4 rows and 4 columns and that's why there are total 16 buttons on it.
- So, I have connected 8 pins of keypad with Port 1 of 8051 microcontroller.
- LCD data pins are connected with Port 2 while the RS and E pins are connected to Port 3.
- So, now let's move to the programming code for Interfacing of keypad with 8051 Microcontroller.
Programming Code
- For programming purposes I have used Keil uvision 3 Compiler.
- Most of the code is quite similar to that for Interfacing of LCD with 8051 Microcontroller, so if you wanna read about that then read this post.
- The new code added in this post is about keypad which is as follows:
char READ_SWITCHES(void)
{
	RowA = 0; RowB = 1; RowC = 1; RowD = 1; 	//Test Row A

	if (C1 == 0) { delay(10000); while (C1==0); return '7'; }
	if (C2 == 0) { delay(10000); while (C2==0); return '8'; }
	if (C3 == 0) { delay(10000); while (C3==0); return '9'; }
	if (C4 == 0) { delay(10000); while (C4==0); return '/'; }

	RowA = 1; RowB = 0; RowC = 1; RowD = 1; 	//Test Row B

	if (C1 == 0) { delay(10000); while (C1==0); return '4'; }
	if (C2 == 0) { delay(10000); while (C2==0); return '5'; }
	if (C3 == 0) { delay(10000); while (C3==0); return '6'; }
	if (C4 == 0) { delay(10000); while (C4==0); return 'x'; }

	RowA = 1; RowB = 1; RowC = 0; RowD = 1; 	//Test Row C

	if (C1 == 0) { delay(10000); while (C1==0); return '1'; }
	if (C2 == 0) { delay(10000); while (C2==0); return '2'; }
	if (C3 == 0) { delay(10000); while (C3==0); return '3'; }
	if (C4 == 0) { delay(10000); while (C4==0); return '-'; }

	RowA = 1; RowB = 1; RowC = 1; RowD = 0; 	//Test Row D

	if (C1 == 0) { delay(10000); while (C1==0); return 'C'; }
	if (C2 == 0) { delay(10000); while (C2==0); return '0'; }
	if (C3 == 0) { delay(10000); while (C3==0); return '='; }
	if (C4 == 0) { delay(10000); while (C4==0); return '+'; }

	return 'n';           	// Means no key has been pressed
}
- In the above function, which is READ_SWITCHES(), what we are doing is we are first checking the rows and after that for each row we are checking the columns.
- For example, if you have pressed the button "1" then it will detect that first ROW and the first COLUMN has gone LOW and it will print out 1 as shown in above code.
- That's how its reading all the 16 buttons, first detecting the Rows and then for each row detecting all the columns and then printing out the respective character.
- Quite simple, isn't it?
- So now, here's the complete code for the Interfacing of Keypad with 8051 Microcontroller:
#include<reg51.h>

//Function declarations
void cct_init(void);
void delay(int);
void lcdinit(void);
void writecmd(int);
void writedata(char);
void Return(void);
char READ_SWITCHES(void);
char get_key(void);

//*******************
//Pin description
/*
P2 is data bus
P3.7 is RS
P3.6 is E
P1.0 to P1.3 are keypad row outputs
P1.4 to P1.7 are keypad column inputs
*/
//********************
// Define Pins
//********************
sbit RowA = P1^0;     //RowA
sbit RowB = P1^1;     //RowB
sbit RowC = P1^2;     //RowC
sbit RowD = P1^3;     //RowD

sbit C1   = P1^4;     //Column1
sbit C2   = P1^5;     //Column2
sbit C3   = P1^6;     //Column3
sbit C4   = P1^7;     //Column4

sbit E    = P3^6;     //E pin for LCD
sbit RS   = P3^7;     //RS pin for LCD

// ***********************************************************
// Main program
//
int main(void)
{
   char key;                // key char for keeping record of pressed key

   cct_init();              // Make input and output pins as required
   lcdinit();               // Initilize LCD

   writecmd(0x95);
   writedata('w');                                 //write
   writedata('w');                                 //write
   writedata('w');                                 //write
   writedata('.');                                 //write
   writedata('T');                                 //write
   writedata('h');                                 //write
   writedata('e');                                 //write
   writedata('E');                                 //write
   writedata('n');                                 //write
   writedata('g');                                 //write
   writedata('i');                                 //write
   writedata('n');                                 //write
   writedata('e');                                 //write
   writedata('e');                                 //write
   writedata('r');                                 //write
   writedata('i');                                 //write
   writedata('n');                                 //write
   writedata('g');                                 //write

   writecmd(0xd8);

   writedata('P');                                 //write
   writedata('r');                                 //write
   writedata('o');                                 //write
   writedata('j');                                 //write
   writedata('e');                                 //write
   writedata('c');                                 //write
   writedata('t');                                 //write
   writedata('s');                                 //write
   writedata('.');                                 //write
   writedata('c');                                 //write
   writedata('o');                                 //write
   writedata('m');                                 //write
   writecmd(0x80);
   while(1)
   {
     key = get_key();       // Get pressed key
	 //writecmd(0x01);        // Clear screen
	 writedata(key);        // Echo the key pressed to LCD
   }
}


void cct_init(void)
{
	P0 = 0x00;   //not used
	P1 = 0xf0;   //used for generating outputs and taking inputs from Keypad
	P2 = 0x00;   //used as data port for LCD
	P3 = 0x00;   //used for RS and E
}

void delay(int a)
{
   int i;
   for(i=0;i<a;i++);   //null statement
}

void writedata(char t)
{
   RS = 1;             // This is data
   P2 = t;             //Data transfer
   E  = 1;             // => E = 1
   delay(150);
   E  = 0;             // => E = 0
   delay(150);
}


void writecmd(int z)
{
   RS = 0;             // This is command
   P2 = z;             //Data transfer
   E  = 1;             // => E = 1
   delay(150);
   E  = 0;             // => E = 0
   delay(150);
}

void lcdinit(void)
{
  ///////////// Reset process from datasheet /////////
     delay(15000);
   writecmd(0x30);
     delay(4500);
   writecmd(0x30);
     delay(300);
   writecmd(0x30);
     delay(650);
  /////////////////////////////////////////////////////
   writecmd(0x38);    //function set
   writecmd(0x0c);    //display on,cursor off,blink off
   writecmd(0x01);    //clear display
   writecmd(0x06);    //entry mode, set increment
}

void Return(void)     //Return to 0 location on LCD
{
  writecmd(0x02);
    delay(1500);
}

char READ_SWITCHES(void)
{
	RowA = 0; RowB = 1; RowC = 1; RowD = 1; 	//Test Row A

	if (C1 == 0) { delay(10000); while (C1==0); return '7'; }
	if (C2 == 0) { delay(10000); while (C2==0); return '8'; }
	if (C3 == 0) { delay(10000); while (C3==0); return '9'; }
	if (C4 == 0) { delay(10000); while (C4==0); return '/'; }

	RowA = 1; RowB = 0; RowC = 1; RowD = 1; 	//Test Row B

	if (C1 == 0) { delay(10000); while (C1==0); return '4'; }
	if (C2 == 0) { delay(10000); while (C2==0); return '5'; }
	if (C3 == 0) { delay(10000); while (C3==0); return '6'; }
	if (C4 == 0) { delay(10000); while (C4==0); return 'x'; }

	RowA = 1; RowB = 1; RowC = 0; RowD = 1; 	//Test Row C

	if (C1 == 0) { delay(10000); while (C1==0); return '1'; }
	if (C2 == 0) { delay(10000); while (C2==0); return '2'; }
	if (C3 == 0) { delay(10000); while (C3==0); return '3'; }
	if (C4 == 0) { delay(10000); while (C4==0); return '-'; }

	RowA = 1; RowB = 1; RowC = 1; RowD = 0; 	//Test Row D

	if (C1 == 0) { delay(10000); while (C1==0); return 'C'; }
	if (C2 == 0) { delay(10000); while (C2==0); return '0'; }
	if (C3 == 0) { delay(10000); while (C3==0); return '='; }
	if (C4 == 0) { delay(10000); while (C4==0); return '+'; }

	return 'n';           	// Means no key has been pressed
}

char get_key(void)           //get key from user
{
	char key = 'n';              //assume no key pressed

	while(key=='n')              //wait untill a key is pressed
		key = READ_SWITCHES();   //scan the keys again and again

	return key;                  //when key pressed then return its value
}
- So, now upload this code to your keil and get the hex file.
- Upload this hex file to your Proteus software and run the simulation.
- Now if everything goes fine then you will get first screen as shown in below figure:

- Obviously our website link at the bottom, now when you press the buttons on Keypad then it will start displaying on the first row of LCD.
- Now I have pressed all the 12 buttons of keypad and they are shown on LCD as shown in below figure:
- Now you can see the keypad buttons are displayed on the LCD.
- Now you can download the Proteus Simulation along with hex file and code by clicking the below button.