Hello friends, I hope you all are doing great. Today, I am going to share the new NEO-7M GPS Library for Proteus V1.1. The u-blox NEO-7M is the next step after the famous NEO-6M: it is the same size and talks to your Arduino the same way, but it can also use the Russian GLONASS satellites instead of GPS. With this NEO-7M Library for Proteus, you can test your GPS sketches on your PC, switch between GPS and GLONASS with one click, and see for yourself which system works better where your project will live.
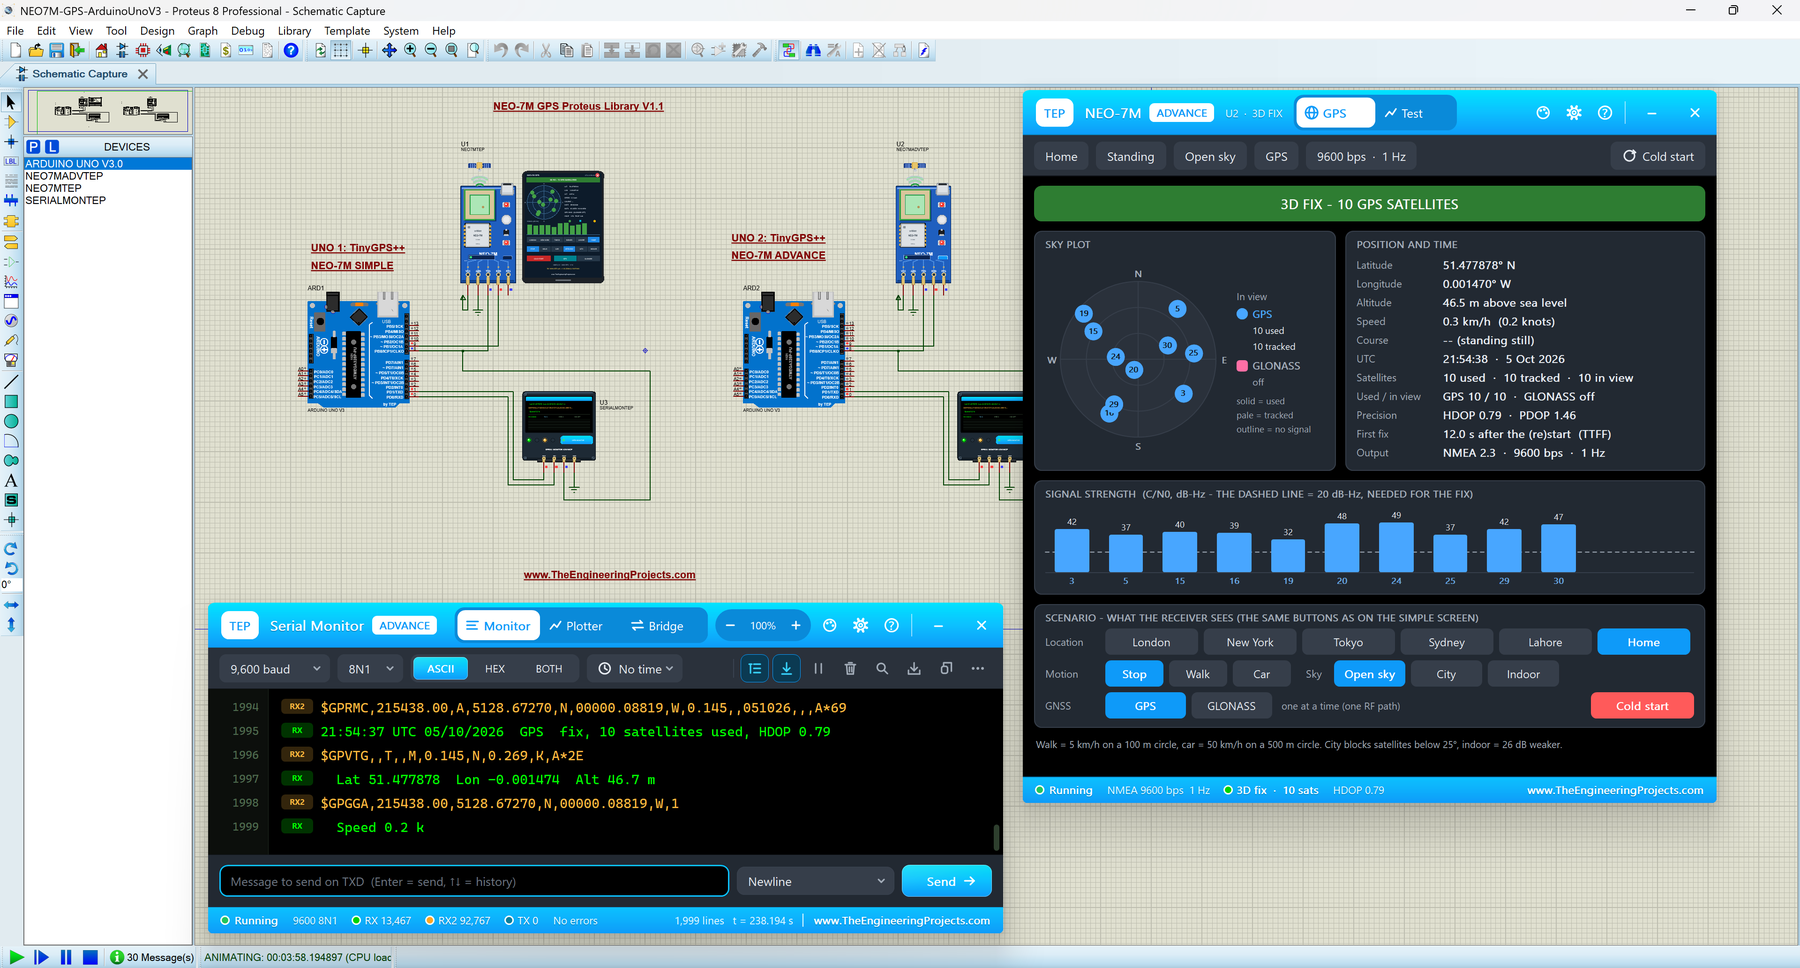
In this version, you get two devices: NEO-7M Simple, with a GPS screen drawn on the schematic, and NEO-7M Advance, with a pop-up window that holds the GPS screen and five measured GNSS test tools: time to first fix, accuracy, NMEA check, route and a new Constellations test that puts GPS and GLONASS side by side. The demo has two Arduino UNOs, one for each device, both reading the position with TinyGPS++.
NOTICE: Our NEO-7M model simulates two complete satellite systems: 30 GPS satellites and 24 GLONASS satellites moving over the sky, with signals, fixes and DOP values computed from their geometry. It took our team a lot of hard work, many test runs and many design changes, and this library is a tribute to that effort. Your feedback is the fuel that keeps us going, so please tell us what you think in the comments below or in the Proteus Libraries category of our forum. And if our free libraries help you in your studies or work, you can buy us a coffee (our donation page is coming soon). So, let's get started with the NEO-7M Library for Proteus:
What is the NEO-7M GPS Module?
The NEO-7M is a GNSS receiver module from u-blox, the 7th generation of the NEO family. It is sold on a small blue board with a square ceramic patch antenna, a micro-USB socket, a backup cell, a red power LED and a status LED. Like the NEO-6M, it sends NMEA sentences over a UART (TX / RX serial port) at 9600 baud and accepts u-blox UBX commands. If NMEA, fix, HDOP and TTFF are new words for you, our NEO-6M Library for Proteus article explains them step by step.
GPS or GLONASS: One at a Time
GLONASS is Russia's satellite navigation system. The NEO-7M can use GPS or GLONASS, but not both at the same time, because it has a single radio path. You choose the system with the UBX command CFG-GNSS. The NMEA sentences then start with a different talker ID:
| System | Talker | Example sentence | Satellite numbers |
|---|---|---|---|
| GPS (default) | $GP | $GPGGA, $GPRMC, $GPGSA, $GPGSV | 1 - 32 |
| GLONASS | $GL | $GLGGA, $GLRMC, $GLGSA, $GLGSV | 65 - 88 |
Here is how the NEO-7M compares with its older and younger brothers:
| Module | Systems | Cold start (data sheet) | NMEA |
|---|---|---|---|
| NEO-6M | GPS only | 27 s | 2.3 |
| NEO-7M | GPS or GLONASS | 30 s GPS, 32 s GLONASS | 2.3 |
| NEO-M8N | GPS and GLONASS together | 26 s (both) | 4.0 |
What's New in NEO-7M Library for Proteus V1.1
- Two devices: NEO-7M Simple (
NEO7MTEP) and NEO-7M Advance (NEO7MADVTEP) inTEPNEO7M.LIB. - Its own library: v1.0 shipped the NEO-7M and NEO-M8N in one package; now each has its own download and article. Both use the same model file,
TEPUBLOX.DLL, so installing both is safe. - Close and reopen the Simple GPS screen: a red X in its header, a PANEL button on the board.
- Board: a red PWR LED, and the patch antenna glows amber while acquiring and green with a fix.
- Five GNSS test tools in the Advance pop-up, including the new Constellations test.
- Realistic TTFF per system: GLONASS takes 32 / 30 of the GPS time, like the data sheet.
- TEP Serial Monitor in the demo: each monitor also shows the raw NMEA of its GPS on RX2.
- Lighter package: about 1.6 MB, without the C++ source code.
NEO-7M Library for Proteus: Simple vs Advance
| Feature | Simple | Advance |
|---|---|---|
| Full NEO-7M model (NMEA, UBX commands, GPS and GLONASS skies, fix, HDOP) | ✔ | ✔ |
| Status and PWR LEDs, glowing patch antenna, animated waves | ✔ | ✔ |
| GPS screen drawn on the schematic | ✔ | ✘ |
| GPS screen in a pop-up window you can move and resize | ✘ | ✔ |
| Location, motion, sky, GNSS and cold start buttons | ✔ | ✔ |
| TTFF, Accuracy, NMEA check, Route and Constellations tests | ✘ | ✔ |
| TEP Dark / Light theme, text size, Help page with Copy diagnostics | ✘ | ✔ |
| Same device name as v1.0 (old designs keep working) | ✔ | ✘ |
Download NEO-7M Library for Proteus
Click the button below to download NEO-7M-GPS-Library-for-Proteus-v1.1.zip:
NEO-7M GPS Library for Proteus V1.1- README.txt: a detailed guide to the files.
- Proteus Library Files:
TEPNEO7M.LIB(both devices),TEPSERIALMON.LIBand our Arduino UNO libraryArduinoV3TEP.LIB/ArduinoV3TEP.IDX. - Proteus Model Files:
TEPUBLOX.DLLandTEPSERIALMON.DLL. - Proteus Simulation: the demo project, the .hex file and copies of both DLLs.
- Arduino Code: the demo sketch, TinyGPS++ 1.0.3a (LGPL-2.1) and AltSoftSerial 1.4 (MIT).
If you don't have Proteus yet, read How to Download and Install Proteus 7 and 8. New to libraries? Follow How to Install a New Library in Proteus.
How to Install NEO-7M Library for Proteus
- Close Proteus and extract the whole zip file.
- Copy the four files from Proteus Library Files into the LIBRARY folder, usually
C:\Program Files (x86)\Labcenter Electronics\Proteus 8 Professional\LIBRARY. - Copy
TEPUBLOX.DLLandTEPSERIALMON.DLLinto the MODELS folder. - Start Proteus, press P and search for NEO-7M. You get the Simple and the Advance device (category Peripherals > Wireless).
Updating from v1.0? Replace TEPNEO7M.LIB and TEPUBLOX.DLL, and delete any TEPNEO7M.IDX from the LIBRARY folder. Tested in Proteus 8.5; Proteus 7 is not supported.
NEO-7M Module in Proteus
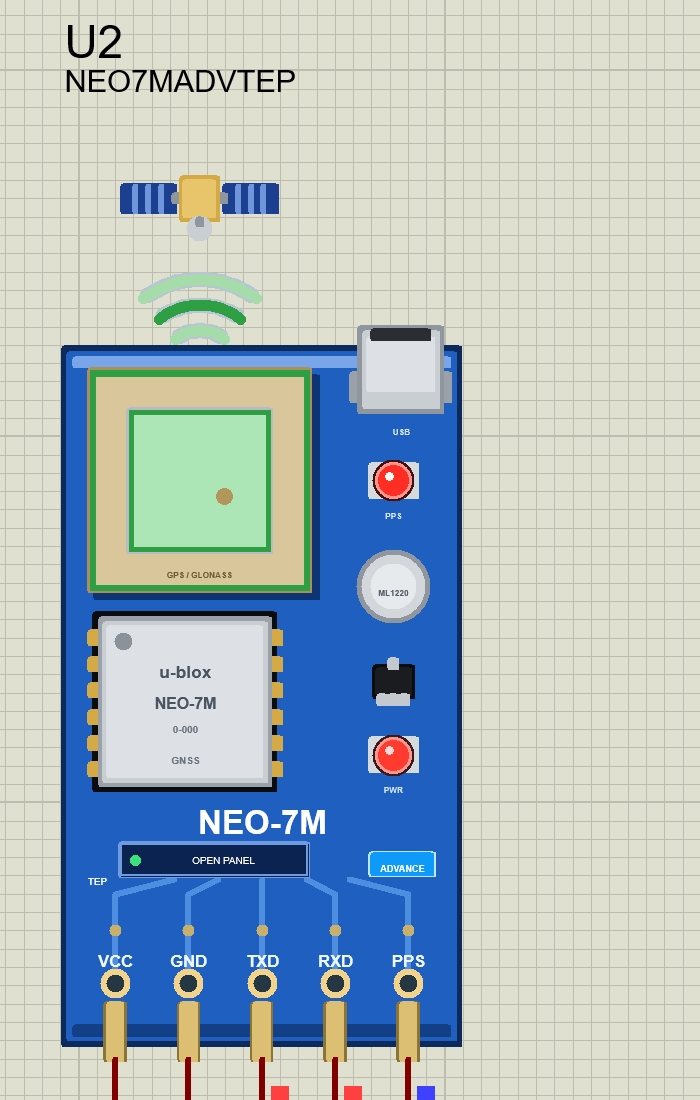
We designed the module as a clean TEP board in the blue of the real NEO-7M board: the ceramic patch antenna with "GPS / GLONASS" printed on it, the silver u-blox NEO-7M can, the micro-USB socket, the ML1220 backup cell, the status LED (PPS) and the red PWR LED. A small satellite floats above the antenna. Here is the NEO-7M Advance:
Pinout
| Pin | Function | Demo connection |
|---|---|---|
| VCC | Power supply (3.3 - 5 V on the board) | +5 V |
| GND | Ground | GND |
| TXD | NMEA sentences and UBX replies | Arduino D8 |
| RXD | UBX commands from the Arduino | Arduino D9 |
| PPS | Time pulse: 100 ms high each second with a fix | Open |
LEDs, Patch Antenna and Waves
| Indicator | What it shows |
|---|---|
| Status LED (PPS) | Lit while searching; goes dark for 100 ms each second after the fix, like the real board |
| PWR LED (red) | On while VCC and GND are powered |
| Patch antenna | Amber (pulsing) while acquiring, green with a fix |
| Waves | Green with a fix, amber while acquiring, grey without a signal |
Component Properties
| Property | Meaning | Default |
|---|---|---|
| GPSLAT / GPSLON | Home position (degrees) | 51.47788 / -0.00148 (Greenwich) |
| GPSALT / GPSGEOID | Home altitude / geoid separation (m) | 46 / 45.4 |
| GPSTTFF | Cold start time to first fix with GPS (s) | 10 (real 30) |
| GPSUTC | UTC at the start: PC or a fixed date and time | PC |
| GPSBAUD | UART baud rate at power-up | 9600 |
| GPSGNSS | System at power-up: GPS or GLONASS | GPS |
The GPS Screen: NEO-7M Simple
Beside the Simple module, we have drawn a GPS screen. A few seconds after Run, it shows 3D FIX - 10 GPS SATELLITES:
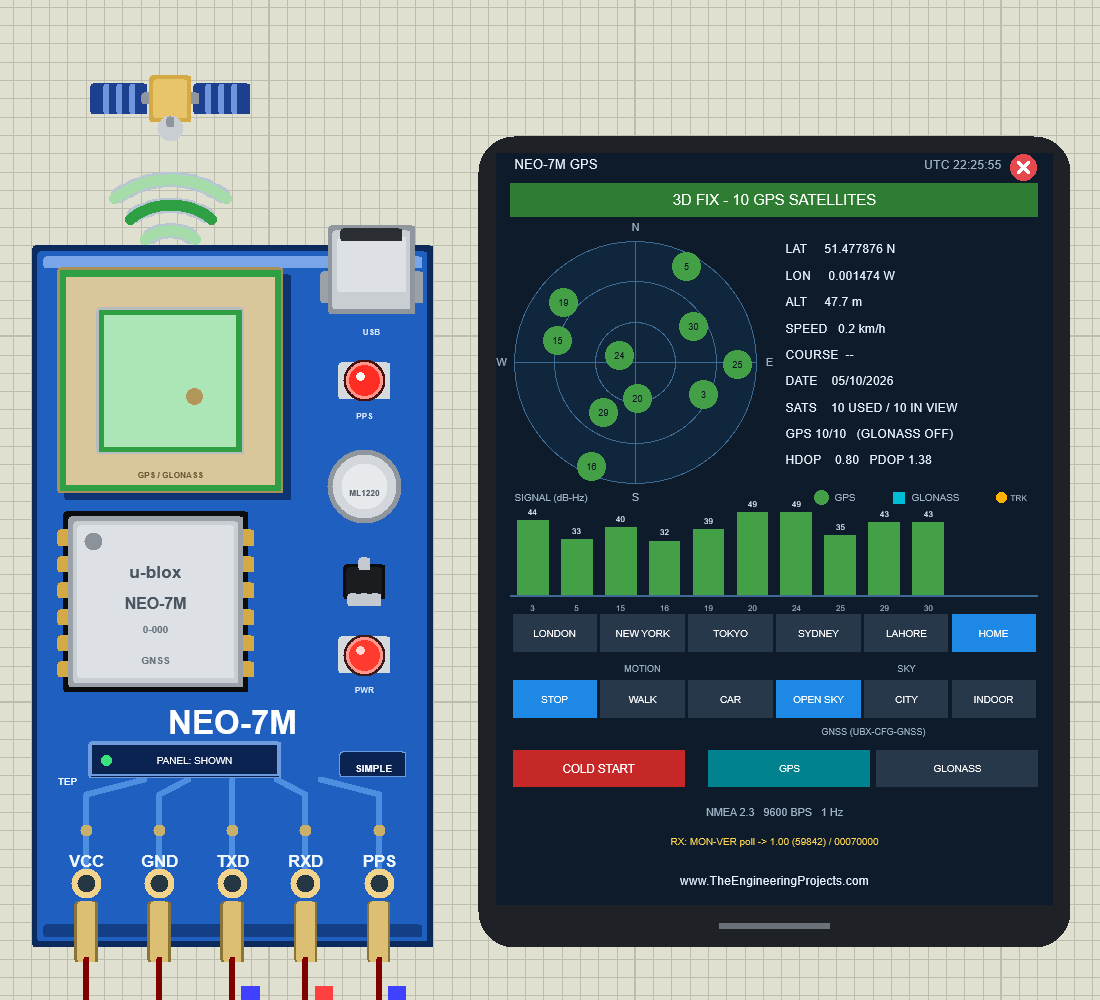
The screen shows 51.477876 N, 0.001474 W, 47.7 m, 10 used / 10 in view, "GPS 10/10 (GLONASS OFF)", HDOP 0.80 and PDOP 1.38, a sky plot, the signal bars in dB-Hz, and at the bottom the reply to the Arduino's UBX MON-VER poll: "1.00 (59842) / 00070000". The buttons:
| Row | Buttons |
|---|---|
| LOCATION | LONDON, NEW YORK, TOKYO, SYDNEY, LAHORE, HOME |
| MOTION | STOP, WALK (5 km/h on a 100 m circle), CAR (50 km/h on a 500 m circle) |
| SKY | OPEN SKY, CITY (buildings hide satellites below 25°), INDOOR (26 dB weaker) |
| GNSS | GPS, GLONASS (does what UBX-CFG-GNSS does) |
| COLD START | Forget everything; the next fix takes GPSTTFF |
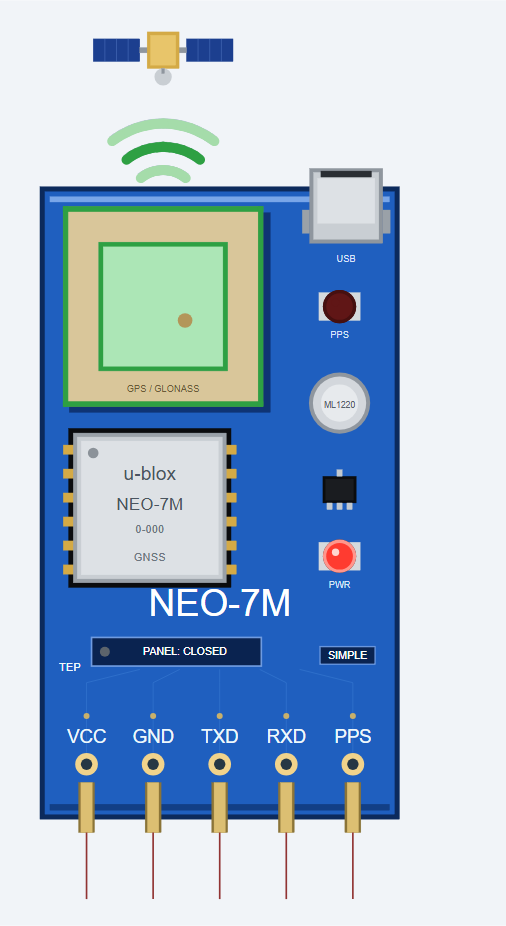
Click the red X in the screen's header to close it; the board button then says PANEL: CLOSED. Click PANEL to bring the screen back:
NEO-7M Advance: The Pop-Up Panel
The Advance device keeps only the board on the schematic and opens a TEP pop-up window at Run, with the look of our TEP Serial Monitor. The header shows the part and its state (U2 · 3D FIX), the tabs GPS and Test, and the theme, Settings and Help icons. Here it is right after the first fix, with both Serial Monitors:
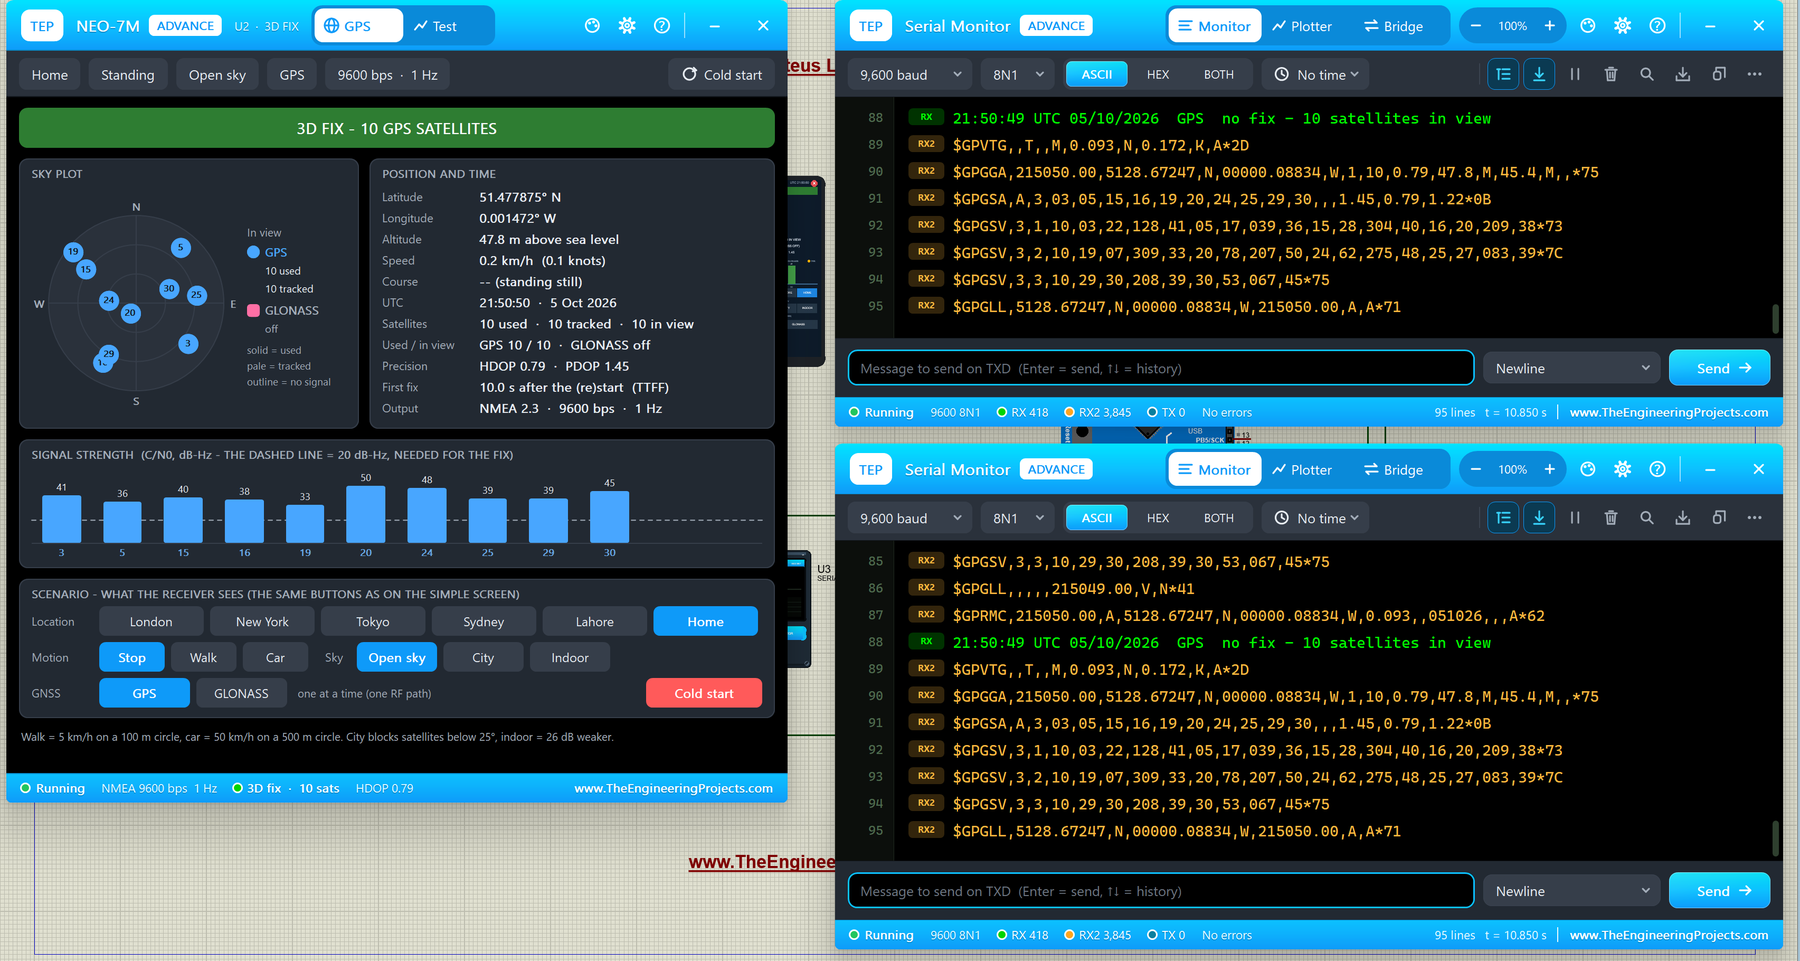
- Fix banner: 3D FIX - 10 GPS SATELLITES.
- Sky plot: GPS satellites as blue circles, GLONASS as pink squares (solid = used, pale = tracked, outline = no signal). Here GLONASS is "off".
- Position and time: 51.477875° N, 0.001472° W, 47.8 m, UTC 21:50:50, 10 used / 10 tracked / 10 in view, HDOP 0.79, PDOP 1.45, first fix 10.0 s after the start, NMEA 2.3 at 9600 bps, 1 Hz.
- Signal strength: one bar per satellite, with a dashed line at 20 dB-Hz, the minimum to be used in the fix.
Switching to GLONASS
Click GLONASS in the GNSS row. Like the real chip, the receiver drops GPS and must find the GLONASS satellites first: for a few seconds the banner says "NO FIX - 0 OF 8 SATELLITES USABLE". Then it gets 3D FIX - 8 GLONASS SATELLITES, and Serial Monitor U4 shows the new $GL talkers:
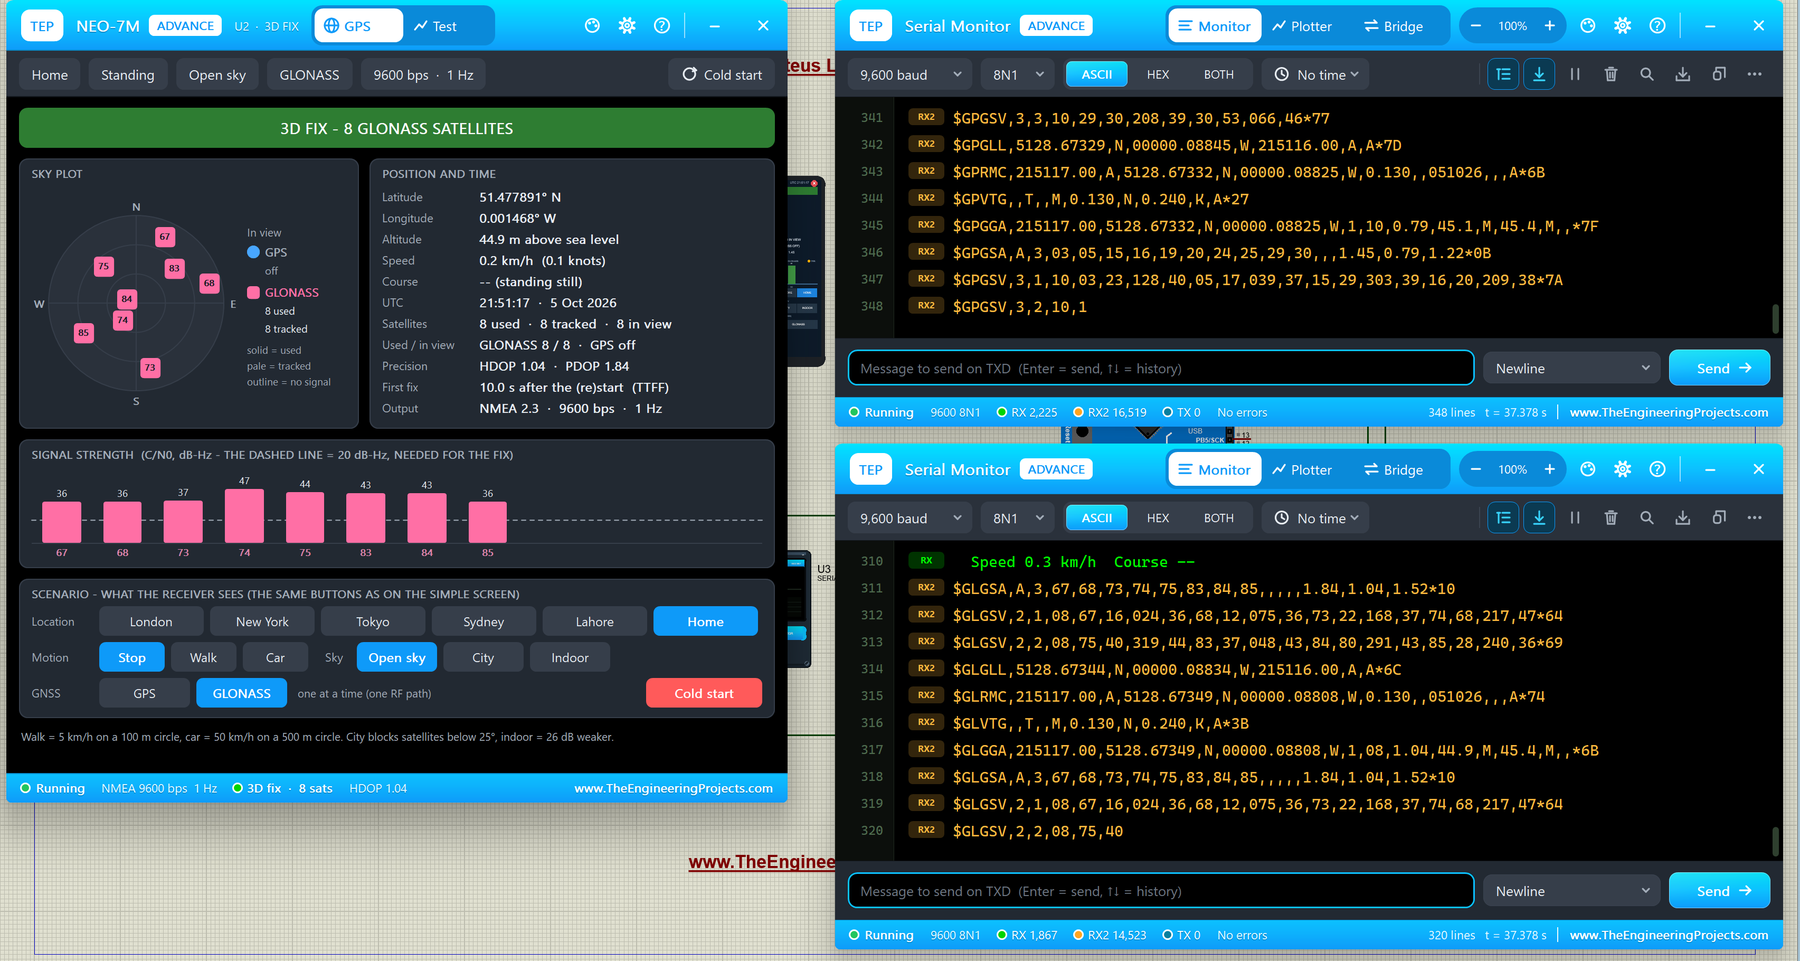
The sky plot now has pink squares numbered 67 to 85, the HDOP is 1.04, and U4 shows lines like:
$GLRMC,215117.00,A,5128.67349,N,00000.08808,W,0.130,,051026,,,A*74
$GLGGA,215117.00,5128.67349,N,00000.08808,W,1,08,1.04,44.9,M,45.4,M,,*6B
$GLGSA,A,3,67,68,73,74,75,83,84,85,,,,,1.84,1.04,1.52*10
Meanwhile U3, the monitor of UNO 1, still shows $GP sentences, because U1 is still on GPS. This is a great way to see the difference between the two systems.
The Test Page: GNSS Test Tools
The Test page has five tools. Every number is measured on the running model, and your sketch sees everything the tool does (for example, the fix dropping during a restart).
1. TTFF: Time to First Fix
Choose Cold, Warm or Hot and 3, 5 or 10 runs. Each run restarts the receiver like the UBX command CFG-RST. I ran three cold starts while the NEO-7M was on GLONASS:
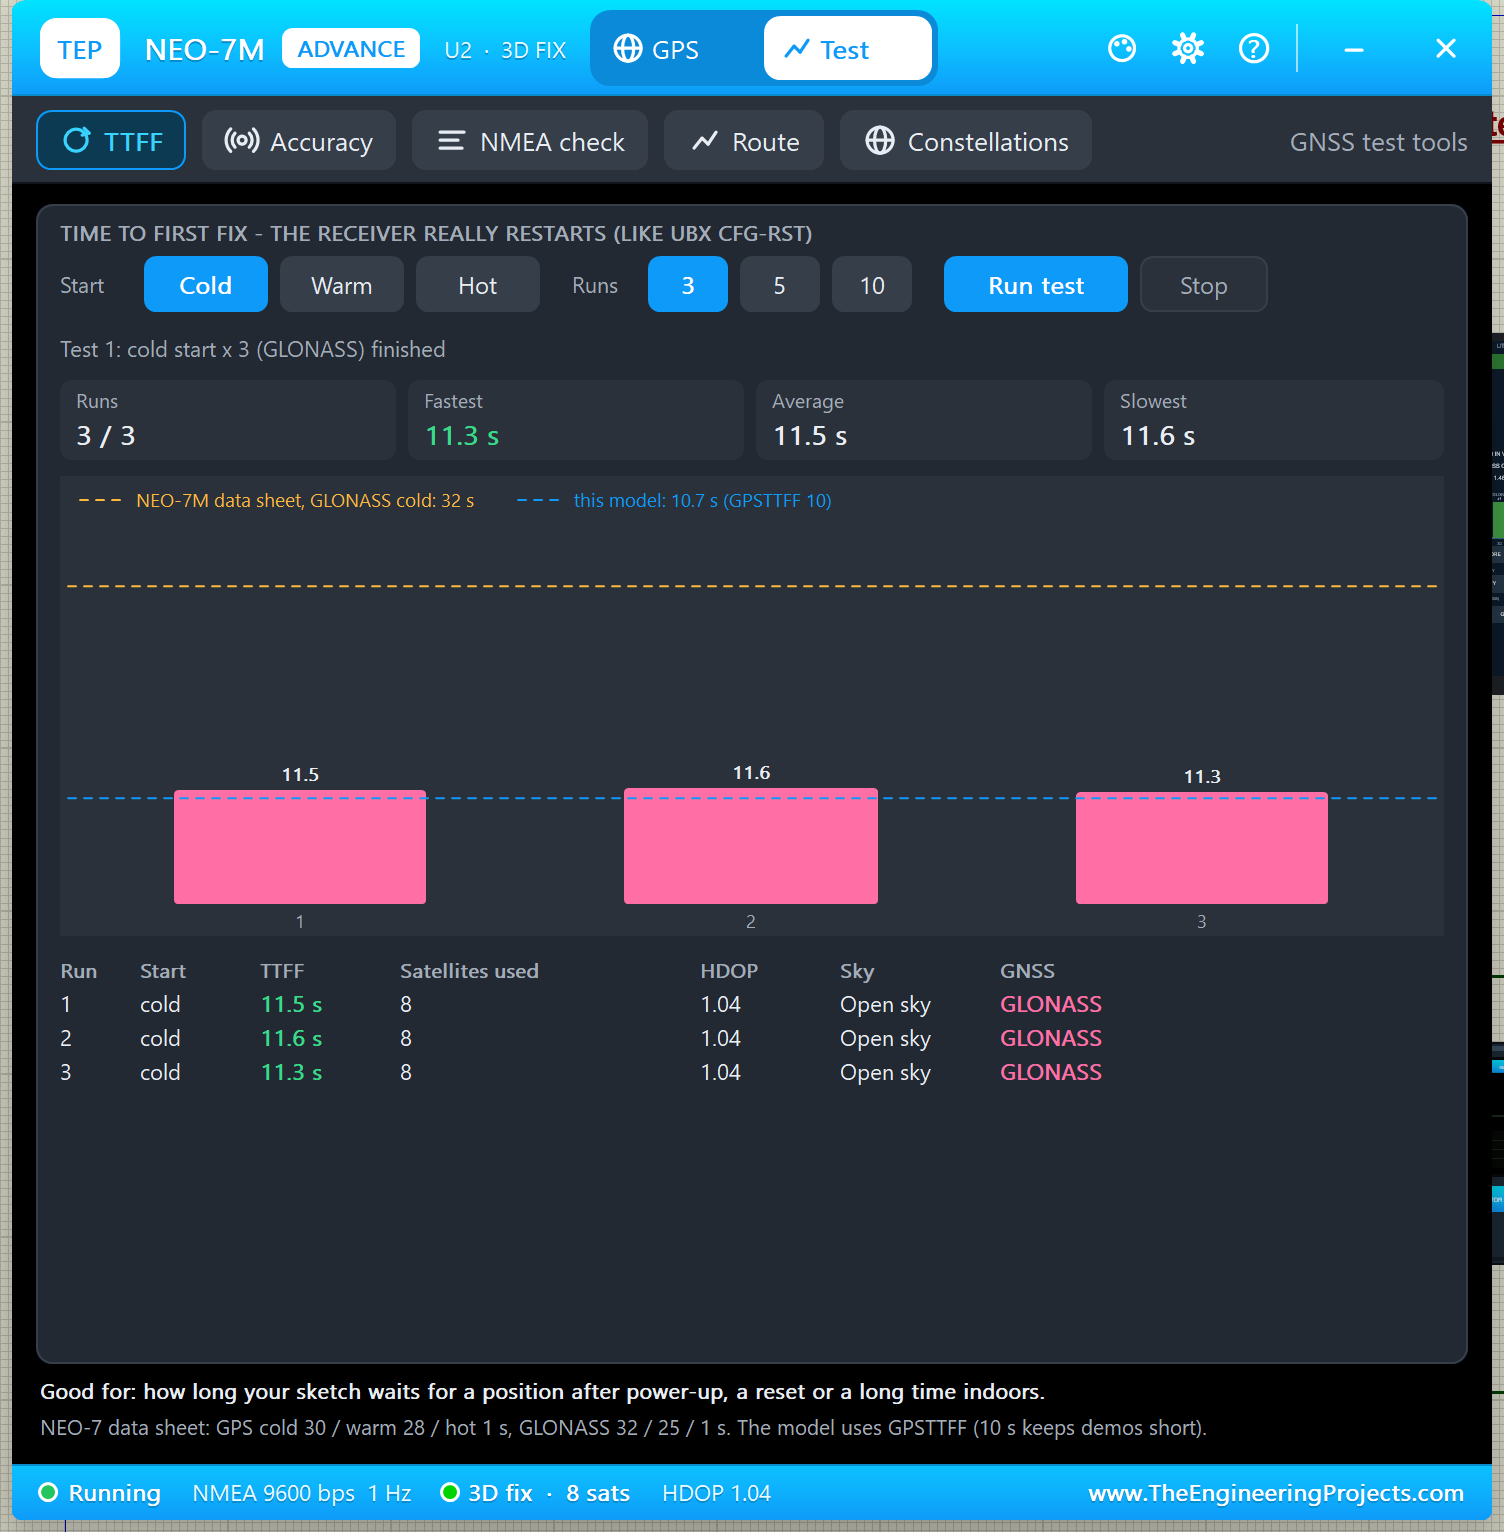
The model's GLONASS line is 10.7 s, because GLONASS takes 32 / 30 of GPSTTFF (10 s), just like the data sheet gives 32 s for GLONASS and 30 s for GPS. The amber dashed line is the real data sheet value, 32 s. Good for: knowing how long your sketch waits for a position after power-up.
2. Accuracy
The accuracy tool compares every reported position with the true one. In this PC render of 60 fixes on GPS in the open sky: CEP 1.37 m, 2DRMS 2.67 m, largest error 2.18 m, HDOP 1.07 with 10 satellites:
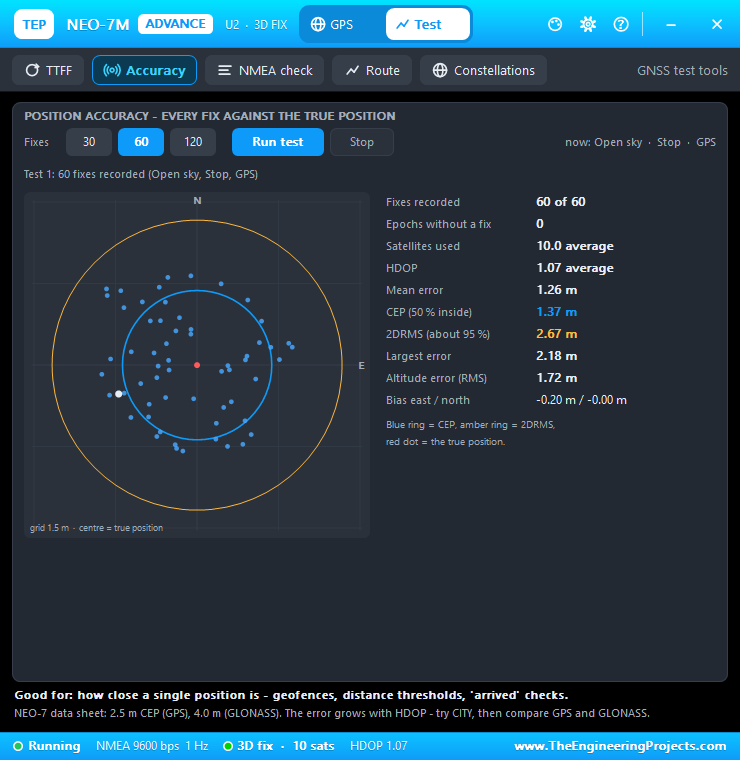
CEP is the radius that holds half of the fixes; 2DRMS holds about 95 %. The NEO-7 data sheet gives 2.5 m CEP for GPS and 4.0 m for GLONASS.
3. NMEA Check
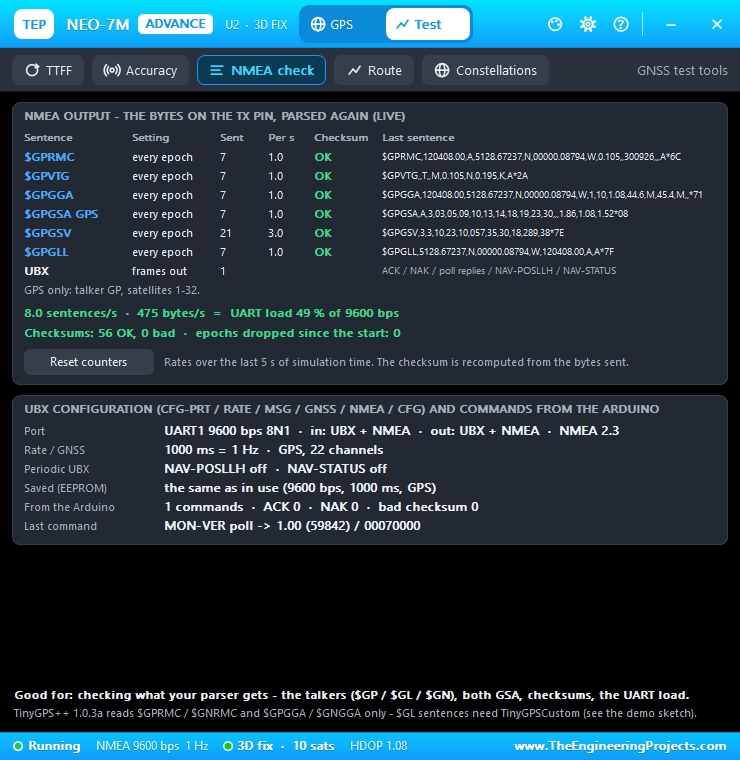
The NMEA check reads the TX bytes again: every sentence, its rate, its checksum and the UART load. On GPS, the NEO-7M sends 8.0 sentences per second, 475 bytes/s, a UART load of 49 % at 9600 bps, with every checksum OK:
4. Route
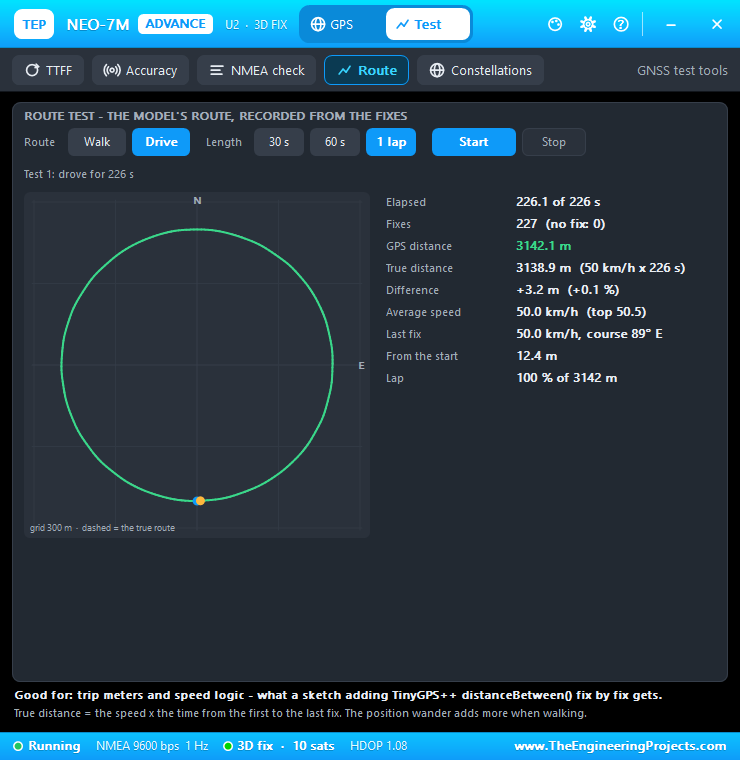
The route tool drives (50 km/h) or walks (5 km/h) the model's circle and compares the GPS distance with the true one. One full lap: 3142.1 m by GPS against 3138.9 m (+0.1 %):
5. Constellations: GPS vs GLONASS
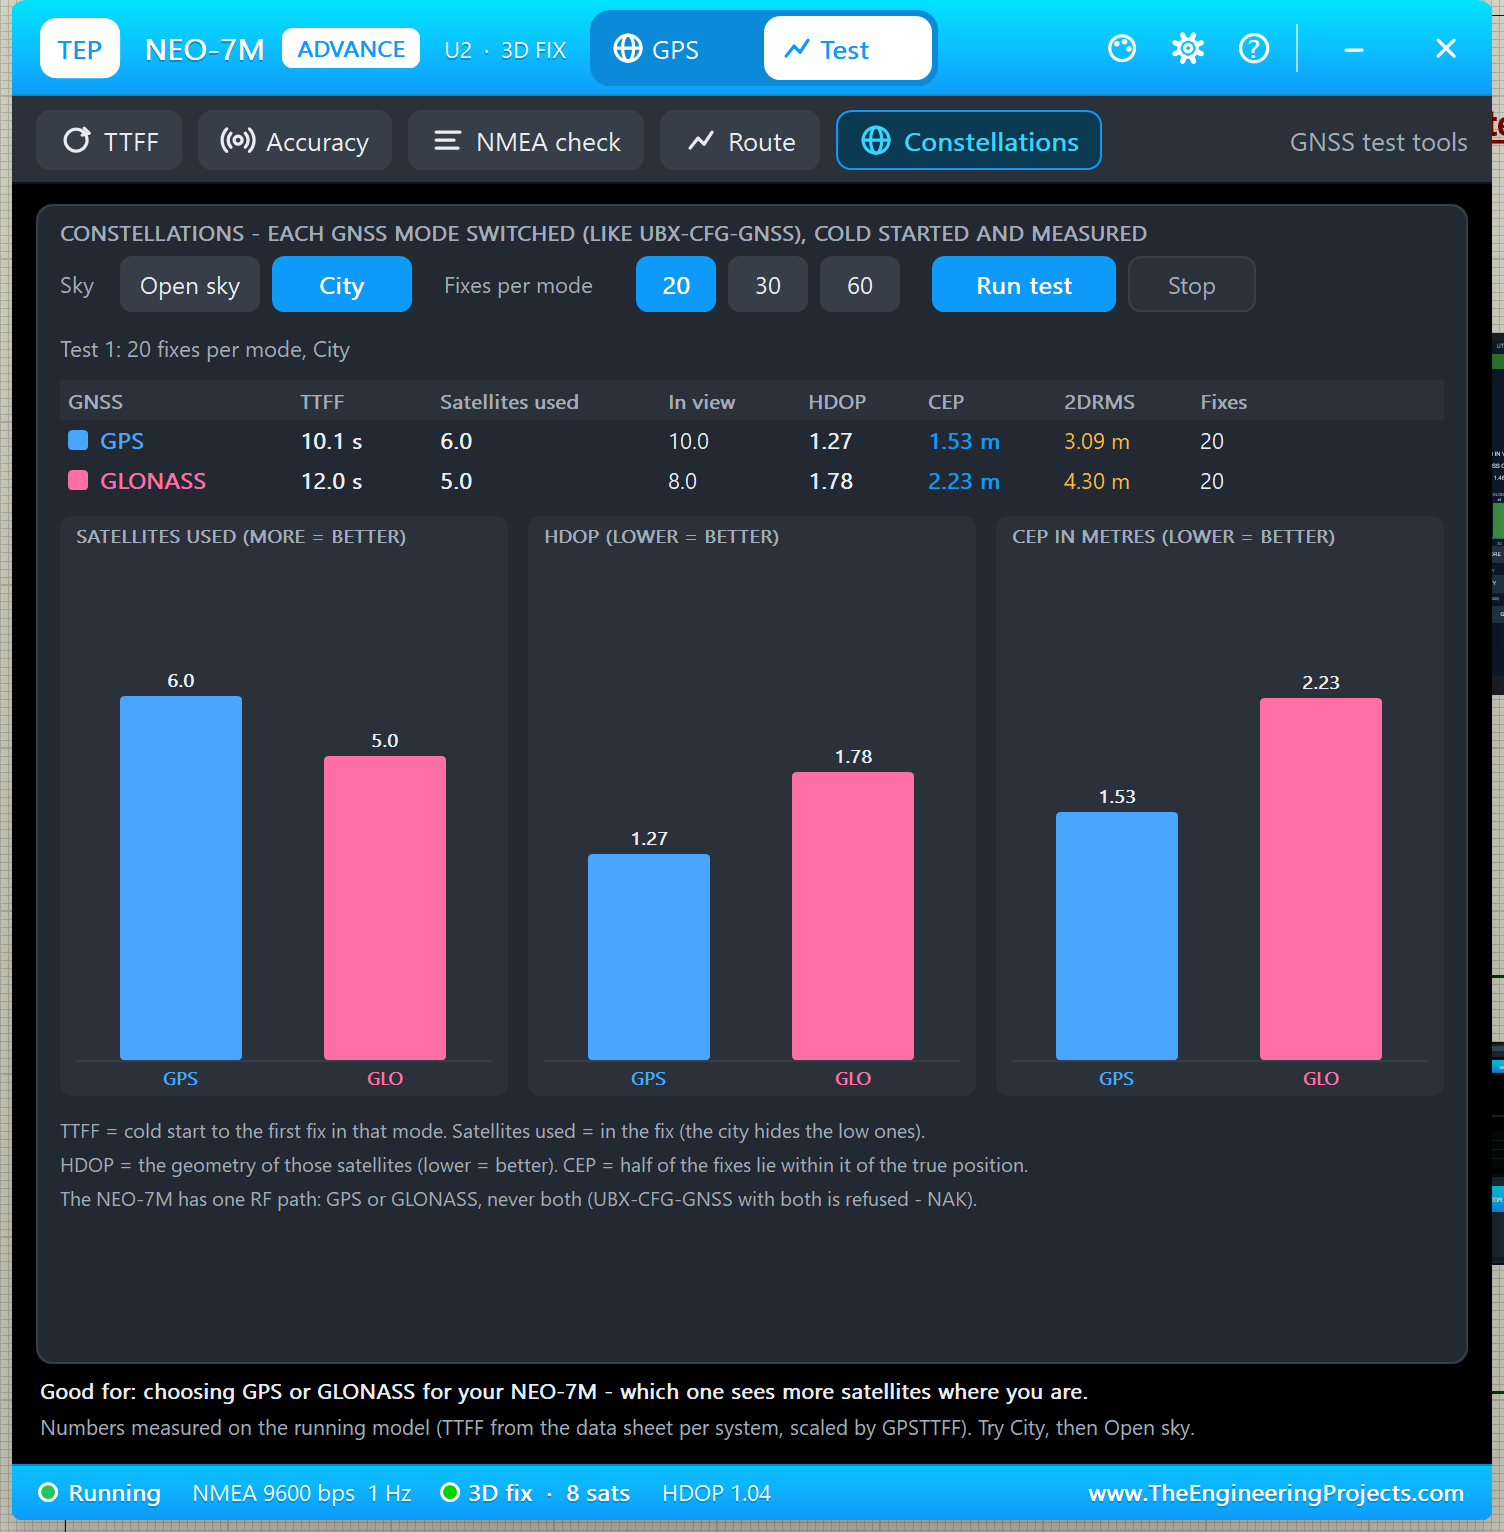
This is the new tool. It switches the receiver to each system (like UBX-CFG-GNSS), cold starts it, times the first fix and records 20, 30 or 60 fixes. The system that was in use runs last, so the receiver ends where it started. I chose City and 20 fixes per mode:
| System | TTFF | Satellites used | In view | HDOP | CEP | 2DRMS |
|---|---|---|---|---|---|---|
| GPS | 10.1 s | 6.0 | 10.0 | 1.27 | 1.53 m | 3.09 m |
| GLONASS | 12.0 s | 5.0 | 8.0 | 1.78 | 2.23 m | 4.30 m |
In this city, GPS saw more satellites, so it had a better geometry and smaller errors. With a different location or time the result can change, and that is the point: the tool lets you test both systems where your project will be used. Good for: choosing GPS or GLONASS for your NEO-7M. If you need both at once, that is what the NEO-M8N does (our NEO-M8N Library for Proteus).
Settings and Help
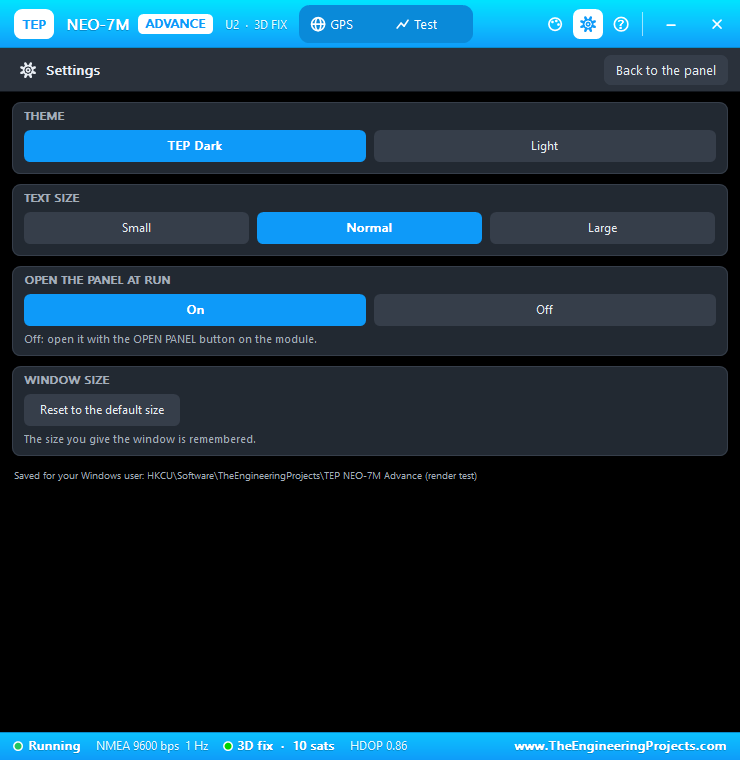
The gear icon opens Settings: theme (TEP Dark or Light), text size, open the panel at Run and the window size, saved for your Windows user:
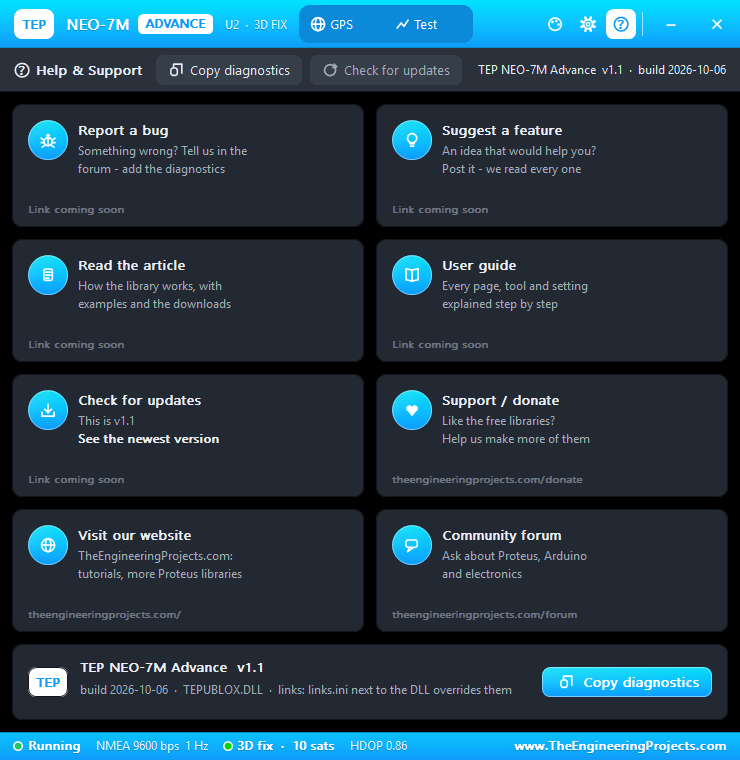
The ? icon opens Help & Support with eight cards and Copy diagnostics, like our other Advance devices:
NEO-7M with Arduino in Proteus
The demo project NEO7M-GPS-ArduinoUnoV3.pdsprj has two Arduino UNOs from our Arduino Library for Proteus V3.0, both running the same sketch: UNO 1 (ARD1) with the NEO-7M Simple (U1) and Serial Monitor U3, and UNO 2 (ARD2) with the NEO-7M Advance (U2) and Serial Monitor U4.
Wiring
| From | To | Why |
|---|---|---|
| NEO-7M VCC / GND | +5 V / ground | Power |
| NEO-7M TXD | Arduino D8 | AltSoftSerial RX: the NMEA sentences |
| NEO-7M RXD | Arduino D9 | AltSoftSerial TX: the UBX MON-VER poll |
| NEO-7M PPS | Open | The sketch does not need it |
| Serial Monitor RXD / TXD | Arduino D1 / D0 | The sketch's output and input |
| Serial Monitor RXD2 | NEO-7M TXD (junction) | Shows the raw NMEA beside the TinyGPS++ output |
The D9 -> RXD wire crosses the TXD -> D8 wire without a junction dot: they are not connected. Want to know more about these pins? Read our Introduction to Arduino UNO. As with every UART module in Proteus 8.5, the sketch uses AltSoftSerial, because SoftwareSerial cannot receive in Proteus (it needs pin-change interrupts).
The Arduino Code
NEO7M_TinyGPS.ino uses TinyGPS++. TinyGPS++ 1.0.3a decodes $GPRMC / $GPGGA but not the $GL sentences, so the sketch reads the GLONASS fields with TinyGPSCustom:
TinyGPSCustom glTime(gps, "GLRMC", 1), glSpeed(gps, "GLRMC", 7), glCourse(gps, "GLRMC", 8), glDate(gps, "GLRMC", 9);
TinyGPSCustom glLat(gps, "GLGGA", 2), glNS(gps, "GLGGA", 3), glLon(gps, "GLGGA", 4), glEW(gps, "GLGGA", 5);
TinyGPSCustom glQuality(gps, "GLGGA", 6), glSats(gps, "GLGGA", 7), glHdop(gps, "GLGGA", 8), glAlt(gps, "GLGGA", 9);
Every 2 seconds, it checks whether $GLRMC sentences are arriving and reads the right set of fields:
  const bool glonass = glTime.age() < 1500;       // $GLRMC arrives (every second): the receiver is in GLONASS mode
  if (glonass) readGlonass(r); else readTinyGps(r);
  TinyGPSCustom &inView = glonass ? gloInView : gpsInView;
  printReading(r, glonass ? "GLONASS" : "GPS", inView.age() < 1500 ? atoi(inView.value()) : 0);
At start-up, it also polls the module's firmware with the UBX command MON-VER. If you change the sketch, see How to get the HEX file from Arduino. New to Arduino? Start with our Arduino Tutorial for Beginners.
Simulation Results
Each monitor prints a status block every 2 seconds, with the raw NMEA in amber (RX2) in between:
NEO-7M + TinyGPS++
u-blox firmware: 1.00 (59842), hardware: 00070000
  PROTVER 14.00
  GPS;SBAS;GLO;QZSS
...
21:54:37 UTC 05/10/2026  GPS  fix, 10 satellites used, HDOP 0.79
  Lat 51.477878  Lon -0.001474  Alt 46.7 m
After switching to GLONASS, the system name changes to GLONASS and the satellites to 8. Read all about the monitor in TEP Serial Monitor Advance for Proteus.
How the NEO-7M Model Works
Knowing what happens inside the model helps you understand the numbers on the screen and in your sketch.
Start-up
0.4 s after power-up, the module prints seven $GPTXT lines, as captured from a real NEO-7M board: u-blox ag, HW UBX-G70xx 00070000, ROM CORE 1.00 (59842), PROTVER 14.00, ANTSUPERV, ANTSTATUS=DONTKNOW and LLC. Then it sends RMC, VTG, GGA, GSA, GSV and GLL every second. Without a fix, the fields are empty exactly like on a real module, for example $GPGGA,,,,,,0,00,99.99,,,,,,*48; time and date appear once satellites are tracked.
Satellites and the Fix
- Two skies: 30 GPS satellites in 6 orbit planes (12 h orbits) and 24 GLONASS satellites, numbers 65 - 88, in 3 planes (11 h 15 min orbits). Their elevation, azimuth and signal come from the geometry, so the sky plot and the DOP values change slowly, like on a real receiver.
- Thresholds: a satellite is acquired from 26 dB-Hz, tracked down to 14 dB-Hz and used in the fix from 20 dB-Hz (the dashed line on the signal chart).
- Fix: 3 satellites give a 2D fix, 4 or more a 3D fix. HDOP and PDOP are computed from the satellites used, and the position wanders by about a metre per unit of HDOP.
- Switching systems: after the GNSS button or a CFG-GNSS command, the new system needs the TTFF again before its satellites join the fix.
UBX Commands Supported
Send these on the module's RXD pin (frames start with B5 62; the checksum is checked):
| Command | What it does in the model |
|---|---|
| CFG-PRT (06 00) | Poll, or set the UART speed 4800 - 115200 (ACK at the old speed, then switch) |
| CFG-RATE (06 08) | Poll, or set the rate: down to 100 ms (10 Hz) with GPS, 1 s with GLONASS |
| CFG-MSG (06 01) | Poll, or set the rate of GGA, GLL, GSA, GSV, RMC, VTG, NAV-POSLLH, NAV-STATUS |
| CFG-GNSS (06 3E) | Choose GPS or GLONASS; both together gets a NAK (one radio path) |
| CFG-NMEA (06 17) | NMEA 2.1 / 2.3 and the talker IDs (NMEA 4.x gets a NAK) |
| CFG-RST (06 04) | Hot / warm / cold start, module restart, GNSS stop / start |
| CFG-CFG (06 09) | Clear / save / load the configuration (kept for the run) |
| MON-VER (0A 04) | "1.00 (59842)", "00070000", "PROTVER 14.00", "GPS;SBAS;GLO;QZSS" |
UART load: if the rate and the sentences do not fit the baud rate (for example 5 Hz with all six sentences at 9600 bps), the model drops a whole epoch, like the real receiver, and the Simulation Log explains it. Raise the baud rate with CFG-PRT or turn sentences off with CFG-MSG.
Troubleshooting
- No fix: wait GPSTTFF seconds of simulation time (GLONASS a little longer), check that SKY is not INDOOR, and after a GNSS button wait the TTFF again.
- "NO POWER - CHECK VCC / GND": wire VCC to a +5 V terminal and GND to ground.
- The monitor shows nothing from the GPS: TXD must go to D8, and the sketch must use AltSoftSerial.
- "No reply to MON-VER": the Arduino's D9 must go to the module's RXD.
- The NEO-7M will not use GPS and GLONASS together: correct, the real NEO-7M cannot either.
- No screen or pop-up:
TEPUBLOX.DLLis missing from MODELS and the project folder.
Things to Know Before Using a Real NEO-7M
- Supply: the board takes 3.3 - 5 V on VCC and has a 3.3 V regulator.
- Logic level: the UART is 3.3 V. A divider between D9 and RXD is the safe choice: 1 k from D9 to RXD and 2 k from RXD to GND.
- Pin order: some NEO-7M boards print GND VCC TX RX PPS; check your board.
- Sky view: a real module usually gets no fix indoors.
Limitations of the Simulation
- The GPS and GLONASS skies are simplified constellations, realistic in kind but not the real satellites of that day. SBAS and QZSS are not simulated.
- Not modelled: the micro-USB port, power save modes, the backup battery (every power-up is a cold start) and the supply current.
- Tested in Proteus 8.5 (the demo and the Proteus screenshots in this article) and with 2,112 automatic checks on the PC; Proteus 7 is not supported.
Need GPS + GLONASS at the same time? Look for our NEO-M8N Library for Proteus. Need GSM too? Try our SIM800L Library for Proteus.
So, that was all about the NEO-7M GPS Library for Proteus V1.1. I hope switching between GPS and GLONASS and comparing them with the Constellations test helps you understand satellite navigation better. Please share your feedback in the comments or in our forum. Till the next tutorial, take care and have fun!