


Project Files of NEO-7M Library for Proteus V1.1 (GPS + GLONASS, Arduino)
 Libraries
 Code
 Projects
 Simulation
neo7m-tep-v1-1-0ea8e8dbf46c4120ab242dbe7951eff1.zip

NEO-7M GPS Library for Proteus V1.1
NEO-7M GPS Library for Proteus V1.1 comes as a ZIP archive of 39 files (1.5 MB, 3.4 MB unpacked) holding Proteus library files, simulation model DLLs, a Proteus simulation, an Arduino sketch, an Arduino library, compiled HEX firmware and data files.
- LIBProteus library
- IDXProteus library index
- DLLProteus model
- DSNProteus simulation
- INOArduino sketch
- LIBArduino library
- HEXHEX firmware
- CSVData file
Description
NEO-7M GPS Library for Proteus V1.1 is the download package that goes with our tutorial NEO-7M Library for Proteus V1.1 (GPS + GLONASS, Arduino). On this page you can download the ZIP file (1.5 MB) and see what is inside before you save it: 39 files in 18 folders, the Proteus library files (LIB and IDX), the simulation model (DLL), a ready Proteus simulation, an Arduino sketch, an Arduino library, the compiled HEX firmware and data files. The tutorial explains the design; this page gets the files onto your computer and into use.
What this library is
NEO-7M-GPS-Library-for-Proteus-v1.1.zip with NEO-7M Simple and Advance (TEPNEO7M.LIB and TEPUBLOX.DLL), the Proteus simulation with its HEX file, the TinyGPS++ demo sketch with the TinyGPS++ and AltSoftSerial libraries and a README.
This is version 1.1; older or newer releases, when they exist, are listed in the Development tab.
What is inside the ZIP file
- ArduinoV3TEP.LIB – Proteus library, 95.6 KB
- TEPNEO7M.LIB – Proteus library, 73.3 KB
- TEPSERIALMON.LIB – Proteus library, 11.1 KB
- ArduinoV3TEP.IDX – Library index, 830 B
- TEPSERIALMON.DLL – Simulation model, 978 KB
- TEPUBLOX.DLL – Simulation model, 463 KB
- and 33 more, all listed in the File Structure tab
The archive unpacks to 3.4 MB and carries its own README (README.txt), shown in the README tab above.
How to download
Use the download panel at the top of this page: after the counter (30 seconds for guests, 10 for members) the black button unlocks and the ZIP file comes straight from our content network. If the browser opens it instead of saving, use Save as; extract the whole archive before using anything inside it.
How to install
- Step 1: Extract the ZIP file with Windows (Extract All), 7-Zip or WinRAR, keeping its folders.
- Step 2: Close Proteus and copy ArduinoV3TEP.LIB, TEPNEO7M.LIB and TEPSERIALMON.LIB and ArduinoV3TEP.IDX into its LIBRARY folder (Proteus 8: C:\Program Files (x86)\Labcenter Electronics\Proteus 8 Professional\LIBRARY).
- Step 3: Copy TEPSERIALMON.DLL and TEPUBLOX.DLL into the MODELS folder next to it, so the part simulates.
- Step 4: Start Proteus, press P and search for "ArduinoV3TEP"; place and wire it as in the tutorial.
- Step 5: In the Arduino IDE use Sketch → Include Library → Add .ZIP Library, then restart the IDE.
- Step 6: Open NEO7M_TinyGPS.ino, Echo.ino and ReceiveTest.ino and 7 more in the Arduino IDE, pick board and port and Verify (Export Compiled Binary gives the HEX).
- Step 7: In Proteus set the controller's Program File to NEO7M_TinyGPS.hex; on hardware, flash the same file.
- Step 8: Open NEO7M-GPS-ArduinoUnoV3.pdsprj in Proteus and press Play.
Read the detailed guide
This page is for the files. The full tutorial, NEO-7M Library for Proteus V1.1 (GPS + GLONASS, Arduino), explains the circuit and the code step by step and shows the working results and the simulation; read it before you build. Questions about the download or the installation go in the comments below; more Proteus downloads are listed further down this page.

File Structure
 File Structure
4.6 KB9.8 KB968 B1.4 KB8.3 KB2.5 KB82 B441 B422 B1.3 KB384 B2.4 KB2.2 KB4.4 KB5.5 KB265.9 KB3.7 KB4.5 KB2.4 KB12.7 KB7.8 KB1.1 KB1.4 KB483 B539 B1.7 KB729 B8 KB830 B95.6 KB73.3 KB11.1 KB978 KB463 KB23.8 KB37.4 KB978 KB463 KB31.1 KBGallery12 images from the tutorialOpen the tutorial
 Gallery12 images from the tutorial
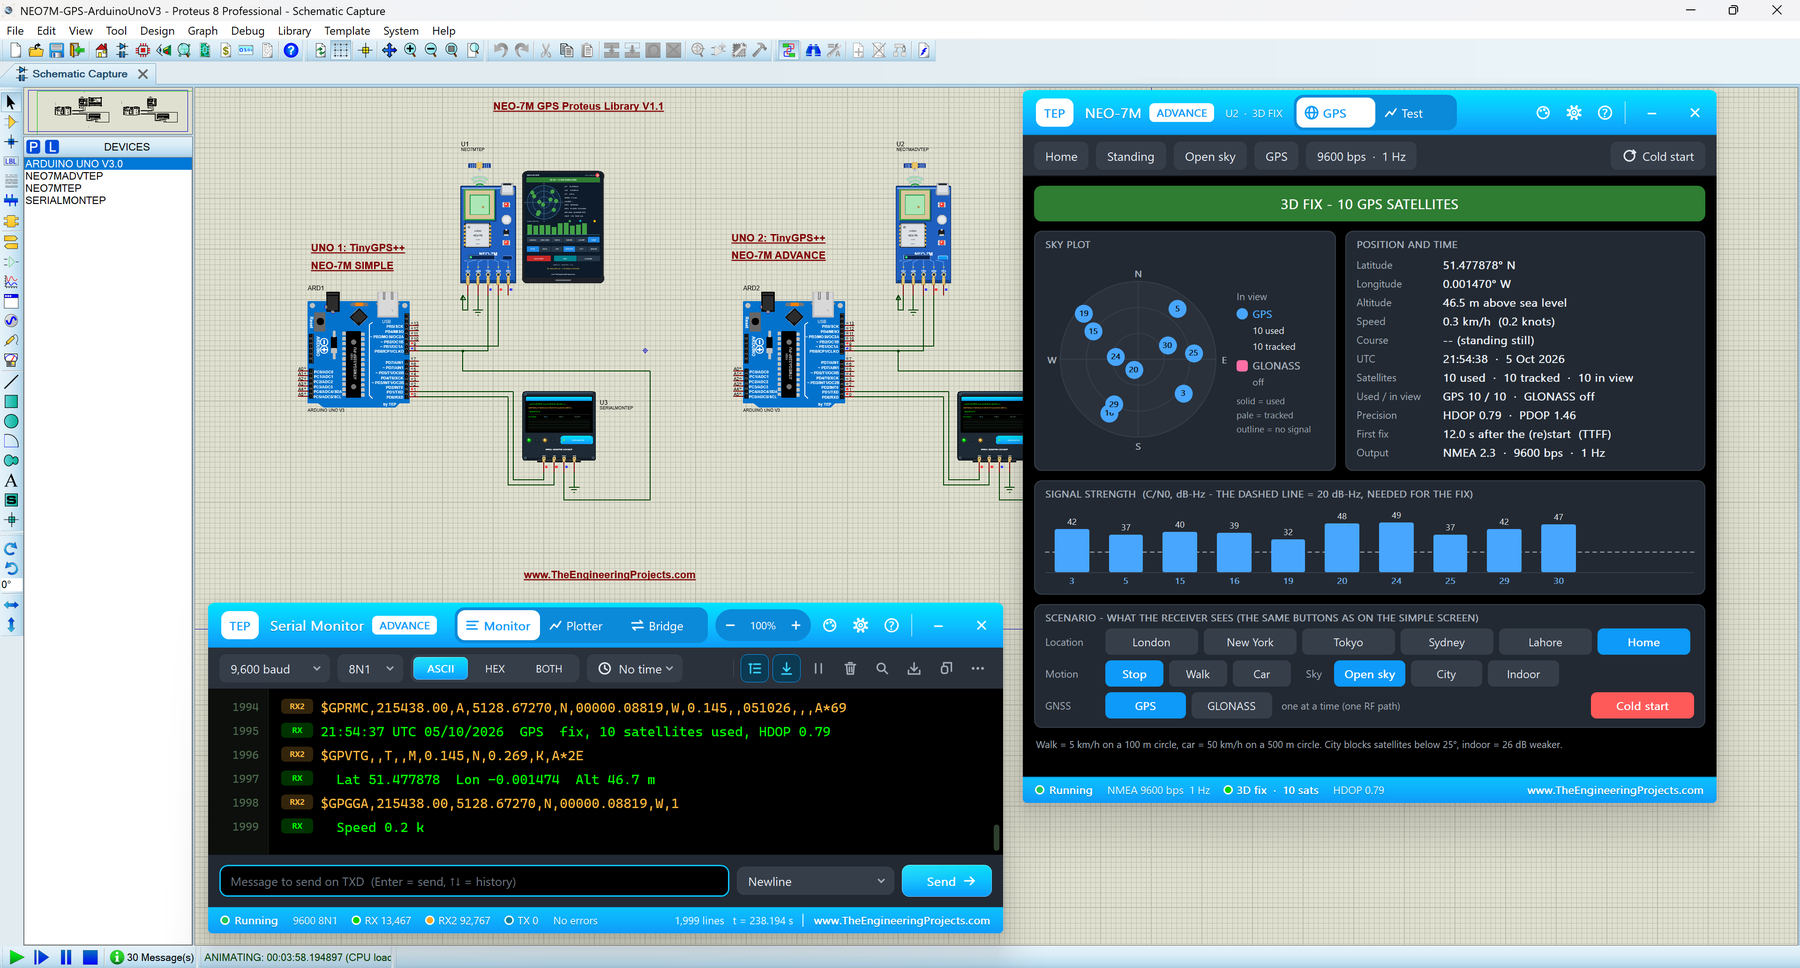
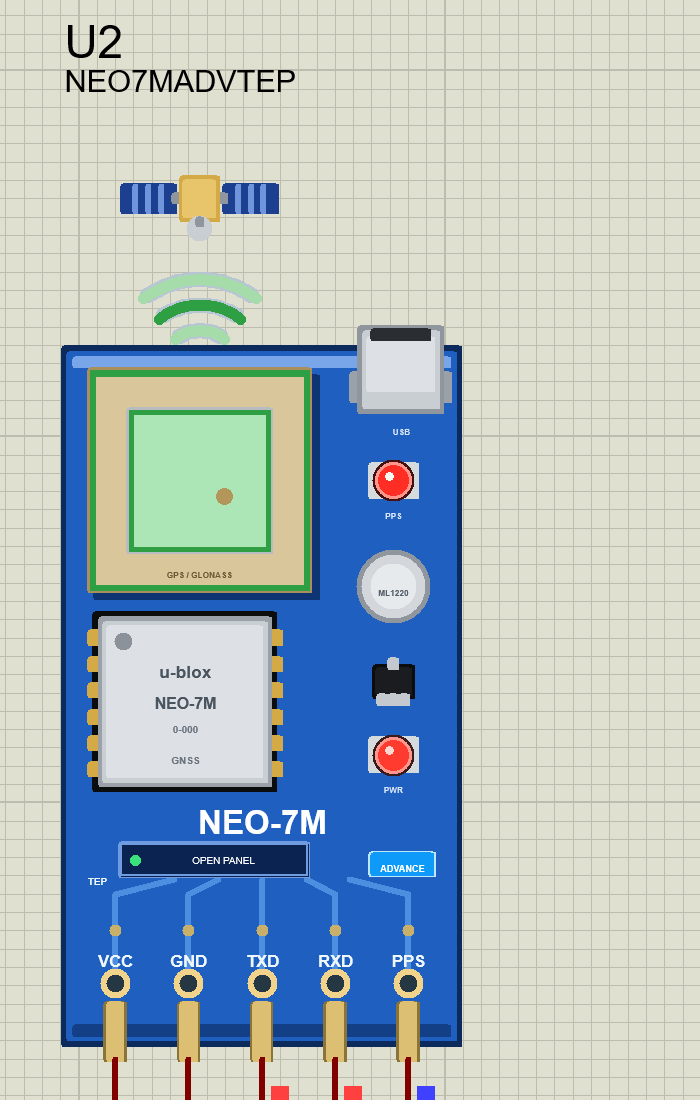
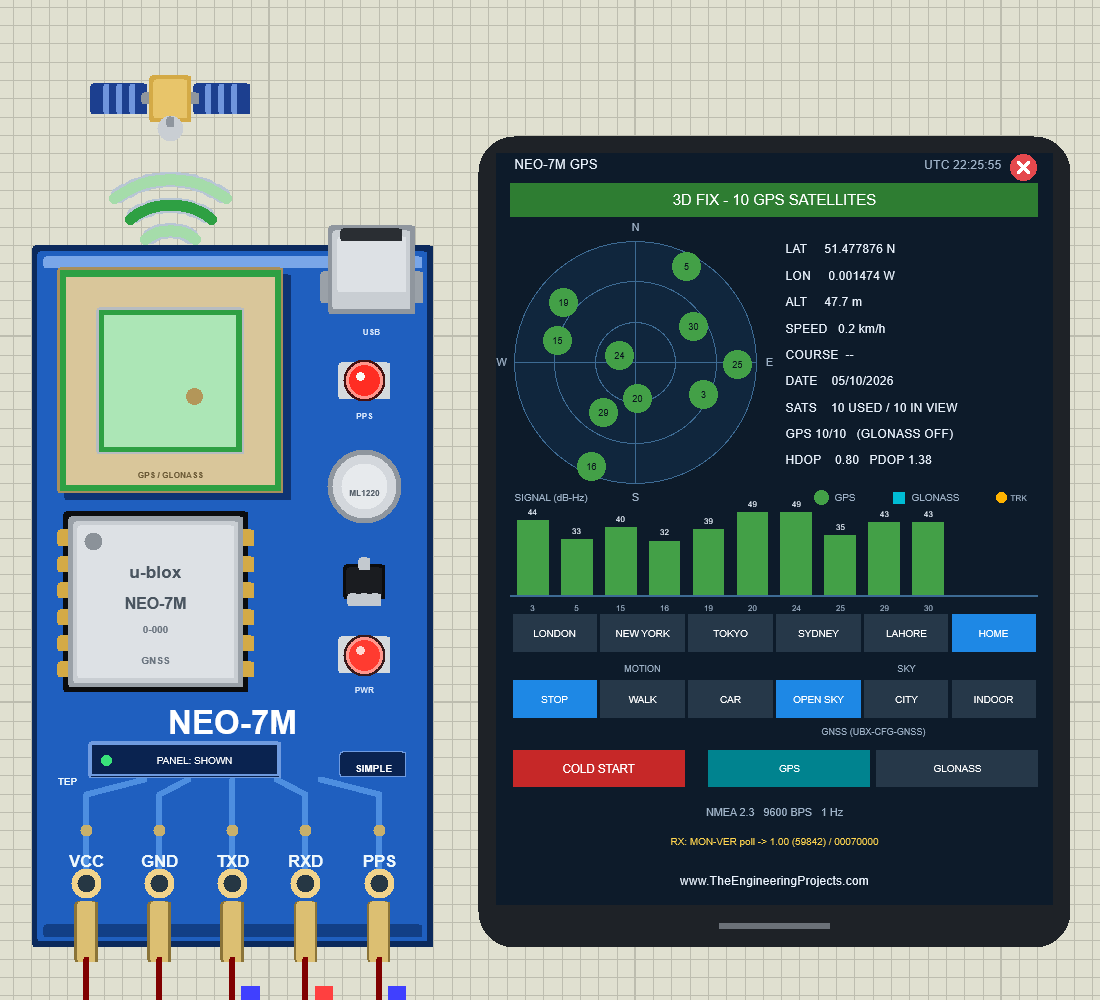
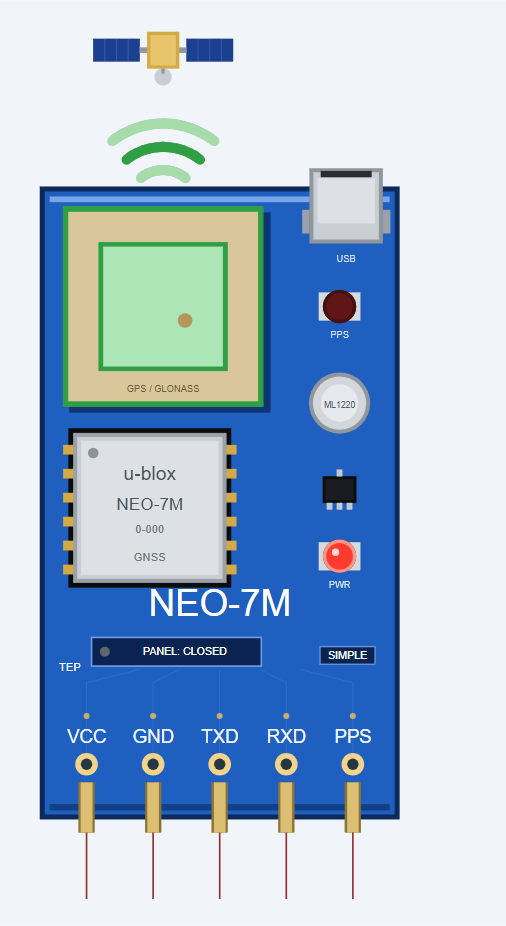
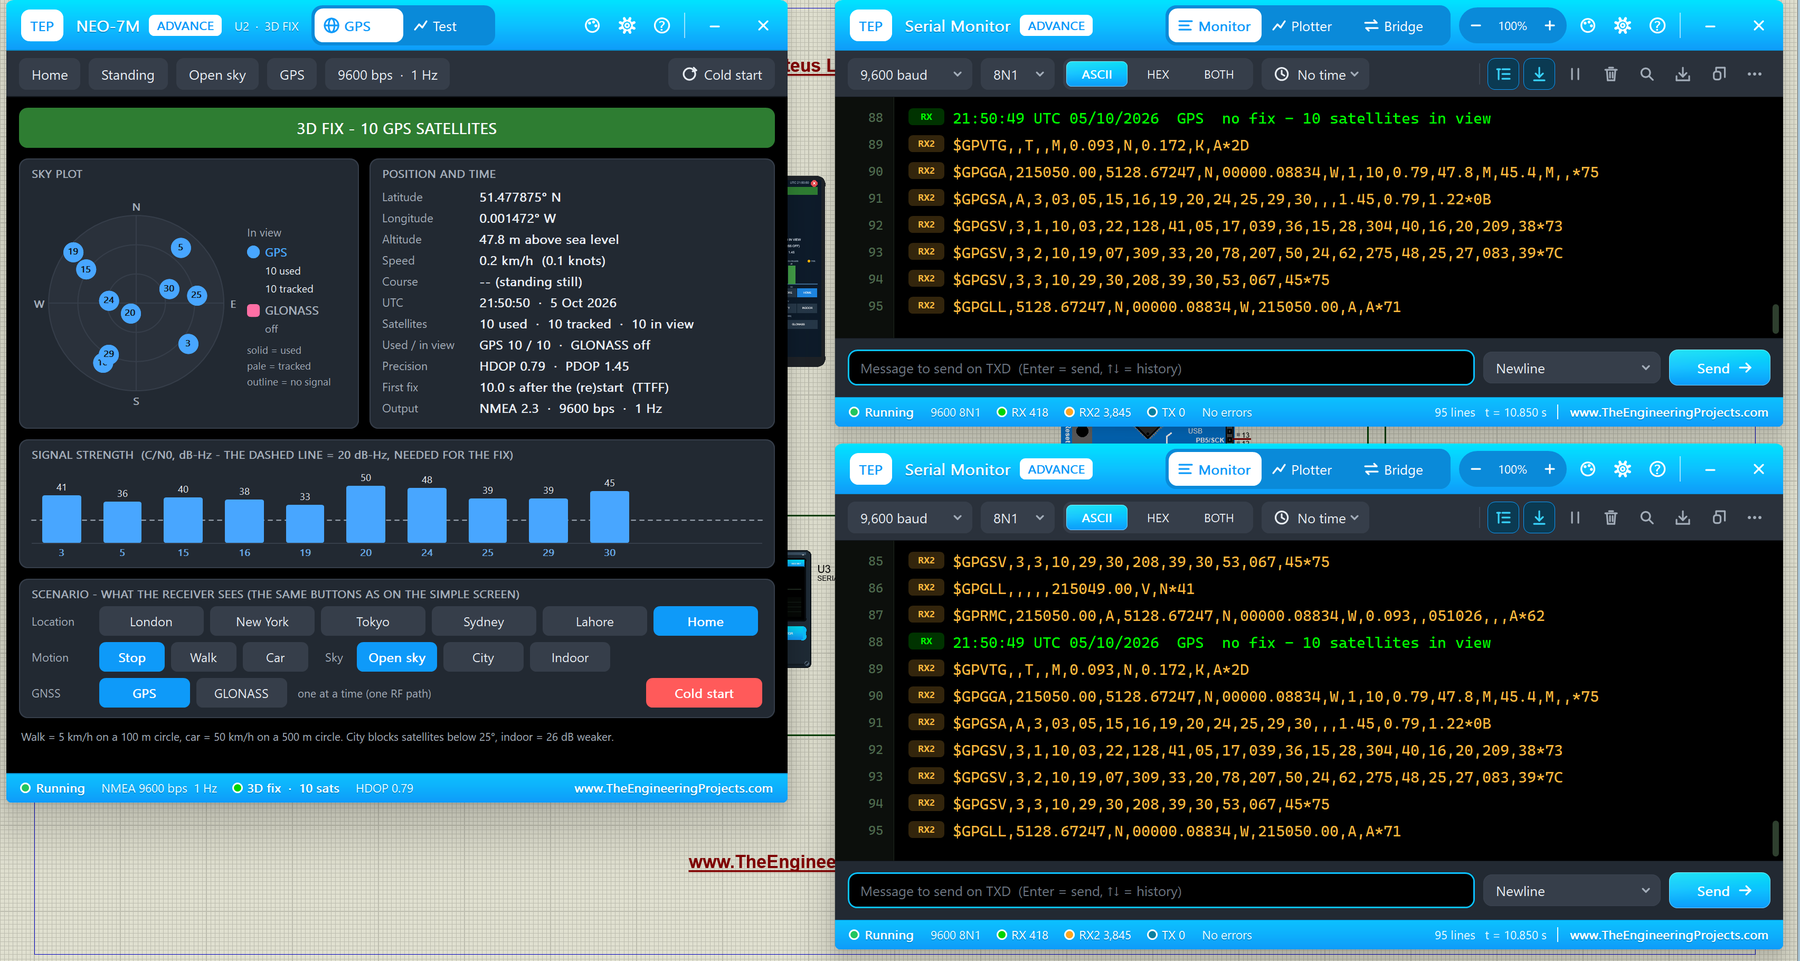
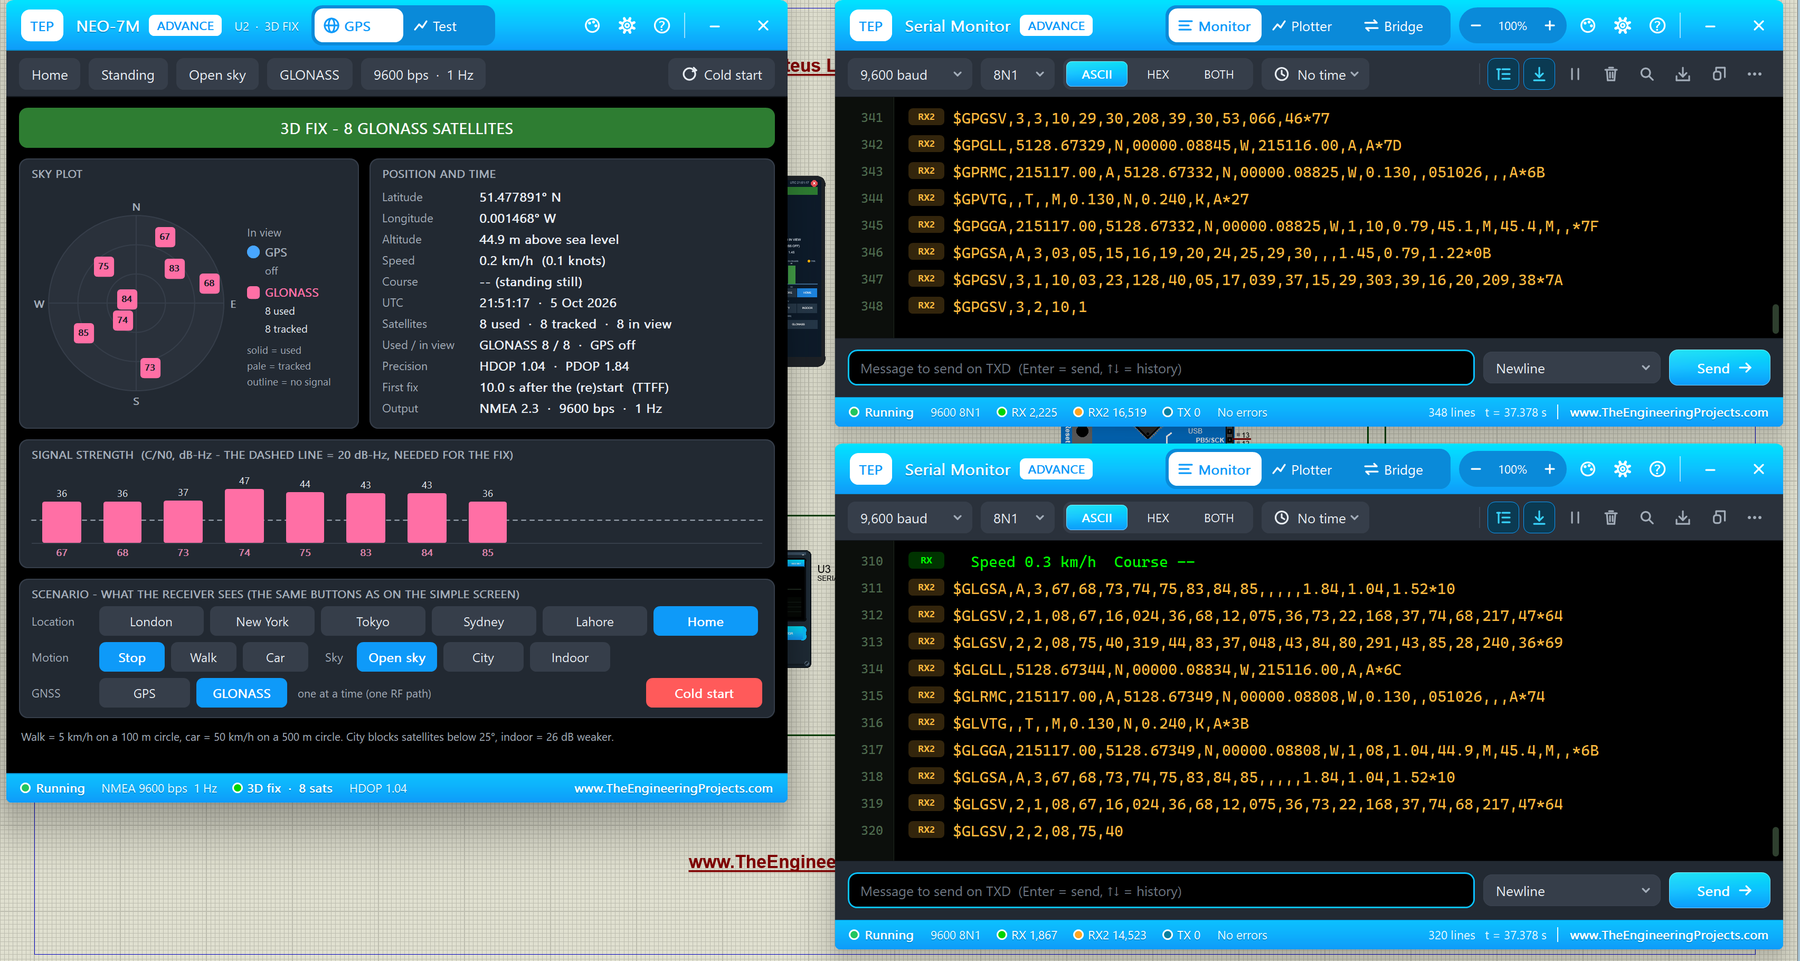
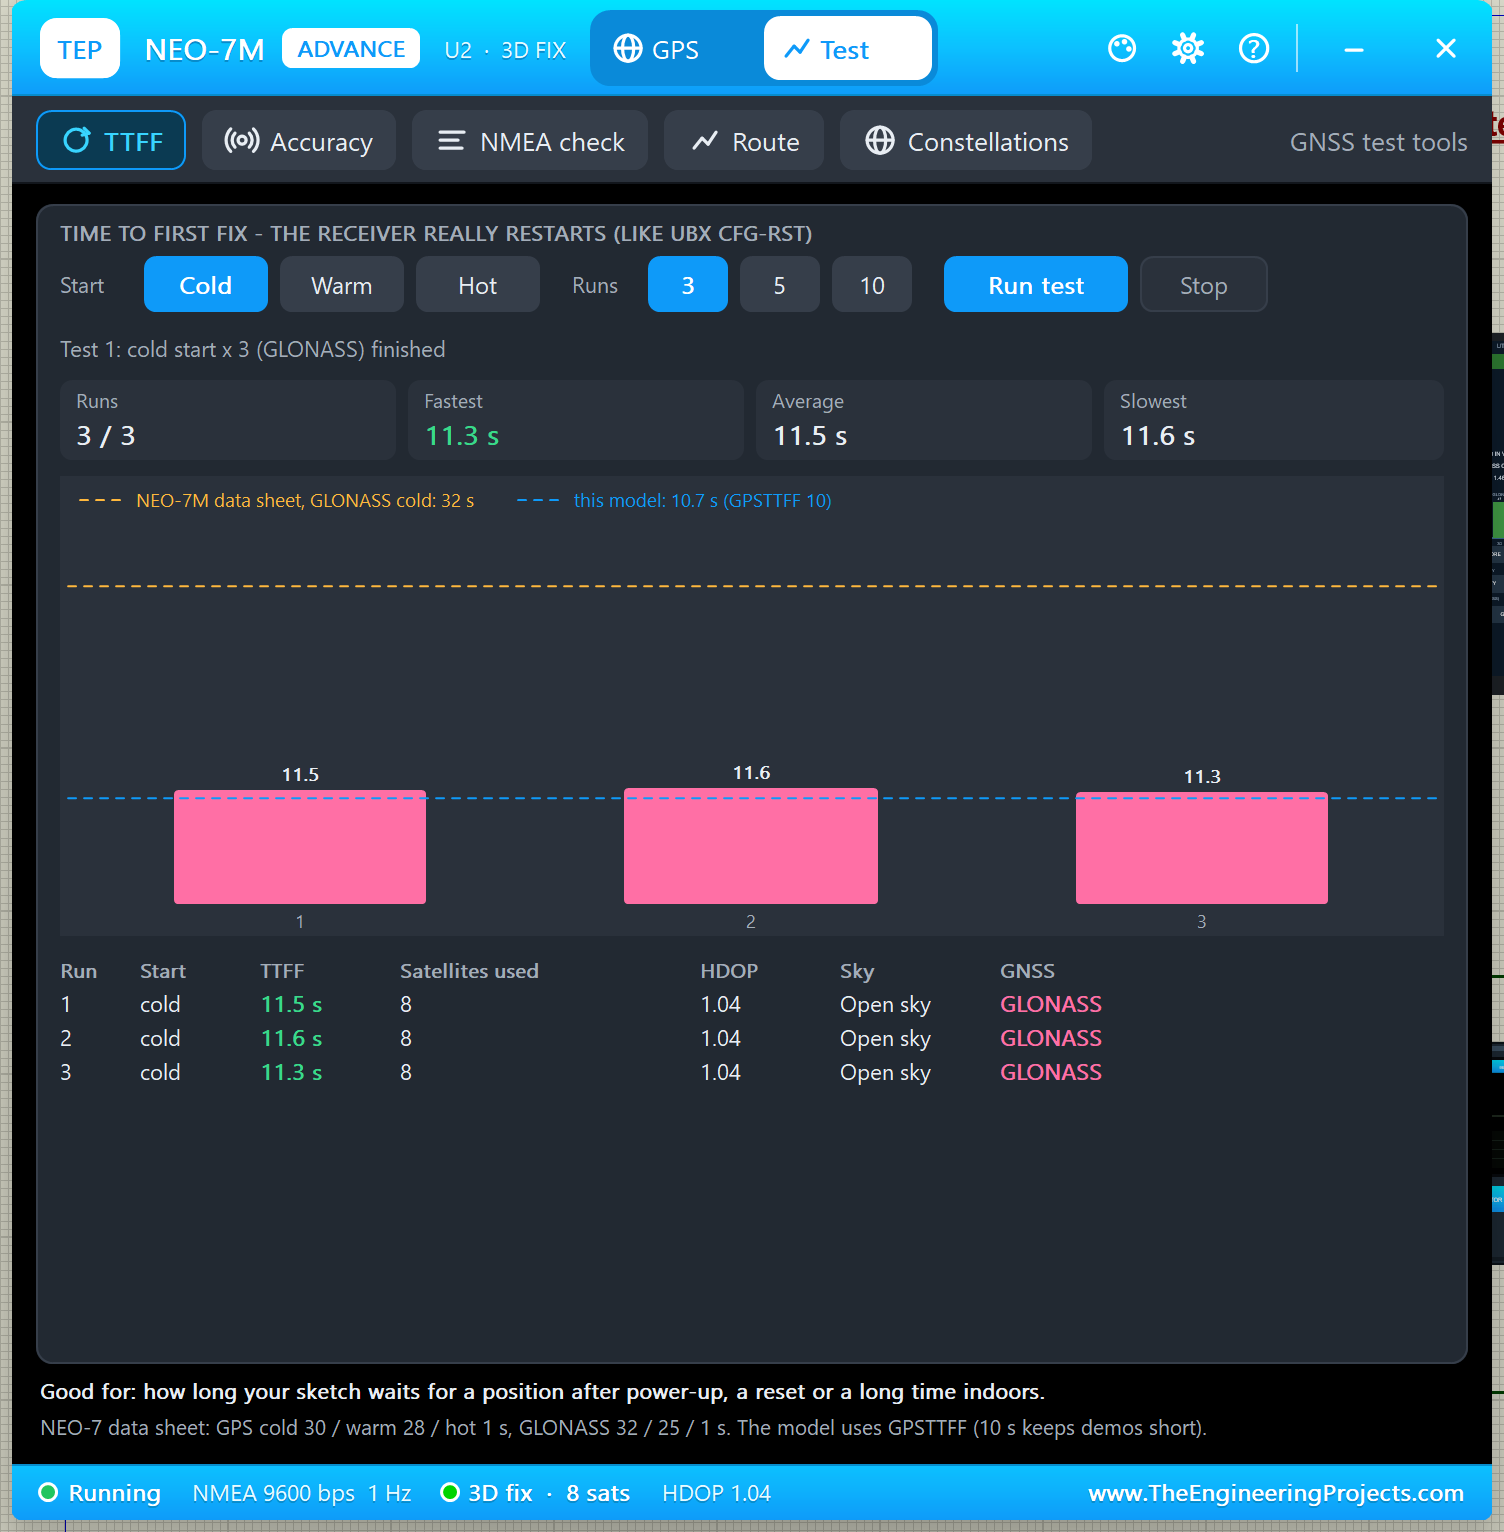
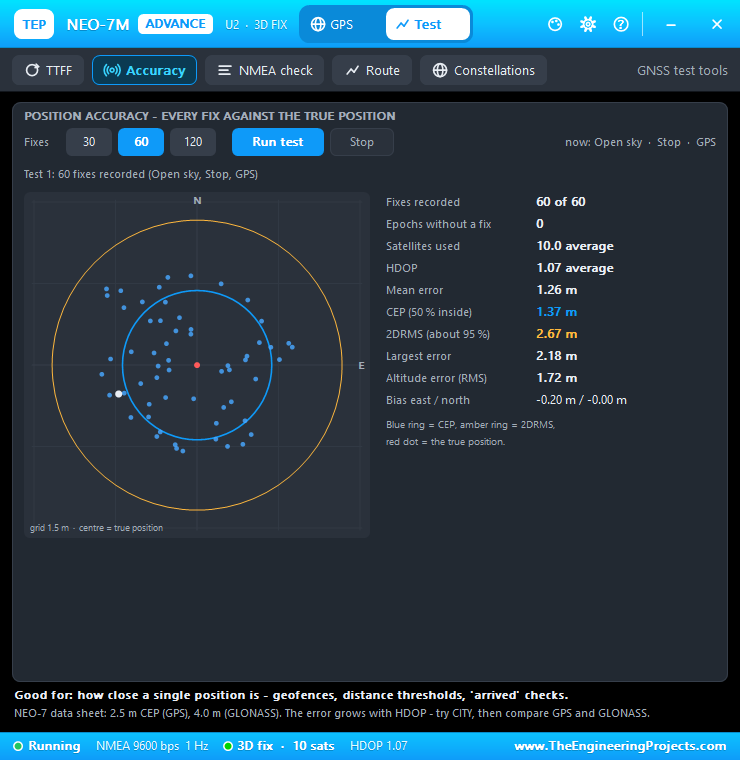
The circuit, the board and the results as they appear in NEO-7M Library for Proteus V1.1 (GPS + GLONASS, Arduino). Open an image for its full size.
README
 README
NEO-7M GPS MODULE (u-blox NEO-7M, micro-USB board) LIBRARY FOR PROTEUS - V1.1
Designed by The Engineering Projects
www.TheEngineeringProjects.com

IMPORTANT LINKS
Article (read it first - pictures, step by step, every feature explained):
  https://www.theengineeringprojects.com/2026/10/neo-7m-library-for-proteus.html
Report a bug or suggest a feature (our forum):
  https://www.theengineeringprojects.com/forum/category/neo-7m-proteus-library
The demo uses our TEP Serial Monitor Advance (included) instead of Proteus's
Virtual Terminal - its own article:
  https://www.theengineeringprojects.com/2026/10/serial-monitor-advance-proteus-library.html

FILE STRUCTURE
NEO7M-TEP-v1.1/
|-- Proteus Library Files/
|   |-- ArduinoV3TEP.IDX                        0.8 KB   its index -> LIBRARY folder
|   |-- ArduinoV3TEP.LIB                       95.6 KB   TEP Arduino UNO (demo) -> LIBRARY folder
|   |-- TEPNEO7M.LIB                           73.3 KB   NEO-7M Simple + Advance (2 devices) -> LIBRARY folder
|   |-- TEPSERIALMON.LIB                       11.1 KB   TEP Serial Monitor Advance -> LIBRARY folder
|-- Proteus Model Files/
|   |-- TEPSERIALMON.DLL                      978.0 KB   Serial Monitor model -> MODELS folder
|   |-- TEPUBLOX.DLL                          463.0 KB   NEO-7M model (shared with the NEO-M8N library) -> MODELS
|-- Proteus Simulation/
|   |-- NEO7M_TinyGPS.hex                      37.4 KB   both UNOs (TinyGPS++)
|   |-- NEO7M-GPS-ArduinoUnoV3.pdsprj          23.8 KB   demo: UNO 1 + NEO-7M Simple, UNO 2 + Advance
|   |-- TEPSERIALMON.DLL                      978.0 KB   copy of the monitor model
|   |-- TEPUBLOX.DLL                          463.0 KB   copy of the model so the demo runs as is
|-- Arduino Code/
|   |-- NEO7M_TinyGPS/NEO7M_TinyGPS.ino         8.0 KB   sketch (source of the .hex)
|   |-- libraries/AltSoftSerial/               30.1 KB   AltSoftSerial 1.4 (MIT, LICENSE.txt), 11 files
|   |-- libraries/TinyGPSPlus/                317.4 KB   TinyGPS++ 1.0.3a (LGPL-2.1, LICENSE.txt), 16 files
|-- README.txt                                ~32.0 KB   this file
Total: 3.43 MB (unzipped). The C++ source code of the model is not included.

WHAT IS IT?
A simulation model of the u-blox NEO-7M GPS receiver on the popular blue
"NEO-7M GPS module with micro USB" board for Proteus 8. It talks to your
Arduino like the real module: the seven u-blox start-up lines, then the NMEA
sentences RMC, VTG, GGA, GSA, GSV and GLL every second at 9600 baud, and it
answers the u-blox UBX commands (rate, baud rate, messages, GNSS, NMEA version,
reset, save, version). The NEO-7M receives GPS OR GLONASS - one system at a
time, like the real chip (one radio path): talker $GP or $GL. Satellites move
over simplified GPS and GLONASS skies; the module acquires them, gets a 2D / 3D
fix after the time to first fix, computes HDOP / PDOP from their geometry and
reports a position that wanders a little like a real receiver. You choose where
it is (5 cities or your own HOME), whether it stands, walks or drives, the sky
(open, city, indoor) and the system (GPS / GLONASS).
The part looks like the blue NEO-7M board with its ceramic patch antenna, the
micro-USB socket and a satellite above it. While the simulation runs the
status LED is lit while searching and blinks once a second with a fix (it hangs
on the TIMEPULSE / PPS output, like on the real board), the red PWR LED shows the
power, the patch antenna glows amber while acquiring and green with a fix, and
the signal waves between the satellite and the antenna follow the fix.

TWO DEVICES IN ONE LIBRARY (search "NEO-7M" or "GPS" in Pick Devices):
  NEO-7M Simple    device NEO7MTEP     "NEO-7M GPS Module (u-blox NEO-7M, micro-USB board) - Simple"
                   On-Sheet Panel: the GPS screen is drawn on the schematic
                   next to the module (the v1.0 screen) - click its LOCATION,
                   MOTION, SKY, COLD START and GNSS buttons. The red X in the
                   screen's header closes it, the PANEL button on the board
                   opens it again. Your v1.0 designs keep working with this
                   device.
  NEO-7M Advance   device NEO7MADVTEP  "NEO-7M GPS Module (u-blox NEO-7M, micro-USB board) - Advance"
                   Pop-Up Panel: only the module board on the schematic; at Run
                   a TEP pop-up window opens - the same look as the TEP Serial
                   Monitor (move it by its header, resize it, minimise it). The
                   tabs GPS and Test sit in the header; the gear and ? icons
                   open Settings and Help; the palette icon switches the theme:
                     GPS       the GPS screen redrawn for the window: fix banner,
                               sky plot coloured by system (GPS blue circles,
                               GLONASS pink squares; solid = used, pale =
                               tracked, outline = no signal), position,
                               altitude, speed, course, UTC date / time,
                               satellites used / tracked / in view per system,
                               HDOP / PDOP, the time to first fix, the output
                               (NMEA version, baud rate, rate), the signal bars
                               and the location / motion / sky / GNSS / cold
                               start buttons
                     Test      five test tools, all measured on the model:
                               TTFF - time to first fix: 3, 5 or 10 real cold,
                                 warm or hot restarts of the receiver, each
                                 timed to its first fix: fastest / average /
                                 slowest, a bar per run against the data sheet
                               Accuracy - 30, 60 or 120 fixes compared with the
                                 true position: a scatter plot, CEP (50 %),
                                 2DRMS (about 95 %), mean / largest error,
                                 altitude error, bias, HDOP and satellites
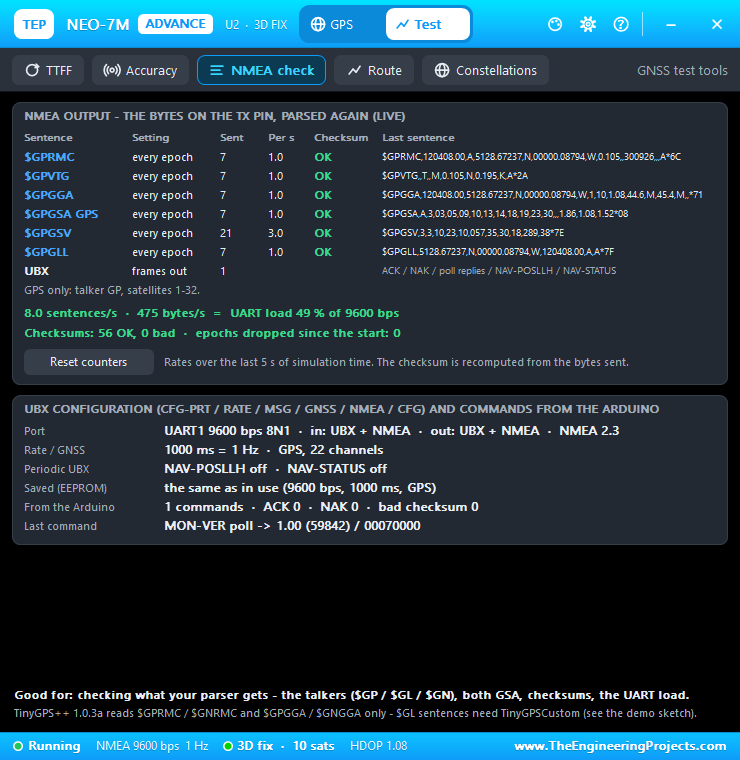
                               NMEA check - the bytes leaving the TX pin parsed
                                 again: every sentence type and talker ($GP /
                                 $GL) with its setting, count, rate per second,
                                 checksum check and the last sentence; UART
                                 load; epochs dropped; the UBX configuration
                                 (port, rate, GNSS, messages, what is saved) and
                                 the commands your Arduino sent
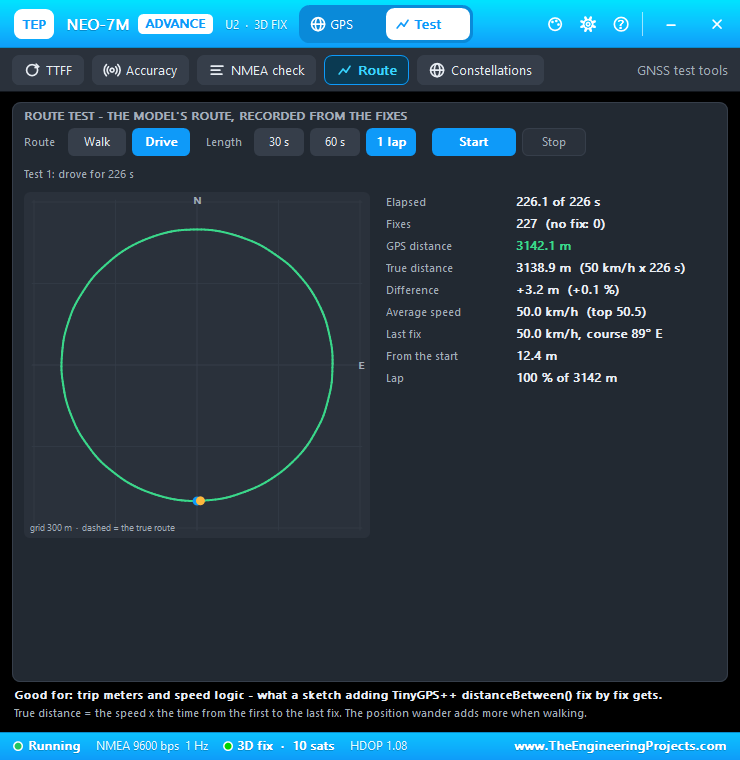
                               Route - walk (5 km/h) or drive (50 km/h) the
                                 model's circle for 30 s, 60 s or one lap: the
                                 track of the fixes on a map, GPS distance
                                 against the true distance, speeds, lap progress
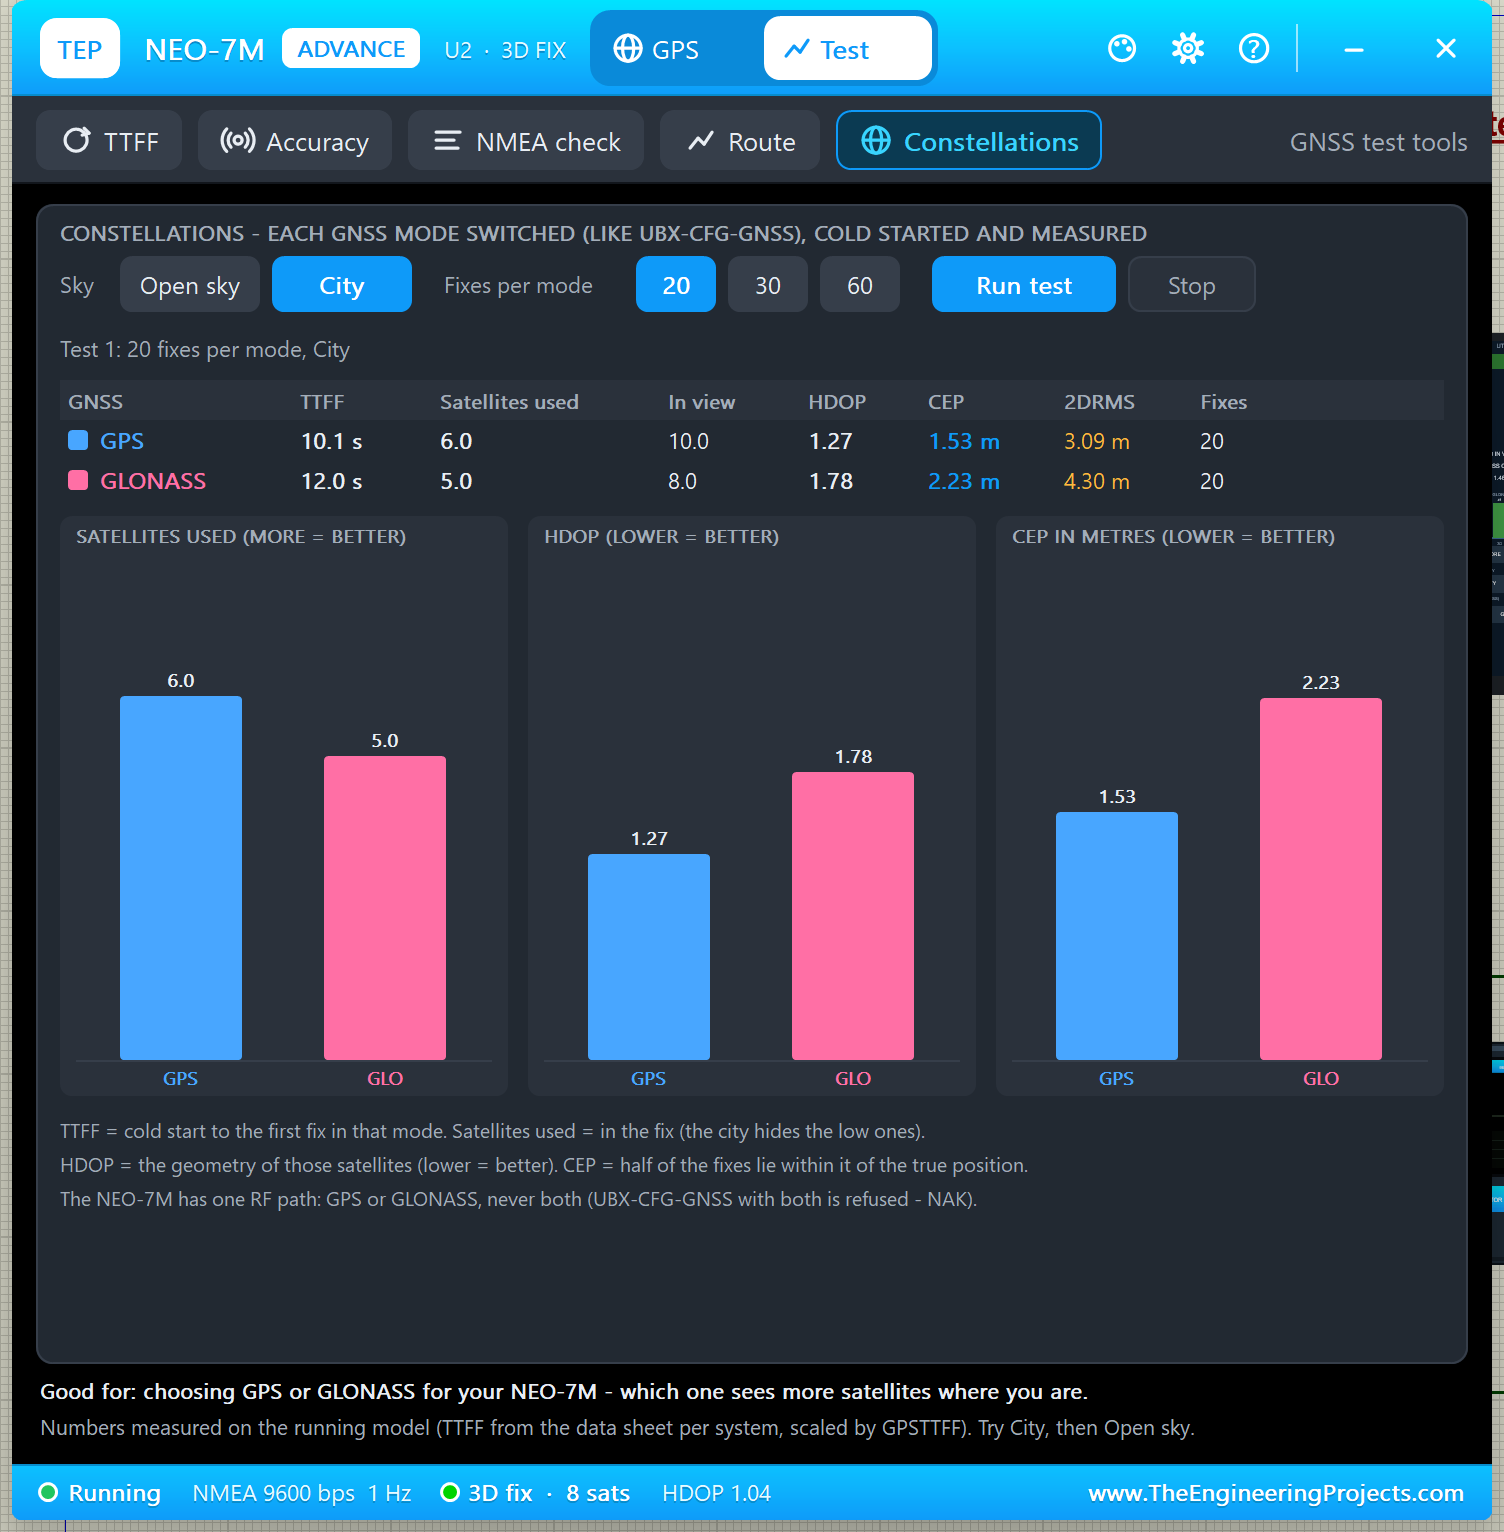
                               Constellations - GLONASS, then GPS, each
                                 switched like UBX-CFG-GNSS and cold started:
                                 its TTFF, then 20 / 30 / 60 fixes - satellites
                                 used, in view, HDOP, CEP, 2DRMS - side by side
                                 (open sky or city)
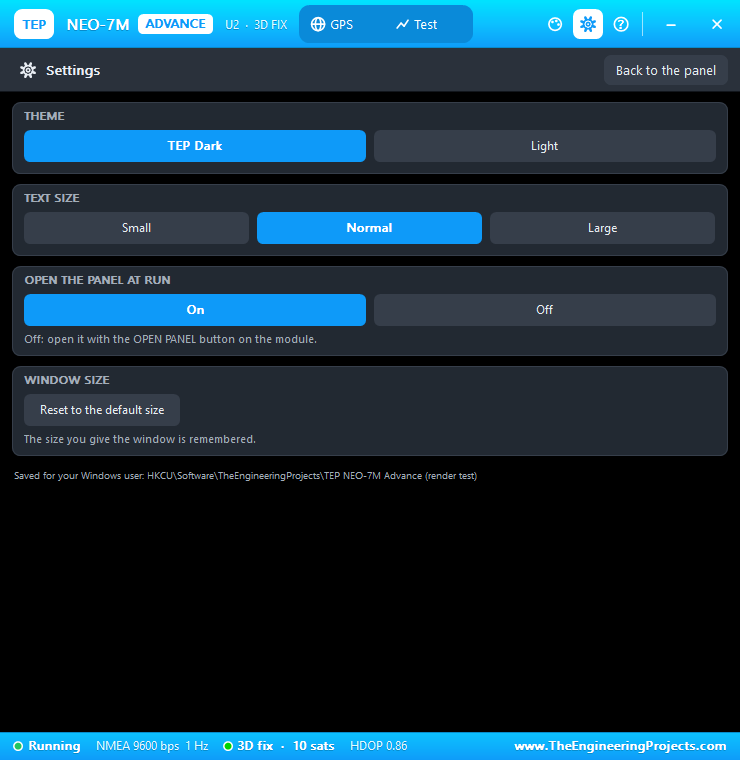
                     Settings  theme (TEP Dark / Light), text size, open at Run,
                               window size - remembered for your Windows user
                     Help      Help & Support like the TEP Serial Monitor: report
                               a bug, suggest a feature, article, user guide,
                               updates, donate, website, forum; Copy diagnostics
                               (state, position, configuration, test results)
                               for a bug report
                   The OPEN PANEL button on the board opens the window again
                   after you close it.
Both devices use the same model and the same properties.

ONE MODEL DLL FOR TWO LIBRARIES
The model is TEPUBLOX.DLL. The same DLL file also runs our NEO-M8N library
(TEPNEOM8N.LIB, a separate download): both packages ship identical TEPUBLOX.DLL
bytes, so installing both libraries is safe - the second copy simply replaces
the first. The DLL file name did not change from v1.0, so v1.0 designs keep
working.

NEW IN V1.1
* Two devices: NEO-7M Simple (GPS screen on the sheet, close / open) and NEO-7M
  Advance (pop-up window with the GPS screen, five test tools, settings and
  help) - see above.
* Board: a red PWR LED, the ceramic patch glows amber while acquiring and green
  with a fix, a PANEL / OPEN PANEL button and a SIMPLE / ADVANCE badge. The
  status LED keeps its real behaviour (lit while searching, dark 100 ms each
  second with a fix).
* The time to first fix follows the data sheet per system: GPSTTFF is the GPS
  cold start (data sheet 30 s); GLONASS takes 32 / 30 of it (data sheet 32 s).
* The demo uses the TEP Serial Monitor Advance instead of Virtual Terminals -
  one monitor per Arduino - and shows both styles: UNO 1 with NEO-7M Simple and
  monitor U3, UNO 2 with NEO-7M Advance and monitor U4. Each monitor also
  watches its GPS TX line on its second input (RXD2): the raw NMEA in amber
  beside the TinyGPS++ output (this replaces the v1.0 NMEA MONITOR terminal).
* One library per module: this package holds the NEO-7M only (v1.0 had both
  modules in one package; the NEO-M8N is now its own library).
* Version 1.1 everywhere; the C++ source code is no longer included.

TEST STATUS
v1.0 was tested in Proteus 8.5 SP0 (1 Oct 2026): 3D fix at HOME (Greenwich) 10 s
after the start, 10 GPS satellites, HDOP 0.85; the GLONASS button gave "3D FIX -
8 GLONASS SATELLITES", HDOP 1.06, with the $GL talker on the line monitor.
v1.1 was tested on a PC with 2,112 automatic checks (the receiver model at
the pin level with the unmodified TinyGPS++, the complete Proteus model with
both devices and its pop-up through a stand-in for the simulator, the demo
sketch running unmodified on a host UNO wired to the model, the rendered
pop-up window; see the article for details).
v1.1 was then tested in Proteus 8.5 SP0 (6 Oct 2026) with this package's demo:
both Serial Monitors and the Advance pop-up open at Run (no system caption
row); first fix 3D FIX - 10 GPS SATELLITES (HDOP 0.79); U4 shows TinyGPS++
and the raw $GP sentences on RX2. NEO-7M Advance: GLONASS -> 3D fix on 8
GLONASS satellites with $GL talkers; TTFF GLONASS cold x 3 = 11.5 / 11.6 /
11.3 s; Constellations (City, 20 fixes) GPS 6 used, HDOP 1.27, CEP 1.53 m -
GLONASS 5 used, HDOP 1.78, CEP 2.23 m; Settings, Help, close + OPEN PANEL.
NEO-7M Simple: the GPS screen, the red X closes it, PANEL reopens it.
Proteus 7 is not supported.

INSTALLATION (about 2 minutes)
1. Close Proteus. Extract the WHOLE ZIP to a normal folder (e.g. Desktop).
2. Copy everything in "Proteus Library Files" (TEPNEO7M.LIB with both devices,
   TEPSERIALMON.LIB and the TEP Arduino UNO V3 library ArduinoV3TEP.LIB / .IDX
   used by the demo) to the LIBRARY folder of Proteus, for example:
     C:\Program Files (x86)\Labcenter Electronics\Proteus 8 Professional\LIBRARY
   (on some PCs: C:\ProgramData\Labcenter Electronics\Proteus 8 Professional\
   LIBRARY - use the folder that already holds Proteus's own .LIB files).
3. Copy TEPUBLOX.DLL and TEPSERIALMON.DLL from "Proteus Model Files" to the
   MODELS folder (...\Proteus 8 Professional\MODELS).
4. Updating from v1.0: replace TEPNEO7M.LIB (delete any TEPNEO7M.IDX) and
   TEPUBLOX.DLL. Keep TEPNEOM8N.LIB if you use the NEO-M8N (or install the
   NEO-M8N v1.1 library).
5. Start Proteus. In Pick Devices (P) search "NEO-7M": you get the Simple and
   the Advance device (category Peripherals > Wireless).

RUN THE DEMO
"Proteus Simulation\NEO7M-GPS-ArduinoUnoV3.pdsprj" - keep NEO7M_TinyGPS.hex and
the two DLLs beside the project.
  UNO 1 (ARD1): NEO-7M Simple (U1, GPS screen on the sheet) and Serial Monitor
  U3. UNO 2 (ARD2): NEO-7M Advance (U2, GPS screen in its pop-up window) and
  Serial Monitor U4. Both UNOs run the same sketch NEO7M_TinyGPS.
  1. Press Run. Both monitor windows open (9600 baud) and so does U2's pop-up.
     Each monitor shows "NEO-7M + TinyGPS++", the firmware ("u-blox firmware:
     1.00 (59842), hardware: 00070000", asked with UBX MON-VER), then a status
     block every 2 s - and in amber (RX2) the raw NMEA of its GPS module that
     TinyGPS++ parses.
  2. After the time to first fix (GPSTTFF = 10 s of simulation time) both GPS
     screens say "3D FIX", the status LEDs blink, the patches turn green, the
     monitors print the position.
  3. U1: click TOKYO and CAR on its screen - U3 shows the new position and
     50 km/h. Click GLONASS: the $GL talker in amber, then "GLONASS  fix" from
     the sketch. Try INDOOR (the fix is lost) and OPEN SKY again. Close the
     screen with its red X and open it with PANEL.
  4. U2 (Advance): the same buttons are on its GPS page. Open the Test tab:
     TTFF: choose Cold and 5 runs, click Run test - the receiver restarts five
     times (watch U4: the fix drops and comes back). Accuracy: 60 fixes - the
     scatter plot and CEP / 2DRMS; again with CITY. NMEA check: the sentences
     per second and their checksums. Route: Drive, 1 lap - the track of a 3.1 km
     lap. Constellations: City, Run test - GLONASS and GPS side by side.
  5. Close U2's window and open it again with OPEN PANEL on the board.
Closed a monitor window? Click OPEN MONITOR on the monitor part.

WIRING (AltSoftSerial, the same on both UNOs)
  NEO-7M VCC -> +5 V (POWER terminal), GND -> GND, TXD -> D8, RXD <- D9
  (AltSoftSerial's fixed UNO pins), PPS open (the sketch does not need it).
  Serial Monitor RXD <- Arduino D1 (TX), Serial Monitor TXD -> Arduino D0 (RX),
  Serial Monitor GND -> ground, Serial Monitor RXD2 <- the NEO-7M TXD line (the
  D8 net, a junction), BAUD 9600, BAUD2 9600. Serial.begin(9600) in the sketch.
  (The D9 -> RXD wire crosses the TXD -> D8 wire without a junction dot: they are
  not connected.)
In the sketch: AltSoftSerial gpsSerial;   gpsSerial.begin(9600);
REAL HARDWARE:
 * Supply: the board takes 3.3-5 V on VCC and has a 3.3 V regulator (the
   NEO-7M module itself runs at 1.65-3.6 V).
 * Logic levels: the UART is 3.3 V logic. Sellers call the board's RXD 5 V
   tolerant; a divider between the UNO's D9 and RXD is the safe choice: D9 ->
   1 k -> RXD, RXD -> 2 k -> GND. TXD can go straight to D8.
 * Pin order in Proteus: VCC GND TXD RXD PPS (the Keyestudio / Microscale
   boards); some NEO-7M boards print GND VCC TX RX PPS - check your board.
 * The antenna needs a view of the sky: a real module usually gets no fix
   indoors.
Proteus needs no divider.

WHY AltSoftSerial AND NOT SoftwareSerial
SoftwareSerial can send but cannot RECEIVE in Proteus 8.5: it needs pin-change
interrupts, which the Proteus 8.5 ATmega328P model never runs. AltSoftSerial
(Paul Stoffregen, MIT licence) uses Timer1 and works in Proteus and on real
boards. Don't use D10 while it runs (digitalRead / digitalWrite on D10 disturbs
its Timer1 output). Your own SoftwareSerial GPS sketches will show the module
working on its screen but the Arduino receiving nothing - use AltSoftSerial,
the hardware Serial port or an Arduino Mega (Serial1-3).
Keep feeding the parser: AltSoftSerial buffers only 80 bytes, so avoid delay()
and long print blocks without reading the GPS in between (the demo sketch reads
it between lines).

WHAT THE MODULE DOES
Start-up (0.4 s after power-up), 9600 8N1: 7 $GPTXT lines (u-blox ag, HW
UBX-G70xx 00070000, ROM CORE 1.00 (59842) Jun 27 2012 17:43:52, PROTVER 14.00,
ANTSUPERV, ANTSTATUS=DONTKNOW, LLC), as captured from a real NEO-7M board.
Then every second (default) RMC, VTG, GGA, GSA, GSV and GLL, NMEA 2.3, ONE
system at a time: GPS (talker $GP, the default) or GLONASS (talker $GL,
satellites 65-88). Without a fix the fields are empty exactly like a real
module ($GPGGA,,,,,,0,00,99.99,,,,,,*48); time and date appear once satellites
are tracked; the fix follows after the time to first fix.
Satellites: simplified constellations seen from the module's position at the
simulated UTC time - GPS 30 satellites (6 planes at 55 degrees, 12 h orbits),
GLONASS 24 satellites (numbers 65-88, 3 planes at 64.8 degrees, 11 h 15 min 44 s
orbits). Elevation, azimuth and signal strength (C/N0, dB-Hz) come from the
geometry, so the sky plot, $GxGSV and the DOP values change slowly like on a
real receiver (not the exact real satellites of that day).
Acquisition needs 26 dB-Hz, tracking continues down to 14 dB-Hz, a satellite is
used in the fix from 20 dB-Hz; 3 satellites give a 2D fix, 4 or more a 3D fix.
HDOP / PDOP / VDOP are computed from the satellites used; the position wanders
by about a metre per unit of HDOP like a real receiver.
Time to first fix: GPSTTFF (default 10 s; the NEO-7 data sheet: GPS cold 30 s,
warm 28 s, hot 1 s; GLONASS cold 32 s, warm 25 s, hot 1 s). The model scales
GPSTTFF by the data sheet for GLONASS (x 32 / 30); warm starts take as long as
cold ones; hot starts take about 1 s. A system switched on later (GNSS button
or CFG-GNSS) needs the TTFF again before its satellites join the fix.
Board LEDs and PPS: the status LED is lit while searching and goes dark for
100 ms each second after the fix; the PPS pin gives a 100 ms high pulse each
second after the fix (low before), at the top of the UTC second; the red PWR
LED is on while VCC / GND are powered; the patch antenna's rim and radiator glow
amber (pulsing) while satellites are tracked without a fix and green with a fix;
the waves above it are green with a fix, amber while acquiring, grey without
signal.
UTC: the PC clock when the simulation starts (GPSUTC = PC) or a fixed date and
time (GPSUTC = 2026-09-30 12:00:00), plus the simulated time.

THE GPS SCREEN (NEO-7M Simple on the sheet; NEO-7M Advance: its GPS page)
Banner: NO POWER - CHECK VCC / GND / STARTING... / SEARCHING FOR SATELLITES /
ACQUIRING - FIX IN ABOUT n s / NO FIX - n OF m SATELLITES USABLE / NO SIGNAL -
INDOOR / 2D or 3D FIX - n GPS (or GLONASS) SATELLITES. Sky plot (N up; GPS
circles, GLONASS squares), position, altitude, speed, course, UTC date,
satellites used / in view per system, HDOP / PDOP, signal bars (dB-Hz).
Buttons:
  LOCATION  LONDON, NEW YORK, TOKYO, SYDNEY, LAHORE, HOME (the properties
            GPSLAT / GPSLON / GPSALT / GPSGEOID; default Greenwich observatory)
  MOTION    STOP, WALK (5 km/h on a 100 m circle), CAR (50 km/h on a 500 m circle)
  SKY       OPEN SKY; CITY (buildings block satellites below 25 degrees, 6 dB
            weaker); INDOOR (26 dB weaker - usually no fix, like a real module)
  COLD START  clears everything, the next fix takes GPSTTFF
  GNSS (UBX-CFG-GNSS)  GPS / GLONASS - does what the UBX command CFG-GNSS does
The last command the module received is shown at the bottom (Simple screen).

THE TEST TOOLS (NEO-7M Advance, Test tab) - what they really do
  TTFF       Each run restarts the receiver like the UBX command CFG-RST mode 2
             (cold FFFF / warm 0001 / hot 0000) - your sketch sees the fix drop -
             and times the first epoch with a fix. The next run starts 2-3 s
             after a fix. A hot start needs a fix first; a run without a fix
             ends after a time-out (60 s or 3 x the cold TTFF). Example
             (GPSTTFF 10, open sky, GPS): cold 10.3 / 10.7 / 11.0 s (fastest /
             average / slowest); hot 1-2 s.
  Accuracy   Records the next 30 / 60 / 120 fixes; error = reported position
             minus the true position (the same values TinyGPS++ reads from the
             pin). Example (GPS): open sky CEP 1.4 m, 2DRMS 2.7 m (HDOP 1.1,
             10 satellites); city CEP 2.1 m, 2DRMS 4.7 m (HDOP 2.0, 6
             satellites). The data sheet: 2.5 m CEP (GPS), 4.0 m (GLONASS).
  NMEA check Live: the sentences of each type and talker per second (the last
             5 s), the checksum of every sentence recomputed, bytes per second
             and the UART load (at 5 Hz with all six sentences 9600 baud is full
             and whole epochs are dropped), UBX frames sent, the configuration
             and what CFG-CFG saved. "Reset counters" starts again.
  Route      Sets MOTION to WALK or CAR and records every fix: the track on the
             model's circle, GPS distance (the sum of the steps between the
             fixes, what a sketch adding TinyGPS++ distanceBetween() gets)
             against the true distance (the speed x the time from the first
             to the last fix). Example: one car lap 3142 m against 3139 m;
             walking 60 s 85 m against 83 m. Afterwards MOTION goes back to STOP.
  Constellations  Runs GLONASS, then GPS (the system in use last, so the receiver
             ends where it started): each switched like UBX-CFG-GNSS and cold
             started, its TTFF timed, then 20 / 30 / 60 fixes recorded -
             satellites used and in view, HDOP, CEP, 2DRMS - in the open sky or
             the city (the sky goes back afterwards). Example (city, 30 fixes):
             GPS 6 used, HDOP 1.97, CEP 2.6 m, TTFF 10 s; GLONASS 5 used, HDOP
             1.72, CEP 1.9 m, TTFF 11 s. Your sketch sees the $GL talker during
             the GLONASS part.

UBX COMMANDS (on the module's RXD pin, sync B5 62, checksum checked)
  CFG-PRT (06 00)   poll, or set UART1 baud 4800-115200 8N1 and the in/out
                    protocols; ACK at the old speed, then switch
  CFG-RATE (06 08)  poll, or set the measurement rate: 100 ms (10 Hz) with GPS,
                    1 s with GLONASS; faster -> NAK; navRate must be 1
  CFG-MSG (06 01)   poll, or set the rate of GGA GLL GSA GSV RMC VTG (F0 00-05),
                    NAV-POSLLH (01 02), NAV-STATUS (01 03); other messages are
                    acknowledged but not generated
  CFG-GNSS (06 3E)  poll, or choose GPS or GLONASS (both together -> NAK, one RF
                    path); SBAS / QZSS are accepted but not simulated
  CFG-NMEA (06 17)  poll, or set NMEA 2.1 / 2.3 and the talker IDs (4.x -> NAK)
  CFG-RST (06 04)   hot (0000) / warm (0001) / cold (FFFF) start; reset mode 0 /
                    1 / 4 restarts the module (the saved configuration is
                    reloaded, the start-up lines appear again); 2 = GNSS
                    restart; 8 / 9 = GNSS stop / start. No acknowledge
  CFG-CFG (06 09)   clear / save / load the configuration (kept for the run)
  MON-VER (0A 04)   poll -> "1.00 (59842)", "00070000", "PROTVER 14.00",
                    "GPS;SBAS;GLO;QZSS"
  NAV-POSLLH (01 02), NAV-STATUS (01 03)   poll or periodic
  other CFG commands -> NAK; other classes are ignored (logged)
NMEA input: $PUBX,40 sets a sentence rate, $xxGPQ,<sentence> polls one
sentence; anything else valid gets "$GPTXT,01,01,01,NMEA unknown msg*58".
If the UART cannot send everything before the next epoch (e.g. 5 Hz with all
sentences at 9600 bps) a whole epoch's output is dropped - raise the baud rate
or turn sentences off with CFG-MSG (the Simulation Log explains it).

EXPECTED MONITOR OUTPUT (U3 and U4 alike; the raw NMEA (RX2, amber) between)
  NEO-7M + TinyGPS++
  u-blox firmware: 1.00 (59842), hardware: 00070000
    PROTVER 14.00
    GPS;SBAS;GLO;QZSS
  --:--:-- UTC             GPS  no fix - 0 satellites in view
  ...
  21:43:15 UTC 30/09/2026  GPS  fix, 10 satellites used, HDOP 0.85
    Lat 51.477874  Lon -0.001474  Alt 48.0 m
    Speed 0.2 km/h  Course --
  RX2: $GPRMC,214346.00,A,5128.67303,N,00000.08855,W,0.087,,300926,,,A*6A
       $GPGGA,214346.00,5128.67303,N,00000.08855,W,1,10,0.85,44.3,M,45.4,M,,*7D
       ...
  After GLONASS: "GLONASS  no fix - n satellites in view", then about GPSTTFF
  later "GLONASS  fix, 8 satellites used, HDOP 1.06" ($GLRMC, $GLGGA, $GLGSA,
  $GLGSV on RX2).
Your times, date and satellites will differ: UTC comes from the PC clock.

THE DEMO SKETCH (Arduino Code\NEO7M_TinyGPS, TinyGPS++ + AltSoftSerial)
At start-up it asks the module for its firmware with the UBX command MON-VER,
then prints a status block every 2 s: UTC time and date, the system, fix,
satellites used, HDOP, latitude, longitude, altitude, speed, course. Worth
knowing for your own sketches:
…Development1 release
 Development1 release
-
V1.1NEO-7M GPS Library for Proteus V1.1this page
V1.1 is the only release in the Download Center so far. When a newer version is published, it appears above with its own download page.
Installation10 steps
 Installation10 steps
From the download to a working project, in order. The steps follow what the package contains.
You will need
- Proteus Design SuiteProteus 7 or newer (Labcenter), on Windows
- Arduino IDE1.8 or 2.x, with the board of the tutorial chosen under Tools → Board
- Any archive toolWindows, macOS and Linux extract ZIP files on their own
Steps
- 1
Extract the archive
Right-click neo7m-tep-v1-1-0ea8e8dbf46c4120ab242dbe7951eff1.zip and choose Extract All (or open it with 7-Zip or WinRAR) into a folder you can find again. Keep its folder structure (NEO7M-TEP-v1.1) as it is.
- 2
Copy the library files into Proteus
Move ArduinoV3TEP.LIB, TEPNEO7M.LIB and TEPSERIALMON.LIB and ArduinoV3TEP.IDX into the LIBRARY folder of your Proteus installation: C:\Program Files (x86)\Labcenter Electronics\Proteus 8 Professional\LIBRARY for Proteus 8, or the matching Proteus 7 folder. Older versions keep it under ProgramData\Labcenter Electronics. If Proteus is open, close it first.
- 3
Add the simulation model
Copy TEPSERIALMON.DLL and TEPUBLOX.DLL into the MODELS folder next to LIBRARY, so the component can run, not only be drawn.
- 4
Restart Proteus and place the component
Start Proteus, open a schematic, press P (Pick Devices) and search for the component by the name used in the tutorial. It appears with its pins ready to wire.
- 5
Install the Arduino library
In the Arduino IDE choose Sketch → Include Library → Add .ZIP Library and pick the library, or copy its folder into Documents\Arduino\libraries. Restart the IDE to see its examples.
- 6
Open the sketch in the Arduino IDE
Open NEO7M_TinyGPS.ino, Echo.ino and ReceiveTest.ino and 7 more, select your board and port under Tools, then Verify. Sketch → Export Compiled Binary writes the HEX file a simulation needs.
- 7
Load the HEX file
In Proteus double-click the microcontroller, set Program File to NEO7M_TinyGPS.hex and run the simulation. For real hardware, flash the same file with your programmer.
- 8
Open the example simulation
Open NEO7M-GPS-ArduinoUnoV3.pdsprj in Proteus to see the wiring exactly as in the tutorial. Check the controller's Program File path, then press Play.
- 9
Use the data files
library.json hold the readings or settings the project uses; open them with Excel, a text editor or the script of the tutorial.
- 10
Follow the tutorial
NEO-7M Library for Proteus V1.1 (GPS + GLONASS, Arduino) explains every connection and setting in order; keep it open beside the files while you build.
FAQs9 questionsContact TEP
 FAQs9 questions
How do I download NEO-7M GPS Library for Proteus V1.1?
Wait for the 30-second guest countdown on this page, then press the download button; the file comes straight from our storage. Members who are logged in skip the wait. If the browser opens the file instead of saving it, use its Save as option. The download link is made for you when the countdown ends and works for 15 minutes; a saved or shared link stops working, so share this page instead.
What is inside the archive?
NEO-7M GPS Library for Proteus V1.1 comes as a ZIP archive of 39 files (1.5 MB, 3.4 MB unpacked) holding Proteus library files, simulation model DLLs, a Proteus simulation, an Arduino sketch, an Arduino library, compiled HEX firmware and data files. Open the File Structure tab for the full list of 39 files.
What should I do if the download does not start?
Check the browser's download list first; an ad blocker or a company firewall can also hold it back, so try another browser or network. If the file arrives incomplete, download it again. For an installation problem, read the Install tab or tell us in the comments with your software version and the exact error message.
Is this file free?
Yes. Every file in the TEP Download Center is free for learning, personal and student projects. If you share it, link back to this page or the tutorial so others find the latest version.
How do I check that the file arrived complete?
Compare its SHA-256 with the one on this page, b30b6a11f2cf3f04d2865b8bb5aa8d6bc333670b2df56450ab3e51859d255129. In PowerShell run Get-FileHash "neo7m-tep-v1-1-0ea8e8dbf46c4120ab242dbe7951eff1.zip"; on macOS or Linux run shasum -a 256 "neo7m-tep-v1-1-0ea8e8dbf46c4120ab242dbe7951eff1.zip". The same value means the file is exactly the one in our storage; a different one means the download broke off, so download it again.
Do I need WinRAR to open the ZIP file?
No. Windows, macOS and Linux open ZIP archives on their own (Extract All, or double-click). WinRAR and 7-Zip work too. Extract the whole archive before using the files.
Where do I put the LIB and IDX files?
Both files go into the LIBRARY folder of your Proteus installation (Proteus 8: C:\Program Files (x86)\Labcenter Electronics\Proteus 8 Professional\LIBRARY; Proteus 7 has the same folder under its own name). Restart Proteus afterwards and search for the component with P.
Which Proteus version does the library need?
The tutorial names the Proteus version the library was made and tested with. Most TEP libraries work in Proteus 7 and Proteus 8; if the component does not appear after a restart, check that both the LIB and the IDX file were copied and that Proteus was fully closed while copying.
How do I get the HEX file into the simulation?
Compile the sketch in the Arduino IDE (Sketch → Export Compiled Binary gives you the HEX next to the sketch), then in Proteus double-click the board, set Program File to that HEX and run.
Members skip the wait. Log in or join TEP.

- 6Total downloads
- 4%Popularity
- ProteusCategory
- 0Comments
- ssyedzainnasirUploaded by
- 5 Oct 2026Uploaded at


 SHA-256
b30b6a11f2cf3f04d2865b8bb5aa8d6bc333670b2df56450ab3e51859d255129


 Need help with this file?
 Tags
Related Proteus
All Proteus tutorials




More GPS project files
All GPS tutorials


Comments
0