Hello friends, I hope you all are doing great. Today, I am going to share the new Active Buzzer Library for Proteus. A buzzer is the voice of a small project: the beep of a microwave, the warning of a smoke alarm, the alert when you leave the fridge door open. Proteus has a sounder of its own, but it is a plain symbol. Ours is the real 12 mm black can, drawn to true scale, and it makes a real sound through your PC speaker.
Active Buzzer Library for Proteus
Latest version: V1.0 (November 2026, this tutorial)
Other component libraries: C945 Transistor · PC817 Optocoupler · Relay Module · Resistor · 5 mm LED · Designer Colour LED · Push Button · Electrolytic Capacitor · Ceramic Capacitor · Tantalum Capacitor · Film Capacitor · 1N4007 Diode · Zener Diode · Schottky Diode · Supercapacitor · Photodiode · RGB LED · Bridge Rectifier · Flashing LED · Bi-Colour LED · SMD LED · Slide Switch · Toggle Switch · Rocker Switch · Micro Limit Switch · Emergency Stop Switch · SMD Resistor · Power Resistor · Resistor Network · Potentiometer · Trimmer Potentiometer · Slide Potentiometer · NTC Thermistor · DIP Switch · Fuse · Passive Buzzer · Mini Speaker · 7-Segment Display · LED Bar Graph · IR / UV LED · Small Transistors · TIP122 Darlington · N-MOSFET · P-MOSFET · PC817 Optocoupler · Filament Bulb · Power LED · Voltage Regulator · SCR and TRIAC · Inductor · Toroid Inductor · Crystal
Helping Tools
- Serial Monitor Advance: a serial terminal window for the UART of your board
- Serial Monitor Expert: the serial monitor with extra debugging tools
- LCD Library for Proteus V3.0: 16x2, 20x4 and I2C LCDs to show your readings
Power it and it sounds, with no code but a single digitalWrite(). Rings pulse on its top while it sounds, the pop-up counts the beeps, and you can set the volume or mute it at any moment. For the demo we built a fridge door alarm that gets more and more insistent the longer the door stays open.
NOTICE: Our team has put a lot of effort into these small parts: the bodies, the animation and the pop-ups are all our own design, and you get them free. Your feedback is the fuel that keeps us going, so please tell us what you think in the comments below or in the Active Buzzer board of our forum. And if our free libraries help you, you can buy us a coffee. So, let's get started with the Active Buzzer Library for Proteus:
What is an Active Buzzer?
A buzzer is a small sounder. Inside the can is a thin metal disc with a layer of piezo ceramic on it. Put a voltage on the ceramic and it bends; switch the voltage on and off quickly and the disc flexes in and out, and that pushes the air and makes a tone. Something has to do that switching, and that is where the two kinds of buzzer differ.
| Feature | Active buzzer | Passive buzzer |
|---|---|---|
| Inside | its own oscillator | just the disc |
| What it needs | plain DC | a square wave at the tone you want |
| Arduino code | digitalWrite(pin, HIGH) | tone(pin, 1000) |
| Sound | one fixed tone | any tone you ask for |
| On 5 V from a battery | a steady tone | a single click |
So an active buzzer is the easy one: it asks for nothing but power. The catch is that it can only ever play its one tone. If you want a melody, you need a passive buzzer instead. Telling them apart on the bench is simple: put 5 V on it and listen. A steady tone means active, and one click means passive.
Why That Tone?
Buzzers are not tuned to about 2.3 kHz by accident. Every piezo disc has a natural frequency at which it flexes most easily, called its resonance, and the can is built around it, so a little power makes a lot of sound. That frequency also sits where the human ear is very sensitive, around 2 to 4 kHz. So a tiny part can be heard across a room. It is also a sharp sound, which is why warnings use it: you cannot easily ignore it, and you can hear it over a noisy kitchen. Our part plays 2300 Hz by default, and you can set a different tone in its properties.
The Electrical Side
A 5 V active buzzer is a small load. Ours looks like about 170 ohms above its 2 V threshold, so it takes close to 30 mA at 5 V. An Arduino pin can give that, but it is near the top of what a pin should do. In the demo the pin's own output resistance pulls the voltage down a little, and the buzzer sees about 4.5 V at about 26 mA. A louder buzzer draws more, and then you need a transistor between the pin and the buzzer.
| Property of the part | Value in the library |
|---|---|
| Size | 12 mm across, legs 7.6 mm apart |
| Sounds from | 2 V |
| Load | about 170 ohm |
| Tone | 2300 Hz, a property |
| Rated | 5 V |
Driving a Louder Buzzer
An Arduino pin is happy at 20 mA, so anything hungrier needs help. The usual answer is a small NPN transistor. The pin drives the base through a resistor of about 1k, the emitter goes to ground, and the buzzer sits between the supply and the collector. Now the pin only supplies a tiny base current, while the buzzer draws what it needs from the supply. This also lets you use a 12 V buzzer with a 5 V Arduino. Add a diode across the buzzer if it is a magnetic type, because its coil can kick back a voltage spike when it switches off.
Features of the Active Buzzer Library for Proteus
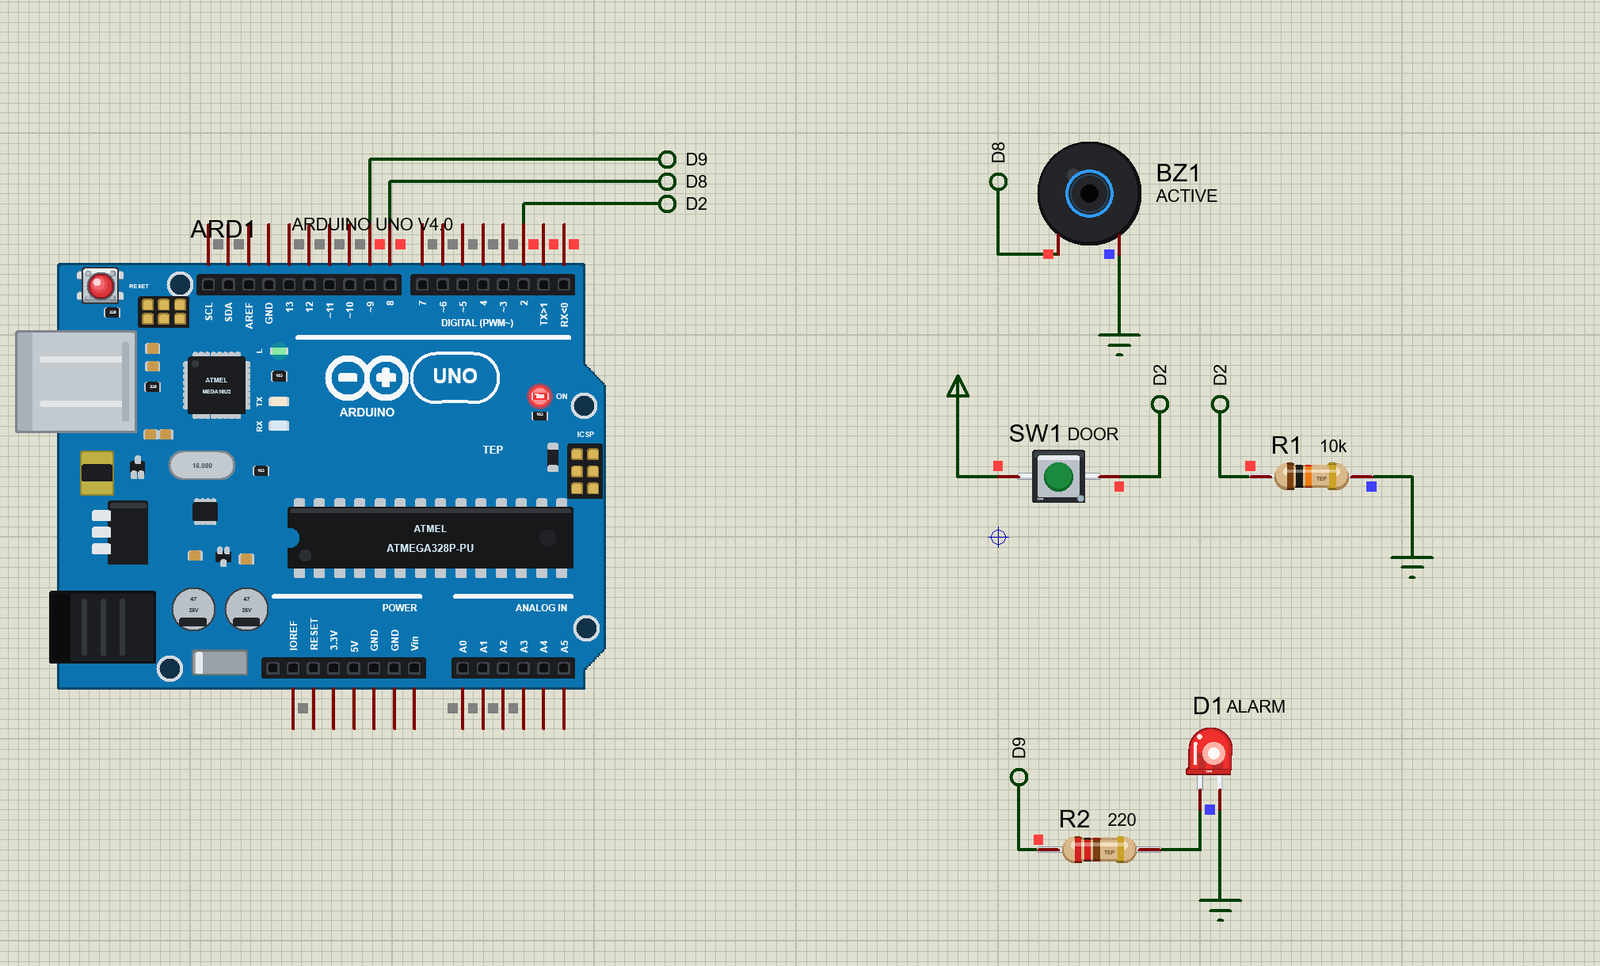
- The real look, at true scale: the 12 mm black can with its sound hole and the + mark, with our small TEP signature.
- Real sound: it plays its tone through your PC speaker, and stops the moment the pin goes LOW.
- You stay in control: mute it or set the volume on the pop-up while it runs, or set the volume property to 0.
- Animated: rings pulse on its top while it sounds, so you can see it on a silent PC too.
- It tells you what is wrong: REVERSED, TOO LOW and OVER VOLTAGE are all named.
- A beep counter: the pop-up counts the beeps, and shows how long and how fast they are.
- A complete package: about 2.1 MB with the library, our Arduino UNO V4.0, the demo's button, resistors and LED and the demo, without the source code of the models.
The Active Buzzer in Proteus
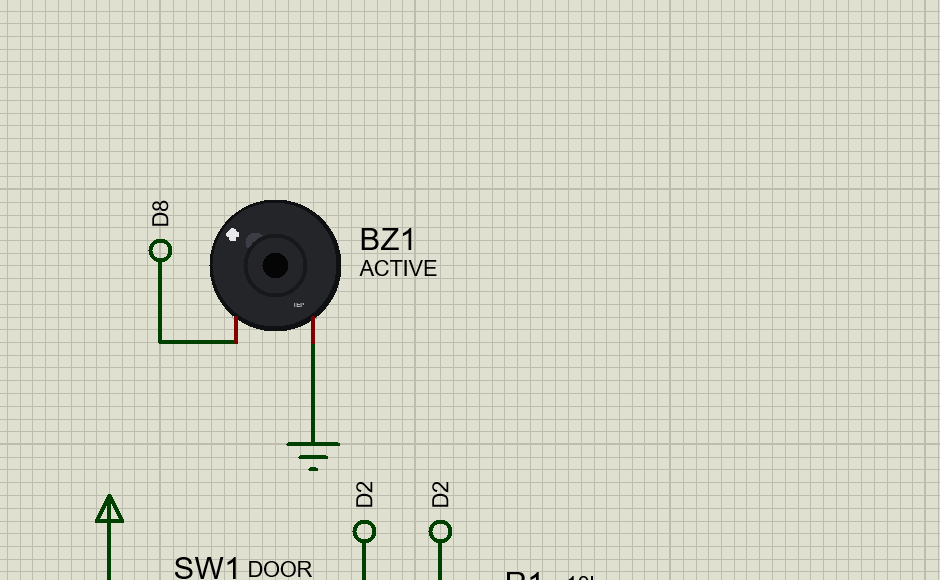
The device is BUZZERACTIVETEP in TEPBUZZER.LIB, under Speakers and Sounders, with the prefix BZ and the model TEPBUZZER.DLL. Search BUZZERACTIVE in Pick Devices. The pins are + and -, and they come out at the bottom, 300 thou apart, the real spacing of the legs.
The Properties
| Property | What it does |
|---|---|
| Sound on the PC, % | the volume, 40 by default; 0 is silent |
| Tone, Hz | the tone, 2300 Hz by default |
Download Active Buzzer Library for Proteus
Click the button below to download Active-Buzzer-Library-for-Proteus-v1.0.zip (about 2.1 MB, without the source code of the models):
Active Buzzer Library for Proteus V1.0- README.txt: installation, the demo, the properties, troubleshooting and the limits.
- Proteus Library Files:
TEPBUZZER.LIB,TEPBUTTON.LIB,TEPRESISTOR.LIB,TEPLED5MM.LIBand ourArduinoV4TEP.LIB. - Proteus Model Files:
TEPBUZZER.DLL,TEPBUTTON.DLL,TEPRESISTOR.DLL,TEPLED5MM.DLLandTEPARDUINO.DLL. - Arduino Code: the demo sketch.
- Proteus Simulation: the demo project, its HEX file and copies of the DLLs.
No Proteus yet? Read How to Download and Install Proteus 7 and 8. New to libraries? Follow How to Install a New Library in Proteus.
How to Install Active Buzzer Library for Proteus
- Close Proteus and extract the whole zip file, for example to your Desktop.
- Copy the files from Proteus Library Files into the LIBRARY folder of Proteus.
- Copy the files from Proteus Model Files into the MODELS folder.
- Delete
TEPBUZZER.IDXfrom the LIBRARY folder if it is there. - Start Proteus, press P and search for BUZZERACTIVE.
Demo: a Fridge Door Alarm
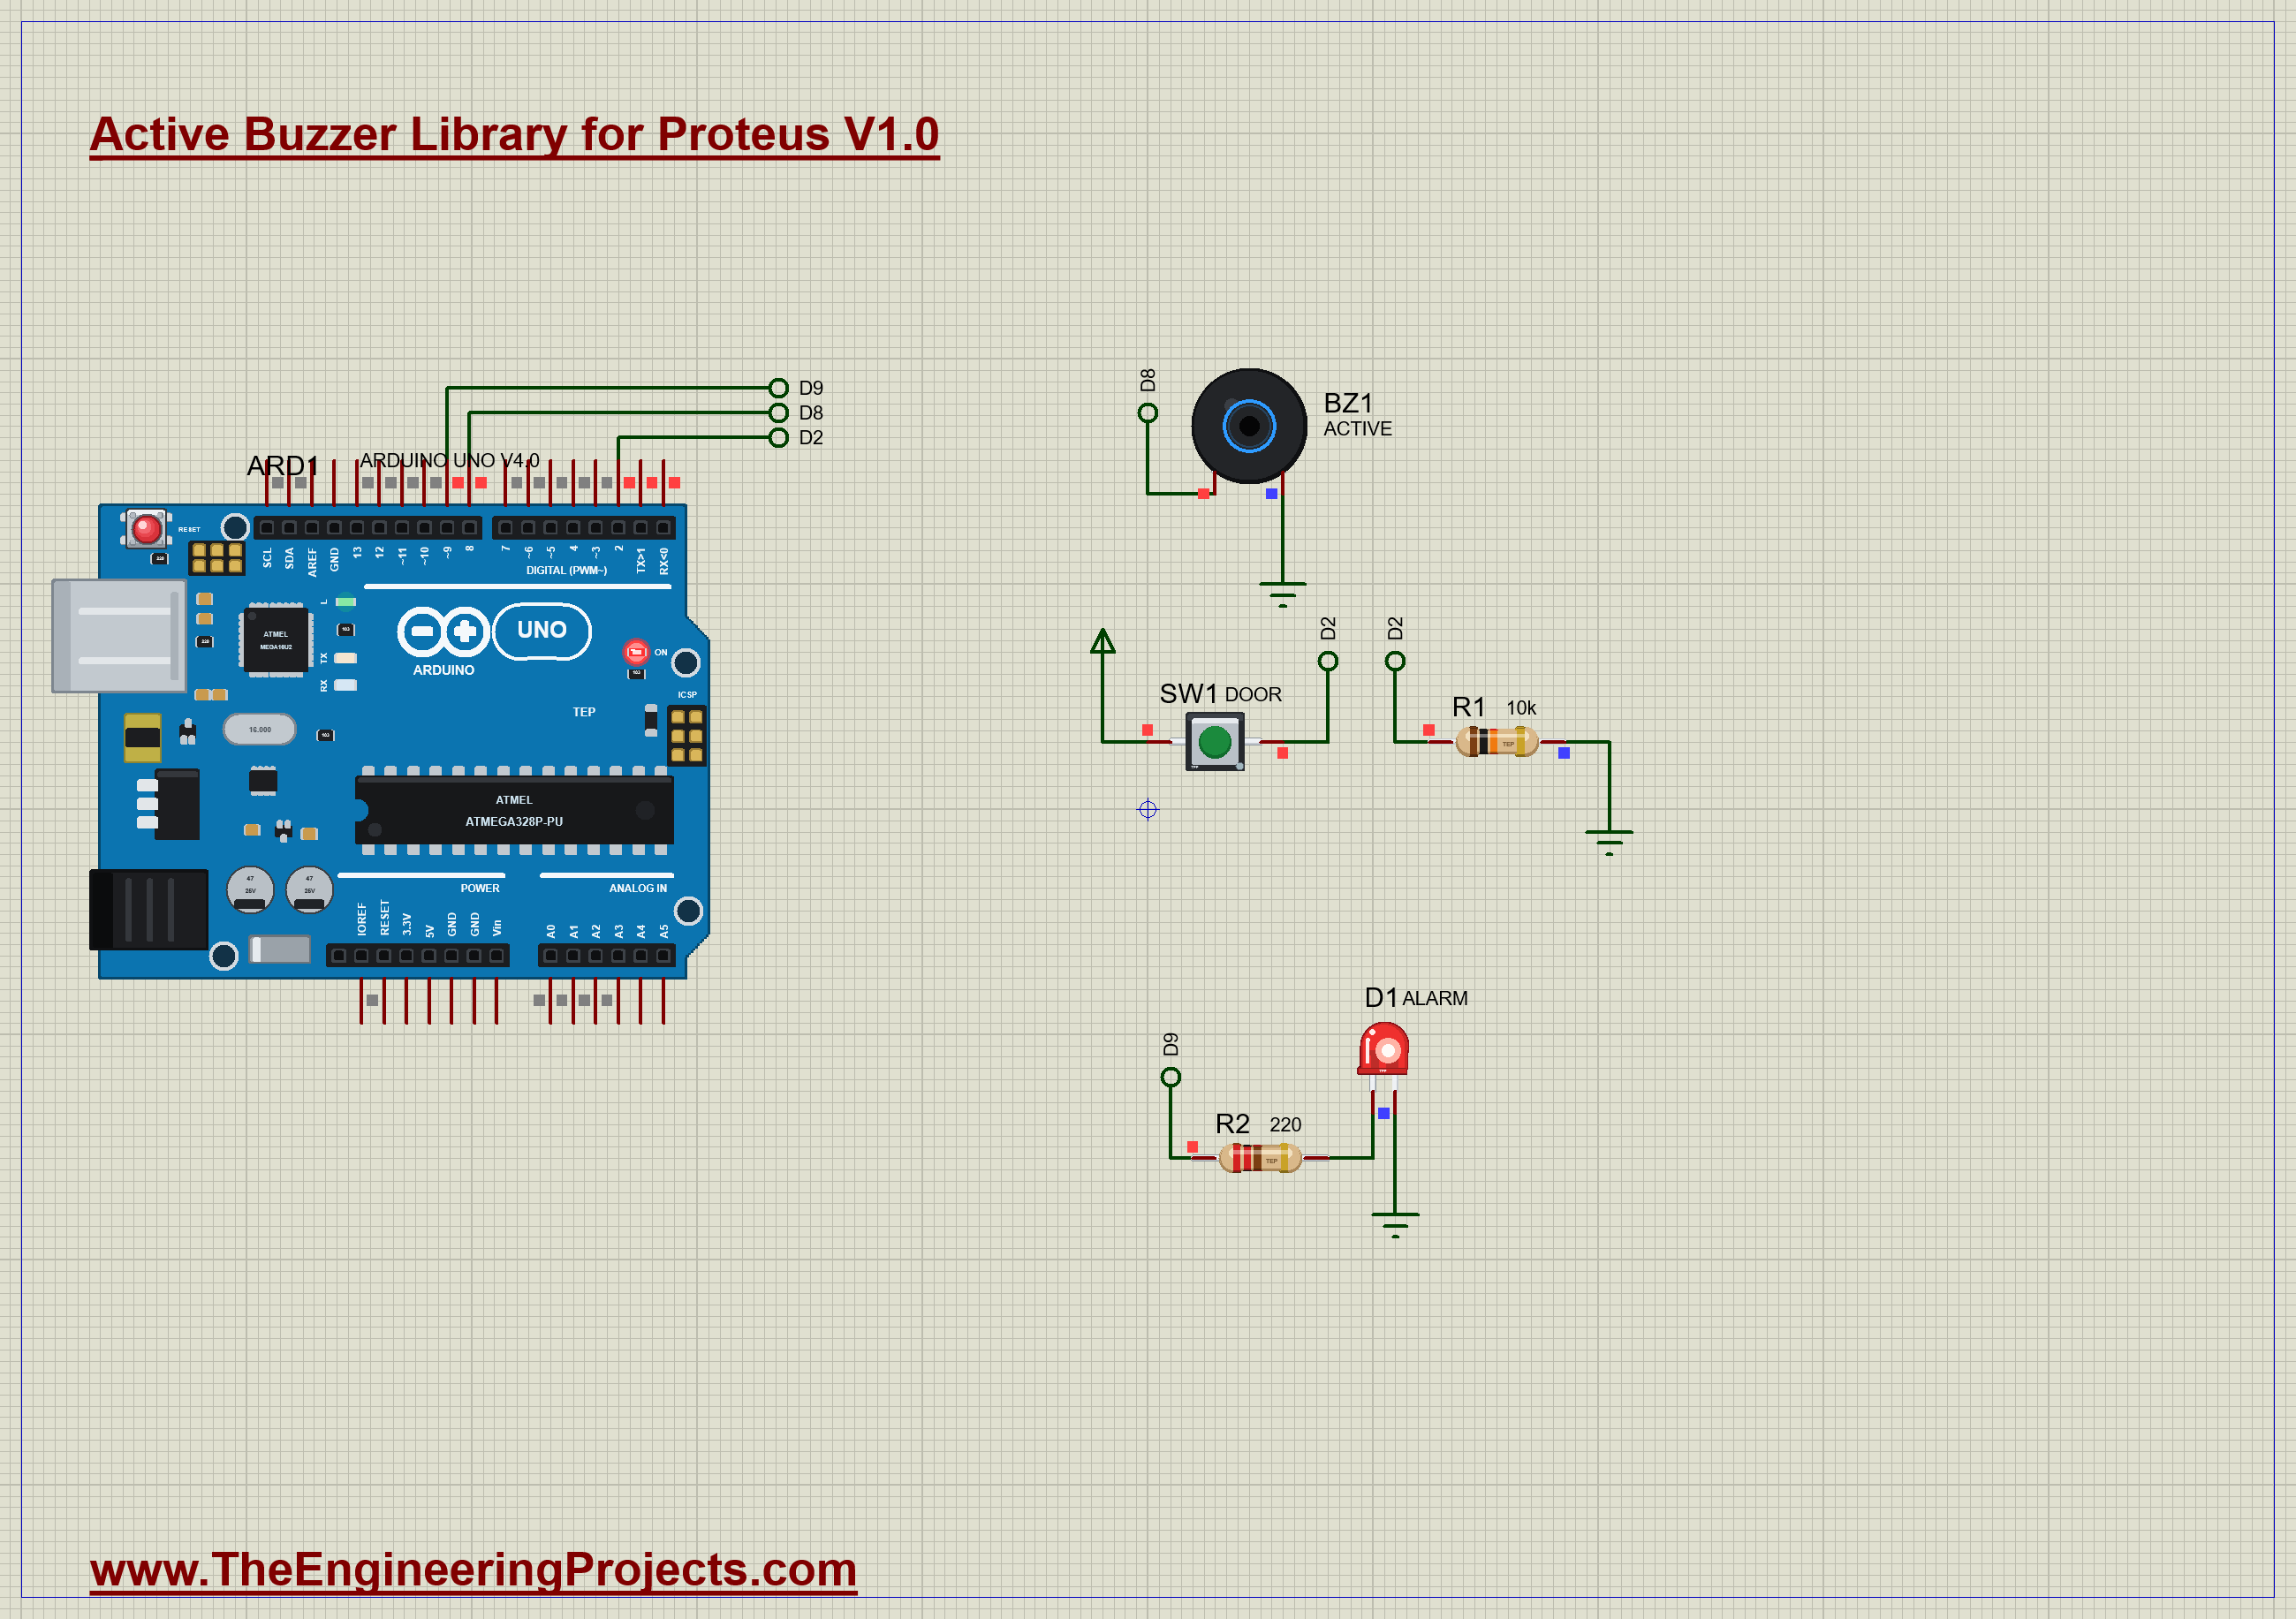
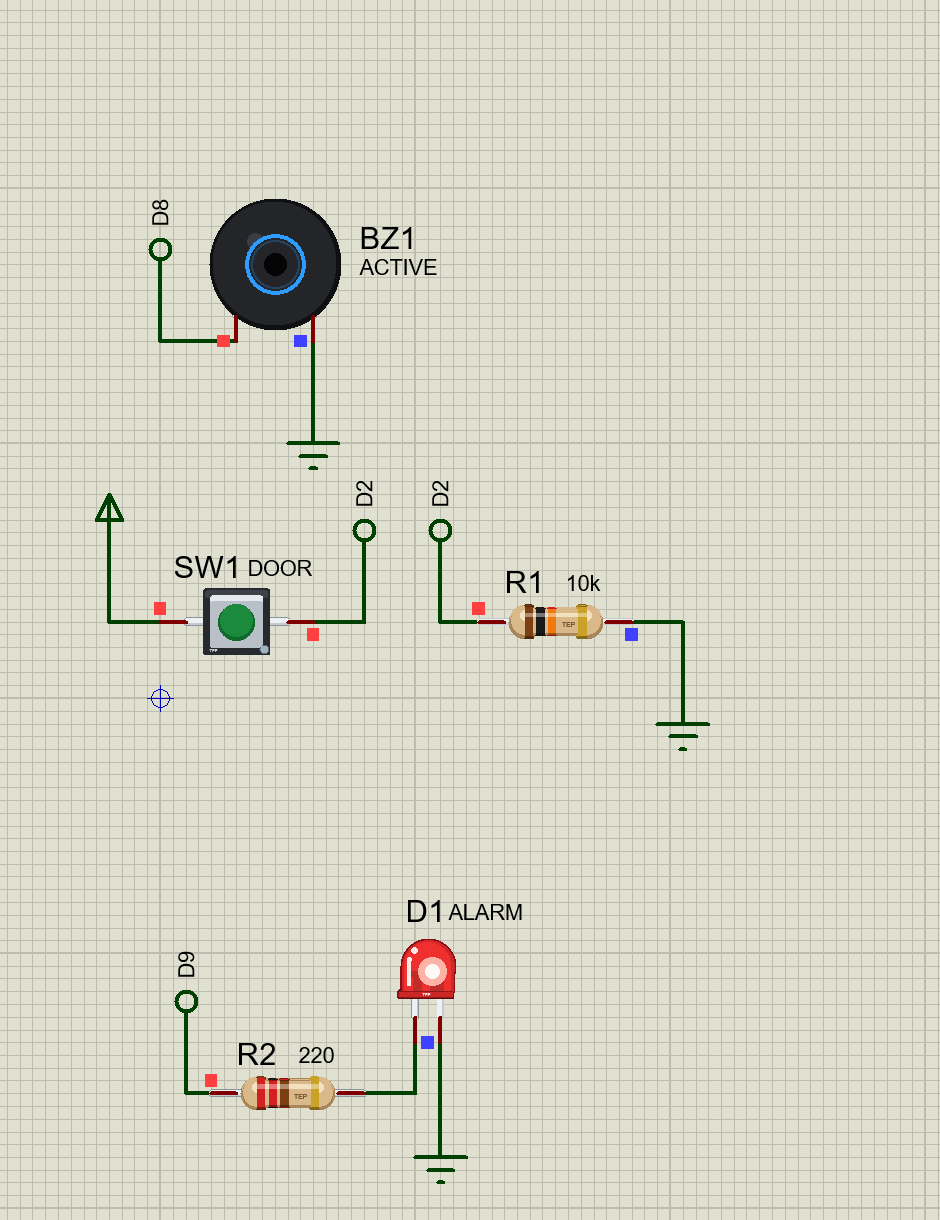
Every modern fridge does this little job. Open the door and it stays quiet for a moment. Leave it open, and it starts to complain. Open Active-Buzzer-Door-Alarm-ArduinoUnoV4.pdsprj. It runs on our Arduino UNO Library for Proteus V4.0, with its built-in monitor, the same window as our TEP Serial Monitor Advance for Proteus. The door switch is a part from our Push Button Library for Proteus, the resistors from our Resistor Library for Proteus, and the lamp from our 5 mm LED Library for Proteus.
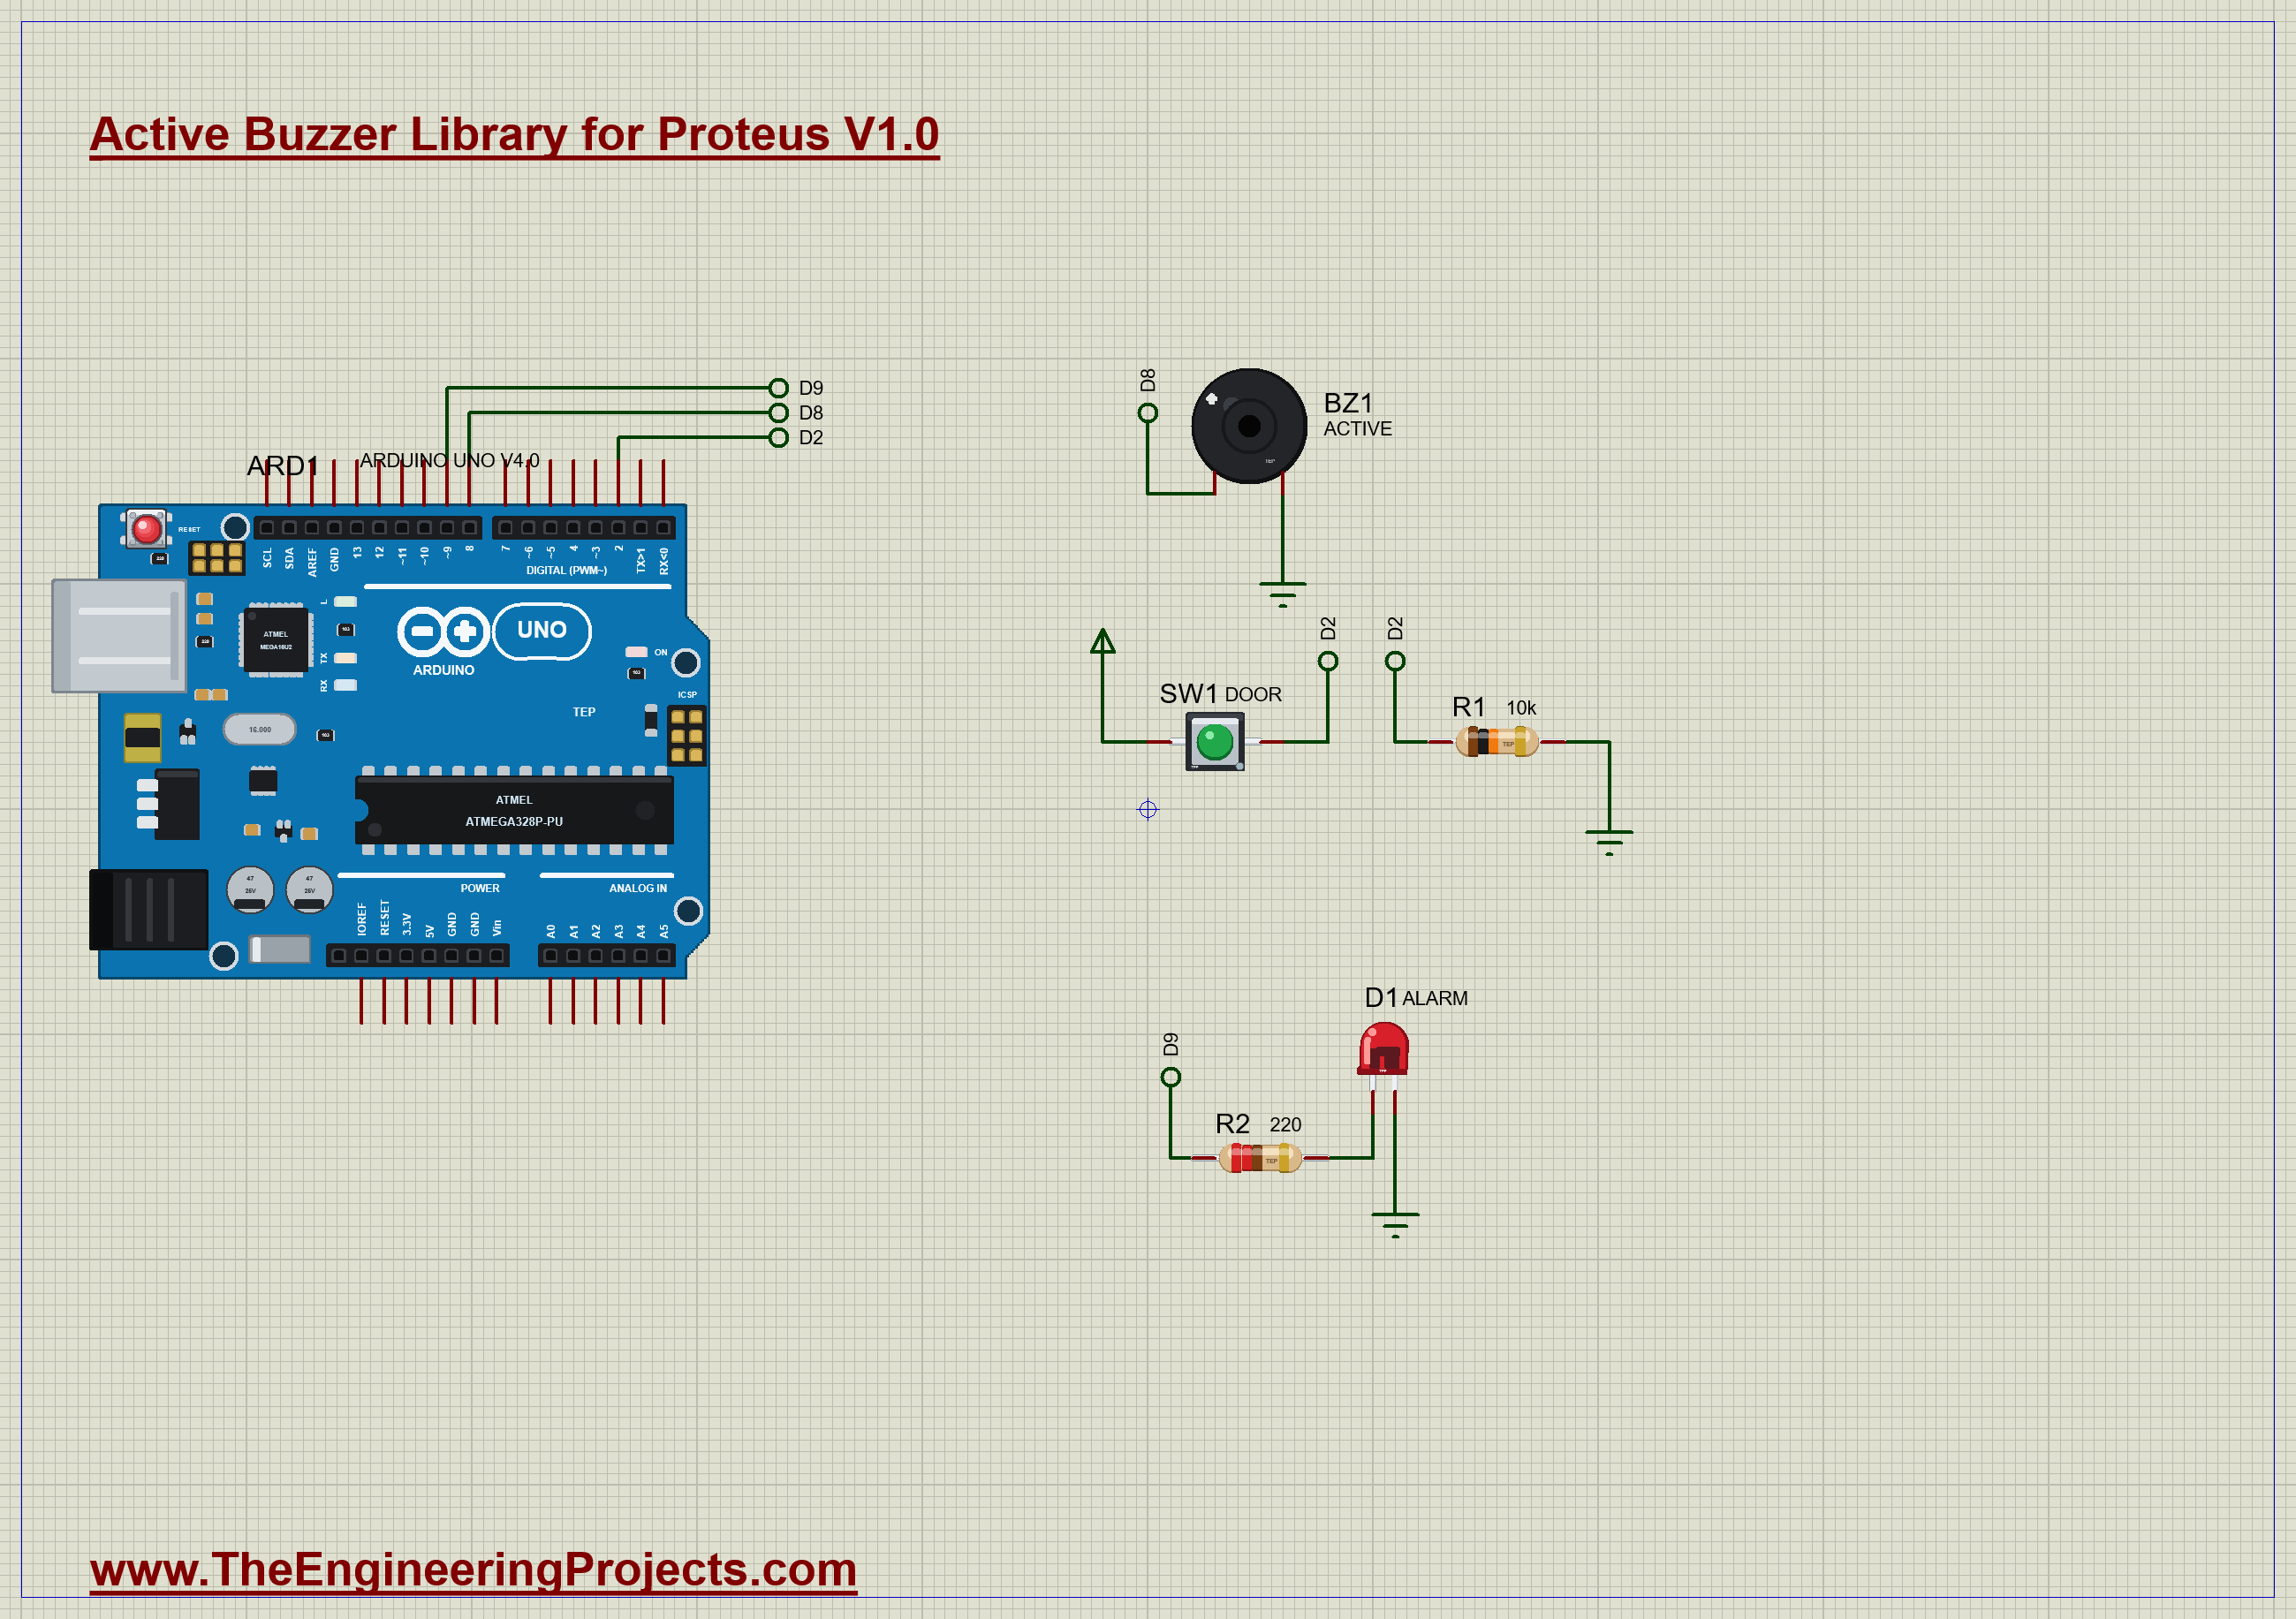
| Part | Connection | Job |
|---|---|---|
| BZ1 | + on D8, - on GND | the alarm |
| SW1 | +5V to D2, R1 10k to GND | the door switch: pressed means open |
| D1 | D9 through 220 ohm | a lamp that flashes with the buzzer |
Making a Sound
Here is the whole trick of an active buzzer, in one small function. It writes the pin, and the buzzer does the rest. We drive the lamp from the same place, so the two always agree:
void sound(bool on) {
  digitalWrite(BUZZER, on);
  digitalWrite(LAMP, on);
  beeping = on;
}
The Alarm
The sketch has four levels, in a small state machine. CLOSED is quiet. OPENED gives one short beep, as a friendly note that the door has opened. After 3 seconds it moves to SLOW, and after 6 seconds to FAST:
  } else if (level == SLOW) {
    if (now >= nextToggle) { sound(!beeping); nextToggle = now + (beeping ? 150 : 850); }
    if (now - openedAt >= FAST_AFTER) setLevel(FAST, F("Still open: fast beeps"));
  } else if (level == FAST) {
    if (now >= nextToggle) { sound(!beeping); nextToggle = now + 120; }
  }
A state machine is a simple idea with a grand name. The sketch is always in exactly one state, and each state knows two things: what to do now, and what would move it to another state. Here that gives us a small table:
| State | What it does | What moves it on |
|---|---|---|
| CLOSED | nothing, the buzzer is quiet | the door opens |
| OPENED | one 100 ms beep | 3 s open, or the door closes |
| SLOW | one short beep a second | 6 s open, or the door closes |
| FAST | about four beeps a second | the door closes |
Written this way, a complicated behaviour stays easy to read and easy to change. If you want a fifth level, you add one row to the table and one more branch to the code, and nothing else has to move.
Notice the timing. Slow beeps are 150 ms on and 850 ms off, one beep a second. Fast beeps are 120 ms on and 120 ms off, about four a second. There is no delay() anywhere, so the sketch always watches the door, and the alarm stops the moment it closes. The door switch is debounced too, in the way our Push Button article explains.
Why Not Just Use delay()?
It is tempting to write a beep as HIGH, delay(150), LOW, delay(850). It would sound exactly the same. The trouble is what the Arduino does during those delays: nothing at all. It would not see the door close until the beep had finished, and with longer patterns you would notice that lag. Instead we keep a note of the time for the next change in nextToggle, and check it on every pass through loop(). The loop spins thousands of times a second, so the sketch feels instant, and it has time left over for anything else you want to add.
Run the Demo
Press Run and the monitor opens. All is quiet. Click the cap of SW1 to open the door for a moment. You hear one short beep, and the monitor reports it:
Door open: one short beep
Door closed: quiet
The Pop-Up
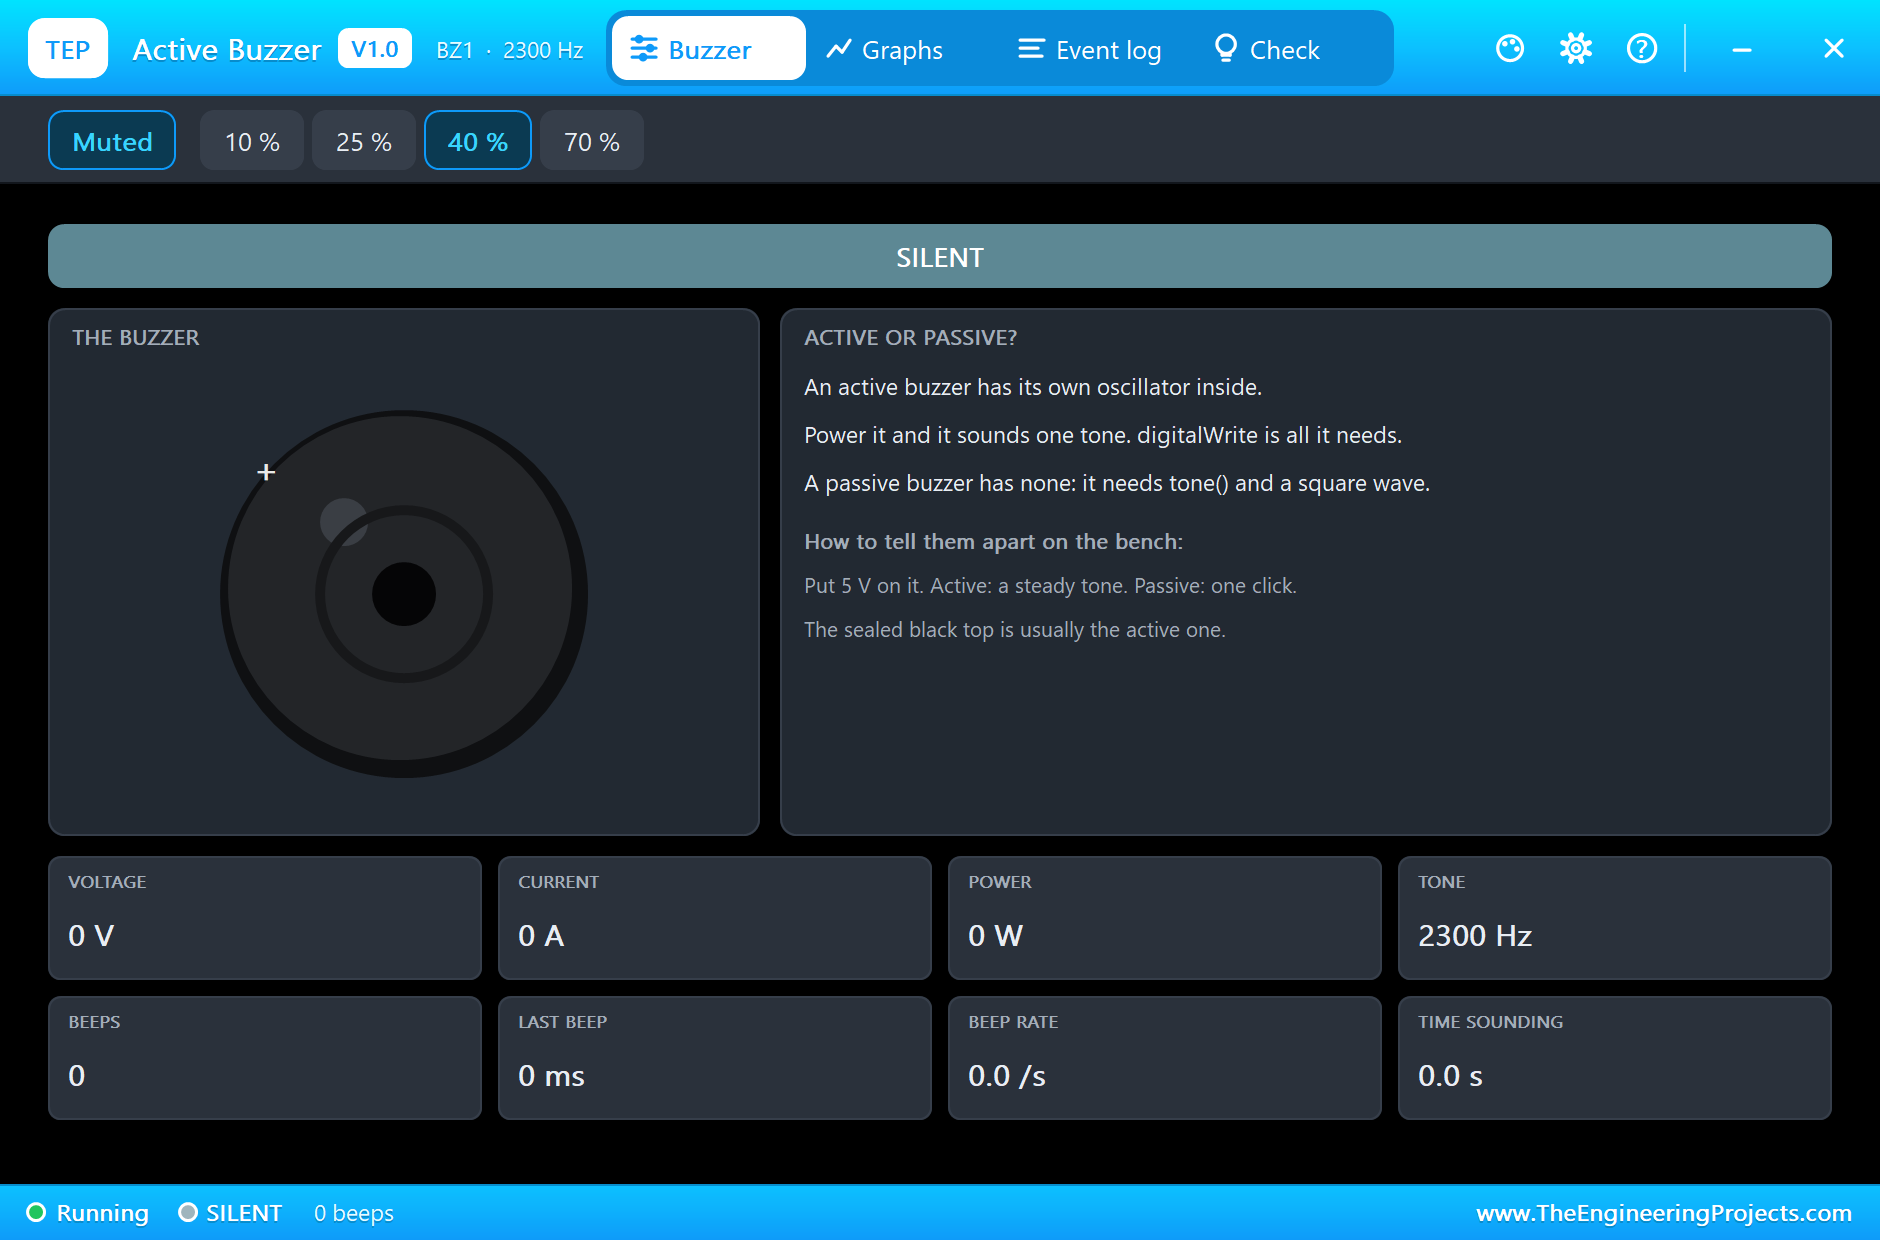
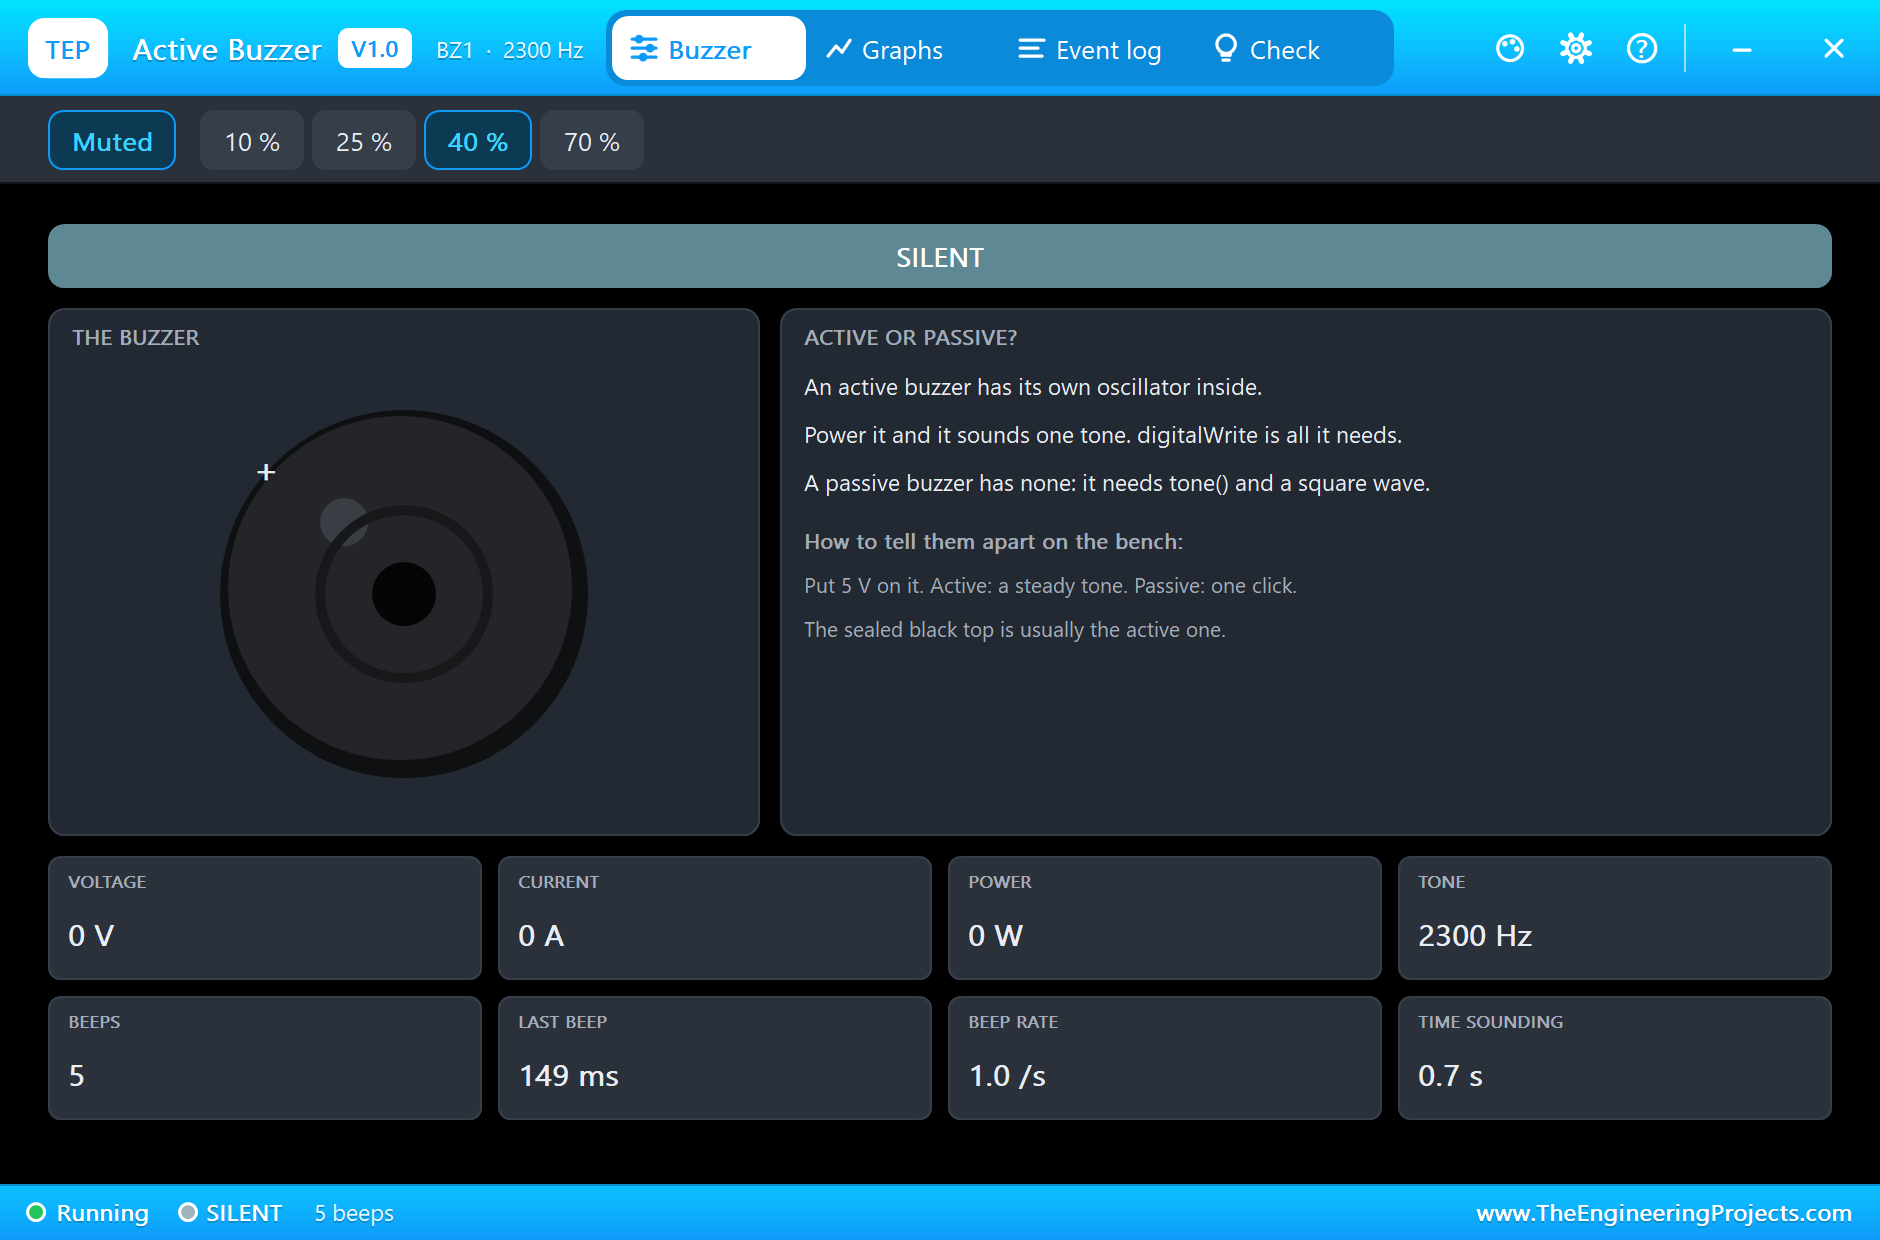
Click the buzzer. The Buzzer tab shows the state, the can with its sound rings, a short note on active and passive parts, and the live values. The chips along the top set the volume, and Mute silences your PC without changing the simulation. That is handy when you are testing the same alarm for the twentieth time:
Leave the Door Open
Now press Hold down on SW1's pop-up, as if someone had left the door open. There is one short beep. After 3 seconds the slow beeps begin, and the pop-up counts them:
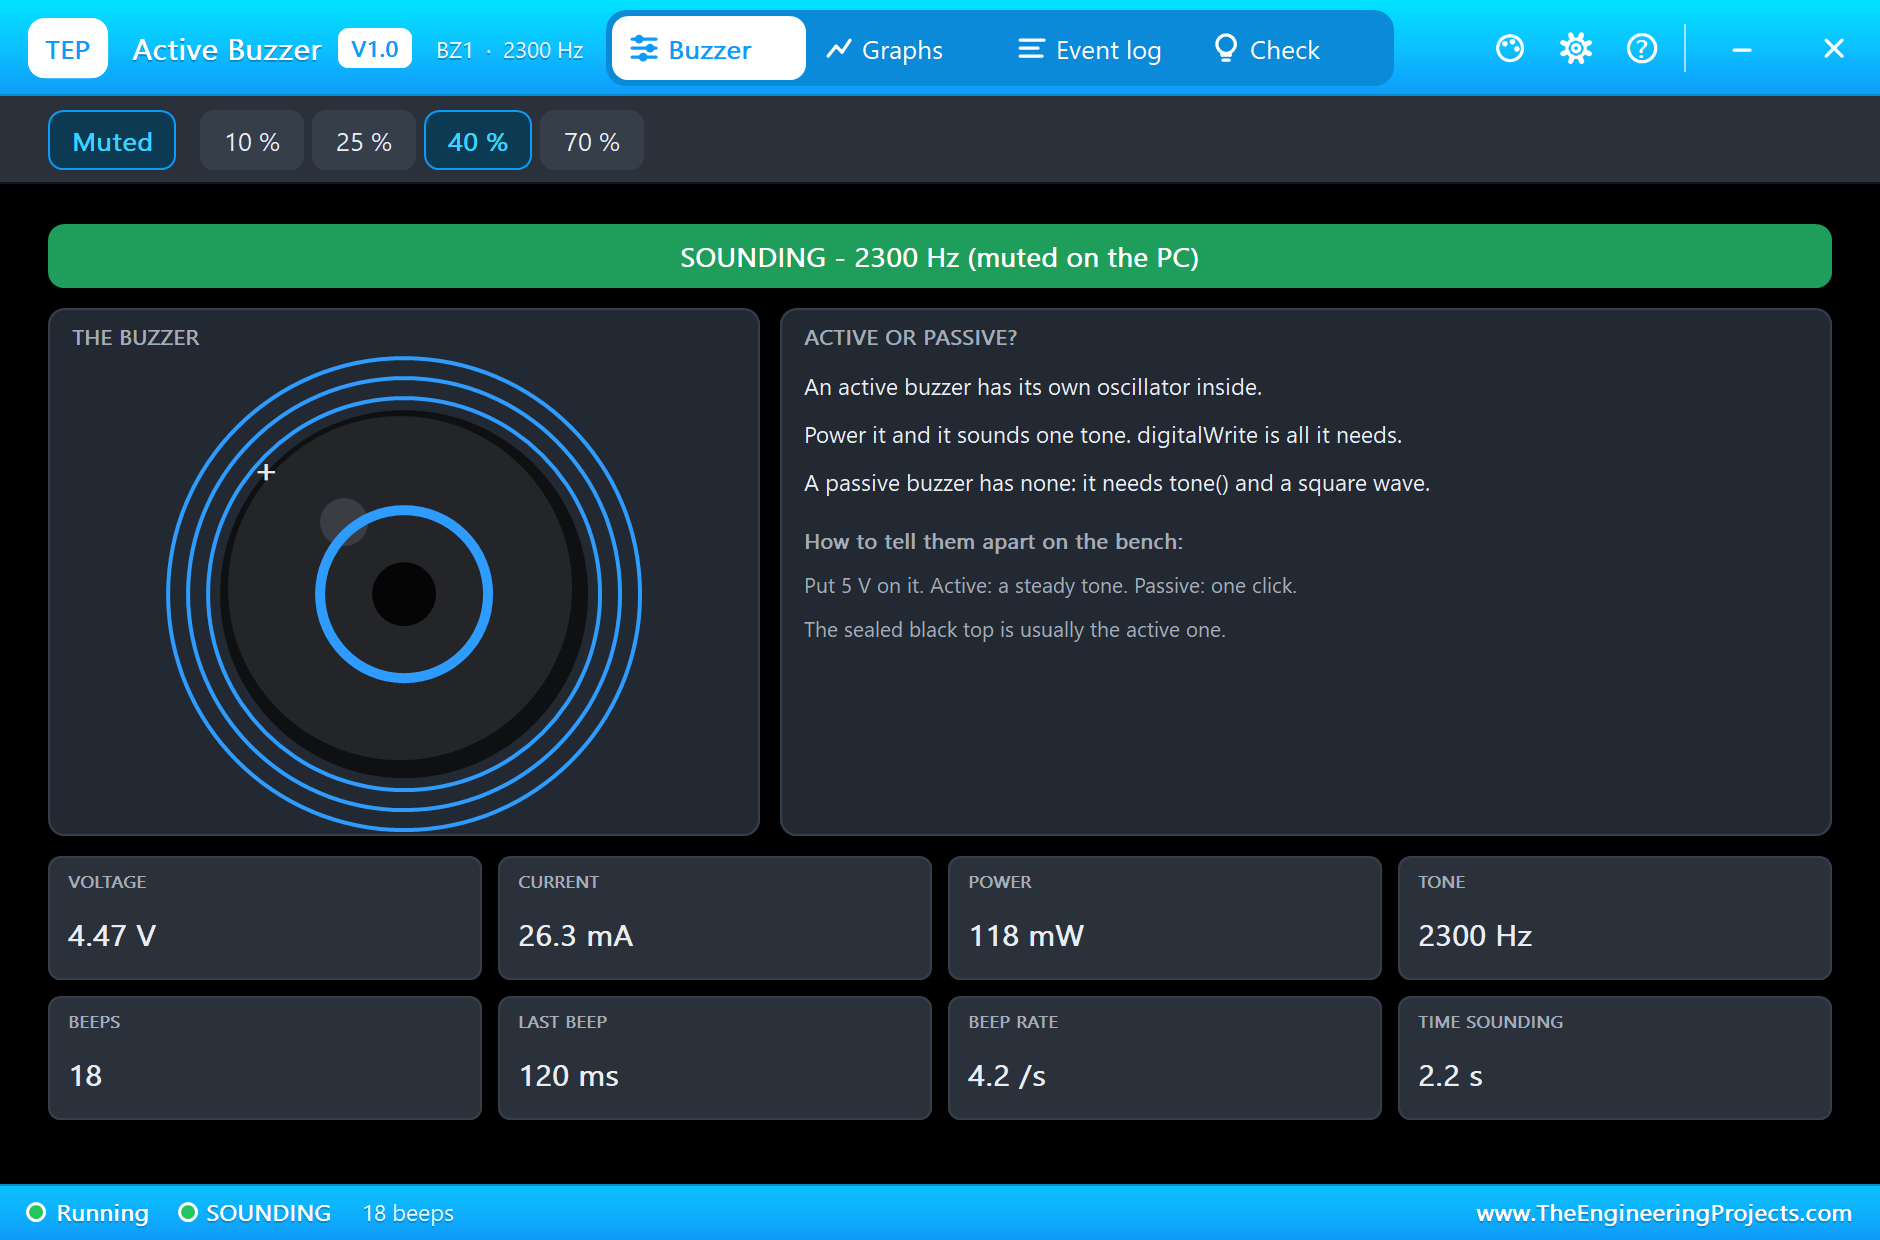
After 6 seconds it gets serious, with about four beeps a second. The rings pulse on the buzzer, the red lamp flashes, and the bars on the pop-up show the pin's 4.47 V and 26.3 mA. Here is the complete circuit, truly running, caught during a beep:
What the Rings Tell You
Not everyone wants a buzzer sounding from their PC all day, and a shared office will thank you for the Mute chip. That is why the part also shows its sound on the sheet. While it sounds, a blue ring lights around the hole and pulses outward. If you press Mute, the ring carries on, so you can still follow the alarm by eye. The lamp on D9 does the same job in a different way. It is good practice on a real product too: a warning that can only be heard is useless to someone who cannot hear it, so most alarms pair a sound with a light.
The Graphs
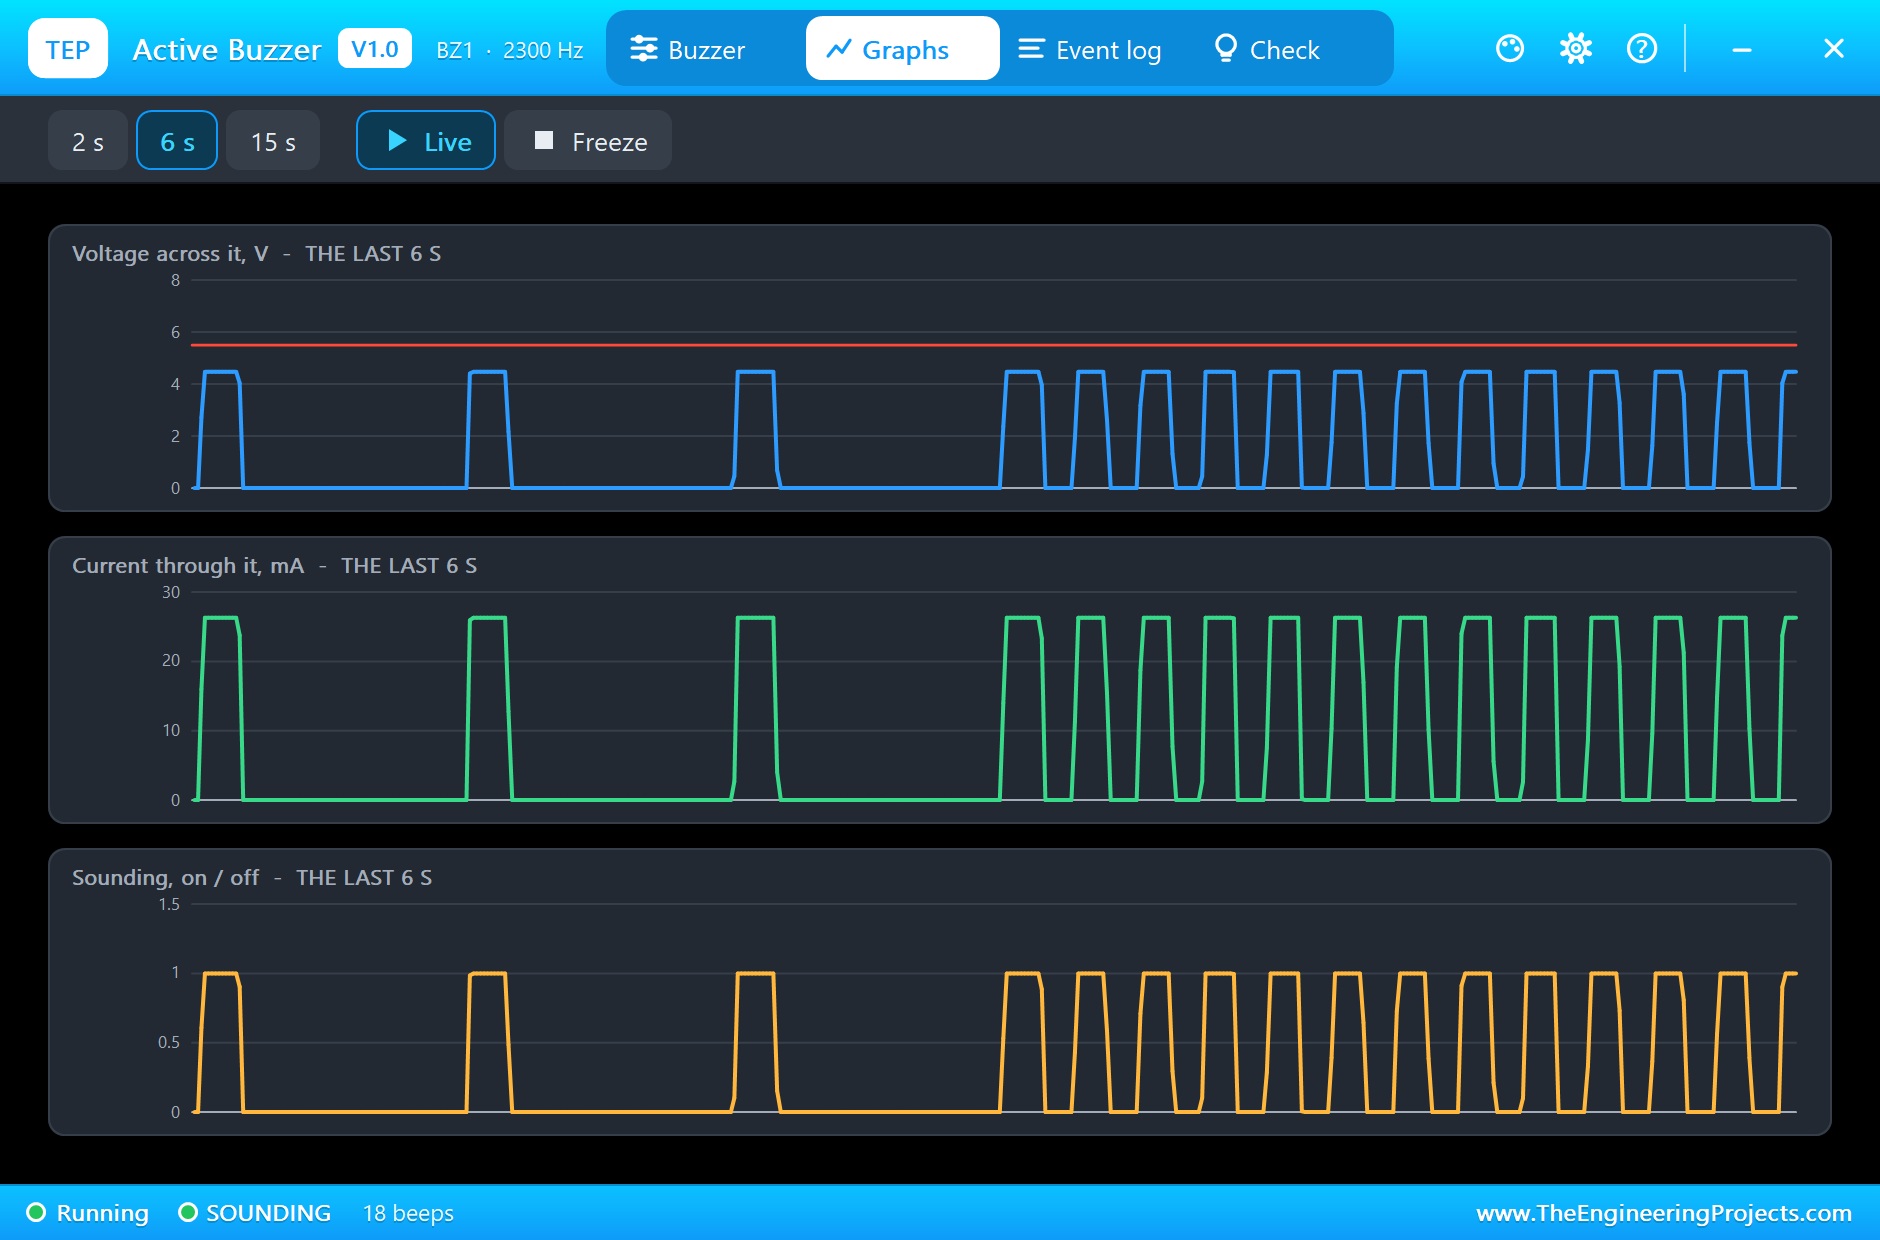
The Graphs tab draws the whole story: one short beep when the door opened, then the slow beeps, then the fast ones. You can read the timing straight off it:
The Log and the Check Page
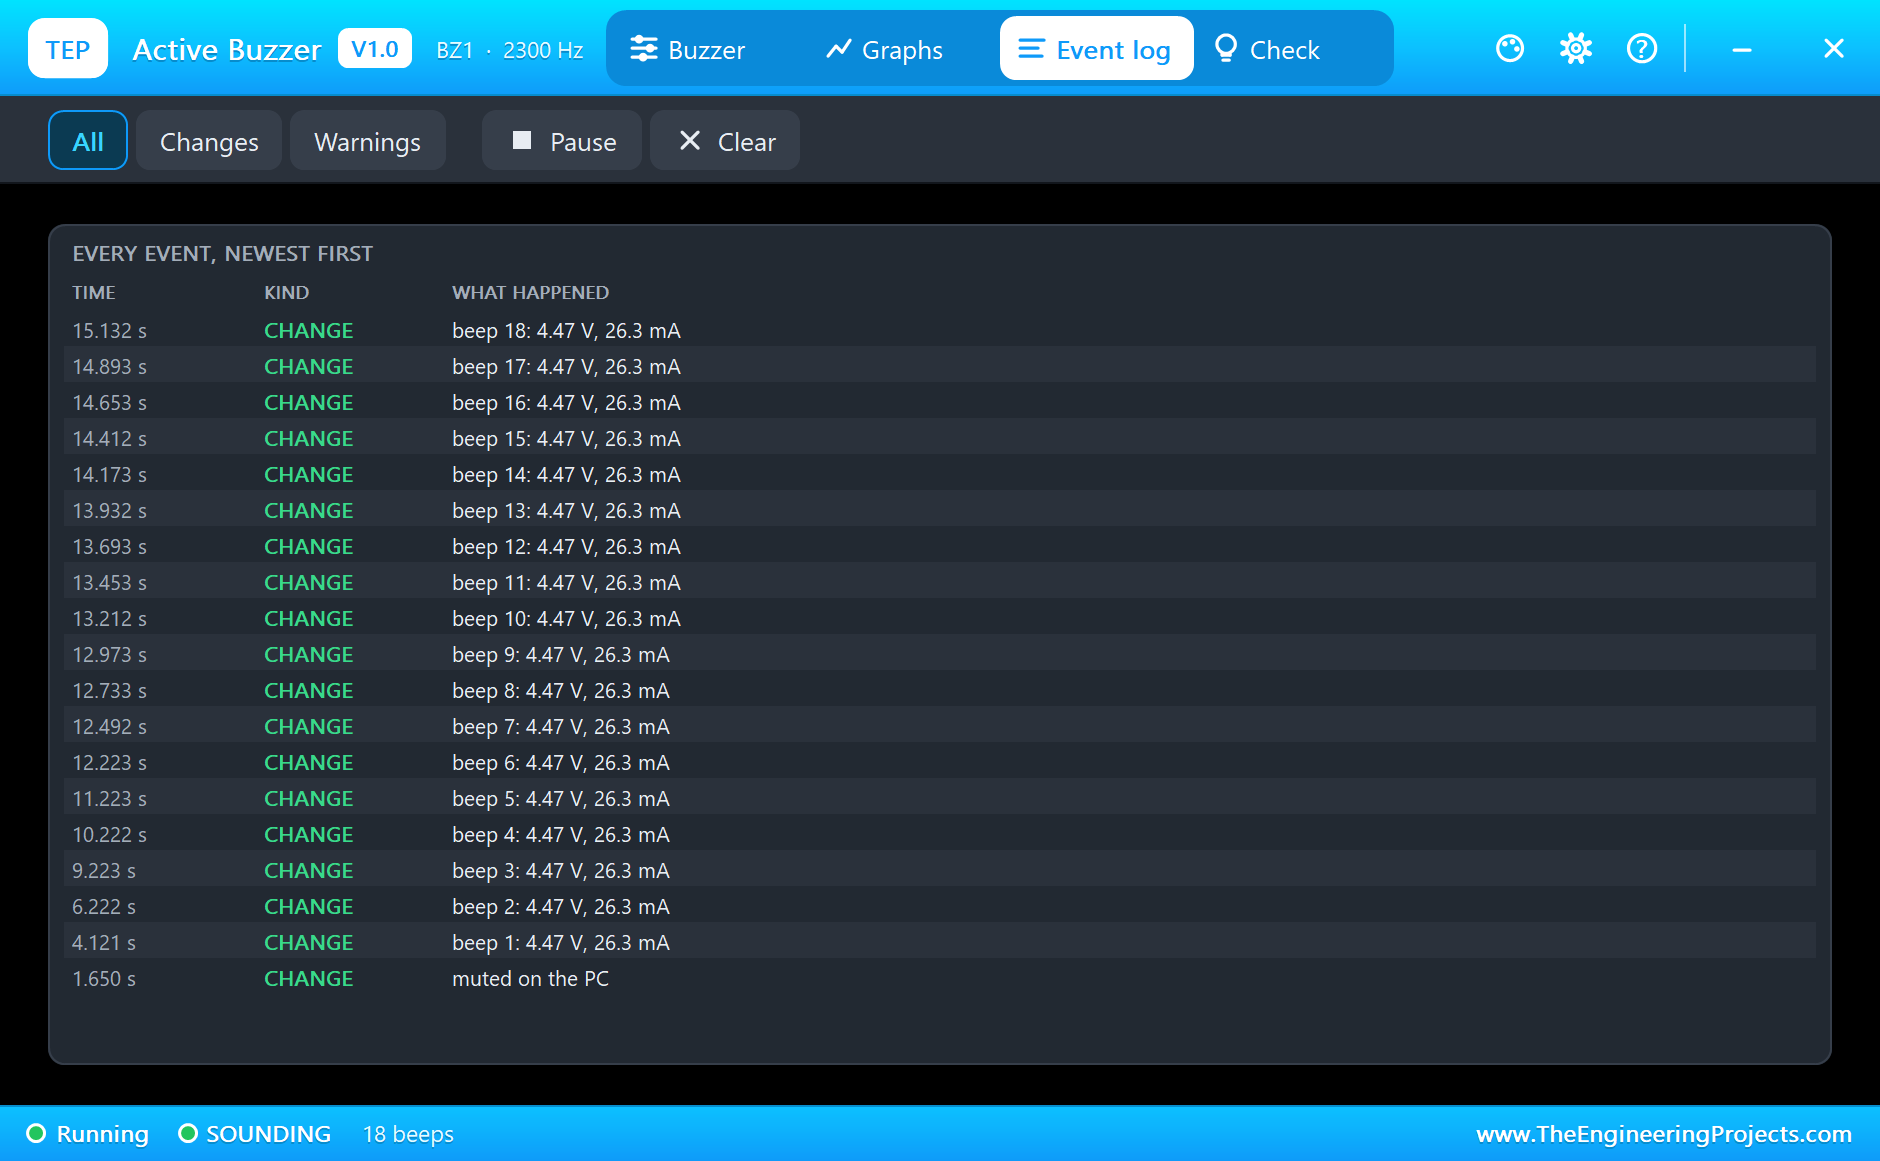
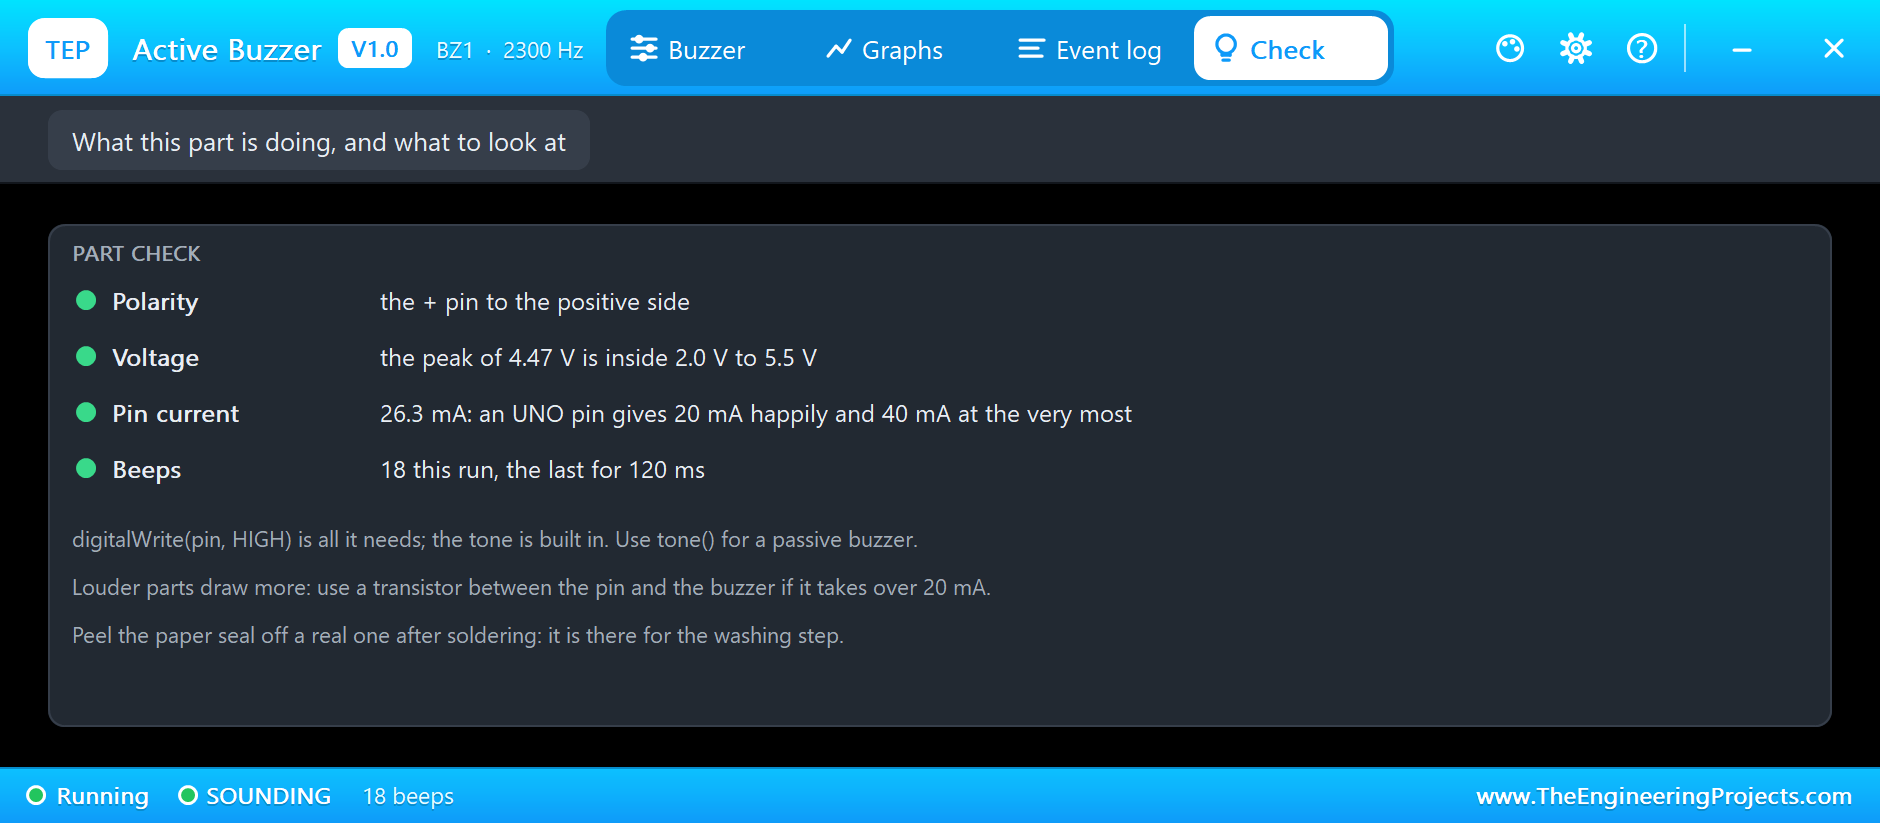
The Event log lists each beep, with the voltage and current it took. The Check page looks at the polarity, the voltage and the current through the pin. It is the place to look when a buzzer stays silent:
Press Hold down again to close the door. The alarm stops at once. The monitor has followed it all:
Active Buzzer door alarm - The Engineering Projects
Door open: one short beep
Door closed: quiet
Door open: one short beep
Left open: slow beeps
Still open: fast beeps
Door closed: quiet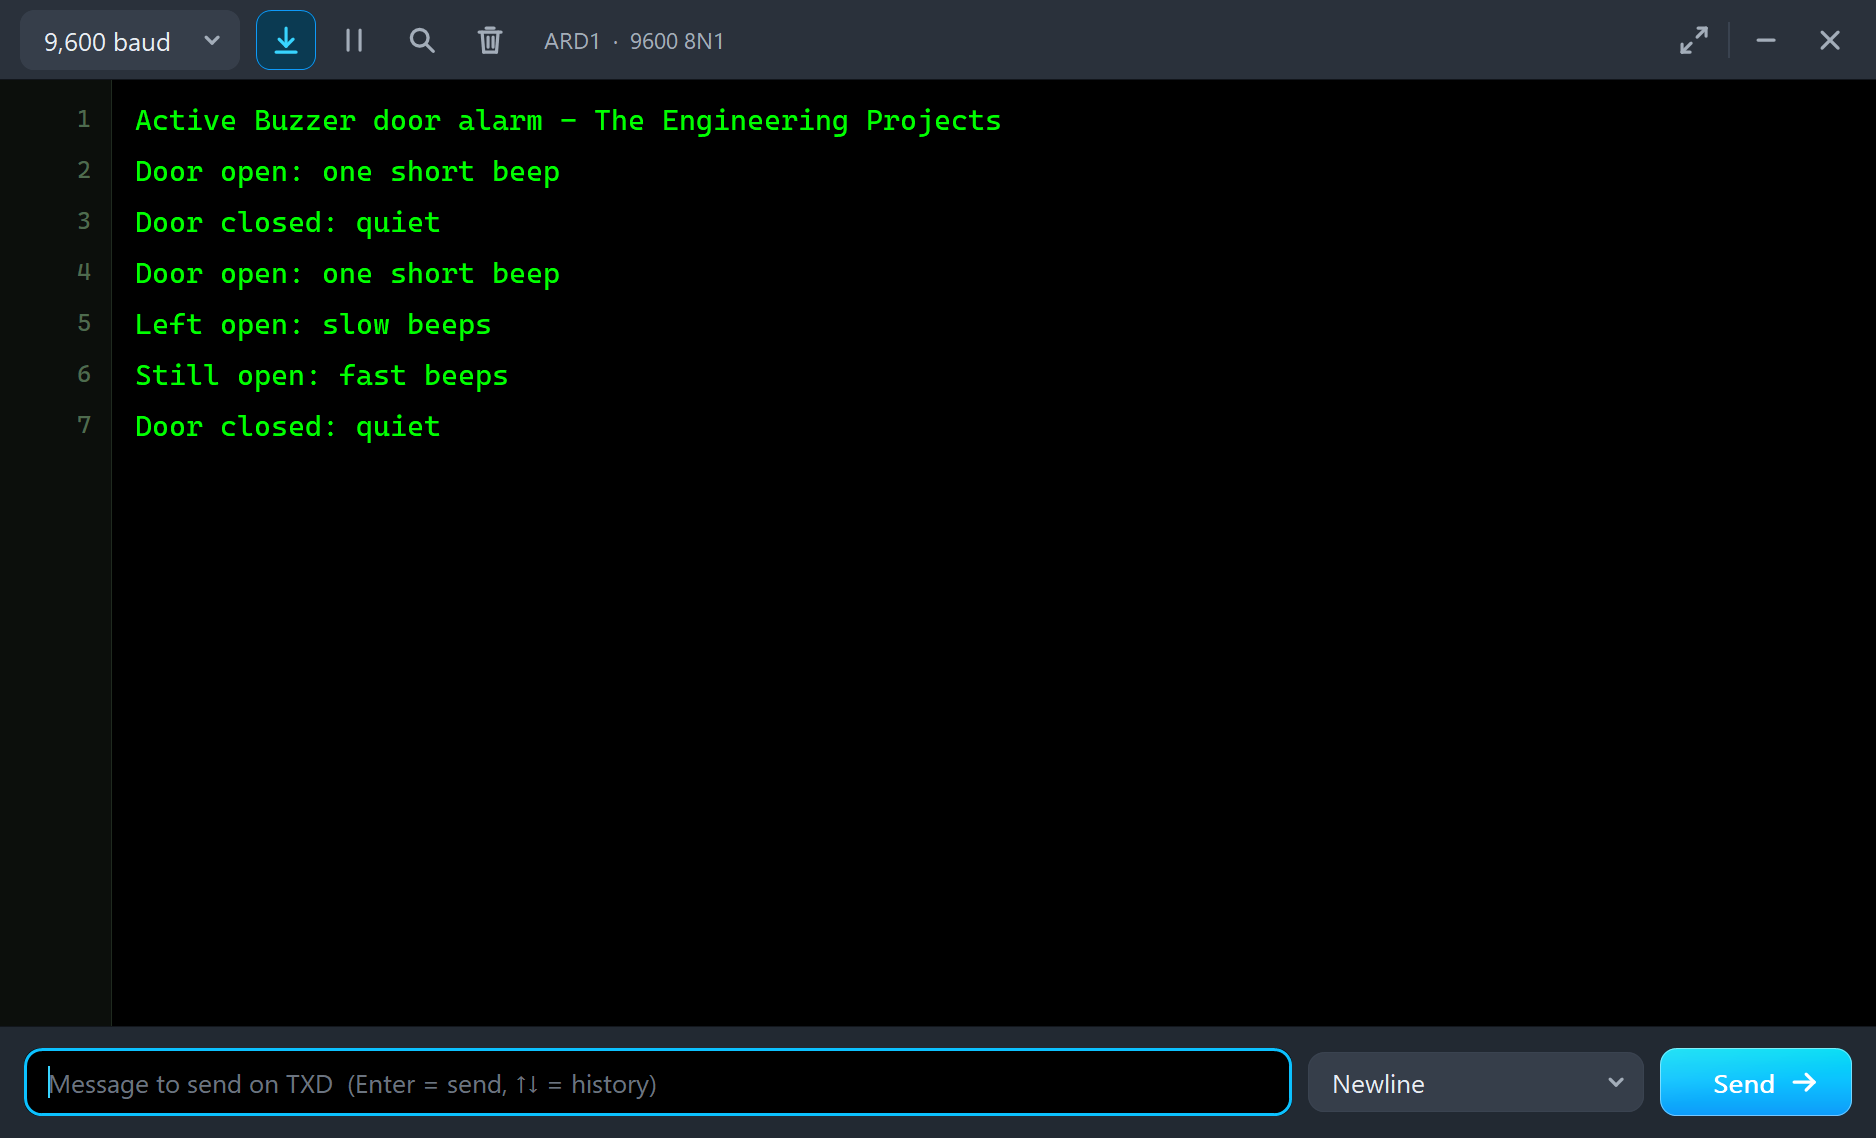
Try It Yourself
- Change the tone property to 1000 Hz, and hear the difference.
- Change
SLOW_AFTERandFAST_AFTER, and make your own alarm. - Swap the + and - pins of the buzzer, and read the pop-up.
- Put a 10k resistor in series with the buzzer, and see the TOO LOW warning.
- Make a third level, with a steady tone after 10 seconds.
Ideas to Extend the Demo
- Count how many times the door was opened today.
- Add a second buzzer for a two-tone alarm.
- Use a reed switch and a magnet as the real door switch.
- Add a silence button, which keeps the alarm quiet for a minute.
Your Own Sketches
The demo sketch is in the zip file, and you can change it in the Arduino IDE. New to Arduino? Start with our Arduino Tutorial for Beginners. Export the compiled binary, and set the UNO's PROGRAM property to the new file. Our guide on How to get the HEX file from Arduino shows you where the file ends up.
Where Active Buzzers Are Used
Once you start listening, you will hear them everywhere. They are in smoke alarms, reversing lorries, microwave ovens, printers, washing machines and car seat belt warnings. They suit these jobs because they are cheap, small and hard to get wrong: a single wire from a controller, and the job is done. When a product needs a melody or a voice, designers move up to a passive buzzer or a speaker.
Things to Know Before Using a Real Buzzer
- Mind the pin current: a pin gives 20 mA happily and 40 mA at the very most. A loud buzzer needs a transistor.
- The long leg is +: a reversed active buzzer stays silent.
- Peel off the paper seal: it is there for the washing step when the board is made, and the buzzer is much louder without it.
- Check which one you have: active and passive buzzers look almost the same, and a passive one will not work with this sketch.
- Be kind to the neighbours: at close range, a small buzzer is surprisingly loud.
Troubleshooting
- No sound on the PC: check that the pop-up is not on Mute, that the volume property is above 0, and that your PC's sound is on. The rings show it sounding either way.
- REVERSED: swap + and -.
- TOO LOW: it needs 2 V, so a pin behind a large resistor will not do.
- The pop-up does not open: click the part while the simulation runs.
- The part is not simulated:
TEPBUZZER.DLLis missing from MODELS and from the project folder.
Limitations of the Simulation
- The sound on your PC follows the simulation, so it is only in step when Proteus runs in real time.
- The real sound pressure, the rise of the tone and the buzzer's own electrical noise on the supply are left out.
- Arduino is a name of Arduino; this library is not made or endorsed by Arduino or Labcenter.
- Tested in Proteus 8.5 in October 2026 (the demo as shipped). Proteus 7 is not supported.
So, that was all about the Active Buzzer Library for Proteus. I hope it gives your next project a voice, without a single wire on your bench. If you have any questions, ask in the comments and I will help you out. Till the next tutorial, take care and have fun!