Hello friends, I hope you all are doing great. Today, I am going to share the new Electrolytic Capacitor Library for Proteus. Open any power supply and you will see them standing in rows: little black cans with a white stripe down one side. Proteus has a capacitor of its own, drawn as two plates. Ours is the real can, at true scale, with the stripe, the legs and a live charge level that climbs its sleeve as it fills.
Electrolytic Capacitor Library for Proteus
Latest version: V1.0 (November 2026, this tutorial)
Other component libraries: C945 Transistor · PC817 Optocoupler · Relay Module · Resistor · 5 mm LED · Designer Colour LED · Push Button · Active Buzzer · Ceramic Capacitor · Tantalum Capacitor · Film Capacitor · 1N4007 Diode · Zener Diode · Schottky Diode · Supercapacitor · Photodiode · RGB LED · Bridge Rectifier · Flashing LED · Bi-Colour LED · SMD LED · Slide Switch · Toggle Switch · Rocker Switch · Micro Limit Switch · Emergency Stop Switch · SMD Resistor · Power Resistor · Resistor Network · Potentiometer · Trimmer Potentiometer · Slide Potentiometer · NTC Thermistor · DIP Switch · Fuse · Passive Buzzer · Mini Speaker · 7-Segment Display · LED Bar Graph · IR / UV LED · Small Transistors · TIP122 Darlington · N-MOSFET · P-MOSFET · PC817 Optocoupler · Filament Bulb · Power LED · Voltage Regulator · SCR and TRIAC · Inductor · Toroid Inductor · Crystal
Helping Tools
- Serial Monitor Advance: a serial terminal window for the UART of your board
- Serial Monitor Expert: the serial monitor with extra debugging tools
- LCD Library for Proteus V3.0: 16x2, 20x4 and I2C LCDs to show your readings
It behaves like the real part too. It charges on the true curve, it stores energy, and it holds that energy after the supply is gone. Like a real electrolytic it is polarised, so if you connect it backwards it heats up and vents. For the demo we use an Arduino to measure a time constant, and then we blow up a capacitor on purpose, which is far cheaper here than on your bench.
NOTICE: Our team has put a lot of effort into these small parts: the bodies, the animation and the pop-ups are all our own design, and you get them free. Your feedback is the fuel that keeps us going, so please tell us what you think in the comments below or in the Electrolytic Capacitor board of our forum. And if our free libraries help you, you can buy us a coffee. So, let's get started with the Electrolytic Capacitor Library for Proteus:
What is an Electrolytic Capacitor?
A capacitor stores electric charge. It is two conductors, the plates, with a thin insulator between them. The closer the plates and the larger they are, the more it stores. An electrolytic capacitor takes that idea to the limit. One plate is a long strip of etched aluminium, rolled up tight, which gives a huge surface in a small can. The insulator is an oxide layer on that strip, thinner than anything you could make by hand. The other plate is a liquid, the electrolyte.
That is how a small can reaches hundreds of microfarads. There is a price to pay, though. The oxide layer is grown by the voltage itself, so it only works one way round. Reverse the voltage and the layer breaks down, the part heats, the electrolyte boils and the pressure has to go somewhere. That is why real cans have a scored cross on the top: it is a safety vent, designed to split open.
| Feature | The real part | In the library |
|---|---|---|
| Size | 6.3 x 11 mm radial can | 265 x 460 thou, true scale |
| Legs | 2.5 mm apart, long leg + | 100 thou apart |
| Value | from 1 uF to thousands | 100 uF by default, any value |
| Voltage rating | 6.3 V to 450 V | 16 V by default |
| Polarity | the stripe marks the negative leg | the same, and it vents if reversed |
Where Electrolytic Capacitors Are Used
Their big value for a small price decides where they go. The most common job is smoothing: after a rectifier, the voltage comes in bumps, and a large capacitor fills the gaps between them. They also sit beside regulators and motor drivers, where they supply sudden demands for current that the long wires from the supply cannot. In audio amplifiers they pass the music from one stage to the next while blocking the steady voltage. On an Arduino UNO you will find them next to the voltage regulator, doing exactly this kind of smoothing.
Reading the Markings
The sleeve of a real can tells you almost everything. A print of 100 uF 16 V gives the value and the highest working voltage. A figure such as 105 C is the temperature it is rated for, and a part rated higher usually lasts longer in a warm box. The white stripe, with its row of minus signs, marks the negative leg. A new part has one leg longer than the other, and that long leg is the positive one.
The Three Sums
Three small formulas cover nearly everything you will do with a capacitor:
| Sum | Formula | What it tells you |
|---|---|---|
| Charge | Q = C x V | the charge grows with the voltage |
| Energy | E = C x V x V / 2 | twice the voltage holds four times the energy |
| Time constant | T = R x C | how quickly it charges through a resistor |
The Time Constant
Charge a capacitor through a resistor and the voltage does not rise in a straight line. At first the capacitor is empty and the current is large, so it fills quickly. As the voltage rises the current falls, and it fills more and more slowly. The curve has a neat property: in one time constant, R x C, the capacitor reaches 63 % of the supply. After five time constants it is as good as full. This is how the humble RC circuit sets delays, filters noise and smooths power supplies.
| Time | Share of the supply | From 5 V |
|---|---|---|
| 1 x R x C | 63.2 % | 3.16 V |
| 2 x R x C | 86.5 % | 4.32 V |
| 3 x R x C | 95.0 % | 4.75 V |
| 4 x R x C | 98.2 % | 4.91 V |
| 5 x R x C | 99.3 % | 4.97 V |
Why such an odd number as 63 %? In each time constant, the capacitor covers the same share of whatever voltage is still missing. That share works out at 1 - 1/e, which is 0.632. So the gap to the supply shrinks by the same factor again and again, and in theory it never quite closes. In practice, five time constants is treated as full.
What is ESR?
A real capacitor has a little resistance in series with it, from its foil and electrolyte. This is the equivalent series resistance, or ESR. It limits the first rush of current, and it turns ripple current into heat. An old capacitor dries out and its ESR rises, which is one of the most common faults in old power supplies. Our part has an ESR of 0.5 ohm by default, and you can change it.
Features of the Electrolytic Capacitor Library for Proteus
- The real look, at true scale: the black sleeve, the white minus stripe, the groove, the silver top and two thin legs, with our small TEP signature.
- A live charge level: a blue bar climbs the sleeve as it charges, and turns red over its rating.
- A true capacitor: a capacitance behind an ESR in the analog simulator, so it charges on the real curve and holds its charge.
- It is polarised: reversed or over its voltage it heats, and past its limit the can vents and opens.
- A pop-up for every part: click it at Run for the charge, the stored energy, eight live values, graphs, an event log and a check page.
- Live changes: step the value through the E6 series while it runs, or discharge it by hand.
- A complete package: about 1.5 MB with the library, our Arduino UNO V4.0, the demo's resistors and the demo, without the source code of the models.
The Electrolytic Capacitor in Proteus
The device is CAPELECTROTEP in TEPELECTRO.LIB, under Capacitors, Radial Electrolytic, with the prefix C and the model TEPELECTRO.DLL. Search CAPELECTRO in Pick Devices. The pins are + and -, 100 thou apart, and the stripe is on the minus side.
The Properties
| Property | What it does |
|---|---|
| Capacitance | the value: 100u, 4u7 or 1000u; a bare number is in uF |
| Voltage rating, V | the working voltage, 16 by default |
| Series resistance (ESR), ohm | 0.5 ohm by default |
Download Electrolytic Capacitor Library for Proteus
Click the button below to download Electrolytic-Capacitor-Library-for-Proteus-v1.0.zip (about 1.5 MB, without the source code of the models):
Electrolytic Capacitor Library for Proteus V1.0- README.txt: installation, the demo, the properties, troubleshooting and the limits.
- Proteus Library Files:
TEPELECTRO.LIB,TEPRESISTOR.LIBand ourArduinoV4TEP.LIB. - Proteus Model Files:
TEPELECTRO.DLL,TEPRESISTOR.DLLandTEPARDUINO.DLL. - Arduino Code: the demo sketch.
- Proteus Simulation: the demo project, its HEX file and copies of the DLLs.
No Proteus yet? Read How to Download and Install Proteus 7 and 8. New to libraries? Follow How to Install a New Library in Proteus.
How to Install Electrolytic Capacitor Library for Proteus
- Close Proteus and extract the whole zip file, for example to your Desktop.
- Copy the files from Proteus Library Files into the LIBRARY folder of Proteus.
- Copy the files from Proteus Model Files into the MODELS folder.
- Delete
TEPELECTRO.IDXfrom the LIBRARY folder if it is there. - Start Proteus, press P and search for CAPELECTRO.
Demo: an RC Timer and a Warning
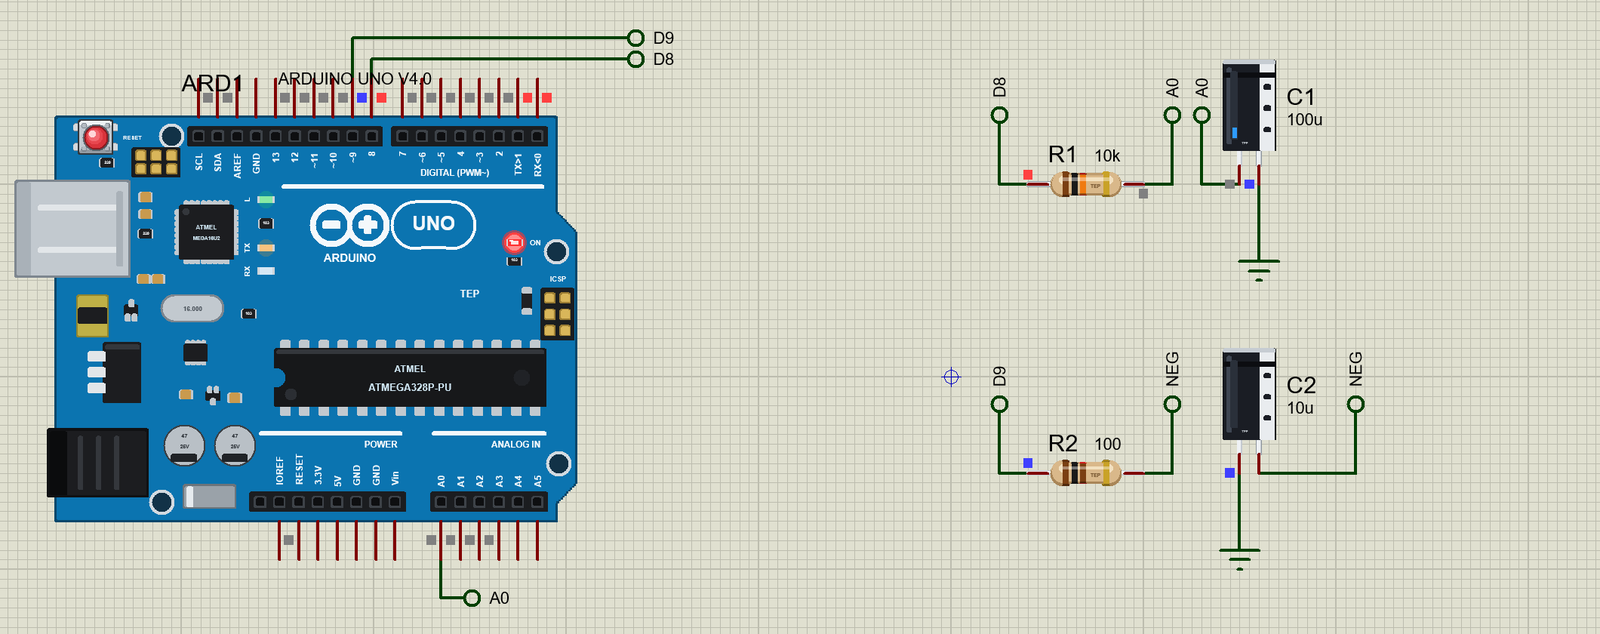
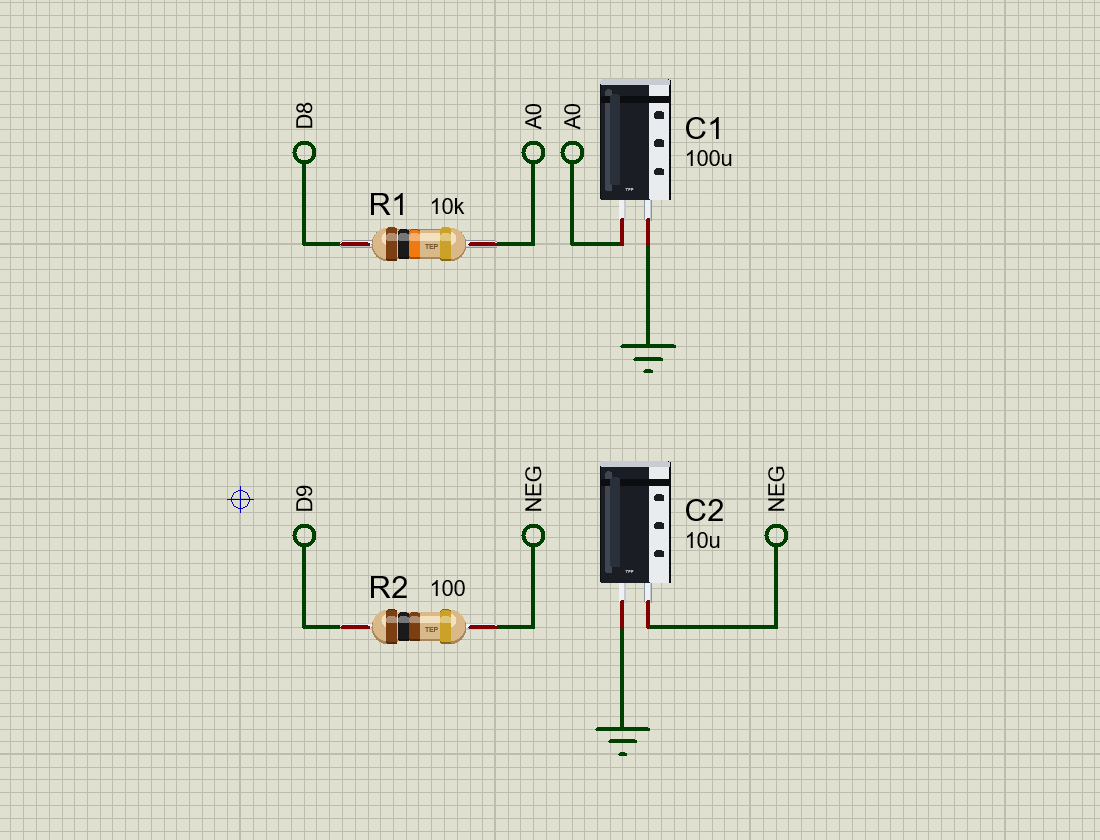
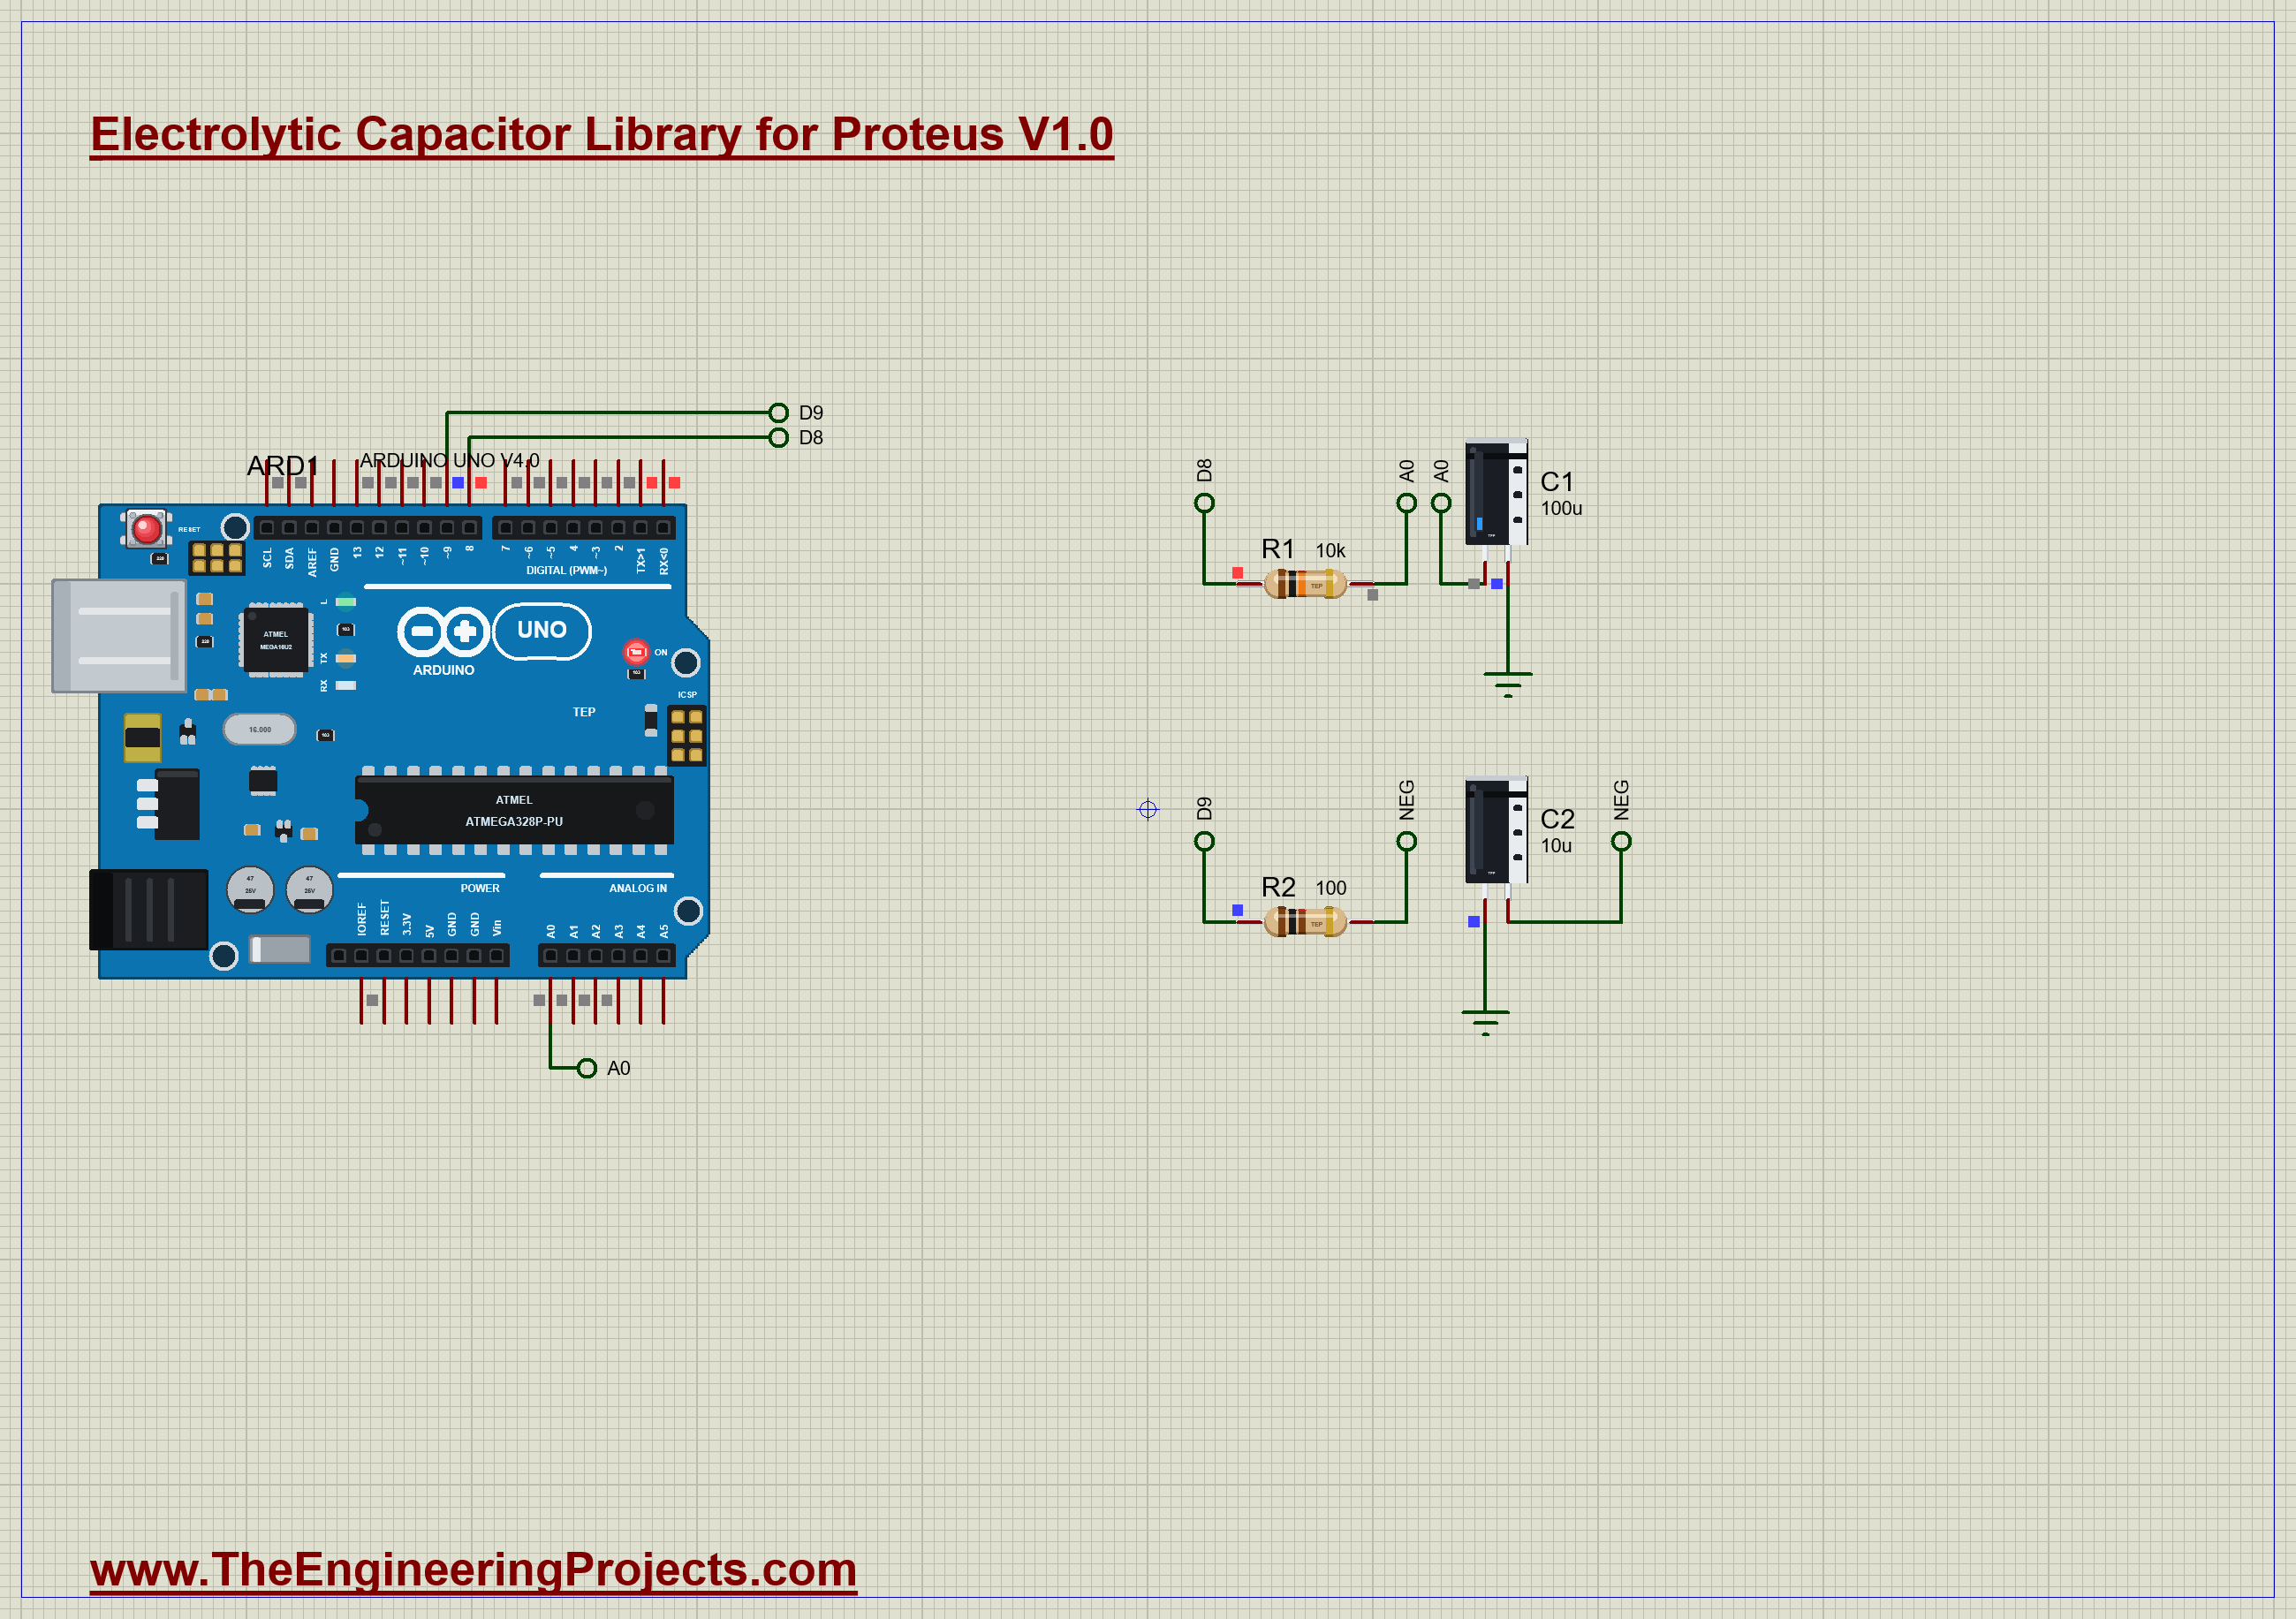
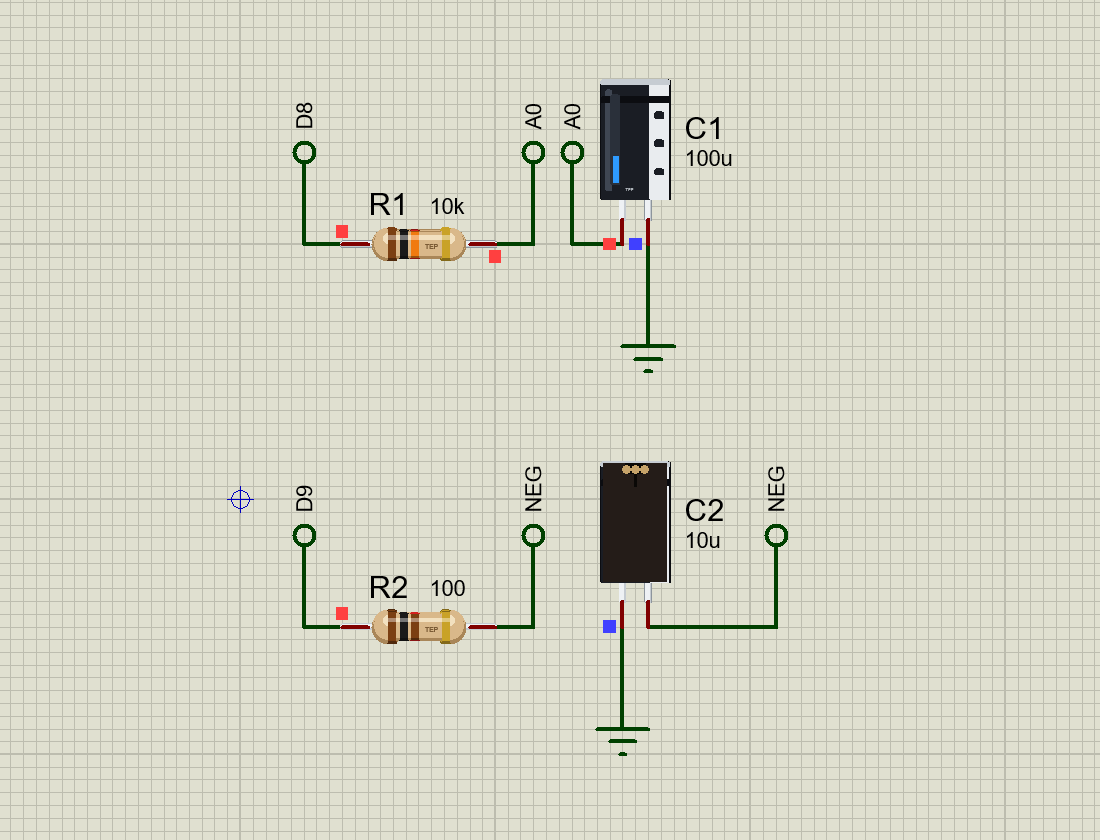
The demo has two halves. R1 and C1 make an RC timer. With 10k and 100 uF, the time constant should be 10,000 x 0.0001 = 1 second, and the Arduino measures it. R2 and C2 are the warning: C2 stands the wrong way round, ready for the moment we send it 5 V backwards. Open Electrolytic-RC-Timer-ArduinoUnoV4.pdsprj. It runs on our Arduino UNO Library for Proteus V4.0, with its built-in monitor, the same window as our TEP Serial Monitor Advance for Proteus. The resistors are the parts from our Resistor Library for Proteus.
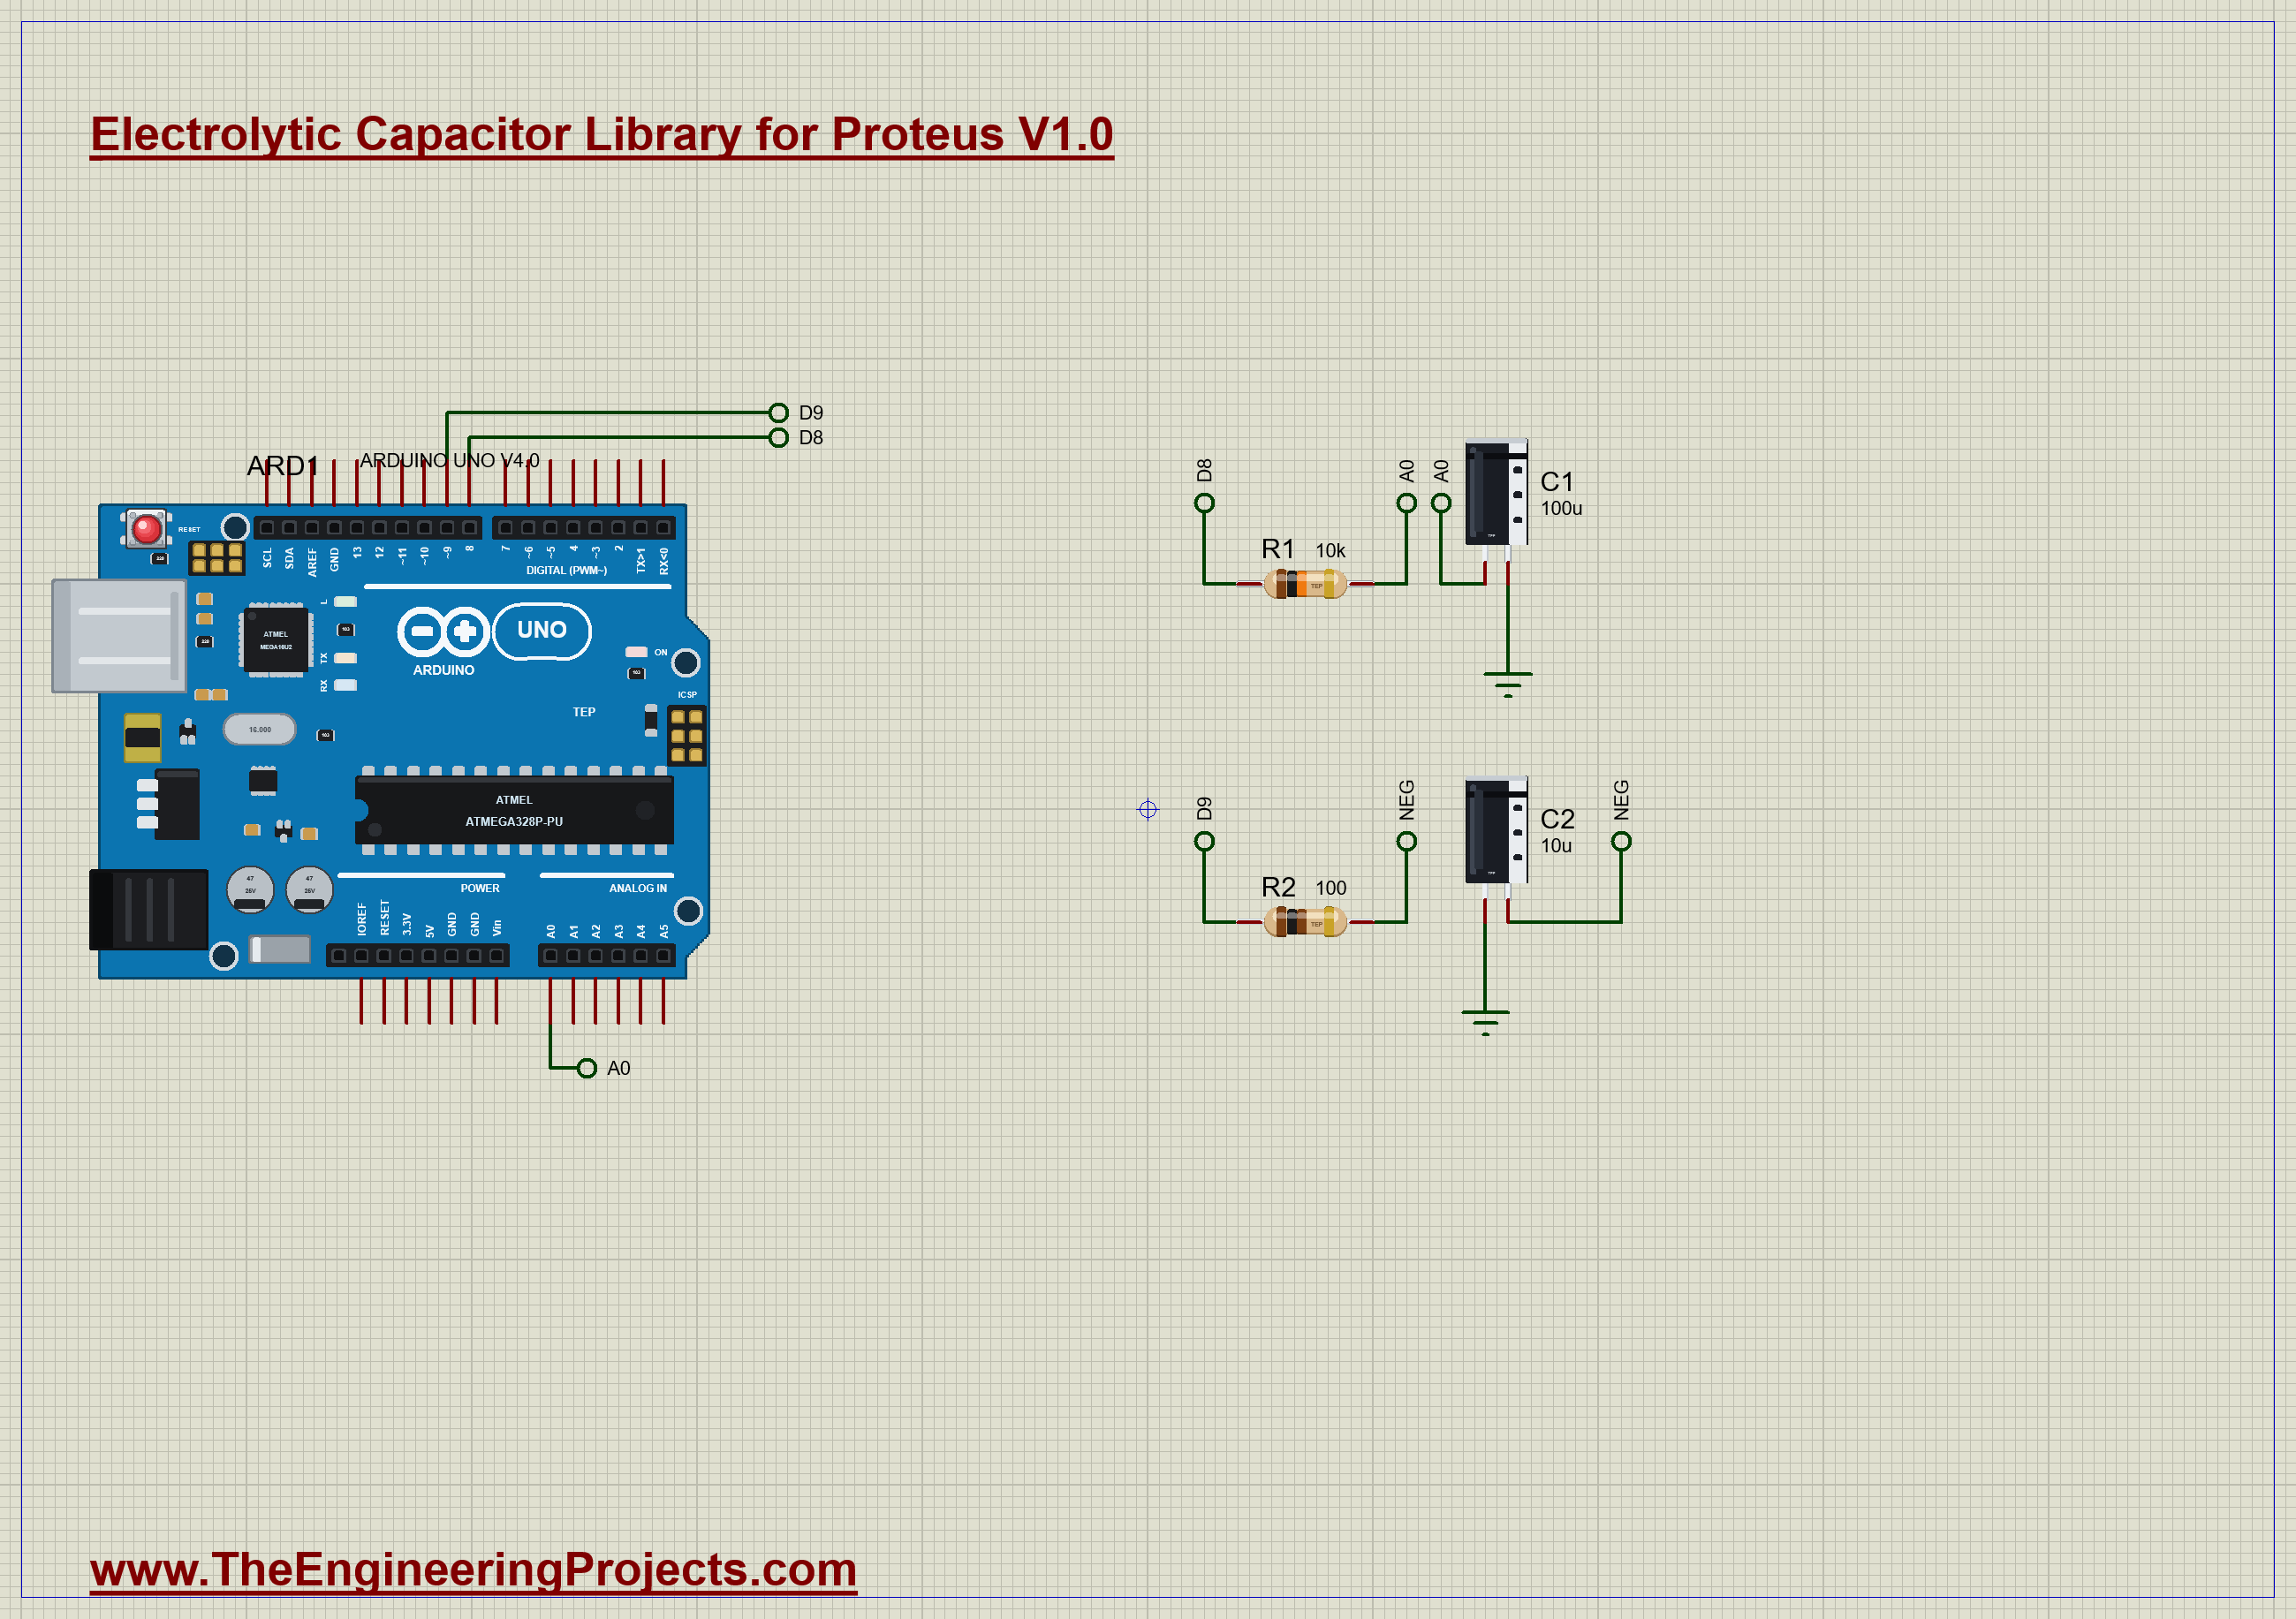
| Part | Connection | Job |
|---|---|---|
| R1 | D8 to A0, 10k | charges C1 |
| C1 | A0 to GND, 100 uF | the timer |
| R2 | D9 to C2, 100 ohm | limits the current |
| C2 | - on R2, + on GND, 10 uF | the reversed part |
Timing the Charge
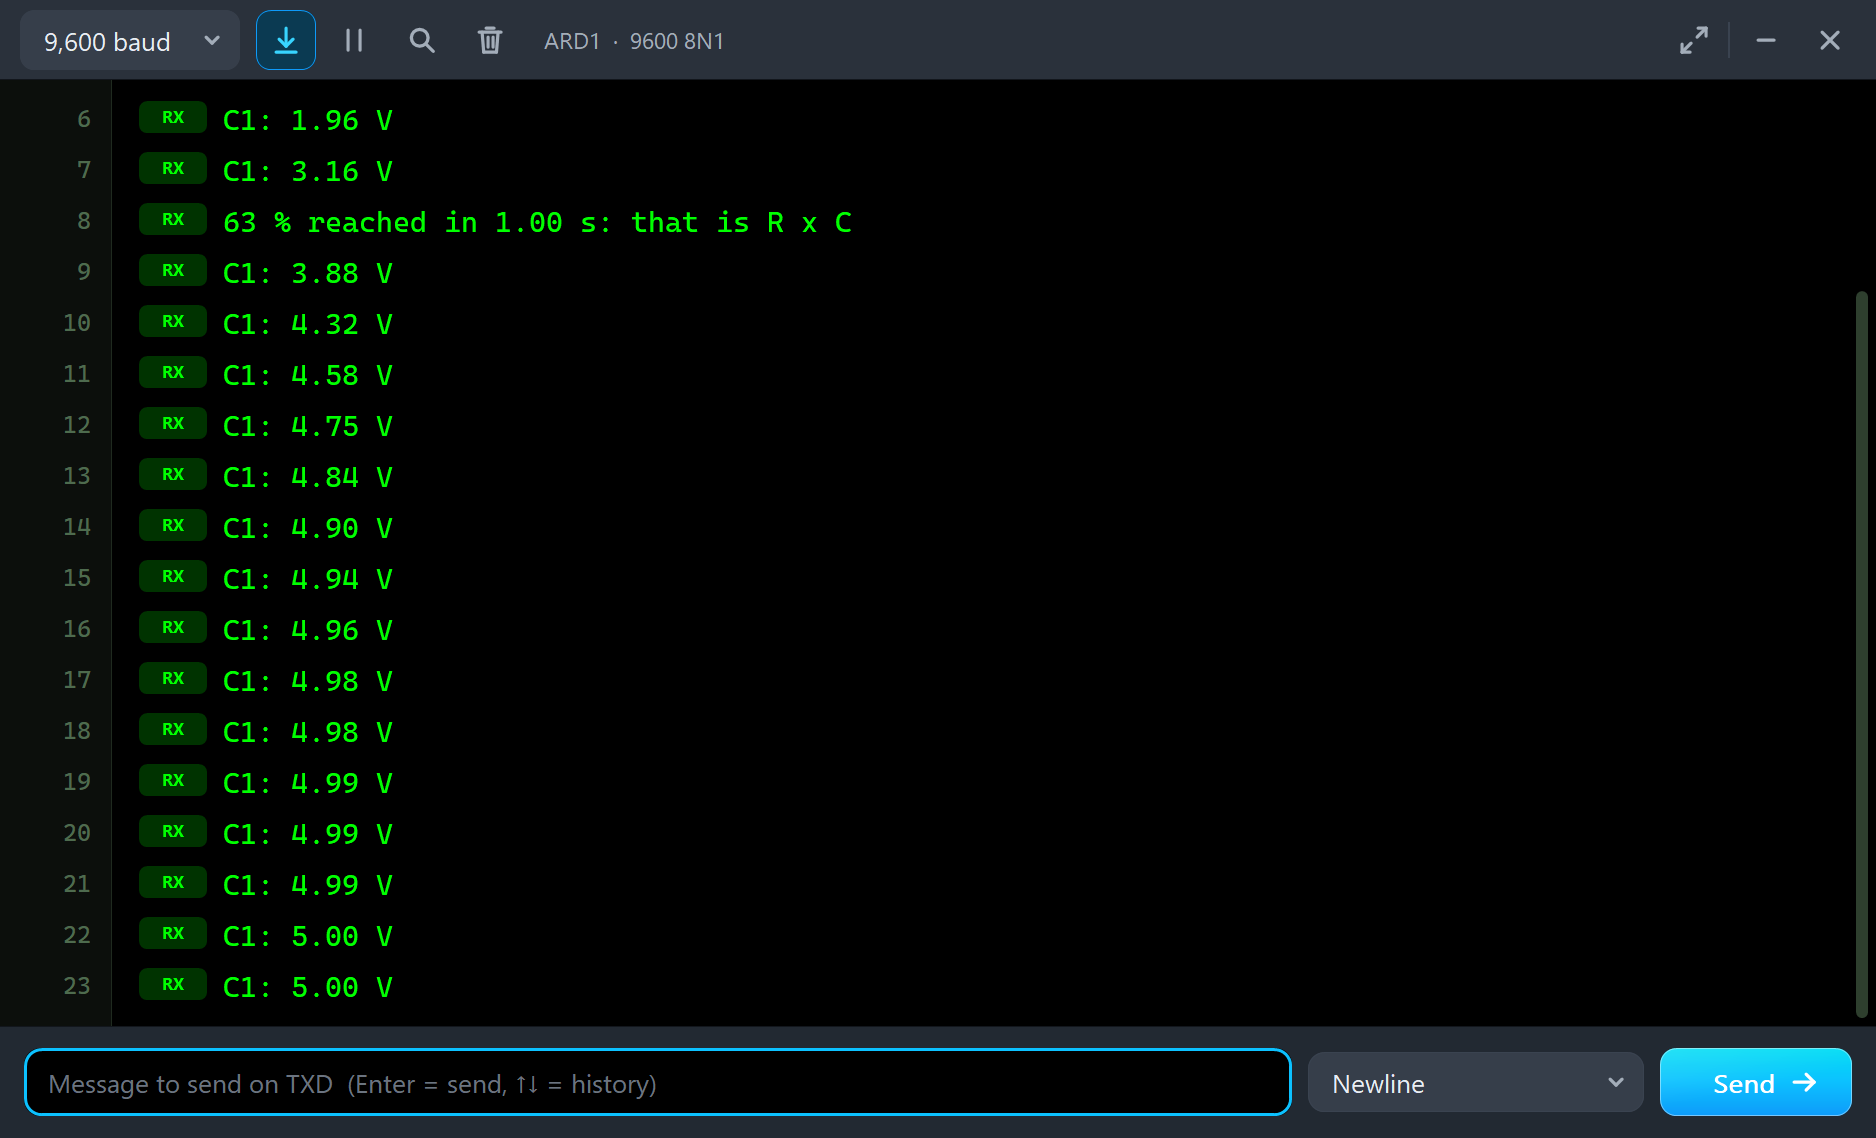
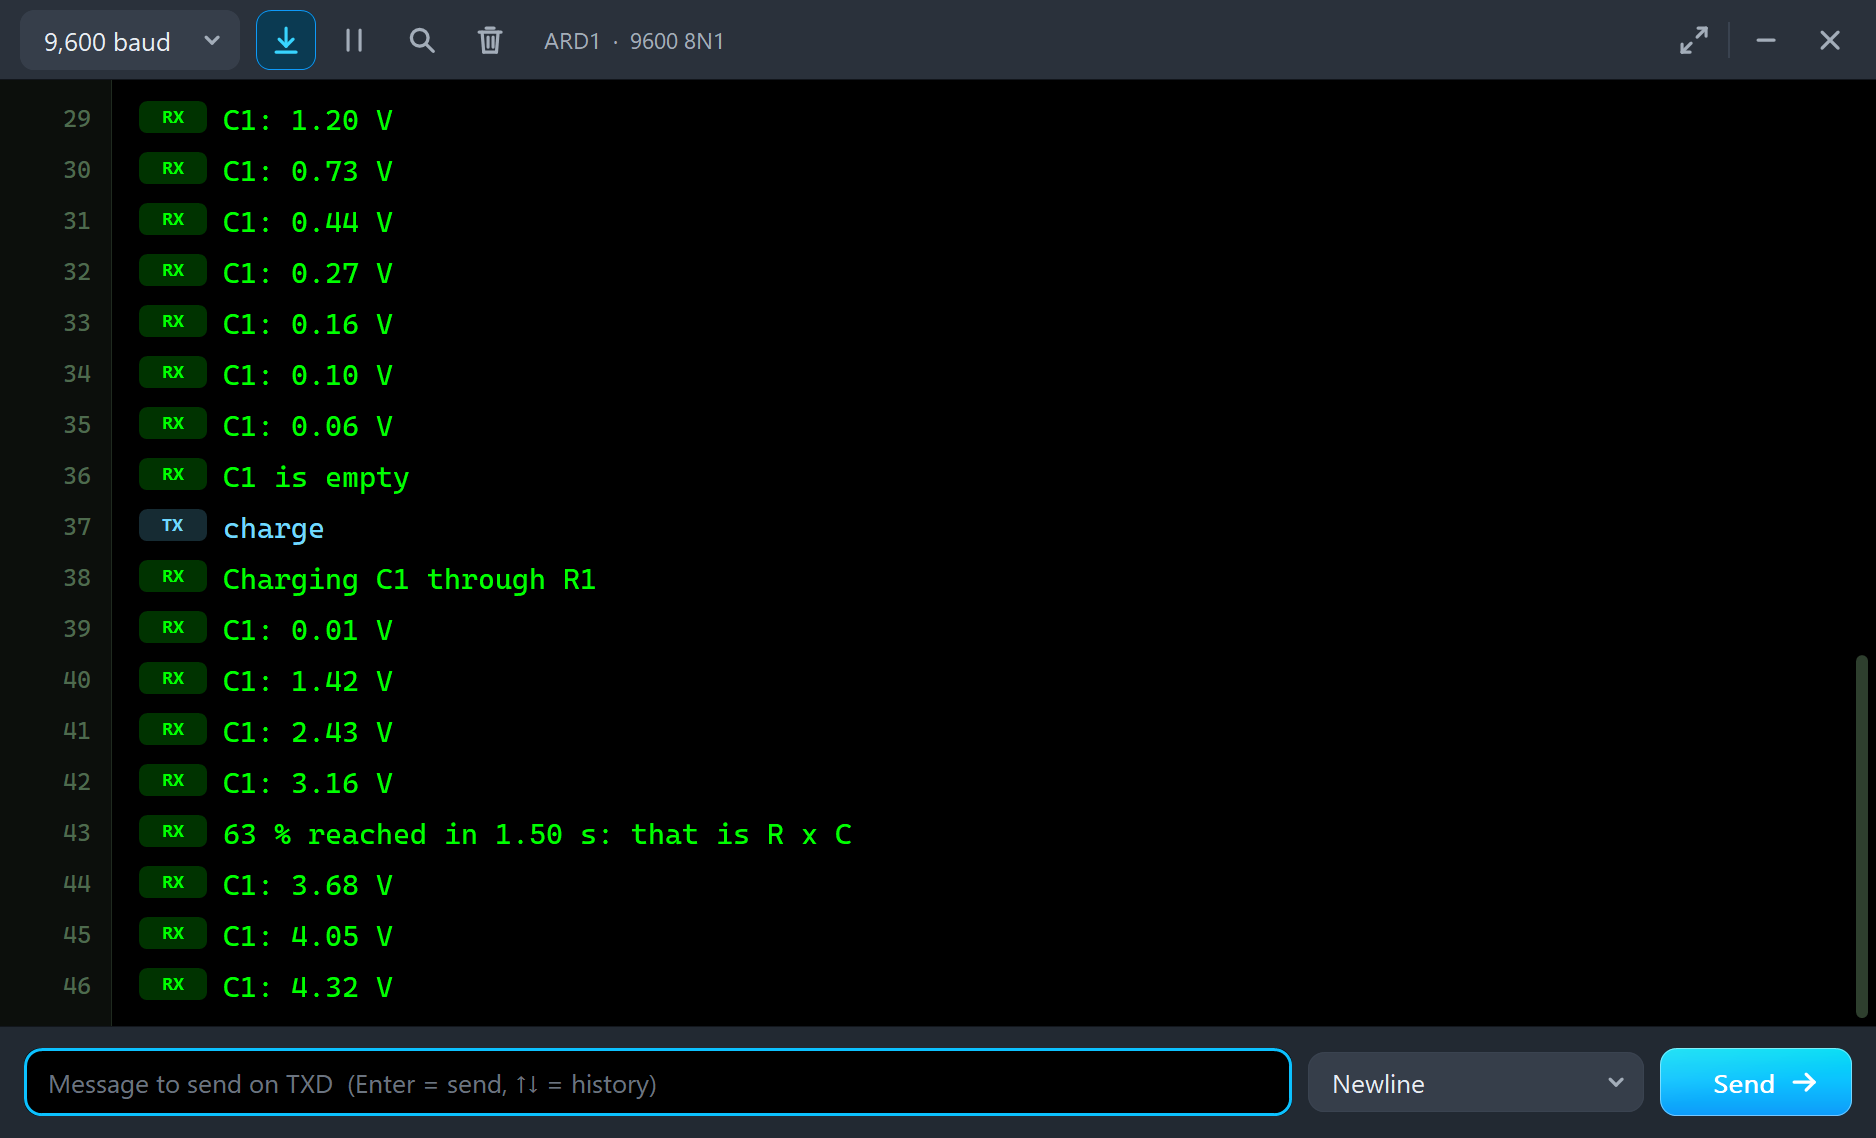
The sketch charges C1 from D8 and watches the voltage on A0. It knows that 63.2 % of 5 V is 3.16 V, so it simply notes the time when the voltage gets there:
  if (step == TIMING && volts >= TARGET) {
    Serial.print(F("63 % reached in "));
    Serial.print((now - startedAt) / 1000.0, 2);
    Serial.println(F(" s: that is R x C"));
    step = FILLING;
  }
Notice that the sketch discharges through the same resistor, simply by taking D8 LOW. A pin can both give and take current, so one resistor does both jobs.
The Commands
| Type this | What happens |
|---|---|
| charge | D8 goes HIGH, and the sketch times C1 |
| discharge | D8 goes LOW, and C1 empties through R1 |
| reverse | D9 goes HIGH: 5 V across C2 the wrong way |
| safe | D9 goes LOW again |
Run the Demo
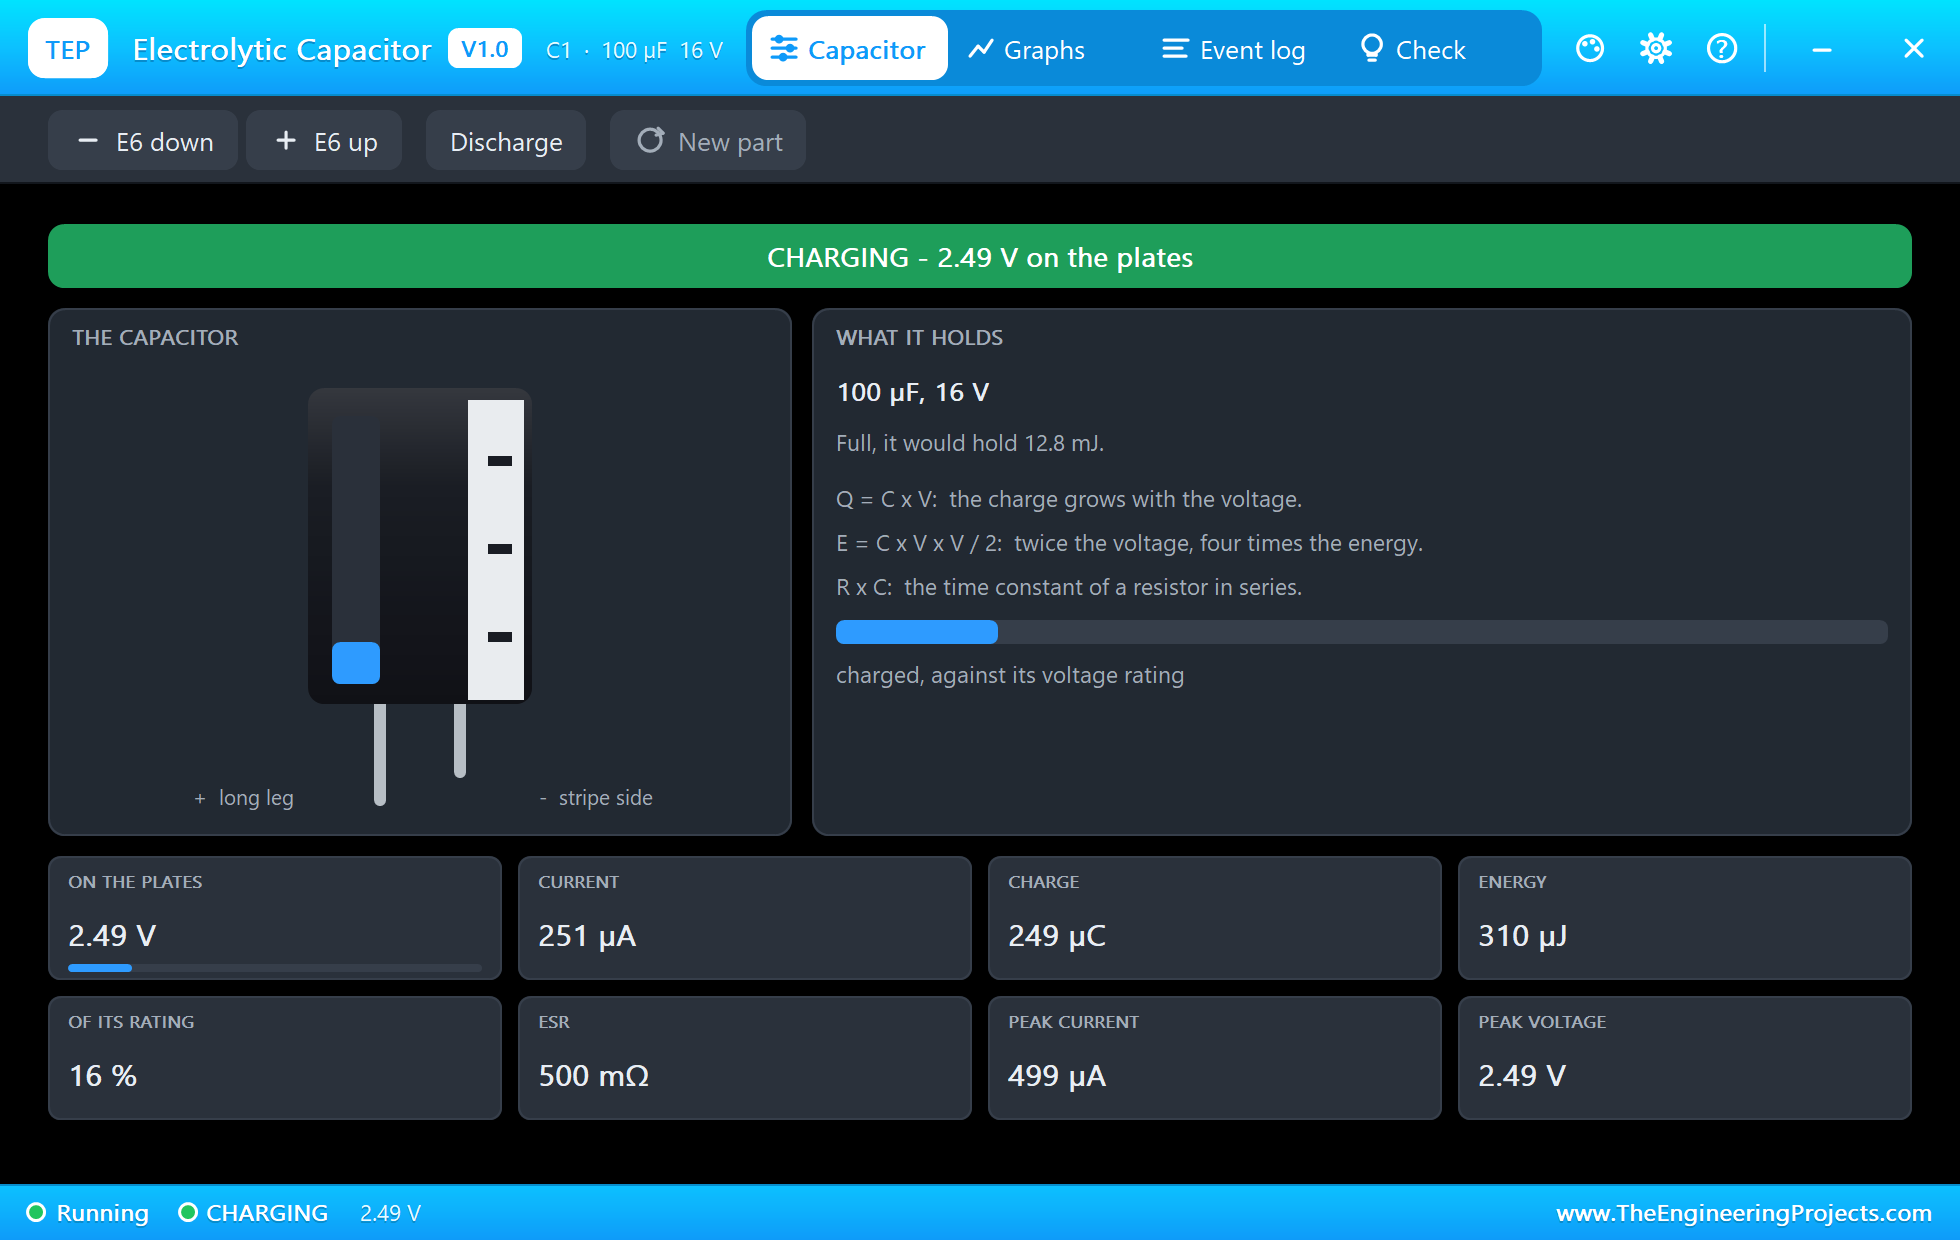
Press Run, then type charge in the monitor and press Send. The blue level starts to climb the sleeve of C1. Click the can to open its pop-up. A sheet can hold a lot of capacitors, so the pop-ups stay closed until you ask for one:
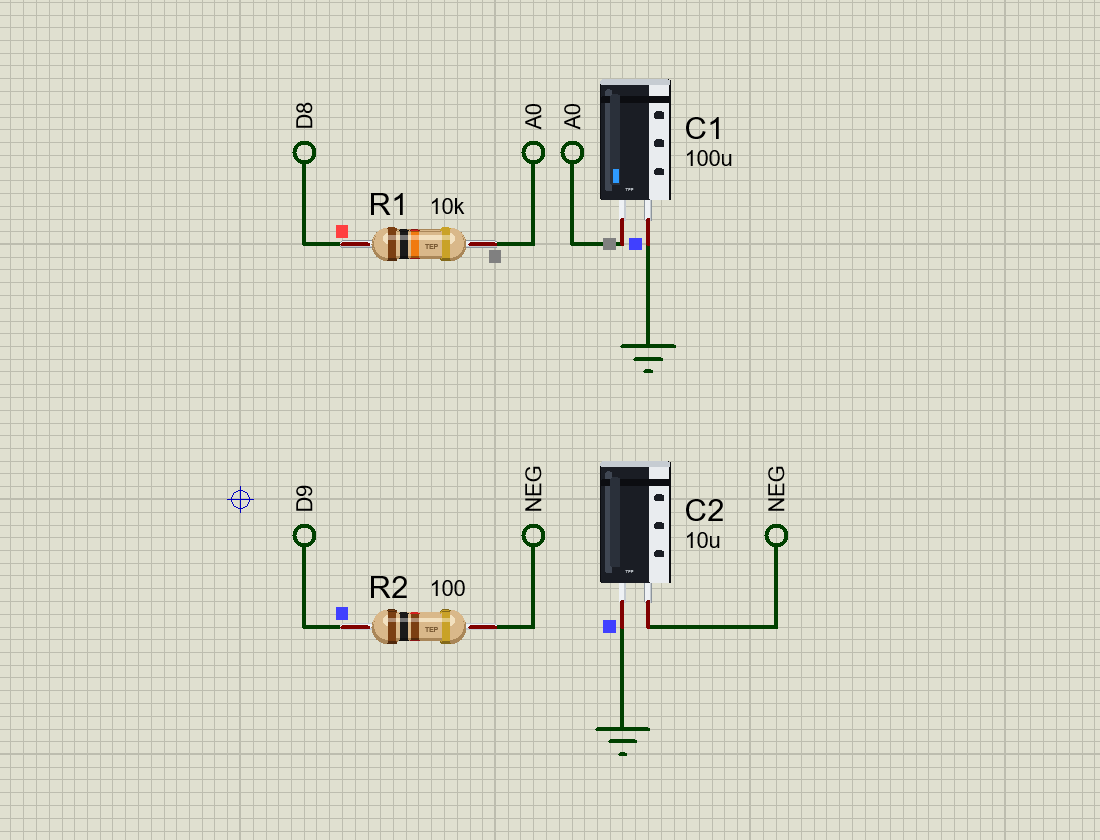
Here is the complete circuit, truly running:
The monitor reports the time to 63 %, and it is very close to the 1 second we worked out:
The Curve
The Graphs tab shows that famous curve, with the voltage rising fast and then slowing down, and the current falling away as the capacitor fills:
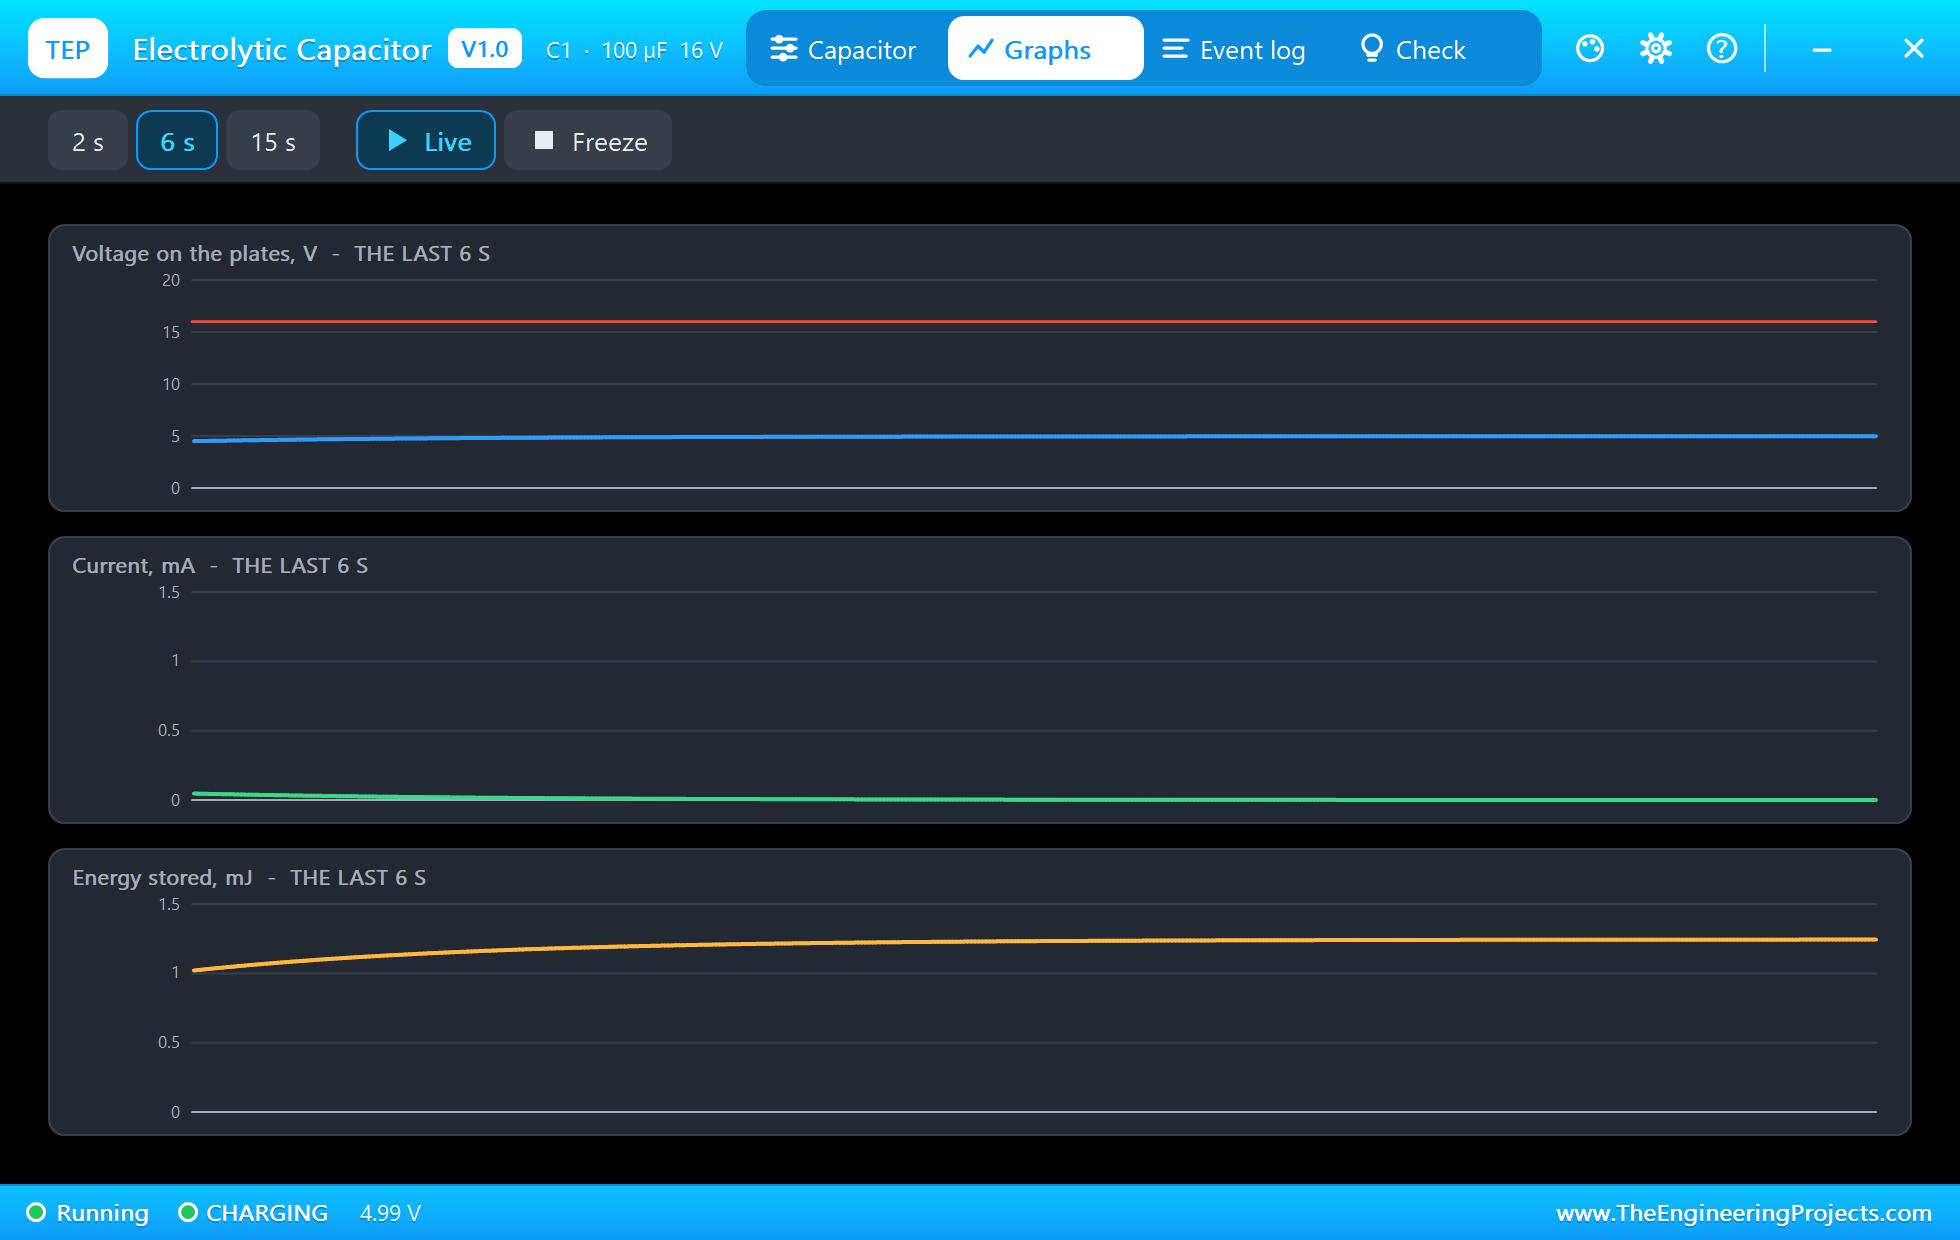
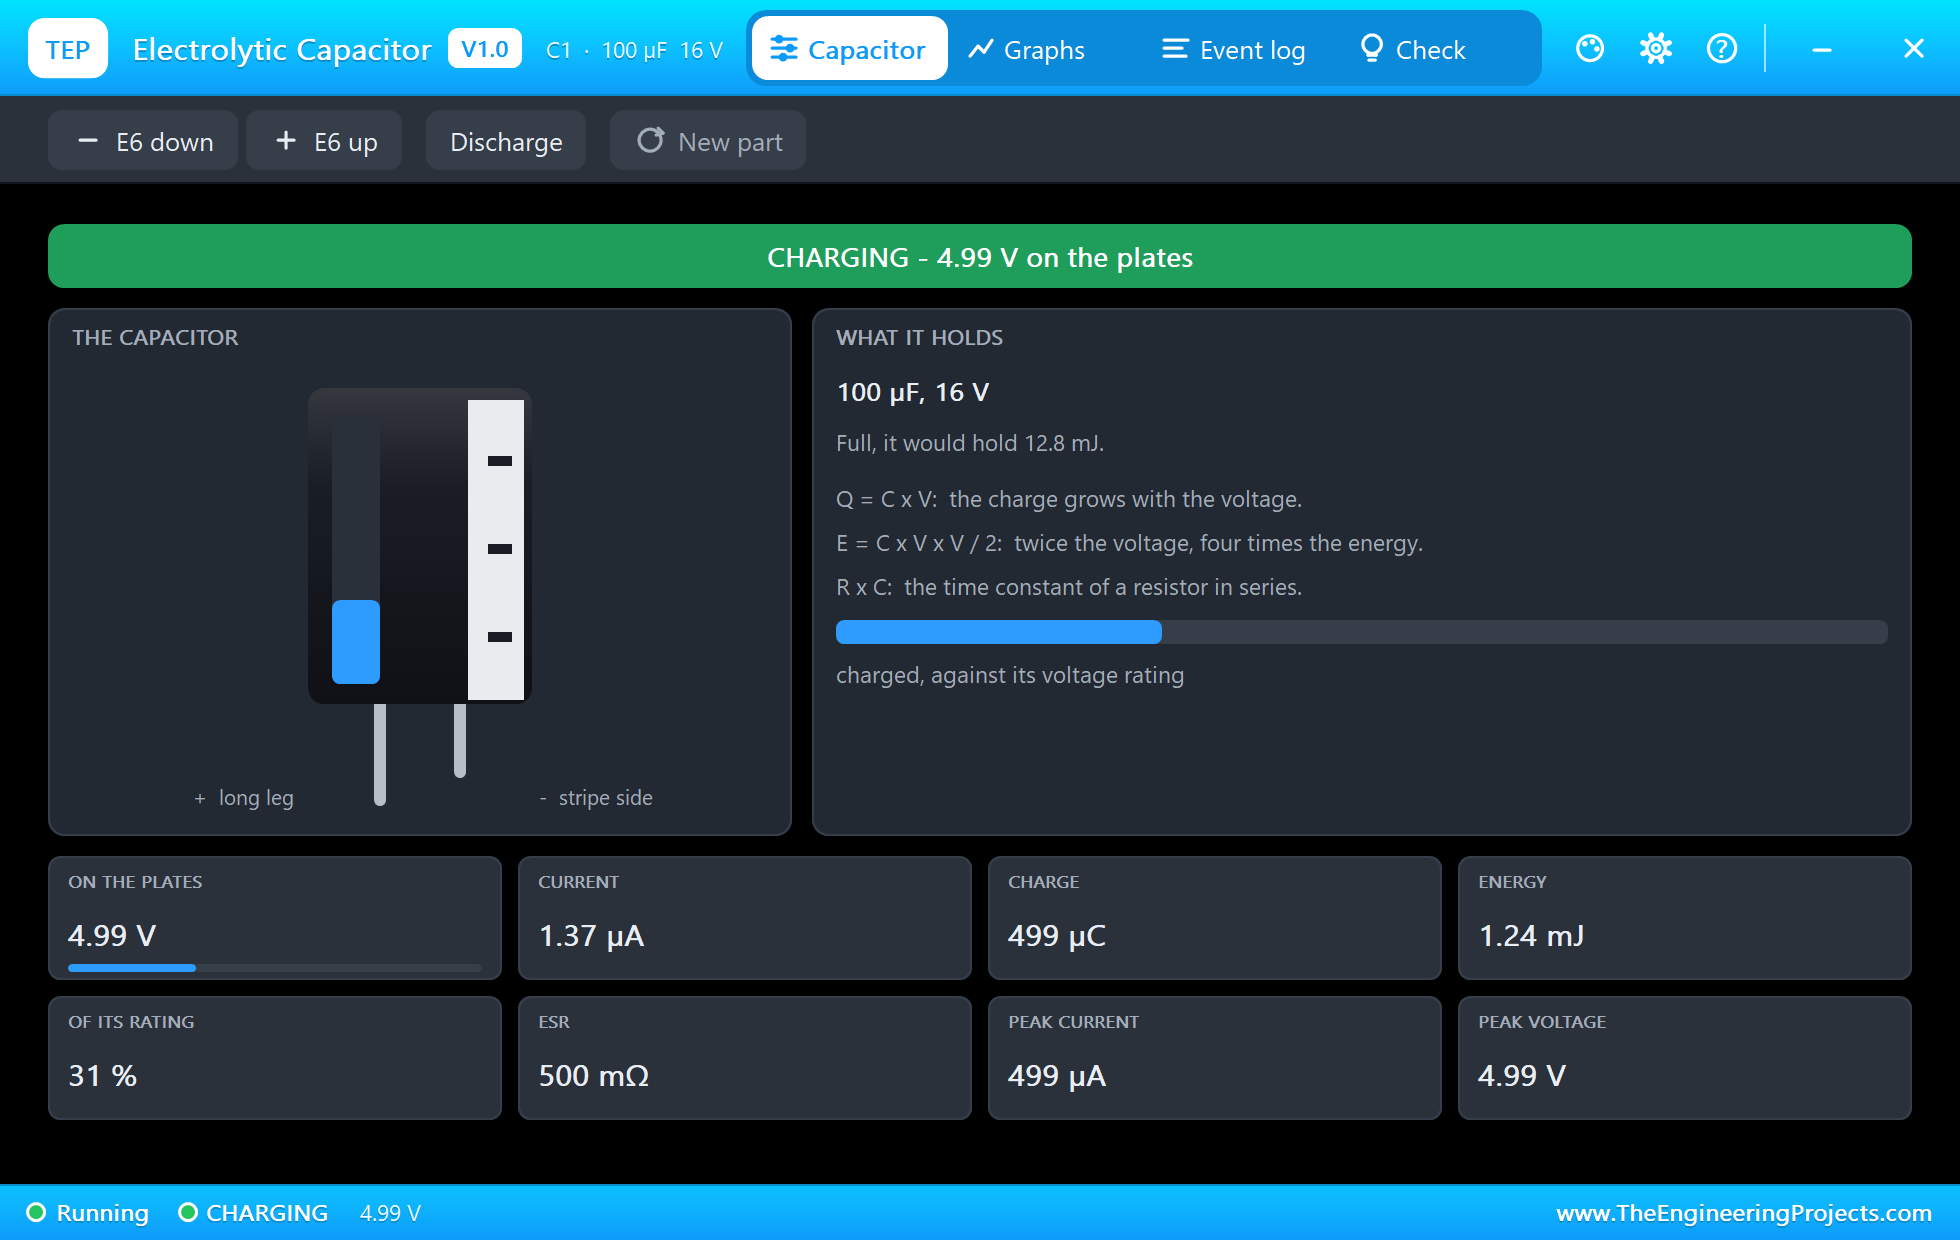
Those numbers are easy to check by hand. With 100 uF at 4.98 V, E = 0.0001 x 4.98 x 4.98 / 2, which is 1.24 mJ, the same as the pop-up shows. That sounds tiny, and it is. Now look at the top of the Capacitor tab, which works out what the same part would hold at its full 16 V: 12.8 mJ, about ten times as much for roughly three times the voltage. This is why energy storage circuits run their capacitors as near to the rating as they safely can.
Change the Value
Type discharge and watch it empty on the same curve, upside down. Now press E6 up on the pop-up. C1 becomes 150 uF, and R x C is now 1.5 seconds. Type charge again, and the monitor reports the longer time:
Now the Warning
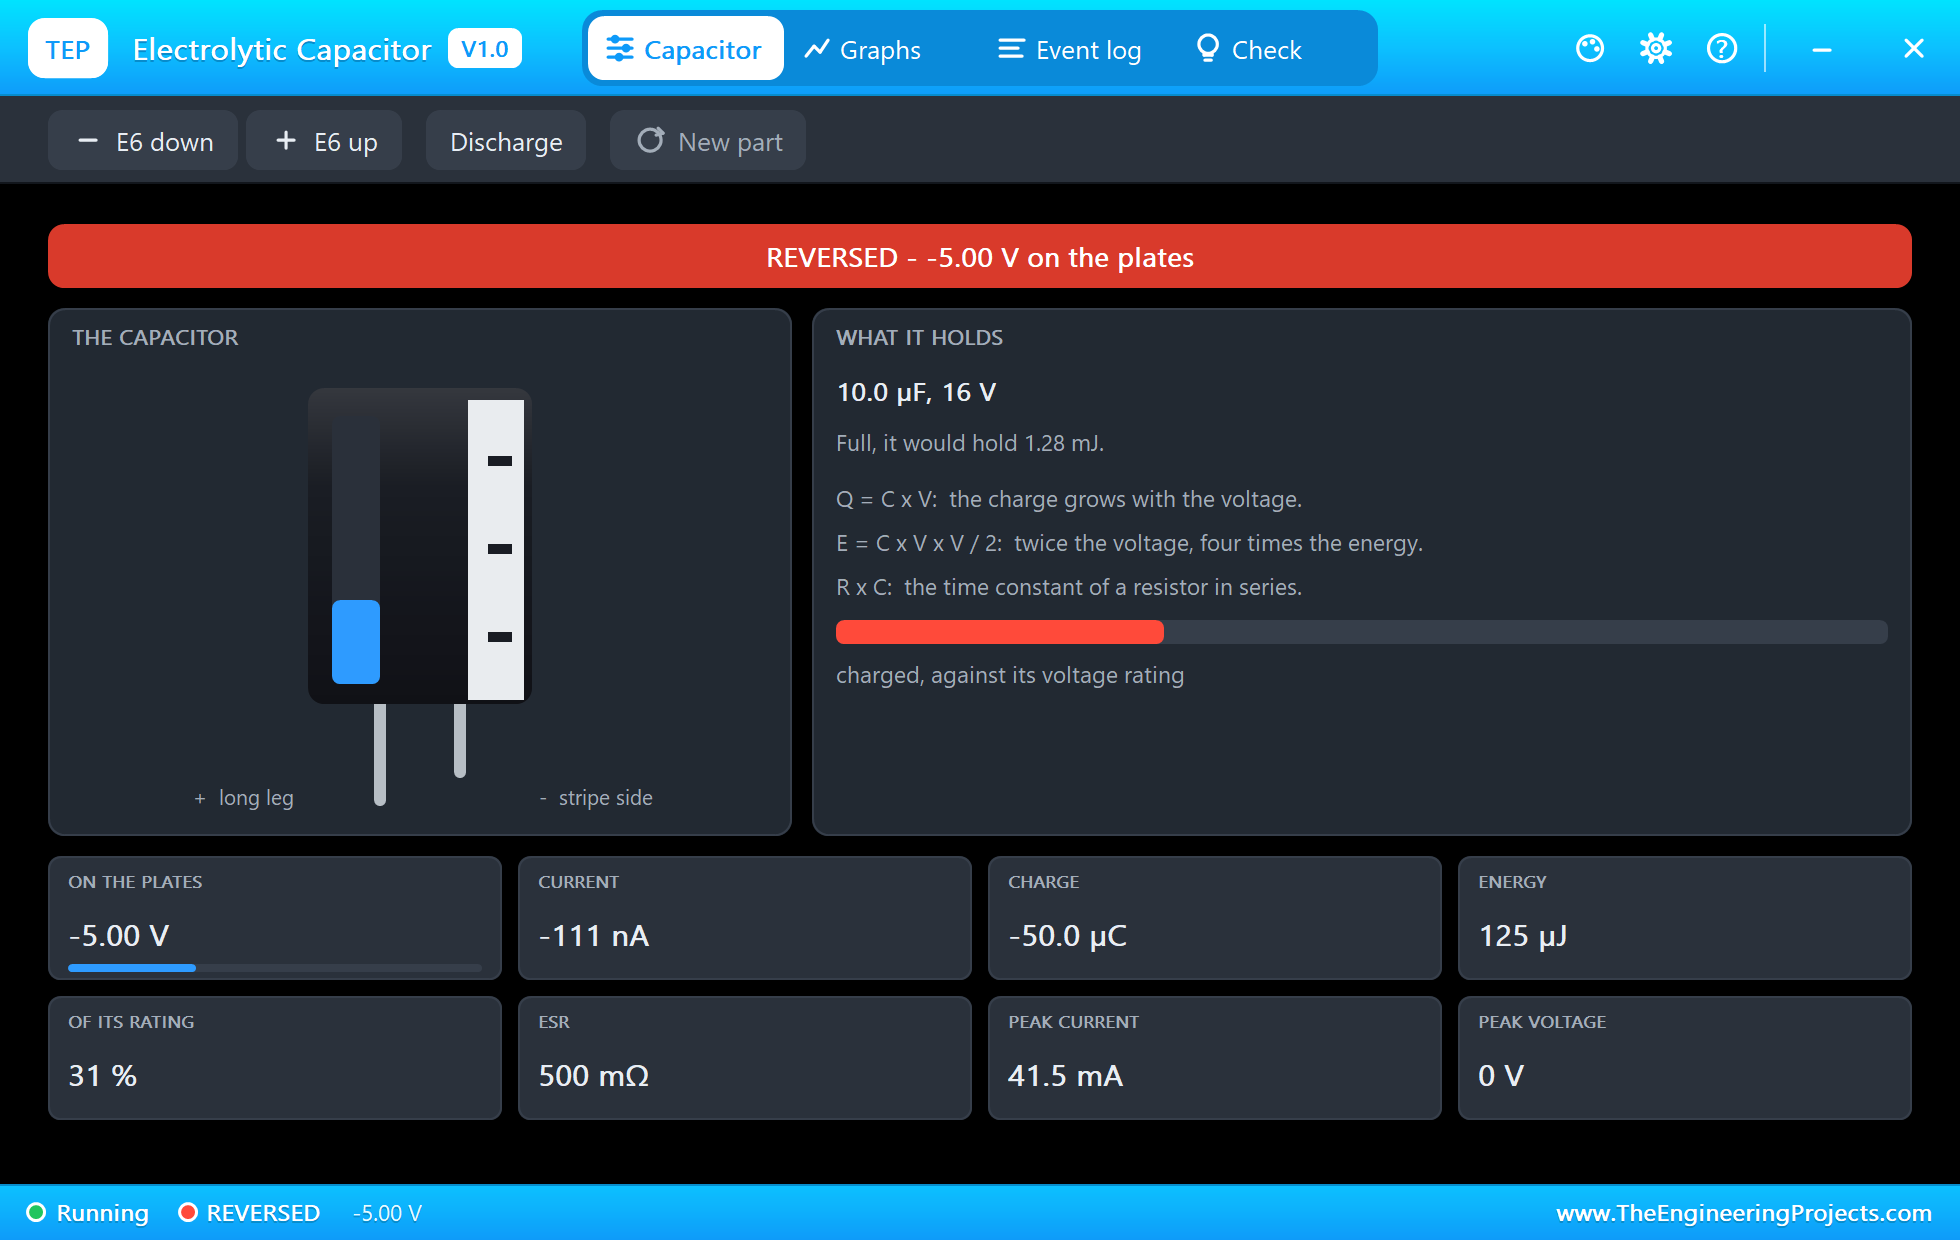
Type reverse. D9 goes HIGH, and C2 sees 5 V the wrong way round. On a real bench this is when you step back. The banner turns red straight away:
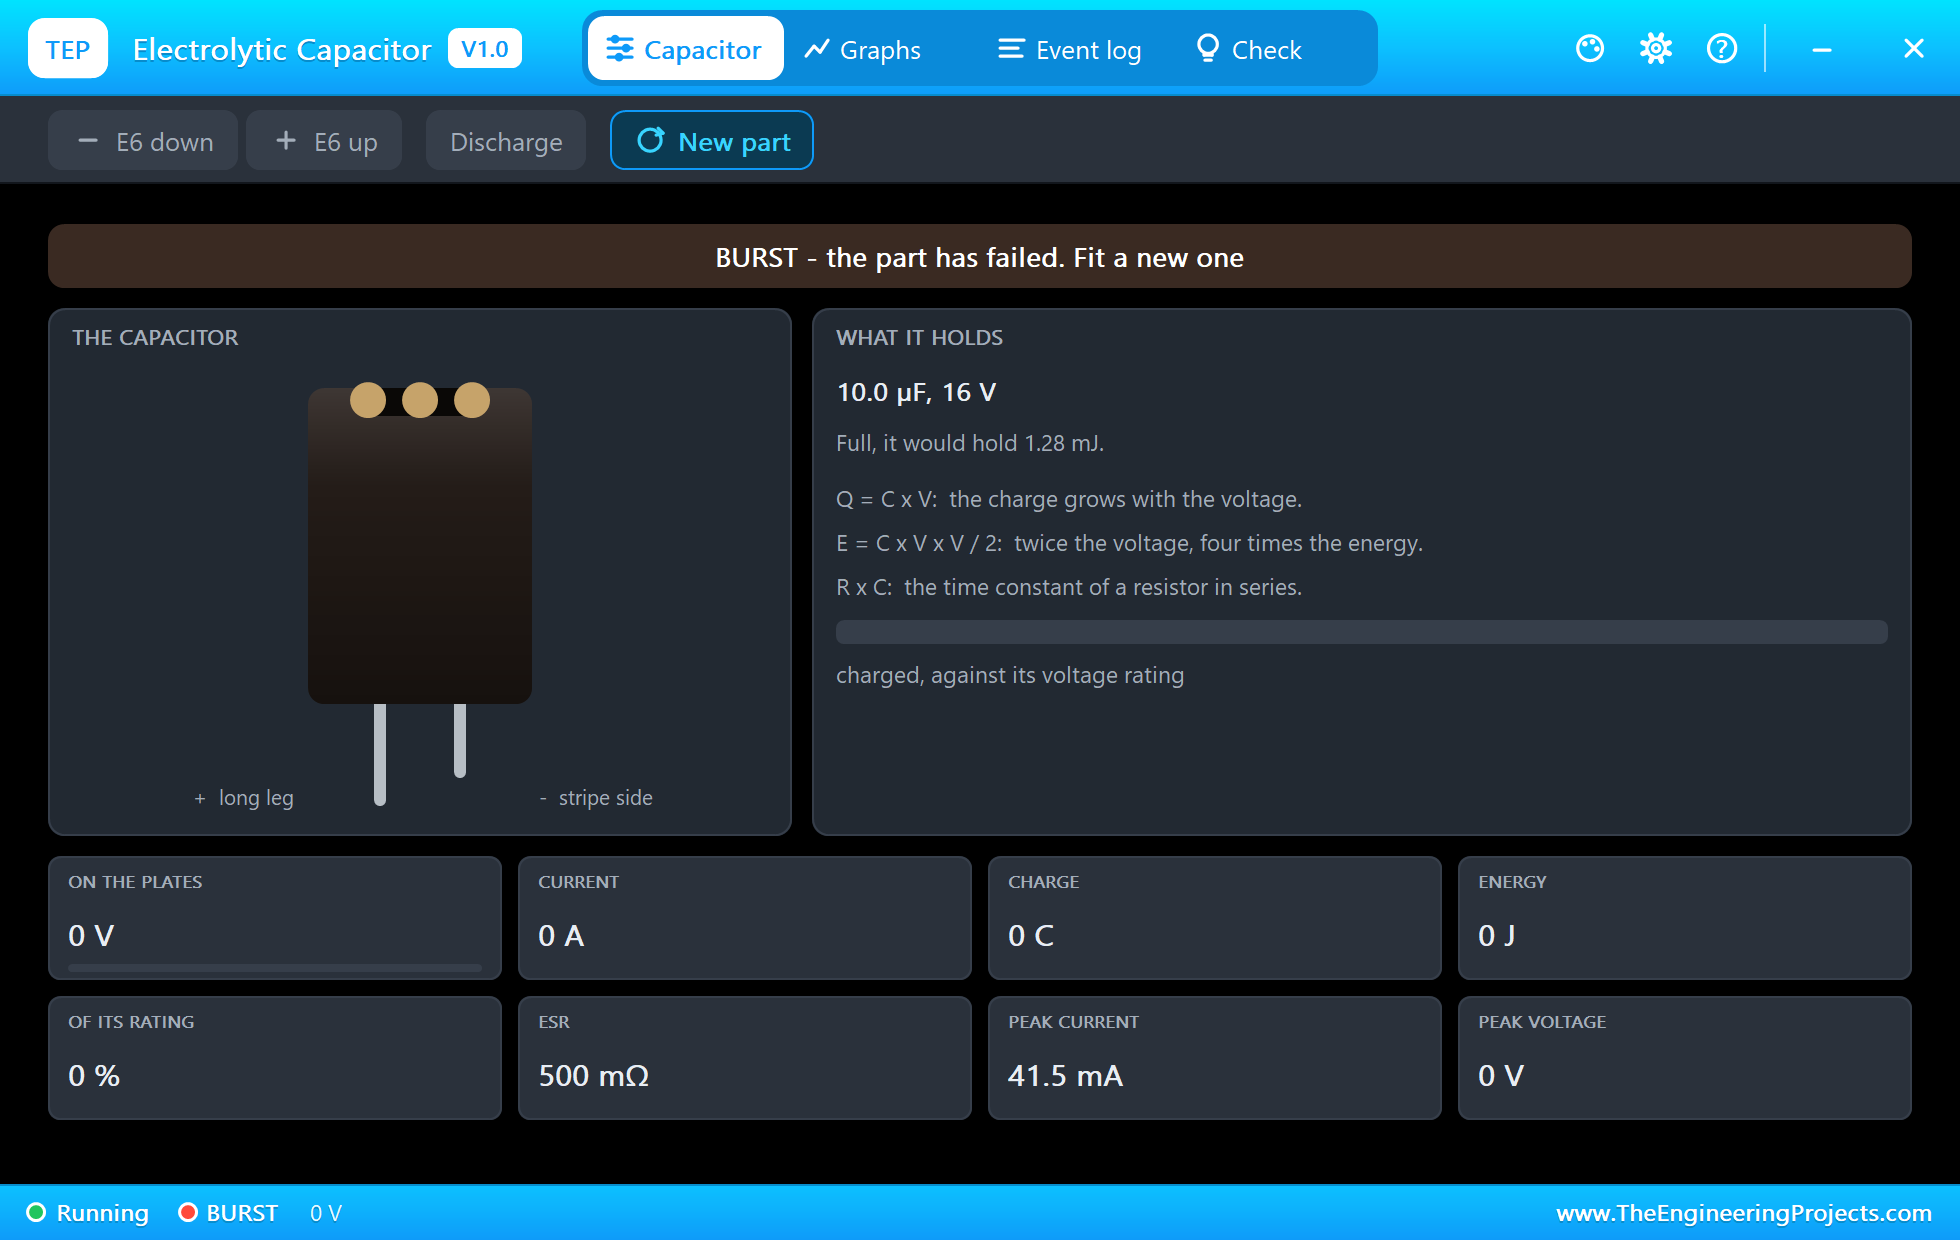
Give it a few seconds. The heat builds up, and then the can vents. The top splits, the sleeve darkens, and the part opens:
The Log and the Check Page
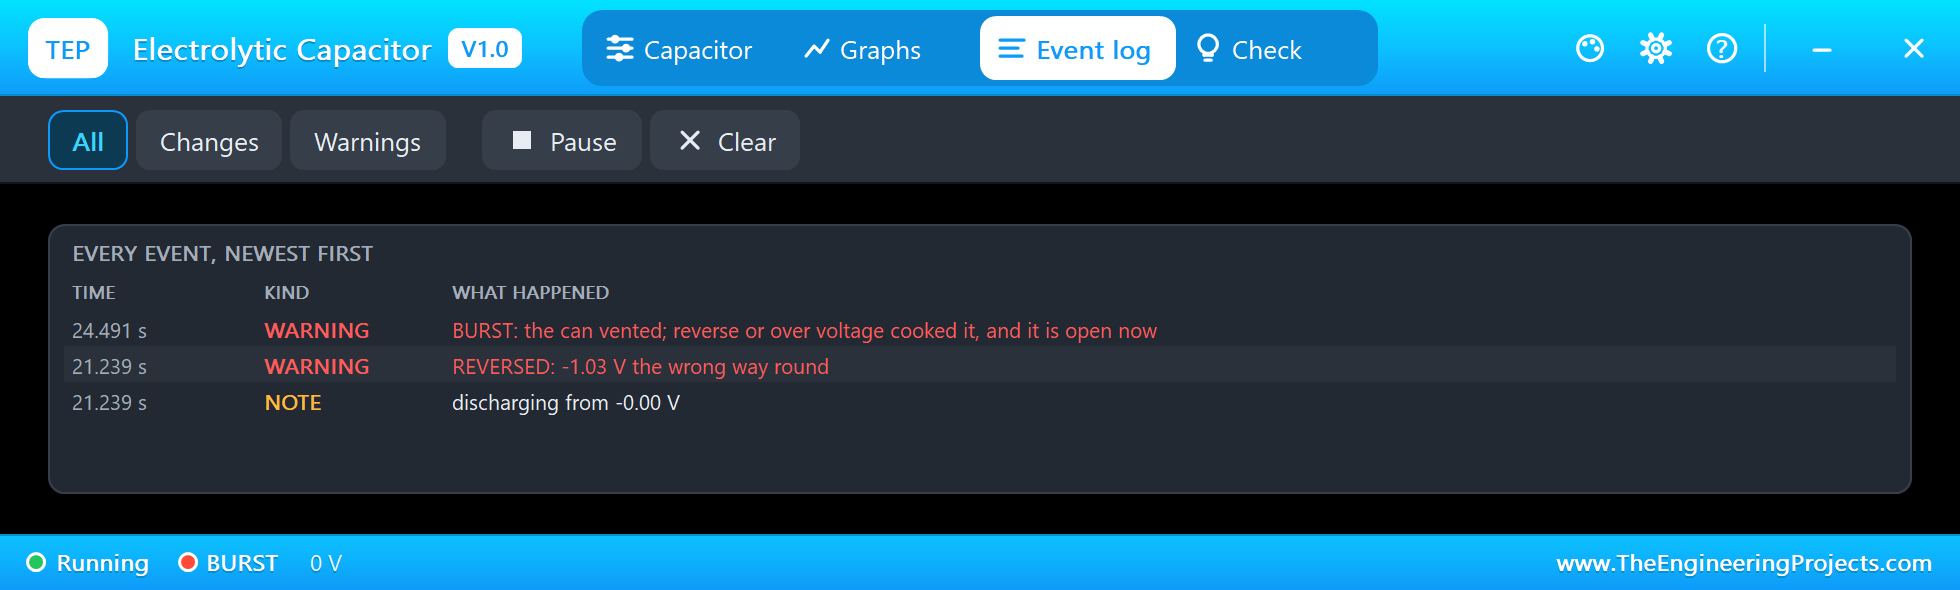
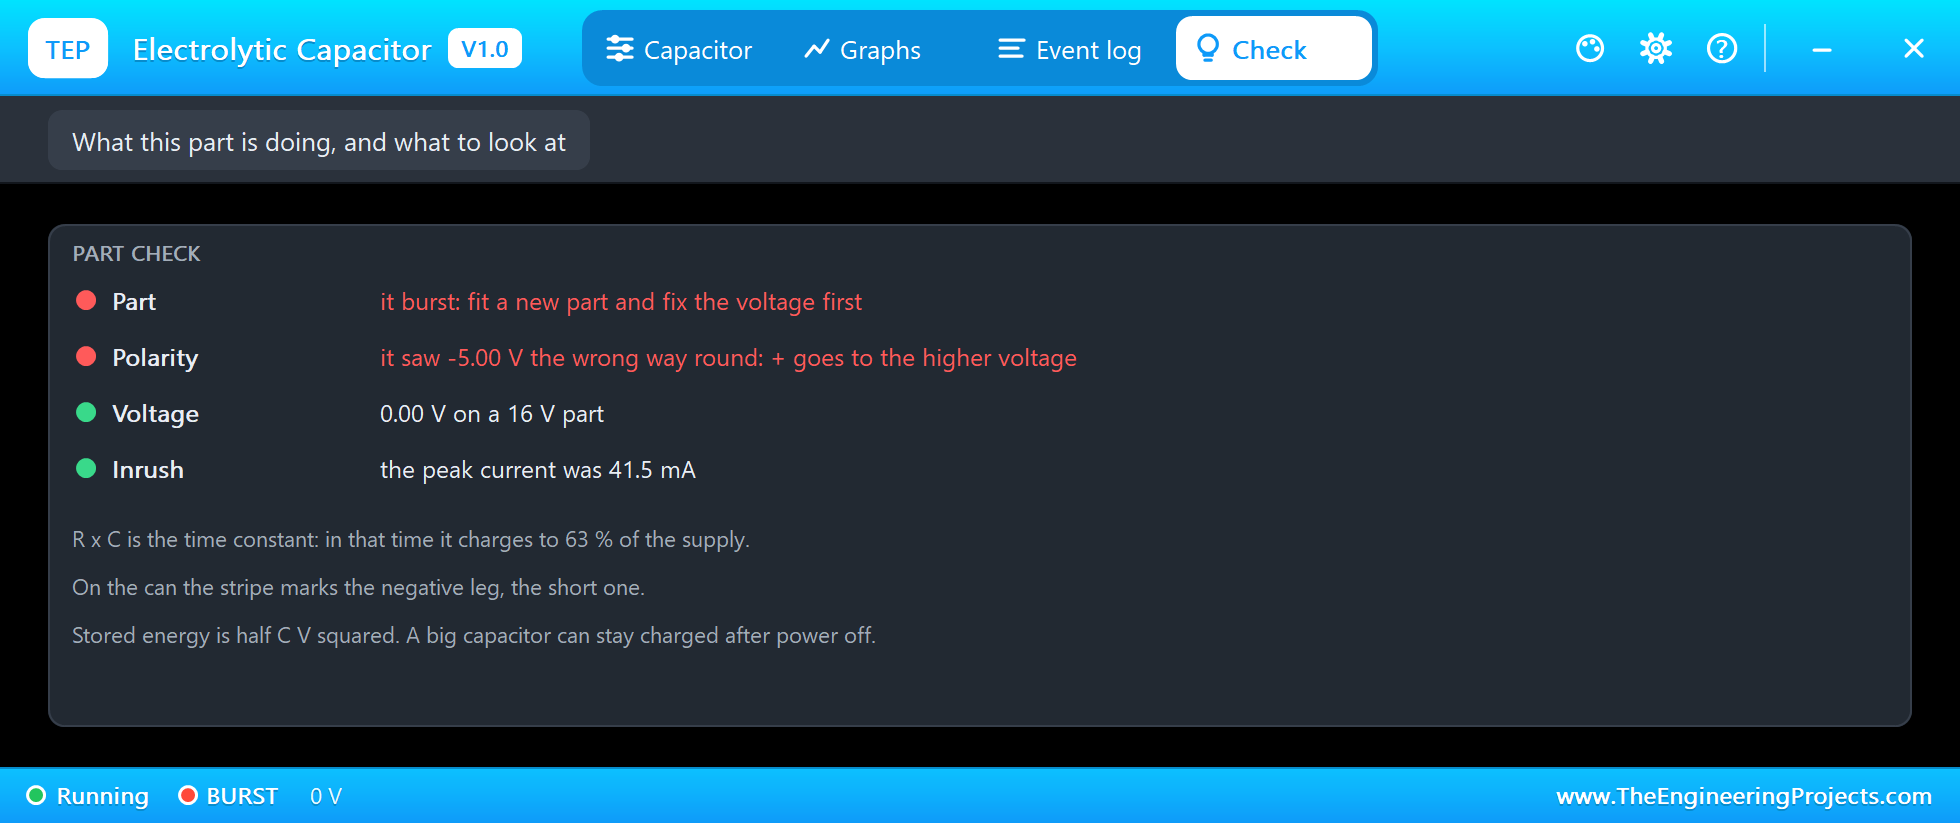
The Event log keeps the whole story, and the Check page tells you what went wrong and what to do:
Press New part on the pop-up to fit a fresh one, after typing safe to take the reverse voltage away.
Capacitors in Parallel and in Series
Capacitors add up the opposite way to resistors. Put two in parallel and the values add, so two 100 uF parts make 200 uF, and the demo's time constant would become 2 seconds. Put two in series and the value halves to 50 uF, though the pair can take twice the voltage. You can try both on this sheet. Just remember that each part of a series pair still needs its stripe the right way round.
Try It Yourself
- Change R1 to 4.7k, work out the time constant, and check it in the monitor.
- Type a value of 47u in the Capacitance box, and time it.
- Set the voltage rating of C1 to 4 V, and see what 5 V does to it.
- Press Discharge on the pop-up in the middle of a charge.
- Print a table of the voltage against time, and plot the curve yourself.
Ideas to Extend the Demo
- Measure an unknown capacitor: charge it through a known resistor, and work out C from the time.
- Build a soft-start for an LED, which fades up as the capacitor charges.
- Add a diode and make a small power supply with a smoothing capacitor.
- Keep an Arduino alive through a short power cut, with a big capacitor.
Your Own Sketches
The demo sketch is in the zip file, and you can change it in the Arduino IDE. New to Arduino? Start with our Arduino Tutorial for Beginners. Export the compiled binary, and set the UNO's PROGRAM property to the new file. Our guide on How to get the HEX file from Arduino shows you where the file ends up.
Choosing a Real Capacitor
For a smoothing job, start from the current you need and the ripple you can accept: more current or less ripple both mean more capacitance. Then choose the voltage with a margin. For timing, an electrolytic is a poor choice if you need accuracy, and a film capacitor will do better. For fast noise on a logic supply, a small ceramic of 100 nF beside each chip beats a large can, because the can's ESR and inductance make it slow. That is why real boards so often have the two side by side.
Things to Know Before Using a Real Electrolytic
- Mind the polarity: the stripe marks the negative leg, the short one. A reversed can may vent with force, so keep your face away and wear eye protection.
- Leave a voltage margin: choose a rating at least 20 % over the highest voltage it will see.
- They stay charged: a big capacitor can hold its charge long after power off. Discharge it through a resistor before you touch it.
- They age: the electrolyte dries out, so old capacitors lose value and gain ESR, especially when hot.
- A wide tolerance is normal: electrolytics are often 20 %, so do not trust them for precise timing.
Troubleshooting
- The can stays empty: the path through the resistor is open, or the charging pin is LOW.
- BURST: it was reversed or over voltage. Fix the circuit first, then press New part.
- It charges too fast to see: R x C is small. Use a bigger resistor or capacitor.
- The pop-up does not open: click the can while the simulation runs.
- The part is not simulated:
TEPELECTRO.DLLis missing from MODELS and from the project folder.
Limitations of the Simulation
- The capacitance does not change with temperature or age, and the part's inductance is left out.
- A real part vents in its own time. Ours follows a simple heating rule, so the seconds are not a prediction.
- The chips on the pop-up change the current run only.
- Arduino is a name of Arduino; this library is not made or endorsed by Arduino or Labcenter.
- Tested in Proteus 8.5 in October 2026 (the demo as shipped). Proteus 7 is not supported.
So, that was all about the Electrolytic Capacitor Library for Proteus. I hope it helps you see what a capacitor really does, and lets you make all your mistakes safely on the screen first. If you have any questions, ask in the comments and I will help you out. Till the next tutorial, take care and have fun!