


Design a Simple Calculator with 8051 Microcontroller


Actually we have already understood the working of both keypad and LCD so I thought to share this small project as it will give you the practical application of both keypad and LCD. And if you are new to 8051 Microcontroller then its always better to first design a small project and then move to pro one. The Simulation file along with hex file and complete code is given at the end for download. But my suggestion is to design it by yourself as it will help you in learning. You will do mistakes but obviously it will help you in learning so make mistakes and learn with it. So, let's get started with it.
Design a Simple Calculator with 8051 Microcontroller
- The calculator we are going to design in this post is quite basic calculator, it will only perform 4 tasks, which are as follows:
- When you press the (+) button then it will add the two digits. For example, you want to add 2 and 3 then you need to press 2 + 2 = these four buttons in sequence and when you press the = button it will automatically will give you the sum.
- When you press (-) button it will subtract the two digits like 3 - 2 = and it will give you the result.
- When you press (x) button it will multiply the two digits.
- When you press the (/) button it will simply divide the two digits.
- Whenever you press the (=) button, it will give you the output depending on the function you used before and if you press (=) in the start then it will give "Wrong Input".
- Finally, there's (ON/C) button on the Calculator, when you press this it will simply reset the code and will clear the LCD.
- So, that's how this calculator is gonna work. Moreover, it will always reset when you try to calculate new value.
- As its a simple calculator, so its only limited to 1 digit, means it will only apply the operation on single digit input like 2+3 but it won't work on more than 1 digit like 12 + 13.
- I will soon design a more complicated calculator but for this one its only limited to single digit.
- So, now let's design this calculator, so first we are gonna have a look at the Proteus simulation of Simple calculator with 8051 Microcontroller.
- After that, we will do the coding part for calculator with 8051 Microcontroller.
- So, now let's get started with Proteus Simulation.
Proteus Simulation
- The Proteus Simulation of this Calculator with 8051 Microcontroller is same as we used for Interfacing of Keypad with 8051 Microcontroller and is shown in below figure:
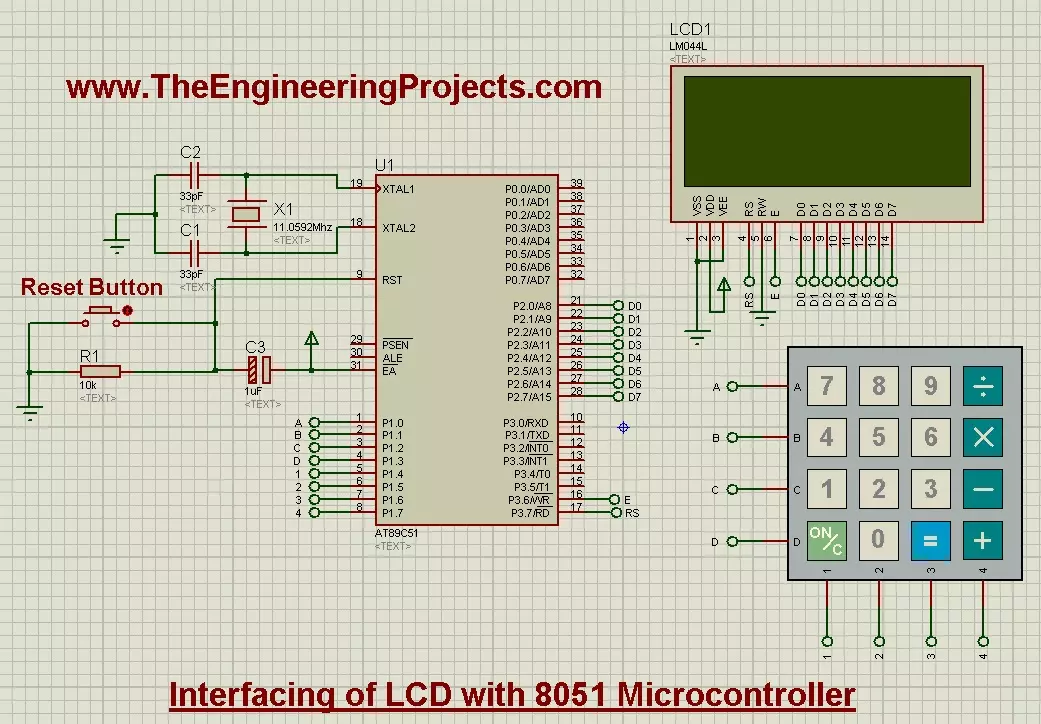
- So, you can see we have used the same LCD which is 20x4 and have used the same keypad as did in previous tutorial.
- You can see this keypad has all the required operations for this project which are (+), (-), (x) and (/).
- So, now let's have a look at the programming code for calculator with 8051 Microcontroller.
Programming Code
- We have already seen the programming code for keypad and LCD and I am assuming that you have also read those posts so I am not going into the details of those posts.
- So,we know that how to print data on LCD and we are also aware of how to get key press from keypad and then display it on LCD.
- So, now let's move on to adding these functions.
while(1)
   {
     //get numb1
     key = get_key();
     writecmd(0x01);            //clear display
	 writedata(key);            //Echo the key pressed to LCD
	 num1 = get_num(key);       //Get int number from char value, it checks for wrong input as well

	 if(num1!=Error)            //if correct input then proceed, num1==Error means wrong input
	 {
		 //get function
		 key = get_key();
		 writedata(key);                  //Echo the key pressed to LCD
		 func = get_func(key);            //it checks for wrong func

		 if(func!='e')                    //if correct input then proceed, func=='e' means wrong input
		 {
			 //get numb2
			 key = get_key();
			 writedata(key);              //Echo the key pressed to LCD
			 num2 = get_num(key);         //Get int number from char value, it checks for wrong input as well

			 if(num2!=Error)              //if correct input then proceed, num2==Error means wrong input
			 {
				 //get equal sign
				 key = get_key();
				 writedata(key);          //Echo the key pressed to LCD

				 if(key == '=')           //if = is pressed then proceed
				 {
					 switch(func)         //switch on function
					 {
					 case '+': disp_num(num1+num2); break;
					 case '-': disp_num(num1-num2); break;
					 case 'x': disp_num(num1*num2); break;
					 case '/': disp_num(num1/num2); break;
					 }
				 }
				 else				      //key other then = here means error wrong input
				 {
					 if(key == 'C')       //if clear screen is pressed then clear screen and reset
						writecmd(0x01);   //Clear Screen
					 else
						DispError(0); 	  //Display wrong input error
				 }
			 }
		 }
     }
   }
- As you can see in the above function, I have first check for the first key press.
- When you pressed the first key on keypad then I get this key and converter it to integer.
- After that I waited for the next key which must be some operation key like + - X or / otherwise it will generate the error message.
- After that code is waiting for the third key which should be some numerical digit and then I converter it to integer again and if you entered some invalid key then it will generate the error.
- Finally waiting for the = sign. When you press the = sign it will automatically perform the required operation which I placed in the switch case loop.
- It will calculate the value and then print out the result and on next key press it will first clear the screen and then get the value and will continue.
- Below is the detailed code for the project with comments and I hope you wont get into any trouble and will get it clearly.
#include<reg51.h>
#include<string.h>

//Define Macros
#define Error  13    // Any value other than 0 to 9 is good here

//Function declarations
void cct_init(void);
void delay(int);
void lcdinit(void);
void writecmd(int);
void writedata(char);
void writeline(char[]);
void ReturnHome(void);
char READ_SWITCHES(void);
char get_key(void);
int get_num(char);
char get_func(char);
void DispError(int);
void disp_num(int);
void WebsiteLogo();

//*******************
//Pin description
/*
P2 is data bus
P3.7 is RS
P3.6 is E
P1.0 to P1.3 are keypad row outputs
P1.4 to P1.7 are keypad column inputs
*/
//********************
// Define Pins
//********************
sbit RowA = P1^0;     //RowA
sbit RowB = P1^1;     //RowB
sbit RowC = P1^2;     //RowC
sbit RowD = P1^3;     //RowD

sbit C1   = P1^4;     //Column1
sbit C2   = P1^5;     //Column2
sbit C3   = P1^6;     //Column3
sbit C4   = P1^7;     //Column4

sbit E    = P3^6;     //E pin for LCD
sbit RS   = P3^7;     //RS pin for LCD

// ***********************************************************
// Main program
//
int main(void)
{
   char key;                     //key char for keeping record of pressed key
   int num1 = 0;                 //First number
   char func = '+';              //Function to be performed among two numbers
   int num2 = 0;                 //Second number

   cct_init();                   //Make input and output pins as required
   lcdinit();                    //Initilize LCD
   WebsiteLogo();
   while(1)
   {
     WebsiteLogo();
     //get numb1
     key = get_key();
     writecmd(0x01);            //clear display
	 WebsiteLogo();
	 writedata(key);            //Echo the key pressed to LCD
	 num1 = get_num(key);       //Get int number from char value, it checks for wrong input as well

	 if(num1!=Error)            //if correct input then proceed, num1==Error means wrong input
	 {
		 //get function
		 key = get_key();
		 writedata(key);                  //Echo the key pressed to LCD
		 func = get_func(key);            //it checks for wrong func

		 if(func!='e')                    //if correct input then proceed, func=='e' means wrong input
		 {
			 //get numb2
			 key = get_key();
			 writedata(key);              //Echo the key pressed to LCD
			 num2 = get_num(key);         //Get int number from char value, it checks for wrong input as well

			 if(num2!=Error)              //if correct input then proceed, num2==Error means wrong input
			 {
				 //get equal sign
				 key = get_key();
				 writedata(key);          //Echo the key pressed to LCD

				 if(key == '=')           //if = is pressed then proceed
				 {
					 switch(func)         //switch on function
					 {
					 case '+': disp_num(num1+num2); break;
					 case '-': disp_num(num1-num2); break;
					 case 'x': disp_num(num1*num2); break;
					 case '/': disp_num(num1/num2); break;
					 }
				 }
				 else				      //key other then = here means error wrong input
				 {
					 if(key == 'C')       //if clear screen is pressed then clear screen and reset
					 {
					    writecmd(0x01);   //Clear Screen
						WebsiteLogo();
					 }
					 else
					 {
					 	DispError(0); 	  //Display wrong input error
						WebsiteLogo();
					 }
				 }
			 }
		 }
     }
   }
}

void WebsiteLogo()
{
   writecmd(0x95);
   writedata('w');                                 //write
   writedata('w');                                 //write
   writedata('w');                                 //write
   writedata('.');                                 //write
   writedata('T');                                 //write
   writedata('h');                                 //write
   writedata('e');                                 //write
   writedata('E');                                 //write
   writedata('n');                                 //write
   writedata('g');                                 //write
   writedata('i');                                 //write
   writedata('n');                                 //write
   writedata('e');                                 //write
   writedata('e');                                 //write
   writedata('r');                                 //write
   writedata('i');                                 //write
   writedata('n');                                 //write
   writedata('g');                                 //write

   writecmd(0xd8);

   writedata('P');                                 //write
   writedata('r');                                 //write
   writedata('o');                                 //write
   writedata('j');                                 //write
   writedata('e');                                 //write
   writedata('c');                                 //write
   writedata('t');                                 //write
   writedata('s');                                 //write
   writedata('.');                                 //write
   writedata('c');                                 //write
   writedata('o');                                 //write
   writedata('m');                                 //write
   writecmd(0x80);
}

void cct_init(void)
{
	P0 = 0x00;   //not used
	P1 = 0xf0;   //used for generating outputs and taking inputs from Keypad
	P2 = 0x00;   //used as data port for LCD
	P3 = 0x00;   //used for RS and E
}

void delay(int a)
{
   int i;
   for(i=0;i<a;i++);   //null statement
}

void writedata(char t)
{
   RS = 1;             // This is data
   P2 = t;             //Data transfer
   E  = 1;             // => E = 1
   delay(150);
   E  = 0;             // => E = 0
   delay(150);
}


void writecmd(int z)
{
   RS = 0;             // This is command
   P2 = z;             //Data transfer
   E  = 1;             // => E = 1
   delay(150);
   E  = 0;             // => E = 0
   delay(150);
}

void lcdinit(void)
{
  ///////////// Reset process from datasheet /////////
     delay(15000);
   writecmd(0x30);
     delay(4500);
   writecmd(0x30);
     delay(300);
   writecmd(0x30);
     delay(650);
  /////////////////////////////////////////////////////
   writecmd(0x38);    //function set
   writecmd(0x0c);    //display on,cursor off,blink off
   writecmd(0x01);    //clear display
   writecmd(0x06);    //entry mode, set increment
}

void ReturnHome(void)     /* Return to 0 cursor location */
{
   writecmd(0x02);
   delay(1500);
   WebsiteLogo();
}

void writeline(char Line[])
{
   int i;
   for(i=0;i<strlen(Line);i++)
   {
      writedata(Line[i]);     /* Write Character */
   }

   ReturnHome();          /* Return to 0 cursor position */
}

char READ_SWITCHES(void)
{
	RowA = 0; RowB = 1; RowC = 1; RowD = 1; 	//Test Row A

	if (C1 == 0) { delay(10000); while (C1==0); return '7'; }
	if (C2 == 0) { delay(10000); while (C2==0); return '8'; }
	if (C3 == 0) { delay(10000); while (C3==0); return '9'; }
	if (C4 == 0) { delay(10000); while (C4==0); return '/'; }

	RowA = 1; RowB = 0; RowC = 1; RowD = 1; 	//Test Row B

	if (C1 == 0) { delay(10000); while (C1==0); return '4'; }
	if (C2 == 0) { delay(10000); while (C2==0); return '5'; }
	if (C3 == 0) { delay(10000); while (C3==0); return '6'; }
	if (C4 == 0) { delay(10000); while (C4==0); return 'x'; }

	RowA = 1; RowB = 1; RowC = 0; RowD = 1; 	//Test Row C

	if (C1 == 0) { delay(10000); while (C1==0); return '1'; }
	if (C2 == 0) { delay(10000); while (C2==0); return '2'; }
	if (C3 == 0) { delay(10000); while (C3==0); return '3'; }
	if (C4 == 0) { delay(10000); while (C4==0); return '-'; }

	RowA = 1; RowB = 1; RowC = 1; RowD = 0; 	//Test Row D

	if (C1 == 0) { delay(10000); while (C1==0); return 'C'; }
	if (C2 == 0) { delay(10000); while (C2==0); return '0'; }
	if (C3 == 0) { delay(10000); while (C3==0); return '='; }
	if (C4 == 0) { delay(10000); while (C4==0); return '+'; }

	return 'n';           	// Means no key has been pressed
}

char get_key(void)           //get key from user
{
	char key = 'n';              //assume no key pressed

	while(key=='n')              //wait untill a key is pressed
		key = READ_SWITCHES();   //scan the keys again and again

	return key;                  //when key pressed then return its value
}

int get_num(char ch)         //convert char into int
{
	switch(ch)
	{
		case '0': return 0; break;
		case '1': return 1; break;
		case '2': return 2; break;
		case '3': return 3; break;
		case '4': return 4; break;
		case '5': return 5; break;
		case '6': return 6; break;
		case '7': return 7; break;
		case '8': return 8; break;
		case '9': return 9; break;
		case 'C': writecmd(0x01); return Error; break;  //this is used as a clear screen and then reset by setting error
		default: DispError(0); return Error; break;     //it means wrong input
	}
}

char get_func(char chf)            //detects the errors in inputted function
{
	if(chf=='C')                   //if clear screen then clear the LCD and reset
	{
		writecmd(0x01);            //clear display
		WebsiteLogo();
		return 'e';
	}

	if( chf!='+' && chf!='-' && chf!='x' && chf!='/' )  //if input is not from allowed funtions then show error
	{
		DispError(1);
		WebsiteLogo();
		return 'e';
	}

	return chf;                        //function is correct so return the correct function
}


void DispError(int numb)           //displays differet error messages
{
	writecmd(0x01);                //clear display
	WebsiteLogo();
	switch(numb)
	{
	case 0: 	writeline("Wrong Input");      break;
	case 1: 	writeline("Wrong Function");   break;
	default:    writeline("Wrong Input");      break;
	}
}

void disp_num(int numb)            //displays number on LCD
{
	unsigned char UnitDigit  = 0;  //It will contain unit digit of numb
	unsigned char TenthDigit = 0;  //It will contain 10th position digit of numb

	if(numb<0)
	{
		numb = -1*numb;  // Make number positive
		writedata('-');	 // Display a negative sign on LCD
	}

	TenthDigit = (numb/10);	          // Findout Tenth Digit

	if( TenthDigit != 0)	          // If it is zero, then don't display
		writedata(TenthDigit+0x30);	  // Make Char of TenthDigit and then display it on LCD

	UnitDigit = numb - TenthDigit*10;

	writedata(UnitDigit+0x30);	  // Make Char of UnitDigit and then display it on LCD
}
- The above code is quite self explanatory and the main part I have already explained but still if you get into any troubled then ask in comments and I will resolve them.
- Now copy this code in your keil uvision 3 and get the hex file.
- Upload your hex file in Proteus ISIS and run your simulation.
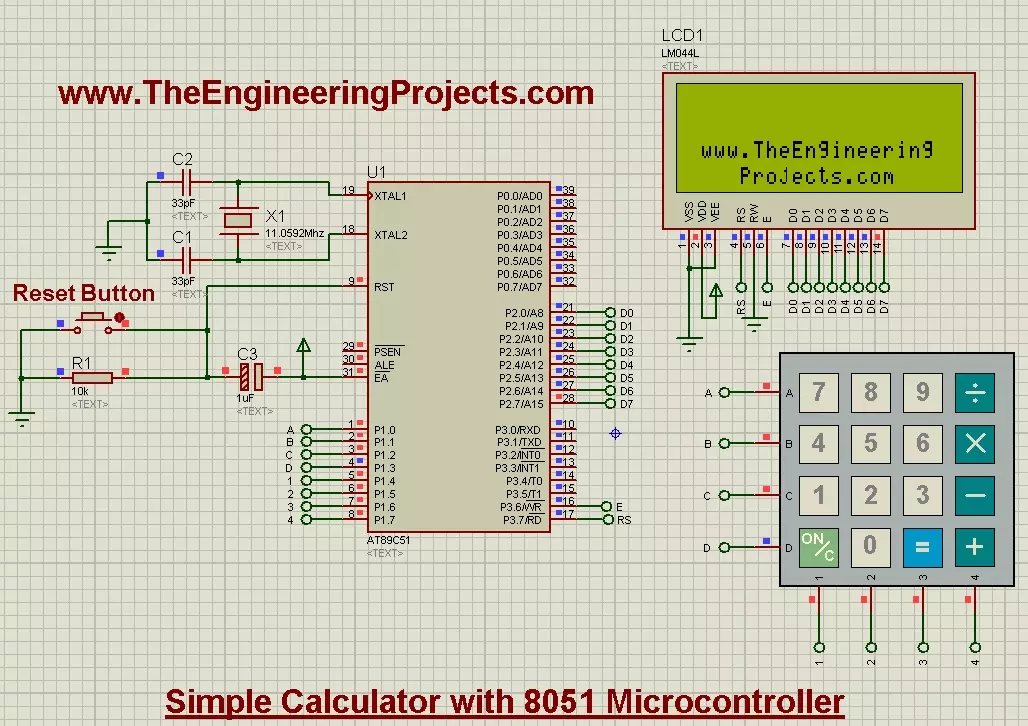
- The first screen you will get is as follows, which obviously displays our website address :P
- Now, let's add 3 + 5 and we will get as shown in below figure:

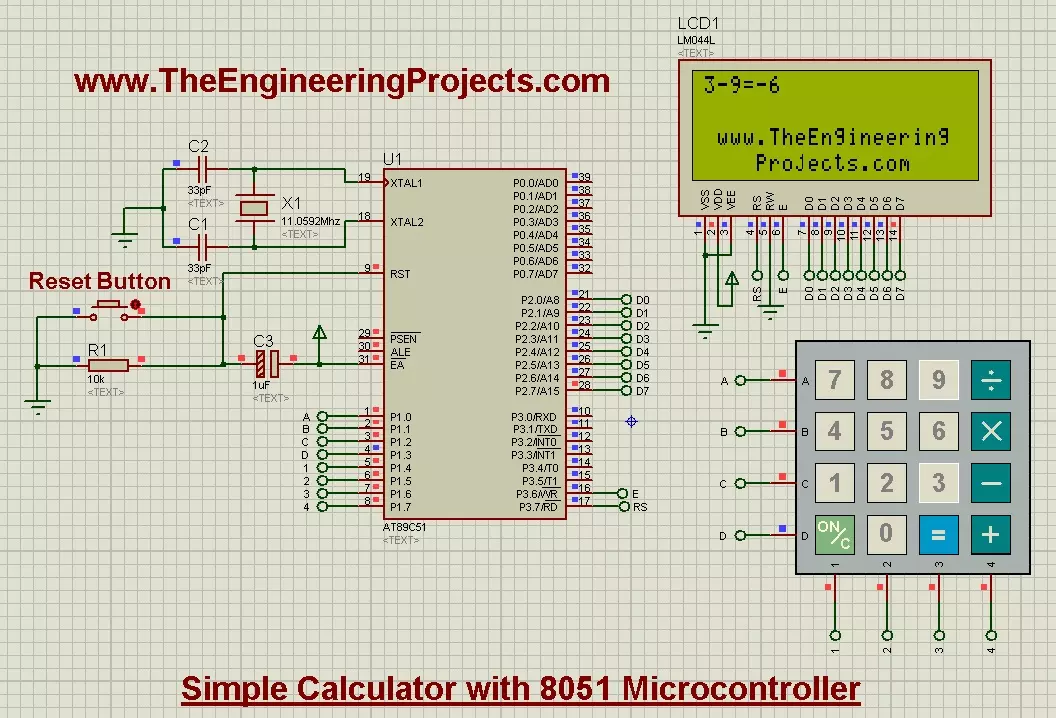
- Next operation, we are gonna do is the subtract one, so lets do this operation 3-9 = , shown below:
- Now, lets do the third operation which is multiplication, so let's do this operation 9x9, shown below:

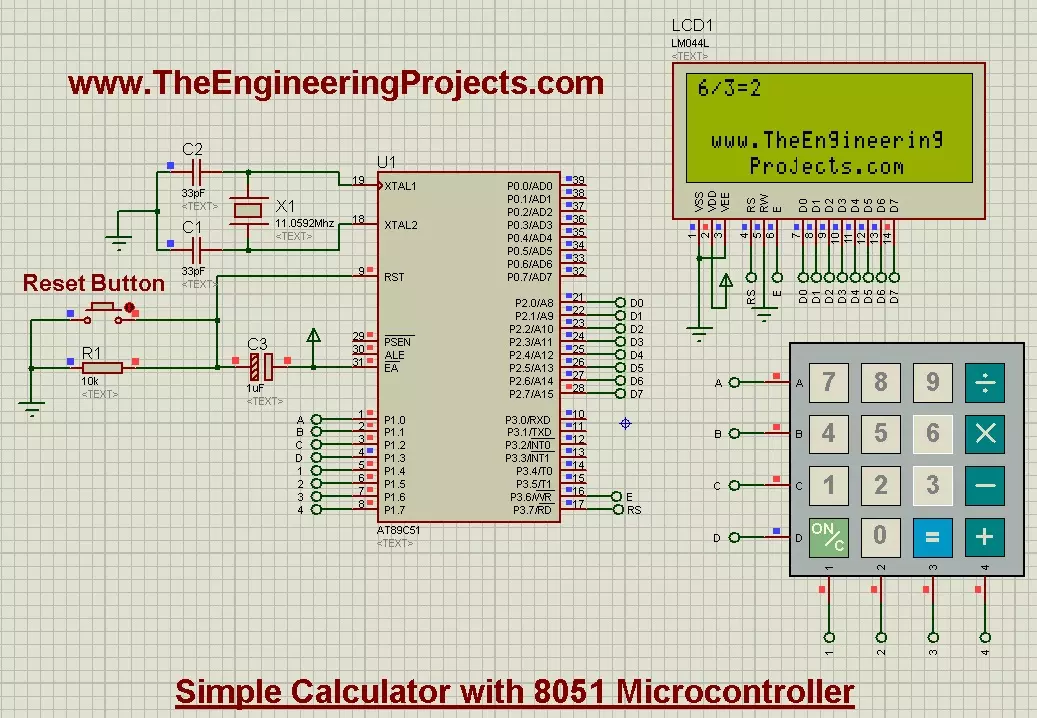
- Now, finally do the last operation which is division, so I did 6/3 and result is shown below:
- So, all the operations are shown in above figures, now if you give it wrong number like 2 digit number then it will display error message, as shown below:

- It has become quite a lengthy post, so let's have the ending part. :)
- You can download the Proteus Simulation along with hex file and code by clicking the below button.


