

So, before going in details of this project, let me first tell you that its not free because we have done quite a lot of work in designing it so it will be of $20. We have placed quite a small amount as mostly it will be downloaded by the engineers students.You can download it by clicking the above button, but before buying it must read the details and also check the video posted at the end of this tutorial so that you know what you are buying. So, let's get started with the details of this project.
Overview of Electronics Quiz Project
- Let's first have some overview of Electronic Quiz Project with 8051 Microcontroller.
- In this project, I have designed a quiz game which has two modes in total named as:
- Single Player.Mode
- Two player Mode
- In the start of this project, using keypad you have to select the Mode i.e. you wanna start Single player Mode or Two Player Mode.
- Now let's check the details of each mode seperately:
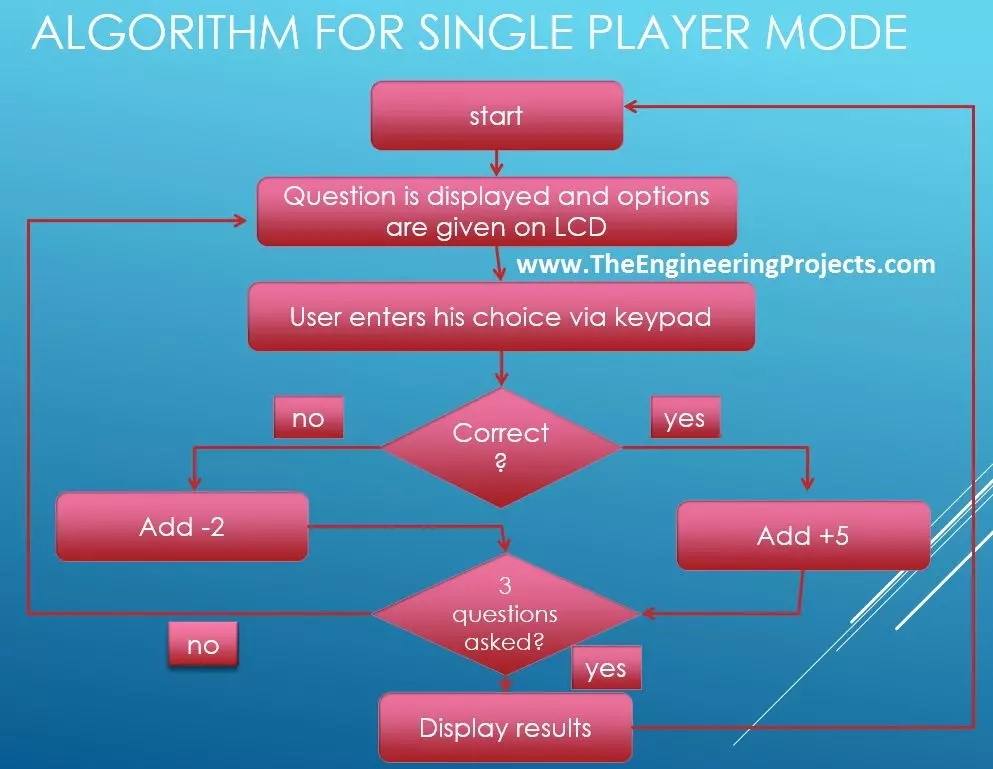
Single Player Mode
- When you select the single player mode then only one player can answer the questions.
- In order to answer the questions, you have to use keypad.
- The questions will be displayed on LCD.
- The questions are in the form of MCQs so ti will have four options.
- So,whenever the question is displayed on LCD, you need to use keypad to select the correct answer.
- Rite now, I have added 6 questions in its database, which you can change easily or can also add more questions.
- In single run, it will ask 3 random questions from the user and will get the answers.
- For each correct answer, it will add the 5 marks and for each wrong answer it will subtract 2 marks.
- After attempting all the 3 questions, it will display the final marks on the LCD screen.
- Now you need to press any button to restart the system.
- Below is given the Block diagram for the algorithm of Single Player Mode.
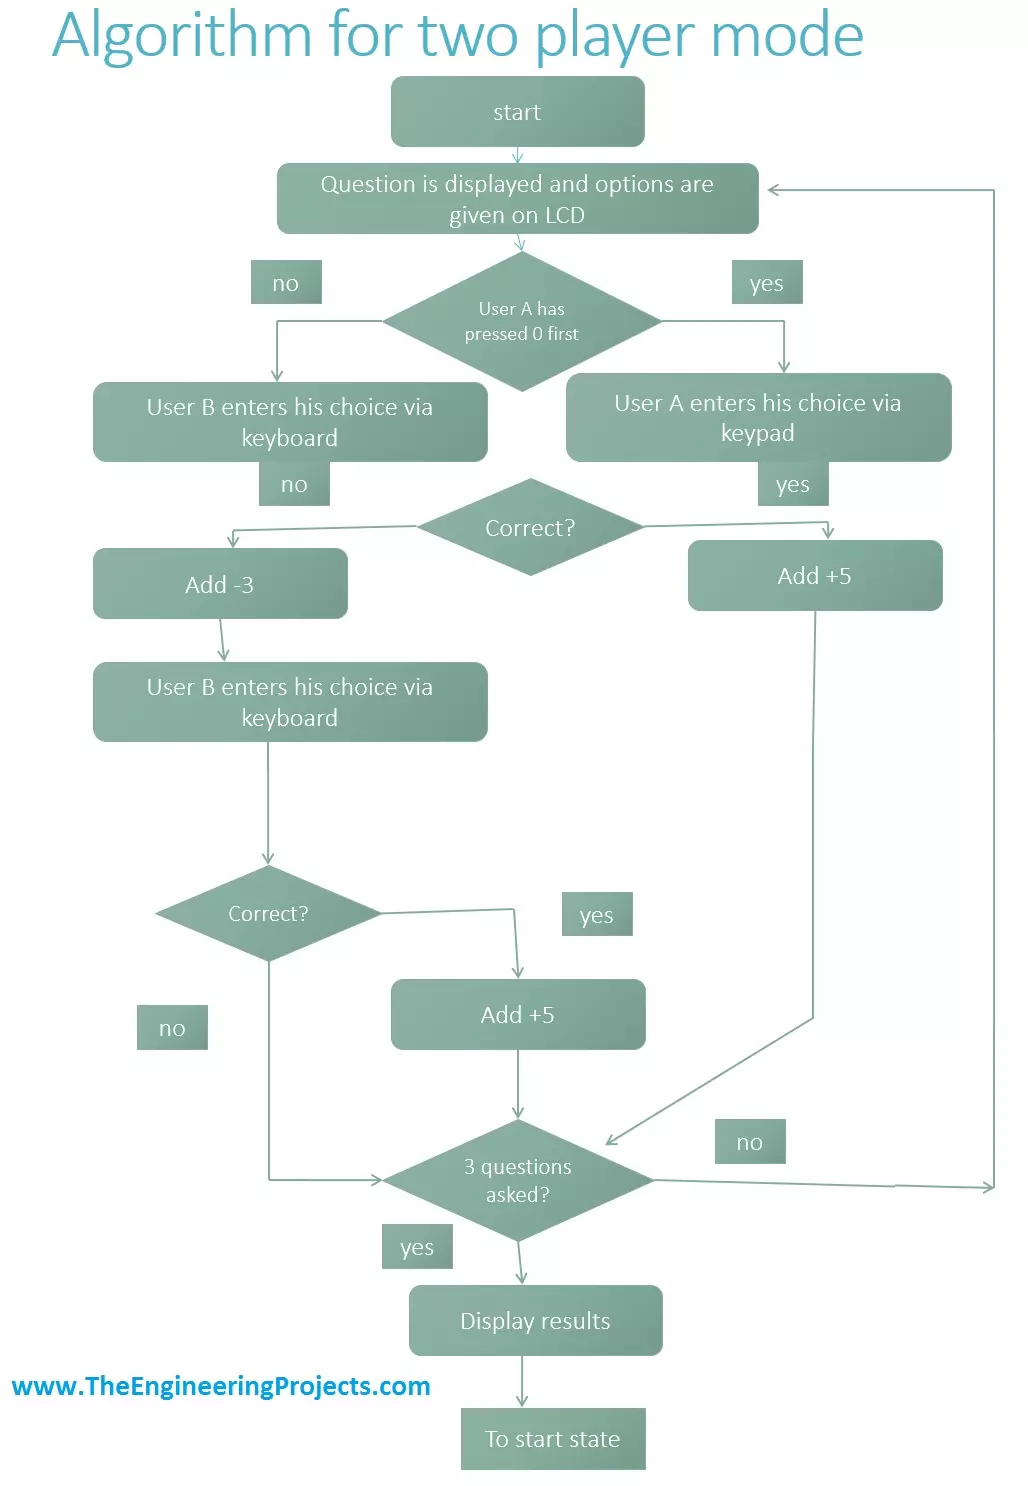
Two Player Mode
- In two player Mode, there will be a competition between two players, in which first player will reply the question using keypad while the second player will reply the question using Keyboard which will come to the system via Serial port.
- The question will be displayed on the LCD and the laptop at the same time, the question coming to laptop is via Serial port so you need to open some Serial Monitoring if you have designed it in hardware while in Proteus I have used Virtual Terminal to display the question.
- Now after the question is displayed, system will wait for the response from both the players.
- Now among the two players, who will press the 0 button first will be able to answer the question.
- If he gave the correct answer, then 5 marks will be added in his total marks and if he gave wrong answer then 3 marks will be deducted.
- IF the selected person given the wrong answer then the system will move to second user and will ask for the answer from him.
- Now if the second user give the correct answer then 5 marks will be added in his marks and he give wrong answer then no marks will be deducted.
- Total of three marks will be asked and at the end of these questions, marks of both players will be displayed and who got the maximum marks will be considered as a winner.
- Now if you press any key, the system will restart.
- The complete block diagram for the algorithm of two player mode is shown below:
Components Used
I have used below components in designing this project:- 8051 Microcontroller (AT89C51)
- Keypad
- LCD (20 x 4)
- Serial Communication
- Laptop or PC
Electronic Quiz Project with 8051 Microcontroller
- So, now we have the detailed overview of Electronic quiz project with 8051 microcontroller. Let's design its Proteus Simulation.
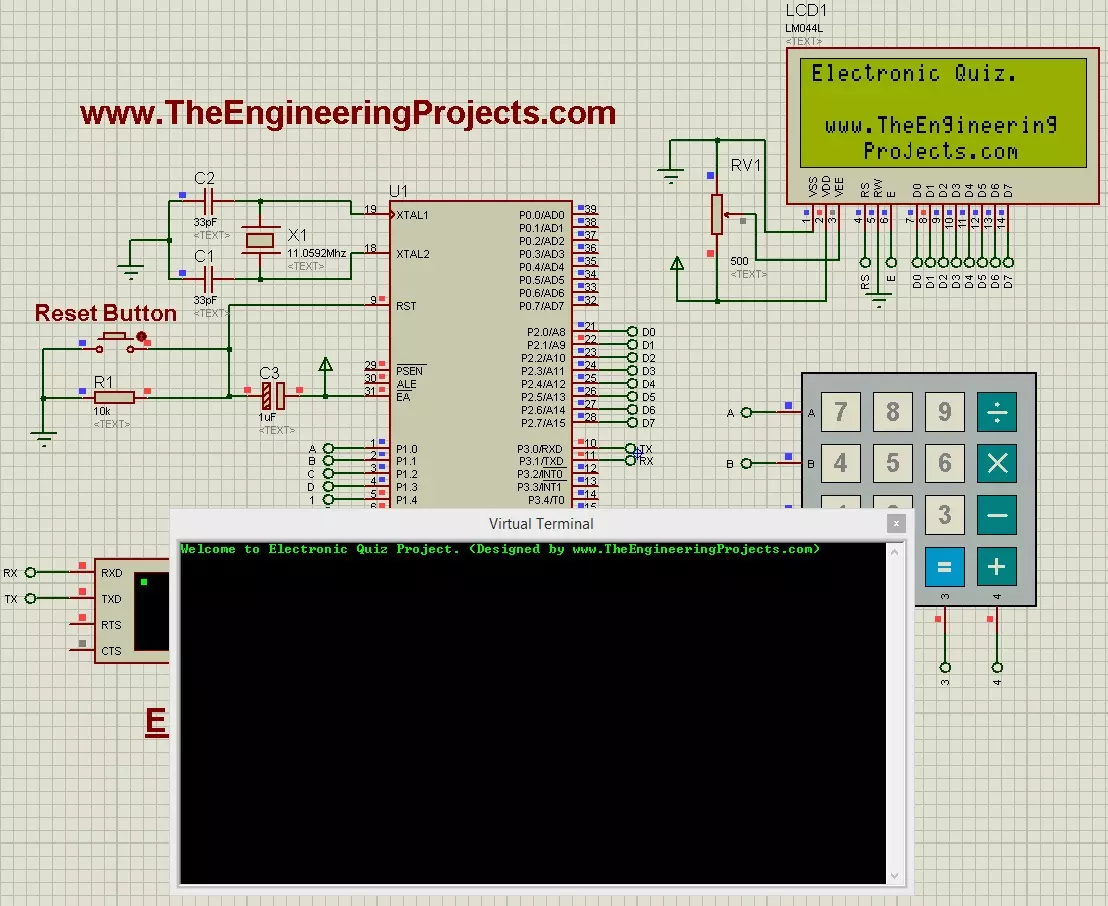
- Design a circuit in Proteus as shown in below figure:

- Now you can see in the above figure that I have used LCD, keypad, 8051 Microcontroller and Virtual terminal for Serial communication. That's why I was forcing before to read the below tutorials first so that you already get your hands on these components.
- Interfacing of LCD with 8051 Microcontroller in Proteus ISIS
- Interfacing of Keypad with 8051 Microcontroller in Proteus ISIS
- Serial Communication with 8051 Microcontroller in Proteus ISIS
- Now let's move to the programming part for this project.
Programming Code
- I have designed the programming code in Keil uvision 3 for Electronic Quiz Project with 8051 Microcontroller.
- I am not gonna share the complete code here because its not free but you can buy it quite easily by clicking the below button for just $20.
- But I am gonna explain the code in chunks so that you get some idea How I am doing this Electronic quiz project with 8051 Microcontroller.
- First of all let's have look at lcd code. In my previous post I was writing character by character on LCD because it was quite a small project, but now I have to print quite a lot of string so that's why I have written a function to which you can give any string and it will print it on LCD. The function is as follow:
void writeline_lcd(char line[])
{
   		int i;
   		for(i=0;i<strlen(line);i++)
   		{ writedata(line[i]); } //write to lcd

}
- Using this function, you can easily write complete string on LCD.
- Next in order to send data to Serial Port I have used the below function:
void writeline_serial(char line1[])
{
   int i;
   EA = 0; ES = 0;
   for(i=0;i<strlen(line1);i++)
   { SendByteSerially(line1[i]); } // SEND DATA TO PC
   EA = 1; ES = 1;
}
- For storing the questions I have used the below function:
void Ask_Question(void)
{
	int q = 13;
	writecmd(0x01);

	//randomize question
	while(!(q<7 & q>-1))
	{
		q = (TL1%6);
		if(q1==1 & q==1)  { q = 6; }
		if(q2==1 & q==2)  { q = 4; }
		if(q3==1 & q==3)  { q = 5; }
		if(q4==1 & q==4)  { q = 6; }
		if(q5==1 & q==5)  { q = 2; }
		if(q6==1 & q==6)  { q = 3; }
	}

	switch(q)
	{
	case 1:  q1=1; writeline_lcd("3,8,15,24,35..."); newline2(); writeline_lcd("51  48  46  42"); Return();
			 if(mode=='1') { writeline_serial("3,8,15,24,35...   options are (1)51  (2)48  (3)46  (4)42"); } break;
	case 2:  q2=1; writeline_lcd("6,14,18,28,30..."); newline2(); writeline_lcd("32  46  42  28"); Return();
			 if(mode=='1') { writeline_serial("6,14,18,28,30...   options are (1)32  (2)46  (3)42  (4)28"); } break;
	case 3:  q3=1; writeline_lcd("4, 1, 0, 1, 4..."); newline2(); writeline_lcd("1   3   9   0"); Return();
			 if(mode=='1') { writeline_serial("4, 1, 0, 1, 4...   options are (1)1  (2)3  (3)9  (4)0"); } break;
	case 4:  q4=1; writeline_lcd("-1, 4, 1, 6, 3..."); newline2(); writeline_lcd("8   10   5   7"); Return();
			 if(mode=='1') { writeline_serial("-1, 4, 1, 6, 3...   options are (1)8  (2)10  (3)5  (4)7"); } break;
	case 5:  q5=1; writeline_lcd("10,21,33,46,60..."); newline2(); writeline_lcd("88   73   65   75"); Return();
			 if(mode=='1') { writeline_serial("10,21,33,46,60...   options are (1)88  (2)73  (3)65  (4)75"); } break;
	case 6:  q6=1; writeline_lcd("1-1+1-1+...inf=?"); newline2(); writeline_lcd("0   1   1/2   -1"); Return();
			 if(mode=='1') { writeline_serial("1-1+1-1+...inf=?   options are (1)0  (2)1  (3)1/2  (4)-1"); } break;
	}

	q_no = q;
}
- This same function is also used for asking the questions, I simply call this function when I need to ask the question.
- These are the main functions used in this project. Another important function is the cchecking answer function, which I am not sharing here. this function is used to check the reply i.e. the answer is correct or not.
- After that there is another function which is result function. This function calculate the result and display it on LCD.
- Now once you have the code compile it and get the hex file.
- Upload that hex file in your 8051 Microcontroller and run your simulation.
- The first screen you will get is as follow:
- After a delay of some seconds, it will ask for Mode Selection as follows:
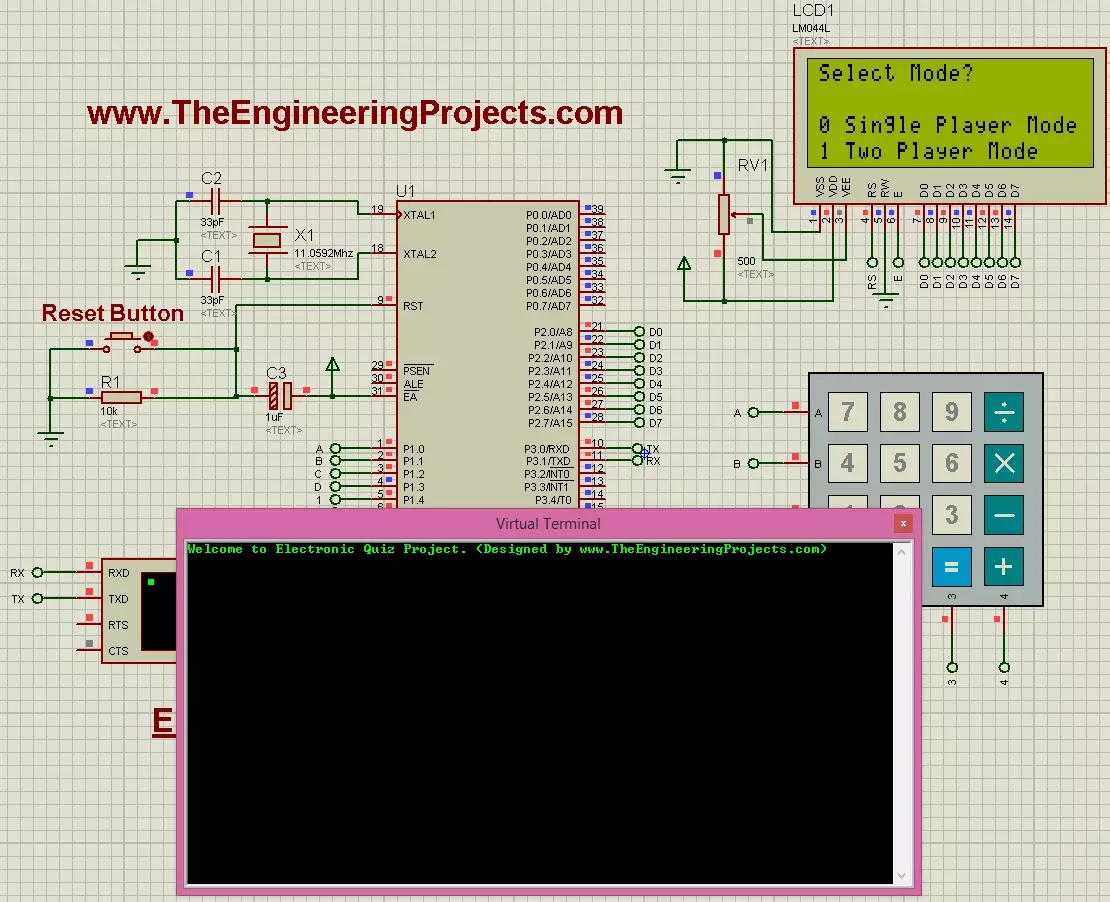
- Now, you need to give 0 if you want to select Single Player Mode or 1 if you want to Select Two Player Mode and the game will start.
- I am not adding more images as the post will become quite long so I have made a video given below which will give you detailed working of this project.
