Hello readers, I hope you all are doing great.
ESP32 is a powerful chip for Internet of Things applications. This tutorial is also based on one of the ESP32 applications in the field of IoT.
Project Overview
In this tutorial, we will learn how to update LCD display with new data or input using a web server created with ESP32.
Fig. 1
To achieve the target, we will be using an HTML (Hypertext Markup Language) form to provide web input and then update the text displayed on LCD. The values or input received from the webserver will be further stored inside a variable in the code for further use (to display on LCD).
We have already posted a tutorial on LCD (Liquid Crystal Display) interfacing with ESP32. In that tutorial, we demonstrated how to displa ...
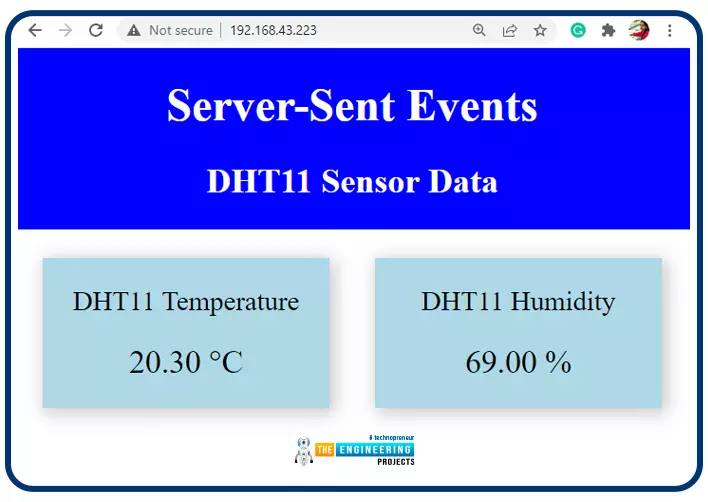
Hello readers, I hope you all are doing great. In this tutorial, we will learn how to update a webpage using Server-Sent Events and the ESP32 web server.
What is Server-Sent Events (SSE)?
It is a server push technology that enables the client devices to receive automatic updates from a server over HTTP (Hypertext Transfer Protocol) connection. SSE also describes how the server can initiate data transmission towards the client once an initial connection with the client has been established.
We have already posted a tutorial on how to implement Web socket protocol with ESP32 which is also a protocol used to notify events to a web client. Both the Server-Sent Events (SSE) and Web-Socket technologies seem to be quite similar but they are not.
The major difference between the two is that SSE ...
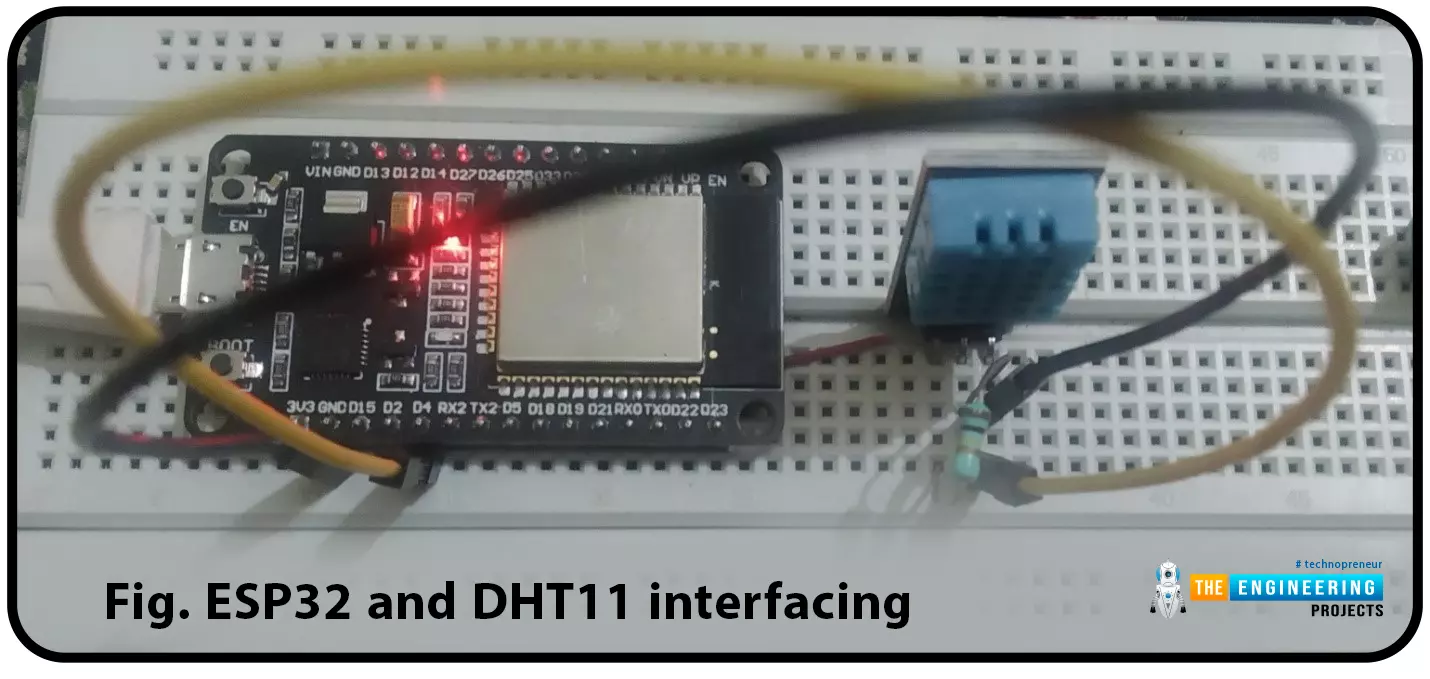
ESP32 module comes with multiple inbuilt features and peripheral interfacing capability is one of those features. ESP32 module also consists of an inbuilt temperature sensor, but that can only measure the temperature of the ESP32 core not the temperature of the surrounding environment. So it is required to use a peripheral sensor to measure the temperature of the surrounding environment like home, garden, office etc.
Hello readers. I hope you all are doing great. In this tutorial, we will learn how to interface DHT11 (temperature and humidity sensor) with the ESP32. Later in this tutorial, we will discuss how to share the sensor readings obtained from the DHT11 sensor to a web server.
Before moving towards the interfacing and programming part, let’s have a short introduction to the DHT11 ...
The IoT is the interconnection of physical objects or devices with sensors and software accessing capabilities to communicate data or information over the internet.
To build an IoT network, we need an interface medium that can fetch, control, and communicate data between sender and receiver electronics devices or servers.
Espressif Systems created the ESP32 Wi-Fi chip series. The ESP32 module is equipped with a 32-bit Tensilica microcontroller, 2.4GHz Wi-Fi connectivity, an antenna, memory, and power management modules, and much more. All of these built-in features of this ESP32 module make it ideal for IoT applications.
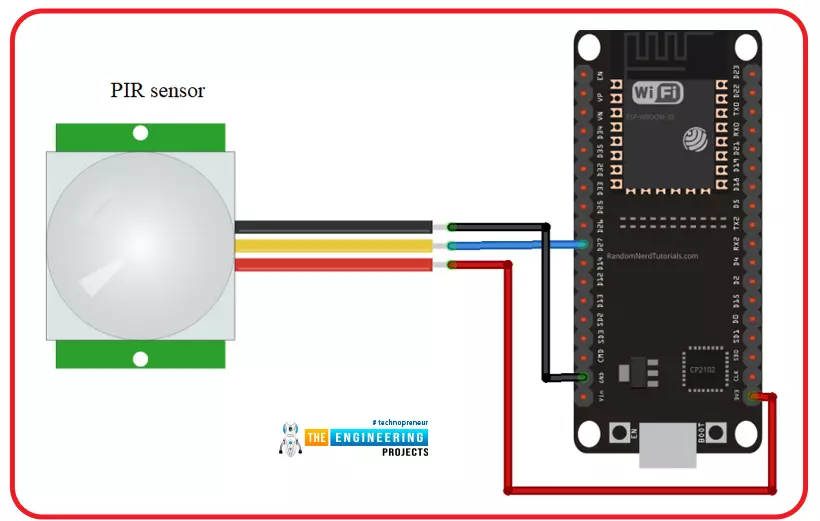
Hello readers, I hope you all are doing great. In this tutorial, we will learn another application of ESP32 in the field of IoT (Internet of Things). We are using a PIR s ...
Hello readers, we hope you all are doing great. Welcome to the 1st lecture of Section 4 in the ESP32 Programming Series. In this section, we will interface the ESP32 module with common Embedded modules(i.e. LCD, Keypad, RTC etc.).
In today's tutorial, we will interface ESP32 with a 16x2 LCD and will display data using both Data Mode and I2C Mode. LCD is the most commonly used embedded module in IoT Projects. It is used to display different types of data i.e. sensor readings, warning messages, notifications etc.
Before going forward, let's first have a look at what is LCD and How it works:
16x2 LCD Module
LCD(Liquid Crystal Display) is a type of electronic display module that is used in a wide variety of applications and devices such as calculators, computers, mobile phones, ...
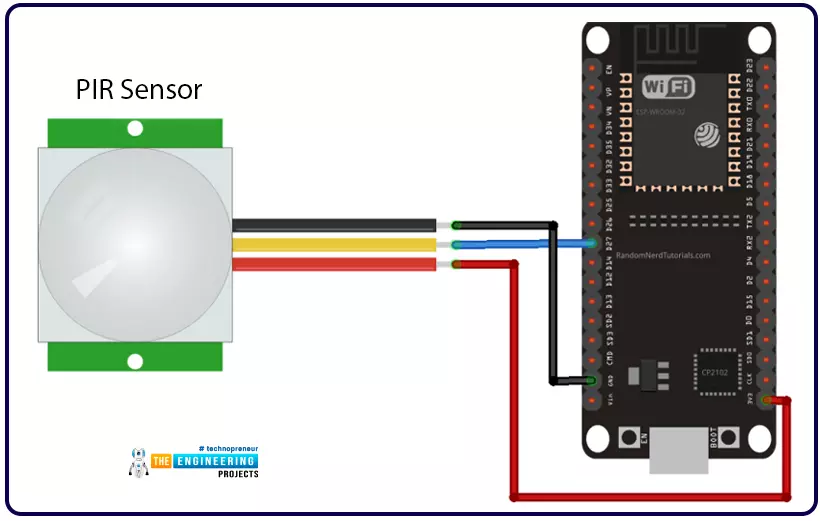
Hello readers, we hope you all are doing great. Welcome to the 4th lecture of Section 5(ESP32 Sensor) in the ESP32 Programming Series. So far, we have discussed the ESP32 built-in sensors in this section. Today, we are going to interface an external embedded sensor(i.e. PIR Sensor) with the ESP32 Microcontroller board. At the start, we will discuss the basics of a PIR Sensor(HC-SR501) i.e. its pinout and working. After that, we will design a simple project to detect the motion with a PIR sensor and ESP32. Finally, we will display the motion detection results on the ESP32 WebServer.
We will use ESP32 interrupts to detect the motion. Interrupts are used when a microcontroller needs to continuously monitor an event while executing other tasks at the same time. We have already posted a tuto ...
Hello readers, we hope you all are doing great. In this tutorial, we are going to demonstrate how to interface and control a servo motor using an ESP32 board. After that, we will demonstrate how to create a webserver to control the servo motor’s shaft position with the ESP32 board.
Servo Motors are among the most important actuators in robotics, with applications ranging from RC planes to automated door locks.
Hardware components required
A servo motor
ESP32 development board
Connecting wires
Breadboard
Servo Motor
There are several specific types of electric motor applications in which the motor must rotate only at a specific angle. For such applications, we need a special type of motor with such a special arrangement that causes the m ...
We are familiar with multiple features of the ESP32 module. Like Wi-Fi capabilities, classic Bluetooth, Bluetooth low energy (BLE), inbuilt sensors etc.
Hello readers, I hope you all are doing great. We have already mentioned in our previous tutorials that, ESP32 is also featured with a Dual-Core Processor. Which provides better performance and efficiency.
In this tutorial, we will learn how to use ESP32’s dual cores. ESP32 has two (32-bit each) Tensilica Xtensa LX6 microprocessors namely, core0 and core1 which makes it a powerful dual-core microcontroller and hence stands apart from its predecessors.
When we compile and upload a code using Arduino IDE, we do not have to worry about which core executes the code. It just runs.
Fig. 1 ESP32 dual-co ...
Hello readers, I hope you all are doing great. In our previous tutorial, we learnt how to make HTTP POST from ESP32 to the IFTTT server.
In this tutorial, we will learn about another application of the ESP32 module in the field of IoT (Internet of Things). We can publish multiple sensor readings from ESP32 to Google sheets via the IFTTT web service.
IFTTT is used as a third-party web service to integrate Google sheets with ESP32.
Fig. 1
Creating an IFTTT Account for Integrating ESP32 with Google Sheets
We are going to create an applet (on the IFTTT server) that is responsible to integrate the Webhooks and Google Sheets services.
While operating with the IFTTT server there are some services/utilities that we are going to deal with like Applets an ...
ESP32 is a powerful chip for Internet of Things applications. This tutorial is also based on another ESP32 application in the field of IoT.
Hello readers, I hope you all are doing great. In the previous tutorial, we learned how to send sensor readings from ESP32 to the cloud (ThingSpeak webserver).
In this tutorial, we will learn to send HTTP POST requests from the ESP32 board to ThingSpeak and IFTTT APIs.
What is HTTP?
Fig. 1 Hypertext Transfer Protocol
HTTP stands for hypertext transfer control and it is a protocol for transferring data between a web client and a web server. Hyper text transfer protocol was invented alongside HTML (Hypertext markup language) to create the first interactive, text-based web browser: the original www or World Wid ...