Hello friends, I hope you all are doing great. Today, I am going to share the new Ceramic Capacitor Library for Proteus. Pick up any electronic board and you will find them: tiny orange discs with three odd digits printed on them. Those digits puzzle almost every beginner. What does 104 mean? Why not simply print 100 nF?
Ceramic Capacitor Library for Proteus
Latest version: V1.0 (November 2026, this tutorial)
Other component libraries: C945 Transistor · PC817 Optocoupler · Relay Module · Resistor · 5 mm LED · Designer Colour LED · Push Button · Active Buzzer · Electrolytic Capacitor · Tantalum Capacitor · Film Capacitor · 1N4007 Diode · Zener Diode · Schottky Diode · Supercapacitor · Photodiode · RGB LED · Bridge Rectifier · Flashing LED · Bi-Colour LED · SMD LED · Slide Switch · Toggle Switch · Rocker Switch · Micro Limit Switch · Emergency Stop Switch · SMD Resistor · Power Resistor · Resistor Network · Potentiometer · Trimmer Potentiometer · Slide Potentiometer · NTC Thermistor · DIP Switch · Fuse · Passive Buzzer · Mini Speaker · 7-Segment Display · LED Bar Graph · IR / UV LED · Small Transistors · TIP122 Darlington · N-MOSFET · P-MOSFET · PC817 Optocoupler · Filament Bulb · Power LED · Voltage Regulator · SCR and TRIAC · Inductor · Toroid Inductor · Crystal
Helping Tools
- Serial Monitor Advance: a serial terminal window for the UART of your board
- Serial Monitor Expert: the serial monitor with extra debugging tools
- LCD Library for Proteus V3.0: 16x2, 20x4 and I2C LCDs to show your readings
So we built a ceramic disc that answers the question itself. It is the real orange disc, at true scale, and it prints its own code, so when you change the value, the digits change too. Click it at Run and its pop-up explains the code, the charge and the energy. And for the demo, we use one small 100 nF capacitor to do a job that usually takes a piece of software: it stops a button from bouncing.
NOTICE: Our team has put a lot of effort into these small parts: the bodies, the animation and the pop-ups are all our own design, and you get them free. Your feedback is the fuel that keeps us going, so please tell us what you think in the comments below or in the Ceramic Capacitor board of our forum. And if our free libraries help you, you can buy us a coffee. So, let's get started with the Ceramic Capacitor Library for Proteus:
What is a Ceramic Capacitor?
A ceramic capacitor uses a thin layer of ceramic as the insulator between its two plates. In the common disc type, a small round wafer of ceramic has a silver layer on each face, a wire is soldered to each layer, and the whole thing is dipped in a hard orange coating. There is nothing liquid inside and no polarity, so it can go in either way round.
Compared with the electrolytic can from our Electrolytic Capacitor Library for Proteus, a ceramic stores far less, usually from a few picofarads up to about 1 microfarad. In return it is small, cheap and very fast. Its series resistance and inductance are so low that it can supply a sudden pulse of current in a few nanoseconds. That is exactly what a modern chip needs, and it is why these parts sit on every board.
| Feature | The real part | In the library |
|---|---|---|
| Size | a disc of about 5.5 mm | 230 thou across, true scale |
| Legs | 5 mm apart | 200 thou apart |
| Value | 10 pF to 1 uF is common | 100 nF by default, any value |
| Voltage rating | 50 V is common | 50 V by default |
| Polarity | none | none: pins 1 and 2 are the same |
Reading the Three-Digit Code
A disc is far too small for a full value, so the makers use a three-digit code. It works just like the bands on a resistor. The first two digits are the value, and the third is the number of zeros to add. The answer is always in picofarads. So 104 is 10 followed by four zeros, or 100,000 pF. Since 1,000 pF is 1 nF, that is the same as 100 nF.
| Code | In pF | Usually written | Often used for |
|---|---|---|---|
| 220 | 22 pF | 22 pF | the load capacitors of a crystal |
| 102 | 1,000 pF | 1 nF | filters |
| 103 | 10,000 pF | 10 nF | filters, snubbers |
| 473 | 47,000 pF | 47 nF | filters |
| 104 | 100,000 pF | 100 nF | decoupling, the most common of all |
| 105 | 1,000,000 pF | 1 uF | regulators |
You will often see a letter after the digits, such as 104K. That letter is the tolerance: J is 5 %, K is 10 % and M is 20 %. The one to look out for is Z, which means plus 80 % and minus 20 %. So a 104Z could really be anything from 80 nF to 180 nF. That is fine for decoupling, and useless for timing.
Not All Ceramics Are Equal
The ceramic itself decides how well the part behaves, and makers sort them into classes. The table shows the three you will meet most. The surprise for most people is the last column: many ceramics lose a large share of their value when you put a steady voltage on them, and lose more as they warm up. If a design depends on the value, always look at the graph in the datasheet.
| Type | Values | Stability | Good for |
|---|---|---|---|
| C0G (NP0) | small, up to a few nF | excellent | crystals, filters, timing |
| X7R | medium | good | general use, decoupling |
| Y5V | large for its size | poor | cheap decoupling only |
What is Decoupling?
This is the job that uses more ceramics than any other. A digital chip draws its current in very short bursts, each time its transistors switch. The supply wires on a board are long and slightly inductive, so they cannot deliver those bursts quickly, and the voltage at the chip dips for a moment. A decoupling capacitor sits right beside the chip's supply pins and supplies each burst from its own small store, then quietly refills between bursts.
This is why you see a 100 nF ceramic next to nearly every chip, including the ones on your Arduino UNO. A big electrolytic cannot do this job on its own, because its internal resistance and inductance make it slow. So real boards use both: a big can for the slow demands, and small ceramics for the fast ones.
Features of the Ceramic Capacitor Library for Proteus
- The real look, at true scale: the orange disc, the shine and two thin legs, with our small TEP signature.
- It prints its own code: 31 values from 10 pF to 1 uF, and the digits on the disc follow the value.
- A live charge bar: a small blue bar under the code follows the voltage at Run.
- A true capacitor: a capacitance behind a small ESR in the analog simulator, with no polarity.
- It can fail: well over its voltage rating it heats, cracks and opens.
- A pop-up for every part: click it at Run for the code explained, the charge, eight live values, graphs, an event log and a check page.
- Live changes: step the value through the E6 series while it runs, and watch the code change on the disc.
- A complete package: about 2.1 MB with the library, our Arduino UNO V4.0, the demo's buttons, resistors and LEDs and the demo, without the source code of the models.
The Ceramic Capacitor in Proteus
The device is CAPCERAMICTEP in TEPCERAMIC.LIB, under Capacitors, Ceramic Disc, with the prefix C and the model TEPCERAMIC.DLL. Search CAPCERAMIC in Pick Devices. It has two pins, 200 thou apart, and either way round is fine.
The Code on the Disc
The disc shows its code even while the simulation is stopped. Double-click the part, and the box called Printed code while stopped lets you pick any of the 31 values. Picking one repaints the disc straight away. At Run, the model reads your Capacitance box and sets the code to the nearest E6 value, so the disc and the value can never disagree for long.
The Properties
| Property | What it does |
|---|---|
| Capacitance | the value: 100n, 4n7, 22p or 1u; a bare number is in uF |
| Voltage rating, V | the working voltage, 50 by default |
| Series resistance (ESR), ohm | 0.05 ohm by default |
| Printed code while stopped | the digits shown on the stopped sheet |
Download Ceramic Capacitor Library for Proteus
Click the button below to download Ceramic-Capacitor-Library-for-Proteus-v1.0.zip (about 2.1 MB, without the source code of the models):
Ceramic Capacitor Library for Proteus V1.0- README.txt: installation, the demo, the properties, troubleshooting and the limits.
- Proteus Library Files:
TEPCERAMIC.LIB,TEPBUTTON.LIB,TEPRESISTOR.LIB,TEPLED5MM.LIBand ourArduinoV4TEP.LIB. - Proteus Model Files:
TEPCERAMIC.DLL,TEPBUTTON.DLL,TEPRESISTOR.DLL,TEPLED5MM.DLLandTEPARDUINO.DLL. - Arduino Code: the demo sketch.
- Proteus Simulation: the demo project, its HEX file and copies of the DLLs.
No Proteus yet? Read How to Download and Install Proteus 7 and 8. New to libraries? Follow How to Install a New Library in Proteus.
How to Install Ceramic Capacitor Library for Proteus
- Close Proteus and extract the whole zip file, for example to your Desktop.
- Copy the files from Proteus Library Files into the LIBRARY folder of Proteus.
- Copy the files from Proteus Model Files into the MODELS folder.
- Delete
TEPCERAMIC.IDXfrom the LIBRARY folder if it is there. - Start Proteus, press P and search for CAPCERAMIC.
Demo: Debouncing a Button in Hardware
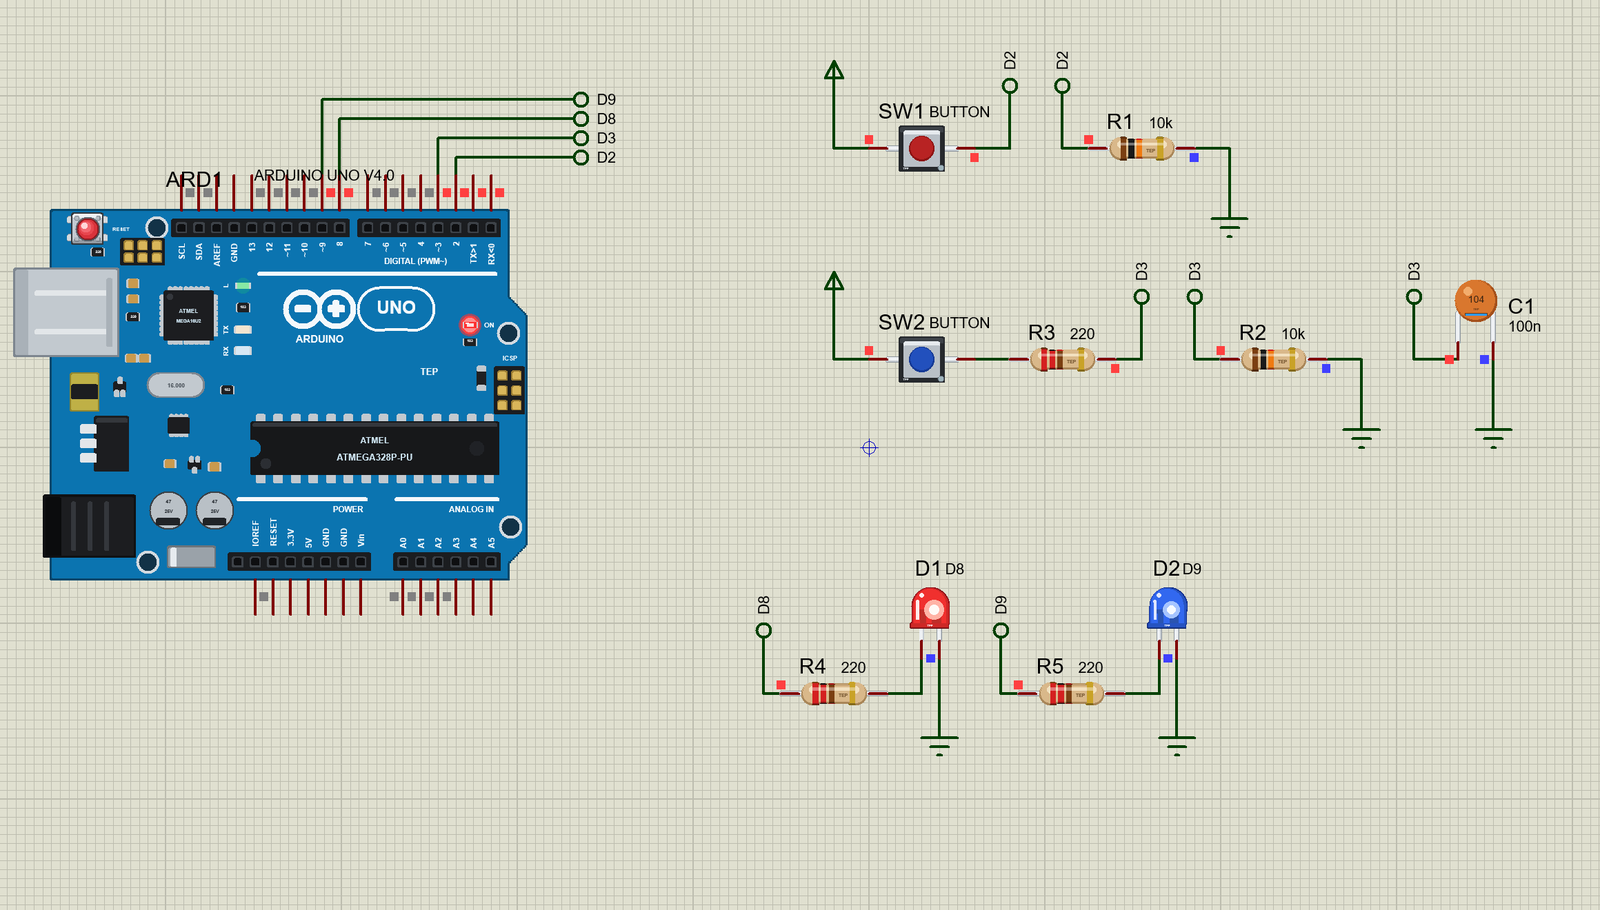
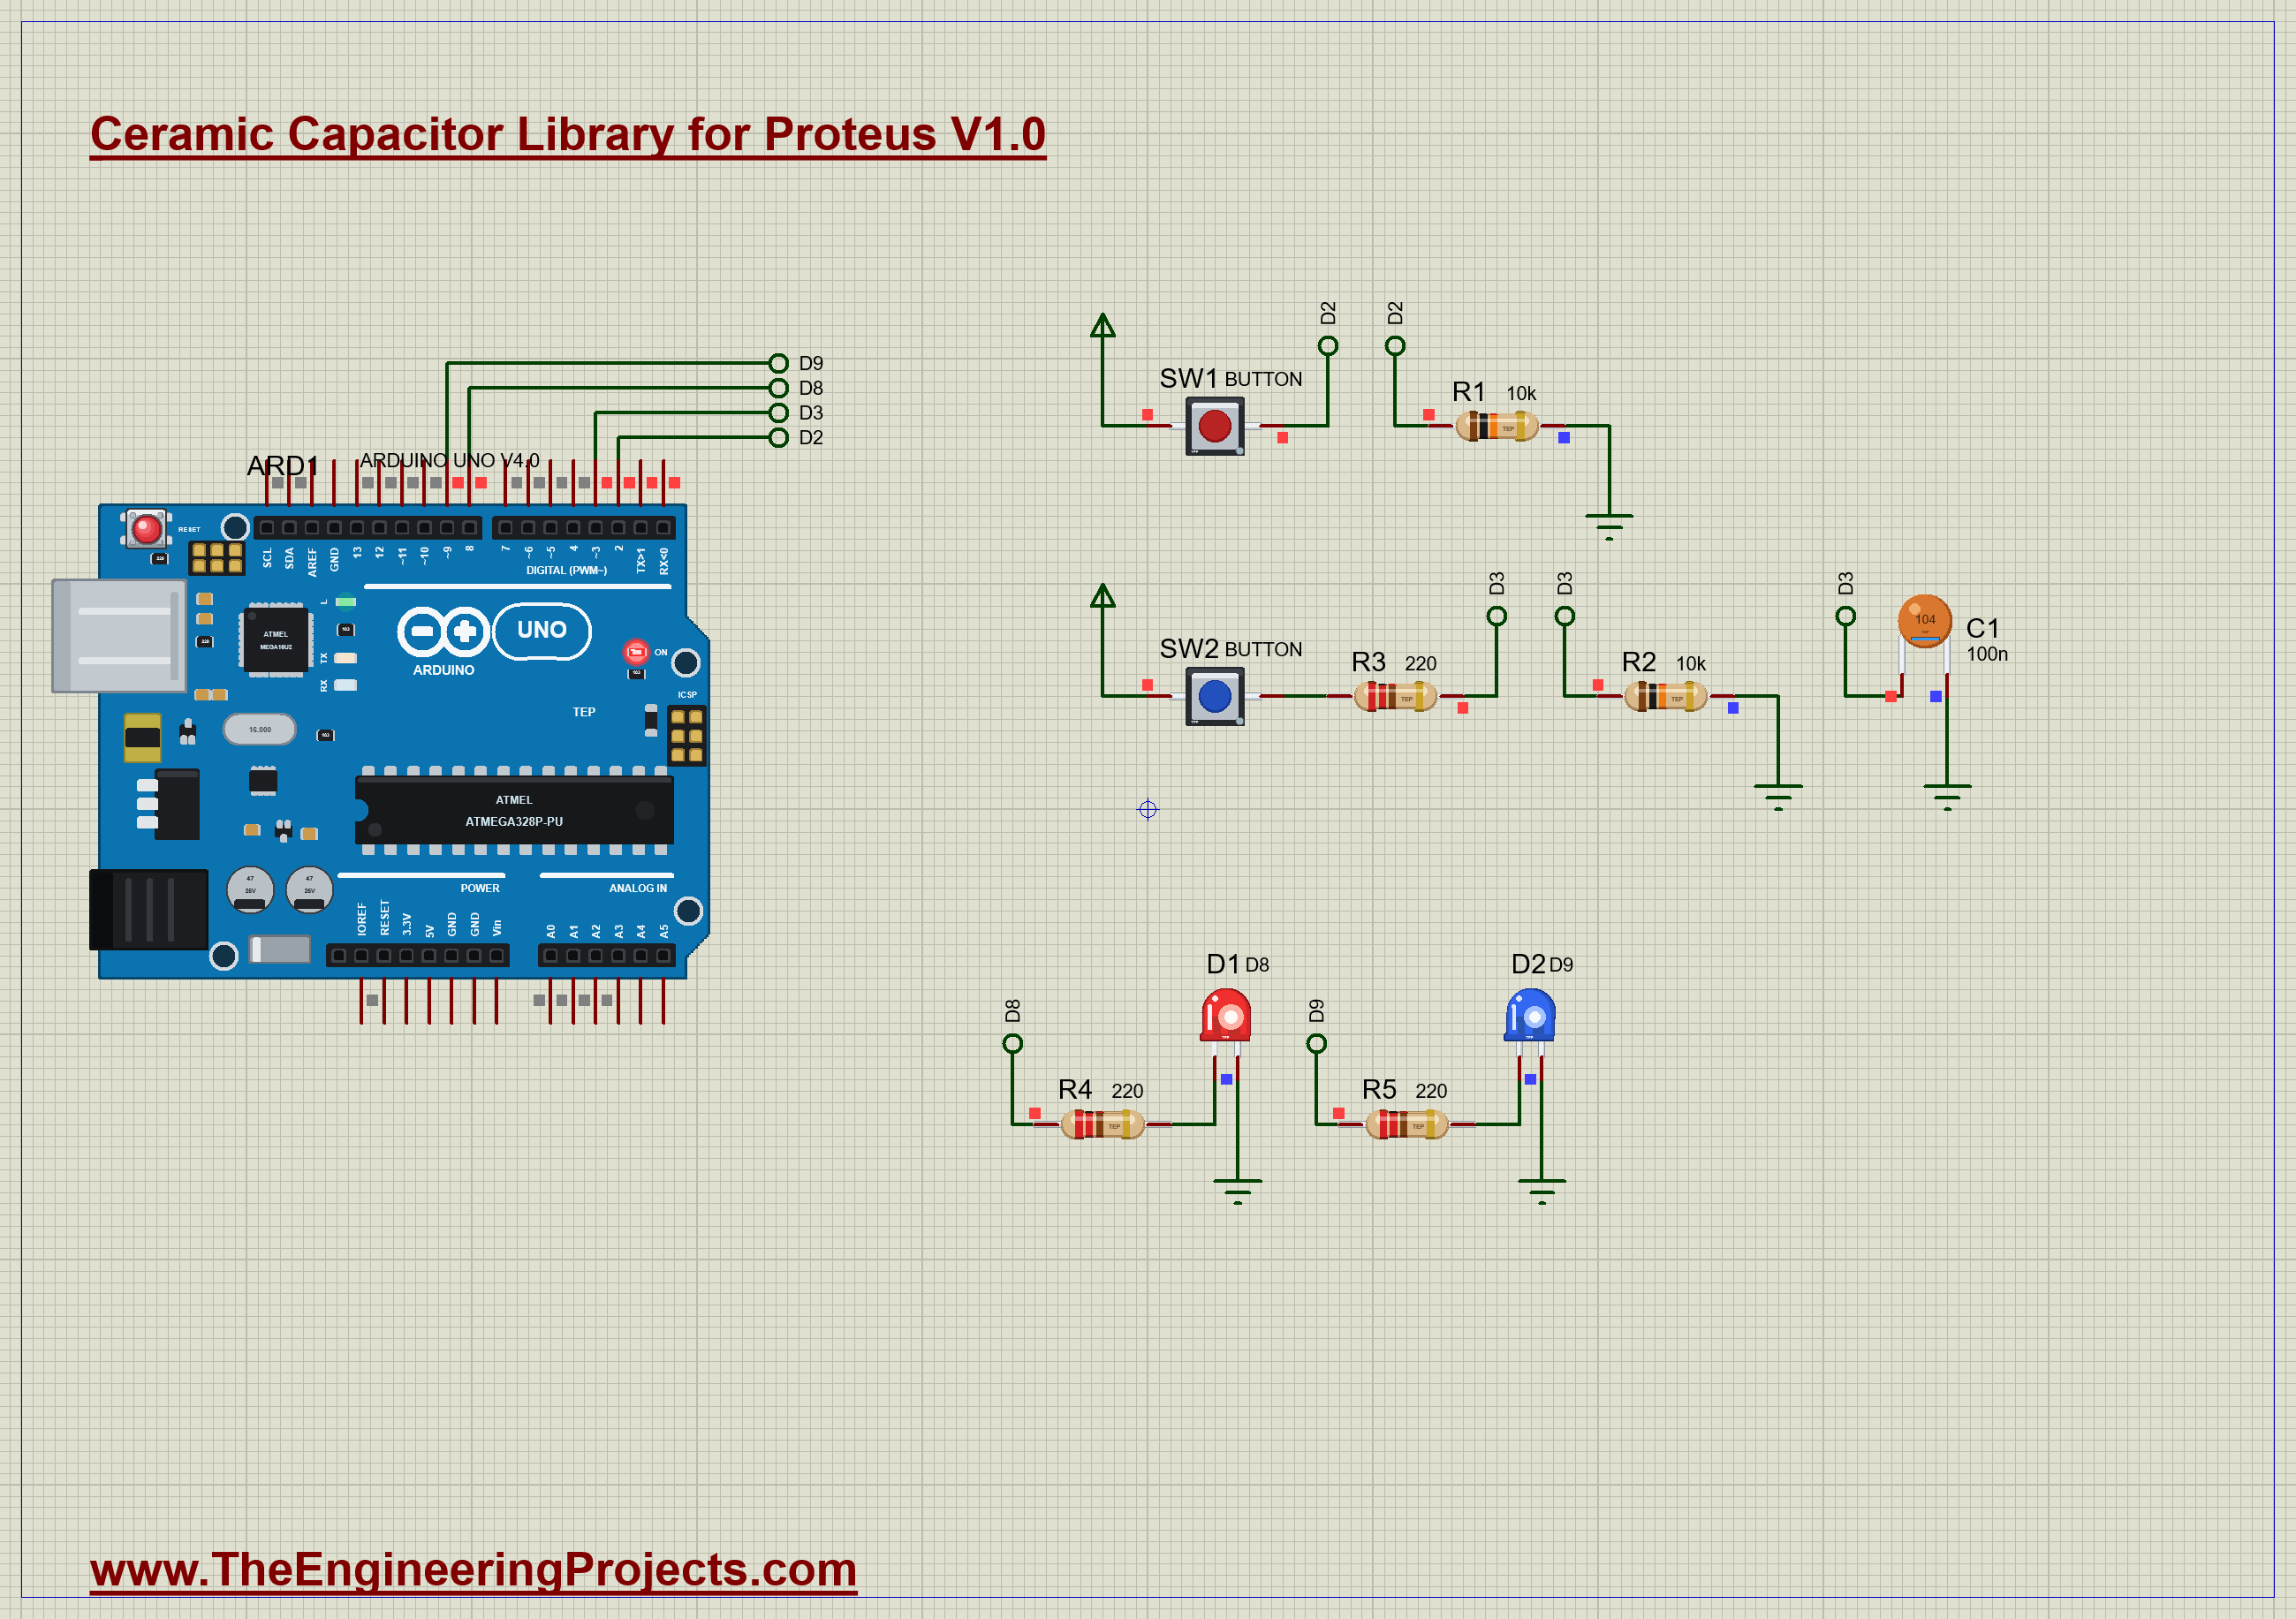
In our Push Button Library for Proteus, a sketch had to wait 20 ms to ignore the contact bounce of a switch. This time we solve the same problem with hardware, and the sketch does nothing clever at all. The demo has two buttons, both counted by interrupts in exactly the same way. SW1 is bare. SW2 has a 100 nF ceramic on its pin. Open Ceramic-Hardware-Debounce-ArduinoUnoV4.pdsprj. It runs on our Arduino UNO Library for Proteus V4.0, with its built-in monitor, the same window as our TEP Serial Monitor Advance for Proteus. The resistors are from our Resistor Library for Proteus.
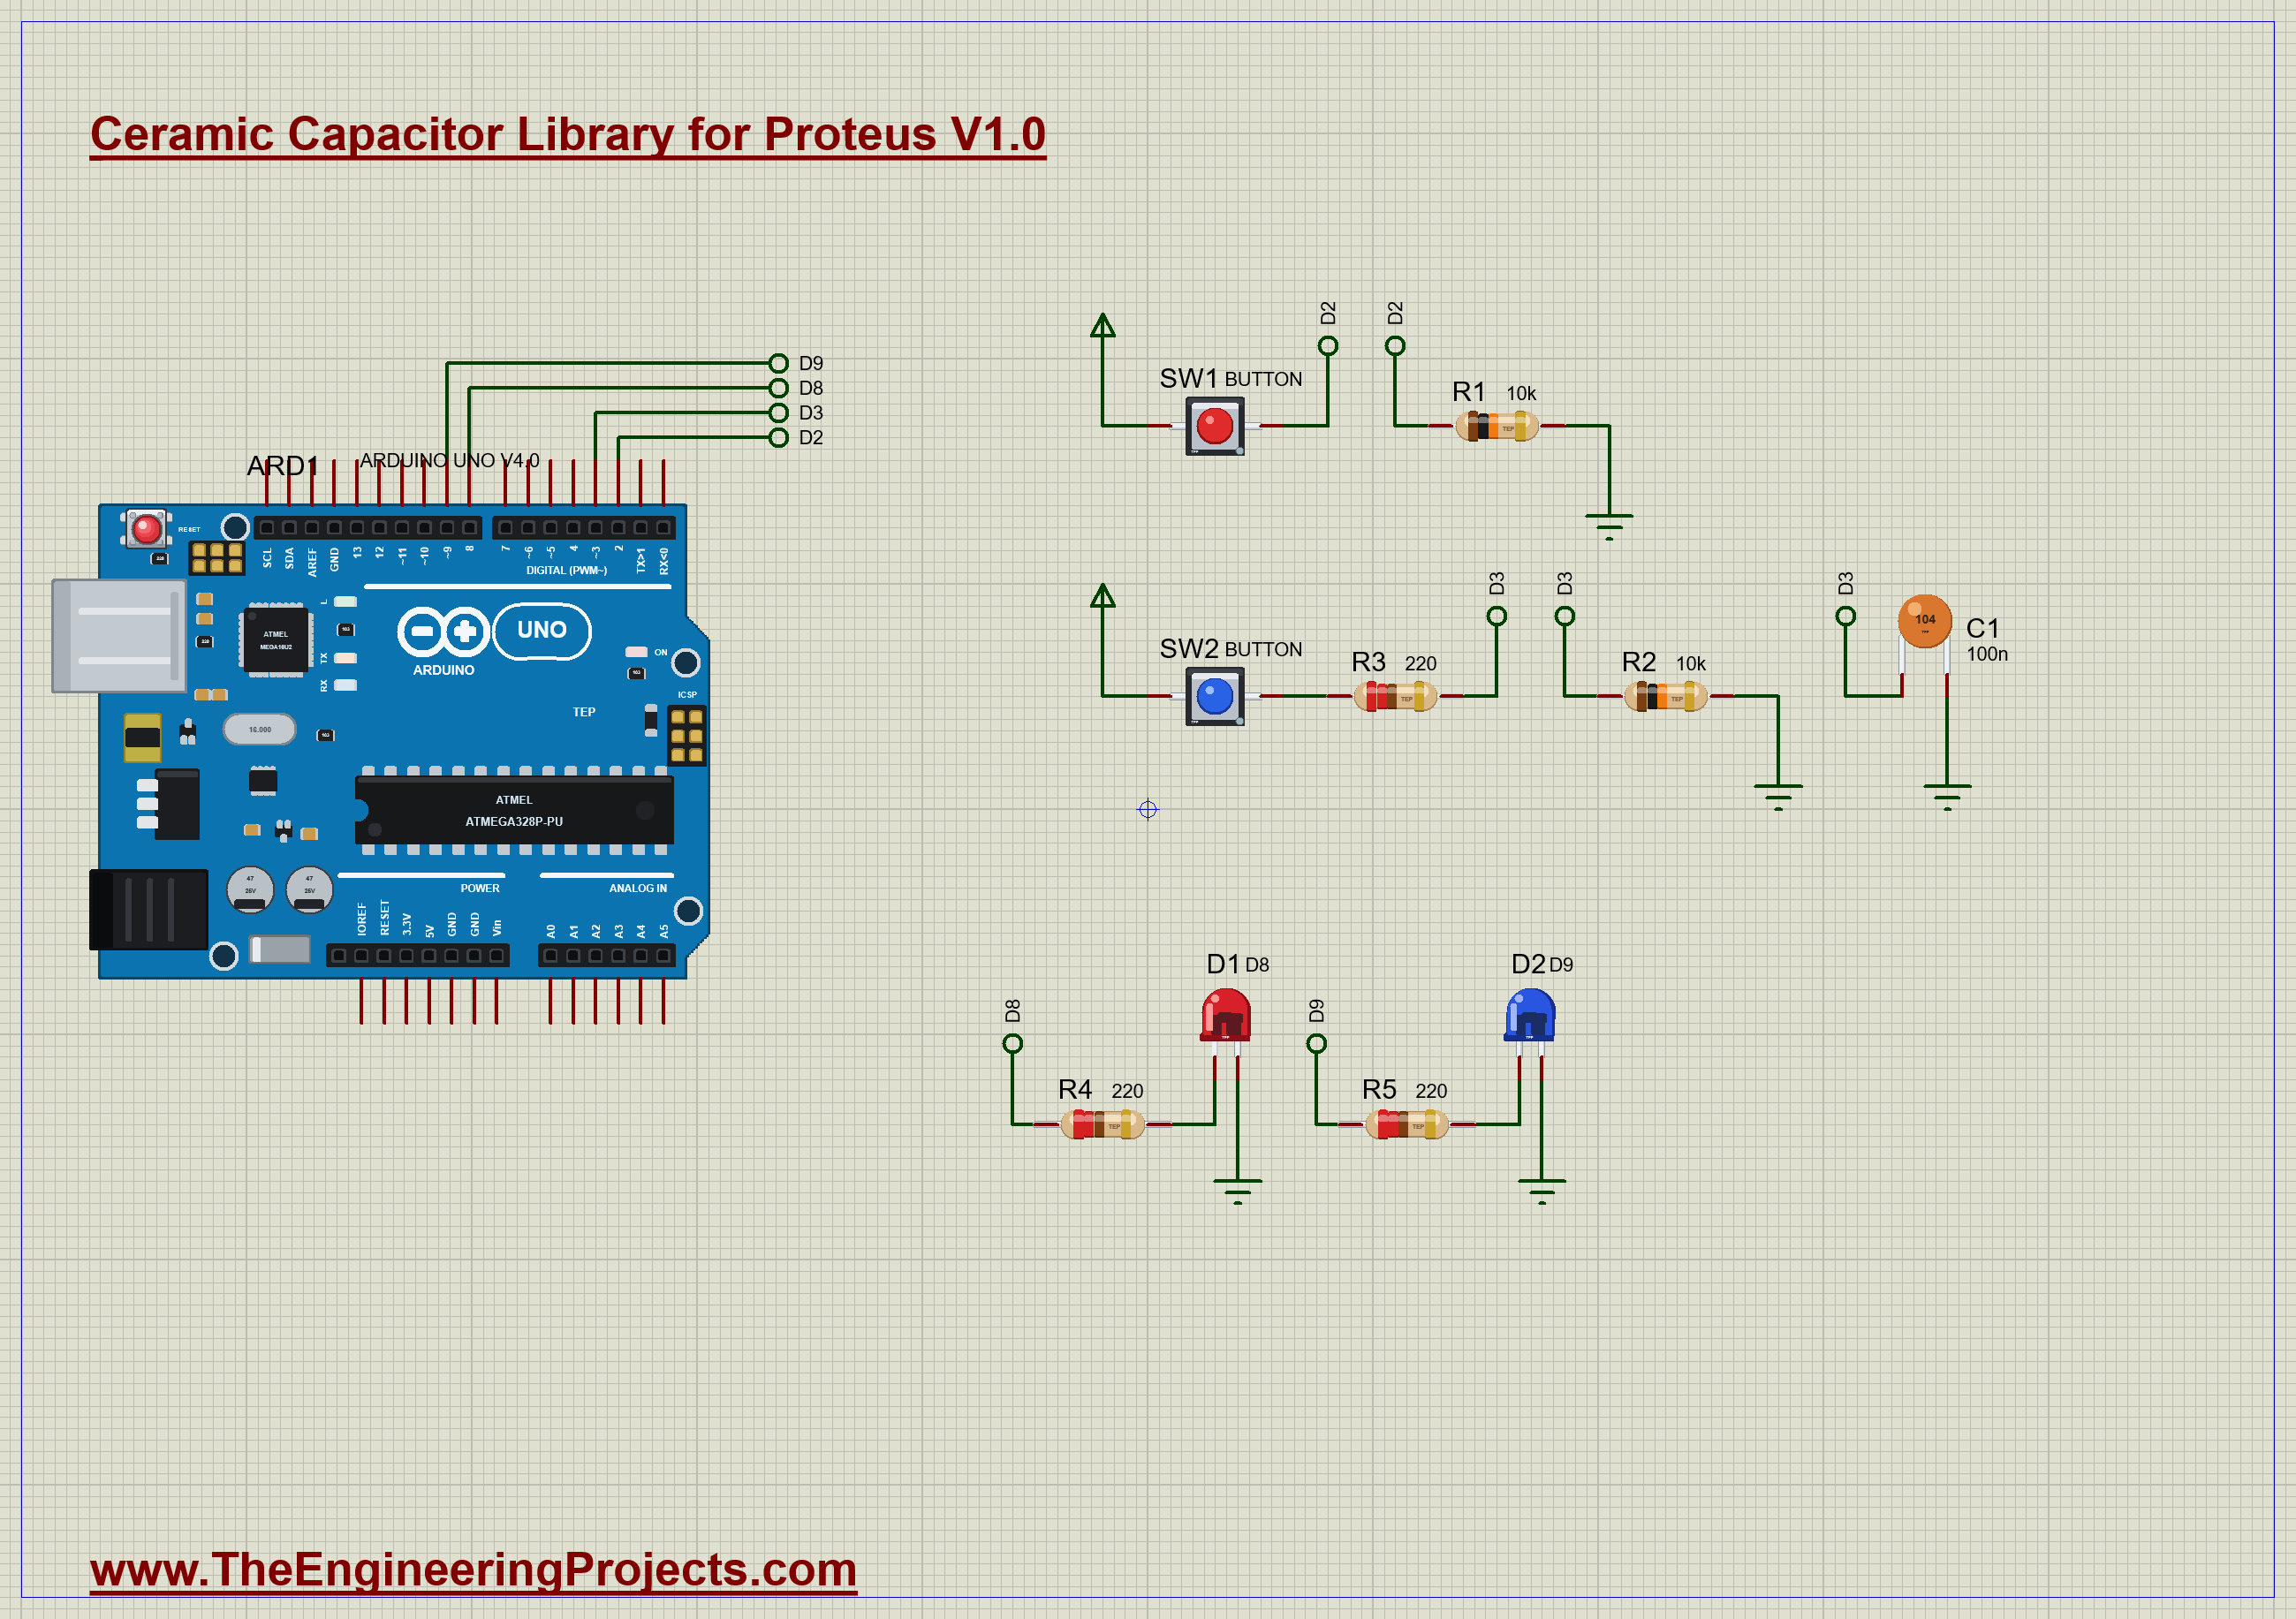
| Part | Connection | Job |
|---|---|---|
| SW1, red | +5V to D2 | the bare button |
| R1, 10k | D2 to GND | its pull-down |
| SW2, blue | +5V, through R3, to D3 | the debounced button |
| R3, 220 ohm | SW2 to D3 | limits the rush of current |
| R2, 10k | D3 to GND | its pull-down |
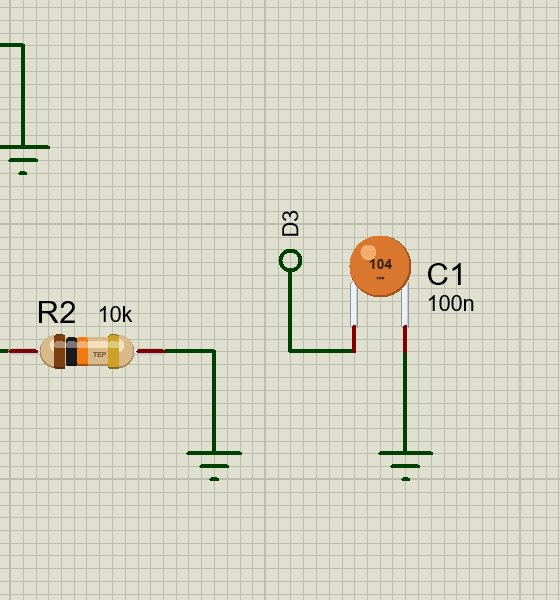
| C1, 100 nF | D3 to GND | holds the pin up |
| D1 and D2 | D8 and D9, through 220 ohm | show what each pin saw |
How the Capacitor Stops the Bounce
When the contact of SW2 first touches, C1 fills almost at once through R3. Now the contact springs apart again, but the pin does not fall, because C1 is holding it up. C1 can only drain through the 10k pull-down, and that is slow. With 10k and 100 nF, the time constant is 1 ms, while the gaps in the bounce are much shorter. So the contact chatters, the capacitor barely notices, and the pin sees a single clean rise.
It works the other way too. On release, the voltage slides down gently over a few milliseconds. The short touches of the bounce only top it up again, and the falling voltage crosses the logic threshold just once.
Why is R3 There?
It is tempting to wire the capacitor straight across the switch, and many diagrams do. But think about the moment the contact closes. An empty capacitor looks like a short circuit, so the current is limited only by the resistance of the contact and the capacitor, a fraction of an ohm. That is a brief spike of many amps through a switch rated for 50 mA, and over time it will pit the contact. A small resistor, here 220 ohm, solves the problem. It keeps the peak under 25 mA, and the time constant for charging is still only 22 microseconds.
The Sketch
Each button has its own interrupt, and the two routines are the same. On every rising edge they count one edge and flip the LED, so if there were nine edges the LED would flip nine times. The sketch has no timers and no debounce, because any cleaning must come from the hardware:
void capButton() {
  capEdges++;
  capLed = !capLed;
  digitalWrite(CAP_LED, capLed);
}
A short function in the main loop waits until a button has gone quiet for 300 ms, and then prints how many edges it counted.
Run the Demo
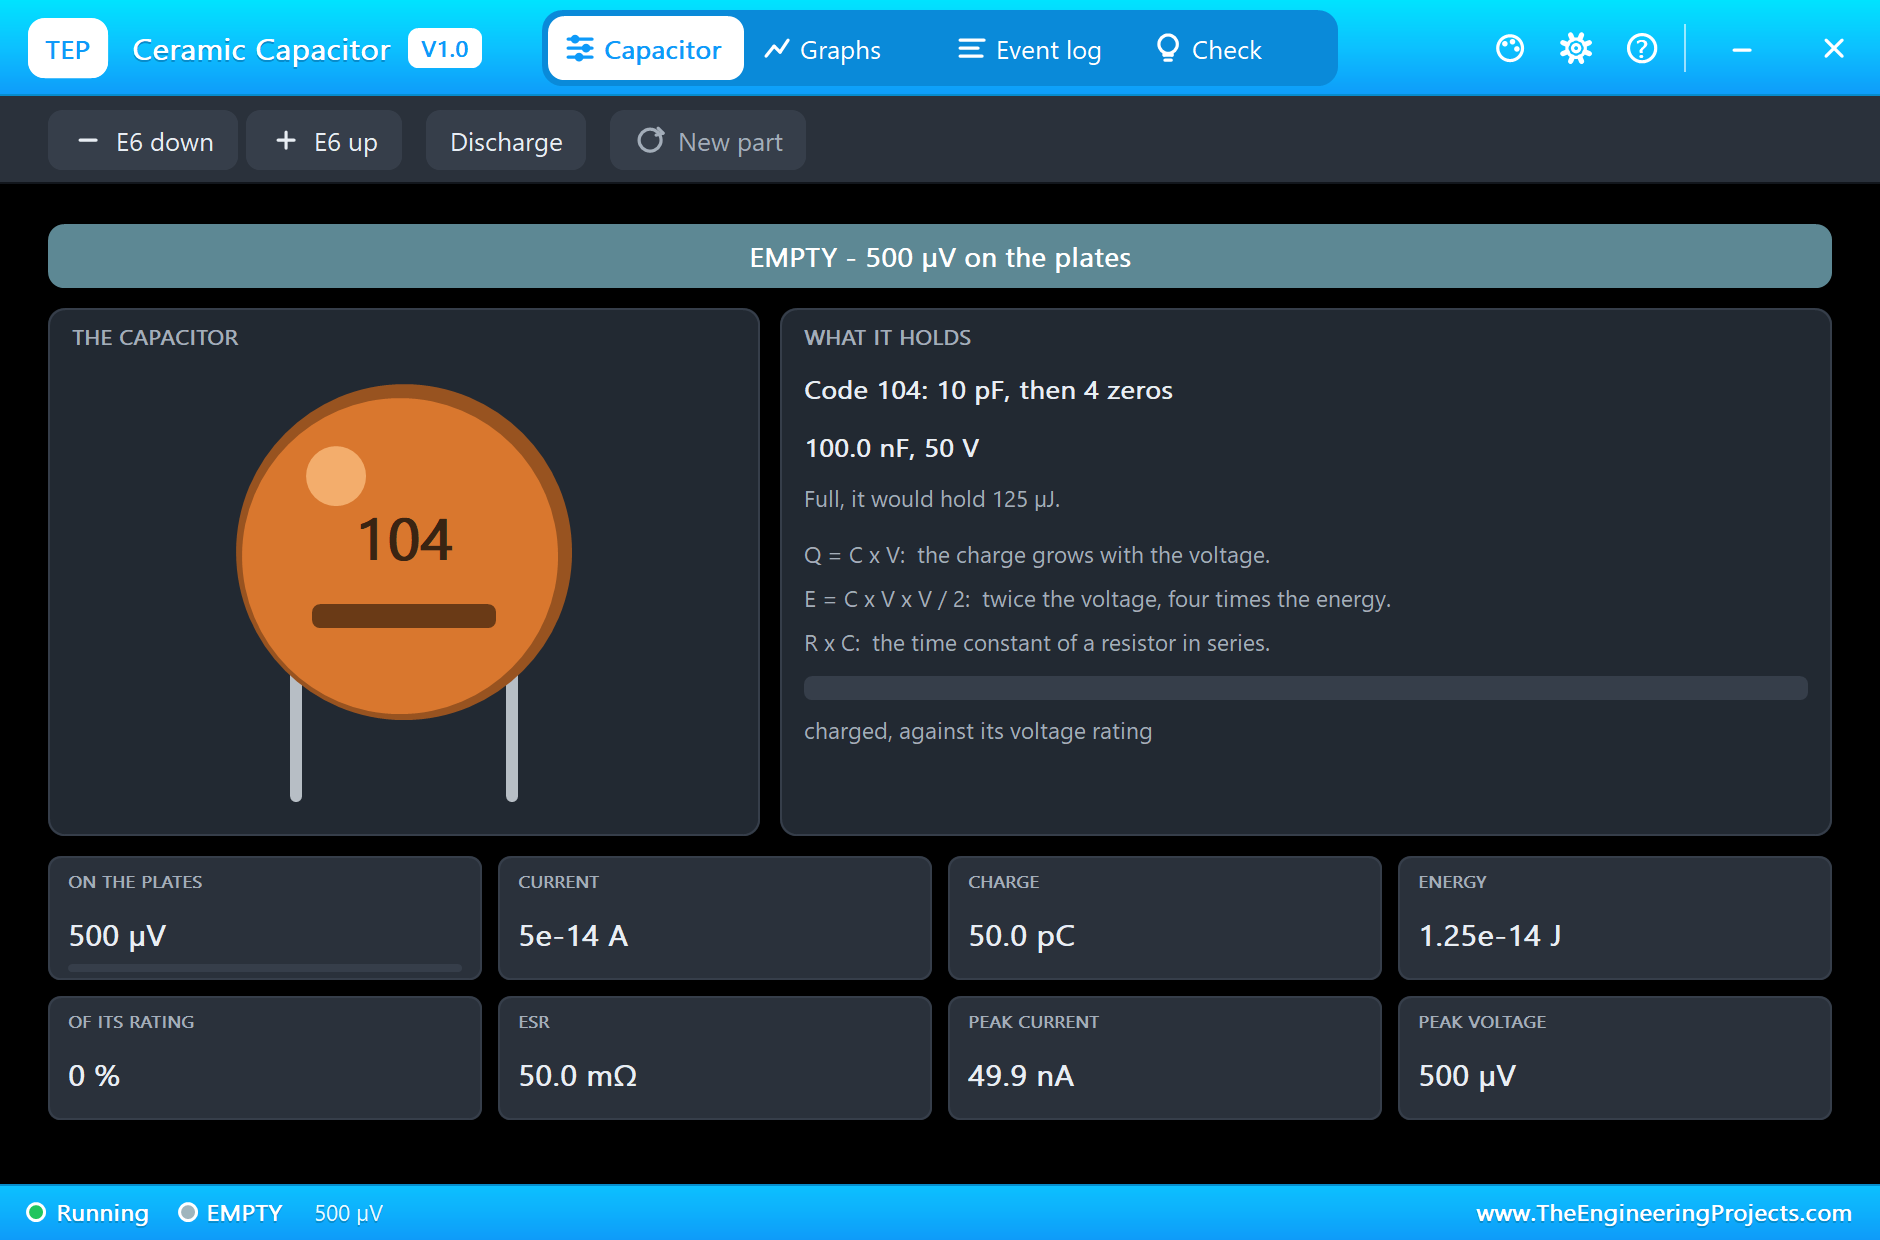
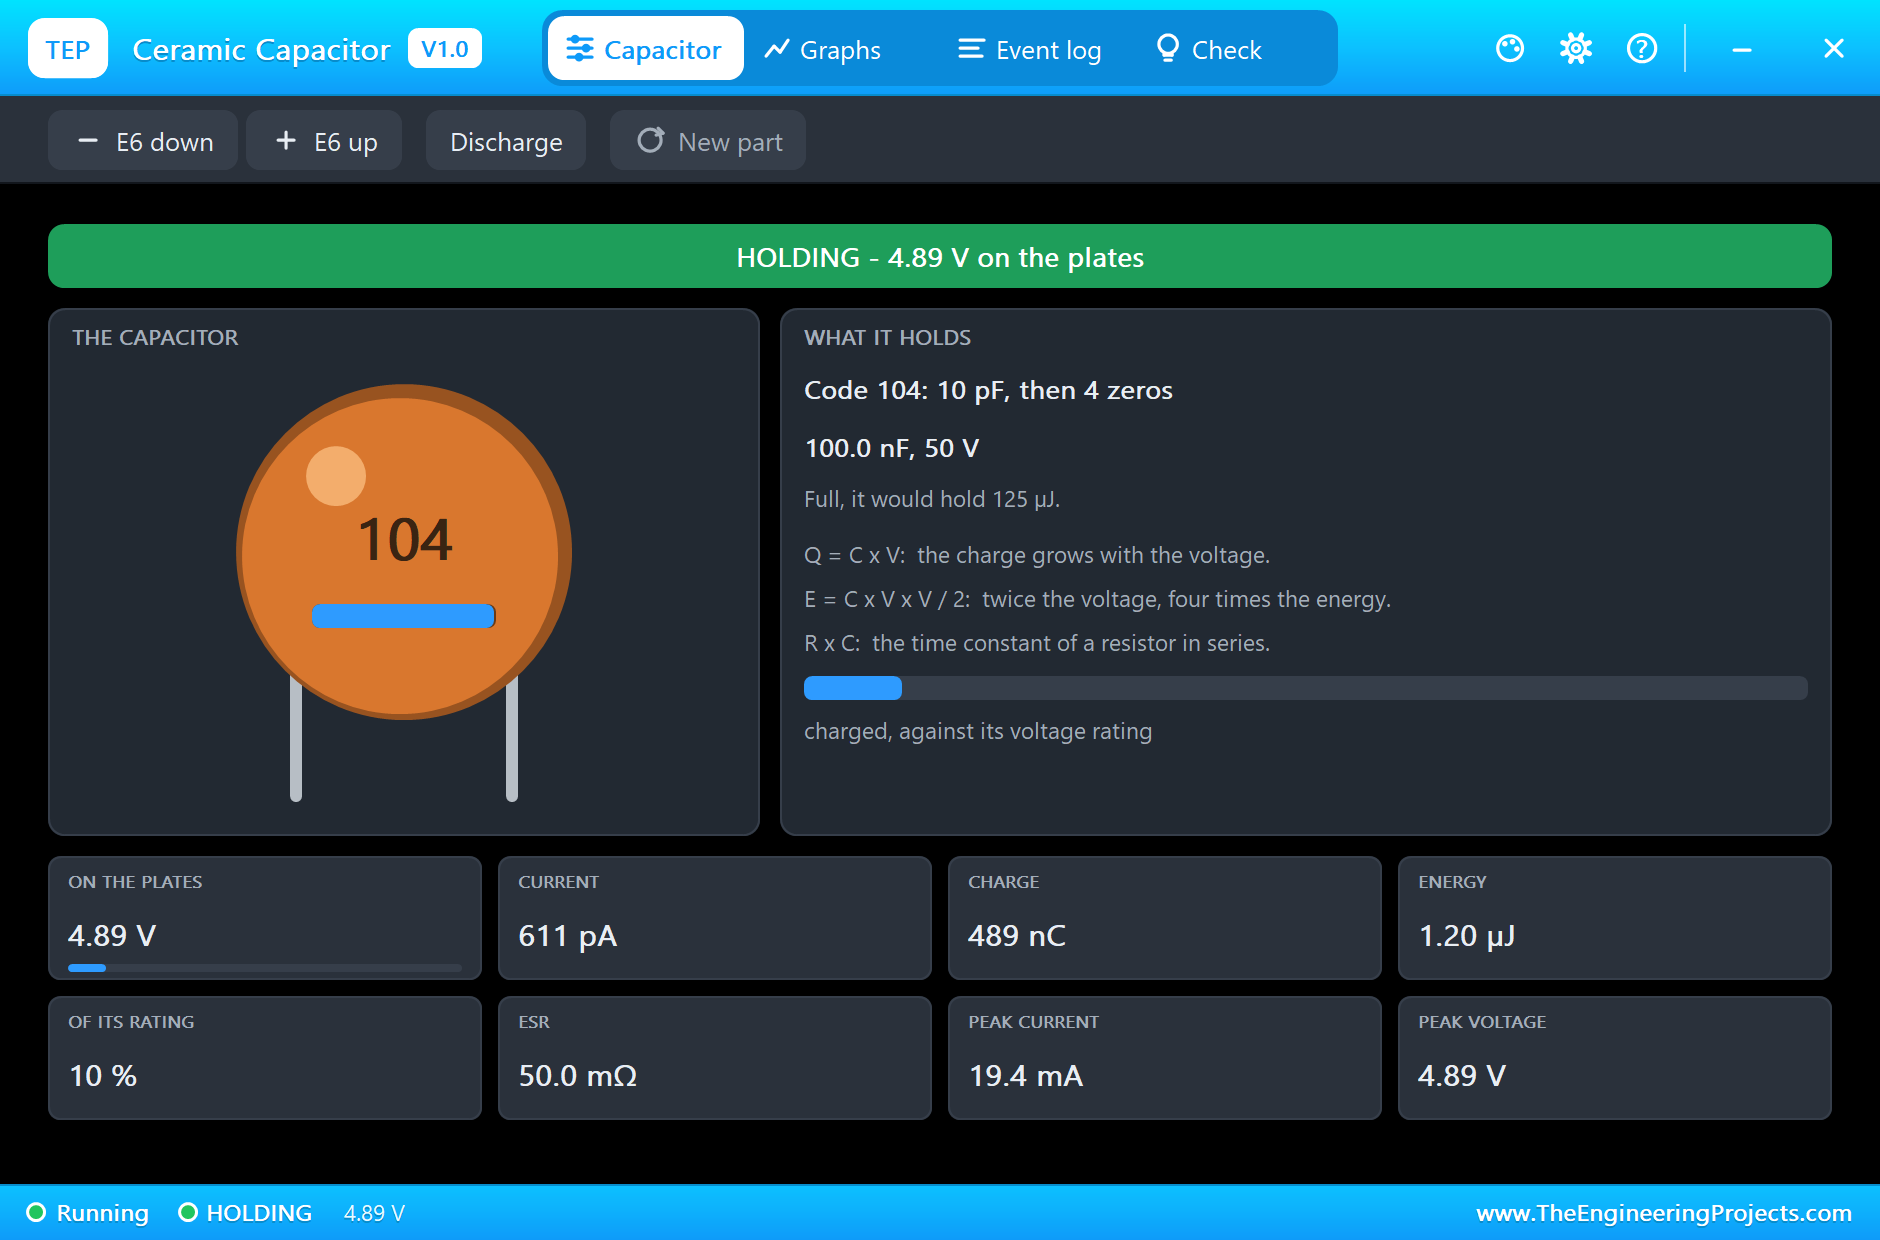
Press Run and the monitor opens. Click C1 to open its pop-up. The disc shows its code, and the card beside it spells out what the digits mean:
Now click the cap of the red button, SW1, a couple of times, and then click the blue button, SW2, a few times. Compare the two in the monitor:
SW1 bare: 9 edge(s), 9 in all, LED on
SW1 bare: 8 edge(s), 17 in all, LED on
SW2 with 100 nF: 1 edge(s), 1 in all, LED on
SW2 with 100 nF: 1 edge(s), 2 in all, LED off
SW2 with 100 nF: 1 edge(s), 3 in all, LED on
SW2 with 100 nF: 1 edge(s), 4 in all, LED off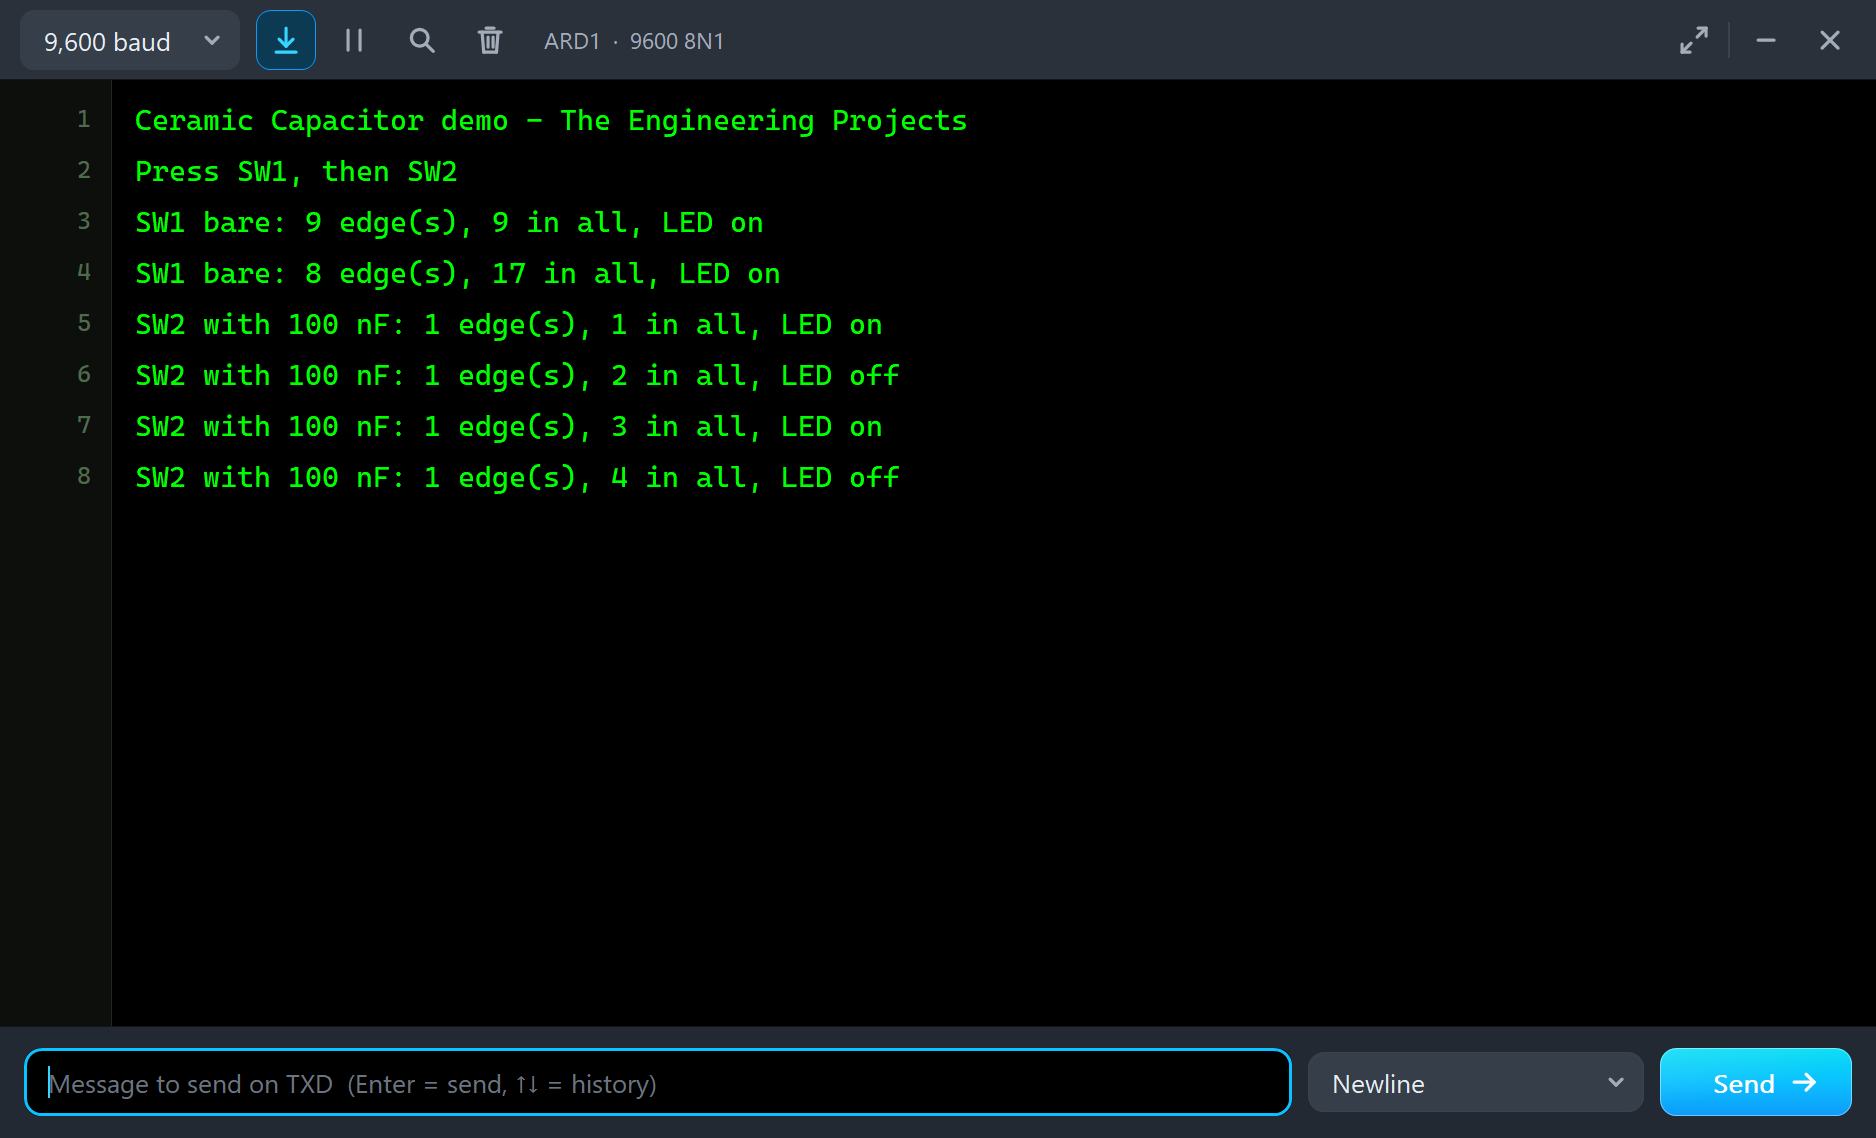
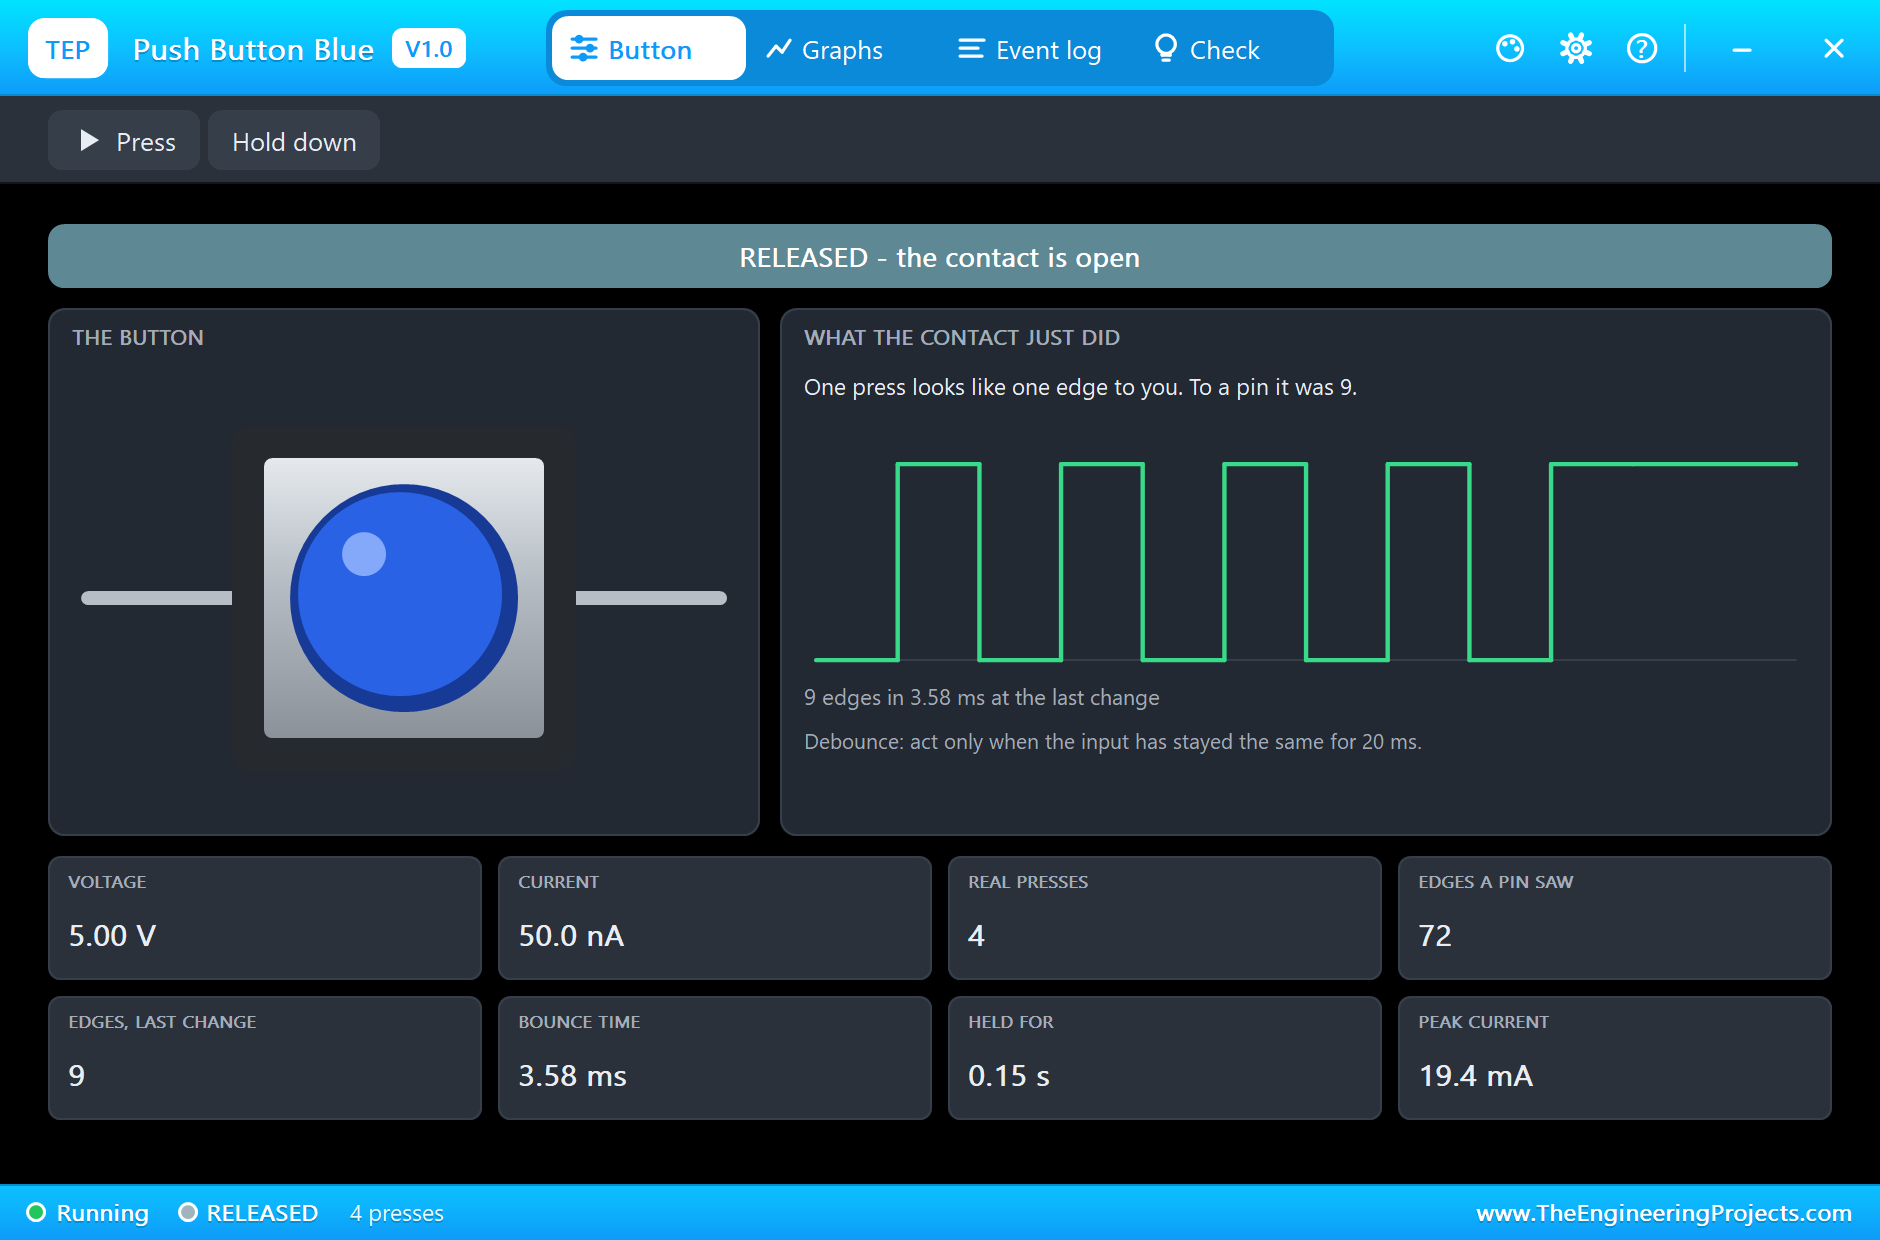
SW1 gives eight or nine edges for every press, so its LED lands anywhere. SW2 gives exactly one, every time, so its LED always toggles. Here is the clever part. Click the small dot in the corner of SW2 to open the button's own pop-up. The contact is still bouncing just as badly. The capacitor has not changed the switch at all. It has only changed what the pin sees:
Hold It Down
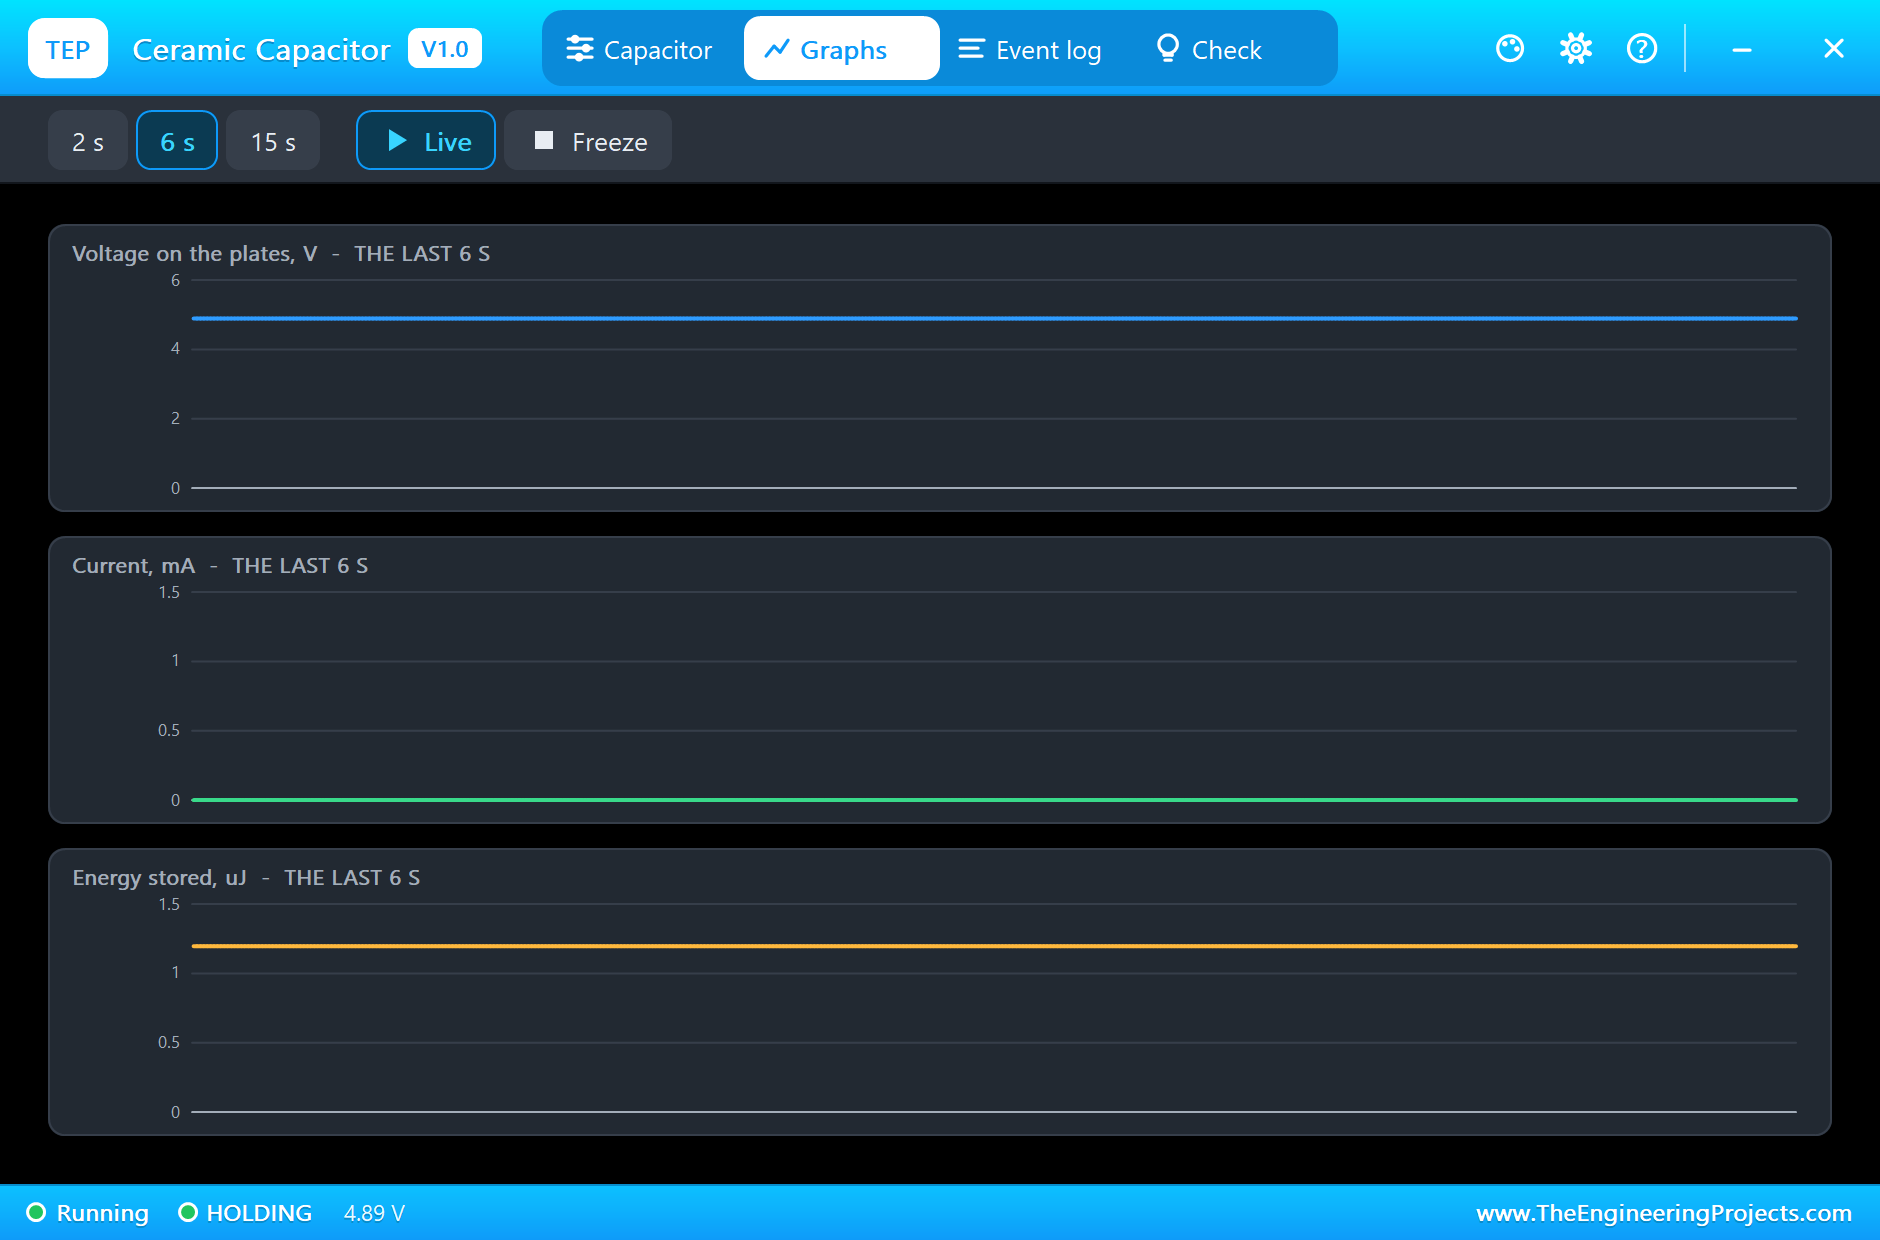
Press the Hold down chip on both buttons. C1 settles at 4.89 V, not 5 V, because R3 and the pull-down form a small divider. You can work it out: 5 x 10,000 / 10,220 is 4.89. Here is the pop-up, and the complete circuit truly running with both LEDs on:
The Graphs, the Log and the Check Page
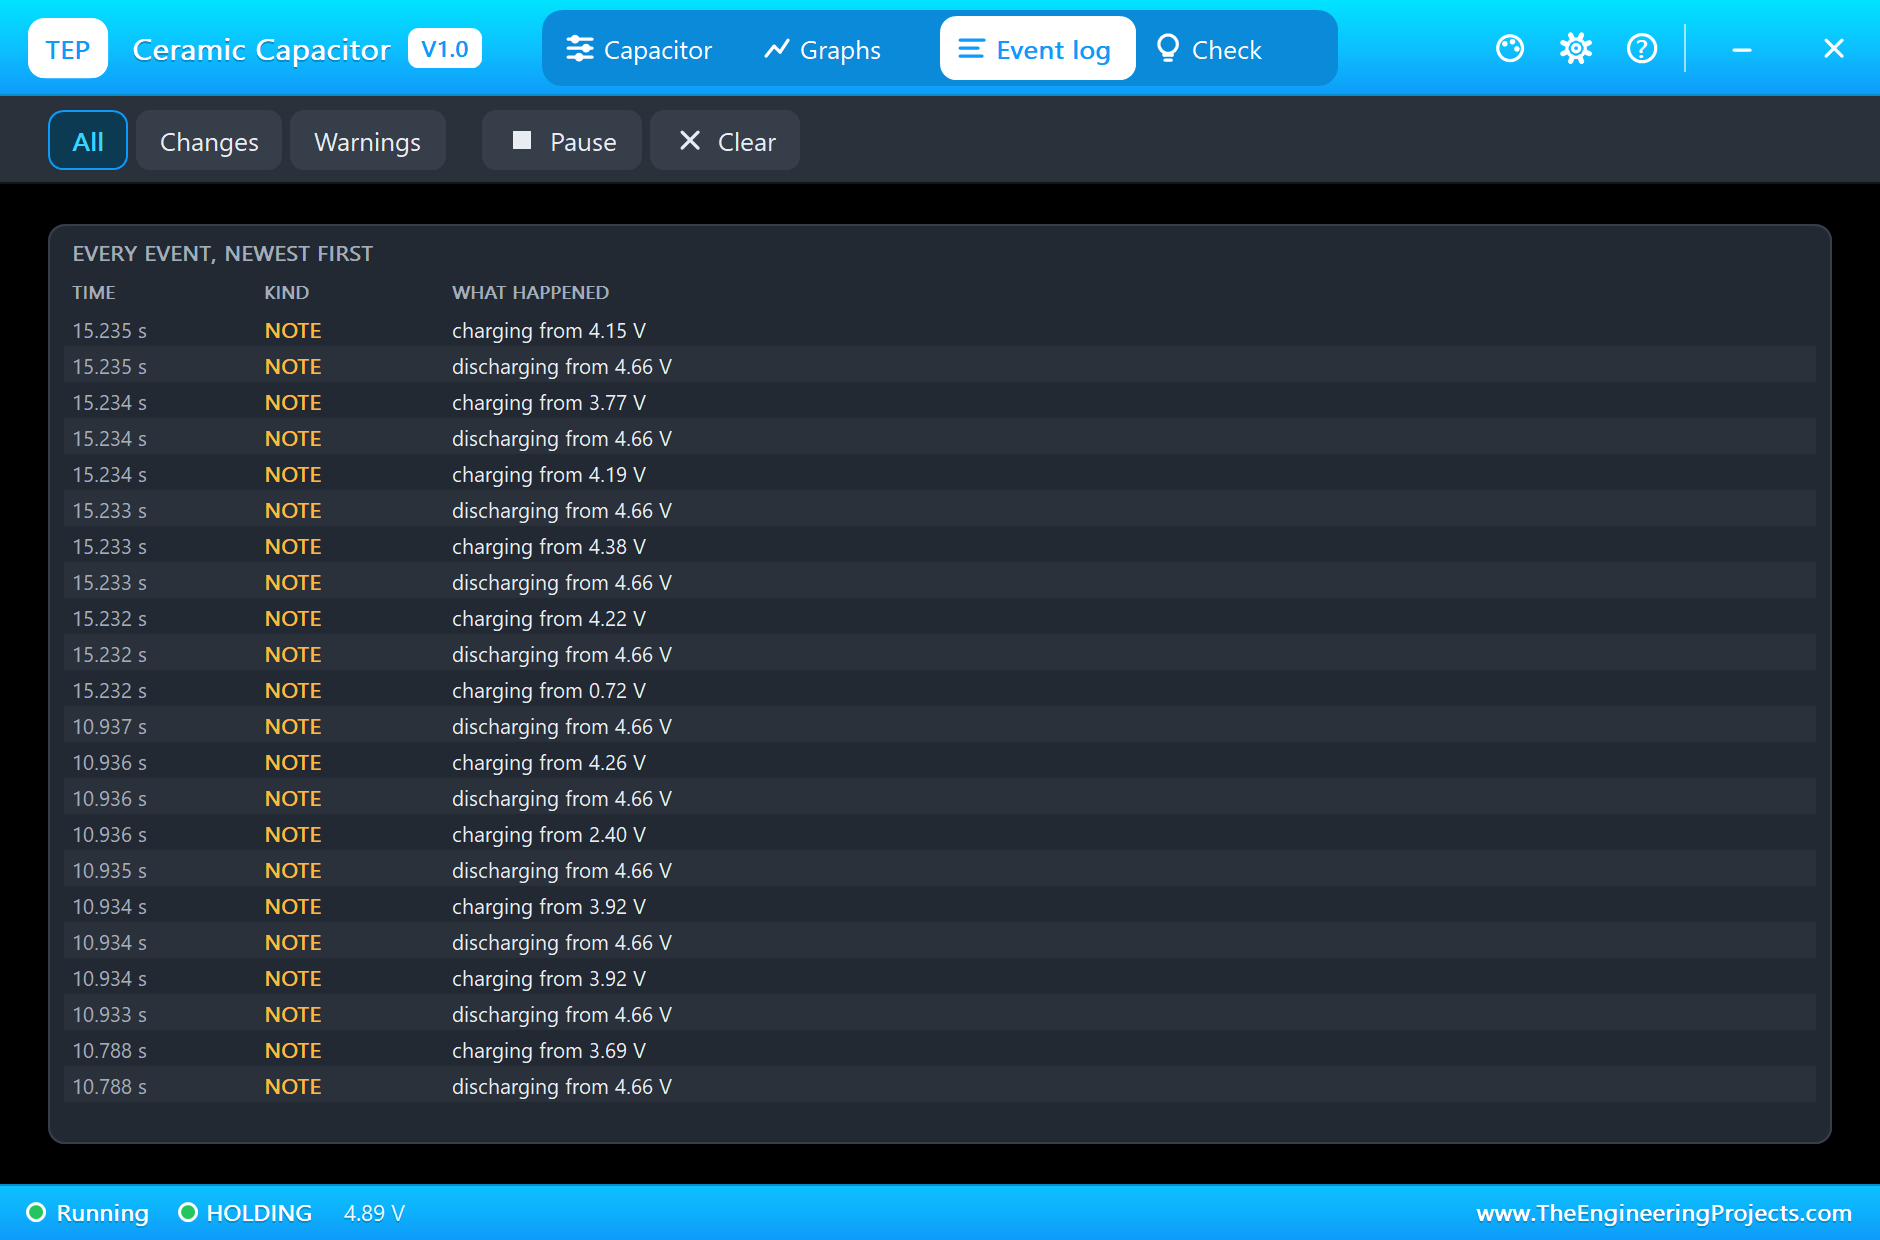
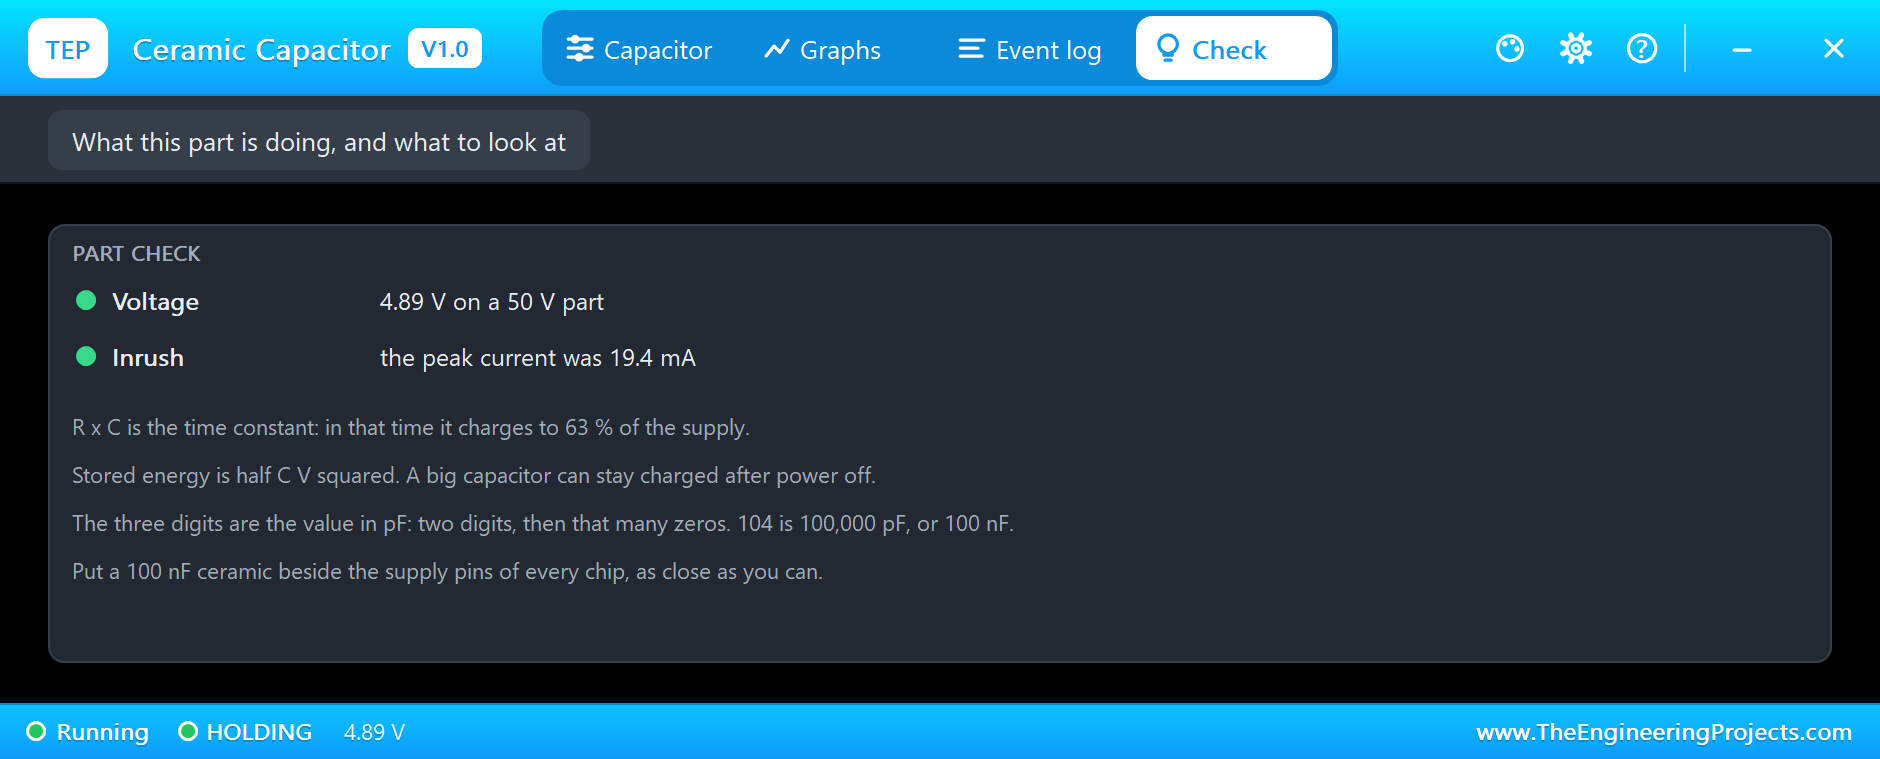
The Graphs tab shows the voltage on the plates, the current and the stored energy over the last few seconds. With SW2 held down, all of them sit perfectly steady, as a charged capacitor should. The Event log tells a busier story: every small touch of the bouncing contact shows up as a short charge and discharge, which is the capacitor doing its job. The Check page looks at the voltage against the rating, and at the peak current. With R3 in place, the inrush is a modest 19.4 mA:
Watch the Code Change
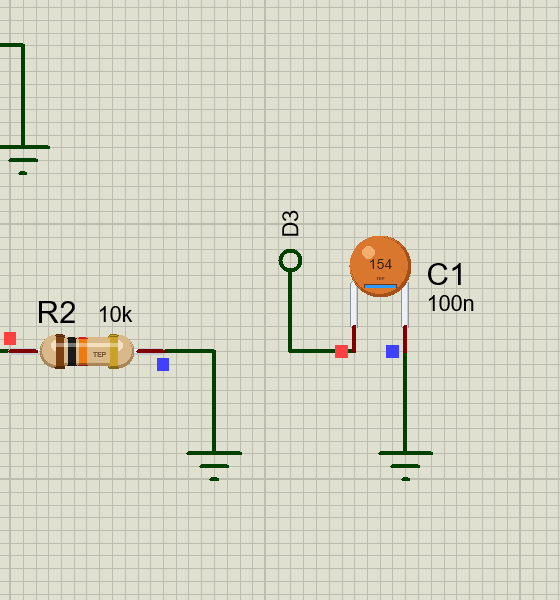
Now press E6 up on the pop-up. C1 becomes 150 nF, and the digits on the disc change to 154 while the simulation runs. The pop-up reads it back for you: 15 pF, then four zeros. This is a good way to learn the code, because you can step through the values and check yourself each time:
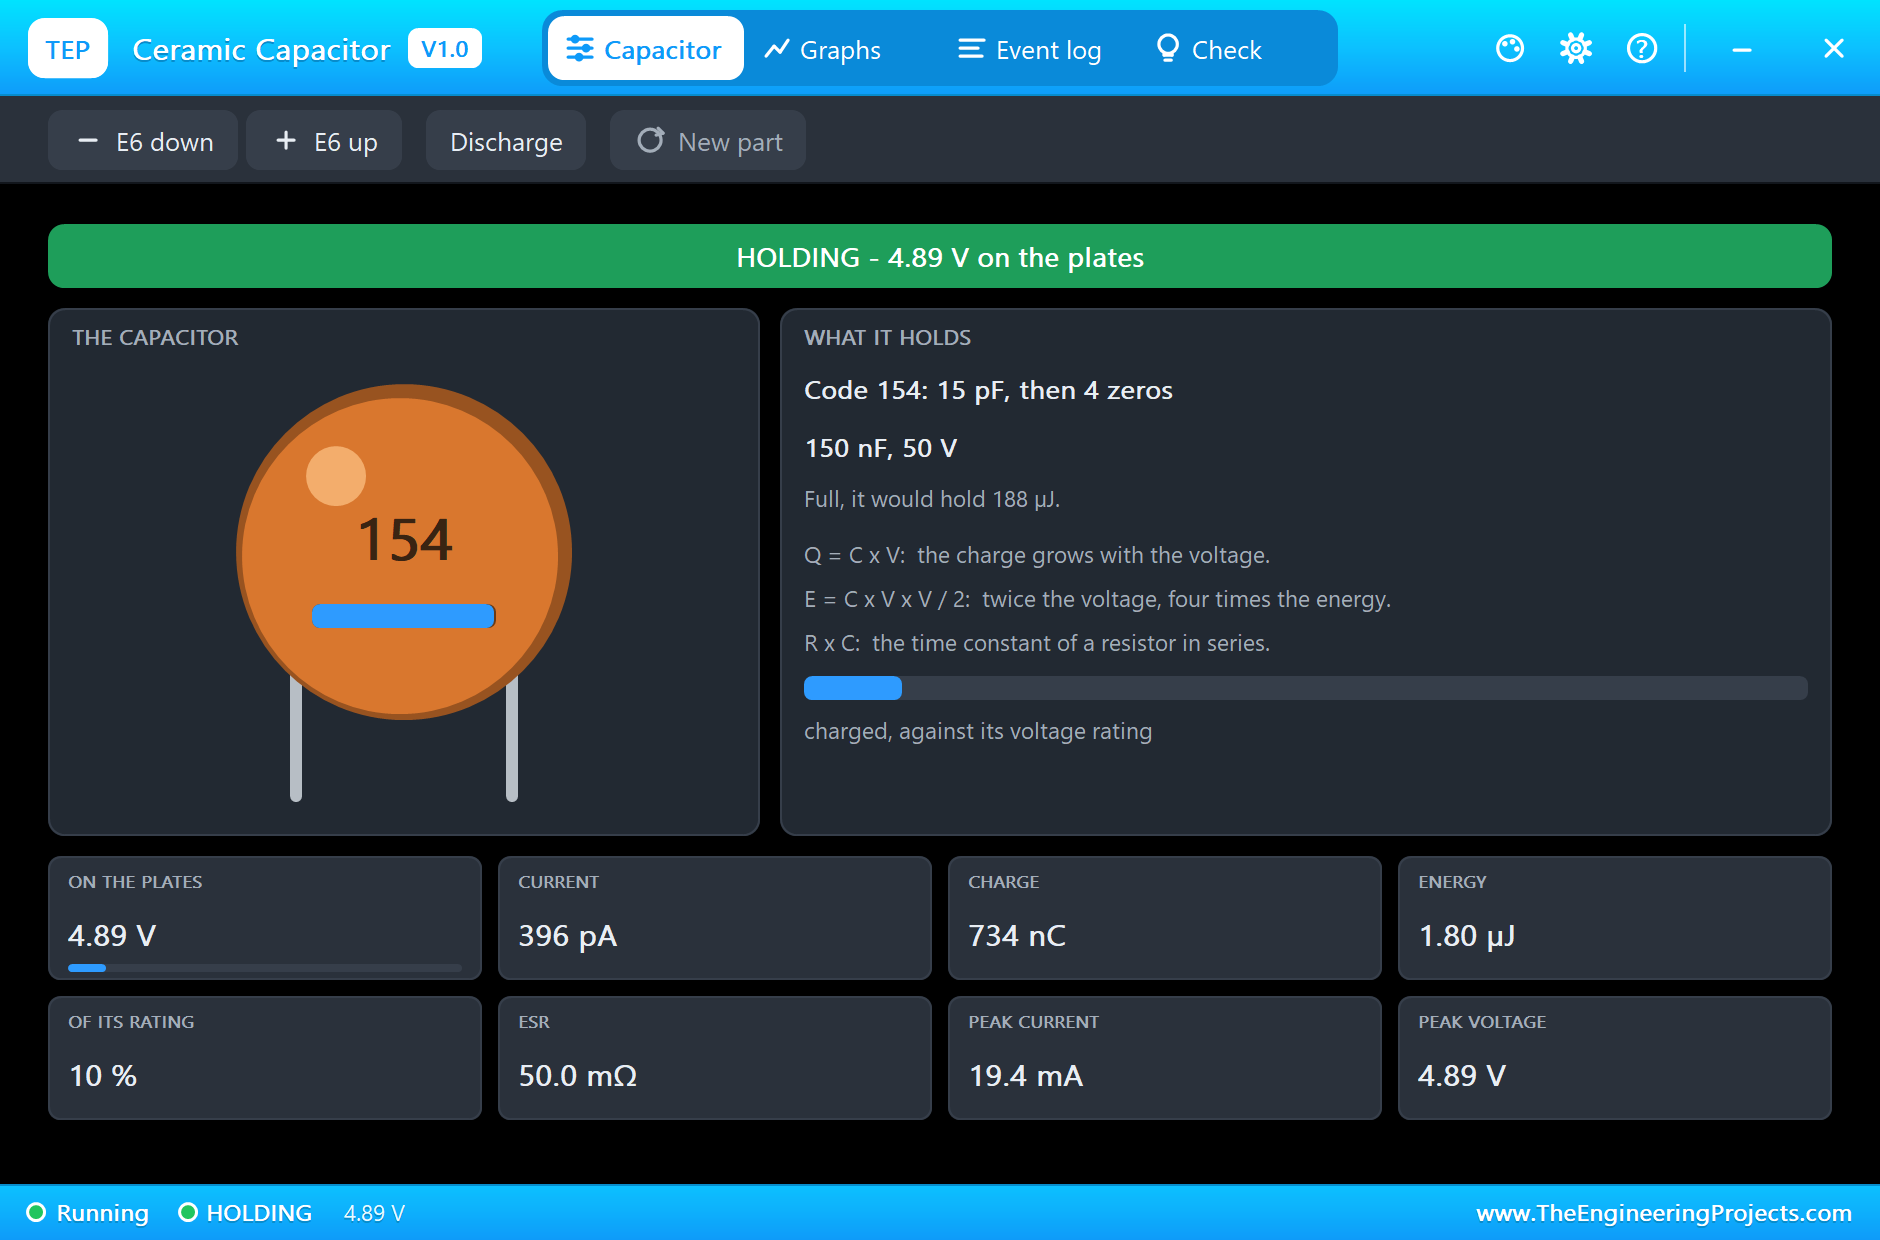
A value set by the chips lasts for this run only. To keep it, type it in the Capacitance box.
Try It Yourself
- Replace R3 with a wire, and read the peak current on the Check page.
- Delete C1, and see SW2 behave just like SW1.
- Step C1 down to 10 nF and find the value where the debouncing starts to fail.
- Set the bounce property of SW2 to 20 ms, and see if 100 nF is still enough.
- Print the time between a press and the edge, and see the small delay the capacitor adds.
Ideas to Extend the Demo
- Fit a 1 uF capacitor, and measure how long the pin stays HIGH after you let go.
- Feed the slow edge into a Schmitt trigger gate, which is how real designs clean it up.
- Use two ceramics and a crystal to make a clock circuit on a breadboard.
- Filter a noisy sensor with 10k and 100 nF before it reaches an analog pin.
Your Own Sketches
The demo sketch is in the zip file, and you can change it in the Arduino IDE. New to Arduino? Start with our Arduino Tutorial for Beginners. Export the compiled binary, and set the UNO's PROGRAM property to the new file. Our guide on How to get the HEX file from Arduino shows you where the file ends up.
Things to Know Before Using a Real Ceramic
- Keep the leads short: a decoupling capacitor only works when it is right beside the chip. Long wires add the very inductance it is there to beat.
- Leave a voltage margin: many types lose value at high voltage, so a 50 V part on a 5 V rail is a good choice.
- Check the tolerance letter: a Z part can be far from its printed value.
- Do not stress them: a ceramic is brittle, and bending a board or pulling a leg can crack it. A cracked part may fail later, not straight away.
- Avoid them for accurate audio: some types change value with voltage, and that adds distortion.
Troubleshooting
- The code does not match the value: press Run once. The model sets the code to the nearest E6 value.
- SW2 still gives more than one edge: the bounce is longer than C1 can hold. Try 220 nF.
- BURST: it saw too much voltage. Fix the circuit first, then press New part.
- The pop-up does not open: click the disc while the simulation runs.
- The part is not simulated:
TEPCERAMIC.DLLis missing from MODELS and from the project folder.
Limitations of the Simulation
- The capacitance does not fall with voltage or temperature, and the part's inductance is left out.
- The tolerance is not modelled: the part is exactly its value.
- A value between two E6 steps prints the nearest code, but simulates as typed.
- Arduino is a name of Arduino; this library is not made or endorsed by Arduino or Labcenter.
- Tested in Proteus 8.5 in October 2026 (the demo as shipped). Proteus 7 is not supported.
So, that was all about the Ceramic Capacitor Library for Proteus. I hope the three digits on those orange discs will never puzzle you again, and that you enjoy seeing a tiny part do a job we usually leave to software. If you have any questions, ask in the comments and I will help you out. Till the next tutorial, take care and have fun!