Hello friends, I hope you all are doing great. Today, I am going to share the new Schottky Diode Library for Proteus. A silicon diode takes 0.7 V away from every circuit it sits in. On a 12 V supply nobody minds. On a 3.3 V rail, or a single battery cell, 0.7 V is a painful loss. The Schottky diode is the answer: it does the same job for about half the price in volts.
Schottky Diode Library for Proteus
Latest version: V1.0 (November 2026, this tutorial)
Other component libraries: C945 Transistor · PC817 Optocoupler · Relay Module · Resistor · 5 mm LED · Designer Colour LED · Push Button · Active Buzzer · Electrolytic Capacitor · Ceramic Capacitor · Tantalum Capacitor · Film Capacitor · 1N4007 Diode · Zener Diode · Supercapacitor · Photodiode · RGB LED · Bridge Rectifier · Flashing LED · Bi-Colour LED · SMD LED · Slide Switch · Toggle Switch · Rocker Switch · Micro Limit Switch · Emergency Stop Switch · SMD Resistor · Power Resistor · Resistor Network · Potentiometer · Trimmer Potentiometer · Slide Potentiometer · NTC Thermistor · DIP Switch · Fuse · Passive Buzzer · Mini Speaker · 7-Segment Display · LED Bar Graph · IR / UV LED · Small Transistors · TIP122 Darlington · N-MOSFET · P-MOSFET · PC817 Optocoupler · Filament Bulb · Power LED · Voltage Regulator · SCR and TRIAC · Inductor · Toroid Inductor · Crystal
Helping Tools
- Serial Monitor Advance: a serial terminal window for the UART of your board
- Serial Monitor Expert: the serial monitor with extra debugging tools
- LCD Library for Proteus V3.0: 16x2, 20x4 and I2C LCDs to show your readings
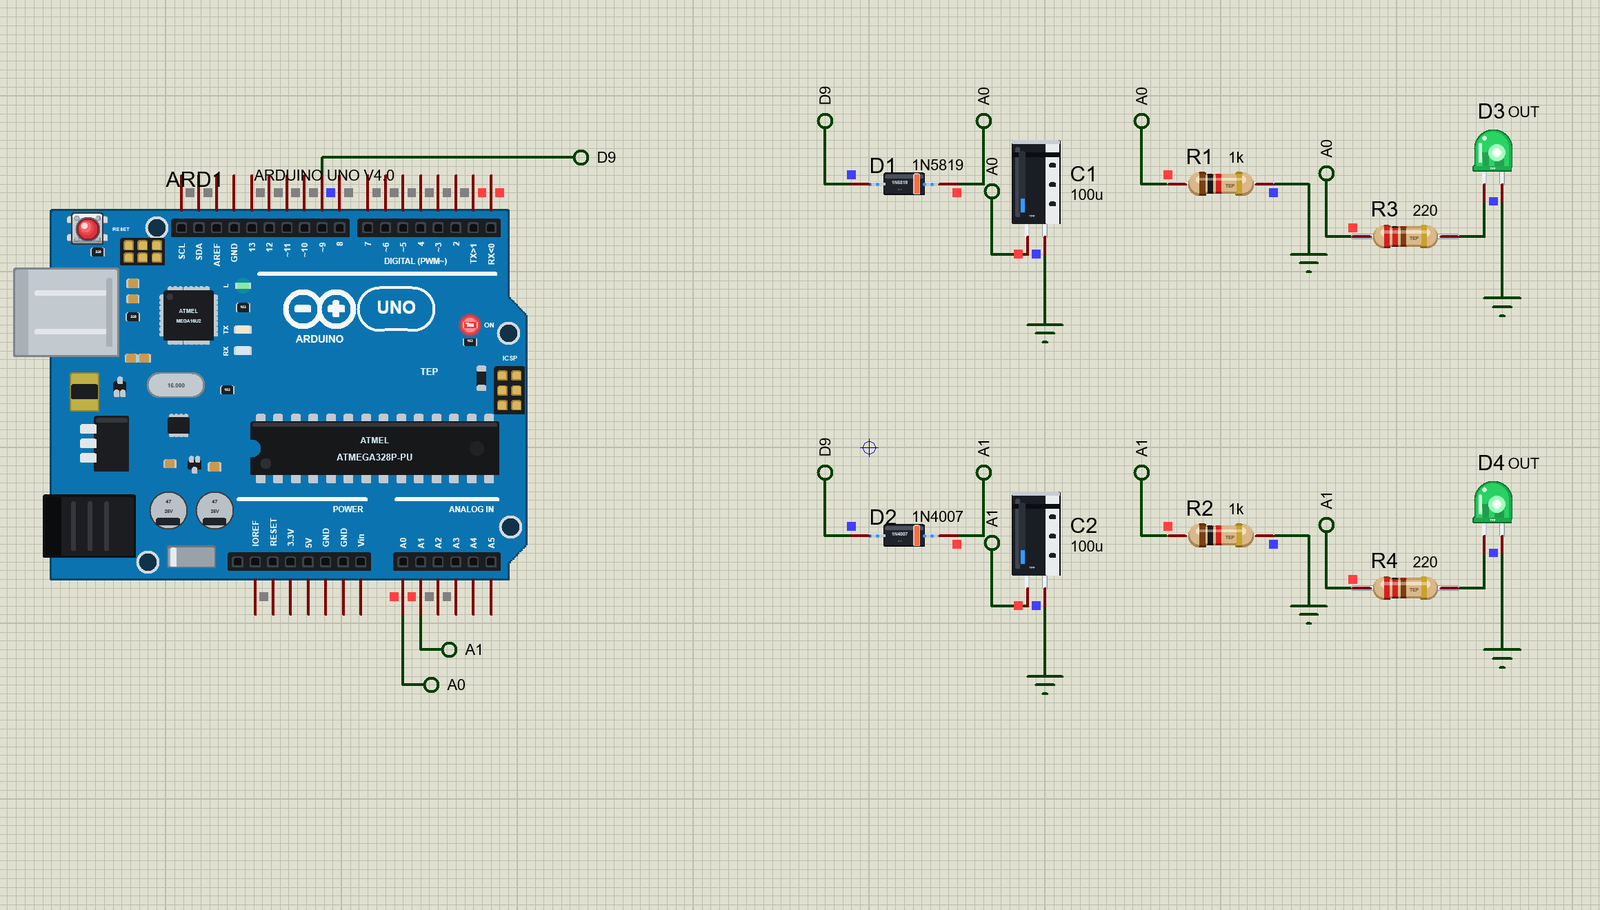
Our part is the popular 1N5819, in the same black body as the 1N4007, at true scale, with beads of current on its legs. The pop-up draws its curve with the live working point, so you can see the difference at once. And for the demo, we put the two diodes in a straight race: one square wave, two identical rectifiers, one Schottky and one silicon, and an Arduino reading the result.
NOTICE: Our team has put a lot of effort into these small parts: the bodies, the animation and the pop-ups are all our own design, and you get them free. Your feedback is the fuel that keeps us going, so please tell us what you think in the comments below or in the Schottky Diode board of our forum. And if our free libraries help you, you can buy us a coffee. So, let's get started with the Schottky Diode Library for Proteus:
What is a Schottky Diode?
An ordinary diode is a junction between two kinds of silicon. A Schottky diode is different: it is a junction between a metal and silicon, and it is named after the German physicist Walter Schottky. That small change in how it is made has big effects. The barrier at a metal junction is lower, so the forward drop is roughly half that of a silicon diode. And since only one kind of charge carrier does the work, there is nothing stored in the junction to clear away when it switches off, so it is extremely fast.
There is a price, as always. A Schottky leaks far more in reverse than a silicon diode, and the leakage grows quickly with temperature. It also cannot block very high voltages. The 1N5819 is the 40 V member of a small family: the 1N5817 blocks 20 V and the 1N5818 blocks 30 V.
| Feature | The real part | In the library |
|---|---|---|
| Body | DO-41, 5.2 x 2.7 mm | 218 x 113 thou, true scale |
| Reverse voltage | 40 V | 40 V |
| Forward current | 1 A on average | the Check page warns over it |
| Forward drop | about 0.3 V at small currents, 0.6 V at 1 A | the same, from the diode law |
| Cathode | the silver band | the same |
Schottky or Silicon?
Here are the two diodes side by side. Neither one is better in every way, and a good designer knows when to use each:
| Feature | 1N5819 Schottky | 1N4007 silicon |
|---|---|---|
| Forward drop at small currents | about 0.3 V | about 0.7 V |
| Forward drop at 1 A | about 0.6 V | about 1 V |
| Reverse voltage | 40 V | 1000 V |
| Reverse leakage | much higher | tiny |
| Switching speed | very fast | slow |
Why Does the Drop Matter So Much?
Every volt dropped in a diode is lost as heat. The power is simply the drop times the current. At 1 A, a 1N4007 wastes about 1 W, and a 1N5819 about 0.6 W. In a small battery device, the other side of the picture matters more. If your battery gives 3 V and your chip needs at least 2.5 V, then a silicon diode for reverse protection leaves you 2.3 V, and the circuit is dead. A Schottky leaves you 2.7 V, and it works.
Where Are They Used?
Almost every switching power supply and DC to DC converter has a Schottky, because it can switch thousands of times a second without waste. They protect battery inputs against reversal. They let a board run from either USB or a battery, without the two fighting. They sit across the outputs of solar panels to stop the battery draining back at night. They also clamp signals: the input of a logic chip may have a small Schottky to catch fast spikes.
Which Way Round?
Just like the 1N4007, the silver band marks the cathode, and current flows from the anode to the cathode. In a circuit diagram, the Schottky has the same triangle as an ordinary diode, but its bar has small hooks at the ends, shaped a little like the letter S.
Why Switching Speed Matters
A silicon diode cannot stop in an instant. While it conducts, its junction fills with stored charge, and when the voltage reverses, that charge has to be cleared out before the diode can block. For a moment, current flows backwards. This is called reverse recovery, and in a 1N4007 it takes several microseconds. At 50 Hz, that hardly matters. In a switching supply running at 500 kHz, a cycle lasts only 2 microseconds, so a slow diode would simply never finish turning off. A Schottky has no such stored charge, so it stops almost at once.
The Catch Diode in a Buck Converter
Here is the classic job. A buck converter chops the input with a fast switch, and feeds the pulses into a coil. While the switch is on, the coil stores energy. When the switch turns off, the coil insists on keeping its current flowing, and it needs a path. A diode gives it that path, and it carries the full load current for much of the time. Any voltage lost in that diode is lost from the whole supply, so a low drop and a high speed count twice. That is why you will see a large Schottky beside the coil on nearly every small converter.
Running From Two Supplies
Suppose you want a board to run from USB when it is plugged in, and from a battery when it is not. Two diodes, one from each supply, feed the same rail. Whichever supply is higher drives the rail, and the diode on the other one blocks, so USB can never push current into the battery. This is called a diode OR, and a Schottky is the natural choice, because it keeps as much of the battery voltage as it can.
Reading the Datasheet
The figures that matter most are the maximum reverse voltage, the average forward current and the forward voltage at a stated current. The reverse leakage needs a closer look. A 1N5819 may leak only a fraction of a milliamp at room temperature, but several milliamps when it is at 100 degrees C. In a battery device that sleeps for months, even a small leak can drain the battery, so a designer may choose a silicon diode after all, and accept the larger drop.
Other Schottky Parts You Will Meet
The 1N5817, 1N5818 and 1N5819 are the through-hole classics, all rated for 1 A. For more current, the 1N5822 carries 3 A in a larger body. On surface-mount boards, the SS14 and its relatives are the everyday choice, and the tiny BAT54 handles small signals. There are also Schottky rectifiers made from silicon carbide, which block hundreds of volts and are now found in solar inverters and electric cars. So the old limit of a low reverse voltage is no longer a law of nature, only a limit of plain silicon.
Features of the Schottky Diode Library for Proteus
- The real look, at true scale: the black body, the silver band and two thin legs, printed 1N5819, with our small TEP signature.
- Beads of current: small blue beads run along the legs while it conducts.
- A band that warns: it turns green while conducting, and orange while blocking.
- A true Schottky: a low forward drop, a higher leakage and breakdown past 40 V.
- A live curve: the pop-up draws the V-I curve, with a dot on the working point.
- It fails like the real thing: too much power cooks it, and it fails short.
- A complete package: about 2.4 MB with the library, our Arduino UNO V4.0, the demo's 1N4007, resistors, LEDs and capacitors and the demo, without the source code of the models.
The Schottky Diode in Proteus
The device is DIODE1N5819TEP in TEP1N5819.LIB, under Diodes, Schottky, with the prefix D and the model TEP1N5819.DLL. Search 1N5819 in Pick Devices and look for the TEP name. The pins are A on the left and K on the right, on the band side. There are no properties to set: it is a 1N5819.
Download Schottky Diode Library for Proteus
Click the button below to download Schottky-Diode-Library-for-Proteus-v1.0.zip (about 2.4 MB, without the source code of the models):
Schottky Diode Library for Proteus V1.0- README.txt: installation, the demo, troubleshooting and the limits.
- Proteus Library Files:
TEP1N5819.LIB,TEP1N4007.LIB,TEPRESISTOR.LIB,TEPLED5MM.LIB,TEPELECTRO.LIBand ourArduinoV4TEP.LIB. - Proteus Model Files:
TEP1N5819.DLL,TEP1N4007.DLL,TEPRESISTOR.DLL,TEPLED5MM.DLL,TEPELECTRO.DLLandTEPARDUINO.DLL. - Arduino Code: the demo sketch.
- Proteus Simulation: the demo project, its HEX file and copies of the DLLs.
No Proteus yet? Read How to Download and Install Proteus 7 and 8. New to libraries? Follow How to Install a New Library in Proteus.
How to Install Schottky Diode Library for Proteus
- Close Proteus and extract the whole zip file, for example to your Desktop.
- Copy the files from Proteus Library Files into the LIBRARY folder of Proteus.
- Copy the files from Proteus Model Files into the MODELS folder.
- Delete
TEP1N5819.IDXfrom the LIBRARY folder if it is there. - Start Proteus, press P and search for 1N5819.
Demo: Schottky Against Silicon
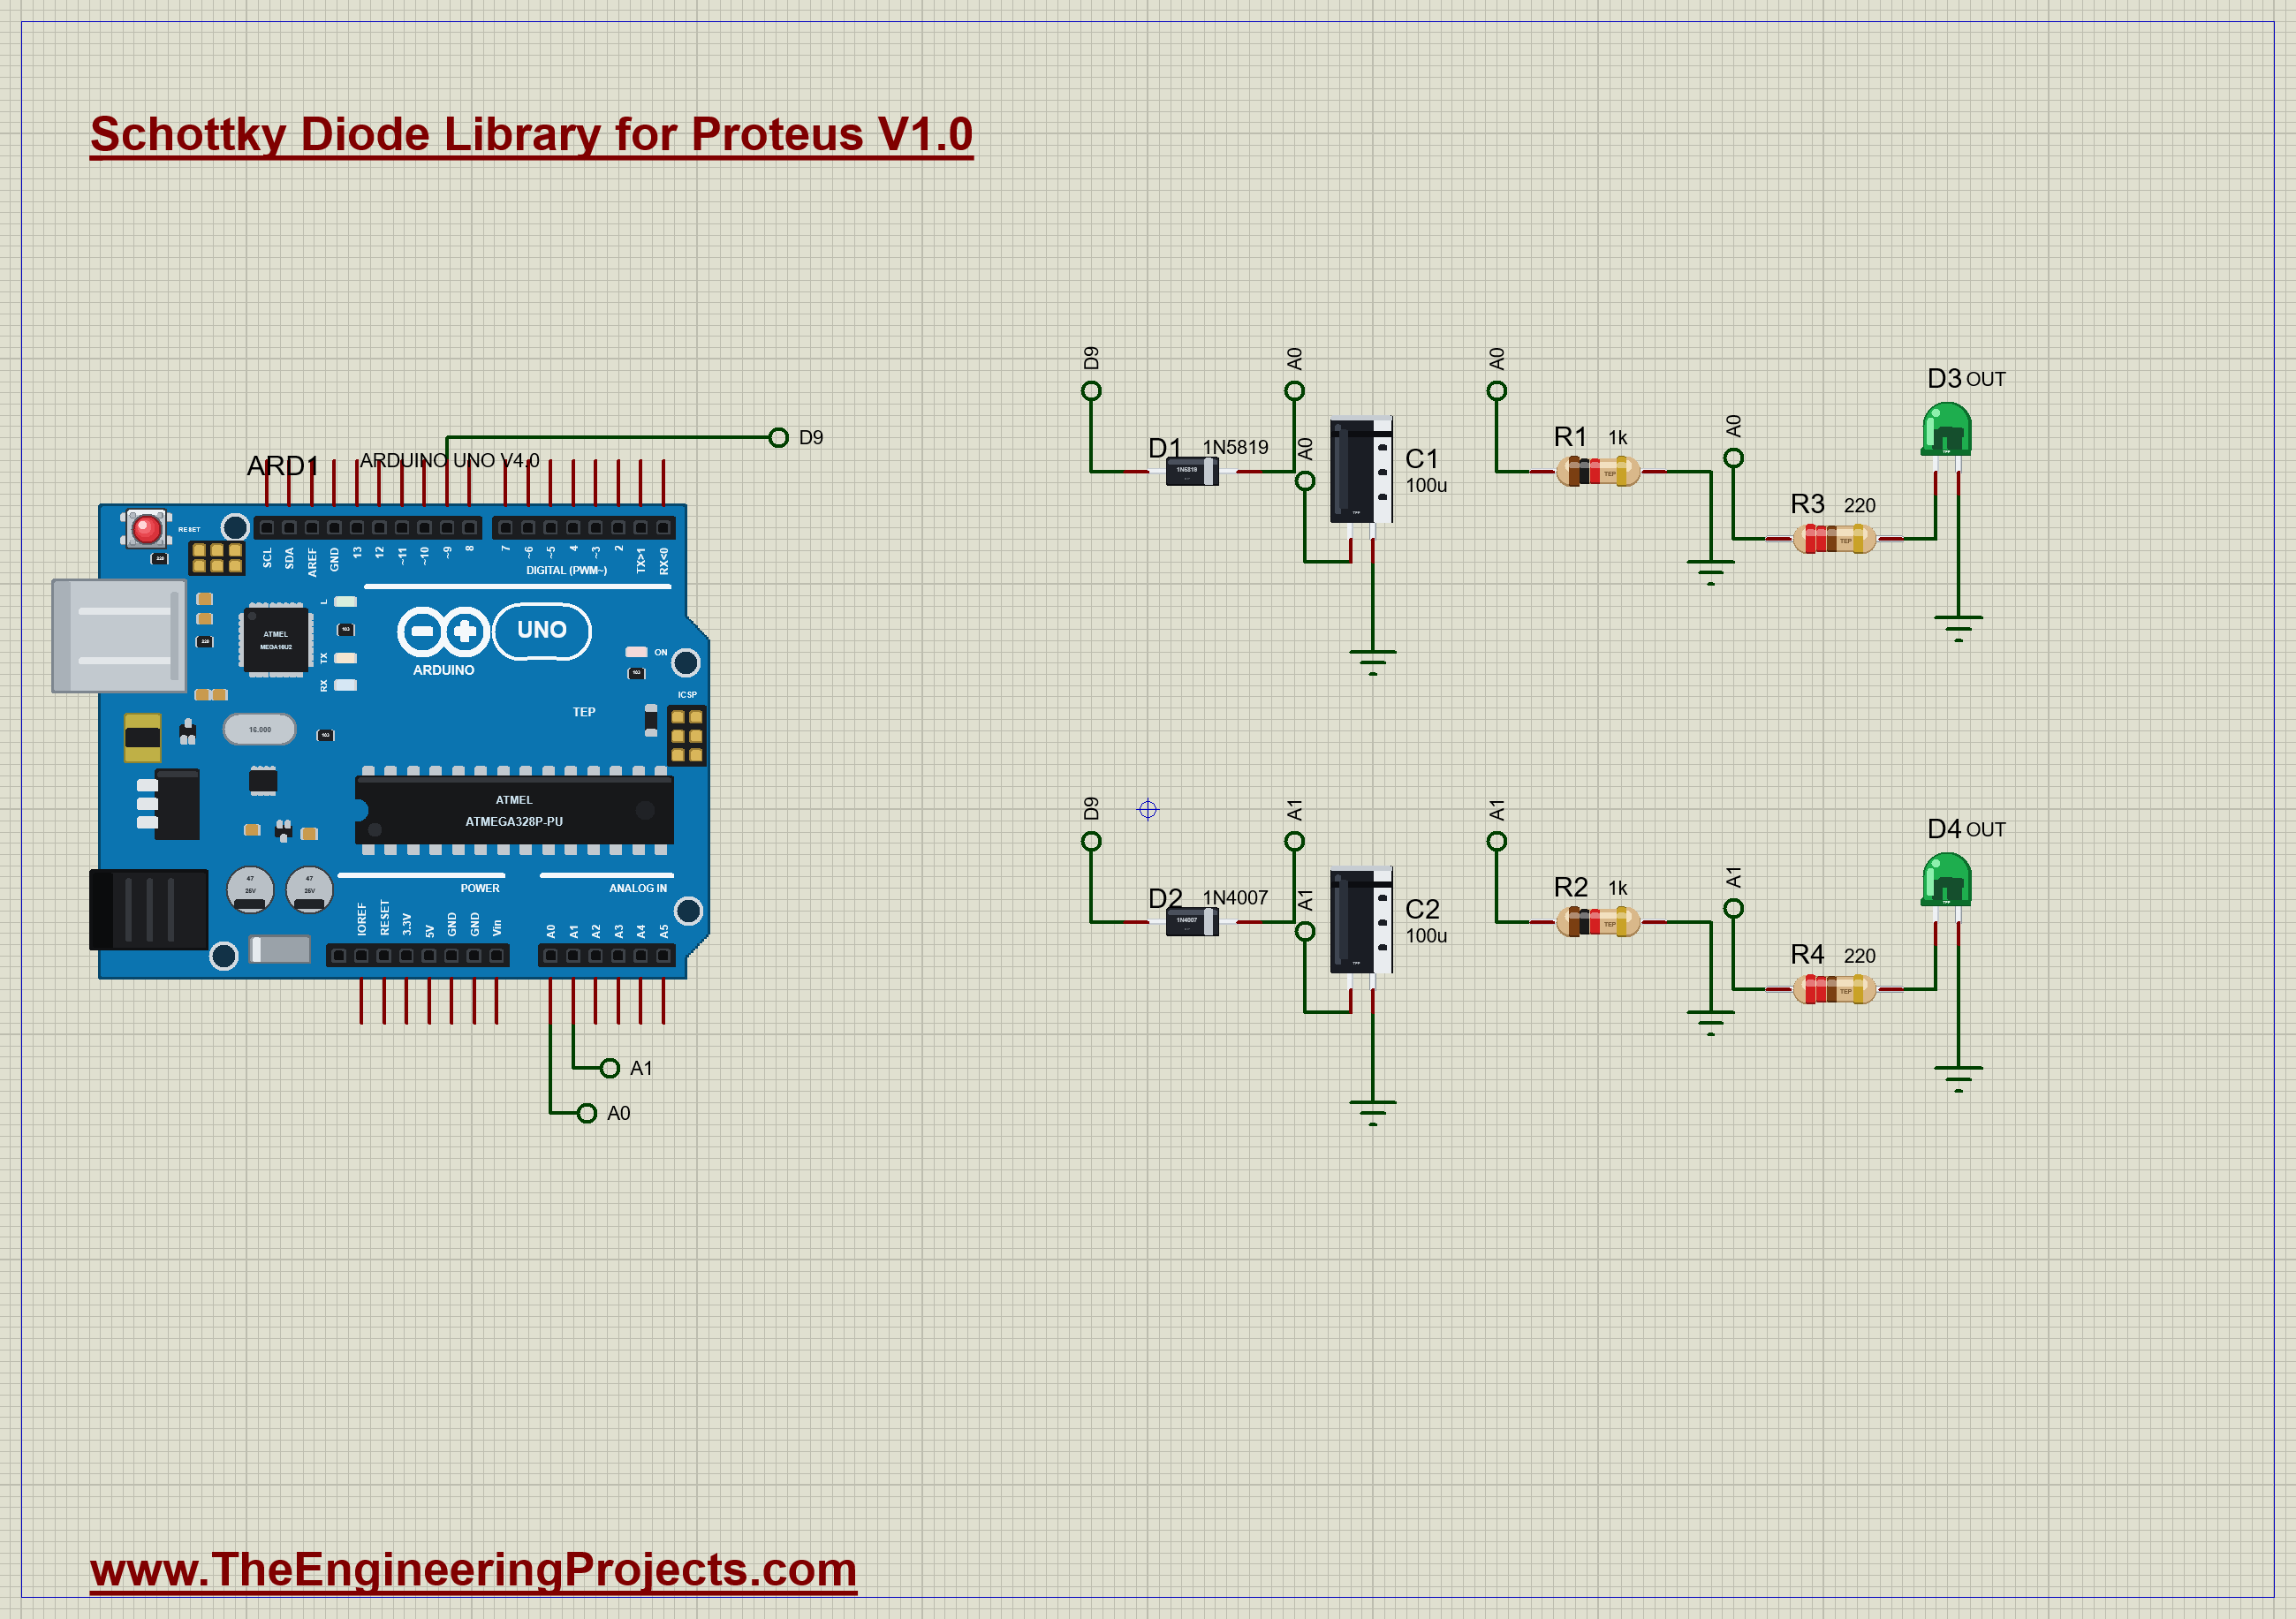
The fairest test is to give both diodes exactly the same job. D9 makes a square wave of about 490 Hz, and it feeds two identical half-wave rectifiers. D1 is our 1N5819, and D2 is the 1N4007 from our 1N4007 Diode Library for Proteus. Each one charges a 100 uF capacitor from our Electrolytic Capacitor Library for Proteus, with a 1k load and an LED. The Arduino reads the two outputs on A0 and A1. Open Schottky-vs-Silicon-ArduinoUnoV4.pdsprj. It runs on our Arduino UNO Library for Proteus V4.0, with its built-in monitor, the same window as our TEP Serial Monitor Advance for Proteus. The resistors are from our Resistor Library for Proteus.
| Part | Connection | Job |
|---|---|---|
| D1, 1N5819 | D9 to A0 | the Schottky rectifier |
| D2, 1N4007 | D9 to A1 | the silicon rectifier |
| C1, C2, 100 uF | A0 and A1 to GND | hold the outputs up |
| R1, R2, 1k | A0 and A1 to GND | the loads |
| D3, D4 with R3, R4 | A0 and A1 to GND | the lamps |
The Sketch
The sketch sets the square wave going, then once a second it reads both outputs. To read a rail with a little ripple on it, it averages 64 samples, spaced out so that they cover several cycles of the wave:
  for (int k = 0; k < 64; k++) {
    sum += analogRead(pin);
    delayMicroseconds(100);
  }
The sketch then prints both rails, and the difference between them. Type off in the monitor to stop the wave, and on to start it again.
Run the Demo
Press Run. Both LEDs light, and the monitor starts its report. Here is the complete circuit, truly running:
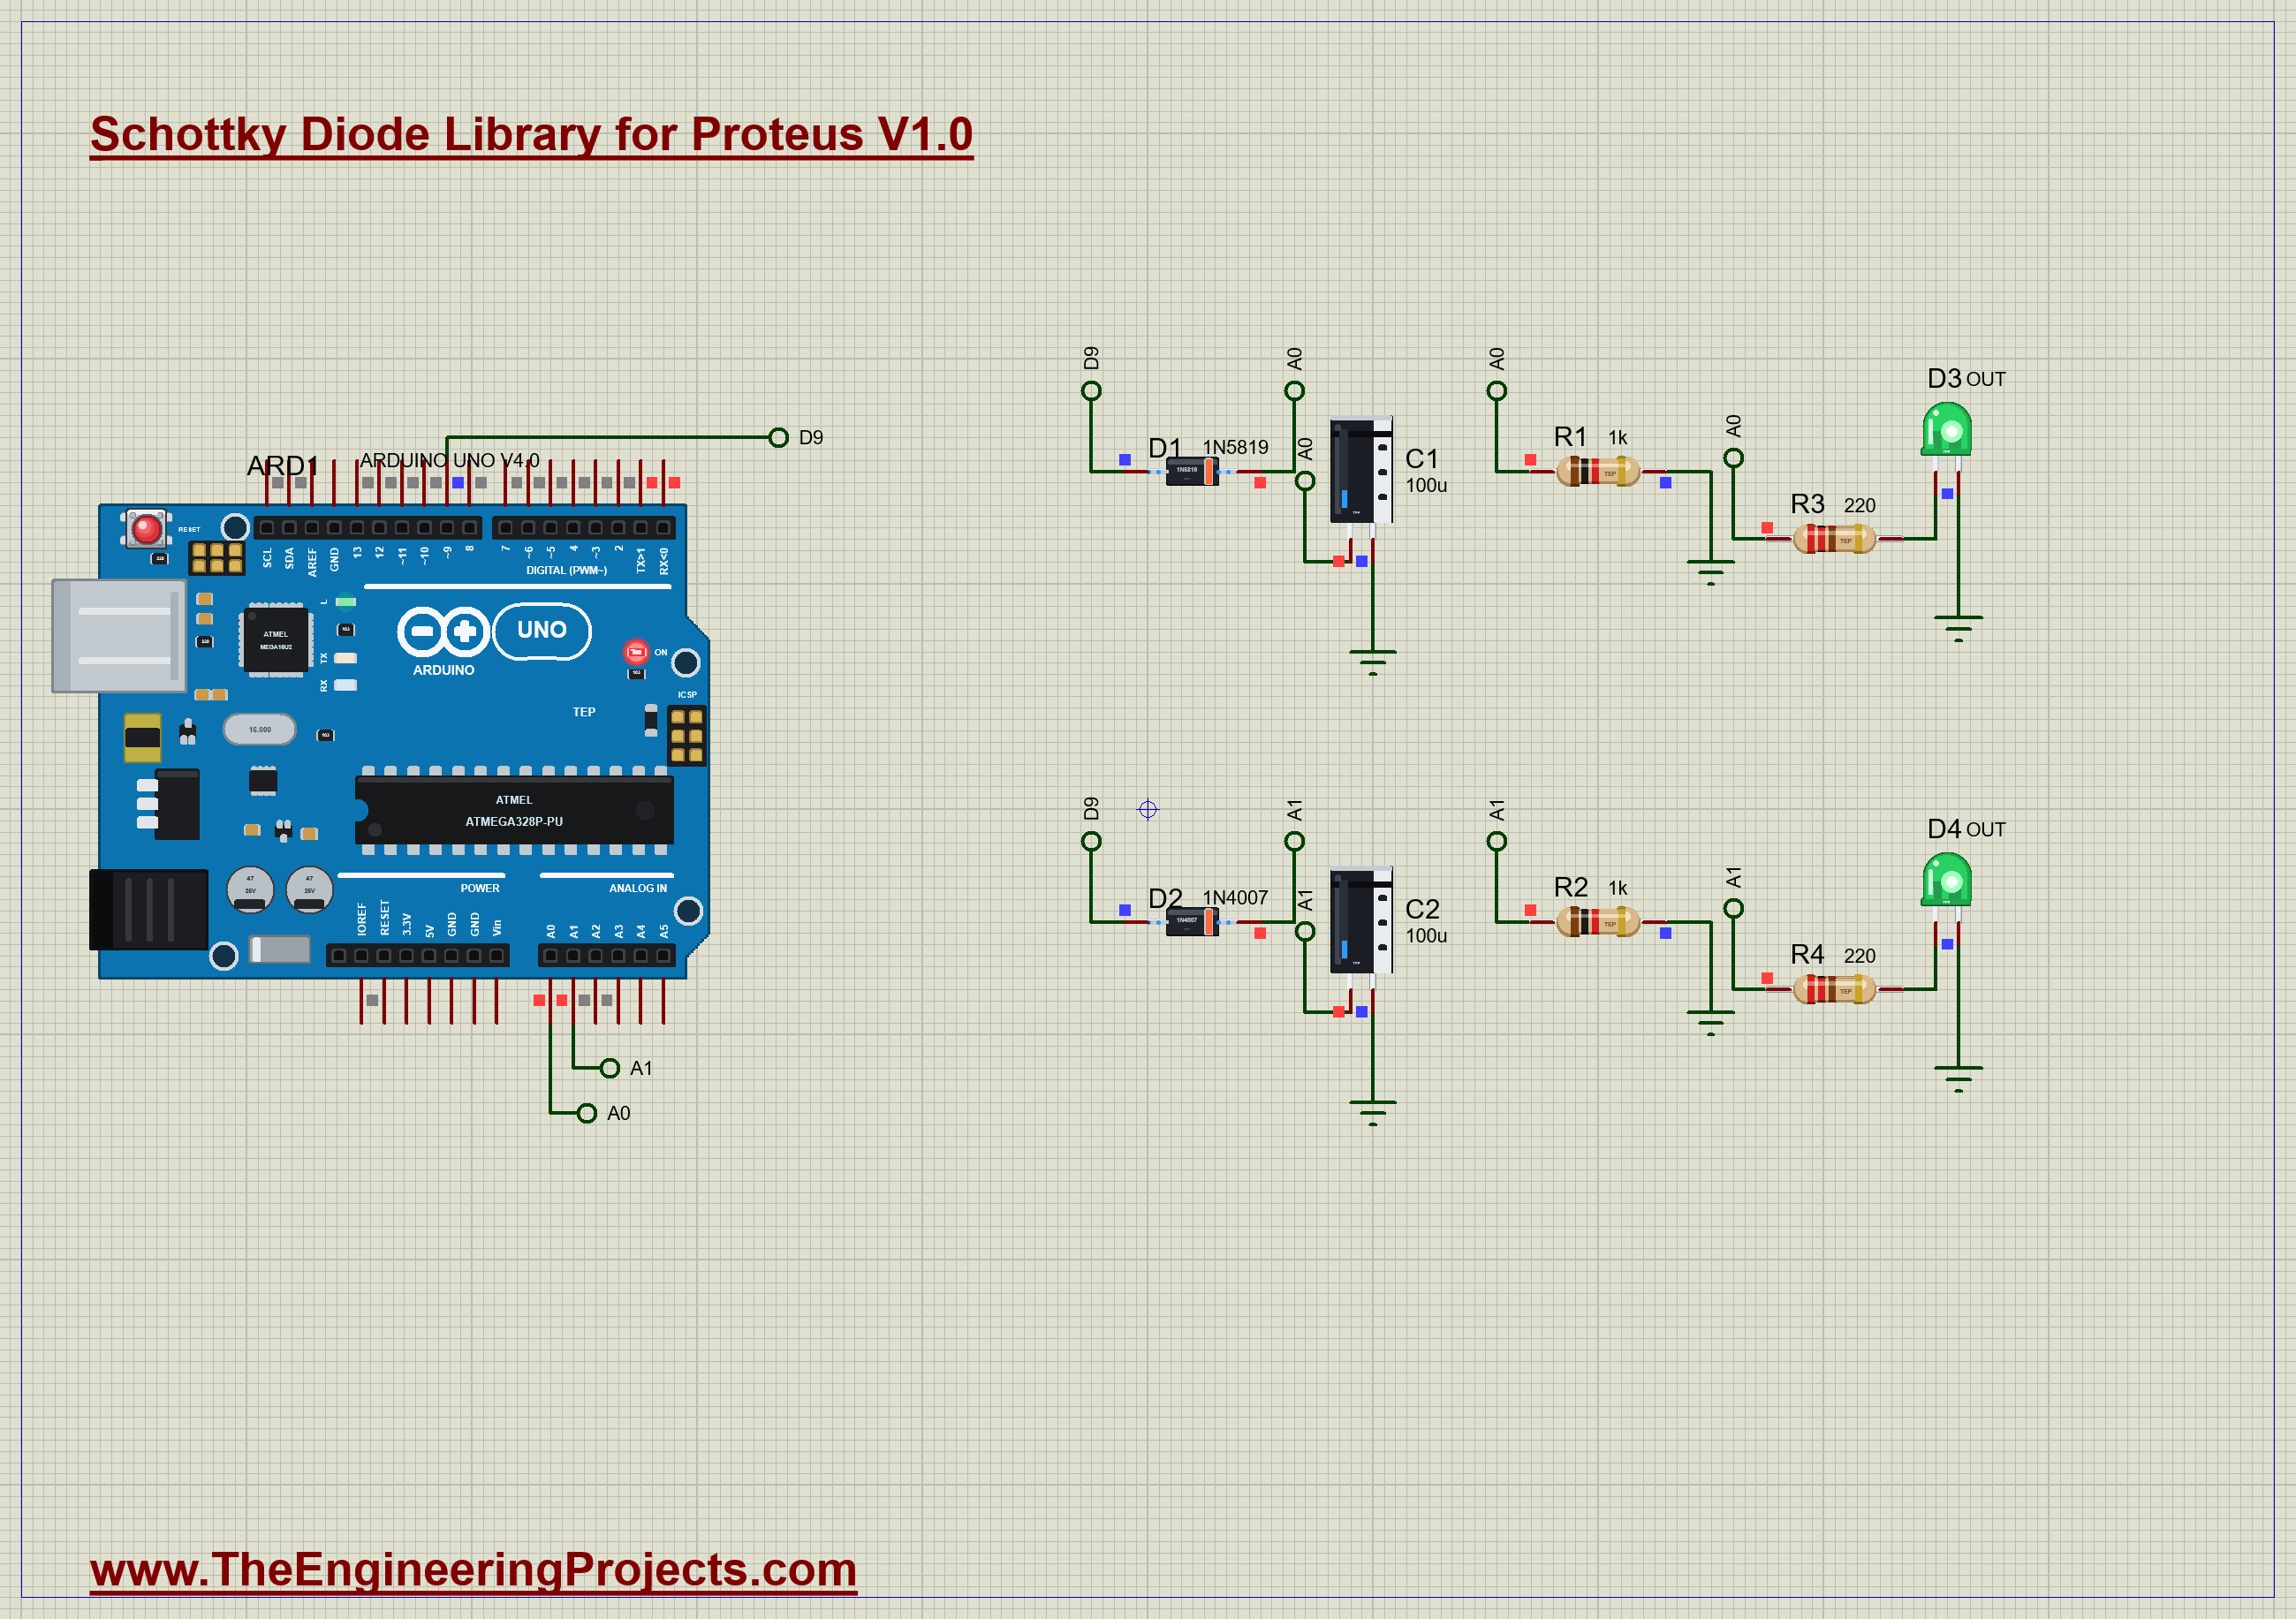
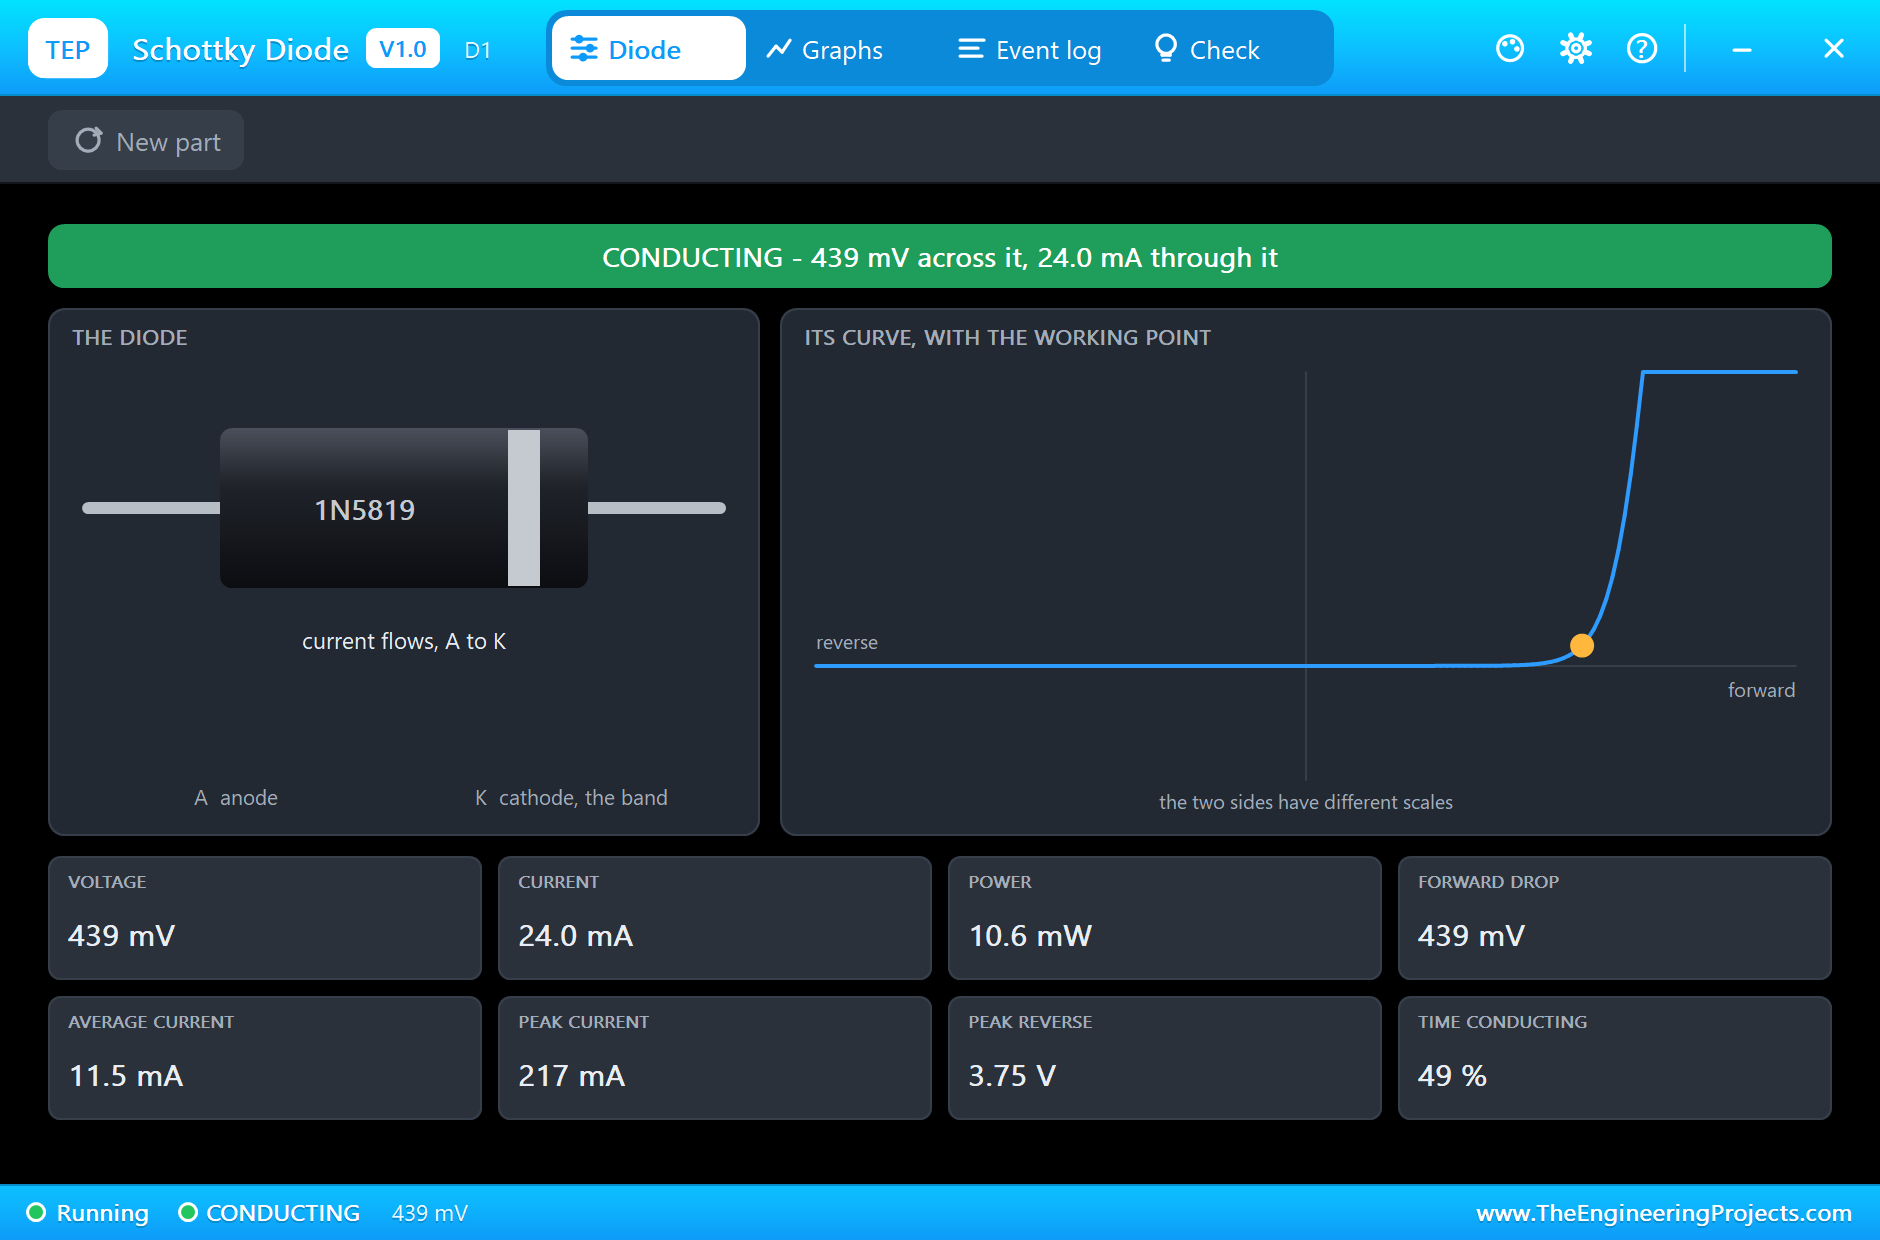
Click D1 to open its pop-up. The diode conducts in short bursts each time D9 goes HIGH, and the band turns green. Look at the Forward Drop tile, and at where the curve bends. It bends much closer to zero than a silicon curve does:
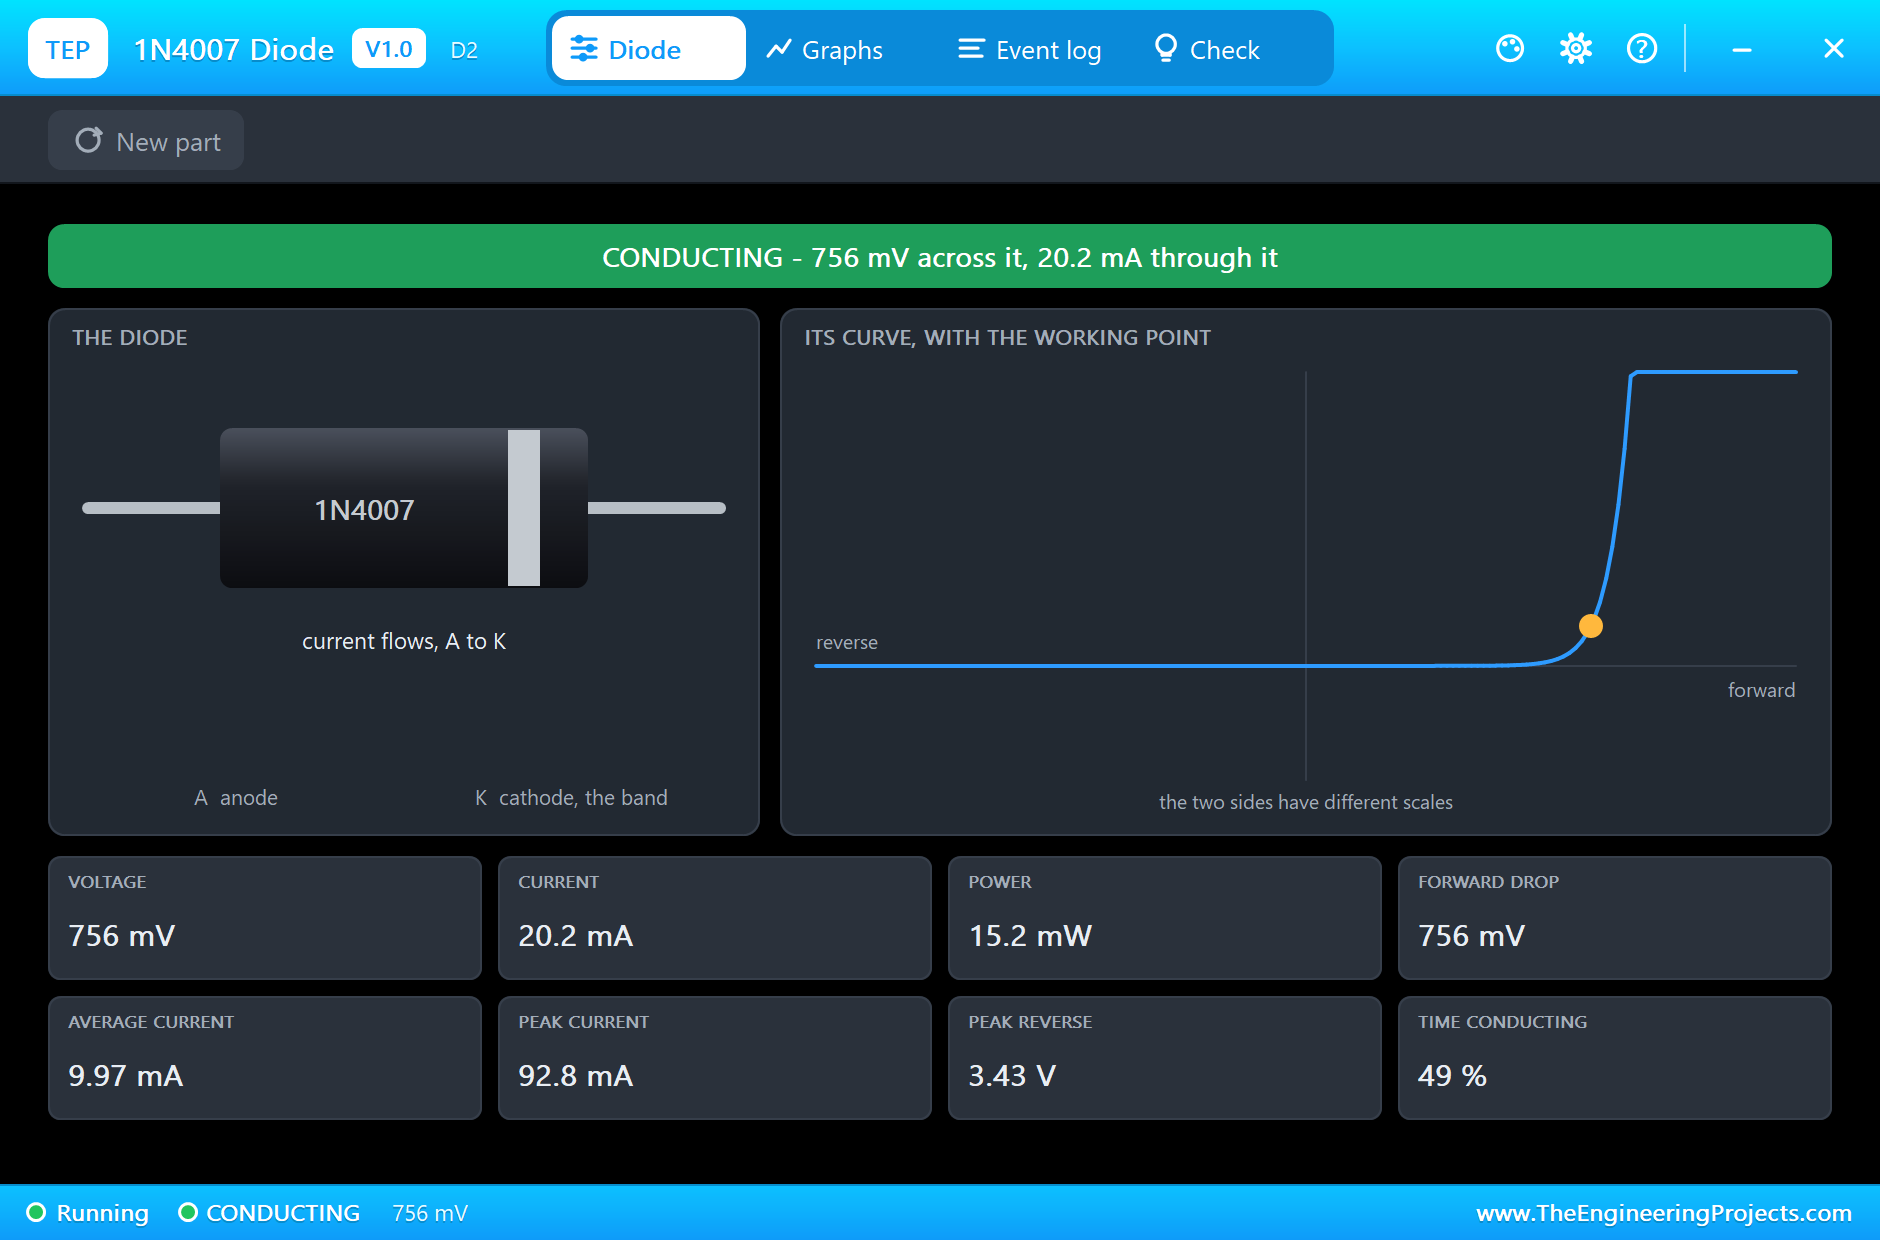
Now click D2, the 1N4007. It is the same job and the same current, but the curve bends further out, and the drop is about twice as big:
The Result
The monitor gives the score each second. From the same wave and the same load, the Schottky rail wins:
| Diode | Forward drop | The rail |
|---|---|---|
| 1N5819 Schottky | 0.44 V | 3.69 V |
| 1N4007 silicon | 0.76 V | 3.38 V |
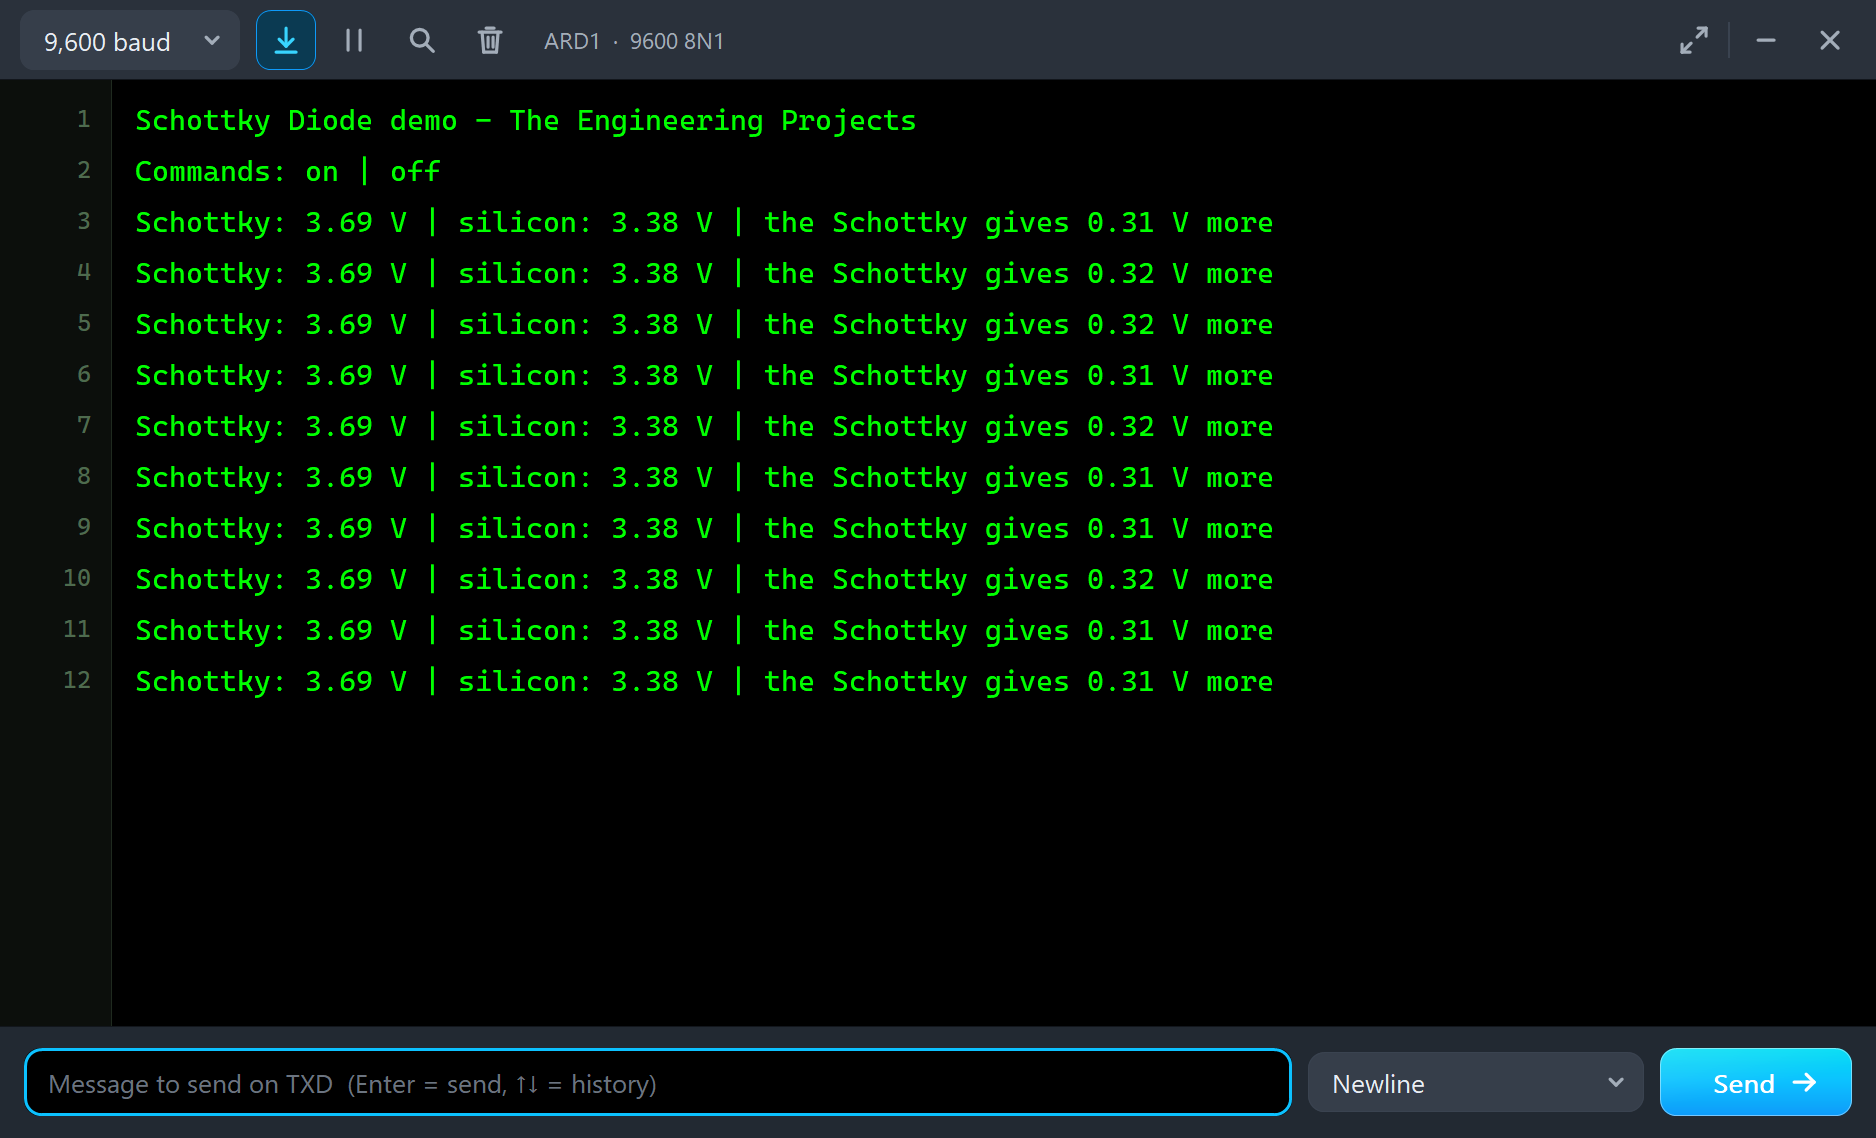
Neither rail reaches the full 5 V, and not only because of the diodes. An Arduino pin has a resistance of its own, about 25 to 40 ohm, so it sags while it pushes current. That is the same for both rails, so the difference between them comes from the diodes alone. Each rail carries about the same current, and the power lost in each diode is its drop times that current, so the Schottky also runs cooler.
A difference of 0.31 V may look small, but on a 3.3 V rail it is nearly a tenth of the supply. Over the life of a battery, that much extra headroom can mean hours of extra running time.
The Graphs
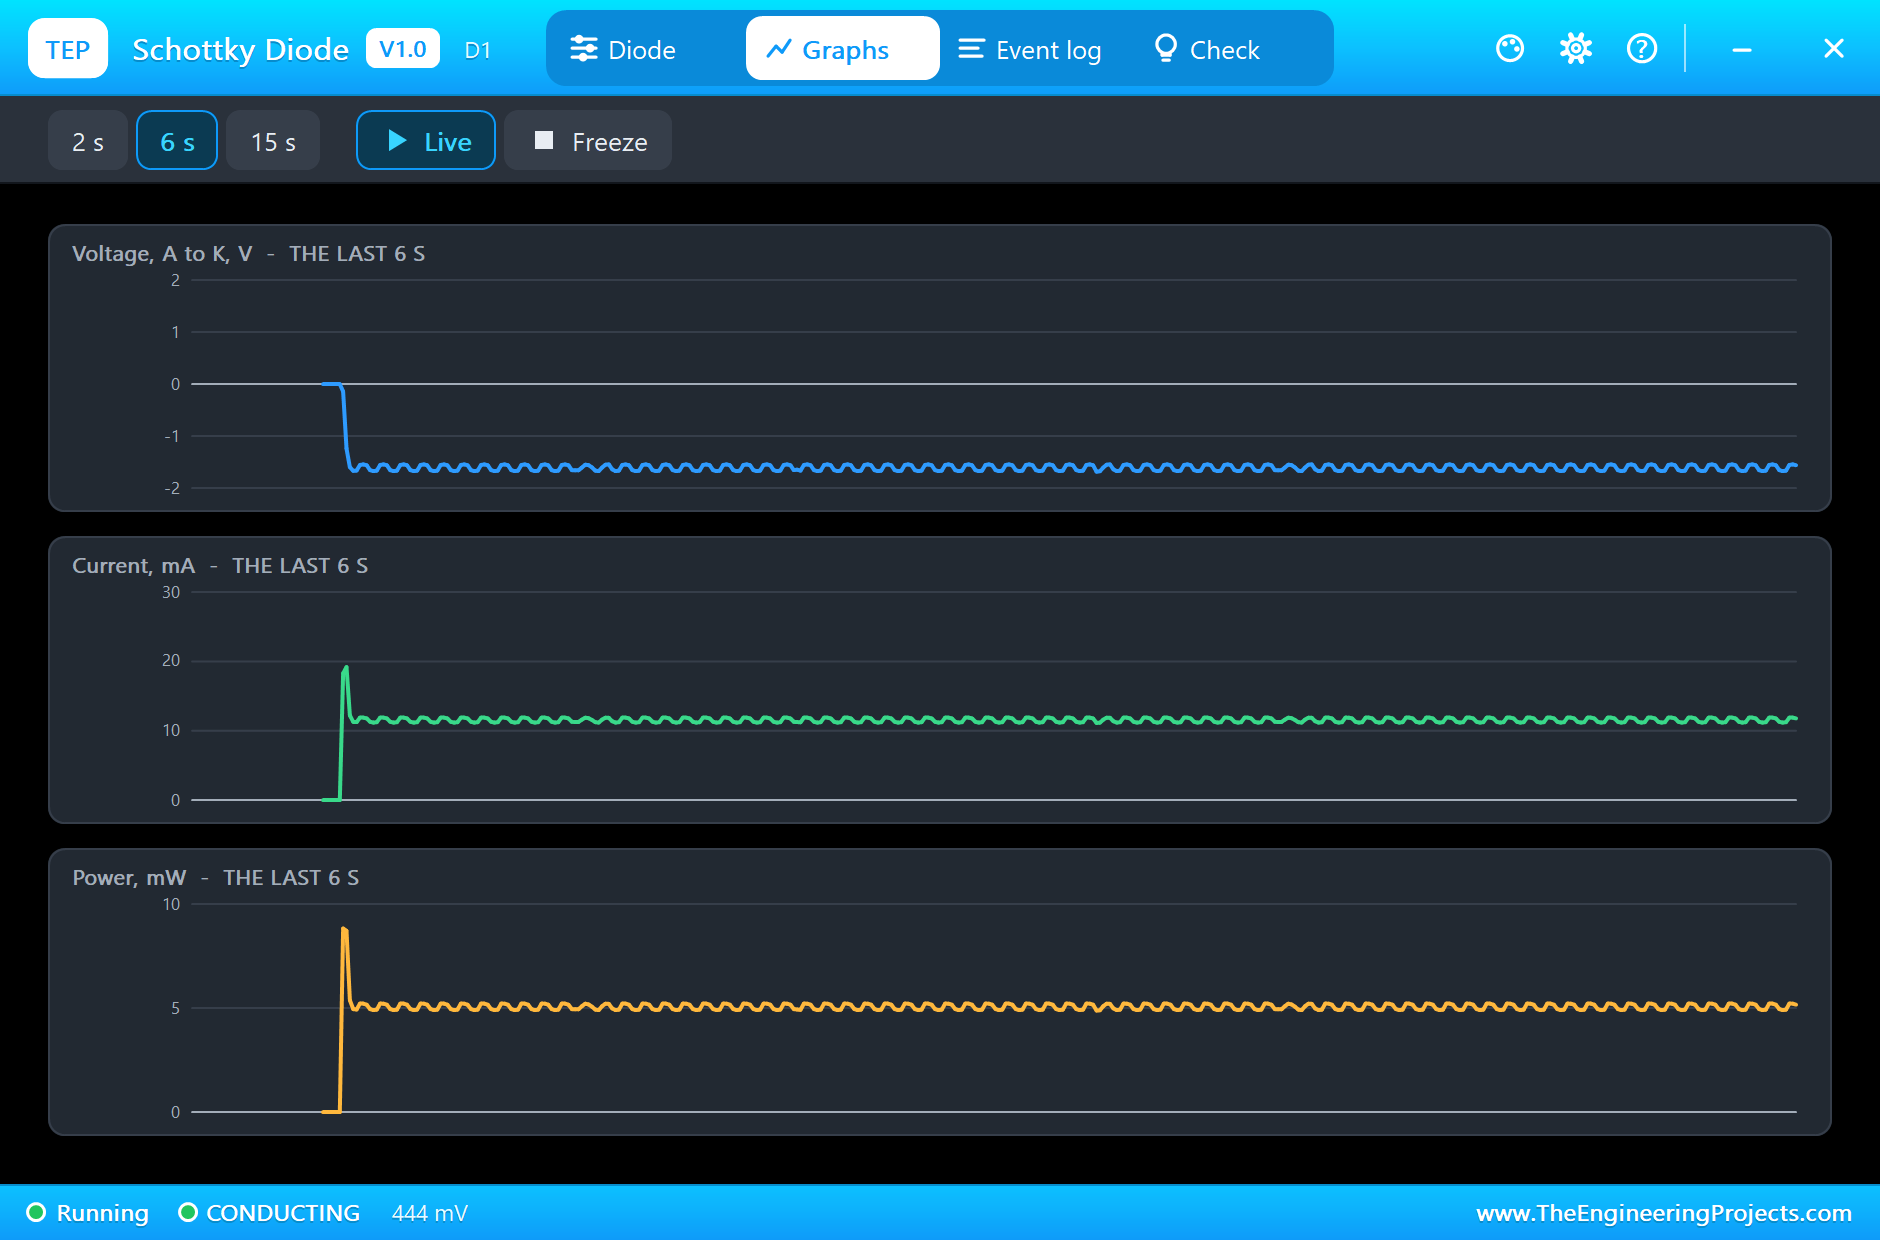
The Graphs tab shows the voltage across D1 swinging as the wave goes up and down, with a short pulse of current each time the capacitor is topped up:
Stop the Wave
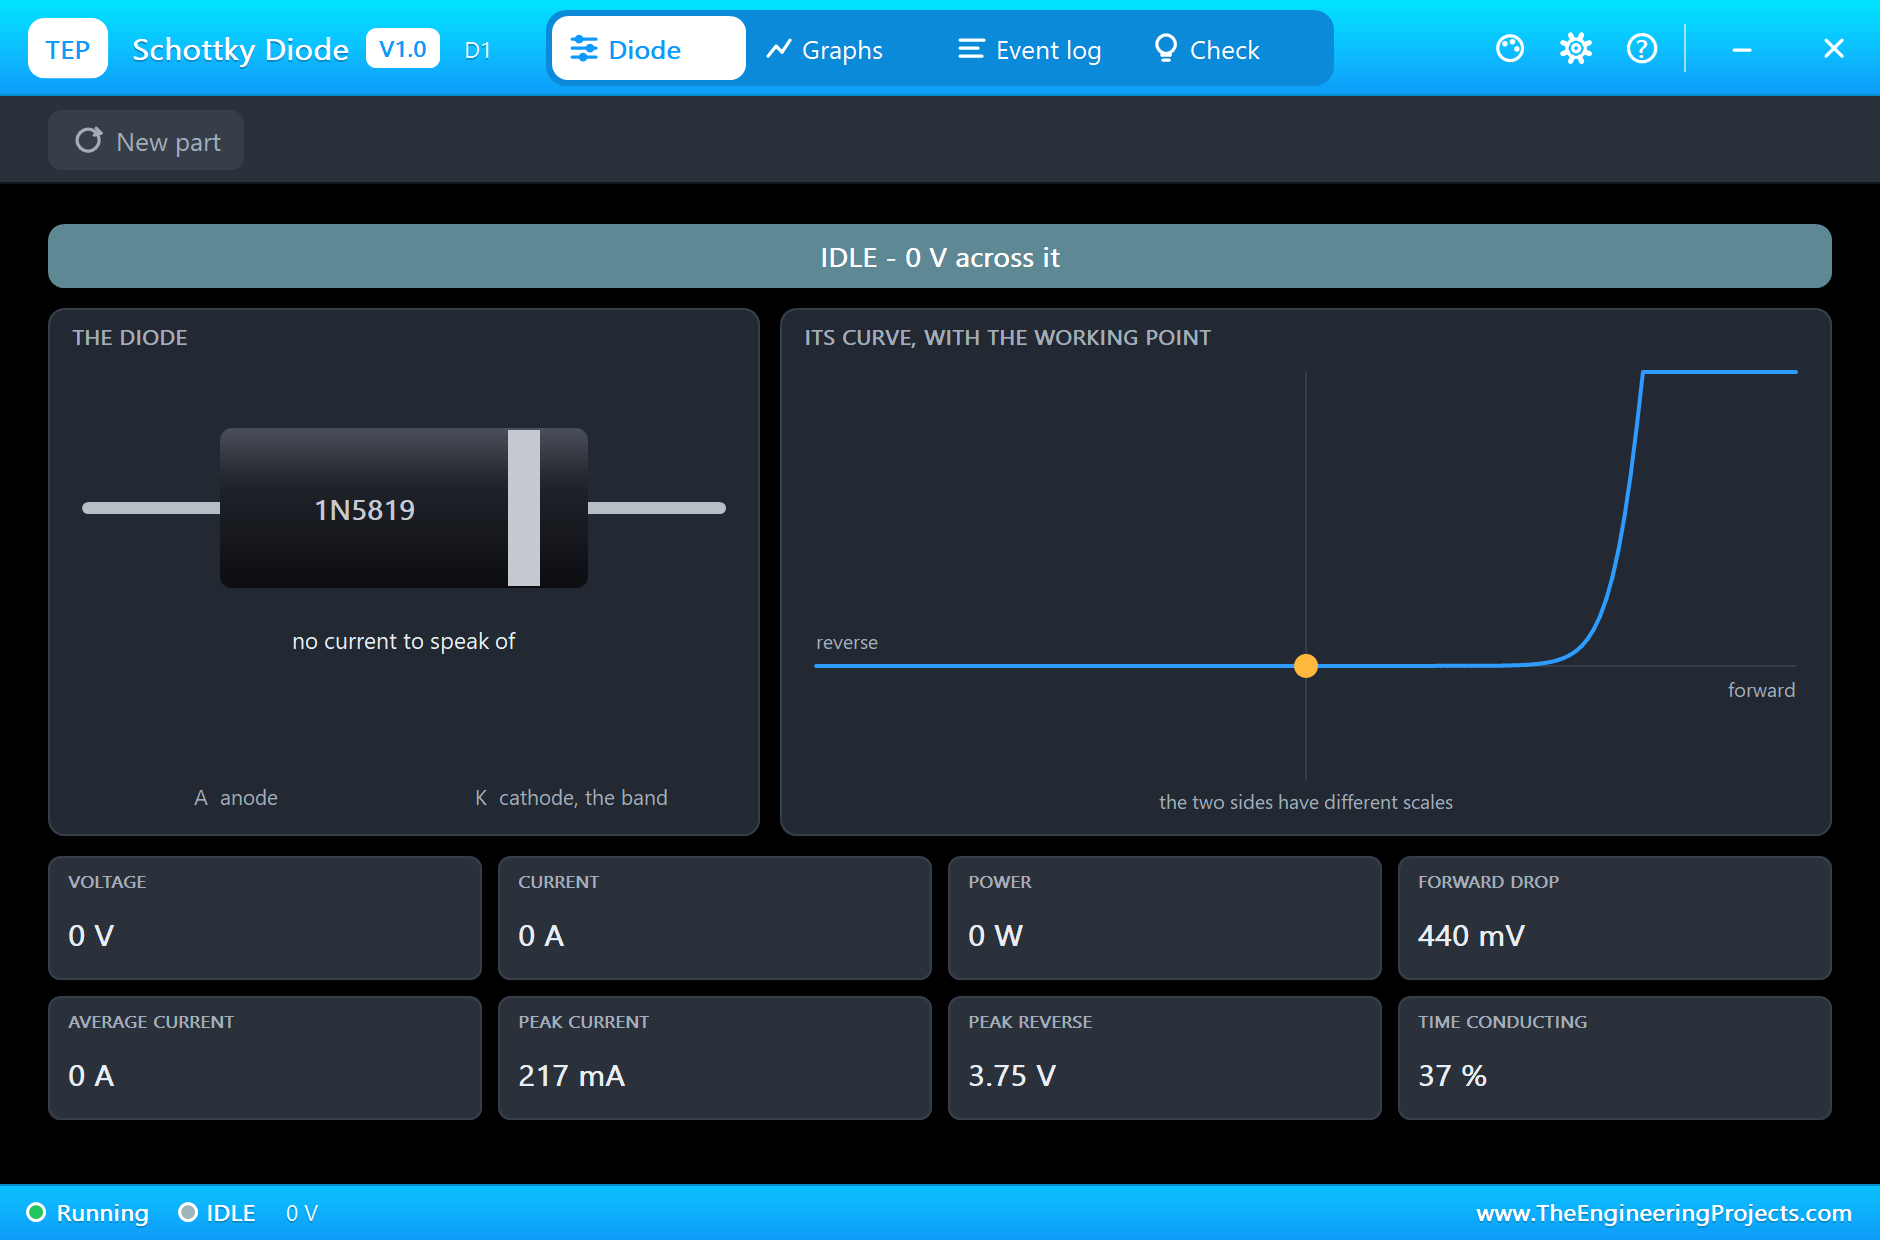
Type off. The capacitors drain through their loads, and the banner on D1 falls to IDLE:
The Log and the Check Page
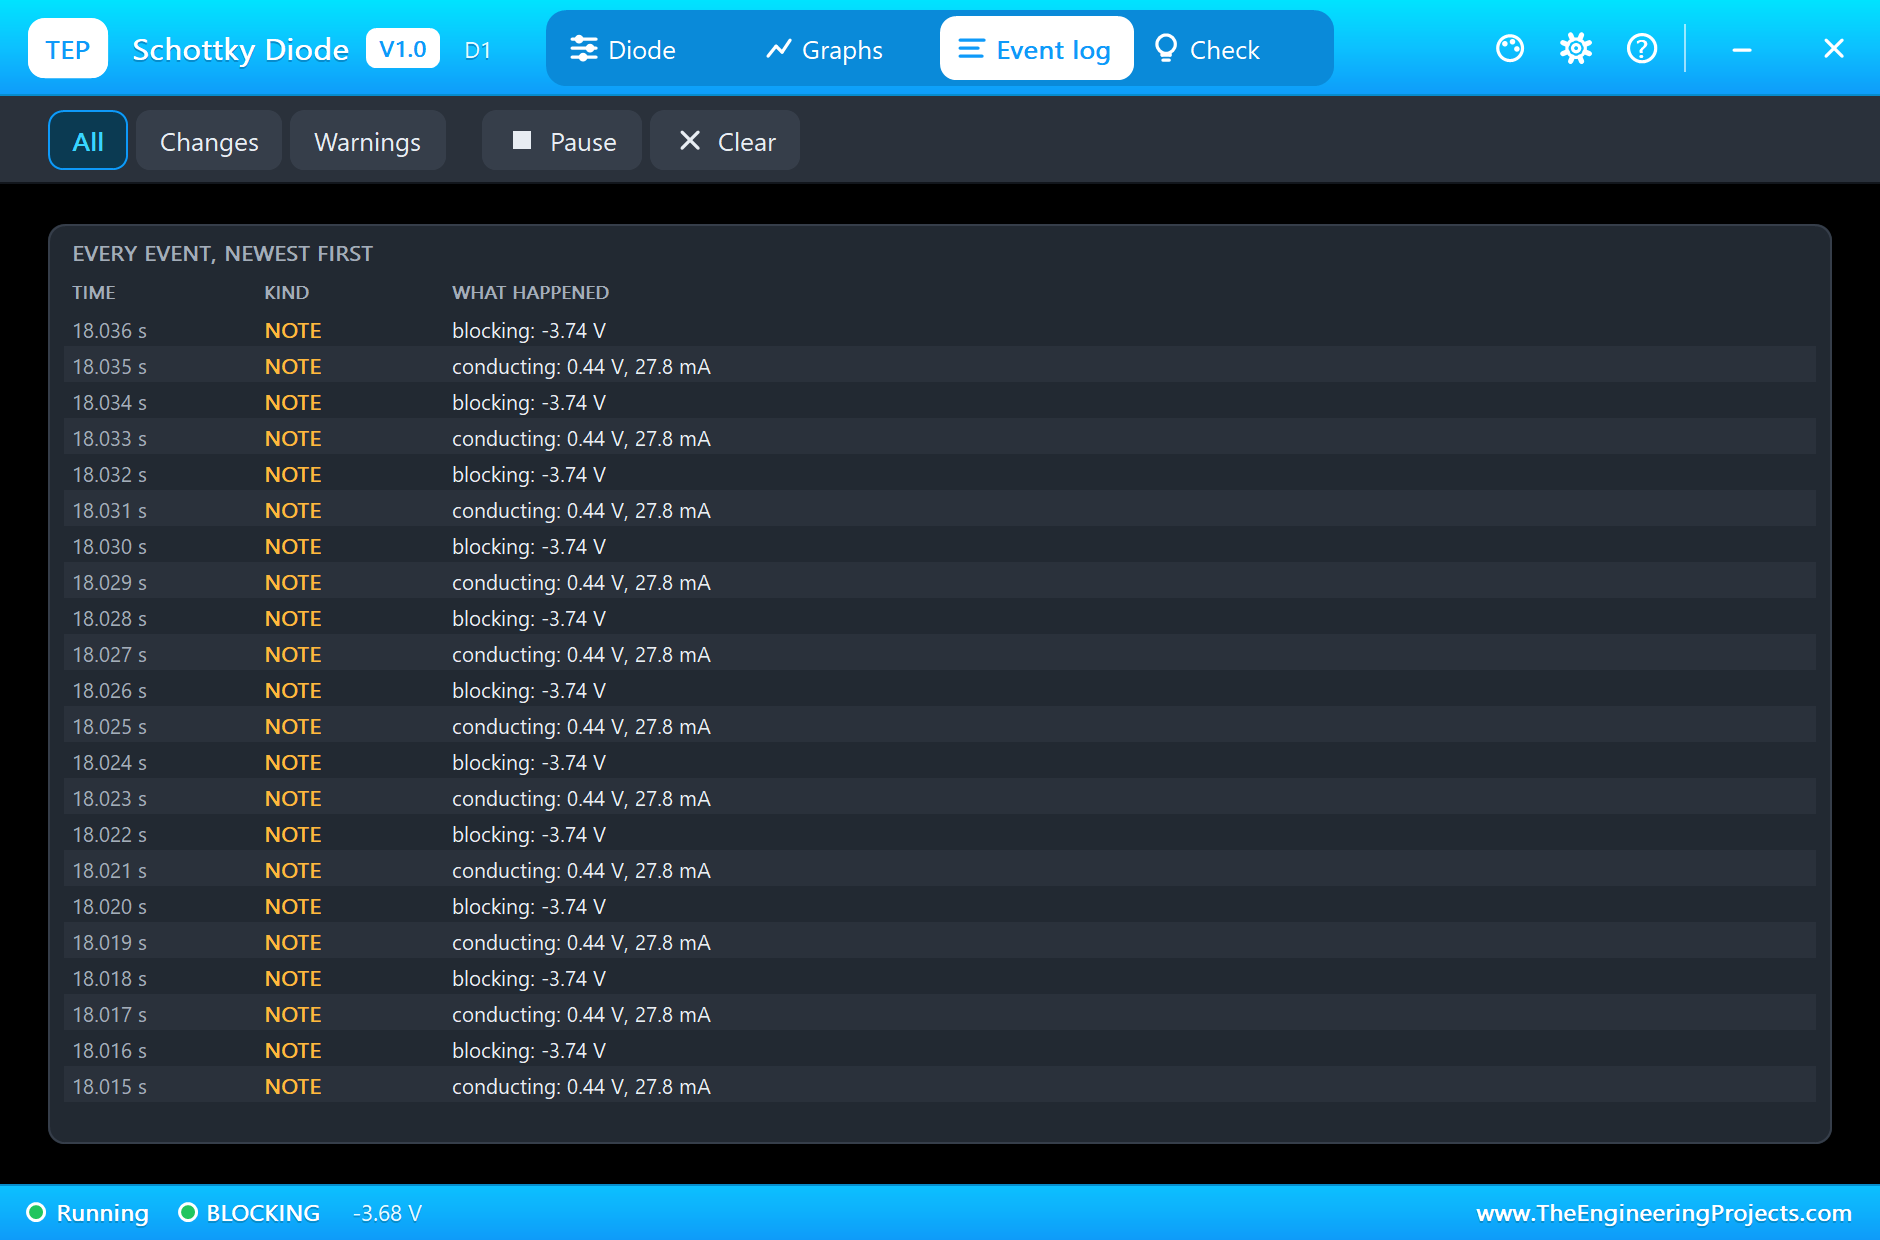
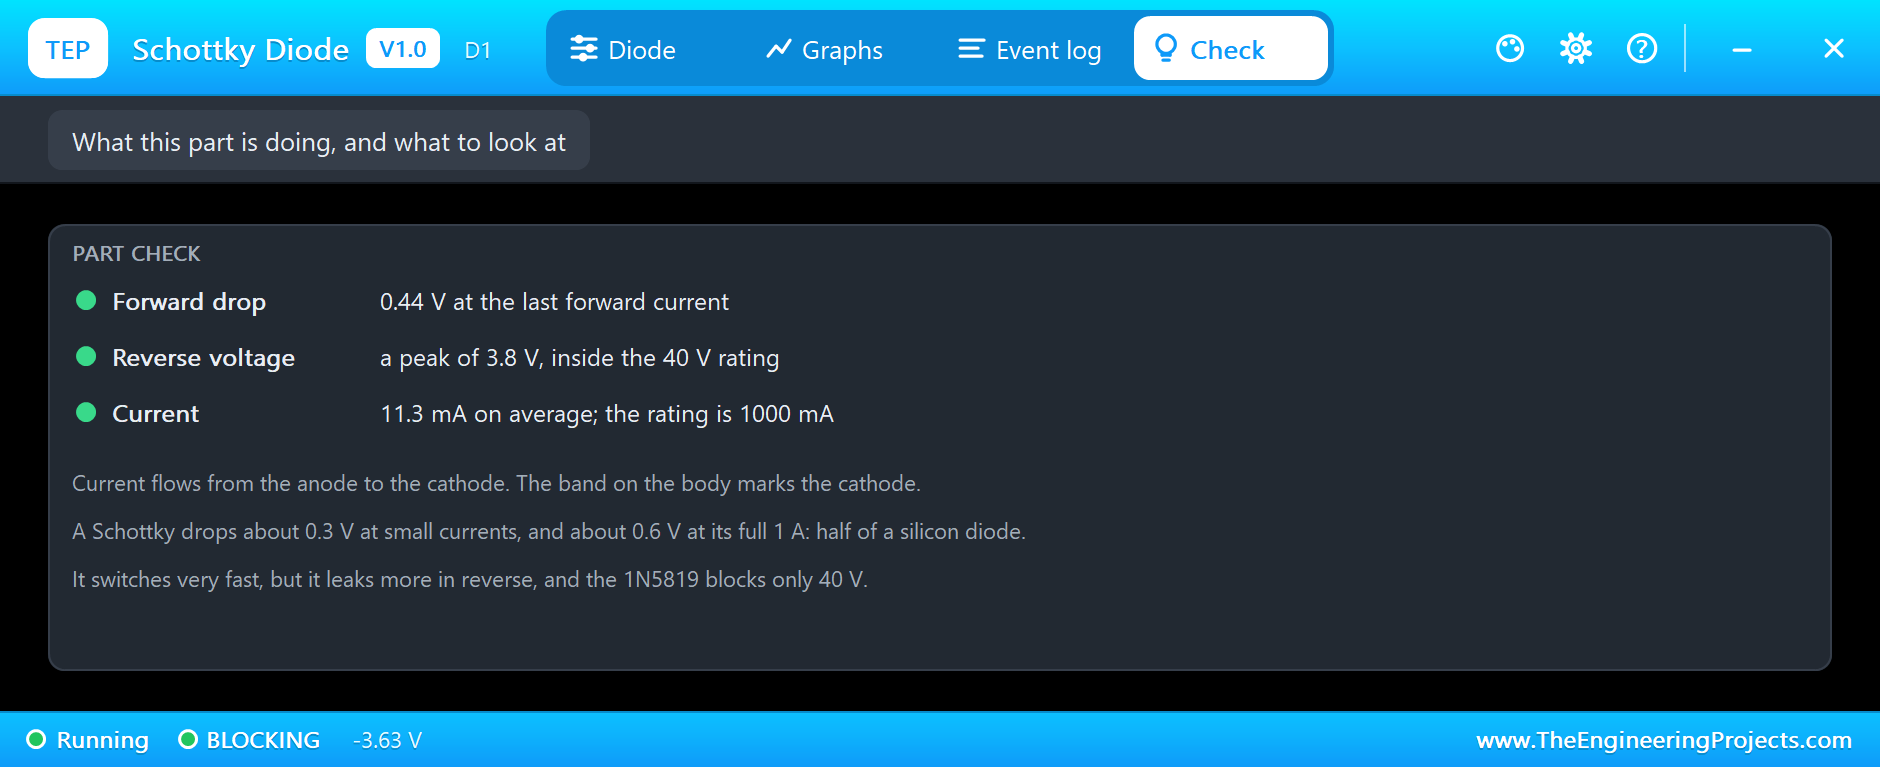
Type on again. The Event log records each change, and the Check page reads the forward drop and the reverse voltage against the 40 V rating:
Try It Yourself
- Change both loads to 100 ohm, and see how both drops grow with the current.
- Remove the capacitors, and compare the two waves.
- Swap the two diodes, and check that the result swaps too.
- Use the 1N5819 in the 1N4007 rectifier demo, and compare the numbers.
- Work out the power lost in each diode from the numbers on the pop-ups.
Ideas to Extend the Demo
- Add a Schottky in series with a battery input as reverse protection.
- Build a board that runs from either USB or a battery, with two diodes.
- Use one as the catch diode in a small buck converter.
- Stop a solar panel from draining a battery at night.
Your Own Sketches
The demo sketch is in the zip file, and you can change it in the Arduino IDE. New to Arduino? Start with our Arduino Tutorial for Beginners. Export the compiled binary, and set the UNO's PROGRAM property to the new file. Our guide on How to get the HEX file from Arduino shows you where the file ends up.
Things to Know Before Using a Real Schottky
- Check the reverse voltage: 40 V for the 1N5819, far less than a 1N4007, and leave a good margin.
- Watch the leakage: it can reach milliamps when hot, which can matter in a low-power battery circuit.
- Keep it cool: heat raises the leakage, and that raises the heat. This is called thermal runaway.
- Look after the pin: an empty capacitor pulls a big rush of current. Our demo feeds one straight from a pin, which a real Arduino would not like. On a bench, add about 100 ohm in series.
- Fast edges are real: in a switching supply, keep the leads short.
- Do not use it as a Zener: a Schottky does not recover well from reverse breakdown.
Troubleshooting
- The LED stays dark: the band is on the wrong side.
- SHORTED: it was overcooked. Fix the circuit first, then press New part.
- The pop-up does not open: click the diode while the simulation runs.
- The part is not simulated:
TEP1N5819.DLLis missing from MODELS and from the project folder.
Limitations of the Simulation
- The junction capacitance is left out.
- The leakage does not rise with temperature.
- A real diode may also fail open. Ours always fails short.
- Arduino is a name of Arduino; this library is not made or endorsed by Arduino or Labcenter.
- Tested in Proteus 8.5 in October 2026 (the demo as shipped). Proteus 7 is not supported.
So, that was all about the Schottky Diode Library for Proteus. I hope the race between the two rails makes the difference easy to remember, and that you know which diode to pick next time. If you have any questions, ask in the comments and I will help you out. Till the next tutorial, take care and have fun!