Hello friends, I hope you all are doing great. Today, I am going to share the new Photodiode Library for Proteus. An LED turns electricity into light. A photodiode does the opposite: it turns light into electricity. It is the small sensor behind remote control receivers, light meters, smoke alarms and the camera in your phone, and in the right circuit it measures light with amazing accuracy.
Photodiode Library for Proteus
Latest version: V1.0 (November 2026, this tutorial)
Other component libraries: C945 Transistor · PC817 Optocoupler · Relay Module · Resistor · 5 mm LED · Designer Colour LED · Push Button · Active Buzzer · Electrolytic Capacitor · Ceramic Capacitor · Tantalum Capacitor · Film Capacitor · 1N4007 Diode · Zener Diode · Schottky Diode · Supercapacitor · RGB LED · Bridge Rectifier · Flashing LED · Bi-Colour LED · SMD LED · Slide Switch · Toggle Switch · Rocker Switch · Micro Limit Switch · Emergency Stop Switch · SMD Resistor · Power Resistor · Resistor Network · Potentiometer · Trimmer Potentiometer · Slide Potentiometer · NTC Thermistor · DIP Switch · Fuse · Passive Buzzer · Mini Speaker · 7-Segment Display · LED Bar Graph · IR / UV LED · Small Transistors · TIP122 Darlington · N-MOSFET · P-MOSFET · PC817 Optocoupler · Filament Bulb · Power LED · Voltage Regulator · SCR and TRIAC · Inductor · Toroid Inductor · Crystal
Helping Tools
- Serial Monitor Advance: a serial terminal window for the UART of your board
- Serial Monitor Expert: the serial monitor with extra debugging tools
- LCD Library for Proteus V3.0: 16x2, 20x4 and I2C LCDs to show your readings
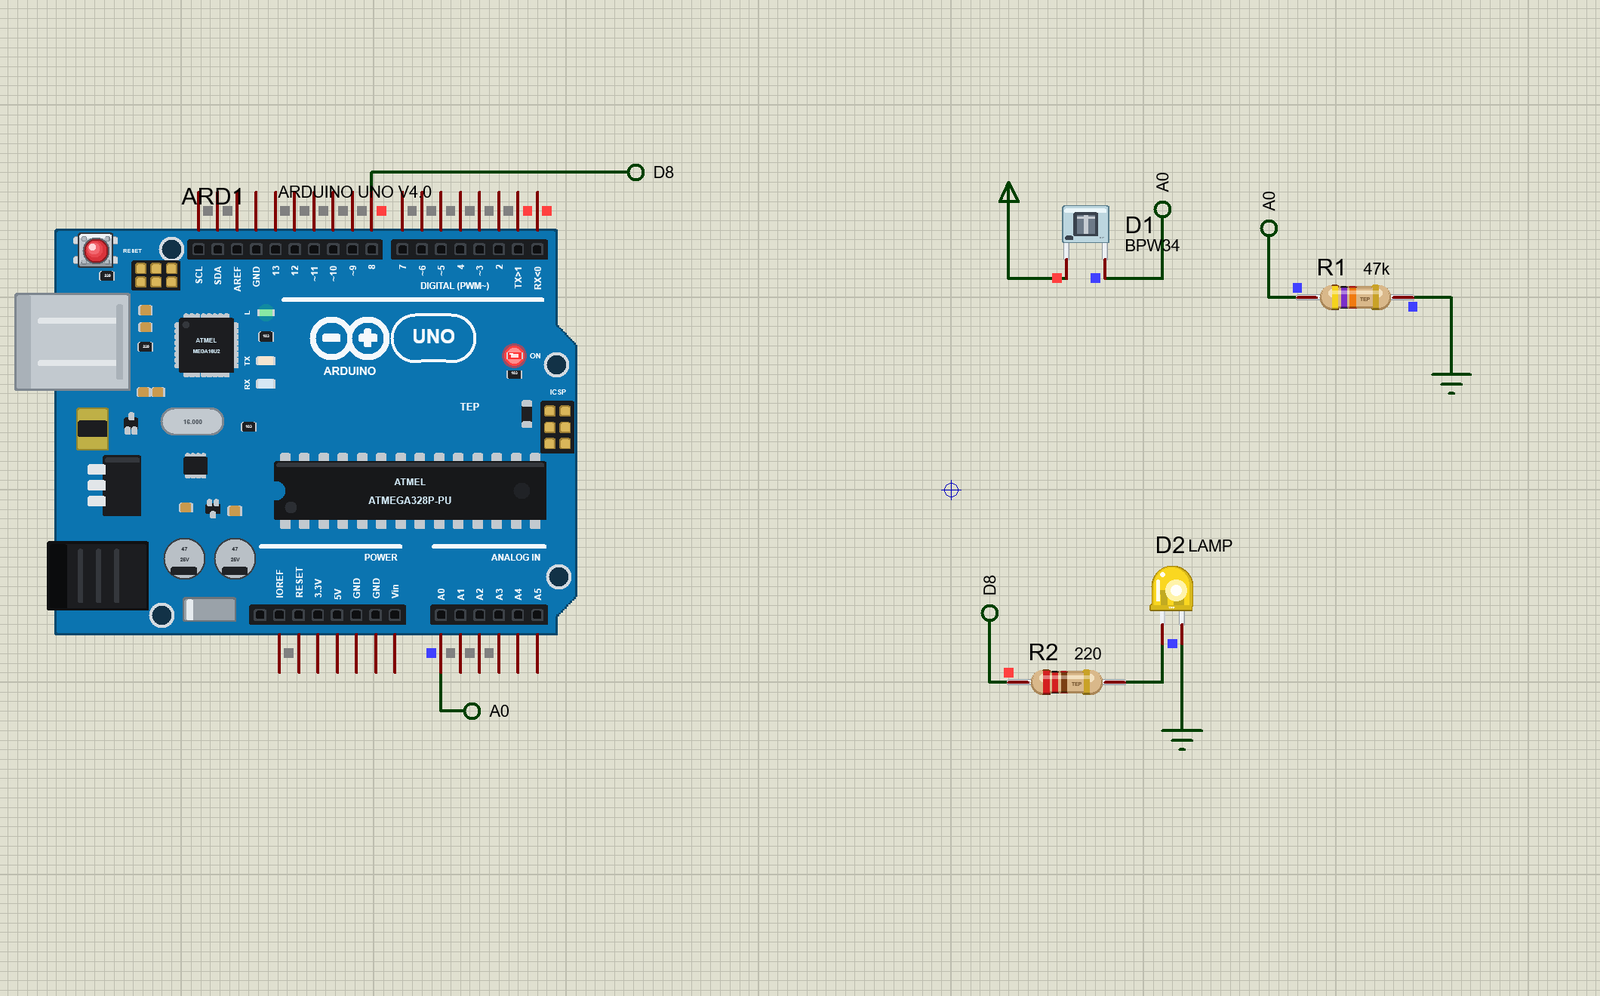
Our part is the popular BPW34, at true scale: a clear block with the silver die showing inside. In a simulator, the hard part with any light sensor is that nothing shines on it. So ours has its own light control: the chips on its pop-up set the light from total darkness to daylight, and the die on your sheet lights up with it. For the demo, an Arduino reads the light in lux and turns on a night lamp when it gets dark.
NOTICE: Our team has put a lot of effort into these small parts: the bodies, the animation and the pop-ups are all our own design, and you get them free. Your feedback is the fuel that keeps us going, so please tell us what you think in the comments below or in the Photodiode board of our forum. And if our free libraries help you, you can buy us a coffee. So, let's get started with the Photodiode Library for Proteus:
What is a Photodiode?
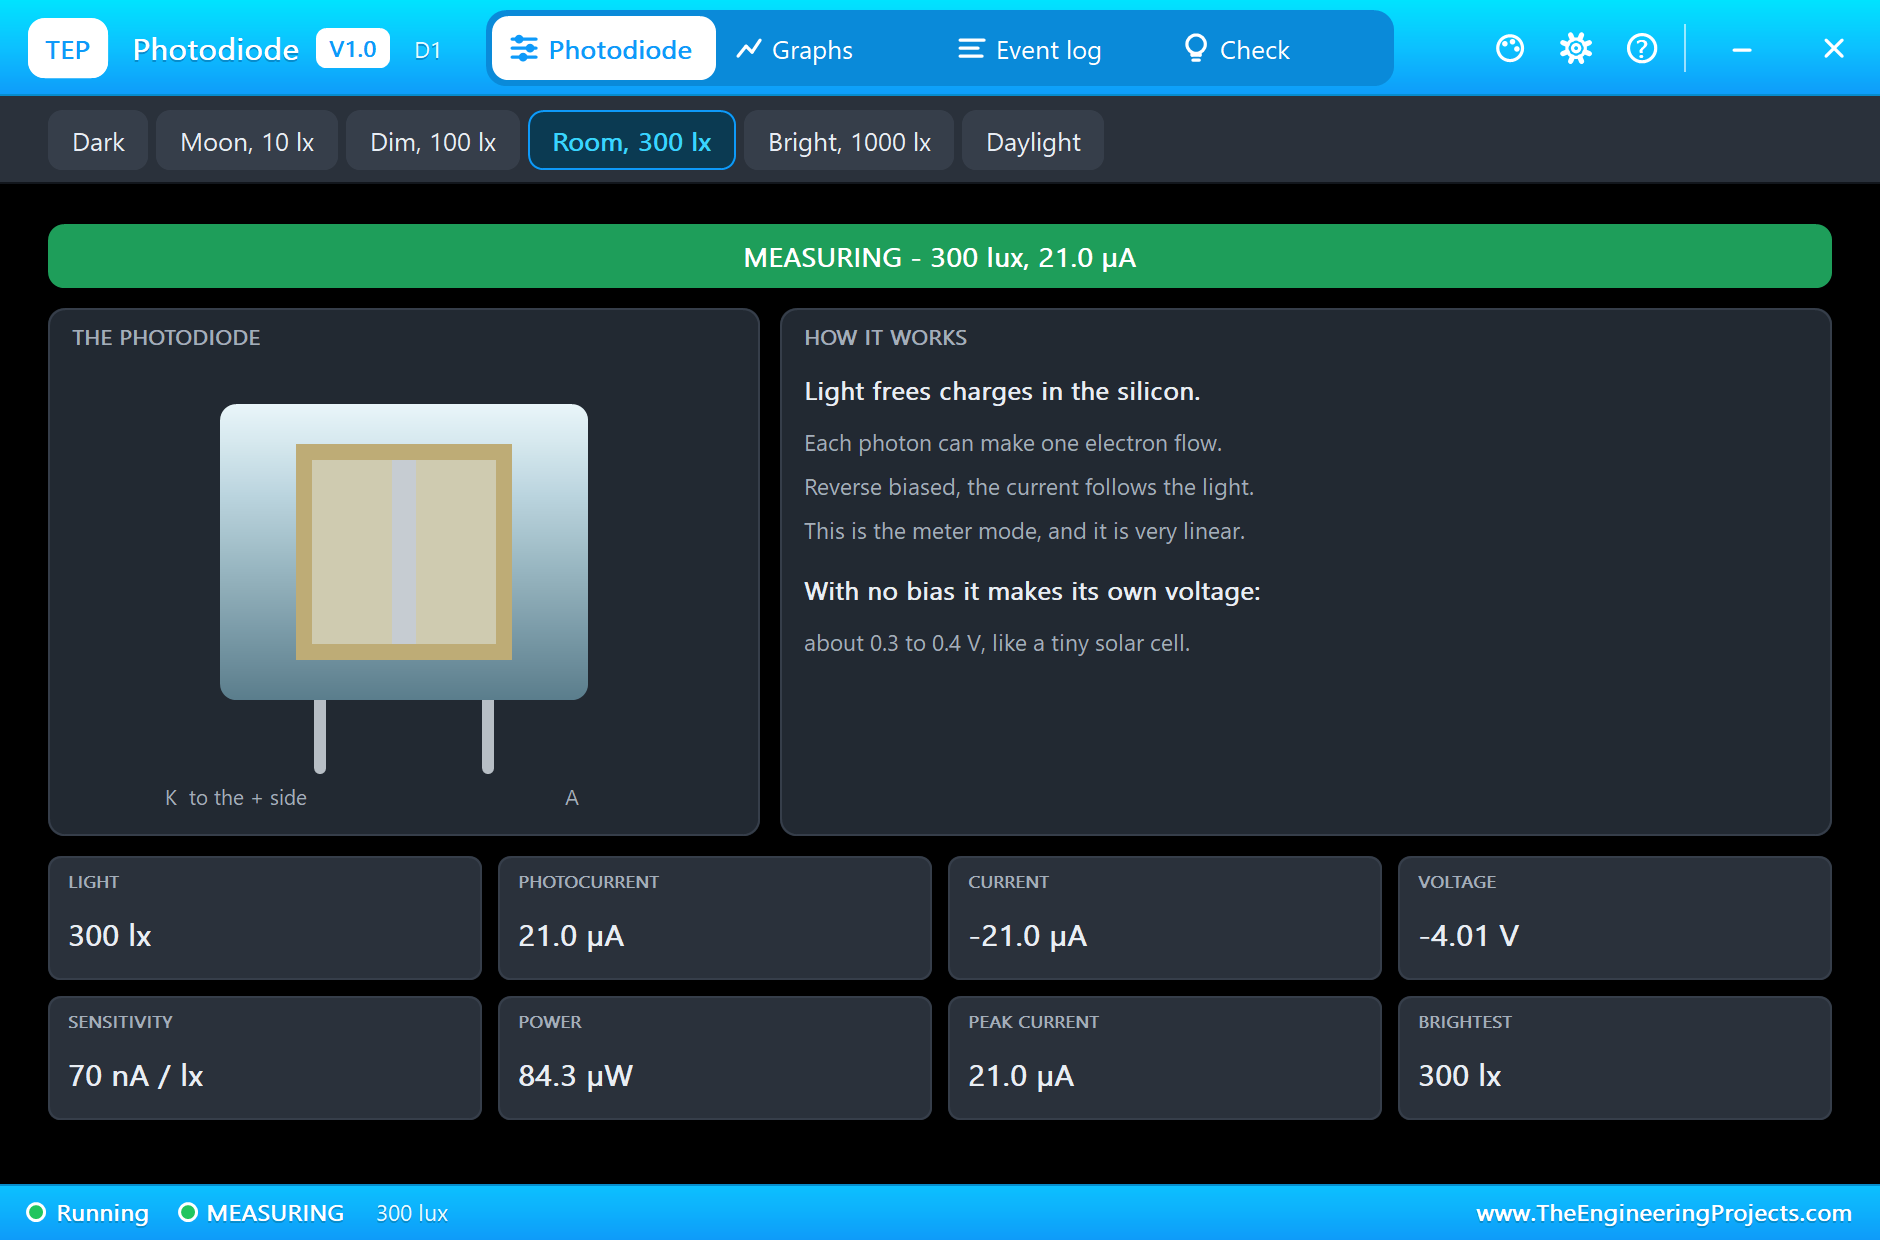
A photodiode is a silicon diode with a window. As we saw in our 1N4007 Diode Library for Proteus, a diode has a junction with a thin region where no charges are free to move. When a photon of light lands in that region, it knocks an electron loose. The electric field across the junction sweeps that electron out, and a tiny current flows. More light means more electrons, so the current follows the light, and it does so in a very straight line over many powers of ten.
The BPW34 is a favourite for experiments. It has a large square die of about 7.5 square millimetres, so it catches a lot of light, and it is fast. Its sensitivity is about 70 nA for each lux of daylight, which is a tiny current, as you will see, and most of the design work is in reading it well.
| Feature | The real part | In the library |
|---|---|---|
| Body | BPW34, 5.4 x 4.3 mm | 227 x 180 thou, true scale |
| Legs | 5 mm apart | 200 thou apart |
| Sensitivity | about 70 nA per lux | 70 nA per lux |
| Reverse voltage | 32 V | the Check page reads it |
| Cathode | marked on the case | the K pin, on the left |
Two Ways to Use One
A photodiode can work in two modes. In photoconductive mode it is reverse biased, with its cathode on the positive side. Almost no current flows in the dark, and the light adds a current that you can read as a voltage across a resistor. It is fast and very linear, and it is what we use in our demo. In photovoltaic mode there is no bias at all, and the diode makes its own small voltage, like a tiny solar cell. A solar panel is really just a huge photodiode.
| Mode | Bias | Output | Good for |
|---|---|---|---|
| Photoconductive | reverse | a current | light meters, fast signals |
| Photovoltaic | none | about 0.3 to 0.4 V | solar cells, very low noise |
What is a Lux?
The lux is the unit of how much light falls on a surface. Your eye copes with an amazing range of light, as the table shows. Direct sun is a million times brighter than moonlight, but you hardly notice, as your eye adjusts itself. A sensor does not, so you must choose the circuit for the range you care about.
| Scene | About |
|---|---|
| Full moon | 0.3 lux |
| A dim street | 10 lux |
| A living room | 100 to 300 lux |
| An office | 500 lux |
| A cloudy day outside | 1,000 to 10,000 lux |
| Direct sun | 100,000 lux |
From Current to Voltage
An Arduino reads volts, not amps. The simplest way to turn the current into a voltage is a resistor, and Ohm's law does the rest: V = I x R. Our demo uses 47k. At 300 lux, the BPW34 gives 300 x 70 nA, or 21 uA, and that makes 21 uA x 47,000, about 1 V. Choose the resistor for the brightest light you want to read: at about 1,400 lux, the voltage reaches 5 V and the reading can go no higher. That is called saturation, and we show it in the demo.
For serious work, designers use a transimpedance amplifier, an op-amp that holds the diode at a fixed voltage and turns the current into a clean signal. It is much faster and quieter than a plain resistor. For a simple light meter, the resistor is hard to beat.
Photodiode or LDR?
The cheap LDR, or light dependent resistor, also senses light, and it is much easier to use. But it is slow, its response is not straight, and every one is a little different. A photodiode responds in nanoseconds and it follows the light faithfully, so it is the choice for anything that needs real numbers or high speed. That is why it is inside your TV remote receiver and not an LDR.
Choosing the Resistor
The resistor sets the range of the meter. Since V = I x R, the full 5 V is reached when the photocurrent times R equals 5 V. A large resistor gives you lots of volts per lux, and reads dim light well, but it saturates early. A small resistor reads bright light, but the signal in dim light is lost in the noise of the Arduino's input. The table shows the choice. Real light meters solve this by switching between resistors, or by using a chip with several built-in ranges.
| Resistor | Saturates at about | Good for |
|---|---|---|
| 470k | 150 lux | dim rooms and dusk |
| 47k | 1,500 lux | indoors |
| 4k7 | 15,000 lux | outdoors in shade |
| 470 ohm | 150,000 lux | direct sun |
How Fast Is It?
A photodiode can follow light that flickers millions of times a second, and that is where it beats every other simple light sensor. A BPW34 is rated at about 100 ns. That speed is what makes fibre optic links, laser rangefinders and barcode readers possible. But a large load resistor spoils it, because the junction has a small capacitance, and R x C sets the speed. In our demo, 47k and about 70 pF give a limit of a few microseconds, which is still far quicker than analogRead().
Where Are They Used?
Your TV remote sends flashes of infrared to a photodiode behind the dark window of the receiver. A smoke alarm shines an LED across a chamber, and a photodiode looks for the light scattered by smoke. A heart rate clip reads the tiny changes in light passing through your fingertip. A CD player reads the disc with a laser and a set of photodiodes. Even the pixels of a camera sensor are, at heart, millions of tiny photodiodes.
Photodiode or Phototransistor?
A phototransistor is a photodiode with a transistor built around it. The transistor multiplies the tiny photocurrent by a hundred or more, so you get milliamps instead of microamps, and a simple resistor gives a healthy signal. That is handy, but you pay for it. A phototransistor is slower, its gain varies from part to part, and it is less linear. So use a phototransistor to detect whether light is there, and a photodiode to measure how much. A smoke alarm can use either, but a light meter should always use a photodiode, and so should anything that must be repeatable from one unit to the next.
Features of the Photodiode Library for Proteus
- The real look, at true scale: the clear block with the silver die showing, and two thin legs, with our small TEP signature.
- Set the light: chips on the pop-up give you darkness, moonlight, dim light, room light, bright light and daylight.
- A die that lights up: at Run, the die on the sheet glows with the light it sees.
- A true photodiode: the diode law plus a photocurrent of 70 nA per lux, in the analog simulator.
- Both modes: reverse biased it measures light, and with no bias it makes its own voltage.
- A pop-up for every part: click it at Run for the light, the current, eight live values, graphs, an event log and a check page.
- A complete package: about 1.8 MB with the library, our Arduino UNO V4.0, the demo's resistors and LED and the demo, without the source code of the models.
The Photodiode in Proteus
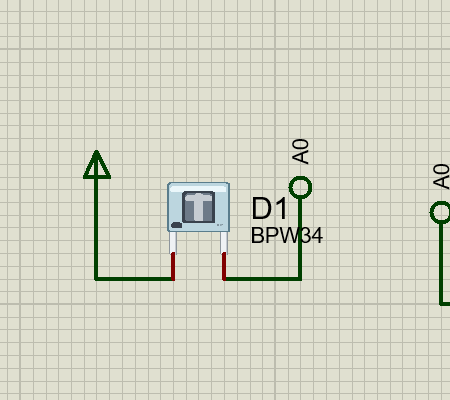
The device is PHOTODIODEBPW34TEP in TEPPHOTODIODE.LIB, under Optoelectronics, Photodiodes, with the prefix D and the model TEPPHOTODIODE.DLL. Search PHOTODIODE in Pick Devices. The pins are K on the left and A on the right.
The Properties
| Property | What it does |
|---|---|
| Light at the start, lux | the light when you press Run, 300 by default |
Download Photodiode Library for Proteus
Click the button below to download Photodiode-Library-for-Proteus-v1.0.zip (about 1.8 MB, without the source code of the models):
Photodiode Library for Proteus V1.0- README.txt: installation, the demo, the properties, troubleshooting and the limits.
- Proteus Library Files:
TEPPHOTODIODE.LIB,TEPRESISTOR.LIB,TEPLED5MM.LIBand ourArduinoV4TEP.LIB. - Proteus Model Files:
TEPPHOTODIODE.DLL,TEPRESISTOR.DLL,TEPLED5MM.DLLandTEPARDUINO.DLL. - Arduino Code: the demo sketch.
- Proteus Simulation: the demo project, its HEX file and copies of the DLLs.
No Proteus yet? Read How to Download and Install Proteus 7 and 8. New to libraries? Follow How to Install a New Library in Proteus.
How to Install Photodiode Library for Proteus
- Close Proteus and extract the whole zip file, for example to your Desktop.
- Copy the files from Proteus Library Files into the LIBRARY folder of Proteus.
- Copy the files from Proteus Model Files into the MODELS folder.
- Delete
TEPPHOTODIODE.IDXfrom the LIBRARY folder if it is there. - Start Proteus, press P and search for PHOTODIODE.
Demo: A Light Meter and a Night Lamp
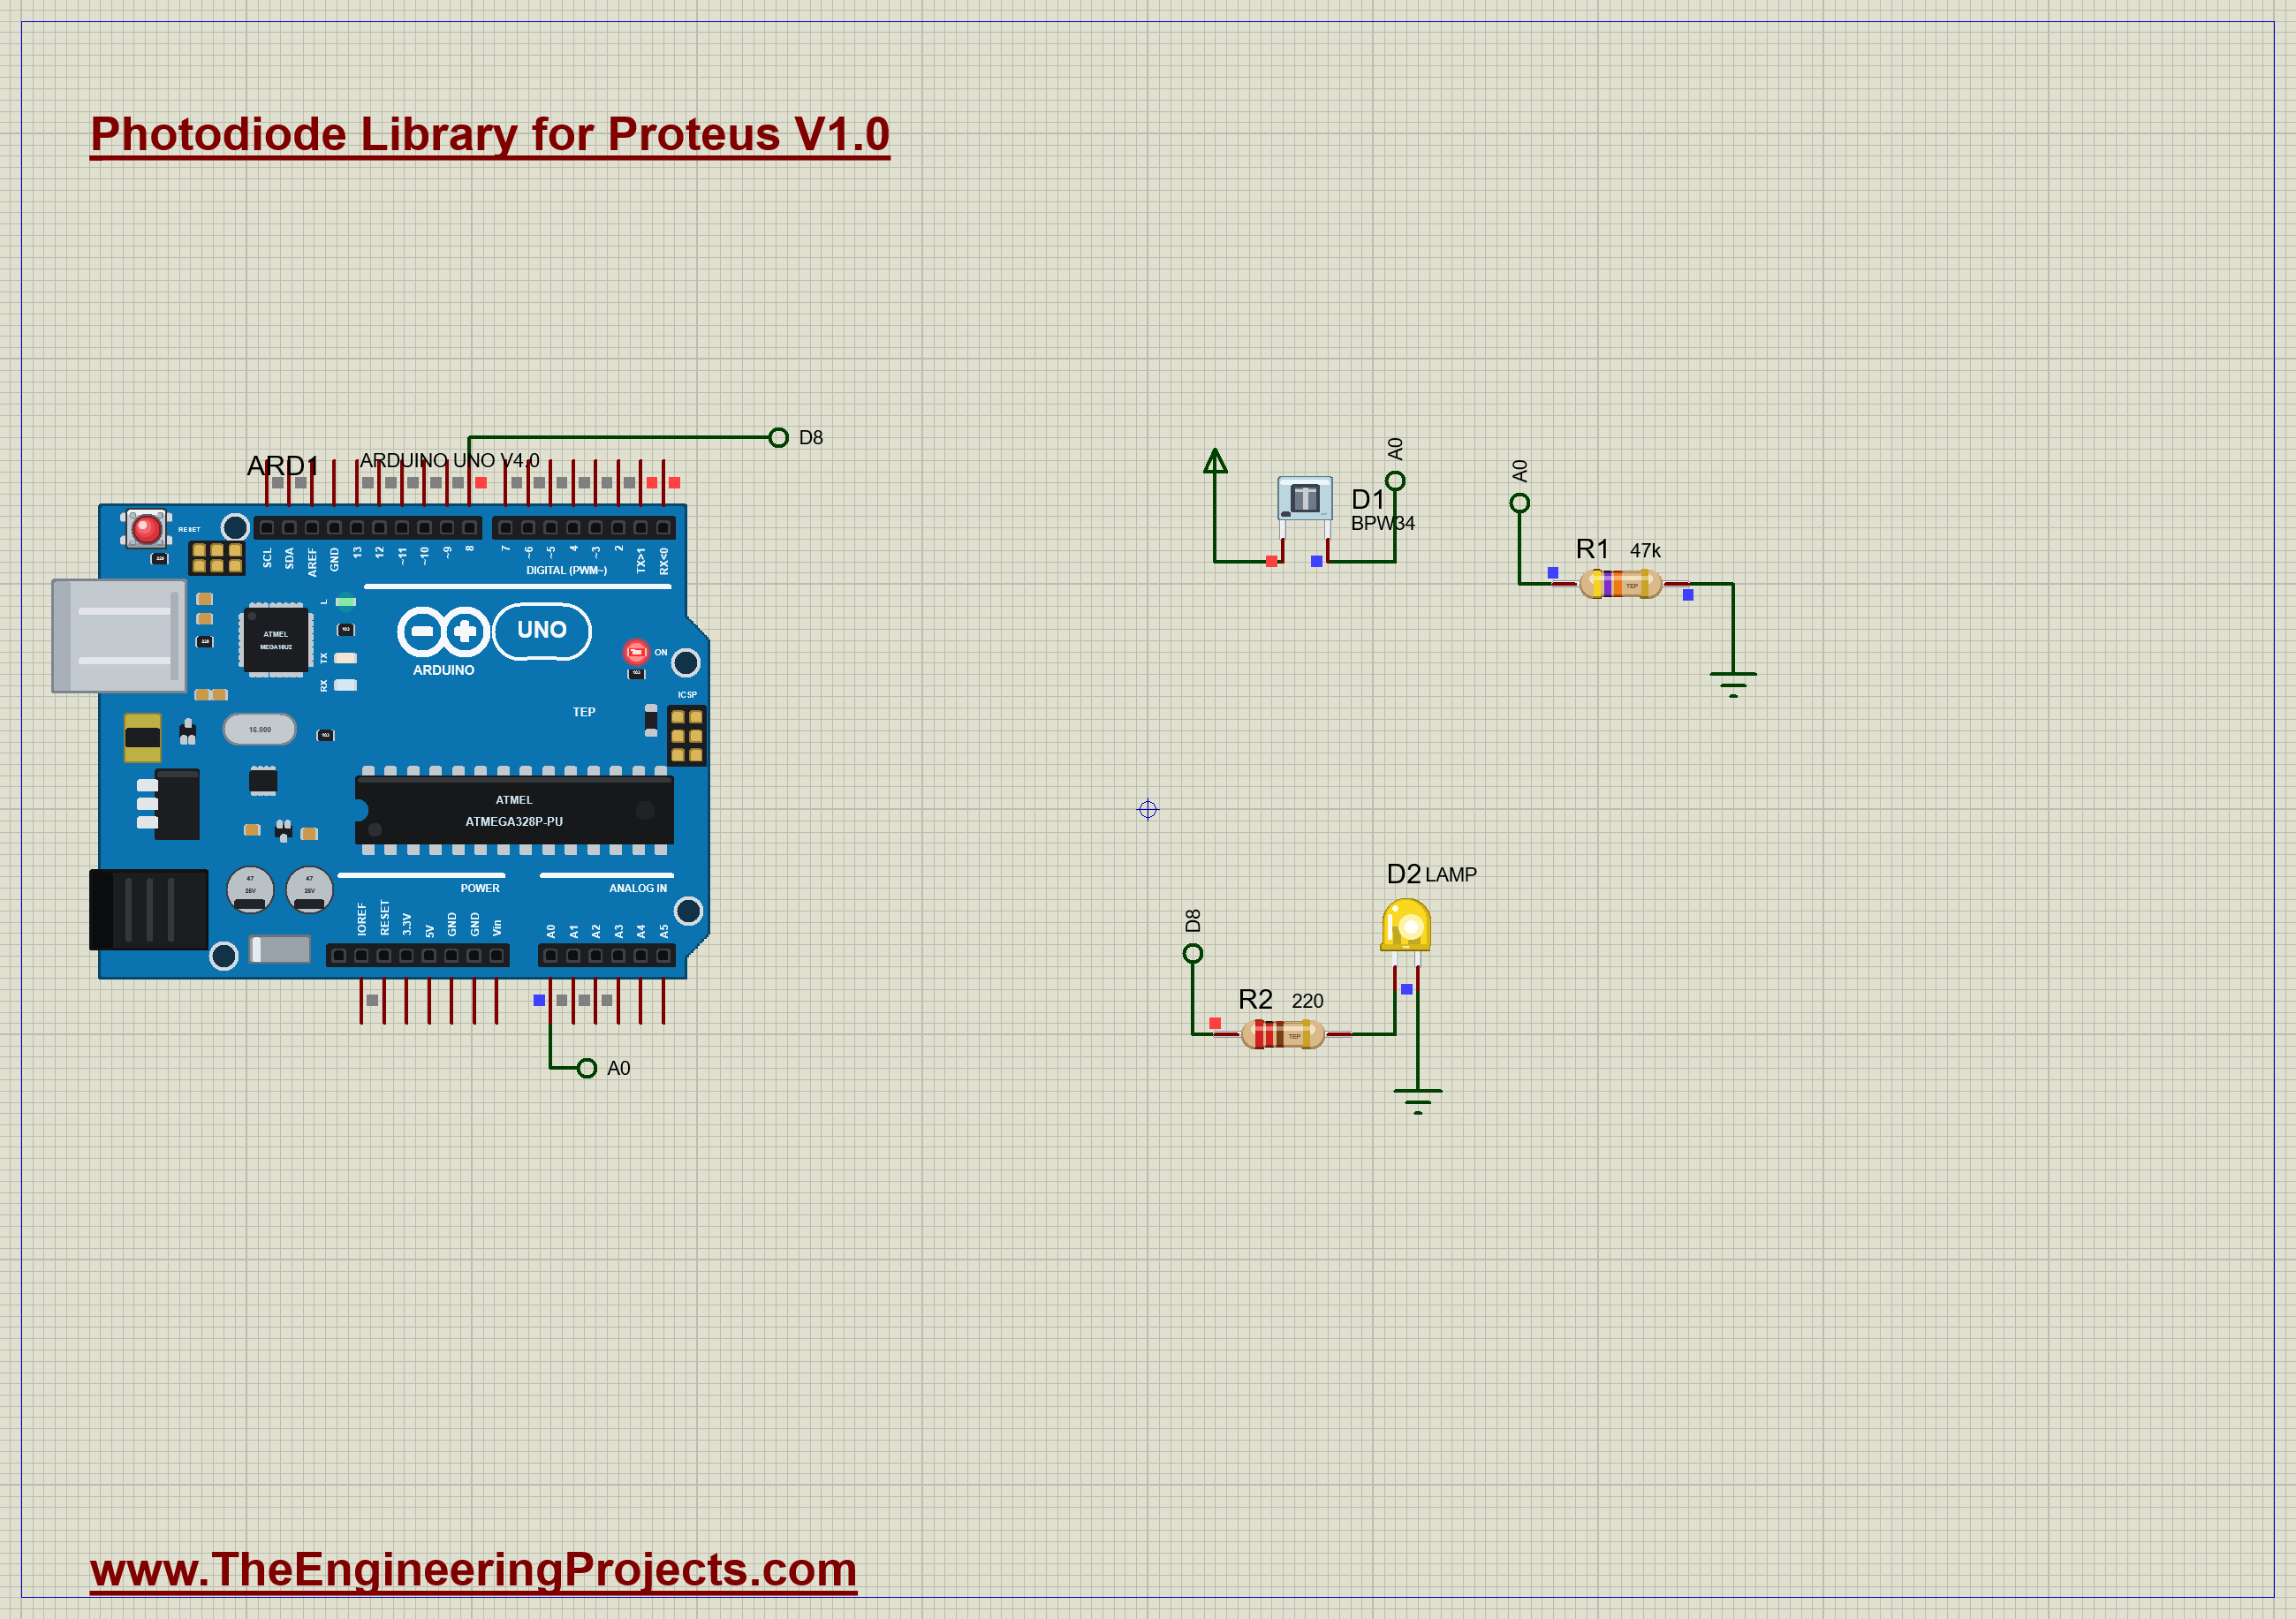
The demo uses the photodiode in reverse, with the cathode on +5V and the anode on A0. A 47k resistor takes the photocurrent to GND, and the voltage across it goes to A0. The sketch turns that voltage back into lux, prints it, and lights a yellow lamp when it gets dark. Open Photodiode-Light-Meter-ArduinoUnoV4.pdsprj. It runs on our Arduino UNO Library for Proteus V4.0, with its built-in monitor, the same window as our TEP Serial Monitor Advance for Proteus. The resistors are from our Resistor Library for Proteus and the LED from our 5 mm LED Library for Proteus.
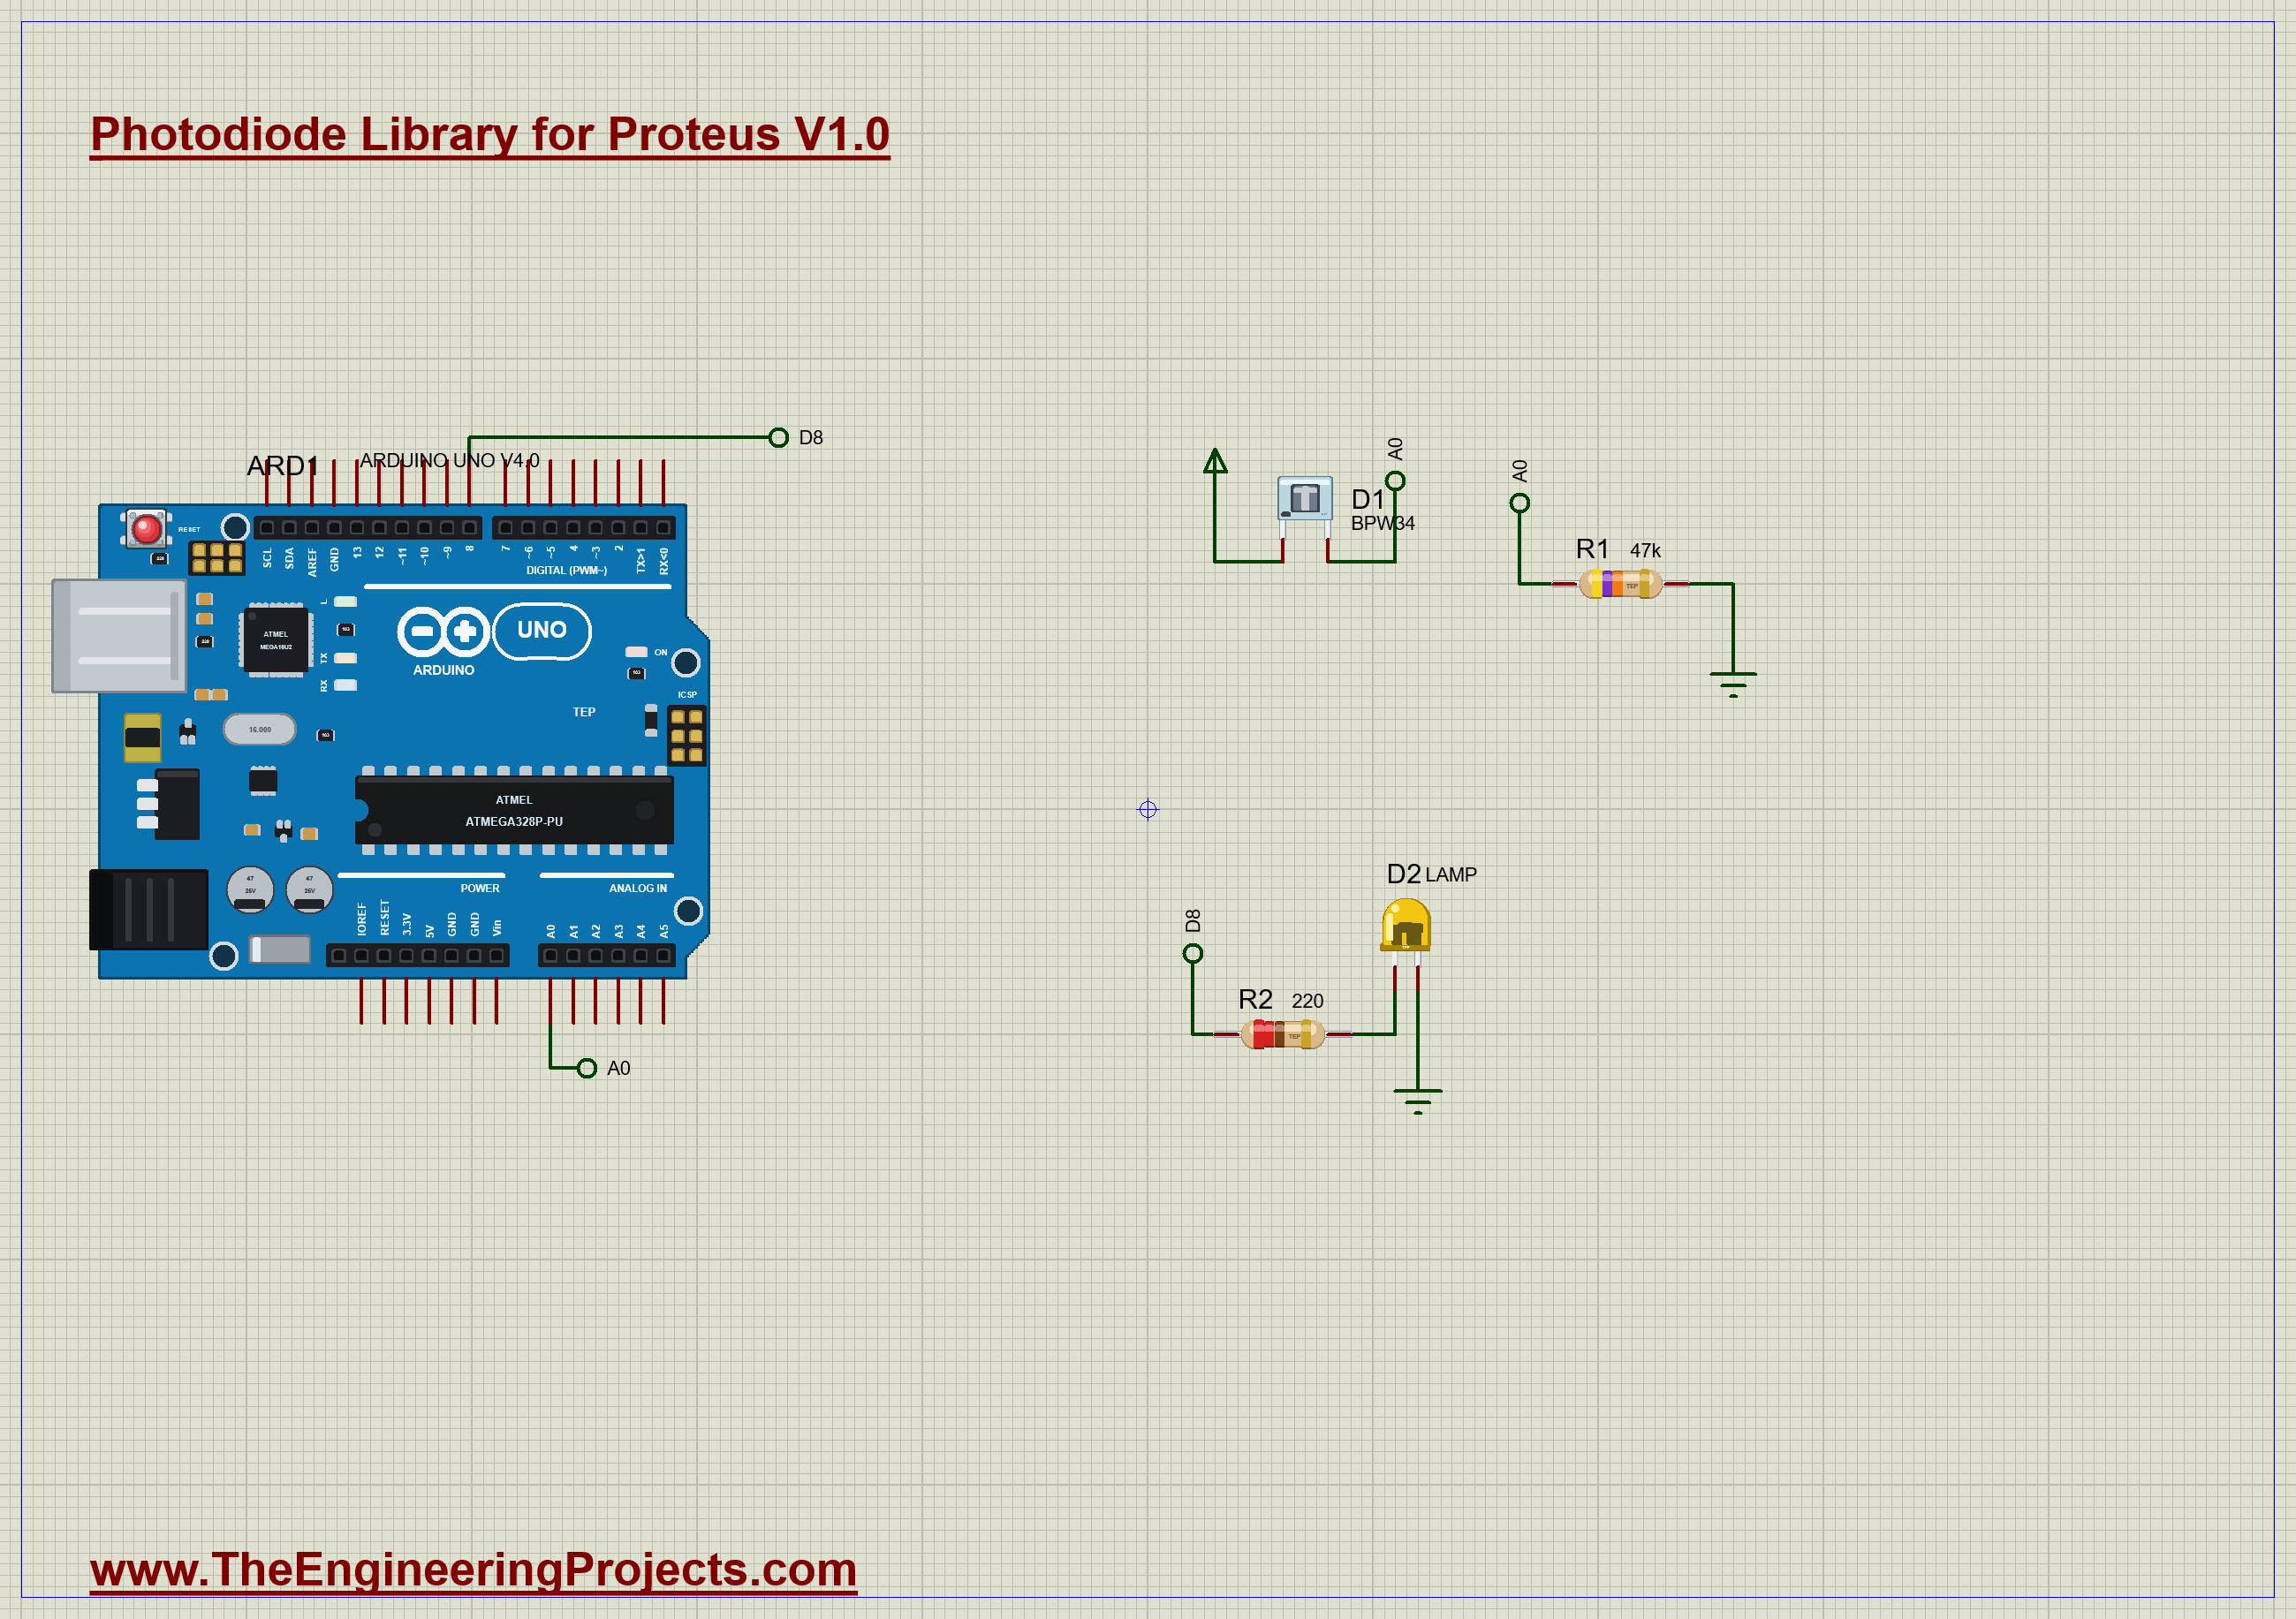
| Part | Connection | Job |
|---|---|---|
| D1, BPW34 | K to +5V, A to A0 | the sensor |
| R1, 47k | A0 to GND | turns the current into a voltage |
| D2 and R2 | D8 to GND | the night lamp |
From Volts Back to Lux
The sketch simply runs the sums backwards. It reads the voltage, divides by R to get the current, and divides by 70 nA to get the lux. Sixteen readings are averaged to keep the number steady:
  float volts = sum * VCC / 16.0 / 1023.0;
  return volts / R_LOAD / AMPS_PER_LUX;
A Lamp That Does Not Flicker
A simple lamp that turns on under 50 lux would chatter at dusk, as the light wavers around that number. So the sketch uses two levels, which is called hysteresis. The lamp turns on under 40 lux and turns off over 60 lux, so that small changes in between do nothing:
  if (!lampOn && lux < LAMP_ON_LUX) {
    lampOn = true;
    digitalWrite(LAMP_PIN, HIGH);
Run the Demo
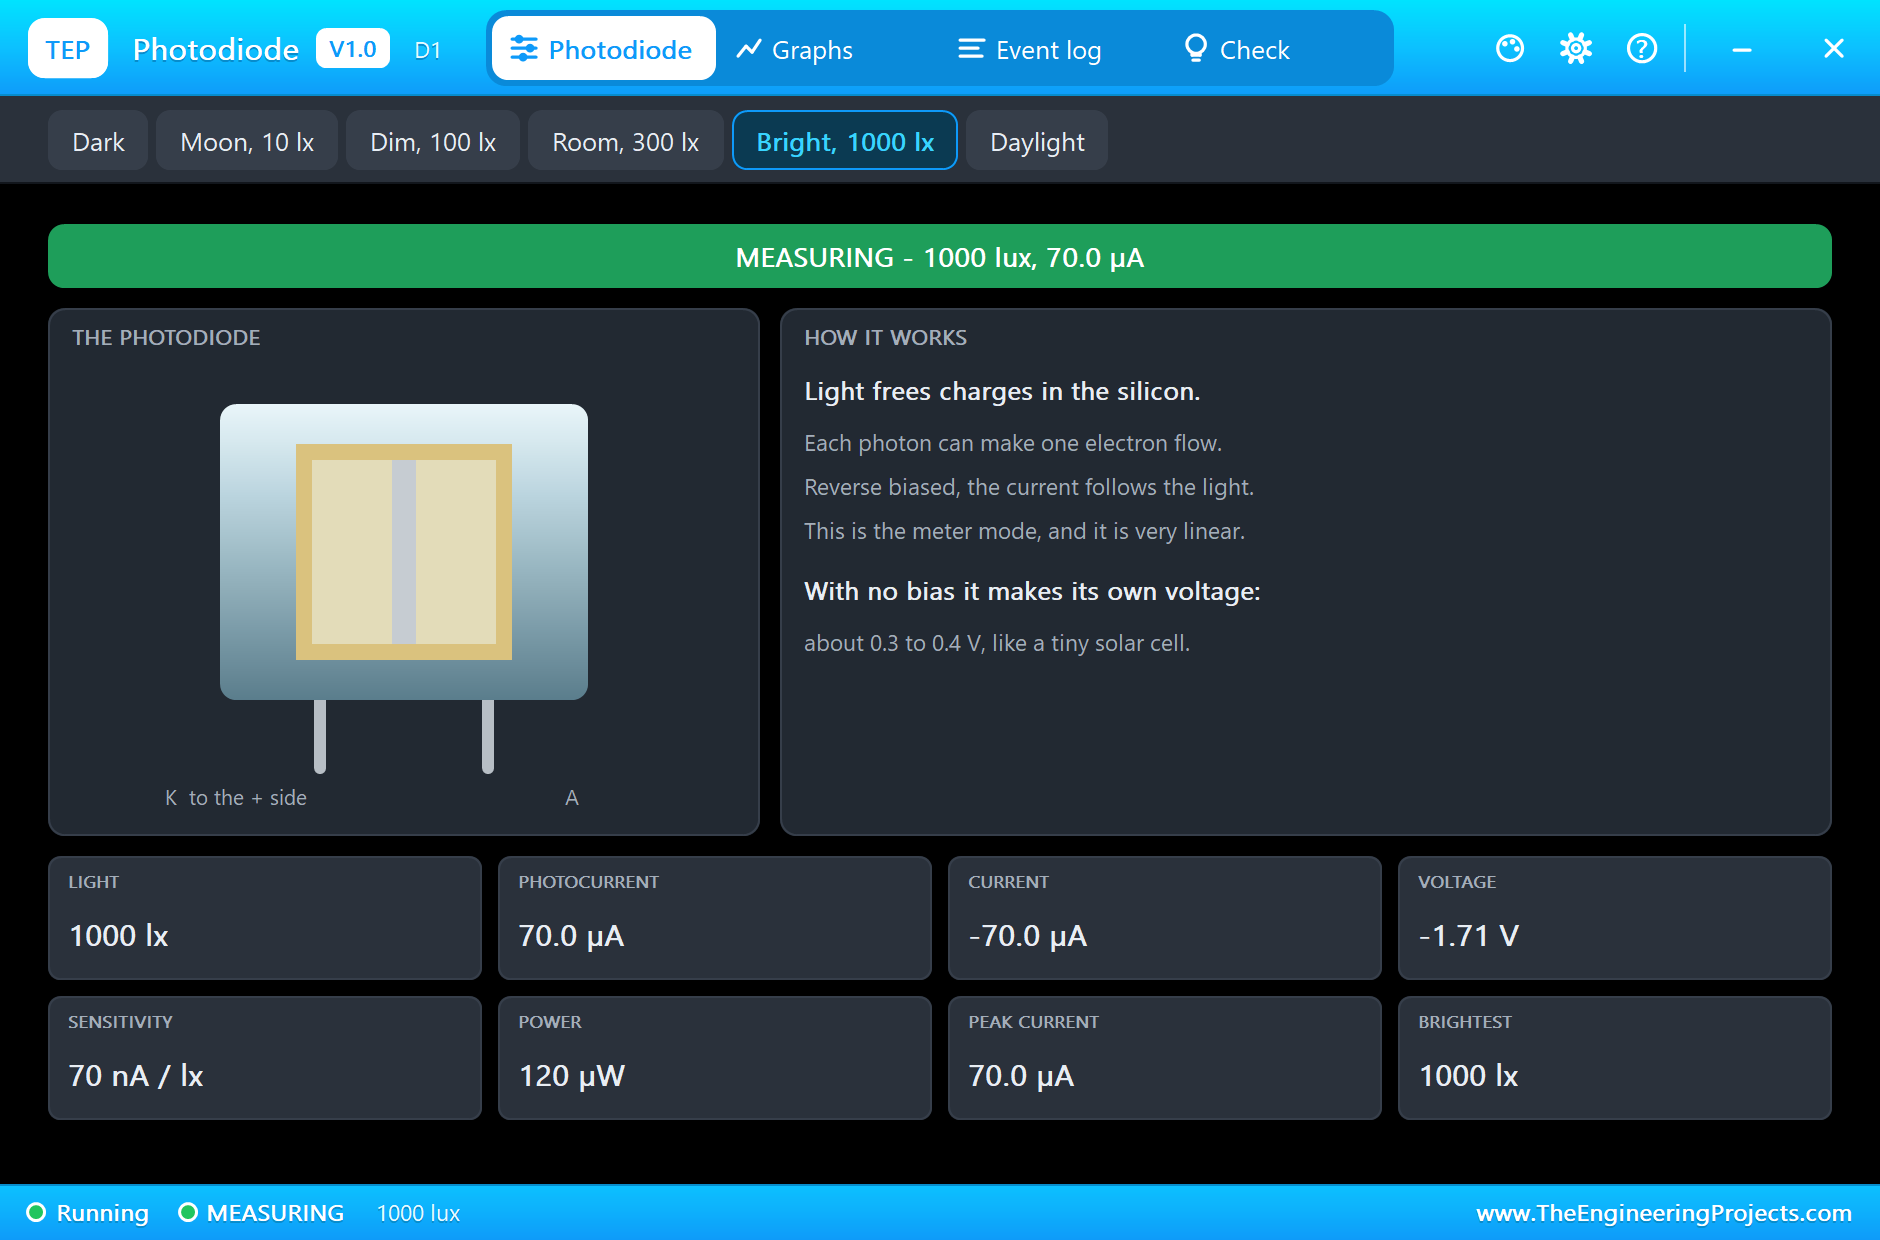
Press Run and the monitor opens. The part starts at 300 lux. Click the block to open its pop-up. The chips along the top set the light, and the banner says MEASURING:
Make It Brighter
Press Bright, 1000 lx. The die on the sheet gets brighter, the current goes up by the same factor, and the monitor follows. That straight-line response is why people choose a photodiode:
Make It Dark
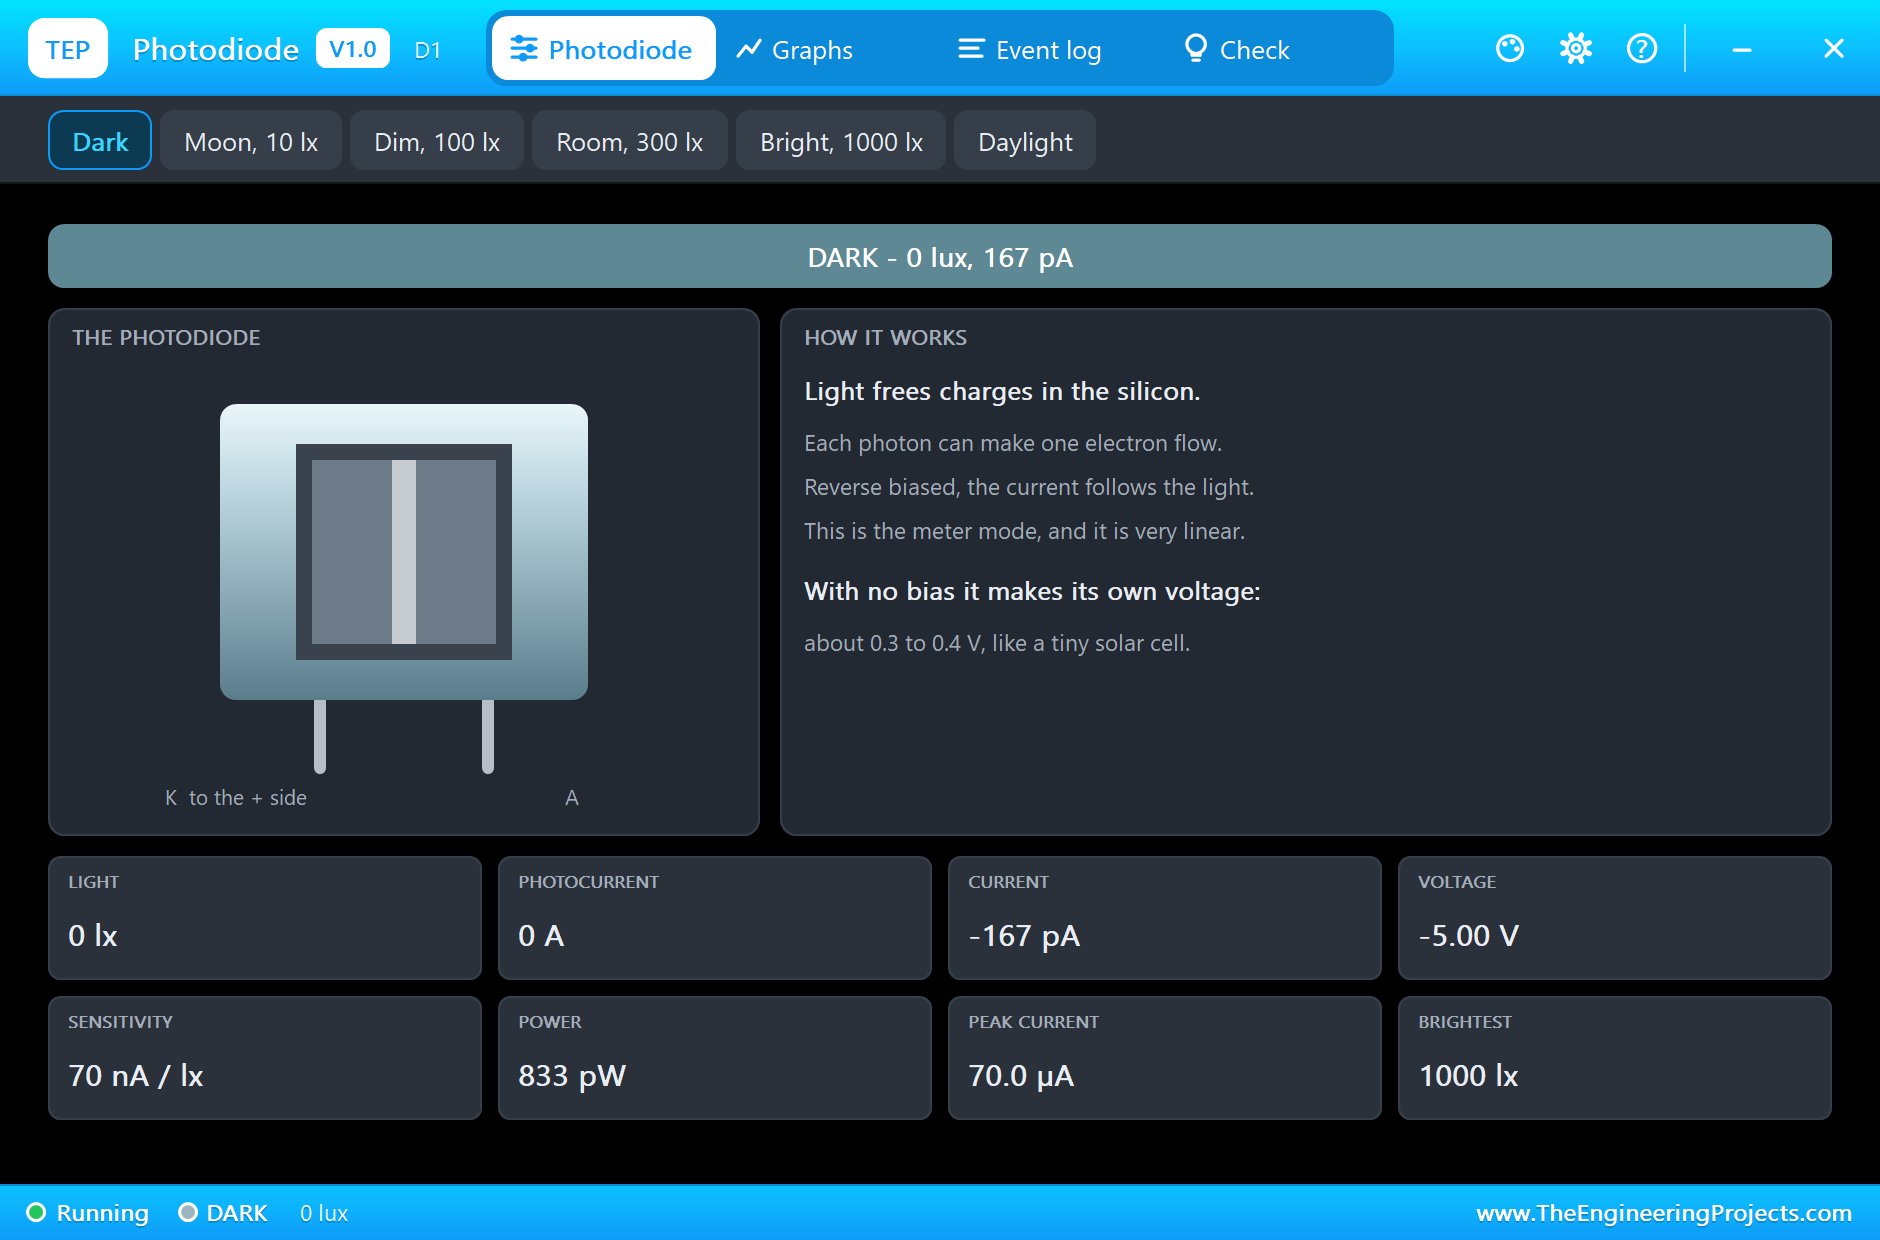
Press Dark. The die goes dark, the voltage falls to almost nothing, and the sketch lights the lamp. Here is the complete circuit, truly running in the dark, with the lamp on:
Too Much Light
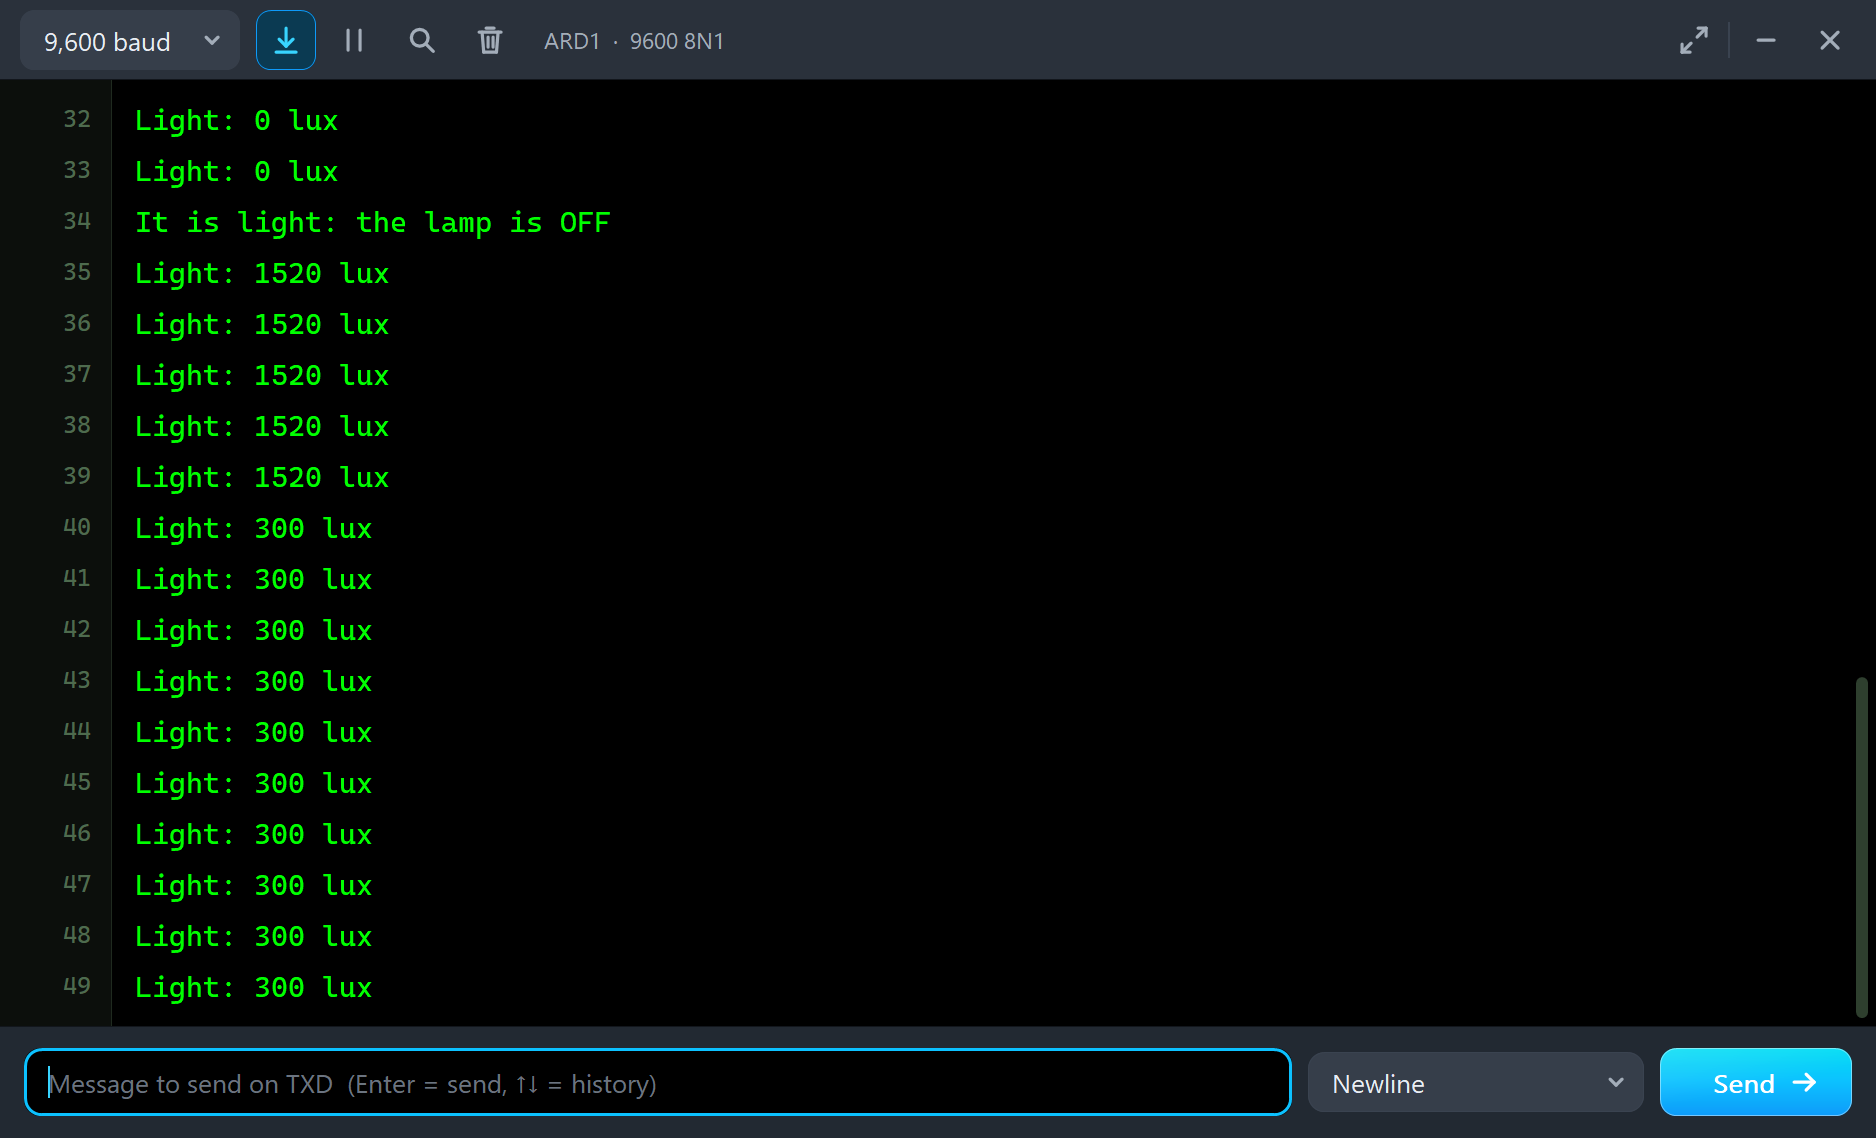
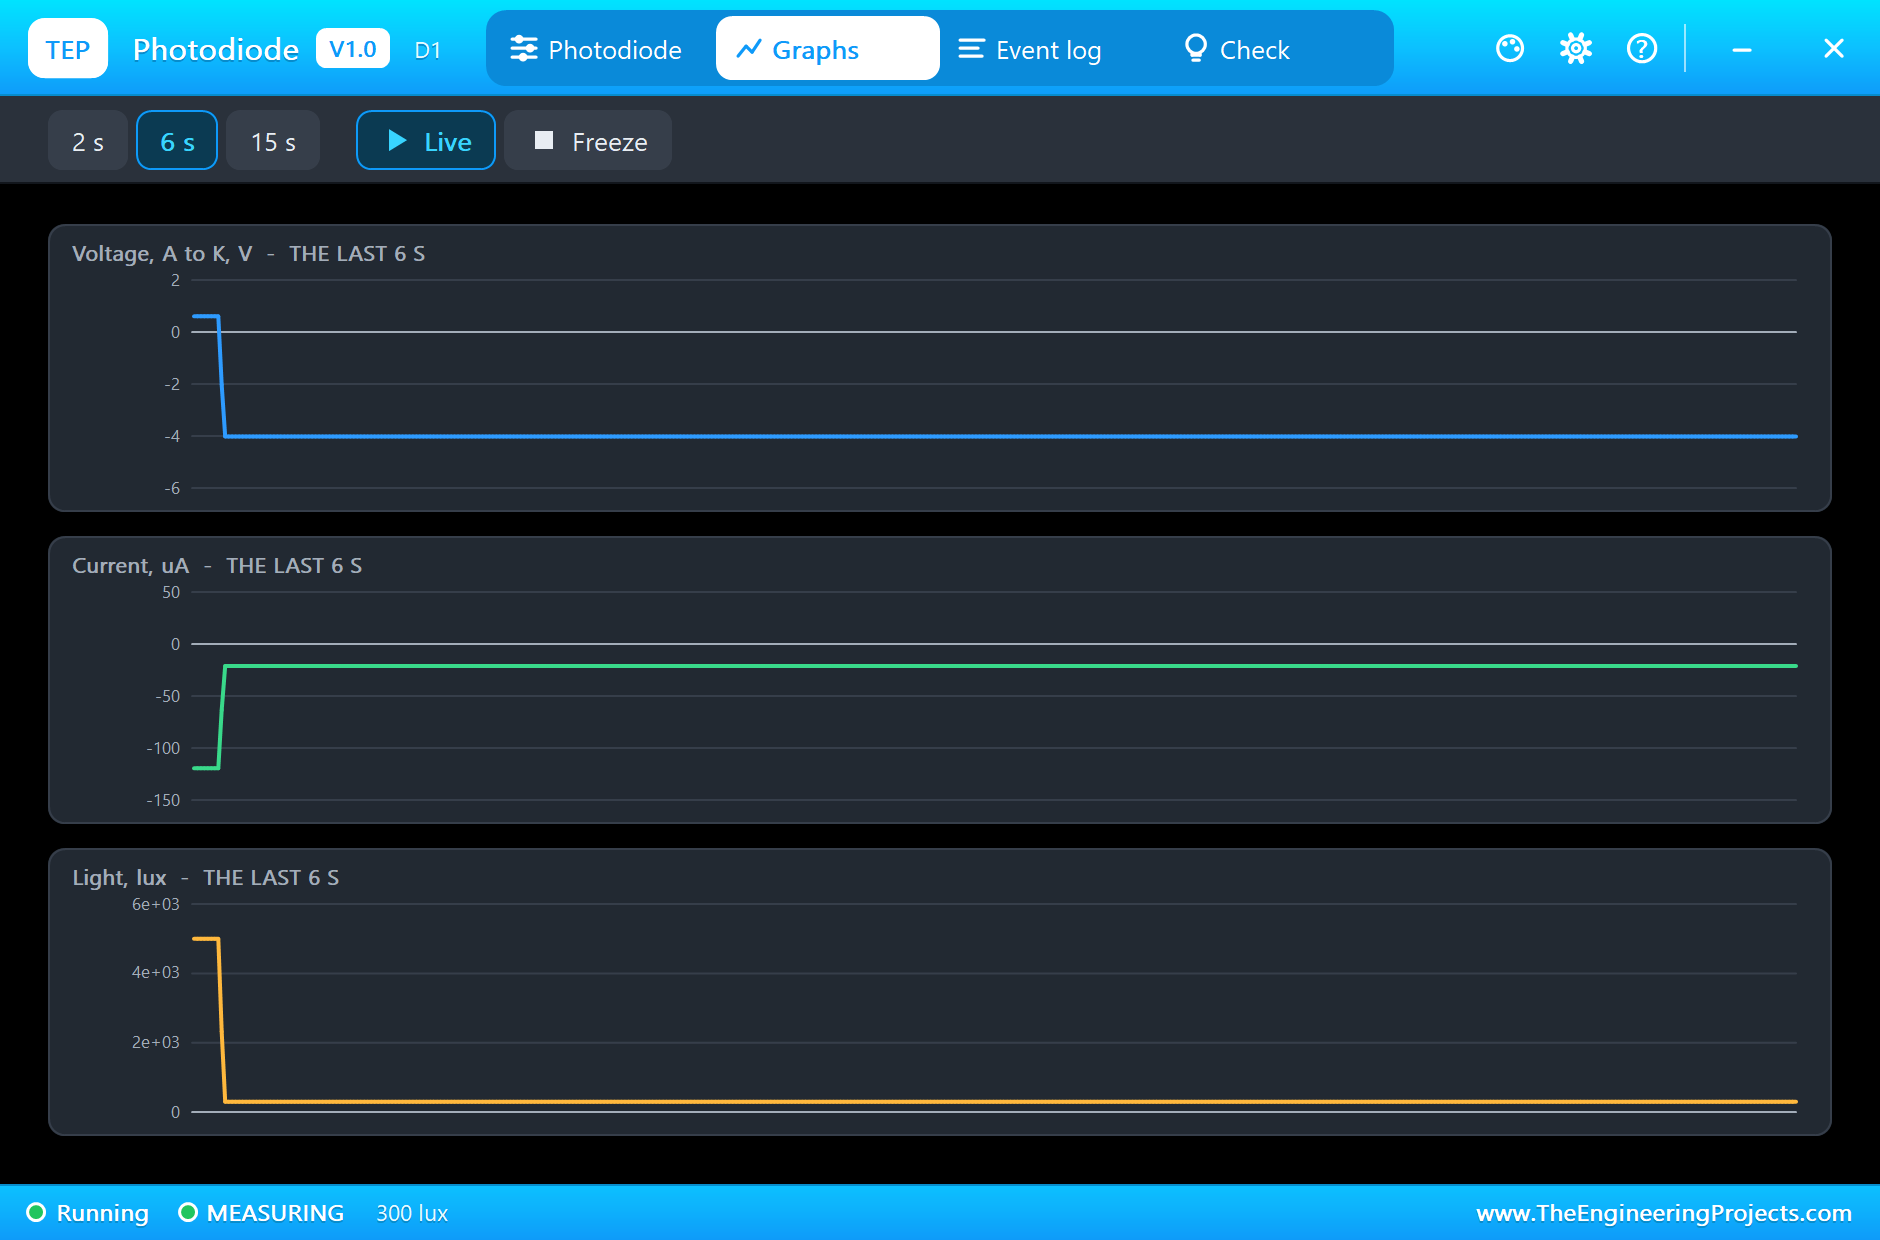
Now press Daylight, at 5000 lux. The diode wants to pass 350 uA, but through 47k, it can only reach about 119 uA before it runs out of volts. The voltage across it even flips over by 0.6 V, as it becomes a tiny solar cell, and the reading sticks at its limit. The Check page will tell you about it. The cure is a smaller resistor, which is a trade: you lose some sensitivity for dim light.
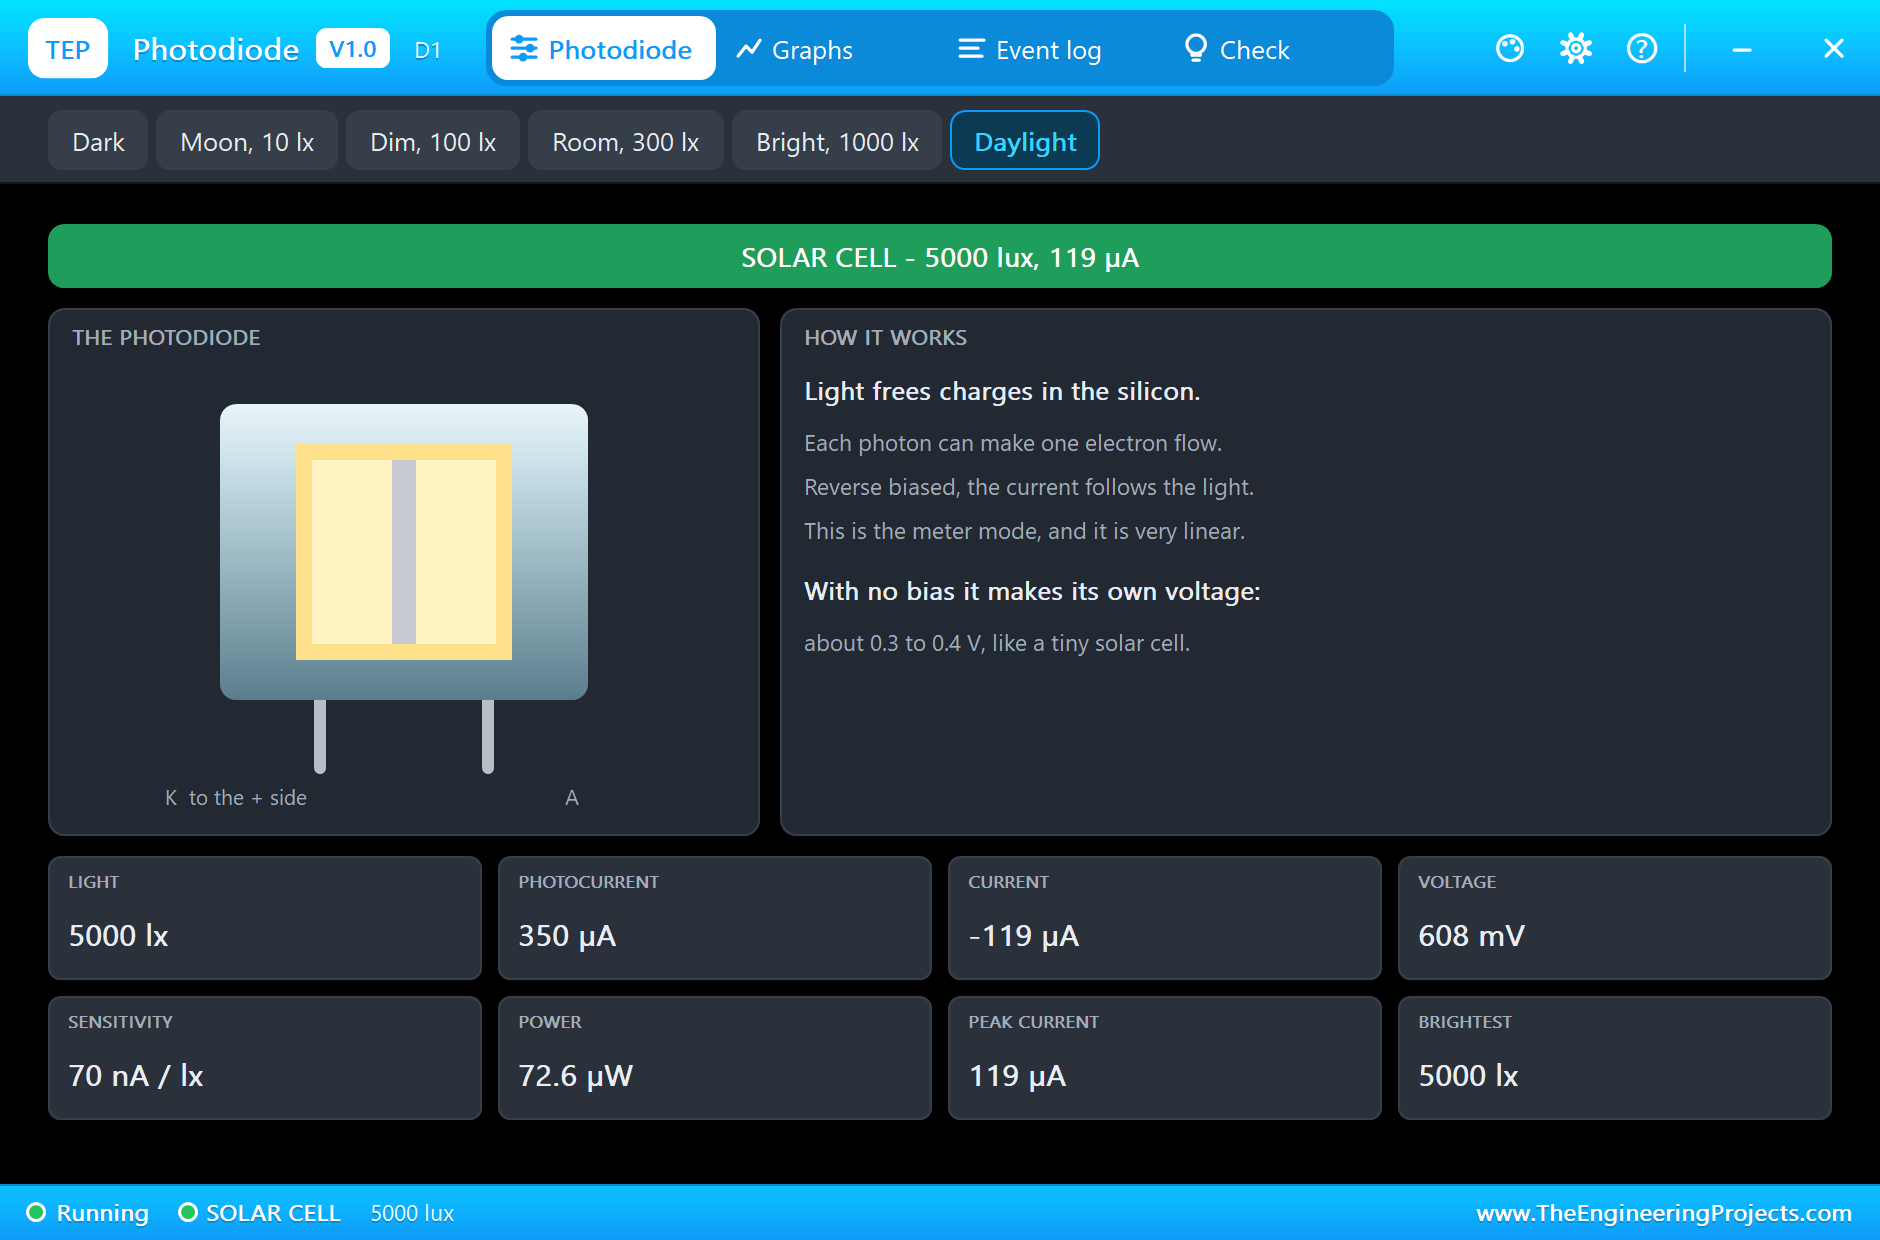
Here is the monitor with the whole story, and the Graphs tab with the current following each step of the light:
The Log and the Check Page
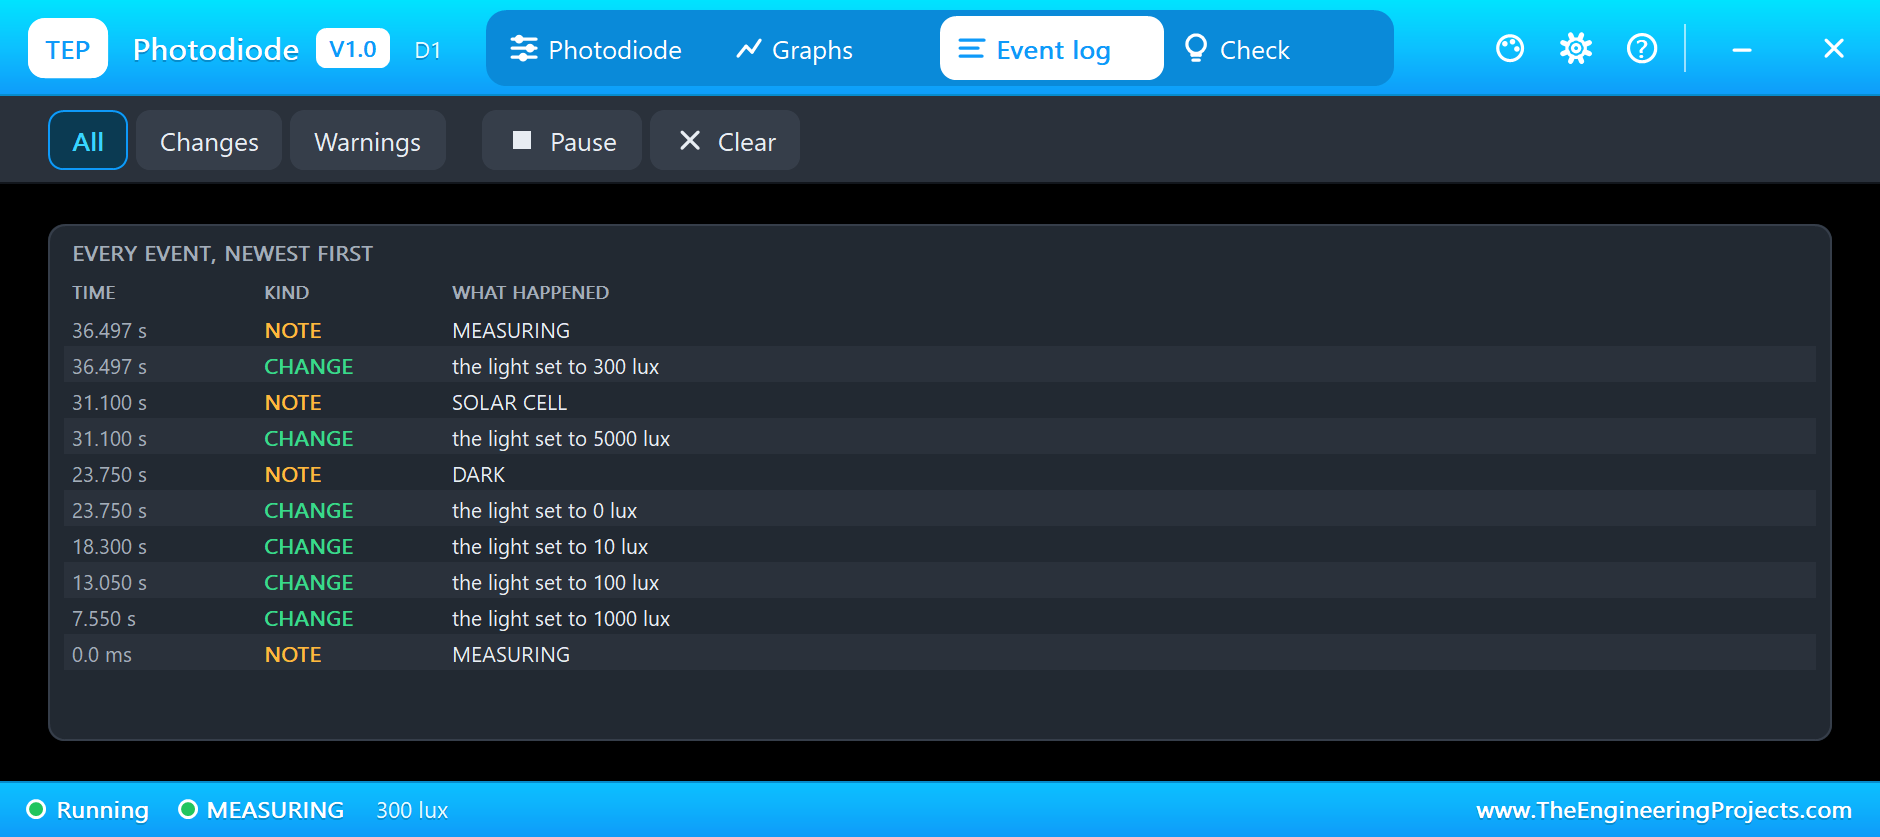
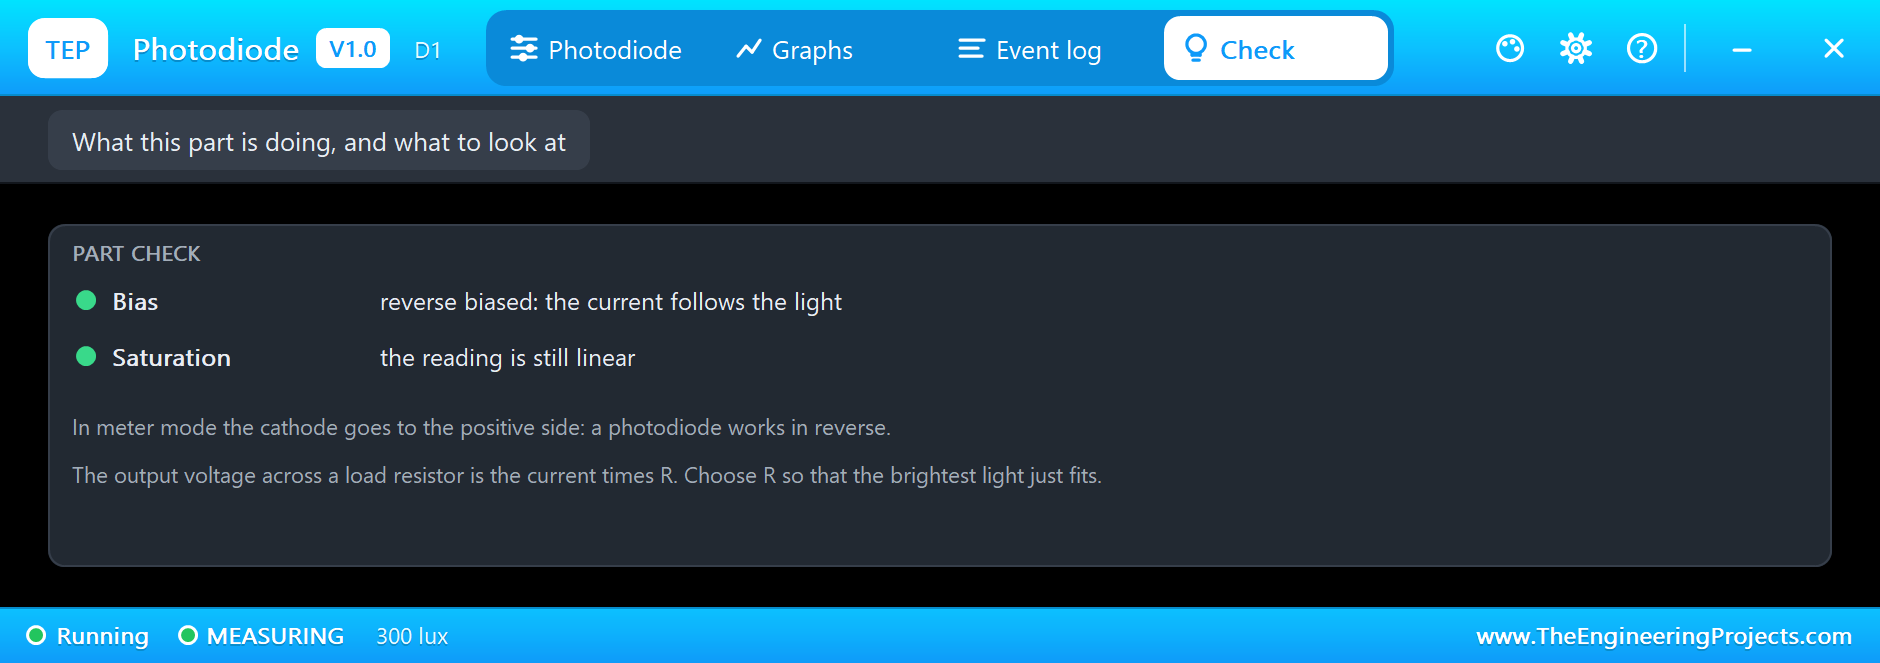
The Event log records each change of light, and the Check page looks at the bias and at saturation:
Try It Yourself
- Change R1 to 4k7, and change
R_LOADto match. Now daylight reads properly, but dim light is hard to see. - Remove +5V from the cathode and tie it to GND, and see the solar cell mode.
- Turn the diode round, and see why it no longer measures light.
- Change the two lamp levels, and find where the lamp starts to chatter.
- Set the starting light in the property box, and test the lamp at power-on.
Ideas to Extend the Demo
- Show the reading on an LCD, and make a pocket lux meter.
- Choose between two resistors with a pin, for two ranges.
- Dim an LED by PWM to keep a room at a steady brightness.
- Pair the photodiode with an LED, and count things passing through the beam.
Your Own Sketches
The demo sketch is in the zip file, and you can change it in the Arduino IDE. New to Arduino? Start with our Arduino Tutorial for Beginners. Export the compiled binary, and set the UNO's PROGRAM property to the new file. Our guide on How to get the HEX file from Arduino shows you where the file ends up.
Things to Know Before Using a Real Photodiode
- It sees infrared: silicon peaks in the near infrared, so a lamp and the sun can look different to it than to your eye. Lux meters use a filter to match the eye.
- Mind the polarity: in meter mode, the cathode goes to the positive side.
- Keep the wires short: a tiny current at high resistance picks up noise from everywhere.
- Watch out for mains flicker: indoor lights flicker at 100 Hz, so average a number of readings.
- Dark current grows with heat: it doubles for about every 10 degrees C.
Troubleshooting
- The reading stops rising: the resistor has run out of volts. Use a smaller one.
- It reads nothing: the part is the wrong way round.
- The die does not light: it only lights while the simulation runs.
- The pop-up does not open: click the block while the simulation runs.
- The part is not simulated:
TEPPHOTODIODE.DLLis missing from MODELS and from the project folder.
Limitations of the Simulation
- The light is set by the chips, and it has no colour: a single number stands for all of it.
- The speed and the capacitance of the junction are left out.
- The dark current does not rise with temperature.
- Arduino is a name of Arduino; this library is not made or endorsed by Arduino or Labcenter.
- Tested in Proteus 8.5 in October 2026 (the demo as shipped). Proteus 7 is not supported.
So, that was all about the Photodiode Library for Proteus. I hope you enjoy having a light sensor you can actually test on a screen, and that it lights the way to your next project. If you have any questions, ask in the comments and I will help you out. Till the next tutorial, take care and have fun!