Hello friends, I hope you all are doing great. Today, I am going to share the new Piezoelectric Energy Harvester Library for Proteus Simulation, the next library of our renewable energy series. If you have searched for a Proteus simulation of a piezoelectric sensor that makes electricity from footsteps, the little 27 mm brass disc of every "footstep power generation" project, this library brings it into Proteus: the press, the charge it moves, the disc's own capacitance and the circuit that collects it.
Piezoelectric Energy Harvester Library for Proteus Simulation
Latest version: V1.0 (November 2026, this tutorial)
Other power libraries: LiPo Battery · Single Cell Battery · CR2032 Coin Cell · Solar Panel · MC34063 Buck · MC34064 Boost · 12V Solar Panel · 6V Mini Solar Panel · 3-Phase PM Generator · Vertical-Axis Wind Turbine · Micro Hydro Generator · Thermoelectric Generator · PEM Hydrogen Fuel Cell
Helping Tools
- Serial Monitor Advance: a serial terminal window for the UART of your board
- Serial Monitor Expert: the serial monitor with extra debugging tools
- LCD Library for Proteus V3.0: 16x2, 20x4 and I2C LCDs to show your readings
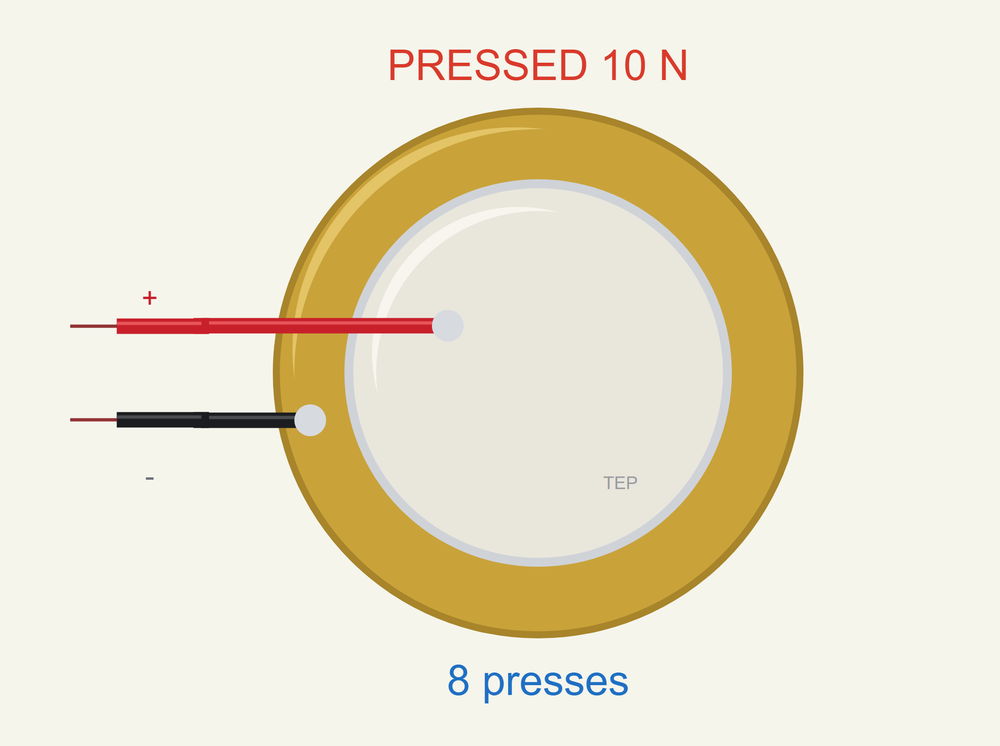
The disc is drawn at its true size, and at run time it writes PRESSED with the force above itself and counts the presses below. The simulation model does what a real disc does: it gives a pulse of charge when it is pressed and the opposite pulse when it is let go, and nothing at all while the force is steady. In the demo the disc charges a capacitor through a bridge rectifier, step by step, while an Arduino watches the voltage climb.
NOTICE: Our team has put a lot of effort into these small parts: the bodies, the animation and the pop-ups are all our own design, and you get them free. Your feedback is the fuel that keeps us going, so please tell us what you think in the comments below or in the Motor Driver board of our forum. And if our free libraries help you, you can buy us a coffee. So, let's get started with the Piezoelectric Energy Harvester Library for Proteus Simulation:
What is a Piezoelectric Energy Harvester?
Some crystals and ceramics have a strange gift: squeeze or bend them and a voltage appears across them. This is the piezoelectric effect. The cheapest piezo part you can buy is the round disc from buzzers and musical greeting cards: a thin brass plate with a layer of piezo ceramic on one face and a silver electrode on top. Solder one wire to the silver and one to the brass, press the disc, and you have a tiny generator.
An energy harvester collects such small bits of energy that would otherwise be lost: the steps of people on a floor, the shaking of a machine, the tap of a finger. Piezo discs under floor tiles, in shoes and on vibrating pipes do exactly that. The energy of one step is small, a few millionths of a joule from a single disc, so real harvesters use many discs and collect the charge in a capacitor until there is enough to flash an LED or wake a sensor.
| 27 mm piezo disc (the makers' sheets) | |
|---|---|
| Brass plate | 27 mm across |
| Ceramic | 19.7 mm across, with a silver electrode |
| Thickness | 0.54 mm, plate and ceramic together |
| Capacitance | 20 nF (+-30 %) at 1 kHz |
| Resonance | 4.6 kHz (as a buzzer) |
| Leads | red on the ceramic, black on the brass |
How a Press Becomes Electricity
When the disc bends, the ceramic is stretched, and charge moves from one electrode to the other. The amount depends on the force: in this simulation 40 nC for every newton, a figure of ours that suits a disc held by its rim and pressed in the middle. A firm press of 10 N, about the weight of a litre of water, moves 400 nC. When you let go, the ceramic relaxes and the same charge moves back. So the output is AC by nature: one pulse on the press, the opposite pulse on the release, and nothing in between, however hard you keep pressing.
The disc is also a capacitor. Its two electrodes with the ceramic between them hold 20 nF, and the charge of a press lands on that capacitance first. With nothing connected, 400 nC on 20 nF is 20 V, which is why a piezo disc on an oscilloscope shows such surprisingly tall spikes. The spikes are tall but thin: there is very little charge behind them, and any load pulls the voltage down at once.
Collecting the Charge: Bridge and Capacitor
To keep the charge you need two more parts. A bridge rectifier turns both pulses the same way, so the press and the release both add to the store. A capacitor much bigger than the disc's own 20 nF is the store. Every pulse lifts its voltage by a small step, the charge of the pulse divided by the capacitance, and the steps add up.
There is a catch that every piezo harvester has, and the simulation shows it clearly. Before any charge can pass the bridge, the disc must first charge its own 20 nF up to the capacitor's voltage plus two diode drops. That part of each pulse is lost. The fuller the capacitor, the more of each pulse is spent this way, so the capacitor charges fast at first and ever more slowly later. It stops at about half the open-circuit voltage of the disc, and the most energy is collected when the capacitor sits near a quarter of it.
Features of the Piezoelectric Energy Harvester Library for Proteus Simulation
- The 27 mm disc at true scale: the brass plate, the ceramic with its silver electrode, the two solder points and the red and black leads; at run time PRESSED and the force above it, the count of presses below.
- A real charge source: 40 nC per newton, handed to the circuit exactly as the force changes: a pulse on the press, the opposite pulse on the release, nothing for a steady force.
- The disc's own capacitance: 20 nF from the makers' sheets and a small leak, so an open disc shows tall spikes and a loaded one hardly any.
- Three ways to press it: footsteps (force and rate), vibration (a sine force at a frequency) or a demo that walks, runs and stops.
- The press in your hands: chips in the pop-up tap once, walk, run, vibrate and set the force from 5 to 40 N while the simulation runs.
- A pop-up: the disc bending under the force, one step with its two pulses and a cursor at the moment now, eight live values, graphs, an event log and a check page.
- A complete package: about 1.8 MB with the library, our bridge rectifier, our tantalum capacitor, our Arduino UNO V4.0 and the demo, without the source code of the models.
The Piezo Disc in Proteus
The device is PIEZODISC27TEP in TEPPIEZO.LIB, under Electromechanical > Generators, with the prefix PZ and the analog model TEPPIEZO.DLL. Search PIEZO in Pick Devices. Its two pins are on the left, at the ends of the leads: the red + from the ceramic and the black - from the brass. The properties are MODE (STEPS, VIBRATE or DEMO), FORCE (the force of a press in newtons) and RATE (presses a second, or hertz when it vibrates). The symbol is drawn to the disc's true size against our Arduino UNO: 27 mm is about half the width of the board.
Download Piezoelectric Energy Harvester Library for Proteus Simulation
Click the button below to download Piezoelectric-Energy-Harvester-Library-for-Proteus-v1.0.zip (about 1.8 MB, without the source code of the models):
Piezoelectric Energy Harvester Library for Proteus V1.0- README.txt: installation, the demo, the wiring, troubleshooting and the limits of the simulation.
- Proteus Library Files:
TEPPIEZO.LIB,TEPBRIDGE.LIB,TEPTANTALUM.LIBandArduinoV4TEP.LIB. - Proteus Model Files:
TEPPIEZO.DLL,TEPBRIDGE.DLL,TEPTANTALUM.DLLandTEPARDUINO.DLL. - Arduino Code: the demo sketch.
- Proteus Simulation: the demo project, its HEX file and copies of the DLLs.
No Proteus yet? Read How to Download and Install Proteus 7 and 8. New to libraries? Follow How to Install a New Library in Proteus.
How to Install Piezoelectric Energy Harvester Library for Proteus Simulation
- Close Proteus and extract the whole zip file, for example to your Desktop.
- Copy the files from Proteus Library Files into the LIBRARY folder of Proteus.
- Copy the files from Proteus Model Files into the MODELS folder.
- Delete
TEPPIEZO.IDXfrom the LIBRARY folder if it is there. - Start Proteus, press P and search for PIEZO.
Proteus Simulation of the Piezoelectric Energy Harvester with Arduino
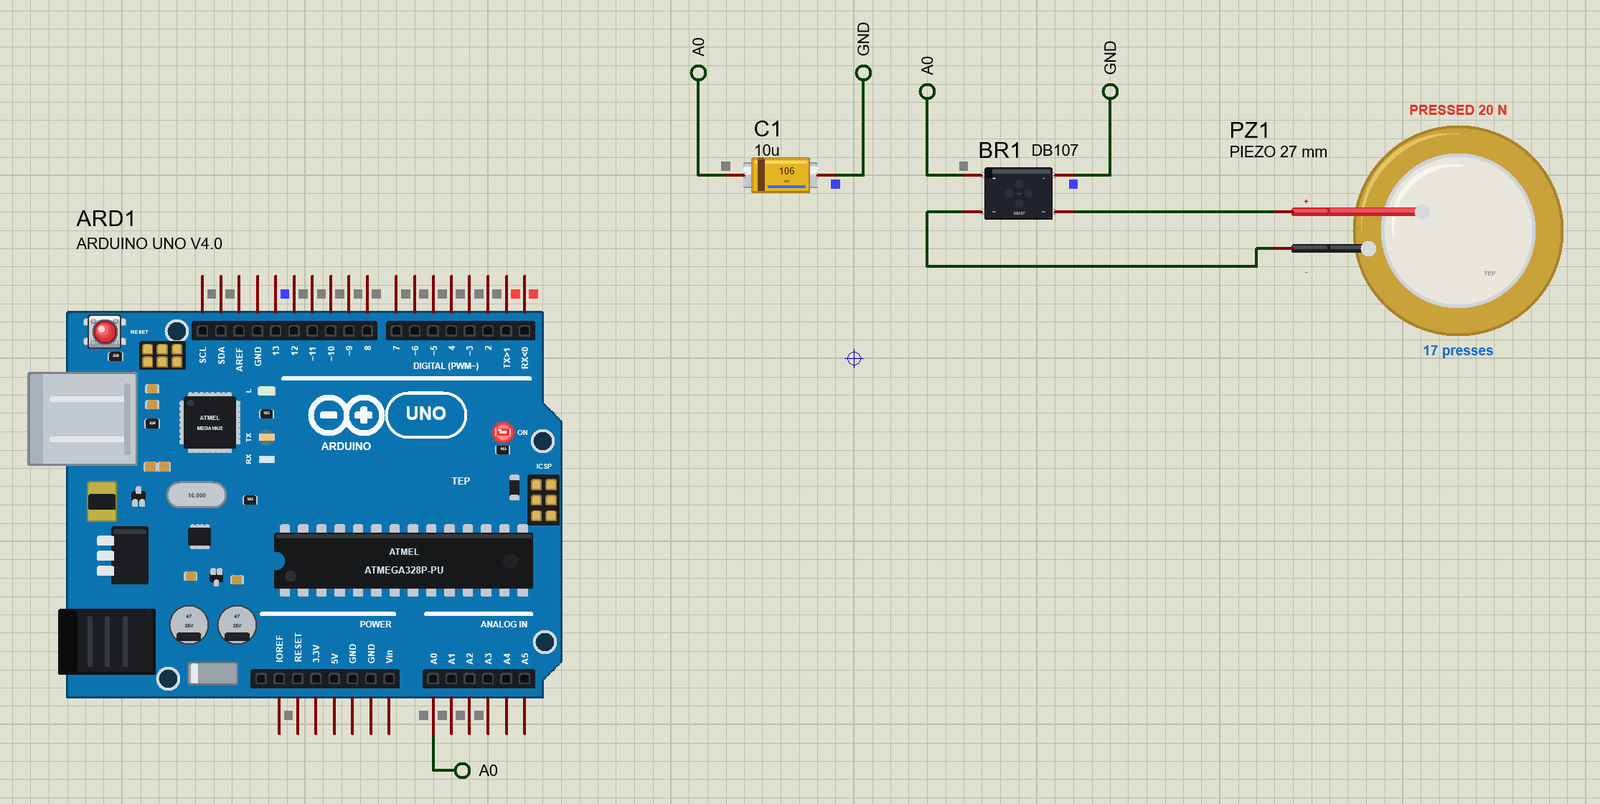
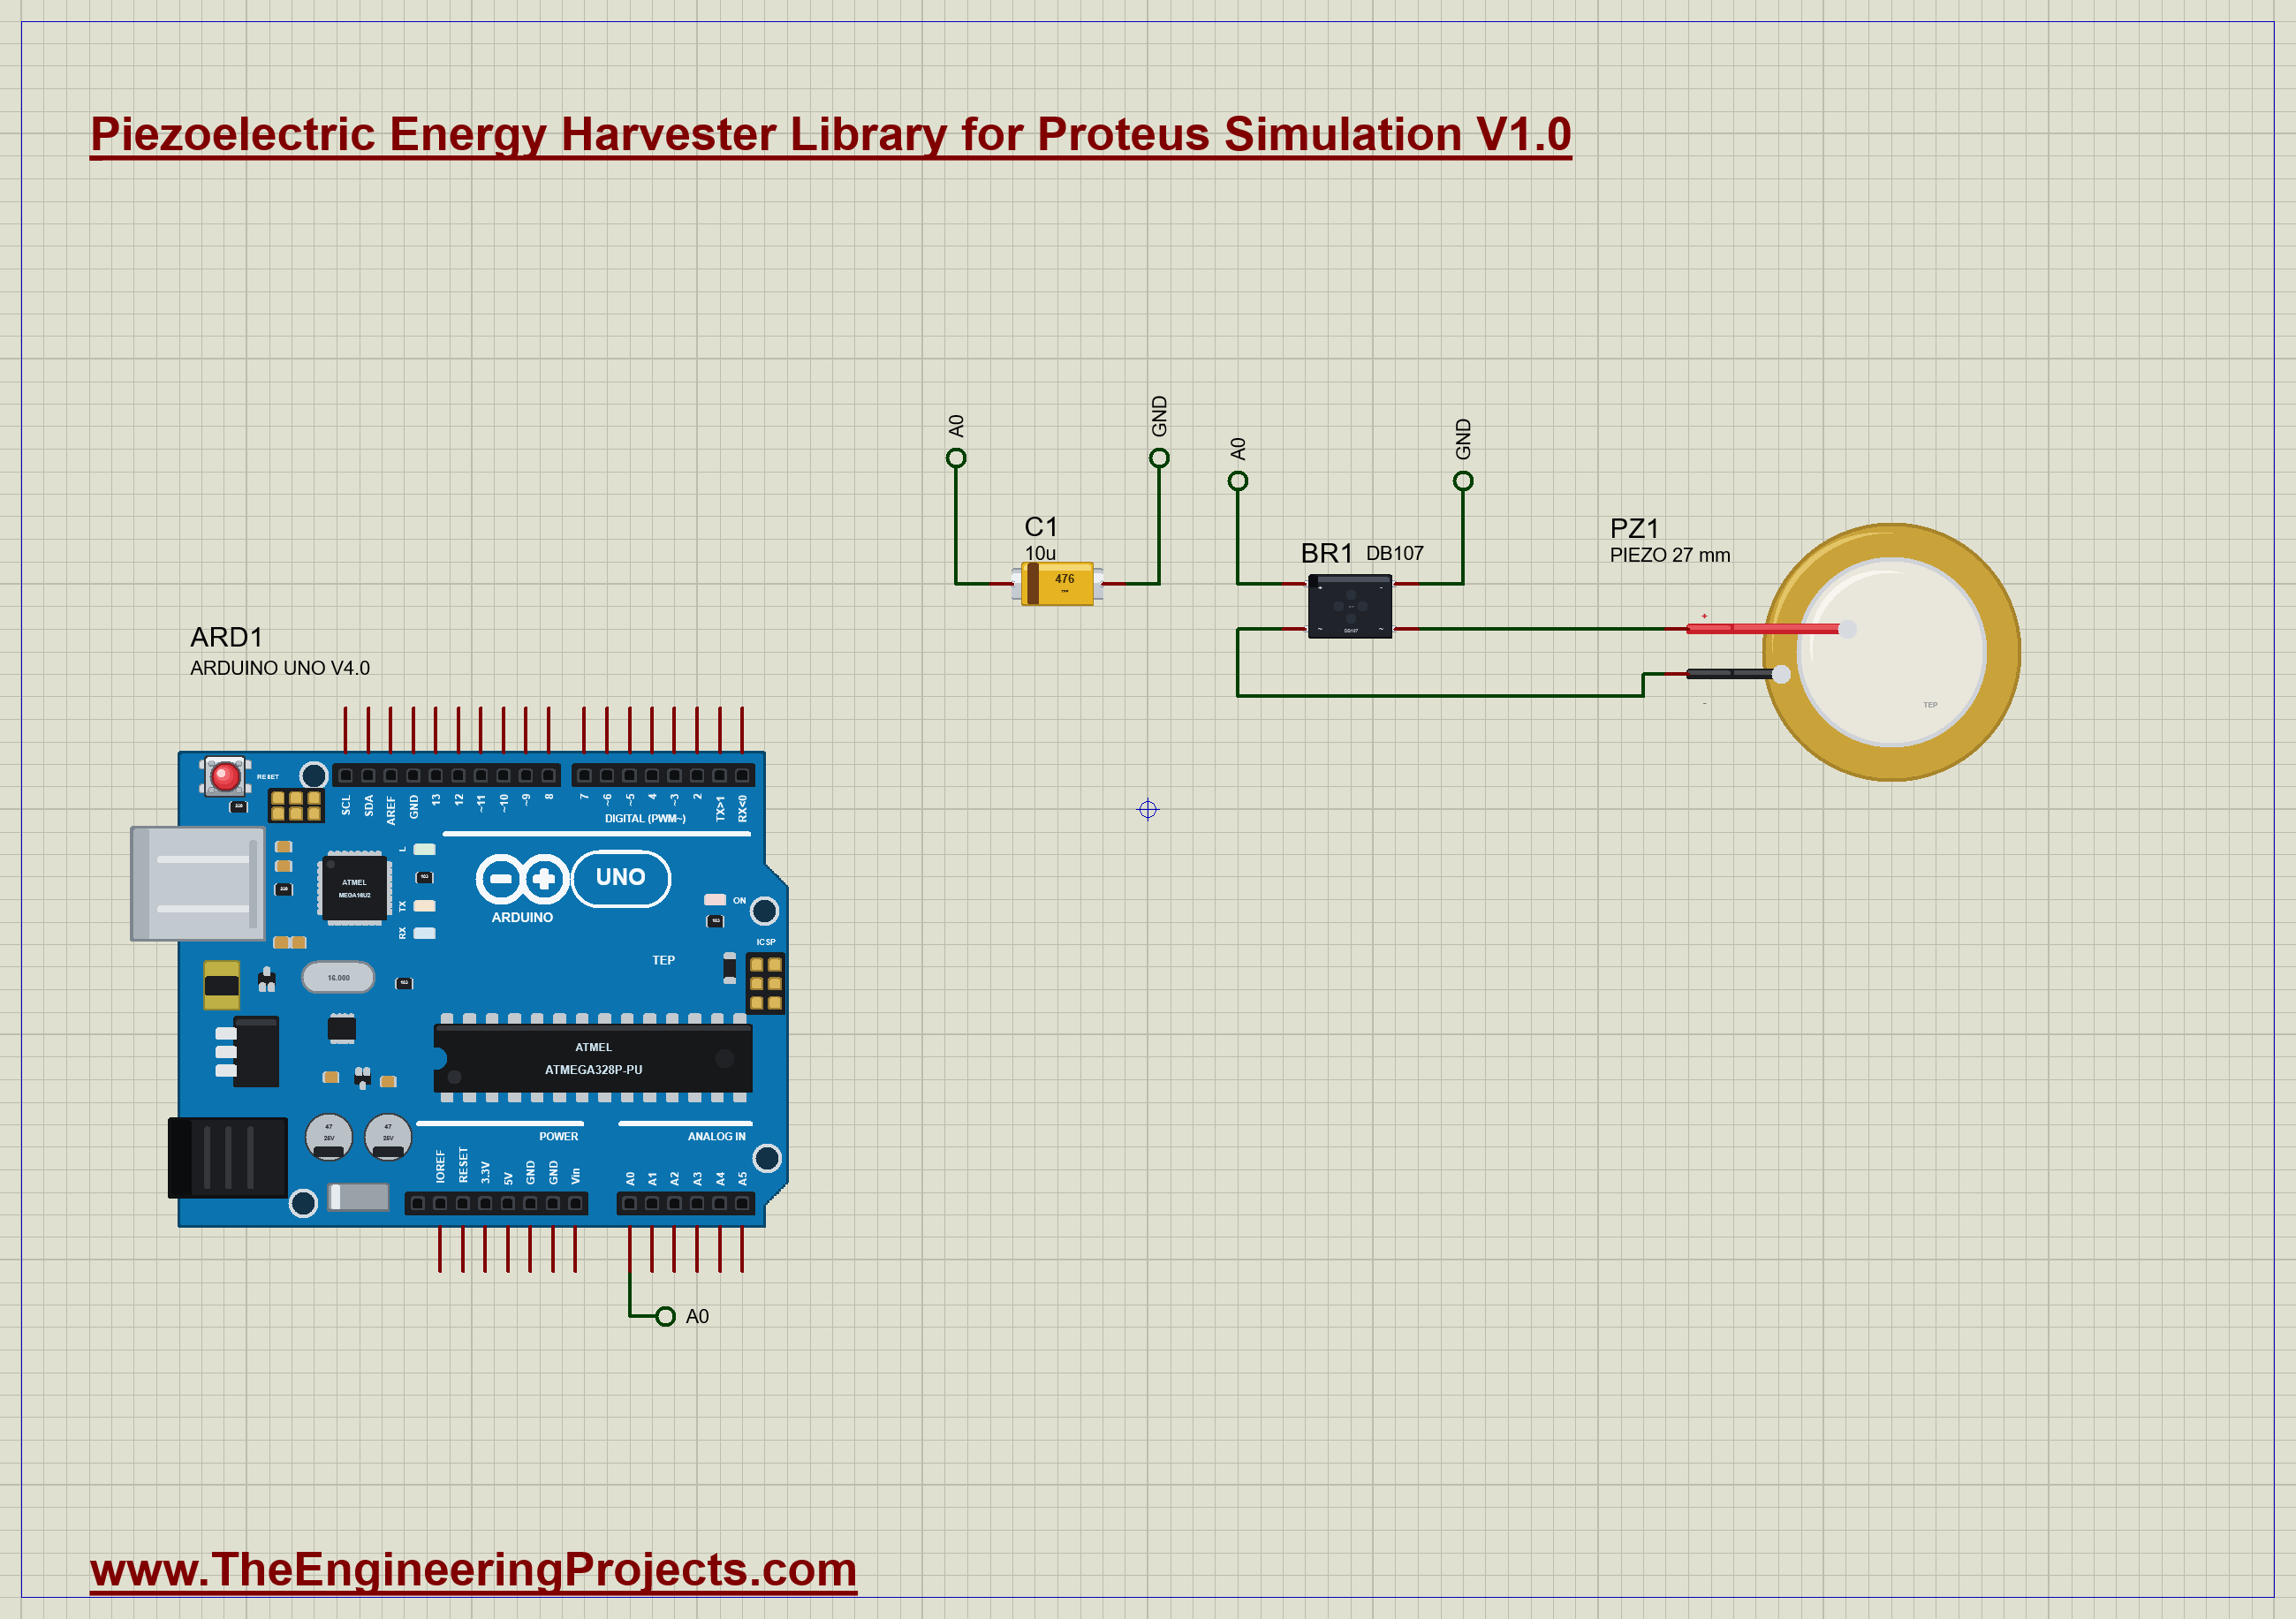
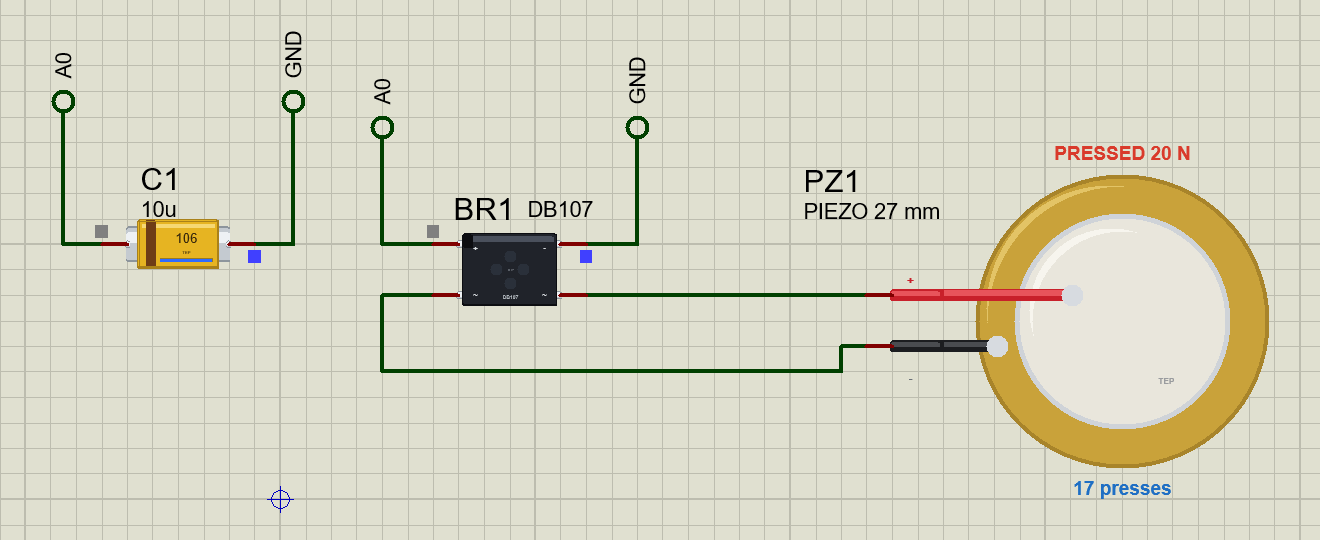
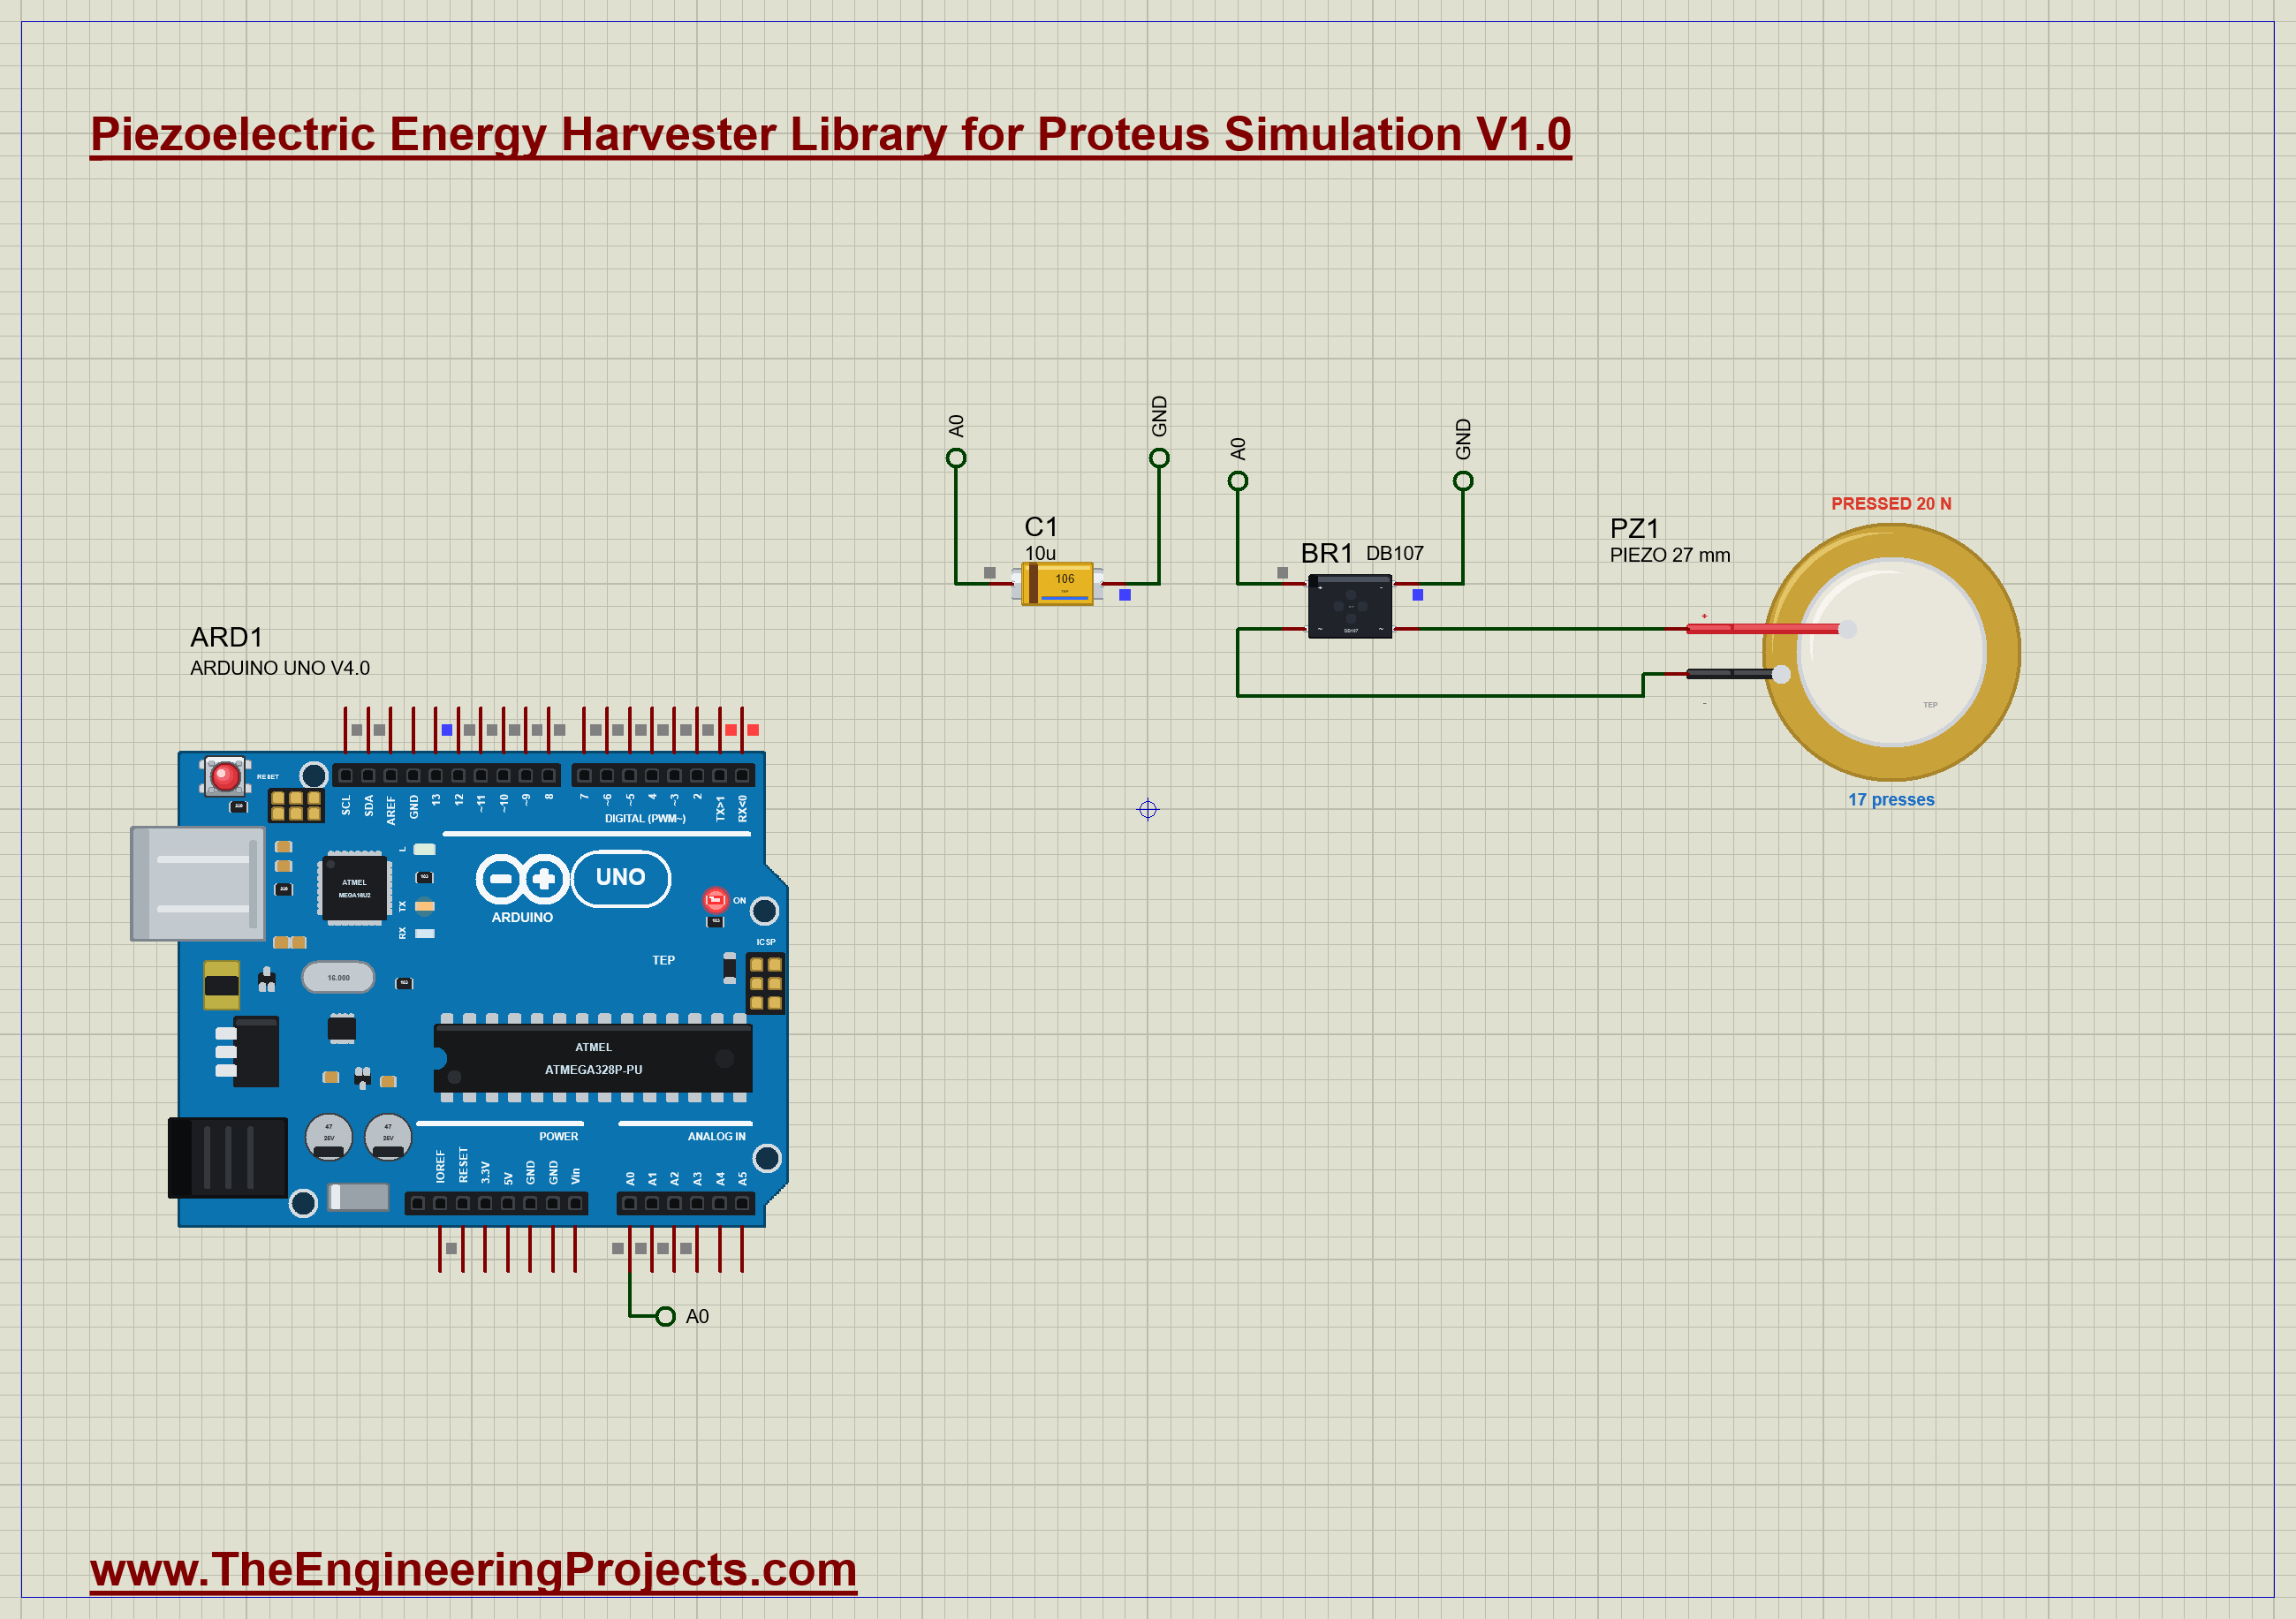
The demo has our Arduino UNO Library for Proteus V4.0 with its built-in monitor, the same window as our TEP Serial Monitor Advance for Proteus, on an A4 sheet. The disc, PZ1, is wired to the two AC pins of BR1, a DB107 from our Bridge Rectifier Library for Proteus. The bridge's positive output charges C1, a 10 uF capacitor from our Tantalum Capacitor Library for Proteus, and the same point goes to the UNO's A0. PZ1's MODE is DEMO: from 0.3 s somebody walks on the disc, 10 N twice a second; from 4.3 s they run, 20 N four times a second; at 8.3 s they step off. Open PIEZO-Harvester-Bridge-ArduinoUnoV4.pdsprj.
The Sketch
The sketch only watches the capacitor. It reads A0 and turns the reading into volts:
float capVolts() { return analogRead(A0) * 5.0 / 1023.0; }The energy in a capacitor is half its capacitance times the square of its voltage. With the capacitance in microfarads the result is in microjoules:
const float microJoules = 0.5 * CAP_UF * v * v; // E = 1/2 C V^2, in uJ with C in uFEvery 20 ms the sketch looks at the capacitor again, and a jump of 10 mV or more counts as one pulse of charge:
if (v - lastSample >= PULSE_VOLTS) { if (!rising) pulses++; rising = true; } else rising = false;Every half second the monitor shows the volts, the microjoules, the pulses and how fast the capacitor is charging, and the LED on pin 13 lights when the capacitor holds 2 V or more. You can type reset to forget the pulses or rate 1000 to report once a second.
Piezoelectric Energy Harvester Simulation Results
Open the project and press Run. The demo runs about 10 simulated seconds; with the pop-ups open and the pictures being taken it took about three and a half minutes on our PC. Click the disc for its pop-up. Every number below comes from one simulation run, the demo exactly as it ships.
The First Press
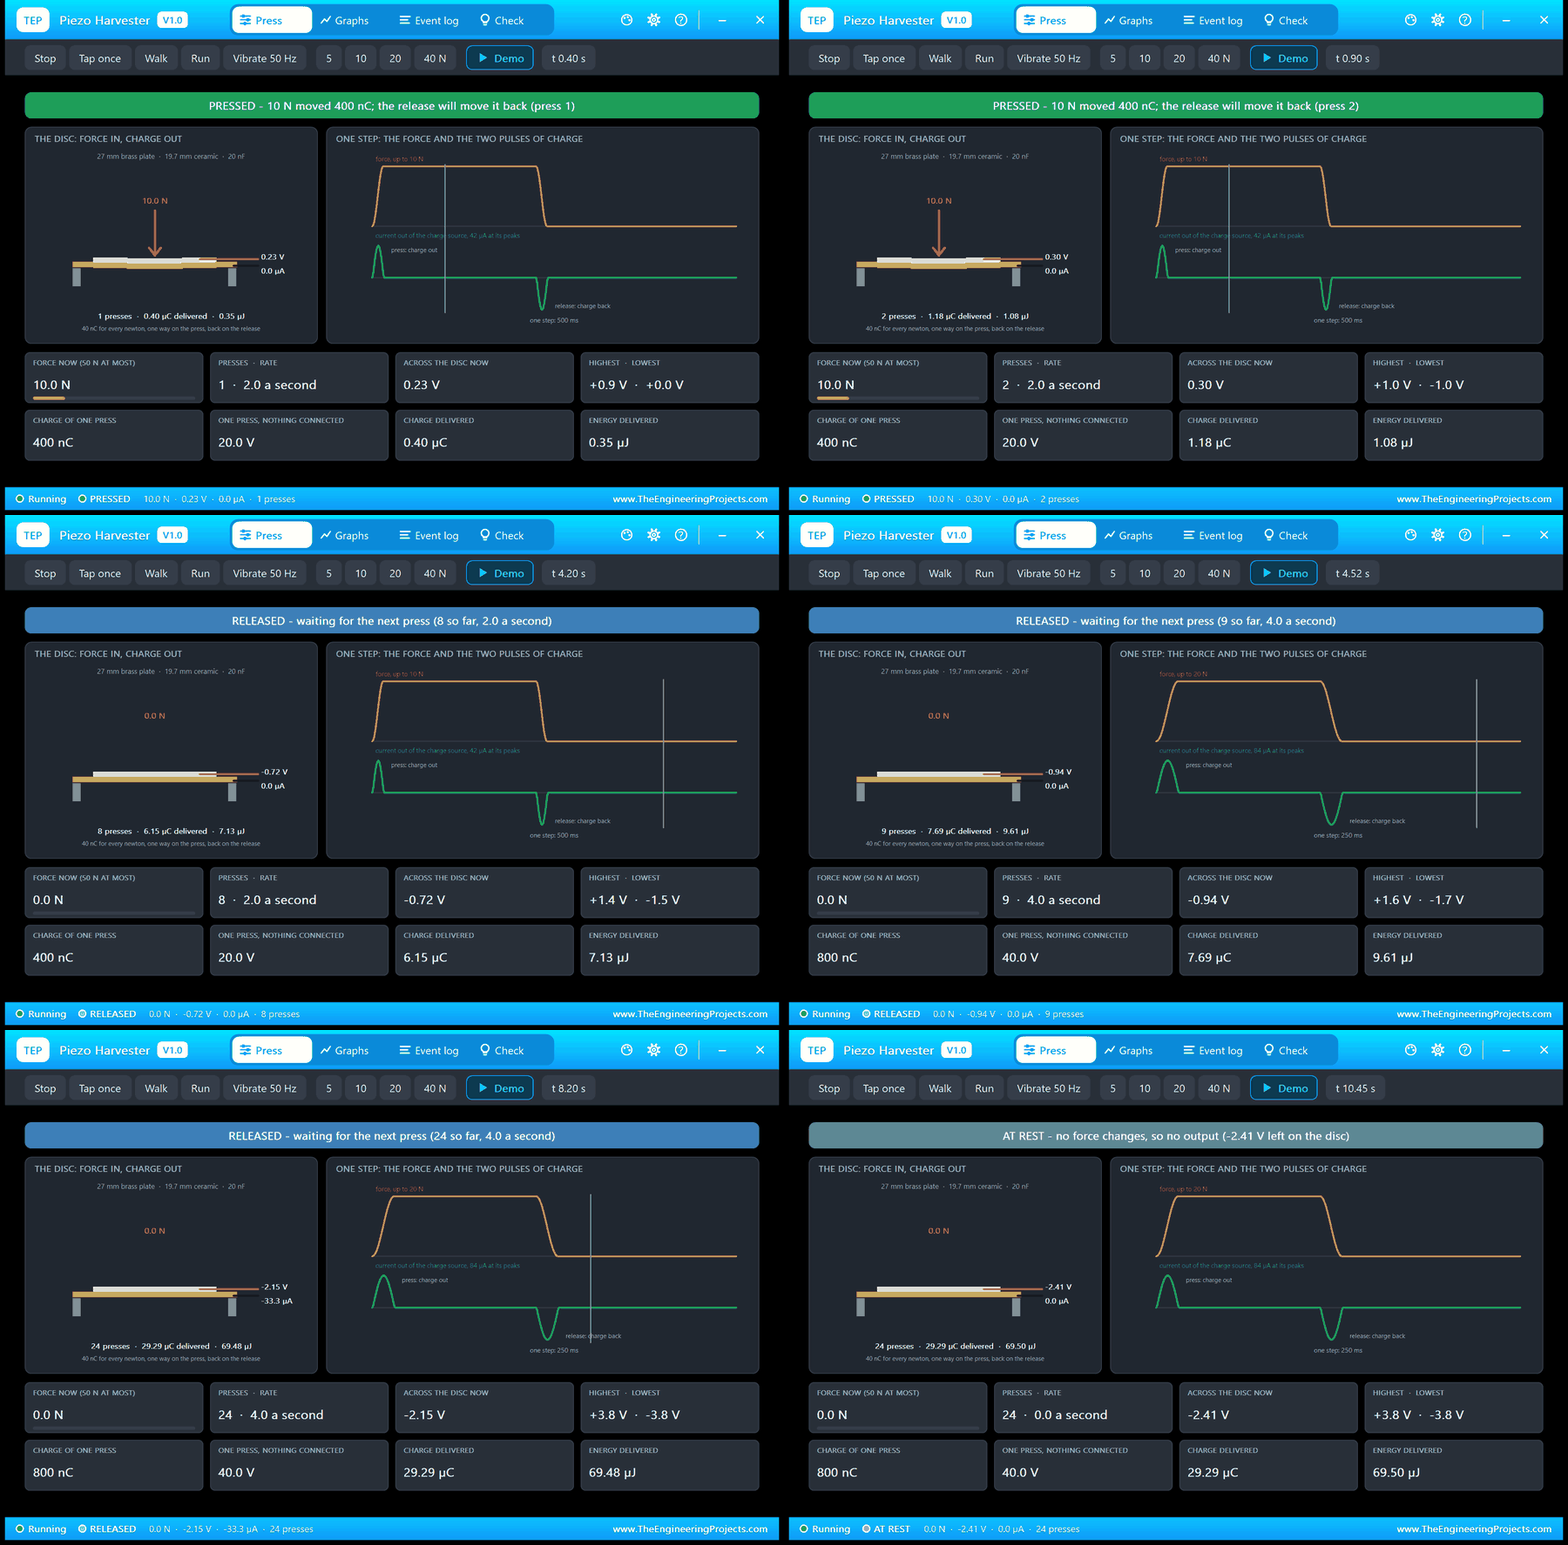
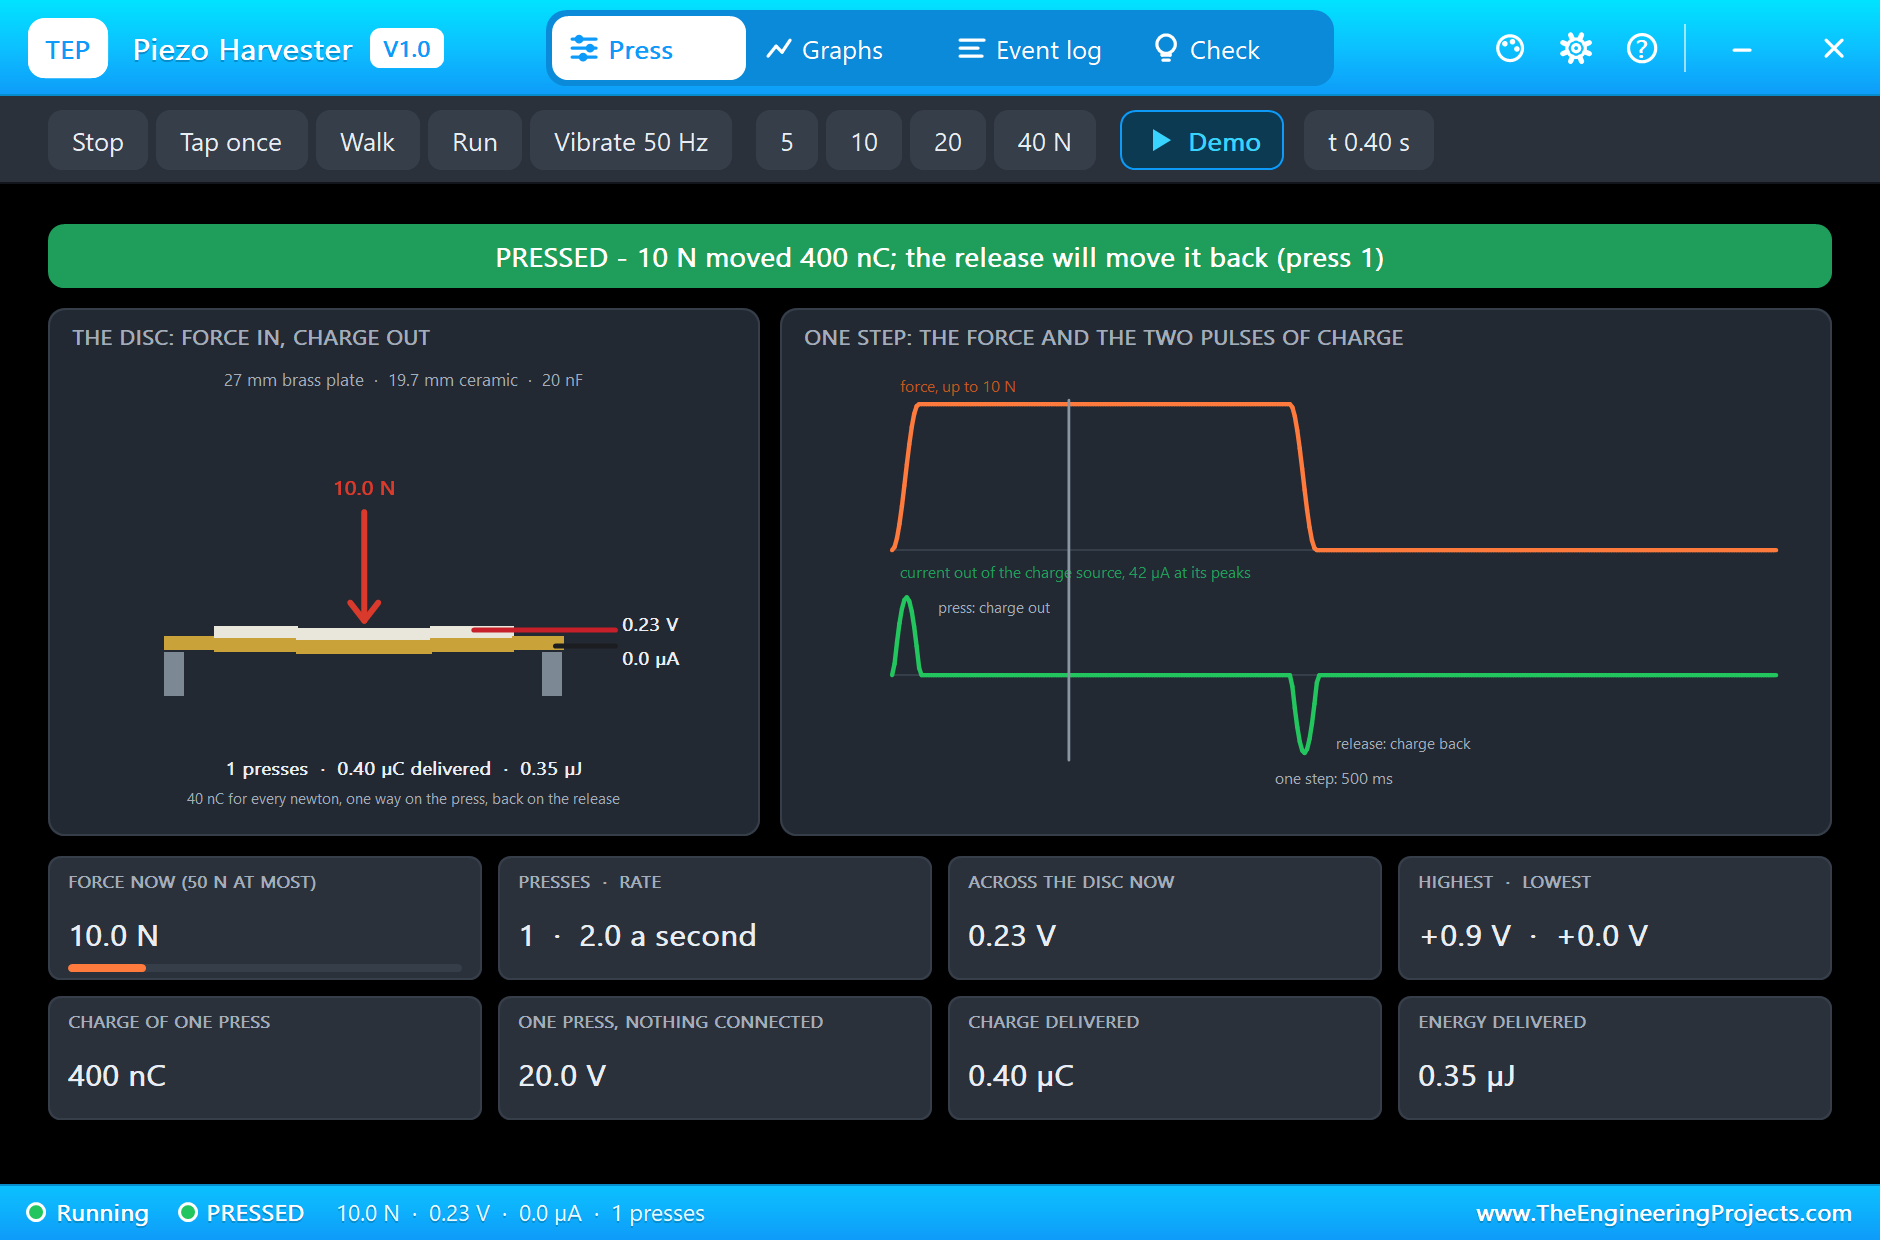
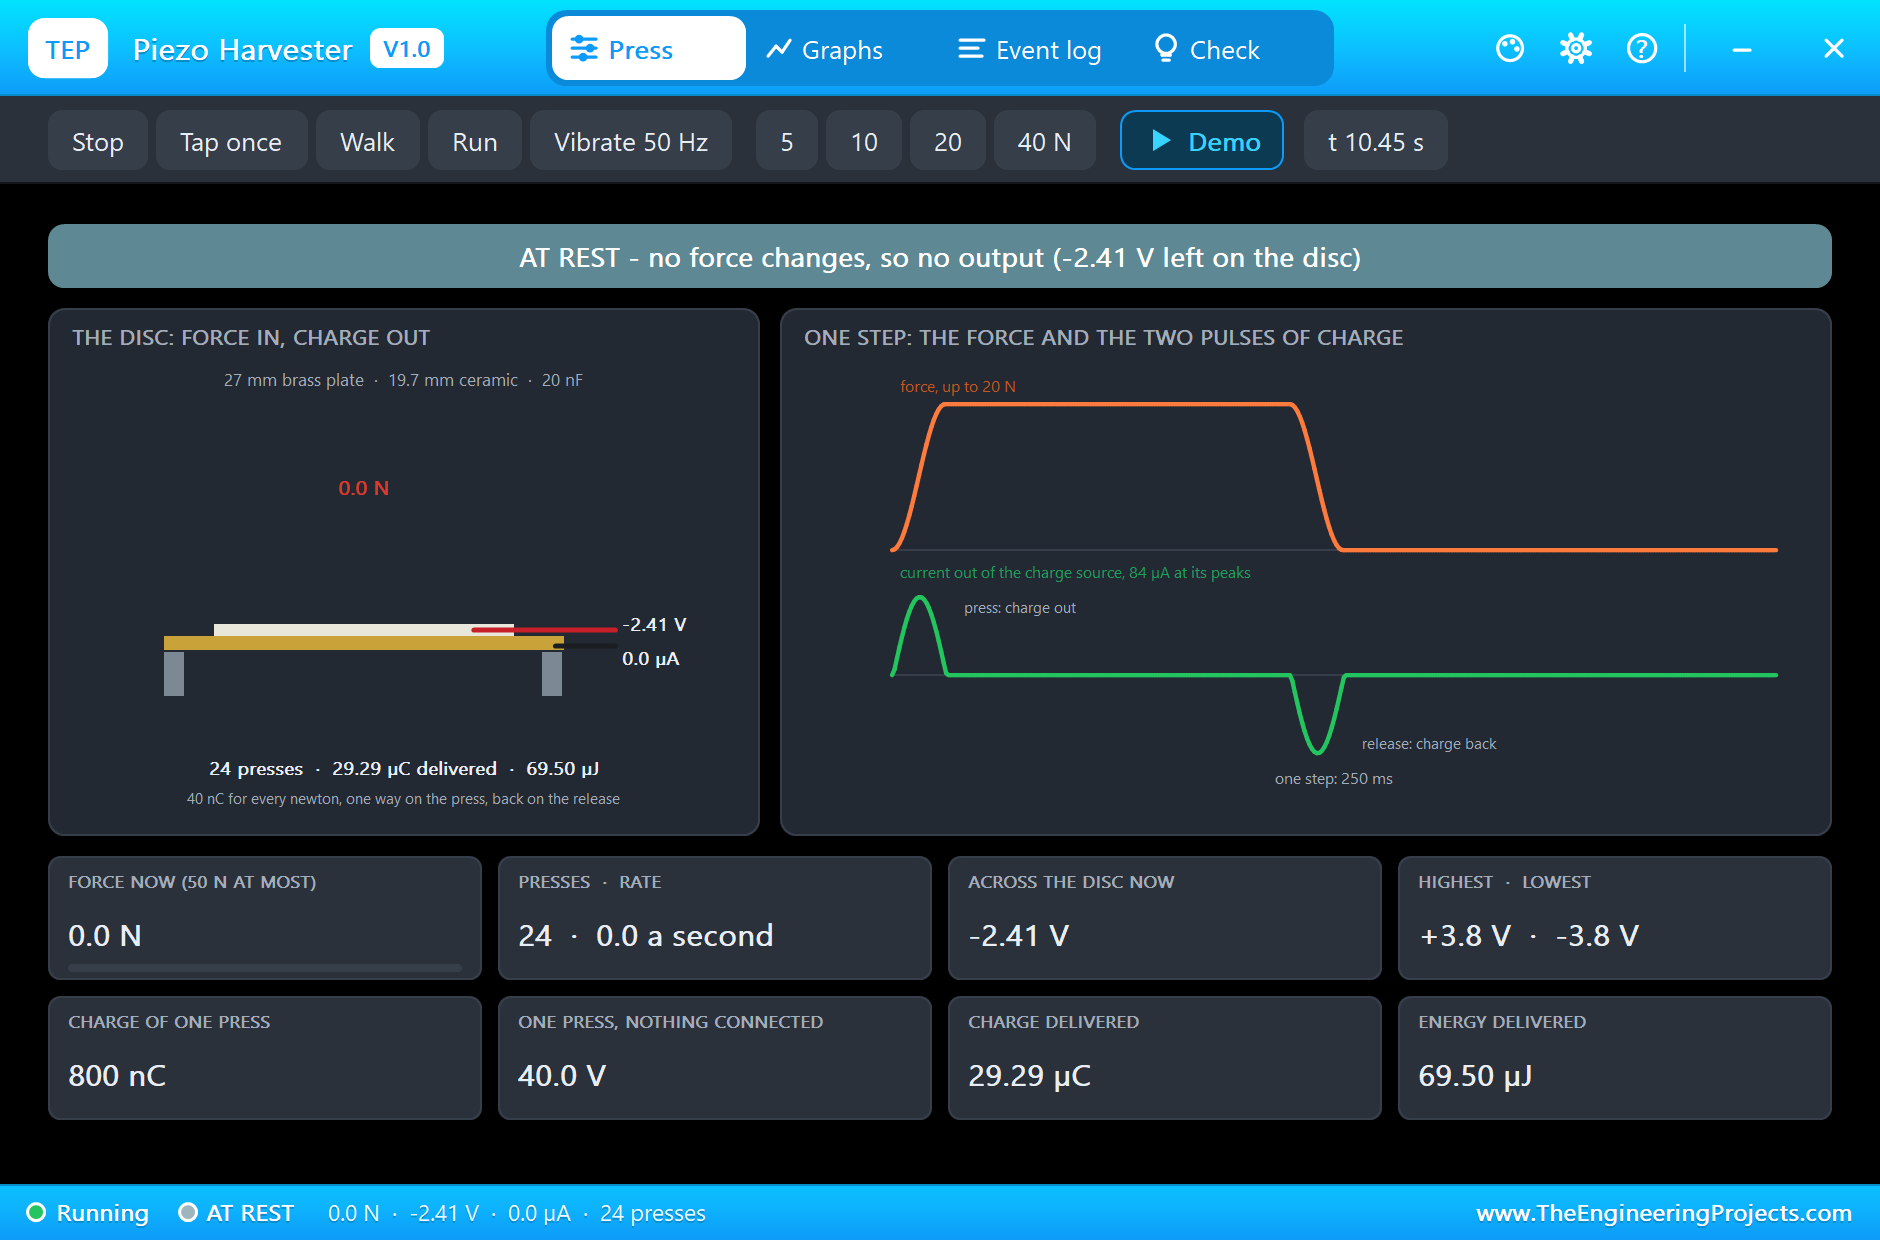
At 0.3 s the first foot comes down with 10 N. The pop-up shows the disc bending under the red arrow, and the picture beside it shows one whole step: the force rising, holding and falling, and under it the two pulses of charge, one up and one down. This press is worth 400 nC, 20 V if nothing were connected. Here the bridge and the capacitor are connected, so the charge flows on at once: 0.40 uC have left the disc after this one press.
Walking: 10 N Twice a Second
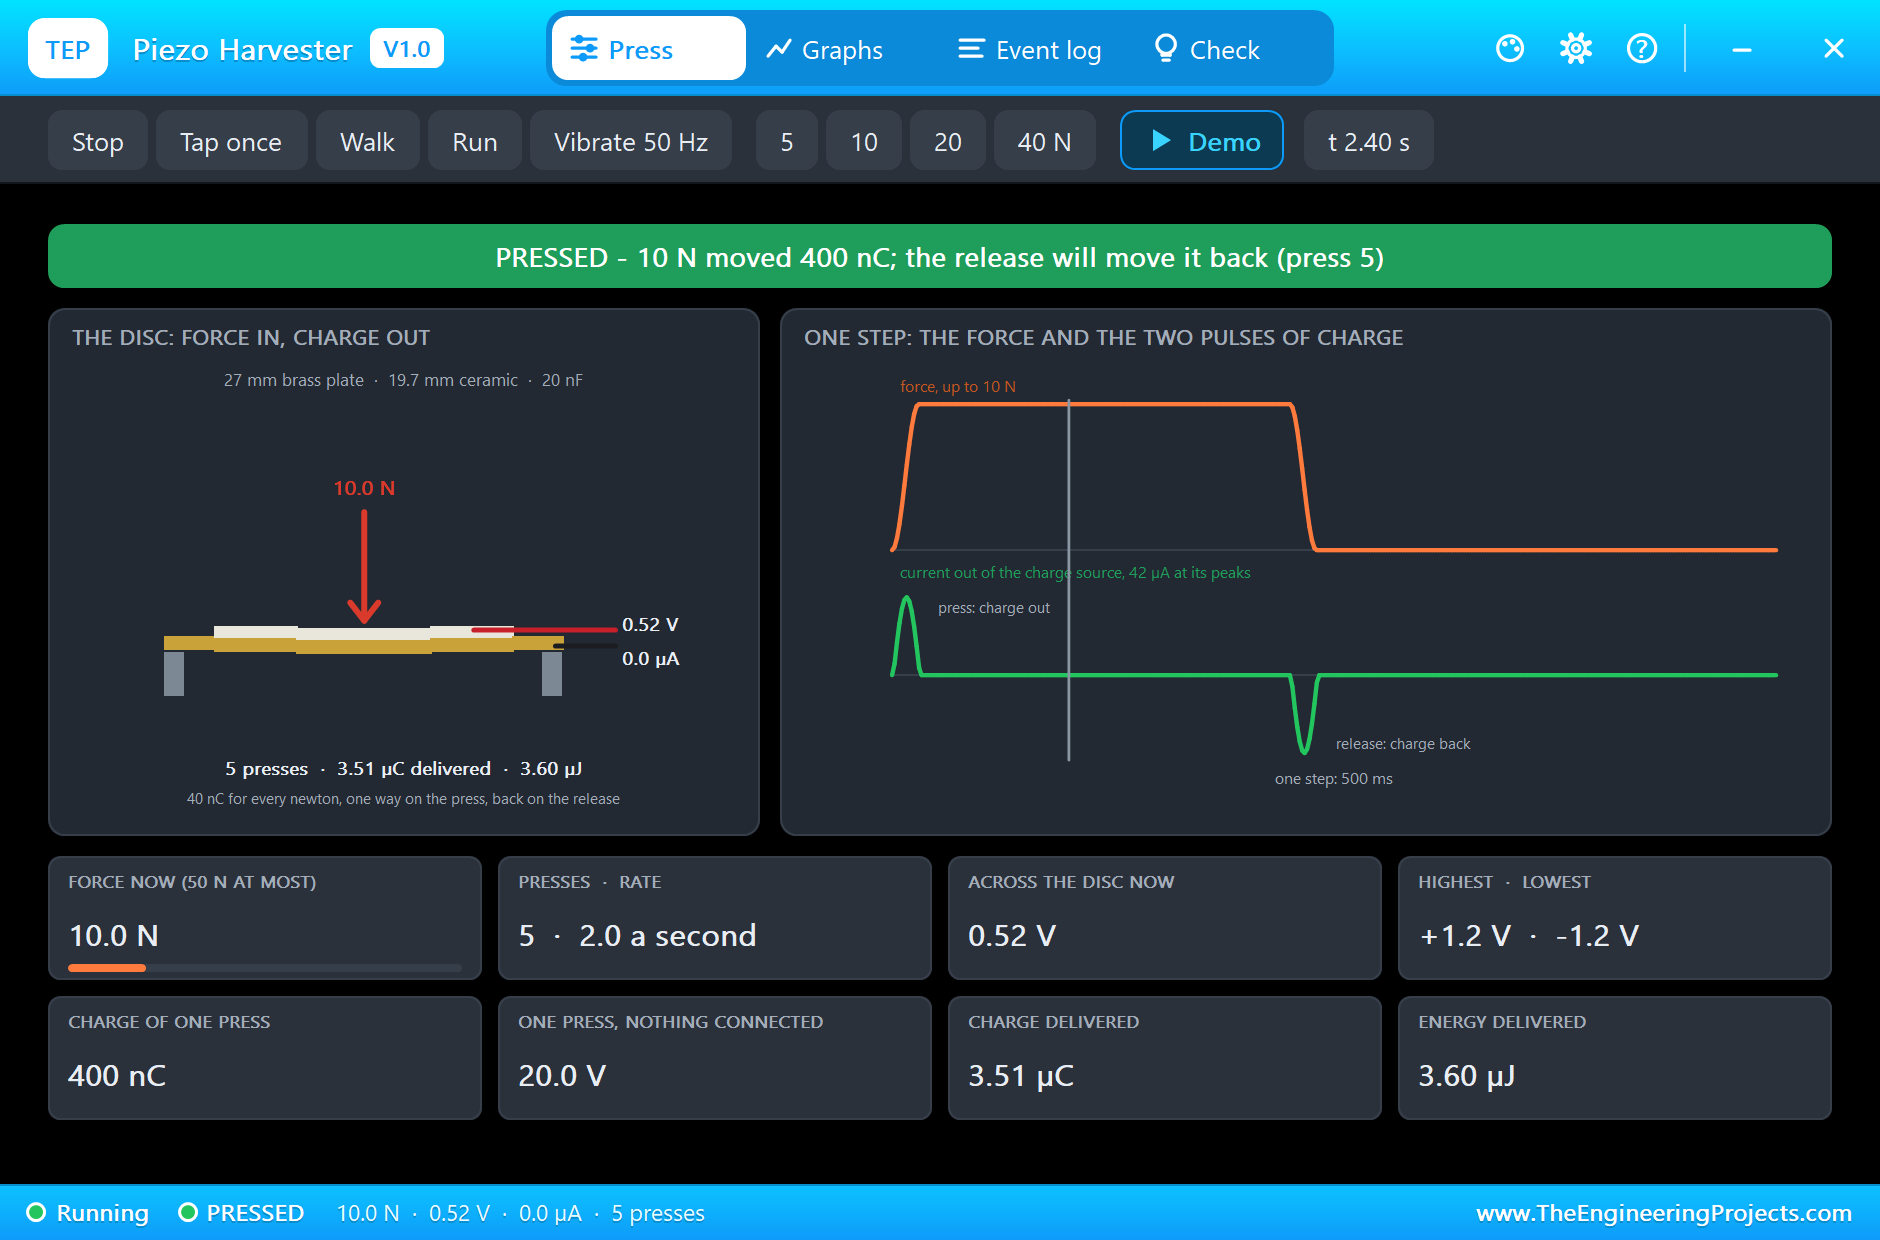
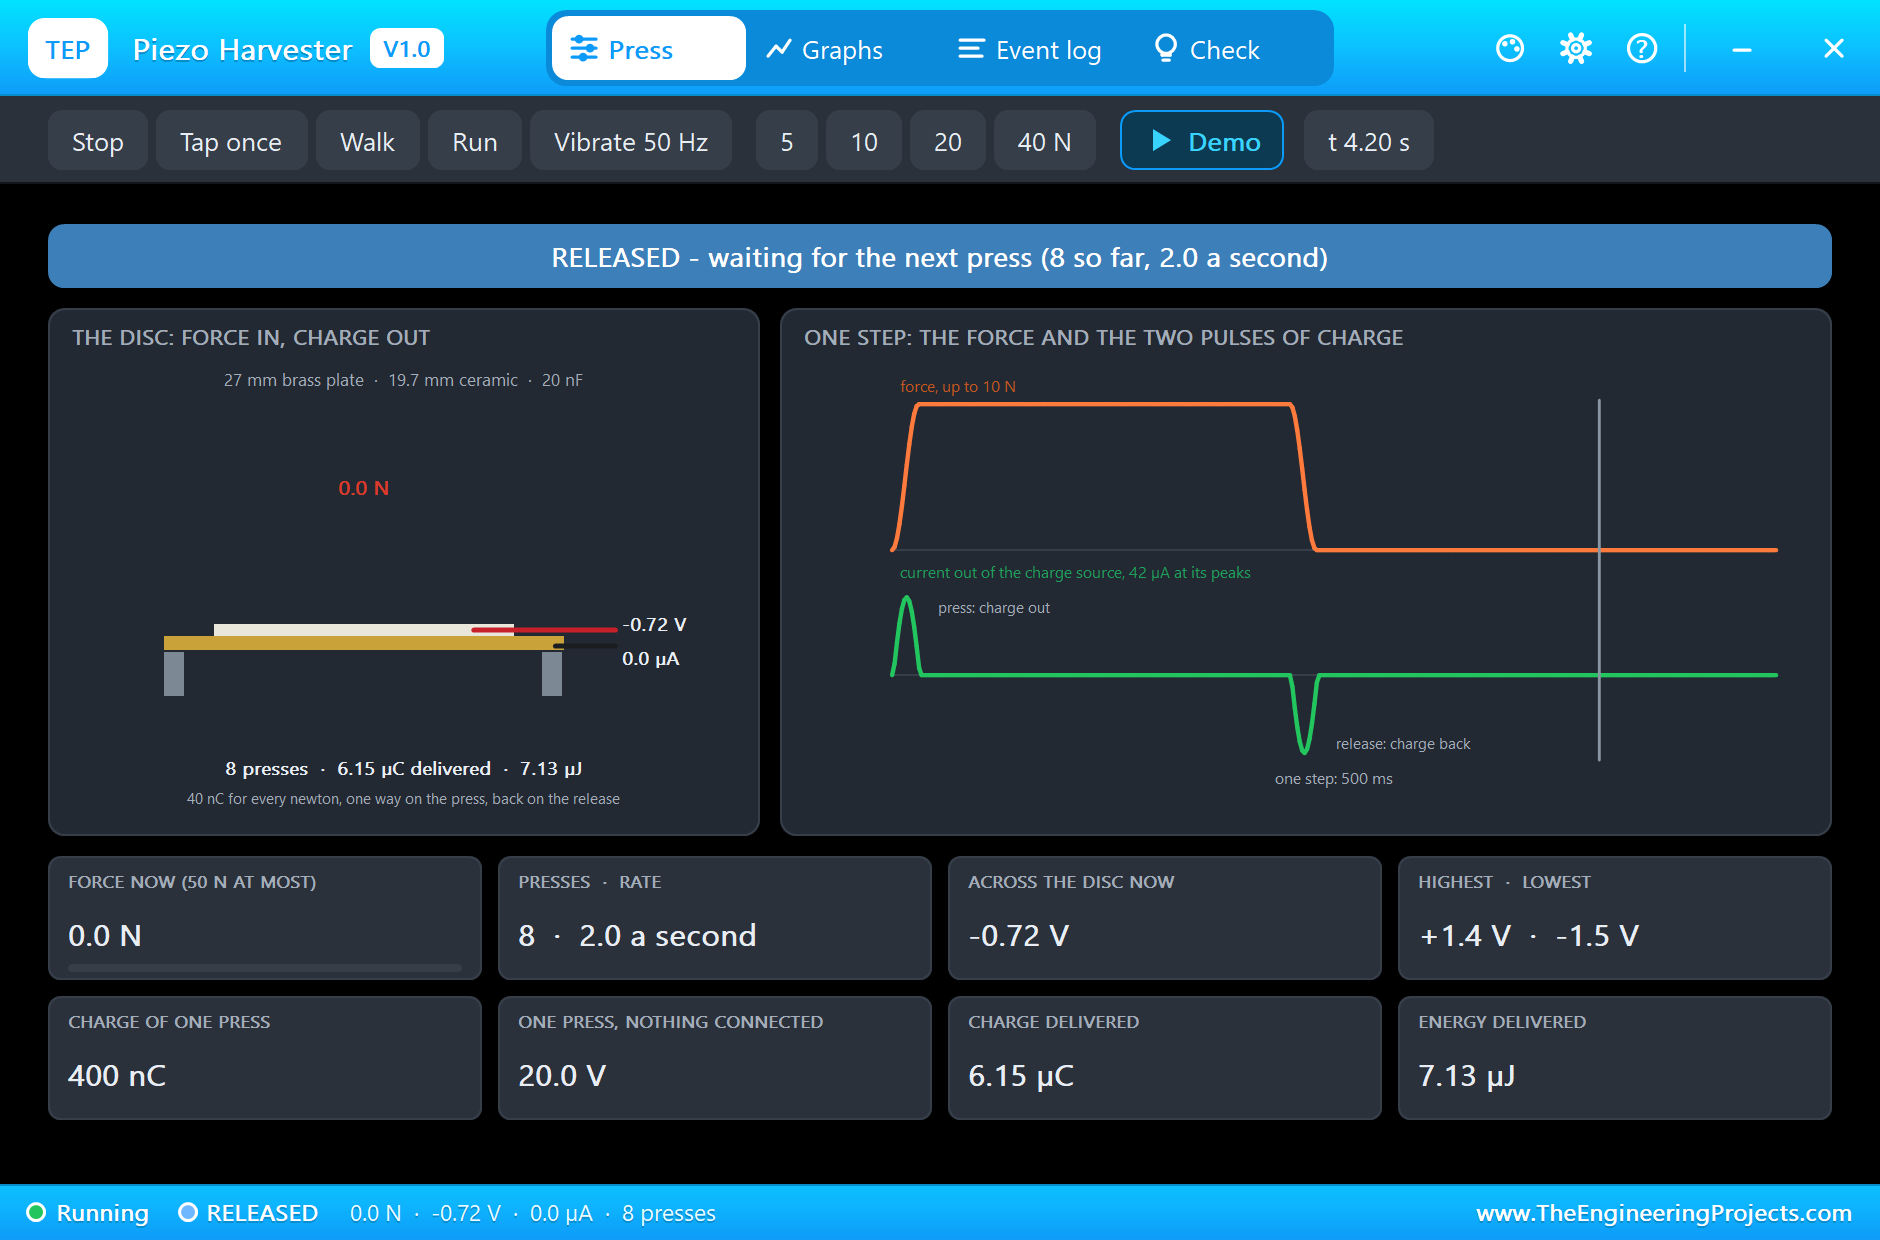
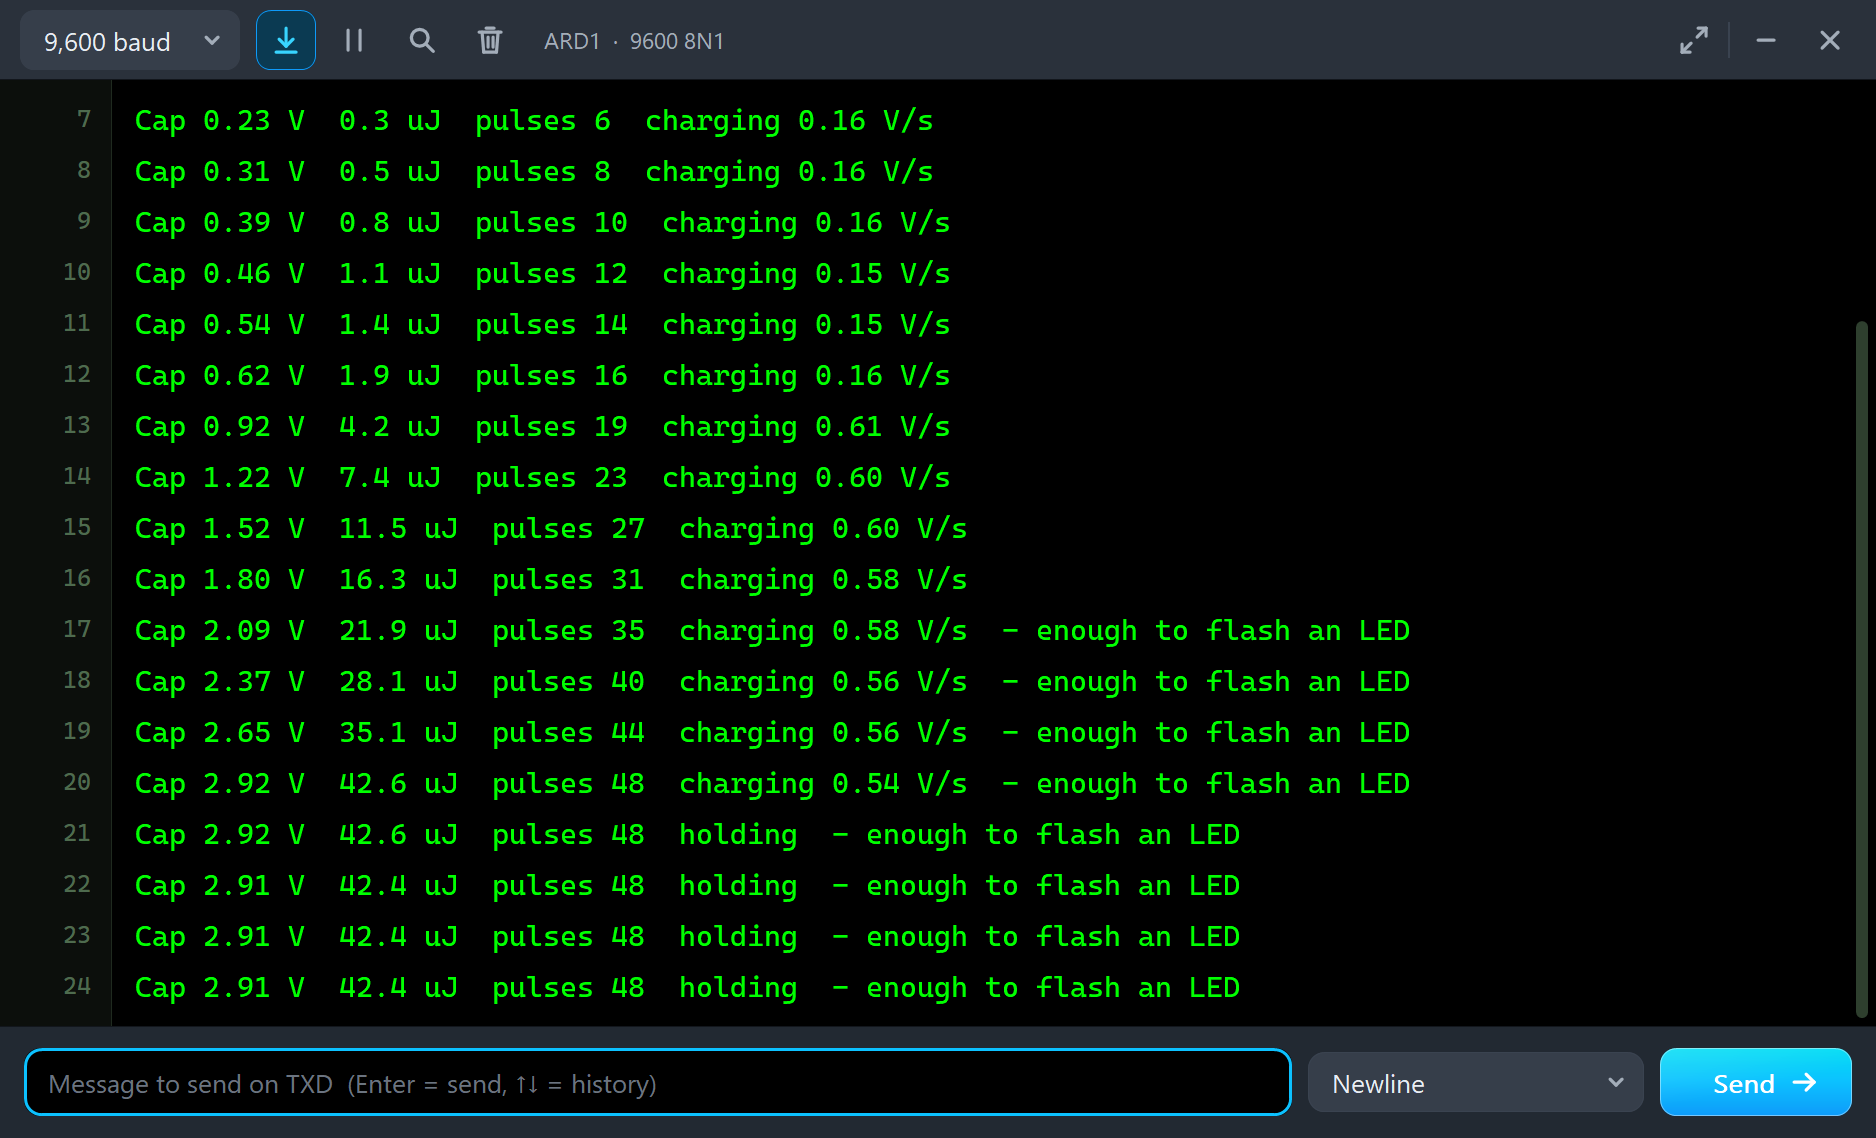
Each step now gives two pulses, one on the press and one on the release, and the bridge sends both into the capacitor. After 8 presses, at 4.2 s, the disc has delivered 6.15 uC and 7.13 uJ. The Arduino reads 0.62 V on the capacitor and reports a steady 0.16 V a second: every pulse lifts the 10 uF capacitor by a little under 40 mV.
Running: 20 N Four Times a Second
At 4.3 s the walker starts to run. Twice the force moves twice the charge, 800 nC a press, and the presses come twice as often, so the capacitor now climbs four times as fast: 0.61 V a second. The current pulses reach 84 uA at their peaks. By 6.35 s the disc has been pressed 17 times and has delivered 18.81 uC and 34.64 uJ.
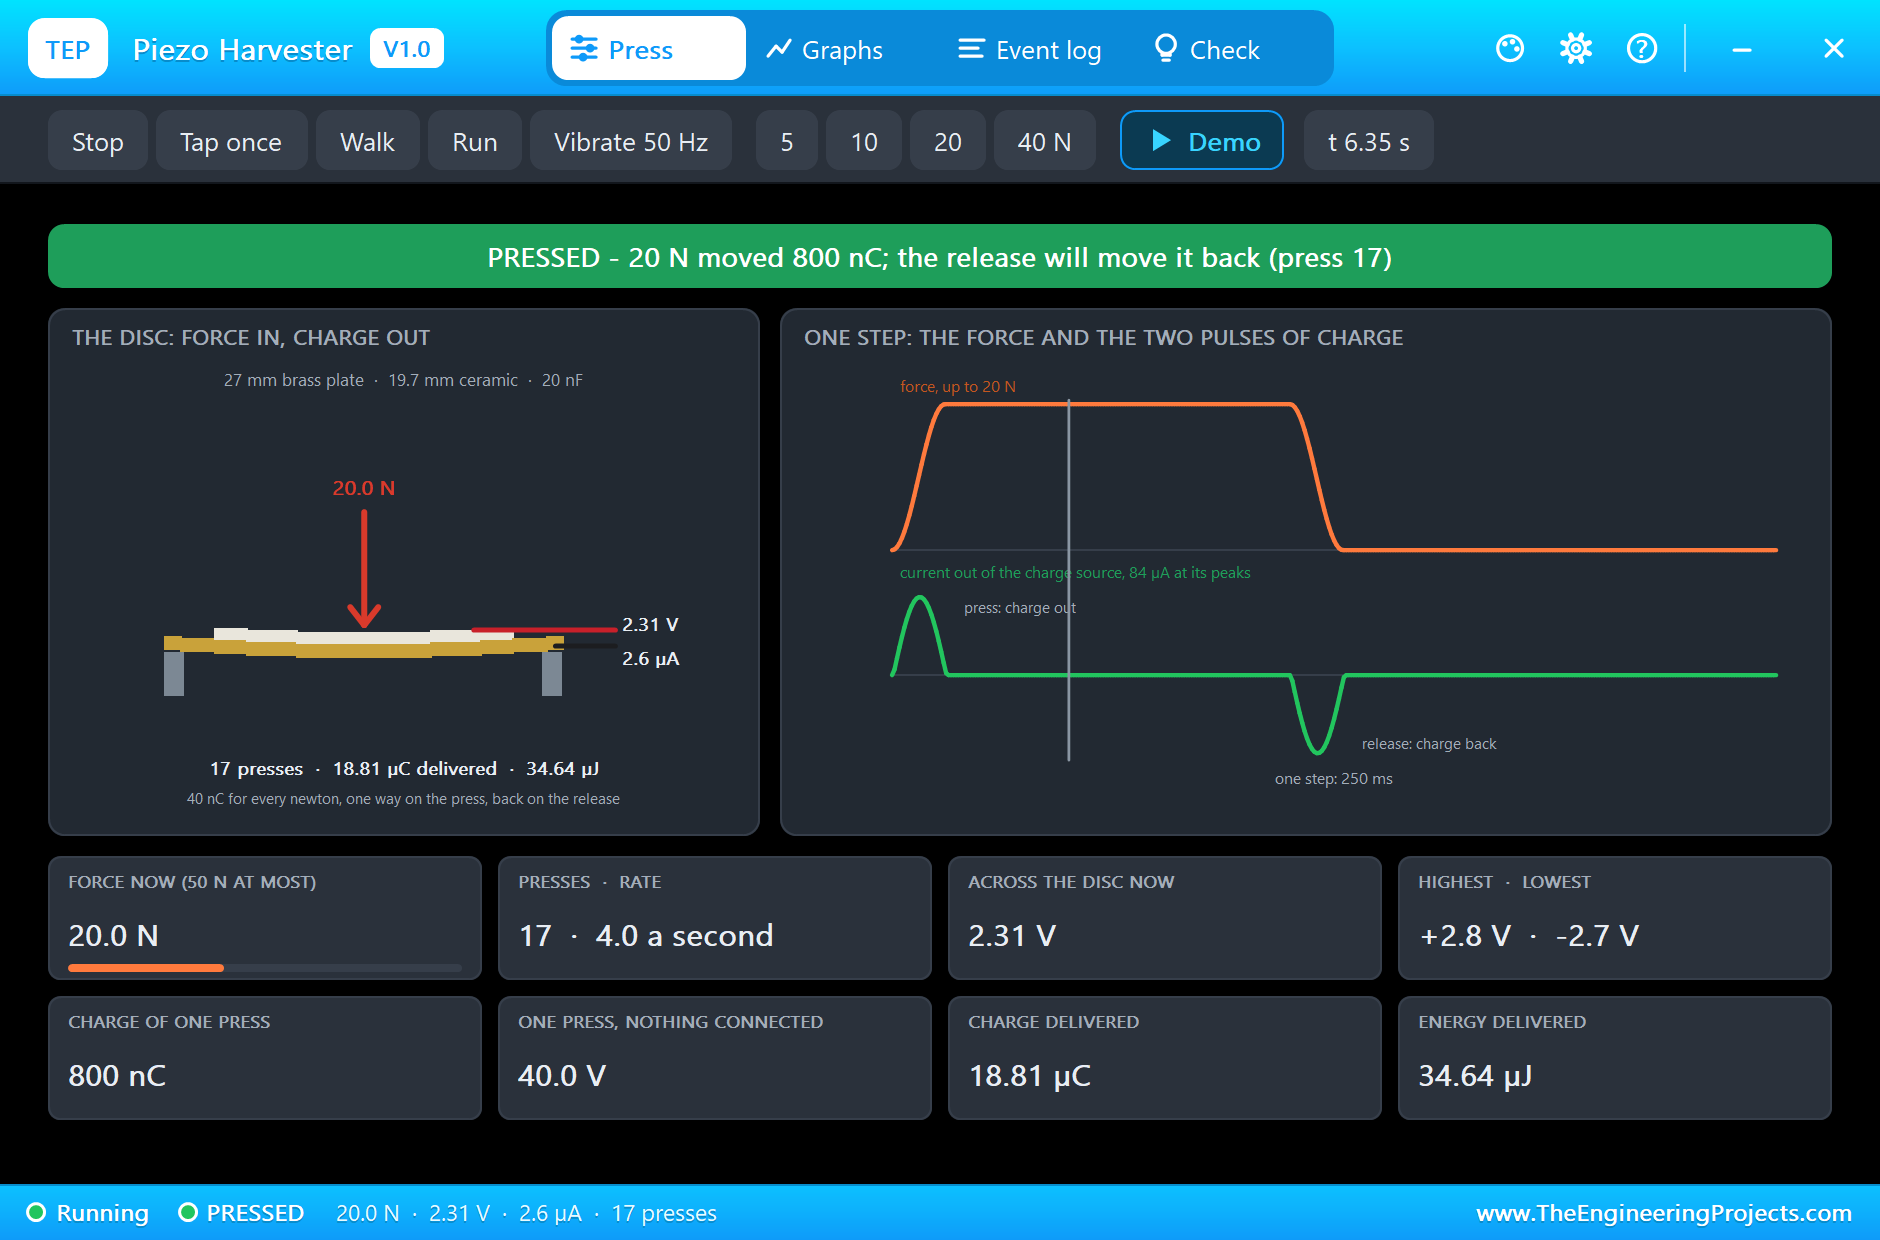
Watch the charging rate on the monitor while the capacitor fills: 0.61 V a second at the start of the run, 0.54 V a second at its end. The steps are getting smaller. This is the catch from above, live in the simulation: the fuller the capacitor, the more of every pulse the disc spends on its own 20 nF before the bridge lets anything through.
The End of the Run: Where the Energy Went
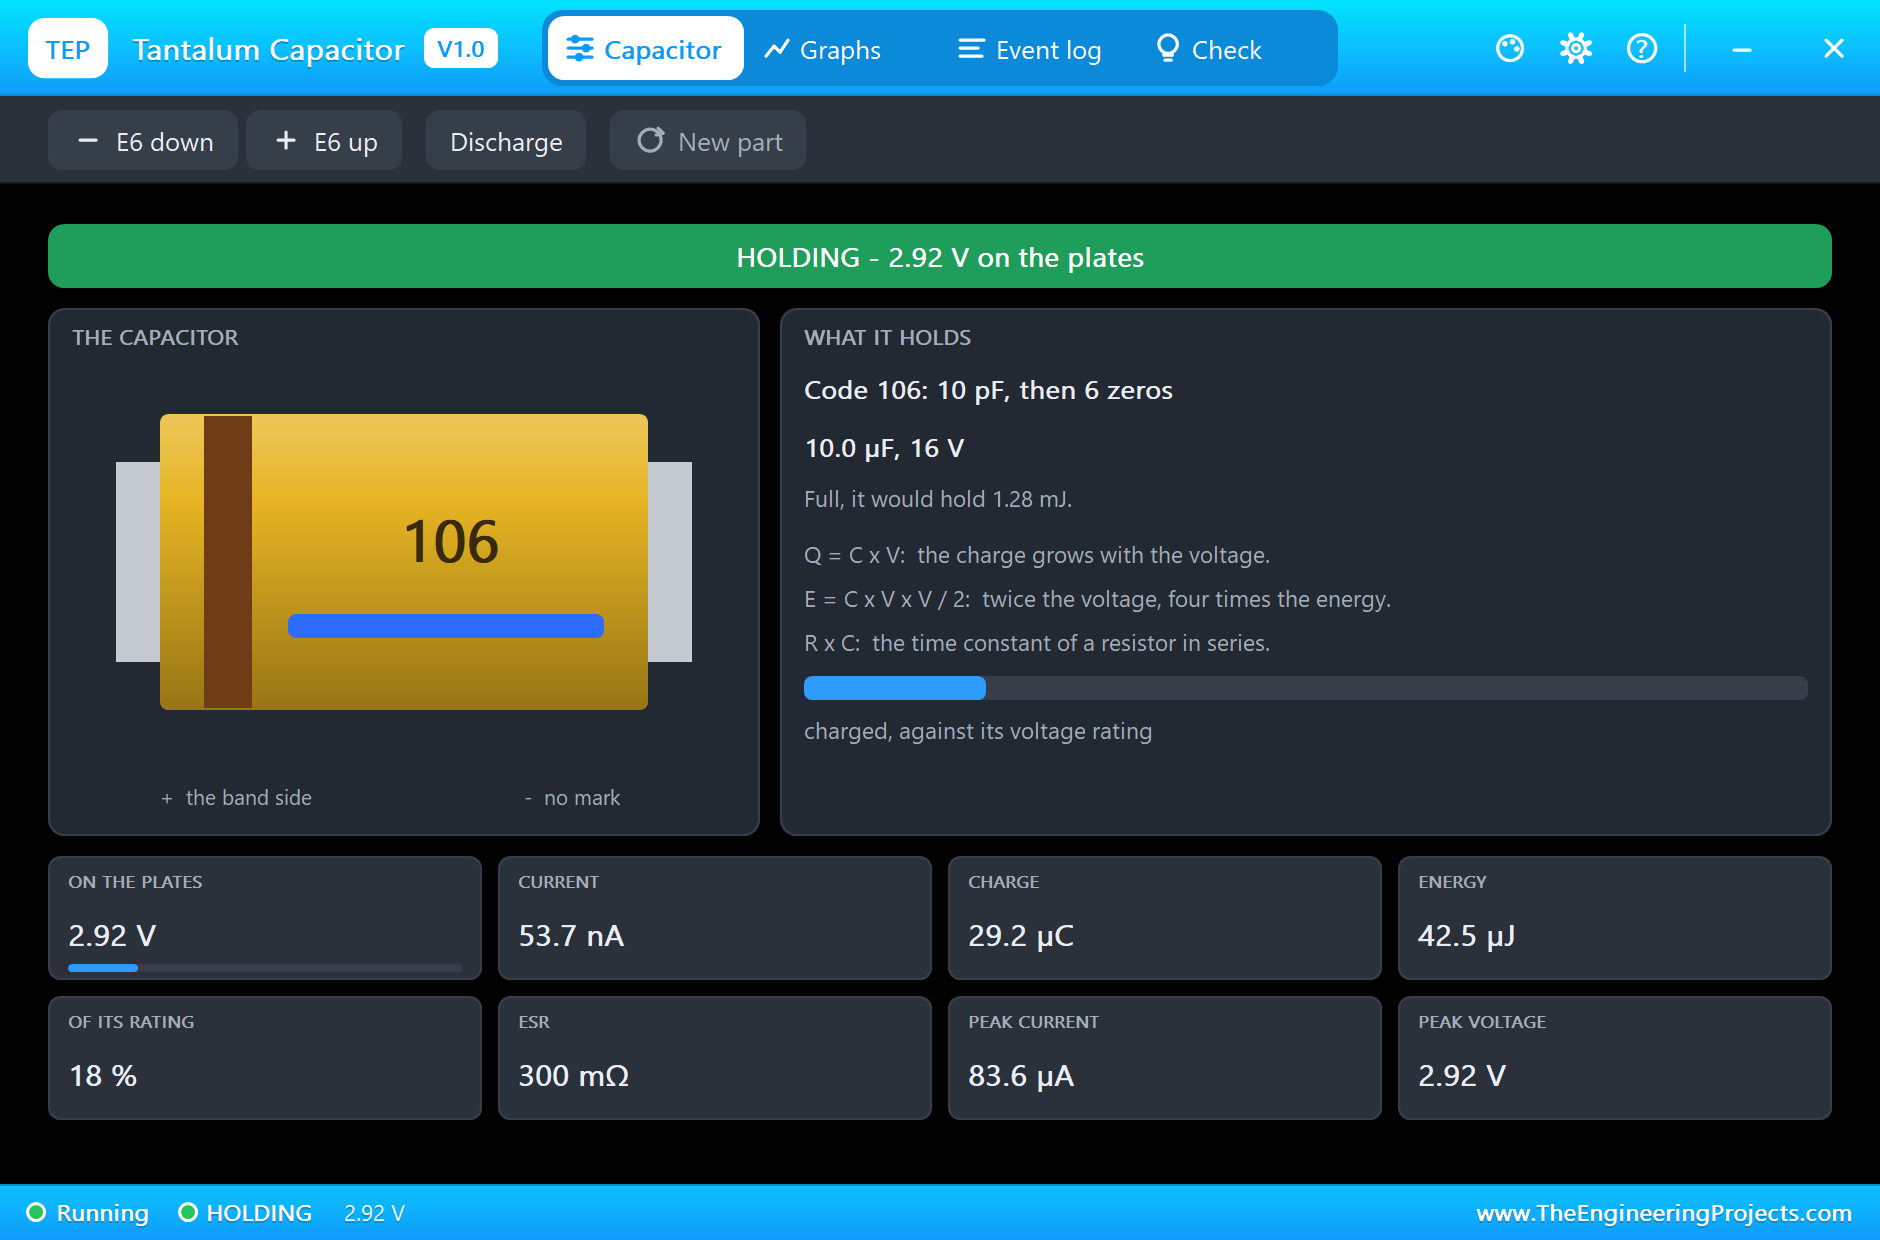
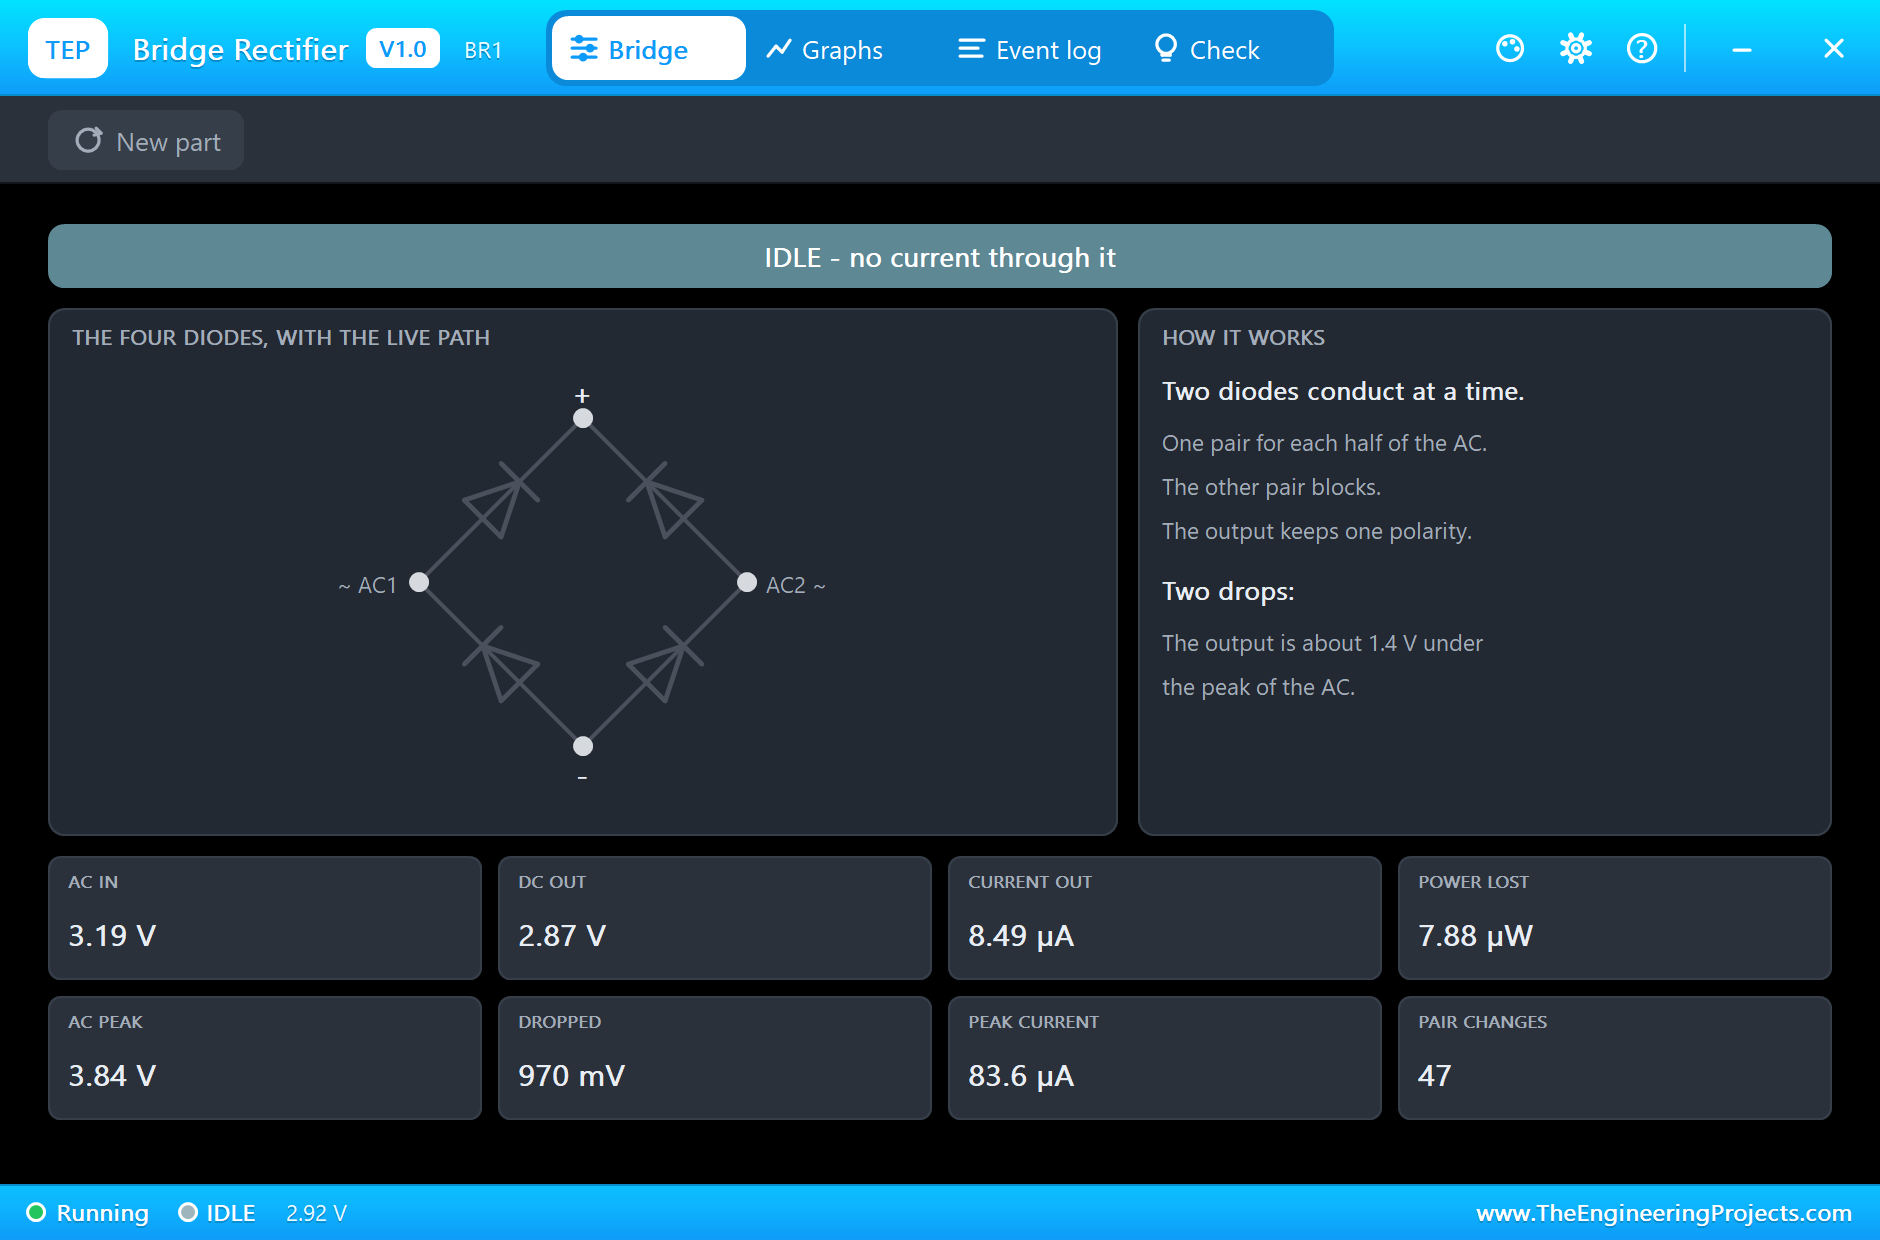
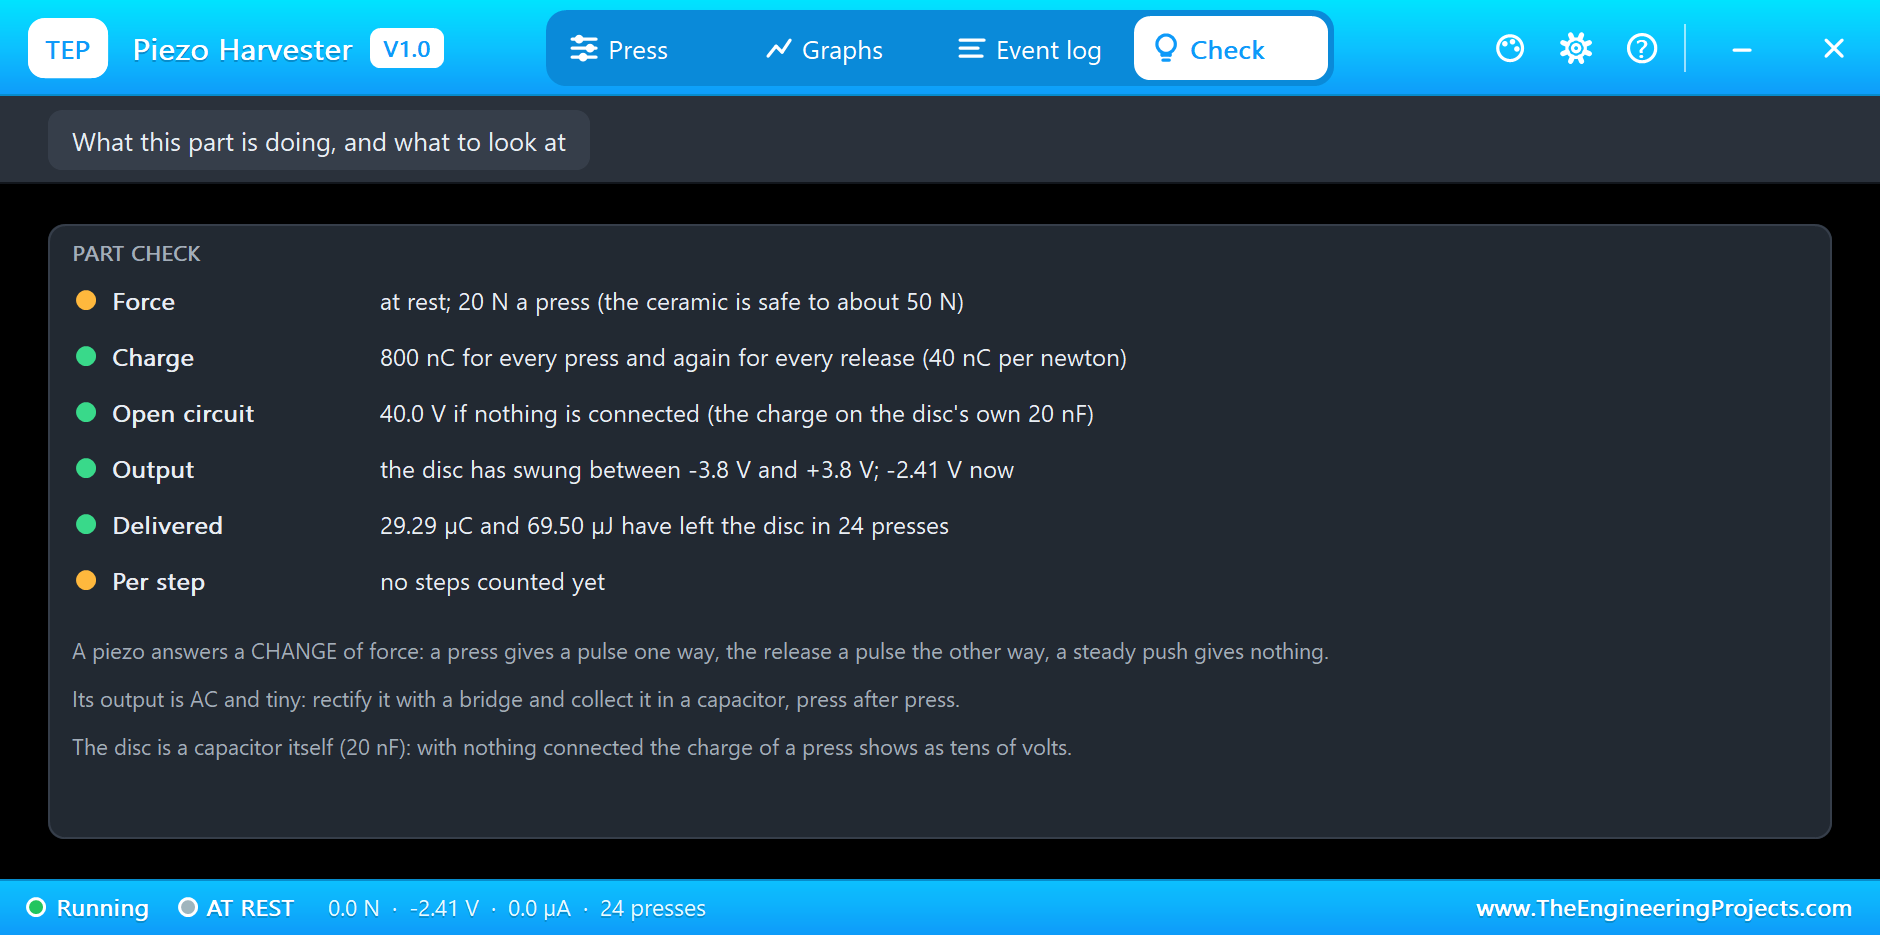
At 8.2 s the disc has been pressed 24 times. It has delivered 29.28 uC and 69.47 uJ, swinging between -3.8 V and +3.8 V on the way. The capacitor holds 2.92 V: 29.2 uC and 42.6 uJ. The charge has all arrived, but about four tenths of the energy has not: the two diodes of the bridge that conduct in every pulse took it as their voltage drop. With a voltage this low, the diode drops matter a great deal, which is why real harvesters use special low-loss rectifiers. The sketch counted 48 pulses, a press and a release for each of the 24 steps, and lit the LED on pin 13 when the capacitor passed 2 V.
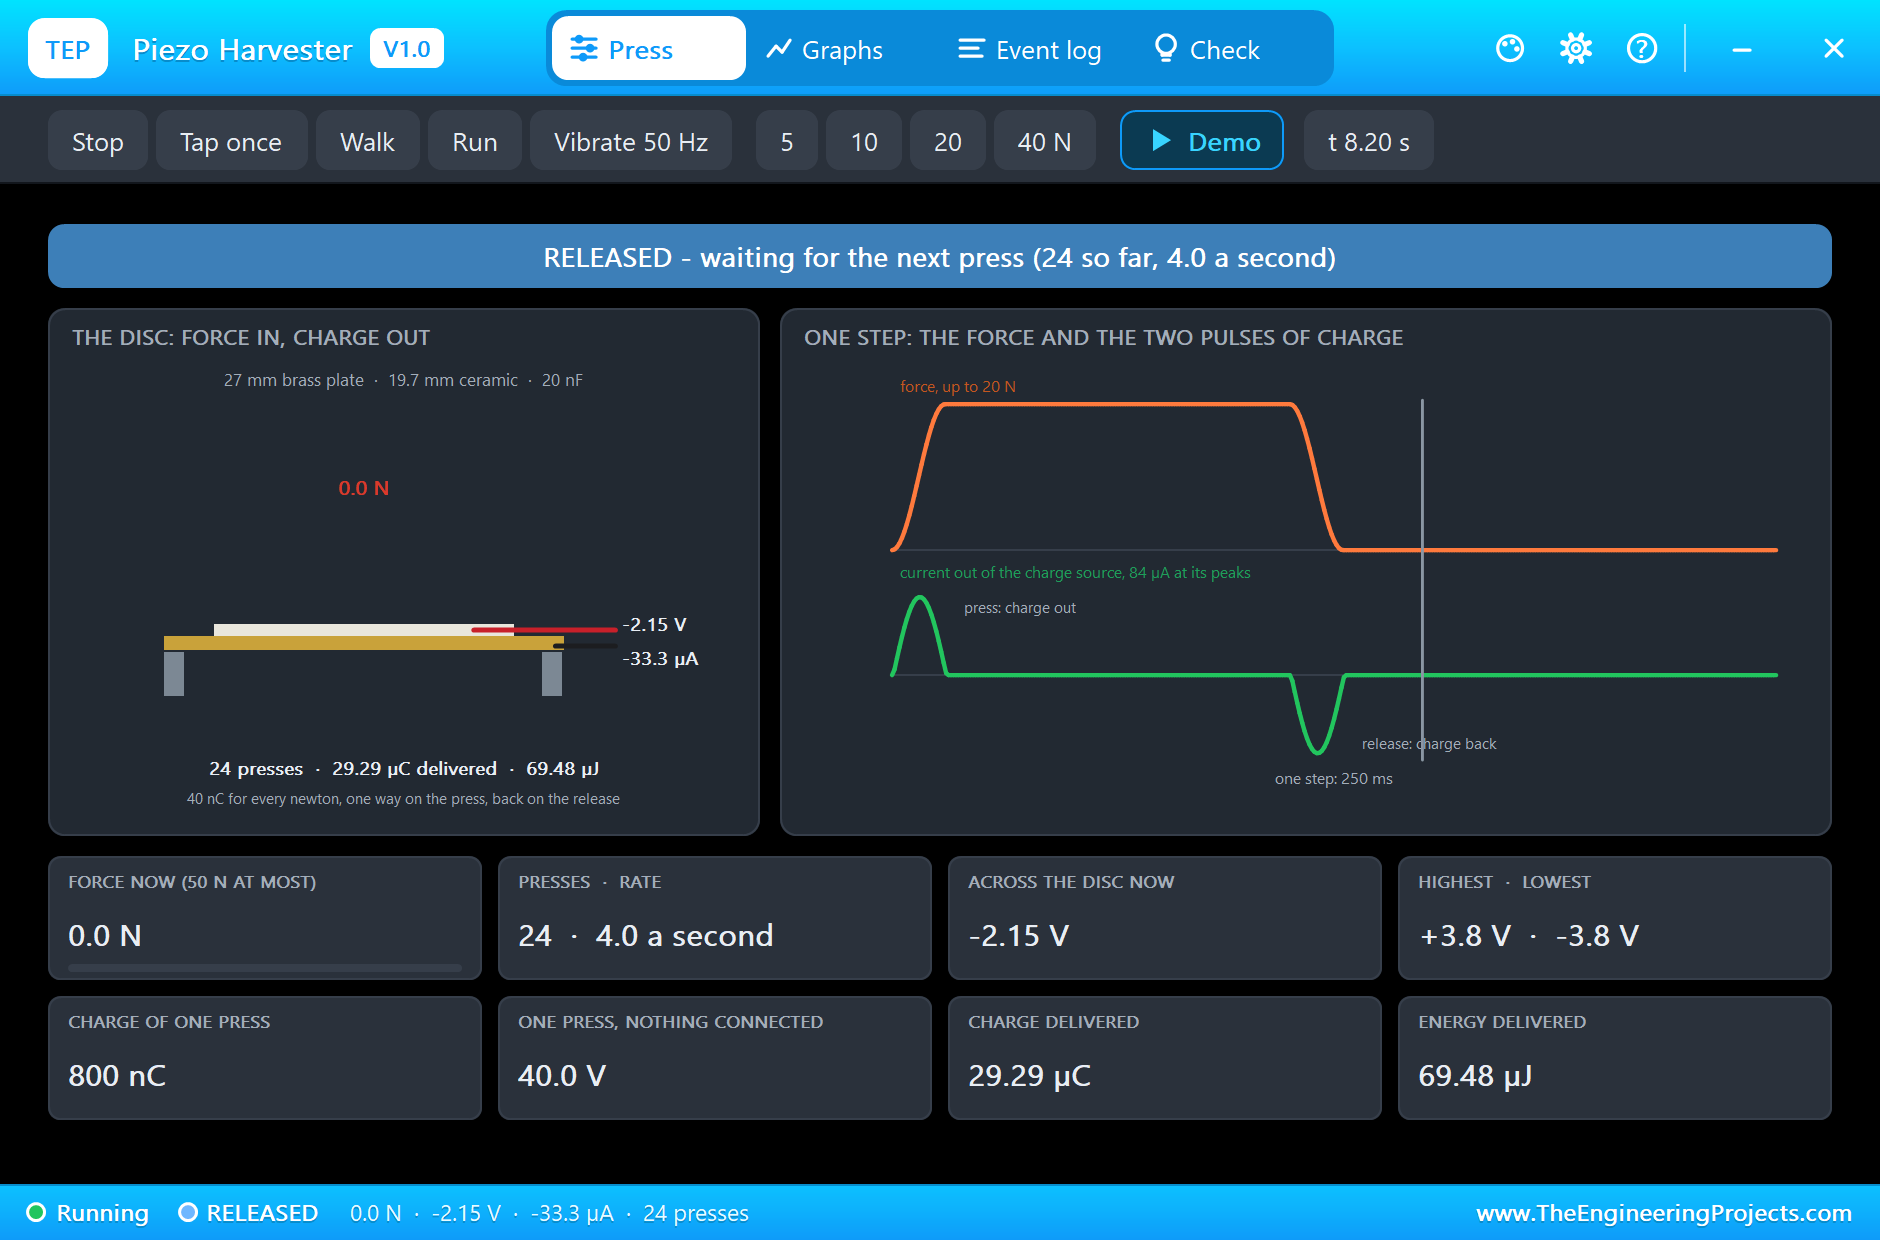
At 8.3 s the runner steps off. No force changes, so no charge moves, and the capacitor simply keeps what it has: 2.91 V to the end of the run.
The Graphs, the Event Log and the Check Page
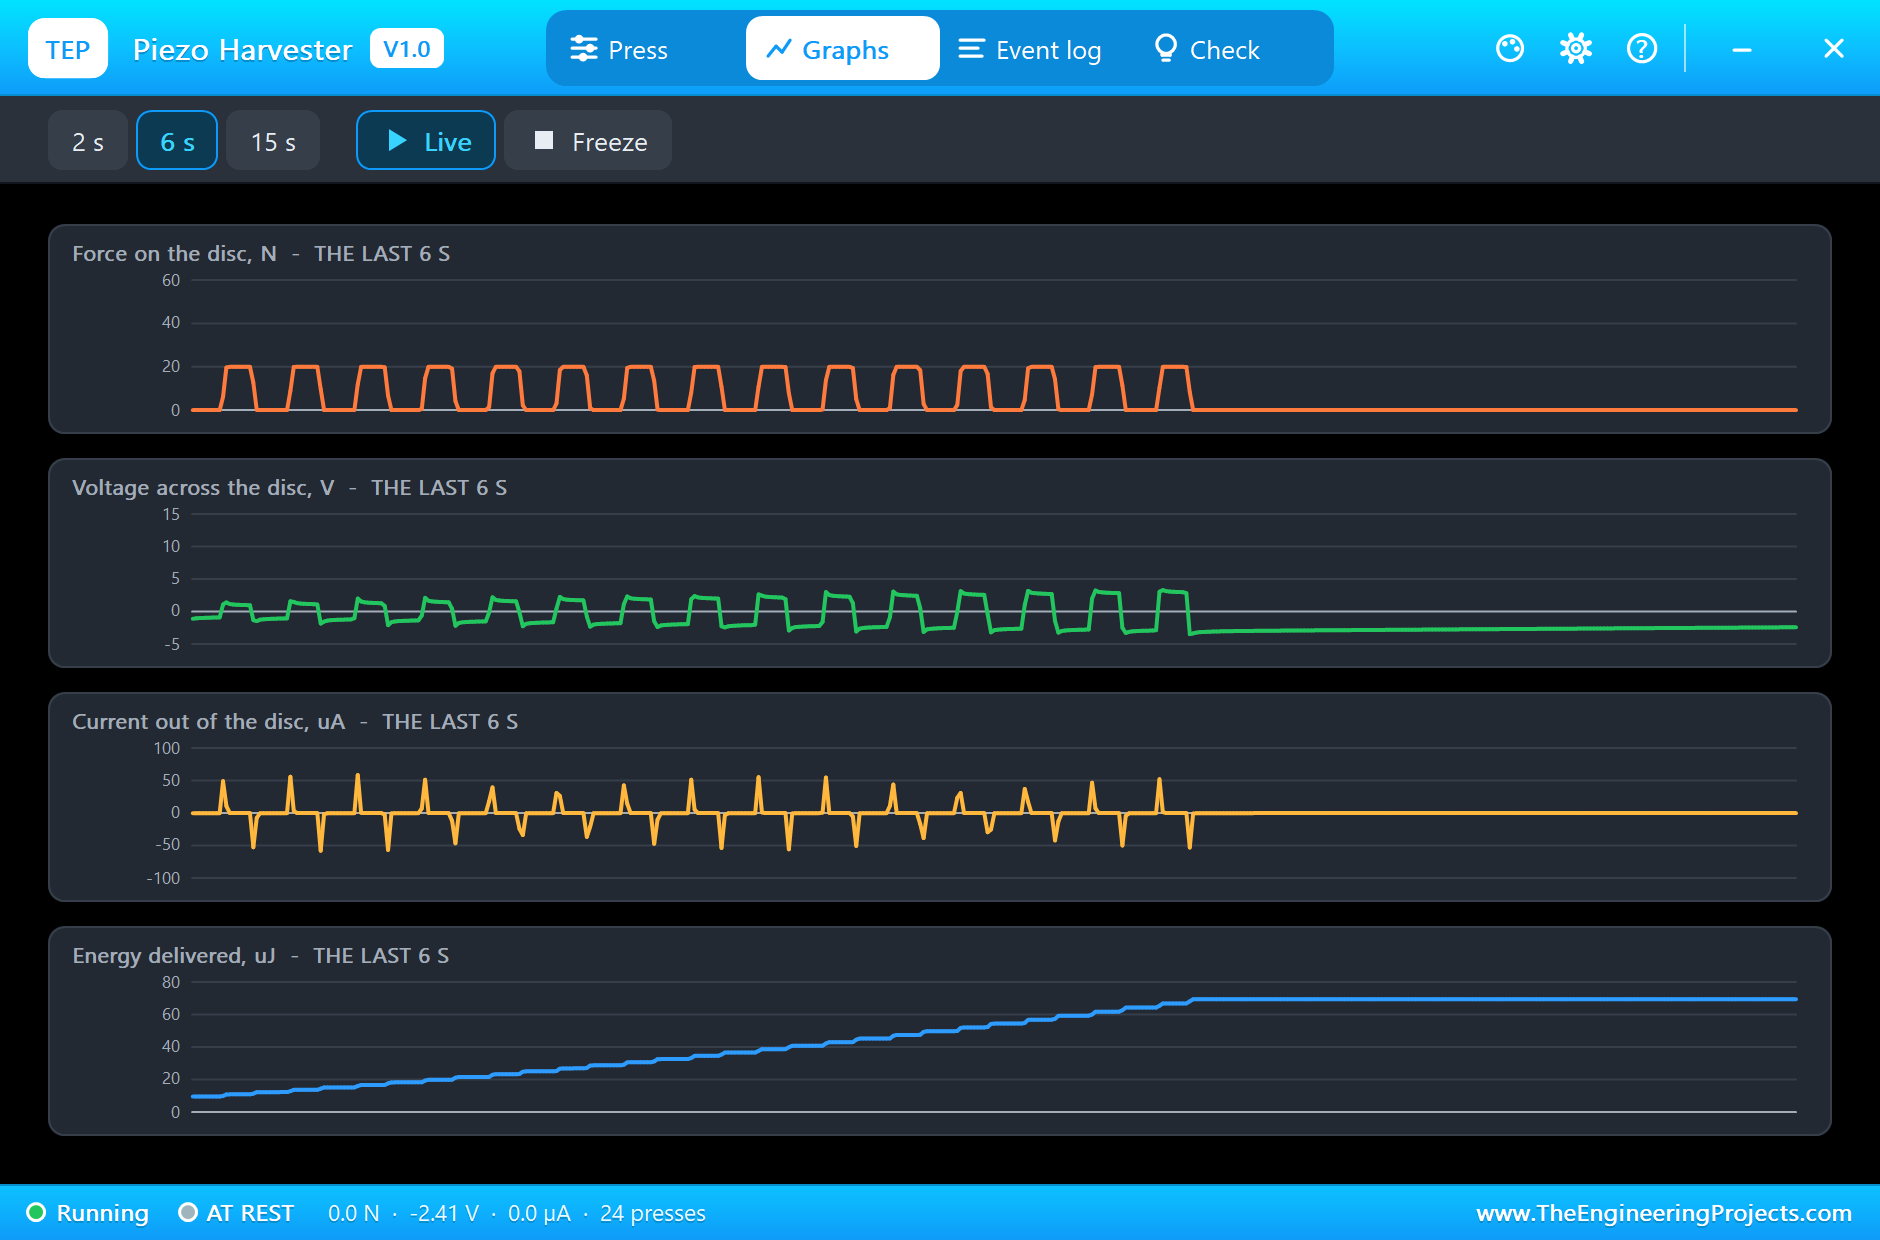
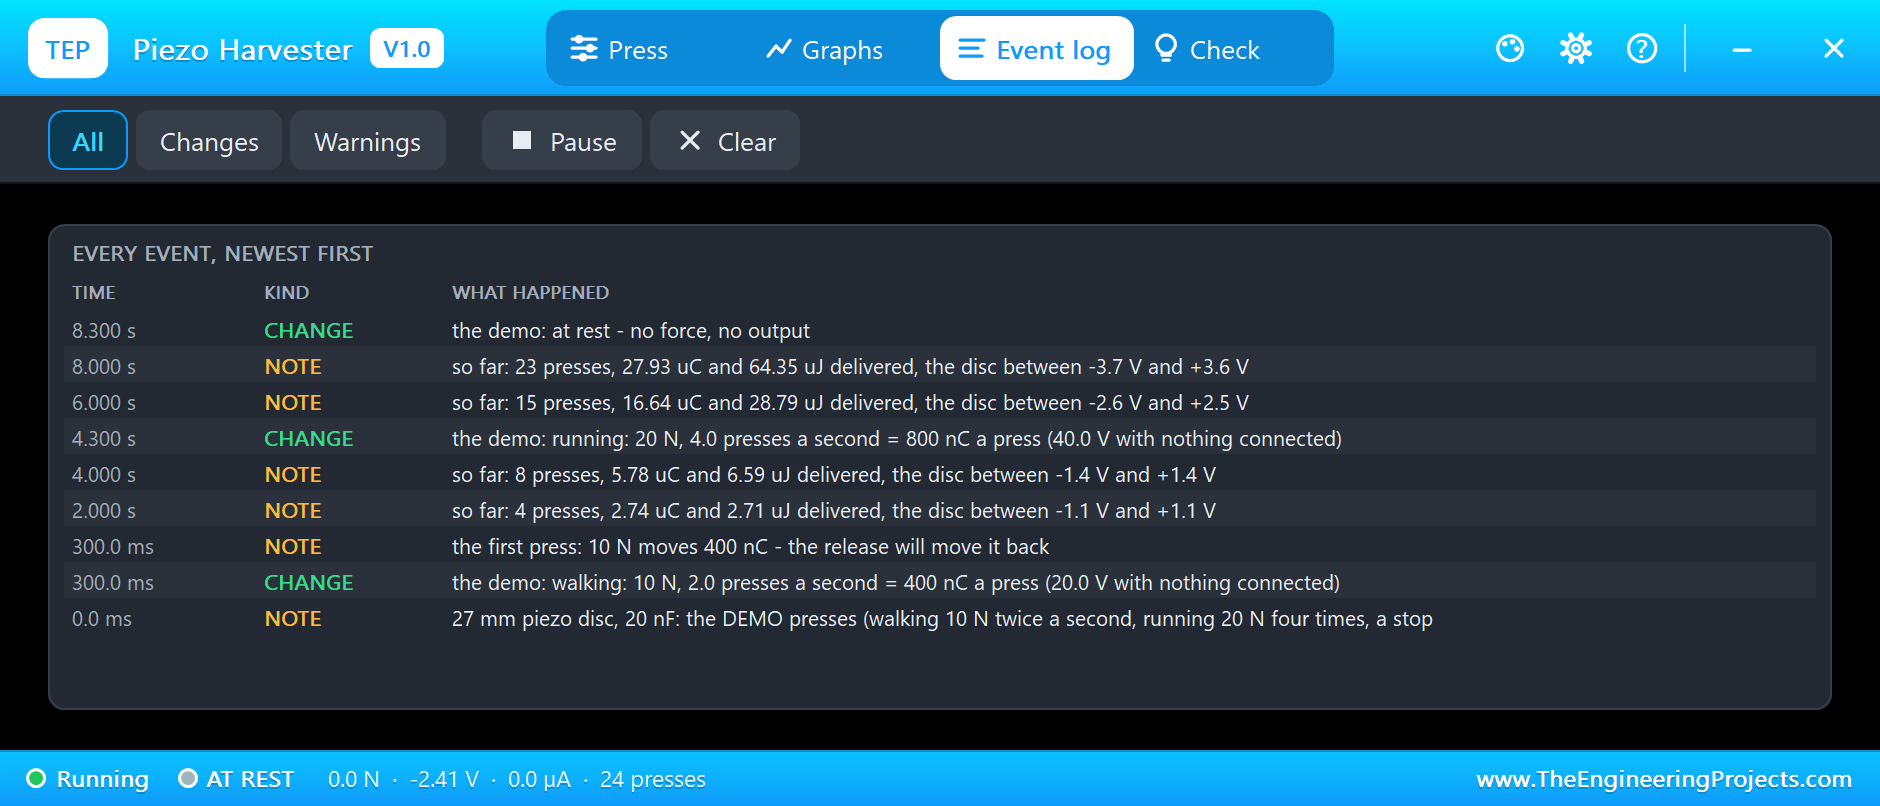
The Graphs page plots the force on the disc, the voltage across it, the current out of it and the energy delivered over the last 2, 6 or 15 simulated seconds: the square steps of the force, the disc flipping between plus and minus with every press and release, the thin current pulses and the energy climbing like a staircase. The Event log keeps every change of pace and a line of totals every two seconds. The Check page sums up the force, the charge of a press, the open-circuit voltage, the output, what has been delivered and the energy of an average step against the best this disc could do.
The monitor shows the harvest from the Arduino's side: the capacitor's voltage, the energy in it, the pulses counted and the charging rate, twice a second.
Try It Yourself
- Click Tap once in the disc's pop-up and watch one press and one release arrive as two steps on the capacitor.
- Click 40 N and Walk: four times the force moves four times the charge, and the capacitor climbs much higher.
- Change C1 to 1 uF: every step is ten times taller, but the energy stored at the end is no bigger.
- Take the capacitor away and put a 1 Mohm resistor across the disc: now the Graphs page shows the tall, thin spikes of an open disc.
Ideas to Extend the Demo
- Add a transistor and an LED, and let the sketch flash the LED every time the capacitor reaches 3 V.
- Put several discs in parallel on the same bridge, as a footstep tile does, and count how many steps one flash needs.
- Use the disc as a knock sensor: a resistor across it, straight to an analog pin, and a threshold in the sketch.
Your Own Sketches
The demo sketch is in the zip file, and you can change it in the Arduino IDE. New to Arduino? Start with our Arduino Tutorial for Beginners. Export the compiled binary, and set the UNO's PROGRAM property to the new file. Our guide on How to get the HEX file from Arduino shows you where the file ends up.
Things to Know Before Using a Real Piezo Disc
- Support the rim, press the middle: the disc makes its charge by bending. On a flat table it gives almost nothing.
- Expect microjoules: one disc gives a few microjoules a step. Real footstep tiles use many discs and a harvester chip.
- Pick low-leak parts: small-signal or Schottky diodes and a ceramic, film or tantalum capacitor. A leaky electrolytic eats the charge.
- Mind the spikes: a hard knock on an open disc can give 50 V and more. Never wire a disc straight to a logic pin without a resistor and a clamp.
- Do not overdo the force: the ceramic is brittle and cracks if it is bent too far.
Troubleshooting
- No output: the disc is at rest, or the force is steady. Only a change of force moves charge.
- The capacitor charges ever more slowly: that is the disc's own 20 nF taking its share of every pulse; it is real.
- Almost nothing arrives: the force is small, so the open-circuit voltage is low and the two diode drops of the bridge take most of it.
- OVERSTRESS: more than 50 N on the disc; a real one may crack.
- The part is not simulated:
TEPPIEZO.DLLis missing from MODELS and from the project folder.
Limitations of the Simulation
- The 40 nC per newton and the 500 Mohm leak are our figures; real discs differ with their size and with how they are mounted. The 20 nF comes from the makers' sheets.
- The disc's own resonance at 4.6 kHz is not modelled: a real disc rings for a moment after a knock.
- Cracking above 50 N is reported, not simulated, and the disc does not age.
- Arduino is a name of Arduino; this library is not made or endorsed by Arduino, Labcenter or any piezo maker.
- Tested in Proteus 8.5 in November 2026 (the demo as shipped). Proteus 7 is not supported.
So, that was all about the Piezoelectric Energy Harvester Library for Proteus Simulation. I hope it helps you try a footstep power project in a simulation before you glue discs under a tile: a press that gives a pulse, a release that gives it back, a bridge that turns both the same way and a capacitor that keeps them. If you have any questions, ask in the comments and I will help you out. Till the next tutorial, take care and have fun!