Hello friends, I hope you all are doing great. Today, I am going to share a list of I2C Sensor Libraries for Proteus. Most modern sensor modules talk to the microcontroller over I2C: two wires, SDA for data and SCL for the clock, shared by every sensor on the board. On an Arduino Uno, these are the A4 and A5 pins. That's why I2C sensors are so popular in student projects: you can connect several of them to one Arduino and still have plenty of pins left for everything else.
Our team designed eight I2C sensor libraries for Proteus in September 2026: the BME280, BH1750, TCS34725, SHT31, VL53L0X, BMP280, MAX30102 and MPU6050. Each one talks to the Arduino over I2C like the real chip, has interactive sliders or controls beside it, and comes with a complete Arduino example, a compiled HEX file and a tutorial that explains the calculations behind every reading. You can drag a slider while your program is running and watch the next reading change.
In this list, I will introduce each sensor with its controls and their ranges, and then show you how to put several I2C sensors on one Arduino without address conflicts. If you are new to Proteus libraries, read How to Add New Library in Proteus 8 first. So, let's get started with the I2C Sensor Libraries for Proteus:
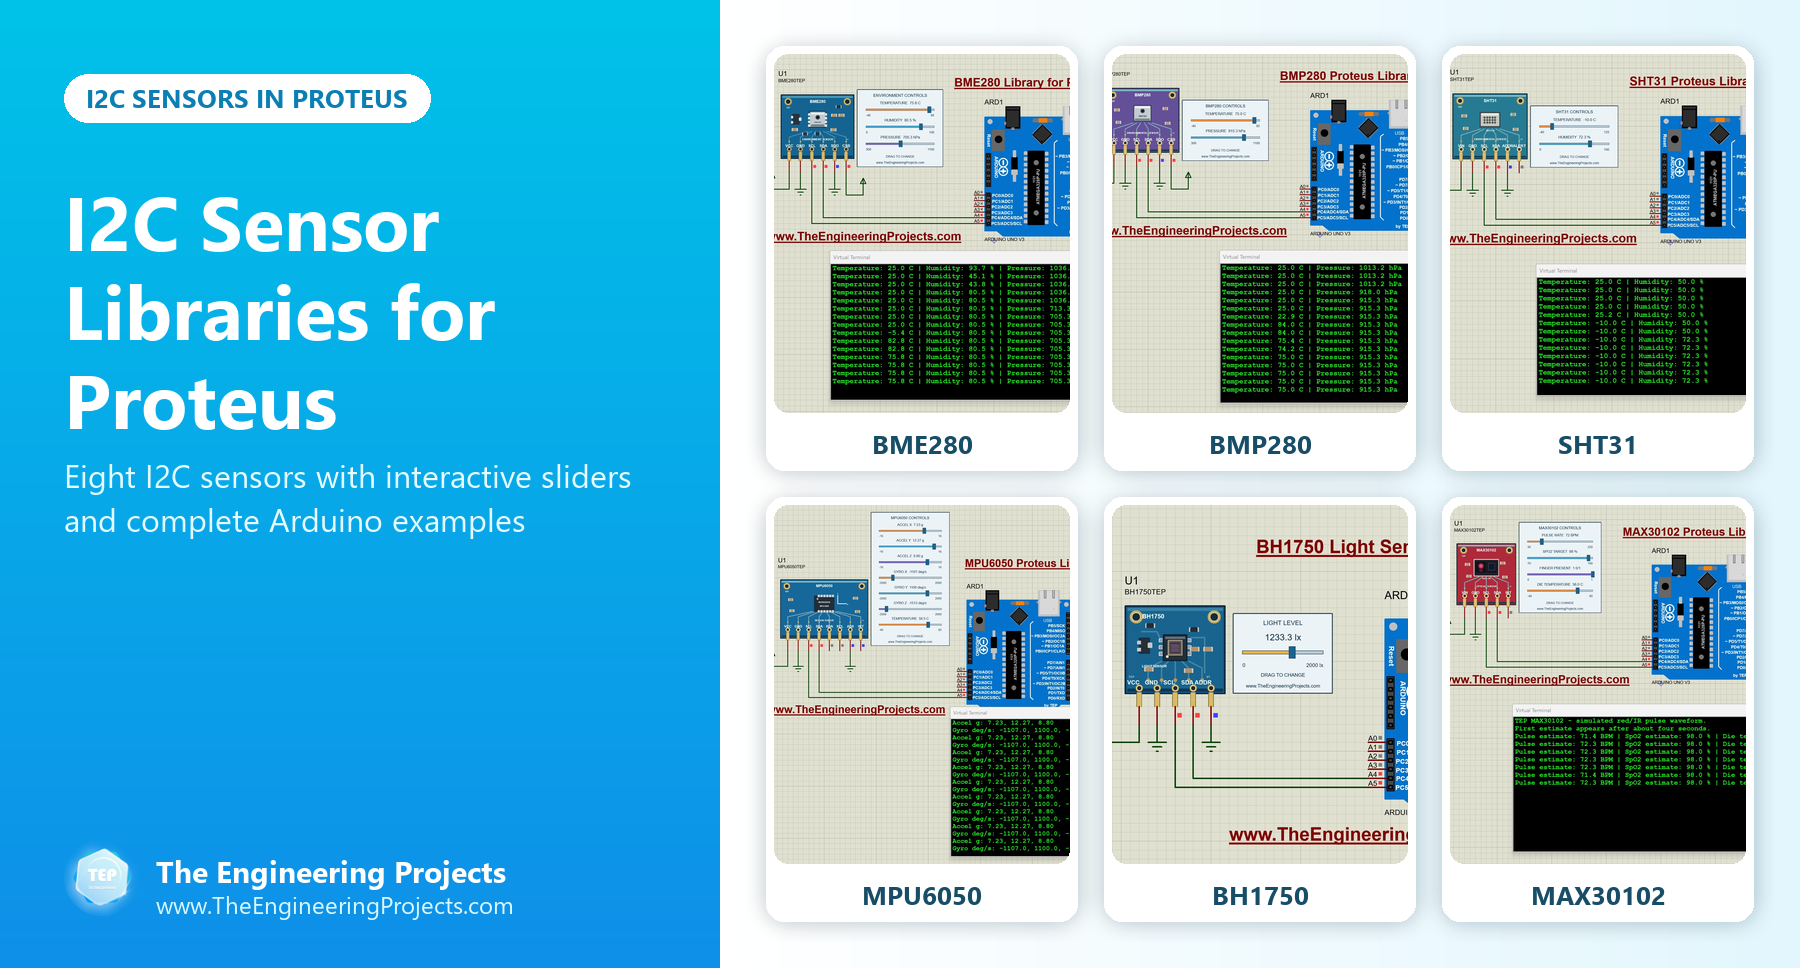
I2C Sensor Libraries at a Glance
Here is a quick comparison of the eight sensors and the controls of their Proteus models. The ranges are the input ranges of our models, taken from each tutorial.
| Sensor | Measures | Controls in Proteus |
|---|---|---|
| BME280 | Temperature, humidity and pressure | Three sliders, one for each value |
| BH1750 | Light in lux | A light slider |
| TCS34725 | Red, green, blue and clear light | A color palette, RGB sliders (0 to 255) and brightness (0 to 100 %) |
| SHT31 | Temperature and humidity | Temperature (-40 to 125 C) and humidity (0 to 100 % RH) |
| VL53L0X | Distance (time of flight) | Distance (0 to 2000 mm) and target present or absent |
| BMP280 | Pressure and temperature | Temperature (-40 to +85 C) and pressure (300 to 1100 hPa) |
| MAX30102 | Pulse and SpO2 (estimated) | Pulse rate, SpO2 target, finger presence and die temperature |
| MPU6050 | Acceleration, rotation and temperature | Seven controls: acceleration (±16 g), gyroscope (±2000 °/s) and temperature |
1. BME280 Sensor Library for Proteus
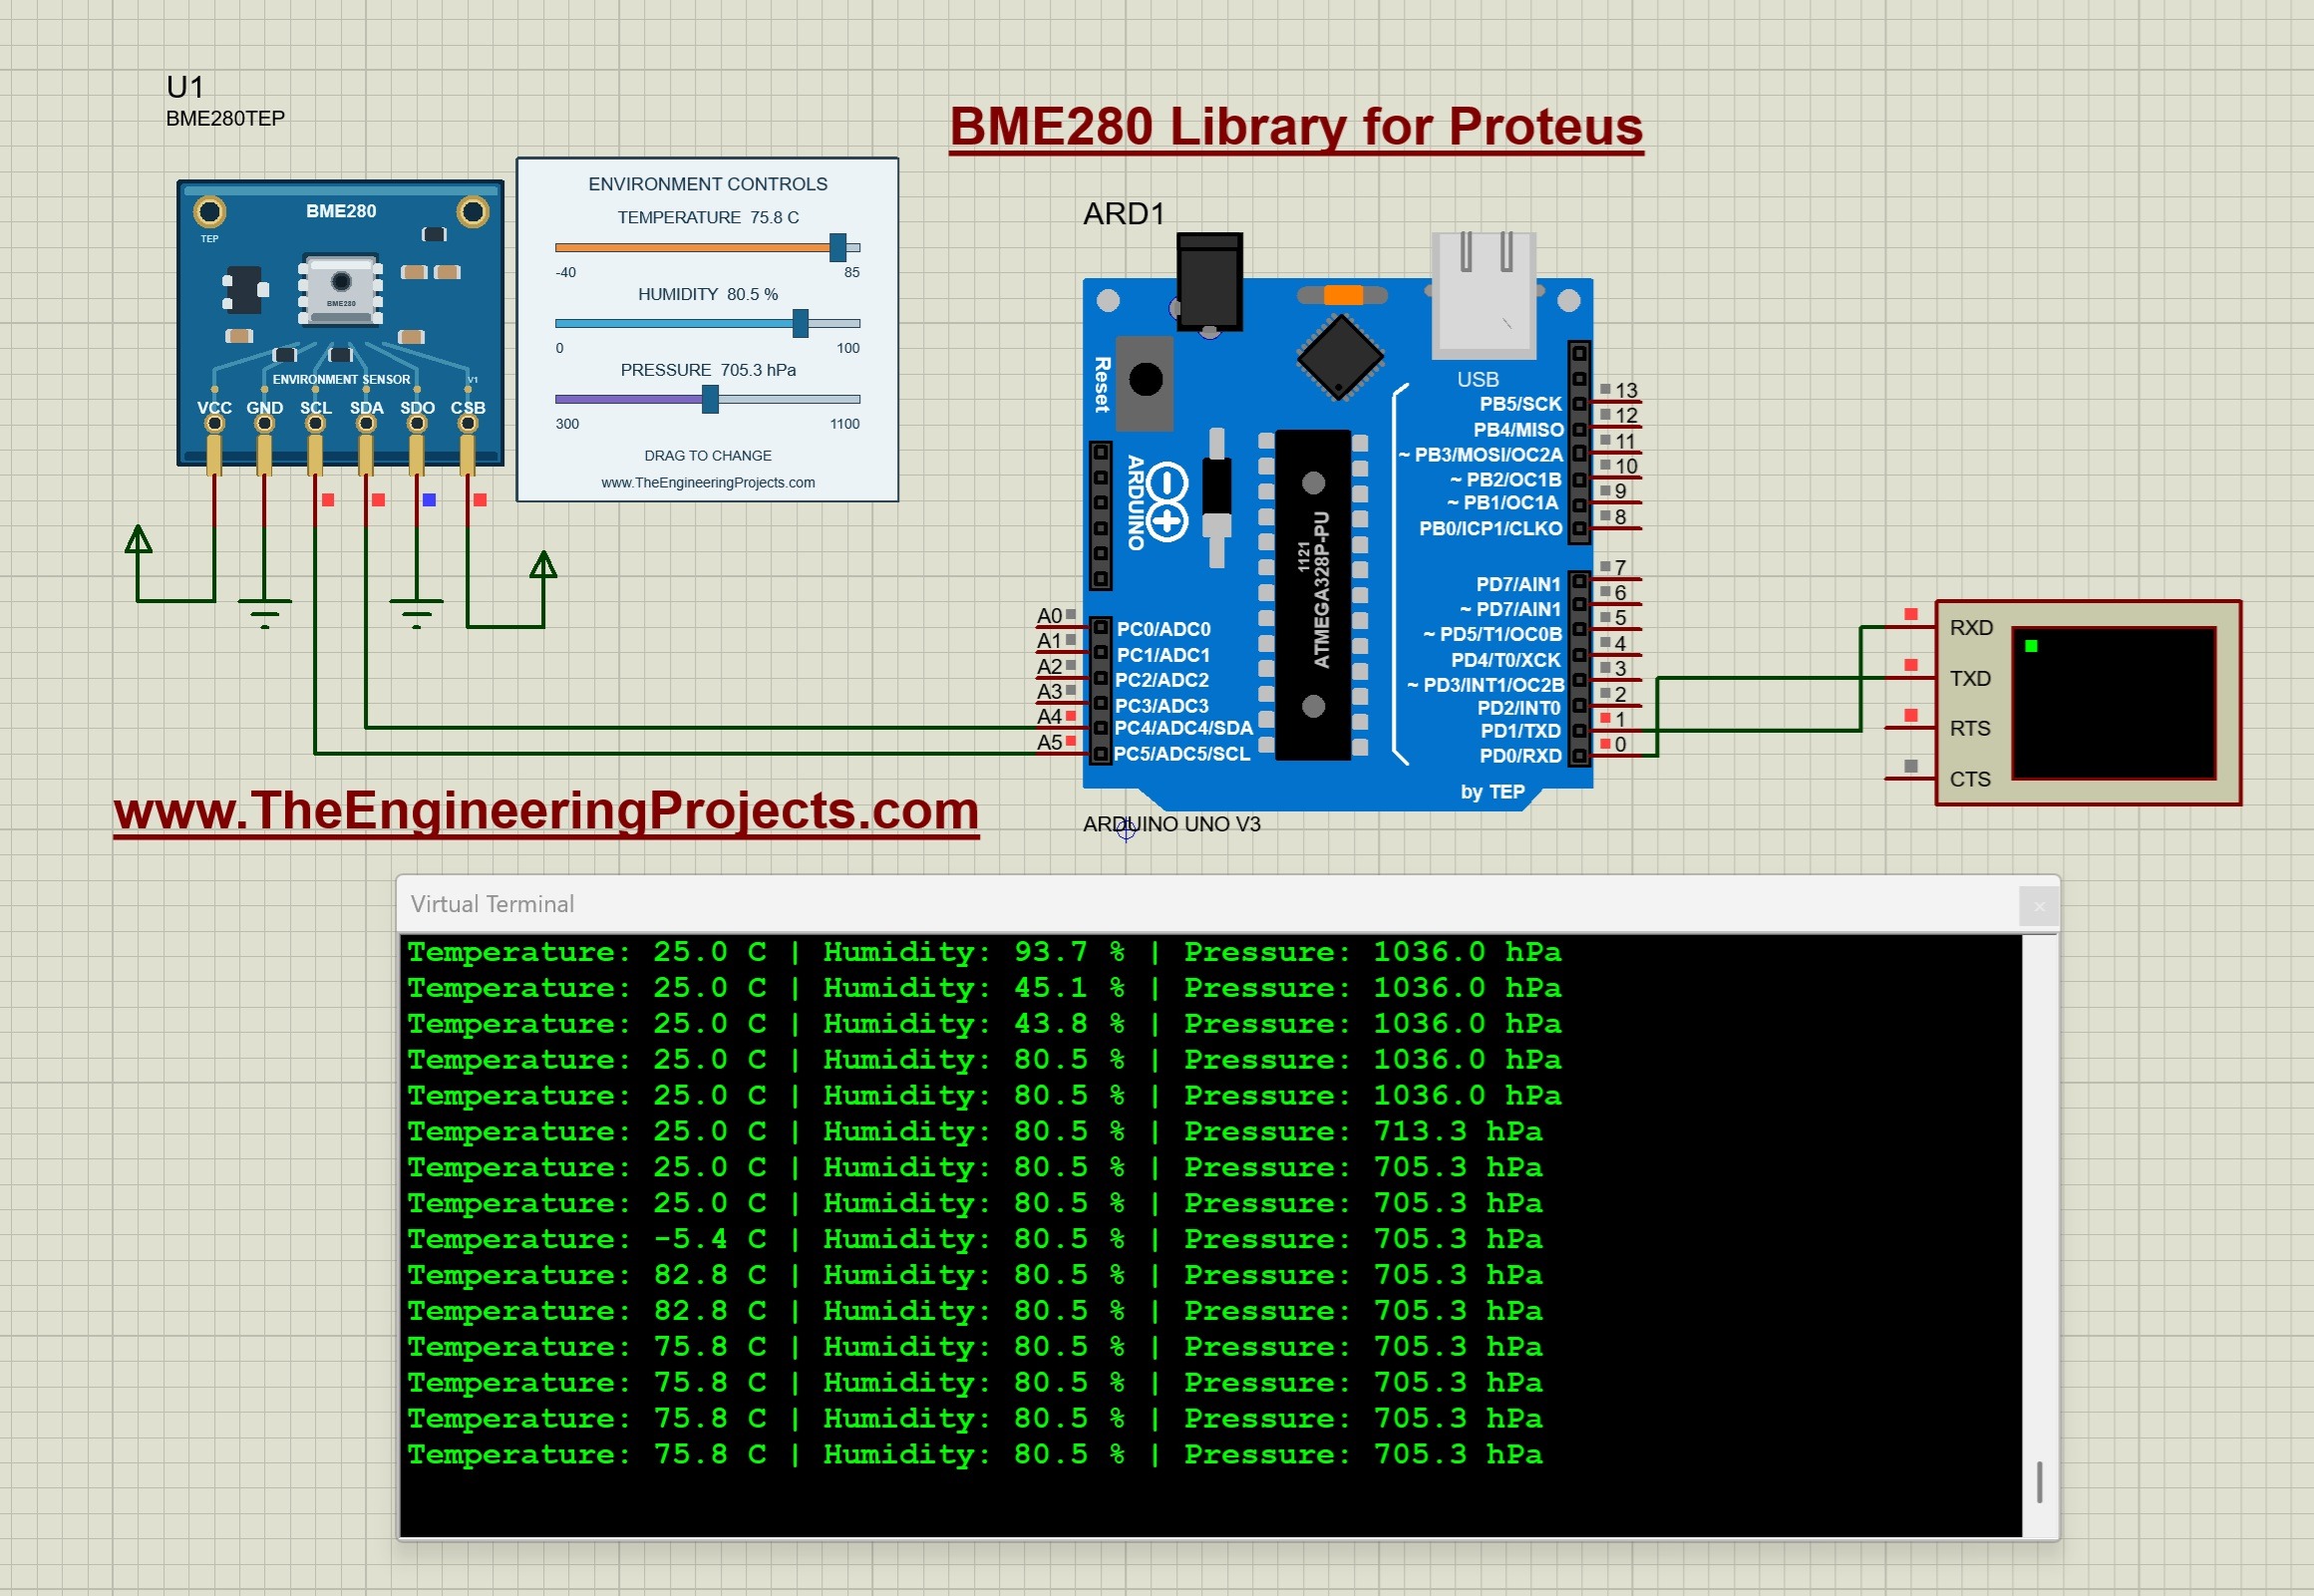
The BME280 from Bosch Sensortec combines temperature, relative humidity and pressure sensing in one small package, which is why it is the favourite sensor of weather stations. Our model has six pins, and in the example, SDA goes to A4 and SCL to A5 of the Arduino Uno. Three sliders change the three values while the simulation runs.
The tutorial suggests changing one value at a time in your first test, so you can confirm which reading each slider affects. It also shows how to convert the pressure from pascals to hPa and Celsius to Fahrenheit, and why the measurement timing and the display timing differ. Read the complete tutorial: BME280 Sensor Library for Proteus
2. BH1750 Light Sensor Library for Proteus
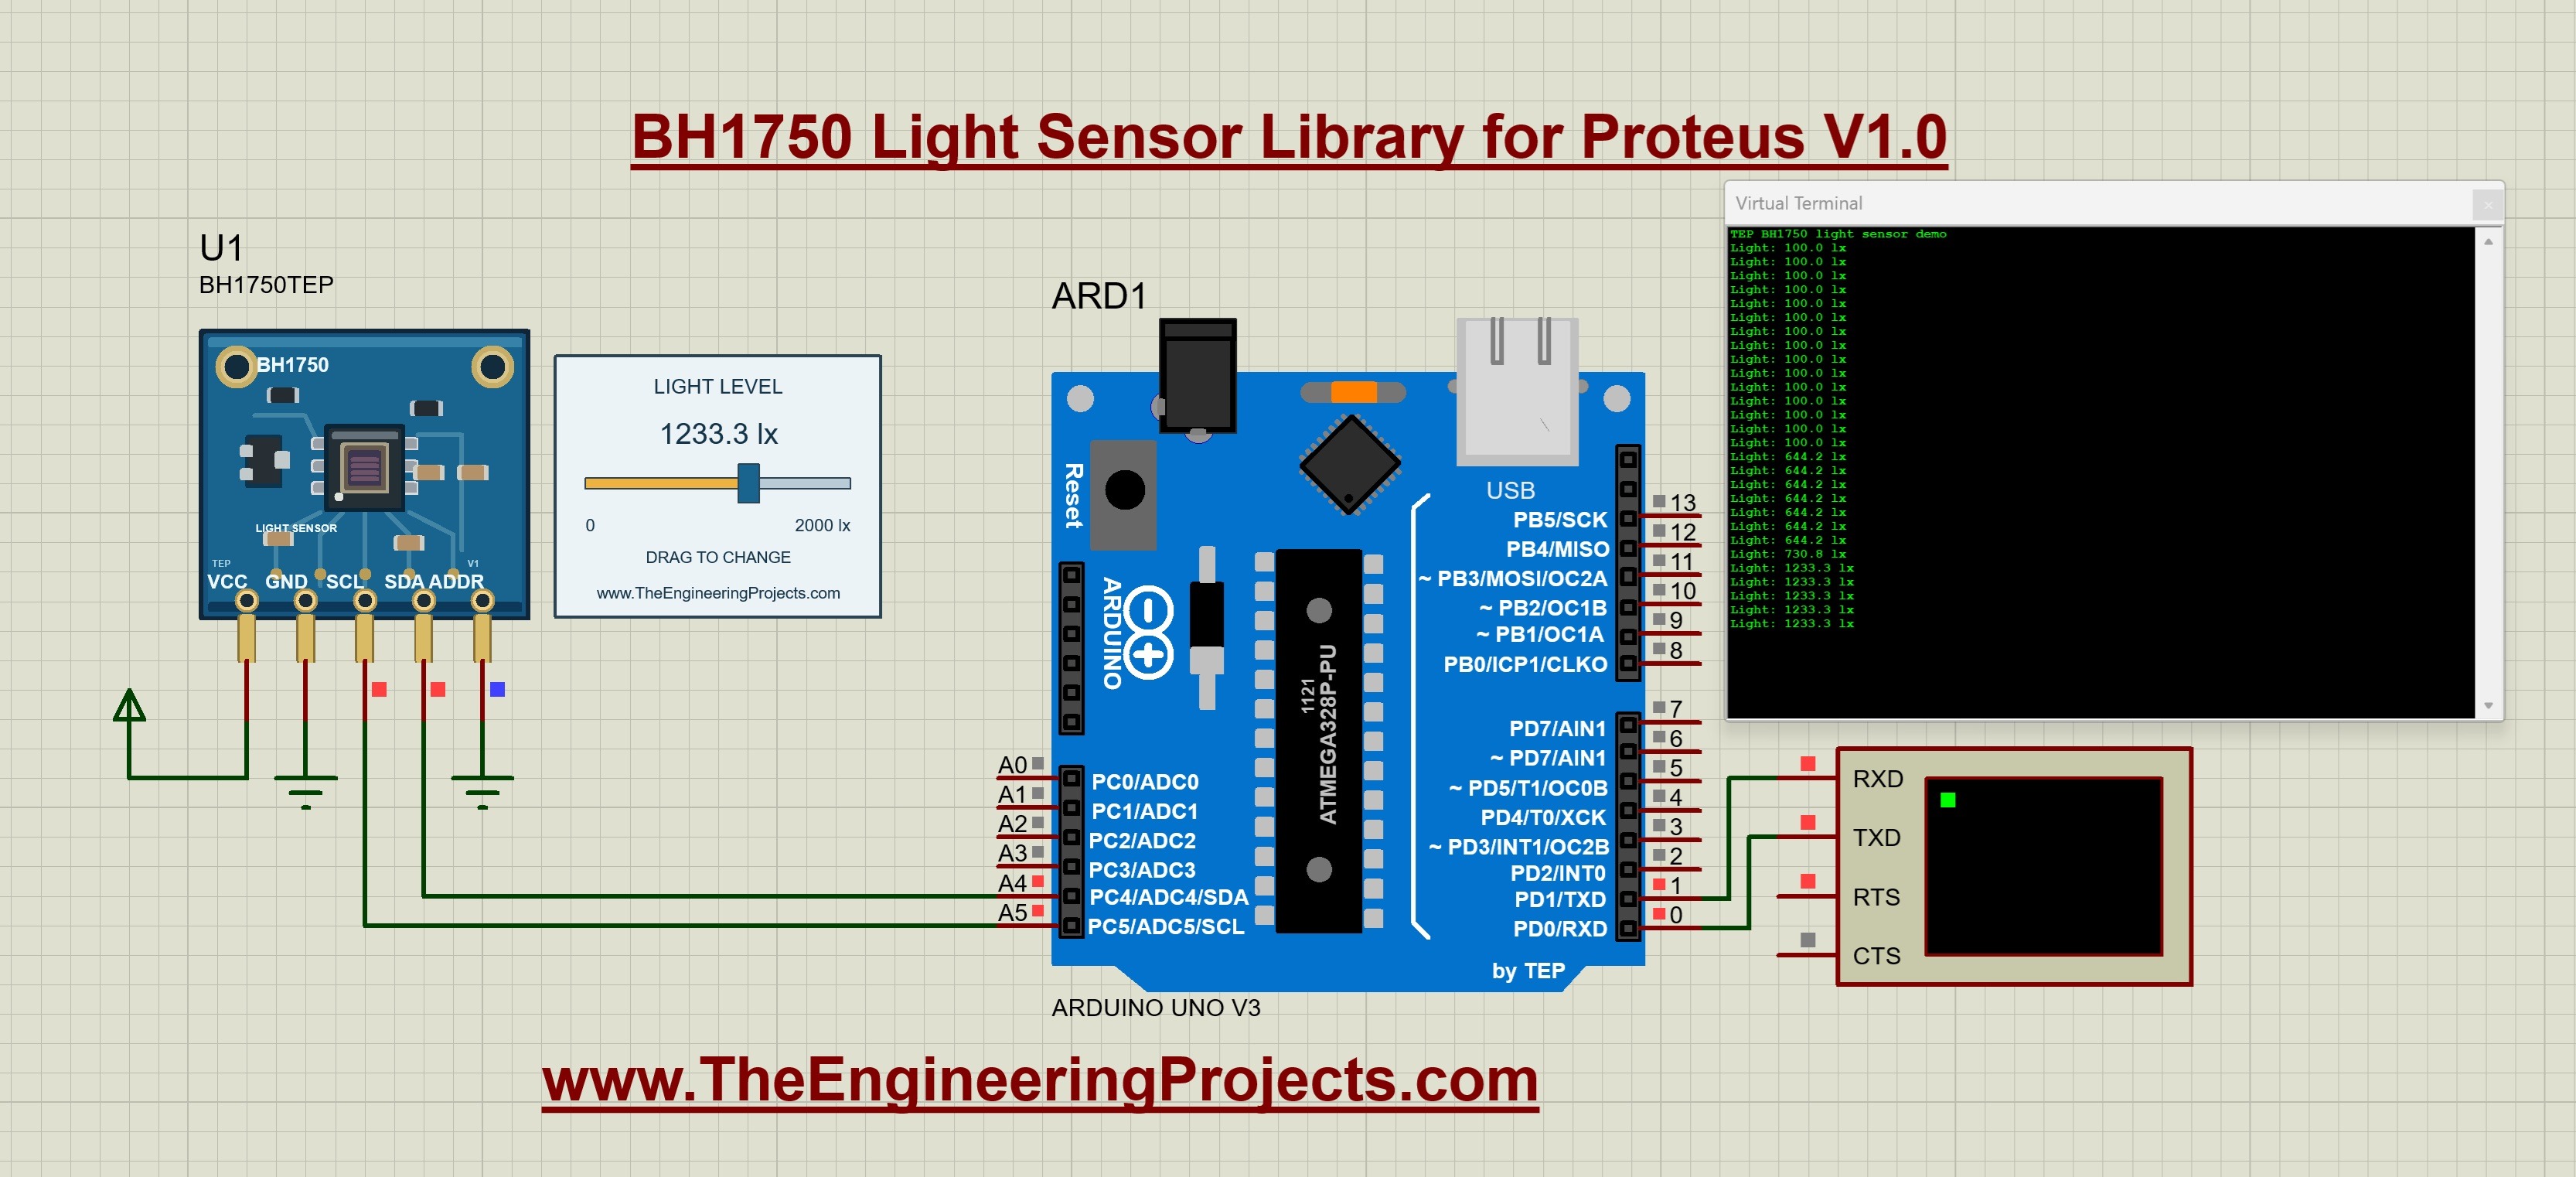
The BH1750 is a digital ambient light sensor that measures illuminance in lux. Unlike an LDR on an analog pin, it sends a ready digital measurement over I2C. Its five pins are VCC, GND, SCL, SDA and ADDR, and a slider beside it supplies the simulated light level.
The tutorial explains why the slider and the terminal can differ slightly: the model returns a two-byte integer, and in the example's high-resolution mode the library converts it with lux = raw / 1.2, where raw = 256 × MSB + LSB. It ends with an automatic-lighting exercise. Read the complete tutorial: BH1750 Light Sensor Library for Proteus
3. TCS34725 Color Sensor Proteus Library

The TCS34725 is a digital color sensor with red, green, blue and clear channels and an infrared-blocking filter. Its five pins are VIN, GND, SCL, SDA and INT. In Proteus, a color palette changes all three RGB inputs together, individual sliders set red, green and blue from 0 to 255, and a brightness control goes from 0 to 100 %.
The tutorial calculates the raw RGBC readings, explains integration time and gain, and shows why white light can saturate the clear channel first. It is a great sensor for color sorting machines and smart lighting projects. Read the complete tutorial: TCS34725 Proteus Library
4. SHT31 Temperature and Humidity Proteus Library

The SHT31 from Sensirion measures temperature and relative humidity. Its six pins are VIN, GND, SCL, SDA, ADDR and ALERT. Our model's temperature control goes from -40 to 125 C and its humidity control from 0 to 100 % RH, and you can set exact starting values in the component properties.
The tutorial converts the raw SHT31 data into degrees Celsius and relative humidity with worked examples, and explains the CRC check that lets your program tell a valid measurement from a failed reading. Read the complete tutorial: SHT31 Proteus Library
5. VL53L0X Distance Sensor Proteus Library
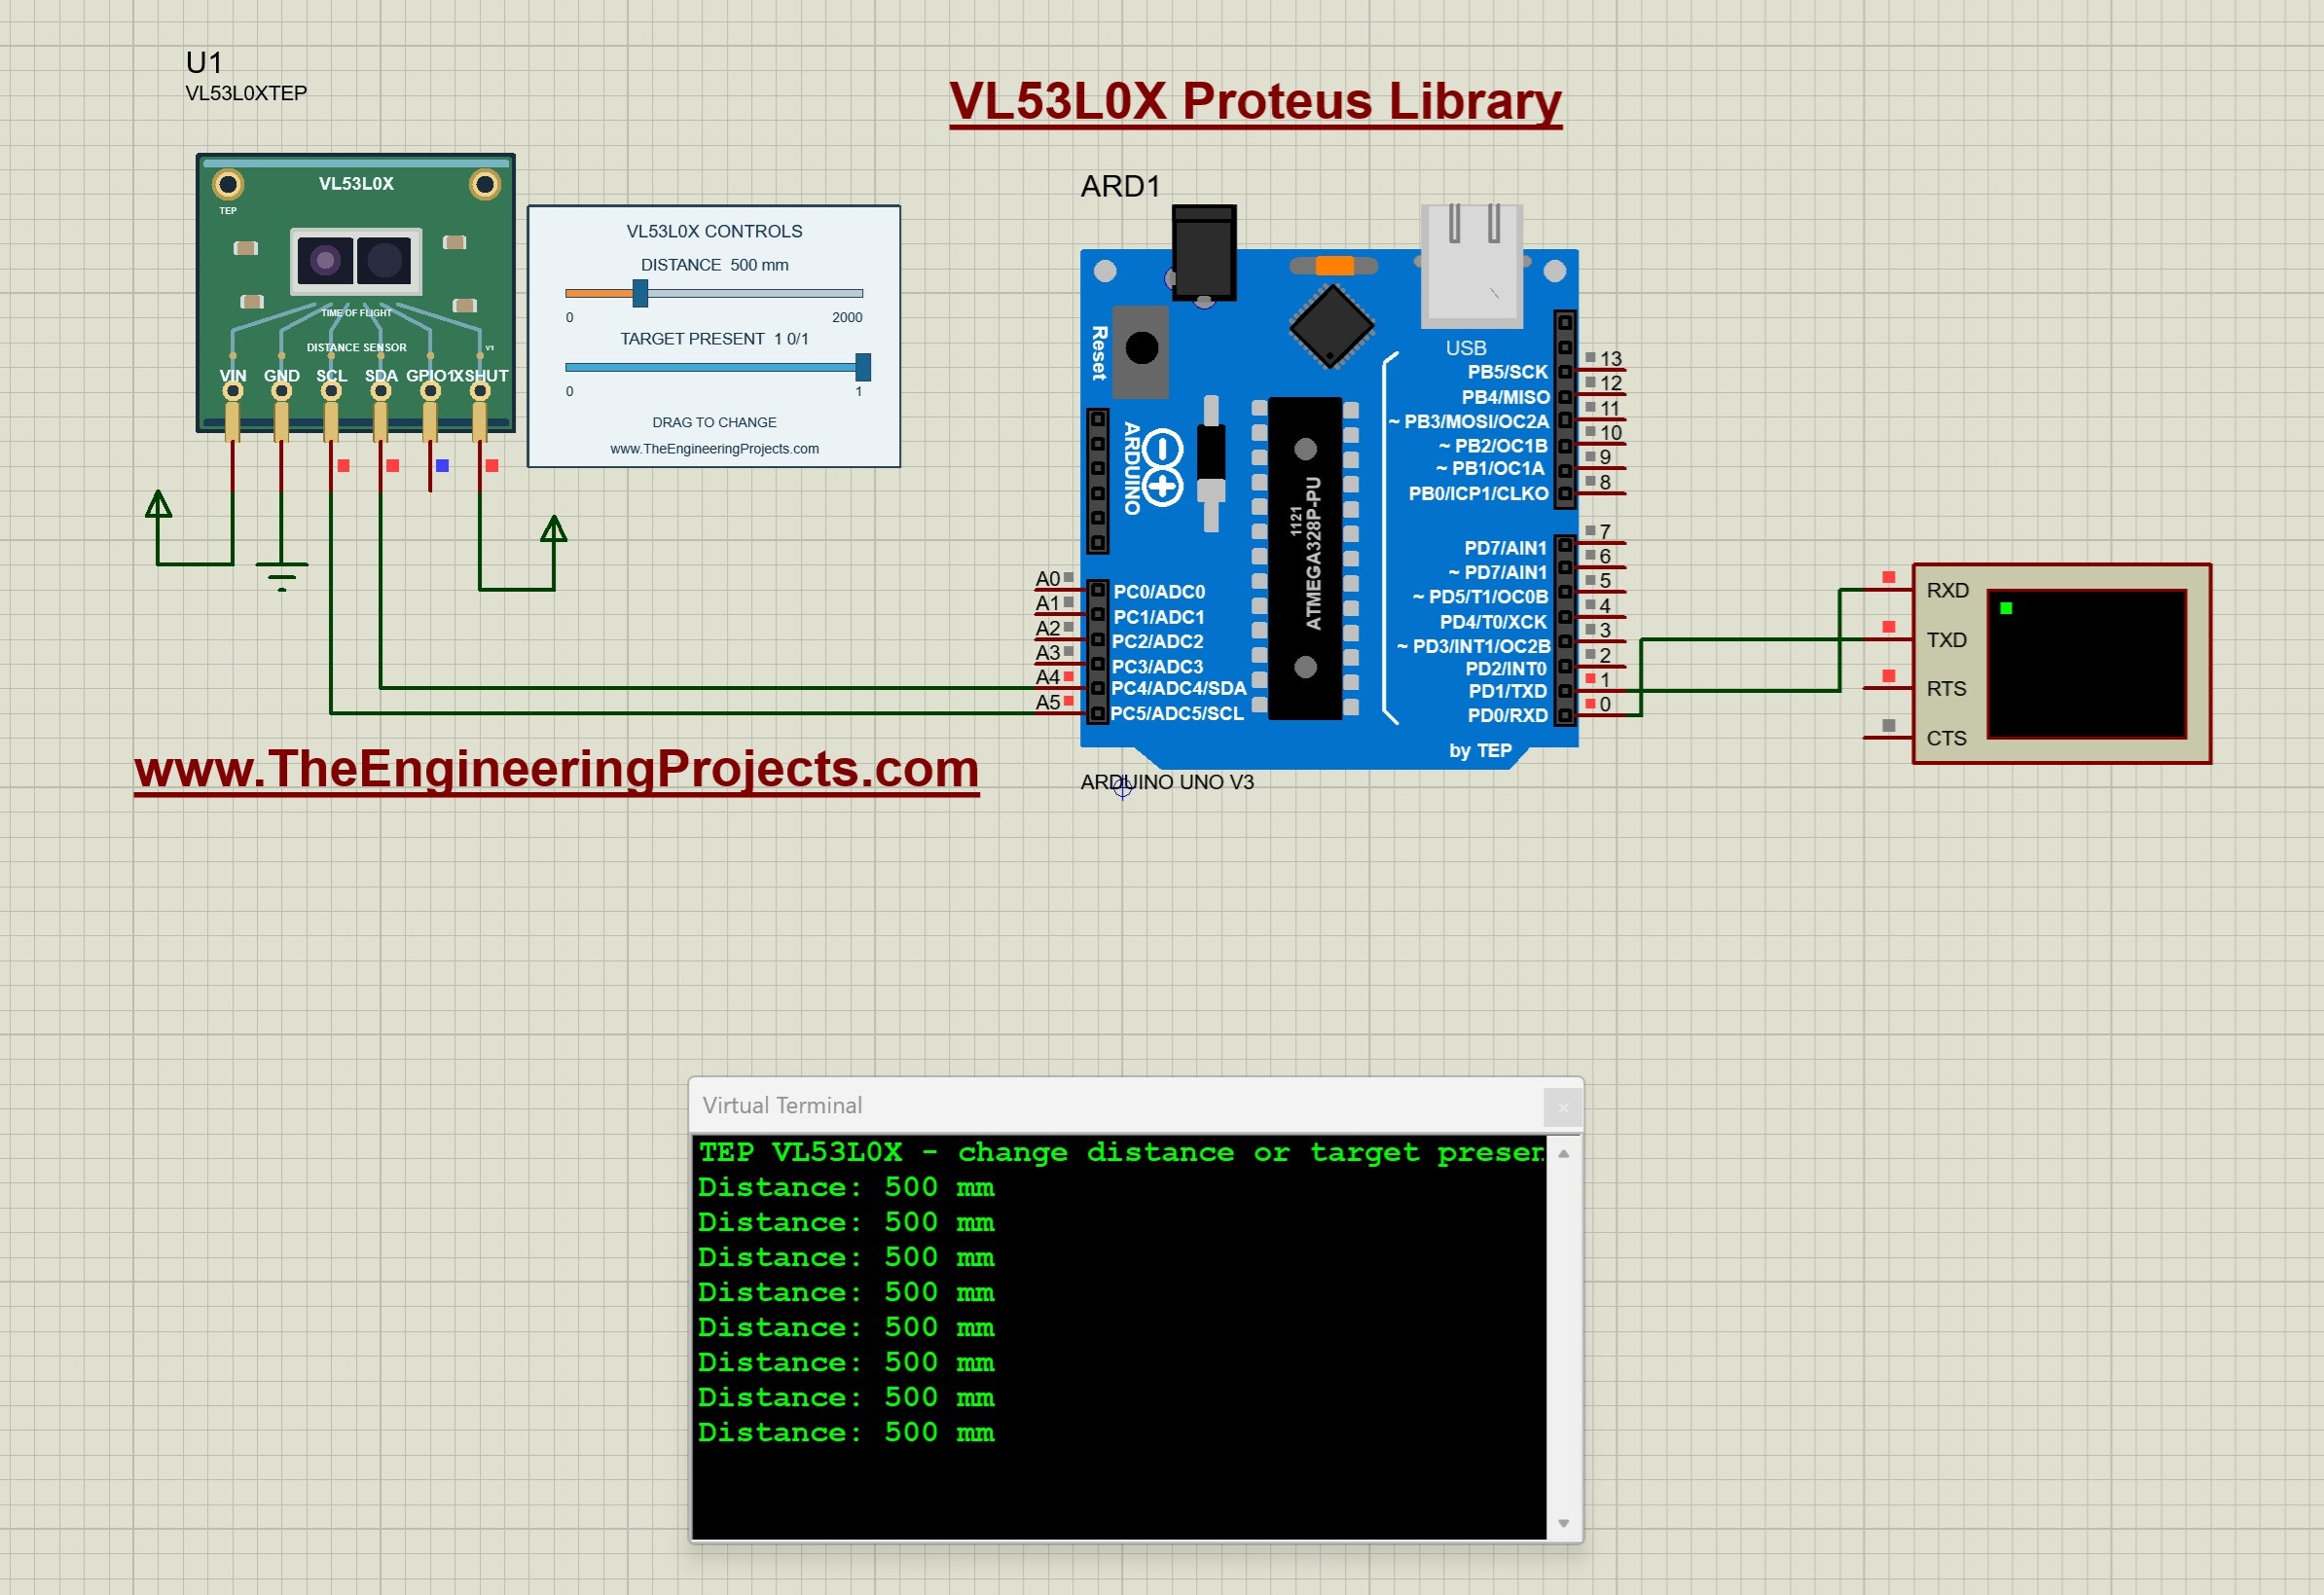
The VL53L0X from ST is a time-of-flight distance sensor: it measures distance with emitted light and returns a digital result over I2C, instead of the echo pulse of an ultrasonic sensor. Its six pins are VIN, GND, SCL, SDA, GPIO1 and XSHUT. The model's distance control goes from 0 to 2000 mm, and a TARGET control removes the target completely.
That second control is what makes this library useful: you can test how your program handles no target, a timeout or an initialization failure. The tutorial also covers address selection for several sensors. Read the complete tutorial: VL53L0X Proteus Library
6. BMP280 Pressure Sensor Proteus Library
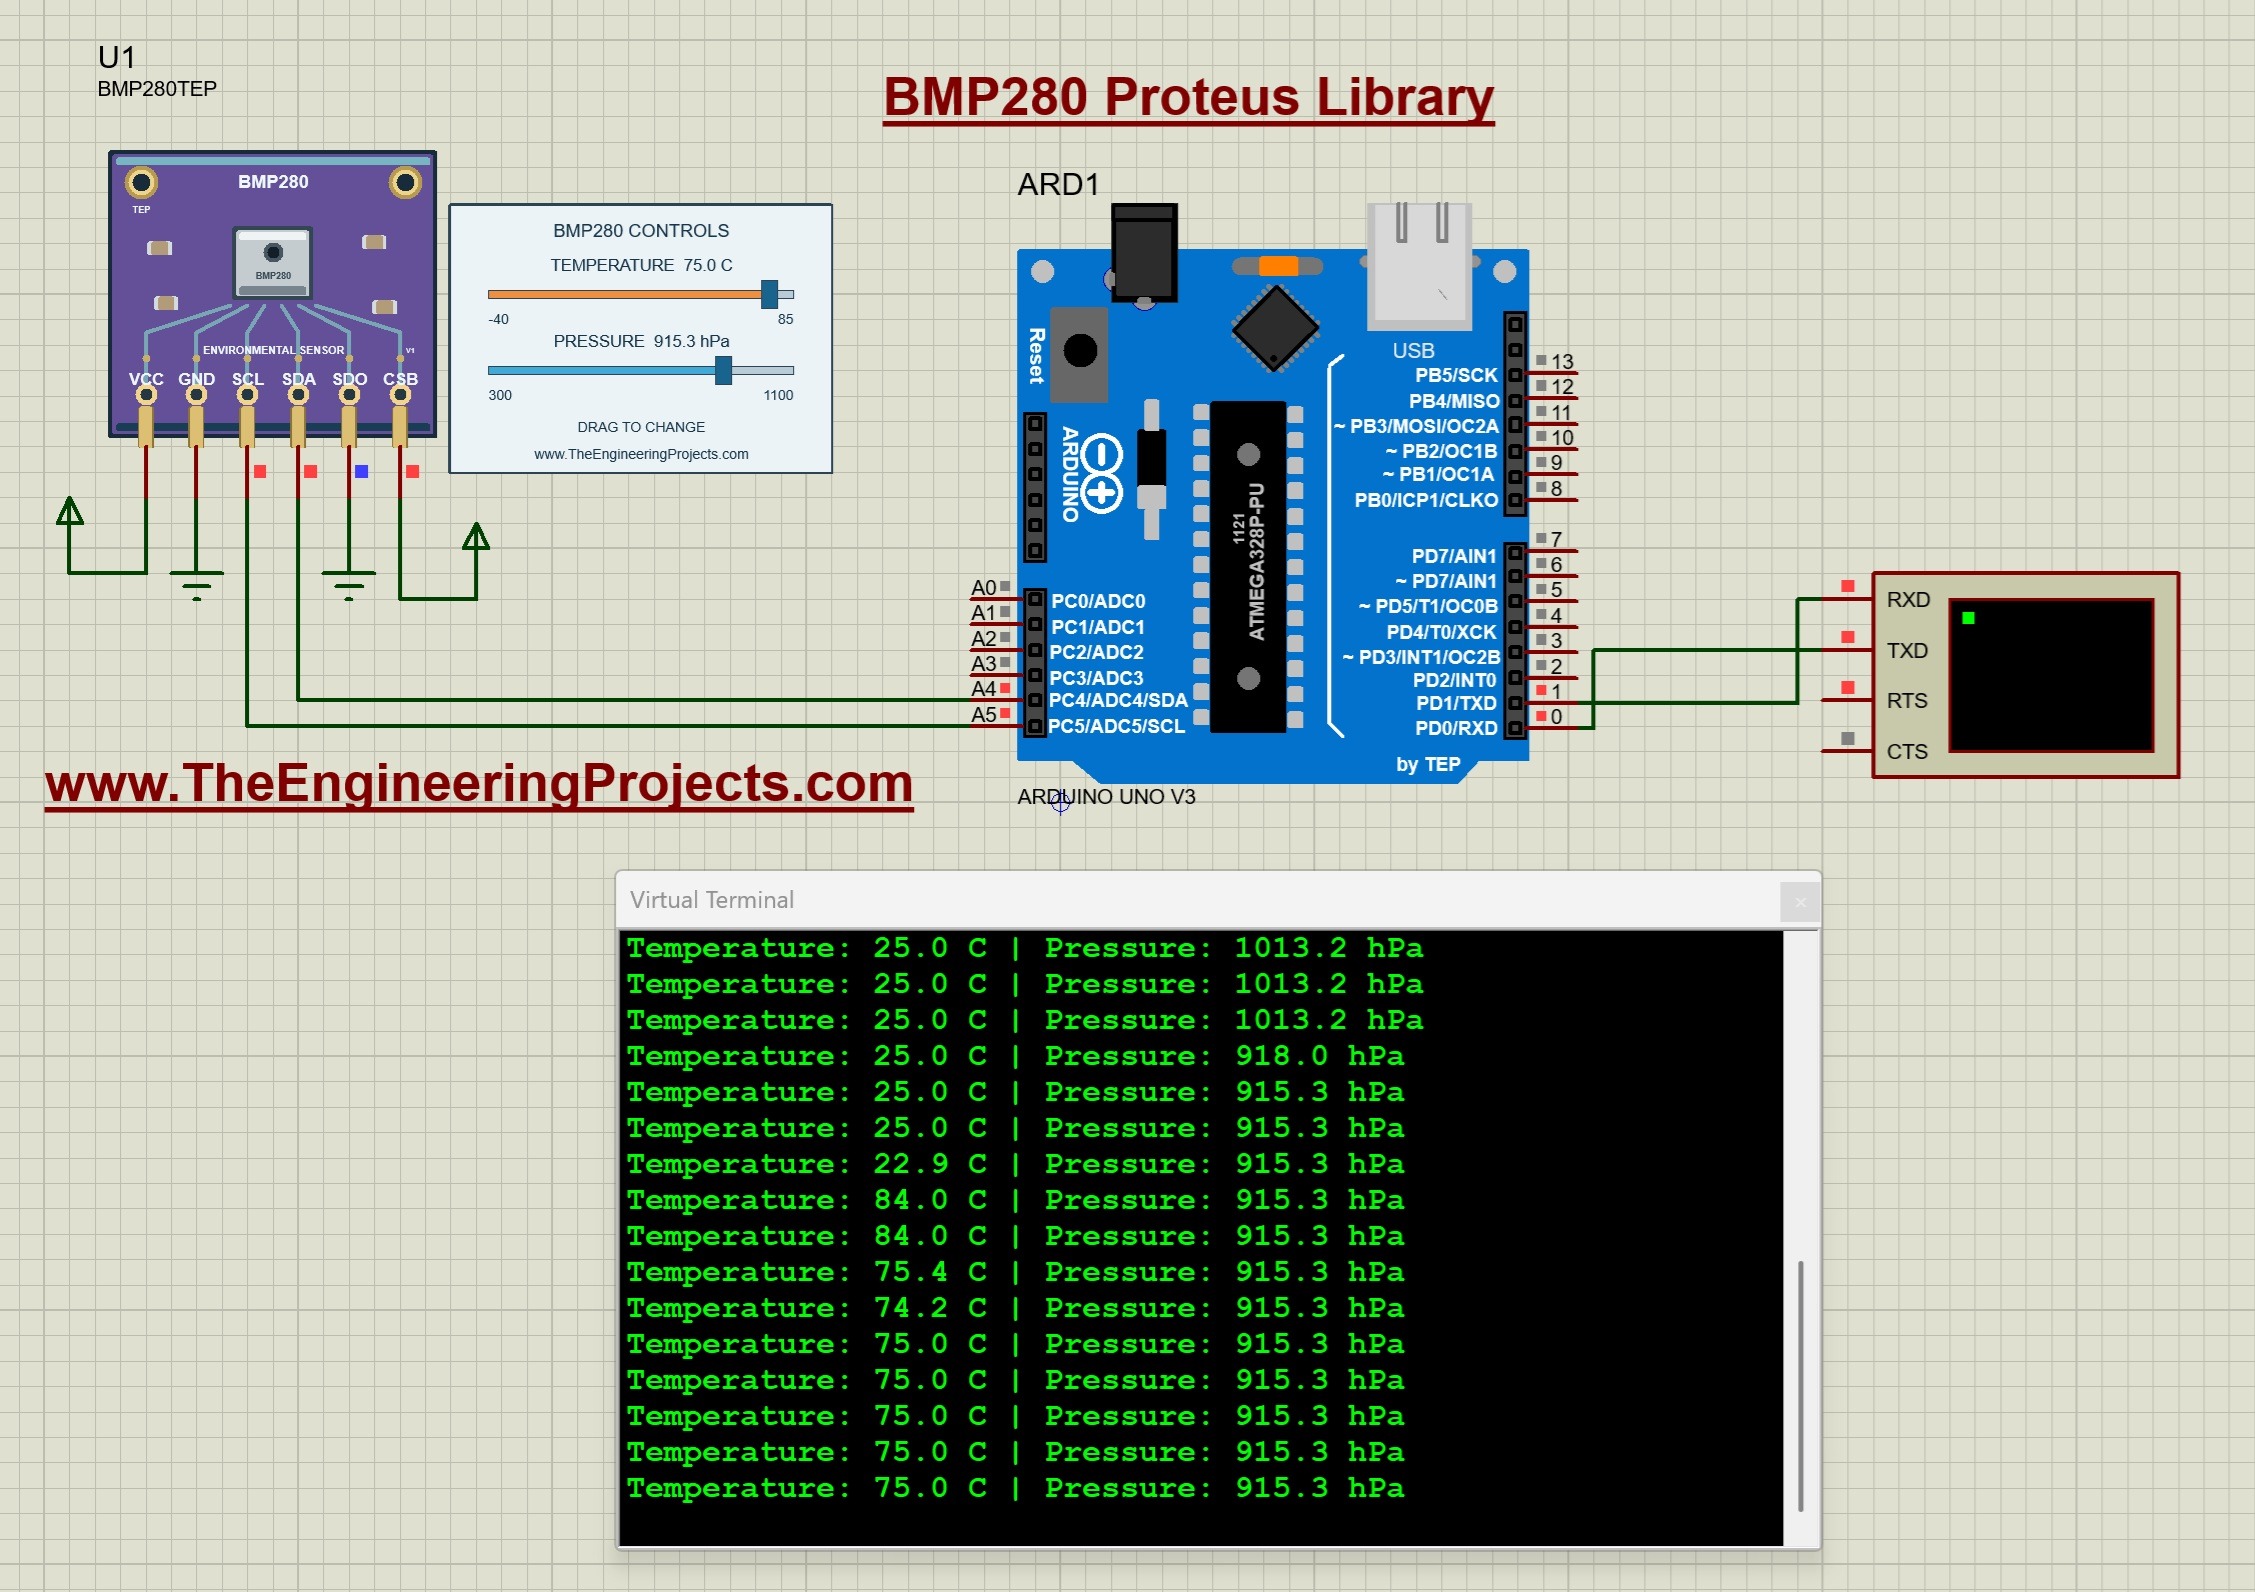
The BMP280 is a barometric pressure and temperature sensor. It is not the same as the BME280: it has no humidity sensor. Its six pins are VCC, GND, SCL, SDA, SDO and CSB, and in the I2C example, SDO and CSB are configuration pins that must be set deliberately. The model's temperature control goes from -40 to +85 C and its pressure control from 300 to 1100 hPa.
The tutorial explains pressure compensation and estimates the altitude with the standard-atmosphere formula altitude = 44330 × [1 - (P / P0)^0.1903]. Read the complete tutorial: BMP280 Proteus Library
7. MAX30102 Pulse Oximeter Proteus Library
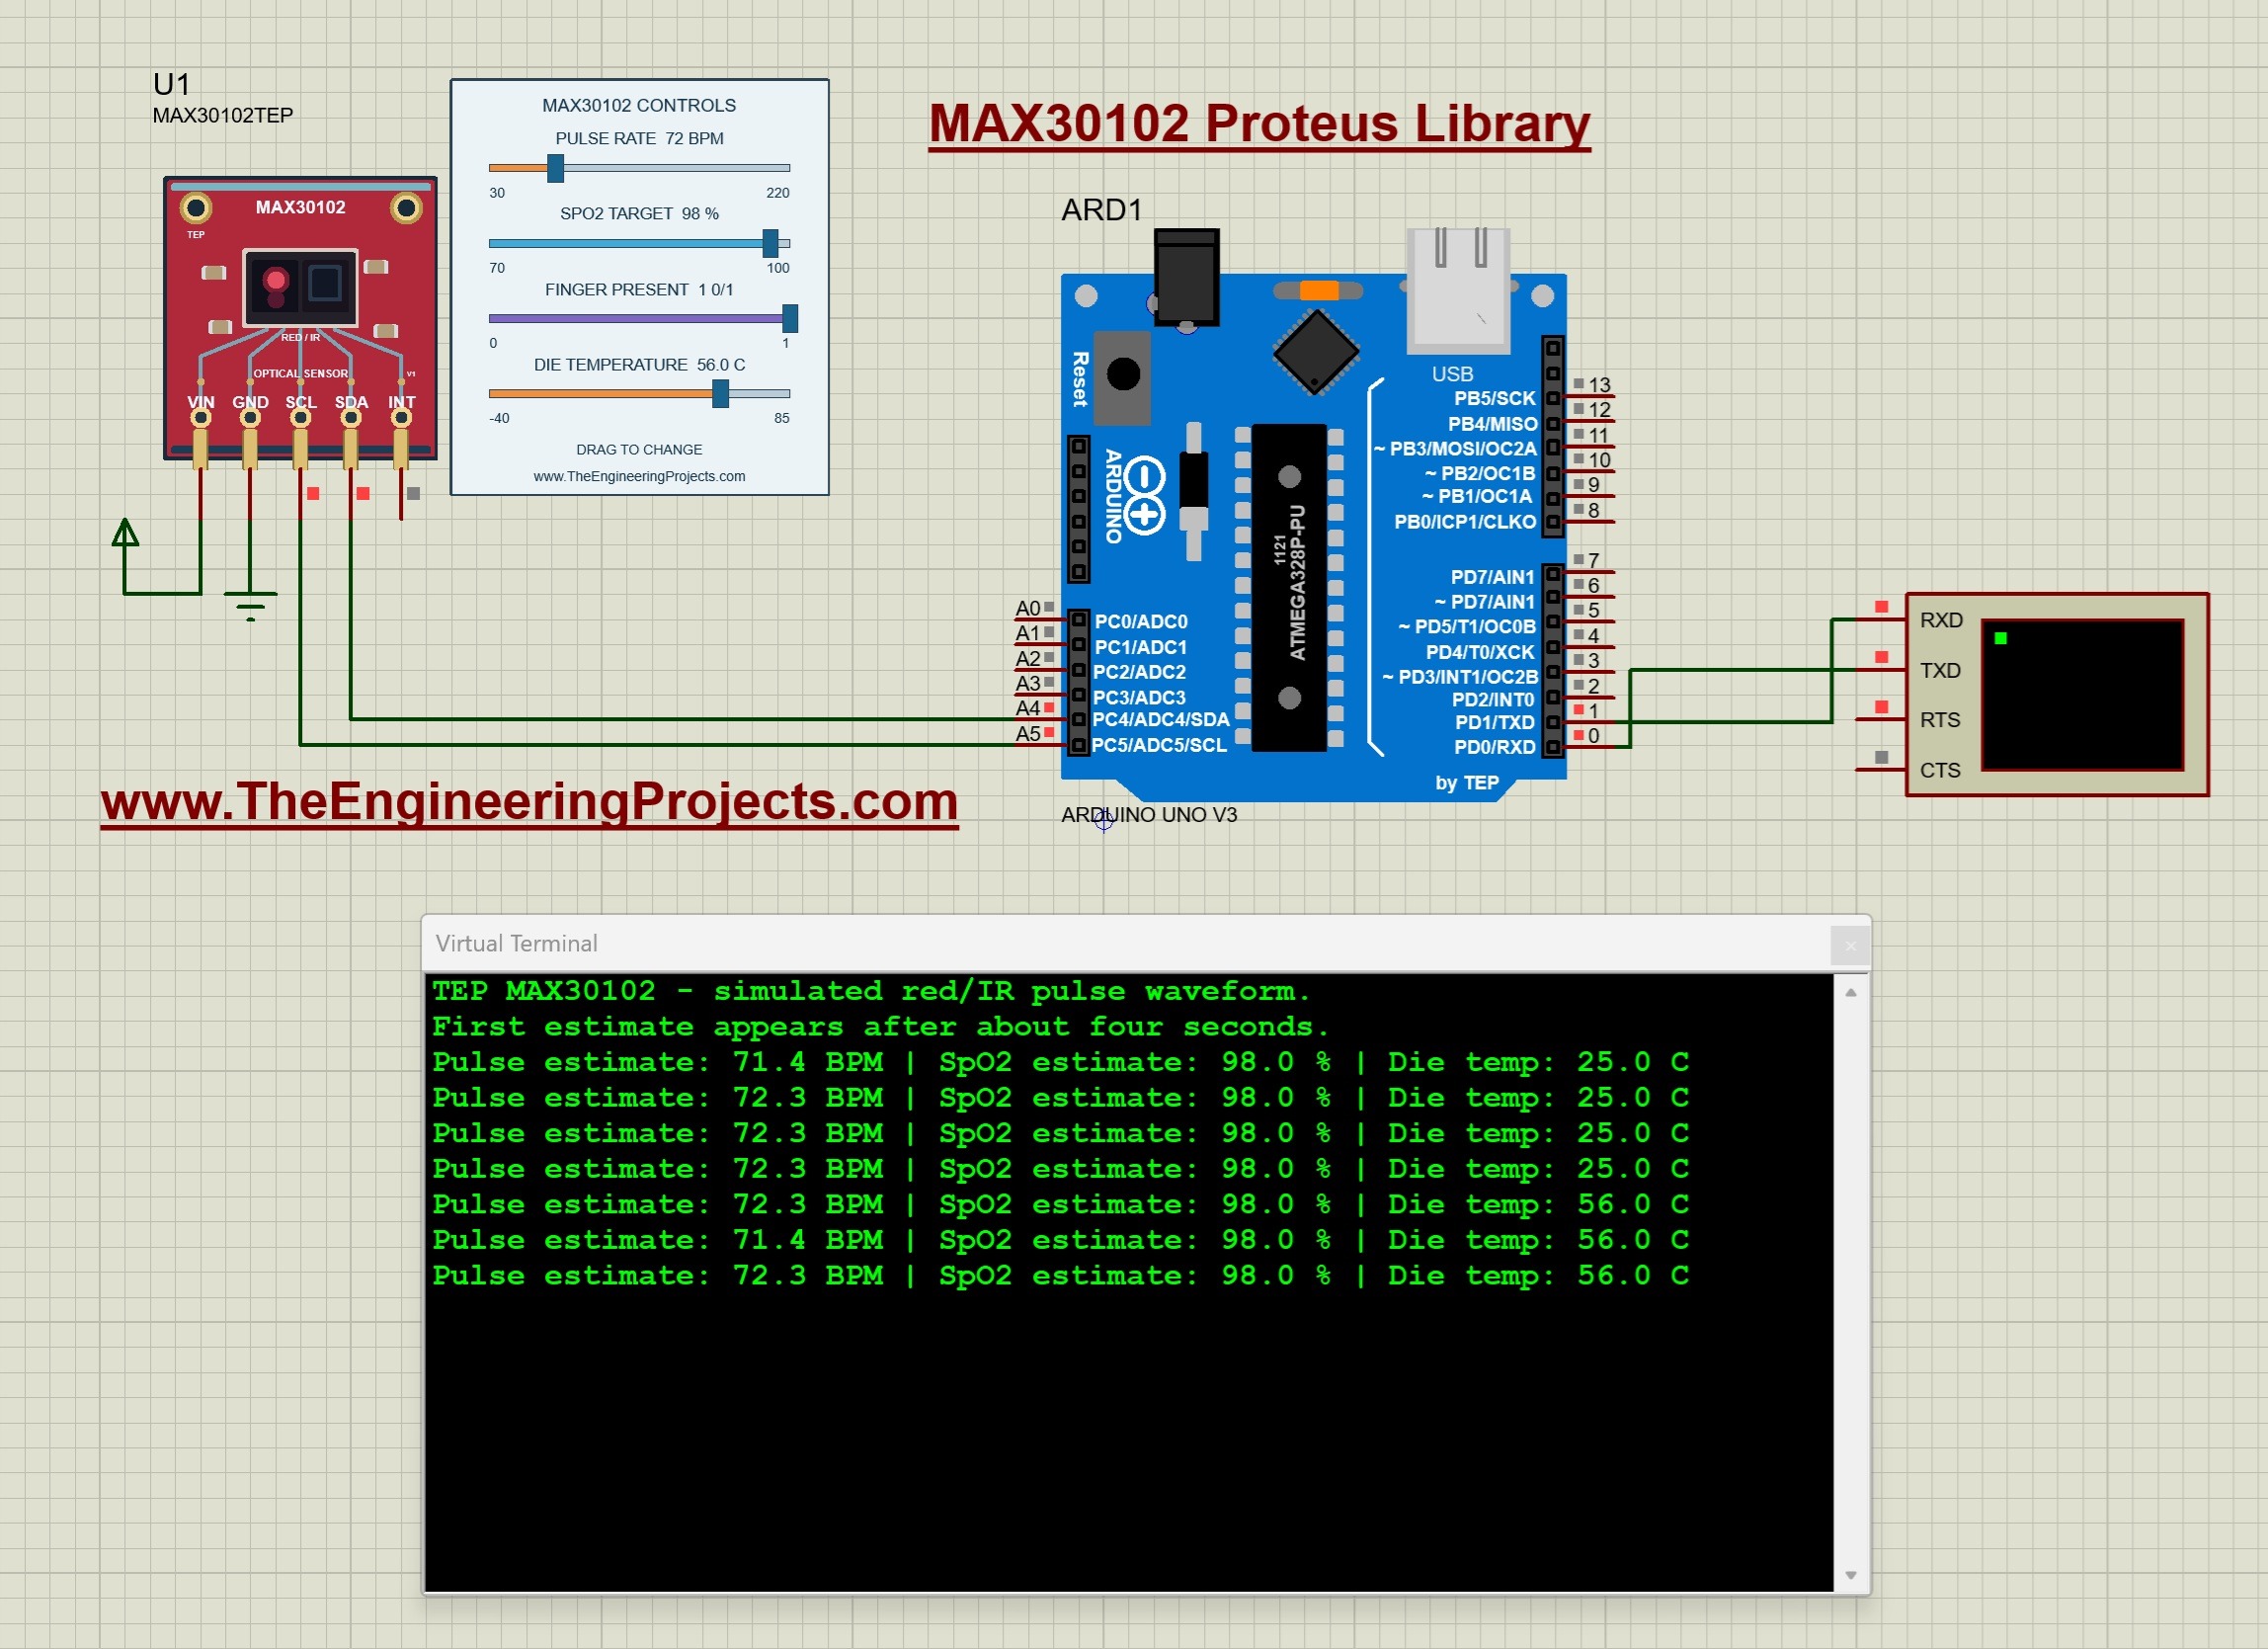
The MAX30102 is the optical sensor of pulse oximeters. It supplies red and infrared samples over I2C, and the microcontroller turns a window of samples into pulse and SpO2 estimates. Its five pins are VIN, GND, SCL, SDA and INT. With the default controls, the pulse target is 72 BPM and the SpO2 target is 98 %, and the first complete estimate appears after about four simulated seconds.
The tutorial explains FIFO sampling, the pulse calculation, the SpO2 estimate and no-finger detection. Please remember that this is for learning the sensor and its code, not for medical use. Read the complete tutorial: MAX30102 Proteus Library
8. MPU6050 Accelerometer and Gyroscope Proteus Library
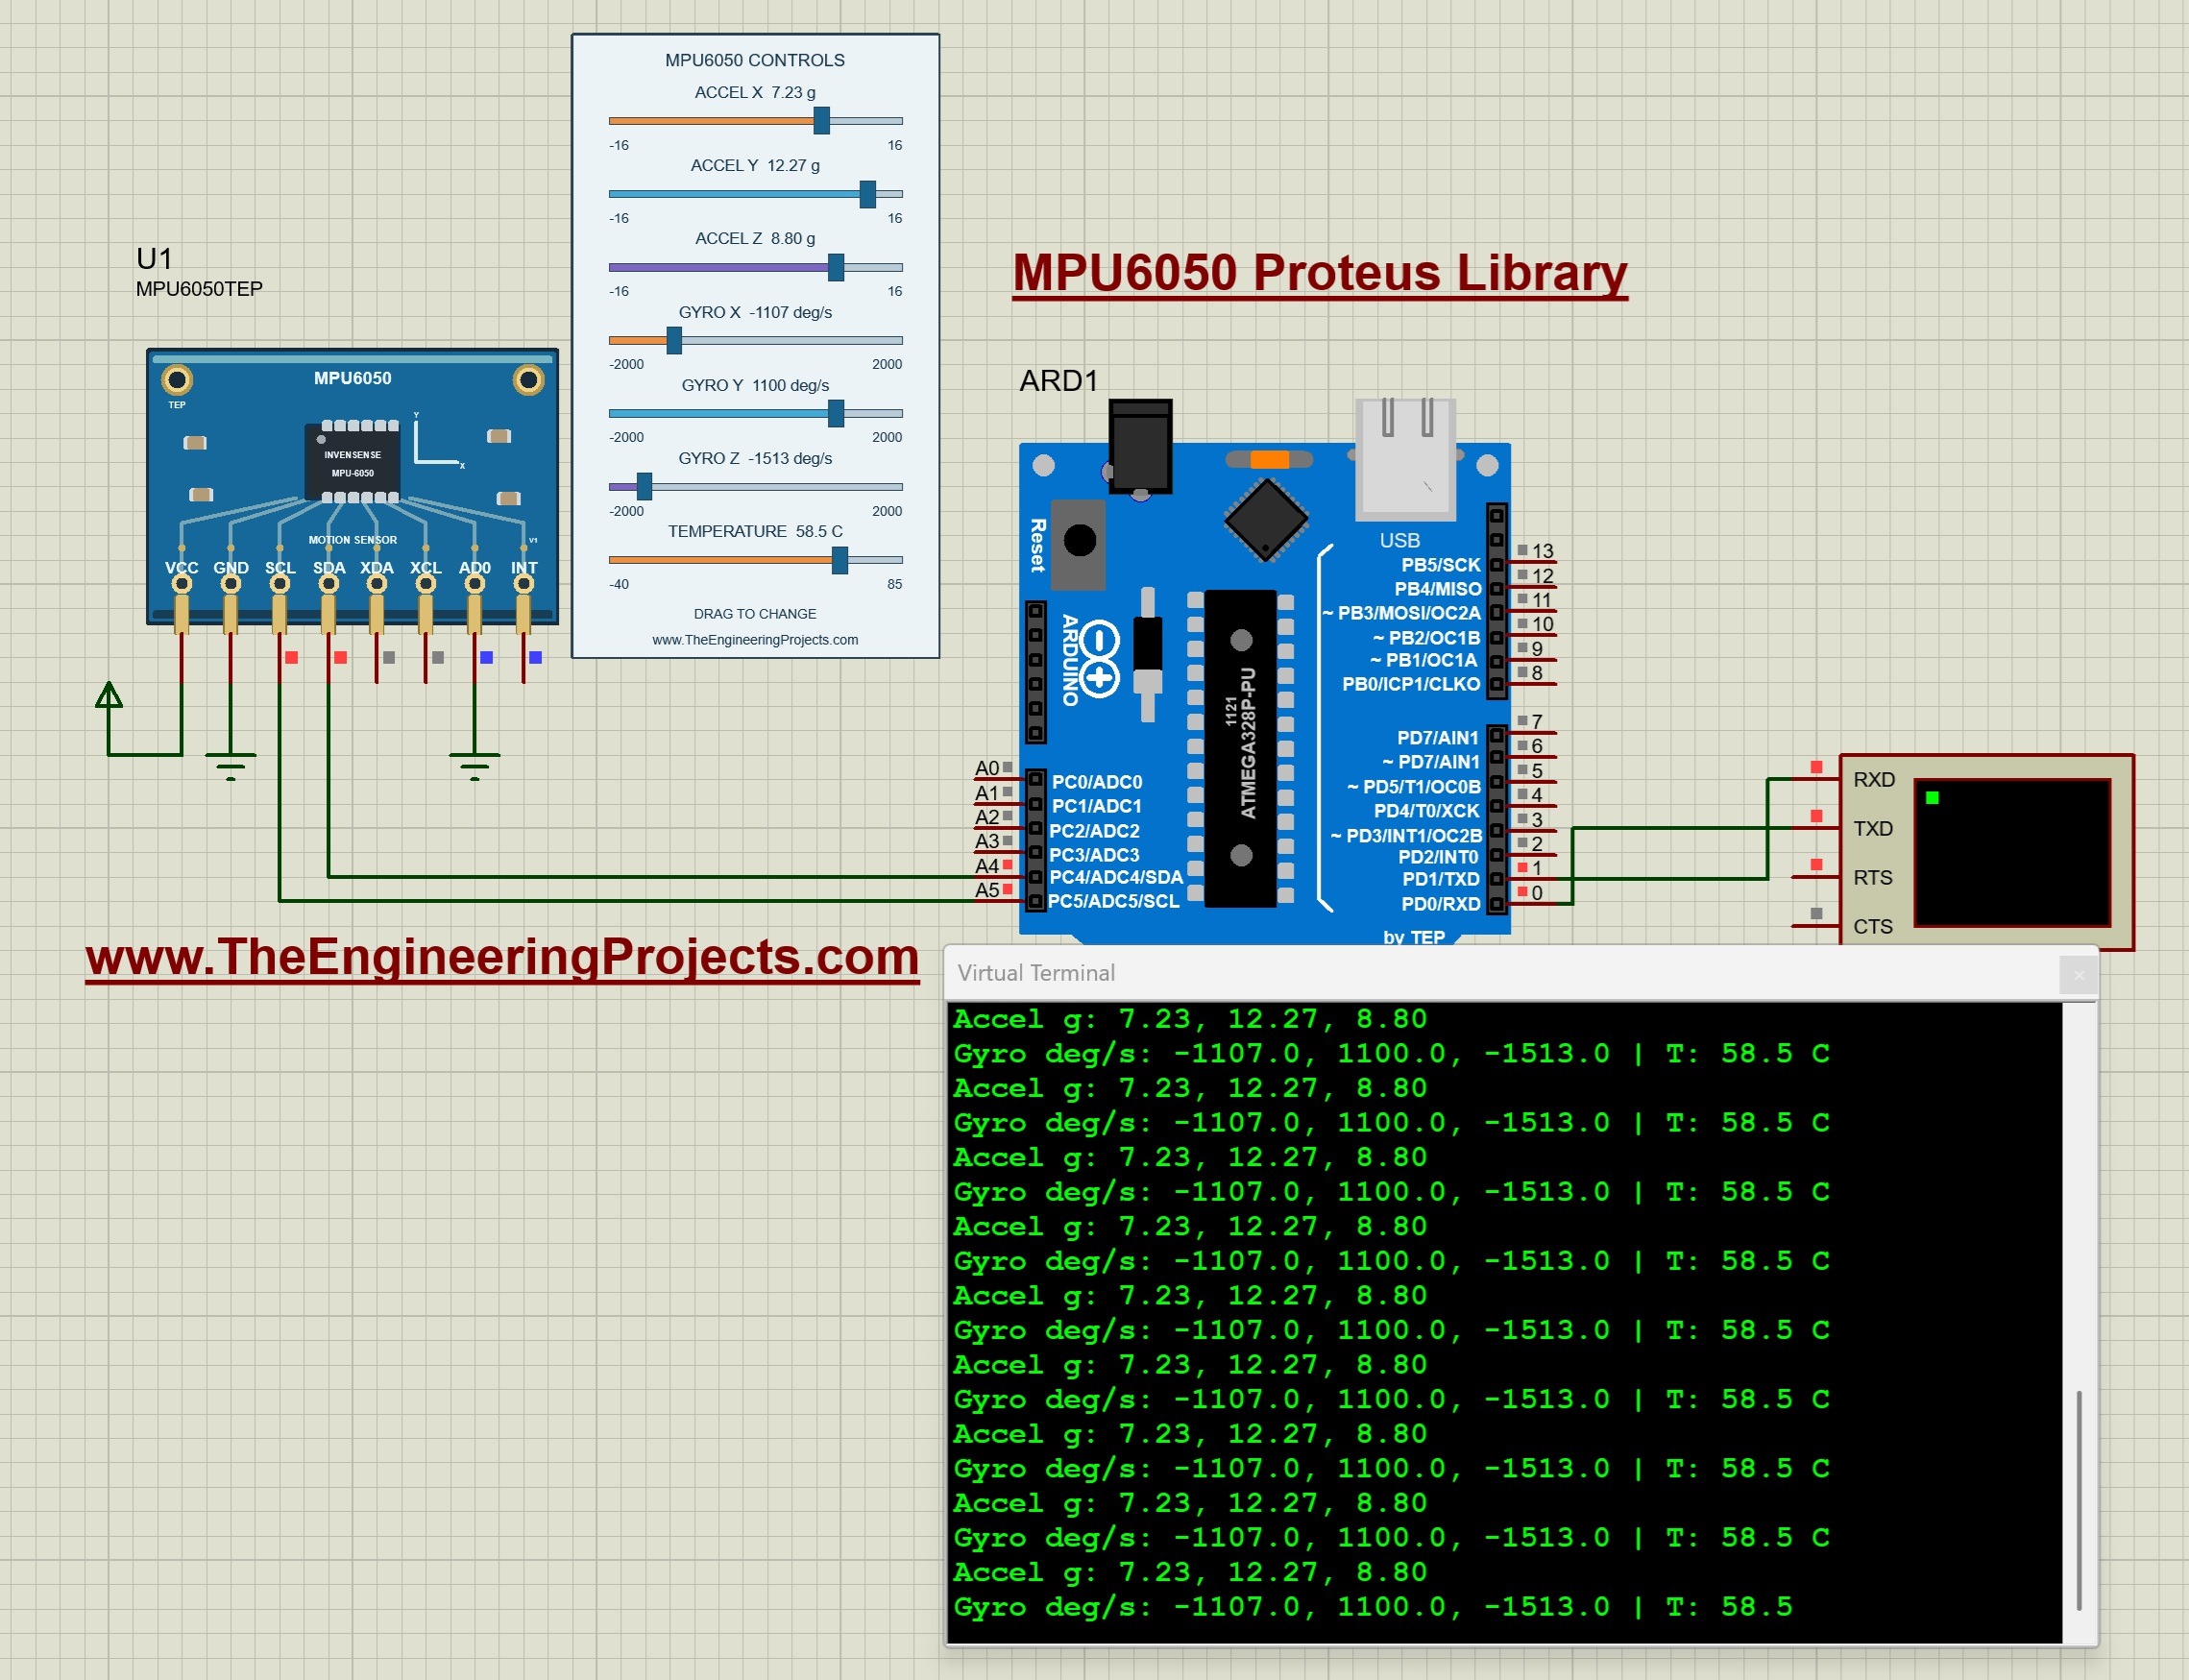
The MPU6050 combines a three-axis accelerometer and a three-axis gyroscope, plus an internal temperature reading. Its eight pins are VCC, GND, SCL, SDA, XDA, XCL, AD0 and INT. Seven controls set the acceleration on X, Y and Z (±16 g, with Z at 1 g by default, like a sensor lying flat), the rotation on X, Y and Z (±2000 °/s) and the temperature.
The tutorial explains raw measurements and scaling, estimates a rotation increment and checks a stationary acceleration vector. Read the complete tutorial: MPU6050 Proteus Library
Using Several I2C Sensors on One Arduino
The best thing about I2C is that all of these sensors can share the same two wires. Each sensor answers only to its own address, so the addresses on one bus must be different. Here are the default addresses of the real chips, from their datasheets:
| Sensor | Default address | Alternative |
|---|---|---|
| BME280 and BMP280 | 0x76 | 0x77 (set by the SDO pin) |
| BH1750 | 0x23 | 0x5C (set by the ADDR pin) |
| SHT31 | 0x44 | 0x45 (set by the ADDR pin) |
| MPU6050 | 0x68 | 0x69 (set by the AD0 pin) |
| VL53L0X | 0x29 | Changed in software, using the XSHUT pin |
| TCS34725 | 0x29 | Fixed |
| MAX30102 | 0x57 | Fixed |
Notice the trap in this table: the VL53L0X and the TCS34725 both use 0x29. If you need both on one bus, hold the VL53L0X in reset with XSHUT, start the TCS34725, then release the VL53L0X and give it a new address in your code. The same idea lets you use several VL53L0X sensors together. Our tutorials use one sensor per example, so when you combine them, test them one by one first and check the address settings of each model. On real hardware, also remember the pull-up resistors on SDA and SCL, which most breakout boards already have.
Which I2C Sensor for Your Project?
- Weather station: the BME280, or the BMP280 with the SHT31 if you need more precise humidity.
- Altitude or floor counter: the BMP280 and its altitude formula.
- Smart lighting: the BH1750 for brightness and the TCS34725 for color.
- Robot distance sensing: the VL53L0X.
- Self-balancing robot or fall detector: the MPU6050.
- Health monitor project: the MAX30102.
You can also send the readings of any of these sensors somewhere else with our Wi-Fi, GSM and LoRa libraries. All of them are listed in our Proteus Libraries tutorial series, and our List of Embedded Sensors in Proteus has all 35 of our sensor libraries.
More Lists of Proteus Libraries
We have grouped our Proteus libraries into several lists, so you can quickly find the right ones for your project:
- 30 New Proteus Libraries for Engineering Students (2026)
- GSM Libraries for Proteus
- GPS Libraries for Proteus
- RF Module Libraries for Proteus
- LoRa and RF Libraries for Proteus
- Wi-Fi and Bluetooth Libraries for Proteus
- List of Wireless Modules for Proteus
- Top IoT Libraries for Proteus
- RFID and NFC Libraries for Proteus
- List of Embedded Sensors in Proteus
- Environmental Sensor Libraries for Proteus
- Motion and Distance Sensor Libraries for Proteus
- Smart Agriculture Sensor Libraries for Proteus
- Medical Sensor Libraries for Proteus
- Must-Have Proteus Libraries for Arduino Simulation
- Microcontroller Board Libraries for Proteus
Conclusion
So, that was all about the I2C Sensor Libraries for Proteus. I hope you enjoy dragging these sliders and watching your Arduino react, and that this list helps you choose the right sensor for your project. If you need another I2C sensor in Proteus, please tell us in the comments or in the Proteus Libraries category of our forum. Till the next tutorial, take care and have fun!