

In order to control the DC Motor, we have to use some drivers in between our Microcontroller and DC Motor. This driver's functionality is to control a 12V DC Motor with a 5V signal from a microcontroller. In today's tutorial, we are gonna use L298 Motor Driver. So, let's get started with How to Control DC Motor with Raspberry Pi 3:
How to Control DC Motor with Raspberry Pi 3
- I have divided this tutorial into four parts, which are:
- Designing of 5V Power Supply.
- L298 Motor Driver Circuit Designing.
- Direction Control of Dc Motor with Raspberry Pi 3.
- Speed Control of DC Motor with Raspberry Pi 3.
- You can download this python File for Controlling of DC Motor with Raspberry Pi 3, by clicking the below button:
- So, let's first design our 5V Power Supply:
1. Designing of 5V Power Supply
- First of all, we need to design a power supply using Voltage Regulator 7805, which will step down our voltage from 12V to 5V.
- We need 12V for our DC Motor and 5V is also required for L298 Motor Driver.
- I am using a 12V adapter so I need to step down this voltage to 5V.
- You can use 5V from Raspberry Pi as well if you don't wanna design this power supply, although it's quite simple.
- For example, if you are designing some robot then you can't place your Laptop on it. In such cases we need to design 5V power supply for our Pi.
- Here's the list of components that are going to be used for this power supply:
- 7805.
- 100uF Capacitor.
- 1000uF Capacitor.
- 1k ohm Resistance.
- 2 Pin Socket.
- Male Header Pins.
- Here's the circuit diagram of our power supply in Proteus, if you wanna read more details about it then you should have a look at How to Design a 5V Power Supply in Proteus.
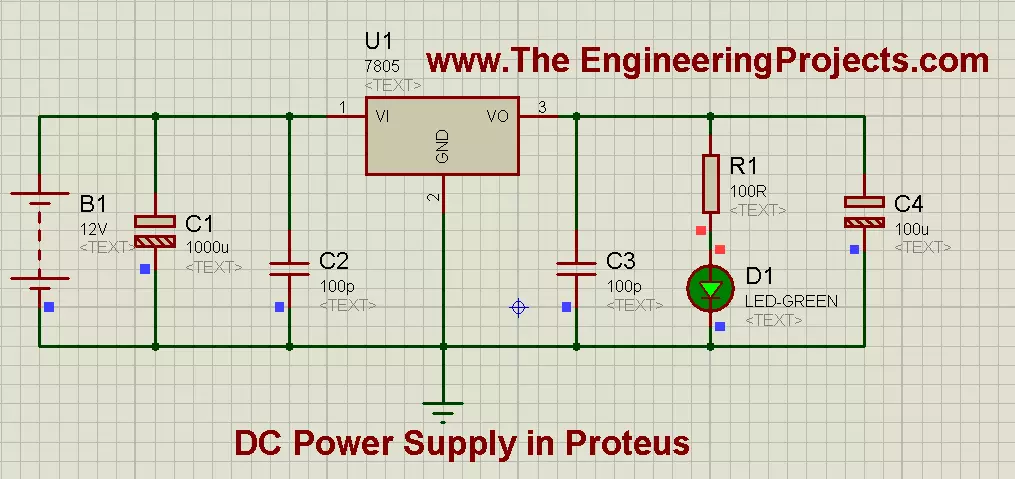
- You can see in above figure that we have used 12V Battery and then used 7805 to get 5V at the output.
- Here's the real circuit which I have designed on wero board:
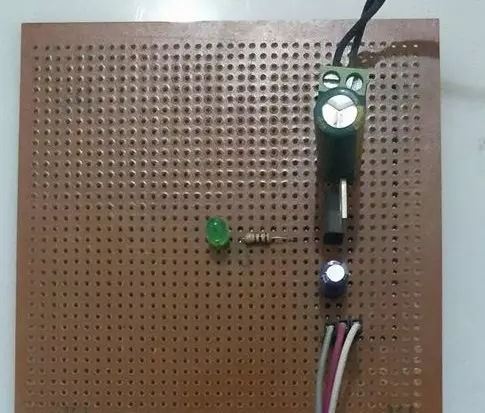
- So, now we have all three voltage levels, which are:
- 12V: White wire.
- 5V: Gray Wire.
- GND ( 0V ): Red Wire.
- The next thing we need to do is, we need to design the Motor driver circuit using L298 Motor Driver:
L298 Motor Driver Circuit
- L298 is an excellent motor driver, you can control two DC Motors with one L298 driver.
- I have used L298 Motor Driver Shield, you can read more about this shield on L298 Motor Driver Library for Proteus.
- Here's the circuit, which I have designed for controlling my DC Motor with Raspberry Pi 3:

- You can quite easily design this circuit as you just need to connect simple jumper wires.
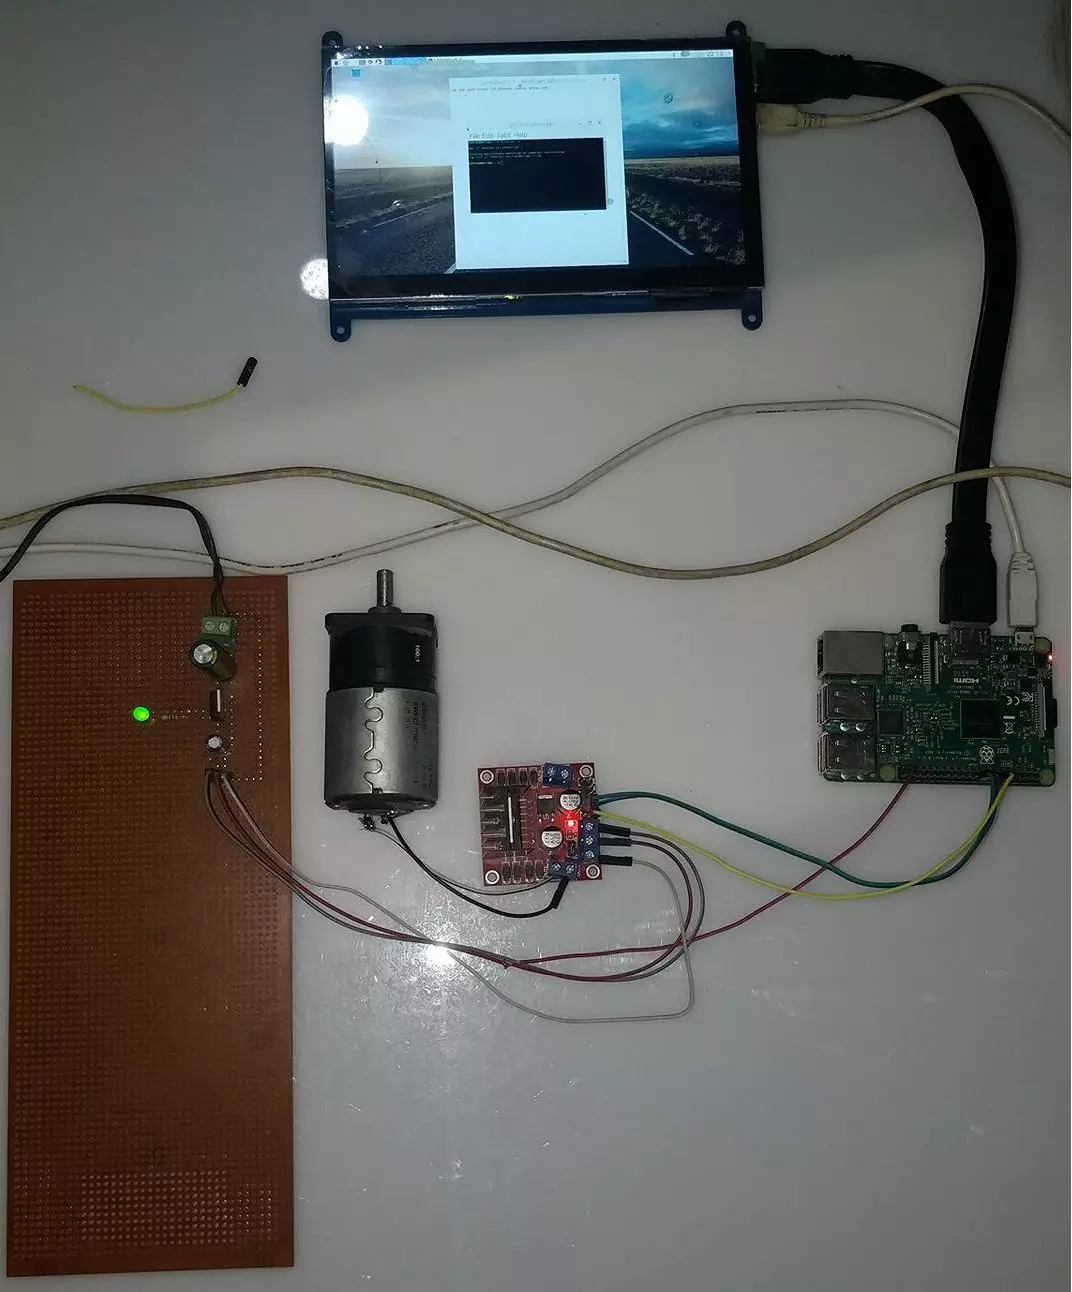
- Here's my real setup with L298 Motor Driver & Raspberry Pi 3:
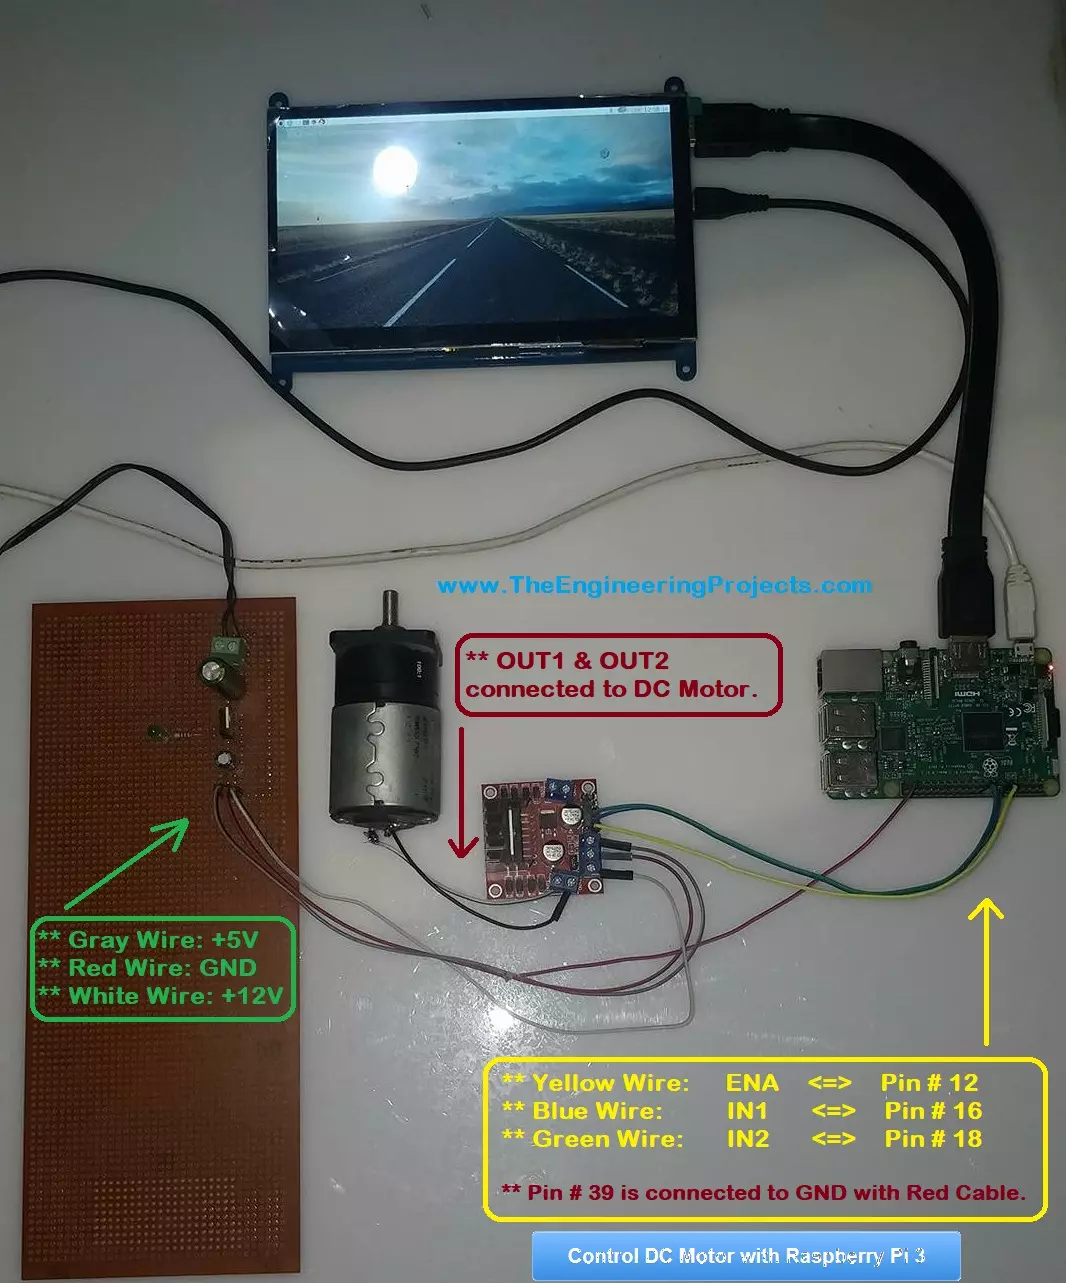
- So, now we are done with our connections and you can see in above figures that we are using these three pins of Raspberry Pi 3:
- Pin # 12: Connected to Enable A.
- Pin # 16: Connected to Input 1.
- Pin # 18: Connected to Input 2.
- The fourth wire is GND, you have to connect the GND of Raspberry Pi 3 with your power supply GND.
- +12V & 5V are provided to the L298 motor driver from our power supply.
- Now let's design our code in python, first, we will control the direction of DC Motor and after that, we will control its speed.
Direction Control of DC Motor with Raspberry Pi 3
- First of all, I am gonna place three Buttons on my GUI and then I will control the direction of my DC Motor with these buttons.
- I have already explained the code in bits in my previous tutorial LEd Blinking with Raspberry Pi 3, so I will not explain it all again but will only cover the new code.
- So, here's our first part of code, where I have done the basic configuration of our pins and GUI:
# ************************************************************************** #
# ****                                                                  **** #
# *********** Code Designed by www.TheEngineeringProjects.com ************** #
# ****                                                                  **** #
# ************** How to Control DC Motor in Raspberry Pi 3 ***************** #
# ****                                                                  **** #
# ************************************************************************** #

# Importing Libraries

import RPi.GPIO as GPIO
import time
from tkinter import *
import tkinter.font

# Libraries Imported successfully

# Raspberry Pi 3 Pin Settings

PWMPin = 12 # PWM Pin connected to ENA.
Motor1 = 16 # Connected to Input 1.
Motor2 = 18 # Connected to Input 2.
GPIO.setwarnings(False)
GPIO.setmode(GPIO.BOARD) # We are accessing GPIOs according to their physical location
GPIO.setup(PWMPin, GPIO.OUT) # We have set our pin mode to output
GPIO.setup(Motor1, GPIO.OUT)
GPIO.setup(Motor2, GPIO.OUT)

GPIO.output(PWMPin, GPIO.LOW) # When it will start then all Pins will be LOW.
GPIO.output(Motor1, GPIO.LOW)
GPIO.output(Motor2, GPIO.LOW)

PwmValue = GPIO.PWM(PWMPin, 2000) # We have set our PWM frequency to 2000.
PwmValue.start(100) # That's the maximum value 100 %.

# Raspberry Pi 3 Pin Settings Completed

# tkinter GUI basic settings

Gui = Tk()
Gui.title("DC Motor Control with Pi 3")
Gui.config(background= "#0080FF")
Gui.minsize(800,300)
Font1 = tkinter.font.Font(family = 'Helvetica', size = 18, weight = 'bold')

# tkinter simple GUI created
- The above code is quite easy to understand, you have seen that I have made the PWM value to maximum as I don't want to change the speed, I just want to control its directions.
- So, now let's add the buttons and Labels on our GUI, here's the code:
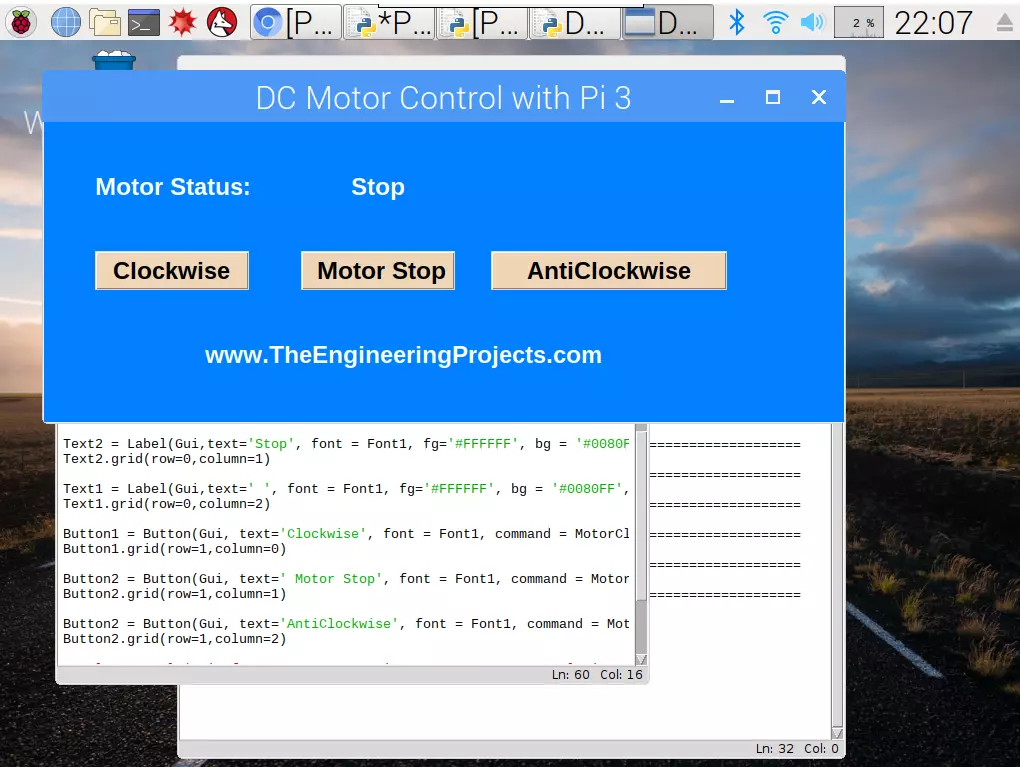
Text1 = Label(Gui,text='Motor Status:', font = Font1, fg='#FFFFFF', bg = '#0080FF', padx = 50, pady = 50)
Text1.grid(row=0,column=0)

Text2 = Label(Gui,text='Stop', font = Font1, fg='#FFFFFF', bg = '#0080FF', padx = 0)
Text2.grid(row=0,column=1)

Text1 = Label(Gui,text=' ', font = Font1, fg='#FFFFFF', bg = '#0080FF', padx = 150, pady = 50)
Text1.grid(row=0,column=2)

Button1 = Button(Gui, text='Clockwise', font = Font1, command = MotorClockwise, bg='bisque2', height = 1, width = 10)
Button1.grid(row=1,column=0)

Button2 = Button(Gui, text=' Motor Stop', font = Font1, command = MotorStop, bg='bisque2', height = 1, width = 10)
Button2.grid(row=1,column=1)

Button2 = Button(Gui, text='AntiClockwise', font = Font1, command = MotorAntiClockwise, bg='bisque2', padx = 50, height = 1, width = 10)
Button2.grid(row=1,column=2)

Text3 = Label(Gui,text='www.TheEngineeringProjects.com', font = Font1, bg = '#0080FF', fg='#FFFFFF', padx = 50, pady = 50)
Text3.grid(row=2,columnspan=2)

Gui.mainloop()
- I have used three Texts in first row, the third text is just used for padding. It's easy that way. :P
- I have placed three buttons in the second row and in the last row we have our site's link.
- Here's the screenshot of this GUI:
- Now, finally, we need to add the functions for these buttons.
- Here's the code for these functions and we need to place that code above our GUI code.
def MotorClockwise():
    GPIO.output(Motor1, GPIO.LOW) # Motor will move in clockwise direction.
    GPIO.output(Motor2, GPIO.HIGH)

def MotorAntiClockwise():
    GPIO.output(Motor1, GPIO.HIGH) # Motor will move in anti-clockwise direction.
    GPIO.output(Motor2, GPIO.LOW)

def MotorStop():
    GPIO.output(Motor1, GPIO.LOW) # Motor will stop.
    GPIO.output(Motor2, GPIO.LOW)
- We have three functions here and simply by toggling the pins of our DC Motor, I have changed it direction.
- In order to stop the DC Motor, I have simply made both the pins LOW.
- Now run your code and if everything goes fine then you will motor will follow your command.
- Here's the screenshot of my system in running form:
- Here's our complete code for DC Motor Direction Control with Raspberry Pi 3, in one piece. :P
# ************************************************************************** #
# ****                                                                  **** #
# *********** Code Designed by www.TheEngineeringProjects.com ************** #
# ****                                                                  **** #
# ************** How to Control DC Motor in Raspberry Pi 3 ***************** #
# ****                                                                  **** #
# ************************************************************************** #

# Importing Libraries

import RPi.GPIO as GPIO
import time
from tkinter import *
import tkinter.font

# Libraries Imported successfully

# Raspberry Pi 3 Pin Settings

PWMPin = 12 # PWM Pin connected to ENA.
Motor1 = 16 # Connected to Input 1.
Motor2 = 18 # Connected to Input 2.
GPIO.setwarnings(False)
GPIO.setmode(GPIO.BOARD) # We are accessing GPIOs according to their physical location
GPIO.setup(PWMPin, GPIO.OUT) # We have set our pin mode to output
GPIO.setup(Motor1, GPIO.OUT)
GPIO.setup(Motor2, GPIO.OUT)

GPIO.output(PWMPin, GPIO.LOW) # When it will start then all Pins will be LOW.
GPIO.output(Motor1, GPIO.LOW)
GPIO.output(Motor2, GPIO.LOW)

PwmValue = GPIO.PWM(PWMPin, 2000) # We have set our PWM frequency to 2000.
PwmValue.start(100) # That's the maximum value 100 %.

# Raspberry Pi 3 Pin Settings Completed

# tkinter GUI basic settings

Gui = Tk()
Gui.title("DC Motor Control with Pi 3")
Gui.config(background= "#0080FF")
Gui.minsize(800,300)
Font1 = tkinter.font.Font(family = 'Helvetica', size = 18, weight = 'bold')

# tkinter simple GUI created

def MotorClockwise():
    GPIO.output(Motor1, GPIO.LOW) # Motor will move in clockwise direction.
    GPIO.output(Motor2, GPIO.HIGH)

def MotorAntiClockwise():
    GPIO.output(Motor1, GPIO.HIGH) # Motor will move in anti-clockwise direction.
    GPIO.output(Motor2, GPIO.LOW)

def MotorStop():
    GPIO.output(Motor1, GPIO.LOW) # Motor will stop.
    GPIO.output(Motor2, GPIO.LOW)

Text1 = Label(Gui,text='Motor Status:', font = Font1, fg='#FFFFFF', bg = '#0080FF', padx = 50, pady = 50)
Text1.grid(row=0,column=0)

Text2 = Label(Gui,text='Stop', font = Font1, fg='#FFFFFF', bg = '#0080FF', padx = 0)
Text2.grid(row=0,column=1)

Text1 = Label(Gui,text=' ', font = Font1, fg='#FFFFFF', bg = '#0080FF', padx = 150, pady = 50)
Text1.grid(row=0,column=2)

Button1 = Button(Gui, text='Clockwise', font = Font1, command = MotorClockwise, bg='bisque2', height = 1, width = 10)
Button1.grid(row=1,column=0)

Button2 = Button(Gui, text=' Motor Stop', font = Font1, command = MotorStop, bg='bisque2', height = 1, width = 10)
Button2.grid(row=1,column=1)

Button2 = Button(Gui, text='AntiClockwise', font = Font1, command = MotorAntiClockwise, bg='bisque2', padx = 50, height = 1, width = 10)
Button2.grid(row=1,column=2)

Text3 = Label(Gui,text='www.TheEngineeringProjects.com', font = Font1, bg = '#0080FF', fg='#FFFFFF', padx = 50, pady = 50)
Text3.grid(row=2,columnspan=3)

Gui.mainloop()
- Now let's have a look at How to Control the Speed of our DC Motor with Raspberry Pi 3.
DC Motor Speed Control with Raspberry Pi 3
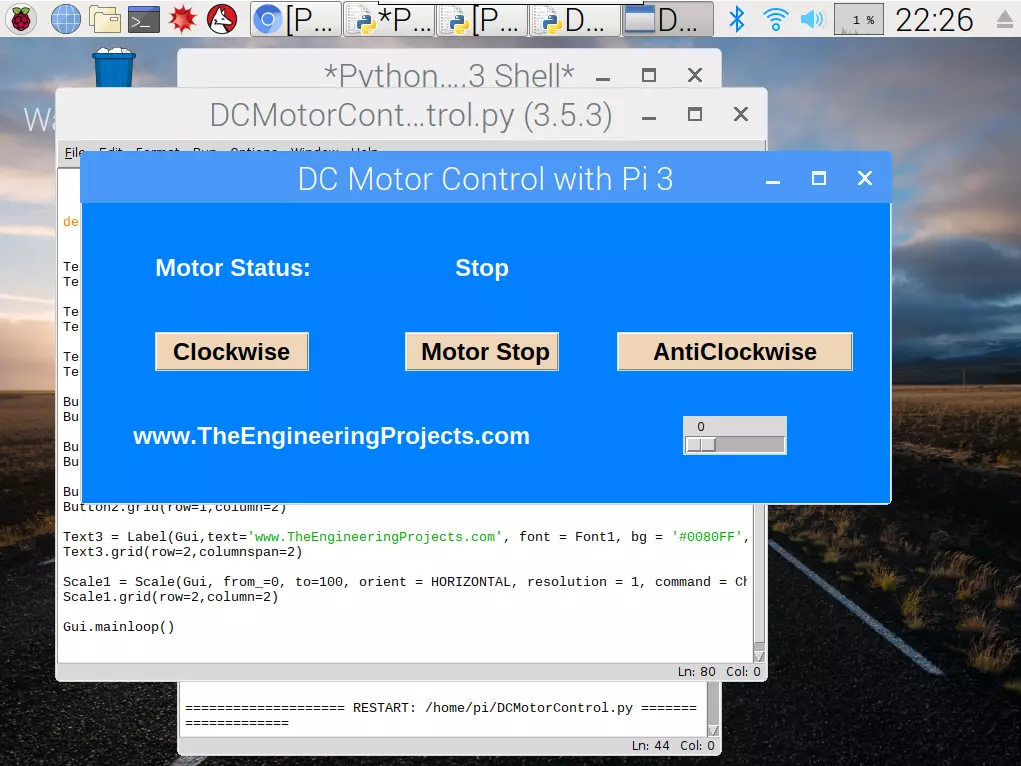
- I'm gonna add a slider in our GUI and with the help of this slider we are gonna change the value of PWM which in turn will change the speed our DC Motor.
- Here's the code for the slider which you need to place below our last Text.
Scale1 = Scale(Gui, from_=0, to=100, orient = HORIZONTAL, resolution = 1, command = ChangePWM)
Scale1.grid(row=2,column=2)
- Now run your GUI and you will get something as shown in below figure:
- Here's the code for the function which will execute when we change the slider value.
def ChangePWM(self):
    PwmValue.ChangeDutyCycle(Scale1.get())
- Now when you will run your simulation and change the value of this slider you will feel a clear change in your DC Motor speed.
- I will also create a video which will give you better understanding of this project.
- Here's our final combined code which will control both speed & direction of our DC Motor.
# ************************************************************************** #
# ****                                                                  **** #
# *********** Code Designed by www.TheEngineeringProjects.com ************** #
# ****                                                                  **** #
# ************** How to Control DC Motor in Raspberry Pi 3 ***************** #
# ****                                                                  **** #
# ************************************************************************** #

# Importing Libraries

import RPi.GPIO as GPIO
import time
from tkinter import *
import tkinter.font

# Libraries Imported successfully

# Raspberry Pi 3 Pin Settings

PWMPin = 12 # PWM Pin connected to ENA.
Motor1 = 16 # Connected to Input 1.
Motor2 = 18 # Connected to Input 2.
GPIO.setwarnings(False)
GPIO.setmode(GPIO.BOARD) # We are accessing GPIOs according to their physical location
GPIO.setup(PWMPin, GPIO.OUT) # We have set our pin mode to output
GPIO.setup(Motor1, GPIO.OUT)
GPIO.setup(Motor2, GPIO.OUT)

GPIO.output(PWMPin, GPIO.LOW) # When it will start then all Pins will be LOW.
GPIO.output(Motor1, GPIO.LOW)
GPIO.output(Motor2, GPIO.LOW)

PwmValue = GPIO.PWM(PWMPin, 2000) # We have set our PWM frequency to 2000.
PwmValue.start(100) # That's the maximum value 100 %.

# Raspberry Pi 3 Pin Settings Completed

# tkinter GUI basic settings

Gui = Tk()
Gui.title("DC Motor Control with Pi 3")
Gui.config(background= "#0080FF")
Gui.minsize(800,300)
Font1 = tkinter.font.Font(family = 'Helvetica', size = 18, weight = 'bold')

# tkinter simple GUI created

def MotorClockwise():
    GPIO.output(Motor1, GPIO.LOW) # Motor will move in clockwise direction.
    GPIO.output(Motor2, GPIO.HIGH)

def MotorAntiClockwise():
    GPIO.output(Motor1, GPIO.HIGH) # Motor will move in anti-clockwise direction.
    GPIO.output(Motor2, GPIO.LOW)

def MotorStop():
    GPIO.output(Motor1, GPIO.LOW) # Motor will stop.
    GPIO.output(Motor2, GPIO.LOW)

def ChangePWM(self):
    PwmValue.ChangeDutyCycle(Scale1.get())

Text1 = Label(Gui,text='Motor Status:', font = Font1, fg='#FFFFFF', bg = '#0080FF', padx = 50, pady = 50)
Text1.grid(row=0,column=0)

Text2 = Label(Gui,text='Stop', font = Font1, fg='#FFFFFF', bg = '#0080FF', padx = 0)
Text2.grid(row=0,column=1)

Text1 = Label(Gui,text=' ', font = Font1, fg='#FFFFFF', bg = '#0080FF', padx = 150, pady = 50)
Text1.grid(row=0,column=2)

Button1 = Button(Gui, text='Clockwise', font = Font1, command = MotorClockwise, bg='bisque2', height = 1, width = 10)
Button1.grid(row=1,column=0)

Button2 = Button(Gui, text=' Motor Stop', font = Font1, command = MotorStop, bg='bisque2', height = 1, width = 10)
Button2.grid(row=1,column=1)

Button2 = Button(Gui, text='AntiClockwise', font = Font1, command = MotorAntiClockwise, bg='bisque2', padx = 50, height = 1, width = 10)
Button2.grid(row=1,column=2)

Text3 = Label(Gui,text='www.TheEngineeringProjects.com', font = Font1, bg = '#0080FF', fg='#FFFFFF', padx = 50, pady = 50)
Text3.grid(row=2,columnspan=2)

Scale1 = Scale(Gui, from_=0, to=100, orient = HORIZONTAL, resolution = 1, command = ChangePWM)
Scale1.grid(row=2,column=2)

Gui.mainloop()
So, that was all for today. I hope you have enjoyed today's tutorial. Let me know if you have any questions. Have a good day. :)
