Hello friends, I hope you all are doing great. Today, I am going to share the new Slide Switch Library for Proteus. A push button tells a circuit that something is happening right now. A slide switch tells it how things should stay: on or off, radio or tape, 3.3 V or 5 V. You slide the knob, and the switch stays where you left it. You will find this little metal part on toys, remote controls and development boards everywhere.
Slide Switch Library for Proteus
Latest version: V1.0 (November 2026, this tutorial)
Other component libraries: C945 Transistor · PC817 Optocoupler · Relay Module · Resistor · 5 mm LED · Designer Colour LED · Push Button · Active Buzzer · Electrolytic Capacitor · Ceramic Capacitor · Tantalum Capacitor · Film Capacitor · 1N4007 Diode · Zener Diode · Schottky Diode · Supercapacitor · Photodiode · RGB LED · Bridge Rectifier · Flashing LED · Bi-Colour LED · SMD LED · Toggle Switch · Rocker Switch · Micro Limit Switch · Emergency Stop Switch · SMD Resistor · Power Resistor · Resistor Network · Potentiometer · Trimmer Potentiometer · Slide Potentiometer · NTC Thermistor · DIP Switch · Fuse · Passive Buzzer · Mini Speaker · 7-Segment Display · LED Bar Graph · IR / UV LED · Small Transistors · TIP122 Darlington · N-MOSFET · P-MOSFET · PC817 Optocoupler · Filament Bulb · Power LED · Voltage Regulator · SCR and TRIAC · Inductor · Toroid Inductor · Crystal
Helping Tools
- Serial Monitor Advance: a serial terminal window for the UART of your board
- Serial Monitor Expert: the serial monitor with extra debugging tools
- LCD Library for Proteus V3.0: 16x2, 20x4 and I2C LCDs to show your readings
Our part is the popular SS12D00, at true scale, with its steel case, black knob and three legs. Click it at Run and the knob really slides, and the sheet keeps that position after you stop the simulation. Inside it behaves like the real thing as well: the contact breaks before it makes, and it bounces on the way in. For the demo, one switch gives a sketch a setting, and another picks between two LEDs with no code at all.
NOTICE: Our team has put a lot of effort into these small parts: the bodies, the animation and the pop-ups are all our own design, and you get them free. Your feedback is the fuel that keeps us going, so please tell us what you think in the comments below or in the Slide Switch board of our forum. And if our free libraries help you, you can buy us a coffee. So, let's get started with the Slide Switch Library for Proteus:
What is a Slide Switch?
A slide switch is a mechanical switch moved by a small knob that slides from side to side. Inside the steel case, a springy metal bridge is carried along by the knob. It rests on two of the three contacts at a time, joining the middle leg to one outer leg or the other. It stays put because a small detent holds it in each position, and that gentle snap is what you feel with your finger.
The part we have drawn is an SPDT switch, which stands for single pole, double throw. A pole is one circuit being switched, and a throw is a place it can go. So one common leg can connect to either of two others. That small part can do more than turn something on and off: it can choose between two things.
| Feature | The real part | In the library |
|---|---|---|
| Case | SS12D00, 8.6 x 4.2 mm | 361 x 176 thou, true scale |
| Legs | three, 2.54 mm apart | the same: 1, C and 3 |
| Rating | about 300 mA at 30 V | the Check page warns over it |
| Contact | a few tens of milliohms | 0.03 ohm, a property |
| Action | slides, and stays | a click moves the knob |
Poles and Throws
Switches are named by these two words, and the table shows the common kinds. It is a short code that tells you exactly what a switch can do, so it is well worth learning.
| Name | Means | What it does |
|---|---|---|
| SPST | single pole, single throw | a simple on and off |
| SPDT | single pole, double throw | one wire picks between two others |
| DPST | double pole, single throw | two wires on and off together |
| DPDT | double pole, double throw | two SPDT switches moved as one |
Using SPDT as a Simple On and Off
An SPDT switch can do the job of an SPST switch. Just use the common leg and one outer leg, and leave the third leg unconnected. This is why so many boards use the 3-leg part even for a plain power switch: it is cheap, it is everywhere, and it covers both jobs.
Two Ways to Read a Switch
Wiring one to an Arduino pin is where an SPDT switch really shines. A push button only ever makes a connection, so the pin needs a pull-up or pull-down resistor for the other state. An SPDT switch can give both. Connect one outer leg to GND, the other to +5V, and the common leg to the pin. Whichever way it goes, the pin sits on a solid LOW or HIGH, with no resistor at all.
| Way of wiring | Left | Right | Extra parts |
|---|---|---|---|
| SPDT, outer legs on GND and +5V | LOW | HIGH | none |
| SPST with a pull-down | LOW | HIGH | a 10k resistor |
| SPST with INPUT_PULLUP | HIGH | LOW | none, but the sense is upside down |
What is Break Before Make?
Inside the switch, the moving bridge has to lift off one contact before it lands on the other. For a moment, the common leg is connected to nothing at all. That is called break before make. It is what you want here, since a switch that made first would short your +5V to GND for an instant, every time you moved it. Some special switches do make before break, and they are used where a signal must never be interrupted, but this is not one of those.
This does mean that for a few milliseconds, the common leg floats. In our demo that is harmless. If it worries you, a 100k resistor from the common leg to GND holds it down during the gap. And of course the contact bounces when it lands, exactly as our Push Button Library for Proteus showed, so the sketch still needs a small debounce.
Where Are They Used?
Look on any development board and you may find one. Boards use them to pick a supply voltage, to select a boot mode, or to connect a battery. Toys use them as power switches. Older hi-fi equipment used larger ones to pick bass and treble ranges. Slide switches are cheap and simple, and their knob shows the setting at a glance. Their weakness is the open slot in the case, which lets in dust and moisture, so they are not the choice for rough places.
The Two-Way Light Switch
Here is a lovely use of SPDT that is probably in your own home. A light on the stairs has a switch at the top and another at the bottom, and either one can turn it on or off. Each switch is an SPDT part. Two wires run between their outer legs, the supply comes to the common leg of one, and the lamp hangs on the common leg of the other. Flipping either switch changes which of the two wires is in use, so the circuit is made or broken. No logic is needed at all, just two throws working together.
Slide, Toggle or Rocker?
Three common styles of switch do much the same electrical job, and the choice is mostly about the hand. A slide switch sits flat, so it is good for a setting you change rarely, and it is hard to knock by accident. A toggle has a long lever that you can find by feel, and it looks professional on a panel. A rocker has a wide flat face, so it suits a mains power switch, and it can carry far more current. We have made libraries for those two as well.
When a Switch Should Be a Button
A slide switch remembers its position, which is both its strength and its weakness. If a sketch can change a setting by itself, or from a phone, then the knob can end up showing the wrong thing. That is why modern products often use a push button and a small display in place of a switch. A slide switch is at its best when the setting truly belongs to the hardware, such as the supply voltage of a board, where the position must be right before the power even comes on.
Reading Many Switches
Each switch takes one pin, which adds up. To read many, you can use a shift register such as the 74HC165, which collects up to eight switches and passes them in over three wires. Another trick is to send several switches through different resistors to one analog pin, so that each combination gives a different voltage. For a row of small settings on a board, a DIP switch packs eight of them into one part.
Features of the Slide Switch Library for Proteus
- The real look, at true scale: the steel case, the black knob and three legs, with our small TEP signature.
- Click to flip: a click on the switch moves the knob, at Run.
- It stays where you leave it: the position stays after Stop, and you can pick it while stopped too.
- True contact behaviour: a small resistance closed, break before make, and real contact bounce.
- A live path: the pop-up draws the contacts, and shows which way the common leg is joined.
- A true analog part: it works with any circuit, not only with logic.
- A pop-up for every part: click the small dot at Run for the contacts, eight live values, graphs, an event log and a check page.
- A complete package: about 1.8 MB with the library, our Arduino UNO V4.0, the demo's resistors and LEDs and the demo, without the source code of the models.
The Slide Switch in Proteus
The device is SWITCHSLIDETEP in TEPSLIDE.LIB, under Switches and Relays, Switches, with the prefix SW and the model TEPSLIDE.DLL. Search SWITCHSLIDE in Pick Devices. The pins are 1, C and 3.
Click It, or Open It
A click anywhere on the case or knob flips the switch while the simulation runs. A click on the small round dot in the corner of the case opens the pop-up instead.
The Properties
| Property | What it does |
|---|---|
| Contact resistance, ohm | the closed contact, 0.03 ohm by default |
| Contact bounce, ms | how long it chatters, 3 ms by default; 0 is a perfect contact |
| Position while stopped | Left or Right: where the knob starts |
Download Slide Switch Library for Proteus
Click the button below to download Slide-Switch-Library-for-Proteus-v1.0.zip (about 1.8 MB, without the source code of the models):
Slide Switch Library for Proteus V1.0- README.txt: installation, the demo, the properties, troubleshooting and the limits.
- Proteus Library Files:
TEPSLIDE.LIB,TEPRESISTOR.LIB,TEPLED5MM.LIBand ourArduinoV4TEP.LIB. - Proteus Model Files:
TEPSLIDE.DLL,TEPRESISTOR.DLL,TEPLED5MM.DLLandTEPARDUINO.DLL. - Arduino Code: the demo sketch.
- Proteus Simulation: the demo project, its HEX file and copies of the DLLs.
No Proteus yet? Read How to Download and Install Proteus 7 and 8. New to libraries? Follow How to Install a New Library in Proteus.
How to Install Slide Switch Library for Proteus
- Close Proteus and extract the whole zip file, for example to your Desktop.
- Copy the files from Proteus Library Files into the LIBRARY folder of Proteus.
- Copy the files from Proteus Model Files into the MODELS folder.
- Delete
TEPSLIDE.IDXfrom the LIBRARY folder if it is there. - Start Proteus, press P and search for SWITCHSLIDE.
Demo: Two Jobs for a Slide Switch
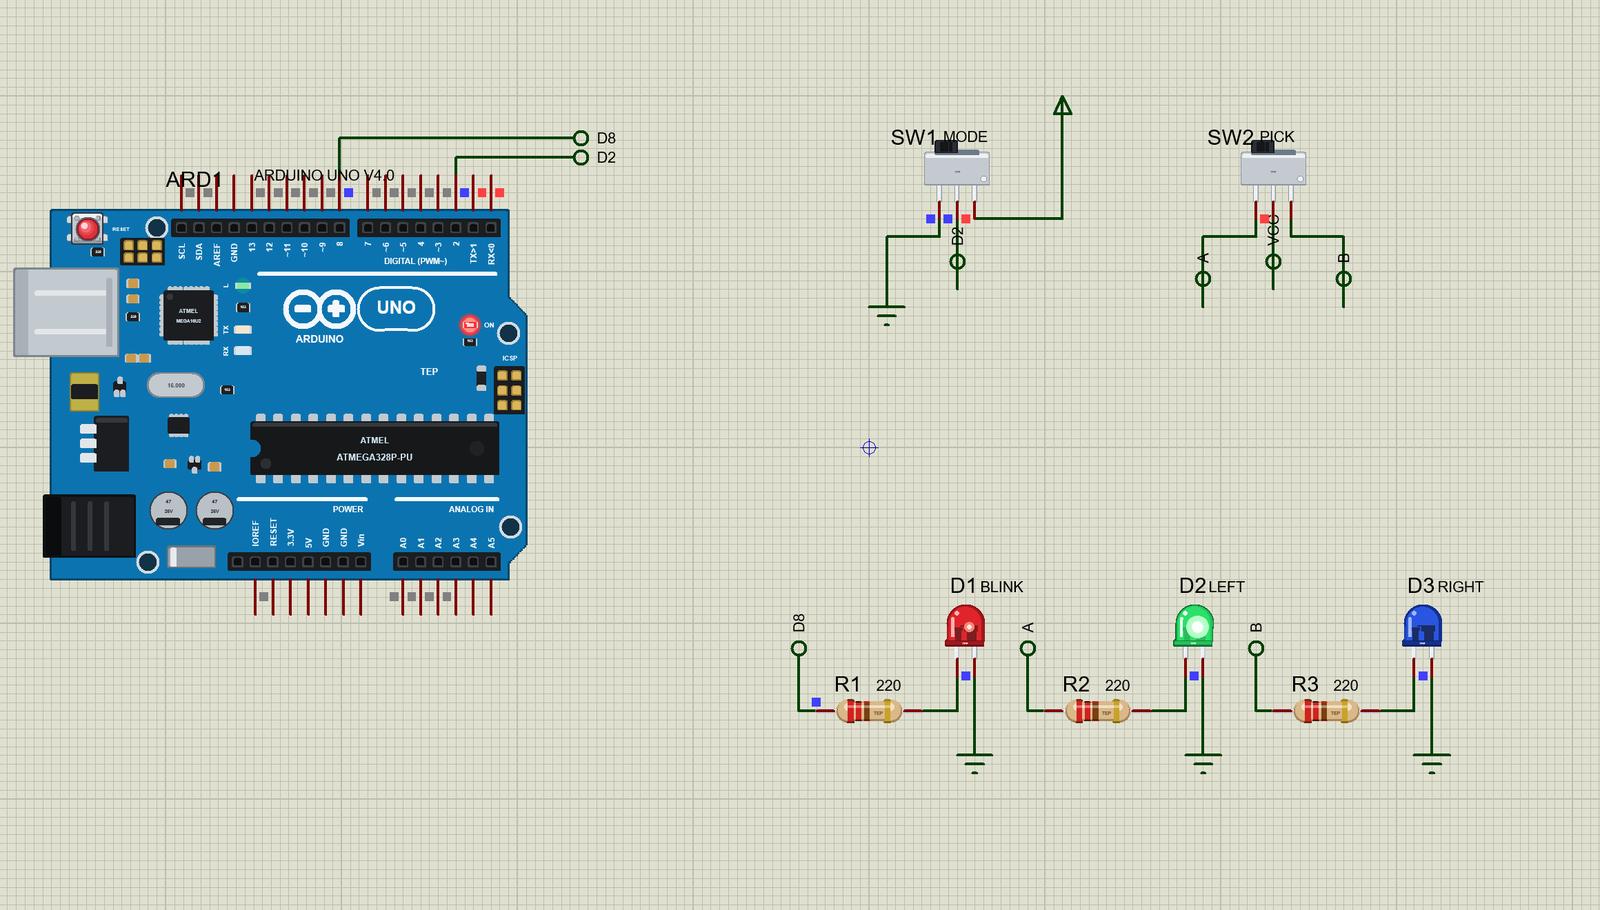
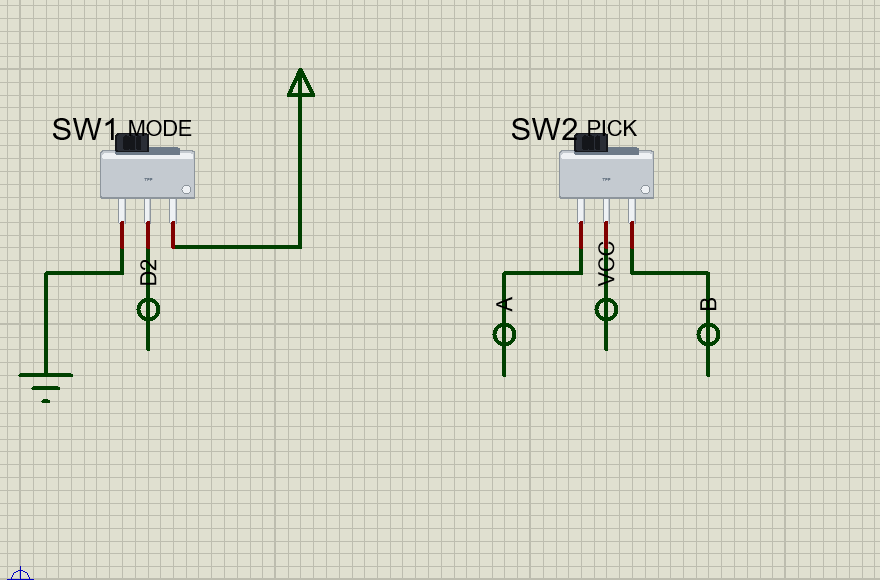
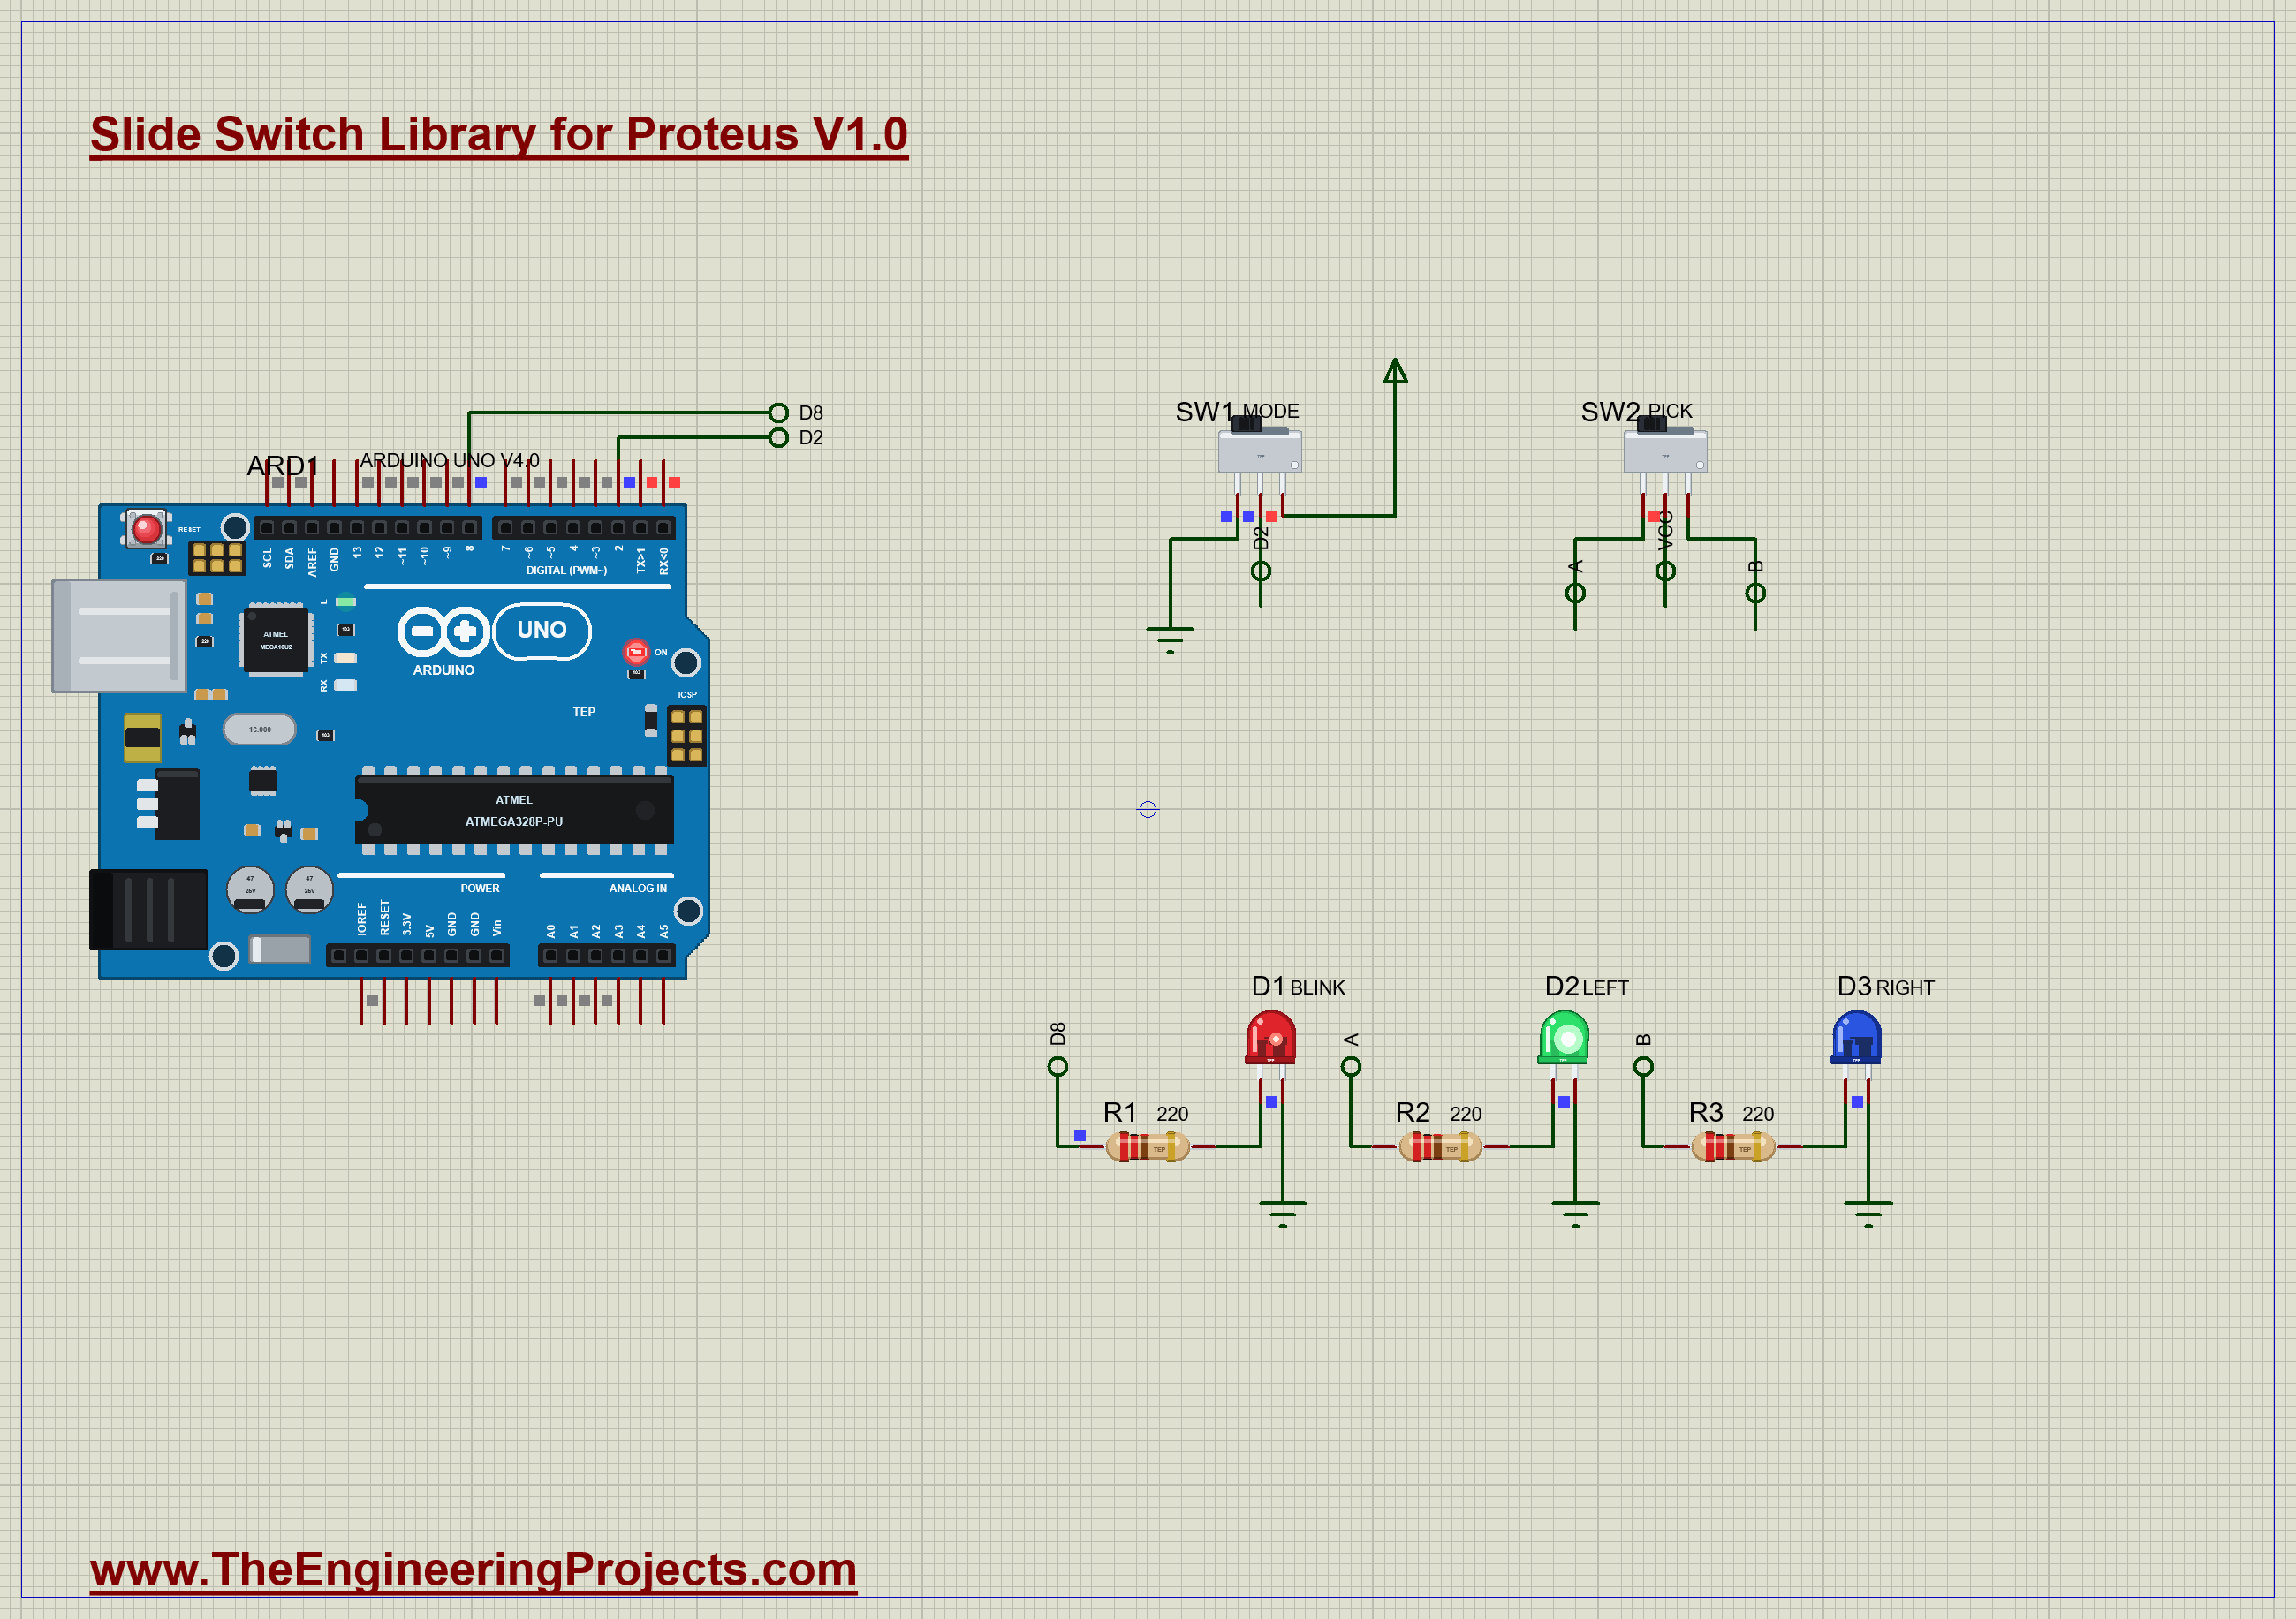
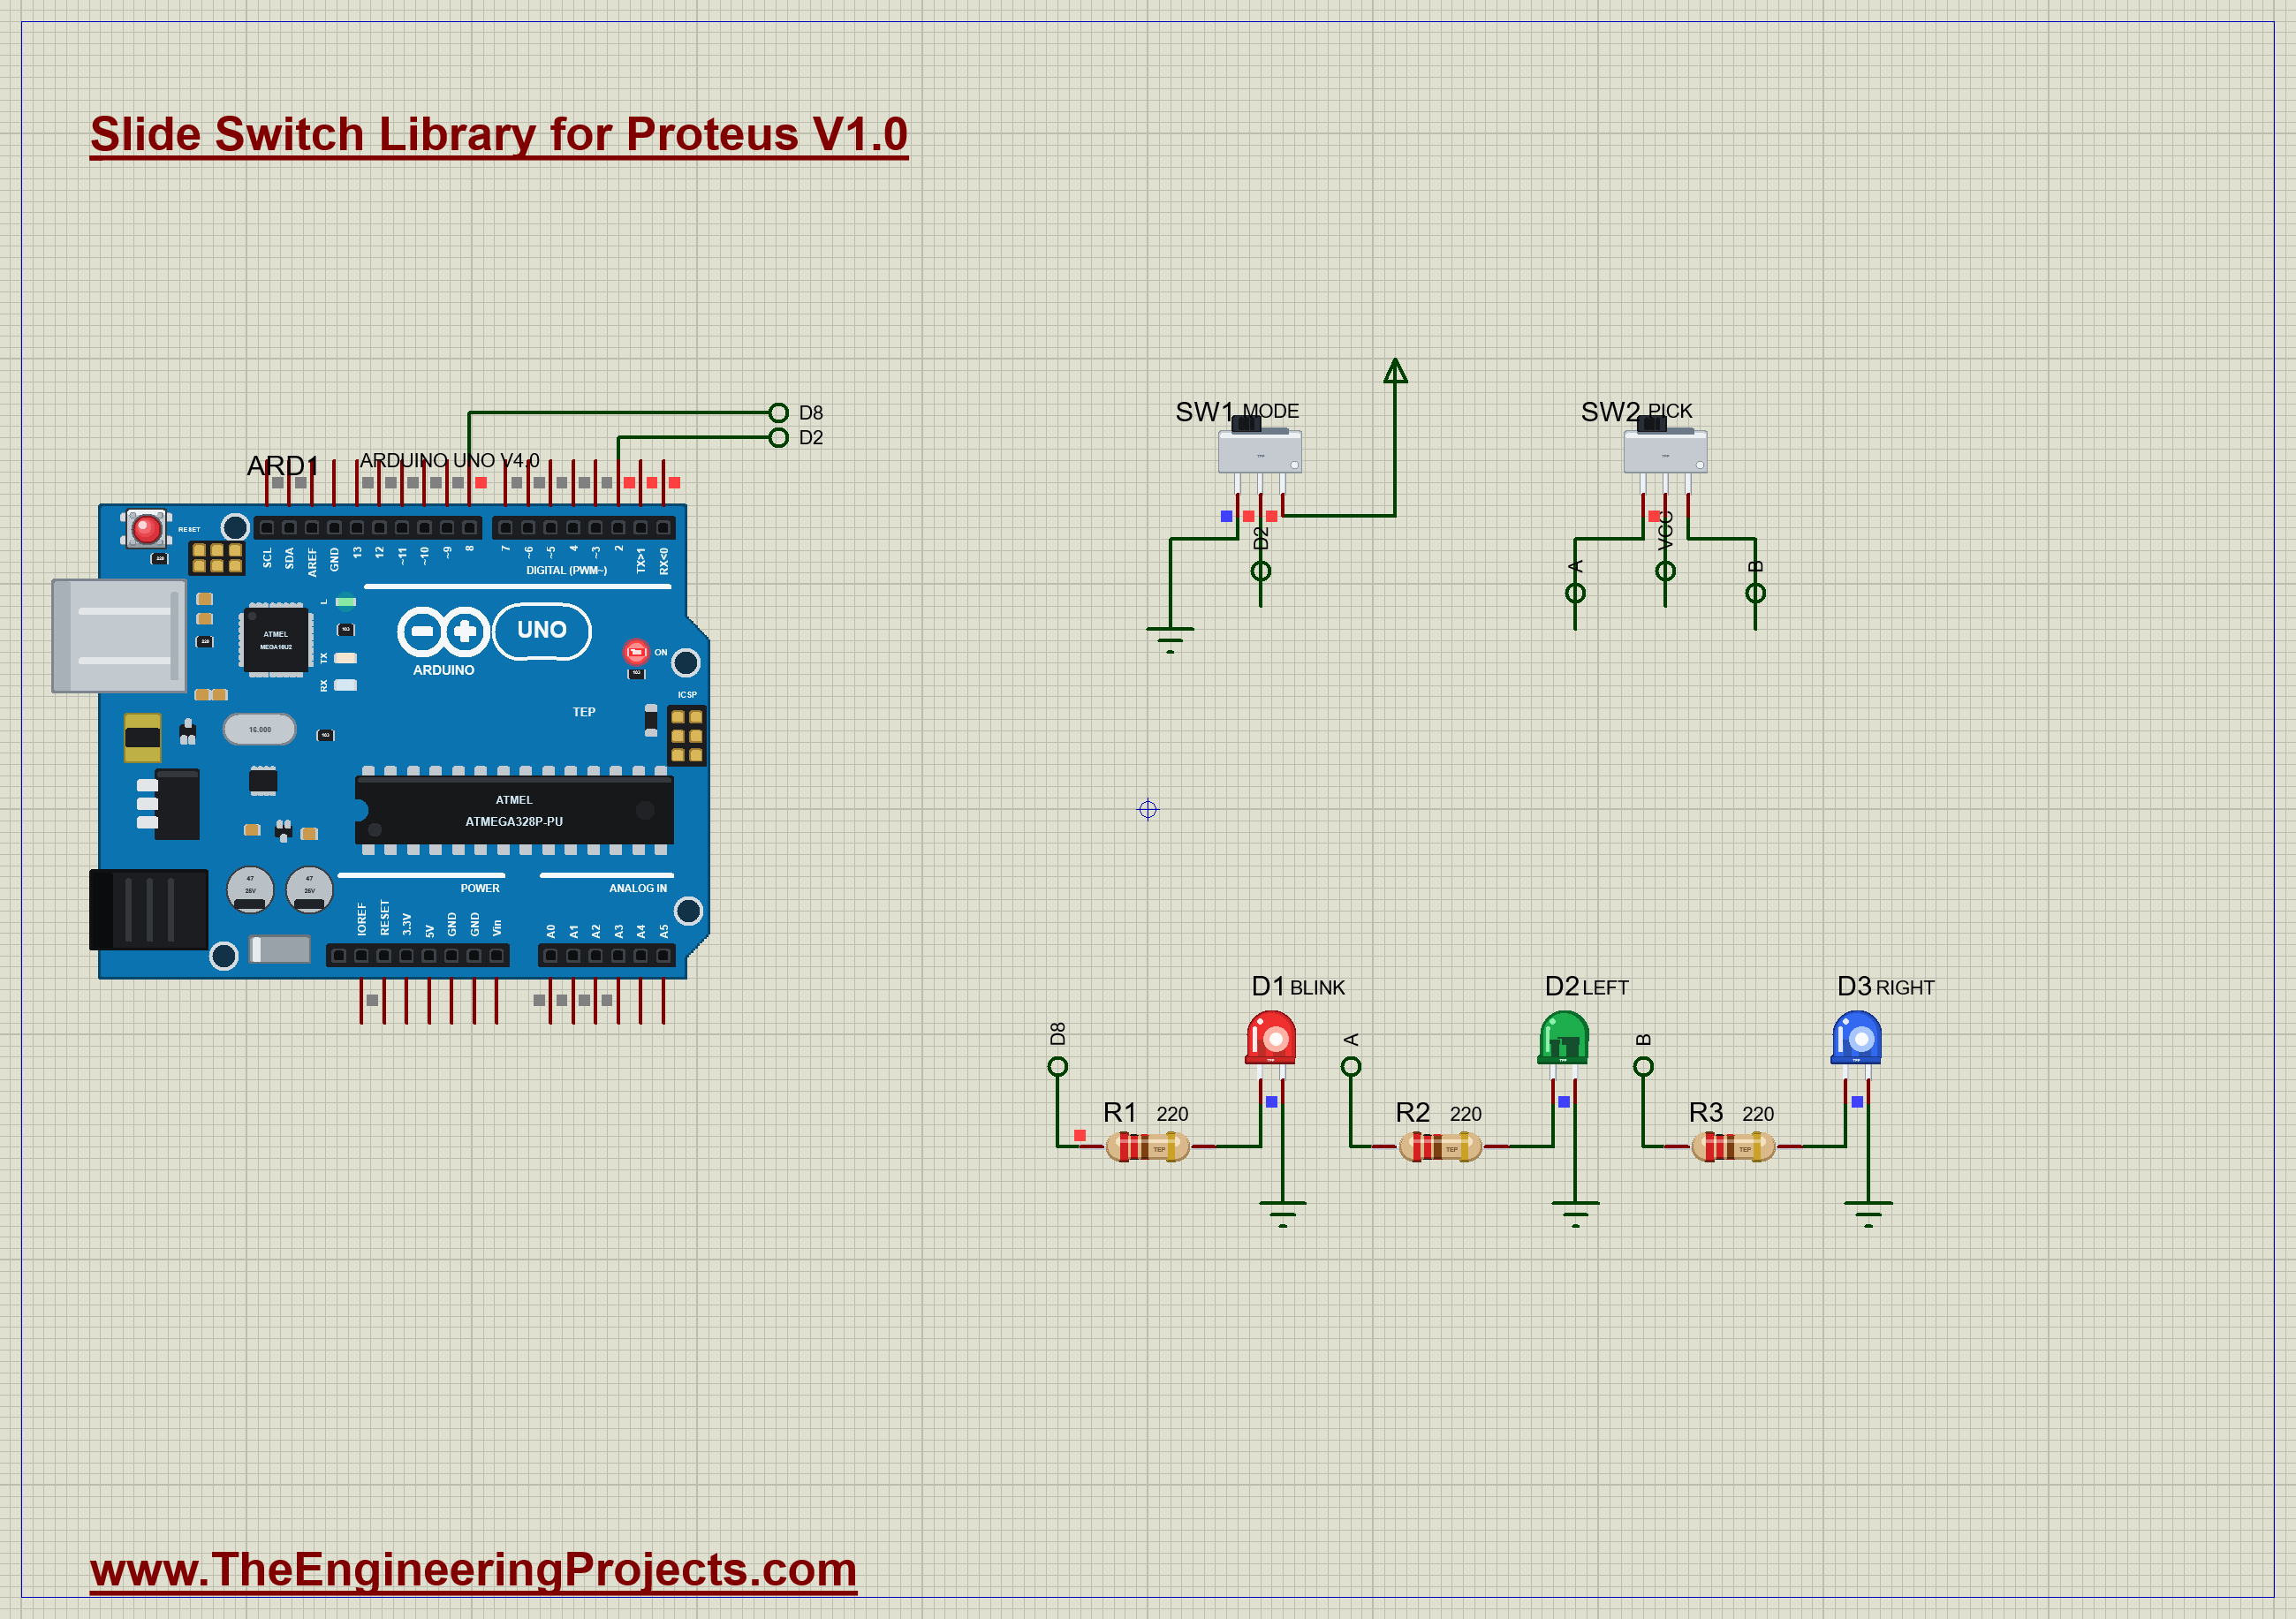
The demo uses the same part for two very different jobs. SW1 is a setting for the sketch: its legs sit on GND and +5V, and D2 reads which way it is. The sketch blinks LED D1 slowly or quickly to match. SW2 needs no sketch at all: its common leg sits on +5V, and it sends the power to one of two LEDs, D2 or D3. Open Slide-Switch-Modes-ArduinoUnoV4.pdsprj. It runs on our Arduino UNO Library for Proteus V4.0, with its built-in monitor, the same window as our TEP Serial Monitor Advance for Proteus. The resistors are from our Resistor Library for Proteus and the LEDs from our 5 mm LED Library for Proteus.
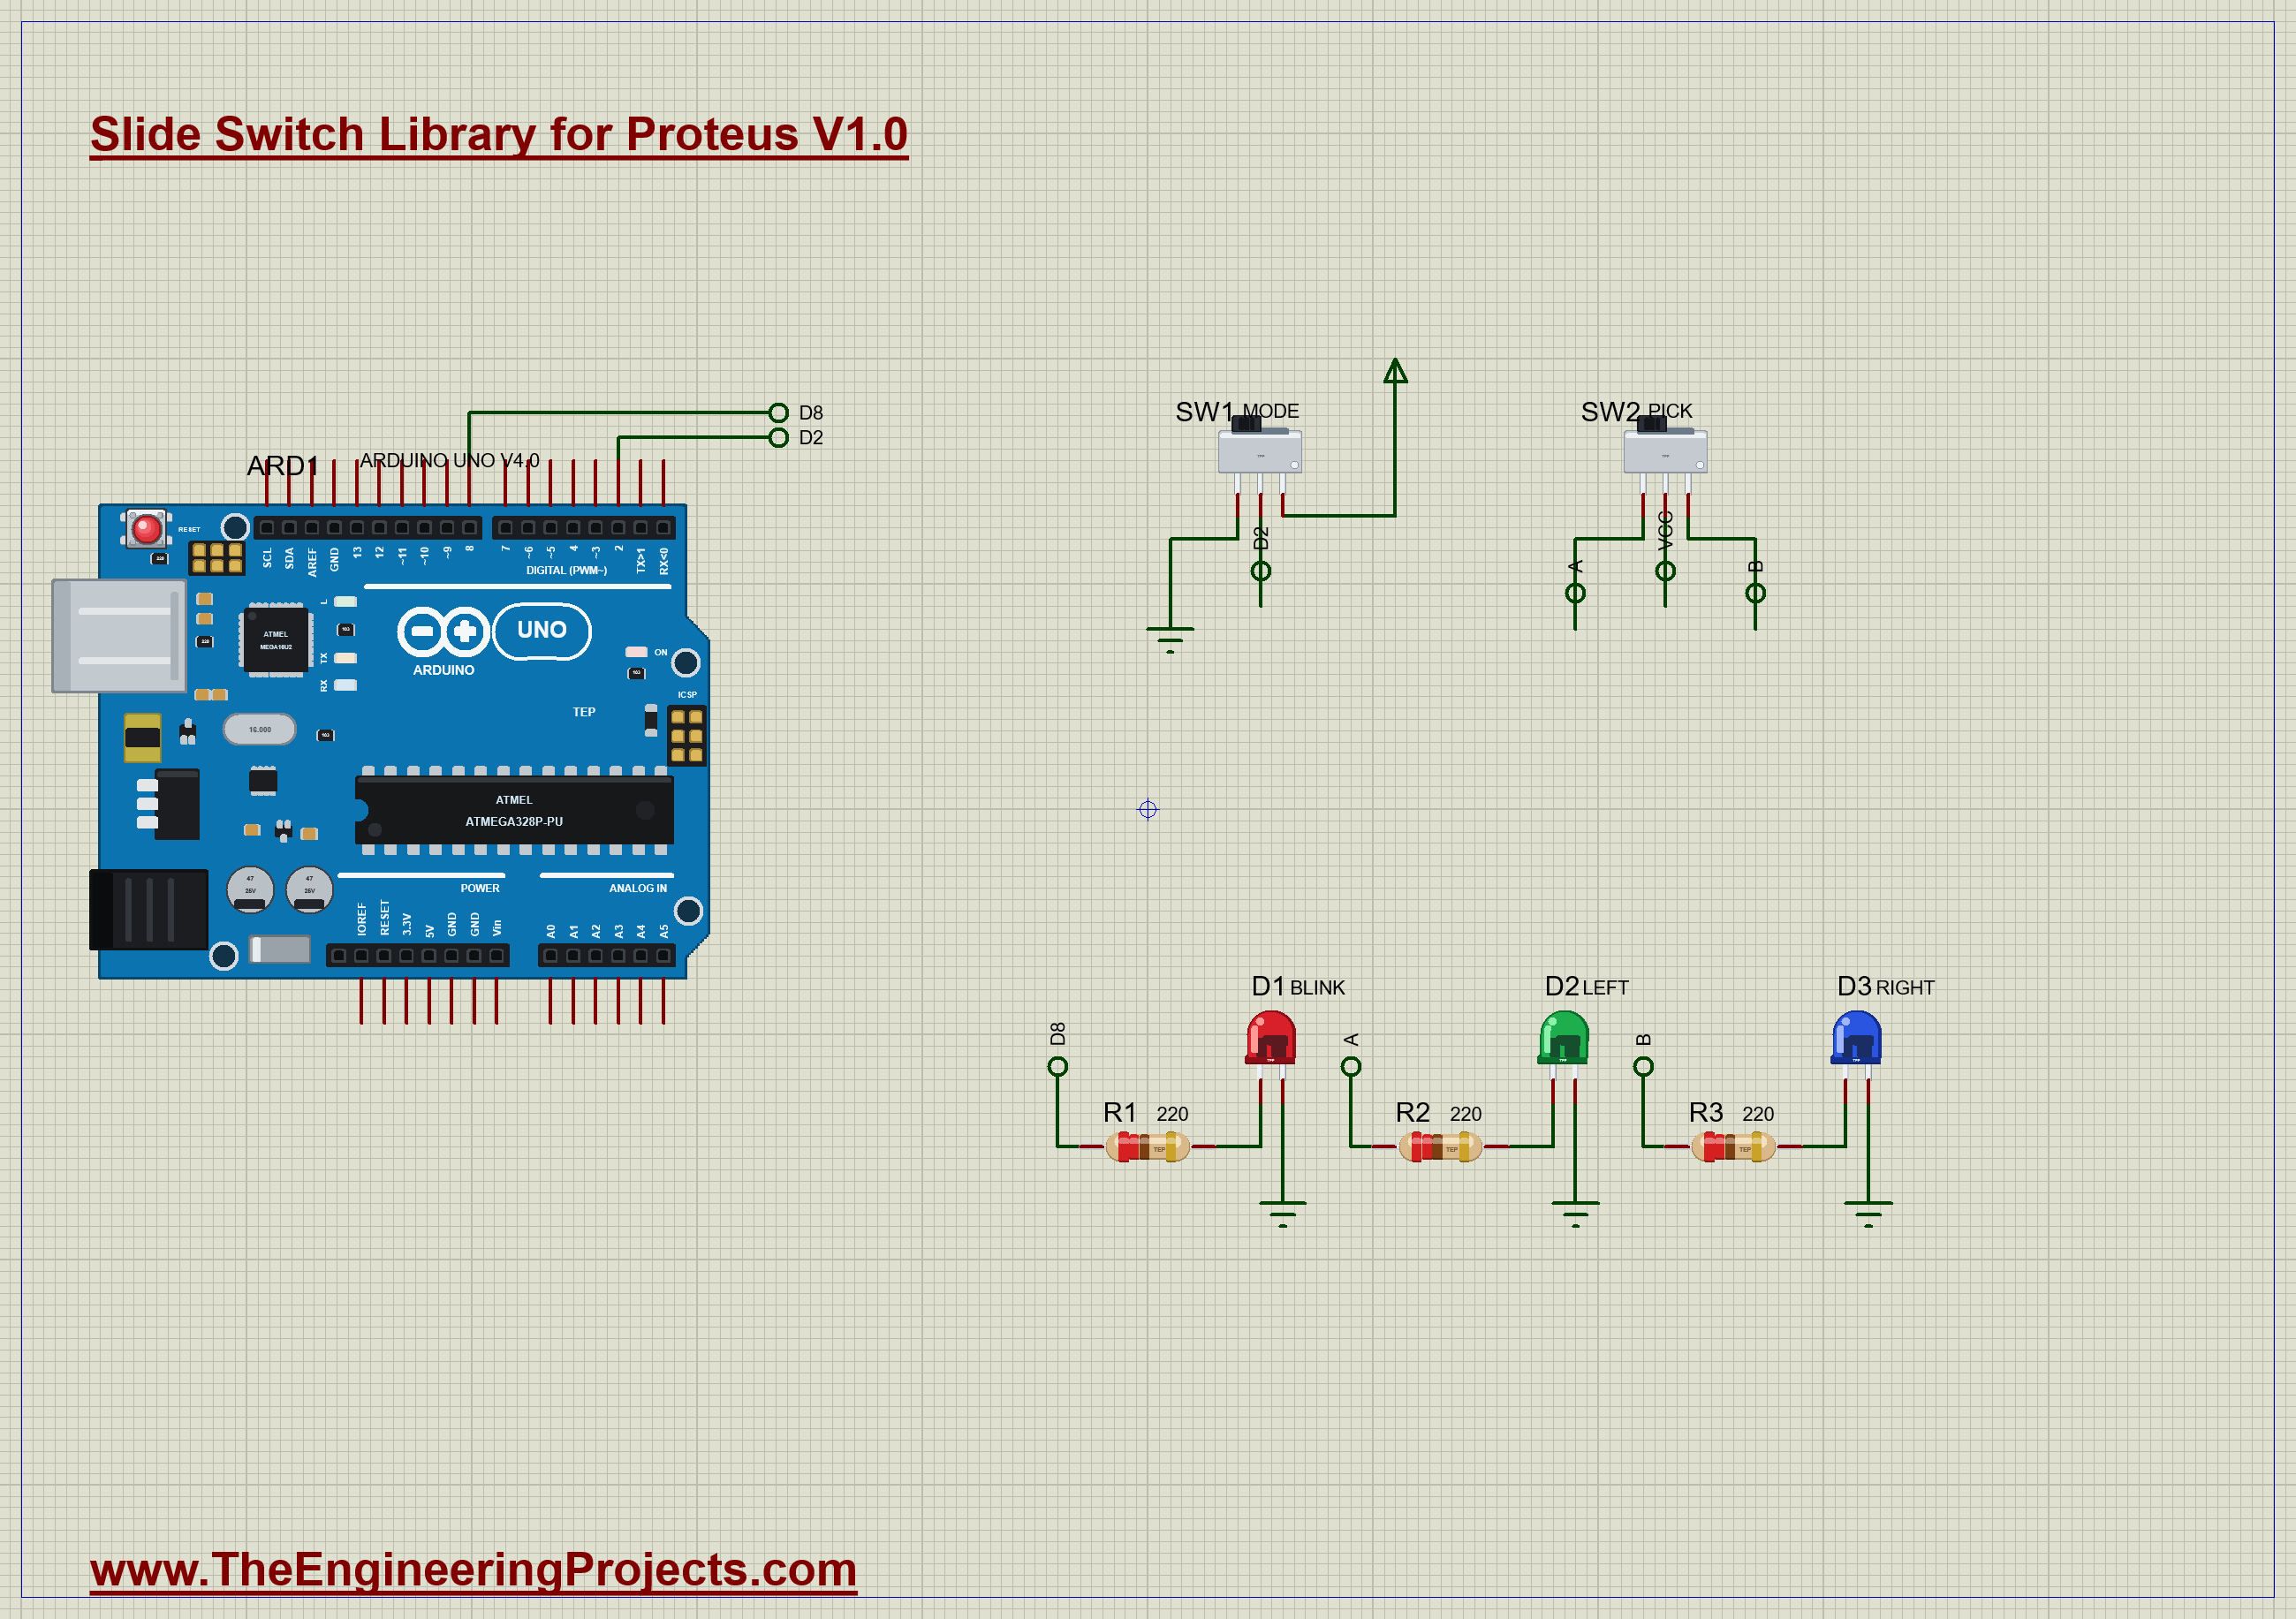
| Part | Connection | Job |
|---|---|---|
| SW1 | 1 to GND, 3 to +5V, C to D2 | a setting for the sketch |
| D1 and R1 | D8, through 220 ohm | blinks slowly or quickly |
| SW2 | C to +5V | picks one of two LEDs |
| D2 and R2 | SW2 leg 1, through 220 ohm | lit when SW2 is left |
| D3 and R3 | SW2 leg 3, through 220 ohm | lit when SW2 is right |
Reading the Setting
The sketch reads D2 in the main loop. It is the same debounce as in our push button demo: it notes when the reading changes, and it only believes a new value once it has lasted 20 ms:
  if (millis() - changedAt >= DEBOUNCE_MS && reading != mode) {
    mode = reading;
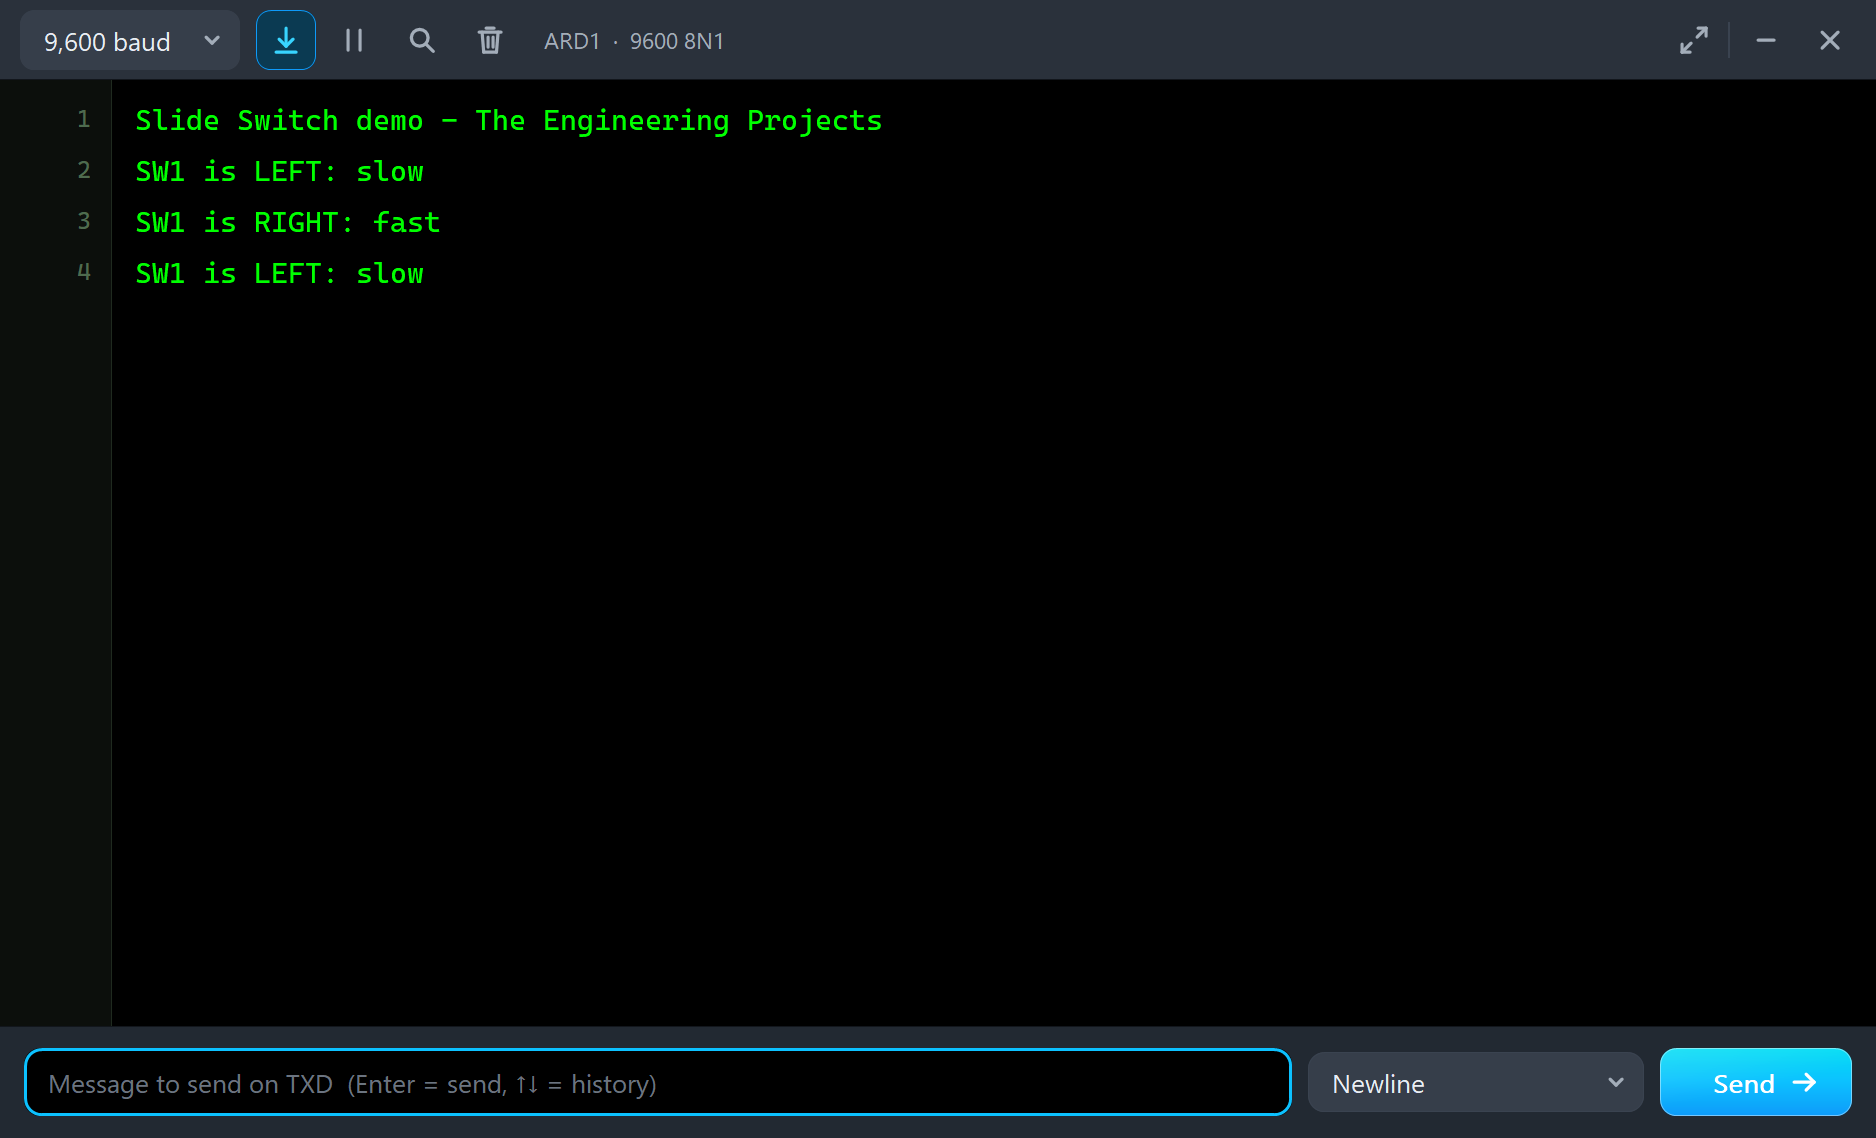
    Serial.println(mode ? F("SW1 is RIGHT: fast") : F("SW1 is LEFT: slow"));
  }
Then the setting simply chooses the blink period, 500 ms or 100 ms. Notice that the sketch never calls delay(), so it is always ready to read the switch:
  unsigned long period = mode ? 100 : 500;
  if (millis() - blinkAt >= period) {
Run the Demo
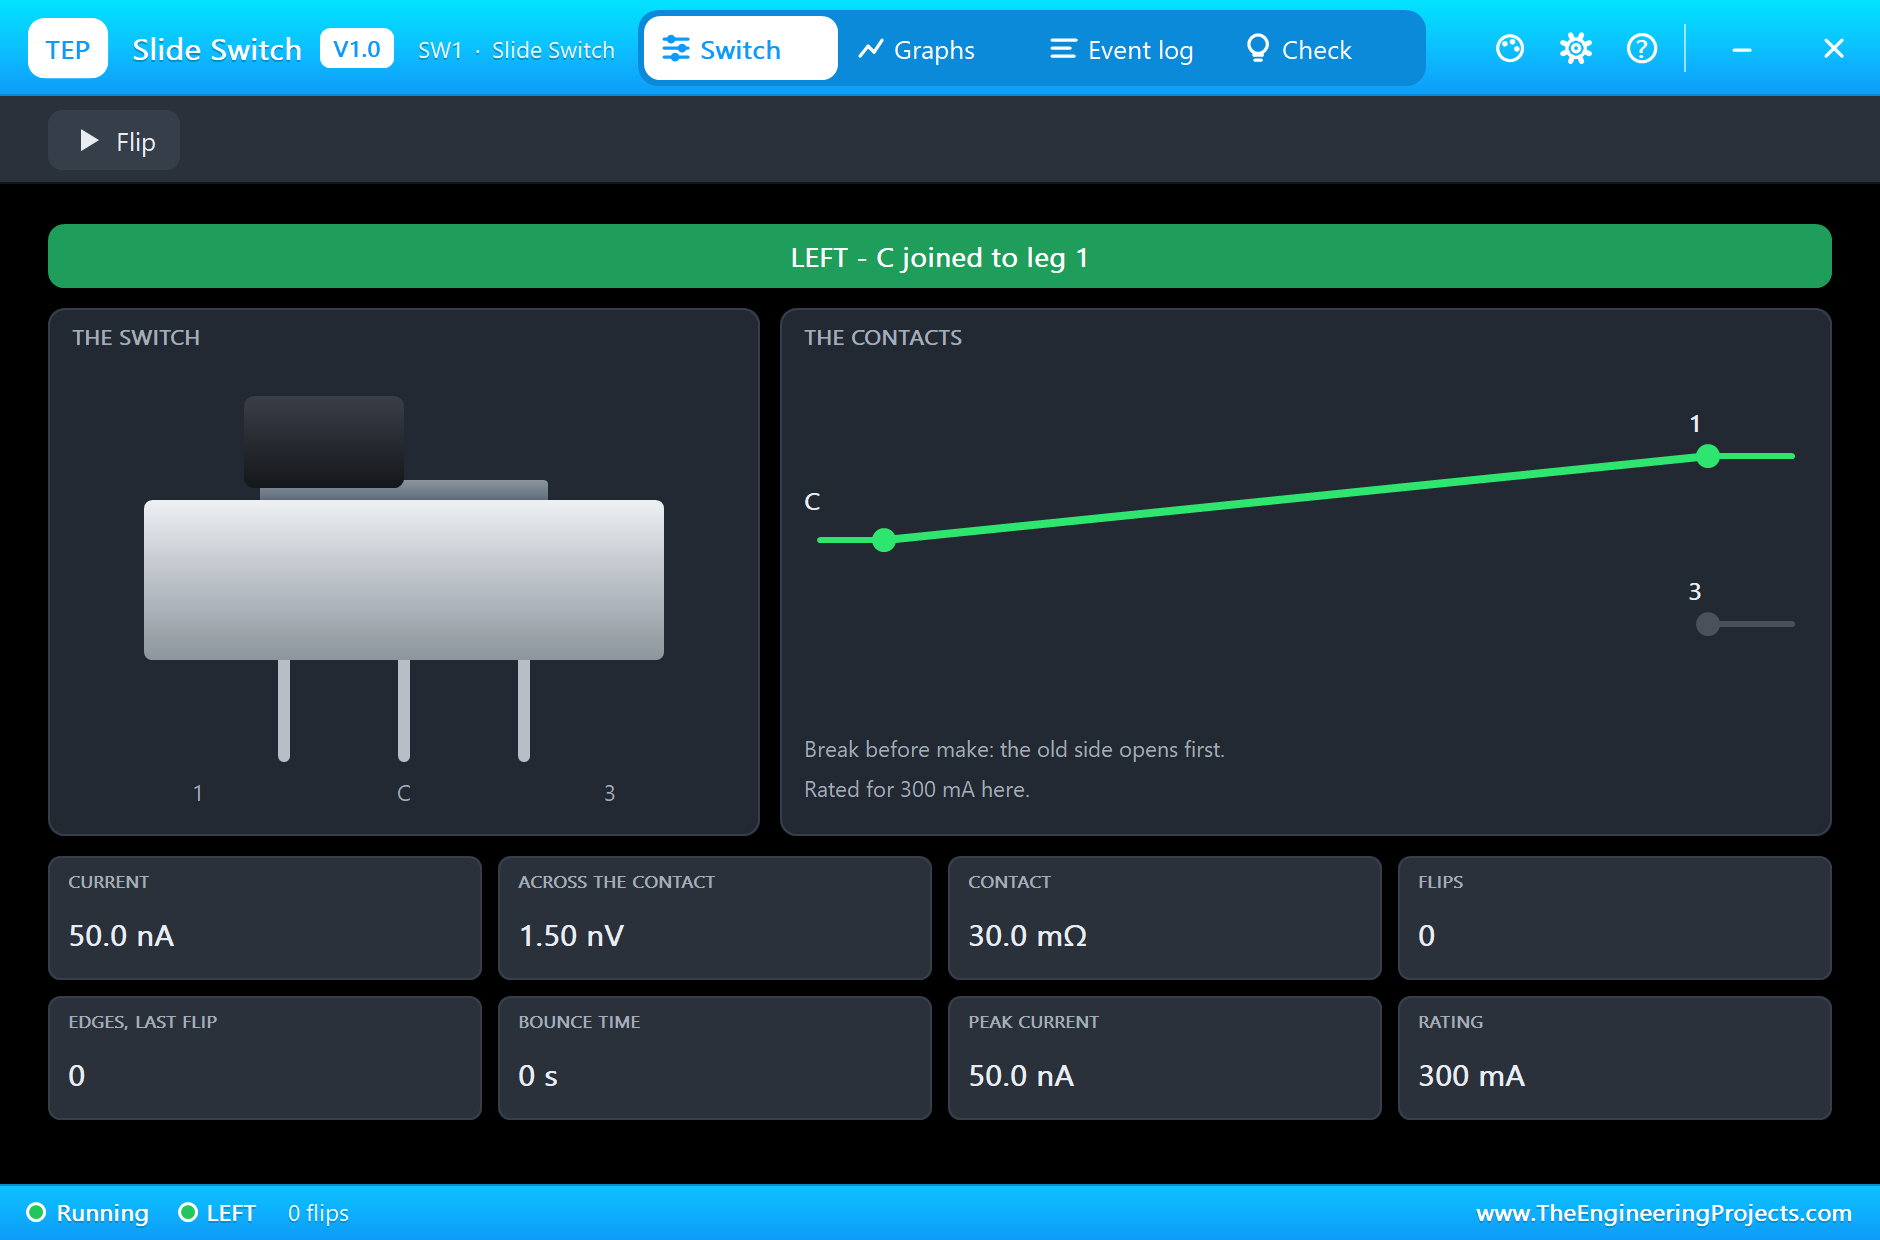
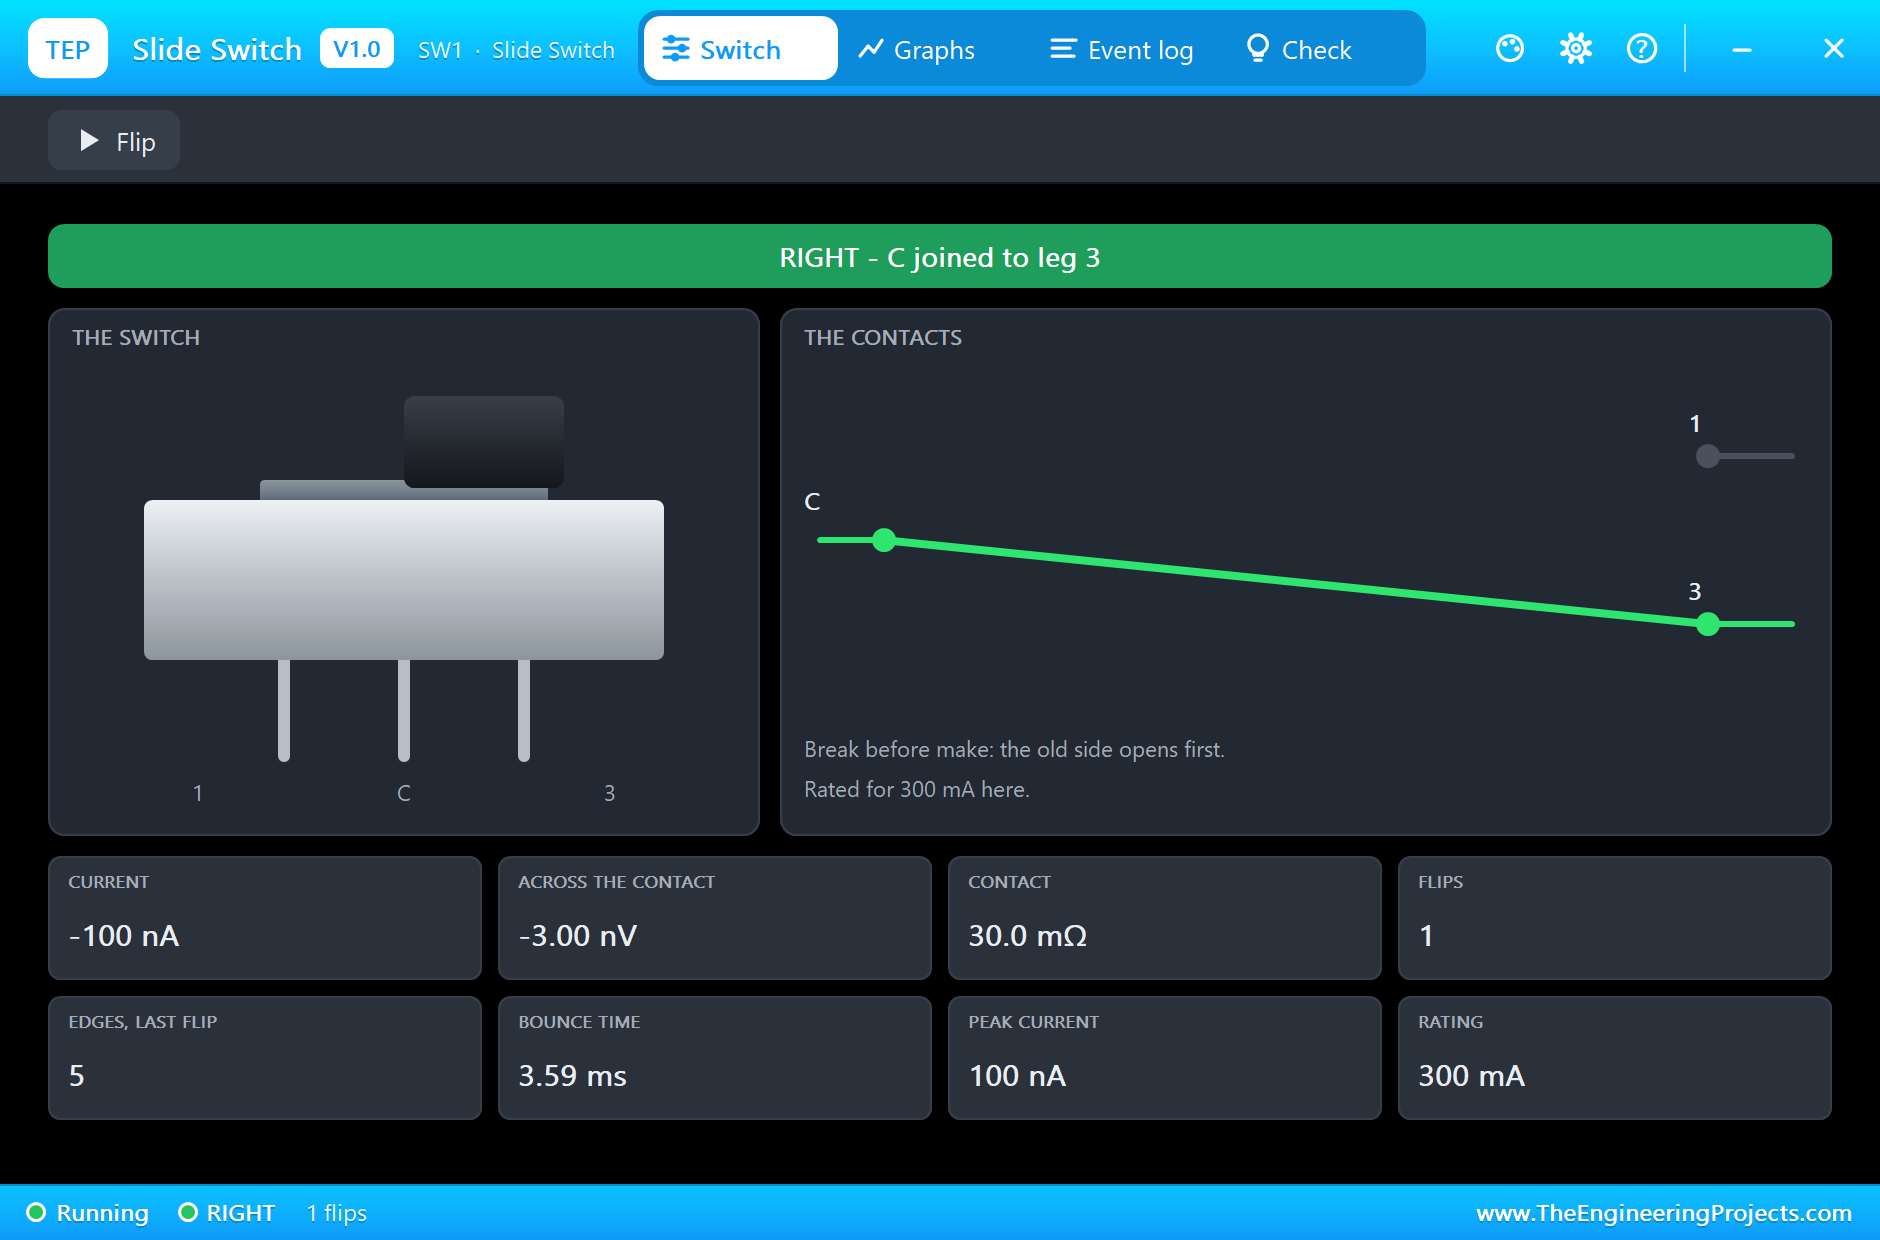
Press Run. Both knobs are to the left, so D1 blinks slowly and the green LED D2 is lit. Click the small dot on SW1 to open its pop-up. The right-hand card draws the contacts, with the live path in green:
Here is the complete circuit, truly running:
Flip SW1
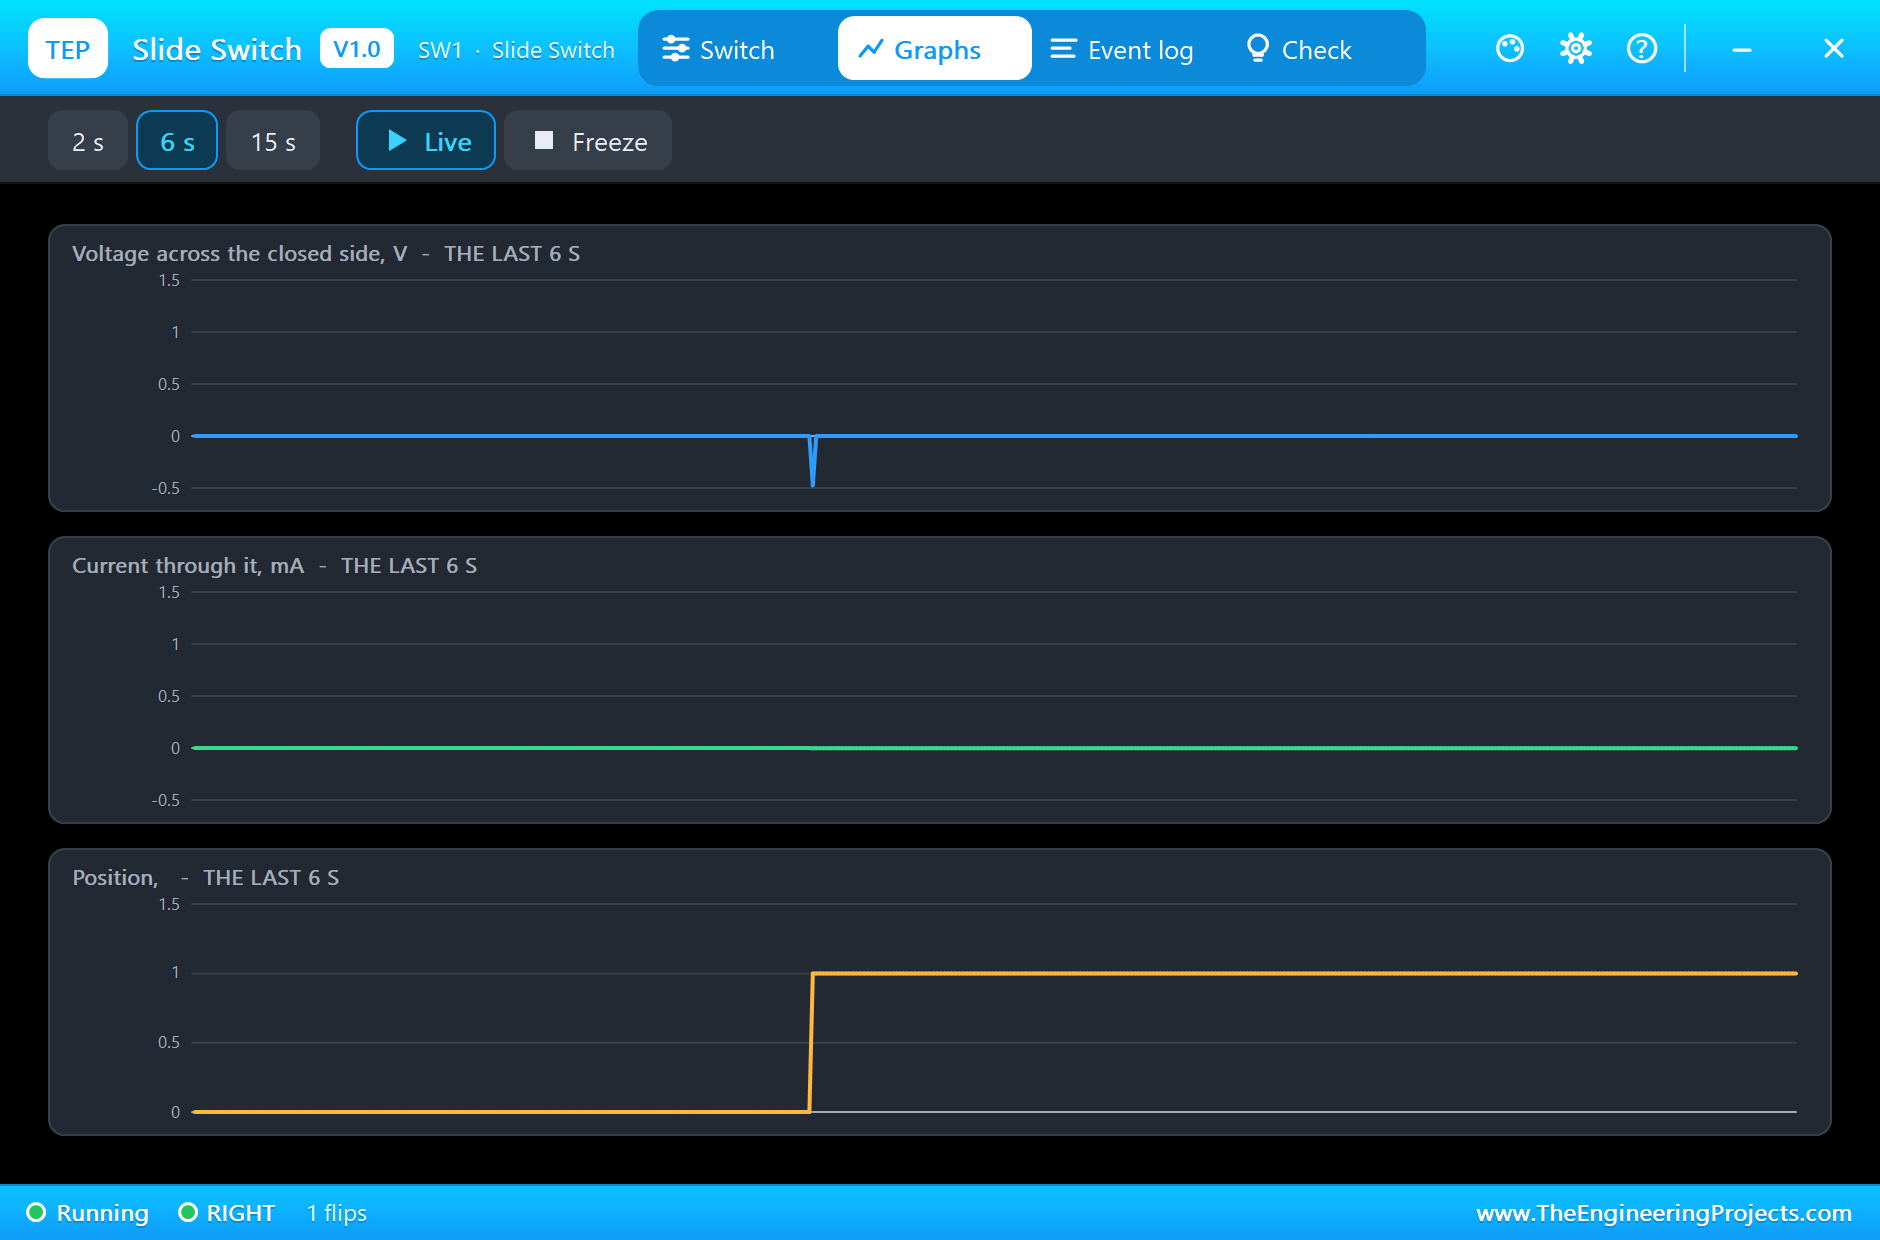
Click SW1. The knob slides across, D2 goes HIGH, and the red LED starts to blink faster. The pop-up shows the path has moved, and the Edges tile shows how many times the contact made as it landed:
Flip SW2
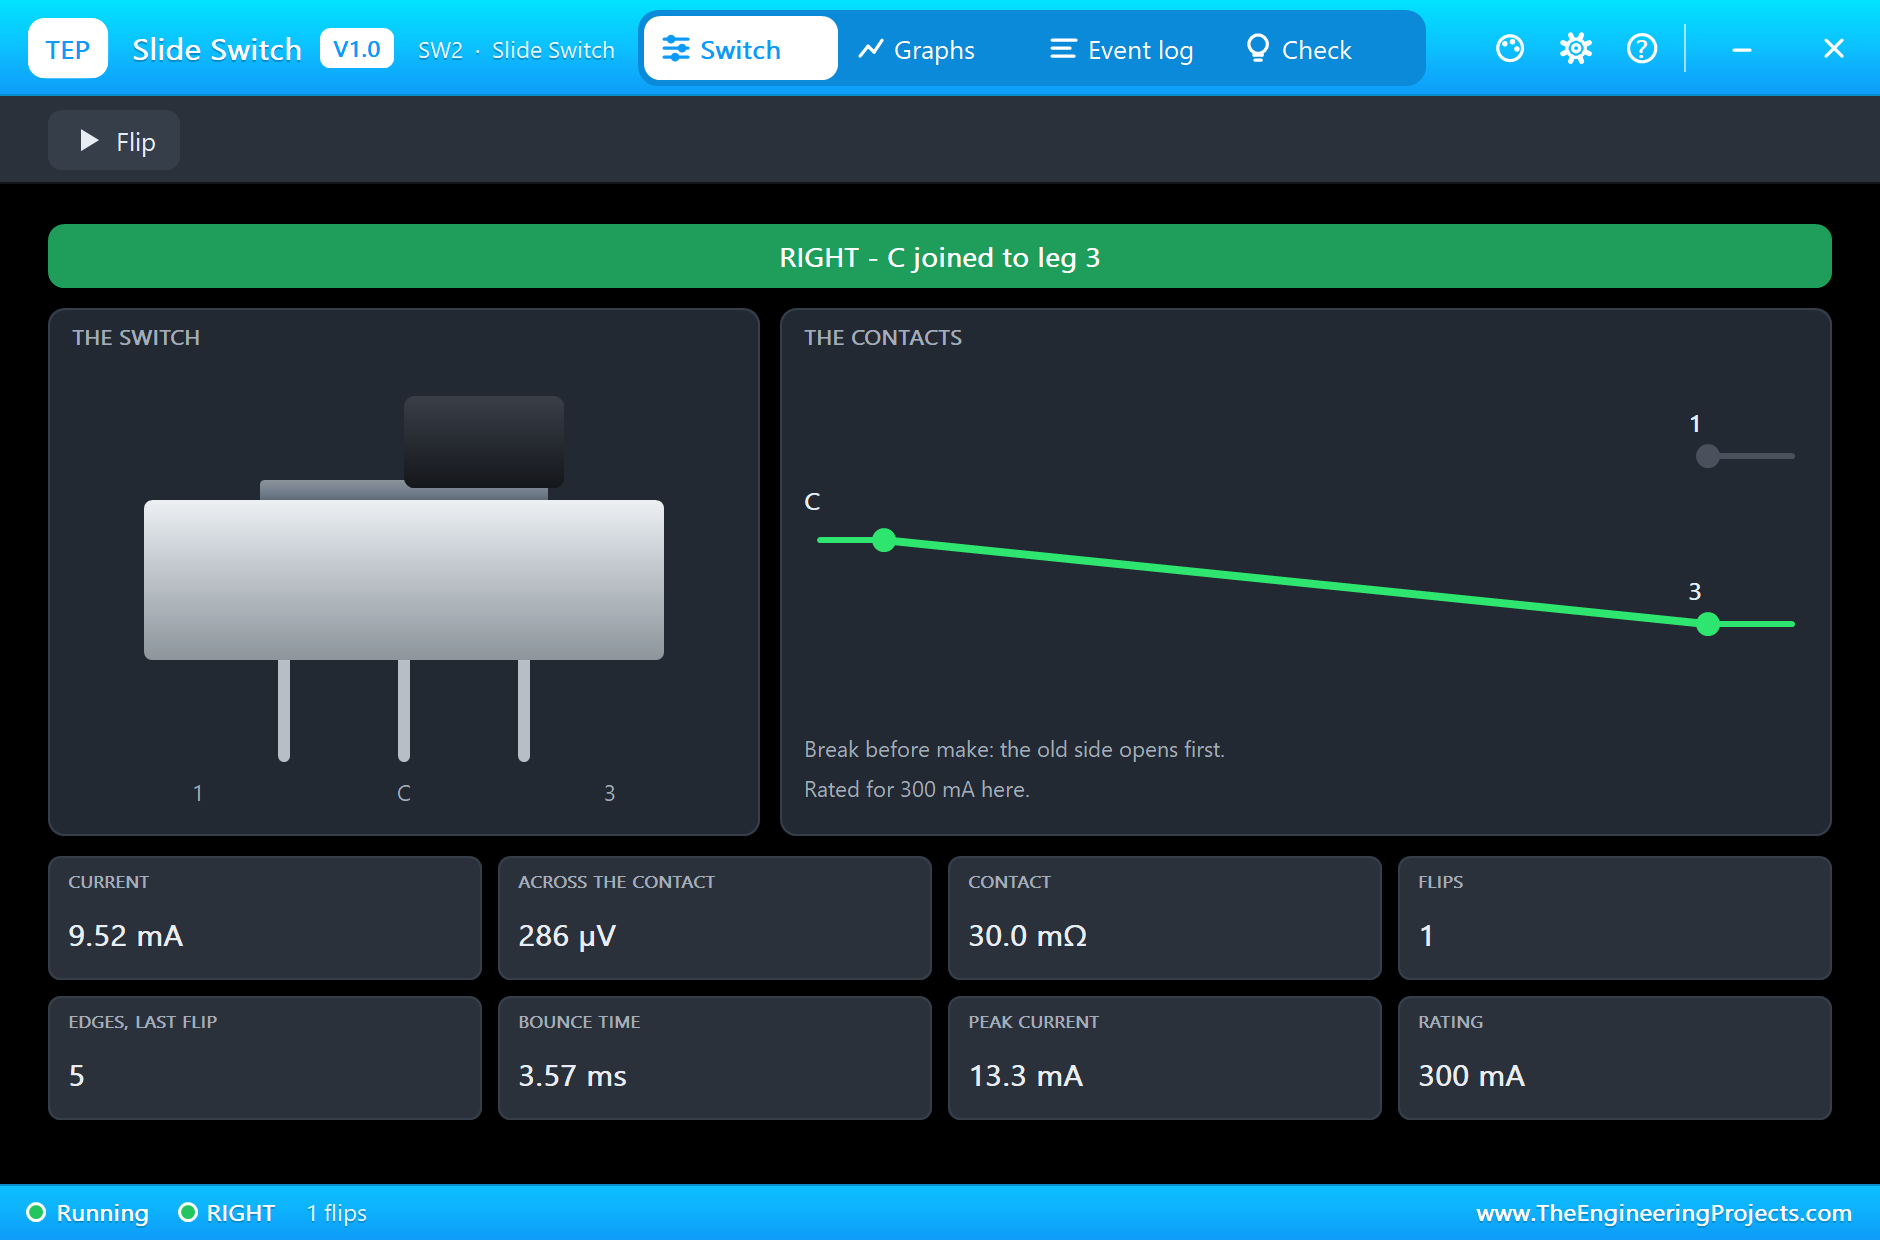
Now click SW2. The green LED goes out, and the blue LED lights. The sketch knows nothing about this: the switch is simply carrying the current to a different place. Its pop-up shows that current, about 10 mA, against a rating of 300 mA:
Stop the simulation, and look at the sheet. The knobs stay where you left them, and they will start there at the next Run.
The monitor keeps a record of each change of setting:
The Log and the Check Page
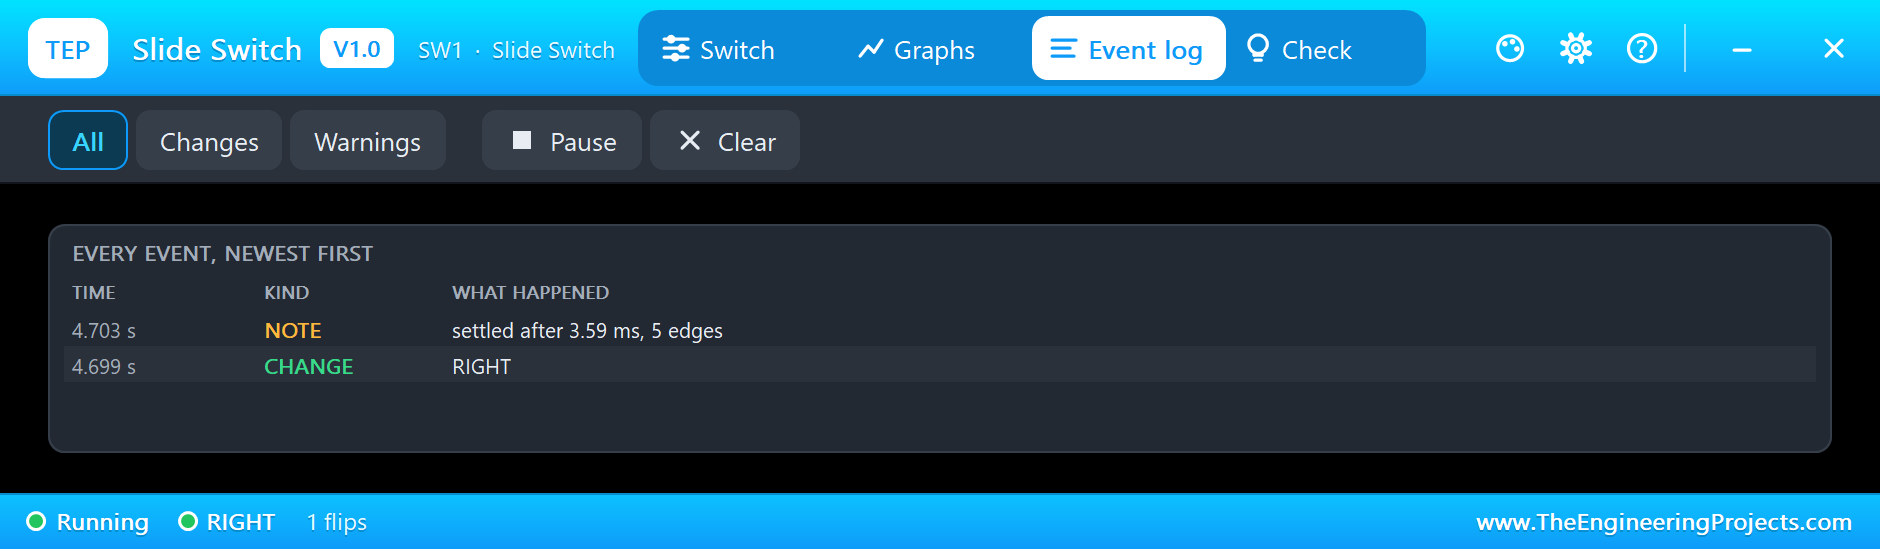
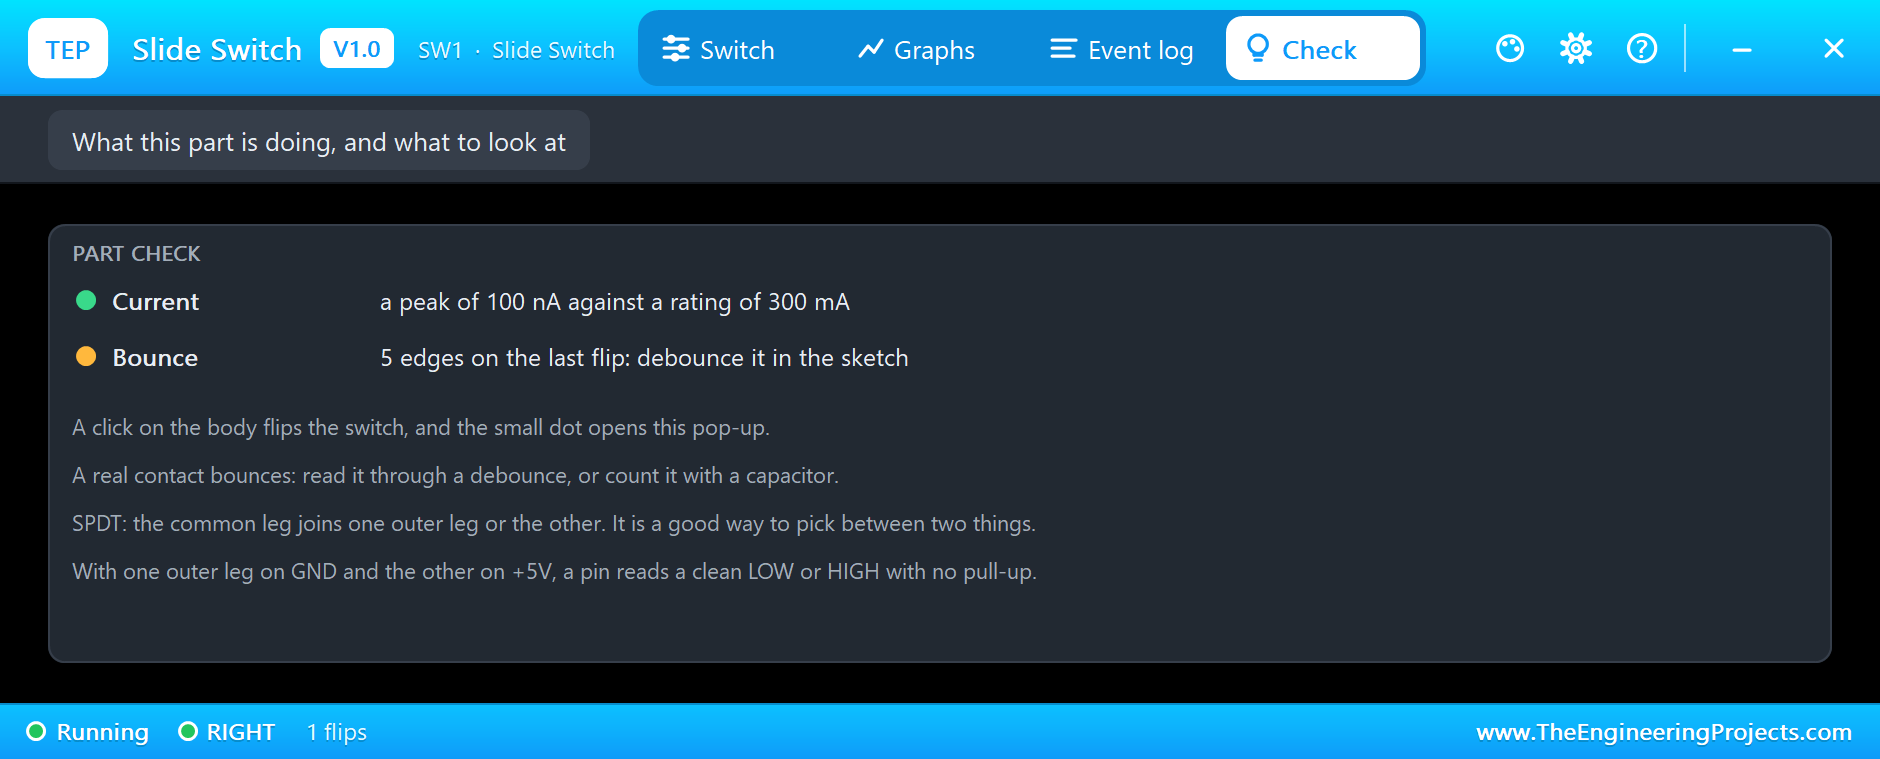
The Event log writes down each flip and how it settled, and the Check page looks at the current against the rating, and at the bounce:
Try It Yourself
- Set the bounce to 20 ms, and see the sketch take longer to agree.
- Remove the debounce from the sketch, and print every change of the pin.
- Add a 100k resistor from D2 to GND, and see that the pin never floats.
- Use SW1 to pick between two tunes on a buzzer.
- Join a third LED to SW2's common leg, and find out where it fits.
Ideas to Extend the Demo
- Use four slide switches to set a number from 0 to 15.
- Make a battery or USB selector.
- Set a boot mode for a sketch, read once in
setup(). - Build a simple two-way lamp, with one SPDT switch at each end.
Your Own Sketches
The demo sketch is in the zip file, and you can change it in the Arduino IDE. New to Arduino? Start with our Arduino Tutorial for Beginners. Export the compiled binary, and set the UNO's PROGRAM property to the new file. Our guide on How to get the HEX file from Arduino shows you where the file ends up.
Things to Know Before Using a Real Slide Switch
- Check the rating: small ones are for signals. Do not switch a motor with one.
- Never use one on the mains: the case is open, and it is not made for it.
- Keep the dust out: a contact can get dirty, and a little contact cleaner helps.
- Watch the pitch: breadboard-friendly parts have a 2.54 mm pitch, but others use 2 mm.
- Solder quickly: the plastic inside softens with too much heat, and the knob may jam.
Troubleshooting
- A click opens the pop-up: you clicked the small dot. Click the case or the knob to flip it.
- The sketch sees several changes: that is contact bounce. Debounce it, or set the bounce to 0.
- The switch starts at the wrong end: use the Position while stopped box.
- The LED stays dark: check that the common leg has power.
- The part is not simulated:
TEPSLIDE.DLLis missing from MODELS and from the project folder.
Limitations of the Simulation
- The bounce follows a fixed pattern, with a real-looking spread, not a measured one.
- Wear, dirt and the feel of the detent are left out.
- The rating is a warning on the Check page: a real contact would weld or pit.
- Arduino is a name of Arduino; this library is not made or endorsed by Arduino or Labcenter.
- Tested in Proteus 8.5 in October 2026 (the demo as shipped). Proteus 7 is not supported.
So, that was all about the Slide Switch Library for Proteus. I hope you enjoy sliding that little knob on your sheet, and that SPDT and break before make now feel like old friends. If you have any questions, ask in the comments and I will help you out. Till the next tutorial, take care and have fun!