Hello friends, I hope you all are doing great. Welcome to the 3rd lecture of Section 5(ESP32 Sensors) in the ESP32 Programming Series. We have already discussed the two built-in ESP32 sensors i.e. Hall Effect Sensor and Capacitive Touch Sensor. Today, we are going to discuss the 3rd and final built-in ESP32 sensor i.e. Internal Temperature Sensor.
ESP32 Internal Temperature Sensor is used to calculate the temperature of the ESP32 core. So, we can't use it to measure the ambient temperature (the temperature of the atmosphere), for that, we need to use embedded temperature sensors i.e. DS18B20, DHT11, BMP280 etc. We will first discuss the basics of this Internal Temperature Sensor and then will design a code to monitor the change in temperature by changing the frequency of the ESP32 CPU.
Note:
- Internal Temperature Sensor is not present in all ESP32 variants.
- So, if ESP32 lacks the sensor, it sends an invalid temperature reading of 53.33oC(equivalent to 128 in decimal).
Important specs of the ESP32 Temperature Sensor are given in the below table:
| ESP32 Temperature Sensor Features |
||||
|---|---|---|---|---|
| Parameter | Value | |||
| Converter Types | ADC (Analog-to-Digital Converter), DAC (Digital-to-Analog Converter) | |||
| Accurate Temperature Sensing Range | -40 °C to 125 °C | |||
| Suitability | Good | |||
| Most Accurate Range | -10 °C to 80 °C | |||
| Temperature Fluctuation Measurement | High resolution | |||
| Potential Performance & Accuracy Issues | Voltage fluctuations, Noise, Environmental factors, Nearby heat sources | |||
| Where To Buy? | ||||
|---|---|---|---|---|
| No. | Components | Distributor | Link To Buy | |
| 1 | ESP32 | Amazon | Buy Now | |
ESP32 Internal Temperature Sensor
ESP32’s on-chip temperature sensor cannot be used for monitoring external temperature. It can only be used to monitor the temperature of the core. This temperature sensor is available on some selective ESP32 boards and obsolete on most ESP32 variants. It has a high-temperature sensing range of -40 to 125 °C.
ESP32 boards are normally used in real-time IoT Projects i.e. home automation, back security etc. Such projects need to run 24/7 to get live updates and may heat up the motherboard. Thus, to get a stable performance in continuous operations, these internal temperature sensors are introduced to monitor the ESP32 Core.

ESP32 Boards with Built-in Temperature Sensor
Most of the modern ESP32 variants are equipped with the Internal Temperature Sensor. I have created a list of the ESP32 boards by taking the ESP-IDF documentation that caters to the built-in temperature sensor. Here's the list:
- ESP32-C2
- ESP32-C3
- ESP32-C6
- ESP32-H2
- ESP32-S2
- ESP32-S3
As you can see, most of the newer versions have a temperature sensor, but some older versions may also have one.
How does this temperature sensor work?
ESP32 temperature sensor consists of 2 converters:
- 8-bit Sigma-Delta analog-to-digital converter(ADC)
- digital-to-analog converter(DAC)
8-bit Sigma-Delta analog-to-digital converter (ADC)
Sigma-delta ADCs are widely favored for their exceptional accuracy and remarkable resolution, enabling them to deliver precise measurements. This ADC takes the analog signal from the temperature sensor, converts it to a digital signal and feeds it to the microcontroller for processing.
Digital-to-analog converter (DAC)
The DAC is responsible for the accuracy of the temperature measurements. It is embedded within the ESP32 and converts the digital values(converted by the Sigma-Delta ADC) again into analog values to offset any temperature-induced variation. As a result, it ensures accurate readings from the sensor.
Measuring Errors in Temperature Sensor
The accuracy of this temperature sensor changes according to the range group of the temperature values. Among different groups, the range of -10 ~ 80 is the most accurate. The reading errors along with their measuring ranges are shown in the below table:
| Measuring Errors in ESP32 Temperature Sensor | ||||
|---|---|---|---|---|
| No. | Offset | Predefined Range (°C) | Error (°C) | Operating Range (°C) |
| 1 | -2 |
50 ~ 125 | < 3 | Not recommended(Error) |
| 2 |
-1 |
20 ~ 100 | < 2 | Ideal range for best accuracy |
| 3 |
0 | -10 ~ 80 | < 1 | Acceptable range with moderate accuracy |
| 4 |
1 |
-30 ~ 50 | < 2 | Usable range with increased error at extremes |
| 5 |
2 |
-40 ~ 20 | < 3 | Not recommended (error) |
Different factors, including voltage fluctuations, noise, environmental factors, and nearby heat sources, can affect the performance and accuracy of this sensor.
Formula to convert observed temperature i.e. Fahrenheit to Celsius:
(F-32) *(5/9) = degree Celsius
ESP32 Temperature Sensor Applications
Here are the main applications of the ESP32 built-in temperature sensor:
Improve Chip Performance
A designer can easily monitor the internal chip’s temperature through the temperature sensor, identify bottleneck conditions, and conduct performance evaluations under extreme circumstances. So, the sensor helps in optimizing the chip's temperature and, thus, the performance.
Avoid Overheating
Electronic components/modules are sensitive, and if they are designed to work for prolonged operation, temperature management is one of the most crucial points to be considered. The built-in temperature sensor is a useful way to measure the operating temperature of the components connected to its peripherals and the whole system. These values are then utilized to set the threshold value so the system can trigger the safety mechanism when a certain heat level is passed. This can be done using the ESP32 code and surely prevent overheating to maintain the performance.
Energy Monitoring
The built-in temperature sensor helps to maintain the energy monitoring that, in turn, allows the energy monitoring of the project. The careful observation of the built-in temperature sensor output helps the user understand the relationship between temperature change and energy consumption. Using this approach, designers can target an optimized energy consumption.
Programming ESP32 to measure Core temperature in Arduino IDE
- We are using the Arduino IDE as a compiler, we have already installed ESP32 in it, if you haven't, please read out How to Install ESP32 in Arduino IDE.
#ifdef __cplusplus
extern "C" {
    #endif
    uint8_t temprature_sens_read();
    #ifdef __cplusplus
}
#endif
uint8_t temprature_sens_read();

void setup()
{
    Serial.begin(115200);
}

void loop()
{
    Serial.print("Temperature: ");
    Serial.print(temprature_sens_read() );
    Serial.print(" F");
    Serial.print("______");

    // Convert raw temperature in F to Celsius degrees
    Serial.print((temprature_sens_read() - 32) / 1.8);
    Serial.println(" C");
    delay(1000);
}
Code Description
- Style guard is used at the beginning to declare some function to be of “C” linkage, instead of “C++” Basically, to allow C++ code to interface with C code.
#ifdef __cplusplus
extern "C" {
    #endif
    uint8_t temprature_sens_read();
    #ifdef __cplusplus
}
#endif
uint8_t temprature_sens_read();
Setup() Function
- Initialize the Serial monitor with a 115200 baud rate for debugging purposes.
void setup()
{
    Serial.begin(115200);
}
Loop() Function
- Temperature_sens_read() function is used to read the temperature of the core.
- Print the observer temperature on the serial monitor.
void loop()
{
    Serial.print("Temperature: ");
    Serial.print(temprature_sens_read() );
    Serial.print("______");
}- Convert the temperature from Fahrenheit to degrees Celsius and print on the serial monitor.
- The result will be printed with a delay of 1 sec.
// Convert raw temperature in F to Celsius degrees
    Serial.print((temprature_sens_read() - 32) / 1.8);
    Serial.println(" C");
    delay(1000);
Testing/Results
- Upload the code into the ESP32 board.
- Open the serial monitor with a 115200 baud rate.
- Press the EN button from the ESP32 development board.
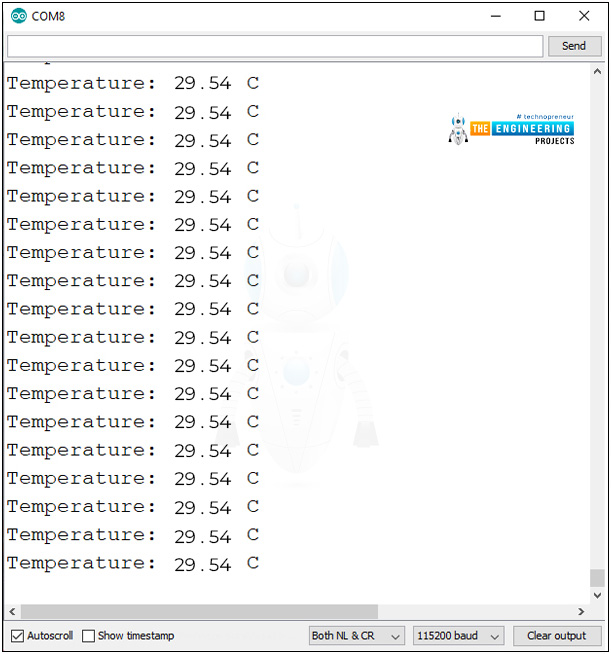
- See the result on the serial monitor as shown below:

This concludes the tutorial. I hope you found this of some help and also to see you soon with the new tutorial on ESP32.


