


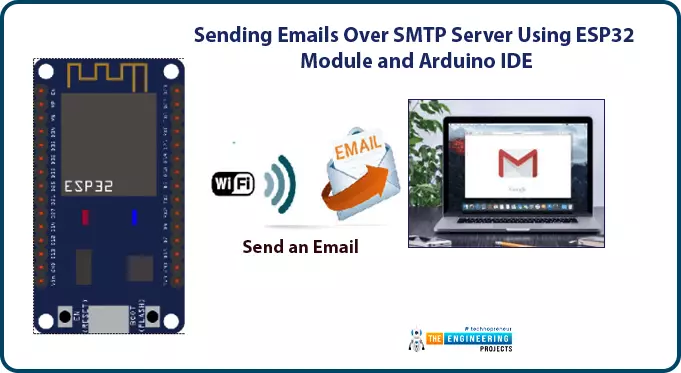
Sending Email with ESP32 using SMTP Protocol


Hello readers, I hope you all are doing great. In this tutorial, we will learn how to send an email using ESP32 module. We will also learn to send text files, images or some sensor readings using the SMTP server using the ESP32 module.
In IoT (Internet of things), there are various applications where we need to send emails carrying information like sending some sensor readings, altering emails, images, text files and much more.
What is SMTP?
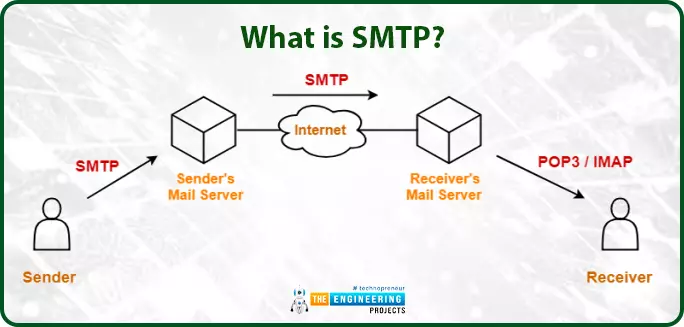
SMTP or simple mail transfer protocol is an internet standard for sending and receiving electronic mail (or email) where an SMTP server receives emails from the email client.
SMTP is also used for setting communication between servers.
Various email providers like Gmail, Hotmail, Yahoo, etc. have unique SMTP addresses and port numbers.
How does SMTP work?
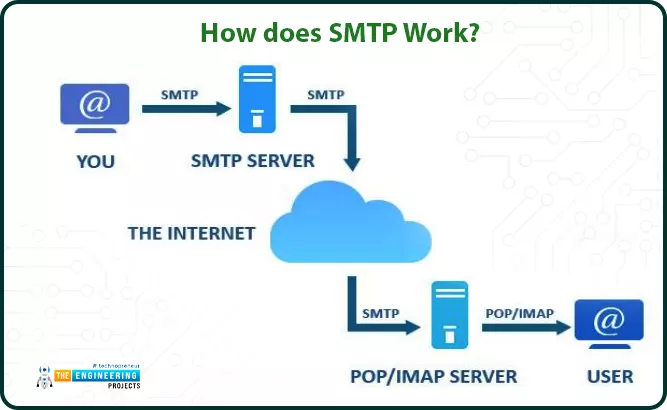
SMTP protocol which is also known as a push protocol is used to send emails and IMAP that is Internet Message Access Protocol (or post office protocol or POP) is used to receive emails at the receiver end.
SMTP protocol operates at the application layer of TCP/IP protocol.
When a client wants to send emails, a TCP connection will be open for the SMTP server and emails will be sent across the connection.
SMTP commands:
- HELO – This command is sent only once per session and is used to identify the qualified domain names and the client to the server.
- MAIL – used to initiate a message
- RCPT – Identifies the address
- DATA – share the data line by line
SMTP parameters for different email providers
SMTP parameters for Gmail
Gmail is the email service provided by Google and Gmail SMTP server is free to access and anyone can access this service, who has a Gmail account.
- SMTP server: smtp.gmail.com
- SMTP Port: 465
- SMTP sender’s address: Gmail address
- SMTP sender's password: Gmail Password
SMTP parameters for Yahoo
- SMTP server: smtp.mail.yahoo.com
- SMTP Port: 465 (with SSL)
- Another Port number: 587 (with TLS)
- SMTP sender’s address: email address
- SMTP sender’s password: password
SMTP parameters for Hotmail
- SMTP server: smtp-mail.outlook.com
- SMTP port: 587
- SMTP sender’s address: Hotmail email address
- SMTP sender’s password: Hotmail password
- SMTP TLS/SSL required : YES
SMTP parameters for Outlook
- SMTP server: smtp-mail.office.com
- SMTP server port for incoming mail: 993
- SMTP server port for outgoing mail: 587
- SMTP sender’s address: Outlook email address
- SMTP sender’s password: Outlook password
- SMTP TLS/SSL required : YES
Sending emails over SMTP using ESP32 in Arduino IDE
- In this tutorial, we will demonstrate sending raw text messages and HTML messages, images, text files, etc. to the client over the SMTP server.
Components required to send and receive emails using ESP32 over SMTP server are:
- Recipient’s email address.
- Sender’s email address.
- Content to be shared over SMTP server.
- ESP mail client library.
- ESP32 module.
ESP mail client Library
To send emails with ESP32 we need to install this ESP Mail Client library. This library, make ESP32 able to send emails over an SMTP server.
Step to install ESP Mail Client Library:
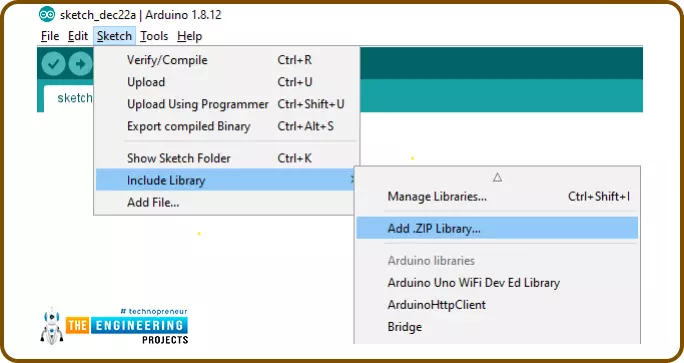
- To download the ESP Mail Client Library click on the link given below: https://github.com/mobizt/ESP-Mail-Client
- Open the Arduino IDE.
- Go to Sketch >> Include Library >> Add .ZIP Library.
- Select the downloaded ZIP file. Click on
Your Arduino IDE is ready to send email using ESP32.
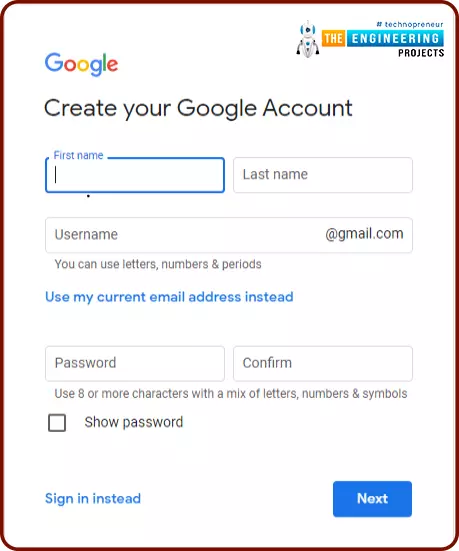
Create a new Gmail account (Sender)
It is recommended to create a new email account for sending emails using ESP32 or ESP8266 modules.
If you are using your main (personal) email account (for sending emails) with ESP and by mistake, something goes wrong in the ESP code or programming part, your email service provider can ban or disable your main (personal) email account.
In this tutorial, we are using a Gmail account.
Follow the link to create a new Gmail account: https://accounts.google.com
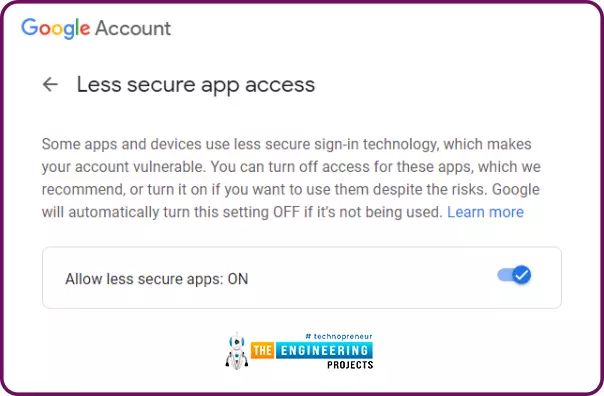
Access to Less Secure apps
To get access to this new Gmail account, you need to enable Allow less secure apps and this will make you able to send emails. The link is: https://myaccount.google.com/lesssecureapps?pli=1
- As we mentioned earlier, we are using Arduino IDE as a compiler and upload into the ESP32 module. To know more about Arduino IDE and how to use it, follow our previous tutorial Introduction to ESP32 Programming Series.
- We have already discussed installing the ESP Mail Client Library to make ESP32 able to send emails over the SMTP server.
- This library includes multiple examples on SMTP like sending text messages, images, HTML code, text files etc. We have attached an image below for your reference.
- You can use those examples to send emails.
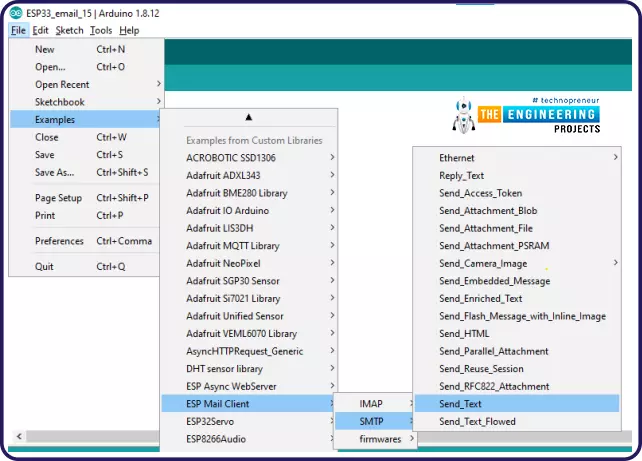
Fig SMTP example code
- Note: You can not use the exact code. Hence, you need to make some changes like replacing SSID and password with your network credentials, email address of sender and receiver, SMTP setting parameters for respective email service providers etc, which need to be done before uploading the code. We will also describe these things during code description.
#include <WiFi.h>
#include <ESP_Mail_Client.h>
#define WIFI_SSID "SSID"
#define WIFI_PASSWORD "PASSWORD"
#define SMTP_HOST "smtp.gmail.com"
#define SMTP_PORT 465
/* The sign in credentials */
#define AUTHOR_EMAIL "email address"
#define AUTHOR_PASSWORD "email password"
/* Recipient's email*/
#define RECIPIENT_EMAIL "email address_Rx"
/* The SMTP Session object used for Email sending */
SMTPSession smtp;
/* Callback function to get the Email sending status */
void smtpCallback(SMTP_Status status);
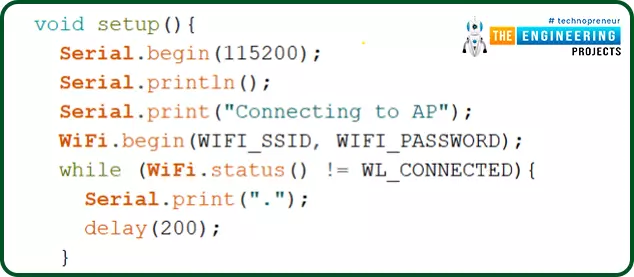
void setup(){ Serial.begin(115200);
Serial.println();
Serial.print("Connecting to AP");
WiFi.begin(WIFI_SSID, WIFI_PASSWORD);
while (WiFi.status() != WL_CONNECTED){
Serial.print(".");
delay(200);
}
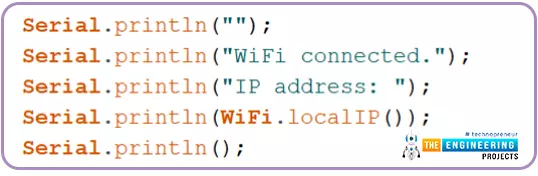
Serial.println("");
Serial.println("WiFi connected.");
Serial.println("IP address: ");
Serial.println(WiFi.localIP());
Serial.println();
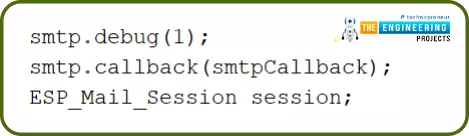
/** Enable the debug via Serial port
none debug or 0 basic debug or 1*/
smtp.debug(1);
/* Set the callback function to get the sending results */
smtp.callback(smtpCallback);
/* Declare the session config data */
ESP_Mail_Session session;
/* Set the session config */
session.server.host_name = SMTP_HOST; session.server.port = SMTP_PORT; session.login.email = AUTHOR_EMAIL; session.login.password = AUTHOR_PASSWORD;
session.login.user_domain = "";
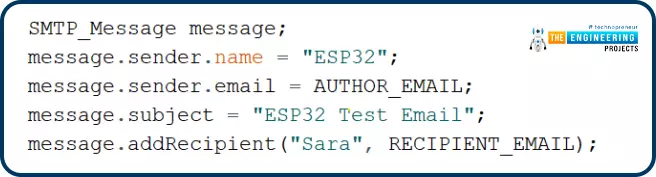
/* Declare the message class */
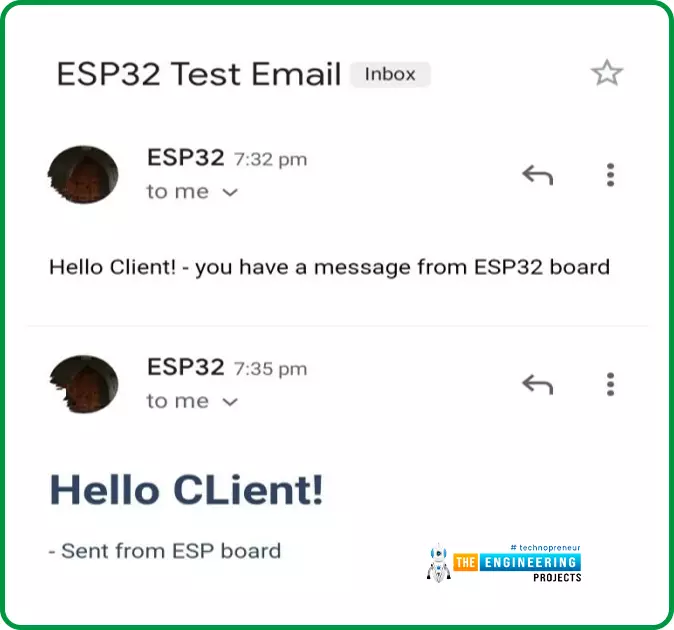
SMTP_Message message; message.sender.name = "ESP32"; message.sender.email = AUTHOR_EMAIL; message.subject = "ESP32 Test Email";
message.addRecipient("Sara", RECIPIENT_EMAIL);
/*Send HTML message*/
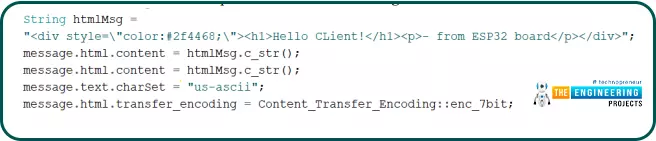
String htmlMsg = "<div style=\"color:#2f4468;\"><h1>Hello CLient!</h1><p>- Sent from ESP board</p></div>"; message.html.content = htmlMsg.c_str(); message.html.content = htmlMsg.c_str(); message.text.charSet = "us-ascii";
message.html.transfer_encoding = Content_Transfer_Encoding::enc_7bit;
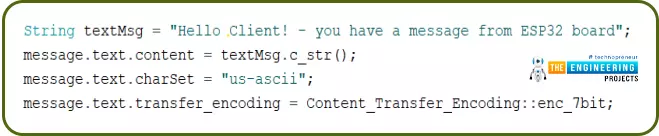
//Send raw text message
/* String textMsg = "Hello Client! - you have a message from ESP32 board"; message.text.content = textMsg.c_str(); message.text.charSet = "us-ascii";
message.text.transfer_encoding = Content_Transfer_Encoding::enc_7bit;*/
message.priority = esp_mail_smtp_priority::esp_mail_smtp_priority_low;
message.response.notify = esp_mail_smtp_notify_success | esp_mail_smtp_notify_failure | esp_mail_smtp_notify_delay;
/* Set the custom message header */
//message.addHeader("Message-ID: <abcde.fghij@gmail.com>");
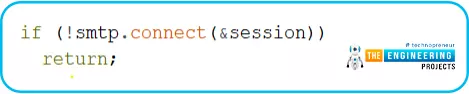
/* Connect to server with the session config */ if (!smtp.connect(&session))
return;
/* Start sending Email and close the session */ if (!MailClient.sendMail(&smtp, &message))
Serial.println("Error sending Email, " + smtp.errorReason());
}
void loop(){
}
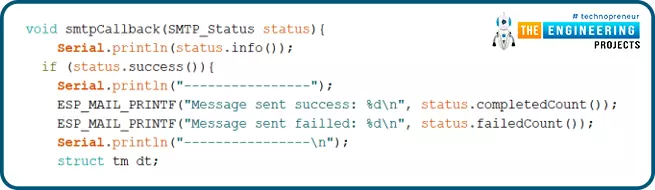
/* Callback function to get the Email sending status */
void smtpCallback(SMTP_Status status){
/* Print the current status */
Serial.println(status.info());
/* Print the sending result */ if (status.success()){
Serial.println("----------------");
ESP_MAIL_PRINTF("Message sent success: %d\n", status.completedCount());
ESP_MAIL_PRINTF("Message sent failled: %d\n", status.failedCount());
Serial.println("----------------\n"); struct tm dt;
for (size_t i = 0; i < smtp.sendingResult.size(); i++){
/* Get the result item */
SMTP_Result result = smtp.sendingResult.getItem(i);
time_t ts = (time_t)result.timestamp; localtime_r(&ts, &dt);
ESP_MAIL_PRINTF("Message No: %d\n", i + 1);
ESP_MAIL_PRINTF("Status: %s\n", result.completed ? "success" : "failed"); ESP_MAIL_PRINTF("Date/Time: %d/%d/%d %d:%d:%d\n", dt.tm_year + 1900,
dt.tm_mon + 1, dt.tm_mday, dt.tm_hour, dt.tm_min, dt.tm_sec); ESP_MAIL_PRINTF("Recipient: %s\n", result.recipients); ESP_MAIL_PRINTF("Subject: %s\n", result.subject);
}
Serial.println("----------------\n");
}
}
Code Description
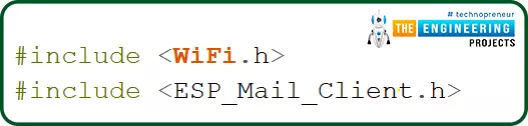
- The first task is adding the required header files or libraries.
- Wifi.h is used to enable the Wi-Fi module and hence wireless network connectivity.
- Another library is ESP_Mail_Client.h to enable email service over SMTP (simple mail transfer protocol).
- Enter the network credentials in place of SSID and PASSWORD.

- Insert SMTP parameter of the respective email service provider.
- The parameters used below are for Gmail.

- Enter the sender’s email address and password details.

- Insert recipient’s email address.

- SMTPSession object is used for sending emails.

- This smtpCallback() function is used to get the email sending status.

- This function also includes printing the results like success and failure of email sent.
Setup()
- Initialize the serial monitor at a 115200 baud rate for debugging purposes.
- WiFi.begin() function is used to initialize the Wi-Fi module with Wi-Fi credentials used as arguments.
- The While loop will continuously run until the ESP32 is connected to the Wi-Fi network.
- If the device is connected to a local Wi-Fi network then print the details on the serial monitor.
- WiFi.localIP() function is used to fetch the IP address.
- Print the IP address on the serial monitor using Serial.println() function.
- Serial.debug() is used to enable the debug via Serial port where ‘0’ and ‘1’ are used as arguments where;
- - none debug
- - basic debug
- Inside ESP_Mail_FS.h header file, ESP_MAIL_DEFAULT_DEBUG_PORT can be used to change the Debug port.
- Set the smtp.callback() function to get sending results.
- Next step is setting the message header.
- Message header will be set inside the setup() function which includes, sender’s name, subject, sender’s email address, receiver’s email address and name.
Sending raw text message
Write the message content (raw text) in the textMsg variable which you want to share over email.
Sending HTML text
To send HTML text write the respective content in the htmlMsg variable.
- Connect to server with session configuration using smtp.connect() function.
- Next thing to do is, send an email to the client for that MailClient.sendMail() function is used and if mail transmission is failed then that will be printed on the serial monitor along with the reason.

- Loop() function will remain empty.
Testing
- Upload the Arduino IDE code in the ESP32 module.
- Make sure the Wi-Fi network is ON to which your ESP32’s Wi-Fi module is supposed to connect.
- Open Serial monitor with 115200 baud rate.
- Also, make sure that you have turned ON the permission for less secure apps.
Otherwise, you won’t be able to send emails and an error will be printed on the serial monitor.
- Press the EN button from the ESP32 development board.

- Check receiver email inbox.
Arduino IDE code, for sending images and text files using ESP32 and SMTP server:
In this example code, we will demonstrate how to share text files and images through emails using ESP32 over the SMTP server.
But, before sharing attachments (text files or images) you need to save those files on the ESP32 filesystem (SPIFFS).
Uploading files to ESP32 Filesystem (SPIFFS)
SPIFFS stands for Serial Peripheral Interface Flash File System, which is built into the ESP32 module. This is a lightweight filesystem designed for microcontrollers with flash chips connected via SPI bus, such as the ESP32 flash memory. In this flash memory, we can write, delete, read, and close files.
- Text files and images will be saved on ESP32 filesystem (SPIFFS) using ESP32 filesystem uploader plugin for Arduino IDE.
Installing Arduino ESP32 Filesystem Uploader:
- Download the ESP32 filesystem zip file from the following link: https://github.com/me-no-dev/arduino-esp32fs-plugin/releases/
- Go to Arduino IDE directory, and then open the tools
- Unzip the .zip file, downloaded from the above link. As shown in the image below:
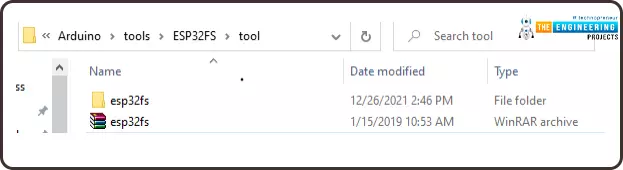
Fig.
- Restart the Arduino IDE.
Check if the plugin is successfully uploaded or not:
- Open Arduino IDE. Select ESP32 development board.
- Go to
- Check whether this ESP32 Sketch Data Upload option is available or not. If it is available that means plugin is uploaded successfully and it is ready to upload files.
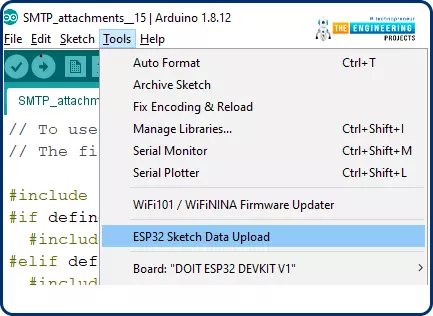
Fig.
Finally, uploading files using SPIFFS or filesystem upload:
- In Arduino IDE, create a new Arduino sketch.
- Save the project.
- Go to Sketch >> Show Sketch Folder. As shown in the image below:
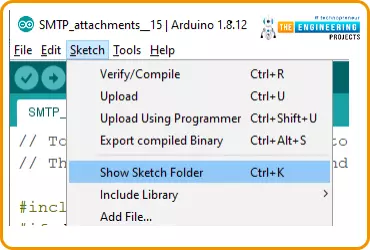
Fig.
- Create a new folder named as
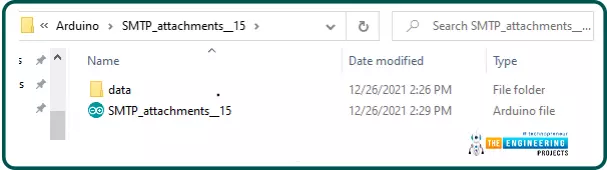
Fig.
- Inside that data folder add the respective text files or images you want to share over email as shown in the image below:
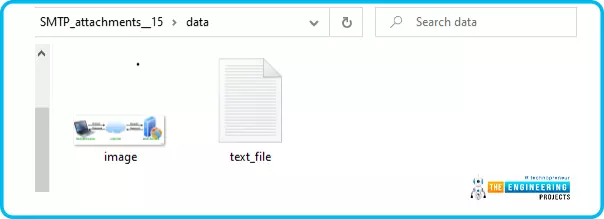
Fig.
- If you are using the example code from ESP mail-client library then the images should be named as png and text files as text_file.text.
- After saving files inside data folder, open the Arduino IDE then go to Tools >> ESP32 Sketch Data Upload to upload the SPIFFS Image.
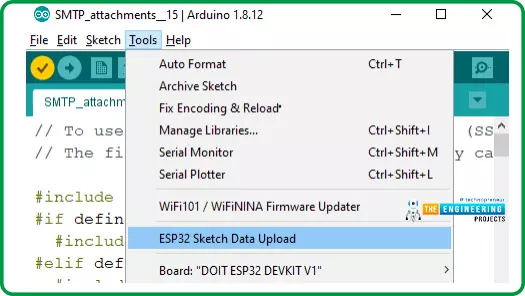
Fig.
A message “SPIFFS Image Uploaded” will be displayed at the bottom of Arduino IDE, once the SPIFFS image is uploaded successfully.
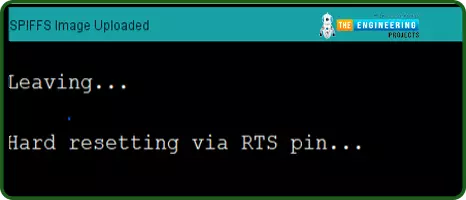
Fig.
Arduino IDE Code
Code is already available in ESP Mail Client Library. As shown below:
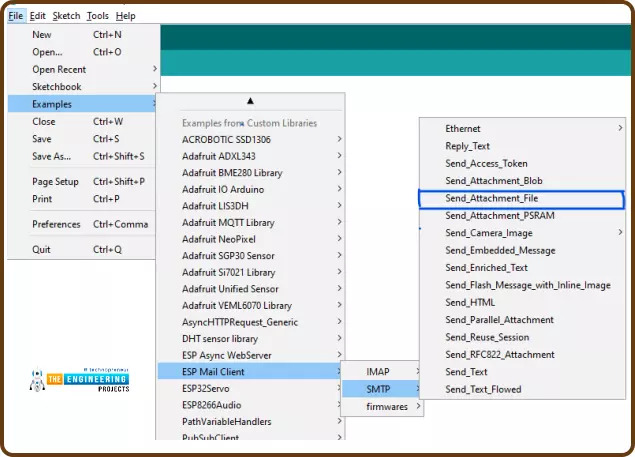
Fig.
- You can not use the exact code.
- Some changes like Wi-Fi credentials, email address of sender and receiver, SMTP setting parameters for respective email service providers etc, need to be done before uploading the code.
// To use send Email for Gmail to port 465 (SSL), less secure app option should be enabled. https://myaccount.google.com/lesssecureapps?pli=1
// The file systems for flash and sd memory can be changed in ESP_Mail_FS.h.
#include <Arduino.h>
#include <WiFi.h>
#include <ESP_Mail_Client.h>
#define WIFI_SSID "SSID"
#define WIFI_PASSWORD "PASSWORD"
// server address for Gmail account
#define SMTP_HOST "smtp.gmail.com"
/** The smtp port e.g.
25 or esp_mail_smtp_port_25 465 or esp_mail_smtp_port_465 587 or esp_mail_smtp_port_587*/
#define SMTP_PORT 465
/* The log in credentials */
#define AUTHOR_EMAIL "Sender's email address"
#define AUTHOR_PASSWORD "password"
/* Recipient's email*/
#define RECIPIENT_EMAIL "receiver's email address"
/* The SMTP Session object used for Email sending */
SMTPSession smtp;
/* Callback function to get the Email sending status */
void smtpCallback(SMTP_Status status);
void setup(){
Serial.begin(115200);
Serial.println();
Serial.print("Connecting to AP");
WiFi.begin(WIFI_SSID, WIFI_PASSWORD);
while (WiFi.status() != WL_CONNECTED){
Serial.print(".");
delay(200);
}
Serial.println("");
Serial.println("WiFi connected.");
Serial.println("IP address: ");
Serial.println(WiFi.localIP());
Serial.println();
if (!SPIFFS.begin(true)) {
Serial.println("An error has occurred while mounting SPIFFS");
}
else{
Serial.println("SPIFFS mounted successfully");
}
/** Enable the debug via Serial port
- none debug or 0
- basic debug or 1
*/
smtp.debug(1);
/* Set the callback function to get the sending results */
smtp.callback(smtpCallback);
/* Declare the session config data */
ESP_Mail_Session session;
/* Set the session config */ session.server.host_name = SMTP_HOST; session.server.port = SMTP_PORT; session.login.email = AUTHOR_EMAIL; session.login.password = AUTHOR_PASSWORD;
session.login.user_domain = "mydomain.net";
/* Declare the message class */
SMTP_Message message;
/* Enable the chunked data transfer with pipelining for large message if server supported
*/
message.enable.chunking = true;
/* Set the message headers */ message.sender.name = "ESP Mail";
message.sender.email = AUTHOR_EMAIL;
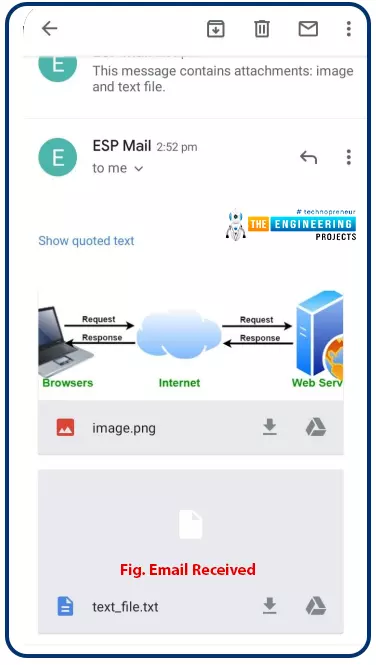
message.subject = "Test sending Email with attachments and inline images from SD card and Flash";
message.addRecipient("Sara", RECIPIENT_EMAIL);
/** Two alternative content versions are sending in this example e.g. plain text and html */
String htmlMsg = "This message contains attachments: image and text file."; message.html.content = htmlMsg.c_str(); message.html.charSet = "utf-8";
message.html.transfer_encoding = Content_Transfer_Encoding::enc_qp;
message.priority = esp_mail_smtp_priority::esp_mail_smtp_priority_normal; message.response.notify = esp_mail_smtp_notify_success | esp_mail_smtp_notify_failure | esp_mail_smtp_notify_delay;
/* The attachment data item */
SMTP_Attachment att;
/** Set the attachment info e.g.
- file name, MIME type, file path, file storage type,
- transfer encoding and content encoding
*/
att.descr.filename = "image.png"; att.descr.mime = "image/png"; //binary data
att.file.path = "/image.png";
att.file.storage_type = esp_mail_file_storage_type_flash;
att.descr.transfer_encoding = Content_Transfer_Encoding::enc_base64;
/* Add attachment to the message */
message.addAttachment(att);
message.resetAttachItem(att);
att.descr.filename = "text_file.txt"; att.descr.mime = "text/plain"; att.file.path = "/text_file.txt";
att.file.storage_type = esp_mail_file_storage_type_flash;
att.descr.transfer_encoding = Content_Transfer_Encoding::enc_base64;
/* Add attachment to the message */
message.addAttachment(att);
/* Connect to server with the session config */ if (!smtp.connect(&session))
return;
/* Start sending the Email and close the session */ if (!MailClient.sendMail(&smtp, &message, true))
Serial.println("Error sending Email, " + smtp.errorReason());
}
void loop()
{
}
/* Callback function to get the Email sending status */
void smtpCallback(SMTP_Status status){
/* Print the current status */
Serial.println(status.info());
/* Print the sending result */ if (status.success()){
Serial.println("----------------");
ESP_MAIL_PRINTF("Message sent success: %d\n", status.completedCount());
ESP_MAIL_PRINTF("Message sent failled: %d\n", status.failedCount());
Serial.println("----------------\n"); struct tm dt;
for (size_t i = 0; i < smtp.sendingResult.size(); i++){
/* Get the result item */
SMTP_Result result = smtp.sendingResult.getItem(i); time_t ts = (time_t)result.timestamp;
localtime_r(&ts, &dt);
ESP_MAIL_PRINTF("Message No: %d\n", i + 1);
ESP_MAIL_PRINTF("Status: %s\n", result.completed ? "success" : "failed"); ESP_MAIL_PRINTF("Date/Time: %d/%d/%d %d:%d:%d\n", dt.tm_year + 1900,
dt.tm_mon + 1, dt.tm_mday, dt.tm_hour, dt.tm_min, dt.tm_sec);
ESP_MAIL_PRINTF("Recipient: %s\n", result.recipients);
ESP_MAIL_PRINTF("Subject: %s\n", result.subject);
}
Serial.println("----------------\n");
}
}
Code Description:
Most part of the code is similar to the previous one (that is sending raw text and HTML text), including libraries, network credentials, enabling Wi-Fi and the serial monitor, setting the email parameters of the respective email service provided. So we not explaining the complete code but, we will explain the programming part which is different than the previous one.
Setup()
- We are initializing the SPIFFS, inside the setup() function to sore files which are to be shared over the SMTP server.
- begin() function is used to for initializing SPIFFS.
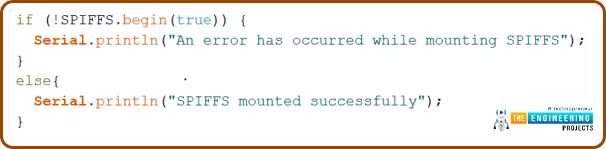
Fig.
- If the server supports, enable chunked data transfer with pipelining for large messages.

Fig.
- Next, you need to create data attachments.

Fig.
- The next thing is sending the image, for that you need to add the attachment details: filename, path, mime type, type of storage, encoding technique.
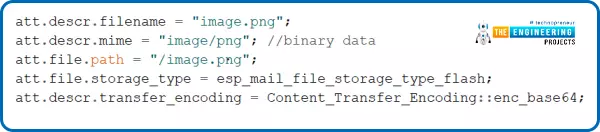
Fig.
- After adding the details of the image, add the attachment to the message.

Fig.
- To send a text file you also need to add similar details: name of the file, path, storage type, mime type and encoding technique.
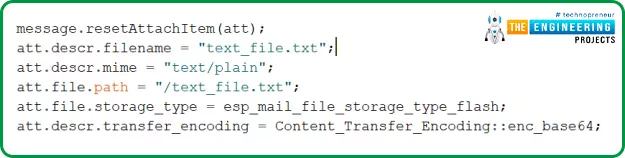
Fig.
- Add this attachment too to the message.

Testing
- Upload the code into the ESP32 board.
- Make sure you have selected the correct ESP32 development board and COM port.
- Also, make sure that you have turned on the access for less secure apps for the sender’s email account as discussed earlier. Otherwise, the ESP32 will face an authentication error.
- Turn ON the Wi-Fi with which your device is supposed to connect with.
- Once the device is connected with the access point, it will automatically send the attachment to the receiver's email account.
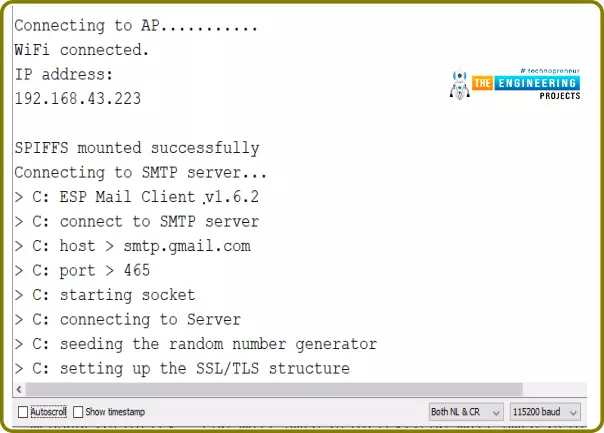
Fig.
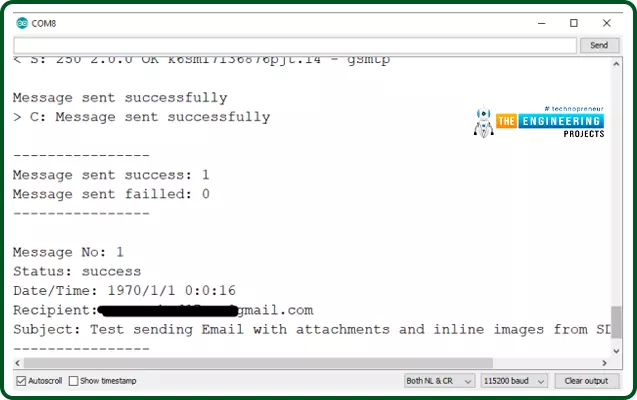
Fig.
This concludes the tutorial; I hope you found this helpful and also hope to see you again with a new tutorial on ESP32.


