Hello friends, I hope you all are doing great. Today, I am going to share the new Anemometer Wind Speed Sensor Library for Proteus Simulation, the next library of our renewable energy series. If you have searched for a Proteus simulation of an anemometer, the spinning three-cup wind speed sensor on every weather station, crane and wind turbine, this library brings one with a pulse output into Proteus, ready for an Arduino.
Anemometer Wind Speed Sensor Library for Proteus Simulation
Latest version: V1.0 (November 2026, this tutorial)
Other power libraries: LiPo Battery · Single Cell Battery · CR2032 Coin Cell · Solar Panel · MC34063 Buck · MC34064 Boost · 12V Solar Panel · 6V Mini Solar Panel · 3-Phase PM Generator · Vertical-Axis Wind Turbine · Micro Hydro Generator · Thermoelectric Generator · PEM Hydrogen Fuel Cell · Piezoelectric Energy Harvester · Hand Crank Generator · 12V LiFePO4 Battery · 12V Lead-Acid Battery · 18650 Li-ion Battery · PWM Solar Charge Controller · MPPT Solar Charge Controller · TP4056 Li-ion Charger Module · Wind Turbine Charge Controller · 12V to 230V Pure Sine Wave Inverter
Helping Tools
- Serial Monitor Advance: a serial terminal window for the UART of your board
- Serial Monitor Expert: the serial monitor with extra debugging tools
- LCD Library for Proteus V3.0: 16x2, 20x4 and I2C LCDs to show your readings
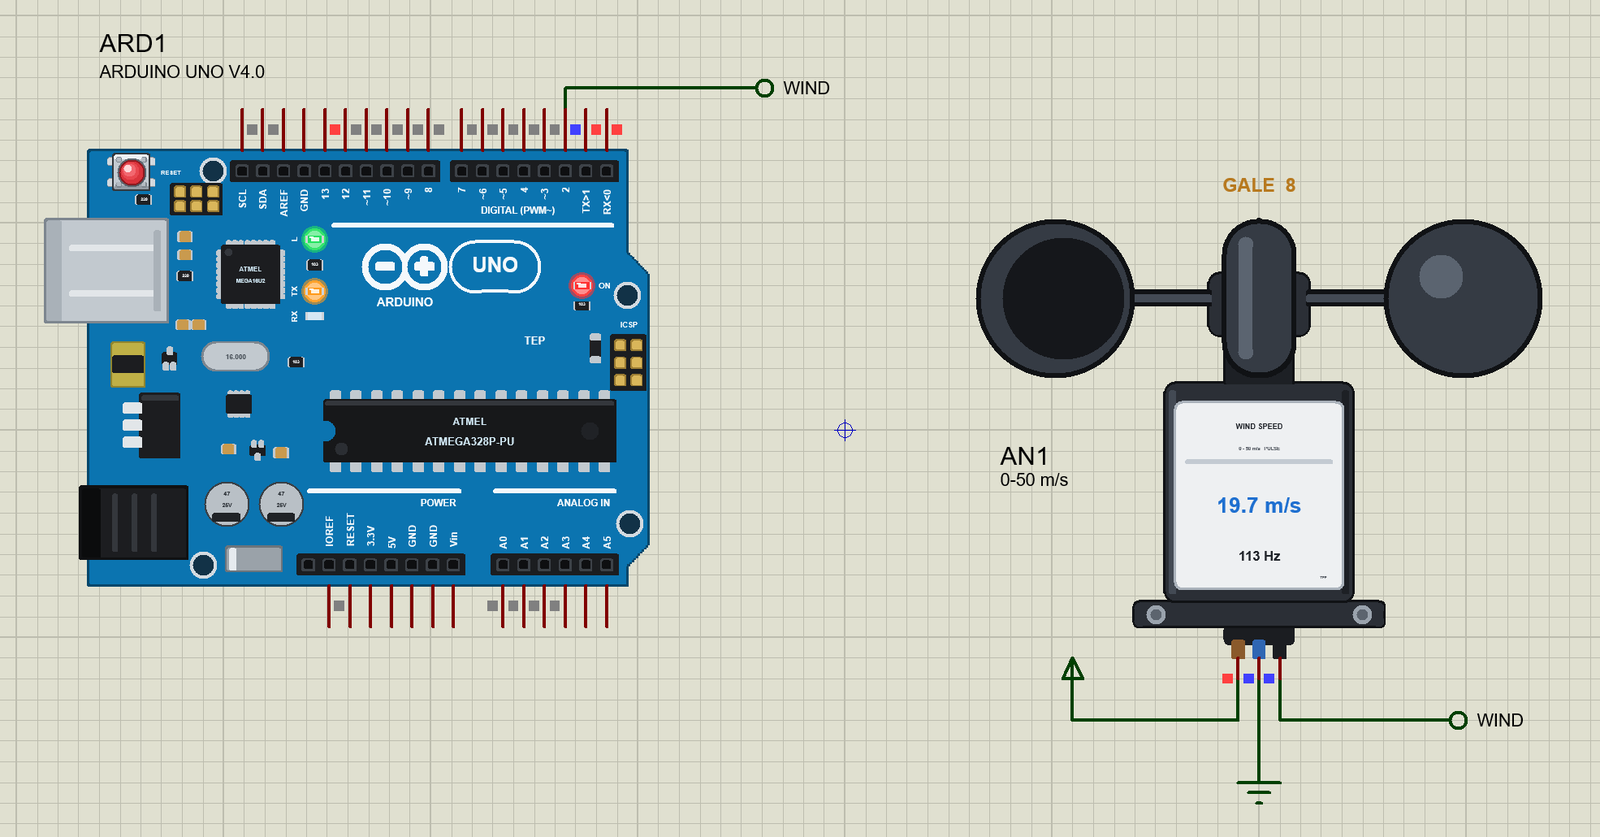
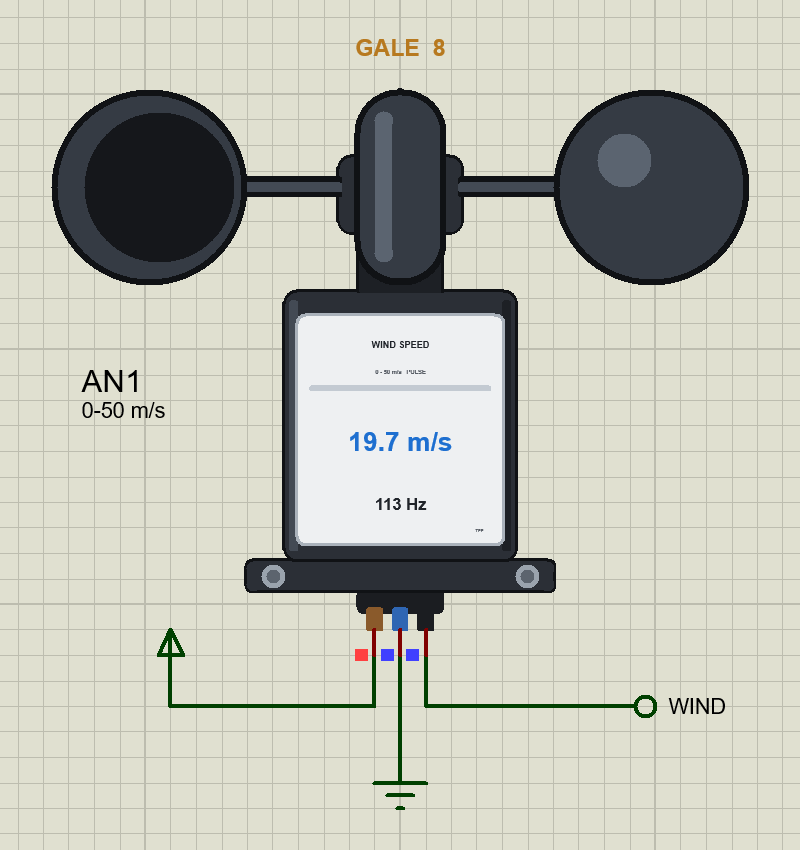
The sensor is drawn compact, a little smaller than an Arduino UNO, and at run time its label shows the wind speed it reports and its pulse frequency, with the wind's name on the Beaufort scale above the cups. The simulation model makes the wind, steady, gusty or rising, lets the cups follow it with their natural lag, and puts out the pulses that a real sensor of this kind gives. The demo is a wind speed monitor with a gale warning, the same job that protects a small wind turbine in a storm.
NOTICE: Our team has put a lot of effort into these small parts: the bodies, the animation and the pop-ups are all our own design, and you get them free. Your feedback is the fuel that keeps us going, so please tell us what you think in the comments below or in the Motor Driver board of our forum. And if our free libraries help you, you can buy us a coffee. So, let's get started with the Anemometer Wind Speed Sensor Library for Proteus Simulation:
What is an Anemometer?
An anemometer is an instrument that measures the speed of the wind. The most common kind is the cup anemometer: three hollow half-spheres, the cups, on three arms around a vertical shaft. The wind pushes harder on the open side of a cup than on its round back, so the rotor always turns the same way, whatever direction the wind comes from, and the stronger the wind, the faster it turns. That is all the mechanics there is, and it is why this design has been in use for more than a century.
Inside the body a small sensor watches the shaft and gives an electrical pulse each time a mark passes. The faster the cups turn, the more pulses arrive in a second. A microcontroller counts them, or times them, and works out the wind speed. Other versions of the same sensor give a current of 4 to 20 mA or speak over RS485; the pulse version is the simplest to read with an Arduino, and it is the one in this library.
| Three-cup anemometer with a pulse output (a maker's manual) | |
|---|---|
| Supply | 5 to 24 V DC, 20 mA at 12 V |
| Output | pulses; the high level is the supply voltage |
| Wind speed | 0.5 + 0.169 x the pulses in one second (m/s) |
| Range | 0 to 30, 50 or 60 m/s, by the version |
| Starting threshold | 0.2 m/s |
| Accuracy | within 0.3 m/s plus 3 % of the speed |
| Response time | under 1 s |
| Body | aluminium, black, IP65, -30 to +70 °C |
From Pulses to Wind Speed
The maker gives one line that turns the pulses into a wind speed: the speed in metres per second is 0.5 plus 0.169 times the number of pulses in one second. A wind of 10 m/s gives about 56 pulses a second, a storm of 30 m/s about 175. The 0.5 at the start is the friction of the bearings: the cups need a little wind before they turn steadily, and below about 0.5 m/s the line gives no pulses at all.
A cup anemometer does not answer at once. The rotor has mass, and it needs a moment to speed up when a gust arrives. The lag is shorter in a strong wind and longer in a light one, and the cups slow down more slowly than they speed up. The simulation shows this lag: the pop-up prints the wind in the air and the wind the sensor reports side by side.
Wind speeds are hard to picture, so sailors and weather services use the Beaufort scale. It sorts the wind into thirteen forces, from 0, calm, to 12, a hurricane, each with a name:
| Force | Name | Wind speed |
|---|---|---|
| 0 | Calm | under 0.3 m/s |
| 1 | Light air | 0.3 to 1.5 m/s |
| 2 | Light breeze | 1.6 to 3.3 m/s |
| 3 | Gentle breeze | 3.4 to 5.4 m/s |
| 4 | Moderate breeze | 5.5 to 7.9 m/s |
| 5 | Fresh breeze | 8.0 to 10.7 m/s |
| 6 | Strong breeze | 10.8 to 13.8 m/s |
| 7 | Near gale | 13.9 to 17.1 m/s |
| 8 | Gale | 17.2 to 20.7 m/s |
| 9 | Strong gale | 20.8 to 24.4 m/s |
| 10 | Storm | 24.5 to 28.4 m/s |
| 11 | Violent storm | 28.5 to 32.6 m/s |
| 12 | Hurricane | 32.7 m/s and more |
Features of the Anemometer Wind Speed Sensor Library for Proteus Simulation
- A compact sensor: a three-cup anemometer seen from the side, with its rotor head, its round body with the label, the mounting flange and the cable's three leads. It is drawn a little smaller than an Arduino UNO, about a third of the real sensor's 180 mm, so that it fits any sheet.
- The wind as a property: a steady wind, a gusty wind, or a wind that rises from calm to a storm in a few seconds; the pop-up changes it at run time.
- Cups with a lag: they follow the wind as real cups do, quicker in a strong wind, and they start at 0.2 m/s.
- The real pulse output: pulses by the maker's line, as high as the supply voltage, on a three-wire lead: brown, blue and black.
- Live on the sheet: the label shows the speed the sensor reports and the pulse frequency, and the wind's Beaufort name stands above the cups.
- A pop-up: the rotor turning seen from above, the pulses as on a scope, the maker's line worked out, the Beaufort scale, eight live values, graphs, an event log and a check page.
- A complete package: about 1.3 MB with the library, our Arduino UNO V4.0 and the demo, without the source code of the model.
The Anemometer in Proteus
The device is WINDSPEEDSENSORTEP in TEPANEMO.LIB, under Transducers > Wind Speed, with the prefix AN and the analog model TEPANEMO.DLL. Search WIND or ANEMOMETER in Pick Devices. It has three pins under its flange, coloured like the leads of an industrial three-wire sensor: VCC (brown, 5 to 24 V), GND (blue) and OUT (black, the pulses). The properties are WIND (the wind speed in m/s), PROFILE (STEADY, GUSTS or RISING) and RAMP (the seconds a RISING wind takes from calm to WIND).
Download Anemometer Wind Speed Sensor Library for Proteus Simulation
Click the button below to download Anemometer-Wind-Speed-Sensor-Library-for-Proteus-v1.0.zip (about 1.3 MB, without the source code of the models):
Anemometer Wind Speed Sensor Library for Proteus V1.0- README.txt: installation, the demo, the wiring, troubleshooting and the limits of the simulation.
- Proteus Library Files:
TEPANEMO.LIBandArduinoV4TEP.LIB. - Proteus Model Files:
TEPANEMO.DLLandTEPARDUINO.DLL. - Arduino Code: the demo sketch.
- Proteus Simulation: the demo project, its HEX file and copies of the DLLs.
No Proteus yet? Read How to Download and Install Proteus 7 and 8. New to libraries? Follow How to Install a New Library in Proteus.
How to Install Anemometer Wind Speed Sensor Library for Proteus Simulation
- Close Proteus and extract the whole zip file, for example to your Desktop.
- Copy the files from Proteus Library Files into the LIBRARY folder of Proteus.
- Copy the files from Proteus Model Files into the MODELS folder.
- Delete
TEPANEMO.IDXfrom the LIBRARY folder if it is there. - Start Proteus, press P and search for WIND.
Proteus Simulation of a Wind Speed Monitor with Arduino
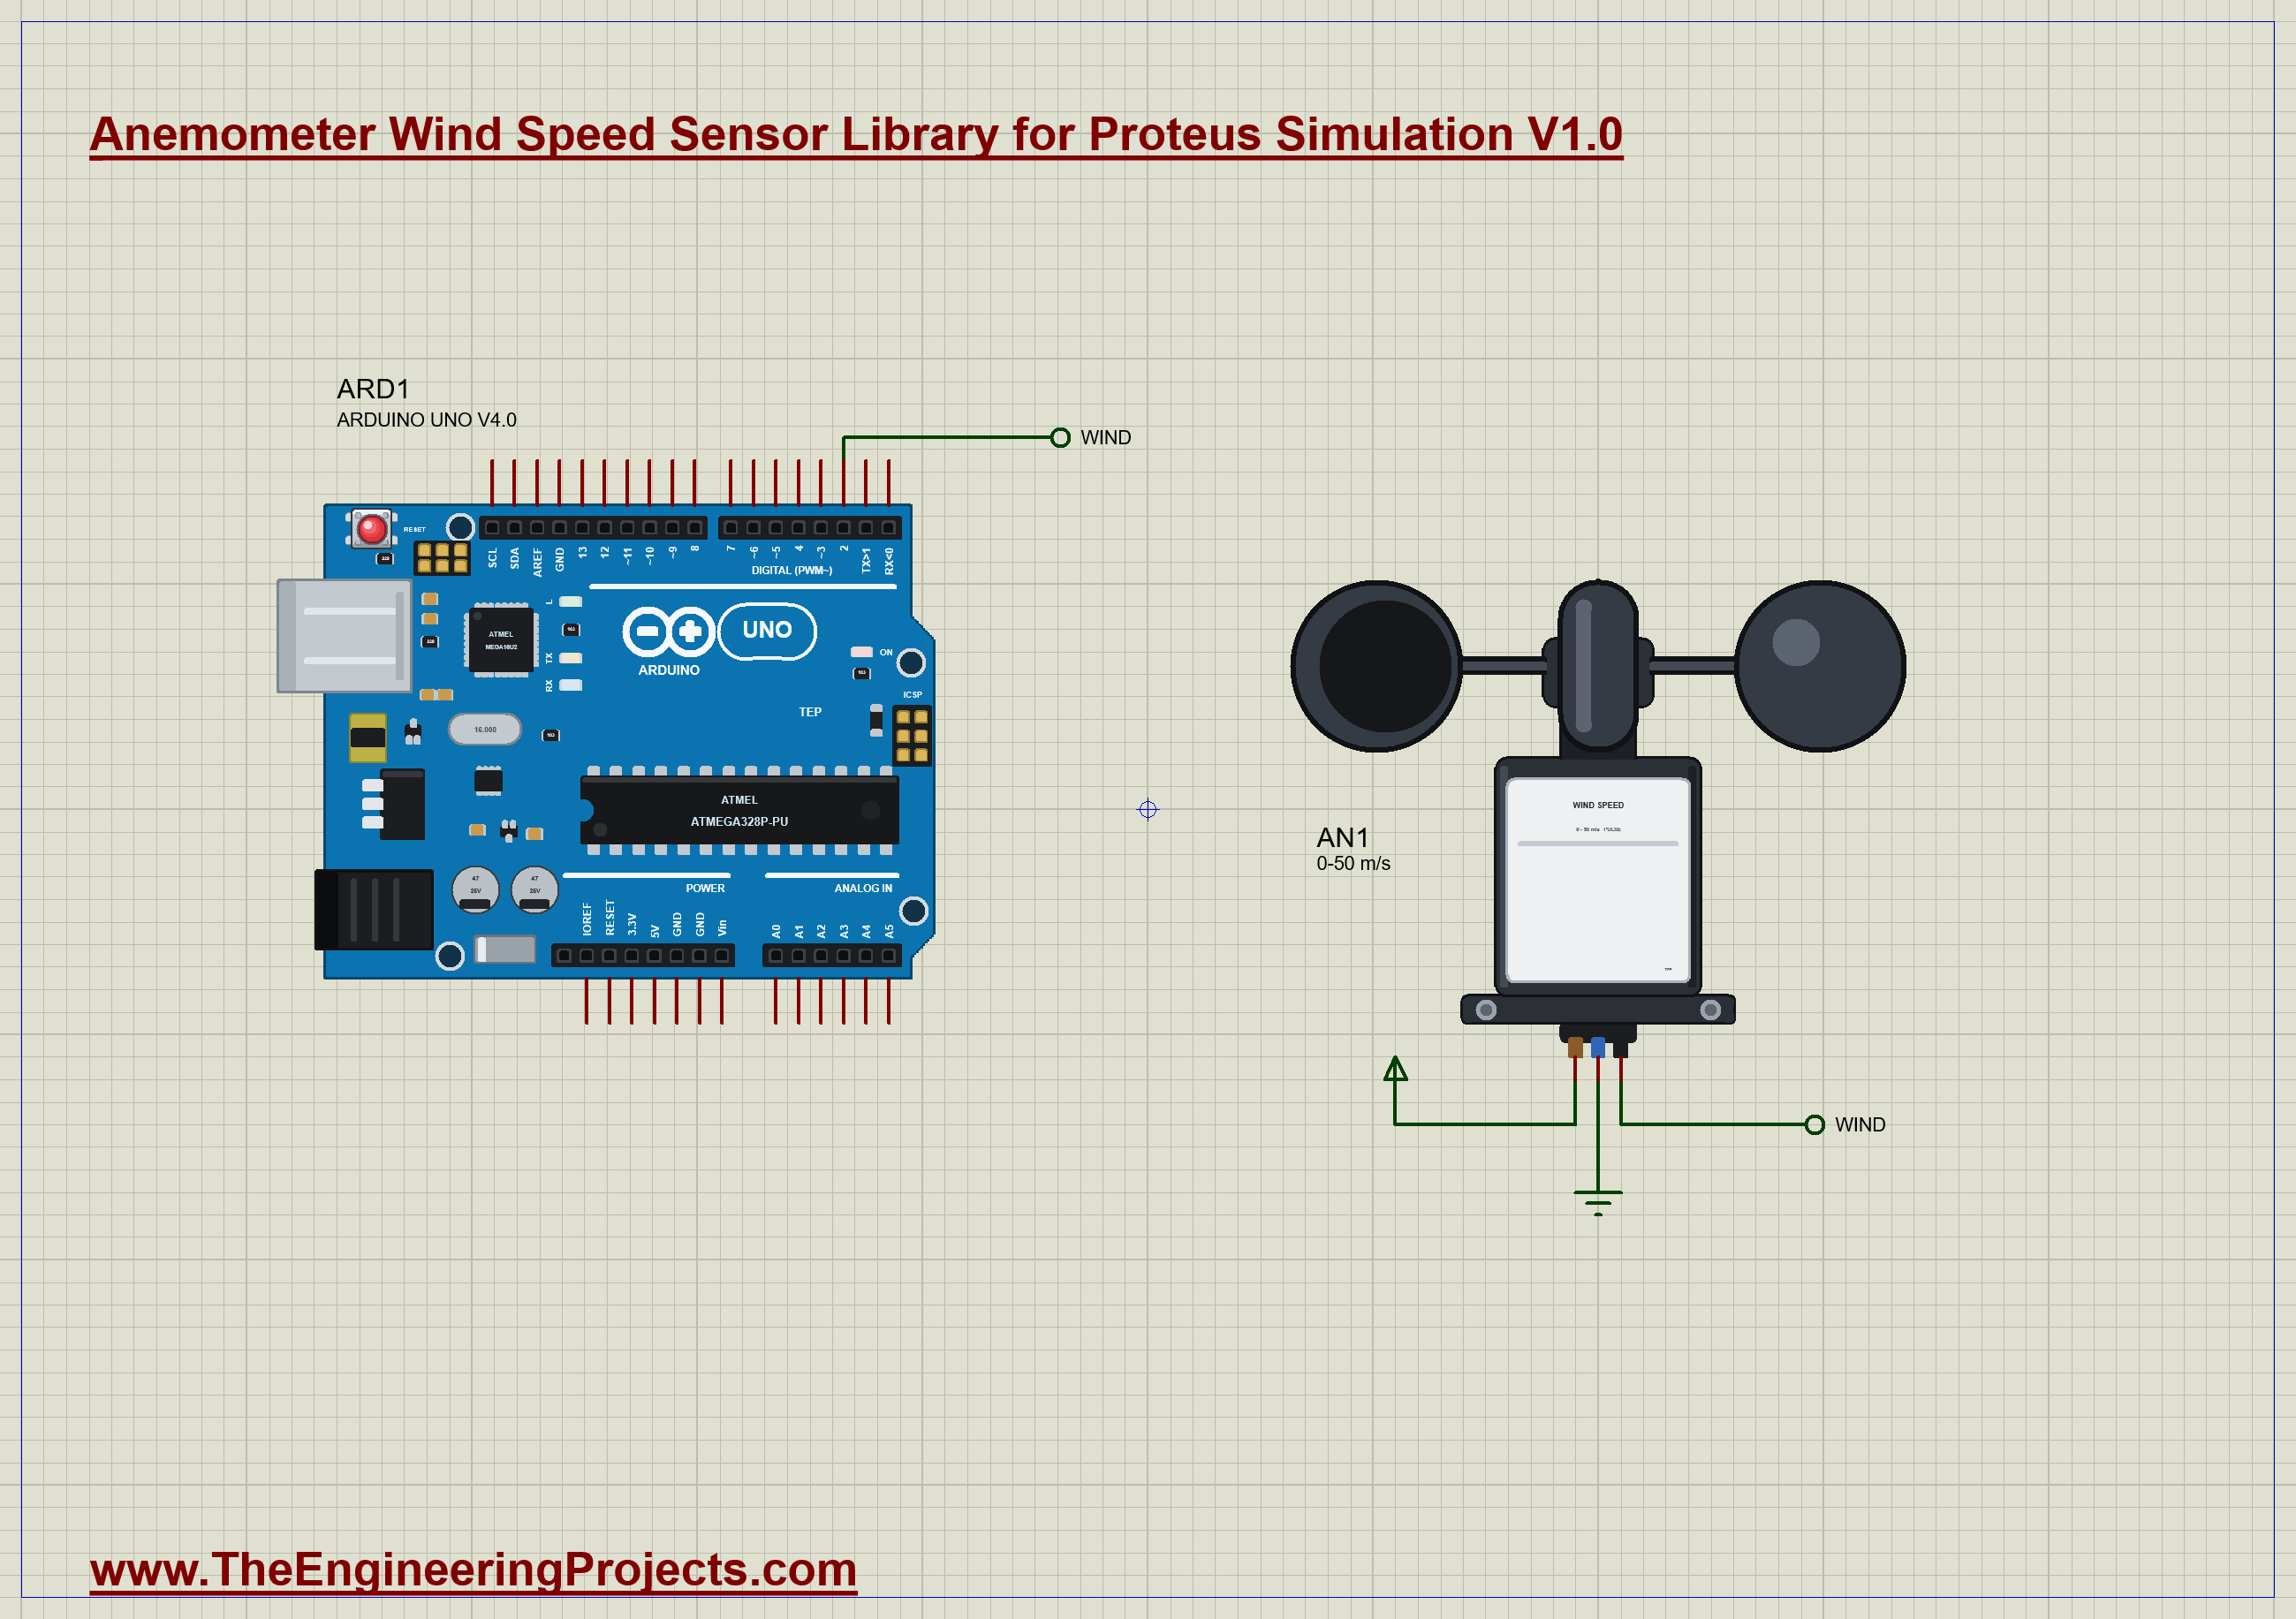
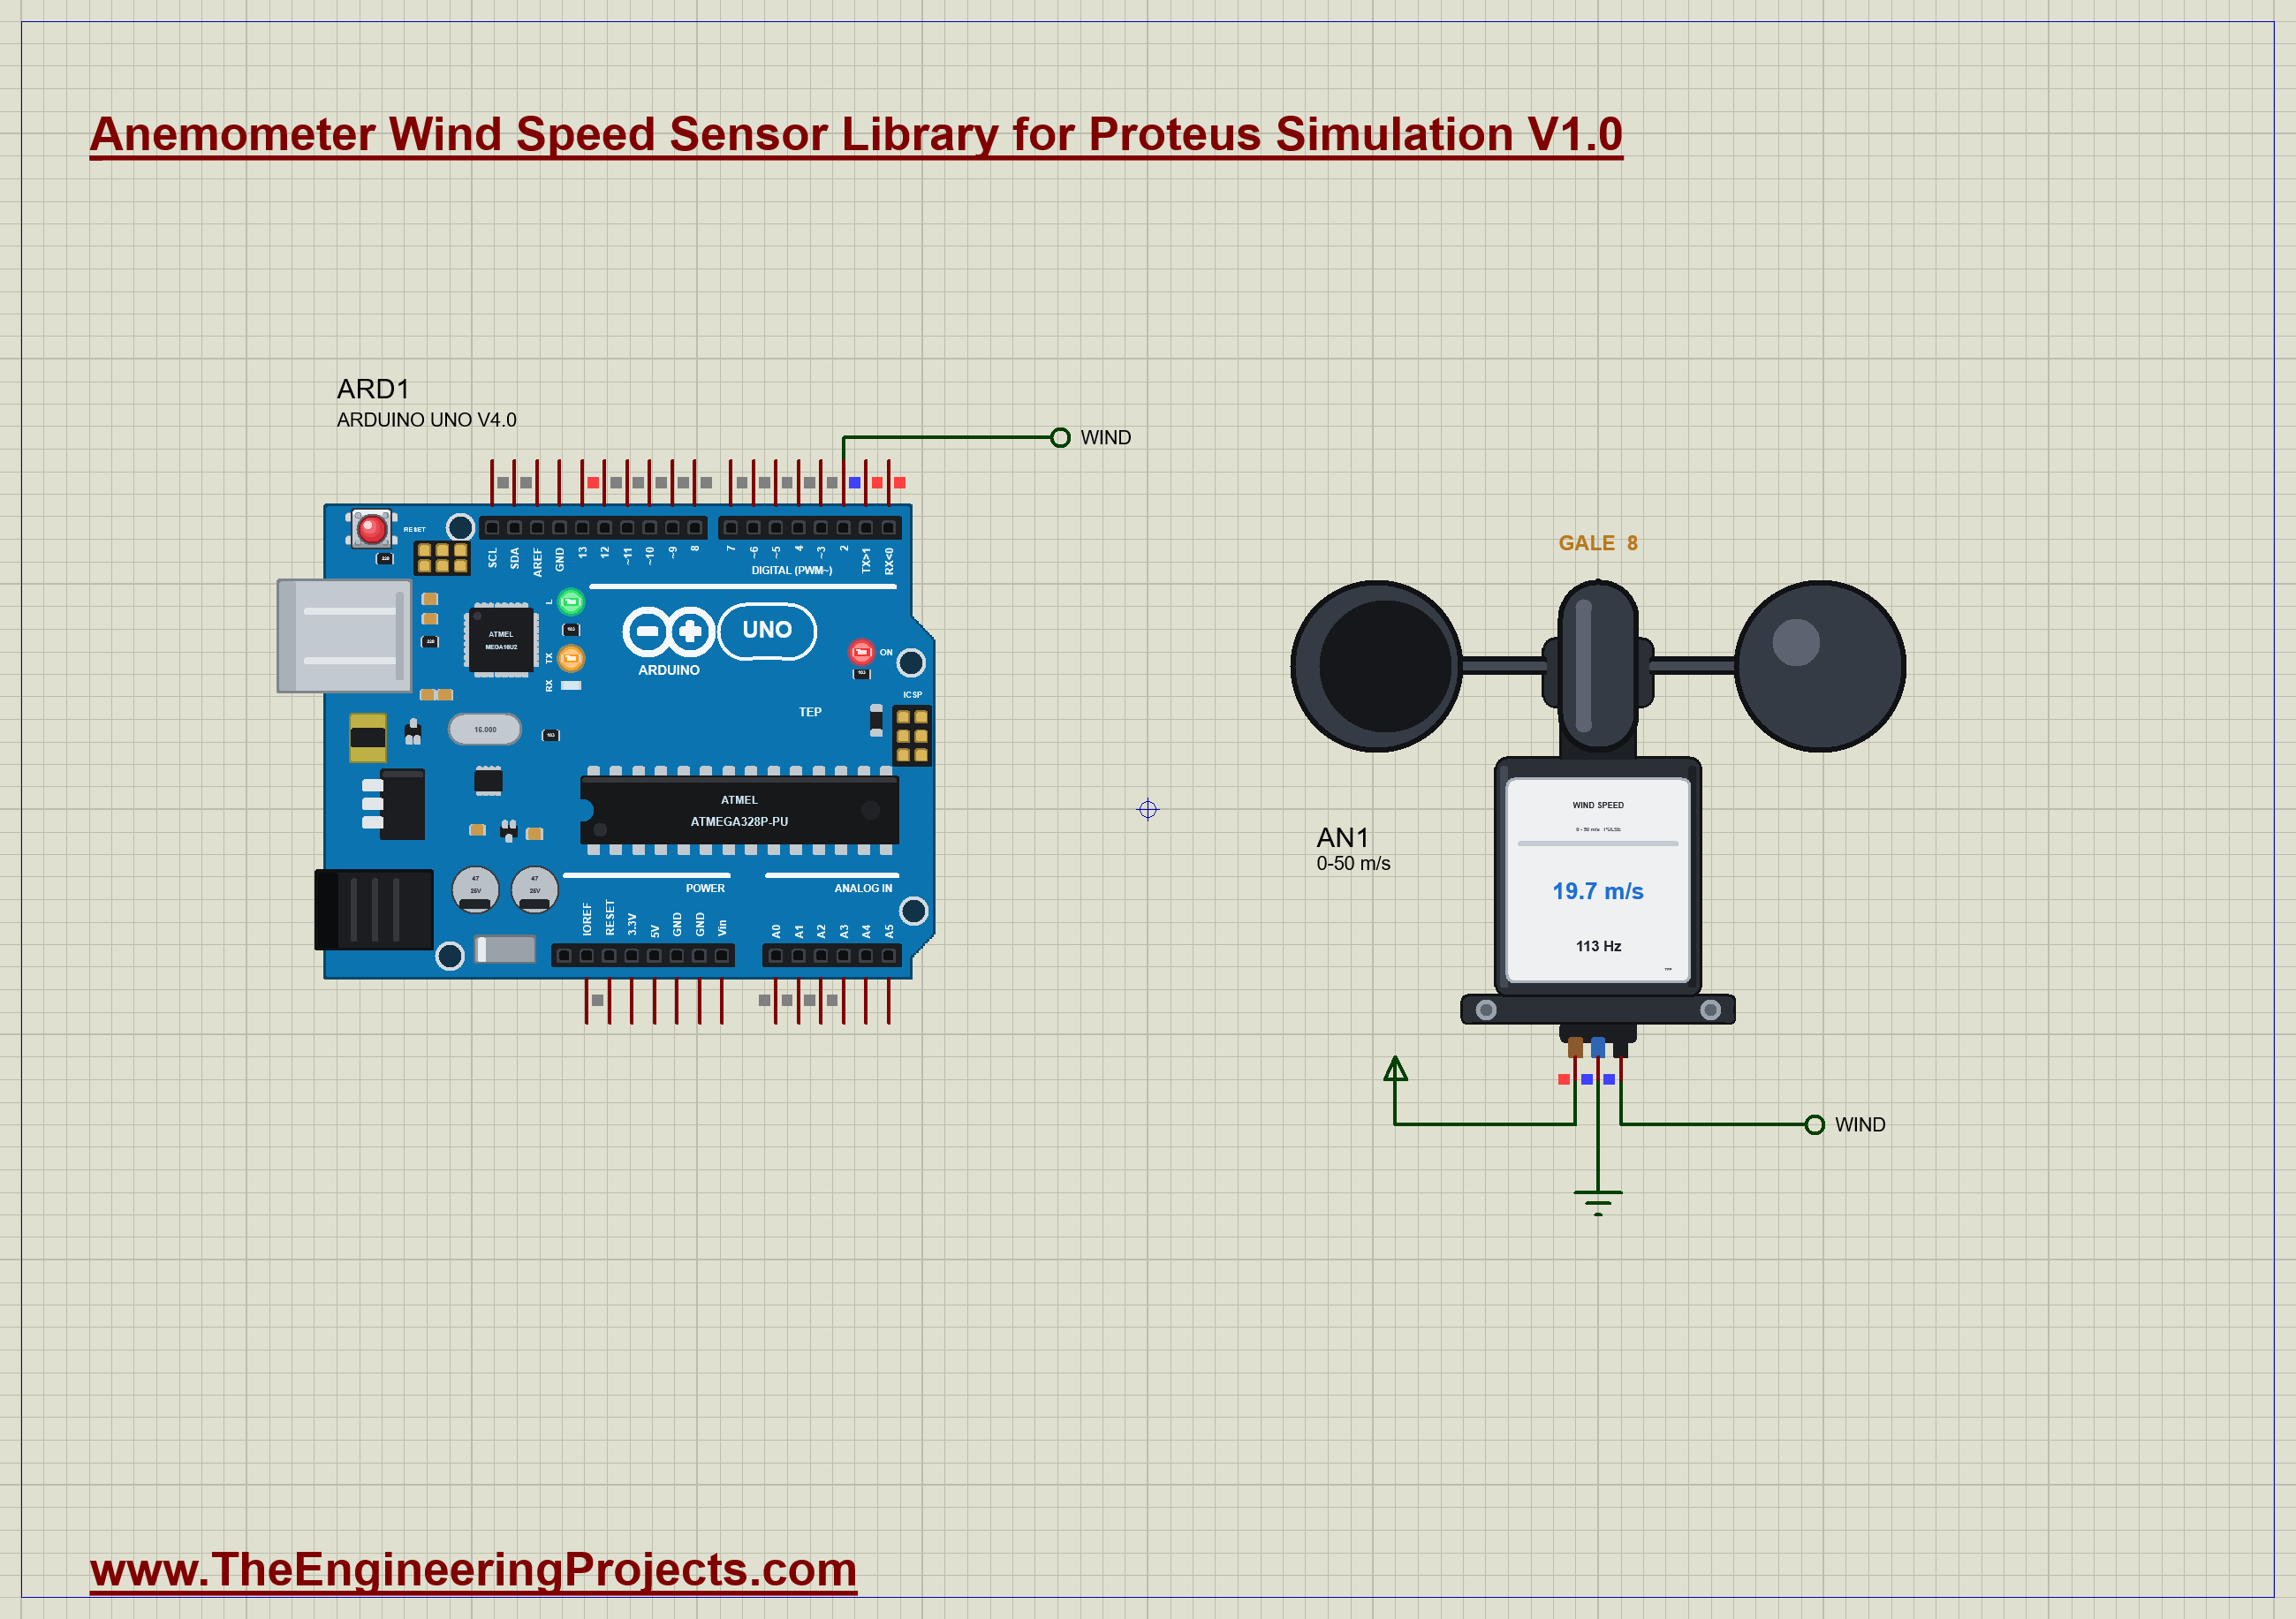
The demo is a wind speed monitor with a gale warning, on an A4 sheet. The anemometer, AN1, gets its supply from the 5 V rail, so that its pulses are 5 V high, and its black lead, the pulse output, goes to pin 2 of our Arduino UNO Library for Proteus V4.0 over the label WIND. The Arduino's built-in monitor is the same window as our TEP Serial Monitor Advance for Proteus. To show the whole scale in one short run, the demo's wind is a rising one: it climbs from calm to 30 m/s, a violent storm, in four seconds, far faster than any real weather (WIND 30, PROFILE RISING, RAMP 4). Open Anemometer-Wind-Speed-Sensor-ArduinoUnoV4.pdsprj.
The Sketch
The sketch needs no library. An interrupt on pin 2 notes the time of every rising edge and keeps the last five of them:
void onPulse() { edgeUs[edgeAt] = micros(); edgeAt = (edgeAt + 1) % 5; if (edgeCount < 5) edgeCount++; }Timing the pulses is better than counting them: in a light wind there are only a few pulses a second, and a count over a short time would be coarse. From the first and the last of the stored times the sketch gets the pulses per second:
return (n - 1) * 1e6 / (newest - oldest);Then the maker's line turns them into a wind speed. OFFSET is 0.5 and SLOPE is 0.169; for a sensor with another line you change only these two numbers:
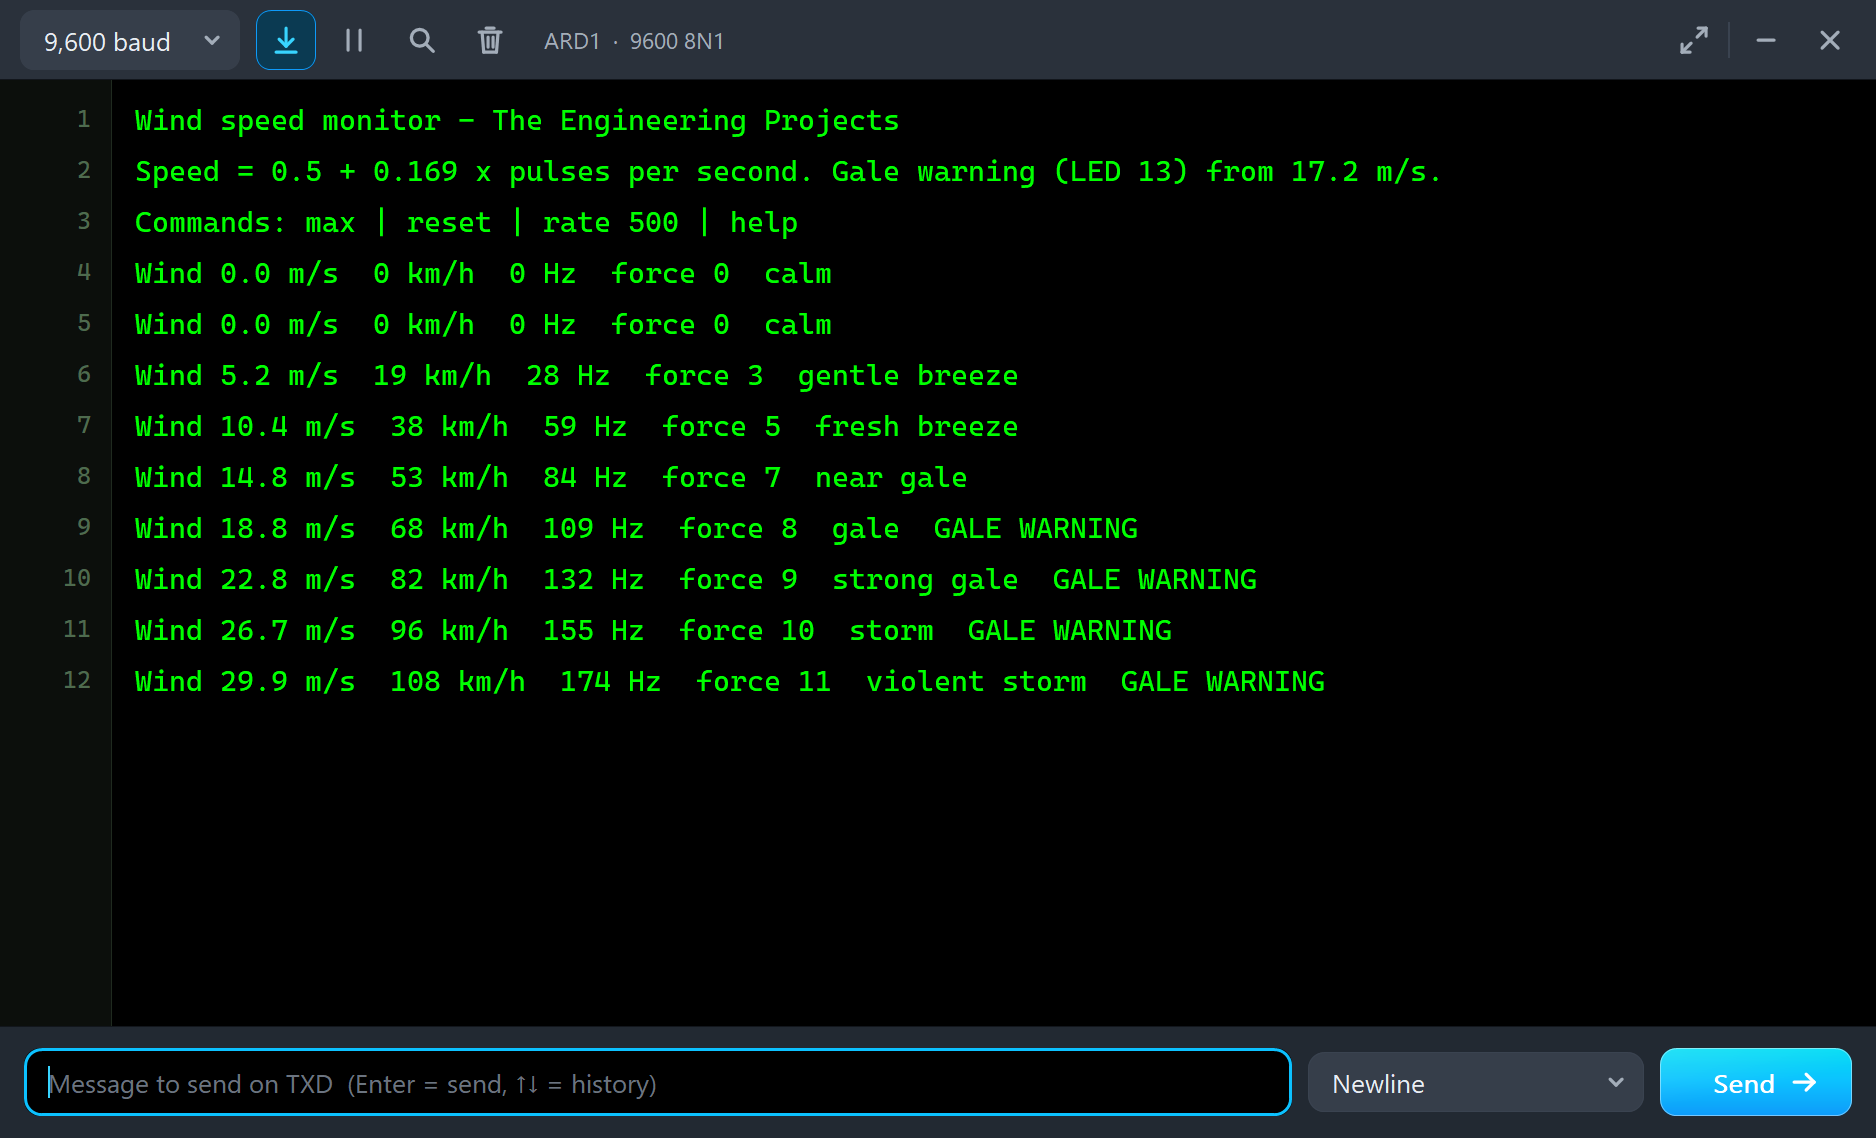
const float speed = hz > 0 ? OFFSET + SLOPE * hz : 0;The sketch prints the speed in m/s and km/h, the pulse frequency and the wind's force and name on the Beaufort scale. From force 8, a gale, it lights the LED on pin 13 and adds the words GALE WARNING. You can type max for the strongest wind so far, reset to forget it, or rate 1000 to report once a second.
Anemometer Simulation Results
Open the project and press Run. The demo runs about 4.5 simulated seconds; with the pop-up open and the pictures being taken it took about a minute and a half on our PC. Click the anemometer for its pop-up. Every number below comes from one simulation run, the demo exactly as it ships.
The First Pulses
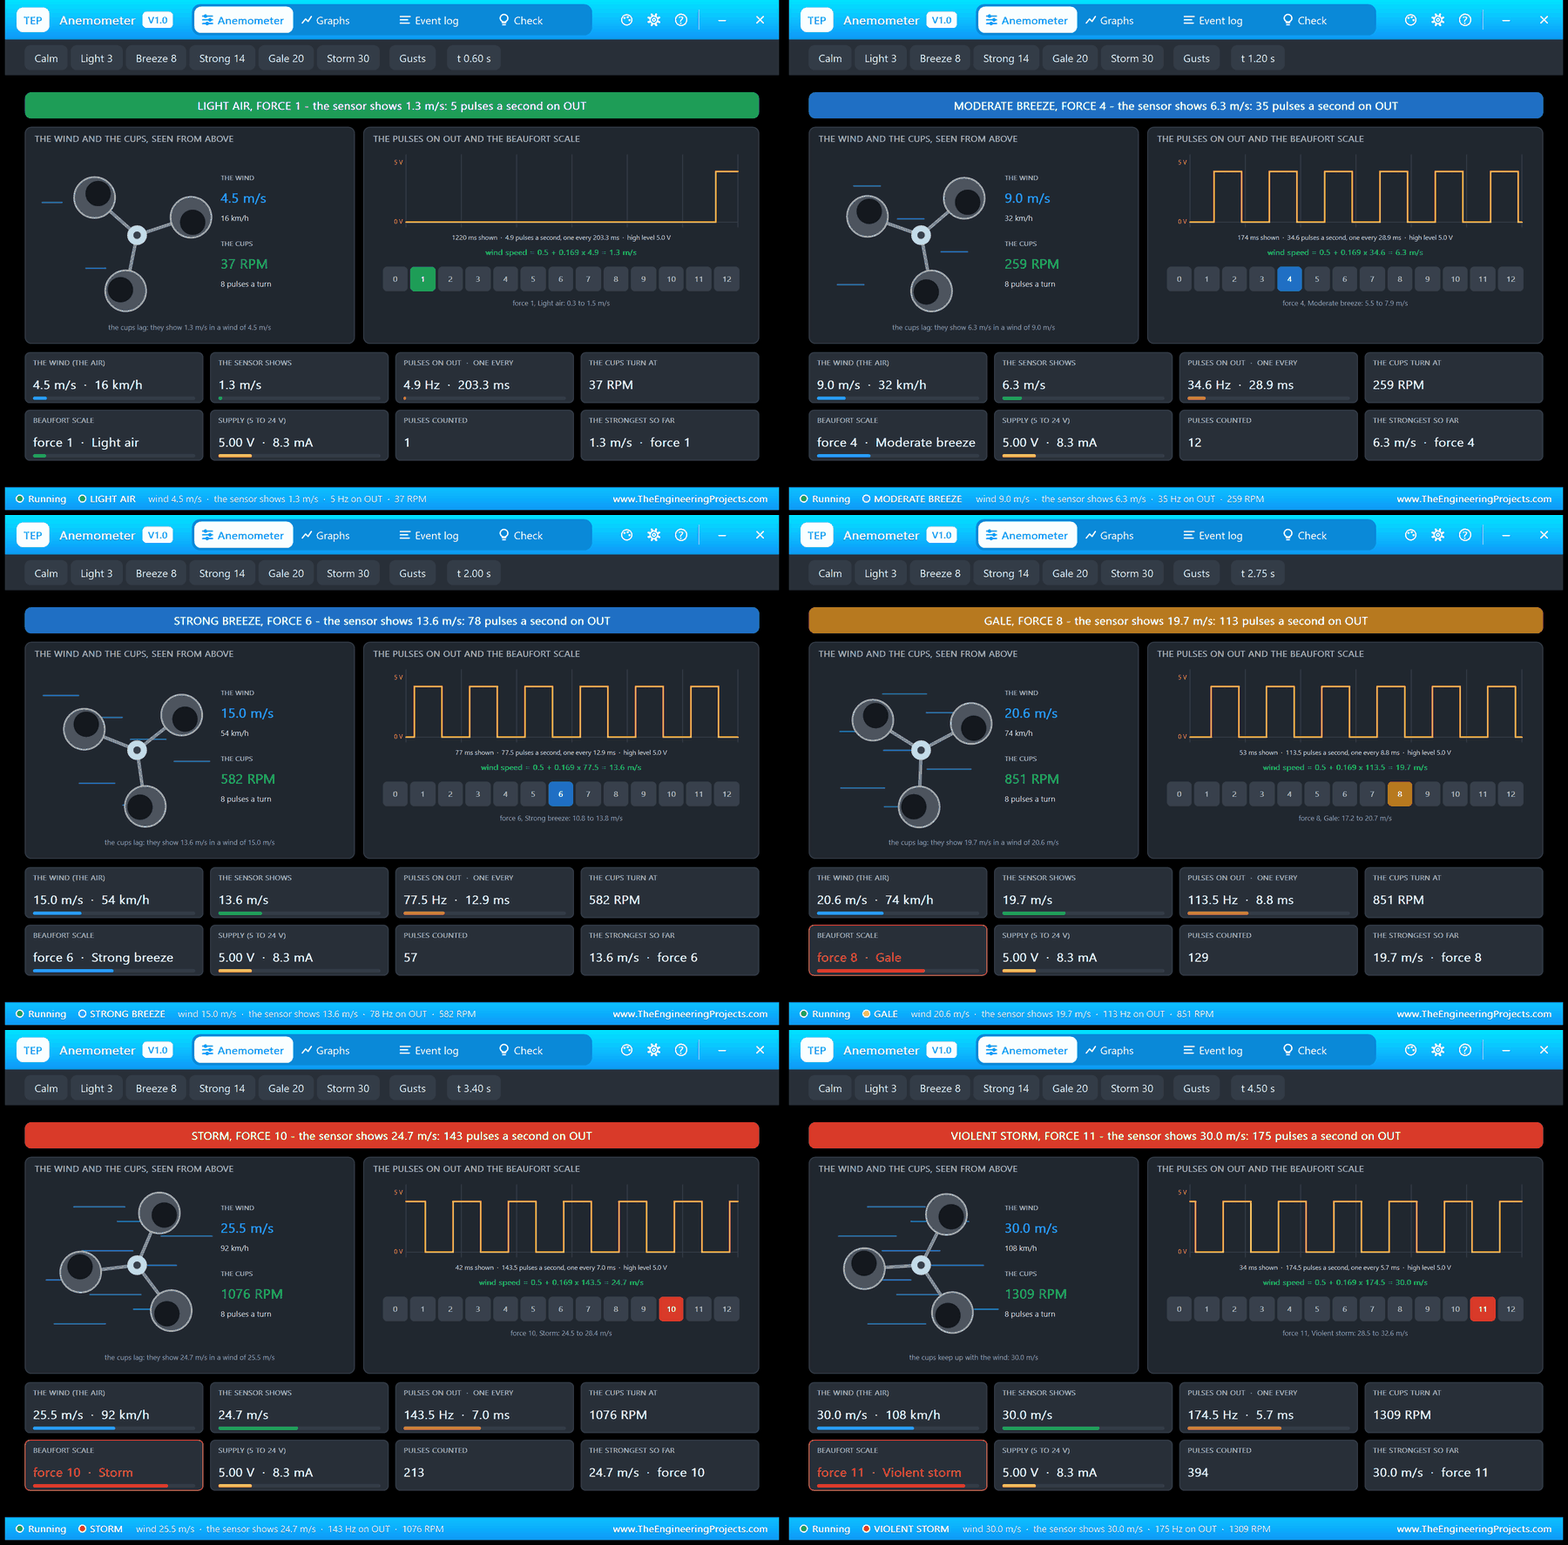
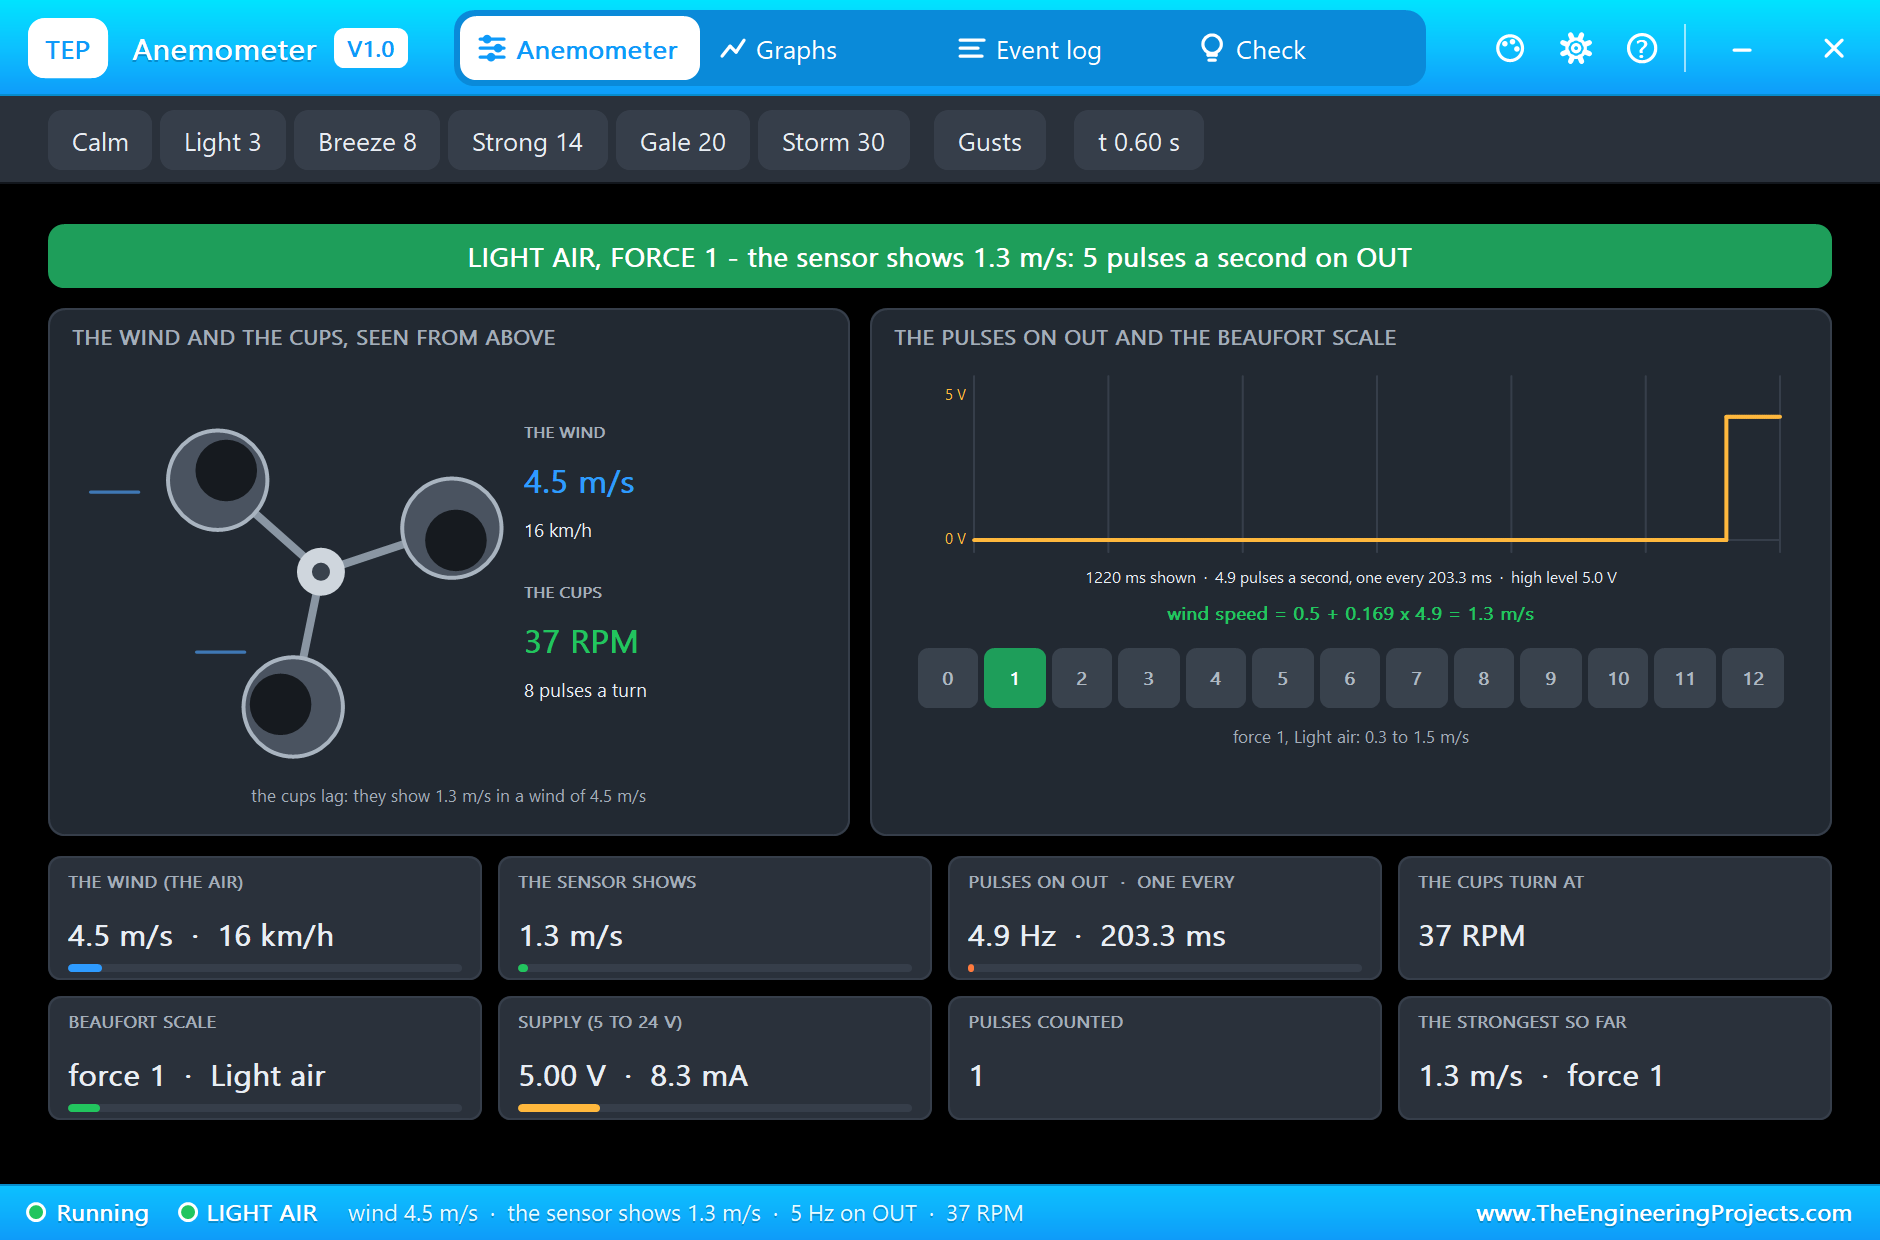
At the start the air is still and the cups stand. As soon as the wind passes 0.2 m/s they begin to turn, and at 0.42 s the Event log notes the first pulses. The pop-up at 0.6 s shows light air, force 1: the wind in the air is at 4.5 m/s, but the cups are still catching up and the sensor shows 1.3 m/s, 4.9 pulses a second, one every 203.3 ms. The left picture is the rotor seen from above, turning with the pulses; the right one draws the pulses as a scope would, 5 V high, and works out the maker's line for them.
The Wind Rises
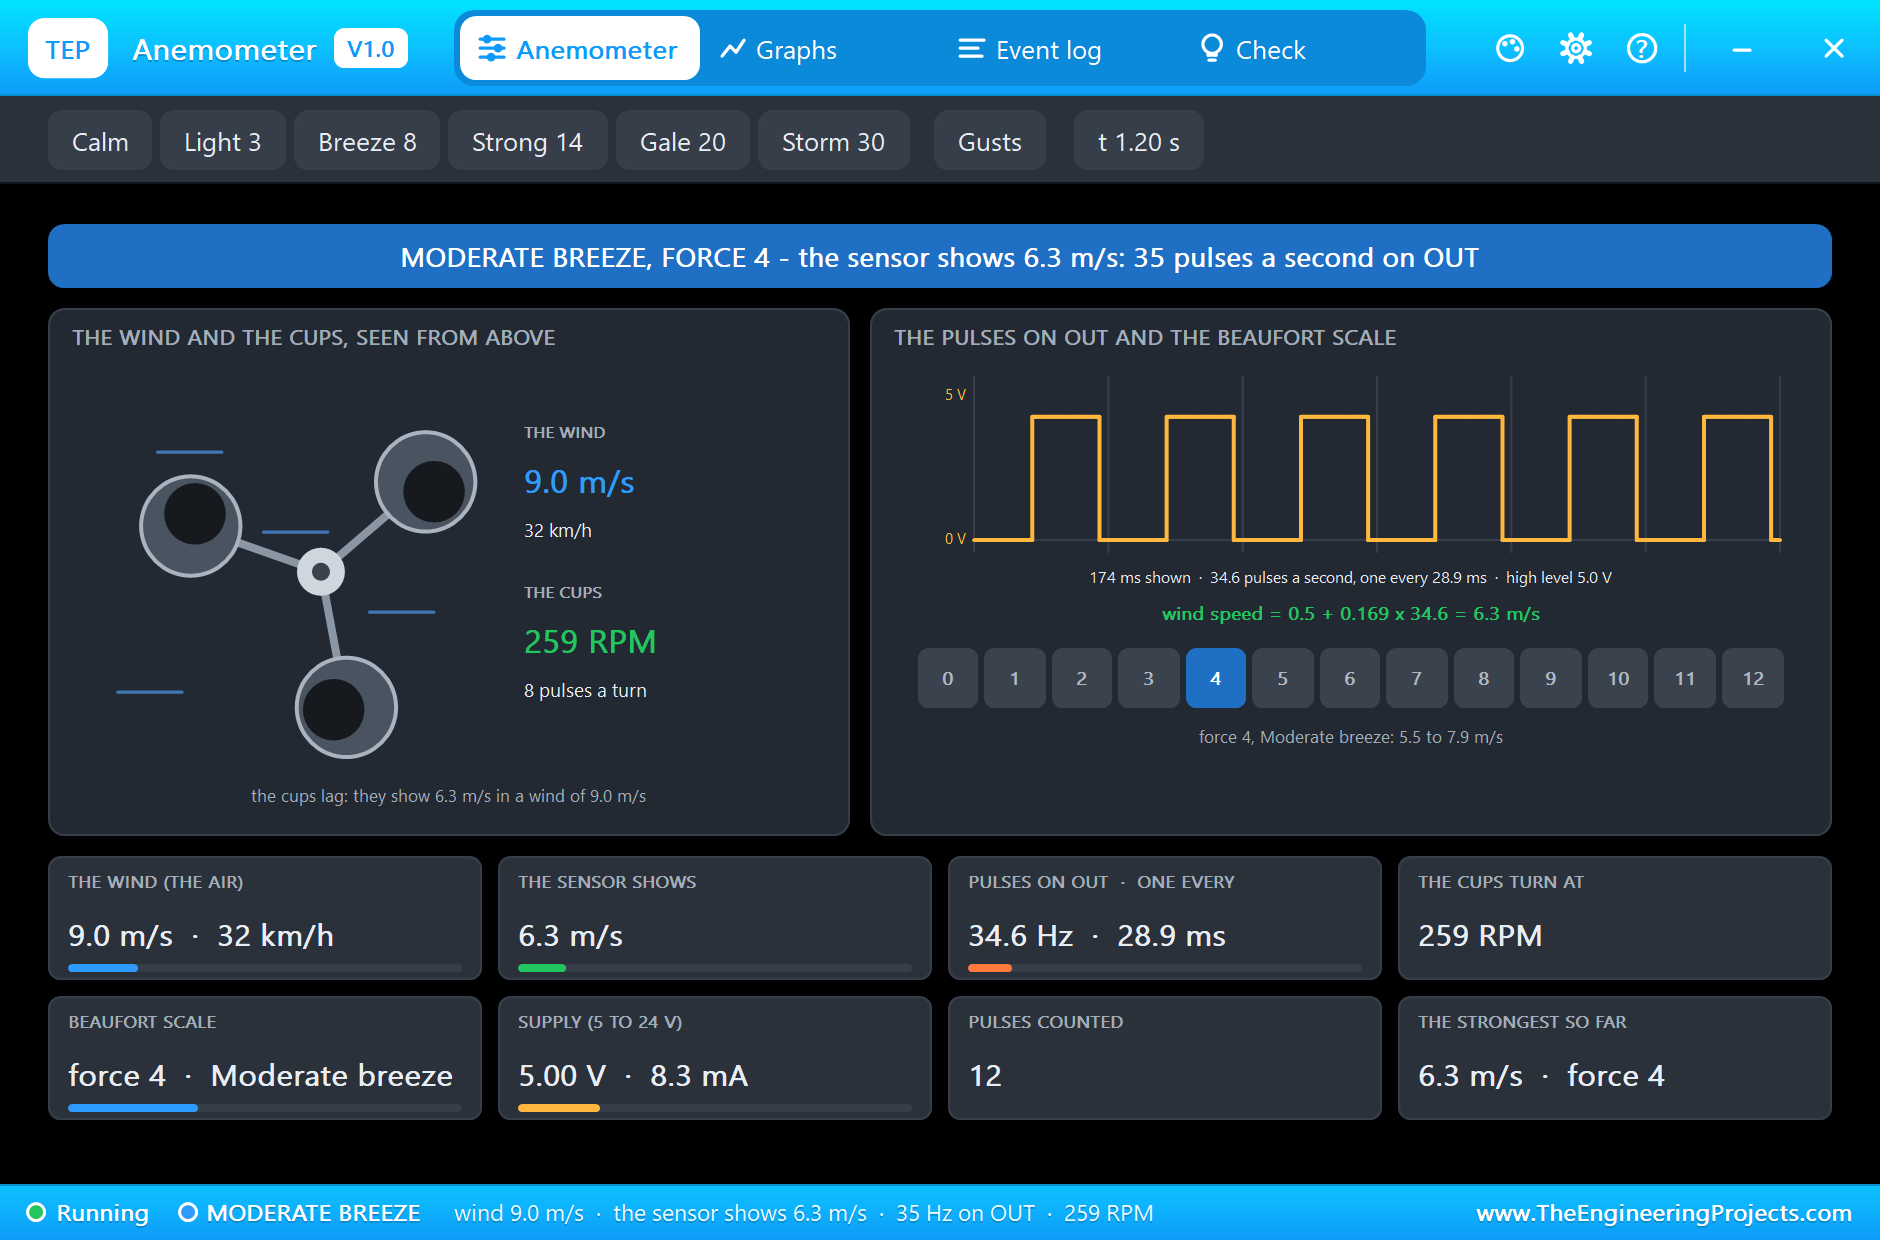
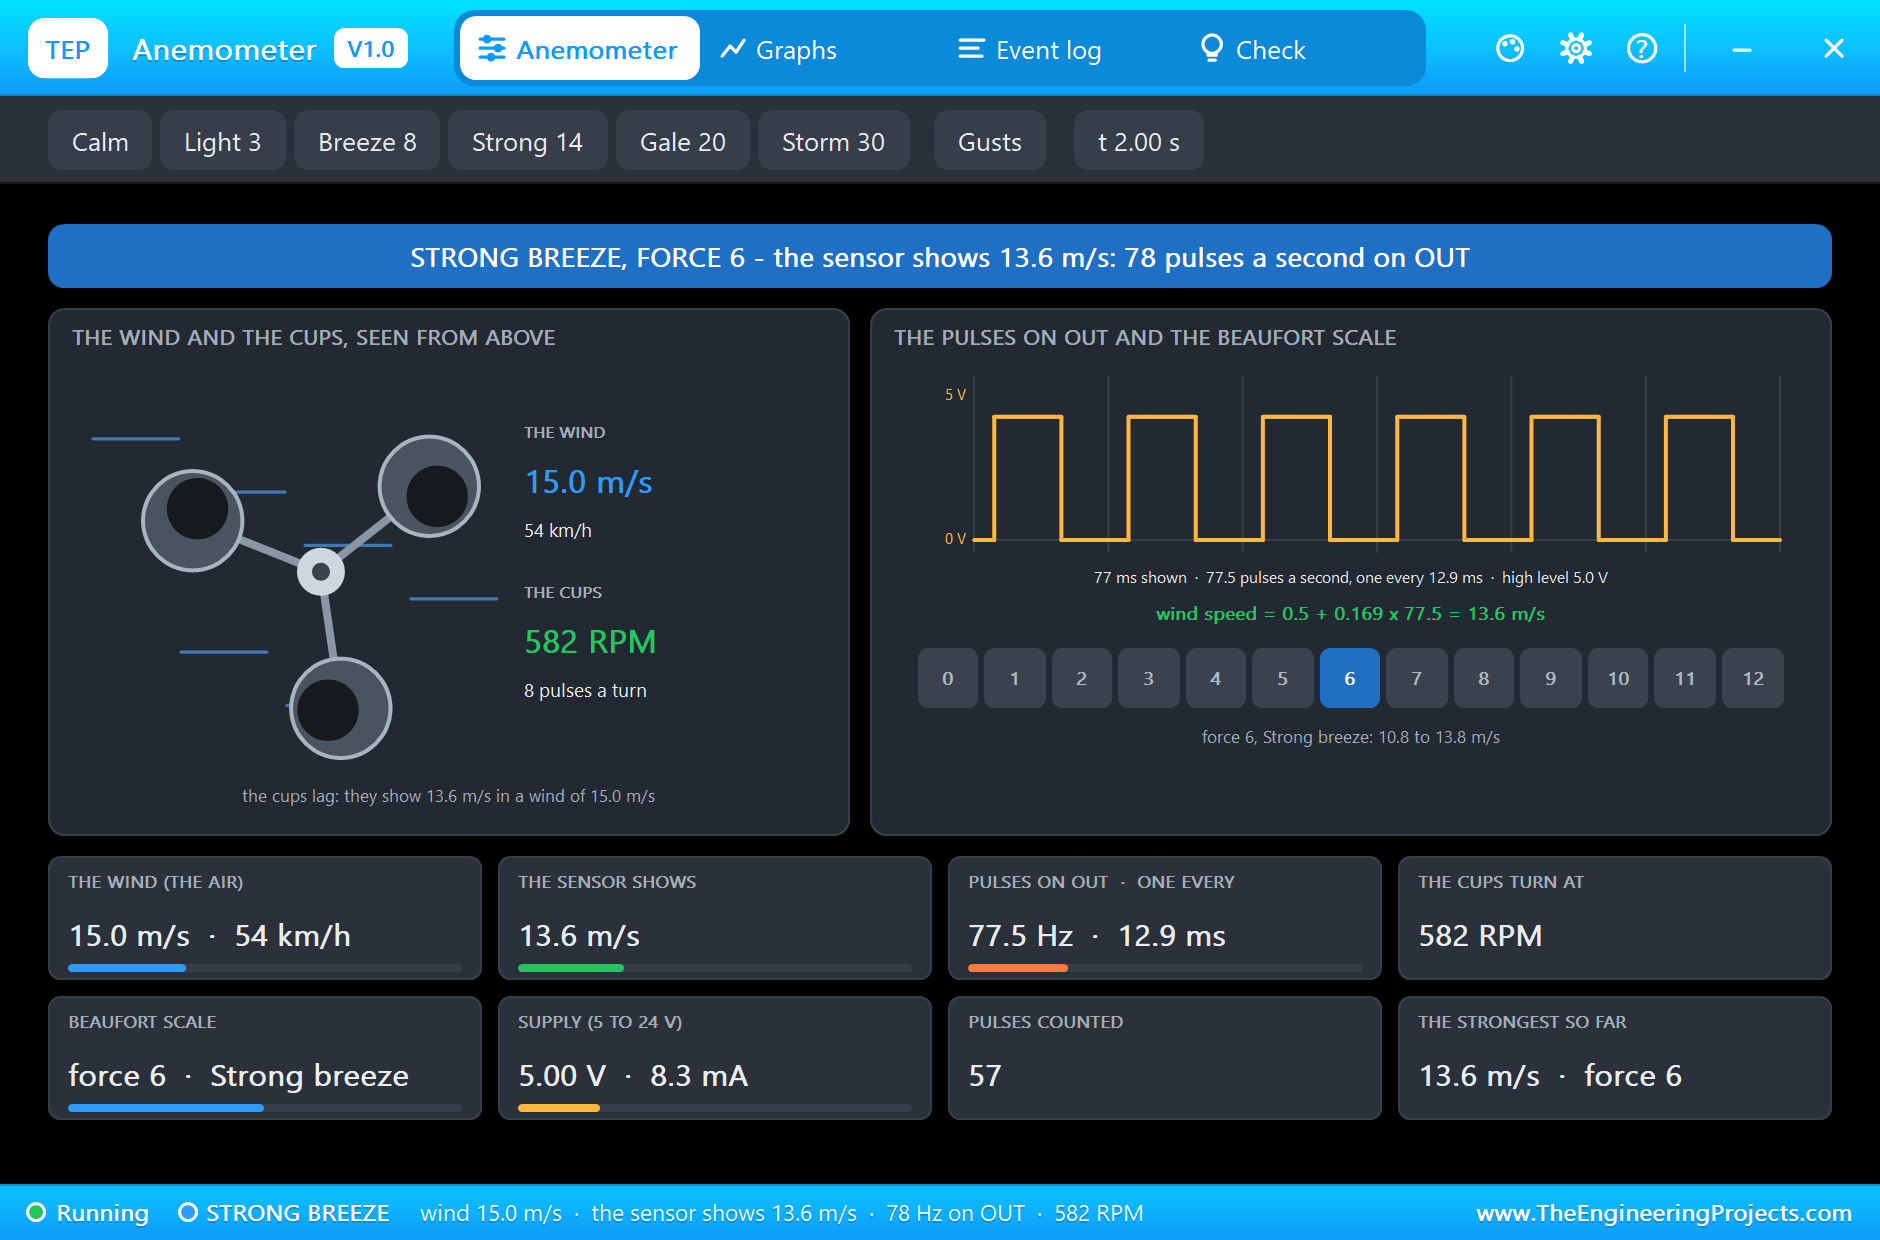
The wind keeps rising, and the pulses crowd together. At 1.2 s the sensor shows 6.3 m/s, a moderate breeze, with 34.6 pulses a second. At 2.0 s it is 13.6 m/s, a strong breeze, with 77.5 pulses a second and the cups at 582 RPM. The gap between the wind and the reading narrows as the wind grows: 15.0 m/s in the air, 13.6 m/s on the sensor. A cup anemometer answers faster in a strong wind.
A Gale: the Warning
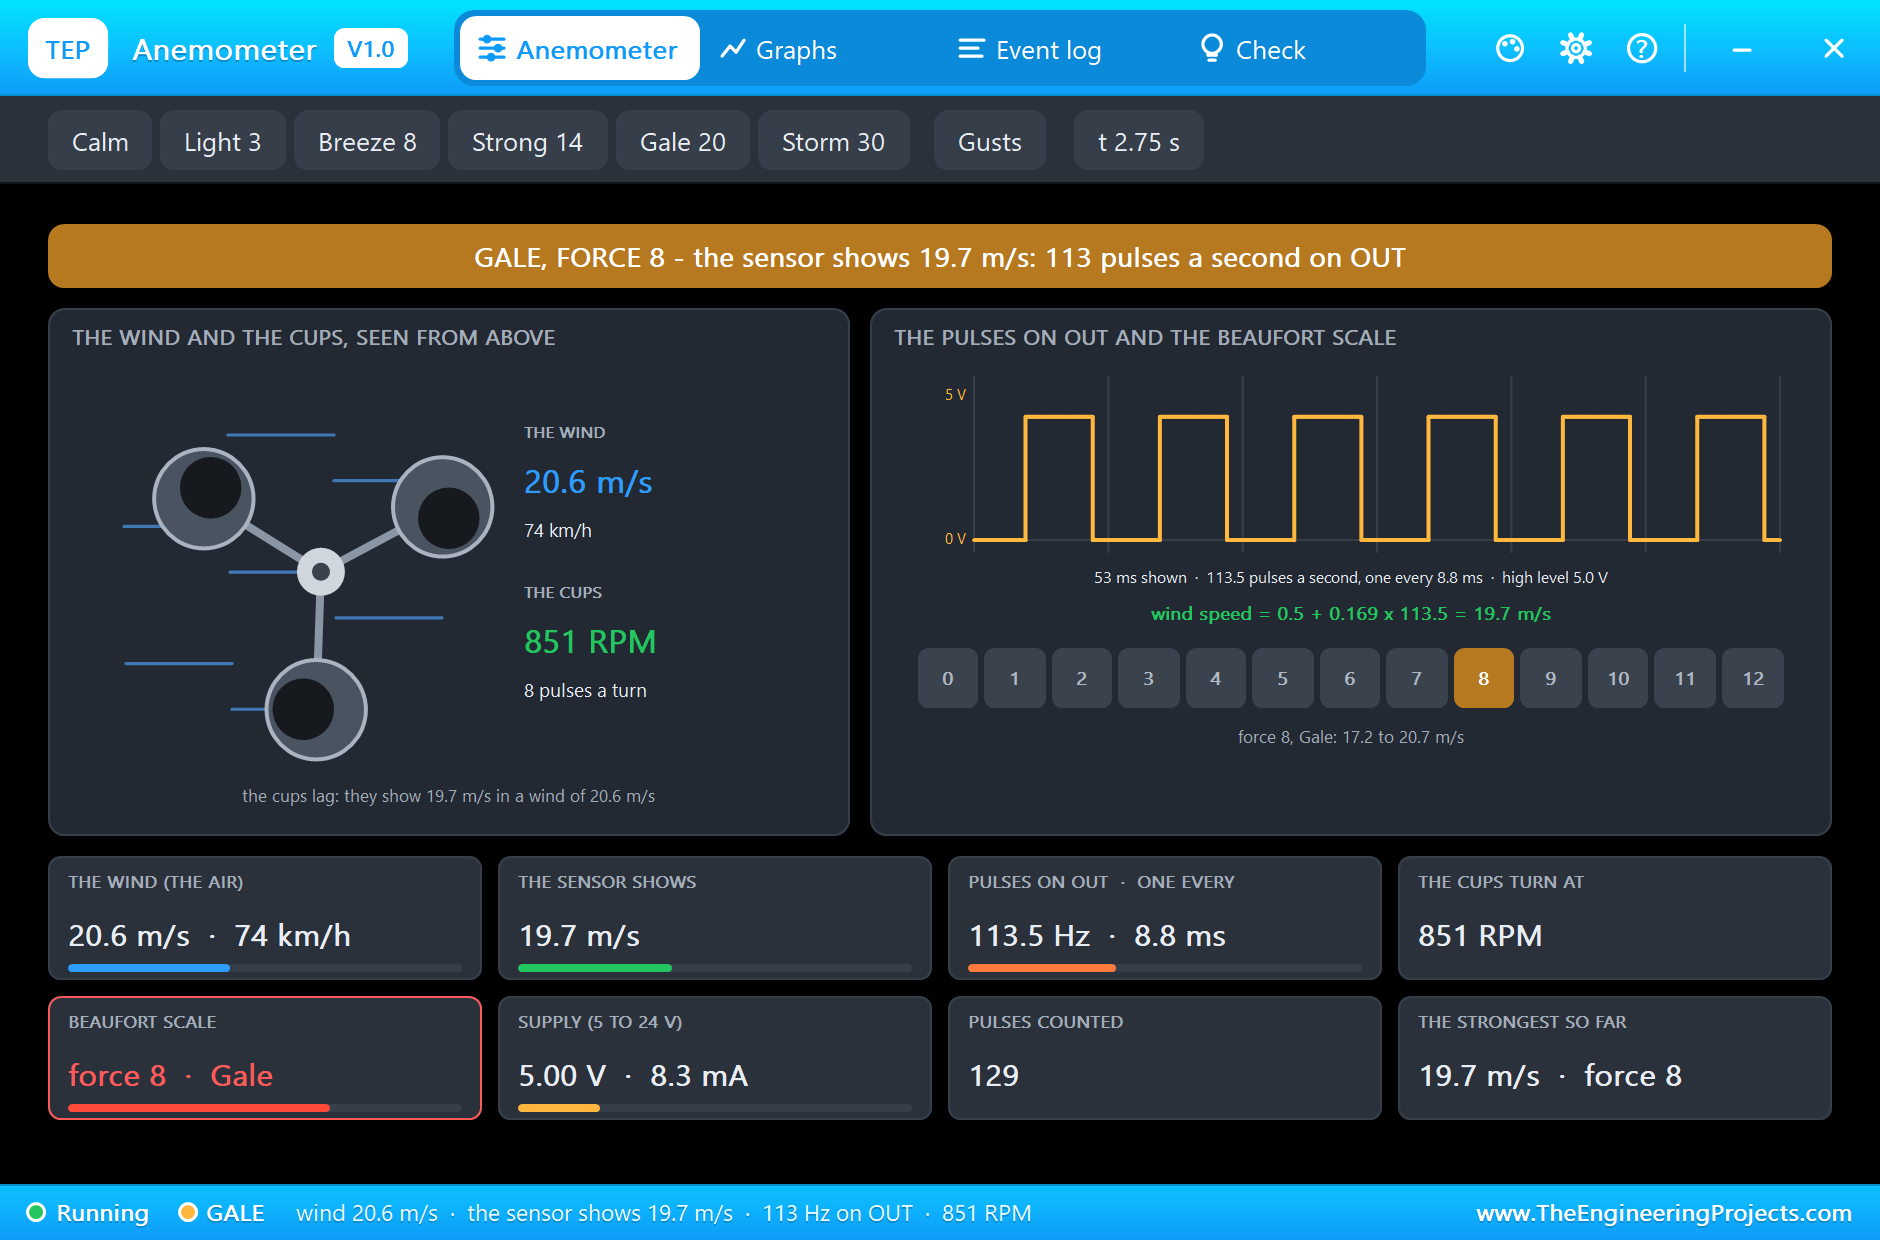
At 2.44 s the sensor reaches 17.2 m/s and the Event log writes GALE as a warning. The pop-up at 2.75 s shows 19.7 m/s and 113.5 pulses a second, one every 8.8 ms. On the sheet the label shows the speed and the frequency, the word GALE stands above the cups, and on the Arduino the LED of pin 13 is lit: the gale warning.
A Storm
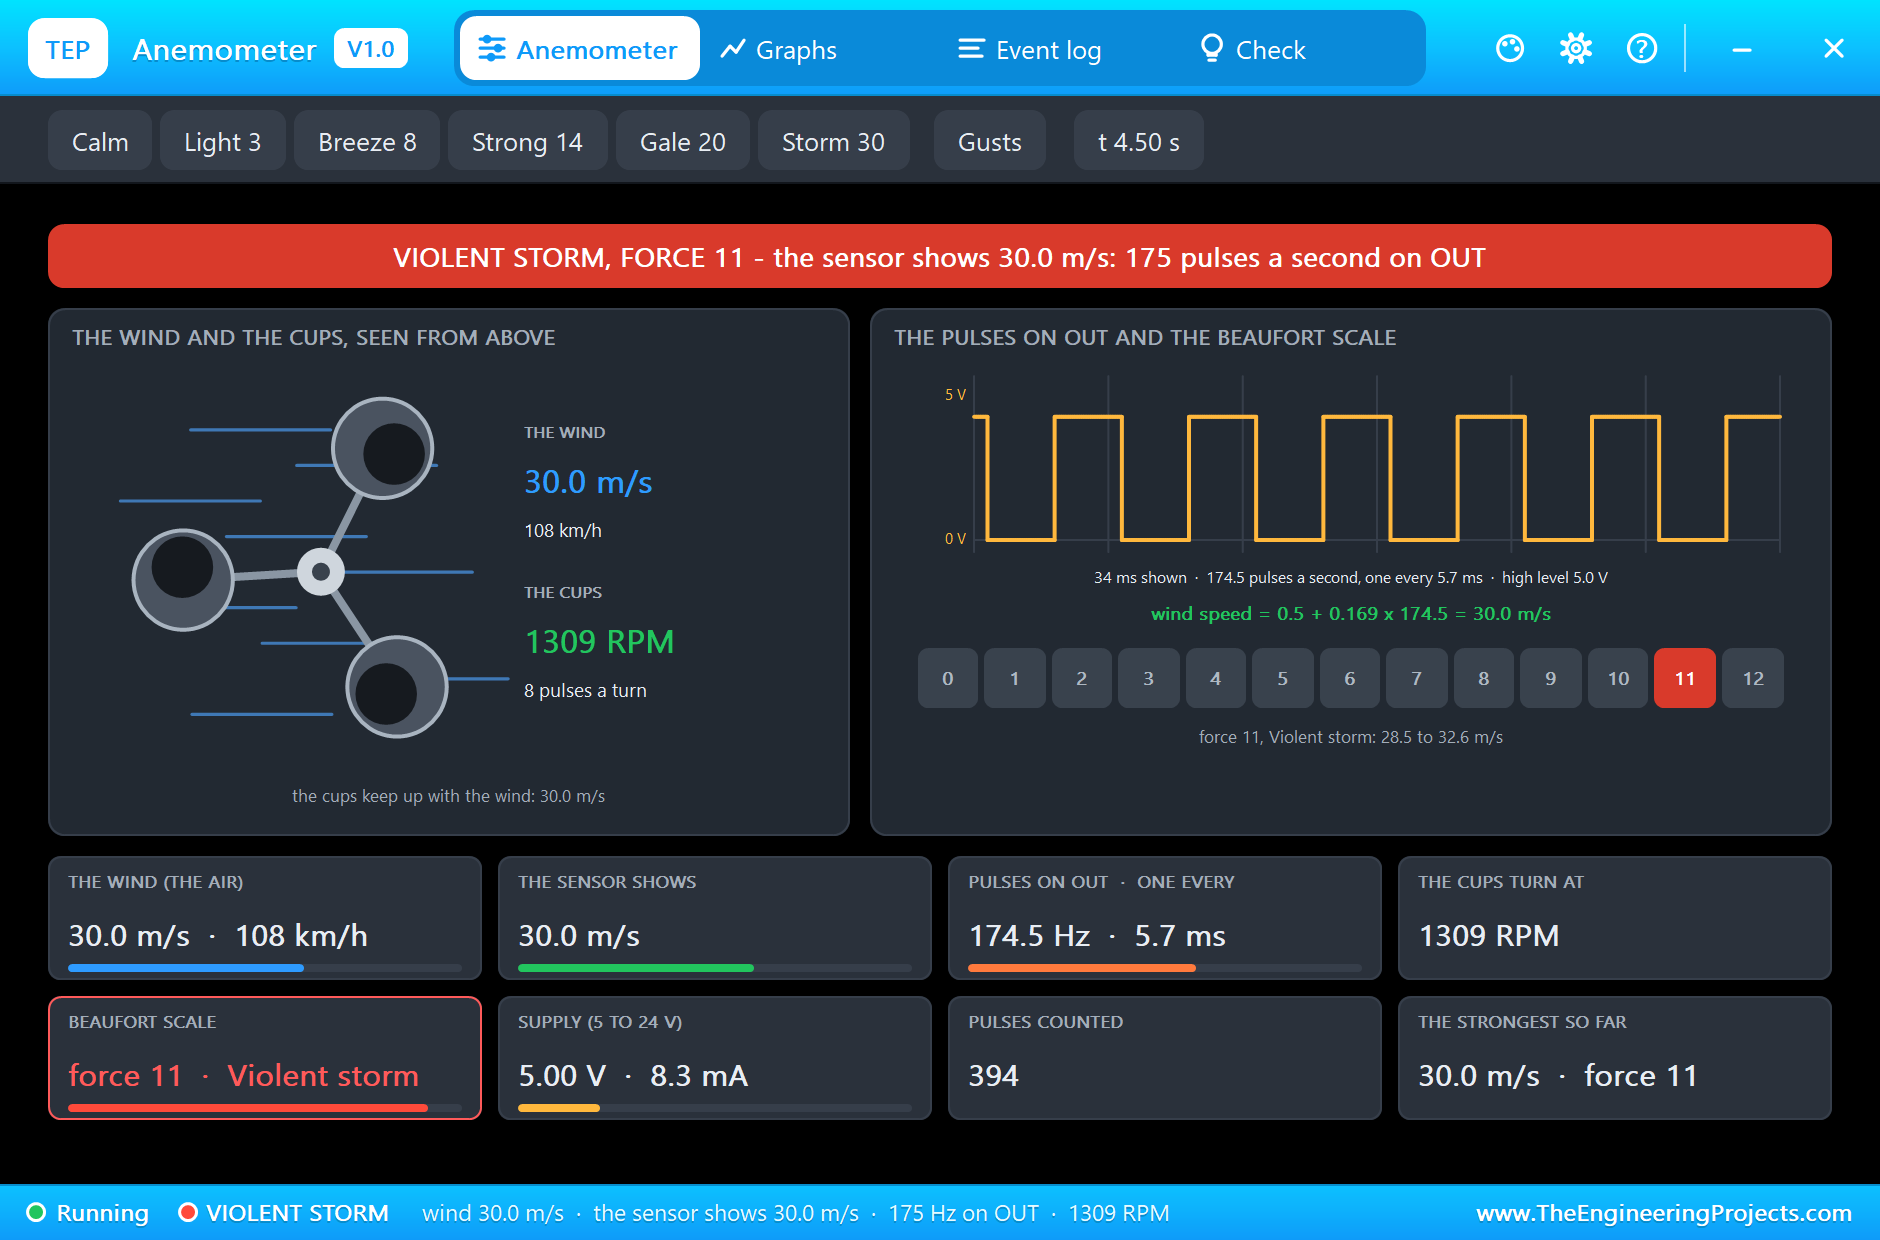
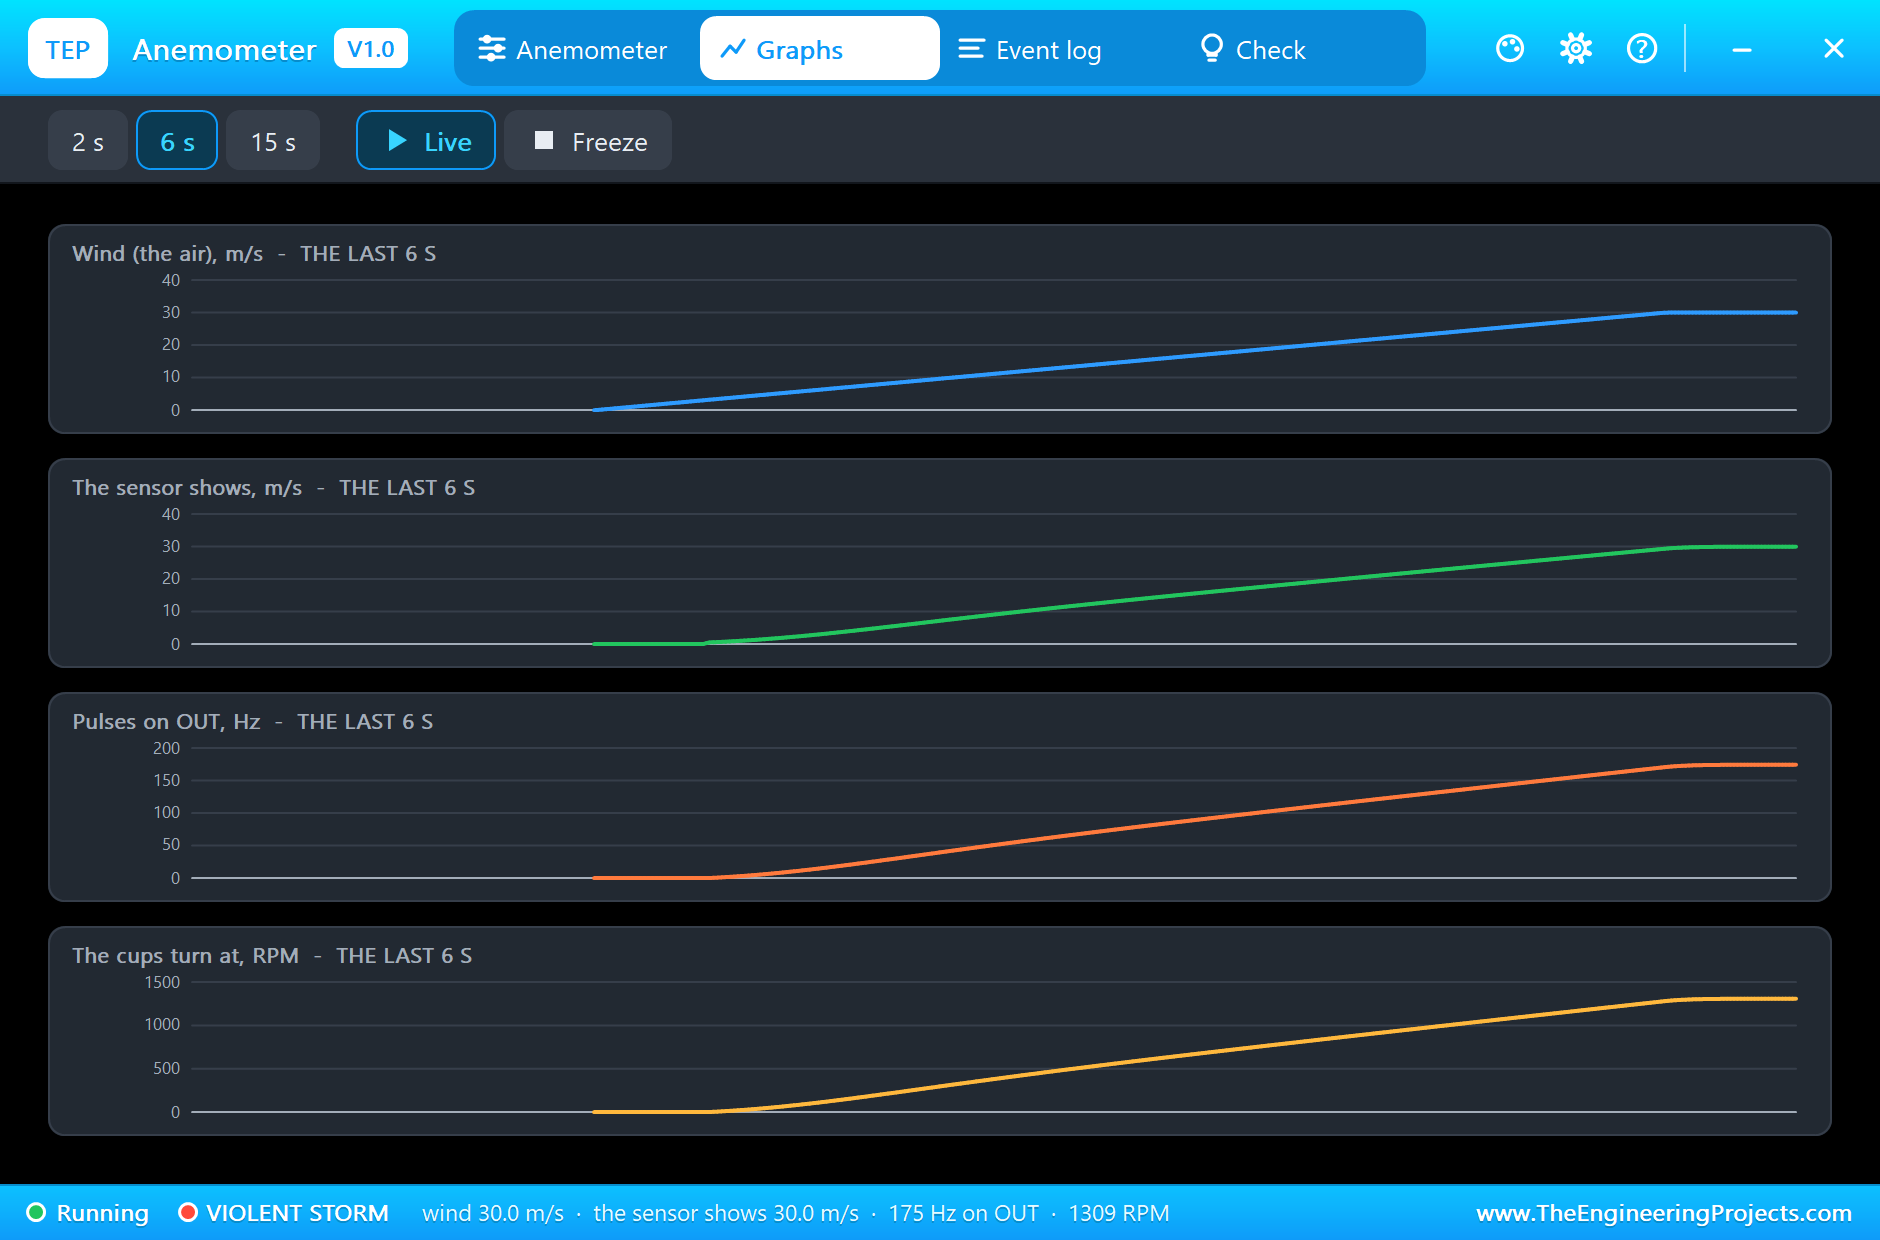
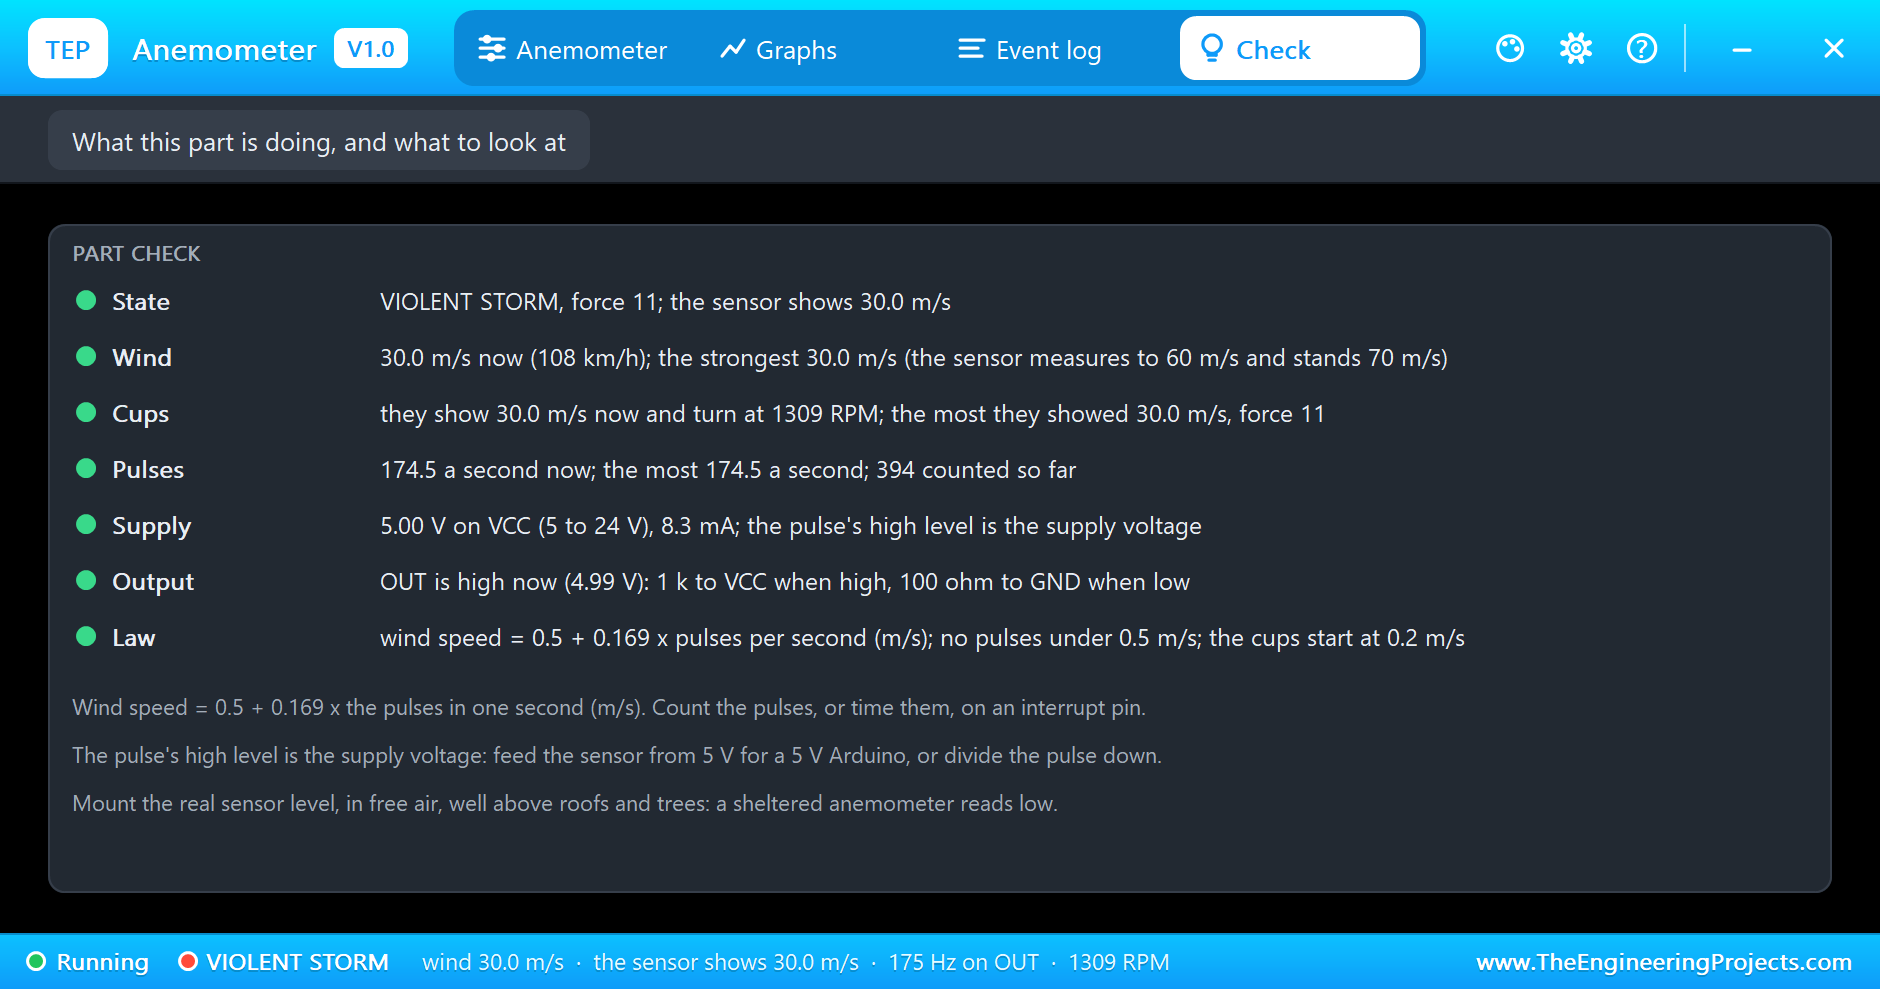
The wind climbs on through a strong gale and a storm. At 3.4 s the sensor shows 24.7 m/s, and at 4.5 s the wind has reached its 30 m/s and stays there: violent storm, force 11, 174.5 pulses a second, the cups at 1309 RPM. Now that the wind is steady, the cups have caught up: the sensor shows 30.0 m/s.
A Gusty Wind
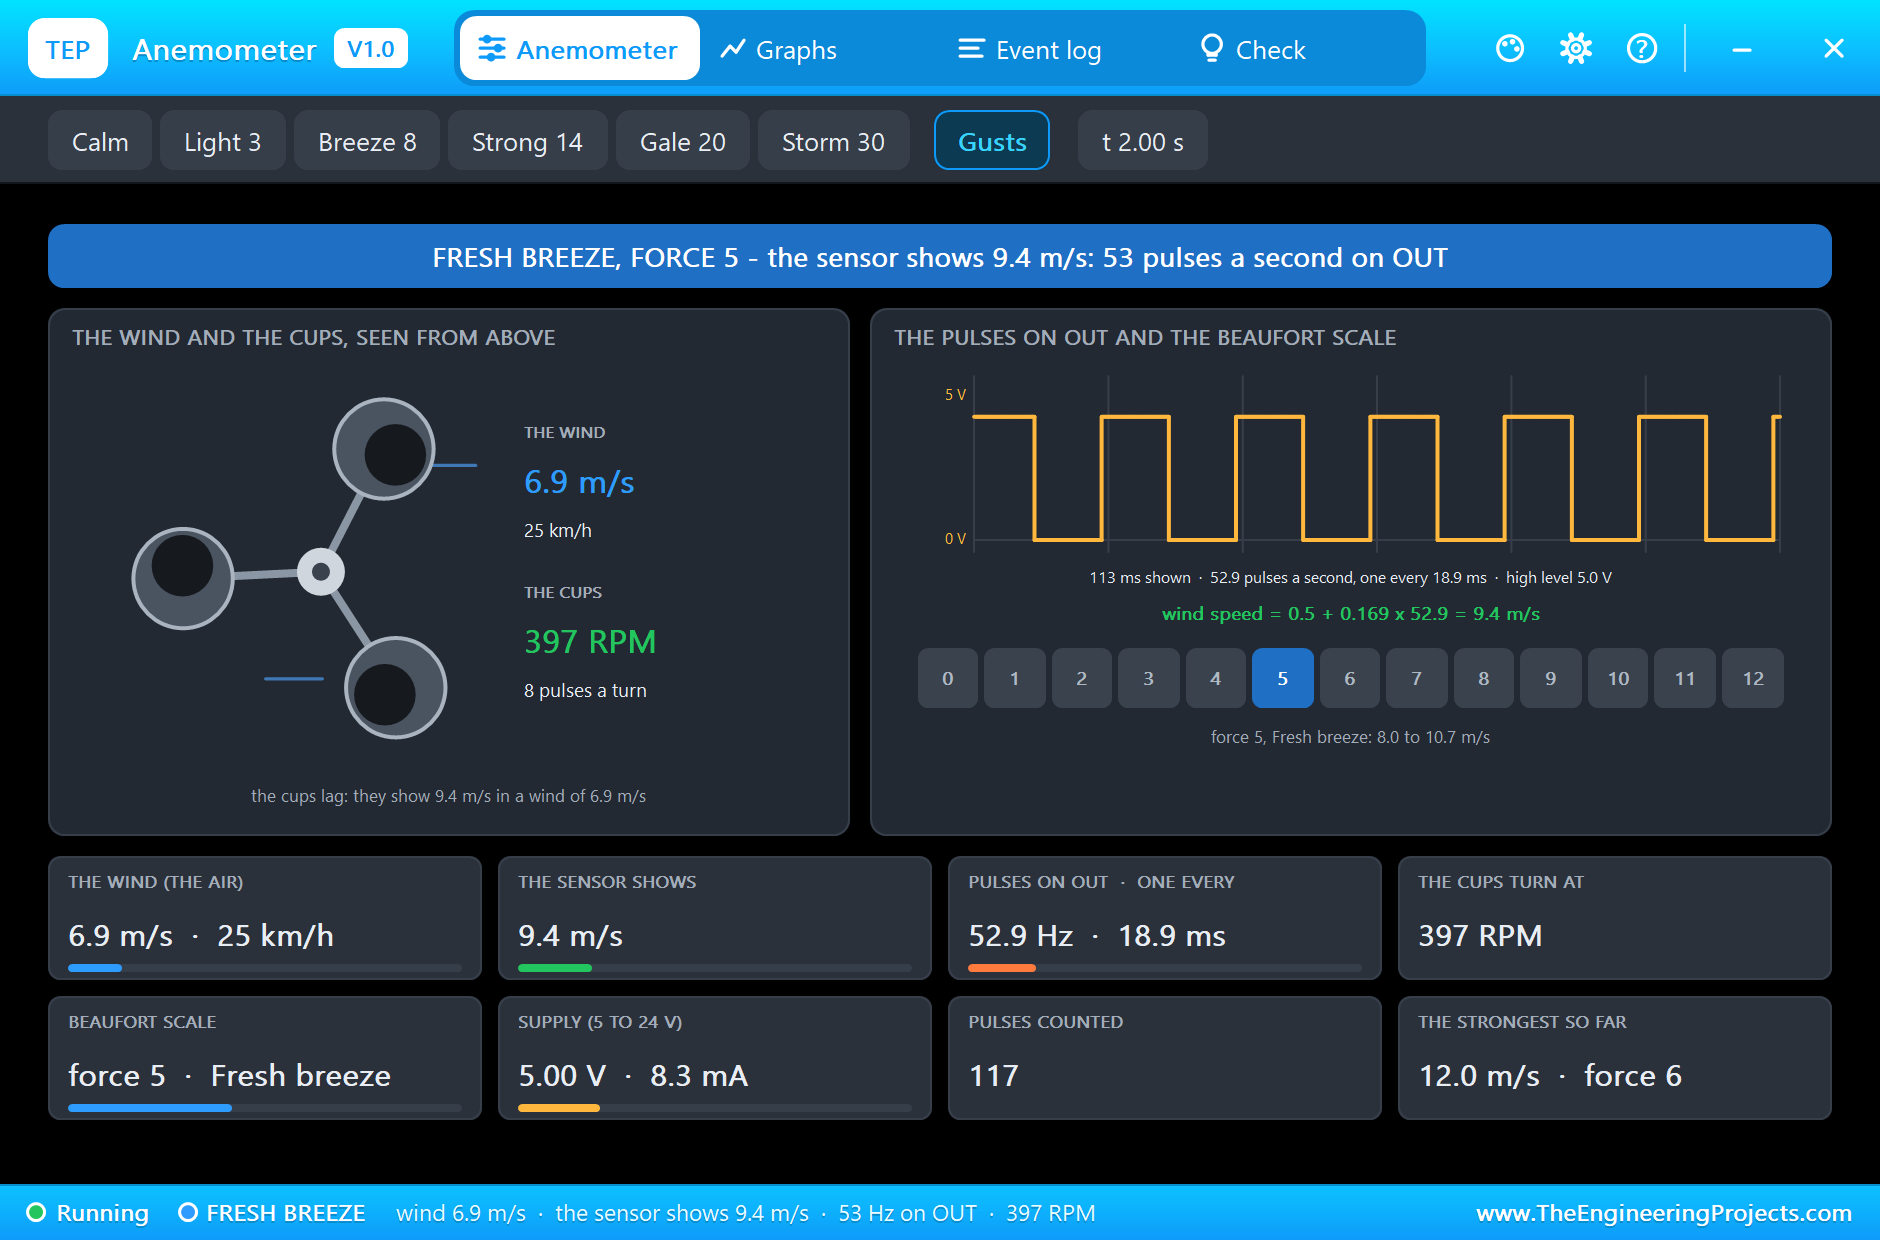
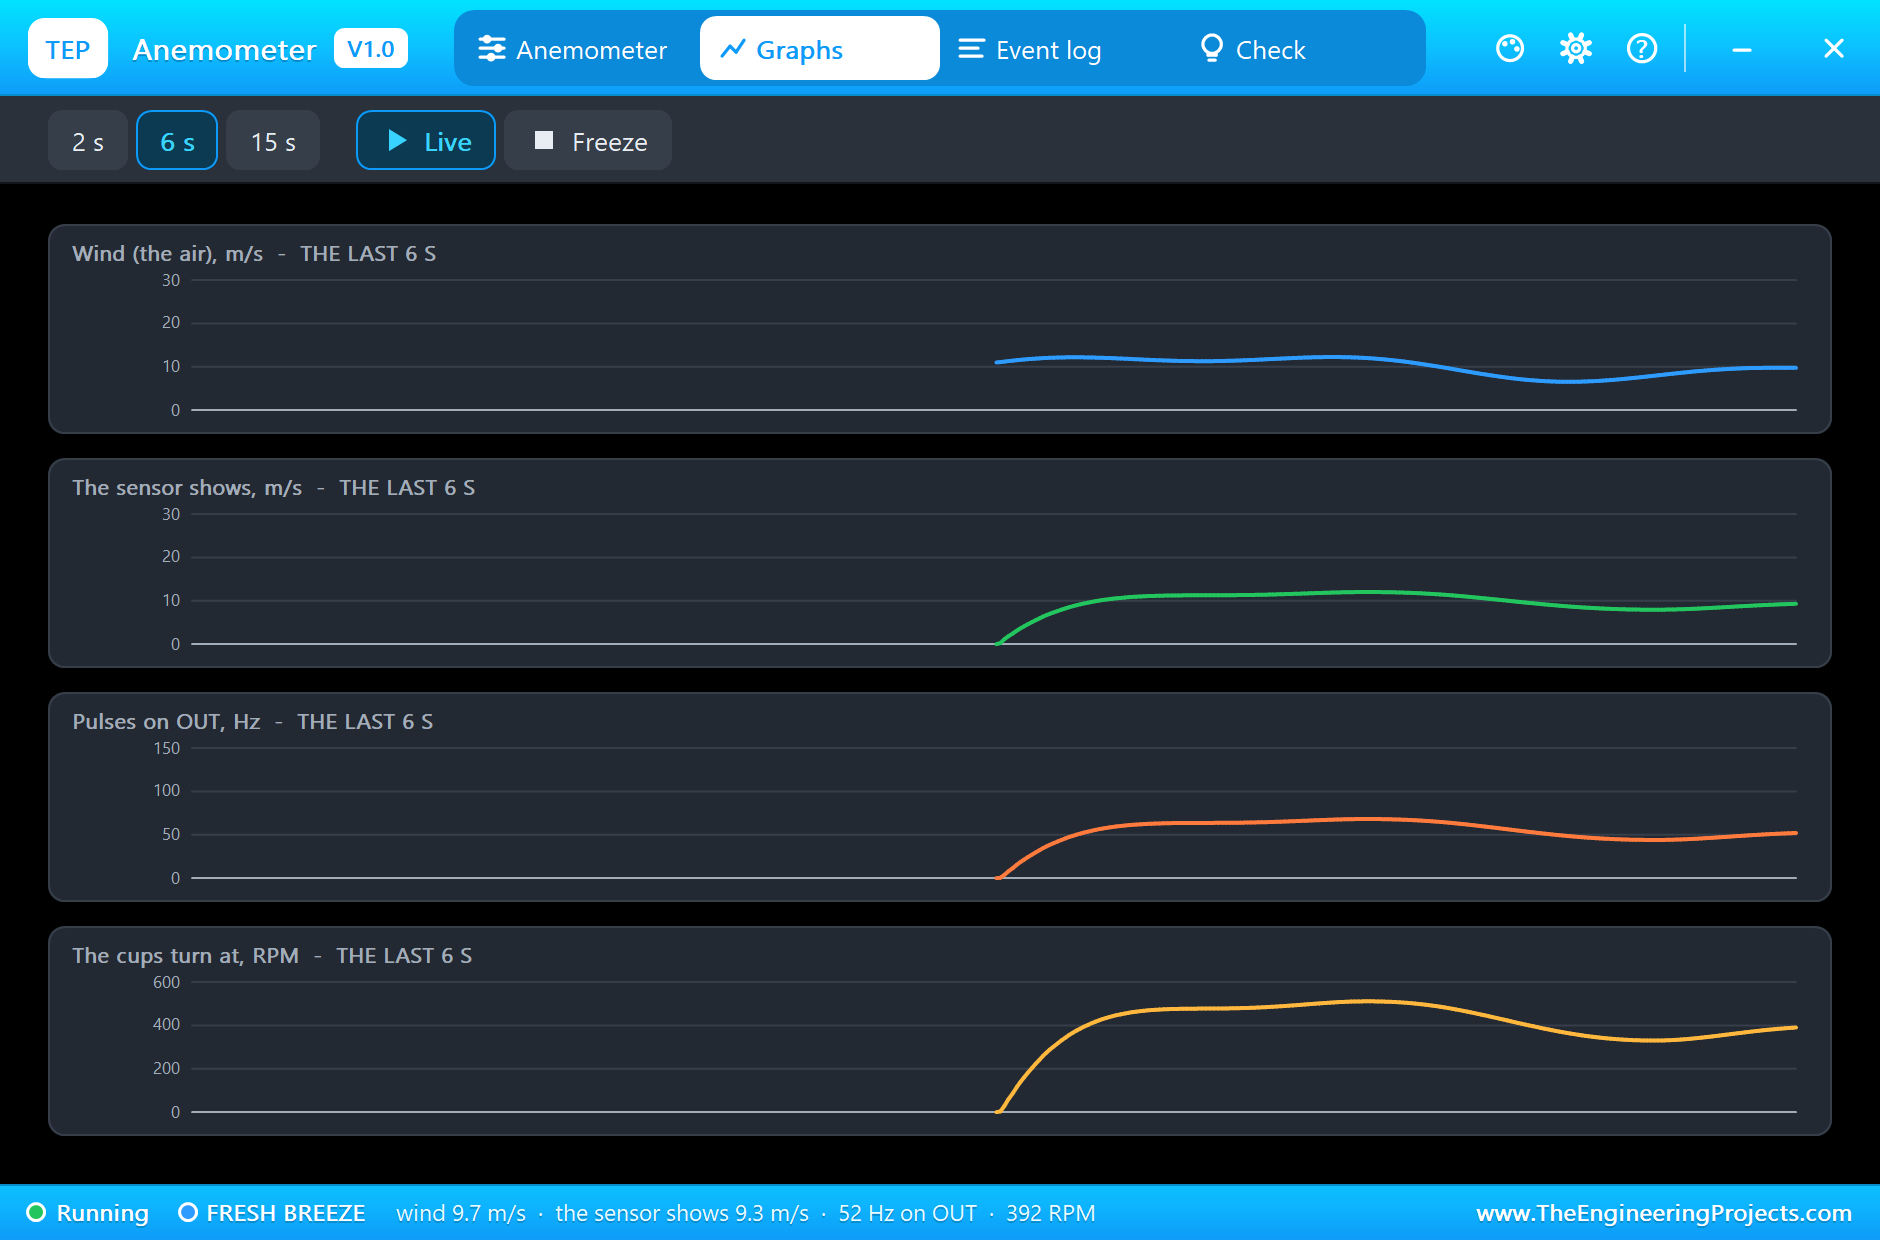
For a second simulation run we set PROFILE to GUSTS and WIND to 10: a wind that swells and drops around 10 m/s. The pop-up at 2.0 s shows 6.9 m/s in the air and 9.4 m/s on the sensor. The Graphs page of this run shows it best: the reading follows the wind a little late, and it falls more slowly than it rises. That is why a cup anemometer reads a little high in gusty weather.
Too Little Wind for Pulses
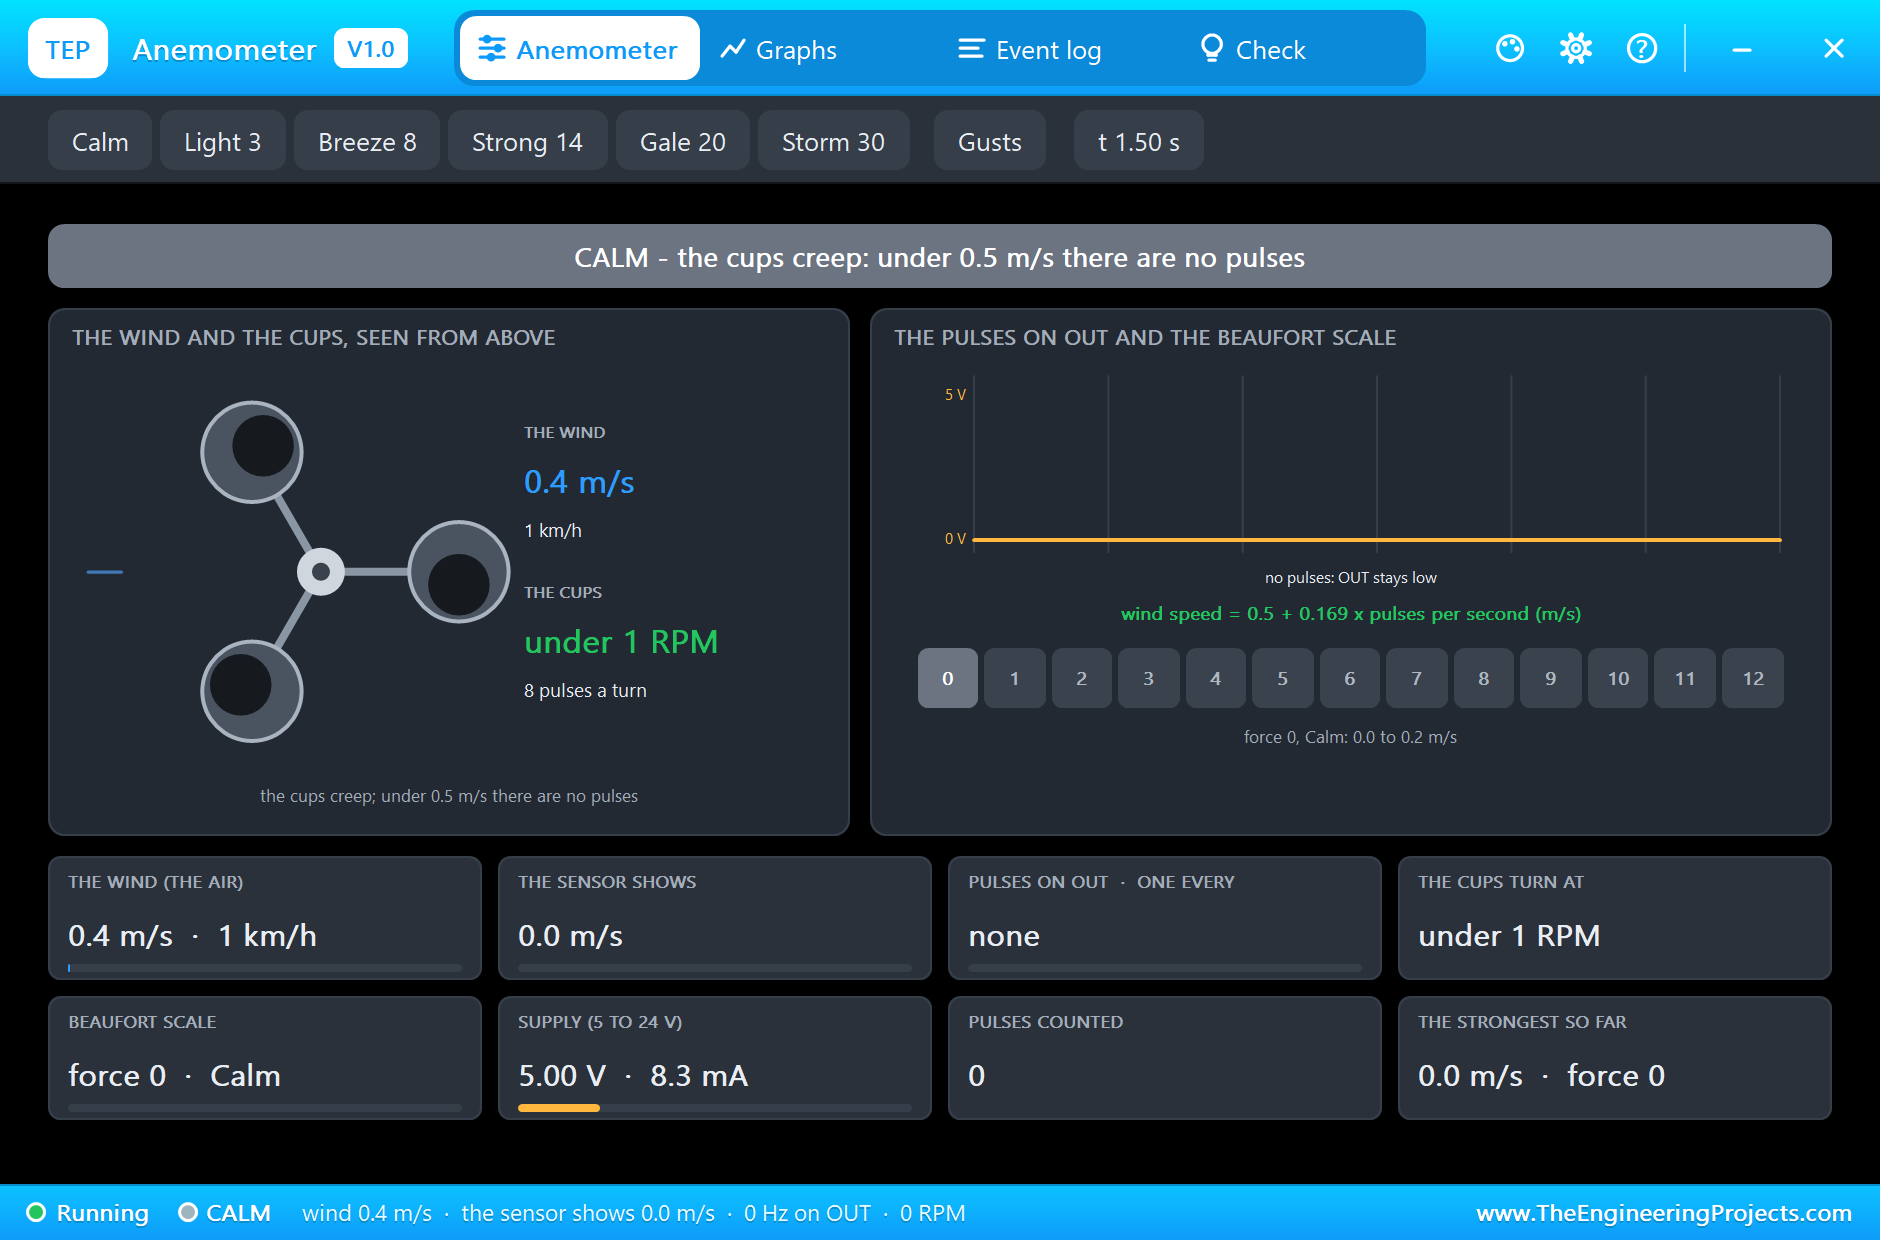
A third run has a wind of only 0.4 m/s. The cups turn slowly, because the wind is over their starting threshold, but the maker's line begins at 0.5 m/s: there are no pulses, the label shows 0.0 m/s, and the Arduino prints calm. Every anemometer has such a blind spot at the bottom of its range.
The Graphs, the Event Log and the Check Page
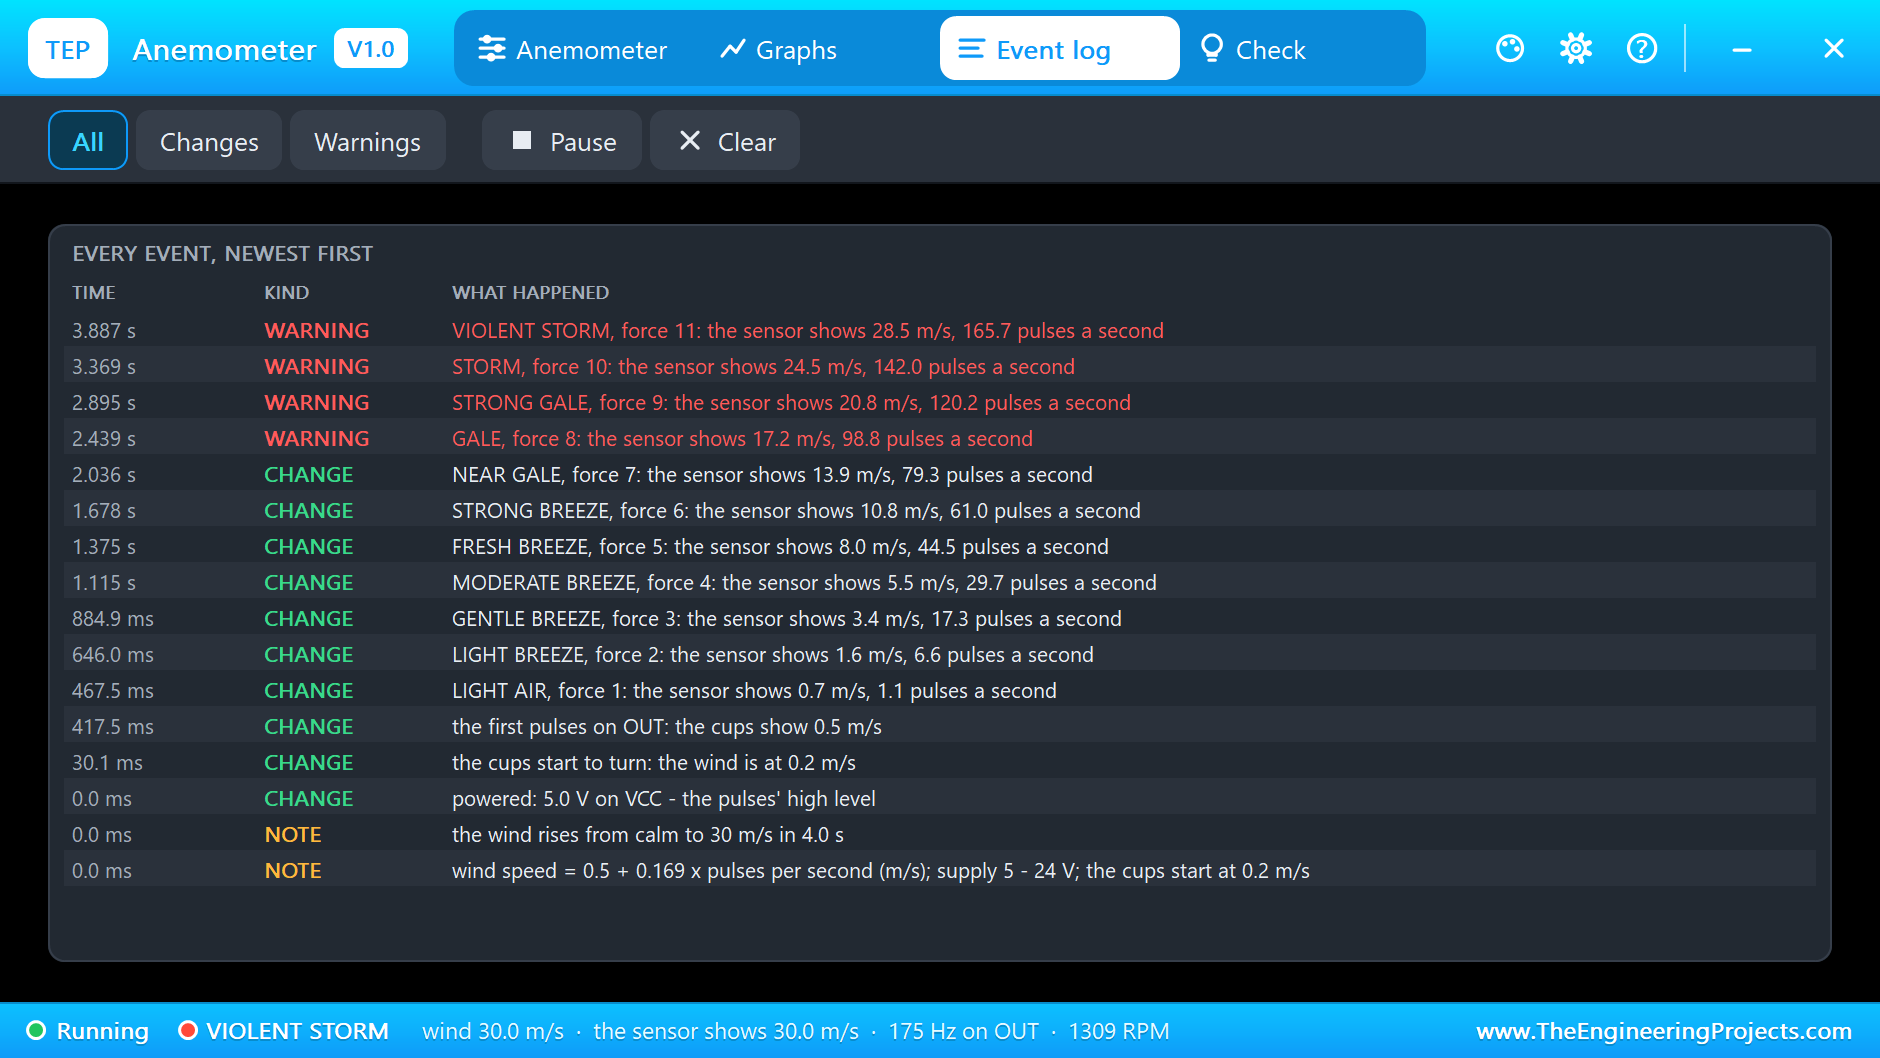
Back to the first run. The Graphs page plots the wind, the speed the sensor shows, the pulse frequency and the cups' RPM over the last 2, 6 or 15 simulated seconds. The Event log notes every change of the wind's name, from light air at 0.47 s to the violent storm at 3.89 s, with the gale and everything above it as warnings. The Check page sums up the run: the strongest wind 30.0 m/s, the most the sensor showed 30.0 m/s, at most 174.5 pulses a second, and 394 pulses counted.
The monitor tells the same story from the Arduino's side, a line every half second: calm at first, then 5.2 m/s, and on up to 29.9 m/s and 174 Hz, with GALE WARNING from 18.8 m/s on. The Arduino measures only the pulses, yet its numbers agree with the sensor's label.
Try It Yourself
- Click the wind chips in the pop-up, from Calm to Storm 30, and watch the label, the pulses and the monitor follow.
- Click Gusts during a run and compare the wind with the sensor's reading on the Graphs page.
- Set PROFILE to STEADY and WIND to 12 for a constant wind, the easiest case to check the sketch against.
- Feed the sensor from 12 V: the pulses are 12 V high, and the pop-up shows it. Do not take them to an Arduino pin without a divider.
- Type
maxin the monitor after a run for the strongest wind the Arduino has seen.
Ideas to Extend the Demo
- Add our Vertical-Axis Wind Turbine Library for Proteus in the same wind and let the Arduino compare the turbine's speed with the wind speed.
- Let the gale warning stop a turbine: a relay on the Arduino can short the generator's wires, as the brake of our Wind Turbine Charge Controller Library for Proteus Simulation does.
- Show the speed and the Beaufort name on an LCD, and keep the day's strongest gust: a small weather station.
Your Own Sketches
The demo sketch is in the zip file, and you can change it in the Arduino IDE. New to Arduino? Start with our Arduino Tutorial for Beginners. Export the compiled binary, and set the UNO's PROGRAM property to the new file. Our guide on How to get the HEX file from Arduino shows you where the file ends up.
Things to Know Before Using a Real Anemometer
- Mount it in free air: level, on a mast, well above roofs and trees. A sheltered anemometer reads low.
- Mind the pulse voltage: the pulses are as high as the supply. From 5 V they suit a 5 V Arduino; from 12 or 24 V they need a divider or an optocoupler.
- Check the line of your sensor: each maker and each version has its own. The label or the manual gives it; change OFFSET and SLOPE in the sketch.
- Use a shielded cable: a long lead on a mast picks up noise, and noise looks like wind. A small capacitor at the input pin helps.
- Look after it: bearings wear and cups collect dirt and ice, and both make the sensor read low.
Troubleshooting
- NO SUPPLY on the label: under 4.5 V between VCC and GND. The sensor needs 5 to 24 V.
- The cups turn but there are no pulses: the wind is under 0.5 m/s, where the maker's line gives none.
- The Arduino prints 0.0 m/s: OUT is not on an interrupt pin, or the sensor's GND is not joined to the Arduino's GND.
- The reading jumps in a very light wind: there are only a few pulses a second, and the sketch needs two for a value.
- The reading lags behind the wind chips: that is the cups' own lag; give them a second.
- The part is not simulated:
TEPANEMO.DLLis missing from MODELS and from the project folder.
Limitations of the Simulation
- The supply, the pulse's level, the line from pulses to wind speed, the starting threshold and the range are from a maker's manual of a three-cup wind speed sensor with a pulse output.
- Our own figures: the cups' lag (a distance constant of 2.5 m, and a slower fall than rise), eight pulses a turn for the picture of the rotor and the RPM, the output stage's resistances, and the least supply of 4.5 V.
- The sensor is drawn compact, at about a third of its real size.
- Not modelled: the sensor's accuracy band, the bearings' friction in the cold, icing, the wind's direction, and the other outputs of the sensor family (4 to 20 mA, RS485).
- Arduino is a name of Arduino; this library is not made or endorsed by Arduino, Labcenter or any maker of wind sensors.
- Tested in Proteus 8.5 in November 2026 (the demo as shipped). Proteus 7 is not supported.
So, that was all about the Anemometer Wind Speed Sensor Library for Proteus Simulation. I hope it helps you see how little it takes to measure the wind: three cups, a pulse for every turn of a mark, and one line of arithmetic. If you have any questions, ask in the comments and I will help you out. Till the next tutorial, take care and have fun!