Hello friends, I hope you all are doing great. Today, I am going to share the new Wind Turbine Charge Controller Library for Proteus Simulation, the next library of our renewable energy series. If you have searched for a Proteus simulation of a wind charge controller, the box between a small wind turbine and its battery, with a dump load that burns off the surplus and a brake that stops the rotor, this library brings a compact 12 V / 24 V one into Proteus.
Wind Turbine Charge Controller Library for Proteus Simulation
Latest version: V1.0 (November 2026, this tutorial)
Other power libraries: LiPo Battery · Single Cell Battery · CR2032 Coin Cell · Solar Panel · MC34063 Buck · MC34064 Boost · 12V Solar Panel · 6V Mini Solar Panel · 3-Phase PM Generator · Vertical-Axis Wind Turbine · Micro Hydro Generator · Thermoelectric Generator · PEM Hydrogen Fuel Cell · Piezoelectric Energy Harvester · Hand Crank Generator · 12V LiFePO4 Battery · 12V Lead-Acid Battery · 18650 Li-ion Battery · PWM Solar Charge Controller · MPPT Solar Charge Controller · TP4056 Li-ion Charger Module
Helping Tools
- Serial Monitor Advance: a serial terminal window for the UART of your board
- Serial Monitor Expert: the serial monitor with extra debugging tools
- LCD Library for Proteus V3.0: 16x2, 20x4 and I2C LCDs to show your readings
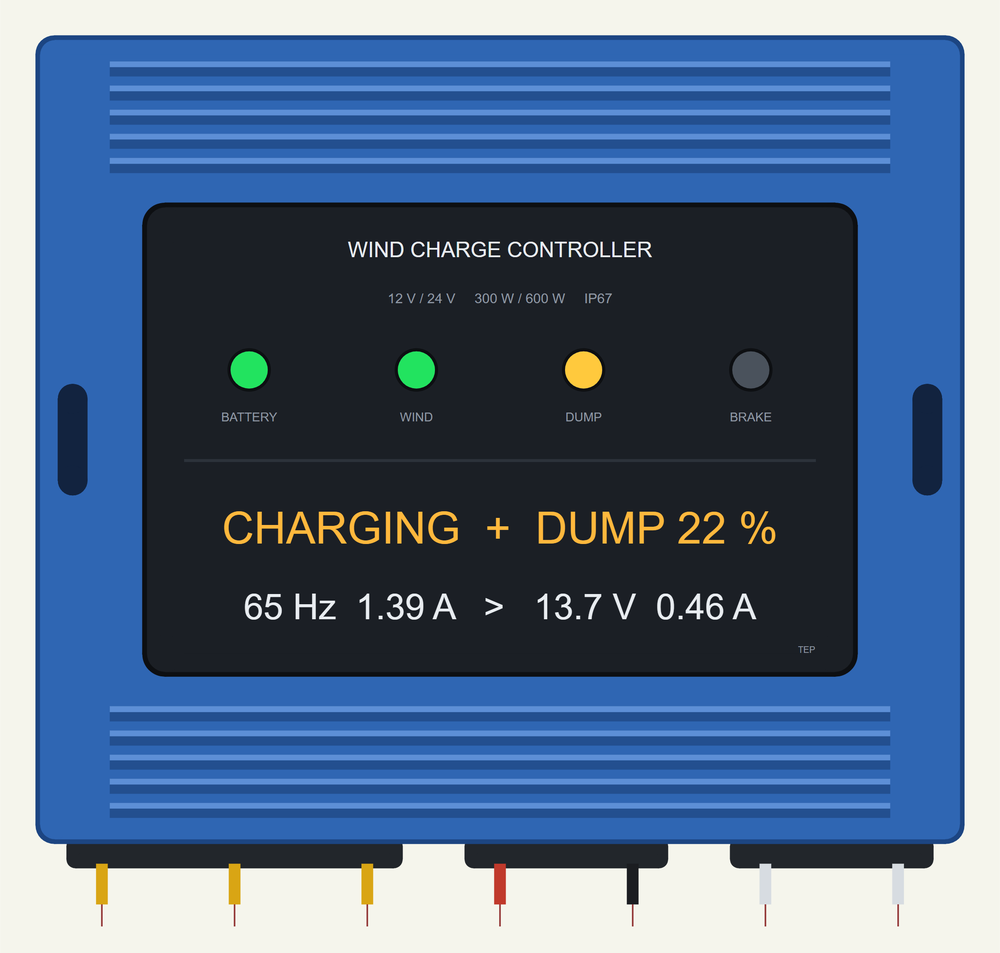
The controller is drawn at its true size, and at run time its four lamps work on your sheet, while its label plate shows what it is doing, the generator's frequency and current, and the battery's volts and amps. The simulation model rectifies the three wires of a wind generator, charges the battery, pulses a dump load when the battery is full and shorts the generator when even that is not enough. The demo is a complete small wind power system built from our own libraries: a turbine, a generator, this controller, a battery and an Arduino that watches it all.
NOTICE: Our team has put a lot of effort into these small parts: the bodies, the animation and the pop-ups are all our own design, and you get them free. Your feedback is the fuel that keeps us going, so please tell us what you think in the comments below or in the Motor Driver board of our forum. And if our free libraries help you, you can buy us a coffee. So, let's get started with the Wind Turbine Charge Controller Library for Proteus Simulation:
What is a Wind Turbine Charge Controller?
A solar panel can simply be switched off when the battery is full. A wind turbine cannot. Its rotor is held back only by the generator's load: take the load away, and the rotor speeds up, in a strong wind far beyond what its blades and bearings are made for. So a wind charge controller has a different job from a solar one. It must protect the battery from overcharging and, at the same time, never leave the turbine without a load.
Small wind generators are three-phase alternators with permanent magnets. They give three wires of AC, with a voltage and a frequency that rise with the speed. The first part of the controller is therefore a rectifier, six diodes that turn the three wires into DC for the battery. As long as the battery can take the current, that is all the controller does.
When the battery is full, the controller turns to its second part, the dump load, also called a diversion load: a large resistor that turns the surplus into heat. The controller switches it on and off quickly, and for a longer share of the time the higher the battery's voltage climbs. The turbine keeps working against a load, the battery gets only what it still needs, and the rest warms the resistor.
The third part is the brake. If the wind is stronger than the dump load can handle, or there is no dump load at all, the controller shorts the three wires of the generator. A shorted permanent-magnet generator is very hard to turn, so the rotor slows to a crawl. The same short circuit, made by a switch, is the manual brake for a storm or for work on the mast.
| Compact wind charge controller, 12 V / 24 V (makers' manuals) | |
|---|---|
| Wind generator | three-phase, 300 W at 12 V, 600 W at 24 V |
| Dump load | by pulses, from 13.5 V (27 V) |
| Brake | at 14.5 V (30 V) or over 15 A; released at 13.5 V (27 V) |
| Its own consumption | 20 mA at most |
| Lamps | battery, wind (flashes with the rotor's speed), dump load, brake |
| Temperature | -35 to +75 °C, case IP67 |
| Size | 100 x 87 x 28 mm |
Features of the Wind Turbine Charge Controller Library for Proteus Simulation
- The controller at true scale: the blue finned aluminium case, 100 x 87 mm, with the label plate, four lamps and seven leads; at run time the lamps work and the plate shows the state and the measurements.
- A real rectifier: six diodes between the generator's three wires and the battery, simulated cycle by cycle.
- A dump load with real pulses: 500 pulses a second that begin at 13.5 V and widen with the battery's voltage, up to always on at 14.5 V.
- A brake: the three wires shorted at 14.5 V or over 15 A, released at 13.5 V; a STOP chip in the pop-up is the manual brake switch.
- The WIND lamp: it flashes with the generator's frequency, as on the real controller.
- 12 V and 24 V: the SYSTEM property doubles the battery voltages for a 24 V system.
- A pop-up: the power flow from the rotor to the battery with the dump load as a branch, the pulses, the battery's voltage on a band with its two marks, eight live values, graphs, an event log and a check page.
- A complete package: about 2.3 MB with the library, our wind turbine, our 3-phase generator, our lead-acid battery, our Arduino UNO V4.0 and the demo, without the source code of the model.
The Wind Turbine Charge Controller in Proteus
The device is WINDCHARGECONTROLLERTEP in TEPWINDCC.LIB, under Electromechanical > Charge Controllers, with the prefix CC and the analog model TEPWINDCC.DLL. Search WINDCHARGE in Pick Devices. Its seven pins are at the ends of the leads along the bottom: U, V and W for the generator's three wires (in any order), BAT+ and BAT- for the battery, DUMP+ and DUMP- for the dump load. DUMP+ is joined to BAT+ inside; the controller switches DUMP-. The properties are SYSTEM (12 or 24), DUMP (PWM for a dump load, OFF for the brake alone) and SPEED (the controller's clock, 1 to 7200, to be set like the SPEED of our battery libraries).
Download Wind Turbine Charge Controller Library for Proteus Simulation
Click the button below to download Wind-Turbine-Charge-Controller-Library-for-Proteus-v1.0.zip (about 2.3 MB, without the source code of the models):
Wind Turbine Charge Controller Library for Proteus V1.0- README.txt: installation, the demo, the wiring, troubleshooting and the limits of the simulation.
- Proteus Library Files:
TEPWINDCC.LIB,TEPVAWT.LIB,TEPPMGEN.LIB,TEPLEADACID.LIBandArduinoV4TEP.LIB. - Proteus Model Files:
TEPWINDCC.DLL,TEPVAWT.DLL,TEPPMGEN.DLL,TEPLEADACID.DLLandTEPARDUINO.DLL. - Arduino Code: the demo sketch.
- Proteus Simulation: the demo project, its HEX file and copies of the DLLs.
No Proteus yet? Read How to Download and Install Proteus 7 and 8. New to libraries? Follow How to Install a New Library in Proteus.
How to Install Wind Turbine Charge Controller Library for Proteus Simulation
- Close Proteus and extract the whole zip file, for example to your Desktop.
- Copy the files from Proteus Library Files into the LIBRARY folder of Proteus.
- Copy the files from Proteus Model Files into the MODELS folder.
- Delete
TEPWINDCC.IDXfrom the LIBRARY folder if it is there. - The demo also uses our INA219 Current Sensor Library for Proteus: install it from its own package (it is not in this zip).
- Start Proteus, press P and search for WINDCHARGE.
Proteus Simulation of a Wind Power System with Arduino
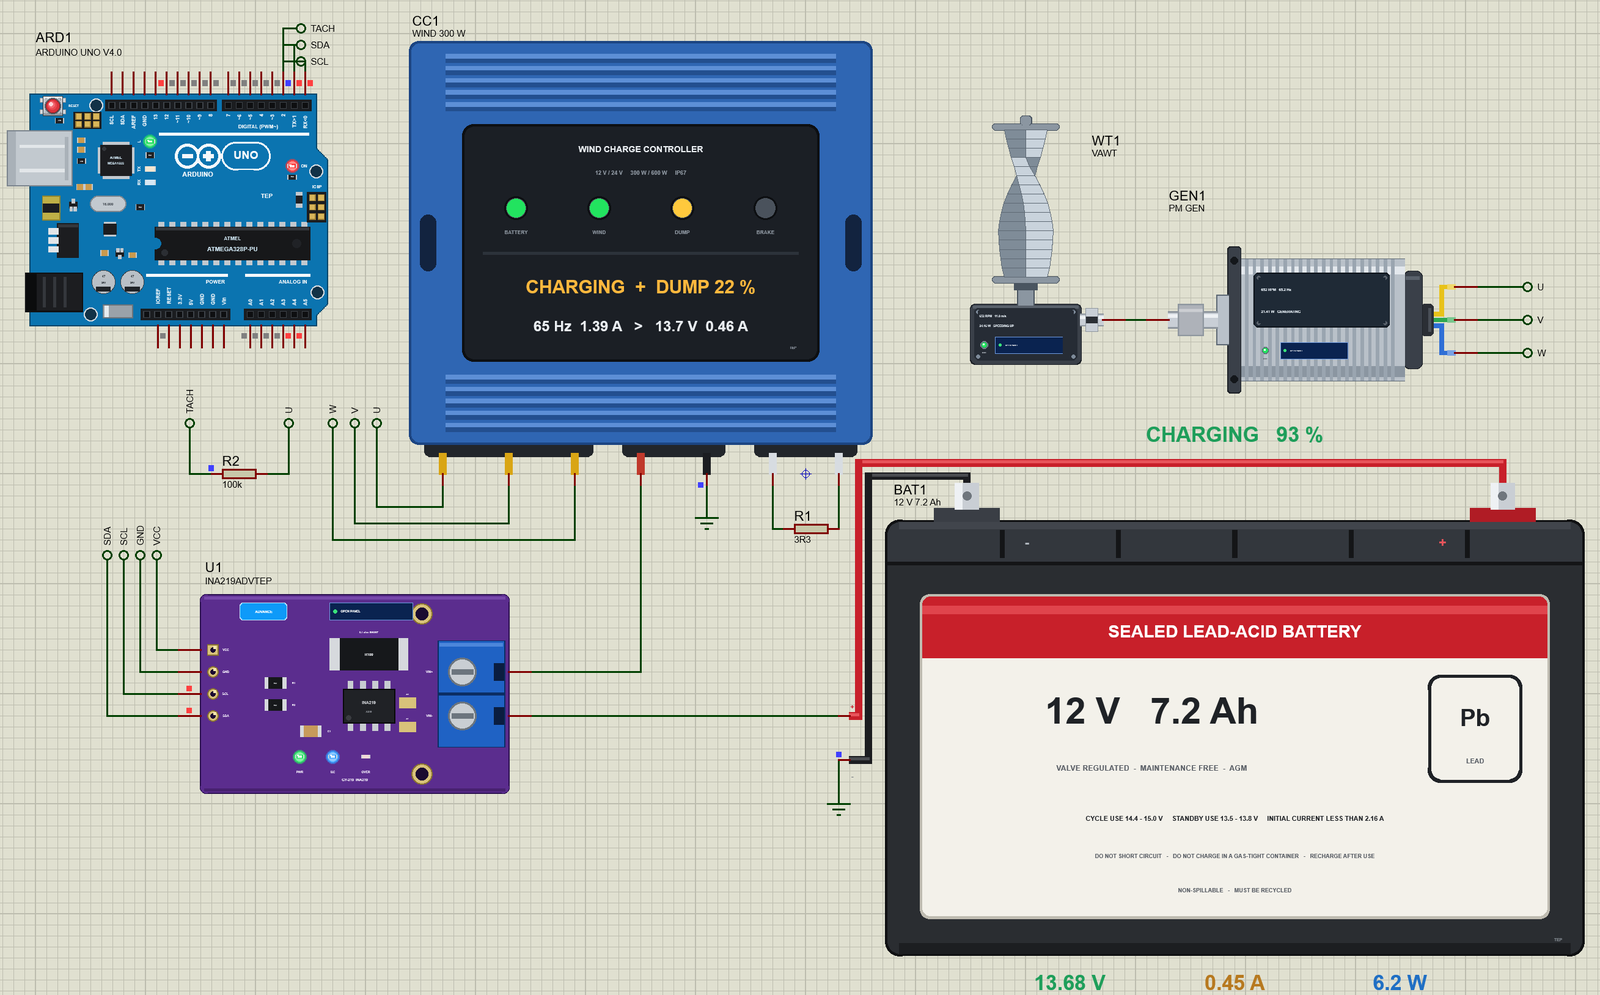
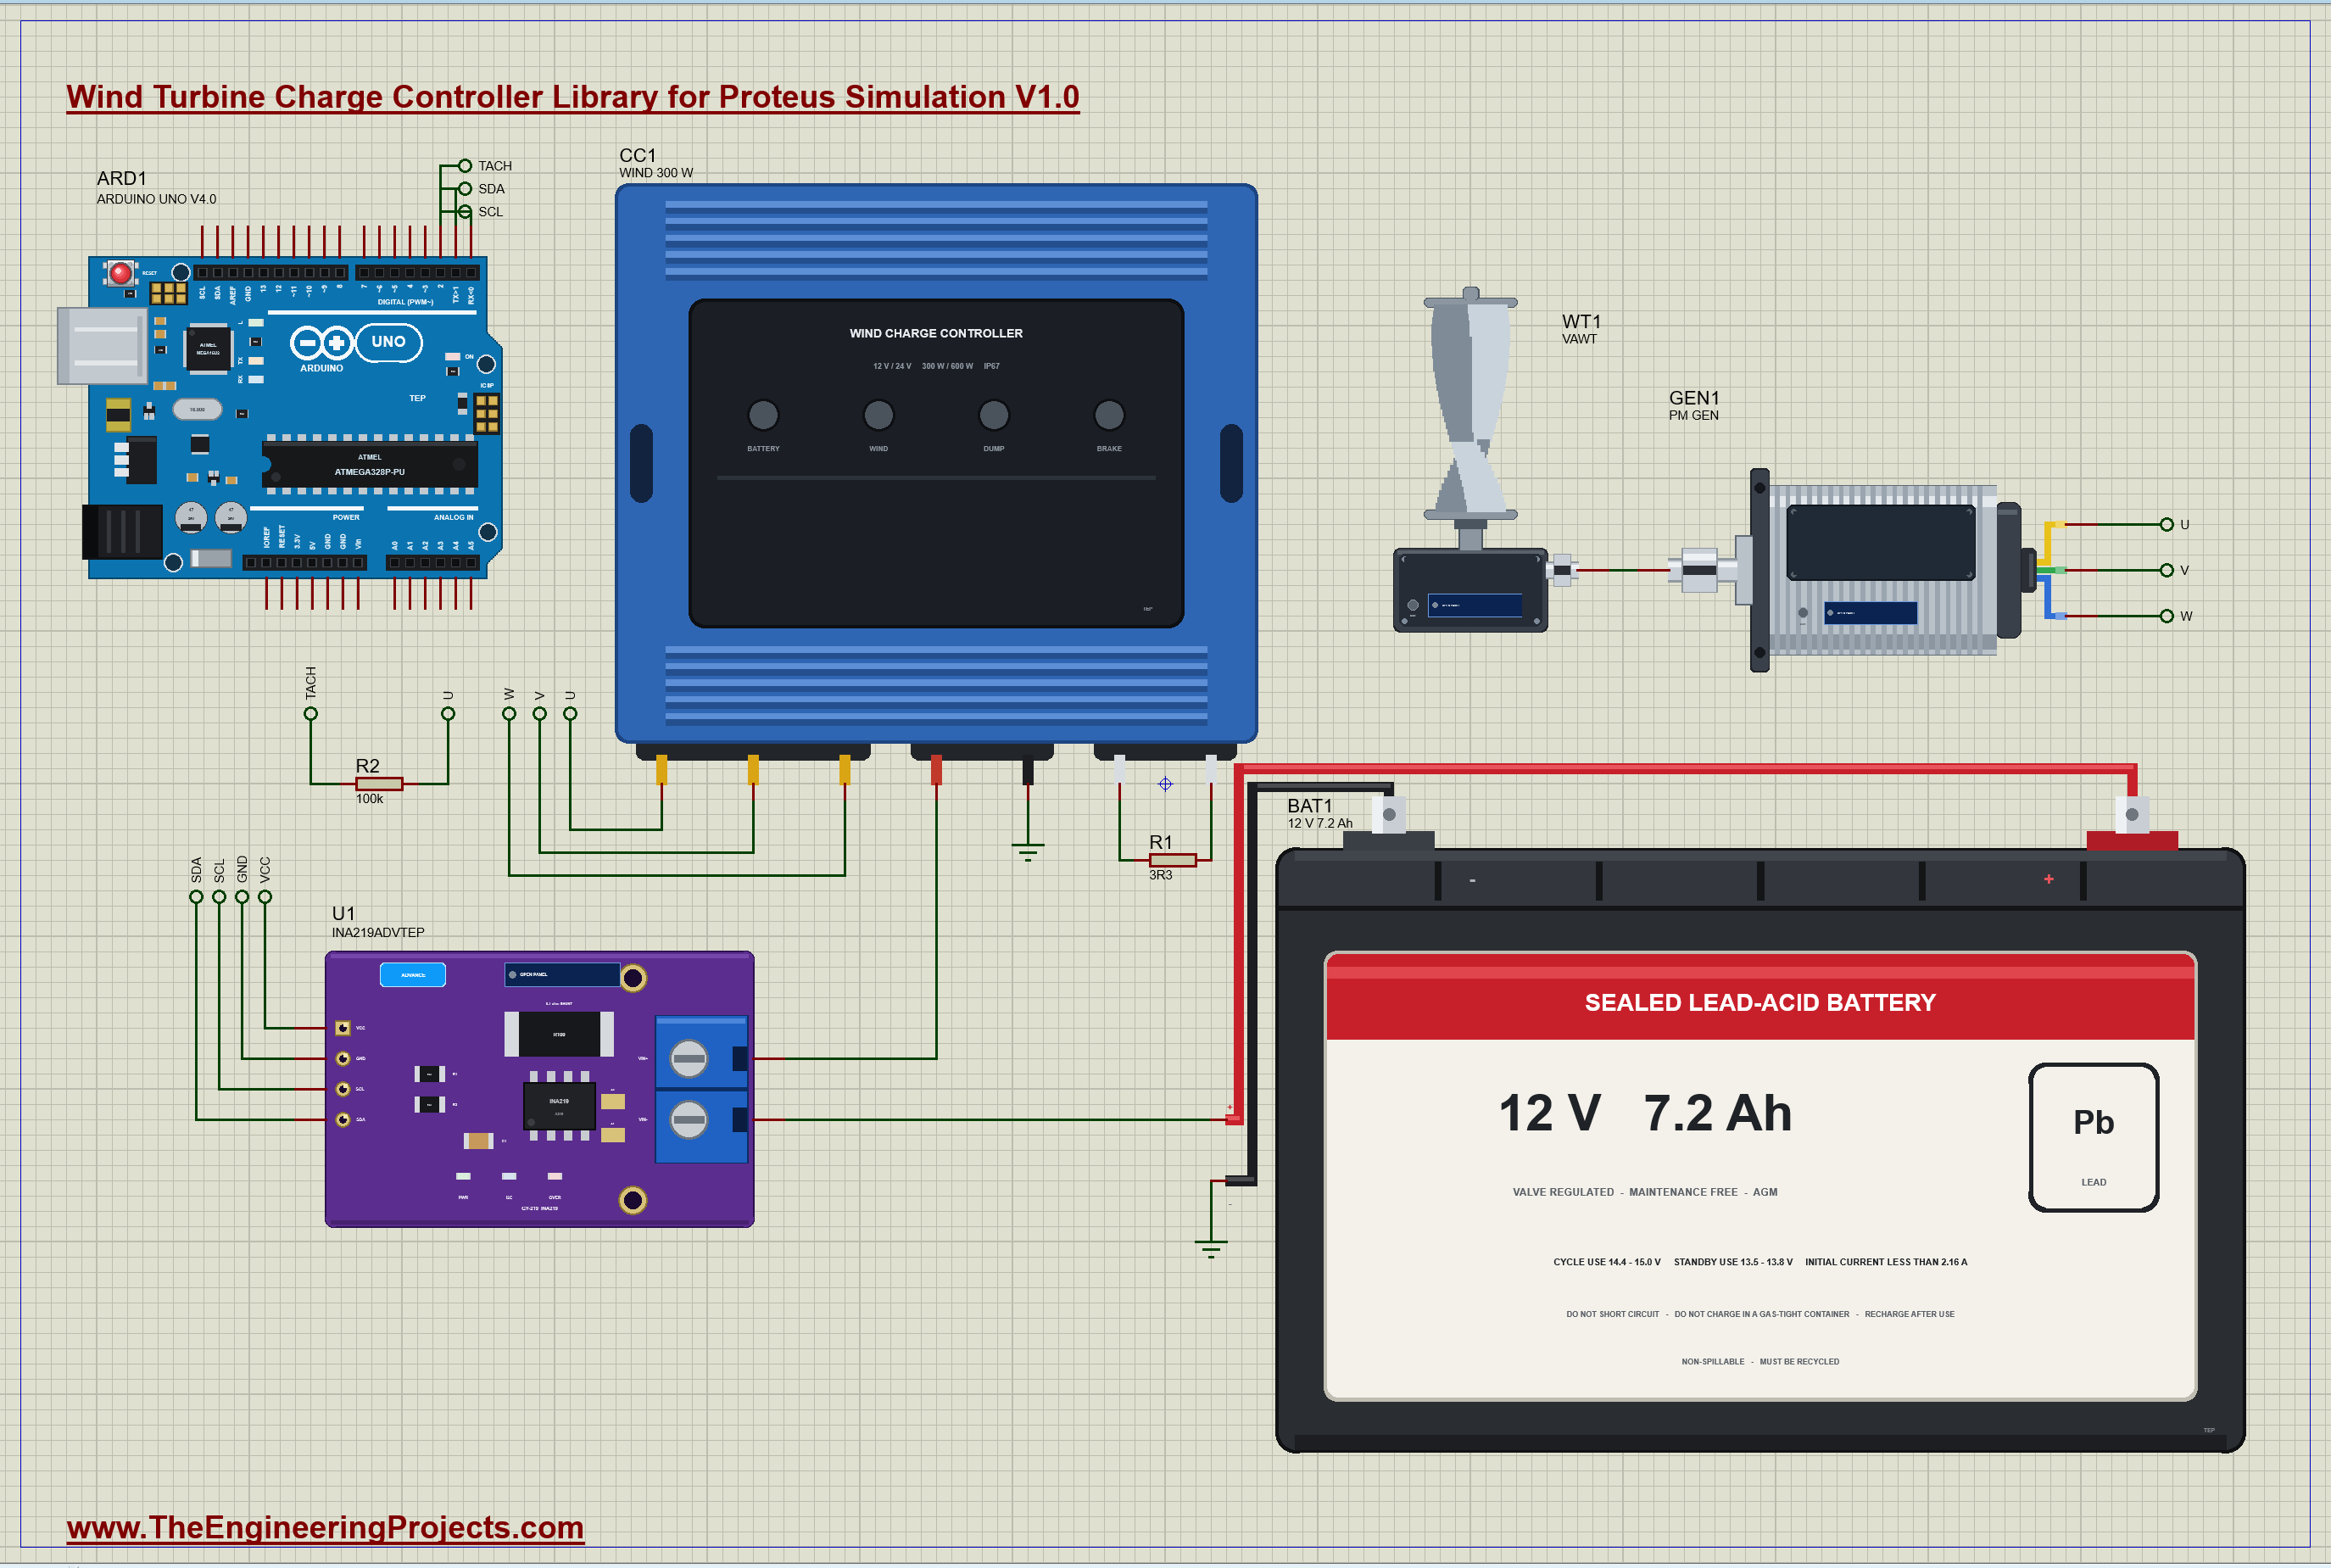
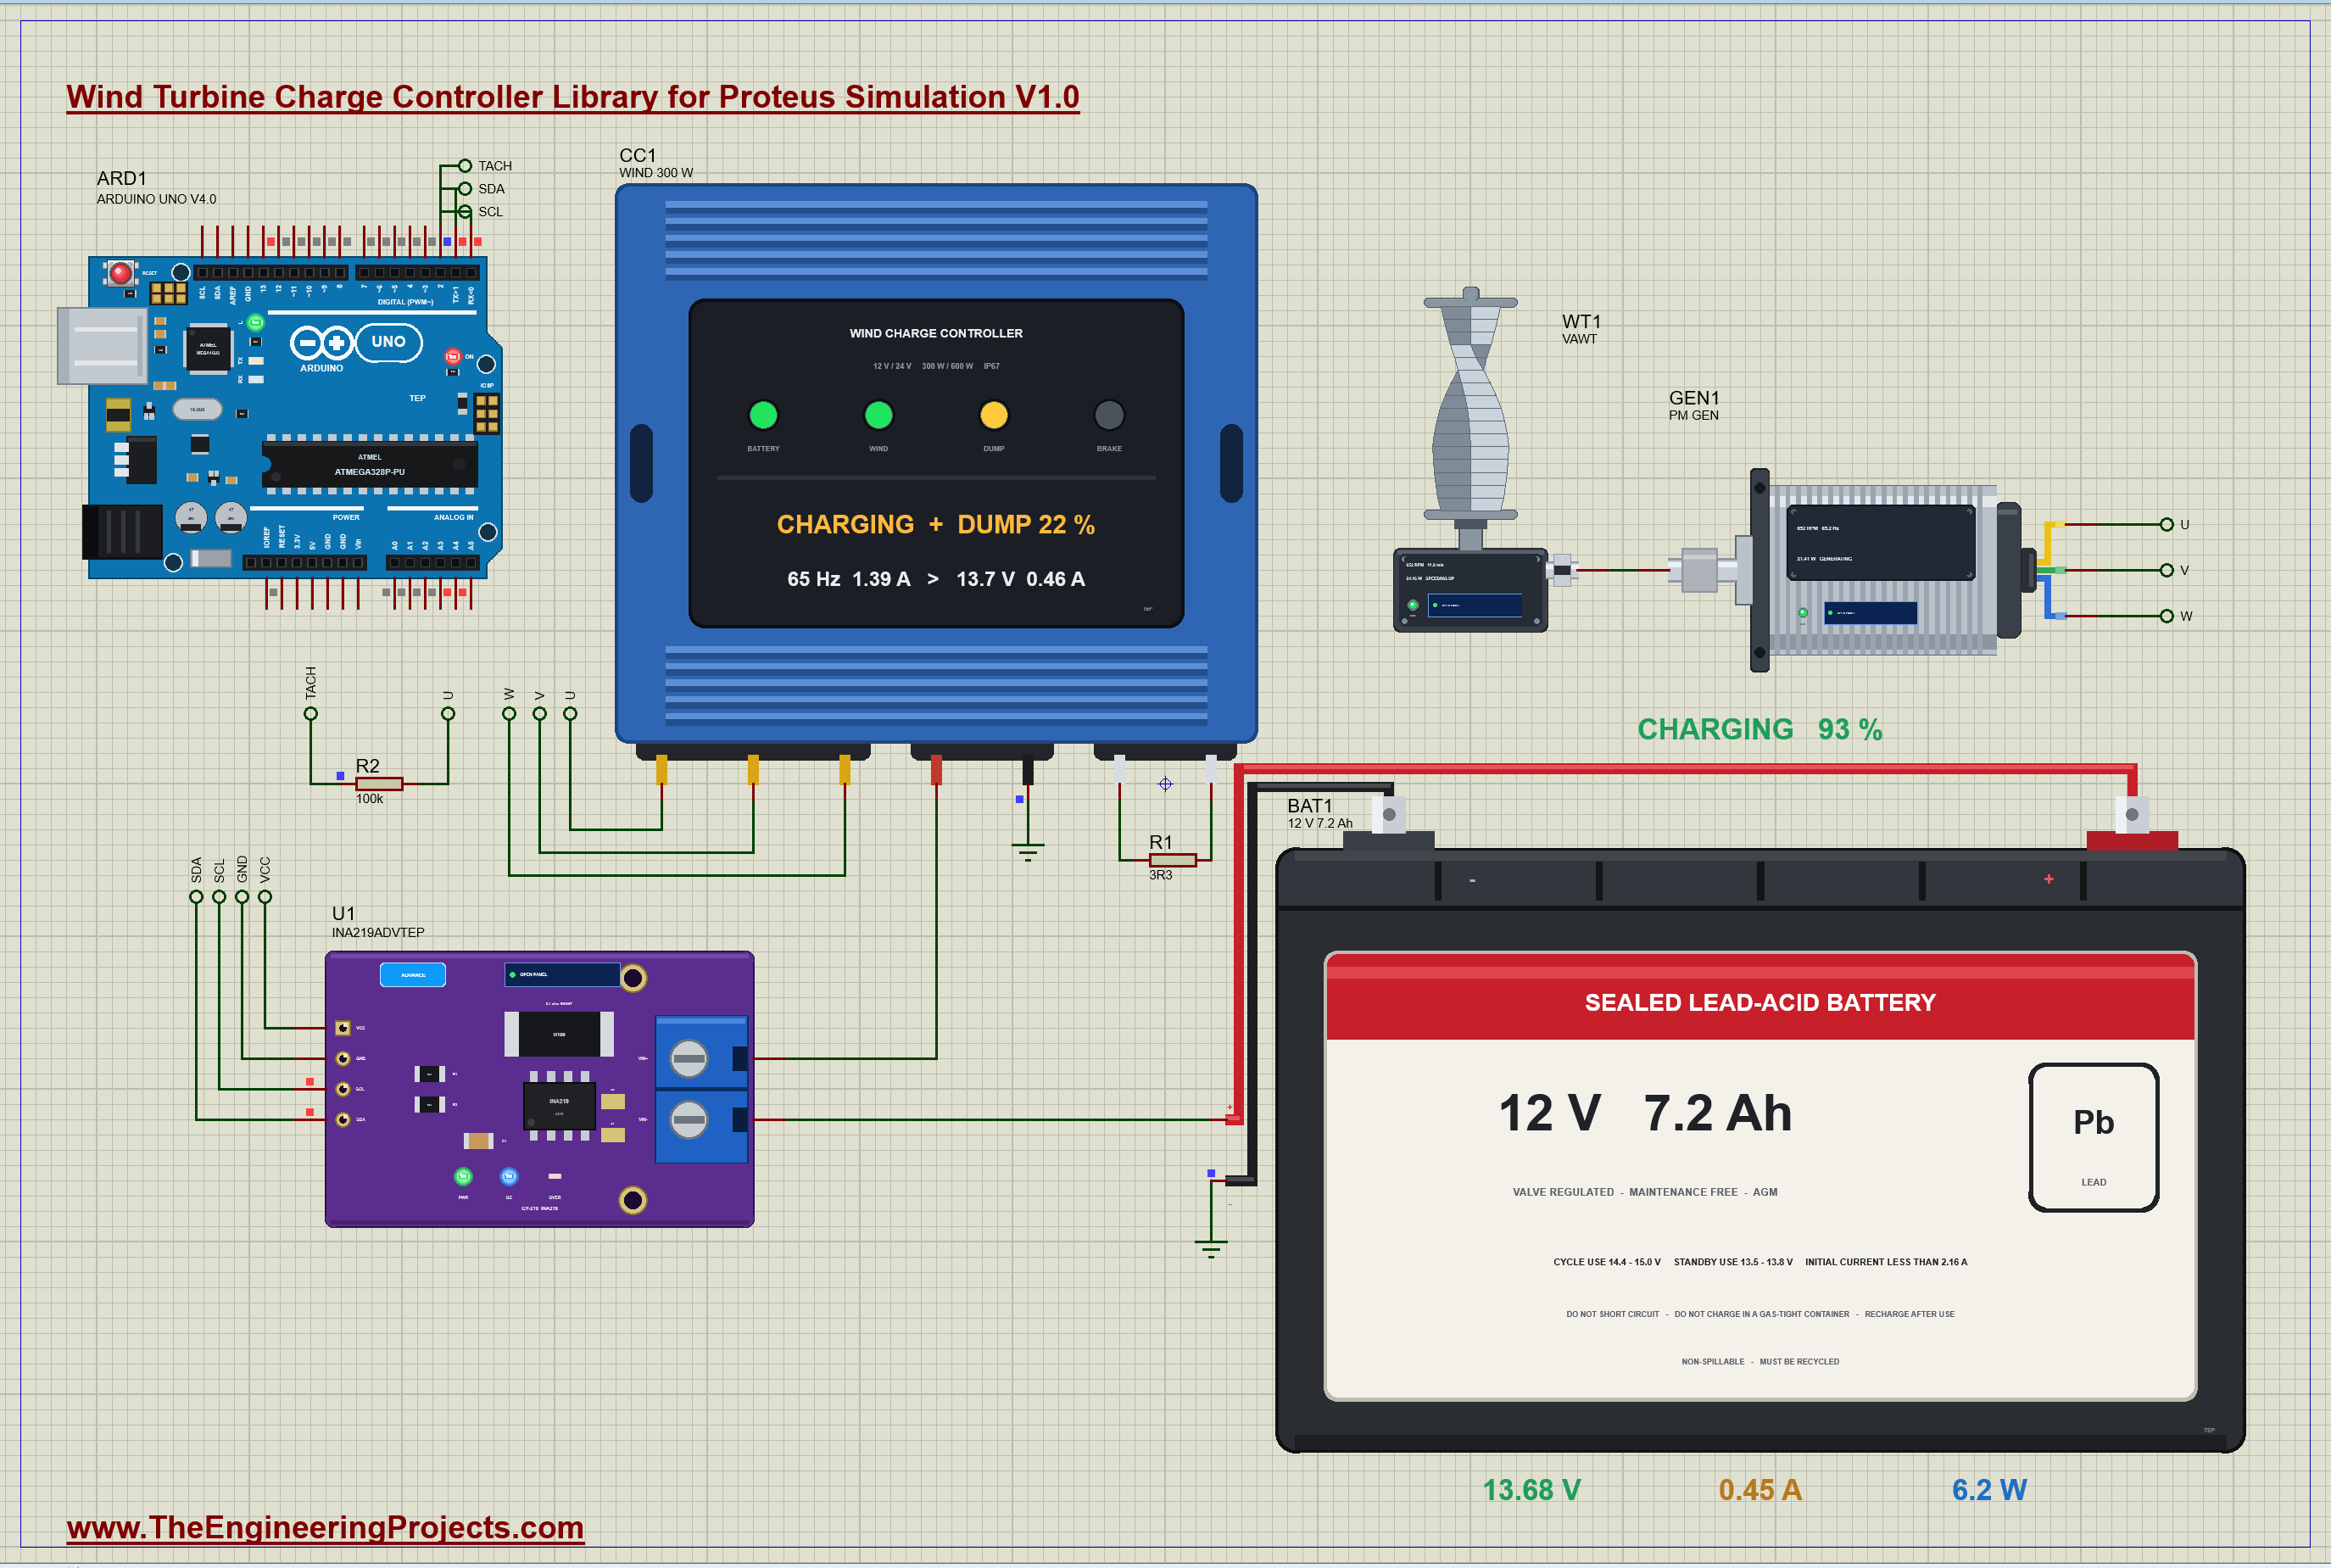
The demo is a small wind power system, complete from the wind to the battery. The turbine, WT1, is the rotor of our Vertical-Axis Wind Turbine Library for Proteus in a wind of 11 m/s. Its shaft turns GEN1, the alternator of our 3-Phase PM Generator Library for Proteus, and the generator's three wires go to the controller, CC1, over the labels U, V and W. The battery, BAT1, is the 12 V 7.2 Ah battery of our 12V Lead-Acid Battery Library for Proteus Simulation, starting at 85 percent, and R1, 3.3 ohm, is the dump load. Our Arduino UNO Library for Proteus V4.0 is the monitor: its built-in monitor is the same window as our TEP Serial Monitor Advance for Proteus, it reads our INA219 (U1, its pop-up version) between the controller and the battery, and it takes the generator's speed from one of the three wires through R2, 100 k, on pin 2. The SPEED of the battery and of the controller is 3600, so one simulated second is an hour. Open Wind-Charge-Controller-Turbine-Battery-INA219-ArduinoUnoV4.pdsprj.
The Sketch
The sketch measures the battery with the INA219, as in our solar charge controller tutorials, and adds the speed of the generator. Every rising edge on pin 2 is one electrical cycle of the generator; an interrupt keeps the times of the last nine edges:
void onEdge() { edgeUs[edgeAt] = micros(); edgeAt = (edgeAt + 1) % 9; if (edgeCount < 9) edgeCount++; }The frequency is taken over the last eight whole cycles, and because the generator has 12 poles, six cycles are one turn: the RPM is the frequency times ten.
return 8e6 / (newest - oldest);From the battery's side the sketch can tell what the controller is doing. A battery that is being charged at 13.5 V or more means that the dump load is at work:
  if (amps > 0.03 && volts >= 13.50) return F("charging, the dump load works");
  if (amps > 0.03) return F("charging");
It also counts the amp-hours that went into the battery. The constant CLOCK is 3600, the same as the SPEED of the battery and the controller; in real life it would be 1. The LED on pin 13 lights while the battery is being charged. You can type reset to set the counter back to 0 or rate 1000 to report once a second.
Wind Turbine Charge Controller Simulation Results
Open the project and press Run. The demo runs about 4 simulated seconds, which are four hours for the battery; with the pop-ups open and the pictures being taken it took about two minutes on our PC. Click the controller for its pop-up. Every number below comes from one simulation run, the demo exactly as it ships.
The Rotor Spins Up
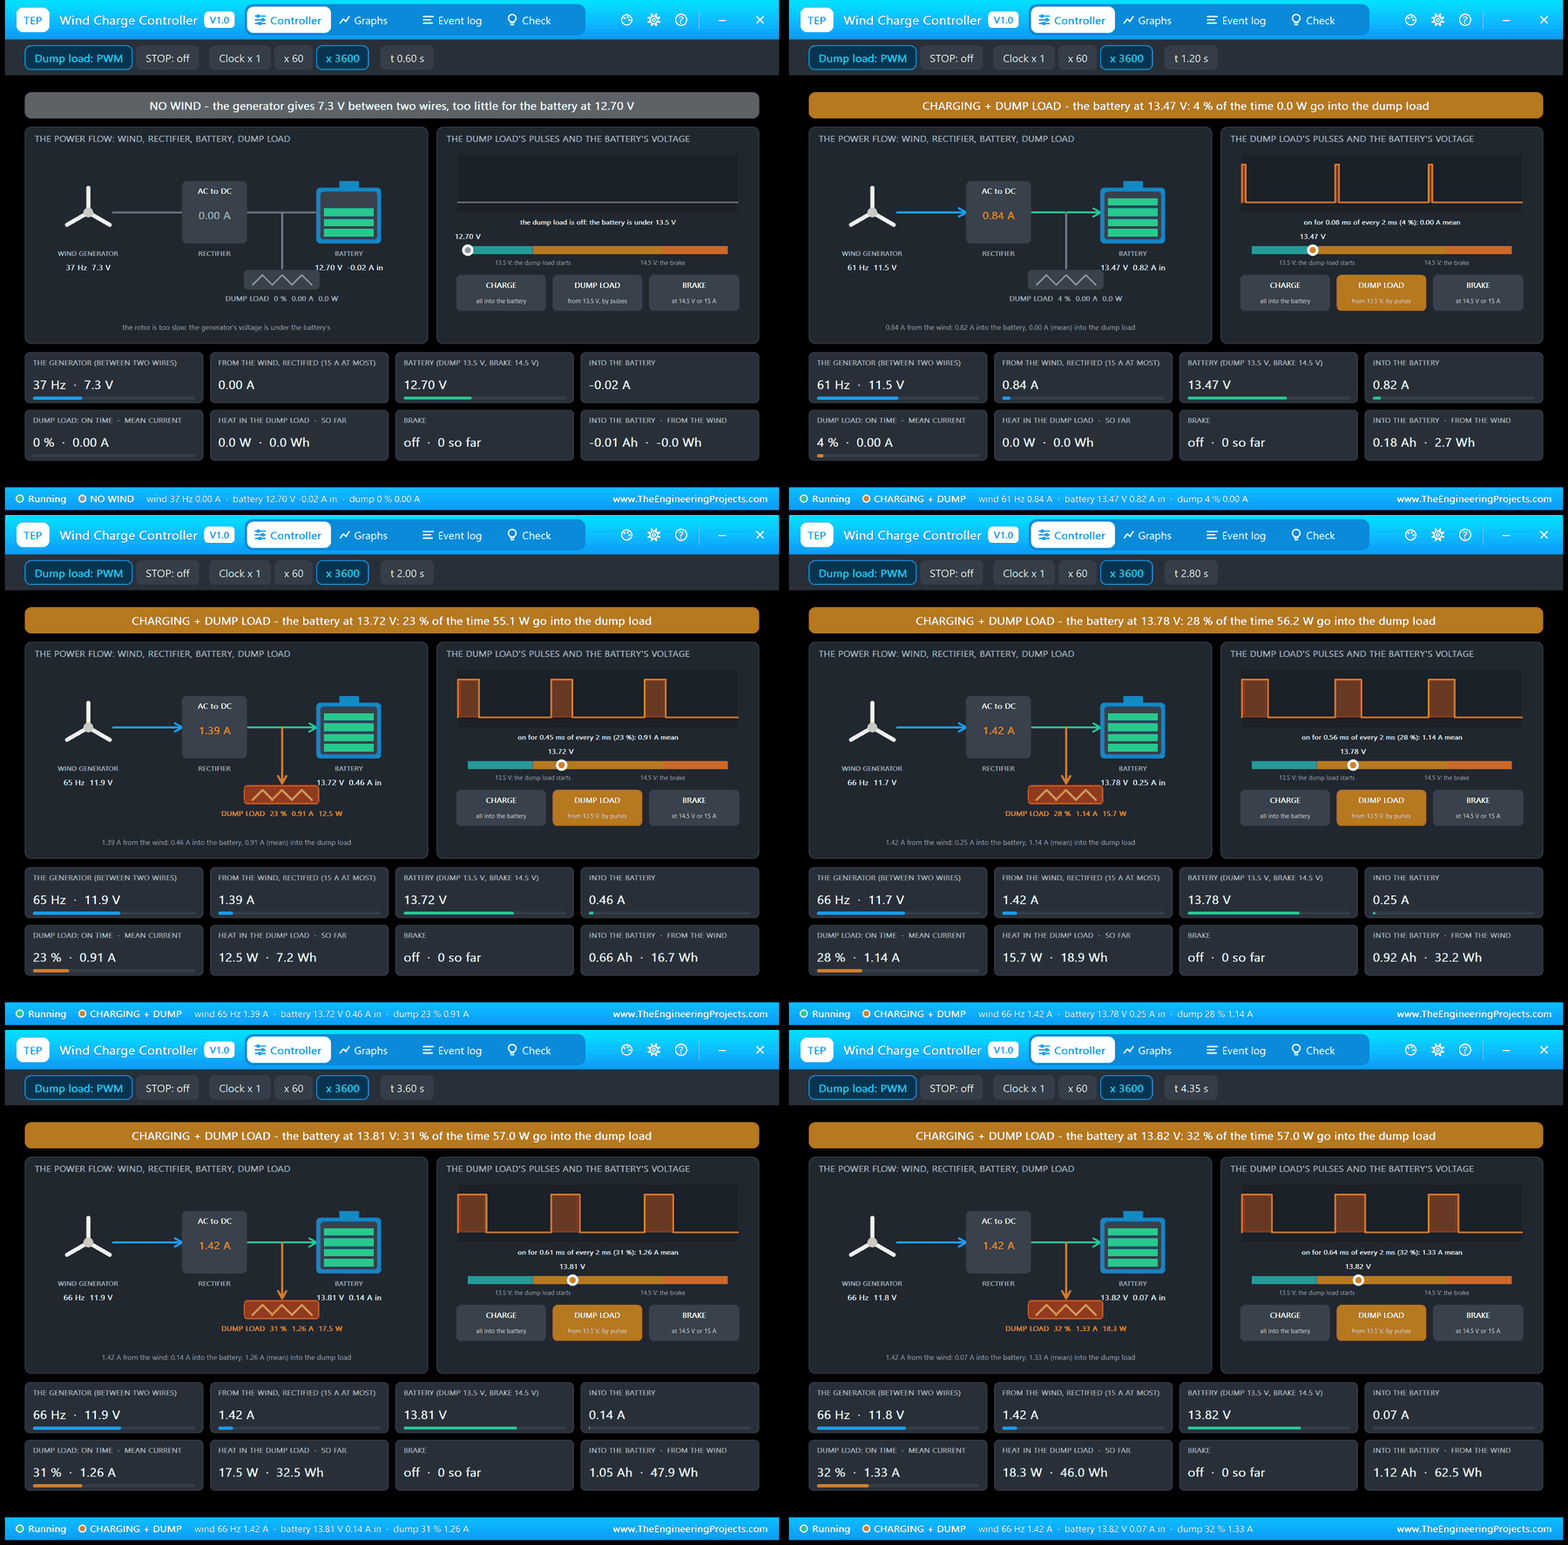
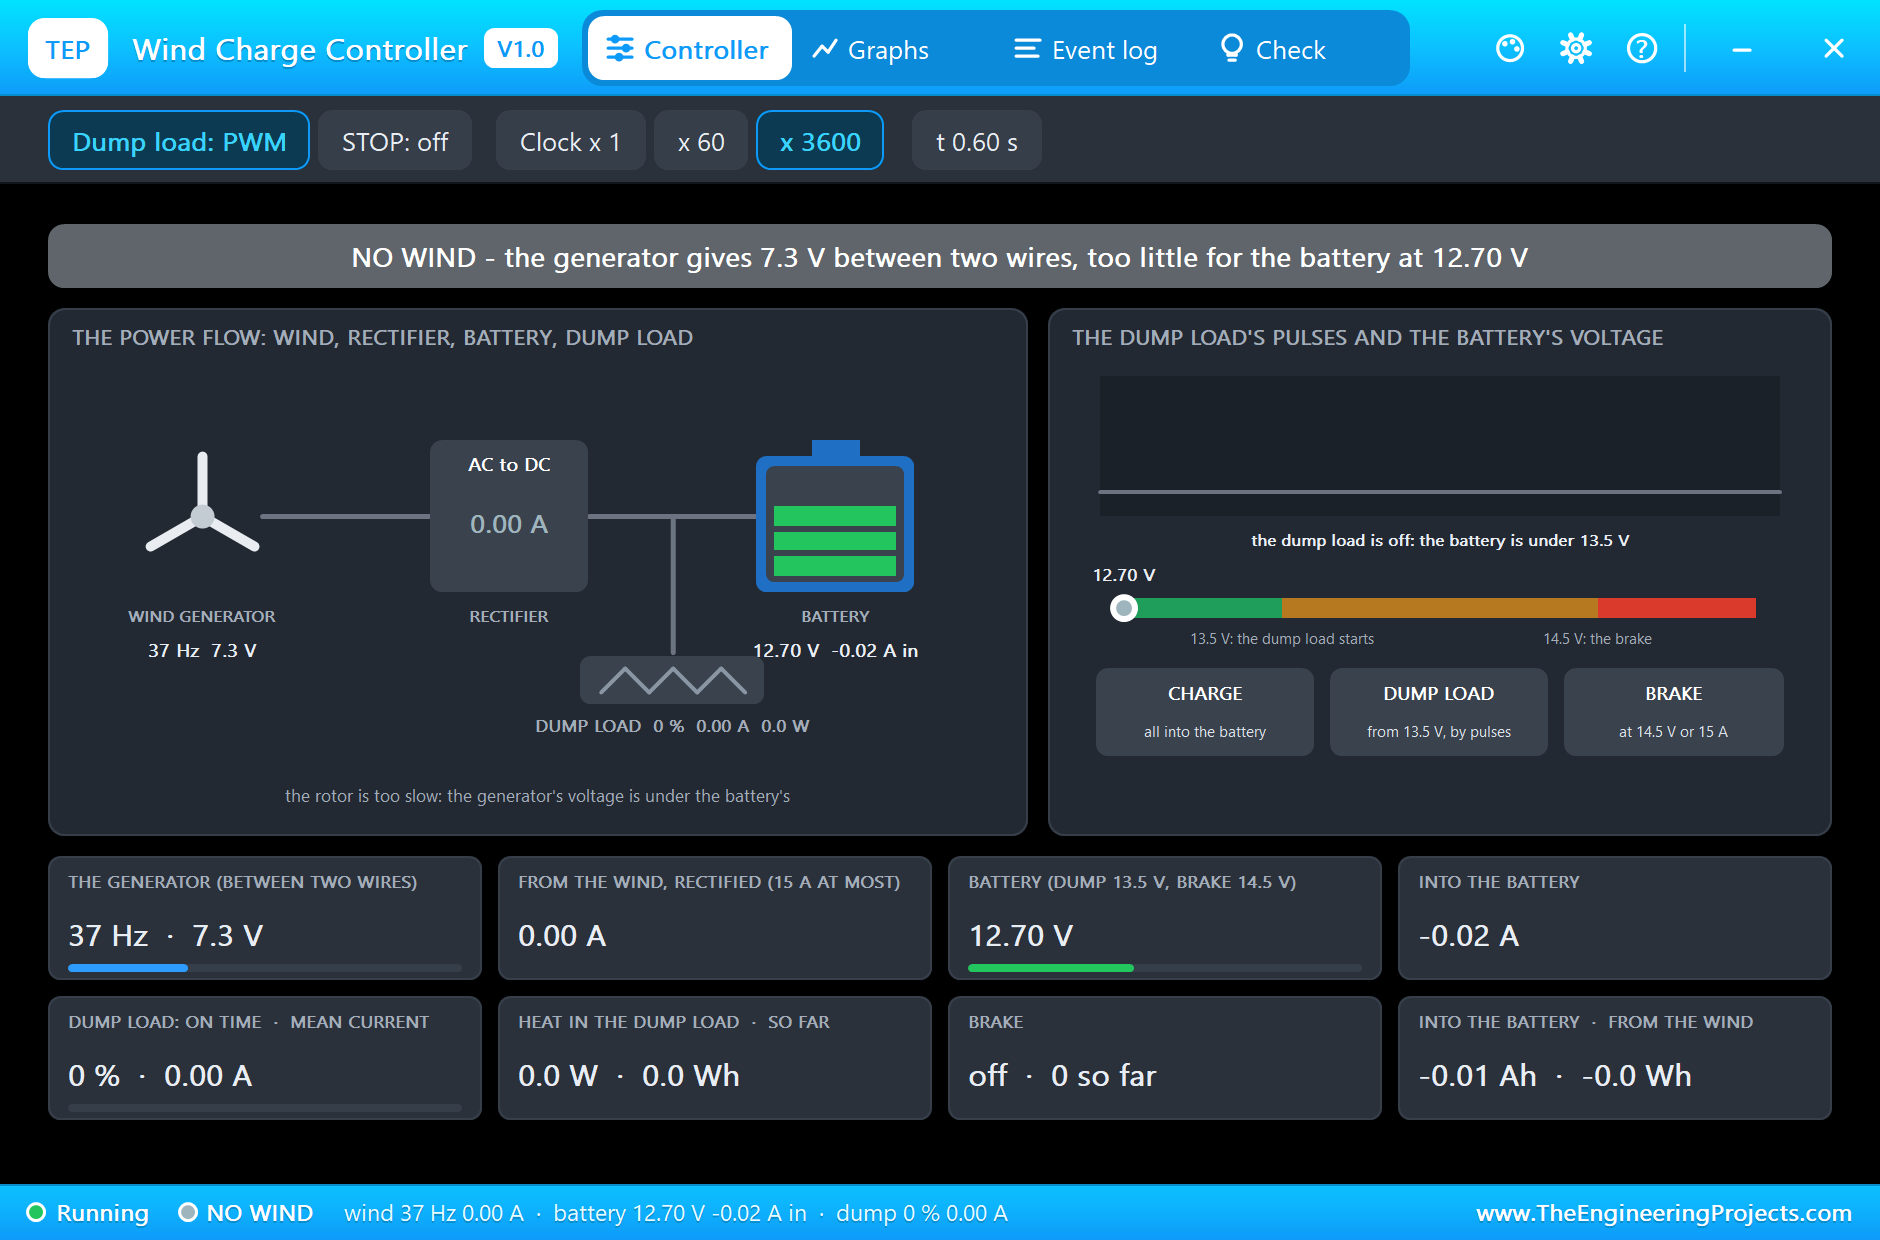
At the start the rotor stands. The wind sets it turning, but a wind generator charges nothing until it is fast enough. The pop-up at 0.6 s shows it on the way: the generator is at 37 Hz and gives 7.3 V between two of its wires, too little for a battery at 12.70 V, so the controller still says NO WIND. At 0.86 s the generator's voltage passes the battery's, the rectifier conducts and the Event log writes CHARGING.
The Dump Load Takes Over
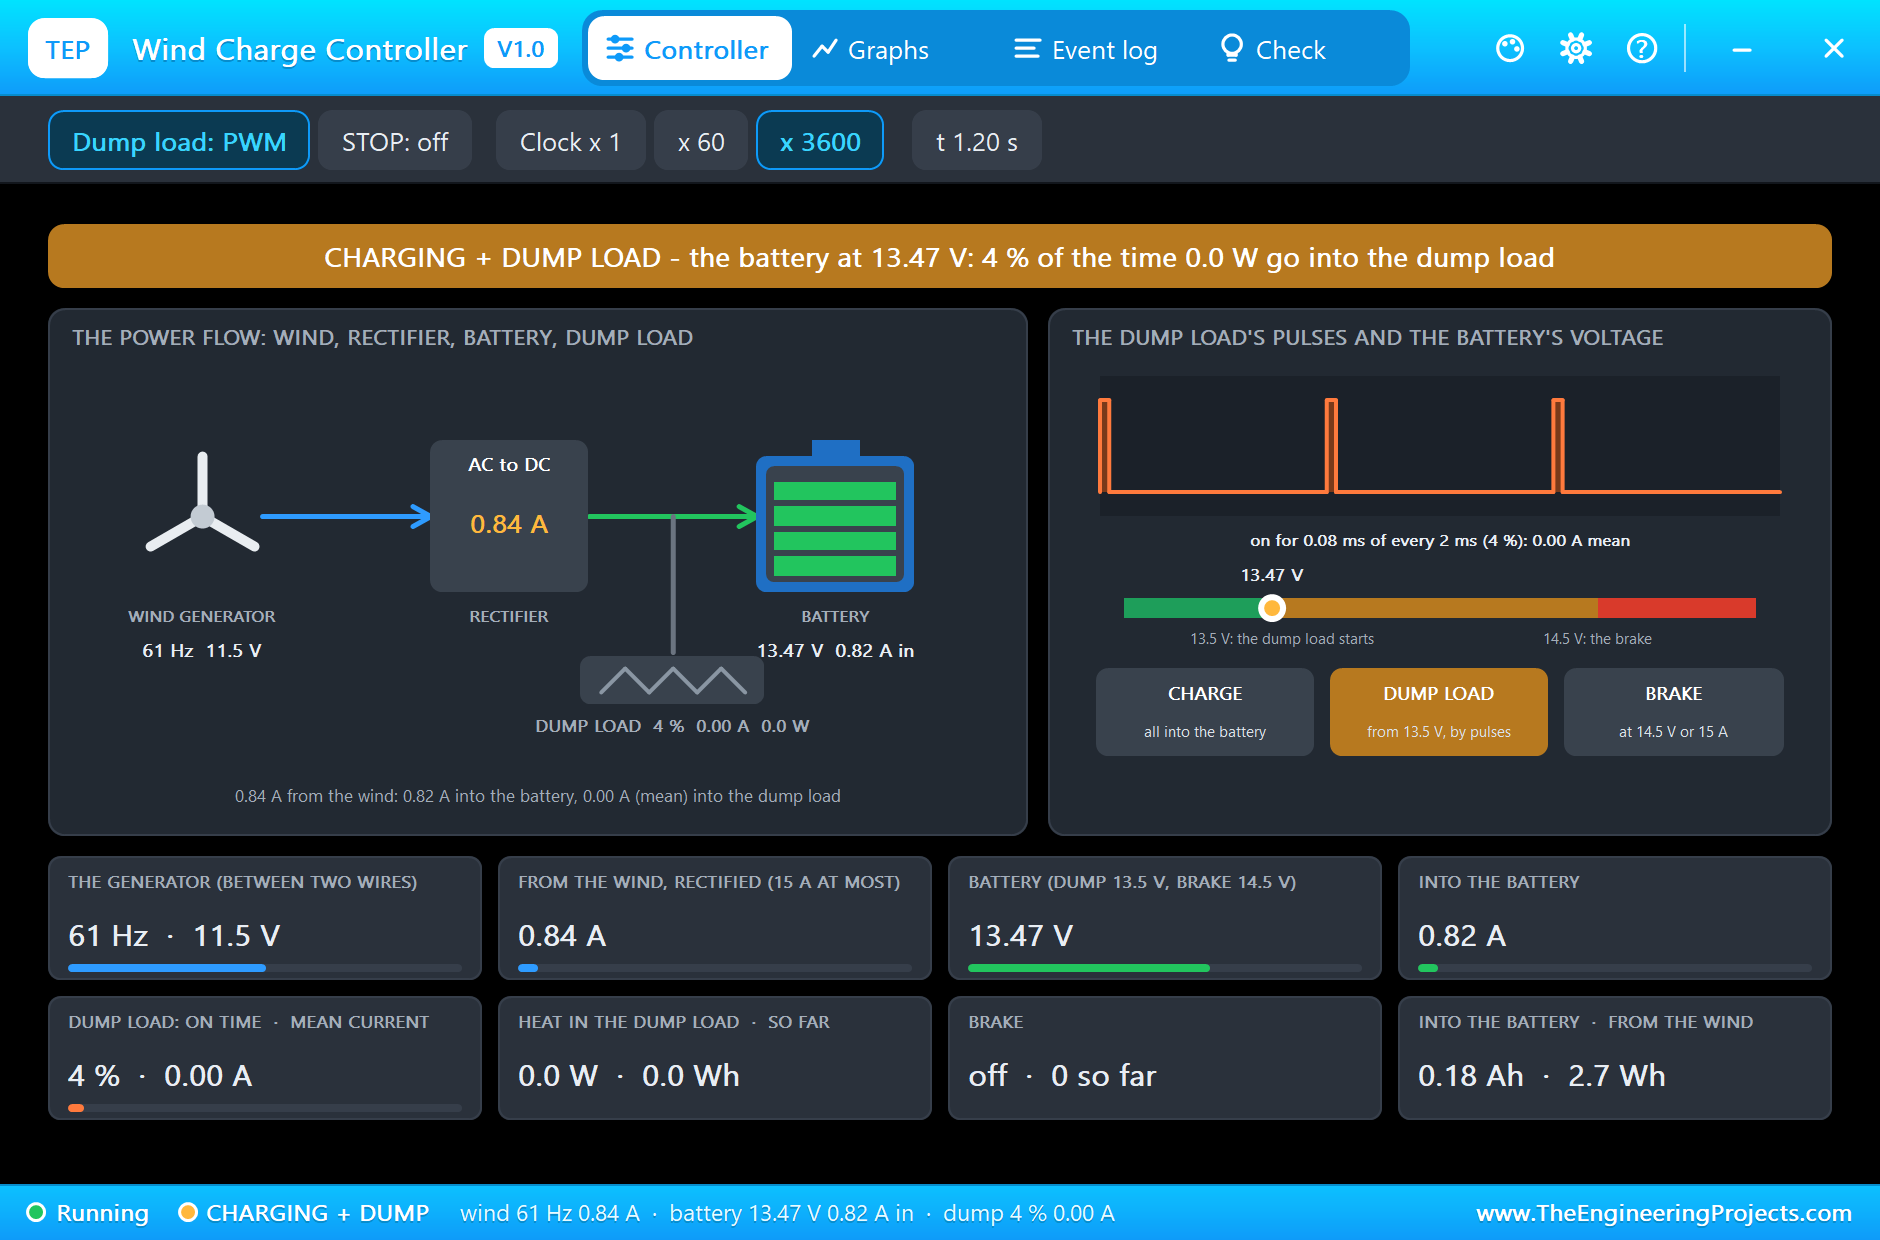
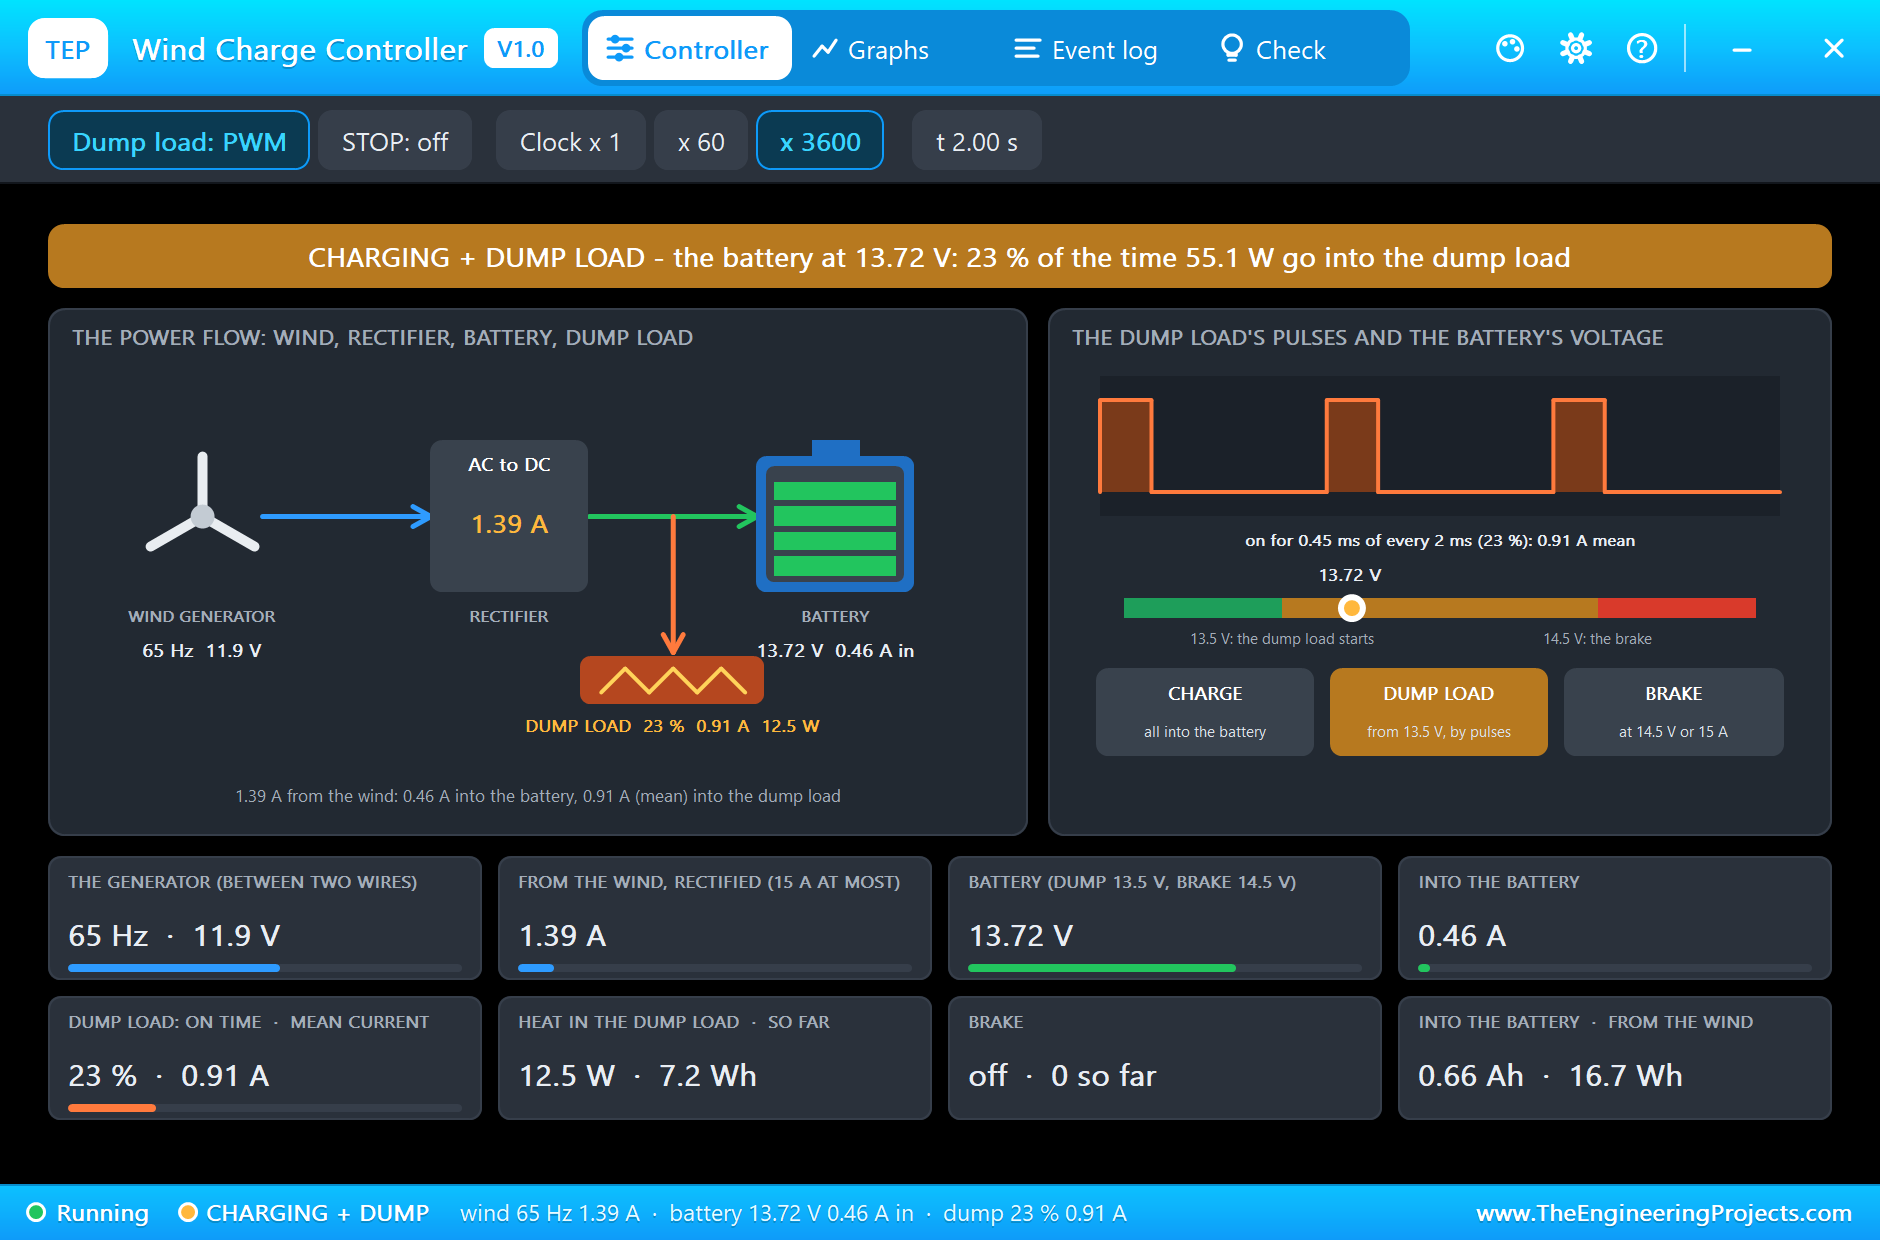
The rotor keeps speeding up and the current grows quickly. Already at 1.18 s the battery reaches 13.5 V and the log writes DUMP LOAD. The pop-up at 1.2 s catches this moment: 0.84 A from the generator, the battery at 13.47 V, and the first narrow pulses on the dump load. From here the pulses widen with the battery's voltage. At 2.0 s the generator gives 1.39 A; the battery, at 13.72 V, takes 0.46 A of it, and the dump load is on for 23 % of the time, a mean of 0.91 A. The pop-up draws the pulses and shows the battery's voltage on its band between the two marks, 13.5 V and 14.5 V.
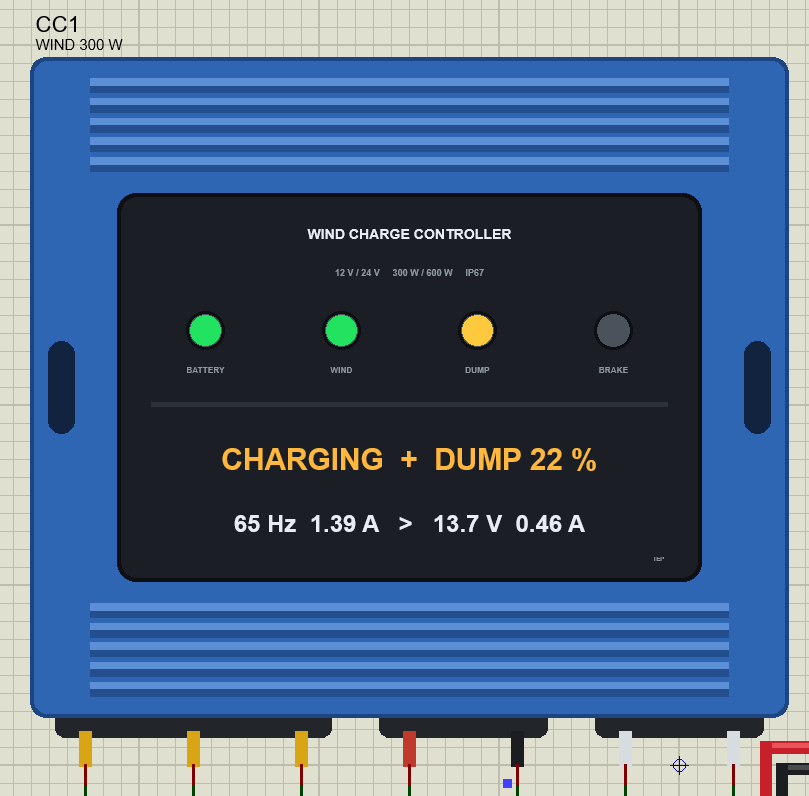
On the sheet the BATTERY lamp is green, the WIND lamp flashes with the generator's frequency and the DUMP lamp is yellow. The plate shows the state, the generator's frequency and current, and the battery's volts and amps.
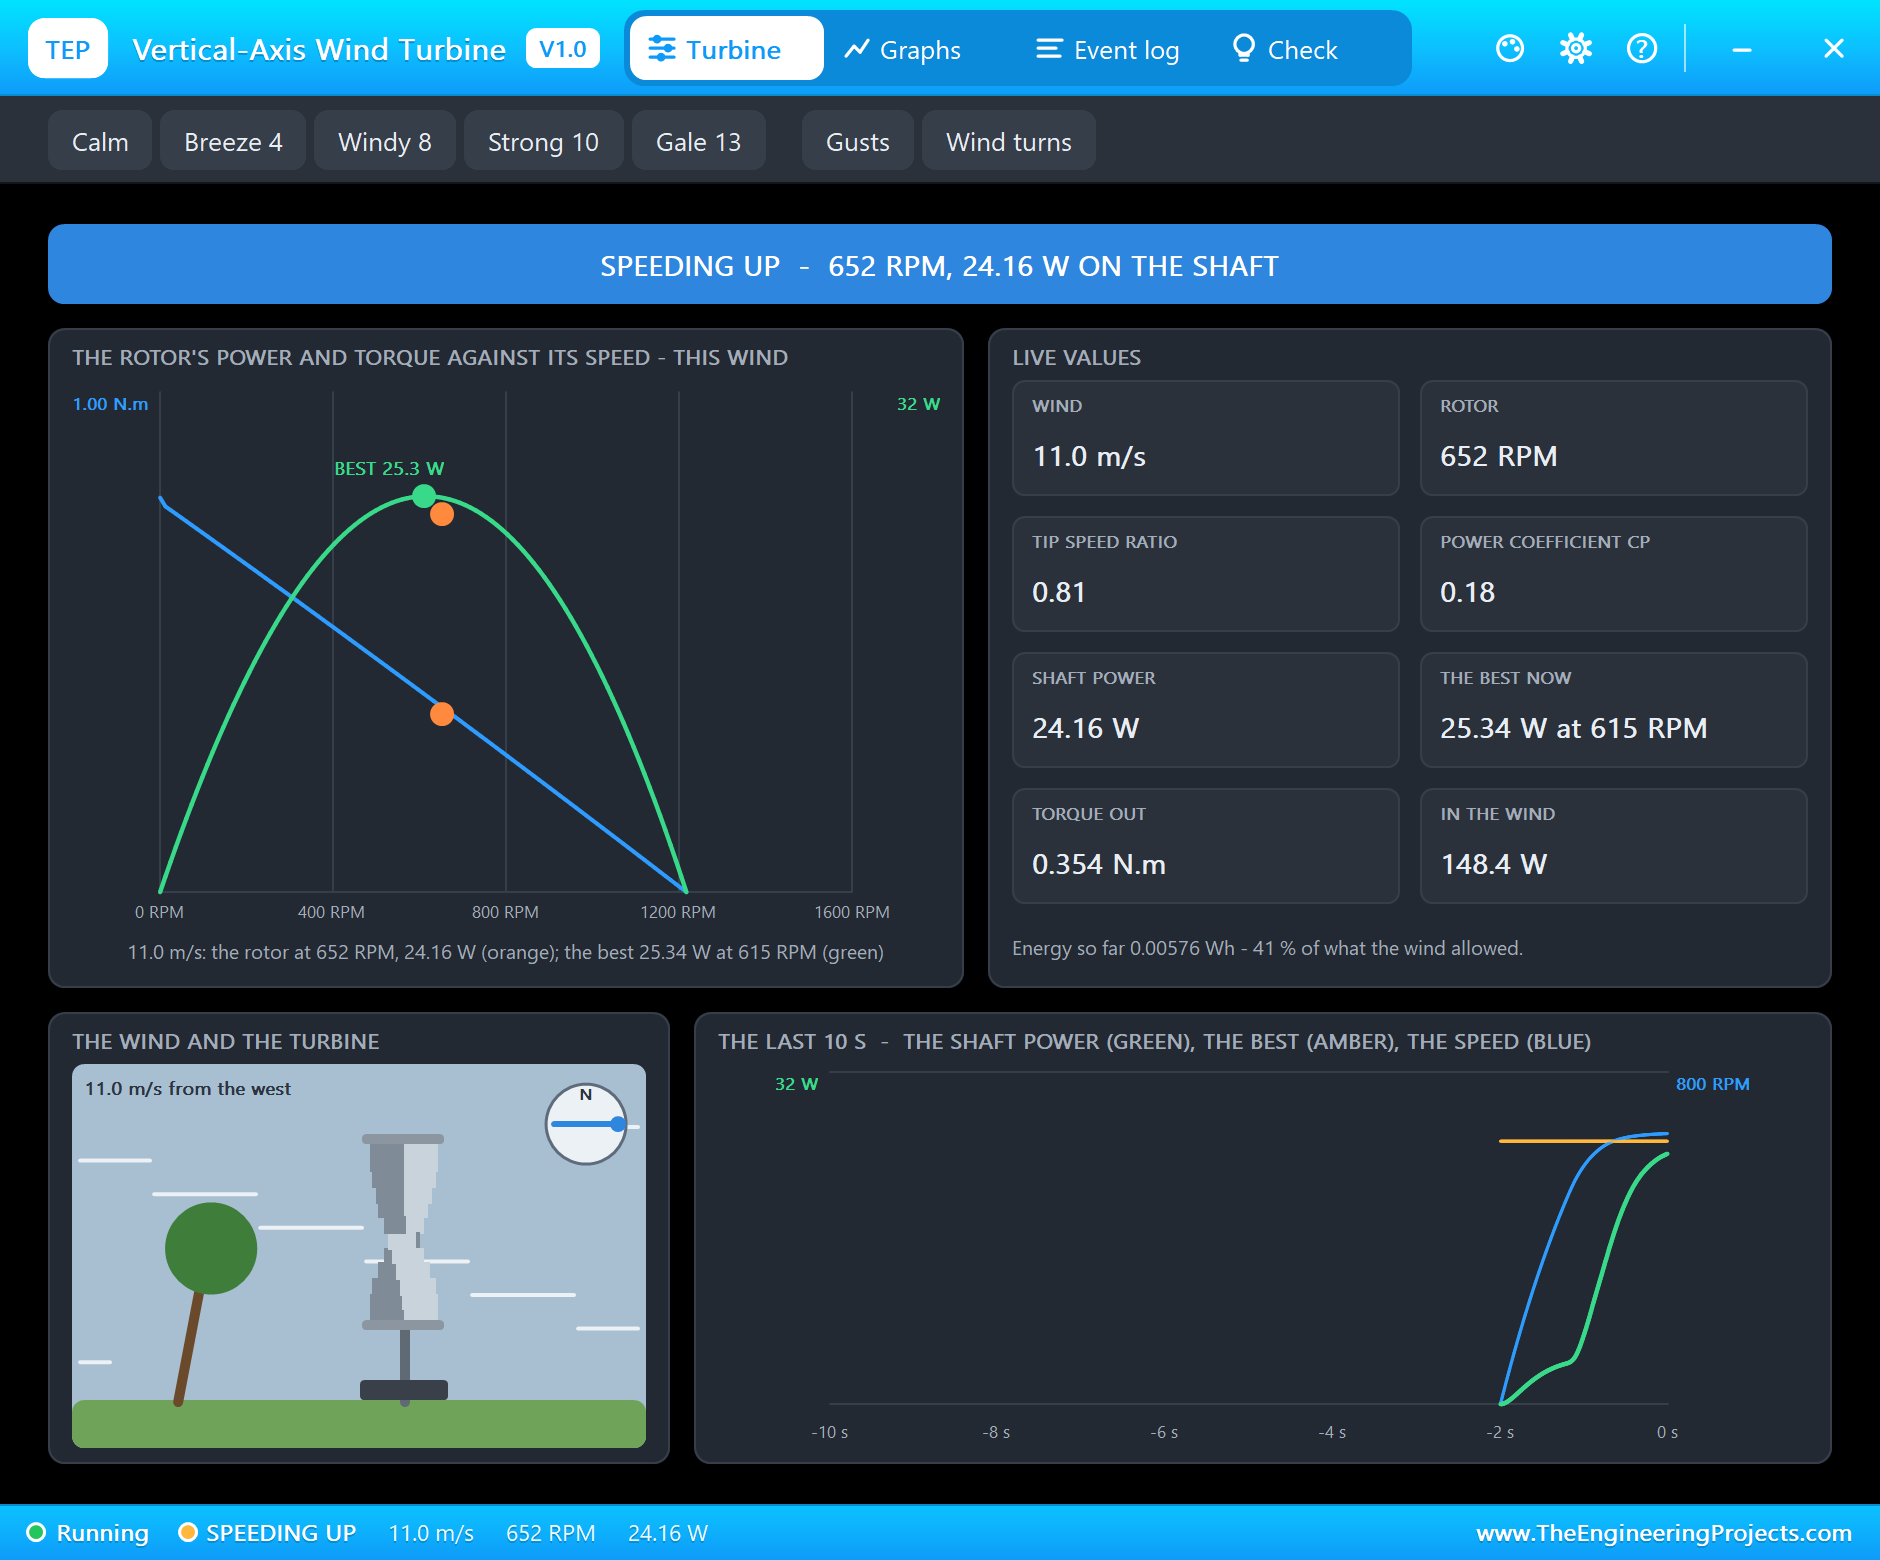
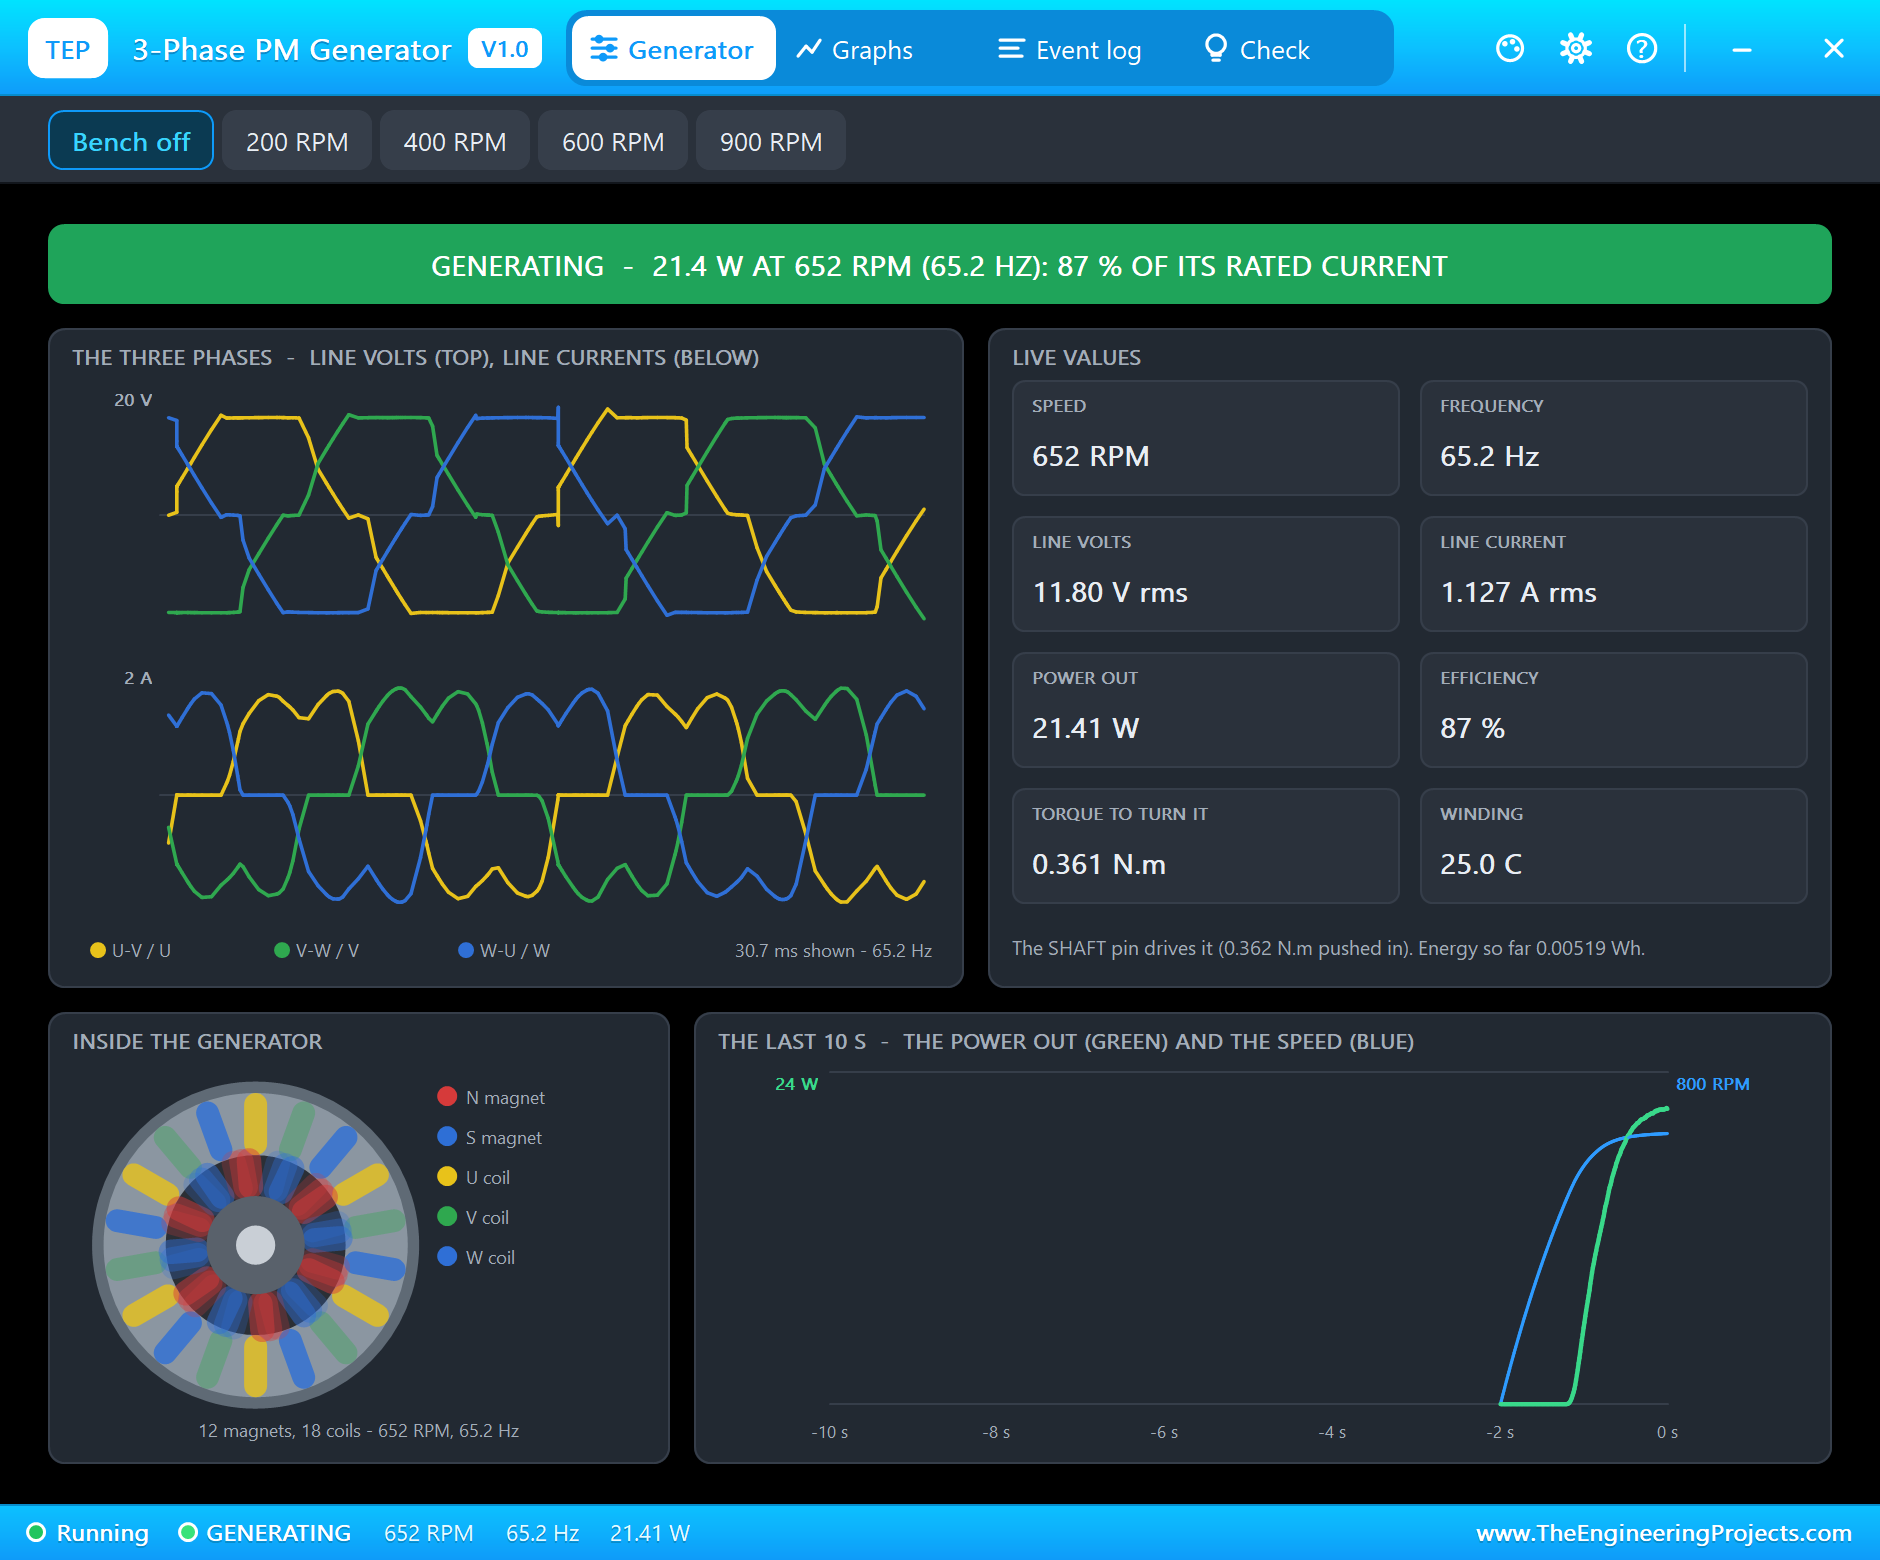
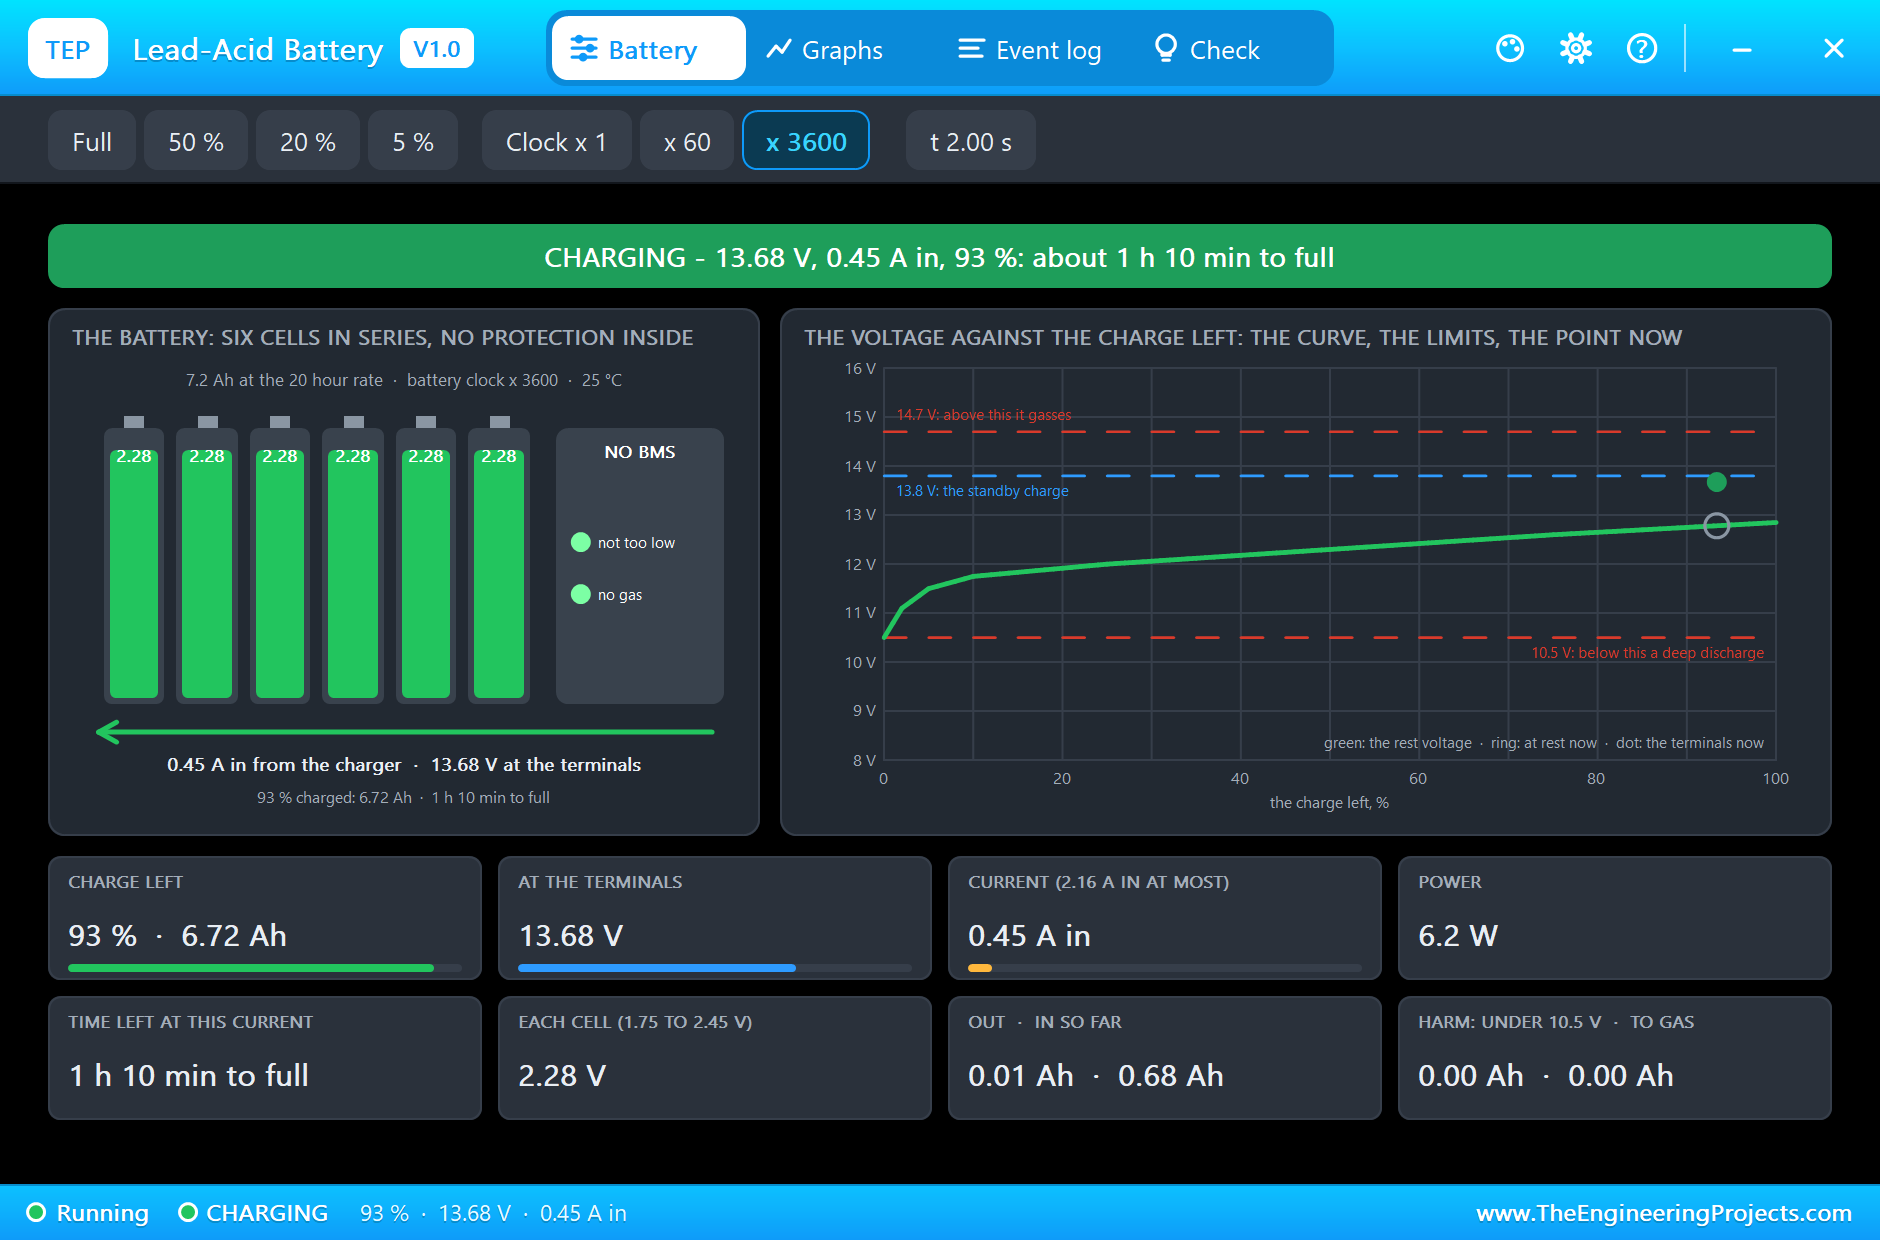
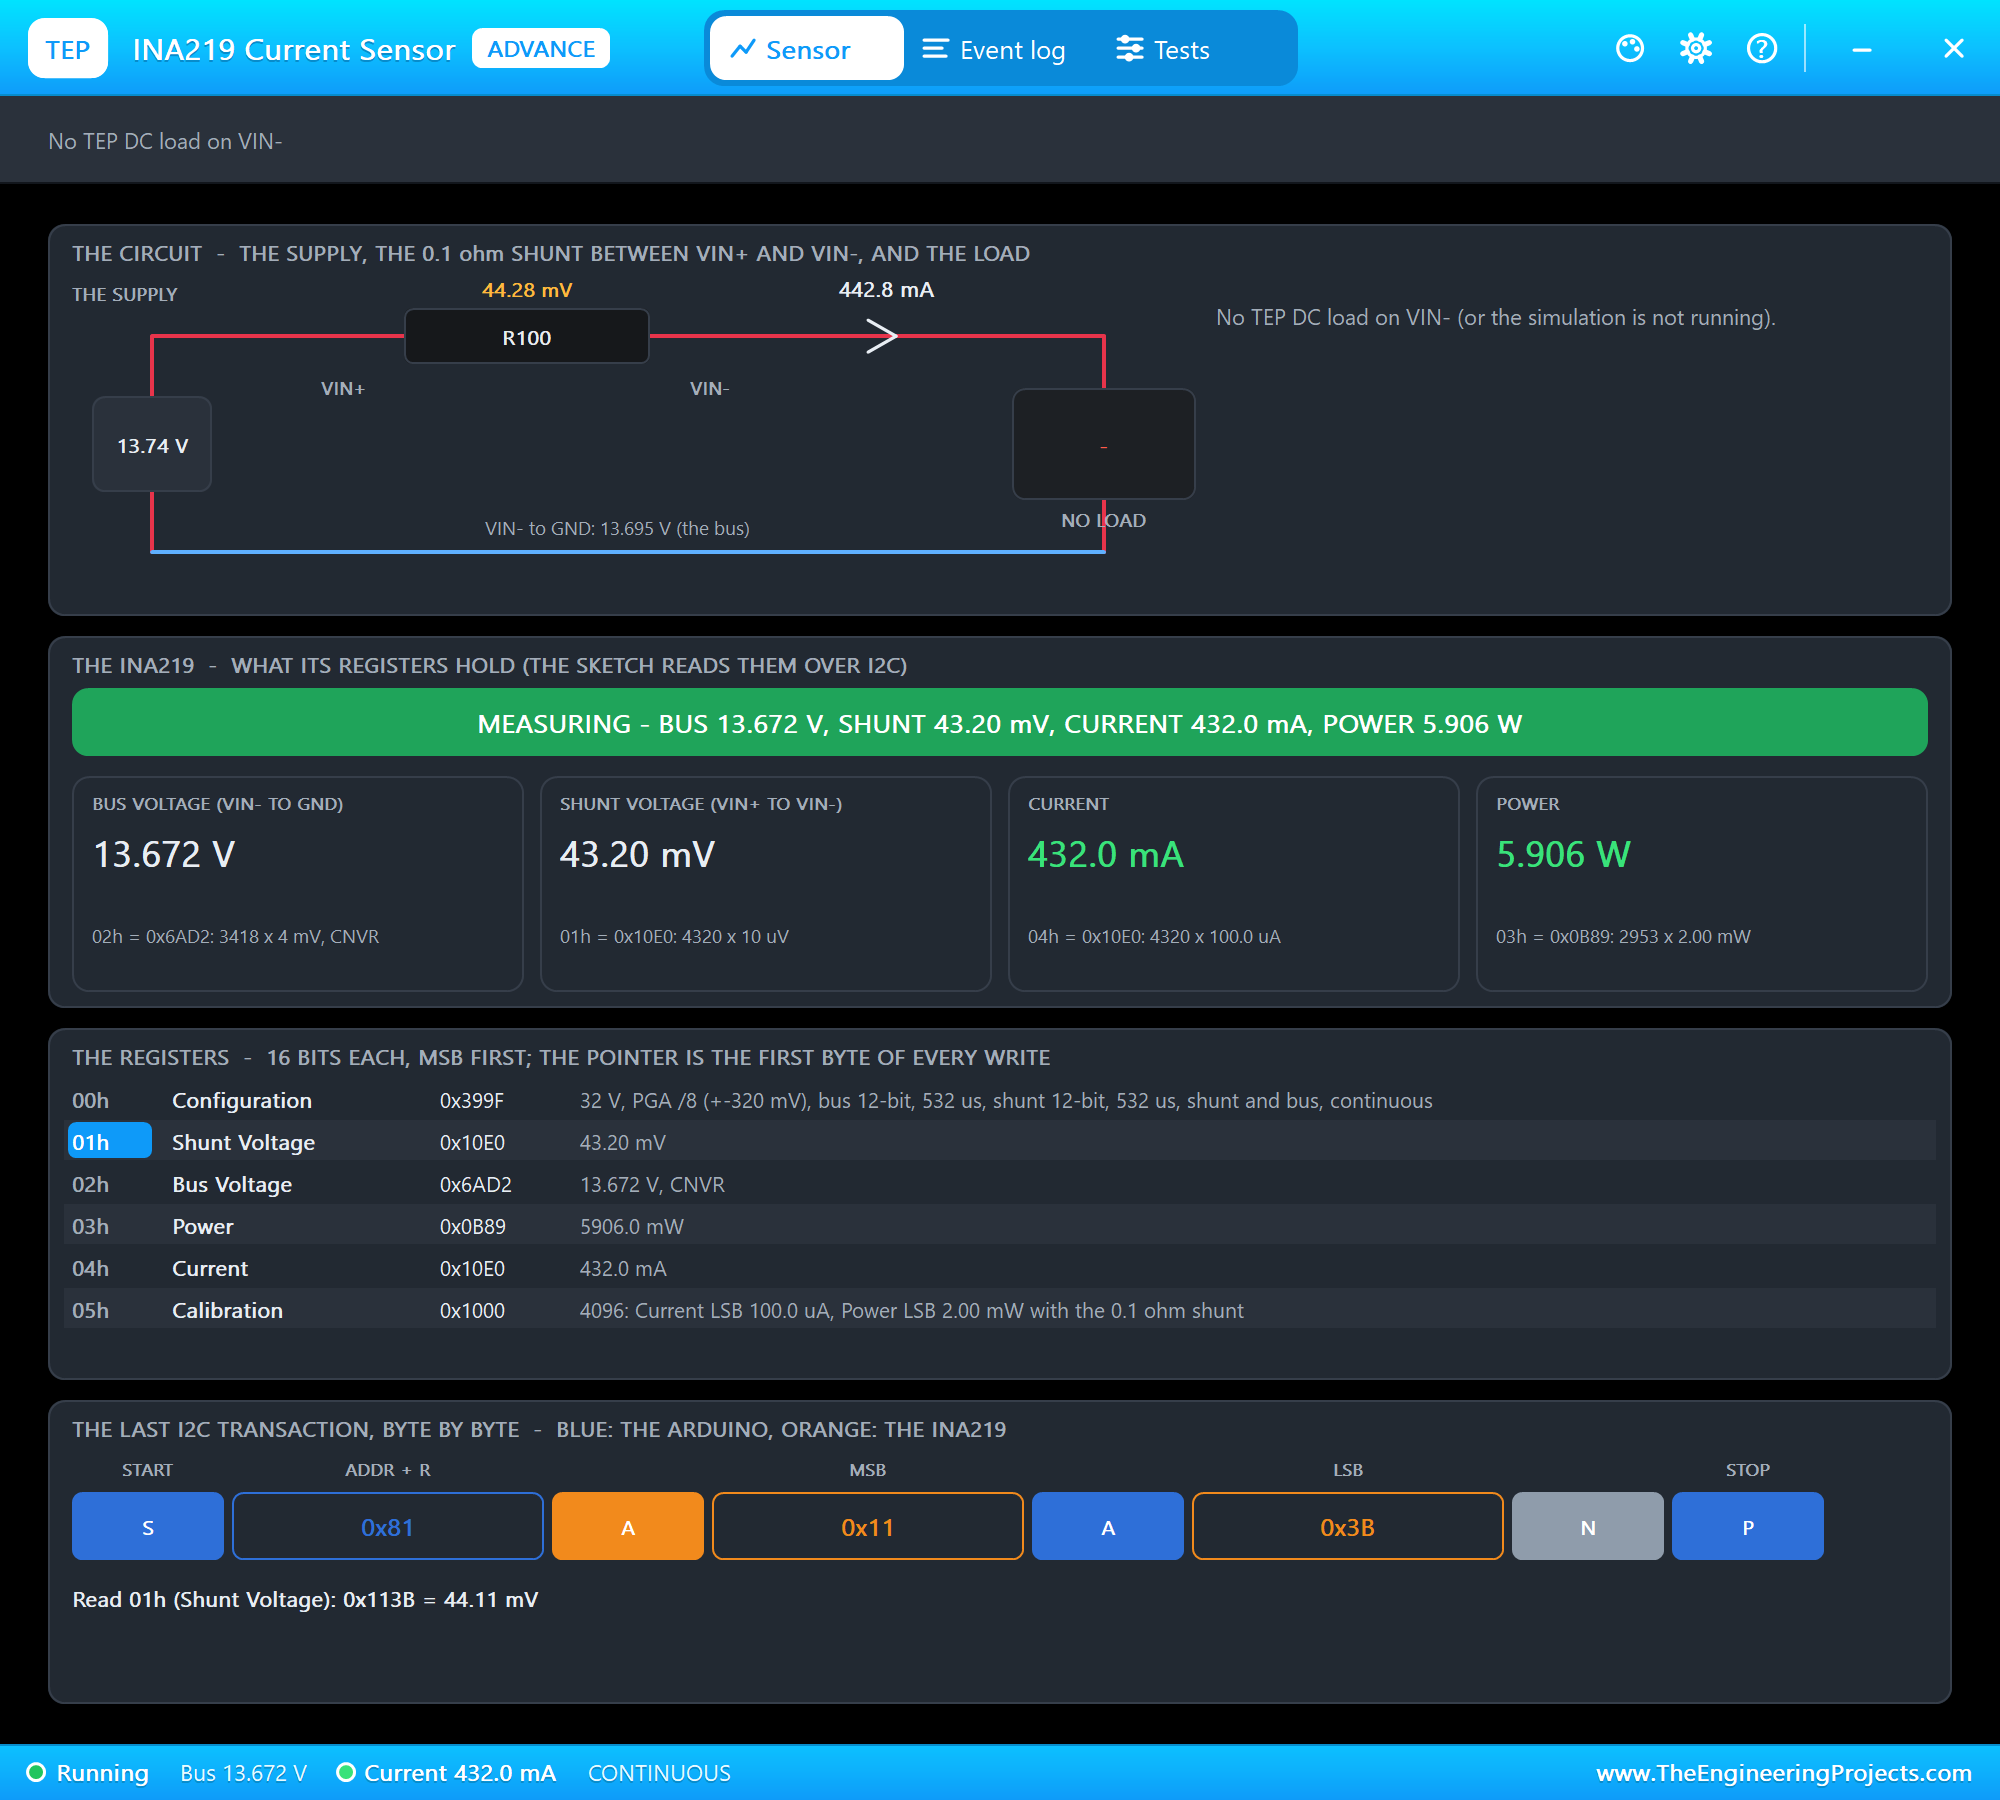
The other pop-ups at 2.0 s show the whole chain. The turbine turns at 652 RPM in the 11 m/s wind and puts 24.16 W on its shaft, close to the 25.34 W this wind can give at best. The generator makes 11.80 V between two of its wires at 65.2 Hz and delivers 21.41 W, at 87 % of its rated current. The battery takes 0.45 A at 13.68 V with 93 % of its charge. The INA219 shows a single reading in the ripple of the pulses, 13.672 V on the bus, 43.20 mV across the shunt and 432.0 mA; the sketch takes the mean of 32 of them.
A Steady State
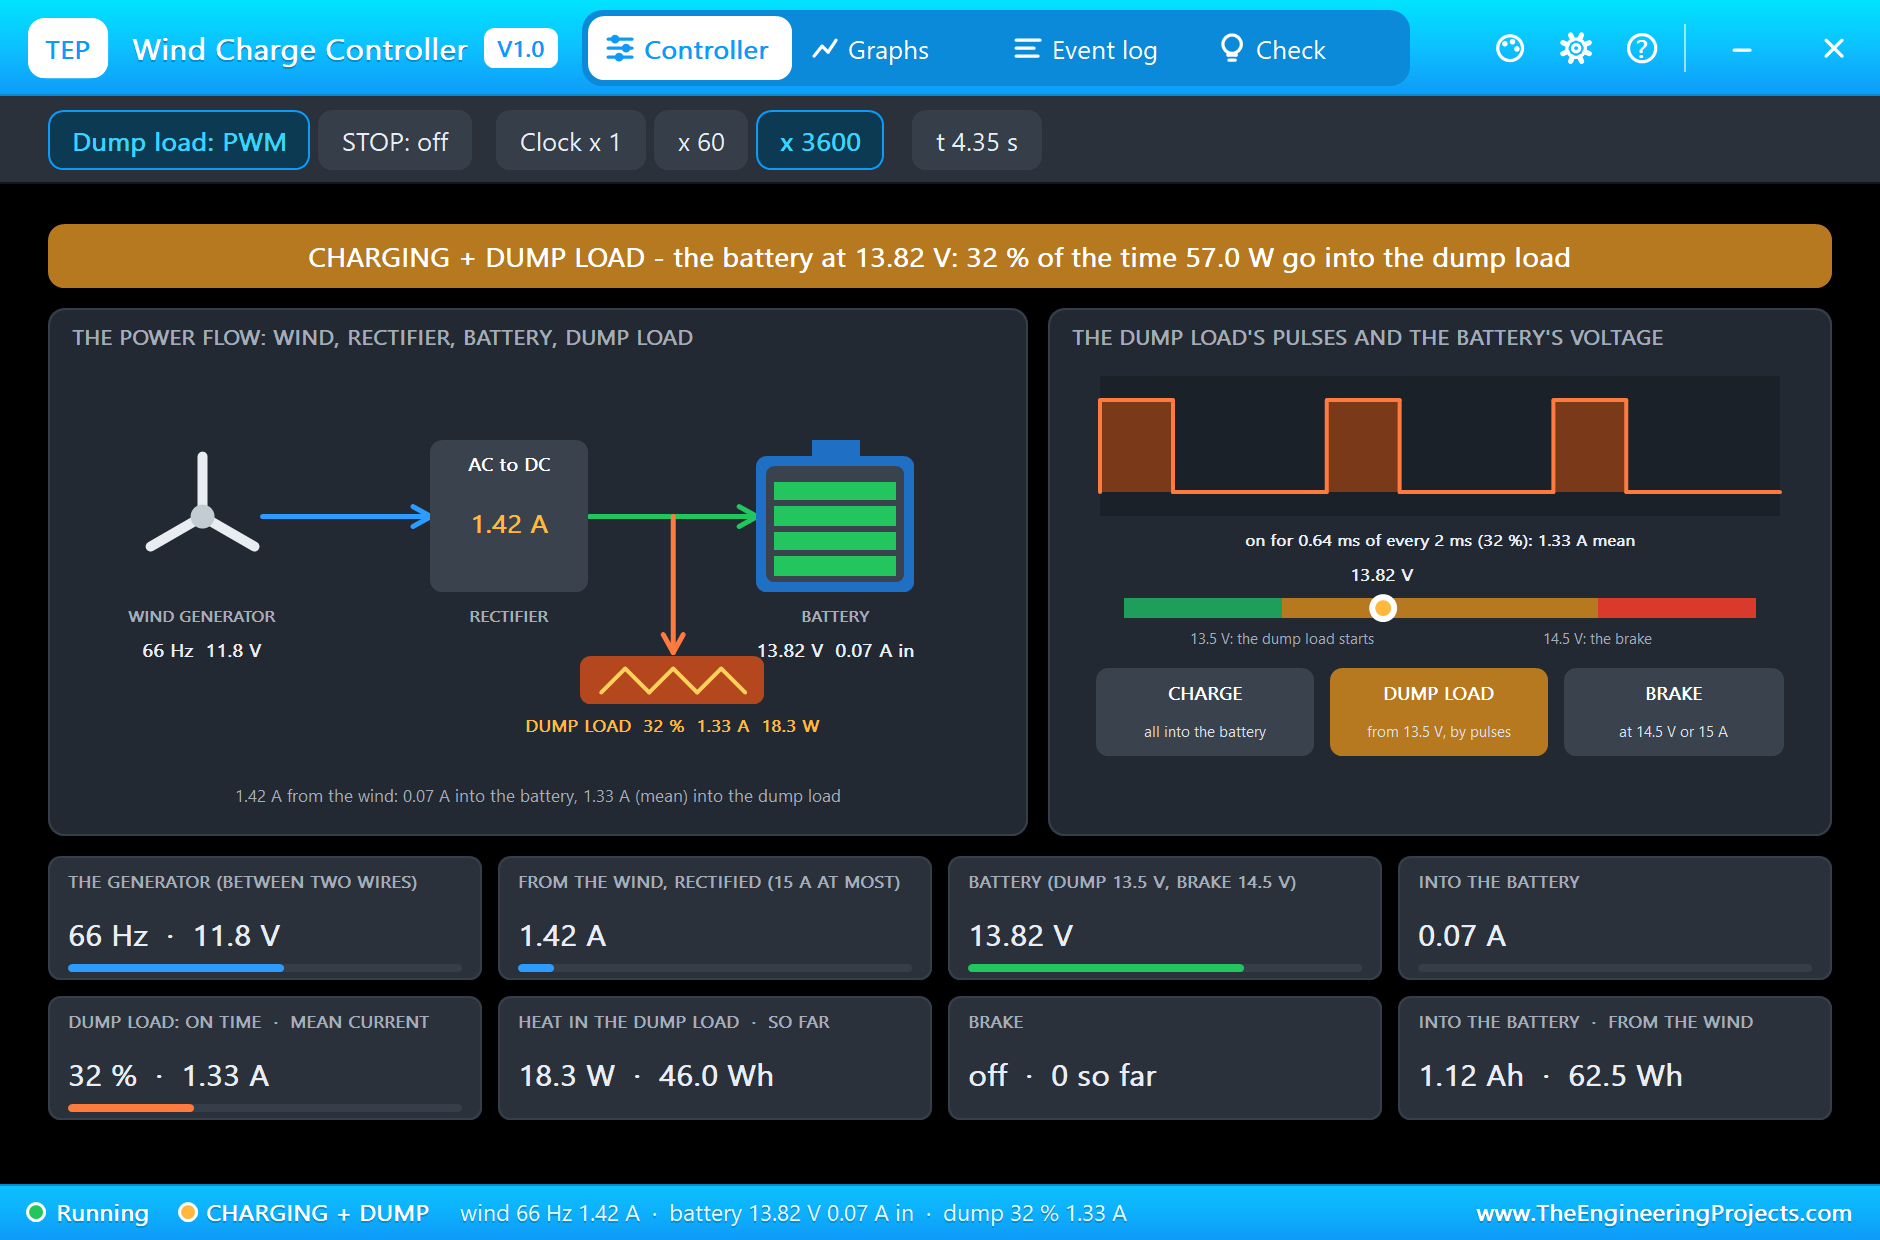
The system settles. As the battery fills, it takes less and less, and the dump load takes more. At 3.6 s the generator still gives 1.42 A, but only 0.14 A go into the battery; the dump load is on for 31 % of the time and turns 17.5 W into heat. At 4.35 s it is 32 %, with the battery held at 13.82 V and taking 0.07 A. The rotor never ran unloaded and the battery was never overcharged. That is the whole job of a wind charge controller.
Without a Dump Load: the Brake
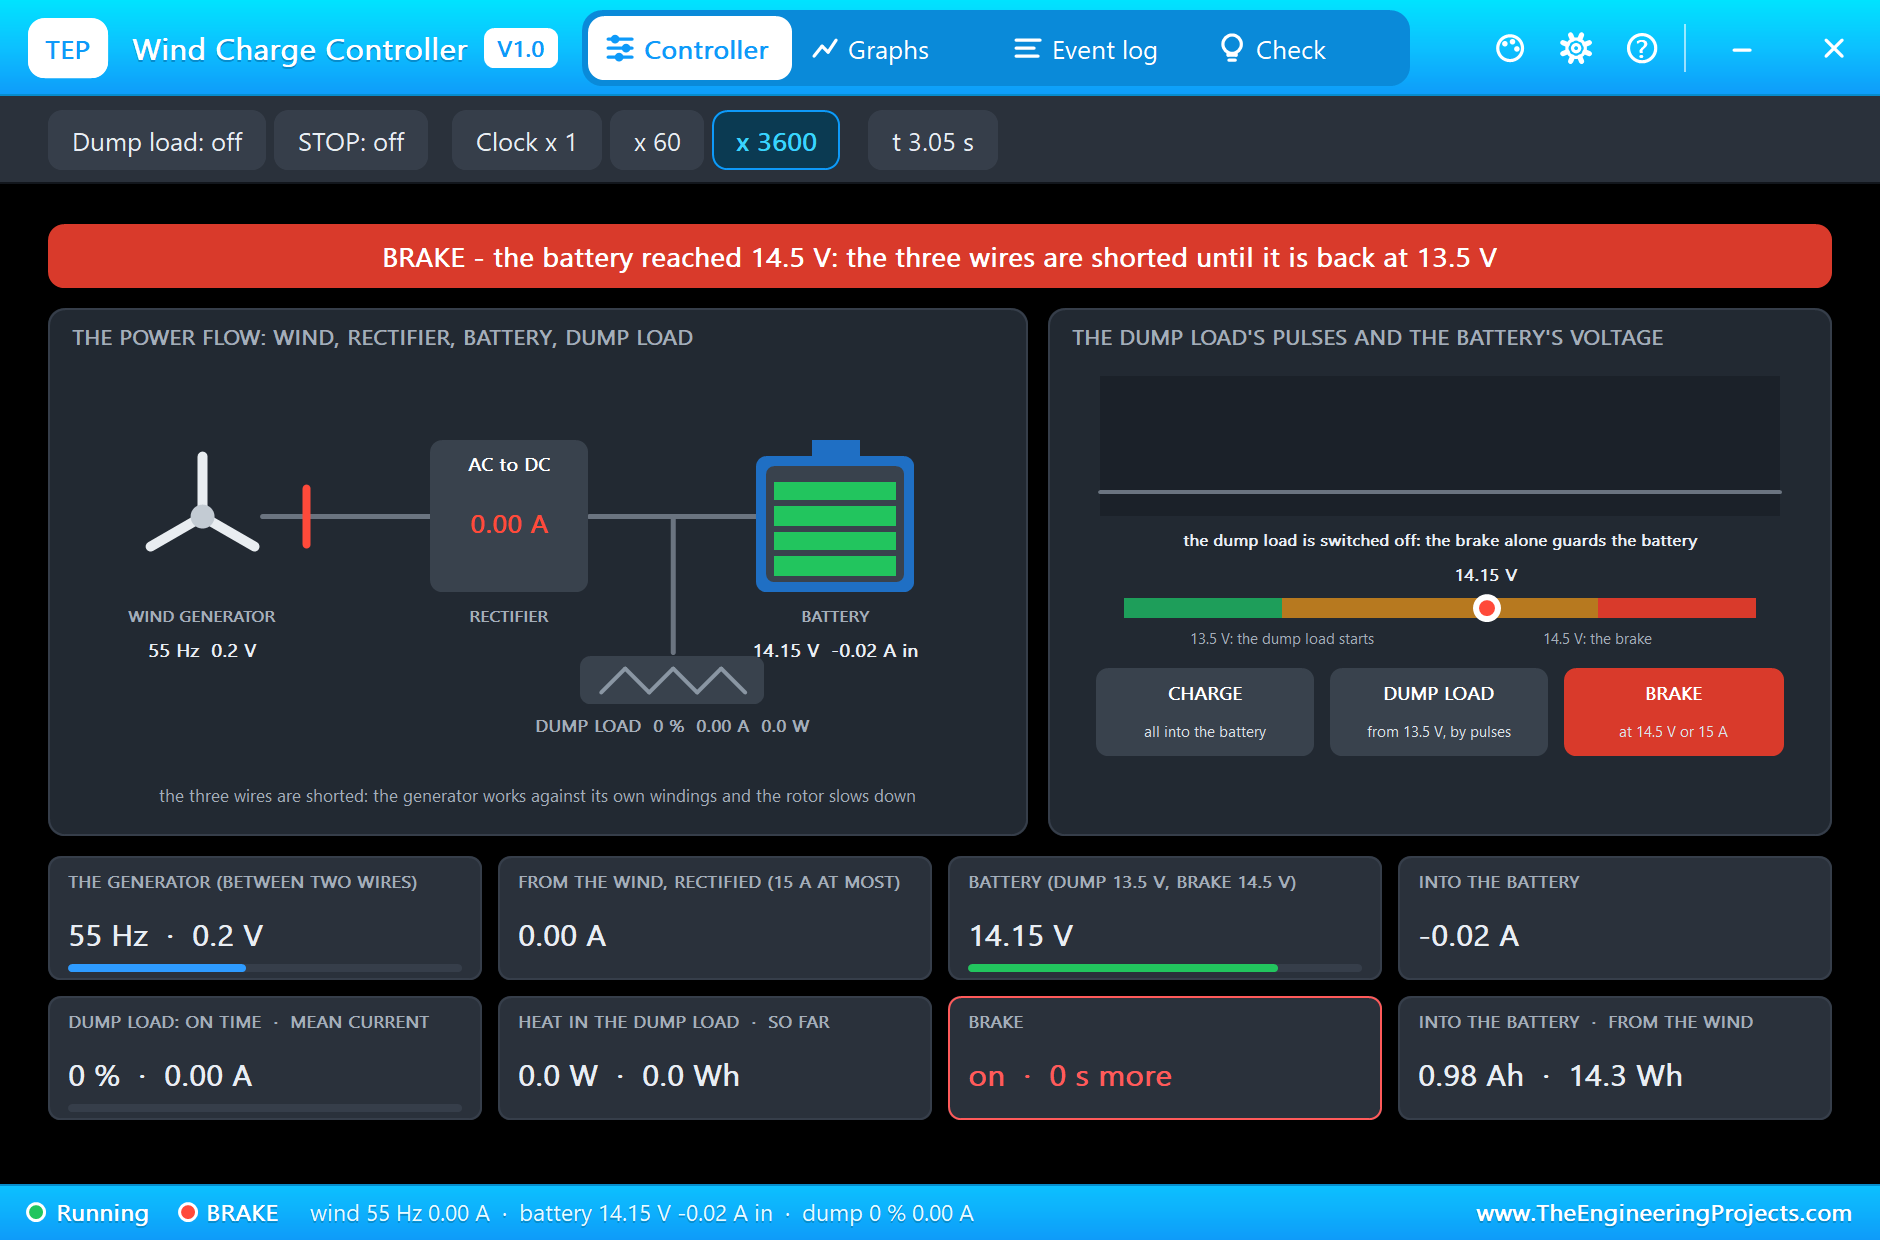
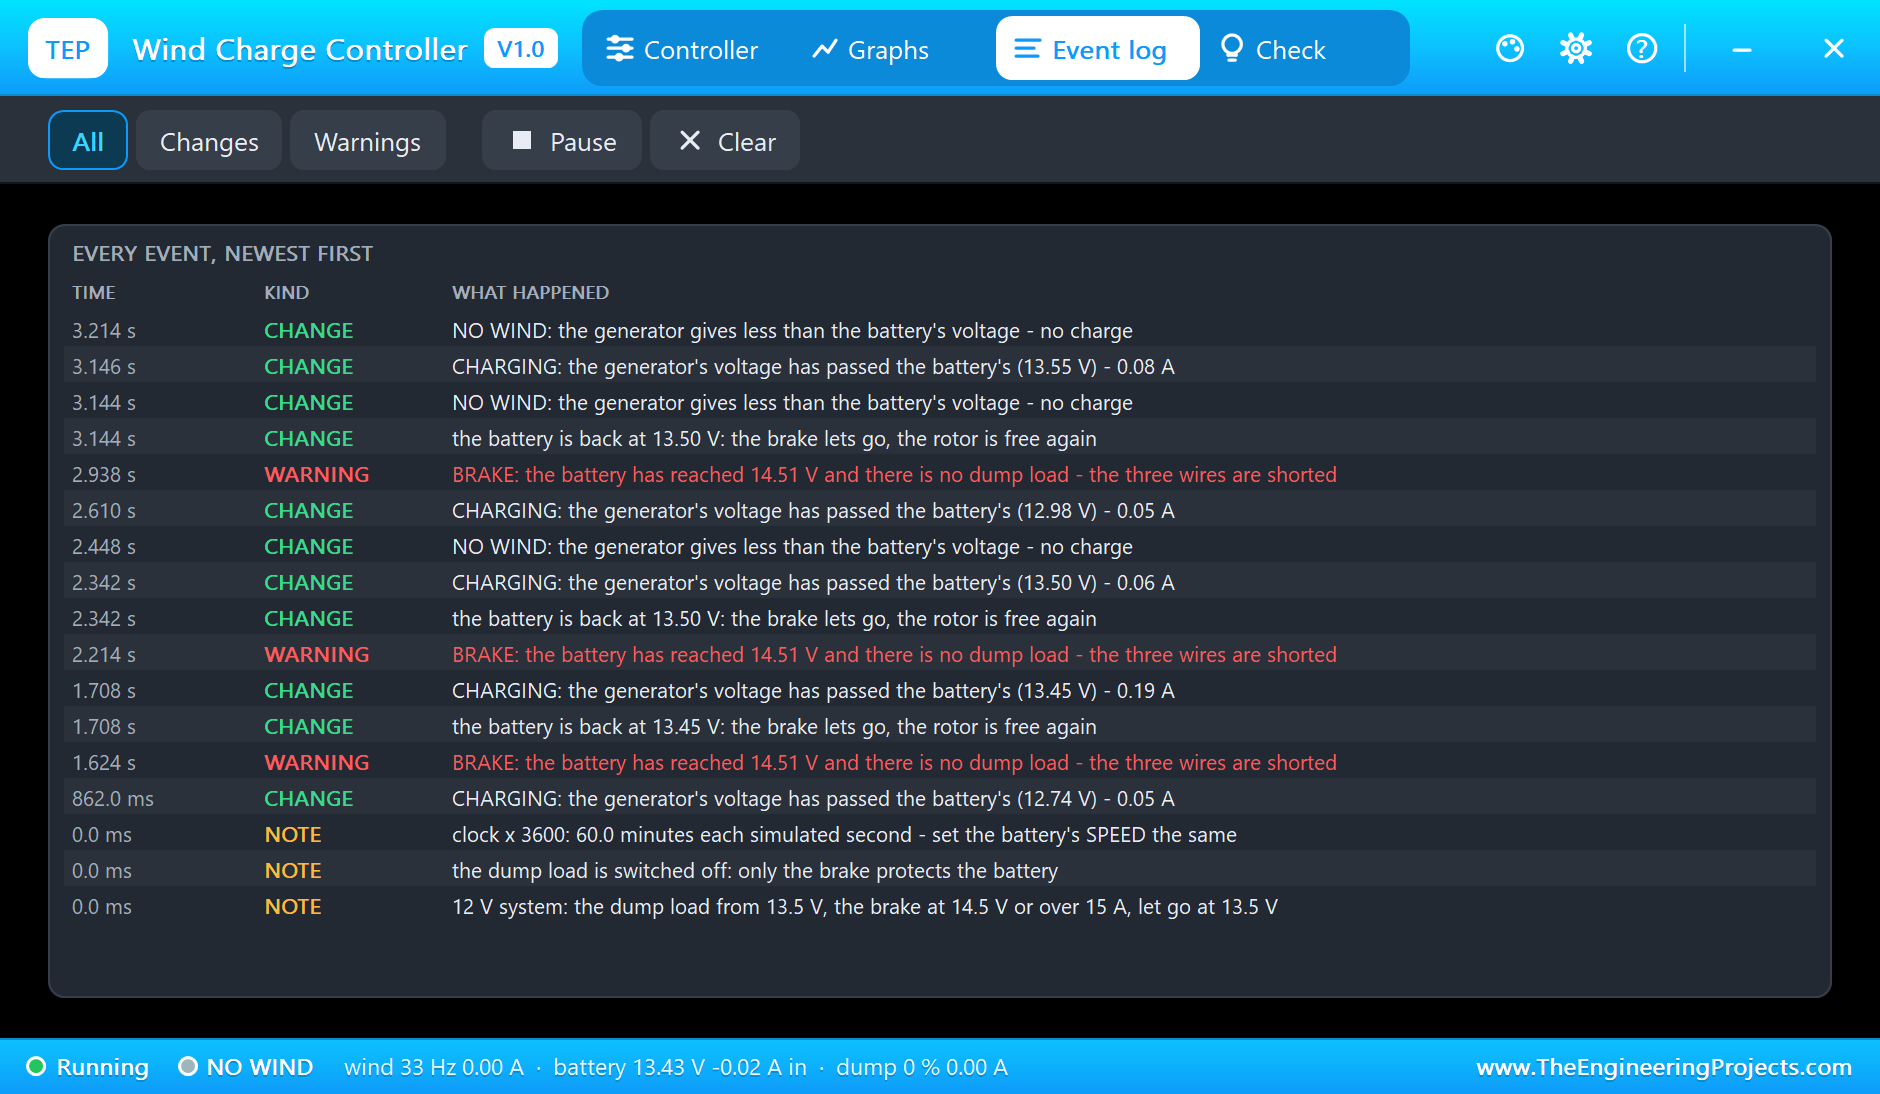
For a second simulation run we set the controller's DUMP property to OFF, a controller without a dump load. Now nothing takes the surplus. The battery climbs past 13.5 V, and at 1.62 s it reaches 14.5 V: the log writes BRAKE, the controller shorts the three wires and its red lamp lights. The generator's current no longer reaches the battery, and the rotor slows. The pop-up shows a brake a tenth of a second after it came on: the rotor, which ran at 64 Hz, is down at 55 Hz, and the battery has fallen to 14.15 V. When the battery is back at 13.5 V the brake lets go; the rotor has to speed up before it charges again, the battery climbs, and the cycle repeats: three times in this run. It protects the battery, but most of the wind is wasted, and that is the case for a dump load.
A Light Wind
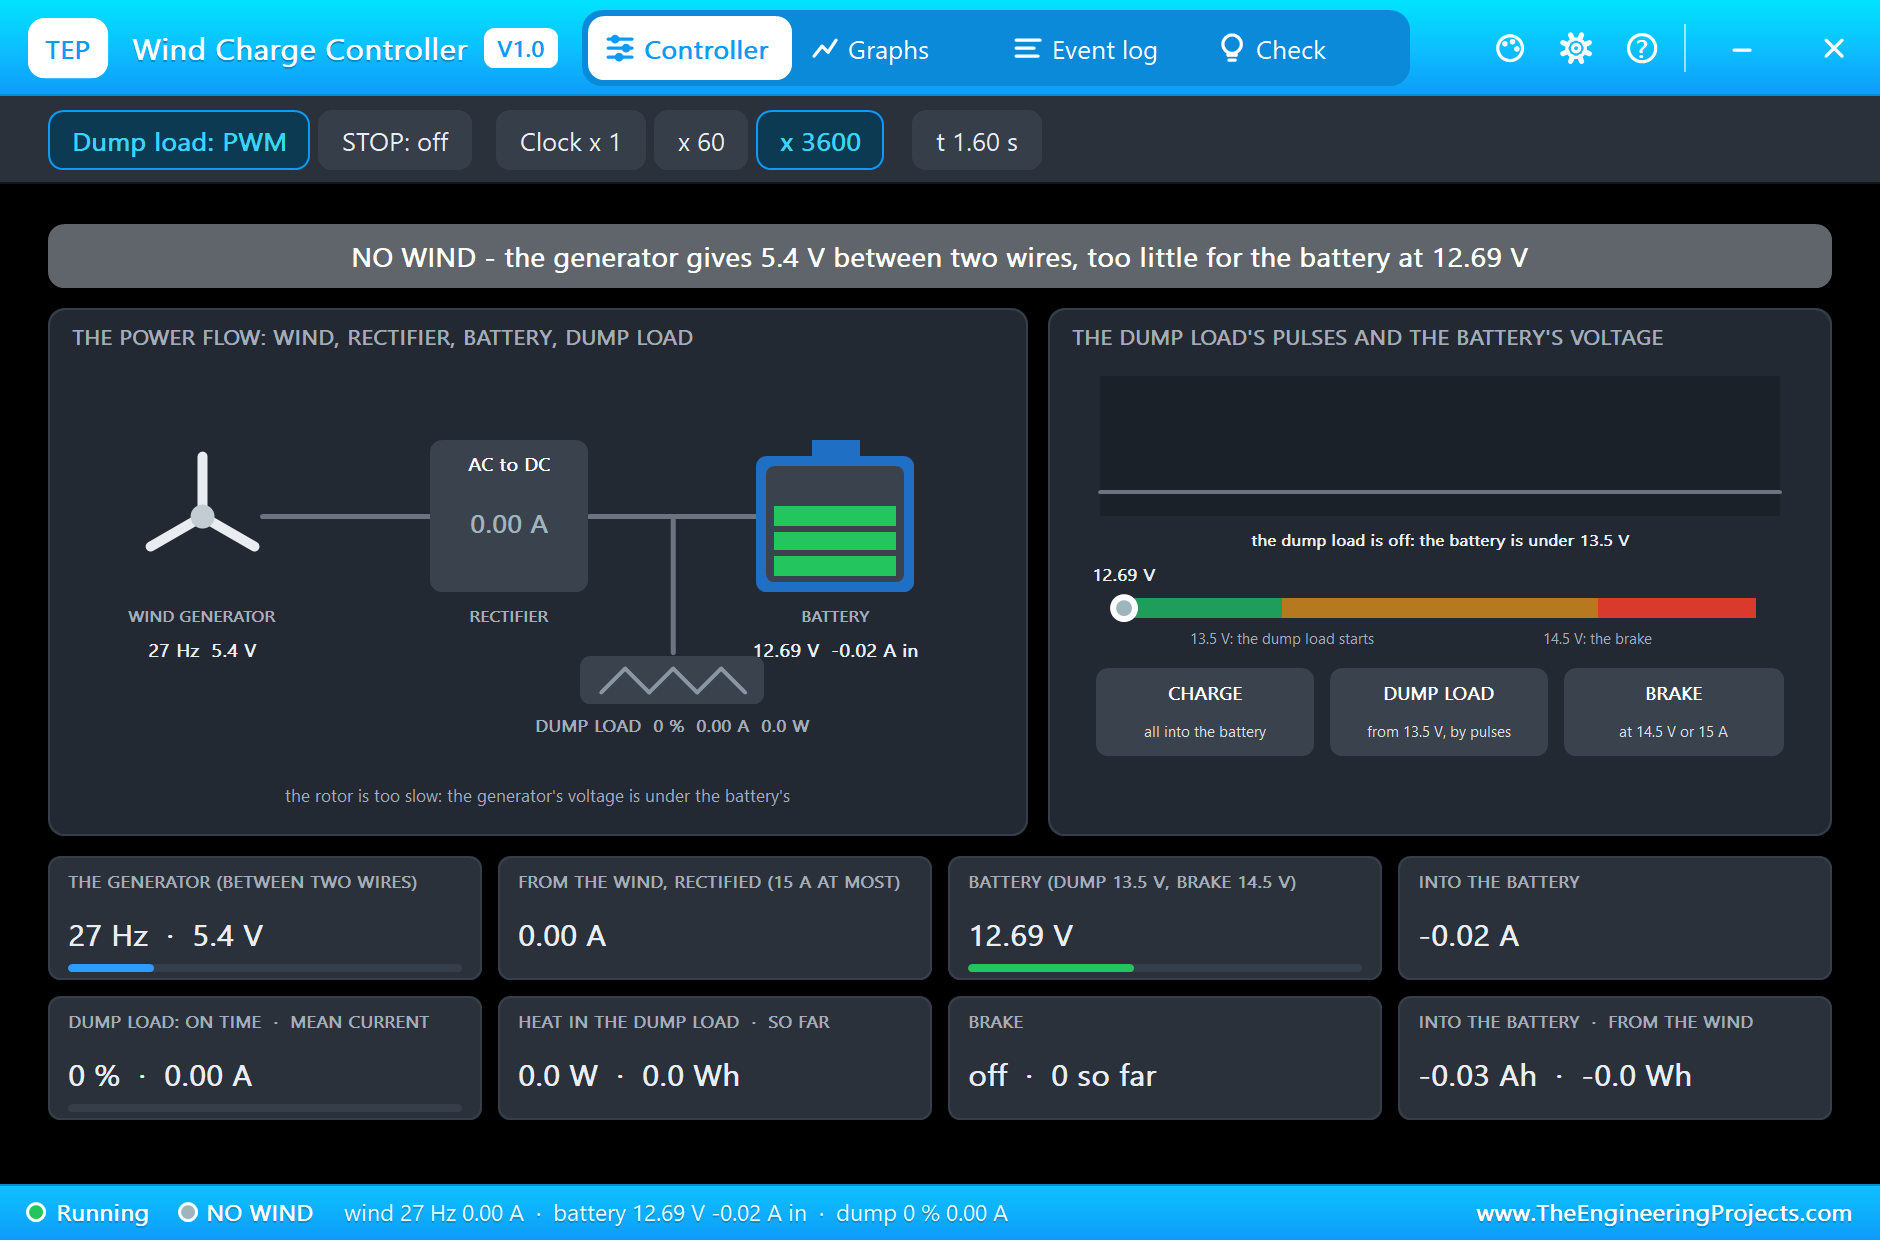
A third run has a wind of only 6 m/s. The rotor turns, but slowly: at 1.6 s the generator has reached 27 Hz and 5.4 V between two wires, which is not enough to push a current into a battery at 12.69 V. The controller shows NO WIND, and its WIND lamp flashes slowly. A wind generator charges only above a certain speed.
The Graphs, the Event Log and the Check Page
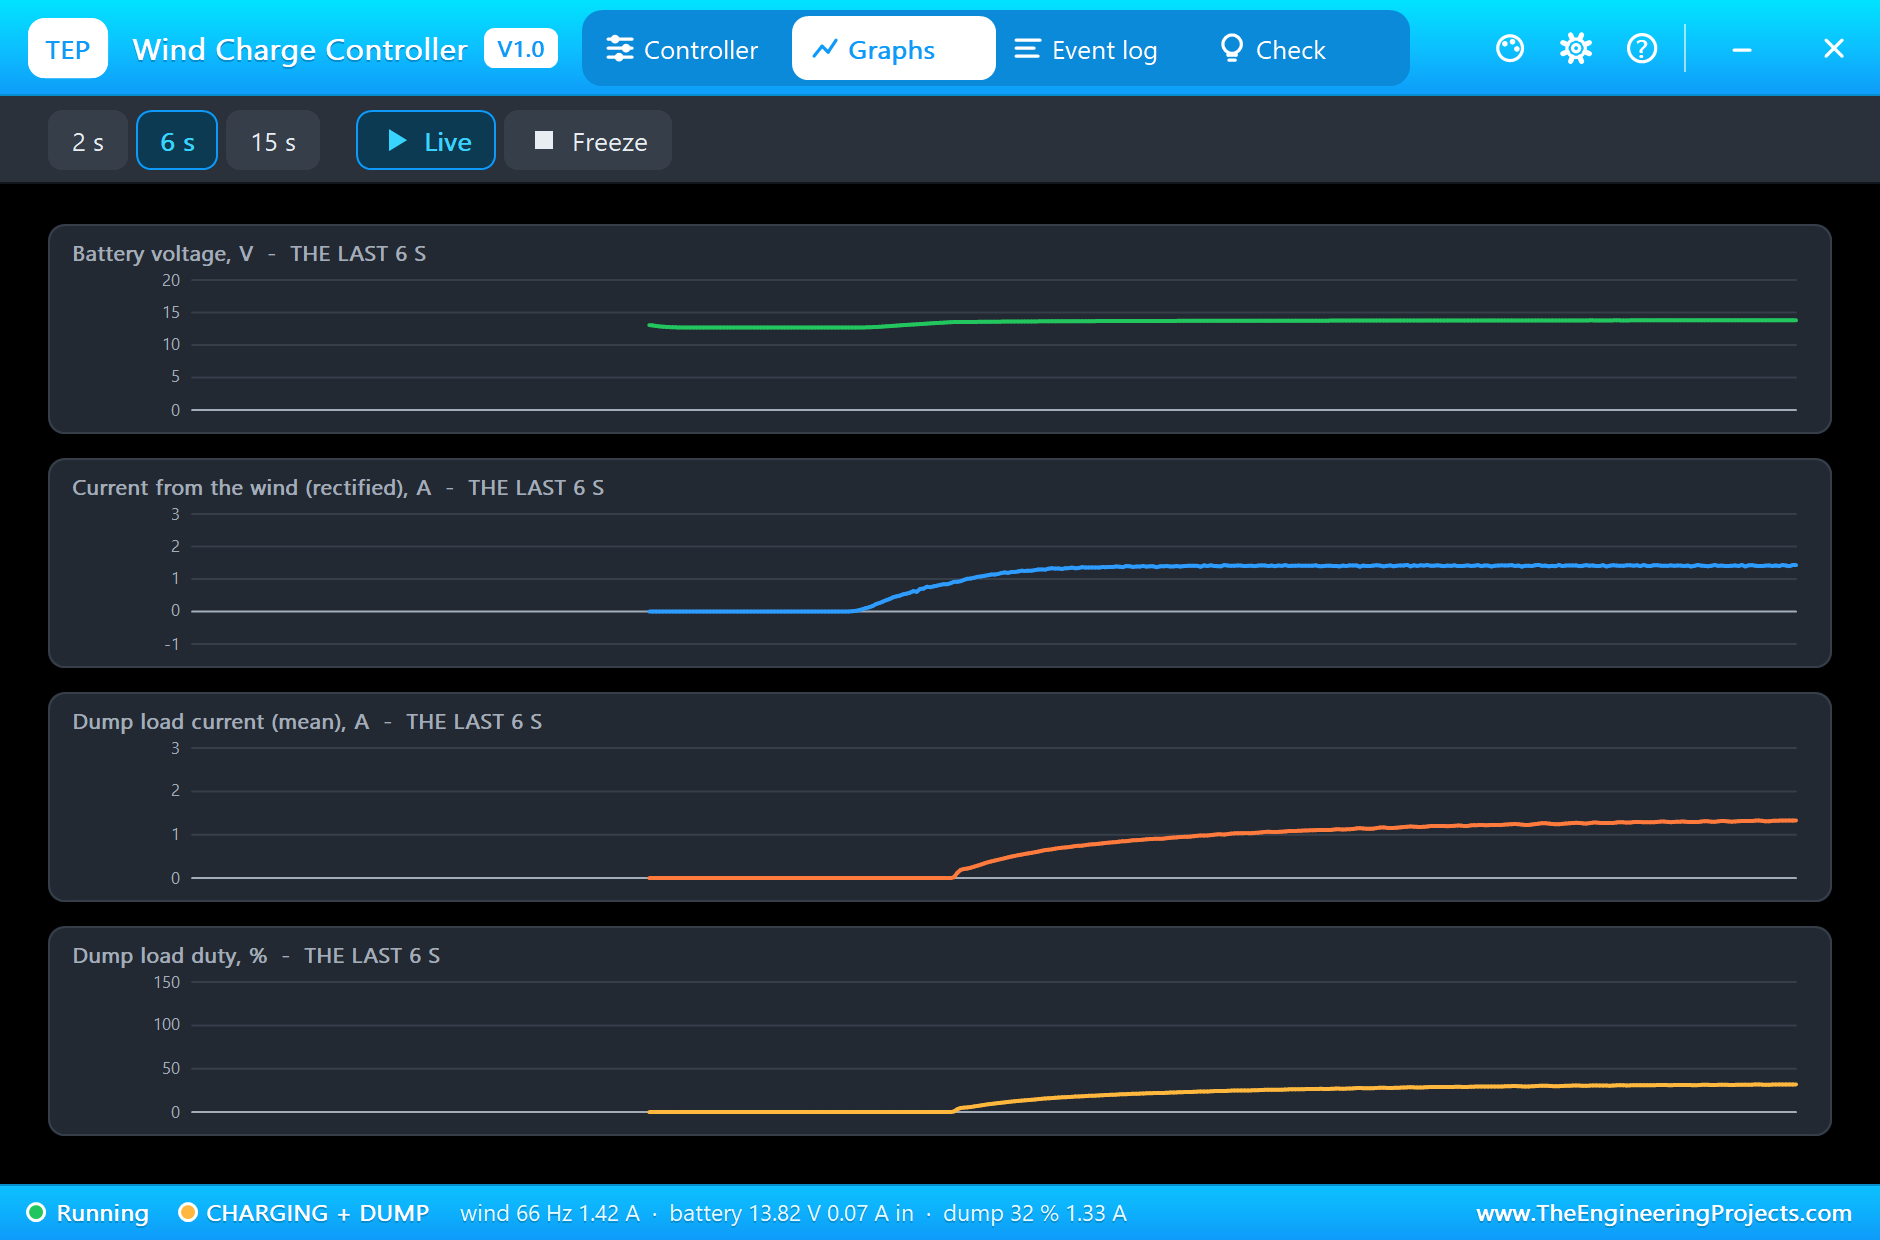
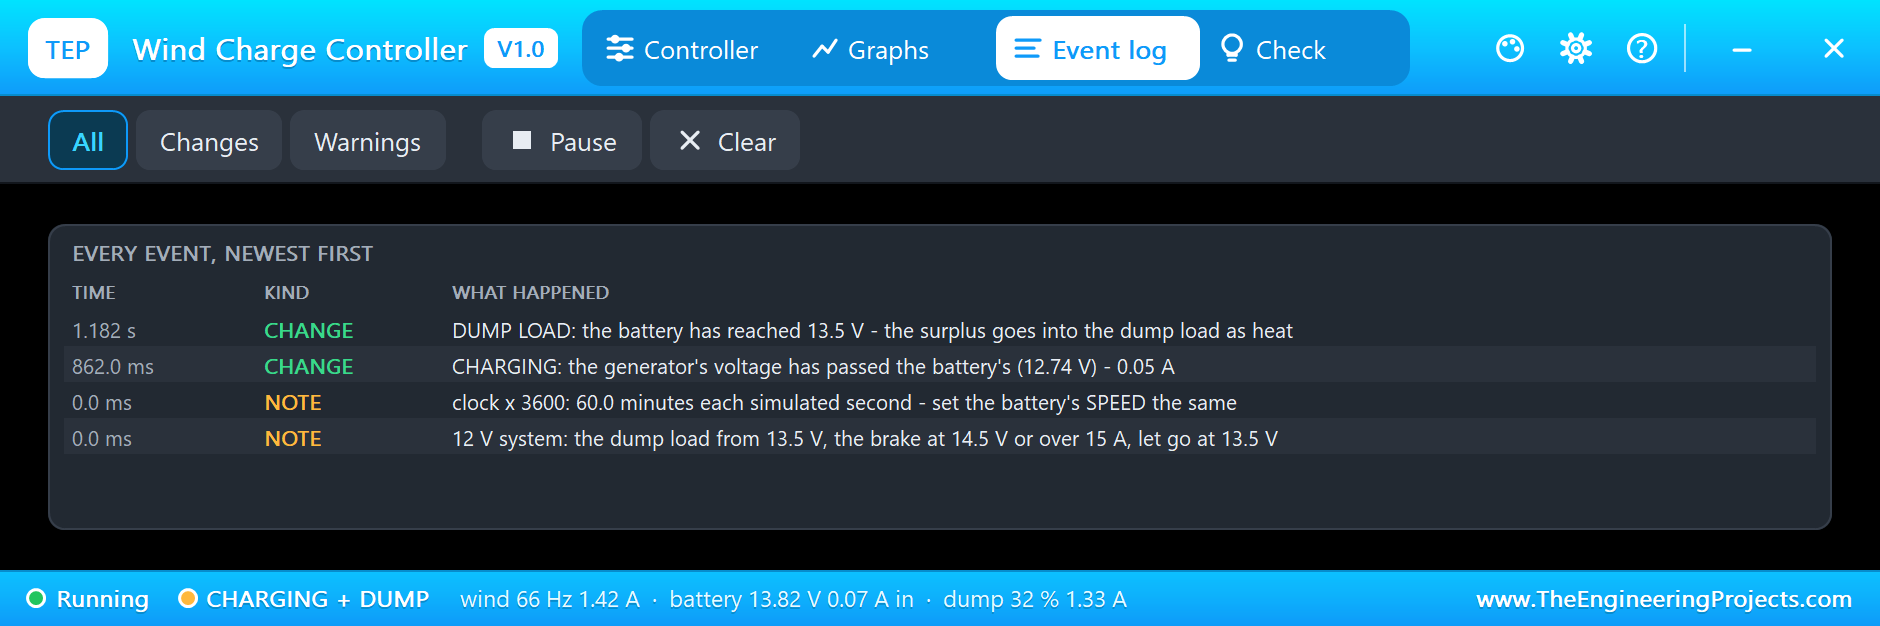
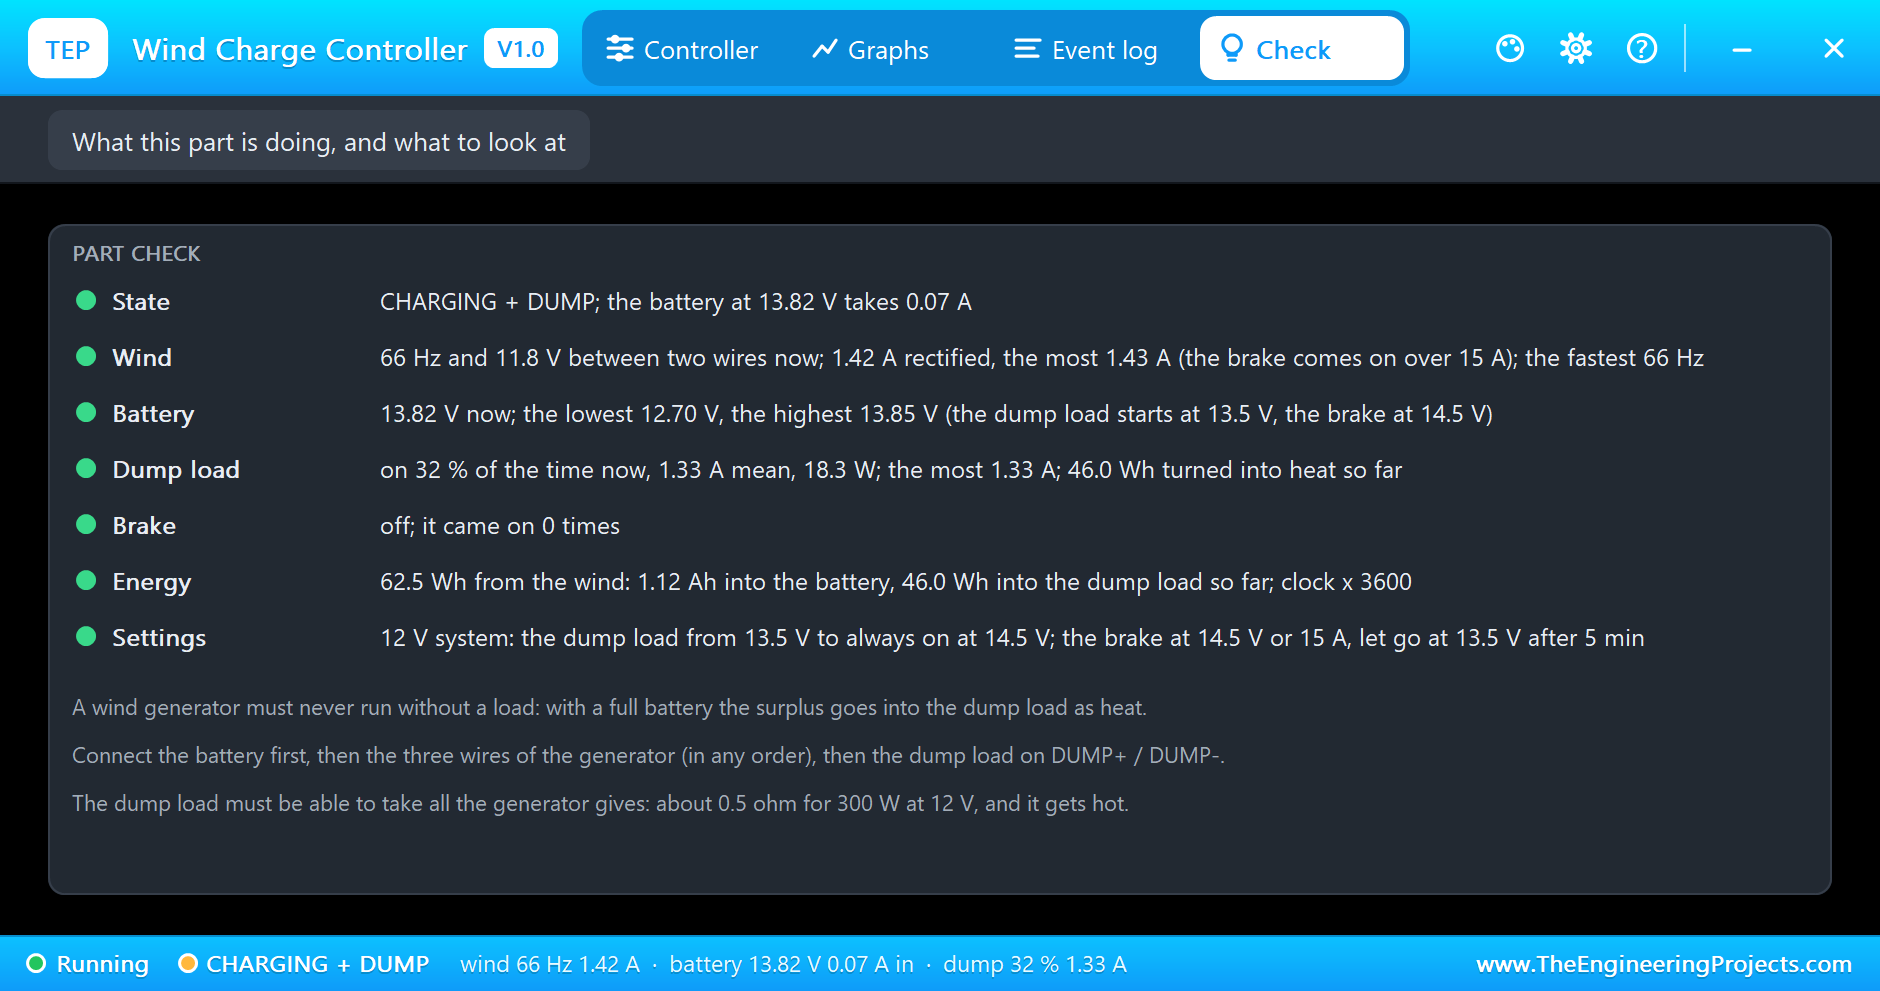
Back to the first run. The Graphs page plots the battery voltage, the rectified current from the wind, the dump load's mean current and its duty over the last 2, 6 or 15 simulated seconds. The Event log keeps every change of the state and every warning. The Check page sums up the run: 62.5 Wh from the wind, 1.12 Ah into the battery and 46.0 Wh into the dump load, the battery between 12.70 V and 13.85 V, 1.43 A as the most current from the generator.
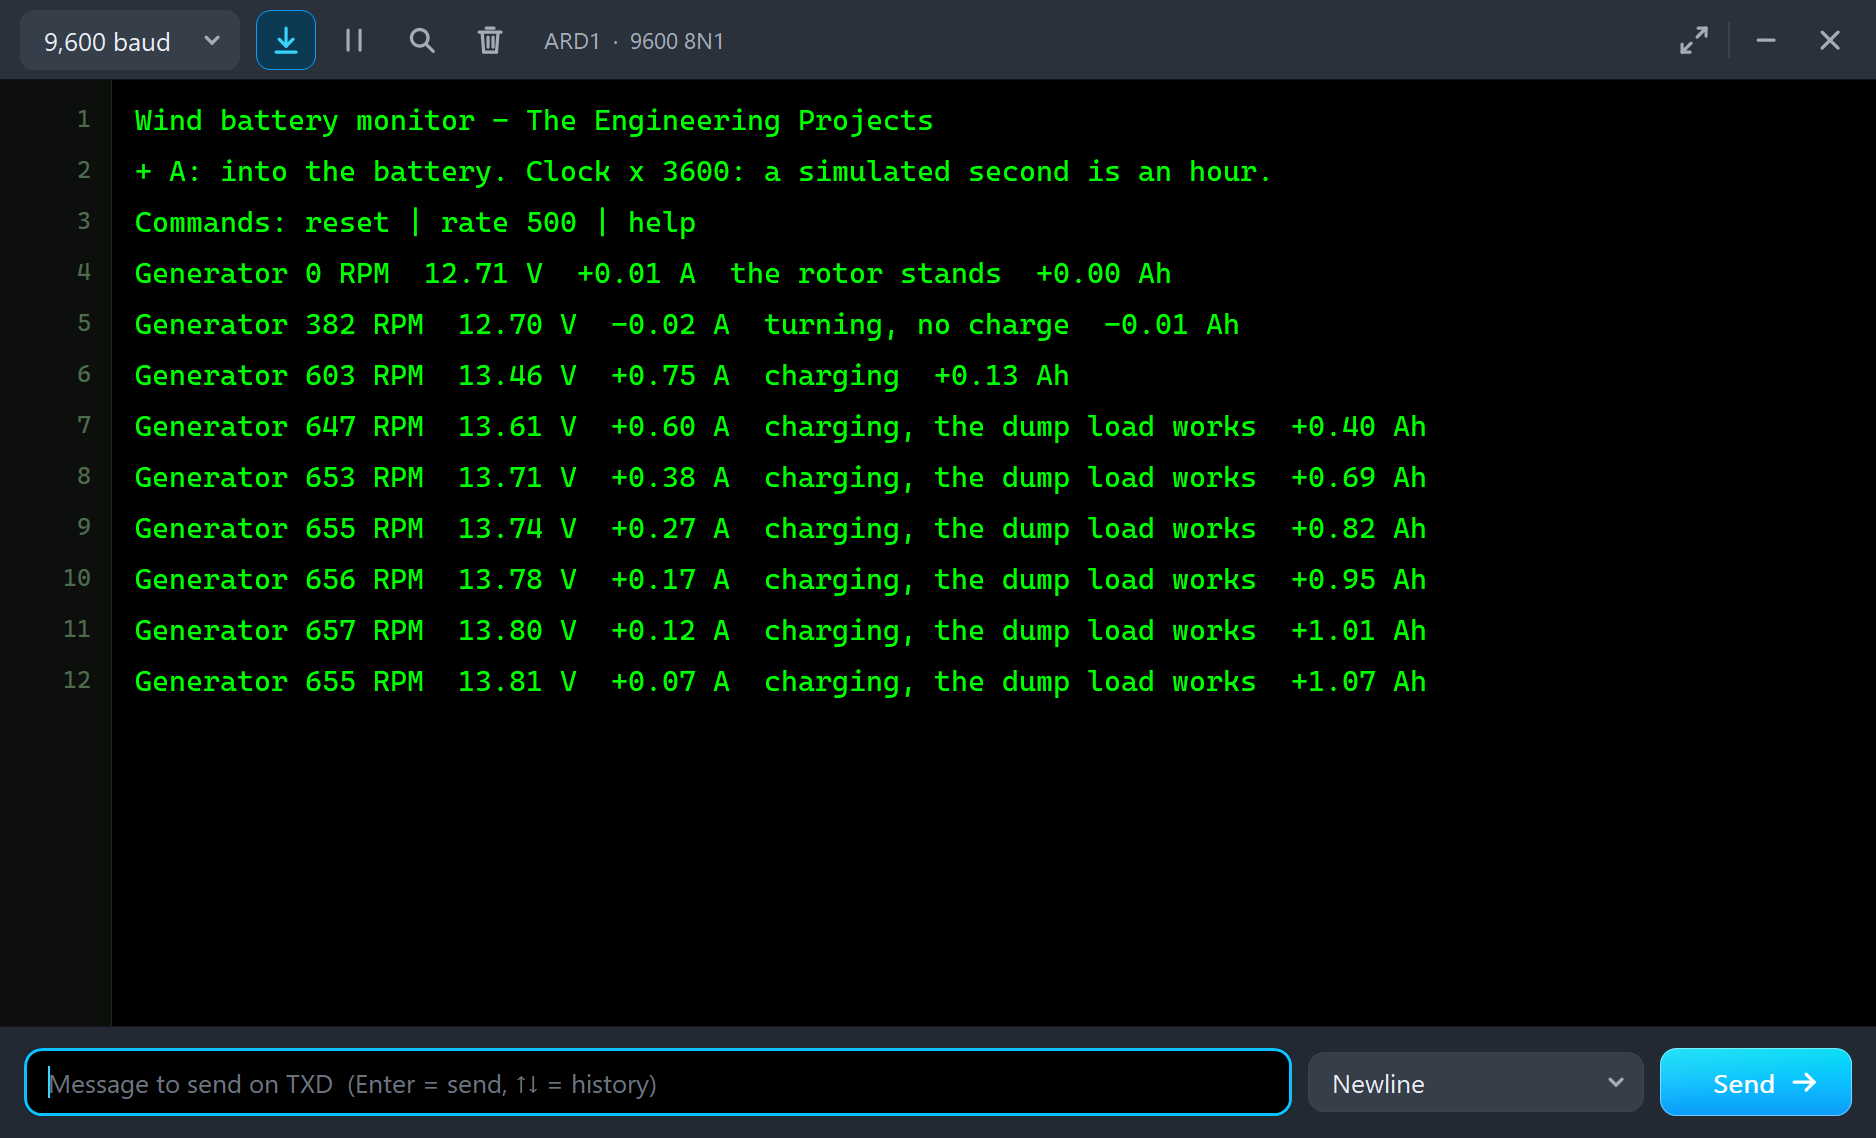
The monitor tells the same story from the Arduino's side, a line for every half hour: the generator's speed climbing to 657 RPM, the battery charging with up to +0.75 A, and from 13.61 V on the words that the dump load works, while the charge current falls to +0.07 A. Its counter ends at +1.07 Ah.
Try It Yourself
- Change the wind in the turbine's pop-up during the run: the generator's frequency, the current and the dump load's duty follow it. (A gale overloads our small generator: its own pop-up says so.)
- Click STOP in the controller's pop-up: the three wires are shorted and the rotor slows down, as with the brake switch of a real system.
- Click Dump load: off and watch the battery climb to 14.5 V and the brake come on, then switch the dump load back on.
- Change R1 to 10 ohm, a dump load that is too small: the pulses grow to always on, the battery still rises, and the brake has to help.
- Set the battery's SOC to 50: the battery takes all the wind gives for a long time before the dump load is needed.
Ideas to Extend the Demo
- Show the speed, the voltage and the current on an LCD: a small wind station display.
- Add our 12V solar panel with its own charge controller on the same battery: a hybrid wind and solar system.
- Use the heat: the dump load can be a water heater element, so that the surplus is not lost.
Your Own Sketches
The demo sketch is in the zip file, and you can change it in the Arduino IDE. New to Arduino? Start with our Arduino Tutorial for Beginners. Export the compiled binary, and set the UNO's PROGRAM property to the new file. Our guide on How to get the HEX file from Arduino shows you where the file ends up.
Things to Know Before Using a Real Wind Charge Controller
- Connect the battery first: the controller is powered by the battery, and a turbine must never run into an open controller.
- Size the dump load: it must take all the generator can give, for hours, and it gets very hot. Mount it in free air.
- Never fuse the generator's wires: a blown fuse there leaves the rotor without a load. The fuse belongs in the battery lead.
- Fit a brake switch: a switch that shorts the three wires lets you stop the rotor for a storm or for maintenance.
- Match the voltage: a 12 V controller for a 12 V generator and a 12 V battery; the generator must reach the battery's voltage in a moderate wind.
Troubleshooting
- NO BATTERY: under 8 V on BAT+ and BAT-. The controller is powered by the battery: connect it first.
- NO WIND although the rotor turns: the generator's voltage is still under the battery's. It needs more wind.
- The dump load takes no current: nothing is on DUMP+ and DUMP-, or DUMP is OFF. The brake then comes on again and again.
- BRAKE all the time: the STOP chip is on, the dump load is too small for this wind, or over 15 A came from the generator.
- The battery never reaches 13.5 V: the battery's clock runs in real time. Set SPEED like the battery's, 60 or 3600.
- The part is not simulated:
TEPWINDCC.DLLis missing from MODELS and from the project folder.
Limitations of the Simulation
- The voltages of the brake, the lamps, the controller's own current and the size are from a maker's manual of a compact waterproof wind charge controller; the dump load output, its start voltage and the brake current follow two other makers' controllers. The compact controller this drawing is modelled on has the brake only.
- Our own figures: the diodes' curve, the 500 pulses a second, the widening of the pulses between 13.5 V and 14.5 V, the brake's five minutes, and a capacitor at the battery terminals that stands for the smoothing a real battery gives.
- Not modelled: a solar input, the heat of the controller, its fuse, protection against a reversed battery.
- Arduino is a name of Arduino; this library is not made or endorsed by Arduino, Labcenter or any maker of charge controllers.
- Tested in Proteus 8.5 in November 2026 (the demo as shipped). Proteus 7 is not supported.
So, that was all about the Wind Turbine Charge Controller Library for Proteus Simulation. I hope it helps you see why a wind turbine needs more than a solar controller: a rectifier for its three wires, a dump load for its surplus and a brake for the day the wind is too strong. If you have any questions, ask in the comments and I will help you out. Till the next tutorial, take care and have fun!