Hello friends, I hope you all are doing great. Today, I am going to share the LilyGO T-Call SIM800L Library for Proteus. The T-Call is a black ESP32 board with a SIM800L 2G modem on it, so one small board has Wi-Fi, Bluetooth and a SIM card. It can send an SMS or take a call from a field, a boat or a water tank, far from any router. With this library it runs your ESP32 Arduino sketch in Proteus 8.5, and the modem on the board answers real AT commands.
T-Call SIM800L Library for Proteus
Latest version: V1.0 (November 2026, this tutorial)
Other ESP32 boards and modules: ESP32 DevKit V1 · ESP32-DevKitC V4 · ESP32-S3 DevKitC-1 · ESP32-C3 SuperMini · ESP32-C6 DevKitC-1 · TTGO T-Display · T-Display S3 · XIAO ESP32-C3 · XIAO ESP32-S3 · ESP32 Feather V2 · QT Py ESP32-S3 · ESP32-C5 DevKitC-1 · Olimex ESP32-POE · FireBeetle 2 ESP32-E · T-SIM7600 · T-Beam Supreme · M5StickC PLUS2 · ESP32-2432S028 CYD · M5Stack AtomS3 · M5Stack Core2 · LilyGO T-Deck · LOLIN S2 Mini · Heltec WiFi LoRa 32 V3 · LilyGO T-Beam · ESP32-CAM · ESP32-WROOM-32 · AirLift WiFi Shield · AirLift ESP32 Breakout · WT32-ETH01
GSM modules: SIM800L · SIM800C · SIM900A · SIM808
Helping Tools
- Laptop WiFi Monitor: a laptop on the Wi-Fi of your design: a browser, a TCP / UDP terminal and ping
- Mobile WiFi Monitor: a smartphone that opens the pages of your board and sends it commands
- Serial Monitor Advance: a serial terminal window for the UART of your board
For the demo we built an SMS irrigation controller. A capacitive soil sensor watches the field, a relay runs the pump, and the board texts the farmer every time the pump starts or stops. The farmer can text it back, and a missed call brings the status by SMS at no cost. A phone window plays the farmer's phone.
NOTICE: Proteus has no ESP32 or SIM800L model, so our team has put a lot of effort into building this board ourselves: the T-Call's pins, LEDs, modem and Wi-Fi are all our own model, and your sketch compiles with our free TEP Boards for Proteus add-on. Your feedback is the fuel that keeps us going, so please tell us what you think in the comments below or in the LilyGO T-Call SIM800L board of our forum. And if our free libraries help you, you can buy us a coffee. So, let's get started with the LilyGO T-Call SIM800L Library for Proteus:
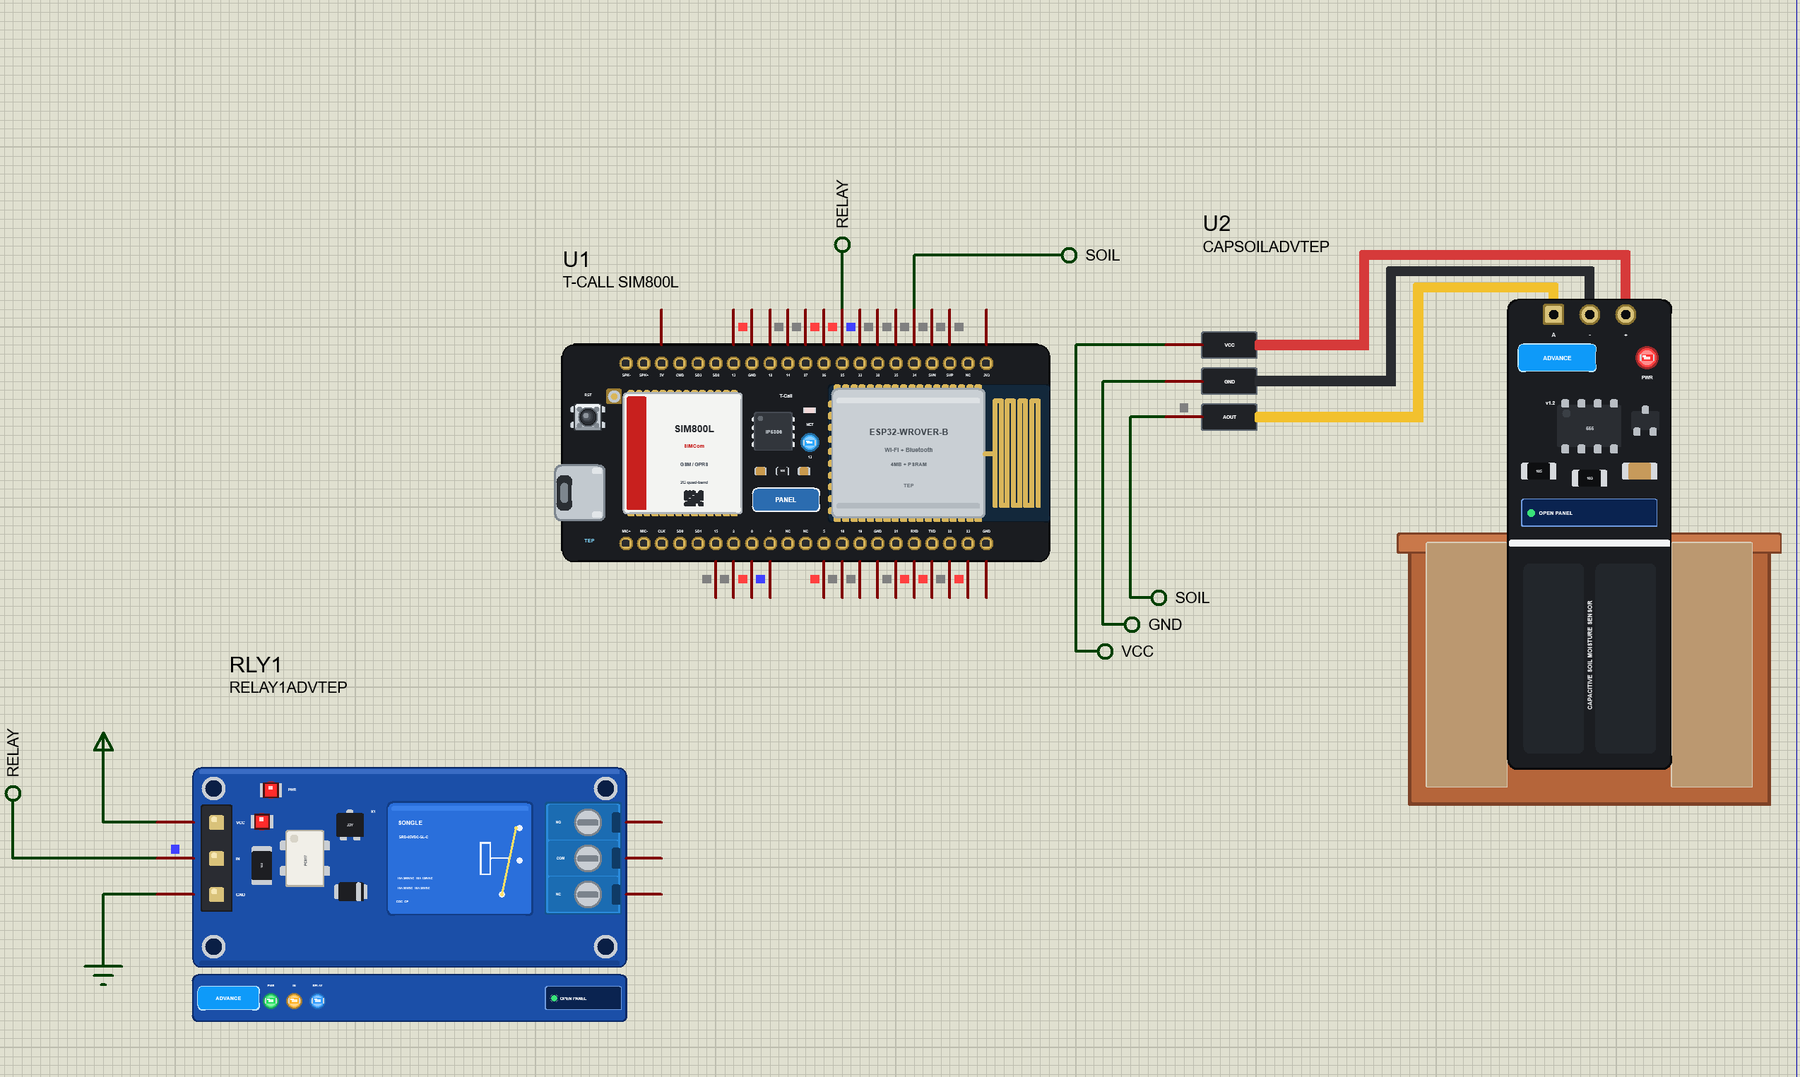
What is the LilyGO T-Call SIM800L?
The T-Call joins two popular parts on one board. An ESP32-WROVER-B module gives two 240 MHz cores, 2.4 GHz Wi-Fi and Bluetooth. Beside it sits a SIM800L from SIMCom, a tiny quad-band GSM and GPRS modem that takes a nano SIM. An IP5306 chip charges a Li-ion cell and boosts its voltage for the modem, which can pull a sharp 2 A while it transmits. That is the hard part of using a loose SIM800L module, and on this board it is already solved. You also get USB-C, a reset button, a blue LED on GPIO13, a red network LED and a u.FL socket for the GSM antenna.
| T-Call SIM800L | ESP32 + SIM800L module | ESP32 DevKit | |
|---|---|---|---|
| Modem | on the board | separate, wired by you | none |
| Modem supply | handled by the IP5306 | needs its own 4 V, 2 A | - |
| Battery | charger on the board | none | none |
| SMS and calls | yes | yes | no |
| Best for | finished GSM gadgets | learning | Wi-Fi projects |
Why GSM in an IoT Project?
Wi-Fi reaches only as far as a router. A pump on a farm, a gate at the end of a track or a sensor on a remote tank usually has no router, but it often has phone coverage. 2G is slow, and it is being switched off in some countries, so check your own network first, yet for a few short messages a day it is still cheap and simple. An SMS needs no server, no app and no data plan, and the person who gets it can be using the oldest phone in the village.
Features of the T-Call SIM800L Library for Proteus
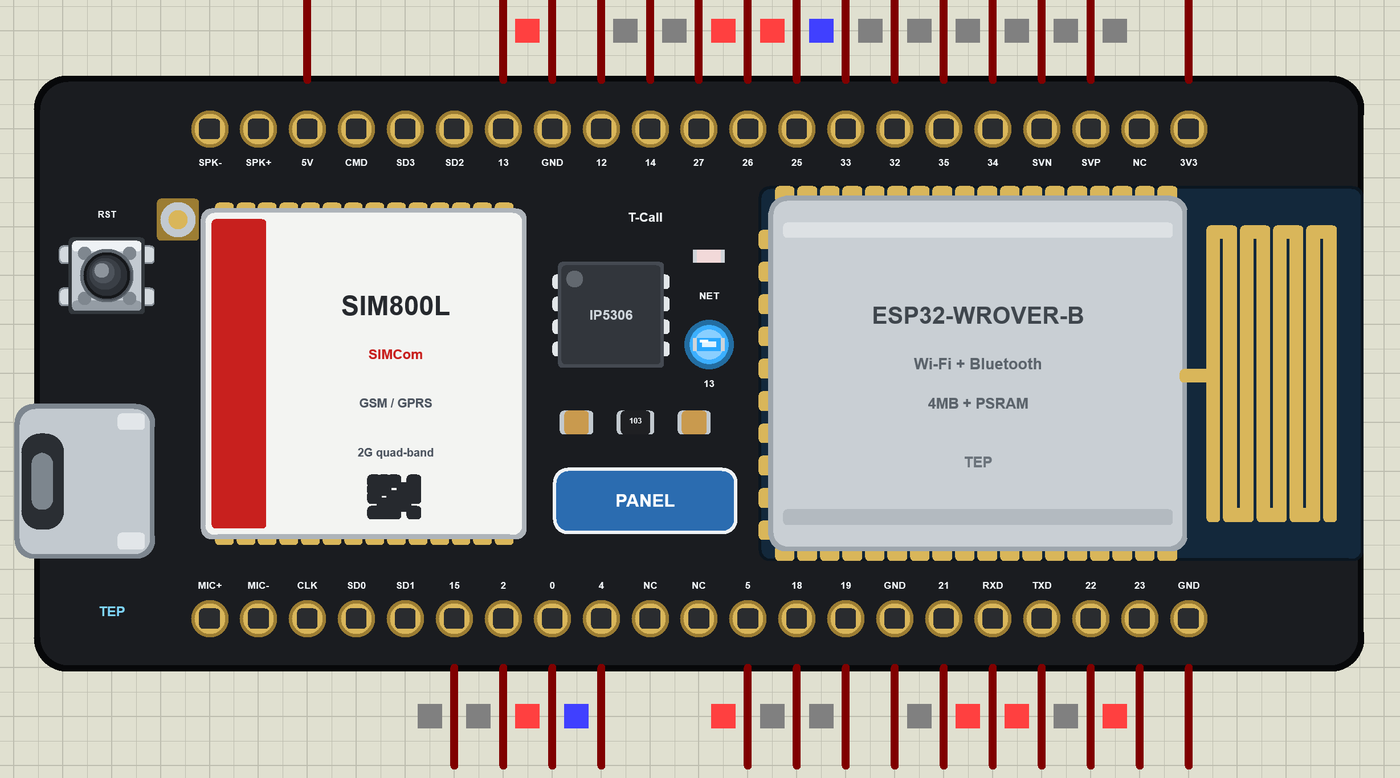
- The board as it looks: the black T-Call with USB-C, the reset button, the u.FL socket, the SIM800L with its red band, the IP5306, the ESP32-WROVER-B module and its PCB antenna.
- Your sketch: a .hex for "T-Call SIM800L (TEP Proteus)" with the board's GPIO numbers - analogRead 0 to 4095, analogWrite and ledc PWM, attachInterrupt, Serial, Serial1, Wire and SPI.
- A real modem on Serial1: auto-baud, AT, ATE, AT+CMGF, AT+CNMI, AT+CLIP, AT+CREG, AT+CSQ, AT+CMGS, ATH and ATA, sent bit by bit on the pins, with GPIO23 as its power switch.
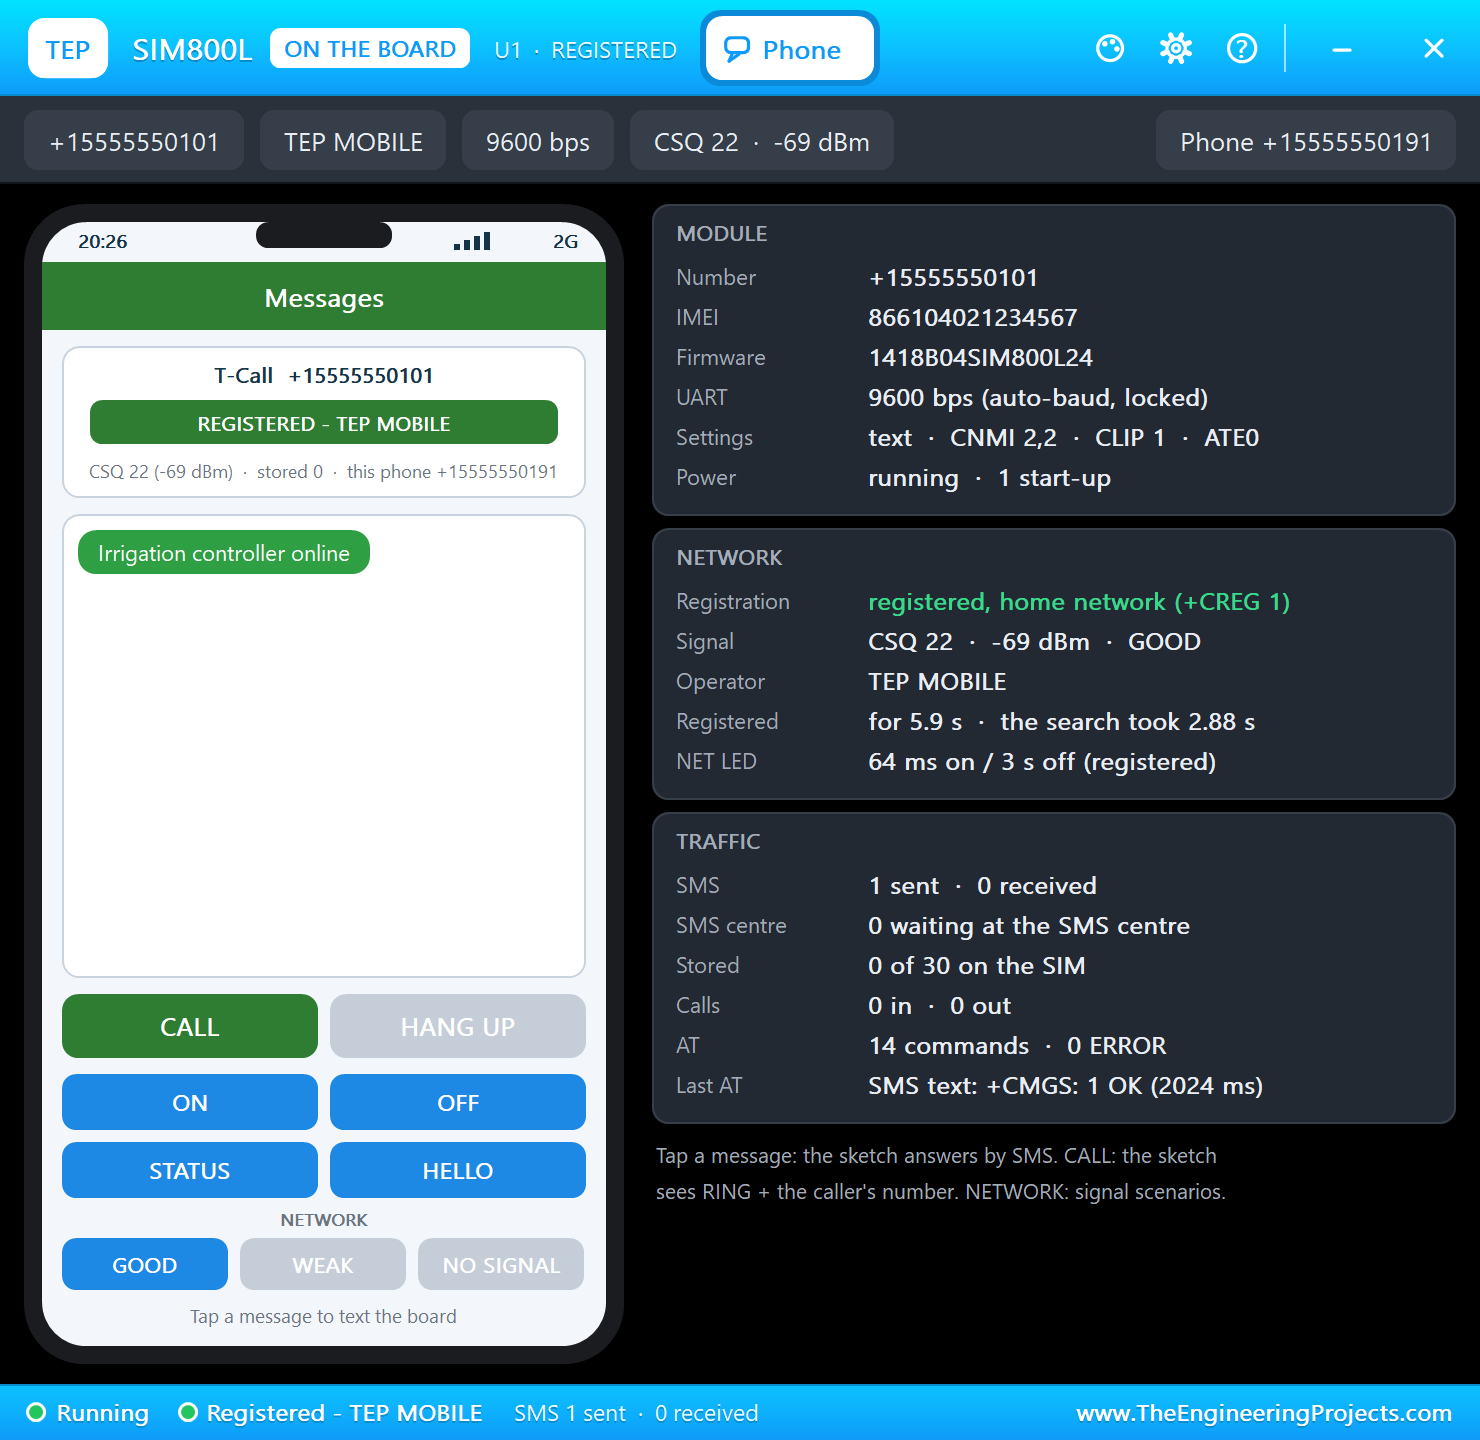
- A phone window: a click on the SIM800L opens a phone that texts the board, shows its SMS, calls it and sets the signal.
- The LEDs work: the blue LED follows GPIO13 and the red network LED flashes as the module does: every 800 ms while it searches, and every 3 s once it is registered.
- A complete package: about 3.9 MB with the board, the add-on, the soil sensor and relay libraries and the demo, without the source code of the models.
The T-Call SIM800L in Proteus
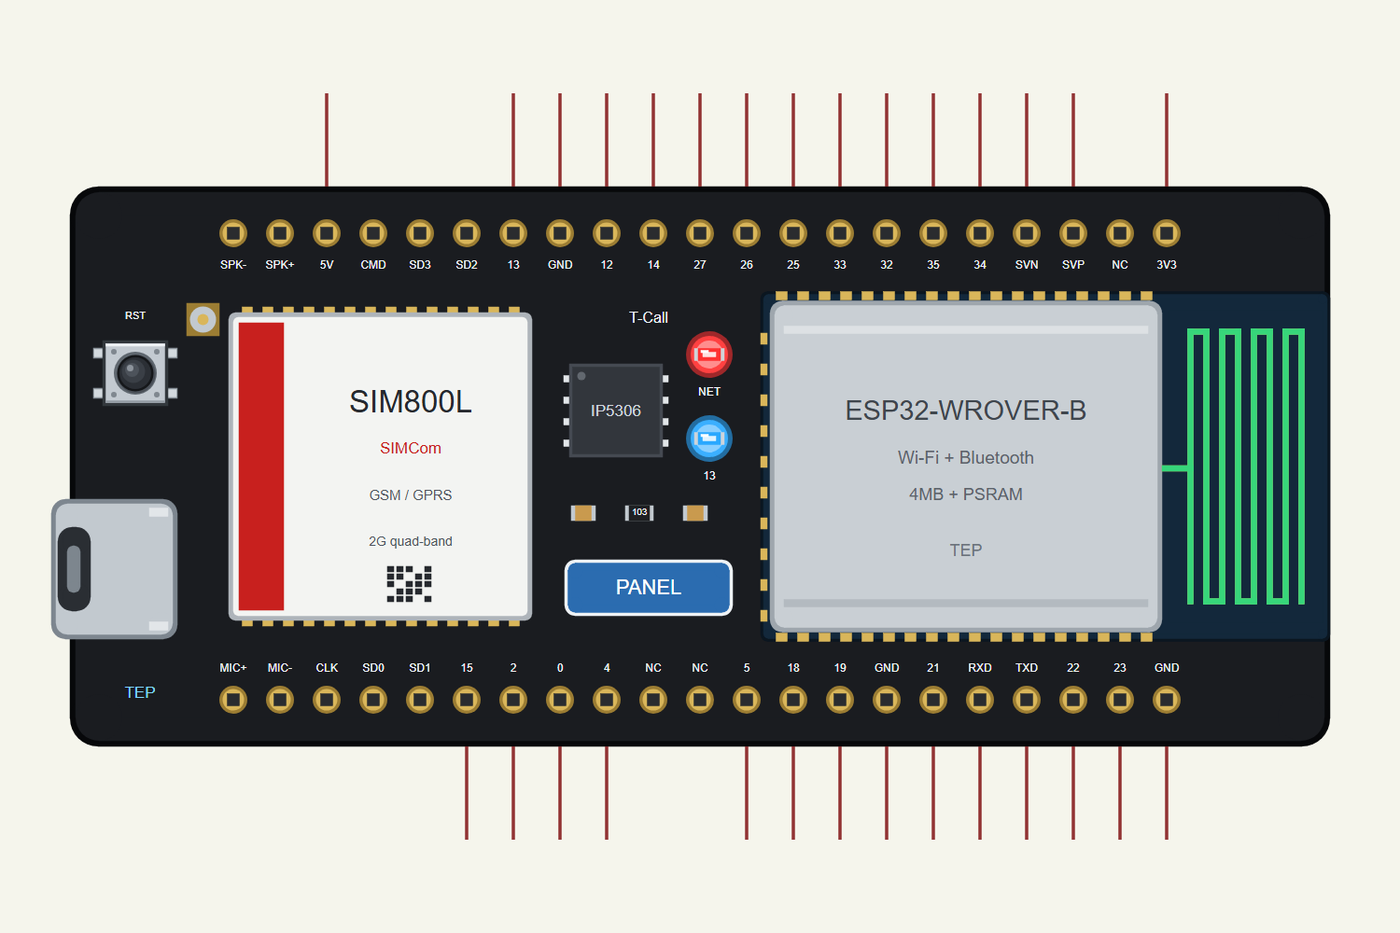
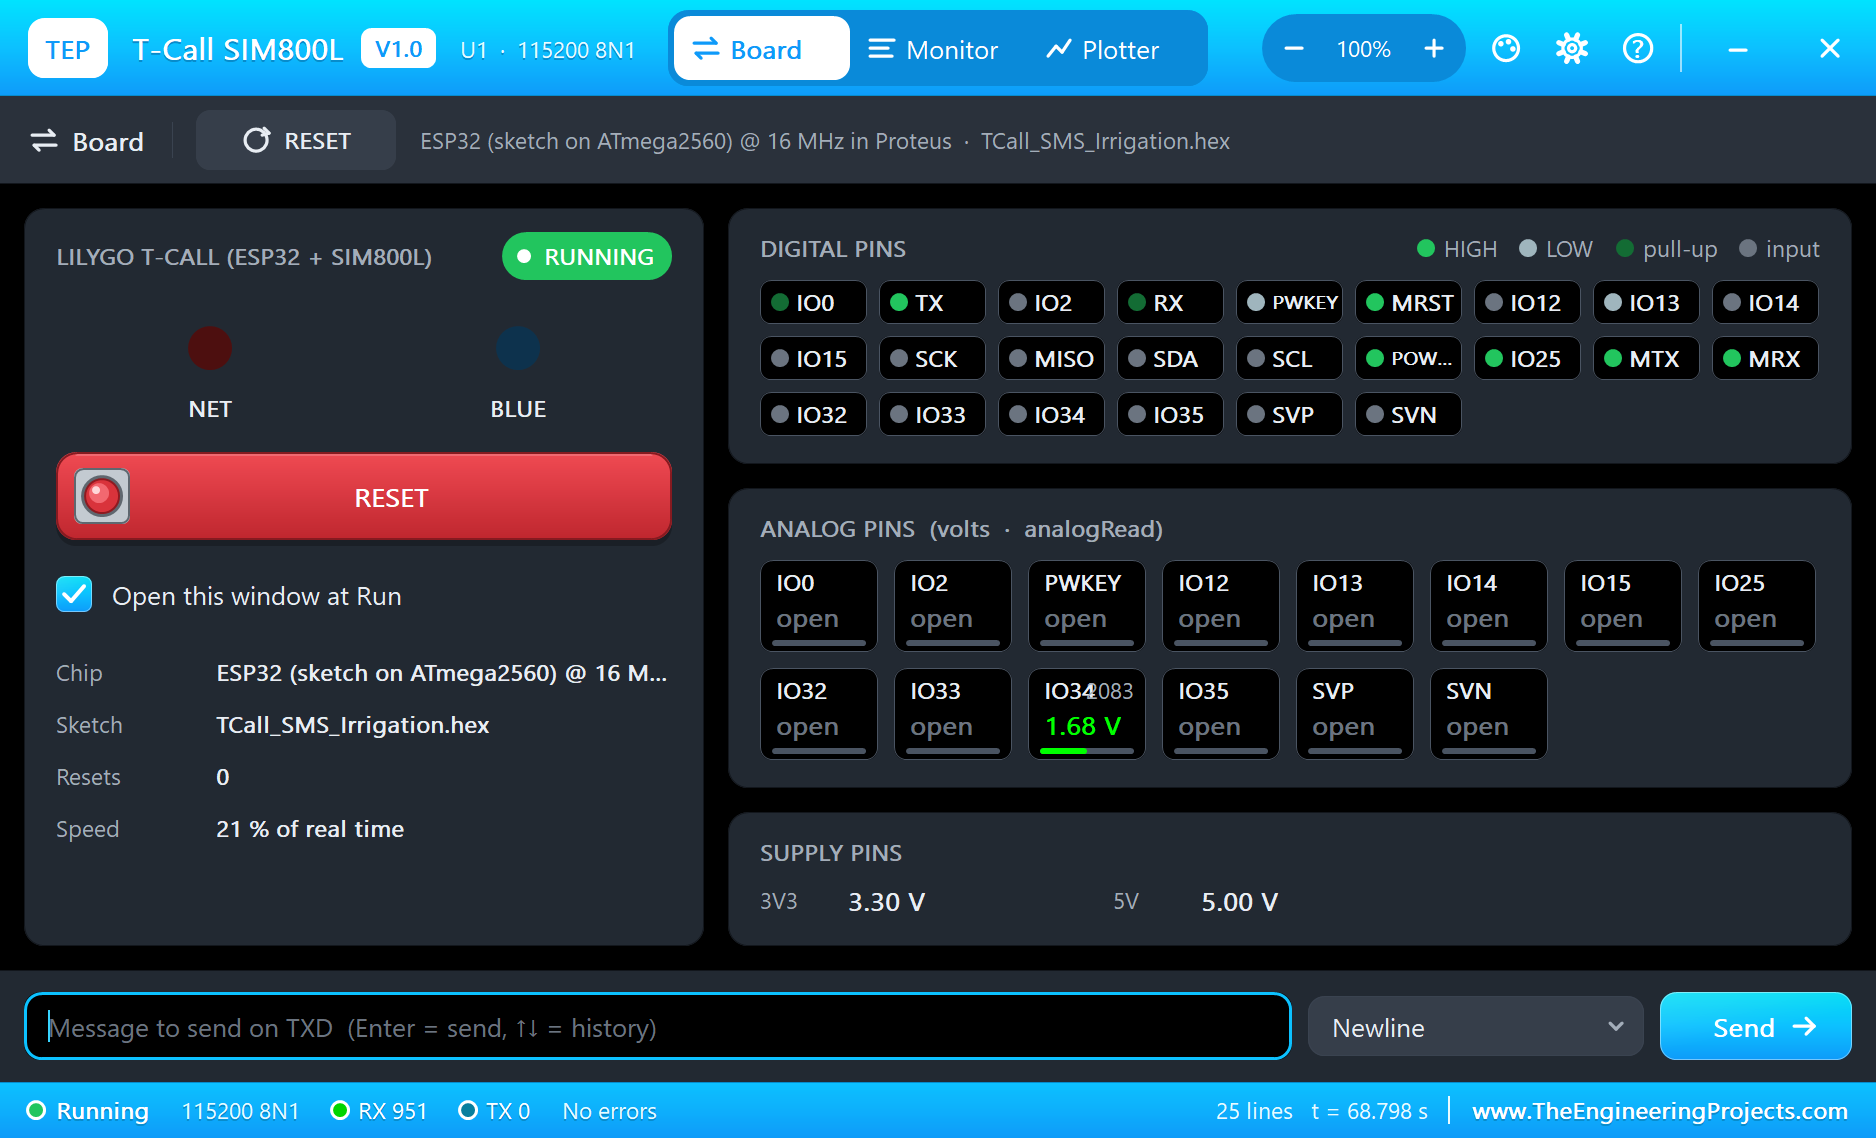
Search T-CALL in Pick Devices; the device T-CALL SIM800L is in TEPTCALL.LIB (Microprocessor ICs, ESP32 Boards), with the prefix U. The board lies with the USB-C port on the left. It has three windows: click the USB-C port for the serial monitor, the PANEL pad for the board's panel, and the SIM800L for the phone.
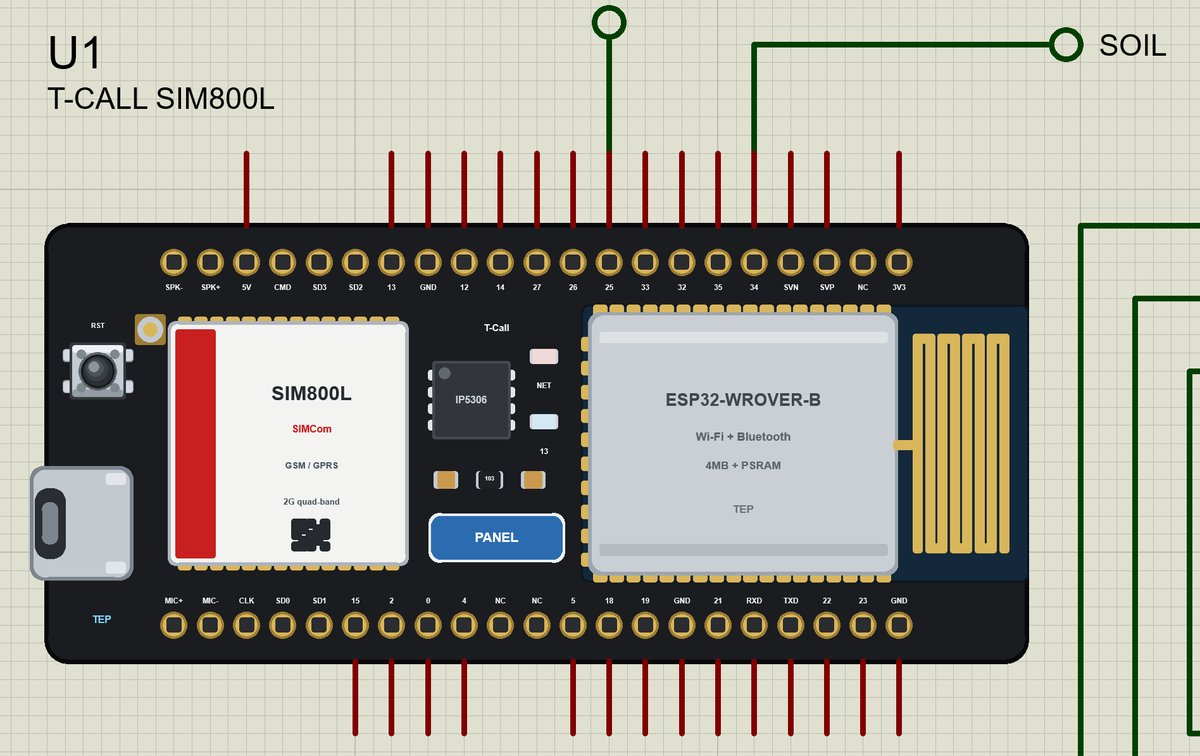
The Pins
| Pins | GPIO | What the library does with them |
|---|---|---|
| MODEM_TX, MODEM_RX | 27, 26 | Serial1, to the SIM800L |
| MODEM_POWER_ON | 23 | the modem's power switch |
| MODEM_RST, MODEM_PWKEY | 5, 4 | reset; PWRKEY is not needed here |
| SDA / SCL | 21 / 22 | Wire |
| TXD / RXD | 1 / 3 | Serial, the board's monitor |
| 13 | LED_BUILTIN | the blue LED |
| SVP, SVN, 34, 35 | 36, 39, 34, 35 | analog inputs only |
| 0, 2, 12, 14, 15, 25, 32, 33 | - | GPIO, PWM, interrupt |
As on the real board, GPIO4, 5, 23, 26 and 27 come out on the headers but belong to the modem, so keep them free. The speaker and microphone pads are drawn only.
Download LilyGO T-Call SIM800L Library for Proteus
Click the button below to download LilyGO-T-Call-SIM800L-Library-for-Proteus-v1.0.zip (about 3.9 MB, without the source code of the models):
LilyGO T-Call SIM800L Library for Proteus V1.0- README.txt: installation, the demo, the pins, the properties, troubleshooting and the limits.
- Proteus Library Files:
TEPTCALL.LIBand the demo's parts:TEPCAPSOIL.LIBandTEPRELAY.LIB. - Proteus Model Files:
TEPNET.DLL(the board and its modem),TEPCAPSOIL.DLLandTEPRELAY.DLL. - Arduino Code: the demo sketch and the TEP Boards for Proteus add-on 1.46.0.
- Proteus Simulation: the demo project, its HEX file and copies of the DLLs.
No Proteus yet? Read How to Download and Install Proteus 7 and 8. New to libraries? Follow How to Install a New Library in Proteus.
How to Install LilyGO T-Call SIM800L Library for Proteus
- Close Proteus and extract the whole zip file, for example to your Desktop.
- Copy the files from Proteus Library Files into the LIBRARY folder of Proteus.
- Copy the DLLs from Proteus Model Files into the MODELS folder, replacing an older TEPNET.DLL.
- Delete
TEPTCALL.IDXfrom the LIBRARY folder if it is there. - For your own sketches, copy Arduino Code\TEP Boards for Proteus\hardware into your Arduino sketchbook (Documents\Arduino) and restart the Arduino IDE; the board is T-Call SIM800L (TEP Proteus).
- Start Proteus, press P and search for T-CALL.
Demo: an SMS Irrigation Controller
Picture a small farm with a borewell pump. The farmer lives a few kilometres away, there is no Wi-Fi, and someone has to walk over each day to feel the soil and start the pump. A board like this can do that walk. It reads the soil, runs the pump when needed and sends a text to say so, and the farmer can step in from any phone.
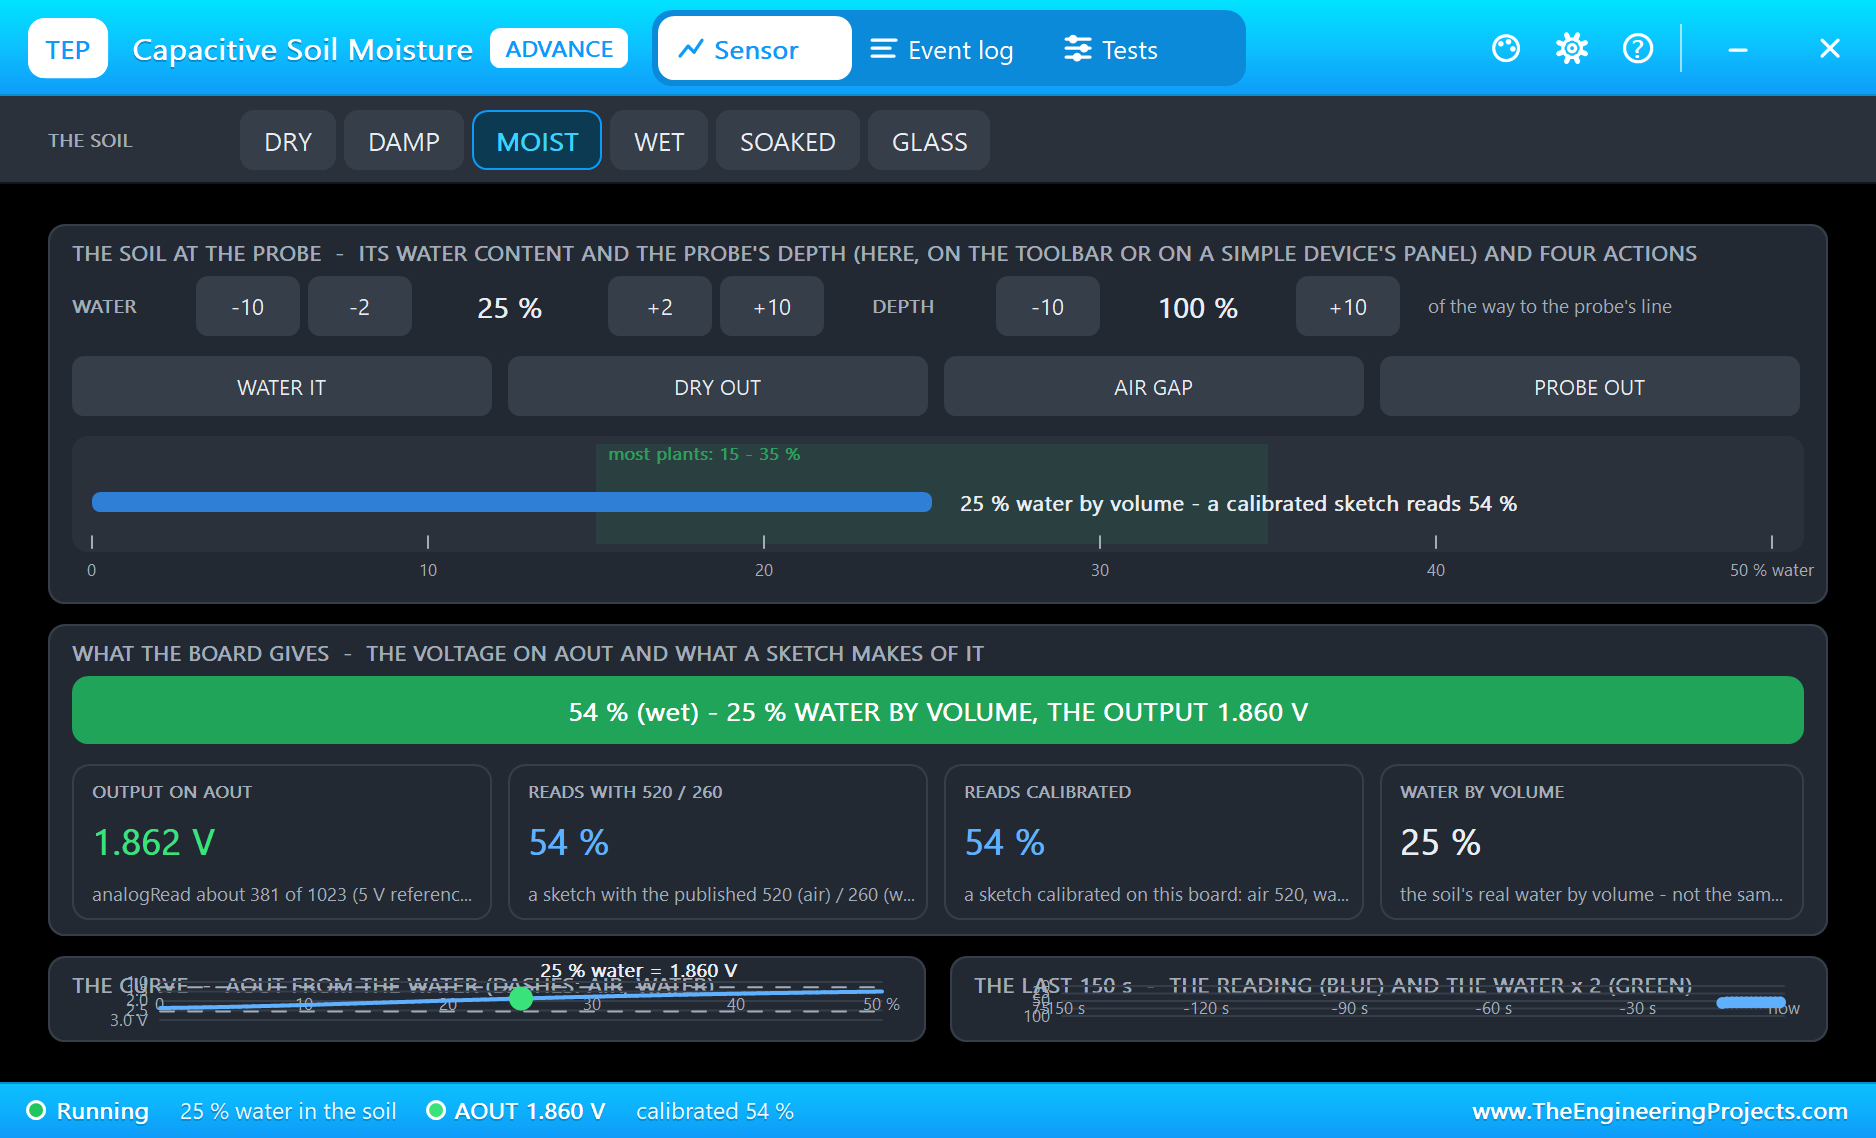
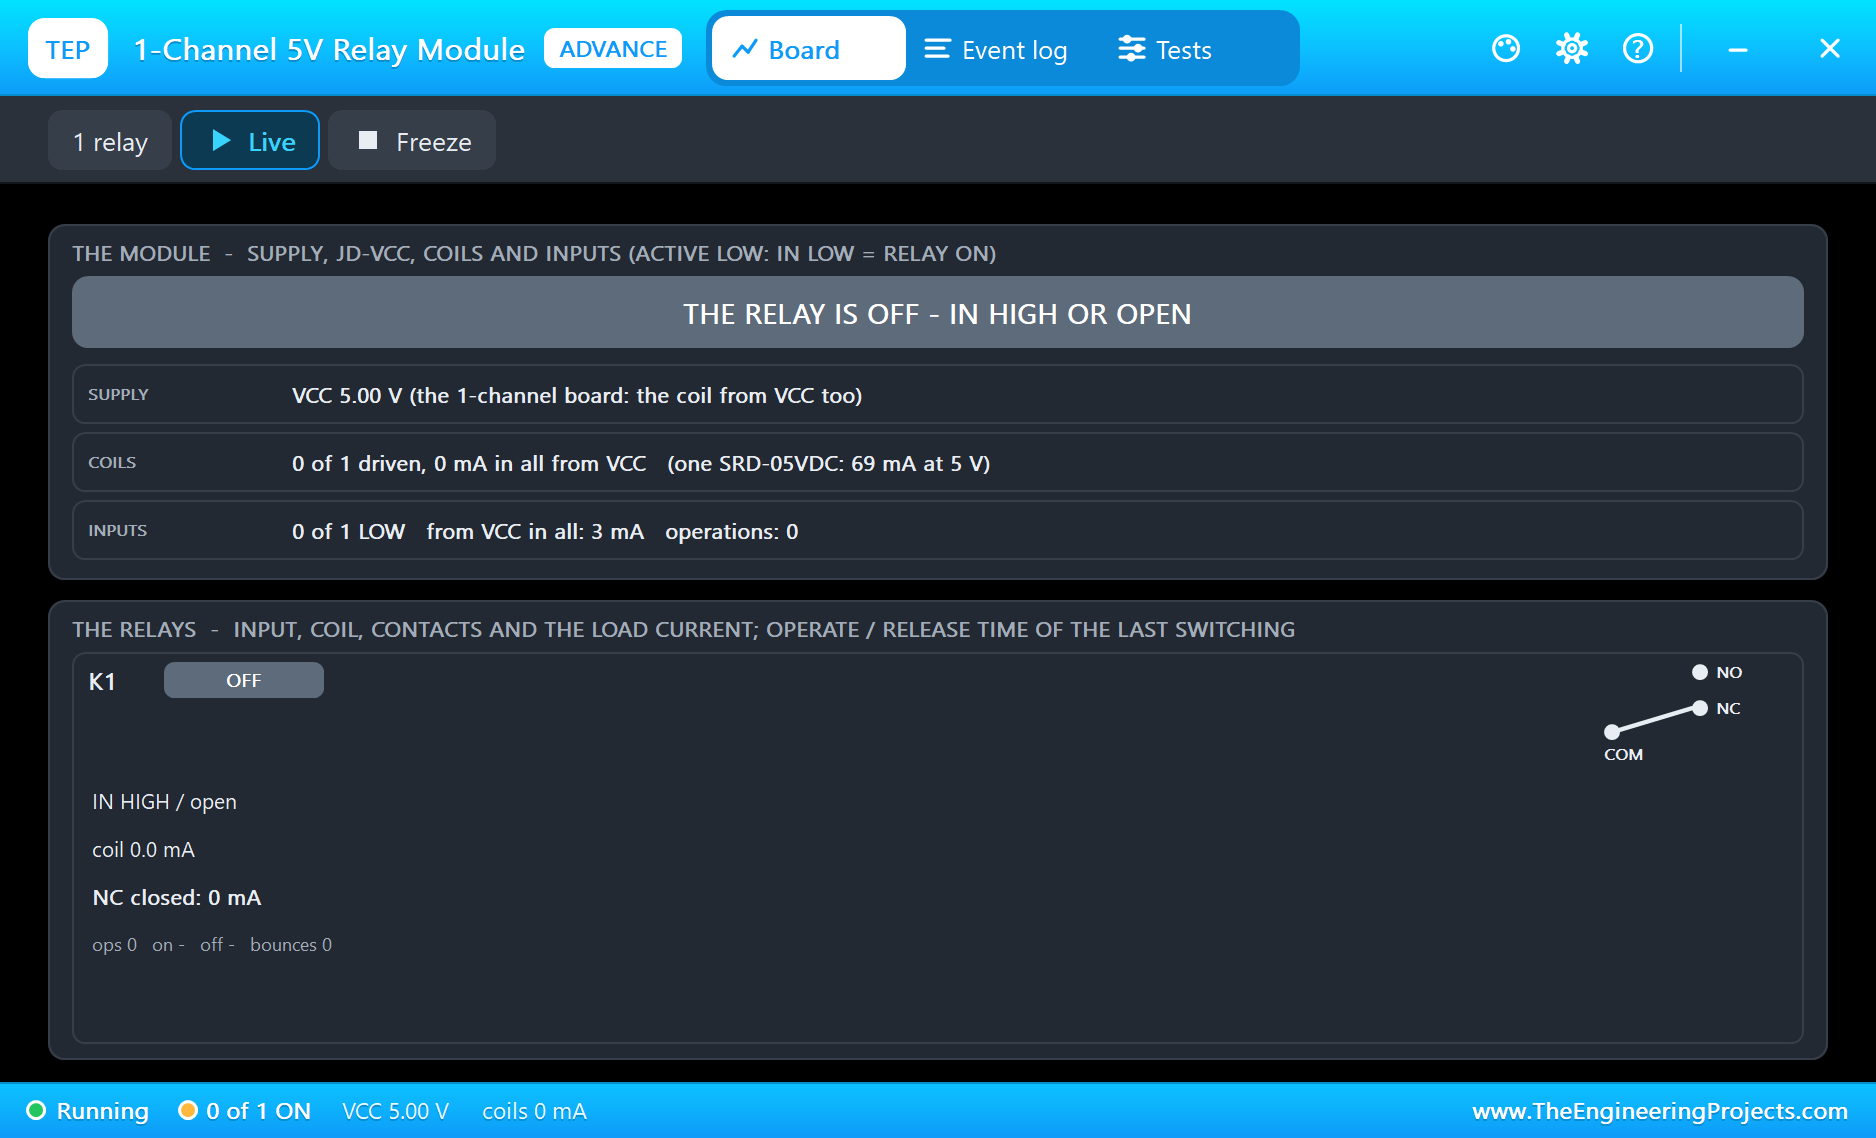
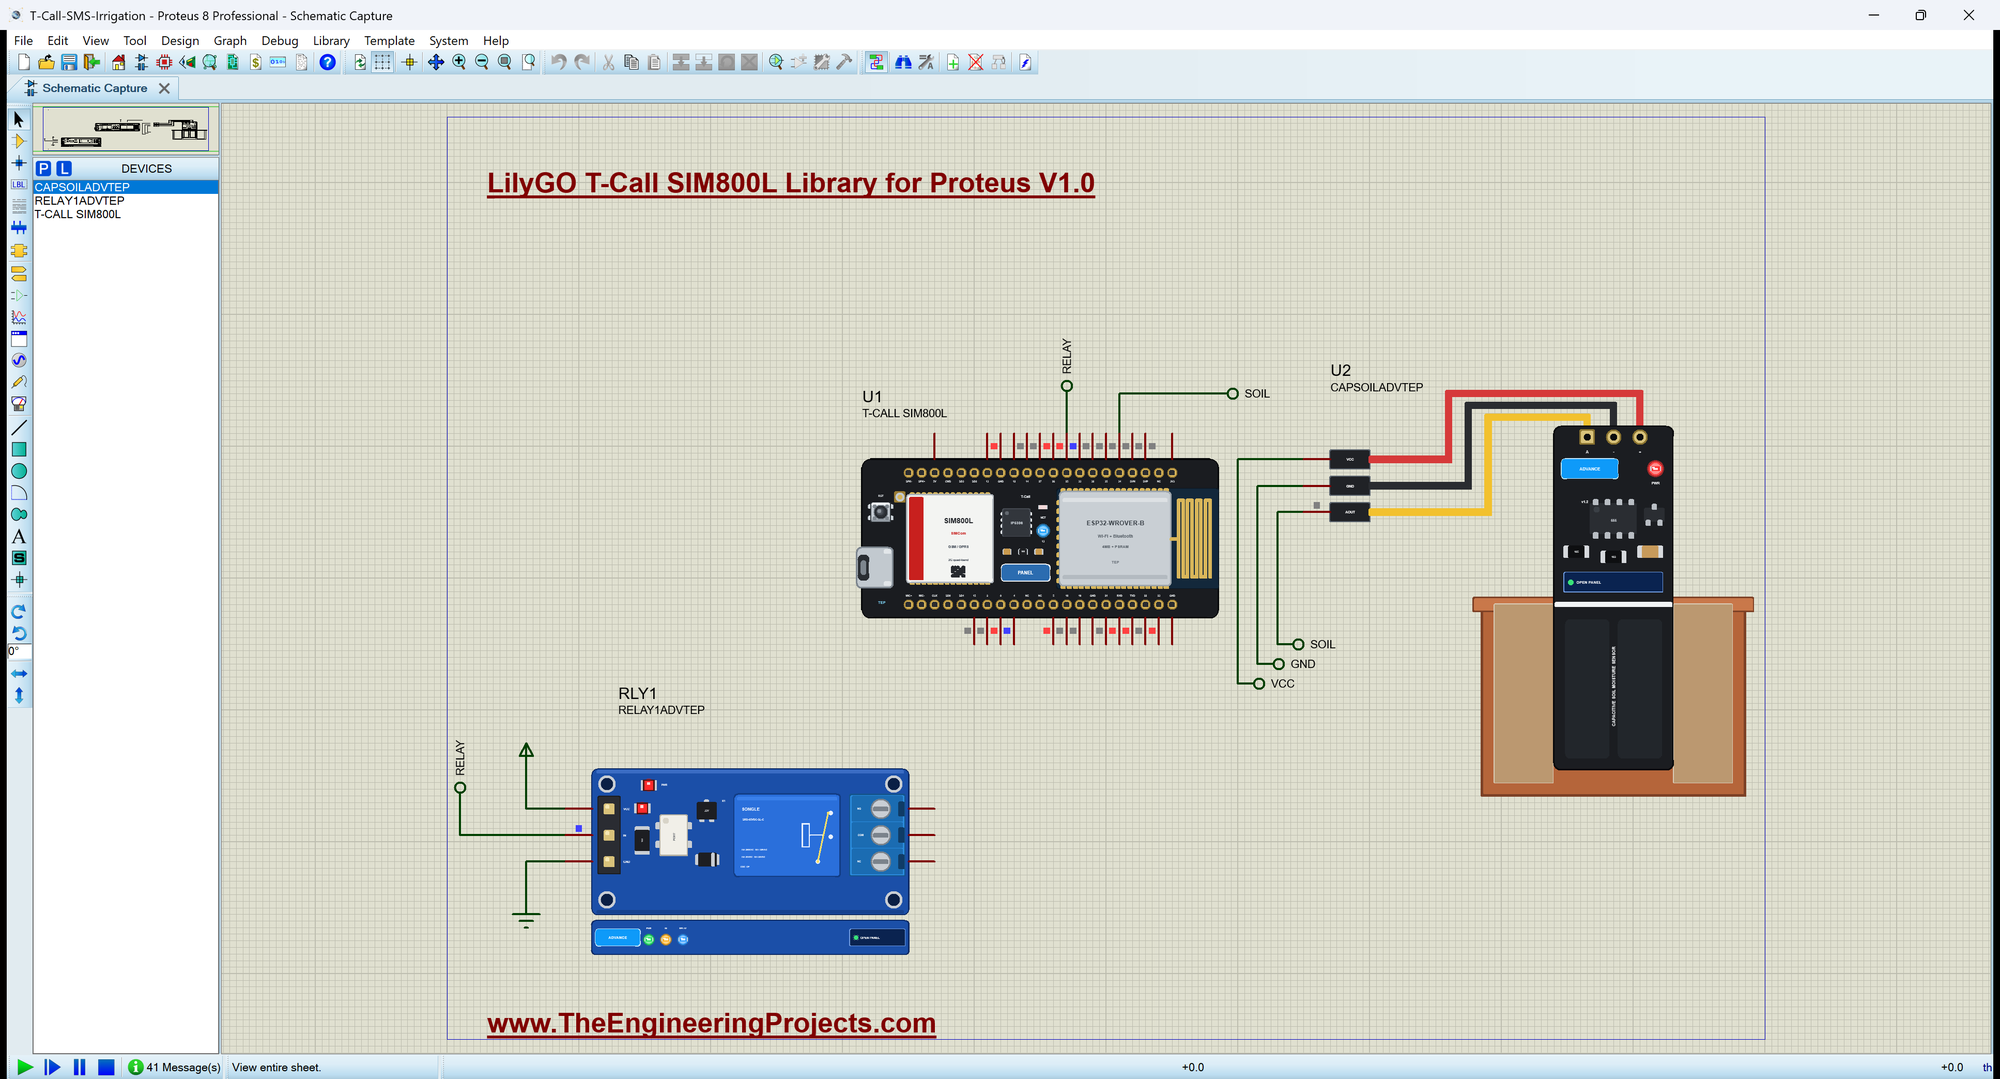
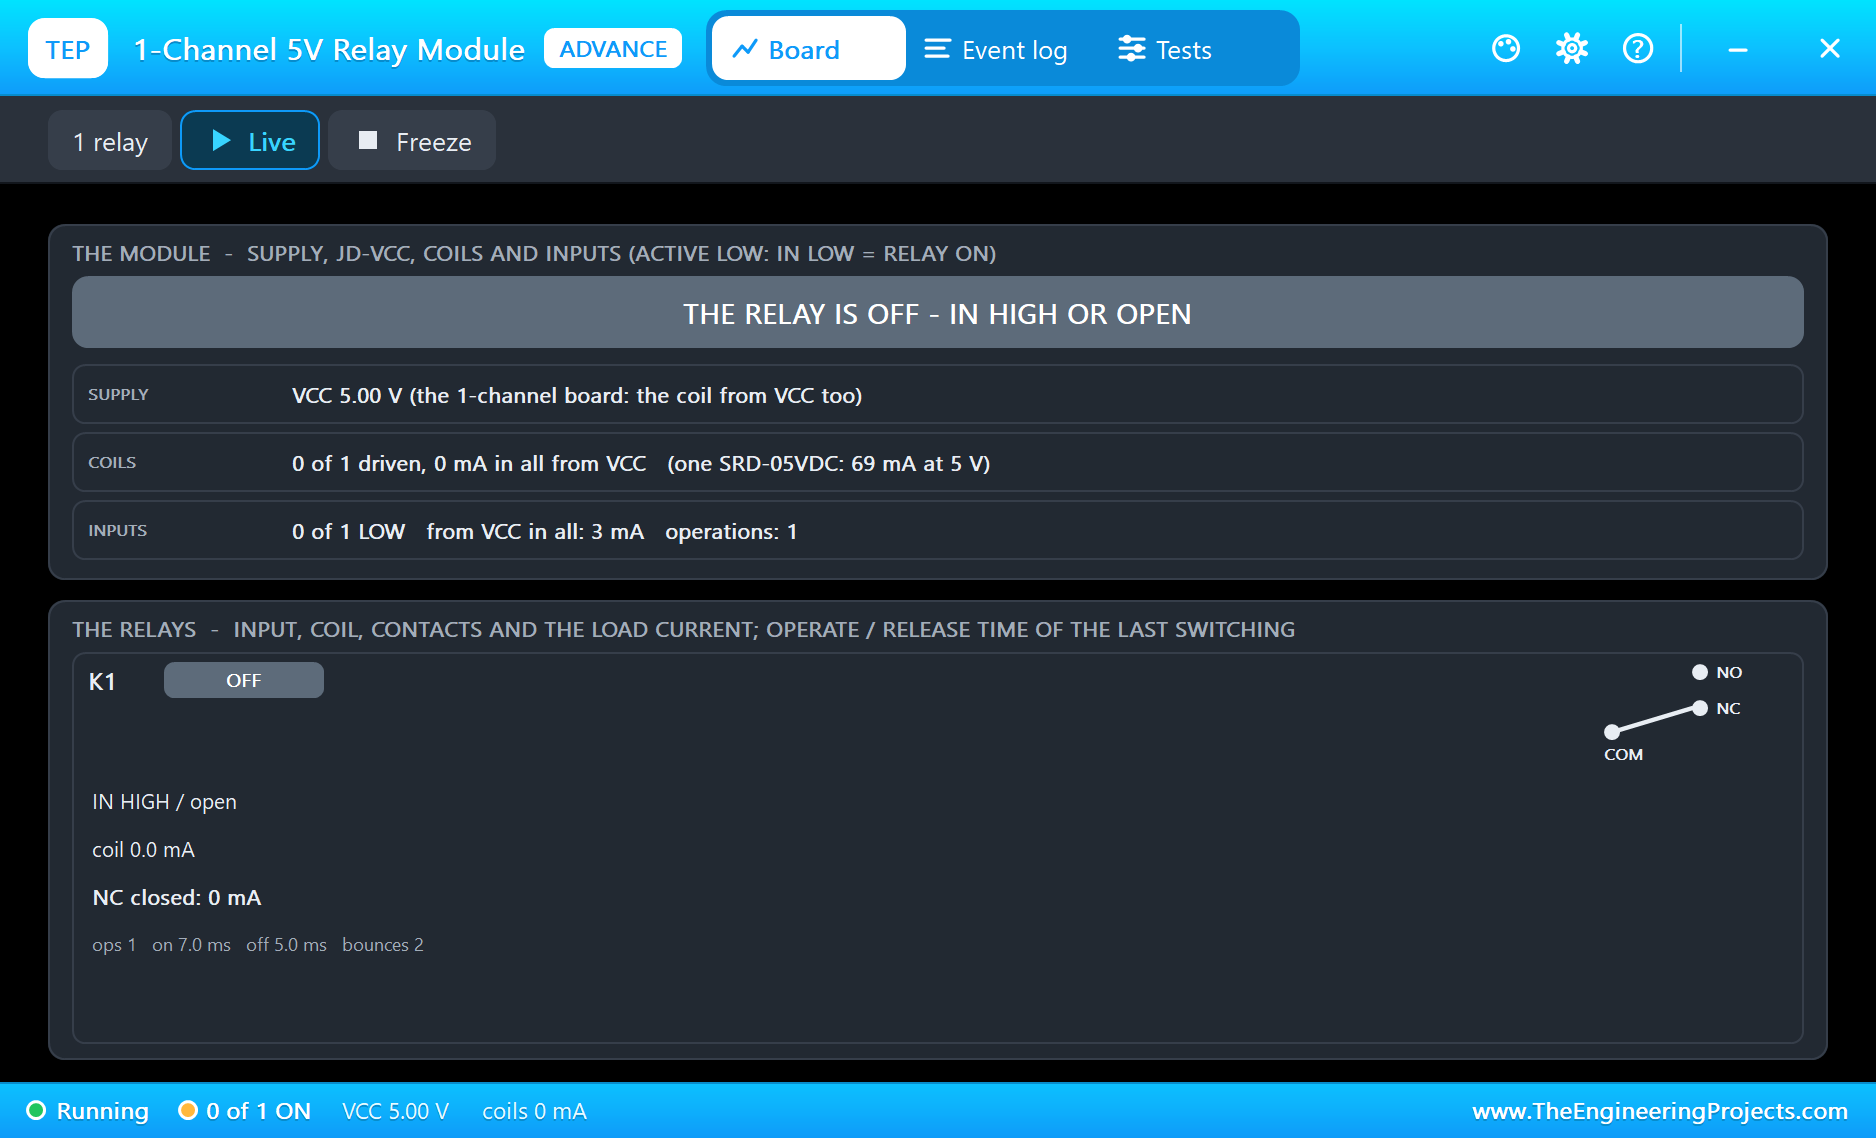
Open T-Call-SMS-Irrigation.pdsprj. U1 runs TCall_SMS_Irrigation.hex. U2 is the probe from our Capacitive Soil Moisture Sensor Library for Proteus and RLY1 the pump's relay from our Relay Module Library for Proteus - both in the Advance version, so they open their pop-up windows at Run. The modem is the same engine as in our SIM800L Library for Proteus, here on the board.
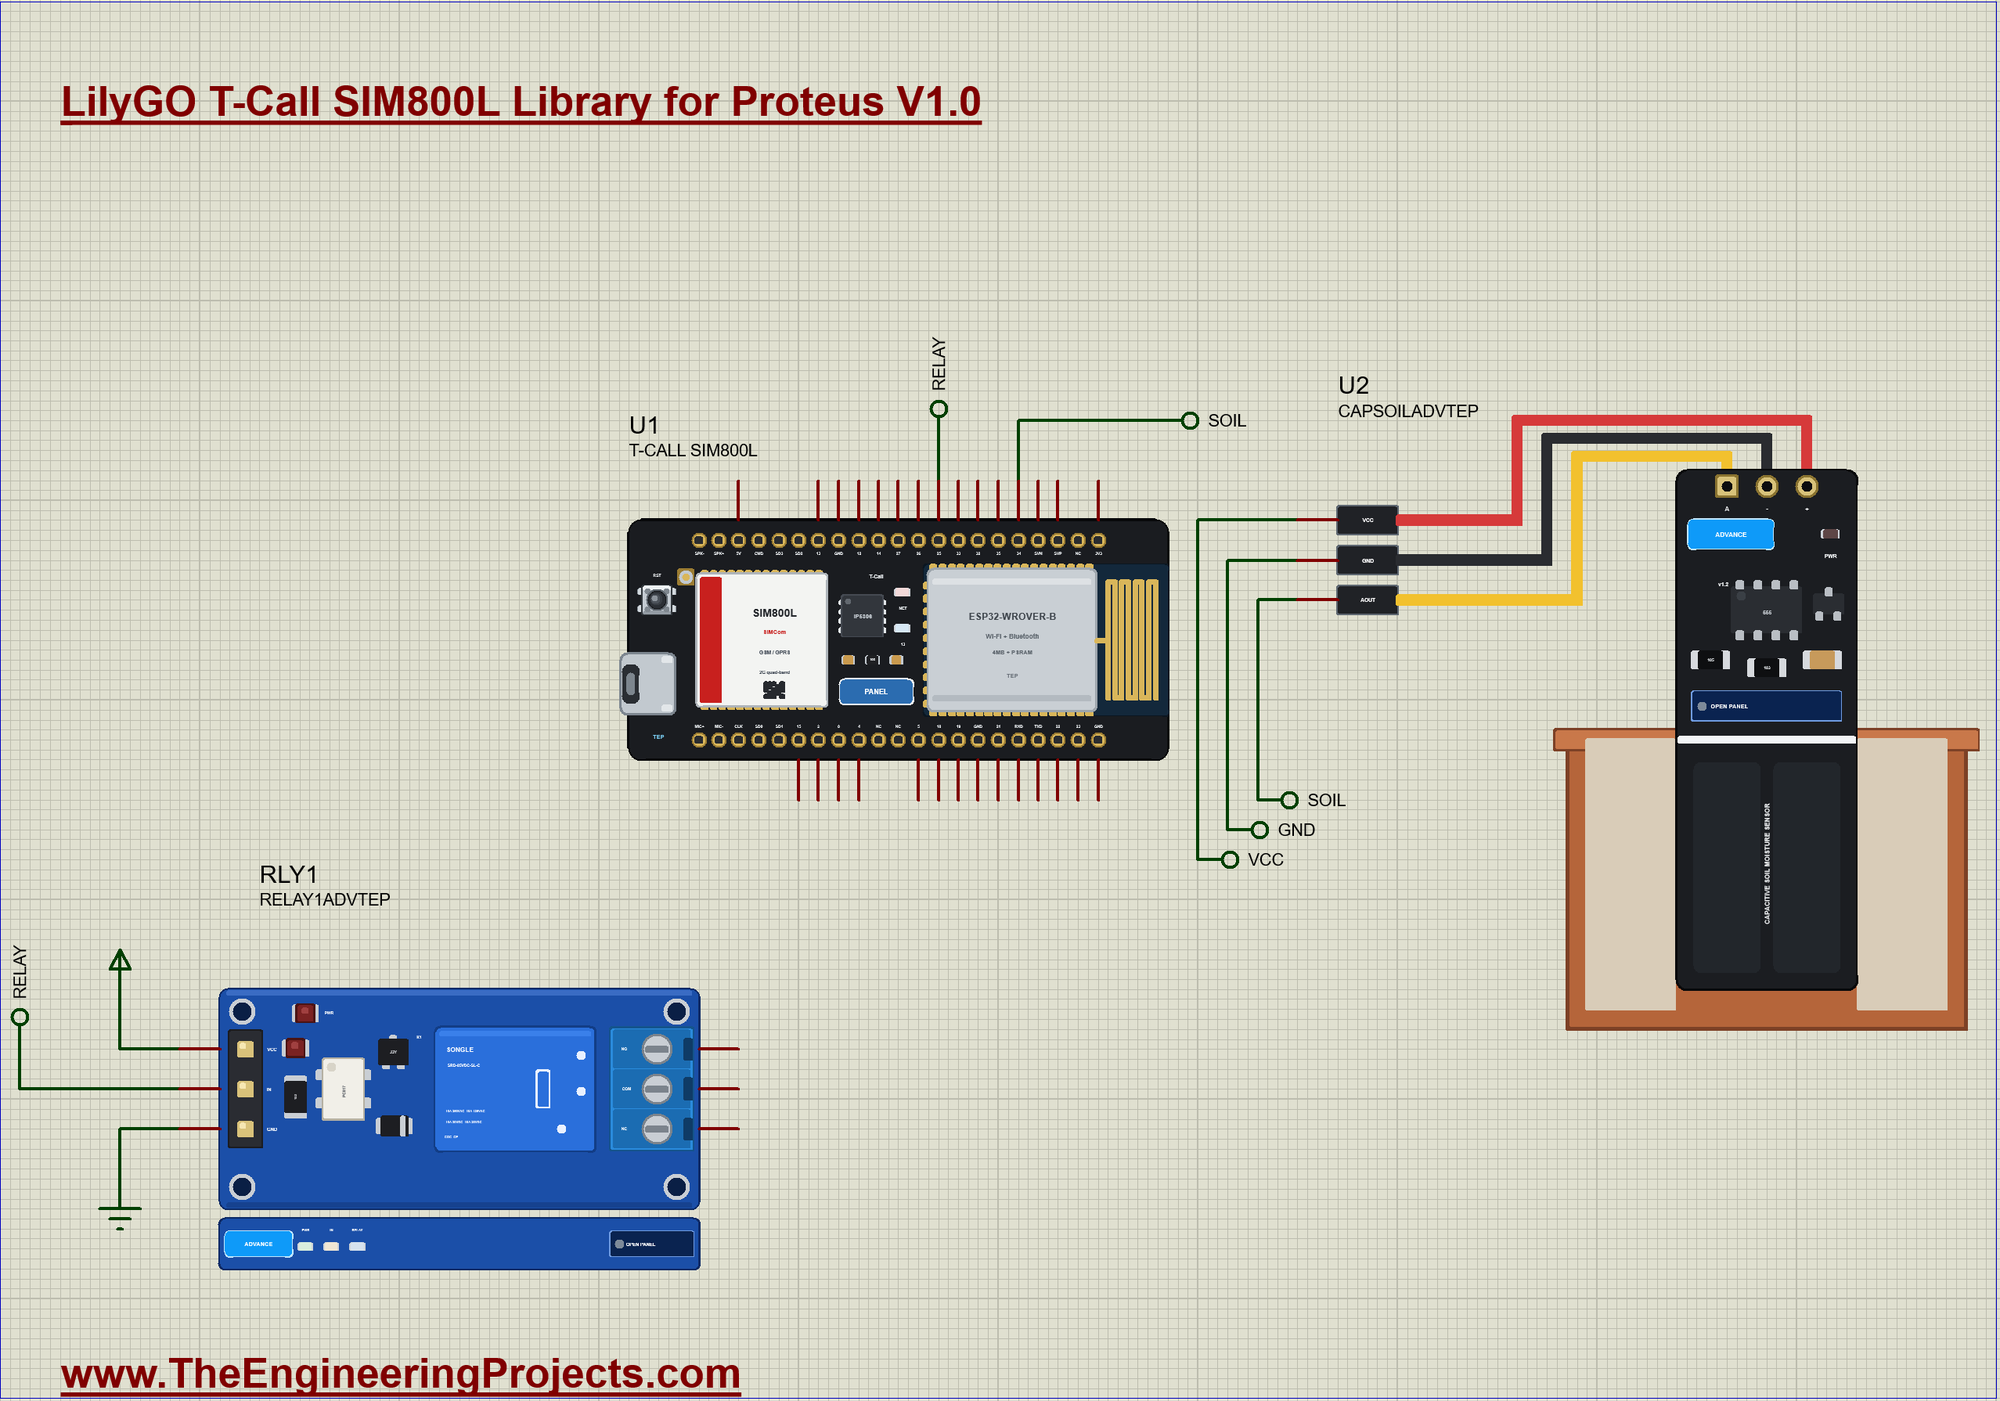
| Module pin | Net label | Board pin | What it does |
|---|---|---|---|
| Sensor AOUT | SOIL | 34 | the soil reading |
| Sensor VCC, GND | VCC, GND | 5V, GND | the supply |
| Relay IN | RELAY | 25 | the pump, active LOW |
| Relay VCC, GND | VCC, GND | 5V, GND | the supply |
Waking the Modem
The SIM800L is off until the sketch raises GPIO23. Then it needs a few seconds to boot, and it starts in auto-baud mode: it stays silent until it hears "AT", and works out your speed from the shape of that first letter. That is why the sketch sends AT three times. We use 9600 baud, which is plenty for short texts. After that come four settings: no echo, SMS as text, new messages straight to the UART, and the caller's number with each RING:
void startModem() {
  pinMode(MODEM_PWKEY, OUTPUT); pinMode(MODEM_RST, OUTPUT); pinMode(MODEM_POWER_ON, OUTPUT);
  digitalWrite(MODEM_PWKEY, LOW);
  digitalWrite(MODEM_RST, HIGH);
  digitalWrite(MODEM_POWER_ON, HIGH);                       // the SIM800L's power switch
  SerialAT.begin(9600, SERIAL_8N1, MODEM_RX, MODEM_TX);
  Serial.println(F("Starting the SIM800L"));
  delay(3000);
  sendAT("AT", 500); sendAT("AT", 500); sendAT("AT", 500);  // the module finds our speed from the first AT
  sendAT("ATE0", 500);
  sendAT("AT+CMGF=1", 500);                                 // SMS as text
  sendAT("AT+CNMI=2,2,0,0,0", 500);                         // a new SMS comes straight to the UART
  sendAT("AT+CLIP=1", 500);                                 // the caller's number with RING
}
Sending an SMS
AT+CMGS takes the phone number and answers with a > prompt. The sketch waits for that sign, sends the text and ends it with Ctrl+Z, which is the byte 26. The network then takes about two seconds to confirm it, and the phone window's Last AT row shows the time:
void sendSms(const String &to, const String &text) {
  SerialAT.print(F("AT+CMGS=\""));
  SerialAT.print(to);
  SerialAT.println(F("\""));
  unsigned long end = millis() + 2000;
  while (millis() < end && SerialAT.read() != '>') { }      // the module's prompt
  SerialAT.print(text);
  SerialAT.write(26);                                       // Ctrl+Z ends the text
  Serial.print(F("SMS to ")); Serial.print(to); Serial.print(F(": ")); Serial.println(text);
  sentAlerts++;
  delay(200);
}
Text Mode and the SMS Limit
AT+CMGF=1 selects text mode, where the module takes plain characters. One SMS holds 160 of them, so keep your alerts short; the ones in this sketch stay under 40. The other mode, PDU, packs the whole message into hex digits. Text mode is much easier to read and debug, and it is all that a small controller needs.
Reading the Soil
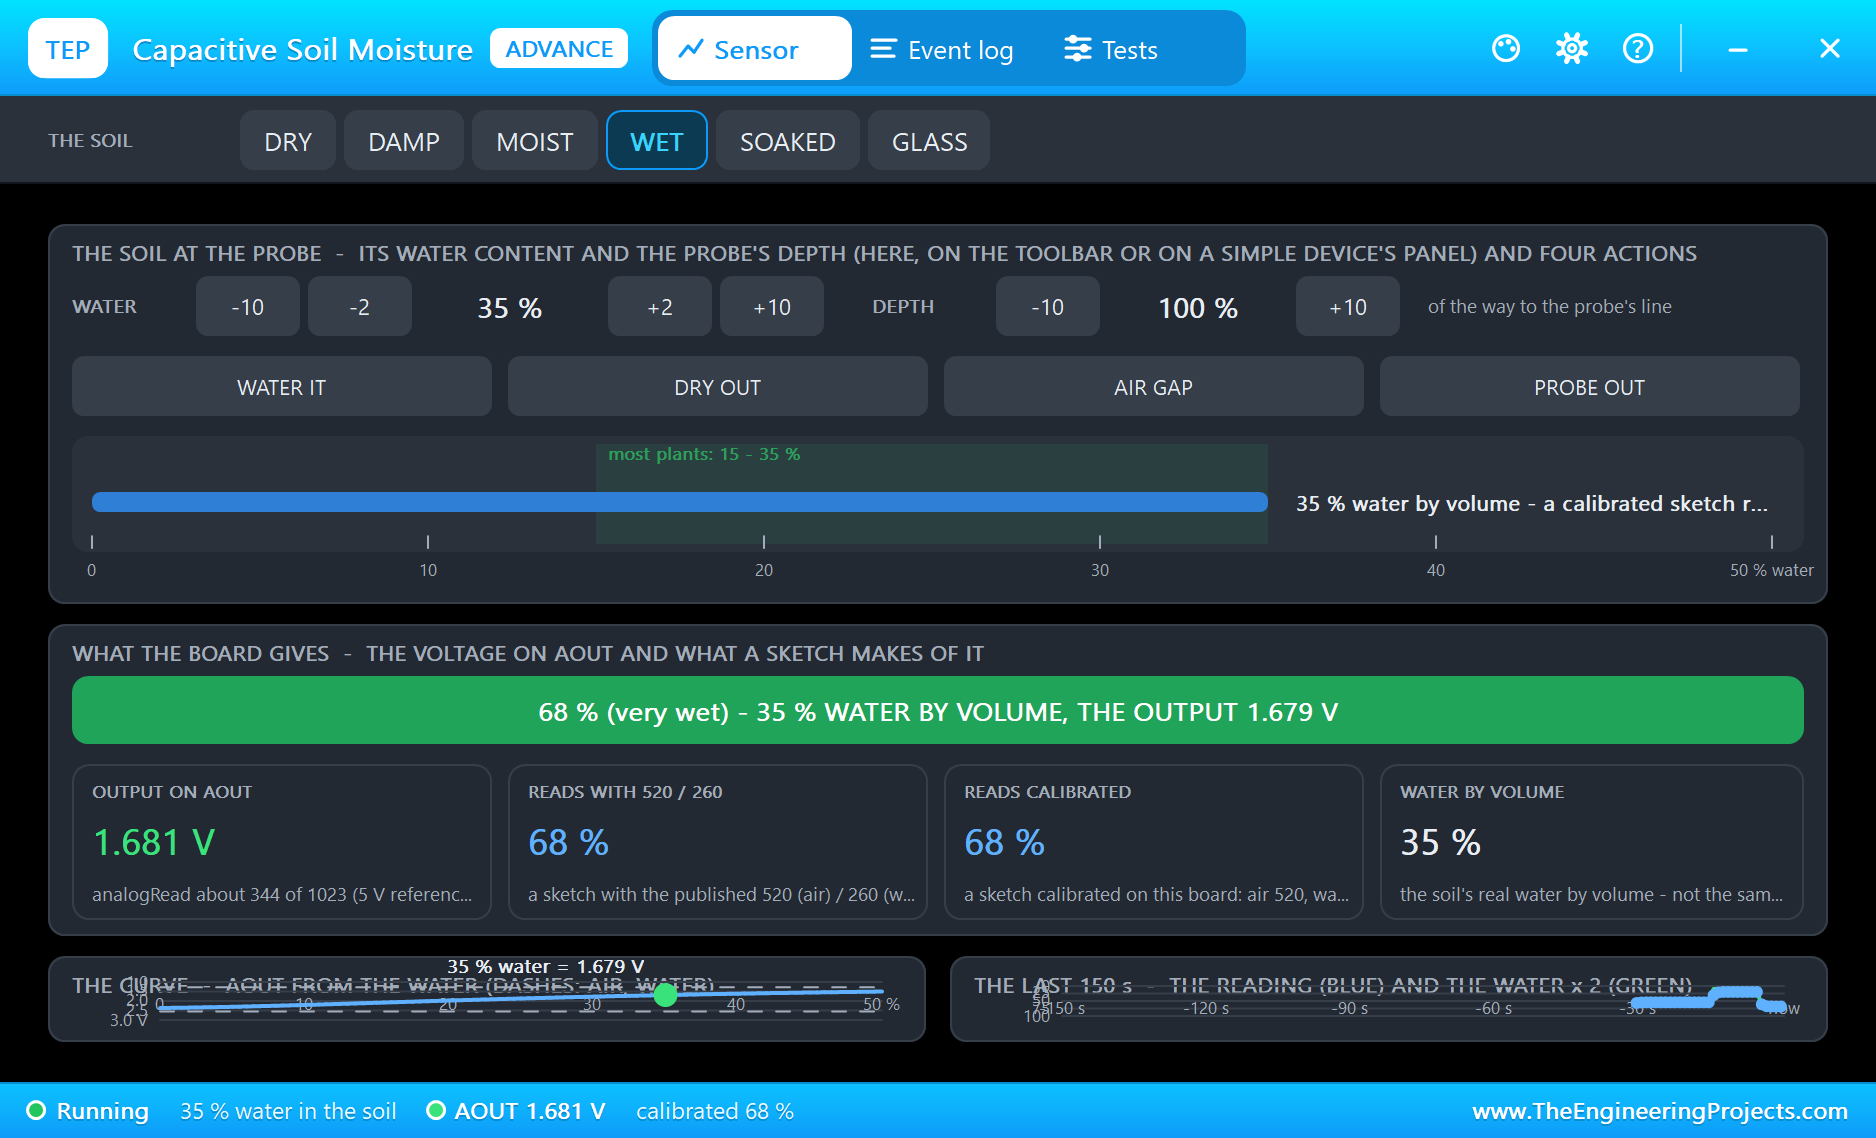
A capacitive soil sensor has no metal in the ground, so it does not corrode like the old two-prong type. Water raises the capacitance around its copper tracks, and the board turns that into a voltage: 2.54 V in air and 1.27 V in water on this probe. The sketch scales those two points to 0 % and 100 %. That is a reading of the probe, not the true water content of the soil, so a real field needs its own calibration. Starting at 40 % and stopping at 60 % leaves a gap, called hysteresis, so the pump does not chatter on and off around a single value:
void readSoil() {
  if (millis() < nextRead) return;
  nextRead = millis() + 2000;
  long raw = analogRead(SOIL_PIN);
  moisture = constrain((SOIL_DRY - raw) * 100 / (SOIL_DRY - SOIL_WET), 0, 100);
  if (manual || !ready) return;
  if (!pump && moisture < DRY_PCT) { setPump(true); Serial.println(F(">> Soil dry: pump ON")); sendSms(farmer, "Soil dry: " + status()); }
  else if (pump && moisture > WET_PCT) { setPump(false); Serial.println(F(">> Soil wet: pump OFF")); sendSms(farmer, "Soil wet: " + status()); }
}
Notice that raw is a long. The sum multiplies a difference of up to 1570 by 100, and that does not fit in 16 bits, which is the size of int in the simulation. With a plain int the percentage would come out wrong, and only on some readings, which is the worst kind of bug to find.
Answering the Farmer
With AT+CNMI=2,2,0,0,0 a new SMS arrives on the UART as two lines: a +CMT: header with the sender's number, then the text. The sketch keeps the number, reads the next line as a command, and always replies to whoever wrote. A real product should also check that number against a list:
void command(const String &from, String text) {
  text.trim(); text.toUpperCase();
  Serial.print(F("SMS from ")); Serial.print(from); Serial.print(F(": ")); Serial.println(text);
  if (text == "ON") { manual = true; setPump(true); sendSms(from, "Pump ON (manual)"); }
  else if (text == "OFF") { manual = true; setPump(false); sendSms(from, "Pump OFF (manual)"); }
  else if (text == "STATUS") sendSms(from, status());
  else sendSms(from, "Commands: ON OFF STATUS");
}
The Free Missed Call
Here is a trick that farmers across South Asia know well. A call that is not answered costs nothing, so a missed call makes a free button. With AT+CLIP=1 the module sends the caller's number along with RING. The sketch hangs up with ATH and answers with a status SMS:
void modemLine(const String &l) {
  if (smsNext) { smsNext = false; command(smsFrom, l); return; }
  if (l.startsWith("+CMT:")) { smsFrom = between(l, '"'); smsNext = true; }
  else if (l.startsWith("+CLIP:")) caller = between(l, '"');
  else if (l == "RING" && caller.length()) {                // a missed call: hang up, answer by SMS
    Serial.print(F("Missed call from ")); Serial.println(caller);
    SerialAT.println(F("ATH"));
    delay(500);
    sendSms(caller, status());
    caller = "";
  }
}
What the Modem Says on Its Own
Most AT commands work like a question and an answer: the sketch sends a line and the module replies with OK or ERROR. A few things do not wait to be asked. RING, +CLIP and +CMT can arrive at any moment, and SIMCom calls them unsolicited result codes. That is why the sketch has two ways of listening. sendAT() waits a short time for OK during setup, while readModem() runs all the time in loop(), collects the characters into a line and hands each finished line to modemLine(). A long delay in loop() would let the serial buffer overflow and lose part of a message, so keep your own additions short and use millis() for timing, as readSoil() and logStatus() do.
Reading the Signal
Send AT+CSQ and the module answers with a number from 0 to 31. Multiply it by two and subtract 113 to get the signal in dBm, so a CSQ of 23 means -67 dBm, which is a good signal. A value of 99 means the module cannot tell. In a real controller, log this number along with the soil reading. A field that loses its texts on rainy evenings will show it in the log long before anyone complains. The WEAK and NO SIGNAL keys on the phone let you test what your sketch does in those cases.
Run the Demo
Press Run. The built-in serial monitor opens, the same window as our TEP Serial Monitor Advance for Proteus, and the sketch powers the modem. The red LED flashes quickly while the module searches, then slows down when it is registered. The first SMS goes out a few seconds into the simulation:
T-Call SMS Irrigation - The Engineering Projects
Starting the SIM800L
On the network
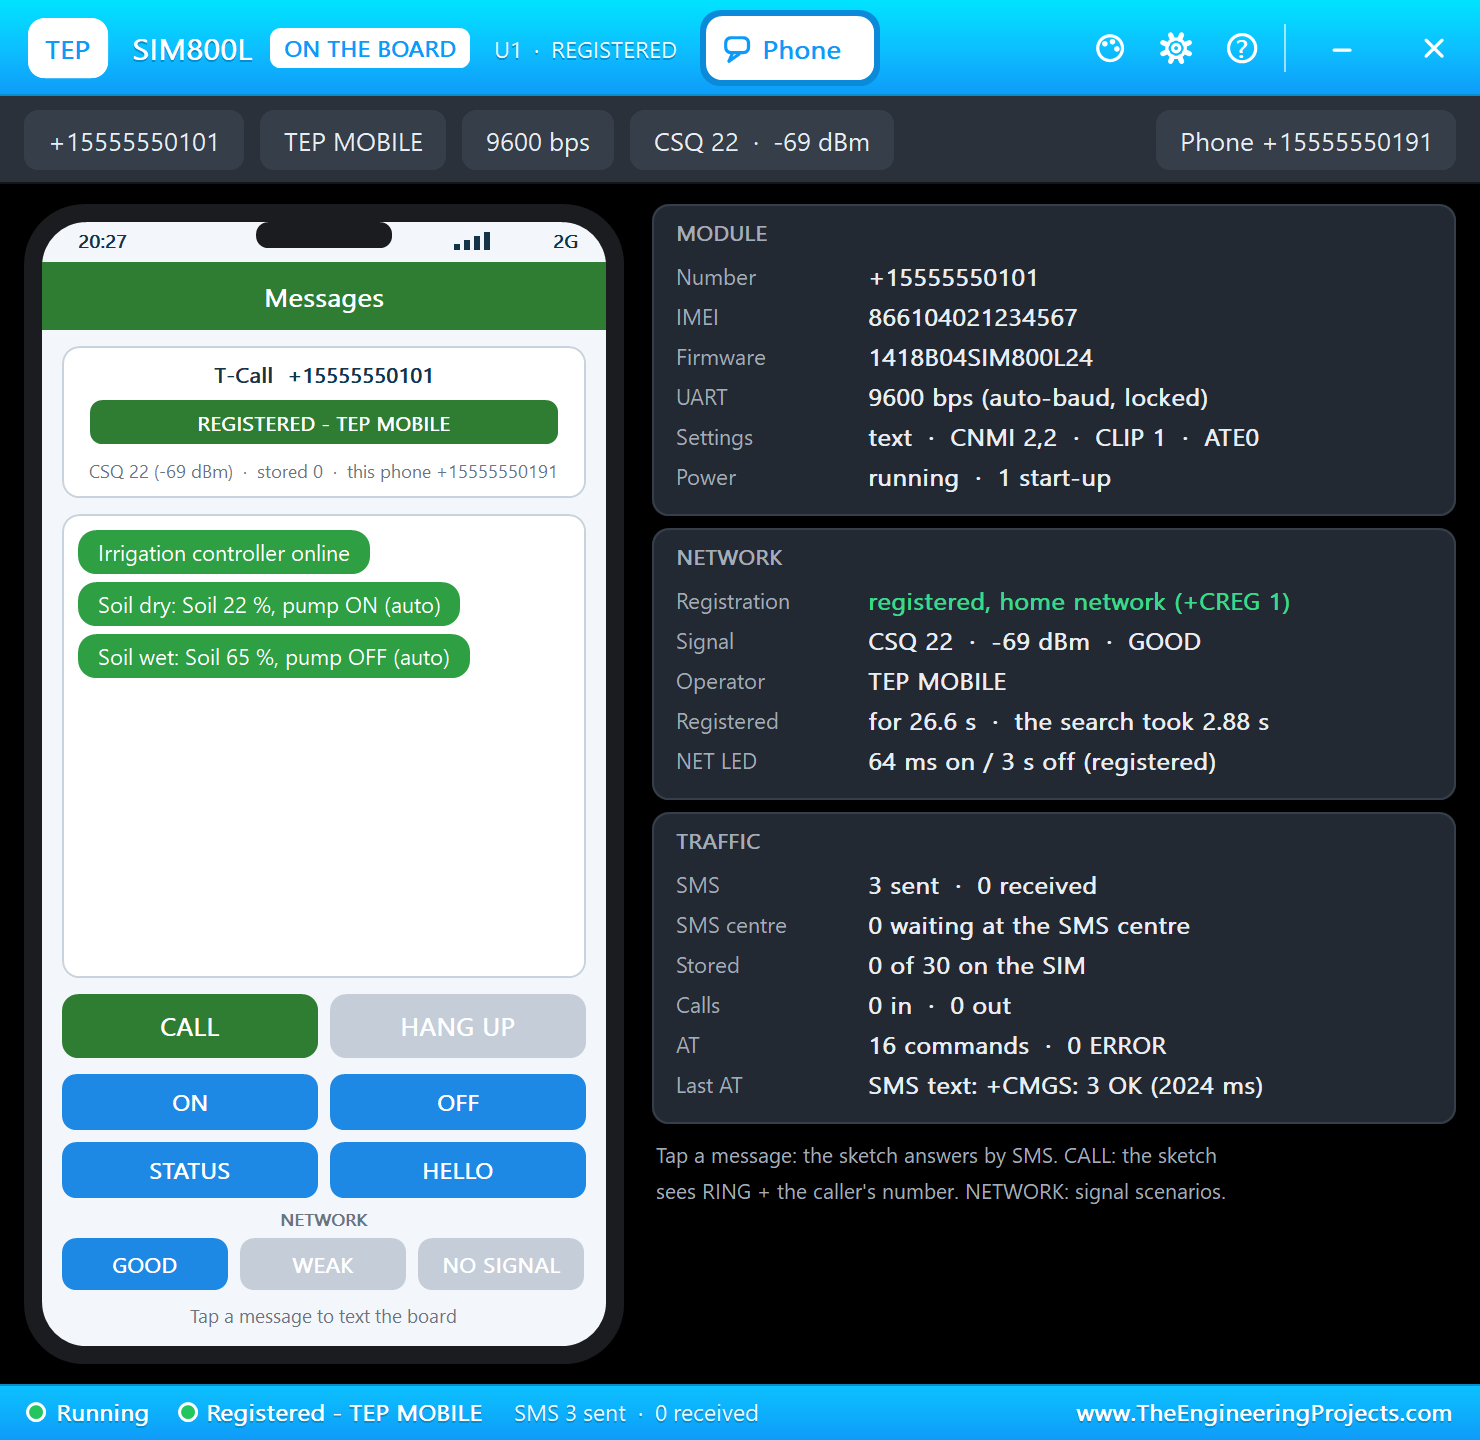
SMS to +15555550191: Irrigation controller online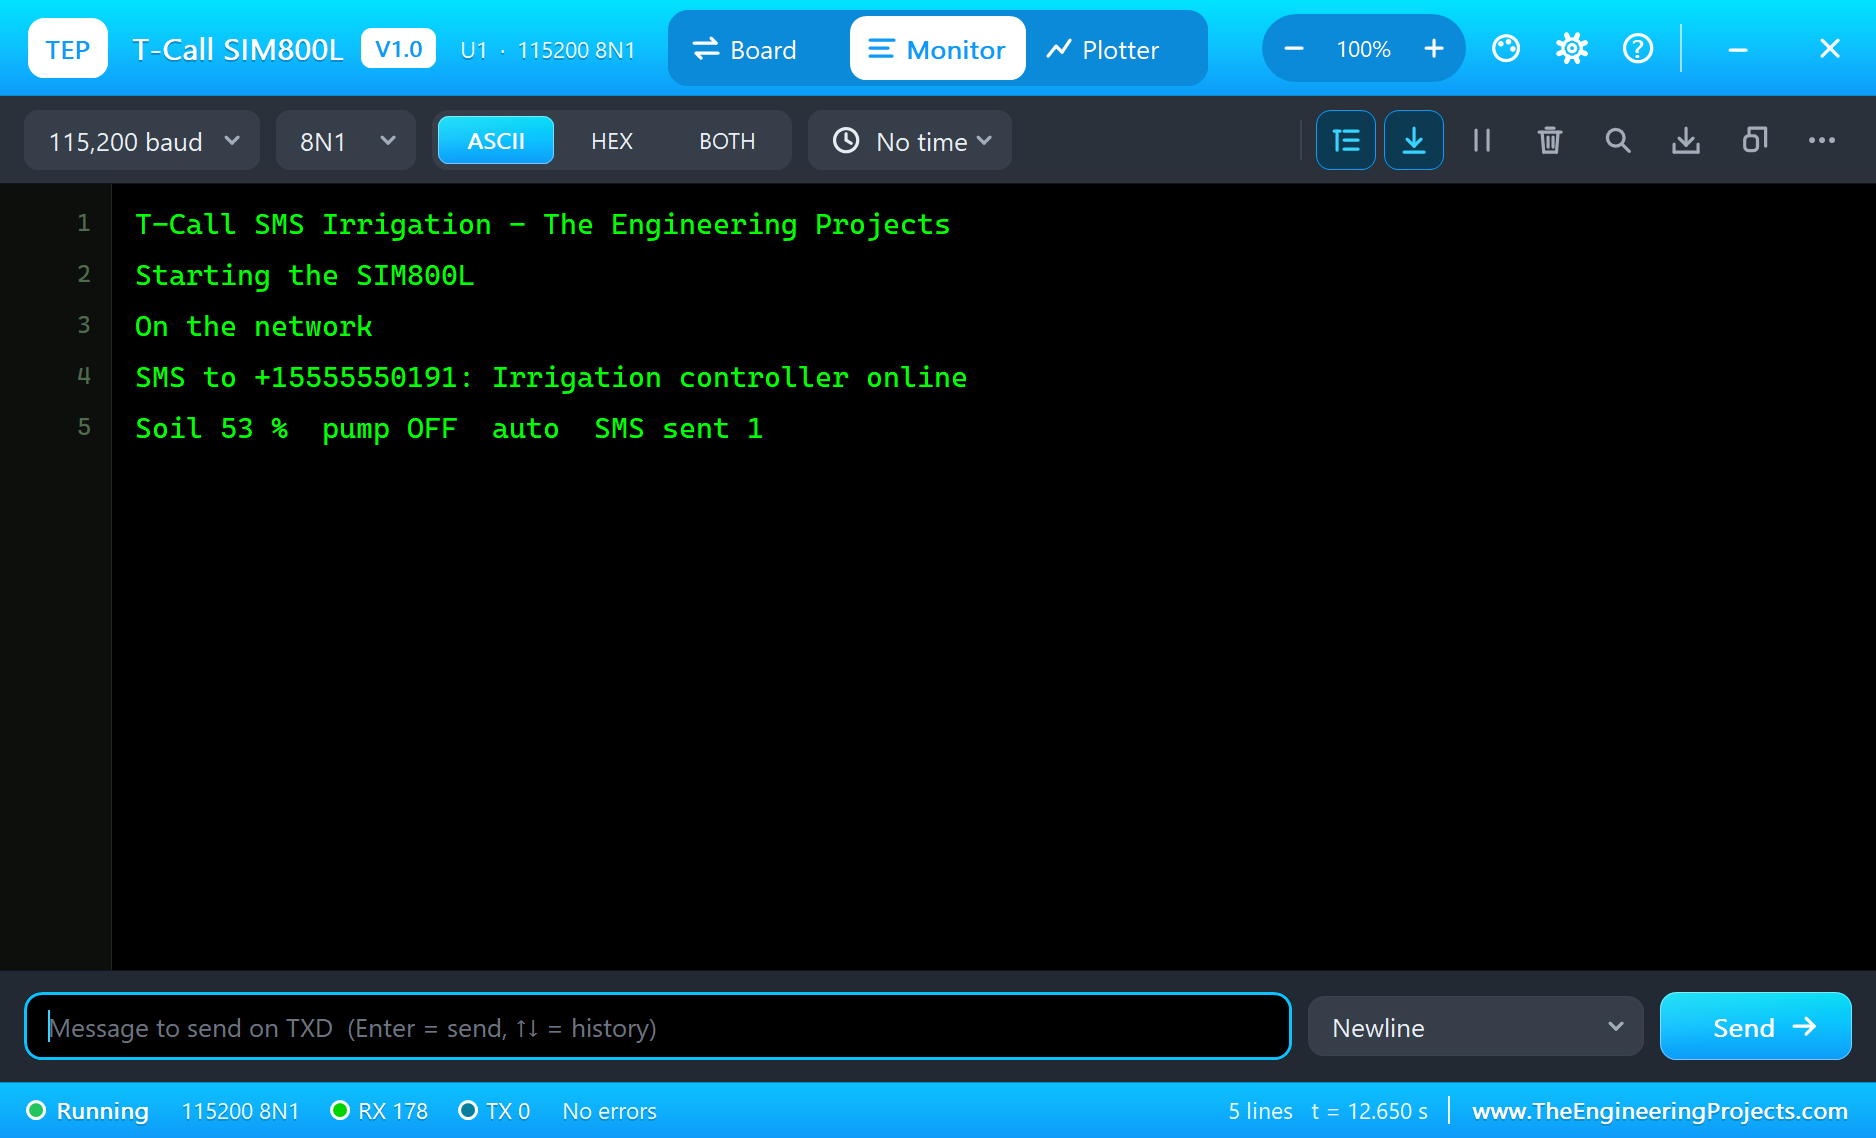
The Soil Dries Out
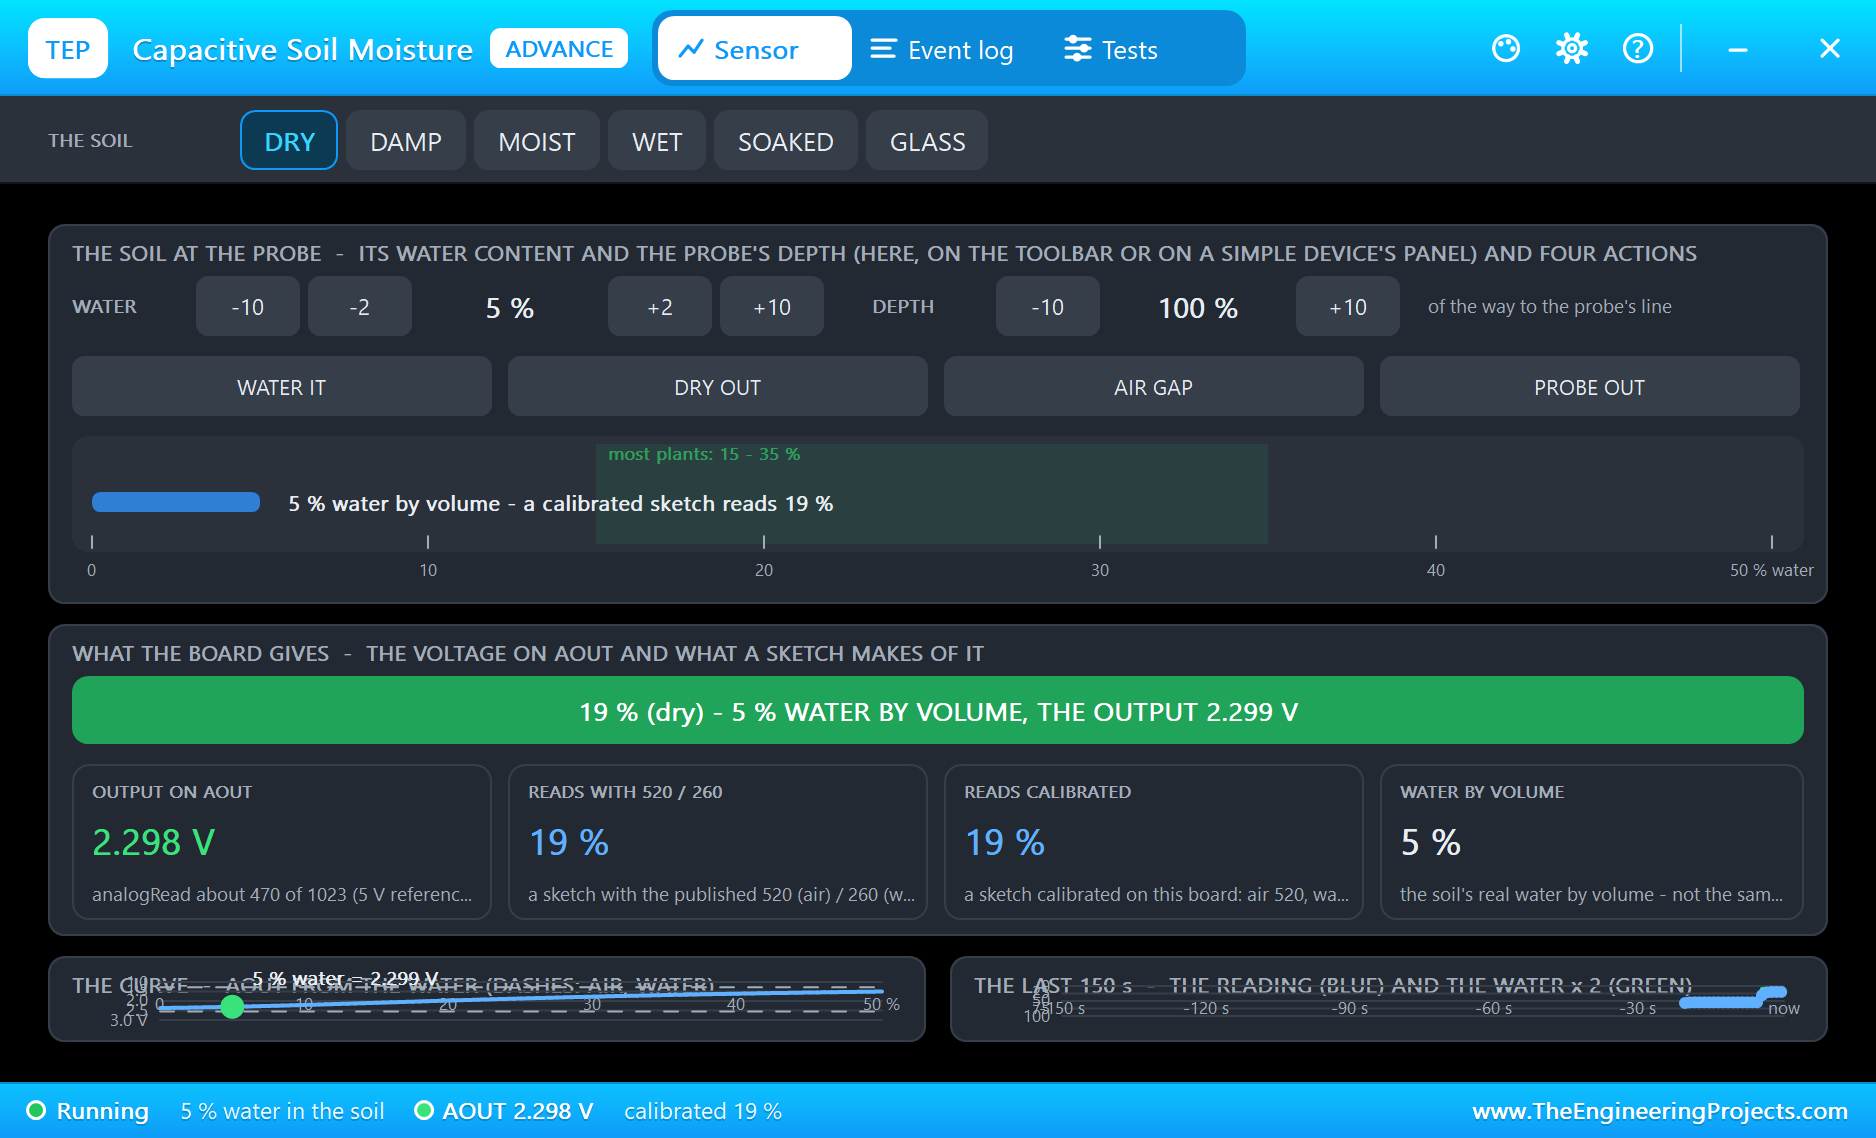
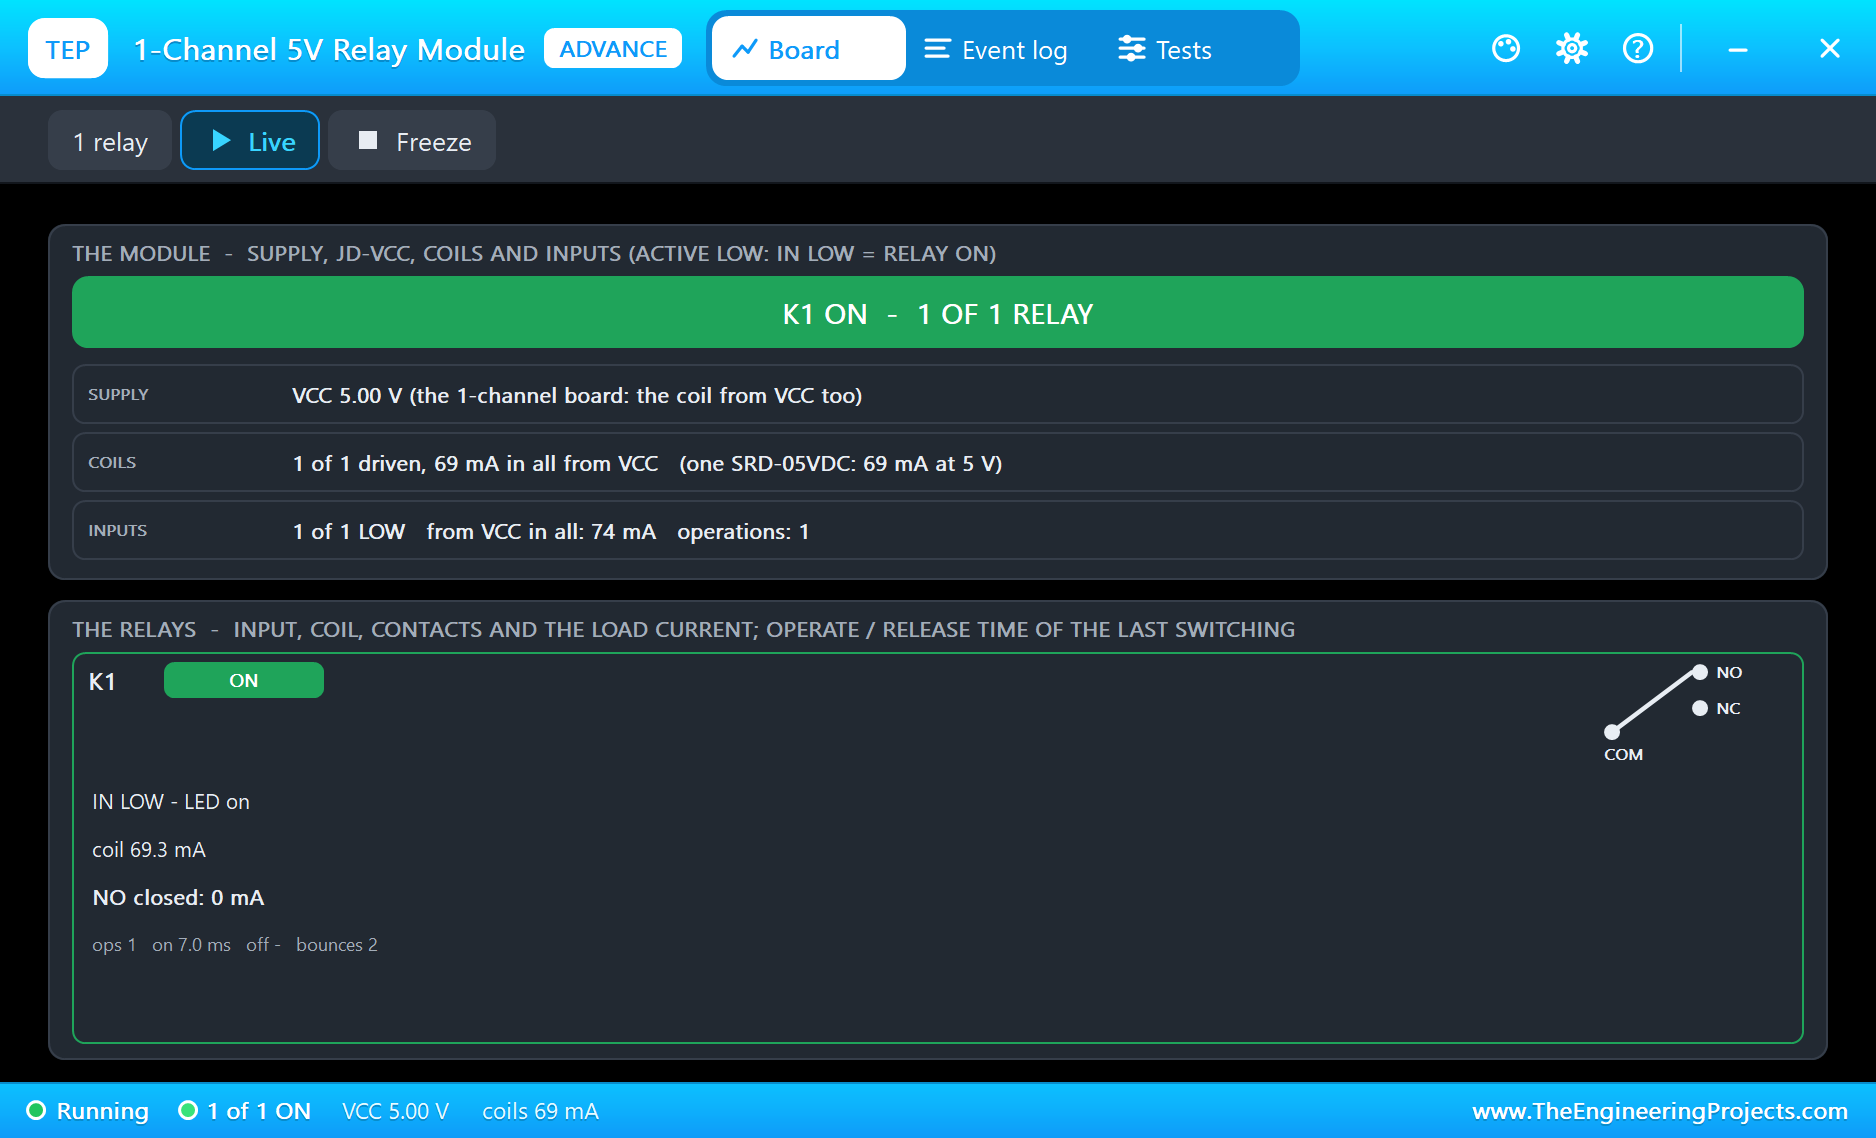
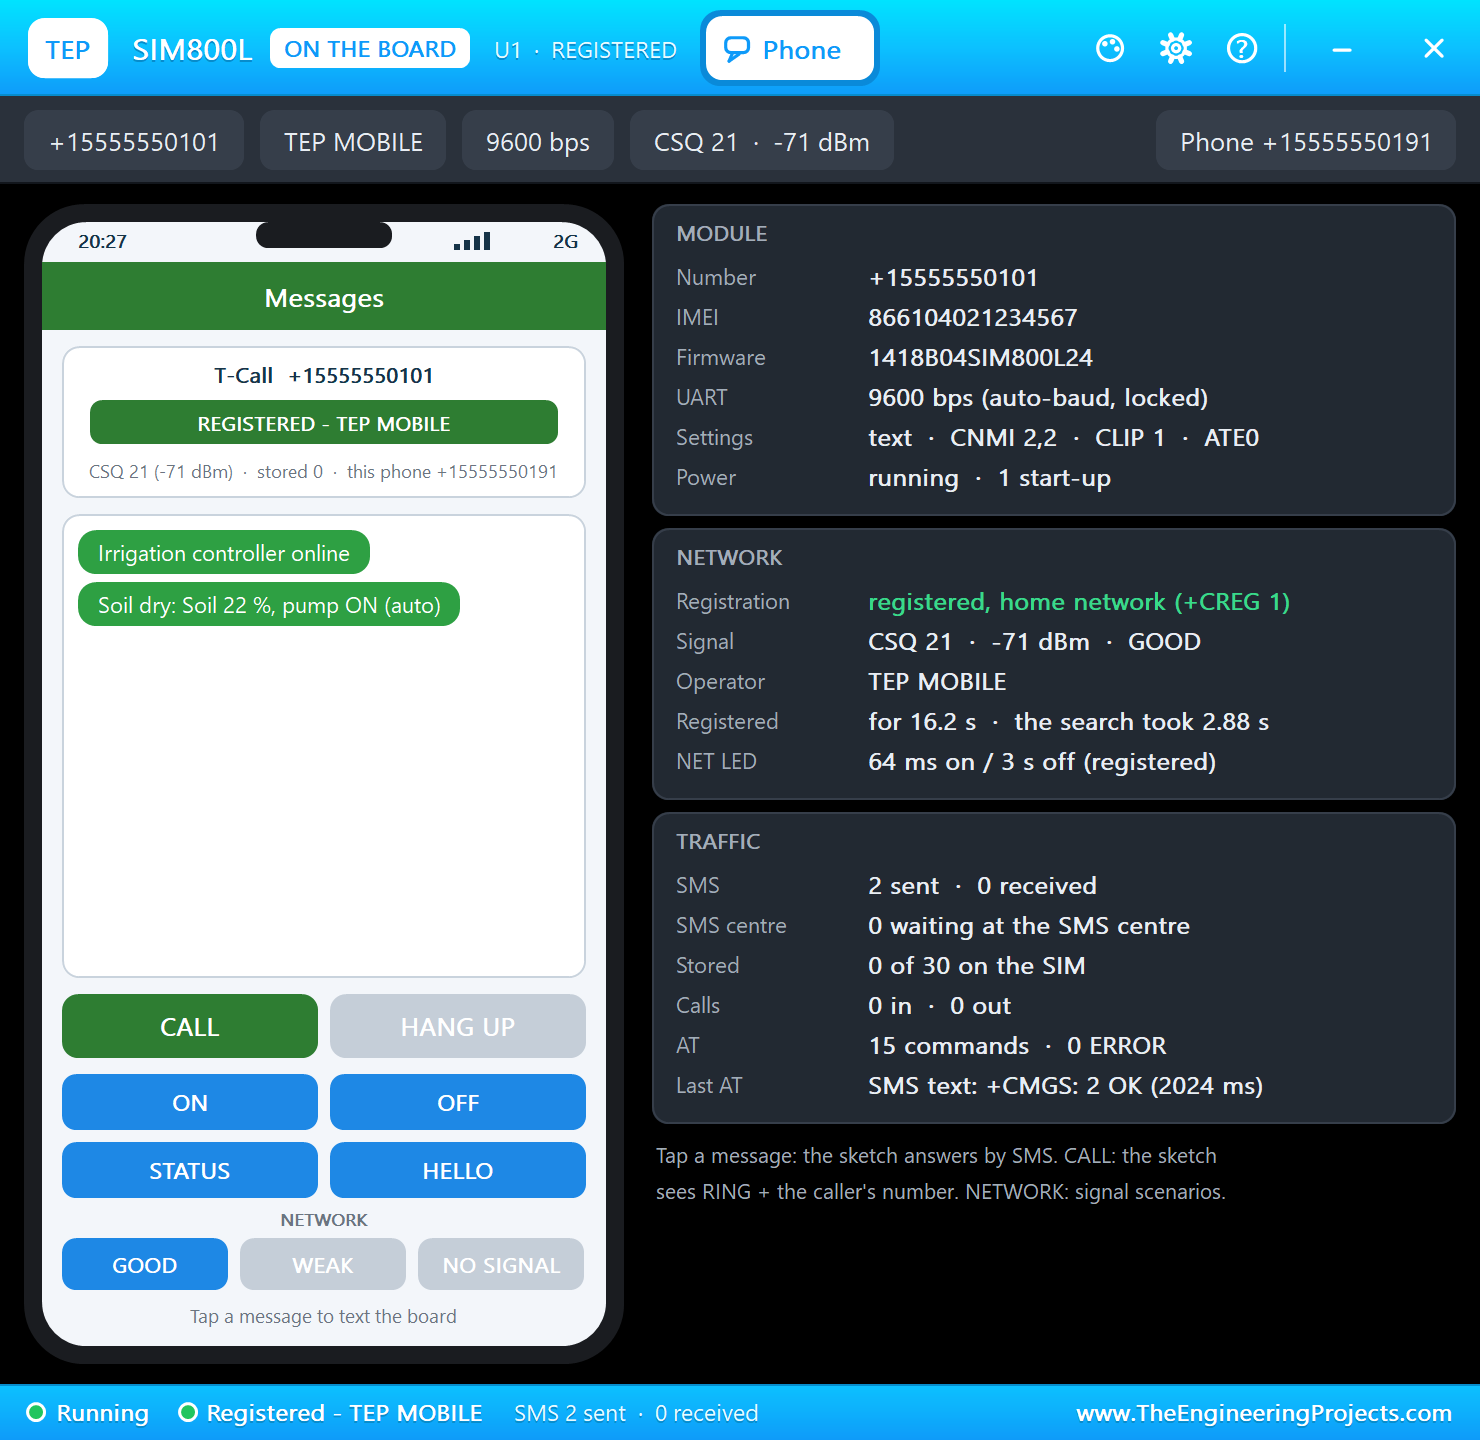
Click DRY on the sensor's window. The reading falls below 40 %, the pump starts, the blue LED lights, and the farmer gets a text:
The Water Arrives
Click WET. The reading climbs past 60 %, the pump stops and the farmer is told:
Texting the Board
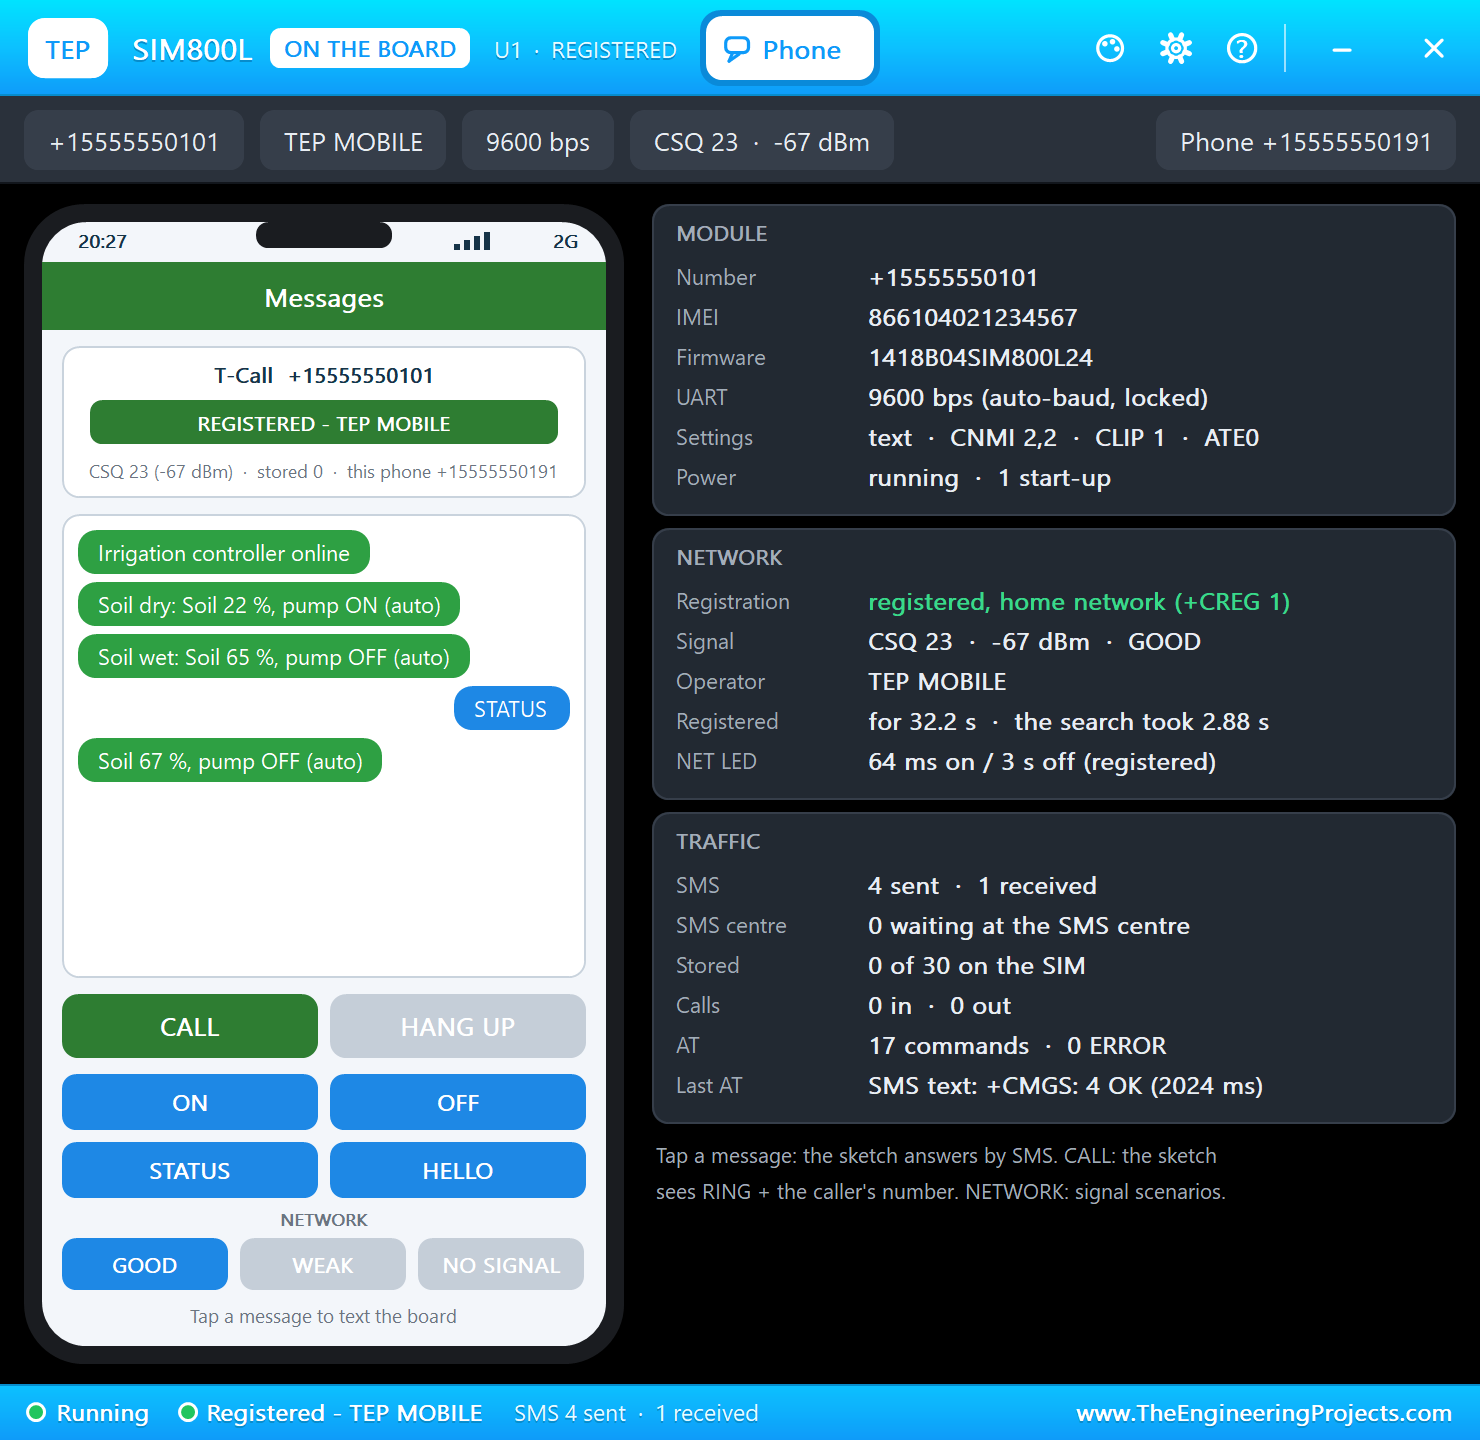
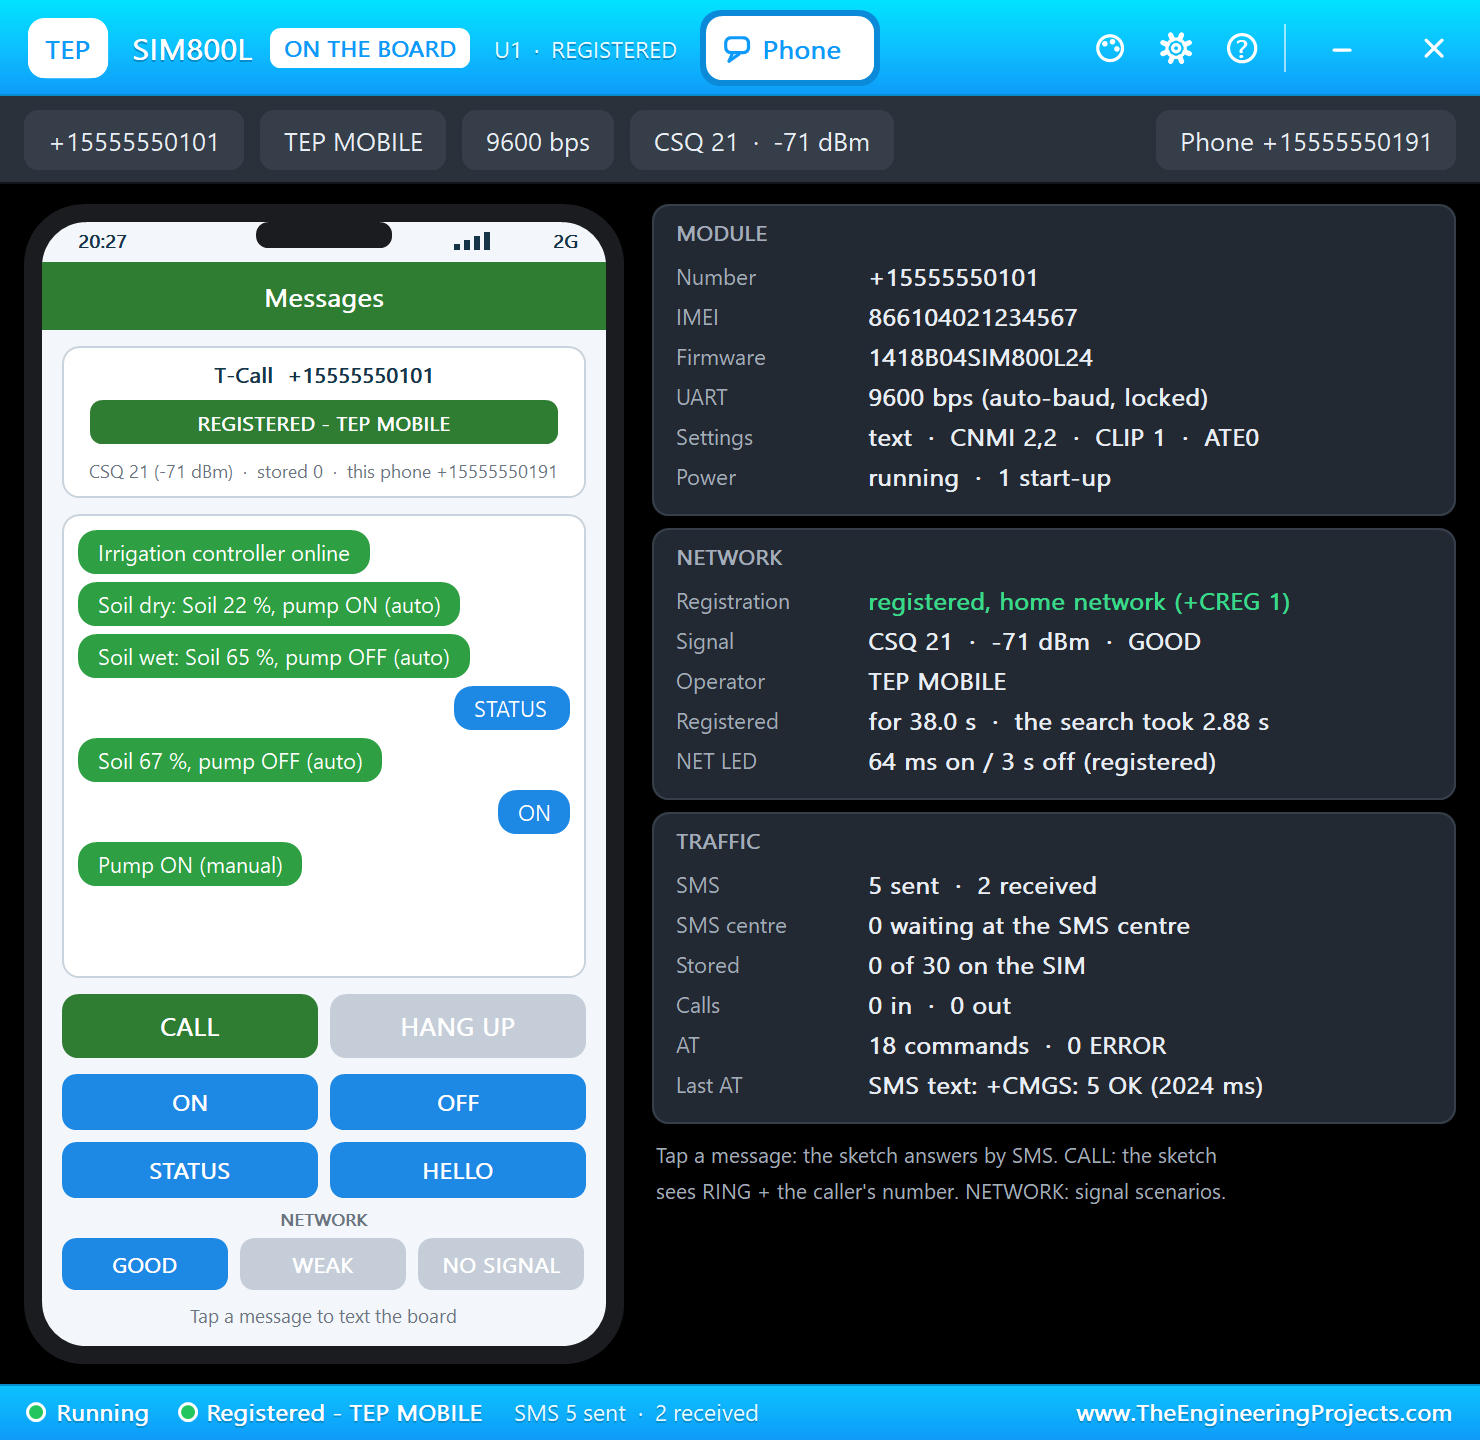
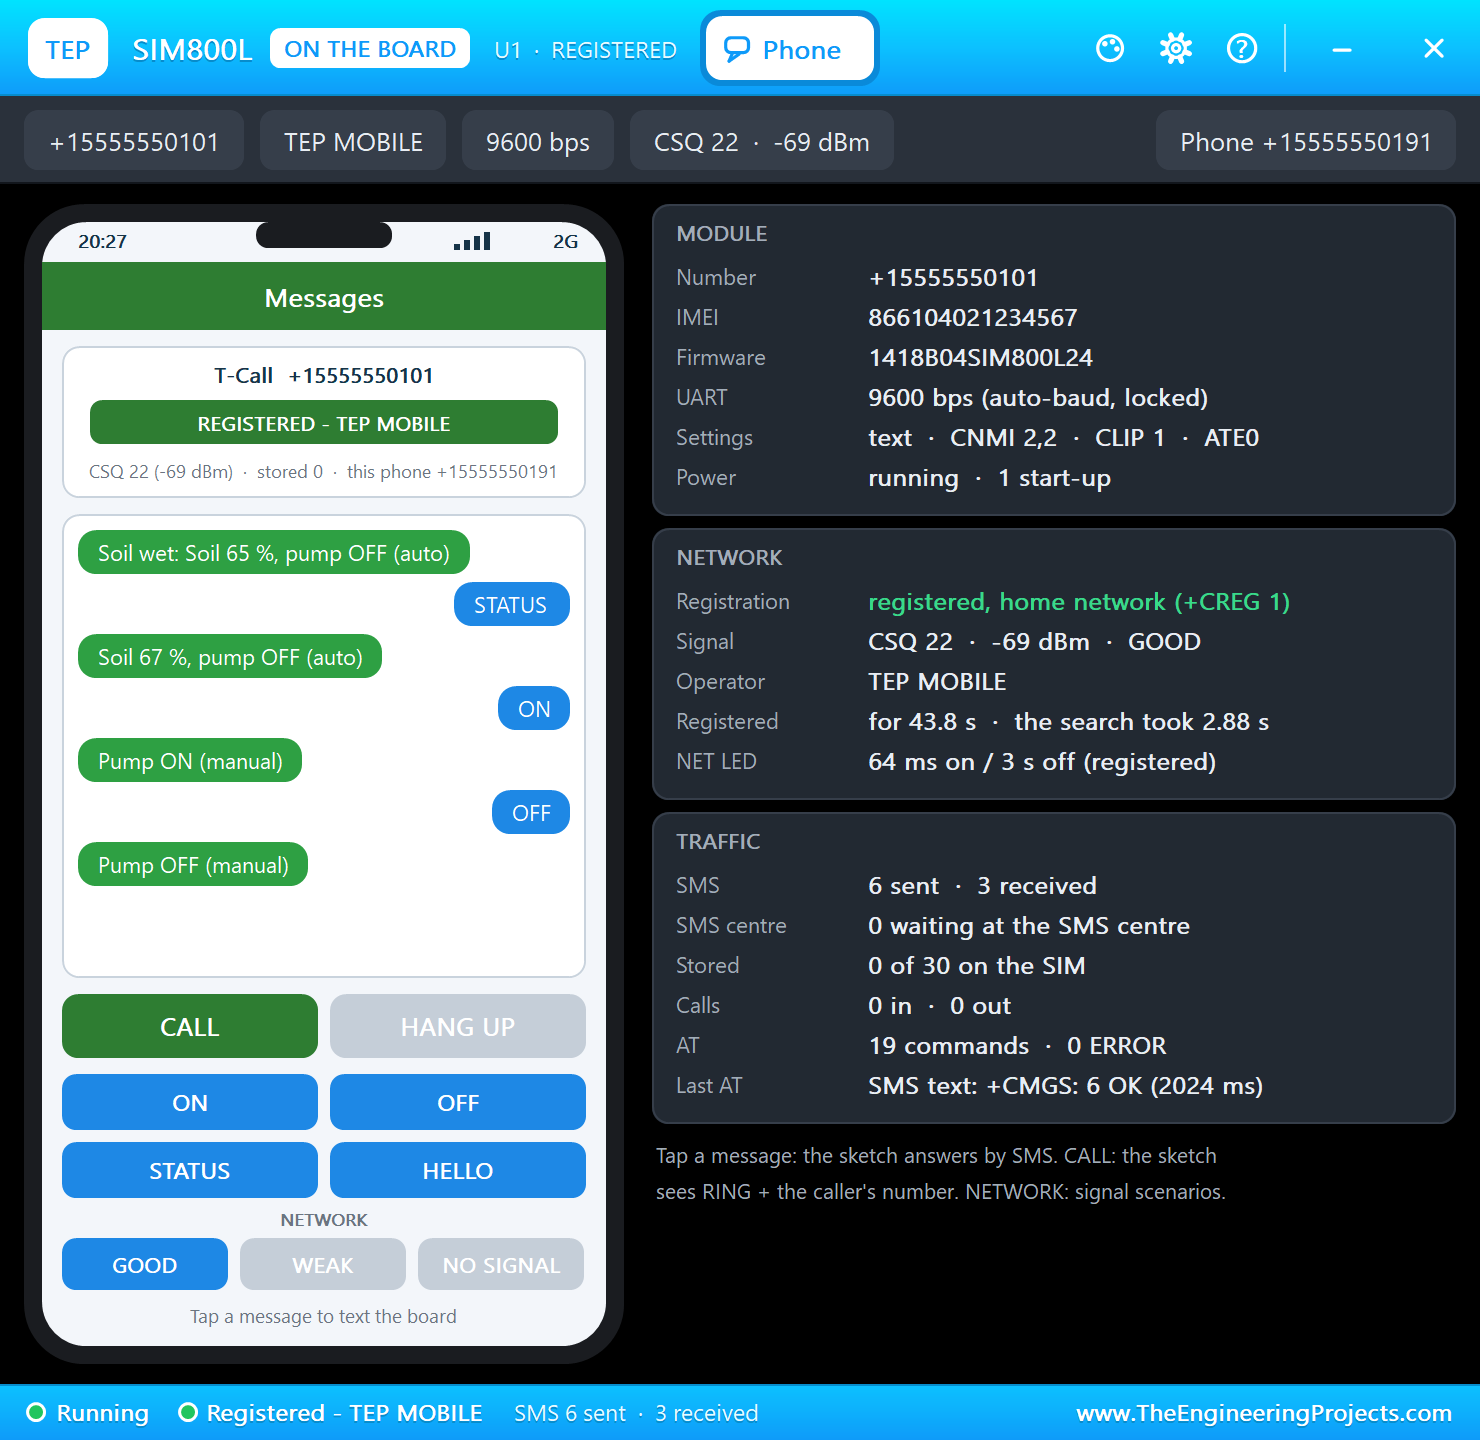
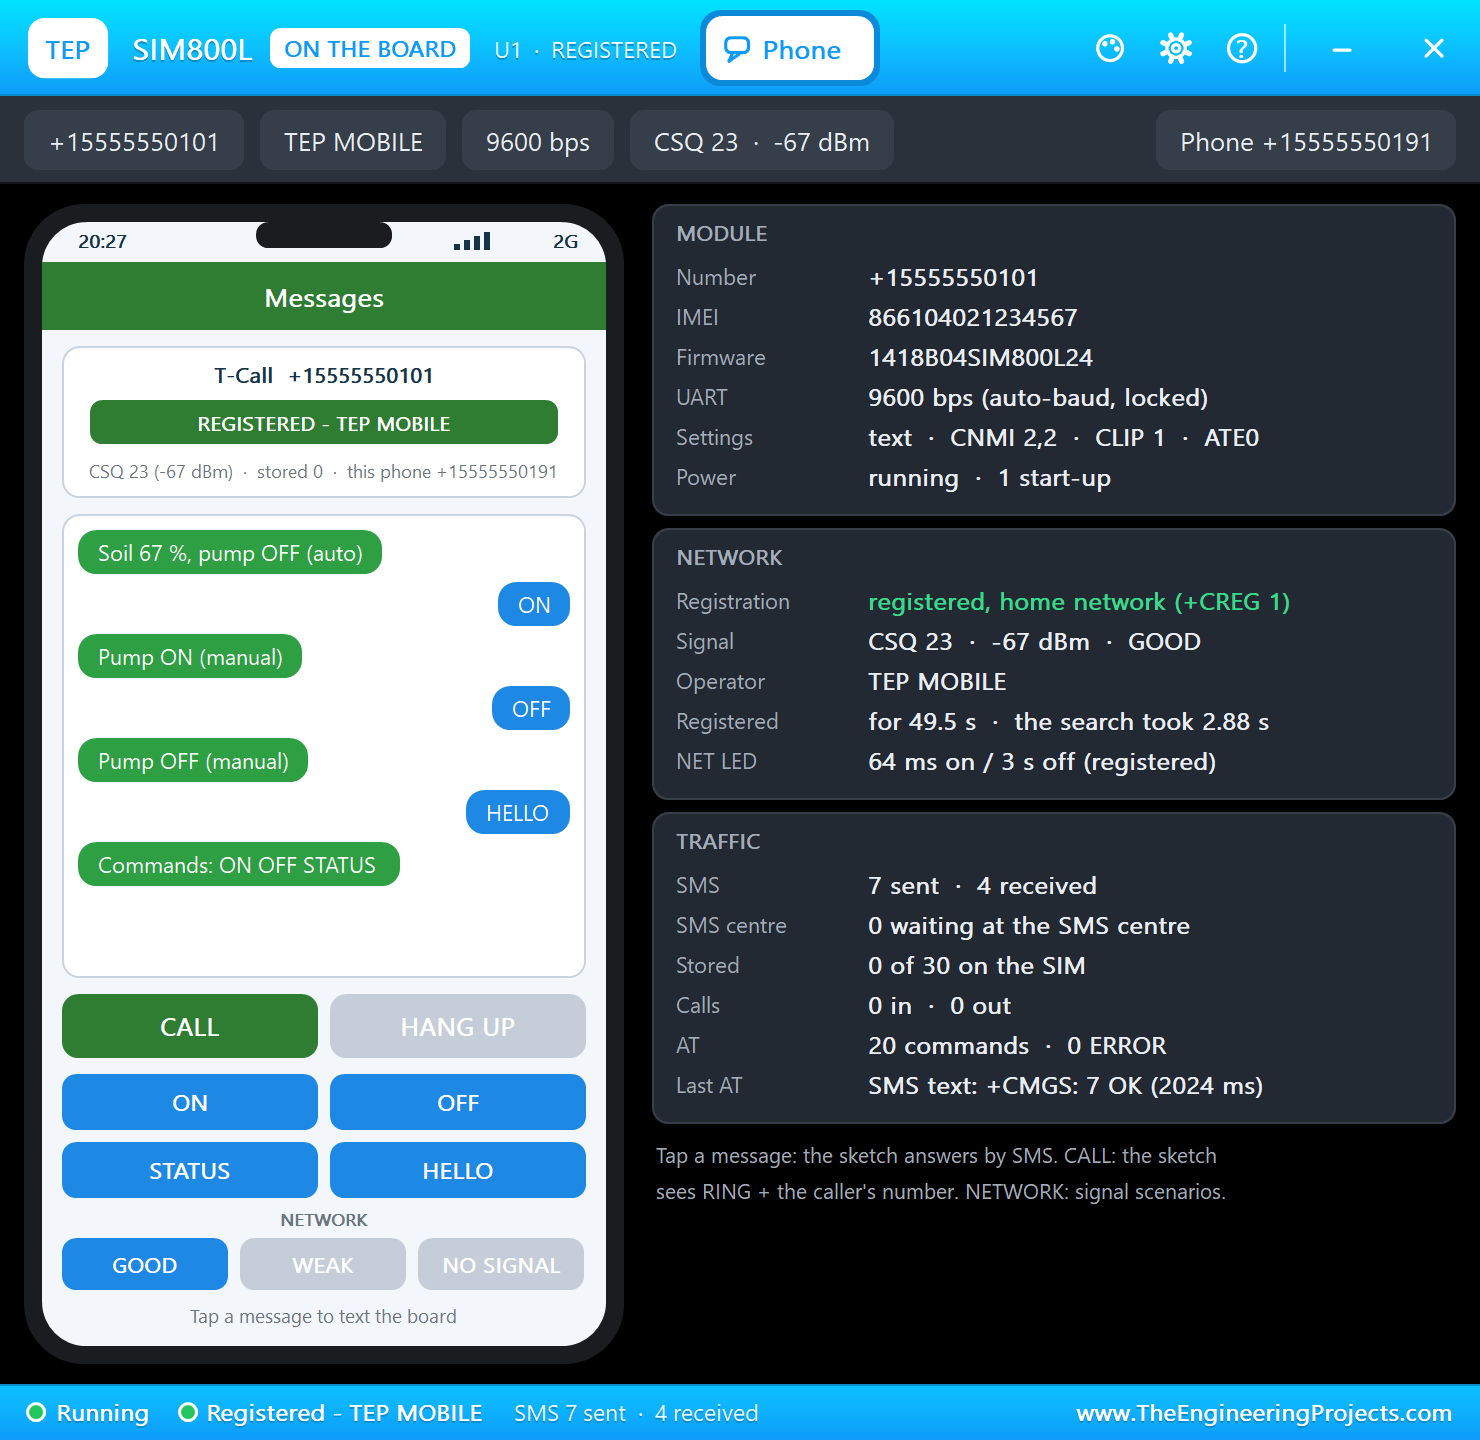
Tap STATUS on the phone: about two seconds later the answer comes back. ON and OFF take manual control, and HELLO, like any word the board does not know, brings the list of commands:
The Missed Call
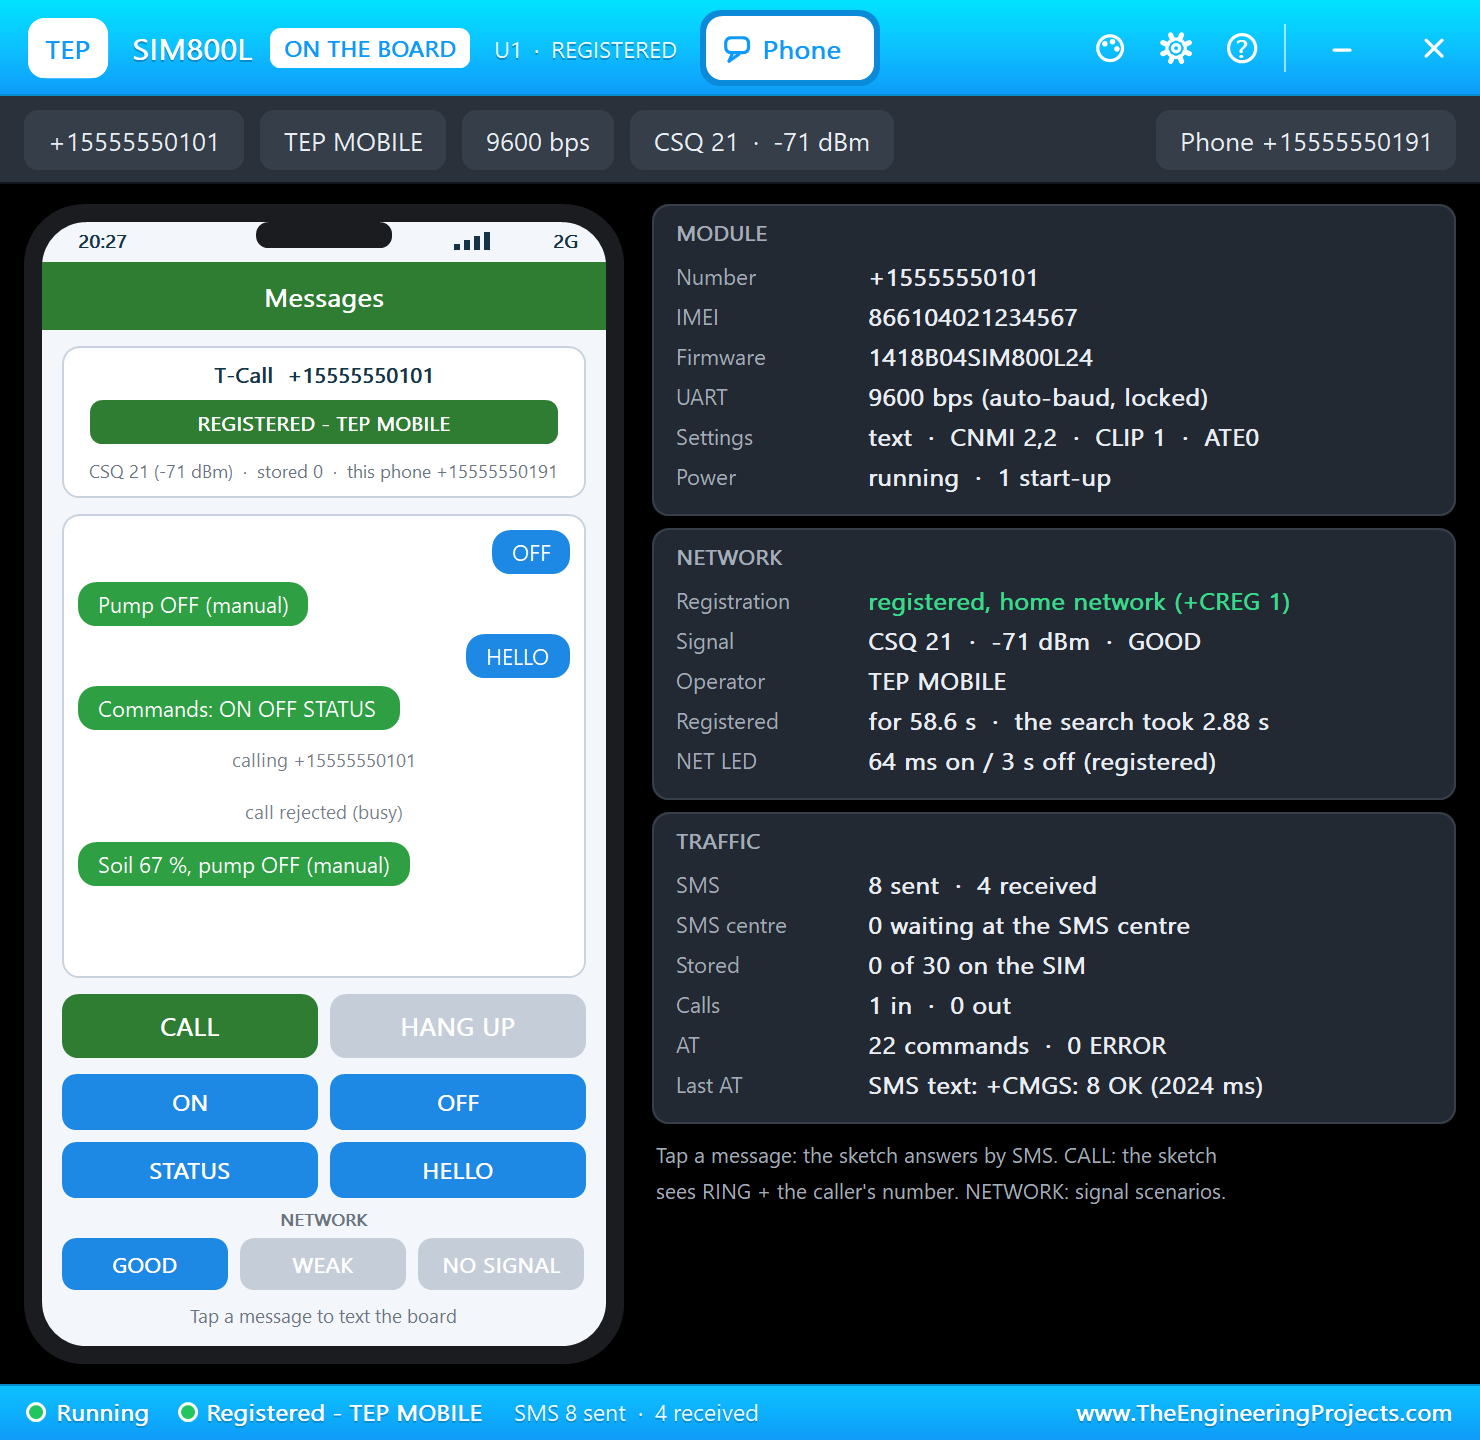
Now tap CALL. The board sees RING and the number, hangs up, and sends the status:
The built-in serial monitor has followed everything:
>> Soil dry: pump ON
SMS to +15555550191: Soil dry: Soil 22 %, pump ON (auto)
Soil 22 %  pump ON  auto  SMS sent 2
>> Soil wet: pump OFF
SMS to +15555550191: Soil wet: Soil 65 %, pump OFF (auto)
Soil 65 %  pump OFF  auto  SMS sent 3
SMS from +15555550191: STATUS
SMS to +15555550191: Soil 67 %, pump OFF (auto)
SMS from +15555550191: ON
SMS to +15555550191: Pump ON (manual)
SMS from +15555550191: OFF
SMS to +15555550191: Pump OFF (manual)
SMS from +15555550191: HELLO
SMS to +15555550191: Commands: ON OFF STATUS
Missed call from +15555550191
SMS to +15555550191: Soil 67 %, pump OFF (manual)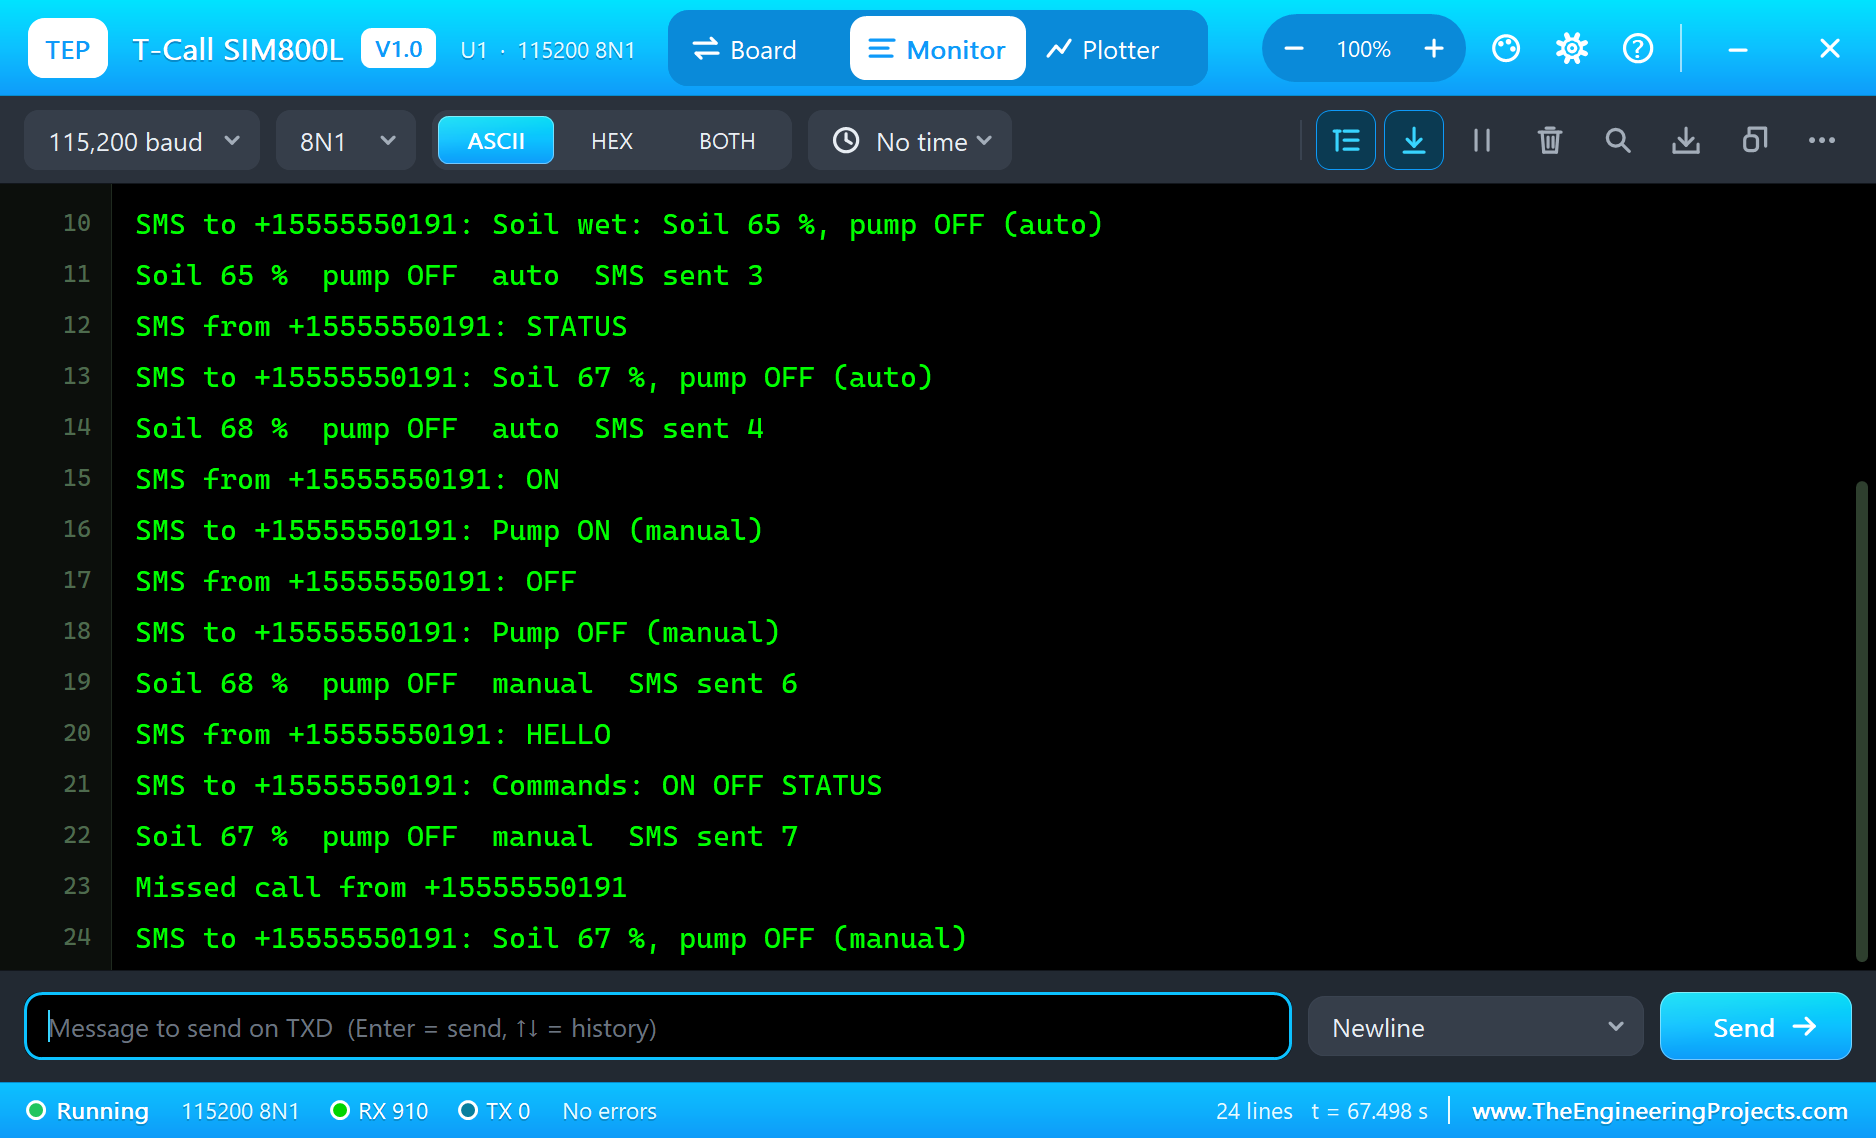
Try It Yourself
- Tap NO SIGNAL on the phone and watch the red LED go back to its fast flash.
- Tap WEAK and read the lower CSQ in the Network card.
- Click WATER IT or DRY OUT on the sensor's window and watch the pump follow.
- Change
DRY_PCTandWET_PCTand rebuild the sketch.
Ideas to Extend the Controller
- Accept commands only from a list of known numbers.
- Add a run-time limit, so that a broken sensor cannot run the well dry.
- Answer a call with ATA and tell the caller the status with a DTMF menu.
- Save the mode in Preferences, so that a power cut does not lose it.
Your Own Sketches
Write the sketch in the Arduino IDE with the board T-Call SIM800L (TEP Proteus), use Sketch > Export Compiled Binary and set the board's PROGRAM property to the .hex. For a real board select "ESP32 Dev Module" in Espressif's "esp32" package, define the five MODEM pins and upload. The sketch here sends plain AT commands, so it needs no extra library.
Things to Know Before Using a Real T-Call
Choosing a Relay and a Pump
The relay module on the sheet stands for the pump's switch. A real borewell pump draws far more current than a small relay can carry, so use the module to drive a contactor with the right rating, and keep the mains wiring well away from the low-voltage side. A motor is also an inductive load, so a suppressor across the contacts helps them last. Ask a qualified electrician to do the mains side of the job.
- Check your network first: the SIM800L is 2G only, and some countries have switched 2G off.
- Connect the antenna first: never transmit with the u.FL socket empty.
- Power on a battery: LilyGO says the IP5306 version needs the reset button pressed to turn on from a Li-ion cell.
- Keep the IP5306 awake: with a light load it can switch itself off, so real sketches set its keep-on bit over I2C at address 0x75.
- Nano SIM: the socket is on the back, and the SIM needs its PIN switched off.
- Check your board's version: newer boards also bring out DTR on GPIO32 and RI on GPIO33.
Properties of the T-Call SIM800L
| Property | What it does |
|---|---|
| PROGRAM | the sketch: a .hex from TEP Boards for Proteus (board "T-Call SIM800L") |
| SIMNUM, PHONENUM | the SIM card's number and the phone's number |
| OPERATOR, GSMCLOCK | the network's name and the module's clock (PC or a date) |
| WIFISSID, WIFIPASS | the router in range (TEP-WiFi, 12345678) |
| MONITOR, BAUD, AUTOOPEN | the built-in serial monitor: on, its baud rate (115200), open at Run |
Troubleshooting
- The phone says NO POWER: the sketch must set GPIO23 HIGH.
- The module never answers: send "AT" first, because it auto-bauds.
- AT+CMGS fails: wait for AT+CREG? to show ,1; the module needs a few seconds.
- No SMS reaches the sketch: AT+CMGF=1 and AT+CNMI=2,2,0,0,0 in setup().
- A number goes wrong above 32767: int is 16 bits in the simulation - use long.
Limitations of the Simulation
- Your sketch gets 8 KB of RAM in the simulation, and there are no FreeRTOS tasks and no second core.
- The modem does SMS in text mode and calls. GPRS data is not modelled, so TinyGSM's gprsConnect, MQTT and HTTP over the SIM800L will not work.
- Audio, PDU-mode SMS, the IP5306, the battery and Bluetooth are not modelled.
- T-Call is a name of LilyGO, SIM800L of SIMCom and ESP32 of Espressif Systems; this library is not made or endorsed by them or by Labcenter.
- Tested in Proteus 8.5 in October 2026 (the demo as shipped, about 70 s of simulation). Proteus 7 is not supported.
So, that was all about the LilyGO T-Call SIM800L Library for Proteus. I hope it helps you build and test your GSM projects before you buy a SIM card - the modem, the SMS, the missed call and the pump in one simulation. If you have any questions, ask in the comments and I will help you out. Till the next tutorial, take care and have fun!