Hello friends, I hope you all are doing great. Today, I am going to share the new Micro Limit Switch Library for Proteus. A limit switch is the part that tells a machine where things are. It knows when a door is closed, when a 3D printer's head has reached the end of its rail, when a lift has arrived at a floor, and when a box has rolled past on a conveyor. Most of the time it is a small black block with a metal lever, quietly waiting for something to push it.
Micro Limit Switch Library for Proteus
Latest version: V1.0 (November 2026, this tutorial)
Other component libraries: C945 Transistor · PC817 Optocoupler · Relay Module · Resistor · 5 mm LED · Designer Colour LED · Push Button · Active Buzzer · Electrolytic Capacitor · Ceramic Capacitor · Tantalum Capacitor · Film Capacitor · 1N4007 Diode · Zener Diode · Schottky Diode · Supercapacitor · Photodiode · RGB LED · Bridge Rectifier · Flashing LED · Bi-Colour LED · SMD LED · Slide Switch · Toggle Switch · Rocker Switch · Emergency Stop Switch · SMD Resistor · Power Resistor · Resistor Network · Potentiometer · Trimmer Potentiometer · Slide Potentiometer · NTC Thermistor · DIP Switch · Fuse · Passive Buzzer · Mini Speaker · 7-Segment Display · LED Bar Graph · IR / UV LED · Small Transistors · TIP122 Darlington · N-MOSFET · P-MOSFET · PC817 Optocoupler · Filament Bulb · Power LED · Voltage Regulator · SCR and TRIAC · Inductor · Toroid Inductor · Crystal
Helping Tools
- Serial Monitor Advance: a serial terminal window for the UART of your board
- Serial Monitor Expert: the serial monitor with extra debugging tools
- LCD Library for Proteus V3.0: 16x2, 20x4 and I2C LCDs to show your readings
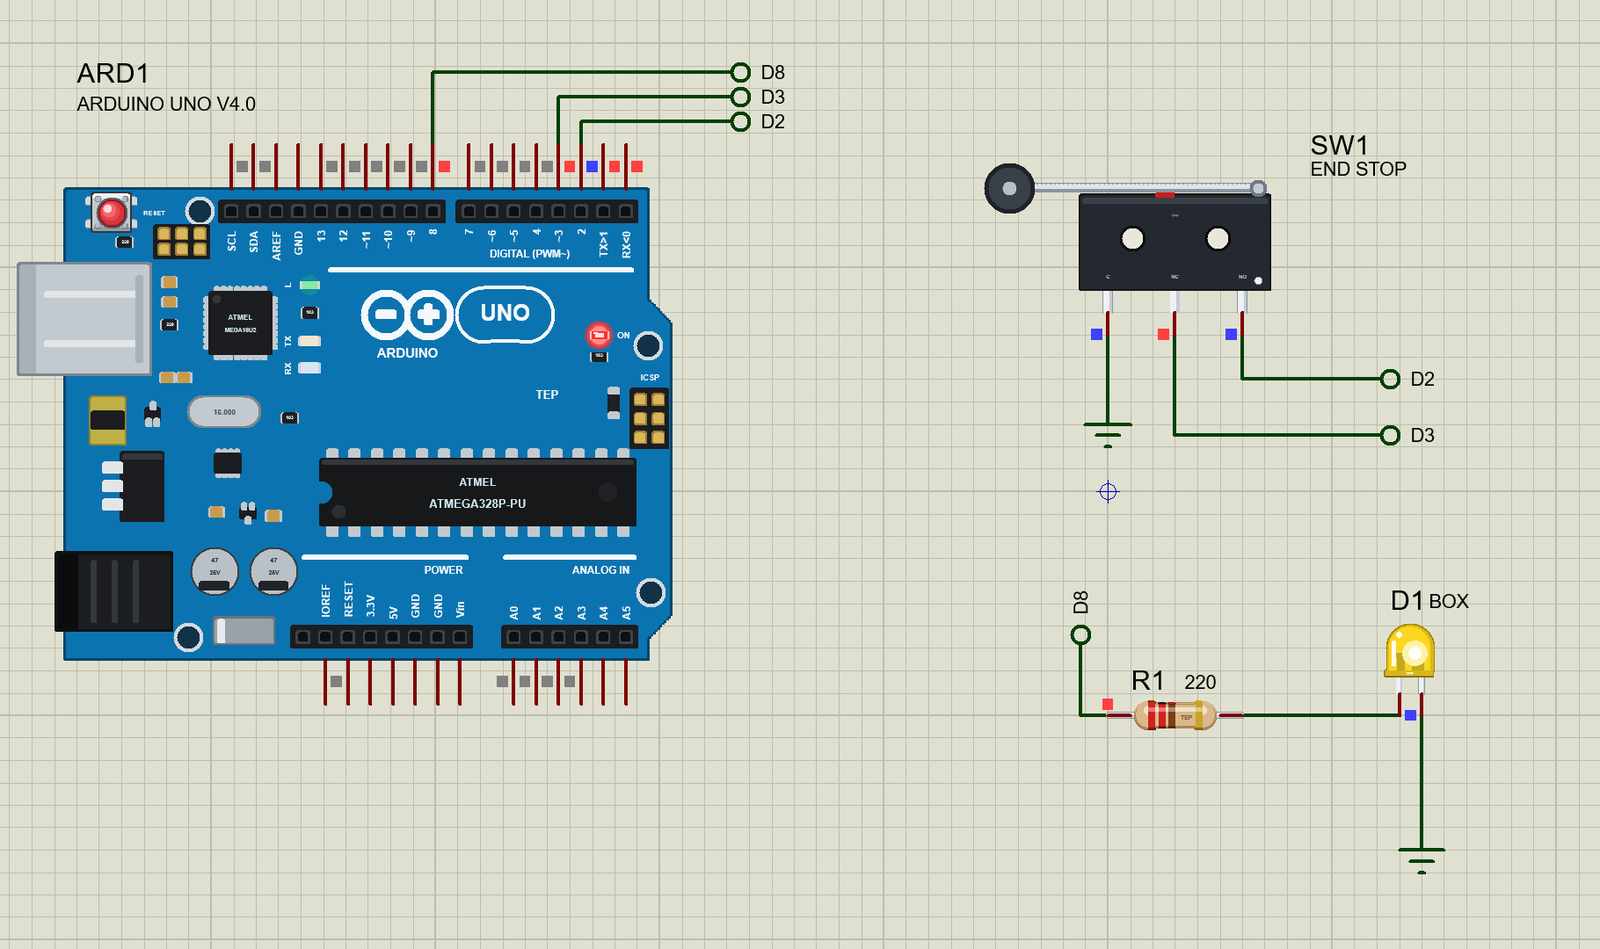
Our part is the very common KW11-3Z micro switch with a roller lever, at true scale, with its black body, two mounting holes and three tabs. Hold the mouse on it at Run and the lever goes down; let go and it springs back up, just like the real part. It has both a normally open and a normally closed contact, with true contact bounce. For the demo we have built a box counter that reads both contacts, the way careful machines do, so that a broken wire can never pass for a box.
NOTICE: Our team has put a lot of effort into these small parts: the bodies, the animation and the pop-ups are all our own design, and you get them free. Your feedback is the fuel that keeps us going, so please tell us what you think in the comments below or in the Micro Limit Switch board of our forum. And if our free libraries help you, you can buy us a coffee. So, let's get started with the Micro Limit Switch Library for Proteus:
What is a Micro Limit Switch?
A micro switch is a small switch that changes over with a very small movement and a very small force. Inside, a curved spring blade holds the moving contact. When the plunger on top is pushed past a certain point, the blade suddenly flips over and slams the contact to the other side. That is called snap action, and it is the secret of the micro switch. However slowly the lever moves, the contact always changes over fast and cleanly.
The name began as a brand. Micro Switch was a company, which later became part of Honeywell, and the word stuck for the whole family of small snap-action switches. When one is used to detect the end of a movement, it is called a limit switch. The lever on top, often with a little roller at its end, lets a moving part press the plunger gently from the side, instead of hitting it head on.
| Feature | The real part | In the library |
|---|---|---|
| Body | KW11-3Z, 20 x 10 mm | 840 x 420 thou, true scale |
| Lever | a steel strip with a roller | the same, about 26 mm long |
| Tabs | C, NC and NO | the same pins |
| Rating | about 5 A at 250 V AC | the Check page warns over 5 A |
| Action | snap action, springs back | hold the mouse to press, let go to release |
C, NO and NC
A micro switch is an SPDT part with three tabs. C is the common. NC means normally closed: it is joined to C while nothing presses the lever. NO means normally open: it is joined to C only while the lever is pressed. So the same switch can give you a signal that turns on when pressed, or one that turns off when pressed, and you choose by the tab you use.
| Lever | C to NC | C to NO |
|---|---|---|
| released | closed | open |
| moving | open | open |
| pressed | open | closed |
Notice the middle row. While the contact is flying across, for a few milliseconds, C is touching neither side. That is break before make, the same as in our Toggle Switch Library for Proteus. It is important here, because the demo uses that moment to tell a healthy switch from a broken wire.
Operating Point and Release Point
The point where the contact snaps over on the way down is called the operating point. On the way back up, it snaps back a little higher, at the release point. The gap between the two is a small built-in hysteresis, and it is very useful. Without it, a lever resting right at the switching point would chatter on and off with every tiny vibration. With it, the switch needs a clear movement in each direction before it changes its mind.
Levers and Plungers
The same body comes with many tops. A plain pin plunger is pressed straight down, for a precise stop. A hinge lever gives a longer, gentler movement with a smaller force. A roller lever, like ours, lets a cam, a door or a sliding block roll onto it from the side, which is why it is the classic choice on conveyors, on doors and at the ends of rails. There is also a simulated roller, a bent lever tip that looks like a roller without being one.
Where Are They Used?
Once you start looking, micro switches are everywhere. The door of a microwave oven has several of them, so that it cannot run with the door open. A 3D printer or a CNC machine uses one at the end of each axis to find its home position. Vending machines use them to know a coin has dropped or a spiral has turned. Washing machines use them in the door lock. The buttons of most computer mice are tiny micro switches, which is why a worn mouse can start to double-click: its contact has begun to bounce badly.
Normally Closed for Safety
Here is a design rule worth remembering. Suppose a printer's end stop is wired on the NO tab, with a pull-up on the pin. If the wire breaks, the pin simply sits HIGH, which looks exactly like "not pressed". The axis keeps driving into the end of its rail, and something breaks. Wire the same switch on the NC tab instead, and a broken wire now reads as "pressed", so the machine stops. That is why safety switches are so often wired normally closed: a fault makes the machine stop, not carry on.
Reading Both Contacts
A step further is to read both tabs at once. A healthy switch always has exactly one of them closed. If both read open for longer than the bounce time, a wire is broken. If both read closed, something is shorted. Industrial safety circuits use this idea with two separate channels, and our demo uses it in its simplest form, on two Arduino pins.
Debouncing a Micro Switch
Snap action makes the contact change over fast, but it does not stop the contact from bouncing when it lands. A micro switch typically bounces for a millisecond or two, a little less than a big toggle. A sketch counting presses must still ignore that chatter, exactly as we did with the Push Button Library for Proteus. Our demo waits for 10 ms of steady readings before it believes a change.
Features of the Micro Limit Switch Library for Proteus
- The real look, at true scale: the black body with its mounting holes, the steel lever and roller, and three tabs, with our small TEP signature.
- Hold to press: hold the mouse on the switch at Run and the lever goes down; let go and it springs back.
- Press and Hold chips: the pop-up gives a short tap, or holds the lever down until you release it.
- Both contacts: C, NC and NO, with break before make between them.
- True contact behaviour: a small resistance closed, and real contact bounce as it lands.
- A true analog part: it works with any circuit, not only with logic.
- A pop-up for every part: click the small dot at Run for the contacts, eight live values, graphs, an event log and a check page.
- A complete package: about 1.8 MB with the library, our Arduino UNO V4.0, the demo's resistor and LED and the demo, without the source code of the models.
The Micro Limit Switch in Proteus
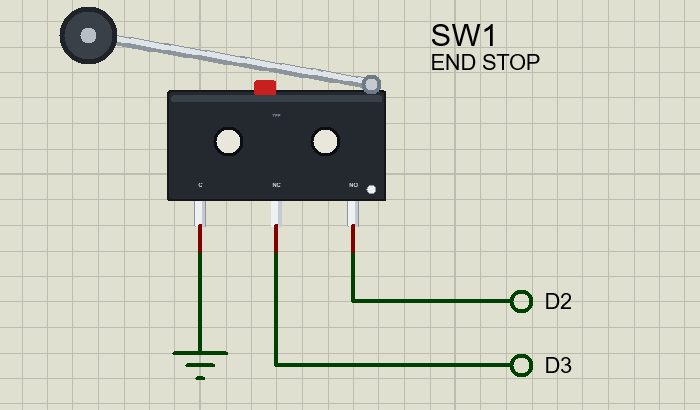
The device is SWITCHLIMITTEP in TEPLIMIT.LIB, under Switches and Relays, Switches, with the prefix SW and the model TEPLIMIT.DLL. Search SWITCHLIMIT in Pick Devices. The pins are C, NC and NO, in that order along the bottom.
Hold It, or Open It
Hold the mouse button down anywhere on the body or the lever while the simulation runs, and the lever goes down. Let go, and it springs back. A click on the small round dot in the corner of the body opens the pop-up instead, and leaves the switch alone.
The Properties
| Property | What it does |
|---|---|
| Contact resistance, ohm | the closed contact, 0.03 ohm by default |
| Contact bounce, ms | how long it chatters, 2 ms by default; 0 is a perfect contact |
| Look while stopped | Released or Pressed, for the drawing only: at Run it always starts released |
Download Micro Limit Switch Library for Proteus
Click the button below to download Micro-Limit-Switch-Library-for-Proteus-v1.0.zip (about 1.8 MB, without the source code of the models):
Micro Limit Switch Library for Proteus V1.0- README.txt: installation, the demo, the properties, troubleshooting and the limits.
- Proteus Library Files:
TEPLIMIT.LIB,TEPRESISTOR.LIB,TEPLED5MM.LIBand ourArduinoV4TEP.LIB. - Proteus Model Files:
TEPLIMIT.DLL,TEPRESISTOR.DLL,TEPLED5MM.DLLandTEPARDUINO.DLL. - Arduino Code: the demo sketch.
- Proteus Simulation: the demo project, its HEX file and copies of the DLLs.
No Proteus yet? Read How to Download and Install Proteus 7 and 8. New to libraries? Follow How to Install a New Library in Proteus.
How to Install Micro Limit Switch Library for Proteus
- Close Proteus and extract the whole zip file, for example to your Desktop.
- Copy the files from Proteus Library Files into the LIBRARY folder of Proteus.
- Copy the files from Proteus Model Files into the MODELS folder.
- Delete
TEPLIMIT.IDXfrom the LIBRARY folder if it is there. - Start Proteus, press P and search for SWITCHLIMIT.
Demo: A Box Counter That Checks Its Own Wires
Picture a conveyor belt, with boxes rolling past. Each box pushes the roller lever down as it goes by, and the Arduino counts it. SW1 is the switch, with C on GND, NO on D2 and NC on D3. The yellow LED D1 on D8 lights while a box is on the lever. Open Micro-Limit-Switch-Box-Counter-ArduinoUnoV4.pdsprj. It runs on our Arduino UNO Library for Proteus V4.0, with its built-in monitor, the same window as our TEP Serial Monitor Advance for Proteus. The resistor is from our Resistor Library for Proteus and the LED from our 5 mm LED Library for Proteus.
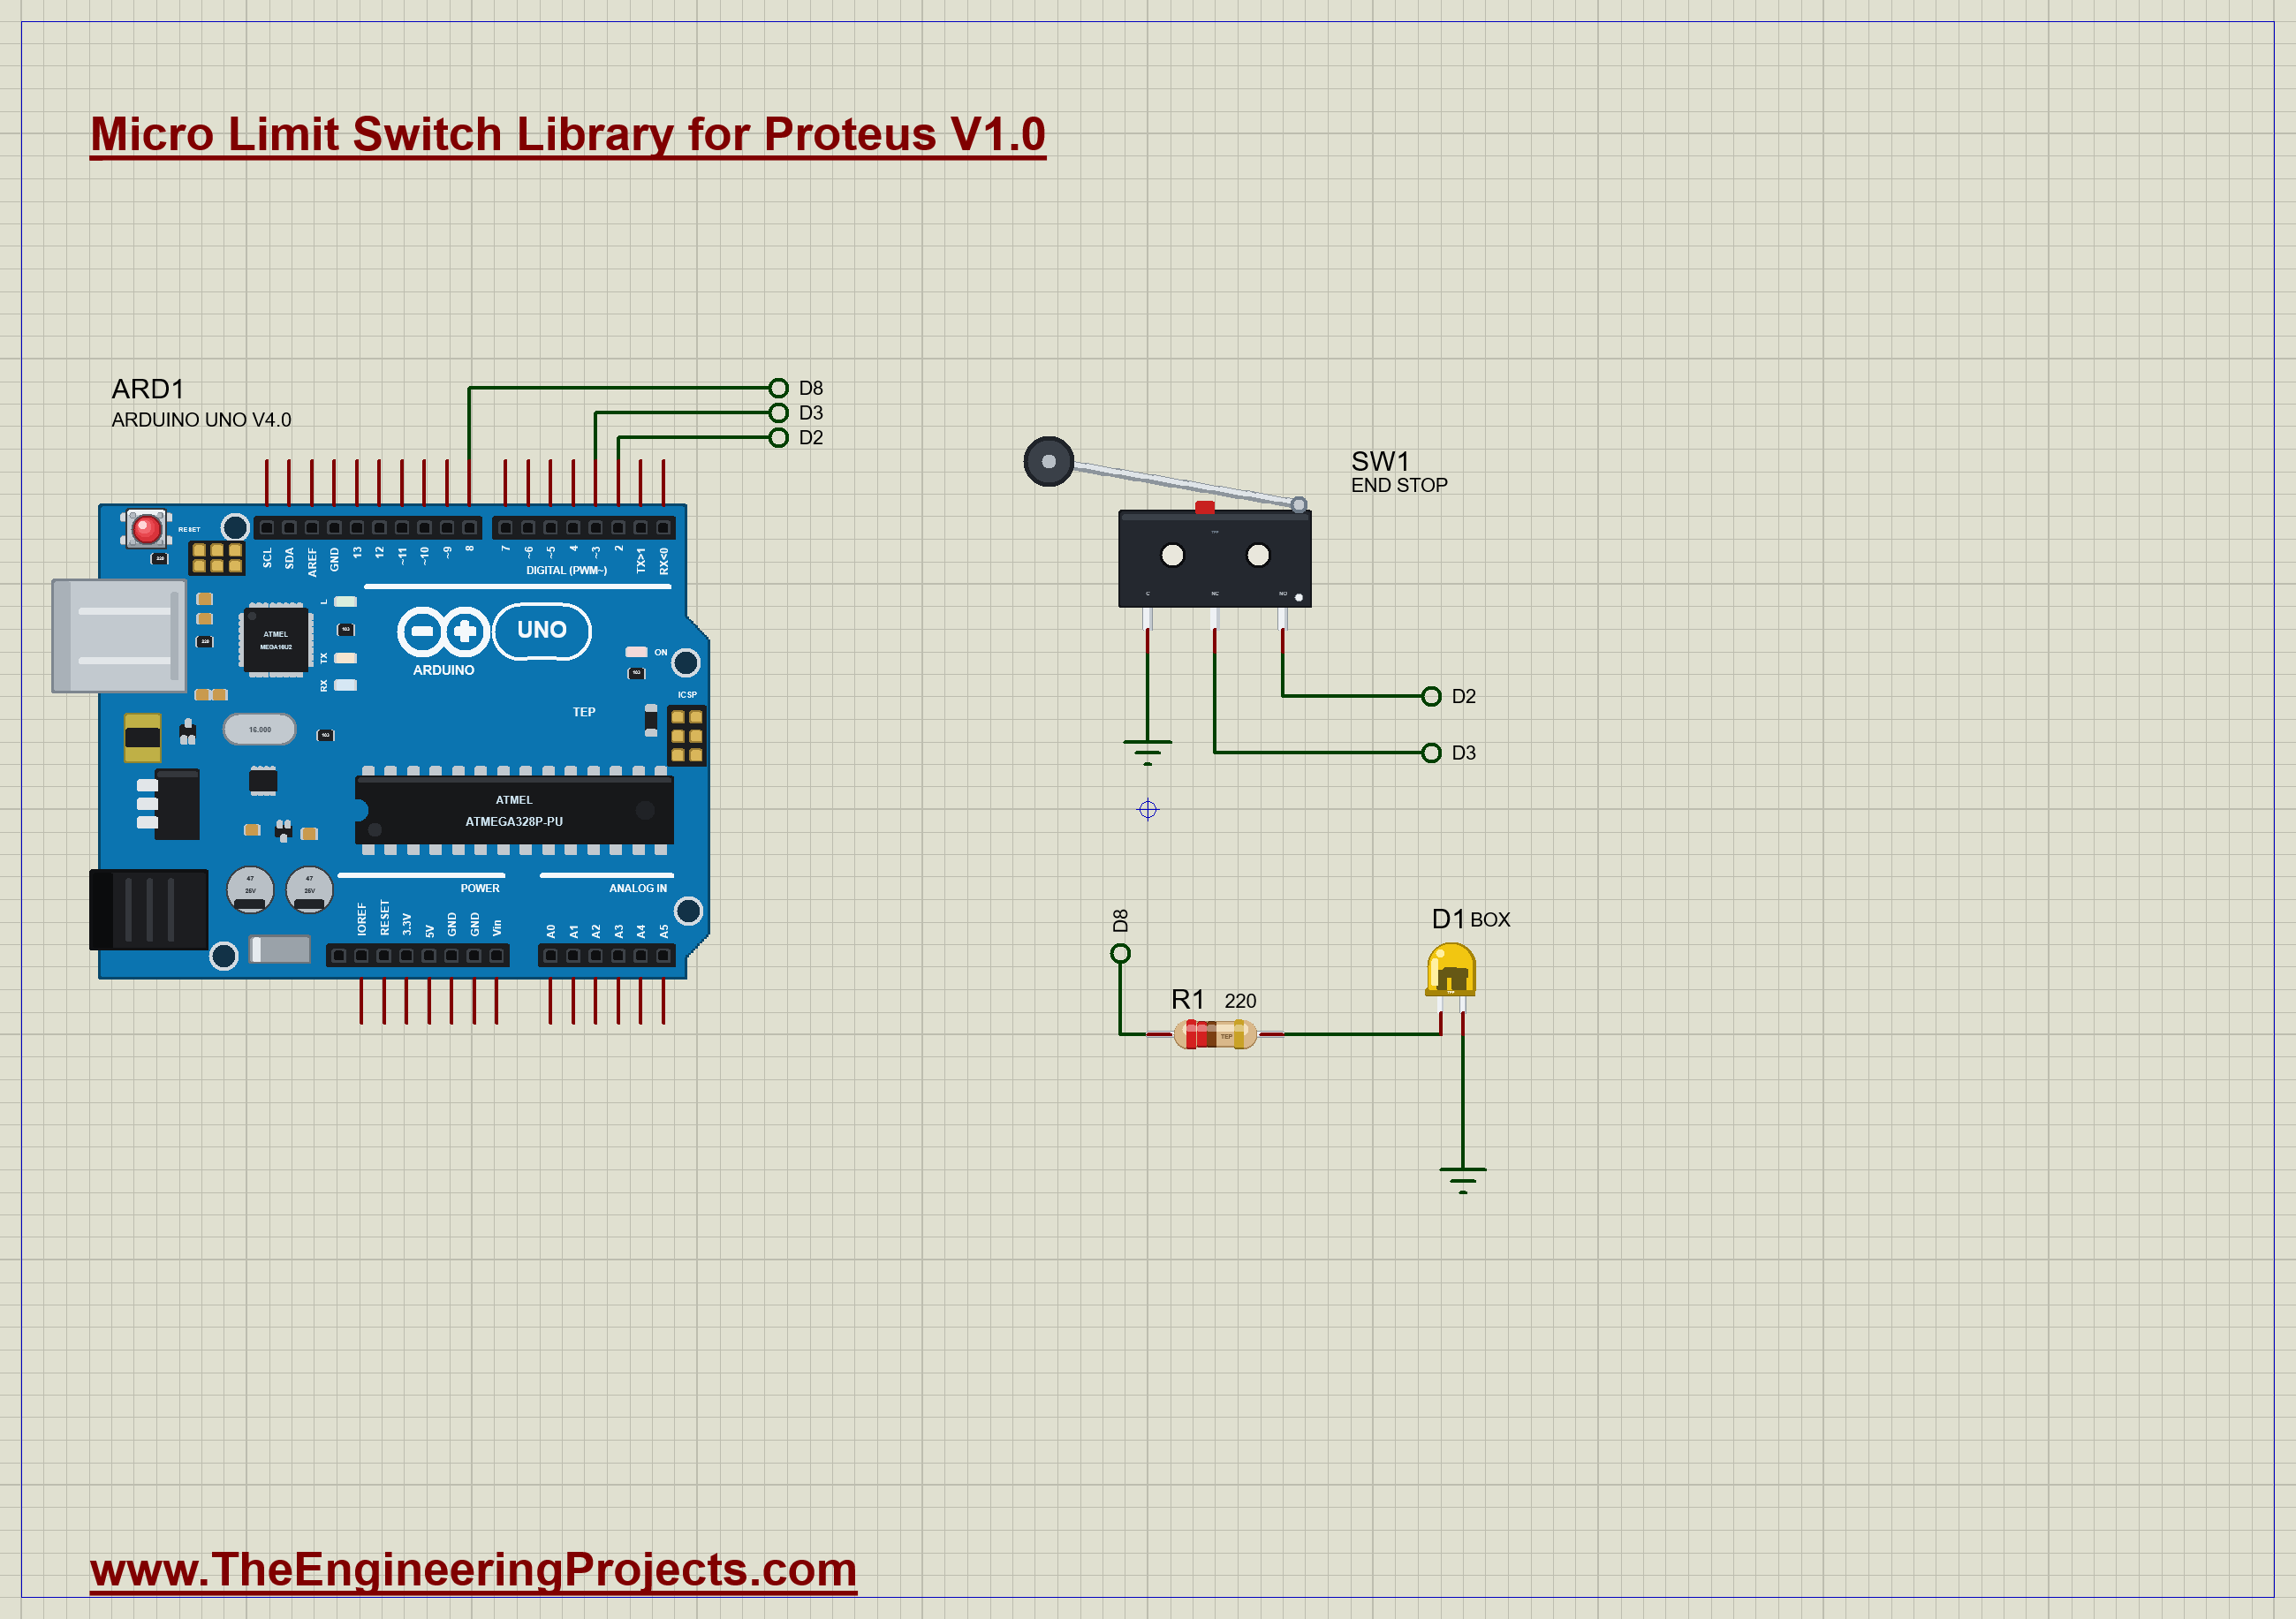
| Part | Connection | Job |
|---|---|---|
| SW1 C | GND | the common |
| SW1 NO | D2, with the UNO's pull-up | LOW while a box presses the lever |
| SW1 NC | D3, with the UNO's pull-up | LOW while the lever is free |
| D1 and R1 | D8, through 220 ohm | lit while a box is on the lever |
Reading Both Pins
The sketch turns the two pins into one of four answers. Pressed and released are the two healthy ones, and each needs exactly one pin LOW:
  if (no && !nc) return READ_PRESSED;
  if (nc && !no) return READ_RELEASED;
The other two answers are "neither" and "both". Neither happens for a few milliseconds on every press, while the contact is in flight, so the sketch allows it. Only if it lasts for 200 ms does the sketch call it a fault:
  if ((now == READ_NEITHER || now == READ_BOTH) && held >= FAULT_MS && !faultShown) {
    faultShown = true;
A change to pressed or released only counts once it has been steady for 10 ms. That is the debounce, and it is what makes one press count as one box.
Run the Demo
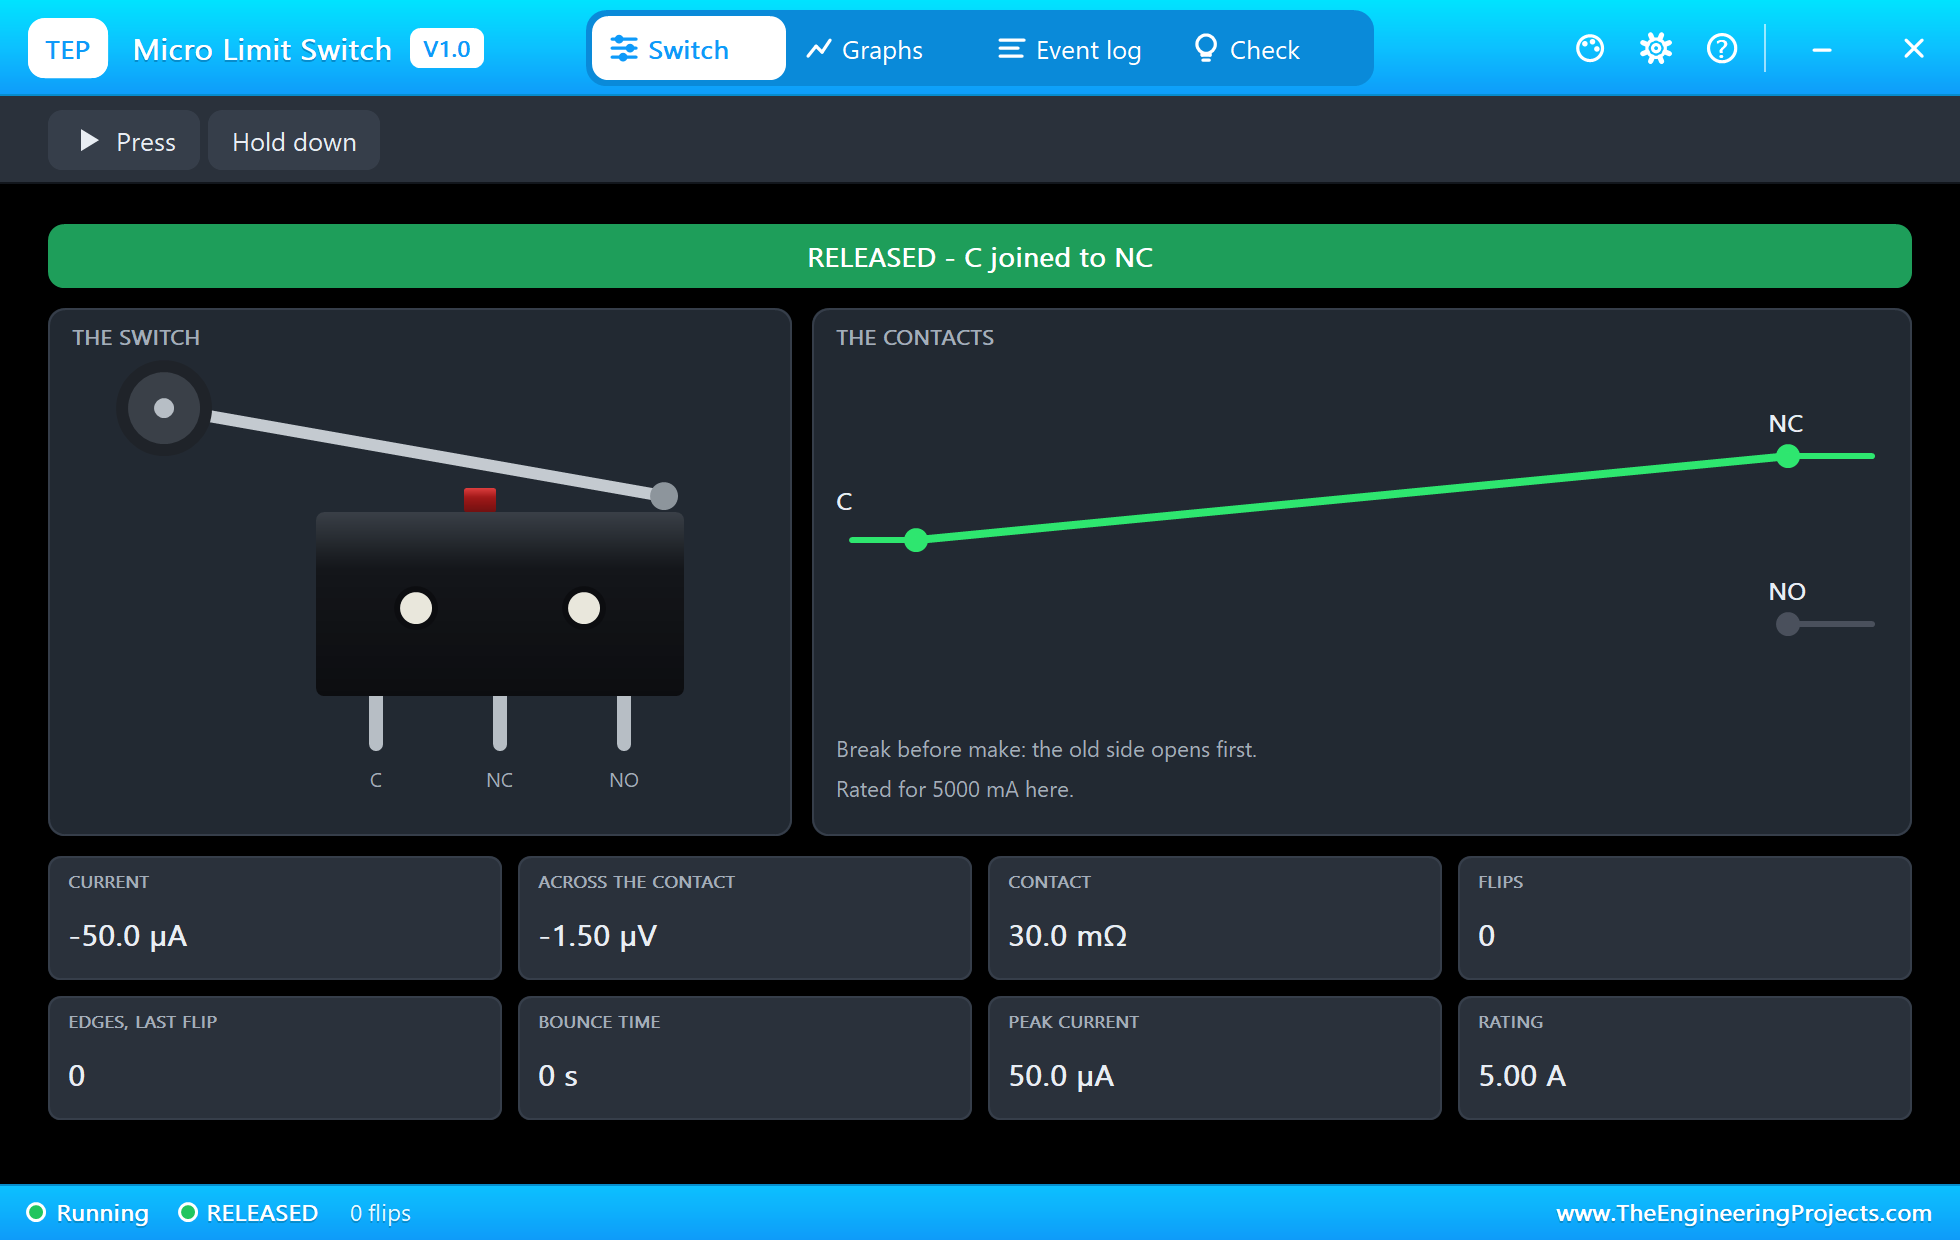
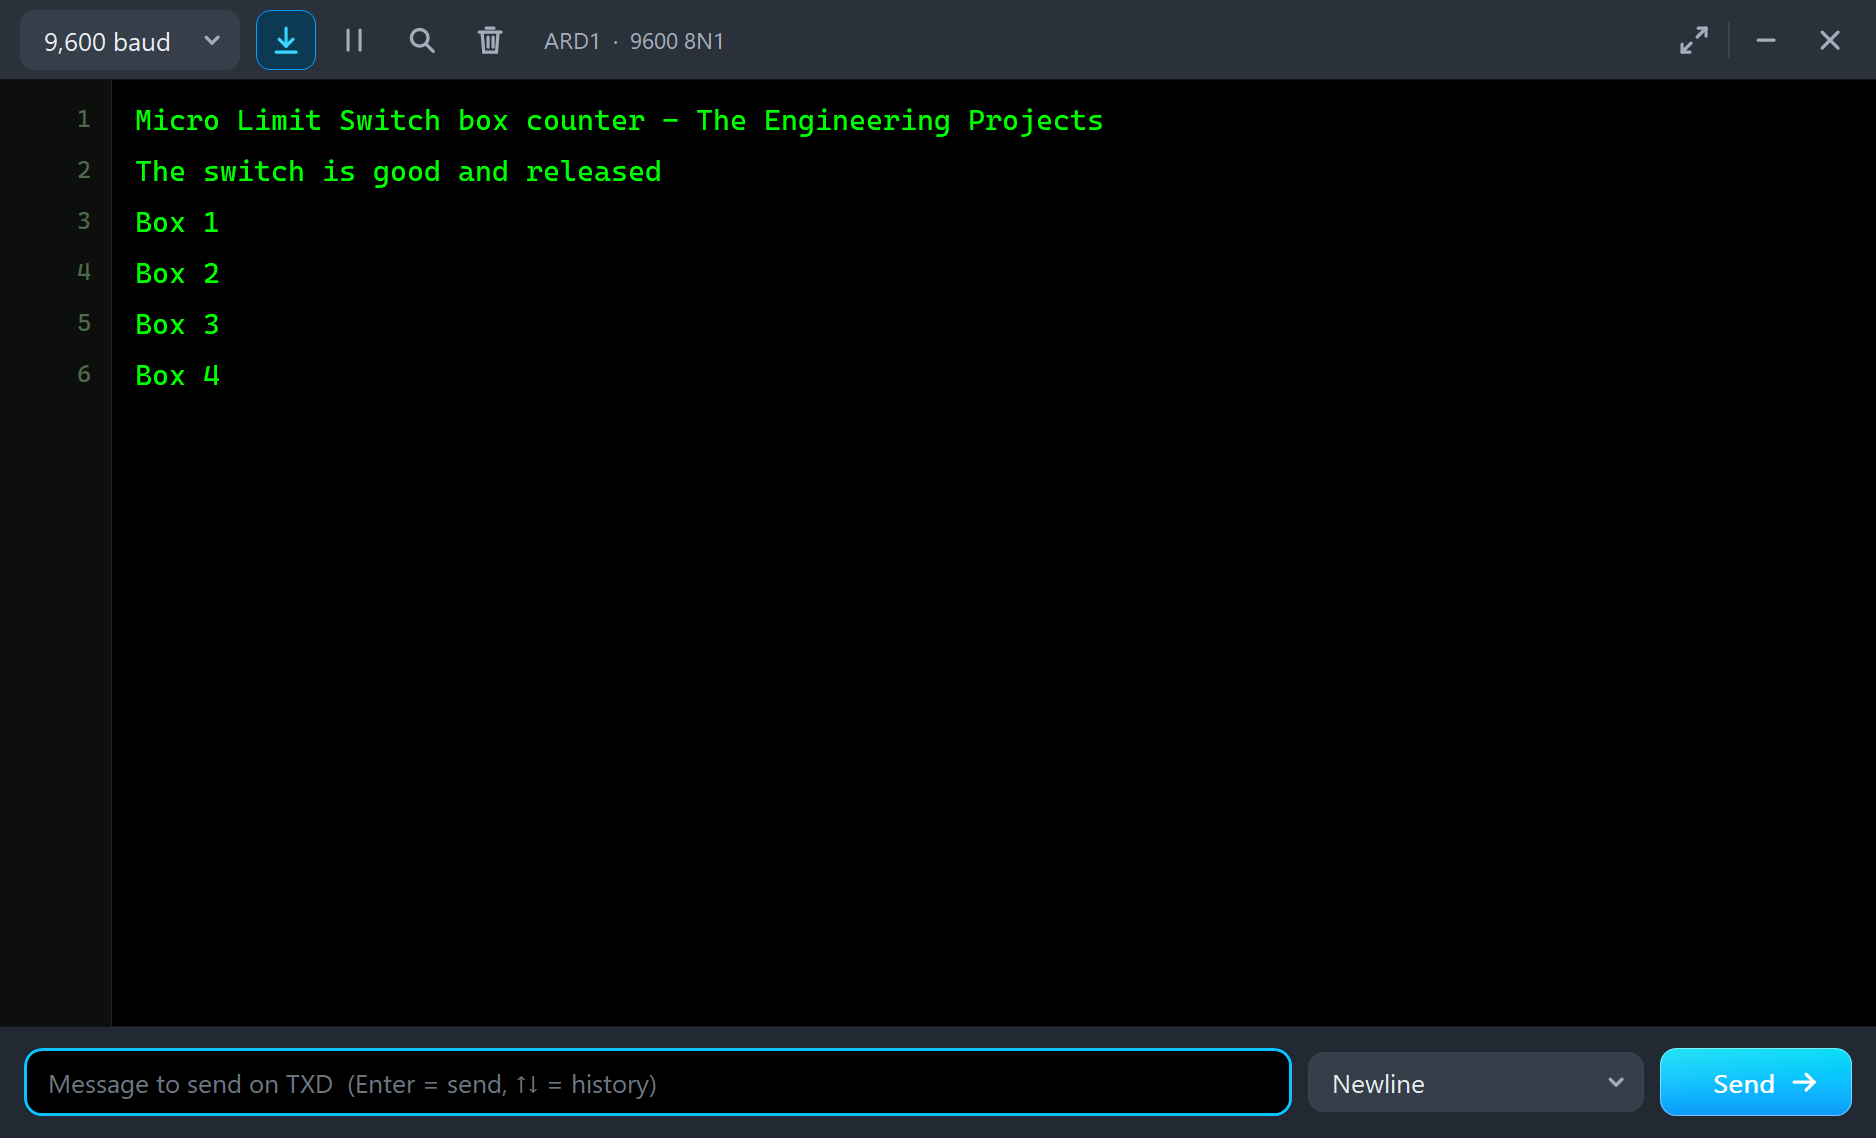
Press Run. The monitor says the switch is good and released, because D3 reads LOW and D2 reads HIGH. Click the small dot on SW1 to open its pop-up. The live path in the right-hand card runs from C to NC:
Count Some Boxes
Now press the switch, either by holding the mouse on the lever or with the Press chip, which gives a short tap of 0.2 s, like a box rolling over the roller. Each press counts one box. Then use Hold down to keep the lever pressed, as if a box had stopped on it. The lever lies down on the body, and the LED lights. Here is the complete circuit, truly running:
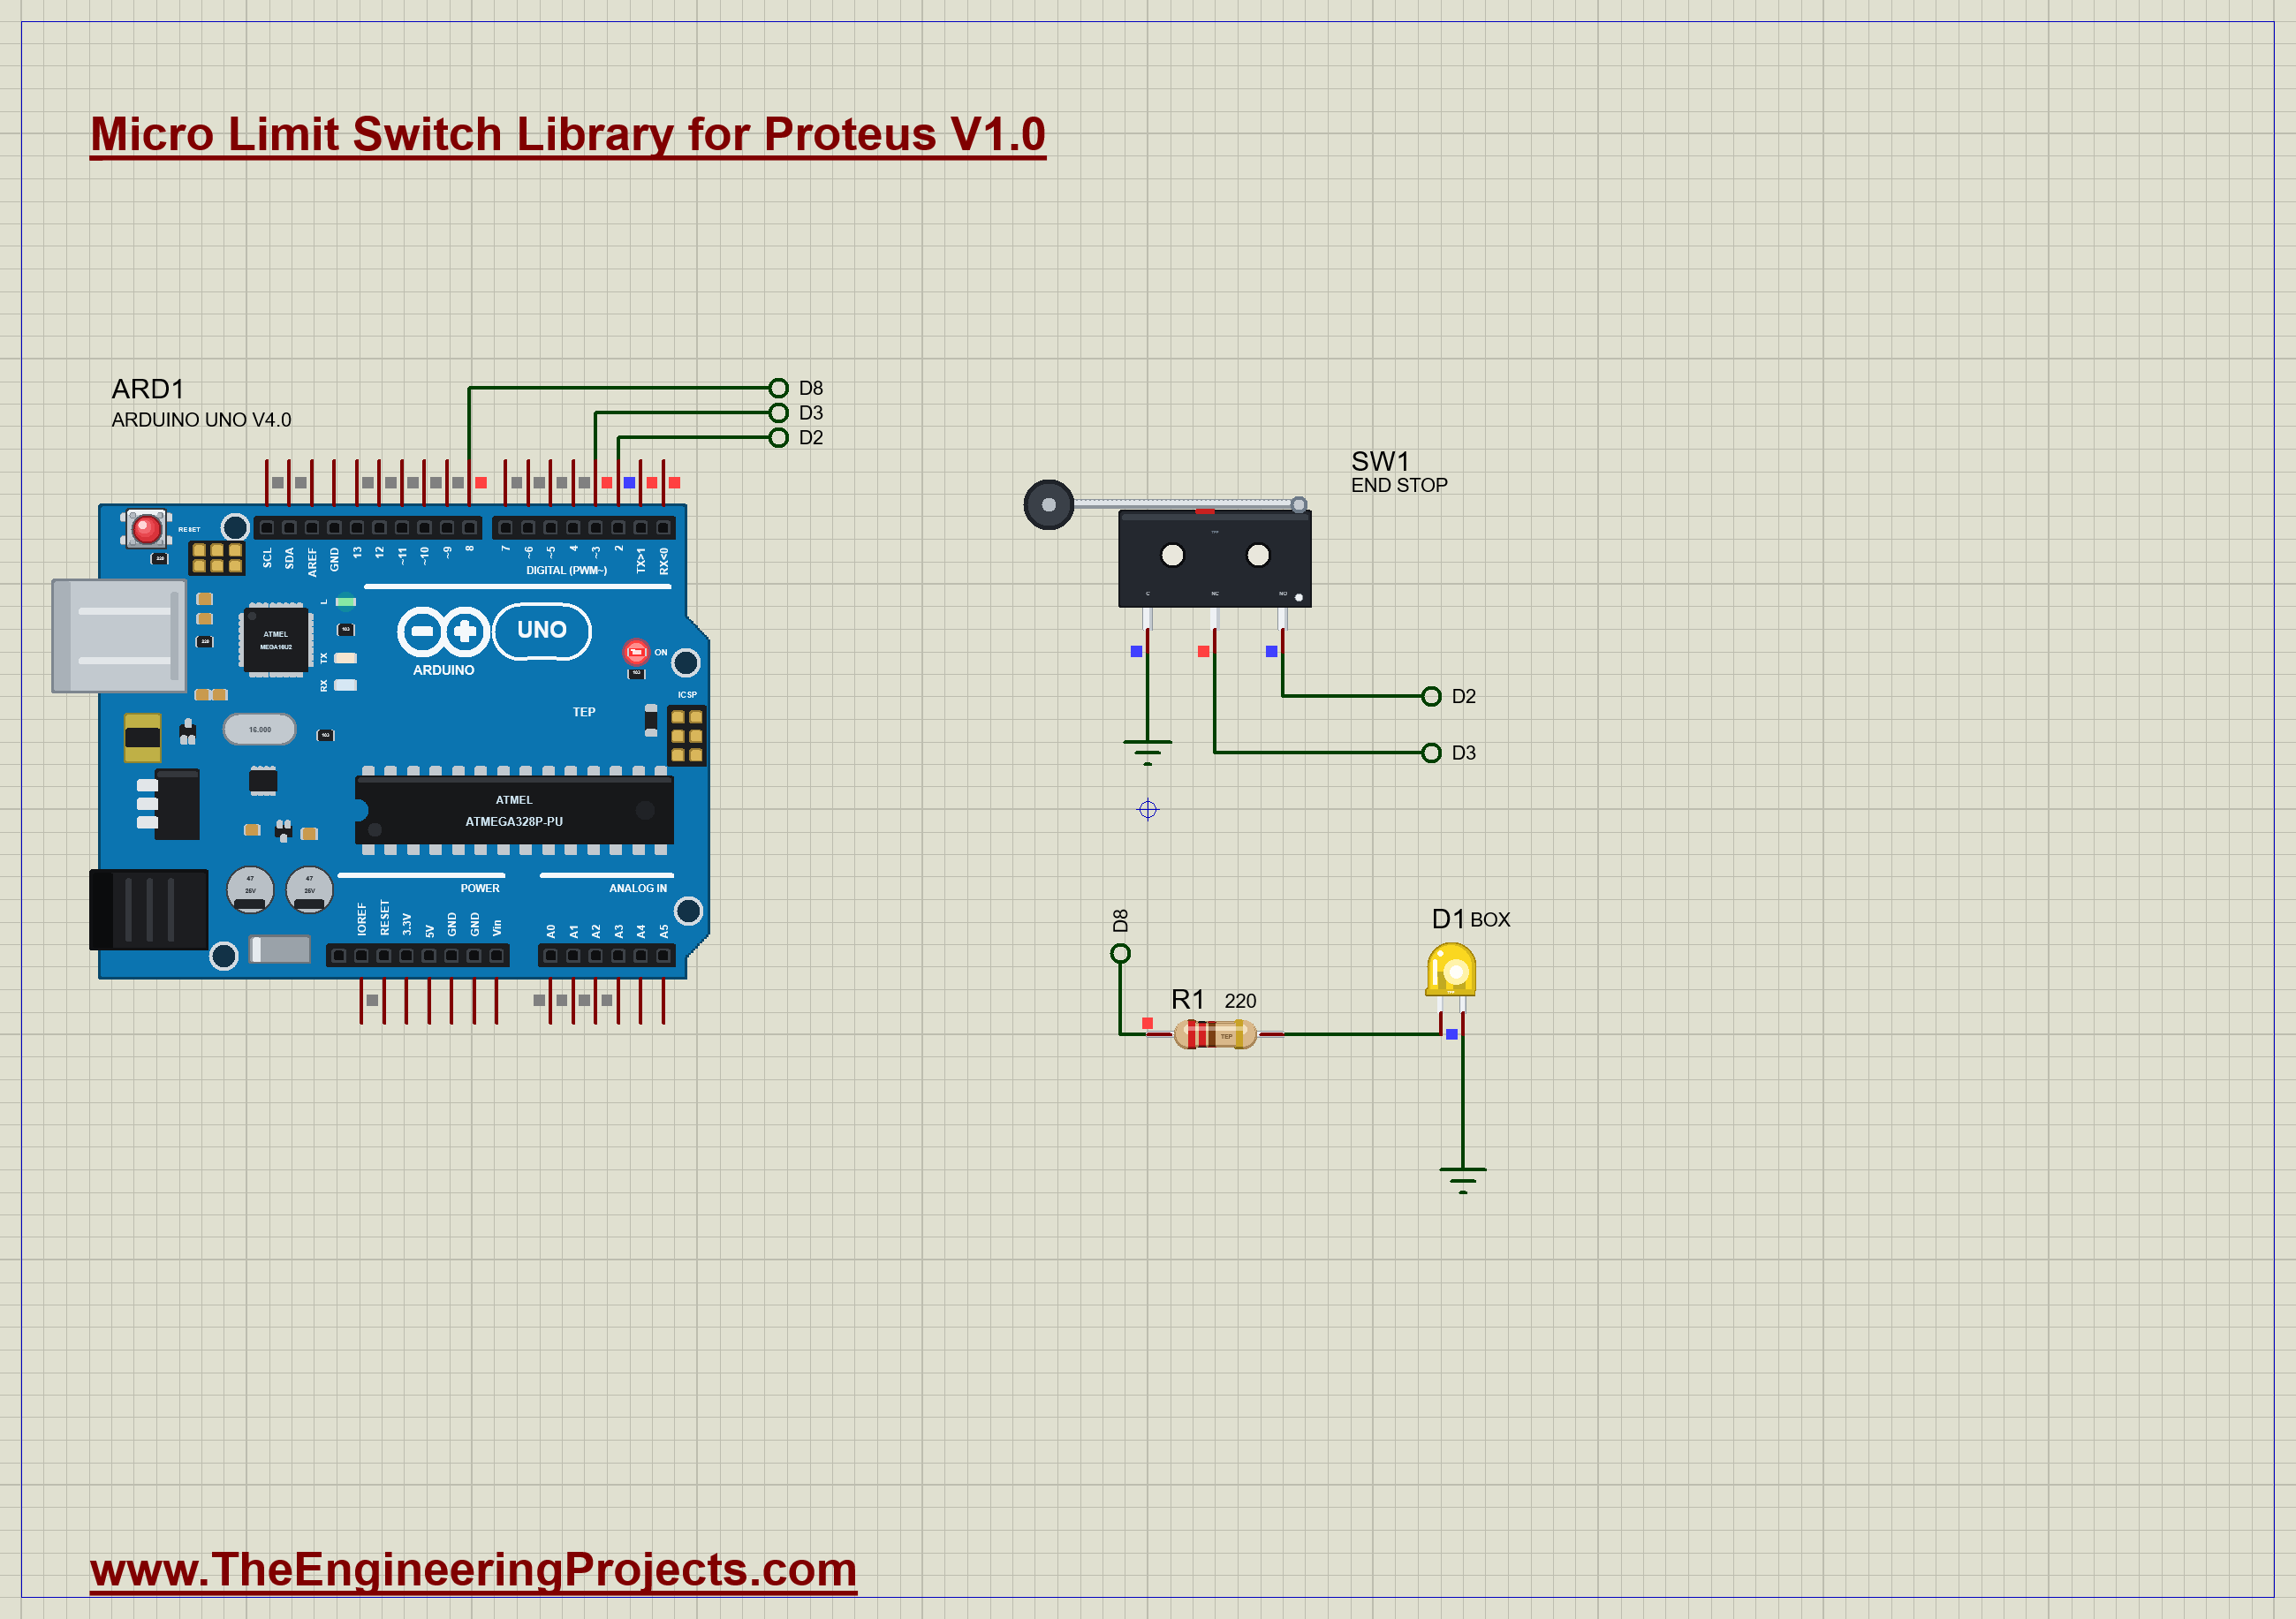
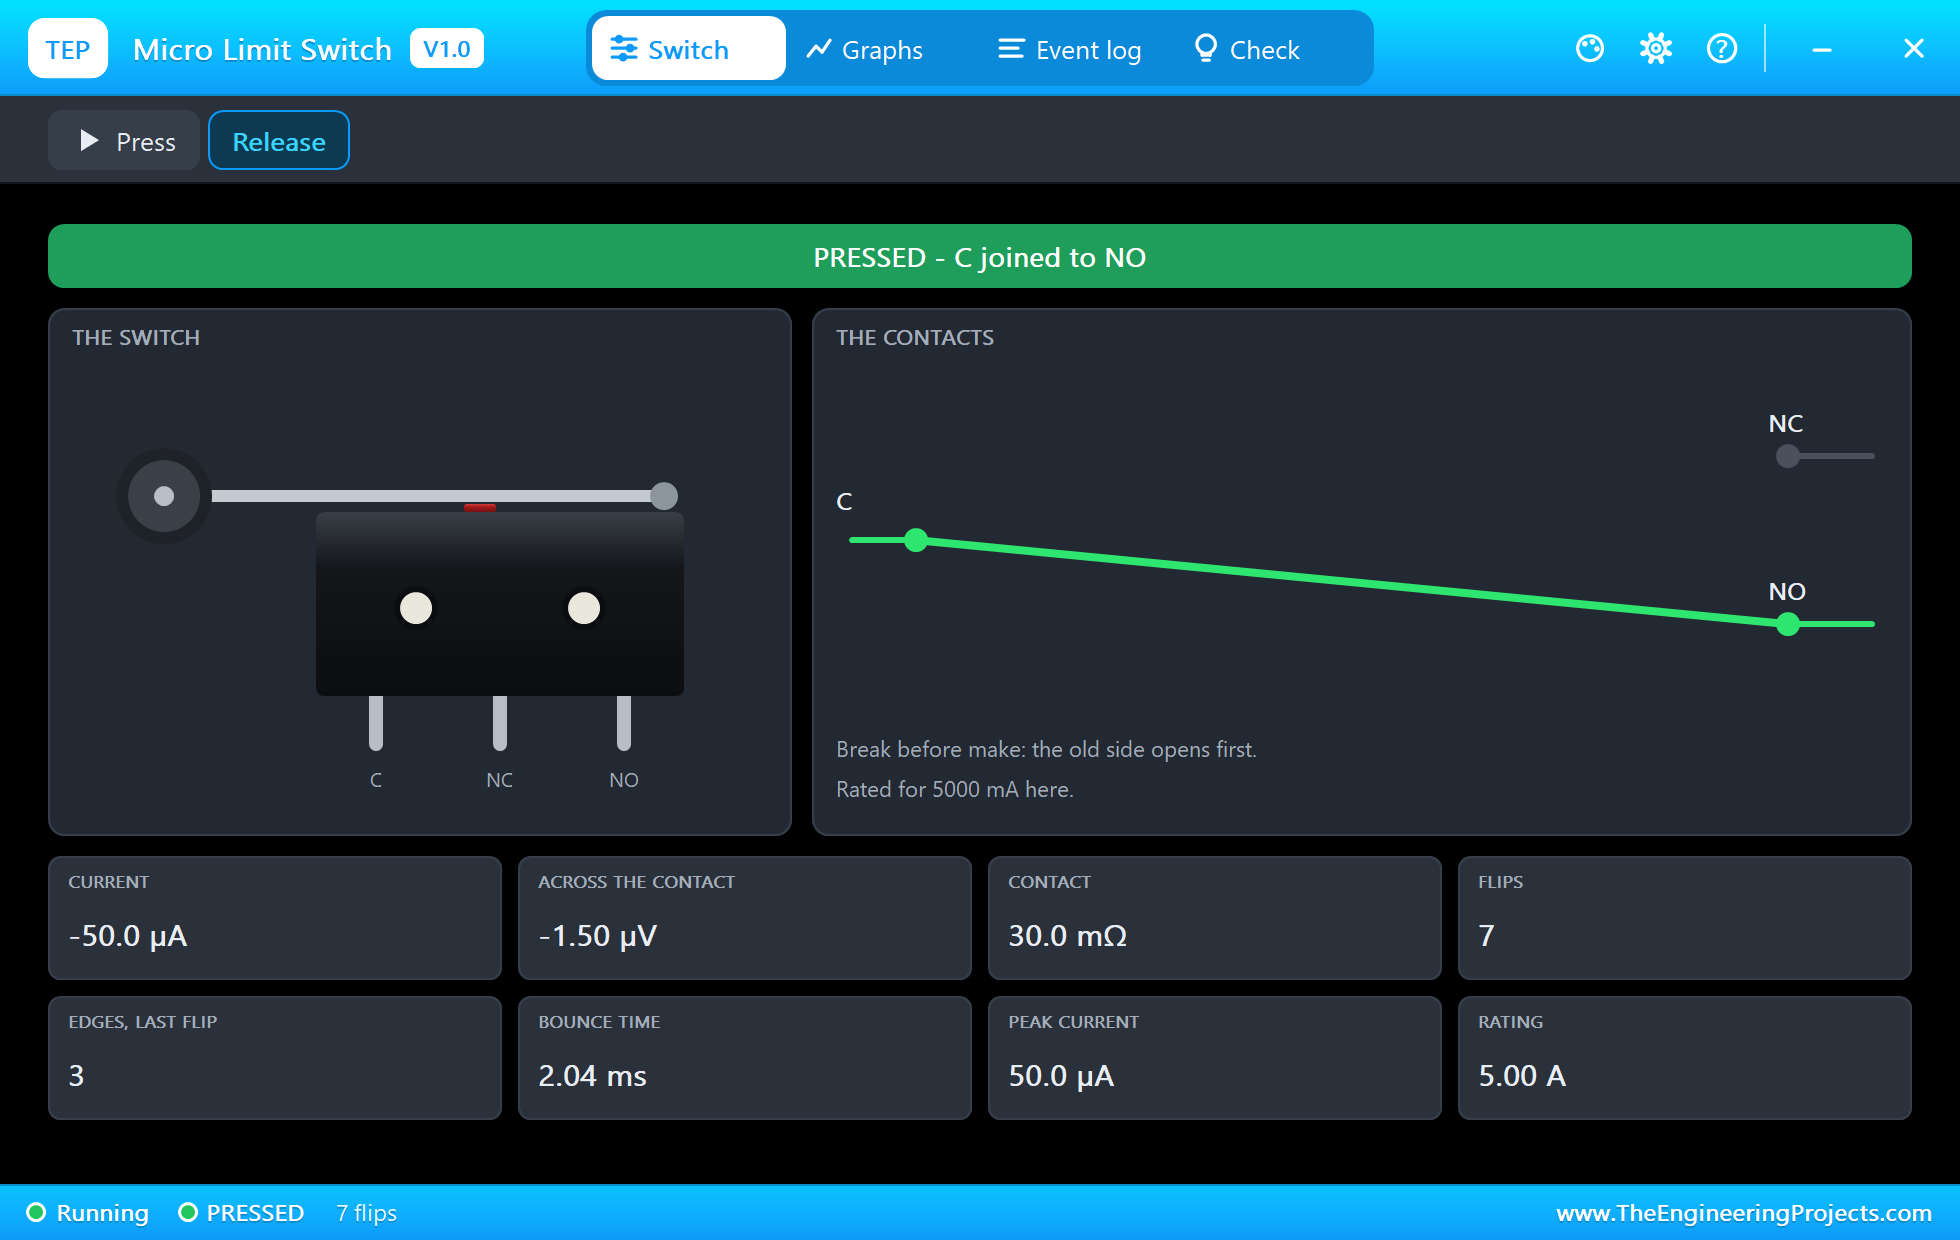
The pop-up shows the path has moved over to NO. The current through the contact is only 50 uA here, because it is just the UNO's pull-up current. A micro switch is often used this way, as a signal switch, far below its rating:
Let Go
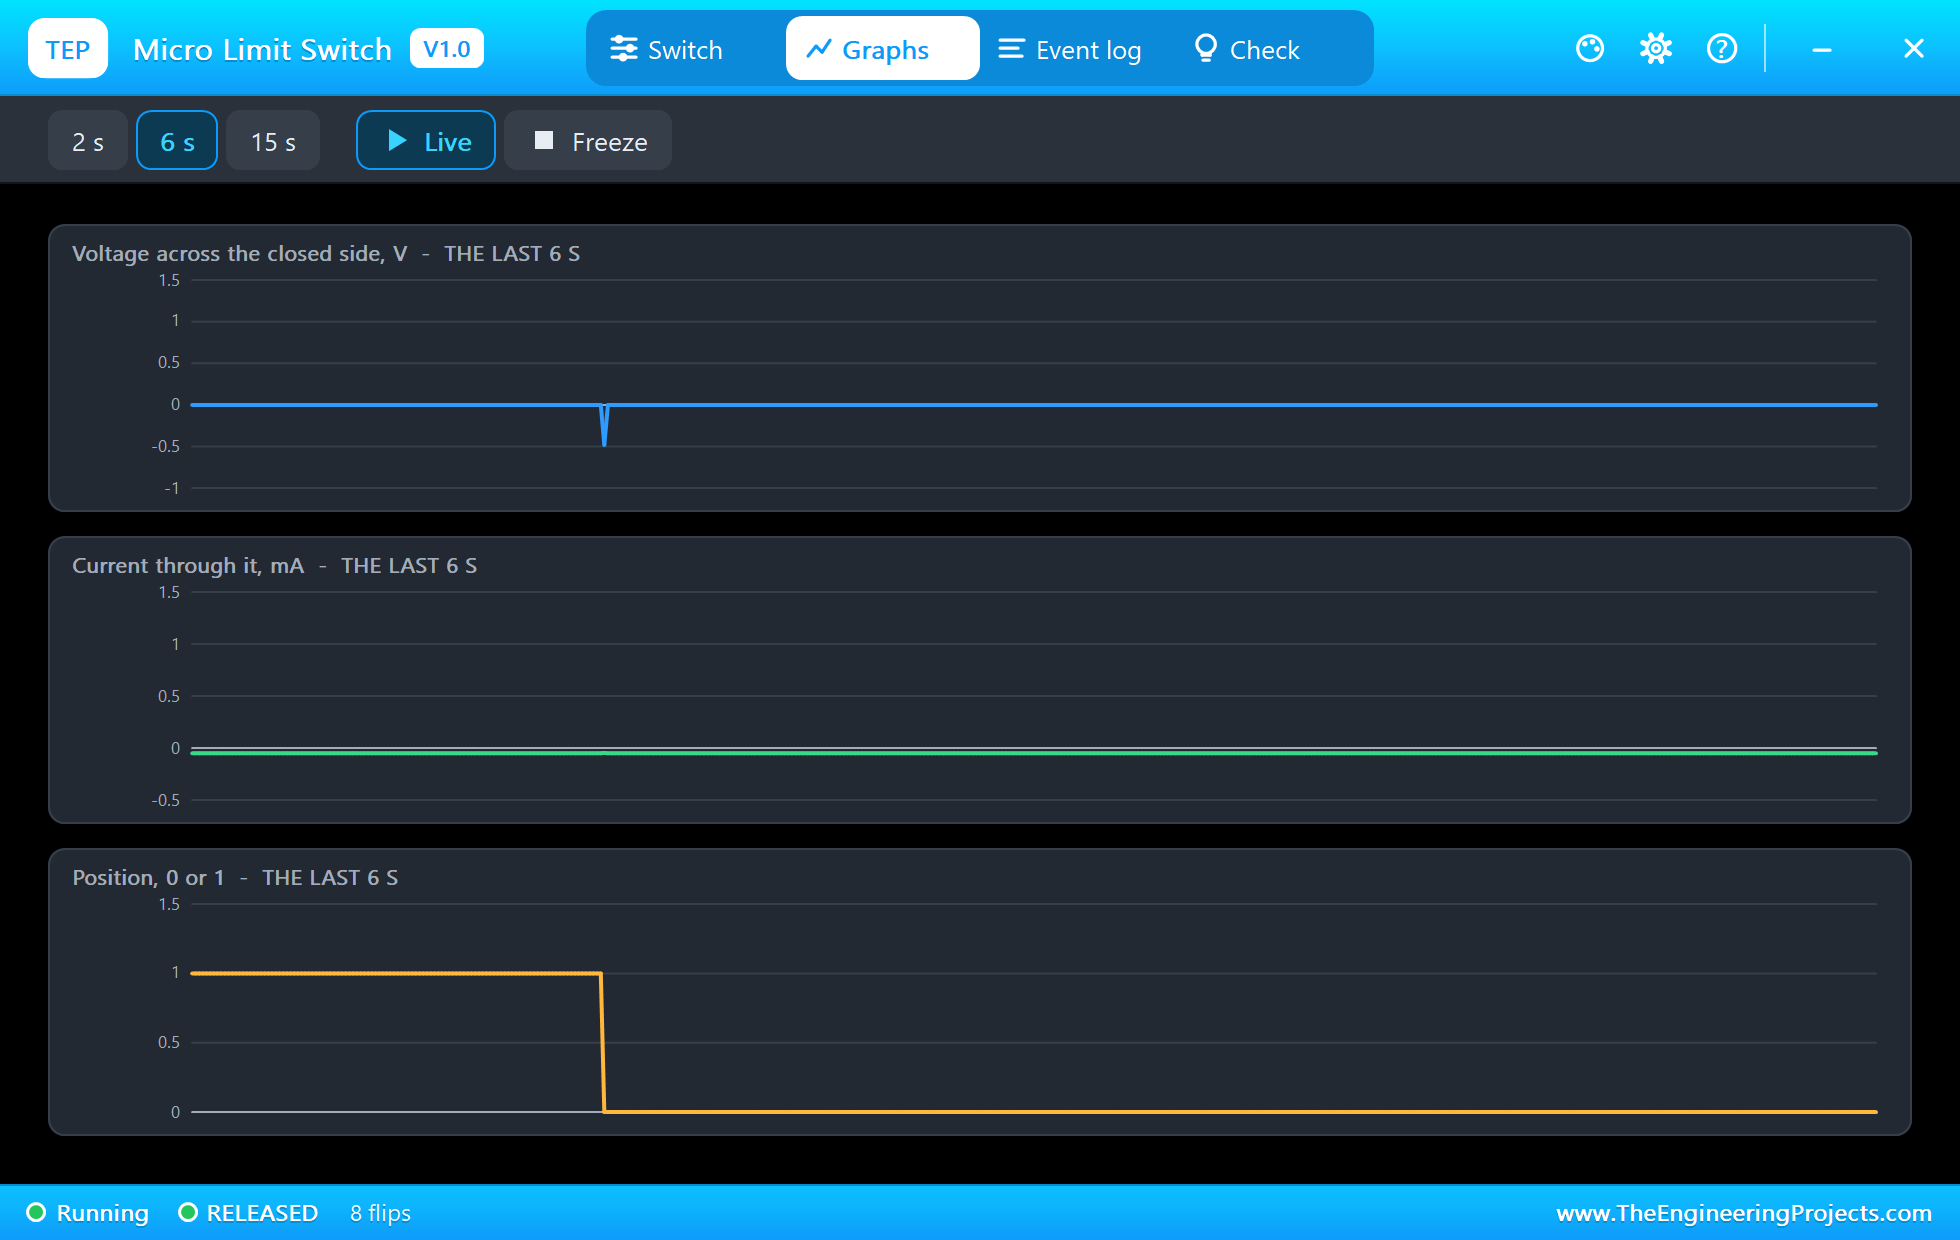
Click Release. The lever springs back up, C goes back to NC, and the LED goes out:
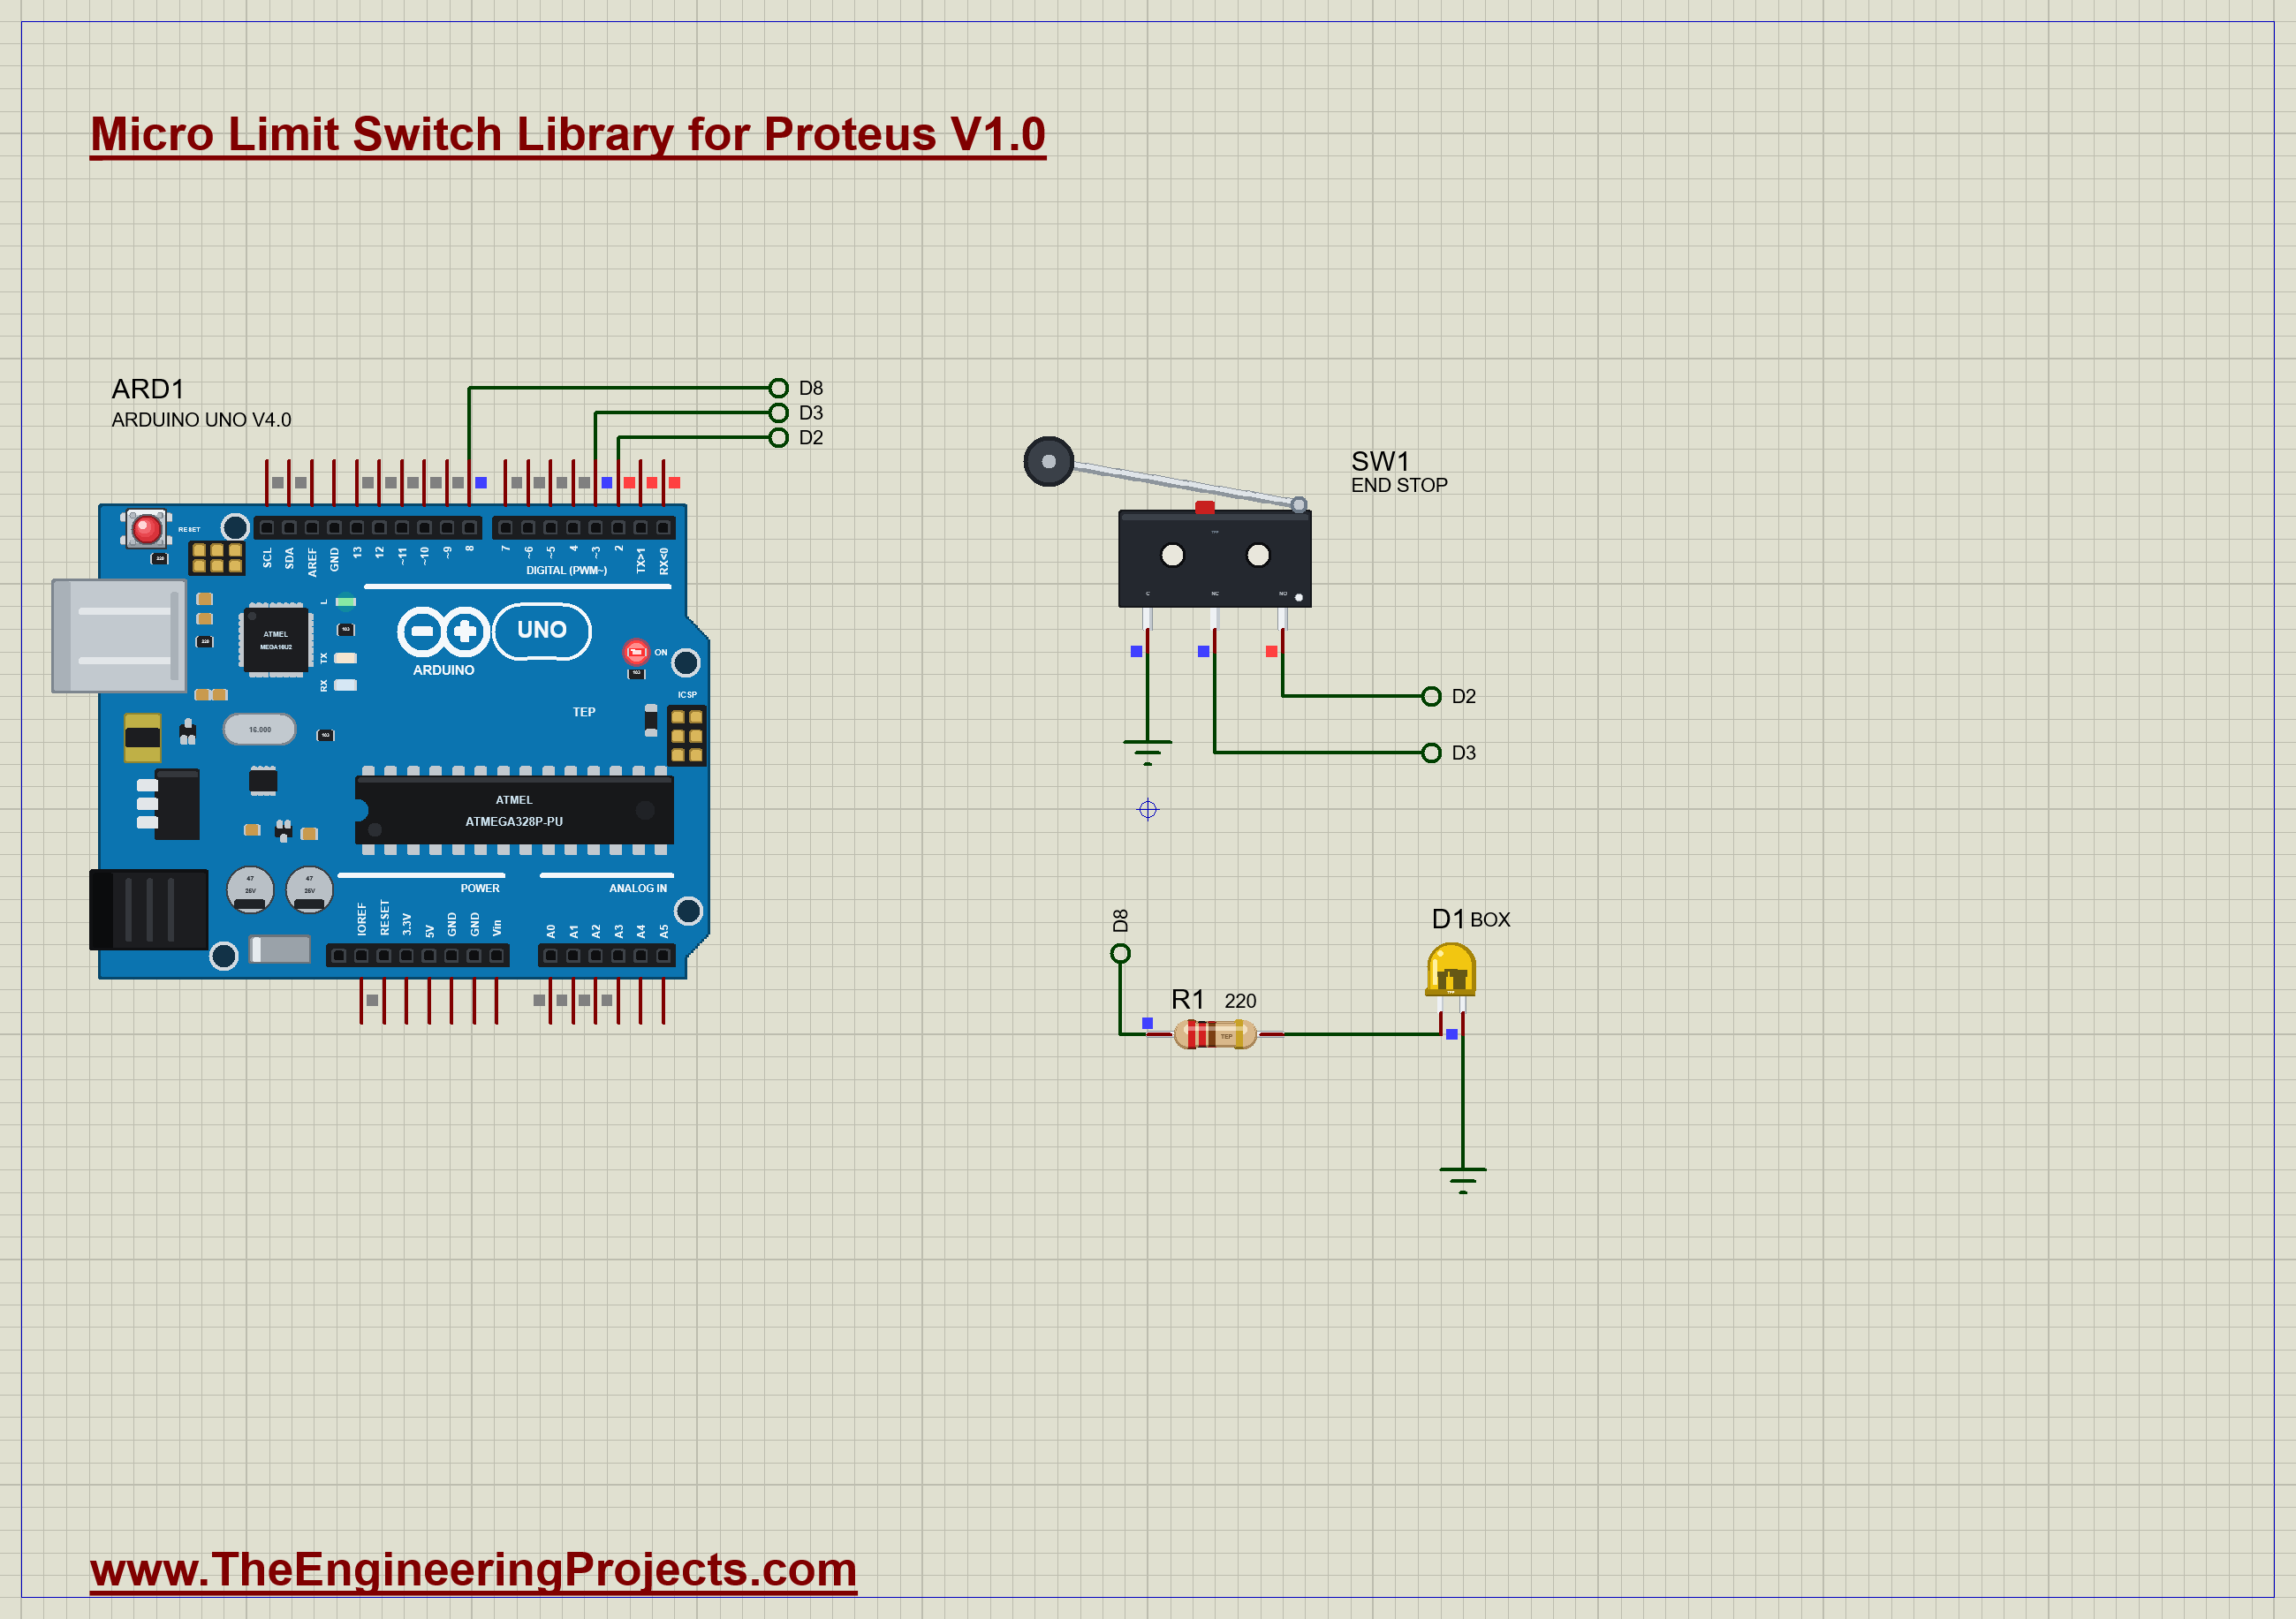
The monitor counted every box. In this run, the three taps and the long hold gave Box 1 to Box 4, and no fault was reported, since the "neither" moment never lasted longer than the bounce:
The Log and the Check Page
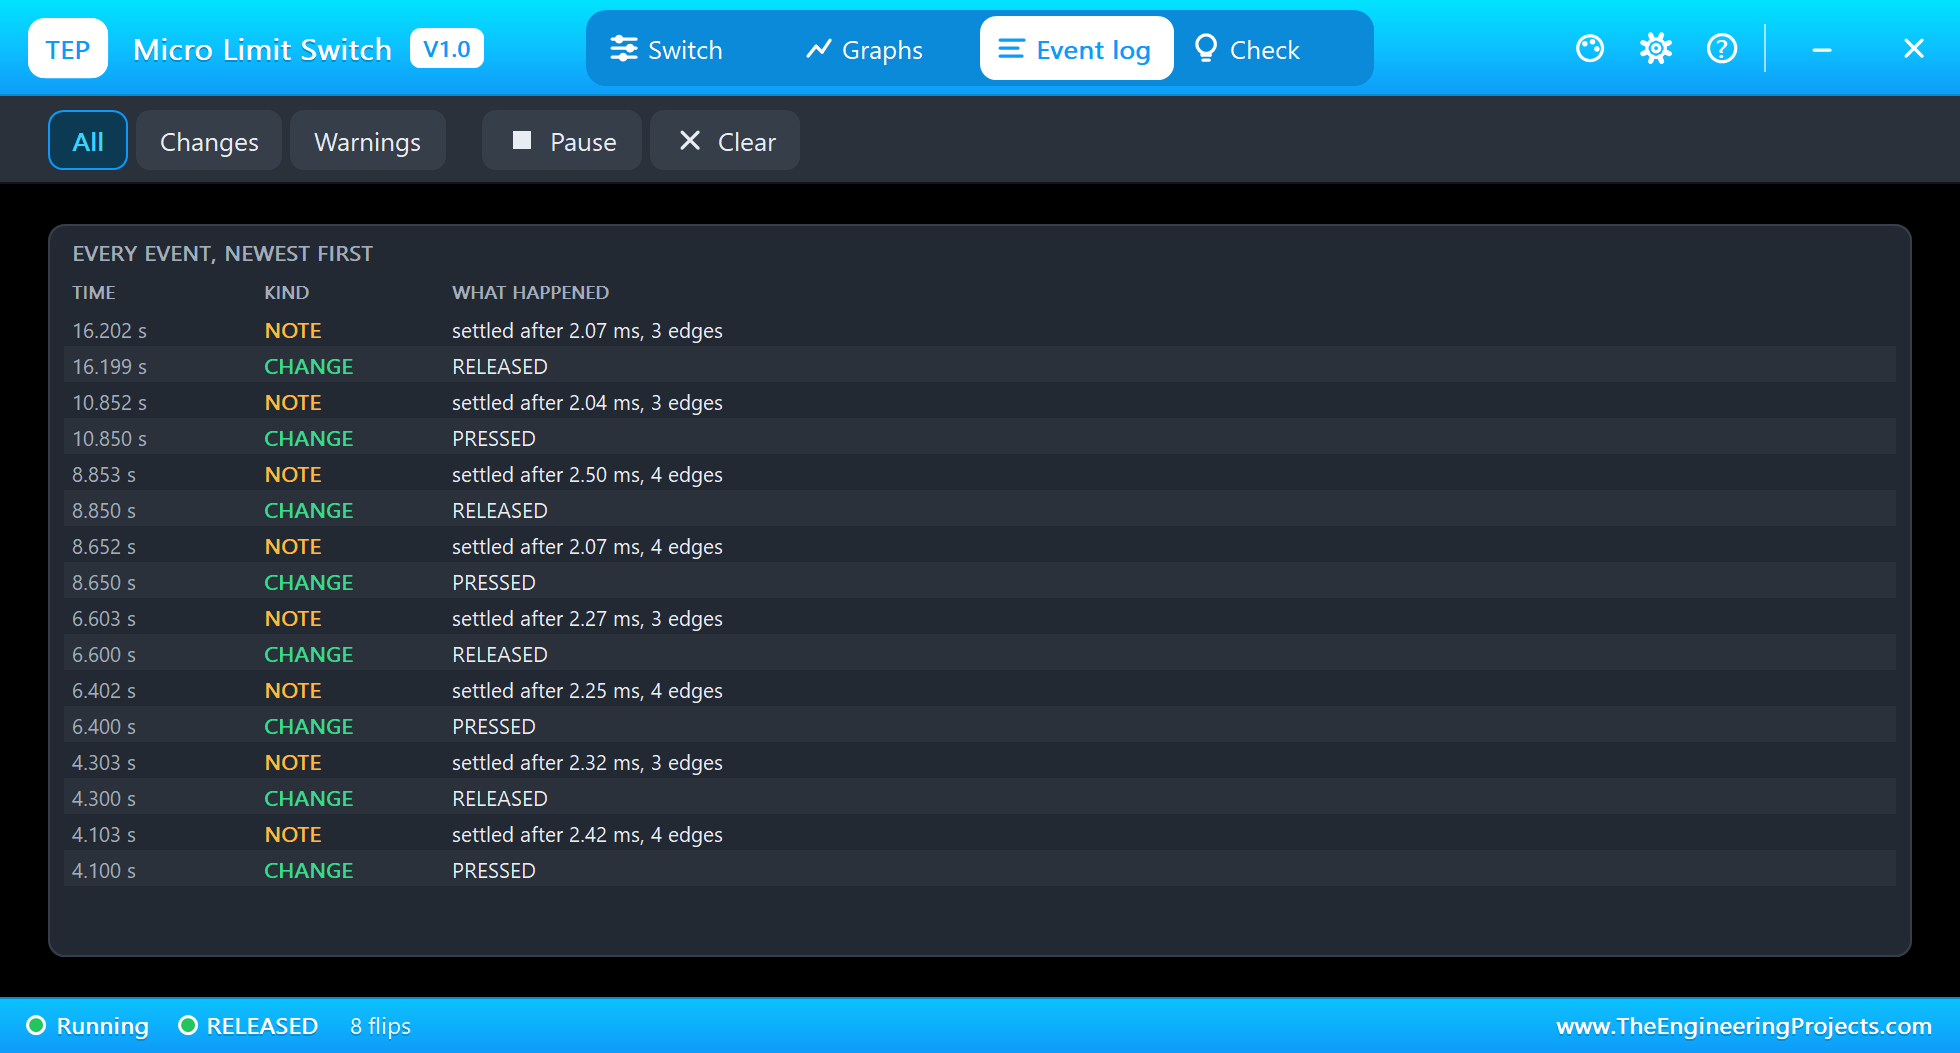
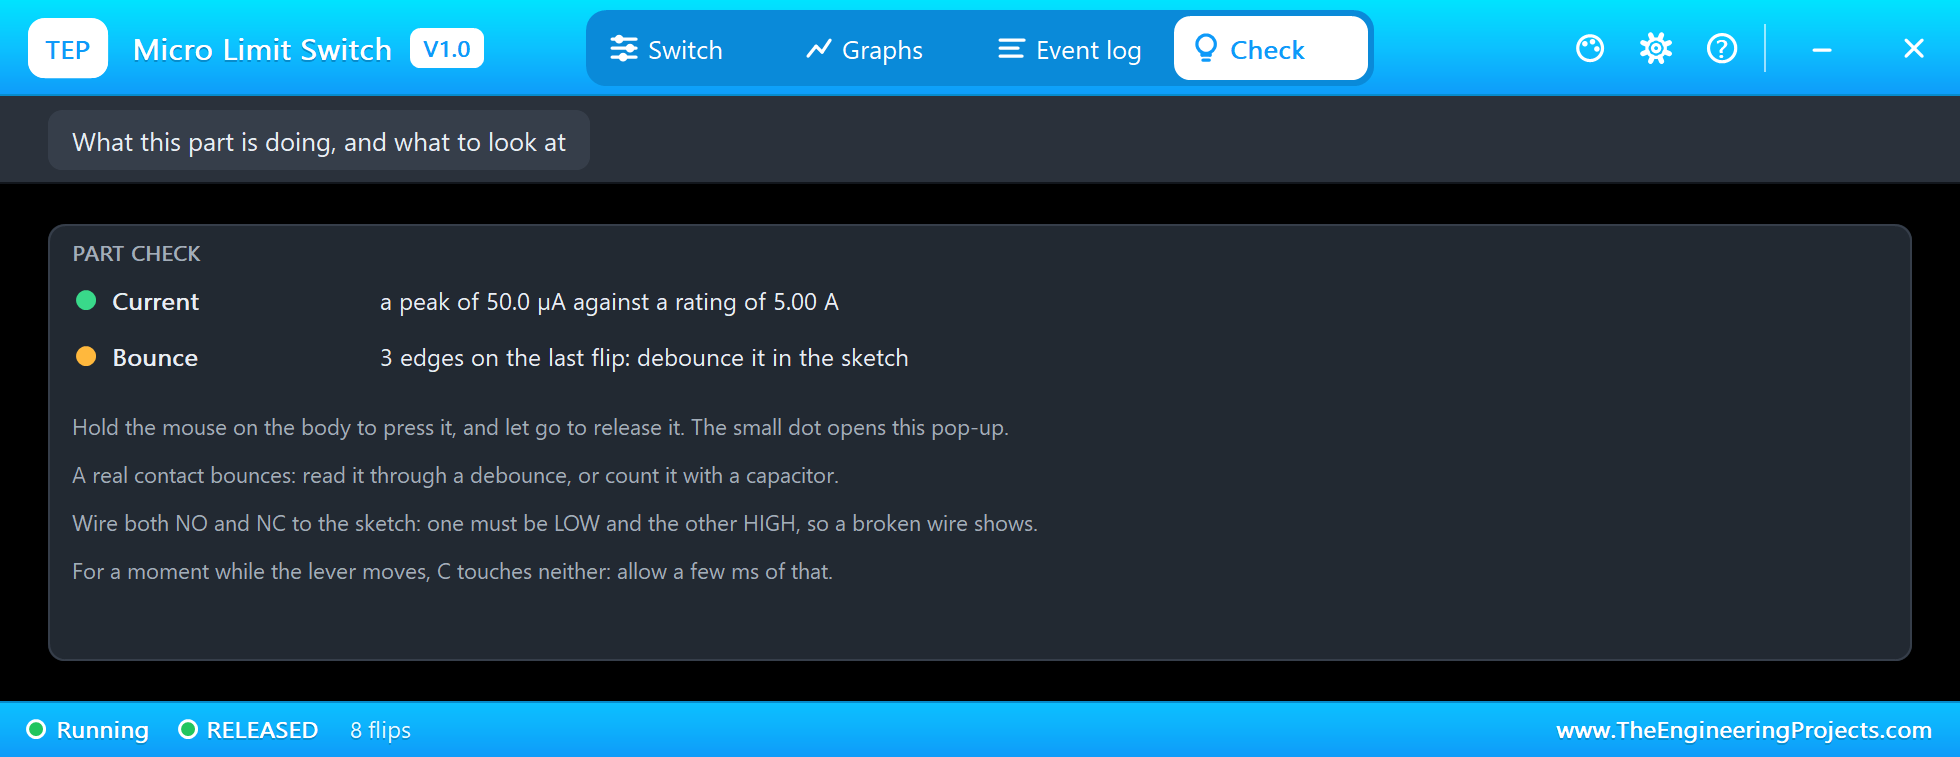
The Event log writes down each press and each release, with how the contact settled. In this run every change settled in 2.04 to 2.50 ms, with 3 or 4 edges. The Check page compares the current with the rating and reminds you to debounce:
Try It Yourself
- Delete the wire from NC to D3, run again, and see what the sketch reports.
- Join NO and NC together, and watch for the other kind of fault.
- Set the bounce to 0 ms, and compare the Event log.
- Change the debounce time in the sketch to 0, and see whether a single press can count twice.
- Use NC alone, without NO, and think about what a broken wire would look like then.
Ideas to Extend the Demo
- Add a second switch further along the conveyor, and measure how fast each box travels between them.
- Use the switch as a 3D printer style end stop, and stop a stepper motor when it is pressed.
- Sound a buzzer when the count reaches a full carton of twelve.
- Show the count on a seven-segment display.
Your Own Sketches
The demo sketch is in the zip file, and you can change it in the Arduino IDE. New to Arduino? Start with our Arduino Tutorial for Beginners. Export the compiled binary, and set the UNO's PROGRAM property to the new file. Our guide on How to get the HEX file from Arduino shows you where the file ends up.
Things to Know Before Using a Real Micro Switch
- Check the rating: the current, the voltage and AC or DC all matter. Small board switches carry far less than the KW11.
- Do not use it as a hard stop: the lever has a little over-travel past the operating point. Something else must stop the moving part.
- Mount it firmly: two screws through the holes, so that the operating point does not drift.
- Choose NC for safety: a broken wire on NC reads as pressed, so the machine stops.
- Keep dust and oil away: a sealed version exists for dirty places.
Troubleshooting
- A click opens the pop-up: you clicked the small dot. Hold the mouse on the lever or the body to press it.
- A single click does nothing visible: it is momentary, so a very short click presses and releases at once. Hold the mouse a moment, or use the Press chip.
- One press counts twice: that is contact bounce. Debounce it, or set the bounce to 0.
- The sketch prints FAULT: one of the wires to NO or NC is missing, or they are joined together.
- The part is not simulated:
TEPLIMIT.DLLis missing from MODELS and from the project folder.
Limitations of the Simulation
- The bounce follows a fixed pattern, with a real-looking spread, not a measured one.
- The force, the travel and the hysteresis of the lever are left out: it is simply pressed or released.
- The rating is a warning on the Check page, for the current only: a real contact would pit or weld.
- Arduino is a name of Arduino; this library is not made or endorsed by Arduino or Labcenter.
- Tested in Proteus 8.5 in November 2026 (the demo as shipped). Proteus 7 is not supported.
So, that was all about the Micro Limit Switch Library for Proteus. I hope you enjoy pressing that little roller lever, and that the idea of reading both contacts, and of choosing normally closed for safety, stays with you for every machine you build. If you have any questions, ask in the comments and I will help you out. Till the next tutorial, take care and have fun!