


Creating First Project using LabVIEW Programming


Creating First Project using LabVIEW Programming
- First of all create a new project as we have done in our previous tutorial Introduction to LabView.
- Now once you created the project you will have two windows in front of you named as Front Panel and Block Diagram.
- I will start the very first step by simple adding two parameters in our Block Diagram.
- So, open your “Block Diagram” window and go to Functions-> Programming-> Numeric.
- By doing this, you can see the following window on your screen:

- Select the very first block named as “Add”, its an addition operator in LabView Programming.
- Drag and place it on the “Block Diagram” window.
- You can see that it has two input terminals (x and y) and only a single output terminal (x+y) which shows that this block gives only one result by manipulating the two different parameters simultaneously.
- Inputs are known as “Controls” and outputs are known as "indicators".
- Since we want to manipulate the two parameters by changing them according to our requirement so we will make the input terminals as “Control”.
- Place the cursor on one of the input terminal and right click it.
- Go to the Create-> Control as shown in the figure below:

- By pressing the “Control” option, one input of this block can be controlled manually by you.
- Similarly, perform the same procedure on the second input terminal.
- The figure shows both of the manually controlled inputs:

- Now we have to observe the output of the block, which is now manipulating the two input parameters.
- Place the cursor on the output terminal of the block and make a click on it.
- Now, go to Create-> Indicator because we have to display the output.
- The figure below shows a bit detail:

- Press the “Indicator” option and you will get an indicator on your output pin.
- You can see that output has also been created now as show in the figure below:

- Now our first project using LabView programming is completed in the “Block Diagram” window.
- Since we have create our project with the help of FPGA blocks.
- So, what we have to do is to observe the output of the designed algorithm.
- So now, we need to go to the “Front Panel” which helps us to show the output of the program as described in detail in our previous tutorial Introduction to LabView.
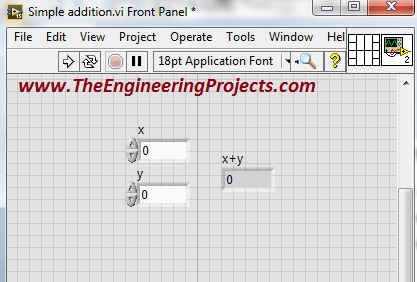
- Open the “Front Panel” window and it will be something like the image shown below:

- On the left side of the “Add” block there are two inputs represented by as “x” and “y”.
- And on the right side there is a single output represented by “x+y” to perform the addition operation.
- Now adjust the both of the input parameters to obtain the desired output according to the adjusted parameters.
- Here I have adjusted “x” input by assigning it with a value “2”.
- And I have adjusted “y” input by assigning it with a value “5”.
- You can see both of the adjusted inputs in the figure below:

How to Run LabView Simulation ???
- You have to see the output of the program according to the adjusted parameter
- Go to the “Run” button on the top left corner of the “Front Panel” window, and just run the program
- The figure shown below will explain a bit about both of the above two steps

- You can see the output of the program has been successfully obtained according to the adjusted input parameters.
- So that is how you can perform the simple addition of the two parameters in LabVIEW.
- You can also use the all of the other operators in the Functions-> Programming-> Numeric similarly to perform different operations for the different input parameters according to your own requirements.
For Loop using LabView Programming
- In previous part, you can see that as you compile (run) your program it shows the desired output and then terminates.
- That means if you have to change input parameters then you have to run your program again as well.
- Now I am going to explain you that what to do with this program, if you want that this should run for a number of iterations.
- There is “For Loop” option which helps us to run our designed algorithm for number of iterations we want.
- You can select the “For Loop” by following the below procedure:

- Select the “For Loop”, drag and place it in the “Block Diagram”.
- It will look like the figure shown below:

- You can see that there is a “N” symbol on the top left corner of the “For Loop”.
- Basically the symbol “N” shows the number of iterations for which we want to run our program.
- Go to the input terminal of the symbol “N” and click on it.
- Now, go to Create Constant as shown below:

- So, set the number of iterations according to the requirement.
- Here, I am going to set the iterations value to 5 as shown in below figure:

- Now place the designed algorithm inside the “For Loop” to run the program five times in this case as shown in the figure below:

- Now your program will run for five iterations.
While Loop using LabView Programming
- If you want that your program should have continue to run until you terminate then it is also possible.
- “While Loop” option will be helpful for us in such a condition.
- Here I will tell you how to select the “While Loop” in this software. It is quite similar to the selection of the “For Loop” described in previous section.
- Go to Functions-> Programming-> Structures-> While Loop as shown in below figure:

- Select the “While Loop” drag and place it on the “Block Diagram” window.
- Now, place the designed algorithm inside the “While Loop” like shown below:

- You can see there the “Run” button is not in a normal condition which shows that there is some problem with the program.
- It is due to the fact because we have not yet defined the terminating condition of the program.
- Now, go to the “Front Panel” window and right click on it.
- Go to Controls-> Modern-> Boolean-> Stop Button as shown in the figure below:

- Connect the “Stop Button” with the red dot surrounded with the green boundary at the bottom right corner of the “While Loop” as shown in the figure below:

- Now you can see that the “Run” button is now again in normal state which shows that the everything is going fine with the program.
- Now, run the program and it will continue to run until you press the “Stop Button” in the “Front Panel” window.
- Running Program is shown in the figure below:

- You can change the input according to the requirements and you can see output immediately and you do not have to run the program again and again for the different inputs
- If you press the stop button you can see that the program terminates only then
×
![]()


