Quadratic Roots Calculation in LabVIEW


Ways to Solve Quadratic Equation
The quadratic equation is of the form ax²+bx+c. Where "x" is unknown variable and we have to find it. "a", "b" and "c" are known as the constants of quadratic equation. It has three different ways to solve as described below.- By factorization: It can be much quicker. The resulting equation are simple and easy to solve when each factor is set to "0". But his method has a lot of of limitations. Sometimes it is very difficult to solve some of the polynomials by factorization and sometimes it becomes impossible with this particular method.
- By completing square: It is very easy to solve when the constant "b" is even. This method includes more steps as compared to the other methods. So, it can make the calculations complicated.
- Using quadratic formula: It is basically a generic formula and it can solve any of the quadratic equation.
Quadratic Roots Calculation in LabVIEW
- You can download this LabView Simulation for Quadratic Roots Calculation by clicking the below button:
- Go to the "Front Panel" and press "Right Click".
- Go to Controls-> Modern-> Numeric-> Numeric Control. You can see the different numeric block here.

- Select the encircled block and place it on the "Front Panel".
- The figure below shows the selected blocks.
- Similarly place two more blocks on the "Front Panel" and change their names as "a", "b" and "c". These are basically the coefficients of quadratic equation.
- The figure below shows the illustration of all of the above steps.

Selection of Numeric Indicator
- Now, again go to Controls-> Modern-> Numeric-> Numeric Indicator.
- Select the encircled block and place it on the "Front Panel".
- Similarly place two more blocks and change their names to "y", "x1" and "x2" respectively.
- The figure below shows all of the above steps.

- In above figure "x1" and "x2" are two quadratic roots of the quadratic equation. These roots can be real as well as imaginary. It depends upon the coefficients of quadratic equation.
- Now go to the "Block Diagram" window.
- You can see it is looking like a figure below.

Selection of Formula Node
- Arrange all the block, as the above figure shows the arrangement.
- Now, go to Functions-> Programming-> Structures-> Formula Node. You can see different structure blocks there.
- The figure below shows the selection of the "Formula Node".

- Select the encircled one and place it on the "Font Panel".
- The figure below shows the "Formula Node" on the "Block Diagram" window.

- Now put you cursor on inside the "Formula Node" and write the code for calculating the roots of quadratic equation.
- Here is the screen shot of the written algorithm to find quadratic roots.

- Now put your cursor on the "Formula Node" and press "Right Click", you can see a new window on you screen.
- Go to "Add Input" and press click.

- After clicking on this option you can see a new input is added to the "Formula Node".
- The below shows the adjusted input.

- Similarly add two more inputs and change their names to "b" and "c".
- Make their connections with the "Numeric Controls".
- The figure below illustrates the above steps.

- Now, put your cursor on the "Formula Node" again an press "Right Click" and go to the "Add Output".
- Similarly add three outputs to the "Formula Node".
- Change their names to "y", "x1" and "x2".
- Make the connections between outputs of the "Formula Node" and "Numeric Indicator".
- The figure below shows the illustration of all of the above steps.

For Loop selection
- Go to the "Block Diagram" window and press "Right Click".
- Go to Functions-> Programming-> Structures-> For Loop. you can see different structures blocks.
- The figures below shows the selection of "For Loop".

- Select the desired block and place it on the "Block Diagram" window.
- The figure below shows the selected "For Loop".

- Now, place the entire program inside the "For Loop".
- Go to the bottom right of the "For Loop" and press "Right Click" on it.
- Go to Create->Control. You can see a stop button is now generated.
- The figure below shows the entire algorithm.

- The figure above shows the complete algorithm for "Calculating Quadratic Roots using NI LabVIEW".
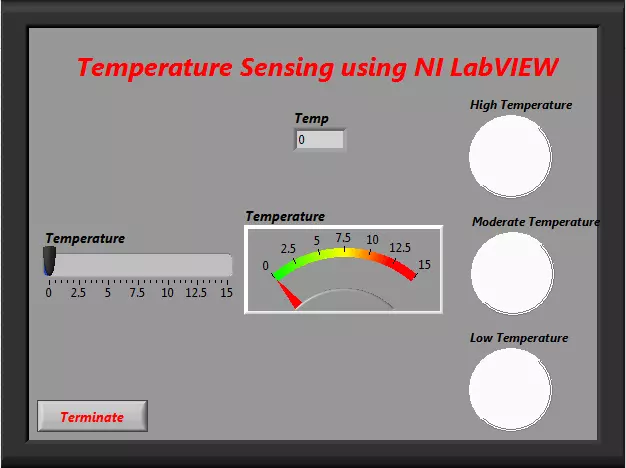
- Now go to "Front Panel". Here you can see the whole output of the designed algorithm.
- "Run" the program and change the values of the quadratic coefficients, you can obtain the corresponding output.
- The program will continue to start until you terminate it.
- If you press the stop button then the program will terminate.
- The figure below shows the screen shot of the complete output of the designed algorithm.

Making better External Look
- Press "Double Click" on the "Front Panel" and start typing the name of the project.
- Go to the upper Toolbar (18pt application form) and change the color, style and size of the text.
- The figure below shows the illustration of all of the above steps.

- Go to the "Front Panel" and press "Right Click".
- Go to Controls-> Modern-> Decoration. You can see different "Decoration" blocks there.

- Select the encircled blocks and place them on the "Front Panel".
- Arrange them in way shown in the figure below.
- Extend the placed blocks so that you can put the whole program inside these blocks.

- Now select the entire program and drag it over these blocks.
- You can see the figure below on your screen.

- Now, go to the upper toolbar and perform the following steps.
- The figure shows the steps to perform.

- Press "Move to Front" your program will appear clearly on the front side of these blocks.
- Here is the screen shot of the above step.

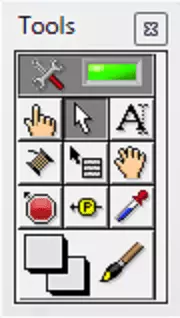
Tools Palette
- You can use this tools to change the color of your output.
- Go to the upper toolbar and go to View-> Tools Palette.
- Screen shot is shown in the figure below.

- When you select this option, you can see a new window on your screen.
- Here is the scree shot of the new window appeared on the screen.
- You can change the color of your output according to your own choice.
- I have changed them according to my choice.
- Here is the screen shot of the final output with different colors.
- The above figure shows the complete output of the designed algorithm.
- Here's the video in which I have explained how to use this LabView VI:
×
![]()