Hello friends! Hope you all will be absolutely fine. Today I am going to share my knowledge with you about how to create an algorithm for Water Level Detector in LabVIEW 2015. LabVIEW is an excellent software for simulation purpose as well as for the hardware interfacing (interfacing with the external devices). I support the "Graphical Language" which is usually known as "Field Programmable Gate Array (FPGA) " based language. In other software we have to create logic first and then we need to write a complete syntax for the created logic. This software is very easy to use and is quite helpful. Because, we don't have to write the complete complex syntax, instead we have to just create our logic and implement this logic using FPGA blocks. In this tutorial we will learn to make a simple water level detector in LabView. The simulation is given below for download and if you guys have any problem in it then ask in comments and I will resolve them. This simulation is tested on LabView 2015.
Water Level Detector in LabView
Here I am going to elaborate you that how to make a simple Water Level Detector in LabVIEW 2015. First of all we will look at the important LabVIEW components or you can say tools, required to design a water level detector. You can see the list of these components below
Tank
Vertical Pointer
Upper Level Indicator
Lower Level Indicator
Graph to observe the results
You can download this simulation of Water Level Detector in LabView by clicking the below button:
Download LabView Simulation
Vertical pointer is used to control the level of the water in the tank. Upper level indicator shows when the tank is about to completely fill. Lower level indicator shows indication by turning "ON" the LED when the level of the water in the tank is too low and we need to fill it. Graphs shows the graphical visualization as the vertical pointer moves up ow down.
Go to the "Front Panel" and press "Right Click" from your personal computer or laptop.
Now, go to the Controls-> Modern-> Numeric-> Tank.
By doing this, you can see the following figure in your PC's screen.
You can see different blocks in the above figure
Select the encircled "Tank" and place it on the "Front Panel"
It looks like the below figure
Now, put the "Cursor" on the tank and press "Click" you can see that the water level changes with each different click on the tank
You can see the above step in the figure below:
Blue color show the level of the water in the tank.
Now go to the "Front Panel" and then go to the Controls-> Modern-> Numeric-> Vertical Pointer.
By doing this, you can see the following figure in your PC's screen:
You can see different blocks in the above figure.
Select the encircled block i.e. "Vertical Pointer".
Place this block on the "Front Panel".
It is looking like the figure below:
Put the "Cursor" on the "Vertical Pointer", press click and then move up and down.
It looks like the figure below:
Blue color indicates the value or rate at which we want to fill the tank
So now, you have selected both the tank and the vertical pointer and you can see that it looks like the figure below:
Now press "Ctril+T"
You can see the "Block Diagram" window is looking like the below figure
Now, since we want to control the level of the water in the tank with the help of the vertical pointer by adjusting it at different positions
So, we have to build a connection between them
Take a wire from the output terminal of the vertical pointer (Slide) and connect it to the input terminal of the tank
The figure below exhibits the above steps
No we have to set the upper and lower level for the less and high amount of water indication
We need to put two LED's, one for the upper level ndication and the second for the lower level indication
Upper Level Indicator
Press "Click" on the "Block Diagram" window
Go to the Functions-> Programming-> Comparison-> Greater or Equal?
Figure displays the above steps
Select and place this block on the "Block Diagram" window
Connect its first input terminal with the output terminal of the "Vertical Pointer"
Go to the second input terminal of the "Greater or Equal" press "Right Click"
Go to the Create->Constant
The figures below displays the above steps
Set the value of the constant as "9"
The figure shows the adjusted value of the "Constant"
Now we have to put an LED in the "Front Panel" for the upper level indication
Press "Right Click" on the "Front Panel"
Go to the Controls-> Modern-> Boolean-> Square LED
The figure below shows all of the above steps
Select the LED and place it onto the "Front Panel" with the top right corner of the tank
Figure elaborates a bit more
Now, Go to the "Block Diagram" window again
Connect the output terminal of the "Greater or Equal" to the input terminal of the "LED" as shown below
Now go back to the "Front Panel"
You can see, as the vertical pointer moves up from the desired upper which is "9" in this case, limit LED turns on
Here is the screenshot of the "ON" LED
Lower Level Indicator
As the upper limit is adjusted above.
Similarly set the lower limit.
Go to the "Block Diagram" window and press "Right Click".
Go to Functions-> Programming-> Comparison-> Less or Equal.
select this block and connects one of its inputs to the "Vertical Pointer".
Go to the second input and press "Right Click".
Go to Create-> Constant.
Set the constant, in this case I have set it to "2" as shown below:
Place and LED in " Front Panel"
In "Block Diagram" window connect the LED with the "Less or Equal" block
If you want that your program should no terminate until you did it by your self then follow the below steps
Now, Go to the "Front Panel" and press "Right Click"
Go to Functions-> Programming-> Structures-> While Loop
Select and place it on the "Block Diagram" window
Place the whole program inside the "While Loop"
Now, go to the "Front Panel" and press "Right Click"
Go to Controls-> Modern-> Boolean-> Stop Button
Select and place it on the "Front Panel"
Now, go to the "Block Diagram" window
Connect this button with the "RED" small circle at the bottom right corner of the "While Loop" as shown below in the figure
Complete "Block Diagram" logic of making water level detector is shown below
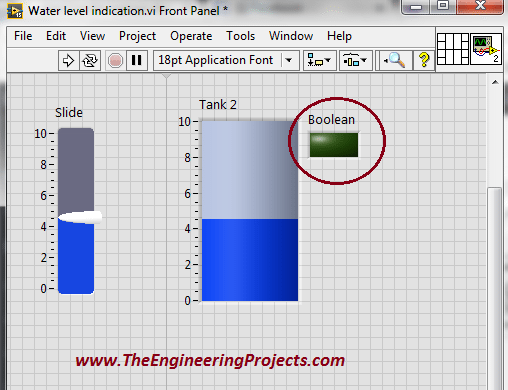
Complete output of the water level detector is shown below
So, That's all from today's tutorial of Water Level Detector in LabVIEW 2015. I hope you have enjoyed my effort. I will share a new project on LabView soon. Till then take care :)