Hello friends, I hope you all are doing great. Today, I am going to share the new Dual-Axis Solar Tracker Library for Proteus Simulation, the last library of our renewable energy series. If you have searched for a Proteus simulation of a solar tracker with two servos and four LDRs, the classic Arduino project, this library gives you the whole mechanism as one small part: the sun moves through the sky, the LDRs see it, and the panel turns on your sheet as your code drives the servos.
Dual-Axis Solar Tracker Library for Proteus Simulation
Latest version: V1.0 (November 2026, this tutorial)
Other power libraries: LiPo Battery · Single Cell Battery · CR2032 Coin Cell · Solar Panel · MC34063 Buck · MC34064 Boost · 12V Solar Panel · 6V Mini Solar Panel · 3-Phase PM Generator · Vertical-Axis Wind Turbine · Micro Hydro Generator · Thermoelectric Generator · PEM Hydrogen Fuel Cell · Piezoelectric Energy Harvester · Hand Crank Generator · 12V LiFePO4 Battery · 12V Lead-Acid Battery · 18650 Li-ion Battery · PWM Solar Charge Controller · MPPT Solar Charge Controller · TP4056 Li-ion Charger Module · Wind Turbine Charge Controller · 12V to 230V Pure Sine Wave Inverter · Anemometer Wind Speed Sensor · PZEM-017 DC Energy Meter
Helping Tools
- Serial Monitor Advance: a serial terminal window for the UART of your board
- Serial Monitor Expert: the serial monitor with extra debugging tools
- LCD Library for Proteus V3.0: 16x2, 20x4 and I2C LCDs to show your readings
The tracker is drawn small and compact. Its simulation model knows where the sun stands for any hour, day and latitude, how much light each of the four LDRs catches behind the shade cross, how fast the two servos turn, and how much power the solar panel gives at its angle to the sun. The pop-up shows the sky as a map and compares the light your tracker catches with a fixed panel, so you can see what your tracking code is worth.
NOTICE: Our team has put a lot of effort into these small parts: the bodies, the animation and the pop-ups are all our own design, and you get them free. Your feedback is the fuel that keeps us going, so please tell us what you think in the comments below or in the Motor Driver board of our forum. And if our free libraries help you, you can buy us a coffee. So, let's get started with the Dual-Axis Solar Tracker Library for Proteus Simulation:
What is a Dual-Axis Solar Tracker?
A solar panel gives its full power only when the sun shines straight onto it. When the light arrives at an angle, the panel catches less of it: at 60 degrees off, only half. A fixed panel therefore works well around noon and poorly in the morning and the evening. A solar tracker turns the panel so that it always faces the sun. A single-axis tracker follows the sun from east to west. A dual-axis tracker has a second axis for the height of the sun, so it can follow it through the whole day and through the seasons.
The small trackers that students build use two hobby servos: the pan servo turns the whole head left and right, the tilt servo tips the panel up and down. To find the sun they use four LDRs, light dependent resistors, set in the four corners of a cross-shaped wall. When the panel faces the sun, all four get the same light. When the sun is to one side, the wall throws its shadow on the LDRs of the other side, and the controller turns the panel towards the brighter pair until all four are equal again.
| The tracker of this library | |
|---|---|
| Axes | pan 0 to 180 degrees (0 east, 90 south, 180 west), tilt 0 to 180 degrees (0 upright, 90 flat) |
| Servos | two of the 9 g class: 544 to 2400 us pulses, 600 degrees a second |
| Sensors | four LDRs behind a shade cross, each with 1 kohm to ground, under a grey cap |
| Solar panel | 6 V, 1 W: 7.2 V open, 0.18 A shorted, 110 x 60 mm |
| Supply | 5 V for the servos and the LDRs |
| Size | about 110 mm wide and 120 mm tall; drawn at a quarter of that |
Features of the Dual-Axis Solar Tracker Library for Proteus Simulation
- A small, compact part: the base, the two servos, the panel and the LDR head, drawn at a quarter of the real size - well under half an Arduino UNO.
- A panel that turns: at run time the panel on your sheet turns and tips exactly as the servos move it.
- A real sun: its place in the sky comes from the solar time, the latitude and the day of the year; a clock runs the day in seconds.
- Four LDRs behind a cross: each one answers to the light it really catches, with the cross's shadow and the slowness of a real LDR.
- Two servo inputs: the pulses of the Arduino Servo library, 544 to 2400 us.
- A working solar panel: its voltage and current follow the light on it, so you can measure the power you win.
- Clear and cloudy skies: under clouds the LDRs read alike, as on a real tracker.
- A pop-up: the sky as a map with the sun's path, the sun and the panel's aim, the four LDRs, eight live values, the gain over a fixed panel, graphs, an event log and a check page.
- A complete package: about 1.3 MB with the library, our Arduino UNO V4.0 and the demo, without the source code of the model.
The Solar Tracker in Proteus
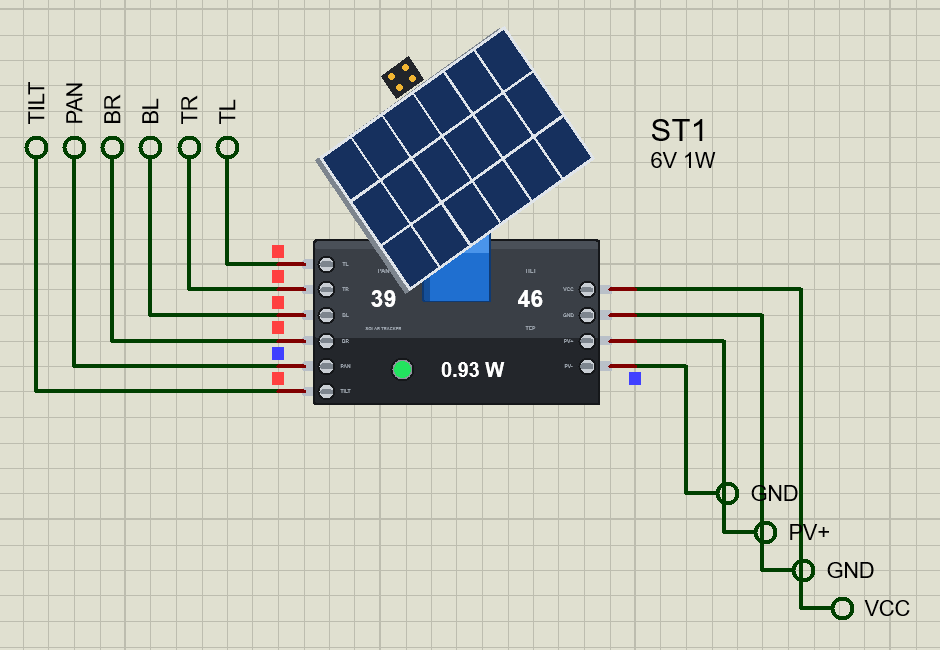
The device is SOLARTRACKERTEP in TEPTRACKER.LIB, under Electromechanical > Solar Trackers, with the prefix ST and the model TEPTRACKER.DLL. Search TRACKER in Pick Devices. It has ten pins. On the left are the four LDR outputs TL, TR, BL and BR (top and bottom, left and right, as seen from the front of the panel) and the two servo inputs PAN and TILT. On the right are VCC and GND for the 5 V supply, and PV+ and PV-, the two wires of the solar panel.
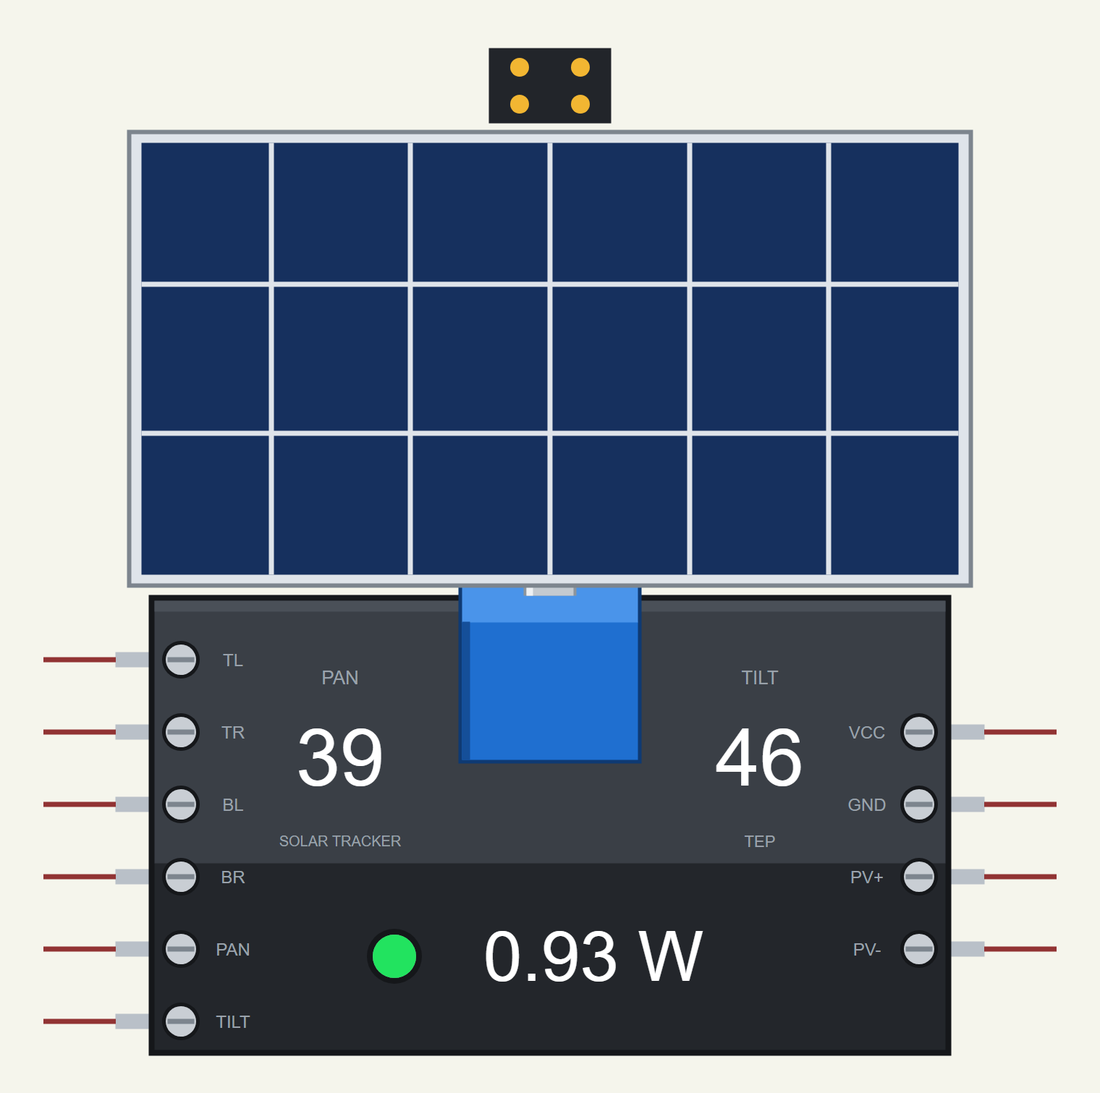
The properties set the day: HOUR (the solar time at the start), SPEED (the clock: 3600 makes an hour of every simulated second), LATITUDE, DAY (the day of the year), SKY (CLEAR or CLOUDY), and PAN0 and TILT0, the angles the panel starts at. A brighter LDR gives a higher voltage. The panel is of the same kind as the one in our 6V Mini Solar Panel Library for Proteus.
Download Dual-Axis Solar Tracker Library for Proteus Simulation
Click the button below to download Dual-Axis-Solar-Tracker-Library-for-Proteus-v1.0.zip (about 1.3 MB, without the source code of the models):
Dual-Axis Solar Tracker Library for Proteus V1.0- README.txt: installation, the demo, the wiring, troubleshooting and the limits of the simulation.
- Proteus Library Files:
TEPTRACKER.LIBandArduinoV4TEP.LIB. - Proteus Model Files:
TEPTRACKER.DLLandTEPARDUINO.DLL. - Arduino Code: the demo sketch.
- Proteus Simulation: the demo project, its HEX file and copies of the DLLs.
No Proteus yet? Read How to Download and Install Proteus 7 and 8. New to libraries? Follow How to Install a New Library in Proteus.
How to Install Dual-Axis Solar Tracker Library for Proteus Simulation
- Close Proteus and extract the whole zip file, for example to your Desktop.
- Copy the files from Proteus Library Files into the LIBRARY folder of Proteus.
- Copy the files from Proteus Model Files into the MODELS folder.
- Delete
TEPTRACKER.IDXfrom the LIBRARY folder if it is there. - Start Proteus, press P and search for TRACKER.
Proteus Simulation of a Sun Tracker with Arduino
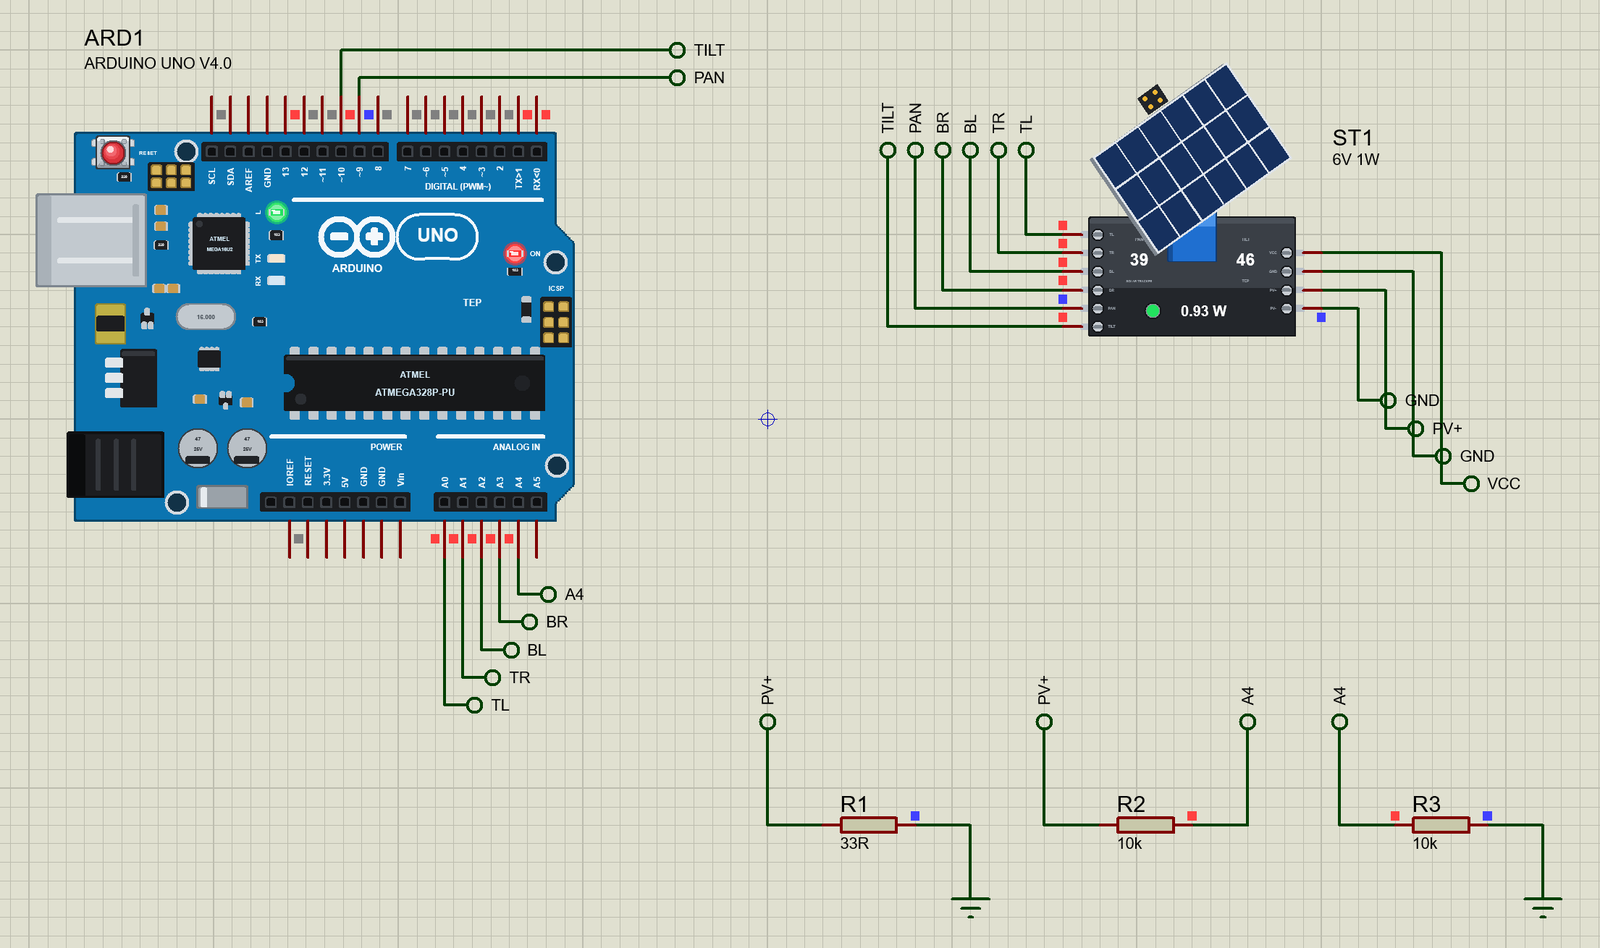
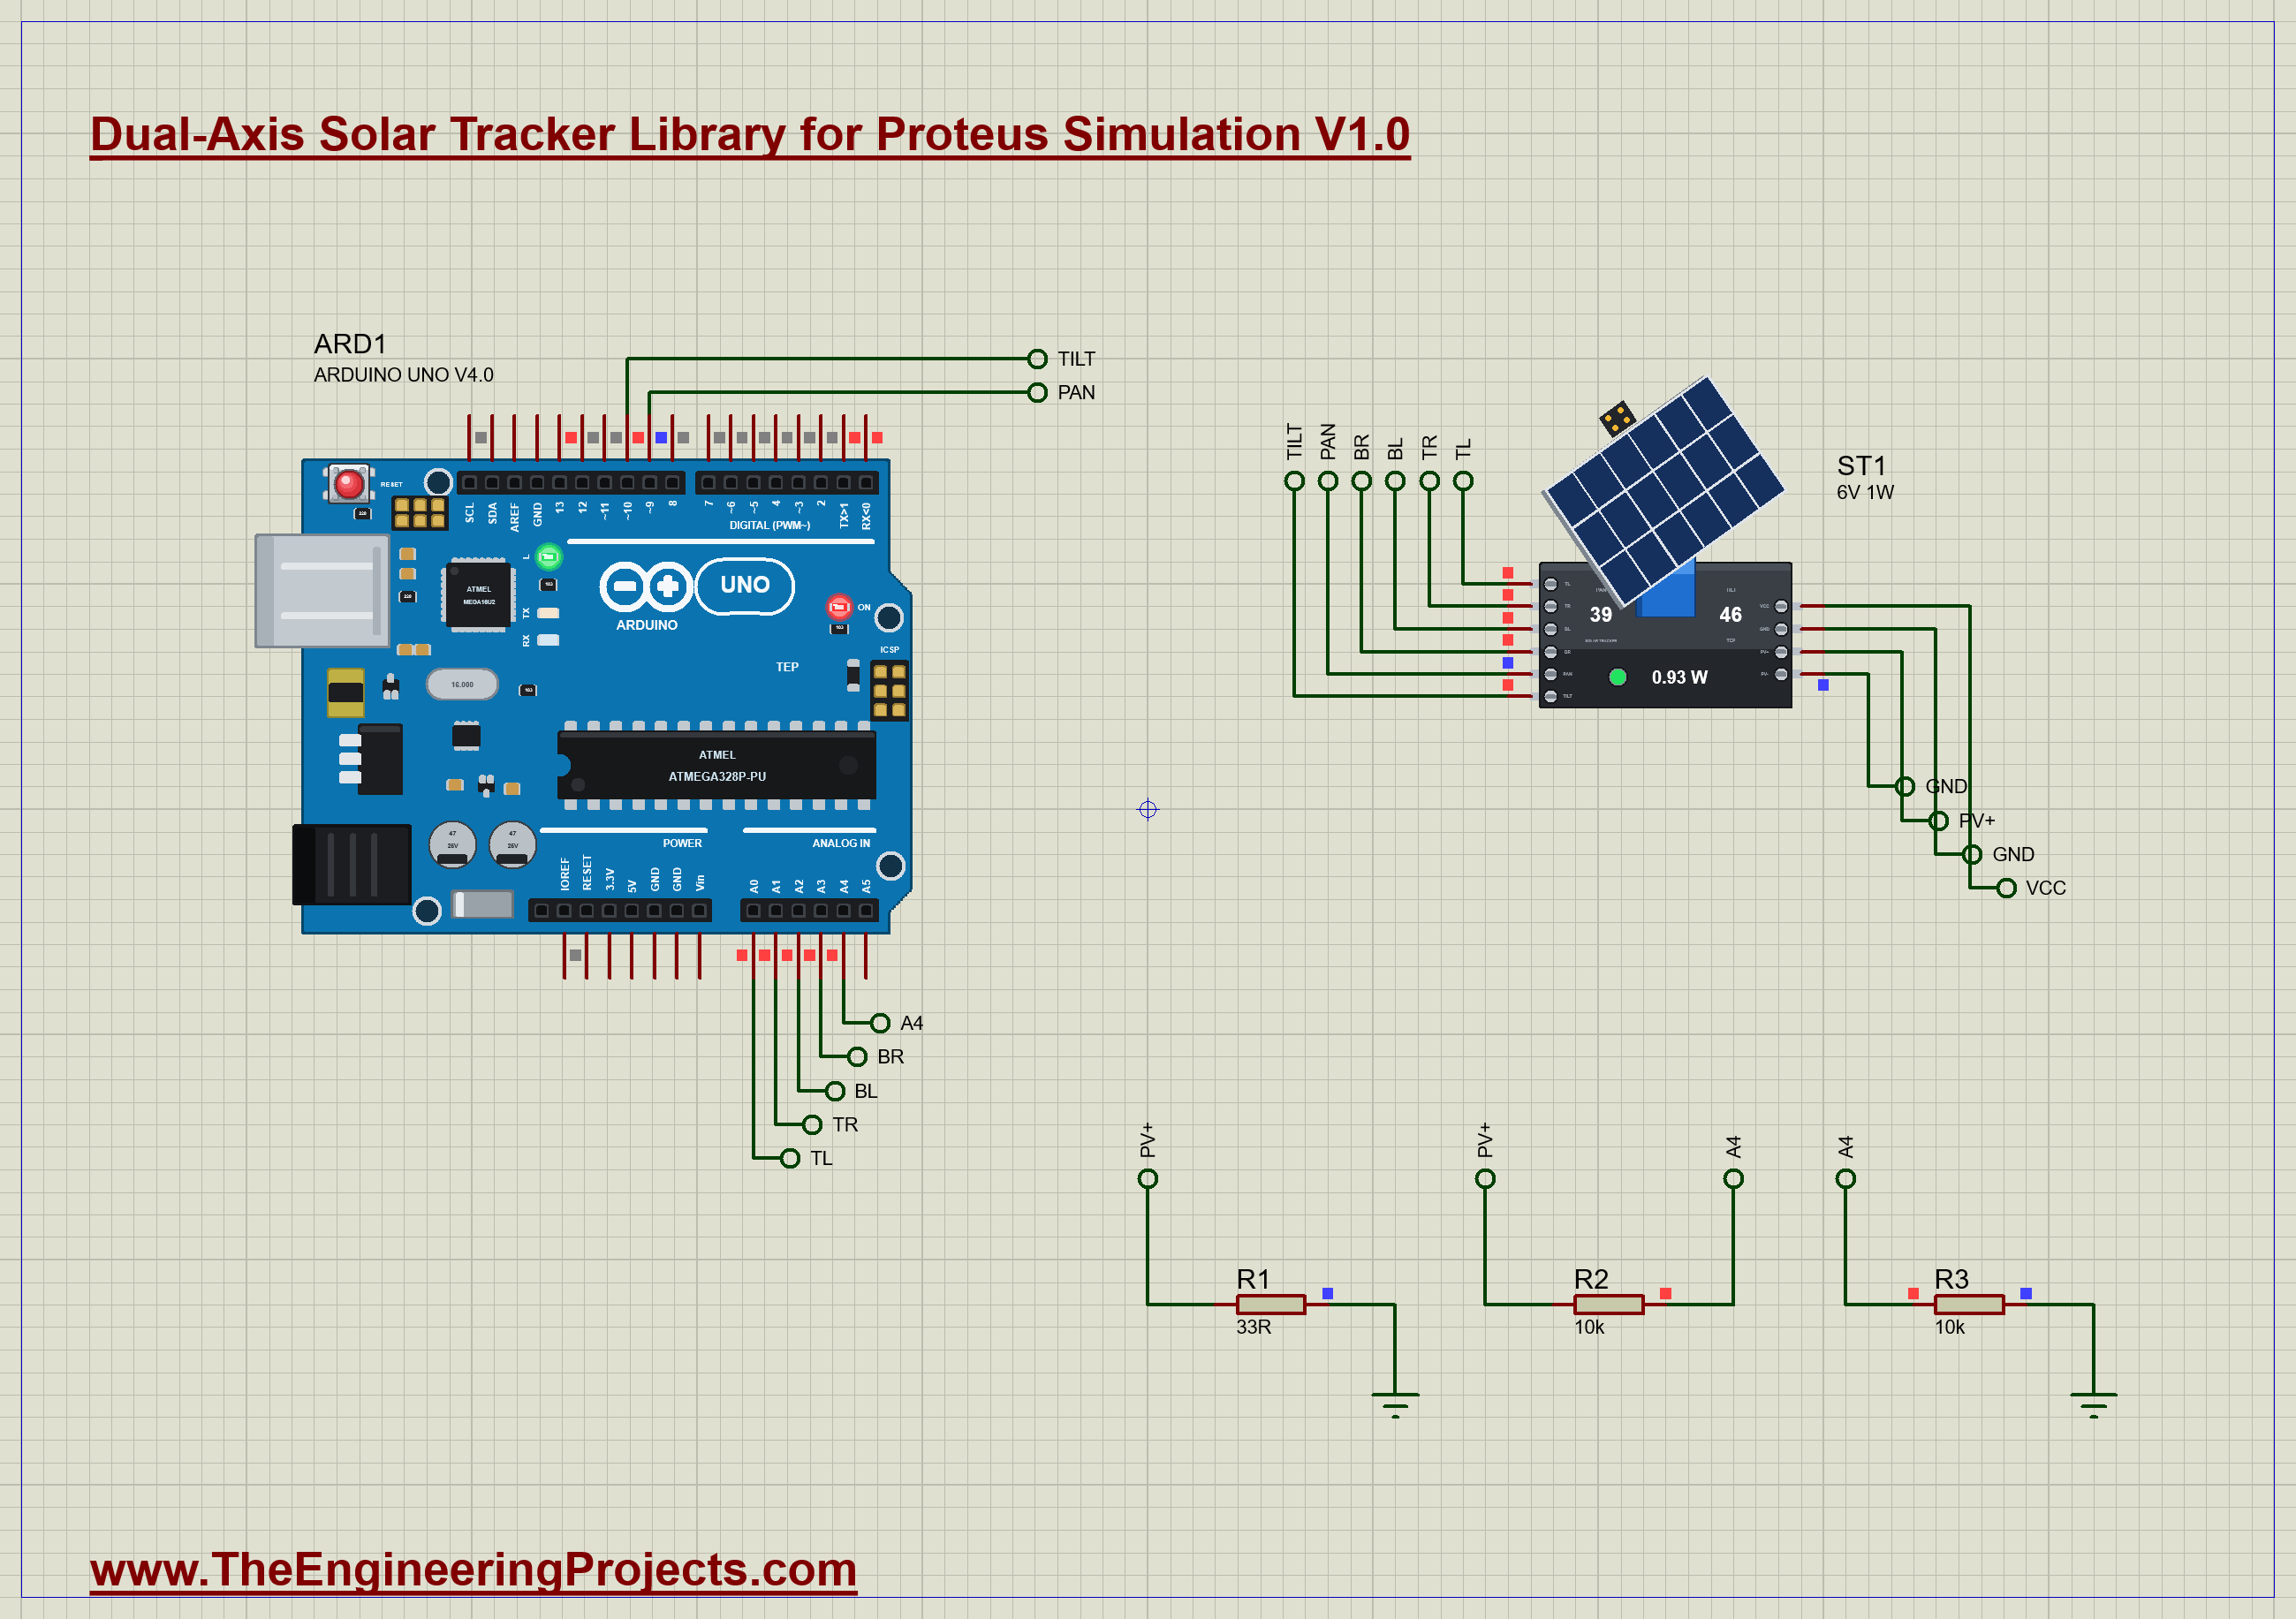
The demo is a sun tracker, complete on one small A4 sheet. The tracker, ST1, stands for 21 March at latitude 30: its day starts at 06:00, the moment of sunrise, and its SPEED of 3600 turns every simulated second into an hour. Its four LDR outputs go to the analog inputs A0 to A3 of our Arduino UNO Library for Proteus V4.0, and its PAN and TILT inputs to the pins 9 and 10. The panel feeds a load, R1, 33 ohm, and two 10 k resistors, R2 and R3, bring half of its voltage to A4. The Arduino's built-in monitor is the same window as our TEP Serial Monitor Advance for Proteus. Open Dual-Axis-Solar-Tracker-ArduinoUnoV4.pdsprj.
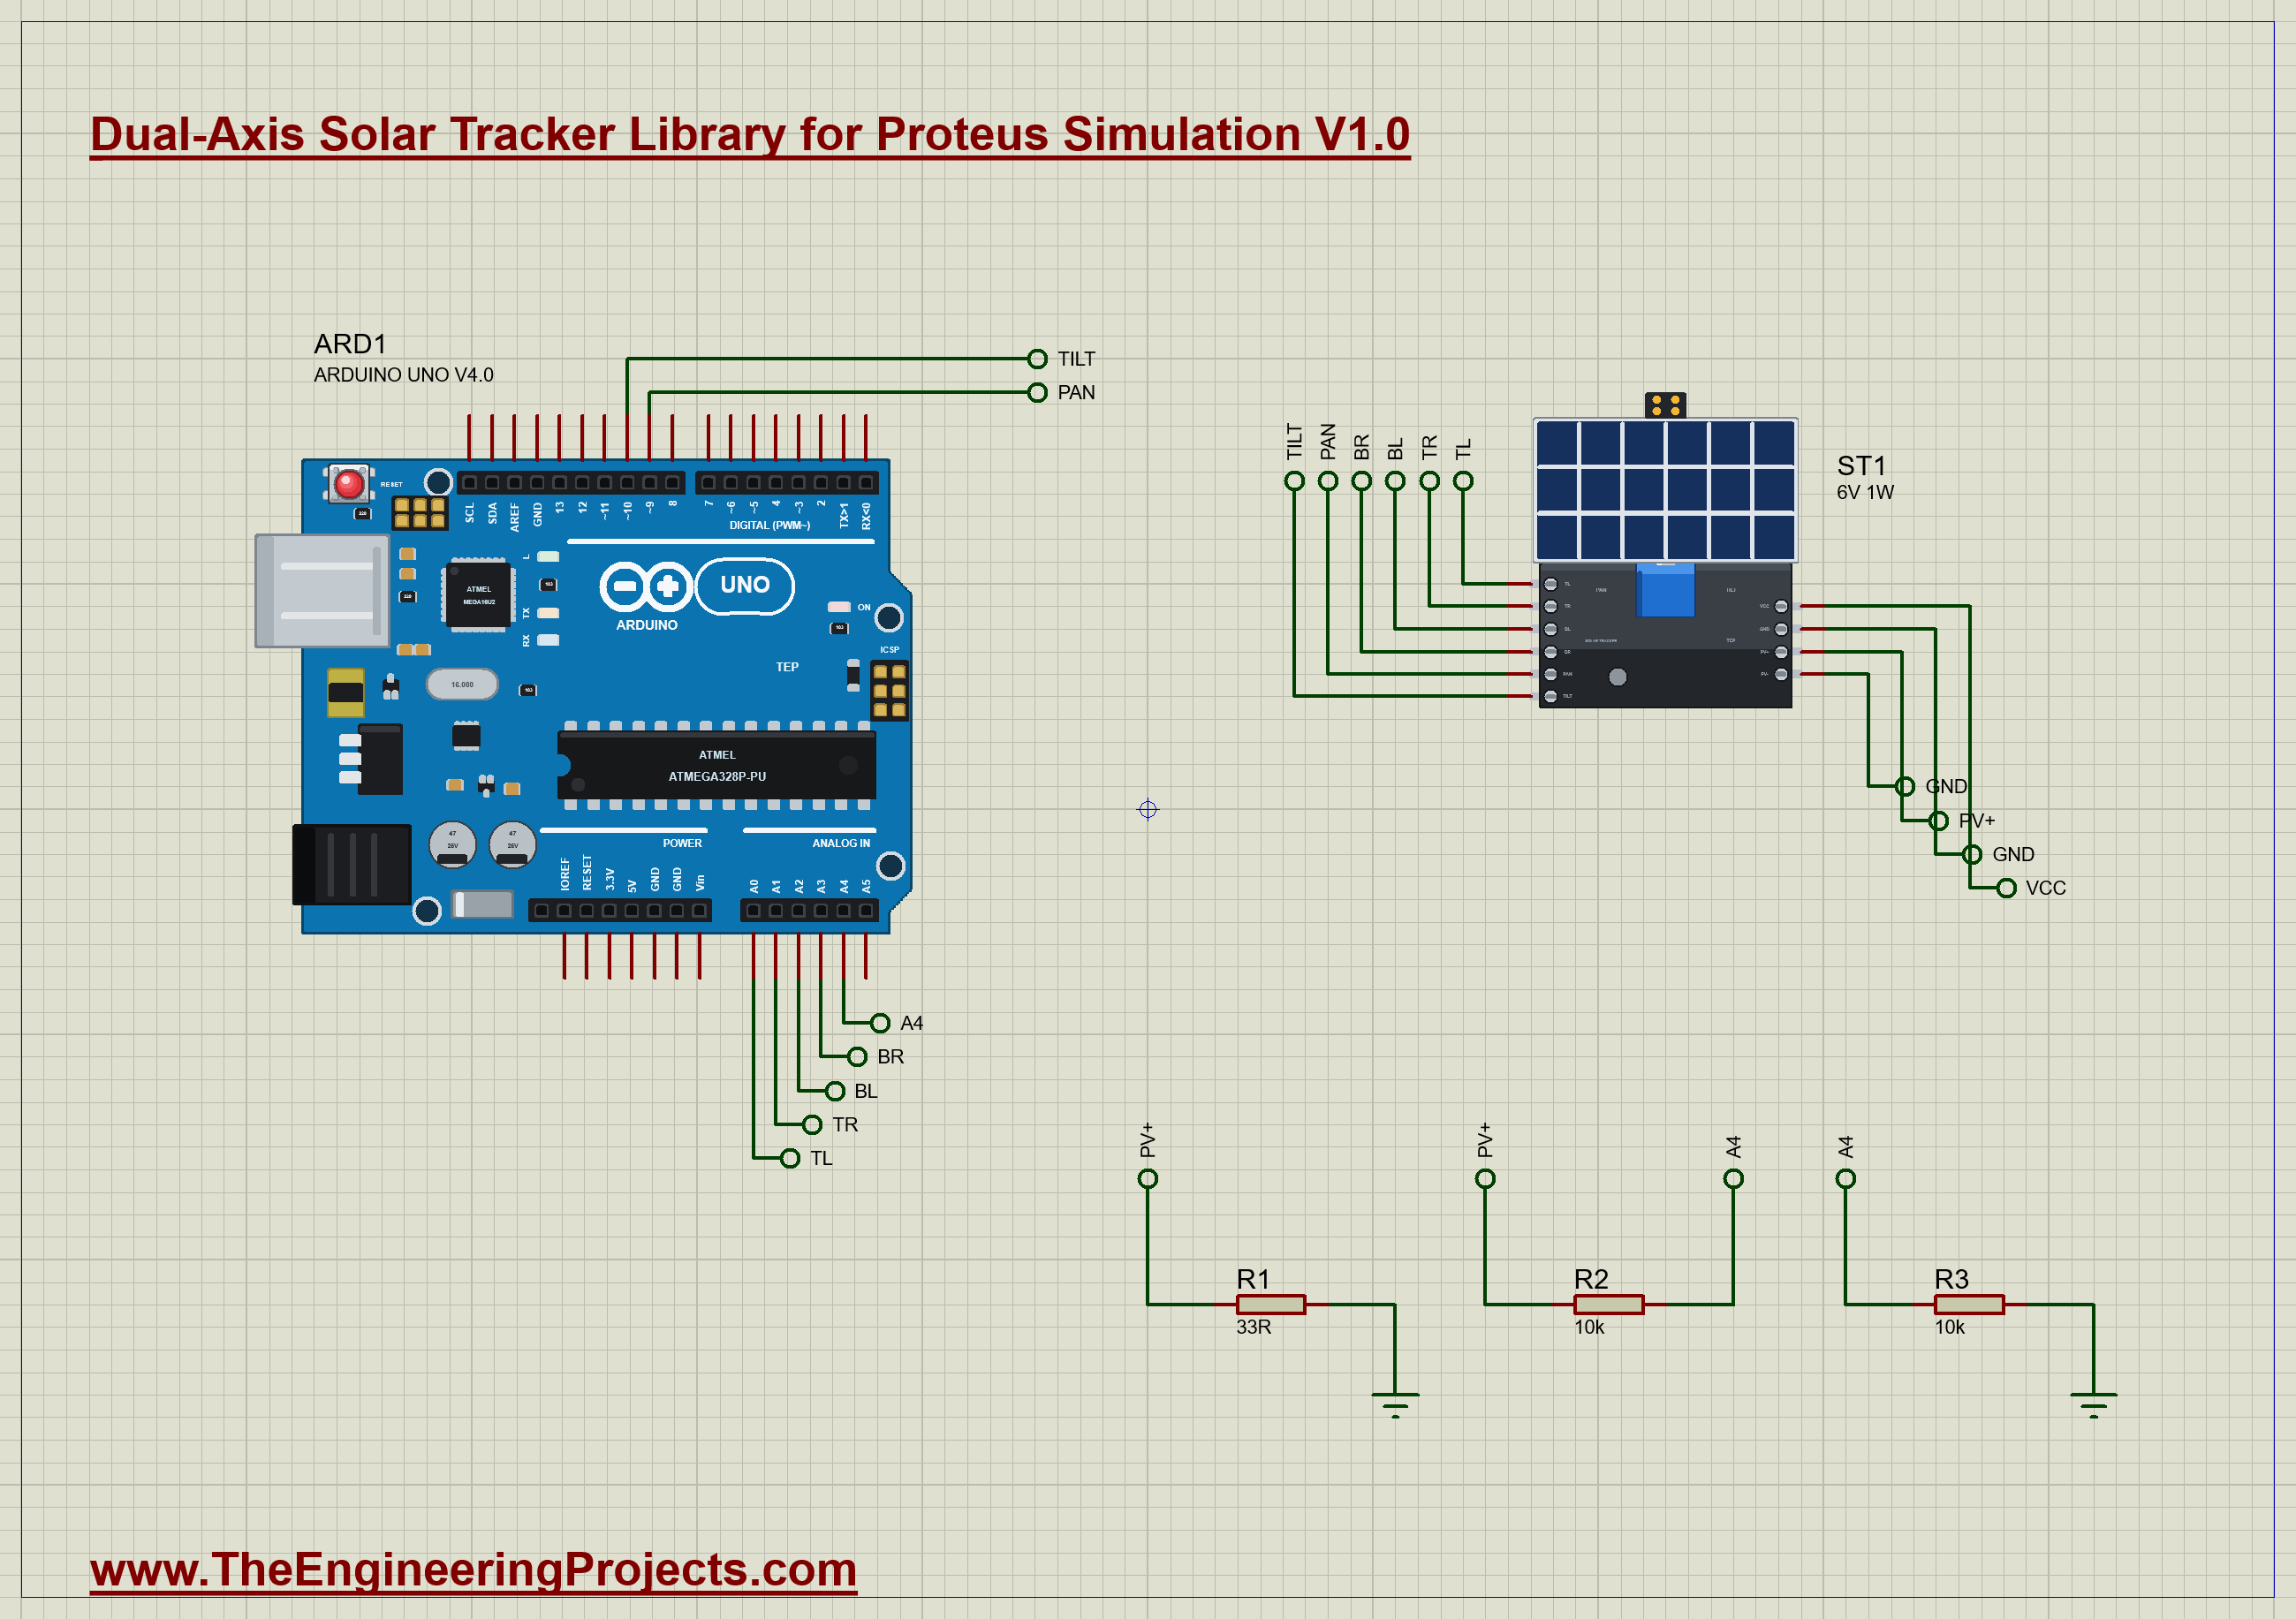
In the simulation the servos take their 5 V from the supply rail of the sheet. A real tracker's servos want a supply of their own; the 5 V pin of an Arduino is too weak for two of them.
The Sketch
Twenty times a second the sketch reads the four LDRs and forms two differences: left against right, and top against bottom.
    const int sideways = (tl + bl) - (tr + br);               // positive: the left pair is brighter - more pan
    const int upDown = (tl + tr) - (bl + br);                 // positive: the upper pair is brighter - more tilt
Each difference becomes a step for its servo, at most six degrees at a time. When the panel lies almost flat, a turn of the pan servo moves its aim only a little, so the pan step grows with the tilt:
    const float flat = max(0.25, cos(radians(tilt)));         // 1 with the panel upright, less as it lies flat
    const int dPan = constrain(int(sideways / (GAIN * flat)), -MAX_STEP, MAX_STEP);
    const int dTilt = constrain(upDown / GAIN, -MAX_STEP, MAX_STEP);
GAIN decides how hard the tracker reacts. One degree off the sun changes a pair of LDRs by about 24 counts; with a GAIN of 48 the sketch corrects half of what it sees in each step, which keeps it calm. A difference under 48 counts is ignored: that dead band lets the servos rest.
In the dark there is nothing to compare. The sketch then turns the panel to the east and waits for the sunrise:
if (dark) { pan = 0; tilt = 20; onSun = false; } // wait for the sunrise in the eastThe panel's voltage arrives halved at A4. The sketch doubles it and works out the power in the 33 ohm load:
const float volts = analogRead(PIN_PV) * (5.0 / 1023.0) * 2.0; // the divider halves the panel's voltageThe LED on pin 13 lights while the panel is on the sun. You can type park to hold the panel like a fixed one, track to follow the sun again and rate 500 to report twice a second. The Servo library comes with the Arduino IDE.
Solar Tracker Simulation Results
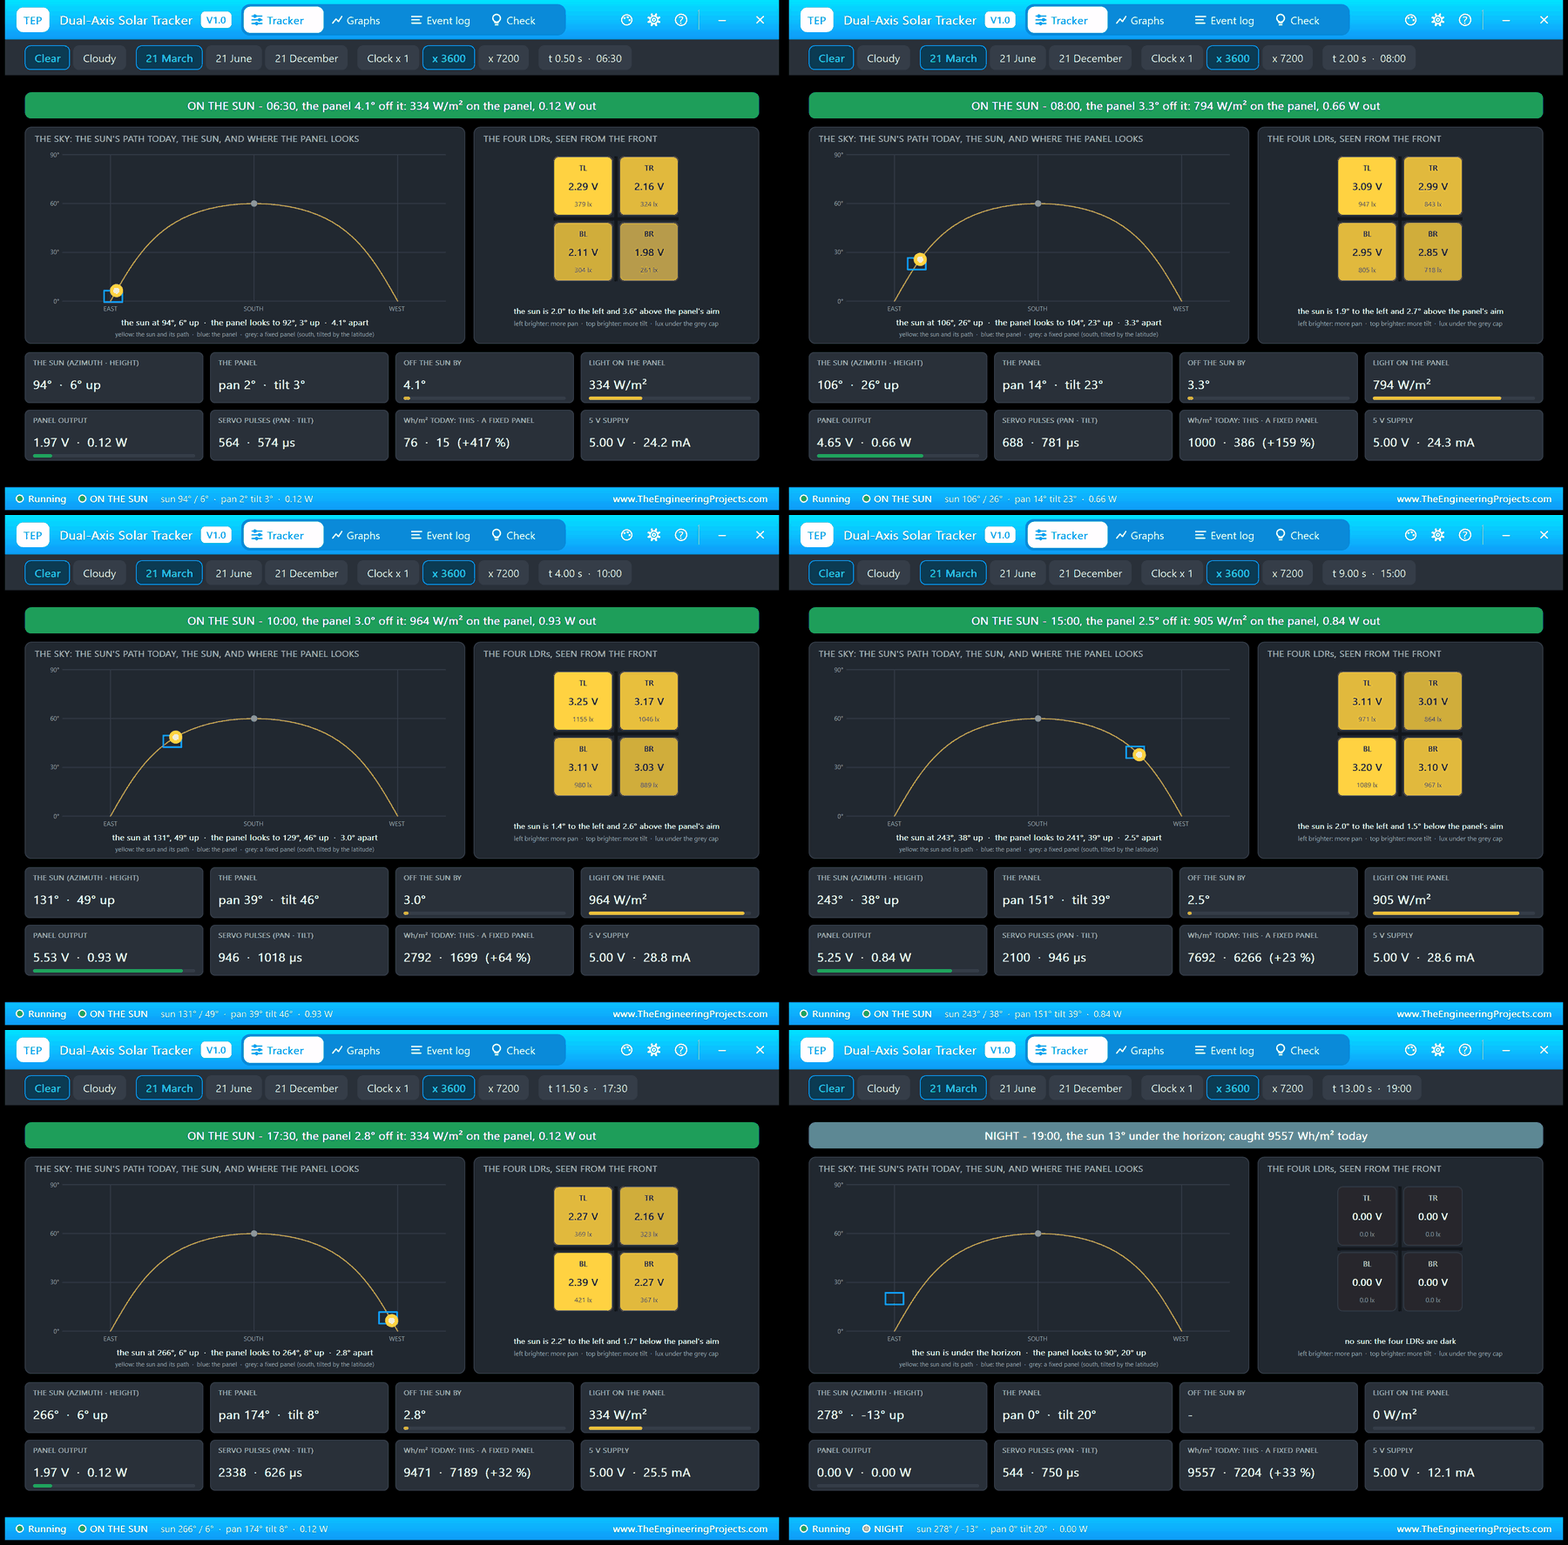
Open the project and press Run. The demo runs 13 simulated seconds, a whole day from 06:00 to 19:00; with the pop-up open and the pictures being taken it took 117 seconds on our PC. Click the tracker for its pop-up. Every number below comes from one simulation run, the demo exactly as it ships.
Sunrise
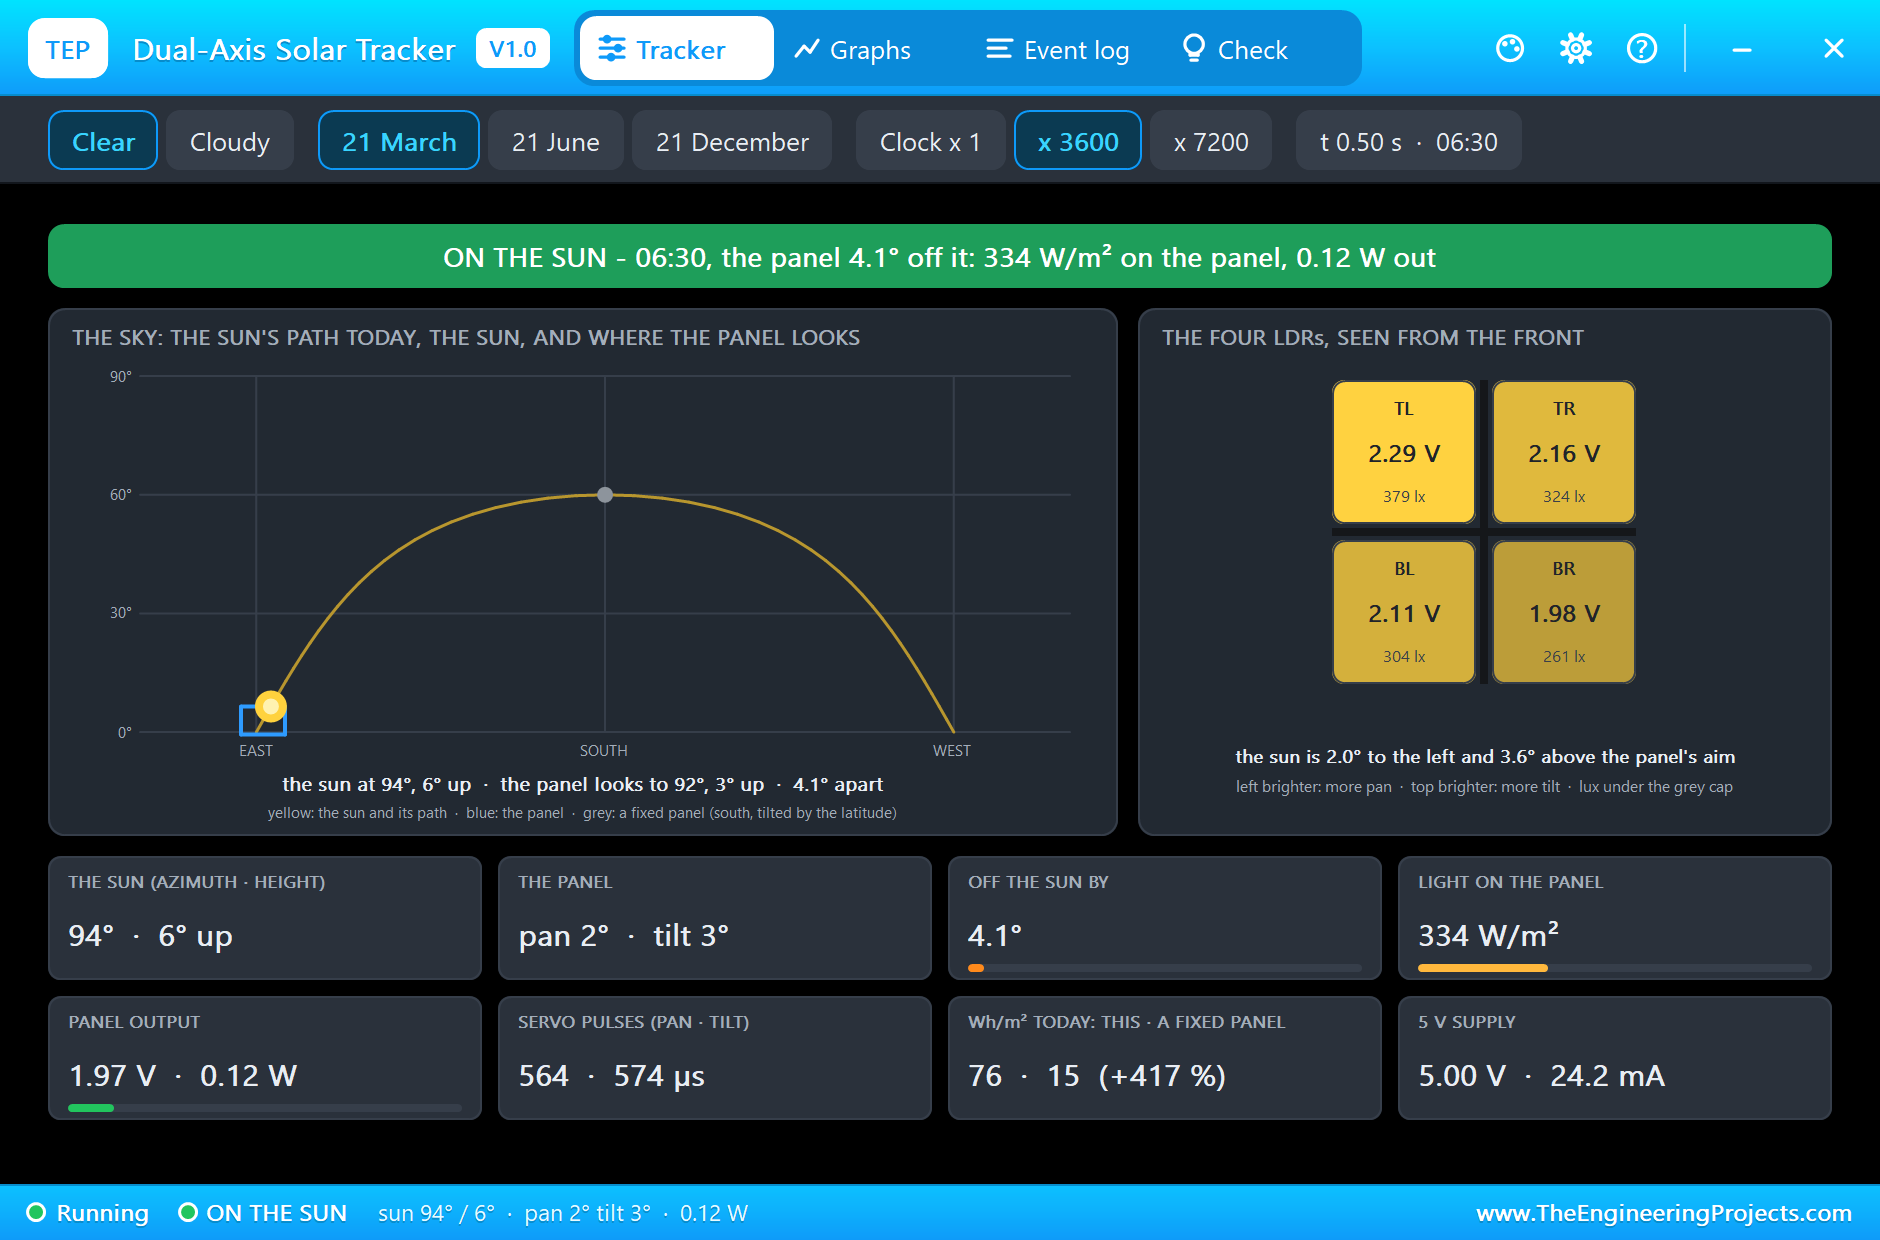
The panel starts facing south, as a fixed panel would. At the first step it is still dark, so the sketch swings it to the east. The sun comes up, and at 06:20 the Event log notes ON THE SUN. The pop-up at 06:30 shows the early morning: the sun stands at 94 degrees, almost exactly east, and 6 degrees up; the panel looks to 92 degrees and 3 degrees up, 4.1 degrees off. On the left of the pop-up is the sky as a map, with the sun's path of the day, the yellow sun and the blue frame that shows where the panel looks. On the right are the four LDRs as you would see them from the front, each with its voltage. The light is still weak, 334 W/m2, and the panel gives 0.12 W.
The Morning
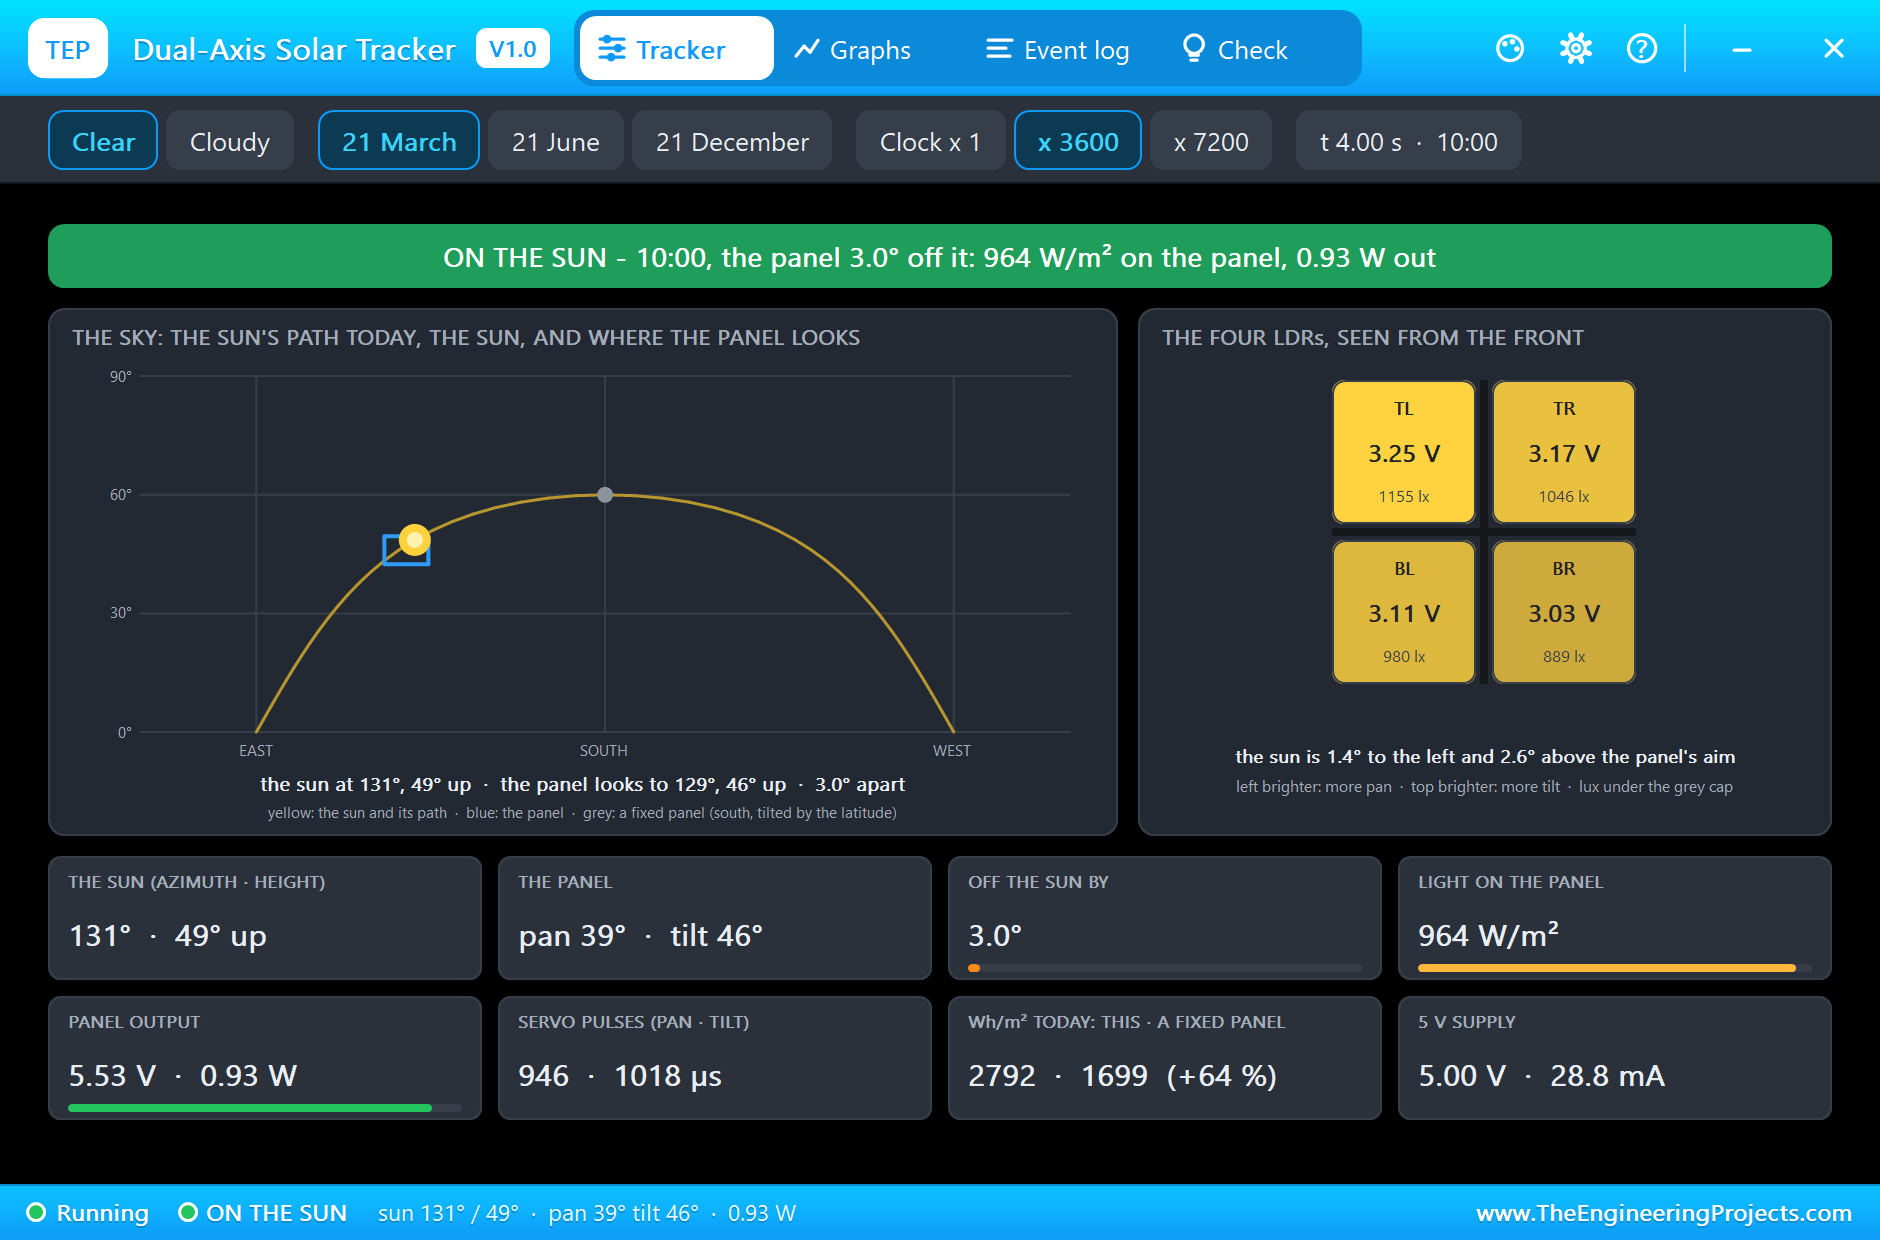
By 10:00 the sun has climbed to 49 degrees in the south-east, at 131 degrees. The tracker has followed it: pan 39 degrees, tilt 46 degrees, 3.0 degrees off the sun. The four LDRs read between 3.03 and 3.25 V; the two left ones and the two upper ones are a little brighter, which tells the sketch that the sun is moving on to the left and upwards. There are 964 W/m2 on the panel now, and it gives 5.53 V and 0.93 W into the load.
On the sheet you can watch all of this without the pop-up: the panel has turned and tipped, the base shows the pan and tilt angles and the watts, and the green lamp says that the panel is on the sun. The LED of the Arduino is lit too.
Noon
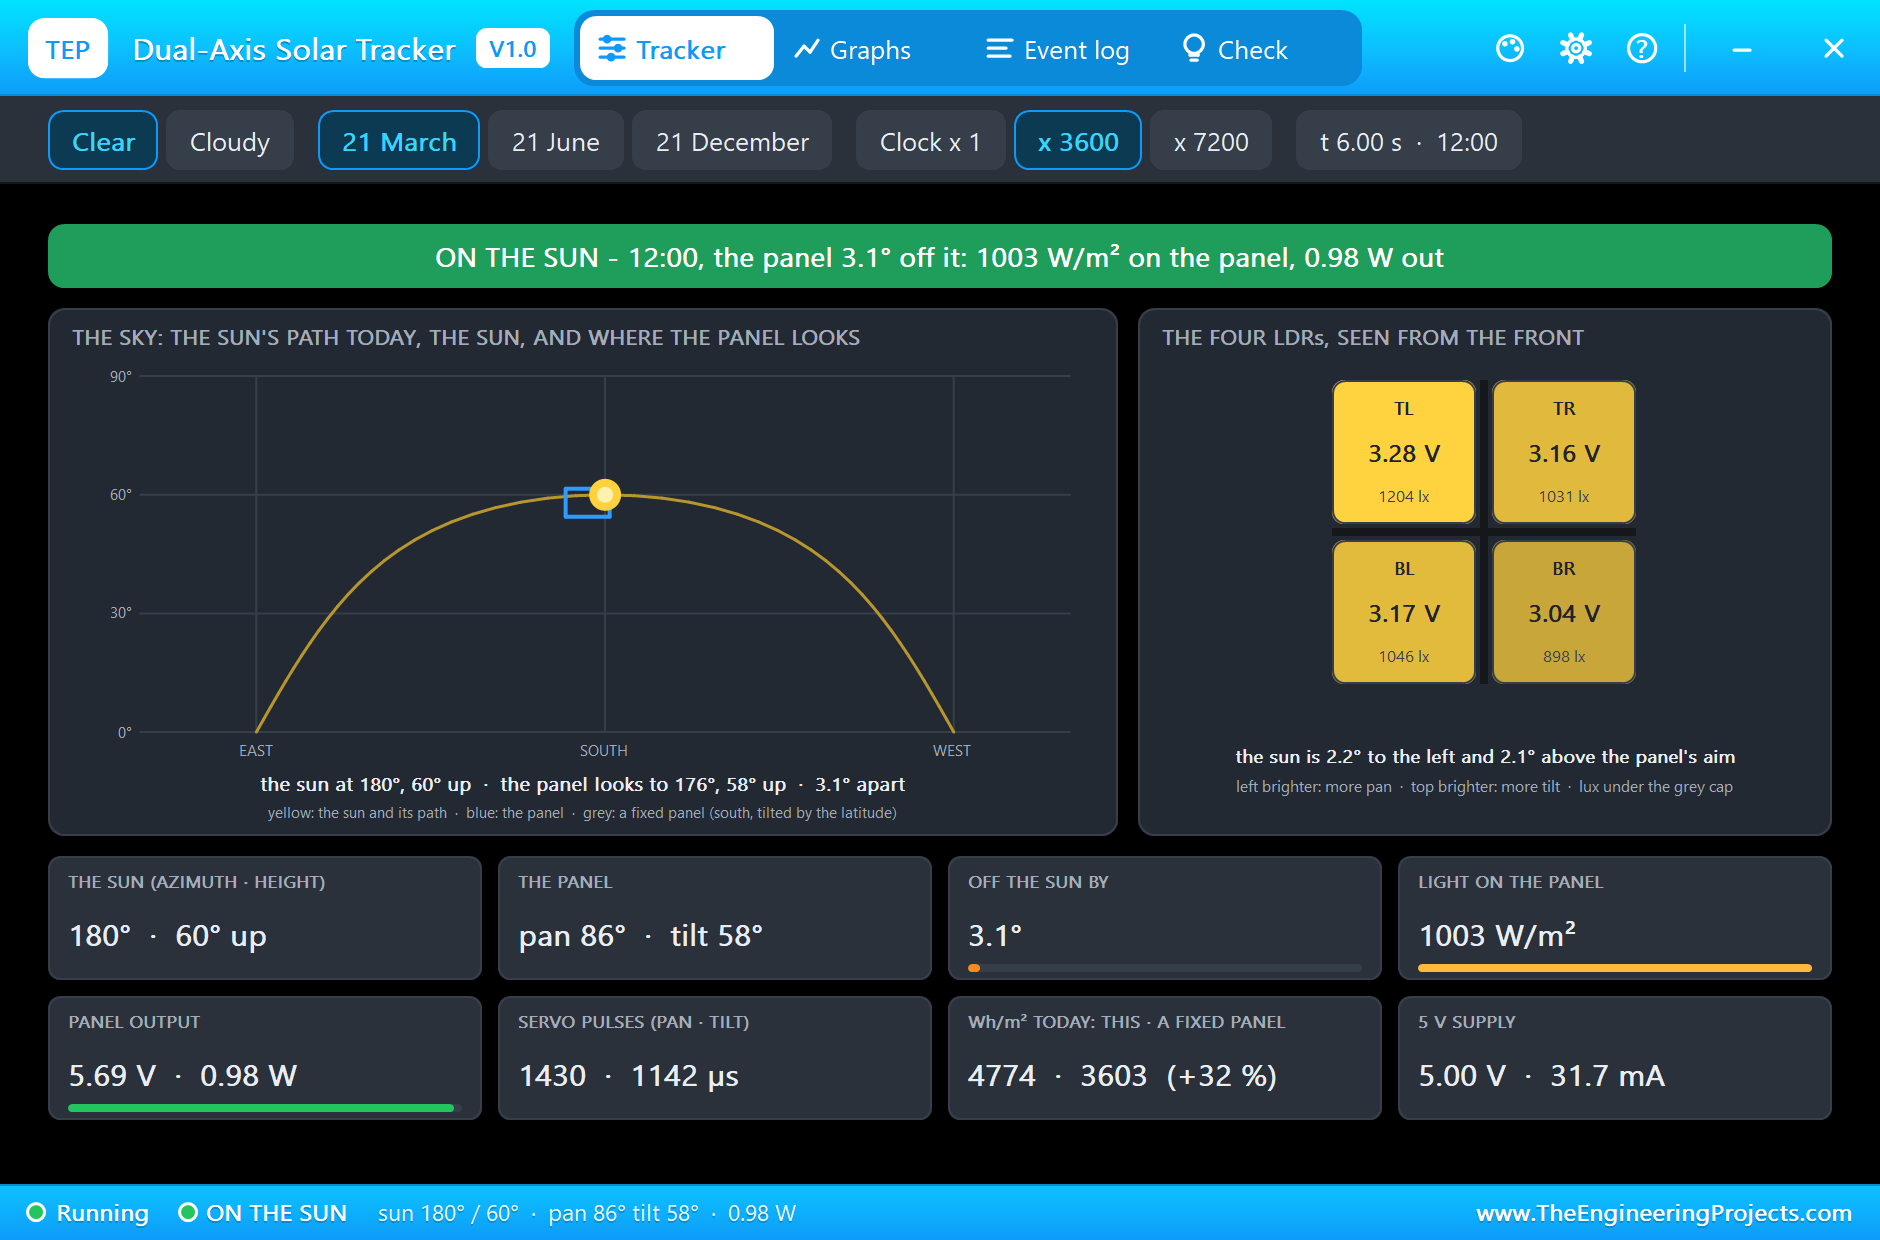
At noon the sun stands in the south, 60 degrees up: at latitude 30 on 21 March that is 90 minus 30. The panel gets 1003 W/m2 and gives its best, 5.69 V and 0.98 W. The tracker is 3.1 degrees behind. Around noon the sun moves fastest along the horizon, and at an hour a second that is 30 degrees every second; in real time the tracker would have all the time in the world.
The Afternoon and the Evening
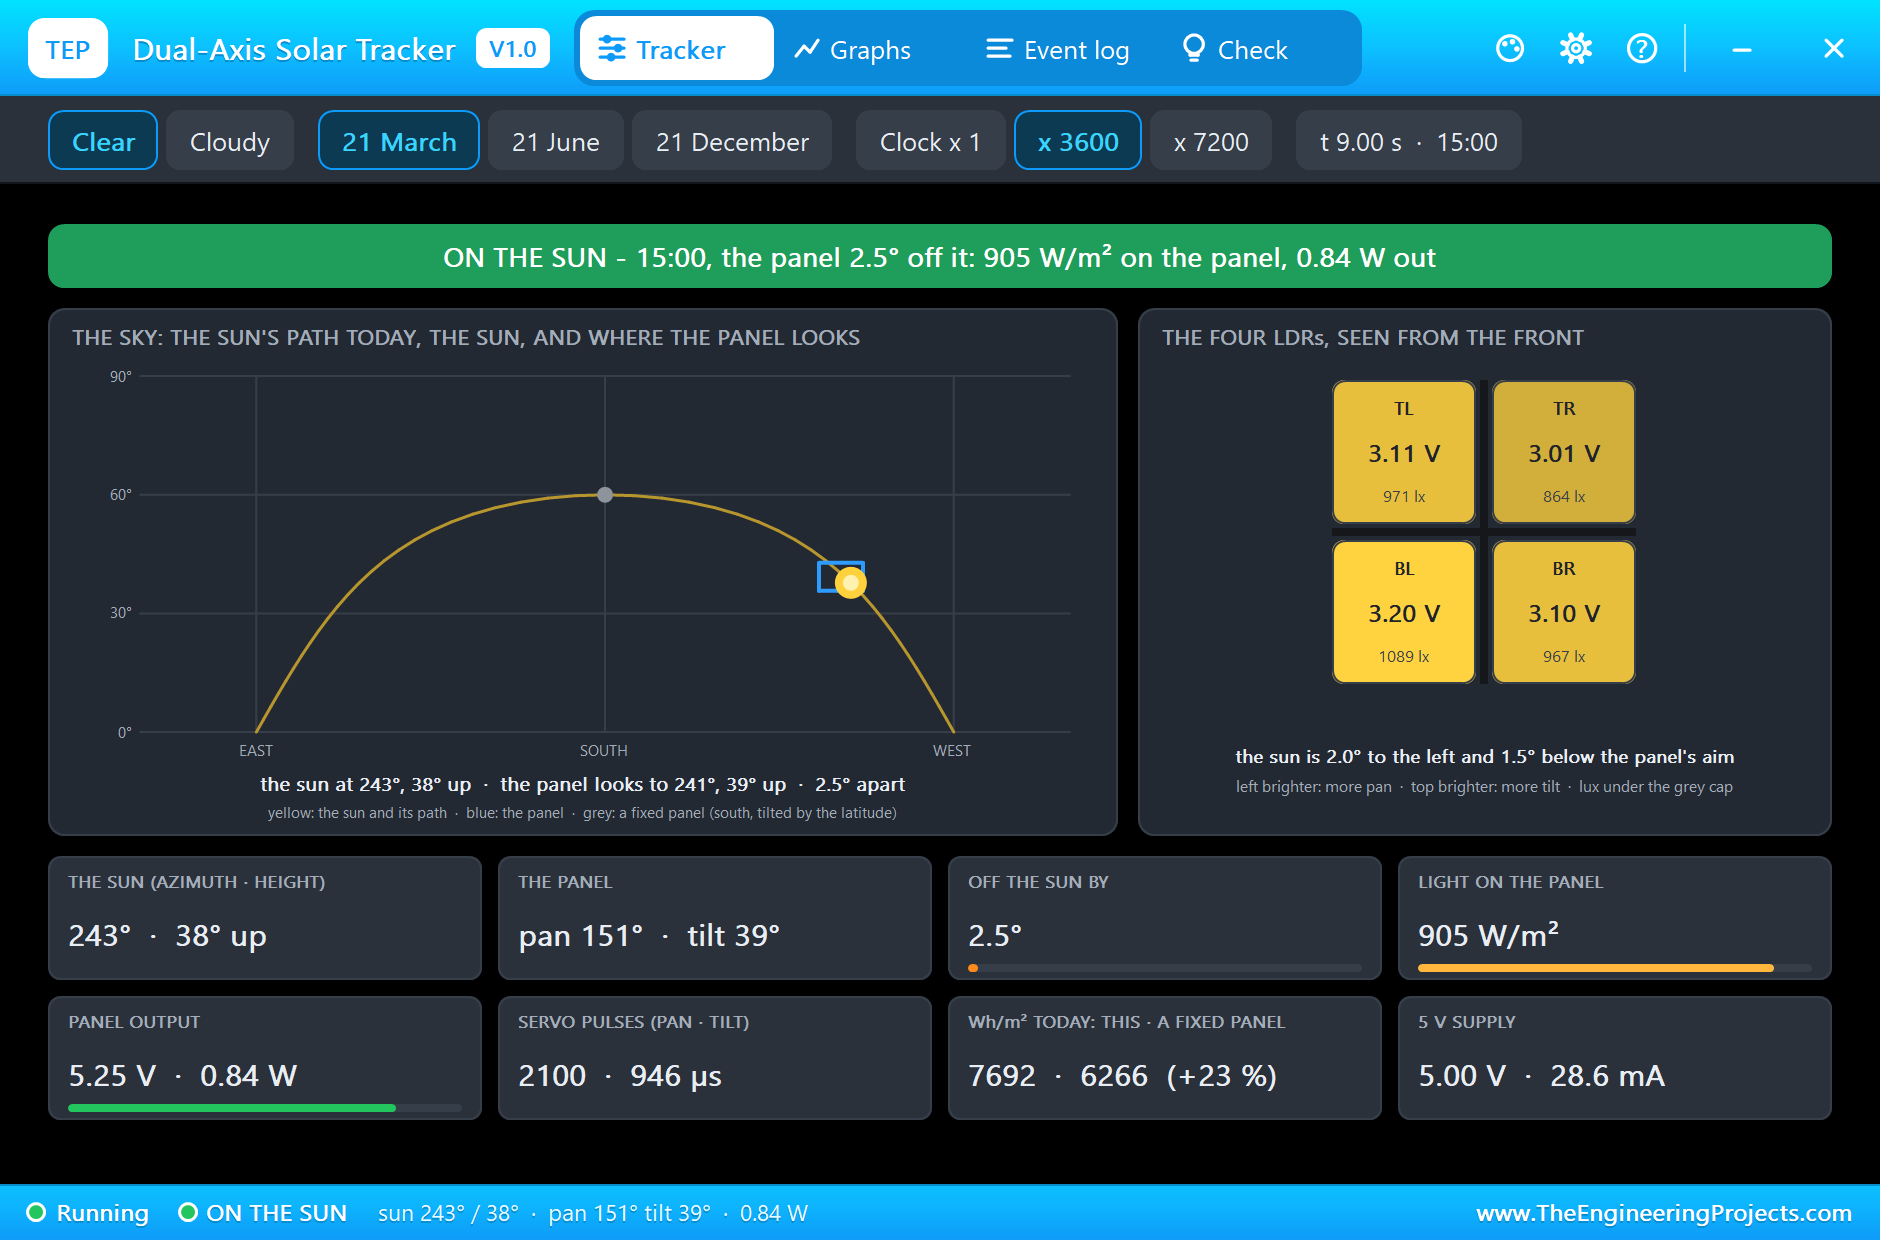
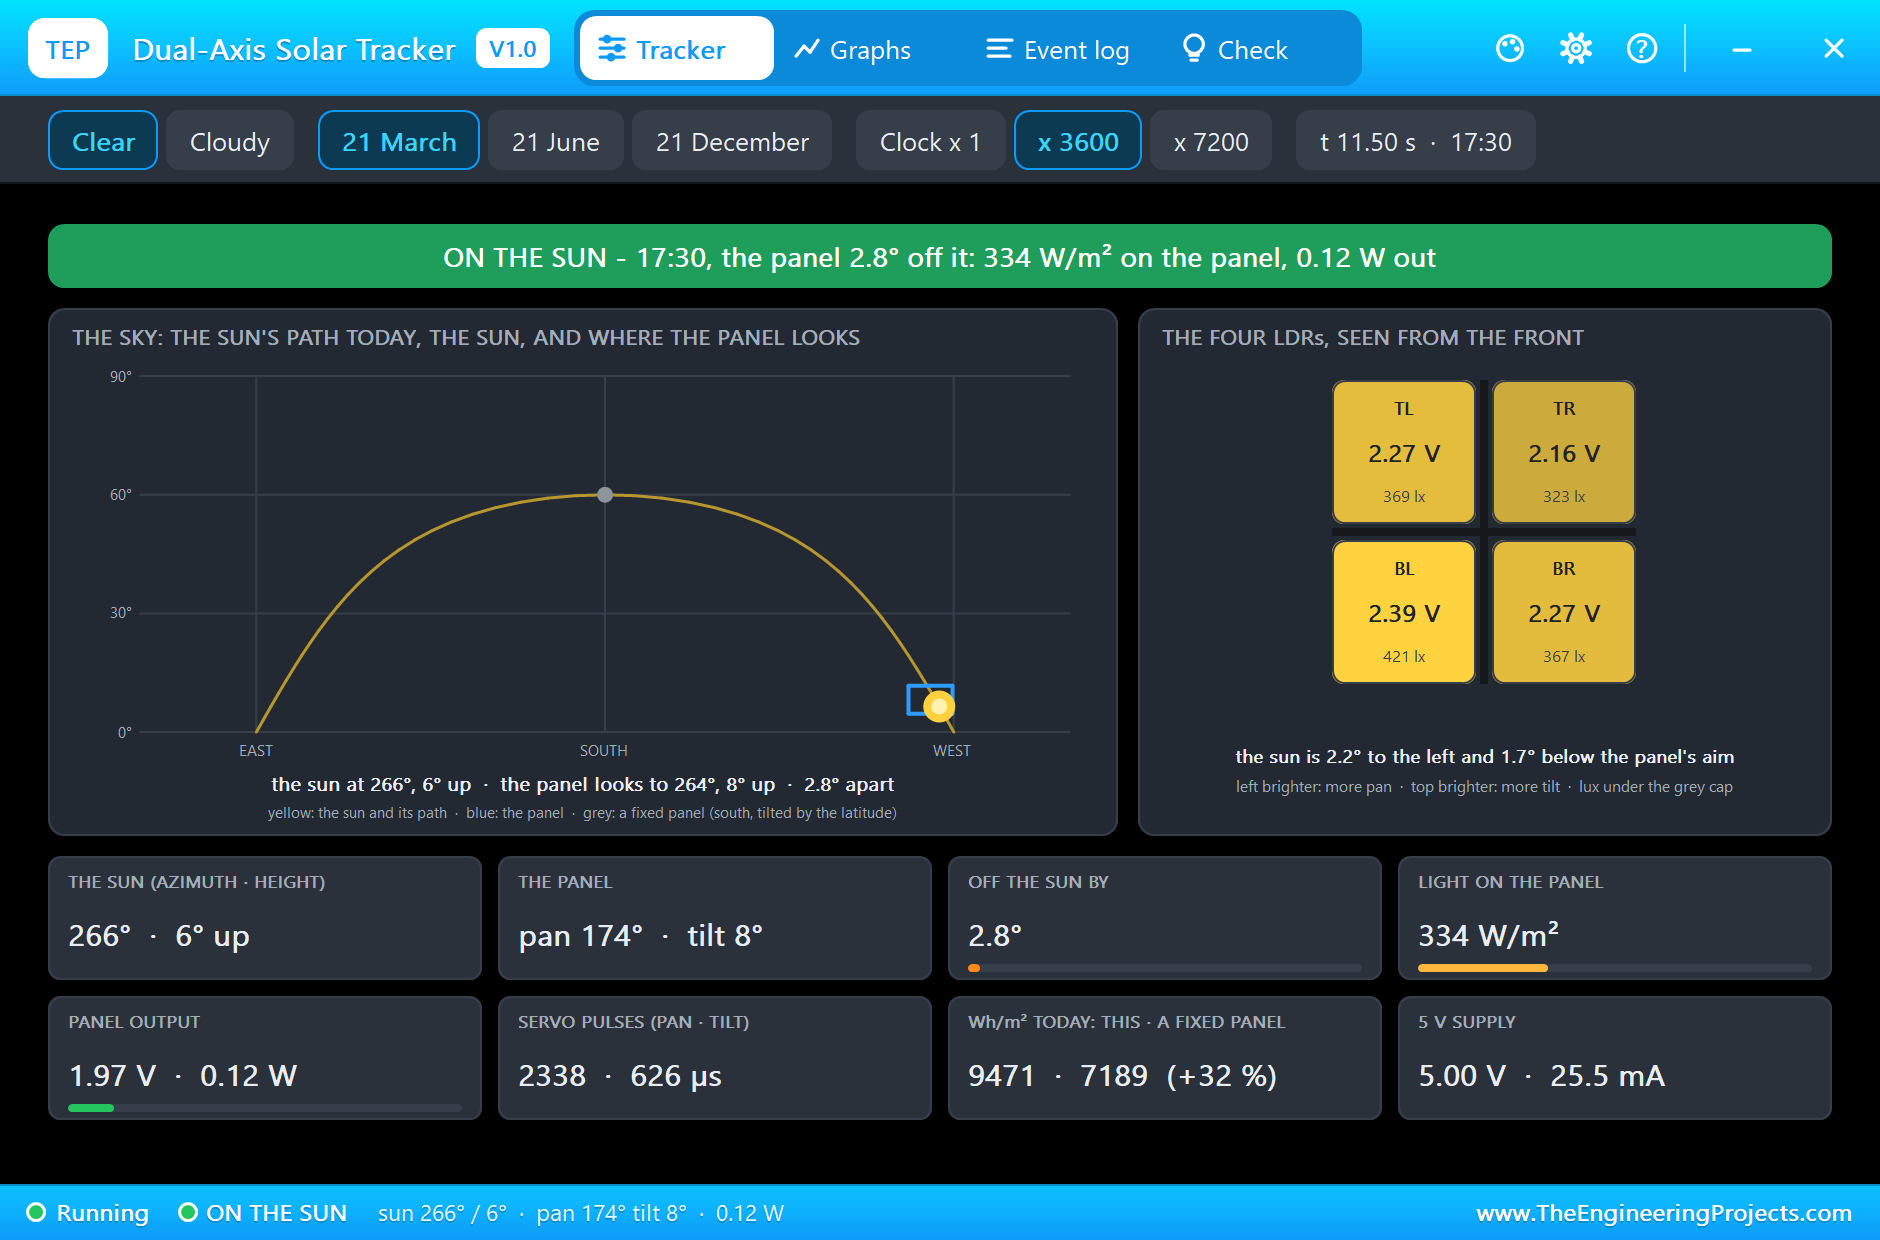
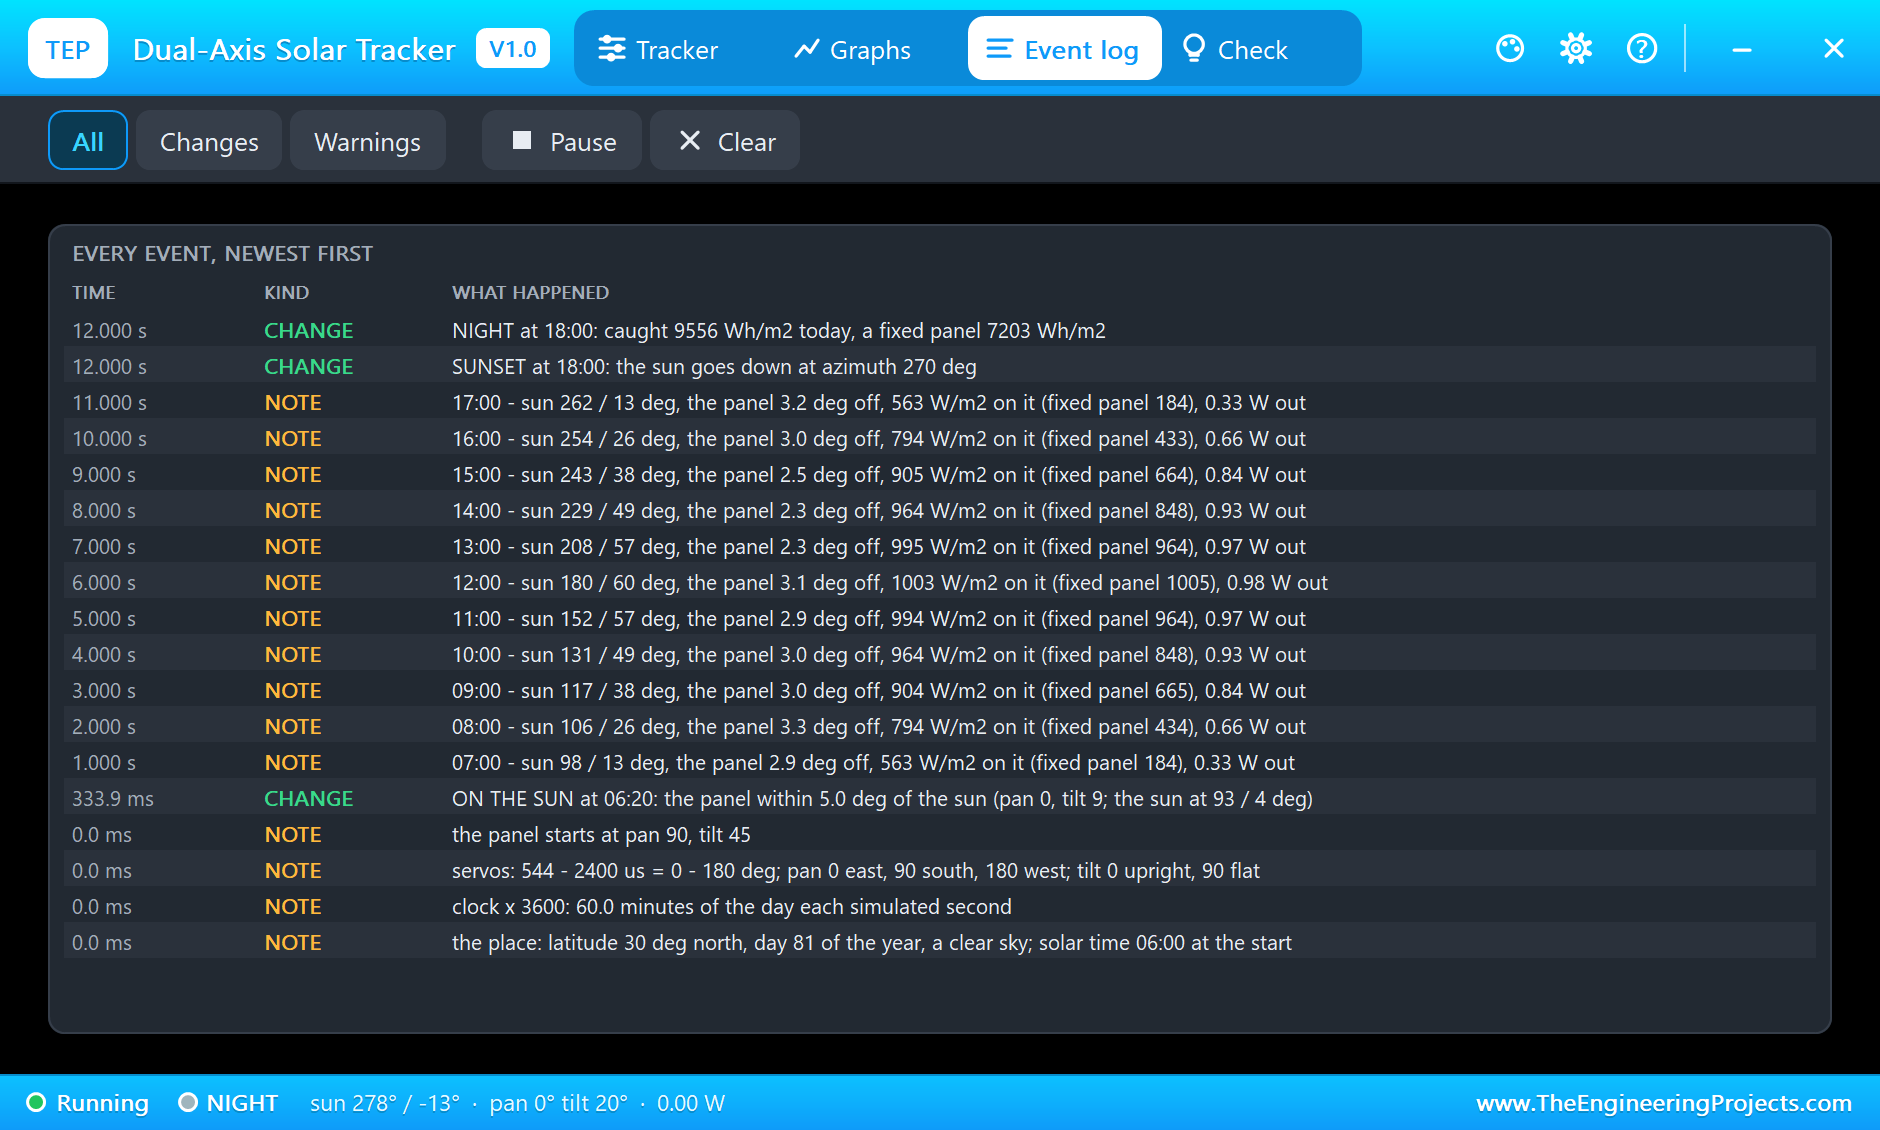
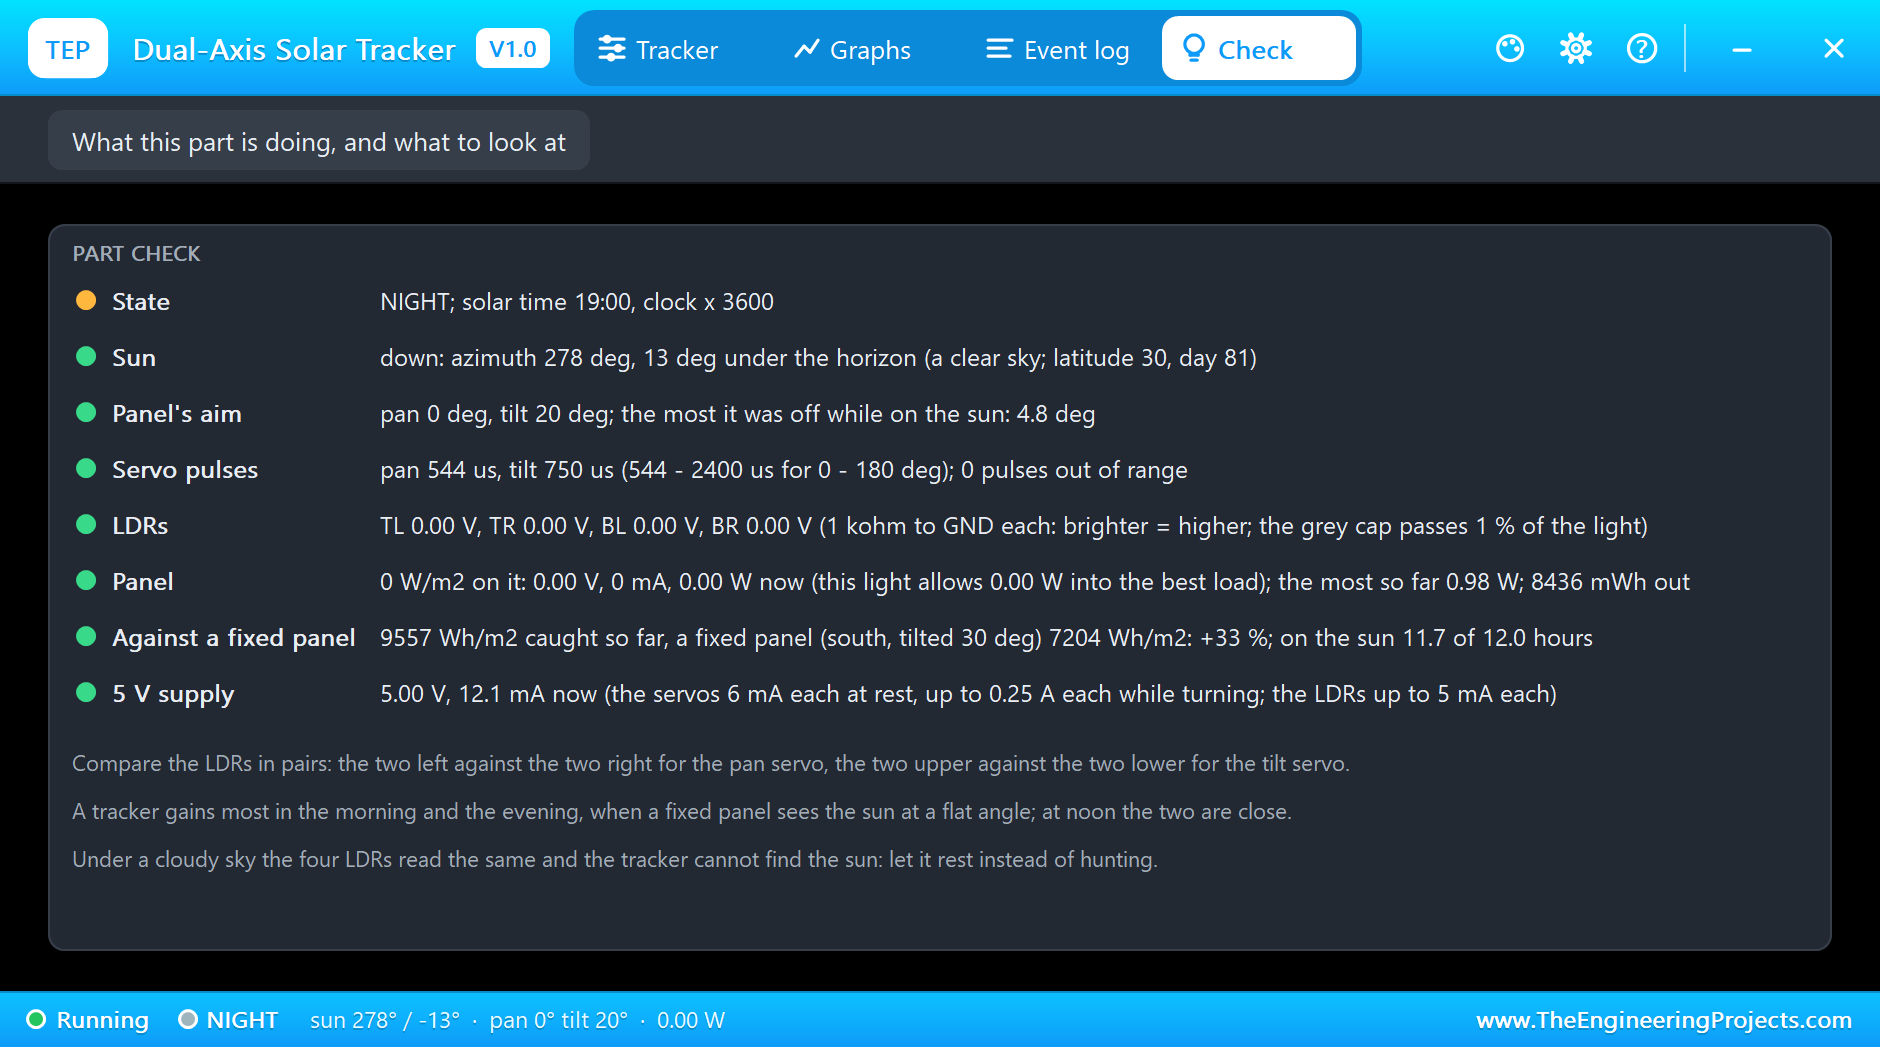
The afternoon mirrors the morning. At 15:00 the sun is at 243 degrees, 38 degrees up, and the panel gives 0.84 W. At 17:30 the sun is low in the west, 6 degrees up, and the light is down to 334 W/m2. One tile keeps the score against a fixed panel that faces south, tilted by the latitude: by 17:30 the tracker has caught 9471 Wh/m2, the fixed panel 7189. Most of that lead is won in the early morning and the late afternoon, when the fixed panel sees the sun at a flat angle. The Event log shows it hour by hour: at 08:00 there are 794 W/m2 on the tracker's panel against 434 on the fixed one, at noon 1003 against 1005.
Night
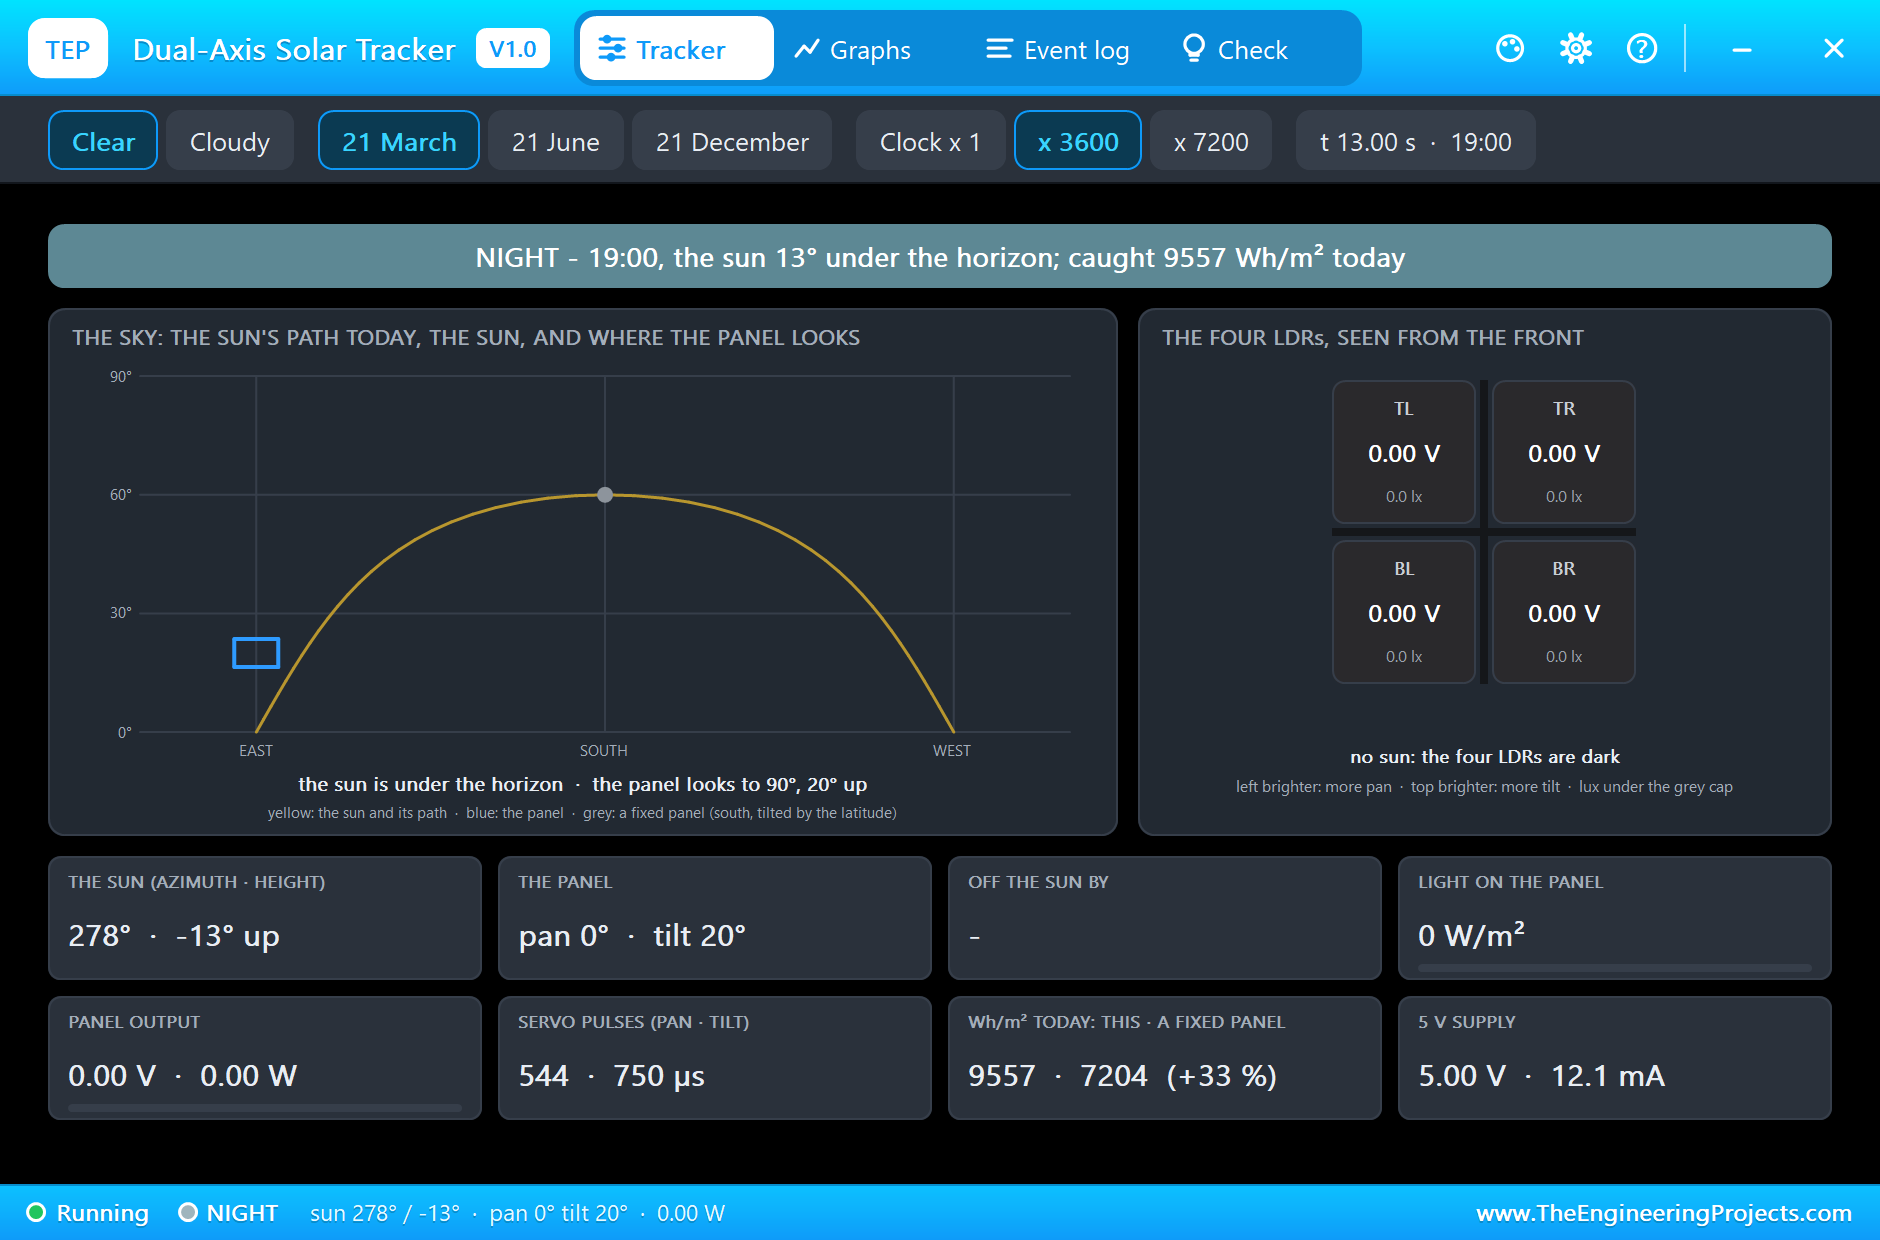
At 18:00 the sun goes down in the west. The LDRs go dark, the sketch turns the panel back to the east, and there it waits for the next morning. The day's result: 9557 Wh/m2 on the tracking panel, 7204 on a fixed one, a third more. The Check page adds that the panel was on the sun for 11.7 of the 12.0 hours of daylight.
A Cloudy Sky
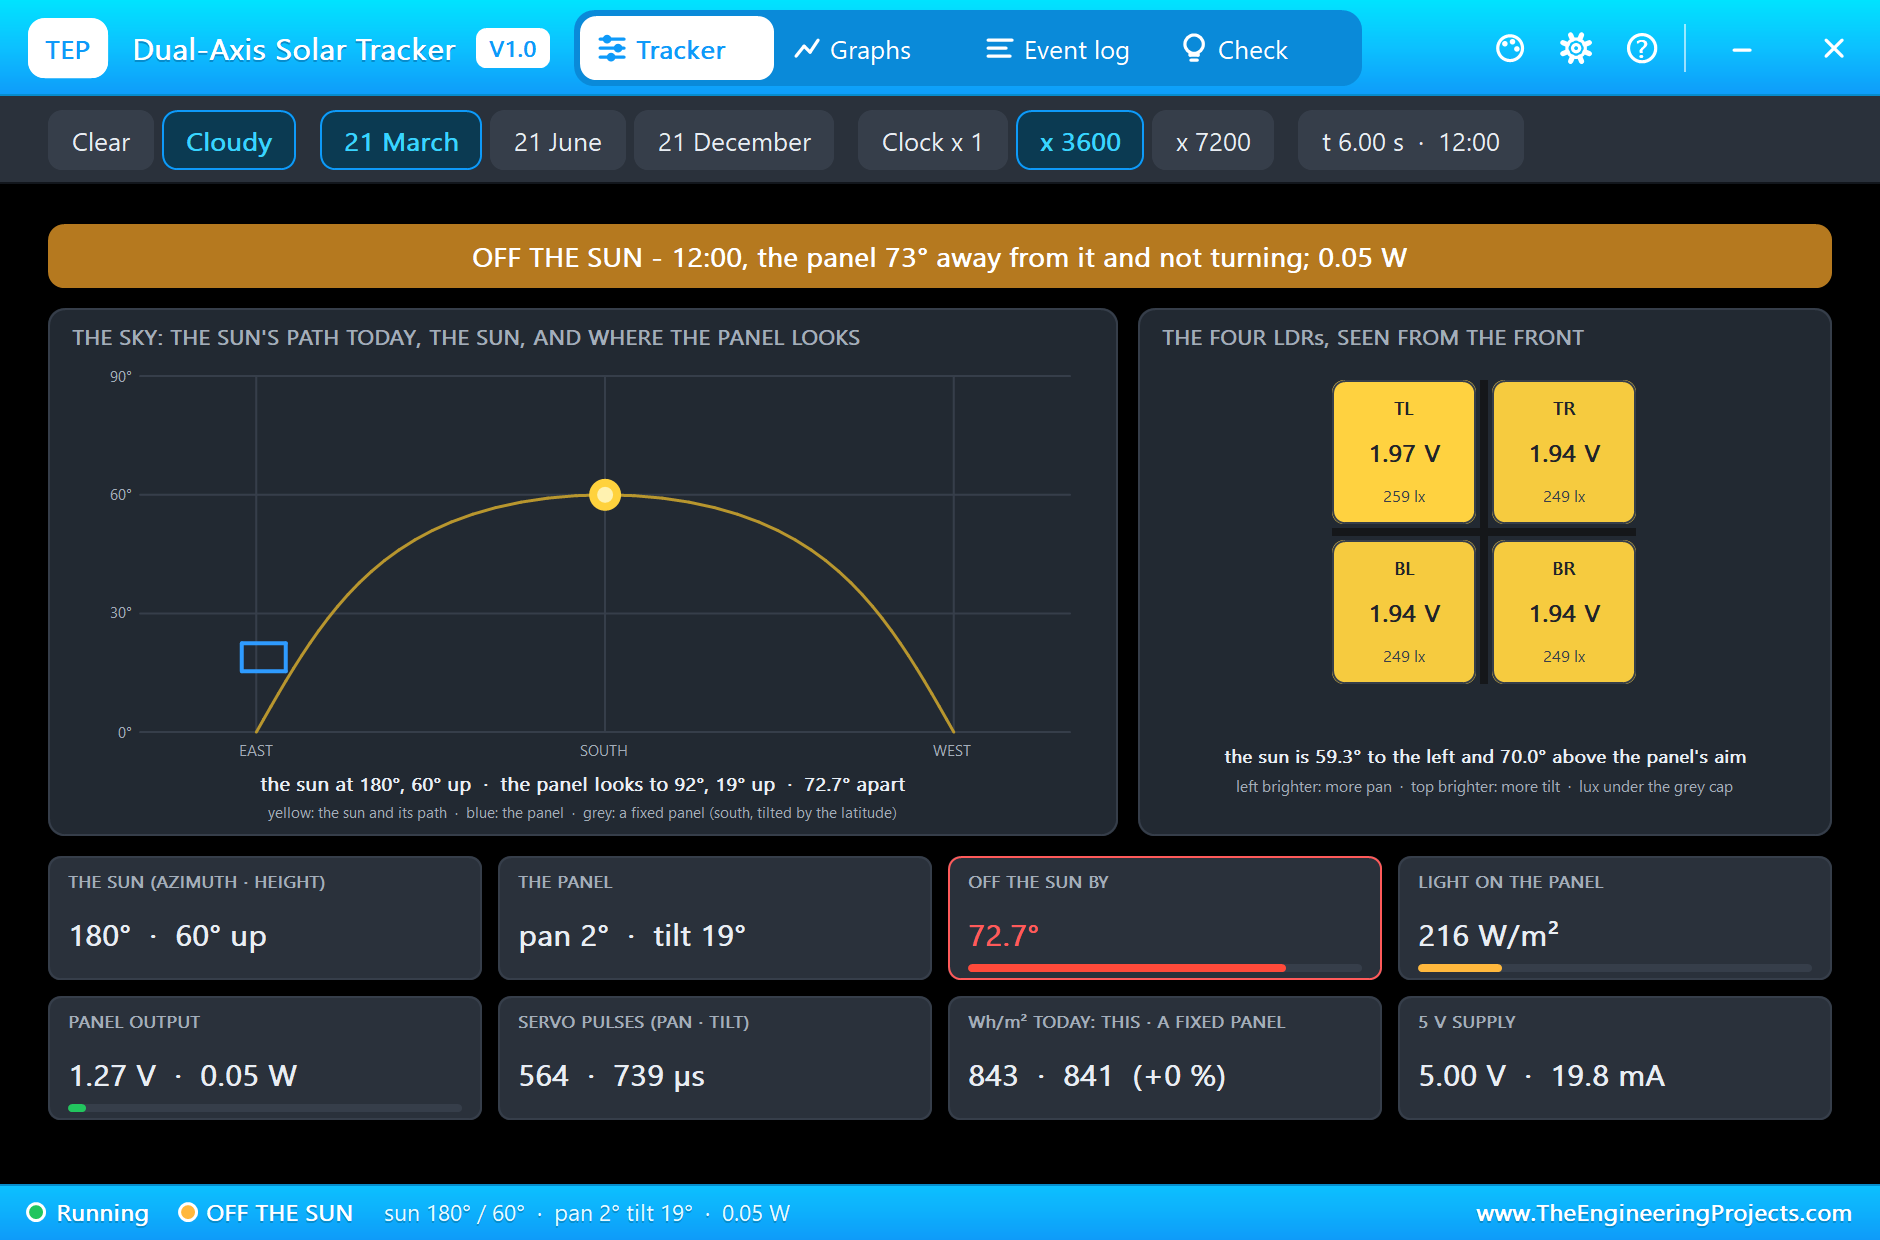
For a second simulation run we set SKY to CLOUDY. Clouds scatter the light: it comes from the whole sky and throws no shadow. The pop-up at noon shows what that does to an LDR tracker: the four LDRs read the same, 1.94 to 1.97 V, the sketch finds nothing to follow, and the panel still looks east, 73 degrees away from the sun. It hardly matters: the panel gets 216 W/m2 wherever it looks, and the fixed panel has caught just as much, 841 against 843 Wh/m2. On a grey day a tracker wins nothing.
A Summer Morning
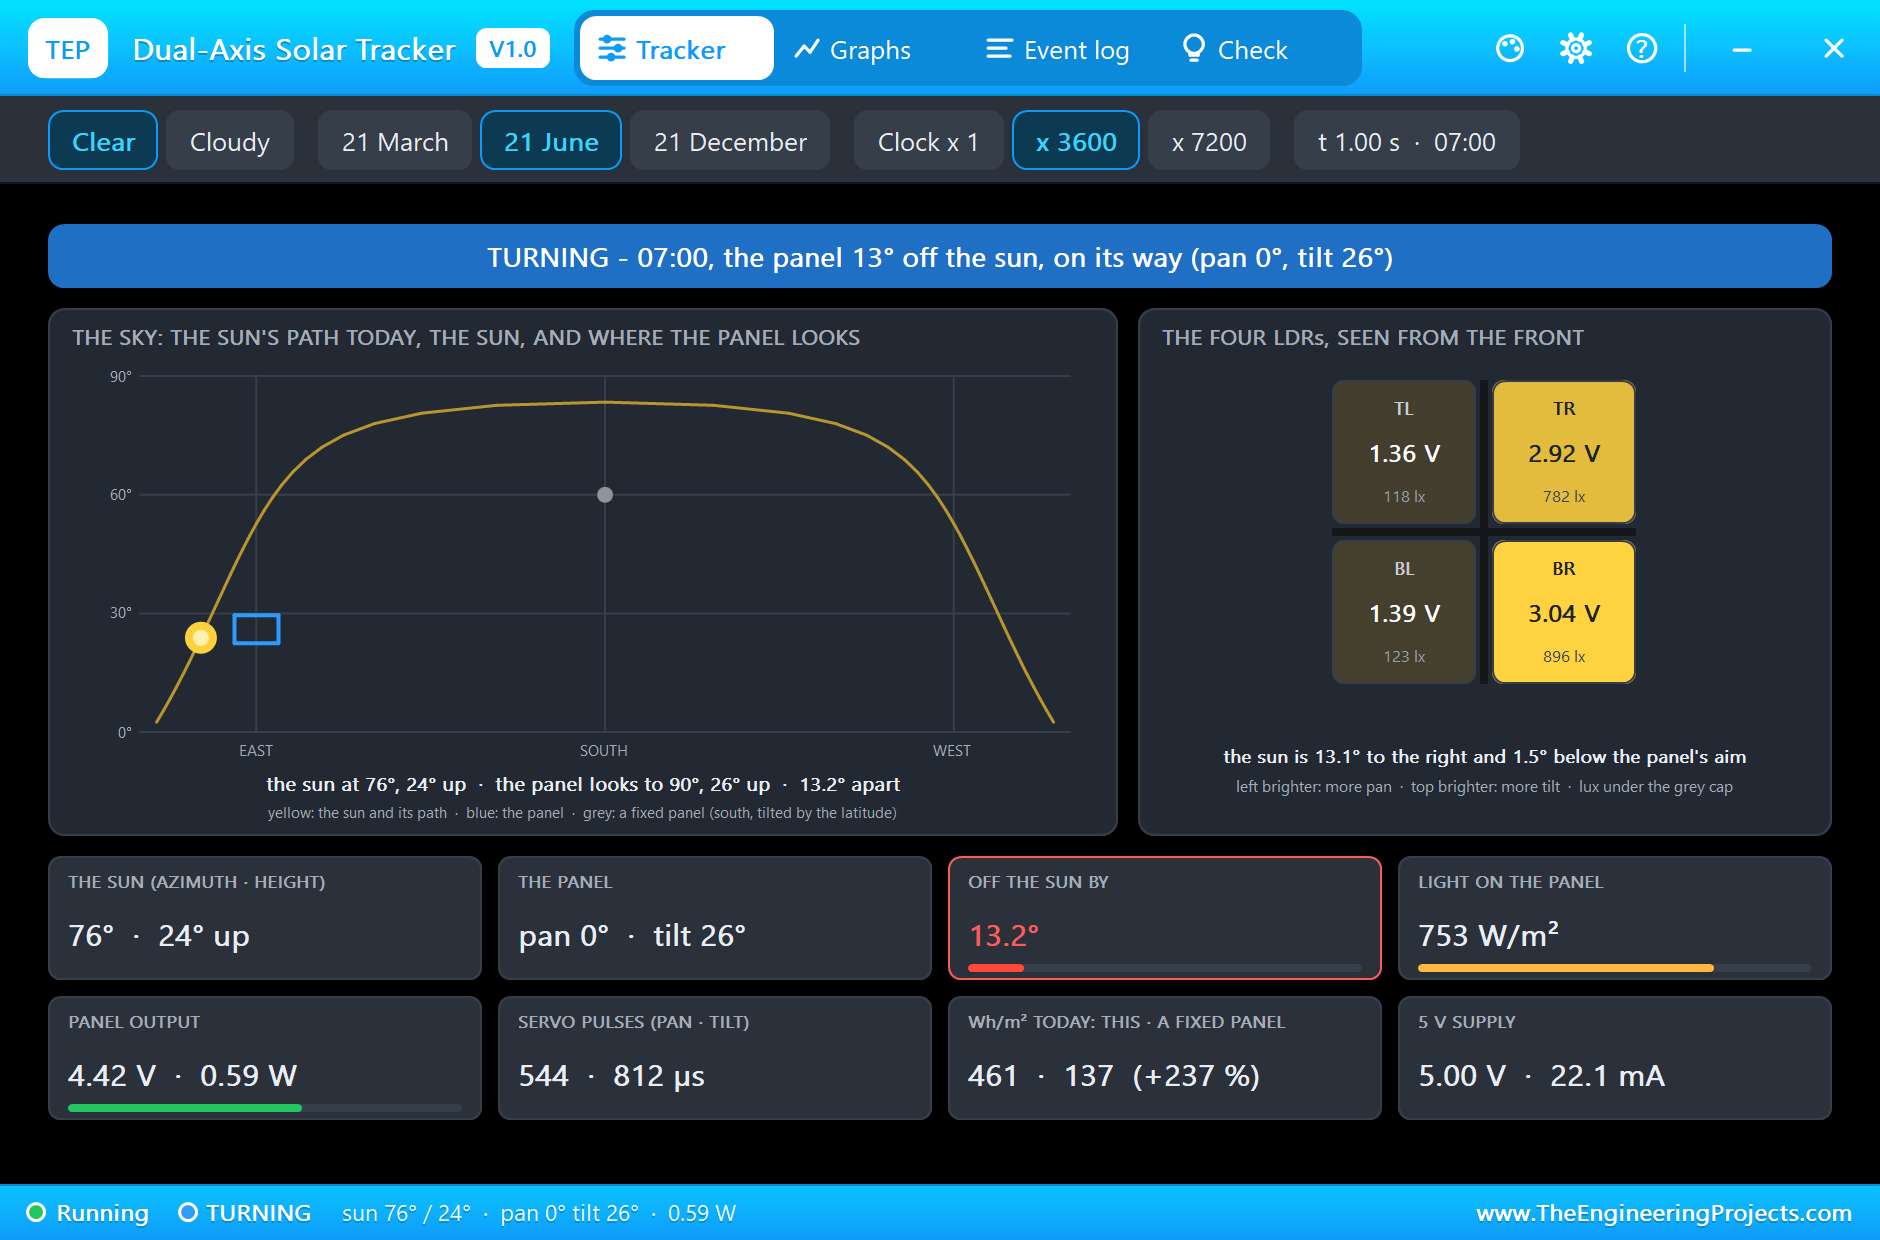
For a third run we set DAY to 172, the 21st of June, and let the panel start in the east. In summer the sun rises north of east. At 07:00 it stands at 76 degrees, and the pan servo is at its stop, because 0 degrees is due east. The right pair of LDRs is much brighter, 2.92 and 3.04 V against 1.36 and 1.39 V, and the sketch asks for less pan, but there is none left. The tilt follows, and the panel stays 13 degrees off the sun. A tracker whose pan servo turns only 180 degrees has this limit in the early morning and the late evening of a summer day.
The Graphs, the Event Log and the Check Page
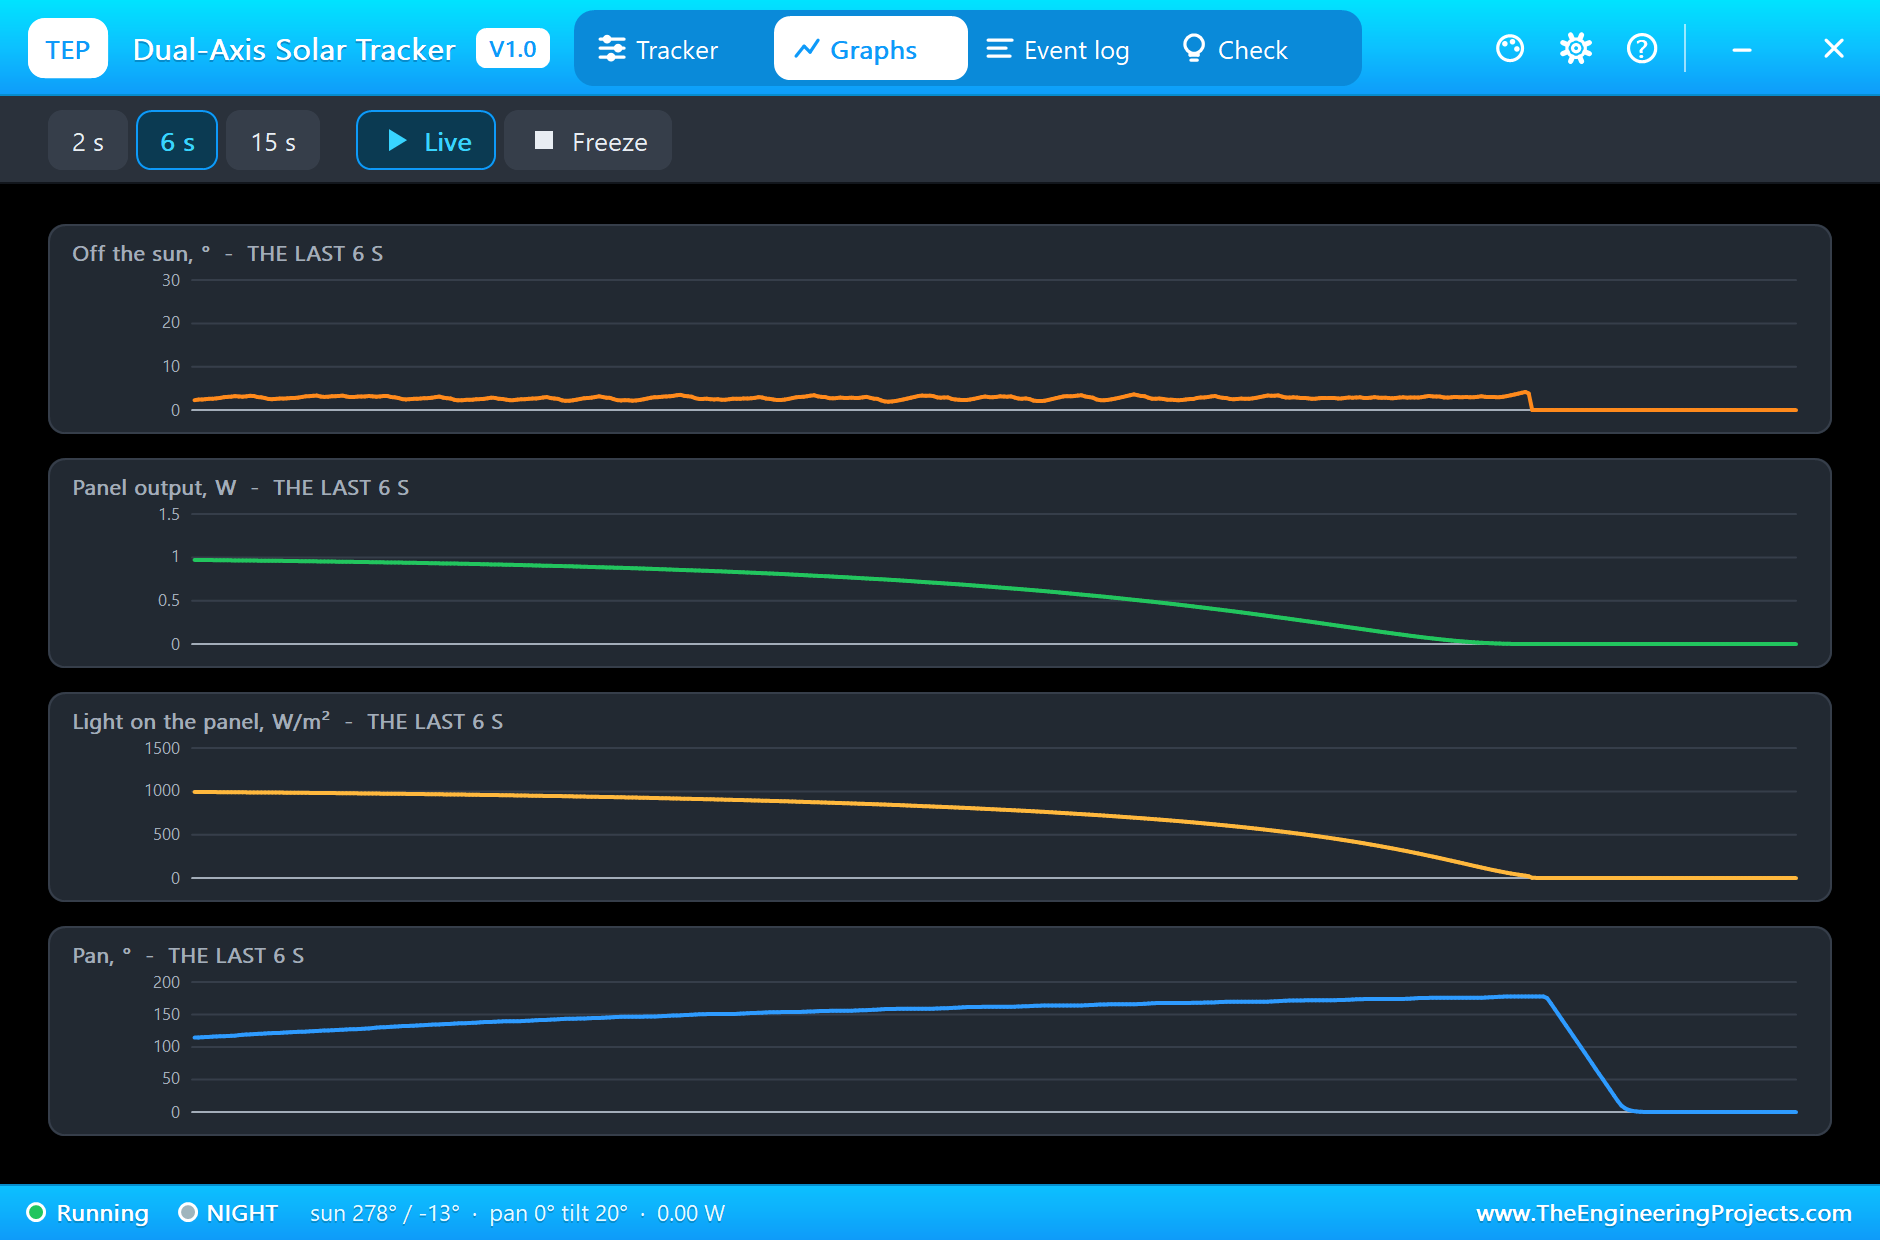
Back to the first run. The Graphs page plots the angle off the sun, the panel's power, the light on the panel and the pan angle over the last 2, 6 or 15 simulated seconds; the picture shows the last six, with the afternoon, the sunset and the swing back to the east. The Event log keeps the day hour by hour, and the Check page sums up the run.
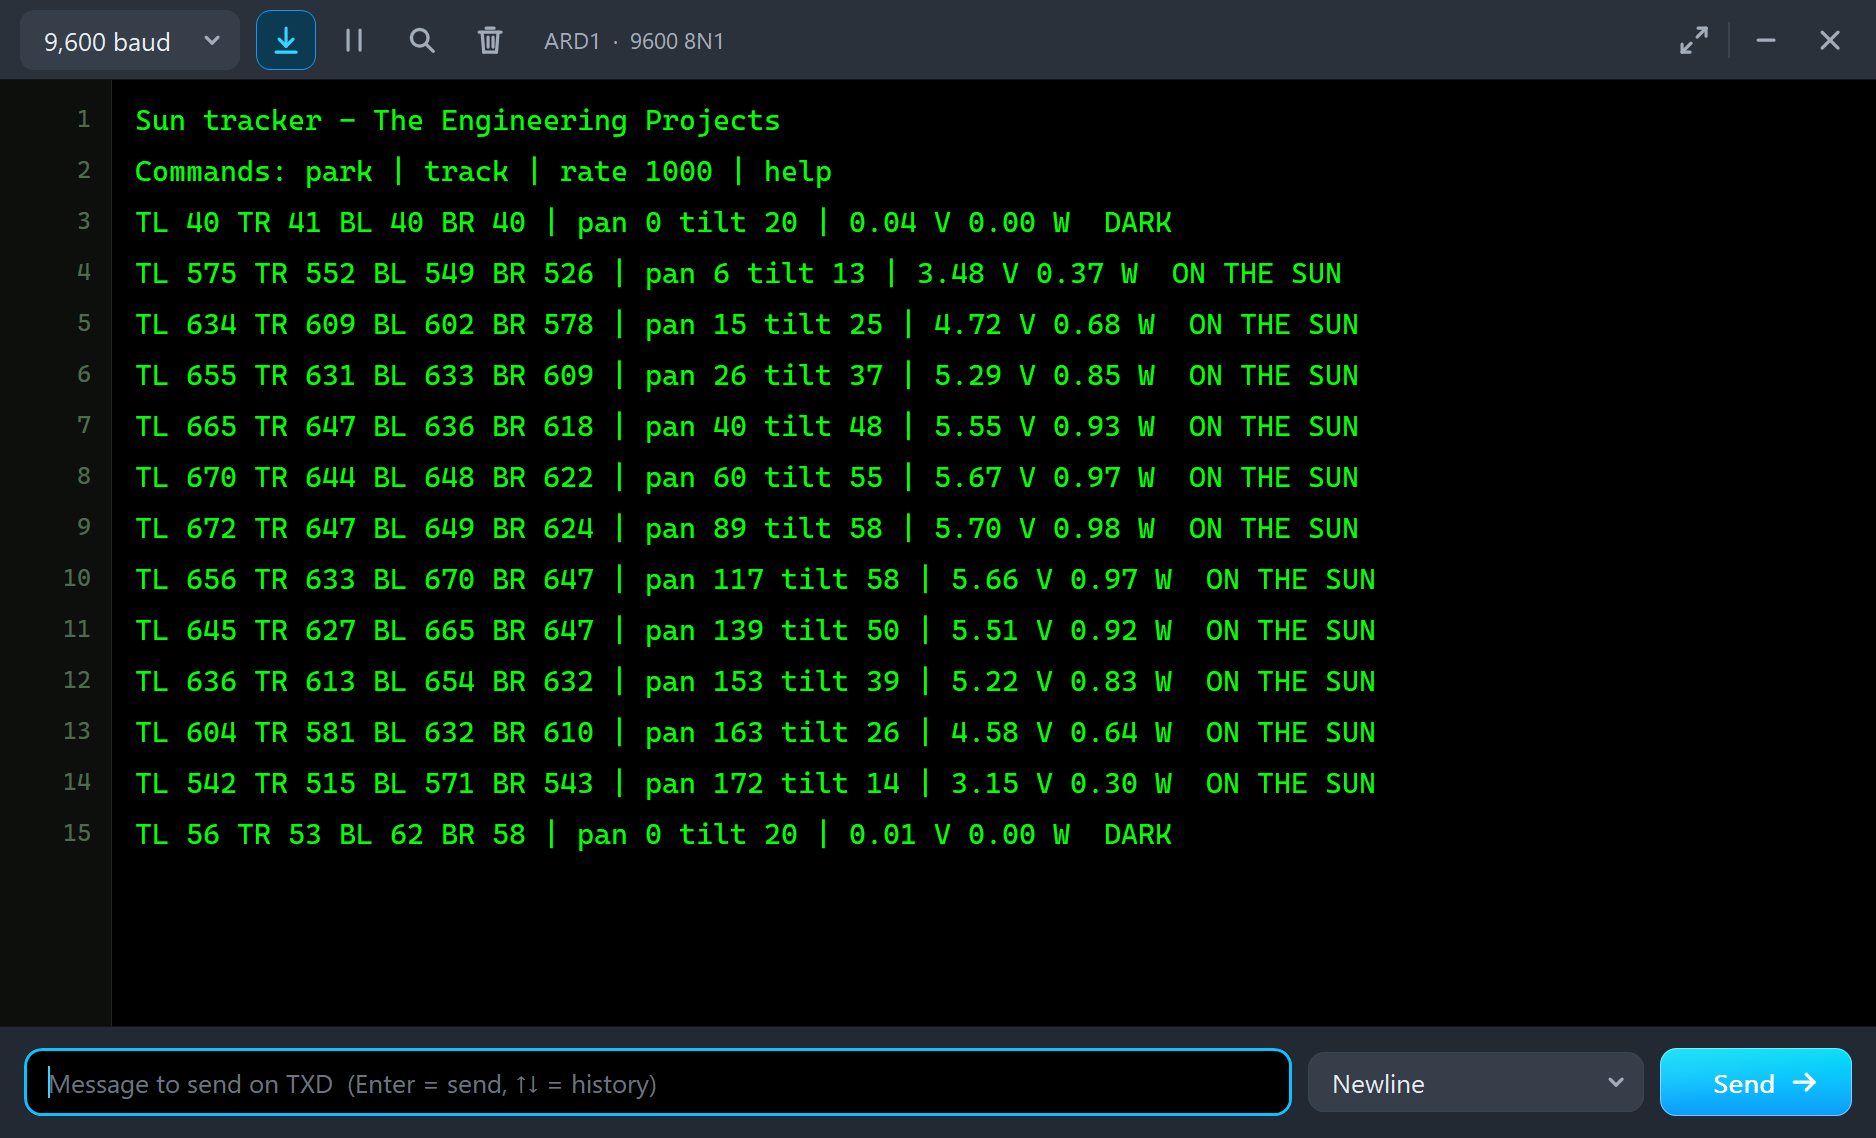
The monitor shows the Arduino's view of the same day, a line for every hour: the four LDR readings, the pan and tilt it has set, and the panel's volts and watts, from DARK at 06:00 through 0.98 W at noon to DARK again at 18:00.
Try It Yourself
- Type
parkin the monitor at the start: the panel stays like a fixed one, and the pop-up shows how much less it catches. - Click the Cloudy chip in the pop-up in the middle of the day, then Clear again, and watch the tracker find the sun.
- Set LATITUDE to 0 or to 60 and see how the sun's path on the sky map changes.
- Change GAIN in the sketch to 12: the tracker reacts four times as hard and starts to hunt to and fro.
- Set SPEED to 7200: the day takes six and a half seconds, and the tracker falls further behind at noon.
Ideas to Extend the Demo
- Move the servos only every few minutes and switch them off in between: real trackers save energy that way.
- Add an LCD that shows the pan and tilt angles and the panel's power.
- Charge a battery from the panel through a charger from our renewable energy series.
- Replace the LDRs by the clock: work out the sun's place from the time and the date, and compare the two methods.
Your Own Sketches
The demo sketch is in the zip file, and you can change it in the Arduino IDE. New to Arduino? Start with our Arduino Tutorial for Beginners. Export the compiled binary, and set the UNO's PROGRAM property to the new file. Our guide on How to get the HEX file from Arduino shows you where the file ends up.
Things to Know Before Building a Real Solar Tracker
- Bare LDRs go blind in full sun: their resistance falls to a few tens of ohms and all four read the same. Shade them, put them in tubes or under a grey filter; our tracker has a grey cap that lets 1 % of the light through.
- Servos need their own supply: a small servo can draw 0.65 A when it stalls. Feed the servos from a separate 5 V supply and join the grounds.
- Count the energy: on a 1 W panel two servos can use more than the tracking wins. Move in steps and rest in between.
- Clouds: the LDRs read alike under a grey sky. Do not let the tracker hunt; keep the last position.
- Wind: a tilted panel is a sail. Large trackers lay their panels flat in a storm.
Troubleshooting
- The panel does not move: no servo pulses on PAN and TILT (the pop-up says NO SIGNAL), or no 5 V on VCC (NO SUPPLY).
- It turns away from the sun: the LDR pairs are swapped in the sketch. A brighter LDR gives a higher voltage here, and TL is the top left one as seen from the front of the panel.
- It hunts to and fro: the steps are too large or too fast for the LDRs, which need 30 ms. Use smaller steps or a wider dead band.
- It stays off the sun under a cloudy sky: the four LDRs read alike; a real LDR tracker does the same.
- The watts look low at noon: the load does not suit the panel. About 36 ohm takes the most in full sun.
- The part is not simulated:
TEPTRACKER.DLLis missing from MODELS and from the project folder.
Limitations of the Simulation
- The sun's place comes from the solar time, the latitude and the day of the year; the light of a clear sky from the air mass. The clock on your wall can differ from solar time by more than an hour.
- The tracker is a typical hobby one, not a copy of a product: two servos of the 9 g class, four common 5 mm LDRs, a 6 V 1 W panel. Our own figures: the height of the shade cross, the grey cap, the servos' currents and the panel's curve.
- The tracker is drawn small and compact, at a quarter of its real size.
- Not modelled: the panel's temperature, wind, the servos' torque and gears, and places south of the equator.
- Arduino is a name of Arduino; this library is not made or endorsed by Arduino or Labcenter.
- Tested in Proteus 8.5 in November 2026 (the demo as shipped). Proteus 7 is not supported.
So, that was all about the Dual-Axis Solar Tracker Library for Proteus Simulation, and with it our renewable energy series is complete: from solar panels and wind turbines through batteries and charge controllers to this tracker. I hope it helps you write and test your tracking code before you cut the first piece of acrylic. If you have any questions, ask in the comments and I will help you out. Till the next tutorial, take care and have fun!